

Page 1

SON'K
3-862-850-11 (1)
Cordless
Telephone
Operating Instructions
Manual de instrucciones
SPP-935
©1998 by Sony Corporation
Page 2

Owner's Record
The mode] and the serial numbers are
located at the bottom of the unit. Record
the serial number in the space provided
below. Refer to these numbers whenever
you call upon your Sony dealer
regarding this product.
Model No. SPP-935
Serial No.
_______________
IMPORTANT
SAFETY
INSTRUCTIONS
When using your telephone equipment,
basic safety precautions should always
be followed to reduce the risk of fire,
electric shock and injury to persons,
including the following;
1. Read and understand all instructions.
2. Follow all warnings and instructions
marked on the product.
3. Unplug this product from the wall
outlet before cleaning. Do not use
liquid cleaners or aerosol cleaners. Use
a damp cloth for cleaning.
4. Do not use this product near water,
for example, near a bath tub, wash
bowl, kitchen sink, or laundry tub, in
a wet basement, or near a swimming
pool.
5. Do not place this product on an
unstable cart, stand, or table. The
product may fall, causing serious
damage to the product.
6. Slots and openings in the cabinet and
the back or bottom are provided for
ventilation. To protect it from
overheating, these openings must not
be blocked or covered. The openings
should never be blocked by placingthe product on the bed, sofa, rug, or
other similar surface. This product
should never be placed near or over a
radiator or heat register. This product
2™
should not be placed in a built-in
installation unless proper ventilation
is provided.
7. This product should be operated only
from the type ot power source
indicated on the marking label. If you
are not sure of the type of power
supply to your home, consult your
dealer or local power company.
8. Do not allow anything to rest on the
power cord. Do not locate this product
where the cord will he abused by
persons walking on it,
9. Do not overload wall outlets and
extension cords as this can result in
the risk of fire or electric shock,
10. Never push objects of any kind into
this product through cabinet slots as
they may touch dangerous voltage
points or short out parts that could
result in a risk of fire or electric shock.
Never spill liquid of any kind on the
product.
11. To reduce the risk of electric shock,
do not disassemble this product, but
take it to a qualified service personnel
when some .service or repair work is
required. Opening or removing covers
may expose you to dangerous
voltages or other risks. Incorrect
reassembly can cause electric shock
when the appliance is subsequently
used.
12. Unplug this product from the wall
outlet and refer servicing to qualified
service personnel under the following
conditions:
A. When the power cord or plug is
damaged or frayed.
B. If liquid has been spilled into the
product.
C. If the product has been exposed to
rain or waterT
D. If the product does not operate
' normally by following the operating
instructions. Adjust only those
controls that are covered by the
operating instructions because
improper adjustment of other controls
Page 3

Page 4

may result in damage and will often
require extensive work by a qualified
technician to restore the product to
normal operation.
E. If the product has been dropped or
the cabinet has been damaged.
F. If the product exhibits a distinct
change in performance.
13. Avoid using a telephone (other than
a cordless type) during an electrical
storm. There may be a remote risk of
electric shock from lightning.
14. Do not use the telephone to report a
gas leak in the vicinity of the leak.
SAVE THESE
INSTRUCTIONS
CAUTION:
To reduce the risk of fire or injury to persons by
battery, read and follow these instructions.
1. Use only the following type and size battery
pack Sony BP-T23.
2. Do not dispose of the batteries in a fire.
The cell may explode. Check with local codes
for possible special disposal instructions.
3. Do not open or mutilate the batteries.
Released electrolyte is cprrosive and may ^
cause damage to the eyes or skin. It may be
toxic if swallowed.
4. Exercise care in handling batteries in order
not to short the battery with conducting
materials such as rings, bracelets, and keysThe battery or conductor may overheat and
cause burns.
5. Charge the battery pack provided with or
identified for use with this product only in
accordance with the instructions and
limitations specified in the instruction manual
provided for this product.
6. Observe proper polarity orientation between
the battery pack and battery charger.
INFORMATION FOR
GENERAL TELEPHONES
1. This equipment complies with Part 68 of the
FCC rules. On the bottom of this equipment is
a label that contains, among other
information, the FCC registration number and
ringer equivalence number (REN) for this
equipment. If requested, this information
must be provided to the telephone company.
2. The applicable registration jack (connector)
USOC-RJllC is used for this equipment.
3- This equipment is designed to be connected to
the telephone netwi>rk or premises wiring
using a compatible modular ¡ack which is Part
68 compliant.
The FCC compliant telephone cord and
modular plug is pro\’ided with this
equipment. ,
4. The REN is used to determine the quantity of
devices which mnv be connected to the
telephone line. Excessive RENs on the
telephone line may result in the devices not
ringing in response to an incoming call. In
most, but not all areas, the sum of the RENs
should not exceed five (5.0).To be certain of
the number of devices that mav be connected
to a line, as determined by the total RENs,
contact the local telephone company.
5. If your equipment (SPP-935) causes harm to
the telephone network, the telephone
company will notify you in advance that
temporary discontinuance of service may be
required. But if advance notice is not practical,
the telephone company will notify the
customer as soon as possible. Also, you will
be advised of your right to file a complaint
with the FCC if vou believe it is necessary.
6. The telephone company mav make changes in
its facilities, equipment, operations or
procedures that could affect the operation of
the equipment. If this happens the telephone
company will pri>\'ide adx ance notice in order
for you to make necessar\’ modifications to
maintain uninterrupted sers’ice.
7. If trouble is experienced \\ ith this equipment
(SPP-935), for repair or warranty information,
please contact Sonv Direct Response Center;
Tel 1-800-222-/669. U the equipment is
causing harm to the teleplione network, the
telephone company may request that you
disconnect the equipment until the problem is
resolved.
8. All repairs will be performed in an authorized
—Sony service station.
9. This equipment cannot be used to party lines
or coin lines.
Ul.This equipment is hearing aid compatible.
Page 5

If your telephone is equipped
with automatic dialers
When programming emergency numbers and
(or) making test calls to emergency numbers:
1. Remain on the line and briefly explain to
the dispatcher the reason for the call.
2. Perform such activities in the off-peak
hours, such as early morning or late
evenings.
Note
This equipment has been tested and found to
comply with the limits for a Class B digital
device, pursuant to Part 15 of the FCC Rules.
These limits are designed to provide reasonable
protection against harmful interference in a
residential installation. This equipment
generates, uses, and can radiate radio frequency
energy and, if not installed and used in
accordance with the instructions, may cause
harmful interference to radio communications.
However, there is no guarantee that
will not occur in a particular installation. If this
equipment does cause harmful interference to
radio or television reception, which can be
determined by turning the equipment off and
on, the user is encouraged to try to correct the
interference by one or more of the following
measures:
— Reorient or relocate the receiving antenna.
— Increase the separation between the
equipment and receiver.
— Connect the equipment into an outlet on a
circuit different from that to which the
receiver is connected.
— Consult the dealer or an experienced radio-
TV technician for help.
interierence
Caution
You are cautioned that any changes or
modifications not expressly approved in this
manual could void your authority to operate this
equipment.
4fw
Page 6

Table of contents
' Getting Started
6 Read this first
7 Step 1: Checking the package
contents
8 Step 2: Setting up the base phone
11 Step 3: Preparing the battery
pack
Basics
13 Making calls
Redialing
15 Receiving calls
Advanced Features
16 Speed dialing
19 Setting the ringer type
21 Switching the phones during a
call
23 Talking between the handset and
the base phone (Intercom)
24 Having a three-way conference
Additional
Information
25 Mounting the base phone on a
wall
26 Notes on power sources
26 Maintenance
27 Troubleshooting
29 Specifications
30 Index
Table of contents 5™
Page 7
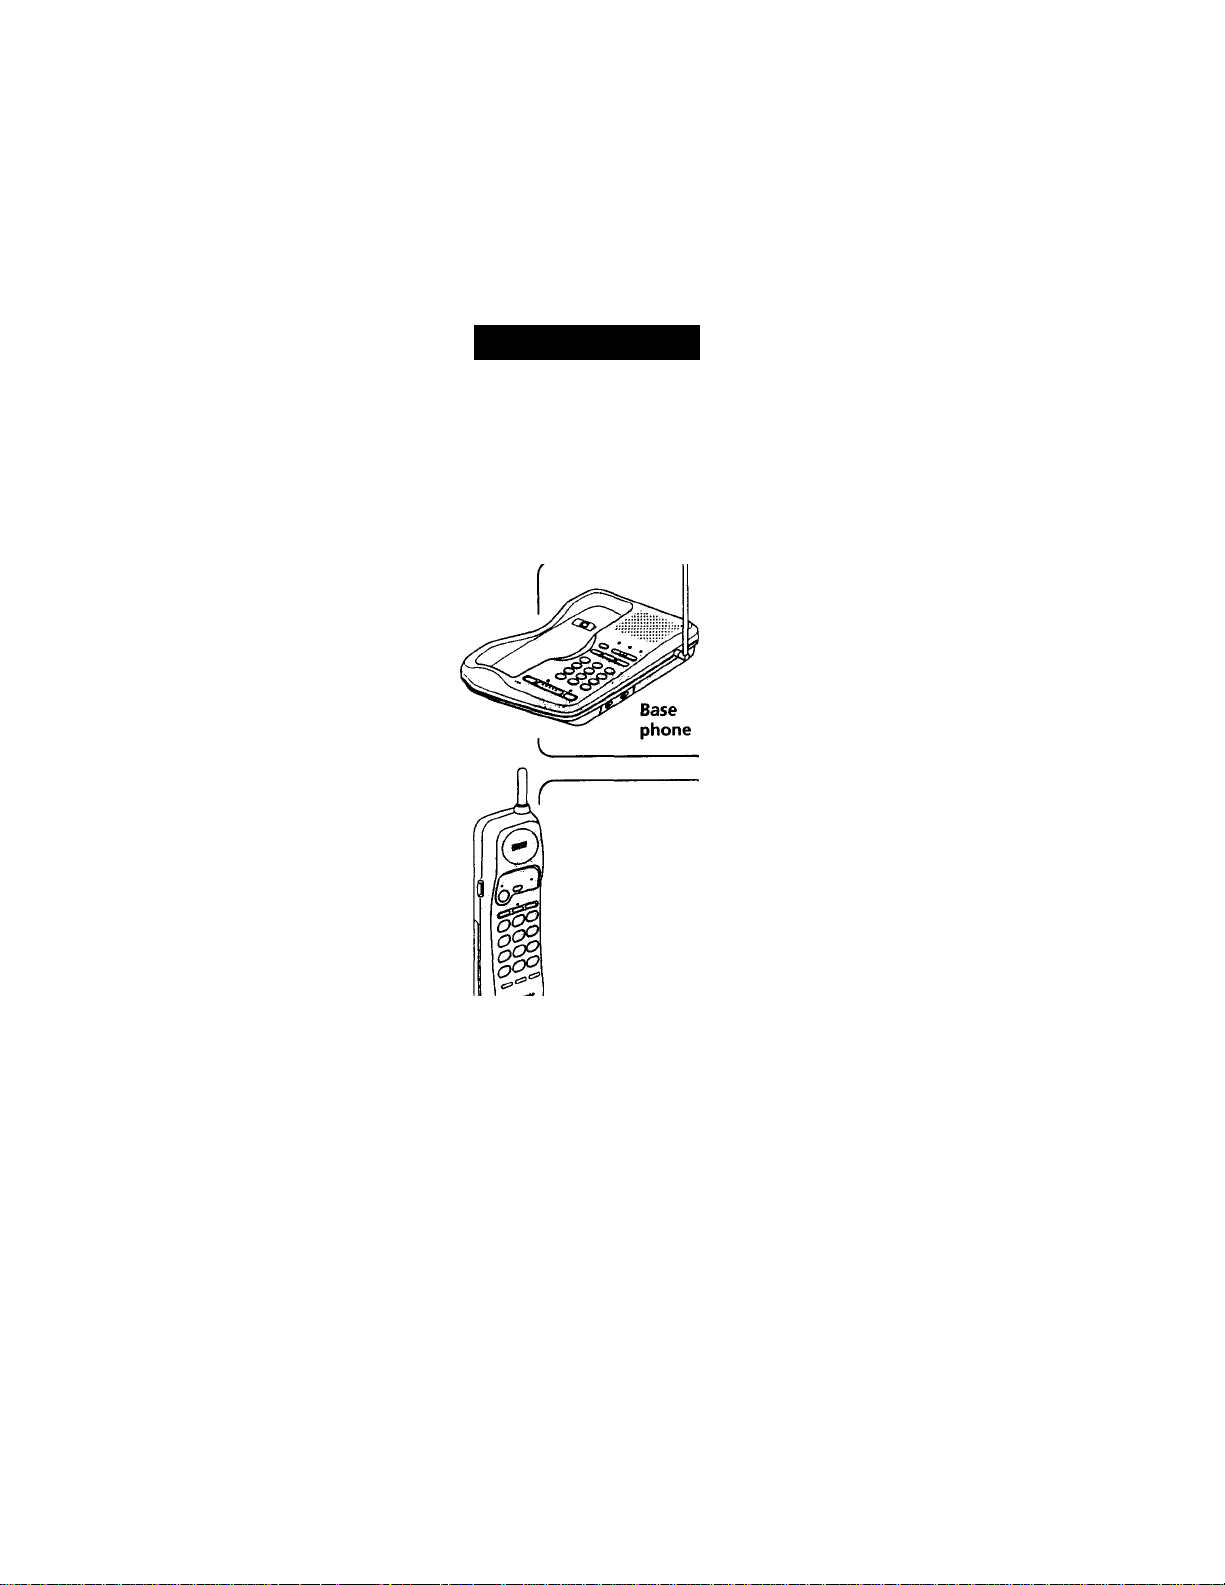
Getting Started
Read this first
Before you use your phone, you must set it up. Here is a quick
way to set up your phone: Step 1, 2 and 3.
Step 1 (page 7)
First, unpack the phone and the supplied
accessories.
Step 2 (page 8 to 10)
Next, you need to do three things
to set up the base phone, including
finding the best location for the
base phone.
Step 3 (page 11 to 12)
Finally, you need to insert the battery
pack into the handset and charge it for
more than 8 hours.
Handset That'S it!
About the digital security code
This cordless telephone uses a digital security code to provide protection against
unintentional access to your base phone.
This security code blocks other cordless handsets to make calls through your base phone.
A random security code will be assigned automatically between your base phone and
handset when you charge the battery pack for the first time.
(The CHARGE lamp flashes during the initialization, then turns on when the initialization
is complete.)
Getting Started
6^^
Page 8
step 1
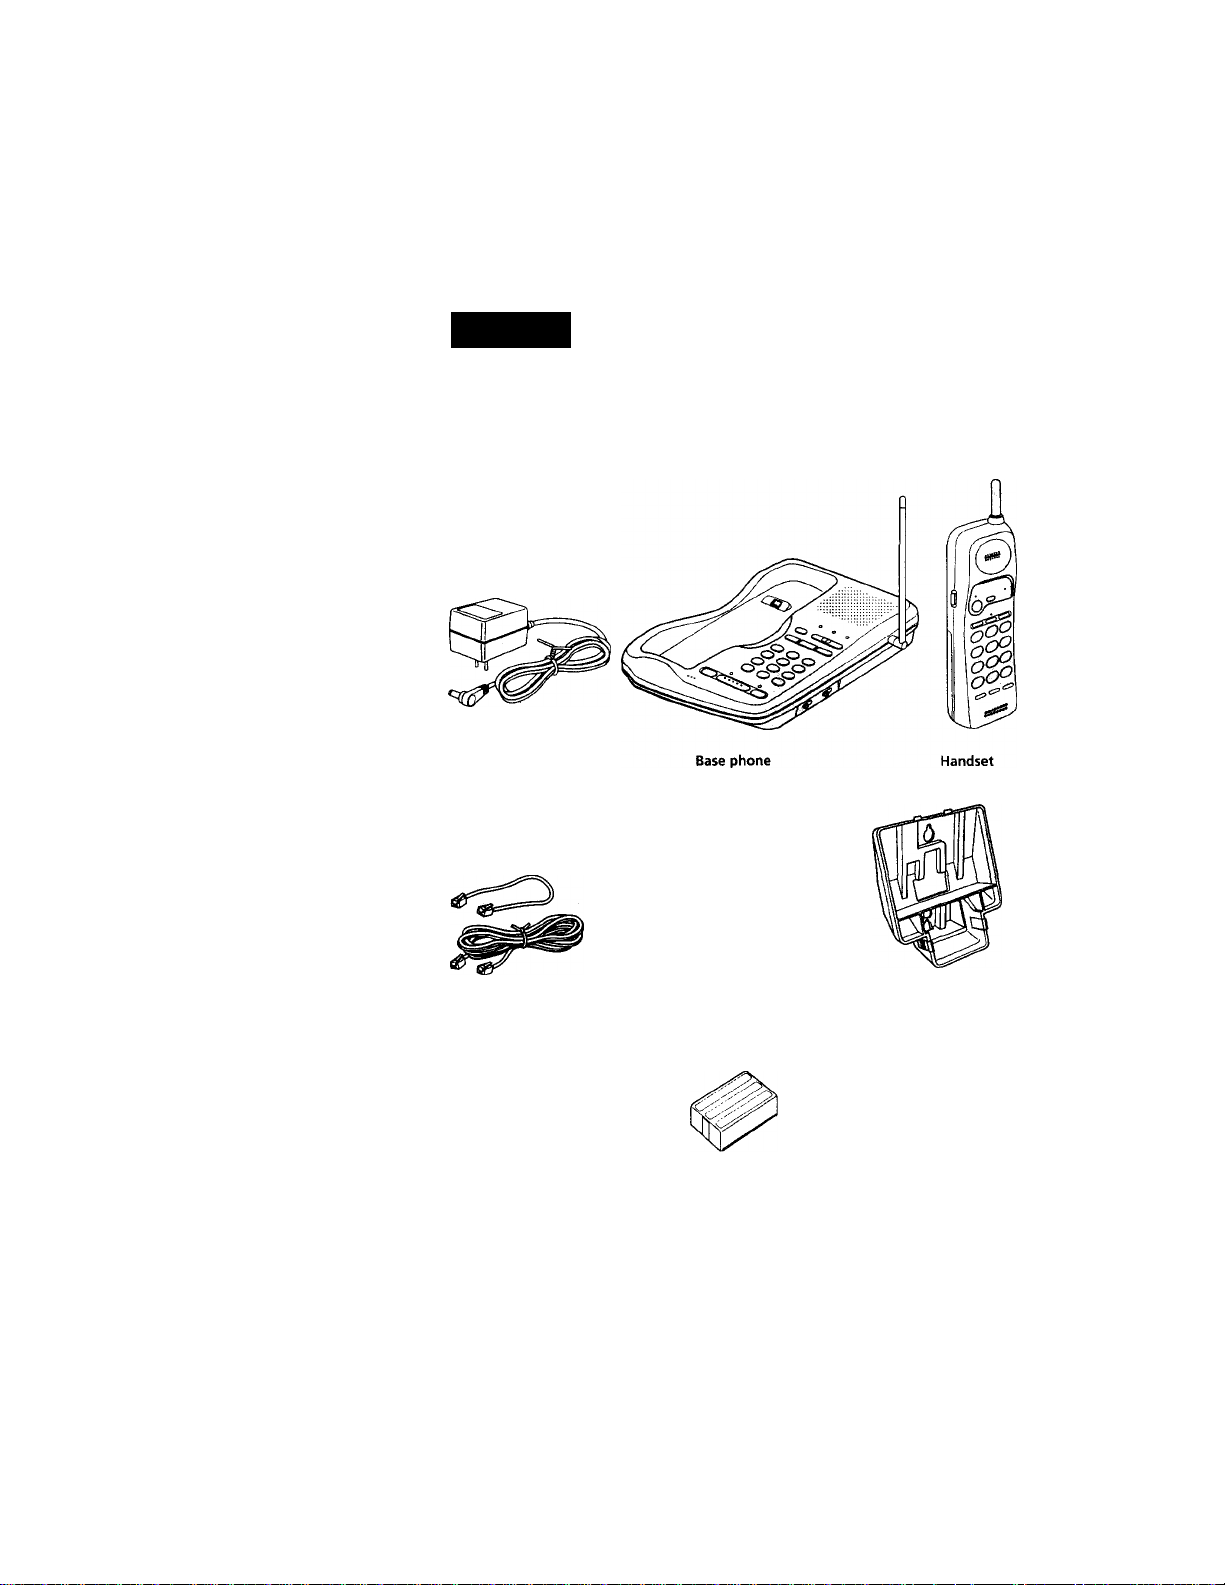
Checking the package contents
Make sure you have received the following items in the package.
If anything is missing, contact your local Sony dealer.
AC power adaptor
(AC-T122)
IS
: 0>
o
<D
S
3
ut
I*
2^
(D
fi.
Telephone line cord (2)
Directories (2)
Screws and caps (2) Wall bracket for
base phone
Rechargeable baffery pack
(BP-T23)
Getting Started 7®*
Page 9
step 2
Setting up the base phone
Do the following steps:
• Choose the best location
• Connect the base phone
• Choose the dialing mode
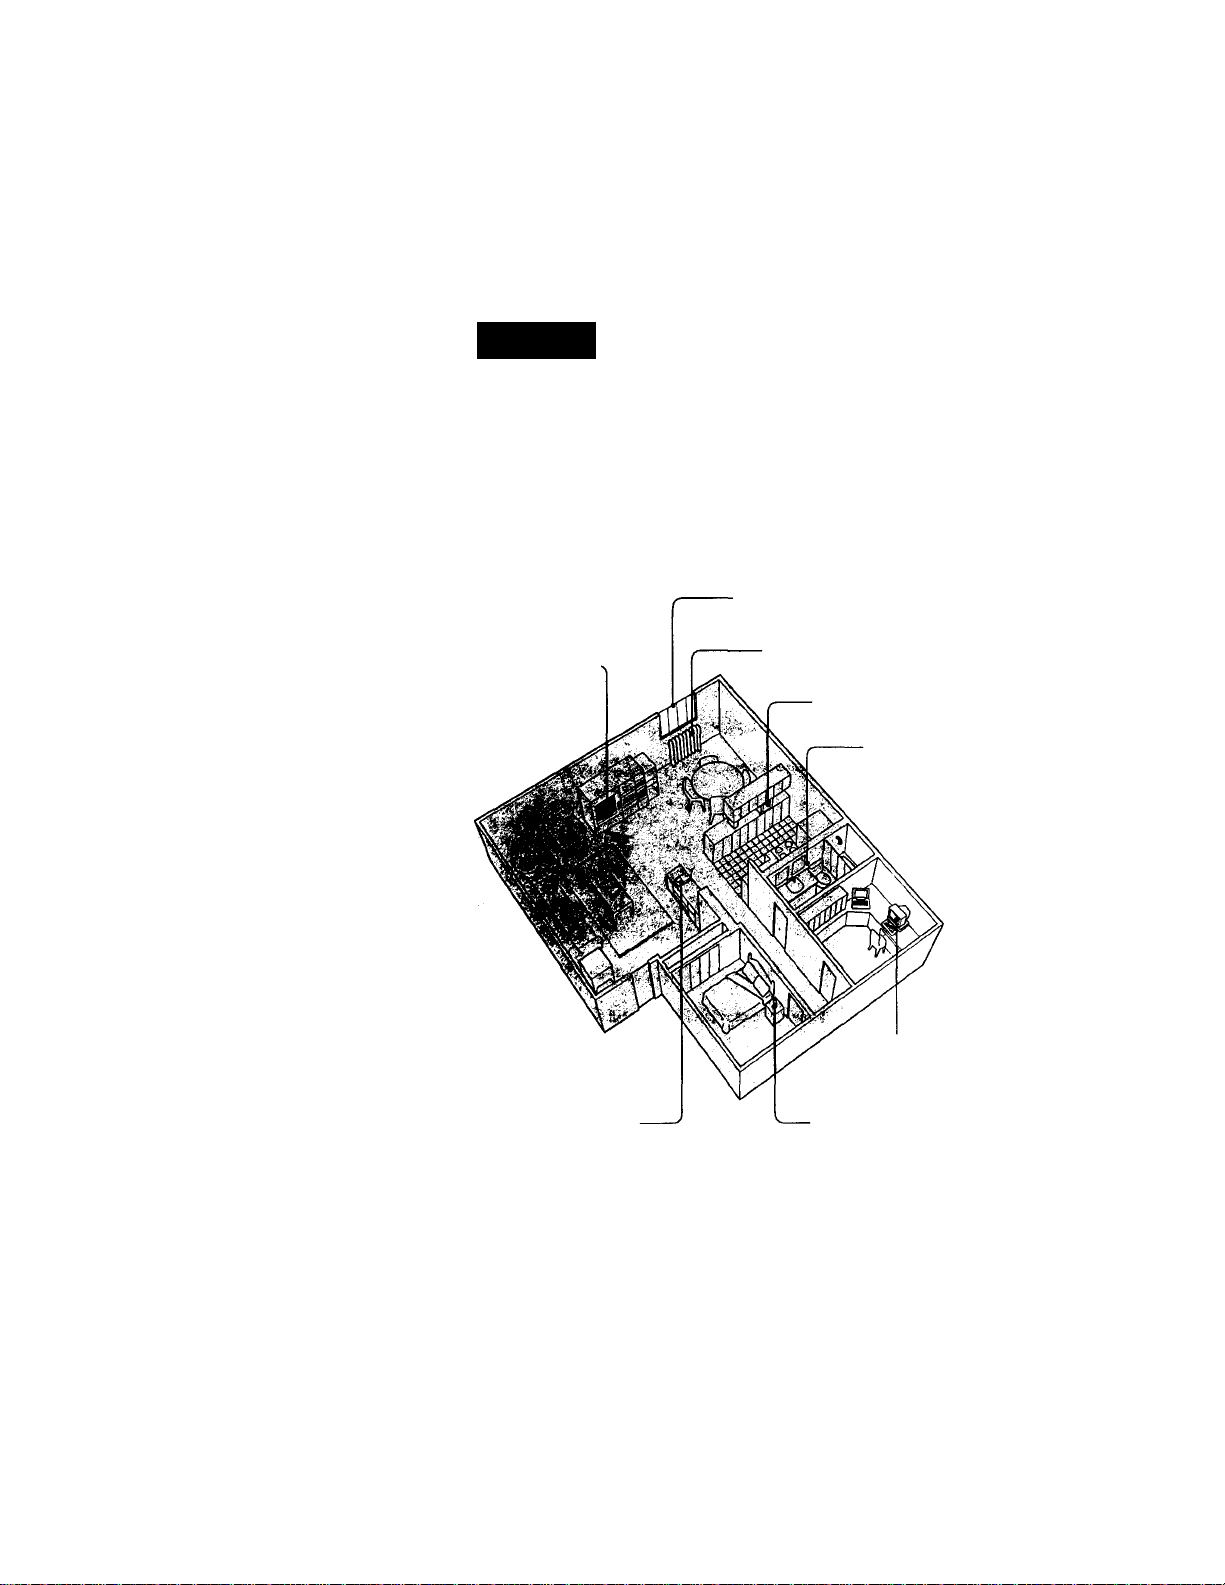
Choosing the best location
Where you place the base phone affects the reception quality of the
handset. » ^ ^ ■ j
' Away from noise sources, such as a window by
a street with heavy traffic
Away from
television sets and
other electronic
equipment
Near a central location
and on a level surface
CAUTION: The cordless telephone operates ate frequency that may cause interference to
----------
nearby TVs and VCRs; the base phone should not be placed near or on top of a
TV or VCR; and if interference is experienced, moving the cordless telephone
farther away from, the TV or VCR will often reduce or eliminate the interference.
Away from heat sources, such as radiators,
airducts, and sunlight
Away from a microwave oven
Away from excessive
moisture, extremely low
temperatures, dust,
mechanical vibration, or
shock
Away from a personal
computer
Away from another cordless
telephone
gfN
Getting Started
Page 10
Connecting the base phone
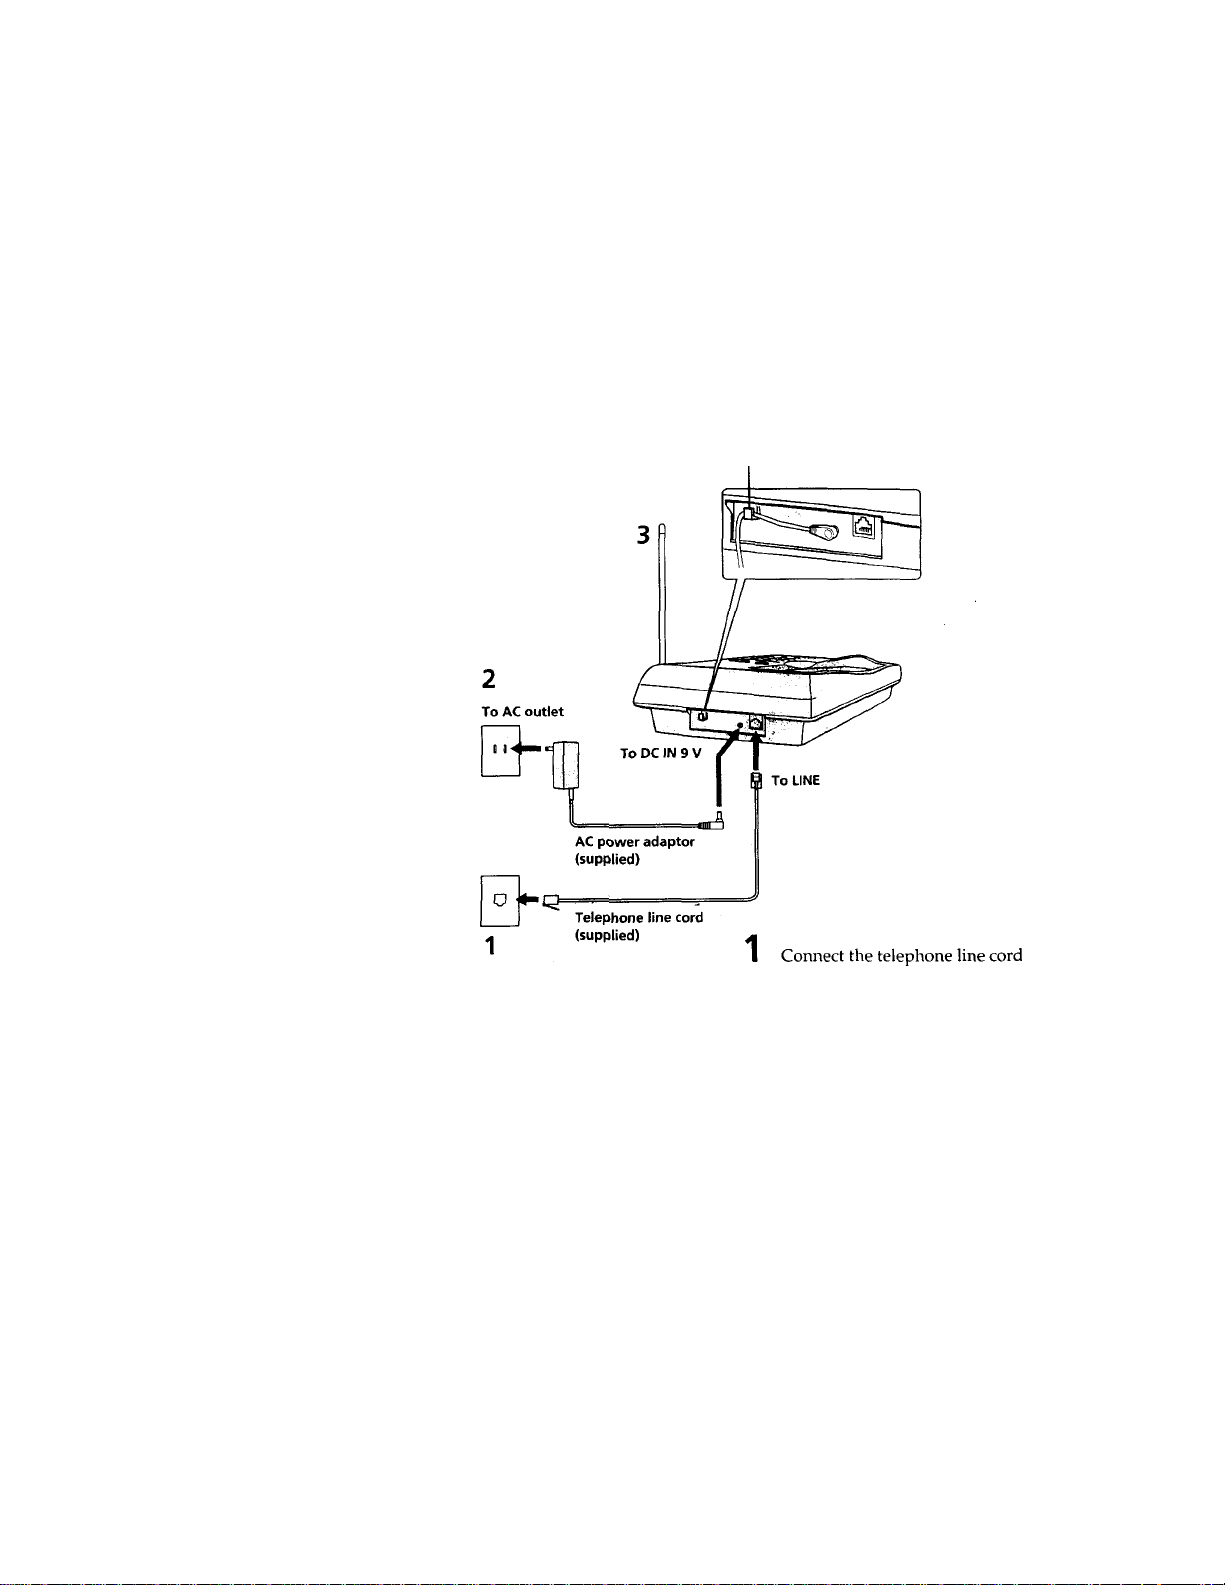
If you want to hang the base phone on the wall, see page 25.
Hook the cord.
s
3
ifi
in
• ST
(D
a
To telephone
outlet
to the LINE jack, and to a
telephone outlet.
Connect the AC power adaptor
2
to the DC IN 9V jack, and to an
AC outlet.
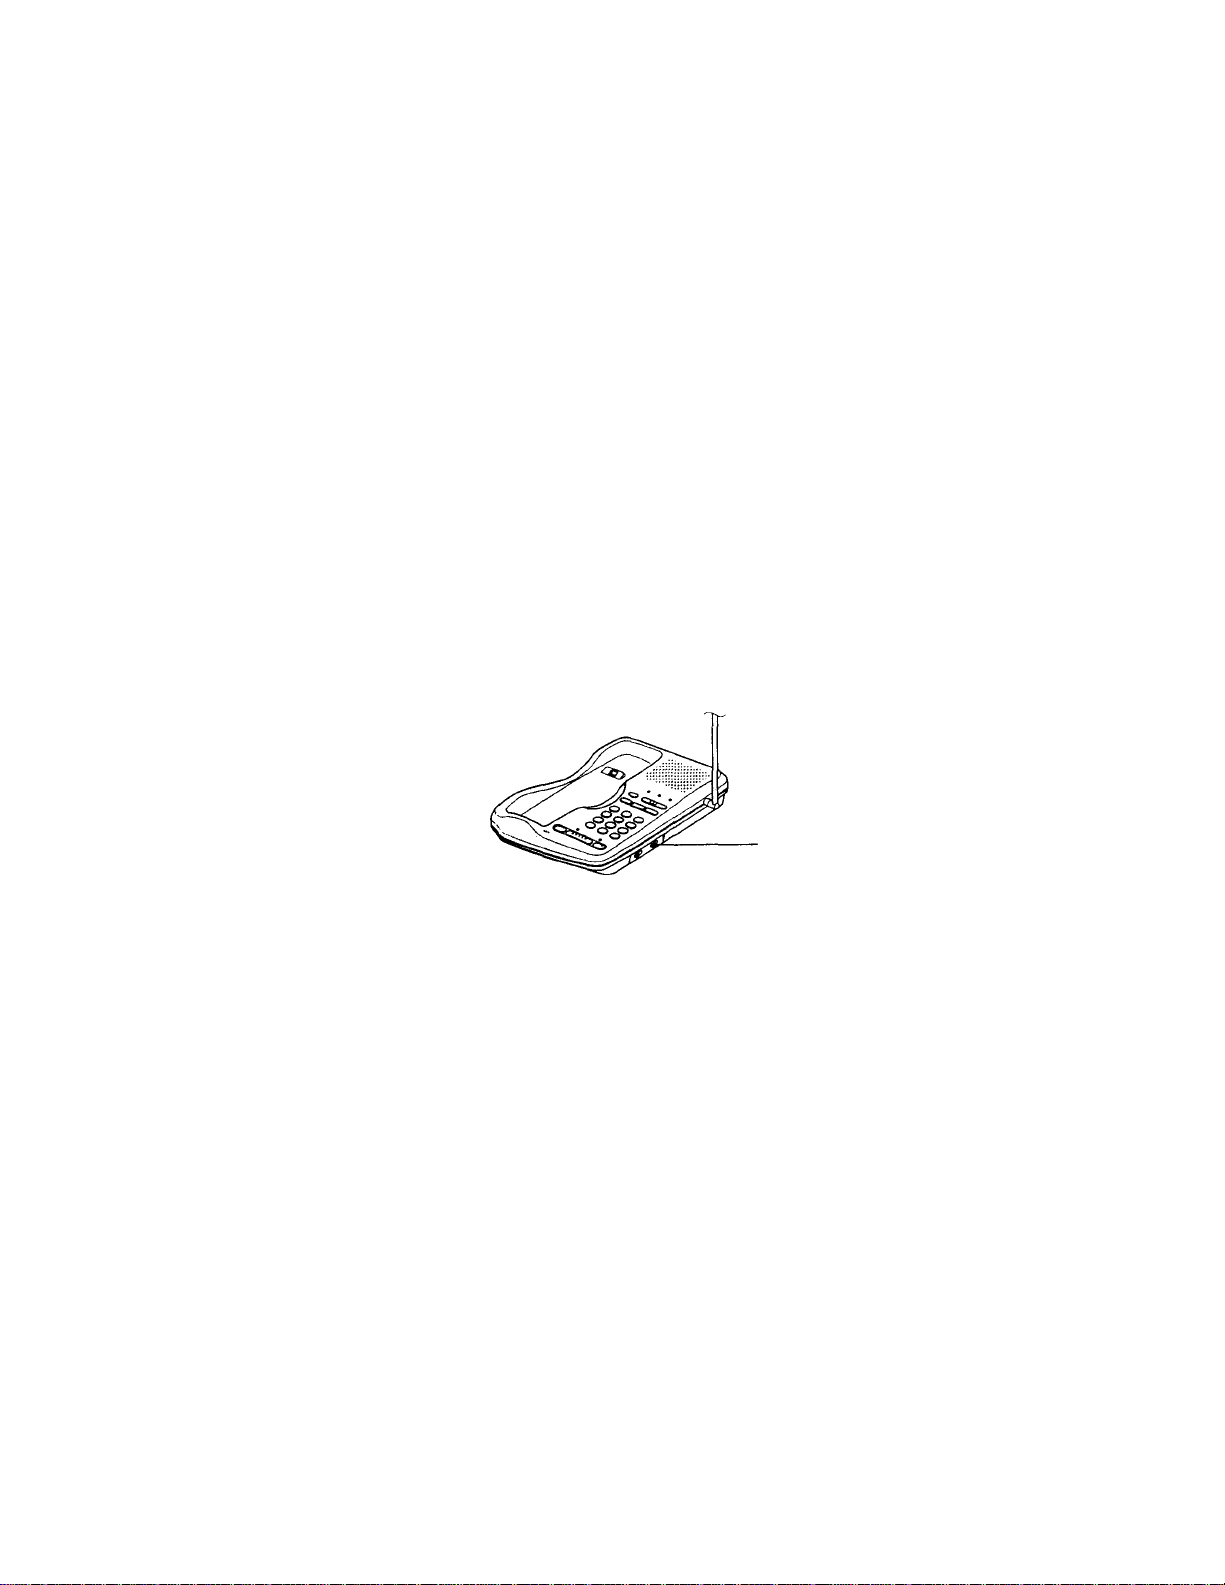
Raise the antenna. Make sure it
3
points toward the ceiling.
continued
Getting Started 9™
Page 11
step 2: Setting up the base phone (continued)
Notes
Use only the supplied AC-T122 AC power adaptor.
Do not use any other AC power adaptor.
• Connect the AC power adaptor to a continuous power supply.
• Place the base phone close to the AC outlet so that you can easily
unplug the AC power adaptor.
Tip
• If vour telephone outlet is not modular, contact vour telephone ser\ ice
company for assistance.
Polarity of the plug
Choosing the dialing mode
For the telephone to work properly, select an appropriate dialing mode
(tone or pulse).
DIAL MODE switch
If you are not sure of your dialing system
Make a trial call with the DIAL MODE switch set to TONE.
If the call connects, leave the switch as it is; otherwise, set to PULSE.
Modular
10^" Getting Started
Page 12
step 3
Preparing the battery pack
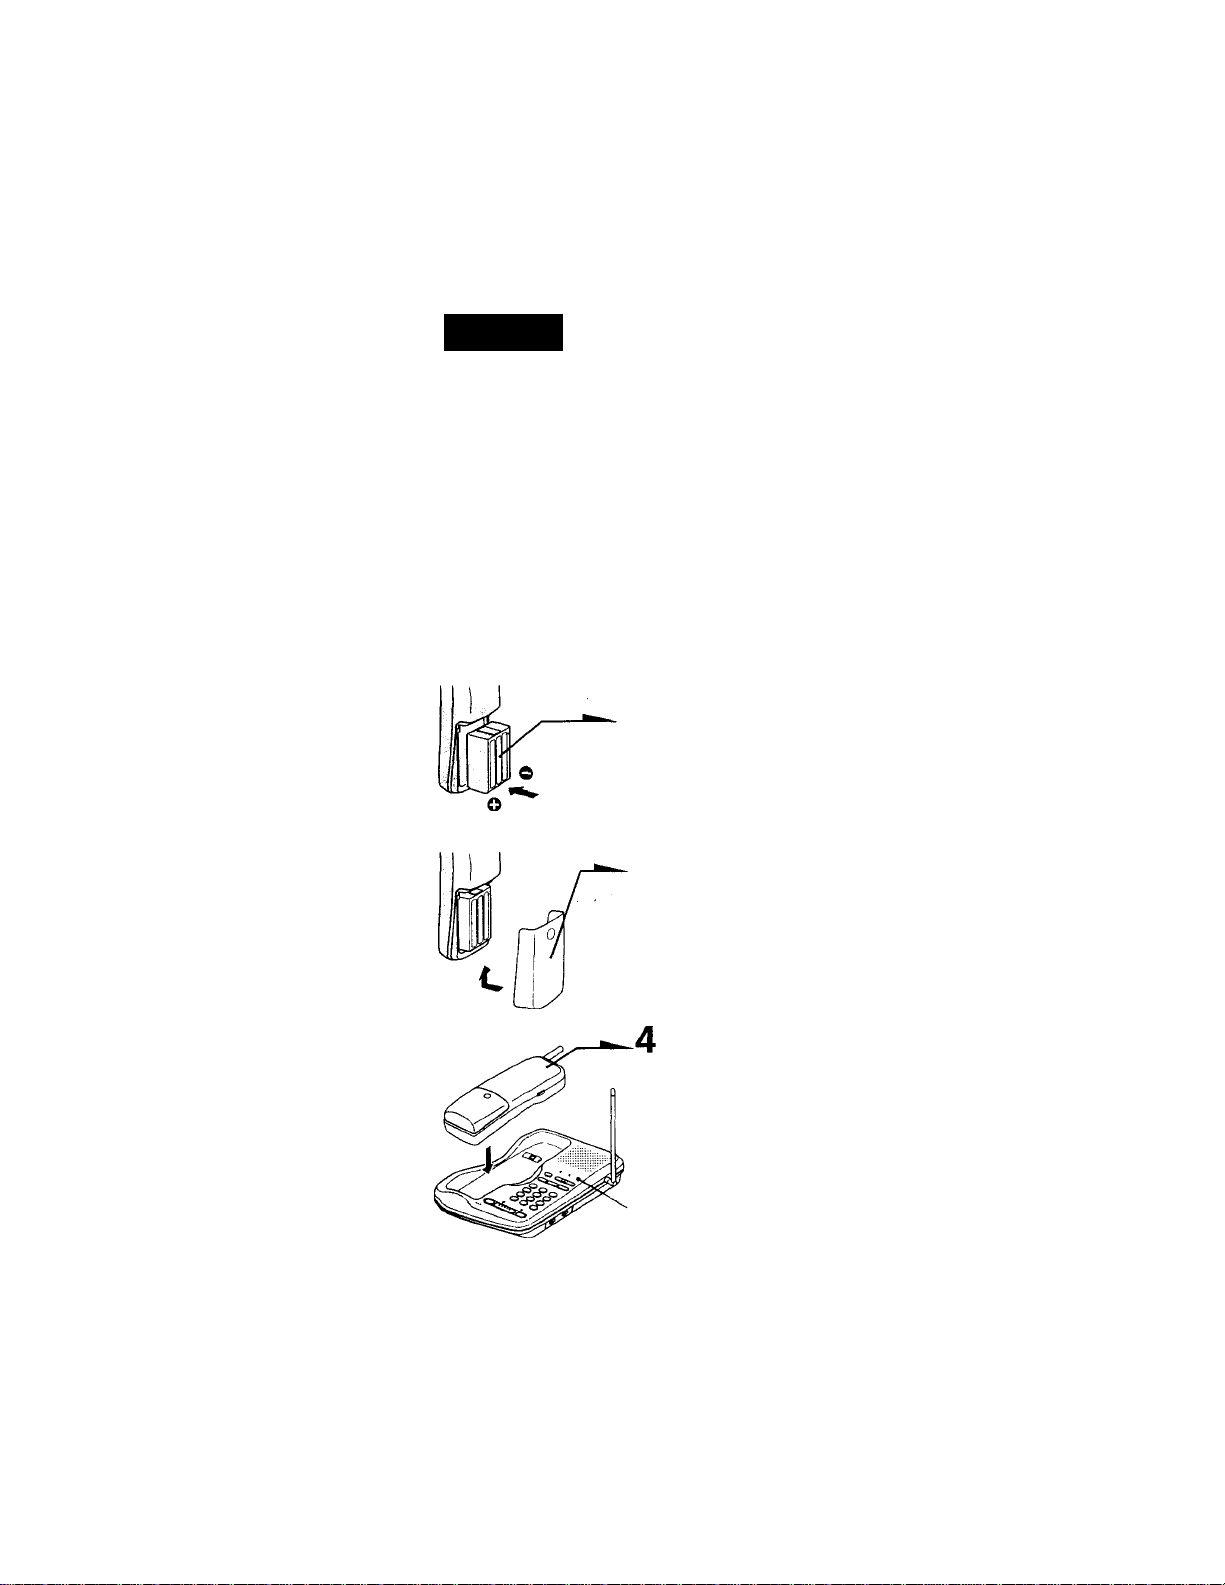
Insert the battery pack into the handset, then place the handset on the
base phone.
LLC
—1 Slide open the battery compartment lid of the
handset.
2 Insert the battery pack (with contacts facing
down) into the battery compartment.
Close the battery compartment lied.
Place the handset on the base phone.
The CHAGE lamp lights up when the handset
is properly seated on the charge terminals of
the base phone. Charge the battery pack for
more than 8 hours so that the battery is fully
charged.
I
5
ta
»
- fi>
№
O.
CHARGE lamp
continued
Getting Started 11™
Page 13

step 3; Preparing the battery pack for the handset (continued)
Battery duration
A fully charged battery pack lasts for about:
• 7 hours when you use the handset continuously.
• 7 days when the handset is in standby mode.
Battery life may vary depending on usage condition and ambient
temperature.
Notes
• The battery pack will gradually discharge over a long period of time, even if
not in use.
• The CHARGE lamp of the base phone is always lighted when the handset is
placed on the base phone, even if the battery pack has been fully charged.
* The battery works best when charged after several calls.
♦ If you leave the battery pack in the handset without charging it, the battery
pack will be completely discharged.
It may require several times of charging to recover to its full capacity.
When to purchase a new battery pack
If the battery lasts only a few minutes even after 8 hours of charging,
the usable life of the battery has expired and needs replacement.
Contact your local Sony authorized dealer or service center, and ask
for a Sony BP-T23 rechargeable battery pack.
12^" Getting Started
Page 14
Basics
Making calls
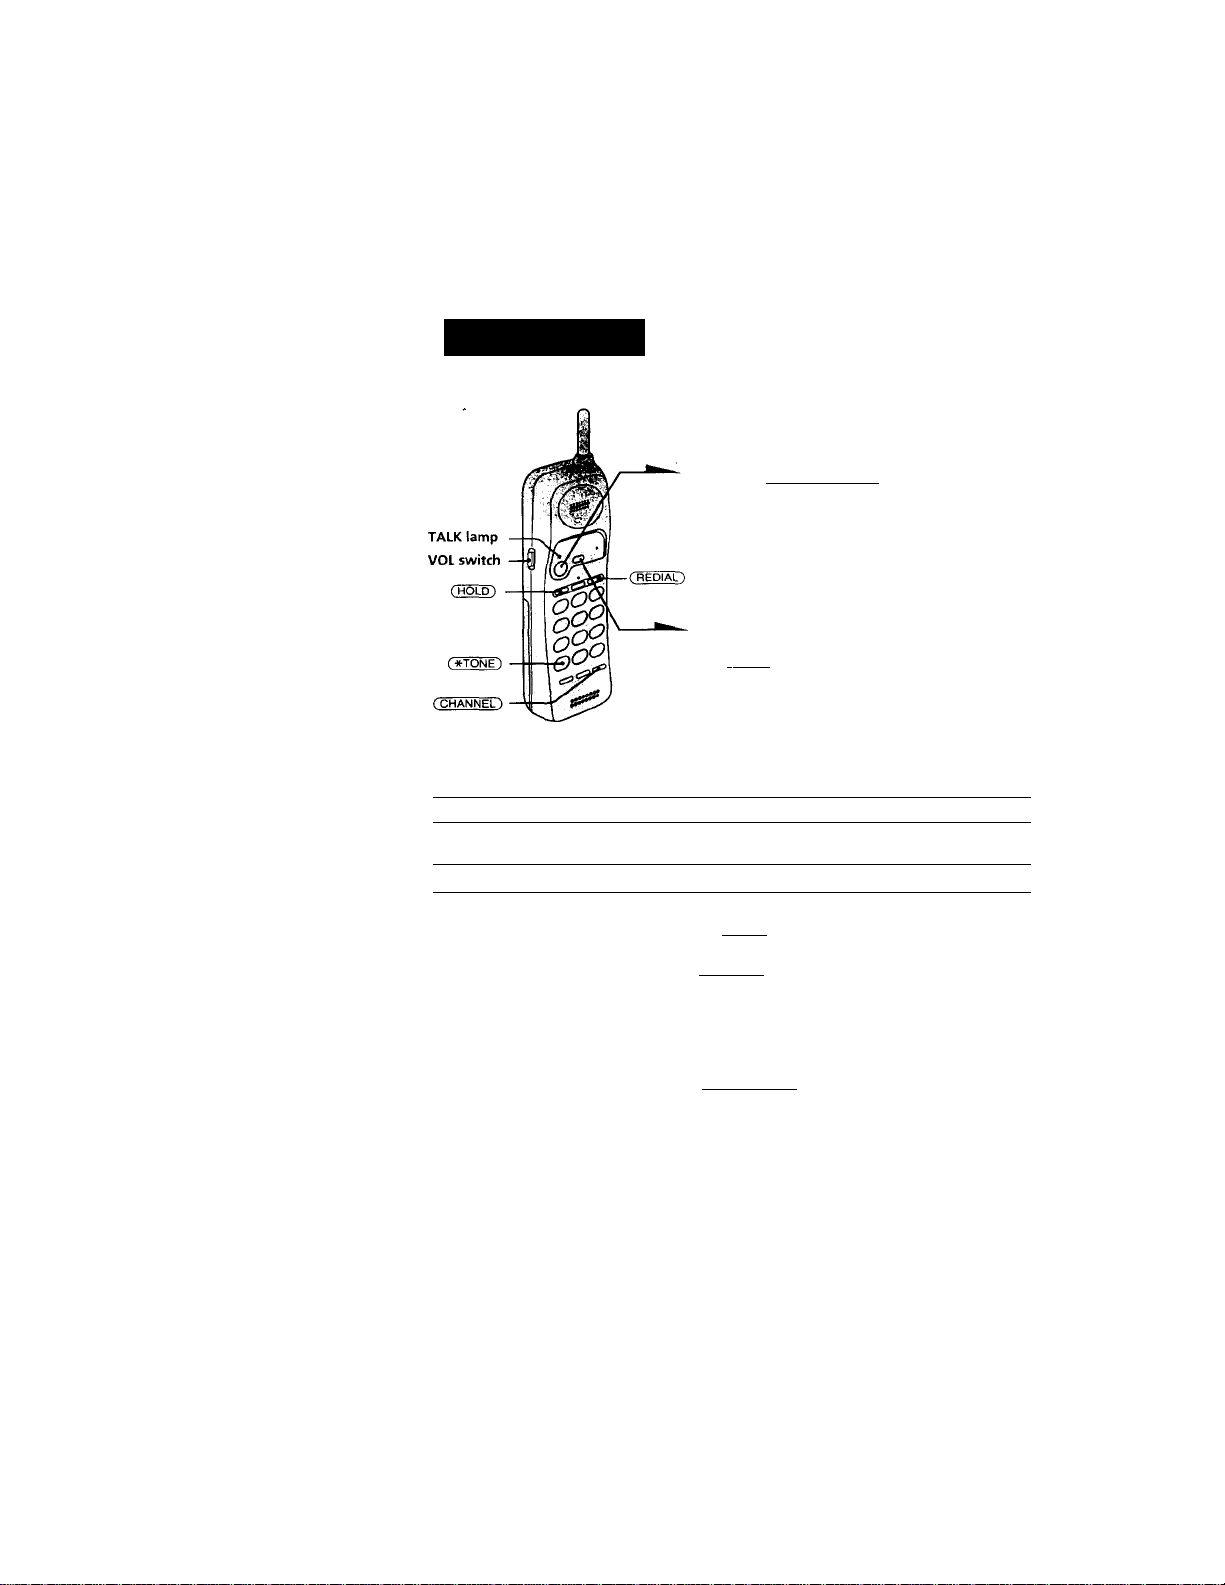
Press (TALK/FLASH).
1
The TALK lamp lights up, then you
will hear a dial tone. If you hear beeps,
move closer to the base phone.
2
Dial the phone number.
When you are done talking, press
3
(OFF) or replace the handset on the
base phone.
The TALK lamp goes off.
Additional tasks
To
Put a call on hold
Improve reception
Adjust the handset volume
Switch to tone dialing temporarily
If you hear a long beep when you press (channel^, move closer to the base
phone.
Do this
Press ( HOLD). Ihe l ALK lamp flashes slowly.
Press (TALK/FLASH) to resume the conversation.
Press (CHANNEL )*.
Slide the VOL switch.
Press (^ONE) after you are connected. The line
will remain in tone dialing until disconnected.
#■>
tfi
Л
5'
»
Д
(D
a
Notes
• Before dialing, make sure you can hear the dial tone, otherwise you cannot
dial correctly. *
• When the TALK lamp lights up by pressing (TALK/FLASH). the IN USE lamp
on the base phone lights up simultaneously.
• When the TALK lamp repeats sets of two flashes, the base phone is in use.
If the handset battery becomes weak during a call
You hear a beep and the ВАТТ LOW lamp on the handset flashes
The call will disconnect soon. Replace the handset on the base phone to
charge.
continued
Getting Started IB®*
Page 15
Making calls (continued)
Making calls through the speakerphone
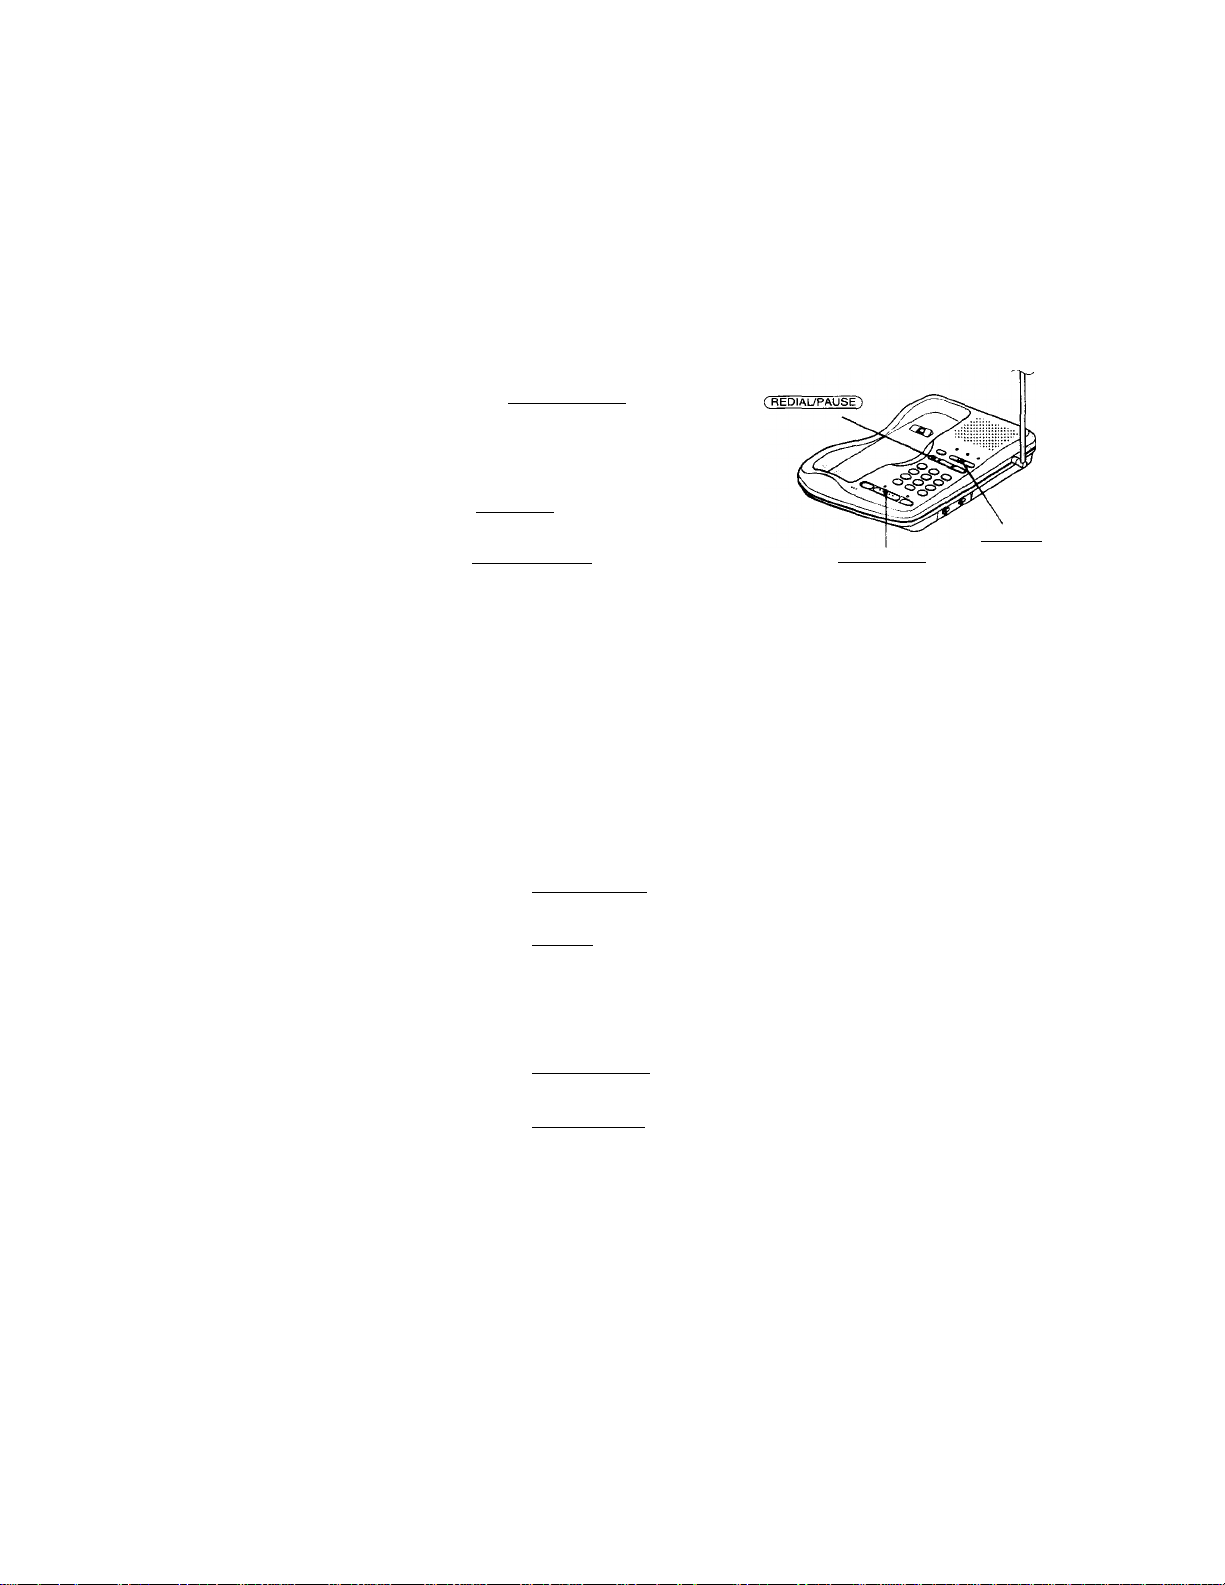
Press (SPEAKERPHONE) on the base
'phone.
The SPEAKERPHONE lamp lights up.
Dial the phone number.
To adjust the speaker volume, press
( volume~T7^.
When you’re done talking, press
(SPEAKERPHONE ~) again.
rSPEAKERPHONE')
To obtain the best speakerphone performance
• You may not be able to hear the other party's voice in a noisy place.
Therefore, use the speakerphone in a quiet room.
• Do not bring your hand or other object too close to the microphone
or you will hear a shrill noise ("feedback").
• When the speaker volume is loud, or the telephone has been placed
close to a wall, you may find that the volume drops suddenly. This is
due to a circuit in the telephone designed to protect against
feedback. In such cases, lower the speaker volume slightly.
Redialing
On the handset
1 Press ( TALK/FLASH ).
The TALK lamp lights up.
2 Press (REDIAL) to redial the number last dialed.
( VOLUME +1^
Note
If the number last dialed exceeds 16 digits, only the first 16 digits are dialed.
On the base phone
1 Press (SPEAKERPHONE).
The SPEAKERPHONE lamp lights up.
2 Press (REDIAL/PAUSE ) to redial the number last dialed.
Note
if the number last dialed c'xceeds 16 digits, onlyThe first 16 digits are dialed.
14'*' Getting Started
Page 16
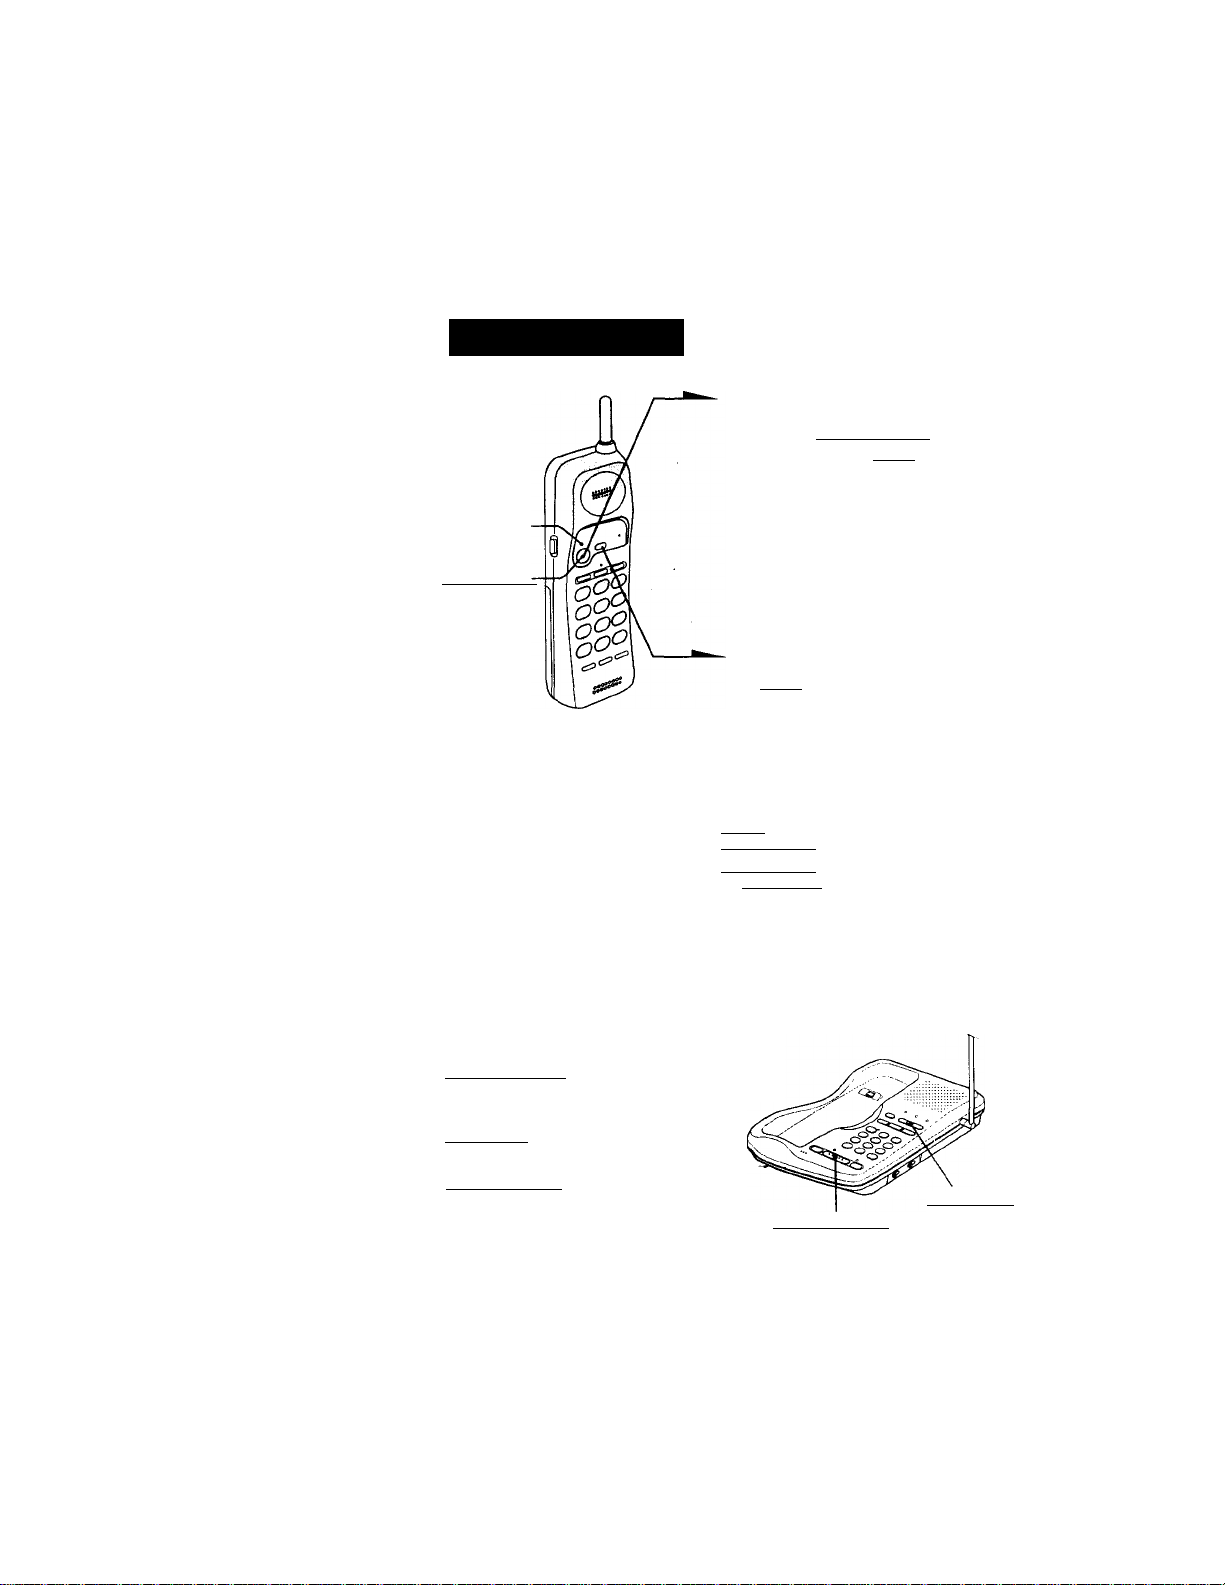
Receiving calls
TALK lamp
(TALK/FLASH)
1
When you hear the phone ring:
• Press (TALK/FLASH) (or any
button except (OFF)).
or
• Pick up the handset from the
base phone when the handset is
placed on the base phone.
The TALK lamp lights up at the
same time the IN USE lamp on the
base phone lights up. «
: fi)
O
5"
in
\A
r*
When you are done talking, press
(OFF) or replace the handset on the
base phone.
The TALK and IN USE lamps go
off.
Additional tasks
To
Put a call on hold.
Switch to another call
("call waiting" service*)
Adjust the ringer volume of See page 20.
the base phone
* Contact your telephone company to subscribe to this service.
See page 19 to change the ringer type.
Do this
Press (HOLD).
Press (TALK/FLASH) to resume the conversation.
Press (TALK/FLASH) to access the flash function.
Press the (Talk/flash) button again to return to the
fiEst caller.
Receiving calls through the speakerphone
When you hear the phone ring, press
( SPEAKERPHONE) on the base phone.
The SPEAKERPHONE lamp lights up.
To adjust the speaker volume, press
(VOLUME +/-).
When you're done talking, press
(SPEAKERPHONE) again.
To obtain the best speakerphone
performance, see page 14.
(SPEAKERPHONE')
( VOLUME +/- )
Getting Started
15™
o
a
Page 17
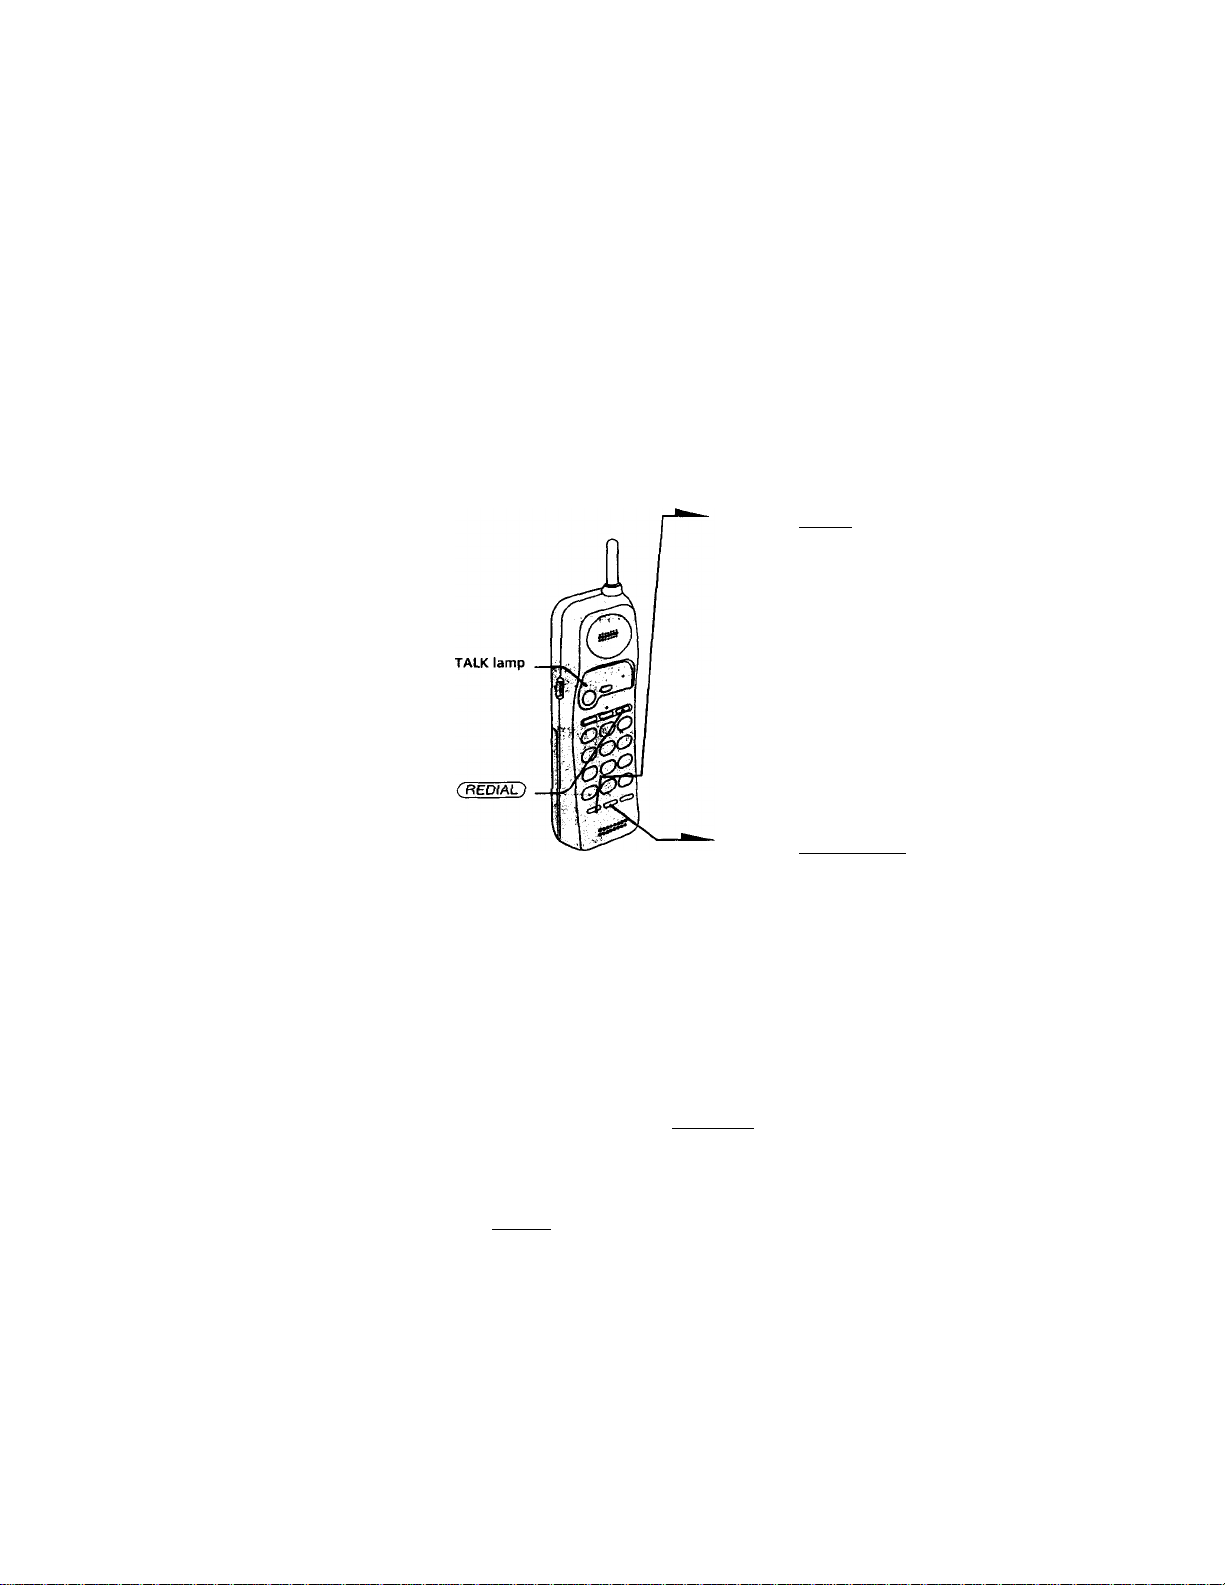
Advanced Features
Speed dialing
You can dial with a touch of a few keys by storing a phone number on
a dialing key. You can store up to 10 phone numbers separately on the
handset and on the base phone.
Storing phone numbers
1 Press (RGMy
The TALK lamp flashes quickly.
2 Press one of the dialing keys ((0} to
d3) for the phone number to be
stored.
You will hear a confirmation beep.
3 Enter the phone number you want to
store.
You can enter up to 16 digits,
including a tone and a pause, each of
which is counted as one digit.
Press (SPEED DIAL).
You will hear another confirmation
beep, and the number is stored. The
TALK lamp goes off.
Notes
• In step 3, if you do not enter the phone number, the previously stored number will be
erased.
• Do not allow more than 20 seconds to elapse between each step of the procedure.
• The handset must be off to store phone numbers.
• You cannnot store phone numbers on the handset while the speakerphone is being used
on the base phone. The TALK lamp will repeat sets of two flashes to indicate this
condition.
Tips
If you enter a wrong number, press (SPEED dial), then start from the beginning.
Use the supplied directory to write down what you have stored on the speed dialing
numbers.
To store the previous number dialed
Press (REDtAL) directly after step 2, then go to step 4.
16"'"! Advanced features
Page 18
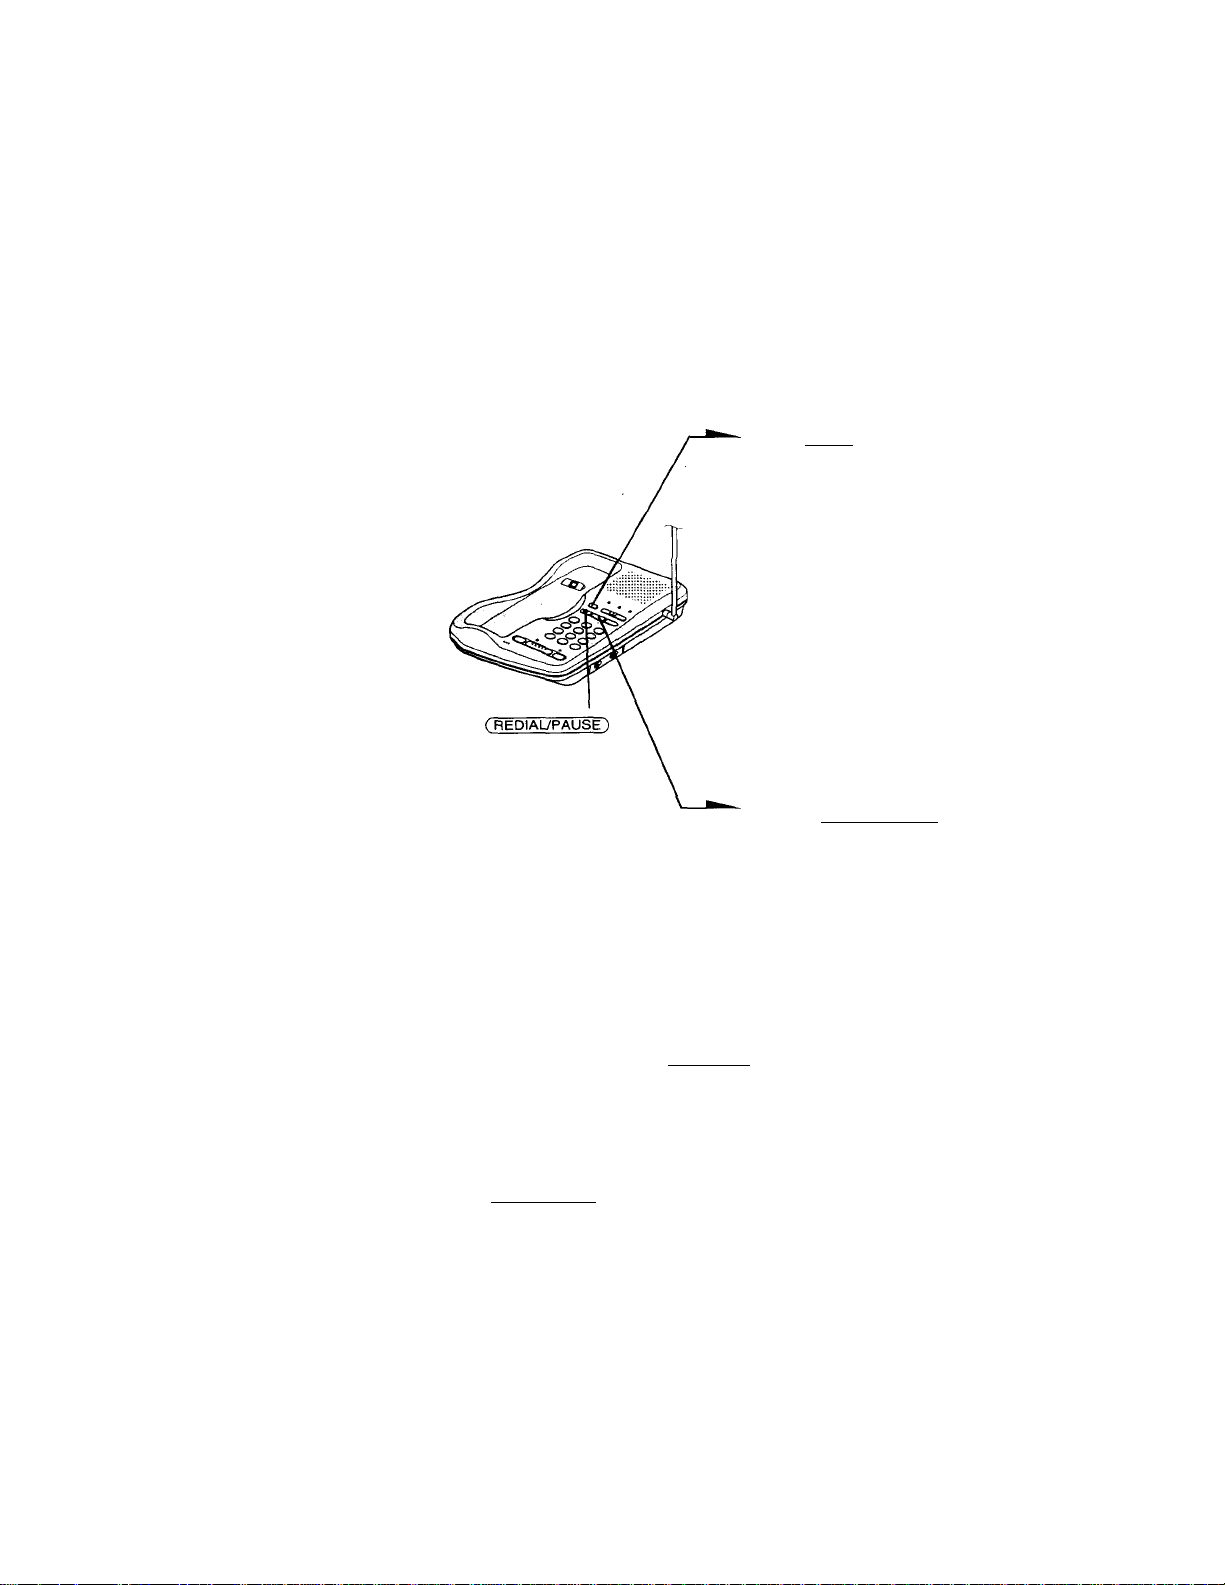
storing phone numbers on the base phone
1 Press (PGM).
The SPEAKERPHONE lamp
flashes quickly.
2 Press one of the ten dialing keys
(Cq) to Cl}) for the phone
number to be stored.
You will hear a confirmation
beep.
3 Enter the phone number you
want to store.
You can enter up to 16 digits,
including a tone and a pause,
each of which is counted as one
digit.
4 Press C SPEED DIAL).
You will hear another
confirmation beep, and the
number is stored.
Notes
In step 3, if you do not enter the phone number, the previously stored number will be
erased.
Do not allow more than 20 seconds to elapse between each step of the
procedure.
You cannot store phone numbers on the base phone while the handset is
being used. The IN USE lamp will light up to indicate this condition.
Tips
If you enter a vvrong number, press ( SPEE^DIal). then start from the
beginning.
Use the supplied directory to write down what you have stored on the speed dialing
numbers.
>
a
<
3
n
(0
a
*n
to
c
to
vs
To store the previous number dialed ^
Press (REDIAL/PAUSE) directly after step 2, then go to step 4.
continued
Advanced Features
17'“'
Page 19

Speed dialing (continued)
To store a number to be dialed via Private Branch Exchange (PBX)
. Before entering a phone number in step 3 on the previous page, do as follows:
1 Enter the outside line access digit (e.g. 9).
2 Press (REDIAL/PAUSEl.
To change a stored number
To store a new number, follow the instructions described on the previous page.
To clear a number from memory
1 Press (PGM).
2 Press the speed dialing key you want to clear.
3 Press (SPEED DIAL).
Making calls with speed dialing on the handset
1 Press (TALK).
The TALK lamp lights up.
2 Press ( SPEED DIAL ).
3 Enter the desired speed dialing key ((2) to ®).
The phone number stored in the speed dialing key will be
dialed.
Making calls with speed dialing on the base phone
Press (SPEAKERPHONE).
1
The SPEAKERPHONE lamp lights up.
Press (SPEED DIAL).
2
Enter the desired speed dialing key (Co) to (J))-
3
The phone number stored in the speed dialing key will be
dialed.
18^'^ Advanced Features
Page 20
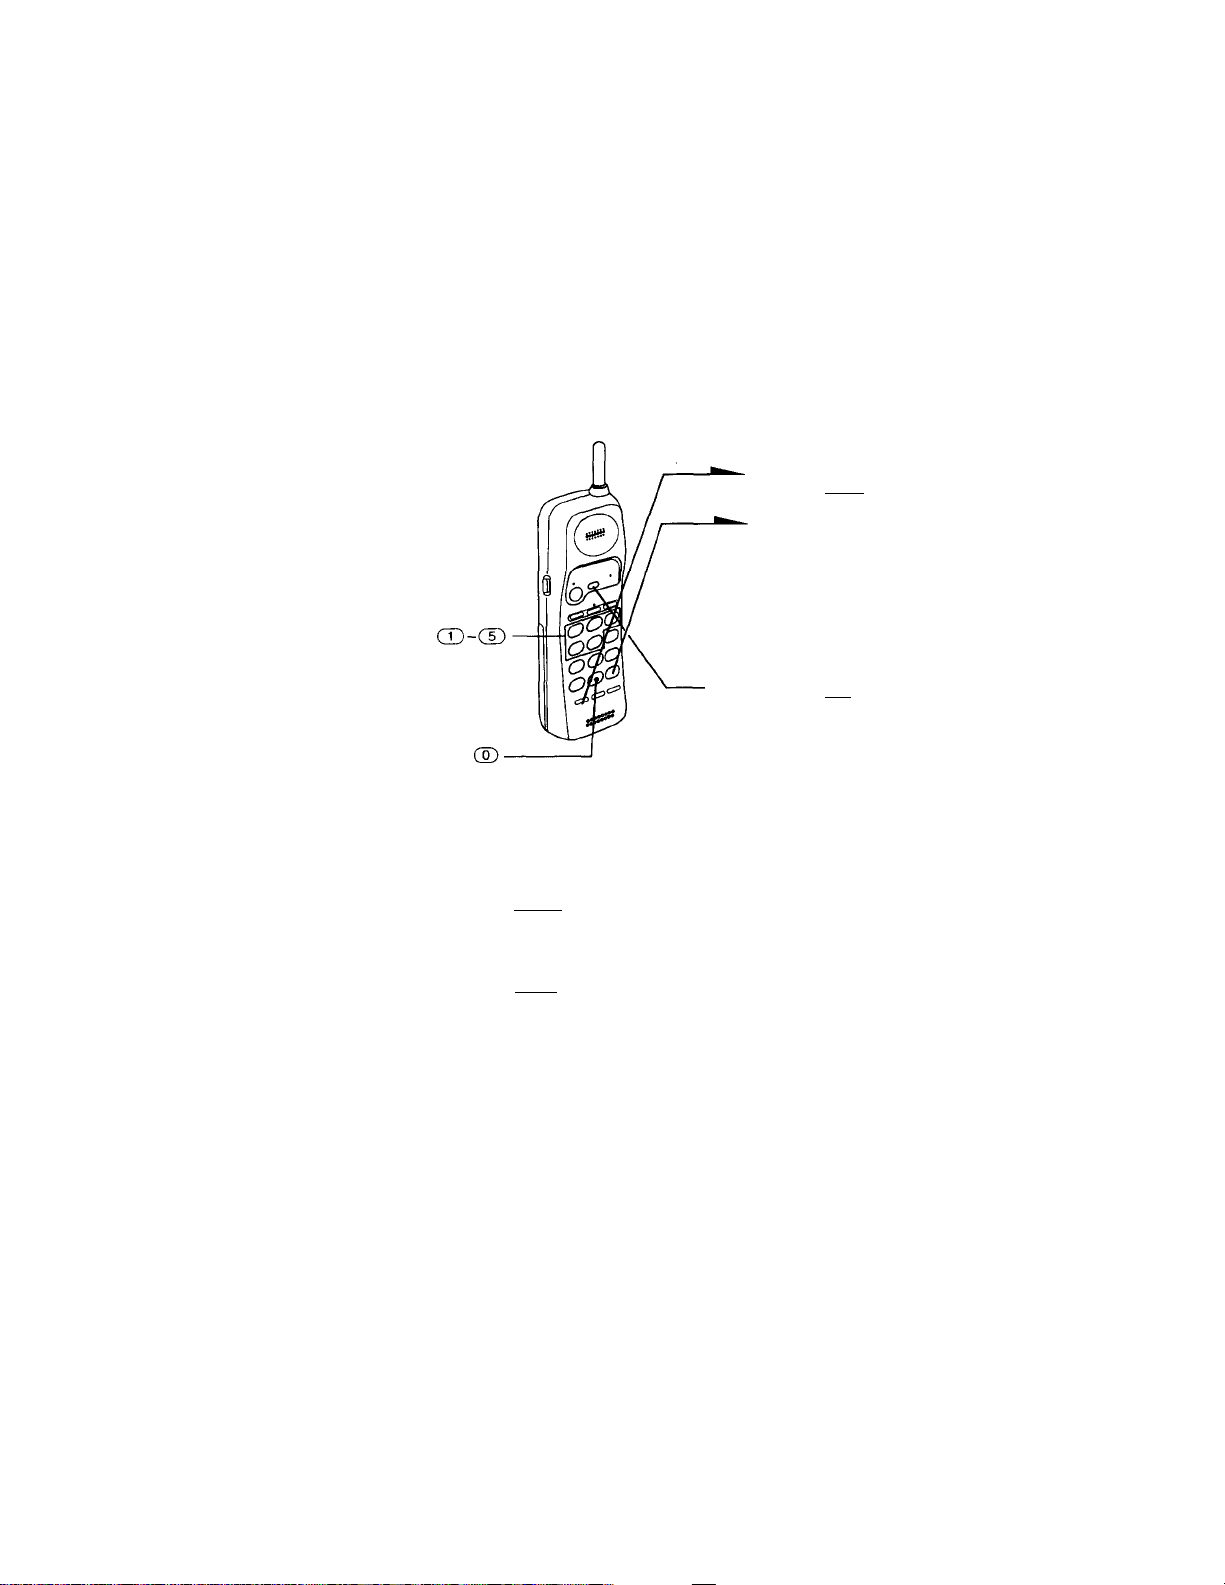
Setting the ringer type
You can select a ringer type from four types.
1
Press ( pgmY
2
Press (5)
3
Press a number button, (T)
t<-' (3). b' select a ringer type.
You will hear the
corresponding ringer tone.
— 4
Press (off).
Turning off the ringer of the handset
1 Press (PGM). -
2 Press («}.
3 Press d).
4 Press (OFF).
The ringer on the handset is turned off.
To turn the ringer on again
Follow the instructions described in “Setting the ringer type.'
continued
Advanced Features 19™
>
a
<
SI
3
n
(S
a
T1
IB
SI
(D
VI
Page 21
Setting the ringer type (continued)
Checking the ringer type
1 Press C PGM).
2 Press CD-
3 Press ®.
The currently selected ringer sounds.
4 Press (OFF).
Note
If you hear no sound (only key beep), the ringer on the handset has been turned off.
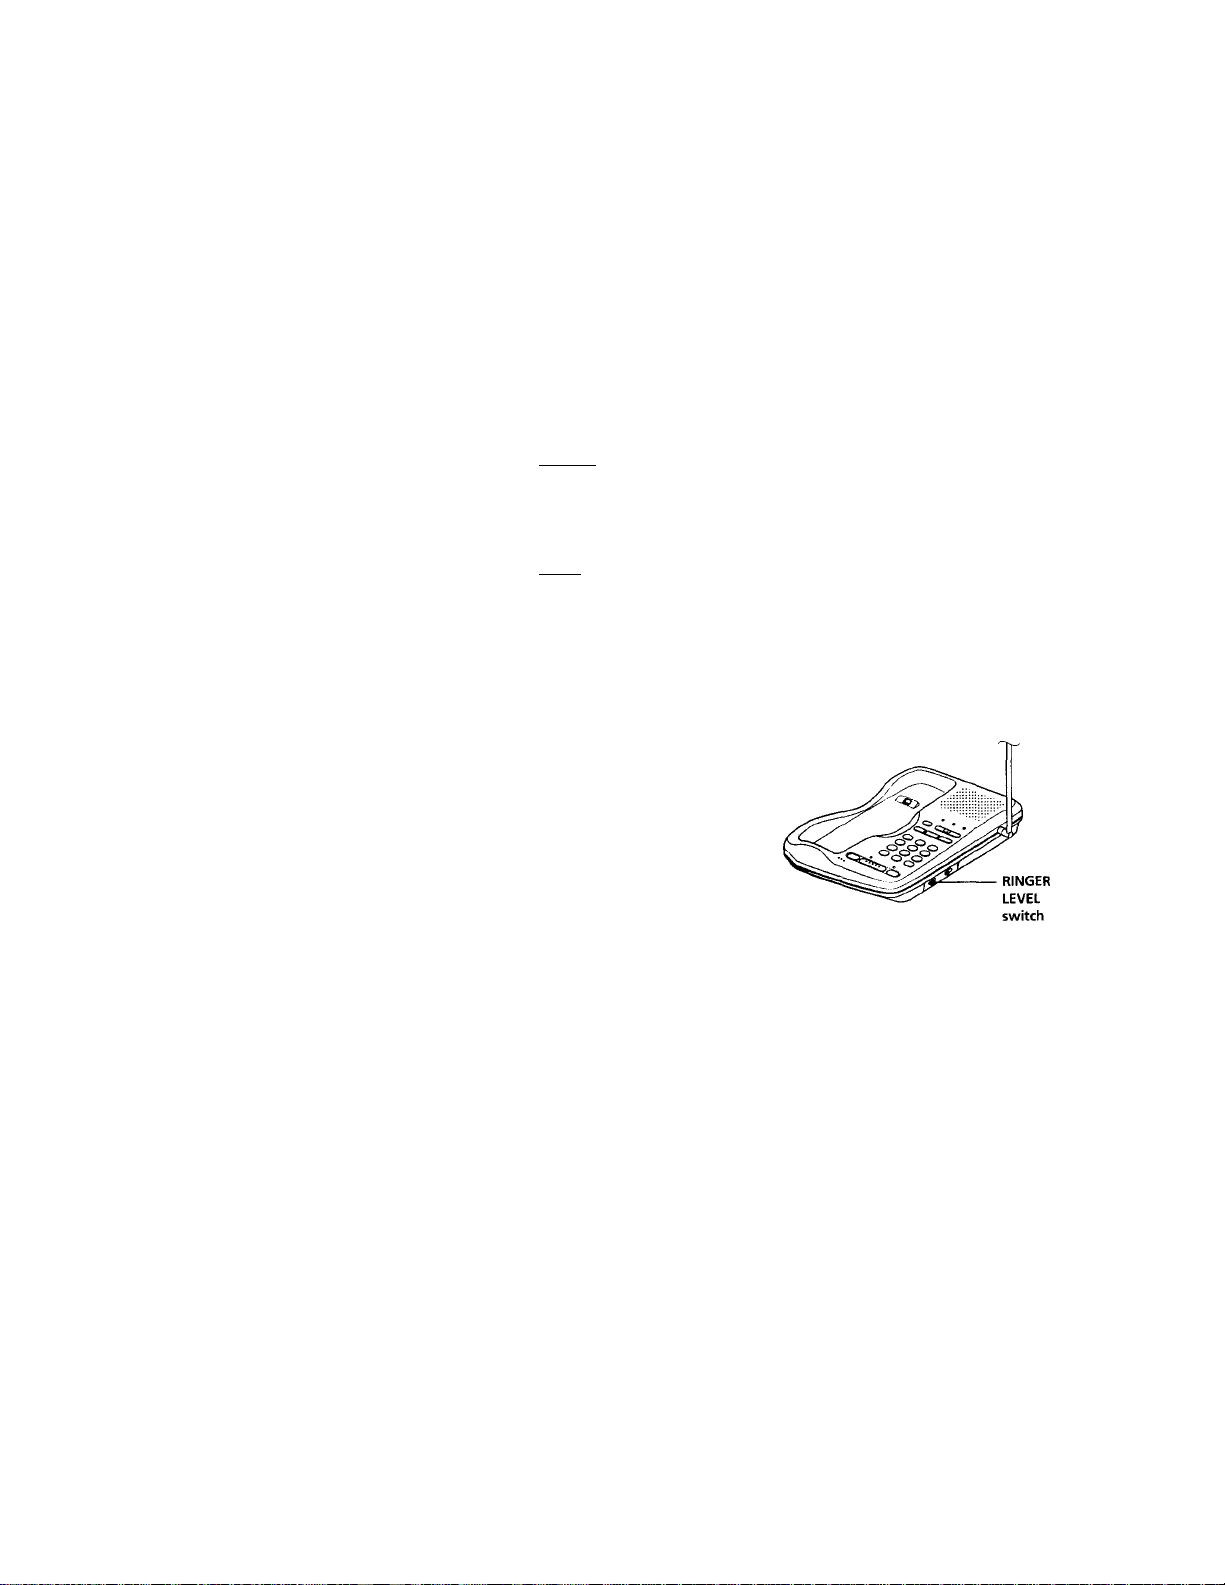
Adjusting the ringer volume level of the base phone
Set the RINGER LEVEL switch on the base
phone to HIGH or LOW. To turn the ringer
off, set it to OFF.
2(K" I Advanced Features
Page 22
Switching the phones during a call
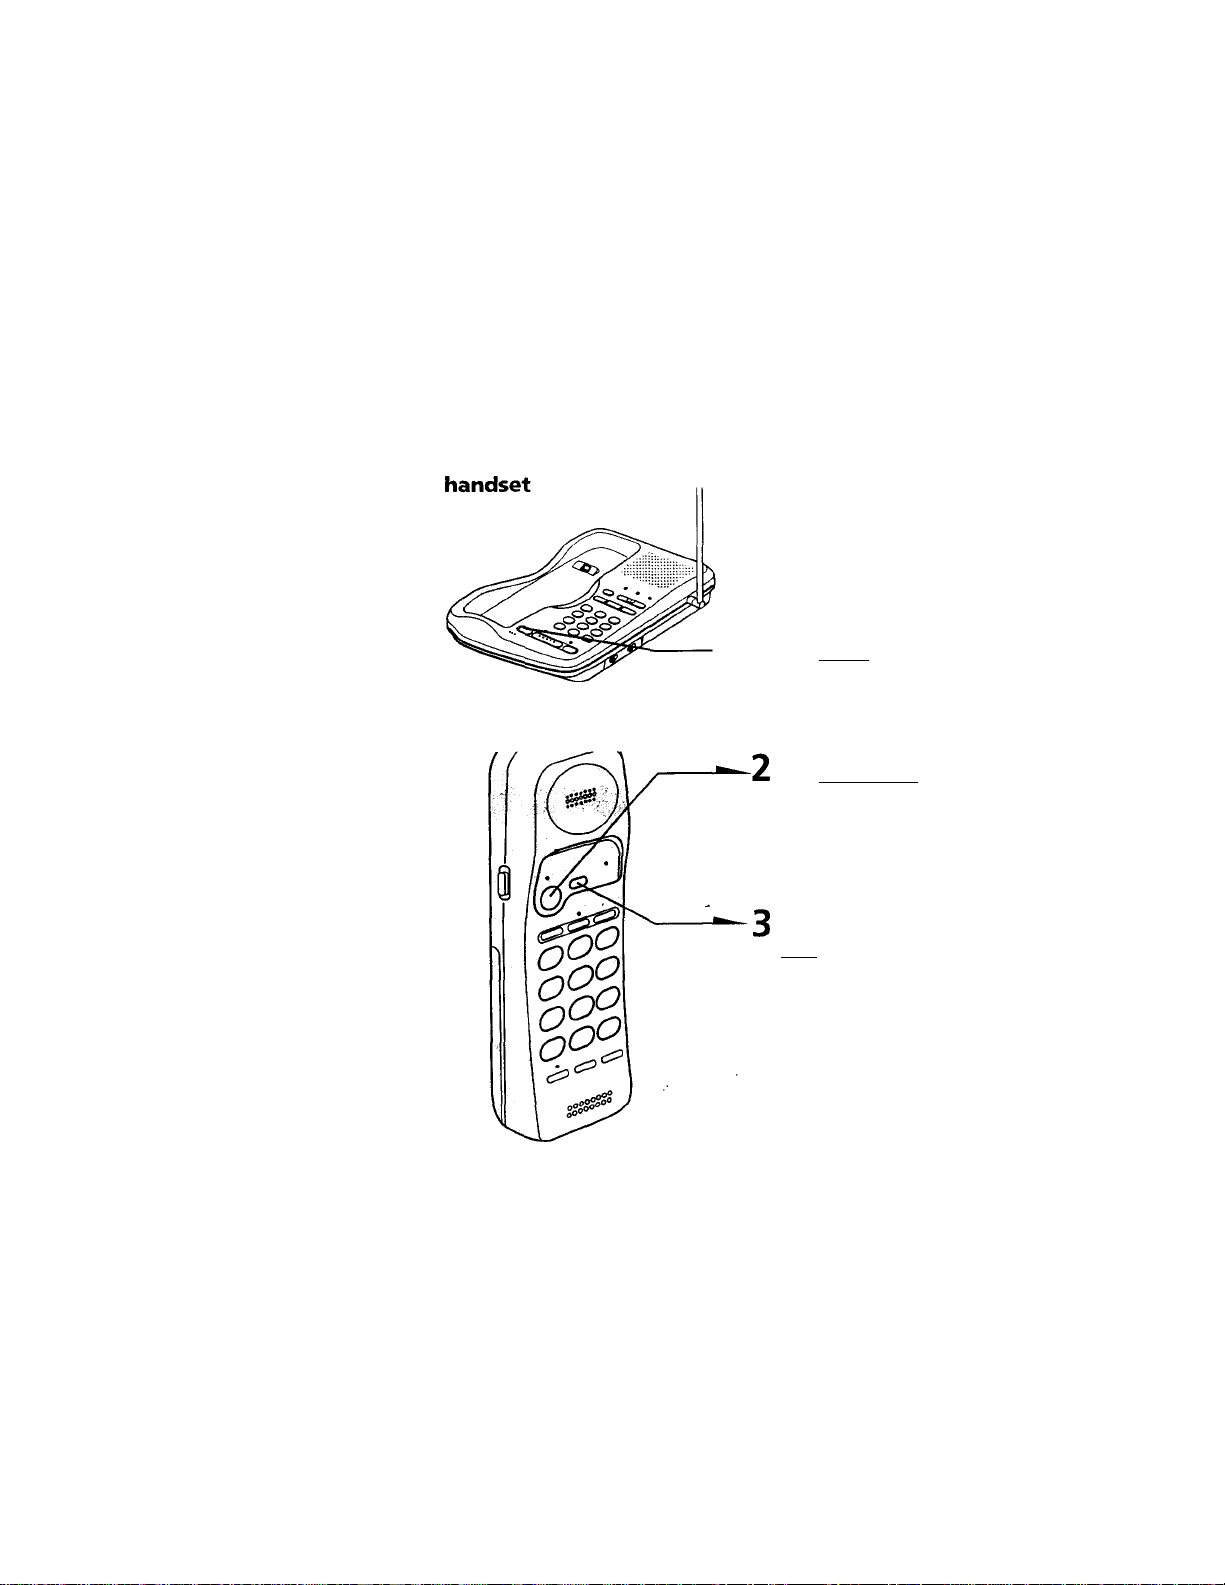
When you put on a call on hold, you can return to the call on the other
phone without disconnecting the call.
To switch from the base phone to the
—1 Press (HOLD) on the base phone.
The SPEAKERPHONE lamp and
the TALK lamp on the handset
will flash slowly.
Press (TALK/FLASH ) or pick up
the handset.
The TALK lamp will light up.
The SPEAKERPHONE lamp will
go off and the IN USE lamp will
light up.
When you are done talking, press
(OFF) or replace the handset to
the base phone.
>
a
<
fii
3
n
(D
a
■n
ID
01
ID
VI
Tip
While talking through the speakerphone on the base phone, if you pick up
the handset, the call will be switched to the handset.
continued
Advanced Features
2V
Page 23
Switching the phones during a call (continued)
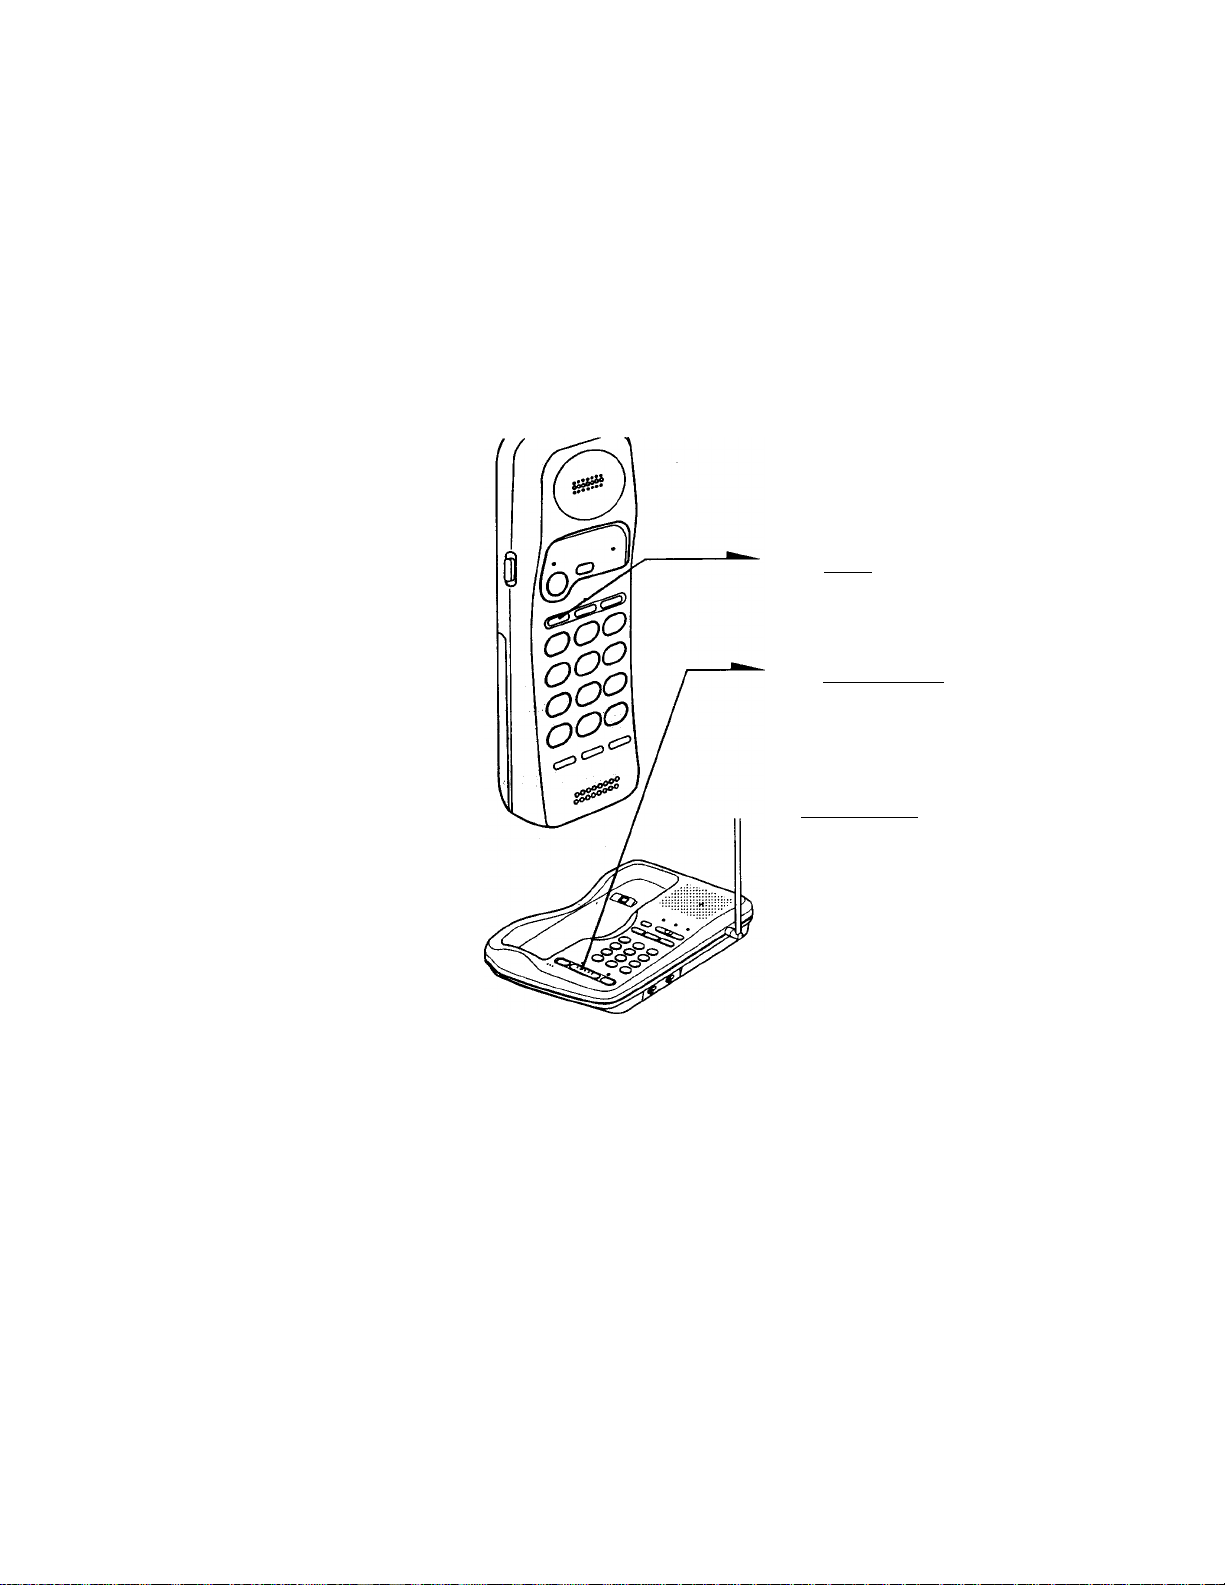
To switch from the handset to the base
phone
1 Press (HOLD') on the handset.
The TALK lamp will flash slowly.
2 Press ( SPEAKERPHONE).
The SPEAKERPHONE lamp will
light up. The TALK lamp will
repeat sets of two flashes.
When you are done talking, press
(SPEAKERPHONE) again.
22'" Advanced Features
Page 24
Talking between the handset and the
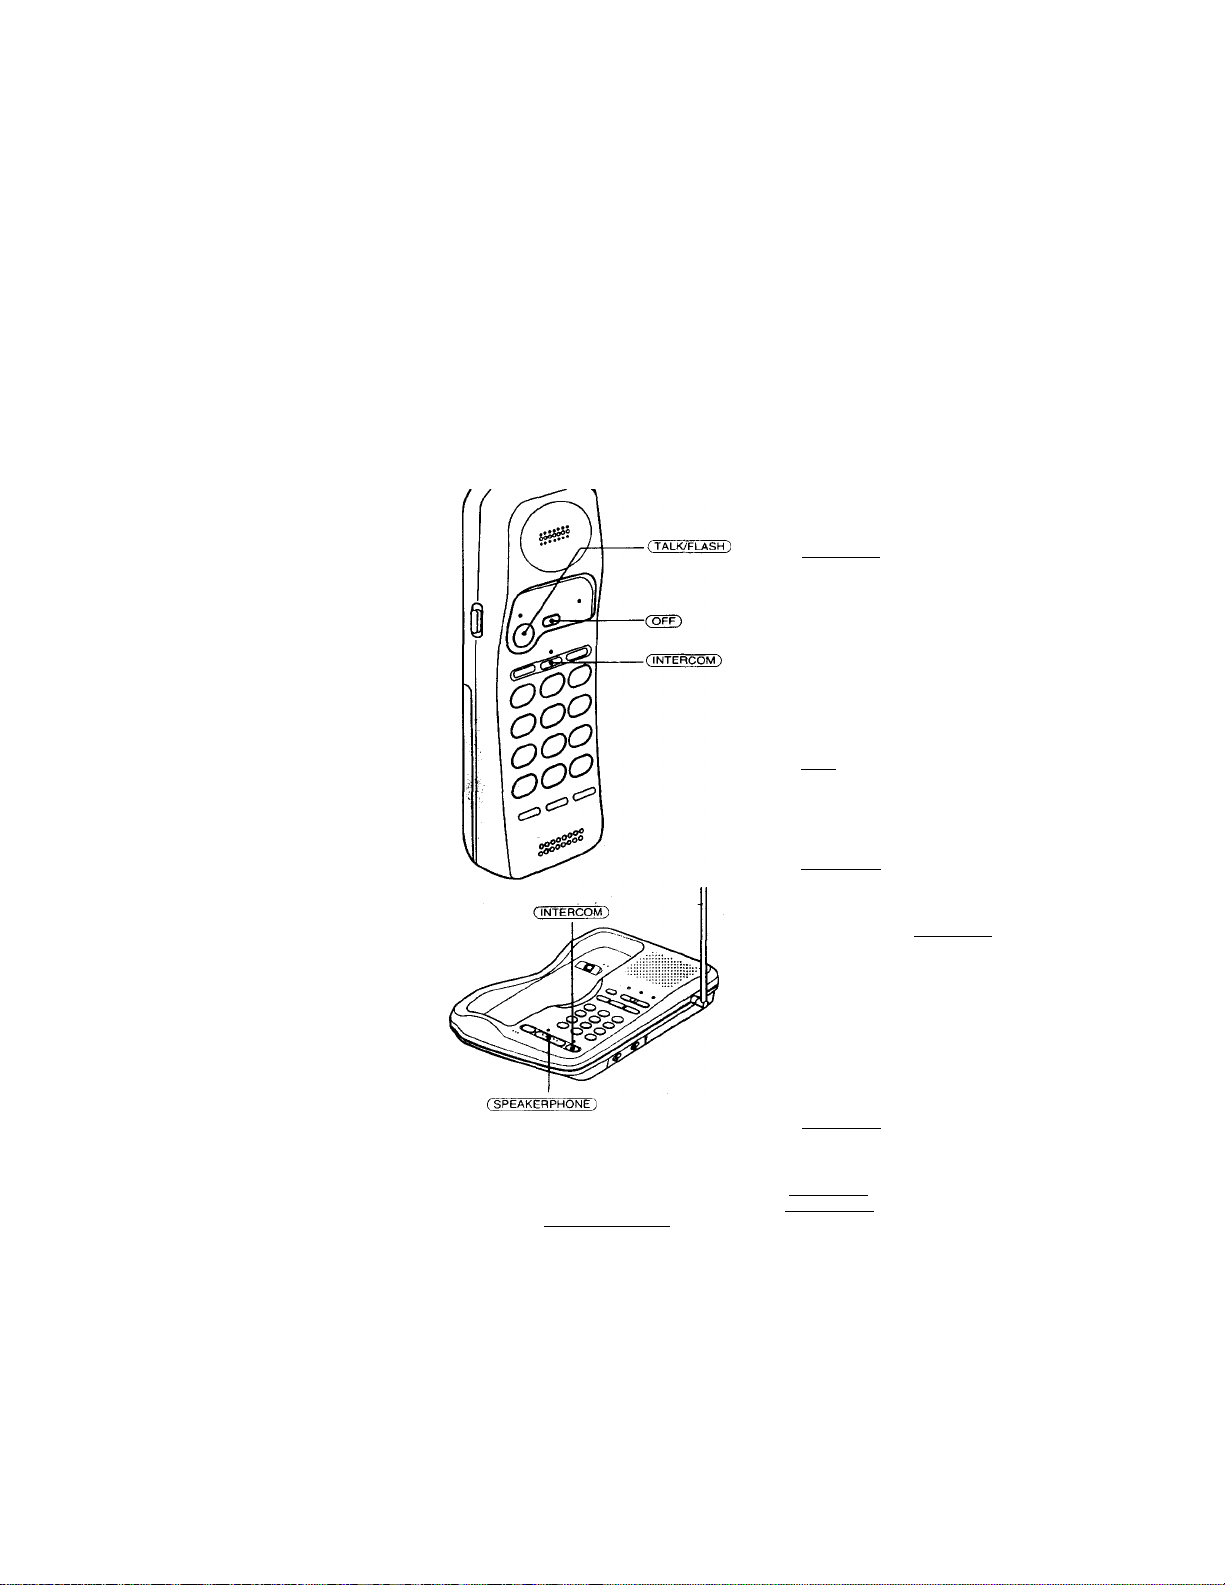
base phone (Intercom)
You can talk between the base phone and the handset. You can start
the intercom from either phone.
To talk from the handset to the base phone
Press (INTERCOM) on the handset.
After the base phone rings once,
you will be connected
automatically. When a person at the
base phone answers, you can talk.
The INTERCOM lamp on the
handset and the base phone will
light up.
When you are done talking
Press (OFF).
To talk from the base phone to the handset
Press (INTERCOM) on the base
phone.
The handset rings. When the person
at the handset presses (INTERCOM),
the line will be connected.
The INTERCOM lamp on the
handset and the base phone will
light up.
When you are done talking or if
no one answers the phone
Press (INTERCOM) again.
Notes
The call to the handset will stop automatically after a minute.
If there is an incoming call while on the intercom, the ringer will ring on both
the base phone and the handset. To answer the call, press (Talk/FLASH) on
the handset or CSPEAKERPHONE ) on the base phone. The intercom will be
disconnected automatically, and the call will be connected to the unit whose
button yt)u have pressed.
>
a
<
fii
3
o
n
a
A
fit
c
rD
Advanced Features 23^'
Page 25
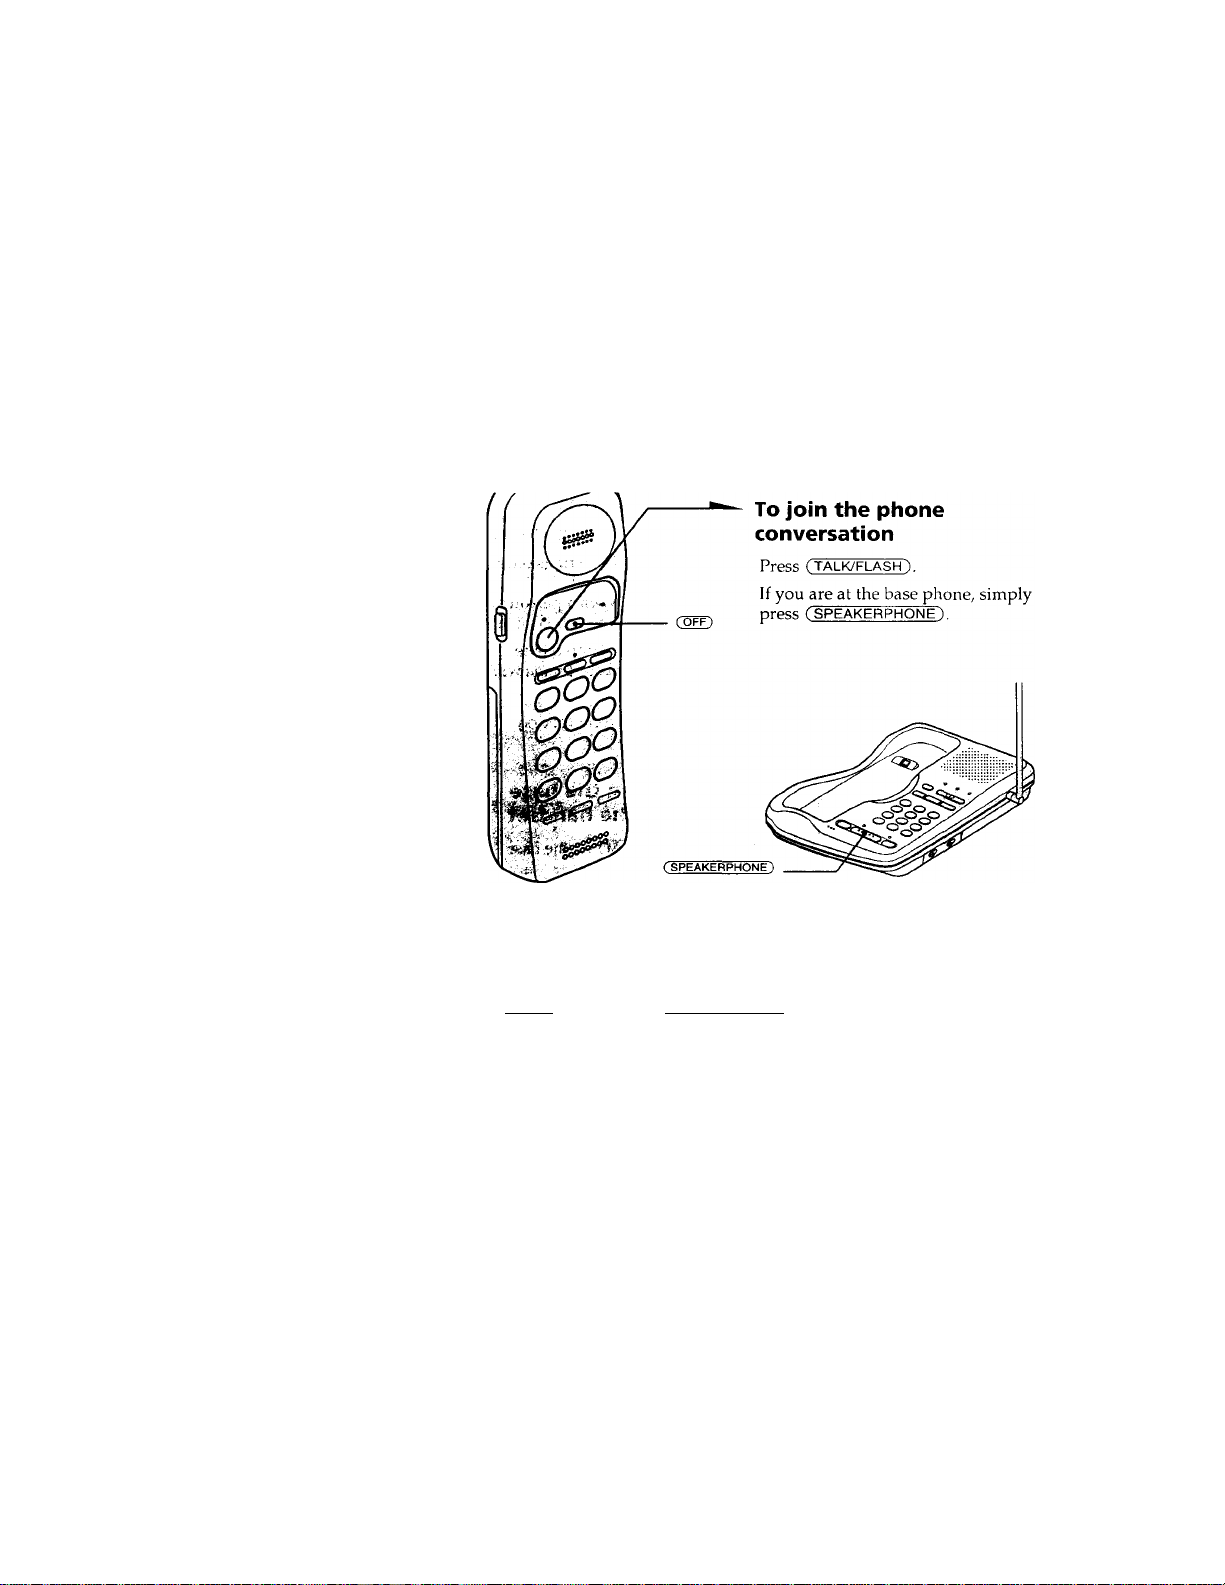
Having a three-way conference
The handset and the base phone operate like two extensions on the
same line. Both phones can operate at the same time, so that you, the
outside caller, and the person at the other phone can engage in a three-
way conversation.
When you are done talking
Press COFF) on the handset/ (SPEAKERPHONE) on the base phone,
respecbvely.
24fN Advanced Features
Page 26
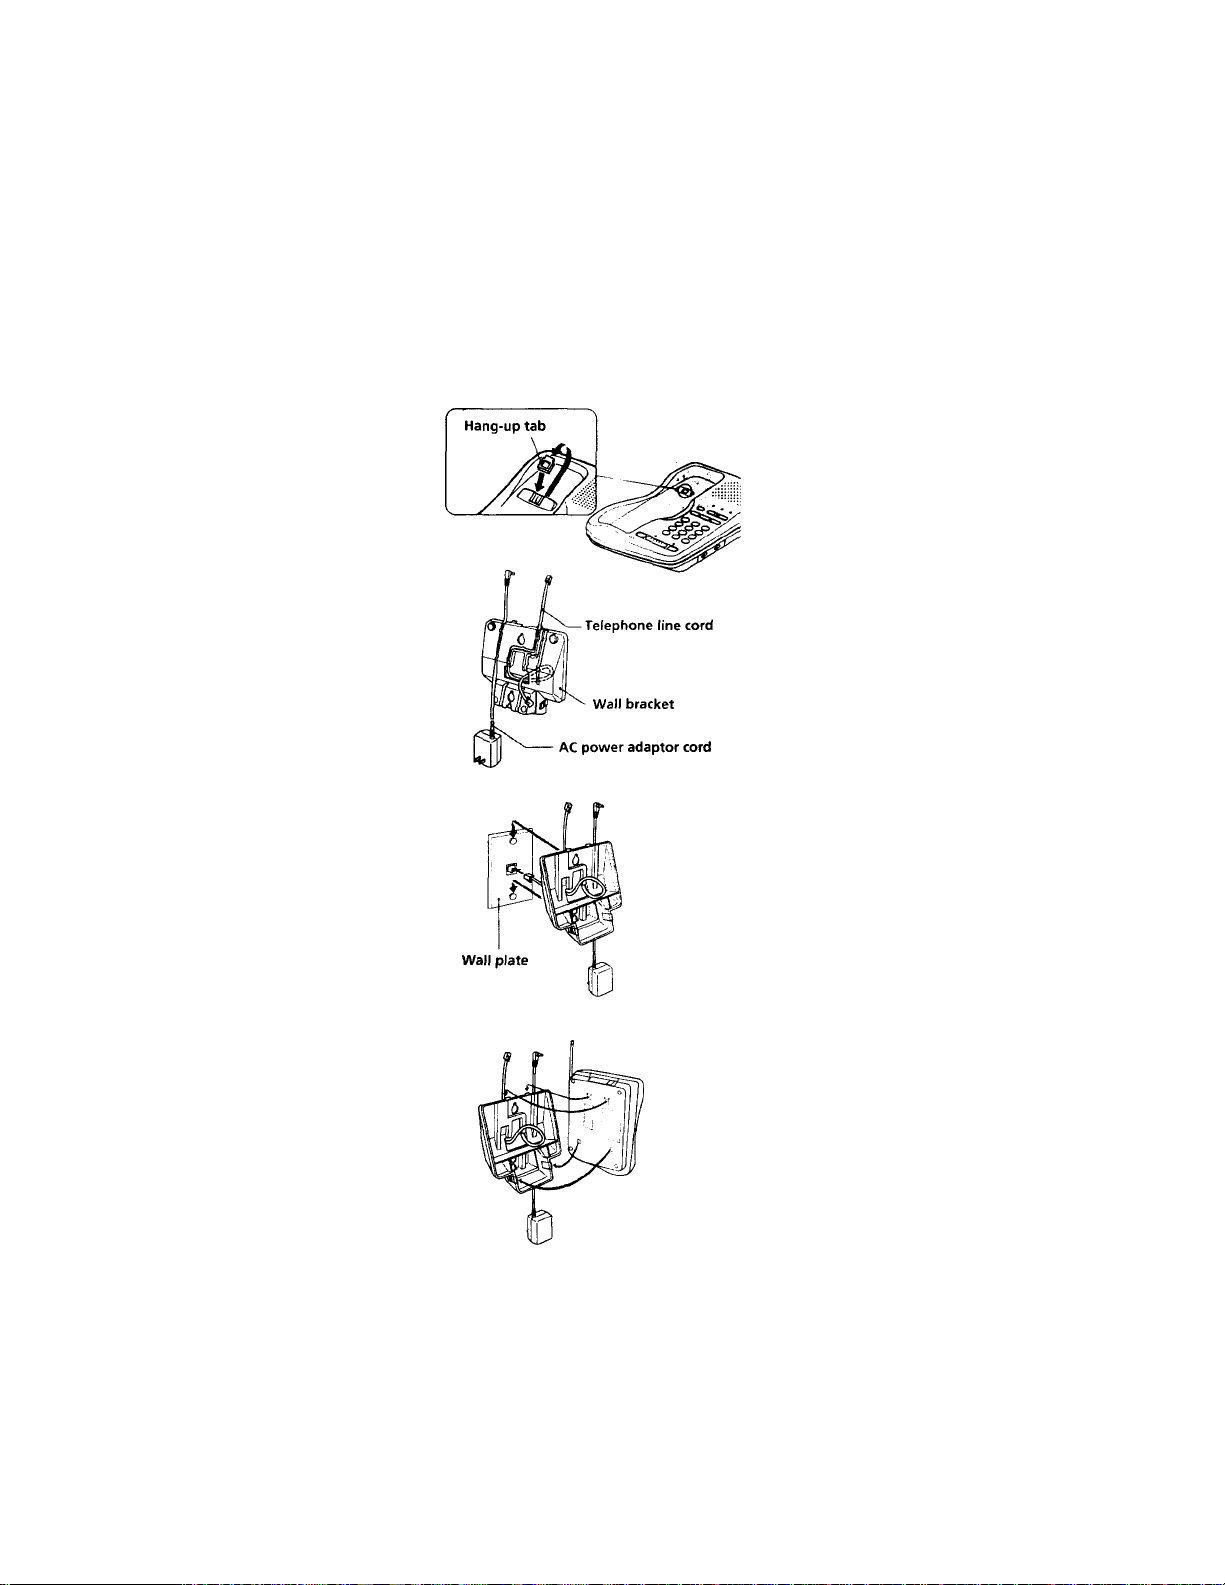
Additional Information
Mounting the base phone on a wall
1
Remove the hang-up tab and
replace it upside down.
Attach the AC power adaptor
cord and the telephone line cord
to the wall bracket.
Hook the wall bracket to the
wall plate, and plug the
telephone line cord into the
telephone outlet.
If the wall plate is not available, use
the two screws provided to mount
the bracket.
If the wall bracket is unstable, tear
off the two protuberances at the
horizontal arrows (b/B) and insert
them to the lower comers of the
wall bracket, at the vertical arrows
(v).
-(XS— -fflUBiQ
>
a
a.
r*
o'
3
SL
3
0
3
Q)
o'
3
Insert the upper tabs first, then
press down the base phone so
that the lower tabs on the
bracket go into the base phone.
Then, raise the antenna
vertically and attach the hang
up tab upside down.
Additional Information 25^'
Page 27

Notes on power sources
On battery pack
• Store the battery pack at a
temperature between 41 °F (5°C) and
95“? (35°C) for best performance.
• If you do not use the handset for a
long period of time, remove the
battery pack after charging for more
than 8 hours.
On power failure
During a power interruption, you
cannot make or receive calls.
Maintenance
• Clean the cabinets with a soft cloth
slightly moistened with water or a
mild detergent solution. Do not use
any type of abrasive pad, scouring
powder or solvent such as alcohol or
benzine as they may damage the
finish of the cabinet.
• If the charge terminals of the base unit
and handset are soiled, wipe them
with a soft cloth or paper.
If you have any questions or problems
concerning your phone, please consult
your nearest Sony dealer.
RECYCLING NICKEL-CADMIUM BATTERIES
NICKEL-CADMIUM
BATTERY.
BATTERY MUST BE
RECYCLED OR DISPOSED
OF PROPERLY.
Ni-Cd
Nickel-Cadmium batteries are recyclable.
You can help preserve our environment by
returning your unwanted batteries to your
nearest Sony Service Center for collection,
recycling or proper disposal.
Note: In some areas the disposal of nickel-
cadmium batteries in household or
business trash may be prohibited.
For the Sony Service Center nearest you call
1-800-222-SONY (United States only)
Caution: Do not handle damaged or leaking
nickel-cadmium batteries.
25^" Additional information
Page 28

Troubleshooting
If you experience any of the following difficulties while using
your phone, use this troubleshooting list to help you remedy
the problem.
Should any problem persist, consult your nearest Sony dealer.
Symptom Remedy
You hear four sliort error beeps
when you press (talk/FLASH).
= You hear no dial tone.
The telephone does not connect
at all, even though the number
you have dialed is correct.
The phone does not redial
correctly.
The handset does not ring.
You hear interference during
conversation.
•c >
You hear a beep during
5 s
the conversation.
Make sure you set up the base phone correctly (page
8).
Move the handset closer to the base phone.
Replace the handset to the base phone for a while to
recharge the battery pack.
Make sure the telephone line cord is securely
connected to the telephone outlet.
Make sure the battery is fully charged (page 11).
Make sure the dialing mode is set correctly (page 10).
Before dialing, make sure you can hear a dial tone.
• Make sure the last dialed number is really the one you
want to dial.
• If the number last dialed exceeds 16 digits, only the
first 16 digits are dialed.
• The battery may be weak. Charge the battery for more
than 8 hours (page 11).
• Make sure you set up the base phone correctly (page
8).
• “Move the handset closer to the base phone.
• Replace the handset to the base phone for a while to
reset the digital security code (page 6).
• Make sure the ringer is turned on (page 19).
• Move the handset closer to the base phone.
• Press (CHANNEL) on the handset for a channel that
gives better reception.
• Place the base phone away from noise sources (page
8).
• The battery is weak. Charge the battery for more than
8 hours (page 11).
>
a
a
o*
3
SL
3
0
“I
3
Ш
r*
o'
3
continued
Additional Information 27™
Page 29

Troubleshooting (continued)
Symptom Remedy
You cannot store a speed
dialing number.
You cannot make a speed
dialing call.
Speed dialing is incorrect.
The handset does not ring
when calling from the base
phone.
The CHARGE lamp does not
light up when you place the
handset on the base phone.
The CHARGE lamp flashes
O
continuously.
(A
«
$
o
a.
The battery duration is short.
Make sure you follow the procedure in storing the
number correctly (page 16, 17).
When the handset is in use, you cannnot store a speed
dialing number on the base phone. When the base
phone is in use, you cannot store a speed dialing
number on the handset.
When you hear four short error beeps, move the
handset closer to the base phone, or make sure you set
up the base phone correcth
You entered a dialing kev to which no phone
number has been stored.
Store a correct number (page 16,17).
The handset may be engaged in conversation.
The battery may have little or no power. Charge the
battery for more than 8 hours (page 11).
Replace the handset to the base phone.
Move the handset closer to the base phone.
Place the base phone awav from noise sources (page
8).
Wipe the charge terminals of the base phone and the
handset with a soft cloth or paper for better contact of
the charge terminals.
Make sure the handset is placed on the base phone
properly.
Place the base phone away from noise sources (page
81
Clean the terminal on the base phone and the handset
with a dry, soft cloth.
The power was not continuously supplied to the base
phone during charging.
The battery pack was charged less than 8 hours (due
to power failure, etc.).
The usable life of the battery has expired and needs
replacement.
Additional Information
Page 30

Specifications
Général
Operating frequency
900 MHz ISM bands/lO channels
Dial signal
Tone, 10 PPS (pulse) selectable
Supplied accessories
See page 7.
Handset
Power source
Rechargeable battery pack BP-T23
Battery life
Talk time: Approx. 7 hours
Standby: Approx. 7 davs
Dimensions
Approx. 60 X 185 X 42 mm (w/h/d).
antenna excluded
(approx. 2 V, X 7 '/j X 1 V, inches)
Antenna: 30 mm (1 '/^ inches)
Mass
Approx. 260 g (approx. 9 oz), battery
included
Base phone
Power source
DC 9 V from AC power adaptor - Q.
Battery charging time
Approx. 8 hours
Dimensions
Approx. 160 x 50 X 223 mm
(w/h/d), antenna excluded
(approx. 6 Vj X 2 X 8 Vj inches)
Antenna : Approx. 150 mm
(approx. 6 inches )
Mass
Approx. 530 g (approx. 19 oz)
Design and specifications are subject to
change without notice.
Additional Information 29^^
>
Û,
3
SL
3
0
3
ti
5’
3
■ 1
Page 31

Index
Adjusting volume
handset volume 13
ringer volume 20
speaker volume 14
B
Battery pack
charging n
duration 12
Call waiting service 15
Channel 13
Connection 9
D, E, F, G
Dialing mode
choosing 10
switching to the tone
temjx)rarily 13
H
Hold 13,15
I, J, K
Intercom 23
Location, base phone 8
M, N, O
Making calls 13
Mounting the base phone
on a wall 25
P, Q
Package contents 7
Pulse dialing 10
Receiving calls 15
Redialing 14
Ringer
checking the ringer type
20
setting the ringer type
19
turning on/off 19
Security code system 6
Setting up
"base phone 8
handset 11
Speakerphone 14,15
Speed dialing 16
Switching phones during a
call 21
T, u
Talking between the
phones 23
Three-way conference 24
Tone dialing
dialing mode 10
switching to 10
Transferring a call 21
Troubleshooting 27
V, W, X, Y, Z
Volume
handset 13
ringer 20
speaker 14
30^^ Additional Information
Page 32

SONY®
I Telephone!
LIMITED WARRANTY
Sony Electronics inc. ("Sony") warrants this Product (including any accessories) against defects in material or
workmanship as follows:
1. LABOR: Fora period of one (1) year from the date of purchase, if this Product is determined to be defective,
Sony will repair or replace the Product, at its option, at no charge, or pay the labor charges to any Sony autho
rized service facility. After the Warranty Period, you must pay for all labor charges.
2. PARTS: In addition, Sony will supply, at no charge, new or rebuilt replacements in exchange for defective
parts for a period of one (1) year. After the warranty p>enod, you must pay for all parts costs.
3. ACCESSORIES: Parts and labor for all accessories are for one (1} year.
To obtain warranty service, you must take the Product, or deliver the Product freight prepaid, in either its original
packaging or pacl^ging affording an equal degree of protection, to any authorized Sony service facility.
This warranty does not cover customer instruction, installation, set up adjustments or signal reception prob
lems.
This warranty does not cover cosmetic damage or damage due to acts of God, accident, misuse, abuse, negli
gence, commercial use, or modification of, or to any part of the Product, including the antenna. This warranty
does not cover damage due to improper operation or maintenance, connection to improper voltage supply, or
attempted repair by anyone other than a facility authorized by Sony to service the Prcxluct. This warranty does
not cover Products sold AS IS or WITH ALL FAULTS, or consumables (such as fuses or batteries). This warranty
is valid only in the United States.
Proof of purchase in the form of a bill of sale or receipted Invoice which is evidence that the unit is within the
Warranty period must be presented to obtain warranty service.
This warranty Is invalid if the factory applied serial number has been altered or removed from the Product
REPAIR OR REPLACEMENT AS PROVIDED UNDER THIS WARRANTY IS THE EXCLUSIVE REMEDY OF THE
CONSUMER. SONY SHALL NOT BE LIABLE FOR ANY INCIDENTAL OR CONSEQUENTIAL DAMAGES FOR
BREACH OF ANY EXPRESS OR IMPUED WARRANTY ON THIS PRODUCT. EXCEPT TO THE EXTENT PROHIB
ITED BY APPUCABLE LAW, ANY IMPLIED WARRANTY OF MERCHANTABILITY OR FITNESS FOR A PARTICU
LAR PURPOSE ON THIS PRODUCT IS UMITED IN DURATION TO THE DURATION OF THIS WARRANTY
Some states do not allow the exclusion or limitation of incidental or consequential damages, or allow limitations
on how long an implied warranty lasts, so the above limitations or exclusions may not apply to you. In addition,
if you enter into a service contract with the Sony Partnership within 90 days of the date of sale, the limitation on
how long an implied warranty lasts does not apply to you. This warranty gives you specific legal rights, and you
may have other rights which vary from state to state.
For your convenience, Sony Electronics Inc. has established telephone numbers for frequently asked questions:
To locate the servicer or dealer nearest you, or for service assistance or resolution of a service problem, or for
product information or operation, call:
Sony Direct Response Center
1-(8001-222-7669
or write to:
Sony Direct Response (^nter
12451 Gateway Blvd.
Fort Myers, FL 33913
For an accessory or part not available from your authorized dealer, call:
1-(800)-488-SONY (7669)
Sony Corporation Printed in Hong Kong
Page 33

Page 34

Registro del propietario
Los números de modelo y de serie se
encuentran en la parte inferior del
teléfono. Anote el número de serie en el
espacio que se proporciona a
continuación. Refiérase a estos números
cada vez que se comunique con su
distribuidor Sony con respecto al
producto.
Modelo N" SPP-9.15
Serie N"
________________________
INSTRUCCIONES
IMPORTANTES
DE SEGURIDAD
A fin de reducir el riesgo de incendio,
descarga eléctrica y lesiones a las
personas cuando usted use su equipo
telefónico, siempre debe observar
precauciones básicas de seguridad, entre
ellas:
1. Lea y entienda todas las instrucciones.
2. Siga todas las advertencias e
instrucciones indicadas en el
producto.
3. Desconecte este producto de la línea
telefónica antes de limpiarlo. No use
limpiadores líquidos ni en aerosol.
Use un paño húmedo para limpiarlo.
4. No use este producto cerca del agua,
por ejemplo, cerca de una bañera,
lavabo, fregadero de cocina o
lavadora, en un sótano mojado o cerca
de una piscina.
5. No ponga este Sproducto sobre un
carrito, estante o mesa inestables. El
aparato se puede caer y ocasionar
daños graves al teléfono.
6. Las ranuras y aberturas situadas en la
parte posterior o inferior son parte del
sistema de ventilación. Para evitar el
calentamiento del aparato, no
obstruya o cubra las ranuras de
ventilación y evite dejarlo sobre la
cama, sofá, sillón o superficie similar.
Este producto nunca debe colocarse
cerca de un radiador o calefacción, o
encima de éste Este producto no debe
colocarse en una instalación
empotrada salvo que se provea
ventilación apropiada.
7. Este producto sólo debe operarse
desde el tipo de fuente de
alimentación indicada en la etiqueta
de especificaciones. Si no está seguro
del tipo de fuente de alimentación en
su hogar, consulte con su distribuidor
o compañía de electricidad local.
8. No deje que nada descanse sobre el
cable eléctrico. No sitúe este producto
en un lugar donde el cable esté
expuesto a abuso debido al tránsito de
la gente.
9. No sobrecargue los tomacorrientes de
pared y cables de extensión, ya que
esto puede ocasionar el riesgo de
incendio o shock eléctrico.
10. Nunca introduzca a presión objetos
de ningún tipo en este producto a
través de las ranuras del gabinete, ya
que pueden hacer contacto con un
punto de voltaje peligroso u ocasionar
un cortocircuito entre piezas que
podría conducir a incendios o shock
eléctrico. Nunca derrame líquidos de
ningún tipo sobre el producto.
11. Para reducir el riesgo de shock
eléctrico, no desarme este producto;
en caso de necesitarse servicio o
reparación, llévelo a personal de
servicio calificado. El abrir o quitar las
tapas puede exponerle a voltaje
peligroso u otros riesgos. El
• reensamblaje incorrecto puede
ocasionar shock eléctrico cuando el
aparato se use posteriormente.
2“
Page 35

12. Desconecte este producto de la línea
telefónica y refiera el servicio a
personal de servicio calificado bajo las
siguientes condiciones:
A. Cuando el cable eléctrico o el
enchufe se encuentra dañado o
deshilachado.
B. Si se ha derramado líquido dentro
del producto.
C. Si el producto ha estado expuesto
a.lluvia o agua.
D. Si el producto no opera
normalmente al seguir las
instrucciones de operación. Sólo debe
ajustar los controles incluidos en las
instrucciones de operación, ya que el
ajuste incorrecto de otros controles
puede producir daños y a menudo
exigirá trabajo extenso por un técnico
calificado para restaurar el producto a
las operaciones normales.
E. Si el producto se ha dejado caer o
el gabinete está dañado.
F. Si el producto exhibe un cambio
perceptible de operación.
13. Evite usar un teléfono (que no sea
del tipo inalámbrico) durante una
tormenta eléctrica. Existe la remota
posibilidad de shock eléctrico debido
a rayos.
14. Para notificar una fuga de gas, no
utilice el teléfono en la vecindad de
dicha fuga.
GUARDE ESTAS
INSTRUCCIONES
PRECAUCIÓN:
Para reducir el riesgo de incendio o lesión a
personas debido a la pila, lea y siga estas
instrucciones:
1. Sólo debe utilizar un paquete de pilas del
siguiente tipo y tamaño: Sony BP-T23.
2. No deseche el paquete de pilas en una
hoguera ya que la pila puede explotar.
Compruebe los reglamentos locales sobre
posibles instrucciones especiales de desecho.
3. No abra ni mutile el paquete de pilas. El
electrólito liberado es corrosivo y puede
ocasionar daños a los ojos o la piel. Puede ser
tóxico si se ingiere.
4. Tenga cuidado al manejar la pila a fin de
evitar cortocircuitos de la pila con materiales
conductores tales como anillos, pulseras y
llaves. La pila o el conductor puede
sobrecalentarse y ocasionar quemaduras.
5. Sólo debe cargar el paquete de pilas
suministrado o identificado para uso con este
producto de acuerdo con las instruccii>nos y
limitaciones espeafic.к^a^ en el manual de
instrucciones correspondiente al producto.
(v Observe la onenlacion de polaridad correcta
entre el paquete de pilas \' el cargadcu' de
pilas.
INFORMACIÓN GENERAL
SOBRE LOS TELÉFONOS
1. Este equipo cumple con la Parte ó8 de las
reglas de la FCC. En la base de este equipo
hay una etiqueta que contiene, entre otra
información, el número de registro de la FCC
y el número de equivalencia de timbre de
llamada (REN) para este equipo. Cuando se
solicite, esta información deberá ofrecerse a la
compañía telefónica.
2. La toma (conector) de registro aplicable
USOC-RJllC se utiliza para este equipo.
3. Este equipo ha sido diseñado para conectarse
a la red telefónica o la de un usuario
utilizando una toma modular compatible que
esté de acuerdo con la Parte 68 de la FCC.
Con este equipo se suministran un cable y una
clavija modular que cumplen con las normas
de la FCC.
4. El REN se utiliza para determinar la cantidad
de dispositivos que podrán conectarse a la
línea telefónica. El exceso de REN conectados
a la línea telefónica puede resultar en que los
dispositivos no contesten a llamadas
entrantes. En la mayoría de las zonas, no en
todas, la suma de RÉN no deberá ser superior
a cinco (5). Para enterarse del número total de
REN que puede conectarse a una línea,
póngase en contacto con la compañía
telefónica.
5. Si su equipo (SPP-^^.^S) pri>duce daños en la
red telefónica, la compañía telefónica le
notificará con antelación que es posible que se
requiera la interrupción temporal del servicio.
Pero si la notificación con antelación no es
práctica, la compañía telefónica lo notificará al
cliente lo antes posible. Además, se le
notificará el derecho a realizar una
reclamación a la FCC si usted lo considera
necesario.
Page 36

b. La compañía telefónica pviede realizar
cambios en sus instalaciones, equipos,
operaciones, o procedimientos que pueden
afectar la operación del equipo. Cuando
- suceda esto, la compañía telefónica le avisará
con antelación para que usted realice las
modificaciones necesarias para mantener
ininterrumpido el servicio,
7. Si experimenta algún problema con este
equipo (SPÍ’-^35), ct>n respecto a la reparación
o a la información sobre la garantía, póngase
en contacto con Son\' Direcl Response Center;
Tel l-8(10-222-7b(iú (íi\glés solan'íente). Si el
equipo causa problemas en la línea, la
compañía telefónica puede solicitarle que
desconecte el equipo hasta que se resuelva el
problema.
8. Todas las reparacioiies deberá realizarlas un
centro de reparaciones Sony.
Este equipo no deberá utilizarse en líneas
compartidas ni en líneas de pago previo.
10. Este equipo es compatible con dispositivos
para avuda a la audición.
Si su teléfono dispone de marcadores automáticos
Cuando programe números de emergencia y (o)
realice llamadas de prueba a los mismos:
1. Permanezca poco tiempo en la línea y
explique a la otra parte la razón de la llamada.
2. Realice tales actix idades en horas no punta,
como por la mañana temprano o a últimas
horas de la tarde.
Nota
Este equipo se ha sometido a pruebas y se ha
determinado que cumple los límites para un
aparato digital Clase B de conformidad con la
Parte 15 de las Reglas FCC. Dichos límites están
diseñados para brindar protección razonable
contra interferencia dañina en una instalación
residencial. Este equipo genera, utiliza y puede
radiar energía de radiofrecuencia y, si no se
instala y se usa de acuerdo con las instrucciones,
puede ocasionar interferencia dañina en las
radiocomunicaciones. Sin embargo, no hay
garantía do que no ocurra interferencia en una
instalación específica. En caso de que este equipo
ticasiono interferencia dañina en la recepción de
radio o televisión, que se puede determinar
apagando y encendiendo el equipo, se le insta al
usuario a que trate de corregir la interferencia
mediante una o más de las siguientes medidas;
- Reorientar o reubicar la antena de recepción.
- Aumentar la separación entre el equipo y el
receptor.
- Conectar el equipo en un enchufe de un
circuito distinto al circuito al cual está
conectado el receptor.
- Consultar con el distribuidor o con un técnico
experimentado de radio/televisión para
ayuda.
Precaución
Se le advierte que cualquier cambio o
modificación no aprobado expresamente en el
presente manual podría anular su autorización
para operar este equipo.
Page 37

índice
Preparativos
En primer lugar, lea esto
Paso 1: Comprobación del
contenido del paquete
Paso 2: Instalación del teléfono
base
Paso 3: Preparación de la batería
11
para el microteléfono
Operaciones básicas
13 Realización de llamadas
Repetición de marcación
15 Recepción de llamadas
Operaciones
avanzadas
16 Marcación abreviada
19 Ajuste del tipo de generador de
llamada
21 Cambio de teléfono durante una
llamada
23 Conversación entre el
microteléfono y el teléfono base
(Intercomunicación)
24 Conferencia tripartita
Información adicional
25 Montaje del teléfono base en una
pared
26 Notas sobre las fuentes de
alimentación
26 Mantenimiento
27 Solución de problemas
29 Especificaciones
30 índice alfabético
índice 5'^
Page 38
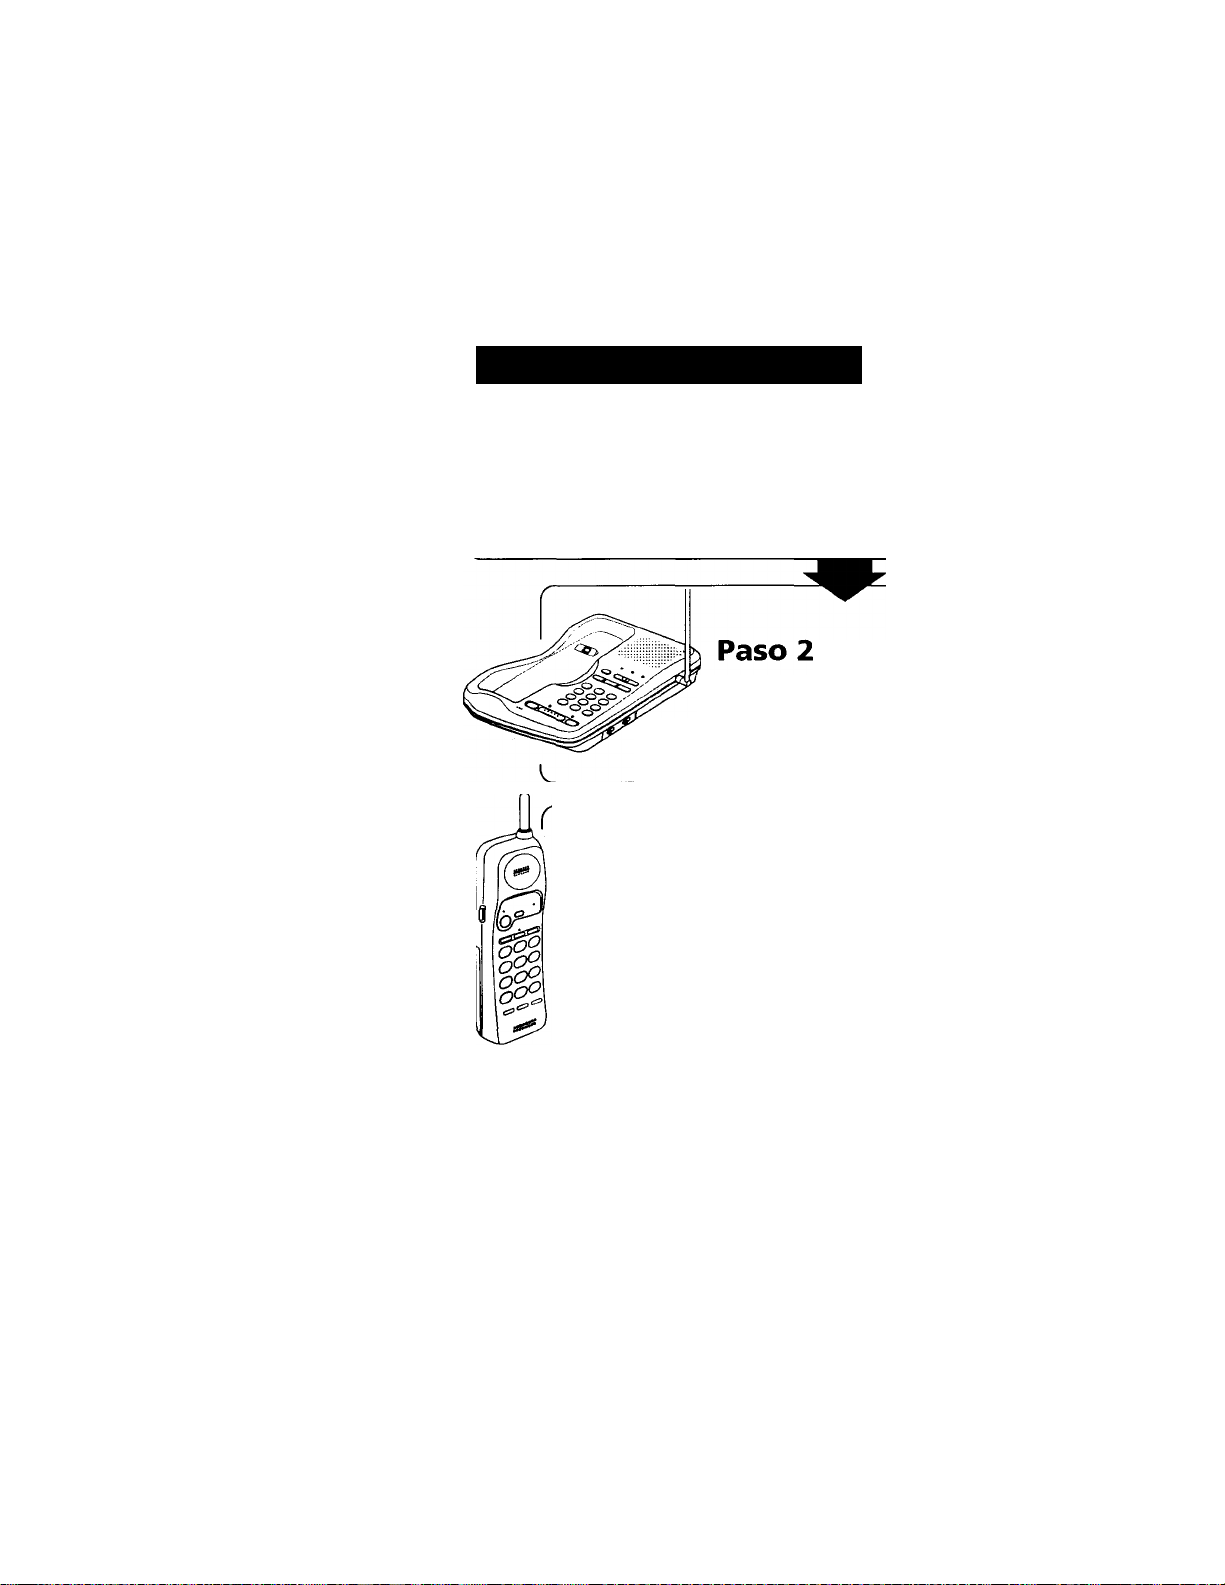
Preparativos
En primer lugar, lea esto
Antes de utilizar su teléfono, tendrá que instalarlo. A continuación se
indica una forma de instalar rápidamente su teléfono: Pasos 1, 2, y 3.
Paso 1 (página 7)
En primer lugar, desembale el teléfono y los
accesorios suministrados.
(página 8 a 10)
A continuación, tendrá que
realizar tres cosas para instalar el
Teléfono
base
teléfono base, incluyendo la
elección del lugar adecuado para
el mismo.
Paso 3 (página 11 y 12)
Finalmente, tendrá que insertar la
batería en el microteléfono y cargarla
durante más de 8 horas.
Microteléfono
Información sobre el código de seguridad
Este telefono inalámbrico utiliza un código de seguridad como medida de protección contra
el acceso involuntario a su teléfono base.
Este código de seguridad bloqueará el acceso de otros microteléfonos inalámbricos para que
no pueden realizar llamada a través de su teléfono base.
Cuando cargue la batería por primera vez, se asignará automáticamente un código de
seguridad aleatorio entre su teléfono base y microteléfono.
(Durante la inicializnción parpadeará la lámpara CHARGE y, cuando dicha inicialización
hava finalizado, permanecerá encendida.)
6“ I Preparativos
¡Esto es
todo!
Page 39
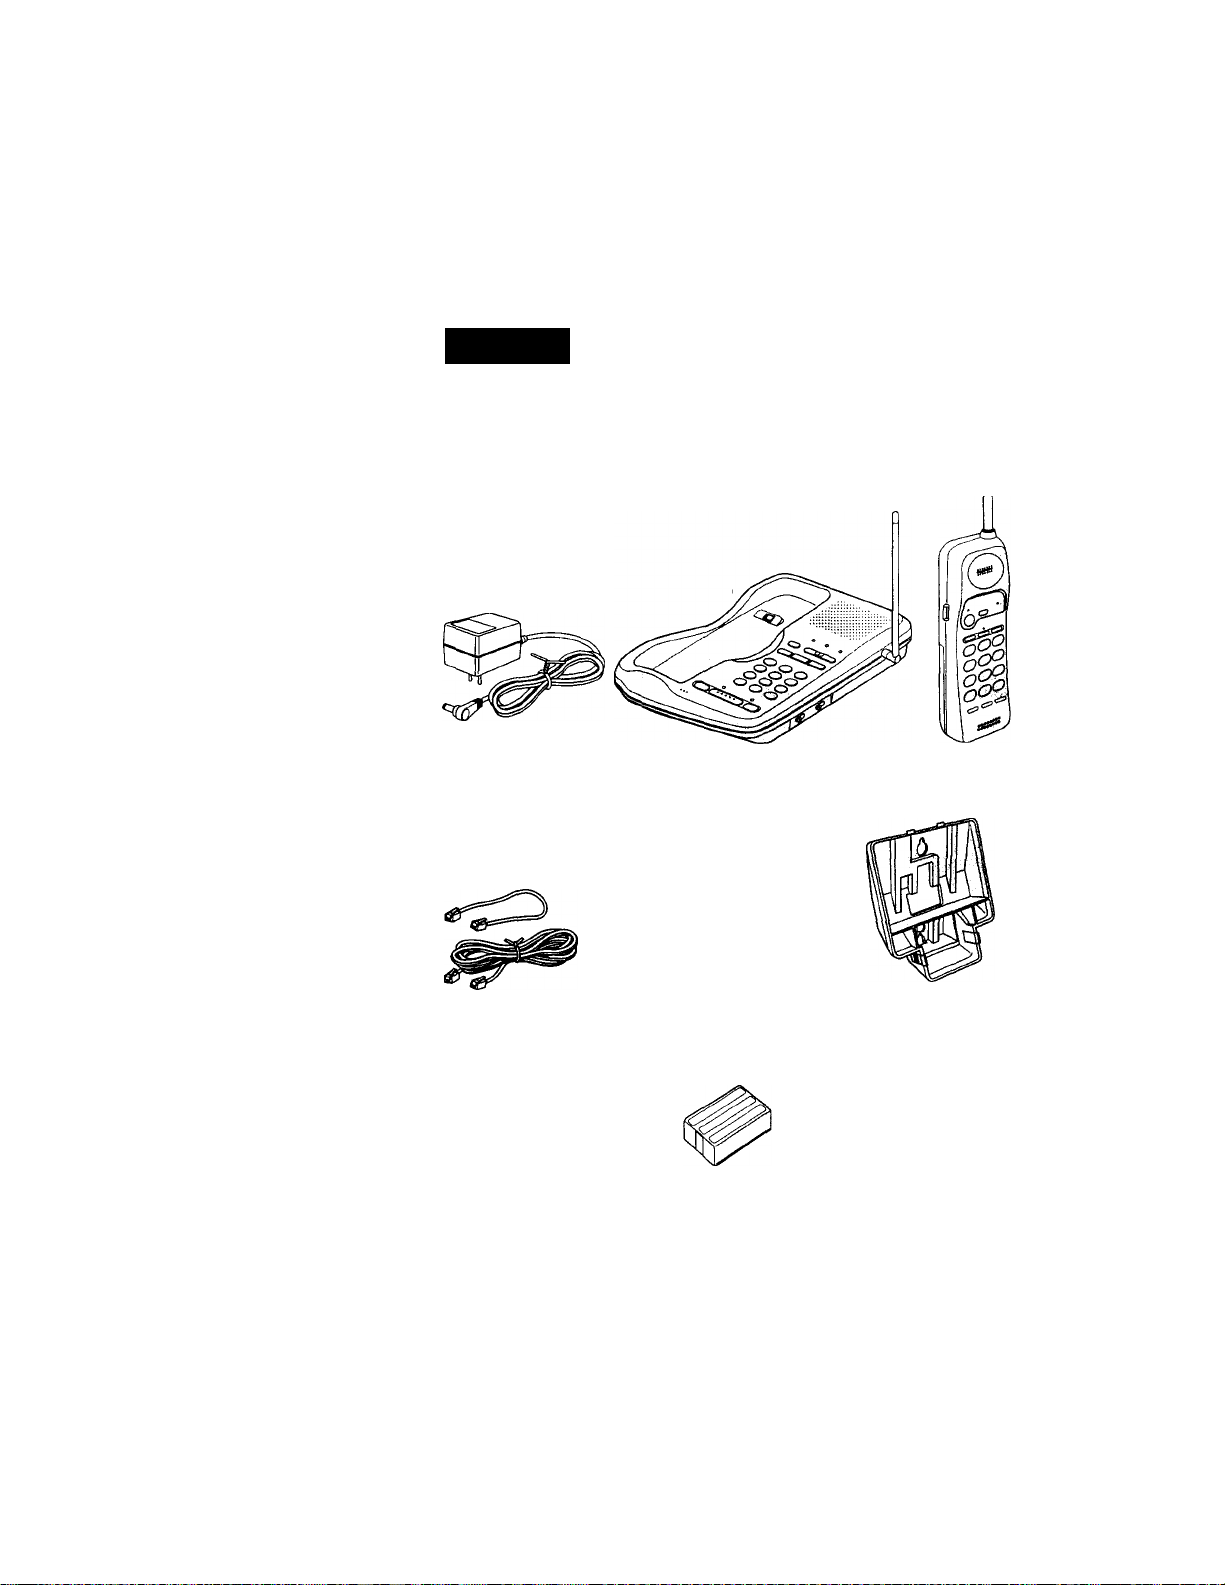
Paso 1
Comprobación del contenido del
paquete
Compruebe si el paquete contiene los componentes siguientes.
Si falta alguno, póngase en contacto con su proveedor Sony.
■O
i'<‘
fD
0)
3
r*
O
in
Adaptador de
alimentación de CA
(AC-T122)
Cables de linea telefónica (2)
Directorios (2)
Teléfono base
Tornillos y tapones (2)
Batería (BP-T23)
Microteléfono
Soporte mural para el
teléfono base
Preparativos 7”
Page 40
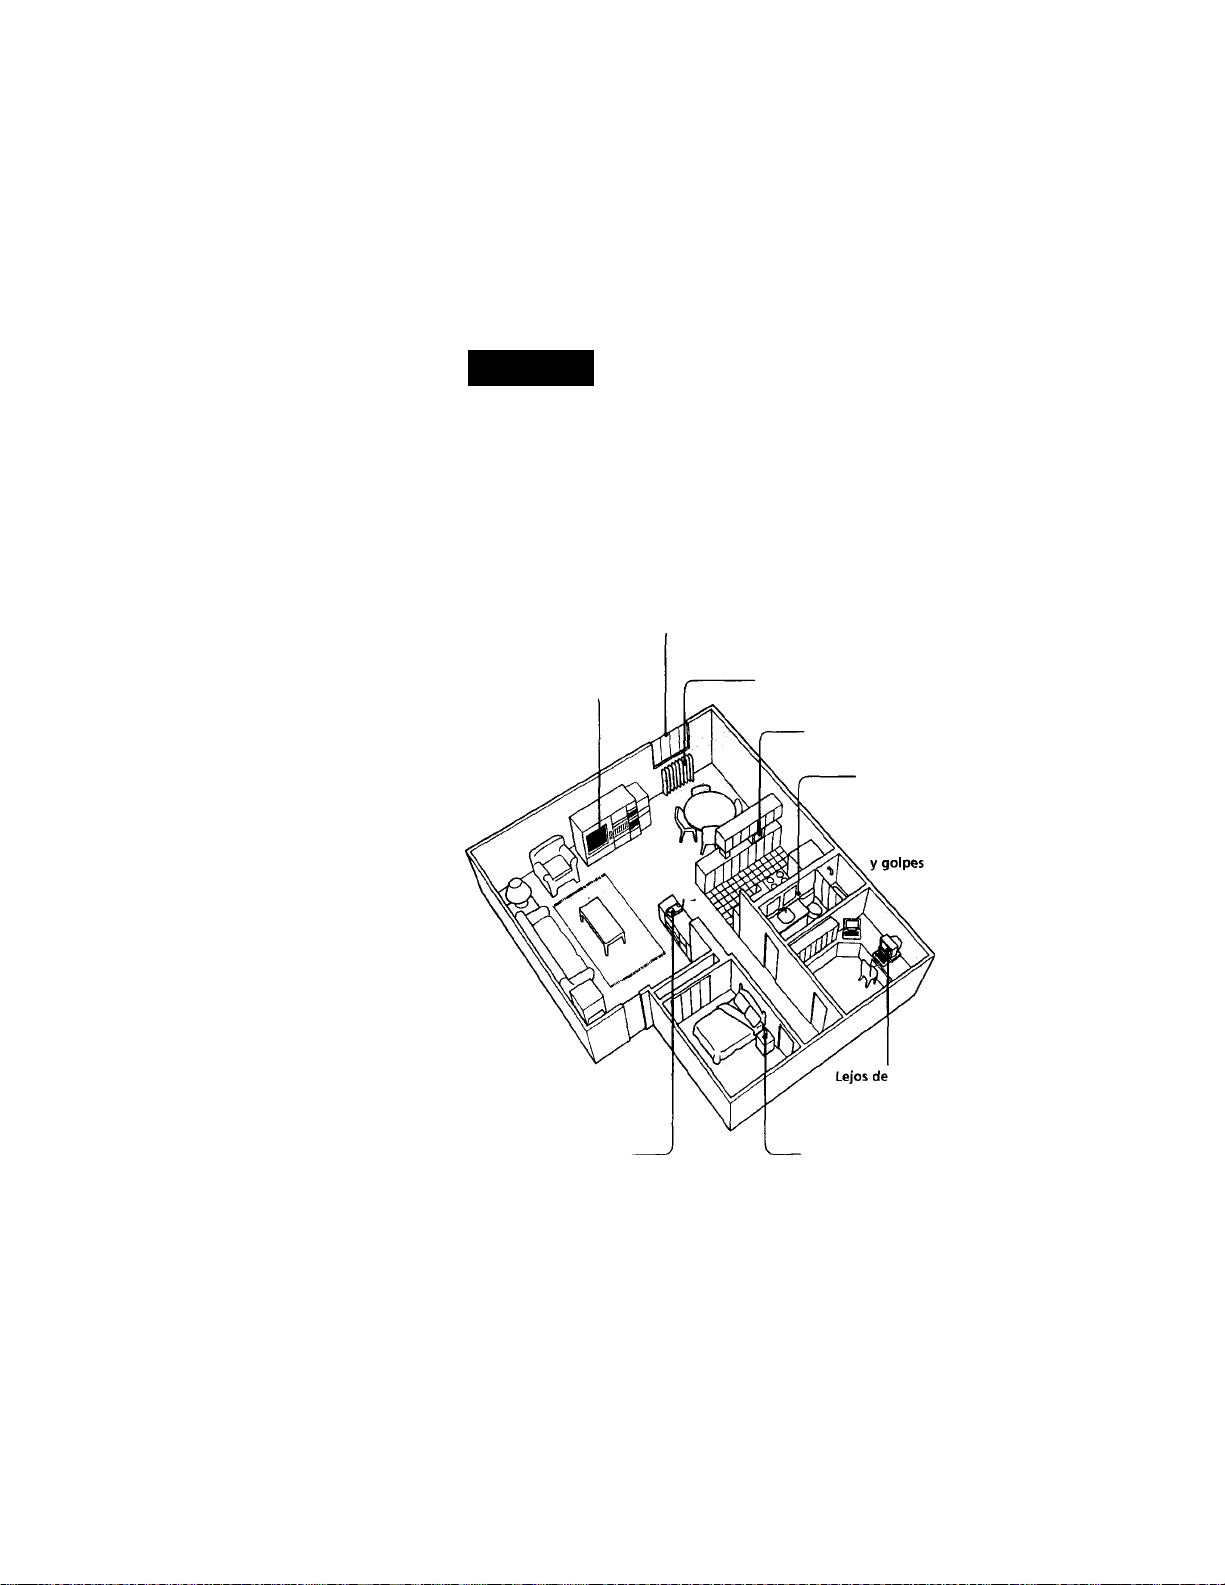
Paso 2
Instalación del teléfono base
Realice los pasos siguientes:
• Elija el lugar más adecuado
• Conecte el teléíono base
• Seleccione el modo de marcación
Elección del lugar más adecuado
El emplazamiento del teléfono base influirá en la calidad de recepción
del microteléfono.
------------
Lejos de fuentes de ruido, como una ventana
cercana a una calle con tráfico intenso
Lejos de
televisores y
otros equipos
electrónicos
En un lugar central y
sobre una superficie
nivelada
PRECAUCIÓN: El teléfono inalámbrico utiliza una frecuencia que puede causar
interferencias en televisores y vídeograbadoras cercanos. El teléfono base
no deberá colocarse cerca ni sobre un televisor ni una videograbadora y, si
se producen interferencias, el alejarlo del televisor o la videograbadora
puede reducir o eliminar tales interferencias.
8“ I Preparativos
Lejos de fuentes térmicas, como radiadores,
conductos de aire, y la luz solar
Lejos de hornos de microondas
Lejos de otro teléfono inalámbrico
Lejos de un lugar expuesto a
humedad excesiva,
temperaturas
extremadamente bajas,
polvo, vibraciones mecánicas.
un PC
Page 41
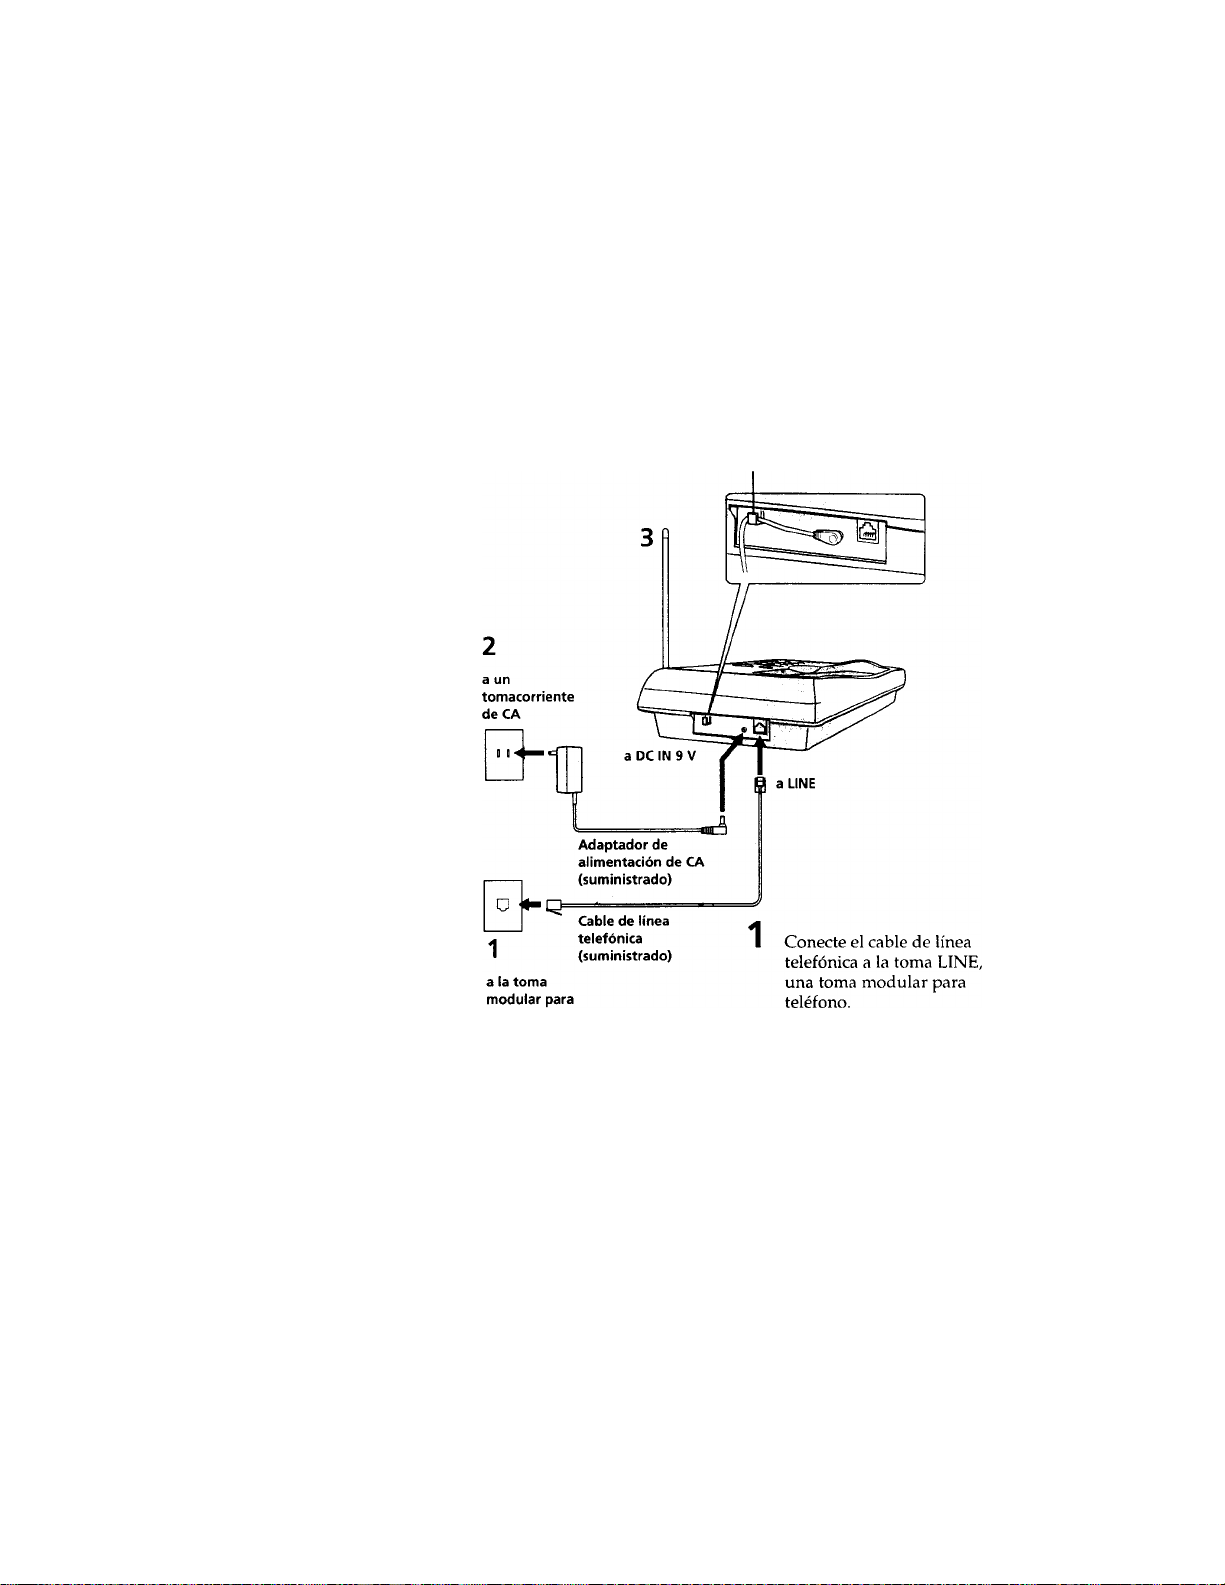
Conexión del teléfono base
Si desea colgar el teléfono base en una pared, consulte la página 25.
Enganche el cable
‘-i’
•a
■O
fS
o>
2
r*
in
teléfono
Conecte el adaptador de
alimentación de CA a la toma
EX^ IN 9 V, y a un tomacorriente
de CA.
Levante la antena. Cerciórese
de que quede apuntando hacia
el techo.
continúa
Preparativos 9“
Page 42
Paso 2: Instalación del teléfono base (continuación)
Notas
• Utilice solamente el adaptador de alimentación de CA AC-T122
suministrado.
No use ningún otn> adaptador de alimentación de CA.
• Conecte el adaptador de alimentación de CA a un tomacorriente que
suministre constantemente alimentación.
• Coloque el tolótono base cerca de un tomacorriente de CA a tin de poder
desenchutar tacilmeiite el adaptador de alimentación de CA.
Sugerencia
• Si su toma para telétono no es modular, solicite ayuda a la compañía
telefónica local.
Polariciad de la clavija
Selección del modo de marcación
Para que el teléfono funcione adecuadamente, seleccione el modo de
marcación apropiado (tonos o pulsos).
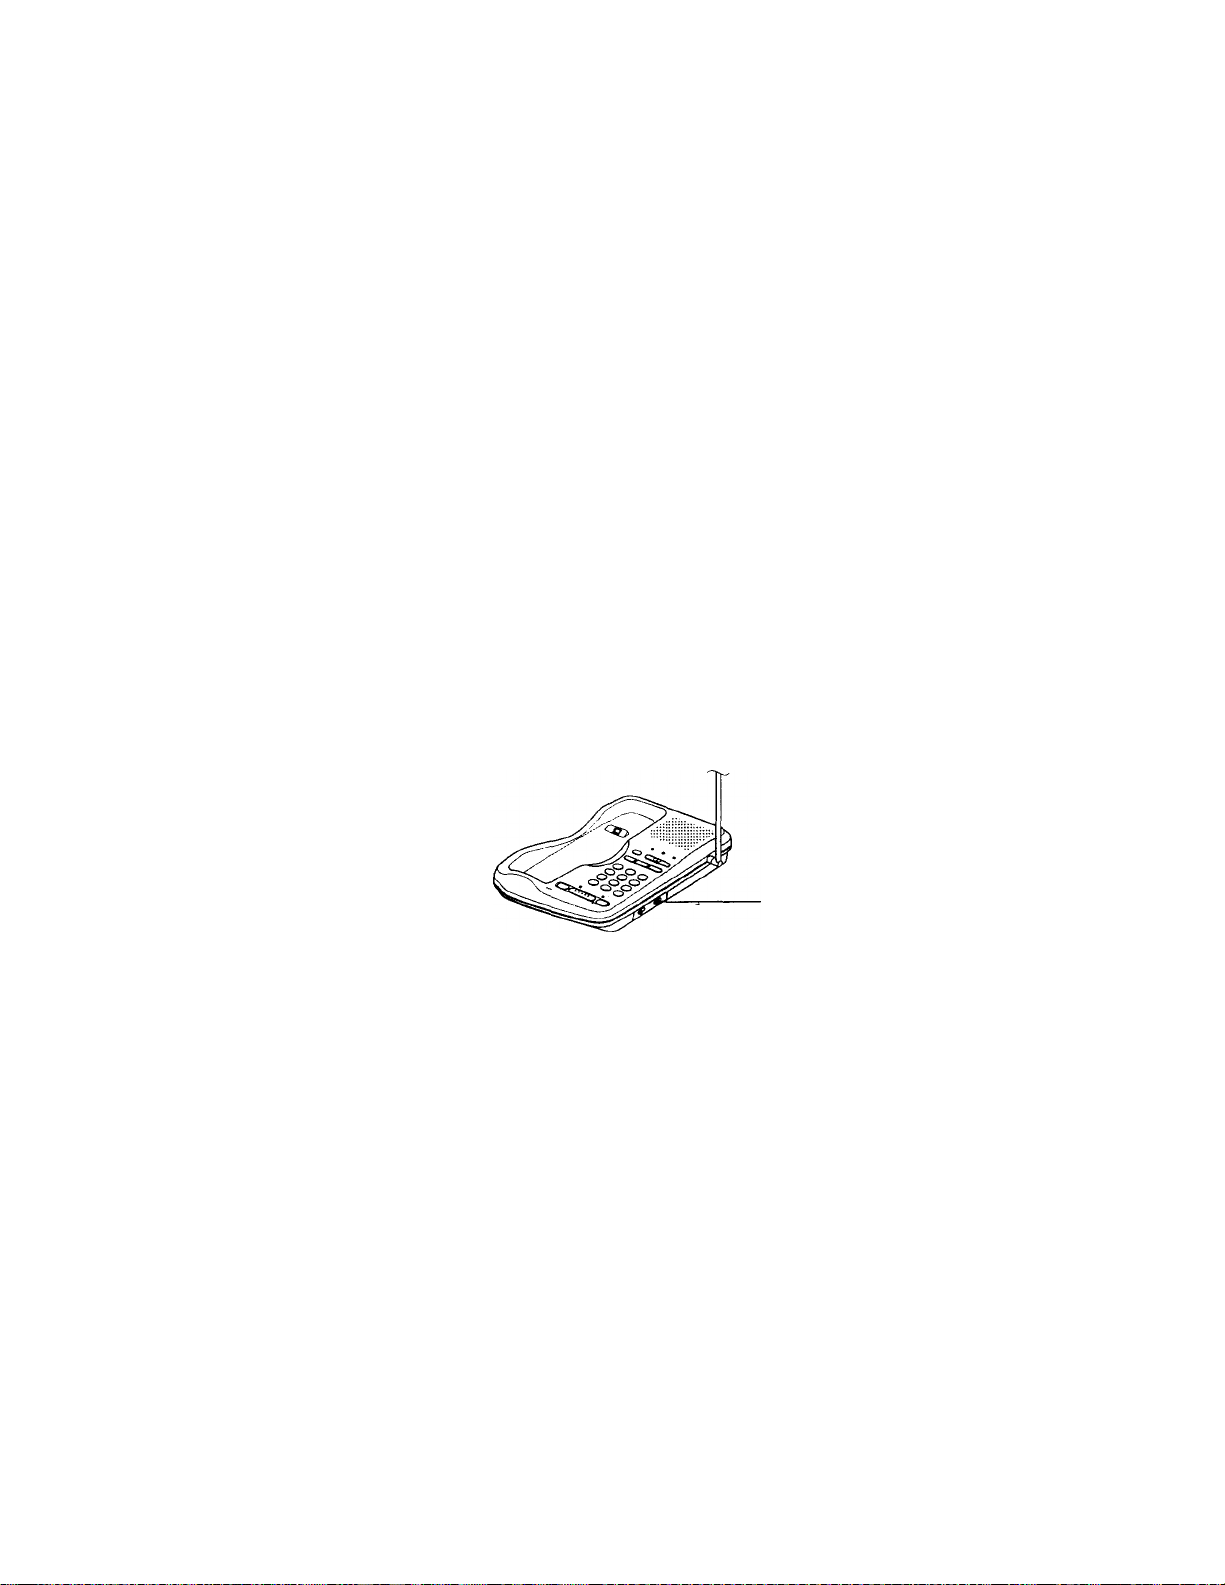
Selector DIAL MODE
Si no conoce su sistema de marcación
Realice una llamada de prueba con el selector DIAL MODE en TONE.
Si la llamada se conecta, deje el selector como está. En caso contrario,
póngalo en PULSE.
Toma
modular
l O i
10^' I Preparativos
Page 43
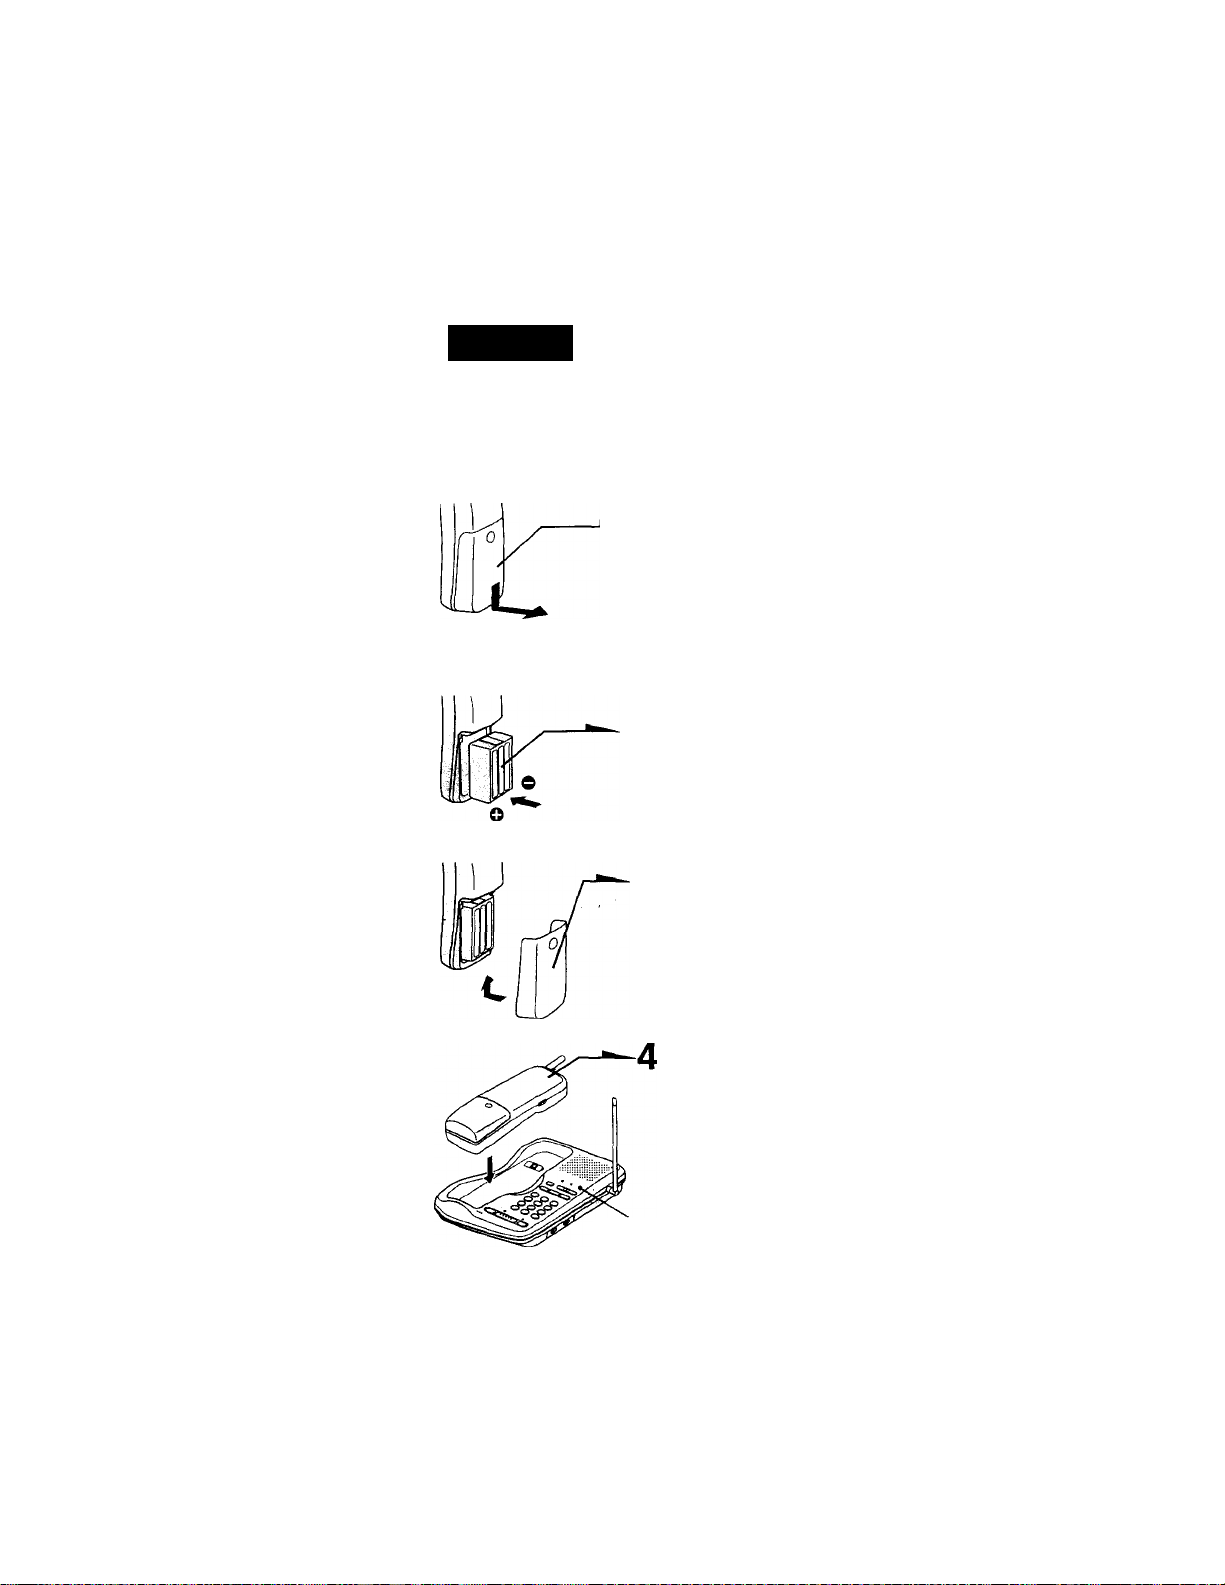
Paso 3
Preparación de la batería para el microteléfono
Inserte la batería en el microteléfono, y después coloque éste en el
teléfono base.
1 Deslice la tapa del compartimiento de la
batería del microteléfono.
Inserte la batería (con los contactos encarados
hacia abajo) en el compartimiento para la
misma.
Cierre la tapa del compartimiento de la
batería.
Coloque el microteléfono en el teléfono base.
Cuando el microteléfono esté adecuadamente
colocado sobre los terminales de carga del
teléfono base, la lámpara CHARGE se
encenderá. Deje así la batería durante más de
8 horqs para que se cargue completamente.
(D
XI
fil
W
5
r*
Lámpara CHARGE
continua
Preparativos 11*^
Page 44

Paso 3: Preparación de la batería para el microteléfono (continuación)
Duración de la batería
Una batería completamente cargada durará:
• 7 horas utilizando continuamente le microteléfono.
• 7 días con el microteléfono en el modo de espera.
La duración do la batería variará de acuerdo con las condiciones de
utilización V la temperatura ambiental.
Notas
• La batería se descargará gradualmente con el tiempo, incluso aunque no la
utilice.
• La lámpara CHARGE del teléfono base estará siempre encendida mientras el
microteléfono esté colocado en el teléfono base, incluso aunque la batería esté
completamente cargada.
• La batería trabajará mejor si la carga después de varias llamadas.
• Si deja la batería en el microteléfono sin cargarla, se descargará
completamente.
Es posible que la batería tenga que cargarse varias veces hasta que adquiera
su plena capacidad.
Cuándo adquirir una nueva batería
Si la batería dura solamente algunos minutos después de 8 horas de
carga, habrá expirado su duración útil, y tendrá que reemplazarla.
Póngase en contactó con su proveedor o centro de reparaciones
autorizado por Sony, y solicítele una batería BP-T23 Sony.
12“ I Preparativos
Page 45
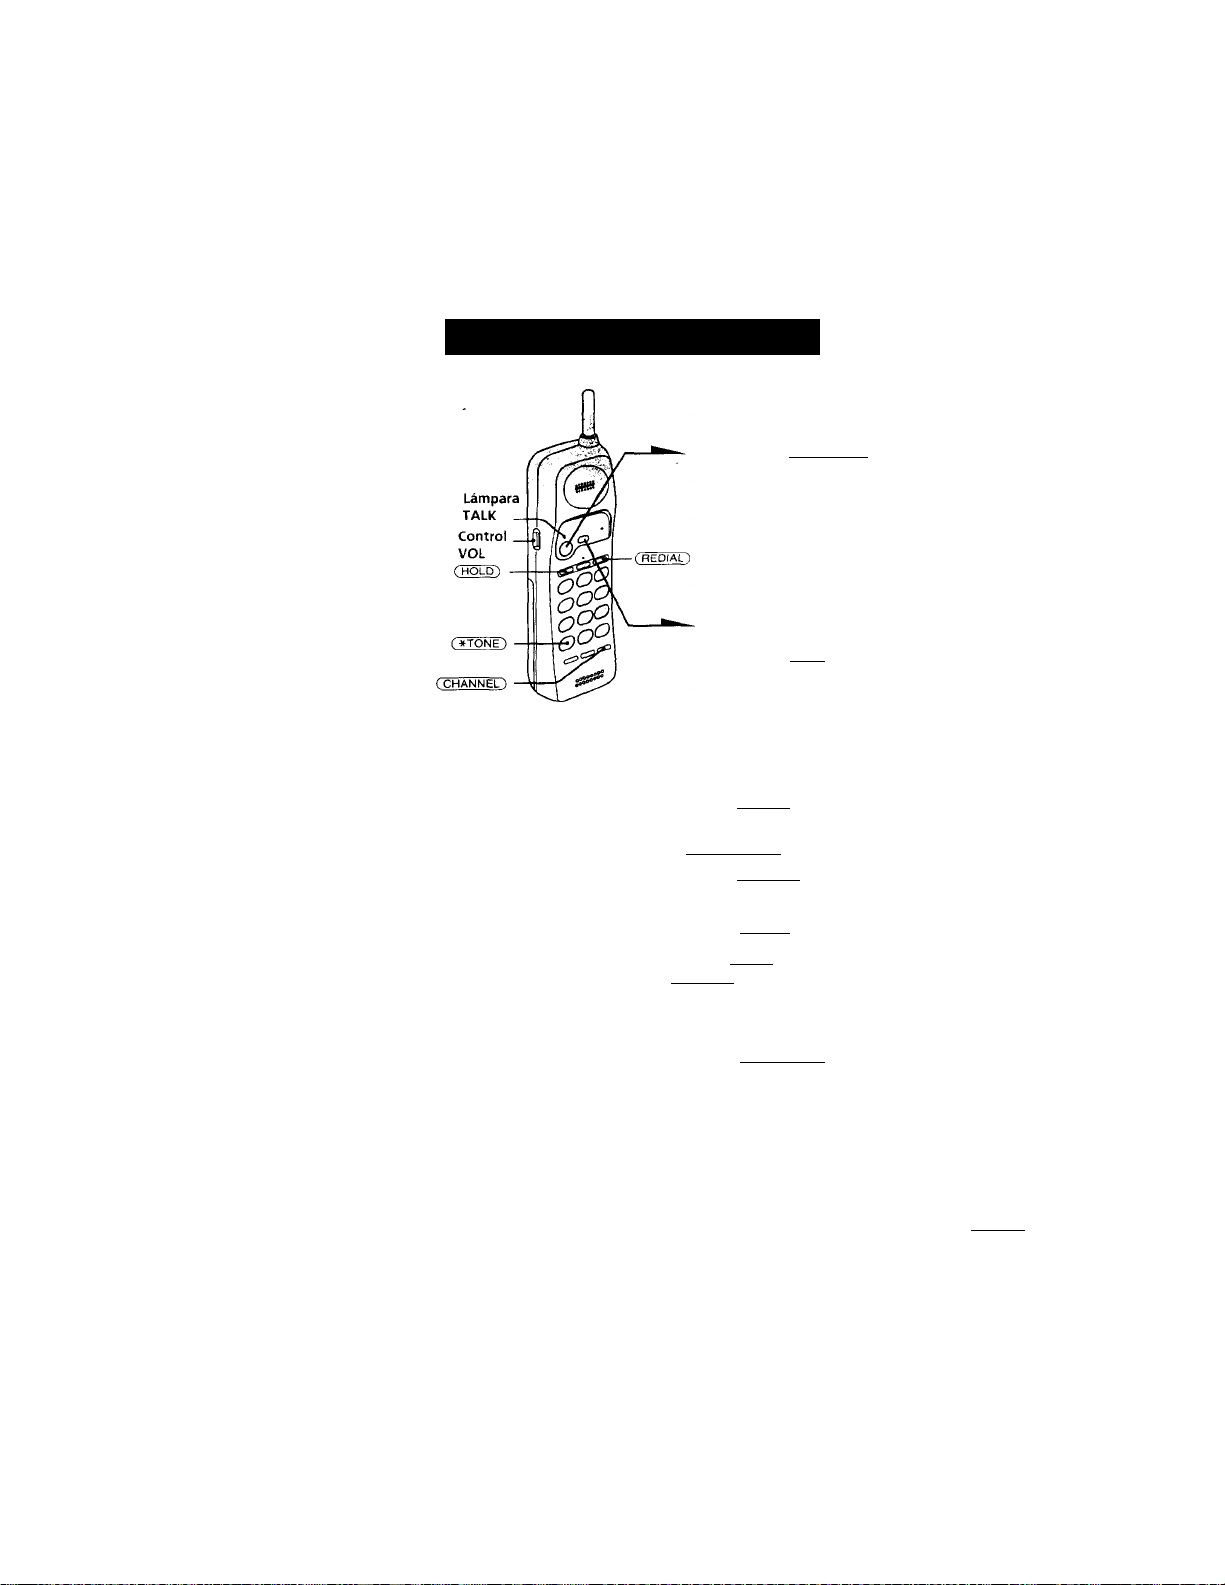
Operaciones básicas
Realización de llamadas
1Presione (talk/flash) .
La lámpara TALK se encenderá, y
usted oirá el tono de invitación a
marcar. Si oye pitidos, acerqúese al
teléfono base.
2
Marque el número de teléfono.
3
Cuando haya terminado de hablar,
presione (OFF) o coloque el
microteléfono en el teléfono base.
La lámpara TALK se apagará.
Tareas adicionales
Para
Poner una llamada en espera
Mejorar la recepción
Ajustar el volumen del microteléfono lUeslice el control VOL.
Cambiar temporalmente a marcación
por tonos
* Si oye un pitido largo cuando presione (channel), acérquesc al teléfono base
Notas
* Antes de marcar, cerciórese de que ha oído el tono de invitación a marcar, va
que de lo contrario no podría marcar correctamente.
• Cuando la lámpara TALK se enciende al presionar ( talk/flash ). también se
encenderá la lámpara IN USE del teléfono base.
• Cuando la lámpara TALK repita juegos de dos parpadeos, el teléfono base
estará utilizándose.
Realice lo siguiente
Presione CHOLD). La lámpara TALK parpadeará
lentamente.
Para reanudar la conversación, presione
(TALK/FLASH).
Presione (channel)*.
(Vesione (*T0NE) después de haberse conectado
la llamada. La línea permaiu'cerá en el modo de
marcación por tonos hasta que la desconecte.
marcación por tonos nasta que la aescor
Ф
■O
&
M
Si se debilita la batería durante una llamada
Usted oirá un pitido y la lámpara ВАТТ LOW del microteléfono parpadeará.
La llamada se desconectará pronto. Coloque el microteléfono en el teléfono base para
que se cargue la batería. continúa
Preparativos
13«
Page 46
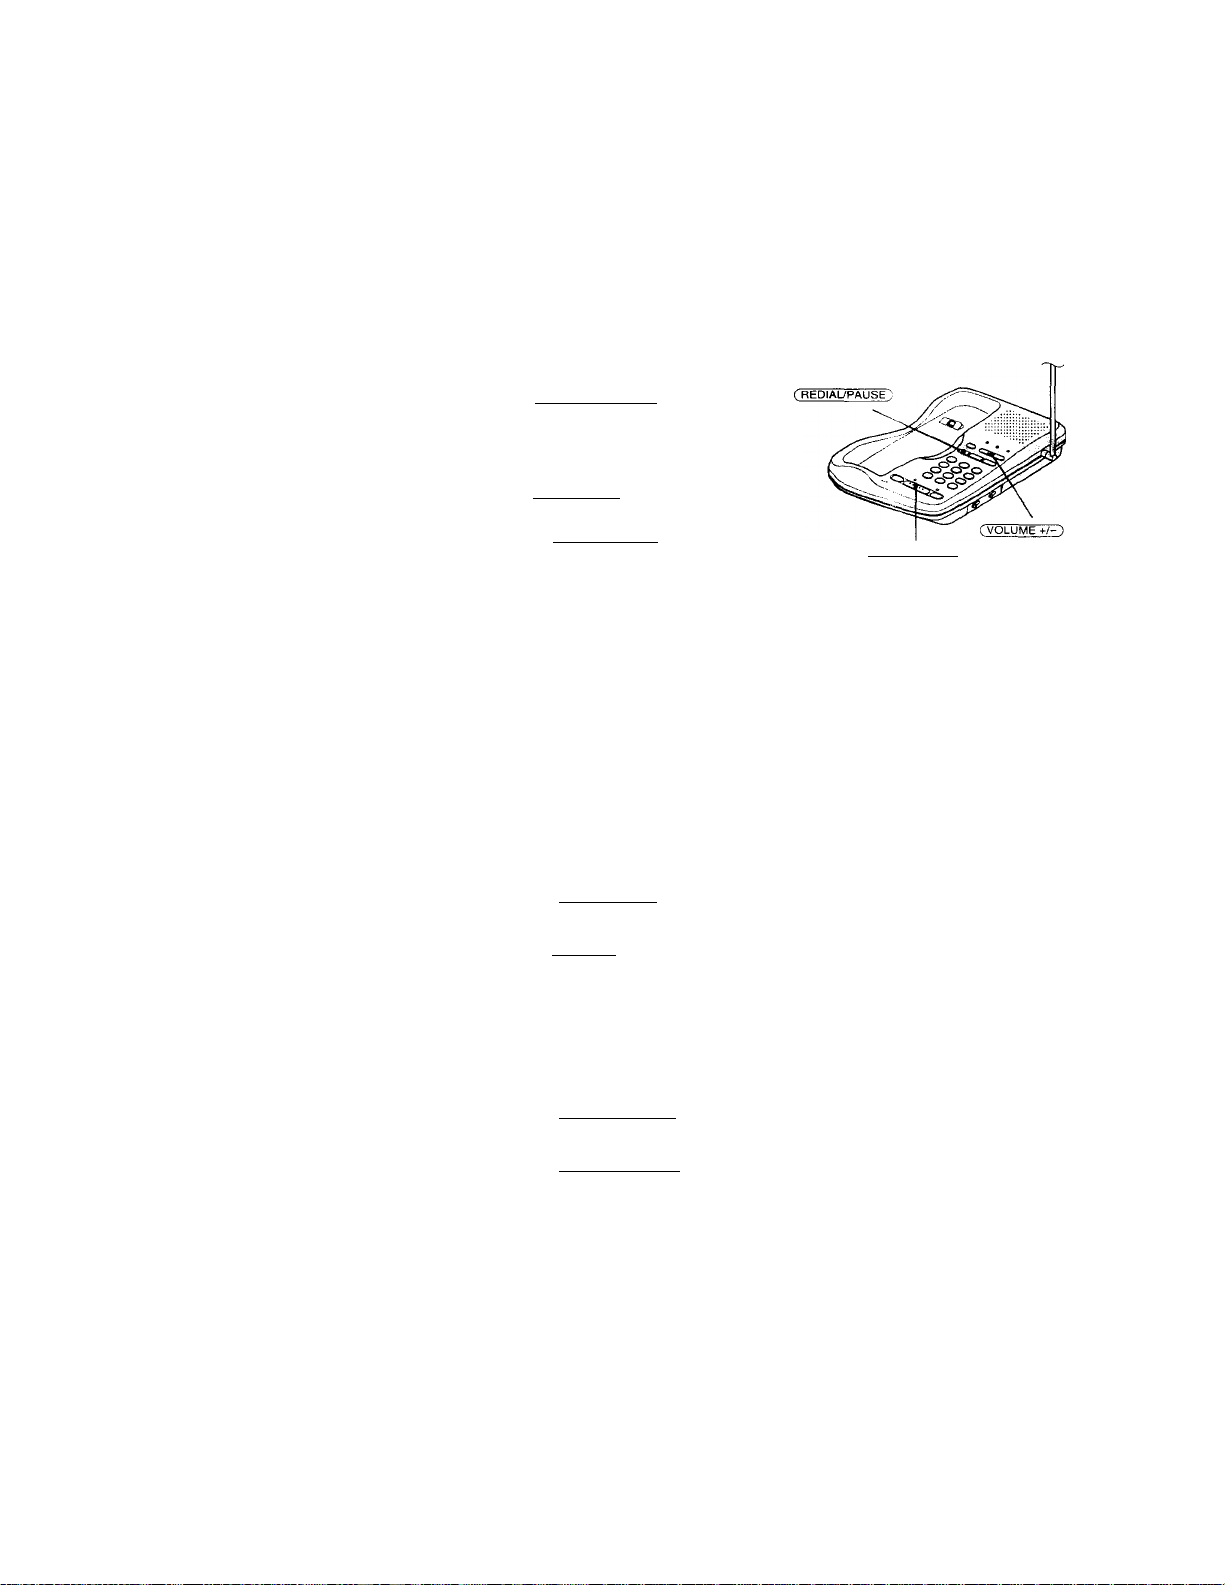
Realización de liamadas (continuación)
Realización de llamadas con la función de interfono
Presione (SPEAKERPHONE*) del teléfono base.
La lámpara SPEAKERPHONE se encenderá.
Marque el número de teléfono.
Para ajustar el volumen del altavoz,
presione (VOLUME +/-).
Cuando haya terminado de hablar, vuelva
a presionar (SPEAKERPHONE^.
fSPÉAKERPHONE^
Para obtener el máximo rendimiento de la función de interfono
• En lugares con mucho ruido es posible que no oiga la voz de su
interlocutor. Por lo tanto, utilice la función de interfono en una sala
silenciosa.
• No acerque sus manos ni ningún otro objeto al micrófono ya que
oiría un ruido de aullido ("retroalimentación").
• Cuando el volumen del altavoz sea demasiado alto, o si ha colocado
el teléfono demasiado cerca de una pared, es posible que el volumen
se reduzca repentinamente. Esto se debe a un circuito del teléfono
diseñado para protección contra la retroalimentación. En tales casos,
reduzca ligeramente el volumen del altavoz.
Repetición de marcación
En el microteléfono
Presione (talk/flash ).
1
La lámpara TALK se encenderá.
2 Presione ( redial) para volver a llamar al último número
marcado.
Nota
Si ei último número marcado tenía más de 16 dígitos, solamente se marcarán 16.
En ei teléfono base
1 Presione (speakerphone).
La lámpara SPEAKERPHONE se encenderá.
2 Presione ( redial/PAUSE) para volver a llamar al último
número marcado.
Nota
Si el último número marcado tenía más de 16 dígitos, solamente se marcarán 16.
14fs Preparativos
Page 47
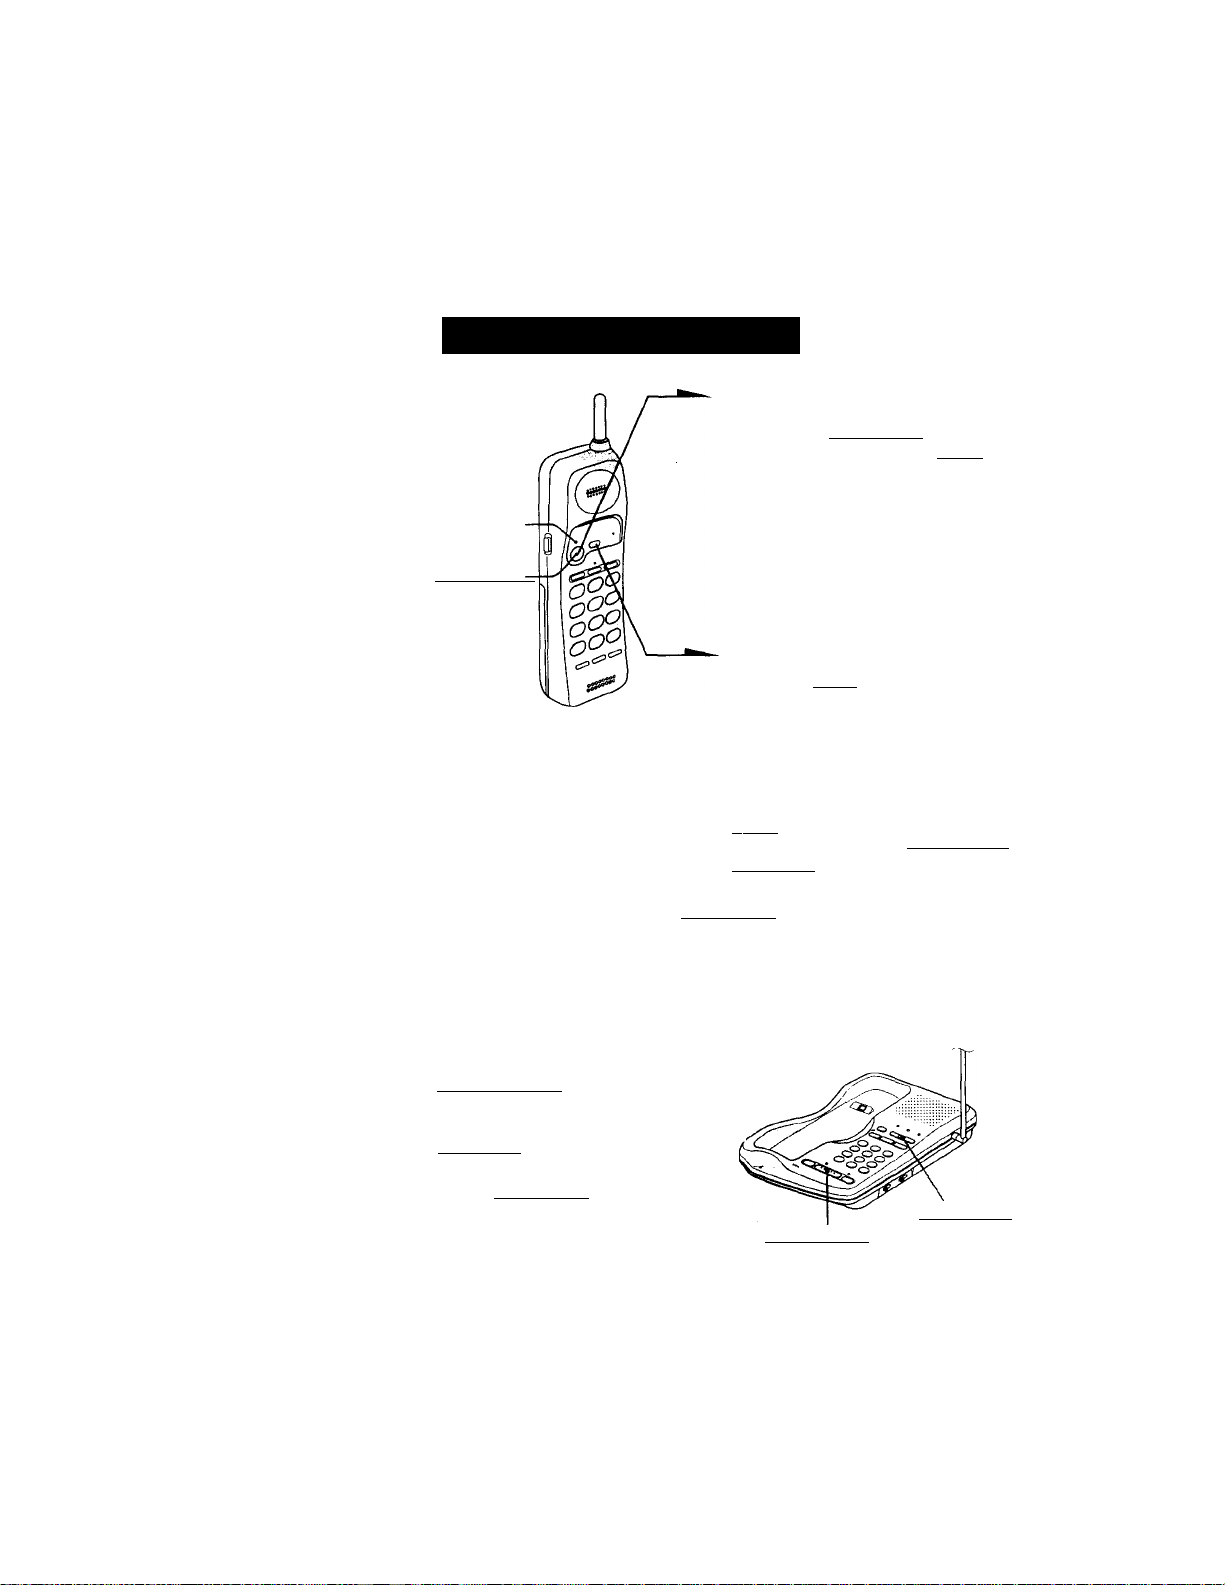
Recepción de llamadas
1Cuando oiga sonar el teléfono:
• Presione (talk/flash) (o
cualquier botón excepto ( OFFl).
Lámpara
TALK
( TALK/FLASH')
teléfono base cuando esté
colocado en él.
La lámpara TALK parpadeará
simultáneamente con la lámpara IN
USE del teléfono base.
Cuando haya terminado de hablar,
presione ÍOFF) o coloque el
microteléfono en el teléfono base.
Las lámparas TALK e IN USE se
apagarán.
Tareas adicionales
• Descuelgue el microteléfono del
Para Realice lo siguiente
Poner una llamada en espera
Cambiar a otra llamada (servicio de
"llamada en espera")
Ajustar el volumen del generador
de llamada del teléfono base
* Para subscribirse a este servicio, llame a la compañía telefónica local.
Con respecto a cómo cambiar el tipo de generador de llamada, consulte la
pàgina 19.
Presione Ohold).
Para reanudar la conversación, presione ( TALK/FLASH ).
Presione (talk/flash ) para activar la función de
accionamiento del gancho.
Para volver a la primera llamada, presione de nuevo
(TALK/FLASH).
Consulte la página 20.
Recepción de llamadas con la función de interfono
Cuando oiga sonar el teléfono, presione
( SPEAKERPHONE ) del teléfono base.
La lámpara SPEAKERPHONE se encenderá
Para ajustar el volumen del altavoz, presione
(VOLUME +/-).
Cuando haya terminado de hablar, vuelva a
presionar (speakerphone).
Para obtener el máximo rendirniento de la
función de interfono, consulte la página 14. ( speakerphone )
( VOLUME r/- )
Preparativos 15“
LO
■O
(D
■O
01
r+
<■
VI
Page 48
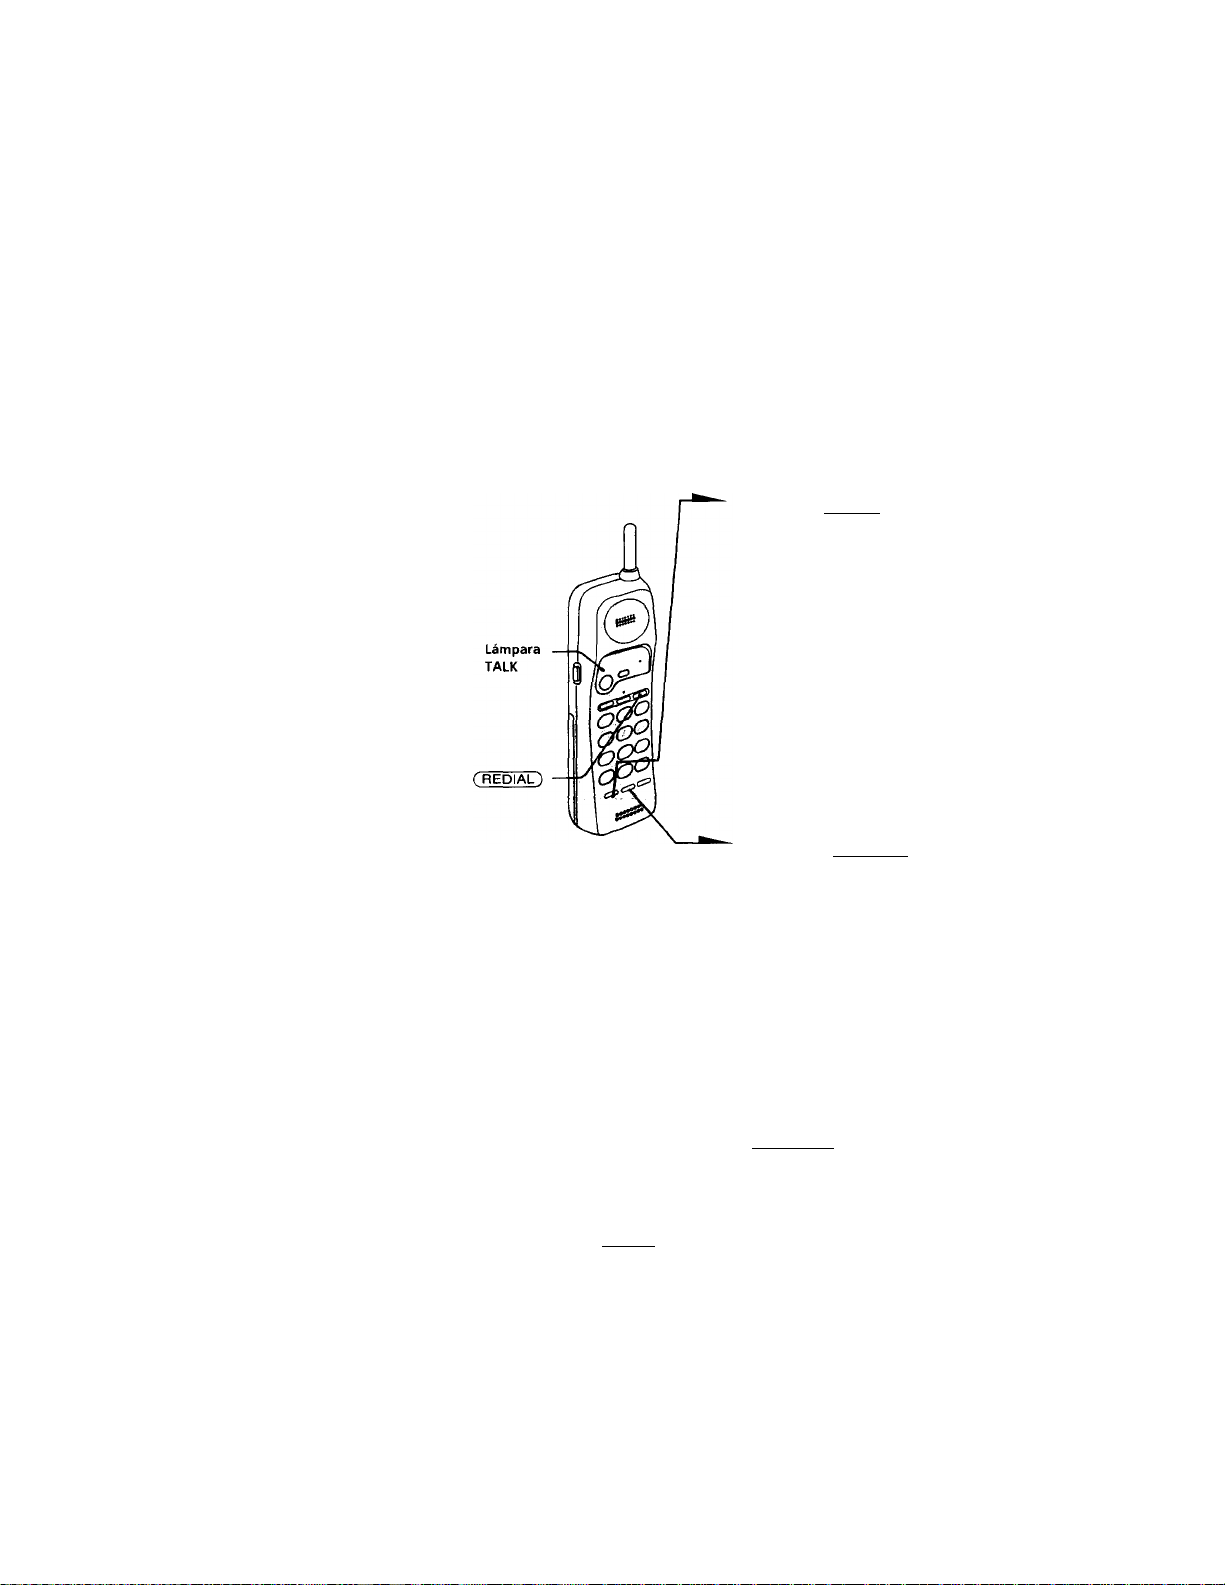
Operaciones avanzadas
Marcación abreviada
Usted podrá marcar presionando unas pocas teclas después de haber almacenado
números de teléfono en el teclado. Usted podrá almacenar hasta 10 números de
teléfono separadamente en el microteléfono y en el teléfono base.
Almacenamiento de números de teléfono
1 Presione (PGM~).
La lámpara TALK parpadeará
rápidamente.
Presione la tecla de marcación (Co) a
®) en la que desee almacenar el
número de teléfono.
Oirá un pitido de confirmación.
Introduzca el número de teléfono que
desee almacenar.
Usted podrá introducir hasta 16
dígitos, incluyendo un tono y una
pausa, que se contarán cada uno
como un dígito más.
Presione (SPEED dial).
Usted oirá otro pitido de
confirmación, y el número se
almacenará. La lámpara TALK se
Notas
• En el paso 3, si no introduce el número de teléfono, el previamente
almacenado se borrará.
• No deje que transcurran más de 20 segundos entre cada paso del
procedimiento.
• Para poder almacenar números de teléfono, la alimentación del microteléfono
deberá estar desconectada.
• Usted no podrá almacenar números de teléfono en el microteléfono cuando
esté utilizando la función de interfono en el teléfono base. La lámpara TALK
repetirá juegos de dos parpadeos par indicar esta condición.
Sugerencias
• Si ha introducido un número erróneo, presione (SPEED dial), y comience
desde el principio.
• Utilice el directorio suministrado para escribidlos números de marcación
abreviada almacenados.
Para almacenar el número previamente marcado
Presione directamente ( redial) después del paso 2, y después vaya al paso 4.
16^^ Operaciones avanzadas
apagará.
Page 49
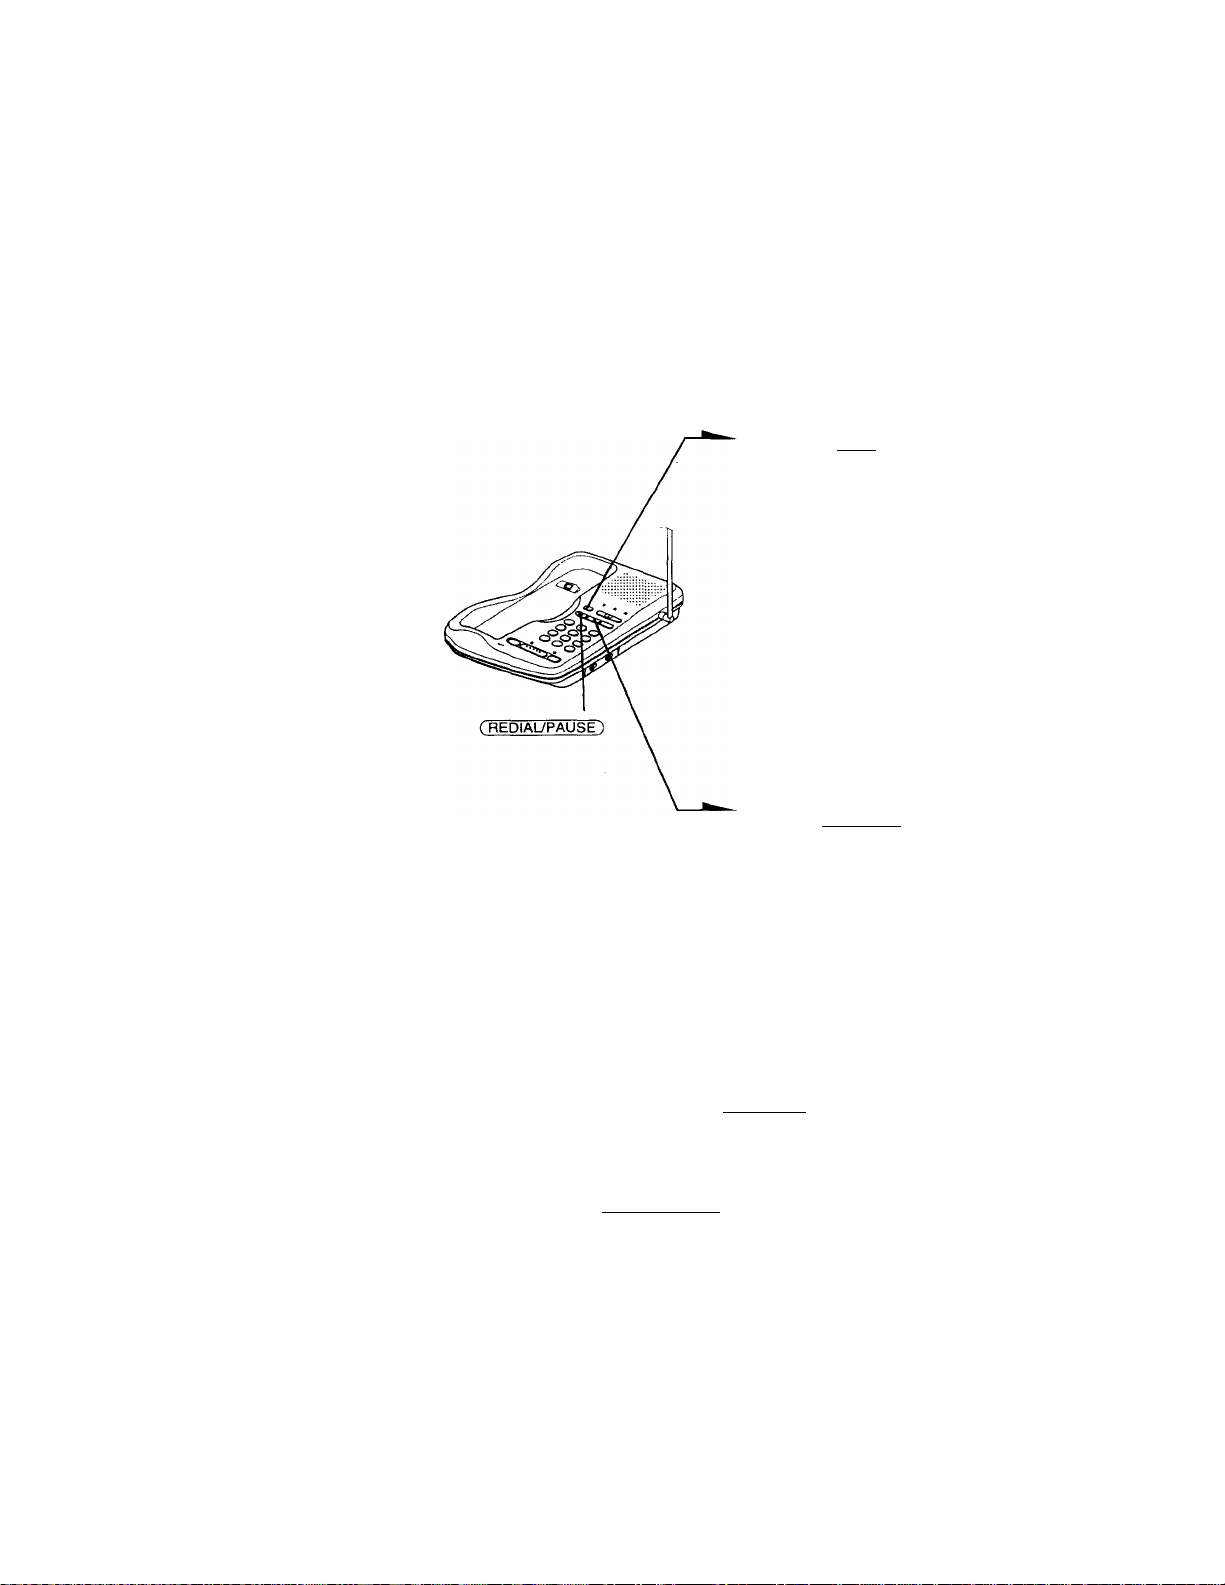
Almacenamiento de números en el teléfono base
1Presione Cpgm).
La lámpara SPEAKERPHONE
parpadeará rápidamente.
Presione una de las diez teclas de
marcación ((£) ^ ®)/ 1^ que
desee almacenar el número de
teléfono.
Oirá un pitido de confirmación.
Introduzca el número de teléfono
que desee almacenar.
Usted podrá introducir hasta 16
dígitos, incluyendo un tono y una
pausa, que se contarán cada uno
como un dígito más.
^ Presione f speed dial).
Usted oirá otro pitido de
confirmación, y el número se
almacenará.
. Notas
• En el paso 3, si no introduce el número de teléfono, el previamente
almacenado se borrará.
• No deje que transcurran más de 20 segundos entre cada paso del
procedimiento.
• Para {X)der almacenar números de teléfono, la alimentación del microteléfono
deberá estar desconectada.
• Usted no podrá almacenar números de teléfono en el teléfono base cuando
esté utilizando el microteléfono. La lámpara IN USE se encenderá para
indicar esta condición.
Sugerencias
• Si ha introducido un número erróneo, presione (SPEED dial), y comience
desde el principio.
• Utilice el directorio suministrado para escribir los números de marcación
abreviada almacenados.
Para almacenar el número previamente marcado
Presione directamente C REDIAUPAUSE) después del paso 2, y después
vaya al paso 4.
continúa
Operaciones avanzadas
O
T3
9
17“
n
O*
3
m
lA
ftl
<
cu
3
N
fi)
a
fi)
(A
Page 50

Marcación abreviada (continuación)
Para almacenar un número de teléfono que desee marcar a través de una centralita privada (PBX)
Antes de introducir el número de teléfono en el paso 3 de la página anterior, realice lo
siguiente:
1 Introduzca el número de acceso a la línea interurbana (p. ej.,
9).
2 Presione ( REDIaupause ).
Para cambiar un número almacenado
Para almacenar un nuevo número, siga las instrucciones ofrecidas en la
página anterior.
Para borrar un número de la memoria
1 Presione (PGM).
2 Presione la tecla de marcación abreviada cuyo número de
teléfono desee borrar.
3 Presione (SPEED DIAL).
Realización de llamadas de marcación abreviada con el microteléfono
1 Presione (talki.
La lámpara TALK se encenderá.
2 Presione (SPEED DIAL).
3 Presione la tecla de marcación abreviada ((2) to (?))
deseada.
El número almacenado en la tecla de marcación abreviada se
marcará.
Realización de llamadas de marcación
abreviada con el teléfono base
SPEAKERPHONE.
1 Presione (SPEAKERPHONE).
La lámpara SPEAKERPHONE se encenderá.
Presione (SPEED DIAL).
2
Presione la tecla de marcación abreviada (® to CI3)
3
deseada. ' ■
El número de teléfono almacenado en la tecla de marcación
abreviada se marcará.
18“ Operaciones avanzadas
Page 51
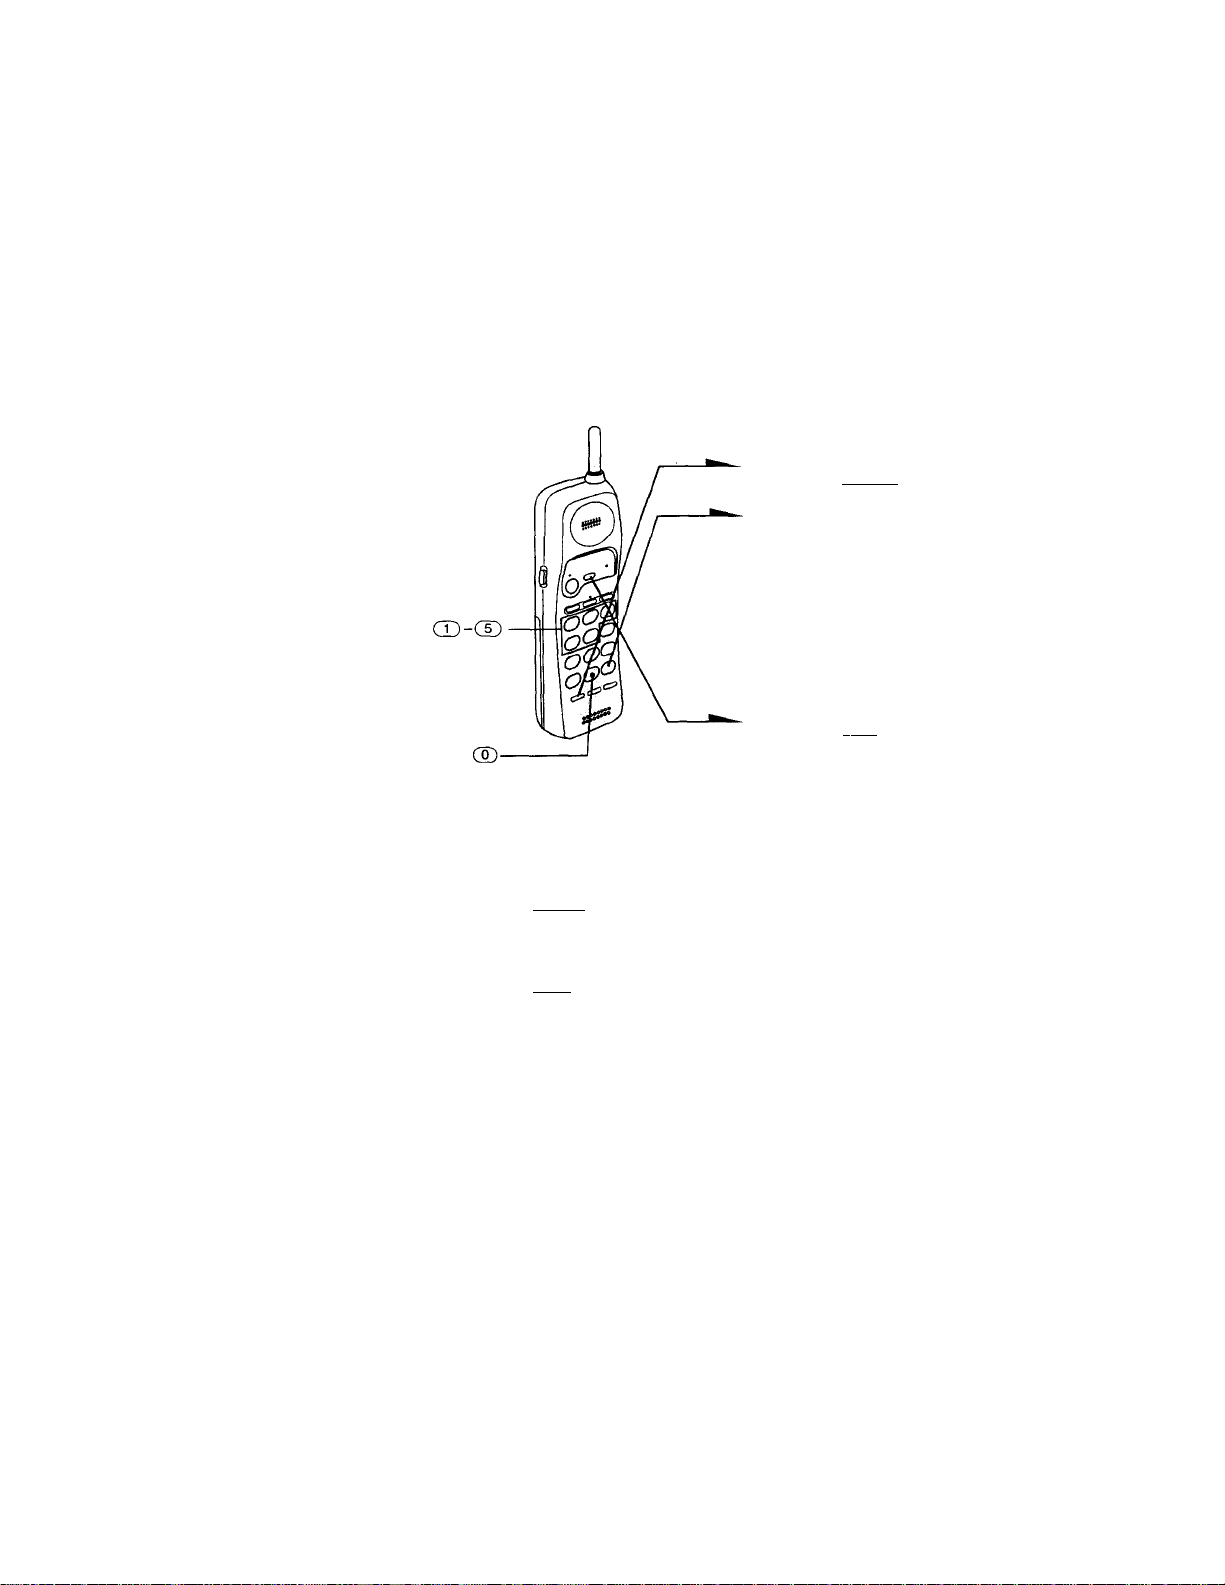
Ajuste del tipo de generador de llamada
Usted podrá seleccionar uno de cuatro tipos de generador de llamada.
1
Presione (PGM~).
2
Presione(5).
Presione una tecla numérica
3
Q!) a ®. para seleccionar el
tipo de generador de llamada.
Usted oirá el tono del
generador de llamada
correspondiente.
Presione 1OFF).
Desactivación del generador de llamada del microteléfono
1 Presione (PGM ).
2 Presione (M).
3 Presione ® ■
4 Presione (OFF).
El generador de llamada del microteléfono habrá quedado
desactivado.
O
■O
n
fi)
rt
5‘
3
iO
V)
fi)
<
fi)
3
N
fi)
a
fi)
«A
Para volver a activar el generador de llamada
Siga las instrucciones ofrecidas en "Ajuste del tipo de generadi>r de
llamada”.
continua
Operaciones avanzadas I 19^^
Page 52
Ajuste del tipo de generador de llamada (continuación)
Comprobación del tipo de generador de llamada
1 Presione (PGM ).
2 Presione CW).
3 Presione Con
sonará el generador de llamada seleccionado.
4 Presione ( OFF ).
Nota
Si no oye sonido (solamente el pitido de teclas), el generador de llamada del
teléfono base estará desactivado.
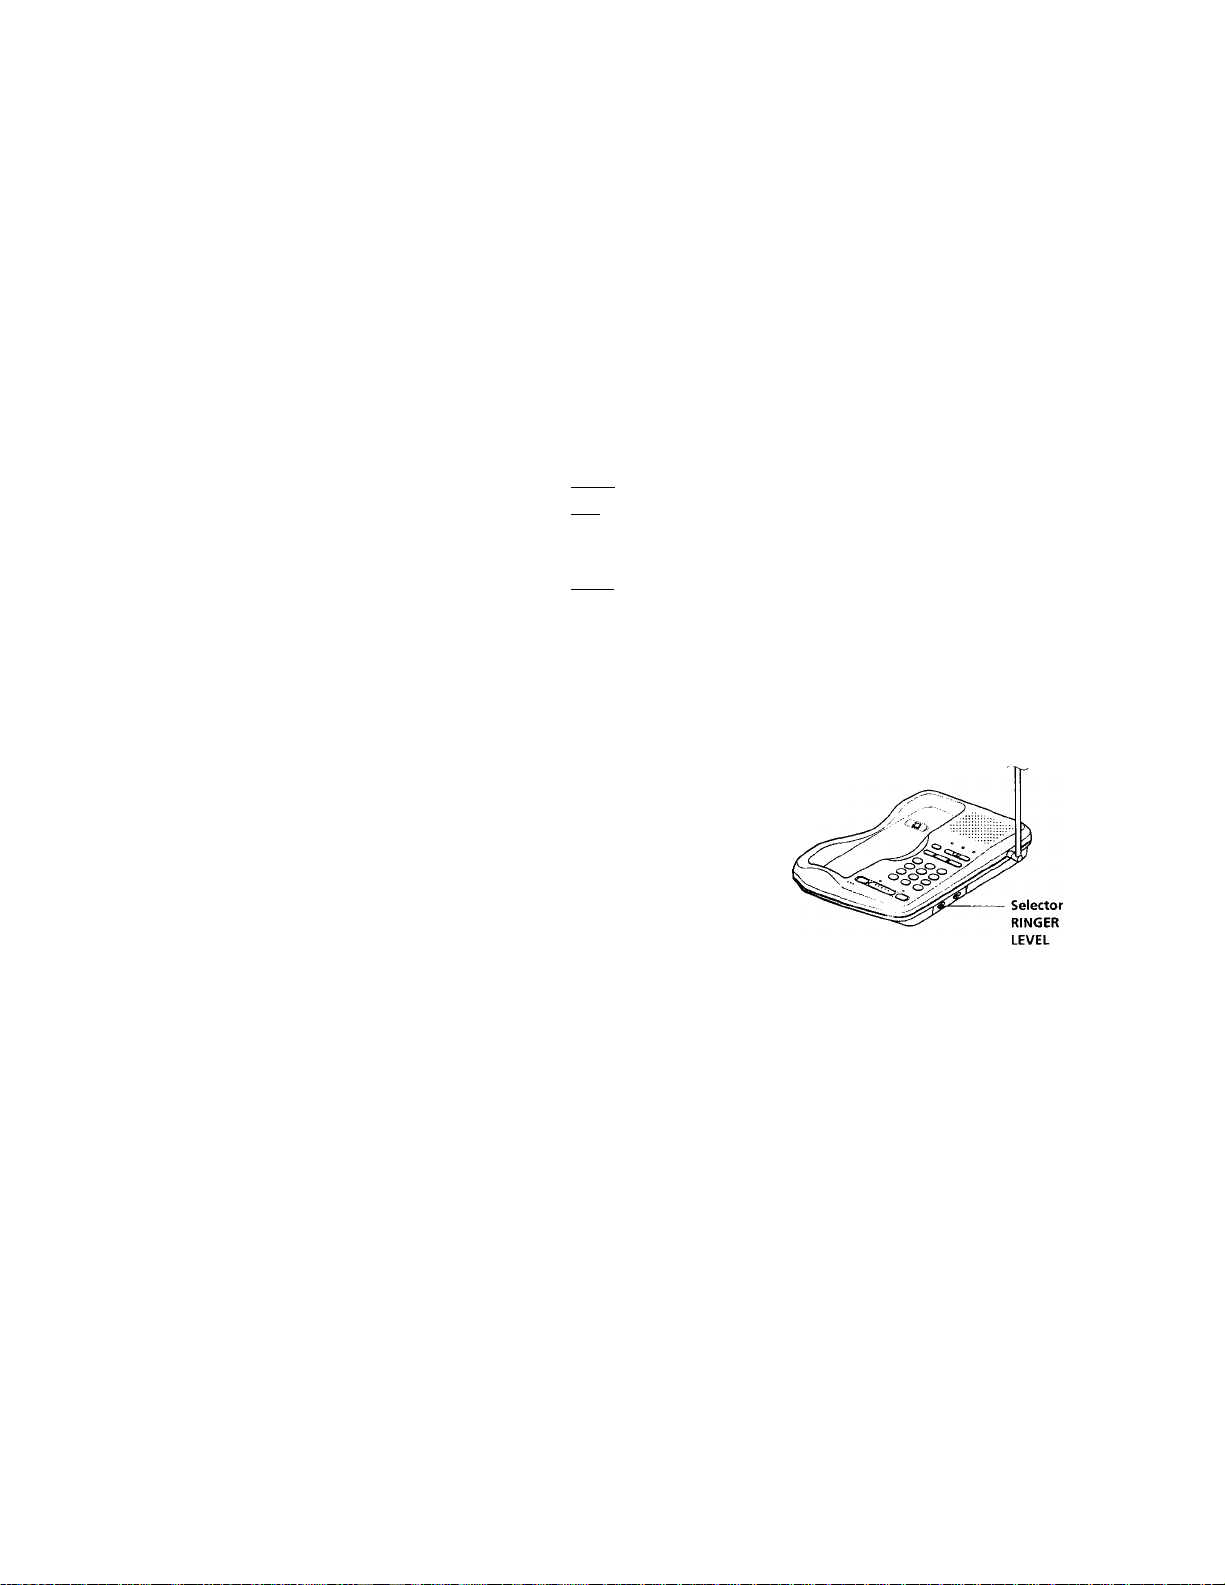
Ajuste del nivel del volumen del generador de llamada del teléfono base
Ponga el selector RINGER LEVEL del teléfono base
en HIGH o LOW. Para desactivar el generador de
llamada, póngalo en OFF.
20'* Operaciones avanzadas
Page 53
Cambio de teléfono durante una llamada
Cuando ponga una llamada en espera, podrá volver a ella a través del
otro teléfono sin desconectarla.
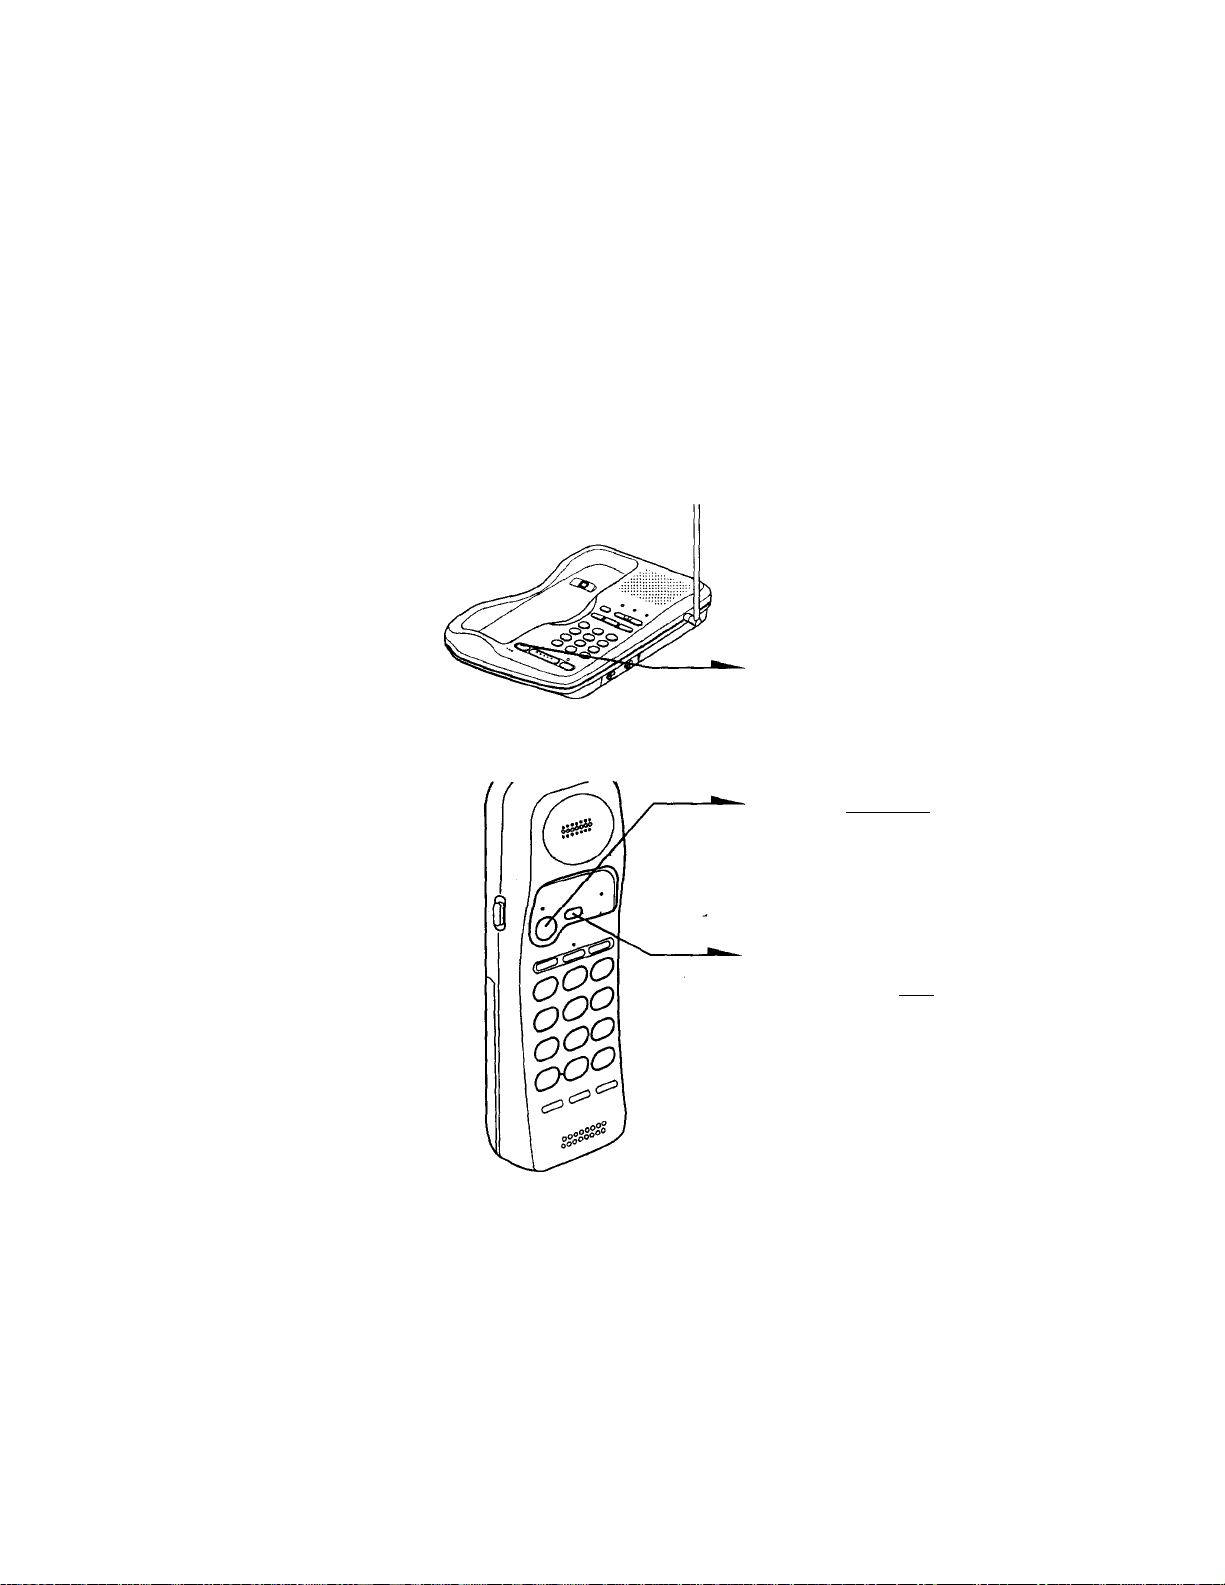
Para cambiar del teléfono base al
microteléfono
1
Presione i
base.
Las lámparas SPEAKERPHONE
y TALK del microteléfono
parpadearán lentamente.
Presione ( talk/flash) o
2
descuelgue el microteléfono.
La lámpara TALK se encenderá.
La lámpara SPEAKERPHONE se
apagará y se encenderá la
lámpara IN USE.
Cuando haya terminado de
hablar, presione (OFF) o cuelgue
el microteléfono en el teléfono
base.
D} del teléfono
0
TJ
«
ai
n
5'
3
(D
VI
01
<
ai
3
N
ai
a
ai
Sugerencia
• Cuando hable con la función de intcrfono del teléfono base, si descuelga i
microteléfono, la llamada cambiará a éste.
continua
Operaciones avanzadas
21«
Page 54
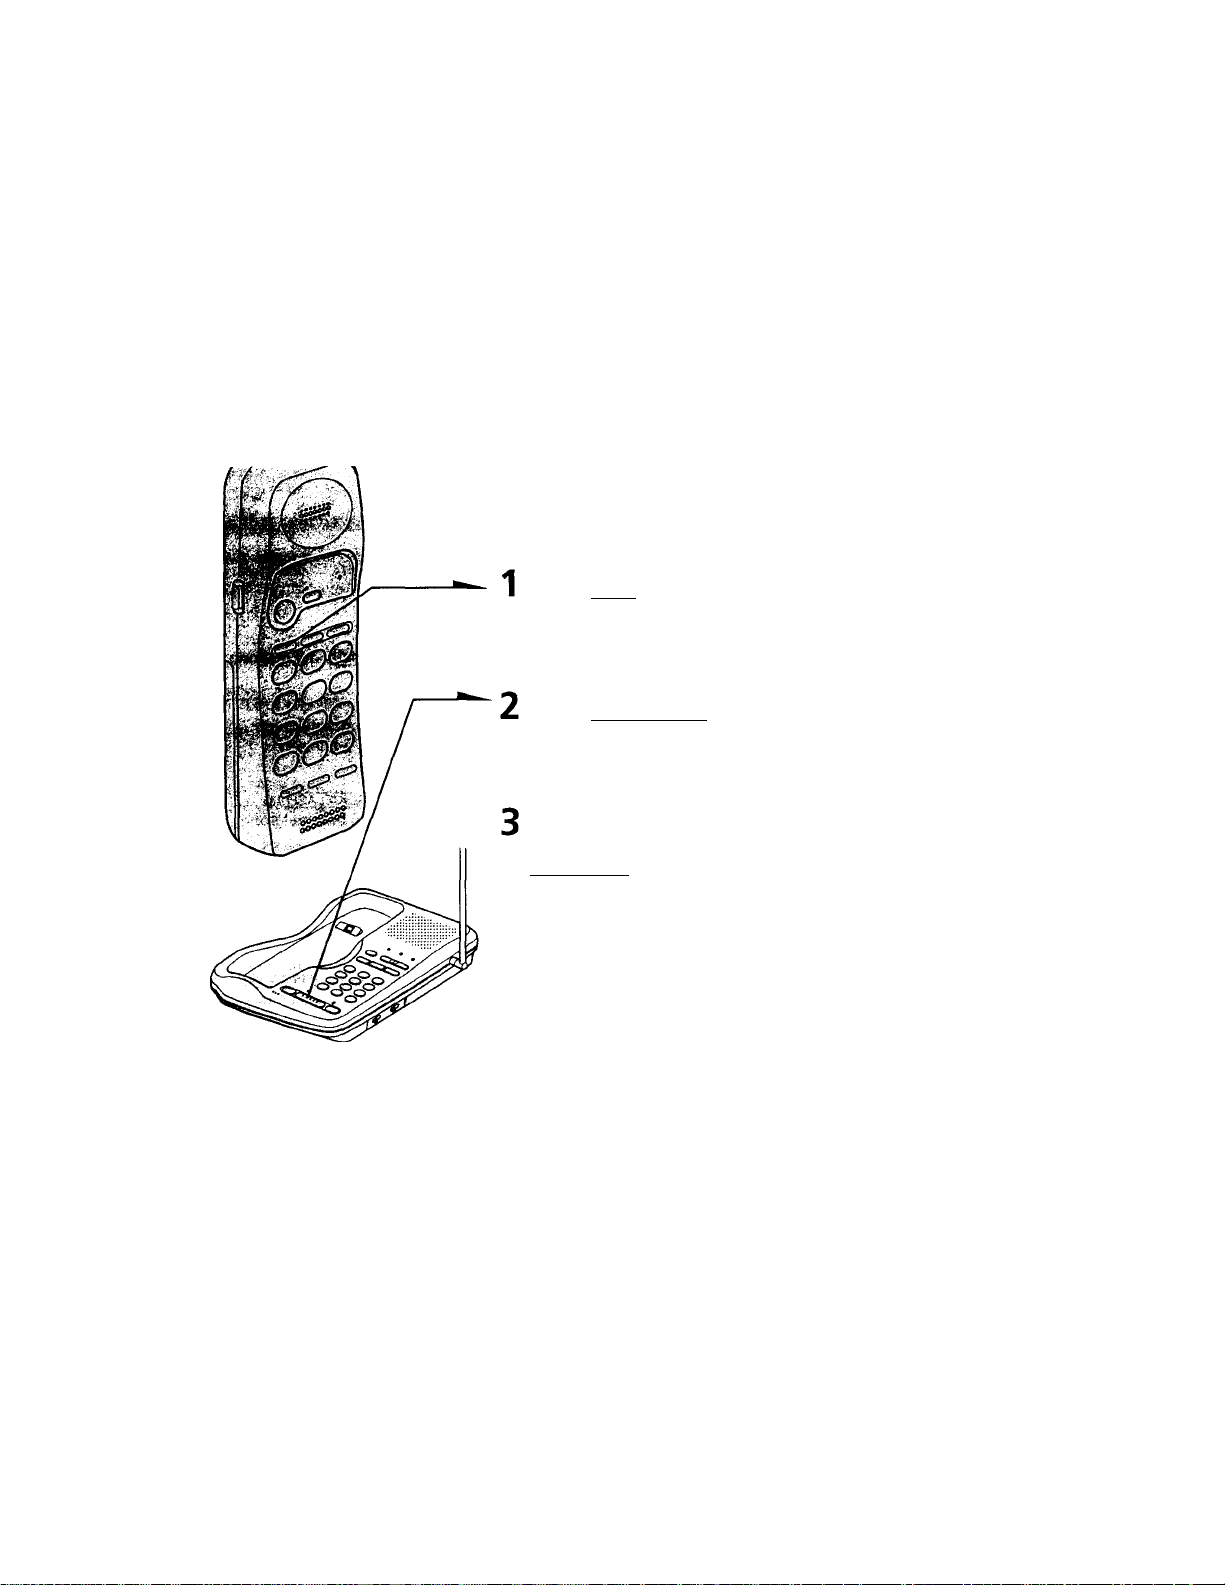
Cambio de teléfono durante una llamada (continuación)
Para cambiar del microteléfono al teléfono base
Presione (HOLD) del
microteléfono.
La lámpara TALK parpadeará
lentamente.
Presione (SPEAKERPHONE).
La lámpara SPEAKERPHONE se
encenderá. La lámpara TALK
repetirá juegos de dos parpadeos.
Cuando haya terminado de
hablar, vuelva a presionar
(speakerphoneT
Operaciones avanzadas
22'
Page 55
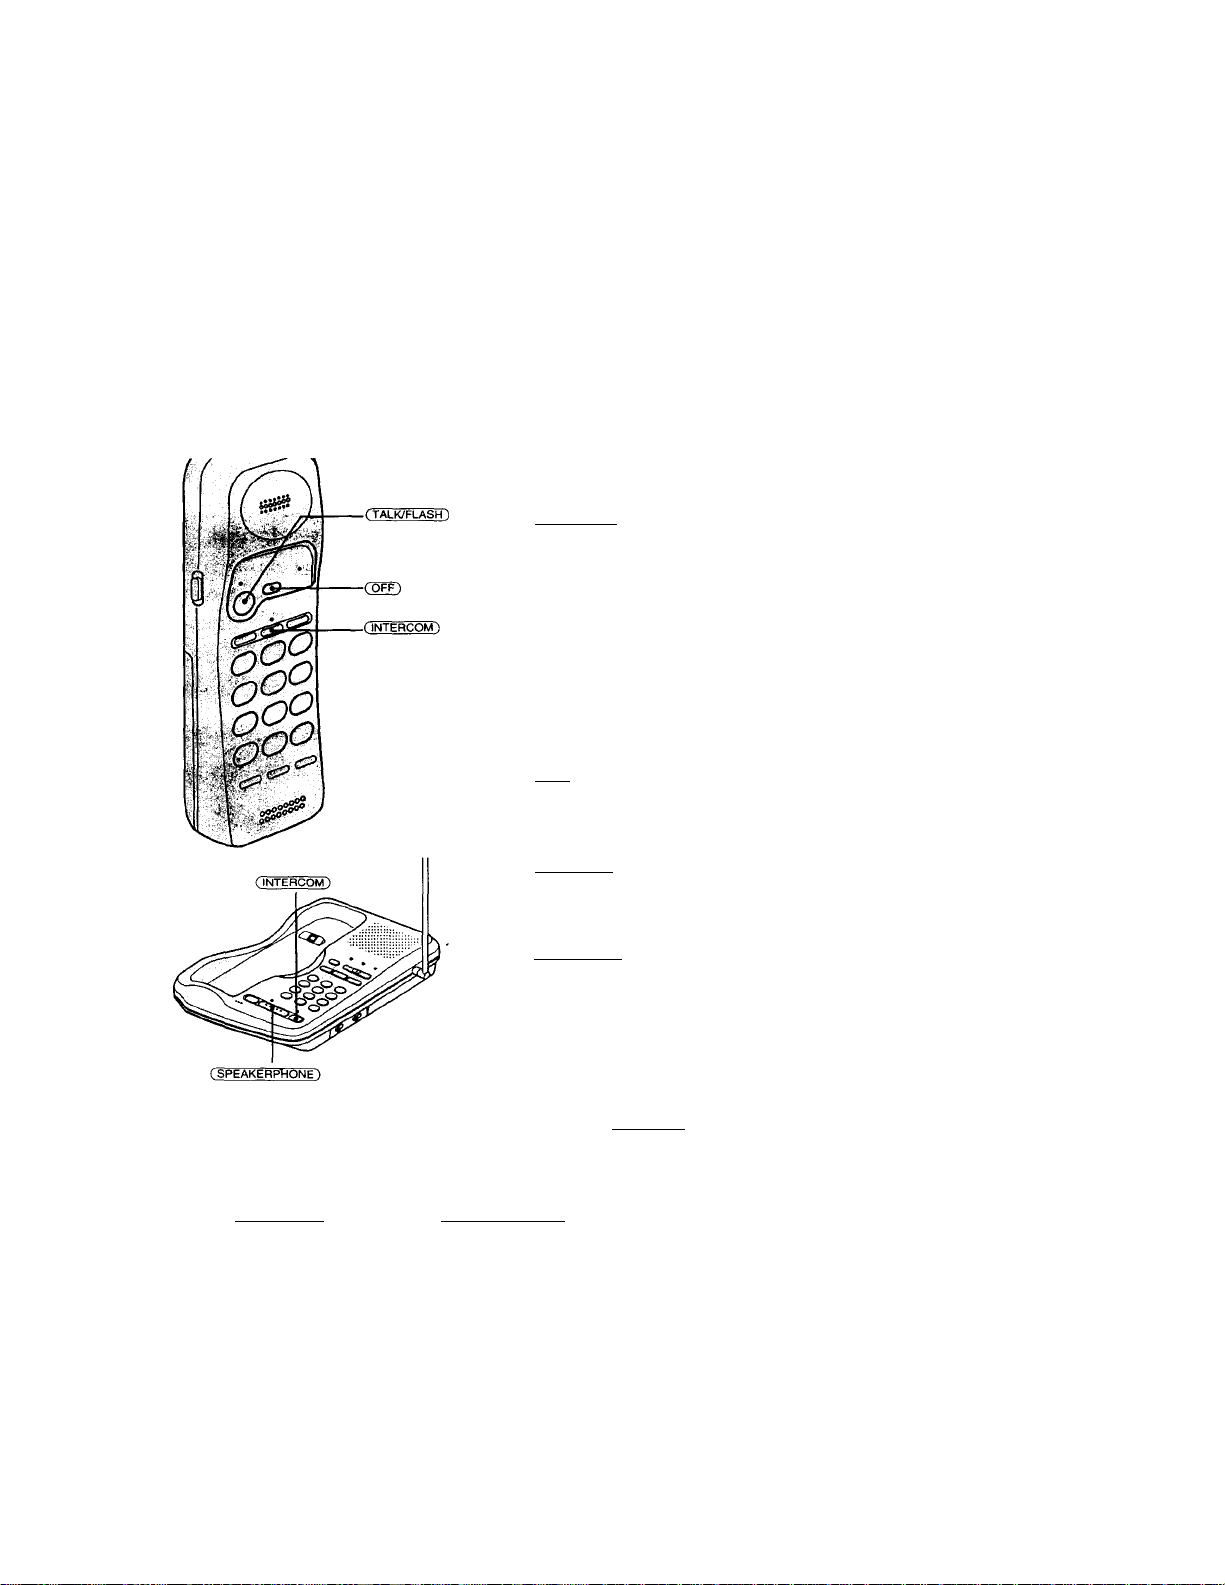
Conversación entre el micrpteléfono y el teléfono base (Intercomunicación)
Usted podrá conversar entre el teléfono base y el microteléfono. Usted
podrá iniciar la intercomunicación desde cualquiera de los teléfonos.
Para conversar desde el microteléfono al teléfono base
Presione (INTERCOM) del
microteléfono.
Después de que el teléfono base haya
sonado una vez, usted se conectará
automáticamente. Cuando responda
alguien en el teléfono base, podrá
conversar.
La lámpara INTERCOM del
microteléfono y del teléfono base se
apagará.
Cuando haya terminado de hablar
Presione (OFF).
Para conversar desde el
teléfono base al micrófono
Presione ( intercÓKF) del teléfono
base.
El microteléfono sonará. Cuando la
persona que tenga el microteléfono
presione (iNTERCCáM). se conectará la
línea.
La lámpara INTERCOM del
microteléfono y del teléfono base se
apagará.
Cuando haya terminado de hablar o cuando nadie conteste al teléfono
Vuelva as presionar ( intercom).
Nota
La llamada al microteléfono se parará automáticamente después de un minuto.
Si entra una llamada mientras esté utilizando ía función de intercomunicación, el generador
de llamada sonará en el teléfono base y en el microteléfono. Para contestar a la llamada,
presione (TÁlk/FLASh) del microteléfono o ( SPEAKERPHOÑE^ del teléfono base. La función
de intercomunicación se desactivará automáticamente, y la llamada se conectará a al unidad
cuya tecla haya presionado.
Operaciones avanzadas
■O
23^
O
(D
fi)
A
o’
3
(9
vt
fi)
<
fi)
3
N
fi)
a
fi)
Page 56
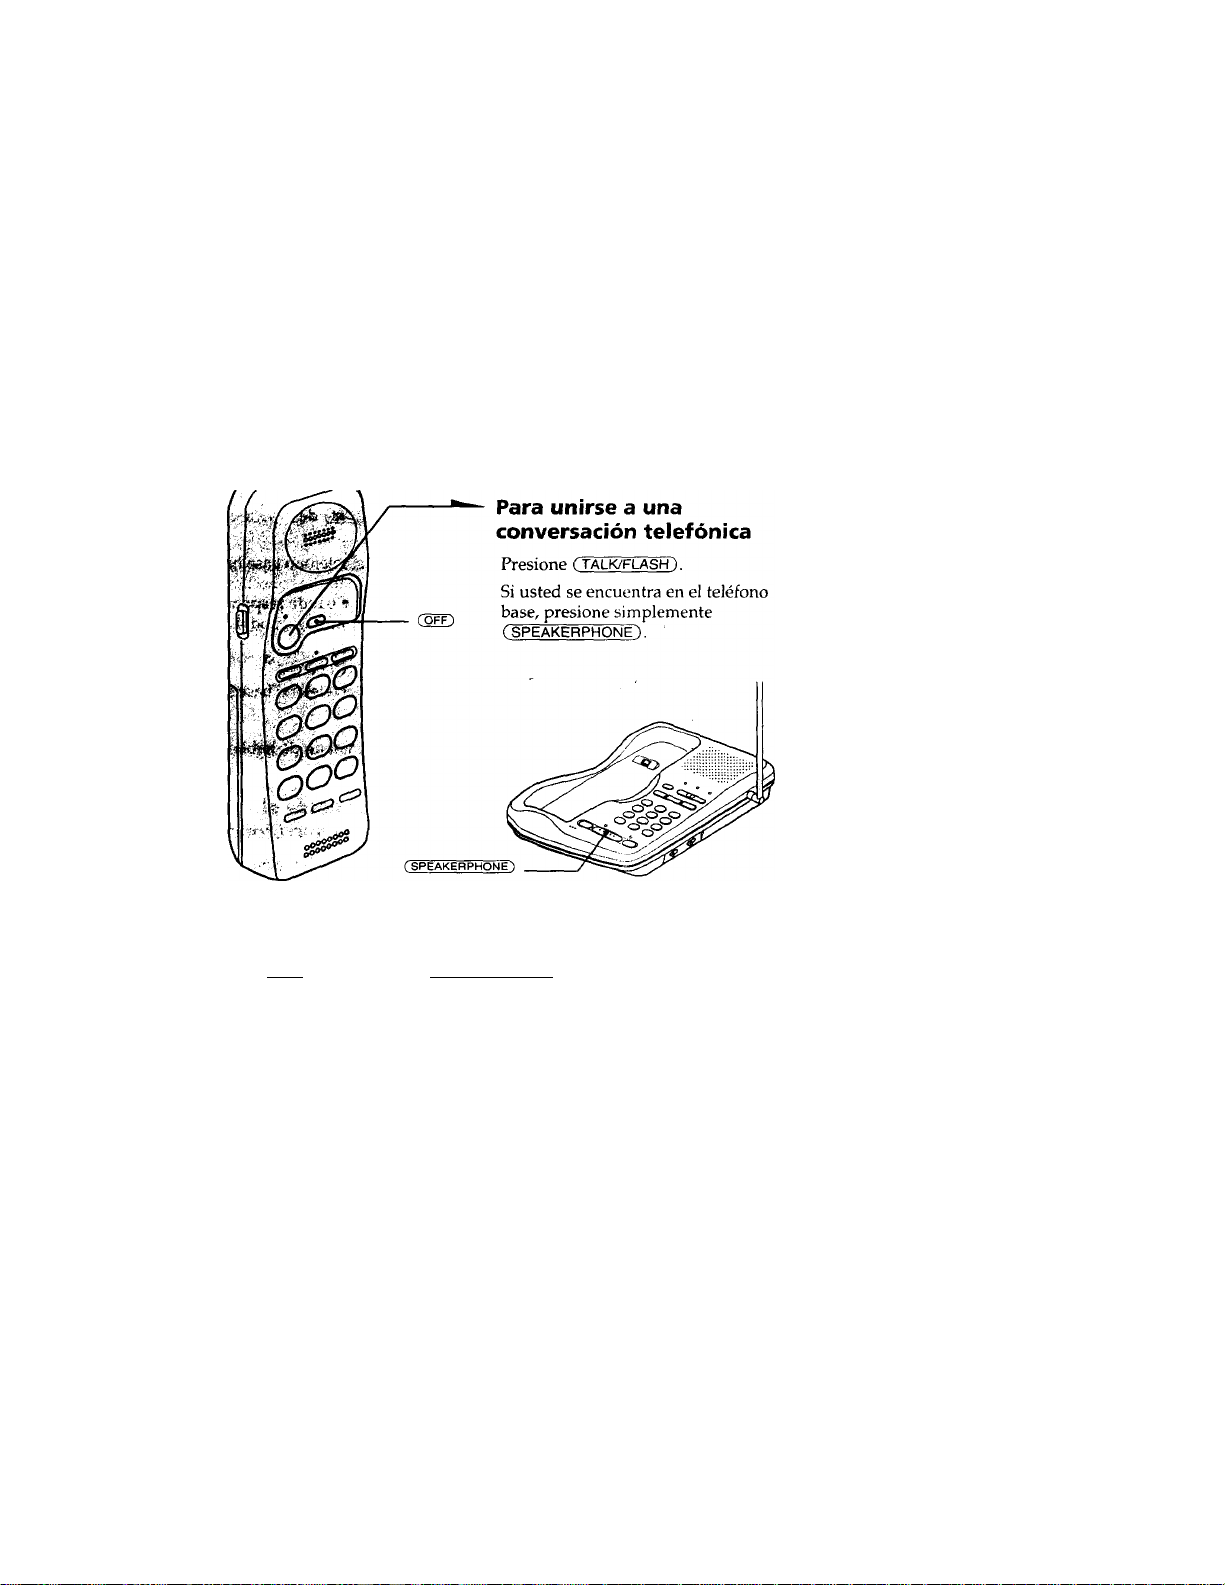
Conferencia tripartita
El microteléfono y el teléfono base funcionan como dos extensiones de
la misma línea. Ambos teléfonos podrén trabajar al mismo tiempo,
motivo por el que usted, el que llama, y la persona del otro teléfono
podrán entablar una conversación tripartita.
Cuando haya terminado de hablar
Presione (OFF) del microteléfono/(SPEAKERPH0NE~) del teléfono
base, respectivamente.
24'* Operaciones avanzadas
Page 57
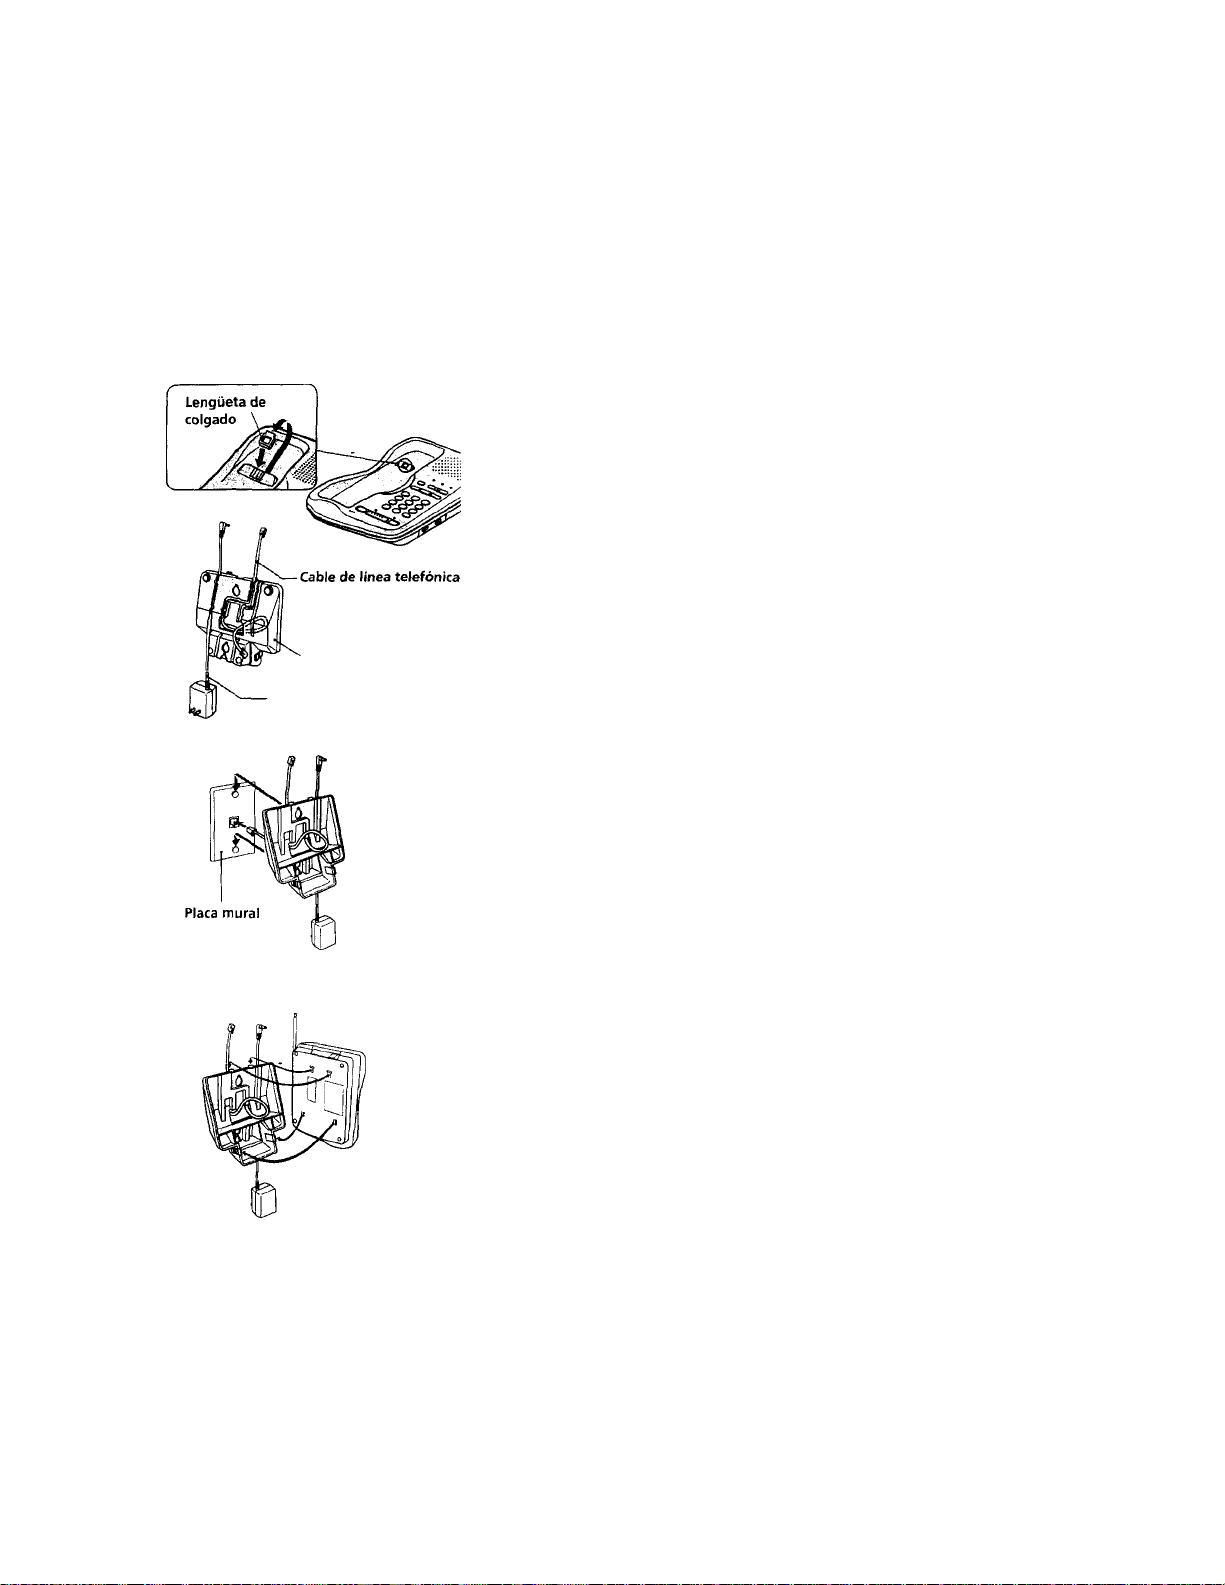
Información adicional
Montaje del teléfono base en una pared
1 Quite la lengüeta de colgado y
^ cólóquela al revés.
Fije el cable del adaptador de
alimentación de CA y el cable
de línea telefónica al soporte
Soporte mural
mural.
Cable del adaptador de
alimentación de CA
Enganche el soporte mural en la
placa mural, y enchufe el cable
de línea telefónica en la toma
modular para teléfono.
Si fa placa mural no está disponible,
utilice los dos tornillos
suministrados para montar el
soporte.
-Q3
---------
mtsuQ
Si el soporte mural queda inestable,
rompa las dos protuberancias de las
flechas horizontales (b/B) e
insértelas en las esquinas inferiores
del soporte mural, en las flechas
verticales (v).
Inserte las lengüetas superiores
en primer lugar, v ciespués
presione el teléfono base cíe
forma que las lengüetas
inferiores del soporte entren en
el teléfono base.
Después levante verticalmente
la antena y fije la lengüeta de
colgado al revés.
Información adicional 25“
0
3
íi
n
Ô-
3
fil
a
o
3
ai
Page 58

Notas sobre las fuentes de alimentación
Batería
• Para un óptimo rendimiento, ^
almacene la batería a una temperatura
de entre 5°C y 35°C.'
• Si no va a utilizar el auricular durante
un periodo de tiempo prolongado,
extraiga la batería después de cargarla
durante más de 8 horas.
Interrupción del suministro
eléctrico
Durante la interrupción del
suministro eléctrico no es posible
realizar o recibir llamadas.
Mantenimiento
• Limpie el exterior con un paño suave
ligeramente humedecido en agua o en
una solución de detergente neutro.
No utilice limpiadores abrasivos,
desengrasantes ni disolventes, como el
alcohol o la bencina, ya que podrían
dañar el acabado.
• Si los terminales de carga de la unidad
base y el auricular están sucios,
limpíelos con un paño suave o papel.
En caso de duda o problemas con el
teléfono, consulte a su proveedor Sony
más próximo.
RECICLADO DE BATERIAS DE NÍQUEL-CADMIO
baterías de níquel-
7a Al la BATERIA DEBE
CADMIO.
RECICLARSE O DESHACERSE
'r DE ELLA CORRECTAMENTE.
Ni-Cd
Las baterías de níquel cadmio pueden
reciclarse. Usted podrá ayudar a conservar el
medio ambiente devolviendo las baterías que
no desee utilizar a un centro de reparaciones
Sony para su recopilación, reciclado, y
eliminación apropiada.
Nota: En ciertas zonas, puede estar
prohibido desechar baterías de níquelcadmio en lugares de recogida de
basura de viviendas o comercios.
Para información sobra el centro de
reparaciones más cercano, llame a 1-800-222SONY (EE.UU. solamente)
Precaución: No maneje baterías de níquel-
cadmio dañadas o con escape de su
electrólito.
26« Información adicional
Page 59

Solución de problemas
Si experimenta cualquiera de las dificultades siguientes cuando
utilice su teléfono, utilice esta lista de seluciórr de problemas
para tratar de resolver el problema.
Si el problema persiste, consulte a su proveedor Sony.
Síntoma
Se oyen cuatro pitidos cortos de
error al presionar
(TALK/FLASH').
OI
■a
‘C ro ^ invitación
3 ■§ a marcar.
15 E
4> <0
te =
El teléfono no conecta la
llamada, incluso aunque el
número marcado es correcto.
El teléfono no repite
correctamente la marcación.
El microteléfono no emite señal
de llamada.
*o
liS
o e
W C
O <D
ec =
Se oyen interferencias durante
•o la conversación.
JS u
jn
c 0»
5 >
n c
o ®
“ Se oye un pitido durante la
conversación.
Solución
• Compruebe si el teléfono base está correctamente
instalado {página 8).
• Acerque el microteléfono al teléfono base.
• Coloque el microteléfono en el teléfono base durante
cierto tiempo para recargar la batería.
• Compruebe si el cable de línea telefónica está
conectado con seguridad a la toma para teléfono.
• Compruebe si la batería está completamente cargada
(página 11).
• Compruebe si el modo de marcación está
correctamente ajustado (página lÜ).
• Antes de marcar, cerciórese de haber oído el tono de
invitación a marcar.
• Compruebe si el último número marcado es realmente
el deseado.
• Si el número de teléfono tiene más de 16 dígitos,
solamente se marcarán los primeros 16.
• La batería puede estar débil. Cárguela durante más
de 8 horas (página 11).
• Compruebe si el teléfono base está correctamente
instalado (página 8).
• Acerque el microteléfono al teléfono base.
• Coloque el microteléfono .sobre el teléfono base
durante cierto tiempo para que se reponga el código
digital de seguridad (página 6).
• Compruebe si el generador de llamada está activado
(página 19).
• Acerque el microteléfono al teléfono base.
• Presione (CHANNEL) del microteléfono oara elecir un
canal que ofrezca mejor recepción,
• Coloque el teléfono base alejado de tuentes de ruido
(página 8).
• La batería está débil. Cárguela durante más de 8 horas
(página 11).
3
o
3
n
O'
3
a
A*
o’
3
fi)
continúa
Información adicional
Page 60

Solución de problemas (continuación)
Síntoma
No es posible almacenar un
número de marcación
abreviada.
:2 TJ
fO
No es posible realizar la
marcación abreviada.
La marcación abreviada es
incorrecta.
El microteléfono no suena al
realizar una llamada desde el
teléfono base.
La lámpara CHARGE no se
enciende al colocar el
microteléfono en el teléfono
base.
La lámpara CHARGE parpadea
continuamente.
La duración de la batería es
corta.
Solución
Realice correctamente el procedimiento de
aTrnacenáfhíento de números (páginas 16 y 17).
Cuando esté utilizando el microteléfono, no podrá
almacenar números de marcación abreviada en el
teléfono base. Cuando esté utilizando el teléfono base,
no podrá almacenar números de marcación abreviada
en el microteléfono.
Si oye cuatro pitidos cortos de error, acerque el
microteléfono al teléfono base, o compruebe si el
teléfono base está correctamente instalado.
• Ha presionado una tecla en la que no hay número de
teléfono almacenado.
• Almacene el número correcto (páginas 16 y 17).
• El microteléfono puede estar ocupado en una
conversación.
• La batería puede estar débil o agotada. Cargúela
durante más de 8 horas (página 11).
• Coloque el microteléfono en el teléfono base.
• Acerque el microteléfono al teléfono base.
• Aleje el teléfono base de fuentes de ruido (página 8).
• Frote los terminales de carga del teléfono base y del
microteléfono con un paño o un papel suave para
mejorar el contacto de los mismos.
• Compruebe sí el microteléfono está correctamente
colocado en el teléfono base.
Coloque el teléfono base alejado de fuentes de ruido
(página 8).
Limpie ios terminales del teléfono base y del
microteléfono con un paño suave y seco.
El teléfono base no recibió continuamente
alimentación durante la carga.
La batería se cargó durante menos de 8 horas (debido
a una interrupción del suministro eléctrico, etc ).
La duración útil de la batería ha expirado, y tiene que
reemplazarse.
- i-
28^^ Información adicional
Page 61

Especificaciones
Generales
Frecuencia de operación
Bandas de ISM de 900 MHz/10
canales
Señal de marcación
Tonos, 10 PPS (pulsos) seleccionadle
Accesorios suministrados
Consulte la página 7.
Microteléfono
Fuente de alimentación
Batería BP-T23
Duración de la batería
Tiempo de conversación; Aprox. 7
horas
Espera: Aprox, 7 días
Dimensiones
Aprox. 60 X 185 X 42 mm (an/al/prf),
excluyendo la antena
(aprox. 2 Vg X 7 ‘/4 X 1 Vg pulgadas)
Antena: 30 mm (1 V, pulgadas)
Masa
Aprox. 260 g (aprox. 9 oz),
excluyendo la batería
Teléfono base
Fuente de alimentación
9 V CC del adaptador de
alimentación de CA
Tiempo de carga de la batería
Aprox. 8 horas
Dimensiones
Aprox. 160 X 50 X 223 mm (an/al/
prf), excluyendo la antena
(aprox. 6 '/4 X 2 X 8 pulgadas)
Anena: Aprox. 150 mm
(aprox. 6 pulgadas)
Masa
Aprox. 530 g (aprox. 19 oz)
3
■4»
O
n
3
fi)
o
O'
3
fi)
Q.
ñ*
o’
3
Qi
El diseño y las especificaciones están sujetos a
cambio sin previo aviso.
Información adicional 29^^
Page 62

indice alfabético
A
Ajuste del volumen
volumen del altavoz 14
volumen del generador
de llamada 20
volumen del
microteléfono 13
B
Batería
carga 11
duración 12
c, D, E, F
Cambio de teléfonos
durante una llamada 21
Canal 13
Contenido del paquete 7
Conexión 9
Conferencia tripartita 24
Conversación entre los
teléfonos 23
G, H
Generador de llamada
activación/desactivación
19
ajuste del tipo de
generador de llamada 19
comprobación del tipo
de generador de llamada
20
I, J, K, L
Instalación
microteléfono 11
teléfono base 8
Instalación del teléfono
base en una pared 25
Intercomunicación 23
Interfono 14,15
M, N. O. P, Q
Marcación abreviada 16
Marcación por pulsos 10
Marcación por tonos
cambio a este modo 10
modo de marcación 10
Modo de marcación
cambio temporal a tonos
13
selección 10
R. p
Realización de llamadas 13
Recepción de llamadas 15
Repetición de marcación
14
Retención 13,15
Servicio de llamada en
espera 15
Sistema de código de
seguridad 6
Solución de problemas 27
Transferencia de una
llamada 21
u
Ubicación, teléfono base 8
V, W, X, Y. Z
Volumen
altavoz 14
generador de llamada 20,
microteléfono 13
30“ i Información adicional
 Loading...