

Page 1
4-528-948-01(1)
Network Camera
設置説明書
Installation Manual
お買い上げいただきありがとうございます。
この設置説明書には、事故を防ぐための重要な注意事項と製品の取り扱いかたを示し
てあります。この設置説明書をよくお読みのうえ、製品を安全にお使いください。お読
みになったあとは、いつでも見られるところに必ず保管してください。
SNC-XM637/XM636/XM632
© 2013 Sony Corporation
A
電気製品は、安全のための注意事項を守らないと、火災や人身事故にな
ることがあります。
Printed in China
日本語
説明書について
設置説明書(本書)
この設置説明書には、カメラ本体の各部の名称や設置、接続のしかたが記載され
ています。操作の前に必ずお読みください。
説明のための例として
安全のために(同梱)
カメラを安全に使うための注意事項が記載されています。必ずお読みください。
SNC easy IP setup
ユーザーガイド/アプリケーションガイド(
カメラのセットアップの方法や、
記載されています。
設置説明書にしたがってカメラを正しく設置、接続したあと、ユーザーガイドを
ご覧になってカメラを操作してください。
SNC-XM637
ガイド(
のイラストを使用しています。
CD-ROM
に収録)
)
Web
ブラウザを介したコントロールの方法が
Web
ソフトウェアの使いかた
付属の
CD-ROM
が収納されています。また、セットアップ方法についての情報が
されています。
ーザーガイドやアプリケーションガイドをご覧になりたい場合は、
ユ
からダウンロードしていただくか、もしくは次の
す。
http://www.sony.net/ipela/snc
CD-ROM
Adobe Reader
す。
Adobe Readerは、Adobe
CD-ROM
1
読みたいガイドを選択してクリックする。
2
ご注意
CD-ROM
窓口経由で購入できます。
Adobe
テムズ社)の商標です。
には、IPアドレスを割り当てるためのセットアッププログラム
形式で記録
PDF
CD-ROM
からダウンロードできま
URL
マニュアルの使いかた
がインストールされたコンピューターで、各ガイドを閲覧できま
のウェブサイトから無償でダウンロードできます。
に収録されている
が破損または紛失した場合は、お買い上げ店またはソニーのサービス
および
Adobe Readerは、Adobe Systems Incorporated
index.html
ファイルを開く。
(アドビシス
本機にIPアドレスを割り当てる
付属の
CD-ROM
を割り当ててください。
セットアップ方法について詳しくは、
に収録されているセットアッププログラムを使ってIPアドレス
SNC easy IP setup
ガイドをご覧ください。
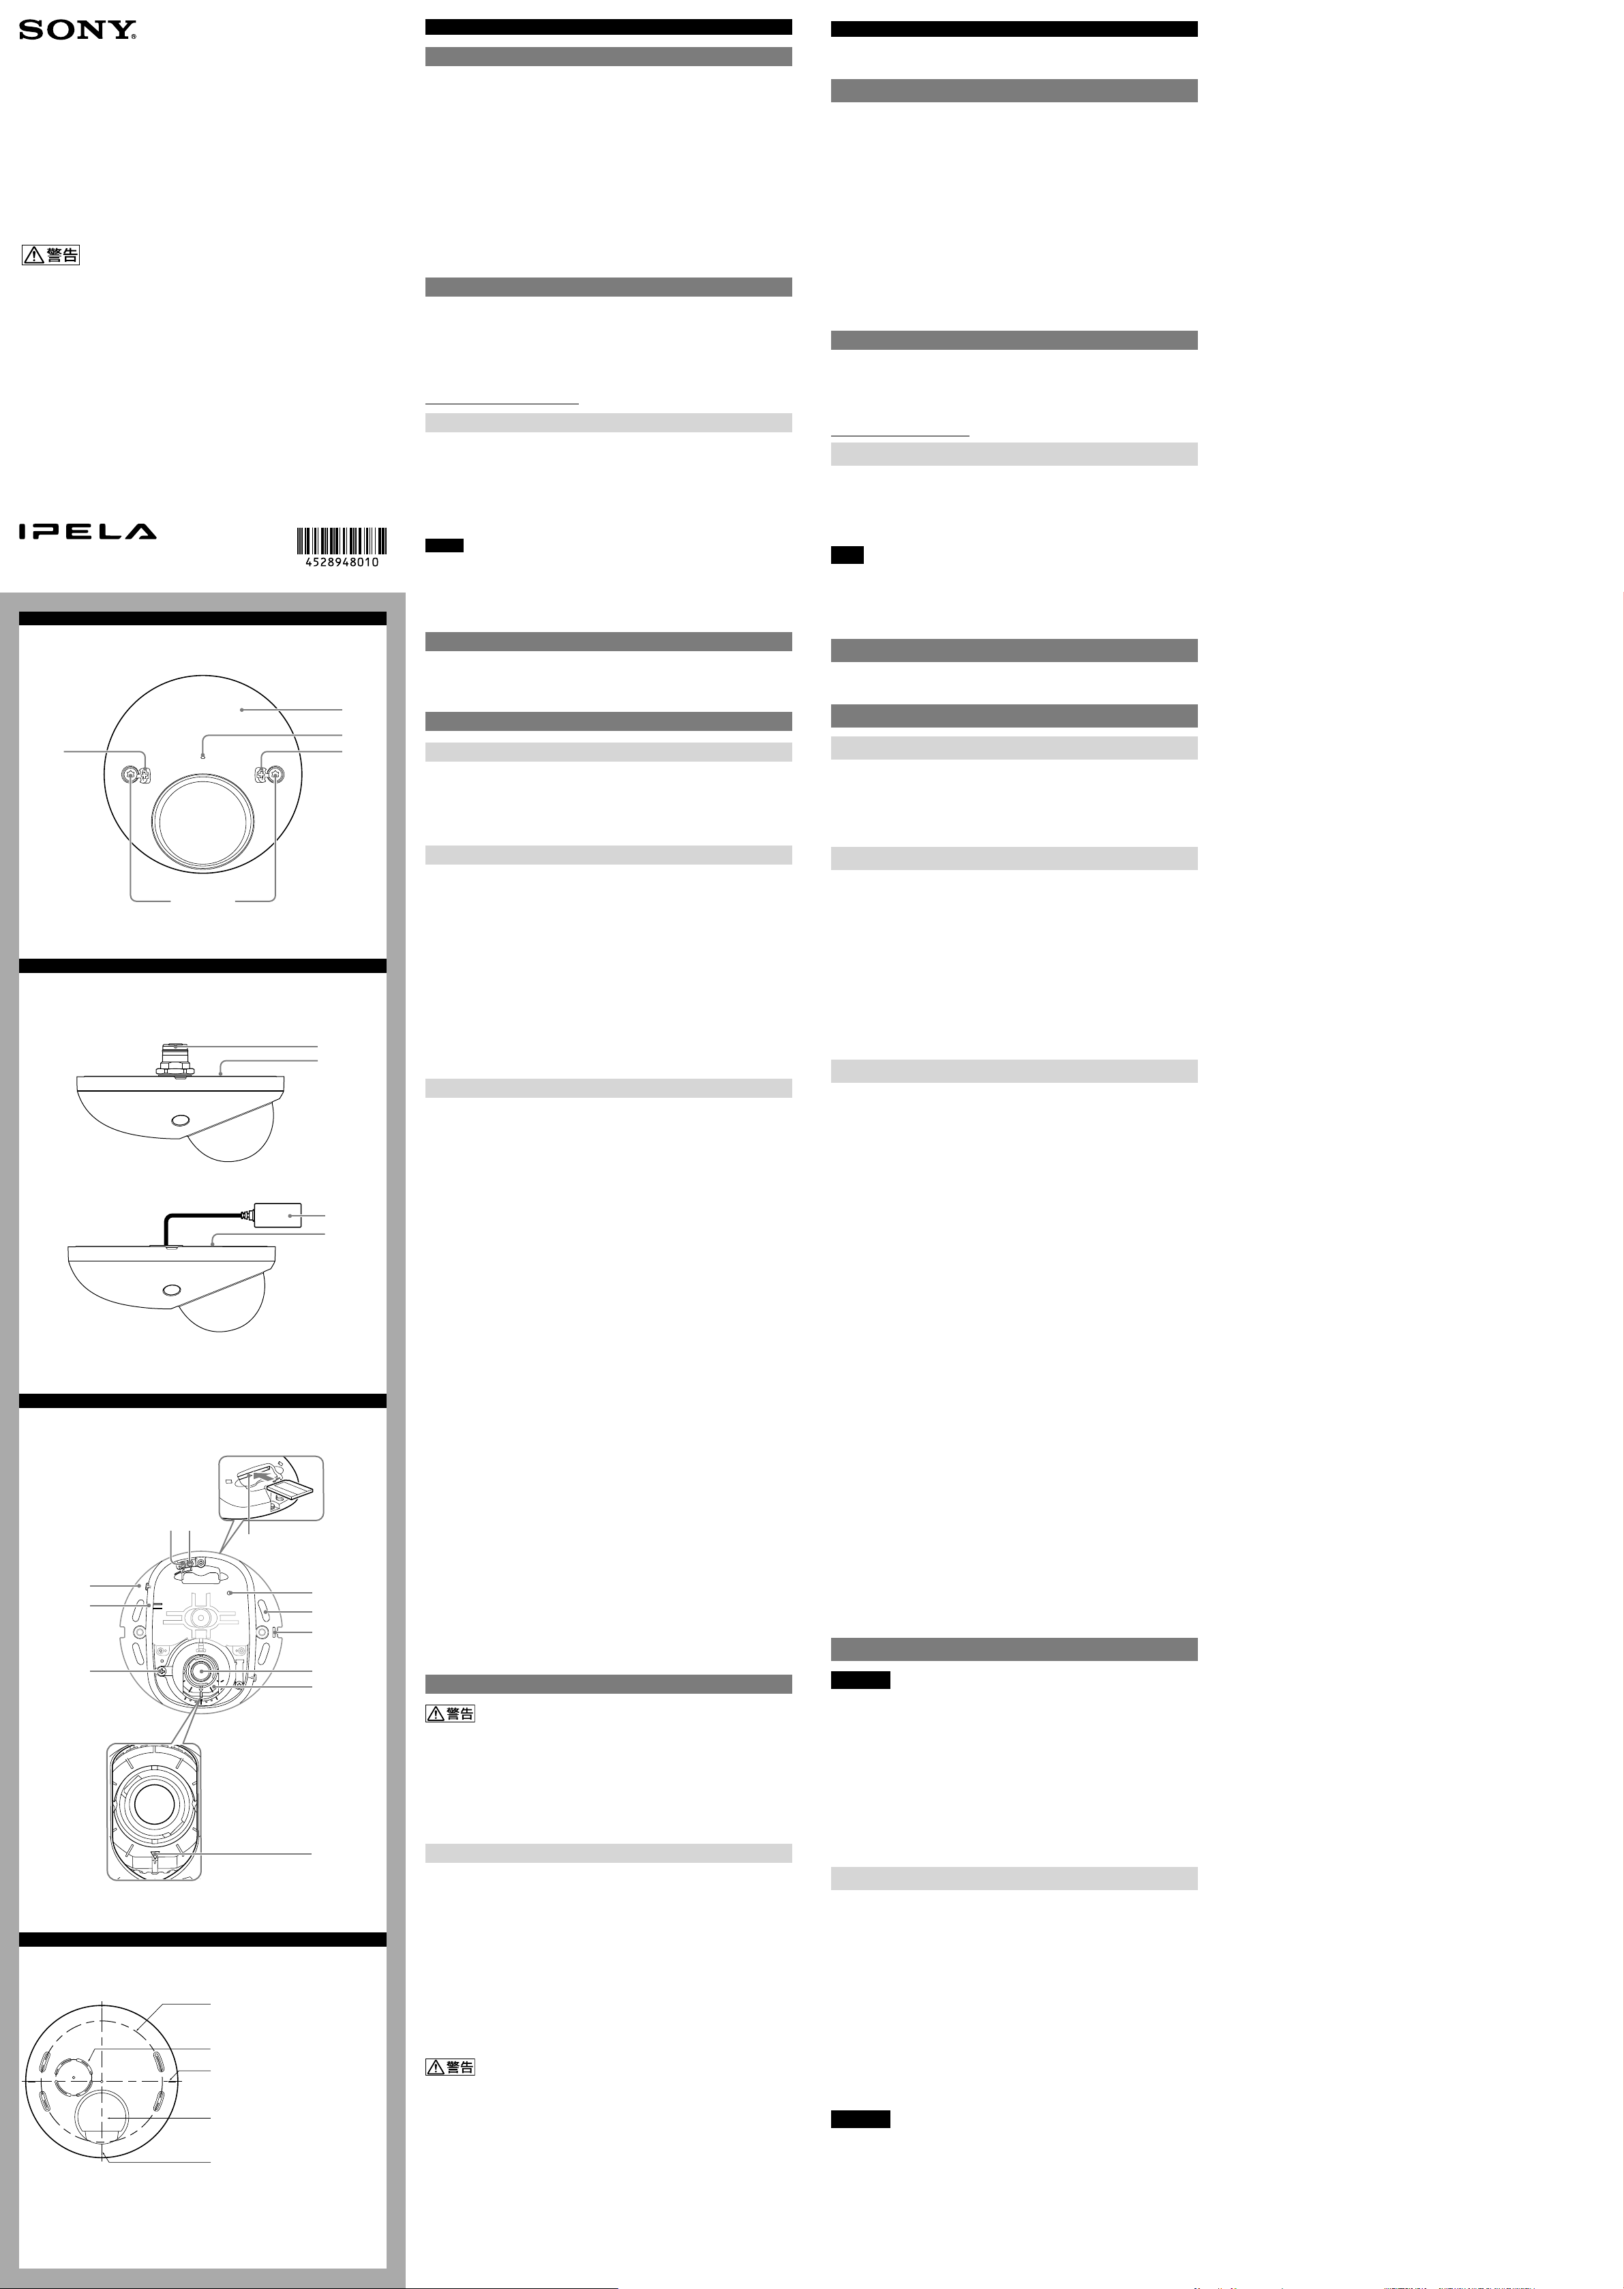
各部の名称と働き
前面
ドームケース
マイク
ネジカバー(
ドームケース取り付けネジ
側面
SNC-XM637/XM636
)
English
Before operating the unit, please read this manual thoroughly and retain it for
future reference.
About the Manuals
Installation Manual (this document)
This Installation Manual describes the names and functions of parts and controls
of the Network Camera, gives connection examples and explains how to set up
the camera. Be sure to read the Installation Manual before operating.
The illustrations in this Installation Manual show the SNC-XM637 as an example.
Safety Regulations (supplied)
The Safety Regulations describes the secure usage of camera. Be sure to read it.
SNC easy IP setup Guide (stored in the CD-ROM)
User’s Guide/Application Guide (Web)
The User’s Guide describes how to set up the camera and how to control the
camera via a Web browser.
After installing and connecting the camera correctly, operate referring to this
User’s Guide.
Using the software
The supplied CD-ROM includes the setup program for assigning an IP address.
The information for how to set up an IP address is also included in the disc in PDF
format.
User’s Guide and Application Guide can be downloaded from the disc, or the
following URL:
http://www.sony.net/ipela/snc
Using the CD-ROM manual
The manual can be read on a computer with Adobe Reader installed.
You can download Adobe Reader free from the Adobe website.
1 Open the index.html file in the CD-ROM.
2 Select and click on the manual that you want to read.
Note
If you have lost or damaged the CD-ROM, you can purchase a new one from your
Sony dealer or Sony service counter.
Adobe and Acrobat Reader are trademarks of Adobe Systems Incorporated in the
United States and/or other countries.
Assigning the IP address
Assign the IP address using the setup program in the supplied CD-ROM.
For details on how to set up the IP address, see SNC easy IP Setup Guide.
Location and Function of Part
Front
Dome case
Microphone
Screw covers (SNC-XM637/XM636)
Dome case mounting screws
Side
B
SNC-XM637/XM636
SNC-XM632
C
D
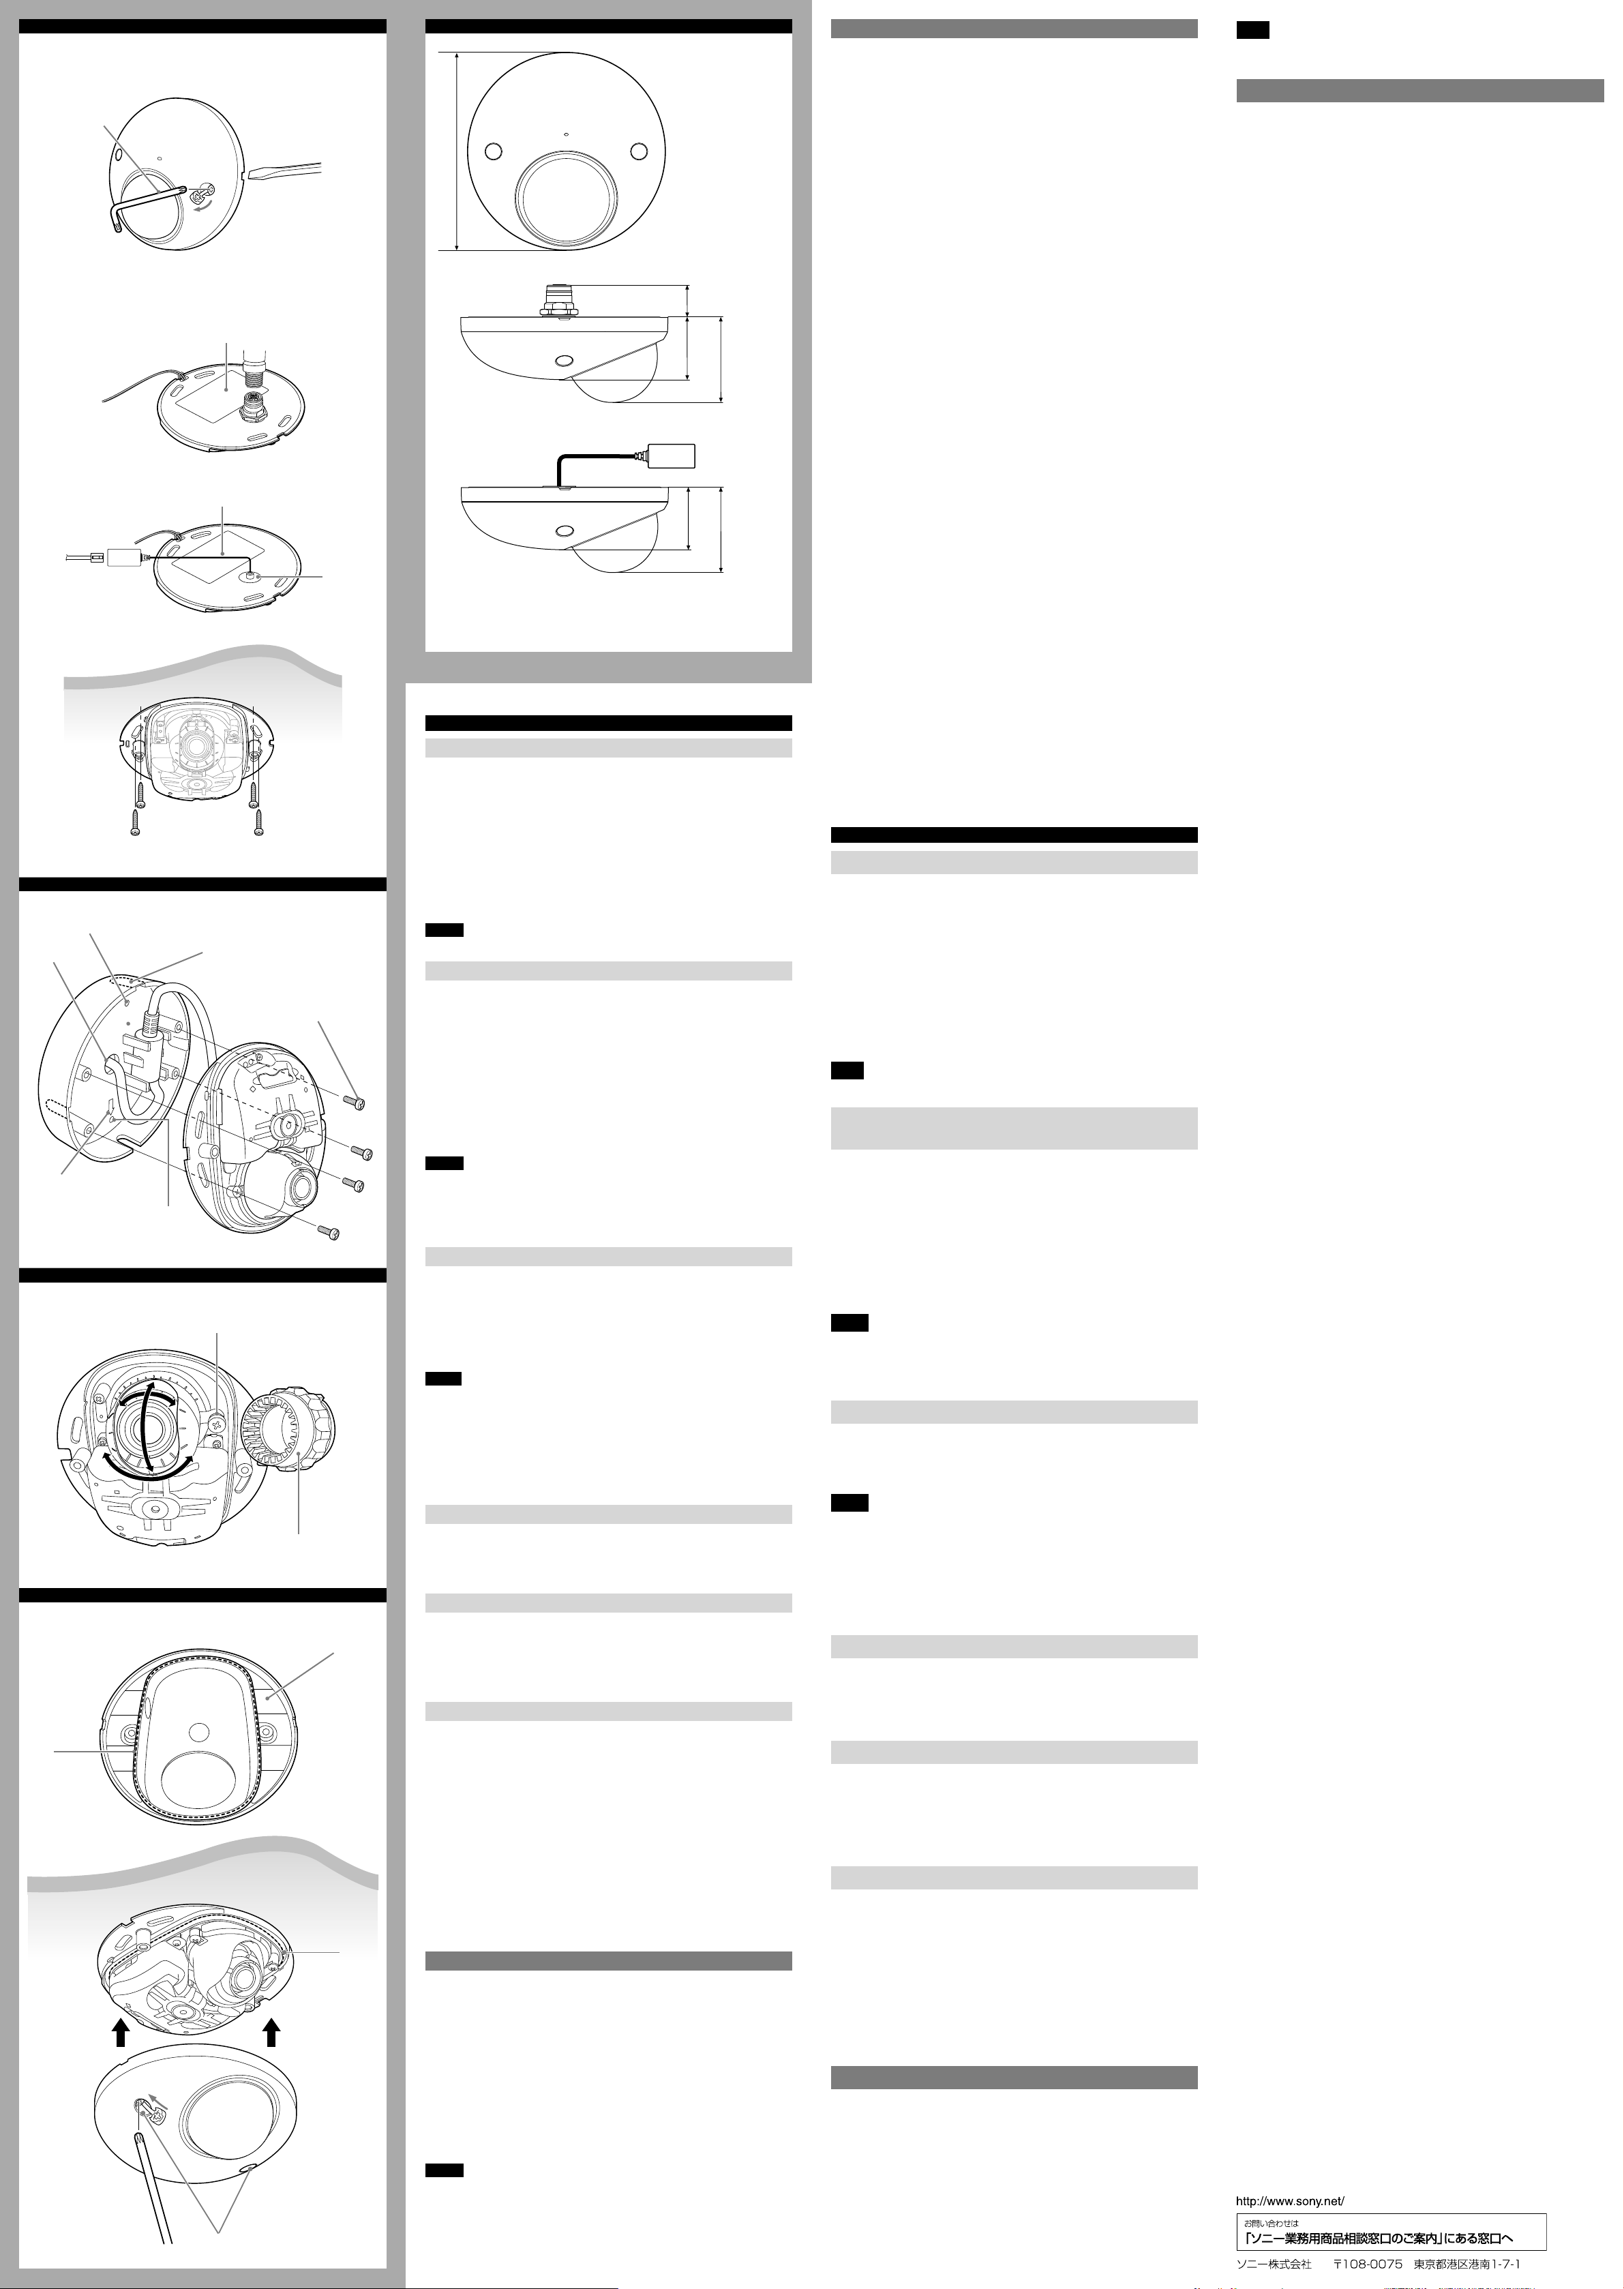
1
カメラ取り付け用穴φ
Hole for installing the camera ø91 (3 5/8)
配線用の穴φ
Hole for connecting cables ø27 (1 1/8)
指標(水平)
Horizontal mark
レンズ位置
Lens position
指標(垂直)
Vertical mark
27
単位:
Unit: mm (inches)
mm
91
ネットワークケーブル(
ワーク通信を行います。
(*PoE: Power over Ethernet
◆
本機の名称や、電気関係の定格情報が記載されています。
ネットワークケーブル(
ワーク通信を行います。
(*PoE: Power over Ethernet
◆
カメラ本体
カメラヘッド固定ネジ
リセットスイッチ
落下防止用ロープ取り付け穴
レンズ
カメラヘッド
△画像上方マーク
コネクタ(
LAN
接続については、裏面の「ネットワークの接続」をご覧ください。
定格ラベル
コネクタ(
LAN
接続については、裏面の「ネットワークの接続」をご覧ください。
内面
NETWORK
ネットワークに接続されているときは緑色で点灯、または点滅します。ネッ
トワークに接続されていないときは消灯しています。
POWER
カメラに電源が供給されると、カメラ内部でシステムチェックを行います。
正常に動作している場合はこのインジケーターが点灯します。
カードスロット
SD
別売のSDメモリーカードを装着できます。
メモリーカードを装着することで、カメラの画像をメモリーカードに記録で
きます。
装着の際は、図のように端子面を定格ラベル側に向けて差し込み、最後まで押
し込んで確実に装着してください。(
本機は、SD規格および
HEATER
内部温度が低下したときのヒーターの動作を切り換えます。
AUTO
:動作しません。
OFF
ネジをゆるめてからカメラヘッドを撮影したい方向に向け、そのあと締めて
固定します。
先の細いもので、このスイッチを押しながら電源を供給すると、工場出荷時の
設定に戻ります。
カメラ取り付け用ネジ(4か所)
取り付ける際、取り付けネジはしっかり締めてください。
別売のロープを取り付けます。
落下防止ロープは、お買い上げ店またはソニーのサービス窓口経由で購入で
きます。(有料)
画像の上方向を示します。
PoE)[M12](SNC-XM637/XM636
、カテゴリー5)を使用して、
STP
の略です。
IEEE802.3af
PoE)[RJ45](SNC-XM632
、カテゴリー5)を使用して、
UTP
の略です。
(ネットワーク)インジケーター(緑/橙)
(電源)インジケーター(緑)
SDHC
(ヒーター)スイッチ
:自動的に動作します。
IEEE802.3af
)
-1
規格のメモリーカードにのみ対応しています。
)
PoE*
に準拠しています。
)
PoE*
に準拠しています。
給電およびネット
給電およびネット
)
)
設置
壁や天井など高所へ設置する際は、専門の工事業者に依頼してください。
天井への設置は、本体と設置用アダプターを含む重量に充分耐えられる強度が
あることをお確かめの上、確実に取り付けてください。充分な強度がないと落
下して大けがの原因となります。
落下事故防止のため、別売のロープを必ず取り付けてください。
天井へ設置した場合は、
てください。また、使用状況に応じて点検の間隔を短くしてください。
直射日光が直接当たる場所へは設置しないでください。
カメラの取り付け位置を決める
カメラ の撮影 方向を 決めて から、付属のテンプレートを使って配線用の穴をあ
け、カメラ取り付け用穴(
取り付けネジについて
カメラには、幅
場所や材質により、使用するネジ類が異なります。(ネジは付属していません。)
鋼材の場合
ん。)
木材の場合:タッピンネジ(呼び径
必要です。
コンクリート壁の場合:ドライビット、またはプラグボルトで固定してください。
(
ネジのボルト頭部形状:ナベネジ、六角ボルトは使用できません。)
M4
ジャンクションボックスの場合:ジャンクションボックスのネジ穴に合ったネ
ジで固定してください。(ネジの頭部形状:φ7
設置する場所や材質により、適切な取り付けネジを使用してください。適切な取
り付けネジを使用しないと落下して大けがの原因になります。
4.5 mm
:
ネジとナットで固定してください。(六角ボルトは使用できませ
M4
年に一度は取り付けがゆるんでいないことを点検し
1
15 mm
以上
か所)の位置を決めます。
4
の長穴が4か所あいています。この穴を利用し、設置する
)で固定してください。板厚は
4
mm
高さ4
以下)
mm
(裏面へ続く)
LAN connector (PoE) [M12] (SNC-XM637/XM636)
Connect a network cable (STP, category 5) to this port to communicate with a
network or PoE* system.
(*PoE stands for Power over Ethernet. It is pursuant to IEEE802.3af.)
For details on connection, refer to “Connection” on the reverse side.
Rating Label
This label shows the name of device and its electric rating.
LAN connector (PoE) [RJ45] (SNC-XM632)
Connect a network cable (UTP, category 5) to this port to communicate with a
network or PoE* system.
(*PoE stands for Power over Ethernet. It is pursuant to IEEE802.3af.)
For details on connection, refer to “Connection” on the reverse side.
Inside
NETWORK indicator (Green/Orange)
The indicator lights up in green or flashes when the camera is connected to the
network. The indicator is off when the camera is not connected to the network.
POWER indicator (Green)
When the power is supplied to the camera, the camera starts checking the
system. If the system is normal, this indicator lights up.
SD card slot
This slot is used for optional SD memory cards.
Image data in the camera can be recorded to a memory card by inserting it into
the slot.
When inserting, point the contact area at the rating label side (referring to the
illustration), and be sure to insert it completely. (-1)
This unit is only compatible with SD and SDHC memory cards.
Camera unit
HEATER switch
The heater activates when the temperature inside the camera is low.
AUTO: Activates automatically.
OFF: Turns off.
Camera head fixing screw
Firstly, loosen the screw and point the camera head in the desired direction, then
tighten the screw to secure in place.
Reset switch
To reset the camera to the factory default settings, hold down this switch with a
point and supply the power to the camera.
Camera unit mounting screws (4 positions)
Make sure to tighten the screws securely when installing the camera.
Hole for fall-prevention rope
Attach the rope (sold separately).
You can purchase the fall-prevention rope at the store of purchase or authorized
Sony dealer.
Lens
Camera head
mark
Indicates the image direction.
Installation
WARNING
If you attach the camera in the height such as the wall or the ceiling, etc.,
entrust the installation to an experienced contractor or installer.
If you install the camera on the ceiling, ensure that the ceiling is strong
enough to withstand the weight of the camera plus the Mounting Adaptor
and then install the camera securely. If the ceiling is not strong enough, the
camera may fall and cause serious injury.
To prevent the camera from falling, make sure to attach the fall-prevention
rope (sold separately).
If you attach the camera to the ceiling, check periodically, at least once a year,
to ensure that the connection has not loosened. If conditions warrant, make
this periodic check more frequently.
Do not install the camera in a location that is exposed to direct sunlight.
Deciding the Installation Location of the Camera
After deciding the direction in which the camera will shoot, make the required
hole for the connecting cables using the supplied template. Then decide the four
mounting hole positions to install the camera.
Mounting screws
The camera is provided with the width 4.5 mm (3/16 inch) four mounting holes.
The required mounting screws differ depending on the installation location and
its material. (Mounting screws are not supplied.)
Steel wall or ceiling: Use M4 bolts and nuts. (Hexagon head bolt should not be
used.)
Wooden wall or ceiling: Use M4 tapping screws. The panel thickness must be
15 mm (5/8 inch) or more.
Concrete wall: Use anchors, bolts and plugs suitable for concrete walls. (Head
shape of M4 bolt: Pan head screw or hexagon head bolt should not be used.)
Junction box: Use screws to match the holes on the junction box. (Head shape
of screw: ø 7 mm (9/32 inch) Height 4 mm (3/16 inch) or less)
WARNING
The required mounting screws differ depending on the installation location and
its material. If you do not secure the camera with the appropriate mounting
screws, the camera may fall off.
(continued on the reverse side)
Page 2
E
1
レンチ
Wrench
2, 3
SNC-XM637/XM636
SNC-XM632
4
天井
Ceiling
F
2
1
BOTTOM
G
H
天井
Ceiling
定格ラベル
Rating label
定格ラベル
Rating label
配線用ノックアウト部
Wiring knockout
アダプター取り付けネジ
3,4
Adaptor Screws
2
カメラヘッド固定ネジ
Camera head fixing screw
フォーカス調整治具
Focus adjustment tool
ドームケース
Dome case
I
)
2
/
1
ø114 (4
SNC-XM637/XM636
)
32
/
18
23
(
)
8
/
3
)
8
/
7
34 (1
47 (1
SNC-XM632
)
8
/
3
)
8
/
7
34 (1
47 (1
単位:
mm
Unit: mm (inches)
日本語
カメラを取り付ける
ドームケースをはずす。
1
あらかじめネジカバーをはずしてください。(
付属のレンチでネジをゆるめる。
ドームケースをはずす。(ケースがはずれにくいときは、カメラ横の穴にマ
イナスドライバーを入れてください。)
落下防止用のロープ(別売)をカメラと天井または壁に取り付ける。
2
ネットワークケーブルを取り付ける。
3
カメラを取り付ける。
4
カメラ本体の
のネジ位置に合わせて、ネジ(付属していません)で締め付ける。
ご注意
カメラの取り付けは、
SNC-XM637/XM636
か所のネジ穴を、付属のテンプレートで決めた天井や壁
4
℃以上で行ってください。
0
)
主な仕様
圧縮方式
映像圧縮方式
音声圧縮方式
最大フレームレート
カメラ
撮像素子
同期方式
最低被写体照度
:
* VE
レンズ
焦点距離
SNC-XM636
最大口径比
SNC-XM636
画角
SNC-XM637/XM632
SNC-XM636
レンズ可動角度
インターフェース
LAN
SNC-XM632:RJ45、10BASE-T/100BASE-TX
メモリーカードスロット
SD
マイク入力
その他
電源電圧
消費電力
HEATER AUTO時:3.8 W/
使用温度
HEATER AUTO
起動温度
HEATER AUTO
保存温度
動作湿度
保存湿度
外形寸法(直径/高さ)
質量
SNC-XM632
付属品
SNC-XM632
本機の仕様および外観は、改良のため予告なく変更することがありますが、ご了
承ください。
JPEG/H.264
G.711/G.726/AAC
30 fps
1/2.9 型CMOS(Exmor
有効画素数:約
View-DR
Visibility Enhancer
内部同期
オフ/
値
MAX / 50 IRE (IP) / 30 fps
カラー:
の略です。
0.3 lx
白黒:
)
万画素
214
オフ/オートゲイン最大
VE*
0.3 lx
SNC-XM637/XM632:f=2.8 mm
:f=
3.8 mm
SNC-XM637/XM632:F2.0
:
F2.2
1920 × 1080
ポート(
PoE) SNC-XM637/XM636:M12、10BASE-T/100BASE-
パン:−30°〜
チルト:0°〜90°
ローテーション:−
、オートネゴシエーション
TX
ネゴシエーション
内蔵タイプ
IEEE802.3af
(アスペクト比
:水平:83° 垂直:45°
:水平:
16:9
113
+30°
175°〜 +175
準拠(
PoE
方式)
HEATER OFF時:3.8 W(PoE CLASS 1
低温時
10 W(PoE CLASS 3
HEATER OFF時:0℃ 〜 50
時:−25℃ 〜
HEATER OFF時:0℃ 〜 50
時:−20℃ 〜
−30℃ 〜 +60℃
℃
+50
℃
+50
20% 〜 80%
20% 〜 80%
Φ
114 mm × 47 mm
(突起部含まず)
SNC-XM637/XM636:約275 g
:約
全機種共通:
レート(
1
ために、設置説明書(一式)
付けネジ(
270 g
CD-ROM
)、レンチ(1)、フォーカス調整治具(1)、安全の
:設置用アダプター(1)、アダプター取り
)
4
(付属プログラム)(1)、テンプ
)のとき
° 垂直:61°
°
、オート
相当)
℃
℃
English
Installing the Camera
1 Remove the dome case.
Be sure to remove the screw covers first. (SNC-XM637/XM636)
Loosen the screw with the supplied wrench.
Remove the dome case. (Use a flat-blade driver in the hole in the side of
the camera, if the case is difficult to remove.)
)
Note
Do not turn off the camera immediately after turning it on. Wait for at least five
minutes before turning off the camera.
Specifications
Compression
Video compression format JPEG/H.264
Audio compression format G.711/G.726/AAC
Maximum frame rate 30 fps
Camera
Image device 1/2.9 type CMOS (Exmor)
Effective picture elements:
Synchronization Internal synchronization
Minimum illumination View-DR Off/VE* Off/Auto gain control
* VE stands for Visibility Enhancer.
Lens
Focal length SNC-XM637/XM632: f = 2.8 mm
Maximum relative aperture SNC-XM637/XM632: F2.0
View angle 1920 × 1080 (aspect ratio 16:9):
Movable angle Pan: −30° to +30°
Interface
LAN port (PoE) SNC-XM637/XM636: M12, 10BASE-T/100BASE-
SD memory card slot
Microphone input Internal type
Others
Power supply IEEE802.3af compliant (PoE system)
Power consumption HEATER OFF: 3.8 W (PoE CLASS 1 equivalent)
Operating temperature HEATER OFF: 0°C to 50°C (32°F to 122°F)
Activation temperature HEATER OFF: 0°C to 50°C (32°F to 122°F)
Storage temperature –30°C to +60°C (–22°F to +140°F)
Operating humidity 20% to 80%
Storage humidity 20% to 80%
Dimensions (diameter/height)
Mass SNC-XM637/XM636: Approx. 275 g (9.7 oz)
Supplied accessories All models: CD-ROM (supplied programs) (1),
Design and specifications are subject to change without notice.
Approx. 2,140,000
maximum rate MAX/50 IRE (IP)/30 fps
Color: 0.3 lx
Black & White: 0.3 lx
SNC-XM636: f = 3.8 mm
SNC-XM636: F2.2
SNC-XM637/XM632: Horizontal: 113°, Vertical:
61°
SNC-XM636: Horizontal: 83°, Vertical: 45°
Tilt: 0° to 90°
Rotation: −175° to +175°
TX, auto negotiation
SNC-XM632: RJ45, 10BASE-T/100BASE-TX, auto
negotiation
HEATER AUTO: 3.8 W/Low temperature: 10 W
(PoE CLASS 3)
HEATER AUTO: −25°C to +50°C (−13°F to +122°F)
HEATER AUTO: −20°C to +50°C (−4°F to +122°F)
ø 114 mm (4
(not including the projecting parts)
SNC-XM632: Approx. 270 g (9.5 oz)
Template (1), Wrench (1), Focus adjustment tool
(1), Safety Regulations, Installation Manual (this
document) (1 set)
SNC-XM632: Mounting Adaptor (1), Adaptor
Screw (4)
1
/2 inches) × 47 mm (1 7/8 inches)
2 Attach the fall-prevention rope (sold separately) to the ceiling or wall
設置用アダプターを使用しての取り付け(
アダプターに接続ケーブルを通す。
1
底面から接続ケーブルを通す場合
アダプターの中央の凹の部分にドリル等を使って、穴をあける。
底面以外から接続ケーブルを通す場合
アダプ
ターの配線用ノックアウト部分をニッパーなどで切り取る。
アダプターを天井や壁に取り付ける。(4か所)
2
使用するネジについては、「取り付けネジについて」をご覧ください。
5
市販のネットワークケーブルを接続する。
3
アダプターの中に接続部とケーブル類をおさめる。
4
カメラを付属のネジ(4か所)で取り付ける。
5
ご注意
アダプターを壁に付ける場合は、「
ケーブルを通すために加工をした場合は、バリなどでケーブルを傷つけないよ
うにしてください。
設置用アダプターは、防水対応ではありません。室外では使用しないでくださ
い。
撮影方向と撮影範囲の調整
カメラヘッド固定ネジをゆるめる。
1
カメラを調整して、撮影したい方向にレンズを向ける。
2
カメラヘッド固定ネジを締めて固定する。(推奨締め付けトルク:
3
0.6
N・m)
フォーカスを調整をしたい場合は、付属のフォーカス調整治具を用い
て、調整してください。
ご注意
カメラヘッド固定ネジをゆるめずにカメラヘッドの向きを調整すると、内部の
部品が変形することがあります。
フォーカスを再調整する場合は、ドームケースを付けた状態が最適になるよう
に調整してください。
フォーカス調整治具で、レンズを強く締めると、緩めにくくなる恐れがありま
す。
レンズの回転方向は、±
破断されるおそれがあります。
175
BOTTOM
°で止まります。それ以上回すと、内部の配線が
SNC-XM632)
↓」を下の方向に向けてください。
カメラの使用温度について
℃未満になる環境でお使いの場合は、
0
ください。低温時、自動的にヒーターが動作し、−
−20℃まで)でご使用になれます。但し、ヒーター動作時に電力が増えますので
ご注意ください。
ドームケースを取り付ける
ドームケースのレンズ部を合わせドームケースをはめる。
1
ドームケースの2か所のネジを締める。(推奨締め付けトルク:
2
締めたあとにネジカバーを取り付けてください。(
)
XM636
ドームカバーに付いている保護シートをはがす。
3
HEATER
スイッチを
25
AUTO
℃までの環境(起動温度は
SNC-XM637/
カメラ設置上の注意事項
本機は保護等級
事故を防ぐための重要な注意事項を示してあります。この内容をよくお読
みのうえ、設置してください。
設置用アダプターおよび本体は、段差、異物、ゆがみが無い場所に取り付け
てください。(-4)
ドームケースの2か所のネジは、必ず推奨締め付けトルクで、締めてくださ
い。(-①)
カメラ底面のケーブル周りの防水ゴムを傷つけないように、取り扱いにご
注意ください。(
ドームケース側もゴミの付着が無いことを確認してからドームケースを
取り付けてください。(-②)
防水ゴムにゴミの付着が無く、きちんと隅に収まっていることを確認して
からドームケースを取り付けてください。(-③)
準拠のカメラですが、ここには、結露または浸水による
IP66
)(
SNC-XM632
-2-
①)
接続
SNC-XM637/XM636
コネクタネットワークケーブル(ストレートケーブル)を使い、本機のネット
M12
ワークコネクタと
い。
SNC-XM632
市販のネットワークケーブル(ストレートケーブル)を使い、本機のネットワーク
コネクタと
電源は、ネットワークケーブルを通して供給されます。詳しくは、
応ハブなどの取扱説明書をご覧ください。
(
*PoE: Power over Ethernet
ご注意
電源を入れたあと、すぐに電源を切らないでください。電源を切る場合は、
程度お待ちください。
PoE(*)
給電機能を持った
PoE(*)
給電機能を持った装置(ハブなど)を接続してください。
の略。
IEEE802.3af
方式のハブを接続してくださ
Type-A
に準拠の機器。)
にしてご使用
1.2 N・m)
PoE(*)
分
5
and the camera.
3 Connect the network cable.
4 Install the camera.
Align the four screw holes on the camera with the fixed screw positions on
the ceiling or wall using the supplied template. Then, tighten the screws (sold
separately).
Note
Install the camera in an environment warmer than 0°C (32°F).
Installing the Camera Using the Mounting Adaptor
(SNC-XM632)
1 Thread the cable through the adaptor.
When threading the cable from the bottom
Make a hole in the joint part in the center of the adaptor, using a drill, etc.
When threading the cable from other than the bottom
Make a hole in the wiring knockout part of the adaptor, using a nipper, etc.
2 Install the adaptor on the ceiling or wall. (4 positions)
For details on the screws to be used, see “Mounting screws.”
3 Connect the network cable (not supplied).
4 Put the cable and connector part into the adaptor.
5 Fix the camera in place, using the supplied four screws.
Notes
When installing the adaptor on the wall, orient “BOTTOM ” downward.
Be careful not to damage cables on any burrs when passing them through the
adaptor.
The Mounting Adaptor is not waterproof. Do not use outdoors.
Adjusting the Camera Direction and Coverage
1 Loosen the camera head fixing screw.
2 Adjust the camera to turn the lens in the desired direction.
3 Tighten the camera head fixing screw. (Recommended torque: 0.6 N∙m)
If you want to adjust the focus, use the supplied focus adjustment tool.
Notes
Adjusting the camera head angle without first loosening the camera head
fixing screw may damage internal parts.
When you readjust the focus, adjust it suitably for when the dome case is
attached to the camera.
If the lens is fixed too tightly using the focus adjustment tool, it may be
difficult to loosen the lens in the future.
Lens rotation direction is ±175°. If you turn the lens beyond this, the wiring
inside the camera may be damaged.
Operating Temperature for the Camera
If you use the camera in an environment lower than 0°C (32°F), set the HEATER
switch to AUTO. The heater activates automatically at low temperature. You can
use the camera in an environment up to −25°C (−13°F) (activation temperature:
more than −20°C (−4 °F)). However, power consumption increases when the
heater is activated.
Attaching the Dome Case
1 Attach the dome case to the camera, aligning the camera lens with the
lens cover part of the dome case.
2 Tighten the two screws of the dome case. (Recommended torque:
1.2 N∙m)
Attach the screw covers after fixing the screws. (SNC-XM637/XM636)
3 Remove the protecting film on the dome cover.
Notes On Installation
This camera is based on International Protection IP66. The following notes
describe how to avoid accidents caused by condensation or water immersion.
Read them thoroughly before installation.
Install the Mounting Adaptor and the camera in a location that is free from
warping, foreign substances, or unevenness. (-4)
Use the recommended torque for tightening the two screws of the dome case.
(-)
Be careful not to damage the waterproof rubber around the cables at the
bottom of the camera. (SNC-XM632) (-2-)
Make sure the dome case is dust-free before attaching it. ( -)
Make sure the rubber part is dust-free. Also make sure it is attached to the
camera in every corner properly before attaching the dome case. (-)
Connection
SNC-XM637/XM636
対
Connect the network connector of the camera to a PoE* supported type-A hub,
using an M12 network connector cable (straight).
SNC-XM632
Connect the network connector of the camera to a PoE* supported device (such
as a hub) using the network cable (straight, not supplied).
The electrical power is supplied through the network cable. For details, refer to
the instruction manuals of the PoE* supported devices.
(* PoE: The acronym for Power over Ethernet. IEEE802.3af standard compliant devices.)
 Loading...