

Page 1

User guide
SmartBand 2 (for iOS)
SWR12
Page 2

Contents
Basics.............................................................................................3
Introduction........................................................................................3
Hardware overview............................................................................3
Charging your SmartBand 2..............................................................4
Assembly...........................................................................................4
Wearing your SmartBand 2................................................................5
Turning on and off..............................................................................5
Setting up your SmartBand 2.........................................................7
Preparing to use your SmartBand 2..................................................7
Reconnecting the SmartBand 2.........................................................7
Resetting your SmartBand 2..............................................................7
Using your SmartBand 2................................................................8
Using the SmartBand 2 application...................................................8
Getting notified..................................................................................8
Measuring Stress & Recovery............................................................8
Smart wake up alarms.....................................................................10
Out-of-range alert notifications........................................................11
Do not disturb..................................................................................11
Remote control................................................................................12
Connecting to Health.......................................................................12
Notification lights.............................................................................12
Important information...................................................................14
Using your SmartBand 2 in wet and dusty conditions....................14
Legal information.............................................................................14
2
This is an Internet version of this publication. © Print only for private use.
Page 3
Basics
Introduction
Your SmartBand 2 is a companion product that connects wirelessly via Bluetooth®
with your iPhone. Worn on your dominant wrist, it can monitor your body movements
and interact with your iPhone to generate data about your daily life and habits. For
example, the SmartBand 2 counts your steps and records data about your physical
state while you walk or run.
Your SmartBand 2 is a device you can wear everyday and features a sensor that
monitors your pulse and helps determine your heart rate. When used with a
compatible iPhone device, you can use the SmartBand 2 to receive notifications and
manage your alarms and phone calls.
Before you can get started using your SmartBand 2, you must download the
SmartBand 2 application and set up the accessory to work with your iPhone. Also,
remember that your iPhone must be running on iOS version 8.2 or higher.
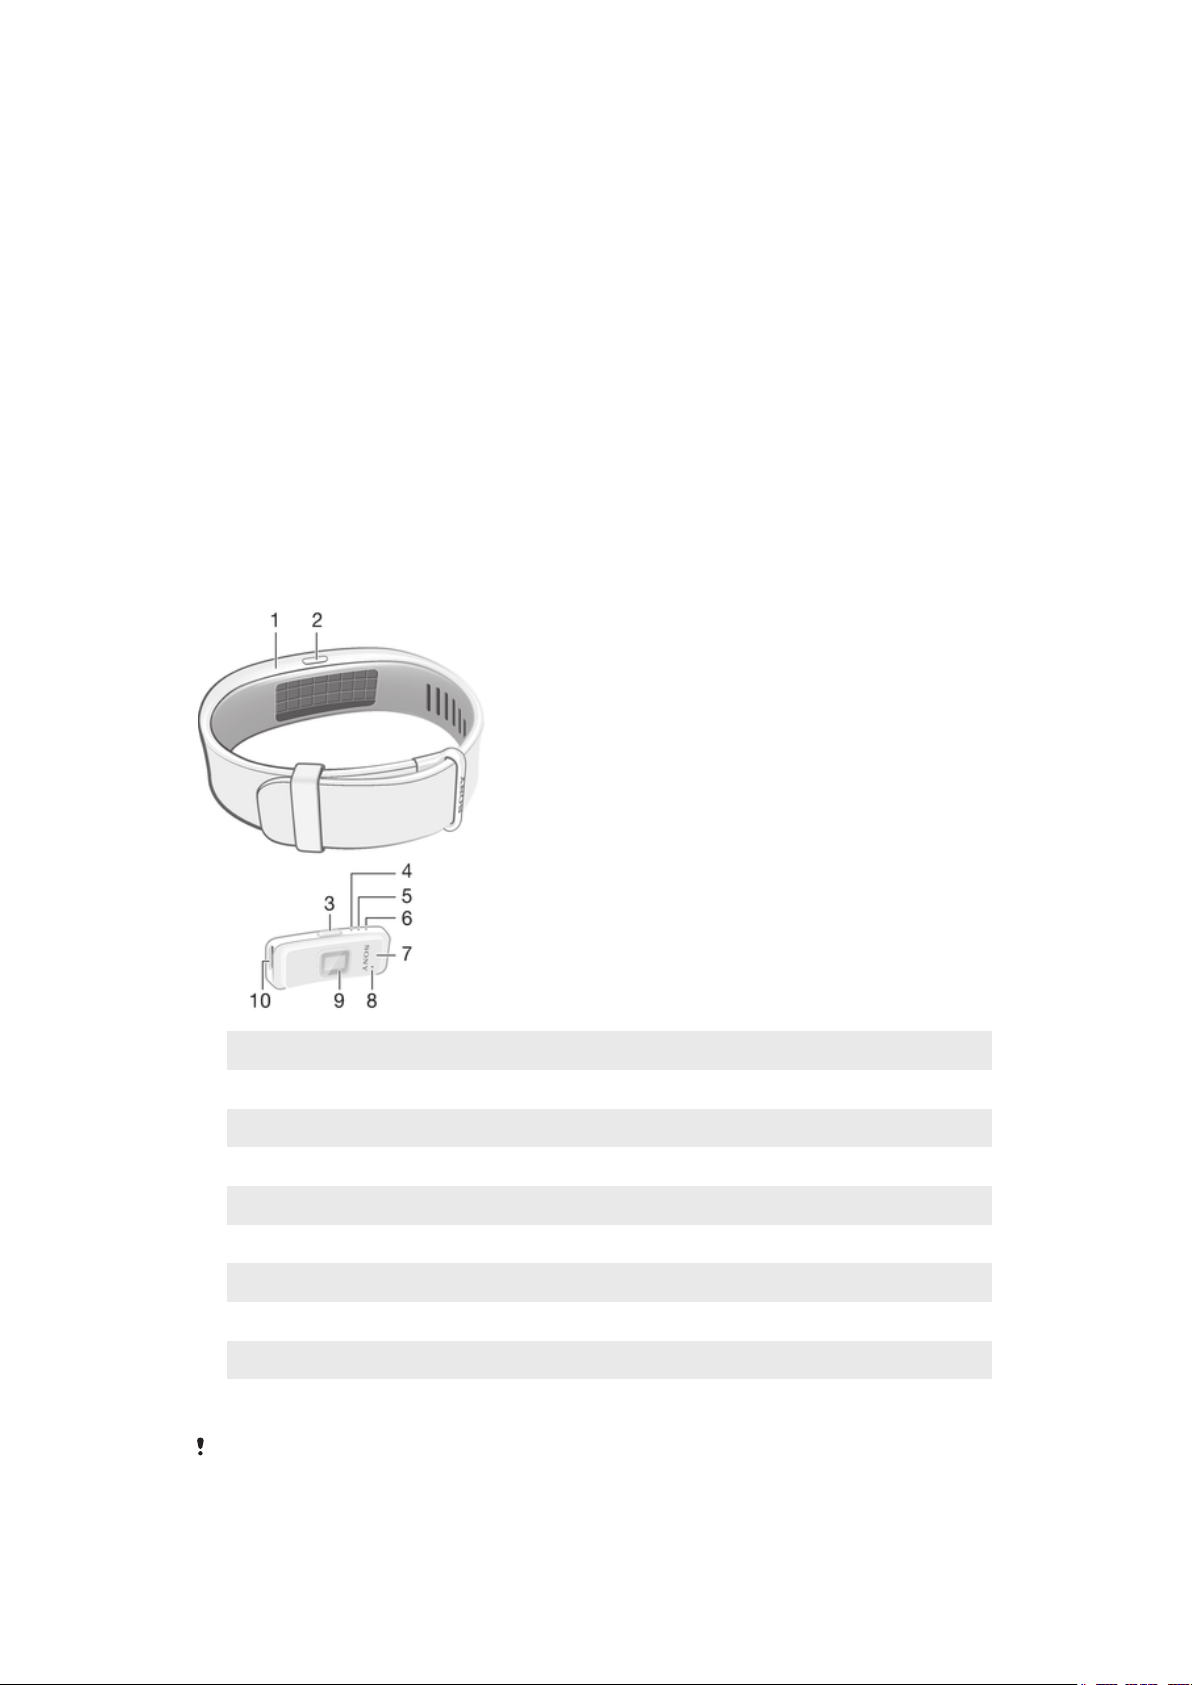
Hardware overview
1
2
3
4
5
6
7
8
9
10
The ventilation hole is not used for resetting the device. Do not insert or force sharp objects in
the hole as this may damage the device.
Wristband
Power key cover
Power key
Notification light A
Notification light B
Notification light C
Core
Ventilation hole
Heart rate sensor
Micro USB port
3
This is an Internet version of this publication. © Print only for private use.
Page 4
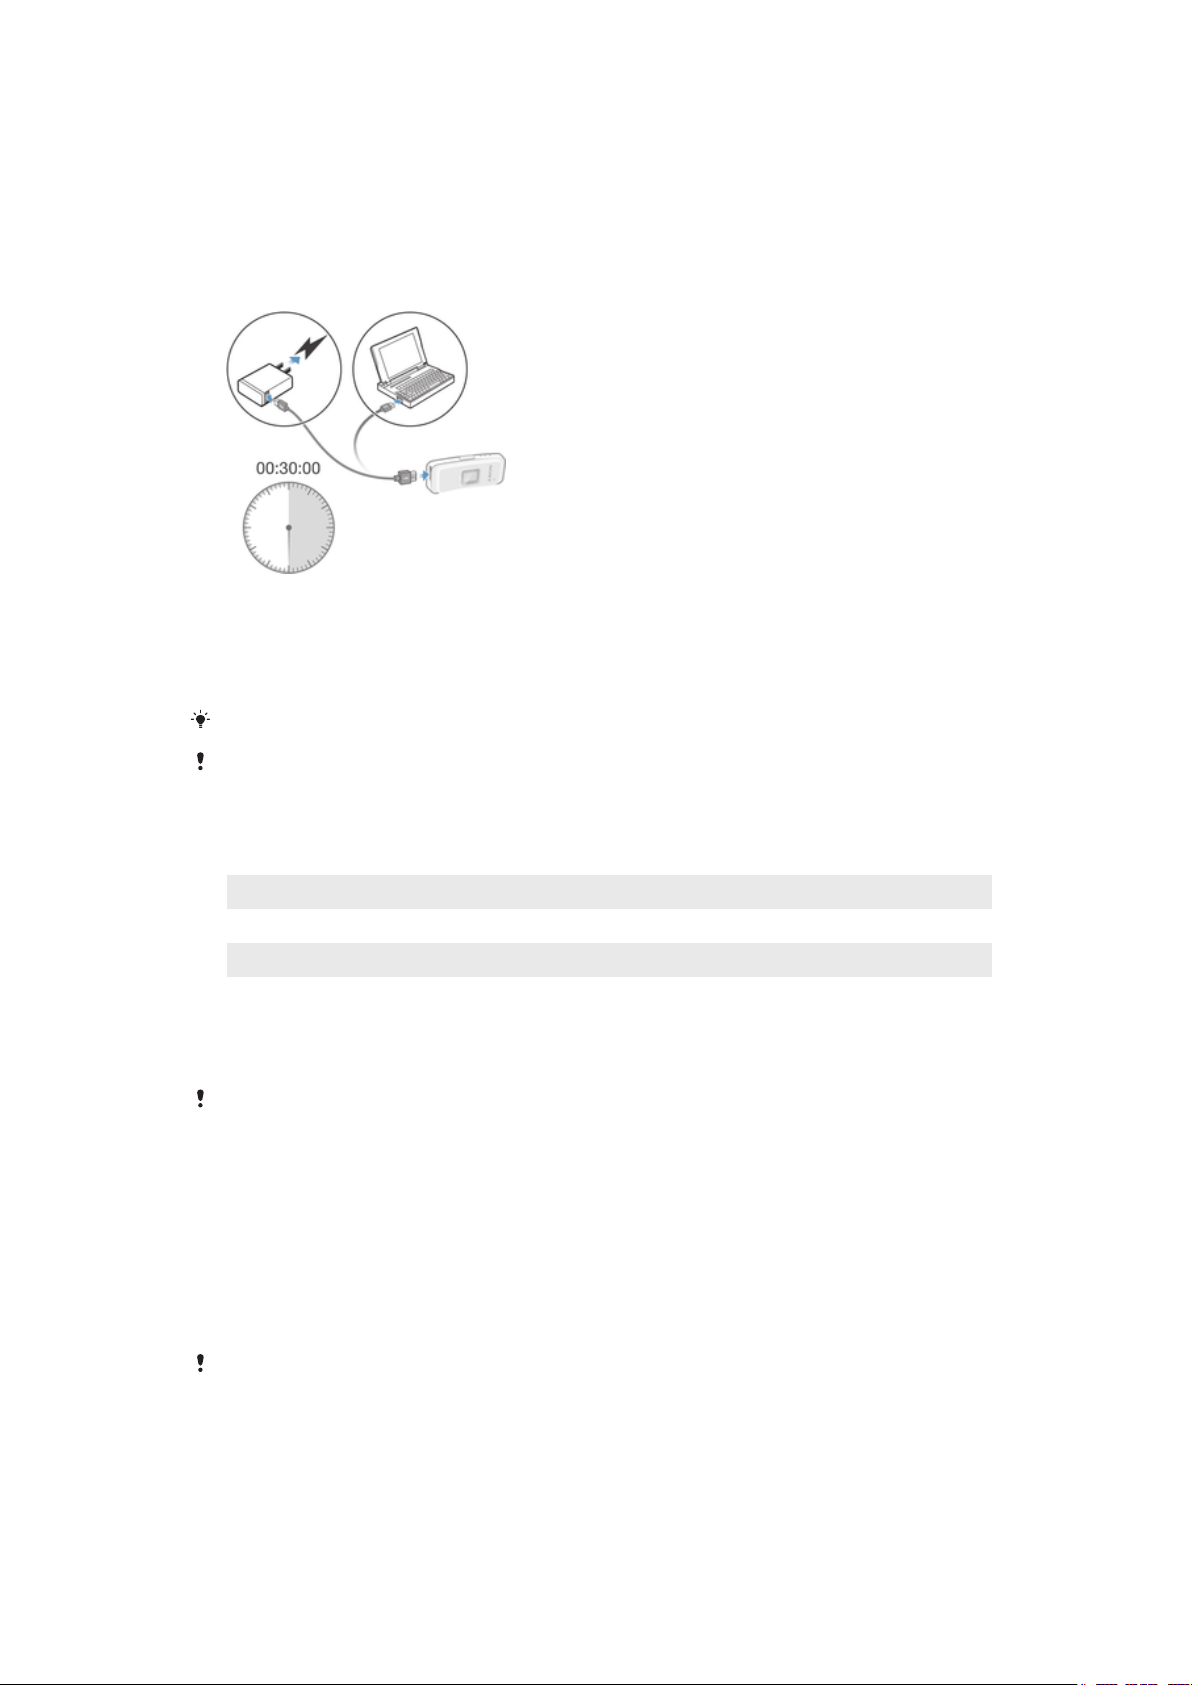
Charging your SmartBand 2
Before using your SmartBand 2 for the first time, you need to charge it for
approximately 30 minutes. Sony chargers are recommended.
Your SmartBand 2 turns off automatically when the charger is connected. You cannot
turn on the device while a charger is connected.
To charge your SmartBand 2
1
Plug one end of the USB cable into the charger or into the USB port of a
computer.
2
Plug the other end of the cable into the Micro USB port of your SmartBand 2.
3
While the battery is charging, notification light A changes its color. The
notification light changes to green when you reach 90% battery power.
Make sure the USB port is dry before you insert a USB cable into the port.
Your SmartBand 2 turns off when connecting to a charger, and goes back to its previous
on/off state when the charger is unplugged.
Battery notification light status
Red light Battery is charging and the charge level is less than 15%.
Orange light Battery is charging and the charge level is between 15% and 90%.
Green light Battery is charging and the charge level is greater than 90%.
To check the battery level of your SmartBand 2
•
On your iPhone, find and tap SmartBand 2. The battery percentage level
appears on the home screen of your SmartBand 2 application.
You cannot check the battery level when your SmartBand 2 is charging.
Low battery level notification
When your SmartBand 2 reaches a specific battery level, the device vibrates and the
red light starts flashing every 4 seconds until you charge the device or it powers off.
The low battery level notification is triggered when you have approximately 5 minutes
left in Heart Activity mode and 75 minutes in STAMINA mode. The time varies
depending on usage. When battery level is below 1%, your SmartBand 2
automatically turns off. You need to charge your SmartBand 2 when the battery runs
out of power.
If the "Do not disturb" function is turned on, you will not get the low battery notification.
Assembly
To personalise your SmartBand 2, you can replace the wristband with bands of
different colour, which can be purchased separately.
4
This is an Internet version of this publication. © Print only for private use.
Page 5

To assemble your SmartBand 2
•
Insert the core into the wristband in such a way that the power key is inserted
underneath the power key cover.
Wearing your SmartBand 2
You should wear the SmartBand 2 on your dominant hand and position the device on
your wrist two fingers above the wrist bone. Wear your SmartBand 2 on your wrist
snugly but comfortably, neither too tight nor too loose. In order for the SmartBand 2
to monitor your pulse, it should stay in place on your wrist. While you're exercising,
tighten the wristband a bit. When you're done, loosen the wristband.
Caring for your SmartBand 2 and your skin
To help avoid skin irritation, correctly adjust the bracelet’s fit around your wrist and
clean your SmartBand 2 regularly. Rinse the SmartBand 2 with fresh water under a
faucet and dry the device completely, particularly after performing rigorous activity,
heavy sweating or exposing the device outdoors.
If you start to experience skin irritation or an allergic reaction, stop wearing your
SmartBand 2. Contact your physician if symptoms persist.
Turning on and off
To turn on the SmartBand 2
•
Press and hold down the power key until your SmartBand 2 vibrates. All
notification lights turn on one by one and then turn off.
When turning on your SmartBand 2 for the first time, it automatically enters pairing mode and
notification light A flashes until your SmartBand 2 is connected to a device.
5
This is an Internet version of this publication. © Print only for private use.
Page 6

To turn off the SmartBand 2
•
Press and hold down the power key until your SmartBand 2 vibrates. All
notification lights are on simultaneously and then turn off one by one.
6
This is an Internet version of this publication. © Print only for private use.
Page 7

Setting up your SmartBand 2
Preparing to use your SmartBand 2
For your SmartBand 2 to work properly, you must install the latest version of the
SmartBand 2 application on your iPhone, and then pair and connect your SmartBand
2 device with your iPhone using Bluetooth®.
To set up your SmartBand 2 using Bluetooth®
1
Make sure that your SmartBand 2 device is fully charged and turned on.
2
On your iPhone, make sure that you have installed and updated the SmartBand
2 application to the latest version.
3
On your iPhone, open SmartBand 2, then follow the on-screen instructions.
You may need to update the firmware of your SmartBand 2 after it’s successfully paired with
your iPhone.
If you don't see the introduction screen, you can tap the SmartBand™ tab on your SmartBand
2 application for help regarding connecting your device.
Reconnecting the SmartBand 2
In cases where a connection gets lost, your SmartBand 2 automatically performs a
series of reconnection attempts. If auto-reconnection fails, you can use the power
key to manually force the accessory to try reconnecting with your iPhone.
To force the SmartBand 2 to try reconnecting
•
Briefly press the power key of your SmartBand 2 device, or tap Search for
SmartBand™ on the SmartBand™ tab of your SmartBand 2 application on
your iPhone.
If you still have issues connecting to your iPhone, tap the help button on the
on your SmartBand 2 application and follow the on-screen instructions.
SmartBand™ tab
Resetting your SmartBand 2
Reset your SmartBand 2 if it behaves unexpectedly or if you want to connect it to a
new device.
To perform a factory reset
1
Turn off your SmartBand 2.
2
Press and hold down the power key for 5–10 seconds until a green light starts
flashing.
To unpair your SmartBand 2
1
On your iPhone, find and tap Settings > Bluetooth.
2
Find SWR12 and tap
3
Tap Forget Device to confirm.
, and then tap Forget This Device.
7
This is an Internet version of this publication. © Print only for private use.
Page 8

Using your SmartBand 2
Using the SmartBand 2 application
You can view and change settings for your SmartBand 2 by using the SmartBand 2
application on your iPhone. You can also view your current pulse, stress and physical
activities, such as steps, from the SmartBand 2 application.
Getting notified
You can set your SmartBand 2 to vibrate when you get an incoming call or a
notification from your iPhone.
All notifications on a connected iPhone can be forwarded to your SmartBand 2.
Notified by
Incoming calls Vibrating continuously All lights flashing white continuously
Smart wake up alarm Vibrating continuously Not available
Other notifications Vibrating once Light A flashing white for 5 minutes
To turn on the "Get Notified" function
1
On your iPhone, open SmartBand 2, then tap SmartBand™.
2
Tap Notifications, then drag the sliders beside Incoming calls and Other apps to
the on position.
To reject an incoming call
•
Briefly press the power key.
Vibration feedback Lights feedback
Measuring Stress & Recovery
Stress is a natural part of everyday life and contributes to the healthy and balanced
overall condition of an individual. The Stress & Recovery values provided by the
SmartBand 2 refer to a combination of your Heart Rate (HR) and Heart Rate
Variability (HRV). SmartBand 2 analyses your Heart Rate Variability (HRV) and
assesses how well your body manages stress levels during different situations
throughout the day.
The SmartBand 2 can measure Heart Rate (HR) and Heart Rate Variability (HRV) even
if the device is disconnected from your iPhone. Data collected using the heart rate
sensor is stored for up to 72 hours and synced to your iPhone once connected via
Bluetooth.
This product is intended to help you track your exercise and lifestyle. It is not a medical device
and data from it should never be used to make medical decisions (like preventing, diagnosing,
monitoring, or treating a disease or injury) or replace the advice of a medical professional.
Sony Mobile disclaims any warranty that this device could be used or suitable for medical
purposes. Seek medical advice before undertaking a new or altered training regime using this
device, particularly if using this device together with a pacemaker or other medical devices.
Extensive use of pulse and stress measurement increases battery consumption.
Pulse measurement
Pulse measurement is the generally recommended method of determining your heart
rate (HR), which can be a rough indicator of intensity of exercise. Pulse rate is
expressed by the number of times your heart beats per minute (BPM). Although
"pulse rate" and "heart rate" are two different concepts, the terms are used in the
same context in this User guide.
8
This is an Internet version of this publication. © Print only for private use.
Page 9

Stress and recovery levels
Stress & Recovery is determined using Heart Rate Variability (HRV). The heart rate is
never constant and the time difference between two consecutive heartbeats changes
from beat to beat. This variation is called Heart Rate Variability (HRV). If the variation
in-between heartbeats is high, this indicates a relaxed or recovering state. If the
variation is low, this indicates stress.
Activities such as reading a book may result in low stress levels, or can even be
tracked as recovery. For example, busy moments at work or school may result in a
high stress indication. It is important to note that a stress reaction does not have to
be negative; it may also indicate that you are experiencing something exciting or fun.
To balance periods of high stress, you need to recover by relaxing and sleeping well.
A medium stress level may indicate effortless productivity, which is common during
work and social activities.
Recovery mostly occurs while you sleep. There are factors that can affect your
recovery measurements. A physically active lifestyle, healthy nutrition, lower
consumption of alcohol, and elimination of stress factors make it possible to improve
recovery during sleep in the long run. Avoiding highly strenuous physical activities
and "slowing down" mental activities well before going to bed also have a positive
effect on recovery.
Stress & Recovery values provided by the SmartBand 2 are not a reliable source for analysing
overall fitness. Low intensity exercises, for example, can be misinterpreted incorrectly as
recovery.
To get an measurement of your Stress & Recovery, wear your SmartBand 2 for at least one
night when you go to bed.
How the SmartBand 2 measures your pulse and stress
The SmartBand 2 uses green lights paired with light‑sensitive photodiodes to detect
the amount of blood flowing through your wrist at any given moment. By flashing its
lights hundreds of times per second, the SmartBand 2 can calculate the number of
times the heart beats each minute and provide an estimate of your heart rate.
Factors that affect pulse and stress measurement
Many factors can affect the performance of the SmartBand 2 heart rate sensor:
•
Skin perfusion. Skin perfusion - how much blood flows through your skin - varies
significantly from person to person and can also be impacted by the environment. If
you’re exercising in the cold, for example, the skin perfusion in your wrist may be too
low for the heart rate sensor to get a result.
•
Movement. Rhythmic movements such as running or cycling give better results from
the heart rate sensor compared with irregular movements like tennis or boxing.
•
Skin pigmentation variations. Permanent or temporary changes to your skin, such as
some tattoos. The ink, pattern, and saturation of some tattoos can block light from
the sensor, making it difficult to get reliable results.
Getting the most from the SmartBand 2 heart rate sensor
Even under ideal conditions, the SmartBand 2 may not be able to get a reliable heart
rate reading every time for each individual. And for a small percentage of users,
various factors may make it impossible to get any heart rate reading at all. Perform
the following steps if you want to improve the reading from the heart rate sensor:
•
Make sure that you wear your SmartBand 2 snugly, but comfortably on your wrist. If it
does not stay in place on your wrist and the heart rate sensor fails to get a good
reading, tighten the wristband.
•
You may need to clean the SmartBand 2, especially the heart rate sensor, after
exercising or heavy sweating.
Measuring pulse and stress automatically
The SmartBand 2 measures your pulse and stress and recovery level about six times
an hour.
9
This is an Internet version of this publication. © Print only for private use.
Page 10

Measuring pulse and stress manually
You can have your SmartBand 2 perform a reading of your pulse at any time, either
from the device itself or from your iPhone.
To get the best heart rate data when exercising, initiate the heart rate sensor a few
minutes before your physical activity so that the sensor is able to detect your pulse.
To measure your pulse and stress manually from your SmartBand 2
1
To start measuring your pulse and stress level, double-press the power key.
The notification lights start to flash orange alternately and then together when
the reading is complete. The results are then displayed on the SmartBand 2
application on your iPhone.
2
To end the measurement, double-press the power key again.
If the SmartBand 2 cannot detect your pulse, it vibrates three times and the notification lights
start to flash alternately in orange. If the heart rate sensor fails to get a reading, adjust the
SmartBand 2's position on your wrist or clean the sensor. For more information on improving
the reading from the heart rate sensor, see
sensor
on page 9.
To measure your pulse and stress manually from your iPhone
1
On your iPhone, open SmartBand 2. The SmartBand 2 immediately attempts to
get a reading from the heart rate sensor and displays the results on the
SmartBand 2 application.
2
To end the measurement, quit the SmartBand 2 application.
Getting the most from the SmartBand 2 heart rate
To view historical data of your pulse and stress
1
Make sure the Portrait Orientation Lock on your iPhone is turned off.
2
On your iPhone, open SmartBand 2, then tap Pulse.
3
To view historical data of your pulse, tap Pulse, then switch your iPhone to
landscape orientation.
4
To view historical data of your stress, tap Stress and recovery, then switch
your iPhone to landscape orientation.
STAMINA mode
To reduce battery consumption, you can turn on STAMINA mode, which disables
automatic measurement of pulse and stress. You can still manually start a
measurement even while your SmartBand 2 is in STAMINA mode.
To turn on STAMINA mode
1
On your iPhone, open SmartBand 2, then tap SmartBand™.
2
Drag the slider beside Stamina mode to the on position.
Smart wake up alarms
You can set one or several Smart wake up alarms in the SmartBand 2 application.
The Smart wake up alarm wakes you up at the best time based on your sleep cycle.
The alarm notifies you with a continuous vibration. After you set a time frame for
when you would like to be awoken by the alarm, your SmartBand 2 detects when you
have reached a state of light sleep and then wakes you up.
For example, if you set a Smart wake up alarm for between 06:30 and 07:00 AM, the
alarm wakes you up sometime between 06:30 and 07:00 AM when you reach a state
of light sleep. If you do not reach a state of light sleep during this period, the Smart
wake up alarm wakes you up at 07:00 AM.
If you want to add, remove or change a Smart wake up alarm, your SmartBand 2 must be
connected to the iPhone.
10
This is an Internet version of this publication. © Print only for private use.
Page 11

To add a Smart wake up alarm
1
On your iPhone, open SmartBand 2, then tap SmartBand™.
2
Tap Smart wake up, then tap .
3
Tap Wake up time and select the relevant values for the hour and minute.
4
To edit a period, tap Wake up interval and select the relevant value.
5
Tap Repeat, then mark the days on which you want the alarm to recur and tap
Edit Alarm.
6
When you’re finished, tap Back.
To edit an existing Smart wake up alarm
1
On your iPhone, open SmartBand 2, then tap SmartBand™.
2
Tap Smart wake up, then tap the alarm that you want to edit.
3
Edit the options as desired.
4
When you’re finished, tap Back.
To delete a Smart wake up alarm
1
On your iPhone, open SmartBand 2, then tap SmartBand™.
2
Tap Smart wake up, then tap the alarm that you want to delete.
3
1
2
3
.
Tap
To turn on a Smart wake up alarm
On your iPhone, open SmartBand 2, then tap SmartBand™.
Tap Smart wake up.
Drag the slider beside the alarm that you want to turn on.
To snooze a Smart wake up alarm when your SmartBand 2 vibrates
•
Briefly press the power key.
To turn off a Smart wake up alarm when your SmartBand 2 vibrates
•
Press and hold down the power key until your SmartBand 2 vibrates once
shortly.
Out-of-range alert notifications
You can receive a notification when you leave your iPhone behind by turning on the
Out-of-range alert notification. Your SmartBand 2 then notifies you with three short
vibrations when the distance between your SmartBand 2 and the connected iPhone
becomes too great and causes a disconnection. This function is turned off by default.
To turn on the Out-of-range alert notification function
1
On your iPhone, open SmartBand 2, then tap SmartBand™.
2
Drag the slider beside Out of range alert to the on position.
Do not disturb
You can turn on the Do not disturb function if you do not want to be interrupted by
notifications. When the Do not disturb function is enabled, only the Smart wake up
alarm is active.
To turn on the Do not disturb function
1
On your iPhone, open SmartBand 2, then tap SmartBand™.
2
Tap Notifications, then drag the slider beside Do not disturb to the on position.
To set the Do not disturb interval
1
On your iPhone, open SmartBand 2, then tap SmartBand™.
2
Tap Notifications, then drag the slider beside Do not disturb to the on position.
3
Tap Start and select the relevant values for the hour and minute.
4
Tap End and select the relevant values for the hour and minute.
11
This is an Internet version of this publication. © Print only for private use.
Page 12

Remote control
You can use your SmartBand 2 to control playback from the Music application on the
connected iPhone.
The three notification lights on the SmartBand 2 are blue when you are using it as a remote
control.
To allow your SmartBand 2 to control the iPhone Music application
1
On your iPhone, open SmartBand 2, then tap SmartBand™.
2
Drag the slider beside Music control to the on position.
To control music playback on your iPhone from your SmartBand 2
1
Make sure that your SmartBand 2 is connected to your iPhone.
2
Briefly press the power key on your SmartBand 2 and tap it immediately. The
three notification lights flash blue.
3
To play or pause the music file, tap the SmartBand 2 once. To go to the next
music file, tap twice. To go to the previous music file, tap three times.
4
To end remote control, briefly press the power key or wait for 10 seconds
without tapping the SmartBand 2. The three blue notification lights turn off.
Connecting to Health
The SmartBand 2 application needs access to the Apple's Health application to be
able to track your activities and progress.
To allow the Apple Health application access to data from the SmartBand 2
application
1
On your iPhone, open Health.
2
Tap Sources > SmartBand 2.
3
Drag the sliders beside all items.
The Health application does not track your stress level from the SmartBand 2 application.
Notification lights
You can determine the status of your SmartBand 2 via the three notification lights on
the device.
Notification light activity
All lights illuminating in white one by one, then turning off
simultaneously
All lights illuminating in white simultaneously, then turning off one
by one
Light A flashing in green Factory data resetting/Updating
Status of the SmartBand 2
Powered on
Powered off
firmware
Light A flashing in blue Connecting to an iPhone
12
This is an Internet version of this publication. © Print only for private use.
Page 13

All lights illuminating in blue one by one, then turning off
simultaneously
Connected to an iPhone
All lights illuminating in white one by one, then turning off
simultaneously
All lights flashing in orange continuously Measuring pulse and stress and
All lights flashing in blue continuously Remote controlling
All lights flashing in red continuously Low battery level
All lights flashing in white continuously Incoming calls
Light A flashing in white for 5 minutes Other notifications
Not connected to an iPhone
recovery level manually
13
This is an Internet version of this publication. © Print only for private use.
Page 14

Important information
Using your SmartBand 2 in wet and dusty conditions
Your SmartBand 2 is waterproof and protected against dust, so don’t worry if you get
caught in the rain or want to wash off dirt after wearing it for a period of time. But
remember that the SmartBand 2 is only protected in fresh and chlorinated water up
to 3m for a maximum of 30 minutes. Rinse the SmartBand 2 with fresh water under a
faucet and dry the device completely after swimming. Abuse and improper use of
your SmartBand 2 will invalidate warranty. The device has Ingress Protection rating
IP65/68. For more info, see
support.sonymobile.com
Your SmartBand 2 has a capless USB port. The USB port must be completely dry
before a cable can be connected for charging. If your SmartBand 2 gets exposed to
water and the USB port gets wet, wipe the SmartBand 2 dry with a microfibre cloth
and shake it several times with the USB port facing downwards. Repeat the
procedure until no moisture is visible in the USB port.
Your warranty does not cover damage or defects caused by abuse or use of your
SmartBand 2 against Sony Mobile’s instructions. For more information about the
warranty, refer to the Important information, which can be accessed via
support.sonymobile.com
.
Legal information
.
Sony SWR12
This product is intended to help you track your exercise and lifestyle. It is not a medical device and data from it
should never be used to make medical decisions (like preventing, diagnosing, monitoring, or treating a disease
or injury) or replace the advice of a medical professional. Sony Mobile disclaims any warranty that this device
could be used or suitable for medical purposes. Seek medical advice before undertaking a new or altered
training regime using this device, particularly if using this device together with a pacemaker or other medical
devices.
Prior to use, please read the
This User guide is published by Sony Mobile Communications Inc. or its local affiliated company, without any
warranty. Improvements and changes to this User guide necessitated by typographical errors, inaccuracies of
current information, or improvements to programs and/or equipment, may be made by Sony Mobile
Communications Inc. at any time and without notice. Such changes will, however, be incorporated into new
editions of this User guide.
All rights reserved.
©2015 Sony Mobile Communications Inc.
Interoperability and compatibility among Bluetooth® devices varies. Device generally supports products
utilising Bluetooth spec. 1.2 or higher, and Headset or Handsfree profile.
Sony is the trademark or registered trademark of Sony Corporation. Bluetooth is the trademark of the
Bluetooth (SIG) Inc. and is used under license. All other marks are the property of their respective owners. All
rights reserved.
All product and company names mentioned herein are the trademarks or registered trademarks of their
respective owners. Any rights not expressly granted herein are reserved. All other trademarks are property of
their respective owners.
www.sonymobile.com
Visit
All illustrations are for illustration only and may not accurately depict the actual accessory.
Important information
for more information.
leaflet separately provided.
14
This is an Internet version of this publication. © Print only for private use.
Page 15

Declaration of Conformity
We, Sony Mobile Communications AB of
Nya Vattentornet
SE-221 88 Lund, Sweden
declare under our sole responsibility that our product
Sony type RD-0180
and in combination with our accessories, to which this declaration relates is in
conformity with the appropriate standards EN 300 328:V1.8.1, EN 300 330-2:V1.5.1,
EN 301 489-7:V1.3.1 EN 301 489-17:V2.2.1, EN 301 489-3:V1.6.1 and EN 60 950-1:
2006+A11:2009+A1:2010+A12:2011, A2:2013 following the provisions of, Radio
Equipment and Telecommunication Terminal Equipment directive 1999/5/EC.
Lund, February 2015
Pär Thuresson,
Quality Officer, SVP, Quality & Customer Services
FCC Statement
This device complies with Part 15 of the FCC rules. Operation is subject to the following two
conditions: (1) This device may not cause harmful interference, and (2) This device must
accept any interference received, including interference that may cause undesired operation.
Any change or modification not expressly approved by Sony may void the user's authority to operate the
equipment.
This equipment has been tested and found to comply with the limits for a Class B digital device, pursuant to
Part 15 of the FCC Rules. These limits are designed to provide reasonable protection against harmful
interference in a residential installation. This equipment generates, uses and can radiate radio frequency
energy and, if not installed and used in accordance with the instructions, may cause harmful interference to
radio communications. However, there is no guarantee that interference will not occur in a particular
installation.
If this equipment does cause harmful interference to radio or television reception, which can be determined by
turning the equipment off and on, the user is encouraged to try to correct the interference by one or more of
the following measures:
•
Reorient or relocate the receiving antenna.
•
Increase the separation between the equipment and receiver.
•
Connect the equipment into an outlet on a circuit different from that to which the receiver is connected.
•
Consult the dealer or an experienced radio/TV technician for help.
AVISO IMPORTANTE PARA MÉXICO
La operación de este equipo está sujeta a las siguientes dos condiciones: (1) es posible que este equipo o
dispositivo no cause interferencia perjudicial y (2) este equipo o dispositivo debe aceptar cualquier
interferencia, incluyendo la que pueda causar su operación no deseada.
Para consultar la información relacionada al número del certificado, refiérase a la etiqueta del empaque y/o del
producto.
Alimentación: 5,0 Vcc
Industry Canada Statement
This device complies with RSS-210 of Industry Canada.
Operation is subject to the following two conditions: (1) this device may not cause interference, and (2) this
device must accept any interference, including interference that may cause undesired operation of the device.
This Class B digital apparatus complies with Canadian ICES-003.
Cet appareil numérique de la classe B est conforme à la norme NMB-003 du Canada.
Avis d’industrie Canada
Le présent appareil est conforme aux CNR d'Industrie Canada applicables aux appareils radio exempts de
licence.
L'exploitation est autorisée aux deux conditions suivantes: (1) l'appareil ne doit pas produire de brouillage, et,
and (2) l'utilisateur de l'appareil doit accepter tout brouillage radioélectrique subi, même si le brouillage est
susceptible d'en compromettre le fonctionnement.
15
This is an Internet version of this publication. © Print only for private use.
 Loading...