

Page 1

WARNING
To prevent fire or shock hazard, do not expose the unit to rain or
moisture.
To avoid electrical shock, do not open the cabinet. Refer servicing to
qualified personnel only.
Precautions
Safety
• The SLV-X842/X842ML/X821MKII operates on 110-240 V AC, 50/
60Hz.
• If anything falls into the cabinet, unplug the unit and have it checked
by qualified personnel before operating it any further.
• The unit is not disconnected from the mains as long as it is connected
to the mains outlet, even if the unit itself has been turned off.
• Unplug the unit from the mains outlet if you do not intend to use it
for an extended period of time. To disconnect the cord, pull it out by
the plug, never by the cord.
Installing
• Allow adequate air circulation to prevent internal heat buildup.
• Do not place the unit on surfaces (rugs, blankets, etc.) or near
materials (curtains, draperies) that may block the ventilation slots.
• Do not install the unit near heat sources such as radiators or air ducts,
or in a place subject to direct sunlight, excessive dust, mechanical
vibration or shock.
• Do not install the unit in an inclined position. It is designed to be
operated in a horizontal position only.
• Keep the unit and cassettes away from equipment with strong
magnets, such as microwave ovens or large loudspeakers.
• Do not place heavy objects on the unit.
• If the unit is brought directly from a cold to a warm location,
moisture may condense inside the VCR and cause damage to the
video head and tape. When you first install the unit, or when you
move it from a cold to a warm location, wait for about one hour
before operating the unit.
Caution
Television programs, films, video tapes and other materials may be
copyrighted. Unauthorized recording of such material may be contrary
to the provisions of the copyright laws. Also, use of this recorder with
cable television transmission may require authorization from the cable
television transmitter and/or program owner.
-EN
2
Introduction
Page 2

Table of contents
4 Welcome!
4 Checking your model name
Getting Started
5 Step 1: Unpacking
6 Step 2: Setting up the remote commander
7 Step 3: Connecting the VCR
8 Step 4: Channel setup map and chart
11 Step 5: Tuning the TV to your VCR
13 Step 6: Setting up the VCR sequentially (EASY SET UP)
15 Setting the clock manually
17 Tuning the VCR to TV channels manually
24 Setting up G-CODE manually
26 Changing the program positions of the stations
Basic Operations
27 Playing a tape
30 Recording TV programs
35 Recording TV programs using G-CODE
37 Setting the timer manually
39 Checking/changing/cancelling timer settings
40 Additional instructions about timer recording
EN
Additional Operations
41 Playing/searching at various speeds
42 Adjusting the picture
43 Searching using the index function
44 Game play
45 Looking at menu options
Editing
46 Editing with another VCR
48 Audio dubbing
Additional Information
50 Troubleshooting
52 Specifications
53 Index to parts and controls
56 Index
Introduction
-EN
3
Page 3

Welcome!
Thank you for purchasing the Sony Video Cassette Recorder (VCR).
Here are some of the features you'll enjoy with your VCR:
• EASY SET UP that guides you through necessary VCR setups
sequentially through the TV screen
• Adaptive Picture Control (APC) that automatically optimizes
recording and playback performance
• Dual Mode Shuttle (DMS) ring for easy playback and search
operations
• G-CODE* system that lets you quickly and easily preset the VCR to
record programs
* G-CODE is a trademark applied for by Gemstar Development Corp. G-CODE
system is manufactured under licence from Gemstar Development Corporation.
Note
• The G-CODE used in this VCR is for Singapore, Malaysia, Hong Kong, Macao,
etc. and cannot be used in areas such as U.S.A., Canada, Japan, Korea, Taiwan,
and U.K.
Compatible color systems
• This VCR is designed to record and play back using the PAL (B/G,
D/K, and I), MESECAM (B/G, D/K, and K1), or NTSC (M) color
system. Recording of video sources based on other color systems
cannot be guaranteed.
Checking your model
name
The instructions in this manual are for the following three models.
Check your model number by looking at the rear panel of your VCR.
SLV-X842ML is used for the illustrations purposes. Any difference in
operation is clearly indicated in the text, for example, “SLV-X842ML
only.”
Types of differences
Feature
Recieving stereo and
bilingual programs in
NICAM system
Recieving stereo and
bilingual programs in
ZWEITON system
Model
X842/X842ML
•
•
X821MKII
–
–
-EN
4
Introduction
Page 4
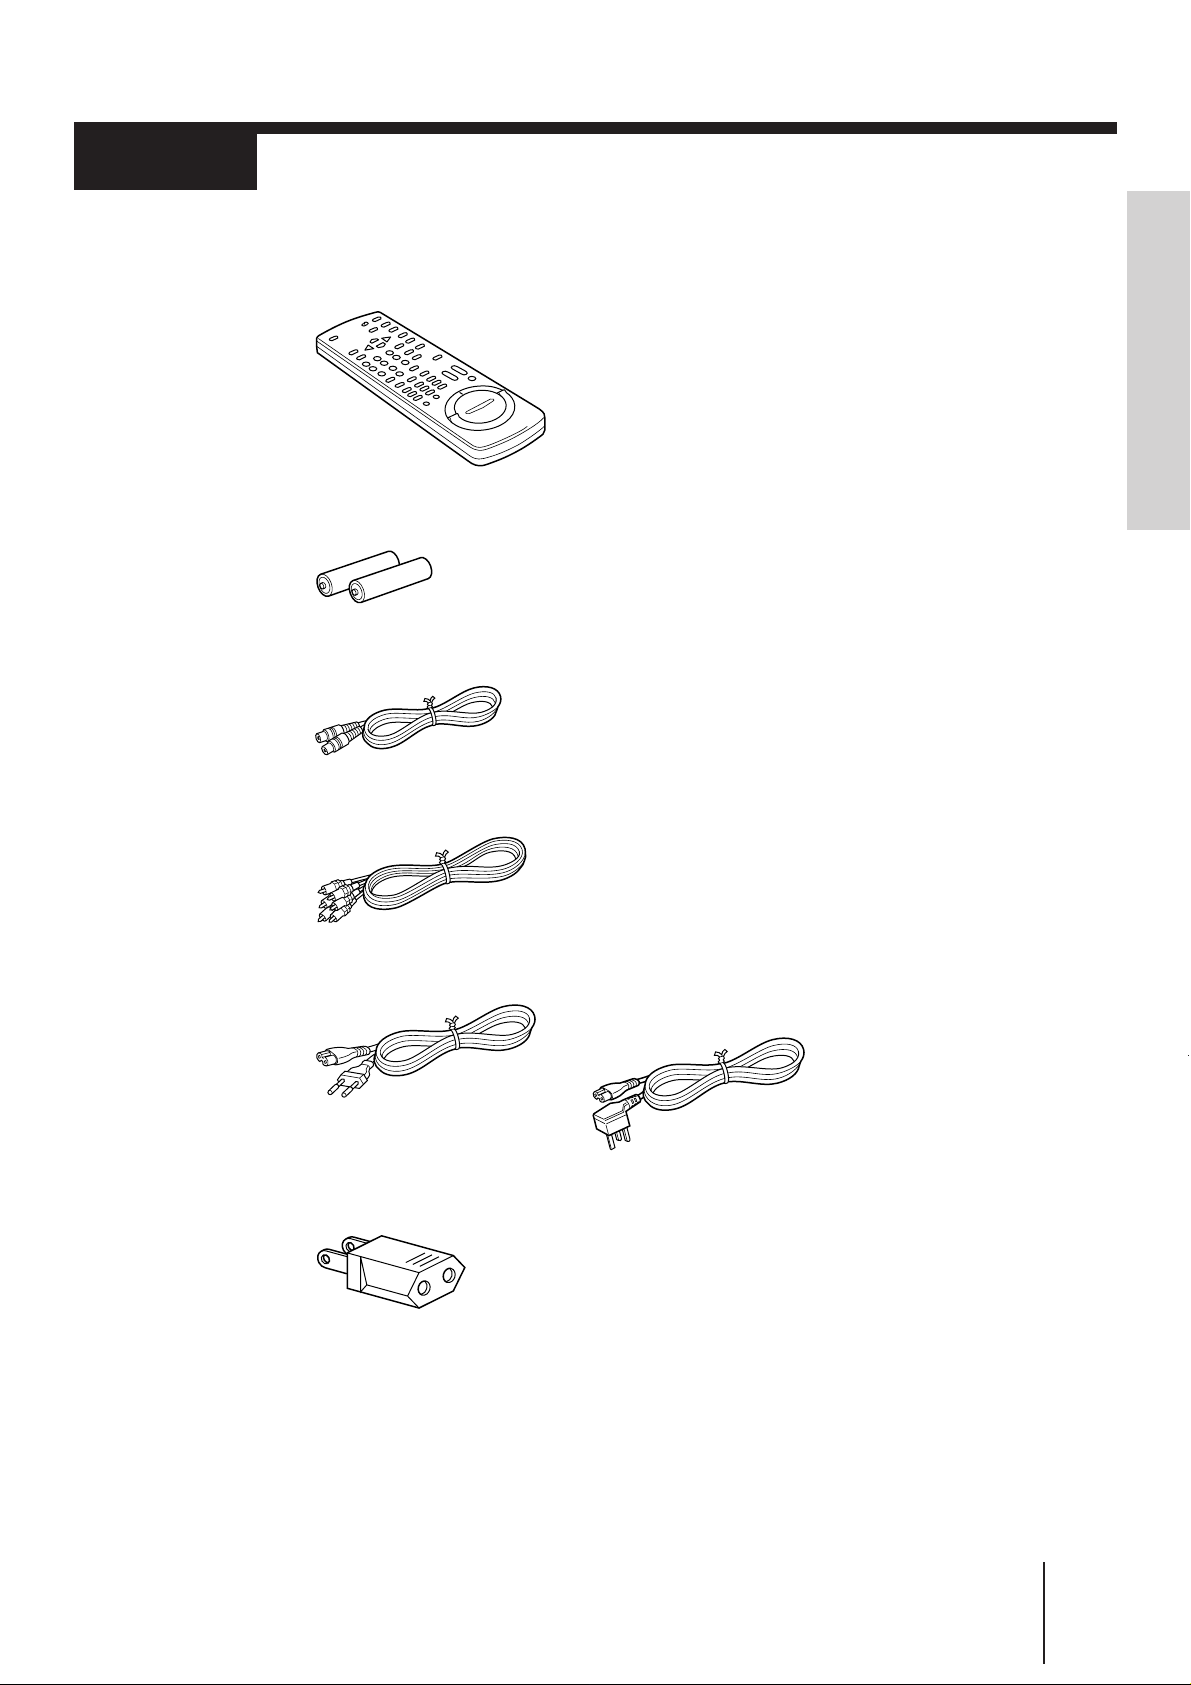
Step 1
Unpacking
Check that you have the following items:
• Remote commander
• R6 (size AA) batteries
• Aerial cable
• Audio/video cable
Getting Started
• Mains lead
• Plug adaptor (SLV-X842/
X821MKII only)
(SLV-X842ML only)
Use this type of mains lead in Hong
Kong.
Getting Started
-EN
5
Page 5
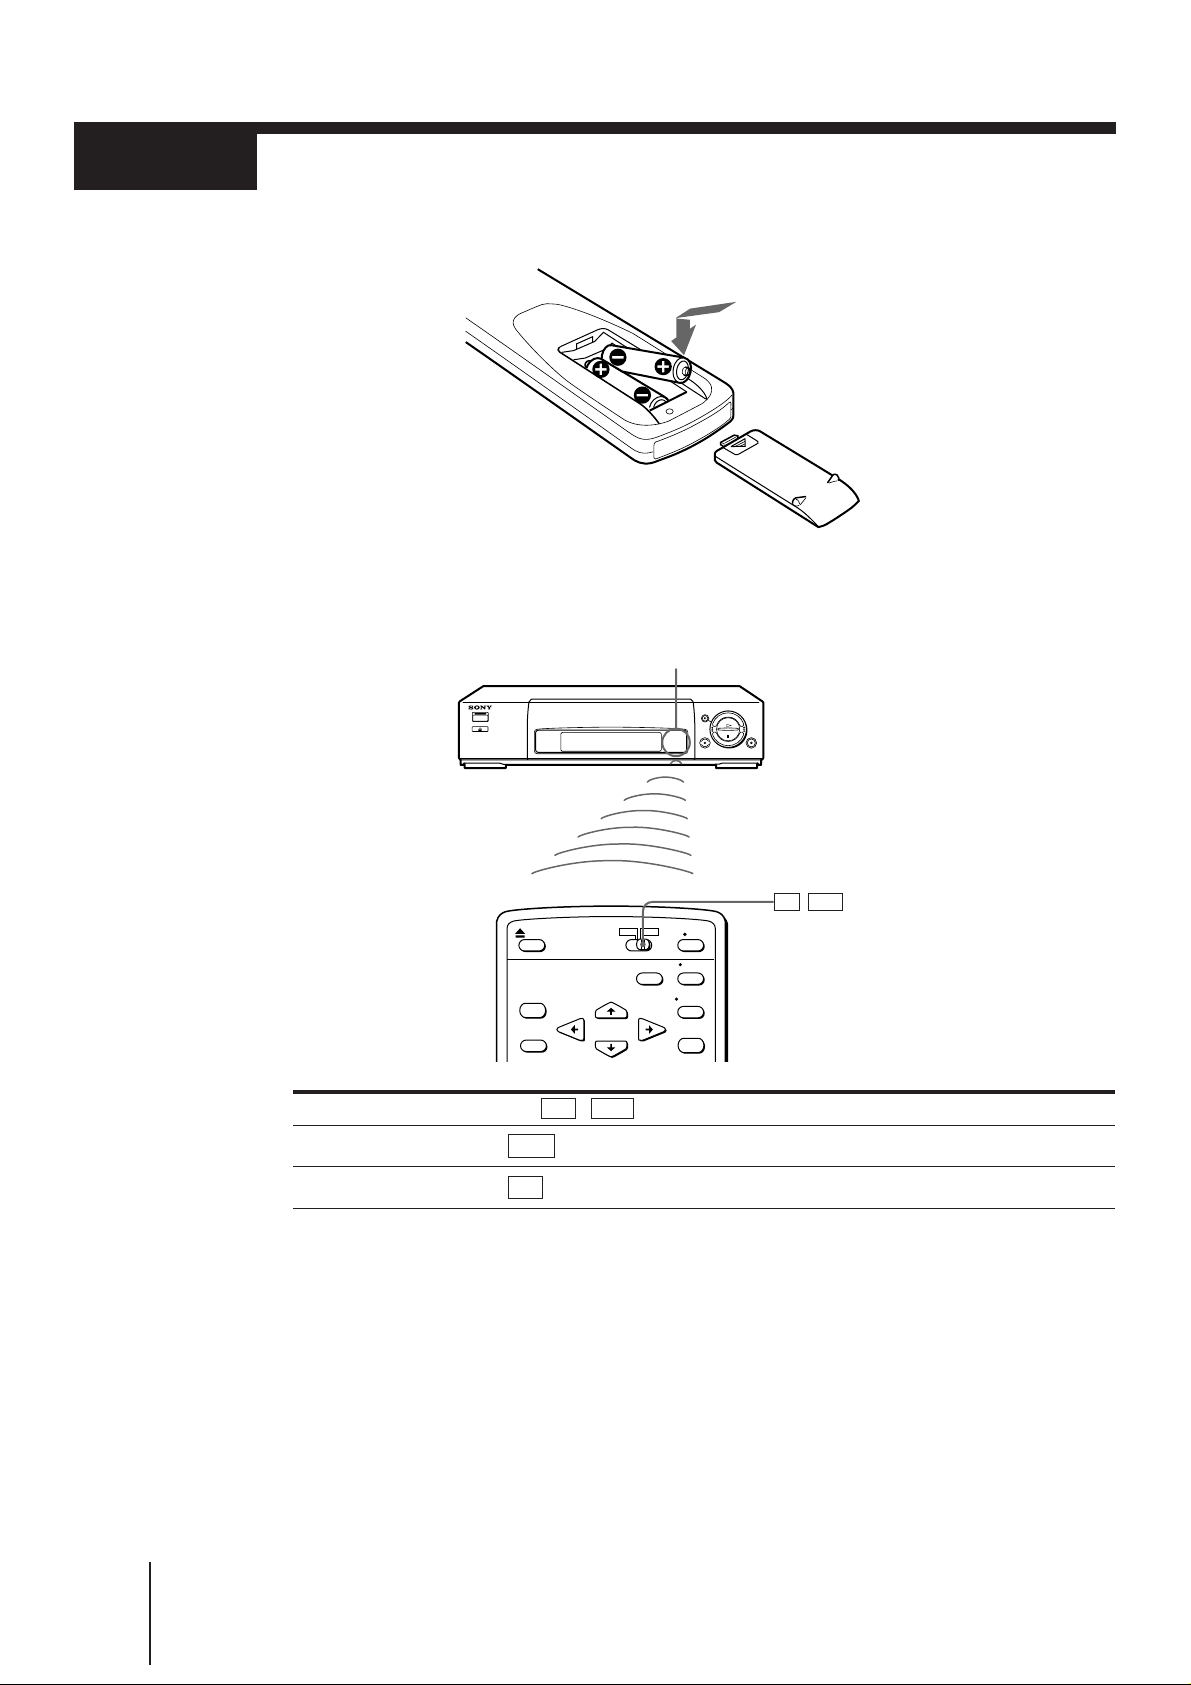
Step 2
Setting up the remote commander
Insert two R6 (size AA) batteries by matching the + and – on the batteries to
the diagram inside the battery compartment.
Using the remote commander
You can use this remote commander to operate this VCR and a Sony TV. Buttons on the
remote commander marked with a dot (•) can be used to operate your TV.
Remote sensor
TV / VTR
To operate Set TV / VTR to
the VCR VTR and point at the remote sensor on the VCR
a Sony TV TV and point at the remote sensor on the TV
Notes
• The TV/VIDEO button selects the TV input either from the aerial in or line in. This button does not
control the VCR input.
• With normal use, the batteries should last for approximately three to six months.
• If you do not use the remote commander for an extended period of time, remove the batteries to avoid
possible damage from battery leakage.
• Do not use a new battery with an old one.
• Do not use different types of batteries.
-EN
6
Getting Started
Page 6
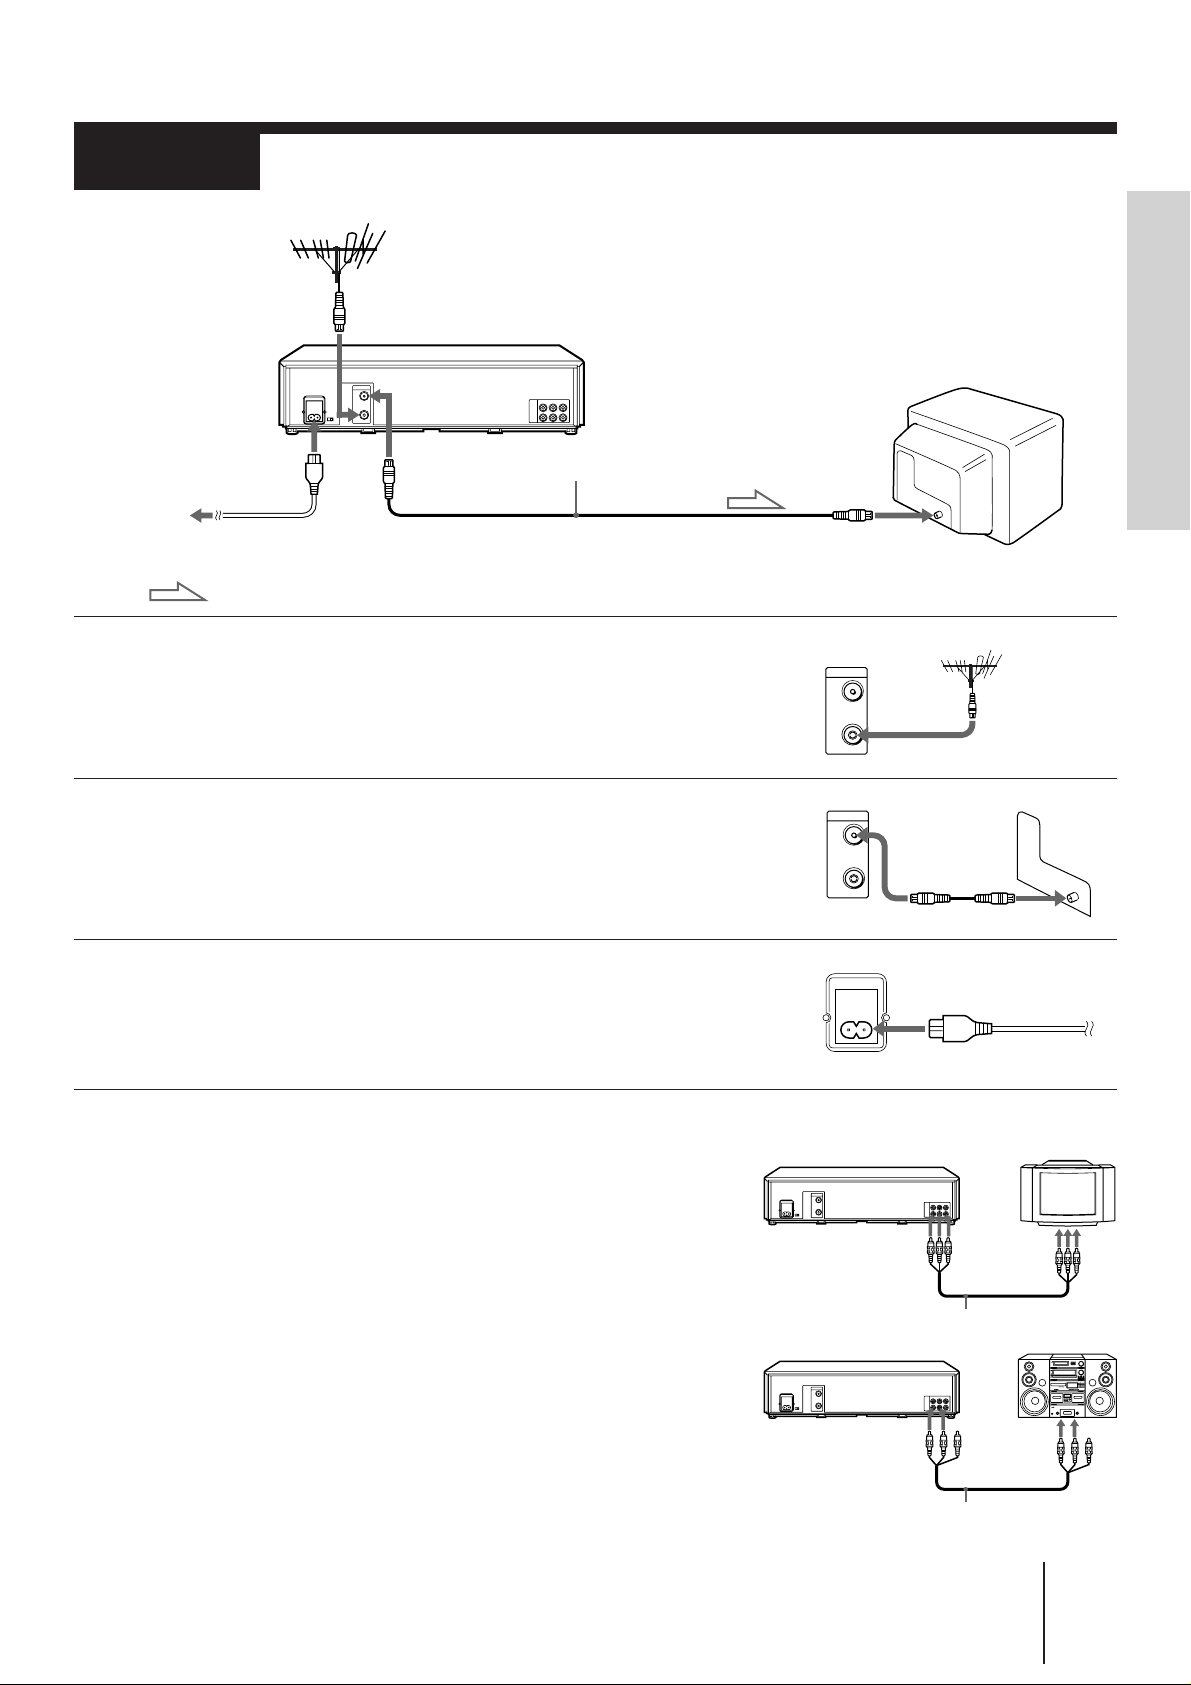
Step 3
AERIAL
OUT
IN
Connecting the VCR
Getting Started
AERIAL IN
AC IN
to mains
: Signal flow
AERIAL OUT
Aerial cable
1 Disconnect the aerial input cable from your TV and
connect it to AERIAL IN of the VCR.
2 Connect AERIAL OUT of the VCR and the aerial input
of your TV using the supplied aerial cable.
3 Connect AC IN of the VCR and the mains supply
using the mains lead.
You’ve completed the basic hookup to watch and record TV
programs.
AERIAL IN
AERIAL
OUT
IN
Additional connections
To a TV that has audio/video input jacks
This additional connection can improve picture and sound quality.
Connect to the TV as shown on the right.
To a stereo system
You can improve sound quality by connecting to a stereo system as
shown on the right.
LINE OUT LINE IN
Audio/video cable
AUDIO OUT
Audio/video cable
Getting Started
LINE IN
-EN
7
Page 7

Step 4
,
,,,,
,,,,
,,,,
,,,,
,,,,
,,,
,,,
Channel setup map and chart
About color systems
Different countries use different color systems and TV systems. These systems handle such things as video playback
and recording differently. Using your VCR in a country that is on a color system not supported by this VCR may
cause problems such as playback without sound, a vertically rolling picture, etc.
Refer to the map above and the chart on the next page to determine which countries use which color and TV systems.
This VCR is compatible with most of the existing color systems (NTSC, PAL, and MESECAM) and TV systems (B/G,
D/K, I, and M) except for those used in France, Brazil, Argentina, and Uruguay.
If you have made TV-VCR connections using the aerial cable, complete the following steps for your TV:
• Set the NTSC PB switch to match your TV color sytem (see page 10).
• Set the TV system using the RF CH SET button on the VCR (see “Tuning the TV to your VCR” on page 11).
This unit displays the color system in the VCR display window.
Color system indicator
8
-EN
Getting Started
Page 8
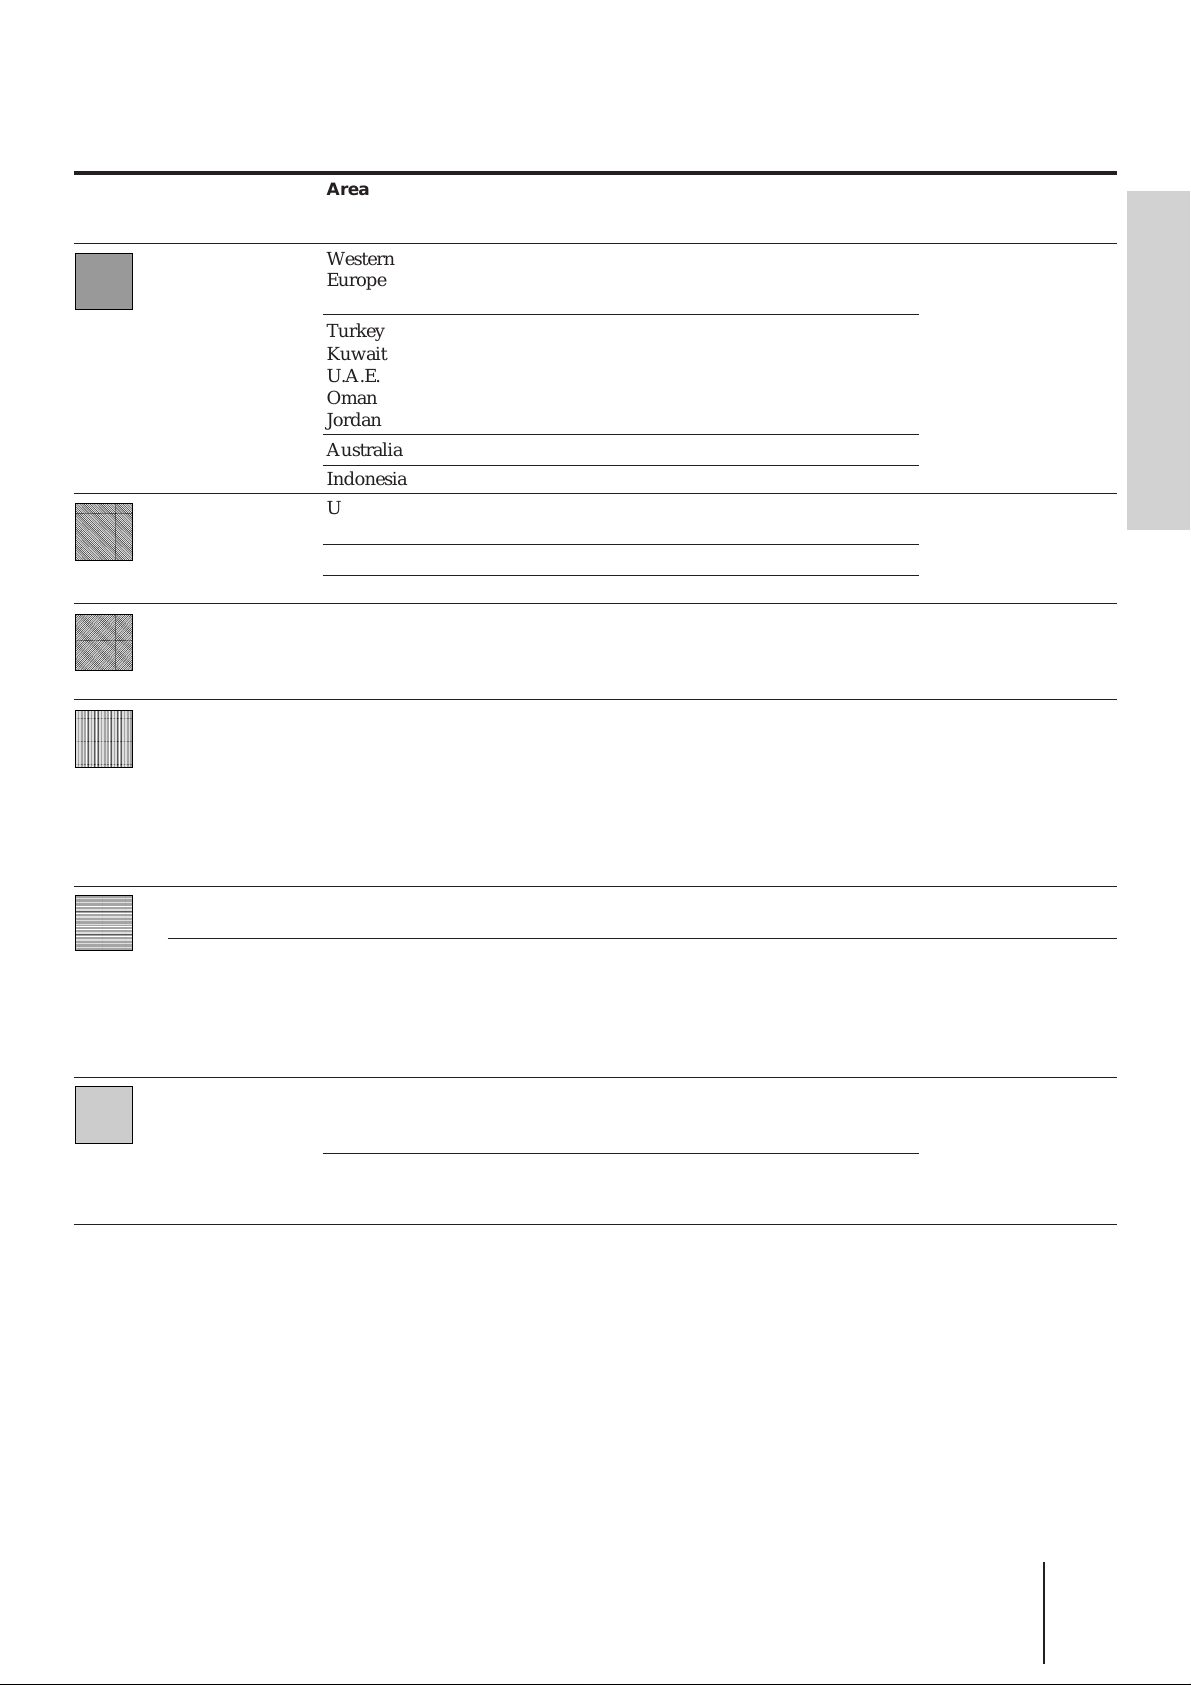
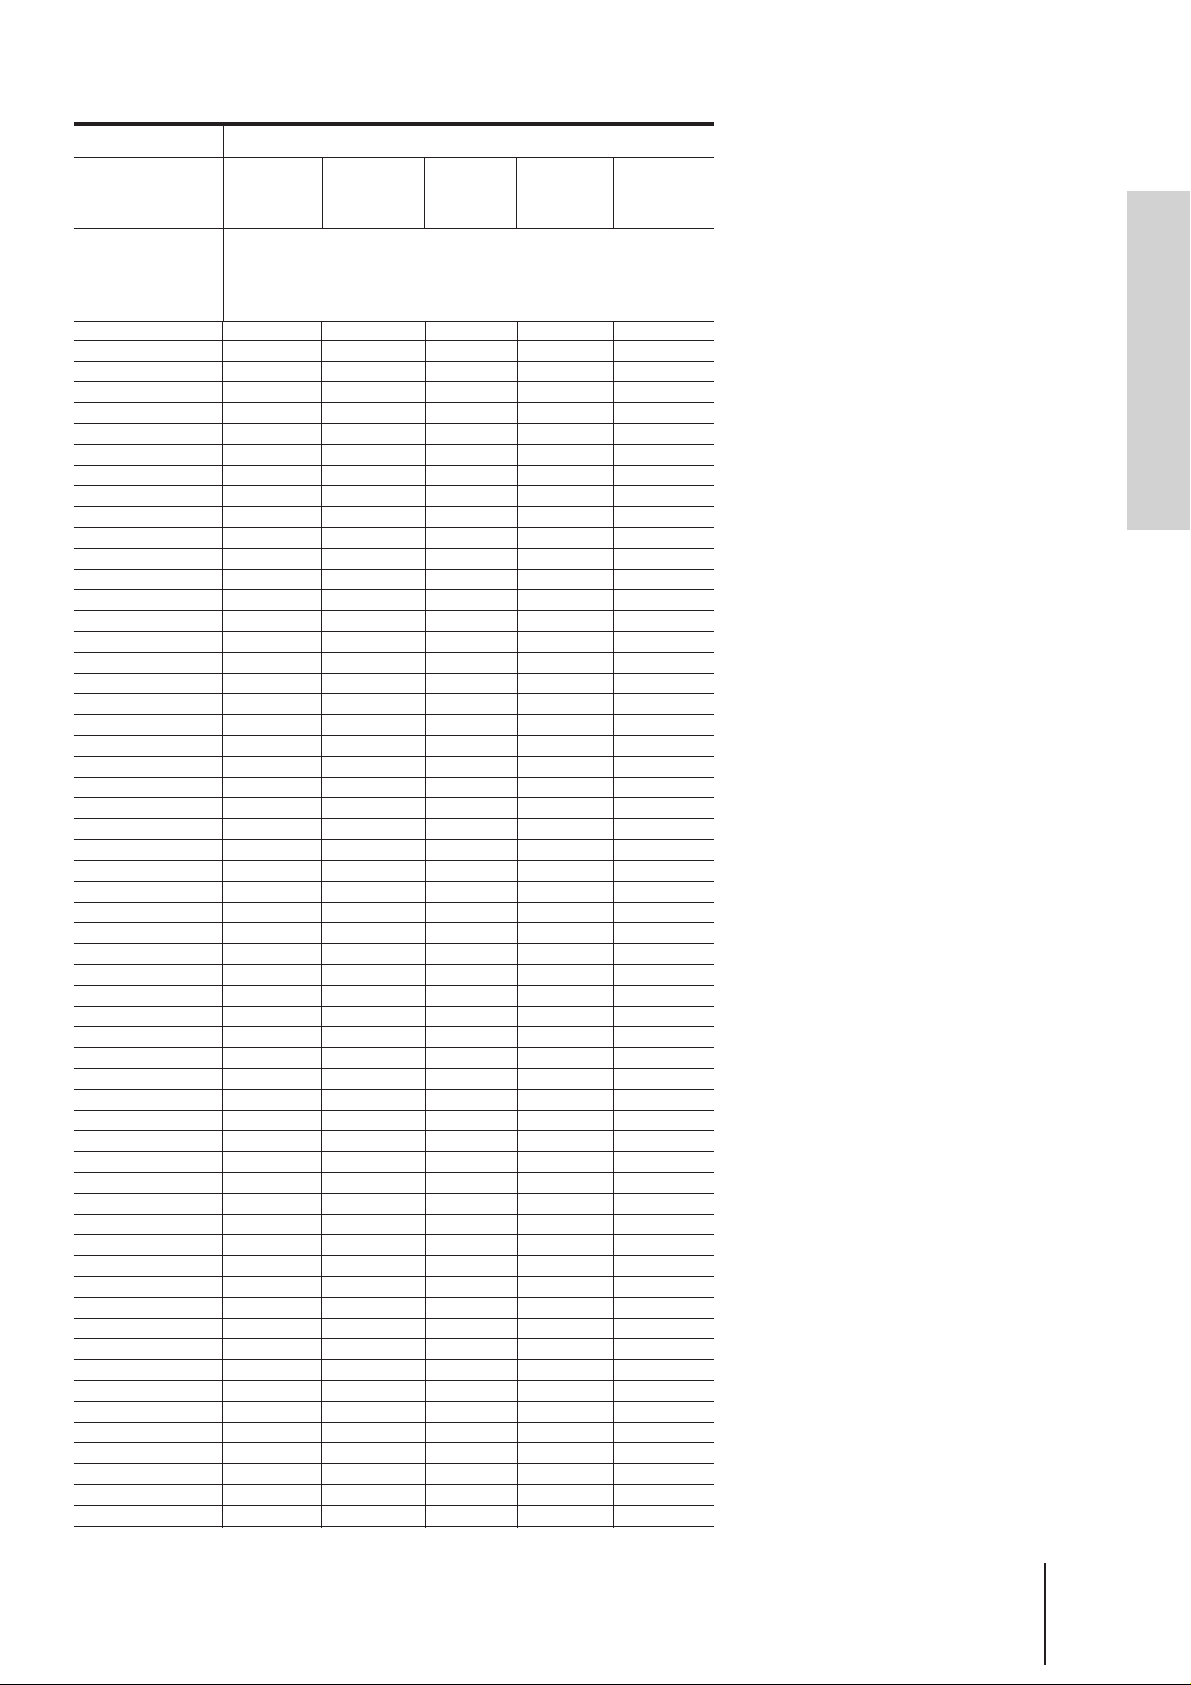
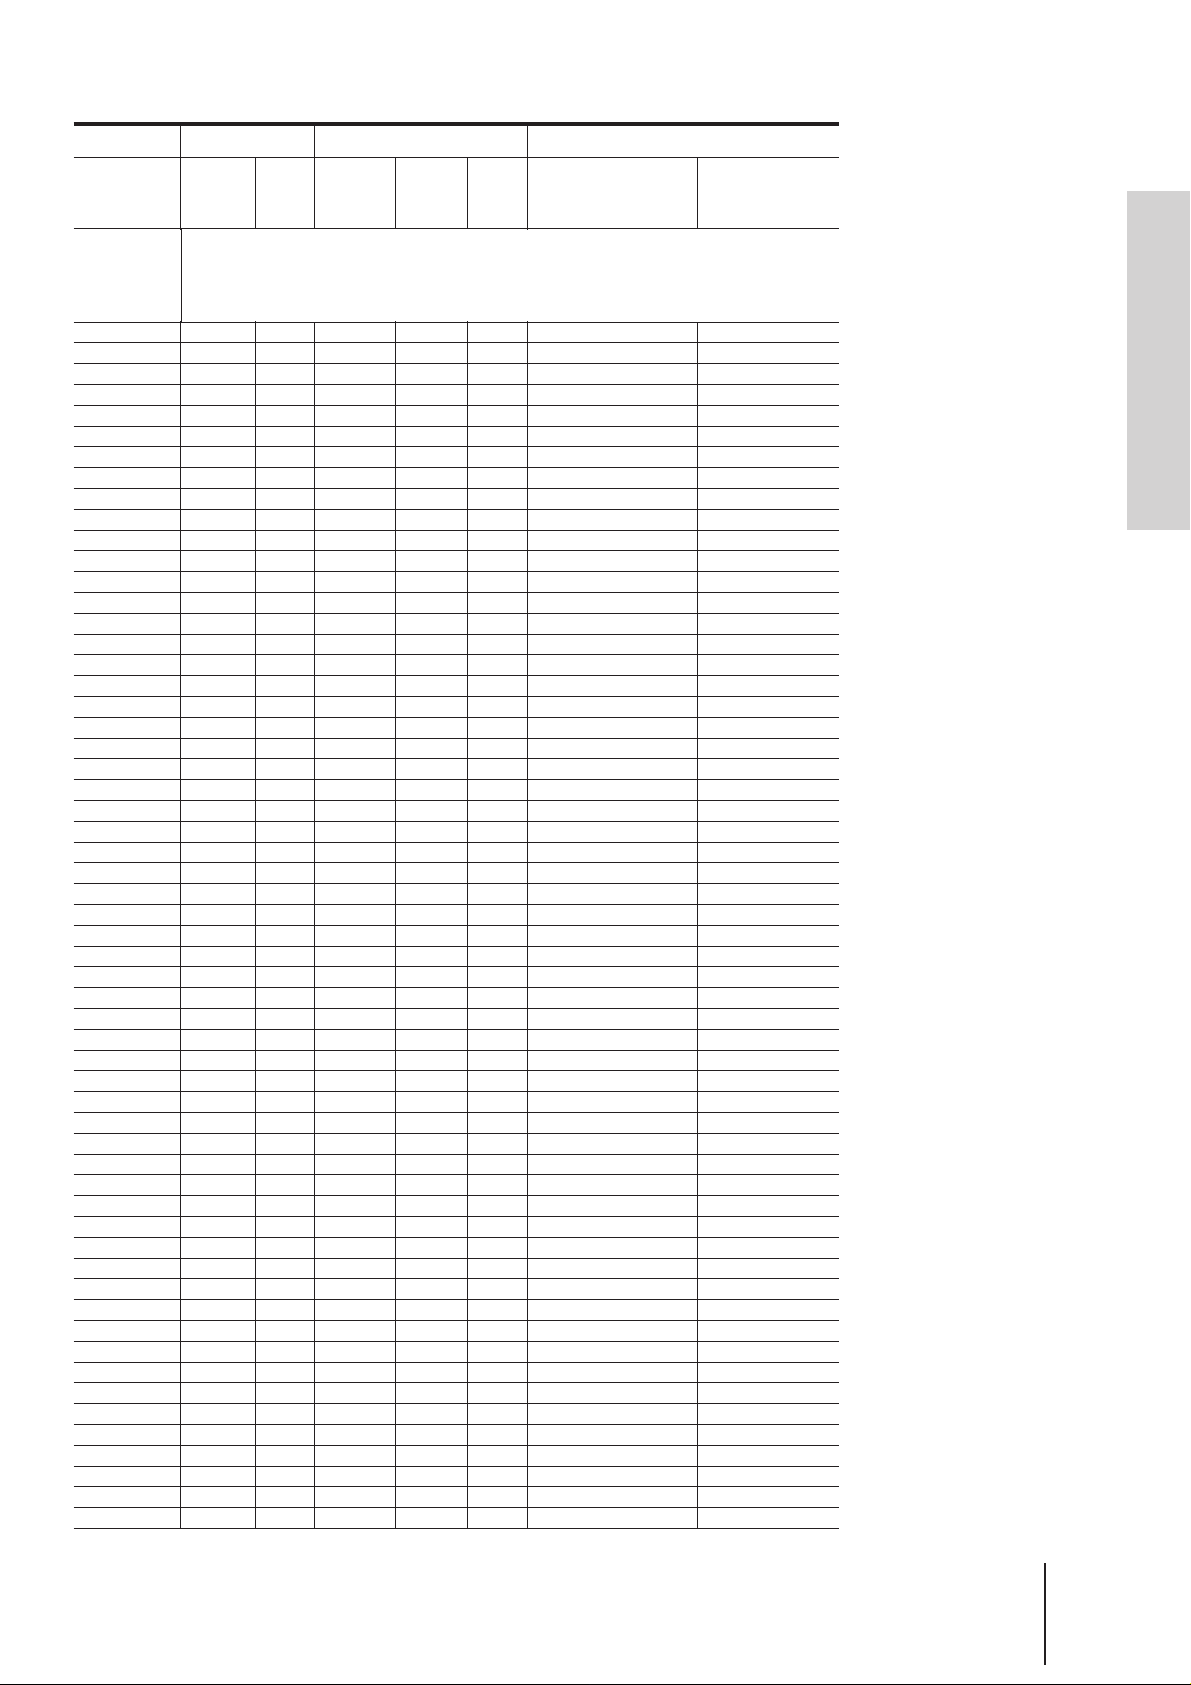
Channel setup chart
,
,
,
,
,
,
,
,
Map
pattern
,,
,,
,,
,,
,,
,,
,,
,,
Color system
and TV system
PAL B/G
PAL I
PAL D/K
MESECAM B/G
MESECAM D/K
MESECAM K1
NTSC 3.58
Area
Western
Europe
Turkey
Kuwait
U.A.E.
Oman
Jordan
Australia
Indonesia
U.K.
Hong Kong
Ireland
South Africa
China
Saudi Arabia
Iran
Iraq
Libya
Egypt
Morocco
Greece
Syria
East Europe
Russia
Zaire
Senegal
Niger
New Caledonia
Tahiti
French Guiana
USA
Japan
Channels*
VL
2 – 4
S01 – S05**
S1 – S7**
2 – 4
0 – 5, 5A
1A, 2, 3
—
A – C
—
1 – 5
2 – 4
1 – 5
—
2 – 6
A5 – A1**
A – E**
1 – 3
M1 – M7**
VH
5 – 12
S8 – S41**
5 – 12
6 – 11
4 – 11
—
D – J
4 – 13
6 – 12
5 – 12
6 – 12
K4 – K9
7 – 13
F – W**
W+1 – W+28**
4 – 12
M8 – M10**
S1 – S41**
U
21 – 69
21 – 69
28 – 69
—
21 – 68
—
21 – 68
13 – 56
21 – 69
21 – 60
—
14 – 78
W+29 – W+58**
13 – 62
TV SYSTEM
(Set by the RF CH SET
button)
G
I
K
G
K
K
M
Getting Started
* VL = VHF low band, VH = VHF high band, U = UHF band
** CATV channels
Note
• The factory-preset RF output channel (which appears in the display window) is 32, and the
adjustable RF output channel range is 28 to 55 (the corresponding channels are different depending
on the area (see pages 20 to 23)). (See pages 11 and 12.)
Getting Started
-EN
9
Page 9

Step 4 Channel setup map and chart (continued)
Setting the NTSC PB switch to match your TV system
NTSC PB switch
You have to set the NTSC PB switch on the rear of the VCR according to your TV system to
display the on-screen menus when there is no video signal input, and play back a tape
recorded in the NTSC 3.58 system properly.
Set the NTSC PB switch following the table below.
If your TV is compatible with
PAL, SECAM, or MESECAM
NTSC 4.43
NTSC 3.58
Tip
• If you are not sure of your TV’s color system, refer to the map and chart on pages 8 and 9.
Notes
• If a video signal is input to the VCR (via the line input, tuner, or playback), the on-screen menus will
appear on your TV regardless of the NTSC PB switch setting.
• If your TV is compatible with the SECAM system, the on-screen menus may be displayed in black and
white.
Set the NTSC PB switch to
ON PAL TV
NTSC 4.43
NTSC 3.58
10
-EN
Getting Started
Page 10
Step 5
PROGRAM
Tuning the TV to your VCR
If you have connected the VCR to your TV using the audio/video cable, skip
this step.
ON/STANDBY
RF CH SET
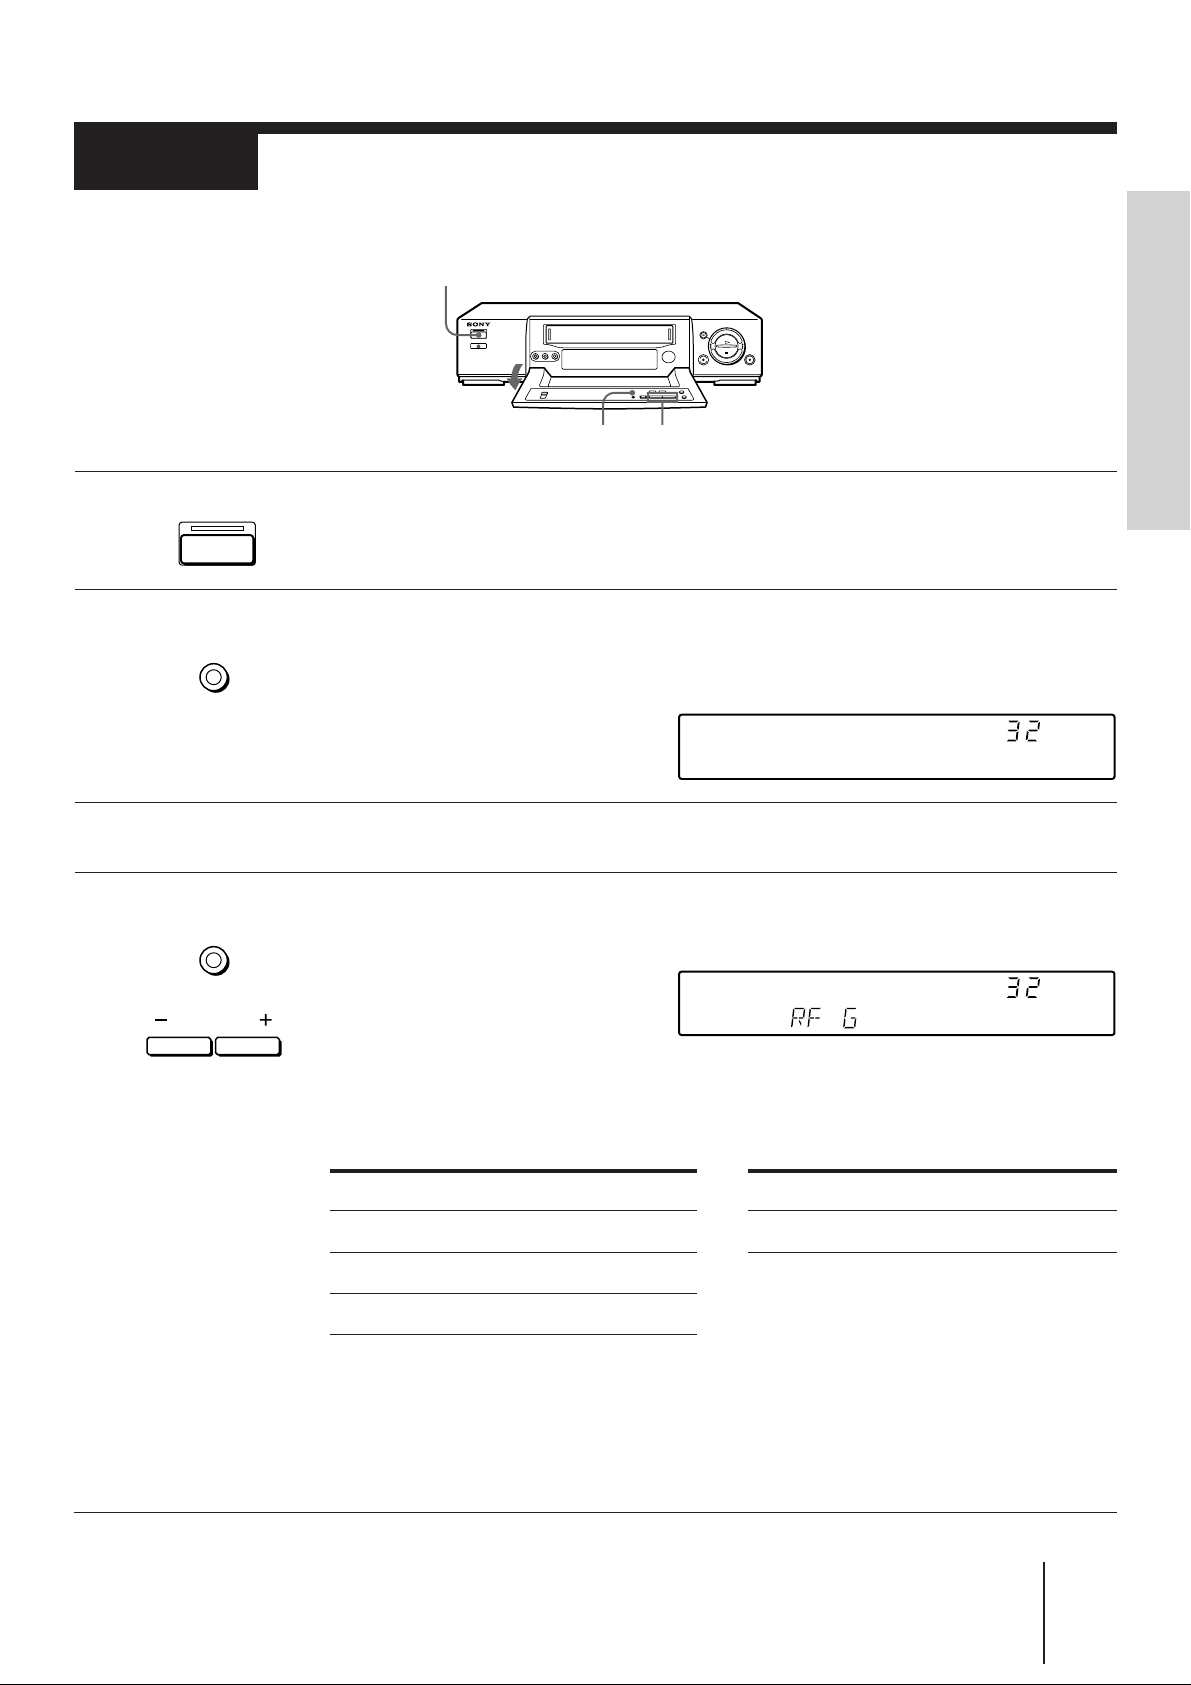
1 Press ON/STANDBY to turn on the VCR.
2 Press RF CH SET on the VCR.
ON/STANDBY
RF
CH SET
The factory-preset RF channel appears in the display window.
The VCR signal is output through this channel to the TV.
PROGRAM +/–
3 Turn on your TV and select a program position for video playback.
Getting Started
RF
4 Press RF CH SET.
RF
CH SET
The TV system indicator appears in the display window.
If the displayed TV system doesn’t match your TV, select the correct TV system by
pressing PROGRAM +/– according to the following table. If you don’t know your TV
system, please refer to the “Channel setup map and chart” on pages 8 and 9.
If your TV color system is PAL
If your TV system is Select TV system
I I
D/K K
B/G G
Tune the TV to the same channel as that shown in the display window so that a gray
screen appears on the TV screen.
Refer to your TV manual for tuning instructions.
If the gray screen does not appear clearly, see “To obtain a clear gray screen” on the
next page.
RF
If your TV color system is NTSC
Select TV system
M
(continued)
Getting Started
11
-EN
Page 11

Step 5 Tuning the TV to your VCR (continued)
5 Press RF CH SET.
RF
CH SET
You have now tuned your TV to the VCR. Whenever you play a tape, set the TV to the
program position selected in step 3 above.
Note
• If you set the wrong TV system, you may have no sound or sound may be distorted.
To check to see if the TV tuning is correct
Select the program position for video playback on the TV and press PROGRAM +/–. If
the TV screen changes to a different program each time you press PROGRAM +/–, the
TV tuning is correct.
To obtain a clear gray screen
If the gray screen does not appear clearly in step 4 above, go to step 5 to finish this
procedure once. Then start again from step 2. After pressing RF CH SET in step 2, press
PROGRAM +/– while the RF channel is displayed, so that another RF channel (between
28 and 55) appears (see page 20 for reference). Then tune the TV to the new RF channel
until a clear gray screen appears.
12
-EN
Getting Started
Page 12
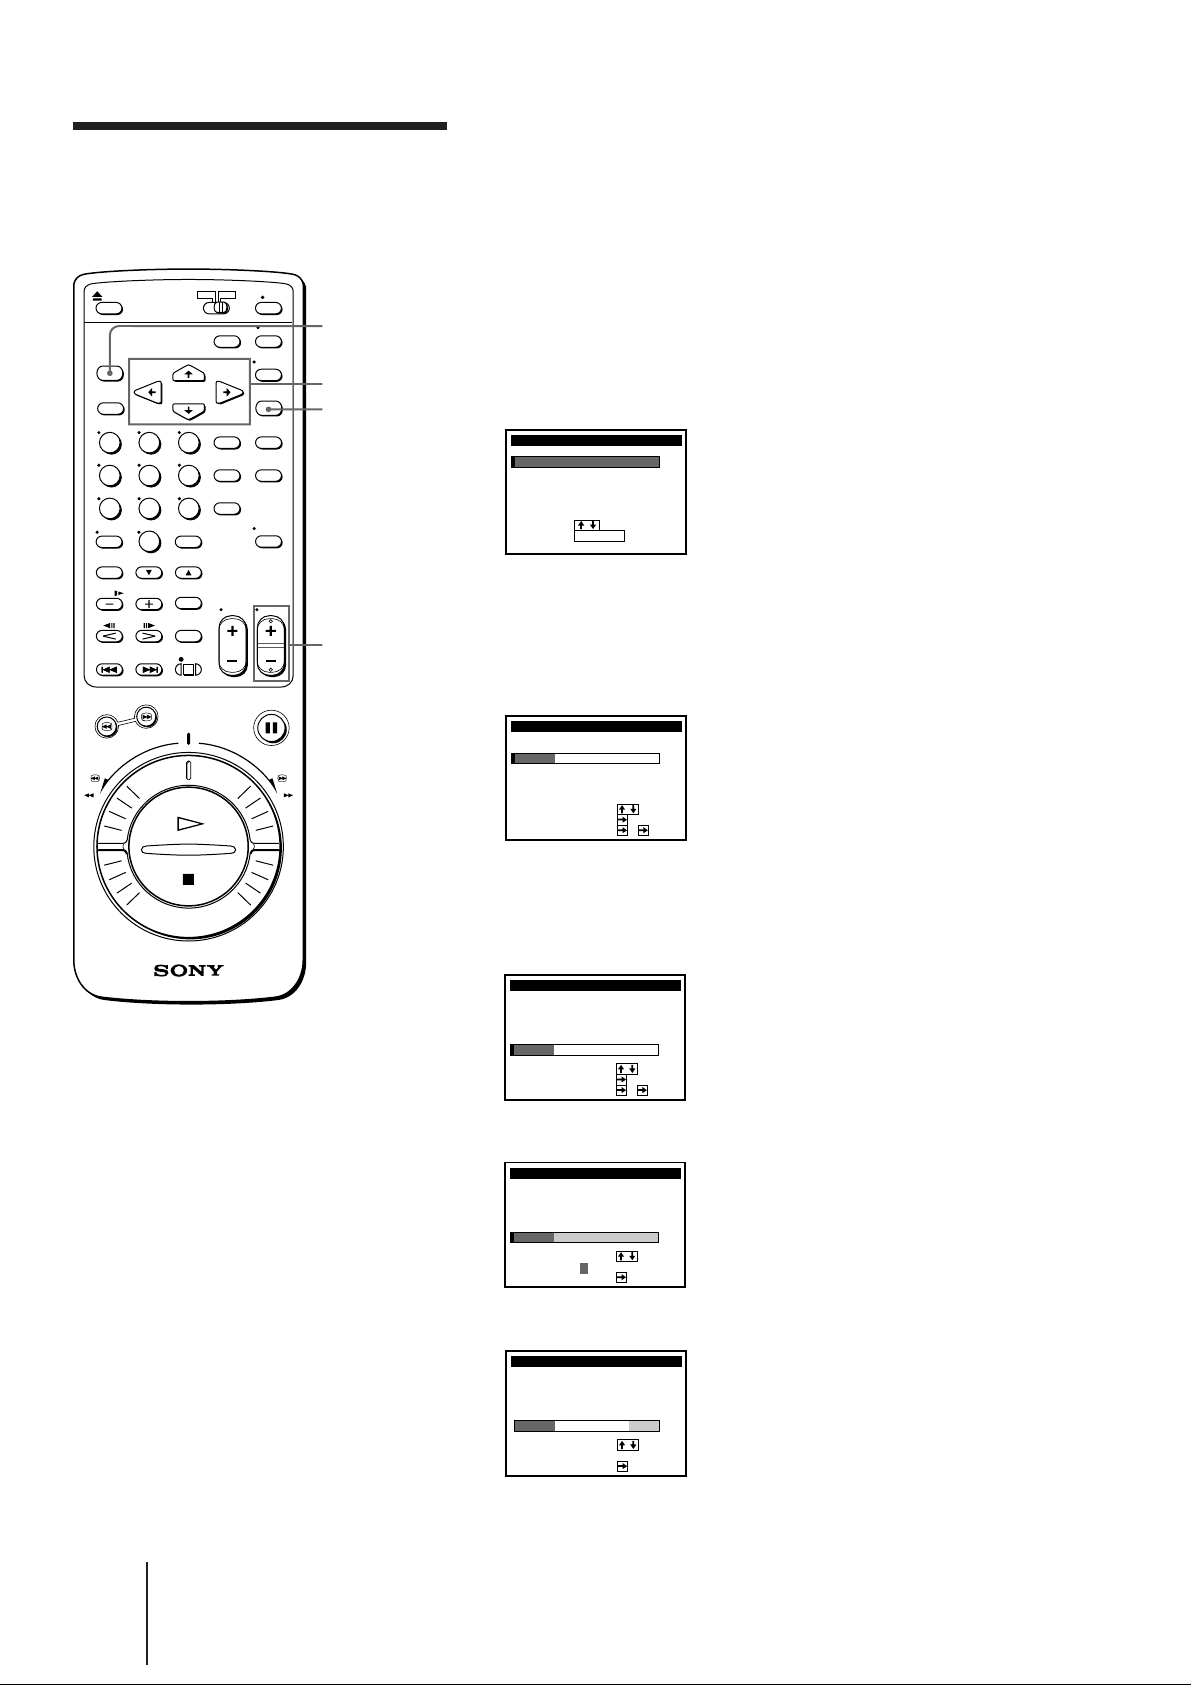
Step 6
Setting up the VCR sequentially
(EASY SET UP)
Before using the VCR for the first time, set up the VCR using the EASY SET UP
function. With this function, you can set the language, TV channels, and clock
guided by the sequence indicated on the TV screen.
u (on/standby)
CURSOR >/./ ?//
EXECUTE
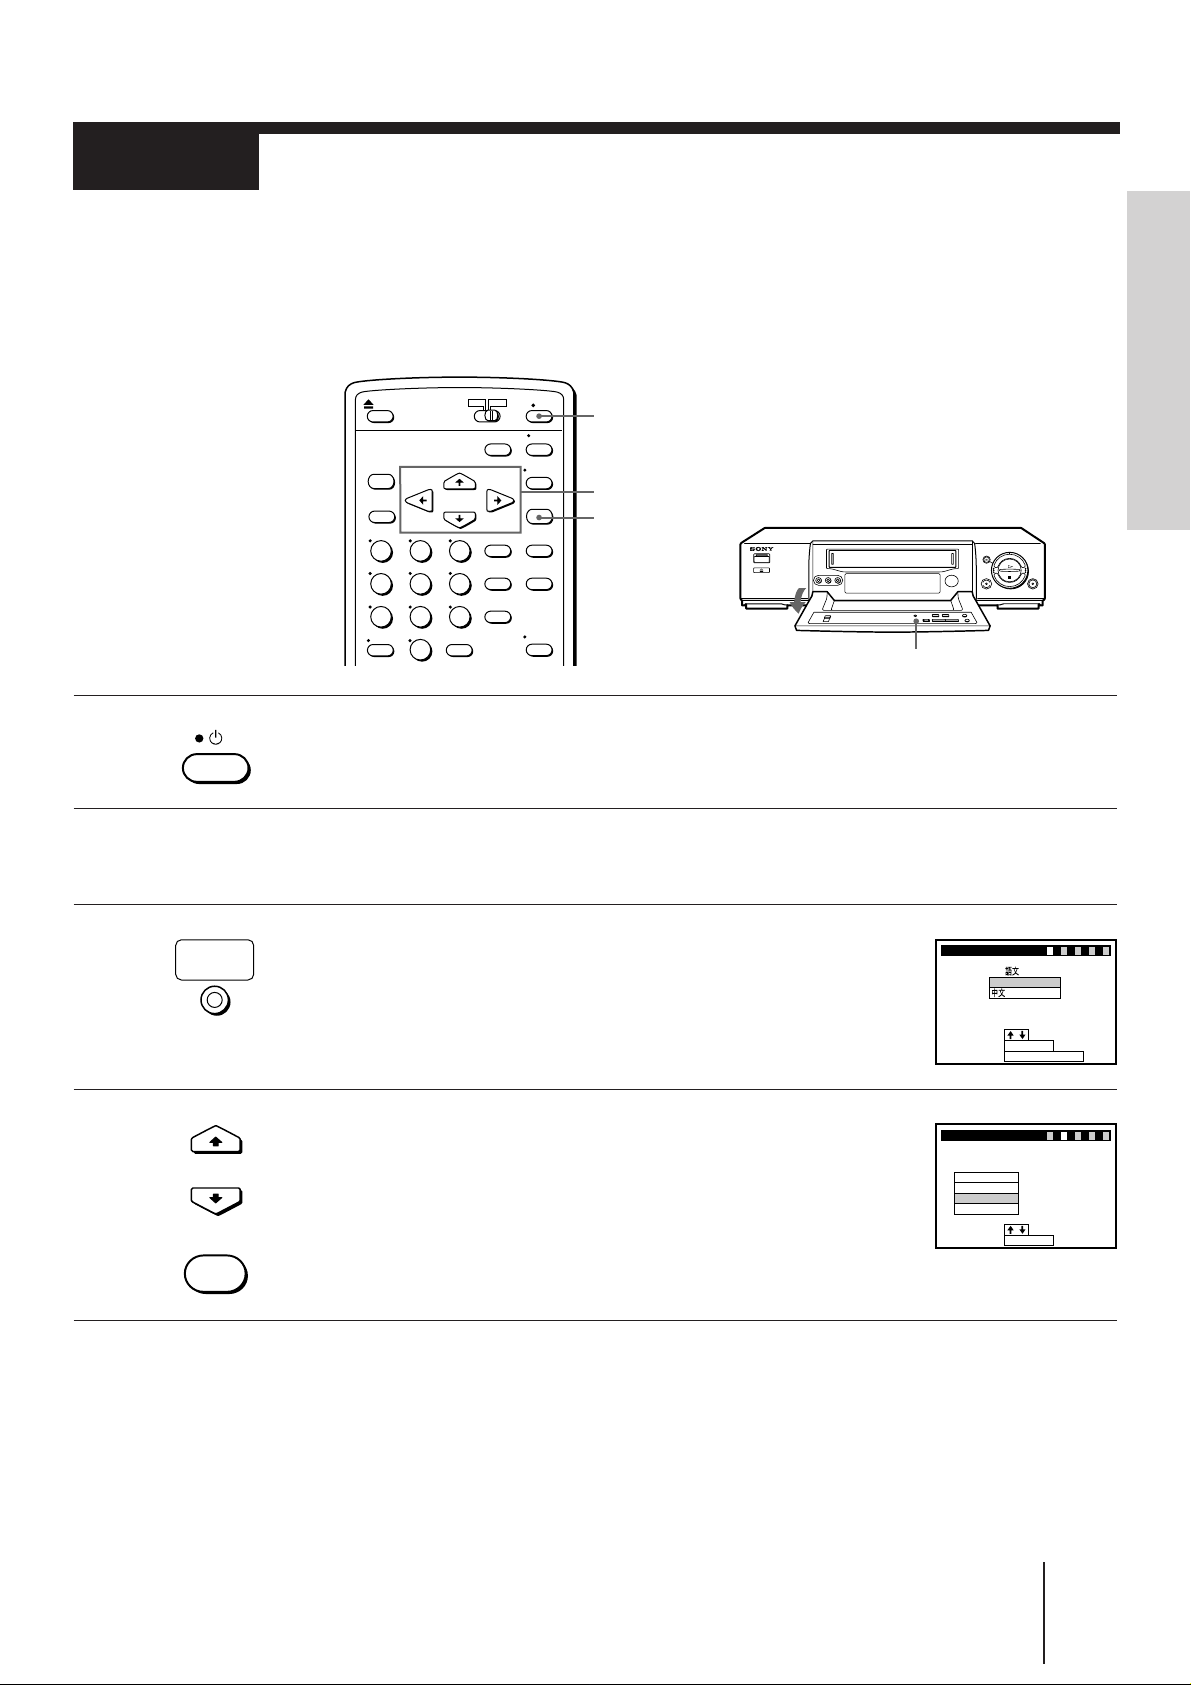
1 Press u (on/standby) to turn on the VCR.
Getting Started
EASY SET UP
2 Turn on your TV, and select a program position for
video playback.
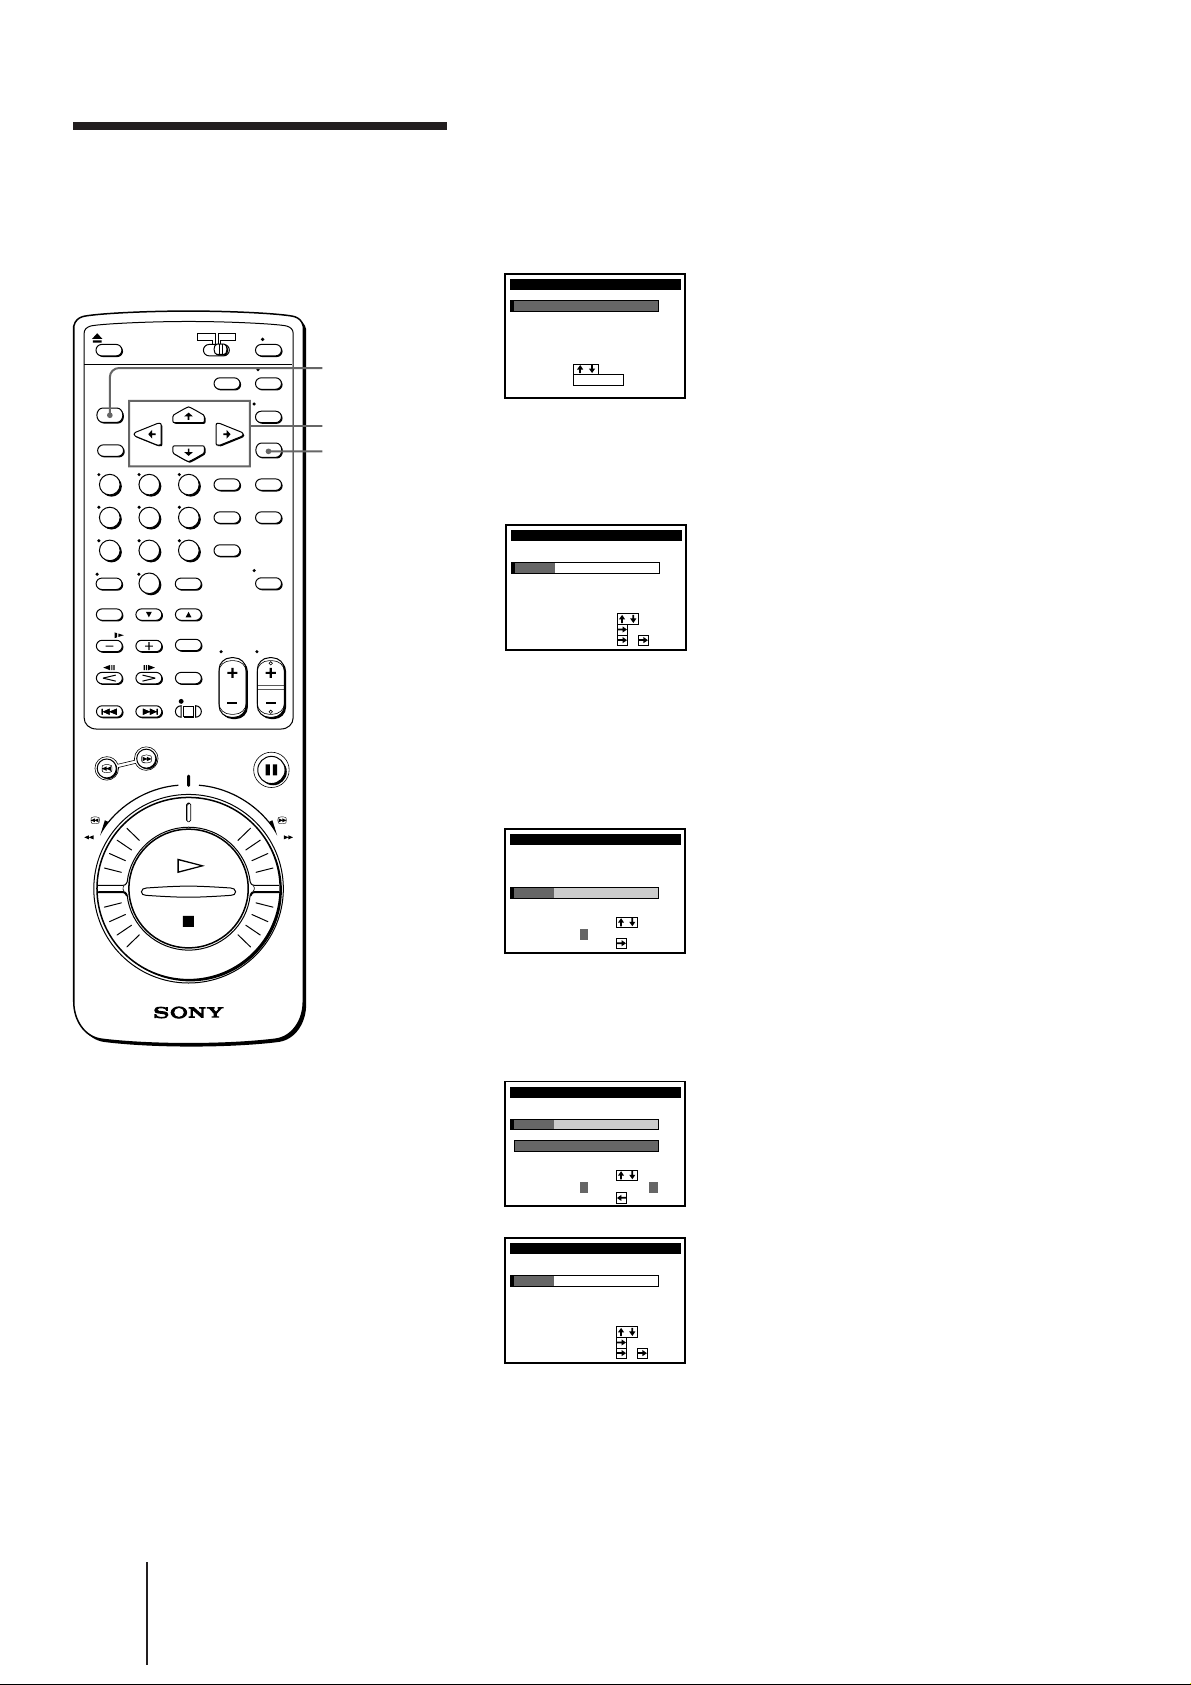
3 Press EASY SET UP on the VCR.
EASY
SET UP
The language select menu appears on the TV screen.
To cancel starting the EASY SET UP function, press EASY SET
UP.
4 Press CURSOR >/. to highlight the desired on-screen
CURSOR
EXECUTE
display language, then press EXECUTE.
The AUTO TUNER PRESET menu appears on the TV
screen.
EASY SET UP
LANGUAGE/
ENGL ISH
:
SELECT
:
NEXT
CANCEL
EASY SET UP
AUTO TUNER PRESET
SELECT
NEXT
I
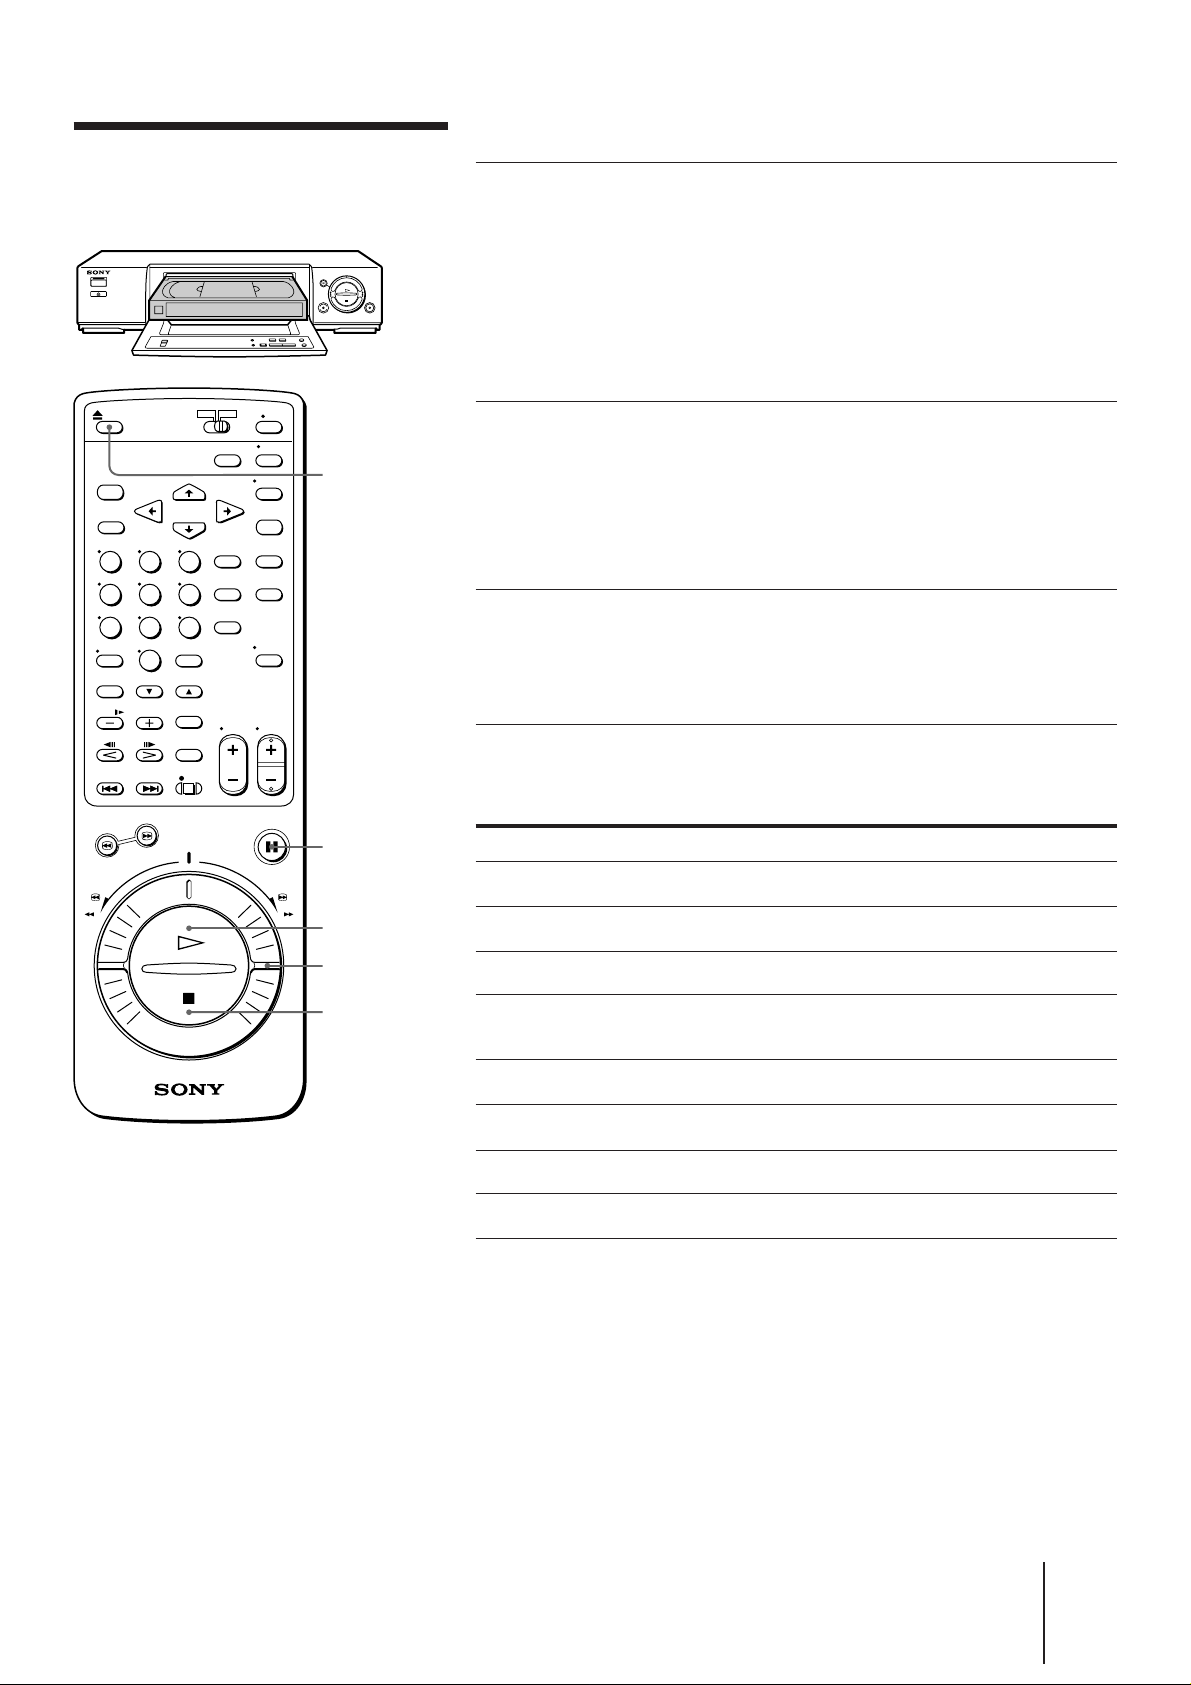
D/K
B/G
M
EXECUTE
:
EASY SET UP
:
:
EXECUTE
(continued)
–––5–
1234
–––
1234
–
5
Getting Started
13
-EN
Page 13
Step 6 Setting up the VCR sequentially (EASY SET UP) (continued)
EASY SET UP
CH 4
PLEASE
WAIT
2
AUTO TUNER PRESET
B/G
1234
–––5–
CURSOR
EASY SET UP
CLOCK SET
END
SET
:
:
SELECT
:
EXECUTE
1 MON.1 1.996
0:00
1234
–––5–
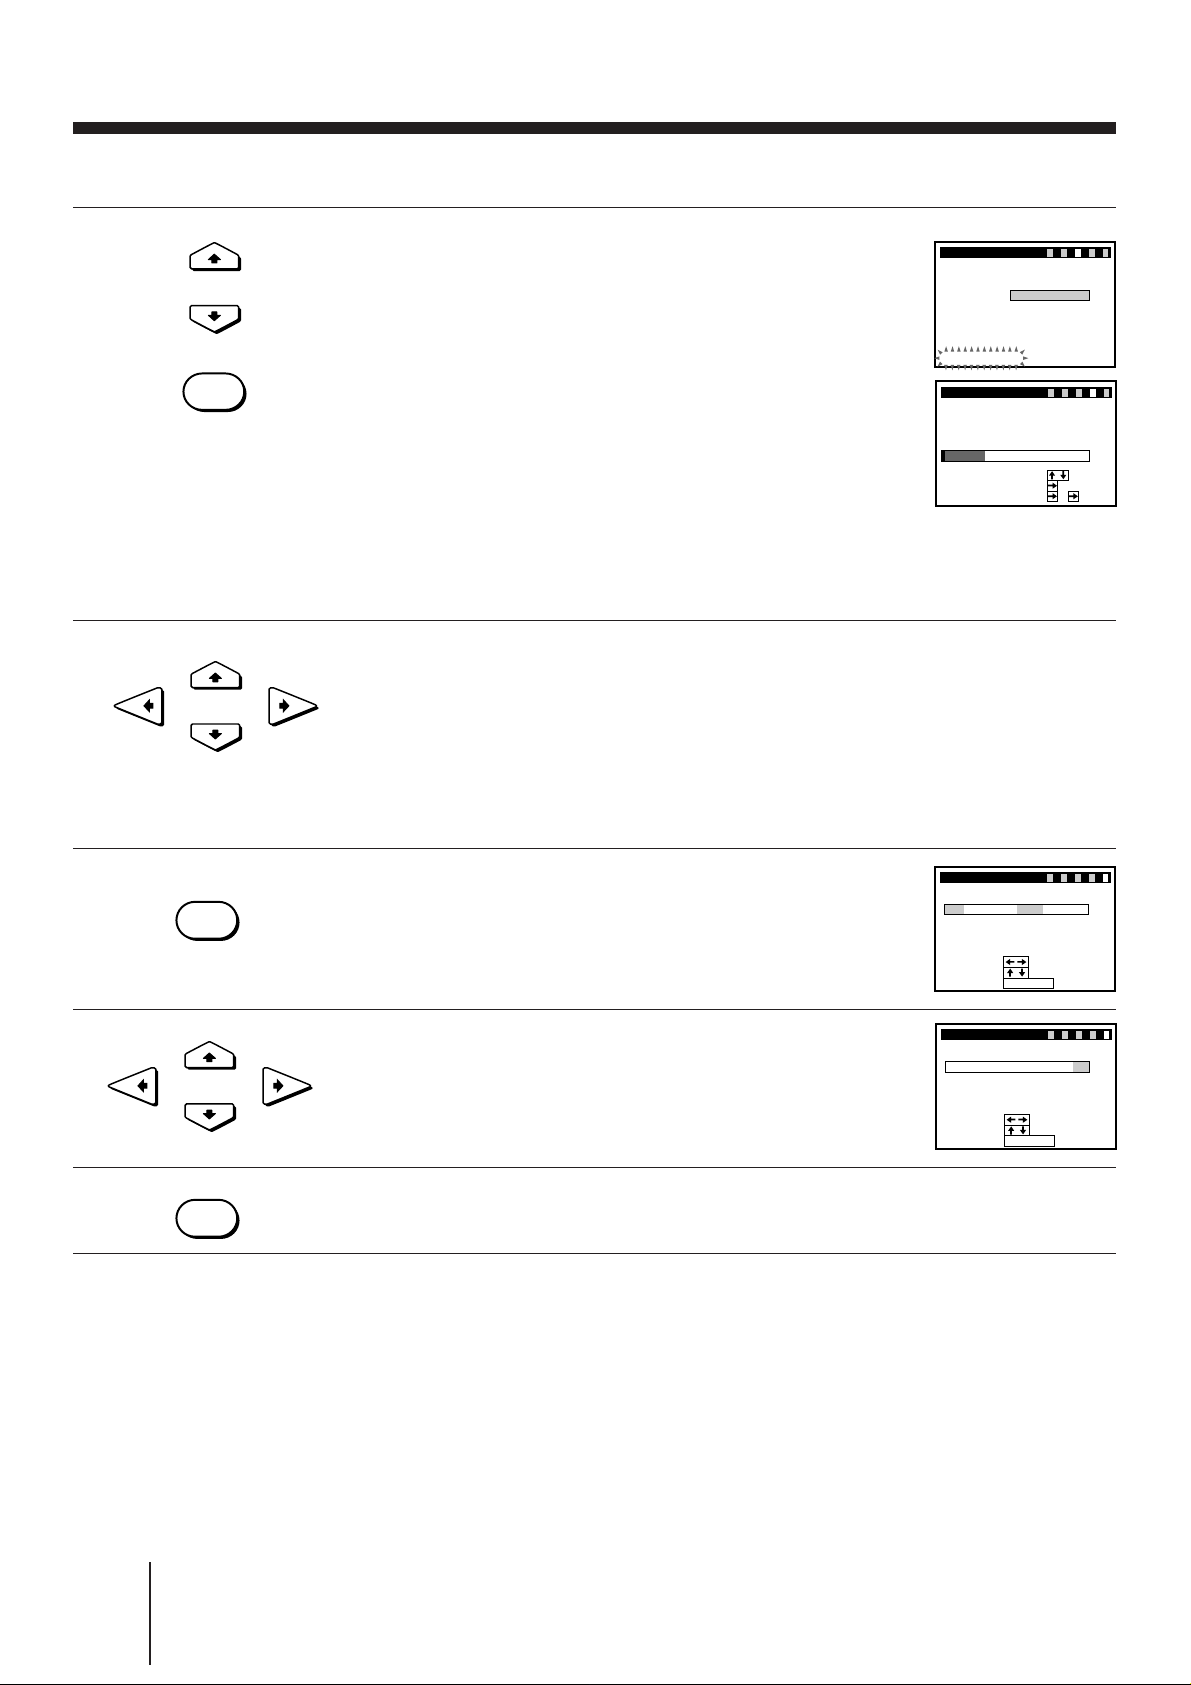
5 Press CURSOR >/. to highlight the desired system,
CURSOR
EXECUTE
then press EXECUTE.
The VCR starts searching for all the receivable channels in your
area and presets the located channels in numerical order.
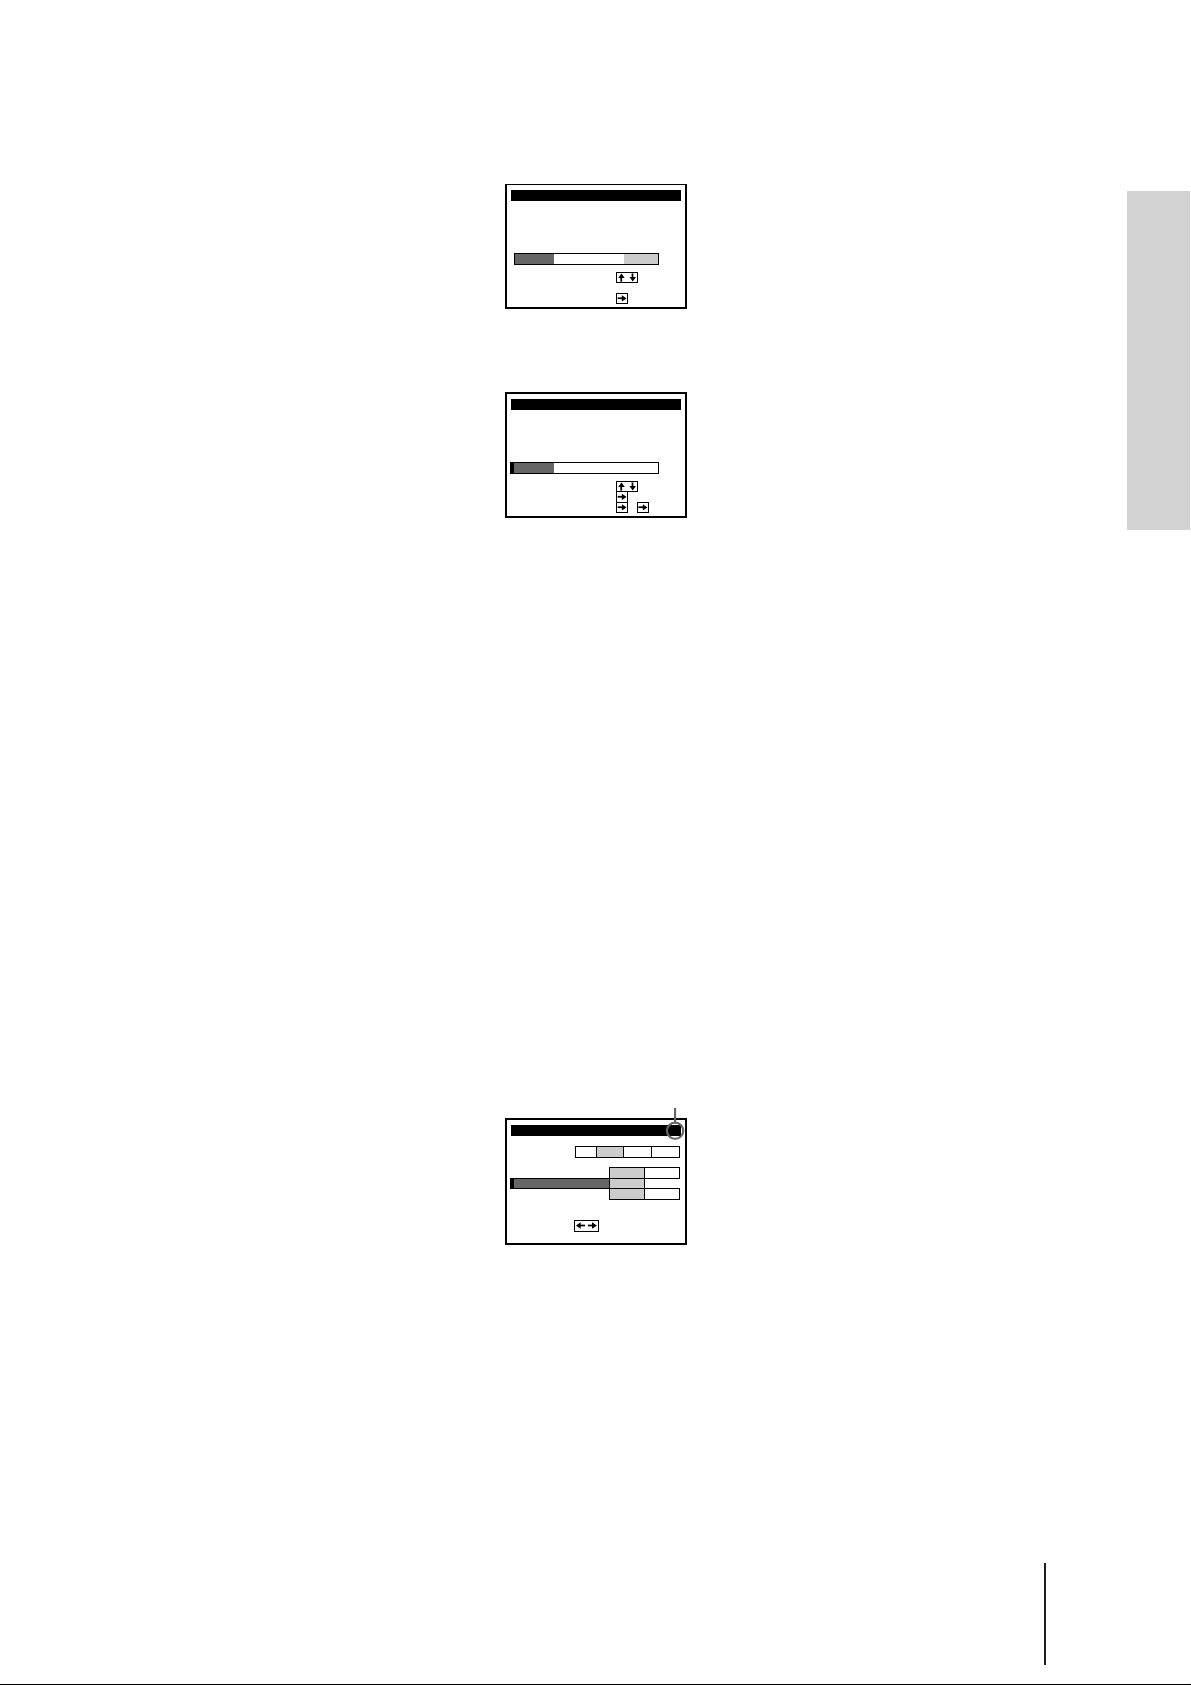
When all the channels are preset, the following screen appears.
Even if various TV systems coexist in your area, the AUTO
TUNER PRESET function picks up most of the channels on the
TV systems other than the one you selected. But you need to
manually reset the proper TV system for the unmatched
channels. See “Resetting the TV system” on page 19.
If necessary, you can add or disable the channels manually.
See “Tuning the VCR to TV channels manually” on page 17.
EASY SET UP
PROG
13 –
2
3
4
5
SELECT
MOVE PROG
SET GUI DE
6 Using CURSOR >/./?//, set the G-CODE guide
channels, and change the program positions of the
stations.
If not necessary, skip this step.
The setting procedures are the same as those described in
“Setting up G-CODE manually” on page 24 and “Changing
the program positions of the stations” on page 26.
–––5–
1234
GU
CH
9
12
27
5
6
IDE
CH
–
–
–
–––
–
–––
–
––
–
–
––––
:
:
4
–
:
CH
7 Press EXECUTE.
EXECUTE
The CLOCK SET menu appears.
8 Using CURSOR >/./?//, set the date and clock.
CURSOR
EXECUTE
The setting procedures are the same as described in “Setting
the clock manually” on page 15.
9 Press EXECUTE to finish the EASY SET UP operation.
Notes
• Do not exit EASY SET UP while AUTO TUNER PRESET is presetting channels. If you do so, repeat
the EASY SET UP operation from the beginning.
• The channel numbers appearing after AUTO TUNER PRESET may not be the same as your local
channel numbers. This is because this VCR’s channel search system is based on the fixed TV system
with the widest channel coverage.
In this case, you can apply your local channel numbers to the program positions. See “Changing the
program positions of the stations” on page 26.
• If the received channel is on cable TV, “C” appears on the left of the channel in step 5 in most areas.
However, this won’t be applied in some areas. See pages 20 to 23 for reference.
EASY SET UP
CLOCK SET
7 WED.111.996
:
SELECT
:
SET
:
END
EXECUTE
–––5–
1234
5:3021
-EN
14
Getting Started
Page 14
Setting the clock
You must set the time and date on the VCR to be able to use the timer
recording features properly. You can set the VCR clock using the menu.
manually
MENU
CURSOR
> / . / ? / /
EXECUTE
1 Press MENU.
The main MENU appears on the TV screen.
MENU
TI
MER SET / CHECK
UP MENU
SET
TUNER
PRESET
SET
UP CH AND G–CODE
CLOCK
SET
GAME
:
SELECT
:
SET
EXECUTE
2 Press CURSOR >/. to move the cursor (I) to CLOCK SET, then
press EXECUTE.
The CLOCK SET menu appears.
CLOCK SET
0:00
:
:
:
EXECUTE
MON.1 1.996
1
SELECT
SET
END
3 Press CURSOR >/. to set the day.
The day of the week is set automatically.
CLOCK SET
0:00
72
SAT.1 1.996
Getting Started
Tip
• To change the digits during
setting, press CURSOR ?
to return to the item to be
changed, and select the
digits using CURSOR >/..
Note
• The menu disappears
automatically if you don’t
proceed for more than a
few minutes.
:
SELECT
:
SET
:
END
EXECUTE
4 Press CURSOR / to highlight the month and set the month using
CURSOR >/..
CLOCK SET
0:00
:
:
:
EXECUTE
WED.111.996
72
SELECT
SET
END
5 Press CURSOR / to highlight the year and set the year using
CURSOR >/..
CLOCK SET
0:00
:
:
:
EXECUTE
WED.111.996
72
SELECT
SET
END
(continued)
Getting Started
15
-EN
Page 15
Setting the clock manually
(continued)
6 Press CURSOR / to highlight the hours and set the hours using
CURSOR >/..
CLOCK SET
5:00721
WED.111.996
:
SELECT
:
SET
:
END
EXECUTE
7 Press CURSOR / to highlight the minutes and set the minutes
using CURSOR >/..
CLOCK SET
5:30721
WED.111.996
:
SELECT
:
SET
:
END
EXECUTE
8 Press EXECUTE to start the clock.
16
-EN
Getting Started
Page 16
Tuning the VCR to TV
channels manually
MENU
CURSOR
> / . / ? / /
EXECUTE
PROG+/–
You may have preset the receivable channels in your area in the EASY
SET UP procedure (page 14). But if:
• some channels could not be preset automatically, preset them
manually. See “Presetting channels manually” on this page.
• there are unwanted channels among the preset ones, disable the
channels. See “Disabling unwanted program positions” on page 19.
• you live in the area where various TV systems coexist, and have
channels that don’t match the TV system you selected in AUTO
TUNER PRESET in the EASY SET UP procedure, reset the TV system
for those channels. See “Resetting the TV system” on page 19.
If the channels don’t match the TV system, the sound may be
distorted or noisy, or the color TV program may become black and
white, etc.
Presetting channels manually
1 Press MENU.
The main MENU appears on the TV screen.
MENU
TI
MER SET / CHECK
SET
UP MENU
TUNER
PRESET
UP CH AND G–CODE
SET
SET
CLOCK
GAME
:
SELECT
:
SET
EXECUTE
Getting Started
Notes
• The menu disappears
automatically if you don’t
proceed for more than a
few minutes.
• Even if you choose CATV
in step 3, normal channels
may be tuned in, and vice
versa depending on the
area. See pages 20 to 23 for
reference.
• The channel numbers
besides CHANNEL SET
may not be the same as
those in your area. This is
because this VCR’s channel
search system is based on
the fixed TV system that
has the widest channel
coverage. If necessary,
apply your local channel
numbers to the program
positions. See “Changing
the program positions of
the stations” on page 26.
2 Press CURSOR >/. to move the cursor (I) to TUNER PRESET, then
press EXECUTE.
The TUNER PRESET menu appears.
TUNER PRESET
SYSTEM
NORMAL
CATV/
CHANNEL
SET
AFT
F
I NE TUNI NG
:
SET
NORM
2
ON
01PROG
B/GD/KIM
CATV
1
OFF
3 Press CURSOR >/./?// to move the cursor (I) to NORMAL/
CATV, then highlight NORM.
To preset CATV channels, highlight CATV.
TUNER PRESET
SYSTEM
NORMAL
CATV/
CHANNEL
SET
AFT
F
I NE TUNI NG
:
SET
NORM
2
ON
01PROG
B/GD/KIM
CATV
1
OFF
4 Press CURSOR >/. to move the cursor (I) to CHANNEL SET.
TUNER PRESET
SYSTEM
NORMAL
CATV/
CHANNEL
SET
AFT
F
I NE TUNI NG
:
SET
NORM
2
ON
01PROG
B/GD/KIM
CATV
1
OFF
(continued)
Getting Started
17
-EN
Page 17
Tuning the VCR to TV
05
channels manually (continued)
5 Press PROG +/– to select the program position.
Selected program position
TUNER PRESET
SYSTEM
CATV/
NORMAL
SET
CHANNEL
AFT
I NE TUNI NG
F
:
SET
NORM
2
ON
41PROG
B/GD/KIM
CATV
1
OFF
6 Press CURSOR / to start tuning.
The VCR starts searching for a channel and displays the first one it
finds on the TV screen. Press CURSOR ?// repeatedly until the
channel you want is displayed.
TUNER PRESET
SYSTEM
NORMAL
CATV/
CHANNEL
SET
AFT
F
I NE TUNI NG
:
SET
NORM
3
ON
41PROG
B/GD/KIM
CATV
5
OFF
The channels are scanned in the order shown in the table beginning
on page 20 to 23.
If you know the number of the channel you want, press the program
number buttons. For example, for channel 5, first press “0” and then
press “5.”
7 If the TV sound is distorted or noisy, or the color TV program
becomes black and white, etc., press CURSOR >/./?// to
move the cursor (I) to SYSTEM, then highlight I, D/K, B/G, or M
whichever is applicable in your area.
Refer to the “Channel setup map and chart” on pages 8 and 9, and
“Resetting the TV system” on page 19.
TUNER PRESET
SYSTEM
NORMAL
CATV/
CHANNEL
SET
AFT
F
I NE TUNI NG
:
SET
NORM
3
ON
41PROG
B/GD/KIM
CATV
6
OFF
8 To allocate another channel to another program position, repeat
steps 5 and 6.
9 Press EXECUTE to store all the allocated channels.
18
-EN
Getting Started
Page 18

Disabling unwanted program positions
After tuning the TV channels, you can disable unused program
positions. The disabled positions will be skipped later when you press
the PROG +/– buttons.
1 Press MENU, then select TUNER PRESET and press EXECUTE.
2 Select CHANNEL SET.
3 Press PROG +/– until the program position you want to disable
appears beside “PROG” on the TV screen.
4 Press program number button “0” twice to display the number “0”
beside CHANNEL SET.
5 Repeat steps 3 and 4 for other positions you want to disable.
6 Press EXECUTE.
Resetting the TV system (only for areas where
various TV systems coexist)
If the sound is distorted or noisy, or the color TV program becomes
black and white, etc., that channel may not be matched to the proper TV
system. In this case, try the following steps.
1 Press MENU, then select TUNER PRESET and press EXECUTE.
2 Press PROG +/– to select the program position that has the channel
with above described conditions.
3 Select SYSTEM and select the TV system on which you can obtain
the best sound and picture.
4 Repeat steps 2 and 3 for other positions you want to preset the TV
system to.
5 Press EXECUTE.
Getting Started
If the picture is not clear
Normally, the Auto Fine Tuning (AFT) function automatically tunes in
channels clearly. If, however, the picture is not clear, you may also use
the manual tuning function.
1 Press PROG +/– to select the program position for which you cannot
obtain a clear picture.
2 Press MENU, then select TUNER PRESET and press EXECUTE.
3 Select FINE TUNING. The fine tuning meter appears.
Selected program position
TUNER PRESET
SYSTEM
NORMAL
CHANNEL
AFT
F I NE TUNI NG
SET
NORM
CATV/
SET
ON
:
4 Press CURSOR ?// to get a clearer picture, then press EXECUTE.
Note that the AFT (Auto Fine Tuning) setting switches to OFF.
51PROG
B/GD/KIM
CATV
8
OFF
Getting Started
19
-EN
Page 19
Tuning the VCR to TV
channels manually (continued)
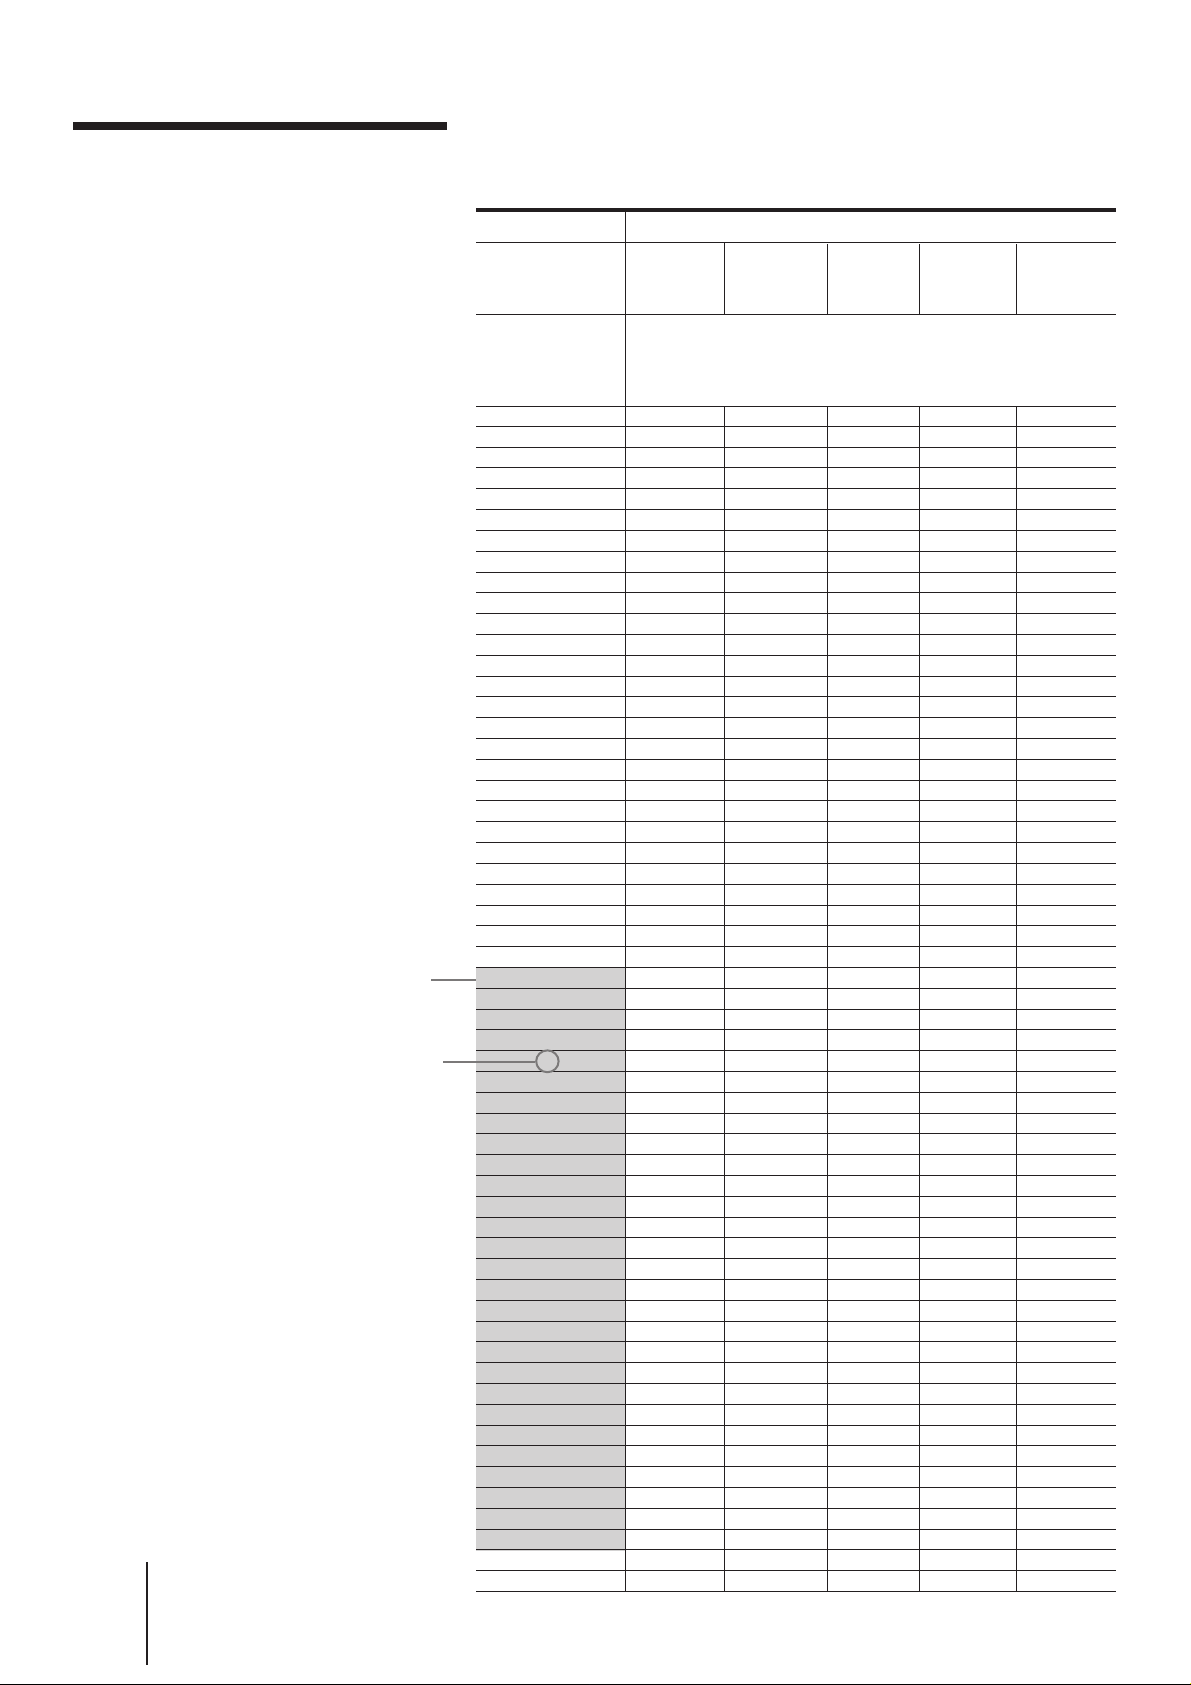
Channel numbers in the CHANNEL SET field and the
corresponding channels
Note
• There may be a case that
the same area channel may
appear repeatedly as the
other channel number in
the CHANNEL SET field.
-EN
20
Getting Started
The shadow in the
table shows the
adjustable RF
output channel
range. (See page
12 for reference.)
The factory-preset
RF output channel
(See page 11 for
reference.)
TV system
Country
Channel
number in
the CHANNEL
SET field
1
2
3
4
5
6
7
8
9
10
11
12
13
14
15
16
17
18
19
20
21
22
23
24
25
26
27
28
29
30
31
32
33
34
35
36
37
38
39
40
41
42
43
44
45
46
47
48
49
50
51
52
53
54
55
56
57
Europe
E2
E3
E4
E5
E6
E7
E8
E9
E10
E11
E12
E21
E22
E23
E24
E25
E26
E27
E28
E29
E30
E31
E32
E33
E34
E35
E36
E37
E38
E39
E40
E41
E42
E43
E44
E45
E46
E47
E48
E49
E50
E51
E52
E53
E54
E55
E56
E57
B/G
Australia New
Corresponding channels
AS0
1
2
6
7
8
9
9A
10
11
Zealand
1
2
3
4
5
6
7
8
9
10
11
3
4
28
29
30
31, 32
33
34
35
36
37
38
39, 40
41
42
43
44
45
46
47, 48
49
50
51
52
53
54
55, 56
57
58
59
60
61
Morocco
M6
M7
M8
M9
M10
IndonesiaWestern
1A
2A
3A
4A
5A
6A
7A
8A
9A
10A
11A
Page 20
TV system
B/G
Country
Channel
number in
the CHANNEL
SET field
58
59
60
61
62
63
64
65
66
67
68
69
C1
C2
C3
C4
C5
C6
C7
C8
C9
C10
C11
C12
C13
C14
C15
C16
C17
C18
C19
C20
C21
C22
C23
C24
C25
C26
C27
C28
C29
C30
C31
C32
C33
C34
C35
C36
C37
C38
C39
C40
C41
C42
C43
C44
C45
C46
Europe
E58
E59
E60
E61
E62
E63
E64
E65
E66
E67
E68
E69
S1
S2
S3
S4
S5
S6
S7
S8
S9
S10
S11
S12
S13
S14
S15
S16
S17
S18
S19
S20
S21
S22
S23
S24
S25
S26
S27
S28
S29
S30
S31
S32
S33
S34
S35
S36
S37
S38
S39
S40
S41
S01
S02
S03
S04
S05
Australia
Corresponding channels
New
Zealand
62
63, 64
65
66
67
68
69
5
5A
Morocco
M4
M5
IndonesiaWestern
Getting Started
Getting Started
21
-EN
Page 21

Tuning the VCR to
TV channels
manually
(continued)
The shadow in the
table shows the
adjustable RF
output channel
range. (See page
12 for reference.)
The factory-preset
RF output channel
(See page 11 for
reference.)
TV system
Country
Channel
number in
the
CHANNEL
SET field
1
2
3
4
5
6
7
8
9
10
11
12
13
14
15
16
17
18
19
20
21
22
23
24
25
26
27
28
29
30
31
32
33
34
35
36
37
38
39
40
41
42
43
44
45
46
47
48
49
50
51
52
53
54
55
56
57
D/K
East
Europe
R1
R6
R7
R12
R2
R3
R4
R5
R8
R9
R10
R11
R21
R22
R23
R24
R25
R26
R27
R28
R29
R30
R31
R32
R33
R34
R35
R36
R37
R38
R39
R40
R41
R42
R43
R44
R45
R46
R47
R48
R49
R50
R51
R52
R53
R54
R55
R56
R57
China UK/Hong
Kong
1
2
3
7
8
4
5
9
10
11
12
13
14
15
16
17
18
19
20
21
22
23
24
B21
B22
B23
B24
B25
B26
B27
B28
B29
B30
B31
B32
B33
B34
B35
B36
B37
25
26
27
28
29
30
31
32
33
34
35
36
37
38
39
40
41
42
43
44
B38
B39
B40
B41
B42
B43
B44
B45
B46
B47
B48
B49
B50
B51
B52
B53
B54
B55
B56
B57
IM
Ireland South
Africa
Corresponding channels
U.S.A.
Japan
A
B
C
D
E
J
4
5
10
2, C2
3
7
8
9
12
13
J
K
J-5
J-6
J-7
J-10
J-11
J-12
S1
5
F
G
H
I
6
7
8
9
21
22
23
24
25
26
27
28
29
30
31
32
33
34
35
36
37
38
39
40
41
42
43
44
45
46
47
48
49
50
51
52
53
54
55
56
57
10
11
14, W+29, W+30
15, 16, W+31
17, W+32
18, W+33, W+34
19, 20, W+35
21, W+36
22, W+37, W+38
23, 24, W+39
25, W+40
26, W+41, W+42
27, 28, W+43
29, W+44
30, W+45, W+46
31, 32, W+47
33, W+48
34, W+49, W+50
35, 36, W+51
37, W+52
38, W+53, W+54
39, 40, W+55
41, W+56
42, W+57, W+58
43, 44
45
46
47, 48
49
50
51, 52
53
54
55, 56
57
58
59, 60
61
62
J-8
J-9
J13
J14, J15
J16
J17
J18, J19
J20
J21
J22, J23
J24
J25
J26, J27
J28
J29
J30, J31
J32
J33
J34, J35
J36
J37
J38, J39
J40
J41
J42, J43
J44
J45
J46, J47
J48
J49
J50, J51
J52
J53
J54, J55
J56
J57
J58, J59
J60
J61
22
-EN
Getting Started
Page 22
TV system
IMD/K
Country
Channel
number in
the
CHANNEL
SET field
58
59
60
61
62
63
64
65
66
67
68
69
C1
C2
C3
C4
C5
C6
C7
C8
C9
C10
C11
C12
C13
C14
C15
C16
C17
C18
C19
C20
C21
C22
C23
C24
C25
C26
C27
C28
C29
C30
C31
C32
C33
C34
C35
C36
C37
C38
C39
C40
C41
C42
C43
C44
C45
C46
East
Europe
R58
R59
R60
China UK/Hong
45
46
47
48
49
50
51
52
53
54
55
56
Kong
B58
B59
B60
B61
B62
B63
B64
B65
B66
B67
B68
B69
6
Ireland South
Africa
Corresponding channels
58
U.S.A.
63, 64
59
60
61
67, 68
62
63
64
71, 72
65
66
67
75, 76
68
A-2, A-1
11
(12)
M, N
13
W+1, W+2
W+3
W+4
W+5, W+6
W+7
W+8
W+9, W+10
W+11
W+12
W+13, W+14
W+15
W+16
W+17, W+18
W+19
W+20
W+21, W+22
W+23
W+24
W+25, W+26
W+27
W+28
4, 4A
65
66
69
70
73
74
77
78
A-3
A
B
C
D
E
F, G
H
I
L
O
P
Q
R
S
T, U
V
W
6
A-5
A-4
Japan
Getting Started
J62
J-3
M1, M2
M3
M4
M5
M6
M7
M8, M9
M10
J-4
S2
S3
S4
S5, S6
S7
S8
S9
S10, S11
S12
S13
S14, S15
S16
S17
S18, S19
S20
S21
S22, S23
S24
S25
S26, S27
S28
S29
S30, S31
S32
S33
S34, S35
S36
S37
S38, S39
S40
S41
J-1
J-2
Getting Started
23
-EN
Page 23
Setting up G-CODE
manually
G-CODE is a feature in Sony VCRs that simplifies the task of
programming the VCR to make timer recordings. Use the on-screen
display to coordinate the program position of each channel with the
guide channel (the number that’s assigned to each TV station in
advance). To get the guide channel numbers, look in the program guide
for your area that features G-CODE numbers.
MENU
CURSOR
> / . / ? / /
EXECUTE
PROG+/–
Setting the guide channels
1 Press MENU.
The main MENU appears on the TV screen.
MENU
TI
MER SET / CHECK
UP MENU
SET
TUNER
PRESET
SET
UP CH AND G–CODE
CLOCK
SET
GAME
:
SELECT
:
SET
2 Press CURSOR >/. to move the cursor (I) to SET UP CH AND
G-CODE, then press EXECUTE.
The SET UP CH AND G-CODE menu appears.
The preset channels are displayed on the screen. “---” in the GUIDE
CH column means that the guide channel has not been preset.
SET UP CH AND G–CODE
SELECT
MOVE PROG
SET GUI DE
3 Press CURSOR >/. to move the cursor (I) to the row on which you
want to set the guide channel.
To display program positions 6 to 50, press CURSOR >/.
repeatedly.
PROG
1
2
3
4
5
EXECUTE
CH
12
27
5
GU
3–
9
–
–
–
6
––––
:
:
1
–
:
CH
IDE
CH
–––
–––
–––
–––
Notes
• The menu disappears
automatically if you don’t
proceed for more than a
few minutes.
• The G-CODE used in this
VCR is for Singapore,
Malaysia, Hong Kong,
Macao, etc. and cannot be
used in areas such as
U.S.A., Canada, Japan,
Korea, Taiwan, and U.K.
• If the preset channel is on
cable TV, “C” appears on
the left of the channel in
step 2 in most areas.
However, this won’t be
applied in some areas. See
pages 20 to 23 for
reference.
SET UP CH AND G–CODE
PROG
CH
1
2
12
3
27
4
5
5
SELECT
MOVE PROG
SET GUI DE
GU
3–
9
6
IDE
–––
–
–––
–
–––
–
–––
––––
:
:
4
–
:
CH
CH
4 Press CURSOR / to highlight the TV channel and guide channel.
SET UP CH AND G–CODE
PROG
CH
1
2
3–
12
27
4 –
5
5
SELECT
MOVE PROG
SET GUI DE CH
–
3
–
9
–
6–––
:
4
:
GU
IDE
CH
–––
–––
–––
–––
5 Press CURSOR / to highlight the guide channel only.
SET UP CH AND G–CODE
PROG
CH
1
2
3––––
12
27
4
5
SELECT
SET
GU
IDE
CH
–
3
9
65
–––
–
–––
–
–––
––––
:
:
24
-EN
Getting Started
Page 24
Notes
• If you inadvertently
entered a guide channel
number, press CURSOR
>/. repeatedly to reset the
”GUIDE CH” column to
”---”. ”---” appears between
1 and 255.
• The VCR does not allow
entering the guide channel
number, if the same
number has been set.
• If you leave the GUIDE CH
column blank (---), the VCR
will record the signal
through LINE IN when
recording with G-CODE.
6 Press CURSOR >/. to select the guide channel number assigned in
the program guide.
SET UP CH AND G–CODE
PROG
CH
1
2
3–
12 –––
27
4
5
SELECT
SET
GU
IDE
CH
–
3
9
65
–––
–
–––
–
52
––––
:
:
7 Press CURSOR / to confirm the setting.
The cursor (I) appears in the leftmost column.
SET UP CH AND G–CODE
PROG
CH
1
2
12 –––
3–
27
4
5
SELECT
MOVE PROG
SET GUI DE
GU
IDE
–
–
–
––––
CH
–––
–––
52
–
3
9
65
:
:
3
:
CH
8 To set the guide channel of another station, repeat steps 3 to 7.
If you want to change the program positions of the stations, proceed
to step 2 of “Changing the program positions of the stations” on
page 26.
9 When you’ve finished, press EXECUTE to exit.
Getting Started
Note
• When you record a satellite
broadcast using G-CODE,
you need to select the
desired channel on the
satellite tuner manually.
Setting up G-CODE for satellite broadcasts
When your satellite tuner is connected via the AERIAL IN connector,
first you have to set the program position for each satellite channel
using the TUNER PRESET menu. Then set the guide channel number
for each satellite channel using the SET UP CH AND G-CODE menu.
1 Turn on the satellite tuner.
2 Press MENU, then select TUNER PRESET and press EXECUTE.
3 Press PROG +/– to select a program position you want to use for
watching a satellite channel.
4 Select CHANNEL SET, then press CURSOR / to tune the VCR to
the satellite tuner.
The channel number displayed beside CHANNEL SET is used for
receiving all satellite broadcasts from the satellite tuner.
Selected program position
TUNER PRESET
SYSTEM
NORM
CATV/
NORMAL
SET
CHANNEL
AFT
I NE TUNI NG
F
SET
3
ON
:
5 Press PROG +/– to select another program position for another
satellite channel, and press the program number buttons to enter the
same channel number as the one displayed in step 4.
Repeat this step for all satellite channels.
6 Set the guide channel number for each program position
assigned to the satellite channel, following the procedures in “Setting
the guide channels” on pages 24 and this page.
6PROG
B/GD/KIM
CATV
0
OFF
Getting Started
25
-EN
Page 25
Changing the
After setting the channels and G-CODE guide channels, you can change
the program positions which are automatically assigned, as you like.
program positions of
the stations
MENU
CURSOR
> / . / ? / /
EXECUTE
1 Press MENU.
The main MENU appears on the TV screen.
MENU
TI
MER SET / CHECK
UP MENU
SET
TUNER
PRESET
SET
UP CH AND G–CODE
CLOCK
SET
GAME
:
SELECT
:
SET
EXECUTE
2 Press CURSOR >/. to move the cursor (I) to SET UP CH AND
G-CODE, then press EXECUTE.
The SET UP CH AND G-CODE menu appears.
SET UP CH AND G–CODE
PROG
1 3
2
3
4
5
SELECT
MOVE PROG
SET GUI DE
CH
12
27
GU
IDE
CH
–
1
–
9
65
1
CH
2
–
83
–
61
––––
:
:
–
:
3 Press CURSOR >/. to move the cursor (I) to the row on which you
want to change the program position, then press CURSOR /.
The TV channel and guide channel are highlighted.
To display other pages for program positions 6 to 50, press CURSOR
>/. repeatedly.
SET UP CH AND G–CODE
PROG
CH
1
2
3 –83
12
4
27
5
SELECT
MOVE PROG
SET
GU
IDE
CH
–
3
9
65
3
1
–
2
–
61
––––
:
:
4 Press CURSOR >/. until the channel and guide channel row moves
to the desired program position, then press CURSOR ?.
The two rows exchange the positions.
SET UP CH AND G–CODE
PROG
CH
1
2
3–83
12
4
27
5
SELECT
MOVE PROG
SET
SET UP CH AND G–CODE
PROG
CH
1 3
12
2
3
4
27
5
SELECT
MOVE PROG
SET GUI DE
3
9
65
9
3
65
TO PROG
3
1
CH
GU
IDE
CH
–
1
–
2
–
61
––––
:
1
:
GU
IDE
CH
–
8
–
2
–
1
–
61
––––
:
:
–
:
5 To change the program position of another station, repeat steps 3
and 4.
26
-EN
6 When you’ve finished, press EXECUTE to exit.
Getting Started
Page 26
Basic Operations
This section shows you how to play back a video tape.
Playing a tape
6 EJECT
1 Turn on your TV and tune in to
the VCR:
• If the TV is connected to the VCR
using the audio/video cable, set the TV
to video input.
• If the TV is connected to the VCR using
only the aerial cable, set the TV to the
program position for the VCR.
2 Open the drop down panel and
insert a tape.
The VCR turns on automatically. The
tape starts playing automatically if its
safety tab has been removed. (See
page 34.)
3 Press · PLAY to start playing.
When the tape reaches the end, the VCR
automatically rewinds it to the
beginning. (The power remains on.)
Tip
• For further information on
searching and playback
functions, see “Playing/
searching at various
speeds” on page 41.
Note
• Tapes recorded in LP mode
can be played back on this
VCR, while playback
picture quality in modes
other than normal forward
speed is not guaranteed.
P PAUSE
· PLAY
DUAL MODE
SHUTTLE
(DMS)
p STOP
Additional tasks
To
Stop play
Pause play
Resume play after pause
Search forward
Search backward
Fast-forward the tape
Rewind the tape
Eject the tape
Press
p STOP
P PAUSE
P PAUSE or · PLAY
Turn the DUAL MODE SHUTTLE (DMS)
ring to # during playback
Turn the DMS ring to 3 during playback
Turn the DMS ring to ) FF during stop
Turn the DMS ring to 0 REW during stop
6 EJECT
Basic Operations
27
-EN
Page 27

Playing a tape (continued)
Note
• Depending on your TV, the
following may occur while
playing an NTSC-recorded
tape:
– the picture becomes black
and white
– the picture shakes.
– no picture appears on the
TV screen
– black streaks appear
horizontally on the TV
screen
– the color density
increases or decreases
– the display does not
appear properly during
search forward or search
backward.
To set the color system
If streaks appear during playback, set the COLOR SYSTEM switch on
the VCR to conform to the system that the tape was recorded in. (The
normal setting is AUTO.) You can check the present color system in the
display window. Refer to the page 8.
When your tape was recorded in
PAL
NTSC
MESECAM
Set COLOR SYSTEM to
PAL/MESECAM
NTSC
PAL/MESECAM
Notes
• The remaining tape length
will not appear while
playing an NTSC-recorded
tape.
• The display won’t appear
during still mode or slowmotion playback.
• When you insert a short
tape such as E-30 or a
nonstandard commercially
available tape, the
remaining tape length may
not be correct.
Notes
• When a tape is reinserted,
the counter returns to
“0H00M00S.”
• The counter will not work
on tape portions with no
recording.
• If a tape has portions
recorded in both PAL and
NTSC systems, the time
counter reading will not be
correct. This discrepancy is
due to the difference
between the counting cycles
of the two video systems.
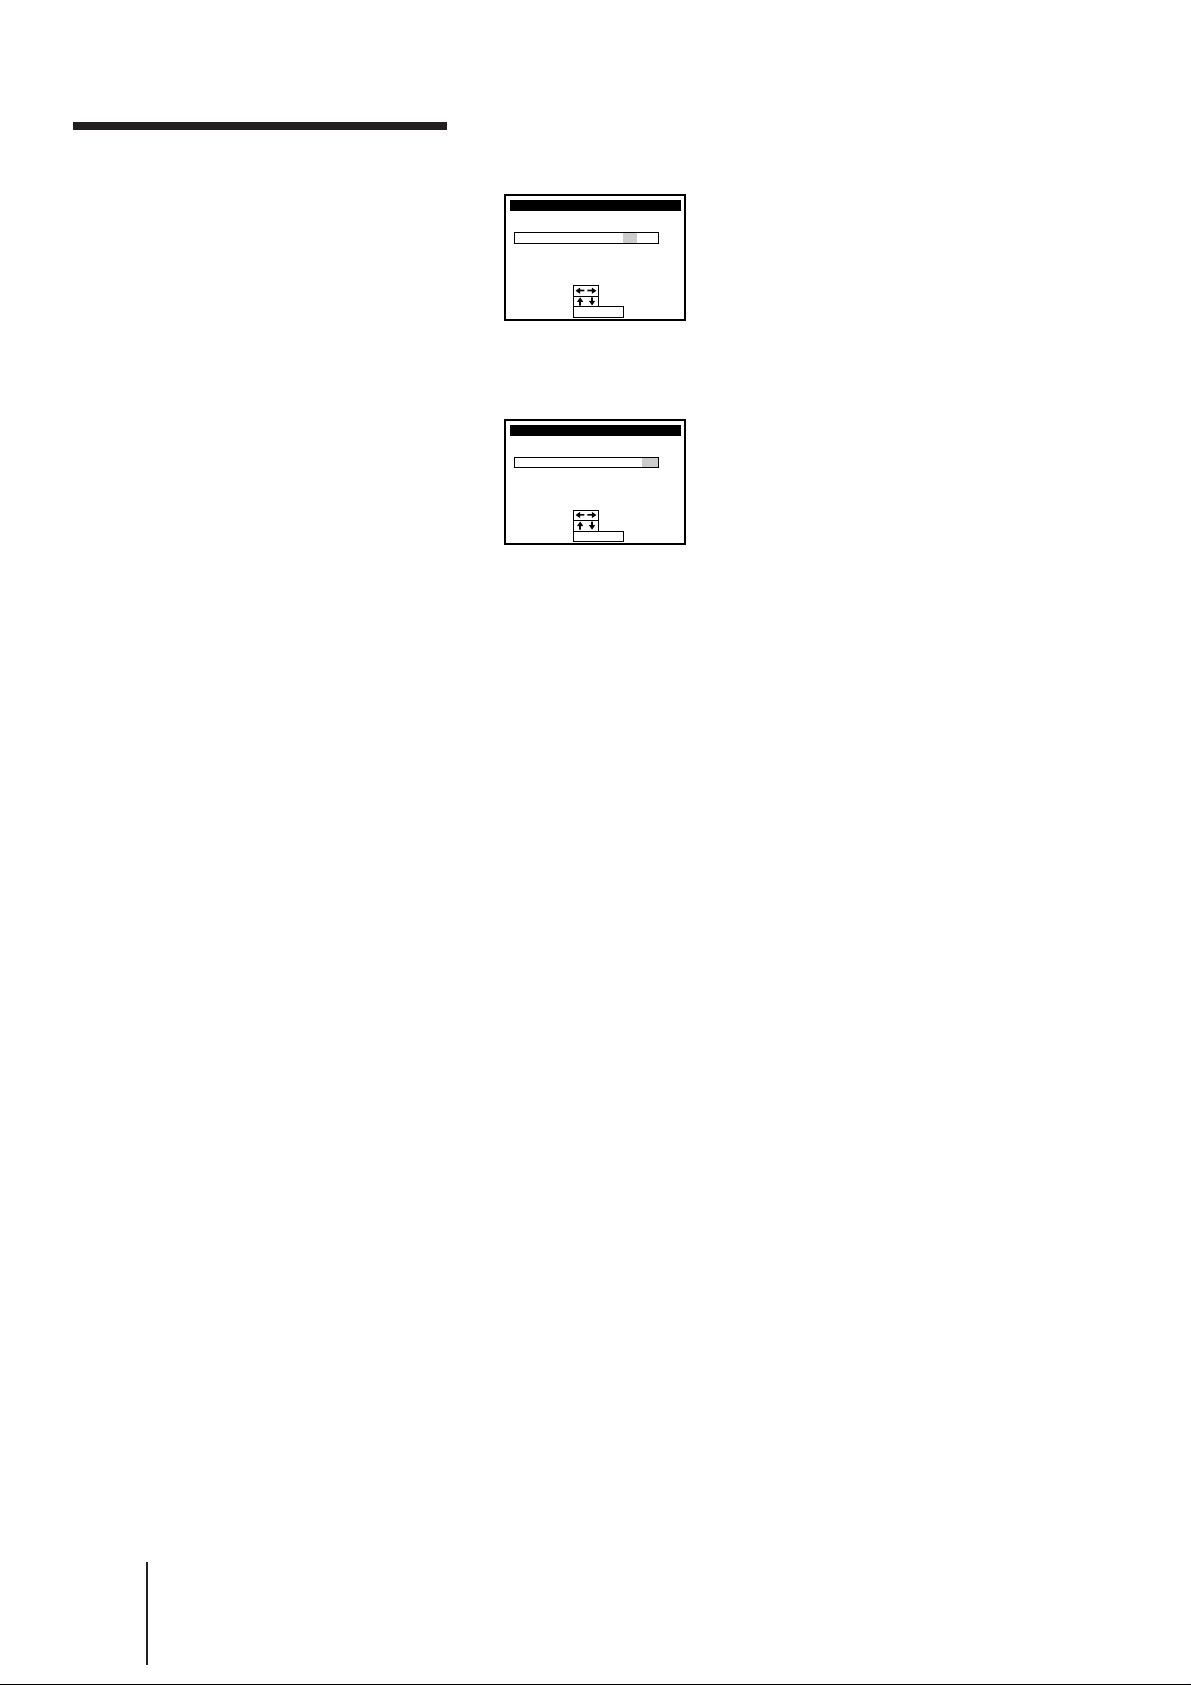
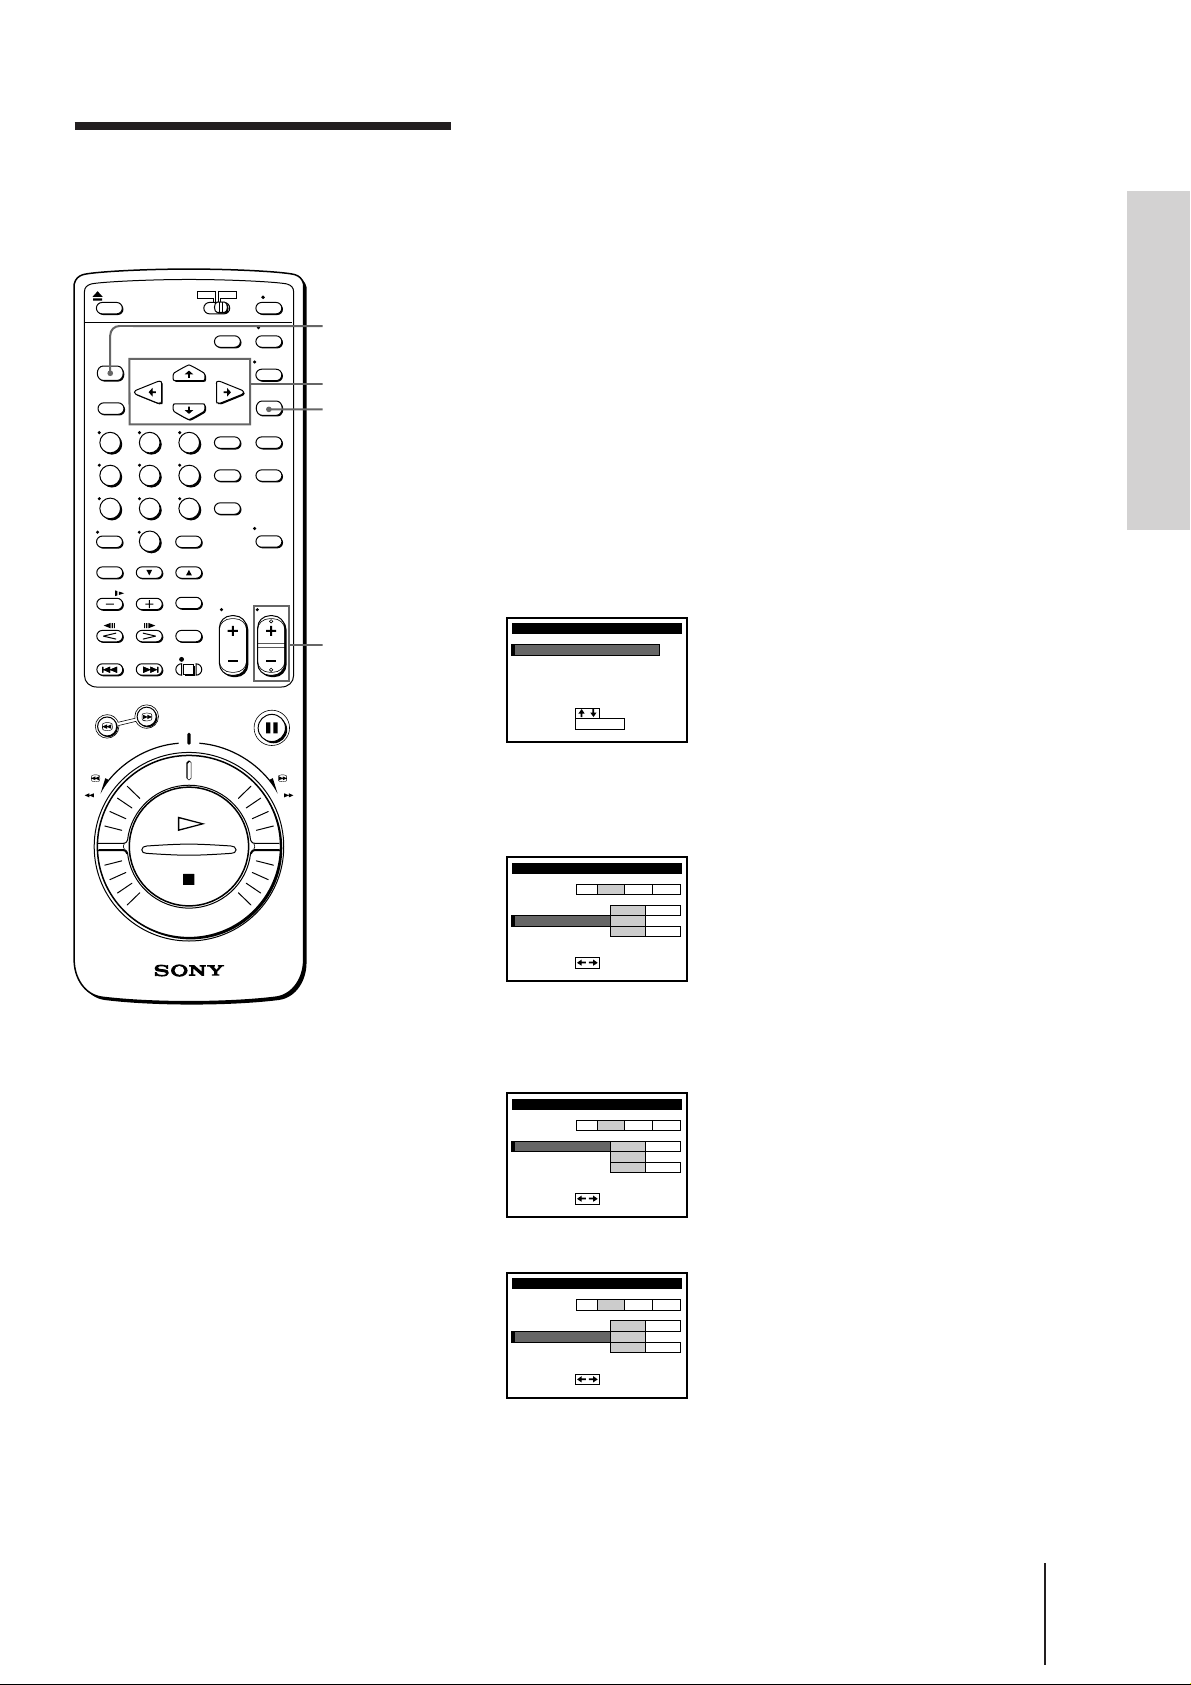
Displaying the remaining tape length and time
counter
Press DISPLAY to turn the display on or off.
SE
0 : 00 : 22
Time counter
Remaining tape length
The white bar represents the
approximate length of tape
remaining.
Using the time counter
At the point on a tape that you want to find later, press COUNTER
RESET to reset the counter to “0H00M00S.” When you rewind or
advance the tape to this point, refer to the counter.
28
-EN
Basic Operations
Page 28
Playing stereo and bilingual programs
Press AUDIO MONITOR to select the desired sound. Each press of the
button changes the display on the VCR and TV screen.
Notes
• When you play a tape
recorded in monaural, the
sound is heard in monaural
regardless of the AUDIO
MONITOR setting.
• To play a tape in stereo,
you must use the AUDIO
OUT connection.
• If AUDIO MIX in the SET
UP MENU is set to ON, the
AUDIO MONITOR button
doesn’t work.
To listen to a
Stereo tape
Stereo
Bilingual
tape
Main and sub
Press AUDIO MONITOR until
The TV screen
shows
“STEREO”
The display window
indicator shows
“STEREO”
sounds
Left channel
Right channel
Standard
sound
Main sound
Sub sound
Standard
sound
CH”
“L
“R
CH”
No indication
“MAIN/L”
“SUB/R”
No indication
(monaural)
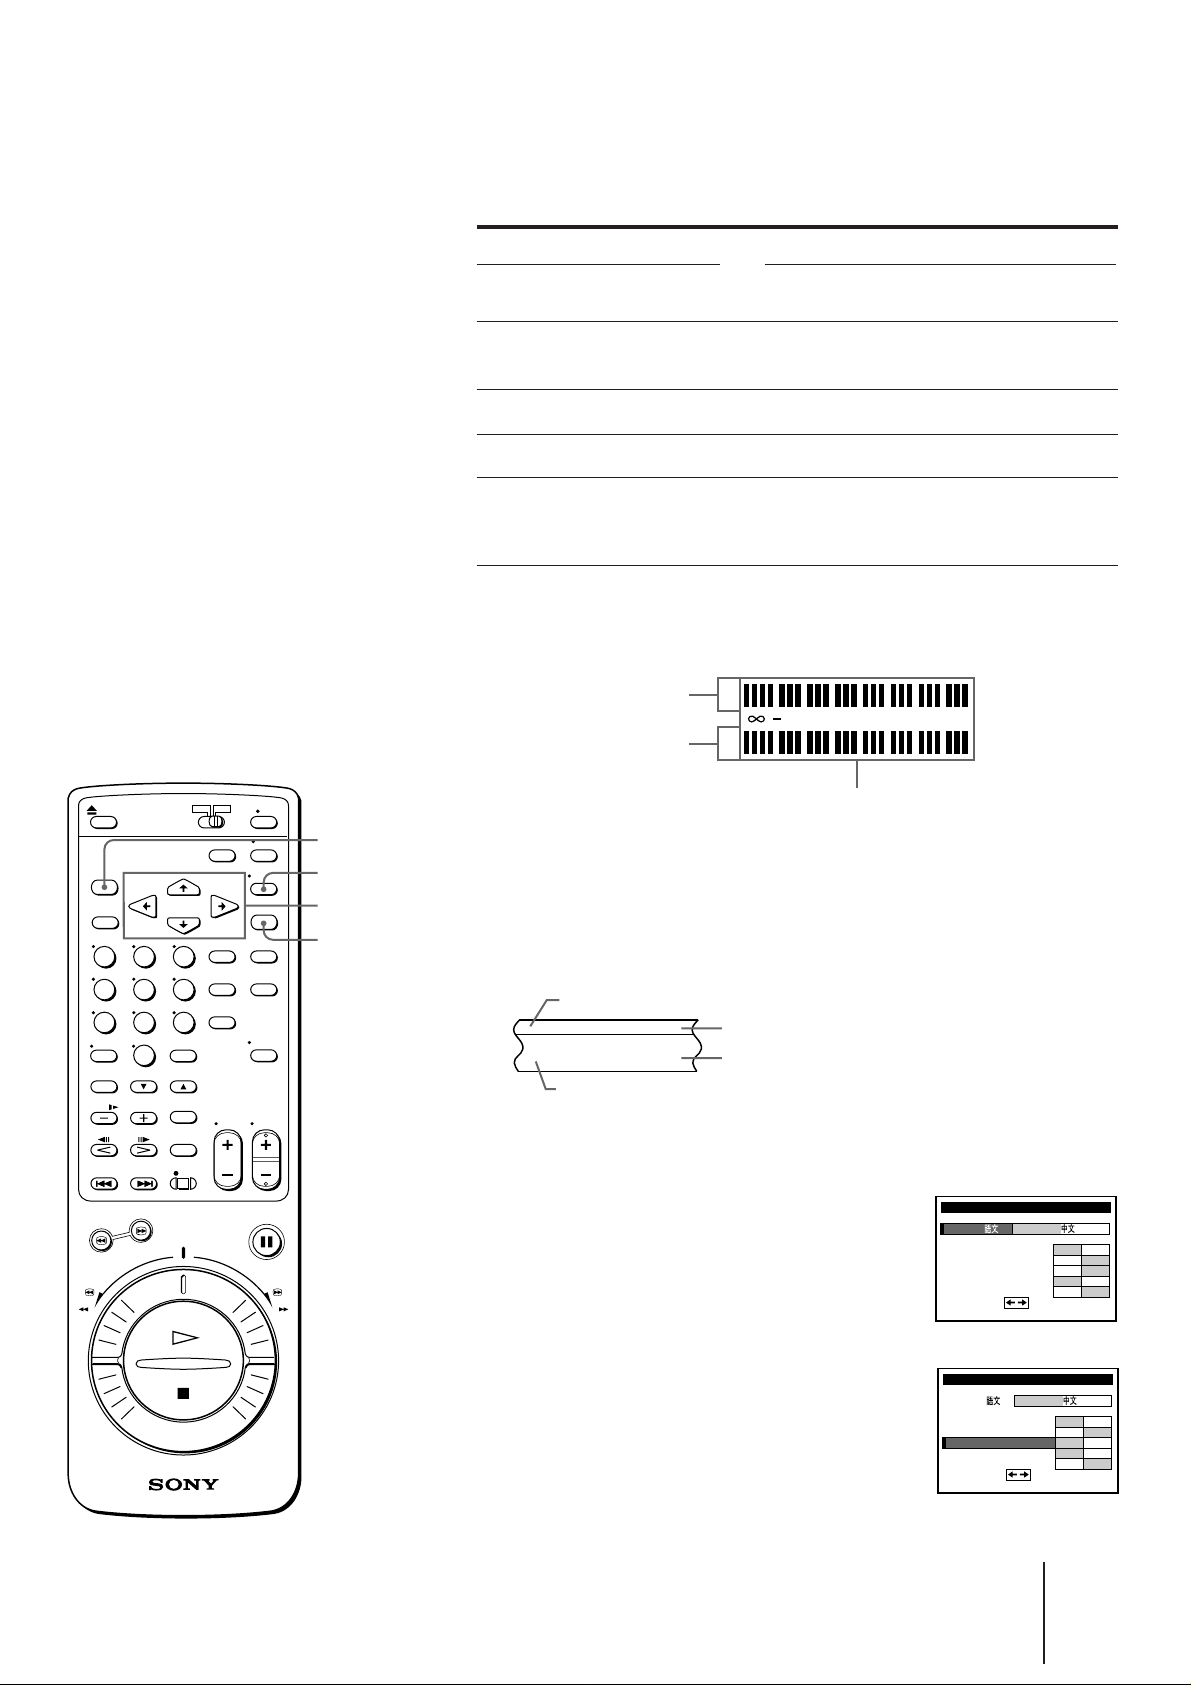
To check audio channel and sound level
You can check the audio channel and sound level visually with the
indicators in the display window.
Left channel indicator
Right channel indicator
L
dB 151063036
R
Sound level indicator
MENU
AUDIO MONITOR
CURSOR>/ ./? / /
EXECUTE
How sound is recorded on a video tape
This VCR records sound onto two different tracks. High-fidelity sound
(usually stereo) is recorded onto the main track along with the picture.
Monaural sound is recorded onto the normal audio track along the edge
of the tape.
Monaural sound
Normal audio track
Main track
Hi-fi sound and
video signals
To listen to hi-fi and normal audio at the same time
1 Press MENU and select SET UP MENU.
2 Set AUDIO MIX to ON using CURSOR
> / . / ? / / .
The AUDIO MONITOR button becomes
inoperative, and the sound you hear is
mixed.
3 Press EXECUTE to store the setting. After
playing the tape, reset AUDIO MIX to OFF.
ex. SLV-X842/X842ML
MENU
SET UP
LANG /
BUZZER
D
AUDI O MI X
GU
HI F I AUD I O
SET
IMMER
DE LAMP
I
:
ENGLI SH
ON OFF
ON OFF
ON OFF
ON OFF
STD
NICAM
ex. SLV-X842/X842ML
SET UP
MENU
LANG /
BUZZER
D
AUDI O MI X
GU
HI F I AUD I O
SET
IMMER
DE LAMP
I
:
ENGLI SH
ON OFF
ON OFF
ON OFF
ON OFF
STD
NICAM
Basic Operations
29
-EN
Page 29
Recording TV
programs
TAPE
SPEED
PROG +/–
This section shows you how to record TV programs in the most basic
way: manual recording. With manual recording, you start the VCR
recording when the program begins, then stop it when the program ends.
The VCR also provides the following ways of recording:
• Manually start recording, then stop it automatically—“Recording
using the quick timer” (page 32)
• Automatically start and stop recording—“Setting the timer
manually” (page 37)
• Automatically start and stop recording by simply entering the
“G-CODE” number—“Recording TV programs using G-CODE”
(page 35)
1 Turn on your TV and tune in to
the VCR:
• If the TV is connected to the VCR
using the audio/video cable, set the
TV to video input.
• If the TV is connected to the VCR
using only the aerial cable, set the TV
to the program position for the VCR.
Tips
• To select program
positions, you can also use
the program number
buttons on the remote
commander. For two-digit
numbers, press the ?
(ten’s digit) button
followed by the program
number buttons.
• To cut out an unwanted
scene while recording,
press P PAUSE, turn the
DUAL MODE SHUTTLE
on the VCR to rewind
ring
the tape to the beginning of
the unwanted scene, then
press P PAUSE to resume
recording.
• Information about the tape
and VCR status will appear
on the TV screen, but it
won’t be recorded on the
tape.
(continued)
r REC
2 Open the drop down panel and
insert a tape with its safety tab in
place.
3 Select the desired program
position by pressing
PROG +/–.
STEREO
L
dB 151063036
R
SP
H M S
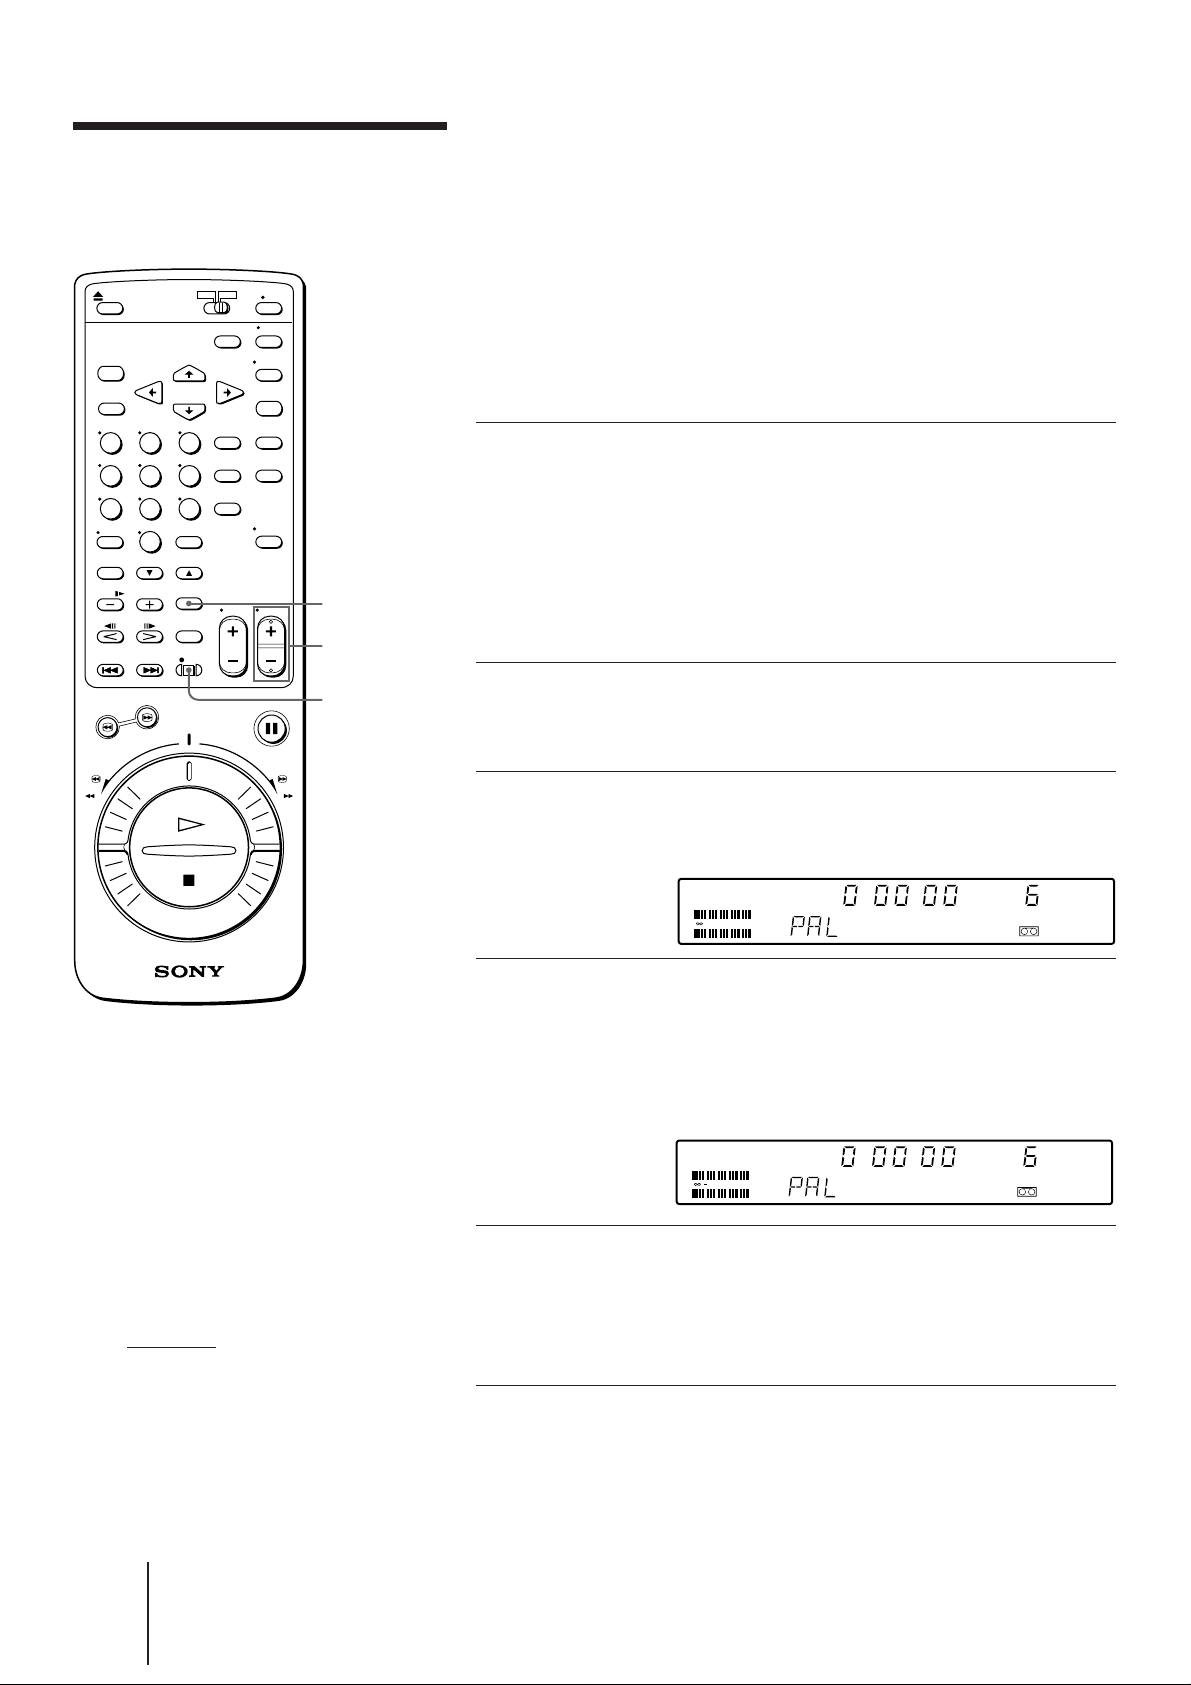
4 Select the tape speed by pressing
TAPE SPEED.
• For PAL/MESECAM, select either SP or LP.
• For NTSC, select either SP or EP.
See “To select tape speeds” on the next
page.
STEREO
L
dB 151063036
R
LP
H M S
5 Start recording by pressing
r REC.
When the tape reaches the end, the VCR
automatically rewinds it to the
beginning.
To stop recording
Press p STOP.
30
-EN
Basic Operations
Page 30

Tips (continued)
• If you don’t want to watch
TV while recording, you
can turn off the TV.
• To record a video source
from LINE 1 or LINE 2,
press INPUT SELECT to
display “L1” or “L2.”
Notes
• If you insert a tape with its
safety tab removed, the
VCR starts playing it
automatically. To record on
this tape, cover the tab hole
with adhesive tape.
• If you’ve inserted a tape
with its safety tab removed,
the VCR ejects it when you
press r REC.
• The VCR automatically
selects either the NTSC,
PAL, or MESECAM color
system when recording TV
broadcasts.
To select tape speeds
PAL color system
When recording, select either SP (Standard Play) or LP (Long Play). LP
provides twice as much recording time as SP. However, SP provides
better picture quality. You can mix SP and LP on the same tape. When
playing back, the VCR automatically detects the tape speed. See the
table below for the maximum recording/playback time in each speed.
Tape type
E-300
E-240
E-180
E-120
E-60
NTSC color system
Maximum recording/playback time
SP
5 hrs.
4 hrs.
3 hrs.
2 hrs.
1 hr.
LP
10 hrs.
8 hrs.
6 hrs.
4 hrs.
2 hrs.
When recording, select either SP (Standard Play) or EP (Extended Play).
EP provides three times as much recording time as long as SP.
However, SP provides better picture quality. You can mix SP and EP on
the same tape. When playing back, the VCR automatically detects the
tape speed. See the table below for the maximum recording/playback
time for each speed.
Tape type
T-160
T-120
T-60
T-30
Maximum recording/playback time
SP
2 hrs. 40 min.
2 hrs.
1 hr.
30 min.
EP
8 hrs.
6 hrs.
3 hrs.
1 hr. 30 min.
Basic Operations
31
-EN
Page 31

Recording TV programs
(continued)
Recording using the quick timer
The quick timer enables you to record for a specified period of time in
intervals of 30 minutes. Once you specify the recording time, the VCR
automatically stops recording. Before you begin, check that the clock is
set correctly.
After you start recording, press QUICK TIMER on the VCR until the
desired duration appears in the display window. The TIMER indicator
on the VCR lights up. Each press increases the recording duration in
increments of 30 minutes as shown below.
0:00 0:30 1:00 10:30 11:00
The recording duration decreases minute by minute to 0:00, then the
VCR turns off automatically.
To stop recording
To stop quick-timer recording while the VCR is recording a program,
press p STOP.
To extend the recording duration while recording
Press QUICK TIMER until the desired duration appears in the display
window.
Watching a TV program while recording another
You can watch a TV program and record another at the same time.
Select the desired program position on the TV.
32
-EN
Basic Operations
Page 32

Recording stereo and bilingual programs in NICAM
system (SLV-X842/X842ML only)
This VCR receives and records stereo and bilingual programs based on
the NICAM system. When NICAM broadcasts are received, the NICAM
indicator appears in the display window; when stereo programs are
received, the STEREO indicator appears in the display window; when
bilingual programs are received, the MAIN/L indicator appears in the
display window.
1 Press MENU.
The main MENU appears on the TV screen.
MENU
TI
MER SET / CHECK
UP MENU
SET
TUNER
PRESET
SET
UP CH AND G–CODE
CLOCK
SET
GAME
:
SELECT
:
SET
2 Press CURSOR >/. to move the cursor (I) to SET UP MENU, then
press EXECUTE.
The SET UP MENU appears.
SET UP
SET
MENU
LANG /
BUZZER
D
IMMER
AUDI O MI X
GU
DE LAMP
I
HI F I AUD I O
:
EXECUTE
ENGLI SH
ON OFF
ON OFF
ON OFF
ON OFF
STD
NICAM
Tip
• When you set HIFI AUDIO
to NICAM, the stereo or
bilingual sound is recorded
on the hi-fi audio track and
the standard sound is
recorded on the normal
audio track. (See page 29.)
3 Press CURSOR >/./?// to move the cursor (I) to HIFI AUDIO,
then highlight NICAM.
SET UP
MENU
LANG /
BUZZER
D
AUDI O MI X
GU
HI F I AUD I O
SET
IMMER
DE LAMP
I
:
ENGLI SH
ON OFF
ON OFF
ON OFF
ON OFF
STD
NICAM
4 Press EXECUTE to store the setting.
Using the NICAM setting, NICAM broadcasts are recorded as in the
following table.
Track
Hi-fi audio
Left channel
Hi-fi audio
Right channel
Normal audio
(monaural)
Sound recorded
Stereo
Left channel
Right channel
Standard (usually the mixed
sound of left and right channels)
Bilingual
Main
Sub
Standard (usually the main
sound)
Basic Operations
33
-EN
Page 33

Recording TV programs
(continued)
AUDIO
MONITOR
Recording stereo and bilingual programs
in ZWEITON (German stereo) system
(SLV-X842/X842ML only)
This VCR automatically receives and records stereo and bilingual
programs based on the ZWEITON system only when the SYSTEM (I,
D/K, B/G, or M) option in the TUNER PRESET menu is set to B/G.
When stereo programs are received, the STEREO indicator appears in
the display window; when bilingual programs are received,
the MAIN/L indicator appears in the display window.
To monitor bilingual programs while recording
Press AUDIO MONITOR to select the desired sound.
Note
• The AUDIO MONITOR
button doesn’t work while
receiving stereo programs
in ZWEITON system.
To listen to
Press AUDIO MONITOR until
The TV screen shows The display window shows
Main sound “MAIN” “MAIN/L”
Sub sound “SUB” “SUB/R”
Main and sub sounds “MAIN/SUB” “MAIN/L, SUB/R”
Recording stereo and bilingual programs
for SLV-X821MKII
This VCR can only record stereo and bilingual programs through the
line input. When stereo or bilingual sound is input through the line
input , ”STEREO” appears on the screen and in the display window.
You cannot select the sound to listen.
Saving a recording
Video tapes have a safety tab to protect against accidental recording. To
prevent accidental erasure of a recording, break off the safety tab with a
screwdriver or other tool. A tape with its safety tab removed is ejected if
you try to record on it.
To record on a tape with its safety tab removed, cover the tab hole with
adhesive tape.
34
-EN
Adhesive tape
Safety
tab
Basic Operations
Page 34

Recording TV
programs using
G-CODE
TIMER CLEAR
u
(on/standby)
The G-CODE feature of this VCR simplifies the task of making timer
recordings. Using G-CODE, you can make all the necessary settings by
just entering the desired program’s 9-digit code, which is available in
your local program guide. To take advantage of this feature, you must
first set up your VCR and assign program positions to the various guide
channels. For details, see “Setting up G-CODE manually” on page 24.
Before you start...
• Check that the clock is set correctly.
• Insert a tape with its safety tab in place. Make sure the tape is longer
than the total recording time.
• Turn on your TV and tune in to the VCR.
G-CODE, ONCE,
DAILY, WEEKLY
program number
buttons
TAPE SPEED
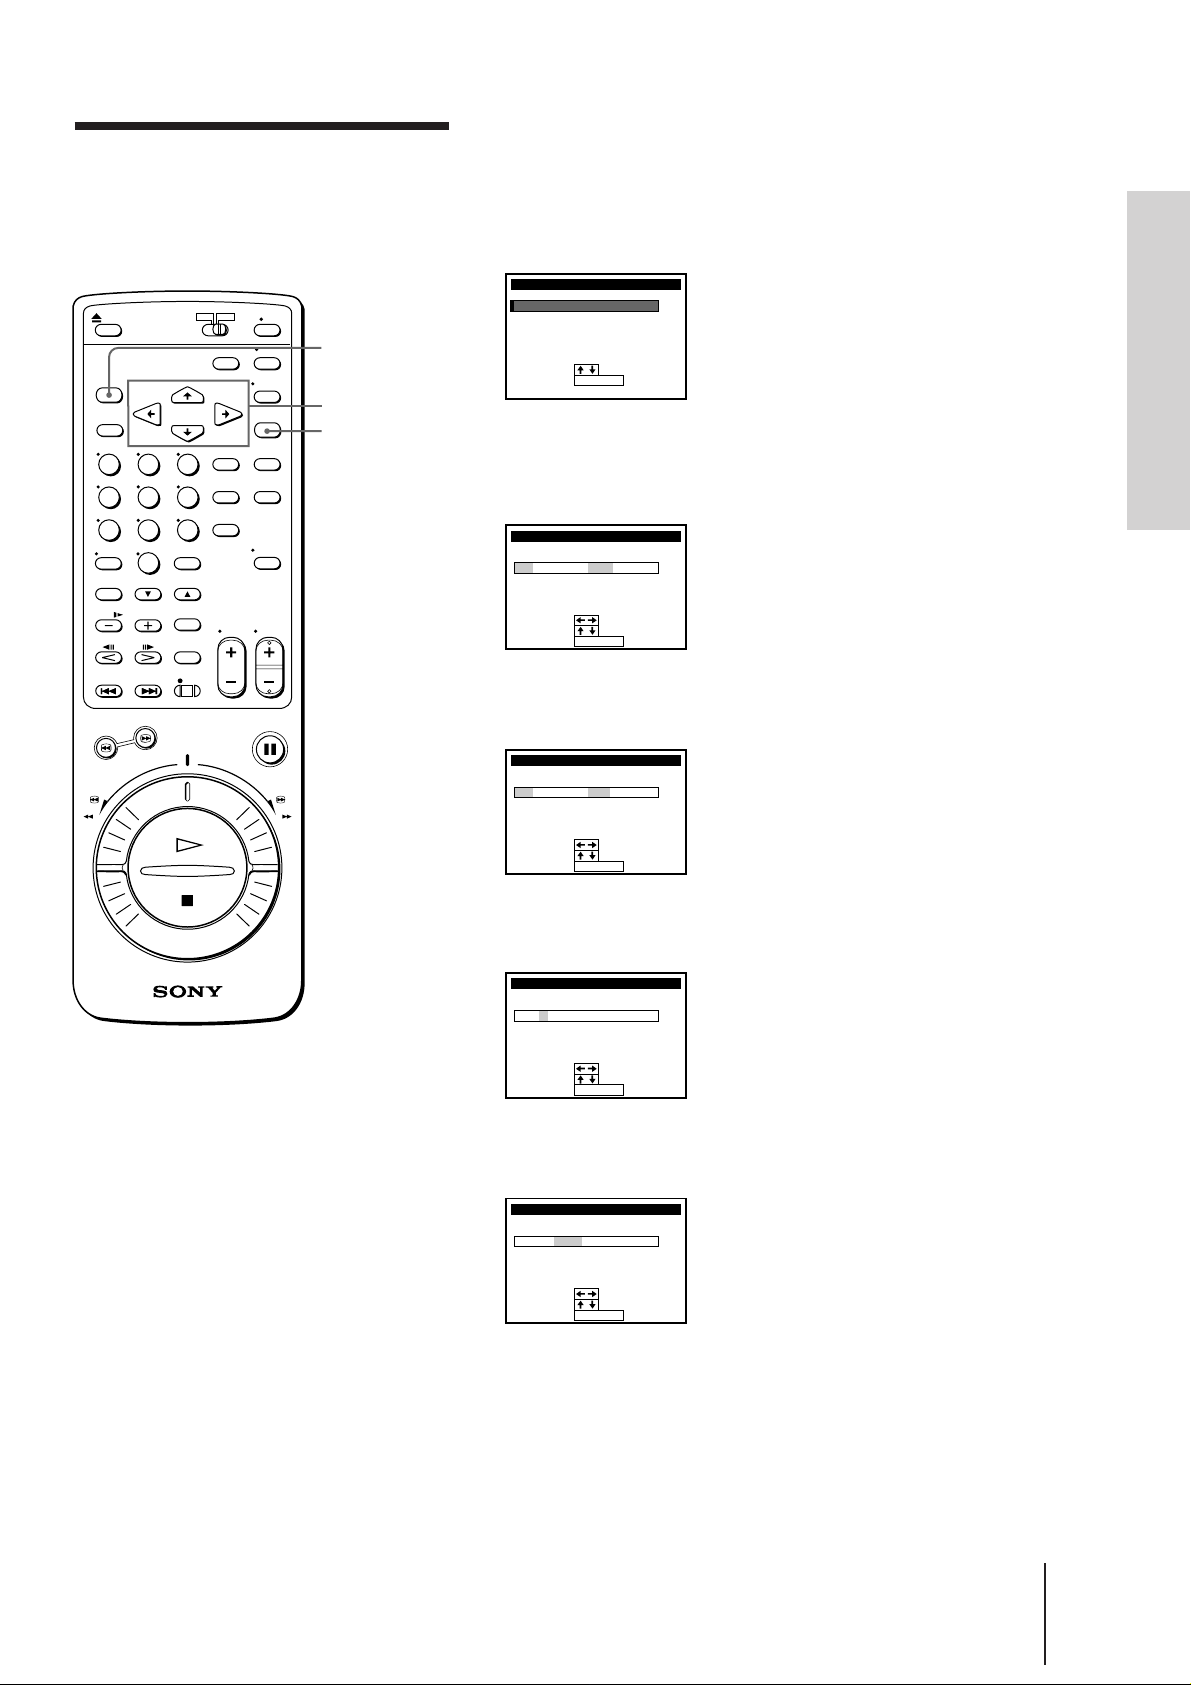
1 Press G-CODE.
The G-CODE menu appears on the TV
screen.
If the clock needs to be set, “PLEASE
SET THE CLOCK” appears on the
screen and the VCR automatically
enters the clock setting mode.
2 Use the number buttons to enter
the desired program’s G-CODE
number.
If you make a mistake, press TIMER
CLEAR and enter the correct number.
3 Select the tape speed, SP or LP, by
pressing TAPE SPEED.
See “To select tape speeds” on page 31.
G–CODE
G–CODE NO.
SET
SP LP/
G–CODE
G–CODE NO.
CONFIRM
CANCEL
G–CODE
G–CODE NO.
CONFIRM
CANCEL
–––––––– –
:
0–9
:
TAPE SPEED
69147782 –
:
ONCE DA I L Y
WEEKLY
:
TIMER CLEAR
69147 782 –
:
ONCE DA I L Y
WEEKLY
:
TIMER CLEAR
SP
LP/
SP
SP
LP/
SP
SP
LP/
LP
Notes
• To record NTSC signals in
EP mode, set the tape speed
to LP.
• The G-CODE used in this
VCR is for Singapore,
Malaysia, Hong Kong,
Macao, etc. and cannot be
used in areas such as
U.S.A., Canada, Japan,
Korea, Taiwan, and U.K.
(continued)
Basic Operations
35
-EN
Page 35

LP
:
SP
69147782 –
LP/
CANCEL
TIMER CLEAR
RECORDI NG T I ME
:
DATE START STOP PROG
LP
850022:000212.0
SUN
1
G–CODE
G–CODE NO.
Recording TV programs using
G-CODE (continued)
Tip
• To exit from the G-CODE
mode, press G-CODE
before pressing ONCE,
DAILY, or WEEKLY in step
4.
Notes
• You cannot set G-CODE in
the following cases:
– when the VCR is turned
off
– while recording using the
timer or quick timer.
• The timer will not accept
settings in the following
cases:
– when you select DAILY
for a Saturday or Sunday
program
– when you select DAILY
or WEEKLY for a
program more than seven
days ahead
– when you enter the
G-CODE number of a
program that has already
ended.
• If the VCR doesn’t accept
the setting, check the GCODE number again and
enter the proper number
starting from step 1.
• If the power is interrupted
for more than one hour
while the VCR is standing
by for recording, the timer
settings are cleared. Reset
the timer.
4 Press ONCE, DAILY or WEEKLY
according to the following
table.
To record the program
Only once
Monday to Friday at the same scheduled time
Every week at the same scheduled time
Press
ONCE
DAILY
WEEKLY
The recording information appears on
the TV screen: date, program start and
stop times, program position number
and tape speed.
Check that the information is correct. If
it is not, press TIMER CLEAR to cancel
the setting.
If you set the wrong G-CODE number,
the VCR sounds short beeps.
To preset another timer setting, repeat
steps 1 to 4.
5 Press u (on/standby) to turn off the VCR.
The TIMER indicator on the VCR lights
up. The VCR turns off and enters timer
recording standby mode automatically.
The VCR automatically turns on and
starts recording at the start time, and
turns off at the stop time.
To stop recording
To stop while the VCR is recording a program, press p STOP.
To record satellite broadcasts using G-CODE
If you connect the satellite tuner and the VCR, you can record satellite
programs using G-CODE.
1 Turn on the satellite tuner.
2 On the satellite tuner, select the satellite program you want to make a
timer setting for.
3 Follow the steps in “Recording TV programs using G-CODE” above.
Keep the satellite tuner turned on until the VCR finishes the timer
recording.
-EN Basic Operations
36
Page 36

Setting the timer
manually
u
(on/standby)
MENU
CURSOR
> / . / ? / /
EXECUTE
This section shows you how to let the VCR automatically start and stop
recording TV programs. You can preset up to eight programs within a
one month time frame.
Before you start...
• Check that the VCR’s clock is set correctly.
• Insert a tape with its safety tab in place. Make sure the tape is longer
than the total recording time.
• Turn on your TV and tune in to the VCR.
1 Press MENU.
MENU
TI
MER SET / CHECK
UP MENU
SET
TUNER
PRESET
SET
UP CH AND G–CODE
CLOCK
SET
GAME
:
SELECT
:
SET
EXECUTE
2 Press CURSOR >/. to move the
cursor (I) to TIMER SET/CHECK,
then press EXECUTE.
The TIMER SET/CHECK menu
appears.
If the clock needs to be set, “PLEASE
SET THE CLOCK” appears on the
screen and the VCR automatically enters
the clock setting mode.
3 Set the date to start recording.
1 Press CURSOR / to highlight the
date.
Make sure today’s date is displayed.
If it isn’t, adjust the clock.
2 Press CURSOR >/. to set the date.
The day of the week is set
automatically.
T SET
I MER /CHECK 9 . 1
DATE START STOP PROG
T SET
I MER /CHECK
DATE START STOP PROG
SAT
T SET
I MER /CHECK
DATE START STOP PROG
SAT
:
:
:
:
:
:
:
:
9.12
:
:
:
:
:
:
:
:
9.12
:
:
:
:
:
:
:
:
SAT
2
–––––––:–––––.––
–––––––:–––––.––
–––––––:–––––.––
–––––––:–––––.––
–––––––:–––––.––
–––––––:–––––.––
–––––––:–––––.––
–––––––:–––––.––
SAT
SP
––––––:––––12.9
–––––––:–––––.––
–––––––:–––––.––
–––––––:–––––.––
–––––––:–––––.––
–––––––:–––––.––
–––––––:–––––.––
–––––––:–––––.––
SAT
SP
––––––:––––1.6
–––––––:–––––.––
–––––––:–––––.––
–––––––:–––––.––
–––––––:–––––.––
–––––––:–––––.––
–––––––:–––––.––
–––––––:–––––.––
4 Set the time to start recording.
1 Press CURSOR / to highlight the
hour under “START,” then press
CURSOR >/. to set the hour.
2 Press CURSOR / to highlight the
minutes under “START,” then press
CURSOR >/. to set the minutes.
5 Press CURSOR /, then set the
time to stop recording in the
same way.
T SET
I MER /CHECK
DATE START STOP PROG
SAT
T SET
I MER / CHECK
DATE START STOP PROG
SAT
(continued)
Basic Operations
9.12
:
:
:
:
:
:
:
:
9.12
:
:
:
:
:
:
:
:
37
SAT
––––––:0071.6
SAT
––008:0071.6
-EN
SP
–––––––:–––––.––
–––––––:–––––.––
–––––––:–––––.––
–––––––:–––––.––
–––––––:–––––.––
–––––––:–––––.––
–––––––:–––––.––
SP
–––––––:–––––.––
–––––––:–––––.––
–––––––:–––––.––
–––––––:–––––.––
–––––––:–––––.––
–––––––:–––––.––
–––––––:–––––.––
Page 37

T SET
:
I MER /CHECK
SAT
DATE START STOP PROG
SP
6008:0071.6
:
–––––––:–––––.––
:
–––––––:–––––.––
:
–––––––:–––––.––
:
–––––––:–––––.––
:
–––––––:–––––.––
:
–––––––:–––––.––
:
–––––––:–––––.––
SAT
9.12
T SET
:
I MER /CHECK
SAT
DATE START STOP PROG
SP
6008:0071.6
:
–––––––:–––––.––
:
–––––––:–––––.––
:
–––––––:–––––.––
:
–––––––:–––––.––
:
–––––––:–––––.––
:
–––––––:–––––.––
:
–––––––:–––––.––
SAT
9.12
Setting the timer manually
(continued)
Tips
• To set the program position,
you can also use the PROG
+/– or program number
buttons.
• To record a video source
from LINE 1 or LINE 2,
press INPUT SELECT to
display “L1” or “L2.”
Tip
• To set the recording tape
speed, you can also use
TAPE SPEED.
Note
• To record NTSC signals in
EP mode, set the tape speed
to LP.
Tip
• To change the digits during
setting, press CURSOR ?
to return to the item to be
changed, and select the
digits using CURSOR >/..
6 Press CURSOR /, then select the
program position by pressing
CURSOR >/..
7 Press CURSOR /, then select the
tape speed, SP or LP, by pressing
CURSOR >/..
See “To select tape speeds” on page
31.
8 To confirm your program, press
CURSOR /.
The cursor (I) appears in the leftmost
column.
To preset another timer setting, move
the cursor to the next line using
CURSOR ., and repeat steps 3 to 8.
9 After making the desired timer
settings, press EXECUTE.
T SET
I MER / CHECK
DATE START STOP PROG
SAT
9.12
:
:
:
:
:
:
:
:
SAT
SP
6008:0071.6
–––––––:–––––.––
–––––––:–––––.––
–––––––:–––––.––
–––––––:–––––.––
–––––––:–––––.––
–––––––:–––––.––
–––––––:–––––.––
Note
• If the power is interrupted
for more than one hour
while the VCR is standing
by for recording, the timer
settings are cleared. Reset
the timer.
the current date
SUN-SAT
MON-SAT
MON-FRI
EVERY SAT
EVERY MON
10 Press u (on/standby) to turn off the
VCR.
The TIMER indicator on the VCR lights up.
The VCR turns off and enters timer
recording standby mode automatically.
The VCR automatically turns on and starts
recording at the start time, and turns off at
the stop time.
To stop recording
To stop while the VCR is recording a program, press p STOP.
Daily/weekly recording
Daily recording records the same program every day of the week;
weekly recording records the same program on the same day, every
week.
When you set the date to start recording in step 3 above, press CURSOR
. until the desired day appears. Each time you press the button, the
indication changes as shown on the left.
EVERY SUN
1 month later
(cycles backward)
-EN Basic Operations
38
Page 38

Checking/changing/
This section shows you how to check, change and cancel the timer
settings after you’ve stored them in the VCR.
cancelling timer
settings
u
(on/standby)
MENU
TIMER CLEAR
CURSOR
> / . / ? / /
EXECUTE
Before you start...
• Turn on your TV and tune in to the VCR.
1 Press u (on/standby) to turn on the VCR.
2 Press MENU and select TIMER SET/
CHECK.
3 Check the timer settings in the list.
• If you don’t want to change or cancel
the settings, press u (on/standby) to
return to recording standby.
• If you want to change or cancel the
settings, press CURSOR >/. to move
the cursor (I) to the setting you want
to change or cancel.
4 Change or cancel the timer
setting:
• To change the setting, press CURSOR
?// to highlight the item you want
to change, and reset it using CURSOR
>/.. Then, press CURSOR /
repeatedly until the cursor appears in
the leftmost column.
• To cancel the setting, press TIMER
CLEAR.
T SET
I MER / CHECK
DATE START STOP PROG
SAT
THU
12
.71
SUN
MON
MON
SAT
EVERY
SUN
T SET
I MER /CHECK
DATE START STOP PROG
SAT
THU
12
.71
SUN
MON
MON
SAT
EVERY
SUN
9.12
:
:
:
510:038
11L
:
0021:8591.8
:
:
000:0032
:
:
9.12
:
:
:
510:038
11L
:
0021:8591.8
:
:
000:0032
:
:
SAT
SP
6008:0071.6
LP
05000:001212.82
LP
SP
2L
LP
720031:210––
SP
1L
–––––––:–––––.––
–––––––:–––––.––
SAT
SP
6008:0071.6
LP
05000:001212.82
LP
SP
2L
LP
720031:210––
SP
1L
–––––––:–––––.––
–––––––:–––––.––
5 Press EXECUTE.
The VCR returns to the original screen.
If there are any other timer settings left
in the TIMER SET/CHECK menu, press
u (on/standby) to return to recording
standby.
To check the timer settings during timer recording
Press MENU and select TIMER SET/CHECK. After checking, press
EXECUTE to turn off the display.
Basic Operations
39
-EN
Page 39

Additional
instructions about
timer recor ding
This section gives additional information about timer recording which
you need after you have stored timer settings in the VCR.
To use the VCR while recording
You can do the following tasks during timer recording.
To
Reset the counter to “0H00M00S”
Display tape information on the
TV screen
Check the timer settings
Watch another TV program
Press
COUNTER RESET
DISPLAY
MENU and select TIMER SET/
CHECK
See “Watching a TV program while
recording another” on page 32.
Using the VCR before timer recording begins
Press u (on/standby). The TIMER indicator on the VCR goes off and
the VCR is ready for use.
After using the VCR, press u (on/standby) again to turn on the TIMER
indicator on the VCR. Remember to reset the VCR to stand by for
recording before the time you’ve set the VCR to start recording, or the
timer setting will be cancelled.
Case 1
Program 1
(listed first)
Program 2
(listed next)
Case 2
Program 1
Case 3
Program 1
10:00
Will be cleared
10:00 10:50
Program 2
10:00
Program 2
10:50
11:30
20 seconds will not be
recorded
11:40
Will be cut off
11:30
10:45 12:15
When the timer settings overlap
The VCR will not record overlapping programs. If any of your timer
settings overlap, change the settings.
Case 1:If you preset two programs to start recording at the same
time...
The program listed first in the TIMER SET/CHECK menu has
priority over the other programs. The timer settings of lower
priority programs will be erased from the list when the first
program begins recording.
Case 2:If you preset program 2 to start recording at the same time
you preset program 1 to finish recording...
The last 20 seconds of program 1 will not be recorded because
the VCR will enter recording pause for program 2 before
program 1 is finished.
Case 3:If you preset program 2 to start recording before program 1
is finished recording...
Program 2 will start recording before program 1 has finished.
-EN Basic Operations
40
Page 40

Additional Operations
Playing/searching at
You can play back a tape at various speeds: high-speed, slow motion
and so on. These options are also useful for searching for a specific point
during playback. The sound is muted during these operations.
various speeds
· PLAY
SKIP
& SLOW +/–
' / 7
FLAME/</ >
3/# SEARCH
· PLAY
DUAL MODE
SHUTTLE
Playback options Operation
Playing at various
speeds:
One-fifth the normal
speed
The normal speed
Twice the normal
speed
High speed
Fast-forwarding/
Rewinding
Viewing the picture
during fast-forward or
rewind
Locking in a high-speed
picture
During playback, turn the
DUAL MODE SHUTTLE ring
right or left to:
1/5
1
× 2
# or 3
During stop, turn the DUAL
MODE SHUTTLE ring to
) FF or to 0 REW and
release.
During fast-forward, turn the
DUAL MODE SHUTTLE ring to
) FF.
During rewind, turn the ring to
0 REW.
During playback or pause, press
# SEARCH or 3 SEARCH.
To change direction, press <
(backward) or > (forward).
To resume
normal
playback
Release the ring.
Press · PLAY.
To return to the
previous mode,
release the ring.
Press · PLAY.
DUAL MODE SHUTTLE
Tip
• Adjust the picture using
$/4 TRACKING NORMAL/
SLOW STILL ADJUST if:
– streaks appear while
playing in slow motion
– bands appear on the top or
bottom while pausing
– the picture shakes while
pausing.
Notes
• If you use these functions in
the LP mode, noise may
appear or there may be no
color.
• When you view the picture of
an NTSC-recorded tape in EP
mode during fast-forward or
rewind, “LP” may be
displayed momentarily.
Locking in a slowmotion
picture
Playing frame by frame
Playing in reverse
Skipping a scene
Rewind and restart play
During playback or pause, press
& SLOW +/–.
You can increase the playback
speed with the + button and
decrease the speed with the –
button.
To change direction, press <
(backward) or > (forward).
During pause, press
7 FRAME to advance the
picture one frame or
' FRAME to reverse the
picture one frame.
Keep pressing the button to
advance or reverse one frame
every one second.
During playback, press <.
During playback, press SKIP.
Pressing once skips about 30
seconds.
During stop, press · PLAY
the VCR while holding the
DUAL MODE SHUTTLE ring
on the VCR at the 0 REW
position.
on
Press · PLAY.
Press · PLAY.
Press · PLAY.
The VCR
automatically
resumes normal
playback.
Additional Operations
41
-EN
Page 41

Adjusting the picture
TRACKING
AUTO/MANUAL
$/4 TRACKING
NORMAL/SLOW
The VCR automatically adjusts the picture for the best possible
playback or recording. If, however, you find the automatic adjustment
unsatisfactory, you can adjust the picture manually.
Adjusting the tracking
Though the VCR automatically adjusts the tracking when playing a tape
(the AUTO TRACKING indicator flashes in the display window, then
lights steadily), distortion may occur if the tape was recorded in poor
condition. If so, manually adjust the tracking condition.
Press $/4 TRACKING NORMAL/SLOW to display the tracking meter.
The distortion should disappear as you press one of the two buttons. If
you cannot get a clear picture with manual adjustment, press
TRACKING AUTO/MANUAL to return to automatic adjustment.
NORMAL TRACKING
Tracking meter
APC
Notes
• Tapes recorded using the
APC function are played
back normally on VCRs
that do not have the APC
function.
• Press P PAUSE to start
recording
indicator stops flashing. If
you start recording before
the APC indicator stops
flashing, the APC function
is cancelled.
after the APC
About Adaptive Picture Control (APC)
Adaptive Picture Control (APC) automatically improves recording and
playback quality by adjusting the VCR to the condition of the video
heads and tape. To maintain better picture quality, press APC on the
VCR so the APC indicator in the display window lights.
APC
To use APC during playback
The APC function automatically works on all types of tapes, including
rental tapes. You can play a tape using the APC function even if the tape
was not recorded with it.
To use APC while recording
Whenever you insert a tape and first start recording, the VCR adjusts to
the tape using the APC function (the APC indicator flashes rapidly).
This adjustment is retained until the tape is ejected. There is a short
delay before the VCR actually starts recording while the VCR analyzes
the tape.
If you want to start recording precisely the first time you record, set the
VCR to recording pause mode (the APC indicator flashes slowly) and
press r REC to let the VCR analyze the tape. When the APC indicator
stops flashing, press P PAUSE to start recording. Recording begins
immediately.
42
-EN
To deactivate the APC
Press APC on the VCR. The APC indicator in the display window goes
off.
Additional Operations
Page 42

Searching using the
index function
= / +
INDEX SEARCH
The VCR automatically marks an index signal at the point where
recording starts (with the exception of when you start recording from
recording pause). Use this as a reference to find the beginning of the
recording. Since the index number indicates the relative position from
the current position, specify how many index signals ahead or behind
the specific index signal is from the current position.
1 Open the drop down panel and
insert an indexed tape into the
VCR.
2 Press =/+ INDEX SEARCH
INDEX
repeatedly until the index number
you want appears on the TV
screen:
• To locate succeeding programs,
press + INDEX SEARCH.
• To locate preceding programs,
press = INDEX SEARCH.
The VCR starts searching and the index
number on the TV screen counts down
to zero. Playback starts automatically
from that point.
SEARCH
5
Additional Operations
43
-EN
Page 43

Game play
MENU
CURSOR
> / . / ? / /
EXECUTE
One special feature that will add lots of enjoyment to the basic VCR
concept of recording and playback is this video game, The Tile Game.
The object
The object of the game is to collect as many points as possible by
removing tiles in pairs.
The game has a total of 255 stages, each stage becoming slightly more
difficult. Clear each stage by removing all the tiles on the screen.
Rules
• To remove the tiles, select pairs of matching tiles.
• You cannot select a tile if it is bordered with the tiles of the same color
on both the left and right sides.
The hidden tiles
The tiles may be arranged in layers up to three.
If the tiles are arranged in three layers, the surface layer is red. The
hidden middle and bottom layers are blue and gray respectively. If the
tiles are arranged in two layers the surface one is blue and the hidden
one is gray. If the tiles don’t have any hidden layers, the tiles are gray.
The hidden tile reveals itself after you remove the one above it. You
have to remove all the tiles to complete the stage (game), including the
hidden ones.
Notes
• Long game play sessions
consume much battery
power from the remote
commander, and reduce
battery life.
• Due to discrepancies
between television systems,
the size of the game screen
may differ between PAL
and NTSC monitors.
Collecting points
Your present score is shown under “YOU.” Your score is the total of the
present stage points and all the former stages you’ve cleared in the
game. The present stage number is shown under “STAGE.”
The highest score ever achieved is saved in the VCR memory and
shown under “BEST.”
Playing the game
1 Press MENU.
2 Select GAME and press EXECUTE.
The first stage appears on the TV screen.
3 Press CURSOR >/./?// to move the
arrow on the screen to a desired tile, and then
press EXECUTE to select the tile.
The selected tile is highlighted.
If it is not highlighted, the tile must be bordered with the tiles of the
same color on both the left and right sides.
To deselect the tile, place the arrow on the tile and press EXECUTE
again.
4 Select a matching tile in the same way.
The tiles will be removed from the screen, and you will receive one
point.
5 Repeat steps 3 and 4.
When all the tiles are removed, press EXECUTE to go to the next
stage.
GAME
A
B C D
E F G H
I J K L
M N O P
A B C D
E F G H
I J K L
M N O P
BEST
YOU
STAGE
0
0
1
44
-EN
To exit the game
Press MENU.
Additional Operations
Page 44

Looking at menu
SET UP
D
BUZZER
GU
SET
:
I
ON OFF
IMMER
AUDI O MI X
DE LAMP
ON OFF
ON OFF
ON OFF
MENU
LANG /
ENGLI SH
options
The SET UP MENU provides you with various options to set up and
customize your VCR. See the table below for the available menu
choices. Initial settings are indicated in bold letters.
SLV-X842/X842ML
MENU
SET UP
LANG /
BUZZER
D
AUDI O MI X
GU
HI F I AUD I O
SET
IMMER
I
DE LAMP
:
ENGLI SH
ON OFF
ON OFF
ON OFF
ON OFF
STD
NICAM
SLV-X821MKII
Menu choices
Menu option
LANG/
BUZZER
DIMMER
AUDIO MIX
GUIDE LAMP
HIFI AUDIO
(SLV-X842/X842ML
only)
Set this option to
• ENGLISH to set the on-screen language to English.
•
to set the on-screen language to Chinese.
• ON to output a beep sound when an illogical
operation is made.
• OFF to deactivate it.
• ON to dim the VCR display.
• OFF to brighten it.
• ON to listen to the hi-fi and normal audio tracks at
the same time. The AUDIO MONITOR button
becomes inoperable.
• OFF to select the sound using the AUDIO
MONITOR button.
For details, see page 34.
• ON to illuminate the DMS ring, r REC button, and
TIMER indicator on the VCR.
• OFF to turn them off.
• STD to record standard sound on a hi-fi audio track.
• NICAM to record NICAM broadcasts on a hi-fi audio
track.
For details, see page 33.
Additional Operations
45
-EN
Page 45

Editing
Editing with another
VCR
This section shows you how to edit to or from another VCR or
camcorder. You can make a copy of a tape using this VCR for recording
or playback.
How to hook up to record on this VCR
This VCR (Recorder)
LINE IN 2
: Signal flow
This VCR (Recorder)
TV
Other VCR
(Player)
LINE OUT
Audio/video cable
TV
Tips
• Make sure you connect the
plugs to jacks of the same
color.
• If the other VCR is a
monaural type, leave the
red plugs unconnected.
: Signal flow
LINE IN 1
Other VCR
(Player)
LINE OUT
Audio/video cable
46
-EN
Editing
Page 46

How to hook up to record on another VCR
Tips
• Make sure you connect the
plugs to jacks of the same
color.
• If the other VCR is a
monaural type, leave the
red plugs unconnected.
P PAUSE
This VCR (Player)
: Signal flow
LINE OUT
Other VCR
(Recorder)
Audio/video cable
TV
LINE IN
Operation (when recording on this VCR)
Before you start …
• Press INPUT SELECT to display “L1” or “L2” in the display window.
• Press TAPE SPEED to select the recording tape speed (SP/LP for
PAL/MESECAM system or SP/EP for NTSC system).
Tips
• To make your editing more
precise, use the pause
buttons on both VCRs.
• To cut out unwanted scenes
while editing, press
P PAUSE on this VCR
when an unwanted scene
begins. When it ends, press
P PAUSE again to resume
recording (Assemble
Editing).
r REC
1 Insert a source tape with its safety
tab removed into the other
(playback) VCR.
Search for the point to start playback
and set it to playback pause.
2 Open the drop down panel and insert
a tape with its safety tab into this
(recording) VCR. Search for the point
to start recording and press P PAUSE.
3 Press r REC on this VCR and set it to
recording pause.
4 To start editing, press the P PAUSE
buttons on both VCRs to release the
VCRs from pause.
For best results, press the pause button on
the other VCR before pressing P PAUSE on
this VCR.
To stop editing
Press the p STOP buttons on both VCRs.
Editing
47
-EN
Page 47

Audio dubbing
A-DUB
COUNTER
RESET
AUDIO DUB
P PAUSE
You can add music and songs on the normal audio track. The monaural
sound previously recorded is replaced while the original picture and hifi sound on the main track are retained. (See page 29.)
How to hook up
TV
LINE IN 2
AUDIO
Stereo system
REC OUT
RK-C510 audio cable
(not supplied)
: Signal flow
Audio dubbing from a stereo system
Note
• You must be in playback
pause mode before pressing
AUDIO DUB. (If you are in
recording pause mode, you
cannot use the audio
dubbing function.)
Before you start editing
• Connect audio source equipment to the LINE IN 2 AUDIO jacks of
this VCR.
• Press INPUT SELECT to display “L2” in the display window.
1 Play a recording source. Search for the point to start
playback and set it to playback pause.
2 Open the drop down panel and insert the prerecorded
tape into this VCR.
Search for the end of the section you want to dub new
sound to and press P PAUSE.
Make sure that the tape has its safety tab in place so that you can
dub new sound onto it.
3 Press COUNTER RESET to reset the counter to
“0H00M00S.”
4 Rewind the tape to the beginning of the section.
This VCR pauses.
5 Press AUDIO DUB.
The A-DUB indicator lights up in the display window.
48
-EN
Editing
Page 48

6 To start editing, press P PAUSE on this VCR and release
the pause mode of the stereo system at the same time.
When the counter of this VCR reaches “0H00M00S,” audio
dubbing stops automatically.
To stop editing
Press the p STOP buttons on this VCR and the stereo system.
Tip
• To listen to the sounds
recorded on the hi-fi audio
and normal audio tracks at
the same time, set AUDIO
MIX to ON using the SET
UP MENU option. (See
page 29.)
Listening to the dubbing sound
When audio-dubbing, you have choice of listening to the dubbing
sound. To do so, press AUDIO MONITOR. (See page 34)
Editing
49
-EN
Page 49

Additional Information
Troubleshooting
Symptom Remedy
Power
Clock
Playback
The ON/STANDBY switch does
not function.
The clock has stopped and “-:--”
lights in the display window.
The playback picture does not
appear on the TV screen.
The picture is not clear.
The picture rolls vertically during
picture search.
The picture has no sound.
• Connect the mains lead securely.
• The clock stops if the VCR is disconnected from the mains for more
than an hour. Reset the clock (and timer).
• Make sure the TV is set to the program position for the VCR. If you are
using a monitor, set it to video input.
• Adjust the tracking with the TRACKING NORMAL/SLOW buttons.
• Make sure the COLOR SYSTEM switch is set to the position
corresponding to the color system with which the tape was recorded.
• Make sure the NTSC PB switch is set to the correct position to match
the TV system of your TV.
• The video heads are dirty (see below). Clean the video heads using the
Sony V-25CL video head cleaning cassette. If this cleaning cassette is
not available in your area, have the heads cleaned at your nearest Sony
service facility (a standard service charge will be required). Do not use
a commercially available wet-type cleaning cassette, as it may damage
the video heads.
• The video heads may have to be replaced. Consult your nearest Sony
service facility for more information.
• Adjust the vertical hold control on the TV or monitor.
• The tape is defective. Use a new tape.
The sound is unstable or has an
echo.
Symptoms caused by contaminated video heads
• Normal picture • Rough picture • Unclear picture • No picture (or
initial terminal
• When you play a tape with the same sound recorded on both the hi-fi
and normal sound tracks, make sure the AUDIO MIX option in the
SET UP MENU is set to OFF.
black & white
screen appears)
50
-EN
Additional Information
Page 50

Symptom Remedy
Recording
Timer recording
Others
A TV program does not appear
on the TV screen.
TV reception is poor.
The tape is ejected when you
press the r REC button.
Nothing happens when you press
the r REC button.
The timer does not operate.
A tape cannot be inserted.
The remote commander does not
function.
• If the TV is connected to the VCR using only the aerial cable, make
sure the TV is set to the program position for the VCR.
If you are using a monitor, set it to video input.
• Adjust the TV aerial.
• Make sure the SYSTEM (I, D/K, B/G, or M) option in the TUNER
PRESET menu is set to the system in your area.
• Check that the safety tab has not been removed.
• Make sure the tape is not at its end.
• Select the correct source with the INPUT SELECT button. Select a
program position when recording TV programs; select “L1” or “L2”
when recording from other equipment.
• Check that the clock is set. The clock and timer stop if the VCR is
disconnected from the mains for more than one hour.
• Make sure a tape has been inserted.
• Check that the safety tab has not been removed.
• Make sure the tape is not at its end.
• Make sure a program has been set for timer recording.
• Check that a tape isn’t already in the tape compartment.
• Make sure you are pointing the remote commander at the remote
sensor on the VCR.
• Replace all the batteries in the remote commander with new ones if
they are weak.
The tracking indicator does not
appear on the screen.
The unit is dirty.
• The recording condition of the tape is very poor and tracking cannot
be adjusted.
• Clean with a dry soft cloth, or a soft cloth slightly moistened with a
mild detergent solution. Do not use any type of solvent, such as
alcohol or benzine.
If you have any questions or problems concerning your unit, please
consult your nearest Sony service facility.
Additional Information
51
-EN
Page 51

Specifications
System
Channel coverage
VHF R1 – R12, E2 – E12, NZ1
UHF E21 – E69, R21 – R69
CATV S01 – S05, S1 – S41
RF output signal
UHF channels 28 – 55
Aerial out
75-ohm asymmetrical aerial
socket
Inputs and outputs
LINE IN 1
VIDEO IN, Phono jack (1)
Input signal: 1 Vp-p, 75 ohms,
unbalanced, sync negative
AUDIO IN, Phono jack (2)
Input level: 327 mVrms
Input impedance: more than
47 kilohms
LINE IN 2
VIDEO IN, Phono jack (1)
Input signal: 1 Vp-p, 75 ohms,
unbalanced, sync negative
AUDIO IN, Phono jack (2)
Input level: 327 mVrms
Input impedance: more than
47 kilohms
LINE OUT
VIDEO OUT, Phono jack (1)
Output signal: 1Vp-p, 75 ohms,
unbalanced, sync negative
AUDIO OUT: Phono jack (2)
Rated output level: 327 mVrms
Load impedance: more than 47
kilohms
Output impedance: less than
10 kilohms
General
Power requirements
110 - 240 V AC, 50/60 Hz
Power consumption
27 W (SLV-X842/X842ML only)
25 W (SLV-X821MKII only)
Operating temperature
5 °C to 40 °C
Storage temperature
–20 °C to 60 °C
Dimensions
Approx. 430 × 103 × 323 mm
(w/h/d)
including projecting parts and
controls
Mass
Approx. 5.0 Kg
Supplied accessories
Remote commander (1)
R6 (size AA) batteries (2)
Aerial cable (1)
Audio/video cable (1)
Mains lead (2-pin type) (1)
(SLV-X842ML only)
Mains lead (3-pin type) (1)
(SLV-X842/X821MKII only)
Plug adaptor (1)
Design and specifications are subject to
change without notice.
52
-EN
Additional Information
Page 52

Refer to the pages indicated in ( ) for details.
Index to parts and
controls
Front panel, with drop down panel opened
1 ON/STANDBY switch/indicator (11)
2 LINE IN 2 jacks (46)
3 Tape compartment
4 AUDIO DUB button (48)
5 APC button (42)
6 Remote sensor (6)
7PPAUSE button (47, 49)
8· PLAY button (41)
9 DUAL MODE SHUTTLE ring (27, 41)
0r REC (recording) button/indicator (47)
!¡p STOP button (47, 49)
!™ TIMER indicator (36, 38)
!£QUICK TIMER button (32)
!¢TAPE SPEED button
! PROGRAM +/– buttons (11)
!§INPUT SELECT button
!¶EASY SET UP button (13)
!•RF CH SET button (11)
!ªCOLOR SYSTEM switch (28)
@º § EJECT button
Additional Information
53
-EN
Page 53

Index to parts and controls
(continued)
Rear panel
1 AC IN connector (7)
2 NTSC PB switch (10)
3 AERIAL IN connector (7)
4 AERIAL OUT connector (7)
5 LINE IN 1 jacks (46)
6 LINE OUT jacks (7, 47)
Display window
STEREO NICAM
MAIN
/
L SUB/R
L
dB 151063036
R
1 Sound indicators (29)
2 NICAM indicator (SLV-X842/X842ML only) (33)
3 A-DUB (audio dubbing) indicator (48)
4 AUTO TRACKING indicator (42)
5 Tape speed indicators (30)
6 Linear time counter/clock (28)
A-DUB
SPLP EP
AUTO
TRACKING
H M S
CATV
RFAPC
INDEX
7 CATV indicator
8 RF channel/line/program position indicator
(11, 30, 47, 48)
9 APC indicator (42)
0 Index search indicator (43)
!¡Tape indicator
!™ RF indicator (11)
!£Color system/TV system indicators (8)
!¢Audio channel/sound level indicator (29)
54
-EN
Additional Information
Page 54

Remote commander
16 EJECT button (27)
2 Menu buttons (13, 15)
MENU button
CURSOR > /. / ?//
buttons
EXECUTE button
3 COUNTER RESET button
(28)
4 Program number buttons (18,
30, 35)
5? (ten’s digit) button (30)
6 TRACKING buttons (41, 42)
AUTO/MANUAL button
$/4 TRACKING
NORMAL/SLOW STILL
ADJUST buttons
7& SLOW +/– buttons (41)
8'/ 7 FRAME /< / >
buttons (41)
9=/+ INDEX SEARCH
buttons (43)
! TIMER CLEAR button (39)
!§TV/VIDEO button
(only for TV) (6)
!¶AUDIO MONITOR button
(34)
!•G-CODE buttons (36)
G-CODE button
ONCE button
DAILY button
WEEKLY button
!ªAUDIO DUB button (48)
@º DISPLAY button (28)
@¡ SKIP button (41)
@™ TAPE SPEED button
(30, 35, 38, 47)
@£ INPUT SELECT button
(31, 38, 47, 48)
@¢ PROG (program) +/–
buttons (18, 19, 30)
03/# SEARCH buttons
(27, 41)
!¡· PLAY button (27, 41)
!™ p STOP button (27, 41)
!£ TV / VTR remote control
switch (6)
!¢u (on/standby) button
(36, 38, 39, 40)
@ VOL (volume) +/– button
(only for TV)
@§P PAUSE button (27, 42)
@¶ r REC button (30, 42)
@• DUAL MODE SHUTTLE ring
(27, 41)
Additional Information
55
-EN
Page 55

Index
A, B
Accessories supplied 5
Adjusting
picture 41, 42
tracking 42
Aerial hookup 7
AFT (Auto Fine Tuning) 19
APC(Adaptive Picture
Control) 42
Audio dubbing 48
Audio track 29
C
Cancelling timer settings 39
Changing timer settings 39
Cleaning the video heads 50
Clock setting 14, 15
Color system
compatible color systems 4, 8
setting 10, 28
Connecting
audio/video input jacks
7, 46, 47
the VCR and your TV 7
to a stereo system 7, 48
to a TV with audio/video
input jacks 7, 46, 47
Counter 28
D
Dubbing. See Editing
E, F
EASY SET UP 13
Editing 46
EP mode 31
G
Game play 44
G-CODE
recording 35
setting 14, 24
Guide channel
setting 14, 24
Guide lamp 45
H
Hi-fi audio track 29
I, J, K
Index
searching 43
L
LP mode 31
N, O
NICAM broadcasts 33
Normal audio track 29
NTSC recorded tape 28
P
Playback 27
at various speeds 27, 41
skip 41
slow motion 41
Program position
changing program
positions 26
disabling program
positions 19
for VCR playback 11
tuning 14, 17
Q
Quick timer 32
R
Recording 30
bilingual programs 33, 34
saving 34
stereo programs 33, 34
while watching another
program 32
Remote commander 6
RF channel 11
S
Safety tab 34
Searching
at various speeds 27, 41
using the index function 43
SP mode 31
T, U, V, W, X, Y
Timer recording 35, 37
cancelling timer settings 39
changing timer settings 39
checking timer settings 39
daily/weekly recording 36, 38
quick timer 32
using G-CODE 35
Tracking adjustment. See Adjusting
Tuning
Auto fine tuning (AFT) 19
the TV to the VCR 11
the VCR to TV channels 14, 17
Z
ZWEITON broadcasts 34
M
Menu
options 45
Monitoring
during playback 29
during recording 34
-EN
56
Additional Information
Page 56

Additional Information
57
-EN
Page 57

Video Cassette Recorder
3-810-314-13 (1)
Video Cassette
SLV-X842/X842ML/X821MKII
Recorder
Operating Instructions
取扱説明書
使用説明書
EN
J
C
PAL NTSC
SLV-X842/X842ML
SLV-X821MKII
© 1995 by Sony Corporation
Page 58

警告
本機を雨や、湿気にさらさないでください。火災や、感電などの事故のもとに
なります。
本機を分解したり、開けたりしないでください。感電の原因になります。故障
等が起こったときは、サービスマンにご連絡ください。
ご注意
安全のために
・ 本機、SLV-X842/X842ML/X821MKIIは、AC110〜240V、50/60Hzで
作動します。
・ 万一異物が本機に入ったときはすぐに使用を中止してください。コンセント
と本機から電源コードを抜き、サービスマンにご連絡ください。
・ 本機の電源が入っていなくても、コンセントと本機が電源コードでつながっ
ているかぎり、電流は流れています。
・ 長期間ご使用にならないときは、コンセントから電源プラグを抜いてくださ
い。抜くときは、コードをひっぱらずにプラグを持ってください。
設置についてのご注意
・ 内部の過熱を防ぐため、通気のよいところに設置してください。
・ じゅうたんや毛布などの上や、カーテンや布製品の側に設置して、本機の通
気孔をふさがないようにしてください。
・ 暖房器具や送風管などの熱源の近くに置いたり、直射日光の当たる場所、ほ
こりの多い場所、振動のある場所、不安定な場所などに置かないでくださ
い。
・ 水平な場所に設置してください。本機は水平な状態でのみ使用するよう、設
計されています。
・ 電子レンジや大型スピーカーなど、強い磁場のあるものに、本機やビデオ
テープを近づけないでください。
・ 本機の上に重いものを置かないでください。
・ 本機を寒い場所から暖かい場所に直接持ち込んだときなどに内部に水滴がつ
く、つゆつき(結露)が起きることがあります。結露が起きたままご使用に
なると、ヘッドやテープをいためます。本機を最初に設置したときや、寒い
場所から暖かい場所に移動したときは、1時間ほど待ってからご使用くださ
い。
警告
テレビ番組や、映画、ビデオには、著作権のあるものがあります。著作権のあ
るものを許可なく録画すると、著作権法の条項に違反する場合があります。ま
た、ケーブルテレビの受信に本機を使用するときは、ケーブルテレビ会社や、
番組所有者、もしくはその双方に許可を得る必要がある場合があります。
-J
2
準備の前に
Page 59

目次
4 はじめに
4 機種名を確かめる
設置と準備
5 準備1:付属品を確かめる
6 準備2:リモコンの準備をする
7 準備3:アンテナとテレビを本機につなぐ
8 準備4:使用する国のカラー方式を確認する
11 準備5:ビデオ用のチャンネルを設定する
13 準備6:かんたん設定にしたがって本機の設定をする
(EASYSETUP)
15 手動で時計を合わせる
17 手動でテレビチャンネルを設定する
24 手動でGコードの設定をする
26 プログラムポジションを入れ替える
基本
27 ビデオを見る
30 テレビ番組を録画する
35 Gコードで録画予約する
37 手動で録画予約する
39 予約を確認する・変更する・取り消しする
40 録画予約をしたあとに
J
応用
41 速さを変えて見る/見たい場面を探す
42 画質調整をする
43 インデックスで頭出しをする
44 テレビゲームを楽しむ
45 お買い上げ時の設定を変える(メニュー)
編集
46 お手持ちのビデオデッキとつないで編集する
48 録画済みテープに音声を追加する(オーディオダビング)
その他
50 故障かな?と思ったら
52 主な仕様
53 各部のなまえ
56 索引
準備の前に
-J
3
Page 60

はじめに
お買い上げいただきありがとうございます。
本機には、以下のような特長があります。
・かんたん設定メニュー(EASYSETUP)が、必要なビデオ設定を順
にガイドしていきます。
・ アダプティブピクチャーコントロール(APC)機能が、録画・再生
をよりきれいにします。
・ シャトルリングで再生や、見たい場面の検索が簡単にできます。
・ G-CODE*(Gコード)機能で、すばやく簡単に録画予約ができま
す。
* G-CODEはGemstarDevelopmentCorp.の登録商標です。G-CODE機能は、
GemstarDevelopmentCorporationとのライセンス契約により製造されていま
す。
ご注意
・ 本機のG-CODEは、シンガポール、マレーシア、ホンコン、マカオなどで使われる方
式に対応しています。したがって、アメリカ、カナダ、日本、韓国、台湾、イギリス
などの地域では使用できません。
カラー方式について
機種名を確かめる
・ 本機の録画・再生は、PAL(B/G、D/K、I)、MESECAM(B/G、D/
K、K1)、NTSC(M) の各方式に対応しています。他のカラー方式
によるものの録画は保証できません。
この取扱説明書はSLV-X842、SLV-X842MLとSLV-X821MKII用に
書かれています。ビデオデッキの裏パネルをご覧になって、お客様がお
買い求めになった機種名をご確認ください。イラストは、SLVX842MLをもとにしています。機種による操作の違いは、例えば、
(SLV-X842MLのみ)
のように明記しています。
機種による特長の違い
特長 機種名
NICAM方式のステレオ、多重音声放送の受信
X842/X842MLX821MKII
・ミ
ZWEITON方式のステレオ、多重音声放送の受信
-J
4
準備の前に
・ミ
Page 61

準備1
付属品を確かめる
箱を開けたら、付属品がそろっているか確かめてください。
・リモコン
・ 乾電池(単3形/R6/sizeAA)
・アンテナケーブル
・映像・音声コード
設置と準備
・電源コード
・変換プラグ
のみ)
(SLV-X842MLのみ)
ホンコンではこちらのタイプの電源コードをご使用ください。
(SLV-X842/X821MKII
設置と準備
-J
5
Page 62

準備2
リモコンの準備をする
乾電池(単3型/R6/sizeAA)を、乾電池ホルダー内の表示にしたがって、+と−を正し
く入れてください。
リモコンを使う
このリモコンは本機以外に、ソニー製のテレビにも使えます。リモコンのボタンの左肩に、点(・)が
ついているものが、テレビ操作用です。
リモコン受光部
TV/VTR
操作の対象が TV/VTRスイッチを
本機のとき VTR 側にし、リモコンの頭を本機のリモコン受光部に向ける。
ソニー製テレビのとき TV側にし、リモコンの頭をテレビのリモコン受光部に向ける。
ご注意
・ TV/VIDEOボタンは、テレビの入力信号を外部アンテナか、ビデオのライン入力かに切り換えるもので、本機
の操作には使用しません。
・ 乾電池は新しいものと交換してから、通常、約3か月から6か月間、使用できます。
・ 長い間リモコンを使わないときは、液漏れによる損害を防ぐため、乾電池を取り出しておいてください。
・ 新しい乾電池と使用した乾電池を混ぜて使用しないでください。
・ 種類の違う乾電池を混ぜて使用しないでください。
-J
6
設置と準備
Page 63

準備3
AERIAL
OUT
IN
アンテナとテレビを本機につなぐ
AERIALIN
ACIN
壁のコンセントへ
:信号の流れ
AERIAL
OUT
アンテナケーブル
1 テレビからアンテナケーブルをはずし、本機のAERIALIN
につなぐ。
2 本機のAERIALOUTとテレビのアンテナ入力を付属のアン
テナケーブルでつなぐ。
設置と準備
AERIALIN
(アンテナ入力)
AERIAL
OUT
IN
3 本機のACINと電源コンセントを付属の電源コードでつな
ぐ。
これでテレビ番組を見たり、録画する基本的な接続ができました。
その他の接続
ビデオ入力端子のあるテレビに接続する
この接続により、画質と音質が向上します。
右のイラストにしたがって接続してください。
オーディオシステムとつなぐ
この接続により、音質が向上します。
右のイラストにしたがって接続してください。
LINEOUT ライン入力
AUDIO
OUT
(LINEIN)
映像・音声コード
ライン入力
(LINEIN)
映像・音声コード
設置と準備
-J
7
Page 64

準備4
,
,,,,
,,,,
,,,,
,,,,
,,,,
,,,
,,,
使用する国のカラー方式を確認する
カラー方式について
カラー方式と放送方式は国によって違います。カラー方式と放送方式が違うと、ビデオの再生や録画方式も違ってきます。本機
で対応していない方式の国で本機を使用すると、音が出ない、画像が縦に回って定まらないなどの現象が起こります。
上の世界地図と次ページの表で、本機を使用される地域のカラー方式と放送方式を確認してください。本機はほとんどのカラー
方式(NTSC・PAL・MESECAM)と放送方式(B/G・D/K・I・M)に対応しています。ただし、フランス、ブラジル、アルゼ
ンチン、ウルグアイなどで使用されている方式には対応していません。
アンテナケーブルによるテレビとの接続を完了したら、お手持ちのテレビの方式に合わせるため、次のことをしてください。
・ NTSCPBスイッチを、お手持ちのテレビのカラー方式に合うように設定する。(10ページ)
・ 「ビデオ用のチャンネルを設定する」(11ページ)(RFCHSETボタンを使って、放送方式を設定する。)
カラー方式は、本体前面の表示窓に出ます。
カラー方式表示
-J
8
設置と準備
Page 65

チャンネル設定表
,
,
,
,
,
,
,
,
地図上の網
のパターン U
カラー方式と
放送方式
PALB/G
地域
西ヨーロッパ
地域のチャンネル*
VL
2ミ 4
VH
5ミ12
21 ミ69
S01ミS05**
トルコ
S1ミS7**
2ミ 4
S8 ミS41**
5ミ12
21 ミ69
クウェート
アラブ首長国連邦
オマーン
ヨルダン
,,
,,
,,
,,
,,
,,
PALI
PALD/K
MESECAMB/G
オーストラリア
インドネシア
イギリス
ホンコン
アイルランド
南アフリカ
中国
サウジアラビア
イラン
イラク
0ミ 5、5A
1A、2、3
ム
AミC
ム
1ミ 5
2ミ 4
6ミ11
4ミ11
ム
DミJ
4ミ13
6ミ12
5ミ12
28 ミ69
ム
21 ミ68
ム
21 ミ68
13 ミ56
21 ミ69
リビア
エジプト
モロッコ
ギリシャ
シリア
,,
,,
MESECAMD/K
MESECAMK1
東ヨーロッパ
ロシア
ザイール
1ミ 5
ム
6ミ12
K4ミK9
21 ミ60
ム
セネガル
ニジェール
ニューカレドニア
タヒチ
フランス領ギアナ
NTSC3.58
アメリカ合衆国
日本
2ミ 6
A5ミA1**
AミE**
1ミ 3
M1ミM7**
7ミ13
FミW**
W+1ミW+28**
4ミ12
M8ミM10**
14 ミ78
W+29ミW+58**
13 ミ62
S1 ミS41**
放送方式
(RFCHSETボタンで
設定します)
G
設置と準備
I
K
G
K
K
M
* VL=VHF低周波層、VH=VHF高周波層、U=UHF
** CATV(ケーブルテレビ)チャンネル
ご注意
・ RF出力チャンネル(本体表示窓に出ます)の初期設定値は32ですが、28から55の範囲で設定し直すことが
できます(11〜12ページ)。地域によって対応するチャンネルは異なります(20 〜23ページ)。
設置と準備
9
-J
Page 66

準備4 使用する国のカラー方式を確認する(つづき)
NTSC PBスイッチをテレビのカラー方式に合うように設定する
NTSCPBスイッチ
本機に何の入力信号もないときにテレビ画面にメニューを表示させたり、NTSC3.58方式で録画した
テープを正しく再生するには、NTSCPBスイッチを設定しなくてはなりません。下の表にしたがっ
て設定してください。
テレビのカラー方式
PAL/SECAM/MESECAM
NTSC4.43
NTSC3.58
ヒント
・ テレビのカラー方式がわからないときは、8ページと9ページの地図と表を参照してください。
ご注意
・ 本機に入力信号(ライン入力、チューナー、再生の信号)があるときは、NTSCPBスイッチの位置に関係な
く、テレビ画面にメニューが出ます。
・ お手持ちのテレビがSECAM方式の場合、メニューは白黒になります。
NTSCPBスイッチの位置
ONPALTV
NTSC4.43
NTSC3.58
10
-J
設置と準備
Page 67

準備5
PROGRAM
ビデオ用のチャンネルを設定する
映像・音声コードで本機とテレビをつないだときは、この準備は必要ありません。
ON/STANDBY
設置と準備
RF C HSET PROGRAM+/−
1 ON/STANDBYスイッチを押して、電源を入れる。
2 本体のRFCHSETボタンを押す。
ON/STANDBY
RF
CH SET
RFチャンネルの初期値が本体表示窓に出ます。
本機の信号がこのチャンネルを通じてテレビに出力されます。
3 テレビの電源を入れ、ビデオ再生用のプログラムポジションを選ぶ。
4 RFCHSETボタンを押す。
RF
CH SET
放送方式が本体表示窓に出ます。
表示された放送方式がテレビと合っていない場合は、PROGRAM+/ミボタンを押して、下の表
にしたがって正しい放送方式を設定してください。放送方式がわからないときは、「使用する国
のカラー方式を確認する」(8〜9ページ)を参照してください。
RF
RF
テレビのカラー方式がPALのとき
放送方式 本体表示窓
II
D/K K
B/G G
本体表示窓に出ているRFチャンネルと同じチャンネルにテレビをチューニングします。正しく
チューニングされているときは、グレーの画面がテレビにあらわれます。
テレビのチューニングの方法は、テレビの取扱説明書を参照してください。
グレーの画面がきれいにあらわれないときは、「グレーの画面をきれいに出すには」(次ページ)
を参照してください。
テレビのカラー方式がNTSCのとき
本体表示窓
M
設置と準備
(つづく)
11
-J
Page 68

準備5 ビデオ用のチャンネルを設定する(つづき)
5 RFCHSETボタンを押す。
RF
CH SET
これでお手持ちのテレビが本機用に設定されました。テープを再生するときはいつも、手順3で
選択したプログラムポジションにテレビを設定してください。
ご注意
・ 正しくない放送方式を選択すると、音が出なかったりひずみが出たりすることがあります。
テレビが正しくチューニングされたか確認する
テレビをビデオ再生用のプログラムポジションにしてください。PROGRAM+/−ボタンを押すたびにテレビ番組が変
わったら、正しくチューニングされています。
グレーの画面をきれいに出すには
もし手順4でグレーの画面がきれいに出ないときは、手順5まで進み、一度手順を終わらせてください。その後、手順2
からもう一度始めます。手順2でRFCHSETボタンを押した後、RFチャンネルが表示されている間に、PROGRAM
+/−ボタンを押して、別のRFチャンネル(28〜55)を表示させます(20ページ参照)。新たに設定したRFチャンネルに
テレビをチューニングして、グレーの画面をきれいに出します。
12
-J
設置と準備
Page 69

準備6
かんたん設定にしたがって本機の設定をす
る(EASYSET UP)
本機を最初に使用する前に、テレビ画面のEASYSETUP(かんたん設定)メニューにし
たがって本機の設定をしてください。これにより、言語、テレビチャンネル、時計が順に
設定できます。
u(電源「入」/スタンバイ)
CURSOR>/./?//
EXECUTE
EASYSETUP
設置と準備
1 u(電源「入」/スタンバイ)を押して、ビデオの電源を入れ
る。
2 テレビの電源を入れ、ビデオ再生用のプログラムポジションを
選ぶ。
3 本体のEASYSETUPボタン押す。
EASY
SET UP
LANGUAGE(言語選択)メニューが出ます。
かんたん設定メニューを途中でぬけるには、EASYSET UPボタ
ンをもう1度押します。
4 CURSOR>/.ボタンを押して、ENGLISH(英語)、または中
CURSOR
EXECUTE
文(中国語)を選び、EXECUTEボタンを押す。
AUTOTUNERPRESET(自動チューニング)メニューがテレビ
画面に出ます。
EASY SET UP
LANGUAGE/
ENGL ISH
:
SELECT
:
NEXT
CANCEL
EASY SET UP
AUTO TUNER PRESET
SELECT
NEXT
I
D/K
B/G
M
EXECUTE
:
EASY SET UP
:
:
EXECUTE
–––5–
1234
–––
1234
–
5
設置と準備
(つづく)
-J
13
Page 70

準備6 かんたん設定にしたがって本機を設定する(EASYSETUP)
EASY SET UP
CH 4
PLEASE
WAIT
2
AUTO TUNER PRESET
B/G
1234
–––5–
CURSOR
CURSOR
(つづき)
5 CURSOR>/.ボタンを押して、放送方式を選び、
CURSOR
EXECUTE
EXECUTEボタンを押す。
お住まいの地域で受信可能なチャンネルが、番号順に自動設定さ
れていきます。
すべてのチャンネルが設定されると、右の画面が出ます。
いろいろな放送方式が混在している地域でも、自動チューニング
機能は、ほとんどすべてのチャンネルを(選択した放送方式と違
うものでも)、設定していきます。ただし、放送方式が違うチャン
ネルについては手動で、「放送方式を設定し直す」(19ページ)必
要があります。
また、手動でチャンネルを加えたり、削ったりすることもできま
す。「手動でテレビチャンネルを設定する」(17ページ)
6 CURSOR >/./?//ボタンを押して、Gコードのガイド
チャンネルを設定し、テレビ番組のプログラムポジションを入
れ替える。
必要がなければこの手順は省いてください。
手順は「手動でGコードの設定をする」(24ページ)、
「プログラムポジションを入れ替える」(26ページ)と同じです。
7 EXECUTEボタンを押す。
EXECUTE
CLOCKSET(時計合わせ)メニューが出ます。
EASY SET UP
PROG
CH
13 –
2
9
3
12
4
27
5
5
6
SELECT
MOVE PROG
SET GUI DE
EASY SET UP
CLOCK SET
1 MON.1 1.996
4
CH
–––5–
1234
GU
–
–
–
–
–
––––
:
:
–
:
–––5–
1234
0:00
IDE
–––
CH
–
–
–––
––
8 CURSOR>/./?//ボタンを押して、日付と時間を設定す
る。
手順は「手動で時計を合わせる」(15ページ)と同じです。
9 EXECUTEボタンを押す。
-J
14
EXECUTE
設置と準備
これでEASYSETUPメニューを完了しました。
ご注意
・ 自動チューニング中は、EASYSETUPメニューを終わらせないでください。終わらせた場合は、EASY
SETUPメニューでの設定を初めからやり直さなくてはなりません。
・ 自動チューニング機能で設定されたチャンネル番号は、お住まいの地域のチャンネル番号と一致しないこ
とがあります。これは自動チューニング機能が、もっとも広範囲のチャンネル領域を持つ固定の放送方式
によっているからです。この場合は、地域のチャンネル番号を同じ番号のプログラムポジションに登録す
ることができます。「プログラムポジションを入れ替える」(26ページ)
・手順5 で、受信したチャンネルがケーブルテレビのときは、チャンネル番号の左に「C」が出ますが、地域
によっては出ないこともあります。20〜23ページを参照してください。
:
SELECT
:
SET
:
END
EASY SET UP
CLOCK SET
7 WED.111.996
:
SELECT
:
SET
:
END
EXECUTE
EXECUTE
–––5–
1234
5:3021
Page 71

手動で時計を合わせる
正しく予約録画するには、日付けと時間を正しく設定しなくてはなりません。
日付けと時間はメニュー画面を使って設定できます。
1 MENUボタンを押す。
MENU(基本メニュー)が出ます。
MENU
CURSOR
>/./?//
EXECUTE
MENU
TI
MER SET / CHECK
UP MENU
SET
TUNER
PRESET
SET
UP CH AND G–CODE
CLOCK
SET
GAME
:
SELECT
:
SET
EXECUTE
2 CURSOR>/.ボタンを押して、カーソル(I)をCLOCKSET (時計合
わせ)に合わせ、EXECUTEボタンを押す。
CLOCKSET(時計合わせ)メニューが出ます。
CLOCK SET
0:00
:
:
:
EXECUTE
MON.1 1.996
1
SELECT
SET
END
3 CURSOR>/.ボタンを押して、日を設定する。
曜日は自動的に設定されます。
CLOCK SET
0:00
72
SAT.1 1.996
設置と準備
ヒント
・ 設定中に数字を変えるとき
は、CURSOR?ボタンで
変えたい項目に戻り、
CURSOR>/.ボタンで数値
を変えてください。
ご注意
・ 設定中2、3分以上何も入力を
しないと、メニュー画面は自
動的に消えます。
:
SELECT
:
SET
:
END
EXECUTE
4 CURSOR/ボタンを押して、月を選び、CURSOR>/. ボタンで設定す
る。
CLOCK SET
0:00
:
:
:
EXECUTE
WED.111.996
72
SELECT
SET
END
5 CURSOR/ボタンを押して、年を選び、CURSOR>/. ボタンで設定す
る。
CLOCK SET
0:00
:
:
:
EXECUTE
WED.111.996
(つづく)
72
SELECT
SET
END
設置と準備
15
-J
Page 72

手動で時計を合わせる(つづき)
6 CURSOR/ボタンを押して、時間を選び、CURSOR>/. ボタンで設定
する。
CLOCK SET
5:00721
WED.111.996
:
SELECT
:
SET
:
END
EXECUTE
7 CURSOR/ボタンを押して、分を選び、CURSOR>/. ボタンで設定す
る。
CLOCK SET
5:30721
WED.111.996
:
SELECT
:
SET
:
END
EXECUTE
8 EXECUTEボタンを押して、時計を動かし始める。
16
-J
設置と準備
Page 73

手動でテレビチャンネル
を設定する
MENU
CURSOR
>/./?//
EXECUTE
PROG+/−
EASYSETUPメニューで地域のチャンネル設定は完了していますが(14ペー
ジ)、次のような場合は手動での設定ができます。
・ 設定されないチャンネルがあった場合、「手動でテレビチャンネルを設定す
る」(本ページ)ことができます。
・ 必要のないチャンネルがあるときは、「必要のないチャンネルを削除する」
(19ページ)ことができます。
・ いろいろな放送方式が混在する地域の場合、EASYSETUPで設定された
チャンネルのなかで、AUTOTUNERPRESETで選んだ放送方式と一致し
ないものがあるかもしれません。放送方式と一致しないチャンネルは、「放
送方式を設定し直す」(19ページ)ようにしてください。
放送方式が合っていないと、音が歪んだり、ノイズが出たり、カラー放送が
白黒になったりすることがあります。
手動でテレビチャンネルを設定する
1 MENUボタンを押す。
MENU(基本メニュー)がテレビ画面に出ます。
MENU
TI
MER SET / CHECK
UP MENU
SET
TUNER
PRESET
SET
UP CH AND G–CODE
CLOCK
SET
GAME
:
SELECT
:
SET
EXECUTE
設置と準備
ご注意
・設定中2、3分以上何も入力をし
ないと、メニュー画面は自動的
に消えます。
・手順3でCATVを選んだ場合で
も、地域によっては、普通のテ
レビ番組がチューニングされた
り、NORMを選んだのにケーブ
ルテレビがチューニングされた
りすることがあります。(20〜
23ページ参照)
・メニュー画面のCHANNELSET
の右横に出るチャンネル番号
は、お住まいの地域のチャンネ
ル番号と一致しないことがあり
ます。これは本機の検索方式
が、もっとも広範囲のチャンネ
ル領域を持つ固定の放送方式に
よっているからです。この場合
は、地域のチャンネル番号を同
じ番号のプログラムポジション
に登録することができます。「プ
ログラムポジションを入れ替え
る」(26ページ)
2 CURSOR>/. ボタンを押して、カーソル(I)をTUNERPRESET
(チューナー設定)に合わせ、EXECUTEボタンを押す。
TUNERPRESET(チューナー設定)メニューが出ます。
TUNER PRESET
SYSTEM
CATV/
NORMAL
SET
CHANNEL
AFT
I NE TUNI NG
F
:
SET
NORM
2
ON
01PROG
B/GD/KIM
CATV
1
OFF
3 CURSOR>/./?//ボタンを押して、カーソル(I)をNORMAL/
CATV(普通のテレビ/ケーブルテレビ)に合わせ、NORM(普通のテレ
ビ)を選ぶ。
ケーブルテレビチャンネルを設定するときは、CATV(ケーブルテレビ)を
選んでください。
TUNER PRESET
SYSTEM
NORMAL
CATV/
CHANNEL
AFT
F
I NE TUNI NG
:
SET
SET
NORM
2
ON
01PROG
B/GD/KIM
CATV
1
OFF
4 CURSOR>/. ボタンを押して、カーソル(I)をCHANNELSET(チャ
ンネル設定)に合わせる。
TUNER PRESET
SYSTEM
CATV/
NORMAL
SET
CHANNEL
AFT
I NE TUNI NG
F
:
SET
NORM
2
ON
01PROG
B/GD/KIM
CATV
1
OFF
設置と準備
(つづく)
17
-J
Page 74

手動でテレビチャンネルを設定す
05
る(つづき)
5 PROG+/−ボタンを押して、プログラムポジションを選ぶ。
選ばれたプログラムポジション
TUNER PRESET
SYSTEM
CATV/
NORMAL
SET
CHANNEL
AFT
I NE TUNI NG
F
:
SET
NORM
2
ON
41PROG
B/GD/KIM
CATV
1
OFF
6 CURSOR/ボタンを押して、チャンネルを探す。
チャンネルの検索が始まり、一番初めに見つかったチャンネルがテレビ画
面に出ます。目的のテレビ番組が出るまで、CURSOR?//ボタンを押
し続けます。
TUNER PRESET
SYSTEM
CATV/
NORMAL
SET
CHANNEL
AFT
I NE TUNI NG
F
:
SET
NORM
3
ON
41PROG
B/GD/KIM
CATV
5
OFF
テレビ番組は、20〜23ページの表にある順に検索されます。
最初から目的のチャンネル番号がわかっているときは、番号ボタンを押し
てください。例えば、5チャンネルを選ぶには0ボタンを押したあとに5ボ
タンを押します。
7 音声が歪む、音声にノイズが入る、カラー放送が白黒になる場合は、
CURSOR>/./?//ボタンを押して、カーソル(
方式)に合わせ、I、D/K、B/G、Mのうち、地域に合った放送方式を選ぶ。
「使用する国のカラー方式を確認する」(8〜9ページ)と、「放送方式を設定
し直す」(19ページ)を参照してください。
TUNER PRESET
SYSTEM
CATV/
NORMAL
SET
CHANNEL
AFT
I NE TUNI NG
F
:
SET
NORM
3
ON
41PROG
B/GD/KIM
CATV
6
OFF
I)をSYSTEM(放送
18
8 他のチャンネルを違うプログラムポジションに設定するときは、手順5と6
を繰り返す。
9 EXECUTEボタンを押して、設定したチャンネルを記憶させる。
-J
設置と準備
Page 75

必要のないチャンネルを削除する
チャンネル設定後、必要のないチャンネルを削除することができます。削除さ
れたチャンネルは、PROG+/−ボタンを押しても画面に出てきません。
1 MENUボタンを押して、TUNER PRESET(チューナー設定)を選び、
EXECUTEボタンを押す。
2 CHANNELSET(チャンネル設定)を選ぶ。
3 PROG+/−ボタンを押して、必要のないチャンネルがあるプログラムポ
ジションを探す。
プログラムポジションは、メニュー画面の「PROG」の右横に出てきます。
4 0ボタンを2回押して、「CHANNELSET」の右横に「0」を出す。
5 他にチャンネルを削除するときは、手順3と4を繰り返す。
6 EXECUTEを押す。
放送方式を設定し直す(いろいろな放送方式が混在してい
る地域のみ)
もし、音がゆがむ、音にノイズがはいる、カラー放送が白黒になるなどが起こ
るときは、そのチャンネルと放送方式が合っていないのかもしれません。こん
なときは次のようにしてみてください。
設置と準備
1 MENUボタンを押したあと、TUNER PRESET(チューナー設定)を選
び、EXECUTEボタンを押す。
2 PROG+/−ボタンを押して、設定し直したいチャンネルのあるプログラ
ムポジションを選ぶ。
3 SYSTEM(放送方式)を選び、最も音声と画質がよくなる放送方式を選
ぶ。
4 他のチャンネルを設定し直すときは、手順2と3を繰り返す。
5 EXECUTEボタンを押す。
テレビ放送の映りが悪いときは
通常は自動微調整機能(AFT)が自動的にチャンネルをきれいにチューニング
していきますが、それでもテレビ放送の映りが悪いときは、手動でチューニン
グすることができます。
1 PROG+/−ボタンを押して、調整したいチャンネルがあるプログラムポ
ジションを選ぶ。
2 MENUボタンを押したあと、TUNER PRESET(チューナー設定)を選
び、EXECUTEボタンを押す。
3 FINETUNING(微調整)を選ぶ。微調整の目安となるバーが出ます。
選ばれたプログラムポジション
TUNER PRESET
SYSTEM
NORMAL
CATV/
CHANNEL
AFT
F I NE TUNI NG
:
SET
SET
NORM
ON
51PROG
B/GD/KIM
CATV
8
OFF
4 CURSOR?//ボタンを押して、微調整する。テレビ放送が最もきれい
に映るところで止め、EXECUTEボタンを押す。
AFT(自動微調整機能)はOFF(切)になります。
設置と準備
19
-J
Page 76

手動でテレビチャンネルを設定す
る(つづき)
ご注意
・ 同じ地域チャンネルが、本機
の複数のチャンネル番号に出
てくることがあります。
本機のチャンネル番号と、対応する地域チャンネル
放送方式
国/地域
本機のチャンネ
ル番号
西
ヨーロッパ
オースト
ラリア
対応する地域チャンネル
B/G
ニュージー
ランド
モロッコ
インド
ネシア
20
10
11
12
1
2
3
4
5
6
7
8
9
E2
E3
E4
E5
E6
E7
E8
E9
E10
E11
E12
AS0
1
2
6
7
8
9
9A
10
11
10
11
1
2
3
4
5
6
7
8
9
M6
M7
M8
M9
M10
1A
2A
3A
4A
5A
6A
7A
8A
9A
10A
11A
13
14
15
16
3
4
17
18
19
20
21
22
表の網のかかった部分
は、RFチャンネルの再
設定をするときに選べる
チャンネル範囲を示して
います。
(12ページを参照してく
ださい。)
23
24
25
26
27
28
29
30
31
RFチャンネルの初期値
(11ページを参照して
ください。)
32
33
34
35
36
37
38
39
40
41
42
43
44
45
46
47
48
49
50
51
52
53
54
55
56
57
-J
設置と準備
E21
E22
E23
E24
E25
E26
E27
E28
E29
E30
E31
E32
E33
E34
E35
E36
E37
E38
E39
E40
E41
E42
E43
E44
E45
E46
E47
E48
E49
E50
E51
E52
E53
E54
E55
E56
E57
28
29
30
31,32
33
34
35
36
37
38
39,40
41
42
43
44
45
46
47,48
49
50
51
52
53
54
55,56
57
58
59
60
61
Page 77

放送方式
B/G
国/地域
本機のチャンネ
ル番号
58
59
60
61
62
63
64
65
66
67
68
69
C1
C2
C3
C4
C5
C6
C7
C8
C9
C10
C11
C12
C13
C14
C15
C16
C17
C18
C19
C20
C21
C22
C23
C24
C25
C26
C27
C28
C29
C30
C31
C32
C33
C34
C35
C36
C37
C38
C39
C40
C41
C42
C43
C44
C45
C46
西
ヨーロッパ
E58
E59
E60
E61
E62
E63
E64
E65
E66
E67
E68
E69
S1
S2
S3
S4
S5
S6
S7
S8
S9
S10
S11
S12
S13
S14
S15
S16
S17
S18
S19
S20
S21
S22
S23
S24
S25
S26
S27
S28
S29
S30
S31
S32
S33
S34
S35
S36
S37
S38
S39
S40
S41
S01
S02
S03
S04
S05
オースト
ラリア
ニュージー
ランド
対応する地域チャンネル
62
63,64
65
66
67
68
69
5
5A
モロッコ
M4
M5
インド
ネシア
設置と準備
設置と準備
21
-J
Page 78

手動でテレビチャンネ
ルを設定する(つづき)
国/地域
東ヨー
ロッパ
中国
イギリス/
ホンコン
IMD/K放送方式
アイル
ランド
南アフ
リカ
アメリカ合衆国 日本
表の網のかかった部分
は、RFチャンネルの再
設定をするときに選べ
るチャンネル範囲を示
しています。
(12ページを参照してく
ださい。)
RFチャンネルの初期値
(11ページを参照してく
ださい。)
本機のチャ
ンネル番号
1
2
3
4
5
6
7
8
9
10
11
12
13
14
15
16
17
18
19
20
21
22
23
24
25
26
27
28
29
30
31
32
33
34
35
36
37
38
39
40
41
42
43
44
45
46
47
48
49
50
51
52
53
54
55
56
57
R1
R6
R7
R12
R2
R3
R4
R5
R8
R9
R10
R11
R21
R22
R23
R24
R25
R26
R27
R28
R29
R30
R31
R32
R33
R34
R35
R36
R37
R38
R39
R40
R41
R42
R43
R44
R45
R46
R47
R48
R49
R50
R51
R52
R53
R54
R55
R56
R57
10
11
12
13
14
15
16
17
18
19
20
21
22
23
24
25
26
27
28
29
30
31
32
33
34
35
36
37
38
39
40
41
42
43
44
対応する地域チャンネル
A
1
2
3
7
8
4
B
C
D
E
J
4
5
10
2,C2
3
7
8
9
12
13
J
K
J-5
J-6
J-7
J-10
J-11
J-12
S1
5
5
9
B21
B22
B23
B24
B25
B26
B27
B28
B29
B30
B31
B32
B33
B34
B35
B36
B37
B38
B39
B40
B41
B42
B43
B44
B45
B46
B47
B48
B49
B50
B51
B52
B53
B54
B55
B56
B57
F
G
H
I
6
7
8
9
21
14,W+29,W+30
22
23
24
25
26
27
28
29
30
31
32
33
34
35
36
37
38
39
40
41
42
15,16,W+31
17,W+32
18,W+33,W+34
19,20,W+35
21,W+36
22,W+37,W+38
23,24,W+39
25,W+40
26,W+41,W+42
27,28,W+43
29,W+44
30,W+45,W+46
31,32,W+47
33,W+48
34,W+49,W+50
35,36,W+51
37,W+52
38,W+53,W+54
39,40,W+55
41,W+56
42,W+57,W+58
43
44
45
46
47
48
49
50
51
52
53
54
55
56
57
10
11
43,44
45
46
47,48
49
50
51,52
53
54
55,56
57
58
59,60
61
62
J-8
J-9
J13
J14,J15
J16
J17
J18,J19
J20
J21
J22,J23
J24
J25
J26,J27
J28
J29
J30,J31
J32
J33
J34,J35
J36
J37
J38,J39
J40
J41
J42,J43
J44
J45
J46,J47
J48
J49
J50,J51
J52
J53
J54,J55
J56
J57
J58,J59
J60
J61
22
-J
設置と準備
Page 79

放送方式
IMD/K
国/地域
本機のチャ
ンネル番号
58
59
60
61
62
63
64
65
66
67
68
69
C1
C2
C3
C4
C5
C6
C7
C8
C9
C10
C11
C12
C13
C14
C15
C16
C17
C18
C19
C20
C21
C22
C23
C24
C25
C26
C27
C28
C29
C30
C31
C32
C33
C34
C35
C36
C37
C38
C39
C40
C41
C42
C43
C44
C45
C46
東ヨー
ロッパ
R58
R59
R60
45
46
47
48
49
50
51
52
53
54
55
56
6
イギリス/
ホンコン
B58
B59
B60
B61
B62
B63
B64
B65
B66
B67
B68
B69
アイル
ランド
南アフ
リカ
対応する地域チャンネル
アメリカ合衆国中国 日本
58
59
60
61
62
63
64
65
66
67
68
11
(12)
13
W+1,W+2
W+5,W+6
W+9,W+10
W+13,W+14
W+17,W+18
W+21,W+22
W+25,W+26
63,64
65
66
67,68
69
70
71,72
73
74
75,76
77
78
A-3
A-2,A-1
A
B
C
D
E
F,G
H
I
L
M,N
O
P
Q
R
S
T,U
V
W
W+3
W+4
W+7
W+8
W+11
W+12
W+15
W+16
W+19
W+20
W+23
W+24
W+27
W+28
4,4A
6
A-5
A-4
J62
設置と準備
J-3
M1,M2
M3
M4
M5
M6
M7
M8,M9
M10
J-4
S2
S3
S4
S5,S6
S7
S8
S9
S10,S11
S12
S13
S14,S15
S16
S17
S18,S19
S20
S21
S22,S23
S24
S25
S26,S27
S28
S29
S30,S31
S32
S33
S34,S35
S36
S37
S38,S39
S40
S41
J-1
J-2
設置と準備
23
-J
Page 80

手動でGコードの設定を
する
録画予約を簡単にするG-CODE(Gコード)機能は、ソニーのビデオデッキの
特長のひとつです。それぞれのチャンネルのプログラムポジションに、その
チャンネルに対応するガイドチャンネルを、テレビ画面のメニューで設定して
いくことができます。(ガイドチャンネルとは、テレビチャンネルにあらかじめ
割り当てられている番号のことです。)ガイドチャンネルの番号については、
Gコード番号がのっている、地域のテレビガイドを参照してください。
MENU
CURSOR
>/./?//
EXECUTE
PROG+/−
ガイドチャンネルを設定する
1 MENUボタンを押す。
MENU(基本メニュー)がテレビ画面に出ます。
MENU
TI
MER SET / CHECK
UP MENU
SET
TUNER
PRESET
SET
UP CH AND G–CODE
CLOCK
SET
GAME
:
SELECT
:
SET
2 CURSOR> /.ボタンを押して、カーソル(I)をSETUPCHANDG-
CODE(プログラムポジション・Gコードの設定)に合わせ、EXECUTE
ボタンを押す。
SETUPCH ANDG-CODEメニューが出ます。
設定されているチャンネルがテレビ画面に出ます。「GUIDE CH 」の下に
「---」が出ているものは、ガイドチャンネルが設定されていません。
SET UP CH AND G–CODE
SELECT
MOVE PROG
SET GUI DE
PROG
1
2
3
4
5
EXECUTE
CH
12
27
5
GU
3–
9
–
–
–
6
––––
:
:
1
–
:
CH
IDE
–––
–––
–––
–––
CH
ご注意
・設定中2、3分以上何も入力を
しないと、メニュー画面は自
動的に消えます。
・ 本機のGコードは、シンガ
ポール、マレーシア、ホンコ
ン、マカオなどで使われる方
式に対応しております。した
がって、アメリカ、カナダ、
日本、韓国、台湾、イギリス
などの地域では使用できませ
ん。
・手順2 で、受信したチャンネ
ルがケーブルテレビのとき
は、チャンネル番号の左に
「C」が出ますが、地域によっ
ては出ないこともあります。
(20〜23ページ参照)
24
-J
設置と準備
3 CURSOR>/.ボタンを押して、ガイドチャンネルを設定したいチャンネ
ルのプログラムポジション(「PROG」の下)にカーソル(
テレビ画面に出ていない6〜50のプログラムポジションを出すには、
CURSOR>/.ボタンを繰り返し押します。
SET UP CH AND G–CODE
PROG
1
2
3
4
5
SELECT
MOVE PROG
SET GUI DE
CH
12
27
5
GU
3–
9
6
IDE
–––
–
–––
–
–––
–
–––
––––
:
:
4
–
:
CH
CH
I)を合わせる。
4 CURSOR/ボタンを押して、テレビチャンネル(「CH」の下)とガイド
チャンネル(「GUIDE CH 」の下)を選ぶ。
SET UP CH AND G–CODE
PROG
CH
1
2
12
3–
27
4 –
5
5
SELECT
MOVE PROG
SET GUI DE CH
–
3
–
9
–
6–––
:
4
:
GU
IDE
CH
–––
–––
–––
–––
5 CURSOR / ボタンをもう1度押して、ガイドチャンネル(「GUIDECH」
の下)のみを選ぶ。
SET UP CH AND G–CODE
PROG
CH
1
2
3––––
12
27
4
5
SELECT
SET
GU
IDE
CH
–
3
9
65
–––
–
–––
–
–––
––––
:
:
Page 81

ご注意
・ 誤ったガイドチャンネルを入
力したときは、CURSOR>/
.を繰り返し押して、
「GUIDECH」の入力フィー
ルドに「---」を出します。
「---」は1と255の間にありま
す。
・ 同じガイドチャンネルは、1
回しか割り当てられません。
・「GUIDECH」の入力フィー
ルドを「-- -」のままにしてG
コードを使って予約録画した
場合、LINEIN(ライン入力)
からの信号が録画されます。
6 CURSOR>/.ボタンを押して、テレビガイドで割り当てられているガイ
ドチャンネルを選ぶ。
SET UP CH AND G–CODE
PROG
CH
1
2
3–
12 –––
27
4
5
SELECT
SET
GU
IDE
CH
–
3
9
65
–––
–
–––
–
52
––––
:
:
7 CURSOR/ボタンを押して、設定する。
カーソル(
SET UP CH AND G–CODE
PROG
SELECT
MOVE PROG
SET GUI DE
I)が行の先頭に出る。
GU
CH
3
1
9
2
12 –––
3–
27
4
65
5
IDE
CH
–––
–
–––
–
52
–
––––
:
:
3
–
:
CH
8 他のチャンネルにガイドチャンネルを設定するときは、手順3〜7を繰り返
す。
チャンネルのプログラムポジションを入れ替えたいときは、「プログラムポ
ジションを入れ替える」(26ページ)の手順
2から行なってください。
9 ガイドチャンネルを設定し終わったら、EXECUTEボタンを押してメ
ニューを終了する。
設置と準備
ご注意
・ Gコードを使って衛星放送を
録画するときは、衛星放送の
チューナーでチャンネルを選
びます。
衛星放送のG-CODE(Gコード)の設定をする
衛星放送のチューナーをAERIALINに接続しているときは、TUNER
PRESET(チューナー設定)メニューで、それぞれの衛星放送チャンネルに、
プログラムポジションを割り当てます。その後、SETUPCHANDG-CODE
(プログラムポジション・Gコードの設定)メニューで、衛星放送チャンネルが
割り当てられたプログラムポジションに、ガイドチャンネルを設定していきま
す。
1 衛星放送のチューナーの電源を入れる。
2 MENUボタンを押したあと、TUNER PRESET(チューナー設定)を選
び、EXECUTEを押す。
3 PROG+/−ボタンを押して、衛星放送チャンネ
ルを割り当てたいプログラムポジションを選ぶ。
4 CHANNELSET(チャンネル設定)を選ぶ。
CURSOR/ ボタンを押して、衛星放送チュー
ナーの出力チャンネルにチューニングする。
CHANNELSETの右横に出ているチャンネル
は、すべての衛星放送番組を受信するチャンネルとして使用されます。
5 PROG+/−ボタンを押して、別のプログラムポジションを他の衛星放送
チャンネル用に選ぶ。
番号ボタンを押して、手順
これの設定を、すべての衛星放送チャンネルに対して繰り返す。
4で設定したチャンネル番号を入力する。
選ばれたプログラムポジション
TUNER PRESET
SYSTEM
NORMAL
CHANNEL
AFT
F
I NE TUNI NG
SET
NORM
CATV/
SET
3
ON
:
B/GD/KIM
CATV
0
OFF
6PROG
6 衛星放送を割り当てたプログラムポジションに、ガイドチャンネルを設定す
る。
「ガイドチャンネルを設定する」(24ページ)参照
設置と準備
25
-J
Page 82

プログラムポジションを
Gコードの設定が終わったら、自動的に割り当てられたプログラムポジション
を自由に入れ替えることができます。
入れ替える
MENU
CURSOR
>/./?//
EXECUTE
1 MENUボタンを押す。
MENU(基本メニュー)がテレビ画面に出ます。
MENU
TI
MER SET / CHECK
UP MENU
SET
TUNER
PRESET
SET
UP CH AND G–CODE
CLOCK
SET
GAME
:
SELECT
:
SET
EXECUTE
2 CURSOR> /.ボタンを押して、カーソル(I)をSETUPCHANDG-
CODE(プログラムポジション・Gコードの設定)に合わせ、EXECUTE
ボタンを押す。
SETUPCH ANDG-CODEメニューが出ます。
SET UP CH AND G–CODE
PROG
1 3
2
3
4
5
SELECT
MOVE PROG
SET GUI DE
CH
12
27
GU
IDE
CH
–
1
–
9
65
1
CH
2
–
83
–
61
––––
:
:
–
:
3 CURSOR>/.ボタンを押して、替えたいプログラムポジションにカーソ
I)を合わせ、CURSOR/ボタンを押す。
ル(
テレビチャンネルとガイドチャンネルが選ばれます。
テレビ画面に出ていない6〜50のプログラムポジションを出すには、
CURSOR>/.ボタンを繰り返し押します。
SET UP CH AND G–CODE
PROG
CH
1
2
3 –83
12
4
27
5
SELECT
MOVE PROG
SET
GU
IDE
CH
–
3
9
65
3
1
–
2
–
61
––––
:
:
4 CURSOR>/.ボタンを押して、選んだテレビチャンネルとガイドチャン
ネルを、登録したいプログラムポジションに移し、CURSOR? ボタンを
押す。
プログラムポジションが入れ替わります。
SET UP CH AND G–CODE
PROG
CH
1
2
3–83
12
4
27
5
SELECT
MOVE PROG
SET
SET UP CH AND G–CODE
PROG
CH
1 3
12
2
3
4
27
5
SELECT
MOVE PROG
SET GUI DE
3
9
65
9
3
65
TO PROG
3
1
CH
GU
IDE
CH
–
1
–
2
–
61
––––
:
1
:
GU
IDE
CH
–
8
–
2
–
1
–
61
––––
:
:
–
:
26
5 他のプログラムポジションを替えたいときは、手順3と4を繰り返す。
6 終了したら、EXECUTEボタンを押して、メニューを終了する。
-J
設置と準備
Page 83

基本
ここではビデオテープの再生のしかたを説明します。
ビデオを見る
6EJECT
1 テレビの電源を入れ、ビデオの入力にす
る。
・ 本機とテレビを映像・音声コードでつない
でいるときは、テレビをビデオ入力にして
ください。
・ 本機とテレビをアンテナケーブルでつない
でいるときは、テレビのチャンネルをビデ
オ用のチャンネルにしてください。
2 前面パネルを開け、ビデオテープを入れ
る。
ビデオの電源が自動的に入ります。誤消去
防止用のツメを取ったテープを入れたとき
は、自動的に再生が始まります。(34ペー
ジ参照)
3 ·PLAYボタンを押して、再生を始める。
テープの終わりまで再生すると、自動的に
巻き戻ります。
ヒント
・「速さを変えて見る/見たい
場面を探す」(41ページ)に、
その他の再生や検索方法が
のっています。
ご注意
・ LPモードで録画されたテー
プも本機で再生できますが、
普通の速度以外での再生によ
る画質は保証できません。
PPAUSE
·PLAY
シャトルリング
p STOP
その他の操作
操作
再生を止める
再生を一時停止する(静止画)
一時停止を解除する
見たい場面を前方向で探す
見たい場面を逆方向で探す
早送りする
巻き戻す
テープを取り出す
押すボタン
pSTOP
PPAUSE
PPAUSEまたは·PLAY
再生中にシャトルリングを#に合わせたまま
にする。
再生中にシャトルリングを3に合わせたまま
にする。
停止中にシャトルリングを)FFまで回して
離す。
停止中にシャトルリングを0REWまで回
して離す。
6EJECT
基本
27
-J
Page 84

ビデオを見る(つづき)
ご注意
・ NTSCで録画したテープを再
生すると、お手持ちのテレビ
によっては次のような現象が
起こります。
ミ 画像が白黒になる。
ミ 画像が揺れる。
ミ 画像がテレビ画面に出てこ
ない。
ミ 黒い横すじがテレビ画面に
出る。
ミ 色が濃くなる、または色が
薄くなる。
ミ 前方向、逆方向の検索中
に、画面表示が出なくな
る。
カラー方式を設定する
再生中に横すじが出るときは、本体のCOLORSYSTEMスイッチを、テープ
が録画されたカラー方式に合わせます。(通常はAUTOにセットします。)
カラー方式は、本体前面の表示窓に出ます。(8ページ参照)
テープが録画されたカラー方式
PAL
NTSC
MESECAM
COLOR SYSTEM スイッチの位置
PAL/MESECAM
NTSC
PAL/MESECAM
ご注意
・ NTSCで録画したテープの再
生中は、テープ残量は出てき
ません。
・ 一時停止(静止画)、スロー
モーションでの再生中は、画
面表示は出ません。
・ 短時間テープのE-30や、市
場に出回っている非標準テー
プを使用しているときは、
テープ残量が正しく出ないと
きがあります。
ご注意
・ テープを入れ直すと、テープ
カウンターは「0H00M00S」
に戻ります。
・ テープカウンターは、録画さ
れていない部分に対しては働
きません。
・ テープがPALとNTSCの両方
の方式で録画されていると、
テープカウンターは正しく働
きません。これは、それぞれ
の方式をカウントする周期が
違うためです。
テープの残量とテープカウンターを表示させる
DISPLAYボタンを押します。
押すごとに表示が出たり消えたりします。
SE
0 : 00 : 22
テープカウンター
テープ残量表示
白いバーがおおよそのテープ残量を
示しています。
テープカウンターを使う
後々見つけたい場面でCOUNTERRESETボタンを押して、テープカウンター
を 「0H00M00S」 に戻します。巻き戻しや早送りをする際に、このテープカウ
ンターを目印にしてください。
28
-J
基本
Page 85

ステレオや多重音声を再生する
AUDIO MONITORボタンを押して、聞きたい音声を選ぶ。押すたびに、本体
表示窓と、テレビ画面の表示が変わります。
ご注意
・ モノラルで録音したテープを
再生したときは、AUDIO
MONITORボタンによる設定
に関係なくモノラルの音声が
再生されます。
・ ステレオ音声を再生するに
は、AUDIOOUTでの接続
が必要です。
・ SETUPMENU(モード設
定)メニューのAUDIOMIX
(音声ミックス)がON(入)
になっているときは、
AUDIOMONITOR ボタン
は働きません。
MENU
AUDIO
MONITOR
CURSOR
>/./?//
EXECUTE
聞きたいテープの音声
AUDIO MONITORボタンを、以下の表示が出
るまで押す。
ステレオ音声
ステレオ
左
右
ノーマル音声
多重音声 本体表示窓テレビ画面
主/副
主
副
ノーマル音声
「STEREO」
「L
CH」
「R
CH」
なし
「STEREO」
「MAIN/L」
「SUB/R」
なし
(モノラル)
左右の音量表示
本体表示窓で、左右の音量を視覚的に確かめることができます。
左の音声表示
L
dB 151063036
右の音声表示
R
音量表示
音声の種類と、録音されるテープのトラック
本機は音声を2つのトラックに別々に録音します。ハイファイ(通常はステレ
オ)音声は、映像と一緒に主トラックに録音されます。モノラル音声は、テー
プの端の通常の(ノーマル)音声トラックに録音されます。
モノラル音声
ノーマル音声トラック
主トラック
ハイファイ音声と
映像信号
ハイファイとノーマル音声を同時に聞く
1 MENUボタンを押して、SETUPMENU
(モード設定)を選ぶ。
2 CURSOR>/./?//ボタンを押して、AUDIO
MIX(音声ミックス)をON(入)にする。
AUDIOMONITORボタンが働かなくなり、2つ
の音声が同時に聞こえてきます。
3 EXECUTEボタンを押して、設定を記憶させる。
テープ再生後は、AUDIOMIXをOFF(切)にし
てください。
例:SLV-X842/X842ML
SET UP
MENU
LANG /
BUZZER
D
AUDI O MI X
GU
HI F I AUD I O
SET
IMMER
I
DE LAMP
:
ENGLI SH
ON OFF
ON OFF
ON OFF
ON OFF
STD
NICAM
例:SLV-X842/X842ML
SET UP
MENU
LANG /
BUZZER
D
AUDI O MI X
GU
HI F I AUD I O
SET
IMMER
DE LAMP
I
:
基本
ENGLI SH
ON OFF
ON OFF
ON OFF
ON OFF
STD
NICAM
29
-J
Page 86

テレビ番組を録画する
TAPE
SPEED
PROG+/−
r REC
ここでは最も基本的なテレビ番組の録画のしかたを説明します。基本的な録
画は、テレビ番組が始まったら手動で録画を始め、番組が終了したら手動で
録画を止めます。この基本的な録画の他に、次のような録画方法がありま
す。
・ 手動で録画を始め、自動的に録画を止める。「クイックタイマーを使っ
て録画する」(32ページ)
・ 自動的に録画を始め、自動的に録画を止める。「手動で録画予約する」(
37ページ)
・ G-CODE(Gコード)番号の入力だけで、自動的に録画を始め、自動的
に録画を止める。「Gコードで録画予約する」(35ページ)
1 テレビの電源を入れ、ビデオの入力に
する。
・ 本機とテレビを映像・音声コード
でつないでいるときは、テレビを
ビデオ入力にしてください。
・ 本機とテレビをアンテナケーブル
でつないでいるときは、テレビの
チャンネルをビデオ用のチャンネ
ルに切り替えてください。
ヒント
・ プログラムポジションを選ぶ
ときは、番号ボタンも使えま
す。2桁の番号を入力をする
ときは、?(2桁入力)ボタ
ンを押したあとにプログラム
ポジションの番号を入力しま
す。
・ 不要な場面を録画中にカット
するときは、PPAUSEボタ
ンを押して一時停止し、本体
のシャトルリングで不要な場
面の頭まで巻き戻しをしま
す。その後再びPPAUSEボ
タンを押し、次の録画を開始
します。
・ 画面にテープや本機の動作情
報が表示されますが、これら
は録画されません。
・ 録画中、テレビ画面を見る必
要がなければ、テレビの電源
を切っても録画に影響は出ま
せん。
(つづく)
2 前面パネルを開け、誤消去防止用のツ
メのついたビデオテープを入れる。
3 PROG+/−ボタンを押して、録画し
たい番組のプログラムポジションを入
力する。
STEREO
L
dB 151063036
R
SP
H M S
4 TAPESPEEDボタンを押して、テー
プスピードを選ぶ。
・ PAL/MESECAM方式のときは、
SPかLPを選びます。
・ NTSC方式のときは、SPかEPを選
びます。
「テープスピードを選ぶ」(次ページ)
を参照してください。
STEREO
L
dB 151063036
R
LP
H M S
5 rRECボタンを押して、録画を始め
ます。
テープの終わりまで録画すると、自動
的に巻き戻します。
30
録画を止めるには
-J
基本
pSTOPボタンを押します。
Page 87

ヒント(つづき)
・ LINE1またはLINE2からの
信号を録画するときは、
INPUTSELECTボタンを押
して「L1」もしくは「L2」を
表示させてください。
ご注意
・ 誤消去防止用のツメを取った
ままテープを入れると、自動
的に再生が始まります。ツメ
を取ったテープに録画すると
きは、セロハンテープでツメ
のあった部分をふさいでくだ
さい。
・ 誤消去防止用のツメを取った
テープを入れてrRECボタ
ンを押すと、テープが出てき
ます。
・ 本機はテレビ番組が、
NTSC、PAL、MESECAM
のうち、どのカラー方式で放
送されているかを自動的に感
知して録画します。
テープスピードを選ぶ
カラー方式がPALのとき
録画をするときに、SPかLPを選びます。SPを標準とすると、LPはSPの倍の
時間、録画できます。しかし、SPの方がよい画質で録画できます。1本のテー
プにSPとLPの両方のモードを混在させて録画してもかまいません。本機は録
画されたときのテープスピードを自動的に感知して再生します。下の表は、
テープの種類とそれぞれのテープスピードによる最大再生/録画時間を示して
います。
テープの種類
E-300
E-240
E-180
E-120
E-60
最大録画/再生時間
SPモードのとき
5時間
4時間
3時間
2時間
1時間
LPモードのとき
10時間
8時間
6時間
4時間
2時間
カラー方式がNTSCのとき
録画をするときに、SPかEPを選びます。SPを標準とすると、EPはSPの3倍
の時間、録画できます。しかし、SPの方がよい画質で録画できます。1本の
テープにSPとEPの両方のモードを混在させて録画してもかまいません。本機
は録画されたときのテープスピードを自動的に感知して再生します。下の表
は、テープの種類とそれぞれのテープスピードによる最大再生/録画時間を示
しています。
テープの種類
T-160
T-120
T-60
T-30
最大録画/再生時間
SPモードのとき
2時間40分
2時間
1時間
30分
EPモードのとき
8時間
6時間
3時間
1時間30分
基本
31
-J
Page 88

テレビ番組を録画する(つづき)
クイックタイマーを使って録画する
クイックタイマーを使い、30分間隔で録画を自動的に停止することができま
す。この機能を使う前に、本機の時計が正確に設定されているか確認してくだ
さい。
録画を始めたあと、本体のQUICKTIMER ボタンを繰り返し押して、本体表示
窓に出る録画終了までの時間を選びます。本体のTIMERランプが点灯します。
ボタンを押すごとに、次のように30分ずつ表示が変わります。
0:00 0:30 1:00 10:30 11:00
録画中、時間が分きざみで逆カウントされ、0:00になった時点で録画は自動的
に止まり、電源が切れます。
録画を途中でやめるときは
pSTOPボタンを押します。
録画中、録画終了までの時間を延長するときは
QUICKTIMER ボタンを押して、本体表示窓に出る録画終了までの時間を選び
ます。
録画中に別のテレビ番組を見るには
録画中でもテレビで別の番組を見ることができます。
テレビで見たい番組のプログラムポジションを選びます。
32
-J
基本
Page 89

NICAM方式のステレオと多重音声を録音する
(SLV-X842/X842MLのみ)
本機はNICAM方式によるステレオと多重音声を録音することができます。
NICAMを受信すると、NICAM表示が本体表示窓に出ます。ステレオ音声を受
信すると、STEREO表示が表示窓に出ます。多重音声を受信すると、MAIN/L
表示が表示窓に出ます。
1 MENUボタン押す。
MENU(基本メニュー)がテレビ画面に出ます。
MENU
TI
MER SET / CHECK
UP MENU
SET
TUNER
PRESET
SET
UP CH AND G–CODE
CLOCK
SET
GAME
:
SELECT
:
SET
2 CURSOR>/. ボタンを押して、カーソル(I)をSETUPMENU(モード
設定)に合わせ、EXECUTEボタンを押す。
SETUPMENU(モード設定)メニューが出ます。
SET UP
SET
MENU
LANG /
BUZZER
D
IMMER
AUDI O MI X
GU
DE LAMP
I
HI F I AUD I O
:
EXECUTE
ENGLI SH
ON OFF
ON OFF
ON OFF
ON OFF
STD
NICAM
ヒント
• HIFIAUDIOをNICAMに設
定すると、ステレオ音声や多
重音声はハイファイ音声ト
ラックに録音され、ノーマル
音声は、ノーマル音声トラッ
クに録音されます。(29ペー
ジ参照)
3 CURSOR>/./?//ボタンを押して、カーソル(I)をHIFIAUDIO(ハ
イファイ音声)に合わせ、NICAMを選ぶ。
SET UP
MENU
LANG /
BUZZER
D
AUDI O MI X
GU
HI F I AUD I O
SET
IMMER
DE LAMP
I
:
ENGLI SH
ON OFF
ON OFF
ON OFF
ON OFF
STD
NICAM
4 EXECUTEボタンを押して、設定を記憶させる。
NICAMを設定すると、NICAM放送は次のように録音されます。
テープトラック
ハイファイ音声
(左)
ハイファイ音声
(右)
ノーマル音声
(モノラル)
録音される音声
ステレオ音声
左
右
標準(通常左右の混合音声が録
音される。)
多重音声
主
副
標準(通常主音声が録音さ
れる。)
基本
33
-J
Page 90

テレビ番組を録画する(つづき)
AUDIO
MONITOR
ZWEITON(ドイツステレオ)方式のステレオと多重音声
を録音する
本機は、TUNERPRESET(チューナー設定)メニューで、SYSTEM(放送方
式)が、I・D/K・B/G・MのうちB/Gに設定されていると、ZWEITON方式の
ステレオと、音声多重放送を自動的に受信します。ステレオ放送を受信する
と、STEREO表示が、音声多重放送を受信すると、MAIN/L表示が、本体表示
窓に出ます。
多重音声放送を録画中にチェックするには
AUDIO MONITORボタンを押して、聞きたい音声を選びます。
(SLV-X842/X842MLのみ)
ご注意
・ AUDIOMONITOR ボタン
は、ZWEITON方式でのステ
レオ放送を受信しているとき
は働きません。
聞きたい音声
主
副
主/副
AUDIOMONITORボタンを次の表示が出るまで押す
テレビ画面表示
「MAIN」
「SUB」
「MAIN/SUB」
本体表示窓
「MAIN/L」
「SUB/R」
「MAIN/L、SUB/R」
SLV-X821MKIIでステレオと多重音声を録音する
SLV-X821MKIIは、ライン入力からのみステレオと多重音声の録音が可能で
す。ライン入力からステレオ、もしくは多重音声信号が入力されているとき
は、STEREO表示が、画面と本体表示窓にでます。その場合音声の選択はでき
ません。音声の選択は再生中のみ可能です。
誤消去を防止する
うっかり録画を防ぐため、テープには誤消去防止用のツメがあります。録画し
たテープを誤って消さないために、誤消去防止用のツメをドライバーなどで折
り取っておきます。ツメを折ったテープで録画しようとすると、テープは自動
的に出てきます。
34
いったんツメを折り取ったテープに録画するときは、セロハンテープでツメを
取ったあとの穴をふさぎます。
誤消去防止
用のツメ
-J
基本
セロハンテープ
Page 91

Gコードで録画予約する
本機の特長のひとつであるG-CODE(Gコード)は、予約録画を簡単にしま
す。Gコードを使うと、お住まいの地域のテレビガイドにのっている9桁のコー
ドを入力するだけで、予約録画の設定が完了します。この特長をいかすには、
まず本機の設定をし、それぞれのプログラムポジションをガイドチャンネル
(guidechannel)に割り当てる必要があります。「手動でGコードの設定をす
る」(24ページ)
u(電源「入」/
スタンバイ)
TIMER
CLEAR
G-CODE、
ONCE、
DAILY、
WEEKLY
番号ボタン
TAPESPEED
始める前に
・ 本機の時計が正しく設定されているか確認してください。
・ 誤消去防止用のツメのついたテープを入れる。ビデオテープが録画時間より
長いことを確認してください。
・ テレビの電源を入れ、ビデオの入力にします。
1 G-CODEボタンを押す。
G-CODE(Gコード)メニューがテレビ画
G–CODE
G–CODE NO.
–––––––– –
SP
LP/
SP
面に出ます。
:
0–9
本体の時計が設定されていないときは、
SET
SP LP/
:
TAPE SPEED
「PLEASESETTHECLOCK」(「時計を設
定してください。」)というメッセージが出
て、自動的に時計設定になります。
2 番号ボタンを押して、G-CODE番号を入力
する。
間違った場合は、TIMERCLEARボタンを
押したあとに正しい番号を入れ直してくだ
G–CODE
G–CODE NO.
CONFIRM
CANCEL
69147782 –
:
ONCE DA I LY
WEEKLY
:
TIMER CLEAR
SP
LP/
SP
さい。
ご注意
・ NTSC信号をEPモードで録
画するときは、LPを設定し
てください。
・ 本機のGコードは、シンガ
ポール、マレーシア、ホンコ
ン、マカオなどで使われる方
式に対応しています。した
がって、アメリカ、カナダ、
日本、韓国、台湾、イギリス
などの地域では使用できませ
ん。
3 TAPESPEEDボタンを押して、SP、LP
どちらかのテープスピードを選ぶ。
「テープスピードを選ぶ」(31ページ)
G–CODE
G–CODE NO.
CONFIRM
CANCEL
69147782 –
:
ONCE DA I L Y
WEEKLY
:
TIMER CLEAR
(つづく)
SP
LP/
LP
基本
35
-J
Page 92

Gコードで録画予約する(つづき)
4 ONCE、DAILY、WEEKLY、いずれか
のボタンを下の表に従って押す。
ヒント
・ G-CODEメニューを途中で
止めるには、ONCE、
DAILY、WEEKLYボタンを
手順4 で押す前に、G-CODE
ボタンを押す。
ご注意
・ 次のときは、Gコード設定は
できません。
ミ 本機の電源が切れていると
き。
ミ クイックタイマーを使って
録画しているとき。
・ 次のときには、録画予約は受
け付けられません。
ミ 土曜、日曜日の番組で、
DAILYボタンを押したと
き。
ミ 1週間以上あとの番組の録
画予約でDAILYまたは
WEEKLYボタンを押した
とき。
ミ すでに予約が完了したG-
CODE番号を入力したと
き。
・ GミCODE番号が受け付けら
れなかったときは、もう1度
G-CODE番号を確認し、正
しい番号で手順1から繰り返
す。
・ 録画待機状態で1時間以上電
気の供給が途絶えたときは、
録画予約設定は解除されま
す。この場合は予約設定をや
り直してください。
プログラムの繰り返し設定
1回だけのとき
月曜日から金曜日まで、毎日同じ時刻の番組を予約す
るとき
毎週、同じ曜日で同じ時刻の番組を予約するとき
日付、録画開始時刻、録画終了時刻、プログラ
G–CODE
ムポジション番号テープスピードなどの情報が
テレビ画面に出ます。
それらの情報が正しいか確認をし、正しく
CANCEL
ないときは、TIMERCLEARボタンを押し
て設定を解除します。
誤ったG-CODE番号を入力すると、警告音
が鳴ります。
他の番組のGコード設定をするときは、手順
1〜4を繰り返します。
5 u(電源「入」/スタンバイ)を押して、電源を切る。
本体のTIMERランプが点灯します。本機の
電源が切れ、自動的に録画待機状態になり
ます。
録画開始時刻になると自動的に電源が入っ
て番組を録画し、録画終了時刻が来ると、
自動的に電源が切れます。
押すボタン
ONCEボタン
DAILYボタン
WEEKLYボタン
SP
G–CODE NO.
69147782 –
RECORDI NG T I ME
DATE START STOP PROG
SUN
1
:
TIMER CLEAR
LP/
LP
:
850022:000212.0
LP
-J 基本
36
録画を止めるには
番組録画中、録画を止めるときはpSTOPボタンを押してください。
衛星放送をGコードで録画予約するには
衛星放送のチューナーと本機を接続すれば、Gコードで録画予約できます。
1 衛星放送のチューナーの電源を入れる。
2 衛星放送のチューナーで録画したい番組のチャンネルを選ぶ。
3 上記「Gコードで録画予約する」の手順にしたがって設定をする。
録画予約の終了時刻まで、衛星放送のチューナーの電源は入れたままにし
ておいてください。
Page 93

手動で録画予約する
u(電源「入」/
スタンバイ)
MENU
CURSOR
>/./?//
EXECUTE
ここでは、自動的に番組の録画を開始し、終了する録画予約の方法を説明しま
す。
始める前に
・ 本機の時計が正しく設定されているか確認してください。
・ 誤消去防止用のツメのついたテープを入れる。テープが録画時間より長いこ
とを確認してください。
・ テレビの電源を入れ、ビデオの入力にします。
1 MENUボタンを押す。
MENU
TI
MER SET / CHECK
UP MENU
SET
TUNER
PRESET
SET
UP CH AND G–CODE
CLOCK
SET
GAME
:
SELECT
:
SET
EXECUTE
2 CURSOR>/.ボタンを押して、カーソル
I)をTIMERSET/CHECK(録画予約設定
(
/確認)に合わせ、EXECUTEボタンを押
す。
TIMERSET/CHECK(録画予約設定/確認)
メニューが出ます。
本体の時計が設定されていないときは、
「PLEASESETTHECLOCK」(「時計を設定し
てください。」)というメッセージが出て、自動
的に時計設定になります。
3 予約録画をする日にちを設定する。
1 CURSOR/ ボタンを押して、日にち
(「DATE」の下)を選ぶ。
今日の日付けが出ているのを確認する。
違う日付けが出ている場合は、時計を設
定し直す。
2 CURSOR>/.ボタンを押して日にちを
設定する。
曜日は自動的に設定されます。
T SET
I MER /CHECK 9 . 1
DATE START STOP PROG
T SET
I MER / CHECK
DATE START STOP PROG
SAT
T SET
I MER /CHECK
DATE START STOP PROG
SAT
:
:
:
:
:
:
:
:
9.12
:
:
:
:
:
:
:
:
9.12
:
:
:
:
:
:
:
:
SAT
2
–––––––:–––––.––
–––––––:–––––.––
–––––––:–––––.––
–––––––:–––––.––
–––––––:–––––.––
–––––––:–––––.––
–––––––:–––––.––
–––––––:–––––.––
SAT
SP
––––––:––––12.9
–––––––:–––––.––
–––––––:–––––.––
–––––––:–––––.––
–––––––:–––––.––
–––––––:–––––.––
–––––––:–––––.––
–––––––:–––––.––
SAT
SP
––––––:––––1.6
–––––––:–––––.––
–––––––:–––––.––
–––––––:–––––.––
–––––––:–––––.––
–––––––:–––––.––
–––––––:–––––.––
–––––––:–––––.––
4 録画開始時刻を設定する。
1 CURSOR/ ボタンを押して、
「START」の下の時間を選び、CURSOR
>/.ボタンで時間を設定する。
2 CURSOR/ボタン押して、「START」
の下の分を選び、CURSOR>/.ボタン
で分を設定する。
5 CURSOR/ ボタンを押したあと、終了時
刻を、開始時刻と同じ要領で設定する。
T SET
I MER / CHECK
DATE START STOP PROG
SAT
T SET
I MER / CHECK
DATE START STOP PROG
SAT
9.12
:
:
:
:
:
:
:
:
9.12
:
:
:
:
:
:
:
:
(つづく)
基本
37
SAT
SP
––––––:0071.6
–––––––:–––––.––
–––––––:–––––.––
–––––––:–––––.––
–––––––:–––––.––
–––––––:–––––.––
–––––––:–––––.––
–––––––:–––––.––
SAT
SP
––008:0071.6
–––––––:–––––.––
–––––––:–––––.––
–––––––:–––––.––
–––––––:–––––.––
–––––––:–––––.––
–––––––:–––––.––
–––––––:–––––.––
-J
Page 94

手動で録画予約する(つづき)
T SET
:
I MER /CHECK
SAT
DATE START STOP PROG
SP
6008:0071.6
:
–––––––:–––––.––
:
–––––––:–––––.––
:
–––––––:–––––.––
:
–––––––:–––––.––
:
–––––––:–––––.––
:
–––––––:–––––.––
:
–––––––:–––––.––
SAT
9.12
T SET
:
I MER /CHECK
SAT
DATE START STOP PROG
SP
6008:0071.6
:
–––––––:–––––.––
:
–––––––:–––––.––
:
–––––––:–––––.––
:
–––––––:–––––.––
:
–––––––:–––––.––
:
–––––––:–––––.––
:
–––––––:–––––.––
SAT
9.12
ヒント
・ プログラムポジションを設定
するのに、PROG+/−ボタ
ンや、番号ボタンも使えま
す。
・LINE1やLINE2からの入力
信号を予約録画するときは、
INPUTSELECTを押して
「L1」、「L2」を表示させま
す。
ヒント
・ テープスピードを設定するの
に、TAPESPEEDボタンも
使えます。
ご注意
・ NTSC信号をEPモードで録
画予約するときは、LPを選
んでください。
ヒント
・ 設定の途中で前の設定を変え
たいときは、CURSOR?
ボタンを押して前の項目に戻
り、CURSOR>/.ボタンで
項目の設定をし直してくださ
い。
6 CURSOR/ ボタンを押したあと、
CURSOR>/. ボタンを押して、プログラ
ムポジションを選ぶ。
7 CURSOR/ ボタンを押したあと、
CURSOR >/.ボタンを押して、SPもし
くはLPのテープスピードを選ぶ。
「テープスピードを選ぶ」(31ページ)参照
8 CURSOR/ ボタンを押して設定を記憶
する。
カーソル(
I)が行の左頭に出ます。
他の番組の録画予約をするときは、
CURSOR.を押して次の行を選び、手順
3
〜8を繰り返す。
9 設定が終わったら、EXECUTEボタンを
押す。
10 u(電源「入」/スタンバイ)を押して、電源を切
る。
T SET
I MER / CHECK
DATE START STOP PROG
SAT
9.12
:
:
:
:
:
:
:
:
SAT
SP
6008:0071.6
–––––––:–––––.––
–––––––:–––––.––
–––––––:–––––.––
–––––––:–––––.––
–––––––:–––––.––
–––––––:–––––.––
–––––––:–––––.––
ご注意
・ 録画待機状態で1時間以上電
気の供給が途絶えたときは、
録画予約設定は解除されま
す。この場合は予約設定をや
り直してください。
今日の日付
SUN-SAT
MON-SAT
MON-FRI
EVERY SAT
EVERY MON
EVERY SUN
本体のTIMERランプが点灯します。本機の電源が
切れ、自動的に録画待機状態になります。
録画開始時刻になると、自動的に電源が入って番組
を録画し、録画終了時刻が来ると、自動的に電源が
切れます。
録画を止めるには
番組録画中、録画を止めるときは、pSTOPボタンを押してください。
毎日/毎週予約
毎日予約は、同じ番組を毎日予約をするときに、毎週予約は、同じ曜日の番組
を毎週予約するときに使います。
上記の手順
して、設定したいプログラムを出します。押すたびに、表示は左の図のように
変わります。
3で録画開始日を設定する際に、CURSOR.ボタンを繰り返し押
38
1か月後
(先頭に戻る)
-J 基本
Page 95

予約を確認する・変更す
ここでは録画予約をしたあとに、どのように予約を確認、変更、取り消しする
か、説明します。
る・取り消しする
u(電源「入」/
スタンバイ)
MENU
TIMERCLEAR
CURSOR
>/./?//
EXECUTE
始める前に
・ テレビの電源を入れ、ビデオの入力にする。
1 u(電源「入」/スタンバイ)ボタンを押して、ビデオの電源を入れる。
2 MENUボタンを押したあと、TIMERSET/
CHECK(録画予約設定・確認)を選ぶ。
3 画面に出たリストを確認する。
・ 何の変更や取り消しもないときは、u(電
源「入」/スタンバイ)ボタンを押して、
録画待機状態に戻します。
I MER / CHECK
DATE START STOP PROG
SAT
THU
12
.71
SUN
MON
MON
SAT
EVERY
SUN
T SET
I MER /CHECK
DATE START STOP PROG
SAT
THU
SUN
12
.71
MON
SAT
MON
SUN
EVERY
9.12
:
:
:
510:038
11L
:
0021:8591.8
:
:
000:0032
:
:
9.12
:
:
:
510:038
11L
:
0021:8591.8
:
:
000:0032
:
:
6008:0071.6
05000:001212.82
2L
720031:210––
1L
6008:0071.6
05000:001212.82
2L
720031:210––
1L
T SET
・ 変更や取り消しがあるときは、CURSOR
>/.ボタンを押して、カーソル(
I)を、
変更、取り消ししたい行に合わせます。
4 変更、取り消しをする。
SAT
SAT
SP
LP
LP
SP
LP
SP
–––––––:–––––.––
–––––––:–––––.––
SP
LP
LP
SP
LP
SP
–––––––:–––––.––
–––––––:–––––.––
・ 変更するときは、CURSOR?//ボタン
を押して、変更したい項目を選び、
CURSOR>/.ボタンを押して、項目の変
更をします。
変更したら、カーソル(
I)が行の左頭に出
るまで、CURSOR/ボタンを繰り返し
押します。
・ 予約を取り消すときは、TIMERCLEAR
ボタンを押します。
5 EXECUTEボタンを押す。
元の画像に戻ります。まだ実行されていない
録画予約がTIMERSET/CHECKメニューに
残っているときは、u(電源「入」/スタン
バイ)ボタンを押して、録画待機状態に戻し
ます。
録画予約中に録画予約状況を確認するには
MENUボタンを押したあと、TIMERSET/CHECKを選びます。確認したあと
は、EXECUTEボタンを押して、表示を消します。
基本
39
-J
Page 96

録画予約をしたあとに
ここでは、録画予約をしたあとに必要な情報を説明します。
録画中に他の機能を使う
録画中でも次の機能を使うことができます。
機能
カウンターを「0H00M00S」 に戻す。
テープ情報をテレビ画面に表示する。
録画予約情報を確認する。
押すボタン
COUNTERRESETボタン
DISPLAYボタン
MENUボタンを押して、TIMER
SET/CHECK(メニュー)を選ぶ。
別のテレビ番組を見る。
「録画中に別のテレビ番組を見るには」
(32ページ)参照
予約録画が始まる前にビデオデッキを使いたいとき
u(電源「入」/スタンバイ)ボタンを押す。本体のTIMERランプが消え、ビデ
オデッキが使えるようになります。
ビデオデッキを使い終わったあとは、u(電源「入」/スタンバイ)ボタンをも
う1度押して、TIMERランプを点灯させます。録画開始時刻前に、録画待機状
態に戻すのを忘れないようにしてください。忘れると、録画予約は取り消され
てしまいます。
録画予約が重なっているときは
例1
プログラム1
(メニュー上部)
プログラム2
(メニュー下部)
例2
プログラム1
プログラム2
例3
プログラム1
プログラム2
10:00
取り消される
最後の20秒間
は録画されない
10:00 10:50
中断される
10:00
10:45 12:15
10:50
11:30
11:40
11:30
録画予約が重なっていても、同時に2つ以上の録画がされることはありませ
ん。もし、重複した録画予約があるときは、設定を変えてください。
例1 もし2つの予約が同じ開始時刻に設定されていたら
TIMERSET/CHECKメニューの、より上部にある録画予約(プログ
ラム1)が優先されます。下の録画予約(プログラム2)は、優先された
予約が開始すると、メニューから消されます。
例2 プログラム1の終了時刻と、プログラム2の開始時刻が全く同じ場合は
プログラム1の最後の20秒は録画されません。プログラム1が終了する
前に、プログラム2のために録画待機状態に入るからです。
例3 プログラム1の終了時刻前に、プログラム2の開始時刻を設定した場合
は
プログラム2が、プログラム1の終了前に始まります。
-J 基本
40
Page 97

応用
速さを変えて見る/
本機は、ハイスピード、スローモーションなど、いろいろな速度で再生するこ
とができます。これらの機能は見たい場面を探すときにも役立ちます。これら
の機能を使っているときは、音声は出ません。
見たい場面を探す
·PLAY
SKIP
&SLOW +/ミ
'/7
FLAME/</>
3/#
SEARCH
·PLAY
シャトルリング
いろいろな再生/検索/
その他
いろいろな速度で再生
する
1/5の速度
普通の速度
倍速
ハイスピード
巻き戻し/早送り
巻き戻し、早送り中に
画像をチェックする
ハイスピードを固定し
て見る
操作
再生中に、シャトルリングを次のマー
クのあるところまで左、または右に回
す。
1/5
1
×2
#ハまたは3
停止中に、シャトルリングを)FF
か0REWまで回して離す。
早送り中に、シャトルリングを
)FFまで回す。
巻き戻し中に、シャトルリングを
0REWまで回す。
再生中か一時停止中に、
#SEARCHボタンか、
3SEARCHボタンを押す。
方向を変えるには、<ボタン(逆方
向)か、>ボタン(正方向)を押す。
普通の再生に
戻すには
シャトルリン
グを離す。
·PLAYボ
タンを押す。
元のモードに
戻すには、
シャトルリン
グを離す。
·PLAYボ
タンを押す。
シャトルリング
ヒント
・ 次の場合、$/4ハTRACKING
NORMAL/SLOWハSTILL
ADJUSTボタンを使って画
質を調整することができま
す。
ミ スローモーション中に横す
じがあらわれるとき
ミ 一時停止中に画面の上部、
もしくは下部に帯が出ると
き
ミ 一時停止中に画像が揺れる
とき
ご注意
・ LPモードで右のような機能
を使うと、ノイズが出たり、
白黒になったりします。
・ NTSC方式をEPモードで録
画したテープを、早送りや巻
き戻し中に画像チェックする
と、「LP」が一時的に出るこ
とがあります。
スローモーションを固
定して見る
コマ送りで再生する
逆再生をする
1シーンを飛ばす
巻き戻したあと自動的
に再生を始める
再生中か一時停止中に、&SLOW
+/ミボタンを押す。
+ボタンを押すたびに、速度がより速
くなり、ミボタンを押すたびに、速度
が遅くなります。
方向を変えるには、<ボタン(逆方
向)か、>ボタン(正方向)を押す。
一時停止中に7FRAMEボタンを押
して、1コマ進め、'FRAMEボタ
ンを押して、1コマ戻す。
押しつづけると、毎秒ごとに1コマず
つ進み(戻り)ます。
再生中に、<ボタンを押す。
再生中に、SKIPボタンを押す。1度
押すと約30秒ほどスキップする。
停止中に、本体のシャトルリングを
0REWまで回して押さえたまま、
本体の·PLAYボタンを押す。
·PLAYボ
タンを押す。
·PLAYボ
タンを押す。
·PLAYボ
タンを押す。
自動的に普通
の速度にな
る。
応用
41
-J
Page 98

画質調整をする
TRACKING
AUTO/MANUAL
$/4
TRACKING
NORMAL/
SLOW
本機は自動的に再生と録画を最良の状態に調整しますが、自動調整で気に入っ
た調整が効かないときは、手動で調整できます。
トラッキングを調整する
本機は自動的に、再生時のトラッキング調整をします。(AUTOTRACKING
表示が本体表示窓で点滅したあと、点滅が止まって表示されます。)しかし、
録画状態が悪いテープを再生すると、画像が歪んだりします。そんなときは、
トラッキング調整を手動でしてください。
$/4TRACKINGNORMAL/SLOWボタンを押して、テレビ画面にトラッキ
ングメーターを表示させます。どちらかのボタンを押していくうちに、画像の
歪みが消えていくはずです。もし手動調整でもうまくいかないときは、
TRACKINGAUTO/MANUALボタンを押して、自動トラッキング調整に戻し
ます。
NORMAL TRACKING
トラッキングメーター
APC
ご注意
・ APC 機能で録画したテープ
を、APC機能のないビデオ
デッキで再生しても、普通に
再生できます。
・ PPAUSEボタンを押して録
画を始めるときは、APC表示
が点滅しなくなってからにし
てください。APC表示点滅中
に録画を始めると、APC機能
は取り消されてしまいます。
アダプティブピクチャーコントロール(APC)機能
アダプティブピクチャーコントロール(APC)機能は、自動的にビデオヘッド
とテープ状態に合わせた録画や再生をして画質を高めます。よりよい画質を保
つために、本体のAPCボタンを押して、本体表示窓にAPC表示を出しておき
ます。
APC
再生のときのAPC機能の働き
APC機能は自動的にどのタイプのテープにも働きます。レンタルテープや、
APC機能を使って録画していないテープの再生にも働きます。
録画のときのAPC機能の働き
テープを入れて最初に録画を始めるときは、いつでもAPC機能が働きます。
(APC表示が速く点滅します。)この調整はテープを取り出すまで働きます。
テープを分析するため、録画が始まるまでに、若干の時間がかかります。
録画を正確に開始したいときは、まず録画一時停止状態にします。(APC表示
がゆっくりと点滅します。)その後、r RECボタンを押して、テープの分析を
させます。APC表示の点滅が止まったら、PPAUSEボタンを押して、録画を
始めます。録画はすぐに始まります。
APC機能を解除するには
本体のAPCボタンをもう1度押して、本体表示窓のAPC表示を消します。
42
-J
応用
Page 99

インデックスで頭出しを
する
=/+ハ
INDEX
SEARCH
本機は、録画が始まる時点でインデックス信号を自動的に記録します。(録画一
時停止状態から録画を開始したときは、インデックス信号は記録されません。)
この機能を使って録画の開始時点を見つけることができます。インデックス番
号は現時点からの相対関係を示しています。現時点からいくつ先の録画か、ま
たはいくつ前の録画なのかを特定してください。
1 前面パネルを開け、ビデオテープを入れ
る。
2 特定したいインデックス番号がテレビ画面
に表示されるまで、=/+ハINDEX
SEARCHボタンを繰り返し押す。
・ 現時点より先にある録画を探すときは、
+ハINDEXSEARCHボタンを押しま
す。
・ 現時点より前にある録画を探すときは、
=ハINDEXSEARCHボタンを押しま
す。
検索が始まり、テレビ画面のインデックス
番号が「0」になるまでカウントダウンして
いきます。再生は、インデックス番号が「0」
になった時点で始まります。
INDEX
SEARCH
5
応用
43
-J
Page 100

テレビゲームを楽しむ
基本的な再生、録画に加えて、本機にはテレビゲームという楽しみがありま
す。「ザ・タイルゲーム」です。
ゲームの目的
MENU
CURSOR
>/./?//
EXECUTE
ペアのタイルを取り除いて、できるだけ高得点を得ることがゲームの目的で
す。
ゲームは255のステージがあります。ステージが上がるごとに少しずつ難易度
が増していきます。
ルール
・ タイルを取り除くには、同じ文字のタイルをペアで選びます。
・ 両脇に同じ色のタイルがあるときは選べません。
隠されたタイル
タイルは重なっていることがあります。最大の重なりは3枚です。
3枚重なっているタイルは、赤のタイルが表にでています。隠れた2番目、3番
目のタイルは順に青とグレーです。2枚重なっているときは、青のタイルが表
で、隠れているのがグレーです。タイルの色がグレーのときは重なっていませ
ん。
隠れているタイルは、1つ上のタイルを取り除くと表にでてきます。ステージ
(ゲーム)を終了するには、この隠されたタイルも含めて、すべてのタイルを取
り除かなくてはなりません。
得点の表示
あなたの現在の得点(今行なっているステージと、今までクリアしたステージ
の合計)が、「YOU」の下に表示されます。今行なっているステージ番号は、
「STAGE」の下に表示されます。いままで行なったゲームのうちの最高得点
は、記憶されて、「BEST」の下に表示されます。
ご注意
・ ゲームを長くしているとリモ
コンの電池をたくさん消費す
るので、電池の寿命が短くな
ります。
・ PALとNTSCではゲーム画面
の大きさが違うかもしれませ
ん。これはテレビの方式の違
いによるものです。
44
-J
応用
ゲームを始める
1 MENUボタンを押す。
2 GAME を選び、EXECUTEボタンを押す。
第1ステージがテレビ画面に出てきます。
3 CURSOR>/./?//ボタンを押して、テレビ画
面上の矢印を動かし、選びたいタイルの上に矢印を
置き、EXECUTEボタンを押す。
タイルが選ばれます。
選ばれないときは、同じ色のタイルにはさまれているはずです。
タイルを選び直すには、選んだタイルの上に矢印を置き、もう1度
EXECUTEボタンを押します。
4 先に選んだタイルと同じ文字のタイルを、同様にして選ぶ。
選んだ2つのタイルが画面から消え、1ポイント得点が増えます。
5 手順3と4を繰り返す。
すべてのタイルを取り終えたら、EXECUTEボタンを押して、次のステー
ジに進む。
ゲームを止めるには
MENUボタンを押します。
GAME
A
B C D
E F G H
I J K L
M N O P
A B C D
E F G H
I J K L
M N O P
BEST
YOU
STAGE
0
0
1
 Loading...