

Page 1
3-864-837-12 (1)
AERIAL
IN
OUT
ON/STANDBY
Step 3
Video Cassette Player
Operating Instructions
SLV-GA60MJ
SLV-GA50ME/PS/SG
SLV-GA30ME/PS/SG
©1998 by Sony Corporation
Getting Started
Step 1
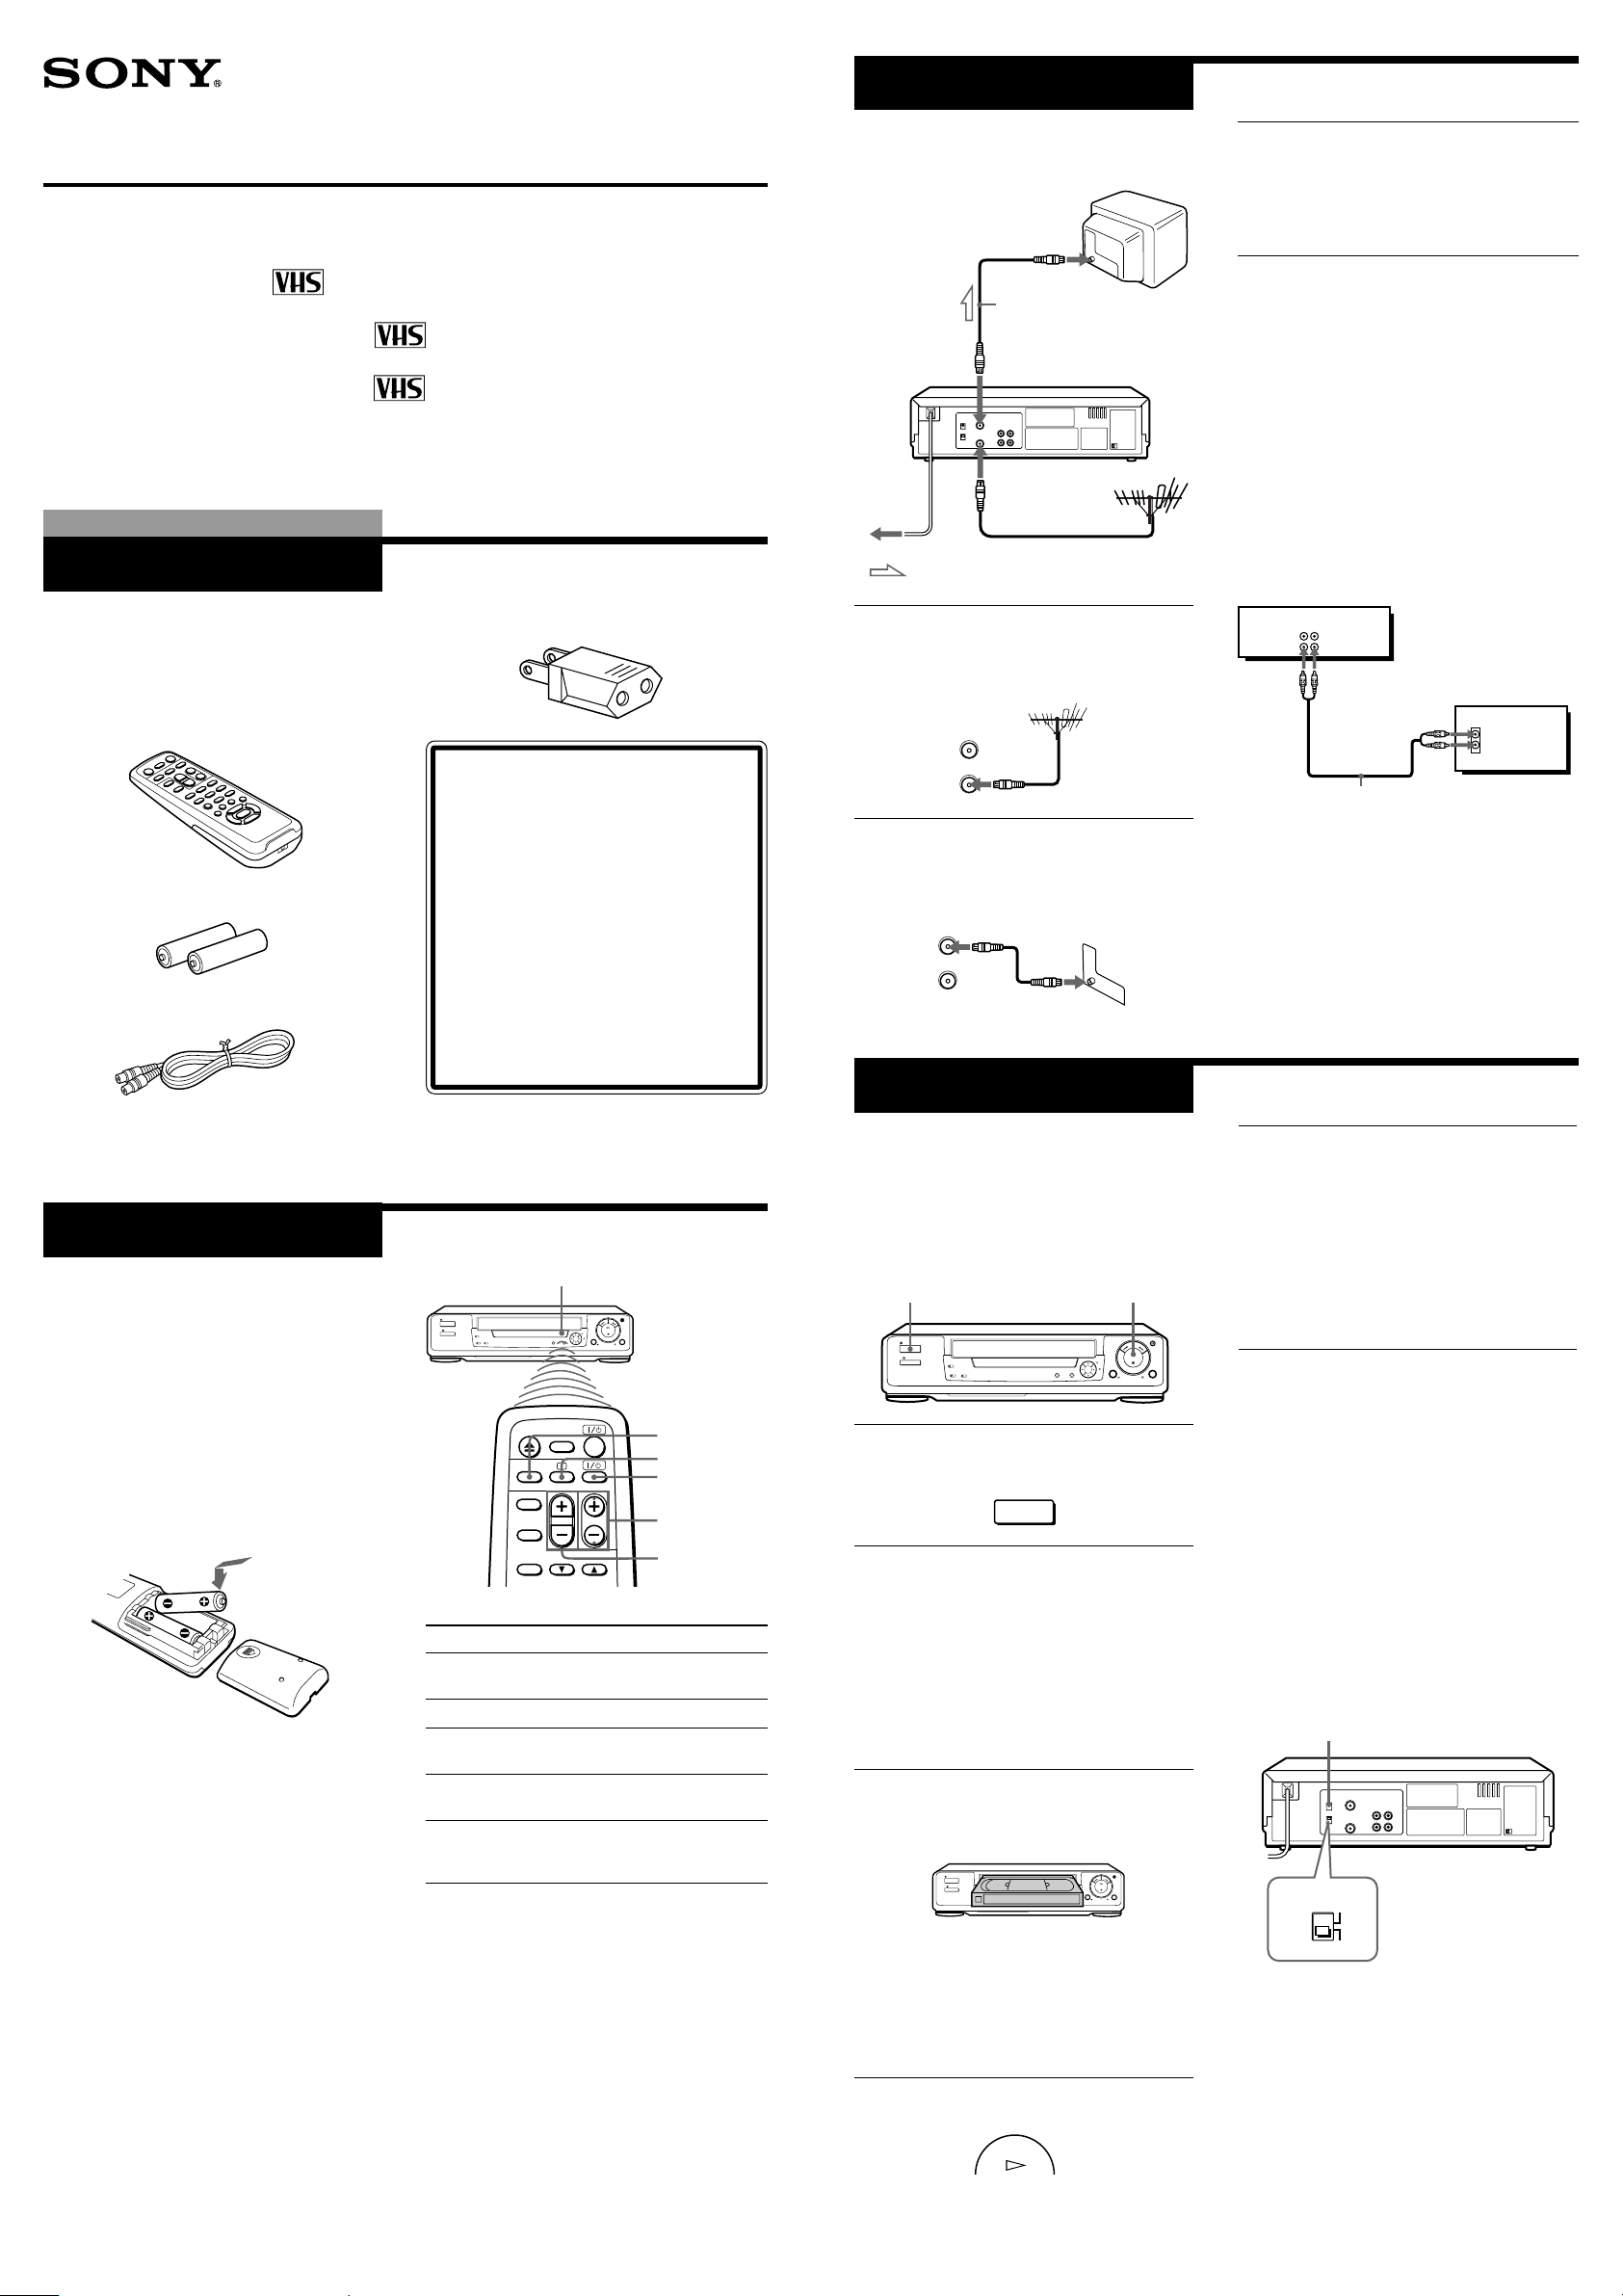
Unpacking
Check that you have received the following
items with the unit:
• Remote commander
• R6 (Size AA) batteries
• Aerial cable
PAL NTSC
PAL NTSC
PAL NTSC 4.43
• Plug adaptor (SLV-GA60MJ, GA50ME and
GA30ME)
Checking your model name
The instructions in this manual are
for the 7 models: SLV-GA60MJ,
GA50ME, GA50PS, GA50SG,
GA30ME, GA30PS and GA30SG.
Check your model number by
looking at the rear panel of your unit.
The SLV-GA60MJ is the model used
for illustration purposes. Any
difference in operation is clearly
indicated in the text, for example,
“SLV-GA60MJ only.”
Connecting the unit
Aerial cable (supplied)
AERIAL OUT
AERIAL IN
to mains
: Signal flow
1 Disconnect the aerial cable from your
TV and connect it to AERIAL IN on the
rear panel of the unit.
AERIAL
OUT
IN
2 Connect AERIAL OUT of the unit and
the aerial input of your TV using the
supplied aerial cable.
Step 4
3 Connect the mains lead to the mains.
Use the supplied plug adaptor, if
necessary, depending on the design of
the mains (SLV-GA60MJ, GA50ME and
GA30ME).
Additional connections
To a TV that has audio/video input jacks
This additional connection improves picture
and sound quality. Connect the TV as
shown below.
If you want to use the Trinitron TV Synchro
Play function, this connection is necessary.
(If your TV has two or more inputs, connect
the audio/video cable to the VIDEO IN 1
jacks.)
For SLV-GA60MJ and GA50ME/PS/SG only
This unit
AUDIO VIDEO
LINE IN
LINE OUT
TV
IN
VIDEO
AUDIO
Audio/video cable (not supplied)
Step 2
Setting up the
remote commander
Inserting the batteries
Insert two R6 (size AA) batteries by
matching the + and – on the batteries to the
diagram inside the battery compartment.
Insert the negative (–) end first, then push
in and down until the positive (+) end
clicks into position.
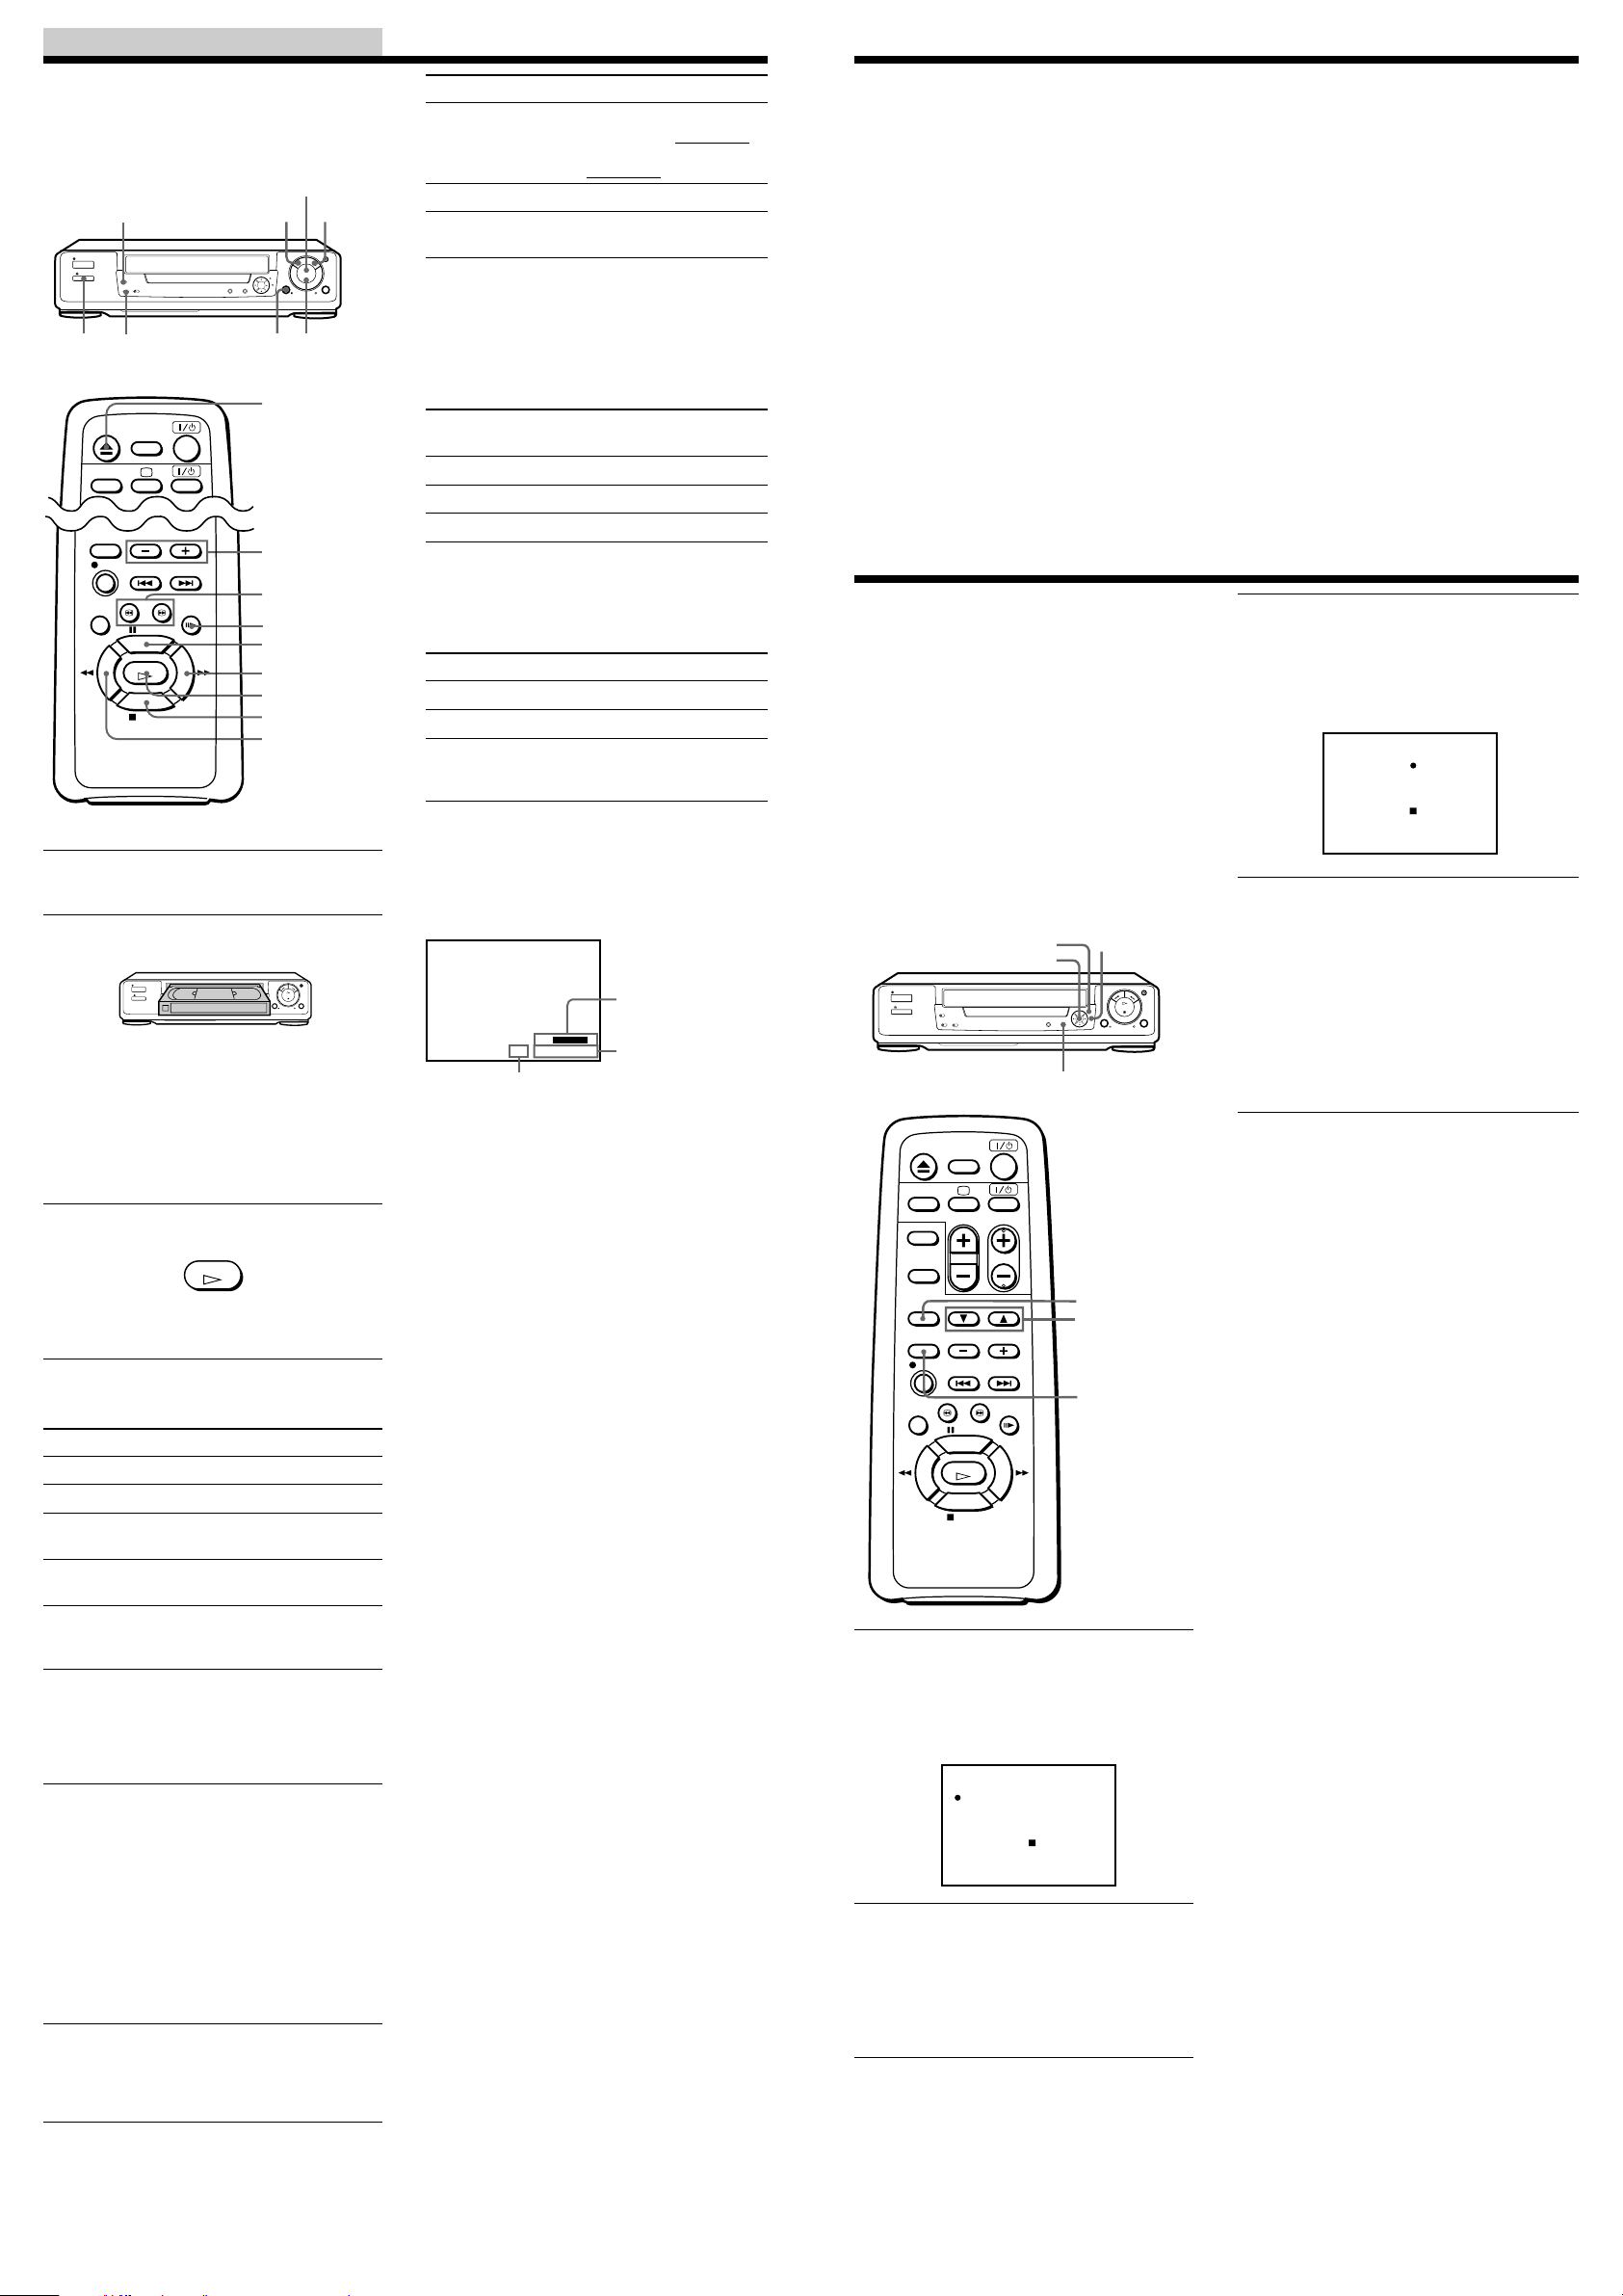
Using the remote commander
You can use this remote commander to
operate the unit and a Sony TV. To operate
this unit, point at the remote sensor on the
unit. To operate the TV, point at the remote
sensor on the TV. Buttons in the shaded
area of the remote commander can be used
to operate your Sony TV. If the TV does not
have the g symbol near the remote sensor,
this remote commander will not operate the
TV.
Remote sensor
TV/VIDEO
; (TV power)
1/u
(on/standby)
PROG (CH) +/–
VOL +/–
To
Turn the TV to standby
or active mode
Turn on the TV power
Increase (+) or decrease (–)
the TV volume
Change the TV
programme position
Select an input source
of the TV either from aerial
in or from line in
Notes
• With normal use, the batteries should last
about three to six months.
• If you do not use the remote commander for an
extended period of time, remove the batteries
to avoid possible damage from battery leakage.
• Do not use a new battery with an old one.
• Do not use different types of batteries.
Press
1/u (on/standby)
; (TV power)
VOL +/–
PROG (CH) +/–
TV/VIDEO
Tuning your TV to
the unit
If you have connected your unit to the TV
using the audio/video cable, skip this step.
ON/STANDBY
· PLAY
1 Press ON/STANDBY to turn on the
unit.
2 Turn on your TV and select a
programme position for video
playback.
Choose a channel between UHF 30 and
39 on the TV where there is no picture
and no sound or only a steady rustling
sound.
This channel will now be referred to as
the video channel.
3 Insert a tape recorded in the colour
system matching your TV into the
cassette compartment.
(SLV-GA30ME/PS/SG)
The unit starts playing automatically.
(SLV-GA60MJ and GA50ME/PS/SG)
The unit starts playing automatically if
you insert a tape with its safety tab
removed.
5 Tune the TV until the video playback
picture is clearly displayed on the TV
screen.
Refer to your TV manual for tuning
instructions.
You have now tuned your TV to the
unit. From now on, whenever you want
to play a tape, set the TV to the video
channel.
To obtain a clear playback picture
If the playback picture does not appear
clearly in step 5 above, turn the RF
CHANNEL screw on the rear panel of the
unit with a screwdriver to a position where
the TV clearly displays the playback
picture.
To select the TV system
For your TV to receive the correct signal
from your unit, you must set the TV
SYSTEM switch on the rear panel of the
unit to either G (for system B/G) or K (for
system D/K). If this switch is set to the
wrong position, the sound will be distorted.
RF CHANNEL
TV SYSTEM
G
K
4 Press · PLAY on the unit.
PLAY
Page 2
Operations
PICTURE CONTROL
NORMAL TRACKING
– – – – – – – –
– – – – – – – –
TRACKING
SELECT : [ TRACK / SHARP ]
SHARPNESS
Playing/searching at various speeds
· PLAY
COLOR SYSTEM
6 EJECT
NTSC PB
0 3 REW
6 EJECT
SLOW +/–
3/# SEACRH
7 FRAME
P PAUSE
) FF
· PLAY
p STOP
0 REW
1 Turn on your TV and set it to the video
channel.
2 Insert a tape.
(SLV-GA30ME/PS/SG)
The unit turns on, and starts playing
automatically.
(SLV-GA60MJ and GA50ME/PS/SG)
The unit turns on, and starts playing
automatically if you insert a tape with
its safety tab removed.
3 Press · PLAY.
PLAY
When the tape reaches the end, it will
rewind automatically.
Additional tasks
Playback options
Stop play
Pause play
Resume play after
pause
Fast-forward the tape
Rewind the tape
View the picture
during fast-forward
or rewind
Play at high speed
Play in slow motion
Play frame by frame
Operation
Press p STOP.
Press P PAUSE.
Press P PAUSE or
· PLAY.
Press ) FF () # FF
on the unit) during stop.
Press 0 REW
(0 3 REW on the unit)
during stop.
During fast-forward, hold
) FF () # FF on the
unit) down.
During rewind, hold
0 REW (0 3 REW on
the unit) down.
• During playback or
pause, press
# SEARCH or
3 SEARCH.
• During playback or
pause, hold down
) FF () # FF on
the unit) or 0 REW
(0 3 REW on the
unit).
When you release the
button, normal
playback resumes.
During playback or
pause, press SLOW +/–.
Press the SLOW +/–
buttons to change the
speed.
During pause, press
7 FRAME to advance
the picture one frame.
Hold the button down to
play one frame each
second.
) # FF
p STOPP PAUSE
Playback options
Rewind and start play
Eject the tape
Resume normal
playback
Operation
During stop, hold
0 3 REW on the unit
down and press · PLAY
on the unit.
Press 6 EJECT.
Press · PLAY.
To set the colour system
If streaks appear during playback, set
COLOR SYSTEM on the unit to conform to
the system that the tape was recorded in.
(Normally set the switch to AUTO.)
If your tape was
recorded in
PAL
NTSC
MESECAM
Set COLOR SYSTEM to
PAL/MESECAM
NTSC
PAL/MESECAM
To play an NTSC-recorded tape
Set NTSC PB on the unit according to the
colour system of your TV.
If your TV is
PAL
NTSC 4.43
NTSC 3.58
Set NTSC PB to
ON PAL TV
NTSC 4.43
NTSC 3.58
(SLV-GA60MJ and
GA50ME/PS/SG only)
To view the tape status on the screen
Press ON SCREEN DISPLAY on the unit.
The following information appears on the
TV screen.
LINE 1
STEREO
Remaining
tape length
–
SE
::
SP
000
Tape speed*
* Appears for a few seconds when the ON
SCREEN DISPLAY is pressed and when the
mode is changed.
Time counter
22
To turn the display off, press ON SCREEN
DISPLAY again.
Notes
• The sound is muted during playback at various
speeds and pause.
• If you press 7 FRAME during playback,
playback continues at the normal speed but the
sound is muted. Press · PLAY to resume
normal playback.
• You can eject a tape even when the power is
off. When you press 6 EJECT, the unit turns on
automatically. After ejecting the tape, the unit
turns off again.
• When the pause mode lasts for more than
approximately five minutes, the unit will
automatically enter the playback mode.
• (SLV-GA50PS and GA30PS only)
You can play back tapes recorded in the SP
mode only.
• (SLV-GA60MJ, GA50ME/SG and GA30ME/SG
only)
Tapes recorded in the LP mode of NTSC system
on other VCRs can be played back on this unit,
but the picture quality cannot be guaranteed.
• The counter resets to “0:00:00” whenever a tape
is inserted.
• The counter stops counting when it comes to a
portion with no recording.
• If a tape has portions recorded in both PAL and
NTSC systems, the time counter reading will
not be correct. This is due to the difference
between the counting cycles of the two colour
systems.
• Streaks or snow cannot be eliminated
completely in the various playback operations,
especially in the slow motion mode.
• On screen symbols may shake while playing or
searching at various speeds.
• Depending on your TV, the following may
occur while playing an NTSC-recorded tape:
– the picture is black and white,
– the picture shakes,
– no picture appears on the TV screen,
– black streaks appear horizontally on the TV
screen, and
– the colour density increases or decreases.
Turning on the unit and TV to start playback (Trinitron TV Synchro Play)
You can only use this function if your TV is
made by Sony (Trinitron TV).
How to connect to use this function
Connect the unit and TV with the audio/
video cable. Be sure to connect the audio/
video cable to the VIDEO IN 1 jacks on the
TV if the TV has two inputs or more. The
TV must be placed where it will respond to
the remote commander while you are
pointing it at the unit.
Operation
Make sure that the TV’s power is in standby
mode.
Adjusting the
picture (Resolution
Control)
Adjusting the tracking and sharpness
Although the unit automatically adjusts the
tracking and sharpness when playing a
tape, distortion or noise may occur if the
tape was recorded in poor condition. If so,
manually adjust the tracking or sharpness.
TRACKING
indicator
PICTURE CONTROL
AUTO MANUAL
SHARPNESS
indicator
AUTO/MANU
$/4 NORMAL/
SLOW/STILL
ADJUST
TRACKING/
SHARPNESS
1 While playing a tape, press the
PICTURE CONTROL dial on the unit
or TRACKING/SHARPNESS on the
remote commander to display the
PICTURE CONTROL menu.
2 Press the PICTURE CONTROL dial on
the unit or TRACKING/SHARPNESS
on the remote commander to move the
cursor (r) to TRACKING.
The TRACKING indicator flashes and
the SHARPNESS indicator lights up.
3 Rotate the PICTURE CONTROL dial to
the left or right or press $/4
NORMAL/SLOW/STILL ADJUST on
the remote commander to reduce the
distortion.
Press TRINITRON TV SYNCHRO PLAY
and hold the remote commander in place
for about two seconds.
The unit and TV turn on, and the TV is set
to the video channel. If there is a tape in the
unit, playback starts automatically.
Notes
• If the Trinitron TV Synchro Play function does
not work properly:
– Wait a few moments, and press the button
again.
– Replace both of the batteries in the remote
commander with new ones, and press the
button again.
Note that this function may not operate some
Sony TVs because of the remote commander’s
signal limitations.
• Do not press TRINITRON TV SYNCHRO
PLAY while playing back a video tape. If you
do so, the TV’s input source will momentarily
switch to the TV’s tuner.
4 Press the PICTURE CONTROL dial on
the unit or TRACKING/SHARPNESS
on the remote commander to move the
cursor (r) to SHARPNESS.
The SHARPNESS indicator flashes.
PICTURE CONTROL
TRACKING
SHARPNESS CONTROL
– – – – – – – –
SELECT : [ TRACK / SHARP ]
SHARPNESS
– – – – – – – –
5 Rotate the PICTURE CONTROL dial to
the left or right or press $/4
NORMAL/SLOW/STILL ADJUST on
the remote commander to get a clearer
picture.
Wait for several seconds until the menu
disappears. The TRACKING and/or
SHARPNESS indicator light(s) up to
show the tracking and/or sharpness
are/is manually adjusted.
To resume the automatic adjustment
Press AUTO/MANUAL on the unit or
AUTO/MANU on the remote commander
so that both of the TRACKING and
SHARPNESS indicators turn off.
About OPC
OPC (Optimum Picture Control)
automatically improves playback quality by
adjusting the unit to the condition of the
video heads and tape.
The OPC function automatically works on
all types of tapes, including rental tapes and
the tapes that were not recorded with OPC.
Tips
• You can adjust the tracking just by rotating the
PICTURE CONTROL dial or pressing $/4
NORMAL/SLOW/STILL ADJUST while
playing a tape.
• Adjust the picture using PICTURE CONTROL
dial or $/4 NORMAL/SLOW/STILL ADJUST
if:
– streaks appear while playing in slow motion
– the picture shakes while pausing
Notes
• The auto tracking function works
automatically when you play back a tape just
after inserting it.
• Sufficient picture quality may not be obtained
when playing back tapes recorded on another
VCR or tapes in poor condition.
• When a tape recorded with the copyguard
system is played back, intermittent distortion
may appear in the upper portion of the picture.
However, this is not a malfunction of the unit.
Page 3
Editing with another unit
(SLV-GA60MJ and GA50ME/
PS/SG only)
Editing (when recording on this unit)
You can make a copy of a tape using this
unit for recording or playback. The unit
cannot record TV programmes directly since
it does not have a TV tuner.
Synchronised recording
(SLV-GA60MJ and GA50ME/
PS/SG only)
To prepare the Synchronised recording
SYNCHRO REC
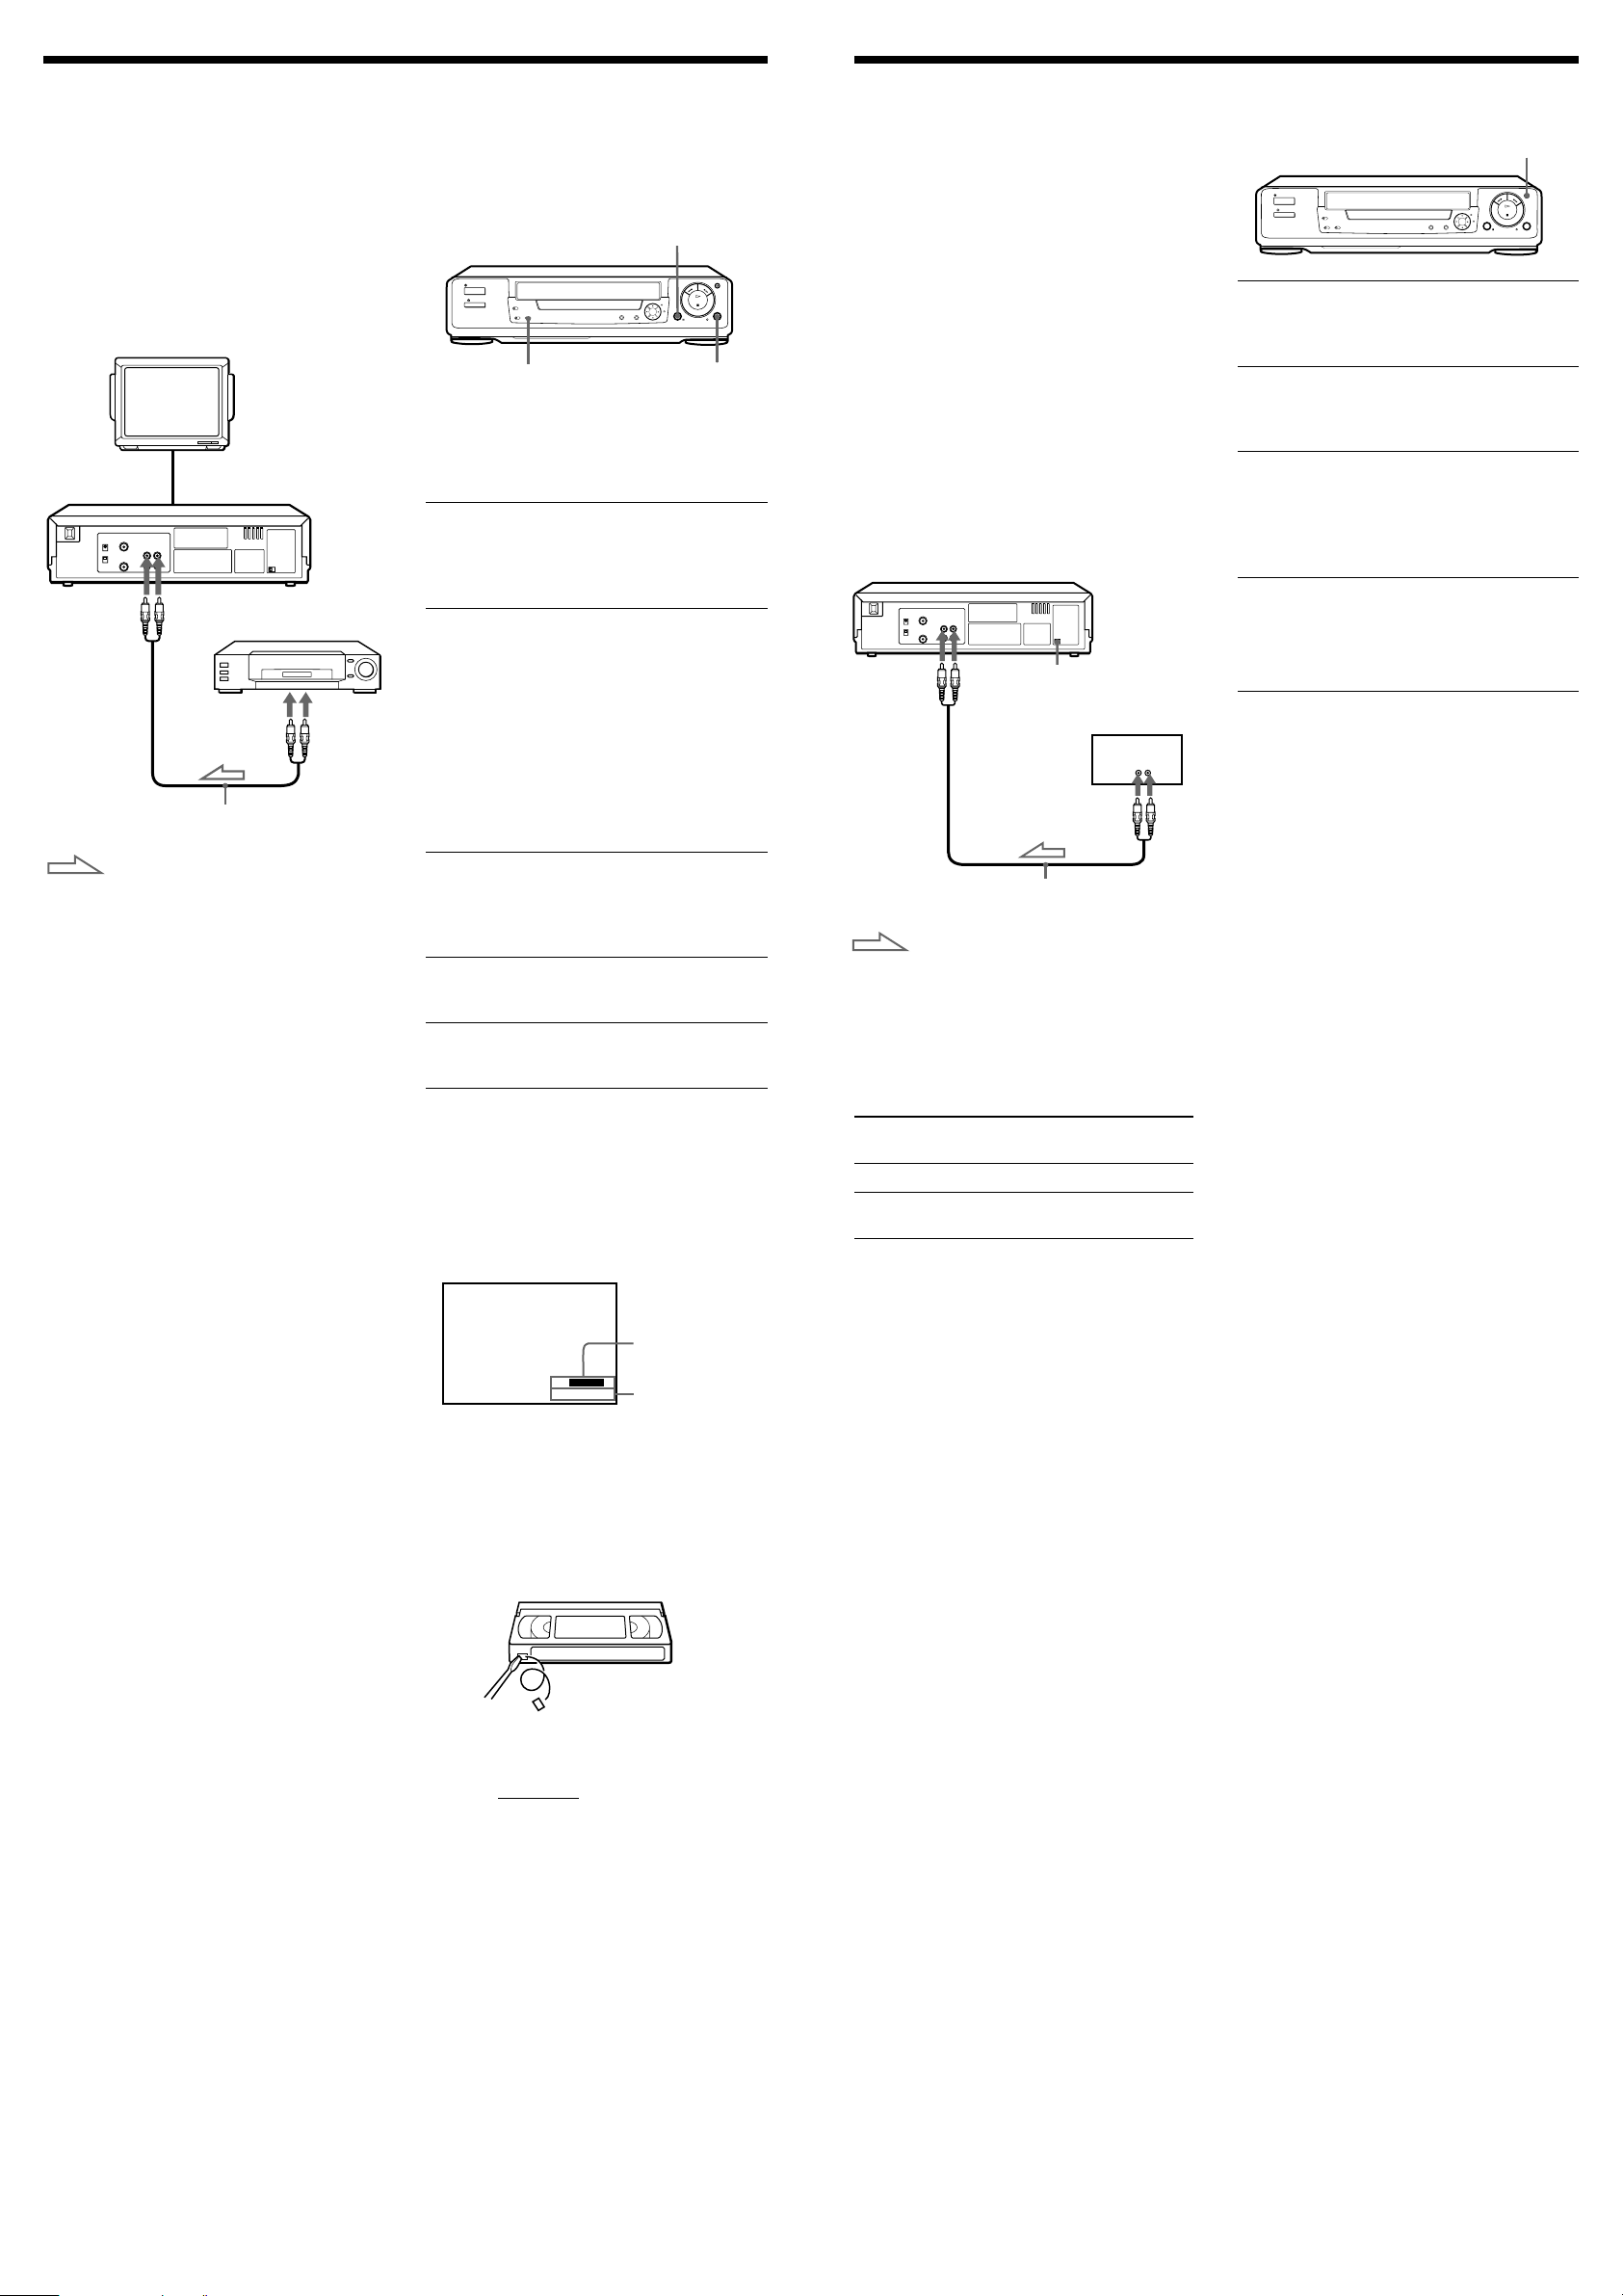
How to connect to record on this unit
TV
This unit (Recorder)
LINE IN
Other VCR (Player)
LINE OUT
VMC-710M/720M audio/video cable
(not supplied)
: Signal flow
Tip
• Use a commercially available connecting cable
like the Sony VMC-710M/720M. If the other
VCR has the AUDIO L and R jacks, use a
connecting cable like the Sony VMC-910MS.
Notes
• Make sure you connect the plugs to jacks of the
same colour.
• If you connected this unit to both the LINE IN
and LINE OUT jacks of the other VCR, select
the input correctly to prevent a humming
noise.
• Make sure you set the CONNECT LINE-1
switch to OTHERS.
P PAUSE
TAPE SPEED
Before you start editing
• Turn on your TV and set it to the video
channel.
r REC
1 Insert a source tape with its safety tab
removed into the other (playback) VCR.
Search for the point to start playback
and set it to playback pause.
2 (SLV-GA60MJ and GA50ME/SG only)
Set TAPE SPEED to select the tape
speed (SP or LP for the PAL colour
system, and SP or EP for the NTSC
colour system).
LP provides a recording time twice as
long as SP. EP provides a recording time
three times as long as SP.
However, SP produces better picture
quality.
3 Insert a tape with its safety tab in place
into this (recording) unit. Search for the
point to start recording and press
P PAUSE.
4 Press r REC on this unit to set it to
recording pause.
5 To start editing, press the P PAUSE
buttons on both units at the same time.
To stop editing
Press the p STOP buttons on both units.
To check the remaining tape length
Press ON SCREEN DISPLAY. The white bar
indicates the approximate length of the tape
recording.
LINE 1
STEREO
The Synchronised Recording feature
enables you to record from the connected
equipment such as a satellite tuner, a cable
TV decoder or a TV that has a timer
function. Once you set the timer on the
other equipment, the unit will start
recording the programme synchronised
with the timer.
How to connect to use this function
Connect the other equipment to the LINE
IN jack of this unit.
This unit (Recorder)
LINE IN
VMC-710M/720M audio/video cable
: Signal flow
Setting the CONNECT LINE-1 switch
When you connect the other equipment to
the LINE-1 IN jacks, set the CONNECT
LINE-1 switch on the rear of the unit
following the table below to allow better
signal transmission to your TV.
If the unit is
connected to
TV
Satellite, cable TV
decoder, etc.
CONNECT LINE-1
Satellite tuner, etc.
LINE OUT
(not supplied)
Set the CONNECT LINE-1
switch to
TV
OTHERS
1 Set the timer on the equipment to the
time of the programme you want to
record, then turn it off.
2 Insert a tape with its safety tab in place.
Make sure the tape is longer than the
total recording time.
3 (SLV-GA60MJ and GA50ME/SG only)
Set TAPE SPEED to select the tape
speed (SP or LP for the PAL colour
system, and SP or EP for the NTSC
colour system).
4 Hold SYNCHRO REC down for more
than two seconds.
The SYNCHRO REC button lights up
and the unit stands by for recording.
The unit automatically turns on and starts
recording when it receives audio/video
signals from the connected equipment.
To cancel the Synchronised recording
Press SYNCHRO REC so that the button’s
light turns off.
To stop recording
Press p STOP while recording.
The unit automatically stops recording
when the tape reaches the end or when the
other equipment stops transmitting the
audio/video signals.
Notes
• Some TVs or other equipment automatically
turn off in a certain time if you do not operate
it after it turns on with the timer. In this case
the Sychronised Recording also stops
automatically.
• The Sychronised Recording starts and stops
according to the signals from the connected
equipment. Refer also to the instruction
manual of the connected equipment for its
timer function.
• (SLV-GA50PS only)
You can record tapes only in SP mode.
Remaining tape
–
SE
::
000
To turn the display off, press ON SCREEN
DISPLAY again.
To save a recording
To prevent accidental erasure, break off the
safety tab as illustrated. To record on a tape
again, cover the tab hole with adhesive tape.
Safety tab
Tips
• To edit more precisely, press the P PAUSE
buttons on the units to release pause.
• To cut out unwanted scenes while editing,
press P PAUSE on this unit when an unwanted
scene begins. When that scene ends, press
P PAUSE again to resume recording.
Note
• (SLV-GA50PS only)
You can record tapes only in SP mode.
length
22
Time counter
Page 4
Additional Information
Warning
To prevent fire or shock hazard, do not expose the
unit to rain or moisture.
To avoid electrical shock, do not open the cabinet.
Refer servicing to qualified personnel only.
The mains lead must only be changed at a
qualified service shop.
Precautions
Safety
• This unit operates on 110 – 240 V AC,
50/60 Hz. Check that the unit’s operating
voltage is identical with your local power
supply.
• If anything falls into the cabinet, unplug the
unit and have it checked by qualified
personnel before operating it any further.
• The unit is not disconnected from the mains as
long as it is connected to the mains, even if the
unit itself has been turned off.
• Unplug the unit from the mains if you do not
intend to use it for an extended period of time.
To disconnect the cord, pull it out by the plug,
never by the cord.
Installing
• Allow adequate air cir culation to prevent
internal heat buildup.
• Do not place the unit on surfaces (rugs,
blankets, etc.) or near materials (curtains,
draperies) that may block the ventilation slots.
• Do not install the unit near heat sources such
as radiators or air ducts, or in a place subject to
direct sunlight, excessive dust, mechanical
vibration or shock.
• Do not install the unit in an inclined position.
It is designed to be operated in a horizontal
position only.
• Keep the unit and cassettes away fr om
equipment with strong magnets, such as
microwave ovens or large loudspeakers.
• Do not place heavy objects on the unit.
Specifications
System
Colour system
PAL, MESECAM, NTSC 4.43
NTSC 3.58 (SLV-GA60MJ and GA50ME/PS/SG
only)
RF output signal
UHF channels 30 to 39
(B/G, D/K)
Aerial out
75-ohm asymmetrical aerial socket
Inputs and outputs
LINE IN
VIDEO IN, phono jack (1)
Input signal: 1 Vp-p, 75 ohms,
unbalanced, sync negative
AUDIO IN, phono jack (1)
Input level: 327 mVrms
Input impedance: more than 47 kilohms
LINE OUT (SLV-GA60MJ and GA50ME/PS/SG)
VIDEO OUT, phono jack (1)
Output signal: 1 Vp-p, 75 ohms,
unbalanced, sync negative
AUDIO OUT, phono jack (1)
Standard output: 327 mVrms
Load impedance: 47 kilohms
Output impedance: less than 10 kilohms
• If the unit is brought directly from a cold to a
warm location, moisture may condense inside
the unit and cause damage to the video head
and tape. When you first install the unit, or
when you move it from a cold to a warm
location, wait for about one hour before
operating the unit.
Caution
Television programmes, films, video tapes, and
other materials may be copyrighted. Unauthorized
recording of such material may be contrary to the
provisions of the copyright laws. Also, use of this
recorder with cable television transmission may
require authorization from the cable television
transmitter and/or programme owner.
Compatible colour systems
• Check the colour systems of your unit using
the table below.
Model name
SLV-GA60MJ
SLV-GA50ME/
PS/SG
SLV-GA30ME/
PS/SG
Colour system
Recording
PAL
MESECAM
NTSC 4.43
NTSC 3.58
Playback
PAL
MESECAM
NTSC 4.43
NTSC 3.58
PAL
MESECAM
NTSC 4.43
Recording of video sources based on other
colour systems cannot be guaranteed.
• To play back tapes recorded with the PAL and
MESECAM colour systems, you need a TV or
colour monitor compatible with these systems.
• Tapes recorded with the NTSC colour system
can be played back on this unit using a TV or a
colour monitor for the PAL colour system.
General
Power requirements
110 – 240 V AC, 50/60 Hz
Power consumption
10 W
Operating temperature
5°C to 40°C
Storage temperature
–20°C to 60°C
Dimensions
Approx. 355 × 102 × 284 mm (w/h/d)
including projecting parts and controls
Mass
Approx. 3.8 kg
Supplied accessories
Remote commander (1)
R6 (Size AA) batteries (2)
Aerial cable (1)
Plug adaptor
(SLV-GA60MJ, GA50ME and GA30ME only) (1)
Design and specifications are subject to change without
notice.
Troubleshooting
If you have any questions or problems not covered below, please consult your nearest Sony
service facility.
Symptom
The ON/STANDBY switch does
not function.
The power is turned on but the
unit does not operate.
The unit enters standby mode
or turns off automatically.
PowerPlaybackRecording*Others
The playback picture does not
appear on the TV screen.
The picture is not clear.
The picture rolls vertically
during picture search.
The picture has no sound.
The tape starts playing as soon
as it is inserted.
The tape is ejected when you
press r REC.
Nothing happens when you
press r REC.
A tape cannot be inserted.
The remote commander does
not function.
The unit needs to be cleaned.
* SLV-GA60MJ and GA50ME/PS/SG only
Auto head cleaner
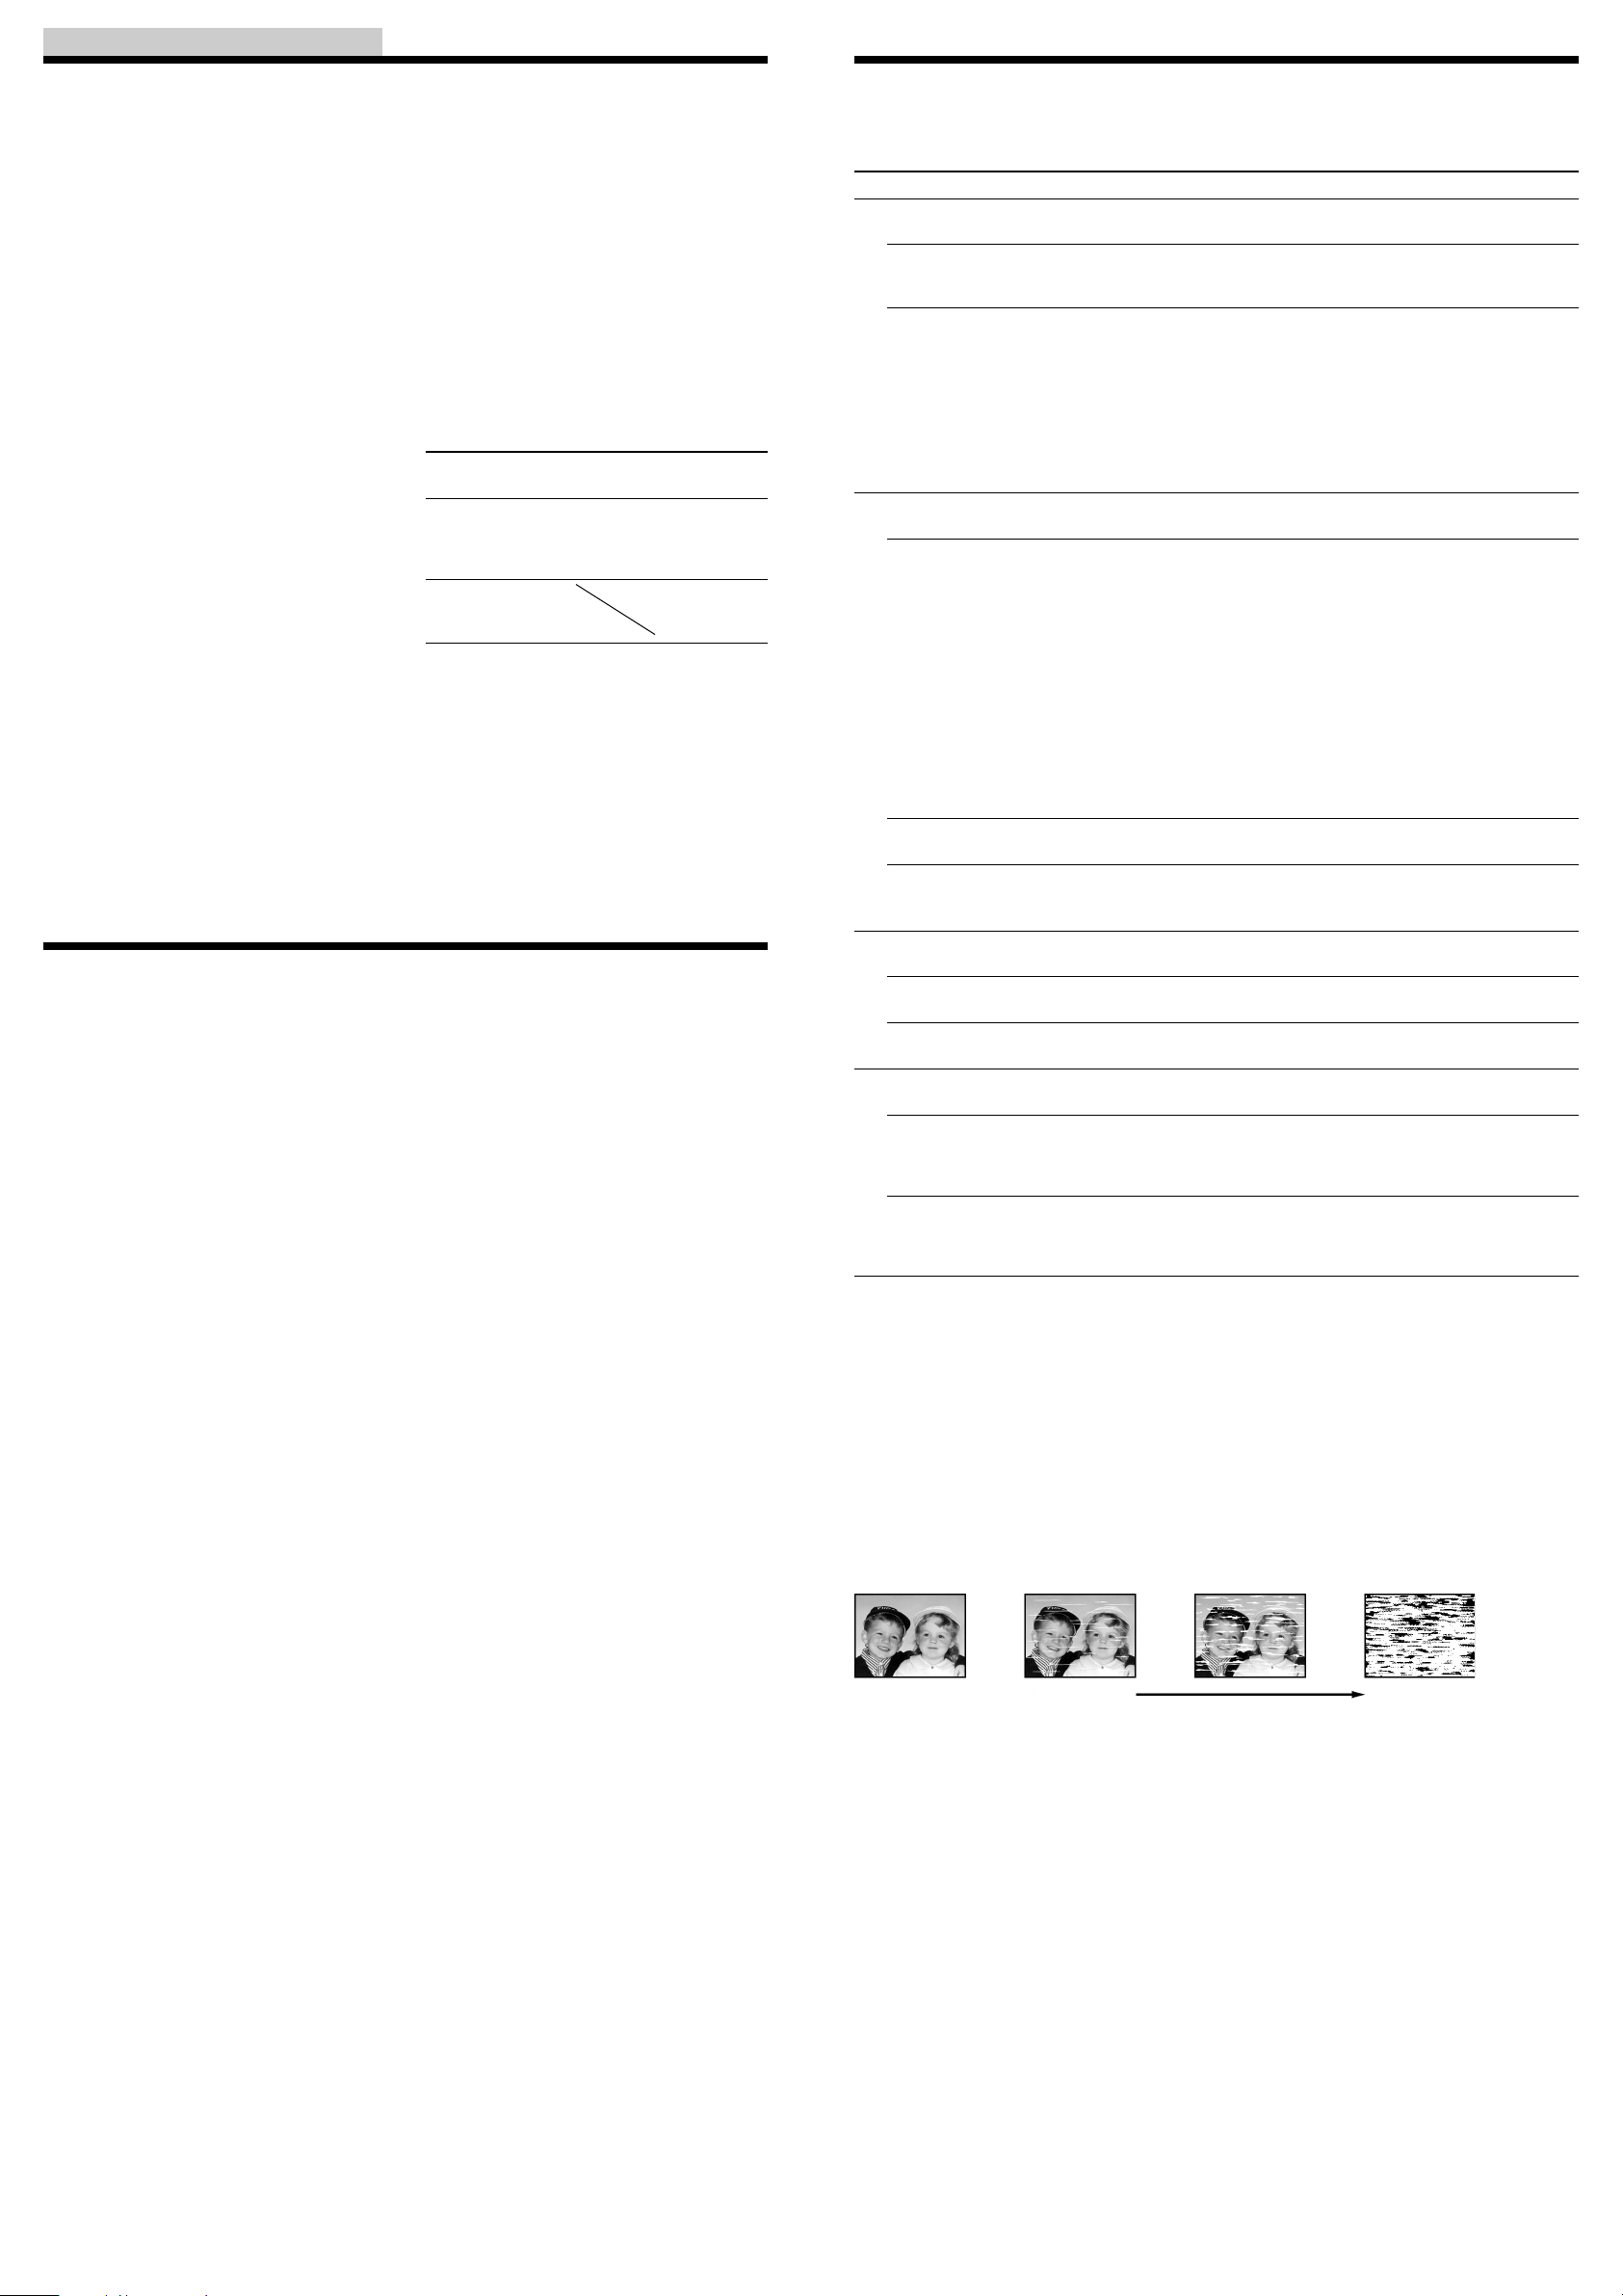
The unit incorporates an auto head cleaner which cleans the video heads when
a tape is loaded or unloaded. When the heads are not sufficiently clean, even
after a tape has been loaded/unloaded several times, use a video head cleaning
cassette.
Symptoms caused by contaminated video heads
Remedy
• Connect the mains lead securely.
• Moisture condensation occurs. Turn the power off,
unplug the mains lead and leave the unit to dry for
over an hour.
• The auto safety system is triggered to protect your
tape and the unit’s mechanism when there is
something wrong with the tape or when the
mechanism is overloaded. Press ON/STANDBY to
restart the unit. If the unit does not work after
pressing ON/STANDBY again, disconnect the mains
lead from the mains. Wait for at least 15 seconds.
Then reconnect mains, and press ON/STANDBY
again. If the unit still does not work, please consult
your nearest Sony service facility.
• Make sure the TV is set to the video channel. If you
are using a monitor, set it to video input.
• Adjust the tracking with the $/4 NORMAL/SLOW/
STILL ADJUST buttons.
• Make sure the COLOR SYSTEM switch is set to the
position corresponding to the colour system which
the tape was recorded with.
• The video heads are dirty (see below). Clean the
video heads using the Sony T-25CLD, T-25CLW or
E-25CLDR video head cleaning cassette. If these
cleaning cassettes are not available in your area, have
the heads cleaned at your nearest Sony service facility
(a standard service charge will be required). Do not
use a commercially available liquid type cleaning
cassette, as it may damage the video heads.
• The video heads may have to be replaced. Consult
your local Sony service facility for more information.
• Adjust the vertical hold control on the TV or monitor.
• The tape is defective.
• If you made A/V connections, check the audio cable
connection.
• The safety tab has been removed. To record on this
tape, cover the tab hole.
• Check that the safety tab has not been removed.
• Make sure the tape is not at its end.
• Check that a tape isn’t already in the tape
compartment.
• Make sure you are pointing the remote commander at
the remote sensor on the unit.
• Replace all the batteries in the remote commander
with new ones if they are weak.
• Clean the cabinet, panel, and controls with a dry soft
cloth, or a soft cloth slightly moistened with a mild
detergent solution. Do not use any type of solvent,
such as alcohol or benzine.
• Normal picture
• Rough picture • Unclear picture • No picture (or
black & white
screen appears)
initial
terminal
contamination
Sapphire tape cleaner
The unit incorporates a sapphire tape cleaner which cleans a video tape when it
is loaded. This cleaner can prevent the video heads from contamination by
removing dust or mold from a tape with the sapphire edge.
Sony Corporation
 Loading...