

Sony SLT-A77V, SLT-A77VQ Instruction Manual
Interchangeable Lens
Digital Camera
Instruction Manual
A-mount
Preparing the camera
Shooting and viewing
images
Shooting images to suit your
subject
Using the shooting
functions
Using the playback
functions
Functions list
Viewing images on a
computer
Others
Advanced operations
Additional information on this product and
answers to frequently asked questions can be
found at our Customer Support Website.
Printed using VOC (Volatile Organic
Compound)-free vegetable oil based ink.
Index

Owner’s Record
The model and serial numbers are located
on the bottom.
Record the serial number in the space
provided below.
Refer to these numbers whenever you call
upon your Sony dealer regarding this
product.
Model No. SLT-A77/A77V
Serial No. __________________________
WARNING
To reduce fire or shock hazard, do
not expose the unit to rain or
moisture.
IMPORTANT SAFETY
INSTRUCTIONS
SAVE THESE
INSTRUCTIONS.
DANGER - TO
REDUCE THE RISK
OF FIRE OR
ELECTRIC SHOCK,
CAREFULLY
FOLLOW THESE
INSTRUCTIONS.
If the shape of the plug does not fit the
power outlet, use an attachment plug
adaptor of the proper configuration for the
power outlet.
Caution
Battery pack
If the battery pack is mishandled, the
battery pack can burst, cause a fire or even
chemical burns. Observe the following
cautions.
• Do not disassemble.
• Do not crush and do not expose the
battery pack to any shock or force such as
hammering, dropping or stepping on it.
• Do not short circuit and do not allow
metal objects to come into contact with
the battery terminals.
• Do not expose to high temperature above
60°C (140°F) such as in direct sunlight or
in a car parked in the sun.
• Do not incinerate or dispose of in fire.
• Do not handle damaged or leaking
lithium ion batteries.
• Be sure to charge the battery pack using a
genuine Sony battery charger or a device
that can charge the battery pack.
2

• Keep the battery pack out of the reach of
small children.
• Keep the battery pack dry.
• Replace only with the same or equivalent
type recommended by Sony.
• Dispose of used battery packs promptly
as described in the instructions.
Battery charger
Even if the CHARGE lamp is not lit, the
battery charger is not disconnected from the
AC power source (mains) as long as it is
connected to the wall outlet (wall socket).
If some trouble occurs while using the
battery charger, immediately shut off the
power by disconnecting the plug from the
wall outlet (wall socket).
The power cord (mains lead), if supplied, is
designed specifically for use with this
camera only, and should not be used with
other electrical equipment.
For Customers in the U.S.A.
and Canada
RECYCLING LITHIUM-ION
BATTERIES
Lithium-Ion batteries are
recyclable.
You can help preserve
our environment by
returning your used
rechargeable batteries to
the collection and
recycling location nearest you.
For more information regarding recycling
of rechargeable batteries, call toll free
1-800-822-8837, or visit http://
www.rbrc.org/
Caution: Do not handle damaged or
leaking Lithium-Ion batteries.
Battery Pack and lens
This device complies with Part 15 of the
FCC Rules, Operation is subject to the
following two conditions:
(1) This device may not cause harmful
interference, and (2) this device must
accept any interference received, including
interference that may cause undesired
operation.
This Class B digital apparatus complies
with Canadian ICES-003.
For Customers in the U.S.A.
UL is an internationally recognized safety
organization.
The UL Mark on the product means it has
been UL Listed.
If you have any questions about this
product, you may call:
Sony Customer Information Center
1-800-222-SONY (7669)
The number below is for the FCC related
matters only.
Regulatory Information
Declaration of Conformity
Trade Name: SONY
Model No.: SLT-A77V
Responsible Party: Sony Electronics
Inc.
Address:16530 Via Esprillo,
San Diego, CA 92127 U.S.A.
Telephone No.: 858-942-2230
This device complies with Part 15 of the
FCC Rules. Operation is subject to the
following two conditions: (1) This
device may not cause harmful
interference, and (2) this device must
accept any interference received,
including interference that may cause
undesired operation.
CAUTION
You are cautioned that any changes or
modifications not expressly approved in
this manual could void your authority to
operate this equipment.
3

Note:
This equipment has been tested and found
to comply with the limits for a Class B
digital device, pursuant to Part 15 of the
FCC Rules.
These limits are designed to provide
reasonable protection against harmful
interference in a residential installation.
This equipment generates, uses, and can
radiate radio frequency energy and, if not
installed and used in accordance with the
instructions, may cause harmful
interference to radio communications.
However, there is no guarantee that
interference will not occur in a particular
installation. If this equipment does cause
harmful interference to radio or television
reception, which can be determined by
turning the equipment off and on, the user
is encouraged to try to correct the
interference by one or more of the
following measures:
– Reorient or relocate the receiving
antenna.
– Increase the separation between the
equipment and receiver.
– Connect the equipment into an outlet
on a circuit different from that to which
the receiver is connected.
– Consult the dealer or an experienced
radio/TV technician for help.
The supplied interface cable must be used
with the equipment in order to comply with
the limits for a digital device pursuant to
Subpart B of Part 15 of FCC Rules.
For Customers in Canada
This device complies with RSS-310 of
Industry Canada. Operation is subject to the
condition that this device does not cause
harmful interference.
For Customers in Europe
Hereby, Sony Corporation, declares that
this SLT-A77V Interchangeable Lens
Digital Camera is in compliance with the
essential requirements and other relevant
provisions of the Directive 1999/5/EC. For
details, please access the following URL:
http://www.compliance.sony.de/
Notice for the customers in the
countries applying EU Directives
The manufacturer of this product is Sony
Corporation, 1-7-1 Konan Minato-ku
Tokyo, 108-0075 Japan. The Authorized
Representative for EMC and product safety
is Sony Deutschland GmbH, Hedelfinger
Strasse 61, 70327 Stuttgart, Germany. For
any service or guarantee matters please
refer to the addresses given in separate
service or guarantee documents.
This product has been tested and found
compliant with the limits set out in the
R&TTE Directive for using connection
cables shorter than 3 meters (9.8 feet).
Attention
The electromagnetic fields at the specific
frequencies may influence the picture and
sound of this unit.
Notice
If static electricity or electromagnetism
causes data transfer to discontinue midway
(fail), restart the application or disconnect
and connect the communication cable
(USB, etc.) again.
4

Disposal of Old Electrical &
Electronic Equipment (Applicable in
the European Union and other
European countries with separate
collection systems)
This symbol on the product or on its
packaging indicates that this product shall
not be treated as household waste. Instead it
shall be handed over to the applicable
collection point for the recycling of
electrical and electronic equipment. By
ensuring this product is disposed of
correctly, you will help prevent potential
negative consequences for the environment
and human health, which could otherwise
be caused by inappropriate waste handling
of this product. The recycling of materials
will help to conserve natural resources. For
more detailed information about recycling
of this product, please contact your local
Civic Office, your household waste
disposal service or the shop where you
purchased the product.
Disposal of waste batteries
(applicable in the European Union
and other European countries with
separate collection systems)
This symbol on the battery or on the
packaging indicates that the battery
provided with this product shall not be
treated as household waste.
On certain batteries this symbol might be
used in combination with a chemical
symbol. The chemical symbols for mercury
(Hg) or lead (Pb) are added if the battery
contains more than 0.0005% mercury or
0.004% lead.
By ensuring these batteries are disposed of
correctly, you will help prevent potentially
negative consequences for the environment
and human health which could otherwise be
caused by inappropriate waste handling of
the battery. The recycling of the materials
will help to conserve natural resources.
In case of products that for safety,
performance or data integrity reasons
require a permanent connection with an
incorporated battery, this battery should be
replaced by qualified service staff only.
To ensure that the battery will be treated
properly, hand over the product at end-oflife to the applicable collection point for the
recycling of electrical and electronic
equipment.
For all other batteries, please view the
section on how to remove the battery from
the product safely. Hand the battery over to
the applicable collection point for the
recycling of waste batteries.
For more detailed information about
recycling of this product or battery, please
contact your local Civic Office, your
household waste disposal service or the
shop where you purchased the product.
5

Notice for customers in the
United Kingdom
A moulded plug complying with BS 1363
is fitted to this equipment for your safety
and convenience.
Should the fuse in the plug supplied need to
be replaced, a fuse of the same rating as the
supplied one and approved by ASTA or
BSI to BS 1362, (i.e., marked with an or
mark) must be used.
If the plug supplied with this equipment has
a detachable fuse cover, be sure to attach
the fuse cover after you change the fuse.
Never use the plug without the fuse cover.
If you should lose the fuse cover, please
contact your nearest Sony service station.
6

Table of Contents
Basic
operations ...............................................................14
This section provides basic information on operating the camera.
Read this section first.
Notes on using your camera ............................................ 15
Preparing the camera
Checking the supplied items ............................................ 18
Identifying parts .............................................................. 19
Charging the battery pack ................................................ 25
Inserting the battery pack/memory card (sold separately)
..................................................................................... 27
Attaching a lens ............................................................... 30
Turning the camera on and setting the clock ................... 33
Before shooting ............................................................... 35
Adjusting the viewfinder to the visual acuity (diopter
adjustment)......................................................... 35
Holding the camera properly ...................................... 35
Shooting and viewing images
Shooting still images ....................................................... 36
Recording movies ............................................................ 38
Playing back images ........................................................ 39
Deleting images (Delete) ................................................. 40
Shooting images to suit your subject
Adjusting the angle of the LCD monitor ......................... 41
Shooting with the various shooting modes ...................... 42
......................................................................... 43
Scene Selection .................................................. 44
Sweep Panorama/ 3D Sweep Panorama ....... 45
Continuous Advance Priority AE ........................ 46
Using the shooting functions
Using the flash ................................................................. 47
Adjusting the brightness of the image ............................. 49
Selecting the drive mode .................................... 51
7

Switching the recording information display (DISP) ...... 52
Setting image size ............................................................ 53
Image Size .................................................................. 53
Panorama: Size ........................................................... 53
Using the playback functions
Enlarging images ............................................................. 55
Switching to the display of the image list ....................... 56
Viewing images on a TV screen ...................................... 57
Functions list
Functions that can be operated with the buttons/dial
..................................................................................... 58
Selecting a function with the Fn (Function) button ......... 59
Functions that can be selected with the Fn (Function) button
..................................................................................... 60
The functions selected with the MENU button ............... 62
Using the guide function of the camera ........................... 70
In-Camera Guide ........................................................ 70
Viewing images on a computer
Using with your computer ............................................... 71
Using the software ........................................................... 73
Selecting the method for creating a disc of movies ......... 77
Others
List of icons on the screen ............................................... 79
Functions available for each shooting mode ................... 82
Flash modes available ...................................................... 83
Advanced
operations ................................................................85
This section provides further information on the camera.
Preparation
Setting up the camera ...................................................... 86
Removing the eyecup ................................................. 86
The screen displayed for shooting mode ......................... 87
Selecting the screen mode .......................................... 87
Histogram ................................................................... 88
The digital level gauge ............................................... 89
8
Shooting
Graphic Display ......................................................... 89
Monitoring the subject through the lens without effects
displayed ........................................................... 89
List of icons for viewfinder mode .............................. 90
Display panel .............................................................. 93
Shooting a clear image without camera shake ................ 94
Camera shake warning indicator ................................ 94
Using the SteadyShot function ................................... 94
Using a tripod ............................................................. 95
Selecting the shooting mode ............................................ 96
AUTO ............................................................... 96
......................................................................... 96
Scene Selection .................................................. 97
Sweep Panorama/ 3D Sweep Panorama ....... 99
Cont. Priority AE ............................................... 101
Program Auto ....................................................... 102
Aperture Priority ................................................. 103
Shutter Priority ..................................................... 105
Manual Exposure ................................................. 107
BULB .................................................................. 109
Movie recording setup ................................................... 111
Recording movies easily .......................................... 111
Recording movies with the shutter speed and aperture
adjusted ........................................................... 112
File Format ............................................................... 113
Record Setting .......................................................... 114
Audio Recording ...................................................... 115
Adjusting the focus ........................................................ 116
Autofocus ................................................................. 116
Focus-lock ................................................................ 119
AF area ..................................................................... 119
The AF illuminator ................................................... 120
AF Micro Adj. .......................................................... 121
Object Tracking ........................................................ 121
Manual focus ............................................................ 123
Peaking ..................................................................... 124
Focus Magnifier ....................................................... 124
9

Direct manual focus ................................................. 125
AF/MF control ......................................................... 126
Detecting faces .............................................................. 127
Face Detection .......................................................... 127
Face Registration ...................................................... 128
Smile Shutter ............................................................ 129
Adjusting the brightness of the image ........................... 131
AE Lock ................................................................... 131
Metering Mode ......................................................... 132
Flash Comp. ............................................................. 132
Flash control ............................................................. 133
The flash ........................................................................ 135
Wireless flash ........................................................... 135
Slow Sync ................................................................. 136
Using a flash equipped with a flash sync terminal cord
.......................................................................... 137
Setting ISO .................................................................... 139
Multi frame noise reduction ..................................... 140
Compensating for the brightness and contrast automatically
(D-Range) ................................................................. 141
D-RangeOptimizer ................................................... 141
Auto HDR ................................................................ 142
Setting the image processing ......................................... 144
Picture Effect ............................................................ 144
Creative Style ........................................................... 145
Adjusting the color tones (White balance) .................... 148
The fine adjustment screen for color ........................ 149
Color Temp./Color Filter ......................................... 150
Custom white balance .............................................. 150
Zooming in in one step .................................................. 153
Selecting the drive mode .................................. 154
Shooting single shot ................................................. 154
Cont. Shooting .......................................................... 154
Self-timer .................................................................. 155
Bracket: Cont./Single Bracket .................................. 155
WB bracket ............................................................... 157
DRO Bracket ............................................................ 158
Remote Cdr. ............................................................. 158
10

Playback
Setup of the camera
The screen displayed for playback mode ...................... 159
Switching the screen during playback ...................... 159
List of icons on the histogram display ..................... 159
Using the playback functions ........................................ 161
Rotating an image .................................................... 161
View Mode ............................................................... 161
Slide Show ............................................................... 162
Playback Display ...................................................... 162
Scrolling panoramic images ..................................... 163
Protecting images (Protect) ........................................... 164
Deleting images (Delete) ............................................... 165
Delete (Multiple Img.) ............................................. 165
Deleting all the images or movies in the same view mode
.......................................................................... 166
About playback on TV .................................................. 167
3D Viewing .............................................................. 167
Using “BRAVIA” Sync ........................................... 167
GPS setting (SLT-A77V only) ...................................... 169
GPS Assist Data ....................................................... 170
GPS Auto Time Cor. ................................................ 170
Setting the aspect ratio and image quality ..................... 172
Aspect Ratio ............................................................. 172
Quality ...................................................................... 172
Setting the other functions of the camera ...................... 174
Long Exposure NR ................................................... 174
High ISO NR ............................................................ 174
Color Space .............................................................. 175
Release w/o Lens ...................................................... 175
Grid Line .................................................................. 176
Auto Review ............................................................. 176
Func. of AEL button ................................................ 176
ISO Button, AF/MF button ...................................... 177
Preview Button ......................................................... 177
Electronic Front Curtain Shutter .............................. 177
LCD Brightness ........................................................ 178
Viewfinder Bright. ................................................... 178
11

Computer
Print
Cleaning
Power Save ............................................................... 179
FINDER/LCD Setting .............................................. 179
Lens compensation ........................................................ 180
Lens Comp.: Peripheral Shading .............................. 180
Lens Comp.: Chromatic Aberration ......................... 180
Lens Comp.: Distortion ............................................ 180
Setting the method for recording on a memory card ..... 181
Format ...................................................................... 181
File Number ............................................................. 181
Folder Name ............................................................. 181
Select REC Folder .................................................... 182
New Folder ............................................................... 182
Recover Image DB ................................................... 183
Upload Settings ........................................................ 183
Registering your own settings ....................................... 185
Resetting to the default .................................................. 186
Confirming the version of the camera ........................... 190
Connecting the camera to the computer ........................ 191
Setting the USB connection ..................................... 191
Connecting to the computer ..................................... 191
Importing images to the computer (Windows) ........ 192
Importing images to the computer (Macintosh) ....... 193
Deleting the USB connection ................................... 194
Creating a movie disc .................................................... 195
Creating an AVCHD format disc ............................. 195
Creating a standard definition image quality (STD) disc
................................................................................... 196
Discs you can use with “PMB” ................................ 197
Specifying DPOF ........................................................... 198
Date Imprint ............................................................. 198
Cleaning the camera and a lens ..................................... 199
Cleaning the image sensor ............................................. 200
12

Trouble shooting/Others
Troubleshooting ............................................................. 203
Warning messages ......................................................... 212
Precautions .................................................................... 214
To use your camera abroad — Power sources .............. 217
AVCHD format ............................................................. 218
GPS (SLT-A77V only) .................................................. 219
3D-shootings ................................................................. 221
Memory card ................................................................. 222
Battery pack/Battery charger ......................................... 224
The License ................................................................... 226
Checking the number of recordable images/recording time
................................................................................... 227
Specifications ................................................................ 231
Index ............................................................................. 239
13

Basic operations
This section provides the basic information on
operating the camera. Read this section first. To
more effectively take advantage of the camera, see
“Advanced operations” (page 85).
14

Notes on using your camera
Shooting procedure
• This camera has 2 modes for monitoring
subjects: the LCD monitor mode using
the LCD monitor, and the viewfinder
mode using the viewfinder.
• The recorded image may be different
from the image you monitored before
recording.
Notes on the functions available with
the camera
• To check whether it is a 1080 60icompatible device or 1080 50icompatible device, check for the
following marks on the bottom of the
camera.
1080 60i-compatible device:60i
1080 50i-compatible device:50i
• This camera is compatible with 1080 60p
or 50p-format movies. Unlike standard
recording modes up to now, which record
in an interlacing method, this camera
records using a progressive method. This
increases the resolution, and provides a
smoother, more realistic image.
• You may feel uncomfortable symptoms
such as eyestrain, nausea, or a tired
feeling while watching 3D-images
recorded with the camera on 3Dcompatible monitors. When you watch
3D-images, we recommend that you take
a break at regular time intervals. Since
the need for or frequency of break times
varies among individuals, please set your
own standards. If you feel sick, stop
watching 3D-images, and consult a
doctor as needed. Also, refer to the
operating instructions of the connected
device or the software used with the
camera. A child’s vision is always
vulnerable (especially for children under
6 years of age). Before allowing them to
watch 3D-images, please consult with an
expert, such as a pediatric or ophthalmic
doctor. Be sure to make sure your
children follow the precautions above.
No compensation for contents of the
recording
The contents of the recording cannot be
compensated for if recording or playback is
not possible due to a malfunction of your
camera or a memory card, etc.
Back up recommendation
To avoid the potential risk of data loss,
always copy (back up) data to other
medium.
Notes on the LCD monitor, electronic
viewfinder, lens, and image sensor
• The LCD monitor and electronic
viewfinder are manufactured using
extremely high-precision technology so
over 99.99% of the pixels are operational
for effective use. However, there may be
some tiny black points and/or bright
points (white, red, blue or green in color)
that constantly appear on the LCD
monitor and electronic viewfinder. These
points are normal in the manufacturing
process and do not affect the images in
any way.
• Do not hold the camera by taking hold of
the LCD monitor.
• Do not expose the camera to sunlight or
shoot sunward for a long time. The
internal mechanism may be damaged. If
sunlight is focused on a nearby object, it
may cause a fire.
• There is a magnet on the back and around
the rotating shaft of the hinge part of the
LCD monitor. Do not bring anything that
is easily affected by a magnet, such as
floppy disk, credit cards near the LCD
monitor.
• Images may trail across on the screen in a
cold location. This is not a malfunction.
When turning on the camera in a cold
location, the screen may become
temporarily dark. When the camera
warms up, the screen will function
normally.
15

Notes on long-time recording
• When you continue to shoot for a long
time, the temperature of the camera rises.
If the temperature reaches above a certain
level, the mark is indicated on the
screen and the camera is turned off
automatically. If the power is turned off,
leave the camera for 10 minutes or longer
to allow the temperature inside the
camera to decrease to a safe level.
• Under high ambient temperatures, the
temperature of the camera rises quickly.
• When the temperature of the camera
rises, the image quality may deteriorate.
It is recommended that you wait until the
temperature of the camera drops before
continuing to shoot.
• The surface of the camera may get warm.
This is not a malfunction.
Notes on importing AVCHD View
movies* to a computer
When importing AVCHD View movies to
a computer, for Windows computers, use
the “PMB” software on the CD-ROM
(supplied).
* “AVCHD View movies” are movies that
were recorded in the [AVCHD 60i/60p]/
[AVCHD 50i/50p] mode of [File Format]
(page 113).
Notes when playing movies on other
devices
• This camera uses MPEG-4 AVC/H.264
High Profile for AVCHD format
recording. Movies recorded in AVCHD
format with this camera cannot be played
with the following devices.
–Other devices compatible with AVCHD
format that does not support High
Profile
–Devices incompatible with the AVCHD
format
This camera also uses MPEG-4 AVC/
H.264 Main Profile for MP4 format
recording. For this reason, movies
recorded in MP4 format with this camera
cannot be played on devices other than
those that support MPEG-4 AVC/H.264.
• Discs recorded with HD image quality
(high definition) can be played back only
Notes on using your camera
on AVCHD format-compatible devices.
DVD-based players or recorders cannot
play back HD image quality discs, as
they are incompatible with the AVCHD
format. Also, DVD-based players or
recorders may fail to eject HD image
quality discs.
• 1080 60p/50p movies can be played back
on compatible devices only.
On GPS-compatible devices (SLTA77V only)
• To determine whether your camera
supports GPS function, check the model
name of your camera.
GPS-compatible: SLT-A77V
GPS-incompatible: SLT-A77
• Use GPS in accordance with regulations
of countries and regions where you use it.
• If you do not record the location
information, set [GPS On/Off] to [Off]
(page 169).
• In an airplane, make sure to turn off the
camera following cabin announcements.
Warning on copyright
Television programs, films, videotapes, and
other materials may be copyrighted.
Unauthorized recording of such materials
may be contrary to the provisions of the
copyright laws.
The pictures used in this manual
The photographs used as examples of
pictures in this manual are reproduced
images, and are not actual images shot
using this camera.
On the data specifications described
in this manual
The data on performance and specifications
is defined under the following conditions,
except as described in this manual: at an
ordinary ambient temperature of 25ºC
(77°F), and using a battery pack that is
charged for about 1 hour after the
CHARGE lamp goes out.
16

Model name
This manual covers several models
supplied with different lenses.
The model name varies depending on the
supplied lens. The available model varies
depending on the countries/regions.
Model name Lens
SLT-A77/A77V –
SLT-A77K/
A77VK
SLT-A77Q/
A77VQ
DT18-55mm
DT16-50mm
Notes on using your camera
17
Preparing the camera
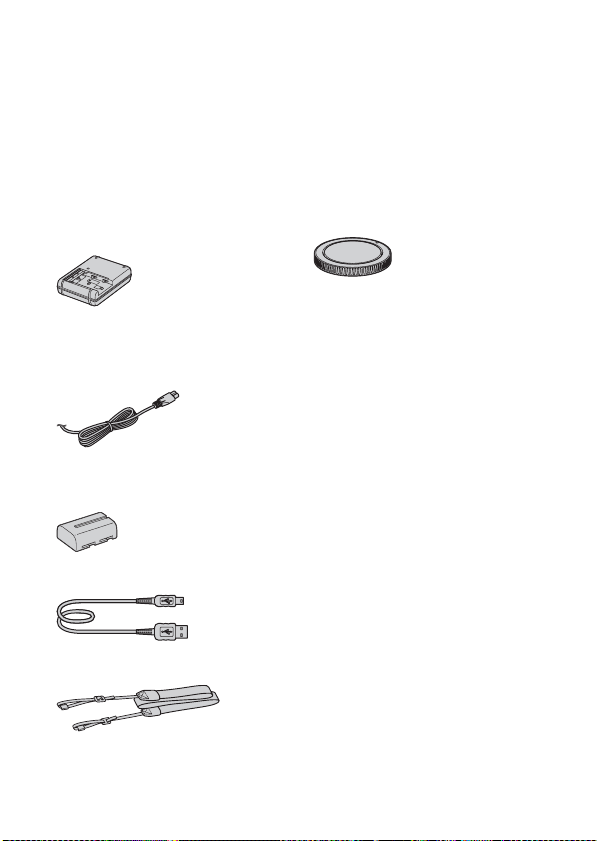
Checking the supplied items
First check the model name of your camera (page 17). The accessories
supplied differ depending on the model.
The number in parentheses indicates the number of pieces.
Common accessories
• Camera (1)
• BC-VM10A Battery charger (1)
• Power cord (mains lead) (1) (not
supplied in the U.S.A. and
Canada)
• Rechargeable battery pack NPFM500H (1)
• USB cable (1)
• Shoulder strap (1)
• Body cap (1) (Attached on the
camera)
• Accessory shoe cap (1) (Attached
on the camera)
• Eyecup (1) (Attached on the
camera)
•CD-ROM (1)
– Application Software for α
camera
• Instruction Manual (1) (This
manual)
SLT-A77K/A77VK
• DT18-55mm zoom lens (1)/Front
lens cap (1)/Rear lens cap (1)
SLT-A77Q/A77VQ
• DT16-50mm zoom lens (1)/Front
lens cap (1)/Rear lens cap (1)/
Lens hood (1)
18
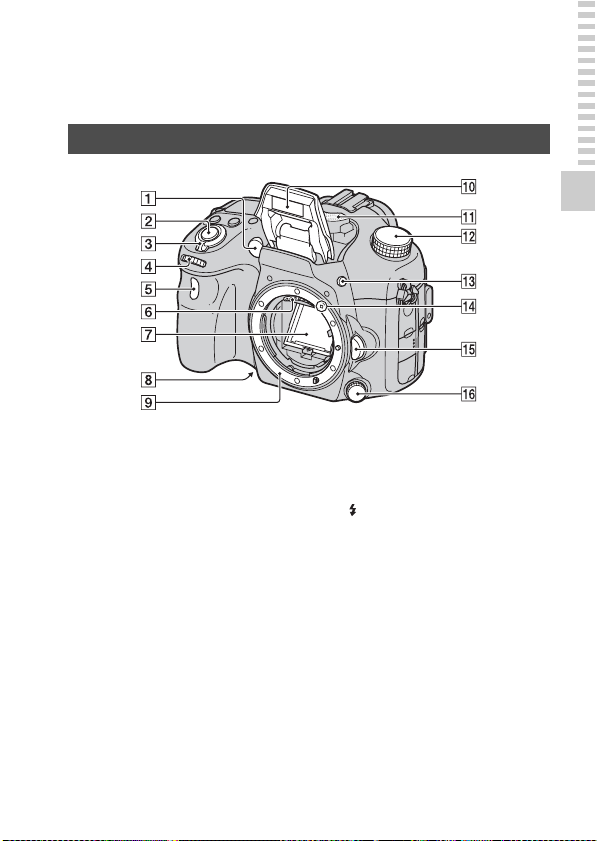
Identifying parts
See the pages in parentheses for details of operation.
Front side
Preparing the camera
A AF illuminator (120)/Self-timer
lamp (155)
B Shutter button (36)
C Power switch (33)
D Front control dial (102)
E Remote sensor (158)
F Lens contacts*
G Mirror*
H Preview button (105)
I Mount
J Built-in flash* (47, 135)
K Microphone** (115)
L Mode dial (42)
M (Flash pop-up) button (47,
135)
N Mounting index (30)
O Lens release button (31)
P Focus mode dial (116, 123)
* Do not directly touch these
parts.
** Do not cover this part
during movie recording.
Doing so may cause noise
or lower the volume.
19
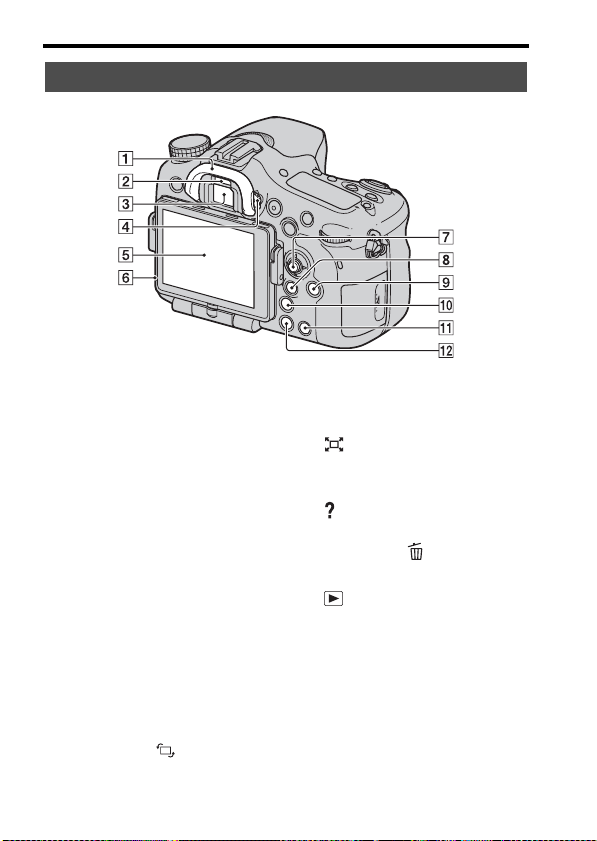
Rear side
Identifying parts
A Eyecup (86)
B Eyepiece sensors (86)
C Viewfinder*
• When you look into the
viewfinder, the viewfinder
mode is activated, and when
you take your face away from
the viewfinder, the screen mode
returns to the LCD monitor
mode.
D Diopter-adjustment dial (35)
E LCD monitor (79, 90, 159)
F Light sensor (178)
G Multi-selector
H For shooting: Fn (Function)
button (59, 60)
For viewing: (Image
rotation) button (161)
20
I DISP (Display) button (87,
159)
J (Smart teleconverter)
button (153)/Focus Magnifier
button (124)
K (In-Camera Guide) button
(70)
For viewing: (Delete) button
(40)
L (Playback) button (39)
* Do not directly touch this
part.
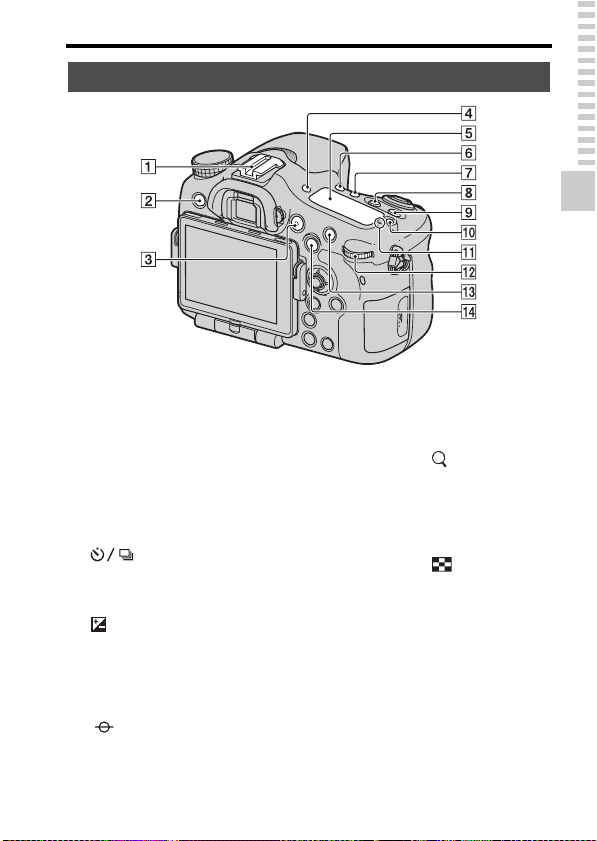
Top side
Identifying parts
Preparing the camera
A Auto-lock Accessory shoe
(135)
B MENU button (62)
C MOVIE button (38, 111)
D FINDER/LCD button (179)
E Display panel (93)
F (Drive) button (51, 154)
G WB (White balance) button
(148)
H (Exposure) button (49)
I ISO button (139)
J Display panel illumination
button (93)
K Image sensor position
mark (118)
L Rear control dial
M For shooting: AF/MF (Auto
focus/manual focus) button
(126)
For viewing: (Enlarge)
button (55)
N For shooting: AEL (AE lock)
button (131)/SLOW SYNC
button (136)
For viewing: (Image index)
button (56)
21
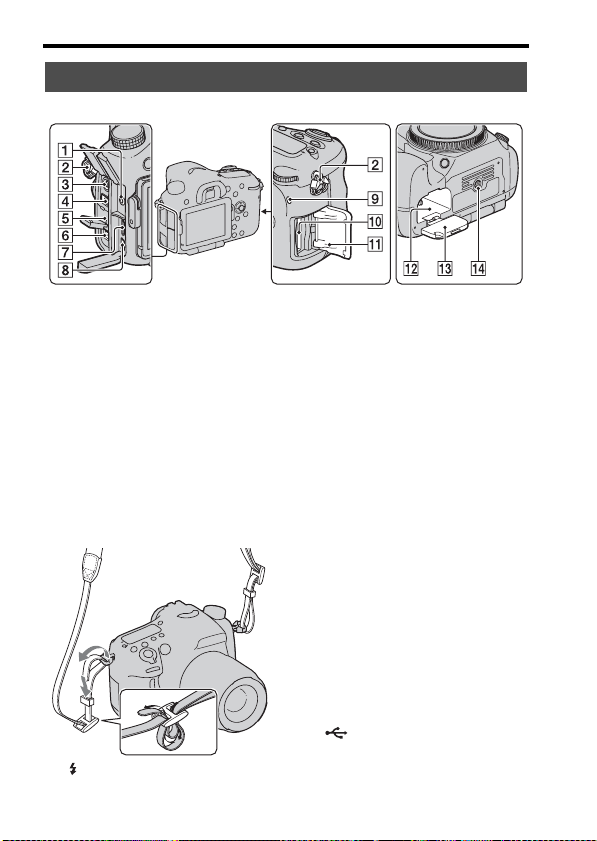
Sides/Bottom
Identifying parts
A Microphone jack
• When an external microphone
is connected, the internal
microphone is turned off
automatically. When the
external microphone is a plugin-power type, the power of the
microphone is supplied by the
camera.
B Hooks for shoulder strap
• Attach both ends of the strap
onto the camera.
C (Flash sync) terminal (137)
22
D REMOTE terminal
• When connecting the RML1AM Remote Commander
(sold separately) to the camera,
insert the plug of the Remote
Commander into the REMOTE
terminal, aligning the guide of
the plug with the guide of the
REMOTE terminal. Make sure
that the cord of the Remote
Commander faces forward.
E Speaker
F DC IN terminal
• When connecting the ACPW10AM AC Adaptor (sold
separately) to the camera, turn
the camera off, then plug the
connector of the AC Adaptor to
the DC IN terminal on the
camera.
G HDMI terminal (57, 167)
H (USB) terminal (191)
I Access lamp (28)

J Memory card insertion slot (27)
K Memory card cover (27)
L Battery insertion slot (27)
M Battery cover (27)
N Tripod receptacle
• Use a tripod with a screw length
of less than 5.5 mm (7/32 inch).
You will be unable to firmly
secure the camera to tripods
with a screw length of 5.5 mm
(7/32 inch) or longer, and
attempting to do so may
damage the camera.
Identifying parts
Preparing the camera
23
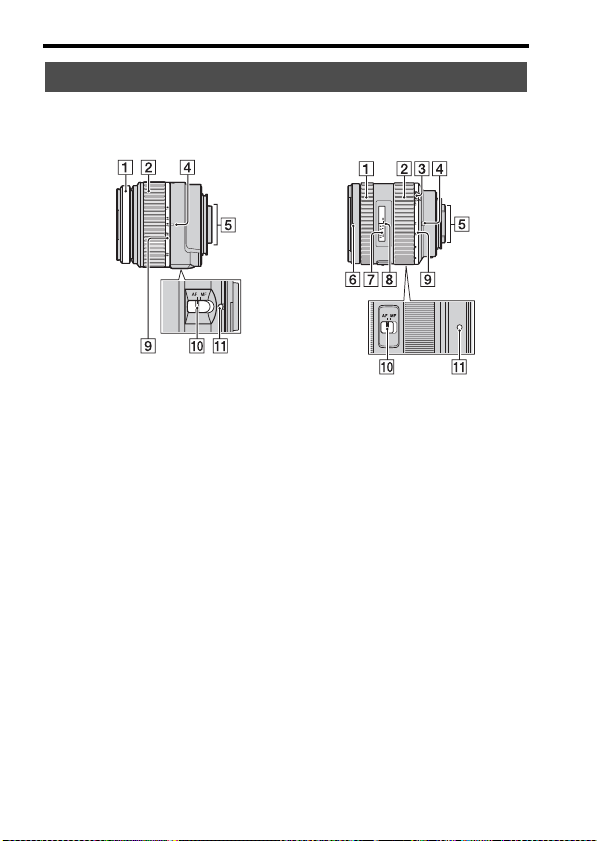
Lens
Identifying parts
DT 18-55mm F3.5-5.6 SAM
(Supplied with the SLT-A77K/
A77VK)
A Focusing ring
B Zoom ring
C Zoom lock switch
D Focal-length index
E Lens contacts
F Lens hood index
G Distance scale
H Distance index
I Focal-length scale
J Focusing mode switch
K Mounting index
• The DT 18-55mm F3.5-5.6
SAM/DT 16-50mm F2.8 SSM
are designed for Sony A-mount
cameras (models equipped with
an APS-C sized image sensor).
DT 16-50mm F2.8 SSM
(Supplied with the SLT-A77Q/
A77VQ)
You cannot use these lenses on
35mm-format cameras.
• For the lenses other than DT 1855mm F3.5-5.6 SAM/DT 1650mm F2.8 SSM, refer to the
operating instructions supplied
with the lens.
24
Charging the battery pack
When using the camera for the first time, be sure to charge the NPFM500H “InfoLITHIUM” battery pack (supplied).
The “InfoLITHIUM” battery pack can be charged even when it has not
been fully depleted.
It can also be used when it has not been fully charged.
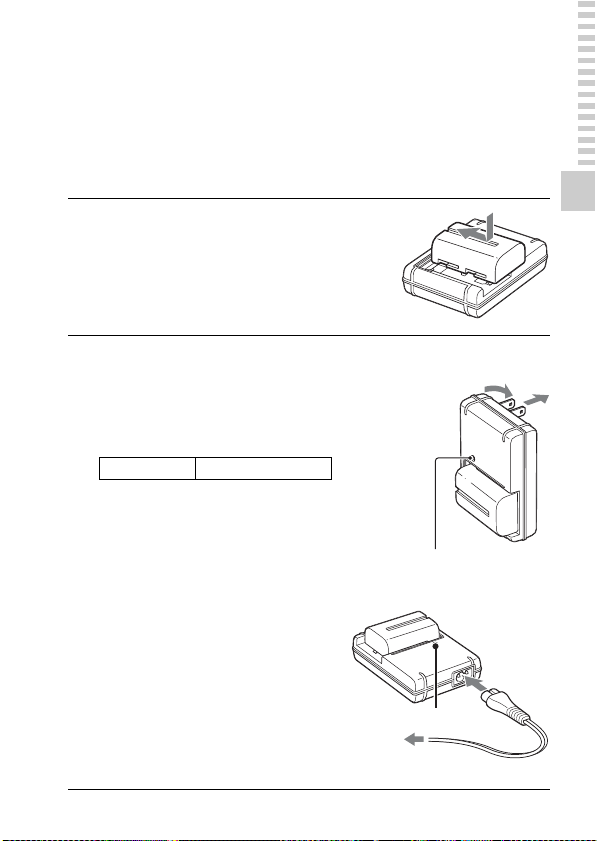
Insert the battery pack onto
1
the battery charger.
Push the battery pack until it clicks.
Connect the battery charger
2
to the wall outlet (wall
socket).
Light on: Charging
Light off: Charge completed
Charging time About 175 minutes
• When charging a fully depleted
battery pack at a temperature of 25°C
(77°F).
• The CHARGE lamp turns off when
charging is completed.
For the U.S.A and Canada
CHARGE lamp
For countries/regions other than the
U.S.A. and Canada
CHARGE lamp
To a wall outlet
(wall socket)
Plug
Preparing the camera
25

Charging the battery pack
Notes
• The charging time differs depending on the remaining capacity of the battery pack or
charging conditions.
• We recommend charging the battery pack in an ambient temperature of between
10°C to 30°C (50°F to 86°F). You may not be able to efficiently charge the battery
pack outside of this temperature range.
• Connect the battery charger to the nearest wall outlet (wall socket).
26
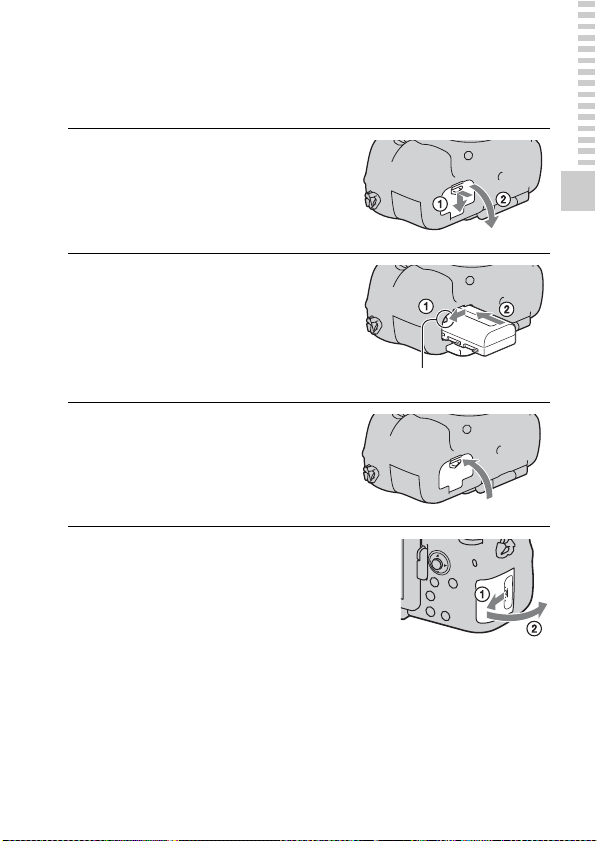
Inserting the battery pack/memory card (sold separately)
While sliding the battery
1
cover open lever, open the
cover.
Firmly insert the battery pack
2
all the way while pressing
the lock lever with the tip of
the battery.
Lock lever
Close the cover.
3
While sliding the memory
4
card cover, open the cover.
Preparing the camera
27
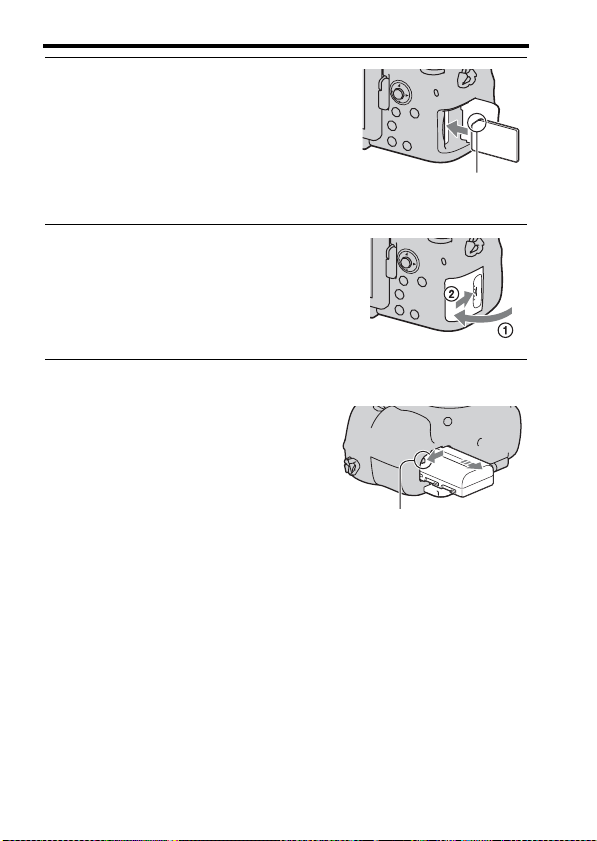
Inserting the battery pack/memory card (sold separately)
Insert a memory card.
5
• With the notched corner facing as
illustrated, insert the memory card
until it clicks into place.
Ensure the notched corner faces
Close the cover.
6
To remove the battery pack
Turn off the camera and slide the lock
lever in the direction of the arrow. Be
careful not to drop the battery pack.
Lock lever
To remove the memory card
Check that the access lamp is not lit, then open the cover, and push the
memory card once.
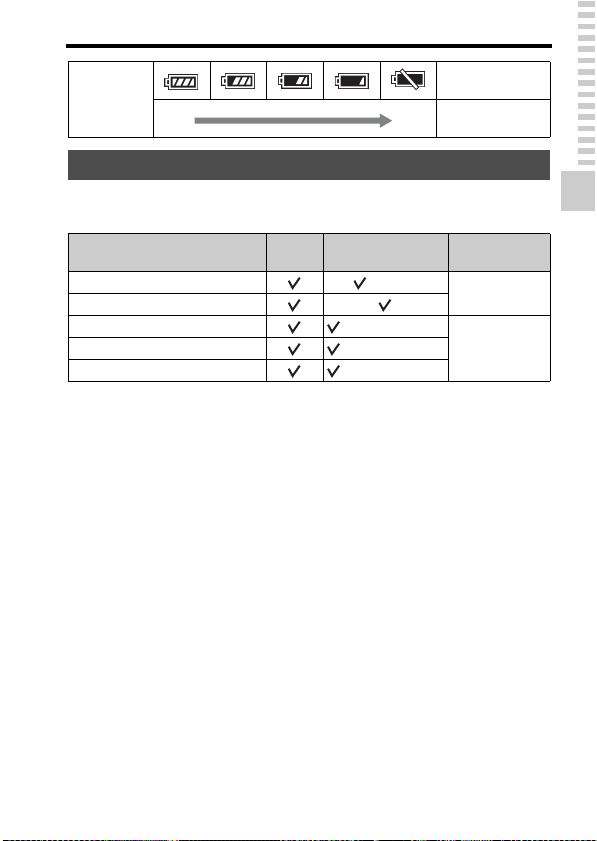
To check the remaining battery level
The supplied battery pack is a lithium-ion battery pack that has functions
for exchanging information related to operating conditions with your
camera. The remaining battery time in percent figures is displayed
according to the operating conditions of your camera.
correctly.
28
Inserting the battery pack/memory card (sold separately)
“Battery
Battery level
High Low
exhausted.”
You cannot shoot
any more pictures.
Available memory cards
The following memory cards are compatible with this camera. However, all
memory cards are not guaranteed to work with this camera.
Types of memory card
Memory Stick PRO Duo (Mark2)
Memory Stick PRO-HG Duo
SD memory card (Class 4 or faster)
SDXC memory card (Class 4 or faster)
• MultiMediaCard cannot be used.
Note
• Images recorded on an SDXC memory card cannot be imported to or played on
computers or AV devices that are not compatible with exFAT. Make sure that the
device is compatible with exFAT before connecting it to the camera. If you connect
your camera to an incompatible device, you may be prompted to format the card.
Never format the card in response to this prompt, as doing so will erase all data on
the card. (exFAT is the file system used on SDXC memory cards.)
Still
Movies In this manual
images
Memory Stick
PRO Duo
SD cardSDHC memory card (Class 4 or faster)
Preparing the camera
29
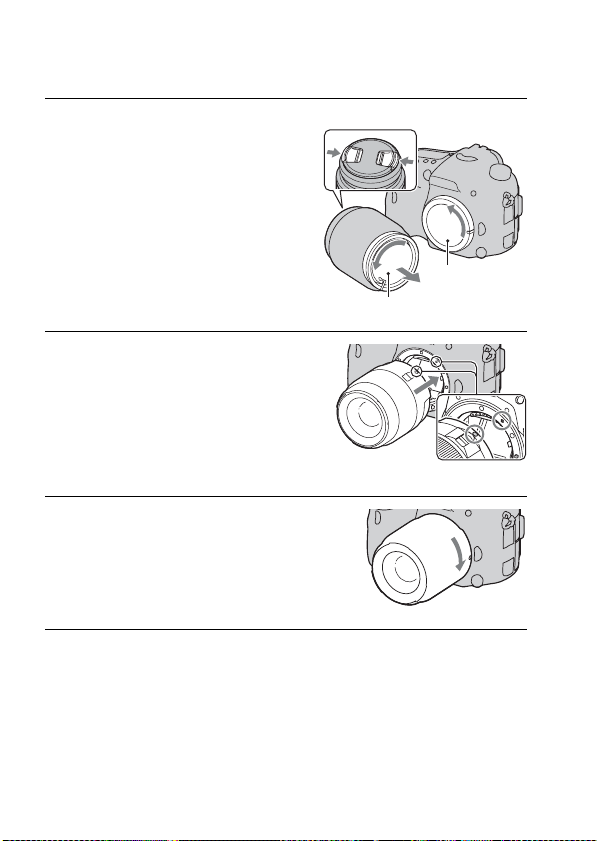
Attaching a lens
Remove the body cap from
1
Front lens cap
the camera and the rear lens
cap from the rear of the lens.
• When changing the lens, quickly
change the lens away from dusty
locations so as to keep dust or debris
from getting inside the camera.
• When shooting, remove the front lens
cap from the front of the lens.
Mount the lens by aligning
2
Rear lens cap
Body cap
the orange index marks
(mounting indexes) on the
lens and camera.
Orange index marks
Turn the lens clockwise until
3
it clicks into the locked
position.
• Be sure to put the lens on straight.
Notes
• When attaching a lens, do not press the lens release button.
• Do not use force when attaching a lens.
• E-mount lenses are not compatible with this camera.
• When you use a lens for which a tripod socket is provided, attach the lens onto the
tripod using the tripod socket provided to help balance the weight of the lens.
• When carrying the camera with a lens attached, hold both the camera and the lens
firmly.
30
 Loading...