

Sony E 30mm F3.5 Macro, E 50mm F1.8 OSS, SonnarT E24mm F1.8 ZA, SEL50F18, SEL21F18Z Operating Instructions Manual
...
SONY.
4-408-1 58-02(1)
~~[..1::.;;;(
Interchangeable
Objectif
Lens
interchangeable
OJ:il!~tl~
E 30mm
F3.5
Macro
E
SOmm
F1.8
OSS
Sonna
rT*E24mmF1.8
ZA
II
''·"·'""'
E
50mm
F1.8
http://www.sony.
Printed
<:OJ!lllllllll<l. <Sil\70%10)1:Q)jlj"'lltl:.
voc
(lfj!tt'lll!l
'-'*'~<(Y;JllV<:c'<'!f.
Printed on 70%
using
VOC
Compound)-free vegetable oil based ink.
neV
in
China
ittsl?!lt'olll¥nil!ll!:H
or
more recycled
(Volatile
Organic
11111111111111111111111111111
4408158020
paper
<:OJII<W:lllllli!ICI<t.
O)lti(OW\...\fJ'tc~~L
JjO)J::.~~~~{Z:<fJ~L,\(tC.(!l,)c
\...
i:o:I!WtJl;jtllJl~l<l,
9.
E 30mm
~an/5YATLEx9Y~n/5W!Ilo:IL!Y7:
co.
SonnarT * E 24mm
'Y7'-1AID:!'l:15Jilll~I;:J;:QE?9/
L!
n-Jv:Y
T LI;:J;IJ<E&C<:i1C:L
•
• l.>/A'i'lll1DHI1C:::t:J>'5'1'Jo"5ii!WicEI<lo.:t:J>'51:
7S~~:ofllllli0<:!H
•
lliZ!:l't.I0::-:1~\'C
•
r.i.181l0)~9;~
1
27:r-nAIJY::/
3
4?9YH~.~
*
5onnar
T * E
Y:JCB~Srt.Qffl-I;:!V9'"~§l_.,
<::o:lr!WtJl;jtBJl~Jl'l<l
L
C:L
i:f
9 . fie!ll.to:IL'i±;O;;I;i:c, L;:.;:;(l;:f!:
im
Lt.:: L:;±;;;:t>;jtBJll;:
O)L')±;;!;;Jl'L'~ffll1:f9.
"'<fL'fie!llo:lilDI;:,
ID3>t
cciie!ll<tce<:L
F3.5
Y7:c9.
7'
-1
otl!IC7H57 H<t
Dil'9.
1..>/AI])f<!jjJJ'i'
75v0/
.J.ii!'F!lB1iiCI<I. l.>/A7-
l!lrt<:!f~L.,<:<ic2cc\.
bttiCJ;::>C::I<lo,
1lll1C!ilb'c>=0<:1:b'ii!5Dil'9.
l.>/AI<loliiUll'B<J
L.,i'1'9. ll;]Ulft!l!l])i!!;Tb'l<I:ICU0tlll'll
s
1-
2fltll1t:>i.Uvc21
L!Y7:7
-t-'
L!Y7:11":~1§:'.~*
ill:W'l'l'J~U1
151
v:,!XO)Jill!:>t-Jit1J'1::/D!:>I:1'
L,1Jl1::
llll!>f':tl:tt.I'~H?7.
1 i!Ulio:II/:O:::\Ov
:\0'1'~7~1<1:~9
•
l.>YA70/
~
JJiliclll1Di111/lll1DI<lo9'L.,1J<co=il'!f.
2
L07:c!:::IJ.)(So:ISID.IIii:(~9/
8t>1t<::l<l:!t>~~-
t.,~<::ta:IJ'S.~ttn-rc.u;:rn7~Jco~-:7
IJliJliJ':Q:fl'~?<
• l.>/A'I<IIl1Df:ti101:>=1<1 . .!:J>'5C7ll.>/AIIl1DI<t
9'Gi1t9::.t{!Jifl~tJ:G
•
L.>YA'i'~!Dicll!L.,il>il't.>on
llll!>lii:'VIAJ'~(-1'?7.
:IJ.)(70)v/A'IIilt>I;I:~[.,;(($'/~!IPL,t.:~
~.v/A'~&:~itniDJI<:IEI[.,Z:I<l~9
[!]
055
v=-'X?-
i!!llilll:l'll;:ii5:Q>'tb
L!Y7:7-t-'o:lfie!ll~
E
30mm
Sonnar T
u/7:7-
I;!:
It>~~-
IJ18-::><::f:IJ7'YJCL\3~l'~itniDJI;:IE19
•
24mm
F1.8
ZA
:t:J751'lot.'t>L.,(I<Jol'l@75'YO/.J.'i'ii!'::>C::Jil~1f0
C::EI<t
/A7-
•
l.>/A77'1'11l1DHI10C:I:b1cEil'9,
ICJ;::>C::I<lo.
A7-
Macro(J)(}-J)
•
Jillt11<LOA7IC!Il1t:>HI1C::<Tccol,(SonnarT * E 24mm F1.8ZA
(7)Jj)
E SOmm F1.8
v/A'7-
!liiiiiDII"..vt~8t>tt.rn7'YJc~,3~c~ztn
iDII<=IE19
•
:t:J751'lK'E>L.,<~I'l~75'YO/.J.'i'lii'::>C::Jil~90
c'el<l. 75'YO/.J.J't1JIJI!SI10L:c1J'ii!5Dil'90)c,U
YA7
•
Jlliii!W:U/A7-
lllllilill3.!1i.C07:::10C!lil8.JII£'ir5
f<l~ll:.A."-COU\'>:I:!llt;ti!.COIPJ8"
C!llUI£Ji:il~O::l:!JII501!T
*ll1'~<1'Jj
<:To!DO)ll!l!'U:±!!'!!IIii:'Eiiiil
L\...Yif9.
L.O)!!lHD~~&~J::<<O~
-c
L;:.;:;(O)fiel
::>L \ C:l<tgljffi)O)
T~cgbt!:L
'·
IJI~O)L;:.;:;(;;;o;tJ~C:
Macro/E
SOmm F1.8
F1.8
ZAI<t"=-e:n-Jv
n-Jv:Y7'-1AIDOil'l!iJio~I;:11!::J~
A
I;:J;-::>
C:M!':<EC<:tl
1:f9
. E 30mm
F3.5
L.,
::>D'
Dl'J::>
C:: < 11'2cc
l.>/AI:75v0/.J.i1)i~J.Iil
l.>YAb'75
ICi!!iiili"'Ul1$11)ftll.b''P•L'1ill1CltrZf!!;T
ii'Fil<lcN1.
.
<fJ~(hj;:t;:~t.:®C:Id:,
<
tCC\...
'Q
1/H.::;;;o;jtBjj
rlle!llilD
J; <S01GJ:I
L
C:L
\;R
OSSI<t"=-
~n/5:W!Ilo:l
t.::Oilii!i*iiEYA
.
Macro'l'ii!'FilVC<f:l
\,
~'i'I<Jo9'L.,
<:1
mrJJ:
vO/ .J.J\O'i'IIJI1,,.!1!0)T
<lo.lllllil1101t)b'
IC!Il1t:liii1C::<ic2cll.
m
~::";~
t::.;
~
gtltrl<l.VFFID3::>o:I1JiM'iiDIJ:f9.
•:t-t-7:t-:IJA
<:'::.;
~gtJtr;;;oEIIIJl'1'J3.
•
DMF($1-1'1.1~
;t
-
~
7"-nA
rJvct':
•
~=:o71~7:t-:IJA
{:'::.;
~gtJtr;;;o'J'IIJl'fJ3.
€r'E<tccl\,
'I?Dfi5IO:::>I.\'t'
(E
30mm
ifilliCI)DI:Iltt.
c::1ta
.
E 30mm
C<:1J18li<UIJ:f9.
n/
5o:IAU
3-
1-'?=:J. r
i1:f9o:ll'.
m~NIDil'!::±lot~iie!llo:Qij1gt>
I
;:Jll~t
e<:
;;;o1~-::>
C:IIUt9:Qij1
t>Lc:<tce<:L.,.
~:±lliliH9'~
li!~IE1llt(m)
•
7::t-1JAI
Q~i§,:;:t-
il!5t:><~ev.
7:t-:t:J7'E
i!ti~=B(%J.:8)
!Oilli'1
U
L
ll'<
tcC<:L '·
*""
1
11ii'3'1c~l!/l9:@0);;;o(!Jj<:'/clbl;:,
F3.5 Macro
* E
24mm
t<0)1il\lli!~v/A'0)1il\11)1<=8t>tt<::
v/;(7-
. 75vO/.J.Ji01JIJI!Sil0C:I:bliJ!5t)<Je9C7lc.
~!;'I<IWL.,
c::<lc2cc'·
~IC'E>.
7
l.>YAIC7-1'
~'l!'!ll1Di1110<:C::1J
~'l!'llil!ll90c>=l<t
OSS:
t-'1DIIllt>M11Bil!D~vtcv/7:1D9t
.
-
~'i'l<t9'L.,C::(Tccl\,
t''i'llillll901:'el<t.;;>iOJ>=Icl//A
t-~abtt-t~
t-~=:o71~7:t-:IJA)
ct'::.;
:.;
~%iill~fl!90.
r:
o:~~:<E1J>!I<t
F3.S
Macro)
~=:~.rlli7?~~:~.HO)
F3.5
Macrol<liliiEilill.llil~c
TO'E-
Jvl!!l\;!Dij1gl<t~:±l1J'EIIIJliliiEC<:
-'to:l:f:flil~l'~:fg.
nc:L
10 x =
0.095 0.
IJ
J70)rt:JI;:'i.e~O)/Rtd::QnO)b\5H!C
1--/~-tJACt:Y
:t:J>'50J!Il1WiiiBJlii'~<2Ji:o''c'c>=
-
~!;'il!lv
jffj~;B(~.g)
t-CJ-
[1]
.1110
~7c!:::IJ.)(S0);((7'-1'
.
v71<ti:lll1)(1 ),
LO:;(~ft<
rc<
l"<t-:tlii!>~D!:>t-:tlt-t~
S
991bL:f9.
F1.8 ZA:
1'0)1il\Jiii:c!:
-1'
Ju?-t>l.>/A7D/
Ju?-z!ll1t)fii1Tcil!51:.
(2)11)2imt)C7J
1-IJ.IIii:)~
:IJ
.)( S 1<::!111
tJIE19
o
rC<!L-
'0
:
:<rc2co\,
t-CJ-[2].1!11)
l//7:0)1il\$1i!
<f:llil'cW)7-<Ju?-
1
c>=;f1f.(E
30mm
.
i;'iOJ>=ICI..>YA
.
~*""
F3.5
*'
<::<:"CC7l35mm'i'JWIJI!<2ieillll<lo,
C7JJilitlrH'~JllliL.,/cl.>/All:W!it7'V?Iv:t:J>'5c
C7Jfi!!'l!'i£l_,<Je]fo
.,
filllii!!!Jiei!I!C::I<Jo.Jii!Sillfl'i!iib'
O<L.,il'9.
.,
0/-vv?
- ::Zt:'-
"ft'l'it'¥7UlllilEI<lollll!2cllC::<f:lt:><Jettlv.
• U/AC7lii!III\ICJ:
ieillll:>'ll'it90\!li'ib'il!5t:Jil'9.
ieilllb'l!l\~ill!cOJlE~co.
15Jllll'i11
E 30mm
F3.5
uY7:(1l. uY7:7o:.;
u/
:l:Ui"''l'-1' 'Y7(1 l.
EP~U'I11-it
*
:$:~1;:~fj-
E
SOmm
Fl.S 055(5ELSOF18) :
u/7:(1).
.
I/
'Y
I//
uY7:7o:.;
L!Y7:1Ji"''l'-1'
Ell~U~ill-it
SonnarT*
u / 7
(1
), L!Y7:
uY
7:1Jt''l'-v
7-A(1).EPliU'I11-it
1±msJo<J:I'IHI<t.
cb'iiDIJ
:fob'.
Sonn
;r
T * E 2'<mrn
SEL21FI8Z
36
APS-Ct:T-1'A
Sllli"i'it:fcO)ie1!l'l!'
~(Jil~'l'ei't'ICJ;t)l\1)d:0)
:::>
C::l<t.
Jl!!illilii!IO)Jl'(ti
oci!I1)!J\.-::<iel!ll<tll!~
Macro(SEL30M35) :
H'1'
'"::ten.
u/7:7-
~'l'-v':J7(1).
v7(1).
u/7:7-
E 24mm
F1.8
ZA(SEL24F18Z) :
70Y
~"'""
':J7(1l.
27~<
v7(1l.
u/7:7-
Cll:~IDt.::lbriStr<Jtl!'o0<=
tce<:L
'·
u;mm;w
This instructi o n manual
ons
Precauti
are
fo
und in the se pa rate "Precautions before using".
su
re to r
ead
This
manua
Th
e E 30
mm
designed for So
Th
e Son
nar
rl
Zeiss and Sony Corp
by Ca
£-mount cam eras. This lens
ndar
ds and quality assurance system
sta
Yo
~;;;ogtJtrt.::Jii
.
n/
:l;:.
x =
:J.
51D!f)(l.!l~B!li!!~cl'i
1.-0:;(0)BJl:Q
t-'Uco:IEIIIJ!'t:±ll!!~~'l"
.
:J.
? Jv 7 5 ';J y :J.!Iil!tll\\im
g l<l.
:11i~~l;::tJ
' ' '
: +2/3 : +1/3 :
098
l--b'\3'L,)(;:(l.,\LC:ti'
c<rc2ccl.
E
10mm
e-3 5 Macro
SEL30M35l SEL50F18
45
/ -
-lllliD75·yy:J.
L Lili:±l;;;ol!!l
0.159
':)
"'(l.,)
.
ft~t<>
E SO•nm
Fl
8 OSS
75
u cannot use it on A-mount cameras.
• The illust
ratio
lens unless otherwi
Notes
on
• When carrying a camera with the lens attached, al
hold both the camera and the lens
Precautions
• When using a
at least
I m (3.3 feet) a
combinations oflens and flash, the
of
the light
the picture.
Vignetting
•· \Nhen using the len
ce
than the
do
se the aperture by l to 2 stops.
riJ
Identifying
I Lens ho
od
2 Fo
cus
ing ring
3 Lens conta
4
Mo
unting index
• Do
not
tou
GJ
Attaching
attach
To
(See
illustration
1 Remove
camera
• You can attach/detach the front lens cap
an
d(2
2 Align
the
the
white index
index),
mount
• Do not press the lens release b utton on the cameta when
mounti ng the
• Do not mount t
To
remove
illustration
(See
While holding down
the
camera,
until it stops,
explains how to use lenses.
common
to all lenses such as notes
bot
h documents befo re using your len
l is for several diffe re
F3.5 Macro and E 50mm
ny a came
T * E 24mm
ns
in
ra syst
em
Fl.B ZA
oration
is
produ
this manual show
se
stated.
nt
lenses.
Fl.
E-mount camera
was developed jointly
and
designed for Sony
ced under the strict
of
theE
Use
on
using a flash
flas
h, always remove the lens hood and shoot
wa
y from your subject. With certain
le
the flash, resulting
s,
nter. To reduce this phenomena (called vignetting),
ind
ex
ct
s•
ch th e lens contacts.
and
the
lens
the
rear
body
cap
).
white index
then
insert
and
rotate
lens.
he
the
lens
rotate
then
ns may partiall
in
a shadow
the corners
of
the screen become darker
the
Parts
Detaching
GJ-[].)
and
front lens caps
.
on
the
on
lens at an angle.
lens barrel with
the
camera (mounting
the
lens into
it clockwise until it locks.
GJ-[2].)
the
lens release
the
lens counterclockwise
detach
the
lens.
Cf#::>
t-'*(1
H 1).
r:
c1
8 O
SS
Carl Zeiss.
30mm
at
the bottom
the
in
two ways, ( 1)
the
button
Fl
i:i
?A
lil
nt.-::1
).
).
on
use
Be
s.
are
s.
F3.5
Macro
v.'ays firmly
y block
of
Lens
and
the
camera
on
~
;m~:g(~.:8)
••
L:L:c0)35mm'i'JI'l!J!Jll\,.,ieiill
OJil!IUfl''ii'!l\liL,tcLJY7Jl'l'l!i1:7'V5> lvtJ:f. 5<:'
O)lil!',;'ll<l_,3'9.
"'!ii!!!lll!IIIJielli!C:I~.ll!®llH'iliib'Sllli">{<;a'cO)Ielll!'i<
li<L,3'9.
.,
YI'Y9-7.1::'-t'(li!llfj""f'l'i<:J;Ol¥1d:it)
••
l't'l'ii:¥:1LJli!llEI~IliOi<:"n<:<50a'ttlv.
•
L!YAO)~#ii<:J::
il'liWJ<Ito:.t!g&b'®
il'iillb11!!!fllili>!C'O);i'Ji!C'Jr.
ICH1111iil
E
30mm F3.5 Macro(SEL30M35) :
IJY7(1
).
IJY77DY
IJY71Jt''tt>
EP!iliJ1iiJ-'1\
*:$0lll!l~lli:W
E SOmm F1.8 055(5ELSOF18) :
IJY7(1).
IJY77DY
IJY71J"\''tt>
EP!iliJ1o/.J-'1\
SonnarT* E 24mm
IJY7(1),
IJY77DY
IJY71J"\''tt>
':T-7.
( 1),
EPliliJ4/J-rt
i±I!J\SJ:lf?>lil!ld:.
cb'®Di!'ob<.
u;mm;w
This
instruction
Pr
ecautions
commo
are
found
in
sure
to
read both
This
manual is for several different lenses.
Th
eE 30mm
F3.5
designed for Sony a ca m
he
Sonna
r T * E 2
T
by
Car
l Zeiss
and
E-moun
t cameras.
standards
and
quality
cannot
use it on A
You
• The illustrations in this manual show
lens unless otherwise stated.
'>nnnMT*E24mmF
ISF-l
225
~
L(c;:,
tll1~il:lO)~ft
o
*".
f-'tt>
Y7(1
),
IJY7:1-
f-'tt>
y7(1
),
IJY7:1-
F1.8 ZA(SEL24F18Z) :
f-'tt>
Y7(1
),
IJY7:1-
OJIJl!O)Tc!b'Pi!>tJ.
c77¥<Tce<-l,,
manua
l explains
n to all lenses
the separate "Precautio
documen
ts befo r e using
Macro
and E 50mm Fl.S
era
system
4mm
Fl.S
ZA was developed jointly
Sony Corpo
ration
This lens
is
produced
assurance
system
-mount
cameras
74Fl87)
l
~.
a
how
suc
E-mount
and
theE
R?A
APS-C+t-171§~
l<:
f*~
L.#.Lr;?,
cliOJ!I\211'filll~llliiiJ
Y7(1)
.
~·(1),
Y7(1),
~(1
),
Y7(1),
~(1),
<
;ll'~9:Q
to
use lenses.
h as
notes
on use
ns before usi ng". Be
your
lens.
OSS are
cameras.
designed for Sony
under
the
strict
of Carl
Zeiss.
.
30mm
F3.5
Macro
[!)
Attaching
It
is
recommended
and ensure
maximum
E
30mm
F3.5
Sonnar T * E
Align
the
red line on
red line on
the
the
lens hood
clockwise until
is
aligned with
Index) ancl
the
• When usi ng a built-in camera flash
camera,
re
move the lens hood to avoid blocking the flash light.
• You can attach a filter
welL
Depending
hood after attaching the filter to the lens.
only)
• When storing,
(Sonnar
T·*
E SOmm F1.8
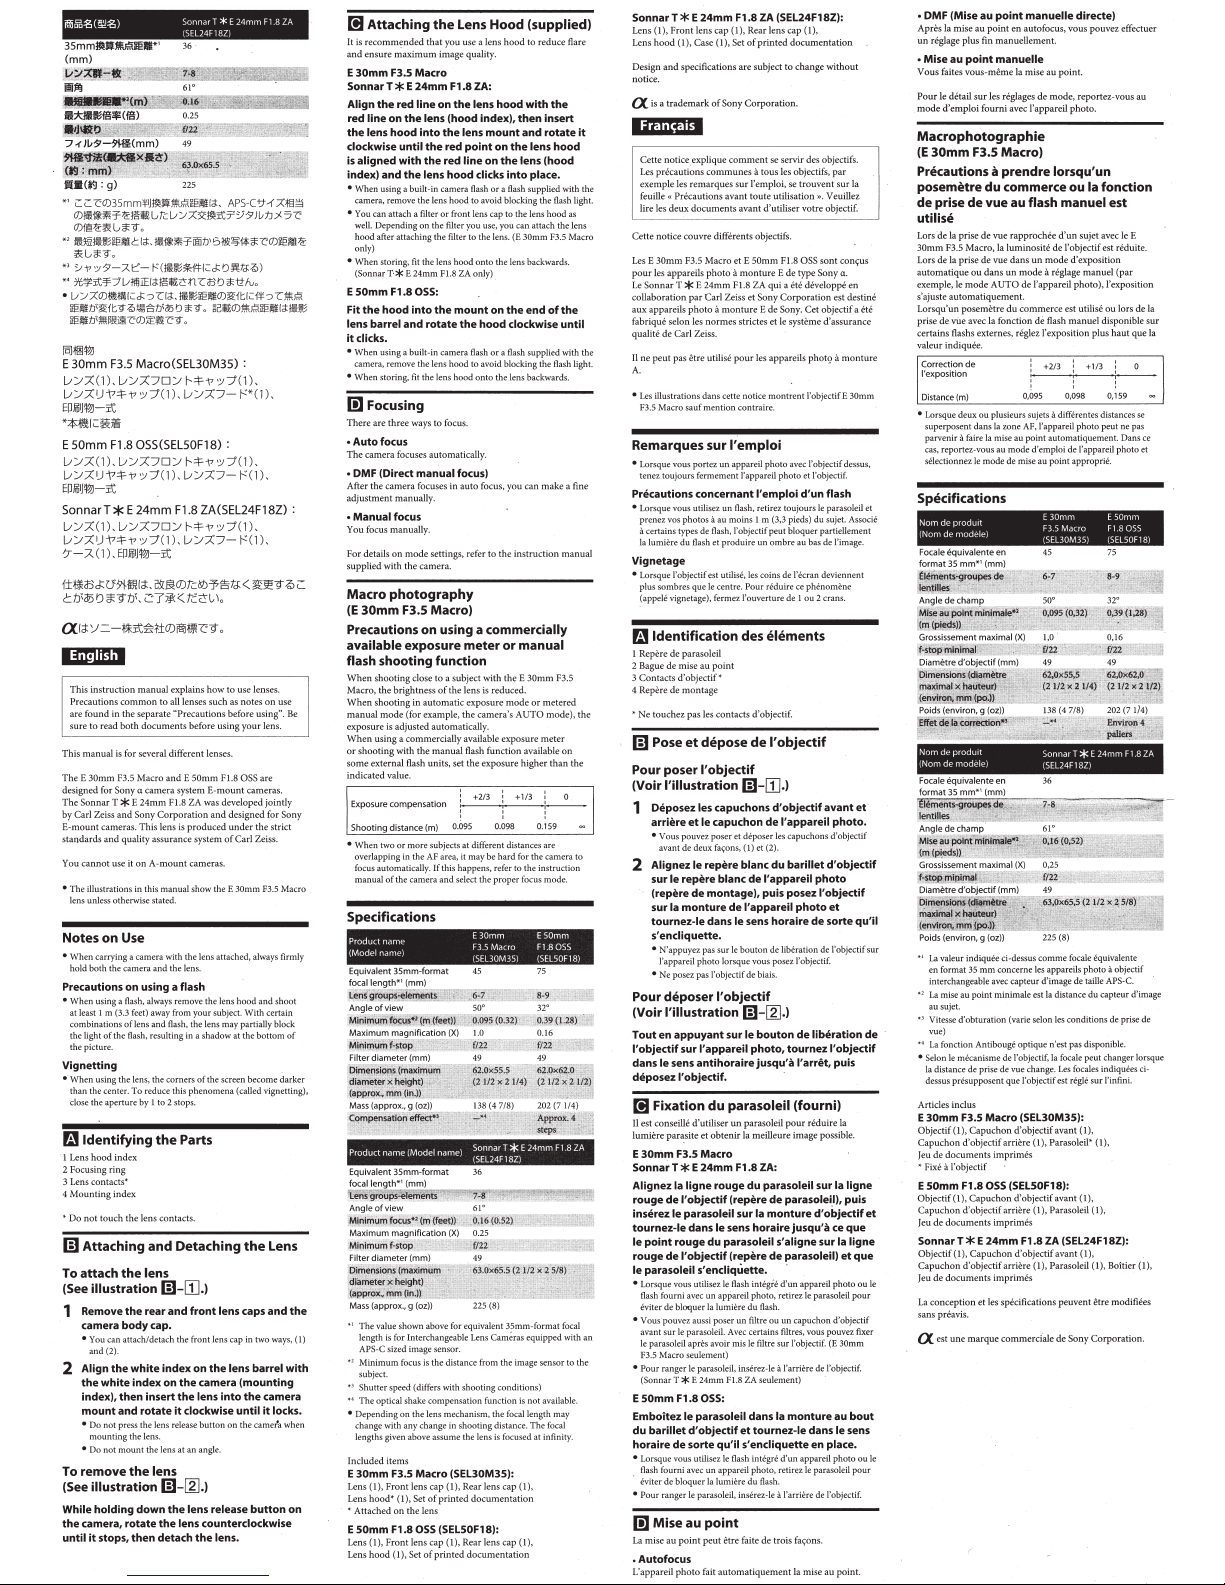
Fit
the
hood
lens barrel and rotate
it
clicks.
• When using a built-in camera flash
camera, remove the lens hood to avoid blocking the flash light.
• When storing,
I!]
Focusing
Ther
e are
thr
ee ways
•Auto
focus
The camera
focuses automa
• DMF (Direct manual focus)
Af
ter
the
camera
adjustme
nt manua
• Manual focus
You
focus
man
For
details
on
s
upp
lied with
the camera.
L.
Macro
photography
(E
30mm
F3.5
Precautions on using a
exposure meter or manual
available
flash shooting function
When
shoo
ting
Macro,
th
e brightness
When sho
oting in
manual
mode
exposure
is
adjusted
When
using a
or shooting with
some
exte
rnal
indicated
va
lue.
Exposure
compe
Shooting dis
tanc
or
• When two
overlapping in the
focus automatica
manual of the camera and select the proper focus mode.
the
Lens Hood (supplied)
that you use a len s
imag
e quality.
Macro
24mm
F1.8 ZA:
the
lens hood·
lens (hood index),
into
the
lens
the
the
lens
on
fit
the lens hood onto the lens bac kwards .
E 24mm
OSS
into
fit
the lens hood onto the lens backwards.
focuses in auto
lly.
ually.
mode
mount
red
point
on
red line on the lens {hood
hood
clicks
or
a flash supplied with the
or
front lens cap
the filter you usc, you can attach the lens
F1.8
ZA onl
y)
:
the
mount
on
the
hood clockwise until
or
a flash supplied with the
to
focus.
tically.
focus, you
settings, refer
to the in
Macro)
commercially
dose
to a subject wi
th
of
the lens
is reduced.
automatic
exposure mod e
(for example,
the
camera's
auto
matically.
com
mercially available
the
manua
flash units, set the
nsati
on
e (m)
more subjects at different distances are
AF
area, it may be hard for the camera to
ll
y.
If
exposu
l flash functio n available
exposure
' ' '
\ +2/3 : +1/3 \
0.098 0.159
0.095
this happens, refer
Specifications
Notes
on
• When carrying a camera with the lens attached, always firmly
he
camera and the lens.
hold both t
Precautions on using a flash
• When using a flas
at least I m (3.3 feet) away from your subject. With certain
combinations oflens
the light
the picture.
Vignetting
• When using the lens, the corners
than the center. To reduce this ph enomena (called vignetting),
dose
r.i1
I Lens
2 Focusing ring
3 Lens contacts•
4
Mounting
~Do
GJ
To
(See illustration
1 Remove
2 Align
To
(See illustration
While holding down
the
until
h, always remove the lens hood
and
of
the aperture by I to 2 stops:
Identifying
hood
not t
ouch
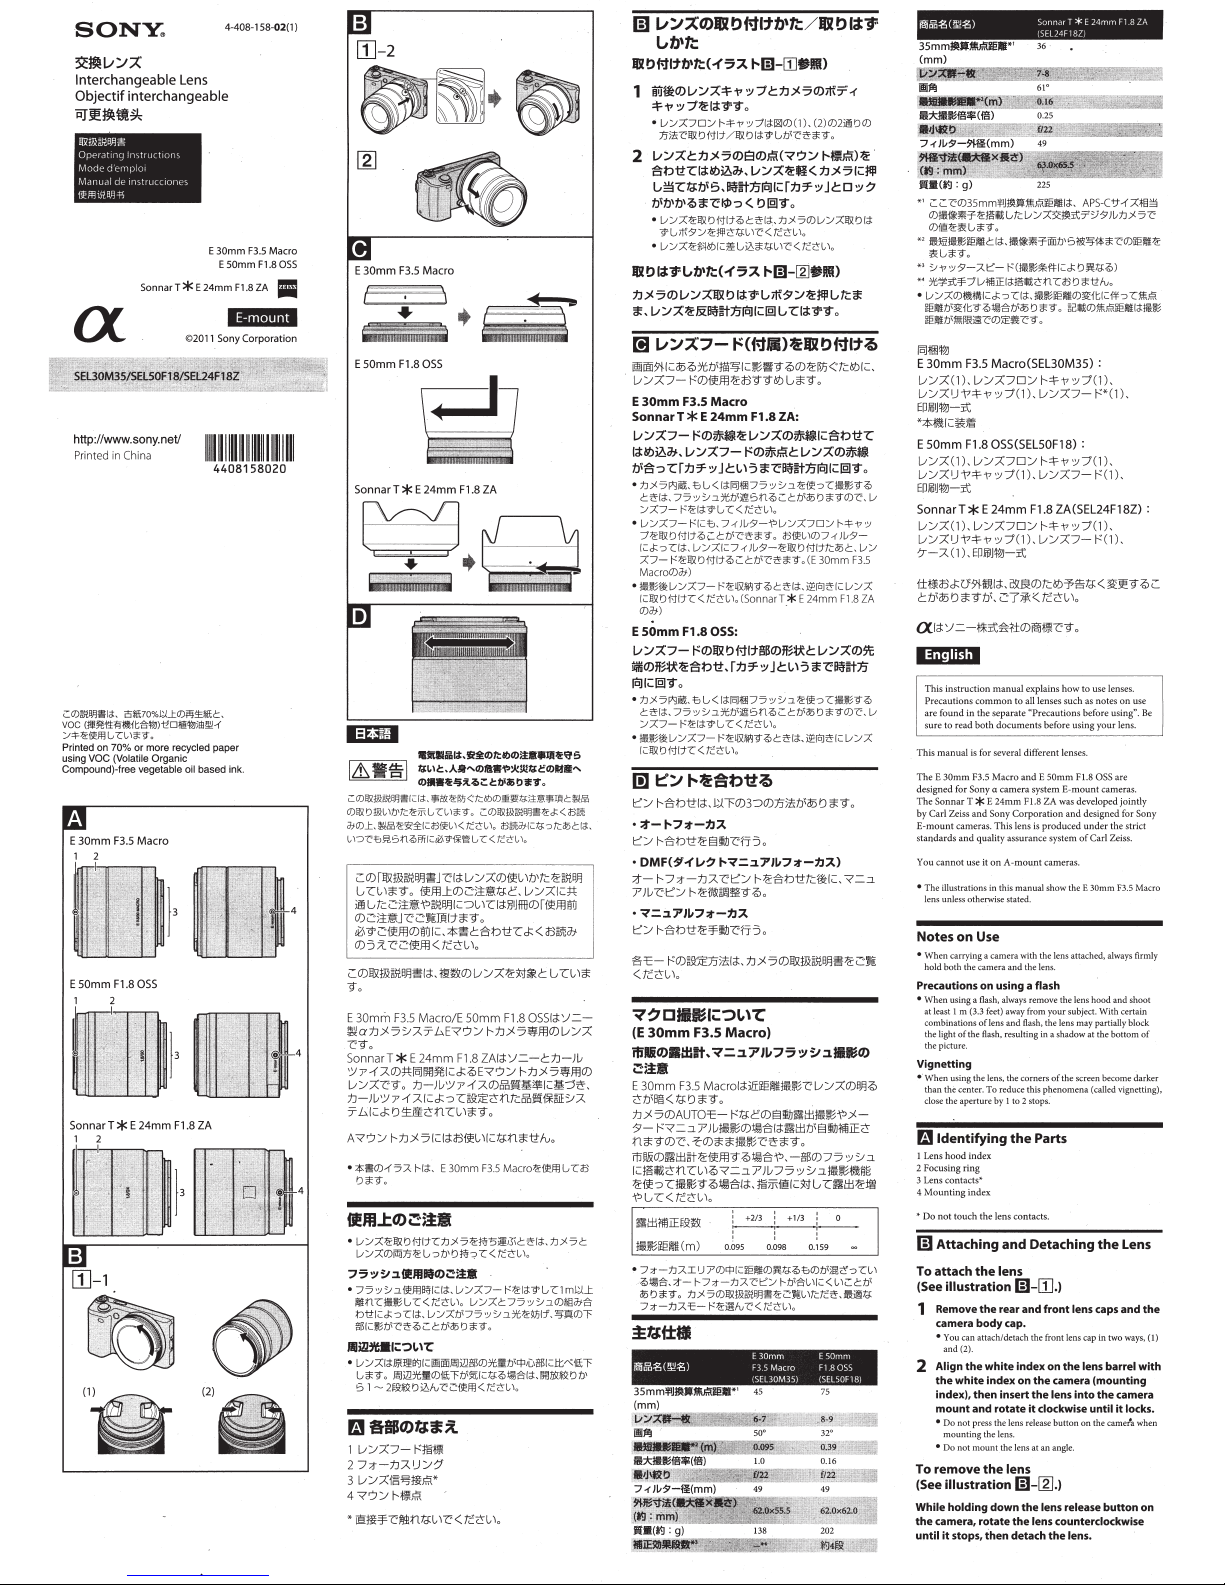
Attaching
attach
camera body cap.
•
You
can attach/detach the front lens cap in two ways,
and (2).
white
the
index),
mount and rotate it clockwise until
• Do not press the lens release button on the cameta when
mounting the lens.
• Do not mount the lens at an angle.
remove
camera, rotate
it
stops, then detach
flash, the lens may partially block
the flash, resulting in a shadow at the bottom
of
the
index
index
the
then
Parts
the
lens contacts.
and
Detaching
the
lens
GJ-[1]
the
rear and front lens caps and
white
index on
index on the camera (mounting
insert the lens
the
lens
GJ-(g].)
the
lens release button on
the
lens counterclockwise
the
and
shoot
the screen become darker
the
Lens
.)
the
lens barrel with
into
the
camera
it
locks.
lens.
of
Use
Product
nanw
(Model name! (SEL30M35)
Equivalent
35mm-
focal length*1 (mm)
M\il19i!/jiii('<f<i!iii,lfi]
Angle of view
~ffi!l!ilJ.
qgl.lf-if
Maximum magnification
~:rnmYmt~f£!~f~H~I
Product
name
(Model name)
en
t 35mm-format 36
Equival
1
focallength*
{mm)
t
~91'9~11h
Angle
of
view
~niffi4ffi1PC
iis~
Maximum magnification
~
t:ttJni{r~ifl1
:
stP,~t~lill:1tt3~iiJ
Filter dia
meter
(mm)
Mass
(approx~
the
'
(I)
• l Minimum focus
~
" The optical shake compensation function
Included items
E
L
~
E SOmm F1.8
L
g
1
T
he
value shown above
length
is
for In terchangeable Lens
APS-C sized image senso
subject.
3
Shutter speed (differs with shooting conditions)
• Depending on the lens mechan ism, the focal length may
change with any change in shooting distance. The focal
lengths given above assume the lens is focused at infinity.
30mm F3.5
ens (I),
Front lens
L
ens
hood•
(1), Set
Attached
on the lens
ens
(1), Front len s
Le
ns
hood
(I),
Set
~~'!~~:cro
format
45
!Jill~
l!jfZ:
I\ill!ll!!llJiill:
50"
!!l.Jf~l!
J.i! !hl!&~!!i
O.:
(X)
1.0
fiC
t4f
l!hngJ!~!
49
Sonnarl*
(5E
L24Fl8Z)
~1~
W~(~tU ~~~
{oz))
is
the distance from the image sensor to the
Macro
cap (1), Rear lens
of print
OSS
(SELSOF18):
cap (I),
of
printed
~~f:i
61"
l~~o~~2t
{X)
0.25
Q.2l
l!~~~~~i;.ill~R,iiffi:~nii
49
225
(8)
for
equivalent 35mm-format focal
Camfras equipped with
r.
(SEL30M3S):
cap
ed
documentation
Rear lens cap (1),
documentation
Sonnar T * E
Lens
(I)
, F
hood to
with
then
and rotate
the
lens hood
Into
place.
to
the lens hood
(E 30mm
the
end
reduce flare
the
insert
as
F3.5
Macro
of
the
it
ront
Lens
hood
(I ),
Design
and
notice.
a is a
trademark
1
if"'Wi
Cette
notice explique
Les
precautions comm
cxcmple les
feuille «
Pr
deux
lire les
Ce
tte notice
30mm
Les E
pour
les appareils
Le
So
nnar
T*
collaboration
aux
appareils
fabriquC selon les
qualitC
de Carl
II
ne
peut
pas Ctre utilisC
A.
•
Lcs
illustrations dans cctte notice
F3.5 Macro sauf mention con
Remarques
• Lorsque vous portez un appareil photo avec l'objecti f dessus,
te
can
make
a fine
struction
manual
the E
30mm
F3.5
or
metere
d
AUTO
mode)
, t
he
re
meter
on
higher than
the
to
the instruction
5
~
~~~'1
1
SELSOF18)
75
ii;2l:Ii!!!lil.li!P.i
32"
~
.Jm!
f!&f
()]
!lil.i
'-11
0.16
~~;gt~imP:!~
49
E 24mm
Fl 8 ZA
~~~~~i~mii*
an
is
not availabl
e.
(I),
nez toujours fermement l'appareil photo et l'objectif.
Precautions concernant l'emploi
• Lorsque vous utilisez un flash, retirez toujours
prcnez vos photos
a certains types de flash, l'objectif peut bloquer partieUement
Ia
lumiCre
Vignetage
• Lorsque l'objectif est utilise, les coins de I'Ccran deviennent
plus sombres que
(a
ppeiC
vignetage), fermez l'ouvcrture de I ou 2 crans.
r.i1
Identification
I RepCre
de
2 Bague
de
mise
3
Contac
ts
d'objectif
4
Rephe
de
• Ne
touche
fi) Pose
Pour poser
(Voir
!'illustration
1 oeposez les capuchons d' object
arrlere
• Vo
us
avant de deux
2
Alignez
sur le repere blanc
{repere
sur Ia monture
tournez-le dans le
s'encliquette.
• N'appuyez pas
l'appareil photo lorsque vous posez l'objectif.
• Ne posez pas l'objectif de biais.
Pour deposer l'objectif
(Voir
!'illustration
Tout
en appuyant sur le bouton
l'objectif sur l'appareil photo, tournez l'objectif
dans le sens antihoraire jusqu•a I' arret, puis
d~posez
l'ob)ectlf.
[!)
Fixation
II
est conseille
lumihe
parasite et
E 30nim F3.5 Macro
Sonnar T * E
Allgnez Ia llgne rouge du parasoleil sur Ia ligne
rouge
de
inserez le parasoleil sur Ia monture d'objectif
tournez-le dans le sens horaire jusqu'il ce
le
point
rouge
rouge
de
le parasoleil s' encliqUette. ·
• Lorsque vous utilisez le flash
flash
fourni avec un appareil photo, retirez
Cviter
de bloquer
• Vous pouvez aussi poser un filtre
avant sur
le
le parasoleil apres avoir mis le filtre
F3.5 Macro seulement)
• Pour ranger le parasoleil, insfrez-le a t'arriere de l'objectif.
(Sonnar T
E SOmm F1.8
Emboitez le parasoleil dans Ia monture au
du
barillet d'objectif
de
horaire
• Lorsque vous utilisez le flash integrC d'un appareil photo ou le
flash f
ourn
eviter de bloquer
• Pour ranger
I!]
Mise
La mise
au
point
.Autofocus
L'appareil
pho
24mm
F1.8 ZA (SEL24F18Z):
lens cap
(I),
Rear lens
Case
( l
),
specifica
tions arc
of
Sony Corporation.
rcmarques sur
ecautions
avant toute
documents ava
couv
re
diffCrent
F3.5
Macro
photo a monture E de
E 24
mm
par Carl Zeiss
photo a monture E de
normes
Zeiss.
sur
a au moins I m (3,3 pieds) du sujet. Assode
du flash et produire un omb
le
centre. Pou r rCduire ce phCnomene
parasoleil
au
point
•
montage
z pas les
con
et
depose
l'objectif
et
le capuchon
pouvez
posere
fa~ons,
le
repere
de
montage), puis posez l'objectif
sur
cap (1),
Set
of
print
ed
documentation
subject
to
change
without
comment
se servir des objectifs.
unes a tous
les objectifs,
l'emploi, se
nt
d'utiliser votre objectif.
s objectifs.
et E
SOrum FLS
Fl.S
ZA qui a
et
Sony
strictes et le systeme d'assu ran cc
pour
les appareils
mon
tr
aire.
par
trouvent
utilisation».
Veuill ez
OS$
sont
type So
ny
ete
dCveloppC en
Corporat
ion
est
Sony. Cet
objectif a CtC
phot9 a monture
t rent l'objectif E 30mm
l'emploi
d~un
flash
le
parasoleil et
re
au bas de ['image.
des
elements
tacts d'objeclif.
de
l'objectif
GJ-[1].)
if
avant
de
l'appareil photo.
t deposer
les
capuchons d'objectif
(I)
et (2).
blanc
du
barillet
de
de
l'apparell
sens
le bouton
l'appareil photo
d'objectif
photo
et
horaire
de
sorte qu'll
de
liberation de l'objectifsur
sur Ia
conjfUS
a.
li)-~.)
de
liberation
du
parasoleil (fourni)
d'utiliser
un
parasoleil
pour
reduire
obtenir
Ia meilleure image possible.
24mm
F1.8 ZA:
l'ob)ectlf
(repere
de
du
parasoleil s'aligne sur Ia ligne
l'objectif (rep&re
Ia
parasoleil. Avec certains filtres, vous pouvez fixer
* E 24mm Fl.S
de
intCgiC d'un appareil photo ou le
lumiere du flash.
ou
sur
ZA
seulcment)
Ia
parasolell),
puis
parasoleil)
et
le
parasoleil
un capuchon d'objectif
l'objectif.
(E 30mm
OSS:
et
sorte qu'it s'encliquette en place.
i avec un appareil photo, retirez le parasole
le
au
tournez-le dans le sens
Ia
lumiere du flash.
parasoleil, inst!rez-le a l'arriere de l'objectif.
point
peut
Ctre faite de
tro
is
fa~ons.
to fait
automatiquement
Ia
mise
au
poin
destine
et
que
que
pour
bout
il
pour
t.
• DMF (Mise au
Apres Ia
un
• Mise
Vous
Pour
mode d'emploi fou
Macrophotographie
(E
Precautions
posemetre
de
utilise
Lors
30mm FJ.S
Lors
automatique
exempl e, Je
s'ajuste
Lorsqu'
prise
certains
valeur indiquCe.
Correcti
!'
exposition
Distance(m)
• Lorsquc deux
superposent dans Ia zone AF.I'apparcil photo peut ne pas
patvenir a faire Ia mise au point automatiqucment. Dans ce
cas. reportez-vous au mode d'emploi de l'appareil photo et
selectionnetle mode de mise au point appropri
Specifications
Nom
(Nom
Focale equlvale
Grossissement maximal
:t
~ ~
NomdeprodUit
(Nom
Focale Cquivale
Poids (environ, g
•l
1
"
"'
de
H
• Selon
Ia
dessus presupposent que J'objectif est regie sur
Articles
E
Objectif
Capuchon
feu de
• FixCa J'ob je
E SOmm F1.8
Objcctif
Capuchon
et
eu
J
Sonnar T * E
Objectif
Capuchon d'
jeu
La
sansprCavis.
a est
point
mise
reg!age plus fin
au
faites vous-mCme Ia
le dCtail
manuelle directe)
au
point en
autofocus, vous
manuellement.
point manuelle
mise
sur
les reglages
rni avec l'apparcil
de
au
mode,
point.
pouvez
reportez-vous
photo.
30mm F3.5 Macro)
a prendre lorsqu'un
du
prise
de
de
de
de p odu
de
~~lijj!~
de
La
valeur indiquee ci-dessus comme focale Cquivalente
en format
interchangeable avec capte ur d'image de taille APS-C.
la
mise au point minimal e est
ausujet.
Vitesse d'obturation (varie selon
w•)
La
fonction Antibouge optique n'est pas disporlibl
distance de prise de vue change.
30mm
de
de
conception
commerce ou
de
vue
au
Ia prise
de
vue
rapprochCe d
Macro, Ia
luminosite
Ia prise
de
vue
dans
ou
dans
un
mode
mode
AUTO
auto
un
vUe
flashs externes, n!glez !'exposition plus
on
n1adele
modeleJ
le
mecanisme de l'objectif,
indu
(I),
documents
(I),
documents imprimCs
( 1),
documents
une
de
matiquemen
t.
posemetre
du
commerce
avec Ia fonction
de
0
,09
ou
plusieurs sujcts a diff'erentes distances se
1t
nt
e en 45
{X) 1,0
~ifi!il~~~
nte
en
(oz))
35
mm
concerne les appareils photo a objectif
s
F3.S
Macro
(SEL30M35):
Capuchon
d'objectif avant (I),
d'
objcctif arrihe
imprimes
ctif
OSS
(SELSOF18):
Capuchon
d'objectif
d'
object if
arriere
24mm F1.8 ZA (SEL24F18Z):
Capuc
hon
d'
objectif avant ( 1),
objec
tif
arriCre
imprim
Cs
et les specifica
marque
commercia
Ia
flash manuel
un
l'apparcil
de
' ' '
: +2/3 : +1
5 0,098 0,159
Prl~\~·iiU~~@~
(I ), Parasoleil,. ( l ),
( 1
),
(I),
tions peuvent etre modifiees
fonction
est
'un
sujet avec le E
de
l'objec
tif
est
mode
a reglage
flash manuel disponible
~:~::ro
(5EL30M3S)
49 49
SonncuT*E24mmF18ZA
{SEL24F18Z)
36
225 (8)
Ia
distance du capteur d'image
les
Ia
avant
Parasoleil (I ),
Parasole
le
rCduit
d'exposition
manuel
(par
photo),
I'
exposition
est utilise
ou
haut
/3
:
C.
5
~
1
SEL50Fl8)
75
' 0,16
conditions de prise de
focalc peut changer lorsque
Les
focales indiquees ci-
l'i
nfini.
(I) ,
il
(I),
Boitier
de
Sony
Corporation.
effectuer
au
e.
Iars de
Ia
sur
que
Ia
~~;~
~ll~lm
e.
(I),
p.61,I.JI
En este manual se expli
pr
ecauciones comunes a todos los objetivos, como notas
sabre
Ia utilizaci6n, se en
pr
evias a Ia utilizaci6n del
separado. Cerci6rese
de
utilizar su objetiv
Es
te manual es
para
El
E 30
mm
F3.5 M
diseflados para cimaras con montura E con sistema de
c:imara
a Sony.
El
Sonnar
T * E
conjuntamente por Carl Zeiss y Sony
di
seflado
para
d.maras con
ha sido p
roducido bajo las
aseguramiento
No
• L
Notas
• Cuando transporte una d mara con
Precauciones sobre Ia utilizaci6n
• Cuan
Viileteado
•
m
1
2 Anillo
3
4 fn
*No
GJ
de
podra
utilizarse con
as
ilustraciones de este manual muestran
F3.5
Macro a
Thenos
sobr'e Ia
si
effipre firmemente tanto Ia
do
utilice un flash qultele siempre
y fotogra
fi
e alejado a I m po r lo menos de su motivo. Con
ciertas combinadones de objetivo
bloquear parcialmente Ia luz del flash, lo que resuhar:l
sombra en Ia parte inferior de
Si
utili
za
el
objetivo, las esquinas de
oscuras que
el
cemro. Para reducir este fen6meno (llama
v
ifl.eteado), derre Ia apertura de I a 2 puntas.
ldentificaci6n
lnd
ice del parasol del objetivo
de
enfoque
Contactos del objet ivo•
dke
de
montajc
toque los
contactos
Colocaci6n y
objetivo
Para colocar el
(Consulte Ia ilustraci6n
E 30mm
F3.5
Macro
•
"liffilMMH
II
U~
UHildlll&
E
SOmm
F1.8
055
;::I
~l
~
5onnarT*
E 24mm
F1.8
ZA
I
1 Extraiga las tapas posterior y frontal del
2 Alinee el
Para extraer el
(Consulte
Manteniendo presionado el
del objetivo
hacia Ia izquierda hasta
extraiga el objetivo.
l!J
Es reco
y garantizar Ia m<ixima calid
E
Sonnar T * E
Ali nee Ia linea roja del parasol con Ia linea roja
del objetivo (indice del parasol),
inserte el parasol en Ia montura
girelo hacia Ia derecha hasta
del parasol quede alineado con Ia linea roja
del·objetivo (indice del parasol)
chasquee en
• Cua
• Tambit!n puede colocar un
• Cuando guarde
E
lnserte el parasol en Ia montura del extremo
del barril del objetivo
derecha hasta
•
• Cua
[!JEnfoque
Existen tres formas
• Enfoque automatico
La
• DMF (Enfoque
Despues
realizar
y Ia tapa del cuerpo
objetlvo
• Usted
podr:l.
de
do
s form
indice
objetivo con el fndlce blanco
(fndlce
de
objetivo
en
hacia Ia derecha hasta
• No presione
cilmara cuando monte el
• No monte
el
Ia
de
Colocaci6n
(suministrado)
mendable
30mm
F3.S Macro
24mm
su
ndo util
ice un flash incorp o rado en Ia
suministrado con Ia camara,
se bloquee
Ia
luz del flash.
en
el
parasol del objetivo. Dependiendo del fihr
po
dr<i
colocar
el
objetivo. (E 30mm
* E 24mm FLS
SOmm
Cuando
suministrado con
se bloquee
Ia
F1.8055:
utilice un flash incorporado en
Ia
luz del flash.
ndo guarde
Ia
dmara
enfocara autom:lticamente.
de que
Ia
manualmentc
ca
c6mo
utiliz
ar
obje tivo
cuentran
en las "Precauciones
producto" suministradas
de leer
ambos docume
o.
varios objetivos
acro
y
el
E
SOmm FJ
24mm
F 1.8 ZA h a si
montura
normas
calidad
de Carl
dmaras
que se indique otra cosa.
ntos ante
diferen
tes.
.S
OSS
han sido
do
desarrollado
Corporation
E Sony. Este objetivo
cstrictas y el sistema de
Zeiss.
con
montura
A.
el
objetivo E 30mm
utilizaci6n
el
objetivo fijad
c:l
mara como
y flash, el objetivo puede
Ia fotografla.
de
las
del objetivo.
extracci6n
objetivo
6)-
colocar/ext raer
as,
montaje), y despues inserte el
el
objetivo
ilustraci6n 6)-[g].)
utilizar
parasol del objetivo Mspues de fijar
clmara,
ZA
que
Ia
dmara,
dmara enfoque
Ia
(I)
y (2).
blanco
del
Ia montura
de
que
bot6n de liberaci6n del objetivo de Ia
ob
jetivo.
de
forma inclinada.
objetivo
Ia camara, gire el objetivo
Iugar.
F3.5
de
manual
bot6n
que
del
parasol
un
para
sol
ad
de
Ia
F1.8 ZA:
ex
traiga
fUtro
o Ia tapa front
Macro solamente)
fije
el parasol hacia atnis.
solamente)
y gire el parasol hacia Ia
chasquee.
dmara,
extraiga
fije
el
parasol hacia atcis.
enfocar.
directo)
automiticamente,
un
ajuste fino.
o,
el
objetivo.
de
un flash
el
pa
rasol del objetivo
Ia
pan lalla se vuelven m:ls
partes
del
[I]
.)
de
Ia
dmara
tapa fron
tal
del objetivo
barril
del
de
Ia camara
Ia camara y girelo
se
bloquee.
de
liberaci6n
se
pare, y despues
del
objetivo
para
reducir
los reflejos
ima
gen.
y despues
de
Ia camara y
que
el
punto
y el parasol
dmara o el
el
parasol para evit
al
del objetivo
o que utili ce,
Ia
dmara o el flas
el
parasol para evit
s.
Las
y
sujete
rojo
flash
e1
(S.
onnar T
por
en
ar
fi
ltro
ar
podni
• Enfoque manual
Usted enfocara
Con
consu
dmara.
s
Fotografia
(E
Precauciones en
medidor
mercado
con exposici6n manual
Cuan
Macro, el brillo del objetivo se
Cuando fotografie
o
modo
au
Cuan
establecimi
de flash
exte
indicado.
Compensaci6n
exposici6n
Distancia
• Cuando dos o mas motivos situ
una
manualmente.
respec
to
a l
os
detalles sobr
e l
os
ajustes de
Ia
a.
exposici6n
(por
ci6n
ce
tomas con
as
valor
0.098
con el E 30
unidades
mod
con
de
venta en el
fotografiado
mm
automi
cjemplo, e\
se ajustar3.
en
un
Ia
funci6n
de
mas
alto
que
0,1
59
dmara
y selcccione
lte el
manual
de
instrucciones suministrado
en
30mm
do
en
el
AUTO
tom
i ticam ente.
do
rnas
se superpongan en
c:lmara enfoque autom:lticamente. Cuan do suceda esto,
consulte
e1
modo de enfoque apropiado.
macro
F3.5
Macro)
Ia
de
exposici6n a
ode
Ia
funci6n de
fotografie cerca
modo
utilice
manual
, ajuste Ia exposici6n a
de
en
cl
m
de
medici6n
de Ia d
mara
un
cxposimetro
ento
del
ramo
o n!ali
dis
pon
ible
de
Ia
de
el
0,095
toma
(m)
el
area
manual de instrucciones de Ia
utilizaci6n
un
motivo
reducir
odo
de
manual
), Ia exposi
adquirido
en
algun
un
' ' '
: +2/3 : +1/3 '
ados a distancias diferentes
AF,
puede resultar difkil que
o,
flash
Ia
F3.5
tica
el
Ia
lf~+Mil
E
30mm
Fl.8
F3.5 Macro
OSS
E
Sonnar
Carl Zeiss
fiilliJf£,
mffii'Jlo
B'JFtMif.f!E~.J&!!lHi1¥tJE~mi!iUm
jffi~
.
ll>tM'l~i#,SJl.
OO:folJtl'i
~~
-t
o~mmtfliffiil15ti¥J
T * E
:ffi
i§!:itffl.:Y:
::2f\:t!Ek:Ji!::f!i:H~
,
E 3
0mm F3.5
:fD E 50mm
j>j
Sony a
ffii'Jl9=11¥1
,
24mm
F1.8
ZA
Ell
Sony Corporation fli
Sony E
-to~
Car
l Zeiss
6'1J!rJ:2fs:i#.SJl4>9='1
Macro
l'JJal
fft'ko
ue.Eil~m~Q
do
Nombrcdcl
producto
!NombrPdel modf'lo) SEUOM3SJ ISEL50Fl8)
Distancia focal•1 (m
eq
ulval
ente
al formato
35mm
~;~~~~ro
m)
45 75
de
5
~
~~~
1
5
Especificaciones
·
~t:E~~ffEidf-Hiltlli.
iltM:
•FilJ
P1lJUH!li'flffifft!k
T=tJHil'
i'1HJ1S1.
o
fAJJ't:tJue.Eilit:e~rm
·
{iE:.Eil
fAJJ't:tJn1
,
ii1l
~£·11HffEki!!J't
~.#t:E~~mm~W~Ylm~~
nmmo
uemm:!k/Pb
n1,
lfJ!:!k
OJf.IE~il!11fAJJ'tH~
J't.
MffiimllXOO
.,_a
.ifffl
ffl:!kP1,
Bil
o
tli!!ifR.i!f!lllll!~
iill¥f:l'ti1
J:I1E:ili
'tn~~
f!lltfl.-&r
l'lf;
Jt~JJ'H!Ilt±!Jl.II.~Jl~
7J- 1'f
o
nHi~mWf~J:t:J't<j:r,c_,
(ft.Ztl
:ll!
lfii
~)
0
1 ~ 2
r.:1l'lfli*iHlltl
1
-fJi::!kiJ;!!;.J't~;fif.ii:
2M
fo.!\
ff
3 it:!k:t£!2*
4
~~tif.tc
m
3i:~lt.llTm*
3t~m'*
1 mH1J,
2
~.ll"Fm:!k
~1~mm1:a<Jm~~!i!l:~w
~m~:m:~~~~.f.:l\sm"Fm~,
[!13i:~tli~i!!!:l't!!
1£i.)(
),\jffilifiJ{¥1\i{i@~
E
Sonnar T * E
ffitli~i!!!J'til..l:a'JUti~tli~..l:a'JUti
!limA
~tl~i!!!:l't!l..l:a'JH.~~tli~..l:a'JHti
~-fl>~Jtfi'Io
-
.fuo:r~
.
twm.tmiE
m-
[I], l
stll:!k~IDmi'flfll.~!J,
.
o:r~Jm
<o
'f
o
(2l
TilU!fJ!M
ffitt~..l:a<JI~Hsfff>ie~mm..l:a<JS
@l.tff>iC
(
3i:~fff>iC)
t!i:!ktmAt!li'fl3i:~$fi'I1t'llimll'.tttfi'i.
~. !i~tli~Hill~,
.
iMIJt:E3i:~ff!:!kll1HH!li'H..l:~ff!:!k
~!i!l:HH.l!
.
iJlio/J
fijj~4
twm.tmiE
~mf<llni\31:~/m:
fro
~;it'
?.:1\6~4;
o
3i:~ff!:!ko
m-
(2], l
,
~~~m~
(llf<tjtj:)
fl.EJtl-fJi
::!k
iJ;!!;.J't
~
~:1.
1~:0>
&.J't
'
30mm
o
F3.5 Macro
24mm F1.8 ZA:
(i!!!:l't~fii\i2)
t
i!!!J'tiilfff>i2 l x<ta£,
~m~•~m~:l'tn•~m•llf<t~~
:l't:tJn1.
111
AJ:l'tH~*:l'to
~)!, f.:I\614Jtli~i!!!J't
t!i~3i:~$1i'I1fllliiill'.tttfi'i.~
.13.
iilll!Hff!:!ki!i!:J't~
,
!i
m~i!!!J'tlllnt
. ~)f£.:1!!
m:!ki!i!::l't~..l:3i:~~:l'tm•~
m:!k~o~~r~.Eil~~:l'tm.o:r~
t:E¥f~:l'tffl3i:~i
lll:!kil!
:l't~
Macro)
:f¥!i!l:
ll1
,
t:Eff!:!k..l:o
24mm Fl.8
1J
lfi:!k..l:/fijl}31;~
o ( {
'ii.~N
E 3
0mm
F3.5
ijlj'¥flJ!:!ki!i!::l't~-fflJi1*lllt
(
{\1.~
Sonnar
ZA)
T * E
h
Nombrc del
.
!Nombre del modelo) (5EL24FlBZl
Distancia focal*1 (mm) 36
equivalente
35mm
~~
£1
valor mostrado arriba para
formato
de
equipadas
•l
El
enfoque minimo es
imligenes
•J
Ve
locidad de obturaci6n (diflere conJas condiciones de
fotografiado)
~•
La
funciOn de co mpensaci
disp onible.
En
funci6n del mecanismo del objetivo, es posible que Ia
•
distancia focal varle
lo hace.
Las
objctivo
e.sta enf
Elementos induido
E
30mm
F3.5
Objetivo (1),
Tapa
poste
rior
Ju
ego
de
documentaci6n
." Fijado
en
el objetivo
E
50mm
F1.8
Obj
que
al
que
eti vo (1),
Tapa
posterior
Ju
ego
de
documentaci6n
Sonnar T * E
Objetivo
(I),
Ta
pa posterior del objetivo (1), Parasol {1),
fuego
de
docurn
El
dis~iio
y las especificaciones es
previo aviso.
a es
mar
ca comercial
producto
arformato
35
co
n un sensor de imagenes de tamafto APS-C.
a!
motivo.
distancias focales indicadas.arriba asumen que el
Tapa
del objelivo (I), Parasol• ( I),
Tapa
del objetivo (I), Parasol ( 1
Tapa
entaci6n
Sonn.uT*F
de
Ia
mm es para
oca
Macro
055
24mm
distancia focal equivale
c<imaras
de
lentes intercambiables
Ia
dist:mcia desde
6n
6ptica de sacudidas
si
Ia
distancia de toma de imagen tambifn
do
al infinito.
s
(SEL30M35):
frontal delobjetivo
(5ELSOF18):
frontal del objetivo (1),
front
al del objetivo (I),
(1),
impr
esa
impr
esa
F1.8 ZA (SEL24F18Z):
impr
esa
ti
n sujetos a cambios sin
de
Sony
Corporation.
e1
sensor
),
Fund
14mm Fl 8
de
no est:l
a (1),
ZA
nte
al
 Loading...