

Super Audio CD
Player
4-233-197-21(2)
Operating Instructions
Mode d’emploi
Bedienungsanleitung
Manual de instrucciones
GB
FR
DE
ES
SCD-XB770
2001 Sony Corporation
WARNING
Welcome!
To prevent fire or shock
hazard, do not expose the
unit to rain or moisture.
To avoid electrical shock,
do not open the cabinet.
Refer servicing to qualified
personnel only.
To prevent fire, do not Cover the
ventilation of the apparatus with news
papers, table-cloths, curtains, etc. And
don’t place lighted candles on the
apparatus.
To prevent fire or shock hazard, do not
place objects filled with liquid, such as
vases, on the apparatus.
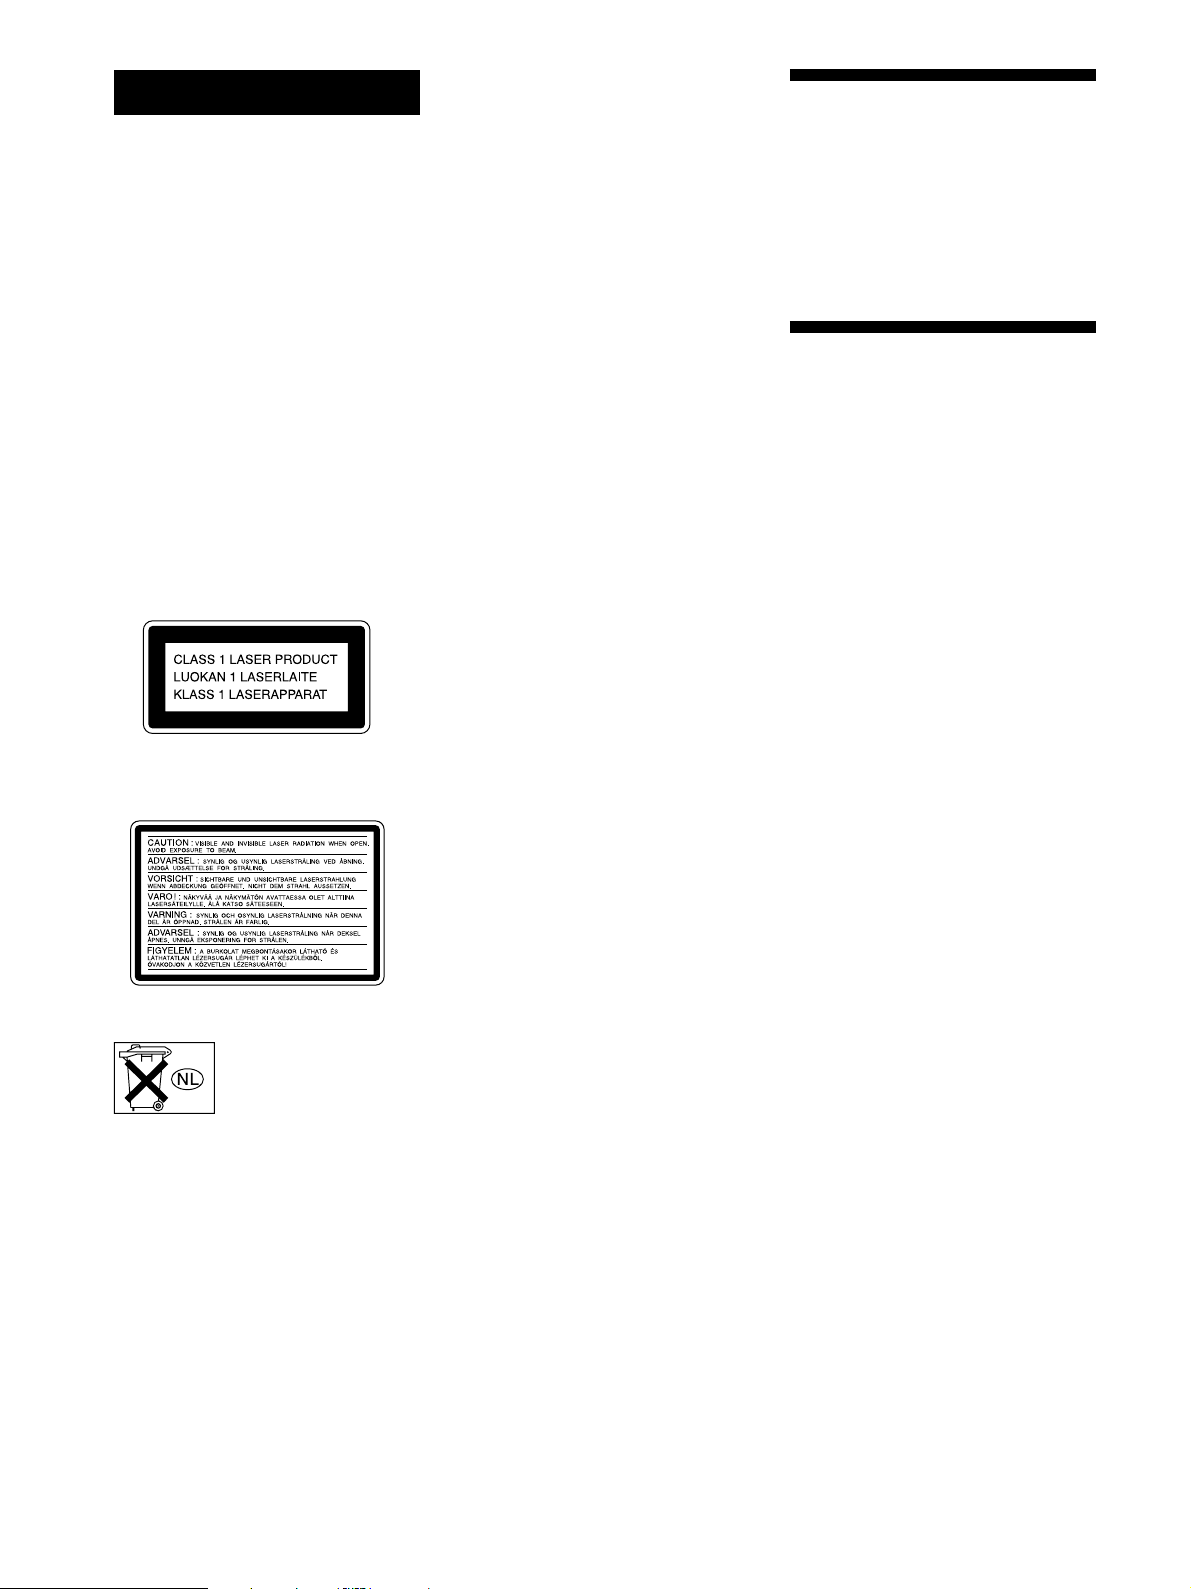
This appliance is classified as a CLASS 1
LASER product.
The CLASS 1 LASER PRODUCT
MARKING is located on the rear exterior.
Thank you for purchasing the Sony Super
Audio CD Player. Before operating the
unit, please read this manual thoroughly
and retain it for future reference.
About This Manual
The instructions in this manual are for
model SCD-XB770.
Conventions
• Instructions in this manual describe the
controls on the player.
You can also use the controls on the
remote if they have the same or similar
names as those on the player.
• The following icons are used in this
manual:
Indicates that you can do the
Z
task using the remote.
Indicates hints and tips for
z
making the task easier.
The following caution label is located
inside the unit.
Don’t throw a battery,
dispose it as the injurious
wastes.
GB
2

Features
TABLE OF CONTENTS
About the Super Audio CD
• Super Audio CD is a new high-quality audio disc
standard where music is recorded in the DSD (Direct
Stream Digital) format (conventional CDs are recorded
in the PCM format). The DSD format, using a sampling
frequency 64 times higher than that of a conventional
CD, and with 1-bit quantization, achieves both a wide
frequency range and a wide dynamic range across the
audible frequency range, and so provides music
reproduction extremely faithful to the original sound.
• The Super Audio CD has two types; a 2 channel stereo
disc and a Multi-channel disc which holds up to 6
independent channels. The multi-channel characteristic
of the Super Audio CD features a speaker allocation
system basically similar to the 5.1 channel output of
current AV systems.
Features of the player
This player is designed to play back 2-channel and multichannel Super Audio CDs, and conventional CDs, and
provides the following features:
• Mounted with a Discrete Dual Laser Optical Pickup,
capable of reading a Super Audio CD or conventional
CD depending on the exclusive wavelength.
• Quicker track access performance enabled by an
advanced servo mechanism.
• A Multi-Channel Management function that allows you
to adjust the multi-channel playback environment
according to the allocation and size of your speakers.
• A Super Audio D/A Converter and Direct Digital Sync
System, which allows higher-quality sound
reproduction.
Others
• A Super Audio CD can mark up to 255 track/index
numbers. This feature applies to SCD-XB770.
• The supplied remote is capable of controlling both the
SCD-XB770 and a conventional Sony CD player.
Getting Started 4
Before You Start the Hookup 4
Hooking Up the Audio Components 5
Location and Functions of Parts 8
Front Panel Parts Descriptions 8
Rear Panel Parts Descriptions 10
Remote Parts Descriptions 11
Playing Discs 12
Compatible Disc Types 12
Playing a Disc 14
Using the Display 15
Locating a Specific Track 18
Locating a Particular Point in a Track 18
Playing Tracks Repeatedly 19
Playing Tracks in Random Order (Shuffle Play) 20
Creating Your Own Programme (Programme
Play) 21
Listening to a Multi-channel Super Audio CD
(Multi-channel management function) 22
Additional Information 25
Precautions 25
Notes on Discs 26
Troubleshooting 27
Specifications 27
Index 28
GB
GB
3
Getting
Before You Start the
Hookup
Started
This chapter provides information on
the supplied accessories and how to
connect various audio components to
the Super Audio CD player. Be sure
to read this chapter thoroughly before
you actually connect anything to the
player.
Checking the supplied accessories
This player comes with the following items:
• Audio connecting cord
phono jack × 2 (Red and White) y phono jack × 2 (Red
and White) (2)
phono jack × 1 (Black) y phono jack × 1 (Black) (2)
• Remote commander RM-SX700 (1)
• R06 (size-AA) batteries (2)
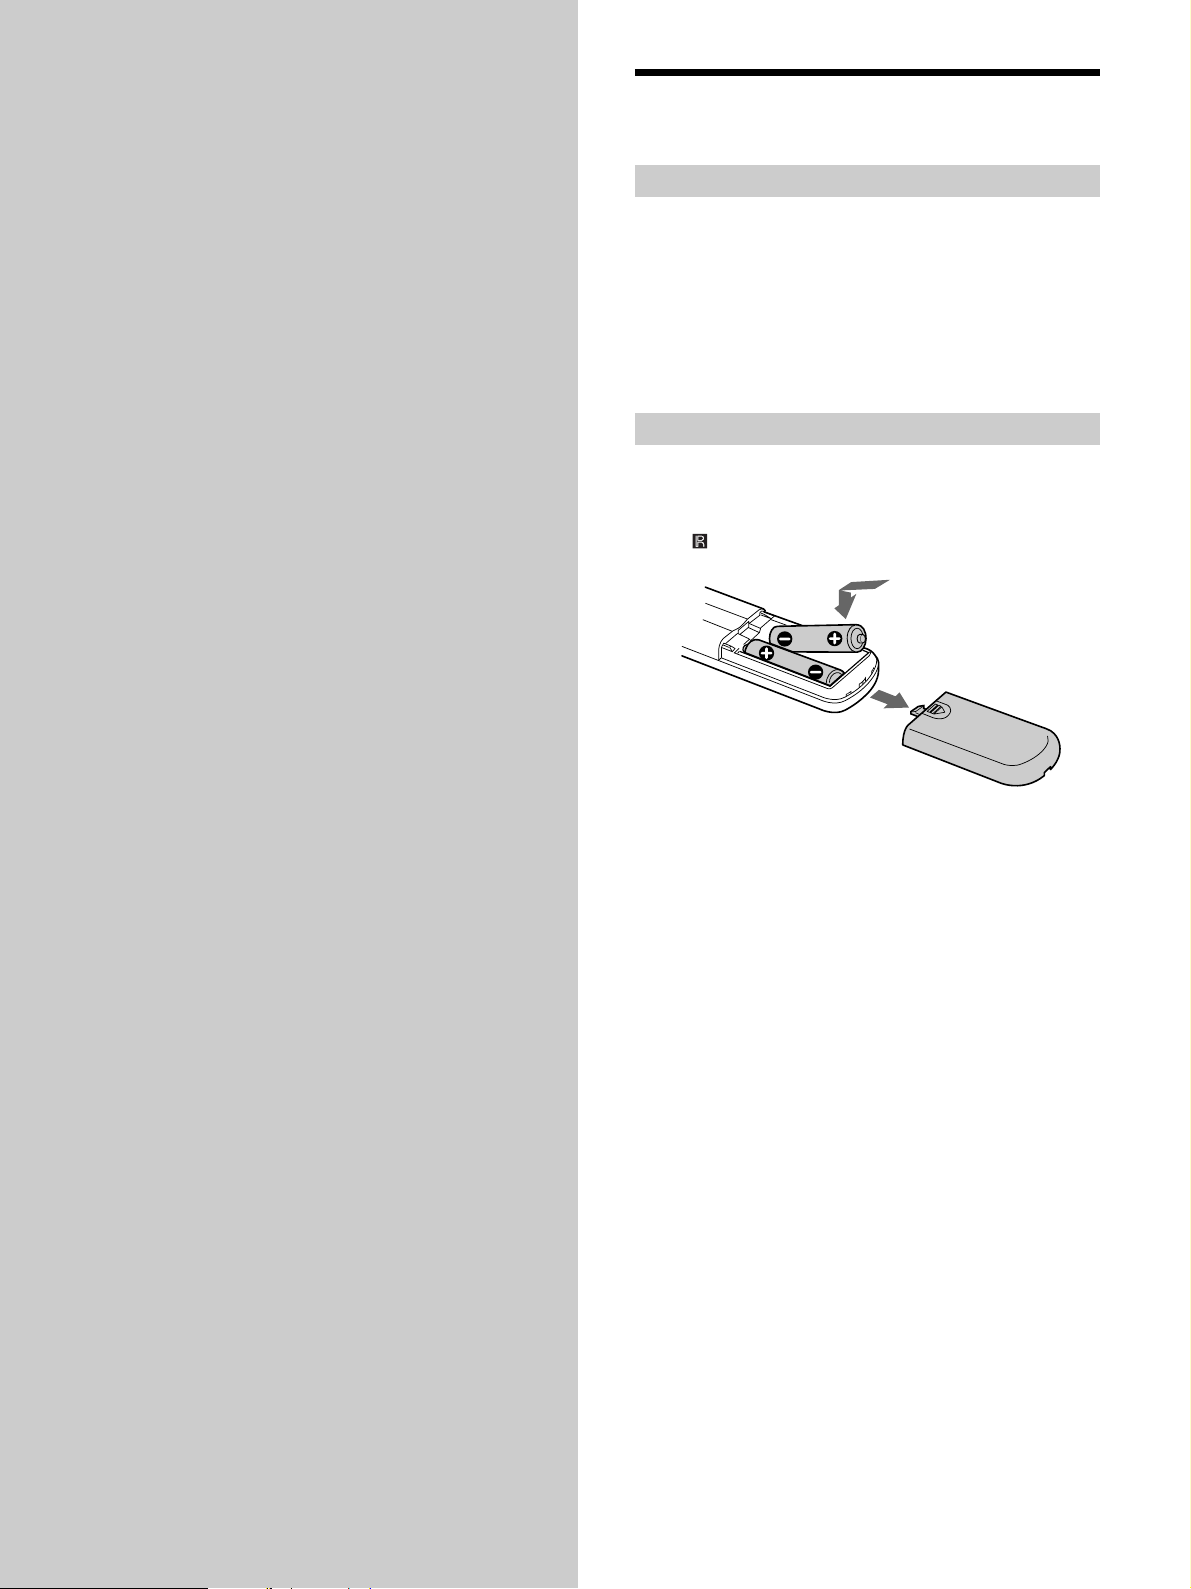
Inserting batteries into the remote
Insert two R06 (size-AA) batteries into the battery
compartment with the + and – correctly oriented to the
markings. When using the remote, point it at the remote
sensor
on the player.
z
When to replace the batteries
Under normal conditions, the batteries should last for about six
months. When the remote no longer operates the player, replace
both batteries with new ones.
Notes
• Do not leave the remote in an extremely hot or a humid place.
• Do not drop any foreign object into the remote casing,
particularly when replacing the batteries.
• Do not use a new battery with an old one.
• Do not expose the remote sensor to direct sunlight or lighting
apparatus. Doing so may cause a malfunction.
• If you do not intend to use the remote for an extended period
of time, remove the batteries to avoid possible damage from
battery leakage and corrosion.
GB
4
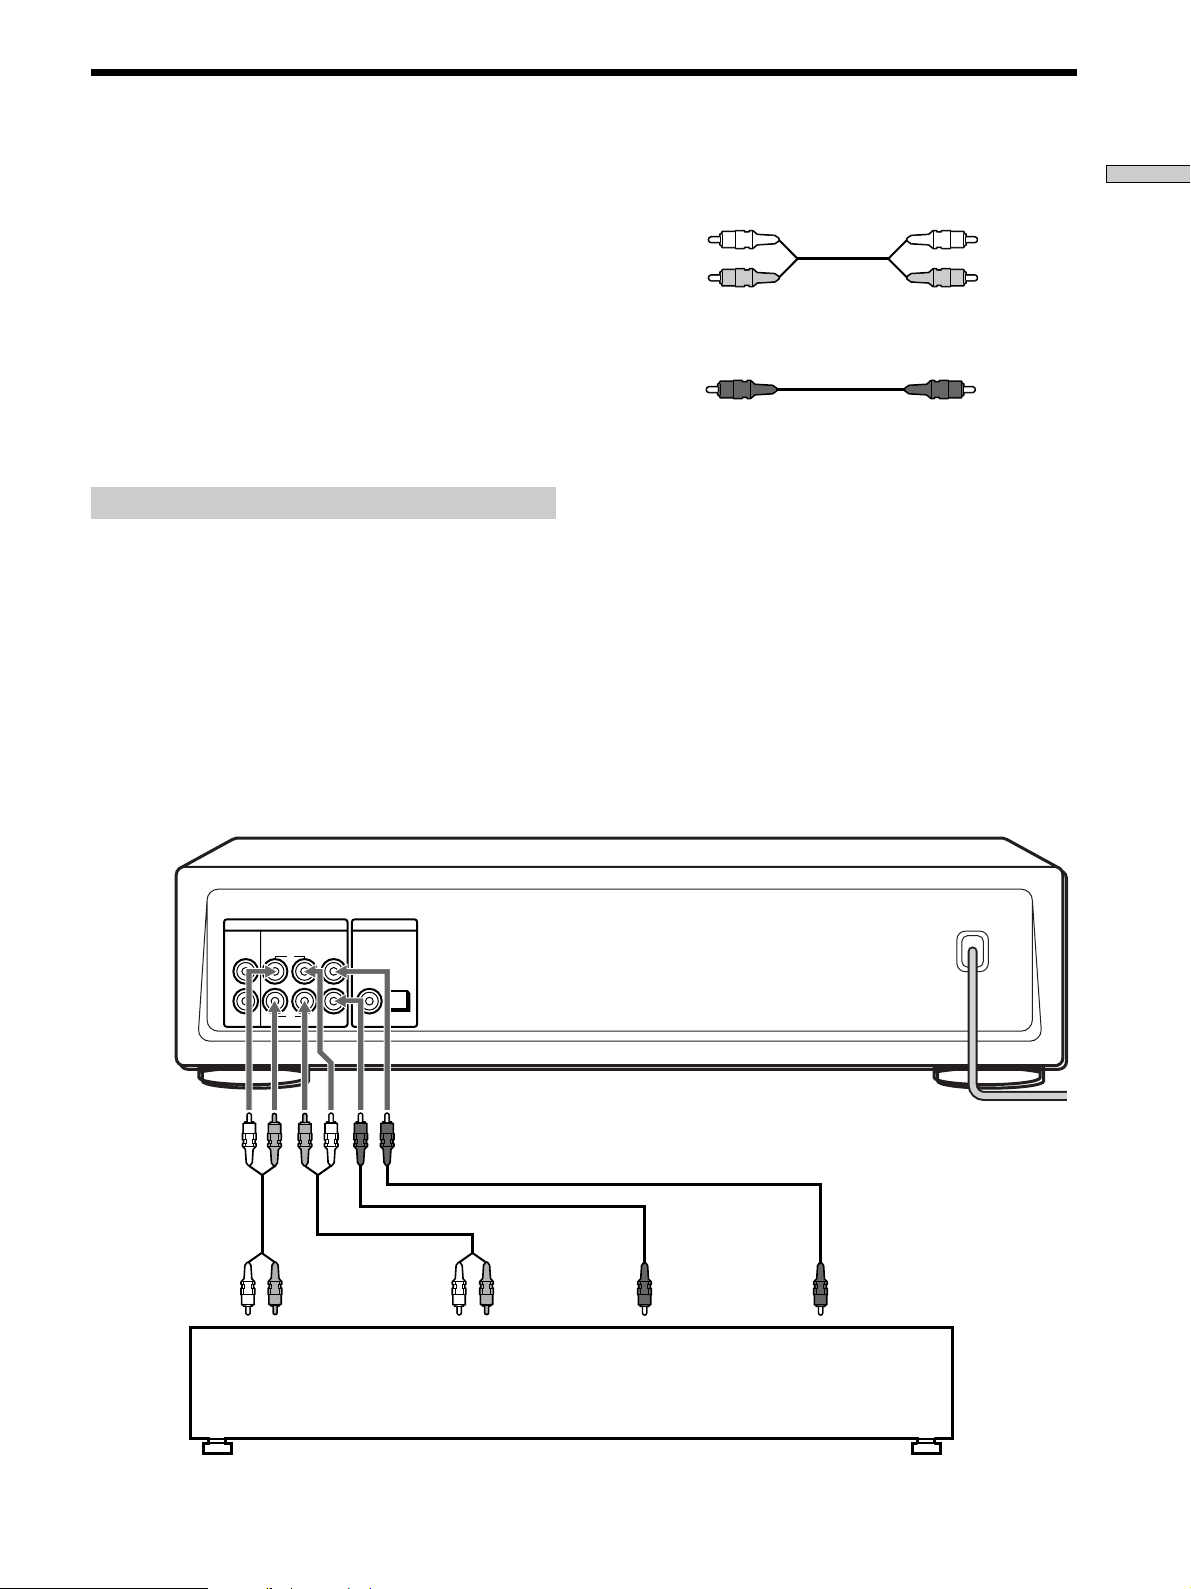
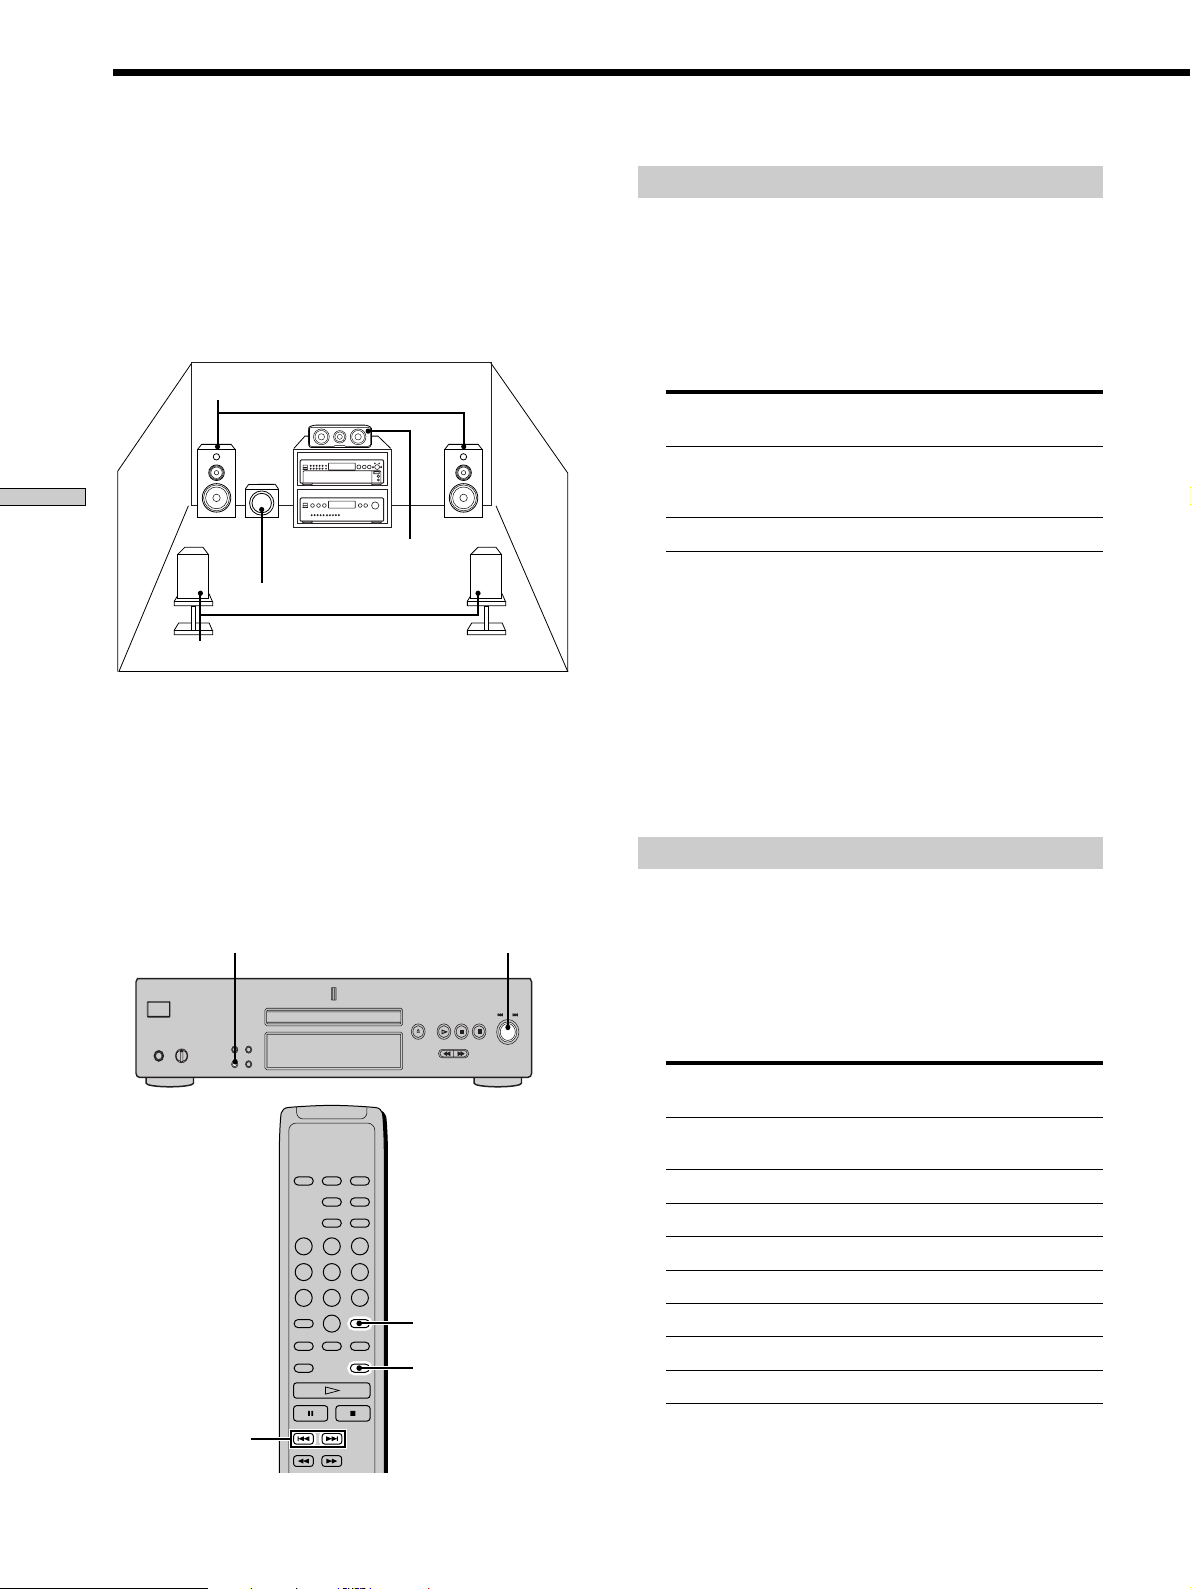
Hooking Up the Audio Components
Connect the Super Audio CD player to an audio
component. Be sure to turn off the power of all
components before making connections and connect
securely to prevent noise.
When you have an amplifier equipped with the 5.1CH
input jacks (multi-channel amplifier, AV amplifier, etc.)
and connect the player and the amplifier via ANALOG
5.1CH OUT jacks, you can play a multi-channel Super
Audio CD and enjoy the multi-channel playback.
For normal playback, connect the player and an amplifier
via ANALOG 2CH OUT jacks.
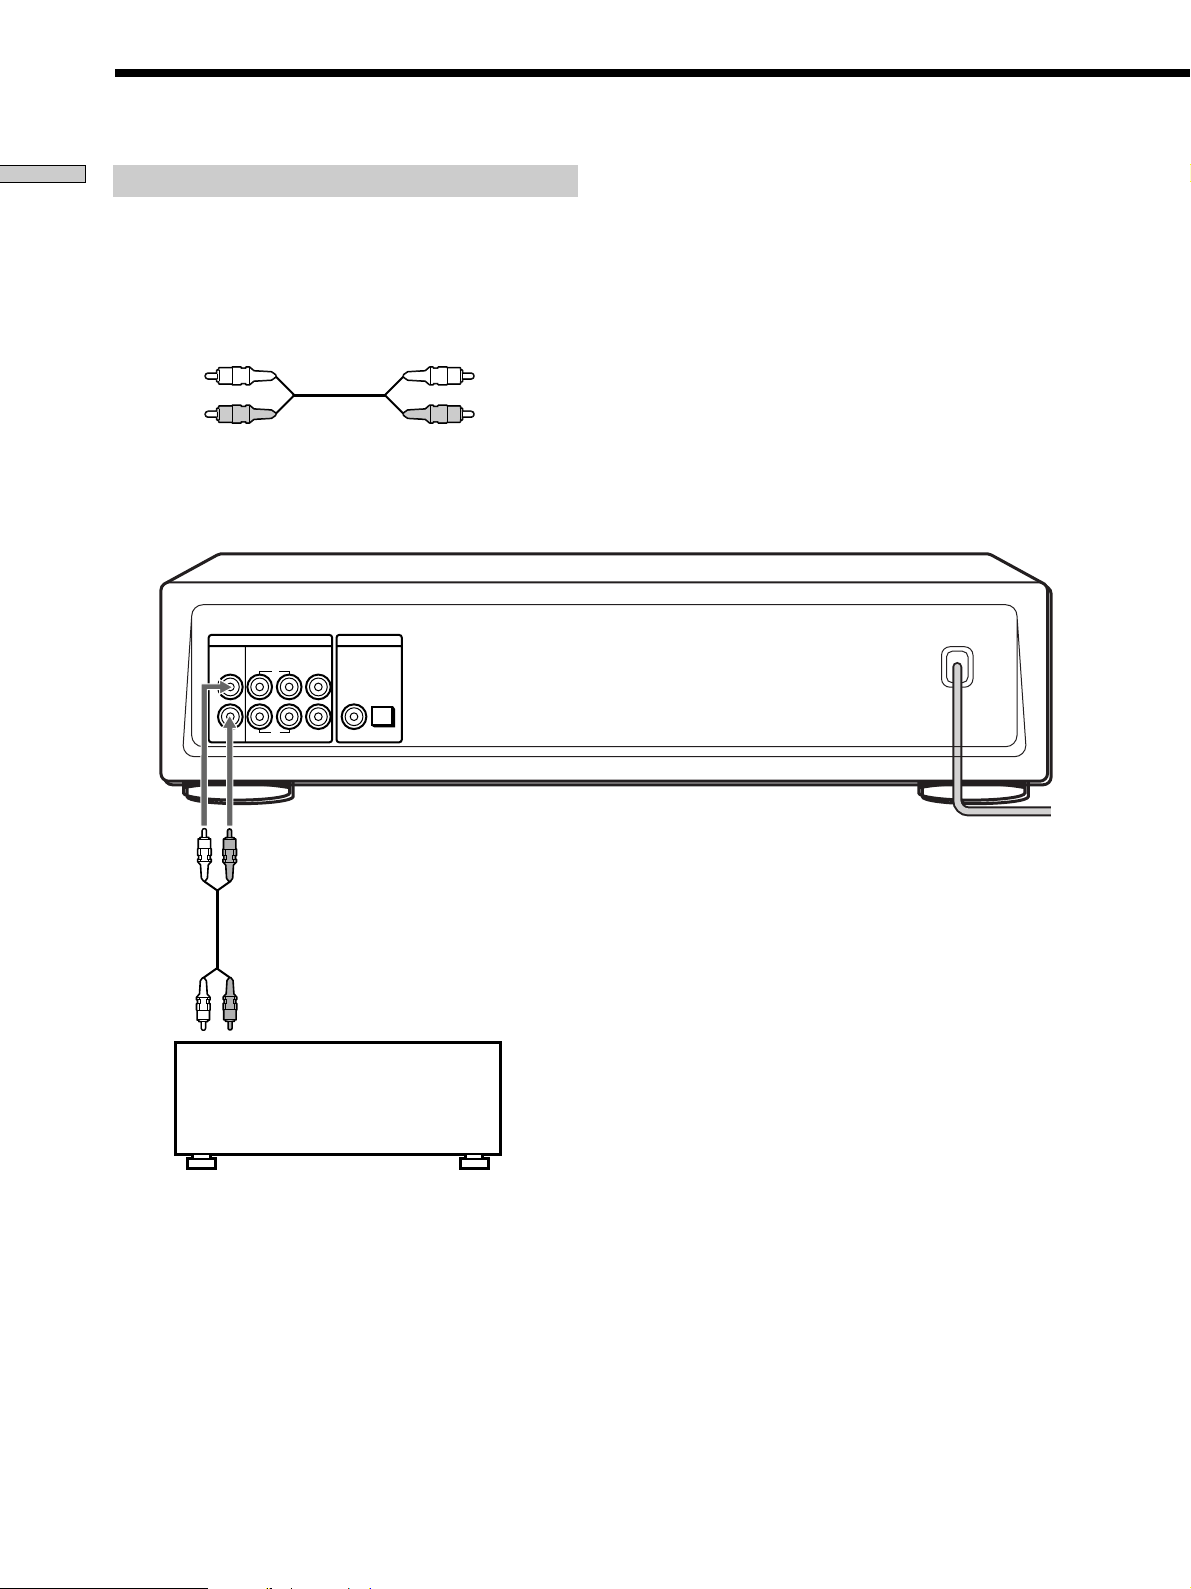
Connecting via ANALOG 5.1CH OUT jacks
Use audio connecting cords for this connection. Connect the
ANALOG 5.1CH OUT jacks (FRONT L/R, SURR L/R, CENTER,
SUBWOOFER) to the corresponding jacks of your amplifier. For
FRONT or SURR connection, use the connecting cords (Red and
White jacks) and be sure to match the colour-coded pin to the
appropriate jacks: white (left) to white and red (right) to red. For
CENTER and SUB WOOFER connection, use the connecting
cords (Black).
FRONT or SURR connection
Audio connecting cords (Red and White) (supplied)
White (L)
Red (R)
White (L)
Red (R)
CENTER or SUB WOOFER connection
Audio connecting cords (Black) (supplied)
Black
Black
Notes
• When you make the Multi-channel connection, connect the
ANALOG 2CH OUT jacks also using another audio connecting
cord so that you can play a CD (or SACD) when you set the
input selector of your amplifier to CD (or SACD) input .
• During playback of a conventional CD or a 2CH Super Audio
CD, the same signal that is output from the ANALOG 2CH
OUT jacks is also output from the ANALOG 5.1CH FRONT L/
R jacks.
• During playback of a Multi-channel Super Audio CD, the same
signal that is output from the ANALOG 5.1CH FRONT L/R
jacks is also output from the ANALOG 2CH OUT jacks. (The
down mixed signal of the Multi-channel signal is not played
back.)
• There are 5CH, 4CH, and 3CH Super Audio CD. When you
play these disc, the signal does not output from all the jacks of
the ANALOG 5.1CH OUT. For details of the playback, see the
cover or instructions of the Super Audio CD.
Getting Started
To FRONT IN
jacks (L/R)
ANALOG
2CH OUT 5.1CH OUT OUT
FRONT COAXIAL OPTICALSURR CENTER
L
R
L
R
SUB
WOOFER
DIGITAL(CD)
To SURROUND or
REAR IN jacks
(L/R)
To SUB WOOFER
IN jack
To CENTER IN
jack
Multi-channel amplifier,
AV amplifier, etc.
GB
5
Hooking Up the Audio Components
Getting Started
Connecting via ANALOG 2CH OUT jacks
Use an audio connecting cords for this connection. Connect the
ANALOG 2CH OUT L/R jacks to the CD (SACD) input jacks of
your amplifier. Be sure to match the colour-coded pin to the
appropriate jacks: white (left) to white and red (right) to red.
Audio connecting cords (Red and White) (not supplied*)
White (L)
Red (R)
* If you do not make the ANALOG 5.1 CH connection (page 5),
you can use the supplied audio connecting cable for the
ANALOG 2CH connection.
ANALOG
2CH OUT 5.1CH OUT OUT
FRONT COAXIAL OPTICALSURR CENTER
L
R
L
R
SUB
WOOFER
DIGITAL(CD)
White (L)
Red (R)
To CD (SACD) IN
jacks (L/R)
GB
6
Stereo amplifier, etc.
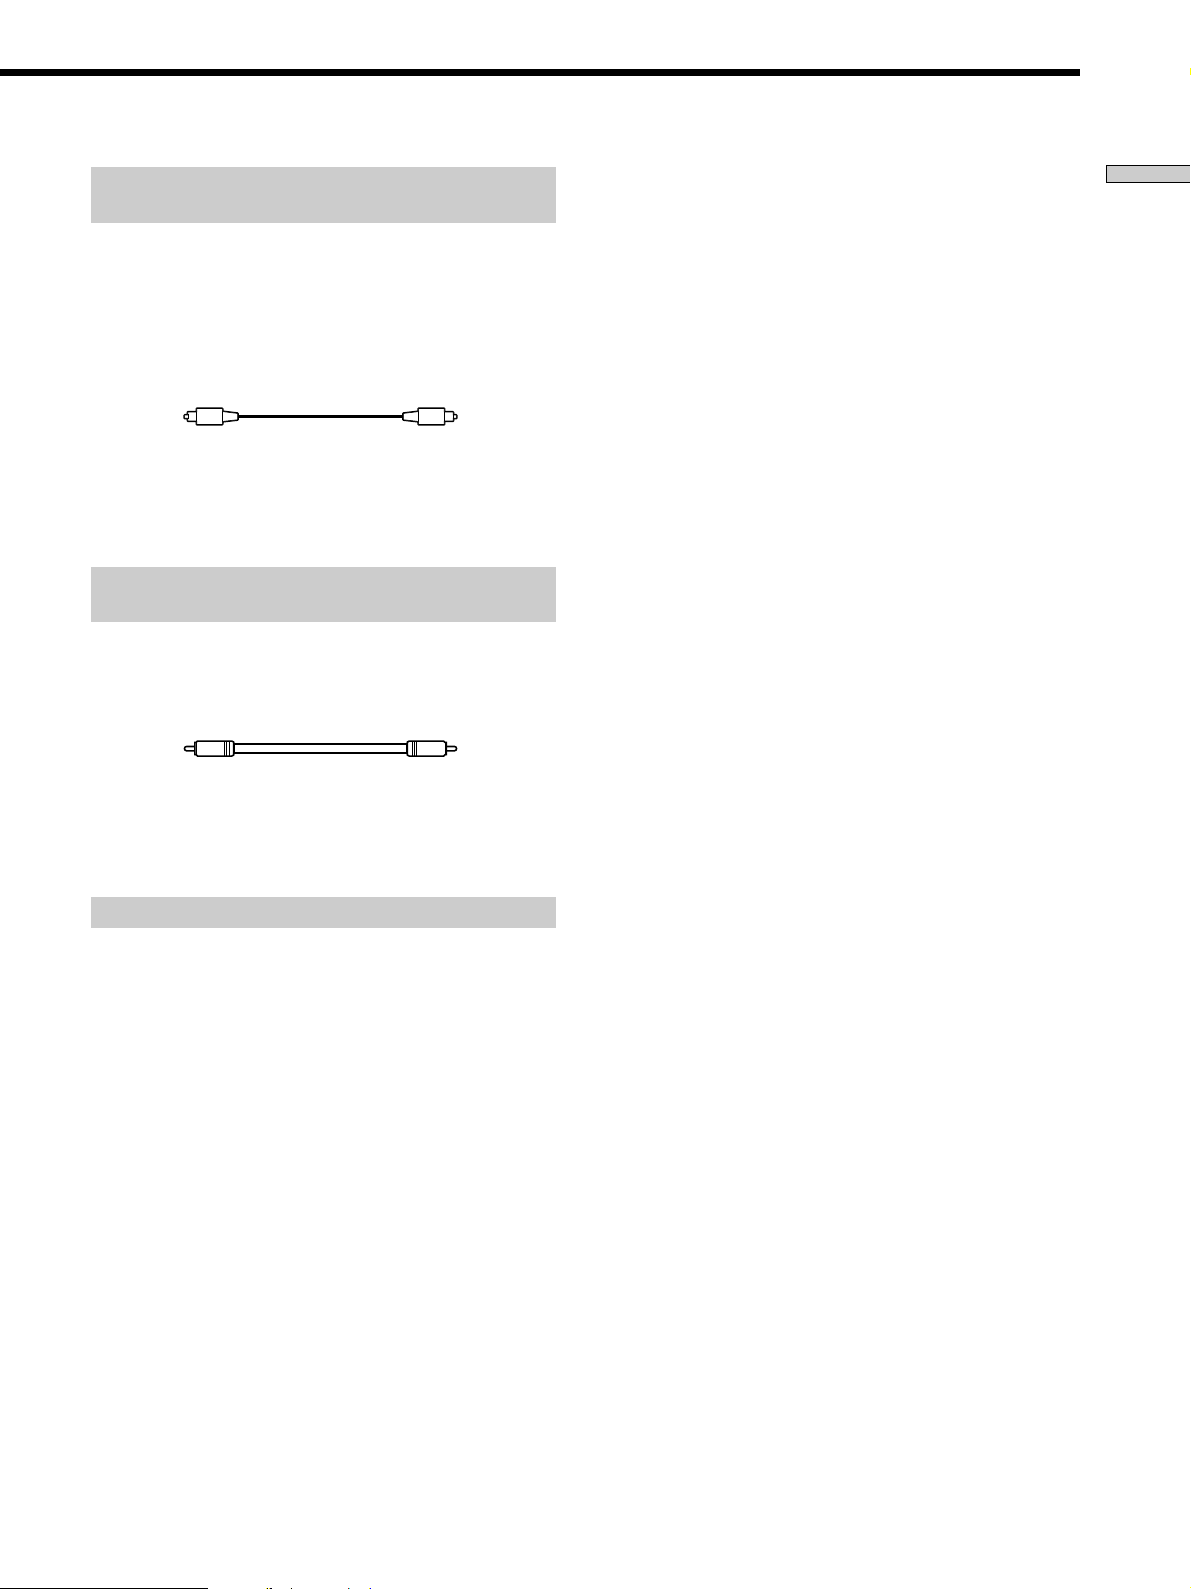
Connecting via DIGITAL (CD) OUT OPTICAL
connector
Use an optical digital cable for this connection. When connecting
the optical digital cable to the DIGITAL (CD) OUT OPTICAL
connector, take the cap off the connectors and push the cable
plugs in until they click into place.
Be careful not to bend or twist the optical cable.
Optical digital cable (not supplied)
Note
Only the audio signals of conventional CDs can be output from
the DIGITAL (CD) OUT connectors. Those of the Super Audio
CD cannot be output through DIGITAL (CD) OUT.
Connecting via DIGITAL (CD) OUT COAXIAL
connector
Use a coaxial digital cable to connect the audio components
equipped with coaxial digital input connectors.
Coaxial digital cable (not supplied)
Getting Started
Note
Only the audio signals of conventional CDs can be output from
the DIGITAL (CD) OUT connectors. Those of the Super Audio
CD cannot be output through DIGITAL (CD) OUT.
Connecting the AC power cord
Connect the AC power cord to a wall outlet.
GB
7

Location and
Functions of
Parts
This chapter tells you about the
location and functions of the various
buttons and controls on the front and
rear panels and the supplied remote.
Further details are provided on the
pages indicated in parentheses.
It also tells you about the information
that appears in the display window.
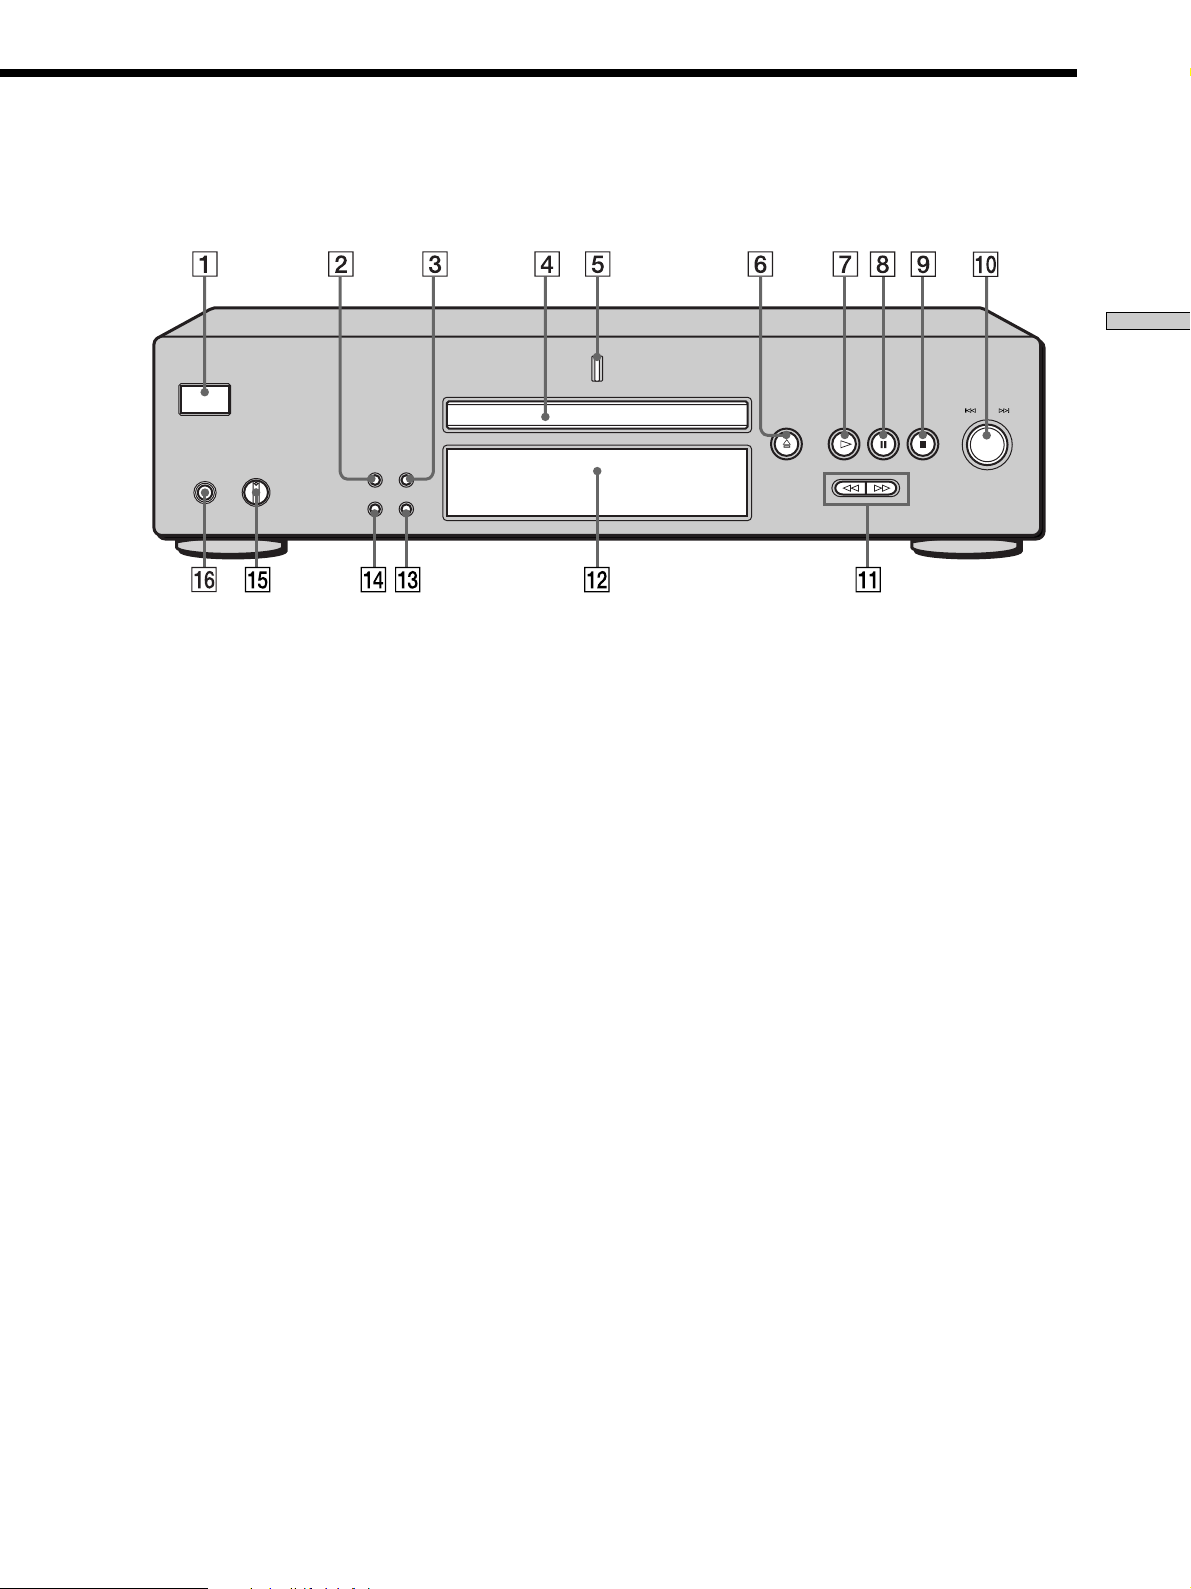
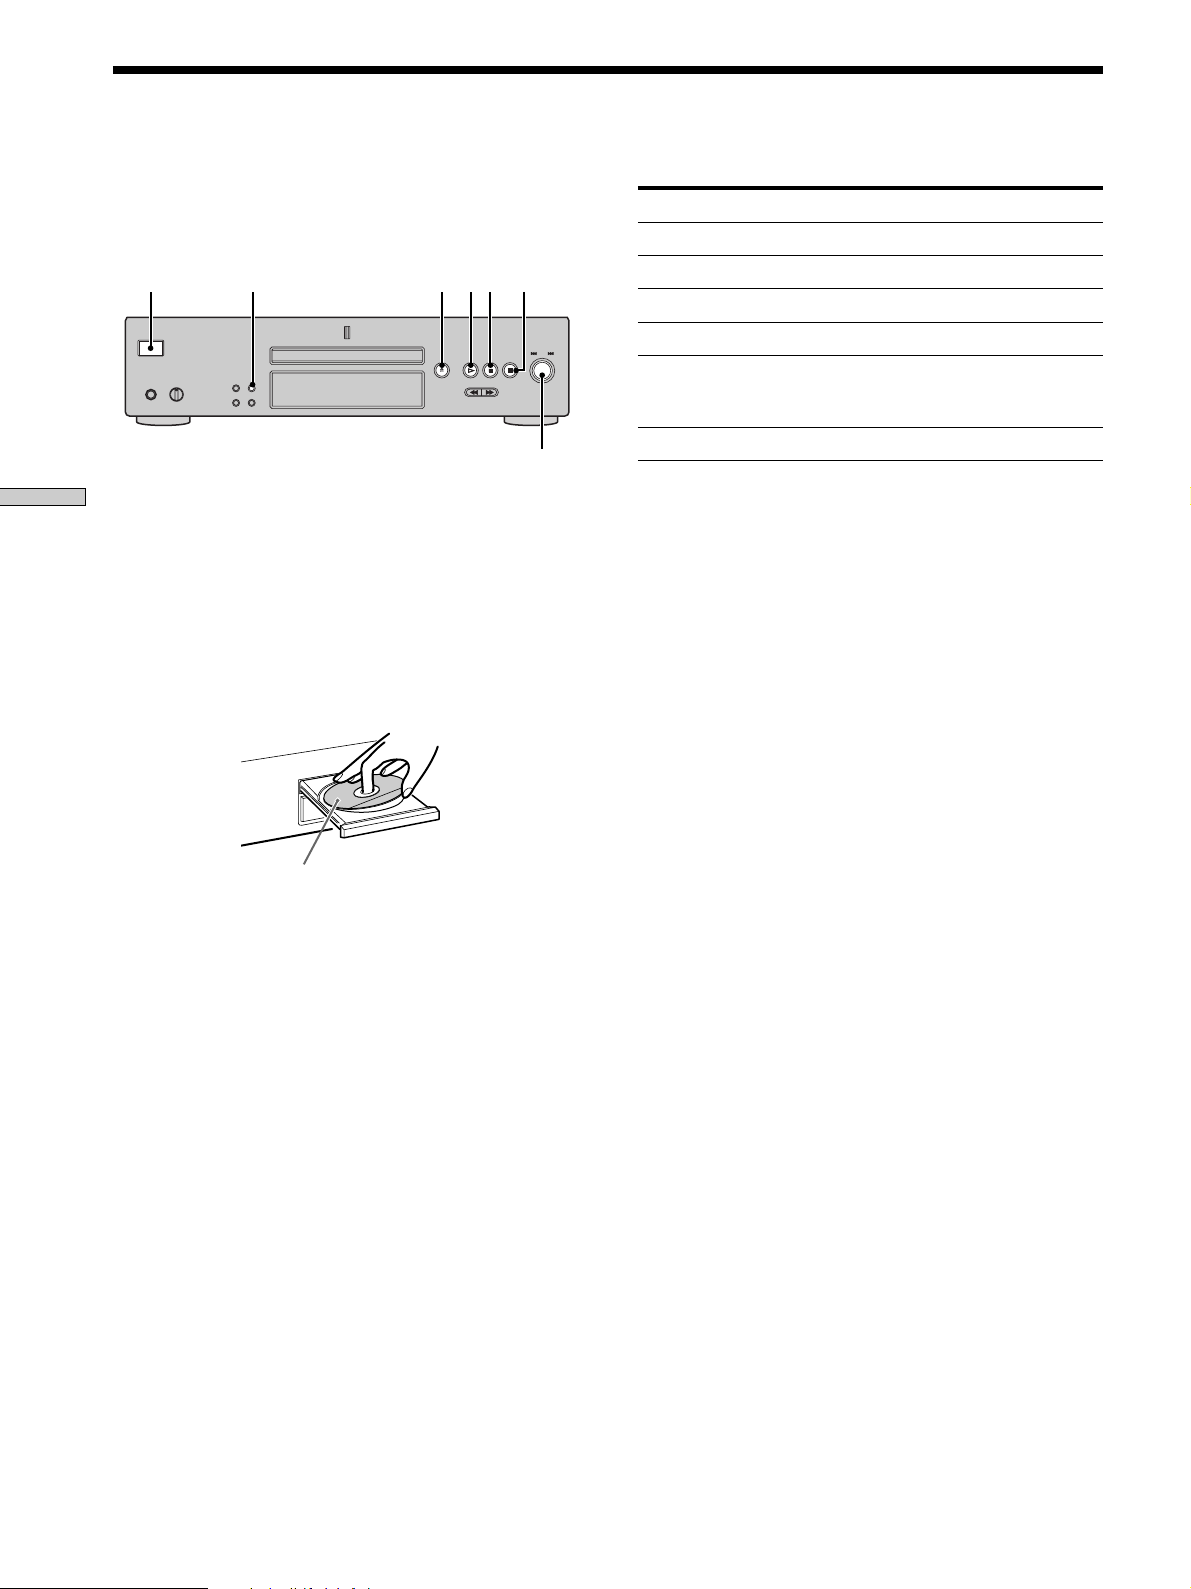
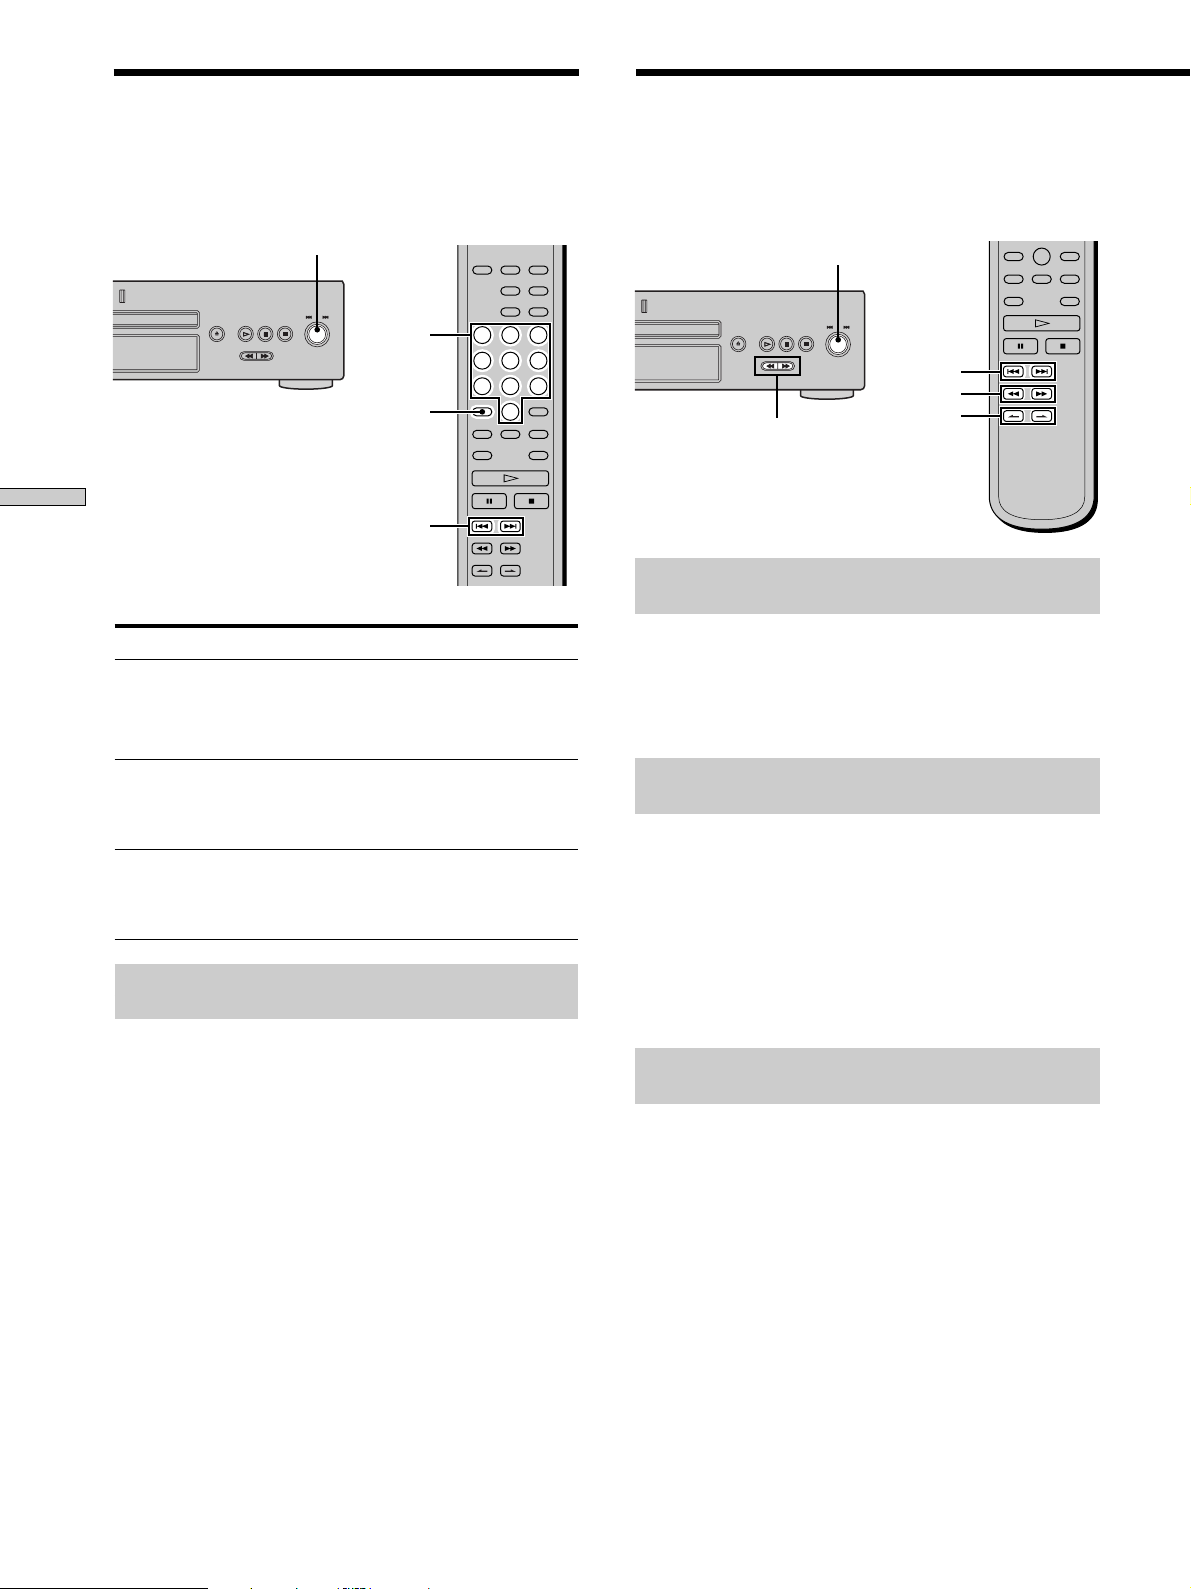
Front Panel Parts
Descriptions
1 POWER switch (14)
Press to turn on the player.
2 TIME/TEXT button (15)
Each time you press the button, the playing time of the
track, the total remaining time on the disc, or TEXT
information appears in the display.
3 SACD/CD button (12)
Each time you press the button, ”SACD“ or ”CD“
appears in the display. Select the type of CD you want
to play.
4 Disc tray (14)
Press A OPEN/CLOSE to open/close the disc tray.
5 Multi-channel indicator
Turns on when you turn on the player, or when the
Multi-channel Super Audio CD is loaded and select
the Multi-channel playback area by pressing MULTI/
2CH.
GB
8
Location and Functions of Parts
POWER
PHONES
PHONE LEVEL
MIN MAX
TIME/TEXT SACD/CD
MENU MULTI/2CH
OPEN CLOSE
AMS
PUSH ENTER
6 A OPEN/CLOSE button (14)
Press to open the disc tray.
7 H button (14)
Press to start play.
8 X button (14)
Press to pause play.
9 x button (14)
Press to stop play.
0 l AMS L dial (AMS: Automatic Music Sensor)
(13)
When you turn the l AMS L dial
counterclockwise by one click, you go back to the
preceding track; when you turn the l AMS L
dial clockwise by one click, you go to the succeeding
track.
qa m/M buttons (18)
Press to locate a portion you want to play within a
track.
qs Display window (15)
Shows various information.
qd MULTI/2CH button (12)
Press to select the playback area when the 2 channel +
Multi-channel Super Audio CD (page 13) is loaded.
qf MENU (13)
Press to enter the menu.
qg PHONES LEVEL
Adjust the headphones volume.
qh PHONES
Connect the headphones.
During playback of a Multi-channel Super Audio CD,
the same signal that is output from the ANALOG
5.1CH FRONT L/R jacks is output from the PHONES
jack.
GB
9

Rear Panel Parts Descriptions
Location and Functions of Parts
ANALOG
2CH OUT 5.1CH OUT OUT
FRONT COAXIAL OPTICALSURR CENTER
L
R
L
R
WOOFER
DIGITAL(CD)
SUB
1 ANALOG 2CH OUT L/R jacks (6)
Connect to an audio component (stereo/2 channel)
using the audio connecting cord.
2 ANALOG 5.1CH OUT jacks (5)
Connect to an amplifier equipped with the 5.1CH
input jacks (Multi-channel amplifier, AV amplifier,
etc.) using the audio connecting cords.
3 DIGITAL (CD) OUT COAXIAL connector (7)
Connect to an audio component using the coaxial
digital cable.
4 DIGITAL (CD) OUT OPTICAL connector (7)
Connect to an audio component using an optical
digital cable.
GB
10
Note
Only the audio signals of the CD can be output from the
DIGITAL (CD) OUT connectors shown in 3 and 4. Those of the
Super Audio CD cannot be output through DIGITAL (CD) OUT.
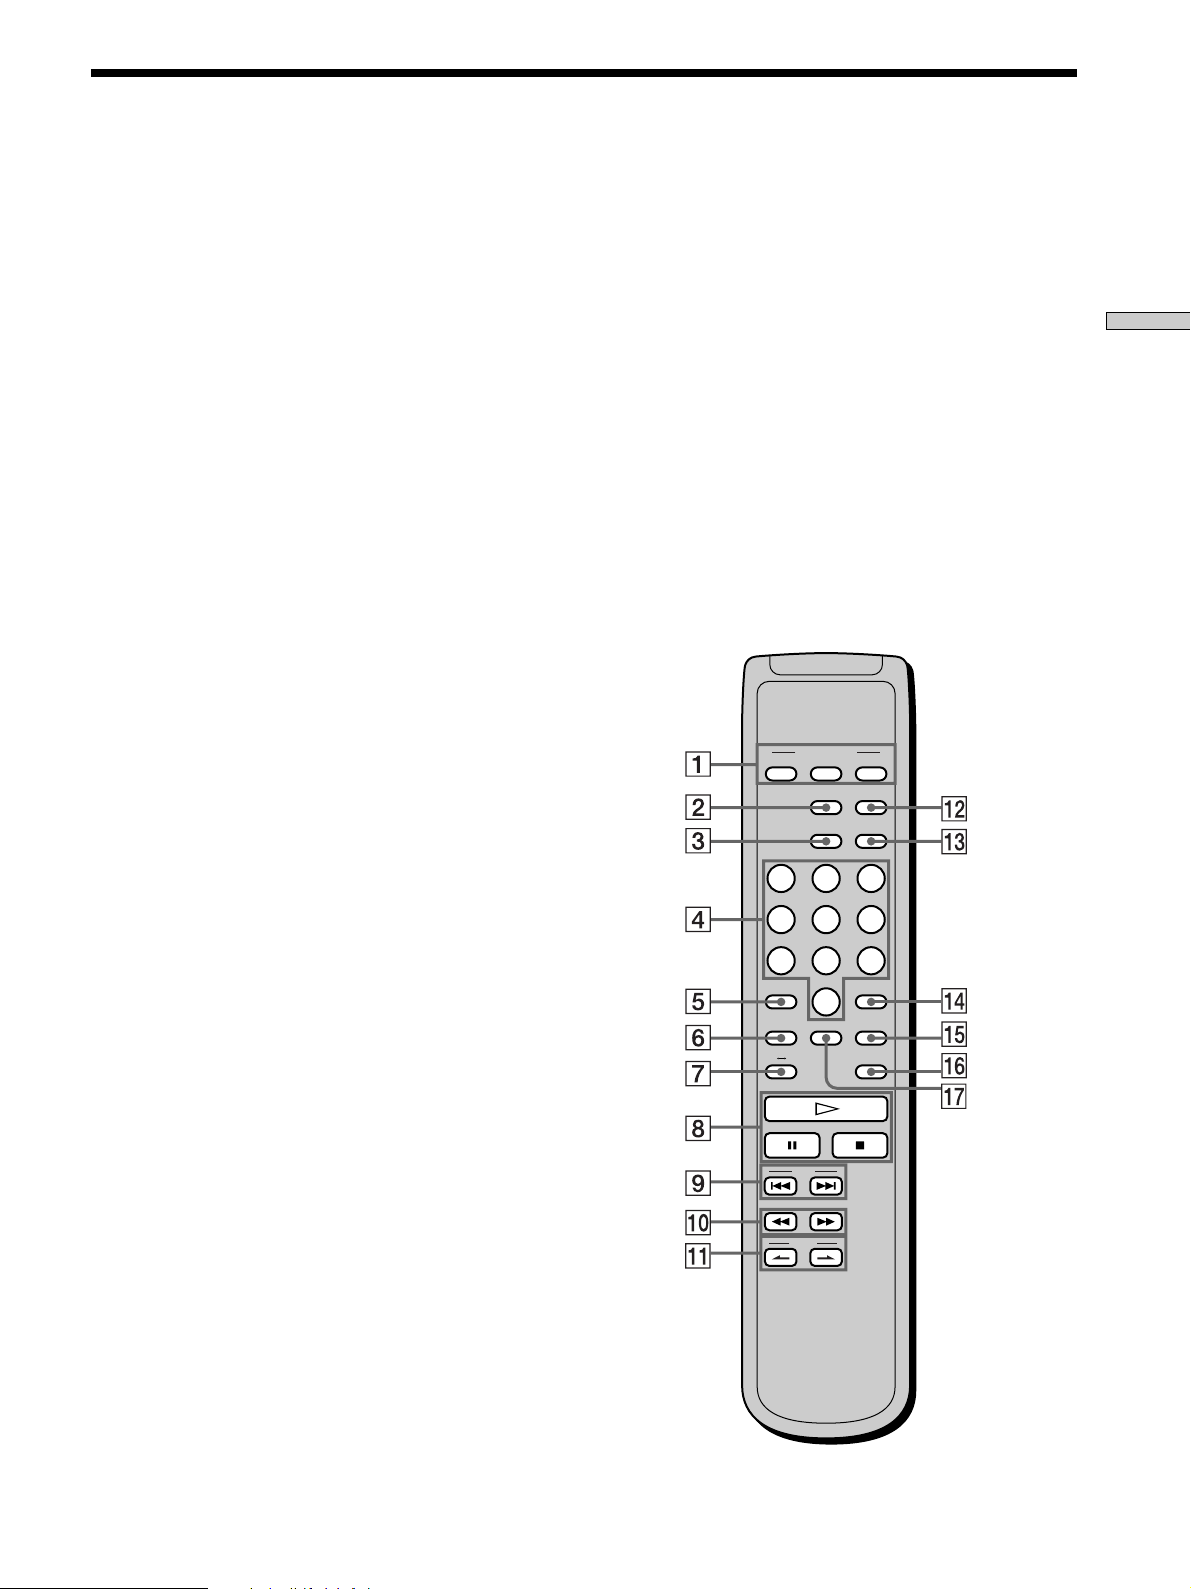
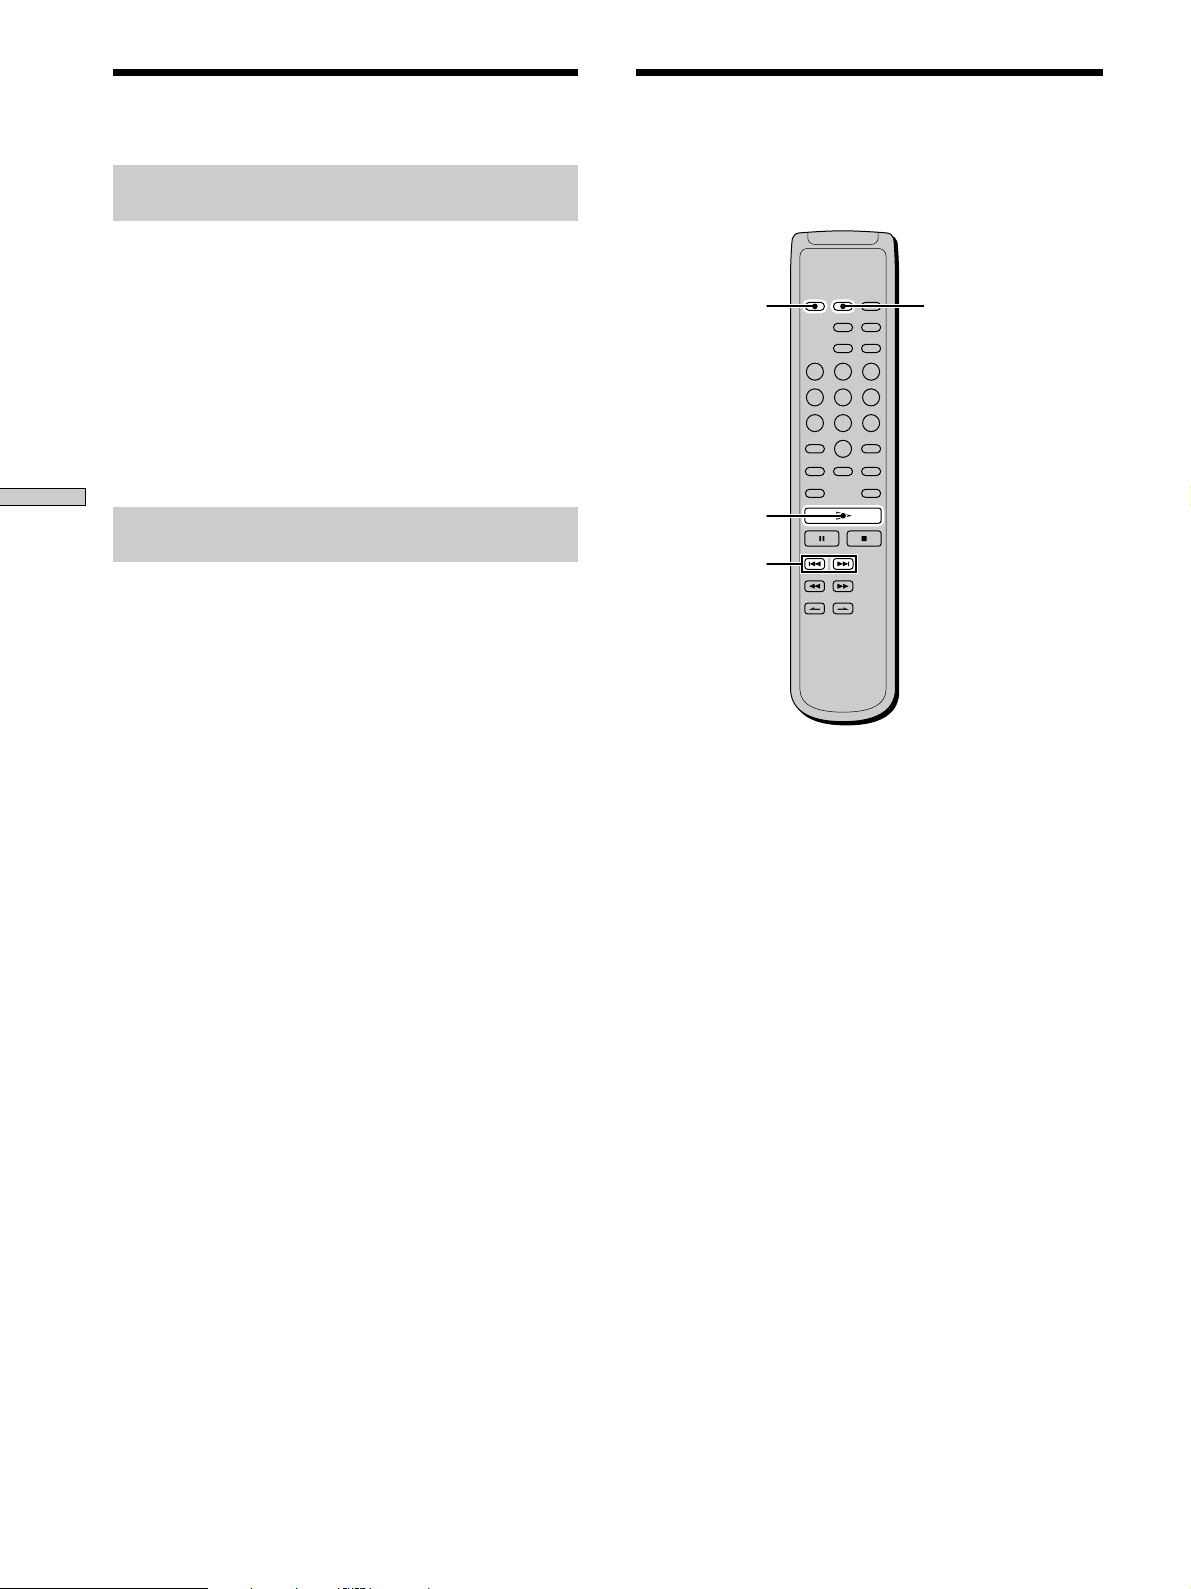
Remote Parts Descriptions
1 CONTINUE button (20)
Press to resume normal play from Shuffle Play or
Programme Play.
SHUFFLE button (20)
Press to select Shuffle Play.
PROGRAM button (21)
Press to select Programme Play.
2 DISPLAY MODE button (16)
Press to turn off the information.
3 TIME/TEXT button (15)
Each time you press the button, the playing time of the
track, the total remaining time on the disc, or TEXT
information appears in the display.
4 Number buttons (18)
Press to enter the track numbers.
5
i
10 button (18)
Press to locate a track numbered over 10.
6 REPEAT button (19)
Press repeatedly to play all tracks or only one track on
the disc.
7 AyB button (20)
Press to select Repeat A-B Play.
8 H button (14)
Press to start play.
X button (14)
Press to pause play.
x button (14)
Press to stop play.
9 AMS ./> (AMS: Automatic Music Sensor)
buttons (18)
Press to locate a specific track.
0 m/M buttons (18)
Press to locate a portion you want to play within a
track.
qs SACD/CD button (12)
Each time you press the button, ”SACD“ or ”CD“
appears in the display. Select the type of CD you want
to play.
qd MULTI/2CH button (12)
Press to select the playback area when the 2 channel +
Multi-channel Super Audio CD (page 13) is loaded.
qf ENTER button (24)
Press to decide the selection.
qg CLEAR button (21)
Press to delete a programmed track number.
qh LEVEL ADJ button (24)
Press to adjust the output level balance for the Multichannel management function (page 22).
qj CHECK button (21)
Press to check the programmed order.
PLAY MODE
CONTINUE SHUFFLE
DISPLAY/
MODE
TIME/TEXT
PROGRAM
SACD/CD
MULTI/2CH
123
456
10/0
CHECK
9
CLEAR
LEVEL
ADJ
78
>10 ENTER
REPEAT
BA
Location and Functions of Parts
qa INDEX >/. buttons (18)
Press to locate a specific point marked with an index
signal when you play a disc that has index signals.
AMS
INDEX
11
GB
Playing Discs
Compatible Disc Types
This chapter explains the various
ways to play discs.
You can play the following discs with this player.
Depending on the type of disc to be played, select the
appropriate indicator by pressing SACD/CD or MULTI/
2CH (pages 14).
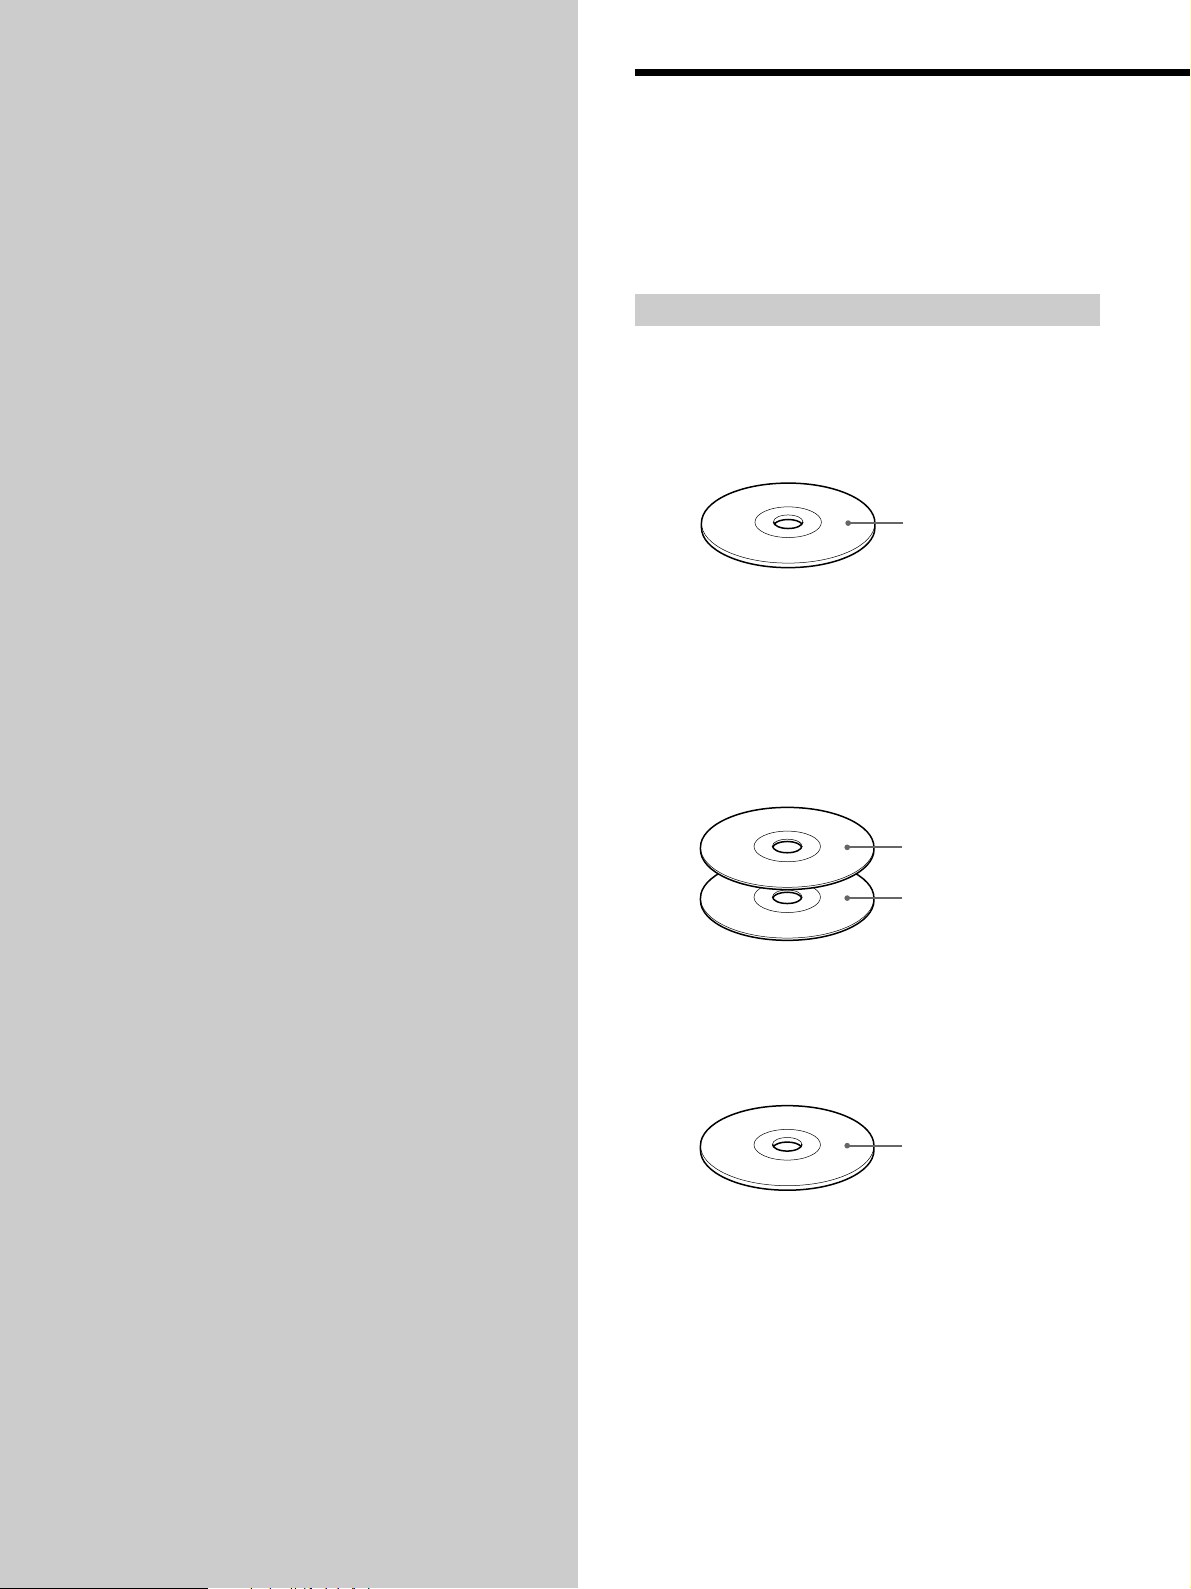
Classification by the layer configuration
Super Audio CD (single layer disc)
This disc consists of a single HD (high density) layer.
When you play this disc, the player is set to the Super
Audio CD playback mode automatically.
HD (Super Audio CD)
layer
Super Audio CD (dual layer disc)
This disc consists of dual HD layers and is capable of
extended play over long periods.
When you play this disc, the player is set to the Super
Audio CD playback mode automatically.
Also, as the dual layer disc consists of dual HD layers on
one side only, it is not necessary to turn the disc over.
HD (Super Audio CD)
layer
HD (Super Audio CD)
layer
Conventional CD
This disc is the standard format.
When you play this disc, the player is set to the
Conventional CD playback mode automatically.
CD layer
12
GB
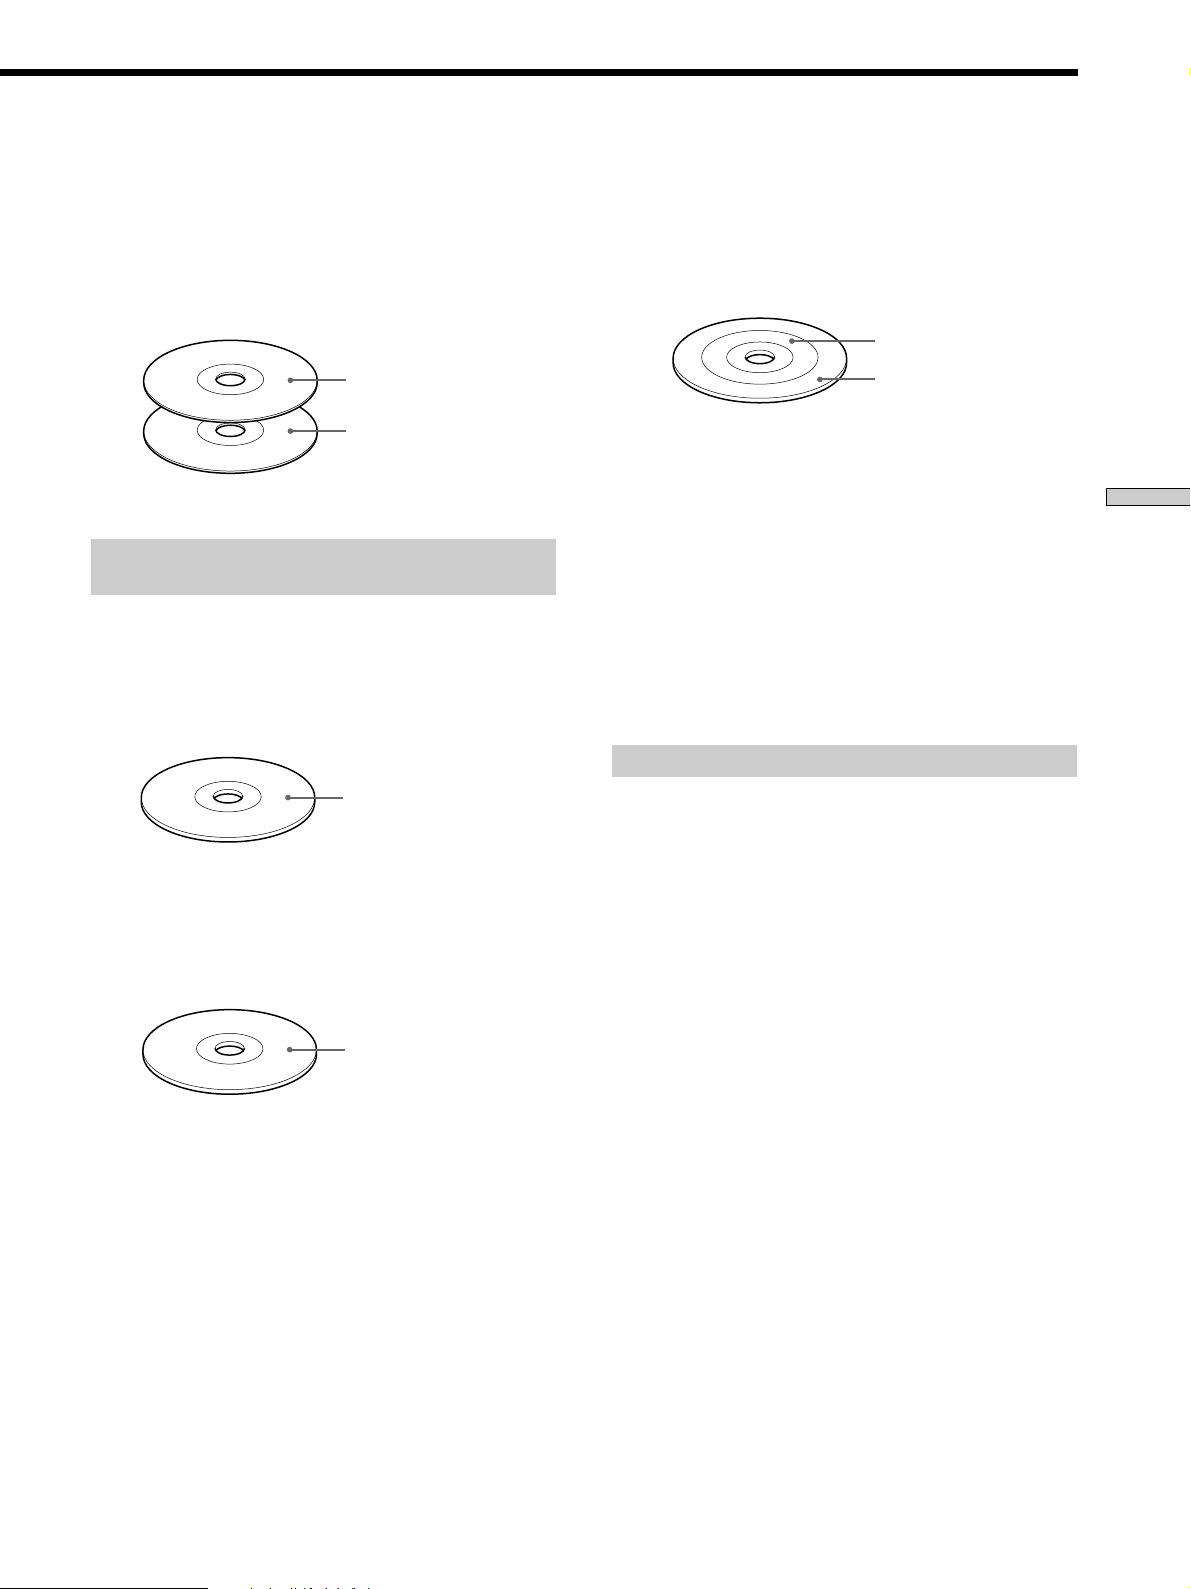
Super Audio CD + CD (Hybrid disc)
This disc consists of an HD layer and a CD layer. Press
SACD/CD to select the layer you want to listen to. Also,
as the dual layers are on one side, it is not necessary to
turn the disc over. You can play the CD layer using a
conventional CD player.
2 channel + Multi-channel Super Audio CD
This disc consists of the 2 channel playback area and the
multi-channel playback area.
Press MULTI/2CH to select the playback area you want to
listen to.
2 channel playback area
CD layer
HD (Super Audio CD)
layer
Classification by the channel
configuration of the Super Audio CD
2 channel Super Audio CD
This disc consists of the 2 channel playback area.
When you play this disc, the player is set to the 2 channel
playback mode automatically.
2 channel playback area
Multi-channel Super Audio CD
This disc consists of the multi-channel playback area.
When you play this disc, the player is set to the multichannel playback mode automatically.
Multi-channel playback
area
You can select the default playback area (2 channel
playback or multi-channel playback area).
1 During stop mode, press MENU.
2 Turn l AMS L until “M/2CH SELECT” appears
in the display.
3 Press l AMS L.
The current playback area appears.
4 Turn l AMS L to select desired playback area,
then press l AMS L.
Incompatible Discs
This player cannot play the following discs. If you try to
play them, the error message “TOC Error” or “NO DISC”
will appear or there will be no sound.
• CD-ROM
• DVD, etc.
Playing Discs
Multi-channel playback
area
13
GB
Playing a Disc
The operations for normal play and the basic operations
during play are explained below.
POWER
Playing Discs
1 Turn on the amplifier. Turn down the volume level
to the lowest.
2 Select the player position using the input selector
on the amplifier.
3 Press POWER to turn on the player.
4 Press A OPEN/CLOSE to open the disc tray, and
place a disc on the tray.
SACD/CD
With the label side up
A OPEN/CLOSE
Xx
H
lAMSL
Basic operations during play
To Press
Stop play x
Pause play X
Resume play after pausing X or H
Locate a succeeding track Turn lAMSL clockwise
Locate the beginning of the Turn lAMSL
current track or a preceding counterclockwise
track
Eject the disc A OPEN/CLOSE
z
If you turn on the player when a disc is already loaded
Playback starts automatically. If you connect a commercially
available timer, you can set it to start playing the disc at any time
you want.
z
To select a layer you want to listen to when playing a hybrid
disc (page 13)
After you stop play using x, press SACD/CD repeatedly to light
either the “SACD” or “CD.”
z
To select a playback area you want to listen to when playing
a 2 channel + Multi-channel Super Audio CD (page 13)
After you stop play using x, press MULTI/2CH repeatedly to
light either the “MULTI CH” or “2 CH.”
Note
During playback, increase the volume level gradually starting
from the lowest level. The output from this unit may contain
band width that are out of the normal listening range. This may
cause damage to the speakers or ears.
5 Press SACD/CD to select the SACD or CD.
Each time you press the button, the SACD or CD
appears alternately in the display. Select the type of
disc on the tray. For details, see page 12.
6 Press H.
Playback starts from the first track. If you want to start
playing from a specific track, turn lAMSL to
select the track number before pressing H.
7 Adjust the volume on the amplifier.
14
GB
Using the Display
The display window shows various information about the
disc or track being played. This section describes the
current disc information and information that appears for
each play status.
MENU
DISPLAY MODE
TIME/TEXT
lAMSL
Disc information when a disc is loaded
Depending on the disc that is currently loaded, the
display shows as follows:
2 channel Super Audio CD
2CH
SACD
12345
678910
Multi-channel Super Audio CD
MULTI 5.1CH
SACD
12345
678910
During playback
a 5.1 channel
Super Audio CD
Conventional CD
or
MULTI 5 CH
SACD
12345
678910
During playback
a 5 channel
Super Audio CD
or
12345
678910
During
playback
other Super
Audio CDs or
during stop
mode
MULTI CH
SACD
Playing Discs
CD
12345
678910
Displaying information while the player is
stopped Z
Press TIME/TEXT.
The display shows the total number of tracks and total
playing time,.
Total number of tracks
TRACK MIN SEC
1 0 45.28
Total playing time
MULTI CH
SACD
12345
678910
15
GB
SONYHITS
SACD
MULTI CH
TEXT
DISC
12345
678910
1045.28
SACD
MULTI CH
TEXT
TRACK INDEX MIN SEC
12345
678910
SONY BAND
SACD
ART.
MULTI CH
TEXT
12345
678910
Using the Display
Displaying information while the player is
playing Z
Press TIME/TEXT.
Each time you press the button, the current track number
and its elapsed time or remaining time appears, or the
total remaining time for the disc appears in the display.
When the player detects a Multi-channel Super Audio
CD, the channel information appears before the default
display appears.
Playing track number and elapsed playing time of
the current track (default display)
Playing Discs
11 1.57
Playing track number and remaining time of
the current track
1-1.56
TRACK INDEX MIN SEC
Press TIME/TEXT
TRACK MIN SEC
Press TIME/TEXT
MULTI 5.1CH
SACD
12345
678910
MULTI 5.1CH
SACD
12345
678910
Displaying the information of a TEXT disc
Z
TEXT discs contain information, such as the disc name or
artist name, as well as the audio signals. This player can
display the disc name, artist name, and current track
name as TEXT information.
When the player detects a TEXT disc, “TEXT” appears in
the display. If your TEXT disc has several languages,
“TEXT” and “MULTI” appear in the display. When you
want to check the information in another language, see
“Displaying the information of a TEXT disc in other
languages” on page 17.
Displaying the information of a TEXT disc
in stop mode Z
Press TIME/TEXT.
Each time you press the button, the disc name or artist
name appears in the display. When you select the artist
name, “ART.” appears in the display.
• Before you start playing
Disc title
Total remaining time on the disc
-43.32
Channel information (appears only when the player
detects a Multi-channel Super Audio CD)
TRACK
[MULTI] 5.1 CH
Turning off the information in the display
Z
Each time you press DISPLAY MODE on the remote while
playing a disc, the display turns off and on alternately.
Even when the display is turned off, the display turns on
if you pause or stop play. When you resume play, the
display turns off again.
Before you start playing, when you press DISPLAY
MODE to turn off the display, “DISPLAY OFF” appears,
and when you press the button to turn on the display,
“DISPLAY ON” appears.
MIN SEC
Press TIME/TEXT
MULTI 5.1CH
SACD
12345
678910
MULTI 5.1CH
SACD
12345
678910
Press TIME/TEXT
Artist name
Press TIME/TEXT
Total number of tracks and total playing time
Press
TIME/
TEXT
GB
16
Display information of a TEXT disc while
playing a disc Z
Displaying the information of a TEXT disc
in other languages
The current track name appears. If the disc name has
more than 15 characters, the first 14 characters will remain
after the name scrolls by in the display.
When the player detects a Multi-channel Super Audio
CD, the channel information appears before the playing
time of the current track appears.
• While playing a disc
Track title
MULTI 5.1CH
SACD
TRACK
HITECHBLUES
Press TIME/TEXT
Channel information (appears only when the player
detects a Multi-channel Super Audio CD)
TRACK
[MULTI] 5.1 CH
Playing time of the current track
TRACK INDEX MIN SEC
111.56
Press TIME/TEXT
TEXT
TEXT
TEXT
12345
678910
MULTI 5.1CH
SACD
12345
678910
MULTI 5.1CH
SACD
12345
678910
You can change the displayed language if the TEXT disc
has multi language capacity. When the player detects such
a TEXT disc, “TEXT” and “MULTI” appear in the display.
Change the language according to the procedures below.
1 Press MENU in stop mode.
2 Turn l AMS L until “LANGUAGE” appears in
the display.
3 Press l AMS L.
The current selected language (English, French,
German, etc.) flashes.
If the player cannot display the language used in a
TEXT disc, “Other Lang” appears in the display.
4 Turn l AMS L until the desired language
appears in the display.
5 Press l AMS L.
After a few seconds, the information appears in the
selected language.
Playing Discs
Remaining time on the current track
MULTI 5.1CH
SACD
TRACK MIN SEC
1 -1.57
TEXT
12345
678910
Press TIME/TEXT
Remaining time on the disc
MULTI 5.1CH
SACD
MIN SEC
-43.32
TEXT
12345
678910
Press
TIME/
TEXT
Notes
• The display may not show all the characters, depending on the
disc.
• This player can display only the disc name, artist name, and
track names from TEXT discs. Other information cannot be
displayed.
17
GB
Locating a Specific Track
During stop or play mode, you can locate any track to be
played.
Locating a Particular Point
in a Track
You can locate a particular point in a track during play or
play pause.
Playing Discs
To locate
The next or
succeeding tracks
The current or
preceding tracks
A specific track directly
Locating a track directly by entering the
track number Z
lAMSL
Number
buttons
>10
./>
You need to
Turn l AMS L clockwise until
you find the track. When using the
remote, press > repeatedly until you
find the track.
Turn l AMS L counterclockwise
until you find the track. When using the
remote, press . repeatedly until you
find the track.
Turn l AMS L until you find the
track number you want. When using
the remote, press . or >
repeatedly until you find the track.
lAMSL
./>
m/M
m/M
INDEX
>/.
Locating a point while monitoring the
sound (Search)
Press and hold m/M during play.
You will hear intermittent playback as the disc goes
forward or reverses.
When you reach the desired point, release the button.
Locating a point by observing the time
indication (High-Speed Search)
Press and hold m/M during play pause.
You will not hear the playback sound.
z
When “Over!!” appears in the display
The disc has reached its end. Press . or m to go back.
Note
Tracks that are only a few seconds long may be too short for
monitoring. In this case, the player may not search correctly.
Press the number button(s) to enter the track number.
z
To enter a track number over 11 Z
1 Press >10.
2 Enter the corresponding digits.
To enter 0, press 10/0 instead.
Examples:
• To play track number 30, press >10, then 3 and 10/0.
• To play track number 100, press >10 twice, then 1, and 10/0
twice.
GB
18
Locating a point using the index function
(Index Search) Z
Press INDEX. or INDEX> repeatedly in play or
pause mode.
z
What is an INDEX?
Some SACD or CD are provided with an index marking system
which divides tracks or discs into smaller segments. This is
especially useful when you want to locate a certain point within a
long track (in classical music for example). The index search
function works only when you use a commercially available
indexed discs (usually indicated on the label).
Locating a point by setting the start time
(Time Search)
1 Press ./> (or turn l AMS L) to select
the desired track in stop mode.
2 Press and hold m/M to set the time to start play
while looking at the display.
You can set the time from the beginning of the desired
a track when you press M at first, and set the time
from the end of the desired track backward’s when
you press m at first.
Playing Tracks Repeatedly
Z
You can play an entire disc or portions thereof repeatedly.
This function can be used with Shuffle Play to repeat all
the tracks in random order (page 20), or with Programme
Play to repeat all the tracks in a programme (page 21).
You can also repeat a specific track or portion within a
track.
TRACK MIN SEC
5 2.57
2 Press H.
Play will start at the time search.
MULTI 5.1CH
SACD
12345
678910
REPEAT
AyB
H
x
Note
If you turn off the player or disconnect the mains lead, the player
will store the last setting of repeat play (“Repeat All” or “Repeat
1”) and recall it the next time you turn on the player. However,
the setting of the Repeat A-B Play will be cancelled if you turn off
the player or disconnect the mains lead.
Repeating all the tracks on the disc
(Repeat All Play)
Press REPEAT once, then press H.
“REPEAT” appears in the display and Repeat All Play
starts.
The repeat play changes depending on the play mode you
select.
Playing Discs
When the play mode is
Normal play (page 14)
Shuffle Play (page 20)
Programme Play (page 21)
The player repeats
All the tracks in sequence
All the tracks in random order
All the tracks in the programme in
sequence
To stop Repeat All Play
Press x.
To resume normal play
Press REPEAT repeatedly until “REPEAT” goes off.
19
GB
Playing Tracks Repeatedly Z
Playing Tracks in Random
Order (Shuffle Play) Z
Repeating the current track
(Repeat 1 Play)
While the track you want to repeat is being played,
press REPEAT repeatedly until “REPEAT 1” appears in
the display.
Repeat 1 Play starts.
To stop Repeat 1 Play
Press x.
To resume normal play
Press REPEAT repeatedly until “REPEAT 1” goes off.
Playing Discs
Repeating a specific portion within a
track (Repeat A-B Play)
You can specify one portion within a track to be played
repeatedly. Note that the portion that you specify must be
within the boundaries of a single track.
1 While the player is playing, press AyB at the
starting point (point A) of the portion to be played
repeatedly.
“REPEAT” appears and “A” flashes in the display.
When you select Shuffle Play, the player plays all the
tracks on the disc in random order.
CONTINUE
H
./>
SHUFFLE
2 Continue playing the track (or press M) to locate
the ending point (point B), then press AyB.
“REPEAT A-B” appears and Repeat A-B Play starts.
To stop Repeat A-B Play and resume normal play
Press REPEAT or x.
z
You can set a new starting point and ending point during
Repeat A-B Play
You can change the current ending point to a new starting point,
then specify a new ending point to repeat another portion right
after the current portion.
1 During Repeat A-B Play, press AyB.
The current ending point changes to the new starting point
(point A).
“REPEAT” lights up and “A-” flashes in the display.
2 Locate the new ending point (point B) and press AyB.
“REPEAT A-B” lights up and the player starts to repeat the
newly specified portion.
When you want to restart from the starting point A, press H
during AyB repeat.
1 Press SHUFFLE in stop mode.
2 Press H.
Shuffle Play starts.
“;” appears while the player is “shuffling” the tracks.
The player will stop after playing all the tracks once.
To resume normal play
Press CONTINUE.
z
You can locate tracks during Shuffle Play
Press ./>.
Press > to locate the next track or press . to locate the
beginning of the current track. The player does not go back to
tracks which have already been played.
20
GB

Creating Your Own
Programme (Programme Play) Z
You can pick out the tracks that you like and specify the
playback order in a programme containing up to 32
tracks (or 999 min. 59 sec. in total programme time)
CONTINUE
Number
buttons
>10
CHECK
H
PROGRAM
CLEAR
./>
1 Press PROGRAM in stop mode.
“PROGRAM” appears in the display.
2 Press the number buttons to enter the track
number.
Checking the contents of the programme
Before you start playing or while the player is playing,
press CHECK.
Each time you press the button, the track numbers will
appear in the display in the programmed order.
When you press CHECK while the player is playing, the
track number appears from the next track numbers of the
current playing track number.
Changing the contents of the programme
You can change the contents of the programme in stop
mode.
To
Erase a track
Erase from the last
track in the
programme
Add a track to the
end of the
programme
Erase all tracks
Do the following:
1 Press CHECK repeatedly until the track
number you want to erase appears.
2 Press CLEAR.
Press CLEAR.
Each time you press the button, the last
track of the programme is erased.
Press ./> to select the track you want
to add, then press PROGRAM. When using
the remote, press the number button of the
track to be added.
Hold down CLEAR or x (for about 2
seconds) until ”Prog CLEAR“ appears in
the display.
Playing Discs
If you entered the wrong track number
Press CLEAR to erase the track number and reenter
the correct track number using the number buttons.
To select a track number over 11
Press >10 (page 18).
3 Repeat step 2 to enter other tracks.
Each time you enter a track number, the total
programme time appears in the display.
4 Press H.
Programme Play starts.
To resume normal play
Press CONTINUE.
z
The programme remains even after Programme Play ends
Press H to play from the beginning of the programme again.
The programme remains even if you stop play.
Note
If you turn off the player, disconnect the mains lead, or press
A OPEN/CLOSE, the programme will be erased.
21
GB
Listening to a Multichannel Super Audio CD
(Multi-channel management function)
This player is equipped with a Multi-channel
management function that sets the playback mode of the
Super Audio CD by the DSD-DSP (built into the player)
according to the layout or size of your speaker.
Example of the speaker layout
Playing Discs
To set the Multi-channel management:
1 Select the appropriate preset playback mode (2 channel
playback or Multi-channel playback).
2 Adjust the output level balance of each speaker (only
when you select the Multi-channel playback mode).
Front speakers
L
Sub woofer
L
Surround speakers
R
Center speaker
Selecting 2 channel playback mode
1 Press MENU.
2 Turn l AMS L until “2CH SPK MODE” appears
in the display.
3 Press l AMS L.
The playback mode appears in the display.
Playback
Front speakers
Sub woofer
mode
2CH Direct
2CH + SW
R
4 Turn l AMS L until desired mode appears in
Each signal outputs directly from front
speakers. No signal outputs from the Sub
woofer.
a
a
the display.
5 Press l AMS L.
Note
You cannot operate this function when the player is in the CD or
Multi-channel playback mode. Operate this function when the
player is in the 2 channel Super Audio CD playback mode, the
disc tray is opened, or no discs are in the player.
Notes
• This features only work when you play the Super Audio CD.
• You may not be able to adjust the output level balance
depending on the speaker layout mode that you selected.
MENU
lAMSL
ENTER
LEVEL ADJ
Selecting Multi-channel playback mode
1 Press MENU.
2 Turn l AMS L until “MCH SPK MODE”
appears in the display.
3 Press l AMS L.
The playback mode appears in the display.
––
––
Surround
speakers
Large
Large
Small
Small
Small
Large
Large
Playback
mode
MCH Direct
5 – Large + SW
5 – Large
5 – Small + SW
FRT – Large +SW
FRT – Large
No – CNTR + SW
No – CNTR
Front
speakers
Each signal outputs directly from each
speaker.
Large
Large
Small
Large
Large
Large
Large
Center
speaker
Large
Large
Small
Small
Small
Sub
woofer
a
––
a
a
––
a
––
22
./>
GB

About “Large” or “Small” speaker
A “Large” speaker is a speaker that can reproduce bass
frequencies plentifully. If you select “Small” for the
surround speakers, the bass frequencies will come
from the front speakers and/or sub woofer.
For normal use, select “MCH Direct” or set all the
speakers to “Large” (ex. “5 – Large + SW,” “5 – Large,”
etc.). If the sound is noisy or the Multi-channel
playback is not effective while playing a Multi-channel
Super Audio CD, change the settings of the speakers
concerned to “Small.”
4 Turn l AMS L until desired mode appears in
the display.
5 Press l AMS L.
The output level balance setting display appears.
To set the output level balance, go to Step 4 in
“Adjusting the output level balance on the front panel
of the player” on page 23 or Step 2 in “Adjusting the
output level from the remote” on page 24.
To return to the normal display, press MENU.
Notes
• The Multi-channel management function does not work when
you select “MCH Direct” (you cannot set the output level
balance of each speaker).
• The front speaker setting is set to “Large” automatically when
you set the Sub woofer to “––.”
• When you play a track that does not contain the LFE* signal,
the signal for the Sub woofer does not output. Therefore, when
you select “MCH Direct,” “5 – Large + SW,” or “No – CNTR +
SW,” no signal outputs from the Sub woofer. However, when
you select “5 – Small + SW” or “FRT – Large +SW” (when you
set the speaker setting to “Small”), the bass frequencies will
come from the sub woofer.
* Low Frequency Enhancement (described as “.1 CH”)
Adjusting the output level balance of
each speaker
You can adjust following items with the Multi-channel
management function:
CNTR BALANCE
The relative output level balance between the front
speakers (FRONT L/R) and the center speaker (CENTER)
SURR BALANCE
The relative output level balance between the front
speakers (FRONT L/R) and the surround speakers (SURR
L/R)
SW BALANCE
The relative output level balance between the front
speakers (FRONT L/R) and the sub woofer (SUB
WOOFER)
Note
Some adjustment may not work depending on the Multi-channel
playback mode that you selected.
Adjusting the output level balance on the front
panel of the player
You can adjust the output level balance of each speaker
while listening during playback. You can also adjust while
listening to the test tone during stop mode.
1 Press MENU.
2 Turn l AMS L until “LEVEL ADJUST” appears
in the display.
3 Press l AMS L.
During playback, go to Step 6.
4 Turn l AMS L until “TONE ON” appears in the
display.
Playing Discs
5 Press l AMS L.
The test tone issues from the speakers in sequence
with the speaker type appearing in the display.
6 Turn l AMS L until the desired item appears
in the display.
Select the item from “CNTR BALANCE,” “SURR
BALANCE,” or “SW BALANCE.”
Note
When you set the Sub woofer to “––” in the Multi-channel
playback mode (page 22), “SW BALANCE” does not appear.
Similarly, “CNTR BALANCE” or “SURR BALANCE” does
not appear when you set the corresponding speaker to “––.”
23
GB
Listening to the Multi-channel Super Audio CD
7 Press l AMS L.
The balance adjustment display appears.
In stop mode, the test tone is output from the selected
speaker.
Example: When you select “SURR BALANCE”
Playing Discs
8 Turn l AMS L to adjust the output level.
9 Press l AMS L.
The player status returns to Step 6.
Repeat Step 6 through 9 for more adjustments.
10
Press MENU after you finish adjusting.
The display returns to the normal display.
Adjusting the output level from the remote Z
You can adjust the output level of each speaker from the
listening position by using the supplied remote.
during stop mode, the test tone is output
from the front speakers and surround
speakers.
DISC
FRT:_____:SURR
DISC
FRT:_____:SURR
MULTI CH
SACD
12345
678910
MULTI CH
SACD
12345
678910
5 Press ENTER.
The balance adjustment display appears.
In stop mode, the test tone is output from the selected
speaker.
Example: When you select “SURR BALANCE”
during stop mode, the test tone is output
from the front speakers and surround
speakers.
MULTI CH
DISC
FRT:_____:SURR
SACD
12345
678910
6 Press ./> repeatedly to adjust the output
level.
MULTI CH
DISC
FRT:_____:SURR
SACD
12345
678910
7 Press ENTER.
The player status returns to Step 4.
Repeat Step 4 through 7 for more adjustments.
8 Press LEVEL ADJ after you finish adjusting.
The display returns to the normal display.
1 Press LEVEL ADJ during playback or stop mode.
During playback, go to Step 4.
2 Press ./> repeatedly until “TONE ON”
appears in the display.
3 Press ENTER.
The test tone issues from the speakers in sequence
with the speaker type appearing in the display.
4 Press ./> repeatedly until the desired item
appears in the display.
Select the item from “CNTR BALANCE,” “SURR
BALANCE,” or “SW BALANCE.”
Note
When you set the Sub woofer to “––” in the Multi-channel
playback mode (page 22), “SW BALANCE” does not appear.
Similarly, “CNTR BALANCE” or “SURR BALANCE” does
not appear when you set the corresponding speaker to “––.”
24
GB

Additional
Precautions
Information
This chapter provides additional
information that will help you
understand and maintain your Super
Audio CD player.
On safety
• Caution — The use of optical instruments with this product
will increase eye hazard.
• Should any solid object or liquid fall into the cabinet, unplug
the player and have it checked by qualified personnel before
operating it any further.
• AC power cord must be changed only at the qualified service
shop.
• The unit is not disconnected from the AC power source
(mains) as long as it is connected to the wall outlet, even if the
unit itself has been turned off.
On power sources
• Before operating the player, check that the operating voltage of
the player is identical with your local power supply. The
operating voltage is indicated on the nameplate at the rear of
the player.
• The player is not disconnected from the mains as long as it is
attached to the mains, even if the player itself has been turned
off.
• If you are not going to use the player for a long time, be sure to
disconnect the player from the mains. To disconnect the mains
lead, grasp the plug itself; never pull the cord.
On placement
• Place the player in a location with adequate ventilation to
prevent heat build-up in the player.
• Do not place the player on a soft surface such as a rug that
might block the ventilation holes on the bottom.
• Do not place the player in a location near heat sources, or in a
place subject to direct sunlight, excessive dust or mechanical
shock.
Additional Information
On operation
• If the player is brought directly from a cold to a warm location,
or is placed in a very damp room, moisture may condense on
the lenses inside the player. Should this occur, the player may
not operate properly. In this case, remove the disc and leave
the player turned on for about an hour until the moisture
evaporates.
• During power on, some noise may be heard while the disc is
being loaded into the Super Audio CD player. This is not a
malfunction.
On adjusting the volume
• Do not turn up the volume too much while listening to a
portion with very low level inputs or no audio signals. If you
do, the speakers may be damaged when a peak level portion is
played.
25
GB
Precautions
Notes on Discs
On inserting a disc
• You may hear a transmission or a mechanical sound from the
player. This indicates that the player is automatically adjusting
its internal mechanisms according to the inserted disc.
You may also hear the mechanical sound from the player when
you insert a warped disc.
On cleaning
• Clean the cabinet, panel, and controls with a soft cloth slightly
moistened with a mild detergent solution. Do not use any type
of abrasive pad, scouring powder, or solvent such as alcohol or
benzine.
On transportation
• Be sure to remove the disc on the tray.
• Be sure to close the disc tray.
If you have any questions or problems concerning your
player, please consult your nearest Sony dealer.
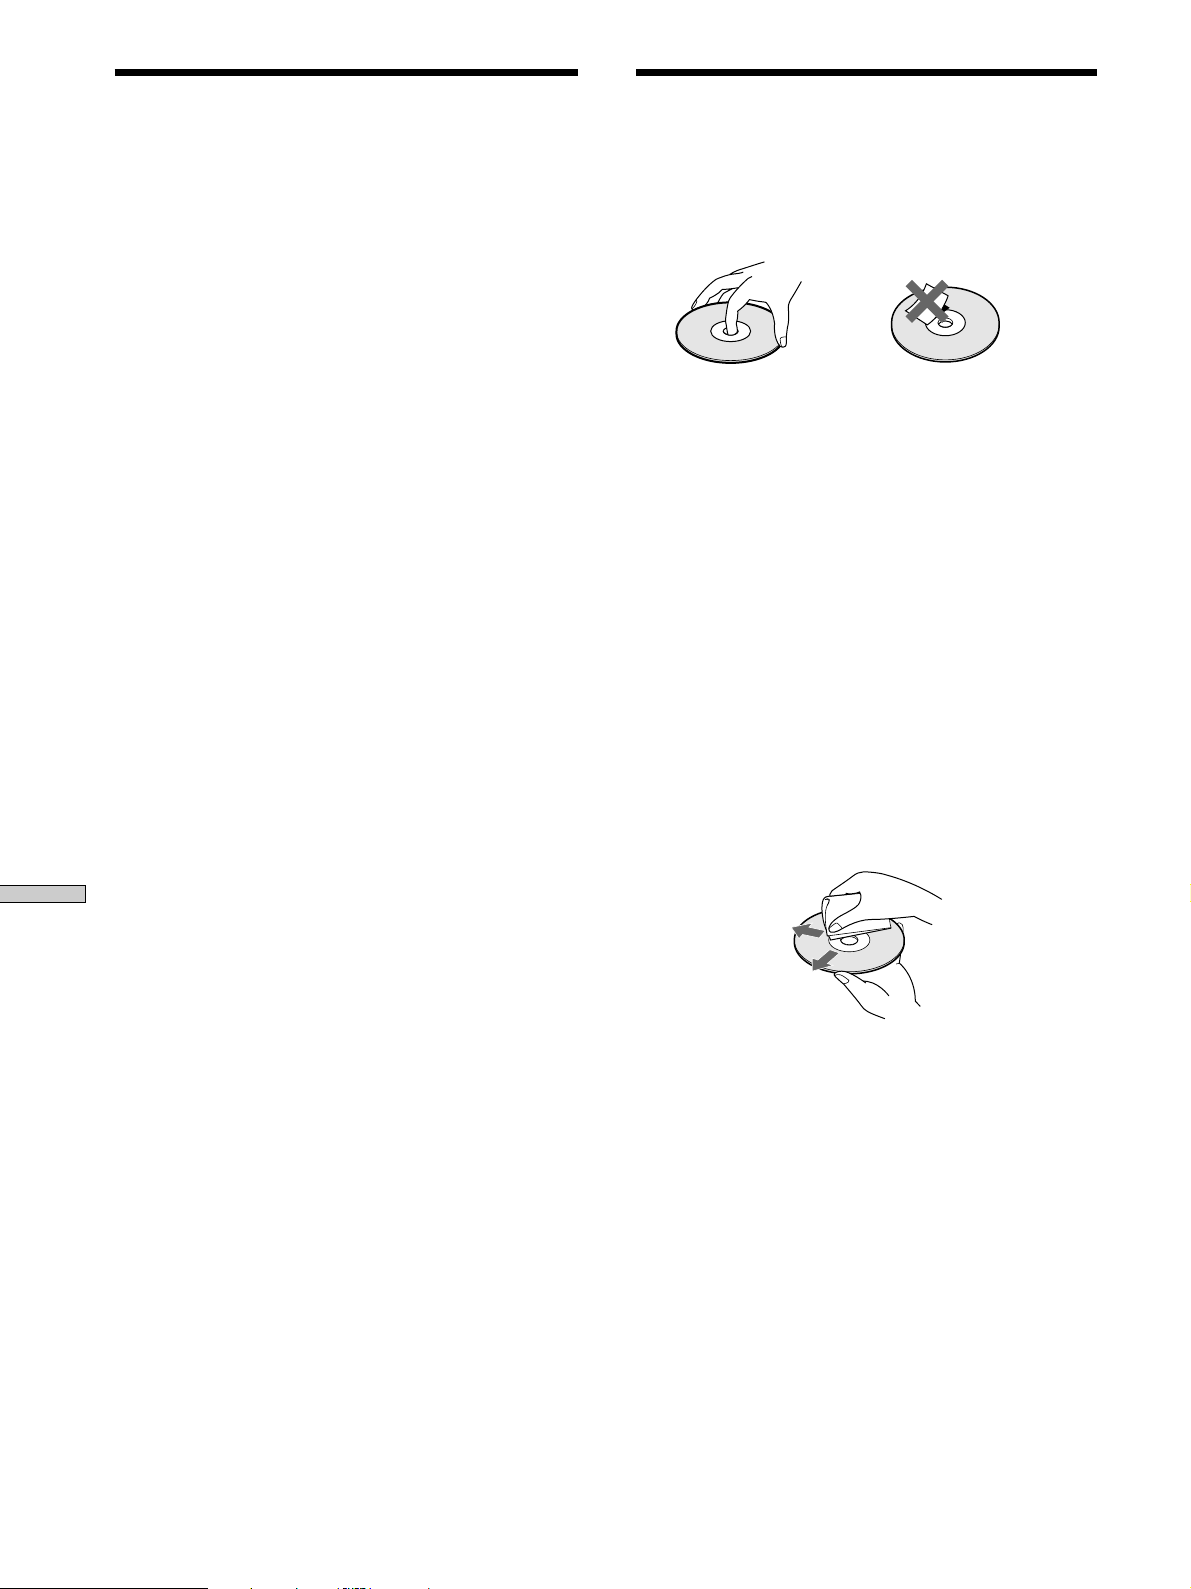
On handling discs
• To keep the disc clean, handle the disc by its edge. Do not
touch the surface.
• Do not stick paper or tape on the disc.
• Use only round-shaped discs. If you use a special shaped disc
(e.g., star-shaped, heart-shaped, or square-shaped, etc.), the
player may be damaged.
• Do not use a disc with a seal attached on such as on a used disc
or rental disc.
On keeping discs
• Do not expose the disc to direct sunlight or heat sources such
as hot air ducts.
• After playing, store the disc in its case. If you put it on top of
another disc without the case , the disc may be damaged.
On placing discs on the disc tray
• Make sure the disc is positioned securely on the tray.
If not, the player or the disc may be damaged.
Additional Information
On cleaning
• If the disc is dirty with fingerprints or dust, it may lessen the
quality of the audio out.
• Before playing, clean the disc with a cleaning cloth. Wipe the
disc from the centre out.
• Clean the disc with a soft cloth slightly moistened with water,
and remove moisture with a dry cloth.
• Do not use solvents such as benzine, thinner, record cleaners,
or anti-static spray.
Notes on CD-R/CD-RW playback
• Discs recorded on CD-R/CD-RW drives may not be played
back because of scratches, dirt, recording condition, or the
drive’s characteristics. Besides, the discs, which are not yet
finalized at the end of recording, cannot be played back.
26
GB

Troubleshooting Specifications
If you experience any of the following difficulties while
using the player, use this troubleshooting guide to help
you remedy the problem. Should any problem persist,
consult your nearest Sony dealer.
There is no sound.
, Check that the player is connected securely.
, Make sure you operate the amplifier correctly.
, When you use the headphones, adjust the volume
with PHONES LEVEL.
There is no sound from the DIGITAL (CD) OUT
connectors.
, The audio signals of the super audio CD cannot be
output from the DIGITAL (CD) OUT connectors.
The disc does not play.
, There is no disc inside the player.
, The disc is placed upside down on the tray.
, Place the disc on the disc tray with the label side
up.
, The disc is placed at an angle. Reload the disc.
, Clean the disc (see page 26).
, Moisture has condensed inside the player. Remove
the disc and leave the player turned on for about
an hour.
, There is an incompatible disc on the tray (see page
13).
The remote does not function.
, Remove any obstacles in the path of the remote
and the player.
, Point the remote at the remote sensor on the
player.
, If the batteries in the remote are weak, replace
with new ones.
There is no sound from the SUB WOOFER jack.
, Select the playback mode so that the Sub woofer is
set to “a” (page 22).
, When you play a track that does not contain the
LFE signal, the signal outputs from the SUB
WOOFER jack only when you select “5 – Small +
SW” or “FRT – Large + SW” for the Multi-channel
playback mode (page 23).
When a super audio CD is played
Playing frequency range 2 Hz to 100 kHz
Frequency response 2 Hz to 50 kHz (–3 dB)
Dynamic range 104 dB or more
Total harmonic distortion rate
0.0018 % or less
Wow and flutter Value of measurable limit (±0.001 %
W. PEAK) or less
When a CD is played
Frequency response 2 Hz to 20 kHz
Dynamic range 99 dB or more
Total harmonic distortion rate
0.002 % or less
Wow and flutter Value of measurable limit (±0.001 %
W. PEAK) or less
Output connector
Jack type
ANALOG OUT
DIGITAL (CD)
OUT
OPTICAL*
DIGITAL (CD)
OUT
COAXIAL*
PHONES
*Output only the audio signals of the CD
Phono
jacks
Square
optical
output
connector
Coaxial
output
connector
Stereo
phone jack
Output level
2 Vrms
(at 50 kilohms)
–18 dBm
0.5 Vp-p
10 mW
Load impedance
Over 10 kilohms
Light emitting
wave length:
( )
660 nm
75 ohms
32 ohms
General
Laser Semiconductor laser
(SACD: λ = 650 nm)
(CD: λ = 780 nm)
Emission duration: continuous
Laser radiant power: 5.47 uW at 650 nm
*These output is the value measured at a distance of about
200mm from the objective lens surface on the optical pick-up.
Power requirements 230 V AC, 50/60 Hz
Power consumption 25 W
Dimensions (w/h/d) 430 × 111 × 283 mm incl. projecting
parts
Mass (approx.) 5.8 kg
Additional Information
Supplied accessories
See page 4.
Design and specifications are subject to change without notice.
27
GB

Index
A
Accessories 4
Amplifier (not supplied) 5
AMS (Automatic Music Sensor) 14
ANALOG OUT
2CH 6
5.1CH 5
B
Batteries 4
C
Cable
Coaxial digital 7
Optical digital 7
Cord
Audio connecting 5
D, E, F, G
DIGITAL (CD) OUT 7
Displaying information 15
H, I, J, K
Hooking Up
Audio Components 5
Power 7
Additional Information
L
Locating
a specific track 18
a particular point 18
by entering the track number 18
by observing the time indication (High-speed Search)
18
using the index function (Index Search) 18
while monitoring the sound (Search) 18
P, Q
Pause play 14
Place a disc 14
Playback mode
2 channel 22
Multi-channel 22
Playing
a disc 14
by entering the track number 18
Multi-channel Super Audio CD 22
repeatedly 19
track in random order 20
Programme Play
Checking the contents of the programme 21
Changing the contents of the programme 21
how to create your own programme 21
R
Remote commander (remote) 11
Repeat
A-B Play 20
All Play 19
1 Play 20
S
Search
High-speed search 18
Index search 18
Time Search 19
Shuffle Play 20
Super Audio CD 12
T, U, V, W, X, Y, Z
TEXT 16
TOC 13
M, N
Multi-channel management function 22
Multi-channel Super Audio CD 13
O
Output level balance 23
GB
28

Additional Information
29
GB
AVERTISSEMENT
Bienvenue!
Pour éviter tout risque
d’incendie ou de décharge
électrique, ne pas exposer
cet appareil à la pluie ou à
l’humidité.
Pour éviter les décharges
électriques, ne pas ouvrir
le châssis. Confier
l’entretien exclusivement
au personnel qualifié.
Cet appareil entre dans la catégorie des
produits LASER DE CLASSE 1.
L’ETIQUETTE INDIQUANT
L’APPARTENANCE DE CE LECTEUR A
LA CLASSE 1 est apposée à l’arrière du
boîtier.
Nous vous remercions d’avoir fait
l’acquisition d’un lecteur Super Audio CD
Sony. Avant de faire fonctionner cet
appareil, lisez attentivement le présent
mode d’emploi et conservez-le pour toute
référence ultérieure.
A propos de ce mode
d’emploi
Les instructions contenues dans le présent
mode d’emploi concernent le modèle
SCD-XB770.
Conventions
• Les instructions présentées dans ce
mode d’emploi se réfèrent aux
commandes situées sur le lecteur.
Vous pouvez également utiliser les
commandes de la télécommande si elles
portent le même nom que celles du
lecteur.
• Les icônes suivantes sont utilisées dans
ce mode d’emploi:
Cette étiquette d’avertissement est
appliquée à l’intérieur de l’appareil.
Ne jetez pas les piles aux
ordures. Portez-les à un
dépôt pour déchets
dangereux.
Indique que vous pouvez
Z
effectuer cette opération avec la
télécommande.
Indique une astuce ou un
z
conseil qui simplifie l’opération.
FR
2

Caractéristiques
TABLE DES MATIÈRES
LÀ propos du Super Audio CD
• Le Super Audio CD représente la nouvelle génération
de disques audio de qualité supérieure, dont le format
d’enregistrement est le DSD (Direct Stream Digital) (les
CD classiques utilisent le format PCM). Le format DSD,
qui utilise une fréquence d’échantillonnage 64 fois
supérieure à celle d’un CD classique et la quantification
1 bit, bénéficie d’une bande de fréquences et d’une
plage dynamique sur la fréquence audible plus larges,
ce qui lui permet de reproduire la musique avec une
extrême fidélité par rapport au son original.
• Le Super Audio CD se présente soit sous la forme d’un
disque stéréo bi-canal, soit sous la forme d’un disque
multicanal pouvant contenir jusqu’à 6 canaux
indépendants. Le Super Audio CD propose, grâce à sa
caractéristique multicanal, un système de répartition
des enceintes globalement similaire au canal 5.1 du
système AV actuel.
Caractéristiques du lecteur
Ce lecteur est conçu pour lire les Super Audio CD bi-canal
et multicanal ainsi que les CD classiques et offre les
caractéristiques suivantes :
• mécanique à double optique capable de lire un Super
Audio CD ou un CD classique, sur chaque longueur
d’onde exclusive ;
• capacité d’accès plus rapide aux pistes grâce à un
servomécanisme de pointe ;
• fonction de gestion multicanal permettant de régler
l’environnement de lecture des différents canaux, en
fonction de la répartition et de la taille de vos enceintes ;
• convertisseur N/A Super Audio et système sync
numérique direct, qui offre une reproduction du son de
meilleure qualité ;
Divers
• Un Super Audio CD peut comporter jusqu’à 255
numéros de plages/index. Cette fonctionnalité
s’applique au modèle SCD-XB770.
• La télécommande fournie est capable de commander le
SCD-XB770 et un lecteur classique Sony.
Préparation 4
Avant d’entamer les raccordements 4
Raccordement de composants audio 5
Emplacement et fonction des
composants 8
Descriptions des composants du panneau frontal 8
Description des composants du panneau arrière 10
Description des composants de la
télécommande 11
Lecture de disques 12
Types de disques compatibles 12
Lecture d’un disque 14
Utilisation de la fenêtre d’affichage 15
Localisation d’une plage spécifique 18
Localisation d’un passage déterminé sur une
plage 18
Lecture de plages répétée 19
Lecture de plages dans un ordre quelconque (lecture
aléatoire) 20
Création de votre propre programme musical
(lecture programmée) 21
Lecture d’un Super Audio CD multicanal (fonction
de gestion multicanal) 22
Informations complémentaires 25
Précautions 25
Remarques sur les disques 26
Dépannage 27
Spécifications 27
Index 28
FR
FR
3

Préparation
Avant d’entamer les
raccordements
Ce chapitre présente des informations
sur les accessoires fournis ainsi que
sur le raccordement de différents
composants audio au lecteur Super
Audio CD. Lisez attentivement ce
chapitre avant de raccorder quoi que
ce soit au lecteur.
Vérification des accessoires fournis
Ce lecteur est fourni avec les éléments suivants :
• Câble de connexion audio
prise phono × 2 (rouge et blanc) y prise phono × 2
(rouge et blanc) (2)
prise phono × 1 (noir) y prise phono × 1 (noir) (2)
• Télécommande RM-SX700 (1)
• Piles R06 (AA) (2)
Installation des piles dans la
télécommande
Introduisez deux piles R06 (AA) dans le compartiment à
piles en faisant correspondre les pôles + et – comme
illustré dans le schéma suivant. Lorsque vous utilisez la
télécommande, dirigez-la vers le capteur de
télécommande
du lecteur.
z
Quand faut-il remplacer les piles ?
Dans des conditions d’utilisation normales, les piles offrent une
autonomie de fonctionnement d’environ six mois. Lorsque la
télécommande n’agit plus sur le lecteur, remplacez les piles.
Remarques
• Ne laissez pas la télécommande à un endroit extrêmement
chaud ou humide.
• Veillez à ce qu’aucun corps étranger ne pénètre à l’intérieur du
boîtier de la télécommande, en particulier lorsque vous
remplacez les piles.
• N’utilisez pas une pile usagée et une pile neuve en même
temps.
• N’exposez pas le capteur de télécommande au rayonnement
direct du soleil ou à des luminaires. Vous risquez sinon de
provoquer un dysfonctionnement.
• Si vous prévoyez de ne pas utiliser la télécommande pendant
une période prolongée, retirez-en les piles afin d’éviter tout
dommage causé par une fuite des piles et la corrosion
subséquente.
FR
4

Raccordement de composants audio
Raccordez le lecteur Super Audio CD à un composant
audio. Veillez à mettre tous les composants hors tension
avant de procéder aux connexions et raccordez-les
fermement de manière à éviter les bruits de souffle.
Si vous disposez d’un amplificateur équipé de prises
d’entrée 5.1CH (amplificateur multicanal, amplificateur
AV...), raccordez le lecteur à l’amplificateur via les prises
ANALOG 5.1CH OUT pour pouvoir écouter votre Super
Audio CD multicanal et apprécier la lecture sur plusieurs
canaux.
Pour une lecture simple, raccordez le lecteur à
l’amplificateur via les prises ANALOG 2CH OUT.
Raccordement via les prises ANALOG
5.1CH OUT
Utilisez les câbles de connexion audio. Raccordez les
prises ANALOG 5.1CH OUT (FRONT L/R, SURR L/R,
CENTER, SUBWOOFER) aux prises correspondantes de
votre amplificateur. Pour le raccordement sur FRONT ou
SURR, utilisez les câbles de connexion (prise rouge et
prise blanche) en vérifiant la concordance de couleur entre
la broche et la prise : le blanc (gauche) sur le blanc et le
rouge (droite) sur le rouge. Pour le raccordement sur
CENTER et SUB WOOFER, utilisez les câbles de
connexion (noir).
Raccordement sur FRONT ou SURR
Câbles de connexion audio (rouge et blanc) (fournis)
Blanc (L)
Rouge (R)
Blanc (L)
Rouge (R)
Raccordement sur CENTER ou SUB WOOFER
Câbles de connexion audio (noir) (fournis)
noir
noir
Remarques
• Pour la connexion multicanal, raccordez les prises ANALOG
2CH OUT en utilisant également le câble audio de façon à
pouvoir lire un CD (ou un SACD), après avoir réglé le sélecteur
de sources de votre amplificateur sur entrée CD (ou SACD).
• Lors de la lecture d’un CD classique ou d’un Super Audio CD
bi-canal, le signal émis par les prises ANALOG 2CH OUT est
également émis par les prises ANALOG 5.1CH FRONT L/R.
• Lors de la lecture d’un Super Audio CD multicanal, le signal
émis par les prises ANALOG 5.1CH FRONT L/R est également
émis par les prises ANALOG 2CH OUT. (Le signal de mixage
aval du signal multicanal n’est pas reproduit.)
• Il existe des Super Audio CD à 5, 4 ou 3 canaux. Lors de la
lecture de l’un de ces disques, le signal n’est pas émis par la
totalité des prises ANALOG 5.1CH OUT. Pour plus de détails,
reportez-vous à la couverture ou aux instructions du Super
Audio CD.
Préparation
Vers les prises
FRONT IN (L/R)
ANALOG
2CH OUT 5.1CH OUT OUT
FRONT COAXIAL OPTICALSURR CENTER
L
R
L
R
DIGITAL(CD)
SUB
WOOFER
Vers les prises
SURROUND ou
REAR IN (L/R)
Vers la prise SUB
WOOFER IN
Vers la prise
CENTER IN
Amplificateur multicanal,
amplificateur AV, etc.
FR
5

Raccordement de composants audio
Préparation
Raccordement via les prises ANALOG 2CH
OUT
Utilisez un câble de connexion audio pour effectuer ce
raccordement. Raccordez les prises ANALOG 2CH OUT L/R aux
prises d’entrée CD (SACD) de votre amplificateur. Branchez les
broches sur les prises identifiées par le même code de couleur: le
blanc (gauche) sur le blanc et le rouge (droite) sur le rouge.
Câble de connexion audio (rouge et blanc) (non fourni*)
Blanc (L)
Rouge (R)
* Si vous ne raccordez pas les prises ANALOG 5.1 CH (page 5),
vous pouvez utiliser le câble de connexion audio fourni pour
raccorder les prises ANALOG 2CH.
ANALOG
2CH OUT 5.1CH OUT OUT
FRONT COAXIAL OPTICALSURR CENTER
L
R
L
R
SUB
WOOFER
DIGITAL(CD)
Blanc (L)
Rouge (R)
Vers les prises CD
(SACD) IN (L/R)
FR
6
Amplificateur stéréo, etc.

Raccordement via le connecteur DIGITAL
(CD) OUT OPTICAL
Utilisez un câble numérique optique pour ce raccordement.
Lorsque vous branchez le câble numérique optique au
connecteur DIGITAL (CD) OUT OPTICAL, retirez le capuchon
des connecteurs et enfoncez les fiches du câble jusqu’à ce qu’elles
s’encliquettent en position.
Prenez garde de ne pas plier ni torsader le câble optique.
Câble numérique optique (non fourni)
Remarque
Seuls les signaux audio de CD conventionnels peuvent être sortis
via les connecteurs DIGITAL (CD) OUT. Les signaux de Super
Audio CD ne peuvent pas être sortis via ces connecteurs.
Raccordement via le connecteur DIGITAL
(CD) OUT COAXIAL
Utilisez un câble numérique coaxial pour raccorder des
composants audio via les connecteurs d’entrée numérique
coaxiaux.
Câble numérique coaxial (non fourni)
Préparation
Remarque
Seuls les signaux audio de CD conventionnels peuvent être sortis
via les connecteurs DIGITAL (CD) OUT. Les signaux de Super
Audio CD ne peuvent pas être sortis via ces connecteurs.
Branchement du cordon d’alimentation
Branchez le cordon d’alimentation sur une prise murale.
FR
7

Emplacement
Descriptions des
composants du panneau
et fonction des
composants
Ce chapitre présente une description
de l’emplacement et des fonctions des
différentes touches et commandes des
panneaux avant et arrière ainsi que de
la télécommande fournie. Pour plus
de détails, reportez-vous aux pages
indiquées entre parenthèses.
Il explique également les informations
apparaissant dans la fenêtre
d’affichage.
frontal
1 Commutateur POWER (14)
Appuyez sur ce commutateur pour mettre le lecteur
sous tension.
2 Touche TIME/TEXT (15)
A chaque fois que vous appuyez sur cette touche, la
durée de lecture de la piste, la durée restante sur le
disque ou les informations TEXT s’affichent.
3 Touche SACD/CD (12)
Chaque fois que vous appuyez sur cette touche,
“SACD” ou “CD” s’affiche. Sélectionnez le type de CD
que vous souhaitez lire.
4 Plateau du disque (14)
Appuyez sur A OPEN/CLOSE pour ouvrir/fermer le
plateau de lecture.
5 Indicateur multicanal
S’allume lorsque vous mettez le lecteur sous tension
ou lorsque le Super Audio CD multicanal est chargé et
que vous sélectionnez la lecture multicanal en
appuyant sur MULTI/2CH.
FR
8

Emplacement et fonction des composants
POWER
PHONES
PHONE LEVEL
MIN MAX
TIME/TEXT SACD/CD
MENU MULTI/2CH
6 Touche A OPEN/CLOSE (14)
Appuyez pour ouvrir le plateau de lecture.
7 Touche H (14)
Appuyez sur cette touche pour démarrer la lecture.
8 Touche X (14)
Appuyez sur cette touche pour activer une pause de
lecture.
9 Touche x (14)
Appuyez sur cette touche pour arrêter la lecture.
0 Molette l AMS L (AMS: Automatic Music
Senser) (13)
Lorsque vous tournez la molette l AMS L dans
le sens antihoraire d’un clic, vous revenez à la piste
précédente ; lorsque vous tournez la molette
l AMS L dans le sens horaire d’un clic, vous
passez à la piste suivante.
OPEN CLOSE
AMS
PUSH ENTER
qa Touches m/M (18)
Appuyez sur cette touche pour localiser un passage
dans une plage.
qs Fenêtre d’affichage (15)
Affiche différentes informations.
qd Touche MULTI/2CH (12)
Appuyez sur cette touche pour sélectionner la zone de
lecture lorsqu’un Super Audio CD bi-canal +
multicanal (page 13) est chargé.
qf Touche MENU (13)
Appuyez sur cette touche pour entrer dans le menu.
qg PHONES LEVEL
Ajustez le volume du casque.
qh PHONES
Branchez le casque.
Lors de la lecture d’un Super Audio CD multicanal, le
signal émis par les prises ANALOG 5.1CH FRONT L/
R est également émis par les prises PHONES.
FR
9

Description des composants du panneau arrière
Emplacement et fonction des composants
ANALOG
2CH OUT 5.1CH OUT OUT
FRONT COAXIAL OPTICALSURR CENTER
L
R
L
R
SUB
WOOFER
DIGITAL(CD)
1 Prises ANALOG 2CH OUT L/R (6)
Raccordez ces prises à un composant audio (stéréo/bicanal) à l'aide du câble de connexion audio.
1 Prises ANALOG 5.1CH OUT (5)
Raccordez à un amplificateur équipé de prises 5.1CH
INPUT (amplificateur multicanal, amplificateur AV,
etc.) à l'aide des câbles de connexion audio.
3 Connecteur DIGITAL (CD) OUT COAXIAL (7)
Raccordez ce connecteur à un composant audio à
l’aide d’un câble numérique coaxial.
4 Connecteur DIGITAL (CD) OUT OPTICAL (7)
Raccordez ce connecteur à un composant audio à
l’aide d’un câble numérique optique.
FR
10
Remarque
Seuls les signaux audio du CD peuvent être sortis via les
connecteurs DIGITAL (CD) OUT indiqués sous les points 3 et
4. Les signaux du Super Audio CD ne peuvent être sortis via
DIGITAL (CD) OUT.

Description des composants de la télécommande
1 Touche CONTINUE (20)
Appuyez sur cette touche pour reprendre la lecture
normale depuis le mode de lecture aléatoire ou
programmée.
Touche SHUFFLE (20)
Appuyez sur cette touche pour sélectionner la lecture
aléatoire.
Touche PROGRAM (21)
Appuyez sur cette touche pour sélectionner la lecture
programmée.
2 Touche DISPLAY MODE (16)
Appuyez sur cette touche pour désactiver l’affichage
des informations.
3 Touche TIME/TEXT (15)
A chaque fois que vous appuyez sur cette touche, la
durée de lecture de la piste, la durée restante sur le
disque ou les informations TEXT s’affichent.
4 Touches numériques (18)
Appuyez sur ces touches pour introduire les numéros
de plages.
5 Touche
i
10 (18)
Appuyez sur cette touche pour rechercher une plage
dont le numéro est supérieur à 10.
qs Touche SACD/CD (12)
Chaque fois que vous appuyez sur cette touche,
“SACD” ou “CD” s’affiche. Sélectionnez le type de CD
que vous souhaitez lire.
qd Touche MULTI/2CH (12)
Appuyez sur cette touche pour sélectionner la zone de
lecture lorsqu’un Super Audio CD bi-canal +
multicanal (page 13) est chargé.
qf Touche ENTER (24)
Appuyez sur cette touche pour confirmer la sélection.
qg Touche CLEAR (21)
Appuyez sur cette touche pour effacer un numéro de
plage programmé.
qh Touche LEVEL ADJ (24)
Appuyez sur cette touche pour régler la balance du
niveau de sortie utile à la fonction de gestion
multicanal (page 22).
qj Touche CHECK (21)
Appuyez sur cette touche pour vérifier l’ordre de
programmation.
Emplacement et fonction des composants
6 Touche REPEAT (19)
Appuyez plusieurs fois de suite sur cette touche pour
reproduire toutes les plages ou une seule plage du
disque.
7 Touche AyB (20)
Appuyez sur cette touche pour sélectionner la lecture
répétée A-B.
8 Touche H (14)
Appuyez sur cette touche pour démarrer la lecture.
Touche X (14)
Appuyez sur cette touche pour activer une pause de
lecture.
Touche x (14)
Appuyez sur cette touche pour arrêter la lecture.
9 Touches AMS ./> (AMS: détecteur
automatique de musique) (18)
Appuyez sur cette touche pour localiser une plage
spécifique.
0 Touches m/M (18)
Appuyez sur cette touche pour localiser un passage
dans une plage.
qa Touches INDEX >/. (18)
Appuyez sur cette touche pour localiser un passage
spécifique identifié à l’aide d’un signal d’index
lorsque vous reproduisez un disque comportant des
signaux d’index.
PLAY MODE
CONTINUE SHUFFLE
DISPLAY/
MODE
TIME/TEXT
PROGRAM
SACD/CD
MULTI/2CH
123
456
78
>10 ENTER
10/0
CHECK
CLEAR
LEVEL
ADJ
REPEAT
BA
AMS
INDEX
9
11
FR

Lecture de
disques
Ce chapitre présente les différents
modes de lecture des disques.
Types de disques
compatibles
Vous pouvez reproduire les types de disques suivants sur
ce lecteur.
En fonction du disque à lire, sélectionnez l’indicateur
correspondant en appuyant sur SACD/CD ou MULTI/
2CH (page 14).
Classification par couche
Super Audio CD (disque à simple couche)
Ce disque est constitué d’une simple couche HD (haute
densité).
Lorsque vous écoutez ce type de disque, le lecteur passe
automatiquement en mode lecture Super Audio CD.
Couche HD
(Super Audio CD)
Super Audio CD (disque à double couche)
Ce disque est constitué d’une double couche HD et offre
une lecture de longue durée.
Lorsque vous écoutez ce type de disque, le lecteur passe
automatiquement en mode lecture Super Audio CD.
De même, comme un disque à double couche est constitué
de deux couches HD sur une seule face, il n’est pas
nécessaire de retourner le disque.
Couche HD
(Super Audio CD)
Couche HD
(Super Audio CD)
CD classique
Ce disque est au format standard.
Lorsque vous écoutez ce type de disque, le lecteur passe
automatiquement en mode lecture CD classique.
Couche CD
12
FR

Super Audio CD + CD (hybride)
Ce disque est constitué d’une couche HD et d’une couche
CD. Appuyez sur SACD/CD pour sélectionner la couche
que vous voulez reproduire. De même, comme les deux
couches se trouvent sur une seule face, il n’est pas
nécessaire de retourner le disque. Vous pouvez reproduire
la couche CD sur un lecteur CD classique.
Super Audio CD bi-canal + multicanal
Ce disque possède une zone de lecture bi-canal ainsi
qu’une zone de lecture multicanal.
Appuyez sur MULTI/2CH pour sélectionner la zone de
lecture que vous souhaitez écouter.
Zone de lecture bi-canal
Couche CD
Couche HD
(Super Audio CD)
Classification par canal du Super Audio
CD
Super Audio CD bi-canal
Ce disque possède une zone de lecture bi-canal.
Lorsque vous écoutez ce type de disque, le lecteur passe
automatiquement en mode lecture bi-canal.
Zone de lecture bi-canal
Super Audio CD multicanal
Ce disque possède une zone de lecture multicanal.
Lorsque vous écoutez ce type de disque, le lecteur passe
automatiquement en mode lecture multicanal.
Zone de lecture
multicanal
Vous pouvez sélectionner la zone de lecture par défaut
(zone de lecture bi-canal ou multicanal).
1 Appuyez sur MENU lorsque votre lecteur est en
mode arrêt.
2 Tournez la commande l AMS L jusqu’à ce
que “M/2CH SELECT” s’affiche.
3 Appuyez sur la commande l AMS L.
La zone de lecture actuellement programmée s’affiche.
4 Tournez la commande l AMS L pour
sélectionner la zone de lecture souhaitée, puis
appuyez de nouveau sur l AMS L.
Disques incompatibles
Ce lecteur ne peut pas lire les disques suivants. Si vous
essayez de les lire, le message “TOC Error” ou
“No Disc” s’affichera ou aucun son ne sera reproduit.
• CD-ROM
• DVD, etc.
Lecture de disques
Zone de lecture
multicanal
13
FR

Lecture d’un disque
Les opérations de lecture normale et les opérations de
base en cours de lecture sont expliquées ci-après.
POWER
1 Mettez l'amplificateur sous tension. Baissez le
volume au maximum.
2 Sélectionnez la source à l’aide du sélecteur de
Lecture de disques
source sur l’amplificateur.
3 Appuyez sur POWER pour mettre le lecteur sous
tension.
4 Appuyez sur A OPEN/CLOSE pour ouvrir le plateau
de lecture et placez un disque.
SACD/CD
A OPEN/CLOSE
Xx
H
lAMSL
Opérations de base en cours de lecture
Pour
Arrêter la lecture
Activer une pause de lecture
Reprendre la lecture après une pause
Localiser l’une des plages
Localiser le début de la plage en
cours ou de l’une des plages
précédentes
Ejecter le disque
z
Si vous mettez le lecteur sous tension alors qu’un disque se
trouve déjà à l’intérieur
La lecture démarre automatiquement. Si vous raccordez un
programmateur disponible dans le commerce, vous pouvez le
régler pour démarrer la lecture du disque à l’heure de votre
choix.
z
Pour sélectionner une couche que vous voulez écouter
pendant la lecture d’un disque hybride (page 13)
Après avoir arrêté la lecture avec la touche x, appuyez plusieurs
fois de suite sur SACD/CD pour activer l’indicateur “SACD” ou
“CD”.
Appuyez sur
x
X
X ou H
Tournez lAMSL
dans le sens des
aiguilles d’une montre
Tournez lAMSL
dans le sens inverse des
aiguilles d’une montre
A OPEN/CLOSE
Etiquette vers le haut
5 Appuyez sur SACD/CD pour sélectionner SACD ou
CD.
Chaque fois que vous appuyez sur cette touche, SACD
ou CD s’affiche tour à tour. Sélectionnez le type de
disque que vous avez placé sur le plateau. Pour plus
de détails, voir page 12.
6 Appuyez sur H.
La lecture commence par la première plage. Si vous
souhaitez commencer la lecture par une plage
spécifique, tournez lAMSL pour sélectionner le
numéro de la plage choisie puis appuyez sur H.
7 Réglez le volume sur l’amplificateur.
z
Pour sélectionner une zone de lecture pendant la lecture
d’un Super Audio CD bi-canal + multicanal (page 13)
Après avoir arrêté la lecture à l’aide de la touche x, appuyez
plusieurs fois de suite sur MULTI/2CH pour activer l’indicateur
“MULTI CH” ou “2 CH”.
Remarque
En cours de lecture, augmentez progressivement le volume en
partant du niveau le plus bas. La bande passante en sortie de cet
appareil est supérieure à la plage d'écoute normale. Ceci peut
provoquer un endommagement de vos haut-parleurs ou des
blessures aux oreilles.
14
FR

Utilisation de la fenêtre
d’affichage
La fenêtre d’affichage affiche différentes informations
relatives au disque ou à la plage en cours de lecture. Cette
section décrit les informations relatives au disque et les
informations qui apparaissent pour chaque statut de
lecture.
Affichage des informations relatives au
disque chargé
En fonction du disque chargé dans le lecteur, les
informations suivantes s’affichent :
MENU
DISPLAY MODE
TIME/TEXT
lAMSL
Super Audio CD bi-canal
2CH
SACD
12345
678910
Super Audio CD multicanal
MULTI 5.1CH
SACD
12345
678910
Pendant la
lecture d’un
Super Audio CD
5.1 canaux
ou
MULTI 5 CH
SACD
12345
678910
Pendant la
lecture d’un
Super Audio
CD 5 canaux
CD classique
CD
12345
678910
MULTI CH
ou
12345
678910
Pendant la
lecture d’autres
Super Audio CD
ou en mode
d'arrêt
SACD
Lecture de disques
Affichage des informations lorsque le
lecteur est à l’arrêt Z
Appuyez sur TIME/TEXT.
La fenêtre d’affichage indique le nombre total de plages,
la durée totale de lecture.
Nombre total
de plages
TRACK MIN SEC
1 0 45.28
Durée totale
de lecture
MULTI CH
SACD
12345
678910
15
FR

SONYHITS
SACD
MULTI CH
TEXT
DISC
12345
678910
1 0 45.28
SACD
MULTI CH
TEXT
TRACK INDEX MIN SEC
12345
678910
SONY BAND
SACD
ART.
MULTI CH
TEXT
12345
678910
Utilisation de la fenêtre d’affichage
Affichage d’informations en cours de
lecture Z
Appuyez sur TIME/TEXT.
Chaque fois que vous appuyez sur cette touche, le numéro de
la plage en cours et sa durée écoulée ou encore la durée
restante totale du disque apparaît dans la fenêtre d’affichage.
Lorsque le lecteur détecte un Super Audio CD multicanal, les
informations relatives aux canaux s'affichent juste avant
l'affichage par défaut.
Numéro de la plage en cours de lecture et durée de lecture
écoulée de la plage en cours (affichage par défaut)
11 1.57
Lecture de disques
Numéro de la plage en cours de lecture et durée restante
de la plage en cours
1 -1.56
Durée restante totale du disque
-43.32
Informations relatives aux canaux (Super Audio CD
multicanal uniquement)
[MULTI] 5.1 CH
TRACK INDEX MIN SEC
Appuyez sur TIME/TEXT
TRACK MIN SEC
Appuyez sur TIME/TEXT
MIN SEC
Appuyez sur TIME/TEXT
TRACK
MULTI 5.1CH
SACD
12345
678910
MULTI 5.1CH
SACD
12345
678910
MULTI 5.1CH
SACD
12345
678910
MULTI 5.1CH
SACD
12345
678910
Affichage des informations d’un disque
TEXT Z
Les disques TEXT contiennent des informations telles que le
titre du disque ou le nom de l’artiste en plus des signaux
audio. Les informations TEXT affichées par ce lecteur sont le
titre du disque, le nom de l’artiste et le titre de la plage en
cours.
Lorsque le lecteur détecte la présence d’un disque TEXT,
l’indication “TEXT” apparaît dans la fenêtre d’affichage. Si
votre disque TEXT comporte plusieurs langues, les
indications “TEXT” et “MULTI” apparaissent dans la fenêtre
d’affichage. Pour visualiser les informations dans une autre
langue, voir “Affichage des informations d’un disque TEXT
dans une autre langue” à la page 17.
Affichage des informations d’un disque
TEXT en mode d’arrêt Z
Appuyez sur TIME/TEXT.
Chaque fois que vous appuyez sur cette touche, le titre du
disque ou le nom de l’artiste apparaît dans la fenêtre
d’affichage. Si vous sélectionnez le nom de l’artiste,
l’indication “ART.” apparaît dans la fenêtre d’affichage.
• Avant de commencer la lecture
Titre du disque
Appuyez sur TIME/TEXT
Nom de l’artiste
Désactivation des informations de la
fenêtre d’affichage Z
Chaque fois que vous appuyez sur DISPLAY MODE sur la
télécommande lors de la lecture d’un disque, l’affichage est
tour à tour activé et désactivé.
Même lorsque l’affichage est désactivé, il est temporairement
rétabli lors d’une pause ou d’un arrêt de la lecture. Lorsque
vous reprenez la lecture, l’affichage est de nouveau désactivé.
Avant de commencer la lecture, lorsque vous appuyez sur
DISPLAY MODE pour désactiver l’affichage, “DISPLAY
OFF” s’affiche. Lorsque vous appuyez sur le bouton pour
activer l’affichage, “DISPLAY ON” s’affiche.
FR
16
Appuyez sur TIME/TEXT
Nombre total de plages et durée totale
Appuyez
sur TIME/
TEXT

Affichage des informations d’un disque
TEXT pendant la lecture d’un disque Z
Affichage des informations d’un disque
TEXT dans d’autres langues
Le numéro de la plage en cours apparaît. Si le titre du
disque comporte plus de 15 caractères, les 14 premiers
caractères restent après que le titre a défilé dans la fenêtre
d’affichage.
Lorsque le lecteur détecte un Super Audio CD multicanal,
les informations relatives aux canaux s’affichent juste
avant la durée de lecture de la piste en cours.
• Lors de la lecture d’un disque
Titre de la plage
MULTI 5.1CH
SACD
TRACK
HITECHBLUES
Appuyez sur TIME/TEXT
Informations relatives aux canaux (Super Audio CD
multicanal uniquement)
TRACK
[MULTI] 5.1 CH
En cours de lecture de la plage actuelle
TRACK INDEX MIN SEC
111.56
Appuyez sur TIME/TEXT
TEXT
TEXT
TEXT
12345
678910
MULTI 5.1CH
SACD
12345
678910
MULTI 5.1CH
SACD
12345
678910
Vous pouvez modifier la langue affichée, à condition que
le disque TEXT dispose d’informations en plusieurs
langues. Lorsque le lecteur détecte ce type de disque,
“TEXT” et “MULTI” s’affichent. Changez la langue
comme suit :
1 Appuyez sur MENU lorsque votre lecteur est en
mode arrêt.
2 Tournez la commande lAMSL jusqu’à ce que
“LANGUAGE” s’affiche.
3 Appuyez sur la commande lAMSL.
La langue actuellement sélectionnée (anglais, français,
allemand, etc.) clignote.
Si votre lecteur ne peut pas afficher une des langues
du disque TEXT, “Other Lang” s’affiche.
4 Tournez la commande lAMSL jusqu’à ce que
la langue souhaitée s’affiche.
5 Appuyez sur la commande lAMSL.
Après quelques secondes, les informations s’affichent
dans la langue sélectionnée.
Lecture de disques
Durée restante de la plage actuelle
MULTI 5.1CH
SACD
TRACK MIN SEC
1 -1.57
TEXT
12345
678910
Appuyez sur TIME/TEXT
Durée restante du disque
MULTI 5.1CH
SACD
MIN SEC
-43.32
TEXT
12345
678910
Appuyez
sur TIME/
TEXT
Remarques
• Suivant les disques, il se peut que la fenêtre d’affichage
n’indique pas tous les caractères.
• Ce lecteur ne peut afficher que le titre du disque, le nom de
l’artiste et les titres des plages des disques TEXT. Il ne peut
afficher d’autres informations.
17
FR

Localisation d’une plage
Localisation d’un passage
spécifique
En mode d’arrêt ou de lecture, vous pouvez localiser une
plage à reproduire.
Lecture de disques
Pour passer
Aux plages suivantes ou
précédentes
À la plage actuelle ou aux plages
précédentes
Directement à une plage
spécifique
Localisation d’une plage en introduisant
directement son numéro Z
Introduisez le numéro de la plage à l’aide des touches
numériques.
z
Pour introduire un numéro supérieur à 11 Z
lAMSL
Touches
numériques
>10
./>
Vous devez
Tourner lAMSL dans le
sens des aiguilles d’une montre
jusqu’à ce que vous ayez trouvé
la plage désirée. Si vous utilisez
la télécommande, appuyez
plusieurs fois sur > jusqu’à
ce que vous ayez trouvé la
plage désirée.
Tourner lAMSL dans le
sens inverse des aiguilles d’une
montre jusqu’à ce que vous
ayez trouvé la plage désirée. Si
vous utilisez la télécommande,
appuyez plusieurs fois sur .
jusqu’à ce que vous ayez trouvé
la plage désirée.
Tourner lAMSL jusqu’à
ce que vous ayez trouvé le
numéro de la plage désirée. Si
vous utilisez la télécommande,
appuyez plusieurs fois sur
. ou > jusqu’à ce que
vous ayez trouvé la plage
désirée.
déterminé sur une plage
Vous pouvez localiser un passage déterminé sur une
plage en cours de lecture ou de pause de lecture.
lAMSL
./>
m/M
m/M
Localisation d’un passage tout en
écoutant le son (recherche)
Maintenez les touches m/M enfoncées en cours de
lecture.
Vous entendez le son de lecture par intermittences au fur
et à mesure que le disque avance ou recule.
Relâchez la touche dès que vous êtes arrivé au passage
voulu.
Localisation d’un passage tout en
observant l’indication de la durée
(recherche à grande vitesse)
Maintenez les touches m/M enfoncées pendant la
pause.
Vous n’entendez pas le son de lecture.
z
Si l’indication “Over!!” apparaît dans la fenêtre d’affichage
Cela signifie que vous êtes arrivé à la fin du disque. Appuyez sur
. ou m pour revenir en arrière.
Remarque
Les plages dont la durée n’excède pas quelques secondes peuvent
être trop courtes pour être contrôlées. Dans ce cas, le lecteur
risque de ne pas effectuer correctement la recherche.
Localisation d’un passage à l’aide de la
fonction d’index (recherche d’index) Z
INDEX
>/.
1 Appuyez sur >10.
2 Introduisez les chiffres correspondants.
Pour introduire 0, appuyez sur 10/0.
Exemples:
• Pour reproduire la plage numéro 30, appuyez sur >10, puis
sur 3 et sur 10/0.
• Pour reproduire la plage numéro 100, appuyez deux fois
sur >10, puis sur 1, et deux fois sur 10/0.
FR
18
Appuyez plusieurs fois de suite sur INDEX. ou
INDEX> en mode de lecture ou de pause.
z
Qu’est-ce qu’un INDEX?
Certains SACD ou CD sont livrés avec un système de marquage
d’index qui divisent les plages ou les disques en sections plus
petites. Cette fonctionnalité s’avère particulièrement utile lors
que vous souhaitez localiser un point spécifique dans une plage
longue (de musique classique par exemple). La fonction de
recherche d’index ne fonctionne qu’avec les disques indexés
disponibles dans le commerce (et portant généralement une
mention vous l’indiquant).

Comment localiser un point en définissant
une heure de départ (recherche
temporelle)
1 En mode d’arrêt, appuyez sur ./> (ou tourner
l AMS L) pour sélectionner la plage désirée.
2 Maintenez les touches m/M enfoncées pour
régler l'heure à laquelle doit débuter la lecture tout
en regardant l'affichage.
Vous pouvez régler l’heure de lecture depuis le début
du morceau désiré en appuyant sur M ou depuis la
fin du morceau désiré vers l’arrière en appuyant sur
m.
MULTI 5.1CH
TRACK MIN SEC
5 2.57
SACD
12345
678910
3 Appuyez sur H.
La lecture commencera à la recherche temporelle.
Lecture de plages répétée
Z
Vous pouvez reproduire de manière répétée un disque
entier ou des passages d’un disque. Cette fonction peut être
utilisée avec la fonction de lecture aléatoire pour répéter
toutes les plages d’un disque dans un ordre quelconque
(page 20) ou de lecture programmée pour reproduire toutes
les plages d’un programme musical (page 21). Vous pouvez
également répéter la lecture d’une plage spécifique ou d’un
passage déterminé d’une plage.
REPEAT
AyB
H
x
Lecture de disques
Remarque
Lorsque vous mettez le lecteur hors tension ou que vous
déconnectez le câble d’alimentation, le lecteur mémorise le
dernier réglage de lecture répétée (“Repeat All” ou “Repeat 1”) et
rappelle ce réglage la prochaine fois que vous mettez le lecteur
sous tension. Le réglage de lecture répétée A-B est cependant
annulé si vous mettez le lecteur hors tension ou si vous
débranchez le câble d’alimentation.
Répétition de toutes les plages du disque
(lecture répétée complète)
Appuyez une fois sur REPEAT et appuyez ensuite sur H.
L’indication “REPEAT” apparaît dans la fenêtre
d’affichage et la lecture répétée du disque complet
démarre.
La lecture répétée change suivant le mode de lecture que
vous avez sélectionné.
Mode de lecture sélectionné Le lecteur répète
Lecture normale (page 14) Toutes les plages
Lecture aléatoire (page 20) Toutes les plages dans un ordre
Lecture programmée (page 21) Toutes les plages du
Pour arrêter la lecture répétée complète
Appuyez sur x.
Pour reprendre la lecture normale
Appuyez plusieurs fois de suite sur REPEAT jusqu’à ce
que l’indication “REPEAT” disparaisse.
successivement
quelconque
programme successivement
19
FR

Lecture de plages répétée Z
Lecture de plages dans un
ordre quelconque
Répétition de la plage en cours (lecture
répétée d’une plage unique)
Pendant la lecture de la plage que vous voulez répéter,
appuyez plusieurs fois de suite sur REPEAT jusqu’à ce
que l’indication “REPEAT 1” apparaisse dans la fenêtre
d’affichage.
La lecture répétée de cette plage démarre.
Pour arrêter la lecture répétée d’une plage
unique
Appuyez sur x.
Pour reprendre la lecture normale
Appuyez plusieurs fois de suite sur REPEAT jusqu’à ce
que l’indication “REPEAT 1” disparaisse.
Lecture de disques
Répétition d’un passage déterminé d’une
plage (lecture répétée A-B)
Vous pouvez spécifier un passage sur une plage dont
vous voulez activer la lecture répétée. Le passage que
vous spécifiez doit être compris entre le début et la fin
d’une seule et même plage.
1 Pendant que le lecteur reproduit la plage en
question, appuyez sur la touche AyB au point de
début (point A) du passage à reproduire de
manière répétée.
L’indication “REPEAT” apparaît et “A” se met à
clignoter dans la fenêtre d’affichage.
2 Poursuivez la lecture de la plage (ou appuyez sur
M) pour localiser le point de fin (point B) et
appuyez ensuite sur AyB.
L’indication “REPEAT A-B” apparaît et la lecture
répétée A-B démarre.
Pour arrêter la lecture répétée A-B et reprendre
la lecture normale
Appuyez sur REPEAT ou x.
z
Vous pouvez définir un nouveau point de début et un
nouveau point de fin en cours de lecture répétée A-B
Vous pouvez transformer le point de fin en cours par un nouveau
point de début et spécifier ensuite un nouveau point de fin de
manière à répéter un autre passage juste après le passage en
cours.
1 En cours de lecture répétée A-B, appuyez sur AyB.
Le point de fin en cours devient le nouveau point de début
(point A).
L’indication “REPEAT” s’allume et “A-” se met à clignoter dans
la fenêtre d’affichage.
2 Localisez le nouveau point de fin (point B) et appuyez sur
AyB.
L’indication “REPEAT A-B” s’allume et le lecteur démarre la
lecture répétée du nouveau passage spécifié.
Lorsque vous souhaitez reprendre depuis le point de départ A,
appuyez sur H au cours d’une répétition AyB.
(lecture aléatoire) Z
Lorsque vous sélectionnez la lecture aléatoire, le lecteur
reproduit toutes les plages du disque dans un ordre
aléatoire.
CONTINUE
H
./>
SHUFFLE
1 Appuyez sur SHUFFLE en mode d’arrêt.
2 Appuyez sur H.
La lecture aléatoire démarre.
L’indication “;” apparaît pendant que le lecteur
“mélange” les plages. Le lecteur s’arrête après avoir
reproduit une fois toutes les plages.
Pour reprendre la lecture normale
Appuyez sur CONTINUE.
z
Vous pouvez localiser des plages en cours de lecture
aléatoire
Appuyez sur ./>.
Appuyez sur > pour localiser la plage suivante ou sur .
pour localiser le début de la plage en cours. Le lecteur ne
retourne pas à des titres qui ont déjà été joués.
20
FR

Création de votre propre
programme musical
(lecture programmée) Z
Vous pouvez sélectionner les plages que vous préférez et
spécifier leur ordre de lecture dans un programme
musical pouvant contenir jusqu’à 32 plages (ou 999 min.
59 sec. de durée totale pour le programme)
CONTINUE
Touches
numériques
>10
CHECK
H
./>
PROGRAM
CLEAR
Remarque
Si vous mettez le lecteur hors tension, si vous débranchez le câble
d’alimentation ou si vous appuyez sur A OPEN/CLOSE le
programme musical est effacé.
Vérification du contenu du programme
musical
Avant de démarrer la lecture ou pendant le lecture,
appuyez sur CHECK.
Chaque fois que vous appuyez sur la touche, les numéros
des plages s’afficheront selon leur ordre de
programmation. Si vous appuyez sur CHECK pendant
que le lecteur est en cours de lecture, ce sont les numéros
des plages suivant le numéro de plage affiché qui
apparaissent.
Lecture de disques
Modification du contenu d’un programme
musical
Vous pouvez changer le contenu d’un programme musical
en mode d’arrêt.
1 Appuyez sur PROGRAM en mode d’arrêt.
L’indication “PROGRAM” apparaît dans la fenêtre
d’affichage.
2 Appuyez sur les touches numériques pour
introduire le numéro d’une plage.
Si vous introduisez un mauvais numéro de plage
Appuyez sur CLEAR pour effacer ce numéro de plage
et réintroduisez le bon numéro de plage à l’aide des
touches numériques.
Pour sélectionner une plage portant un numéro
supérieur à 11
Appuyez sur >10 (page 18).
3 Répétez l’étape 2 pour introduire d’autres plages.
Chaque fois que vous introduisez un numéro de plage,
la durée totale du programme apparaît dans la fenêtre
d’affichage.
4 Appuyez sur H.
La lecture programmée démarre.
Pour
Effacer une plage
Effacer à partir de
la dernière plage
du programme
Ajouter une plage à
la fin du
programme
Effacer toutes les
plages
Procédez comme suit:
1 Appuyez plusieurs fois de suite sur
CHECK jusqu’à ce que le numéro de la
plage que vous voulez effacer apparaisse.
2 Appuyez sur CLEAR.
Appuyez sur CLEAR.
Chaque fois que vous appuyez sur cette
touche, la dernière plage du programme est
effacée.
Appuyez sur ./> pour sélectionner
la plage que vous voulez ajouter et
appuyez ensuite sur PROGRAM. Si vous
utilisez la télécommande, appuyez sur la
touche numérique correspondant à la plage
à ajouter.
Appuyez sur CLEAR ou x (pendant 2
secondes environ) jusqu’à ce que “Prog
CLEAR” s’affiche.
Pour reprendre la lecture normale
Appuyez sur CONTINUE.
z
Le programme reste en mémoire après la fin de la lecture
programmée
Appuyez sur H pour recommencer la lecture programmée à
partir du début. Le programme reste en mémoire si vous arrêtez
la lecture.
21
FR

Lecture d’un Super Audio
CD multicanal (fonction de
gestion multicanal)
le lecteur dispose d’une fonction de gestion multicanal
permettant de régler le mode lecture du Super Audio CD
utilisant la technologie DSD-DSP (intégrée au lecteur), en
fonction de la configuration ou de la taille de vos
enceintes.
Exemple de configuration d’enceintes
Lecture de disques
Pour régler la gestion multicanal :
1 Sélectionnez le mode lecture à partir du mode de
préréglage (lecture bi-canal ou multicanal).
2 Réglez la balance du niveau de sortie de chaque
enceinte (uniquement lorsque le mode de lecture
multicanal est sélectionné).
Remarques
• Cette fonction est disponible uniquement avec le Super Audio
CD.
• En fonction du mode de configuration sélectionné, vous ne
pouvez pas régler la balance du niveau de sortie de vos
enceintes.
Enceintes avant
L
Caisson de basses
L
Enceintes surround
MENU
Enceinte centrale
ENTER
R
R
lAMSL
Sélection du mode lecture bi-canal
1 Appuyez sur MENU.
2 Tournez la commande l AMS L jusqu’à ce
que “2CH SPK MODE” s’affiche.
3 Appuyez sur la commande l AMS L.
Le mode lecture s’affiche.
Mode de
configuration
2CH Direct
2CH + SW
Enceintes avant
Caisson de
basses
Chaque signal est diffusé directement
par les enceintes avant. Aucun signal
n’est émis par le caisson de basses.
a
a
4 Tournez la commande l AMS L jusqu’à ce
que le mode souhaité s’affiche.
5 Appuyez sur la commande l AMS L.
Remarque
Cette fonction n’est pas disponible lorsque le lecteur est en mode
CD ou multicanal. Pour pouvoir l’activer, réglez le lecteur en
mode Super Audio CD bi-canal, ouvrez le plateau de lecture ou
retirez le disque du lecteur.
Sélection du mode lecture multicanal
1 Appuyez sur MENU.
2 Tournez la commande l AMS L jusqu’à ce
que “MCH SPK MODE” s’affiche.
3 Appuyez sur la commande l AMS L.
Le mode lecture s’affiche.
Mode de
configuration
MCH Direct
5 – Large + SW
5 – Large
5 – Small + SW
FRT – Large +SW
FRT – Large
No – CNTR + SW
No – CNTR
Enceintes
avant
Chaque signal est diffusé directement
par chaque enceinte.
Large
Large
Small
Large
Large
Large
Large
Enceinte
centrale
Large
Large
Small
Small
Small
––
––
Enceintes
surround
Large
Large
Small
Small
Small
Large
Large
Caisson de
basses
a
––
a
a
––
a
––
22
LEVEL ADJ
./>
FR

A propos des “Large (grandes)” et des “Small
(petites)” enceintes
On entend par “Large” les enceintes capables de
reproduire parfaitement les basses fréquences. Si vous
sélectionnez “Small” pour les enceintes surround, les
basses fréquences de ces enceintes sont reproduites
par les enceintes avant et/ou le caisson de basses.
Pour une utilisation standard, sélectionnez “MCH
Direct” ou réglez toutes les enceintes sur “Large”
(exemple : “5 – Large + SW”, “5 – Large”, etc.). Si le
son obtenu ou la lecture multicanal ne vous satisfont
pas lors de l’écoute d’un Super Audio CD multicanal,
réglez les enceintes concernées sur “Small”.
4 Tournez la commande l AMS L jusqu’à ce
que le mode souhaité s’affiche.
5 Appuyez sur la commande l AMS L.
La balance du niveau de sortie par défaut s’affiche.
Pour régler la balance du niveau de sortie, passez
directement à l’étape 4 de la section “Réglage de la
balance du niveau de sortie sur le panneau avant du
lecteur” de la page 23 ou à l’étape 2 de la section
“Réglage du niveau de sortie à partir de la
télécommande” de la page 24.
Pour revenir à l’affichage normal, appuyez sur MENU.
Remarques
• La fonction de gestion multicanal n’est pas disponible lorsque
vous sélectionnez “MCH Direct” (vous ne pouvez pas régler la
balance du niveau de sortie de chaque enceinte).
• L’enceinte avant est automatiquement réglée sur “Large”
lorsque le caisson de basses est sur “––”.
• Lorsque vous écoutez une piste ne contenant pas le signal
LFE*, le signal du caisson de basses n’est pas émis. Ainsi,
lorsque vous sélectionnez “MCH Direct”, “5 – Large + SW” ou
“No – CNTR + SW” aucun signal n’est émis par le caisson de
basses. Toutefois, lorsque vous sélectionnez “5 – Small + SW”
ou “FRT – Large +SW” (quand vous réglez l’enceinte sur
“Small”), les basses fréquences proviennent du caisson de
basses.
* LFE : Low Frequency Enhancement (amélioration des basses
fréquences) (décrit comme “.1 CH”)
Réglage de la balance du niveau de sortie
de chaque enceinte
La fonction de gestion multicanal vous permet de régler
les éléments suivants :
CNTR BALANCE
Balance relative du niveau de sortie entre les enceintes
avant (FRONT L/R) et l’enceinte centrale (CENTER)
SURR BALANCE
Balance relative du niveau de sortie entre les enceintes
avant (FRONT L/R) et les enceintes surround (SURR L/
R)
SW BALANCE
Balance relative du niveau de sortie entre les enceintes
avant (FRONT L/R) et le caisson de basses (SUB
WOOFER)
Remarque
Certains réglages ne sont pas disponibles, en fonction du mode
lecture multicanal sélectionné.
Réglage de la balance du niveau de sortie sur le
panneau avant du lecteur
Vous pouvez régler la balance de chacune de vos
enceintes en mode lecture, à partir du son émis. Vous
pouvez également la régler en mode arrêt, à partir du
signal d’essai.
1 Appuyez sur MENU.
2 Tournez la commande l AMS L jusqu’à ce
que “LEVEL ADJUST” s’affiche.
3 Appuyez sur la commande l AMS L.
Si vous effectuez le réglage en mode lecture, passez
directement à l’étape 6.
4 Tournez la commande l AMS L jusqu’à ce
que “TONE ON” s’affiche.
5 Appuyez sur la commande l AMS L.
Le signal d’essai est émis par chacune des enceintes,
l’une après l’autre, et l’écran indique quelle enceinte
émet actuellement le signal.
Lecture de disques
6 Tournez la commande l AMS L jusqu’à ce
que l’élément souhaité s’affiche.
Sélectionnez l’élément “CNTR BALANCE”, “SURR
BALANCE” ou “SW BALANCE”.
Remarque
Lorsque vous réglez le caisson de basses sur “––” en mode de
configuration (page 22), “SW BALANCE” ne s’affiche pas.
De même, lorsque vous réglez les enceintes centrale et
surround sur “––”, “CNTR BALANCE” et “SURR
BALANCE” ne s’affichent pas.
23
FR

Lecture d’un Super Audio CD multicanal
7 Appuyez sur la commande l AMS L.
Le réglage de la balance apparaît.
En mode d’arrêt, l’enceinte sélectionnée émet le signal
d’essai.
Exemple : Si vous sélectionnez “SURR BALANCE”, le
8 Tournez la commande l AMS L pour régler le
niveau de sortie.
Lecture de disques
9 Appuyez sur la commande l AMS L.
Le lecteur revient au statut décrit à l’étape 6.
Répétez les étapes 6 à 9 pour d’autres réglages.
10
Appuyez sur MENU après avoir effectué tous vos
réglages.
L’affichage redevient normal.
signal d’essai est audible sur les enceintes
avant et les enceintes surround.
DISC
FRT:_____:SURR
DISC
FRT:_____:SURR
MULTI CH
SACD
12345
678910
MULTI CH
SACD
12345
678910
5 Appuyez sur ENTER.
Le réglage de la balance apparaît.
En mode d’arrêt, l’enceinte sélectionnée émet le signal
d’essai.
Exemple : Si vous sélectionnez “SURR BALANCE”, le
signal d’essai est audible sur les enceintes
avant et les enceintes surround.
MULTI CH
DISC
FRT:_____:SURR
SACD
12345
678910
6 Appuyez plusieurs fois de suite sur ./> pour
régler le niveau de sortie.
MULTI CH
DISC
FRT:_____:SURR
SACD
12345
678910
7 Appuyez sur ENTER.
Le lecteur revient au statut décrit à l’étape 4.
Répétez les étapes 4 à 7 pour d’autres réglages.
8 Appuyez sur LEVEL ADJ après avoir effectué tous
vos réglages.
L’affichage redevient normal.
Réglage du niveau de sortie à partir de la
télécommande
Z
Vous pouvez régler le niveau de sortie de chaque enceinte
avec la télécommande fournie, en mode lecture.
1 Appuyez sur LEVEL ADJ, que vous soyez en mode
lecture ou en mode arrêt.
Si vous effectuez le réglage en mode lecture, passez
directement à l’étape 4.
2 Appuyez plusieurs fois de suite sur ./>
jusqu’à ce que “TONE ON” s’affiche.
3 Appuyez sur ENTER.
Le signal d’essai est émis par chacune des enceintes,
l’une après l’autre, et l’écran indique quelle enceinte
émet actuellement le signal.
4 Appuyez plusieurs fois de suite sur ./>
jusqu’à ce que l’élément souhaité s’affiche.
Sélectionnez l’élément “CNTR BALANCE”, “SURR
BALANCE” ou “SW BALANCE”.
Remarque
Lorsque vous réglez le caisson de basses sur “––” en mode de
configuration (page 22), “SW BALANCE” ne s’affiche pas.
De même, lorsque vous réglez les enceintes centrale et
surround sur “––”, “CNTR BALANCE” et “SURR
BALANCE” ne s’affichent pas.
24
FR

Informations
Précautions
complémentaires
Ce chapitre fournit des informations
complémentaires sur le
fonctionnement et l’entretien de votre
lecteur Super Audio CD.
Sécurité
• Attention — Les instruments optiques qui équipent cet
appareil sont dangereux pour les yeux.
• Si un objet ou un liquide quelconque pénètre à l’intérieur du
boîtier, débranchez le lecteur et ne l’utilisez plus avant de
l’avoir fait contrôler par un personnel qualifié.
• Le cordon d’alimentation doit être remplacé dans un centre de
service après-vente qualifié exclusivement.
• L’appareil n’est pas débranché de l’alimentation secteur tant
qu’il est raccordé à la prise murale, même si l’appareil luimême a été mis hors tension.
Alimentation
• Avant d’utiliser le lecteur, assurez-vous que la tension
d’utilisation de l’appareil est identique à celle de l’alimentation
secteur locale. La tension d’utilisation est indiquée sur la
plaque signalétique fixée au dos du lecteur.
• Le lecteur reste branché sur l’alimentation secteur tant qu’il est
raccordé à la prise murale, même si l’appareil a préalablement
été mis hors tension.
• Si vous prévoyez de ne pas utiliser le lecteur pendant une
période prolongée, débranchez-le de la prise murale. Pour
déconnecter le cordon d’alimentation, tirez sur la fiche; ne tirez
jamais sur le cordon proprement dit.
Installation
• Installez le lecteur dans un lieu suffisamment ventilé afin de
prévenir tout risque de surchauffe à l’intérieur du boîtier.
• N'installez pas le lecteur sur une surface souple comme un
tapis qui risquerait d’obstruer les ouïes de ventilation situées
sur la base de l’appareil.
• N'installez pas le lecteur à proximité de sources de chaleur ou
dans un endroit excessivement poussiéreux, soumis à la
lumière directe du soleil ou à des vibrations ou des chocs
mécaniques importants.
Utilisation
• Si vous transportez soudainement le lecteur d’une pièce froide
dans une pièce chaude ou si vous l’installez dans une pièce
particulièrement humide, de la condensation peut se former
sur les lentilles montées à l’intérieur du lecteur. Le
fonctionnement du lecteur risque d’en être affecté. En pareil
cas, retirez le disque du plateau de lecture et laissez le lecteur
sous tension pendant environ une heure pour permettre à
l’humidité de s’évaporer.
• A l'allumage, il est possible que du bruit se fasse entendre lors
du chargement du disque dans le lecteur Super Audio CD. Ce
bruit est normal.
Réglage du volume
• N’augmentez pas trop le volume pendant l’écoute d’un
passage de très faible niveau d’entrée ou ne comportant aucun
signal audio. Vous risquez en effet d’endommager les hautparleurs lors de la lecture d’un passage présentant un niveau
d’entrée très élevé.
25
Informations complémentaires
FR

Précautions
Remarques sur les disques
Introduction d’un disque
• Il est possible que vous entendiez un bruit de transmission ou
mécanique émis par le lecteur. Ce sifflement signifie que le
lecteur est en train de régler automatiquement ses mécanismes
intérieurs en fonction du disque introduit.
Il est également possible que vous entendiez un bruit
mécanique lorsque vous introduisez un disque déformé dans
le lecteur.
Entretien
• Nettoyez le boîtier, la console et les commandes à l’aide d’un
chiffon doux imprégné d’une solution détergente neutre.
N’utilisez pas de tampon abrasif, de poudre à récurer ou de
solvant tel que l’alcool ou le benzine.
A propos du transport
• Assurez-vous de retirer le disque placé sur le plateau.
• Assurez-vous de refermer le plateau de lecture.
Si vous éprouvez la moindre difficulté concernant votre
lecteur, n’hésitez pas à consulter votre revendeur Sony.
Manipulation des disques
• Pour que les disques restent propres, saisissez-les par le bord.
N’en touchez pas la surface.
• Ne collez pas de papier ni de bande adhésive sur les disques.
• Utilisez uniquement des disques de forme ronde. L’utilisation
d'un disque de forme spéciale (par exemple : disque carré, en
forme d’étoile, de cœur...) risque d'endommager votre lecteur.
• N’utilisez pas de disque pourvus d’une étiquette comme sur
les disques de location.
Rangement des disques
• N’exposez pas les disques au rayonnement direct du soleil ou
à des sources de chaleur comme des conduits d’air chaud.
• Après lecture, rangez les disques dans leur boîtier. Si vous empilez
les disques sans leurs boîtiers, vous risquez de les endommager.
Installation d’un disque sur le plateau de lecture
• Assurez-vous que le disque est correctement positionné sur du
plateau.
Sinon, le lecteur ou le disque risque d’être endommagé.
Informations complémentaires
Entretien
• Si les disques portent des traces de doigts ou de la poussière, la
qualité audio risque d’en être altérée.
• Avant la lecture, nettoyez les disques avec un chiffon de
nettoyage. Essuyez les disques en allant du centre vers
l’extérieur.
• Nettoyez les disques avec un chiffon doux légèrement
imprégné d’eau et essuyez-les ensuite avec un chiffon sec.
• N’utilisez pas de solvants comme de la benzine, du diluant,
des nettoyants pour disques en vinyle ni de sprays
antistatiques.
Remarques concernant la lecture d’un CD-R/CD-RW
• Il est possible que certains disques enregistrés avec un graveur
CD-R/CD-RW ne puissent pas être reproduits en raison de
rayures, de souillures, de leurs conditions d’enregistrement ou
des caractéristiques techniques du graveur. En outre, les
disques qui ne sont pas finalisés à la fin de l’enregistrement ne
peuvent pas être reproduits.
26
FR

Dépannage
Spécifications
Si vous rencontrez l’une des difficultés suivantes à
l’occasion de l’utilisation de ce lecteur, consultez le
présent guide de dépannage pour tenter de remédier au
problème survenu. Si le problème persiste, consultez votre
revendeur Sony.
Pas de son.
, Vérifiez si le lecteur est correctement raccordé.
, Assurez-vous que vous exploitez correctement
l’amplificateur.
, Lorsque vous utilisez un casque, réglez le volume
à l’aide du bouton PHONES LEVEL.
Pas de son via les connecteurs DIGITAL (CD) OUT.
, Les signaux audio du Super Audio CD ne peuvent
être sortis via les connecteurs DIGITAL (CD) OUT.
La lecture du disque ne démarre pas.
, Il n’y a pas de disque à l’intérieur du lecteur.
, Le disque est placé à l’envers sur le plateau de
lecture.
, Placez le disque sur le plateau de lecture avec la
face imprimée vers le haut.
, Le disque n’est pas inséré correctement. Rechargez
le disque.
, Nettoyez le disque (voir page 26).
, De l’humidité s’est condensée à l’intérieur du
lecteur. Retirez le disque et laissez le lecteur sous
tension pendant environ une heure.
, Le disque posé sur le plateau est incompatible
(voir page 13).
La télécommande ne fonctionne pas.
, Dégagez les obstacles entre la télécommande et le
lecteur.
, Dirigez la télécommande vers le capteur de
télécommande du lecteur.
, Si les piles de la télécommande sont déchargées,
remplacez-les.
Aucun son n’est émis par la prise SUB WOOFER.
, Sélectionnez le mode de lecture de sorte que le
caisson de basses soit réglé sur “a” (page 22).
, Lorsque vous écoutez une piste ne contenant pas le
signal LFE, le signal n’est émis par le caisson de
basses que lorsque vous sélectionnez “5 – Small +
SW” ou “FRT – Large + SW” pour le mode de
lecture multicanal (page 23).
Pendant la lecture d’un Super Audio CD
Plage de fréquence de lecture
Réponse en fréquence 2 Hz à 50 kHz (–3 dB)
Plage dynamique 104 dB ou plus
Distorsion harmonique totale
Pleurage et scintillement Valeur dans la limite mesurable
Pendant la lecture d’un CD
Réponse en fréquence 2 Hz à 20 kHz
Plage dynamique 99 dB ou plus
Distorsion harmonique totale
Pleurage et scintillement Valeur dans la limite mesurable
2 Hz à 100 kHz
0,0018 % ou mois
(±0,001 % W. PEAK) ou moins
0,002 % ou moins
(±0,001 % W. PEAK) ou moins
Connecteurs de sortie
Type de
prise
ANALOG
OUT
DIGITAL (CD)
OUT OPTICAL*
DIGITAL (CD)
OUT COAXIAL*
PHONES
* Sort uniquement les signaux audio de CD
Prises phono
Connecteur
de sortie
optique
carré
Connecteur
de sortie
coaxial
Prise phono
stéréo
Niveau de
sortie
2 Vrms
(à 50 kilohms)
–18 dBm
0,5 Vp-p
10 mW
Impédance de
charge
Plus de
10 kilohms
Longueur d’onde
de l’émission
lumineuse:
( )
660 nm
75 ohms
32 ohms
Caractéristiques générales
Laser Laser à semi-conducteur
(SACD: λ = 650 nm)
(CD: λ = 780 nm)
Durée d’émission : continue
Puissance rayonnante du laser :
*Ces sorties correspondent à la valeur mesurée à une distance
d'environ 200 mm de la surface de la lentille de l'objectif sur le
point de lecture optique.
Puissance de raccordement
Consommation électrique 25 W
Dimensions (l/h/p) 430 × 111 × 283 mm, parties saillantes
Masse (approx.) 5,8 kg
5.47 uW à 650 nm
230 V CA, 50/60 Hz
comprises
Informations complémentaires
Accessoires fournis
Voir page 4.
La conception et les spécifications sont sujettes à modifications
sans préavis.
27
FR

Index
A
Accessoires 4
Affichage d’informations 15
Amplificateur (non fourni) 5
AMS (détecteur automatique de musique) 14
ANALOG OUT
2 CH 6
5.1 CH 5
B
Balance du niveau de sortie 23
C
Câble
connexion audio 5
numérique coaxial 7
numérique optique 7
D, E
DIGITAL (CD) OUT 7
M, N, O
Mode lecture
bi-canal 22
multicanal 22
P, Q
Pause de lecture 14
Piles 4
R
Raccordement
composant audio 5
source d’alimentation 7
Recherche
recherche à grande vitesse 18
recherche d’index 18
recherche temporelle 19
Répétition
lecture A-B 20
lecture complète 19
lecture d’une seule plage 20
Informations complémentaires
F, G, H
Fonction de gestion multicanal 22
I, J, K
Introduction d’un disque 14
L
Lecture
d’un disque 14
en introduisant le numéro de plage 18
plages dans un ordre aléatoire 20
plusieurs fois 19
Lecture aléatoire 20
Lecture programmée
comment créer votre programme musical 21
modification du contenu du programme 21
Vérification du contenu du programme 21
Localisation
avec la fonction d’index (recherche d’index) 18
en contrôlant le son (recherche) 18
en introduisant le numéro de plage 18
en observant l’indication de la durée (rechercher à
grande vitesse) 18
passage déterminé 18
plage spécifique 18
S
Super Audio CD 12
Super Audio CD bi-canal 13
T, U, V, W, X, Y, Z
Télécommande 11
TEXT 16
TOC 13
28
FR

29
Informations complémentaires
FR

ACHTUNG
Willkommen!
Um Feuergefahr und die
Gefahr eines elektrischen
Schlags zu vermeiden,
setzen Sie das Gerät
weder Regen noch
sonstiger Feuchtigkeit aus.
Um einen elektrischen
Schlag zu vermeiden,
öffnen Sie das Gehäuse
nicht. Überlassen Sie
Wartungsarbeiten stets
nur qualifiziertem
Fachpersonal.
Dieses Gerät wurde als Laser-Gerät der
Klasse 1 (CLASS 1 LASER) klassifiziert.
Das entsprechende Etikett (CLASS 1
LASER PRODUCT) befindet sich außen an
der Rückseite des Geräts.
Danke, daß Sie sich für einen SuperAudio-CD-Player von Sony entschieden
haben. Lesen Sie diese Anleitung vor
Inbetriebnahme des Geräts bitte genau
durch, und bewahren Sie sie zum späteren
Nachschlagen sorgfältig auf.
Zu dieser
Bedienungsanleitung
Die Anweisungen in dieser
Bedienungsanleitung beziehen sich auf
Modell SCD-XB770.
Konventionen in dieser Anleitung
• Die Anweisungen in dieser Anleitung
beziehen sich auf die Bedienelemente
am Gerät.
Sie können jedoch auch die
Bedienelemente auf der Fernbedienung
verwenden, sofern sie die gleiche oder
eine ähnliche Bezeichnung tragen wie
die Bedienelemente am Gerät.
• In dieser Bedienungsanleitung werden
folgende Symbole verwendet:
Dieser Warnhinweis befindet sich im
Geräteinneren.
Batterien nicht achtlos
wegwerfen, sondern zum
Sondermüll geben.
Gibt an, daß Sie für die
Z
betreffende Funktion die
Fernbedienung verwenden
können.
Kennzeichnet Hinweise und
z
Tips, mit deren Hilfe sich eine
Funktion leichter ausführen läßt.
DE
2

Merkmale und Funktionen
INHALT
Informationen zur Super-Audio-CD
• Die Super-Audio-CD stellt einen neuen Audio-CDStandard hoher Qualität dar, bei dem Musik im DSDFormat (Direct Stream Digital) aufgezeichnet wird.
Herkömmliche CDs werden im PCM-Format
aufgezeichnet. Die Abtastfrequenz ist beim DSD-Format
64mal höher als bei einer herkömmlichen CD.
Außerdem wird in diesem Format mit 1-BitQuantisierung gearbeitet. So lassen sich mit dem DSDFormat ein breiter Frequenzbereich und eine große
Dynamik über den gesamten hörbaren Frequenzbereich
erzielen. Daher ist eine außerordentlich originalgetreue
Musikreproduktion möglich.
• Es gibt zwei Typen von Super-Audio-CDs: eine 2-KanalStereo-CD und eine Mehrkanal-CD mit bis zu 6
unabhängigen Kanälen. Die Mehrkanalfunktion der
Super-Audio-CD zeichnet sich durch ein Verfahren der
Lautsprecherzuordnung aus, das im wesentlichen der
5.1-Kanal-Ausgabe moderner AV-Systeme ähnelt.
Merkmale und Funktionen des Players
Dieser Player ist für die Wiedergabe von 2-Kanal- und
Mehrkanal-Super-Audio-CDs sowie herkömmlichen CDs
geeignet und bietet folgende Merkmale und Funktionen:
• Ausgestattet mit einem optischen Sensor mit zwei
getrennten Lasern, so daß Super-Audio-CDs und
herkömmliche CDs mit ihrer jeweiligen Wellenlänge
gelesen werden können.
• Schnellerer Zugriff auf die einzelnen Titel dank eines
verbesserten Servo-Mechanismus.
• Mehrkanal-Management zum Einstellen der
Mehrkanalumgebung für die Wiedergabe auf die
Kanalzuordnung und Größe der Lautsprecher.
• Super-Audio-D/A-Wandler und direktes digitales
Synchronisationssystem für Klangreproduktion von
noch höherer Qualität.
Vorbereitungen 4
Vor dem Anschließen des Geräts 4
Anschließen der Audiokomponenten 5
Lage und Funktion der Teile und
Bedienelemente 8
Beschreibung der Teile und Bedienelemente an der
Vorderseite 8
Beschreibung der Teile und Bedienelemente an der
Rückseite 10
Beschreibung der Bedienelemente auf der
Fernbedienung 11
Wiedergeben von CDs 12
Kompatible CD-Typen 12
Wiedergeben einer CD 14
Das Display 15
Ansteuern eines bestimmten Titels 18
Ansteuern einer bestimmten Passage in einem
Titel 18
Wiederholte Wiedergabe von Titeln 19
Wiedergeben von Titeln in willkürlicher Reihenfolge
(Shuffle Play) 20
Zusammenstellen eines eigenen Programms
(Programme Play) 21
Wiedergeben einer Mehrkanal-Super-Audio-CD
(Mehrkanal-Management) 22
DE
Sonstiges
• Auf einer Super-Audio-CD können bis zu 255 Titel-/
Indexnummern aufgezeichnet werden. Diese Funktion
steht beim SCD-XB770 zur Verfügung.
• Mit der mitgelieferten Fernbedienung können Sie den
SCD-XB770 und einen herkömmlichen CD-Player von
Sony steuern.
Weitere Informationen 25
Sicherheitsmaßnahmen 25
Hinweise zu CDs 26
Störungsbehebung 27
Technische Daten 27
Index 28
DE
3

Vorbereitungen
Vor dem Anschließen des
Geräts
In diesem Kapitel finden Sie
Informationen zu dem mitgelieferten
Zubehör. Außerdem wird hier
beschrieben, wie Sie verschiedene
Audiokomponenten an den SuperAudio-CD-Player anschließen
können. Lesen Sie dieses Kapitel
unbedingt sorgfältig durch, bevor Sie
irgendwelche Anschlüsse herstellen.
Überprüfen des mitgelieferten Zubehörs
Im Lieferumfang des Players sind folgende Teile
enthalten:
• Audioverbindungskabel
Cinchbuchse × 2 (rot und weiß) y Cinchbuchs × 2 (rot
und weiß) (2)
Cinchbuchse × 1 (schwarz) y Cinchbuchse × 1
(schwarz) (2)
• Fernbedienung RM-SX700 (1)
• R06-Batterien der Größe AA (2)
Einlegen von Batterien in die
Fernbedienung
Legen Sie zwei R06-Batterien (Größe AA) in das
Batteriefach ein. Achten Sie dabei auf richtige Polarität:
Plus- und Minus-Pol der Batterien müssen den
Markierungen + und – im Batteriefach entsprechen. Wenn
Sie die Fernbedienung benutzen, richten Sie sie auf den
Fernbedienungssensor
am Player.
z
Wann müssen die Batterien ausgetauscht werden?
Unter normalen Bedingungen halten die Batterien etwa sechs
Monate. Wenn sich der Player nicht mehr mit der Fernbedienung
steuern läßt, ersetzen Sie beide Batterien durch neue.
Hinweise
• Setzen Sie den Fernbedienungssensor nicht großer Hitze oder
Feuchtigkeit aus.
• Lassen Sie keine Fremdkörper in das Gehäuse der
Fernbedienung fallen. Achten Sie darauf besonders beim
Austauschen der Batterien.
• Verwenden Sie nicht eine neue Batterie zusammen mit einer
alten.
• Setzen Sie die Fernbedienung keinem direkten Sonnen- oder
Lampenlicht aus. Dies könnte zu einer Fehlfunktion führen.
• Wenn Sie die Fernbedienung längere Zeit nicht benutzen
wollen, nehmen Sie die Batterien heraus, damit nicht durch
auslaufende oder korrodierte Batterien Schäden entstehen.
DE
4

Anschließen der Audiokomponenten
Schließen Sie den Super-Audio-CD-Player an eine
Audiokomponente an. Achten Sie darauf, alle
Komponenten vor dem Anschließen auszuschalten.
Stecken Sie die Stecker fest in die Buchsen, um
Störrauschen zu vermeiden.
Wenn Sie einen Verstärker mit 5.1-KanalEingangsbuchsen (Mehrkanalverstärker, AV-Verstärker
usw.) haben und Player und Verstärker über die Buchsen
ANALOG 5.1CH OUT verbinden, können Sie eine
Mehrkanal-Super-Audio-CD in Mehrkanalklang
wiedergeben lassen.
Bei einer normalen Wiedergabe verbinden Sie Player und
Verstärker über die Buchsen ANALOG 2CH OUT.
Anschließen über die Buchsen ANALOG
5.1CH OUT
Stellen Sie in diesem Fall die Verbindung über
Audioverbindungskabel her. Verbinden Sie die Buchsen
ANALOG 5.1CH OUT (FRONT L/R, SURR L/R, CENTER,
SUBWOOFER) mit den entsprechenden Buchsen am Verstärker.
Für das Anschließen der FRONT- und SURR-Buchsen (rot und
weiß) verwenden Sie die Verbindungskabel und achten darauf,
die farbigen Stifte in die entsprechenden Buchsen zu stecken:
Weiß (links) zu Weiß und Rot (rechts) zu Rot. Zum Anschließen
der CENTER- und SUB WOOFER-Buchsen verwenden Sie die
entsprechenden Verbindungskabel (schwarz).
FRONT- oder SURR-Verbindung
Audioverbindungskabel (rot und weiß) (mitgeliefert)
Weiß (L)
Rot (R)
Weiß (L)
Rot (R)
CENTER- oder SUB WOOFER-Verbindung
Audioverbindungskabel (schwarz) (mitgeliefert)
Schwarz
Schwarz
Hinweise
• Bei einer Verbindung für die Mehrkanalwiedergabe schließen
Sie auch die Buchsen ANALOG 2CH OUT an, so daß Sie eine
CD (oder SACD) wiedergeben können, wenn Sie den
Eingangswählschalter am Verstärker auf CD- bzw. SACDEingang stellen.
• Während der Wiedergabe einer herkömmlichen CD oder einer
2-Kanal-Super-Audio-CD werden dieselben Signale, die über
die Buchsen ANALOG 2CH OUT ausgegeben werden, auch
über die Buchsen ANALOG 5.1CH FRONT L/R ausgegeben.
• Während der Wiedergabe einer Mehrkanal-Super-Audio-CD
werden dieselben Signale, die über die Buchsen ANALOG
5.1CH FRONT L/R ausgegeben werden, auch über die
Buchsen ANALOG 2CH OUT ausgegeben. Die
herunterkonvertierten Mehrkanalsignale werden nicht
wiedergegeben.
• Es gibt 5-Kanal-, 4-Kanal- und 3-Kanal-Super-Audio-CDs. Bei
der Wiedergabe solcher CDs werden die Signale nicht über alle
ANALOG 5.1CH OUT-Buchsen ausgegeben. Einzelheiten zur
Wiedergabe finden Sie auf der Hülle oder den Anweisungen
zur Super-Audio-CD.
Vorbereitungen
an FRONT INBuchsen (L/R)
ANALOG
2CH OUT 5.1CH OUT OUT
FRONT COAXIAL OPTICALSURR CENTER
L
R
L
R
SUB
WOOFER
DIGITAL(CD)
an SURROUNDoder REAR INBuchsen (L/R)
an Buchse SUB
WOOFER IN
an Buchse
CENTER IN
Mehrkanalverstärker,
AV-Verstärker usw.
DE
5

Anschließen der Audiokomponenten
Vorbereitungen
Anschließen über die Buchsen ANALOG
2CH OUT
Stellen Sie in diesem Fall die Verbindung über ein
Audioverbindungskabel her. Verbinden Sie die Buchsen
ANALOG 2CH OUT L/R mit den CD- bzw. SACDEingangsbuchsen am Verstärker. Achten Sie darauf, die
farbcodierten Stecker mit den richtigen Buchsen an den Geräten
zu verbinden: weiß (links) zu weiß und rot (rechts) zu rot.
Audioverbindungskabel (rot und weiß) (nicht mitgeliefert*)
Weiß (L)
Rot (R)
* Wenn Sie nicht die ANALOG 5.1 CH-Verbindung herstellen
(Seite 5), können Sie das mitgelieferte Audioverbindungskabel
für die ANALOG 2CH-Verbindung verwenden.
ANALOG
2CH OUT 5.1CH OUT OUT
FRONT COAXIAL OPTICALSURR CENTER
L
R
L
R
SUB
WOOFER
DIGITAL(CD)
Weiß (L)
Rot (R)
an CD (SACD) INBuchsen (L/R)
DE
6
Stereoverstärker usw.

Anschließen über die Buchse DIGITAL (CD)
OUT OPTICAL
Stellen Sie in diesem Fall die Verbindung über ein optisches
Digitalkabel her. Um ein optisches Digitalkabel an die Buchse
DIGITAL (CD) OUT OPTICAL anzuschließen, nehmen Sie die
Kappe vom Anschluß ab und stecken den Kabelstecker in die
Buchse, bis er mit einem Klicken einrastet.
Verbiegen und verdrehen Sie das optische Kabel nicht.
optisches Digitalkabel (nicht mitgeliefert)
Hinweis
Nur die Audiosignale herkömmlicher CDs werden über die
DIGITAL (CD) OUT-Anschlüsse ausgegeben. Die Signale von
Super-Audio-CDs können über die DIGITAL (CD) OUTAnschlüsse nicht ausgegeben werden.
Anschließen über die Buchse DIGITAL (CD)
OUT COAXIAL
Verwenden Sie ein digitales Koaxialkabel, um eine
Audiokomponente mit digitalen Koaxialeingängen
anzuschließen.
Vorbereitungen
digitales Koaxialkabel (nicht mitgeliefert)
Hinweis
Nur die Audiosignale herkömmlicher CDs werden über die
DIGITAL (CD) OUT-Anschlüsse ausgegeben. Die Signale von
Super-Audio-CDs können über die DIGITAL (CD) OUTAnschlüsse nicht ausgegeben werden.
Anschließen des Netzkabels
Schließen Sie das Netzkabel an eine Netzsteckdose an.
DE
7

Lage und
Beschreibung der Teile und
Bedienelemente an der
Funktion der
Teile und
Bedienelemente
In diesem Kapitel werden die Lage
und Funktion der verschiedenen Teile
und Bedienelemente an der Vorderund Rückseite des Geräts sowie auf
der Fernbedienung erläutert. Näheres
finden Sie auf den in Klammern
angegebenen Seiten.
Außerdem werden die Anzeigen
erklärt, die im Display erscheinen.
Vorderseite
1 Schalter POWER (14)
Dient zum Einschalten des Players.
2 Taste TIME/TEXT (15)
Mit jedem Tastendruck auf diese Taste erscheinen die
Spieldauer des Titels, die gesamte Restspieldauer auf
der CD oder die TEXT-Informationen im Display.
3 Taste SACD/CD (12)
Mit jedem Tastendruck auf diese Taste erscheint
abwechselnd „SACD“ oder „CD“ im Display. Wählen
Sie den CD-Typ aus, den Sie wiedergeben wollen.
4 CD-Fach (14)
Öffnen bzw. schließen Sie mit A OPEN/CLOSE das
CD-Fach.
5 Mehrkanalanzeige
Leuchtet, wenn Sie den Player einschalten oder wenn
Sie eine Mehrkanal-Super-Audio-CD einlegen und mit
der Taste MULTI/2CH den MehrkanalWiedergabebereich auswählen.
DE
8

Lage und Funktion der Teile und Bedienelemente
POWER
PHONES
PHONE LEVEL
MIN MAX
TIME/TEXT SACD/CD
MENU MULTI/2CH
6 Taste A OPEN/CLOSE (14)
Drücken Sie diese Taste, um das CD-Fach zu öffnen.
OPEN CLOSE
AMS
PUSH ENTER
qs Display (15)
Dient zum Anzeigen verschiedener Informationen.
7 Taste H (14)
Mit dieser Taste starten Sie die Wiedergabe.
8 Taste X (14)
Mit dieser Taste schalten Sie in den Pausemodus.
9 Taste x (14)
Mit dieser Taste stoppen Sie die Wiedergabe.
0 Regler l AMS L (AMS: Automatischer
Musiksensor) (13)
Wenn Sie den Regler l AMS L um eine
Klickposition gegen den Uhrzeigersinn drehen,
schalten Sie zum vorhergehenden Titel zurück. Wenn
Sie den Regler l AMS L um eine Klickposition
im Uhrzeigersinn drehen, schalten Sie zum
nachfolgenden Titel.
qa Tasten m/M (18)
Mit diesen Tasten können Sie innerhalb eines Titels
eine bestimmte Passage ansteuern, die Sie
wiedergeben wollen.
qd Taste MULTI/2CH (12)
Mit dieser Taste wählen Sie den Wiedergabebereich
aus, wenn Sie eine Super-Audio-CD mit 2-Kanal- und
Mehrkanal-Wiedergabebereich (Seite 13) einlegen.
qf Taste MENU (13)
Mit dieser Taste rufen Sie das Menü auf.
qg PHONES LEVEL
Stellen Sie die Kopfhörerlautstärke ein.
qh PHONES
Schließen Sie Kopfhörer an.
Während der Wiedergabe einer Mehrkanal-SuperAudio-CD werden dieselben Signale, die über die
Buchsen ANALOG 5.1CH FRONT L/R ausgegeben
werden, auch über die Buchsen PHONES ausgegeben.
DE
9

Beschreibung der Teile und Bedienelemente an der
Rückseite
Lage und Funktion der Teile und Bedienelemente
ANALOG
2CH OUT 5.1CH OUT OUT
FRONT COAXIAL OPTICALSURR CENTER
L
R
DIGITAL(CD)
L
SUB
R
WOOFER
1 Buchsen ANALOG 2CH OUT L/R (6)
Zum Anschließen einer Audiokomponente (Stereo/2
Kanäle) über ein Audioverbindungskabel.
2 Buchsen ANALOG 5.1CH OUT (5)
Zum Anschließen eines Verstärkers mit 5.1-KanalEingangsbuchsen (Mehrkanalverstärker, AVVerstärker usw.) über Audioverbindungskabel.
3 Buchse DIGITAL (CD) OUT COAXIAL (7)
Zum Anschließen einer Audiokomponente über ein
digitales Koaxialkabel.
4 Buchse DIGITAL (CD) OUT OPTICAL (7)
Zum Anschließen einer Audiokomponente über ein
optisches Digitalkabel.
DE
10
Hinweis
Nur die Audiosignale herkömmlicher CDs werden über die
DIGITAL (CD) OUT-Anschlüsse (siehe 3 und 4 in der
Abbildung) ausgegeben. Die Signale von Super-Audio-CDs
können über die DIGITAL (CD) OUT-Anschlüsse nicht
ausgegeben werden.

Beschreibung der Bedienelemente auf der Fernbedienung
1 Taste CONTINUE (20)
Drücken Sie diese Taste im Modus Shuffle Play oder
Programme Play, wenn Sie die normale Wiedergabe
fortsetzen wollen.
Taste SHUFFLE (20)
Mit dieser Taste starten Sie die Wiedergabe in
willkürlicher Reihenfolge (Shuffle Play).
Taste PROGRAM (21)
Mit dieser Taste starten Sie die Programmwiedergabe
(Programme Play).
2 Taste DISPLAY MODE (16)
Drücken Sie diese Taste, um die Anzeigen im Display
auszublenden.
3 Taste TIME/TEXT (15)
Mit jedem Tastendruck auf diese Taste erscheinen die
Spieldauer des Titels, die gesamte Restspieldauer auf
der CD oder die TEXT-Informationen im Display.
4 Zahlentasten (18)
Mit diesen Tasten geben Sie die Titelnummern ein.
5 Taste
i
10 (18)
Mit dieser Taste steuern Sie einen Titel mit einer
Nummer über 10 an.
qs Taste SACD/CD (12)
Mit jedem Tastendruck auf diese Taste erscheint
abwechselnd „SACD“ oder „CD“ im Display. Wählen
Sie den CD-Typ aus, den Sie wiedergeben wollen.
qd Taste MULTI/2CH (12)
Mit dieser Taste wählen Sie den Wiedergabebereich
aus, wenn Sie eine Super-Audio-CD mit 2-Kanal- und
Mehrkanal-Wiedergabebereich (Seite 13) einlegen.
qf Taste ENTER (24)
Drücken Sie diese Taste, um die Auswahl zu
bestätigen.
qg Taste CLEAR (21)
Mit dieser Taste können Sie einen programmierten
Titel löschen.
qh Taste LEVEL ADJ (24)
Mit dieser Taste stellen Sie die Ausgangspegelbalance
für das Mehrkanal-Management ein (Seite 22).
qj Taste CHECK (21)
Mit dieser Taste können Sie die Programmreihenfolge
anzeigen lassen.
Lage und Funktion der Teile und Bedienelemente
6 Taste REPEAT (19)
Drücken Sie diese Taste mehrmals, um alle Titel oder
nur einen Titel auf einer CD mehrmals
wiederzugeben.
7 Taste AyB (20)
Mit dieser Taste wählen Sie Repeat A-B Play
(Wiederholung einer bestimmten Passage) aus.
8 Taste H (14)
Mit dieser Taste starten Sie die Wiedergabe.
Taste X (14)
Mit dieser Taste schalten Sie in den Pausemodus.
Taste x (14)
Mit dieser Taste stoppen Sie die Wiedergabe.
9 Tasten AMS ./> (AMS: automatischer
Musiksensor) (18)
Mit diesen Tasten können Sie einen bestimmten Titel
ansteuern.
0 Tasten m/M (18)
Mit diesen Tasten können Sie innerhalb eines Titels
eine bestimmte Passage ansteuern, die Sie
wiedergeben wollen.
qa Tasten INDEX >/. (18)
Mit diesen Tasten können Sie bei der Wiedergabe einer
CD mit Indexsignalen eine mit einem Indexsignal
markierte Stelle ansteuern.
PLAY MODE
CONTINUE SHUFFLE
DISPLAY/
MODE
TIME/TEXT
PROGRAM
SACD/CD
MULTI/2CH
123
456
78
>10 ENTER
10/0
REPEAT
BA
AMS
INDEX
CHECK
CLEAR
LEVEL
9
ADJ
11
DE

Wiedergeben
Kompatible CD-Typen
von CDs
In diesem Kapitel werden
verschiedene Möglichkeiten zum
Wiedergeben von CDs erläutert.
Folgende CDs können mit diesem Player wiedergegeben
werden.
Je nachdem, welcher CD-Typ wiedergegeben werden soll,
wählen Sie die entsprechende Anzeige mit Hilfe der Taste
SACD/CD oder MULTI/2CH (Seite 14).
Klassifizierung nach Schichten
Super-Audio-CD (einschichtige CD)
Diese CD verfügt über eine einzige HD (hohe Dichte)Schicht.
Wenn Sie eine solche CD wiedergeben, wird der Player
automatisch in den Wiedergabemodus für Super-AudioCDs geschaltet.
HD-Schicht (Super-AudioCD)
Super-Audio-CD (zweischichtige CD)
Diese CD verfügt über zwei HD-Schichten und bietet
somit eine längere Spieldauer.
Wenn Sie eine solche CD wiedergeben, wird der Player
automatisch in den Wiedergabemodus für Super-AudioCDs geschaltet.
Da sich bei der zweischichtigen CD beide HD-Schichten
auf einer Seite befinden, ist es nicht notwendig, die CD
umzudrehen.
12
HD-Schicht (SuperAudio-CD)
HD-Schicht (SuperAudio-CD)
Herkömmliche CD
Diese CD ist das Standardformat.
Wenn Sie eine solche CD wiedergeben, wird der Player
automatisch in den Wiedergabemodus für herkömmliche
CDs geschaltet.
CD-Schicht
DE

Super-Audio-CD + CD (Hybrid-CD)
Diese CD verfügt über eine HD-Schicht und eine CDSchicht. Wählen Sie mit SACD/CD die Schicht aus, die Sie
wiedergeben lassen wollen. Da sich beide Schichten auf
einer Seite befinden, ist es nicht notwendig, die CD
umzudrehen. Die CD-Schicht können Sie auch mit einem
herkömmlichen CD-Player wiedergeben.
CD-Schicht
Super-Audio-CD mit 2-Kanal- und MehrkanalWiedergabebereich
Diese CD enthält einen 2-Kanal-Wiedergabebereich und
einen Mehrkanal-Wiedergabebereich.
Wählen Sie mit MULTI/2CH den Wiedergabebereich aus,
den Sie hören wollen.
2-KanalWiedergabebereich
MehrkanalWiedergabebereich
HD-Schicht
(Super-Audio-CD)
Klassifizierung nach Kanalkonfiguration
der Super-Audio-CD
2-Kanal-Super-Audio-CD
Diese CD enthält einen 2-Kanal-Wiedergabebereich.
Wenn Sie eine solche CD wiedergeben, wird der Player
automatisch in den 2-Kanal-Wiedergabemodus geschaltet.
2-KanalWiedergabebereich
Mehrkanal-Super-Audio-CD
Diese CD enthält einen Mehrkanal-Wiedergabebereich.
Wenn Sie eine solche CD wiedergeben, wird der Player
automatisch in den Mehrkanal-Wiedergabemodus
geschaltet.
Sie können den Standardwiedergabebereich auswählen
(2-Kanal-Wiedergabebereich oder MehrkanalWiedergabebereich).
1 Drücken Sie im Stopmodus die Taste MENU.
2 Drehen Sie l AMS L, bis „M/2CH SELECT” im
Display erscheint.
3 Drücken Sie l AMS L.
Der aktuelle Wiedergabebereich erscheint.
4 Drehen Sie l AMS L, und wählen Sie den
gewünschten Wiedergabebereich aus. Drücken Sie
dann erneut l AMS L.
Nicht kompatible CDs
Folgende CDs/DVDs können mit diesem Player nicht
wiedergegeben werden. Wenn Sie versuchen, eine solche
CD/DVD wiederzugeben, erscheint die Fehlermeldung
„TOC Error” oder „NO DISC”, oder es wird kein Ton
ausgegeben.
• CD-ROM
• DVD usw.
Wiedergeben von CDs
MehrkanalWiedergabebereich
13
DE

Wiedergeben einer CD
Im folgenden wird beschrieben, wie Sie die normale
Wiedergabe starten können und welche Grundfunktionen
bei der Wiedergabe zur Verfügung stehen.
POWER
SACD/CD
1 Schalten Sie den Verstärker ein. Drehen Sie die
Lautstärke ganz herunter.
Wiedergeben von CDs
2 Stellen Sie mit dem Eingangswählschalter am
Verstärker die Position für den CD-Player ein.
3 Schalten Sie den Player mit dem Schalter POWER
ein.
4 Drücken Sie A OPEN/CLOSE um das CD-Fach zu
öffnen, und legen Sie eine CD in das Fach ein.
A OPEN/CLOSE
Xx
H
lAMSL
Grundfunktionen bei der Wiedergabe
Funktion Taste
Stoppen der Wiedergabe x
Unterbrechen der Wiedergabe X
(Pause)
Fortsetzen der Wiedergabe X oder H
nach einer Pause
Ansteuern eines Drehen Sie lAMSL im
nachfolgenden Titels Uhrzeigersinn.
Ansteuern des Anfangs des Drehen Sie lAMSL gegen
aktuellen Titels bzw. eines den Uhrzeigersinn.
vorhergehenden Titels
Auswerfen der CD A OPEN/CLOSE
z
Wenn Sie den Player einschalten und bereits eine CD
eingelegt ist
Die Wiedergabe beginnt automatisch. Wenn Sie einen
handelsüblichen Timer anschließen, können Sie die Wiedergabe
der CD zu einem beliebigen Zeitpunkt beginnen lassen.
z
So wählen Sie bei einer Hybrid-CD die wiederzugebende
Schicht aus (Seite 13)
Beenden Sie die Wiedergabe mit x, und drücken Sie dann
mehrmals SACD/CD, so daß die Anzeige „SACD“ oder „CD“
aufleuchtet.
Mit der Beschriftung nach oben
5 Wählen Sie mit SACD/CD die SACD oder CD aus.
Mit jedem Tastendruck auf diese Taste erscheint
abwechselnd SACD oder CD im Display. Wählen Sie
den Typ der CD im Fach aus. Einzelheiten dazu
finden Sie auf Seite 12.
6 Drücken Sie H.
Die Wiedergabe startet ab dem ersten Titel. Wenn Sie
die Wiedergabe ab einem bestimmten Titel starten
wollen, drehen Sie l AMS L, um die
Titelnummer auszuwählen, bevor Sie H drücken.
7 Stellen Sie die Lautstärke am Verstärker ein.
z
So wählen Sie den gewünschten Wiedergabebereich aus,
wenn Sie eine Super-Audio-CD mit einem 2-Kanal- und einem
Mehrkanal-Wiedergabebereich wiedergeben (Seite 13)
Stoppen Sie die Wiedergabe mit x, und drücken Sie dann
mehrmals MULTI/2CH, so daß „MULTI CH“ oder „2 CH“
angezeigt wird.
Hinweis
Erhöhen Sie während der Wiedergabe die Lautstärke ganz
allmählich vom niedrigsten Pegel aus. Dieses Gerät gibt
Bandbreiten außerhalb des normalen Hörbereichs unter
Umständen nicht vollständig wieder. Dadurch kann es zu
Schäden an den Lautsprechern oder zu Gehörschäden kommen.
14
DE

Das Display
Im Display werden verschiedene Informationen über die
CD bzw. den Titel angezeigt, der gerade wiedergegeben
wird. In diesem Abschnitt wird erläutert, welche
Informationen zur aktuellen CD und in den
verschiedenen Modi angezeigt werden.
MENU
DISPLAY MODE
TIME/TEXT
lAMSL
CD-Informationen beim Einlegen einer CD
Je nach CD, die gerade eingelegt wird, erscheint folgendes
im Display:
2-Kanal-Super-Audio-CD
2CH
SACD
12345
678910
Mehrkanal-Super-Audio-CD
MULTI 5.1CH
SACD
12345
678910
oder
Während der
Wiedergabe
einer 5.1-KanalSuper-Audio-CD
Herkömmliche CD
MULTI 5 CH
SACD
12345
678910
Während der
Wiedergabe
einer 5-KanalSuper-Audio-CD
oder
MULTI CH
SACD
12345
678910
Während der
Wiedergabe
anderer
Super-AudioCDs oder im
Stopmodus
Wiedergeben von CDs
CD
12345
678910
Anzeigen von Informationen im
Stopmodus Z
Drücken Sie TIME/TEXT.
Im Display erscheinen die Gesamtzahl der Titel und die
Gesamtspieldauer.
GesamtspieldauerGesamtzahl der Titel
MULTI CH
TRACK MIN SEC
1 0 45.28
SACD
12345
678910
15
DE

SONYHITS
SACD
MULTI CH
TEXT
DISC
12345
678910
1 0 45.28
SACD
MULTI CH
TEXT
TRACK INDEX MIN SEC
12345
678910
SONY BAND
SACD
ART.
MULTI CH
TEXT
12345
678910
Das Display
Anzeigen von Informationen während der
Wiedergabe Z
Drücken Sie TIME/TEXT.
Mit jedem Tastendruck auf diese Taste erscheinen die
aktuelle Titelnummer und die verstrichene bzw. die
Restspieldauer dieses Titels oder die gesamte
Restspieldauer auf der CD im Display.
Wenn der Player eine Mehrkanal-Super-Audio-CD
erkennt, werden die Kanalinformationen vor der
Standardanzeige angezeigt.
Aktuelle Titelnummer und verstrichene
Spieldauer des aktuellen Titels (Standardanzeige)
TRACK INDEX MIN SEC
11 1.57
Tastendruck TIME/TEXT
Wiedergeben von CDs
Aktuelle Titelnummer und Restspieldauer des
aktuellen Titels
TRACK MIN SEC
1 -1.56
Tastendruck TIME/TEXT
MULTI 5.1CH
SACD
12345
678910
MULTI 5.1CH
SACD
12345
678910
Anzeigen der Informationen auf einer
TEXT-CD Z
TEXT-CDs enthalten zusätzlich zu den Audiosignalen
Informationen wie den Namen der CD und den Namen
des Interpreten. Bei diesem Player können der Name der
CD, der Name des Interpreten und der Name des
aktuellen Titels als TEXT-Informationen angezeigt
werden.
Wenn der Player eine TEXT-CD erkennt, erscheint
„TEXT“ im Display. Wenn auf einer TEXT-CD mehrere
Sprachen aufgezeichnet sind, erscheinen „TEXT“ und
„MULTI“ im Display. Wenn Sie die Informationen in einer
anderen Sprache anzeigen lassen wollen, lesen Sie bitte
unter „Anzeigen der Informationen auf einer TEXT-CD in
einer anderen Sprache“ auf Seite 17 nach.
Anzeigen der Informationen auf einer
TEXT-CD im Stopmodus Z
Drücken Sie TIME/TEXT.
Mit jedem Tastendruck auf diese Taste erscheint
abwechselnd der Name der CD oder der Name des
Interpreten im Display. Wenn Sie den Namen des
Interpreten auswählen, erscheint „ART.“ im Display.
Gesamte Restspieldauer der CD
-43.32
Tastendruck TIME/TEXT
Kanalinformationen (erscheinen nur, wenn der
Player eine Mehrkanal-Super-Audio-CD erkennt.)
TRACK
[MULTI] 5.1 CH
Ausschalten der Informationsanzeige im
Display Z
Jedes Mal, wenn Sie während der Wiedergabe einer CD
auf der Fernbedienung DISPLAY MODE drücken, wird
das Display abwechselnd aus- und wieder eingeschaltet.
Auch wenn Sie das Display ausgeschaltet haben, schaltet
es sich ein, wenn Sie die Wiedergabe unterbrechen oder
stoppen. Wenn Sie die Wiedergabe fortsetzen, schaltet sich
das Display wieder aus.
Vor dem Starten der Wiedergabe erscheint „DISPLAY
OFF“, wenn Sie mit DISPLAY MODE das Display
ausschalten, und „DISPLAY ON“, wenn Sie mit der Taste
das Display einschalten.
MIN SEC
MULTI 5.1CH
SACD
12345
678910
MULTI 5.1CH
SACD
12345
678910
• Vor dem Starten der Wiedergabe
Name der CD
Tastendruck TIME/TEXT
Name des Interpreten
Tastendruck TIME/TEXT
Gesamtzahl der Titel und Gesamtspieldauer
Tastendruck
TIME/TEXT
DE
16

Anzeigen der Informationen auf einer
TEXT-CD während der CD-Wiedergabe Z
Anzeigen der Informationen auf einer
TEXT-CD in einer anderen Sprache Z
Der Name des aktuellen Titels erscheint. Wenn der Name
der CD aus mehr als 15 Zeichen besteht, läuft der Name
durch das Display, und danach werden die ersten 14
Zeichen ständig im Display angezeigt.
Wenn der Player eine Mehrkanal-Super-Audio-CD
erkennt, werden die Kanalinformationen vor der
Spieldauer des aktuellen Titels angezeigt.
• Während der Wiedergabe einer CD
Name des Titels
MULTI 5.1CH
SACD
TRACK
HITECHBLUES
Tastendruck TIME/TEXT
Kanalinformationen (erscheinen nur, wenn der
Player eine Mehrkanal-Super-Audio-CD erkennt.)
TRACK
[MULTI] 5.1 CH
Spieldauer des aktuellen Titels
TRACK INDEX MIN SEC
111.56
Tastendruck TIME/TEXT
TEXT
TEXT
TEXT
12345
678910
MULTI 5.1CH
SACD
12345
678910
MULTI 5.1CH
SACD
12345
678910
Sie können die Sprache, in der die Informationen
angezeigt werden, wechseln, wenn die TEXT-CD über die
Mehrsprachenfunktion verfügt. Wenn der Player eine
solche TEXT-CD erkennt, erscheinen „TEXT“ und
„MULTI“ im Display. Wechseln Sie die Sprache wie im
folgenden beschrieben.
1 Drücken Sie im Stopmodus MENU.
2 Drehen Sie l AMS L, bis „LANGUAGE“ im
Display erscheint.
3 Drücken Sie l AMS L.
Die zur Zeit ausgewählte Sprache (Englisch,
Französisch, Deutsch usw.) blinkt.
Wenn der Player die Sprache auf einer TEXT-CD nicht
anzeigen kann, erscheint im Display „Other Lang“.
4 Drehen Sie l AMS L, bis die gewünschte
Sprache im Display erscheint.
5 Drücken Sie l AMS L.
Nach einigen Sekunden erscheinen die Informationen
in der ausgewählten Sprache.
Wiedergeben von CDs
Restspieldauer des aktuellen Titels
MULTI 5.1CH
SACD
TRACK MIN SEC
1 -1.57
TEXT
12345
678910
Tastendruck TIME/TEXT
Restspieldauer der CD
MULTI 5.1CH
SACD
MIN SEC
-43.32
TEXT
12345
678910
Tastendruck
TIME/TEXT
Hinweise
• Bei einigen CDs werden möglicherweise nicht alle Zeichen im
Display angezeigt.
• Mit diesem Player können nur die Namen von CDs,
Interpreten und Titeln von TEXT-CDs angezeigt werden.
Andere Informationen können nicht angezeigt werden.
17
DE

Ansteuern eines
Ansteuern einer bestimmten
bestimmten Titels
Im Stopmodus und während der Wiedergabe können Sie
jederzeit einen bestimmten Titel ansteuern.
Wiedergeben von CDs
Zum Ansteuern
Des nächsten oder
nachfolgender Titel
Des aktuellen oder
vorhergehender Titel
Eines bestimmten Titels
direkt
Direktes Ansteuern eines Titels durch
Eingabe der Titelnummer Z
Geben Sie die Titelnummer mit der/n Zahlentaste(n)
ein.
lAMSL
Gehen Sie folgendermaßen vor:
Drehen Sie l AMS L im
Uhrzeigersinn, bis Sie den
gewünschten Titel gefunden haben.
Auf der Fernbedienung drücken Sie
so oft >, bis Sie den Titel
gefunden haben.
Drehen Sie l AMS L gegen
den Uhrzeigersinn, bis Sie den
gewünschten Titel gefunden haben.
Auf der Fernbedienung drücken Sie
so oft ., bis Sie den Titel
gefunden haben.
Drehen Sie l AMS L, bis Sie
die Nummer des gewünschten
Titels gefunden haben. Auf der
Fernbedienung drücken Sie so oft
. oder > , bis Sie den Titel
gefunden haben.
Zahlentasten
>10
./>
Passage in einem Titel
Sie können während der Wiedergabe einer CD und im
Pausemodus eine bestimmte Stelle in einem Titel
ansteuern.
lAMSL
./>
m/M
m/M
Ansteuern einer bestimmten Stelle,
während der Ton wiedergegeben wird
(Suchen)
Halten Sie während der Wiedergabe m/M
gedrückt.
Während des Vorwärts- bzw. Rückwärtssuchens wird der
Ton mit Unterbrechungen wiedergegeben.
Lassen Sie die Taste los, sobald Sie die gewünschte Stelle
gefunden haben.
Ansteuern einer bestimmten Stelle mit
Hilfe der Zeitanzeige (Suchen mit hoher
Geschwindigkeit)
Halten Sie im Pausemodus m/M gedrückt.
Der Wiedergabeton ist nicht zu hören.
z
Wenn „Over!!“ im Display erscheint
Das Ende der CD ist erreicht. Drücken Sie . oder m, um
wieder zurückzuschalten.
Hinweis
Bei Titeln, die nur ein paar Sekunden lang sind, wird der Ton
beim Suchen unter Umständen nicht wiedergegeben. In diesem
Fall können Sie die gewünschte Stelle eventuell nicht richtig
ansteuern.
INDEX
>/.
z
So geben Sie eine Titelnummer über 11 ein. Z
1 Drücken Sie >10.
2 Geben Sie die Ziffern der Titelnummer ein.
Wenn Sie 0 eingeben wollen, drücken Sie 10/0.
Beispiele:
• Zum Wiedergeben von Titelnummer 30 drücken Sie >10,
dann 3 und 10/0.
• Zum Wiedergeben von Titelnummer 100 drücken Sie
zweimal >10, dann 1 und zweimal 10/0.
DE
18
Ansteuern einer bestimmten Stelle mit
der Indexfunktion (Indexsuche) Z
Drücken Sie während der Wiedergabe oder im
Pausemodus mehrmals INDEX. oder INDEX>.
z
Was ist ein INDEX?
Auf einigen SACDs oder CDs sind die Titel oder die gesamte CD
mit Hilfe von Indexmarkierungen in kleinere Einheiten unterteilt.
Dies ist besonders nützlich, wenn Sie eine bestimmte Stelle in
sehr langen Titeln, wie sie zum Beispiel bei klassischer Musik
häufiger vorkommen, ansteuern wollen. Die Indexsuchfunktion
kann nur bei im Handel erhältlichen, indizierten CDs verwendet
werden. Ob eine CD indiziert ist, ist normalerweise auf der Hülle
angegeben.

Wiederholte Wiedergabe
von Titeln Z
Ansteuern einer Passage durch Einstellen
eines Zeitpunkts im Titel (Time Search)
1 Wählen Sie mit ./> (oder drehen Sie
l AMS L) den gewünschten Titel im
Stopmodus aus.
2 Stellen Sie mit m/M den Zeitpunkt ein, an dem
die Wiedergabe starten soll. Achten Sie dabei auf
die Anzeige im Display.
Sie können den Zeitpunkt ab dem Anfang des
gewünschten Titels einstellen, wenn Sie zuerst M
drücken, und den Zeitpunkt vom Ende des
gewünschten Titels zurückgerechnet, wenn Sie zuerst
m drücken.
MULTI 5.1CH
TRACK MIN SEC
5 2.57
SACD
12345
678910
3 Drücken Sie H.
Die Wiedergabe beginnt am angegebenen Zeitpunkt
im Titel.
Sie können eine ganze CD oder bestimmte Passagen
darauf wiederholt wiedergeben lassen. Diese Funktion
steht auch bei Shuffle Play zum Wiederholen aller Titel in
willkürlicher Reihenfolge (Seite 20) und bei Programme
Play zum Wiederholen aller Titel in einem Programm
(Seite 21) zur Verfügung. Außerdem können Sie eine
bestimmte Passage in einem Titel wiederholt wiedergeben
lassen.
REPEAT
AyB
H
x
Wiedergeben von CDs
Hinweis
Wenn Sie den Player ausschalten oder das Netzkabel lösen,
speichert der Player die letzte Einstellung für die wiederholte
Wiedergabe („Repeat All“ oder „Repeat 1“), so daß beim
nächsten Einschalten des Players die gespeicherte Einstellung
wieder in Kraft tritt. Die Einstellung für „Repeat A-B Play“ wird
dagegen gelöscht, wenn Sie den Player ausschalten oder das
Netzkabel lösen.
Wiederholte Wiedergabe aller Titel auf
einer CD (Repeat All Play)
Drücken Sie einmal REPEAT und dann H.
„REPEAT“ erscheint im Display, und die wiederholte
Wiedergabe aller Titel beginnt.
In welcher Reihenfolge die Titel wiederholt
wiedergegeben werden, hängt vom gewählten
Wiedergabemodus ab.
Wiedergabemodus Wiederholungsreihenfolge
Normale Wiedergabe Alle Titel in der Originalreihenfolge
(Seite 14)
Shuffle Play (Seite 20) Alle Titel in willkürlicher
Programme Play (Seite 21) Alle Titel im Programm in der
So beenden Sie Repeat All Play
Drücken Sie x.
So setzen Sie die normale Wiedergabe fort
Drücken Sie REPEAT so oft, bis „REPEAT“ ausgeblendet
wird.
Reihenfolge
programmierten Reihenfolge
19
DE

Wiederholte Wiedergabe von Titeln Z
Wiedergeben von Titeln in
willkürlicher Reihenfolge
Wiederholte Wiedergabe des aktuellen
Titels (Repeat 1 Play)
Während der Wiedergabe des gewünschten Titels
drücken Sie REPEAT so oft, bis „REPEAT 1“ im Display
erscheint.
Die wiederholte Wiedergabe des aktuellen Titels beginnt.
So beenden Sie Repeat 1 Play
Drücken Sie x.
So setzen Sie die normale Wiedergabe fort
Drücken Sie REPEAT so oft, bis „REPEAT 1“ ausgeblendet
wird.
Wiederholte Wiedergabe einer
bestimmten Passage in einem Titel
(Repeat A-B Play)
Wiedergeben von CDs
Sie können eine bestimmte Passage in einem Titel
wiederholt wiedergeben lassen. Beachten Sie bitte, daß
sich die angegebene Passage innerhalb eines Titels
befinden muß.
1 Drücken Sie während der Wiedergabe am
Anfangspunkt (Punkt A) der wiederholt
wiederzugebenden Passage die Taste AyB.
„REPEAT“ erscheint, und „A“ blinkt im Display.
2 Lassen Sie den Titel weiter wiedergeben (oder
drücken Sie M), um das Ende (Punkt B) der
gewünschten Passage anzusteuern, und drücken
Sie dann die Taste AyB.
„REPEAT A-B“ erscheint im Display, und die
wiederholte Wiedergabe der angegebenen Passage
beginnt.
So beenden Sie Repeat A-B Play und setzen die
normale Wiedergabe fort
Drücken Sie REPEAT oder x.
z
Festlegen eines neuen Anfangs- und Endpunkts während
Repeat A-B Play
Sie können den aktuellen Endpunkt als neuen Anfangspunkt
definieren und dann einen neuen Endpunkt festlegen, um eine
Passage direkt nach der aktuellen Passage wiederholt
wiedergeben zu lassen.
1 Drücken Sie während Repeat A-B Play die Taste AyB.
Der aktuelle Endpunkt wird zum neuen Anfangspunkt
(Punkt A).
„REPEAT“ leuchtet auf, und „A-“ blinkt im Display.
2 Steuern Sie den neuen Endpunkt (Punkt B) an, und drücken Sie
die Taste AyB.
„REPEAT A-B“ leuchtet auf, und der Player beginnt mit der
wiederholten Wiedergabe der neu definierten Passage.
Wenn Sie wieder am Anfangspunkt A starten wollen, drücken Sie
H während Repeat AyB Play.
(Shuffle Play) Z
Wenn Sie Shuffle Play wählen, gibt der Player alle Titel
auf der CD in willkürlicher Reihenfolge wieder.
CONTINUE
H
./>
SHUFFLE
1 Drücken Sie im Stopmodus SHUFFLE.
2 Drücken Sie H.
Shuffle Play beginnt.
Die Anzeige „;“ erscheint, während der Player die
Titel „mischt“ (engl. „shuffle“). Die Wiedergabe wird
beendet, sobald alle Titel einmal wiedergegeben
wurden.
So setzen Sie die normale Wiedergabe fort
Drücken Sie CONTINUE.
z
Sie können während Shuffle Play einen bestimmten Titel
ansteuern.
Drücken Sie ./>.
Steuern Sie mit > den nächsten Titel bzw. mit . den Anfang
des aktuellen Titels an. Der Player schaltet nicht zurück zu Titeln,
die bereits wiedergegeben wurden.
20
DE

Zusammenstellen eines
eigenen Programms
(Programme Play) Z
Sie können die Titel auswählen, die Ihnen besonders
gefallen und diese in der gewünschten
Wiedergabereihenfolge zu einem Programm
zusammenstellen. Ein solches Programm kann aus bis zu
32 Titeln bestehen (eller darf maximal eine
Gesamtspieldauer von 999 Minuten und 59 Sekunden
aufweisen).
z
Das Programm bleibt gespeichert, auch wenn Programme
Play beendet ist.
Drücken Sie H, wenn Sie das Programm ab dem Anfang erneut
wiedergeben wollen. Das Programm bleibt gespeichert, auch
wenn die Wiedergabe beendet ist.
Hinweis
Wenn Sie den Player ausschalten, das Netzkabel lösen oder
A OPEN/CLOSE drücken, wird das Programm gelöscht.
Überprüfen des Programms
CONTINUE
Zahlentasten
>10
CHECK
H
PROGRAM
CLEAR
./>
1 Drücken Sie im Stopmodus PROGRAM.
„PROGRAM“ erscheint im Display.
2 Geben Sie die Titelnummer mit den Zahlentasten
ein.
Wenn Sie eine falsche Titelnummer eingegeben
haben
Löschen Sie die Titelnummer mit CLEAR, und geben
Sie die richtige Titelnummer mit den Zahlentasten ein.
So wählen Sie eine Titelnummer über 11 aus
Drücken Sie >10 (Seite 18).
3 Wollen Sie weitere Titel programmieren, gehen Sie
wie in Schritt 2 erläutert vor.
Jedesmal, wenn Sie eine Titelnummer eingeben,
erscheint die Gesamtspieldauer des Programms im
Display.
Drücken Sie vor oder während der Wiedergabe die
Taste CHECK.
Mit jedem Tastendruck werden die Titelnummern in der
programmierten Reihenfolge im Display angezeigt. Wenn
Sie während der Wiedergabe CHECK drücken, erscheint
die Nummer des nächsten Titels nach dem Titel, der
gerade wiedergegeben wird.
Ändern des Programms
Im Stopmodus können Sie das Programm ändern.
Funktion Vorgehen:
Löschen eines Titels
Löschen des jeweils
letzten Titels im
Programm
Anfügen eines Titels
ans Ende des
Programms
Löschen aller Titel
1 Drücken Sie CHECK so oft, bis die
Nummer des zu löschenden Titels
erscheint.
2 Drücken Sie CLEAR.
Drücken Sie CLEAR.
Mit jedem Tastendruck auf CLEAR wird
der letzte Titel des Programms gelöscht.
Wählen Sie mit ./> den Titel aus,
den Sie hinzufügen wollen, und drücken
Sie dann PROGRAM. Auf der
Fernbedienung drücken Sie die Zahlentaste
für den hinzuzufügenden Titel.
Halten Sie CLEAR oder x etwa 2 Sekunden
lang gedrückt, bis „Prog CLEAR“ im
Display erscheint.
Wiedergeben von CDs
4 Drücken Sie H.
Programme Play beginnt.
So setzen Sie die normale Wiedergabe fort
Drücken Sie CONTINUE.
21
DE

Wiedergeben einer
Mehrkanal-Super-Audio-CD
(Mehrkanal-Management)
Mit Hilfe des Mehrkanal-Managements stellt der Player
den Wiedergabemodus einer Super-Audio-CD mit dem in
den Player integrierten DSD-DSP je nach Anordnung und
Größe der Lautsprecher ein.
Beispiel für Lautsprecheranordnung
Vordere Lautsprecher
L
Wiedergeben von CDs
Surround-Lautsprecher
So stellen Sie das Mehrkanal-Management ein:
1 Wählen Sie einen voreingestellten Wiedergabemodus
aus (für 2-Kanal- oder Mehrkanal-Wiedergabe).
2 Stellen Sie die Ausgangspegelbalance der einzelnen
Lautsprecher ein (nur wenn Sie den MehrkanalWiedergabemodus auswählen).
Hinweise
• Diese Funktionen stehen nur bei der Wiedergabe von Super-
Audio-CDs zur Verfügung.
• Die Ausgangspegelbalance läßt sich je nach ausgewähltem
Modus für die Lautsprecheranordnung nicht einstellen.
L
Mittlerer
Lautsprecher
Tiefsttonlautsprecher
Auswählen des 2-KanalWiedergabemodus
1 Drücken Sie MENU.
2 Drehen Sie l AMS L, bis „2CH SPK MODE“ im
Display erscheint.
3 Drücken Sie l AMS L.
Der Wiedergabemodus erscheint im Display.
R
R
Wiedergabemodus
2CH Direct
2CH + SW
Vordere
Lautsprecher
Jedes Signal wird direkt von den
vorderen Lautsprechern ausgegeben.
Über den Tiefsttonlautsprecher wird kein
Signal ausgegeben.
a
Tiefsttonlautsprecher
a
4 Drehen Sie l AMS L, bis der gewünschte
Modus im Display erscheint.
5 Drücken Sie l AMS L.
Hinweis
Sie können diese Funktion nicht ausführen, wenn sich der Player
im CD- oder Mehrkanal-Wiedergabemodus befindet. Diese
Funktion steht nur zur Verfügung, wenn sich der Player im
Wiedergabemodus für 2-Kanal-Super-Audio-CDs befindet, das
CD-Fach offen ist oder keine CDs in den Player eingelegt sind.
Auswählen des MehrkanalWiedergabemodus
22
./>
DE
MENU
lAMSL
ENTER
LEVEL ADJ
1 Drücken Sie MENU.
2 Drehen Sie l AMS L, bis "MCH SPK MODE"
im Display erscheint.
3 Drücken Sie l AMS L.
Der Wiedergabemodus erscheint im Display.
––
––
Surround-
Lautsprecher
Large
Large
Small
Small
Small
Large
Large
Tiefstton-
lautsprecher
a
––
a
a
––
a
––
Wiedergabemodus
MCH Direct
5 – Large + SW
5 – Large
5 – Small + SW
FRT – Large +SW
FRT – Large
No – CNTR + SW
No – CNTR
Vordere
Lautsprecher
Jedes Signal wird direkt von den
einzelnen Lautsprechern ausgegeben.
Large
Large
Small
Large
Large
Large
Large
Mittlerer
Lautsprecher
Large
Large
Small
Small
Small

Hinweise zu großen („Large”) bzw. kleinen
(„Small”) Lautsprechern
Ein großer Lautsprecher („Large”) kann Bässe
kraftvoll wiedergeben. Wenn Sie für die SurroundLautsprecher „Small“ auswählen, werden die Bässe
der Surround-Lautsprecher von den vorderen
Lautsprechern und/oder dem Tiefsttonlautsprecher
reproduziert.
Im Normalfall wählen Sie "MCH Direct" oder die
Einstellungen, bei denen für alle Lautsprecher „Large“
definiert wird (z. B. „5 - Large + SW“, „5 - Large“).
Wenn Tonstörungen auftreten oder der Mehrkanalton
während der Wiedergabe einer Mehrkanal-SuperAudio-CD nicht deutlich zu hören ist, ändern Sie die
Einstellungen der betreffenden Lautsprecher in
„Small“.
4 Drehen Sie l AMS L, bis der gewünschte
Modus im Display erscheint.
5 Drücken Sie l AMS L.
Die Anzeige zum Einstellen der
Ausgangspegelbalance erscheint.
Wenn Sie die Ausgangspegelbalance einstellen wollen,
fahren Sie mit Schritt 4 unter „Einstellen der
Ausgangspegelbalance am Bedienfeld vorne am
Player“ auf Seite 23 bzw. Schritt 2 unter „Einstellen
des Ausgangspegels mit der Fernbedienung“ auf Seite
24 fort.
Um zur normalen Anzeige zurückzuschalten, drücken
Sie MENU.
Hinweise
• Das Mehrkanal-Management steht nicht zur Verfügung, wenn
Sie „MCH Direct“ auswählen (Sie können die
Ausgangspegelbalance der einzelnen Lautsprecher nicht
einstellen).
• Die Einstellung für die Lautsprecher vorn wird automatisch auf
„Large“ gesetzt, wenn Sie für den Tiefsttonlautsprecher
„––“ einstellen.
• Wenn Sie einen Titel wiedergeben, der kein LFE-Signal* enthält,
wird für den Tiefsttonlautsprecher kein Signal ausgegeben.
Wenn Sie „MCH Direct”, „5 – Large + SW” oder „No - CNTR +
SW” wählen, wird vom Tiefsttonlautsprecher kein Signal
ausgegeben. Wenn Sie dagegen „5 - Small + SW” oder „FRT Large +SW” wählen und die Lautsprechereinstellung auf
„Small” gesetzt ist, werden die Bässe über den
Tiefsttonlautsprecher ausgegeben.
* LFE: Niederfrequenzverstärkung (angezeigt durch „.1 CH”)
Einstellen der Ausgangspegelbalance der
einzelnen Lautsprecher
Folgende Optionen können Sie über das MehrkanalManagement einstellen:
CNTR BALANCE
Die relative Ausgangspegelbalance zwischen den
vorderen Lautsprechern (FRONT L/R) und dem mittleren
Lautsprecher (CENTER)
SURR BALANCE
Die relative Ausgangspegelbalance zwischen den
vorderen Lautsprechern (FRONT L/R) und den
Surround-Lautsprechern (SURR L/R)
SW BALANCE
Die relative Ausgangspegelbalance zwischen den
vorderen Lautsprechern (FRONT L/R) und dem
Tiefsttonlautsprecher (SUB WOOFER)
Hinweis
Einige Einstellungen sind je nach ausgewähltem MehrkanalWiedergabemodus nicht möglich.
Einstellen der Ausgangspegelbalance am
Bedienfeld vorne am Player
Sie können die Ausgangspegelbalance der einzelnen
Lautsprecher einstellen, während Sie den Wiedergabeton
hören. Die Einstellung ist auch möglich, wenn Sie im
Stopmodus den Testton hören.
1 Drücken Sie MENU.
2 Drehen Sie l AMS L, bis „LEVEL ADJUST“ im
Display erscheint.
3 Drücken Sie l AMS L.
Fahren Sie während der Wiedergabe mit Schritt 6 fort.
4 Drehen Sie l AMS L, bis „TONE ON“ im
Display erscheint.
5 Drücken Sie l AMS L.
Der Testton wird nacheinander von den Lautsprechern
ausgegeben, und der entsprechende Lautsprechertyp
erscheint im Display.
6 Drehen Sie l AMS L, bis die gewünschte
Option im Display erscheint.
Wählen Sie „CNTR BALANCE“, „SURR BALANCE“
oder „SW BALANCE“ aus.
Hinweis
Wenn Sie den Tiefsttonlautsprecher im MehrkanalWiedergabemodus auf „––“ stellen (Seite 22), wird „SW
BALANCE” nicht angezeigt. Analog wird „CNTR
BALANCE“ bzw. „SURR BALANCE” nicht angezeigt, wenn
Sie den entsprechenden Lautsprecher auf „––“ setzen.
Wiedergeben von CDs
23
DE

Wiedergeben einer Mehrkanal-Super-Audio-CD
7 Drücken Sie l AMS L.
Die Anzeige zum Einstellen der Balance erscheint.
Im Stopmodus wird der Testton vom ausgewählten
Lautsprecher ausgegeben.
Beispiel: Wenn Sie im Stopmodus „SURR
BALANCE” auswählen, wird der Testton
von den vorderen Lautsprechern und den
Surround-Lautsprechern ausgegeben.
DISC
FRT:_____:SURR
8 Drehen Sie l AMS L, und stellen Sie den
Ausgangspegel ein.
DISC
Wiedergeben von CDs
FRT:_____:SURR
9 Drücken Sie l AMS L.
Der Player schaltet wieder in den Status in Schritt 6
zurück.
Weitere Einstellungen nehmen Sie wie in Schritt 6 bis 9
erläutert vor.
10
Drücken Sie MENU, wenn das Einstellen
abgeschlossen ist.
Im Display erscheint wieder die normale Anzeige.
Einstellen des Ausgangspegels mit der
Fernbedienung
Sie können den Ausgangspegel der einzelnen
Lautsprecher mit der mitgelieferten Fernbedienung von
der Hörposition aus einstellen.
Z
MULTI CH
SACD
12345
678910
MULTI CH
SACD
12345
678910
5 Drücken Sie ENTER.
Die Anzeige zum Einstellen der Balance erscheint.
Im Stopmodus wird der Testton vom ausgewählten
Lautsprecher ausgegeben.
Beispiel: Wenn Sie im Stopmodus „SURR
BALANCE” auswählen, wird der Testton
von den vorderen Lautsprechern und den
Surround-Lautsprechern ausgegeben.
MULTI CH
DISC
FRT:_____:SURR
SACD
12345
678910
6 Drücken Sie mehrmals ./>, um den
Ausgangspegel einzustellen.
MULTI CH
DISC
FRT:_____:SURR
SACD
12345
678910
7 Drücken Sie ENTER.
Der Player schaltet wieder in den Status in Schritt 4
zurück.
Weitere Einstellungen nehmen Sie wie in Schritt 4 bis 7
erläutert vor.
8 Drücken Sie LEVEL ADJ, wenn das Einstellen
abgeschlossen ist.
Im Display erscheint wieder die normale Anzeige.
1 Drücken Sie während der Wiedergabe oder im
Stopmodus LEVEL ADJ.
Fahren Sie während der Wiedergabe mit Schritt 4 fort.
2 Drücken Sie ./> so oft, bis „TONE ON“ im
Display erscheint.
3 Drücken Sie ENTER.
Der Testton wird nacheinander von den Lautsprechern
ausgegeben, und der entsprechende Lautsprecher
erscheint im Display.
4 Drücken Sie ./> so oft, bis die gewünschte
Option im Display erscheint.
Wählen Sie „CNTR BALANCE“, „SURR BALANCE“
oder „SW BALANCE“ aus.
Hinweis
Wenn Sie den Tiefsttonlautsprecher im MehrkanalWiedergabemodus auf „––“ stellen (Seite 22), wird „SW
BALANCE” nicht angezeigt. Analog wird „CNTR
BALANCE“ bzw. „SURR BALANCE” nicht angezeigt, wenn
Sie den entsprechenden Lautsprecher auf „––“ setzen.
DE
24

Weitere
Informationen
In diesem Kapitel finden Sie weitere
Informationen zu Ihrem Super-AudioCD-Player, die Sie beachten sollten,
damit Sie lange Freude an diesem
Gerät haben.
Sicherheitsmaßnahmen
Sicherheit
• Vorsicht — Die Verwendung optischer Instrumente
zusammen mit diesem Produkt stellt ein Gesundheitsrisiko
für die Augen dar.
• Sollten Fremdkörper oder Flüssigkeiten in das Gerät
gelangen, trennen Sie es von der Netzsteckdose, und lassen
Sie es von qualifiziertem Fachpersonal überprüfen, bevor
Sie es wieder benutzen.
• Das Netzkabel darf nur von einem qualifizierten
Kundendienst ausgetauscht werden.
• Das Gerät bleibt auch in ausgeschaltetem Zustand mit dem
Stromnetz verbunden, solange das Netzkabel mit der
Netzsteckdose verbunden ist.
Stromversorgung
• Bevor Sie den CD-Player in Betrieb nehmen, überprüfen Sie
bitte, ob die Betriebsspannung des CD-Players Ihrer lokalen
Stromversorgung entspricht. Die Betriebsspannung ist auf
dem Typenschild hinten am CD-Player verzeichnet.
• Das Gerät bleibt auch in ausgeschaltetem Zustand mit dem
Stromnetz verbunden, solange das Netzkabel mit der
Netzsteckdose verbunden ist.
• Wenn Sie den CD-Player längere Zeit nicht benutzen
wollen, ziehen Sie bitte das Netzkabel aus der
Netzsteckdose. Ziehen Sie dabei immer am Stecker, nie am
Kabel selbst.
Aufstellort
• Stellen Sie den CD-Player an einem Ort mit ausreichender
Luftzufuhr auf, damit sich im Gerät kein Wärmestau bildet.
• Stellen Sie den CD-Player nicht auf eine weiche Oberfläche
wie zum Beispiel einen Teppich. Dadurch könnten die
Lüftungsöffnungen an der Unterseite blockiert werden.
• Stellen Sie den CD-Player nicht in der Nähe von
Wärmequellen oder an Orten auf, an denen er direktem
Sonnenlicht, übermäßig viel Staub oder mechanischen
Erschütterungen ausgesetzt ist.
Niederschlag von Kondenswasser
• Wird der CD-Player direkt von einem kalten in einen
warmen Raum gebracht oder in einem sehr feuchten Raum
aufgestellt, kann sich auf den Linsen im CD-Player
Feuchtigkeit niederschlagen. In diesem Falle funktioniert
der CD-Player unter Umständen nicht mehr richtig.
Nehmen Sie dann die CD heraus, und lassen Sie den
CD-Player etwa eine Stunde lang eingeschaltet stehen, bis
die Feuchtigkeit verdunstet ist.
• Beim Einschalten sind möglicherweise Störgeräusche zu
hören, während die CD in den Super-Audio-CD-Player
eingelesen wird. Dies ist keine Fehlfunktion.
Einstellen der Lautstärke
• Erhöhen Sie die Lautstärke nicht, wenn gerade eine sehr
leise Passage oder eine Stelle ohne Tonsignale
wiedergegeben wird. Wenn danach wieder eine sehr laute
Passage folgt, können die Lautsprecher beschädigt werden.
Weitere Informationen
25
DE

Sicherheitsmaßnahmen Z
Einlegen einer CD
• In manchen Fällen hören Sie ein Transport- oder ein anderes
mechanisches Geräusch vom Gerät. Dies zeigt an, daß der CDPlayer den internen Mechanismus automatisch an die
eingelegte CD anpaßt.
Auch wenn Sie eine verzogene CD einlegen, kann es sein, daß
ein mechanisches Geräusch zu hören ist.
Reinigung
• Reinigen Sie Gehäuse, Bedienfeld und Bedienelemente mit
einem weichen Tuch, das Sie leicht mit einem milden
Reinigungsmittel angefeuchtet haben.
Verwenden Sie keine Scheuermittel, Scheuerschwämme oder
Lösungsmittel wie Alkohol oder Benzin.
Transport
• Nehmen Sie unbedingt die CD aus dem Fach.
• Achten Sie darauf, das CD-Fach zu schließen.
Wenn Sie zu Ihrem CD-Player Fragen haben oder
Probleme daran auftreten, wenden Sie sich bitte an Ihren
Sony-Händler.
Hinweise zu CDs
Umgang mit CDs
• Fassen Sie CDs nur am Rand an, damit sie nicht verschmutzen.
Berühren Sie nicht die Oberfläche einer CD.
• Kleben Sie weder Papier noch Klebeband auf CDs.
• Verwenden Sie ausschließlich runde CDs. Wenn Sie anders
geformte CDs verwenden, zum Beispiel stern- oder
herzförmige oder quadratische CDs, kann der Player
beschädigt werden.
• Verwenden Sie keine CDs mit Aufklebern jeglicher Art, wie sie
bei gebrauchten CDs oder Leih-CDs zu finden sind.
Aufbewahren von CDs
• Setzen Sie CDs weder direktem Sonnenlicht noch
Wärmequellen wie zum Beispiel Warmluftauslässen aus.
• Bewahren Sie CDs nach der Wiedergabe immer in ihrer Hülle
auf. Wenn Sie CDs ohne Hülle übereinanderlegen, können die
CDs beschädigt werden.
Weitere Informationen
Einlegen von CDs in das CD-Fach
• Achten Sie darauf, daß die CD fest im CD-Fach sitzt.
Andernfalls können der Player und die CD beschädigt werden.
Reinigung
• Wenn die CD durch Fingerabdrücke oder Staub verschmutzt
ist, kann sich die Qualität des Audioausgabesignals
verringern.
• Reinigen Sie die CD vor dem Abspielen mit einem
Reinigungstuch. Wischen Sie dabei von der Mitte nach außen.
• Reinigen Sie die CD mit einem weichen Tuch, das Sie leicht mit
Wasser angefeuchtet haben. Wischen Sie sie anschließend mit
einem trockenen Tuch trocken.
• Verwenden Sie keine Lösungsmittel wie Benzin, Verdünner,
Reinigungsmittel für Schallplatten oder Antistatik-Sprays.
Hinweise zur Wiedergabe von CD-Rs/CD-RWs
• Auf CD-R-/CD-RW-Laufwerken bespielte CDs können
aufgrund von Kratzern, Verschmutzungen, den
Aufnahmebedingungen oder den Laufwerkseigenschaften
möglicherweise nicht wiedergegeben werden. Auch CDs, die
nach der Aufnahme nicht abgeschlossen wurden, können nicht
wiedergegeben werden.
26
DE

Störungsbehebung
Technische Daten
Sollten an Ihrem Gerät Störungen auftreten, versuchen
Sie, diese anhand der folgenden Checkliste zu beheben.
Sollte die Störung bestehen bleiben, wenden Sie sich an
Ihren Sony-Händler.
Es ist kein Ton zu hören.
, Überprüfen Sie, ob das Gerät korrekt
angeschlossen ist.
, Überprüfen Sie, ob Sie den Verstärker korrekt
eingestellt haben.
, Wenn Sie die Kopfhörer benutzen, stellen Sie die
Lautstärke mit PHONES LEVEL ein.
Über die DIGITAL (CD) OUT-Anschlüsse wird kein
Ton ausgegeben.
, Die Audiosignale von Super-Audio-CDs werden
nicht über die DIGITAL (CD) OUT-Anschlüsse
ausgegeben.
Die CD wird nicht abgespielt.
, Es wurde keine CD in den Player eingelegt.
, Die CD wurde mit der falschen Seite nach oben in
das Fach eingelegt.
, Legen Sie die CD mit der beschrifteten Seite nach
oben in das CD-Fach ein.
, Die CD wurde schräg eingelegt. Legen Sie die CD
erneut ein.
, Reinigen Sie die CD (siehe Seite 26).
, Im Gerät hat sich Feuchtigkeit niedergeschlagen.
Nehmen Sie die CD heraus, und lassen Sie das
Gerät etwa eine Stunde lang eingeschaltet.
, Eine nicht kompatible CD wurde in das CD-Fach
eingelegt (siehe Seite 13).
Die Fernbedienung funktioniert nicht.
, Entfernen Sie Hindernisse zwischen der
Fernbedienung und dem Gerät.
, Richten Sie die Fernbedienung auf den
Fernbedienungssensor am Player.
, Tauschen Sie alle Batterien in der Fernbedienung
gegen neue aus, wenn sie zu schwach sind.
Über die Buchse SUB WOOFER wird kein Ton
ausgegeben.
, Wählen Sie den Wiedergabemodus so aus, daß der
Tiefsttonlautsprecher auf „a“ gesetzt wird (Seite
22).
, Wenn Sie einen Titel wiedergeben, der kein LFE-
Signal enthält, werden über die Buchse SUB
WOOFER nur Signale ausgegeben, wenn Sie für
den Mehrkanal-Wiedergabemodus „5 – Small +
SW“ oder „FRT – Large + SW“ wählen (Seite 23).
Bei Wiedergabe einer Super-Audio-CD
Wiedergabefrequenzbereich
Frequenzgang 2 Hz bis 50 kHz (–3 dB)
Dynamikbereich mindestens 104 dB
Gesamte harmonische Verzerrung
Gleichlaufschwankungen maximal Wert der Meßgrenze
2 Hz bis 100 kHz
maximal 0,0018 %
(±0,001 % Spitzenpegel)
Bei Wiedergabe einer CD
Frequenzgang 2 Hz bis 20 kHz
Dynamikbereich mindestens 99 dB
Gesamte harmonische Verzerrung
maximal 0,002 %
Gleichlaufschwankungen maximal Wert der Meßgrenze
(±0,001 % Spitzenpegel)
Ausgang
Buchsentyp
ANALOG
OUT
DIGITAL
(CD) OUT
OPTICAL*
DIGITAL
(CD) OUT
COAXIAL*
PHONES Stereo-
*Nur Ausgabe der Audiosignale von CDs
Cinchbuchsen
Quadratische, optische
Ausgangsbuchse
Koaxialausgangsbuchse
Klinkenbuchse
Ausgangspegel
2 V effektiver
Mittelwert (bei
50 kOhm)
–18 dBm
0,5 Vp-p
10 mW
Lastimpedanz
Über 10 kOhm
LaserWellenlänge:
( )
660 nm
75 Ohm
32 Ohm
Allgemeines
Laser Halbleiter-Laser
(SACD: λ = 650 nm)
(CD: λ = 780 nm)
Emissionsdauer: kontinuierlich
Leistung der Laser-Strahlung:
*Gemessen im Abstand von etwa 200 mm von der
Linsenoberfläche am optischen Sensorblock.
Betriebsspannung 230 V Wechselstrom, 50/60 Hz
Leistungsaufnahme 25 W
Abmessungen (B/H/T) 430 × 111 × 283 mm
Gewicht ca. 5,8 kg
5,47 uW bei 650 nm
einschließlich vorstehender Teile und
Bedienelemente
Mitgeliefertes Zubehör
Siehe Seite 4.
Änderungen, die dem technischen Fortschritt dienen, bleiben
vorbehalten.
Weitere Informationen
27
DE

Index
A
AMS (Automatischer Musiksensor) 14
ANALOG OUT
2 CH 6
5.1 CH 5
Anschließen
an den Netzstrom 7
Audiokomponenten 5
Ansteuern
durch Eingeben der Titelnummer 18
einer bestimmten Passage 18
eines bestimmten Titels 18
mit der Indexfunktion (Indexsuche) 18
mit Hilfe der Zeitanzeige (Suchen mit hoher
Geschwindigkeit) 18
während der Ton wiedergegeben wird (Suche) 18
Anzeigen von Informationen 15
Ausgangspegelbalance 23
B, C
Batterien 4
P, Q, R
Programme Play
eigenes Programm zusammenstellen 21
Programm ändern 21
Programm überprüfen 21
S
Shuffle Play 20
Suchen
Indexsuche 18
in hoher Geschwindigkeit 18
Time Search 19
Super-Audio-CD 12
T
TEXT 16
TOC 13
U
Unterbrechen der Wiedergabe (Pause) 14
D
DIGITAL (CD) OUT 7
E
Einlegen einer CD 14
F, G, H, I, J
Fernbedienung 11
K, L
Kabel
Weitere Informationen
M, N, O
Mehrkanal-Management 22
Mehrkanal-Super-Audio-CD 13
Audioverbindungskabel 5
digitales Koaxialkabel 7
optisches Digitalkabel 7
V
Verstärker (nicht mitgeliefert) 5
W, X, Y
Wiedergeben
der Titel in willkürlicher Reihenfolge 20
durch Eingeben der Titelnummer 18
einer CD 14
wiederholt 19
Wiedergabemodus
2-Kanal-Modus 22
Mehrkanalmodus 22
Wiederholte Wiedergabe
Repeat 1 Play 20
Repeat A-B Play 20
Repeat All Play 19
Z
Zubehör 4
28
DE

29
Weitere Informationen
DE

ADVERTENCIA
¡Bienvenido!
Para evitar el riesgo de
incendios o electrocución,
no exponga la unidad a la
lluvia ni a la humedad.
Para evitar descargas
eléctricas, no abra el
aparato. Solicite asistencia
técnica únicamente a
personal especializado.
Este dispositivo está clasificado como
producto LÁSER DE CLASE 1.
La etiqueta CLASS 1 LASER PRODUCT se
encuentra en la parte posterior exterior.
Esta etiqueta de precaución se encuentra en
el interior de la unidad.
Gracias por adquirir el reproductor de CD
Super Audio de Sony. Antes de emplear la
unidad, lea este manual atentamente y
consérvelo para consultarlo en el futuro.
Acerca de este
manual
Las instrucciones de este manual son para
el modelo SCD-XB770.
Convenciones
• Las instrucciones de este manual
describen los controles del reproductor.
También es posible utilizar los controles
del mando a distancia si presentan los
mismos nombres o similares a los del
reproductor.
• Los siguientes iconos se emplean en este
manual:
Indica que es posible realizar la
Z
tarea con el mando a distancia.
No tire las pilas, deshágase
de ellas como basura
peligrosa.
Indica consejos y sugerencias
z
para facilitar la tarea.
ES
2

Características
ÍNDICE
Acerca de CD Super Audio
• CD Super Audio es un nuevo estándar de disco de
audio de alta calidad en el que la música se graba en el
formato DSD (Direct Stream Digital); los discos
compactos normales se graban en el formato PCM. El
formato DSD, utilizando una frecuencia de muestreo 64
veces mayor que la de los discos compactos
convencionales, y la cuantización de 1 bit, ofrece tanto
una amplia gama de frecuencias como un amplio rango
dinámico en la gama de frecuencias audibles. De este
modo la reproducción es extremadamente fiel al sonido
original.
• El CD Super Audio incluye 2 tipos: un disco estéreo de
2 canales y un disco multicanal con hasta 6 canales
independientes.
Las características multicanal del CD Super Audio
incluyen un sistema de asignación de altavoces muy
similar a la salida de 5,1 canales de los sistemas AV
actuales.
Características del reproductor
Este reproductor, diseñado para reproducir discos CD
Super Audio de 2 canales y multicanales y discos
compactos convencionales; tiene las características
siguientes,
• Incorpora lentes láser duales ópticas independientes,
capaces de leer un CD Super Audio o un CD normal en
función de la longitud de onda exclusiva.
• Acceso rápido a las pistas gracias a un servomecanismo
avanzado.
• Función de gestión multicanal que permite ajustar el
entorno de reproducción multicanal de acuerdo con la
posición y el tamaño de sus altavoces.
• Un sistema convertidor D/A Super Audio y de
sincronía digital directa que permite una reproducción
de sonido de la más alta calidad.
Procedimientos iniciales 4
Antes de realizar las conexiones 4
Conexión de componentes de audio 5
Ubicación y funciones de los
componentes 8
Descripción de los componentes del panel
frontal 8
Descripción de los componentes del panel
posterior 10
Descripción de los componentes del mando a
distancia 11
Reproducción de discos 12
Tipos de discos compatibles 12
Reproducción de discos 14
Uso del visor 15
Localización de una pista específica 18
Localización de un punto determinado de una
pista 18
Reproducción repetida de pistas 19
Reproducción de pistas en orden aleatorio
(Reproducción aleatoria) 20
Creación de su propio programa (Reproducción de
programa) 21
Audición de CD Super Audio multicanal (función
de gestión multicanal) 22
ES
Otros
• En un CD Super Audio pueden marcarse hasta 255
números de pista/índice. Esta característica se aplica al
SCD-XB770.
• El mando a distancia suministrado puede controlar el
SCD-XB770 y un reproductor de CD de Sony
convencional.
Información complementaria 25
Precauciones 25
Notas sobre los discos 26
Solución de problemas 27
Especificaciones 27
Índice alfabético Cubierta Posterior
ES
3

Procedimientos
Antes de realizar las
conexiones
iniciales
En este capítulo se proporciona
información sobre los accesorios
suministrados y sobre cómo conectar
distintos componentes de audio al
reproductor de CD Super Audio.
Asegúrese de leer este capítulo
atentamente antes de conectar algún
dispositivo al reproductor.
Comprobación de los accesorios
suministrados
Los siguientes artículos se proporcionan junto con este
reproductor:
• Cable de conexión de audio
toma fonográfica × 2 (rojo y blanco) y toma
fonográfica × 2 (rojo y blanco) (2)
toma fonográfica × 1 (negro) y toma fonográfica × 1
(negro) (2)
• Mando a distancia (control remoto) RM-SX700 (1)
• Pilas R06 (tamaño AA) (2)
Inserción de las pilas en el mando a
distancia
Inserte dos pilas R06 (tamaño AA) en el compartimento
de las mismas con las polaridades + y – correctamente
orientadas a las marcas. Cuando emplee el mando a
distancia, oriéntelo hacia el sensor de control remoto
del reproductor.
z
Cuándo sustituir las pilas
En condiciones normales, la duración de las pilas es de seis meses
aproximadamente. Cuando el reproductor no responda al mando
a distancia, sustituya las dos pilas por unas nuevas.
Notas
• No deje el mando a distancia en lugares extremadamente
cálidos o húmedos.
• No permita que caigan objetos extraños sobre el mando a
distancia, particularmente cuando sustituya las pilas.
• No emplee pilas nuevas junto con usadas.
• No exponga el sensor de control remoto a la luz solar directa ni
a dispositivos de iluminación. Si lo hace, pueden producirse
fallos de funcionamiento.
• Cuando no vaya a utilizar el mando a distancia durante mucho
tiempo, extraiga las pilas para evitar posibles daños por fugas y
corrosión de las mismas.
ES
4

Conexión de componentes de audio
Conecte el reproductor de CD Super Audio a un
componente de audio. Asegúrese de desactivar la
alimentación de todos los componentes antes de realizar
las conexiones. Igualmente, realice éstas firmemente con
el fin de evitar ruidos.
Si posee un amplificador equipado con las tomas de
entrada 5.1CH (amplificador multicanal, amplificador AV,
etc.) y conecta el reproductor y el amplificador mediante
tomas ANALOG 5.1CH OUT, podrá disfrutar de la
reproducción de un CD Super Audio multicanal.
Para la reproducción normal, conecte el reproductor y el
amplificador utilizando las tomas ANALOG 2CH OUT.
Conexión mediante las tomas ANALOG
5.1CH OUT
Utilice cables de conexión de audio para esta conexión. Conecte
las tomas ANALOG 5.1CH OUT (FRONT L/R, SURR L/R,
CENTER, SUBWOOFER) a las tomas correspondientes del
amplificador. En la conexión FRONT y SURR, utilice los cables de
conexión (tomas roja y blanca) y asegúrese de hacer coincidir los
terminales codificados con colores con las tomas apropiadas:
blanco (izquierdo) con blanco y rojo (derecho) con rojo. Para la
conexión CENTER y SUB WOOFER, utilice los cables de
conexión (negros).
Conexión FRONT o SURR
Cables de conexión de audio (rojo y blanco) (suministrados)
Blanco (L)
Rojo (R)
Blanco (L)
Rojo (R)
Conexión CENTER o SUB WOOFER
Cables de conexión de audio (negro) (suministrados)
Negro
Negro
Notas
• Al realizar una conexión multicanal, conecte también las tomas
ANALOG 2CH OUT con otro cable de conexión de audio de
forma que pueda reproducir un CD (o SACD) cuando ajuste el
selector de entrada de su amplificador en CD (o SACD).
• Durante la reproducción de un CD convencional o de un CD
Super Audio de 2 canales, la señal que se envía por las tomas
ANALOG 2CH OUT también se envía por las tomas ANALOG
5.1CH FRONT L/R.
• Durante la reproducción de un CD Super Audio multicanal, la
señal que se envía por las tomas ANALOG 5.1CH FRONT L/R
también se envía por las tomas ANALOG 2CH OUT. (No se
reproduce la señal mezclada de la señal multicanal).
• Existen discos CD Super Audio 5CH, 4CH y 3CH (5, 4 y 3
canales). Al reproducir estos discos, la señal no se envía por
todas las tomas ANALOG 5.1CH OUT. Para obtener
información detallada sobre la reproducción, consulte la
cubierta o las instrucciones del CD Super Audio.
Procedimientos iniciales
A las tomas
FRONT IN (L/R)
ANALOG
2CH OUT 5.1CH OUT OUT
FRONT COAXIAL OPTICALSURR CENTER
L
R
L
R
SUB
WOOFER
DIGITAL(CD)
A las tomas
SURROUND o
REAR IN (L/R)
A la toma SUB
WOOFER IN
A la toma
CENTER IN
Amplificador multicanal,
amplificador AV, etc.
ES
5

Conexión de componentes de audio
Procedimientos iniciales
Conexión mediante las tomas ANALOG
2CH OUT
Utilice un cable de conexión de audio para esta conexión.
Conecte las tomas ANALOG 2CH OUT L/R a las tomas de
entrada de CD (SACD) del amplificador.
Asegúrese de hacer coincidir el pin codificado con colores con las
tomas apropiadas: blanco (izquierdo) con blanco y rojo (derecho)
con rojo.
Cables de conexión de audio (rojo y blanco) (no
suministrados*)
Blanco (L)
Rojo (R)
* Cuando no realice la conexión ANALOG 5.1 CH (página 5),
puede utilizar el cable de conexión de audio suministrado para
la conexión ANALOG 2CH.
2CH OUT 5.1CH OUT OUT
L
R
ANALOG
FRONT COAXIAL OPTICALSURR CENTER
L
SUB
R
WOOFER
Blanco (L)
Rojo (R)
DIGITAL(CD)
A las tomas CD (SACD)
IN (L/R)
ES
6
Amplificador estéreo, etc.

Conexión mediante el conector DIGITAL
(CD) OUT OPTICAL
Utilice un cable digital óptico para esta conexión. Cuando conecte
el cable digital óptico al conector DIGITAL (CD) OUT OPTICAL,
retire la tapa de los conectores y ejerza presión sobre los enchufes
del cable para introducirlos hasta que queden encajados en su
sitio.
Tenga cuidado de no doblar ni retorcer el cable óptico.
Cable digital óptico (no suministrado)
Nota
Sólo las señales de audio de los discos compactos convencionales
pueden enviarse mediante los conectores DIGITAL (CD) OUT.
Las del CD Super Audio no pueden enviarse mediante DIGITAL
(CD) OUT.
Conexión mediante el conector DIGITAL
(CD) OUT COAXIAL
Utilice un cable digital coaxial para conectar los componentes de
audio equipados con conectores de entrada digital coaxial.
Cable digital coaxial (no suministrado)
Procedimientos iniciales
Nota
Sólo las señales de audio de los discos compactos convencionales
pueden enviarse mediante los conectores DIGITAL (CD) OUT.
Las del CD Super Audio no pueden enviarse mediante DIGITAL
(CD) OUT.
Conexión del cable de alimentación de CA
Conecte el cable de alimentación a una toma mural.
ES
7

Ubicación y
Descripción de los
componentes del panel
funciones de
los
componentes
En este capítulo se muestran la
ubicación y las funciones de los
distintos botones y controles de los
paneles frontal y posterior y del
mando a distancia suministrado.
Se proporciona más información en
las páginas indicadas entre paréntesis.
También se describe la información
mostrada en el visor.
frontal
1 Interruptor POWER (14)
Púlselo para encender el reproductor.
2 Botón TIME/TEXT (15)
Cada vez que pulse el botón, el tiempo de
reproducción de la pista, el tiempo total restante del
disco o la información de texto aparecerá en el visor.
3 Botón SACD/CD (12)
Cada vez que pulse el botón, aparecerá “SACD” o
“CD” en el visor. Seleccione el tipo de CD que desee
reproducir.
4 Bandeja de discos (14)
Pulse A OPEN/CLOSE para abrir y cerrar la bandeja
de discos.
5 Indicador multicanal
Se enciende al encender el reproductor o cuando se
carga un CD Super Audio multicanal y se selecciona el
área de reproducción multicanal pulsando MULTI/
2CH.
ES
8

Ubicación y funciones de los componentes
POWER
PHONES
PHONE LEVEL
MIN MAX
TIME/TEXT SACD/CD
MENU MULTI/2CH
6 Botón A OPEN/CLOSE (14)
Púlselo para abrir la bandeja de discos.
qs Visor (15)
Muestra información.
OPEN CLOSE
AMS
PUSH ENTER
7 Botón H (14)
Púlselo para iniciar la reproducción.
8 Botón X (14)
Púlselo para introducir pausas durante la
reproducción.
9 Botón x (14)
Púlselo para detener la reproducción.
0 Dial l AMS L (AMS: Sensor de música
automático) (13)
Al girar un clic el dial l AMS L en el sentido
contrario a las agujas del reloj, retrocederá a la pista
anterior, y al girarlo un clic en el sentido de las agujas
del reloj, accederá a la pista posterior.
qa Botones m/M (18)
Púlselos para localizar dentro de una pista una parte
que desee reproducir.
qd Botón MULTI/2CH (12)
Púlselo para seleccionar el área de reproducción al
cargar CD Super Audio de 2 canales + multicanal
(página 13).
qf Botón MENU (13)
Púlselo para ver el menú.
qg PHONES LEVEL
Ajuste el volumen de los auriculares.
qh PHONES
Conecte los auriculares.
Durante la reproducción de un CD Super Audio
multicanal, la señal que se envía por las tomas
ANALOG 5.1CH FRONT L/R también se envía por la
toma PHONES.
ES
9

Descripción de los componentes del panel posterior
Ubicación y funciones de los componentes
ANALOG
2CH OUT 5.1CH OUT OUT
FRONT COAXIAL OPTICALSURR CENTER
L
R
L
R
SUB
WOOFER
DIGITAL(CD)
1 Tomas ANALOG 2CH OUT L/R (6)
Conéctelas a un componente de audio (estéreo/2
canales) con el cable de conexión de audio.
2 Tomas ANALOG 5.1CH OUT (5)
Conéctelas a un amplificador equipado con tomas de
entrada 5.1CH (amplificador multicanal, amplificador
AV, etc.) mediante los cables de conexión de audio.
3 Conector DIGITAL (CD) OUT COAXIAL (7)
Conéctelo a un componente de audio con el cable
digital coaxial.
4 Conector DIGITAL (CD) OUT OPTICAL (7)
Conéctelo a un componente de audio con un cable
digital óptico.
ES
10
Nota
Sólo las señales de audio del CD pueden enviarse mediante los
conectores DIGITAL (CD) OUT mostrados en 3 y 4. Las del
CD Super Audio no pueden enviarse mediante DIGITAL (CD)
OUT.

Descripción de los componentes del mando a distancia
1 Botón CONTINUE (20)
Púlselo para reanudar la reproducción normal desde
el modo de reproducción aleatoria o de programa.
Botón SHUFFLE (20)
Púlselo para seleccionar la reproducción aleatoria.
Botón PROGRAM (21)
Púlselo para seleccionar la reproducción de programa.
2 Botón DISPLAY MODE (16)
Púlselo para desactivar la información.
3 Botón TIME/TEXT (15)
Cada vez que pulse el botón, el tiempo de
reproducción de la pista, el tiempo total restante del
disco o la información de texto aparecerá en el visor.
4 Botones numéricos (18)
Púlselos para introducir los números de pista.
5 Botón
i
10 (18)
Púlselo para localizar pistas de número superior a 10.
6 Botón REPEAT (19)
Púlselo varias veces para reproducir todas las pistas
del disco o sólo una.
7 Botón AyB (20)
Púlselo para seleccionar la reproducción repetida A-B.
8 Botón H (14)
Púlselo para iniciar la reproducción.
Botón X (14)
Púlselo para introducir pausas durante la
reproducción.
Botón x (14)
Púlselo para detener la reproducción.
qf Botón ENTER (24)
Púlselo para confirmar la selección.
qg Botón CLEAR (21)
Púlselo para eliminar un número de pista
programado.
qh Botón LEVEL ADJ (24)
Púlselo para ajustar el balance de nivel de salida para
la función de gestión multicanal (página 22).
qj Botón CHECK (21)
Púlselo para comprobar el orden programado.
PLAY MODE
CONTINUE SHUFFLE
DISPLAY/
MODE
TIME/TEXT
PROGRAM
SACD/CD
MULTI/2CH
123
456
78
>10 ENTER
REPEAT
BA
10/0
CHECK
9
CLEAR
LEVEL
ADJ
Ubicación y funciones de los componentes
9 Botones AMS ./> (AMS: Sensor de música
automático) (18)
Púlselos para localizar una pista específica.
0 Botones m/M (18)
Púlselos para localizar dentro de una pista una parte
que desee reproducir.
qa Botones INDEX >/. (18)
Púlselos para localizar un punto específico marcado
con una señal de índice al reproducir discos que
contengan señales de índice.
qs Botón SACD/CD (12)
Cada vez que pulse el botón, aparecerá “SACD” o
“CD” en el visor. Seleccione el tipo de CD que desee
reproducir.
qd Botón MULTI/2CH (12)
Púlselo para seleccionar el área de reproducción al
cargar CD Super Audio de 2 canales + multicanal
(página 13).
AMS
INDEX
11
ES

Reproducción
Tipos de discos compatibles
de discos
En este capítulo se describen distintas
formas de reproducción de discos.
Es posible reproducir los siguientes discos con este
reproductor.
Dependiendo del tipo de disco que vaya a reproducir,
seleccione el indicador apropiado pulsando SACD/CD o
MULTI/2CH (página 14).
Clasificación según la configuración de
capas
CD Super Audio (disco de una capa)
Este disco se compone de una capa HD (alta densidad).
Cuando se reproduce este disco, el reproductor se ajusta
automáticamente en el modo de reproducción de CD
Super Audio.
Capa HD (CD Super
Audio)
CD Super Audio (disco de dos capas)
Este disco se compone de dos capas HD y puede
reproducirse durante mucho tiempo.
Cuando se reproduce este disco, el reproductor se ajusta
automáticamente en el modo de reproducción de CD
Super Audio.
Igualmente, puesto que el disco de dos capas dispone de
dos capas HD en una sola cara, no es necesario darle la
vuelta.
12
Capa HD (CD Super
Audio)
Capa HD (CD Super
Audio)
CD convencional
Este disco es de formato estándar.
Cuando se reproduce este disco, el reproductor se ajusta
automáticamente en el modo de reproducción de CD
convencional.
Capa CD
ES

CD Super Audio + CD (disco híbrido)
Este disco se compone de una capa HD y otra CD. Pulse
SACD/CD para seleccionar la capa que desee escuchar.
Igualmente, puesto que las dos capas se encuentran en
una cara, no es necesario darle la vuelta al disco. Es
posible reproducir la capa CD con un reproductor de CD
convencional.
Capa CD
CD Super Audio de 2 canales + multicanal
Este disco consta de un área de reproducción de 2 canales
y de otra multicanal.
Pulse MULTI/2CH para seleccionar el área de
reproducción que desee escuchar.
Área de reproducción de
2 canales
Área de reproducción
multicanal
Capa HD (CD
Super Audio)
Clasificación según la configuración de
canales del CD Super Audio
CD Super Audio de 2 canales
Este disco consta del área de reproducción de 2 canales.
Cuando se reproduce este disco, el reproductor se ajusta
automáticamente en el modo de reproducción de 2
canales.
Área de reproducción de
2 canales
CD Super Audio multicanal
Este disco consta del área de reproducción multicanal.
Cuando se reproduce este disco, el reproductor se ajusta
automáticamente en el modo de reproducción multicanal.
Es posible seleccionar el área de reproducción por omisión
(área de reproducción de 2 canales o el área multicanal).
1 Durante el modo de parada, pulse MENU.
2 Gire l AMS L hasta que “M/2CH SELECT”
aparezca en el visor.
3 Pulse l AMS L.
Aparece el área de reproducción actual.
4 Gire l AMS L para seleccionar el área de
reproducción que desee y, a continuación, pulse
l AMS L.
Discos incompatibles
Este reproductor no puede reproducir los siguientes
discos. Si intenta reproducirlos, aparecerá el mensaje de
error “TOC Error” o “NO DISC” o no se oirá el sonido.
• CD-ROM
• DVD, etc.
Reproducción de discos
Área de reproducción
multicanal
13
ES

Reproducción de discos
A continuación se describen las operaciones de
reproducción normal y las básicas durante la
reproducción.
POWER
1 Encienda el amplificador. Disminuya el nivel del
volumen al mínimo.
2 Seleccione la posición del reproductor utilizando el
selector de entrada del amplificador.
Reproducción de discos
3 Pulse POWER para encender el reproductor.
4 Pulse A OPEN/CLOSE para abrir la bandeja de
discos y coloque un disco en la bandeja.
SACD/CD
A OPEN/CLOSE
Xx
H
lAMSL
Operaciones básicas durante la reproducción
Para
Detener la reproducción
Introducir pausas durante la
reproducción
Reanudar la reproducción
después de la pausa
Localizar una pista posterior
Localizar el principio de la
pista actual o una pista
anterior
Expulsar el disco
z
Si enciende el reproductor con un disco ya cargado
La reproducción se iniciará automáticamente. Si conecta un
temporizador disponible en el mercado, podrá programarlo para
que el disco comience a reproducirse a la hora que desee.
z
Para seleccionar una capa que desee escuchar al reproducir
un disco híbrido (página 13)
Una vez detenida la reproducción con x, pulse SACD/CD varias
veces para que se ilumine el indicador “SACD” o “CD”.
Pulse
x
X
X o H
Gire lAMSL en el sentido
de las agujas del reloj
Gire lAMSL en el sentido
contrario a las agujas del reloj
A OPEN/CLOSE
Con el lado de la etiqueta hacia arriba
5 Pulse SACD/CD para seleccionar SACD o CD.
Cada vez que pulse el botón, aparecerá SACD o CD en
el visor de forma alterna. Seleccione el tipo de disco en
la bandeja. Para más información, consulte la página
12.
6 Pulse H.
La reproducción se inicia a partir de la primera pista.
Si desea iniciar la reproducción a partir de una pista
específica, gire lAMSL para seleccionar el
número de la pista antes de pulsar H.
7 Ajuste el volumen en el amplificador.
z
Para seleccionar el área de reproducción que desee escuchar
al reproducir un disco CD Super Audio de 2 canales + multicanal
(página 13)
Una vez detenida la reproducción con x, pulse MULTI/2CH
varias veces para que se ilumine el indicador “MULTI CH” o “2
CH”.
Nota
Durante la reproducción, aumente el nivel del volumen
gradualmente a partir del nivel más bajo. La salida de esta
unidad puede encubrir el ancho de banda que se encuentra fuera
del margen de audición normal. Esto puede causar daños a los
altavoces o los oídos.
14
ES

Uso del visor
El visor muestra información sobre el disco o la pista en
reproducción. En esta sección se describe la información
del disco actual que aparece durante cada estado de
reproducción.
MENU
DISPLAY MODE
TIME/TEXT
lAMSL
Información del disco cargado
En función del disco cargado actualmente, el visor
aparece como sigue:
CD Super Audio de 2 canales
2CH
SACD
12345
678910
CD Super Audio multicanal
MULTI 5.1CH
SACD
12345
678910
Durante la
reproducción de
un CD Super Audio
de 5,1 canales
CD convencional
o
MULTI 5 CH
SACD
12345
678910
Durante la
reproducción de un
CD Super Audio de
5 canales
o
Durante la
reproducción de
otros discos
compactos
Super Audio o
durante el
modo de parada
MULTI CH
SACD
12345
678910
Reproducción de discos
CD
12345
678910
Información mostrada con el reproductor
parado Z
Pulse TIME/TEXT.
El visor mostrará el número total de pistas y el tiempo
total de reproducción.
Número total
de pistas
TRACK MIN SEC
1 0 45.28
Tiempo total de
reproducción
MULTI CH
SACD
12345
678910
15
ES

Uso del visor
SONYHITS
SACD
MULTI CH
TEXT
DISC
12345
678910
1 0 45.28
SACD
MULTI CH
TEXT
TRACK INDEX MIN SEC
12345
678910
SONY BAND
SACD
ART.
MULTI CH
TEXT
12345
678910
Información mostrada con el reproductor
en reproducción Z
Pulse TIME/TEXT.
Cada vez que pulse el botón, el visor mostrará el número
de la pista actual y el tiempo transcurrido o el restante de
la misma, o el tiempo total restante del disco.
Cuando el reproductor detecta un CD Super Audio
multicanal, aparece la información de canales antes que la
pantalla por omisión.
Número de la pista en reproducción y tiempo de
reproducción transcurrido de la pista actual
(indicación por omisión)
11 1.57
Reproducción de discos
Número de la pista en reproducción y tiempo
restante de la pista actual
1 -1.56
TRACK INDEX MIN SEC
Pulse TIME/TEXT
TRACK MIN SEC
Pulse TIME/TEXT
MULTI 5.1CH
SACD
12345
678910
MULTI 5.1CH
SACD
12345
678910
Visualización de la información de discos
con texto Z
Los discos con texto contienen información, como el
nombre del disco o del artista, así como señales de audio.
Este reproductor puede mostrar el nombre del disco, el
del artista y el de la pista actual como información de
texto.
Cuando el reproductor detecta discos con texto, el visor
muestra “TEXT”. Si el disco con texto dispone de varios
idiomas, el visor mostrará “TEXT” y “MULTI”. Si desea
comprobar la información en otro idioma, consulte
“Visualización de la información de discos con texto en
otros idiomas” en la página 17.
Visualización de la información de discos
con texto en el modo de parada Z
Pulse TIME/TEXT.
Cada vez que pulse el botón, el visor mostrará el nombre
del disco o el del artista. Si selecciona el nombre del
artista, el visor mostrará “ART.”.
• Antes de iniciar la reproducción
Título del disco
Tiempo total restante del disco
-43.32
Pulse TIME/TEXT
Información de canales (sólo aparece cuando el
reproductor detecta un CD Super Audio multicanal)
TRACK
[MULTI] 5.1 CH
Desactivación de la información del
visor Z
Cada vez que pulse DISPLAY MODE en el mando a
distancia mientras se reproduce un disco, la indicación se
desactivará y activará de forma alterna.
Incluso con la indicación desactivada, ésta se activará si
detiene la reproducción o la ajusta en el modo de pausa.
Al reanudar la reproducción, la indicación vuelve a
desactivarse.
Antes de iniciar la reproducción, al pulsar DISPLAY
MODE para desactivar la indicación, aparece “DISPLAY
OFF”, y al pulsar el botón para activar la indicación,
aparece “DISPLAY ON”.
MIN SEC
MULTI 5.1CH
SACD
12345
678910
MULTI 5.1CH
SACD
12345
678910
Pulse TIME/TEXT
Nombre del artista
Pulse TIME/TEXT
Número total de pistas y tiempo total de reproducción
Pulse
TIME/
TEXT
ES
16
 Loading...