

Page 1
Super Audio CD
S200
TM
Player
4-249-411-14(1)
Operating Instructions
Mode d’emploi
US
FR
SCD-XA9000ES
2003 Sony Corporation
Page 2
WARNING
To reduce the risk of fire or
electric shock, do not
expose this apparatus to
rain or moisture.
To prevent fire, do not cover the ventilation
of the apparatus with news papers, tablecloths, curtains, etc. And don’t place
lighted candles on the apparatus.
To prevent fire or shock hazard, do not
place objects filled with liquids, such as
vases, on the apparatus.
This apparatus has to be connected to a
mains socket outlet with a protective
earthing connection.
This appliance is
classified as a
CLASS 1 LASER
product. This
marking is located
on the rear exterior.
For the customers in the United States
– Reorient or relocate the receiving antenna.
– Increase the separation between the
equipment and receiver.
– Connect the equipment into an outlet on a
circuit different from that to which the
receiver is connected.
– Consult the dealer or an experienced
radio/TV technician for help.
CAUTION
You are cautioned that any changes or
modification not expressly approved in this
manual could void your authority to operate
this equipment.
Owner’s Record
The model and serial numbers are located
on the rear of the unit.
Record the serial number in the space
provided below. Refer to them whenever
you call upon your Sony dealer regarding
this product.
Model No. SCD-XA9000ES
Serial No. _________________________
CAUTION
The use of optical instruments with this
product will increase eye hazard.
Welcome!
Thank you for purchasing the Sony Super
Audio CD Player. Before operating the
unit, please read this manual thoroughly
and retain it for future reference.
About This Manual
The instructions in this manual is for SCDXA9000ES.
Conventions
• Instructions in this manual describe the
controls on the player.
You can also use the controls on the
remote if they have the same or similar
names as those on the player.
• The following icons are used in this
manual:
Indicates that you can do the
Z
task using the remote.
This symbol is intended to alert the
user to the presence of uninsulated
“dangerous voltage” within the
product’s enclosure that may be of
sufficient magnitude to constitute a
risk of electric shock to persons.
This symbol is intended to alert the
user to the presence of important
operating and maintenance (servicing)
instructions in the literature
accompanying the appliance.
WARNING
This equipment has been tested and found to
comply with the limits for a Class B digital
device, pursuant to Part 15 of the FCC Rules.
These limits are designed to provide
reasonable protection against harmful
interference in a residential installation. This
equipment generates, uses, and can radiate
radio frequency energy and, if not installed
and used in accordance with the instructions,
may cause harmful interference to radio
communications. However, there is no
guarantee that interference will not occur in a
particular installation. If this equipment does
cause harmful interference to radio or
television reception, which can be determined
by turning the equipment off and on, the user
is encouraged to try to correct the interference
by one or more of the following measures:
For the customers in Canada
This Class B digital apparatus complies
with Canadian ICES-003.
CAUTION
TO PREVENT ELECTRIC SHOCK,
MATCH WIDE BLADE OF PLUG TO
WIDE SLOT, FULLY INSERT.
Don’t throw away the
battery with general house
waste, dispose of it
correctly as chemical waste.
Indicates hints and tips for
z
making the task easier.
US
2
Page 3

Features
TABLE OF CONTENTS
About the Super Audio CD
• Super Audio CD is a new high-quality audio disc
standard where music is recorded in the DSD (Direct
Stream Digital) format (conventional CDs are recorded
in the PCM format). The DSD format, using a sampling
frequency 64 times higher than that of a conventional
CD, and with 1-bit quantization, achieves both a wide
frequency range and a wide dynamic range across the
audible frequency range, and so provides music
reproduction extremely faithful to the original sound.
• The Super Audio CD has two types; a 2 channel stereo
disc and a Multi-channel disc which holds up to 6
independent channels. The multi-channel characteristic
of the Super Audio CD features a speaker allocation
system basically similar to the 5.1 channel output of
current AV systems.
Features of the player
This player is designed to play back 2-channel and multichannel Super Audio CDs, and conventional CDs, and
provides the following features:
• Mounted with a Discrete Dual Laser Optical Pickup,
capable of reading a Super Audio CD or conventional
CD depending on the exclusive wavelength.
• Quicker track access performance enabled by an
advanced servo mechanism.
•A Multi-Channel Management function that allows you
to adjust the multi-channel playback environment
according to the allocation and size of your speakers.
•A Super Audio D/A Converter and Direct Digital Sync
System, which allows higher-quality sound
reproduction.
• An i.LINK digital transmission system that provides
higher quality sound and lets you make connections
with just 1 i.LINK cord instead of 6 pin cords.
• This player complies with DTLA copy protection
technology (Revision 1.2).
Others
•A Super Audio CD can mark up to 255 track/index
numbers. This feature applies to SCD-XA9000ES.
• The supplied remote is capable of controlling both the
SCD-XA9000ES and a conventional Sony CD player.
Getting Started 4
Before You Start the Hooking Up 4
Hooking Up the Audio Components 5
Location and Functions of Parts 10
Front Panel Parts Descriptions 10
Rear Panel Parts Descriptions 12
Remote Parts Descriptions 13
Playing Discs 14
Compatible Disc Types 14
Playing a Disc 16
Using the Display 17
Locating a Specific Track 20
Locating a Particular Point in a Track 20
Playing Tracks Repeatedly 21
Playing Tracks in Random Order (Shuffle Play) 22
Creating Your Own Program (Program Play) 23
Listening to a CD Using a Filter (Digital Filter
Function) 24
Setting the DIGITAL OUT on/off 24
Listening to a Multi-channel Super Audio CD
(Multi-channel management function) 25
Additional Information 29
Precautions 29
Notes on Discs 30
Troubleshooting 31
Display Messages 32
Specifications 32
Index 34
US
US
3
Page 4

Getting
Before You Start Hooking
Up
Started
This chapter provides information on
the supplied accessories and how to
connect various audio components to
the Super Audio CD player. Be sure to
read this chapter thoroughly before
you actually connect anything to the
player.
Checking the supplied accessories
This player comes with the following items:
• Audio connecting cord
phono jack × 2 (Red and White) y phono jack × 2 (Red
and White) (3)
phono jack × 1 (Black) y phono jack × 1 (Black) (2)
• i.LINK connecting cord (1)
• Remote commander RM-SX700 (1)
• Size AA (R6) batteries (2)
• AC power cord (1)
• Plug adapter (1) (North American model only)
Inserting batteries into the remote
Insert two size AA (R6) batteries into the battery
compartment with the + and – correctly oriented to the
markings. When using the remote, point it at the remote
sensor
on the player.
z
When to replace the batteries
Under normal conditions, the batteries should last for about six
months. When the remote no longer operates the player, replace
both batteries with new ones.
Notes
• Do not leave the remote in an extremely hot or a humid place.
• Do not drop any foreign object into the remote casing,
particularly when replacing the batteries.
• Do not use a new battery with an old one.
• Do not expose the remote sensor to direct sunlight or lighting
apparatus. Doing so may cause a malfunction.
• If you do not intend to use the remote for an extended period
of time, remove the batteries to avoid possible damage from
battery leakage and corrosion.
US
4
Page 5

Hooking Up the Audio Components
Connect the Super Audio CD player to an audio
component. Be sure to turn off the power of all
components before making connections and connect
securely to prevent noise.
If you have an amplifier equipped with the 5.1CH input
jacks (multi-channel amplifier, AV amplifier, etc.) and
connect the player and the amplifier via the ANALOG
5.1CH OUT jacks, you can play multi-channel Super
Audio CDs and enjoy multi-channel playback.
For normal playback, connect the player and an amplifier
via ANALOG 2CH OUT jacks.
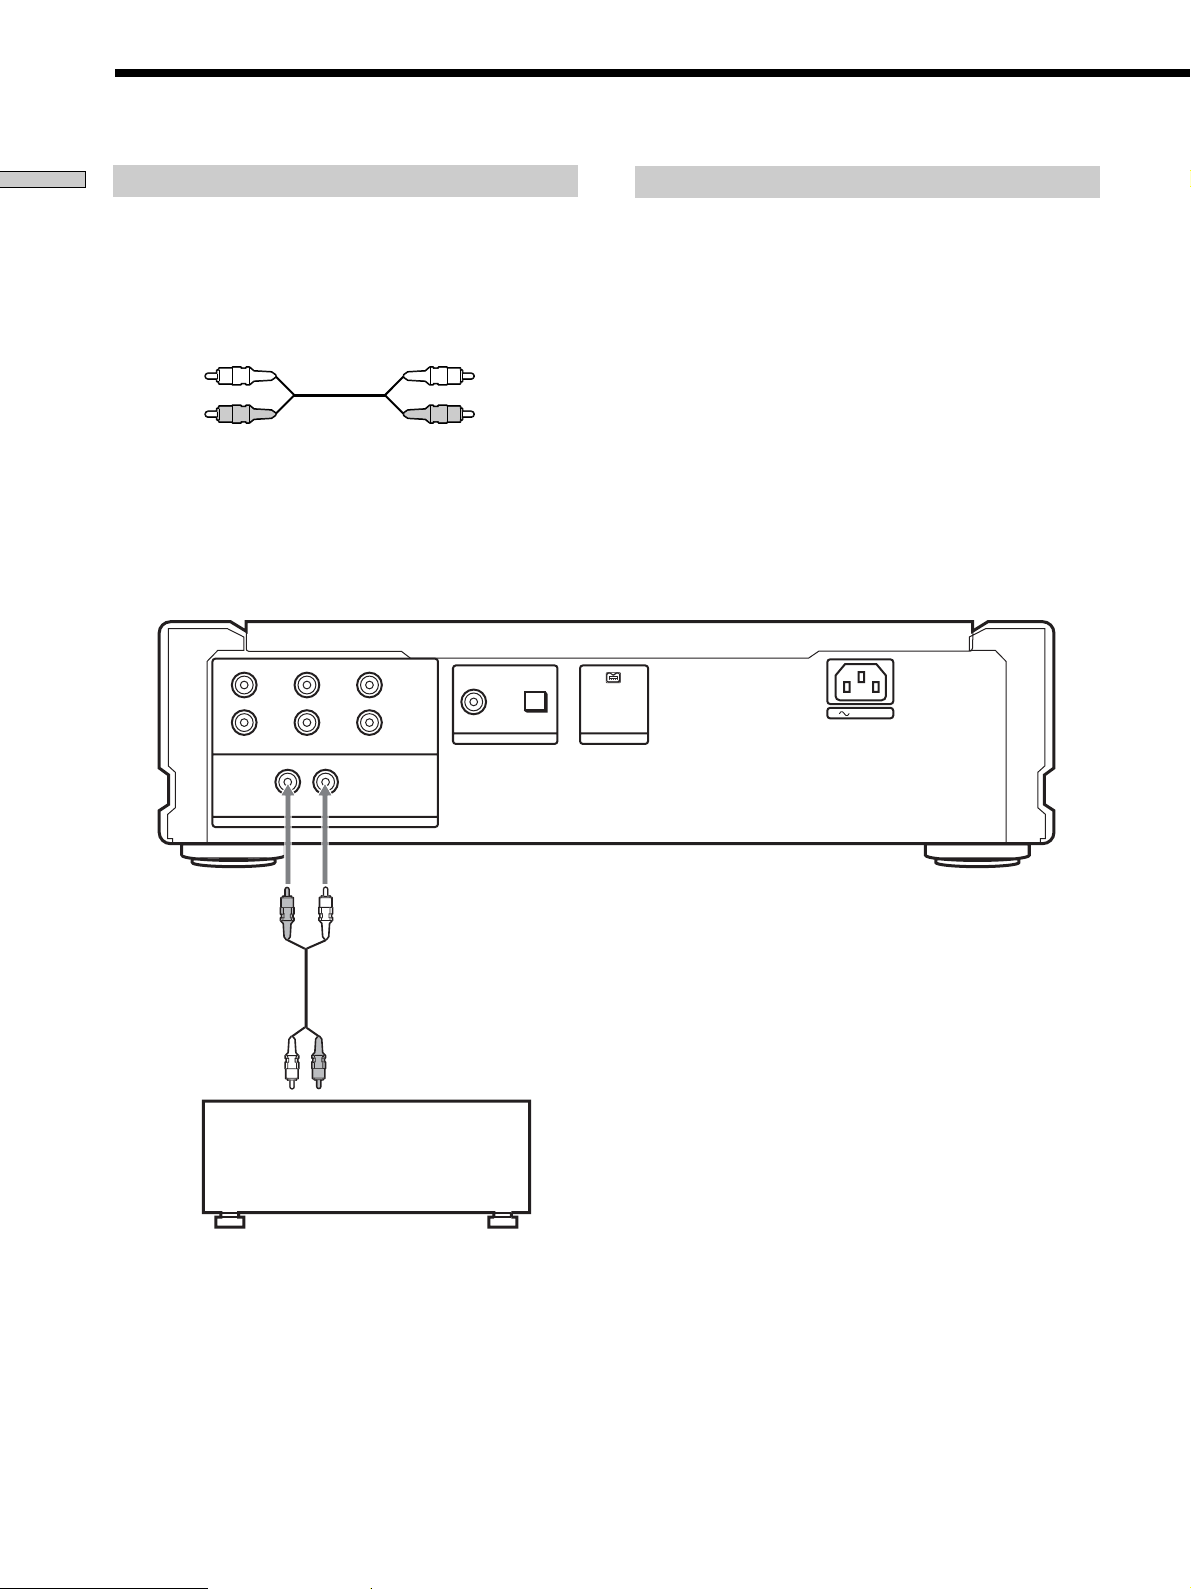
Connecting via ANALOG 5.1CH OUT jacks
Use audio connecting cords for this connection. Connect the
ANALOG 5.1CH OUT jacks (FRONT L/R, SURR L/R, CENTER,
SUB WOOFER) to the corresponding jacks on your amplifier. For
FRONT or SURR connection, use the connecting cords (Red and
White jacks) and be sure to match the color-coded pin to the
appropriate jacks: white (left) to white and red (right) to red. For
CENTER and SUB WOOFER connection, use the connecting
cords (Black).
FRONT or SURR connection
Audio connecting cords (Red and White) (supplied)
CENTER or SUB WOOFER connection
Audio connecting cords (Black) (supplied)
Black
Black
Notes
• Even when you make Multi-channel connections, be sure to
also connect the ANALOG 2CH OUT jacks using another audio
connecting cord so that you can play CDs (or SACDs) when
you set the input selector of your amplifier to CD (or SACD)
input .
• During playback of a conventional CD or a 2CH Super Audio
CD, same signal is output from the ANALOG 5.1CH FRONT
L/R jacks and ANALOG 2CH OUT jacks. The signal is output
in higher quality from the ANALOG 2CH OUT jacks (see page
9).
• During playback of a Multi-channel Super Audio CD, the same
signal is output from the ANALOG 5.1CH FRONT L/R jacks
and ANALOG 2CH OUT jacks. (The downmixed signal of the
Multi-channel siginal is not played back.)
• There are 5CH, 4CH, and 3CH Super Audio CD. When you
play these disc, the signal is not output from all of the
ANALOG 5.1CH OUT jacks. For details of the playback, see the
cover or instructions of the Super Audio CD.
Getting Started
White (L)
Red (R)
To FRONT IN
jacks (L/R)
L
RR
L
FRONT SURROUND SUB WOOFER
LR
ANALOG
To SURROUND or
REAR IN jacks
(L/R)
CENTER
5.1CH OUT
2CH OUT
White (L)
Red (R)
OUT
DIGITAL(CD)
OPTICALCOAXIAL
i.LINK S200
To CENTER IN
jack
AUDIO OUT
To SUB WOOFER
IN jack
AC IN
Multi-channel amplifier,
AV amplifier, etc.
US
5
Page 6
Hooking Up the Audio Components
Getting Started
Connecting via ANALOG 2CH OUT jacks
Use an audio connecting cords for this connection. Connect the
ANALOG 2CH OUT L/R jacks to the CD (SACD) input jacks of
your amplifier. Be sure to match the color-coded pin to the
appropriate jacks: white (left) to white and red (right) to red.
Audio connecting cords (Red and White) (supplied)
White (L)
Red (R)
Note
During playback of a Multi-channel Super Audio CD, the same
signal is output from the ANALOG 5.1CH FRONT L/R jacks and
ANALOG 2CH OUT jacks. (The downmixed signal of the Multichannel signal is not played back.)
L
RR
L
FRONT SURROUND SUB WOOFER
LR
CENTER
5.1CH OUT
2CH OUT
White (L)
Red (R)
OPTICALCOAXIAL
OUT
DIGITAL(CD)
About the ANALOG 2CH OUT
When you play a conventional CD or a 2CH Super Audio CD, the
stereo signal is sent to the FRONT, SURROUND, and CENTER/
SUB WOOFER D/A Converters, and each signal is combined
after D/A conversion, then combined signal is output from the
2CH OUT jacks.
Since each digital signal is converted to analog signal by three
converters, this system offers a 3-times increase in signal, with
only a 3-times incr ease in noise, for an inproved sugnal to noise
ratio. Therefore, a high quality signal is output from the
ANALOG 2CH OUT jacks.
During playback of a Multi-channel Super Audio CD, the signal
conversion described above is not applied, and the same signal is
output from the ANALOG 5.1CH FRONT L/R jacks and
ANALOG 2CH OUT jacks. (The downmixed signal of the Multichannel signal is not played back.)
AUDIO OUT
i.LINK S200
AC IN
To CD (SACD) IN
jacks (L/R)
ANALOG
Stereo amplifier, etc.
US
6
Page 7
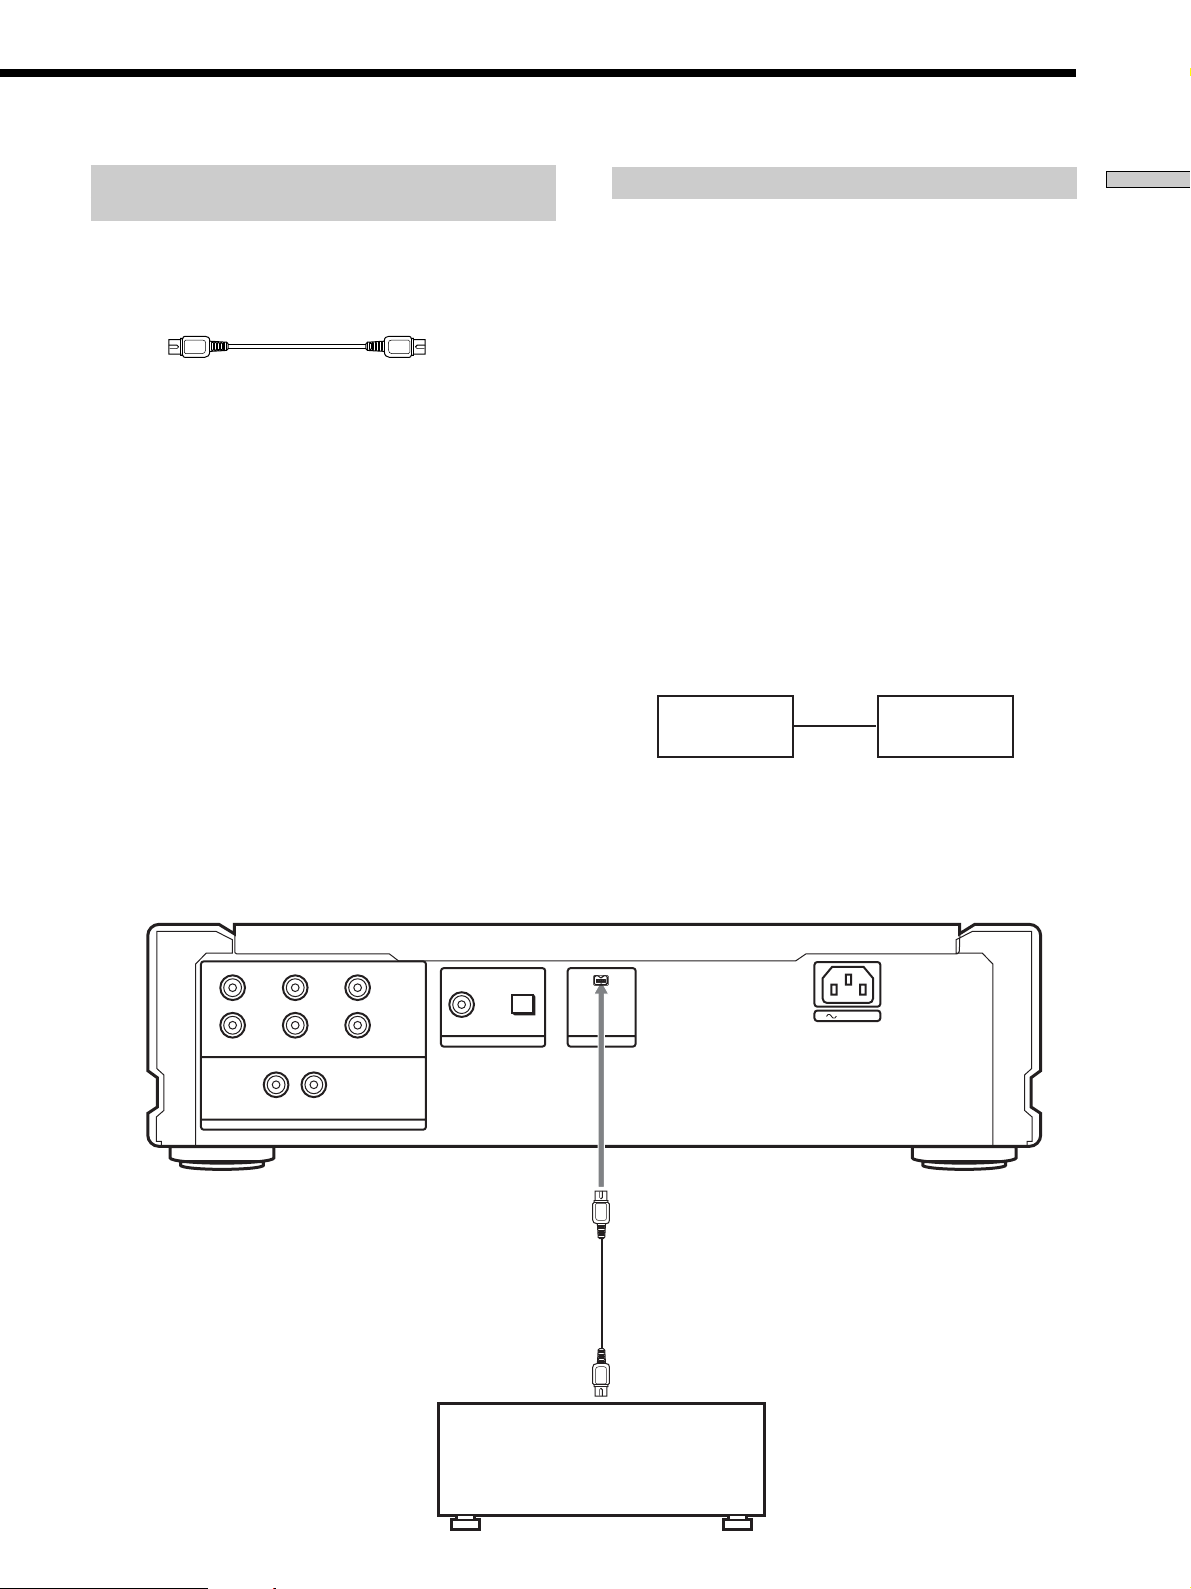
Connecting via i.LINK S200 AUDIO OUT
jack
Connect SCD-XA9000ES to STR-DA9000ES/TADA9000ES with the supplied i.LINK connecting cord.
i.LINK connecting cord (supplied)
Notes
• i.LINK connections are only possible between this player and
STR-DA9000ES/TA-DA9000ES. This player has some
restrictions on i.LINK functions and may not operate properly
if connected to components other than STR-DA9000ES/TADA9000ES.
• If a metal object should fall into the i.LINK S200 AUDIO OUT
jack, short-circuiting may occur and damage the components.
• Be sure to insert the plug firmly to prevent malfunction.
• See page 32 for information about compatible signals.
• Some i.LINK components comply with copy protection
technology and handle encrypted signals. This player complies
with the DTLA copy protection technology (Revision 1.2).
• “i.LINK“ lights up in the display when this player is ready to
output the audio signals from the i.LINK S200 AUDIO OUT
jack.
Establishing a LINC
Before an audio signal can be transmitted between i.LINK
components, a LINC (Logical INterface Connection) must
first be established between the receiving component (of
the audio signal) and the sending component.
Establishing a LINC means establishing a logical path for
the transmission of digital audio signals between the two
components. Each logical path has an ID number. Since
the component that sends an audio signal must output the
signal to a path, and the component that receives the
signal must input it from the same path, the path must be
mutually known by both components. During the
establishment of a LINC, the following communication
occurs between the two i.LINK components.
Example
STR-DA9000ES/TA-DA9000ES establishes a LINC with SCDXA9000ES.
1 STR-DA9000ES/TA-DA9000ES sends a request and path
information to SCD-XA9000ES to establish a transmission
path for the audio signal.
1
STR-DA9000ES
TA-DA9000ES
,
SCD-XA9000ES
2
<
2 SCD-XA9000ES responds to STR-DA9000ES/TA-DA9000ES,
agreeing to the establishment of a LINC.
The digital audio signal transmission becomes possible only
after the communication described above has occurred and a
LINC has been established.
Getting Started
L
RR
L
FRONT SURROUND SUB WOOFER
LR
ANALOG
CENTER
5.1CH OUT
DIGITAL(CD)
2CH OUT
To i.LINK S200
AUDIO IN jack
OUT
OPTICALCOAXIAL
AUDIO OUT
i.LINK S200
AC IN
STR-DA9000ES
TA-DA9000ES
US
7
Page 8

Hooking Up the Audio Components
Getting Started
Listening in high fidelity H.A.T.S. (High
quality digital Audio Transmission
System) function
When the H.A.T.S. function of STR-DA9000ES/TADA9000ES is “ON” digital audio signals are momentarily
stored in a buffer, then read with exact timing before
being converted to analog. This eliminates the jitter
(timing lapses) that sometimes occur during digital signal
transmission and greatly improves sound quality.
When this function is turned on, “H.A.T.S.” lights up in
the display of STR-DA9000ES/TA-DA9000ES whenever
the digital audio signal is input to the receiver. When not
using this function, set it to “OFF” on STR-DA9000ES/
TA-DA9000ES. For details, refer to the Operating
Instructions supplied with STR-DA9000ES/TADA9000ES.
Notes
• Because of the way the H.A.T.S. function operates, a slight time
lag is introduced between each operation (e.g., pressing play,
stop, or pause) and its implementation. The duration of this
time lag may be different for CD and Super Audio CD sources.
• The H.A.T.S. function works only with H.A.T.S. compatible
components.
• The H.A.T.S. function works only when this player is selected
as the input source by a single STR-DA9000ES/TA-DA9000ES.
This is because the receiving component (STR-DA9000ES/TADA9000ES) controls the rate of digital audio signal
transmission from the player. To insure proper signal
transmission within the i.LINK configuration, only one
component can receive the digital audio signals output from a
source component.
Copyright
i.LINK components complying with copyright protection
incorporate digital data copy protection technology. One
such technology is the DTLA (The Digital Transmission
Licensing Administrator) recognized by the Copy
Protection Technical Working Group. It may not be
possible to make digital copies of copy restricted digital
data (video/audio/data) using i.LINK signals between
components that comply with the DTLA copy protection
technology. In addition, it may not be possible to transfer
digital data (video/audio/data) via i.LINK between
i.LINK components which comply with DTLA copy
protection and i.LINK components which do not.
• i.LINK is a designation referring to IEEE 1394-1995 and IEEE
1394a-2000. i.LINK and the i.LINK logo “TM” are trademarks of
Sony Corporation.
Connecting via DIGITAL (CD) OUT OPTICAL
connector
Use an optical digital cable for this connection. When connecting
the optical digital cable to the DIGITAL (CD) OUT OPTICAL
connector, take the cap off the connectors and push the cable
plugs in until they click into place.
Be careful not to bend or twist the optical cable.
Optical digital cable (not supplied)
Note
Only the audio signals of conventional CDs can be output from
the DIGITAL (CD) OUT connectors. Those of the Super Audio
CD cannot be output through DIGITAL (CD) OUT.
When the i.LINK indicator is lit
No signal is output from DIGITAL (CD) OUT OPTICAL
connector.
Connecting via DIGITAL (CD) OUT COAXIAL
connector
Use a coaxial digital cable to connect the audio components
equipped with coaxial digital input connectors.
Coaxial digital cable (not supplied)
Note
Only the audio signals of conventional CDs can be output from
the DIGITAL (CD) OUT connectors. Those of the Super Audio
CD cannot be output through DIGITAL (CD) OUT.
When the i.LINK indicator is lit
No signal is output from DIGITAL (CD) OUT COAXIAL
connector.
Connecting the AC power cord
Connect the supplied AC power cord to the AC IN terminal on
the player and to the mains.
Note
Install this system so that the power cord can be unplugged from
the wall socket immediately in the event of trouble.
US
8
Page 9
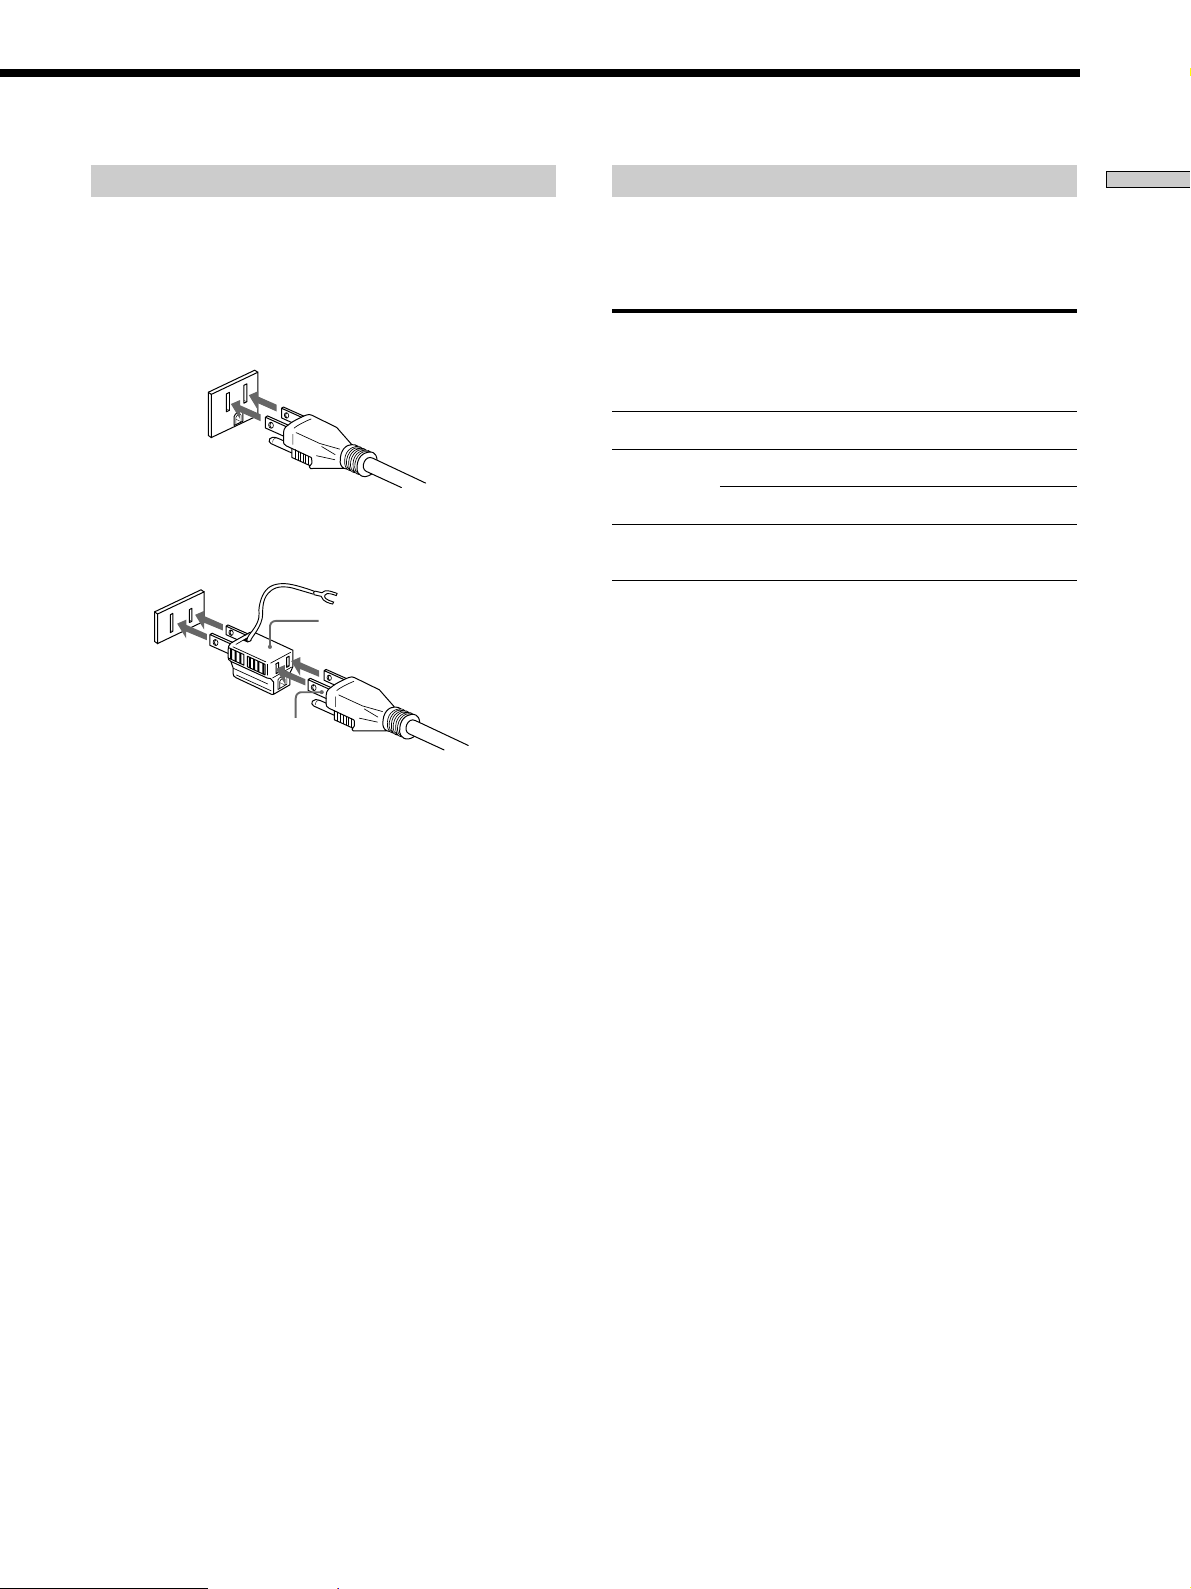
About the AC power cord
The supplied AC power cord has a 3-pronged grounded plug. If
you are using 3-pronged grounded mains, the plug can be
inserted directly into the mains. However, if the socket is a 2pronged grounded mains, use the supplied plug adapter (North
American model only) or a commercially available plug adapter.
3-pronged grounded mains
Note on the output jacks
This player is equipped with a Tri-Powered D/A Converter
System and a Multi Channel Management function. The usable
output settings differ depending on the mode you select as
follows. For details, refer to the Operating Instructions.
Source Multi 2CH 5.1CH
Channel OUT OUT jack
Manage- jacks jacks jacks
ment
CD Not available
Super Audio CD Direct
a*1aa*
a*1aa*
PHONES DIGITAL
(CD) OUT
1
1
a*
×
3
Getting Started
2-pronged polarized mains
• When the width of the mains are a different size
Use the supplied plug adapter (North American model
only).
3 to 2-prong polarized
plug adapter
N pole
• When the width of the mains are the same size
Use a commercially available plug adapter. In this case, you
can check the polarity of the mains with a commercially
available spark-testing screwdriver. It is the pronged ground
that does not light the neon grow lamp even if you insert the
spark-testing screwdriver into the mains. Insert the blades so
that the “N pole” can be inserted to the ground on the plug.
If noise (hum) is produced
Noise may be caused by an electric potential difference on the
ground circuit.* In this case, use the supplied plug adapter
(North American model only) and be careful not to connect the
ground lead to anything.
* Although the ground of the domestic mains is normally a
safety ground, a few electrical potential differences may be
produced, depending on the mains. Therefore, use of the
supplied 3-pronged mains lead may lessen the quality of the
audio signal or may produce humming noise.
(2 channel) 2ch + SW
Super Audio CD Available for
(Multi-channel) all playback modes
*1Output through the Tri-Powered D/A Converter.
*2The same signal that is output from the ANALOG 5.1CH OUT
FRONT L/R jacks is output.
*3Only when “D. OUTPUT” is set to “ON” (page 24).
aa a ×
a*2aa*
2
×
Note
Tri-Powered D/A Converter System works only for 2 channel
signals from 2 CH OUT jacks.
When the i.LINK indicator is lit
• No signal is output from all the other jacks (ANALOG 2CH
OUT jacks, ANALOG 5.1CH OUT jacks, PHONES jack,
DIGITAL (CD) OUT jacks).
• The Multi Channel Management function does not work.
z
When you want to listen to the sound through headphones
when the i.LINK indicator is lit
Connect the headphones to the PHONES jack on the amplifier,
not on this player.
US
9
Page 10

Location and
Functions of
Parts
This chapter tells you about the
location and functions of the various
buttons and controls on the front and
rear panels and the supplied remote.
Further details are provided on the
pages indicated in parentheses.
It also tells you about the information
that appears in the display window.
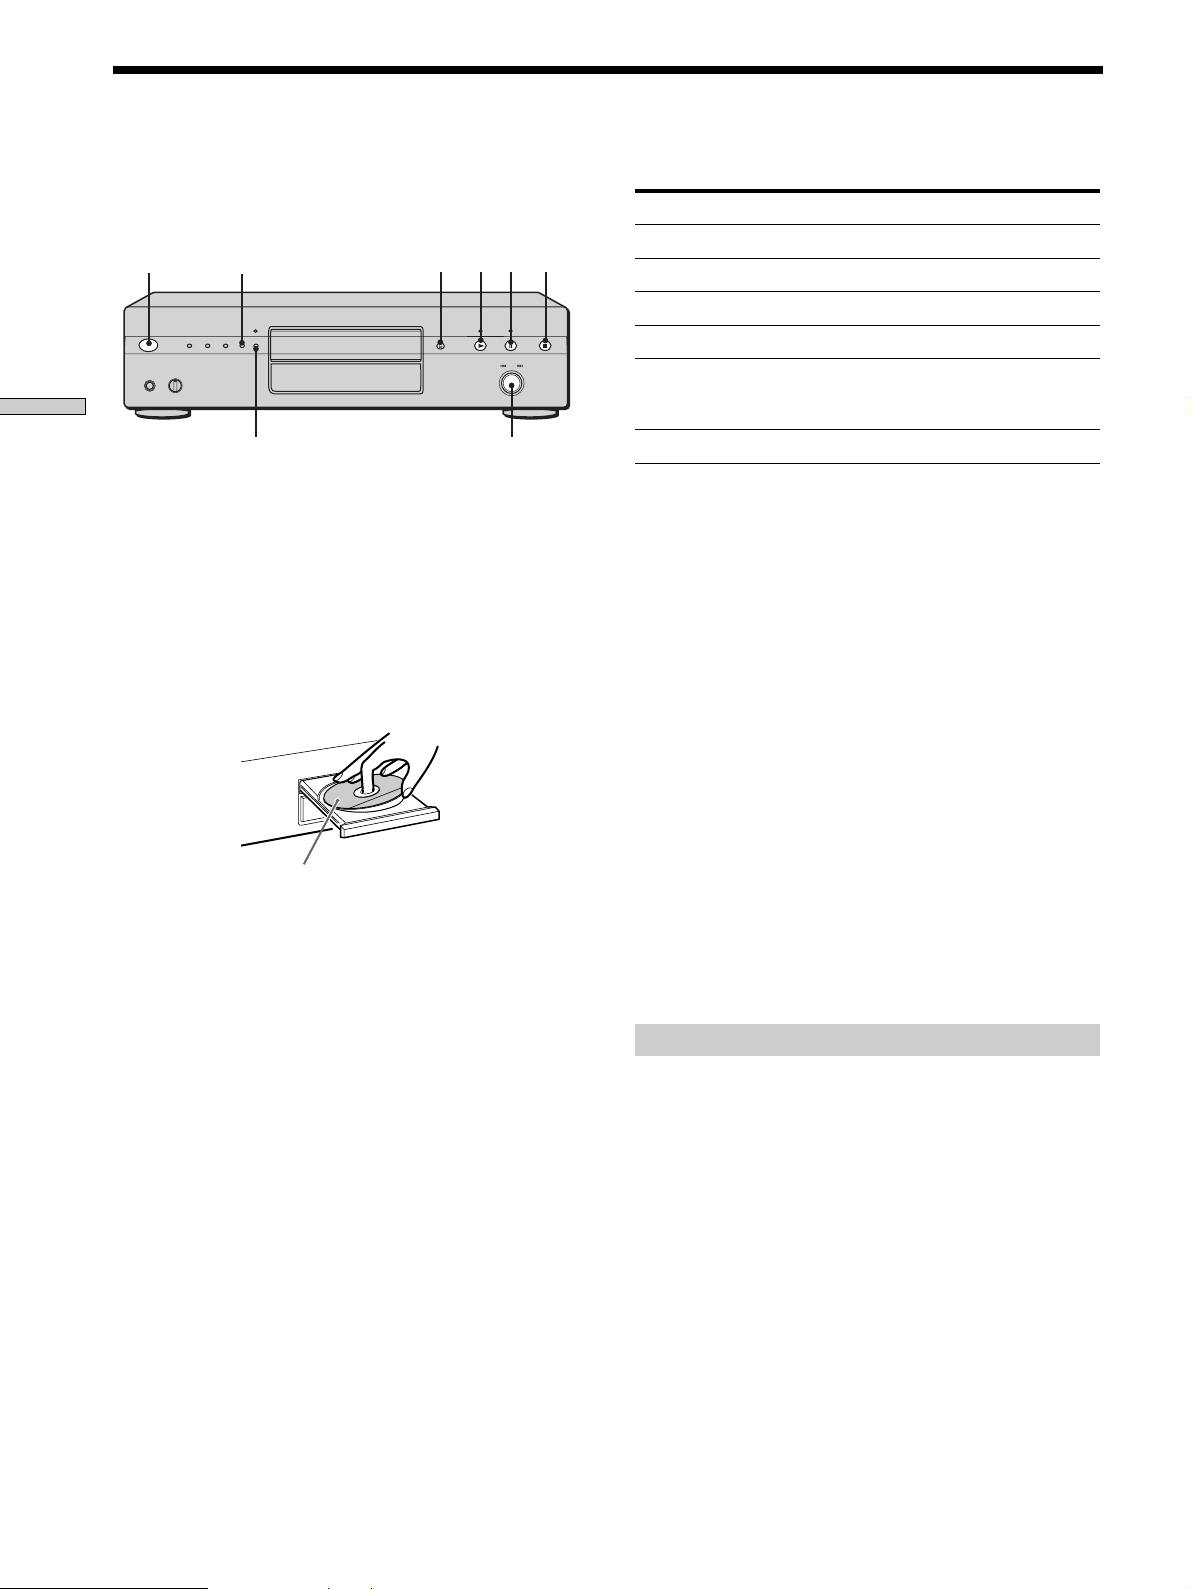
Front Panel Parts
Descriptions
1 POWER switch (16)
Press to turn on the player.
2 TIME/TEXT button (17)
Each time you press the button, the playing time of the
track, the total remaining time on the disc, or TEXT
information appears in the display.
3 SACD/CD button (16)
Each time you press the button while playing back a
hybrid disc, the layer to be played back switches
between the HD (Super Audio CD) layer and the CD
layer.
4 i.LINK button (16)
Each time you press the button, i.LINK function turns
on or off.
i.LINK indicator (16)
Lights up when the i.LINK function is used.
5 Disc tray (16)
Press A OPEN/CLOSE to open/close the disc tray.
10
US
Page 11

Location and Functions of Parts
POWER
PHONES
TIME/TEXT
PHONE LEVEL
MIN MAX
MENU
MULTI/2CH
SACD/CD
i.LINK
6 A OPEN/CLOSE button (16)
Press to open or close the disc tray.
7 N button (16)
Press to start play.
N indicator (16)
Lights up during playback.
8 X button (16)
Press to pause play.
X indicator (16)
Lights up during pause.
9 x button (16)
Press to stop play.
0 PHONES
Connect the headphones.
During playback of a Multi-channel Super Audio CD,
the same signal that is output from the ANALOG
5.1CH FRONT L/R jacks is output from the PHONES
jack.
AMS
PUSH
ENTER
qs MENU (15, 26–28)
Press to enter the menu.
Press to exit from the menu and return to the normal
display.
qd MULTI/2CH button (16)
Press to select the playback area when the 2 channel +
Multi-channel Super Audio CD (page 15) is loaded.
qf Remote sensor
qg Display window (17)
Shows various information.
qh . AMS > dial (AMS: Automatic Music Sensor)
(20)
When you turn the . AMS > dial
counterclockwise by one click, you go back to the
preceding track; when you turn the . AMS >
dial clockwise by one click, you go to the succeeding
track.
qa PHONE LEVEL
Adjust the headphones volume.
11
US
Page 12
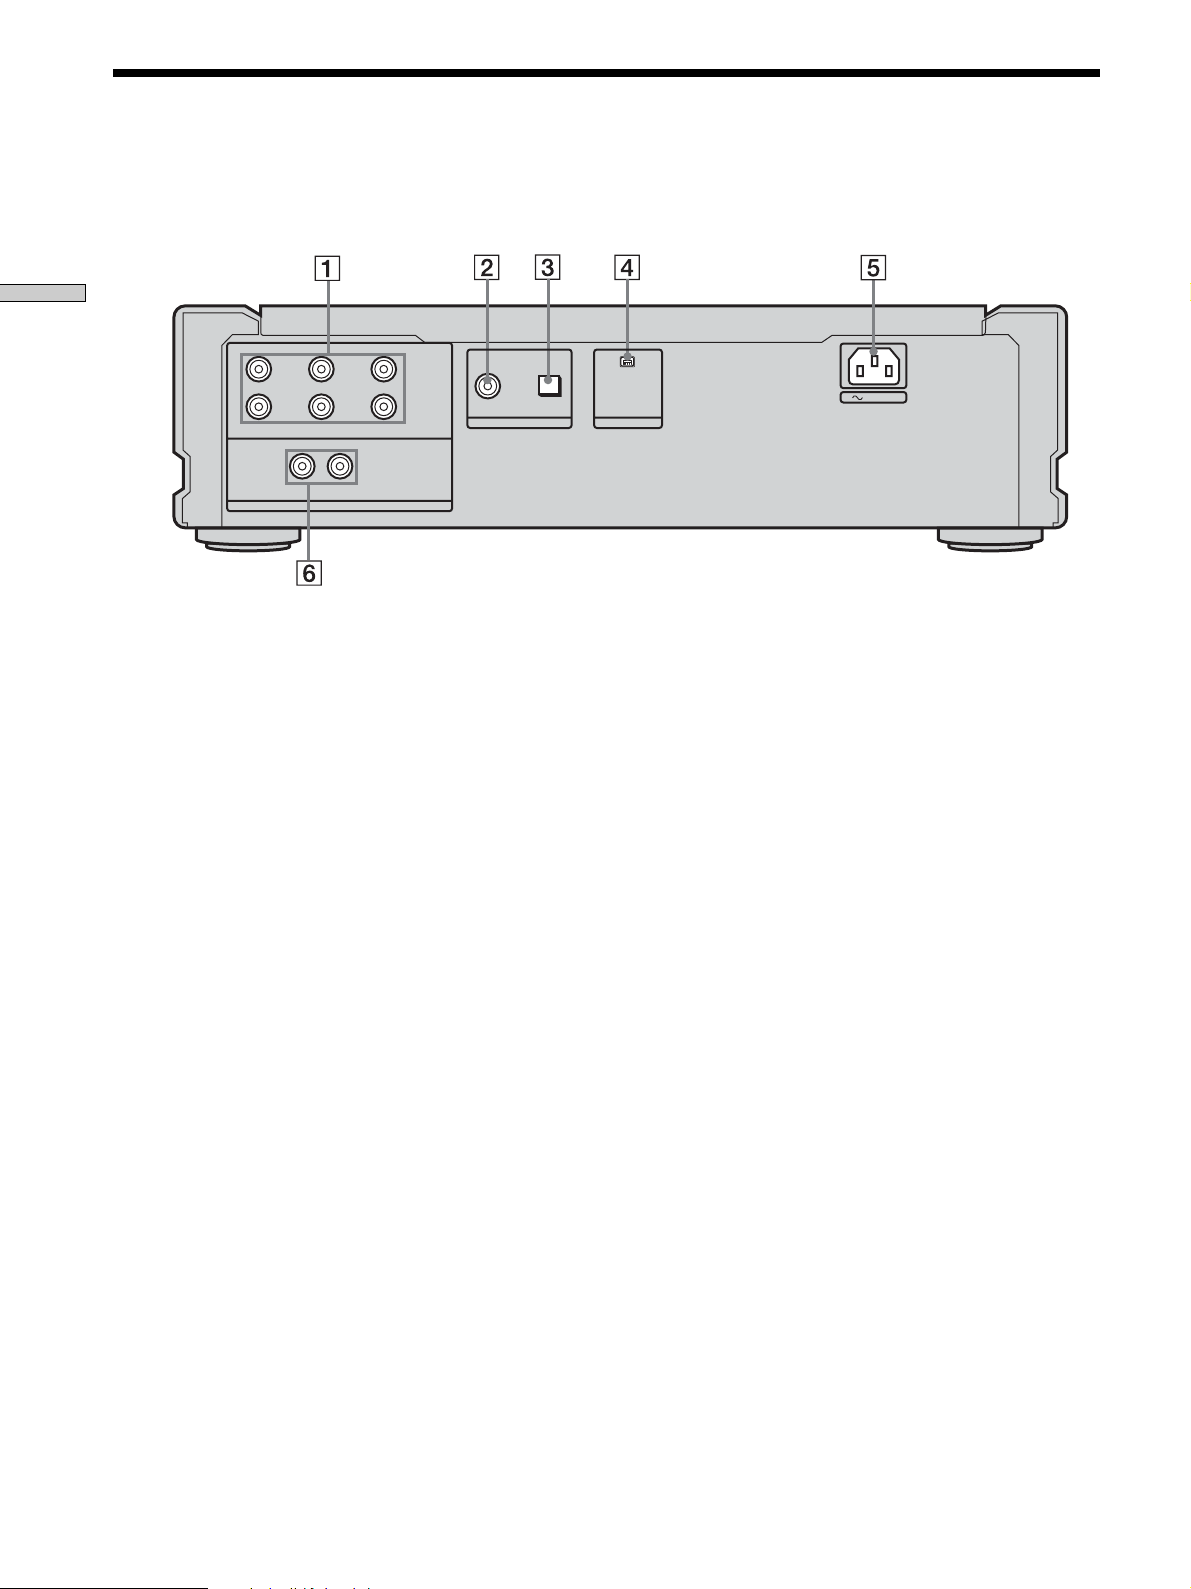
Rear Panel Parts Descriptions
Location and Functions of Parts
L
RR
L
FRONT SURROUND SUB WOOFER
ANALOG
CENTER
LR
5.1CH OUT
2CH OUT
OUT
DIGITAL(CD)
OPTICALCOAXIAL
AUDIO OUT
i.LINK S200
AC IN
1 ANALOG 5.1CH OUT jacks (5)
Connect to an amplifier equipped with the 5.1CH
input jacks (Multi-channel amplifier, AV amplifier,
etc.) using the audio connecting cords.
2 DIGITAL (CD) OUT COAXIAL connector (8)
Connect to an audio component using the coaxial
digital cable.
3 DIGITAL (CD) OUT OPTICAL connector (8)
Connect to an audio component using an optical
digital cable.
4 i.LINK S200 AUDIO OUT jack (7)
Connect to STR-DA9000ES/TA-DA9000ES using the
i.LINK connecting cord.
5 AC IN terminal (9)
Connect the AC power cord.
6 ANALOG 2CH OUT L/R jacks (6)
Connect to an audio component (stereo/2 channel)
using the audio connecting cord.
US
12
Note
Only the audio signals of the CD can be output from the
DIGITAL (CD) OUT connectors shown in 2 and 3. Those of the
Super Audio CD cannot be output through DIGITAL (CD) OUT
connectors.
When the i.LINK indicator is lit
No signal is output from all the other jacks (ANALOG 2CH OUT
jacks, ANALOG 5.1CH OUT jacks, PHONES jack, DIGITAL (CD)
OUT jacks).
Page 13
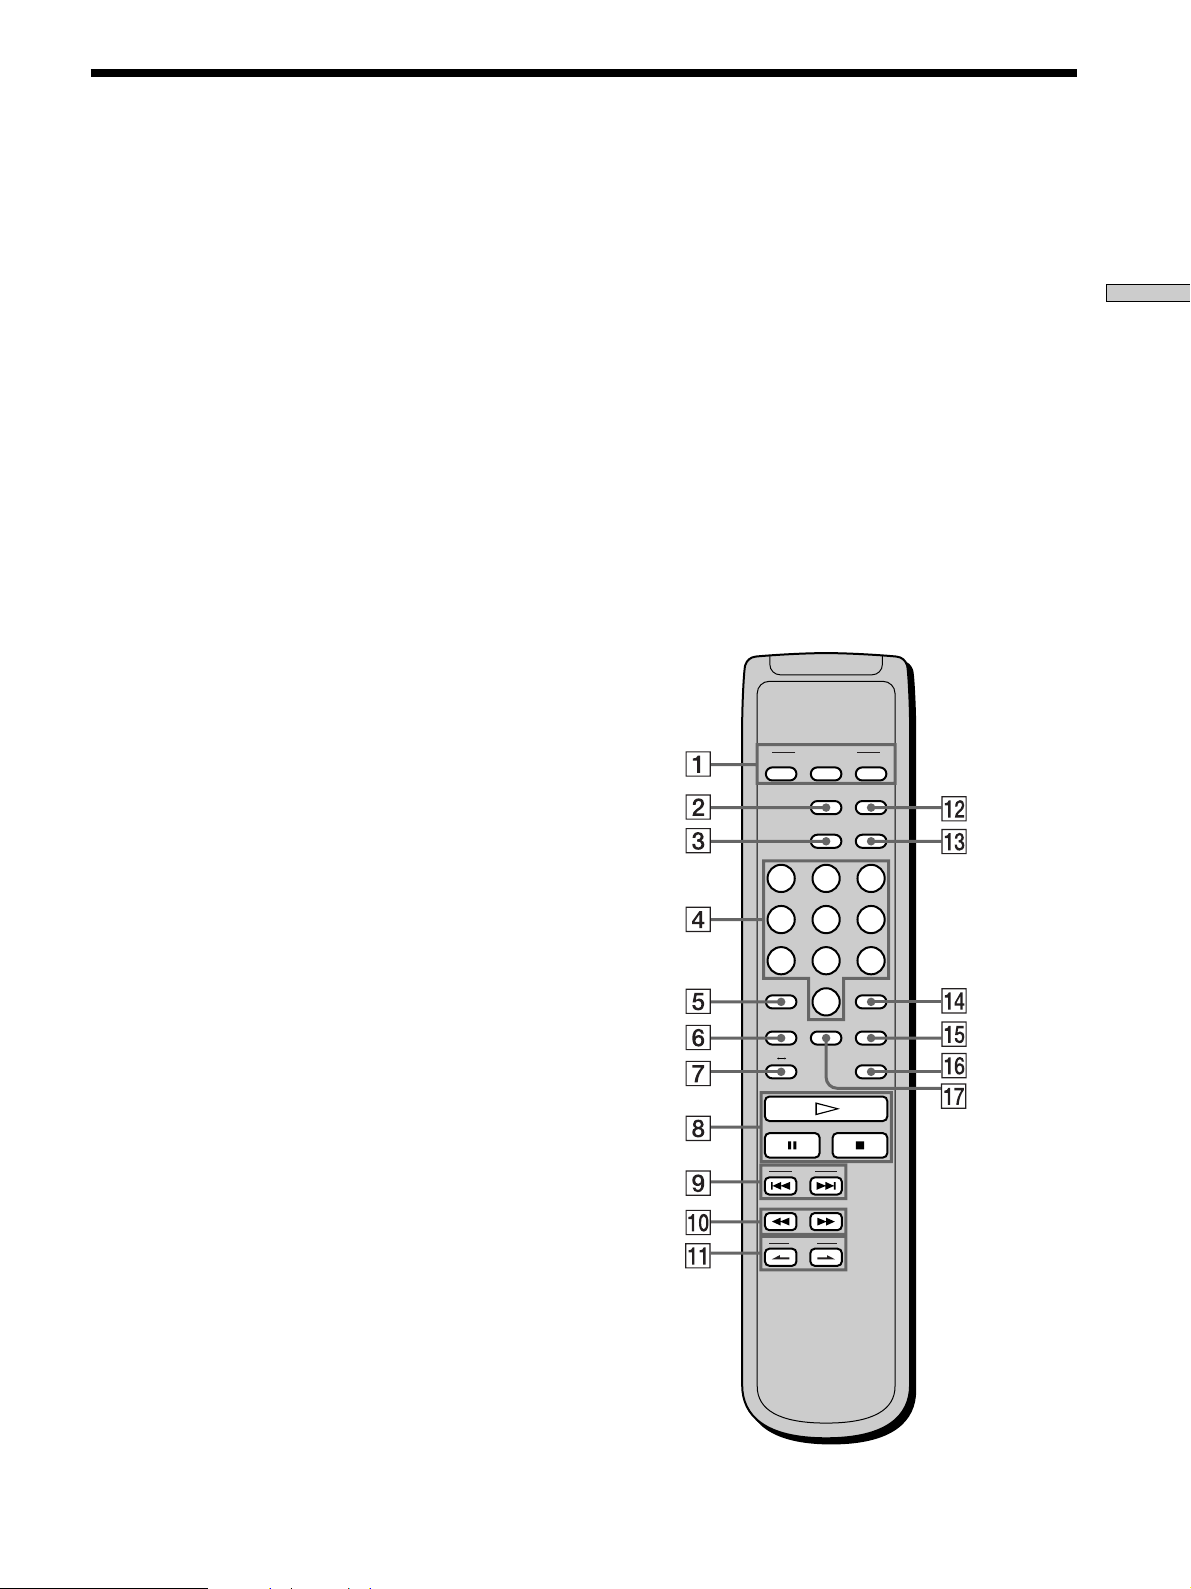
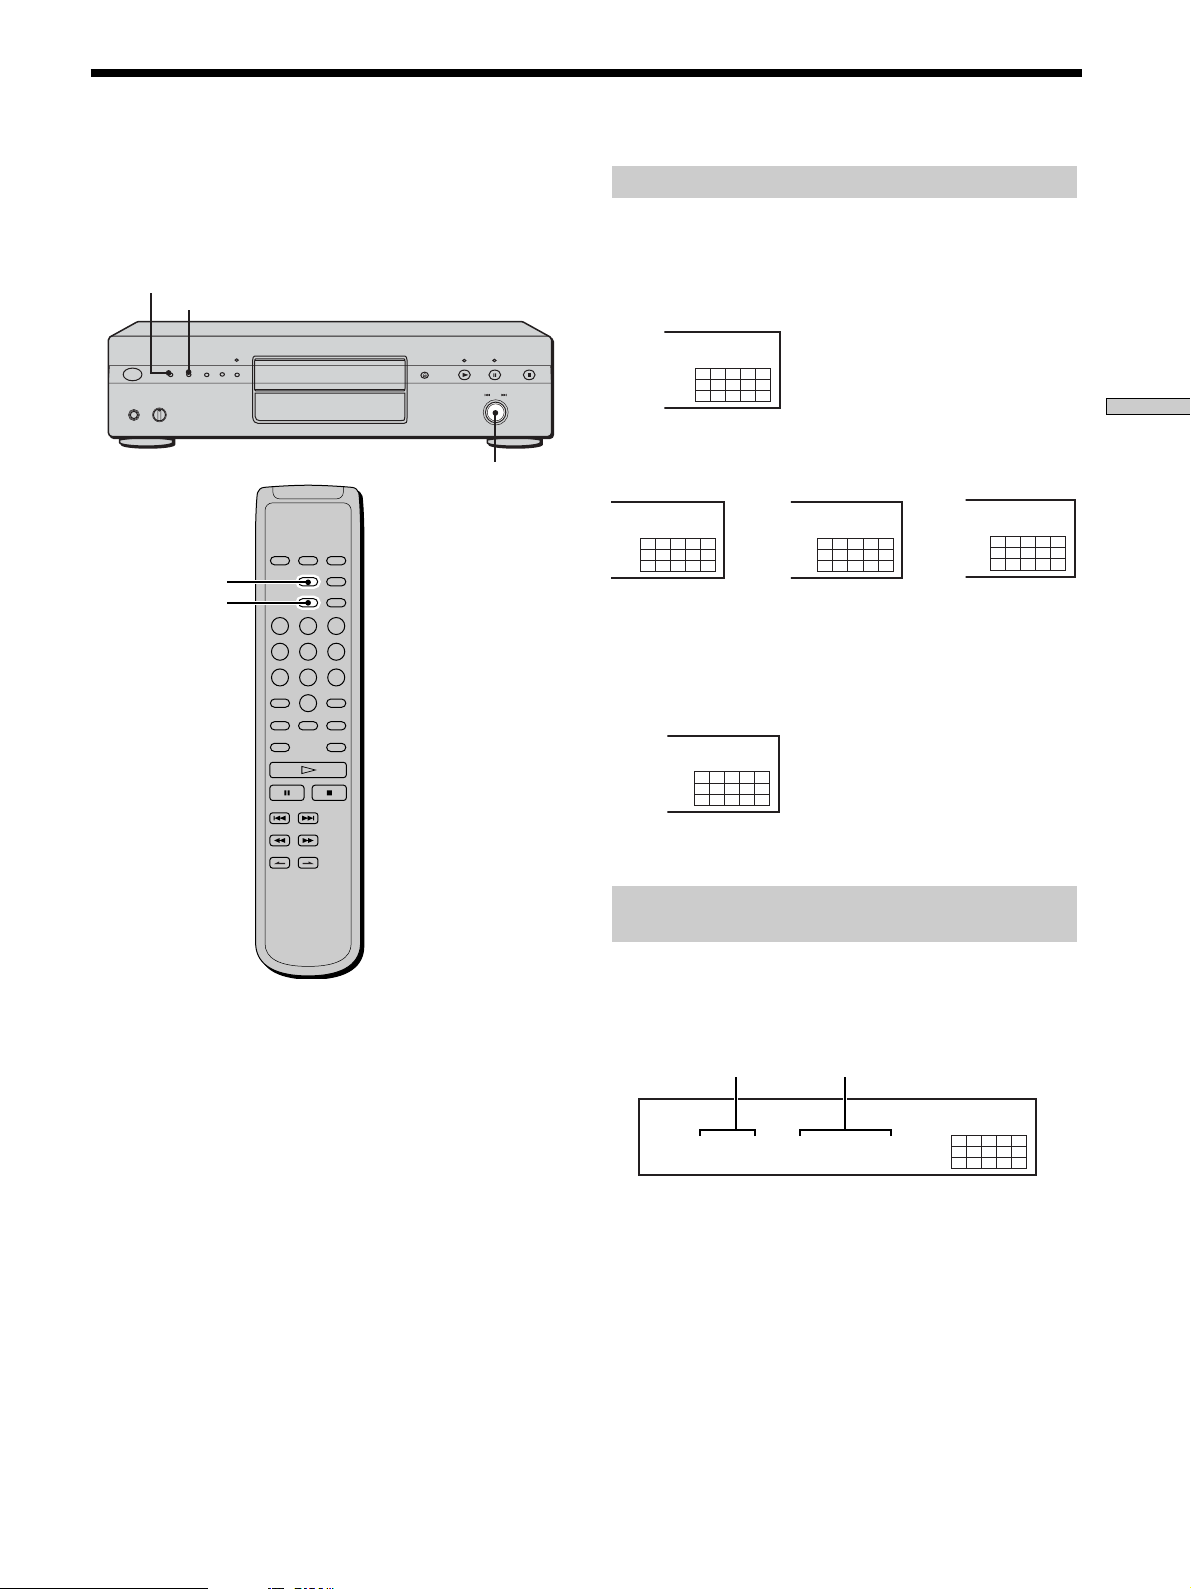
Remote Parts Descriptions
1 CONTINUE button (22)
Press to resume normal play from Shuffle Play or
Program Play.
SHUFFLE button (22)
Press to select Shuffle Play.
PROGRAM button (23)
Press to select Program Play.
2 DISPLAY MODE button (18)
Press to turn the display information off or on.
3 TIME/TEXT button (17)
Each time you press the button, the playing time of the
track, the total remaining time on the disc, or TEXT
information appears in the display.
4 Number buttons (20)
Press to enter the track numbers.
5
i
10 button (20)
Press to locate a track numbered over 10.
6 REPEAT button (21)
Press repeatedly to play all tracks or only one track on
the disc.
7 AyB button (22)
Press to select Repeat A-B Play.
8 H button (16)
Press to start play.
X button (16)
Press to pause play.
x button (16)
Press to stop play.
9 AMS ./> (AMS: Automatic Music Sensor)
buttons (20)
Press to locate a specific track.
0 m/M buttons (20)
Press to locate a portion you want to play within a
track.
qs SACD/CD button (16)
Each time you press the button, ”SACD“ or ”CD“
appears in the display. Select the type of CD you want
to play.
qd MULTI/2CH button (16)
Press to select the playback area when the 2 channel +
Multi-channel Super Audio CD (page 15) is loaded.
qf ENTER button (27)
Press to decide the selection.
qg CLEAR button (23)
Press to delete a programed track number.
qh LEVEL ADJ button (27)
Press to adjust the output level balance for the Multichannel management function (page 25).
qj CHECK button (23)
Press to check the programed order.
PLAY MODE
CONTINUE SHUFFLE
DISPLAY/
MODE
TIME/TEXT
PROGRAM
SACD/CD
MULTI/2CH
123
456
78
>10 ENTER
REPEAT
BA
10/0
CHECK
9
CLEAR
LEVEL
ADJ
Location and Functions of Parts
qa INDEX >/. buttons (20)
Press to locate a specific point marked with an index
signal when you play a disc that has index signals.
AMS
INDEX
13
US
Page 14

Playing Discs
Compatible Disc Types
This chapter explains the various
ways to play discs.
You can play the following discs with this player.
Depending on the type of disc to be played, select the
appropriate indicator by pressing SACD/CD or MULTI/
2CH (page 16).
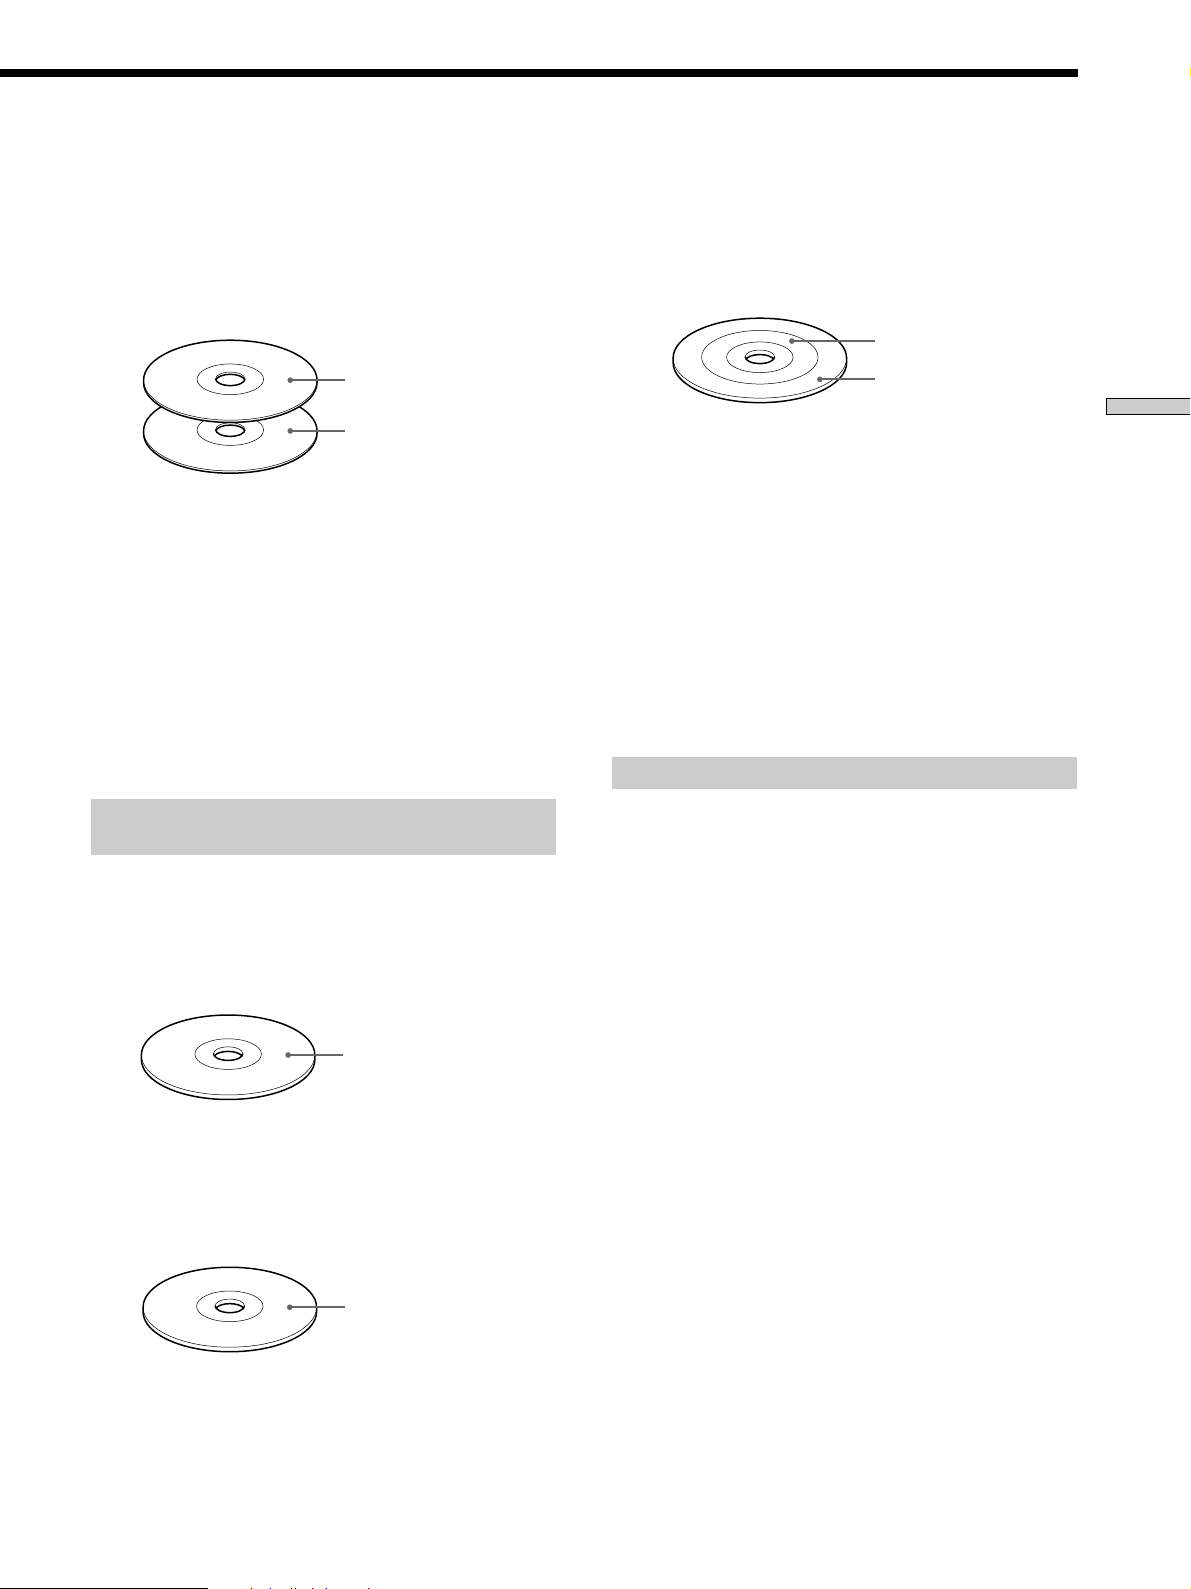
Classification by the layer configuration
Super Audio CD (single layer disc)
This disc consists of a single HD (high density) layer.
When you play this disc, the player is set to the Super
Audio CD playback mode automatically.
HD (Super Audio CD)
layer
Super Audio CD (dual layer disc)
This disc consists of dual HD layers and is capable of
extended play over long periods.
When you play this disc, the player is set to the Super
Audio CD playback mode automatically.
Also, as the dual layer disc consists of dual HD layers on
one side only, it is not necessary to turn the disc over.
HD (Super Audio CD)
layer
HD (Super Audio CD)
layer
Conventional CD
This disc is the standard format.
When you play this disc, the player is set to the
Conventional CD playback mode automatically.
CD layer
14
US
Page 15
Super Audio CD + CD (Hybrid disc)
This disc consists of an HD layer and a CD layer. Press
SACD/CD to select the layer you want to listen to. Also,
as the dual layers are on one side, it is not necessary to
turn the disc over. You can play the CD layer using a
conventional CD player.
2 channel + Multi-channel Super Audio CD
This disc consists of the 2 channel playback area and the
multi-channel playback area.
Press MULTI/2CH to select the playback area you want to
listen to.
2 channel playback area
CD layer
HD (Super Audio CD)
layer
Selecting the default playback layer (HD or CD)
1 During stop mode, press MENU.
2 Turn . AMS > until “SACD/CD SEL” appears in
the display.
3 Press . AMS >.
The current playback layer appears.
4 Turn . AMS > to select desired playback layer,
then press . AMS >.
Classification by the channel
configuration of the Super Audio CD
2 channel Super Audio CD
This disc consists of the 2 channel playback area.
When you play this disc, the player is set to the 2 channel
playback mode automatically.
Multi-channel playback
area
Playing Discs
Selecting the default playback area
(2 channel or multi-channel)
1 During stop mode, press MENU.
2 Turn . AMS > until “M/2CH SELECT” appears
in the display.
3 Press . AMS >.
The current playback area appears.
4 Turn . AMS > to select desired playback area,
then press . AMS >.
Incompatible Discs
This player cannot play the following discs. If you try to
play them, the error message “TOC Error” or “No Disc”
will appear or there will be no sound.
• CD-ROM
• DVD, etc.
2 channel playback area
Multi-channel Super Audio CD
This disc consists of the multi-channel playback area.
When you play this disc, the player is set to the multichannel playback mode automatically.
Multi-channel playback
area
15
US
Page 16
Playing a Disc
The operations for normal play and the basic operations
during play are explained below.
Playing Discs
1 Turn on the amplifier. Turn down the volume level
to the lowest.
2 Select the player position using the input selector
on the amplifier.
3 Press POWER to turn on the player.
4 Press A OPEN/CLOSE to open the disc tray, and
place a disc on the tray.
5 Press N.
Playback starts from the first track. If you want to start
playing from a specific track, turn . AMS > to
select the track number before pressing N.
SACD/CDPOWER
i.LINK
With the label side up
A OPEN/CLOSE
X
N
.AMS>
x
Basic operations during play
To Press
Stop play x
Pause play X
Resume play after pausing X or N
Locate a succeeding track Turn . AMS > clockwise
Locate the beginning of the Turn . AMS >
current track or a preceding counterclockwise
track
Eject the disc A OPEN/CLOSE
z
If you turn on the player when a disc is already loaded
Playback starts automatically. If you connect a commercially
available timer, you can set it to start playing the disc at any time
you want.
z
To select a layer you want to listen to when playing a hybrid
disc (page 15)
Press SACD/CD repeatedly to light either the “SACD” or “CD.”
z
To select a playback area you want to listen to when playing
a 2 channel + Multi-channel Super Audio CD (page 15)
Press MULTI/2CH repeatedly to light either the “MULTI CH” or
“2 CH.”
Notes
• During playback, increase the volume level gradually starting
from the lowest level. The output from this unit may contain
band width that are out of the normal listening range. This may
cause damage to the speakers or ears.
• When you change the playback area during the Program Play
mode, the program is cleared.
• When you change the playback area, the playback starts from
the beginning of the same track. However, the playback starts
from the first track depending on the disc.
6 Adjust the volume on the amplifier.
US
16
To use the i.LINK function
You can output the sound through i.LINK S200 AUDIO
OUT jack and enjoy the high quality sound. Refer to the
Operating Instructions supplied with the connected
component.
Press i.LINK to turn on the i.LINK indicator.
To turn off the i.LINK function and listen to the analog
sound, press i.LINK again to turn off the i.LINK indicator.
Note
If you press N while the connected component is not ready for
the i.LINK function (ex., while “i.LINK Connecting” appears in
the display of STR-DA9000ES/TA-DA9000ES), the sound at the
beginning of the track may be dropped out.
When the i.LINK indicator is lit
• No signal is output from all the other jacks (ANALOG 2CH
OUT jacks, ANALOG 5.1CH OUT jacks, PHONES jack,
DIGITAL (CD) OUT jacks).
• The “D. FILTER”, “D. OUTPUT”, “2CH SPK MODE”, “MCH
SPK MODE”, “LEVEL ADJUST” and “SPK DISTANCE” menu
operations are not available.
Page 17
Using the Display
CD
12345
678910
The display window shows various information about the
disc or track being played. This section describes the
current disc information and information that appears for
each play status.
TIME/TEXT
MENU
.AMS>
DISPLAY MODE
TIME/TEXT
Disc information when a disc is loaded
Depending on the disc that is currently loaded, the
display shows as follows:
2 channel Super Audio CD
2CH
SACD
12345
678910
Multi-channel Super Audio CD
MULTI 5.1CH
SACD
12345
678910
During playback
of a 5.1 channel
Super Audio CD
Conventional CD
or
MULTI 5 CH
SACD
12345
678910
During playback
of a 5 channel
Super Audio CD
or
During
playback of
other Super
Audio CDs or
during stop
mode
12345
678910
MULTI CH
SACD
Playing Discs
Displaying information while the player is
stopped
Press TIME/TEXT.
The display shows the total number of tracks and total
playing time.
Total number of tracks
TRACK MIN SEC
10 45.28
Total playing time
MULTI CH
SACD
12345
678910
17
US
Page 18

SONYHITS
SACD
MULTI CH
TEXT
DISC
12345
678910
10 45.28
SACD
MULTI CH
TEXT
TRACK MIN SEC
12345
678910
SONY BAND
SACD
ART.
MULTI CH
TEXT
12345
678910
Using the Display
Displaying information while the player is
playing
Press TIME/TEXT.
Each time you press the button, the current track number
and its elapsed time or remaining time appears, or the
total remaining time for the disc appears in the display.
When the player detects a Multi-channel Super Audio CD,
the channel information appears before the default
display appears.
Playing Discs
Playing track number and elapsed playing time of
the current track (default display)
Playing track number and remaining time of
the current track
TRACK INDEX MIN SEC
11 1.57
Press TIME/TEXT
TRACK MIN SEC
1 -1.56
Press TIME/TEXT
MULTI 5.1CH
SACD
12345
678910
MULTI 5.1CH
SACD
12345
678910
Displaying the information of a TEXT disc
TEXT discs contain information, such as the disc name or
artist name, as well as the audio signals. This player can
display the disc name, artist name, and current track
name as TEXT information.
When the player detects a TEXT disc, “TEXT” appears in
the display. If your TEXT disc has several languages,
“MULTI-TEXT” appears in the display. When you want to
check the information in another language, see
“Displaying the information of a TEXT disc in other
languages” on page 19.
Displaying the information of a TEXT disc
in stop mode
Press TIME/TEXT.
Each time you press the button, the disc name or artist
name appears in the display. When you select the artist
name, “ART.” appears in the display.
• Before you start playing
Disc title
Total remaining time on the disc
Channel information (appears only when the player
detects a Multi-channel Super Audio CD)
[MULTI] 5.1 CH
Turning off the information in the display
Z
Each time you press DISPLAY MODE on the remote while
playing a disc, the display turns off and on alternately.
Even when the display is turned off, the display turns on
if you pause or stop play. When you resume play, the
display turns off again.
Before you start playing, when you press DISPLAY
MODE to turn off the display, “Display Off” appears, and
when you press the button to turn on the display,
“Display On” appears.
-43.32
TRACK
MIN SEC
Press TIME/TEXT
MULTI 5.1CH
SACD
12345
678910
MULTI 5.1CH
SACD
12345
678910
Press TIME/TEXT
Artist name
Press TIME/TEXT
Total number of tracks and total playing time
Press
TIME/
TEXT
US
18
Page 19

Display information of a TEXT disc while
playing a disc
Displaying the information of a TEXT disc
in other languages
The current track name appears. If the disc name has
more than 15 characters, the first 14 characters will remain
after the name scrolls by in the display.
When the player detects a Multi-channel Super Audio
CD, the channel information appears before the playing
time of the current track appears.
• While playing a disc
Track title
TRACK
HITECHBLUES
Press TIME/TEXT
Channel information (appears only when the player
detects a Multi-channel Super Audio CD)
TRACK
[MULTI] 5.1 CH
Playing time of the current track
TRACK INDEX MIN SEC
111.56
Press TIME/TEXT
TEXT
TEXT
TEXT
MULTI 5.1CH
SACD
12345
678910
MULTI 5.1CH
SACD
12345
678910
MULTI 5.1CH
SACD
12345
678910
You can change the displayed language if the TEXT disc
has multi language capacity. When the player detects such
a TEXT disc, “MULTI-TEXT” appears in the display.
Change the language according to the procedures below.
1 Press MENU in stop mode.
2 Turn . AMS > until “LANGUAGE” appears in
the display.
3 Press . AMS >.
The current selected language (English, French,
German, etc.) flashes.
If the player cannot display the language used in a
TEXT disc, “Other lang” appears in the display.
4 Turn . AMS > until the desired language
appears in the display.
5 Press . AMS >.
After a few seconds, the information appears in the
selected language.
Playing Discs
Remaining time on the current track
MULTI 5.1CH
SACD
TRACK MIN SEC
1 -1.57
TEXT
12345
678910
Press TIME/TEXT
Remaining time on the disc
MULTI 5.1CH
SACD
MIN SEC
-43.32
TEXT
12345
678910
Press
TIME/
TEXT
Notes
• The display may not show all the characters, depending on the
disc.
• This player can display only the disc name, artist name, and
track names from TEXT discs. Other information cannot be
displayed.
19
US
Page 20

Locating a Specific Track
During stop or play mode, you can locate any track to be
played.
Locating a Particular Point
in a Track
You can locate a particular point in a track during play or
play pause.
Playing Discs
To locate
The next or
succeeding tracks
The current or
preceding tracks
A specific track directly
Locating a track directly by entering the
track number Z
.AMS>
Number
buttons
>10
./>
You need to
Turn . AMS > clockwise until
you find the track. When using the
remote, press > repeatedly until you
find the track.
Turn . AMS > counterclockwise
until you find the track. When using the
remote, press . repeatedly until you
find the track.
Turn . AMS > until you find the
track number you want. When using
the remote, press . or >
repeatedly until you find the track.
H
./>
m/M
.AMS>
INDEX
>/.
Locating a point while monitoring the
sound (Search) Z
Press and hold m/M during play.
You will hear intermittent playback as the disc goes
forward or reverses.
When you reach the desired point, release the button.
Locating a point by observing the time
indication (High-Speed Search) Z
Press and hold m/M during play pause.
You will not hear the playback sound.
z
When “Over!!” appears in the display
The disc has reached its end. Press . or m to go back.
Note
Tracks that are only a few seconds long may be too short for
monitoring. In this case, the player may not search correctly.
Press the number button(s) to enter the track number.
z
To enter a track number over 11 Z
1 Press >10.
2 Enter the corresponding digits.
To enter 0, press 10/0 instead.
Examples:
•To play track number 30, press >10, then 3 and 10/0.
•To play track number 100, press >10 twice, then 1, and 10/0
twice.
Note
The default display reappears if you press >10 twice when the
number of total tracks is less than 100.
US
20
Locating a point using the index function
(Index Search) Z
Press INDEX. or INDEX> repeatedly in play or
pause mode.
z
What is an INDEX?
Some Super Audio CD or CD are provided with an index
marking system which divides tracks or discs into smaller
segments. This is especially useful when you want to locate a
certain point within a long track (in classical music for example).
The index search function works only when you use a
commercially available indexed discs (usually indicated on the
label).
Page 21

Locating a point by setting the start time
(Time Search)
1 Press ./> (or turn . AMS >) to select the
desired track in stop mode.
2 Press and hold m/M to set the time to start play
while looking at the display.
You can set the time from the beginning of the desired
a track when you press M at first, and set the time
from the end of the desired track backward’s when
you press m at first.
Playing Tracks Repeatedly
Z
You can play an entire disc or portions thereof repeatedly.
This function can be used with Shuffle Play to repeat all
the tracks in random order (page 22), or with Program
Play to repeat all the tracks in a program (page 23). You
can also repeat a specific track or portion within a track.
Playing Discs
TRACK MIN SEC
5 2.57
3 Press H.
Play will start at the time search.
MULTI 5.1CH
SACD
12345
678910
REPEAT
AyB
H
x
Note
If you turn off the player or disconnect the mains lead, the player
will store the last setting of repeat play (“Repeat All” or “Repeat
1”) and recall it the next time you turn on the player. However,
the setting of the Repeat A-B Play will be cancelled if you turn off
the player or disconnect the mains lead.
Repeating all the tracks on the disc
(Repeat All Play)
Press REPEAT once, then press H.
“Repeat” appears in the display and Repeat All Play
starts.
The repeat play changes depending on the play mode you
select.
When the play mode is
Normal play (page 16)
Shuffle Play (page 22)
Program Play (page 23)
The player repeats
All the tracks in sequence
All the tracks in random order
All the tracks in the program in
sequence
To cancel Repeat All Play
Press REPEAT repeatedly until “REPEAT” goes off.
21
US
Page 22

Playing Tracks Repeatedly Z
Repeating the current track
(Repeat 1 Play)
While the track you want to repeat is being played,
press REPEAT repeatedly until “REPEAT 1” appears in
the display.
Repeat 1 Play starts.
To cancel Repeat 1 Play
Press REPEAT repeatedly until “REPEAT 1” goes off.
Playing Discs
Repeating a specific portion within a
track (Repeat A-B Play)
Playing Tracks in Random
Order (Shuffle Play) Z
When you select Shuffle Play, the player plays all the
tracks on the disc in random order.
CONTINUE
SHUFFLE
You can specify one portion within a track to be played
repeatedly. Note that the portion that you specify must be
within the boundaries of a single track.
1 While the player is playing, press AyB at the
starting point (point A) of the portion to be played
repeatedly.
“REPEAT” appears and “A” flashes in the display.
2 Continue playing the track (or press M) to locate
the ending point (point B), then press AyB.
“REPEAT A-B” appears and Repeat A-B Play starts.
To cancel Repeat A-B Play
Press REPEAT.
z
You can set a new starting point and ending point during
Repeat A-B Play
You can change the current ending point to a new starting point,
then specify a new ending point to repeat another portion right
after the current portion.
1 During Repeat A-B Play, press AyB.
The current ending point changes to the new starting point
(point A).
“REPEAT” lights up and “A” flashes in the display.
2 Locate the new ending point (point B) and press AyB.
“REPEAT A-B” lights up and the player starts to repeat the
newly specified portion.
When you want to restart from the starting point A, press H
during AyB repeat.
H
./>
1 Press SHUFFLE in stop mode.
2 Press H.
Shuffle Play starts.
“;” appears while the player is “shuffling” the tracks.
The player will stop after playing all the tracks once.
To resume normal play
Press CONTINUE.
z
You can locate tracks during Shuffle Play
Press ./>.
Press > to locate the next track or press . to locate the
beginning of the current track. The player does not go back to
tracks which have already been played.
Note
When you change the playback area (2 channel/multi channel) or
layer (CD/HD) of the Super Audio CD (page 15), Shuffle Play
setting is cleared.
22
US
Page 23

Creating Your Own
Program (Program Play) Z
You can pick out the tracks that you like and specify the
playback order in a program containing up to 32 tracks
(or 999 min. 59 sec. in total program time).
CONTINUE
Number
buttons
PROGRAM
Checking the contents of the program
Before you start playing or while the player is playing,
press CHECK.
Each time you press the button, the track numbers will
appear in the display in the programed order.
When you press CHECK while the player is playing, the
track number appears from the next track numbers of the
current playing track number.
Changing the contents of the program
Playing Discs
>10
CHECK
H
CLEAR
./>
1 Press PROGRAM in stop mode.
“Program” appears in the display.
2 Press the number buttons to enter the track
number.
If you entered the wrong track number
Press CLEAR to erase the track number and reenter
the correct track number using the number buttons.
To select a track number over 11
Press >10 (page 20).
You can change the contents of the program in stop mode.
To
Erase a track
Erase from the last
track in the program
Add a track to the
end of the program
Erase all tracks
Do the following:
1 Press CHECK repeatedly until the track
number you want to erase appears.
2 Press CLEAR.
Press CLEAR.
Each time you press the button, the last
track of the program is erased.
Press ./> to select the track you want
to add, then press PROGRAM. When using
the remote, press the number button of the
track to be added.
Hold down CLEAR or x (for about 2
seconds) until ”Prog CLEAR“ appears in
the display.
3 Repeat step 2 to enter other tracks.
Each time you enter a track number, the total
program time appears in the display.
4 Press H.
Program Play starts.
To resume normal play
Press CONTINUE.
z
The program remains even after Program Play ends
Press H to play from the beginning of the program again.
The program remains even if you stop play.
Note
If you turn off the player, disconnect the mains lead, press
A OPEN/CLOSE, or change the playback area (2 channel/
mulch channel) or layer (CD/HD) of the Super Audio CD (page
15), the program will be erased.
23
US
Page 24

Listening to a CD Using a
Setting the DIGITAL OUT on/
Filter (Digital Filter Function)
This player is equipped with a digital filter that eliminates
noise generated during sampling. By selecting type of
filters, you can adjust the sound quality.
You can select “STANDARD” or “OPTION.” (The default
setting is “ST ANDARD.”)
When the i.LINK indicator is lit
This function is not available.
Playing Discs
1 Press MENU.
2 Turn . AMS > until “D. FILTER” appears in the
display.
3 Press . AMS >.
4 Turn . AMS > until desired filter name
(“STANDARD” or “OPTION”) appears in the display.
5 Press . AMS >.
When you select “OPTION,” “FILTER” appears in the
display.
Characteristics of each digital filter
STANDARD
Provides a wide frequency range and spatial feeling.
OPTION
Provides smooth and powerful sound with clear image
position.
Notes
• Digital filters are effective only when you play a conventional
CD. You cannot select the digital filter when you play a Super
Audio CD.
• According to the disc or connected equipment, there may be no
noticeable effect after switching the filter.
MENU
.AMS>
off
You can set the digital out mode to on (the digital signals
can be output) or off (the digital signals cannot be output).
When you use the DIGITAL (CD) OUT COAXIAL or
DIGITAL (CD) OUT OPTICAL connecter, set the digital
mode to on (“D.OUT ON”). (The default setting is
”D.OUT ON.”)
When the i.LINK indicator is lit
This function is not available.
MENU
1 Press MENU.
2 Turn . AMS > until “D. OUTPUT” appears in
the display.
3 Press . AMS >.
4 Turn . AMS > until desired digital mode
(“D.OUT ON” or “D.OUT OFF”) appears in the
display.
5 Press . AMS >.
Note
When you play a Super Audio CD, this function does not work
and no signal is output from the DIGITAL (CD) OUT connectors.
.AMS>
24
US
Page 25

Listening to a Multichannel Super Audio CD
(Multi-channel management function)
This player is equipped with a Multi-channel
management function that sets the playback mode of the
Super Audio CD by the DSD-DSP (built into the player)
according to the layout or size of your speaker.
When the i.LINK indicator is lit
This function is not available.
Example of the speaker layout
Front speakers
L
Center speaker
Sub woofer
L
Surround speakers
To set the Multi-channel management:
1 Select the appropriate preset playback mode (2 channel
playback or Multi-channel playback).
2 Adjust the output level balance of each speaker (only
when you select the Multi-channel playback mode).
Notes
• This features only work when you play a Super Audio CD.
•You may not be able to adjust the output level balance
depending on the speaker layout mode that you selected.
MENU
R
R
.AMS>
Selecting 2 channel playback mode
1 Press MENU.
2 Turn . AMS > until “2CH SPK MODE” appears
in the display.
3 Press . AMS >.
The playback mode appears in the display.
Playback
Front speakers
Sub woofer
mode
2CH Direct
2CH + SW
Each signal outputs directly from front
speakers. No signal outputs from the Sub
woofer.
a
a
4 Turn . AMS > until desired mode appears in
the display.
5 Press . AMS >.
Note
You cannot operate this function when the player is in the CD or
Multi-channel playback mode. Operate this function when the
player is in the 2 channel Super Audio CD playback mode, the
disc tray is opened, or no discs are in the player.
Selecting Multi-channel playback mode
1 Press MENU.
2 Turn . AMS > until “MCH SPK MODE”
appears in the display.
3 Press . AMS >.
The playback mode appears in the display.
Playing Discs
./>
ENTER
LEVEL ADJ
Playback
mode
MCH Direct
5 – Large + SW
5 – Large
5 – Small + SW
FRT – Large +SW
FRT – Large
No – CNTR + SW
No – CNTR
Front
speakers
Each signal outputs directly from each
speaker.
Large
Large
Small
Large
Large
Large
Large
Center
speaker
Large
Large
Small
Small
Small
––
––
Surround
speakers
Large
Large
Small
Small
Small
Large
Large
Sub
woofer
a
––
a
a
––
a
––
25
US
Page 26

Listening to the Multi-channel Super Audio CD
About “Large” or “Small” speaker
A “Large” speaker is a speaker that can reproduce bass
frequencies plentifully. If you select “Small” for the
surround speakers, the bass frequencies will come
from the front speakers and/or sub woofer.
For normal use, select “MCH Direct” or set all the
speakers to “Large” (ex. “5 – Large + SW,” “5 – Large,”
etc.). If the sound is noisy or the Multi-channel
playback is not effective while playing a Multi-channel
Super Audio CD, change the settings of the speakers
Playing Discs
concerned to “Small.”
4 Turn . AMS > until desired mode appears in
the display.
5 Press . AMS >.
To return to the normal display, press MENU.
Notes
• The Multi-channel management function does not work when
you select “MCH Direct” (you cannot set the output level
balance of each speaker).
• The front speaker setting is set to “Large” automatically when
you set the Sub woofer to “––.”
• When you play a track that does not contain the LFE* signal,
the signal for the Sub woofer does not output. Therefore, when
you select “MCH Direct,” “5 – Large + SW,” or “No – CNTR +
SW,” no signal outputs from the Sub woofer. However, when
you select “5 – Small + SW” or “FRT – Large +SW” (when you
set the speaker setting to “Small”), the bass frequencies will
come from the sub woofer.
* Low Frequency Enhancement (described as “.1 CH”)
Adjusting the output level balance of
each speaker
You can adjust following items with the Multi-channel
management function:
CNTR BALANCE
The relative output level balance between the front
speakers (FRONT L/R) and the center speaker (CENTER)
SURR BALANCE
The relative output level balance between the front
speakers (FRONT L/R) and the surround speakers (SURR
L/R)
SW BALANCE
The relative output level balance between the front
speakers (FRONT L/R) and the sub woofer (SUB
WOOFER)
Note
Some adjustment may not work depending on the Multi-channel
playback mode that you selected.
Adjusting the output level balance on the front
panel of the player
You can adjust the output level balance of each speaker
while listening during playback. You can also adjust while
listening to the test tone during stop mode.
1 Press MENU.
2 Turn . AMS > until “LEVEL ADJUST” appears
in the display.
3 Press . AMS >.
During playback, go to Step 6.
4 Turn . AMS > until “TONE ON” appears in the
display.
5 Press . AMS >.
The test tone issues from the speakers in sequence
with the speaker type appearing in the display.
6 Turn . AMS > until the desired item appears
in the display.
Select the item from “CNTR BALANCE,” “SURR
BALANCE,” or “SW BALANCE.”
Note
When you set the Sub woofer to “––” in the Multi-channel
playback mode (page 25), “SW BALANCE” does not appear.
Similarly, “CNTR BALANCE” or “SURR BALANCE” does
not appear when you set the corresponding speaker to “––.”
26
US
Page 27

7 Press . AMS >.
The balance adjustment display appears.
In stop mode, the test tone is output from the selected
speaker.
Example: When you select “SURR BALANCE”
during stop mode, the test tone is output
from the front speakers and surround
speakers.
5 Press ENTER.
The balance adjustment display appears.
In stop mode, the test tone is output from the selected
speaker.
Example: When you select “SURR BALANCE”
during stop mode, the test tone is output
from the front speakers and surround
speakers.
MULTI CH
DISC
FRT:_____:SURR
SACD
12345
678910
8 Turn . AMS > to adjust the output level.
MULTI CH
DISC
FRT:_____:SURR
SACD
12345
678910
9 Press . AMS >.
The player status returns to Step 6.
Repeat Step 6 through 9 for more adjustments.
10
Press MENU after you finish adjusting.
The display returns to the normal display.
Adjusting the output level from the remote
Z
You can adjust the output level of each speaker from the
listening position by using the supplied remote.
1 Press LEVEL ADJ during playback or stop mode.
During playback, go to Step 4.
2 Press ./> repeatedly until “TONE ON”
appears in the display.
MULTI CH
DISC
FRT:_____:SURR
SACD
12345
678910
6 Press ./> repeatedly to adjust the output
level.
MULTI CH
DISC
FRT:_____:SURR
SACD
12345
678910
7 Press ENTER.
The player status returns to Step 4.
Repeat Step 4 through 7 for more adjustments.
8 Press LEVEL ADJ after you finish adjusting.
The display returns to the normal display.
Note
If you select a playback mode other than “2CH Direct” or “MCH
Direct” using the Multi-channel management function, the sound
distribution to the speakers will change, possibly causing a
decrease in overall sound volume. If this occurs, adjust the
volume with the volume control on the connected amplifier.
Playing Discs
3 Press ENTER.
The test tone issues from the speakers in sequence
with the speaker type appearing in the display.
4 Press ./> repeatedly until the desired item
appears in the display.
Select the item from “CNTR BALANCE,” “SURR
BALANCE,” or “SW BALANCE.”
Note
When you set the Sub woofer to “––” in the Multi-channel
playback mode (page 25), “SW BALANCE” does not appear.
Similarly, “CNTR BALANCE” or “SURR BALANCE” does
not appear when you set the corresponding speaker to “––.”
27
US
Page 28

Listening to the Multi-channel Super Audio CD
Adjusting the speaker distance
You can adjust the speaker distance when the connected
amplifier does not have the setting menu for speaker
distance. If the amplifier has this function, we recommend
that you set the speaker distance on the amplifier. This
setting is available only for the Multi-Channel Super
Audio CD.
Note
When you set the speaker distance on this player and the
Playing Discs
amplifier, both of the setting may work and you may not be able
to get the proper result.
FRT DIST.
The distance from your listening position to the front
speakers
You can adjust from 1.0 meter to 7.0 meters (3 to 23 feet) in
0.1 meter (1 foot) steps.
If both front speakers are not placed an equal distance
from your listening position, set the distance to the closest
speaker.
SURR DIST.
The distance from your listening position to the surround
speakers
You can adjust from 1.0 meter to 7.0 meters (3 to 23 feet) in
0.1 meter (1 foot) steps.
If both front speakers are not placed an equal distance
from your listening position, set the distance to the closest
speaker.
CNTR DIST.
The distance from your listening position to the center
speaker
You can adjust from 1.0 meter to 7.0 meters (3 to 23 feet) in
0.1 meter (1 foot) steps.
SUBW DIST.
The distance from your listening position to the sub
woofer
You can adjust from 1.0 meter to 7.0 meters (3 to 23 feet) in
0.1 meter (1 foot) steps.
1 Press MENU.
2 Turn . AMS > until “SPK DISTANCE” appears
in the display.
3 Press . AMS >.
4 Turn . AMS > until the desired item appears
in the display.
Select the item from “FRT DIST.,” “SURR DIST.,”
“CNTR DIST.,”or “SUBW DIST.”
Note
When you set the Sub woofer to “––” in the Multi-channel
playback mode (page 25), “SUBW DIST.” cannot be adjusted
(“Not In Use” appears). Similarly, “CNTR DIST.”cannot be
adjusted (“Not In Use” appears) when you set the
corresponding speaker to “––.”
5 Press . AMS >.
The speaker distance adjustment display appears.
Example: When you select “SURR DIST.” (with
“DIST. UNIT” set to “meter”).
MULTI CH
DISC
SURR 3.0meter
SACD
12345
678910
6 Turn . AMS > to adjust the speaker distance.
MULTI CH
DISC
SURR 2.5meter
SACD
12345
678910
7 Press . AMS >.
The player status returns to Step 4.
Repeat Step 4 through 7 for more adjustments.
8 Press MENU after you finish adjusting.
The display returns to the normal display.
Selecting the distance unit
In Step 4 above, select “DIST. UNIT”.
Turn . AMS > to select “meter” or “feet”, then press
. AMS >.
DIST. UNIT
The unit of measure for setting distances (meter or feet)
The initial setting is “feet” for the North American model
and “meter” for the European model.
Note
Speaker distance cannot be adjusted in the following cases.
– When the player is reading the disc information of CD (or the
CD area of Super Audio CD)
– When the player is reading the 2 channel area of Super Audio
CD
– When the i.LINK indicator is lit
US
28
Setting speaker distances back to the default
Set all speaker distances to 3 meters (10 feet).
Page 29

Additional
Precautions
Information
This chapter provides additional
information that will help you
understand and maintain your Super
Audio CD player.
On safety
• Caution — The use of optical instruments with this product
will increase eye hazard.
• Should any solid object or liquid fall into the cabinet, unplug
the player and have it checked by qualified personnel before
operating it any further.
• AC power cord must be changed only at the qualified service
shop.
• The unit is not disconnected from the AC power source
(mains) as long as it is connected to the wall outlet, even if the
unit itself has been turned off.
On power sources
• Before operating the player, check that the operating voltage of
the player is identical with your local power supply. The
operating voltage is indicated on the nameplate at the rear of
the player.
• The player is not disconnected from the mains as long as it is
attached to the mains, even if the player itself has been turned
off.
• If you are not going to use the player for a long time, be sure to
disconnect the player from the mains. To disconnect the mains
lead, grasp the plug itself; never pull the cord.
On placement
• Place the player in a location with adequate ventilation to
prevent heat build-up in the player.
• Do not place the player on a soft surface such as a rug that
might block the ventilation holes on the bottom.
• Do not place the player in a location near heat sources, or in a
place subject to direct sunlight, excessive dust or mechanical
shock.
Additional Information
On operation
• If the player is brought directly from a cold to a warm location,
or is placed in a very damp room, moisture may condense on
the lenses inside the player. Should this occur, the player may
not operate properly. In this case, remove the disc and leave
the player turned on for about an hour until the moisture
evaporates.
• During power on, some noise may be heard while the disc is
being loaded into the Super Audio CD player. This is not a
malfunction.
On adjusting the volume
• Do not turn up the volume too much while listening to a
portion with very low level inputs or no audio signals. If you
do, the speakers may be damaged when a peak level portion is
played.
29
US
Page 30

Precautions
Notes on Discs
On inserting a disc
• You may hear a transmission or a mechanical sound from the
player. This indicates that the player is automatically adjusting
its internal mechanisms according to the inserted disc.
You may also hear the mechanical sound from the player when
you insert a warped disc.
On cleaning
• Clean the cabinet, panel, and controls with a soft cloth slightly
moistened with a mild detergent solution. Do not use any type
of abrasive pad, scouring powder, or solvent such as alcohol or
benzine.
On transportation
• Be sure to remove the disc on the tray.
Additional Information
• Be sure to close the disc tray.
If you have any questions or problems concerning your
player, please consult your nearest Sony dealer.
On handling discs
• To keep the disc clean, handle the disc by its edge. Do not
touch the surface.
• Do not stick paper or tape on the disc.
• Use only round-shaped discs. If you use a special shaped disc
(e.g., star-shaped, heart-shaped, or square-shaped, etc.), the
player may be damaged.
• Do not use a disc with a seal attached on such as on a used disc
or rental disc.
On keeping discs
• Do not expose the disc to direct sunlight or heat sources such
as hot air ducts.
• After playing, store the disc in its case. If you put it on top of
another disc without the case , the disc may be damaged.
On placing discs on the disc tray
• Make sure the disc is positioned securely on the tray.
If not, the player or the disc may be damaged.
On cleaning
• If the disc is dirty with fingerprints or dust, it may lessen the
quality of the audio out.
• Before playing, clean the disc with a cleaning cloth. Wipe the
disc from the centre out.
• Clean the disc with a soft cloth slightly moistened with water,
and remove moisture with a dry cloth.
• Do not use solvents such as benzine, thinner, record cleaners,
or anti-static spray.
Notes on CD-R/CD-RW playback
• Discs recorded on CD-R/CD-RW drives may not be played
back because of scratches, dirt, recording condition, or the
drive’s characteristics. Besides, the discs, which are not yet
finalized at the end of recording, cannot be played back.
Music discs encoded with copyright protection technologies
This product is designed to playback discs that conform to the
Compact Disc (CD) standard.
Recently, various music discs encoded with copyright protection
technologies are marketed by some record companies. Please be
aware that among those discs, there are some that do not
conform to the CD standard and may not be playable by this
product.
30
US
Page 31

Troubleshooting
If you experience any of the following difficulties while
using the player, use this troubleshooting guide to help
you remedy the problem. Should any problem persist,
consult your nearest Sony dealer.
There is no sound from the i.LINK S200
AUDIO OUT jack.
Is the i.LINK component selected by the input selector
on the connected amplifier?
, Make sure the i.LINK component is selected by the
input selector on the connected amplifier. Refer
to the Operating Instructions supplied with the
amplifier.
Is the i.LINK function turned on?
, See page 16. Press i.LINK to output signals from
the i.LINK S200 AUDIO OUT jack. When the
i.LINK function is on, i.LINK indicator lights up.
Is the i.LINK cord connected correctly?
, Check the connection and connect the cord firmly.
Is the correct i.LINK cord used?
, Make sure you use the i.LINK cord compatible
with i.LINK S200 (less than 3.5 meters).
Is the connection to the i.LINK component verified?
, See page 7. Refer to the Operating Instructions
supplied with the component.
Are several i.LINK components connected?
, There may be no sound when several i.LINK
components are connected.
There is no sound when beginning the playback.
, According to the copy protection technology, no
sound is output while components are establishing
LINC.
There is no sound from the ANALOG OUT
jacks.
Is the i.LINK function turned on?
, When the i.LINK function is on, no sound is
output from the ANALOG OUT jacks. Press
i.LINK to turn off the i.LINK indicator.
Is the input selector on the amplifier correctly set?
, Set the input selector on the amplifier correctly to
output the sound from this player.
, Make sure this player is connected to the correct
input jacks on the amplifier.
Is the connecting cord connected correctly?
, Check the connection and connect the cord firmly.
There is no sound from the DIGITAL (CD)
OUT connectors.
Is the i.LINK function turned on?
, When the i.LINK function is on, no sound is
output from the DIGITAL (CD) OUT jacks. Press
i.LINK to turn off the i.LINK indicator.
Is a Super Audio CD played back?
, The audio signals of the Super Audio CD cannot
be output from the DIGITAL (CD) OUT
connectors.
Is “D. OUTPUT” in the menu set to “Off”?
, Set “D. OUTPUT” to “On” (see page 24).
There is no sound from the SUB WOOFER
jack.
Do you select a playback mode which has subwoofer
output?
, Select the playback mode so that the Sub woofer is
set to “a” (see page 25).
Do you play a disc which contains the LFE signal?
, When you play a track that does not contain the
LFE signal, the signal outputs from the SUB
WOOFER jack only when you select “5 – Small +
SW” or “FRT – Large + SW” for the Multi-channel
playback mode (see page 25).
There is no sound from the headphones.
Is the i.LINK function turned on?
, When the i.LINK function is on, no sound is
output from the PHONES jack. Use the
headphones output on your amplifier.
The disc does not play.
Is a correct disc inserted?
, Make sure there is a disc inside the player.
, Make sure the disc is not placed upside down on
the tray. Place the disc on the disc tray with the
label side up.
, If the disc is placed at an angle, reload the disc.
, If the disc is dirty, clean the disc (see page 30).
, Make sure the disc is compatible with this player
(see page 15).
Moisture has condensed inside the player.
, Remove the disc and leave the player turned on for
about an hour.
The remote does not function.
Are there any obstacles in the path of the remote and
the player?
, Use the remote from the location you can see this
player.
The remote is not pointed at the remote sensor on the
player.
,
Point the remote at the remote sensor on the player.
Are the batteries in the remote weak?
, Replace with new batteries.
31
Additional Information
US
Page 32

Display Messages
Specifications
The following table explains the various messages that
appear in the display.
Message Error code(s) Cause and/or remedy
TOC ERROR — An incompatible disc is inserted.
BUS FULL C78:15 The signal bus within the i.LINK
Additional Information
configuration is full and no more
signals can be output from the
player. Cancel the LINC between
the component and this player.
When a super audio CD is played
Playing frequency range 2 Hz to 100 kHz
Frequency response 2 Hz to 50 kHz (–3 dB)
Dynamic range 108 dB or more
Total harmonic distortion rate
0.0012 % or less
Wow and flutter Value of measurable limit (±0.001 %
W. PEAK) or less
When a CD is played
Frequency response 2 Hz to 20 kHz
Dynamic range 100 dB or more
Total harmonic distortion rate
0.0017 % or less
Wow and flutter Value of measurable limit (±0.001 %
W. PEAK) or less
Output connector
Load impedance
Over 10 kilohms
Light emitting
wave length:
( )
660 nm
75 ohms
32 ohms
ANALOG OUT
DIGITAL (CD)
OUT
OPTICAL*
DIGITAL (CD)
OUT
COAXIAL*
PHONES
Jack type
Phono
jacks
Square
optical
output
connector
Coaxial
output
connector
Stereo
phone jack
Output level
2 Vrms
(at 50 kilohms)
–18 dBm
0.5 Vp-p
10 mW
32
*Output only the audio signals of the CD
i.LINK section
Pin 4 pins
Transmission speed S200
(Maximum data transmission speed
200 Mbps)
Transmission protocol A/M transmission protocol
Format (output) Super Audio CD* (DSD PLAIN)
2 channel linear PCM (IEC 60958-3)
Sampling frequency: 44.1 kHz
* Conforms to the copy protection technology of DTLA (Revision
1.2).
US
Page 33

General
Laser Semiconductor laser
(SA-CD: λ = 650 nm)
(CD: λ = 780 nm)
Emission duration: continuous
Laser radiant power: 5.47 uW at 650 nm
*These output is the value measured at a distance of about
200mm from the objective lens surface on the optical pick-up.
Power requirements North American model:
120 V AC, 60 Hz
Other models:
230 V AC, 50/60 Hz
Power consumption 32 W
Dimensions (w/h/d) 430 × 127 × 387 mm
(17 × 5 × 15 1/4 in.)
incl. projecting parts
Mass (approx.) 16.2 kg (35 lbs 12 oz.)
Supplied accessories
See page 4.
Design and specifications are subject to change without notice.
Additional Information
33
US
Page 34

Index
A
Accessories 4
Amplifier (not supplied) 5
AMS (Automatic Music Sensor) 20
ANALOG OUT
2CH 6
5.1CH 5
Area 15
B
Batteries 4
C
Additional Information
Cable
Coaxial digital 8
Optical digital 8
Cord
Audio connecting 5
i.LINK connecting 7
D, E, F, G
DIGITAL (CD) OUT 8
Digital filter 24
Displaying information 17
M, N
Multi-channel management function 25
Multi-channel Super Audio CD 15
O
Output level balance 26
P, Q
Pause play 16
Place a disc 16
Playback mode
2 channel 25
Multi-channel 25
Playing
a disc 16
by entering the track number 20
Multi-channel Super Audio CD 25
repeatedly 21
track in random order 22
Plug adapter 9
Program Play
Checking the contents of the program 23
Changing the contents of the program 23
how to create your own program 23
H
Hooking Up
Audio Components 5
Power 7
I, J, K
i.LINK 7, 16
L
Layer 14
Locating
a specific track 20
a particular point 20
by entering the track number 20
by observing the time indication (High-speed Search)
20
using the index function (Index Search) 20
while monitoring the sound (Search) 20
R
Remote commander (remote) 13
Repeat
A-B Play 22
All Play 21
1 Play 22
S
Search
High-speed search 20
Index search 20
Time Search 21
Shuffle Play 22
Speaker distance 28
Super Audio CD 14
T, U, V, W, X, Y, Z
TEXT 18
TOC 15
34
US
Page 35

Page 36

AVERTISSEMENT
Bienvenue!
Afin de réduire les risques
d’incendie ou de choc
électrique, n’exposez pas
cet appareil à la pluie ni à
l’humidité.
Pour prévenir tout risque d’incendie,
n’obturez pas les orifices de la ventilation
de l’appareil avec des journaux, une nappe,
des rideaux, etc. Ne placez pas de bougies
allumées sur l’appareil.
Pour prévenir tout risque d’incendie ou
d’électrocution, ne posez aucun objet
rempli de liquide, comme un vase, sur
l’appareil.
Cet appareil doit être raccordé à une prise
secteur raccordée à la terre.
Cet appareil entre
dans la catégorie
des produits
LASER DE
CLASSE 1.
L’etiquette
indiquant
l’appartenance de
ce lecteur a la
CLASSE 1 est
apposée à l’arrière
du boîtier.
A l’attention de la clientéle canadienne
Cet appareil numérique de la classe B est
conforme à la norme NMB-003 du Canada.
ATTENTION
POUR EVTER LES CHOCS
ELECTRIQUES, INTRODUIRE LA LAME
LA PLUS LARGE DE LA FICHE DANS LA
BORNE CORRESPONDANTE DE LA
PRISE ET POUSSER JUSQU’AU FOND.
Ne pas jeter les piles avec
les ordures ménagères.
Suivre la procédure locale
d’élimination des déchets
chimiques.
Nous vous remercions d’avoir fait
l’acquisition d’un lecteur Super Audio CD
Sony. Avant de faire fonctionner cet
appareil, lisez attentivement le présent
mode d’emploi et conservez-le pour toute
référence ultérieure.
A propos de ce mode
d’emploi
Les instructions contenues dans ce manuel
concernent les appareils SCD-XA9000ES.
Conventions
• Les instructions présentées dans ce
mode d’emploi se réfèrent aux
commandes situées sur le lecteur.
Vous pouvez également utiliser les
commandes de la télécommande si elles
portent le même nom que celles du
lecteur.
• Les icônes suivantes sont utilisées dans
ce mode d’emploi:
Indique que vous pouvez
Z
effectuer cette opération avec la
télécommande.
Indique une astuce ou un
z
conseil qui simplifie l’opération.
FR
2
Page 37

Caractéristiques
TABLE DES MATIÈRES
A propos du Super Audio CD
• Le Super Audio CD représente la nouvelle génération
de disques audio de qualité supérieure, dont le format
d’enregistrement est le DSD (Direct Stream Digital) (les
CD classiques utilisent le format PCM). Le format DSD,
qui utilise une fréquence d’échantillonnage 64 fois
supérieure à celle d’un CD classique et la quantification
1 bit, bénéficie d’une bande de fréquences et d’une
plage dynamique sur la fréquence audible plus larges,
ce qui lui permet de reproduire la musique avec une
extrême fidélité par rapport au son original.
• Le Super Audio CD se présente soit sous la forme d’un
disque stéréo bi-canal, soit sous la forme d’un disque
multicanal pouvant contenir jusqu’à 6 canaux
indépendants. Le Super Audio CD propose, grâce à sa
caractéristique multicanal, un système de répartition
des enceintes globalement similaire au canal 5.1 du
système audio et vidéo actuel.
Caractéristiques du lecteur
Ce lecteur est conçu pour lire les Super Audio CD
bi-canaux et multicanaux ainsi que les CD classiques et
offre les caractéristiques suivantes :
• Mécanique à double optique capable de lire un Super
Audio CD ou un CD classique, sur chaque longueur
d’onde exclusive.
• Capacité d’accès plus rapide aux plages grâce à un
servomécanisme de pointe.
• Fonction de gestion multicanal permettant de régler
l’environnement de lecture des différents canaux, en
fonction de la répartition et de la taille de vos enceintes.
• Convertisseur N/A Super Audio et système sync
numérique direct, qui offre une reproduction du son de
meilleure qualité.
• Système de transmission numérique i.LINK qui offre un
son de meilleure qualité et, au lieu de vous obliger à
utiliser des cordons à six broches, vous permet
d’effectuer des branchements avec un seul cordon
i.LINK.
• Ce lecteur est conforme à la technologie de protection
contre la copie DTLA (version 1.2).
Divers
• Un Super Audio CD peut comporter jusqu’à
255 numéros de plages/index. Cette fonctionnalité
s’applique au modèle SCD-XA9000ES.
• La télécommande fournie est capable de commander le
SCD-XA9000ES et un lecteur classique Sony.
Préparation 4
Avant d’entamer les raccordements 4
Raccordement de composants audio 5
Emplacement et fonctions des
composants 10
Descriptions des composants du panneau
frontal 10
Description des composants du panneau arrière 12
Description des composants de la
télécommande 13
Lecture de disques 14
Types de disques compatibles 14
Lecture d’un disque 16
Utilisation de la fenêtre d’affichage 17
Localisation d’une plage spécifique 20
Localisation d’un passage déterminé sur une
plage 20
Lecture de plages répétée 21
Lecture de plages dans un ordre quelconque (lecture
aléatoire) 22
Création de votre propre programme musical
(lecture programmée) 23
Ecoute d’un CD à l’aide d’un filtre (fonction de filtre
numérique) 24
Activation/désactivation de DIGITAL OUT 24
Lecture d’un Super Audio CD multicanal (fonction
de gestion multicanal) 25
Informations complémentaires 29
Précautions 29
Remarques sur les disques 30
Dépannage 31
Messages affichés 32
Spécifications 32
Index Couverture dos
FR
FR
3
Page 38

Préparation
Avant d’entamer les
raccordements
Ce chapitre présente des informations
sur les accessoires fournis ainsi que
sur le raccordement de différents
composants audio au lecteur Super
Audio CD. Lisez attentivement ce
chapitre avant de raccorder quoi que
ce soit au lecteur.
Vérification des accessoires fournis
Ce lecteur est fourni avec les éléments suivants :
• Câble de connexion audio
prise phono × 2 (rouge et blanc) y prise phono × 2
(rouge et blanc) (3)
prise phono × 1 (noir) y prise phono × 1 (noir) (2)
• Câble de raccordement i.LINK (1)
• Télécommande RM-SX700 (1)
• Piles R6 (taille AA) (2)
• Cordon d’alimentation secteur (1)
• Adapteur (1) (modèle destiné à l’Amérique du Nord
uniquement)
Installation des piles dans la
télécommande
Introduisez deux piles AA (R6) dans le compartiment à
piles en faisant correspondre les pôles + et – comme
illustré dans le schéma suivant. Lorsque vous utilisez la
télécommande, dirigez-la vers le capteur de
télécommande
du lecteur.
z
Quand faut-il remplacer les piles
Dans des conditions d’utilisation normales, les piles offrent une
autonomie de fonctionnement d’environ six mois. Lorsque la
télécommande n’agit plus sur le lecteur, remplacez les piles.
Remarques
• Ne laissez pas la télécommande à un endroit extrêmement
chaud ou humide.
•Veillez à ce qu’aucun corps étranger ne pénètre à l’intérieur du
boîtier de la télécommande, en particulier lorsque vous
remplacez les piles.
• N’utilisez pas une pile usagée et une pile neuve en même
temps.
• N’exposez pas le capteur de télécommande au rayonnement
direct du soleil ou à des luminaires. Vous risquez sinon de
provoquer un dysfonctionnement.
• Si vous prévoyez de ne pas utiliser la télécommande pendant
une période prolongée, retirez-en les piles afin d’éviter tout
dommage causé par une fuite des piles et la corrosion
subséquente.
FR
4
Page 39

Raccordement de composants audio
Raccordez le lecteur Super Audio CD à un composant
audio. Veillez à mettre tous les composants hors tension
avant de procéder aux connexions et raccordez-les
fermement de manière à éviter les bruits de souffle.
Si vous disposez d’un amplificateur équipé de prises
d’entrée 5.1CH (amplificateur multicanal, amplificateur
audio et vidéo...), raccordez le lecteur à l’amplificateur via
les prises ANALOG 5.1CH OUT pour pouvoir écouter
votre Super Audio CD multicanal et apprécier la lecture
sur plusieurs canaux.
Pour une lecture simple, raccordez le lecteur à
l’amplificateur via les prises ANALOG 2CH OUT.
Raccordement via les prises ANALOG
5.1CH OUT
Utilisez les câbles de connexion audio. Raccordez les prises
ANALOG 5.1CH OUT (FRONT L/R, SURR L/R, CENTER, SUB
WOOFER) aux prises correspondantes de votre amplificateur.
Pour le raccordement sur FRONT ou SURR, utilisez les câbles de
connexion (prise rouge et prise blanche) en vérifiant la
concordance de couleur entre la broche et la prise : le blanc
(gauche) sur le blanc et le rouge (droite) sur le rouge. Pour le
raccordement sur CENTER et SUB WOOFER, utilisez les câbles
de connexion (noir).
Raccordement sur CENTER ou SUB WOOFER
Câbles de connexion audio (noir) (fournis)
noir
noir
Remarques
• Même pour les raccordements multicanaux, veillez à raccorder
également les prises ANALOG 2CH OUT en utilisant un autre
câble de raccordement audio de façon à pouvoir lire des CD
(ou des SACD) après avoir réglé le sélecteur d’entrée de votre
amplificateur sur l’entrée CD (ou SACD).
• Lors de la lecture d’un CD classique ou d’un Super Audio CD à
deux canaux, le même signal est émis par les prises ANALOG
5.1CH FRONT L/R et ANALOG 2CH OUT. Le signal émis par
les prises ANALOG 2CH OUT est de meilleure qualité
(voir page 9).
• Lors de la lecture d’un Super Audio CD multicanal, le signal
émis par les prises ANALOG 5.1CH FRONT L/R est également
émis par les prises ANALOG 2CH OUT. (Le signal de mixage
aval du signal multicanal n’est pas reproduit.)
• Il existe des Super Audio CD à 5, 4 ou 3 canaux. Lors de la
lecture de l’un de ces disques, le signal n’est pas émis par la
totalité des prises ANALOG 5.1CH OUT. Pour plus de détails,
reportez-vous à la couverture ou aux instructions du Super
Audio CD.
Préparation
Raccordement sur FRONT ou SURR
Câbles de connexion audio (rouge et blanc) (fournis)
Blanc (L)
Rouge (R)
L
RR
Vers les prises
FRONT IN (L/R)
CENTER
L
FRONT SURROUND SUB WOOFER
LR
ANALOG
Vers les prises
SURROUND ou
REAR IN (L/R)
5.1CH OUT
2CH OUT
Blanc (L)
Rouge (R)
OUT
DIGITAL(CD)
OPTICALCOAXIAL
Vers la prise
CENTER IN
AUDIO OUT
i.LINK S200
Vers la prise SUB
WOOFER IN
AC IN
Amplificateur multicanal,
amplificateur AV, etc.
FR
5
Page 40

Raccordement de composants audio
Préparation
Raccordement via les prises ANALOG 2CH
OUT
Utilisez un câble de connexion audio pour effectuer ce
raccordement. Raccordez les prises ANALOG 2CH OUT L/R aux
prises d’entrée CD (SACD) de votre amplificateur. Branchez les
broches sur les prises identifiées par le même code de couleur:
le blanc (gauche) sur le blanc et le rouge (droite) sur le rouge.
Câble de connexion audio (rouge et blanc) (fournis)
Blanc (L)
Rouge (R)
Remarque
Lors de la lecture d’un Super Audio CD multicanal, le même
signal est émis par les prises ANALOG 5.1CH FRONT L/R et
ANALOG 2CH OUT (le signal obtenu par mixage aval du signal
multicanal n’est pas lu).
L
RR
L
FRONT SURROUND SUB WOOFER
CENTER
LR
5.1CH OUT
2CH OUT
Blanc (L)
Rouge (R)
OUT
DIGITAL(CD)
A propos de ANALOG 2CH OUT
Lorsque vous écoutez un CD traditionnel ou un Super Audio CD
bi-canal, le signal stéréo est envoyé aux adaptateurs FRONT,
SURROUND et CENTER/SUB WOOFER D/A et chaque signal
est combiné après conversion numérique/analogique, puis le
signal combiné est émis par les prises 2CH OUT.
Etant donné que chaque signal numérique est converti en un
signal analogique par trois adaptateurs, ce système offre une
amélioration en trois étapes dans un rapport de signal et une
amélioration en trois étapes à la base dans un rapport de bruit, ce
qui améliore notablement le rapport signal/bruit. Par
conséquent, le signal de haute qualité est émis par les prises
ANALOG 2CH OUT.
Lors de la lecture d’un Super Audio CD multicanal, la conversion
du signal décrite ci-dessus ne s’applique pas et le même signal est
émis par les prises ANALOG 5.1 CH FRONT L/R et ANALOG
2CH OUT (le signal obtenu par mixage aval du signal multicanal
n’est pas lu).
OPTICALCOAXIAL
AUDIO OUT
i.LINK S200
AC IN
Vers les prises CD
(SACD) IN (L/R)
ANALOG
Amplificateur stéréo, etc.
FR
6
Page 41

Raccordement via la prise AUDIO OUT
i.LINK S200
Etablir une connexion LINC (connexion
d’interface logique)
Préparation
Raccordez le SCD-XA9000ES au STR-DA9000ES/
TA-DA9000ES avec le câble de raccordement i.LINK
fourni.
Câble de raccordement i.LINK (fourni)
Remarques
• Les raccordements i.LINK sont uniquement possibles entre ce
lecteur et le STR-DA9000ES/TA-DA9000ES. Les fonctions
i.LINK de ce lecteur sont limitées et il est possible qu’il
fonctionne mal s’il est raccordé à des appareils autres que le
STR-DA9000ES/TA-DA9000ES.
• Si un objet métallique tombe dans la prise AUDIO OUT i.LINK
S200, un court-circuit peut se produire et endommager les
appareils.
•Veillez à insérer la fiche solidement afin d’éviter un mauvais
fonctionnement de l’appareil.
• Pour de plus amples informations sur les signaux compatibles,
reportez-vous à la page 32.
• Certains appareils i.LINK sont conformes à la technologie de
protection contre la copie et prennent en charge les signaux
cryptés. Ce lecteur est conforme à la technologie de protection
contre la copie DTLA (version 1.2).
•«i.LINK » s’affiche dans le panneau d’affichage lorsque le
lecteur est prêt à émettre les signaux audio à partir de la prise
AUDIO OUT i.LINK S200.
Avant qu’un signal audio puisse être émis entre des
appareils i.LINK, il est nécessaire d’établir d’abord une
connexion LINC (Logical INterface Connection) entre
l’appareil récepteur (du signal audio) et l’appareil émetteur.
Etablir une connexion LINC signifie établir un chemin logique
pour la transmission de signaux audio numériques entre deux
appareils. Chaque chemin logique possède un numéro
d’identification. Puisque l’appareil qui envoie un signal audio
doit émettre le signal vers un chemin et que l’appareil qui
reçoit le signal doit le recevoir à partir de ce même chemin, les
deux appareils doivent connaître le chemin. Au cours de
l’établissement d’une connexion LINC, la communication
suivante s’effectue entre les deux appareils i.LINK.
Exemple
Le STR-DA9000ES/TA-DA9000ES établit une connexion LINC
avec le SCD-XA9000ES.
1 Le STR-DA9000ES/TA-DA9000ES envoie une requête et les
informations relatives au chemin au SCD-XA9000ES pour
établir un chemin de transmission pour le signal audio.
1
STR-DA9000ES
TA-DA9000ES
,
SCD-XA9000ES
2
<
2
Le SCD-XA9000ES répond au STR-DA9000ES/TA-DA9000ES pour
confirmer l’établissement d’une connexion LINC.
La transmission du signal audio numérique devient possible une fois la
communication décrite ci-dessus effectuée et une connexion LINC établie.
L
RR
L
FRONT SURROUND SUB WOOFER
LR
ANALOG
CENTER
5.1CH OUT
2CH OUT
Vers la prise AUDIO
IN i.LINK 200
OUT
DIGITAL(CD)
OPTICALCOAXIAL
AUDIO OUT
i.LINK S200
AC IN
STR-DA9000ES
TA-DA9000ES
FR
7
Page 42

Raccordement de composants audio
Préparation
Ecoute avec la fonction H.A.T.S. à haute
fidélité (système de transmission audio
numérique de haute qualité)
Lorsque la fonction H.A.T.S. du STR-DA9000ES/
TA-DA9000ES est réglée sur « ON », les signaux audio
numériques sont momentanément stockés dans une
mémoire tampon, puis lus à un moment précis avant
d’être convertis en signaux analogiques. Cette fonction
permet d’éviter les sautillements sonores (sautillements
temporels) qui se produisent parfois lors de la
transmission des signaux numériques et permet d’obtenir
un son de meilleure qualité.
Après que cette fonction a été activée, « H.A.T.S. »
apparaît dans la fenêtre d’affichage du STR-DA9000ES/
TA-DA9000ES dès que le signal audio numérique est émis
vers le récepteur. Lorsque vous n’utilisez pas cette
fonction, réglez-la sur « OFF » sur le STR-DA9000ES/
TA-DA9000ES. Pour de plus amples informations,
reportez-vous au mode d’emploi fourni avec le
STR-DA9000ES/TA-DA9000ES.
Remarques
•
En raison du mode de fonctionnement de la fonction H.A.T.S.,
un décalage de très courte durée se produit entre chaque
opération (par exemple lorsque vous appuyez sur la touche
lecture, arrêt ou pause) et sa mise en application. La durée de ce
décalage peut varier pour les sources CD et Super Audio CD.
• La fonction H.A.T.S. fonctionne avec des appareils compatibles
H.A.T.S. uniquement.
•
La fonction H.A.T.S. fonctionne uniquement lorsque ce lecteur est
sélectionné en tant que source d’entrée par le STR-DA9000ES/TADA9000ES car l’appareil récepteur (STR-DA9000ES/TADA9000ES) commande le débit de transmission du signal audio
numérique du lecteur. Pour obtenir une bonne transmission du
signal avec la configuration i.LINK, un seul appareil peut recevoir
les signaux audio numériques émis par un appareil émetteur.
Raccordement via le connecteur DIGITAL
(CD) OUT OPTICAL
Utilisez un câble numérique optique pour ce raccordement.
Lorsque vous branchez le câble numérique optique au
connecteur DIGITAL (CD) OUT OPTICAL, retirez le capuchon
des connecteurs et enfoncez les fiches du câble jusqu’à ce que
vous entendiez un déclic.
Prenez garde de ne pas plier ni torsader le câble optique.
Câble numérique optique (non fourni)
Remarque
Seuls les signaux audio de CD conventionnels peuvent être sortis
via les connecteurs DIGITAL (CD) OUT. Les signaux de Super
Audio CD ne peuvent pas être sortis via ces connecteurs.
Lorsque le voyant i.LINK s’allume
Aucun signal n’est émis à partir du connecteur DIGITAL (CD)
OUT OPTICAL.
Raccordement via le connecteur DIGITAL
(CD) OUT COAXIAL
Utilisez un câble numérique coaxial pour raccorder des
composants audio via les connecteurs d’entrée numérique
coaxiaux.
Câble numérique coaxial (non fourni)
Remarque
Seuls les signaux audio de CD conventionnels peuvent être sortis
via les connecteurs DIGITAL (CD) OUT. Les signaux de Super
Audio CD ne peuvent pas être sortis via ces connecteurs.
Lorsque le voyant i.LINK s’allume
Aucun signal n’est émis à partir du connecteur DIGITAL (CD)
OUT COAXIAL.
Droits d’auteur
Les appareils i.LINK conformes à la protection des droits d’auteur
comportent une technologie de protection contre la copie des
données numériques. Une de ces technologies est le DTLA (The
Digital Transmission Licensing Administrator) (Administrateur de
licence de transmission numérique) reconnu par le Copy Protection
Technical Working Group (Groupe de travail technique pour la
protection contre la copie). Il se peut qu’il soit impossible de faire
des copies numériques des données numériques pour lesquelles la
copie est limitée (vidéo/audio/données) à l’aide des signaux i.LINK
entre les appareils conformes à la technologie de protection contre la
copie DTLA. De plus, il peut être impossible de transférer des
données numériques (vidéo/audio/données) via le système i.LINK
entre les appareils i.LINK qui sont conformes à la protection contre
la copie DTLA et les appareils i.LINK qui n’y sont pas conformes.
• i.LINK est un terme se rapportant aux normes IEEE 1394-1995
et IEEE 1394a-2000. i.LINK et le logo i.LINK «TM» sont des
marques commerciales de Sony Corporation.
FR
8
Branchez le cordon d’alimentation fourni sur la borne AC IN du
lecteur et sur une prise murale.
Remarque
Installez cette chaîne afin de pouvoir débrancher immédiatement
le cordon d’alimentation de la prise secteur en cas de problème.
Raccordement du câble d’alimentation
Page 43

A propos du cordon d’alimentation
Le cordon d’alimentation fourni possède une fiche à trois broches
destinées à la mise à la masse. Si vous utilisez des prises murales
conçues pour trois broches destinées à la mise à la masse, la fiche
peut directement être branchée sur la prise murale. Cependant, si
la prise est conçue pour deux broches destinées à la mise à la
masse, utlisez l’adatapteur fourni (modèle destiné à l’Amérique
du Nord uniquement) ou un adapteur vendu dans le commerce.
Prise conçue pour trois broches destinées à la mise à la
masse
Prise conçue pour deux broches destinées à la mise à
la masse
• Lorsque la prise a une largeur différente
Utilisez l’adapteur fourni (modèle destiné à l’Amérique
du Nord uniquement).
Adaptateur polarisé de 3
à 2 broches
Pôle N
• Lorsque la prise a la même largeur
Utilisez un adaptateur vendu dans le commerce. Dans ce cas,
vous pouvez vérifier la polarité de la prise avec un
ampèremètre vendu dans le commerce. La prise de terre à
broches n’allume pas la lampe à néon même si vous insérez
l’ampèremètre dans la prise murale. Insérez les lames de façon
à ce que le « pôle N » puisse être enfoncé dans l’orifice de
masse de la prise.
Si vous entendez des parasites (un bourdonnement)
Les parasites peuvent être dus à une différence de potentiel
électrique sur le circuit de masse*. Dans ce cas, utilisez
l’adaptateur fourni (modèle destiné à l’Amérique du Nord
uniquement) et veillez à ne rien brancher sur la prise de terre.
* Même si la masse de la prise murale est normalement une
masse de sécurité, quelques différences de potentiel électrique
peuvent survenir selon les prises murales. Par conséquent,
l’utilisation de la prise conçue pour trois broches destinées à la
mise à la masse risque de réduire la qualité du signal audio ou
de provoquer des parasites.
Remarque sur les prises de sortie
Ce lecteur possède un convertisseur N/A à triple alimentation et
une fonction de gestion multicanal. Les réglages des sorties
utilisables dépendent du mode sélectionné, comme indiqué ciaprès. Pour plus de détails, reportez-vous au mode d’emploi.
Source Gestion Prises Prises Prises Prises
multicanal 2CH 5.1CH
PHONES
OUT OUT (CD) OUT
CD
Super Audio CD
(bi-canal) 2ch + SW aaa ×
Super Audio CD Disponible
(multicanal) pour tous
*1Emis via le convertisseur N/A à triple alimentation.
*2Le même signal qui est émis à partir des prises ANALOG
5.1CH OUT FRONT L/R jacks est émis.
*3Uniquement lorsque « D. OUTPUT » est réglé sur « ON »
(page 24).
Non a*1aa*
disponible
Direct
les modes
de lecture
a*1aa*
a*2aa*
Remarque
Le système du convertisseur N/A à triple alimentation
fonctionne uniquement pour des signaux à deux canaux à partir
des prises 2 CH OUT.
Lorsque le voyant i.LINK s’allume
• Aucun signal n’est émis à partir de toutes les autres prises
(ANALOG 2CH OUT, ANALOG 5.1CH OUT, PHONES,
DIGITAL (CD) OUT).
• La fonction de gestion multicanal ne fonctionne pas.
z
Si vous souhaitez écouter le son avec un casque d’écoute
lorsque le voyant i.LINK s’allume
Raccordez le casque d’écoute à la prise PHONES de
l’amplificateur et non pas à celle du lecteur.
DIGITAL
1
1
2
a*
×
×
3
Préparation
FR
9
Page 44

Emplacement
Descriptions des
composants du panneau
et fonctions
des
composants
Ce chapitre présente une description
de l’emplacement et des fonctions des
différentes touches et commandes des
panneaux avant et arrière ainsi que de
la télécommande fournie. Pour plus
de détails, reportez-vous aux pages
indiquées entre parenthèses.
Il explique également les informations
apparaissant dans la fenêtre
d’affichage.
frontal
1 Commutateur POWER (16)
Appuyez sur ce commutateur pour mettre le lecteur
sous tension.
2 Touche TIME/TEXT (17)
A chaque fois que vous appuyez sur cette touche, la
durée de lecture de la plage, la durée restante sur le
disque ou les informations TEXT s’affichent.
3 Touche SACD/CD (16)
Chaque fois que vous appuyez sur cette touche
pendant la lecture d’un disque hybride, vous
commutez la couche à lire entre HD (Super Audio CD)
et CD.
4 Touche i.LINK (16)
Chaque foi que vous appuyez sur cette touche, le
fonction i.LINK est activée ou désactivée.
Voyant i.LINK (16)
S’allume lorsque la fonction i.LINK est activée.
5 Plateau du disque (16)
Appuyez sur A OPEN/CLOSE pour ouvrir ou fermer
le plateau de lecture.
10
FR
Page 45

Emplacement et fonction des composants
POWER
PHONES
TIME/TEXT
PHONE LEVEL
MIN MAX
MENU
MULTI/2CH
SACD/CD
i.LINK
6 Touche A OPEN/CLOSE (16)
Appuyez sur cette touche pour ouvrir ou fermer le
plateau de lecture.
7 Touche N (16)
Appuyez sur cette touche pour démarrer la lecture.
Indicateur N (16)
S’allume pendant la lecture.
8 Touche X (16)
Appuyez sur cette touche pour activer une pause de
lecture.
Indicateur X (16)
S’allume pendant la pause.
9 Touche x (16)
Appuyez sur cette touche pour arrêter la lecture.
q; PHONES
Branchez le casque.
En cours de lecture d’un Super Audio CD multicanal,
le même signal que celui émis par les prises ANALOG
5.1 CH FRONT L/R est émis par la prise PHONES.
AMS
PUSH
ENTER
qs Touche MENU (15, 26–28)
Appuyez sur cette touche pour entrer dans le menu.
Appuyez sur cette touche pour quitter le menu et
revenir au mode d’affichage normal.
qd Touche MULTI/2CH (16)
Appuyez sur cette touche pour sélectionner la zone de
lecture lorsqu’un Super Audio CD à deux canaux +
multicanaux (page 15) est chargé.
qf Capteur de la télécommande
qg Fenêtre d’affichage (17)
Affiche différentes informations.
qh Molette . AMS > (AMS: Automatic Music
Senser) (20)
Lorsque vous tournez la molette . AMS > dans
le sens antihoraire d’un clic, vous revenez à la plage
précédente ; lorsque vous tournez la molette
. AMS > dans le sens horaire d’un clic, vous
passez à la plage suivante.
qa PHONE LEVEL
Ajustez le volume du casque.
11
FR
Page 46

Description des composants du panneau arrière
Emplacement et fonction des composants
CENTER
L
RR
L
5.1CH OUT
FRONT SURROUND SUB WOOFER
LR
ANALOG
2CH OUT
OUT
DIGITAL(CD)
OPTICALCOAXIAL
AUDIO OUT
i.LINK S200
AC IN
1 Prises ANALOG 5.1CH OUT (5)
Raccordez à un amplificateur équipé de prises
d’entrée 5.1CH (amplificateur multicanal,
amplificateur audio et vidéo, etc.) à l’aide des câbles
de connexion audio.
2 Connecteur DIGITAL (CD) OUT COAXIAL (8)
Raccordez ce connecteur à un composant audio à
l’aide d’un câble numérique coaxial.
3 Connecteur DIGITAL (CD) OUT OPTICAL (8)
Raccordez ce connecteur à un composant audio à
l’aide d’un câble numérique optique.
4 Prise AUDIO OUT i.LINK S200 (7)
Raccordez la prise au STR-DA9000ES/TA-DA9000ES
avec le câble de raccordement i.LINK.
5 Borne AC IN (9)
Raccordez le connecteur au cordon d’alimentation.
6 Prises ANALOG 2CH OUT L/R (6)
Raccordez ces prises à un composant audio (stéréo/bicanal) à l’aide du câble de connexion audio.
FR
12
Remarque
Seuls les signaux audio du CD peuvent être sortis via les
connecteurs DIGITAL (CD) OUT indiqués sous les points 2 et 3.
Les signaux du Super Audio CD ne peuvent être sortis via
DIGITAL (CD) OUT.
Lorsque le voyant i.LINK s’allume
Aucun signal n’est émis à partir de toutes les autres prises
(ANALOG 2CH OUT, ANALOG 5.1CH OUT, PHONES,
DIGITAL (CD) OUT).
Page 47

Description des composants de la télécommande
1 Touche CONTINUE (22)
Appuyez sur cette touche pour reprendre la lecture
normale depuis le mode de lecture aléatoire ou
programmée.
Touche SHUFFLE (22)
Appuyez sur cette touche pour sélectionner la lecture
aléatoire.
Touche PROGRAM (23)
Appuyez sur cette touche pour sélectionner la lecture
programmée.
2 Touche DISPLAY MODE (18)
Appuyez sur cette touche pour activer ou désactiver
l’affichage des informations.
3 Touche TIME/TEXT (17)
A chaque fois que vous appuyez sur cette touche, la
durée de lecture de la piste, la durée restante sur le
disque ou les informations TEXT s’affichent.
4 Touches numériques (20)
Appuyez sur ces touches pour introduire les numéros
de plages.
5 Touche
i
10 (20)
Appuyez sur cette touche pour rechercher une plage
dont le numéro est supérieur à 10.
qs Touche SACD/CD (16)
Chaque fois que vous appuyez sur cette touche,
« SACD » ou « CD » s’affiche. Sélectionnez le type de
CD que vous souhaitez lire.
qd Touche MULTI/2CH (16)
Appuyez sur cette touche pour sélectionner la zone de
lecture lorsqu’un Super Audio CD bi-canal +
multicanal (page 15) est chargé.
qf Touche ENTER (27)
Appuyez sur cette touche pour confirmer la sélection.
qg Touche CLEAR (23)
Appuyez sur cette touche pour effacer un numéro de
plage programmé.
qh Touche LEVEL ADJ (27)
Appuyez sur cette touche pour régler la balance du
niveau de sortie utile à la fonction de gestion
multicanal (page 25).
qj Touche CHECK (23)
Appuyez sur cette touche pour vérifier l’ordre de
programmation.
Emplacement et fonction des composants
6 Touche REPEAT (21)
Appuyez plusieurs fois de suite sur cette touche pour
reproduire toutes les plages ou une seule plage du disque.
7 Touche AyB (22)
Appuyez sur cette touche pour sélectionner la lecture
répétée A-B.
8 Touche H (16)
Appuyez sur cette touche pour démarrer la lecture.
Touche X (16)
Appuyez sur cette touche pour activer une pause de
lecture.
Touche x (16)
Appuyez sur cette touche pour arrêter la lecture.
9 Touches AMS ./> (AMS: détecteur
automatique de musique) (20)
Appuyez sur cette touche pour localiser une plage
spécifique.
0 Touches m/M (20)
Appuyez sur cette touche pour localiser un passage
dans une plage.
qa Touches INDEX >/. (20)
Appuyez sur cette touche pour localiser un passage
spécifique identifié à l’aide d’un signal d’index
lorsque vous reproduisez un disque comportant des
signaux d’index.
PLAY MODE
CONTINUE SHUFFLE
DISPLAY/
MODE
TIME/TEXT
PROGRAM
SACD/CD
MULTI/2CH
123
456
78
>10 ENTER
10/0
CHECK
CLEAR
LEVEL
ADJ
REPEAT
BA
AMS
INDEX
9
13
FR
Page 48

Lecture de
disques
Ce chapitre présente les différents
modes de lecture des disques.
Types de disques
compatibles
Vous pouvez lire les types de disques suivants sur ce
lecteur.
En fonction du disque à lire, sélectionnez l’indicateur
correspondant en appuyant sur SACD/CD ou MULTI/
2CH (page 16).
Classification par couche
Super Audio CD (disque à simple couche)
Ce disque est constitué d’une simple couche HD (haute
densité).
Lorsque vous écoutez ce type de disque, le lecteur passe
automatiquement en mode lecture Super Audio CD.
Couche HD
(Super Audio CD)
Super Audio CD (disque à double couche)
Ce disque est constitué d’une double couche HD et offre
une lecture de longue durée.
Lorsque vous écoutez ce type de disque, le lecteur passe
automatiquement en mode lecture Super Audio CD.
De même, comme un disque à double couche est constitué
de deux couches HD sur une seule face, il n’est pas
nécessaire de retourner le disque.
Couche HD
(Super Audio CD)
Couche HD
(Super Audio CD)
CD classique
Ce disque est au format standard.
Lorsque vous écoutez ce type de disque, le lecteur passe
automatiquement en mode lecture CD classique.
Couche CD
14
FR
Page 49

Super Audio CD + CD (hybride)
Ce disque est constitué d’une couche HD et d’une couche
CD. Appuyez sur SACD/CD pour sélectionner la couche
que vous voulez lire. De même, comme les deux couches
se trouvent sur une seule face, il n’est pas nécessaire de
retourner le disque. Vous pouvez reproduire la couche CD
sur un lecteur CD classique.
Super Audio CD bi-canal + multicanal
Ce disque possède une zone de lecture bi-canal ainsi
qu’une zone de lecture multicanal.
Appuyez sur MULTI/2CH pour sélectionner la zone de
lecture que vous souhaitez écouter.
Zone de lecture bi-canal
Couche CD
Couche HD
(Super Audio CD)
Sélection de la couche de lecture par défaut
(HD ou CD)
1 Appuyez sur MENU lorsque votre lecteur est en
mode d’arrêt.
2 Tournez la molette . AMS > jusqu’à ce que
« SACD/CD SEL » s’affiche.
3 Appuyez sur la molette . AMS >.
La couche de lecture actuellement programmée
s’affiche.
4 Tournez la molette . AMS > pour
sélectionner la couche de lecture souhaitée, puis
appuyez sur . AMS >.
Classification par canal du Super Audio
CD
Zone de lecture
multicanal
Sélection de la zone de lecture par défaut
(2 canaux ou multicanal)
1 Appuyez sur MENU lorsque votre lecteur est en
mode arrêt.
2 Tournez la commande . AMS > jusqu’à ce
que « M/2CH SELECT » s’affiche.
3 Appuyez sur la commande . AMS >.
La zone de lecture actuellement programmée s’affiche.
4 Tournez la commande . AMS > pour
sélectionner la zone de lecture souhaitée, puis
appuyez de nouveau sur . AMS >.
Disques incompatibles
Ce lecteur ne peut pas lire les disques suivants. Si vous
essayez de les lire, le message « TOC Error » ou
« No Disc » s’affichera ou aucun son ne sera reproduit.
• CD-ROM
• DVD, etc.
Lecture de disques
Super Audio CD bi-canal
Ce disque possède une zone de lecture bi-canal.
Lorsque vous écoutez ce type de disque, le lecteur passe
automatiquement en mode lecture bi-canal.
Zone de lecture bi-canal
Super Audio CD multicanal
Ce disque possède une zone de lecture multicanal.
Lorsque vous écoutez ce type de disque, le lecteur passe
automatiquement en mode lecture multicanal.
Zone de lecture
multicanal
15
FR
Page 50

Lecture d’un disque
Les opérations de lecture normale et les opérations de
base en cours de lecture sont expliquées ci-après.
Lecture de disques
1 Mettez l’amplificateur sous tension. Baissez le
volume au maximum.
2 Sélectionnez la source à l’aide du sélecteur de
source sur l’amplificateur.
3 Appuyez sur POWER pour mettre le lecteur sous
tension.
4 Appuyez sur A OPEN/CLOSE pour ouvrir le plateau
de lecture et placez un disque.
5 Appuyez sur N.
La lecture commence par la première plage. Si vous
souhaitez commencer la lecture par une plage
spécifique, tournez . AMS > pour sélectionner
le numéro de la plage choisie puis appuyez sur N.
6 Réglez le volume sur l’amplificateur.
SACD/CDPOWER
i.LINK
Etiquette vers le haut
A OPEN/CLOSE
X
N
.AMS>
x
Opérations de base en cours de lecture
Pour
Arrêter la lecture
Activer une pause de lecture
Reprendre la lecture après une pause
Localiser l’une des plages
Localiser le début de la plage en cours
ou de l’une des plages précédentes
Ejecter le disque
z
Si vous mettez le lecteur sous tension alors qu’un disque se
trouve déjà à l’intérieur
La lecture démarre automatiquement. Si vous raccordez un
programmateur disponible dans le commerce, vous pouvez le
régler pour démarrer la lecture du disque à l’heure de votre choix.
z
Pour sélectionner une couche que vous voulez écouter
pendant la lecture d’un disque hybride (page 15)
Appuyez plusieurs fois sur SACD/CD pour afficher « SACD » ou « CD ».
z
Pour sélectionner une zone de lecture pendant la lecture
d’un Super Audio CD bi-canal + multicanal (page 15)
Appuyez plusieurs fois sur MULTI/2CH pour afficher « MULTI
CH » ou « 2 CH ».
Remarques
•
En cours de lecture, augmentez progressivement le volume en partant du
niveau le plus bas. La bande passante en sortie de cet appareil est
supérieure à la plage d’écoute normale. Ceci peut provoquer un
endommagement de vos haut-parleurs ou entraîner une perte d’audition.
• Lorsque vous changez la zone de lecture en mode de lecture
programmée, le programme est supprimé.
• Lorsque vous modifiez la zone de lecture, la lecture commence
à partir du début de la même plage. Cependant, la lecture
commence à partir de la première plage, en fonction du disque.
Appuyez sur
x
X
X ou N
Tournez . AMS >
dans le sens des
aiguilles d’une montre
Tournez . AMS >
dans le sens inverse des
aiguilles d’une montre
A OPEN/CLOSE
Pour utiliser la fonction i.LINK
16
Vous pouvez émettre le son à partir de la prise AUDIO OUT
i.LINK S200 et obtenir un son de haute qualité. Reportezvous au mode d’emploi fourni avec l’appareil raccordé.
Appuyez sur i.LINK pour allumer le voyant i.LINK.
Pour désactiver la fonction i.LINK et écouter un son analogique,
appuyez de nouveau sur i.LINK pour éteindre le voyant i.LINK.
Remarque
Si vous appuyez sur N alors que l’appareil raccordé n’est pas prêt à
être utilisé avec la fonction i.LINK (p. ex. pendant que « i.LINK
Connecting » est affiché dans la fenêtre d’affichage du STR-DA900ES/
TA-DA900ES), le son du début de la plage peut ne pas être lu.
Lorsque le voyant i.LINK s’allume
•
Aucun signal n’est émis à partir de toutes les autres prises (ANALOG
2CH OUT, ANALOG 5.1CH OUT, PHONES et DIGITAL (CD) OUT).
• Les opérations de menus « D. FILTER », « D. OUTPUT »,
FR
« 2CH SPK MODE », « MCH SPK MODE », « LEVEL ADJUST »
et « SPK DISTANCE » ne sont pas disponibles.
Page 51

Utilisation de la fenêtre
CD
12345
678910
d’affichage
La fenêtre d’affichage affiche différentes informations
relatives au disque ou à la plage en cours de lecture. Cette
section décrit les informations relatives au disque et les
informations qui apparaissent pour chaque statut de
lecture.
Affichage des informations relatives au
disque chargé
En fonction du disque chargé dans le lecteur, les
informations suivantes s’affichent :
TIME/TEXT
MENU
DISPLAY MODE
TIME/TEXT
.AMS>
Super Audio CD bi-canal
2CH
SACD
12345
678910
Super Audio CD multicanal
MULTI 5.1CH
SACD
12345
678910
Pendant la
lecture d’un
Super Audio CD
5.1 canaux
ou
MULTI 5 CH
SACD
12345
678910
Pendant la
lecture d’un
Super Audio
CD 5 canaux
CD classique
MULTI CH
SACD
12345
ou
678910
Pendant la
lecture d’autres
Super Audio CD
ou en mode
d’arrêt
Lecture de disques
Affichage des informations lorsque le
lecteur est à l’arrêt
Appuyez sur TIME/TEXT.
La fenêtre d’affichage indique le nombre total de plages,
la durée totale de lecture.
Durée totale de lectureNombre total de plages
MULTI CH
TRACK MIN SEC
10 45.28
SACD
12345
678910
17
FR
Page 52

SONYHITS
SACD
MULTI CH
TEXT
DISC
12345
678910
10 45.28
SACD
MULTI CH
TEXT
TRACK MIN SEC
12345
678910
SONY BAND
SACD
ART.
MULTI CH
TEXT
12345
678910
Utilisation de la fenêtre d’affichage
Affichage d’informations en cours de
lecture
Appuyez sur TIME/TEXT.
Chaque fois que vous appuyez sur cette touche, le
numéro de la plage en cours et sa durée écoulée ou encore
la durée restante totale du disque apparaît dans la fenêtre
d’affichage.
Lorsque le lecteur détecte un Super Audio CD multicanal,
les informations relatives aux canaux s’affichent par
Lecture de disques
défaut juste avant l’affichage.
Numéro de la plage en cours de lecture et durée de lecture
écoulée de la plage en cours (affichage par défaut)
Numéro de la plage en cours de lecture et durée
restante de la plage en cours
Durée restante totale du disque
TRACK INDEX MIN SEC
11 1.57
Appuyez sur TIME/TEXT
TRACK MIN SEC
1 -1.56
Appuyez sur TIME/TEXT
MIN SEC
-43.32
Appuyez sur TIME/TEXT
MULTI 5.1CH
SACD
12345
678910
MULTI 5.1CH
SACD
12345
678910
MULTI 5.1CH
SACD
12345
678910
Affichage des informations d’un disque
TEXT
Les disques TEXT contiennent des informations telles que
le titre du disque ou le nom de l’artiste en plus des
signaux audio. Les informations TEXT affichées par ce
lecteur sont le titre du disque, le nom de l’artiste et le titre
de la plage en cours.
Lorsque le lecteur détecte un disque de type TEXT,
« TEXT » s’affiche. Si votre disque TEXT dispose de
plusieurs langues, « MULTI-TEXT » s’affiche. Lorsque
vous souhaitez vérifier les informations dans une autre
langue, reportez-vous à la section « Affichage des
informations d’un disque TEXT dans d’autres langues » à
la page 19.
Affichage des informations d’un disque
TEXT en mode d’arrêt
Appuyez sur TIME/TEXT.
Chaque fois que vous appuyez sur cette touche, le titre du
disque ou le nom de l’artiste apparaît dans la fenêtre
d’affichage. Si vous sélectionnez le nom de l’artiste,
l’indication « ART. » apparaît dans la fenêtre d’affichage.
• Avant de commencer la lecture
Titre du disque
Appuyez sur TIME/TEXT
Informations relatives aux canaux (Super Audio CD
multicanal uniquement)
[MULTI] 5.1 CH
Désactivation des informations de la
fenêtre d’affichage Z
Chaque fois que vous appuyez sur DISPLAY MODE sur la
télécommande lors de la lecture d’un disque, l’affichage
est tour à tour activé et désactivé.
Même lorsque l’affichage est désactivé, il est
temporairement rétabli lors d’une pause ou d’un arrêt de
la lecture. Lorsque vous reprenez la lecture, l’affichage est
de nouveau désactivé.
Avant de commencer la lecture, lorsque vous appuyez sur
DISPLAY MODE pour désactiver l’affichage, « Display
Off » s’affiche. Lorsque vous appuyez sur le bouton pour
activer l’affichage, « Display On » s’affiche.
FR
18
TRACK
MULTI 5.1CH
SACD
12345
678910
Nom de l’artiste
Appuyez sur TIME/TEXT
Nombre total de plages et durée totale
Appuyez
sur TIME/
TEXT
Page 53

Affichage des informations d’un disque
TEXT pendant la lecture d’un disque
Affichage des informations d’un disque
TEXT dans d’autres langues
Le numéro de la plage en cours apparaît. Si le titre du
disque comporte plus de 15 caractères, les 14 premiers
caractères restent après que le titre a défilé dans la fenêtre
d’affichage.
Lorsque le lecteur détecte un Super Audio CD multicanal,
les informations relatives aux canaux s’affichent juste
avant la durée de lecture de la piste en cours.
• Lors de la lecture d’un disque
Titre de la plage
MULTI 5.1CH
SACD
TRACK
HITECHBLUES
Appuyez sur TIME/TEXT
Informations relatives aux canaux (Super Audio CD
multicanal uniquement)
TRACK
[MULTI] 5.1 CH
Durée écoulée de la plage actuelle
TRACK INDEX MIN SEC
111.56
Appuyez sur TIME/TEXT
TEXT
TEXT
TEXT
12345
678910
MULTI 5.1CH
SACD
12345
678910
MULTI 5.1CH
SACD
12345
678910
Vous pouvez modifier la langue affichée, à condition que
le disque TEXT dispose d’informations en plusieurs
langues. Lorsque le lecteur détecte un disque de type
TEXT, « MULTI-TEXT » s’affiche. Changez la langue
comme suit.
1 Appuyez sur MENU lorsque votre lecteur est en
mode arrêt.
2 Tournez la commande . AMS > jusqu’à ce
que « LANGUAGE » s’affiche.
3 Appuyez sur la commande . AMS >.
La langue actuellement sélectionnée (anglais, français,
allemand, etc.) clignote.
Si votre lecteur ne peut pas afficher une des langues
du disque TEXT, « Other lang » s’affiche.
4 Tournez la commande . AMS > jusqu’à ce
que la langue souhaitée s’affiche.
5 Appuyez sur la commande . AMS >.
Après quelques secondes, les informations s’affichent
dans la langue sélectionnée.
Lecture de disques
Durée restante de la plage actuelle
MULTI 5.1CH
SACD
TRACK MIN SEC
1 -1.57
TEXT
12345
678910
Appuyez sur TIME/TEXT
Durée restante du disque
MULTI 5.1CH
SACD
MIN SEC
-43.32
TEXT
12345
678910
Appuyez
sur TIME/
TEXT
Remarques
• Suivant les disques, il se peut que la fenêtre d’affichage
n’indique pas tous les caractères.
• Ce lecteur ne peut afficher que le titre du disque, le nom de
l’artiste et les titres des plages des disques TEXT. Il ne peut
afficher d’autres informations.
19
FR
Page 54

Localisation d’une plage
Localisation d’un passage
spécifique
En mode d’arrêt ou de lecture, vous pouvez localiser une
plage à reproduire.
Lecture de disques
Pour passer
Aux plages suivantes
ou précédentes
À la plage actuelle ou
aux plages précédentes
Directement à une
plage particulière
Localisation d’une plage en introduisant
directement son numéro Z
Entrez le numéro de la plage à l’aide des touches
numériques.
z
Pour entrer un numéro supérieur à 11 Z
1 Appuyez sur >10.
2 Entrez les chiffres correspondants.
Pour entrer 0, appuyez sur 10/0.
Exemples:
• Pour lire la plage numéro 30, appuyez sur >10, puis sur 3 et
• Pour lire la plage numéro 100, appuyez deux fois sur >10,
Remarque
L’affichage par défaut réapparaît si vous appuyez deux fois sur
>10 lorsque le nombre total de plages est inférieur à 100.
20
.AMS>
Vous devez
Tourner . AMS > dans le sens des
aiguilles d’une montre jusqu’à ce que
vous ayez trouvé la plage souhaitée. Si
vous utilisez la télécommande, appuyez
plusieurs fois sur > jusqu’à ce que
vous ayez trouvé la plage souhaitée.
Tourner . AMS > dans le sens
inverse des aiguilles d’une montre
jusqu’à ce que vous ayez trouvé la plage
souhaitée. Si vous utilisez la
télécommande, appuyez plusieurs fois
sur . jusqu’à ce que vous ayez
trouvé la plage souhaitée.
Tournez . AMS > jusqu’à ce que
vous ayez trouvé la plage souhaitée. Si
vous utilisez la télécommande appuyez
plusieurs fois . ou > jusqu’à ce
que vous ayez trouvé la plage
souhaitée.
sur 10/0.
puis sur 1, et deux fois sur 10/0.
FR
Touches
numériques
>10
./>
déterminé sur une plage
Vous pouvez localiser un passage déterminé sur une
plage en cours de lecture ou de pause de lecture.
H
./>
m/M
.AMS>
Localisation d’un passage tout en
écoutant le son (recherche) Z
Maintenez les touches m/M enfoncées en cours de
lecture.
Vous entendez le son de lecture par intermittences au fur
et à mesure que le disque avance ou recule.
Relâchez la touche dès que vous êtes arrivé au passage
voulu.
Localisation d’un passage tout en
observant l’indication de la durée
(recherche à grande vitesse) Z
Maintenez les touches m/M enfoncées pendant la
pause.
Vous n’entendez pas le son de lecture.
z
Si l’indication « Over!! » apparaît dans la fenêtre d’affichage
Cela signifie que vous êtes arrivé à la fin du disque. Appuyez sur
. ou m pour revenir en arrière.
Remarque
Les plages dont la durée n’excède pas quelques secondes peuvent
être trop courtes pour être contrôlées. Dans ce cas, le lecteur
risque de ne pas effectuer correctement la recherche.
Localisation d’un passage à l’aide de la
fonction d’index (recherche d’index) Z
Appuyez plusieurs fois de suite sur INDEX. ou
INDEX> en mode de lecture ou de pause.
z
Qu’est-ce qu’un INDEX?
Certains Super Audio CD ou CD sont fournis avec un système de
marquage d’index qui permet de diviser les plages ou les disques
en segments plus petits. Cette fonctionnalité s’avère
particulièrement utile lors que vous souhaitez localiser un passage
précis dans une plage longue (de musique classique par exemple).
La fonction de recherche d’index ne fonctionne qu’avec les disques
indexés disponibles dans le commerce (indiqué sur l’étiquette).
INDEX
>/.
Page 55

Comment localiser un point en définissant
une heure de départ (recherche
temporelle)
1 Appuyez sur ./> (ou tournez la molette
. AMS >) pour sélectionner la plage
souhaitée en mode d’arrêt.
2 Maintenez les touches m/M enfoncées pour
régler l’heure à laquelle doit débuter la lecture tout
en regardant l'affichage.
Vous pouvez régler l’heure de lecture depuis le début
du morceau souhaité en appuyant sur M ou depuis
la fin du morceau souhaité vers l’arrière en appuyant
sur m.
MULTI 5.1CH
TRACK MIN SEC
5 2.57
SACD
12345
678910
3 Appuyez sur H.
La lecture commencera à la recherche temporelle.
Lecture de plages répétée
Z
Vous pouvez reproduire de manière répétée un disque entier ou
des passages d’un disque. Cette fonction peut être utilisée avec
la fonction de lecture aléatoire pour répéter toutes les plages
d’un disque dans un ordre quelconque (page 22) ou de lecture
programmée pour reproduire toutes les plages d’un programme
musical (page 23). Vous pouvez également répéter la lecture
d’une plage spécifique ou d’un passage déterminé d’une plage.
Lecture de disques
REPEAT
AyB
H
x
Remarque
Lorsque vous mettez le lecteur hors tension ou que vous
déconnectez le câble d’alimentation, le lecteur mémorise le
dernier réglage de lecture répétée (« Repeat All » ou « Repeat 1 »)
et rappelle ce réglage la prochaine fois que vous mettez le lecteur
sous tension. Le réglage de lecture répétée A-B est cependant
annulé si vous mettez le lecteur hors tension ou si vous
débranchez le câble d’alimentation.
Répétition de toutes les plages du disque
(lecture répétée complète)
Appuyez une fois sur REPEAT et appuyez ensuite sur H.
L’indication « Repeat » apparaît dans la fenêtre d’affichage
et la lecture répétée du disque complet démarre.
La lecture répétée change suivant le mode de lecture que
vous avez sélectionné.
Mode de lecture sélectionné Le lecteur répète
Lecture normale (page 16) Toutes les plages
Lecture aléatoire (page 22) Toutes les plages dans un ordre
Lecture programmée (page 23) Toutes les plages du
successivement
quelconque
programme successivement
Pour mettre fin à la lecture répétée complète
Appuyez plusieurs fois de suite sur REPEAT jusqu’à ce
que l’indication « REPEAT » disparaisse.
21
FR
Page 56

Lecture de plages répétée Z
Lecture de plages dans un
ordre quelconque
Répétition de la plage en cours (lecture
répétée d’une plage unique)
Pendant la lecture de la plage que vous voulez répéter,
appuyez plusieurs fois de suite sur REPEAT jusqu’à ce
que l’indication « REPEAT 1 » apparaisse dans la
fenêtre d’affichage.
La lecture répétée de cette plage démarre.
Pour mettre fin à la lecture répétée 1
Lecture de disques
Appuyez plusieurs fois de suite sur REPEAT jusqu’à ce
que l’indication « REPEAT 1 » disparaisse.
Répétition d’un passage déterminé d’une
plage (lecture répétée A-B)
Vous pouvez spécifier un passage sur une plage dont
vous voulez activer la lecture répétée. Le passage que
vous spécifiez doit être compris entre le début et la fin
d’une seule et même plage.
1 Pendant la lecture de la plage en question,
appuyez sur la touche AyB au point de début
(point A) du passage à lire de manière répétée.
L’indication « REPEAT » apparaît et « A » se met à
clignoter dans la fenêtre d’affichage.
(lecture aléatoire) Z
Lorsque vous sélectionnez la lecture aléatoire, le lecteur
reproduit toutes les plages du disque dans un ordre
aléatoire.
CONTINUE
H
./>
SHUFFLE
2 Poursuivez la lecture de la plage (ou appuyez sur
M) pour localiser le point de fin (point B) et
appuyez ensuite sur AyB.
L’indication « REPEAT A-B » apparaît et la lecture
répétée A-B démarre.
Pour mettre fin à la lecture répétée A-B
Appuyez sur REPEAT.
z
Vous pouvez définir un nouveau point de début et un
nouveau point de fin en cours de lecture répétée A-B
Vous pouvez transformer le point de fin en cours en un nouveau
point de début et spécifier ensuite un nouveau point de fin de
manière à répéter un autre passage juste après le passage en
cours.
1 En cours de lecture répétée A-B, appuyez sur AyB.
Le point de fin en cours devient le nouveau point de début
(point A).
L’indication « REPEAT » s’allume et « A » se met à clignoter
dans la fenêtre d’affichage.
2 Localisez le nouveau point de fin (point B) et appuyez sur
AyB.
L’indication « REPEAT A-B » s’allume et le lecteur démarre la
lecture répétée du nouveau passage spécifié.
Lorsque vous souhaitez reprendre depuis le point de départ A,
appuyez sur H au cours d’une répétition AyB.
1 Appuyez sur SHUFFLE en mode d’arrêt.
2 Appuyez sur H.
La lecture aléatoire démarre.
L’indication « ; » apparaît pendant que le lecteur
« mélange » les plages. Le lecteur s’arrête après avoir
reproduit une fois toutes les plages.
Pour reprendre la lecture normale
Appuyez sur CONTINUE.
z
Vous pouvez localiser des plages en cours de lecture
aléatoire
Appuyez sur ./>.
Appuyez sur > pour localiser la plage suivante ou sur .
pour localiser le début de la plage en cours. Le lecteur ne
retourne pas à des titres qui ont déjà été joués.
Remarque
Lorsque vous changez de zone de lecture (2 canaux ou
multicanal) ou de couche (CD ou HD) sur le Super Audio CD
(page 15), le réglage de lecture aléatoire est supprimé.
22
FR
Page 57

Création de votre propre
programme musical
(lecture programmée) Z
Vous pouvez sélectionner les plages que vous préférez et spécifier leur
ordre de lecture dans un programme musical pouvant contenir jusqu’à
32 plages (ou 999 min. 59 sec. de durée totale pour le programme).
CONTINUE
Touches
numériques
>10
CHECK
H
PROGRAM
CLEAR
./>
1 Appuyez sur PROGRAM en mode d’arrêt.
L’indication « Program » apparaît dans la fenêtre
d’affichage.
2 Appuyez sur les touches numériques pour entrer le
numéro d’une plage.
Si vous entrez un mauvais numéro de plage
Appuyez sur CLEAR pour effacer ce numéro de plage et entrez
le bon numéro de plage à l’aide des touches numériques.
Pour sélectionner une plage portant un numéro
supérieur à 11
Appuyez sur >10 (page 20).
Vérification du contenu du programme
musical
Avant de démarrer la lecture ou pendant le lecture,
appuyez sur CHECK.
Chaque fois que vous appuyez sur la touche, les numéros
des plages s’afficheront selon leur ordre de
programmation.
Si vous appuyez sur CHECK pendant que le lecteur est en
train de lire un disque, le numéro de plage s’affiche à
partir du numéro de plage suivant le numéro de la plage
en cours de lecture.
Modification du contenu d’un programme
musical
Vous pouvez changer le contenu d’un programme musical
en mode d’arrêt.
Pour
Effacer une plage
Effacer à partir de
la dernière plage
du programme
Ajouter une plage à
la fin du
programme
Effacer toutes les
plages
Procédez comme suit:
1 Appuyez plusieurs fois de suite sur
CHECK jusqu’à ce que le numéro de la
plage que vous voulez effacer apparaisse.
2 Appuyez sur CLEAR.
Appuyez sur CLEAR.
Chaque fois que vous appuyez sur cette
touche, la dernière plage du programme est
effacée.
Appuyez sur ./> pour sélectionner la
plage que vous voulez ajouter et appuyez
ensuite sur PROGRAM. Si vous utilisez la
télécommande, appuyez sur la touche
numérique correspondant à la plage à
ajouter.
Maintenez la touche CLEAR ou x enfoncée
(pendant environ 2 secondes) jusqu’à ce que
le message « Prog CLEAR » s’affiche.
Lecture de disques
3 Répétez l’étape 2 pour entrer d’autres plages.
Chaque fois que vous entrez un numéro de plage, la durée
totale du programme apparaît dans la fenêtre d’affichage.
4 Appuyez sur H.
La lecture programmée démarre.
Pour reprendre la lecture normale
Appuyez sur CONTINUE.
z
Le programme reste en mémoire après la fin de la lecture
programmée
Appuyez sur H pour recommencer la lecture programmée à partir
du début. Le programme reste en mémoire si vous arrêtez la lecture.
Remarque
Si vous mettez le lecteur hors tension, que vous débranchez le cordon
d’alimentation, que vous appuyez sur A OPEN/CLOSE ou que vous
changez de zone de lecture (2 canaux ou multicanal) ou de couche (CD
ou HD) sur le Super Audio CD (page 15), le programme est supprimé.
23
FR
Page 58

Ecoute d’un CD à l’aide
Activation/désactivation de
d’un filtre (fonction de filtre
numérique)
Le lecteur est équipé d'un filtre numérique qui élimine les
interférences générées au cours de l’échantillonnage. En
sélectionnant le type des filtres, vous pouvez régler la
qualité sonore.
Vous pouvez sélectionner « STANDARD » ou
« OPTION ». (Le réglage par défaut est « STANDARD ».)
Lorsque le voyant i.LINK est allumé
Cette fonction n’est pas disponible.
Lecture de disques
1 Appuyez sur MENU.
2 Tournez . AMS > jusqu’à ce que « D. FILTER »
apparaisse dans la fenêtre d’affichage.
MENU
.AMS>
DIGITAL OUT
Vous pouvez régler le mode digital out sur on (les signaux
numériques peuvent être émis) ou sur off (les signaux
numériques ne peuvent pas être émis). Lorsque vous
utilisez le connecteur DIGITAL (CD) OUT COAXIAL ou
DIGITAL (CD) OUT OPTICAL, réglez le mode numérique
sur on (« D.OUT ON »). (Le réglage par défaut est
« D.OUT ON ».)
Lorsque le voyant i.LINK est allumé
Cette fonction n’est pas disponible.
MENU
1 Appuyez sur MENU.
2 Tournez . AMS > jusqu’à ce que l’indication
« D. OUTPUT » apparaisse dans la fenêtre
d'affichage.
.AMS>
3 Appuyez sur . AMS >.
4 Tournez . AMS > jusqu’à ce que le nom du
filtre souhaité (« STANDARD » ou « OPTION »)
apparaisse dans la fenêtre d’affichage.
5 Appuyez sur . AMS >.
Lorsque vous sélectionnez « OPTION », la mention
« FILTER » s’affiche.
Caractéristiques de chaque filtre numérique
STANDARD
Offre une gamme de fréquence étendue et une impression
d’espace.
OPTION
Offre un son lisse et puissant avec une position d’image
nette.
Remarques
• Les filtres numériques sont efficaces uniquement lorsque vous
lisez un CD traditionnel. Vous ne pouvez pas sélectionner le
filtre numérique lorsque vous lisez un Super Audio CD.
• Selon le disque ou l’équipement raccordé, il se peut qu’il n’y ait
aucun changement notable après commutation du filtre.
3 Appuyez sur . AMS >.
4 Tournez . AMS > jusqu’à ce que le mode
numérique souhaité (« D.OUT ON » ou « D.OUT
OFF ») apparaisse dans la fenêtre d’affichage.
5 Appuyez sur . AMS >.
Remarque
Lors de la lecture d’un Super Audio CD, cette fonction est
inopérante et aucun signal n’est émis par les connecteurs
DIGITAL (CD) OUT.
24
FR
Page 59

Lecture d’un Super Audio
CD multicanal (fonction de
gestion multicanal)
Le lecteur dispose d’une fonction de gestion multicanal
permettant de régler le mode lecture du Super Audio CD
utilisant la technologie DSD-DSP (intégrée au lecteur), en
fonction de la configuration ou de la taille de vos enceintes.
Lorsque le voyant i.LINK est allumé
Cette fonction n’est pas disponible.
Exemple de configuration d’enceintes
Enceintes avant
L
Enceinte centrale
Caisson de basses
L
Enceintes surround
Pour régler la gestion multicanal :
1 Sélectionnez le mode lecture à partir du mode de
préréglage (lecture bi-canal ou multicanal).
2
Réglez la balance du niveau de sortie de chaque enceinte
(uniquement lorsque le mode de lecture multicanal est sélectionné).
Remarques
•
Cette fonction est disponible uniquement avec le Super Audio CD.
•
En fonction du mode de configuration sélectionné, vous ne
pouvez pas régler la balance du niveau de sortie de vos enceintes.
MENU
R
R
.AMS>
Sélection du mode lecture bi-canal
1 Appuyez sur MENU.
2 Tournez la commande . AMS > jusqu’à ce
que « 2CH SPK MODE » s’affiche.
3 Appuyez sur la commande . AMS >.
Le mode lecture s’affiche.
Mode de
configuration
2CH Direct
2CH + SW
Enceintes avant
Caisson de
basses
Chaque signal est diffusé directement
par les enceintes avant. Aucun signal
n’est émis par le caisson de basses.
a
a
4 Tournez la commande . AMS > jusqu’à ce
que le mode souhaité s’affiche.
5 Appuyez sur la commande . AMS >.
Remarque
Cette fonction n’est pas disponible lorsque le lecteur est en mode
CD ou multicanal. Pour pouvoir l’activer, réglez le lecteur en
mode Super Audio CD bi-canal, ouvrez le plateau de lecture ou
retirez le disque du lecteur.
Sélection du mode lecture multicanal
1 Appuyez sur MENU.
2 Tournez la commande . AMS > jusqu’à ce
que « MCH SPK MODE » s’affiche.
3 Appuyez sur la commande . AMS >.
Le mode lecture s’affiche.
Lecture de disques
./>
ENTER
LEVEL ADJ
Mode de
configuration
MCH Direct
5 – Large + SW
5 – Large
5 – Small + SW
FRT – Large +SW
FRT – Large
No – CNTR + SW
No – CNTR
Enceintes
avant
Chaque signal est diffusé directement
par chaque enceinte.
Large
Large
Small
Large
Large
Large
Large
Enceinte
centrale
Large
Large
Small
Small
Small
––
––
Enceintes
surround
Large
Large
Small
Small
Small
Large
Large
Caisson de
basses
a
––
a
a
––
a
––
25
FR
Page 60

Lecture d’un Super Audio CD multicanal
A propos des « Large (grandes) » et des « Small
(petites) » enceintes
On entend par « Large » les enceintes capables de
reproduire parfaitement les basses fréquences. Si vous
sélectionnez « Small » pour les enceintes surround, les
basses fréquences de ces enceintes sont reproduites
par les enceintes avant et/ou le caisson de basses.
Pour une utilisation standard, sélectionnez « MCH
Direct » ou réglez toutes les enceintes sur « Large »
(exemple : « 5 – Large + SW », « 5 – Large », etc.). Si le
son obtenu ou la lecture multicanal ne vous satisfont
Lecture de disques
pas lors de l’écoute d’un Super Audio CD multicanal,
réglez les enceintes concernées sur « Small ».
4 Tournez la commande . AMS > jusqu’à ce
que le mode souhaité s’affiche.
5 Appuyez sur la commande . AMS >.
Pour revenir à l’affichage normal, appuyez sur MENU.
Remarques
• La fonction de gestion multicanal n’est pas disponible lorsque
vous sélectionnez « MCH Direct » (vous ne pouvez pas régler
la balance du niveau de sortie de chaque enceinte).
•L’enceinte avant est automatiquement réglée sur « Large »
lorsque le caisson de basses est sur « –– ».
• Lorsque vous écoutez une plage ne contenant pas le signal
LFE*, le signal du caisson de basses n’est pas émis. Ainsi,
lorsque vous sélectionnez « MCH Direct », « 5 – Large + SW »
ou « No – CNTR + SW » aucun signal n’est émis par le caisson
de basses. Toutefois, lorsque vous sélectionnez « 5 – Small +
SW » ou « FRT – Large +SW » (quand vous réglez l’enceinte sur
« Small »), les basses fréquences proviennent du caisson de
basses.
* LFE : Low Frequency Enhancement (amélioration des basses
fréquences) (décrit comme « .1 CH »)
Réglage de la balance du niveau de sortie
de chaque enceinte
La fonction de gestion multicanal vous permet de régler
les éléments suivants :
CNTR BALANCE
Balance relative du niveau de sortie entre les enceintes
avant (FRONT L/R) et l’enceinte centrale (CENTER)
SURR BALANCE
Balance relative du niveau de sortie entre les enceintes
avant (FRONT L/R) et les enceintes surround (SURR L/
R)
SW BALANCE
Balance relative du niveau de sortie entre les enceintes
avant (FRONT L/R) et le caisson de basses (SUB
WOOFER)
Remarque
Certains réglages ne sont pas disponibles, en fonction du mode
de lecture multicanal sélectionné.
Réglage de la balance du niveau de sortie sur le
panneau avant du lecteur
Vous pouvez régler la balance de chacune de vos
enceintes en mode lecture, à partir du son émis. Vous
pouvez également la régler en mode arrêt, à partir du
signal d’essai.
1 Appuyez sur MENU.
2 Tournez la commande . AMS > jusqu’à ce
que « LEVEL ADJUST » s’affiche.
3 Appuyez sur la commande . AMS >.
Si vous effectuez le réglage en mode lecture, passez
directement à l’étape 6.
4 Tournez la commande . AMS > jusqu’à ce
que « TONE ON » s’affiche.
5 Appuyez sur la commande . AMS >.
Le signal d’essai est émis par chacune des enceintes,
l’une après l’autre, et l’écran indique quelle enceinte
émet actuellement le signal.
6 Tournez la commande . AMS > jusqu’à ce
que l’élément souhaité s’affiche.
Sélectionnez l’élément « CNTR BALANCE »,
« SURR BALANCE » ou « SW BALANCE ».
Remarque
Lorsque vous réglez le caisson de basses sur « –– » en mode
de configuration (page 25), « SW BALANCE » ne s’affiche
pas. De même, lorsque vous réglez les enceintes centrale et
surround sur « –– », « CNTR BALANCE » et « SURR
BALANCE » ne s’affichent pas.
26
FR
Page 61

7 Appuyez sur la commande . AMS >.
Le réglage de la balance apparaît.
En mode d’arrêt, l’enceinte sélectionnée émet le signal
d’essai.
Exemple : Si vous sélectionnez « SURR BALANCE »,
le signal d’essai est audible sur les enceintes
avant et les enceintes surround.
MULTI CH
DISC
FRT:_____:SURR
SACD
12345
678910
8 Tournez la commande . AMS > pour régler le
niveau de sortie.
5 Appuyez sur ENTER.
Le réglage de la balance apparaît.
En mode d’arrêt, l’enceinte sélectionnée émet le signal
d’essai.
Exemple : Si vous sélectionnez « SURR BALANCE »,
le signal d’essai est audible sur les enceintes
avant et les enceintes surround.
MULTI CH
DISC
FRT:_____:SURR
SACD
12345
678910
6 Appuyez plusieurs fois de suite sur ./> pour
régler le niveau de sortie.
Lecture de disques
MULTI CH
DISC
FRT:_____:SURR
SACD
12345
678910
9 Appuyez sur la commande . AMS >.
Le lecteur revient au statut décrit à l’étape 6.
Répétez les étapes 6 à 9 pour d’autres réglages.
10
Appuyez sur MENU après avoir effectué tous vos
réglages.
L’affichage redevient normal.
Réglage du niveau de sortie à partir de la
télécommande
Z
Vous pouvez régler le niveau de sortie de chaque enceinte
avec la télécommande fournie, en mode lecture.
1 Appuyez sur LEVEL ADJ, que vous soyez en mode
lecture ou en mode arrêt.
Si vous effectuez le réglage en mode lecture, passez
directement à l’étape 4.
2 Appuyez plusieurs fois de suite sur ./>
jusqu’à ce que « TONE ON » s’affiche.
3 Appuyez sur ENTER.
Le signal d’essai est émis par chacune des enceintes,
l’une après l’autre, et l’écran indique quelle enceinte
émet actuellement le signal.
MULTI CH
DISC
FRT:_____:SURR
SACD
12345
678910
7 Appuyez sur ENTER.
Le lecteur revient au statut décrit à l’étape 4.
Répétez les étapes 4 à 7 pour d’autres réglages.
8 Appuyez sur LEVEL ADJ après avoir effectué tous
vos réglages.
L’affichage redevient normal.
Remarque
Si vous sélectionnez un mode de lecture autre que « 2CH Direct »
ou « MCH Direct » avec la fonction de gestion multicanal, la
distribution des sons vers les enceintes changera, provoquant
peut-être une diminution du volume sonore d’ensemble. Dans ce
cas, ajustez le volume avec la commande de volume sur
l’amplificateur raccordé.
4 Appuyez plusieurs fois de suite sur ./>
jusqu’à ce que l’élément souhaité s’affiche.
Sélectionnez l’élément « CNTR BALANCE », « SURR
BALANCE » ou « SW BALANCE ».
Remarque
Lorsque vous réglez le caisson de basses sur « –– » en mode
de configuration (page 25), « SW BALANCE » ne s’affiche
pas. De même, lorsque vous réglez les enceintes centrale et
surround sur « –– », « CNTR BALANCE » et « SURR
BALANCE » ne s’affichent pas.
27
FR
Page 62

Lecture d’un Super Audio CD multicanal
Réglage de la distance des enceintes
Vous pouvez régler la distance des enceintes lorsque
l’amplificateur raccordé n’est pas doté d’un menu de réglage
de la distance des enceintes. Si l’amplificateur est doté de
cette fonction, il est recommandé de régler la distance des
enceintes sur l’amplificateur. Ce réglage est uniquement
disponible pour les Super Audio CD multicanaux.
Remarque
Lorsque vous réglez la distance des enceintes sur ce lecteur et sur
Lecture de disques
l’amplificateur, les deux réglages peuvent fonctionner et il se peut
que vous ne soyez pas en mesure d’obtenir le résultat souhaité.
FRT DIST.
Distance entre votre position d’écoute et les enceintes
avant
Vous pouvez régler une distance allant de 1,0 m à 7,0 m,
par incréments de 0,1 m.
Si les deux enceintes avant ne sont pas placées à une
distance égale par rapport à votre position d’écoute,
réglez la distance en fonction de l’enceinte la plus
rapprochée.
SURR DIST.
Distance entre votre position d’écoute et les enceintes
ambiophoniques
Vous pouvez régler une distance allant de 1,0 m à 7,0 m,
par incréments de 0,1 m.
Si les deux enceintes avant ne sont pas placées à une
distance égale par rapport à votre position d’écoute,
réglez la distance en fonction de l’enceinte la plus
rapprochée.
1 Appuyez sur MENU.
2 Tournez la molette . AMS > jusqu'à ce que
« SPK DISTANCE » s’affiche.
3 Appuyez sur la molette . AMS >.
4 Tournez la molette . AMS > jusqu'à ce que
l’élément souhaité s’affiche.
Sélectionnez l’élément souhaité parmi « FRT DIST. »,
« SURR DIST. » « CNTR DIST. » et « SUBW DIST. ».
Remarque
Lorsque vous réglez le caisson de basses sur « –– » dans le
mode de lecture multicanal (page 25), « SUBW DIST. » ne
peut pas être réglé (« Not In Use » s’affiche). De même,
« CNTR DIST. » ne peut pas être réglé (« Not In Use »
s’affiche) lorsque vous réglez l’enceinte correspondante sur
«––».
5 Appuyez sur la molette . AMS >.
Le menu de réglage de la distance des enceintes
s’affiche.
Exemple : lorsque vous sélectionnez « SURR DIST. »
(avec « DIST. UNIT » réglé sur « meter »).
MULTI CH
DISC
SURR 3.0meter
SACD
12345
678910
6 Tournez la molette . AMS > pour régler la
distance des enceintes.
MULTI CH
DISC
SURR 2.5meter
SACD
12345
678910
CNTR DIST.
Distance entre votre position d’écoute et l’enceinte
centrale
Vous pouvez régler une distance allant de 1,0 m à 7,0 m,
par incréments de 0,1 m.
SUBW DIST.
Distance entre votre position d’écoute et le caisson de
basses
Vous pouvez régler une distance allant de 1,0 m à 7,0 m,
par incréments de 0,1 m.
DIST. UNIT
Unité de mesure pour le réglage des distances (en mètres ou en pieds)
Le réglage par défaut est « feet » pour le modèle destiné à
l’Amérique du Nord et « meter » pour le modèle destiné à l’Europe.
Remarque
La distance des enceintes ne peut pas être réglée dans les cas suivants :
– lorsque le lecteur est en train de lire les informations de disque
du CD (ou de la zone CD d’un Super Audio CD) ;
– lorsque le lecteur est en train de lire la zone à deux canaux d’un
Super Audio CD ;
– lorsque le voyant i.LINK est allumé.
FR
28
7 Appuyez sur la molette . AMS >.
Le statut du lecteur revient à celui de l’étape 4.
Répétez les étapes 4 à 7 pour effectuer d’autres
réglages.
8 Appuyez sur MENU après avoir effectué tous les
réglages.
L’affichage revient à la normale.
Sélection de l’unité de distance
A l’étape 4 ci-dessus, sélectionnez « DIST. UNIT ».
Tournez la molette . AMS > pour sélectionner
« meter » ou « feet », puis appuyez sur . AMS >.
Réinitialisation des distances des enceintes à
leurs valeurs par défaut
Réglez toutes les distances des enceintes sur 3 mètres.
Page 63

Informations
Précautions
complémentaires
Ce chapitre fournit des informations
complémentaires sur le
fonctionnement et l’entretien de votre
lecteur Super Audio CD.
Sécurité
• Attention — Les instruments optiques qui équipent cet
appareil sont dangereux pour les yeux.
• Si un objet ou un liquide quelconque pénètre à l’intérieur du
boîtier, débranchez le lecteur et ne l’utilisez plus avant de
l’avoir fait contrôler par un personnel qualifié.
• Le cordon d’alimentation doit être remplacé dans un centre de
service après-vente qualifié exclusivement.
• L’appareil n’est pas débranché de l’alimentation secteur tant
qu’il est raccordé à la prise murale, même si l’appareil luimême a été mis hors tension.
Alimentation
• Avant d’utiliser le lecteur, assurez-vous que la tension
d’utilisation de l’appareil est identique à celle de l’alimentation
secteur locale. La tension d’utilisation est indiquée sur la
plaque signalétique fixée au dos du lecteur.
• Le lecteur reste branché sur l’alimentation secteur tant qu’il est
raccordé à la prise murale, même si l’appareil a préalablement
été mis hors tension.
• Si vous prévoyez de ne pas utiliser le lecteur pendant une
période prolongée, débranchez-le de la prise murale. Pour
déconnecter le cordon d’alimentation, tirez sur la fiche; ne tirez
jamais sur le cordon proprement dit.
Installation
• Installez le lecteur dans un lieu suffisamment ventilé afin de
prévenir tout risque de surchauffe à l’intérieur du boîtier.
• N’installez pas le lecteur sur une surface souple comme un
tapis qui risquerait d’obstruer les ouïes de ventilation situées
sur la base de l’appareil.
• N’installez pas le lecteur à proximité de sources de chaleur ou
dans un endroit excessivement poussiéreux, soumis à la
lumière directe du soleil ou à des vibrations ou des chocs
mécaniques importants.
Informations complémentaires
Utilisation
• Si vous transportez soudainement le lecteur d’une pièce froide
dans une pièce chaude ou si vous l’installez dans une pièce
particulièrement humide, de la condensation peut se former
sur les lentilles montées à l’intérieur du lecteur. Le
fonctionnement du lecteur risque d’en être affecté. En pareil
cas, retirez le disque du plateau de lecture et laissez le lecteur
sous tension pendant environ une heure pour permettre à
l’humidité de s’évaporer.
• A l’allumage, il est possible que du bruit se fasse entendre lors
du chargement du disque dans le lecteur Super Audio CD. Ce
bruit est normal.
Réglage du volume
• N’augmentez pas trop le volume pendant l’écoute d’un
passage de très faible niveau d’entrée ou ne comportant aucun
signal audio. Vous risquez en effet d’endommager les hautparleurs lors de la lecture d’un passage présentant un niveau
d’entrée très élevé.
29
FR
Page 64

Précautions
Remarques sur les disques
Informations complémentaires
Introduction d’un disque
• Il est possible que vous entendiez un bruit de transmission ou
mécanique émis par le lecteur. Ce sifflement signifie que le
lecteur est en train de régler automatiquement ses mécanismes
internes en fonction du disque introduit.
Il est également possible que vous entendiez un bruit
mécanique lorsque vous introduisez un disque déformé dans
le lecteur.
Entretien
• Nettoyez le boîtier, le panneau et les commandes à l’aide d’un
chiffon doux imprégné d’une solution détergente neutre.
N’utilisez pas de tampon abrasif, de poudre à récurer ou de
solvant tel que l’alcool ou le benzine.
A propos du transport
• Assurez-vous de retirer le disque placé sur le plateau.
• Assurez-vous de refermer le plateau de lecture.
Si vous éprouvez la moindre difficulté concernant votre
lecteur, n’hésitez pas à consulter votre revendeur Sony.
Manipulation des disques
• Pour que les disques restent propres, saisissez-les par le bord.
N’en touchez pas la surface.
• Ne collez pas de papier ni de bande adhésive sur les disques.
• Utilisez uniquement des disques de forme ronde. L’utilisation
d’un disque de forme spéciale (par exemple : disque carré, en
forme d’étoile, de cœur...) risque d’endommager votre lecteur.
• N’utilisez pas de disque pourvus d’une étiquette comme sur
les disques d’occasion ou les disque de location.
Rangement des disques
• N’exposez pas les disques au rayonnement direct du soleil ou
à des sources de chaleur comme des conduits d’air chaud.
• Après lecture, rangez les disques dans leur boîtier. Si vous empilez
les disques sans leurs boîtiers, vous risquez de les endommager.
Installation d’un disque sur le plateau de lecture
• Assurez-vous que le disque est correctement positionné sur le
plateau.
Sinon, le lecteur ou le disque risque d’être endommagé.
30
Entretien
• Si les disques portent des traces de doigts ou de la poussière, la
qualité audio risque d’en être altérée.
•
Avant la lecture, nettoyez les disques avec un chiffon de
nettoyage. Essuyez les disques en allant du centre vers l’extérieur.
• Nettoyez les disques avec un chiffon doux légèrement
imprégné d’eau et essuyez-les ensuite avec un chiffon sec.
•
N’utilisez pas de solvants comme de la benzine, du diluant, des
nettoyants pour disques en vinyle ni de sprays antistatiques.
Remarques concernant la lecture d’un CD-R/CD-RW
• Il est possible que certains disques enregistrés avec un graveur
CD-R/CD-RW ne puissent pas être reproduits en raison de
rayures, de souillures, de leurs conditions d’enregistrement ou
des caractéristiques techniques du graveur. En outre, les
disques qui ne sont pas finalisés à la fin de l’enregistrement ne
peuvent pas être reproduits.
Disques audio encodés par des technologies de protection
des droits d’auteur
Cet appareil est conçu pour la lecture des disques conformes à la
norme Compact Disc (CD).
Dernièrement, certaines maisons de disques ont lancé sur le marché
divers types de disques audio encodés selon des technologies de
protection des droits d’auteur. Notez que, parmi ces types de
FR
disques, certains ne sont pas conformes à la norme CD. La lecture
de ces disques peut alors être impossible avec cet appareil.
Page 65

Dépannage
Si vous rencontrez l’une des difficultés suivantes à l’occasion
de l’utilisation de ce lecteur, consultez le présent guide de
dépannage pour tenter de remédier au problème survenu. Si
le problème persiste, consultez votre revendeur Sony.
Aucun son n’est émis à partir de la prise
AUDIO OUT i.LINK S200.
Est-ce que l’appareil i.LINK est sélectionné par le
sélecteur d’entrée de l’amplificateur raccordé ?
,
Assurez-vous que l’appareil i.LINK est sélectionné par le
sélecteur d’entrée de l’amplificateur raccordé. Reportez-
vous au mode d’emploi fourni avec l’amplificateur.
La fonction i.LINK est-elle activée ?
, Reportez-vous à la page 16. Appuyez sur i.LINK
pour émettre des signaux à partir de la prise
AUDIO OUT i.LINK S200. Lorsque la fonction
i.LINK est activée, le voyant i.LINK s’allume.
Le câble i.LINK est-il raccordé correctement ?
,
Vérifiez le raccordement et raccordez solidement le câble.
Le bon câble i.LINK est-il utilisé ?
, Assurez-vous d’utiliser le câble i.LINK compatible
avec la prise i.LINK S200 (d’une longueur
inférieure à 3,5 mètres).
Le raccordement à l’appareil i.LINK a-t-il été vérifié ?
, Voir page 7. Reportez-vous au mode d’emploi
fourni avec l’appareil.
Plusieurs appareils i.LINK sont-ils raccordés ?
, Il se peut qu’aucun son ne soit émis si plusieurs
appareils i.LINK sont raccordés.
Aucun son n’est émis au début de la lecture.
,
En fonction de la technologie de protection contre la
copie utilisée, aucun son n’est émis pendant que les
appareils sont en train d’établir la connexion LINC.
Aucun son n’est émis à partir des prises
ANALOG OUT.
La fonction i.LINK est-elle activée ?
,
Lorsque la fonction i.LINK est activée, aucun son
n’est émis à partir des prises ANALOG OUT.
Appuyez sur i.LINK pour éteindre le voyant i.LINK.
Le sélecteur d’entrée de l’amplificateur est-il
correctement réglé ?
,
Raccordez correctement le sélecteur d’entrée de l’amplificateur
de manière à ce que le son soit émis à partir de ce lecteur.
, Assurez-vous que le lecteur est raccordé aux
bonnes prises d’entrée de l’amplificateur.
Le câble de raccordement est-il raccordé correctement ?
,
Vérifiez le raccordement et raccordez solidement le câble.
Aucun son n’est émis à partir des
connecteurs DIGITAL (CD) OUT.
La fonction i.LINK est-elle activée ?
,
Lorsque la fonction i.LINK est activée, aucun son
n’est émis à partir des prises DIGITAL (CD) OUT.
Appuyez sur i.LINK pour éteindre le voyant i.LINK.
Un Super Audio CD est-il en cours de lecture ?
,
Les signaux audio du Super Audio CD ne peuvent pas
être émis à partir des connecteurs DIGITAL (CD) OUT.
« D. OUTPUT » dans le menu est-il réglé sur « Off » ?
, Réglez « D. OUTPUT » sur « On » (voir page 24).
Aucun son n’est émis à partir de la prise
SUB WOOFER.
Sélectionnez-vous un mode lecture à sortie par caisson
de basses ?
,
Sélectionnez le mode de lecture de manière à ce que
le caisson de basses soit réglé sur «
(voir page 25).
Le disque en cours de lecture contient-il le signal LFE ?
,
Lors de la lecture d’une plage qui ne contient pas le
signal LFE, le signal est uniquement émis à partir
de la prise SUB WOOFER lorsque vous sélectionnez
«5
–
Small + SW » ou « FRT – Large + SW » pour le
mode de lecture multicanal (voir page 25).
a
»
Aucun son n’est émis à partir du casque
d’écoute.
La fonction i.LINK est-elle activée ?
, Lorsque la fonction i.LINK est activée, aucun son
n’est émis à partir de la prise PHONES. Utilisez la
sortie du casque sur votre amplificateur.
La lecture du disque ne démarre pas.
Le disque inséré est-il correct ?
,
Assurez-vous qu’un disque est inséré dans le lecteur.
,
Assurez-vous que le disque n’est pas placé à l’envers
sur le plateau de lecture. Placez le disque sur le
plateau de lecture avec l’étiquette tournée vers le haut.
, Si le disque est placé en position inclinée, chargez-
le de nouveau.
, Si le disque est sale, nettoyez-le (voir page 30).
, Assurez-vous que le disque est compatible avec ce
lecteur (voir page 15).
De l’humidité s’est condensée à l’intérieur du lecteur.
, Retirez le disque et laissez le lecteur sous tension
pendant environ une heure.
La télécommande ne fonctionne pas.
Y a-t-il des obstacles entre la télécommande et le lecteur ?
, Utilisez la télécommande à partir d’un endroit
dans lequel vous pouvez voir ce lecteur.
La télécommande n’est pas pointée vers le capteur de
télécommande du lecteur.
, Pointez la télécommande vers le capteur de
télécommande du lecteur.
Les piles de la télécommande sont-elles faibles ?
, Remplacez-les par des neuves.
31
Informations complémentaires
FR
Page 66

Messages affichés
Spécifications
Informations complémentaires
Le tableau suivant explique la signification des divers
messages qui s’affichent.
Message
TOC ERROR — Un disque incompatible est
BUS FULL C78:15 Le bus de signal de la
Code(s) d’erreur(s)
Cause et/ou solution
inséré.
configuration i.LINK est plein et
aucun signal supplémentaire ne
peut être émis à partir du lecteur.
Annulez la connexion LINC entre
l’appareil et ce lecteur.
Pendant la lecture d’un Super Audio CD
Plage de fréquence de lecture
Réponse en fréquence 2 Hz à 50 kHz (–3 dB)
Plage dynamique 108 dB ou plus
Distorsion harmonique totale
Pleurage et scintillement Valeur dans la limite mesurable
2 Hz à 100 kHz
0,0012 % ou mois
(±0,001 % W. PEAK) ou moins
Pendant la lecture d’un CD
Réponse en fréquence 2 Hz à 20 kHz
Plage dynamique 100 dB ou plus
Distorsion harmonique totale
Pleurage et scintillement Valeur dans la limite mesurable
0,0017 % ou moins
(±0,001 % W. PEAK) ou moins
Connecteurs de sortie
Type de
prise
ANALOG
OUT
DIGITAL (CD)
OUT OPTICAL*
DIGITAL (CD)
OUT COAXIAL*
PHONES
* Sort uniquement les signaux audio de CD
Prises
phono
Connecteur
de sortie
optique
carré
Connecteur
de sortie
coaxial
Prise phono
stéréo
Niveau de
sortie
2 Vrms
(à 50 kilohms)
–18 dBm
0,5 Vp-p
10 mW
Impédance de
charge
Plus de
10 kilohms
Longueur d’onde
de l’émission
lumineuse:
( )
660 nm
75 ohms
32 ohms
32
Section i.LINK
Broches 4 broches
Vitesse de transmission
Protocole de transmission
Format (sortie) Super Audio CD* (DSD PLAIN)
* Conforme à la technologie de protection contre la copie DTLA
(version 1.2).
FR
S200
(vitesse maximale de transmission
des données de 200 Mbps)
Protocole de transmission A/M
Signal PCM linéaire à 2 canaux
(IEC 60958-3)
Fréquence d’échantillonnage :
44,1 kHz
Page 67

Caractéristiques générales
Laser Laser à semi-conducteur
(SA-CD: λ = 650 nm)
(CD: λ = 780 nm)
Durée d’émission : continue
Puissance rayonnante du laser :
*Ces sorties correspondent à la valeur mesurée à une distance
d’environ 200 mm de la surface de la lentille de l’objectif sur le
point de lecture optique.
Puissance de raccordement
Consommation électrique 32 W
Dimensions (l/h/p) 430 × 127 × 387 mm
Masse (approx.) 16,2 kg (35 lbs 12 oz.)
5.47 uW à 650 nm
Modèle destiné à l’Amérique du
Nord:
120 V CA, 60 Hz
Autres modèles:
230 V CA, 50/60 Hz
(17 × 5 × 15
parties saillantes comprises
1
/4 po)
Accessoires fournis
Voir page 4.
La conception et les spécifications sont sujettes à modifications
sans préavis.
Informations complémentaires
33
FR
Page 68

Index
Informations complémentaires
A
Accessoires 4
Adaptateur 9
Affichage des informations
Amplificateur (non fourni) 5
AMS (détecteur automatique de musique) 20
ANALOG OUT
2 CH 6
5.1 CH 5
B
Balance du niveau de sortie 24
Branchement
Appareils audio
Alimentation
C
Câble
numérique coaxial 8
numérique optique 8
Cordon
branchement audio
branchement i.Link
Couche
D, E
DIGITAL (CD) OUT 8
Distance des enceintes 28
F, G, H
Filtre numérique 24
Fonction de gestion multicanal 25
I, J, K
i.Link
Introduction d’un disque 14
L
Lecture
d’un Super Audio CD multicanal
d’un disque 16
en entrant le numéro de plage 20
plages dans un ordre aléatoire 25
plusieurs fois 21
Lecture aléatoire 22
Lecture programmée
comment créer votre programme musical 23
modification du contenu du programme 23
Vérification du contenu du programme 23
Localisation
avec la fonction d’index (recherche d’index) 20
en contrôlant le son (recherche) 20
en entrant le numéro de plage 20
en observant l’indication de la durée (rechercher à
grande vitesse) 20
passage déterminé 20
plage spécifique 20
M, N, O
Mode lecture
bi-canal 25
multicanal 15
P, Q
Pause de lecture 16
Piles 4
R
Raccordement
composant audio 5
Raccordement i.LINK 7
Recherche
recherche à grande vitesse 20
recherche d’index 20
recherche temporelle 21
Répétition
lecture A-B 22
lecture complète 21
lecture d’une seule plage 22
S
Super Audio CD 14
Super Audio CD multicanal
T, U, V, W, X, Y
Télécommande 13
TEXT 18
TOC 15
Z
Zone 15
Printed on 100% recycled paper using VOC (Volatile Organic Compound)-free vegetable oil based ink.
Imprimé sur papier 100% recycé avec de l’encre à base d’huile végétale sans COV (composés organiques volatils).
34
FR
Sony Corporation Printed in Japan
 Loading...