

Page 1
2-103-394-12(2)
Super Audio CD
Player
Operating Inst ructions_____________ __ ___________
Mode d’emploi___________________ __ ___________
US
FR
SCD-C2000ES
©2004 Sony Corporation
Page 2
WARNING
To prevent fire or shock hazard, do not
expose the unit to rain or moi st u r e.
To avoid electrical shock, do not open
the cabinet. Refer servicing to qualified
personnel only.
To prevent fire, do not cover the ventil at ion of the
apparatus with news papers, table-cloths, curtains, etc.
And don’t place lighted candles on the apparatus.
To prevent fire or shock hazard, do not place obje c ts
filled with liquids, such as vas es , on the ap pa ratus.
Don’t throw away the battery with
general house waste, dispose of it
correctly as chemical waste .
NOTICE FOR THE CUSTOMERS IN
THE U.S.A.
This symbol is intended to alert the user to
the presence of uninsulated “da nge r ous
voltage” within the product’s enclosure that
may be of sufficient magn itude to constitute
a risk of electric shock to persons.
This symbol is intended to alert the user to
the presence of important oper a ting and
maintenance (servi ci ng ) in s tructions in the
literature accompanying the ap pliance.
CAUTION
The use of optical instruments wit h this product will
increase eye hazard.
WARNING
This equipment has been tested and found to comply
with the limits for a Class B digital device, pursuant to
Part 15 of the FCC Rules. These limits are designed to
provide reasonable protectio n aga i nst ha r mf ul
interference in a residential installation. This
equipment generates, uses, and ca n r adia te radio
frequency energy and, if not in sta ll ed and used in
accordance with the instructions, may cause harmful
interference to radio communications. However, there
is no guarantee that interference will not occur in a
particular installa tion. If this equipment doe s ca use
harmful interference to radio or television reception,
which can be determined by turning the equipment off
and on, the user is encouraged to try to correct the
interference by one or more of the following measures:
– Reorient or relocate the receiving antenna.
– Increase the separation betwee n the equi pment and
receiver.
– Connect the equipment into an outlet on a circuit
different from tha t to w h i ch the receiver is
connected.
– Consult the dealer or an experienc e d radio/TV
technician for help.
CAUTION
You are cautioned that any changes or modif icat ions
not expressly approved in this manual could void your
authority to operate this equipment.
Owner’s Record
The model and serial numbers are located at the rear.
Record the serial numbe r in the s pace pro vided belo w.
Refer to them whenever you call upon your So ny
dealer regarding this product.
Model No. ______________
Serial No. ______________
NOTICE FOR THE CUSTOMERS IN
CANADA
This Class B digital apparatus complies with Canadian
ICES-003.
CAUTION
The use of optical instruments with this product will
increase eye hazard.
CAUTION
TO PREVENT ELECTRIC SHOCK, MATCH WIDE
BLADE OF PLUG TO WIDE SLOT, FULLY
INSERT.
US
2
Page 3

Table of Contents
Features of the player....................................................................................4
Compatible Disc Types.................................................................................4
About the Super Audio CD...........................................................................5
Getting Started
Inserting batteries into the remote.................................................................6
Hooking Up the Audio Components.............................................................6
Playing Discs
Playing a Disc................................................................................................9
Using the Display........................................................................................11
Replacing Discs While Playing a Disc........................................................13
— Ex-Chan g e
Locating a Particular Point in a Track.........................................................14
Playing Tracks Repeatedly..........................................................................14
— Repeat Play
Playing Tracks in Random Order................................................................15
— Shuffle Play
Creating Your Own Program ......................................................................15
— Program Play
Enjoying a Multi-channel Super Audio CD................................................16
— Multi-channel management function
US
Storing Information About CDs
Labeling Discs.............................................................................................21
— Disc Name
Additional Informa ti on
Precautions ..................................................................................................22
Notes on Discs.............................................................................................23
Troubleshooting...........................................................................................24
Specifications ..............................................................................................25
Index to Parts and Controls......................................................................... 26
US
3
Page 4

Features of the player Compatible Disc Types
This player is designed to play back 2-channel
and Multi-channel Super Audio CDs, and
conventional CDs , a nd pr ovides the following
features:
• Mounted with a Discrete Dual Laser Optical
Pickup, capable of reading a Super Audio CD
or conventional C D depending on the
exclusive wavelength.
• Quicker track access performance enabled by
an advanced servo mechanism.
• A Multi-Channel Management function that
allows you to adjust the multi-channel
playback environment according to t he
allocation and s iz e of your speakers.
• A Super Audio D/A Converter, which allows
higher-quality sound reproduction.
• A Super Audio CD can mark up to 255 track
numbers. This feature appli es to SCDC2000ES.
• The supplied remote is capable of cont rolling
both the SCD-C2000ES and a conventional
Sony CD player.
You can play the following types of discs on this
player.
• Super Audio CDs
• Audio CDs
This player cannot pl ay the following disc s. If
you try to play them, th e er ror message “TOC
ERROR” or “NO DISC” will appear.
•CD-ROMs
• DVDs, etc.
Music discs encoded w ith copy r igh t
protection techn ol ogi es
This product is designed to playback discs that
conform to the Compact Disc (CD) standard .
Recently, various music discs encoded with copyright
protection technologies a re ma r ke te d by som e re cor d
companies. Please be aware that among those discs,
there are some that do not conform to the CD standard
and may not be playable by this product.
Notes on CD-R/CD-RW playback
Discs recorded on CD-R/CD-RW drives may not be
played back because of scratches, dirt, recording
condition, or the drive’s chara ct eri stics. Besides, the
discs, which are not yet finalized at the end of
recording, cannot be played back. In the se cases,
“READING” will remain or “TOC ERROR” will
appear in the display.
Note on dts-CDs
Do not play a dts-CD on this player. If you do, severe
noise will be generated.
US
4
Page 5
About the Super Audio CD
Super Audio CD i s a new high-quali t y audio
disc standard wh ere music is recorded in the
DSD (Direct Stream Digital) format
(conventional CDs are recorded i n t h e PCM
format). The DSD format, using a sampling
frequency 64 times higher than that of a
conventional CD, and with 1-bit quantization,
achieves bo th a wide fr equency rang e and a wide
dynamic range ac ross the audible frequency
range, and so provi d es music reproduction
extremely faithf ul to th e original sound.
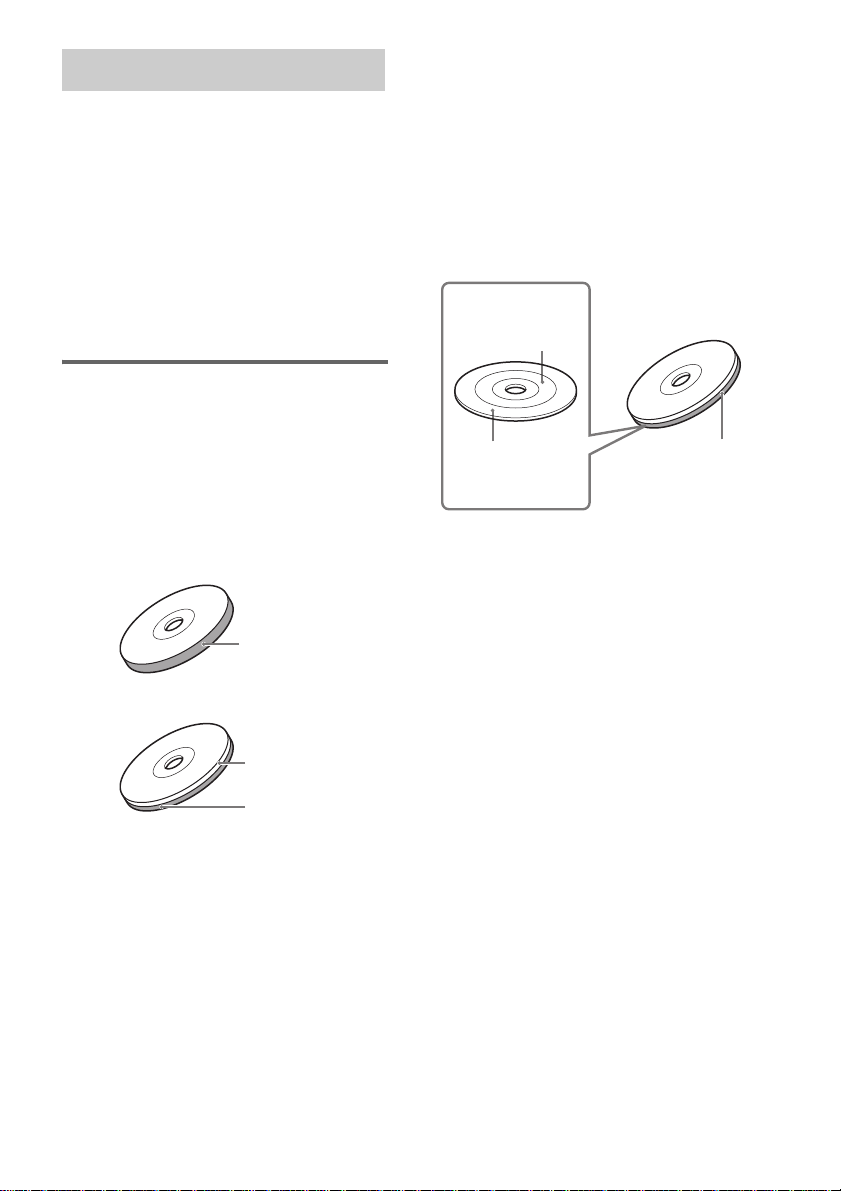
Types of Super Audio CDs
There are two types of discs, depending on the
SA-CD layer and CD layer combination.
SA-CD layer:A high-density signal layer for
Super Audio CD
CD layer
Single layer disc
(a disc with a single SA-CD layer)
Hybrid disc
(a disc with an SA-CD layer and a CD layer)
1)
: A layer that is readable by a
conventional CD pl ayer
SA-CD layer
2)
An SA-CD layer consists of the 2 channe l a rea
or the multi-channel area.
2 channel area: An area in which 2 channel
stereo tracks are recorded
Multi-channel area:
An area in which multichannel (up to 5.1 channels)
tracks are recorded
Example:
When the 2 channel area and the multi-channel area
are recorded on an SA-CD layer of a hybrid disc
2 channel area
Multi-channel area
1)
You can play the CD layer on a conventi ona l C D
player.
2)
Since both layers are on one side, it is not necessary
to turn the disc ove r.
3)
Press SA-CD/CD to select the la yer you want to
listen to (see page 10 ) .
4)
In case of a disc with bot h areas, press M ULTI/2CH
to select the area you want to listen to (see page 10).
4)
4)
SA-CD layer
3)
CD layer
SA-CD layer
3)
US
5
Page 6

Getting Started
Inserting batteries into
the remote
Insert two R6 (size-AA) batteries into the
battery compartment with the + and – correctly
oriented to the markings. When using the
remote, point it at the remote sensor on the
player.
Tip
Under normal conditions, the bat te r ie s should last for
about six months. When the remote no longer operates
the player, replace both batteri es with ne w one s.
Notes
• Do not leave the remote in an extrem e ly hot or a
humid place.
• Do not drop any foreign object into the remote
casing, particular ly when rep lacing the batteries.
• Do not use a new battery with an old one.
• Do not expose the remote sensor to direct sunlight or
lighting apparatus. Doing so may cause a
malfunction.
• If you do not intend to use the remote for an extended
period of time, remove the batteries to avoid possible
damage from battery leakage and corro s io n .
Hooking Up the Audio
Components
Connect the Su per Audio CD play er to a n audi o
component. Be sure to turn off the power of all
components before making connections and
connect securely to prevent noise.
Connecting a multi-channel
amplifier
When you have an am plifier equipped wi t h t h e
5.1CH input jacks (multi-ch annel amplifier, AV
amplifier, etc.) and connect the player and the
amplifier through the ANALOG 5.1CH OUT
jacks (FRONT L/R, SURR L/R, CENTER, SUB
WOOFER), you ca n play a Multi -channe l Super
Audio CD and enjo y th e m ulti-channel
playback.
Use audio conn ec tin g co rds fo r th is conn ect ion .
For FRONT or SURR conn ection, use the
connecting cords (Red and White jac ks) and be
sure to match the color-coded pin to the
appropriate jacks: white (left) to white and red
(right) to red. For CENTER and SUB WOOFER
connection, use t he connecting cords (Black).
FRONT or SURR connection
Audio connecting cords (supplied)
White (L)
Red (R)
CENTER or SUB WOOFER
connection
Audio connecting cords (supplied)
Black
US
6
Page 7
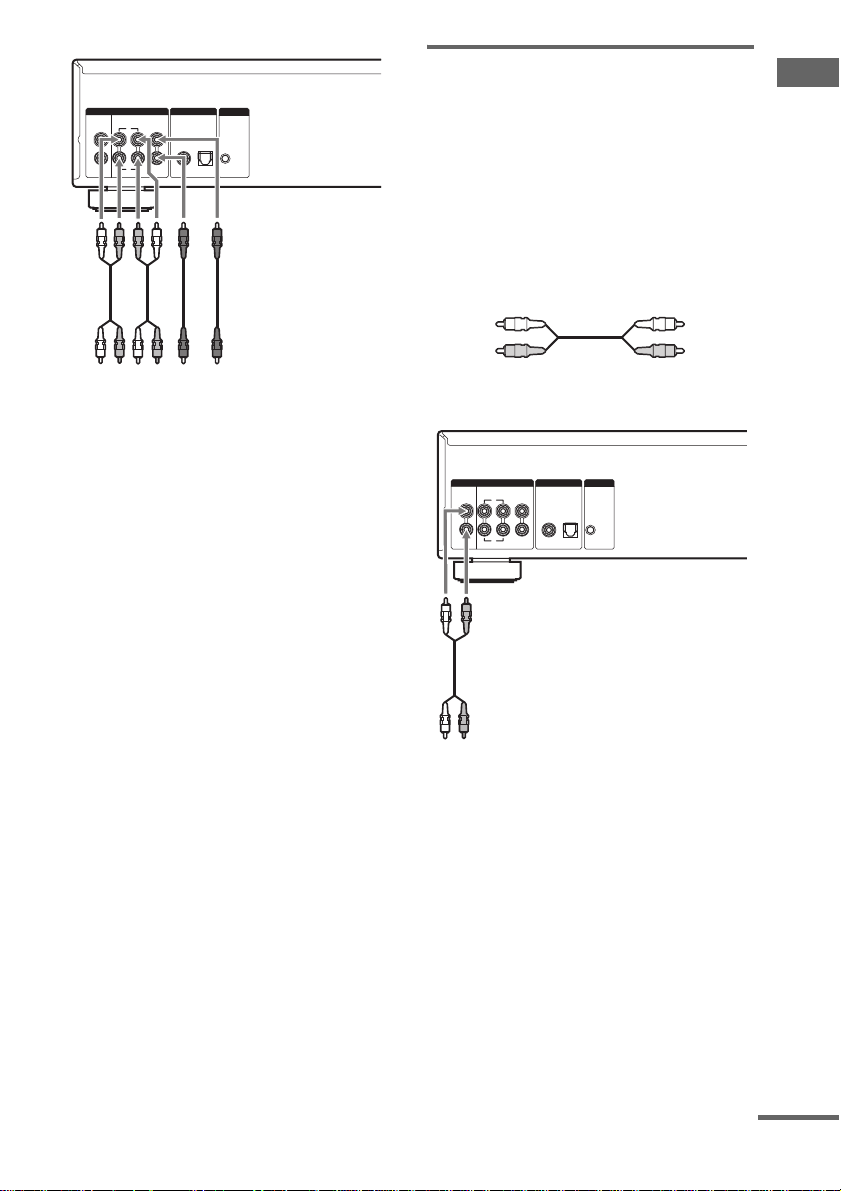
ANALOG DIGITAL(CD) IR REMOTE
5.1CH OUT2CH OUT
FRONT
L
L
R
R
OUT
OPTICALCOAXIAL
CENTER
SURR
SUB
WOOFER
IR
IN
To multi-channel
amplifier, AV amplifier,
etc.
ABC
D
A: To front speaker input jacks (L/R)
B: To surround or rear speaker input jacks (L/R)
C: To sub woof er inpu t jack
D: To center speaker input jack
Notes
• When you make the multi-channel connection,
connect the ANALOG 2CH OUT jacks also using
another audio connecting cord so that you can play a
CD (or Super Audio CD) when you set the input
selector of your amplifier to CD (or Super Aud io
CD) input.
• During playback of a conventional CD or a 2CH
Super Audio CD, the same signal that is output from
the ANALOG 5.1CH OUT FRONT L/R jacks is also
output from the ANALOG 2CH OUT jacks.
• During playback of a Multi-channel Super Audio
CD, the same signal that is output from the
ANALOG 5.1CH OUT FRONT L/R jacks is also
output from the ANALOG 2CH OUT jacks. (The
down mixed signal of the multi-channel signal is not
played back.)
• There are 5CH, 4CH, and 3CH Super Audio CD.
When you play these discs, the signal does not output
from all the jacks of the ANALOG 5.1CH OUT. F or
details of the playback, see th e cover or instructions
of the Super Audio CD.
Connecting a stereo ampli fier
or MD deck
When you connect a stereo amplifier or make an
analog connec tion with an MD deck, co nnect the
player and the com ponent through the
ANALOG 2CH OUT jacks.
Use an audio connecting cord for thi s
connection. Be sure to match the color-coded
pin to the appropriate jacks: white (left) to white
and red (right) to red.
Audio connecting cord (not supplied*)
White (L)
Red (R)
* If you do not make the ANALOG 5.1CH connection,
you can use the supplied audio connecting c or d fo r
the ANALOG 2CH connection.
ANALOG DIGITAL(CD) IR REMOTE
5.1CH OUT2CH OUT
FRONT
L
L
R
R
To CD (Super Audio CD) or line input jacks
(L/R) on a stereo amplifier, MD deck, etc.
Notes
• When a disc with the 2 channel area and mu l ti channel area is played through the ANALOG 2CH
OUT jacks, change the default pl ay b ack area to
“SEL– 2ch” (2 channel playback area) (see page 10).
If you do not, the multi-channel playback area will be
automaticall y pl ay ed back and only the si g nal to the
front speakers will be output. In this case, the vocals
or other sounds may not be heard, depending on the
disc.
• During playback of a Multi-channel Super Audio
CD, the same signal that is output from the
ANALOG 5.1CH OUT FRONT L/R jacks is also
output from the ANALOG 2CH OUT jacks. (The
down mixed signal of the multi-channel signal is not
played back.)
OUT
OPTICALCOAXIAL
CENTER
SURR
SUB
WOOFER
IR
IN
continued
Getting Started
US
7
Page 8
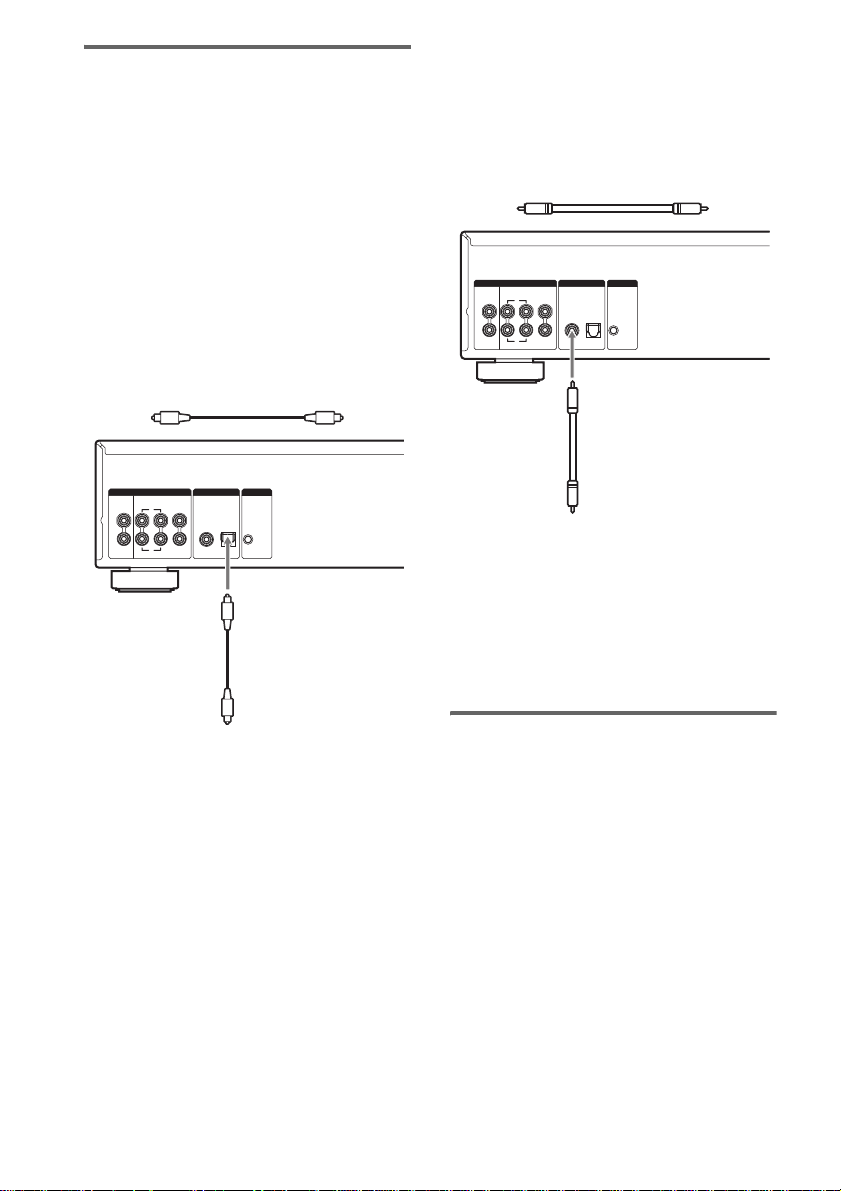
Connecting a digital
component
When you connect an MD deck or another
digital component through the DIGITAL (CD)
OUT connectors, you can make a digital
recording.
To connect through the DIGITAL
(CD) OUT OPTICAL connector
Use an optical digital cable for this connection.
When connecting the optical dig ital cab le to th e
DIGITAL (CD) OUT OPTICAL connector,
push the cable plug in until it clicks into place.
Be careful not to bend or twist the optical cable.
Optical digital cable (not supplied)
ANALOG DIGITAL(CD) IR REMOTE
5.1CH OUT2CH OUT
FRONT
L
L
R
R
OUT
CENTER
SUB
WOOFER
OPTICALCOAXIAL
IR
IN
SURR
To connect through the DIGITAL
(CD) OUT COAXIAL connector
Use a coaxial digital cable to connect the audi o
components equipped with coax ia l digital input
connectors.
Coaxial digital cable (not supplied)
ANALOG DIGITAL(CD) IR REMOTE
5.1CH OUT2CH OUT
FRONT
L
L
R
R
To CD coaxial digital input connector
on an MD deck, etc.
Note
Only the audio signals of conventional CDs can be
output from the DIGITAL (CD) OUT COAXIAL
connector. Those of the Super Audio CD cannot be
output through the DIGITAL (CD) OUT COAXIAL
connector.
OUT
OPTICALCOAXIAL
CENTER
SURR
SUB
WOOFER
IR
IN
To CD optical digital input connector
on an MD deck, etc.
Note
Connecting the AC power
cord
Connect the AC pow er cord to a wall outlet.
Only the audio signals of conventional CDs can be
output from the DIGITAL (CD) OUT OPTICAL
connector. Those of the Super Audio CD cannot be
output through the DIGITAL (CD) OUT OPTICAL
connector.
US
8
Page 9

When using another So ny CD
player in conjunct ion with this
player
You can set the supplied remote to be effective
on this player only by c hanging the command
mode of the remote.
To set the command mode of the
remote
• If the other player’s command mo de can be
set:
Set the CD1/2 switch of this player’s remote
to CD1 (factory setting), and set the other
player’s remote to CD2.
• If the other player’s command mo de cannot
be set:
Set the CD1/2 switch of this player’s remote
to CD2.
To set the command mode of this
player
1 Press MENU on the player.
2 Turn l AMS L (or press ./>
on the remote repeatedly) to select
“CD1/2 SEL”.
3 Press l AMS L (or ENTER on the
remote).
The current command mode appears.
4 Turn l AMS L (or press ./>
on the remote) to select “CD – 1” or
“CD – 2”, then press l AMS L (or
ENTER on the remote).
Playing Discs
Playing a Disc
The operations for normal play and the basic
operations during play are explaine d below.
1 Turn on the amplifier. Turn down the
volume level to the lowest.
2 Select the player position using the
input selector on the amplifier.
3 Press POWER on the player to turn on
the player.
4 Press A OPEN/CLOSE on the player to
open the disc tray, and place a disc on
the tray.
With the label side up Disc number
5 To place other discs, press DISC SKIP
(or DISC SKIP +/– on the remote)
repeatedly and place the discs in the
order you want to play.
Each time you press the but ton, the disc tray
turns and you can pl ace the discs in the
empty disc compartments. The player plays
the disc in front of you first.
6 Press PLAY MODE (or CONTINUE on
the remote) repeatedly to select ALL
DISCS or 1DISC Continuous Play
mode.
Each time you press CONTINUE on the
remote, “ALL DISCS” or “1 DISC”
appears in the display.
When you select The player plays
ALL DISCS All discs in the player
consecutively in the order
of disc number
1DISC Only the disc you have
selected
continued
Playing Discs
US
9
Page 10

7 Press N.
Playback starts from the first track. I f you
want to start playi ng f rom a specific track,
turn l AMS L (or press ./>
on the remote repeatedly) to select the tr ack
number before pr essing N.
8 Adjust the volume on the amplifier.
Basic operations during play
To Do the following:
Stop play Press x.
Pause play Press X.
Resume play
after pausing
Select a track Turn l AMS L (or press
Select a disc Press DISC SKIP (or DISC SKIP
Select a disc
directly
Eject a disc Press A OPEN/CLOSE on the
Note
During playback, increase the volume level gradually
starting from the lowest level. The output from this
player may contain band width that is out of the normal
listening range. This may cause damage to the speakers
or ears.
To locate a track directly by
entering the track number
Press the numeric button(s) on the remote
to enter the track number.
To enter a track number 11 or over
1 Press >10 on the remote.
2 Enter the corresponding digits.
To enter 0, press 10/0 on the remote ins t ead .
Example:
To play track number 30, press >10, then 3 and 10/0.
To play track number 100, press >10 twice, then 1, and
10/0 twice.
Press X or N.
./> on the remote
repeatedly).
+/– on the remote) repeatedly.
Press DISC 1-5 on the player.
When using the remote, follow the
procedure below.
1 Press DISC.
2 Press the corresponding
numeric button for the disc.
3 Press ENTER.
player.
Selecting the playback layer
When playing a hybr id disc with an SA-CD
layer and a C D layer ( page 5), yo u can se lect t he
layer you want to listen to. Also, since both
layers are on one side, it i s not n ecess ary to tu rn
the disc over. The facto ry setting is “SEL SA–
CD” (SA-CD layer).
Press SA-CD/CD to select the desired
playback layer.
To select the default playback
layer
1 Press MENU on the player.
2 Turn l AMS L (or press ./>
on the remote repeatedly) until “LAYER
SEL” appears in the display.
3 Press l AMS L (or ENTER on the
remote).
The current default lay er appears.
4 Turn l AMS L (or press ./>
on the remote) to select the desired
playback layer.
5 Press l AMS L (or ENTER on the
remote).
Selecting the playback area
When playing a disc with the 2 channel playback
area and the multi-channel playback area
(page 5), you can select the playback area you
want to listen to.
Press MULTI/2CH to select the desired
playback area.
To select the default playback
area
1 Press MENU on the player.
2 Turn l AMS L (or press ./>
on the remote repeatedly) until “M/2ch
SEL” appears in the display.
3 Press l AMS L (or ENTER on the
remote).
The current defaul t area appears.
10
US
Page 11
4 Turn l AMS L (or press ./>
on the remote) to select the desired
playback area.
5 Press l AMS L (or ENTER on the
remote).
Note
The multi-channel playback area is automatically
selected whenever you start playback bec au se “SEL–
Mch” (multi-channel playbac k are a ) is the factor y
setting. Select “SEL– 2ch” (2 channel pl ay back a r ea)
when the ANALOG 2CH OUT jacks are connected. If
you do not, only the signal to the front speakers will be
output.
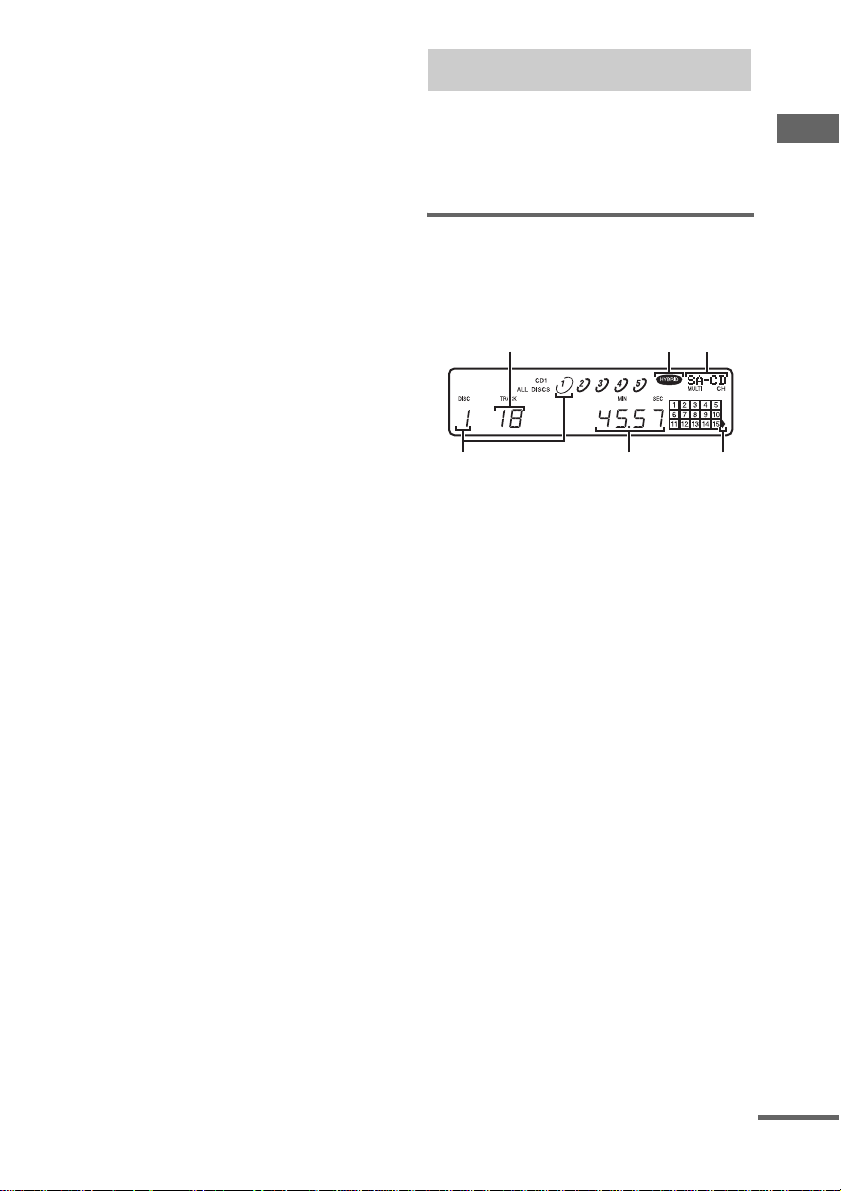
Using the Display
The display window shows various information
about the disc or track being played. This section
describes the cu rrent disc information and
information that appears for each play status.
Disc information when a disc
is loaded
The display shows the current disc number, total
number of tracks and total playing time.
ABC
Playing Discs
F
A: Total number of tracks
B: Hybrid disc
C: Currently selected disc and number of playable
channels
D: Track 16 and above (for discs with 16 or more
tracks)
E: Total playin g time
F: Current disc number
Notes on the disc number indications
• The red circle around a disc number indicates the
disc is ready to be played.
• A semi-circle around the disc number indicates a disc
with tracks to be played. In Program Play mode, the
semi-circle indicates a disc with programed tracks.
• The disc number disappears when no disc is detected
in the disc component.
E
D
continued
11
US
Page 12
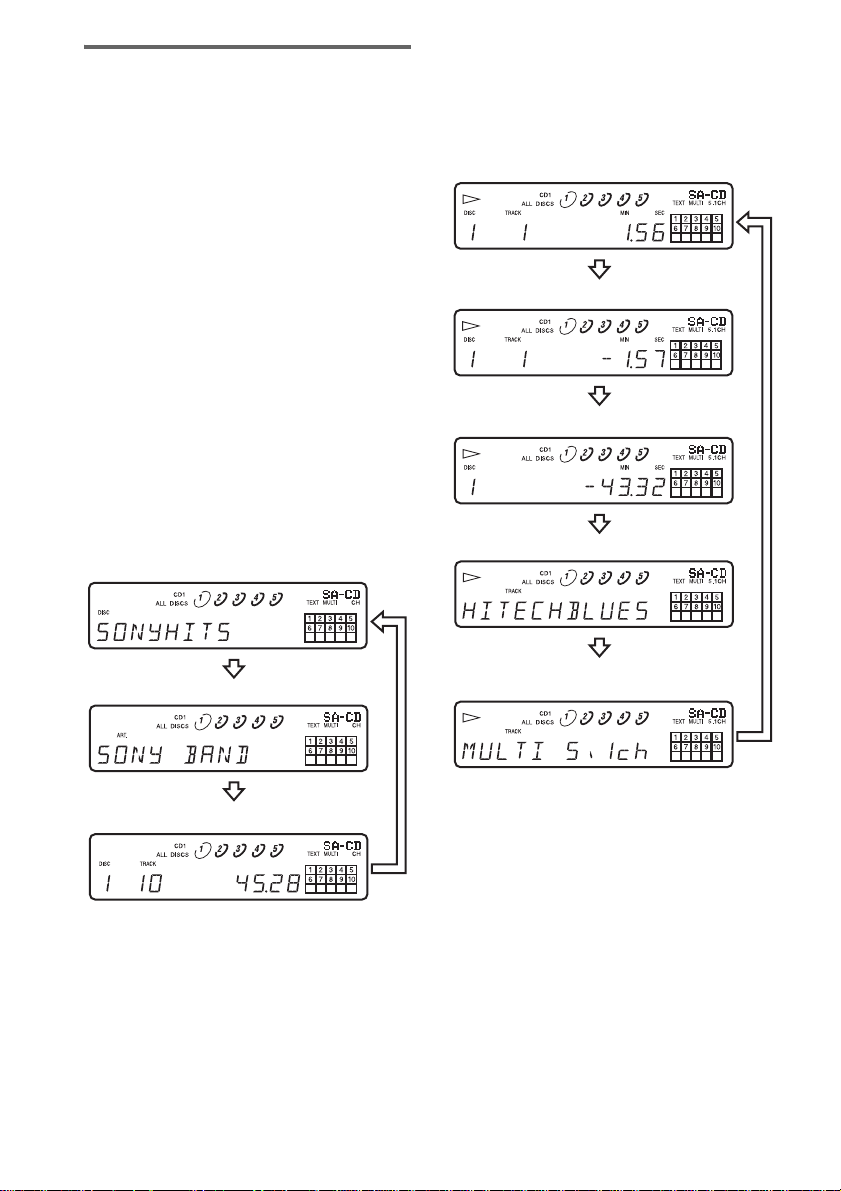
Displaying the information
TEXT discs contain information, such as the
disc name or artist name, as well as the audio
signals. This play er can display the disc na me,
artist name, and current track name as TEXT
information.
When the player dete cts a TEXT disc, “TEXT”
appears in the display. If your TEXT disc has
several languages, “MULTI-TEXT” appears in
the display. When you want to check the
information in another language, see
“Displaying the inf or m ation of a TEXT disc in
other langua ges” on page 13.
If a name has 13 or more characters, the first 12
characters will remain after th e name s crolls by
in the display.
Before you start playing
Press TIME/TEXT repeate dly.
Each time you press the button, the disc name or
artist name appears in the display. When you
select the artist name, “ART.” appears in the
display.
Disc title*
While playing a disc
Press TIME/TEXT repeatedly.
When the player det ects a Multi-channel Super
Audio CD, the channel information appears for
a few seconds after the track title appears.
Playing time of the current track
Remaining time of the current track
Remaining time of the disc
Track title
2)
1)
12
Artist name*
Total number of tracks and total playing time
* Only for TEXT discs
US
Channel information (ap pe ars only w hen the
player detects a Multi-channel Super Audio CD)
1)
Only when Continuous Play is selected
2)
Only for TEXT discs
Notes
• The display may not show all the charact e rs ,
depending on the disc.
• This player can display only the di sc nam e , art ist
name, and track names from TEXT discs. Other
information cannot be displ aye d.
Page 13

Turning off the in fo r mat io n in
the display
Press DISPLAY MODE on the remote.
Each time you press the button while playing a
disc, the display turns off and on alternately.
Even when the display is turned off, it will turn
on when certain butt ons are pressed, and then
turn off again after a few seconds.
Before you start playing, when you press the
button to turn off the display, “DISP OFF”
appears, an d w hen you press the but ton to turn
on the display, “DISP ON” appears.
Displaying the information of
a TEXT disc in other
languages
You can change the displayed language if the
TEXT disc has multi language capacity. When
the player detects s uch a TEXT disc, “MULTI TEXT” appears in the display. Change the
language accord in g t o th e pr ocedures below.
1 Press MENU on the player.
2 Turn l AMS L (or press ./>
on the remote repeatedly) until
“LANGUAGE” appears in the display.
3 Press l AMS L (or ENTER on the
remote).
The current selected language (ENGLI SH ,
FRENCH, GERM A N, etc.) flashes.
If the player cannot display the language
used in a TEXT disc, “OTHER LANG”
appears in the display.
4 Turn l AMS L (or press ./>
on the remote repeatedly) until the
desired language appears in the
display.
5 Press l AMS L (or ENTER on the
remote).
After a few seconds, the information
appears in the selected language.
Replacing Discs While
Playing a Disc
—Ex-Change
You can open the di sc tray while playing a disc
so that you can check what discs are to be played
next and replac e di sc s wit hou t in ter ru pt ing pl ay
of the current disc.
1 Press EX-CHANGE on the player.
The disc tray opens and two disc
compartments appear. Even if the player is
playing a disc, it does not stop playing.
2 Replace discs in the compartments
with new ones.
The player plays the disc on the left side
compartment a fter the current dis c, and then
the one on the right side compartment.
3 Press DISC SKIP (or DISC SKIP +/– on
the remote).
The disc tray turns and other two disc
compartment s appear.
4 Replace discs in the compartments
with new ones.
5 Press EX-CHANGE on the player.
The disc tray closes.
Note
Do not push the disc tray to close it in Step 5, as you
may damage the player.
While the disc tray is open by pressing EXCHANGE on the player
• If the play of the current disc ends, the player stops
playing. If the disc is played in 1DISC Repeat Play
mode (page 14), t he c urrent disc start s pl ayin g a gain.
• In ALL DISCS Shuffle Play mode (page 15), tracks
are reshuffled on the current disc.
• In Program Play mode (page 15), only the tracks on
the current disc are played.
Playing Discs
13
US
Page 14

Locating a Particular
Playing Tracks
Point in a Track
You can locate a pa rt i cul ar point in a track
during play or play pause.
Locating a point Do the following:
While monitorin g the
sound (Search)
By observing the
time indication
(High-Speed Search)
By setting the start
time (Time Search)
Tip
When “OVER” appears in the display, the disc has
reached its end. Press and hold m to go back.
Note
Tracks that are only a few seconds long may be too
short for monitoring. In this ca se , the pla ye r ma y not
search correctly.
Press and h o ld m/M
during play.
Press and h o ld m/M
during play pause.
1 Turn l AMS L (or
press ./> on the
remote repeatedly) in stop
mode to select the desired
track.
2 Press and hold m/M to
set the time to start play
while looking at the display,
then press N.
Repeatedly
— Repeat Play
You can play an ent i re disc or a specific tr ack
repeatedly. This function can be used w i th
1DISC Shuffle Play to repeat all the tracks in
random order (page 15), or with Program Play to
repeat all the tr acks in a program (p age 15).
Press REPEAT on the remote repeatedly
until “REP” or “REP1” appears in the
display.
REP: For all the tracks on the disc(s).
REP1:For a single track only.
When “REP” is selected, Repeat Play changes
according to the selected play mode .
When the play
mode is
ALL DISCS
Continuous Play
(page 9)
1DISC
Continuous Play
(page 9)
1DISC Shuffle
Play (page 15)
Program Play
(page 15)
The player repeats
All the tracks on all the discs in
sequential order.
All the tracks on t he current dis c in
sequential order.
All the tracks on t he current dis c in
random order.
All the tracks in th e program in
sequential order.
14
To cancel Repeat Play
Press REPEAT on the remote repeatedly until
both “REP” and “REP1” disappear.
Notes
• Repeat All Play cannot be used with ALL DISCS
Shuffle Play.
• Repeat All Play stops automatically after all the
tracks have been repeated five times.
• If you turn off the player or disconnect the power
cord, Repeat Play is cancele d .
US
Page 15

Playing Tracks in Random
Creating Your Own
Order
— Shuffle Play
When Shuffle Play is sel ected, the player will
play all the tracks on all the discs or on a specific
disc in random order.
Shuffle Play on all discs
You can play all the tracks on all the discs in
random order.
1 Press PLAY MODE (or SHUFFLE on the
remote) repeatedly in stop mode until
“ALL DISCS” and “SHUF” appear in the
display.
2 Press N.
“;” appears while the player is “shuffling”
the tracks. The player will stop after playing
all the tracks once .
Shuffle Play on one disc
You can play all the tracks on a specific disc in
random order.
1 Press PLAY MODE (or SHUFFLE on the
remote) repeatedly in stop mode until
“1DISC” and “SHUF” appear in the
display.
2 Press DISC 1-5 on the player.
“;” appears while the player is “shuffling”
the tracks. The player will stop after playing
all the tracks once .
To resume Continuous Play
Press PLAY MODE repeatedly (or CONTINUE
on the remote) in stop mode until “SHUF” and
“PGM” disappear.
Note
The player does not go back to tracks which have
already been played.
Program
—Program Play
You can pick out the t ra cks that you like and
specify the playback order in a program
containing up to 32 steps.
1 Press PLAY MODE repeatedly (or
PROGRAM on the remote) in stop
mode until “PGM” appears in the
display.
2 Press DISC 1-5 on the player, then
press l AMS L (or ENTER on the
remote).
The selected disc number appears in the
display.
When using the remote, press DISC first,
and then the corresponding numeric button
for the disc.
To program all the tracks o n a disc at once,
press l AMS L (or ENTER on the
remote) while “AL” is displayed.
3 Turn l AMS L (or press ./>
on the remote repeatedly) to select the
desired track number, then press l
AMS L (or ENTER on the remote).
To select a track number directly
Press the numeric button(s) on the remote.
For track number 11 or over, press >10 on
the remote (page 10).
If you entered the wrong track number
Press CLEAR on the remote. Then repeat
Step 3 to enter the correct track number.
4 Repeat Steps 2 through 3 to enter other
tracks.
Each time you enter a disc or track number,
the total number of program steps appears
in the display.
5 Press N.
Program Play star ts .
Playing Discs
continued
15
US
Page 16

To resume Continuous Play
Press PLAY MODE repeatedly (or CONTINUE
on the remote) in stop mode until “SHUF” and
“PGM” disappear.
Tip
The program remains even after Program Play ends.
Press N to play from the beginning of the progra m
again. The program remains even if you stop play.
Notes
• If you turn off the player, disconnect the power cord,
press A OPEN/CLOSE on the player, or switch the
playback layer or area, the progra m wil l be er as ed .
• If you switch the playback layer or area during
Program Play, a single track only will be played back
from its beginning, and then the progr a m wil l be
erased.
Checking the contents of the
program
Before you start playing or while the player
is playing, press CHECK on the remote
repeatedly.
Each time you press the button, the disc and
track numbers will appear in the display in the
programed order.
If you press CHECK on th e remote while the
player is playing, the programed disc an d track
numbers will appear starting with the currently
playing prog ram step.
Changing the contents of the
program
You can change the contents of the program in
stop mode.
To Do the following:
Erase a track 1 Press CHECK on the remote
Erase from the
last track in the
program
Add a track to the
end of the
program
Erase all tracks Hold down CLEAR on the remote
repeatedly until th e track
number you want to erase
appears.
2 Press CLEAR on the remote.
Press CLEAR on the remote.
Each time you press the button, the
last track of the p ro g ram is erased.
Perform Steps 2 through 3.
or x (for about 2 seconds) until
“PGM CLEAR” appears in the
display.
Enjoying a Multi-channel
Super Audio CD
— Multi-channel management
function
This player is equipped with a Multi-channel
management function that sets the playback
mode of the Super Audio CD by t he D SD - D SP
(built into the player ) according to the layout or
size of your speaker.
Front speakers
L
Center speaker
Sub woofer
LR
Surround speakers
To set the Multi-channel management functi on,
select the appropriate preset play back mode (2
channel mode or Multi-channel mode), and then
adjust the output level balance for each speaker
(only in the case of Multi-channel mode).
Notes
• This features only work when you play the Super
Audio CD.
• You may not be able to adjust the out put le ve l
balance depending on the speake r layout mode that
you selected.
R
16
US
Page 17

Selecting the playback mode
1 Press MENU on the player.
2 Turn l AMS L (or press ./>
on the remote repeatedly) until the
desired channel mode appears in the
display.
2chSP MODE: To play a 2 channel Super
Audio CD.
MchSP MODE: To play a Multi-channel
Super Audio CD.
3 Press l AMS L (or ENTER on the
remote).
The playback mode appears in the display.
4 Turn l AMS L (or press ./>
on the remote repeatedly) until the
desired playback mode appears in the
display.
In 2 channe l mode
Playback mode F SW
2ch DIRECT* a ––
2ch+SW aa
In Multi-channel mode
Playback mode F C SR SW
Mch DIRECT* aaaa
5–LARGE+SW L L L a
5–LARGE L L L ––
5–SMALL+SW S S S a
F–LARGE+SW L S S a
F–LARGE L S S ––
NO–CNTR+SW L –– L a
NO–CNTR L –– L ––
* Each signal outputs d i rectly from each speaker.
Explanation of table symbols
F: Front speakers
C: Center speaker
SR: Surround speakers
SW: Sub woofer
a: Signal is output
––: Signal is not output
L: Large
S: Small
About “Large” or “Small” speaker
An “L” speaker is a speaker that can
reproduce bass frequencies plent if ul ly. If
you select “S” for th e surround speaker s,
the bass frequencies will come from the
front speakers and/or sub woofer .
For normal use, select “Mch DIRECT” or
set all the speakers to “L” (ex. “5–
LARGE+SW”, “5–LARGE”, etc.). If th e
sound is noisy or the Multi-channel
playback is not effective while playing a
Multi-channel Super Audio CD, change the
settings of the speakers concerned to “S”.
5 Press l AMS L (or ENTER on the
remote).
To return to the normal display, press
MENU on the player.
Notes
• The Multi-channel mana ge me nt function does not
work when you select “Mch DIRECT” (you cannot
set the output level balanc e of ea ch speaker).
• The front speaker setting is set to “L” automatically
when you set the sub woofer to “––”.
• When you play a track that does not contain the LFE*
signal, the signal for the sub woofer does not output.
Therefore, when you select “Mch DIRECT”, “5–
LARGE+SW”, or “NO–CNTR+SW”, no signal
outputs from the sub woofer. However, when you
select “5–SMALL+SW” or “F–LARGE+SW”
(when you set the speaker setting to “ S”) , th e bass
frequencies will come from the sub woofer .
* Low Frequency Enhancement (described as “.1
CH”)
• If you select a playback mode other than “2ch
DIRECT” or “Mch DIRECT” using the Multichannel management function, the sound distribution
to the speakers will change, possibly causing a
decrease in overall sound volume. If this occurs,
adjust the volume with the volume control on the
connected amplifie r .
• If you change the playback mode while the player is
in Multi-channel mode, the output level bala nc e
settings will be canceled.
• This function cannot be used during CD playback.
Playing Discs
continued
17
US
Page 18
Adjusting t he output level
balance of each speaker
You can adjust the following items in the case of
Multi-channel mode:
SURR BAL
The relative output level balance between the
front speakers (FRONT L/R) and the surround
speakers (SURR L/R)
CNTR BAL
The relative output level balance between the
front speakers (FRONT L/R) and the center
speaker (CENTER)
SW BAL
The relative output level balance between the
front speakers (FRONT L/R) and the sub woofer
(SUB WOOFER)
Notes
• Some adjustment may not work depending on the
Multi-channel mode that you selected.
• You cannot adjust the s pe ak er lev e l when “Mch
DIRECT” is selected.
To adjust the output level
balance on the front panel of the
player
You can adjust the output level balance of each
speaker while listening during pl ayback. You
can also adjust it while listening to the test to ne
during stop mode .
1 Press MENU.
2 Turn l AMS L until “LEVEL ADJ”
appears in the display.
3 Press l AMS L.
During play back, go to Step 6.
4 Turn l AMS L until “TONE ON”
appears in the display.
5 Press l AMS L.
The test tone issues from the speakers in
sequence with the speaker type appearing in
the display.
6 Turn l AMS L until the desired
item appears in the display.
Select the item from “SURR BAL”,
“CNTR BAL”, or “SW BAL”.
Note
When you set the sub woofer to “––” in the Multichannel mode (page 17), “SW BAL” cannot be
adjusted (“NOT IN USE” appears). Similarly,
“CNTR BAL” or “SURR BAL” cannot be
adjusted (“NOT IN USE” appears) when you set
the corresponding speaker to “––” .
7 Press l AMS L.
The balance adjustment display appears.
In stop mode, the tes t tone is output from
the selected speaker.
Example:
When you select “SURR BAL” during stop
mode, the test tone is output from the fron t
speakers and surround speakers.
8 Turn l AMS L to adjust the output
level.
Note
The output level balance can be adjusted in up to
24 steps. Since fine adjustmen ts c an be ma de , it
may be difficult to observe the movement of
needle.
9 Press l AMS L.
The player status retur ns to Step 6.
Repeat Steps 6 through 9 for more
adjustments.
10Press MENU after you finish adjusting.
The display retur ns to the normal displa y.
To adjust the output level from
the remote
You can adjust the output level of each speaker
from the listening po sition by using t he supplied
remote.
1 Press LEVEL ADJ during playback or
stop mode.
During playback, g o to St ep 4.
2 Press ./> repeatedly until “TONE
ON” appears in the display.
18
US
Page 19

3 Press ENTER.
The test tone issues from the speakers in
sequence with the speaker type appearing in
the display.
4 Press ./> repeatedly until the
desired item appears in the display.
Select the item from “SURR BAL”,
“CNTR BAL”, or “SW BAL”.
Note
When you set the sub woofer to “––” in the Multichannel mode (page 17), “SW BAL” cannot be
adjusted (“NOT IN USE” appears). Similarly,
“CNTR BAL” or “SURR BAL” cannot be
adjusted (“NOT IN USE” appears) when you set
the corresponding speaker to “––”.
5 Press ENTER.
The balance adjustment display appears.
In stop mode, the test tone is output from
the selected speaker.
Example:
When you select “SURR BAL” during stop
mode, the test tone is output from the fro nt
speakers and surround speakers.
6 Press ./> repeatedly to adjust
the output level.
Note
The output level balance can be adjusted in up to
24 steps. Since fine adjustment s can be ma de , it
may be difficult to observe th e mo vement of
needle.
7 Press ENTER.
The player status returns to Step 4.
Repeat Steps 4 th ro ugh 7 for more
adjustments.
8 Press LEVEL ADJ after you finish
adjusting.
The display returns to the normal display.
Adjusting the speaker
distance
You can adjust t he s p eaker distance when the
connected amplifier does not have the setting
menu for speaker distance. If the amplifier has
this function, we recommend that you set the
speaker distance on the amplifi er. This setting is
available only for the Multi-channel Super
Audio CD.
Note
When you set the speaker distance on this player and
the amplifier, both of the setti ng ma y wor k an d you
may not be able to get the proper result.
FRT DIST
The distance from your listening position to the
front speakers
You can adjust from 3 to 23 feet (1.0 met er to 7.0
meters) in 1 foot (0.1 meter) ste ps .
If both front speakers are not placed an equal
distance from your listening position, set the
distance to the closest speaker.
SURR DIST
The distance from your listening position to the
surround speakers
You can adjust from 3 to 23 feet (1.0 met er to 7.0
meters) in 1 foot (0.1 meter) ste ps .
If both surround speakers are not placed an equal
distance from your listening position, set the
distance to the closest speaker.
CNTR DIST
The distance from your listening position to the
center speaker
You can adjust from 3 to 23 feet (1.0 met er to 7.0
meters) in 1 foot (0.1 meter) ste ps .
SW DIST
The distance from your listening position to the
sub woofer
You can adjust from 3 to 23 feet (1.0 met er to 7.0
meters) in 1 foot (0.1 meter) ste ps .
DIST UNIT
The unit of measure for setting distances (meter
or feet)
The initial setting is “SEL–FEET”.
Playing Discs
continued
19
US
Page 20

Note
Speaker distance cannot be adjusted in the following
cases.
– When the player is reading the disc inf or m at ion of
CD (or the CD area of Super Audio CD)
– When the player is reading the 2 chann el area of
Super Audio CD
1 Press MENU on the player.
2 Turn l AMS L (or press ./>
on the remote repeatedly) until “SPK
DIST” appears in the display.
3 Press l AMS L (or ENTER on the
remote).
4 Turn l AMS L (or press ./>
on the remote repeatedly) until the
desired item appears in the display.
Select the item from “FRT DIST”, “SURR
DIST”, “CNTR DIST” or “SW DIST”.
Note
When you set the sub woofer to “––” in the Multichannel mode (page 17), “SW DIST” can not be
adjusted (“NOT IN USE” appears). Similarly,
“CNTR DIST” cannot be adjusted (“NOT IN
USE” appears) when you set the c enter speaker to
“––”.
5 Press l AMS L (or ENTER on the
remote).
The speaker distance adjustment dis play
appears.
Example:
When you select “SURR DIST” (with
“DIST UNIT” set to “SEL–FEET”).
7 Press l AMS L (or ENTER on the
remote).
The player status retur ns to Step 4.
Repeat Steps 4 through 7 for more
adjustments.
8 Press MENU on the player after you
finish adjusting.
The display retur ns to the normal displa y.
To select the distance unit
In Step 4 above, select “DIST UNIT”.
Turn l AMS L (or press ./> on
the remote) to select “SEL–METER” or “SEL–
FEET”, then press l AMS L (or ENTER
on the remote).
To set speaker distances back to
the default
Set all speaker di st ances to 10 feet (3 met ers).
20
6 Turn l AMS L (or press ./>
on the remote repeatedly) to adjust the
speaker distance.
US
Page 21

Storing Information About CDs
8 Press MENU to store the disc name.
Repeat Steps 1 through 8 to assign disc
names to other di scs.
Labeling Discs
—Disc Name
The player can store the information called
“Disc Name”, up to 10 0 di scs (for the Hybrid
disc, each layer is correspond to the Disc Name).
Once you have store d t he disc name for a disc,
the player automat ically recalls what you have
stored whenever you select that disc.
You can label discs using up to 12 characters
and have the player display the disc name each
time you select the disc.
Note that you cannot cha nge the disc title of a
TEXT disc.
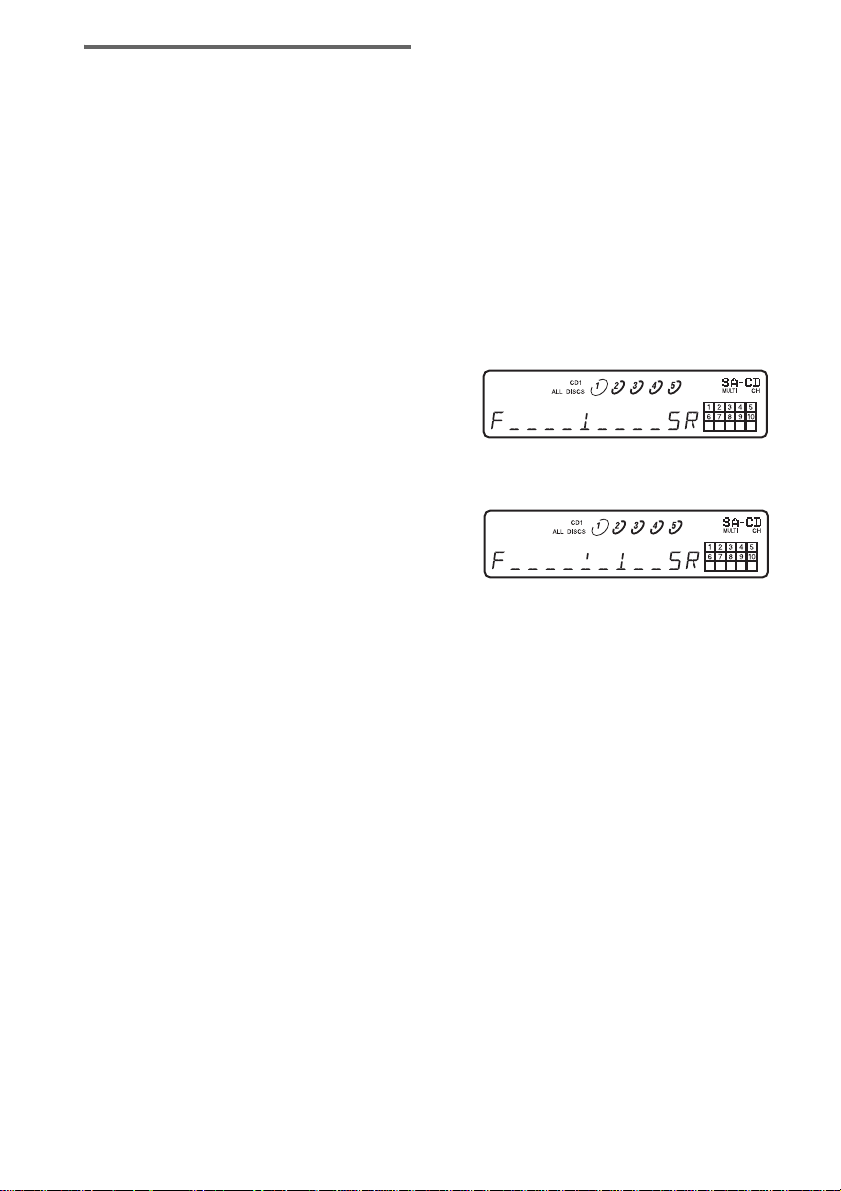
Labeling discs on the player
1 Insert or select the disc.
2 Press MENU.
3 Turn l AMS L until “DISC NAME”
appears in the display.
4 Press l AMS L.
“NAME INPUT” ap pears, th en the fl ashing
cursor appears.
5 Turn l AMS L until the character
you want appears in the display.
The followin g ch aracters can be sele cted.
A - Z, 0 - 9, + – / < = > ? @ [ \ ] _ (space)
6 Press l AMS L (or M) to select
the character.
The flashing cursor appears to indicate the
next space to be input.
Example:
To input AA
Turn l AMS L until “A” appears.
t Press l AMS L (or M). t
Turn l AMS L until “A” appears.
t Press l AMS L (or M).
7 Repeat Steps 5 and 6 to input more
characters.
Labeling discs using the
remote
1 Insert or select the disc.
2 Press NAME INPUT.
The flashing curs or appears.
3 Press CAPS repeatedly to select the
desired character type.
Each time you press the button, th e dis p lay
changes cyclically as follows:
“INPUT ABC” (capital letters and
symbols) y “INPUT 123” (numbers)
4 Press the numeric button to input
characters.
x When “INPUT ABC” is selected
To select Do the following:
, +, – Press the numeric button 1*
repeatedly.
A - Z Press the numeric button 2-9
(the button corresponding to
the desired character)
repeatedly.
* If you press > repeatedly after pressing the
numeric button 1, the following symbols can be
selected:
/ < = > ? @ [ \ ] _ (space)
If you press SPACE, you can select space
directly.
x When “INPUT 123” is selected
Press the desire d numeric button.
5 Press M to select the character.
The flashing curs or appears to indicate th e
next space to be input.
Example:
To inpu t A A
Press the numeric button 2 once. t Press
M. t Press th e numeric button 2 once.
t Press M.
6 Repeat Steps 3 through 5 to input more
characters.
Storing Information About CDs
continued
21
US
Page 22

7 Press ENTER to store the disc name.
Repeat Steps 1 thro ugh 7 to assign disc
names to other discs.
Other operations
To Do the following:
Correct a wrong
character
Erase a disc name
Erase all disc
names
Note
You cannot use the Disc Name when you play the disc
on other players.
1 Press m/M repeated ly until
the incorrect character flashes.
2 Press CLEAR on the remote to
delete the incorrect cha racter,
then input the correct character.
3 Press ENTER on the remote to
store the disc name.
1 Insert or select the disc you
want, then press NAME INPUT
on the remote.
2 Press CLEAR on the remote
repeatedly to de lete all the
characters.
3 Press ENTER on the remote.
1 Turn off the player.
2 While holding down x, press
POWER on the player.
After “ERASING” is displayed,
“ALL ERASE” appears in the
display and all disc names are
erased.
Additional Information
Precautions
On safety
• Caution – The use of o ptical instruments with this
product will increase eye hazard.
• Should any solid object or liquid fall into the cabinet,
unplug the player and have it checked by qualified
personnel before operating it any further.
• AC power cord must be changed only at the qualified
service shop.
• The unit is not disconnected from the AC power
source (mains) as long as it is connected to the wall
outlet, even if the unit itse lf ha s been turned off.
On power sources
• Before operating the player, check that the operating
voltage of the player is identical with your local
power supply. The operating voltage is indicated on
the nameplate at the rear of the player.
• The player is not disconnected from the ma ins as
long as it is attached to the mains, even if the player
itself has been turned of f .
• If you are not going to use the player for a long time,
be sure to disconnect the player from the ma ins. To
disconnect the mains lead, grasp the plug itself; never
pull the cord.
On placement
• Place the player in a location with adequate
ventilation to prevent heat b uild-up in the player.
• Do not place the player on a soft surface such as a rug
that might block the ventilati on hole s on the bottom.
• Do not place the player in a location near heat
sources, or in a place subject to dire ct sunlight,
excessive dust or mechanical shock.
On operation
• If the player is brought directly from a cold to a warm
location, or is placed in a very damp room, moisture
may condense on the lenses inside the player. Should
this occur, the player may not ope r at e prop erly. In
this case, remove the d isc and leave the player tu rned
on for about an hour until the moisture evaporates.
• During power on, some noise may be heard while the
disc is being loaded into the Super Audio CD player.
This is not a malfunction.
On adjusting the volume
Do not turn up the volume too much while listening to
a portion with very low level inputs or no audio signals.
If you do, the speakers may be damaged when a peak
level portion is played.
22
US
Page 23

On inserting a disc
You may hear a transmission or a mechan ic al sound
from the play e r. This indicates that the player is
automatically adjusting its internal mechanisms
according to the inserted di sc .
You may also hear the mechanical sound from the
player when you insert a warped disc.
On cleaning
Clean the cabinet, panel, and controls with a soft cloth
slightly moistened with a mi ld detergent solution. Do
not use any type of abrasive pad, scouring pow der, or
solvent such as alcohol or benzine.
On transportation
• Be sure to remove the discs on the tray.
• Be sure to close the disc tray.
If you have any questions or problems concerning your
player, please consult your neare st S ony de a le r.
Notes on Discs
On handling discs
• To keep the disc clean, handle the disc by its edge .
Do not touch the surfac e.
• Do not stick paper or tape on the dis c.
Additional Information
• Use only round-shaped discs. If you use a sp ecia l
shaped disc (e.g., star-shaped, hea rt- shaped, or
square-shaped, etc.), the player may be dama ge d.
• Do not use a disc with a seal attached on such as on
a used disc or rental disc.
On keeping discs
• Do not expose the disc to direct sunlight or heat
sources such as hot air ducts.
• After playing, store the disc in its case. If you put it
on top of another disc without the case, the disc may
be damaged.
On placing discs on the disc tray
Make sure the disc is positione d se c ur el y on the tray.
If not, the player or the disc may be dam a ge d.
On cleaning
• If the disc is dirty with fin ge rprints or dust, it may
lessen the quality of the audio out.
• Before playing, clean the disc with a cleaning cloth.
Wipe the disc from the center ou t .
• Clean the disc with a soft cloth slightl y moistened
with water, and remove moisture with a dry cloth.
• Do not use solvents such as benzine, thinner, record
cleaners, or anti-static spray.
23
US
Page 24

Troubleshooting
If you experience any of the following
difficulties while using the player, use this
troubleshooting guide to help you remedy the
problem. Should any problem persist, consult
your nearest Sony dealer.
There is no sound.
• Check that the player is connected securely.
• Make sure you operate the amplif ier correctly.
• When you use the headphones, adjust the volume
with LEVEL.
There is no sound from the DIGITAL (CD) OUT
connectors.
• The audio signals of the Super Audio CD cannot
be output from the DIGITAL (CD) OUT
connectors.
The disc does not play.
• There is no disc inside the player.
• Place the disc on the disc tray with the la be l side
up.
• The disc is pl a ced at an angle. Reload the disc .
• Clean the disc (see page 23).
• Moisture has condensed inside the player.
Remove the disc and leave the pla yer turned on fo r
about an hour.
• There is an inc ompatible disc on the tr a y ( s e e
page 4).
The remote does not function.
• Remove any obstacles in the path of the remote
and the player.
• Point the remote at the remote sensor on th e
player.
• If the batteries in the re mo t e ar e weak , rep l ace
with new ones.
• Be sure that the comma nd mode of the remote
(position of the CD1/2 switch) (page 28) matches
the command mode of the player (page9).
There is no sound from the SUB WOOFER
jack.
• Select a playback mode in which the sub woofer
signal is output from the SUB WOOFER jack.
The mode indication is displaye d with “+ SW”
(page 17) when such a mode is selected.
• When you play a track that does not contain the
LFE signal, the signal outputs from the SUB
WOOFER jack only when you select “5–
SMALL+SW” or “F–LARGE+SW” for Mu ltichannel mode (page 17).
A disc cannot be ejected and “LOCKED”
appears in the front panel display.
• Contact your Sony dealer or local authorized Sony
service facility.
“REMOVE” is displa y ed in th e f ron t p ane l
display.
• Remove the disc in front of you and turn of f the
player once, and then turn it on again.
After you have attempted the
prescribed corrective actions
If the player still does not operate properly, or if
other problems not described above occur , tur n
off the player, unpl ug it from the power outl et
for a few minutes, then reinsert the plug into the
power outlet.
24
US
Page 25

Specifications
When a Super Audio CD is played
Playing frequency range 2 Hz to 100 kHz
Frequency response 2 Hz to 40 kHz (–3 dB)
Dynamic range 101 dB or more
Total harmonic distortion rate
0.003 % or less
Wow and flutter Value of measurable limit
(±0.001 % W. PEAK) or
less
When a CD is played
Frequency response 2 Hz to 20 kHz
Dynamic range 97 dB or more
Total harmonic distortion rate
0.0032 % or less
Wow and flutter Value of measurable limit
(±0.001 % W. PEAK) or
less
Output connector
ANALOG OUT (phono jacks):
Output level 2 Vrms (at 50 kilohms)
Load impedance Over 10 kilohms
DIGITAL (CD) OUT OPTICAL*
(square optical output connector ) :
Output level –18 dBm
DIGITAL (CD) OUT COAXIAL*
(coaxial output co nn e ctor):
Output level 0.5 Vp-p
Load impedance 75 ohms
PHONES (stereo phone jack):
Output level 10 mW
Load impedance 32 ohms
* Output only the audio signals of the CD
Supplied accessories
Audio connecting cord Red and White × 2 (2)
Black × 2 (2)
Remote commander RM-SC505 (1)
Battery R6 (size-AA) (2)
Design and specifications are subject to change
without notice.
Additional Information
General
Laser Semiconductor laser
(Super Audio CD: λ= 650
nm) (CD: λ= 780 nm)
Emission duration:
continuous
Power requirements 120 V AC, 60 Hz
Power consumption 15 W
Dimensions (w/h/d) 430 × 115 × 420 mm incl .
projecting parts
Mass (approx.) 5.8 kg
25
US
Page 26

Index to Parts and Controls
Further details ar e provided on the pages indicated in parentheses.
Instructions in this manual describe the controls on the player. You can also use the controls on the
remote if they have the same or similar names as those on the player.
Front Panel
A POWER s wit c h (9 , 22 )
B DISC 1-5 buttons (10, 15)
Press to select the disc directly.
C Remote sensor (6)
D Display window (11)
E N button (10, 14, 15)
F X button (10)
G x button (10, 16, 22)
H m/M buttons (14, 21)
I l AMS L dial
(AMS: Automatic Music Sensor) (9, 10, 13,
14, 15, 17, 18, 20, 21)
J EX-CHANGE button (13)
Press to replace discs while playi ng a disc .
K DISC SKIP button (9, 13)
Press to select the disc.
L A OPEN/CLOSE button (9)
M LEVEL control
Adjust the headphones volume.
N PHONES jack
Connect the headphones.
During playback of a Multi-channel Super Audi o
CD, the same signal that is output from the
ANALOG 5.1CH OUT FRONT L/R jacks is
output from the PHON ES ja ck.
O Disc tray (9)
P MULTI CHANNEL DECODING indicator
Turns on when you turn on the player, or when the
Multi-channel Super Audio CD is loaded and
select the multi-cha nnel pl ayback area by p ress ing
MULTI/2CH.
Q TIME/TEXT button (12)
Each time you press the button, the playing time of
the track, the remaining time of the disc, or TEXT
information appears in the displ ay.
In name input mode, pr ess to select the character
type.
R PLAY MODE button (9, 15)
Press to select the play mode.
S MULTI/2CH button (5, 10)
Press to select the playback area when a disc with
the 2 channel area and the multi-c ha nnel area
(page 5) is loaded.
T SA-CD/CD button (5, 10)
Each time you press the button while playing back
a hybrid disc, the layer to be played back switches
between the SA-CD layer and the CD layer.
U MENU button (9, 10, 13, 17, 18, 20, 21)
Press to enter the menu.
Press to exit from the menu and return to the
normal display.
26
US
Page 27

Rear Panel
ANALOG DIGITAL(CD) IR REMOTE
5.1CH OUT2CH OUT
FRONT
SURR
L
L
R
R
A ANALOG 2CH OUT jacks (7)
B ANALOG 5.1CH OUT jacks (6)
C DIGITAL (CD) OUT COAXIAL connector (8)
D DIGITAL (CD) OUT OPTICAL connector (8)
E IR REMOTE IR IN jack
Connect to a component equipped with the I R
output jack.
CENTER
SUB
WOOFER
OUT
OPTICALCOAXIAL
IR
IN
Additional Information
continued
27
US
Page 28

Remote
CD2
CD1
PLAY MODE
CONTINUE SHUFFLE
NAME
INPUT
DISC
CAPS
DISPLAY
MODE
TIME/TEXT
SPACE
ABC DEF
PROGRAM
SA-CD/CD
MULTI/2CH
123
JKL MNOGHI
456
TUV WXYZPQRS
78
>10 ENTER
10/0
REPEAT CHECK
AMS
DISC SKIP
–+
CLEAR
LEVEL
ADJ
A CONTINUE button (9, 15, 16)
Press to resume Continuous Play from Shuffle Play
or Program Play.
SHUFFLE button (15)
PROGRAM button (15)
B NAME INPUT button (21)
Press to enter the name input m ode .
C DISC button (10, 15)
Press to select the disc.
CAPS button (21)
Press to switch between capi tal letters (ABC) and
numbers (123) in name input mode.
D Nume ric buttons (10 , 15, 21)
E >10 button (10, 15)
F REPEAT button (14)
G CHECK button (16)
Press to check the programed order .
9
H H button (10, 14, 15)
X button (10)
x button (10, 16, 22)
I AMS ./> buttons
(AMS: Automatic Music Sensor) (9, 10, 13,
14, 15, 17, 18, 20, 21)
J m/M buttons (14, 21)
K DISC SKIP +/– buttons (9, 13)
Press to select the disc.
L CD1/2 (command mode) switch (9)
Select the command mode.
M DISPLAY MODE button (13)
Press to turn the displa y information off or on.
N SA-CD/CD button (5, 10)
Each time you press the button while playing back
a hybrid disc, the layer to be played back switches
between the SA-CD layer and the CD layer.
O MULTI/2CH button (5, 10)
Press to select the playback area when a disc with
the 2 channel area and the multi-c ha nnel area
(page 5) is loaded.
P TIME/TEXT button (12)
Each time you press the button, the playing time of
the track, the remaining time of the disc, or TEXT
information appears in the displ ay.
SPACE button (21)
Press to insert a space in name input mode.
Q ENTER button (9, 10, 13, 15, 17, 19, 20, 22)
R CLEAR button (15, 16, 22)
Press to delete a progr a me d tr a ck number.
S LEVEL ADJ button (18)
Press to adjust the outp u t le ve l ba la nce for the
Multi-channel manage me nt function (page 16).
28
US
Page 29

Page 30

AVERTISSEMENT
Afin d’éviter tout risque d’incendie ou
d’électrocution, n’exposez pas cet
appareil à la pluie ou à l’humidité.
Afin d’écarter tout risque
d’électrocution, gardez le boîtier fermé.
Ne confiez l’entretien de l’appareil qu’à
un personnel qualifié.
Afin d’éviter tout risque d’ince ndie, n’obstruez pas la
ventilation de l’appareil (journaux, nappes, rideaux,
etc.). Ne posez pas de bougies allumé e s sur l’ap pare il.
Afin d’éviter tout risque d’incendie ou d’électrocution,
ne placez pas d’objets contena nt un liquide (un vase,
par exemple) sur l’appareil.
Ne jetez pas la pile avec vos
déchets ménagers, suivez le
programme de récupération et de
recyclag e d es piles et batteries
usagées en vigueur.
AVERTISSEMENT POUR LES
UTILISATEURS AU CANADA
Cet appareil numérique de la classe B est conforme à la
norme NMB-003 du Canada.
ATTENTION
L’utilisation d’instru me nts optiques avec ce produit
augmente les risques pour les veux.
ATTENTION
POUR EVITER LES CHOCS ELECTRIQUES,
INTRODUIRE LA LAME LA PLUS LARGE DE LA
FICHE DANS LA BORNE CORRESPONDANTE
DE LA PRISE ET POUSSER JUSQU AU FOND.
FR
2
Page 31

Table des matières
Caractéristiques du lecteur ............................................................................4
Disques compatibles......................................................................................4
A propos du Super Audio CD.......................................................................5
Mise en service
Mise en place des piles dans la télécommande .............................................6
Connexion des composants audio.................................................................6
Lecture des disques
Lecture d’un disque....................................................................................... 9
Utilisation de la fenêtre d’affichage............................................................12
Remplacement des disques en cours de lecture d’un disque.......................14
— Ex-Chan g e
Localisation d’un point donné dans une plage............................................15
Lecture répétée des plages...........................................................................15
— Lecture répétée
Lecture aléatoire des plages ........................................................................16
— Lecture aléatoire
Composition de votre programme...............................................................17
— Lecture programmée
Utilisation des Super Audio CD multicanaux.............................................18
— Fonction de gestion multicanaux
FR
Stockage des informations rel atives aux CD
Etiquetage des disques.................................................................................23
— Nom du disque
Informations complémenta ires
Précautions ..................................................................................................25
Remarques sur les disques...........................................................................26
Dépannage...................................................................................................26
Spécifications ..............................................................................................27
Nomenclature ..............................................................................................29
FR
3
Page 32

Caractéristiques du
Disques compatibles
lecteur
Ce lecteur peut lire des Super Audio CD
bicanaux et mul ticanaux, ainsi que des CD
conventionnels. Il présente aussi les
caractéristiques suiv antes :
• Bloc optique à deux lasers capable de lire un
Super Audio CD ou un CD convent i onnel en
fonction de la longueur d’onde du faisceau
laser.
• Accès plus rapide aux plages grâce à un
servomécanisme de pointe.
• Fonctionnalités de gestion multicanaux
permettant de parfaire l’environnement de
lecture multicanaux en fonction de la
disposition et de la taille des enceintes.
• Convertisseu r Super Audio numéri que/
analogique permettant de restituer un son
d’une qualité supér i eure.
• Un Super Audio CD peut enregistrer jus qu'à
255 numéros de plage/index. Le
SCD-C2000ES di spose de cette fonction .
• La télécommande fournie peut piloter aussi
bien le SCD-C2000ES qu’un lecteur CD
Sony conventionnel.
Vous pouvez lire le s types de disques su ivants
sur ce lecteur.
• Super Audio CD
• CD audio
Ce lecteur ne peut pa s l ir e l es disques suivants .
Si vous tentez de le faire, le message d’erreur
« TOC ERROR » ou « NO DISC » apparaît.
•CD-ROM
• DVD, etc.
Disques audio encodés par des
technologie s de protecti on des droits
d’auteur
Cet appareil est conçu pour la lectu re de disques
conformes à la norme Compact Disc (CD).
Récemment, des disques audio encodés par des
technologies de protectio n des droits d’ a ute ur ont é té
mis en vente par certaines comp agnies de disques.
Veuillez noter que, parmi ces disques, certains ne sont
pas conformes à la norme CD et qu’il es t po ssi ble
qu’ils ne puissent pas être lus sur cet appareil.
Remarques sur la lecture de
CD-R/CD-RW
Vous ne pourrez peut-être pas lire les disques
enregistrés sur des graveurs CD-R/CD-RW en raison
de rayures, de saletés, de l’état d’enregistrement ou des
caractéristiques du graveur. En outre, les disques non
encore finalisés au terme de l’ enre gistrement sont
illisibles. Dans ces cas , « READING » rest e affiché ou
« TOC ERROR » apparaît dans la fenêtre d’affichag e.
Remarques sur les CD dts
Ne lisez pas de CD dts sur cet appareil. En effet, cela
générerait beaucoup de bruit.
FR
4
Page 33

A propos du Super Audio
CD
Le Super Audio CD est un nouveau format de
disque audi o de qualité exceptionnelle assu rant
l’enregistrement de la musique avec la
technologie DSD (Direct Stream Digital).
Les CD convent i onnels sont, quant à eux,
enregistrés au format PCM. Avec une fréquence
d’échantillonnage 64 fois supér ie ure à celle
d’un CD conventionnel et une quantification des
données sur 1 bi t , la t echnologie DSD propose
un large spectre de fréquences et une vaste plage
dynamique sur tou t e la gamme de fréquences
audio, ce qui lui permet de restituer une musique
très fidèle au son d’origine.
Types de Super Audio CD
Il existe deux type s de disques qui se
différencient p ar la c o m binaison couche
SA-CD/couche CD.
Couche SA-CD : Couche signal haute densité
pour Super Audio CD
1)
Couche CD
Disque à une couche
(disque composé d’une seule couche SA-CD)
: Couche pouvant être lue sur
un lecteur CD
conventionnel
Couche SA-CD
Une couche SA-CD se compose d’un e zone
bicanaux ou d’ une zone multica naux.
Zone bicanaux : Zone dans laquelle sont
enregistrées 2 plages stéréo
bicanaux.
Zone multicanaux :
Zone dans laquelle sont
enregistrées des pl ages
multicanaux (j usqu’à 5.1
canaux).
Exemple:
Lorsque la zone bicanaux et la zone multicanaux sont
enregistrées sur la couche SA-CD d’un disque
hybride
Zone bicanaux
Zone multicanaux
1)
Vous pouvez lire la couche CD sur un lecteur CD
conventionnel.
2)
Les deux couches se trouvant sur la mê me f ace , il
n’est pas nécessaire de retourner le disque.
3)
Appuyez sur SA-CD/CD pour sélectionner la
couche à écouter (voir page 10).
4)
Si le disque comporte les deux zon es , appuyez sur
MULTI/2CH pour sélectio nne r ce lle que v ous
désirez écouter (voir page 11).
4)
4)
Couche SA-CD
Disque hybride
(disque composé d’une couche SA-CD et d’une
couche CD)
2)
Couche CD
Couche SA-CD
3)
3)
FR
5
Page 34

Mise en service
Mise en place des piles
dans la télécommande
Insérez deux piles R6 (format AA) dans le
logement réservé à cet effet, en respectant la
position des pôles + et –. Pour utiliser la
télécommande, pointez-la vers le capteur de
télécommande du lecteur.
Conseil
En utilisation normale, les piles offrent une autonomie
d’environ six mois. Lorsque la télé co mmande ne
parvient plus à piloter le lecteur, insérez deux piles
neuves.
Remarques
• Ne laissez pas la télécommande dans un espace
extrêmement chaud ou humide.
• Veillez à ne laisser péné trer aucun corps étranger
dans la télécommande, surtout lorsque vous
remplacez les piles.
• Ne mélangez pas des piles neuves et usagées.
• N’exposez pas le capteur de télé com mande aux
rayons directs du soleil ou d
’altérer son bon fonctionnement.
risque d
• Si vous ne comptez pas utilise r la télé c ommande
pendant une longue période, retirez les piles pour
éviter tout dommage dû à une fuite d’ électrolyte ou à
la corrosion.
’un luminaire. Cela
Connexion des
composants audio
Branchez le lecteur Super Audio CD sur un
composant audio. Veillez à mettre tous les
composants hors tension avant d’établir les
connexions et à les raccorder correctement pour
éviter les bruits.
Connexion à un amp lific ateu r
multicanaux
Lorsque vous dispo se z d’ un amplificateur
équipé de prises d’en trée 5.1CH (amplificateu r
multicanaux, amplificateur AV, etc.) et que vous
connectez le lecteur et l’amplifica te ur par
l’intermédiaire des prises ANALOG 5.1CH
OUT (FRONT L/R, SURR L/R, CENTER, SUB
WOOFER), vous pouvez lire un Super A udio
CD multicanaux et pr of iter pleinement des
avantages qu’il procure.
Utilisez les cordons de connexion aud i o pour
établir cette connexion. Pour connecter FRONT
ou SURR, utilisez les cordons de connexion
(prises rouge s et blanches) et respectez le code
couleur pour associer les fiches et le s prises :
blanc (gauche) avec blanc et rouge (droite) avec
rouge. Pour conn ecter CENTER et SUB
WOOFER, utilisez les cordons de connexion
(noirs).
Connexion de FRONT ou SURR
Cordons de connexion audio (fournis)
Blanc (L)
Rouge (R)
Connexion de CENTER ou SUB
WOOFER
Cordons de connexion audio (fournis)
Noir
FR
6
Page 35

ANALOG DIGITAL(CD) IR REMOTE
5.1CH OUT2CH OUT
FRONT
L
L
R
R
OUT
OPTICALCOAXIAL
CENTER
SURR
SUB
WOOFER
IR
IN
Vers amplificateur
multicanaux,
amplificateur AV, etc.
ABC
D
A : Vers prises d’entrée des enceintes avant (L/R)
B : Vers prises d’entrée des enceintes surround ou
arrière (L/R)
C : Vers prise d’entrée du caisson de graves
D : Vers prise d’entrée de l’enceinte centrale
Remarques
• Lors de la connexion multicanaux , conne ctez
également les prises ANALOG 2CH OUT à l’aide
d’un autre cordon de connexion audio afin de
pouvoir lire un CD (ou un Super Audio CD) dès que
vous réglez le sélecteur de source de votre
amplificateur sur CD (ou Super Audio CD).
• Au cours de la lecture d’un CD conventionnel ou
d’un Super Audio CD bicanaux, les signaux transmis
par les prises ANALOG 5.1CH OUT FRONT L/R le
sont aussi par les prises ANALOG 2CH OUT.
• Lors de la lecture d’un Super Audio CD multicanaux,
les signaux transmis par les prises ANALOG 5.1CH
OUT FRONT L/R le sont aussi par la prise
ANALOG 2CH OUT. (Le signal converti du signal
multicanaux n'est pas lu.)
• Il existe des Super Audio CD à 5, 4 et 3 canaux.
Lorsque vous lisez ces disques, le signa l n’ e st pa s
reproduit par toutes les prises ANALOG 5.1CH
OUT. Pour plus d’informations à ce sujet,
reportez-vous à la pochette ou aux instructions du
Super Audio CD.
Connexion à un ampli fi cateur
stéréo ou une platine MD
En cas de con nexion à un amplificat eur stéréo ou
de connexion an al ogi que à une platine MD,
raccordez le lecteur et le composant par
l’intermédiaire des prises ANALOG 2CH OUT.
Utilisez un cord on de connexion audio pour
établir cette connexion. Respectez bien le code
couleur pour associer correctement les fiches et
les prises correspondantes : blanc (gauche) avec
blanc et rouge (dro i t e ) avec rouge.
Cordon de connexion audio (non fourni*)
Blanc (L)
Rouge (R)
* Si vous n’établissez pas de connexion ANALOG
5.1CH, vous pouvez utiliser le cordon de connexion
audio fourni pour la connexion ANALOG 2CH.
ANALOG DIGITAL(CD) IR REMOTE
5.1CH OUT2CH OUT
FRONT
L
L
R
R
Vers prises d’entrée CD (Sup er Audi o CD )
ou ligne (L/R) d’un ampl ificateur stéréo,
d’une platine MD, etc.
OUT
OPTICALCOAXIAL
CENTER
SURR
SUB
WOOFER
IR
IN
Mise en serv ice
suite
FR
7
Page 36

Remarques
• En cas de lecture d’un disque comportant une zone
bicanaux et une zone multicanaux, par
l’intermédiaire des prises ANALOG 2CH OUT,
remplacez la zone de lecture pa r déf a ut pa r
« SEL– 2ch » (zone de lecture bicanaux) (voir
page 11). Sinon, la zone de lecture multicanaux est
automatiquement lue et seul le signal des enceintes
avant est reproduit. Dans ce cas, vous risquez de ne
pas entendre les voix ou d’autres sons, selon le
disque.
• Lors de la lecture d’un Super Audio CD multicanaux,
les signaux transmis par les prises ANALOG 5.1CH
OUT FRONT L/R le sont aussi par la prise
ANALOG 2CH OUT. (Le signal converti du signal
multicanaux n'est pas lu.)
Connexion à un composant
numérique
En cas de connexion à u ne platine MD ou un
autre composan t nu mérique par l
des connecteurs DIGITAL (CD) OUT, vous
pouvez effectuer un enregistrement numérique.
Pour vous connecter par
l’intermédiaire du connecteur
DIGITAL (CD) OUT OPTICAL
Utilisez un câble numérique optique pour établir
cette connexion. En cas de raccordement du
câble numériqu e optique au connecteur
DIGITAL (CD) OUT OPTICAL, enfoncez la
fiche du câble jusqu’à ce qu’elle se bloque en
émettant un déclic.
Veillez à ne pas plier ou tordre le câble optique.
Câble numérique optique (non fourni)
ANALOG DIGITAL(CD) IR REMOTE
5.1CH OUT2CH OUT
FRONT
L
L
R
R
OUT
CENTER
SUB
WOOFER
OPTICALCOAXIAL
IR
IN
SURR
’intermédiaire
Remarque
Seuls les signaux audio des CD conventionnels
peuvent être reproduits à partir du connecteur
DIGITAL (CD) OUT OPTICAL. Les signaux du
Super Audio CD ne peuvent pas être reproduits pa r
l’intermédiair e d u connecteur DIGITA L ( CD) OUT
OPTICAL.
Pour vous connecter par
l’intermédiaire du connecteur
DIGITAL (CD) OUT COAXIAL
Utilisez un câble coaxial numérique pour
raccorder les com posants audio équ ip és de
connecteurs d’en tr ée coaxiaux numéri ques.
Câble coaxial numérique (non fourni)
ANALOG DIGITAL(CD) IR REMOTE
5.1CH OUT2CH OUT
FRONT
L
L
R
R
OUT
OPTICALCOAXIAL
CENTER
SURR
SUB
WOOFER
IR
IN
Vers connecteur d’entrée coaxial
numérique CD d’une platine MD, etc.
Remarque
Seuls les signaux audio des CD conventionnels
peuvent être reproduits à partir du connecteur
DIGITAL (CD) OUT COAXIAL. Les signaux du
Super Audio CD ne peuvent pas être reproduits pa r
l’intermédiair e d u connecteur DIGITA L ( CD) OUT
COAXIAL.
Connexion du cordon
d’alimentation secteur
Branchez le cord on d’alimentation secteur sur
une prise murale .
Vers connecteur d’entrée numér iq ue
optique CD d’une platine MD, etc.
FR
8
Page 37

En cas d’utilisati on d’un autre
lecteur CD Sony
conjointement avec ce
lecteur
Vous pouvez p iloter ce t autre appa reil à l’ai de de
la télécommande fournie avec ce lecteur en
changeant simplement le mode de commande de
la télécommande.
Pour régler le mode de
commande de la télécommande
• S’il est possible de régler le mode de
commande de l’ autre lecteur :
Réglez le sélect eur CD1/2 de la
télécommande de ce lecteur sur CD1 (réglage
usine) et réglez la télécommande de l’autre
appareil sur CD2.
• S’il n’est pas possible de régler le mode de
commande de l'autre lecteur :
Réglez le sélect eur CD1/2 de la
télécommande de ce lecteur su r C D2.
Pour régler le mode de
commande de ce lecteur
1 Appuyez sur la touche MENU du
lecteur.
2 Tournez l AMS L (ou appuyez
plusieurs fois sur la touche ./>
de la télécommande) pour sélectionner
« CD1/2 SEL ».
3 Appuyez sur l AMS L (ou sur la
touche ENTER de la télécommande).
Le mode de comman de en cours s’affiche .
4 Tournez l AMS L (ou appuyez
sur la touche ./> de la
télécommande) pour sélectionner
« CD – 1 » ou « CD – 2 », puis appuyez
sur l AMS L (ou sur la touche
ENTER de la télécommande).
Lecture des disques
Lecture d’un disque
Lecture des disques
La section ci-de ss ous vous explique com m ent
passer en lectur e normale et vous pré se nte les
opérations de base ré alisab les pen dant la le cture.
1 Mettez l’amplificateur sous tension.
Baissez le volume au minimum.
2 Préparez la mise en route du lecteur à
l’aide du sélecteur de source de
l’amplificateur.
3 Appuyez sur la touche POWER du
lecteur pour le mettre sous tension.
4 Appuyez sur la touche A OPEN/CLOSE
du lecteur pour ouvrir le plateau et y
placer un disque.
Etiquette vers le haut Numéro du disque
5 Pour insérer d’autres disques, appuyez
plusieurs fois sur DISC SKIP (ou sur la
touche DISC SKIP +/– de la
télécommande) et insérez le disque à la
position de lecture souhaitée.
Chaque fois que vous appuyez sur cette
touche, le plateau tourne et vous pouvez
insérer les disques dans les logements
vides. Le disque situé face à vous est lu en
premier.
suite
FR
9
Page 38

6 Appuyez plusieurs fois sur PLAY
MODE (ou sur la touche CONTINUE de
la télécommande) pour sélectionner le
mode de lecture continue ALL DISCS
ou 1DISC.
Chaque fois que vous appuyez sur la touche
CONTINUE de la télécommande,
«ALL DISCS» ou «1 DISC» s’affiche.
Si vous
sélectionnez
ALL DISCS Tous les disques
1DISC Uniquement le disque
Le lecteur lit
successivement dans
l
’ordre de leurs numéros
sélectionné
7 Appuyez sur N.
La lecture com mence à partir de la première
plage. Si vous souhaitez que la lecture
commence à partir d'une plage particuliè re,
tournez l AMS L (ou appuyez
plusieurs fois sur la tou che ./> de la
télécommande) pour sélectionner le
numéro de la plage av ant d’appu yer sur N.
8 Réglez le volume sur l’amplificateur.
Opérations de base réalisables
pendant la lecture
Pour Procédez ainsi :
Arrêter la lecture Appuyez sur x.
Arrêter
temporairement
la lecture
Reprendre la
lecture après la
pause
Sélectionner une
plage
Sélectionner un
disque
Appuyez sur X.
Appuyez sur X ou N.
Tournez l AMS L
(ou appuyez plusieurs fois sur la
touche ./> de la
télécommande).
Appuyez sur plusieurs fois sur
DISC SKIP (ou sur la touche
DISC SKIP +/– de la
télécommande).
Pour Procédez ainsi :
Sélectionner un
disque
directement
Ejecter un disque Appuyez sur la touche A OPEN/
Remarque
Au cours de la lecture, augmentez progre ssivement le
volume à partir du niveau le plus faible. Cet appareil
peut produire des sons, situés en dehors de la plage de
fréquences normale, qui risquent d’e ndommager les
enceintes ou de provoquer des troubles auditifs graves.
Appuyez sur la touche DISC 1-5
du lecteur.
Lorsque vous utilisez la
télécommande, suivez la
procédure ci-dessous.
1 Appuyez sur DISC.
2 Appu yez sur la touche
numérique correspondant au
disque.
3 Appuyez sur ENTER.
CLOSE du lecteur.
Pour localiser une plage donnée
en entrant directement son
numéro
Appuyez sur la ou les touches numériques
de la télécommande pour saisir le numéro
de la plage.
Pour saisir un numéro de plage égal ou
supérieur à 11
1 Appuyez sur la touc he >10 de la télé commande.
2 Entrez les chiffres correspondants.
Pour entrer 0, appuyez sur la touche 10/0 de la
télécommande.
Exemple :
Pour lire la plage numéro 30, appuyez sur >10, puis
sur 3 et sur 10/0.
Pour lire la plage numéro 100, appuyez deux fois sur
>10, puis sur 1 et deux fois sur 10/0.
Sélection de la couche de
lecture
Si vous lisez un disque hybride comportant une
couche SA-CD et une couche CD (page 5), vous
pouvez sélectionner celle que vous désirez
écouter. Les deux couches se trouvant sur la
même face, il n’est pas nécessa ire de retourner le
disque. Le réglag e par défaut est
« SEL SA–CD » (couche SA-CD).
10
FR
Page 39

Appuyez sur SA-CD/CD pour sélectionner
la couche de lecture souhaitée.
Pour sélectionner la couche de
lecture par défaut
1 Appuyez sur la touche MENU du
lecteur.
2 Tournez l AMS L (ou appuyez
plusieurs fois sur la touche ./>
de la télécommande) jusqu’à ce que
« LAYER SEL » s’affiche.
3 Appuyez sur l AMS L (ou sur la
touche ENTER de la télécommande).
La couche par défaut actuelle s’affiche.
4 Tournez l AMS L (ou appuyez
sur la touche ./> de la
télécommande) pour sélectionner la
couche de lecture souhaitée.
5 Appuyez sur l AMS L (ou sur la
touche ENTER de la télécommande).
Sélection de la zone de
lecture
Si vous lisez un disque comportant une zone de
lecture bicanaux et une zone de lecture
multicanaux (page 5), vous pouvez sélectionner
celle que vous dési rez écouter.
Appuyez sur MULTI/2CH pour sélectionner
la zone de lecture souhaitée.
Pour sélectionner la zone de
lecture par défaut
1 Appuyez sur la touche MENU du
lecteur.
2 Tournez l AMS L (ou appuyez
plusieurs fois sur la touche ./>
de la télécommande) jusqu’à ce que
« M/2ch SEL » s’affiche.
3 Appuyez sur l AMS L (ou sur la
touche ENTER de la télécommande).
La zone par défaut actuelle appara ît.
4 Tournez l AMS L (ou appuyez
sur la touche ./> de la
télécommande) pour sélectionner la
zone de lecture souhaitée.
5 Appuyez sur l AMS L (ou sur la
touche EN TER de la télécommande).
Remarque
La zone de lecture multicana ux es t au tomatiquement
sélectionnée chaque fois que vous lancez la lecture, car
le réglage d’usine est « SEL– Mch » (zone de lecture
multicanaux). Sélectionn ez « SEL– 2ch » (zo ne de
lecture bicanaux) lorsque les prises ANALOG 2CH
OUT sont connectées. Sinon, seul le signa l de s
enceintes avant est reproduit.
Lecture des disques
11
FR
Page 40

Utilisation de la fenêtre
d’affichage
La fenêtre d’affichage communique diverses
informations sur le disque ou sur la plage en
cours de lecture. Cette section décrit ces
informations ainsi que les éléments affichés au
cours des différents stades de la lecture.
Informations sur le disque
lors du chargement du disque
La fenêtre d’affichage indique le nu m ér o du
disque, le nombre total de plages et le temps de
lecture total.
ABC
F
A : Nombre total de plages
B : Disque hybride
C : Disque actuellement sélectionné et nombre de
canaux pouvant être lus
D : Plage 16 et ultérieures (pour les disques
comptant 16 plages ou davantage)
E : Temps de lecture total
F : Numéro du disque en cours
Remarques sur les numéros de disques
affichés
• Un numéro entouré d’un cercle rouge indique que le
disque est prêt à être lu.
• Un numéro entouré d’un semi-cercle indique que des
plages du disque peuvent être lues. En mode de
lecture programmée, le semi-cerc le indi que que des
plages du disque sont programmées.
• Le numéro du disque disparaît si aucun disque n’es t
détecté à l’intérieur du logement.
E
D
Affichage d’informations
Les disques TEXT contiennent, outre les
signaux audio, des in formations telles que le
titre du disque ou le nom de l’ ar tiste. Ce lecteur
peut afficher le titre du disque, le nom de
l’artiste et le nom de la pl age en cours au titre
d’informations TEXT.
Lorsque le lecteur détecte la présence d’un
disque TEXT, « TEXT » s’affiche. Si vo tr e
disque TEXT est en pl usieurs langues,
« MULTI-TEXT » s’affi che. Pour consulter les
informations dans une autre langue, voir
« Affichage des informations d’un disque TEXT
en diverses la ngues » à la page 13.
Si un nom comport e pl us de 13 caractèr es, les
12 premiers restent affichés une fois que l e nom
entier a défilé.
Avant le début de la lecture
Appuyez plusieurs fois sur TIME/TEXT.
Chaque fois que vous appuyez sur la touche, le
titre du disque et le nom de l’artist e s’affichent.
Lorsque vous sélectionnez le nom de l’artiste,
« ART. » s’affiche.
Titre du disque*
Nom de l’artiste*
Nombre total de plages et temps de lecture total
* Uniquement pour disques TEXT
12
FR
Page 41

Pendant la lecture d’un disque
Appuyez plusieur s fois sur TIME/TEXT.
Si le lecteur détecte la pr ésence d’un Super
Audio CD multicanaux, les informations
relatives aux canaux s’affichent penda nt
quelques secondes à la suite du titre de la plage.
Temps de lecture de la plage en cours
Temps restant de la plage en cours
Désactivation de l’affichage
des informations
Appuyez sur la touche DISPLAY MODE de
la télécommande.
Chaque fois qu e vous appuyez sur cette touche
pendant la lectu re d’un disque, l’affich age est
alternativement désactivé et ac tivé.
Même si est dés activé, l’affichage s’active
lorsque vous appuyez sur certaines touches, puis
se désactive de nouveau quelques secondes plus
tard.
Si, avant le début de la lecture, vous appuyez sur
la touche de désactivation de l’affichage, « DISP
OFF » s’affiche. Dès que vous appuyez sur cette
touche pour l e r éact i ver, «DISP O N » s’af fic he.
Lecture des disques
Temps restant sur le disque
Titre de la plage
Informations sur les canaux (n’apparaissent que
si le lecteur détecte la présence d’un Super Audio
CD multicanaux)
1)
Uniquement lorsque Continuous Play
(lecture continue) est sélectionné
2)
Uniquement pour disques TEX T
Remarques
• Selon le disque, la fenêtre d’affichage risque de ne
pas présenter tous les caract ères.
• Ce lecteur ne peut afficher que le titre du disque, le
nom de l’artiste et le nom des plages des disques de
type TEXT. Aucune autre information ne peut ê tre
affichée.
2)
1)
Affichage des informations
d’un disque TEX T en di verse s
langues
Vous pouvez modifier la langue d’af fi chage à
condition que le disque TEXT soit, lui-même,
multilingue. Lorsque le lecteur détecte la
présence d’un disque TEXT de cette nature,
« MULTI-TEXT » s’affich e. Modifie z la langue
en procédant ains i :
1 Appuyez sur la touche MENU du
lecteur.
2 Tournez l AMS L (ou appuyez
plusieurs fois sur la touche ./>
de la télécommande) jusqu’à ce que
« LANGUAGE » s’affiche.
3 Appuyez sur l AMS L (ou sur la
touche EN TER de la télécommande).
La langue actuellement sélectionnée
(ENGLISH, FRENCH, GERMAN, etc.)
clignote. Si le lecteur n’est pas en mesure
d’afficher la langue utilis ée d an s u n dis qu e
TEXT, « OTHER LANG» s’affiche.
4 Tournez l AMS L (ou appuyez
plusieurs fois sur la touche ./>
de la télécommande) jusqu’à ce que la
langue souhaitée s’affiche.
5 Appuyez sur l AMS L (ou sur la
touche EN TER de la télécommande).
Après quelqu es secondes, les informations
apparaissent dans la langue choisie.
13
FR
Page 42

Remplacement des
disques en cours de
lecture d’un disque
—Ex-Change
Vous pouvez ouvrir le plateau pendant la lecture
d’un disque afin d e connaître les disques qui
vont être lus par la suite ou encore pour
remplacer des disques sans interrompre la
lecture du disque en cours.
1 Appuyez sur la touche EX-CHANGE du
lecteur.
Le plateau s’ouvr e et deux logements pour
disques appara issent. Même si un disque est
en cours de lecture, celle-ci n’est pas
interrompue.
2 Remplacez les disques par d’autres
dans les logements.
Après le disque en cours, le lecteur lit le
disque du logement gauche, puis celui du
logement dr oit.
3 Appuyez sur DISC SKIP (ou sur la
touche DISC SKIP +/– de la
télécommande).
Le plateau pivote et deux autres logements
pour disques apparaissent.
4 Remplacez les disques par d’autres
dans les logements.
5 Appuyez sur la touche EX-CHANGE du
lecteur.
Le plateau se ferme.
Remarque
N’appuyez par sur le plateau lorsque vous le ferme z à
l’étape 5, car vous ri squeriez d’endommage r le lecteu r.
Pendant que le plateau est ouvert en
appuyant sur la touche EX-CHANGE du
lecteur
• Si la lecture du disque en cours se termine, le lecteur
s’arrête. Si le disque en cours est lu e n mode de
lecture répétée 1DISC (page15), sa lecture
recommence.
• En mode de lecture aléatoire ALL DISCS (page 16),
l’ordre des plages du disque en cour s es t modifié au
hasard.
• En mode de lecture programmée (page 17), seules les
plages du disque en cours sont lues.
14
FR
Page 43

Localisation d’un point
Lecture répétée des
donné dans une plage
Vous pouvez localiser n’importe quel point
donné sur le disque p endant la lecture ou la
pause de ce dernier.
Localisation d’un
point
En écoutant le son
(Recherche)
En regardant
l’affichage du temps
(Recherche rapide)
En réglant le début
de la lecture
(Reche r c he par
temps)
Conseil
Lorsque « OVER » s’affiche, la fin du disque est
atteinte. Appuyez sur m pour revenir en arrière.
Remarque
Les plages trop courtes (quelques secondes seulement)
ne permettent pas un bon suivi. La recherche risque
alors de ne pas être effectuée correctement.
Procédez ainsi :
Maintenez la touche m/M
enfoncée pendant la lecture.
Maintenez la touche m/M
enfoncée en mode pause.
1 Tournez l AMS L
(ou appuyez plusieurs fois
sur la touche ./> de
la télécomman de) en mode
d'arrêt pour sélectionner la
plage de votre choix.
2 Maintenez la touche
m/M enfoncée pour
régler le début de la lecture
en vous aidant de la fenêtre
d’affichage, puis appuyez
sur N.
plages
— Lecture répétée
Vous pouvez répéter la lecture de la totalité du
disque ou d
avec la lecture aléatoire 1DISC et la lecture
programmée, cette fonction permet de répéter
toutes les plages d ans un ordre quelconqu e
(page 16) ou da ns un ordre programmé
(page 17).
Appuyez plusieurs fois sur la touche
REPEAT de la télécommande jusqu’à ce
que « REP » ou « REP1 » s’affiche.
REP : Pour toutes les plag es du (des ) disq ue(s).
REP1 :Pour une seule plage.
Quand « REP » est sélectionné, la lecture
répétée change en fonction du mode de lecture
choisi.
Si le mode de
lecture est
ALL DISCS
Lecture continue
(page 9)
1DISC Lecture
continue (page 9)
1DISC Lecture
aléatoire
(page 16)
Lecture
programmée
(page 17)
’une plage détermi née. Compatible
Le lecteur répète
Toutes les plages de tous les
disques dans l’ordre séquentie l.
Toutes le s plages du disque en
cours dans l’ordre séquentiel.
Toutes le s plages du disque en
cours dans un ordre aléatoire.
Toutes les plages dans l’ordre du
programme.
Lecture des disques
Pour annuler la lecture répétée
Appuyez plusieur s f ois sur la touche REPEAT
de la télécommande jusqu’à ce que «REP » et
« REP1 » disparaissent.
Remarques
• La lecture répétée de toutes les plages ne peut pas
être utilisée avec la lectu re aléatoire A L L DISCS.
• La lecture répétée de toutes les plages s’arrête
automatiquement quand toutes les plages ont été lues
à cinq reprises.
• Si vous éteignez le lecteur ou si vous débranchez son
cordon d’alimentation sec teu r , vous a nnulez la
lecture rép étée.
15
FR
Page 44

Lecture aléatoire des
plages
— Lecture aléatoire
Lorsque la lecture aléatoire est sélectionnée, le
lecteur lit dans un ordre aléatoire toutes les
plages de tous les di sques ou d'un disque
déterminé.
Lecture aléatoire de tous les
disques
Vous pouvez lire toutes les plages de tou s l es
disques dans un ordre aléatoir e.
1 Appuyez plusieurs fois sur PLAY
MODE (ou sur la touche SHUFFLE de la
télécommande) en mode d’arrêt
jusqu’à ce que « ALL DISCS » et
« SHUF » s’affichent.
2 Appuyez sur N.
« ; » s’affiche pendant que le lecteur
« mélange » les plages. Le lecteur s’arrête
après une prem ière lecture de tout es les
plages.
Pour reprendre la lecture
continue
Appuyez plusieurs fois sur PLAY MODE (ou
sur la touche CONTINUE de la télécommande)
en mode d’arrêt jus qu’à ce que « SHU F » et
« PGM » disparaissent.
Remarque
Le lecteur ne revient pas sur les plages déjà lues.
16
Lecture aléatoire d’un seul
disque
Vous pouvez lire toutes les plages d’un disque
déterminé dans un ordre aléatoire.
1 Appuyez plusieurs fois sur PLAY
MODE (ou sur la touche SHUFFLE de la
télécommande) en mode d’arrêt
jusqu’à ce que « 1DISC » et « SHUF »
s’affichent.
2 Appuyez sur la touche DISC 1-5 du
lecteur.
« ; » s’affiche pendant qu e l e le ct eur
« mélange » les plages. Le lecteur s’arrête
après une prem ière lecture de tout es les
plages.
FR
Page 45

Composition de votre
programme
— Lecture programmée
Vous pouvez composer un programme
contenant jusqu’à 32 plages en précisant l’ordre
dans lequel vous voulez les écouter.
1 Appuyez plusieurs fois sur PLAY
MODE (ou sur la touche PROGRAM de
la télécommande) en mode d’arrêt
jusqu’à ce que « PGM » s’affiche.
2 Appuyez sur la touche DISC 1-5 du
lecteur, puis sur la touche l AMS
L (ou sur la touche ENTER de la
télécommande).
Le numéro du disque sélectionne s’affi che.
Lorsque vous utilisez la télécommande,
appuyez d’ab ord sur DISC, puis sur la
touche numérique correspondant au disque.
Pour programme r t outes les plages d'un
disque en une seule opération, appuyez sur
l AMS L (ou sur la touche ENTER
de la télécommande) tandis que « AL » est
affiché.
3 Tournez l AMS L (ou appuyez
plusieurs fois sur la touche ./>
de la télécommande) pour sélectionner
le numéro de la plage de votre choix,
puis appuyez sur l AMS L (ou sur
la touche ENTER de la télécommande).
Pour sélectionner directement un
numéro de plage
Appuyez sur la (le s) touche(s) de la
télécommande. Pour la plage numéro 11 ou
supérieur, appuyez sur la touche >10 de la
télécommande (page 10).
Si vous avez entré un numéro de plage
incorrect
Appuyez sur la touche CLEAR de la
télécommande. En suite, répétez l'étape 3
pour entrer le numéro de plage correct.
4 Répétez les étapes 2 à 3 pour entrer les
autres plages.
Chaque fois que vous entrez un numéro de
disque ou de plage, le nombre total de pas
programmés s’affiche.
5 Appuyez sur N.
La lecture programmée commence.
Pour reprendre la lecture
continue
Appuyez plusieurs fois sur PLAY MOD E (ou
sur la touche CONTINUE de la tél éc ommande)
en mode d’arrêt jus qu’à ce que « SHUF » et
« PGM » disparaissent.
Conseil
En fin d’exécution, le programme reste en mémoire.
Appuyez sur N pour réécoute r le prog ramme depuis
le début. Le programme reste en mémoire même
lorsque vous arrêtez la lecture.
Remarques
• Si vous arrêtez le lecteur, débranchez le cordon
d’alimentation, appuyez sur A OPEN/CLOSE sur le
lecteur, ou bien changez de couche ou zone de
lecture, et l e programme ser a effacé.
• Si vous changez de couche ou de zone de lectur e
pendant la lecture de programme, une seule plage
sera lue depuis le début, puis le programme se ra
effacé.
Vérification du contenu du
programme
Avant le début de la lecture ou pend a nt la
lecture, appuyez plusieurs fois sur la
touche CHECK de la télécommande.
Chaque fois que vous appu yez su r la touc he, le s
numéros des disques et des plages s’affichent
dans l’ordre de la programmation.
Si vous appuyez sur la touche CHECK de la
télécommande pendant la lecture, les numéros
des disques et de s plages programmés
s’affichent en commençant par la plage en cours.
Lecture des disques
suite
17
FR
Page 46

Modification du pro gr a mm e
Vous pouvez modifier le contenu du programme
en mode d’arrêt.
Pour Procédez ainsi :
Effacer une plage 1 Appuyez plusieurs fois sur la
Effacer la
dernière plage du
programme
Ajouter une
plage à la fin du
programme
Effacer toutes les
plages
touche CHECK de la
télécommande pour faire
apparaître le numéro de la pla ge
à effacer.
2 Appuyez sur la touche CLEAR
de la télécommande.
Appuyez sur la touche CLEAR de
la télécomman de.
Chaque fois que vous appuyez sur
cette touche, la dernière pla g e du
programme est effacée.
Exécutez les étapes 2 à 3.
Maintenez enfoncée la touche
CLEAR de la télécommande ou la
touche x (pendant environ
2 secondes) pour faire apparaître
« PGM CLEA R» dans la fenêtre
d’affichage.
Utilisation des Super
Audio CD multicanaux
— Fonction de gestion multicanaux
Ce lecteur est doté d’une fonction de gestio n
multicanaux qui règle le mode de lectur e du
Super Audio CD à l’aide du DSD-DSP (intégré
au lecteur) en fonction de la configuration ou de
la taille des enceintes.
Enceintes avant
L
Enceinte centrale
Sub woofer
LR
Enceintes surround
Pour activer la gestion multicanaux,
sélectionnez le mode de lecture prédéfi ni
approprié (lecture bicanaux ou lectu re
multicanaux) et réglez l’intensité des sorties de
chaque enceinte (mode de lecture multicanaux
uniquement).
Remarques
• Cette fonction n’est compatible qu’avec la l ect u r e
d’un Super Audio CD.
• Selon la configuration des enceintes choisie, il n’est
pas toujours possible de régler l’intensité des sorties
des enceintes.
R
18
Sélection du mode de lecture
1 Appuyez sur la touche MENU du
lecteur.
2 Tournez l AMS L (ou appuyez
plusieurs fois sur la touche ./>
de la télécommande) jusqu’à ce que le
mode de canal souhaité s’affiche.
2chSP MODE : Pour lire un Super Audio
CD bicanaux
MchSP MODE : Pour lire un Super Audio
CD multicanaux
FR
Page 47

3 Appuyez sur l AMS L (ou sur la
touche ENTER de la télécommande).
Le mode de lecture s’a ffiche.
4 Tournez l AMS L (ou appuyez
plusieurs fois sur la touche ./>
de la télécommande) jusqu’à ce que le
mode de lecture souhaité s’affiche.
Mode bicanaux
Mode de lecture F SW
2ch DIRECT* a ––
2ch+SW aa
Mode multicanaux
Mode de lecture F C SR SW
Mch DIRECT* aaaa
5–LARGE+SW L L L a
5–LARGE L L L ––
5–SMALL+SW S S S a
F–LARGE+SW L S S a
F–LARGE L S S ––
NO–CNTR+SW L –– L a
NO–CNTR L –– L ––
* Chaque signal est directement transmis par
chaque enceinte.
Description des symboles
F : Enceintes avan t
C :Enceinte centrale
SR : E nc ei nte s surr ound
SW: Sub woofer
a : Signal émis
–– :Signa l non émis
L: Large
S: Small
A propos de l’enceinte « Large » ou
«Small»
Une enceinte es t dit e « L » si elle est
capable de restituer pleinement les graves.
Si vous sélectionnez « S » pou r l es
enceintes surround, les fréquences graves
sont repro duites par les enceintes avant
et/ou le caisson de graves.
Pour une utilisation normale, sélectionnez
« Mch DIRECT » ou réglez toutes les
enceintes sur « L » (exemple :
« 5–LARGE+SW », « 5–LAR GE », etc.).
Si le son s’accompagne de bruit ou si le
mode de lecture multicanaux n’est pas en
vigueur pendant la lecture d’un Super
Audio CD multicanaux, réglez le s enceintes
concernées su r « S ».
5 Appuyez sur l AMS L (ou sur la
touche EN TER de la télécommande).
Pour revenir à l’affichage normal, appuyez
sur la touche MENU du lecteur.
Remarques
• La gestion multicanaux ne fonc tionne pas si vous
sélectionnez « Mch DIRECT » (il est im possible de
régler la balance des sorties de chaque enc e inte ).
• L’enceinte avant est automat iquement réglée sur
« L » dès que vous réglez le caisson de graves sur
«––».
• En cas de lecture d’une plage ne comporta nt pa s de
signal LFE*, le signal du caisson de graves n’est pas
reproduit. Par conséquent, lorsque vous sélectionnez
« Mch DIRECT », « 5–LARGE+SW » ou
« NO–CNTR+SW », aucun signal n’est repr oduit
par le caisson de graves. En revanche, lorsque vous
sélectionnez « 5–SMALL+SW » ou
« F–LARGE+SW » (si vous réglez l'enceinte sur
« S »), les fréquences graves sont reprodui te s pa r le
caisson de graves.
* Low Frequency Enhancement (décrit e n ta nt que
«.1 CH»)
• Si vous sélectionnez un mode de lecture différent de
« 2ch DIRECT » ou de « Mch DIRECT » à l’aide de
la gestion multicanau x, la répartition du son sur les
enceintes change, provoquant proba ble m ent une
diminution du volume sonore global. Si tel est le cas,
réglez le volume à l’aide de la commande du volume
de l’amplificateur connecté.
• Si vous changez de mode de lecture alors que le
lecteur est en mod e multicanaux, le réglage de
l'intensité des sorties est annulé.
• Cette fonction ne peut pas être utilisée pendant la
lecture d'un CD.
suite
19
Lecture des disques
FR
Page 48

Réglage de l’intensité des
sorties de chaque enceinte
Vous pouvez régler les éléments suivants avec le
mode multicanaux :
SURR BAL
Intensité relative de s so rties des enc eint es ava nt
(FRONT L/R) et des enceintes surround
(SURR L/R)
CNTR BAL
Intensité relative de s so rties des enc eint es ava nt
(FRONT L/R) et de l’enceinte centrale
(CENTER)
SW BAL
Intensité relative de s so rties des enc eint es ava nt
(FRONT L/R) et du caisson de graves
(SUB WOOFER)
Remarques
• Certains réglages ne peuven t pas se fai r e selon le
mode multicanaux choisi.
• Vous ne pouvez pas régler le niveau des e nceintes
lorsque « Mch DIRECT » est sélectionn é.
Pour régler l’intensité des sorties
à partir du panneau avant du
lecteur
Vous pouvez régl ez l’intensit é des sorties de
chaque enceinte en cours de lecture. V ous
pouvez aussi procéder au réglage pendant
l’écoute de la tonalité de test en mode d’arrêt.
1 Appuyez sur MENU.
2 Tournez l AMS L jusqu’à ce que
« LEVEL ADJ » s’affiche.
3 Appuyez sur l AMS L.
Pendant la lecture , allez à l’étape 6.
4 Tournez l AMS L jusqu’à ce que
« TONE ON » s’affiche.
5 Appuyez sur l AMS L.
La tonalité de test est reproduite, à tour de
rôle, par chaque en ceinte dont le nom
apparaît simultanément dans la fenêtre
d’affichage.
6 Tournez l AMS L pour faire
apparaître l’élément voulu.
Sélectionnez l’élément parmi « SURR
BAL », « CNTR BAL » ou « SW BAL ».
Remarque
Lorsque vous réglez le caisson de graves sur
« –– » en mode multicanaux (page 18), il est
impossible de régler « SW BAL » (« NOT IN
USE » s
’affiche). De même, vous ne pouvez pas
régler « CNTR BAL » ou « SURR BAL »
(« NOT IN USE » s’affiche) lorsque l
correspondante est réglée sur « –– ».
’enceinte
7 Appuyez sur l AMS L.
La fenêtre d’affichage du réglage de
l’intensité apparaît.
En mode d’arrêt, la t onalité de test est émise
par l’enceinte sélectionnée.
Exemple :
Si vous sélectionnez «SURR BAL » en
mode d’arrêt, la tonalité de test est émise
par les enceintes avant et surround.
8 Tournez l AMS L pour régler
l’intensité de sortie.
Remarque
L’intensité des sorties peut être réglée sur 24 pas.
Comme il s’agit là de régla ge s fi ns, il pe ut
s’avérer difficile d’observer le mouvement de
l’aiguille.
9 Appuyez sur l AMS L.
Le lecteur reprend l’ ét at de l’étape 6.
Répétez les étapes 6 à 9 pour procéder à
d’autres réglag es.
10Appuyez sur MENU une fois les
réglages terminés.
L’affichage reprend son apparence
normale.
Pour régler l’intensité des sorties
à partir de la télécommande
Vous pouvez régle r l ’intensité des sorties de
chaque enceinte pendant l’écoute, à l’aide de la
télécommande.
20
FR
Page 49

1 Appuyez sur LEVEL ADJ pendant la
lecture ou en mode d’arrêt.
Pendant la le ct ure, allez à l’étape 4.
2 Appuyez plusieurs fois sur ./>
pour faire apparaî tre « TONE ON »
dans la fenêtre d’affichage.
3 Appuyez sur ENTER.
La tonalité de test est reproduite, à tour de
rôle, par chaque enc ei n t e dont le nom
apparaît simultanément dans la fenêtre
d’affichage.
4 Appuyez plusieurs fois sur ./>
pour faire apparaî tre l’élément voulu.
Sélectionnez l’élément parmi « SURR
BAL », « CNTR BAL » ou « SW BAL ».
Remarque
Lorsque vous réglez le caisson de graves sur
« –– » en mode multicanaux (page 18), il est
impossible de régler « SW BAL » (« NOT IN
USE » s’affiche). De même, vous ne pouvez pas
régler « CNTR BAL » ou « SURR BAL »
(« NOT IN USE » s’affiche) lorsque l’enceinte
correspondante est réglée sur « –– ».
5 Appuyez sur ENTER.
La fenêtre d’affichage du réglage de
l’intensité apparaît.
En mode d
par l
Exemple :
Si vous sélectionnez « SURR BAL » en
mode d
par les enceintes avant et surround .
’arrêt, la tonalité de te st est émise
’enceinte sélectionnée.
’arrêt, la tonalité de test est émise
6 Appuyez plusieurs fois sur ./>
pour régler l’inte ns ité de sortie.
Remarque
L'intensité des sorties peut être réglée sur 24 pas.
Comme il s’agit là de réglages fins, il peut
s’avérer difficile d’observer le mouvement de
l’aiguille.
7 Appuyez sur ENTER.
Le lecteur reprend l’état de l’étape 4.
Répétez les étapes 4 à 7 pour procéder à
d’autres réglages.
8 Appuyez sur LEVEL ADJ une fois les
réglages terminés.
L’affichage repr end son apparence
normale.
Réglage de la distance des
enceintes
Vous pouvez régler la distance des enceintes si
l
’amplificateur connecté ne possèd e pas
’élément de menu à cet effet. Par contre, s’il
d
dispose de cette fonction, nous vous conseillons
de régler la dist ance des enceintes sur
l
’amplificateur. Ce réglage n’est disponible que
pour les Super Audi o CD m ulticanaux.
Remarque
Lorsque vous réglez la distance des e n c einte s sur ce
lecteur et sur l’amplificateur, il est possible que ces
deux réglages ne marchent pas et que vous ne puissiez
pas obtenir un résultat co r r ect.
FRT DIST
Distance entre votre position d
enceintes avant
Vous pouvez régler cette distance en tr e
1,0 mètre et 7 ,0 mè tr es (3 à 23 pi eds) pa r pas de
0,1 mètre (1 pied).
Si les deux enceintes avant ne se trouvent pas à
égale distance de la position d’écoute, réglez la
distance par rapport à l
SURR DIST
Distance entre v o t re po s it i on d'écoute et les
enceintes surround
Vous pouvez régler cette distance en tr e
1,0 mètre et 7 ,0 mè tr es (3 à 23 pi eds) pa r pas de
0,1 mètre (1 pied).
Si les deux enceintes surround ne se trouvent pas
à égale dist ance de l a position d
distance par rapport à l
CNTR DIST
Distance entre votre position d
’enceinte centrale
l
Vous pouvez régler cette distance en tr e
1,0 mètre et 7 ,0 mè tr es (3 à 23 pi eds) pa r pas de
0,1 mètre (1 pied).
SW DIST
Distance entre votre position d
caisson de graves
Vous pouvez régler cette distance en tr e
1,0 mètre et 7 ,0 mè tr es (3 à 23 pi eds) pa r pas de
0,1 mètre (1 pied).
DIST UNIT
Unité de mesure appliquée aux mesures de
distance (mètre ou pied)
Le réglage initial est « SEL–FEET ».
’écoute et les
’enceinte la plus proche.
’écoute, réglez la
’enceinte la plus proche.
’écoute et
’écoute et le
suite
21
Lecture des disques
FR
Page 50

Remarque
La distance des enceintes ne peut pas ê tre réglé e dans
les cas suivants:
– Lorsque le lecteur lit les informations de disque d’un
CD (ou la zone CD d’un Super Audio CD).
– Lorsque le lecteur lit la zone bica na ux d’ un Su pe r
Audio CD.
1 Appuyez sur la touche MENU du
lecteur.
2 Tournez l AMS L (ou appuyez
plusieurs fois sur la touche ./>
de la télécommande) jusqu’à ce que
« SPK DIST » s’affiche.
3 Appuyez sur l AMS L (ou s ur la
touche ENTER de la télécommande).
4 Tournez l AMS L (ou appuyez
plusieurs fois sur la touche ./>
de la télécommande) jusqu’à ce que
l’élément souhait é s’ affiche.
Sélectionnez l’élément parmi « FRT
DIST », « SURR DIST », « CNTR DIST »
ou « SW DIST ».
Remarque
Lorsque vous réglez le caisson de graves sur
« –– » en mode multicanaux ( page 18), il est
impossible de régler « SW DIST » («NOT IN
USE » s’affiche). De même, vous ne pouvez pas
régler « CNTR DIST » (« NOT IN USE »
s’affiche) lorsque l’en ceinte centrale est réglée
sur «––».
5 Appuyez sur l AMS L (ou s ur la
touche ENTER de la télécommande).
Le réglage de la distance des enceintes
s’affiche.
Exemple :
Lorsque vous sélectionnez « SURR DIST »
(alors que « DIST UNIT » est réglé sur
« SEL–FEET »).
6 Tournez l AMS L (ou appuyez
plusieurs fois sur la touche ./>
de la télécommande) pour régler la
distance des enceintes.
7 Appuyez sur l AMS L (ou sur la
touche ENTER de la télécommande).
Le lecteur reprend l’ ét at de l’étape 4.
Répétez les étapes 4 à 7 pour procéder à
d’autres réglag es.
8 Appuyez sur la touche MENU du
lecteur, une fois les réglages terminés.
L’affichage reprend son apparence
normale.
Pour sélectionner l’unité de
mesure de la distance
A l’étape 4 ci-dessus, sélectionnez
« DIST UNIT ».
Tournez l AMS L (ou appuyez sur la
touche ./> de la télécomm ande) pour
sélectionner « SEL–METER » ou « SEL–
FEET », puis app uyez sur l AMS L
(ou sur la touche ENTER de la télécommande).
Pour rétablir les distances par
défaut des enceintes
Réglez les distan ces de toutes les enceintes sur
3 mètres (10 pieds).
22
FR
Page 51

Stockage des informations relatives
aux CD
Etiquetage des disques
— Nom du disque
Le lecteur peut stocker les info rmations appelées
« Nom du disque » pour 100 disques maximum
(dans le cas d
correspond au Nom du disque). Une fois qu e
vous avez enregistré le nom d
lecteur le rappelle automatiquement chaque fois
que vous sélection nez ce disque.
Vous pouvez étiqueter les disques au moyen de
noms de 12 caractères maximum. Ainsi, le
lecteur peut afficher ce nom chaque f oi s que le
disque est sélectionné.
Remarquez que vous ne pouvez pas modifier le
titre d'un disque TEXT.
’un disque hybride, chaque couche
’un disque, le
Etiquetage des disques sur le
lecteur
1 Insérez ou sélectionnez le disque.
2 Appuyez sur MENU.
3 Tournez l AMS L jusqu’à ce que
« DISC NAME » s’affiche.
4 Appuyez sur l AMS L.
« NAME INPUT » apparaît, suivi du
curseur clignotant.
5 Tournez l AMS L jusqu’à ce que
le caractère recherché apparaisse.
Vous pouvez sélectionner les caractères
suivants.
A - Z, 0 - 9, + – / < = > ? @ [ \ ] _ (espace )
6 Appuyez sur l AMS L (ou sur
M) pour sélectionner le caractère.
Le curseur clign otant s’affich e pour
indiquer la positi on du caractère suivant.
Exemple :
Pour saisir AA
Tournez l AMS L jusqu
«A» s
’affiche. t Appuyez sur l AMS
L (ou M). t Tournez l AMS
L jusqu’à ce que « A » apparaisse.
t Appuyez sur l AMS L (ou M).
’à ce que
7 Répétez les étapes 5 et 6 pour saisir
des caractères supplémentaires.
8 Appuyez sur MENU pour enregistrer le
nom du disque.
Répétez les étapes 1 à 8 pour affecter des
noms de disque à d
’autres disque s.
Etiquetage des disques à
l’aide de la télécommande
1 Insérez ou sélectionnez le disque.
2 Appuyez sur NAME INPUT.
Le curseur clignotant s’affiche.
3 Appuyez plusieurs fois sur CAPS pour
sélectionner le type de caractère
souhaité.
Chaque fois que vous appuyez sur la
touche, l
’affichage change successivement
’ordre suivant :
dans l
« INPUT ABC » (lettres majuscules et
symboles) y « INPUT 123 » (nombres)
4 Appuyez sur la touche numérique pour
saisir des caractères.
x Si vous sélectionnez « INPUT ABC ».
Pour
sélectionner
, +, – Appuyez plusieurs fois sur la
A - Z Appuyez plusieurs fois sur la
* Si vous appuyez plusieurs fois sur > après
avoir appuyé sur la touche numérique 1, vous
pouvez sélectionner les sym boles suivants :
/ < = > ? @ [ \ ] _ (espace)
Si vous appuyez sur SPACE, vous pouvez
sélectionner directement l’espace.
x Lorsque « INPUT 123 » est sélectionné
Appuyez sur la touche numérique de votre
choix.
Procédez ainsi :
touche numérique 1*.
touche numérique 2-9
(touche correspondant au
caractère so u haité).
suite
23
Stockage des informations r elatives aux CD
FR
Page 52

5 Appuyez sur M pour sélectionner le
caractère.
Le curseur clignotant s’affiche pour
indiquer la position du caractère suivant.
Exemple :
Pour sais ir AA
Appuyez une fois sur la touche
numérique 2. t Appuyez sur M.
t Appuyez une fois sur la touche
numérique 2. t Appuyez sur M.
6 Répétez les étapes 3 à 5 pour saisir des
caractères supplémentaires.
7 Appuyez sur ENTER pour enregist rer le
nom du disque.
Répétez les étapes 1 à 7 pour affecter des
noms de disque à d’autres disques.
Autres fonctions
Pour Procédez ainsi :
Corriger un
caractère erroné
Effacer un nom
de disque
Effacer tous les
noms de disque
1 Appuyez plusieurs fois sur
m/M jusqu’à ce que le
caractère erroné clignote.
2 Appuyez sur la touche CLEAR
de la télécommande pour
supprimer le caractère erroné,
puis saisiss e z le caractère
correct.
3 Appuyez sur la touche ENTER
de la télécommande pour
enregistrer le nom du disque.
1 Insérez ou sélectionnez le
disque souhaité, puis appuyez
sur la touche NAME INPUT de
la télécomma n de.
2 Appuyez plusieurs fois sur la
touche CLEAR de la
télécommande pour supprimer
tous les caractères.
3 Appuyez sur la touche ENTER
de la télécommande.
1 Mettez le lecteur hors tension.
2 Tout en appuyant sur x,
appuyez sur la touche POWER
du lecteur.
Après l'affichage de
«ERASING», «ALL
ERASE » apparaît sur
l'affichage et tous les noms de
disque sont effacés.
Remarque
Vous ne pouvez pas utiliser la fonction Nom du disque
lorsque vous écoutez le disque sur d'autres lecteurs.
24
FR
Page 53

Informations complémentaires
Précautions
Sécurité
• Attention – L’utilisation d’instruments optiques avec
cet appareil présente un risqu e ocula ire.
• Si un solide ou un liquide venait à pénétrer le boîtier,
débranchez le lecteur et faites-en vérifier tous les
composants par un technicien qualifié avant de le
réutiliser.
• Le cordon d’alimentation secteur ne doit être changé
que dans un centre de service qualifié.
• L’appareil reste alim enté tant que le cordon
d’alimentation est branch é s u r la prise secteur e t ce ,
même si l’appa r e il est hors tensi o n.
Sources d’alimentation
• Avant de faire fonctionner le lecteur, vérifiez que sa
tension de fonctionnement e st ide ntique à celle de
l’alimentation secte u r loc al e. L a tension de
fonctionnement figure sur la pla que signalétique à
l’arrière d u lecteur.
• Le lecteur reste alimenté tant que le cordon
d’alimentation est branch é s u r la prise secteur e t ce ,
même si le lecteur est hors tensio n .
• Si vous ne comptez pas utiliser le lecteur pendant une
longue période, débranchez-le de la pris e sec te ur.
Pour débrancher le cordon d’alimentation de la prise
secteur, saisissez la fiche ; ne tirez jamais sur le
cordon.
Installation
• Installez le lecteur dans un endroit suffisamment
ventilé pour éviter une surchauffe interne.
• N’installez pas le lecteur sur une surface souple telle
qu’un tapis. Vous risqueriez d’obturer les trous de
ventilation situés en dessous de l’appareil.
• N’installez pas le lect eu r pr ès d’u ne sour ce de
chaleur et ne le soumettez pas aux rayons directs du
soleil, à la poussière ou à un choc mécanique.
Fonctionnement
• Si vous déplacez directement le lecteur d’une p ièce
froide à un endroit chaud, ou l’installez dans un lieu
très humide, de l’humidité peu t se condenser sur les
lentilles à l’intérieur du lecteur. Cela peut provoquer
un dysfonctionnement de l’appareil. Si tel est le cas,
retirez le disque et laissez le lecteur sous tension
pendant une heure environ jusqu’à complète
évaporation de l’humidité.
• A la mise sous tension, vous risquez d’entendre des
bruits mécaniques lors du chargement du disque dans
le lecteu r S upe r Aud i o C D. C es br uit s s o nt no r ma ux .
Réglage du volume
N’augmentez pas trop le volume pendant la lecture
d’un passage dépourvu de signal audio ou dont le
signal est très faible. En effet, la lecture d’un passage
de crête risquerait d'endommager les enceintes.
Insertion d’un disque
Vous risquez d’entendre le lecteur émettre un bruit de
transmission ou des bruits mécaniques. Ce bruit
indique que le lecteur règle automatiquement ses
mécanismes internes en fonc tion du disque inséré.
Le bruit mécanique peut aussi résulter de l’insertion
d’un disq ue voilé.
Nettoyage
Nettoyez le boîtier, le panneau et les commandes à
l’aide d’un chiffon doux légèremen t imprégné d’une
solution détergente neutre. N’utilisez pas de tampon
abrasif, de poudre à récurer ni de solvant tel qu’alcool
ou essence .
Transport
• N’oubliez pas de retirer les disques du plateau.
• Veillez à toujours refermer le plateau.
Si vous avez des questions ou des problèm e s
concernant votre lecteur, consul te z votr e revende ur
Sony le plus proche.
Informations complémentaires
25
FR
Page 54

Remarques su r les
Dépannage
disques
Manipulation des disques
• Pour maintenir un disque en bon état de propr e té ,
tenez-le par les bords. Ne touchez pas la sur f ace .
• Ne collez ni papier ni ruban adhésif sur le disque.
• N’utilisez que des disques circula ires . Si vous
utilisez un disque de forme no n sta nda r d (étoile,
cœur ou carré, par exemple), vous risquez
d’endommager le lecteur.
• N’utilisez pas de disques comportant des étiquettes
tels que disques usagés ou loués.
Rangement des disques
• N’exposez pas le dis que à la lumi ère direct e du soleil
ou à des sources de chaleur telles que des conduits
d’air chaud.
• Après la lecture, rangez le disq ue dans son étui. Si
vous empilez les disques les uns sur les autres sans
étui, vous risquez de les endommager.
Insertion du disque sur le plateau
Assurez-vous que le disque est correc teme nt
positionné sur le plateau.
Si ce n’est pas le cas, le lecteur ou le disque risque
d’être endommagé.
Entretien
• Si le disque est poussiéreux ou qu’il présente des
traces de doigt, la qualité sonore ri sque d’en souffrir.
• Avant de lire un disque, nettoyez- le à l’aide d’un
chiffon. Essuyez-le en partant du cent re ve rs les
bords externes.
Si vous rencontre z l’ une des difficultés
suivantes lors de l’u tilisation du lecteur , ce guide
de dépannage peut vous aider à résoudre l es
problèmes. Si un problème quelconque persiste,
consultez votre revendeur Sony le plus proche.
Aucun son n’est transmis.
• Vérifiez la connexion d u l ecteur.
• Vérifiez le bon fonctionnement de l’amplificateur.
• En cas d’utilisation d’un casque, réglez le volume
à l’aide de LEVEL.
Aucun son n’est transmis par les connecteurs
DIGITAL (CD) OUT.
• Les signaux audio du Super Audio CD ne sont pas
reproduits par les connecteurs DIGITAL (CD)
OUT.
Impossible de lire le disque.
• Il n’y a pas de disque dans le lecteur.
• Placez le disque sur le pla teau, étiquette vers le
haut.
• Le disque est mal inséré. Rechargez le disque.
• Nettoyez le disque (voir page 26).
• Il y a condensation d’humidité à l’in té ri e ur du
lecteur.
Retirez le disque et laissez le lecteur sous tension
pendant une heure environ.
• Le disque qui se trouve sur le plateau n’ es t pa s
compatible (voir page 4).
La télécommande ne fonctionne pas.
• Eliminez les obstacles séparant la télécommande
du lecteur.
• Pointez la télécommande vers le capteur de
télécommande du lecteur .
• Si les piles de la télécommande sont faibles,
remplacez-les.
• Assurez-vous que le mode de commande de la
télécommande (position du sélecteur CD1/2)
(page 31) correspond à celui du lecteur (page 9).
26
• Nettoyez le disque à l’aide d’un chiffon lé gè r em e nt
humide, puis enlevez les tra ces d’ humidité avec un
chiffon sec.
• N’utilisez pas de solvant (essence, diluants, produits
nettoyants disponibles dans le com merce ou sprays
antistatiques).
FR
Page 55

Aucun son n’est transmis de la prise SUB
WOOFER.
• Sélectionnez un mode de lecture où un signal
caisson de graves est reproduit par la pr ise SUB
WOOFER. Le mode s’affiche suivi de « + SW »
(page 18) en cas de sélection d’un mode de ce
type.
• Lorsque vous lisez une piste ne comportant pas de
signal LFE, le signal est reproduit par la prise
SUB WOOFER uniquement si vous sélectionnez
« 5–SMALL+SW » ou « F–LARGE+SW » pour
le mode multicanaux (page 18) .
Il est impossible d’éjecter un disque et
« LOCKED » s’affiche.
• Contactez votre revendeur Sony ou le centre de
service Sony le plus proche.
« REMOVE » apparaît dans la fenêtre
d'affichage du panneau frontal.
• Retirez le disque devant vous et mettez le lecteur
hors tension, puis de nouveau sous tension.
Vous avez essayé les solutions
proposées
Si le lecteur ne fonctionne toujours pas
correctement, ou si vous rencontrez un problème
qui ne figure pas d ans la liste ci-dessus, mettez
le lecteur hors te ns ion, débranchez-le pendant
quelques minutes de la prise d'alimentat io n
secteur, puis rebranchez-le.
Spécifications
En cas de lecture d’un Super Audio
CD
Plage de fréquences en lecture
2 Hz à 100 kHz
Réponse en fréquence 2 Hz à 40 kHz (–3 dB)
Plage dynamique 101 dB ou supérieure
Taux de distorsion harmonique totale
0,003 % maximum
Pleurage et scintil lement Inférieurs aux seuils
mesurables (± 0,001 % W.
PEAK)
En cas de lecture d’un CD
Réponse en fréquence 2 Hz à 20 kHz
Plage dynamique 97 dB ou supérieure
Taux de distorsion harmonique totale
0,0032 % maximum
Pleurage et scintil lement Inférieurs aux seuils
mesurables (± 0,001 % W.
PEAK)
Connecteur de so rt ie
ANALOG OUT (prises phono) :
Niveau de sortie 2 Vrms (à 50 kohms)
Impédance de charge Supérieure à 10 kohms
DIGITAL (CD) OUT OPTICAL*
(connecteur de sortie optique carré) :
Niveau de sortie –18 dBm
DIGITAL (CD) OUT COAXIAL*
(connecteur de sortie coaxial) :
Niveau de sortie 0,5 Vc-c
Impédance de charge 75 ohms
PHONES (prise casque stéréo) :
Niveau de sortie 10 mW
Impédance de charge 32 ohms
* Ne transmet que les signaux audio du CD
Informations complémentaires
Généralités
Laser Laser à semi-conducteur
(Super Audio CD : λ=
650 nm) ( CD : λ= 780 nm)
Durée d’émission :
continue
Alimentation électrique 120 V CA, 60 Hz
Consommation électrique 15 W
Dimensions (l/h/p) 430 × 115 × 420 mm,
saillies comprises
Poids (approx.) 5,8 kg
suite
27
FR
Page 56

Accessoires fournis
Cordon de connexion audio
Télécommande RM-SC505 (1)
Piles R6 (format AA) (2)
La conception et les spécifications sont susceptibles
d’être modifiées sans préavis.
Rouge et blanc × 2 (2)
Noir × 2) (2)
28
FR
Page 57

Nomenclature
Pour plus de détails, reportez-vous au x numéros de page indi qués entre parenthèses.
Les instructions de ce manuel décrivent les commandes du lecteur. Vous pouvez également utiliser les
touches de la télécommande si elles portent des noms identiques ou similaires aux commandes du
lecteur.
Panneau avant
Informations complémentaires
A Interrupteur d’alimentation POWER (9, 24)
B Touches DISC 1-5 (10, 16, 17)
Appuyez sur ces touches pour sélectionner
directement le disque.
C Capteur de télécommande (6)
D Fenêtre d’affichage (12)
E Touche N (10, 15, 16, 17)
F Touche X (10)
G Touche x (10, 18, 24)
H Touches m/M (15, 23)
I Molette l AMS L
(AMS : Automatic Music Sensor)
(9, 10, 11, 13, 15, 17, 18 , 20, 22, 23)
J Touche EX-CHANGE (14)
Appuyez sur cette touche pour remplacer de s
disques pendant la lecture d'un disque.
K Touche DISC SKIP (9, 14)
Appuyez sur cette touche pour sélect ionner le
disque.
L Touche A OPEN/CLOSE (9)
M Commande LEVEL
Permet de régler le volume du casque.
N Prise PHONES
Permet de connecter le casque.
Lors de la lecture d’un Super Audio CD
multicanaux, les signaux tr a nsmis par les prises
ANALOG 5.1CH OUT FRONT L/R le sont aussi
par la prise PHONES.
O Plateau (9)
P Témoin MULTI CHANNEL DECODING
Ce témoin s’allume lorsque vous mettez le lecteur
sous tension ou lorsqu’un Super Audio CD
multicanaux est chargé et que vous sélectionnez la
zone de lecture multicanaux en appuyant sur
MULTI/2CH.
Q Touche TIME/TEXT (12)
Cette touche permet d’afficher successivement le
temps de lecture de la plage, le temps restant sur le
disque ou les informations TEXT.
En mode de saisie du nom, appuyez sur cette
touche pour sélectionner le typ e de ca r a ctère.
R Touche PLAY MODE (10, 16, 17)
Appuyez sur cette touche pour sélectionner le
mode de lecture.
S Touche MULTI/2CH (5, 11)
Appuyez sur cette touche pour sélectionner la zone
de lecture en cas de chargement d’un disque
comportant une zone bicanaux et une zon e
multicanaux (page 5 ).
T Touche SA-CD/CD (5, 11)
En présence d’un disque hybride, cette tou ch e
permet de sélectionner la couche à lir e : couc he
SA-CD et couche CD.
U Touche MENU (9, 11, 13, 18, 20, 22, 23)
Appuyez sur cette touche pour faire apparaître le
menu.
Appuyez une nouvelle fois pour quitter le menu et
revenir à l’affichage normal.
suite
29
FR
Page 58

Panneau arrière
ANALOG DIGITAL(CD) IR REMOTE
5.1CH OUT2CH OUT
FRONT
SURR
L
L
R
R
A Prises ANALOG 2CH OUT (7)
B Prises ANALOG 5.1CH OUT (6)
C Connecteur DIGITAL (CD) OUT COAXIAL
(8)
D Connecteur DIGITAL (CD) OUT OPTICAL
(8)
E Prise IR REMOTE IR IN
Permet le raccordement à un composant équipé
d'une prise de sortie IR.
CENTER
SUB
WOOFER
OUT
OPTICALCOAXIAL
IR
IN
30
FR
Page 59

Télécommande
CD2
CD1
PLAY MODE
CONTINUE SHUFFLE
NAME
INPUT
DISC
CAPS
123
456
78
>10 ENTER
REPEAT CHECK
DISC SKIP
–+
A Touche CONTINUE (10, 16, 17)
Appuyez sur cette touche pour reprendre la lecture
continue après une lecture aléatoire ou une lecture
programmée.
Touche SHUFFLE (16)
Touche PROGRAM (17)
B Touche NAME INPUT (23)
Appuyez sur cette touche pour accéder au mode de
saisie du nom.
DISPLAY
MODE
TIME/TEXT
SPACE
ABC DEF
JKL MNOGHI
TUV WXYZPQRS
10/0
AMS
PROGRAM
SA-CD/CD
MULTI/2CH
9
CLEAR
LEVEL
ADJ
C Touche DISC (10, 17)
Appuyez sur cette touche pour sélectionner le
disque.
Touche CAPS (23)
Appuyez sur cette touche pour permuter les lettres
majuscules (ABC) et les chiffres (123) en mode de
saisie du nom.
D Touches numériques (10, 17, 23)
E Touche >10 (10, 17)
F Touche REPEAT (15)
G Touche CHECK (17, 18)
Appuyez sur cette touche pour vérifier la
composition d’un programme.
H Touche H (10, 15, 16, 17)
Touche X (10)
Touche x (10, 18, 24)
I Touches AMS ./>
(AMS : Automatic Music Sensor)
(9, 10, 11, 13, 15, 17, 18 , 21, 22, 23)
J Touches m/M (15, 24)
K Touches DISC SKIP +/– (9, 14)
Appuyez sur cette touche pour sélectionner le
disque.
L Sélecteur CD1/2 (mode de commande) (9)
Sélectionnez le mode de commande.
M Touche DISPLAY MODE (13)
Appuyez sur cette touche pour activer ou
désactiver l’affichage des informations.
N Touche SA-CD/CD (5, 11)
En présence d’un disque hybride, cette tou ch e
permet de sélectionner la couche à lir e : couc he
SA-CD et couche CD.
O Touche MULTI/2CH (5, 11)
Appuyez sur cette touche pour sélectionner la zone
de lecture en cas de chargement d’un disque
comportant une zone bicanaux et une zon e
multicanaux (page 5 ).
P Touche TIME/TEXT (12)
Cette touche permet d’afficher successivement le
temps de lecture de la plage, le temps restant sur le
disque ou les informations TEXT.
Touche SPACE (23)
Appuyez sur cette touche pour insérer un espace en
mode de saisie du nom.
Q Touche ENTER (9, 10, 11, 13, 17, 19, 21, 22,
24)
R Touche CLEAR (17, 18, 24)
Appuyez sur cette touche pour effacer un numéro
de plage d’un programme.
S Touche LEVEL ADJ (21)
Appuyez sur cette touche pour régler l’intensité
dans le cadre de la gestion multic a na ux ( pa ge 18).
Informations complémentaires
31
FR
Page 60

Sony Corporation Printed in Malaysia
 Loading...