

Page 1
Micro Satellite
System
4-226-697-11(1)
Operating Instructions
Manual de instrucciones
Owner’s Record
The model and serial numbers are located on the rear of the unit. Record the serial
number in the space provided below. Refer to them whenever you call upon your
Sony dealer regarding this product.
Model No. SA-VE315/VE312 Serial No.
SA-VE315
GB
ES
SA-VE312
©2000 Sony Corporation
Page 2
WARNING
To prevent fire or shock hazard, do not
expose the unit to rain or moisture.
To avoid electrical shock, do not open the cabinet.
Refer servicing to qualified personnel only.
Do not install the appliance in a confined space,
such as a bookcase or built-in cabinet.
NOTICE FOR THE CUSTOMERS IN THE
USA
This symbol is intended to alert the
user to the presence of uninsulated
“dangerous voltage” within the
product’s enclosure that may be of
sufficient magnitude to constitute a
risk of electric shock to persons.
This symbol is intended to alert the
user to the presence of important
operating and maintenance
(servicing) instructions in the
literature accompanying the
appliance.
CAUTION
You are cautioned that any changes or modification
not expressly approved in this manual could void
your authority to operate this equipment.
Note to CATV system installer:
This reminder is provided to call CATV system
installer’s attention to Article 820-40 of the NEC that
provides guidelines for proper grounding and, in
particular, specifies that the cable ground shall be
connected to the grounding system of the building,
as close to the point of cable entry as practical.
CAUTION
Use of this applicance with some systems may
present a shock or fire hazard. Do not use with any
units which have the following marking located
near output.
WARNING: HAZARDOUS ENERGY!
GB
2
Page 3

Table of Contents
Hooking up the system ......................... 4
Positioning the speakers........................ 7
Listening to the sound ........................... 8
Adjusting the sound .............................. 8
Precautions ............................................ 10
Troubleshooting ................................... 11
Specifications ........................................ 11
About this manual
The instructions in this manual are for SA-VE315 and SA-VE312, Sony Micro Satellite Systems.
Differences between the systems
• SA-VE315
The SA-VE315 is a 5.1 channel speaker system consisting of two front speakers, two rear
speakers, one center speaker, and one subwoofer. It supports Sony DigitCinema Sound, Dolby*
Pro Logic, and Dolby Digital (AC-3), and is thus geared towards the enjoyment of movies.
• SA-VE312
Consisting of two front speakers and one subwoofer, the SA-VE312 is suited for the enjoyment
of music.
* Manufactured under license from Dolby Laboratories. DOLBY, the double-D symbol ;, “PRO LOGIC” and
“Dolby Digital (AC-3)” are trademarks of Dolby Laboratories.
Any difference in operation is clearly indicated in the text, for example, “SA-VE315 only.”
GB
GB
3
Page 4
Hooking up the system
Connect the speaker system to the speaker output terminals of an amplifier.
Make sure power to all components (included the subwoofer) is turned off before starting the
hook-up.
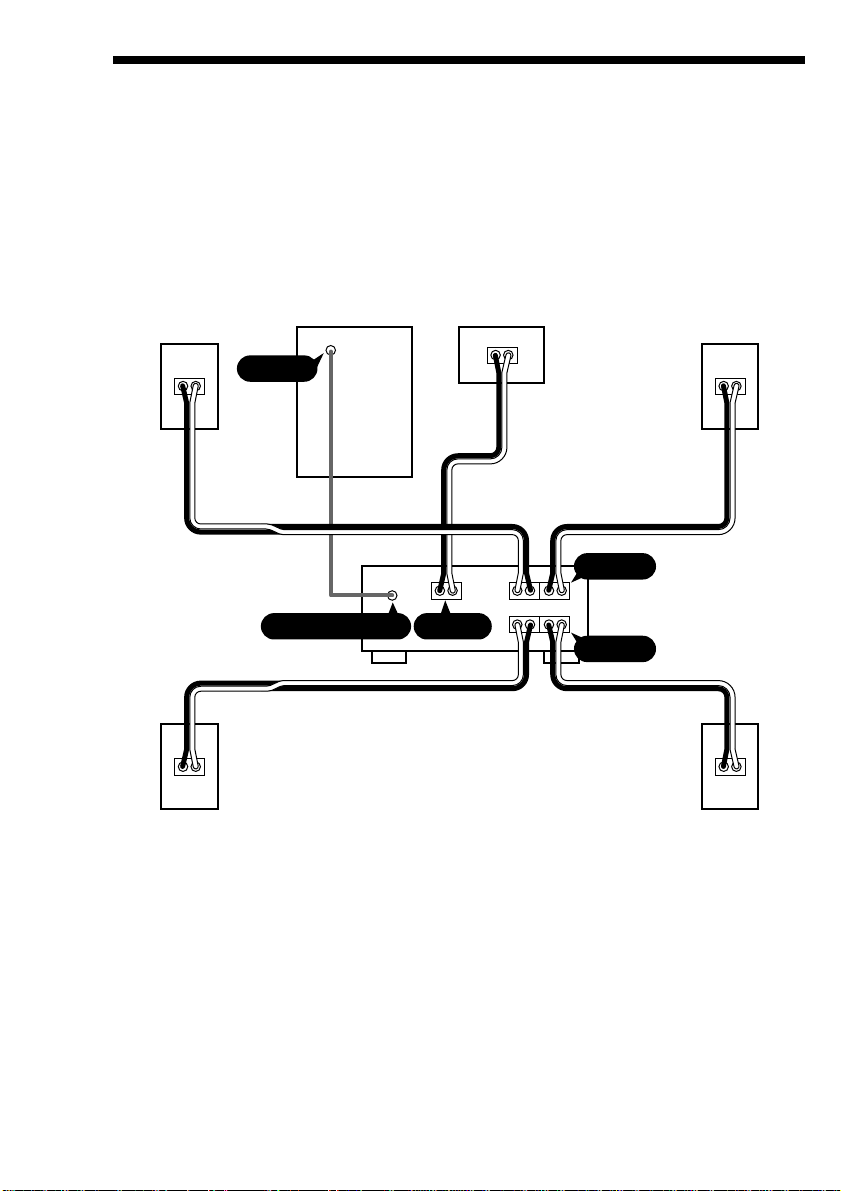
Hookup A (for SA-VE315)
This configuration is used when the amplifier is connected to a DVD player, LD player, VCR or
other video devices.
Front (Right)
Ee Ee
LINE IN
Subwoofer Center
Amplifier
Ee
WOOFER OUT
CENTER
Ee
R
eE Ee
R
FRONT
L
L
REAR
Ee Ee
Front (Left)
Rear (Left)Rear (Right)
GB
4
Page 5
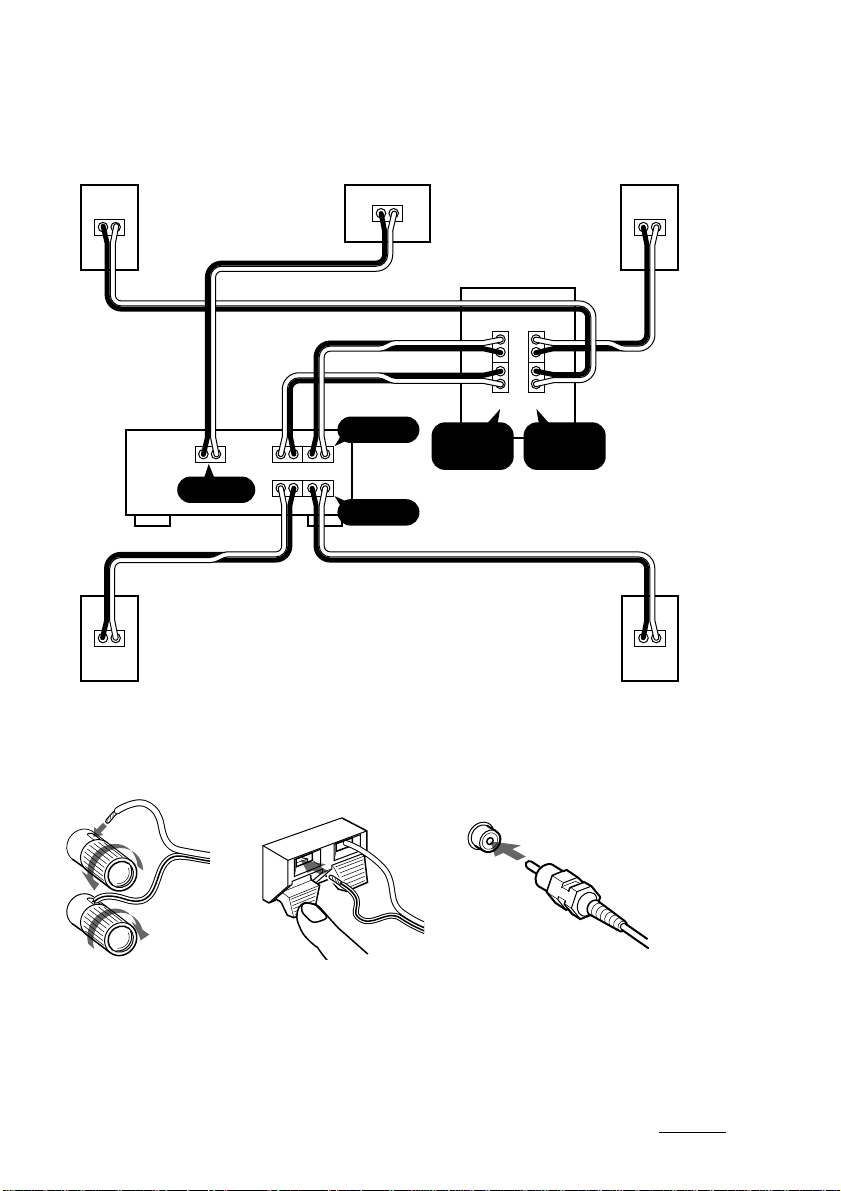
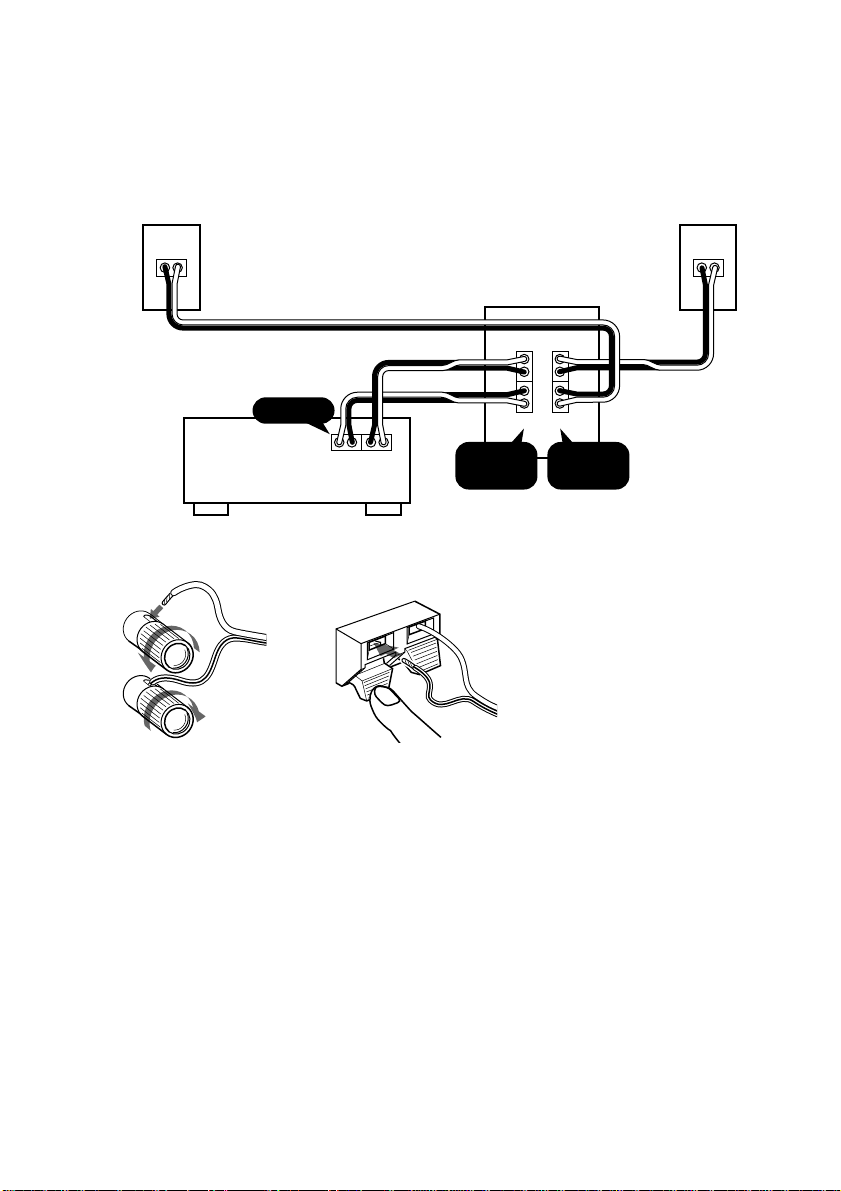
Hookup B (for SA-VE315)
Try this configuration instead of “Hookup A” in the following situations:
— When there are no jacks on the amplifier for a subwoofer.
— When you want a stronger bass sound from the subwoofer.
Front (Right)
Ee Ee
Amplifier
Ee
CENTER
R
eE Ee
R
Center Front (Left)
Ee
Subwoofer
RLR
FRONT
L
L
SPEAKERINSPEAKER
REAR
L
e
E
E
e
OUT
Ee Ee
Terminal (jack) connections
e
e
E
E
E
e
E
e
Rear (Left)Rear (Right)
continued
GB
5
Page 6
Hooking up the system (continued)
Hookup C (for SA-VE312)
This configuration is used when the amplifier is connected to a CD player, MD deck, cassette
deck, or other audio devices.
Front (Right)
Ee Ee
Subwoofer
L
e
E
Amplifier
FRONT
RL
eE Ee
SPEAKERINSPEAKER
E
e
RLR
Front (Left)
OUT
Terminal connections
e
E
e
e
E
E
e
E
Notes
• Make sure the plus (+) and the minus (–) terminals on the speakers are matched to the corresponding plus (+)
and minus (–) terminals on the amplifier.
• Be sure to tighten the screws of the speaker terminals securely as loose screws may become a source of noise.
• Make sure all connections are firm. Contact between bare speaker wires at the speaker terminals may cause a
short-circuit.
• Do not connect the subwoofer to the amplifier’s CENTER output terminal (which is for Dolby Pro Logic or
Dolby Digital (AC-3)). No bass sound will output from the subwoofer if you do.
• For details regarding the connections on the amplifier side, refer to the manual that was provided with your
amplifier.
Tip
All striped wires are minus (–) in polarity, and should be connected to the minus (–) speaker terminals.
GB
6
Page 7
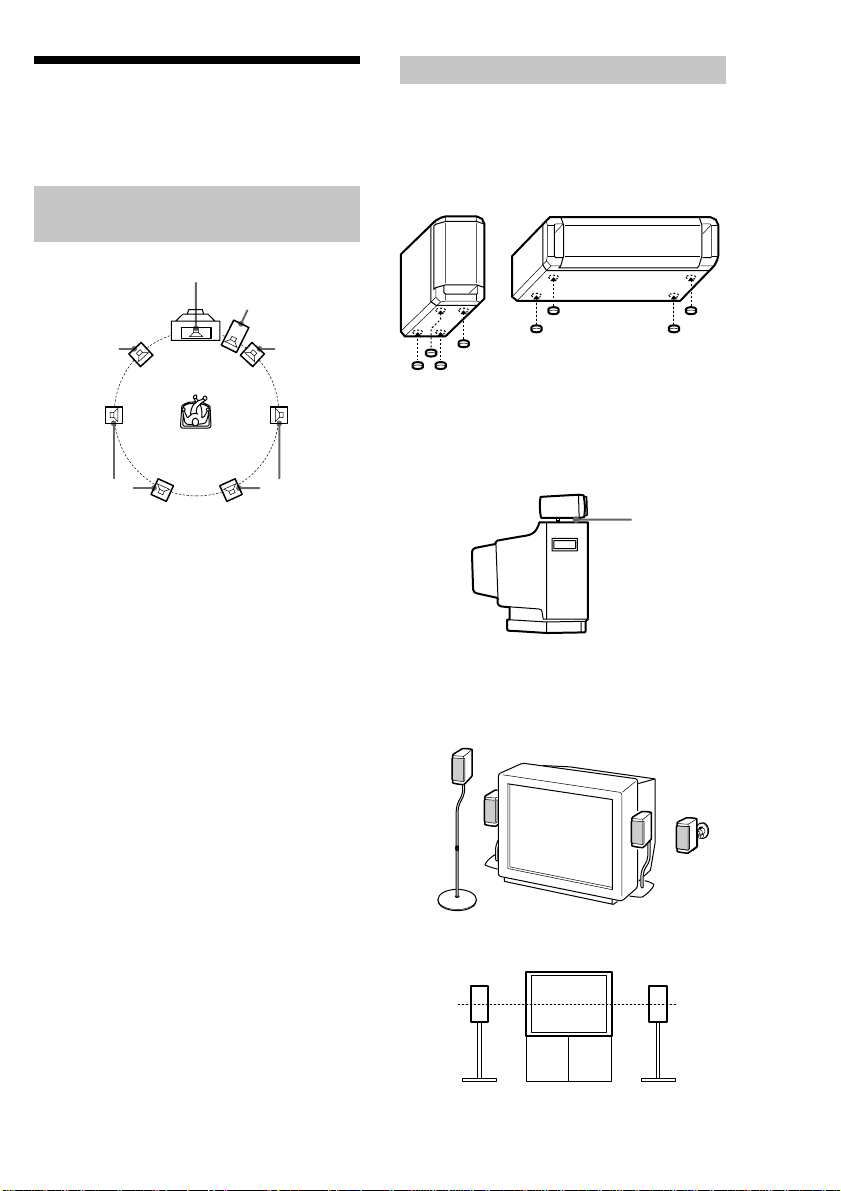
Positioning the speakers
Location of each
speaker
Center*
Setting the speakers
To prevent speaker vibration or movement
while listening, attach the supplied foot pads
to the bottom four corners of the center
speaker*, front speakers, and rear speakers*.
*SA-VE315 only
Subwoofer
Front
(Left)
AA
Rear*
(Left)
BB
*SA-VE315 only
Each speaker should face the listening
position. Better surround effect will result if
all speakers are set at the same distance from
the listening position.
Place the front speakers at a suitable distance
to the left and right of the television.
Place the subwoofer on either side of the
television.
Place the center speaker on the top-center of
the TV set.
The placement of rear speakers greatly
depends on the configuration of the room.
The rear speakers may be placed on both
sides of the listening position A or behind
the listening position B.
Tips
• Movies are best enjoyed in a room that produces
no echoes (as in one with surrounding curtains).
• Music (especially classical music) is best enjoyed
in a room that produces some echo.
Front
(Right)
Rear*
(Right)
Foot pads
Setting the center speaker
(SA-VE315 only)
Set the center speaker firmly on top of the TV
set, making sure it is completely level.
Foot pads
Setting other speakers
For greater flexibility in the positioning of the
speakers, use the optional WS-FV10, WSTV10, or WS-WV10 speaker stand (available
only in certain countries).
WS-FV10 WS-TV10 WS-WV10
(for rear speakers)
Tip
The height of the front speakers should be adjusted
to about the center of the TV screen.
GB
7
Page 8
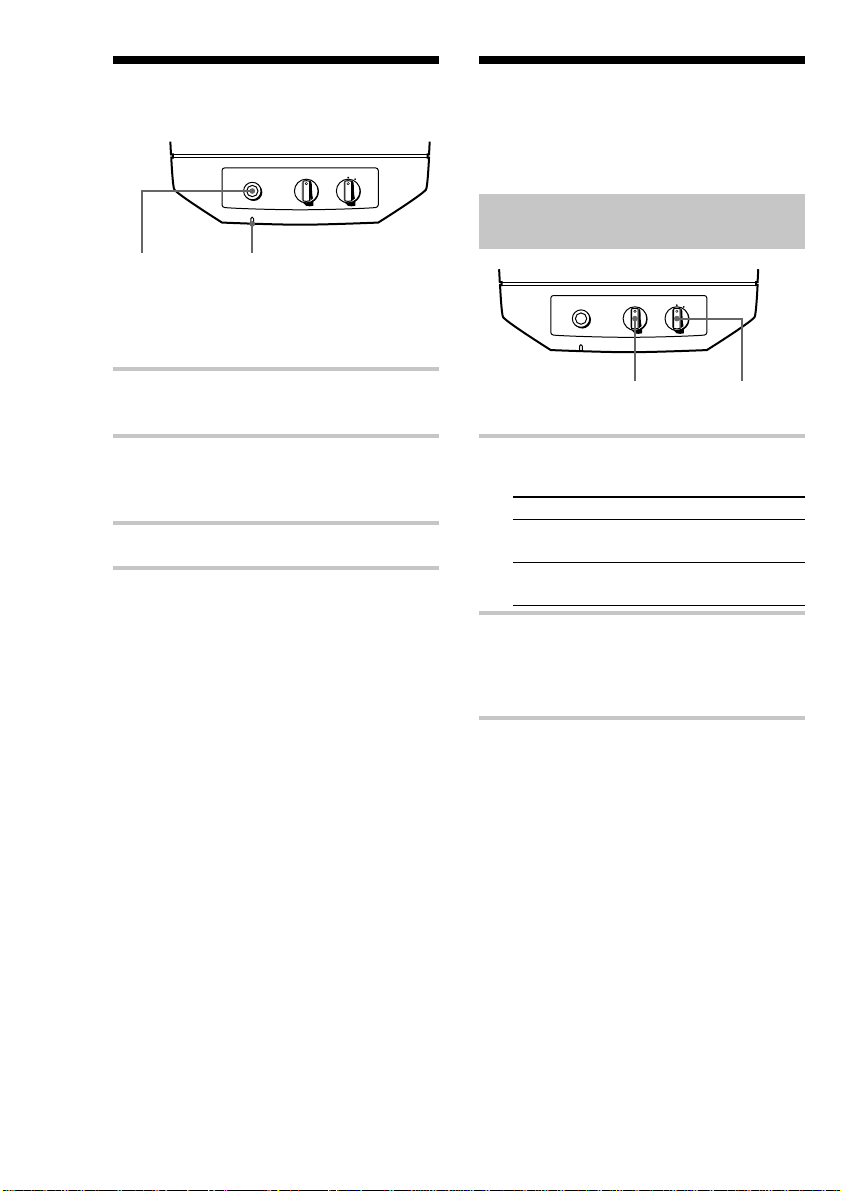
Listening to the sound
LEVEL MODE
MOVIE
POWER
MIN MAX
POWER POWER indicator
First, turn down the volume on the amplifier.
The volume should be set to minimum before
you begin playing the program source.
MUSIC
Adjusting the sound
Slight adjustments to the system can enhance
your sound enjoyment.
Adjusting the
subwoofer
LEVEL MODE
MOVIE
POWER
MIN MAX
MUSIC
1 Turn on the amplifier and select the
program source.
2 Press POWER on the subwoofer.
The POWER indicator on the subwoofer
lights up green.
3 Play the program source.
LEVEL MODE
1 Set MODE according to the program
source as follows:
Source MODE
DVD, LD, video cassette MOVIE
or other video source
MD, CD, cassette tape MUSIC
or other audio source
2 Rotate LEVEL to adjust the volume.
Set the volume level to best suit your
preference according to the program
source.
Notes
• Some amplifier functions for enhancing the sound
may cause distortion in the subwoofer. If such
distortion occurs, turn off those functions.
• To enjoy high-quality sound, do not turn the
subwoofer volume too high.
• To increase the bass sound from the subwoofer,
connect the system using “Hookup B” (see
page 5).
• The bass sound is enhanced in MOVIE mode
rather than in MUSIC mode. Therefore, if you
change the mode to MOVIE while listening to
some sources that do not include the bass sound,
you may not be able to get the effect.
GB
8
Page 9

Setting your amplifier
to enjoy movies
(SA-VE315 only)
For the Dolby Digital (AC-3)
If your amplifier is connected internally or
externally with a Dolby Digital (AC-3)
processor, you should use the setup menus
for the amplifier to specify the parameters of
your speaker system.
See the table below for the proper settings.
For details on the setting procedure, refer to
the manual that was provided with your
amplifier.
When “Hookup A” is used
(Speaker setup)
For Set to
Front speakers SMALL
Center speaker SMALL
Rear speakers SMALL
Subwoofer ON (or YES)
(Other setup)
Menu Set to
LFE MIX* –10 dB
BASS BOOST** ON
* Low Frequency Effect
**A function that reinforces the bass sound
When “Hookup B” is used
(Speaker setup)
For Set to
Front speakers LARGE
Center speaker SMALL
Rear speakers SMALL
Subwoofer OFF (or NO)
(Other setup)
Menu Set to
LFE MIX –10 dB
BASS BOOST ON
For the Dolby Pro Logic
If your amplifier is connected internally or
externally with a Dolby Pro Logic processor,
you should set the surround effect mode to
“NORMAL” on the amplifier for your
particular speaker system.
For details on the setting procedure, refer to
the manual that was provided with your
amplifier.
GB
9
Page 10

Precautions
On safety
• Before operating the system, be sure that the
operating voltage of the system is identical with
that of your local power supply.
• The unit is not disconnected from the AC power
source (mains) as long as it is connected to the
wall outlet, even if the unit itself has been turned
off.
• Unplug the system from the wall outlet if it is not
to be used for an extended period of time. To
disconnect the cord, pull the cord by grasping the
plug. Never pull the cord itself.
• Should any liquid or solid object fall into the
system, unplug the system’s power cord and have
the system checked by qualified personnel before
operating it any further.
• AC power cord must be changed only at the
qualified service shop.
On operation
• Do not drive the speaker system with a
continuous wattage exceeding the maximum
input power of the system.
• If the polarity of the speaker connections are not
correct, the bass tones will be weak and the
position of the various instruments obscure.
• Contact between bare speaker wires at the speaker
terminals may result in a short-circuit.
• Before connecting, turn off the amplifier to avoid
damaging the speaker system.
• The speaker grille cannot be removed. Do not
attempt to remove the grille on the speaker
system. If you try to remove it, you may damage
the speaker.
If you encounter color irregularity on a
nearby TV screen
This speaker system is magnetically shielded to
allow it to be installed near a TV set. However,
color irregularities may still be observed on certain
types of TV sets.
If color irregularity is observed...
c Turn off the TV set once, then turn it on again
after 15 to 30 minutes.
If color irregularity is observed again...
c Place the speakers further away from the TV
set.
If howling occurs
Reposition the speakers or turn down the volume
on the amplifier.
On placement
• Do not set the speakers in an inclined position.
• Do not place the speakers in locations that are:
— Extremely hot or cold
— Dusty or dirty
— Very humid
— Subject to vibrations
— Subject to direct sunlight
On cleaning
Clean the speaker cabinets with a soft cloth lightly
moistened with a mild detergent solution or water.
Do not use any type of abrasive pad, scouring
powder or solvent such as alcohol or benzine.
If you have any questions or problems concerning
your speaker system, please consult your nearest
Sony dealer.
10
GB
Page 11

Troubleshooting
Specifications
Should you encounter a problem with your
speaker system, check the following list and
take the indicated measures. If the problem
persists, consult your nearest Sony dealer.
There is no sound from the speaker
system.
•Make sure all the connections have been
correctly made.
•Make sure the volume on the amplifier
has been turned up properly.
•Make sure the program source selector on
the amplifier is set to the proper source.
•Check if headphones are connected. If
they are, disconnect them.
There is distortion in the subwoofer sound
output.
•Check if any sound-enhancing functions
have been activated on the amplifier. If
they have, turn them off.
There is hum or noise in the speaker
output.
•Make sure all the connections have been
correctly made.
•Make sure none of the audio components
are positioned too close to the TV set.
The sound has suddenly stopped.
•Make sure all the connections have been
correctly made. Contact between bare
speaker wires at the speaker terminals
may cause a short-circuit.
SA-VE315/VE312
For the U.S. model
AUDIO POWER SPECIFICATIONS
POWER OUTPUT AND TOTAL
HARMONIC DISTORTION:
with 6 ohm loads both channels driven, from
20 - 150 Hz; rated 75 watts per channel
minimum RMS power, with no more than
0.8% total harmonic distortion from
250 milliwatts to rated output.
SS-V315 (front and rear speakers)
Speaker system Full range, magnetically
Speaker units 5 × 10 cm (2 × 4 in.),
Enclosure type Bass reflex
Rated impedance 8 ohms
Power handling capacity
Maximum input power: 100 watts
Sensitivity level 87 dB (1 W, 1 m)
Frequency range 90 Hz - 20,000 Hz
Dimensions (w/h/d) Approx. 68 × 150 ×
Mass
European model: Approx. 640 g (1 lb 7 oz)
Other models: Approx. 740 g (1 lb 10 oz)
SS-CN315 (center speaker)
Speaker system Full range × 2,
Speaker units 5 × 10 cm (2 × 4 in.),
Enclosure type Bass reflex
Rated impedance 8 ohms
Power handling capacity
Maximum input power: 120 watts
Sensitivity level 89 dB (1 W, 1 m)
Frequency range 90 Hz - 20,000 Hz
Dimensions (w/h/d) Approx. 301 × 68 ×
Mass
European model: Approx. 1.4 kg (3 lb 1 oz)
Other models: Approx. 1.5 kg (3 lb 5 oz)
shielded
cone type
3
125 mm (2
including front grille
each
each
magnetically shielded
cone type
125 mm (11
5 in.), including front
grille
/4 × 6 × 5 in.),
7
/8 × 2 3/4 ×
continued
11
GB
Page 12

SA-WMS315 (subwoofer)
System
Speaker system Active subwoofer,
Speaker unit Woofer: 16 cm (6
Enclosure type Advanced SAW type
Continuous RMS power output
European model: 50 W
Other models: 75 W
Reproduction frequency range
High frequency cut-off frequency
Inputs
LINE IN (input pin jack)
SPEAKER IN (input terminals)
Outputs
LINE OUT (output pin jack)
SPEAKER OUT (output terminals)
General
Power requirements
European model: 220 - 230 V AC, 50/60 Hz
Other models: 120 V AC, 60Hz
Power consumptions
European model: 50 W
Other models: 70 W
Dimensions (w/h/d) Approx. 205 × 385 ×
Mass Approx. 10.5 kg
magnetically shielded
cone type
3
/8 in.),
(8 ohms, 20 - 150 Hz, 0.8%
THD)
28 Hz - 200 Hz
200 Hz
1
385 mm (8
15
/8 × 15 1/4 ×
1
/4 in.), including front
grille
(23 lb 2 oz)
12
Supplied accessories
SA-VE315
Foot pads (20)
Audio connecting cord (1)
Speaker connecting cords, 10 m
Speaker connecting cords, 2.5 m
SA-VE312
Foot pads (8)
Audio connecting cord (1)
Speaker connecting cords, 2.5 m
Design and specifications are subject to change
without notice.
GB
(32 ft 9
(8 ft 2
(8 ft 2
3
/4 in.) (2)
1
/2 in.) (5)
1
/2 in.) (4)
Page 13

13
GB
Page 14

ADVERTENCIA
Para evitar incendios o riesgo de
electrocución, no exponga la unidad a la
lluvia ni a la humedad.
Para evitar la electrocución, no abra el mueble.
Solicite el servicio sólo a un técnico cualificado.
No instale el aparato en un espacio cerrado,
como una estantería para libros o un armario
empotrado.
ES
2
Page 15

Indice
Conexiones del sistema ......................... 4
Instalación de los altavoces................... 7
Escuchando el sonido ............................ 8
Ajuste del sonido .................................... 8
Precauciones.......................................... 10
Localización de averías........................ 11
Especificaciones .................................... 11
Sobre este manual
Las instrucciones de este manual son para los sistemas micro-satélites SA-VE315 y SA-VE312 de
Sony.
Diferencias entre los sistemas
• SA-VE315
SA-VE315 es un sistema de altavoces de 5,1 canales que consta de dos altavoces frontales, dos
altavoces posteriores, un altavoz central y un altavoz potenciador de graves. Soporta Sony
Digital Cinema Sound, Dolby* Pro Logic y Dolby Digital (AC-3), con lo que está diseñado para
el disfrute de películas.
• SA-VE312
Con dos altavoces frontales y un altavoz potenciador de graves, SA-VE312 resulta idóneo para
disfrutar de la música.
ES
* Fabricado bajo licencia de Dolby Laboratories. DOLBY, el símbolo de la doble D ;, “PRO LOGIC” y “Dolby
Digital (AC-3)” son marcas comerciales de Dolby Laboratories.
Cualquier diferencia en su funcionamiento se indica a título expreso en el texto, por ejemplo “sólo
SA-VE315”.
ES
3
Page 16

Conexiones del sistema
Conecte el sistema de altavoces en los terminales de salida de altavoz de un amplificador.
Asegúrese de que todos los componentes (incluido el altavoz de subgraves) están desconectados
antes de empezar las conexiones.
Conexión A (para SA-VE315)
Esta configuración se utiliza cuando el amplificador está conectado a un tocadiscos de DVD,
tocadiscos de discos láser, videograbadora u otros aparatos de video.
Delantero
(derecho)
Ee Ee
Potenciador de graves Central
LINE IN
Amplificador
Ee
WOOFER OUT
CENTER
Ee
R
eE Ee
R
FRONT
L
L
REAR
Ee Ee
Trasero
(derecho)
Delantero
(izquierdo)
Trasero
(izquierdo)
ES
4
Page 17

Conexión B (para SA-VE315)
Pruebe con esta configuración en lugar de la “Conexión A” en los siguientes casos:
— Cuando no hay tomas en el amplificador para un altavoz potenciador de graves.
— Si desea un sonido de graves más potente del altavoz potenciador de graves.
Delantero
(derecho)
Ee Ee
Amplificador
Ee
CENTER
R
eE Ee
R
Central
FRONT
L
L
Ee
Potenciador de graves
L
e
E
E
e
RLR
SPEAKERINSPEAKER
OUT
REAR
Ee Ee
Trasero
(derecho)
Delantero
(izquierdo)
Trasero
(izquierdo)
Conexiones de terminales (tomas)
e
E
e
e
E
E
E
e
Continúa
ES
5
Page 18

Conexiones del sistema (continuación)
Conexión C (para SA-VE312)
Esta configuración se utiliza cuando el amplificador está conectado a un tocadiscos de discos
compactos, platina de minidiscos, platina de casetes u otros aparatos de audio.
Delantero
(derecho)
Ee Ee
Potenciador de graves
L
e
E
Amplificador
FRONT
RL
eE Ee
SPEAKERINSPEAKER
E
e
RLR
Delantero
(izquierdo)
OUT
Conexiones de terminales
e
E
e
e
E
E
e
E
Notas
• Asegúrese de que los terminales positivos (+) y negativos (–) de los altavoces coinciden con los
correspondientes terminales positivos (+) y negativos (–) del amplificador.
• Asegúrese de apretar bien los tornillos de los terminales de altavoz, ya que los tornillos flojos pueden
convertirse en una fuente de ruido.
• Compruebe que todas las conexiones están firmes. Una conexión entre cables de altavoz desnudos en los
terminales de altavoz puede provocar un cortocircuito.
• No conecte el altavoz potenciador de graves en el terminal de salida CENTER del amplificador (que es para
Dolby Pro Logic o Dolby Digital (AC-3)). Si lo hace, no se emitirá ningún sonido de graves desde el altavoz
potenciador de graves.
• Para más detalles sobre las conexiones del lado del amplificador, consulte el manual incluido con su
amplificador.
Consejo
Todos los cables con rayas son de polaridad negativa (–) y deben conectarse a los terminales de altavoz
negativos (–).
ES
6
Page 19

Instalación de los
altavoces
Ubicación de cada
altavoz
Ajuste de los altavoces
Para evitar vibraciones o movimientos de los
altavoces mientras escucha, fije los pies
suministrados a las cuatro esquinas inferiores
del altavoz central* y de los altavoces
frontales y posteriores*.
*Sólo SA-VE315
Central*
Delantero
(izquierdo)
AA
Trasero*
(izquierdo)
*Sólo SA-VE315
Cada altavoz debe estar enfrentado hacia la
posición de escucha. El efecto ambiental será
mejor si todos los altavoces están a la misma
distancia de la posición de escucha.
Coloque los altavoces delanteros a una
distancia apropiada a la izquierda y derecha
del televisor.
Coloque el altavoz potenciador de graves a
uno de los lados del televisor.
Coloque el altavoz central arriba en el centro
del televisor.
La instalación de los altavoces traseros
depende mucho de la forma de la habitación.
los altavoces traseros pueden instalarse en
ambos lados de la posición de escucha A o
detrás de la posición de escucha B.
Consejos
• Las películas se disfrutan mejor en una habitación
sin ecos (o rodeada por cortinas).
• La música (especialmente la música clásica) se
disfruta mejor en una habitación que tiene algún
eco.
BB
Potenciador de
graves
Delantero
(derecho)
Trasero*
(derecho)
Pies
Ajuste del altavoz central
(Sólo SA-VE315)
Coloque el altavoz central firmemente encima
del televisor, asegurándose de que se
encuentra completamente nivelado.
Pies
Ajuste de otros altavoces
Para una mayor flexibilidad en la situación de
los altavoces, utilice el soporte opcional para
altavoces WS-FV10, WS-TV10 o WS-WV10
(disponibles sólo en determinados países).
WS-FV10 WS-TV10 WS-WV10
(para los altavoces
posteriores)
continuación
ES
7
Page 20

Instalación de los altavoces
(continuación)
Consejo
La altura de los altavoces frontales debe ajustarse
hasta el centro de la pantalla del televisor,
aproximadamente.
Ajuste del sonido
Pequeños ajustes del sistema pueden
ayudarle a disfrutar más del sonido.
Ajuste del altavoz de
subgraves
LEVEL MODE
MOVIE
POWER
MIN MAX
MUSIC
Escuchando el sonido
LEVEL MODE
MOVIE
POWER
MIN MAX
POWER
Indicador POWER
Primero baje el volumen en el amplificador.
El volumen debe estar al mínimo antes de
empezar a reproducir la fuente de programa.
1 Conecte el amplificador y seleccione
la fuente de programa.
2 Presione POWER en el altavoz
potenciador de graves.
El indicador POWER del altavoz de
potenciador de graves se enciende en
verde.
3 Reproduzca la fuente de programa.
MUSIC
LEVEL
MODE
1 Ajuste MODE de acuerdo a la fuente
de programa, de la siguiente forma:
Fuente MODE
DVD, discos láser, videocasete MOVIE
u otra fuente de video
Minidisco, disco compacto, MUSIC
cintas de casete u otra fuente
de audio
2 Gire LEVEL para ajustar el
volumen.
Ajuste el volumen según sus
preferencias para la fuente de programa.
Notas
• Algunas funciones del amplificador para mejorar
el sonido pueden provocar distorsión en el altavoz
potenciador de graves. Si hay distorsión, desactive
estas funciones.
• Para disfrutar de sonidos de alta calidad, no suba
demasiado el volumen del altavoz potenciador de
graves.
• Para aumentar el sonido de graves del altavoz
potenciador de graves, conecte el sistema con la
“Conexión B” (consulte la página 5).
• El sonido de graves se potencia en el modo
MOVIE en lugar del modo MUSIC. Por tanto, si
cambia al modo MOVIE mientras escucha algunas
fuentes que no incluyen el sonido de graves, es
posible que no consiga este efecto.
ES
8
Page 21

Ajuste del amplificador
para disfrutar las
películas (sólo
SA-VE315)
Para el Dolby Digital (AC-3)
Si el amplificador está conectado interna o
externamente a un procesador Dolby Digital
(AC-3), debe utilizar los menús de ajuste para
el amplificador para especificar los
parámetros del sistema de altavoces.
Consulte el siguiente cuadro para los ajustes
correctos. Para más detalles sobre el
procedimiento de ajuste, consulte el manual
que viene con su amplificador.
Cuando se utiliza la “Conexión A”
(Ajuste de altavoz)
Para Ajuste a
Altavoces delanteros SMALL
Altavoz central SMALL
Altavoces traseros SMALL
Altavoz potenciador de graves ON (o YES)
(Otros ajustes)
Menú Ajuste a
LFE MIX* –10 dB
BASS BOOST** ON
* Efecto de baja frecuencia
**Una función que refuerza el sonido de graves
Cuando se utiliza la “Conexión B”
(Ajuste de altavoz)
Para Ajuste a
Altavoces delanteros LARGE
Altavoz central SMALL
Altavoces traseros SMALL
Altavoz potenciador de graves OFF (o NO)
(Otros ajustes)
Menú Ajuste a
LFE MIX –10 dB
BASS BOOST ON
Para el Dolby Pro Logic
Si el amplificador está conectado interna o
externamente a un procesador Dolby Pro
Logic, debe ajustar el modo de efecto de
sonido envolvente en “NORMAL” en el
amplificador para su sistema de altavoces en
particular.
Para más detalles sobre el procedimiento de
ajuste, consulte el manual que viene con su
amplificador.
ES
9
Page 22

Precauciones
Para su seguridad
• Antes de hacer funcionar el sistema, compruebe
que el voltaje de funcionamiento de su sistema es
igual que el de la electricidad local.
• La unidad no se desconecta de la fuente de CA
(electricidad) mientras siga enchufada al
tomacorriente, incluso si se ha desconectado la
alimentación de la unidad.
• Desenchufe el sistema del tomacorriente si no lo
va a utilizar durante mucho tiempo. Para
desconectar el cable, tire del enchufe. No tire del
cable.
• Si se cae líquido o un objeto sólido en el sistema,
desenchufe el cable eléctrico del sistema y hágalo
inspeccionar por un técnico cualificado antes de
seguir utilizando.
• El cable de CA debe cambiarse sólo en una tienda
de servicio cualificada.
Para el funcionamiento
• No accione el sistema de altavoz con un vatiaje
continuo que supere la máxima entrada del
sistema.
• Si la polaridad de las conexiones del altavoz no es
la correcta, los graves se escucharán débiles y la
posición de los distintos instrumentos no podrá
distinguirse bien.
• Una conexión entre cables de altavoz desnudos en
los terminales de altavoz puede provocar un
cortocircuito.
• Antes de conectar, desconecte el amplificador para
no dañar el sistema de altavoces.
• No se puede desmontar la pantalla del altavoz. No
trate de desmontar la pantalla del sistema de
altavoces. Si lo hace, puede dañar el altavoz.
Si se produce una irregularidad de
colores en una pantalla de TV cercana
Este sistema de altavoces está blindado
magnéticamente para que pueda instalarse cerca de
un aparato de TV. Sin embargo, pueden aparecer
problemas de color en algunos tipos de aparatos de
TV.
Si aparecen problemas de color...
c Desconecte una vez el aparato de TV y vuelva
a conectar después de 15 a 30 minutos.
Si aparecen otra vez problemas de
color ...
c Aleje los altavoces del aparato de TV.
Si se producen aullidos
Cambie la posición de los altavoces o baje el
volumen del amplificador.
Ubicación
• No coloque los altavoces en una posición
inclinada.
• No coloque los altavoces en lugares:
— Muy calientes o fríos
— Con polvo o suciedad
— Muy húmedos
— Expuestos a vibraciones
— Expuestos a los rayos directos del sol
Para la limpieza
Limpie los muebles de altavoz con un paño suave
ligeramente empapado con una solución detergente
neutra o agua. No utilice esponjas de metal, polvo
abrasivo o disolventes tales como alcohol o bencina.
Si tiene dudas o problemas sobre el sistema de
altavoces, consulte con su tienda de Sony más
cercana.
10
ES
Page 23

Localización de
averías
Si tiene problemas con su sistema de
altavoces, verifique la siguiente lista y tome
las medidas indicadas para cada caso. Si el
problema persiste, consulte al proveedor
Sony más próximo.
No se escuchan sonidos del sistema de
altavoces.
•Compruebe que se han hecho
correctamente todas las conexiones.
•Compruebe que ha subido correctamente
el volumen del amplificador.
•Compruebe que el selector de fuente de
programa del amplificador está en la
fuente correcta.
•Compruebe que los altavoces están
conectados. Si lo están, desconecte.
Hay distorsión en la salida de sonidos del
altavoz potenciador de graves.
•Verifique si se han activado las funciones
de mejora de sonido en el amplificador. Si
lo están, desactívelas.
Se escucha un zumbido o ruido en la salida
del altavoz.
•Compruebe que todas las conexiones
están bien hechas.
•Compruebe que ninguno de los
componentes de audio está demasiado
cerca del aparato de TV.
Se ha parado repentinamente el sonido.
•Compruebe que todas las conexiones
están bien hechas. Una conexión entre
cables de altavoz desnudos en los
terminales de altavoz puede provocar un
cortocircuito.
Especificaciones
SA-VE315/VE312
SS-V315 (altavoces delanteros y
traseros)
Sistema de altavoces Gama completa,
Unidades de altavoz 5 × 10 cm, tipo cono
Tipo de caja Reflejo de graves
Impedancia de régimen 8 ohmios
Capacidad de potencia de excitación
Máxima potencia de entrada:
Nivel de sensibilidad 87 dB (1 W, 1 m)
Gama de frecuencias 90 Hz - 20.000 Hz
Dimensiones (an/al/prof)
Peso
Modelos para Europa: Aprox. 640 g cada uno
Otros modelos: Aprox. 740 g cada uno
SS-CN315 (altavoz central)
Sistema de altavoz Gama completa × 2,
Unidades de altavoz 5 × 10 cm, tipo cono
Tipo de caja Reflejo de graves
Impedancia de régimen 8 ohmios
Capacidad de potencia de excitación
Máxima potencia de entrada:
Nivel de sensibilidad 89 dB (1 W, 1 m)
Gama de frecuencias 90 Hz - 20.000 Hz
Dimensiones (an/al/prof)
Peso
Modelos para Europa Aprox. 1,4 kg
Otros modelos Aprox. 1,5 kg
blindado magnéticamente
100 vatios
Aprox. 68 × 150 × 125 mm
incluyendo pantalla
frontal
blindado magnéticamente
120 vatios
Aprox. 301 × 68 × 125 mm
incluyendo pantalla
frontal
continuación
11
ES
Page 24

Especificaciones (continuación)
SA-WMS315 (altavoz potenciador de
graves)
Sistema
Sistema de altavoz Altavoz potenciador de
Unidad de altavoz Altavoz para graves:
Tipo de caja Tipo SAW avanzado
Salida de potencia RMS continua
Modelos para Europa: 50 vatios
Otros modelos: 75 vatios
Gama de frecuencias de reproducción
Frecuencia de corte de frecuencias altas
Entradas
LINE IN (toma de pasador de entrada)
SPEAKER IN (terminales de entrada)
Salidas
LINE OUT (toma de pasador de salida)
SPEAKER OUT (terminales de salida)
General
Requisitos eléctricos
Modelos para Europa: CA de 220 - 230 V,
Otros modelos: CA de 120V, 60Hz
Consumo eléctrico
Modelos para Europa: 50 vatios
Otros modelos: 70 vatios
Dimensiones (an/al/prof)
Peso Aprox. 10,5 kg
Accesorios suministrados
SA-VE315
Pies (20)
Cable de conexión de audio (1)
Cables de conexión de altavoz, 10 m (2)
Cables de conexión de altavoz, 2,5 m (5)
SA-VE312
Pies (8)
Cable de conexión de audio (1)
Cables de conexión de altavoz, 2,5 m (4)
graves activo, blindado
magnéticamente
16 cm, tipo cono
(8 ohmios a 20 - 150 Hz,
0,8 % THD)
28 Hz - 200 Hz
200 Hz
50/60 Hz
Aprox. 205 × 385 ×
385 mm, incluyendo
pantalla frontal
El diseño y las especificaciones están sujetos a
cambios sin previo aviso.
ES
Sony Corporation Printed in China
12
 Loading...