

Page 1
4-079-943-22
DIRECTV Receiver with
™
UltimateTV Service from Micr osoft
Digital Satellite Receiver/Recorder
Installation Guide
Before you begin using your DIRECTV Rece iver with
UltimateTV service:
• Make sure your Satellite Dish Antenna is properly installed.
• Follow the steps in “Connecting Your DIRECTV Receiver” on
pages 7-12.
• Activate DIRECTV programming and UltimateTV by calling:
1-800-DIRECTV (347-3288)
®
®
®
SAT-W60
© 2000 by Sony Electronics Inc. Reproduction in whole or in part
without written permission is prohibited. All rights reserved.
1
Page 2
WARNING
To prevent fire or shock hazard, do not expose the Satellite Receiver to rain or moisture.
This symbol is intended to alert the user to the presence of uninsulated “dangerous voltage” within the
product’s enclosure that may be of sufficient magnitude to constitute a risk of electric shock to persons.
This symbol is intended to alert the user t o the presence of important o perating a nd maintenance (servicing)
instructions in the literature accompanying the appliance.
Note to the CATV Installer
This reminder is provided to call the CATV system installer’s attention to Article 820-40 of the NEC (National
Electrical Code) that provides guidelines for proper gr ound ing and , in particular, sp ecifies that the cable ground shall
be connected to the grounding system of the building as close to the point of cable entry as practical.
! T o prevent electric shock, do not use this polarized plug with an extension cord, receptacle,
or other outlet unless the blades can be fully inserted to prevent blade exposure.
✍ Any changes or modifications not expressly approved in these Operating Instructions could void your
authority to operate this equipmen t.
Owner’s Record
The model and serial numbers are located on the bottom of the Satellite Receiver. Record the serial number in the
space provided below. Refer to these numbers whenever you call upon Sony Customer Service regarding this
product. (see page 29 for the Sony Customer Service number)
Model No. SAT-W60
Serial No.
Access Card No.
Trademarks
Sony is a trademark of Sony. Microsoft, UltimateTV, the UltimateTV Logo, WebTV, and the WebTV logo are either
registered trademarks or trademarks of Microsoft Corporation in the United States and/or other countries. DIRECTV
and the Cyclone Design logo are trademarks of DIRECTV, Inc., a unit of Hughes Electronics Corp., and are used with
permission. Manufactured under license from Dolby Laboratories. “Dolby” and the double-D symbol are trademarks
of Dolby Laboratories. Confidential Unpublished Works.
© 1992-1997 Dolby Laboratories Inc. All rights reserved.
Other company or product names mentioned herein may be trademarks of their respective owners.
Notice
Your Satellite Receive r pro vides access t o the Intern et and the W orld Wide W eb. In formation on the Intern et and W orl d
Wide Web is created by millions of individuals and organizations. This is what gives the Internet its diversity and
value. However , some information may include material which you find objectio nable. Son y is n ot respo nsible fo r t he
content of material accessed through your Satellite Receiver.
The Satellite Receiver, like other Internet devices, does not support all data formats.
2
Page 3

SONY SOFTWARE LICENSE AGREEMENT
ATTENTION: USE OF THE SOFTWARE IS
SUBJECT TO THE S ONY SOFTWARE LICENSE
TERMS SET FORTH BELOW. USING THE
SOFTWARE OR THE PRODU C T IN WHI CH IT
IS INCORPORATED INDICATES USER’S
ACCEPTANCE OF THESE LICENSE TER M S. IF
THE USER DOES NOT ACCEPT THESE
LICENSE TERMS , T H E USER MAY
IMMEDIA TEL Y RETU RN TH E EN TIRE
PRODUCT IN ITS ORIGINAL PACKING FOR A
FULL REFUND OF THE PUR C HASE PRICE.
License and Restrictions
Sony Electronics Inc. (“Sony”) grants User a
license to Use one copy of the software which is
provided to you as part of this Sony product
(“Software”). "Use" means storing, loading,
installing, executing or displaying the Software.
User may not copy, modify the Software or
disable any licensing or control features of the
Software. No portion of the Software may be
reproduced in any form, or by any means,
without prior written permission from Sony.
User is not permitted to modify, distribute,
publish, transmit or create derivative works of
any Software included for any public or
commercial purposes. In consideration of this
authorization, User agrees that any copy of this
Software which User makes shall retain all
copyright and other proprietary notices in the
same form and manner as on the original. Except
as specified above, nothing contained herein shall
be construed as conferring by implication,
estoppel or otherwise any license or right under
any patent, trademark or copyright of Sony, its
affiliates or any third party licensor . User may not
in any way sell, lease, rent, license, sublicense or
otherwise distribute the Software. The Software
may only be accessed by the functionality of the
Sony product in which the Software is
incorporated by Sony (the “Product(s)”), and a
User shall not intentionally make the Software
directly accessible to others or to hardware other
than the Products, or otherwise expose an API.
Nothing in this Agreement grants User any
rights, license or interest with respect to source
code of the Soft ware. User sha l l no t m odify,
translate, reverse engineer, decompile or
disassemble the Software or any part thereof or
otherwise attempt to derive source code or create
derivative works therefrom, and shall not
authorize any third party to do any of the
foregoing unless Sony's prior written consent is
obtained. Sony may elect to provide to User
updates and other support services for the
licensed Software. All updates provided to User
shall constitute licensed Software under this
License, and s u ch updates sha l l be go verned by
the terms hereof.
Intellectual Property
The Software is owned and copyrighted by Sony,
its affiliates or its third party licensors. User’s
license confers no title or ownership in the
Software and is not a sale of any rights in the
Software. Sony's affiliates and/or third party
suppliers may protect their rights directly in the
event of any User’s violation of this Agreement.
The trademarks, tradenames, Product
designation, logos and service marks ("Mark s")
displayed with this Software are the property of
Sony, its affiliates or third party licensors, and
User shall acquire no rights of any kind in or to
any Mark under which the Software and/or
Products are marketed. User is not permitted to
use these Marks without the prior written
consent of Sony, its affiliates or the applicable
third party licensor which may own the Mark.
"Sony" is a registered trademark of Sony
Corporation. User agrees not to remove, alter or
destroy any patent, trademark or copyright
markings or notices placed upon or contained
within the Software , User Manuals or
documentation. User further agrees to insert and
maintain with the Software and any
documentation a copyright notice in User’s name.
Termination
User’s license will automatically terminate upon
any transfer of the Product. Upon transfer, User
must deliver the Software, including any copies
and related documentation, to the transferee. The
transferee must accept these License Terms as a
condition to the transfer. Otherwise, Sony does
not authorize the transfer and the User and
transferee will be in violation of this Agreement
should the transferee use the Product. This
license will automatically terminate upon User’s
failure to comply with any of these License
T erms. Upon termination, User must stop using
the Product and i mm e dia t e l y destroy the
Software, together with all copies, adaptations
and merged portions in any form and/or re turn it
to Sony.
3
Page 4

Export Requirements and U.S.
Government Restricted Rights
User may not export or re-export the Software or
any copy or adaptation in violation of any
applicable laws or regulations. The Software and
documentation have been developed entirely at
private expense and are provided as
"Commercial Computer Software - Restricted
Rights" in accordance with FAR 52.227-19 (1987)
or limited rights in technical data in accordance
with FAR 52.227-14 (1987). User has only those
rights provided for such Software and
documentation by the applicable FAR or DFARS
clause or this Sony Software License Agreement.
Limited Warranty
Sony warrants to User that the Software will not
fail to execute its programming instructions due
to defects in material and workmanship for a
period equal to the warranty period provided for
the Product when properly installed and used.
Warranty does not apply to defects r esulting from
(a) improper or inadequate maintenance, (b)
software, interfacing, parts or supplies not
supplied by Sony, (c) unauthorized modification
of the Software or the Product, or (d) improper
site preparation or maintenance. If Sony rec eives
notice of a covered defect(s) during the warranty
period, Sony will replace Software that does not
execute its programming instructions due to such
defect(s). Sony does not warrant that the
operation of the Software and/or Product will be
uninterrupted or error free. If Sony is unable,
within a reasonable time, to repair or replace any
Software to a condition as warranted, User shall
be entitled to a refund of the purchase price upon
prompt return of the Product.
POSSIBILITY OF SUCH DAMAGES. IN NO
EVENT WILL SO NY OR ANY OF ITS
AFFILIATES OR THIRD PARTY LICENSOR’S
LIABILITY UNDER AGREEMENT, WHETHER
IN CONTRACT, TORT OR OTHERWISE,
EXCEED THE COST OF THE PRODUCT
.
General
This Agreement shall be deemed to have been
made and executed in the State of California and
both parties agree that any dispute arising
hereunder related to this Agreement or the
Product will be governed by laws of the State of
California, exclusive of its conflicts of law
principles and that the courts in the County of
San Diego, California will have exclusive
jurisdiction over all such disputes. FURTHER
THE PARTIES HEREBY WAIVE TRIAL BY JURY
IN CONNECTION WITH ANY ACTION OR
SUIT ARISING UNDER THIS AGREEMEN T OR
OTHERWISE ARISING FROM THE
RELATIONSHIP BETWEEN THE PARTIES
HERETO. This Agreement shall be binding upon
the parties’ authorized successor and assignees.
Neither party’s waiver of any breach or failure to
enforce any of the provisions of this Agreement at
any time shall in any way affect, limit or waive
such party’s right thereafter to enforce and
compel strict compliance with every other
provision. No modification of this Agreement
shall be effective unless in writing signed by both
parties.
EXCEPT AS SPECIFI CALLY STATED ABOVE,
THE SOFTW ARE IS PROVIDED “AS IS”
WITHOUT WARRANTY AND SONY, IT S
AFFILIATES AND ITS THIRD PARTY
LICENSORS DISCLAIM ANY IMPLIED
WARRANTY OF NONINFRINGEMENT,
MERCHANTABILITY OR FITNESS FOR A
PARTICULAR PURPOSE. THE REMEDIES IN
THIS WARRANTY STA T EMENT ARE USER’S
SOLE AND EXCLUSIVE REME D IES. EXCEPT
AS INDICATED ABOVE, IN NO EVENT WILL
SONY, ITS AFFILIATES OR ANY OF ITS THIRD
PARTY LICENSORS BE LIABLE FOR LOS S OF
DATA OR FOR DIRECT, INDIRECT, SPECIAL,
INCIDENTAL, CONSEQUENTIAL
(INCLUDING LOST PROFIT), EXEMPLARY, OR
OTHER DAMAGE, WHETHER BASED IN
CONTRACT, TORT, OR OTHERWISE, EVEN IF
SUCH PARTY HAS BEEN ADVISED OF TH E
4
Page 5

Contents
Connecting Your Satellite Receiver................................... 7
Package Contents................................................................................7
Cables and Jack s................ .. ................ ... .. ................ ... .. ................ ... ...8
Connection Overview......................................................................9
Step 1: Connecting the Antenna .....................................................10
Step 2: Connecting Your Phone Line .............................................10
Step 3: Connecting Your TV Set......................................................11
Step 4: Connecting the AC Power ..................................................12
Step 5: Checking the Ac c ess Ca rd .............. ... ... ............... ... ... .........12
Step 6: Activating Your Service ......................................................12
Making Advanced Connections ....................................... 13
Advanced Connection: Connecting Your VCR ............................13
Advanced Connection: Connecting Your IR Blaster ...................14
Advanced Connection: Connecting an Audio System................15
Advanced Connection: Connecting a Microphone......................15
Advanced Connection: Connecting a Printer...............................16
Advanced Connection: Connecting a Camcorder........................16
Using Your Remote Control ............................................. 17
Batteries for the Remote Control ....................................................17
Selecting Items................... .. ... ................ .. ... ................ .. ... .................18
Setting up the Remote Control........................................................21
Manufacturer Co d e s...... ... ............... ... ... ............... ... ... ......................22
Other Information............................................................. 23
Front Panel Controls & Terminals..................................................23
Back Panel Terminals .......................................................................24
Specifications .....................................................................................25
Troubleshooting ...............................................................................26
Limited Warran ty .................... ... ... ............... ... ... ............... ... ... .. .......28
FCC Regulations and Information...............................................30
5
Page 6

Page 7
Connecting Your Satellite Receiver
|
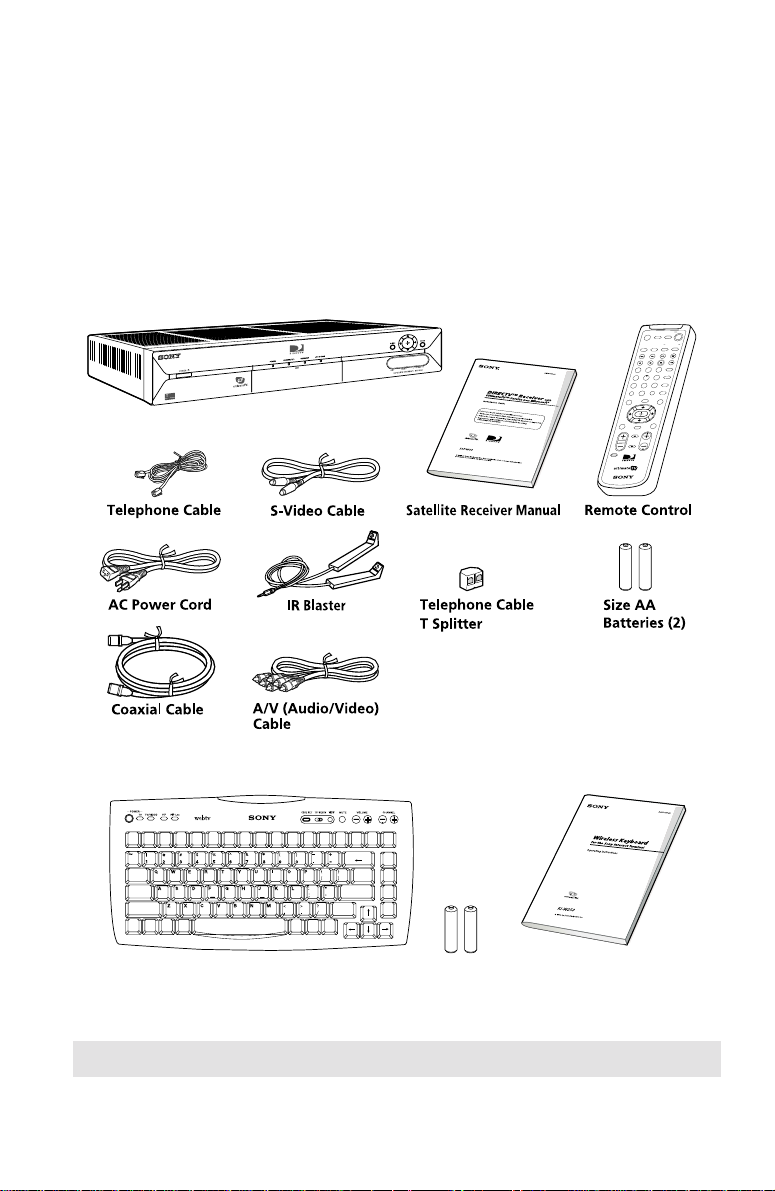
Package Contents
Make sure you have received all of the following items in your Satellite
Receiver package.
T
A
S
R
E
W
O
P
G
N
I
T
U
M
V
T
O
E
D
I
V
/
V
T
N
O
I
T
C
N
U
F
T
A
S
V
T
W
O
D
N
I
W
P
I
P
U
N
E
M
3
2
1
T
I
X
E
456
T
N
E
C
E
R
9
8
7
B
E
W
/
V
T
R
E
T
N
E
.
0
E
M
O
S
H
W
O
H
S
Y
M
K
C
A
Satellite Receiver
B
S
N
O
I
T
P
O
O
F
N
I
E
D
I
U
G
H
C
L
O
V
L
L
O
R
C
S
T
E
S
E
D
O
C
4
0
8
Y
M
R
Boxed separately
WEB
F1 Fav Home Search Mail Find Info GoTo Save Send
Esc
Tab
Caps
Lock
Shift
Fn
Cmd
Ctrl
Keyboard
(For keyboard instructions, please
F6F5F4F3F2 F7
Alt
Delete
Edit
Back
\
Scroll
Return
Up
Scroll
Shift
Down
Option
Recent
Alt
Size AA
Batteries (2)
refer to the keyboard manual)
✍ If you are missing any of these items, contact your Sony dealer.
Keyboard Manual
7
Page 8
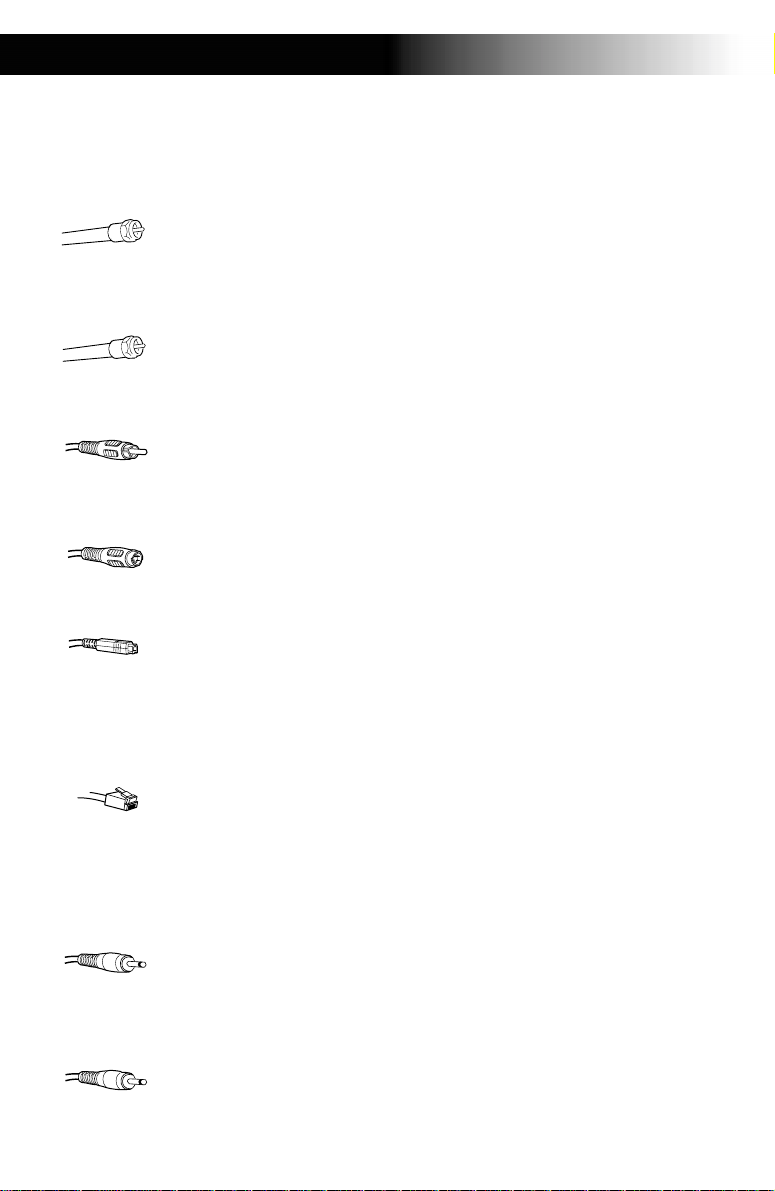
Below is a description of the jacks an d cables you can use to make
connections. Note that not all cables come with your Satellite Receiver.
VHF/UHF Jacks and Coaxial (RF) Cable
Use the VHF/UHF IN jacks to receive signals from a TV antenna or
from a cable TV connection. You can also use the VHF(SAT)/UHF
OUT jack to send audio and video signals to your TV.
SA TELLITE IN Jacks and RG-6 Coaxial cable
Use the SATELLITE IN jacks to receive signals from your Satellite
Dish Antenna with RG-6 coaxial cable.
Audio/Video Jacks an d Audio/Video Cables (RCA-type)
Use the audio/video jacks to send good quality analog video and
stereo audio signals.
S-VIDEO Jack and S-VIDEO Cables
Use the S-VIDEO jack to send excellent quality analog video signal.
DIGITAL AUDIO OUT (OPTICAL) Jack and Optical Cable
Use the DIGITAL AUDIO OUT (OPTICAL) jack to send excellent
quality audio signal.
TEL LINE Jack and RJ-11 Telephone Cable
Use the TEL LINE jack to connect to a telephone outlet. If you
subscribe to DIRECTV programming, some services require a
continuously connected telephone line. The telephone line
connection is used to periodically call out to DIRECTV and to use for
connection to the UltimateTV service. (connection is needed for
DIRECTV and UltimateTV service)
IR Blaster Jack and Controller
Use the IR jack to connect your Infrared Controller to your Satellite
Receiver. This allows you to control your VCR and/or Cable Box
through your Satellite Receiver.
MIC (Microphone) Jack
Use the MIC jack to connect to an external microphone. This allows
you to record and send voice messages on the Web in e-mail notes.
8
Page 9
Connecting Your Satellite Receiver
Connection Overvi ew
Follow the procedures or make the connections in each of the steps to
connect your Satellite Receiver.
Step 1: Connecting the Antenna
Page 10
v
Step 2: Connecting the Telephone Line
Page 10
v
Step 3: Connecting Your TV
Page 11
v
Step 4: Connecting the AC Power
Page 12
v
Step 5: Checking the Access Card
v
Step 6: Activating Your Service
Page 12
Page 12
9
Page 10
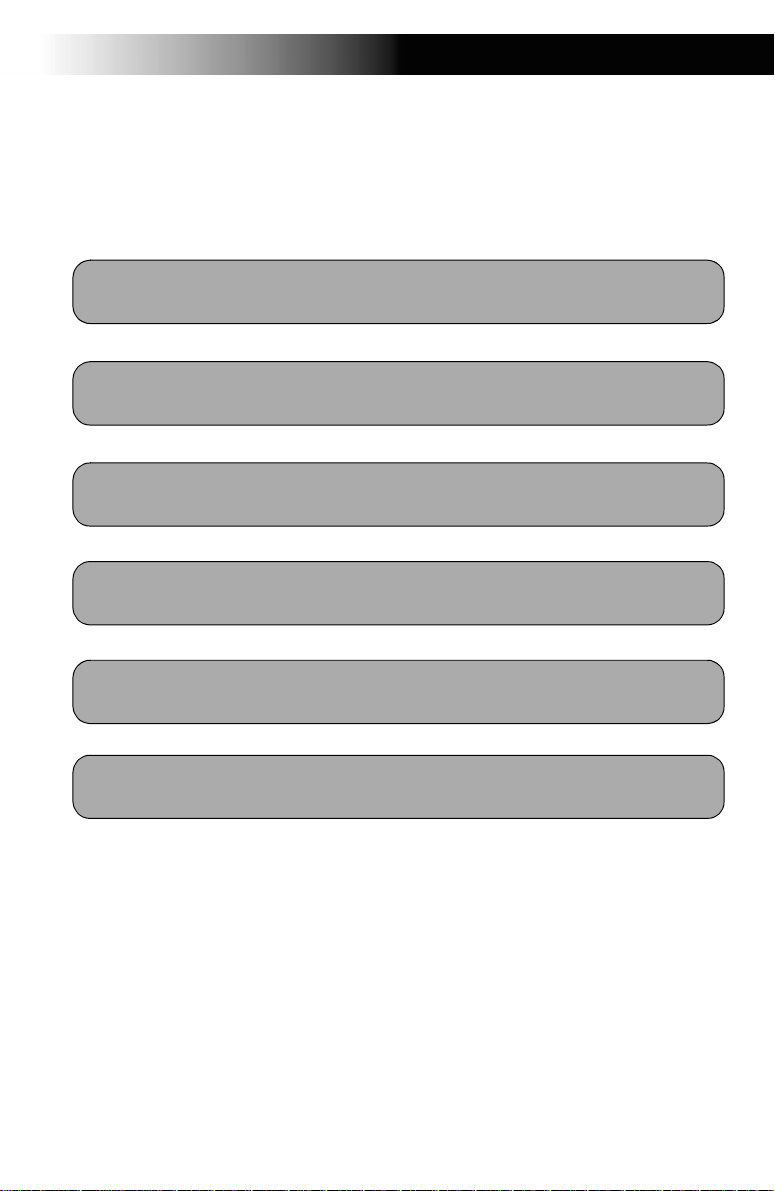
Step 1: Connecting the Antenna
Satellite Receiver
Connect the SATELLITE IN jack
1
to your Satellite Dish Antenna
using RG-6 coaxial cable.
Connect the 2nd signal if you
2
have Dual LNB. Advance Set
Up for dual output.
1
2
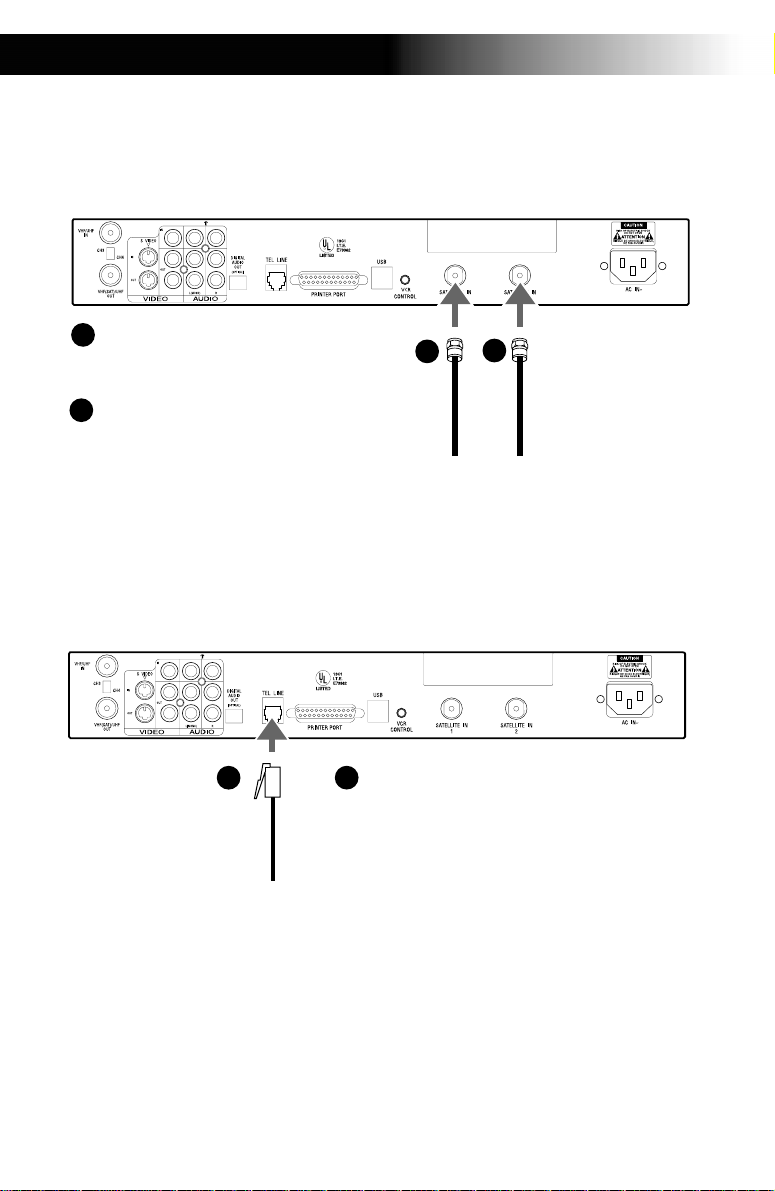
Step 2: Connecting Your Phone Line
Satellite Receiver
10
Connect the TELEPHONE
1
1
LINE jack to a telephone
line wall jack using the
supplied telephone cord.
Page 11

Connecting Your Satellite Receiver
Step 3: Connecting Your TV Set
Satellite Receiver
1c
1a
TV
VHF / UHF
1b
If your TV has A/V input jacks
1a
Connect the VIDEO OUT jacks on your Satellite Receiver to the
IN
VIDEO 1 VIDEO 2
S VIDEO
VIDEO
L
(
MONO
AUDIO
R
)
A/V input jacks on your TV using the supplied A/V cable. (Be sure to match the
colors on the jacks with the colored plugs on the A/V cable.) If your TV has only
one audio input, connect it to the L(MONO) jack on the Satellite Receiver.
If your TV has an S-Video input
1b
Use an S-Video cable instead of the yellow video connection. S-Video cable is
supplied.
If your TV does not have A/V jacks
1c
Connect the VHF/UHF OUT jack to the VHF / UH F in pu t ja ck o n yo u r TV using
coaxial cable. Set the CH3/CH4 switch to the chann el tha t does not ca rry off-ai r
broadcasts in your area.
Note
With this connection, your input source
is channel 3 or channel 4 depending on
how you set the CH3/CH4 switch on the
Satellite Receiver.
11
Page 12

Step 4: Connecti ng t h e AC Pow er
Satellite Receiver
After all other connections are
1
complete, connect the AC Power Cord
to the Satellite Receiver. Then connect
the AC Power Cord to a power outlet.
Step 5:
1
Step 6:
Checking the Access Card
Satellite Receiver
1
Open the access door by applying gentle pressure to the latch and releasing.
Make sure the DIRECTV Access Card is firmly inserted into the front left hand
slot of the Satellite Receiver. After the DIRECTV Access Card is inserted
(correctly), DO NOT remove it unless instructed to do so by your service
provider.
Activating Your Ser v ice
AC Power Cord
to power outlet
1
After checking to see that the DIRECTV Access Card and your Satellite Dish Antenna
is installed, you are ready to begin enjoying service.
Call DIRECTV at 1-800-D I RECTV (347-3288) to begi n your service.
For DIRECTV and UltimateTV operational in structions, please refer to the User Guide.
12
Page 13

Connecting Your Satellite Receiver
Advanced Connection: Connecting Your VCR
Satellite Receiver
1c
1a
If your TV and VCR have A/V jacks
1a
Connect the VIDEO OUT jacks of your Satellite
Receiver to the A/V input jacks of your VCR
using the supplied A/V cable. Then, connect
the A/V output jacks of your VCR to the A/V
input jacks of your TV using an A/V cable. (Be
1b
sure to match the colors on the jacks with the
colored plugs on the A/V cable.) Some TVs
LINE
VCR
IN
IN
S VIDEO
LINE
OUT
OUT
If your TV and VCR have S-Video jacks
1b
Use an S-Video cable instead of the yellow video conn ection. S-Video cable is
VIDEO
AUDIO
and VCRs do not have stereo audio, if yours
does not, just connect the white A/V cable to
the Left output jack.
supplied.
z Tip
To allow your Satellite Receiver to control the
recording functions of your VCR, see page 14.
If your TV and VCR do not have A/V jacks
1c
Connect the VHF(SAT)/UHF OUT jack on the Satellite Receiver to the VHF/UHF input
jack on your VCR using coaxial cable.
Then, connect the VHF/UHF output jack on your VCR to th e VHF/ U HF input jack on
your TV using a second coaxial cable.
Set the CH3/CH4 switch to the channel that does not carry off-air broadcasts in your
area.
Note
With this connection, your input source
is channel 3 or channel 4 depending on
how you set the CH3/CH4 switch on
your VCR.
13
Page 14

Advanced Connection: Connecting Your IR Blaster
Satellite Receiver
To allow the Satellite
1
1
Receiver to control your VCR
Connect the IR Blaster to the VCR
CONTROL jack on the Satellite
Receiver.
VCR (front)
IR Sensor
2
z Tip
If the infrared sensor is not
marked on your VCR, shine a
flashlight into the front panel of
the VCR to locate the sensor.
1
/2" to 1
In front of the VCR
2
"
Place the IR Blaster under and
in front of the VC R.
The IR Blaster must extend just
in front of the infrared sensor
of the VCR.
14
Page 15

Connecting Your Satellite Receiver
Advanced Connection: Connecting an Audio System
If you have a digital or Dolby
Audio Receiver
E
IN
L
T
U
O
IO
D
U
A
E
LIN
IN
OPTICAL
1
Satellite Receiver
z Tip
If you connect your Satellite Receiver to a Dolby
Digital receiver, set the Dolby Digital option of the
Audio display to Auto Select.
1
Digital audio system
Connect the DIGITAL OUT (OPTICAL)
IN
of the Satellite Receiver to the optical
digital input of your audio system.
Advanced Connection: Connecting a Microphone
Satellite Receiver
GUIDE HOME
SATELLITE RECEIVER SAT-W60
1
15
If you have a Microphone
1
First, remove the cover from the
microphone jack, then connect the
microphone plug to the Satellite
Receiver’s Microphone IN jack.
z Tip
Check “Help” screen for a list of
compatible microphones.
PUSH
PUSH
Page 16

Advanced Connection: Connecting a Printer
Connecting a printer to your Satellite Receiver enables you to pri nt Web pages
and e-mail messages. The Satellite Receiver is not compatible with all printers.
Check the on-line instructions for a list of the latest compatible printers.
Satellite Receiver
To print screens
Connect the printer port on
the Satellite Receiver to the
port on the printer.
DB-25
Male
Note
Unplug the Satellite
Receiver an d p rinter before
you begin connecting.
Printer
Advanced Connection: Connecting a Camcorder
Satellite Receiver
PUSH
PUSH
If you have a Camcorder
1
First, remove the c over from th e A/V jacks, then , using
A/V cables, connect the camcorder’s A/V OUT jacks
to the Satellite Receiver’s A/V IN jacks.
GUIDE HOME
SATELLITE RECEIVER SAT-W60
1
Note
If you have a mono camcorder, connect its left
audio output to the Satellite Receiver’s AUDIO L
(white) jack.
16
Page 17

Using the Remote Control and Basic Functions
Although the Satellite Receiver’s remote control is preset to operate Sony
brand TVs, you can program the remote control to operate other
manufacturer’s TVs. This will enable you to operate your TV when
viewing regular broadcast TV using the remote control.
Batteries for the Remote Control
Insert two size AA batteries (supplied) into the remote control as shown.
Be sure to match the + and – marks on the batteries with the + and –
marks inside the battery compartment.
✍ If the remote control is not working properly, the batteries may be worn out. When
replacing batteries, replace both batteries. Do not mix different brands and types of
batteries. After you replace batteries, you may need to reprogram the remote control.
17
Page 18

Selecting Items
In on-screen displays such as the TV Home Screen and program guide,
you must first move the highlight to the item you want, then select the
item.
T
A
S
R
E
W
O
P
G
IN
T
U
T
A
S
R
E
W
O
P
G
IN
T
U
M
V
T
TV/VIDEO
N
IO
T
C
N
FU
T
A
S
V
T
INDOW
W
IP
P
U
N
E
M
3
2
1
IT
X
E
6
45
T
N
E
C
E
R
9
78
EB
TV/W
R
E
T
N
E
.
0
E
M
O
H
S
W
O
H
S
Y
M
K
C
A
B
OPTIONS
O
F
IN
E
ID
U
G
H
C
L
O
V
L
L
O
R
C
S
CODE SET
4
0
8
Y
-
M
R
M
V
T
TV/VIDEO
N
IO
T
C
N
U
F
T
A
S
V
T
INDOW
W
IP
P
U
N
E
M
3
2
1
IT
X
E
456
T
N
E
C
E
R
9
78
EB
TV/W
R
E
T
N
E
.
0
E
M
O
H
S
W
O
H
S
Y
M
K
C
A
B
OPTIONS
FO
IN
E
ID
U
G
H
C
L
O
V
L
L
O
R
C
S
CODE SET
4
0
8
Y
-
M
R
1 Press the V/v /B/b buttons
2 Press the button to
to move the highlight to the
item you want.
z Tip
Be sure to always press the SAT
FUNCTION button before operating
the Satellite Receiver with the remote
control.
18
select the item.
Page 19

Using the Remote Control and Basic Functions
POWERMUTING
TV/VIDEO
TV
WINDOW
0
MY SHOWS
GUIDE
SCROLL
FUNCTION
TV
3
ENTER
MENU
RECENT
TV/WEB
OPTIONS
CHVOL
RM-Y804
PIP
12
456
789
.
BACK HOME
INFO
CODE SET
EXIT
SAT
Muting Press to mute the sound. Press again,
or press VOL +, to restore the sound.
(For the TV only)
SAT
TV/VIDEO Cycles through the video inputs of
your TV.
TV POWER Turns your TV on and off.
SAT POWER Turns your Satellite Receiver on and
off.
PIP T urns the Picture-in-Picture features of
the Satellite Receiver on an d off.
WINDOW Selects the active window while in PIP
mode, allowing you to change the
Main or PIP window.(For the
Satellite Receiver only)
TV FUNCTION Selects TV feature control.
SAT FUNCTION Selects Satellite Receiver feature
control.
Button Review button.
Button Play button.
Button Forward scan button.
Button Record button.
Button Stop button.
Button Pause button.
Button Replay button.
Button Jump ahead button.
0 – 9 Buttons Select channels or enter numbers in
text boxes.
.
Button Adds period to separate major/minor
channel numbers.
MENU Opens the TV Main Menu.
EXIT Closes all on-screen displays,
including program guides and menus.
ENTER Activates the selected channel on your
TV.
19
Page 20

OPTIONS Displays the OPTIONS panel.
RECENT Displays and allows you to access the
most recently viewed Web pages or
the last TV channel.
SCROLL V/v
Buttons
HOME Displays the Web Home or TV Home
BACK Displays the last screen viewed, or
TV/WEB Switches between TV and Internet
Arrow Buttons Move the yellow highlight box to a
MY SHOWS Displays a list of programs that you
INFO Displays information on the program
GUIDE Displays information on available
Moves the page up or down when the
page is too long to be displa yed on t he
screen.
screen.
hides the on-screen keyboard.
modes.
different command or activity on the
screen; select different keys when the
on-screen keyboard is displayed.
have recorded with your Satellite
Receiver.
you are viewing.
programs, including channel, time
and date.
Button Activates a highlighted link or
command; displays the on-screen
keyboard.
VOL +/– Increases and decreases the volume.
CH +/– Moves to the next or previous channel.
CODE SET Used for programming the remote
control to operate your TV. See
page 21 for details.
20
Page 21

POWERMUTING
TV/VIDEO
TV
WINDOW
0
MY SHOWS
GUIDE
SCROLL
FUNCTION
TV
3
ENTER
MENU
RECENT
TV/WEB
OPTIONS
CHVOL
RM-Y804
PIP
12
456
789
.
BACK HOME
INFO
CODE SET
EXIT
Using the Remote Control and Basic Functions
Setting up the Remote Control
SAT
SAT
The remote control can be programmed to operate
most brands of televisions.
1 Find the code(s) for the manufacturer of the TV
you want to operate with this remote control.
You can find these codes on page 22.
2 Press the CODE SET button.
The function indicators begin flas hing.
CODE SET
FUNCTION
TV
SAT
3 Press the 0–9 buttons to input the manufacturer
code, then press the ENTER button.
The function indicator goes off, and the remote is
set up to operate that device.
1 0 1
ENTER
4 Test the remote control.
Press the POWER button for the device you want
to control, then press other operation controls
such as the CH +/– buttons.
If the TV does not respond to the remote control,
repeat from step 2 and enter a different
manufacturer code in step 3.
z Tip
Remember to aim the remote control at
the TV you are trying to operate.
21
Page 22

Manufacturer Codes
TV Codes
Manufacturer Code
Sony
Admiral (M.
Wards)
ABC 112
Bell & Howell
(M. Wards)
Broksonic 103, 112
Craig 122, 123, 120, 121
Croslex 111
Curtis Mathis 103, 11 9, 123
Daewoo 135, 136, 103
Daytron 113
Emerson 122, 113, 120, 121,
Fisher 125
General Electric 102, 118, 103, 107
Goldstar 103, 113, 112, 130
Hitachi 131, 113, 103, 132
JC Penney 103, 102, 130, 107
JVC 128, 129
KTV 133, 113, 103, 123,
LXI (Sears) 102, 103 111, 125,
Magn avox 111, 112, 113, 107
Mitsubishi/MGA 124, 103, 112
NEC 103, 112
Panasonic 118, 116, 117, 107
Philco 111, 118, 109
Philips 111
Pilot 103
Pioneer 137, 118, 119
101
102, 1 1 4, 109
11 4, 10 9, 138
123, 103, 115
134
119, 112
Manufacturer Code
Portland 103, 108
Quasar 1 1 0, 107
Radio Shack 1 02 , 112, 124, 123
RCA/Prosc a n 102, 103, 104,
Samsung 126, 112, 113, 103
Sanyo 125
Scott 123, 112
Sharp 114, 113, 115
Signature 2000
(M. Wards)
Sylvania 111, 112, 108
Symphonic 123, 139
Tenika 109
Toshiba 119, 114
Videch 131, 103, 112
Wards 113, 103, 115, 112
Zenith 108, 110
105,106, 107, 108
11 4, 10 9
22
Page 23

Other Information
Front Panel Controls & Terminals
Satellite Receiver
PUSH
PUSH
2
14
Feature Description
1 Power Bu tt on Turns you r Sate llit e Receiver on and off
2 POWER
Indicates whether the Satellite Receiver is on or off.
Indicator
3 CONNECTED
Indicator
Flashes while the Satellite Receiver is connecting to the
WebTV service and while receiving new information.
Remains lit while in use.
4 MESSAGE
Indicator
5 MY SHOWS
Indicator
Lights up to indicate you have an unopened e-mail
message.
Indicates that a program is being recorded by My
Shows.
6 GUIDE Button Opens the Program Guide.
7 HOME Button Opens the TV Home screen.
8 Arrow and
Buttons
9 AUDIO (R/L)/
VIDEO IN
0 ACCESS CARD
Slot
The arrow buttons move the highlight in the on-screen
displays. The button selects the highlighted item.
Allows easy connection of audio/video devices, such as
a camcorder or digital camera.
The Access Card allows you to access DIRECTV
services.
qa MIC INPUT Jack Allows easy connection of a microphone.
3
5
0qa
GUIDE HOME
SATELLITE RECEIVER SAT-W60
67
8
9
23
Page 24

Back Panel Terminals
Satellite Receiver
7
1
3
8
Connector Description
1 TELEPHONE LINE Connects your Satellite Receiver to a telephone jack.
2 VCR CONTROL Allows you to connect your IR Blaster for easy control of
3 PRINTER PORT Allows you to connect your Satellite Receiver to a printer.
4 AUDIO (R)/(L)
IN/OUT
5 VIDEO IN/OUT Connects your Satellite Receiver to your TV’s or VCR’s
6 S-VIDEO IN/OUT Allo w s y o u t o c o n n e c t y our Satellite Receiver to your TV
7 CH 3-CH 4 Switch The switch determines which TV channel allows you to
8 VHF/UHF IN: Allows you to connect your normal (antenna) TV or
9 AC IN Connects your Satellite Receiver to a 120V AC outlet.
0 DIGITAL AUDIO
OUTPUT
qa USB Port Allows you to connect Universal Serial Bus components.
qs SATELLITE IN Connect the cable from your satellite dish antenna here.
56
your cable box and/or VCR through the Satellite Receiver.
Connects your Satellite Receive r to the righ t and left au dio
inputs and outputs of your TV.
video inputs and outputs.
and VCR for optimal picture quality (if your TV and VCR
support S-Video.
view programs from your Satellite Receiver when
connected through the VHF/UHF connector.
cable TV service to your Satellite Receiver.
OUT: Allows you to send normal (antenna) TV or cable
signals to your TV or VCR from your Satellite Receiver.
Allows you to connect an optional digital audio system.
Connect a second cable if you wish to use both of the
Satellite Receiver’s tuners, this allows features such as PIP
and recording one show while viewing another.
0
4
qaqs2
qs
9
24
Page 25

Specifications
Terminals Video In (2)
Video Out (2)
Audio (R/L) In (2)
Audio (R/L) Out (2)
S-Video In (1)/Out (1)
Tel Line (1)
Microphone In (1)
Printer Port (DB25) (1)
VCR Control (1)
Digital Audio Out (1)
USB Port (2)
Satellite In (2)
CH3-CH4 Switch (1)
VHF/UHF In/Out (1)
AC In (1)
Dimensions 430 mm x 70 mm x 290 mm (w/h/d)
(17” x 2
Weight 4.3 kg (9.4 lbs)
Power
Requirements
Power
Consumption
Supplied
Accessories
Optional
Accessories
AC 120V
90 W max
Remote Control RM-Y804 (1)
Size AA Batteries (2)
AC Power Cord (1)
A/V (Audio/Video) Cable (1)
Telephone Cable (1)
S-Video Cable (1)
T Splitter (1)
Coaxial Cable (1)
IR Blaster (1)
Wireless Keyboa rd KI- W250 (1)
Access Card (1)
Local Antenna ANJ-AA1
Installation Kit ANJ-DS2
Amplifier EAC-DA1
Diplexer EAC-DD1
Voltage Switch EAC-DV2
Dish SAN-24MD1
3
/4” x 11 1/2”)
Other Information
25
Page 26

Troubleshooting
Symptom Possible Cause and remedies
TV POWER button
doesn’t turn on TV.
No picture, no sound. Make sure the AC Power Cord is connected.
No sound. If you connected the Satellite Receiver using A/V
Can’t change TV
channels while using
UltimateTV servi ce.
The UltimateTV
service screens
disappear after
pressing the
CHANNEL +/
buttons.
VCR Control doesn’t
seem to be working
correctly.
–
The remote control h as not been pr operl y pr ogrammed.
See “Setting up the Remote Control” on page 21.
The batteries in the r emote cont ro l or w ir eless keyboar d
could be weak. Check the batteries and replace them if
necessary.
Check that the TV/VIDEO switch is set correctly.
Make sure the Satellite Receiver is properly connected.
If you connected using a S-Video or A/V cables, make
sure they are properly connected.
If your TV must be set to a certain channel to view other
devices to which it is con necte d, make su r e this c han nel
is selected.
Check that the correct video input is selected by
pressing the TV/VIDEO button.
If your TV is not connected using the S-Video or A/V
cables, set the CH3-CH4 switch on the back of the
Satellite Receiver to the opposite channel to which it is
currently set.
cables, make sure the cables are properly connected.
Make sure you select the TV FUNCTION button.
Press the TV/VIDEO button on the remote control until
the UltimateTV screen appears.
Check that the IR Blaster is positioned directly in front
of the infrared sensor area of your cable box and/or
VCR.
Follow the on-line instructio ns in the “Settings” link,
accessible from the TV Home page of the UltimateTV
service.
26
Page 27

Symptom Possible Cause and remedies
The Satellite Receiver
gets extremely hot.
The Satellite Receiver
turns off and on by
itself.
The Satellite Receiver
will not turn on.
The Satellite Receiver
will not connect to
the Internet after
receiving an upgrade
from the UltimateTV
service.
The Message
Indicator light is not
working.
Remote control or
keyboard is no longer
working.
No channels are
viewable.
Check the placement of the Satellite Receiver. Place the
Satellite Receiver in a location with adequate
ventilation. Do not place the Satellite Receiver in a
cabinet or on a TV. If the heat is excessive, contact your
Sony dealer.
This is often caused by st atic build up. Turn off the
Satellite Receiver and disconnect the AC Power Cord
from the power outlet. Then reconnect the AC Power
Cord to the power outlet and turn on the Satellite
Receiver. If this does not solve the problem, contact
your Sony dealer.
Make sure the AC Pow er Co rd is securely c onnected to
the Satellite Receiver and a power outlet.
Turn off the Satellite Receiver and disconnect the AC
Power Cord from the power outlet. Then reconnect the
AC Power Cord to the power o u tlet and turn on the
Satellite Receiver. You may need to repeat this
procedure three or four times to solve the problem.
Yo u can set your Satell ite Receiver to check for
messages automatically. However, if you check for
messages yourself before the Satellite Receiver is set to
do so automatically, the Message Indicator may not
light until the Satellite Receiver checks again. You may
want to consider setting the Satellite Receiver to check
for mail when you usually are not connec t ed.
Replace the batteries.
Try pressing the SAT FUNCTION bu tton .
Activate your service by contacting D I RECTV at
1-800-DIRECTV (347-3288)
Check the status of your serv ice with UltimateTV at
1-877-ULTIMATE (858-4628)
Other Information
27
Page 28

Limited Warranty
Satellite Receiver
SONY ELECTRONICS INC. (“SONY”)
warrants this Product agai nst defects in
material or workmans h i p as follows:
1. Labor: For a period of 90 days from the
original date of purchase, if the Product
is determined to be defective, SONY
will repair or replace the Product at no
charge. After this 90 day period, you
must pay for all labo r charges.
2. Parts: For a period of one year from the
original date of p u rchase, SON Y will
supply, at no charge, new or rebuilt
replacements in exchange for defec ti ve
parts. Any replacements will be
warranted for the longer of the
remainder of the original warranty
period or 90 days from the parts
installation by a SONY authorized
DIRECTV System installer or facility.
To obtain warranty se rvice:
– If the Product was installed by a SONY
authorized DIRECTV S yst em in st aller,
contact that installe r for instructions.
– If the Product was not installed by a
SONY authorized DIRECTV System
installer, you must take the Product or
deliver the Product in either its original
packaging or packaging affording an equal
degree of protection (with freight prepaid),
to a SONY authorized DIRECTV System
service facility . To locate the closest such
facility, please call the telephone number
listed below.
This warranty doe s not cover customer
instruction, installation, set up adjustments
or signal reception problems. This warranty
does not cover cosmetic damage or damage
due to acts of God, accident, misuse, abuse,
negligence, commercial use, or
modification of, or to any part of the
Product. This warranty does not cover
improper installation (if not installed by a
SONY authorized DIRECTV System
installer), loss of use of t h e pr od u ct, or
wasted programming charges due to
product malfunction. This warranty does
not cover damage due to improper
operation or maintenance, connection to
improper voltage supply, or attempted
repair by anyone other than a facility
authorized by SONY to service the Product.
This warranty does not cove r Products sold
AS IS or WITH ALL FAULTS. This
warranty is valid o n l y in the United States.
Proof of purchase in the form of a bill of sale
or receipted invoice which is evidence that
the Product is within the Warranty period
must be presented to obtain warranty
service.
REPAIR OR REPLACEMENT AS
PROVIDED UNDER THIS
WARRANTY IS THE EXCLUSIVE
REMEDY OF THE CONSUMER. SONY
SHALL NOT BE LIABLE FOR ANY
INCIDENTAL OR CONSEQUENTIAL
DAMAGES FOR BREA CH OF A N Y
EXPRESS OR IMPLIED WARRANTY
ON THIS PRODUCT. IN NO EVENT
SHALL SONY BE LIABLE FOR ANY
INCIDENTAL OR CONSEQUENTIAL
DAMAGES WHATSOEVER ARISING
OUT OF THE USE OR INABILITY TO
USE THE PRODUCT. UNDER NO
CIRCUMSTANCES SHALL SONY’s
LIABILITY, IF ANY, EXCEED T HE
PURCHASE PRICE PAID FOR THE
PRODUCT. EXCEPT TO THE EXTENT
PROHIBITED BY APPLICABL E LA W,
ANY IMPLIED WARRANTY OF
MERCHANTABILITY OR FITNESS
FOR A PARTICULAR PURPOSE ON
THIS PRODUCT IS LIMITED IN
DURATION TO THE DURATION OF
THIS WA RRANTY.
This warranty is in valid if the factory
applied serial number has been a ltered or
removed from the Product. Some states do
not allow the exclusion or limitation of
incidental or consequentia l da mages, or
allow limitatio n s on how long an implied
warranty lasts, so the above limitations or
exclusions may not apply to you. In
28
Page 29

Other Information
addition, if you ent er in to a serv ic e cont ract
with the SONY Partnership within 90 days
of the date of sale, th e limitation on how long
an implied warranty lasts does not apply to
you. This warranty gives you specific legal
rights, and you may have other rights which
vary from state to state.
For your convenience, SONY ELECTRONICS
INC. has established telephone numbers for
frequently asked questions:
For assistance with installation, contact the
dealer from whom you purchased your
Multi-Sat Oval Antenna System.
For product information or operation, for
service assistance or for resolution of a
service problem, call:
SONY SATELLITE SYSTEM
INFORMATION CENTER
1-800-838-SONY (7669)
For an accessory or part not available from
your authorized dealer, call:
1-800-488-SONY (7669)
About Sony Customer Sup port
Every DIRECTV System manufactured by
Sony comes with Sony’s Express Support at
no charge to you. In the event of a system
failure, our Express Support Program can
have a replacement Satellite Rec eiver on i ts
way to you via overnight Federal Express
(for calls Monday-Friday until 7:30 pm
Eastern Time; Saturday del ivery depends
upon zip code). All it takes is a valid credit
card to cover a security deposit, and Sony
will pay freight in both di r ections. Our
Express Support continues with our 800
number, staffed by dedicated techn ical
representatives who can answer questi ons on
dealer loca t ions, system operat io n ,
installation, hookup, accessories, and how to
get the most out of your home entertainment
system. Sony’s ExpressSupport
another expression of our co mmitment to
excellence in customer service.
SM
✍ Should you have any other problems with your Satellite Receiver, please call one of the
following numbers:
• For service problems call: 1-877-ULTIMATE (858-4628)
• To begin service call: 1-800-DIRECTV (347-3288)
program:
29
Page 30

FCC Regulations and Information
FCC Registr a tion In f or ma ti on
Y our Satellite Receiver has been registered by the
Federal Commu n i c a t ion Commission (FCC) as not
being harmful to the telephone network when
connected directly to the telephone lines. In order
to fully comply with the Rules of the FCC, the
following instructions should be read carefully and
followed completely where applicable:
FCC has established Rules which permit this
device to be directly connected to the telephone
network. Standardized jacks are used for these
connections. This equipment should not be used on
party lines or coin phones.
If this device is malfunctioning, it may also be
causing harm to the telephone network; this device
should be disconnected until the source of the
problem can be determined and until the repair has
been made. If this is not done, the telephone
company may temporarily disconnect service.
The telephone comp an y may ma ke c hang e s in its
technical operations and procedures; if such
changes affect the compatibility or use of this
device, the telephone company is required to give
adequate notice of the changes. You will be advised
of your right to file a complaint with the FCC.
If the telephone company requests information on
what equipment is connected to their lines, inform
them of:
a. The telephone number to which this unit is
connected.
b. The ringer equivalence number.
c. The USOC jack required.
d. The FCC Registration Number.
Items (b) and (d) are indicated on the label. The
Ringer Equivalence Number (REN) is used to
determine how many devices can be connected to
your telephone line. In most areas, the sum of the
REN’s of all devices on any one line should not
exceed five (5). If too many devices are attached,
they may not ring properly.
Service Requirements
In the event of equipment malfunction, all repairs
should be performed by our Company or an
authorized agent. It is the responsibility of users
requiring service to report the need for service to
our company or to one of our authorized agents.
For service, call 1-888-772-7669.
Radio Interference Information
This equipment has been tested and found to
comply with the limits for a Class B digital device,
pursuant to Part 15 of the FCC rules. These limits
are designed to provide reasonable pr otection
against harmful interference in a residential
installation. This equipment generates, uses and
can radiate radio frequency energy and, if not
installed and used in accordance with the
instructions, may cause harmful interference with
radio communications. However, there is no
guarantee that interference will not occur in a
particular installation. If this equipment does cause
interference to radio or television reception (which
you can determine by turning the equipment off
and on), you are encouraged to try to correct the
interference by one or more of the following
measures:
Change the position of the Satellite Receiver with
respect to the radio or television equipment that is
receiving the interference.
Move the Satellite Receiver away from the
equipment that is receiving the interference.
Plug the Satellite Receiver into a different outlet so
that the Satellite Receiver and the equipment
receiving the interference are on different branch
circuits.
Shielded cables and I/O cords must be used for
this equipment to comply with the relevant FCC
regulations. Changes or modifications not
expressly approved in writing by Sony Electronics,
Inc., void the user’s authority to operate this
equipment.
If these measures do not eliminate the interference,
you should consult your Satellite Receiver dealer or
an experienced radio/television technician for
additional suggestions. In addition, you may find
the following booklet prepared by the FCC helpful:
“How to Identify and Resolve Radio-TV
Interference Problems.” This booklet is available
from the U.S. Government P rint ing Office,
Washington, D.C., 20402
Stock No. 004-000-00345-4.
30
Page 31

Page 32

Sony Electronics Inc.
Contact Sony with your questions and comment s
www.sel.sony.com/SEL/feedback.htm
Printed in the U.S.A.
 Loading...