

Page 1
01USBook.BOOK Page 1 Wednesday, July 5, 2000 12:24 PM
Digital Satellite
Receiver/Recorder
Installation Guide
x-xxx-xxx-xx
Before you begin using your Digital Satellite Receiver/Recorder:
• Make sure your Satellite Dish Antenna is properly installed.
• Follow the steps in “Connecting Your Receiver/Recorder” on pages 7-12.
• Begin service with UltimateTV by following the on-screen steps.
• Begin service with DIRECTV by calling: 1-800-DIRECTV (347-3288)
SAT-W60
© 2000 by Sony Electronics Inc. Reproduction in whole or in part without written
permission is prohibited. All rights reserved.
1
Page 2
01USBook.BOOK Page 2 Wednesday, July 5, 2000 12:24 PM
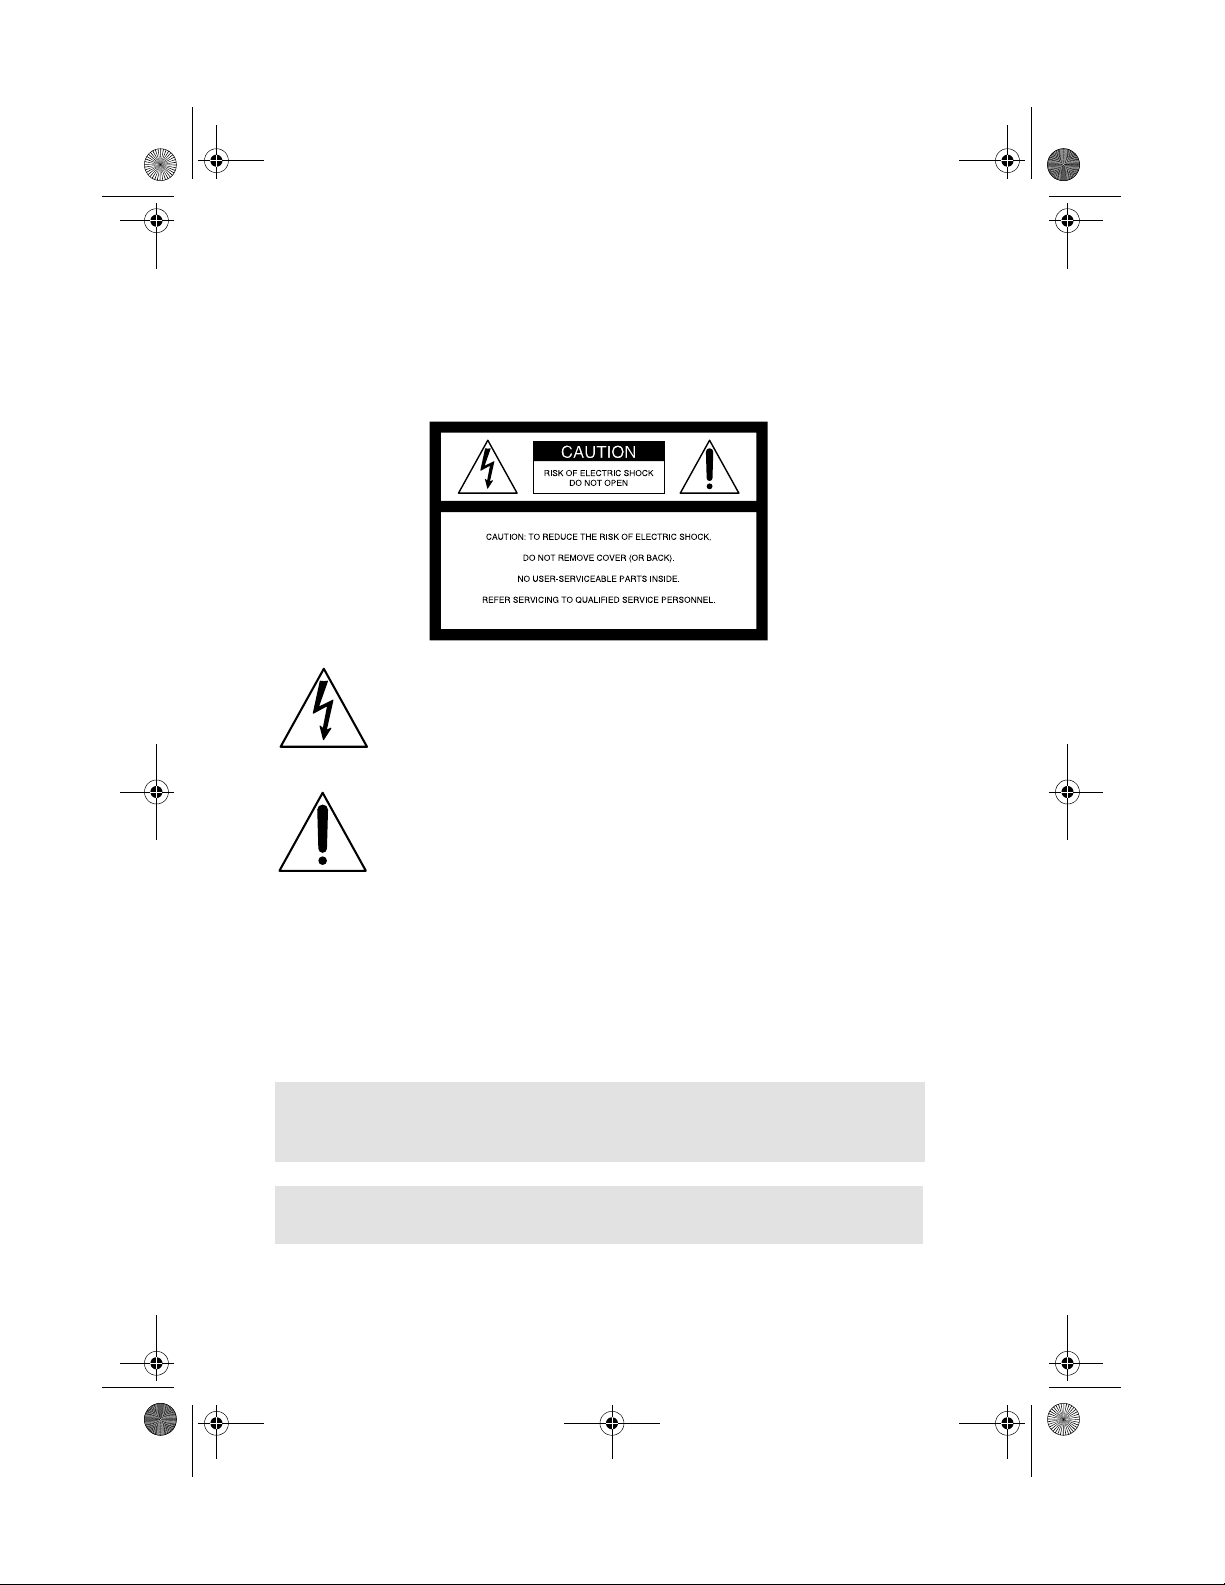
WARNING
To prevent fire or shock hazard, do not expose the Digital Satellite
Receiver/Recorder to rain or moisture.
This symbol is intended to alert the user to the presence of
uninsulated “dangerous voltage” within the product’s
enclosure that may be of sufficient magnitude to constitute
a risk of electric shock to persons.
This symbol is intended to alert the user to the presence of
important operating and maintenance (servicing)
instructions in the literature accompanying the appliance.
Note to the CATV Installer
This reminder is provided to call the CATV system installer’s attention to
Article 820-40 of the NEC (National Electrical Code) that provides
guidelines for proper grounding and, in particular , specifies that the cable
ground shall be connected to the grounding system of the building as
close to the point of cable entry as practical.
! To prevent electric shock, do not use this polarized plug with an
extension cord, receptacle, or other outlet unless the blades can be
fully inserted to prevent blade exposure.
✍ Any changes or modifications not expressly approved in these Operating Instructions could
void your authority to operate this equipment.
2
Page 3
01USBook.BOOK Page 3 Wednesday, July 5, 2000 12:24 PM
Owner’s Record
The model and serial numbers are located on the rear panel of the Digital
Satellite Receiver/Recorder. Record the serial number in the space
provided below. Refer to these numbers whenever you call upon Sony
Customer Service regarding this product.
Model No. SAT-W60
Serial No.
Access Card No.
Trademarks
Sony is a trademark of Sony. Microsoft, UltimateTV, the Ultimate TV
Logo, WebTV, and the WebTV logo are either registered trademarks or
trademarks of Microsoft Corporation in the United States and/or other
countries. DIRECTV is a trademark of DIRECTV Inc., a division of
Hughes Electronics, and are used with permission. Manufactured under
license from Dolby Laboratories. “Dolby” and the double-D symbol are
trademarks of Dolby Laboratories. Confidential Unpublished Works.
© 1992-1997 Dolby Laboratories Inc. All rights reserved.
Other company or product names mentioned herein may be trademarks
of their respective owners.
Notice
Your Digital Satellite Receiver/Recorder provides access to the Internet
and the World Wide Web. Information on the Internet and World Wide
Web is created by millions of individuals and organizations. This is what
gives the Internet its diversity and value. However, some information
may include material which you find objectionable. Sony is not
responsible for the content of material accessed through your Digital
Satellite Receiver/Recorder.
The Digital Satellite Receiver/Recorder, like other Internet devices, does
not support all data formats.
3
Page 4

01USBook.BOOK Page 4 Wednesday, July 5, 2000 12:24 PM
Page 5

01USBook.BOOK Page 5 Wednesday, July 5, 2000 12:24 PM
Contents
Connecting Your Receiver/Recorder ..................................7
Package Contents...............................................................................7
Cables and Jacks.................................................................................8
Connection Overview .....................................................................9
Step 1: Connecting the Antenna.....................................................10
Step 2: Connecting Your Phone Line............................................. 10
Step 3: Connecting Your TV Set..................................................... 11
Step 4: Connecting the AC Power..................................................12
Step 5: Inserting the Access Card and Smart Card...................... 12
Making Advanced Connections........................................13
Advanced Connection: Connecting Your VCR ........................... 13
Advanced Connection: Connecting Your VCR Controller........ 14
Advanced Connection: Connecting an Audio System...............15
Advanced Connection: Connecting a Microphone..................... 15
Advanced Connection: Connecting a Printer ..............................16
Advanced Connection: Connecting a Camcorder....................... 16
Using Your Remote Control..............................................17
Inserting the Batteries......................................................................17
Selecting Items.................................................................................. 18
Setting Up the Remote Control...................................................... 21
Manufacturer Codes........................................................................22
Other Information .............................................................24
Front Panel Controls & Terminals.................................................24
Back Panel Terminals....................................................................... 25
Specifications .................................................................................... 26
Troubleshooting .............................................................................. 27
Limited Warranty.............................................................................29
FCC Regulations and Information ..............................................31
5
Page 6
01USBook.BOOK Page 6 Wednesday, July 5, 2000 12:24 PM
6
Page 7
|
01USBook.BOOK Page 7 Wednesday, July 5, 2000 12:24 PM
Connecting Your Receiver/Recorder
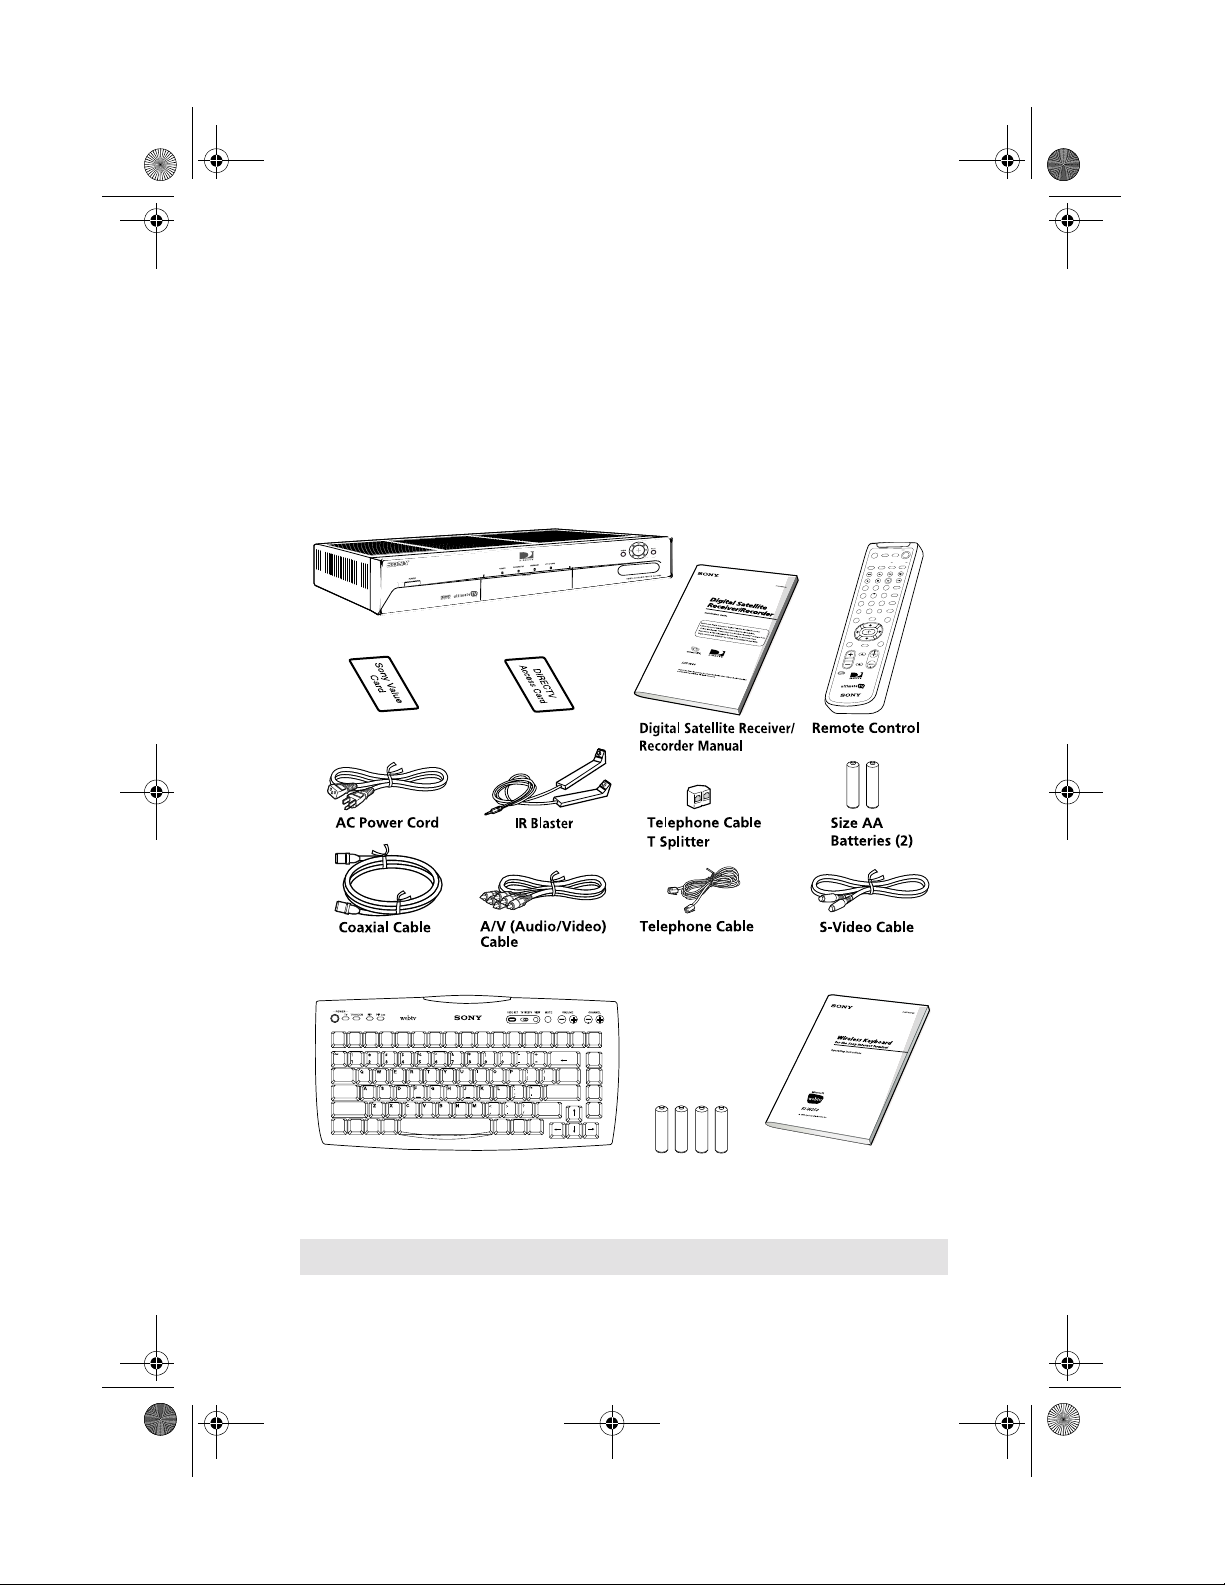
Package Contents
Make sure you have received all of the following items in your Digital
Satellite Receiver/Recorder package.
Digital Satellite Receiver/Recorder
SAT
ER
OW
P
MUTING
TV
EO
TV/VID
N
FUNCTIO
SAT
TV
W
INDO
W
PIP
MENU
3
2
1
XIT
E
456
RECENT
9
8
7
B
E
W
/
V
T
ENTER
.
0
S
HOME
MY SHOW
BACK
OPTIONS
INFO
GUIDE
H
C
L
O
V
OLL
SCR
T
E
S
E
D
O
C
4
0
8
-Y
M
R
Smart Card
Access Card
Boxed spearately
WEB
F1 Fav Home Search Mail Find Info GoTo Save Send
Esc
Tab
Caps
Lock
Shift
Fn
Cmd
Ctrl
Keyboard
(For keyboard instructions, please
F6F5F4F3F2 F7
Alt
Delete
Edit
Back
\
Scroll
Return
Up
Scroll
Shift
Down
Option
Recent
Alt
Size AA
Batteries (4)
refer to the keyboard manual)
✍ If you are missing any of these items, contact your Sony dealer.
Keyboard Manual
7
Page 8
01USBook.BOOK Page 8 Wednesday, July 5, 2000 12:24 PM
Digital Satellite Receiver/Recorder
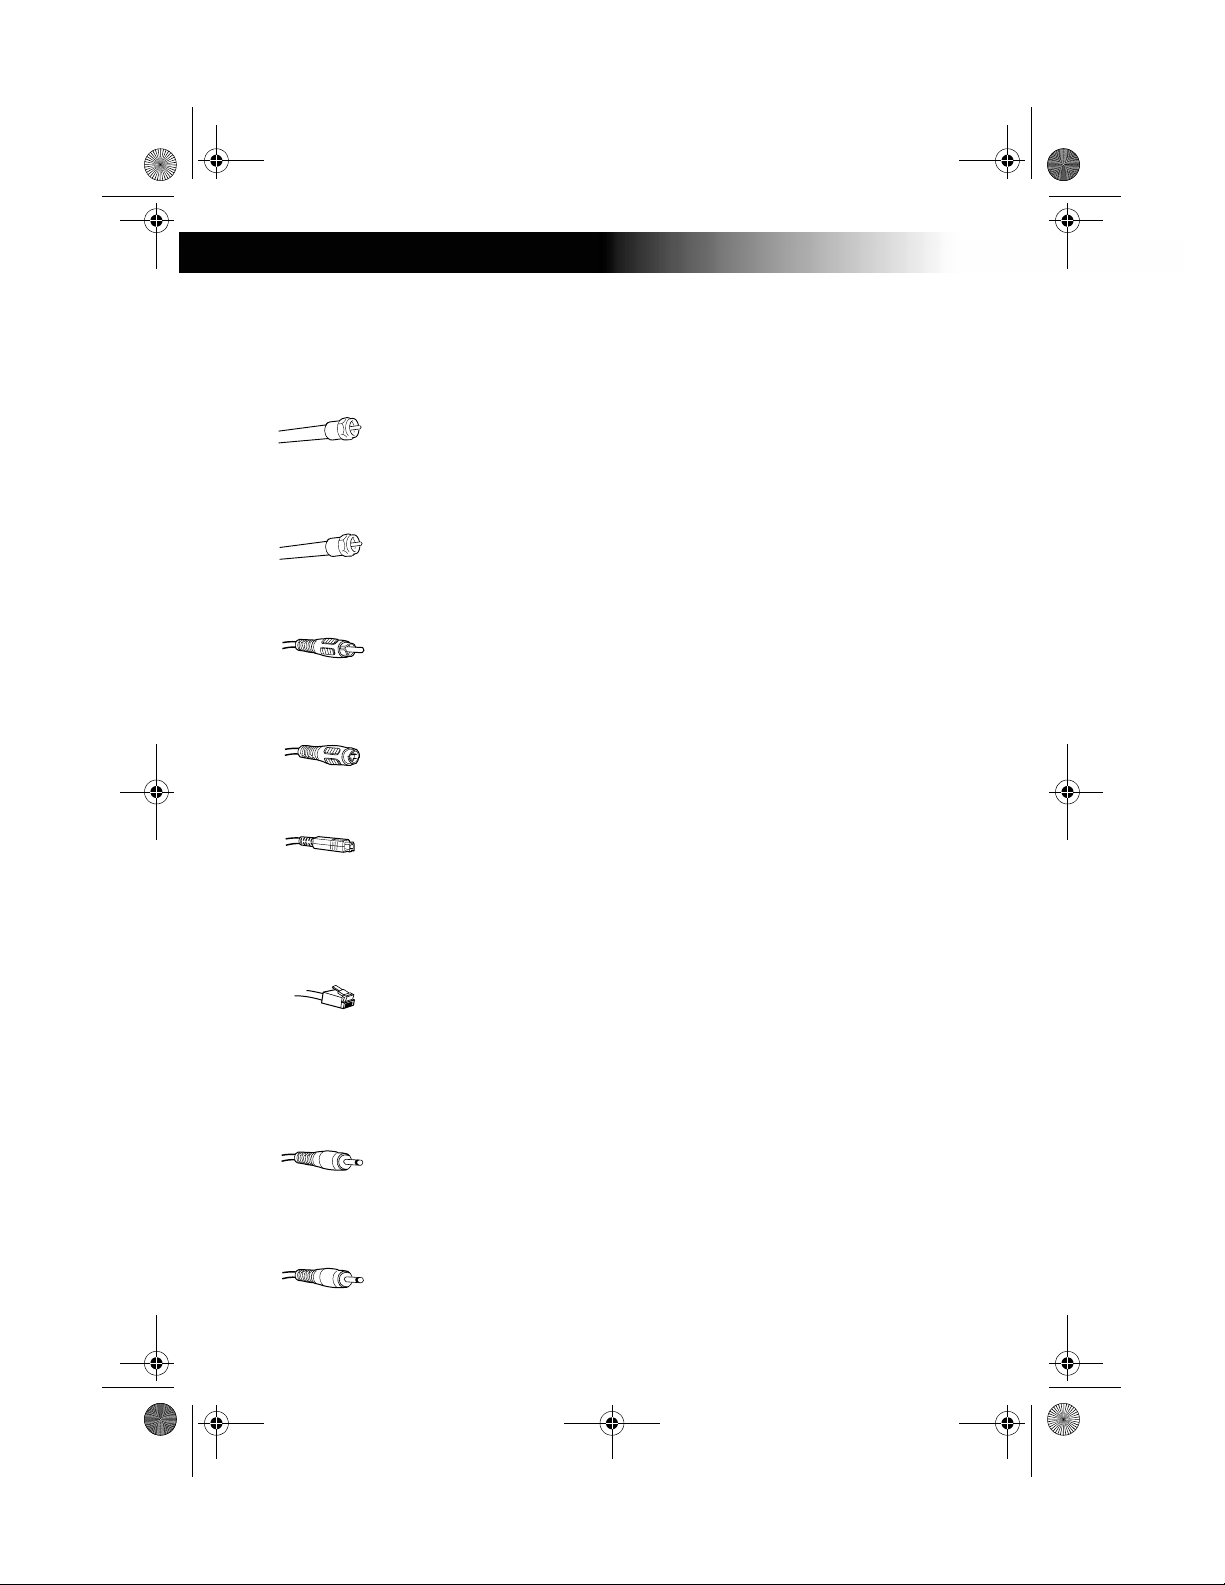
Below is a description of the jacks and cables you can use to make
connections. Note that not all cables come with your receiver/recorder.
VHF/UHF Jacks and Coaxial (RF) Cable
Use the VHF/UHF IN jacks to receive signals from a TV antenna or
from a cable TV connection. You can also use the VHF(SAT)/UHF
OUT jack to send audio and video signals to your TV.
SATELLITE IN Jacks and RG-6 Coaxial cable
Use the SATELLITE IN jacks to receive signals from your Satellite
Dish Antenna with RG-6 coaxial cable.
Audio/Video Jacks and Audio/Video Cables (RCA-type)
Use the audio/video jacks to send good quality analog video and
stereo audio signals.
S-VIDEO Jack and S-VIDEO Cables
Use the S-VIDEO jack to send excellent quality analog video signal.
DIGITAL AUDIO OUT (OPTICAL) Jack and Optical Cable
Use the DIGITAL AUDIO OUT (OPTICAL) jack to send excellent
quality audio signal.
TEL LINE Jack and RJ-11 Telephone Cable
Use the TEL LINE jack to connect to a telephone outlet. If you
subscribe to DIRECTV programming, some services require a
continuously connected telephone line. The telephone line
connection is used to periodically call out to DIRECTV and to use for
connection to the UltimateTV (WebTV) service. (connection is
needed for UltimateTV service)
IR Blaster Jack and Controller
Use the IR jack to connect your Infrared Controller to your Digital
Satellite Receiver/Recorder. This allows you to control your VCR
and/or Cable Box through your Digital Satellite Receiver/Recorder.
MIC (Microphone) Jack
Use the MIC jack to connect to an external microphone. This allows
you to record and send voice messages on the Web in e-mail notes.
8
Page 9

01USBook.BOOK Page 9 Wednesday, July 5, 2000 12:24 PM
Connection Overview
Follow the procedures or make the connections in each of the steps to
connect your Digital Satellite Receiver/Recorder.
Connecting Your Receiver/Recorder
Step 1: Connecting the Antenna
Page 10
v
Step 2: Connecting the Telephone Line
Page 10
v
Step 3: Connecting Your TV
Page 11
v
Step 4: Connecting the AC Power
Page 12
v
Step 5: Inserting the Access Card and Smart Card
Page 12
9
Page 10
01USBook.BOOK Page 10 Wednesday, July 5, 2000 12:24 PM
Digital Satellite Receiver/Recorder
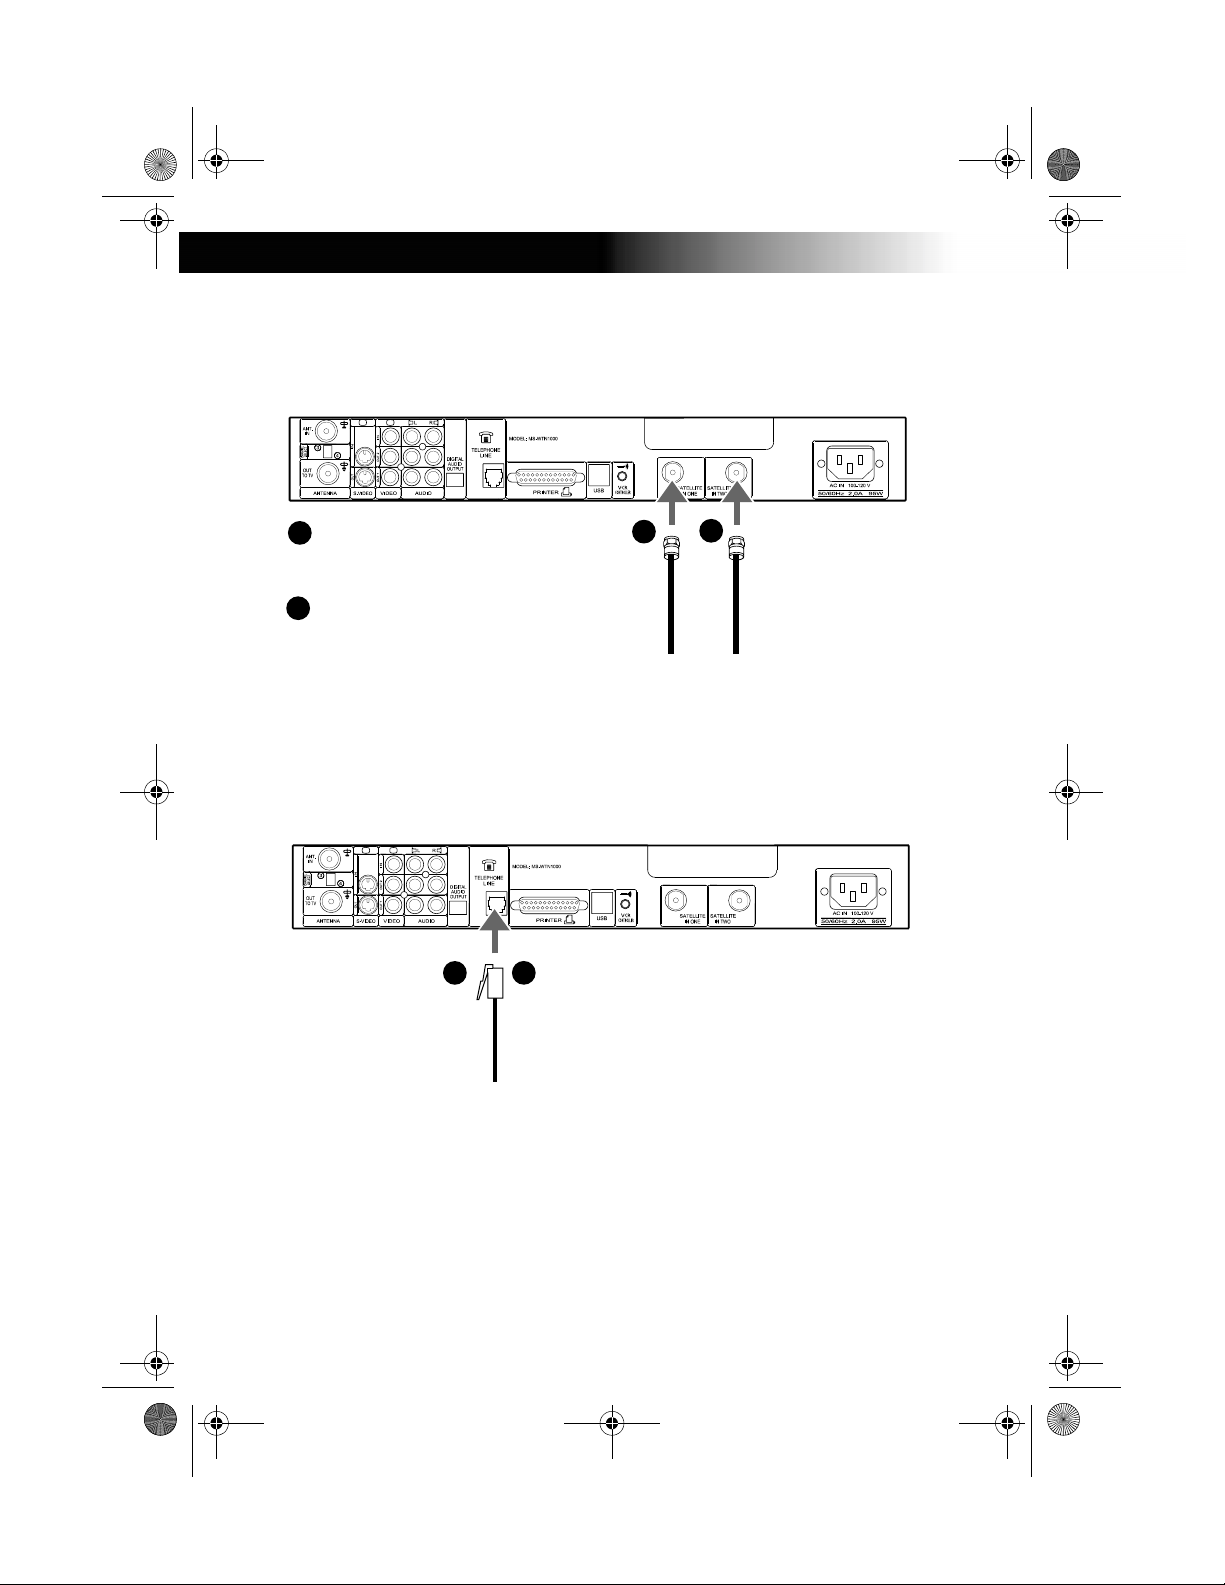
Step 1: Connecting the Antenna
Digital Satellite Receiver/Recorder
Connect the SATELLITE IN jack
1
to your Satellite Dish Antenna
using RG-6 coaxial cable.
Connect the 2nd signal if you
2
have Dual LNB. Advance Set
Up for dual output.
1
2
Step 2: Connecting Your Phone Line
Digital Satellite Receiver/Recorder
Connect the TELEPHONE
1
1
LINE jack to a telephone
line wall jack using the
supplied telephone cord.
10
Page 11

01USBook.BOOK Page 11 Wednesday, July 5, 2000 12:24 PM
Step 3: Connecting Your TV Set
Digital Satellite Receiver/Recorder
Connecting Your Receiver/Recorder
1c
1a
TV
VHF / UHF
1b
If your TV has A/V input jacks
1a
Connect the VIDEO OUT jacks on your Digital Satellite Receiver/Recorder to the
IN
VIDEO 1 VIDEO 2
S VIDEO
VIDEO
L
(
MONO
AUDIO
R
)
A/V input jacks on your TV using the supplied A/V cable. (Be sure to match the
colors on the jacks with the colored plugs on the A/V cable.) If your TV has only one
audio input, connect it to the L(MONO) jack on the receiver/recorder.
1b
If your TV has an S-Video input
Use an S-Video cable instead of the yellow video connection. S-Video cable is
supplied.
If your TV does not have A/V jacks
Connect the VHF/UHF OUT jack to the VHF/UHF input jack on your TV using
1c
coaxial cable. Set the CH3/CH4 switch to the channel that does not carry off-air
broadcasts in your area.
Note
With this connection, your input source
is channel 3 or channel 4 depending on
how you set the CH3/CH4 switch on the
receiver/recorder.
11
Page 12

01USBook.BOOK Page 12 Wednesday, July 5, 2000 12:24 PM
Digital Satellite Receiver/Recorder
Step 4: Connecting the AC Power
Digital Satellite Receiver/Recorder
After all other connections are
1
complete, connect the AC Power
Cord to the Digital Satellite
Receiver/Recorder. Then
connect the AC Power Cord to a
power outlet.
Step 5:
After you insert the DIRECTV Access Card and your Satellite Dish Antenna is
installed, you are ready to begin enjoying service.
Call DIRECTV at 1-800-DIRECTV (347-3288) to begin digital satellite programming.
1
2
Inserting the Access Card and Smart Card
Digital Satellite Receiver/Recorder
1
Open the access door by applying gentle pressure to the latch and releasing.
Insert the DIRECTV Access Card into the front left hand slot of the Digital
Satellite Receiver/Recorder. After the DIRECTV Access Card is inserted,
DO NOT remove it unless instructed to do so by your service provider.
You may insert the Sony Value access card into the front right hand slot of the
Digital Satellite Receiver/Recorder to take advantage of its features. The Sony
Value access card is not required to remain in place and can be removed/
re-inserted at any time.
AC Power Cord
to power outlet
2
1
12
Page 13

e
01USBook.BOOK Page 13 Wednesday, July 5, 2000 12:24 PM
Advanced Connection: Connecting Your VCR
Digital Satellite Receiver/Recorder
Connecting Your Receiver/Recorder
1c
1
If your TV and VCR have A/V jacks
1
Connect the VIDEO OUT jacks of your Digital
Satellite Receiver/Recorder to the A/V input
jacks of your VCR using the supplied A/V
cable. Then, connect the A/V output jacks of
your VCR to the A/V input jacks of your TV
1b
using an A/V cable. (Be sure to match the
colors on the jacks with the colored plugs on
LINE
VCR
IN
IN
S VIDEO
LINE
OUT
OUT
If your TV and VCR have S-Video jacks
1b
Use an S-Video cable instead of the yellow video connection. S-Video cable is
VIDEO
AUDIO
the A/V cable.) Some TVs and VCRs do not
have stereo audio, if yours does not, just
connect the white A/V cable to the Left output
jack.
supplied.
z Tip
To allow your Digital Satellite Receiver/
Recorder to control the recording functions of
your VCR, see page 14.
If your TV and VCR do not have A/V jacks
1c
Connect the VHF(SAT)/UHF OUT jack on the Digital Satellite Receiver/Recorder to th
VHF/UHF input jack on your VCR using coaxial cable.
Then, connect the VHF/UHF output jack on your VCR to the VHF/UHF input jack on
your TV using a second coaxial cable.
Set the CH3/CH4 switch to the channel that does not carry off-air b roadcasts in your area
Note
With this connection, your input source is
channel 3 or channel 4 depending on how
you set the CH3/CH4 switch on your VCR.
13
Page 14

01USBook.BOOK Page 14 Wednesday, July 5, 2000 12:24 PM
Digital Satellite Receiver/Recorder
Advanced Connection: Connecting Your IR
Blaster
Digital Satellite Receiver/Recorder
To allow the Digital Satellite
1
1
Receiver/Recorder to control
your VCR
Connect the IR Blaster to the VCR
CONTROLLER jack on the
receiver/recorder.
VCR (front)
IR Sensor
2
z Tip
If the infrared sensor is not
marked on your VCR, shine a
flashlight into the front panel of
the VCR to locate the sensor.
1
/2" to 1
In front of the VCR
2
"
Place the IR Blaster under and
in front of the VCR.
The IR Blaster must extend just
in front of the infrared sensor
of the VCR.
14
Page 15

01USBook.BOOK Page 15 Wednesday, July 5, 2000 12:24 PM
Advanced Connection: Connecting an Audio
System
Audio Receiver
LINE
OUT
LINE
IN
1b
AUDIO
OPTICAL
IN
1a
Digital Satellite Receiver/Recorder
Connecting Your Receiver/Recorder
If you have a digital or Dolby
1a
Digital audio system
Connect the DIGITAL OUT (OPTICAL)
of the Digital Satellite Receiver/
Recorder to the optical digital input of
your audio system.
If you have a stereo or Dolby
1b
Pro Logic® audio system
Connect the upper AUDIO R and
L(MONO) jacks on the Digital Sat e ll i te
Receiver/Recorder to the audio inputs of
your stereo amplifier.
®
z Tip
If you connect your Digital Satellite Receiver/
Recorder to a Dolby Digital receiver, set the Dolby
Digital option of the Audio display to Auto Select.
Advanced Connection: Connecting a Microphone
Digital Satellite Receiver/Recorder
PUSH OPEN
PUSH OPEN
If you have a Microphone
1
Connect the microphone plug to the
Receiver/Recorder’s Microphone IN jack.
z Tip
Check “on screen help” (see Ultimate
TVs guide to see how to call this) for a
list of compatible microphones.
GUIDE MENU
DIGITAL SATELLITE PLAYER SAT-W60
1
15
Page 16

01USBook.BOOK Page 16 Wednesday, July 5, 2000 12:24 PM
Digital Satellite Receiver/Recorder
Advanced Connection: Connecting a Printer
Connecting a printer to your Digital Satellite Receiver/Recorder enables you to
print Web pages and e-mail messages. The Digital Satellite Receiver/Recorder is
not compatible with all printers. Check the on-line instructions for a list of the
latest compatible printers.
Digital Satellite Receiver/Recorder
To print screens
Connect the printer port on
the receiver/recorder to the
port on the printer.
DB-25
Male
Note
Unplug the Digital Satellite
Receiver/Recorder and
printer before you begin
connecting.
Printer
Advanced Connection: Connecting a Camcorder
Digital Satellite Receiver/Recorder
PUSH OPEN
PUSH OPEN
If you have a Camcorder
1
Using A/V cables, connect the camcorder’s A/V OUT jacks to the Receiver/Recor der’s
A/V IN jacks.
GUIDE MENU
DIGITAL SATELLITE PLAYER SAT-W60
1
Note
If you have a mono camcorder, connect its left
audio output to the Receiver/Recorder’s
AUDIO L (white) jack.
16
Page 17

01USBook.BOOK Page 17 Wednesday, July 5, 2000 12:24 PM
Using the Remote Control and Basic
Functions
Although the Digital Satellite Receiver/Recorder’s remote control is
preset to operate Sony brand TVs, you can program the remote control to
operate other manufacturer’s TVs. This will enable you to operate your
TV when viewing regular broadcast TV using the remote control.
Batteries for the Remote Control
Insert two size AA batteries (supplied) into the remote control as shown.
Be sure to match the + and – marks on the batteries with the + and –
marks inside the battery compartment.
✍ If the remote control is not working properly, the batteries may be worn out. When
replacing batteries, replace both batteries. Do not mix different brands and types of
batteries. After you replace batteries, you may need to reprogram the remote control.
17
Page 18

01USBook.BOOK Page 18 Wednesday, July 5, 2000 12:24 PM
Digital Satellite Receiver/Recorder
Selecting Items
In on-screen displays such as the TV Home Screen and program guides,
you must first move the highlight to the item you want, then select the
item.
T
A
S
R
E
W
O
P
G
IN
T
U
T
A
S
R
E
W
O
P
G
IN
T
U
M
V
T
TV/VIDEO
N
IO
T
C
N
U
F
T
A
S
V
T
W
INDO
W
IP
P
U
N
E
M
3
2
1
IT
X
E
6
45
T
N
E
C
E
R
9
78
EB
TV/W
R
E
T
N
E
.
0
E
M
O
H
S
W
O
H
S
Y
M
K
C
A
B
NS
OPTIO
O
F
IN
E
ID
U
G
CH
VOL
L
L
O
R
C
S
CODE SET
RM-Y804
M
TV
EO
TV/VID
N
O
TI
C
N
U
F
T
A
S
V
T
INDOW
W
IP
P
U
N
E
M
3
2
1
IT
X
E
456
T
N
E
C
E
R
9
78
EB
TV/W
R
E
T
N
E
.
0
E
M
O
H
S
W
O
H
S
Y
M
K
C
A
B
S
PTION
O
O
F
IN
E
ID
U
G
CH
VOL
L
L
O
R
C
S
CODE SET
RM-Y804
1 Press the V/v/B/b buttons
2 Press the button to
to move the highlight to the
item you want.
z Tip
Be sure to always press the SAT
FUNCTION button before operating
the Digital Satellite Receiver/
Recorder with the remote control.
18
select the item.
Page 19

01USBook.BOOK Page 19 Wednesday, July 5, 2000 12:24 PM
Using the Remote Control and Basic Functions
POWERMUTING
TV/VIDEO
TV
WINDOW
0
MY SHOWS
SCROLL
GUIDE
TV
3
ENTER
FUNCTION
MENU
RECENT
TV/WEB
OPTIONS
CHVOL
RM-Y804
PIP
12
456
789
.
BACK HOME
INFO
CODE SET
SAT
SAT
EXIT
Muting Press to mute the sound. Press again,
or press VOL +, to restore the sound.
(For the TV only)
TV/VIDEO Cycles through the video inputs of
your TV.
TV POWER Turns your TV on and off.
SAT POWER Turns your Player on and off.
PIP Operate the Picture-in-Picture features
of the receiver/recorder.
WINDOW Selects the active window while in PIP
mode, allowing you to change the
Main or PIP channel.(For the
recorder/receiver only)
TV FUNCTION Selects TV feature control.
SAT FUNCTION Selects Player feature control.
Button Replay button.
Button Jump ahead button.
0 – 9 Buttons Select channels or enter numbers in
text boxes.
MENU Opens the TV Main Menu.
EXIT Closes all on-screen displays,
including program guides and menus.
ENTER Activates the selected channel on your
TV.
OPTIONS Displays the OPTIONS panel.
RECENT Displays and allows you to access the
most recently viewed Web pages and
TV channels.
SCROLL V/v
Buttons
Moves the page up or down when the
page is too long to be displayed on the
screen.
HOME Displays the Web Home or TV Home
screen.
BACK Displays the last screen viewed, or
hides the on-screen keyboard.
TV/WEB Press the button to switch between TV
and WebTV modes.
19
Page 20

01USBook.BOOK Page 20 Wednesday, July 5, 2000 12:24 PM
Digital Satellite Receiver/Recorder
Arrow Buttons Move the yellow highlight box to a
different command or activity on the
screen; select different keys when the
on-screen keyboard is displayed.
MY SHOWS Displays a list of programs that you
have recorded with your receiver/
recorder.
INFO Displays information on the program
you are viewing.
GUIDE Displays information on available
programs, including channel, time
and date.
Button Activates a highlighted link or
command; displays the on-screen
keyboard.
VOL +/– Increases and decreases the volume.
CH +/– Moves to the next or previous channel.
CODE SET Used for programming the remote
control to operate your TV. See
page 21 for details.
20
Page 21

01USBook.BOOK Page 21 Wednesday, July 5, 2000 12:24 PM
Using the Remote Control and Basic Functions
Setting up the Remote Control
POWERMUTING
ENTER
0
MY SHOWS
TV
FUNCTION
TV
3
SAT
SAT
MENU
EXIT
RECENT
TV/WEB
TV/VIDEO
PIP
WINDOW
12
456
789
.
BACK HOME
The remote control can be programmed to operate
most brands of audio/video equipment.
1 Find the code(s) for the manufacturer of the
device you want to operate with this remote
control.
You can find these codes on page 22 and 23.
2 Press the CODE SET button.
The function indicators begin flashing.
CODE SET
FUNCTION
TV
SAT
INFO
GUIDE
OPTIONS
CHVOL
3 Press the 0–9 buttons to input the manufacturer
code, then press the ENTER button.
The function indicator goes off, and the remote is
CODE SET
SCROLL
RM-Y804
set up to operate that device.
1 0 1
4 Test the remote co ntrol.
Press the POWER button for the device you want
to control, then press other operation controls
such as the CH +/– buttons.
If the device does not respond to the remote
control, repeat from step 2 and enter a different
manufacturer code in step 3.
z Tip
Remember to aim the remote control at
the device you are trying to operate.
ENTER
21
Page 22

01USBook.BOOK Page 22 Wednesday, July 5, 2000 12:24 PM
Digital Satellite Receiver/Recorder
Manufacturer Codes
TV Codes
Manufacturer Code
Sony
Admiral (M.
Wards)
ABC 112
Bell & Howell
(M. Wards)
Broksonic 103, 112
Craig 122, 123, 120, 121
Croslex 111
Curtis Mathis 103, 119, 123
Daewoo 135, 136, 103
Daytron 113
Emerson 122, 113, 120, 121,
Fisher 125
General Electric 102, 118, 103, 107
Goldstar 103, 113, 112, 130
Hitachi 131, 113, 103, 132
JC Penney 103, 102, 130, 107
JVC 128, 129
KTV 133, 113, 103, 123,
LXI (Sears) 102, 103 111, 125,
Magnavox 111, 112, 113, 107
Mitsubishi/MGA 124, 103, 112
NEC 103, 112
Panasonic 118, 116, 117, 107
Philco 111, 118, 109
Philips 111
Pilot 103
Pioneer 137, 118, 119
101
102, 114, 109
114, 109, 138
123, 103, 115
134
119, 112
Manufacturer Code
Portland 103, 108
Quasar 110, 107
Radio Shack 102, 112, 124, 123
RCA/Proscan 102, 103, 104,
105,106, 107, 108
Samsung 126, 112, 113, 103
Sanyo 125
Scott 123, 112
Sharp 114, 113, 115
Signature 2000
(M. Wards)
Sylvania 111, 112, 108
Symphonic 123, 139
Tenika 109
Toshiba 119, 114
Videch 131, 103, 112
Wards 113, 103, 115, 112
Zenith 108, 110
114, 109
22
Page 23

01USBook.BOOK Page 23 Wednesday, July 5, 2000 12:24 PM
VCR Codes
Manufacturer Code
Sony 301,302, 303
Aiwa 338
Audio Dynamic 314, 347
Bell & Howell
(M. Wards)
Broksonic 317, 319
Canon 309, 308
Citizen 332
Craig 315, 302, 332
Curtis Mathis 304, 338, 309
Daewoo 341, 312, 309
DBX 314, 336, 337
Dimensia 304
Emerson 319, 320, 316, 317,
Fisher 330, 334, 335, 333
Funai 338
General Electric 329, 304, 309
Go Video 322, 339, 340
Goldstar 332
Hitachi 306, 304, 305, 338
HQ 315
Instant Replay 309, 308
JCPenney 309, 305, 304, 330,
JVC 314, 336, 337
Kenwood 314, 336, 332, 337
LXI (Sears) 332, 305, 333, 334,
Magnavox 310, 308, 309
Marantz 314, 336, 337
Marta 332
Memorex 309, 335
Minolta 305, 304
Mitsubishi/MGA 323, 324, 325, 326
330, 343
318, 341
314, 336, 337
330, 335, 338
Manufacturer Code
Multitech 325, 338, 321
NEC 314, 336, 337
Olympic 309, 308
Optimus 327
Panasonic 308, 309, 306, 307
Pentax 305, 304
Philco 308, 309
Philips 310, 308, 309
Pioneer 308
Quasar 306, 308, 309
RCA/Proscan 304, 305, 308, 309,
310, 311, 312, 313
Realistic 309, 330, 328, 335,
324, 338
Sansui 314
Singer 315
Samsung 322, 313, 321
Sanyo 330, 335
Scott 312, 313, 321, 335,
Sharp 327, 325, 328
Shintom 315
Signature 2000
(M. Wards)
Sylvania 310, 308, 309, 338
Symphonic 338
Tashiro 332
Tatung 314, 336, 337
Teac 314, 336, 338, 337
Technics 309, 308
Teknika 338, 342
Toshiba 312, 311
Wards 327, 328, 335, 331,
Yamaha 330, 314, 336, 337
Zenith 331
323, 324, 325, 326
336, 327
332
23
Page 24

01USBook.BOOK Page 24 Wednesday, July 5, 2000 12:24 PM
Digital Satellite Receiver/Recorder
Other Information
Front Panel Controls
Digital Satellite Receiver/Recorder
GUIDE MENU
PUSH OPEN
PUSH OPEN
DIGITAL SATELLITE PLAYER SAT-W60
1
2
0
3
4
5
qa
Feature Description
1 Power Button Turns your Digital Satellite Receiver/Recorder on and
off
2 POWER
Indicator
3 CONNECTED
Indicator
Indicates whether the Digital Satellite Receiver/
Recorder is on or off.
Flashes while the Digital Satellite Receiver/Recorder is
connecting to the WebTV service and while receiving
new information. Remains lit while in use.
4 MESSAGE
Indicator
5 MY SHOWS
Indicator
Lights up to indicate you have an unopened e-mail
message.
Indicates that a program is being recorded by My
Shows.
6 GUIDE Button Opens the Program Guide.
7 MENU Button Opens the TV Home screen.
8 Arrow and
Buttons
9 AUDIO (R/L)/
VIDEO IN
0 SMART CARD
Slot
qa ACCESS CARD
Slot
The arrow buttons move the highlight in the on-screen
displays. The button selects the highlighted item.
Allows easy connection of audio/video devices, such as
a camcorder or digital camera.
The SmartCard allows you to access special features for
WebTV.
The Access Card allows you to access DIRECTV
services.
qs MIC INPUT Jack Allows easy connection of a microphone.
6
qs
8
7
9
24
Page 25

01USBook.BOOK Page 25 Wednesday, July 5, 2000 12:24 PM
Back Panel Terminals
Digital Satellite Receiver/Recorder
7
4
5
6
8
Connector Description
1 TELEPHONE LINE Connects your receiver/recorder to a telephone jack.
2 VCR CONTROLLER Allows you to connect your IR Blaster for easy control of
3 PRINTER PORT Allows you to connect your receiver/recor der to a printer.
4 AUDIO (R)/(L)
IN/OUT
5 VIDEO IN/OUT Connects your receiver/recorder to your TV’s or VCR’s
6 S-VIDEO IN/OUT Allows you to connect your receiver/recorder to your TV
7 CH 3-CH 4 Switch The switch determines which TV channel allows you to
8 VHF/UHF IN: Allows you to connect your normal (antenna) TV or
9 AC IN Connects your receiver/recorder to a 120V AC outlet.
0 DIGIT AL AUDIO
OUTPUT
qa USB Port Allows you to connect Universal Serial Bus components,
qs SATELLITE IN Connect the cable from your satellite dish antenna here.
0
your cable box and/or VCR through the receiver/recor der.
Connects your receiver/recorder to the right and left
audio inputs and outputs of your TV.
video inputs and outputs.
and VCR for optimal picture quality (if your TV and VCR
support S-Video.
view programs from your receiver/recorder when
connected through the VHF/UHF connector.
cable TV service to your receiver/r ecorder.
OUT: Allows you to send normal (antenna) TV or cable
signals to your TV or VCR from your receiver/recorder.
Allows you to connect an optional digital audio system.
such as a keyboard or a digital camera.
Connect a second cable if you wish to use both of the
receiver/recorder’s tuners, this allows features such as PIP
and recording one show and while viewing another.
1
3
qa
2
Other Information
qs
9
25
Page 26

01USBook.BOOK Page 26 Wednesday, July 5, 2000 12:24 PM
Digital Satellite Receiver/Recorder
Specifications
Terminals Video In (2)
Video Out (2)
Audio (R/L) In (2)
Audio (R/L) Out (2)
S-Video In (1)/Out (1)
Tel Line (1)
Microphone In (1)
Printer Port (DB25) (1)
VCR Controller (1)
Digital Audio Out (1)
USB Port (2)
Satellite In (2)
CH3-CH4 Switch (1)
VHF/UHF In/Out (1)
AC In (1)
Dimensions 430 mm x 70 mm x 290 mm (w/h/d)
(17” x 2
Weight TBD x kg (x lbs xx oz)
Power
Requirements
Power
Consumption
Supplied
Accessories
Optional
Accessories
AC 120V
90 W max
Remote Control RM-Y804 (1)
Size AA Batteries (2)
AC Power Cord (1)
A/V (Audio/Video) Cable (1)
Telephone Cable (1)
S-Video Cable (1)
T Splitter (1)
Coaxial Cable (1)
IR Blaster (1)
Wire less Keyboard KI-W250 (1)
Access Card (1)
Smart Card (1)
Local Antenna ANJ-AA1
Installation Kit ANJ-DS2
Amplifier EAC-DA1
Diplexer EAC-DD1
Voltage Switch EAC-DV2
DSS Dish SAN-XXX
3
/4” x 11 1/2”)
26
Page 27

01USBook.BOOK Page 27 Wednesday, July 5, 2000 12:24 PM
Troubleshooting
Symptom Possible Cause and remedies
TV POWER button
doesn’t turn on TV.
No picture, no sound. Make sure the AC Power Cord is connected.
No sound. If you connected the Digital Satellite Receiver/Recorder
Can’t change TV
channels while using
WebTV service.
The WebTV service
screens disappear
after pressing the
CHANNEL +/
buttons.
VCR Controller
doesn’t seem to be
working correctly.
–
The remote control has not been properly pr ogrammed.
See “Setting up the Remote Control” on page 21.
The batteries in the remote control or optional wireless
keyboard could be weak. Check the batteries and
replace them if necessary.
Check that the TV/VIDEO switch is set correctly.
Make sure the Digital Satellite Receiver/Recorder is
properly connected. If you connected using a S-Vide o or
A/V cables, make sure they are properly connected.
If your TV must be set to a certain channel to view other
devices to which it is connected, make sur e this channel
is selected.
Check that the correct video input is selected by
pressing the TV/VIDEO button.
If you connected the Digital Satellite Receiver/Recorder
using the S-Video or A/V cables, make sure the cables
are properly connected.
If your TV is not connected using the S-Video or A/V
cables, set the CH3-CH4 switch on the back of the
Digital Satellite Receiver/Recorder to the opposite
channel to which it is currently set.
using A/V cables, make sure the cables are properly
connected.
Make sure you select the TV FUNCTION button.
Press the TV/VIDEO button on the remote contr ol until
the WebTV screen appears.
Check that the IR Blaster is positioned directly in front
of the infrared sensor area of your cable box and/or
VCR.
Follow the on-line instructions in the “Settings” link,
accessible from the TV Home page of the WebTV
service.
Other Information
27
Page 28

01USBook.BOOK Page 28 Wednesday, July 5, 2000 12:24 PM
Digital Satellite Receiver/Recorder
Symptom Possible Cause and remedies
The unit gets
extremely hot.
The unit turns off and
on by itself.
The unit will not turn
on.
The unit will not
connect to the W ebTV
Network after
receiving an upgrade
from the WebTV
service.
The Message
Indicator light is not
working.
Remote control or
keyboard is no longer
working.
Check the placement of the unit. Place the unit in a
location with adequate ventilation. Do not place the
unit in a cabinet or on a TV.
If the heat is excessive, contact your Sony dealer.
This is often caused by static build up. Turn off the unit
and disconnect the AC Power Cord from the power
outlet. Then reconnect the AC Power Cord to the power
outlet and turn on the unit. If this does not solve the
problem, contact your Sony dealer.
Make sure the AC Power Cord is securely connected to
the Digital Satellite Receiver/Recorder and a power
outlet.
Turn off the Digital Satellite Receiver/Recorder and
disconnect the AC Power Cord from the power outlet.
Then reconnect the AC Power Cord to the power outlet
and turn on the Digital Satellite Receiver/Recorder . You
may need to repeat this procedure thr ee or four times to
solve the problem.
You can set your Digital Satellite Receiver/Recorder to
check for messages automatically. However, if you
check for messages yourself before the receiver/
recorder is set to do so automatically, the Message
Indicator may not light until the receiver/recorder
checks again. You may want to consider setting the
receiver/recorder to check for mail when you usually
are not connected.
Replace the batteries.
Try pressing the SAT FUNCTION button.
28
Page 29

01USBook.BOOK Page 29 Wednesday, July 5, 2000 12:24 PM
Other Information
Limited Warranty
Digital Satellite Receiver/Recorder
SONY ELECTRONICS INC. (“SONY”)
warrants this Product against defects in
material or workmanship as follows:
1. Labor: For a period of 90 days from the
original date of purchase, if the Product
is determined to be defective, SONY
will repair or replace the Product at no
charge. After this 90 day period, you
must pay for all labor charges.
2. Parts: For a period of one year from the
original date of purchase, SONY will
supply, at no charge, new or rebuilt
replacements in exchange for defective
parts. Any replacements will be
warranted for the longer of the
remainder of the original warranty
period or 90 days from the parts
installation by a SONY authorized
DIRECTV System installer or facility.
To obtain warranty service:
– If the Product was installed by a SONY
authorized DIRECTV System installer,
contact that installer for instructions.
– If the Product was not installed by a
SONY authorized DIRECTV System
installer, you must take the Product or
deliver the Product in either its original
packaging or packaging affording an equal
degree of protection (with freight prepaid),
to a SONY authorized DIRECTV System
service facility. To locate the closest such
facility, please call the telephone number
listed below.
This warranty does not cover customer
instruction, installation, set u p adjustments
or signal reception problems. This warr anty
does not cover cosmetic damage or damage
due to acts of God, accident, m isuse, abu se,
negligence, commercial use, or
modification of, or to any part of the
Product. This warranty does not cover
improper installation (if not installed by a
SONY authorized DIRECTV System
installer), loss of use of the product, or
wasted programming charges due to
product malfunction. This warranty does
not cover damage due to improper
operation or maintenance, connection to
improper voltage supply, or attempted
repair by anyone other than a facility
authorized by SONY to service the Product.
This warranty does not cover Products sold
AS IS or WITH ALL FAULTS. This
warranty is valid only in the United States.
Proof of purchase in the form of a bill of sale
or receipted invoice which is evidence that
the Product is within the Warranty period
must be presented to obtain warranty
service.
REPAIR OR REPLACEMENT AS
PROVIDED UNDER THIS
WARRANTY IS THE EXCLUSIVE
REMEDY OF THE CONSUMER. SONY
SHALL NOT BE LIABLE FOR ANY
INCIDENTAL OR CONSEQUENTIAL
DAMAGES FOR BREACH OF ANY
EXPRESS OR IMPLIED WARRANTY
ON THIS PRODUCT. IN NO EVENT
SHALL SONY BE LIABLE FOR ANY
INCIDENTAL OR CONSEQUENTIAL
DAMAGES WHATSOEVER ARISING
OUT OF THE USE OR INABILITY TO
USE THE PRODUCT. UNDER NO
CIRCUMSTANCES SHALL SONY’s
LIABILITY, IF ANY, EXCEED THE
PURCHASE PRICE PAID FOR THE
PRODUCT. EXCEPT TO THE EXTENT
PROHIBITED BY APPLICABLE LAW,
ANY IMPLIED WARRANTY OF
MERCHANTABILITY OR FITNESS
FOR A PARTICULAR PURPOSE ON
THIS PRODUCT IS LIMITED IN
DURATION TO THE DURATION OF
THIS WARRANTY.
This warranty is invalid if the factory
applied serial number has been altered or
removed from the Product. Some states do
not allow the exclusion or limitation of
incidental or consequential damages, or
allow limitations on how long an implied
warranty lasts, so the above limitations or
exclusions may not apply to you. In
29
Page 30

01USBook.BOOK Page 30 Wednesday, July 5, 2000 12:24 PM
Digital Satellite Receiver/Recorder
addition, if you enter into a service contract
with the SONY Partnership within 90 days
of the date of sale, the limitation on how
long an implied warranty lasts does not
apply to you. This warranty gives you
specific legal rights, and you may have
other rights which vary from state to state.
For your convenience, SONY ELECTRONICS
INC. has established telephone numbers for
frequently asked questions:
For assistance with installation, contact the
dealer from whom you purchased your
Multi-Sat Oval Antenna System.
For product information or operation, for
service assistance or for resolution of a
service problem, call:
SONY SATELLITE SYSTEM
INFORMATION CENTER
1-800-838-SONY (7669)
For an accessory or part not available from
your authorized dealer, call:
1-800-488-SONY (7669)
About Sony Customer Support
Every DIRECTV System manufactured by
Sony comes with Sony’s Express Support at
no charge to you. In the event of a system
failure, our Express Support Program can
have a replacement receiver/recorder on its
way to you via overnight Federal Express
(for calls Monday-Friday until 7:30 pm
Eastern Time; Saturday delivery depends
upon zip code). All it takes is a valid credit
card to cover a security deposit, and Sony
will pay freight in both directions. Our
Express Support continues with our 800
number, staffed by dedicated technical
representatives who can answer questions
on dealer locations, system operation,
installation, hookup, accessories, and how
to get the most out of your home
entertainment system. Sony’s
ExpressSupport
expression of our commitment to excellence
in customer service.
.
SM
program: another
30
Page 31

01USBook.BOOK Page 31 Wednesday, July 5, 2000 12:24 PM
Other Information
FCC Regulations and
Information
FCC Registration Information
Your Digital Satellite Receiver/Recorder has been
registered by the Federal Communication
Commission (FCC) as not being harmful to the
telephone network when connected directly to the
telephone lines. In order to fully comply with the
Rules of the FCC, the following instructions should
be read carefully and followed completely where
applicable:
FCC has established Rules which permit this device
to be directly connected to the telephone network.
Standardized jacks are used for these connections.
This equipment should not be used on party lines or
coin phones.
If this device is malfunctioning, it may also be
causing harm to the telephone network; this device
should be disconnected until the source of the
problem can be determined and until the repair has
been made. If this is not done, the telephone
company may temporarily disconnect service.
The telephone company may make changes in its
technical operations and procedures; if such
changes affect the compatibility or use of this
device, the telephone company is required to give
adequate notice of the changes. You will be advised
of your right to file a complaint with the FCC.
If the telephone company requests information on
what equipment is connected to their lines, inform
them of:
a. The telephone number to which this unit is
connected.
b. The ringer equivalence number.
c. The USOC jack required.
d. The FCC Registration Number.
Items (b) and (d) are indicated on the label. The
Ringer Equivalence Number (REN) is used to
determine how many devices can be connected to
your telephone line. In most areas, the sum of the
REN’s of all devices on any one line should not
exceed five (5). If too many devices are attached,
they may not ring properly.
Service Requirements
In the event of equipment malfunction, all repairs
should be performed by our Company or an
authorized agent. It is the responsibility of users
requiring service to report the need for service to
our company or to one of our authorized agents.
For service, call 1-888-772-7669.
Radio Interference Information
This equipment has been tested and found to
comply with the limits for a Class B digital device,
pursuant to Part 15 of the FCC rules. These limits
are designed to provide reasonable protection
against harmful interference in a residential
installation. This equipment generates, uses and can
radiate radio frequency energy and, if not installed
and used in accordance with the instructions, may
cause harmful interference with radio
communications. However, there is no guarantee
that interference will not occur in a particular
installation. If this equipment does cause
interference to radio or television reception (which
you can determine by turning the equipment off
and on), you are encouraged to try to correct the
interference by one or more of the following
measures:
Change the position of the Digital Satellite
Receiver/Recorder with respect to the radio or
television equipment that is receiving the
interference.
Move the Digital Satellite Receiver/Recorder away
from the equipment that is receiving the
interference.
Plug the Digital Satellite Receiver/Recorder into a
different outlet so that the Digital Satellite
Receiver/Recorder and the equipment receiving the
interference are on different branch circuits.
Shielded cables and I/O cords must be used for this
equipment to comply with the relevant FCC
regulations. Changes or modifications not expr essly
approved in writing by Sony Electronics, Inc., void
the user’s authority to operate this equipment.
If these measures do not eliminate the interference,
you should consult your Digital Satellite Receiver/
Recorder dealer or an experienced radio/television
technician for additional suggestions. In addition,
you may find the following booklet prepared by the
FCC helpful: “How to Identify and Resolve RadioTV Interference Problems.” This booklet is available
from the U.S. Government Printing Office,
Washington, D.C., 20402 Stock No. 004-000-00345-4.
Declaration of Conformity
Trade Name: Sony
Model No.: SAT-W60
Responsible Party: Sony Electronics Inc.
Address: 1 Sony Drive, Park Ridge, NJ. 07656 USA
Telephone No.: 201-930-6972
This device complies with Part 15 of the FCC rules.
Operation is subject to the following two conditions:
(1) This device may not cause harmful interference, and
(2) this device must accept any interference received,
including interference that may cause undesired operation.
31
Page 32

01USBook.BOOK Page 32 Wednesday, July 5, 2000 12:24 PM
Sony Electronics Inc.
Printed in the U.S.A.
Contact Sony with your questions and comments
www.sel.sony.com/SEL/feedback.htm
 Loading...