

Sony PUPPY Training manual

®
®
Sony Media & Application Solutions
1 Sony Drive
Park Ridge, NJ 07656
www.sony.com/puppy
®

Training Your PUPPY®Unit
1.
A Guide to Installing and Using Your
Sony FIU-600 Fingerprint Identity
Device with Puppy Suite
™
Authentication Software.

Introduction
Thanks for purchasing (shall we say adopting?) a Sony Puppy®fingerprint
identity device. We think you’ll find it to be easy-to-use and a convenient tool
in your day-to-day interactions with your computer. Just think…you won’t
need to worry about typing and remembering passwords any more!
This handy guide will assist you in setting up, using, and maintaining your
Puppy unit to obtain the best results. Note that this guide is set up in several
sections:
• Section 1: You and Your Puppy Fingerprint Identity Device provides
general advice for using the Puppy unit, including connection and finger
placement.
• Section 2: Installing the Software is a step-by-step walkthrough for
Puppy Suite™software installation.
• Section 3: Enrolling Your Fingerprints on the Puppy Device discusses the
registration of your fingerprints, as well as specific usage, settings, and
troubleshooting for the Puppy unit.
• Section 4: Using Puppy Suite Authentication Software shows you how to
easily logon to your PC, replace your passwords, control access to your files,
change settings, and practice using the Puppy unit.
• Section 5: Uninstalling the Puppy Suite Software describes how to remove
the software from your PC.
• Section 6: Frequently Asked Questions (FAQ) lists a number of common
questions and answers regarding installation and use of the FIU-600 device and
Puppy Suite software.
• Section 7: Who to Contact? provides contact information and websites for
additional information, technical support, and software updates.
Throughout this guide, you will see text and headings in italics. This indicates
an important notice that you will need to pay special attention to.
This manual refers several times to the Puppy Suite Help file, accessible by
right-clicking on the Puppy icon in the system tray or via the [Puppy Suite
600] program group in the Start menu. This help file contains detailed information, tips, and walkthroughs for installation, use, and troubleshooting of the
Puppy unit and Puppy Suite software.
Training Your PUPPY®Unit
3.
2.
Training Your PUPPY®Unit
©2003 Sony Electronics Inc. All rights reserved. Features and specifications are
subject to change without notice. Sony, Puppy, and the Puppy logo are trademarks of Sony. Microsoft and Windows are registered trademarks of Microsoft
Corporation. Adobe and Acrobat are trademarks of Adobe, Inc. Other trademarks are property of their respective owners.
This product may have a possibility (of less than 0.1% according to our measurements) of granting access to persons other than those who have registered
their fingerprints. In no event shall our corporation or our representatives be
liable for any incidental, consequential, or special loss arising from granting an
access to persons from other than those who have registered their fingerprints. In
no event shall our corporation or our representatives be liable for any incidental,
consequential or special loss arising from any use, defect, malfunction, or fault of
this product.
When sending the fingerprint data via a communication line or storing such data
in a computer, sufficient security control is required to avoid abuse of the data.
Sony Media & Application Solutions
1 Sony Drive
Park Ridge, NJ 07656
www.sony.com/puppy
®
Section 1:
You and Your Puppy
®
Fingerprint Identity Device
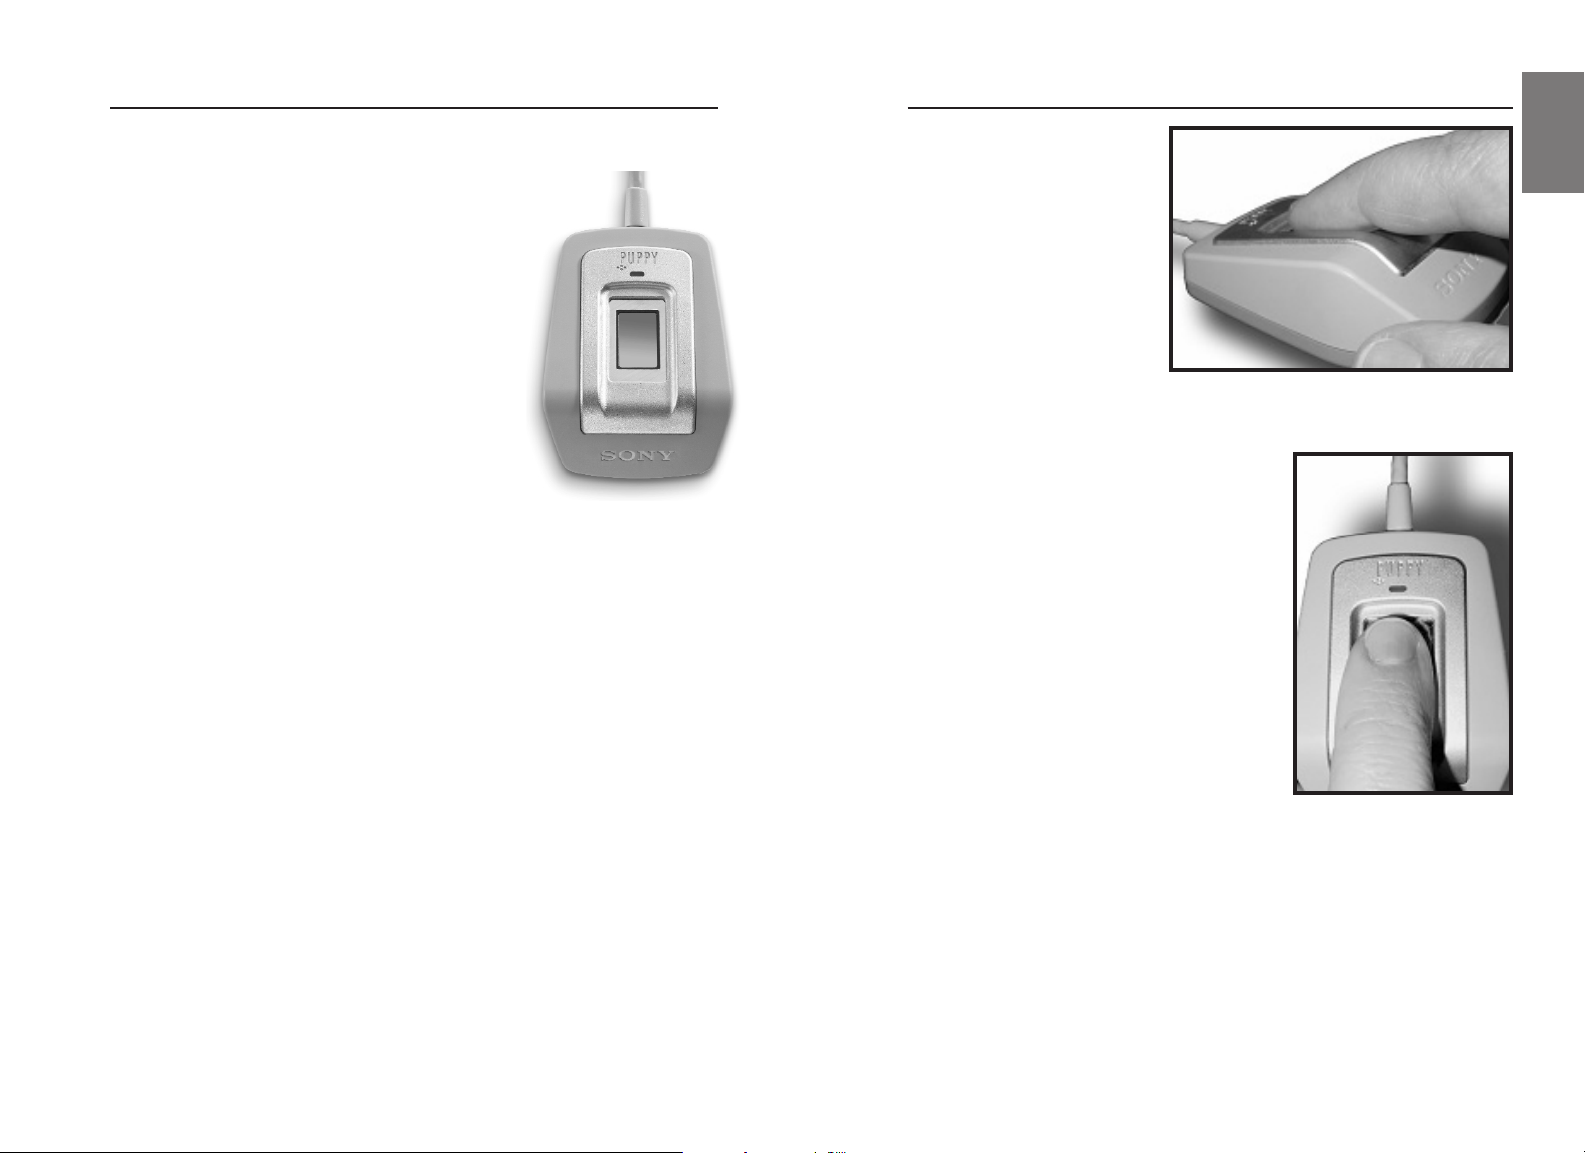
Always place your finger flat and
comfortably resting entirely on the
sensor surface, so that it touches
the metal plate around the sensor
itself. See the images for refer-
ence. Sometimes twisting your
finger slightly or moving it
forward and back can trigger
the detection.
2. Be comfortable! Don’t try to
use a finger that causes your
hand to be at a funny angle to your desktop. Use the finger that’s most
convenient and most comfortable.
3. Always be sure to register at least two fingers
when setting up a user. This way, if you’ve hurt
your finger and have a bandage on it, you still
have a ‘backup’ finger.
4. During enrollment (registration), do your best
to provide consistent finger placement: THIS IS
CRITICAL. Good enrollment enables the unit
to provide the best matching possible during
your daily use of the device, and thus this
process is one of the most important steps in
setting up your Puppy unit. Don’t rush it!
5. If you typically have dry skin, the Puppy
unit may have difficulty reading your finger.
Try touching your finger to your forehead or
the side of your nose and then placing your
finger on the unit. The oils will help the sensor to correctly read the ridges
and valleys of your fingerprint.
6. If you typically have very moist skin or tend to perspire a lot, the Puppy
unit may have difficulty reading your finger. Try rubbing your finger on
your slacks or sleeve and then place your finger on the unit.
5.
1
Section 1: You and Your Puppy
®
Fingerprint Identity Device
If you follow some general guidelines, you will be quite happy with the
performance and capabilities of your Puppy unit.
THE UNIT
Lightweight and small in size, the FIU-600 Puppy
unit offers the ultimate in convenience with a new
level of safekeeping. This ID unit is equipped with
the intelligence to recognize your fingerprints onboard the device, for the utmost security. The Puppy
device also offers robust fingerprint imaging technology based on a technique known as capacitance,
which digitally reads the fingerprint without leaving
ink residue on your finger. Capacitance sensors
cannot be fooled by paper copies and do not
require cleaning.
CONNECTIONS
Sony’s Puppy fingerprint security units connect to your PC with a USB
connector. Please be sure to connect the Puppy®device directly to your PC’s USB
port or to a powered* USB hub when prompted during installation. The Puppy
units will not be recognized if connected to a ‘self-powered’ or unpowered hub,
and your PC may become unstable.
The Puppy unit can also be connected to a USB extension cord, if the existing
cord is not long enough.
You should be able to unplug the Puppy®unit at any time, though if you do
unplug it when it is required for a fingerprint check, you could get an error.
Simply plug the Puppy unit’s USB cord back in, and provide your fingerprint
as requested. Never unplug your Puppy unit during fingerprint enrollment.
FINGERPRINTS
Puppy units use highly robust sensing technology to take images of your fingerprints. However, there are instances where the units may have some difficulty reading your fingerprint. Here are some things you can do to avoid this
situation!
1. The Puppy unit reads the patterns of ridges and valleys on the portion of
your finger between the tip and the first bend in your finger. Do not simply
put the tip of your finger on the sensor and hope for the unit to detect it! And
don’t turn your finger to the right or the left, or place it upside down… use the
finger guide on the device to judge correct finger placement.
4.
* Connected to an AC adapter.

Section 2: Installing the Software
WHEN UPGRADING YOUR OS
Please uninstall Puppy Suite™BEFORE upgrading your OS. (Uninstallation
is not necessary when using Windows Update.)
IMPORTANT!! If you upgrade your OS without uninstalling Puppy
Suite, not only will you not be able to use the PUPPY device, but you
will also not be able to install/uninstall Puppy Suite.
(In this case, you will have to re-format your hard disk and reinstall
Windows.)
INSTALLATION
Make sure the PUPPY®unit is not connected to your PC, then follow
these steps.
Note: In Windows XP or Windows 2000, log on to Windows as a user who has
administrative authority.
1. Insert the CD-ROM into the CD-ROM drive. The [Puppy Suite] dialog
box will appear.
If the dialog box is not displayed:
a. Select [Start] from the
taskbar and the click
[Run].
b. Type [D:\Setup.exe] (where
D is the drive letter for
your CD-ROM drive or
other source media) and
follow the onscreen
instructions to begin
the installation process.
2. We highly recommend
you read the manual before
attempting to install and use this software. You can click on [Read Manual]
to view an electronic copy of the manual. If you are comfortable with the
instructions, click [Install]. The start-up screen will appear.
7.
2
6.
Section 2: Installing the Software
System Requirements for Sony’s Puppy Suite™ Authentication Software
for Windows Operating Systems.
• CPU: Intel Pentium 300MHz or higher (PentiumII 400MHz or
higher recommended)
• Memory: 128MB or higher
• HDD: 20MB of free hard disk space
• CD-ROM Drive
• Interface: USB port (USB 1.1 compliant. The port must be able
to supply up to 500mA.)
• OS
o Windows 98 Second Edition (Windows 98 SE)
o Windows Millennium (Windows Me)
o Windows 2000 Professional Service Pack 2 or later (Windows
2000)
o Windows XP Professional, Windows XP Home Edition
(Windows XP)
• Browser
o Internet Explorer 5.0 or later
o (Netscape browsers below 6.0 are supported, but 6.0 and above
are not.)
Note
• Please be sure to connect the Puppy®device directly to your PC’s USB
port or to a powered (AC connected) USB hub when prompted
during installation. The Puppy units will not be recognized if
connected to a self-powered or unpowered hub, and your PC may
become unstable. (USB ports in keyboards and monitors are often not
powered hubs)
• When cascading USB hubs, please connect the PUPPY unit to the
first hub closest to the PC.(When connecting the unit to the second or
other hubs, operation is not guaranteed.)
• Puppy Suite may not operate correctly on any OS upgraded from
Windows 95.
• Windows 2000 Server & Windows 2000 Advanced Server operating
sytems are not supported.
• In Windows XP installations upgraded from other OSes, BIOS
adjustments may be needed for certain PCs in order for them start up
properly.
9.
Section 2: Installing the Software
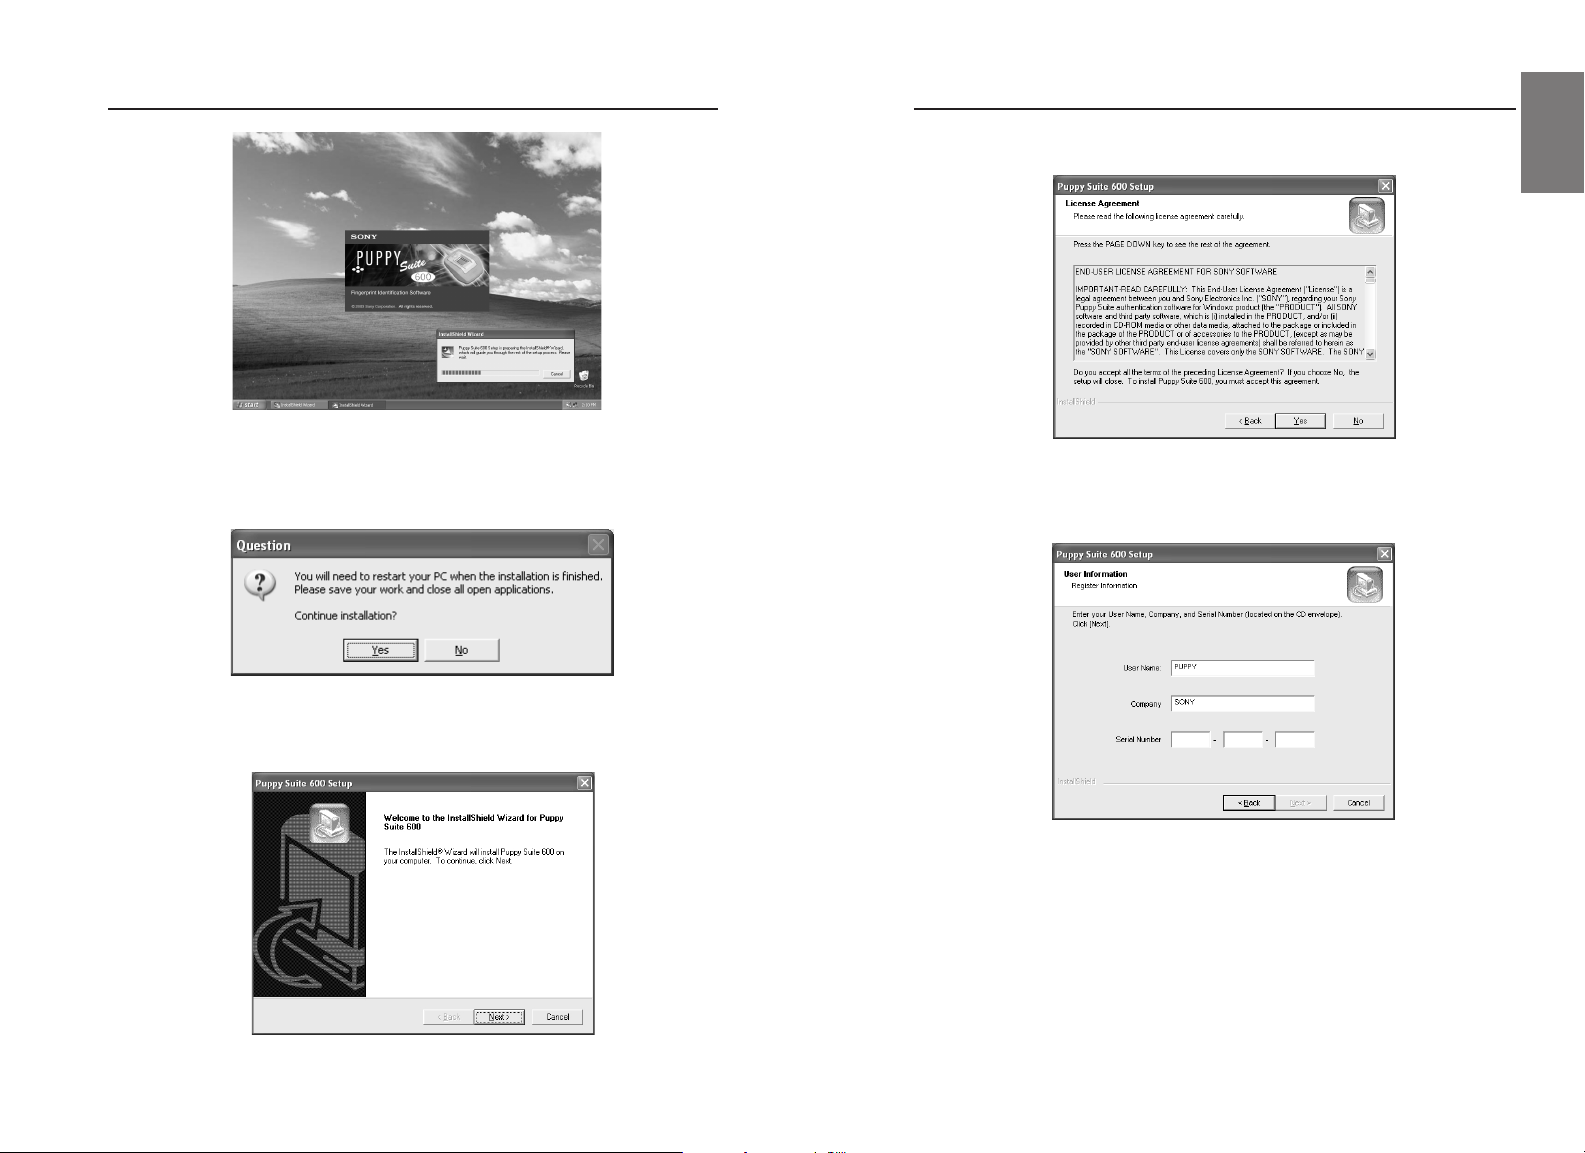
Click [Next]. The [Product License Agreement] dialog box will appear.
Click [Yes] if you agree. The [User Information] dialog box will appear.
4. Fill out the necessary information in [User Name], [Company Name] and
[Serial Number] text box and click [Next]. You can find the serial number
on the supplied CD-ROM envelope.
2
8.
Section 2: Installing the Software
3. The message box requesting, "Please save your work and close all open
applications" will appear. If you are running any applications, close them
and click [Yes].
The [Puppy Suite 600 Setup] dialog box will appear.
 Loading...