

Sony PS3 CECH-ZED1H, PS3 CECH-ZED1T Instruction Manual
GB
Checking the version of the PS3™ system software
Using the 3D display
3D Display /
3D 顯示器
Instruction Manual / 使用説明書
CECH-ZED1H / CECH-ZED1T
4-400-605-51(1)
WARNING
To avoid electrical shock, do not open the cabinet. Refer servicing to qualified personnel only.
Some people may experience discomfort (such as eye strain, eye fatigue, or nausea) while
watching 3D video images or playing stereoscopic 3D games on 3D televisions. If you
experience such discomfort you should immediately discontinue use of your television until
the discomfort subsides.
SCE recommends that all viewers take regular breaks while watching 3D video, or playing
stereoscopic 3D games. The length and frequency of necessary breaks may vary from person to
person – please take breaks that are long enough to allow any feelings of discomfort to subside.
If symptoms persist, consult your physician.
The vision of young children (especially those under six years old) is still under development.
Consult with a physician (such as a pediatrician or eye doctor) before allowing a young child
to watch 3D video images or play stereoscopic 3D games. When using any 3D enabled device
with your PlayStation®3 system you should read the instruction manual for that device.
Precautions
Before using this product, carefully read this manual and retain it for future reference. Read also
the instructions for the PlayStation®3 system.
Safety
Do not use a power cord other than the supplied AC power cord. Do not modify the cord.
Do not allow liquid or small particles to get into the product. If this happens, stop use and
disconnect it from the electrical outlet immediately.
Never disassemble or modify the product.
Do not expose the product to dust, smoke or steam.
Do not expose the product to high temperatures, high humidity or direct sunlight.
Do not touch the product with wet hands.
Unplug the AC power cord from the electrical outlet before cleaning or when you do not
intend to use the system for an extended period of time.
Do not connect the AC power cord to a voltage transformer or inverter. Connecting the AC
power cord to a voltage transformer for overseas travel or an inverter for use in an automobile
may cause heat to build up in the system and may cause burns or a malfunction.
Keep this product out of the reach of small children. Small children may swallow small parts or
may wrap the cables around themselves, which may inflict injury or cause an accident or a
malfunction.
Use and handling
The LCD screen is made of glass and may crack if subjected to excessive force.
Pixels that are not lit or are continuously lit may appear in certain locations on the LCD screen.
The appearance of such spots is a normal occurrence associated with LCD screens and is not a
sign of a product malfunction. LCD screens are made using highly precise technology.
However, a very small number of dark pixels or continuously lit pixels exist on each screen.
Also, a distorted image may remain on the screen for several seconds after the product has
been turned off.
Direct exposure to sunlight may damage the product’s LCD screen. Be careful when using the
product outdoors or near a window.
When using the product in a cold environment, you may notice shadows on the graphics or
the screen may appear darker than usual. This is not a malfunction, and the screen will return
to normal when the temperature goes up.
Be careful when carrying the product. If you do not have a good grip, the product may drop
causing potential damage or injury.
Do not place the product on surfaces that are unstable, tilted or subject to vibration.
Do not place any objects on top of the product. Do not stand on the product.
Do not throw or drop the product, or otherwise expose it to strong physical impact.
Do not allow the product to come into contact with liquids.
Follow the instructions below to help prevent the product exterior from deteriorating or
becoming discoloured.
Wipe with a soft, dry cloth.
Do not place any rubber or vinyl materials on the product exterior for an extended period
of time.
Do not use solvents or other chemicals. Do not wipe with a chemically-treated cleaning
cloth.
To use the 3D display, the PS3™ system software must be version 3.70 or later. You
can check the system software version by selecting (Settings) (System
Settings) [System Information] on the XMB™ (XrossMediaBar) menu of the PS3™
system.
Unpacking
3D display (1) Stand (1) Neck (1)
AC power cord (1) HDMI cable (1) 3D glasses (1 set) (pouch, USB cable)
Instruction manual (1)
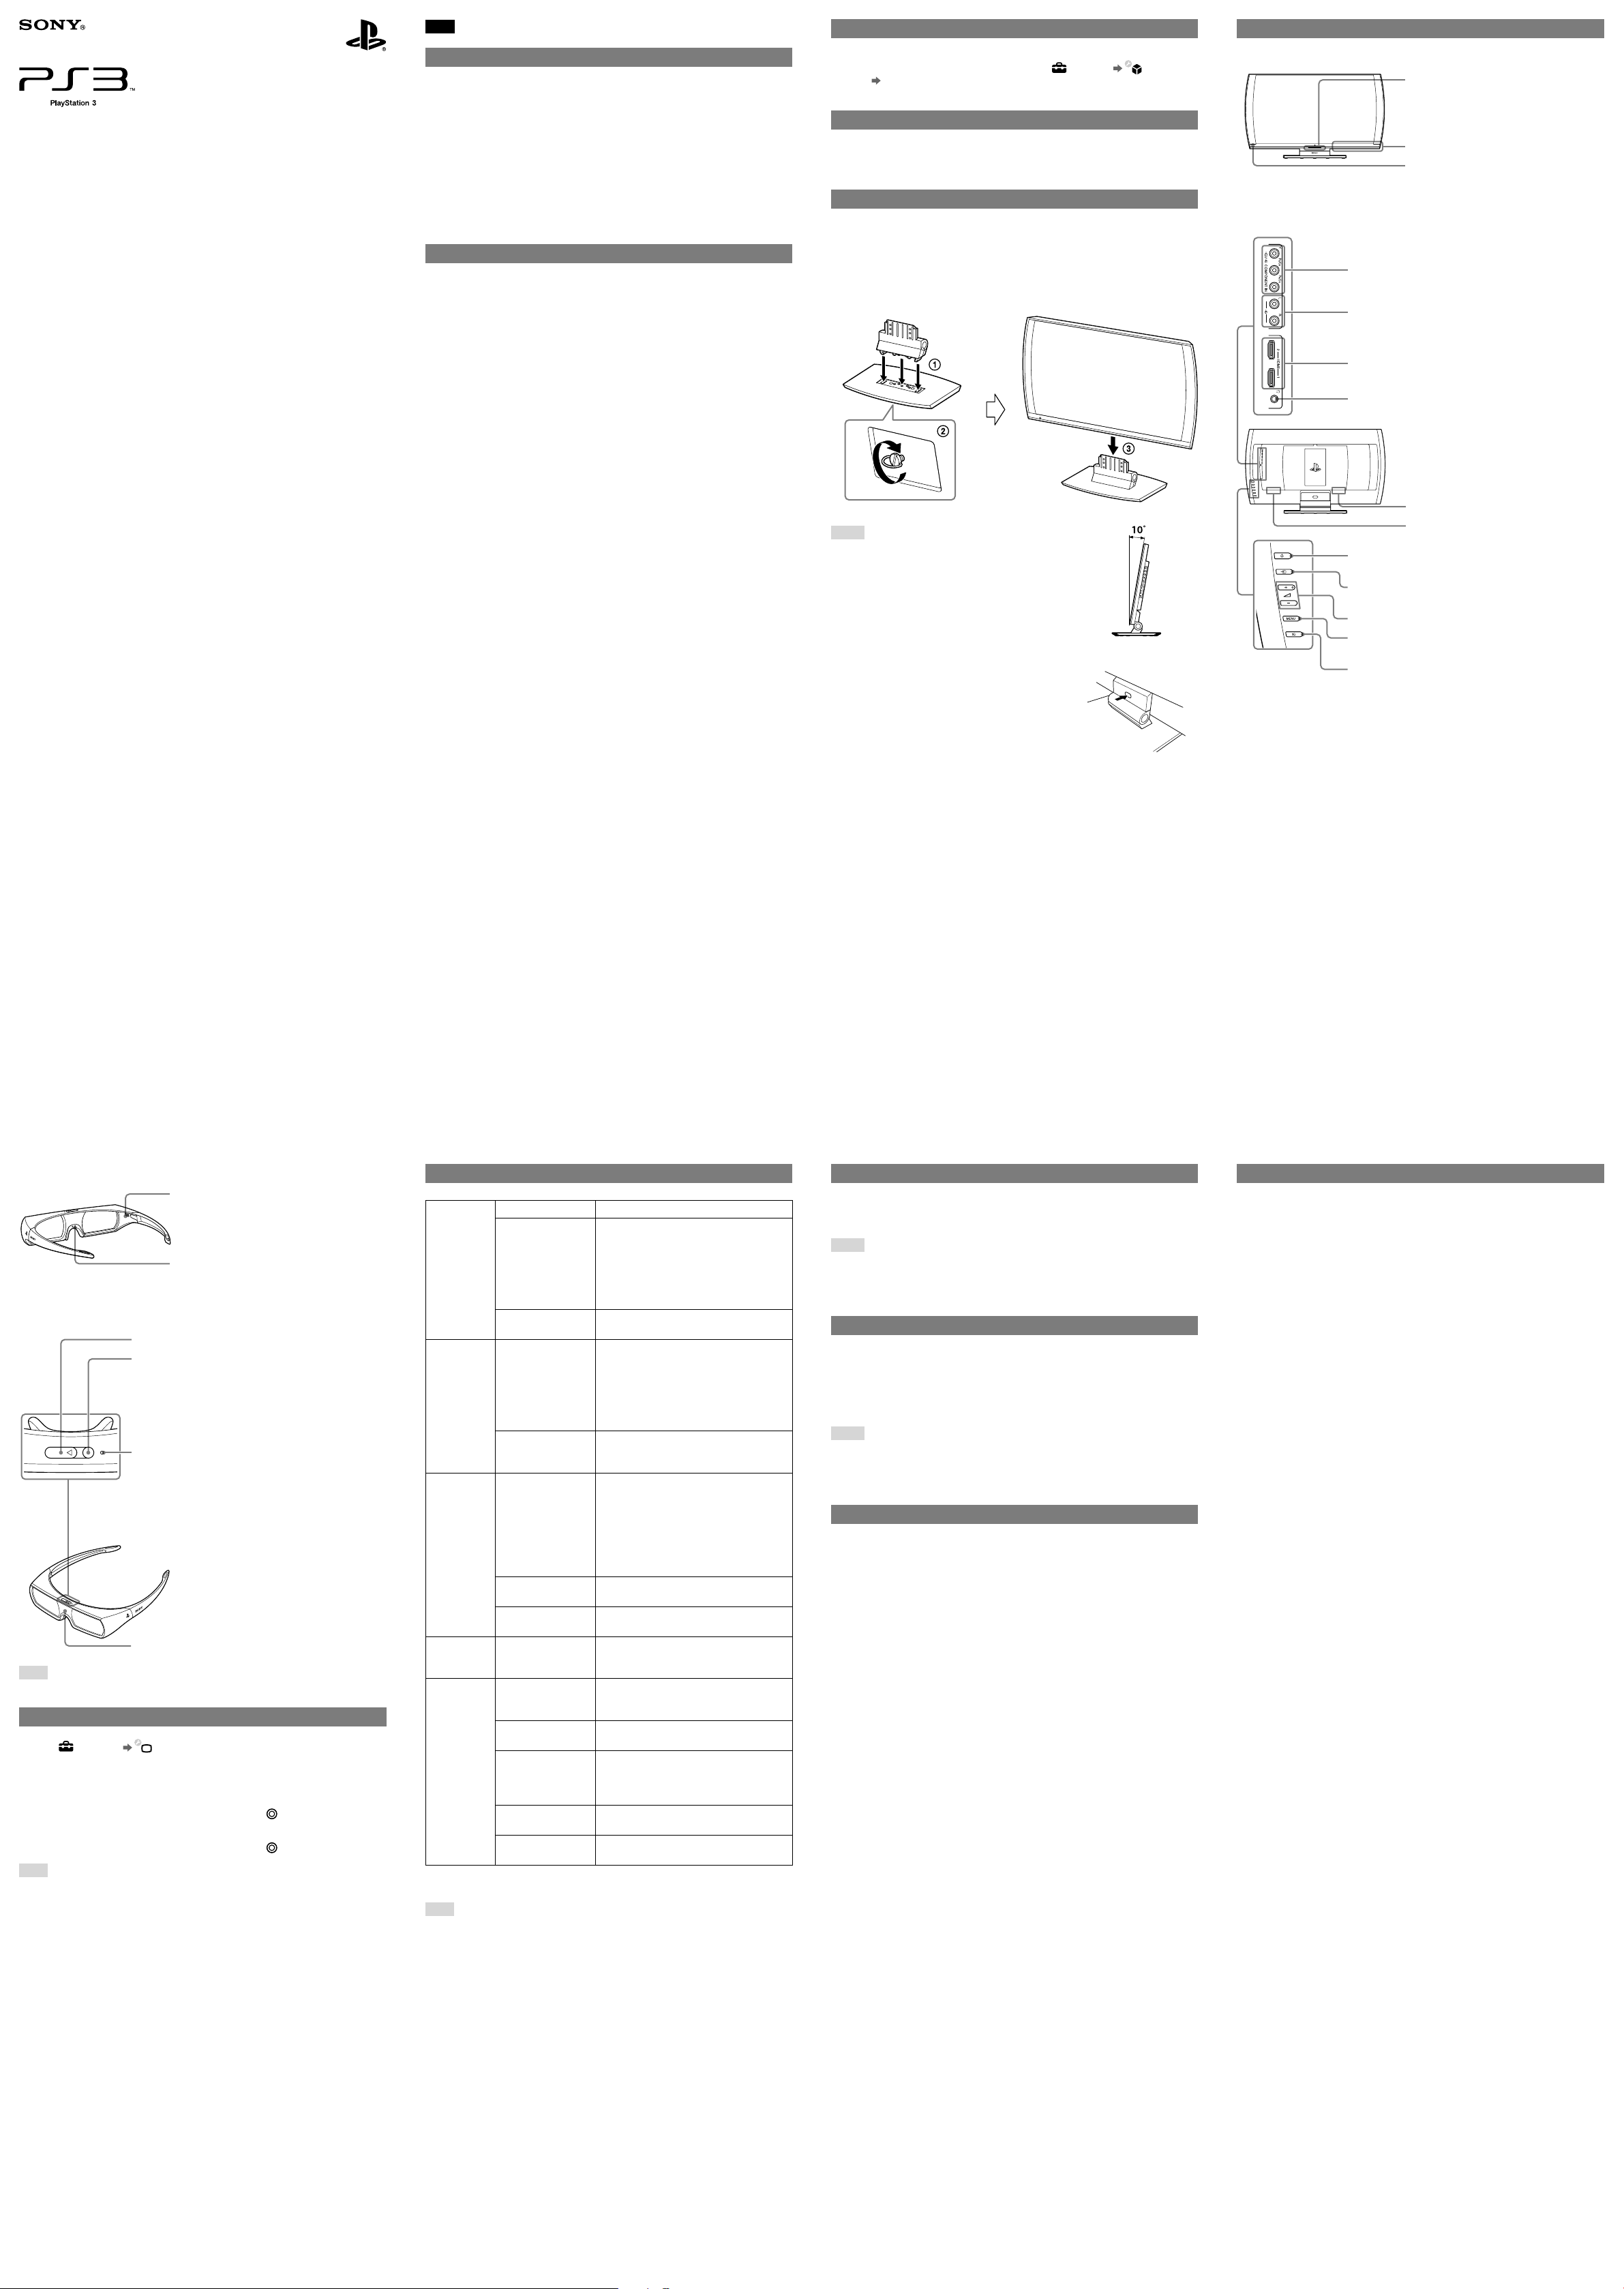
Assembly
1 Insert the neck into the stand until you hear a click.
Check that the neck and stand face in the same direction, as shown in the
illustration.
2 Securely anchor the neck in place by tightening the mounting screw on the
bottom of the stand.
3 Insert the display into the neck until you hear a click.
Hints
Be careful not to pinch your hands or fingers when
you assemble the stand and display.
You can adjust the tilt angle of the display by up to
10° from the vertical. Hold the stand down with
one hand and move the upper part of the display
with your other hand. Do not try to tilt the display
any further than 10° from the vertical, since this
may damage it.
At least two people must perform the steps for
removing the display from the neck and stand.
One person must hold the neck and stand securely
on a flat surface and press the button on the hinge.
At the same time, another person can lift the
display upwards.
Rear
Press to detach display
from neck and stand.
Front
Status indicator
Red: power off (standby mode)
Blue: starting up
Green: running
Orange: no input signal
3D sync transmitter
Infrared receiver
Infrared receiver for the remote control
(sold separately).
Rear
Component video input connectors
Audio input jacks
HDMI™ input connectors
Headphone jack
AC IN connector
Service connector
Power button
Turns the power on and off (standby).
Input selector button
Switches between input signals.
Volume + button/ volume – button
MENU button
Displays and hides the menu.
3D button
Press the 3D button to display video images in 3D.
3D glasses
BATTERY switch
When you start using the 3D glasses, be sure to
put the BATTERY switch in the On position.
Nose pad
You can adjust the nose pad to fit the shape of
your nose.
USB connector
Power button
Power on/off: press and hold for at least 2 seconds.
Switching players when using SimulView™:
with the power on, press and release quickly.
Power indicator
Flashes: 3D mode
Flashes two times repeatedly: SimulView™ mode (2P)
Flashes slowly: SimulView™ mode (1P)
Flashes quickly: low battery charge
Infrared receiver
Hint
Be careful not to pinch yourself in the hinges of the 3D glasses.
Setting the video output on the PS3™ system
1 Go to (Settings) (Display Settings).
2 Select [Video Output Settings].
3 Select [HDMI].
4 Select [Auto].
5 Verify the settings, select [Yes] and then press the button.
6 Set the display size to 24 inches.
7 Verify the settings, select [Yes] and then press the button.
Hint
When using this setting, connect the PS3™ system to the 3D display directly using an
HDMI cable. If the display and the PS3™ system are connected via an AV amplifier
or other device, this setting may not work correctly.
Navigating the menu
Picture Backlight
Picture Mode
Reset Current
Mode
Screen* Wide Mode
Overscan
Sound Sound Mode
Reset Current
Mode
Balance
3D 3D Format
Settings HDMI Control
Signal Information
Quick Start
Language
Restore Default
Settings
* The [Screen] menu can be adjusted only when component video signal is input to the 3D
display.
Hint
You can operate the 3D display using the Blu-ray Disc™ Remote Control CECHZRC1 (sold separately). When operating using the BD remote control, use the TV
button, the MENU button, the RETURN button, the ENTER button and the
directional buttons. For details on operation, see the instruction manual for the BD
remote control.
Adjusts the brightness of the backlight
[Standard]: Provides a standard natural
looking picture appropriate for home use
[Cinema]: Provides a picture optimized for
watching movies
[Custom]: Applies custom picture settings
[Dynamic]: Provides a bright picture with
emphasis on sharpness and contrast
Resets all picture settings to default values
[Normal]: Displays the picture in its
original size
[Full]: Displays the picture in full-screen
mode
[PSP™ Zoom]: Displays the picture from a
connected PSP® (PlayStation®Portable)
system in full-screen mode
Select [On] when visual noise or a black
frame can be seen around the edges of the
screen
[Standard]: Provides a well-balanced,
natural sound over the entire range
[Cinema]: Provides a sound with a feeling
of you-are-there immediacy, just like being
in a movie theatre
[Custom]: Applies custom sound settings
[Dynamic]: Provides a clear sound with
emphasis on high and low frequencies
Resets all sound settings to default values
Adjusts the volume balance between the
left and right speakers
Adjusts the settings to match the 3D
format of the content being played when
the 3D image is not displayed properly
When you select [On], the display and the
connected HDMI equipment will be
powered on and off simultaneously
Displays the resolution and frequency of
the picture
When you select [On], the display will start
more quickly when it is turned on. Note
that this will increase power consumption
when the display is in standby mode
Sets the language displayed on the menu
screens
Resets all settings to default values
Using SimulView™ mode
SimulView™ allows two players to view different screen images while playing the
same game. To use this feature, the game must support SimulView™ and both players
need 3D glasses.
Hints
Images from software that supports the SimulView™ feature are shown in 2D for
each player.
In some viewing environments and for some video content, the images may not be
completely separate and it may appear that two different images are overlapping.
Charging the 3D glasses
1 Open the USB connector cover. Connect a Type A - micro-B USB cable.
2 Connect the other end of the USB cable to a PS3™ system or other
supported device.
The power indicator lights up during charging and turns off when charging is
complete.
Hints
If you start charging the 3D glasses while they are turned on, the power will turn
off.
The 3D glasses cannot be charged when the BATTERY switch is in the Off
position.
Troubleshooting
The power to the display shuts off suddenly or has shut off unexpectedly.
The power goes off automatically when there is no incoming signal.
There are bright spots or dark spots on the screen.
Black (dark) pixels and continuously lit pixels may appear in certain locations on
the LCD screen. The appearance of such spots is a normal occurrence associated
with LCD screens and is not a sign of a system malfunction.
3D or SimulView™ images are not displayed, or the image does not look like a
3D or SimulView™ image.
Check that the 3D glasses are turned on.
Check that the 3D glasses are charged.
The 3D glasses operate by receiving a constant infrared signal from the 3D sync
transmitter. The glasses may not operate properly in the following cases.
The 3D glasses do not face the 3D sync transmitter.
There are objects blocking the path between the 3D glasses and the 3D sync
transmitter.
There are other infrared communication devices, lighting fixtures, space
heaters, or similar equipment nearby.
Use the 3D glasses so that they are level with the display. If you are lying down or
if your head is tilted, it may be difficult to experience the 3D effect and the
colour of the image may change.
If the display and the PS3™ system are connected via an AV amplifier or other
device, 3D or SimulView™ images may not be displayed correctly. Connect the
PS3™ system to the display directly using an HDMI cable, and then adjust the
video output settings on the PS3™ system.
The 3D glasses are not receiving any power.
Check that the BATTERY switch is in the On position.
Specifications
3D display
Inputs and Outputs
Speakers
Panel resolution
Effective screen size
Power requirement
Power consumption
Operating temperature
Dimensions (w × h × d)
Weight
3D glasses
Type of 3D glasses
Battery type
Battery voltage
Battery capacity
Power consumption
Dimensions (w × h × d)
Weight
* This does not guarantee compatibility with all products that use IR active shutter technology.
Design and specifications are subject to change without notice.
HDMI input connectors × 2
Component video input connectors
(Y/CB (PB)/CR (PR)) × 1 each
Audio input connectors × 2: 2 ch, pin jack
USB connector × 1: Type A, for service use only
Headphone output connector × 1: stereo mini jack
Stereo 2 ch (full range, 3 W × 2, 28 mm × 28 mm, elliptical)
Subwoofer (5 W, 50 mm)
Load impedance: 8 Ω
1920 × 1080
23.5 inches (59,7 cm)
AC 100 V - 240 V (50/60 Hz)
60 W, 0.6 A - 0.26 A (in use),
0.2 W or less (in standby mode),
7 W or less (when the Quick Start feature is [ON])
5°C - 35°C
Approx. 650 × 391 × 207 mm (including stand)
Approx. 5.7 kg (including stand)
IR active shutter
Built-in, rechargeable lithium-ion battery
DC 3.7 V
70 mAh
5 V 100 mA
Approx. 174 × 41 × 177 mm (in use),
approx. 174 × 41 × 60 mm (folded)
Approx. 47 g

CT
警告
為避免觸電,請勿打開外殼擅⾃分解。維修僅能由專業的維修⼈員進⾏。
有些⼈在使⽤3D電視機觀看3D影像或遊玩3D⽴體遊戲時,可能會感到不舒服(例如眼
睛疲勞、噁⼼等)。若您感到不舒服,請⽴即停⽌使⽤您的電視機,直⾄不舒服的症
狀消退。
SCE建議所有使⽤者在觀看3D影像或遊玩3D⽴體遊戲時,應該定時休息。休息的時間和
次數因⼈⽽異,請休息⾜夠時間,直⾄不舒服的症狀消退。如果症狀持續存在,請⽴
即就醫。
幼童(特別是六歲以下者)的視⼒仍在發育階段。在讓幼童觀看3D影像或遊玩3D⽴體
遊戲前,應先洽詢醫⽣(例如⼩兒科醫⽣或眼科醫⽣)。使⽤PlayStation®3主機時若
同時使⽤任何⽀援3D的裝置,請先閱讀該裝置的使⽤說明書。
使用前須知事項
在使⽤本產品前,請先詳細閱讀本說明書並妥善保存,以備將來參考之⽤。同時亦請參
閱PlayStation®3主機的使⽤說明書。
關於安全
請勿使⽤隨附之交流電源線以外的其他電源線。且切勿改造該電源線。
請勿讓液體或⼩顆粒掉入本產品中。若有液體或⼩顆粒掉入本產品中,請⽴即停⽌使
⽤,並拔掉電源插頭。
切勿分解,改造本產品。
請勿將本產品暴露在灰塵、煙霧或蒸氣中。
請勿將本產品放在高溫、濕氣極重或受日光直射的地方。
請勿⽤濕手觸摸本產品。
在您準備開始清潔或打算長時間不使⽤本產品時,請⾃電源插座拔出交流電源線。
請勿將交流電源線插入變壓器或反相器。將交流電源線插入海外旅⾏者使⽤的變壓器
或汽⾞專⽤的反相器,可能會導致交流電轉換器發熱,並造成灼傷或故障。
請將本產品放在兒童拿不到的地方保管。兒童可能會吞下細⼩零件,或⽤連接線纏繞
⾃己,造成⼈身損傷或導致意外發⽣、機器故障。
使用與保養
液晶螢幕乃是採⽤玻璃製成。若受到過大的外⼒衝擊可能會出現破裂。
在液晶畫面的某些特定位置可能會出現黑點(暗點)或持續性的亮點。液晶畫面出現
此類現象乃是正常現象,並非故障。液晶畫面係使⽤高精密度的技術製造。但每個畫
面仍可能會殘存極少數的暗點或持續性的亮點。又,在關閉本產品後,部分已消滅的
影像仍可能於畫面上殘存數秒鐘。
直射的日光可能會損壞本產品的液晶畫面。當於戶外或窗戶附近使⽤本產品時請務必
⼩⼼。
在寒冷的環境中使⽤本產品時,您可能會發現圖像出現陰影或畫面似乎顯得比平常陰
暗。此非一種故障,且螢幕會於溫度上昇後恢復正常。
請⼩⼼搬運本產品。若您未確實持有顯示器,可能會導致顯示器掉落並有造成損壞或
⼈身傷害的潛在性危險。
請勿將本產品或附屬品放在傾斜、不平穩或易受震動的地方。
請勿在本產品上放置重物。請物在本產品上站⽴。
請勿投擲或掉落本產品,或使其受到強烈的外⼒撞擊。
請勿讓本產品被液體沾濕。
請遵循以下使⽤說明,以免產品外殼變形或變色。
使⽤乾淨軟布輕柔擦拭。
切勿在產品外殼上長時間放置任何橡膠或乙烯基材質。
切勿使⽤溶劑或其他化學藥劑。切勿使⽤經化學處理的擦布擦拭。
確認PS3™系統軟件的版本
若要使⽤3D 顯示器,PS3™系統軟件需為3.70以上版本。若要確認系統軟件的
目前版本,請進入PS3™主機的XMB™ (XrossMediaBar)選單,再選擇 (設
定) (主機設定) [系統資訊]。
確認內容
3D 顯示器 (1)底座 (1)
交流電源線 (1)HDMI連接線 (1)3D 眼鏡一組 (收藏包,USB連接線)
使⽤說明書 (1)
底座⽀撐架 (1)
組裝
將底座支撐架插入底座直到聽見喀嚓聲為止。
1
請按圖所示確認底座⽀撐架與底座的朝向同一方向。
鎖緊底部的安裝用螺絲以固定底座支撐架。
2
將顯示器插入底座支撐架直到聽見喀嚓聲為止。
3
提示
組裝底座或顯示器時,請注意不要夾到手或手
指。
顯示器的角度可調整⾄10°。請以單手固定底
座,並以另一隻手移動顯示器的上部。請注意
若強⾏傾斜顯示器,可能會導致故障。
要取下底座時,請按下中央按鈕同時將顯示器
往上舉起。請務必兩⼈以上進⾏此動作。
背面
按下按鈕可讓顯示器與底
座支撐架及底座分離
使用3D 顯示器
正面
背面
狀態顯示燈
亮紅燈:關閉電源(待命狀態)
亮藍燈:啟動中
亮綠燈:運作中
亮橘燈:無信號輸入
3D 同步傳輸器
紅外線接收器
遙控器(另售)的紅外線接收器。
影像色差輸入端子
聲音輸入端子
HDMI™輸入端子
耳機端子
AC IN 連接埠
維修專用連接埠
電源按鈕
切換電源為啟動/關閉(待命)。
輸入切換按鈕
切換輸入訊號
音量+按鈕/音量-按鈕
MENU按鈕
切換選單畫面為顯示/隱藏。
3D 按鈕
3D影像未顯示為3D時請按下此按鈕。
3D 眼鏡
BATTERY 開關
使⽤ 3D 眼鏡前,請確認 BATTERY 開關是否已
調整⾄ On。
鼻墊
可配合鼻子的形狀調整高低。
USB連接埠
電源按鈕
啟動/關閉電源:持續按住2秒鐘以上。
使⽤SimulView™時切換玩者:
啟動電源的狀態下按下按鈕並⽴刻放開。
電源指示燈
閃爍:3D模式
連續閃爍2次:SimulView™模式(2P)
緩慢閃爍:SimulView™模式(1P)
快速閃爍:電池的充電量已逐漸減少。
紅外線接收器
提示
請注意不要被3D 眼鏡的鉸鏈(折疊部分)夾到。
設定PS3™的影像輸出
選擇 (設定) (顯示器設定)。
1
選擇[影像輸出設定]。
2
選擇[HDMI]。
3
選擇[自動]。
4
確認設定內容後,選擇[是]並按下 按鈕。
5
將顯示器尺寸設定為24吋。
6
確認設定內容後,選擇[是]並按下 按鈕。
7
提示
進⾏此設定時,請直接使⽤HDMI連接線連接3D 顯示器與PS3
機(喇叭)等連接顯示器或PS3™,可能無法正常設定。
™
。若使⽤AV擴大
使用選單
Picture Backlight
Picture Mode
Restore Default
Settings
*
Screen
Wide Mode
Overscan
Sound Sound Mode
Reset Current
Mode
Balance
3D 3D Format
Settings HDMI Control
Signal
Information
Quick Start
Language
Restore Default
Settings
*
[Screen]僅可在輸入影像色差信號時進⾏設定。
提示
亦可使⽤BD遙控器(CECH-ZRC1)(另售)操作3D 顯示器。使⽤BD遙控器操作
時,需使⽤TV按鈕、MENU按鈕、RETURN按鈕、ENTER按鈕及方向按鈕。詳細操
作方法請參閱BD遙控器的使⽤說明書。
調整背光燈的亮度
[Standard]:適合家庭使⽤,重視⾃然
表現的標準影像。
[Cinema]:適合觀賞電影的影像。
[Custom]:可依照個⼈喜好調整影像設
定。
[Dynamic]:重視影像輪廓與對比的鮮
明影像。
將音質設定恢復為預設狀態。
[Normal]:以原始尺寸顯示。
[Full]:將影像放大⾄整個螢幕顯示。
[PSP™ Zoom]:連接PSP® (PlayStation
Portable)時,將PSP®的影像放大⾄整
個螢幕顯示。
畫面四周出現雜訊或黑色邊框時,請選
擇[On]。
[Standard]:全音域保持均衡的⾃然音
質。
[Cinema]:電影院般臨場感十⾜的音場
效果。
[Custom]:可依照個⼈喜好調整聲音設
定。
[Dynamic]:強調低音與高音,高低起
伏明顯的清晰音質。
將音質設定恢復為預設狀態。
調整左右喇叭的音量平衡。
無法正常顯示3D影像時,可配合播放中
的內容設定的3D格式。
若選擇[On],關閉顯示器的電源時,
HDMI裝置的電源亦會同步關閉。此外啟
動HDMI裝置的電源時,顯示器的電源也
會同步啟動。
顯示影像的解析度與頻率。
若選擇[On],啟動電源時可較快。
請注意待命狀態時可能會增加耗電量。
設定顯示語言。
所有設定恢復為預設狀態。
使用SimulView™模式
™
SimulView
使⽤此機能時需準備⽀援SimulView
是可讓兩個玩者在遊玩相同遊戲時,各⾃觀看不同影像的機能。
™
的遊戲及3D 眼鏡。
提示
SimulView™的影像會以2D顯示於各玩者的畫面中。
隨著使⽤環境或播放的影像不同,可能會產⽣影像無法完全分離、不同影像
重疊顯示的情形。
為3D 眼鏡充電
打開USB端子蓋,連接USB連接線。
1
與PS3™等USB連接埠連接。
2
充電中電源指示燈會亮燈,充電完成後會熄燈。
®
提示
・若在開啟3D 眼鏡電源的狀態下進⾏充電,會⾃動關閉電源。
・若BATTERY 開關調整為Off時無法進⾏充電。
支援
顯示器的電源突然關閉或不知何時關閉。
無輸入信號時會⾃動關閉電源。
螢幕上出現光點或暗點。
在液晶畫面的某些特定位置可能會出現黑點(暗點)或持續性的亮點。液
晶畫面出現此類現象乃是正常現象,並非故障。
無法顯示為3D或SimulView™的影像/看不見3D或SimulView™的影像。
請確認是否已開啟3D 眼鏡的電源。
請確認3D 眼鏡是否正在充電。
3D 眼鏡需接收3D 同步傳送器的紅外線以進⾏動作。發⽣下列情形時可能
無法正確啟動。
3D 眼鏡未朝向3D 同步傳送器。
3D 同步傳送器與3D 眼鏡之間有障礙物。
附近有紅外線通訊裝置或照明設備、家庭⽤暖氣裝置等。
使⽤3D 眼鏡時請與顯示器保持水平狀態。若躺下或傾斜臉部,可能會較
難感受3D效果,或產⽣影像變色的情形。
若使⽤AV擴大機(喇叭)連接顯示器或PS3
SimulView
™
。請直接使⽤HDMI連接線連接顯示器與PS3™,進⾏PS3
™
,可能無法正常顯示3D或
™
的影像
規格
3D 顯示器
輸出入
喇叭
螢幕解析度
有效螢幕尺寸
電源
耗電量
操作溫度
外殼尺寸(寬 × 高 × 深)
重量
3D 眼鏡
3D 眼鏡方式
電池種類
電池電壓
電池容量
耗電量
外殼尺寸
重量
* 不保證可以觀看所有⽀援IR主動快門(IR Active Shutter)式產品。
本公司保留在沒有事先通知情況下,變更設計或規格之權利。
HDMI輸入端子 × 2
影像色差輸入端子(Y/CB(PB)/CR(PR))× 各1
聲音輸入端子 × 2:2ch、插孔
USB 連接埠 × 1:Type A、維修專⽤
耳機輸出端子 × 1:⽴體聲迷你插孔
⽴體聲 2ch(全音域、 3 W × 2、28 mm × 28 mm、
橢圓形)
超重低音揚聲器(5 W、50 mm)
負荷阻抗:8 Ω
1920 × 1080
23.5吋
AC 100 V~240 V(50/60 Hz)
60 W, 0.6 A - 0.26 A (使⽤時)、
0.2 W以下(待機時)、
7 W以下([Quick Start] 為 [On] 時)
5℃~35℃
約650 × 391 × 207 mm (包含底座)
約5.7 kg(包含底座)
IR主動快門(IR Active Shutter)式*
內藏型充電式鋰電池
DC 3.7 V
70 mAh
5 V 100 mA
約174 × 41 × 177 mm(使⽤時)
約174 × 41 × 60 mm(折疊時)
約47 g
輸出設定。
無法開啟3D 眼鏡的電源。
請確認BATTERY 開關是否調整為On。
廢電池請回收
(僅適⽤於台灣)
製造年份:請見產品本體標示
製造號碼:請見產品本體標示
" ", "PlayStation" and "PSP" are registered trademarks of Sony Computer Entertainment Inc.
" " and "SimulView" are trademarks of Sony Computer Entertainment Inc.
"XMB" and "xross media bar" are trademarks of Sony Corporation and Sony Computer
Entertainment Inc.
"SONY" and " " are registered trademarks of Sony Corporation.
" "、"PlayStation" 和 "PSP" 為Sony Computer Entertainment Inc. 之註冊商標。
" "
和 "SimulView" 亦為該公司之商標。
"XMB" 和 "xross media bar" 為 Sony Corporation 與 Sony Computer Entertainment
Inc. 之商標。
"SONY" 和
"Blu-ray Disc™" and "Blu-ray™" are trademarks of the Blu-ray Disc Association.
HDMI, the HDMI logo and High-Definition Multimedia Interface are trademarks or registered
trademarks of HDMI Licensing, LLC.
© 2011 Sony Computer Entertainment Inc. All rights reserved. Printed in China
© 2011 Sony Computer Entertainment Inc. 保留所有權利。 中國印刷
" "
為Sony Corporation之註冊商標。
 Loading...