

Page 1
Important Information
Before you use your device, please read the
Important
Information
provided in your device regarding warranty,
safety and handling information.
Overview
1 2 3
5
6
7
89
4
11 14
16
17
12
13
10
15
18
Page 2
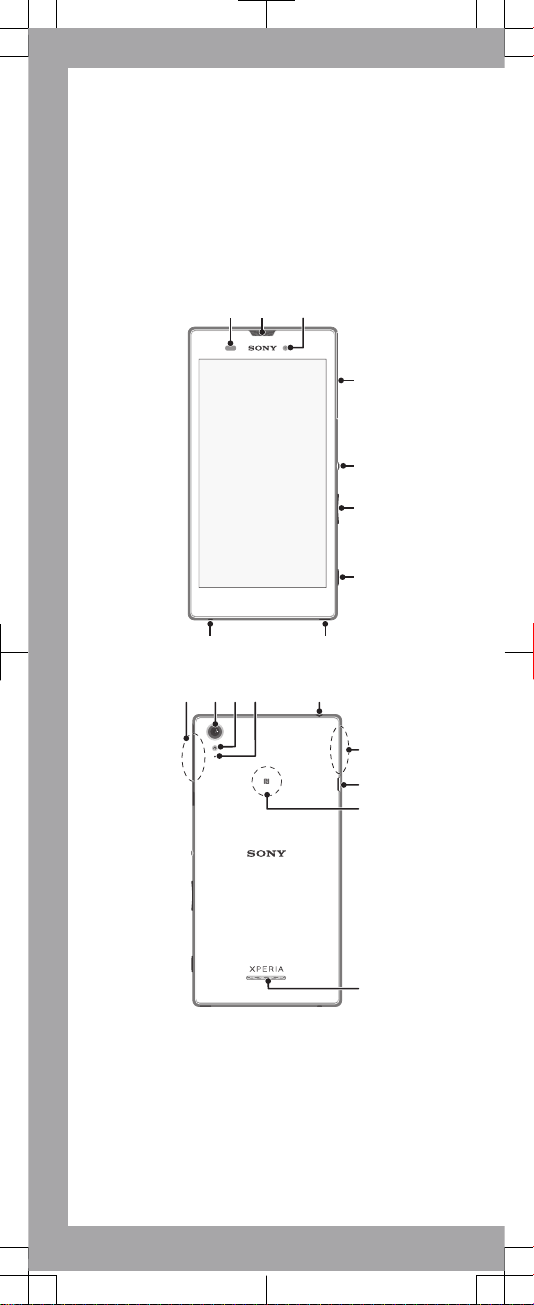
1. Proximity/Light sensor
2. Charging/Notification
light/Ear speaker
3. Front camera lens
4. Micro SIM and memory
card slot cover
5. Power key
6. Volume/Zoom key
7. Camera key
8. Strap hole
9. Microphone
10. Wi-Fi/Bluetooth antenna
area
11. Main camera lens
12. Camera light
13. Second microphone
14. Headset jack
15. GPS antenna area
16. Port for charger/USB
cable
17. NFC™ detection area
18. Speaker
Assembly
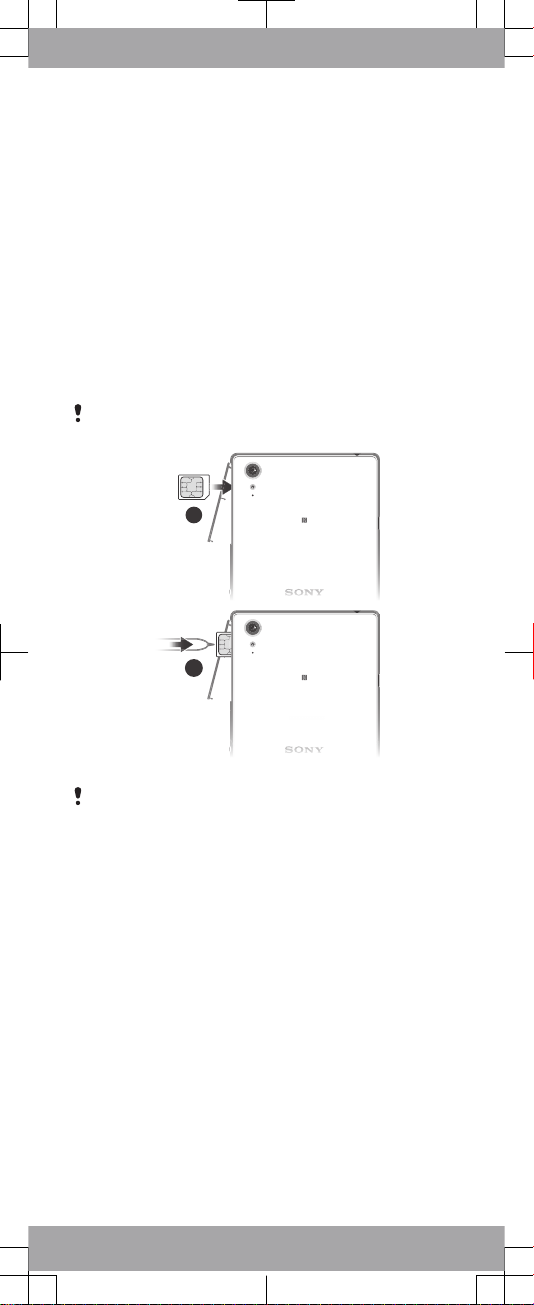
To insert the micro SIM card
If you insert a micro SIM card while the device is powered
on, the device restarts automatically.
1
2
Use a fine-tipped pen or other similar tool to insert the
micro SIM card.
Page 3
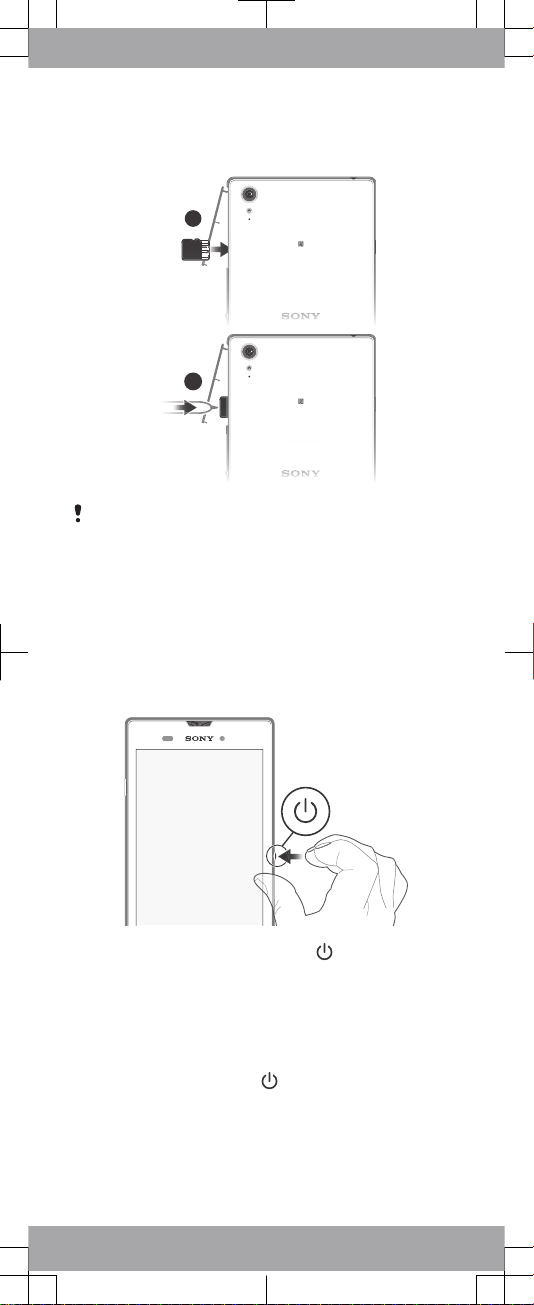
To insert a memory card
1
2
Use a fine-tipped pen or other similar tool to insert the
memory card.
Basics
Turning on the device
Make sure that the battery is charged for at least 30 minutes
before you turn on the device for the first time.
To turn on the device
1
Press and hold down the power key until the device
vibrates.
2
Wait a while for the device to start.
Waking up the screen
To activate the screen
•
Briefly press the power key .
Setting up your device
Setup guide
The first time you start your device, a setup guide opens to
help you configure basic settings, sign in to some accounts
Page 4
(for example, your Google™ account), and personalise your
device. You can also manually access the setup guide at a
later stage.
To access the setup guide manually
1
From the Home screen, tap .
2
Tap > Setup guide.
Accessing settings
View and change settings for your device from the Settings
menu. The Settings menu is accessible from both the
Application screen and the Quick settings panel.
To access your device settings
1
From your Home screen, tap
.
2
Find and tap .
Transferring your contacts
Xperia™ Transfer and Contacts Setup are applications within
the PC Companion and the Sony Bridge for Mac computer
programs that help you to collect contacts from your old
device and transfer them to your new device. These
applications support several device brands, including iPhone,
Samsung, HTC, BlackBerry, LG, Motorola and Nokia.
You need:
•
An Internet-connected computer.
•
A USB cable for your old device.
•
A USB cable for your new Android™ device.
•
Your old device.
•
Your new Android™ device.
To transfer contacts to your new device
1
Search and download PC Companion (on a PC) or Bridge
for Mac (on a Mac computer) from
www.sonymobile.com
if
the application is not already installed.
2
After successful installation, open the PC Companion
application or the Sony Bridge for Mac application, then
click
Xperia™ Transfer
or
Contacts Setup
and follow the
relevant instructions to transfer your contacts.
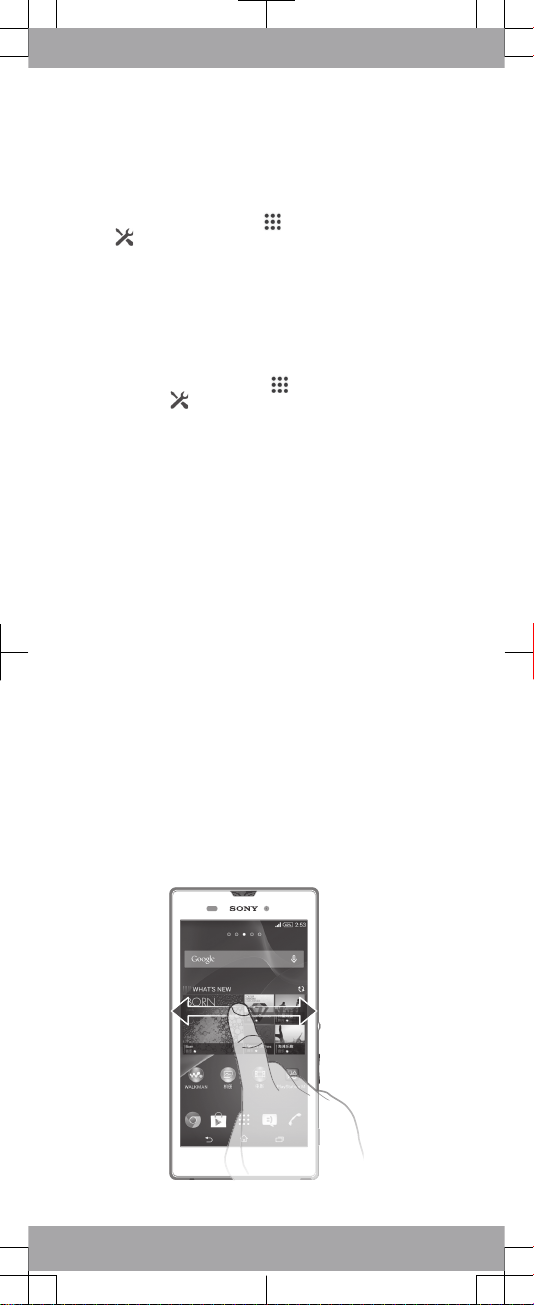
Finding your way
Page 5

Using the keys
Back navigation key
•
Go back to the previous screen within an
application or close the application.
Home navigation key
•
Exit an application and go back to the Home
screen.
Task navigation key
•
Open the recently used applications window and
the small apps bar.
Application screen
•
Open the Application screen.
Basic applications and settings
Make phone calls by dialling the number manually or by
using the smart dial function.
Use the Messaging application to send and receive text
and multimedia messages.
Go to Google Play™ to download free and paid
applications for your device.
Optimise the device settings to suit your own
requirements.
Status and notifications
To open or close the Notification panel
Drag down two fingers instead of one to open the Quick
settings panel instead.
Page 6
Support on the web
Visit
www.sonymobile.com/support
to access a range of
support options for your device, including downloads,
troubleshooting tips and a User guide.
Page 7
Legal information
Sony D5102/D5103/D5106
Publication number: 1281-5220.1
This Startup guide is published by Sony Mobile
Communications AB or its local affiliated company, without
any warranty. Improvements and changes to this Startup
guide necessitated by typographical errors, inaccuracies of
current information, or improvements to programs and/or
equipment, may be made by Sony Mobile Communications
AB at any time and without notice. Such changes will,
however, be incorporated into new editions of this Startup
guide. All illustrations are for illustration only and may not
accurately depict the actual device.
See regulatory information such as the CE mark in the
relevant label tray in the device.
All product and company names mentioned herein are the
trademarks or registered trademarks of their respective
owners. All other trademarks are property of their respective
owners. Any rights not expressly granted herein are reserved.
Visit
www.sonymobile.com/us/legal/
for more information.
Product compliance: This product has been manufactured by
or on behalf of Sony Mobile Communications, Mobilvägen,
SE-221 88 Lund, Sweden. Inquiries related to product
compliance based on national legislation shall be addressed
to Sony Mobile Quality Officer, Sony Mobile Communications
AB, Mobilvägen, SE-221 88 Lund, Sweden. For any service
or guarantee matters, please refer to the contact details
provided in the separate service or guarantee documents.
© 2014 Sony Mobile Communications AB. All rights reserved.
FCC Caution: Your device can only connect to an FCC
approved access point when using 5 GHz WLAN for indoor
and outdoor operation. This is because operation in the 5.15
GHz to 5.25 GHz frequency band is only permitted for indoor
use.
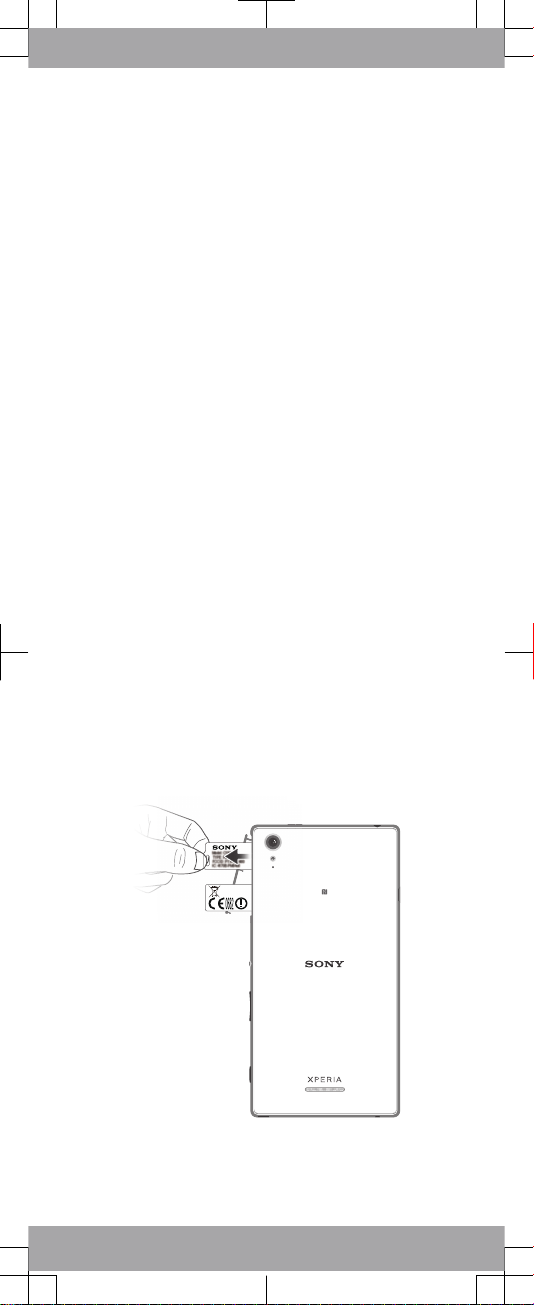
To view the CE mark and the FCC ID
1
Detach the micro SIM and memory card slot cover.
2
Place a fingernail under the right or left edge of the label
tray, then drag the tray outwards. The information is
displayed on the tray.
Page 8
Startup guide
Xperia™ T3
D5102/D5103/D5106
Sony Mobile Communications AB
SE-221 88 Lund, Sweden
www.sonymobile.com
Page 9
SAR Information
FCC Statement
Declaration of Conformity
Sony D5102
UMTS HSPA Band 1 2 5 8 GSM GPRS/EDGE
850/900/1800/1900
Page 10

Important Information
United States & Canada
THI S PHO NE MO DEL HAS BEEN CE
WIT H THE GOVE RNM ENT’S REQU IREME NTS FOR EXPOS URE
TO RADIO WAVE S.
The D5102 Se ries mob ile p hones have be en de signe d to
com ply w ith a ppl icabl e saf ety r equ ireme nts f or ex posur e t o
rad io wa ves. You r wir eless phon e i s a r adio trans mitte r a nd
rec eiver . It is desig ned t o not ex ceed the l imits * of exp osure to
rad io fr equen cy (RF) energ y set by gove rnmen tal a uthor iti es.
The se li mits est ablis h per mitte d l evels of R F ene rgy f or the
gen eral popul ati on. T he gu ideli nes are based on s tanda rds
tha t wer e dev elo ped b y int ernat ion al sc ienti fic o rgani zat ions
thr ough perio dic and thoro ugh e val uatio n of scien tific st udies .
The stan dards in clude a sa fety mar gin d esign ed to assu re the
saf ety o f all in divid uals, rega rdl ess o f age and healt h.
The radi o wav e e xposu re gu ideli nes empl oy a unit of
mea surem ent k now n as the S pecif ic Absor ption Rate (SAR ).
Tes ts fo r SAR ar e con ducte d usi ng stand ardiz ed me thods wi th
the phon e tra nsm ittin g at its h igh est c ertif ied p ower lev el in all
use d fre quenc y b ands. Whil e the re may b e dif feren ces
bet ween the S AR level s of vario us phone mode ls, t hey a re all
des igned to m eet the relev ant g uid eline s for expo sure to radio
wav es. F or mo re infor matio n on SAR , ple ase r efer to th e
Imp ortan t Inf orm ation chap ter i n t he Us er Gu ide.
The high est S AR value as r eport ed to th e aut horit ies for this
pho ne mo del w hen test ed fo r use by the ear i s 0.480 W/ kg* ,
and when worn on the body is 1.131 W /kg *. Fo r bod y-wor n
ope ratio n, th e p hone has b een t est ed wh en po sitio ned a
min imum of 15 mm from the body wit hout any m etal parts in
the vici nity of the p hone or wh en prope rly u sed w ith a n
app ropri ate a cce ssory and worn on the b ody. For d evice s
whi ch in clude “W iFi h otspo t” fu nct ional ity, SAR m easur eme nts
for the devic e o perat ing i n WiF i h otspo t mod e wer e tak en
usi ng a separ ati on di stanc e of 10 mm. U se of thir d-par ty
2
RTI FIED IN CO MPL IANCE
Page 11

acc essor ies m ay resul t in diffe ren t SAR leve ls th an th ose
rep orted .
**B efore a ph one mode l is avail abl e for sale to t he pu bli c in
the US, it mu st be te sted and c ert ified by t he Fe deral
Com munic ation s C ommis sion (FCC) th at it does not excee d
the limi t est abl ished by t he go ver nment -adop ted r equir eme nt
for safe expo sur e*. T he te sts a re perfo rmed in po sitio ns and
loc ation s (i. e., by t he ea r and wo rn on the body) as r equ ired by
the FCC for e ach mode l. Th e FCC ha s gra nted an Eq uipme nt
Aut horiz ation fo r thi s pho ne mo del with all repor ted S AR level s
eva luate d as in compl iance with th e FCC RF e xposu re
gui delin es. W hil e the re ma y be dif feren ces b etwee n the SA R
lev els o f var iou s pho nes, all m obi le ph ones grant ed an FC C
equ ipmen t aut hor izati on me et th e g overn ment requi remen t f or
saf e exp osure . S AR in forma tion on this phone mode l is on file
at the F CC an d c an be foun d und er the D ispla y Gra nt se cti on
of http: //tra nsi tion. fcc.g ov/oe t/e a/fcc id af ter s earch ing on F CC
ID PY7PM -0732. A ddi tiona l inf ormat ion on S AR ca n be fou nd
on the M obile Ma nufac turer s For um EMF w ebsit e at
htt p://w ww.em fex plain ed.in fo/.
* I n the Unit ed State s and Cana da, the SAR l imit for m obi le
pho nes u sed b y t he pu blic is 1. 6 w atts/ kilog ram ( W/kg)
ave raged over on e gra m of tissu e. The s tanda rd in corpo rat es a
mar gin o f saf ety to g ive a dditi ona l pro tecti on fo r the pu blic and
to accou nt fo r a ny va riati ons i n m easur ement s.
**T his p aragr aph is o nly a pplic abl e to autho ritie s and
cus tomer s in the Unit ed St ates.
3
Page 12

Renseignements importants
États-Unis et Canada
CE MODÈL E DE TÉL ÉPHON E A É TÉ
EXI GENCE S GOU VER NEMEN TALES RELA TIV ES À
L'E XPOSI TION AUX ONDE S RAD IOÉLE CTR IQUES .
Les télé phone s m obile s de la D5102 ont été conçu s pou r
rép ondre aux nor mes d e séc urité en vigu eur e n mat ière
d'e xposi tion aux onde s rad ioéle ctr iques . Vot re té lépho ne sans fil
est un é mette ur et un réce pteur ra dio. Il es t con çu de ma nière à
ne pas d épass er les l imite s* d' exp ositi on à l'éne rgie des
fré quenc es ra dio (RF) étab lies par les autor ités
gou verne menta les . Ces limi tes f ixe nt le s niv eaux maxim aux
d'é nergi e RF aux quels peut être so umis le gr and p ublic . C es
lig nes d irect ric es so nt ba sées sur des norme s qui ont été
éla borée s par de s org anisa tions sc ienti fique s int ernat ion ales par
le biais d'év alu ation s pér iodiq ues et a pprof ondie s des ét udes
sci entif iques . C es no rmes prévo ien t une marg e de sécur ité visa nt
à a ssure r la pro tecti on de tous le s ind ividu s, pe u imp ort e leu r
âge et l eur é tat de s anté.
Les lign es di rec trice s rel ative s à l'ex posit ion a ux ondes
rad ioéle ctriq ues util isent une uni té de mesu re ap pelée « Taux
d'a bsorp tion spé cifiq ue » (TAS) . L es te sts d e TAS sont ef fectu és
sel on de s mét hod es st andar disée s d ans l esque lles le té lép hone
éme t dan s tou tes les bande s de fré quenc es ut ilisé es, à la plus
for te pu issan ce pour laque lle i l a été homol ogué. Bien qu e le
TAS puis se êt re diffé rent d'un mod èle d e tél éphon e à u n a utre,
tou s les appa rei ls so nt co nçus pou r res pecte r les lign es
dir ectri ces r ela tives aux ondes ra dioél ectri ques. Pour en savo ir
plu s sur le D AS, repo rtez- vous au chapi tre s ur le s
ren seign ement s i mport ants du gu ide de l 'util isate ur.
Le DAS l e plu s é levé relev é par le s aut orité s pou r ce mod èle
de télép hone est de 0.480 W/kg* lors qu' il es t tes té en util isa tion
prè s de l'ore ill e, et de 1.131 W/kg* lo rsqu' il es t por té su r l e
cor ps. E n mod e d ’util isati on po rté sur le co rps, le té lép hone a
été test é lor squ ’il e st à au mo ins 15 m m du corps et à l’ écart de
tou te pi èce e n m étal, ou l orsqu ’il est utili sé de faço n a déqua te
4
CER TIFIÉ CONF ORM E AUX
Page 13

ave c un acces soi re et port é sur le corp s. Po ur le s app are ils
mun is de la f onc tionn alité « po int d'ac cès W iFi » , les me sures du
DAS de l 'appa rei l en mode WiFi ont été prise s à u ne di sta nce d e
séc urité de 1 0 m m. L' utili satio n d 'acce ssoir es ti ers p eut prod uire
des nive aux d e D AS di ffére nts d e c eux r elevé s.
**A vant qu'un mo dèle de té lépho ne ne so it mi s en vente
aup rès d u pub lic aux États -Unis , l a Com missi on fé déral e d es
com munic ation s ( CFC) doit le te ste r et certi fier qu'il re spect e les
lim ites fixée s d ans l es ex igenc es gouve rneme ntale s d'e xpo sitio n
san s dan ger*. Po ur ch aque modèl e, les t ests sont effec tué s en
pos ition et a ux endro its d 'usag e ( c.-à- d. pr ès de l'or eil le et port é
sur le c orps) , t el qu e req uis p ar la CF C. La CFC a acc ord é une
aut orisa tion d'é quipe ment pour ce modèl e de télép hone, ap rès
que tous les niv eaux de TA S ind iqu és ai ent é té év alués et
con sidér és co nfo rmes aux l ignes di rectr ices de la CFC en
mat ière d'exp osi tion aux r adiof réq uence s. Mê me s' il pe ut y avo ir
des diff érenc es entre les nivea ux de TA S des diff érent s
tél éphon es, t ous les télép hones mo biles auxq uels la CF C a
acc ordé une a uto risat ion d 'équi pem ent r épond ent a ux no rme s
gou verne menta les en m atièr e d'e xpo sitio n san s dan ger. La CFC
con serve dans se s dos siers l'in for matio n rel ative aux TAS rele vés
pou r ce modèl e d e tél éphon e. Vo us pouve z la consu lter au
htt p://t ransi tio n.fcc .gov/ oet/e a/f ccid sous la ru briqu e « Disp lay
Gra nt », aprè s a voir effec tué u ne reche rche sur C FC
ID PY7PM -0732. V ous trou verez des ren seign ement s
sup pléme ntair es conce rnant le D AS sur l e sit e Web du M obi le
Man ufact urers Fo rum M MF au http :// www.e mfexp laine d.inf o/.
* A ux Ét ats-U nis et a u Can ada, la limit e de TAS d es
tél éphon es mo bil es ut ilisé s par le publ ic es t de 1,6 w att /kg
(W/ kg) e n moy enn e sur un g ramme de tiss us. C ette norme
com porte une mar ge im porta nte d e s écuri té af in d' assur er une
pro tecti on su ppl ément aire et de te nir c ompte de t oute var iatio n
dan s les mesu res .
**C e par agrap he ne co ncern e que le s aut orité s et les c lie nts
des État s-Uni s.
5
Page 14

Información importante
Estados Unidos y Canadá
EST E MOD ELO D E T ELÉFO NO HA
CON FORME A LO S R EQUIS ITOS GUBER NAM ENTAL ES PA RA
LA EXPOS ICIÓN A ONDAS DE R ADIO.
Los telé fonos mó viles de l a Ser ie D 5102 han si do di señad os
seg ún lo s req uis itos de se gurid ad aplic ables para la e xpo sició n a
ond as de radi o. Su te léfon o ina lám brico es u n tra nsm isor y
rec eptor de r adi o. Es tá di señad o p ara n o sup erar los lími tes* de
exp osici ón a ene rgía de ra diofr ecu encia (RF) fija dos por las
aut orida des g ube rname ntale s. Es tos lími tes e stabl ece n los
niv eles permi tid os de ener gía d e R F par a la pobla ció n gen eral.
Las espe cific aci ones se ba san e n l os es tánda res d esa rroll ados
por orga nizac ion es ci entíf icas int ernac ional es me dia nte
eva luaci ones per iódic as y minuc ios as de estu dios cie ntífi cos.
Los está ndare s i ncluy en un marg en de se gurid ad de sti nado a
gar antiz ar la se gurid ad de toda s l as pe rsona s,
ind epend iente men te de la e dad y de la s alud.
Las espe cific aci ones de la expo sic ión a onda s de radio
emp lean una u nid ad de medi da co noc ida c omo l a Tas a
esp ecífi ca de ab sorci ón (S AR, p or su si gla e n ing lés ). La s
pru ebas de SA R s e lle van a cabo me diant e el uso d e m étodo s
est andar izado s c on la tran smisi ón telef ónica al m ás alto nivel de
ene rgía regis tra do en toda s las ba ndas de fr ecuen cia util izada s.
Aun que e s pos ibl e que haya dife ren cias entre los niv eles de SA R
de los d ifere nte s mod elos de te léf onos, todo s est án diseñ ados
par a cum plir con las espec ifica cio nes c orres pondi ent es de la
exp osici ón a ond as de radi o. Pa ra obten er má s inf orm ación
sob re SA R, co nsu lte e l cap ítulo so bre i nform ación im porta nte e n
la guía del u sua rio.
Seg ún se repo rtó a la s aut orida des , el valor más alto de SAR
de este model o d e tel éfono cuan do se pr obó u sándo lo cerca del
oíd o es de 0.480 W /kg * y a l usa rlo e n e l cue rpo e s de
1.131 W /kg*. Para su uso cerca del cue rpo, el te léfon o ha sid o
pro bado para su funci onami ento a u na di stanc ia mí nima de 15
mm (0,59 pulg .) del c uerpo , sin qu e hay a pie zas m etá licas cerc a
6
SID O CER TIFIC ADO
Page 15

del telé fono o c uando se u tiliz a c orrec tamen te co n el acc esori o
ade cuado . Par a l os di sposi tivos qu e inc luyen la f uncio nal idad
“Zo na ac tiva WiF i”, l as me didas SA R par a el dispo sitiv o e n mod o
de zona activ a W iFi s e tom aron con una dista ncia de se par ación
de 10 mm (0,3 9 p ulg.) . El uso d e a cceso rios de te rcero s p uede
pro vocar nive les de S AR di feren tes a lo s inf ormad os.
**A ntes de qu e u n mod elo d e tel éfo no se encu entre disp oni ble
par a la venta al públ ico e n los Es tados Unid os, l a Com isi ón
fed eral de te lec omuni cacio nes ( FCC ) deb e apr obarl o y c ert ifica r
que no s upera el lími te es table cid o por el r equis ito a dop tado por
el gobie rno p ara una expos ición se gura* . Las prue bas s e l levan a
cab o en posic ion es y ubica cione s ( es de cir, cerca del oíd o y
cer ca de l cue rpo ) seg ún lo requ ier e la FCC p ara c ada m ode lo.
La FCC h a oto rga do un a Aut oriza ció n de equip o par a est e
mod elo d e tel éfo no co n tod os lo s n ivele s de SAR r eport ado s, lo s
cua les f ueron ev aluad os co nform e a las espec ifica cione s d e
exp osici ón a RF de la FCC. Aunq ue es po sible que haya
dif erenc ias e ntr e los nive les d e S AR de los difer entes te léfon os,
tod os lo s tel éfo nos m óvile s que cu entan con una a utori zac ión d e
equ ipo d e la FCC cump len c on lo s r equis itos guber namen tal es
par a la expos ici ón se gura. La i nfo rmaci ón so bre S AR de es te
mod elo d e tel éfo no es tá ar chiva da en la FCC y pue de
enc ontra rla e n l a sec ción Displ ay Grant (Mos trar subve nci ón) e n
htt p://t ransi tio n.fcc .gov/ oet/e a/f ccid despu és de busc ar la
ID PY7PM -0732 de la FCC. Si d esea obt ener infor mació n
adi ciona l sob re SAR, visit e el sit io We b de EMF d el fo ro de
fab rican tes d e d ispos itivo s móv ile s en
htt p://w ww.em fex plain ed.in fo/.
* E n los Esta dos Unid os y Canad á, el lí mite de SA R de los
tel éfono s móv ile s uti lizad os po r e l púb lico es de 1.6
wat ts/ki logra mo (W/kg ) pro media dos sobr e un gramo de t eji do.
El están dar i ncl uye u n mar gen d e s eguri dad p ara p ropor cio narle
una prot ecció n a dicio nal a l púb lic o y p ara t omar en cu ent a
cua lquie r var iac ión e n las medi das .
**E ste p árraf o s e apl ica ú nicam ent e a a utori dades y cl ien tes d e
los Esta dos U nid os.
7
Page 16

Important Information
Latin & South America
Rad io wa ve ex pos ure a nd Sp eci
inf ormat ion
Thi s mob ile p hon e mod el D5102 has b een desi gned to
com ply w ith a ppl icabl e saf ety r equ ireme nts f or ex pos ure t o
rad io wa ves. The se re quire ments ar e bas ed on scie nti fic
gui delin es th at inclu de sa fety mar gins desig ned t o ass ure the
saf ety o f all pe rsons , reg ardle ss of ag e and heal th.
The radi o wav e e xposu re gu ideli nes empl oy a unit of
mea surem ent k now n as the S pecif ic Absor ption Rate , or SAR .
Tes ts fo r SAR ar e con ducte d usi ng stand ardiz ed me thods wi th
the phon e tra nsm ittin g at its h igh est c ertif ied p ower lev el in all
use d fre quenc y b ands.
Whi le th ere m ay be di ffere nces bet ween the S AR le vel s of
var ious phone mo dels, they are all desi gned to me et th e
rel evant guid eli nes f or ex posur e t o rad io wa ves.
For more info rma tion on SA R, pl eas e ref er to the Imp ortan t
Inf ormat ion c hap ter i n the User Gu ide.
SAR data info rma tion for r eside nts in c ountr ies t hat have
ado pted the S AR limit reco mmend ed by th e Int ernat ional
Com missi on of No n-Ion izing Radi ati on Pr otect ion ( ICNIR P),
whi ch is 2 W/ kg avera ged o ver t en (10) gram of ti ssue (fo r
exa mple Europ ean Unio n, Ja pan, Bra zil a nd Ne w Zea land) . F or
bod y wor n ope rat ion, this phone ha s bee n tes ted a nd me ets
RF expos ure g uid eline s whe n use d w ith a n acc essor y tha t
con tains no m eta l and that posi tio ns th e han dset a min imu m of
15 mm fr om th e b ody. Use o f oth er acces sorie s may not
ens ure c ompli anc e wit h RF expos ure guid eline s.
The high est S AR value for this mod el ph one w hen t est ed by
Son y for use at the e ar is 0.431 W/k g ( 10g). In t he ca se wh ere
the phon e is wor n dir ectly on t he body, the highe st te ste d SAR
val ue is 0.851 W/k g ( 10g).
8
fic Abso rptio n R ate ( SAR)
Page 17

Información importante
América Latina y América del Sur
Inf ormac ión s obr e
esp ecífi cas d e a bsorc ión ( SAR)
Est e mod elo d e t eléfo no mó vil D5102 ha sido dise ñado según
los requ isito s d e seg urida d apl ica bles para la ex posic ión a on das
de radio . Est os requi sitos se b asa n en espec ifica cione s
cie ntífi cas q ue inclu yen m árgen es de se gurid ad di señad os para
gar antiz ar la se gurid ad de toda s l as pe rsona s,
ind epend iente men te de la e dad y la salu d.
Las espe cific aci ones de la expo sic ión a onda s de rad io
emp lean una u nid ad de medi da co noc ida c omo l a Tas a
esp ecífi ca de ab sorci ón o SAR. Las prue bas d e SAR se l lev an a
cab o med iante el uso de mé todos es tanda rizad os co n la
tra nsmis ión t ele fónic a al más a lto nive l de energ ía re gis trado en
tod as la s ban das de f recue ncia uti lizad as.
Aun que e s pos ibl e que haya dife ren cias entre los nivel es de
SAR de l os di fer entes mode los d e t eléfo nos, todos está n
dis eñado s par a c umpli r con las esp ecifi cacio nes
cor respo ndien tes de l a exp osici ón a ond as de radi o.
Par a obt ener más info rmaci ón so bre SAR, cons ulte el ca pít ulo
sob re in forma ció n imp ortan te en la guía del usuar io.
La infor mació n s obre SAR p ara r esi dente s en paíse s que ha n
ado ptado el l ími te re comen dado de SAR s egún la Co misió n
int ernac ional so bre l a pro tecci ón contr a las radi acion es no
ion izant es (C NIR P), q ue es 2 W/ kg prome diado en
die z (10 ) gra mos de t ejido corp ora l (po r eje mplo, Unió n E urope a,
Jap ón, B rasil y Nueva Zela nda). Pa ra su uso cerca del cue rpo, el
tel éfono ha s ido prob ado p ara s u f uncio namie nto a una dis tanci a
mín ima d e 15 mm del c uerpo y cu mpl e con las espec ifica cio nes
de expos ición a RF cu ando se ut ili za co n un acces orio que no
con tiene meta les . Es posib le qu e e l uso de o tros acces ori os no
gar antic e el cum plimi ento de la s e speci ficac iones de e xpo sició n
a R F.
El valor de S AR más a lto p ara e ste mode lo de telé fono
pro bado por S ony para usar en e l o ído e s 0.431 W/ kg (1 0g). En
ex posic ión a on das d e rad io y tas as
9
Page 18

cas o de que e l t eléfo no se util ice dire ctame nte c erca del cuer po,
el valor de S AR más a lto p robad o e s 0.851 W/ kg (1 0g).
10
Page 19

Informações importantes
América Latina e do Sul
Inf ormaç ões s obr e exp osiçã
Abs orção Espe cíf ica ( SAR)
Est e cel ular mod elo D5102 foi pro jetad o de mod o a e star em
con formi dade com os r equis itos de segur ança aplic áve is pa ra
exp osiçã o a o nda s de rádio . Ess es requi sitos se b ase iam e m
dir etriz es ci ent ífica s que incl uem marg ens d e seg ura nça
pro jetad as pa ra garan tir a segu ran ça de toda s as pes soas,
ind epend entem ent e da idade e do es tado de sa úde.
As diret rizes de expo sição a on das de r ádio empre gam u ma
uni dade de me did a con hecid a com o T axa d e Abs orção
Esp ecífi ca, o u S AR. O s tes tes r ela ciona dos à SAR são
con duzid os co m m étodo s pad roniz ado s em que o celu lar
tra nsmit e com se u nív el de potê nci a cer tific ado m ais alto em
tod as as band as de fr equên cia u til izada s.
Emb ora p ossa hav er di feren ças e ntr e os nívei s de SAR d os
vár ios m odelo s d e cel ular, todo s e les f oram proje tad os pa ra
ate nder às di ret rizes rele vante s d e exp osiçã o a o nda s de rádio .
Par a obt er ma is infor maçõe s sob re SAR, consu lte o capí tul o
Inf ormaç ões i mpo rtant es no Manu al do us uário .
Inf ormaç ões d e d ados de SA R par a r eside ntes em pa íses que
ado taram o li mit e de SAR r ecome nda do pe la Co missã o
Int ernac ional de Prot eção contr a a s Rad iaçõe s Não -Io nizan tes
(IC NIRP) , cuj a m édia é de 2 W/k g p or 10 (dez ) gra mas de t ecido
(po r exe mplo, Un ião E urope ia, J apã o, Br asil e Nov a Z elând ia).
Par a ope ração pr óximo ao c orpo, es te ce lular foi tes tado e
cum pre a s dir etr izes de ex posiç ão à RF quand o usa do com u m
ace ssóri o que nã o con tenha meta l e com o apa relho
pos icion ado a , n o mín imo, 15 mm do corp o. O uso d e o utros
ace ssóri os po de não g arant ir a con formi dade com a s d iretr izes
de expos ição à R F.
O m ais a lto v alo r de SAR d este mod elo d e cel ular quand o
tes tado pela Son y par a uso ao o uvi do é de 0.431 W /kg ( 10 g) .
Nos caso s em que o ce lular é us ado em c ontat o dir eto com o
cor po, o valo r d e SAR mais alto te stado é de 0.851 W/k g (10 g) .
o a onda s de rád io e Taxa de
11
Page 20

///
Ang uilla
1-8 00-08 0-951 8
(To ll Fr ee)
que stion s.CO@ sup port. sonym obile .c
om
Ant igua an d
Bar buda
1-8 00-08 1-951 8
(To ll Fr ee)
que stion s.CO@ sup port. sonym obile .co m
Arg entina
080 0-333 -7427
(nú mero gratu ito )
que stion s.CO@ sup port. sonym obile .co m
Aus tralia
130 0 650 -050
(To ll Fr ee)
que stion s.AU@ sup port. sonym obile .co m
The
Bah amas
1-8 00-20 5-606 2
(To ll Fr ee)
que stion s.CO@ sup port. sonym obile .co m
Bar bados
1-8 00-08 2-951 8
(To ll Fr ee)
que stion s.CO@ sup port. sonym obile .co m
Bel gique/B el
gië
02- 0745 1611 que stion s.BE@ sup port. sonym obile .co m
Bel ize
AN 815, PIN 5 597
(To ll Fr ee)
que stion s.CO@ sup port. sonym obile .co m
Ber muda
1-8 00-08 3-951 8
(To ll Fr ee)
que stion s.CO@ sup port. sonym obile .co m
Bol ivia
800 -100- 542
(nú mero gratu ito )
que stion s.CO@ sup port. sonym obile .co m
Bra sil
400 1-044 4
(Ca pitai s e
reg iões
met ropol itana s)
080 0 884 0444
(De mais regiõ es)
que stion s.BR@ sup port. sonym obile .co m
Can ada
1 8 66 76 6 937 4
(To ll Fr ee / san s
fra is)
que stion s.CA@ sup port. sonym obile .co m
Cay man
Isl ands
1-8 00-08 4-951 8
(To ll Fr ee)
que stion s.CO@ sup port. sonym obile .co m
12
Page 21

Cen tral an d
Sou thern
Afr ica
+27 11 5 06 01 23 que stion s.CF@ sup
por t.son ymobi le. com
Čes ká
rep ublik a
844 550 055 que stion s.CZ@ sup port. son
ymo bile. com
Chi le
800 -646- 425
(nú mero gratu ito )
que stion s.CO@ sup port. sonym o
bil e.com
Col ombia
018 00-09 66-08 0
(nú mero gratu ito )
que stion s.CO@ sup port. sonym obile .co m
Cos ta Rica
0 8 00 01 1 040 0
(nú mero gratu ito )
que stion s.CO@ sup port. sonym obile .co m
Dan mark
333 1 282 8 que stion s.DK@ sup port. sonym obile .co m
Deu tschlan d
018 0 534 2020
(or tsübl iche
Geb ühren )
que stion s.DE@ sup port. sonym obile .co m
Dom inica
1-8 00-08 5-951 8
(To ll Fr ee)
que stion s.CO@ sup port. sonym obile .co m
Ecu ador
1-8 00-01 02-50
(nú mero gratu ito )
que stion s.CO@ sup port. sonym obile .co m
Ees ti
06 032 0 32 que stion s.EE@ sup port. sonym obile .co m
Egy pt/
167 27 que stion s.EG@ sup port. sonym obile .co m
Ελλ άδα 801 11 810 810
+30 210 899 19 19
(από κινητό
τηλέφωνο)
questions
.GR @supp ort.s ony mobil e.com
El Salvado r
800 -6323 (núm ero
gra tuito )
que stion s.CO@ sup port. sonym obile .co m
E
spa ña
902 180 576
(ta rifa local )
que stion s.ES@ sup port. sonym obile .co m
Fra nce
09 69 32 21 2 1
09 69 32 21 2 2
(Xp eria™
uni queme nt)
que stion s.FR@ sup port. sonym obile .co m
Gua temala
1-8 00-30 0-005 7
(nú mero gratu ito )
que stion s.CO@ sup port. sonym obile .co m
13
Page 22

Haï ti/Ayit i
AN 193, PIN 5 598
(nu méro gratu it /
nim ewo g ratis )
que stion s.CO@ sup port. sonym obile .co m
Hon duras
AN 80001 22, P IN
559 9 (nú mero
gra tuito )
que stion s.CO@ sup port. son
ymo bile. com
Hon g Kon g/香港+85 2 820 3 886 3 ques tio ns.HK @supp ort.s ony mobil e.com
Hrv atska
062 000 000 que stion s.HR@ sup port. sonym obile .co m
Ind ia/ 1800 11 18 00 (Toll
Fre e)
+91 (011 )
390 11111
que stion s.IN@ sup port. sonym obile .co m
Ind onesia
+62 21 2 935 7 669 que stion s.ID@ sup port. sonym obile .co m
Ire land
185 0 545 888
(Lo cal r ate)
que stion s.IE@ sup port. sonym obile .co m
Ita lia
06 48895 206
(ta riffa loca le)
que stion s.IT@ sup port. sonym obile .co m
Jam aica
1-8 00-44 2-347 1
(To ll Fr ee)
que stion s.CO@ sup port. sonym obile .co m
Κύπ ρος/Kıb
rıs
080 0 90 909 que stion s.CY@ sup port. sonym obi
le. com
Lat vija
67 21 43 01 que stion s.LV@ sup port. sonym obile .co m
Lie tuva
8 7 00 55 030 que stion s.LT@ sup port. sonym obile .co m
Mag yarorsz á
g
01 880 4 7 47 questions .HU@s upp ort.s onymo bile. com
Mal aysia
1 8 00-88 -7666 que stion s.MY@ sup port. sonym obile .co m
Mar oc/
+21 2 2 2 958 3 44 que stion s.MA@ sup port. sonym obile .co m
Méx ico
0 1 800 0 00 47 22
(nú mero gratu ito )
que stion s.MX@ sup port. sonym o
bil e.com
Ned erland
090 0 899 8318 que stion s.NL@ sup port. sonym obile .co m
Ned erlands e
Ant illen
001 -866- 509-8 660
(gr atis numme r)
que stion s.CO@ sup port. sonym obile .co m
New Zealan d
080 0-100 -150
(To ll Fr ee)
que stion s.NZ@ sup port. sonym obile .co m
14
Page 23

Nic aragua
AN 1800- 0166,
PIN 5600 (núm ero
gra tuito )
que stion s.CO@ sup port. sonym obile .co m
Nor ge
815 00 8 40
(lo kalta kst)
que stion s.NO@ sup port. sonym obile .
com
Öst erreich
081 0 200 245 q uesti ons.A T@s uppor t.son ymobi le.co m
Pak istan /
021 - 11 1 22 5573que stion s.PK@ sup port. sonym obile .co m
Pan amá
008 00-78 7-000 9
(nú mero gratu ito )
que stion s.CO@ sup port. sonym o
bil e.com
Par aguay
009 800 54 20 032
(nú mero gratu ito )
que stion s.CO@ sup port. sonym obile .co m
Per ú
080 0-532 -38
(nú mero gratu ito )
que stion s.CO@ sup port. sonym obile .co m
Phi lippine s/
Pil ipinas
+63 2 479 9777 or
180 0 1 8 53 76 69
que stion s.PH@ sup port. sonym obile .co m
Pol ska
+48 22 2 2 77 444 que stion s.PL@ sup port. sonym obile .co m
Por tugal
808 204 466
(ch amada loca l)
que stion s.PT@ sup port. sonym obile .co m
Rep ública
Dom inicana
1-8 00-75 1-337 0
(nú mero gratu ito )
que stion s.CO@ sup port. sonym obile .co m
Rom ânia
+40 21 4 01 04 01 que stion s.RO@ sup port. sonym obile .co m
Sai nt Kitt s
and Nevis
1-8 00-08 7-951 8
(To ll Fr ee)
que stion s.CO@ sup port. sonym obile .co m
Sai nt
Vin cent an d
the
Gre nadines
1-8 00-08 8-951 8
(To ll Fr ee)
que stion s.CO@ sup port. sonym obile .co m
Sch weiz/Su i
sse /Svizze ra
084 8 824 040 q uesti ons.C H@s uppor t.son ymobi le .com
Sin gapore
+65 6744 0733 qu estio ns.SG @su pport .sony mobil e.com
Slo venia
080 0 812 91 que stion s.si@ sup port. sonym obile .co m
Slo vensko
02 5443 6443 q uesti ons.S K@s uppor t.son ymobi le. com
Sou th Afri ca
086 1 632 222 questions .ZA@s upp ort.s onymo bile. com
Sou th
Κor ea/대한
민국
(+8 2) 15 88 41 70 q uesti ons.K O@sup por t.son ymobi le.co m
Suo mi
que stion s.FI@ sup port. sonym obile .co m
15
Page 24

Sve rige
013 24 4 5 00
(lo kal t axa)
que stion s.SE@ sup port. sonym obile .co m
Tha iland
001 800 852 7 663
or 02401 3030
que stion s.CO@ sup port. sonym obile .co m
Tri nidad a nd
Tob ago
1-8 00-08 0-952 1
(To ll Fr ee)
que stion s.CO@ su
ppo rt.so nymob ile .com
Tür kiye
+90 212 473 7 777que stion s.TR@ sup port. sonym obile .co m
Uni ted
Kin gdom
087 05 23 7 237
(Lo cal r ate)
que stion s.GB@ sup port. sonym obile .co m
Uni ted
Sta tes
1 8 66 76 6 937 4 que stion s.US@ sup port. sonym obile .co m
Uru guay
000 -401- 787-0 13
(nú mero gratu ito )
que stion s.CO@ sup port. sonym obile .co m
Ven ezuela
0-8 00-1- 00-22 50
(nú mero gratu ito )
que stion s.CO@ sup port. sonym obile .co m
Việ t Nam
180 0 588 885
(mi ễn ph í)
sev .cic@ ap.so ny. com
Бъл гария
080 0 1 8 778 que stion s.BG@ sup port. sonym obile .co m
Рос сия
8-8 00-10 08022 quest ion s.RU@ suppo rt.so nym obile .com
Укр аїна
+38 044 590 1 515 que stion s.UA@ sup port. sonym obile .co m
+97 1 4 3 919 8 80 que stion s.JO@ sup port. sonym obile .co m
+97 1 4 3 919 8 80
(UA E)
que stion s.AE@ sup port. sonym obile .co m
+97 1
4 3 919 8 80 que stion s.KW@ sup port. sonym obile .co m
800 -8200 -727 qu estio ns.SA @su pport .sony mobil e.c om
中国
+86 400 810 0 000 que stion s.CN@ son ymobi le.co m
台灣
+88 6 2 2 56255 11 que stion s.TW@ sup port. sonym obile .co m
ไทย
02 2483 030 que stion s.TH@ sup port. sonym obile .co m
16
Page 25

FCC Statement
Thi s dev ice c omp lies with Part 15 of th e FC
C r ules.
Ope ratio n is sub ject to th e fol low ing t wo co nditi ons:
(1) This devi ce may n ot ca use h arm ful i nterf erenc e,
and (2) This dev ice m ust a ccept an y int erfer ence recei ved ,
inc ludin g int erf erenc e tha t may ca use u ndesi red o perat ion .
Any chan ge or mo dific ation not exp ressl y app roved by S ony
may void the use r's a uthor ity t o o perat e the equi pment .
Thi s equ ipmen t h as be en te sted and foun d to compl y wit h
the limi ts fo r a Clas s B d igita l d evice , pur suant to Part 15 o f
the FCC Rules . T hese limit s are de signe d to provi de
rea sonab le pr ote ction agai nst h arm ful i nterf erenc e i n a
res ident ial i nst allat ion. This equ ipmen t gen erate s, uses and
can radi ate r adi o fre quenc y ene rgy and, if n ot in sta lled and
use d in accor dan ce wi th th e ins tru ction s, ma y cau se harmf ul
int erfer ence to radio comm unica tio ns. H oweve r, th ere is n o
gua rante e tha t i nterf erenc e wil l n ot oc cur i n a p art icula r
ins talla tion.
If this equip men t doe s cau se ha rmf ul in terfe rence to r adi o or
tel evisi on re cep tion, whic h can be dete rmine d by tur ning the
equ ipmen t off an d on, the user is encou raged to t ry to co rrect
the inte rfere nce by o ne or more of the follo wing mea sures :
•
Reo rient or r elo cate the r eceiv ing ante nna.
•
Inc rease the sep arati on be tween th e equ ipmen t and
rec eiver .
•
Con nect the e qui pment into an o utl et on a ci rcuit diff ere nt
fro m tha t to whi ch th e rec eiver is conn ected .
•
Con sult the d eal er or an e xperi enc ed ra dio/T V tec hnici an for
hel p.
17
Page 26

Industry Canada Statement
Thi s dev ice c omp lies with RSS-2 10 of In dust
ry Canad a.
Ope ratio n is sub ject to th e fol low ing t wo co nditi ons : (1) this
dev ice m ay no t c ause inter feren ce, and (2) t his d evice mu st
acc ept a ny in ter feren ce, i nclud ing inte rfere nce t hat m ay cause
und esire d ope rat ion o f the devi ce.
Thi s Cla ss B dig ital appar atus com plies with Cana dia n
ICE S-003 .
Cet appa reil num ériqu e de la cl ass e B e st co nform e à la
nor me NM B-003 du Cana da.
Ope ratio n in the band 5150 -5250 MH z is only for i ndo or us e
to reduc e the po tenti al fo r har mfu l int erfer ence to co -ch annel
mob ile s atell ite syst ems. Pleas e n ote t hat h igh-p ower rad ars
are allo cated as prim ary u sers (i. e. pr iorit y use rs) o f t he ba nds
525 0-535 0 MHz an d 565 0-585 0 MHz an d tha t the se ra dars
cou ld ca use i nte rfere nce a nd/or da mage to LE -LAN devic es.
Avis d’industrie Canada
Le prése nt ap par eil e st co nform e a ux CN R d'I ndust rie C ana da
app licab les a ux appar eils radio ex empts de l icenc e.
L'e xploi tatio n e st au toris ée au x d eux c ondit ions sui vante s:
(1) l'ap parei l n e doi t pas prod uir e de broui llage , et, an d (2)
l'u tilis ateur de l'ap parei l doi t a ccept er to ut br ouill age
rad ioéle ctriq ue subi, même si l e b rouil lage est s uscep tib le
d'e n com prome ttr e le fonct ionne men t.
18
Page 27

Declaration of Conformity for D5102
19
Pär Thur esson ,
Qua lity Offic er, SVP, Qual ity & Cu stome r Ser vices
We fulfi l the re quire ments of t he R&TTE Dire ctive
(19 99/5/ EC).
Ce produ it es t c onfor me au x dir ect ives de R& TTE
(19 99/5/ EC).
We, Sony Mobi le Commu nicat ions AB of
Nya Vatt entor net
Lu nd, S weden
SE- 221 8 8
dec lare under ou r sol e res ponsi bil ity t hat o ur pr oduct
Son y typ e PM- 0732-B V
and in c ombin ati on wi th ou r acc ess ories , to which this
dec larat ion r ela tes i s in confo rmi ty wi th th e app ropri ate
sta ndard s EN 301 489-3:V1.6.1, EN 301 489-7:V1.3.1,
EN 301 489-17:V2.2.1, EN 301 489-24:V1.5.1, EN 300 328:V1.8.1,
EN 300 440-2:V1.4.1, EN 301 511:V9.0.2, EN 301 893:V1.7.1,
EN 301 908-1:V5.2.1, EN 301 908-2:V5.2.1, EN 302 291-2:V1.1.1,
EN 62209-1:2006, EN 62209-2:2010 and
EN 60950-1:2006+A11:2009+ A1:20 10+A1 2:2 011 f ollow ing
the p rovis ions of, Radi o Equ ipmen t a nd Te lecom munic ation
Ter minal Equi pme nt di recti ve 19 99/ 5/EC.
Lun d, April 20 14
Page 28

Cum plimo s con lo s req uisit os de la Dire ctiva R&TT E – N orm as
sob re eq uipos de term inale s de rad io y telec omuni cacio nes
(19 99/5/ EC).
Ate ndemo s aos re quisi tos d a Dir etr iz R& TTE ( 1999/ 5/EC) .
19
Page 29

www.sonymobile.com
Sony Mobile Communications AB
SE-221 88 Lund, Sweden
 Loading...