

Page 1
PSP-2001
3-218-749-11(1)
PSP-2001 3-218-749-11(1) US/FR/ES
Quick Reference
Aide-mémoire
Referencia rápida
Page 2
PSP-2001 3-218-749-11(1) US/FR/ES
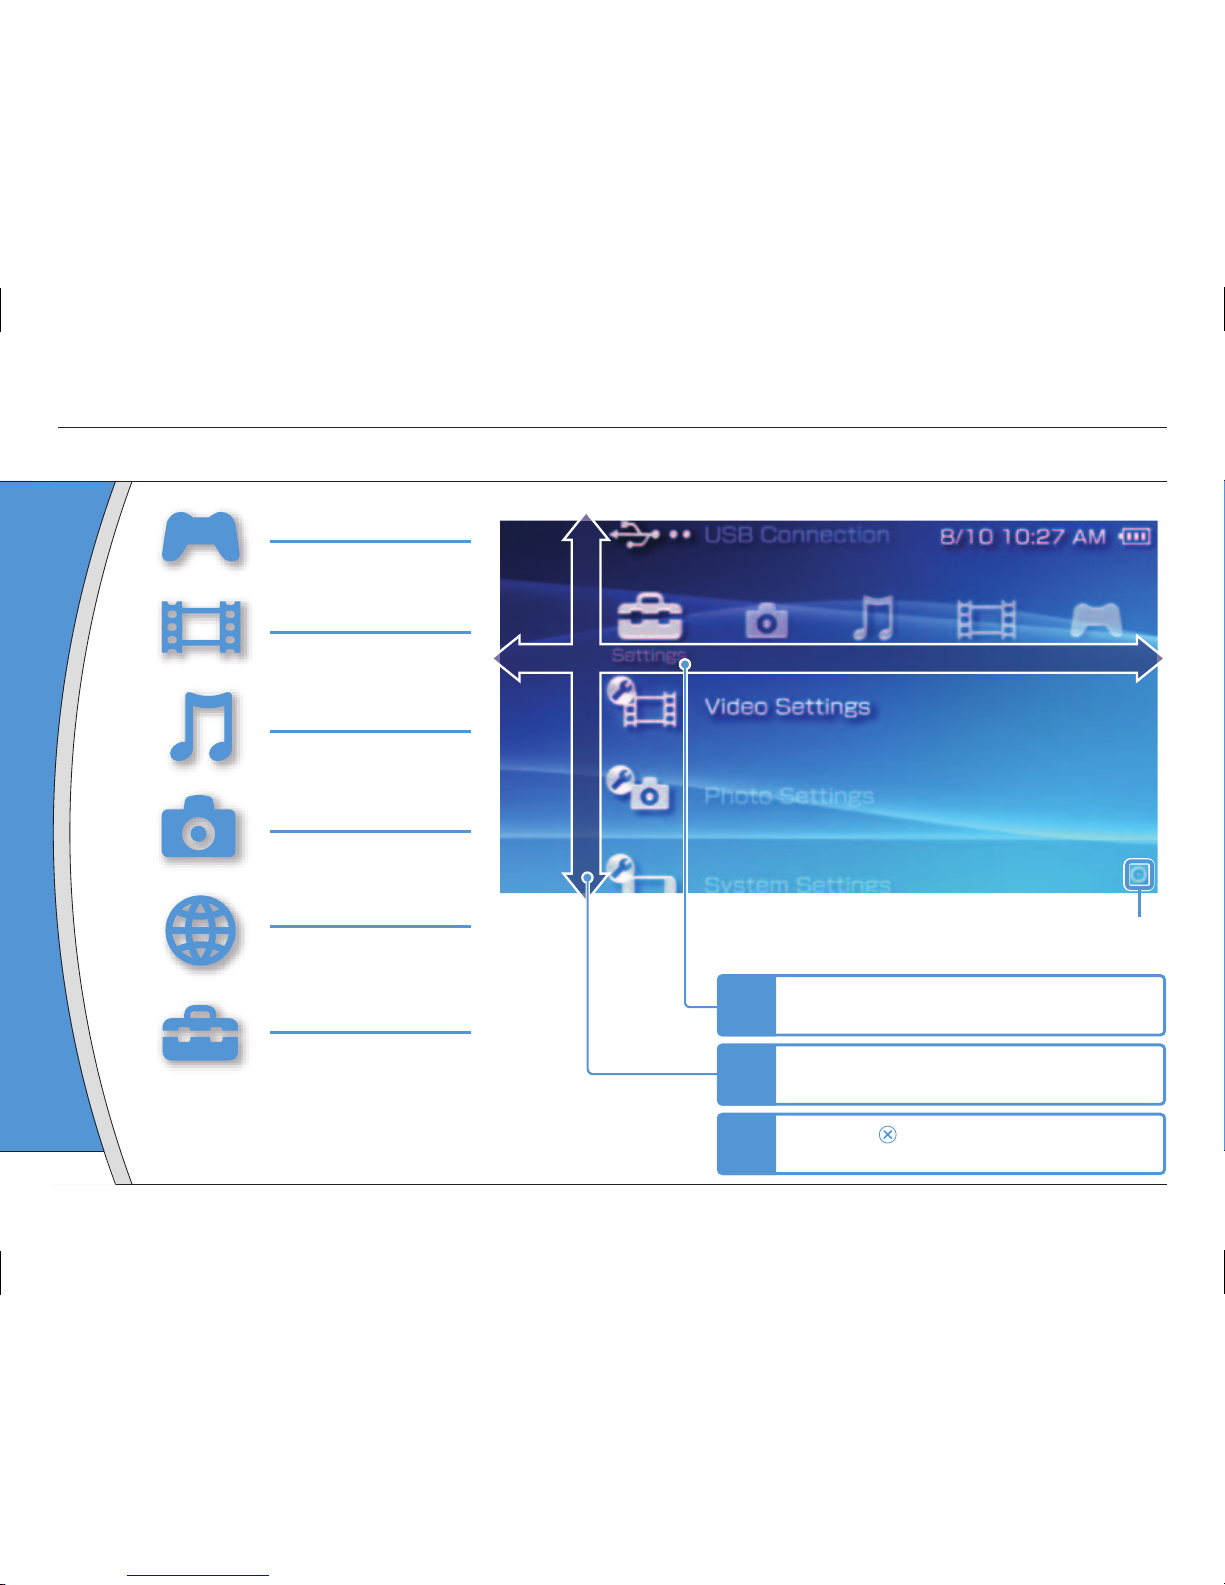
Using the home menu
Introduction
GAME
Playing games
VIDEO
Playing video
MUSIC
Playing music
PHOTO
Displaying images
NETWORK
Connecting to the
Internet
SETTINGS
Adjusting PSP® system
settings
Busy icon:
This icon is displayed when a page is loading.
Category
1
Select a category using the left or right
button.
2
Select an item using the up or down
button.
3
Press the button to confi rm the
selected item.
Item
Icons displayed in the home menu vary depending on
the system software version.
2
Page 3
DE
IT
NL
PT
PSP-2001 3-218-749-11(1) US/FR/ES
US
FR
ES
HOME SELECT START
VOL
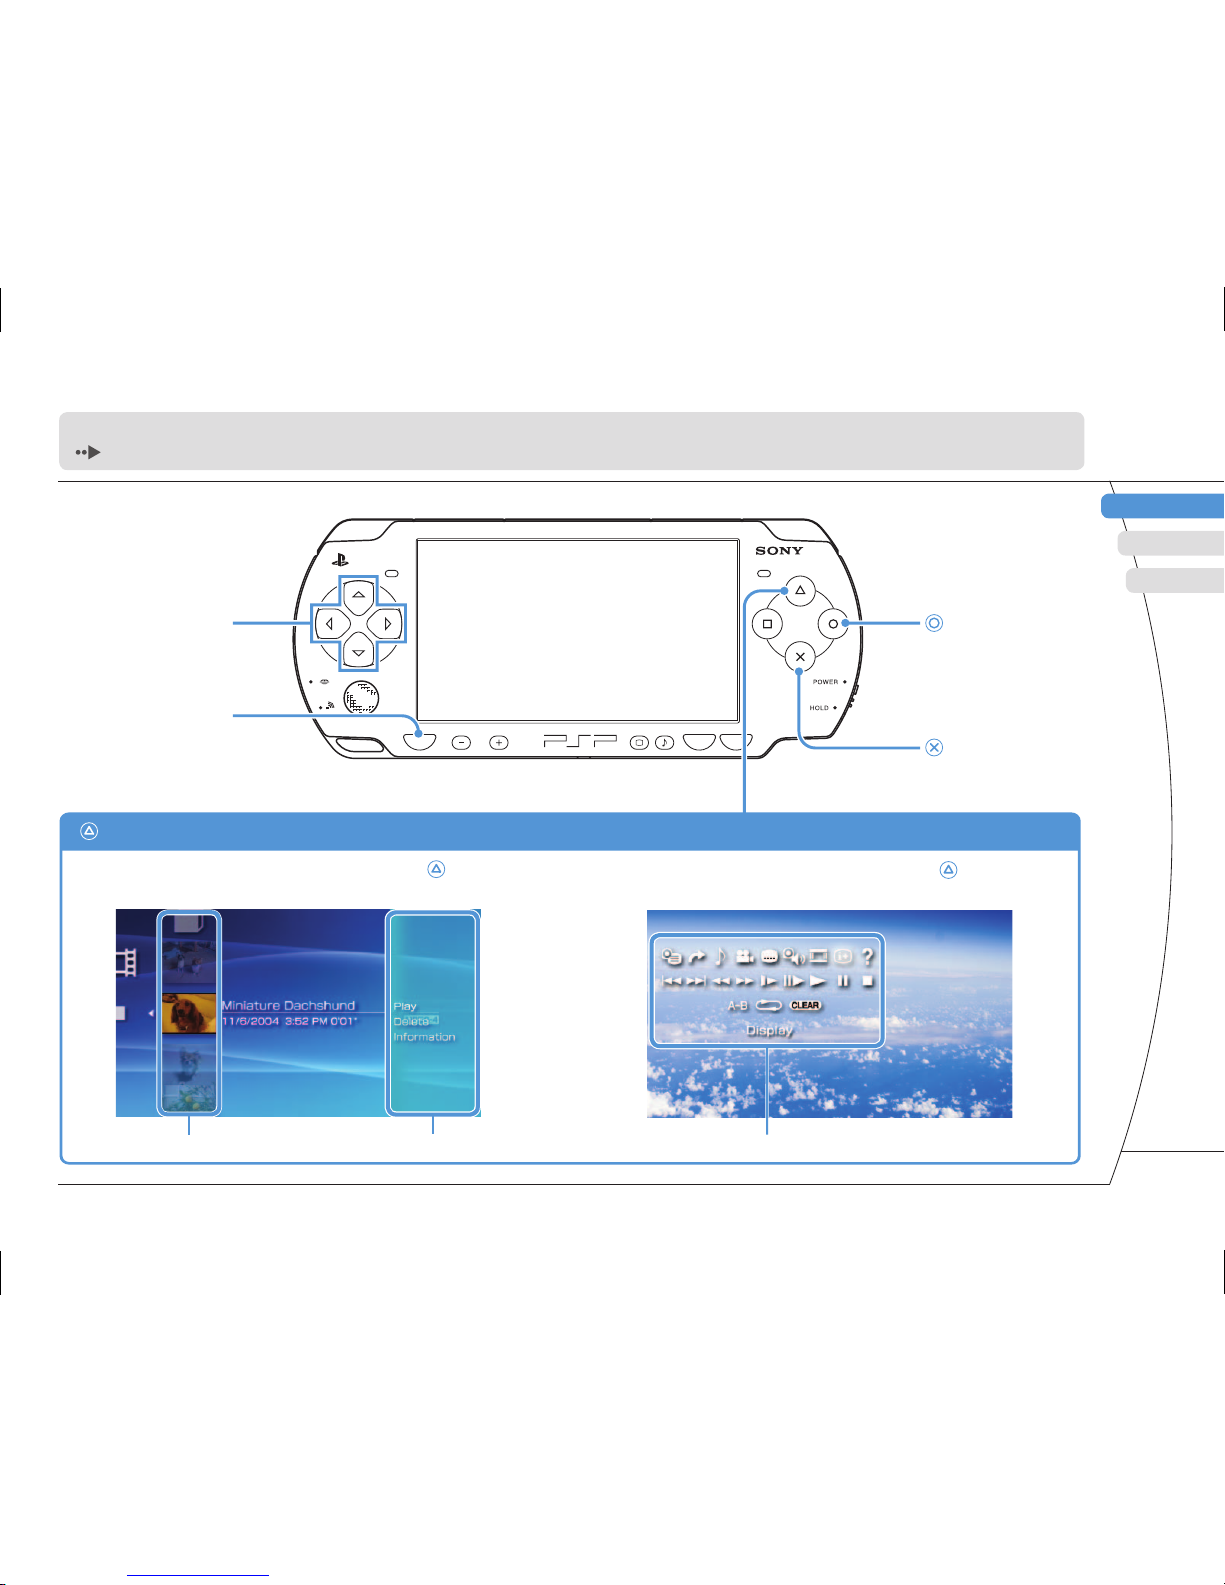
This document describes basic operations of the PSP® system. For detailed instructions, refer to the online user's guide
( page 25): http://manuals.playstation.net/document/
Directional buttons:
Used to select
categories/items
button:
Cancels selected
operations
button:
Confi rms selected
items
Home button:
Returns to the home
menu
Select an icon, and then press the button
to display the options menu.
While playing content, press the
button
to display the control panel.
button: Displays the options menu/control panel
Icons Options menu Control panel
3
Page 4
PSP-2001 3-218-749-11(1) US/FR/ES
01
Checking the package contents
Preparation
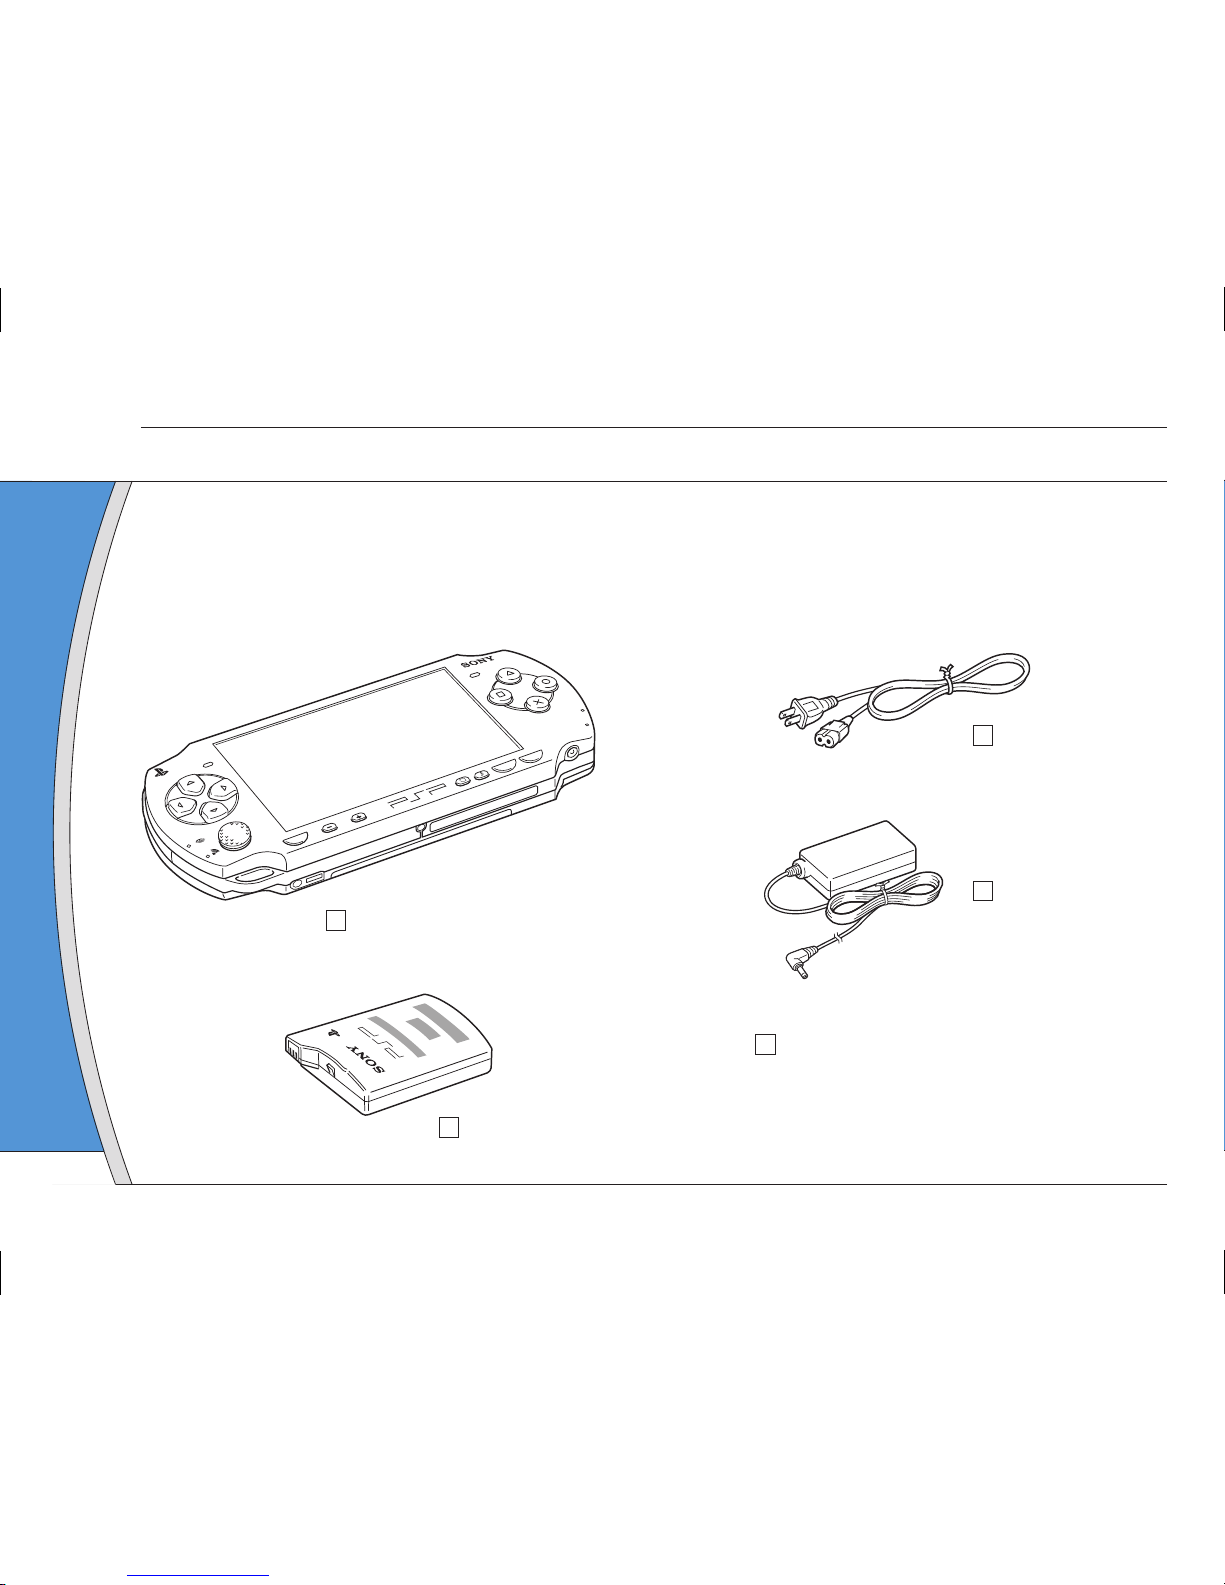
Check that you have all of the following items.
If any items are missing, contact our technical support line at 1-800-345-7669 for assistance.
Additional items may be included with certain models of this product. Please check against the contents listed
on the product package.
PSP® (PlayStation®Portable) system
Battery pack
AC adaptor
AC power cord
Printed materials
P
O
W
E
R
H
O
L
D
S
E
L
E
C
T
H
OME
V
O
L
S
T
A
R
T
4
Page 5
DE
IT
NL
PT
PSP-2001 3-218-749-11(1) US/FR/ES
FR
US
ES
Preparation
Checking the package contents
About the PSP® system documentation
The PSP® system documentation includes the
following:
• Safety and Support
Before using the product, carefully read this document fi rst.
It contains safety information related to the use of the PSP®
system, troubleshooting, specifi cations and other
information.
• Quick Reference (this document)
This document contains information on basic hardware
operations of the PSP® system.
• User's Guide
(http://manuals.playstation.net/document/)
This online document is accessed through the Internet and
contains detailed information related to the use of the PSP®
system software ( page 25).
5
Page 6
PSP-2001 3-218-749-11(1) US/FR/ES
02
Preparing the PSP® system for use
Preparation
Charging the battery
Before using the PSP® system for the fi rst time after
purchase, you must follow these steps to charge the battery.
Caution
• The socket-outlet shall be installed near the equipment
and shall be easily accessible.
•
Do not plug the AC power cord for the PSP® system into an
electrical outlet until you have made all other connections
.
Notice
Before inserting the battery pack, fi nd the serial and model
numbers listed within the battery compartment and make a
record of the numbers for future reference.
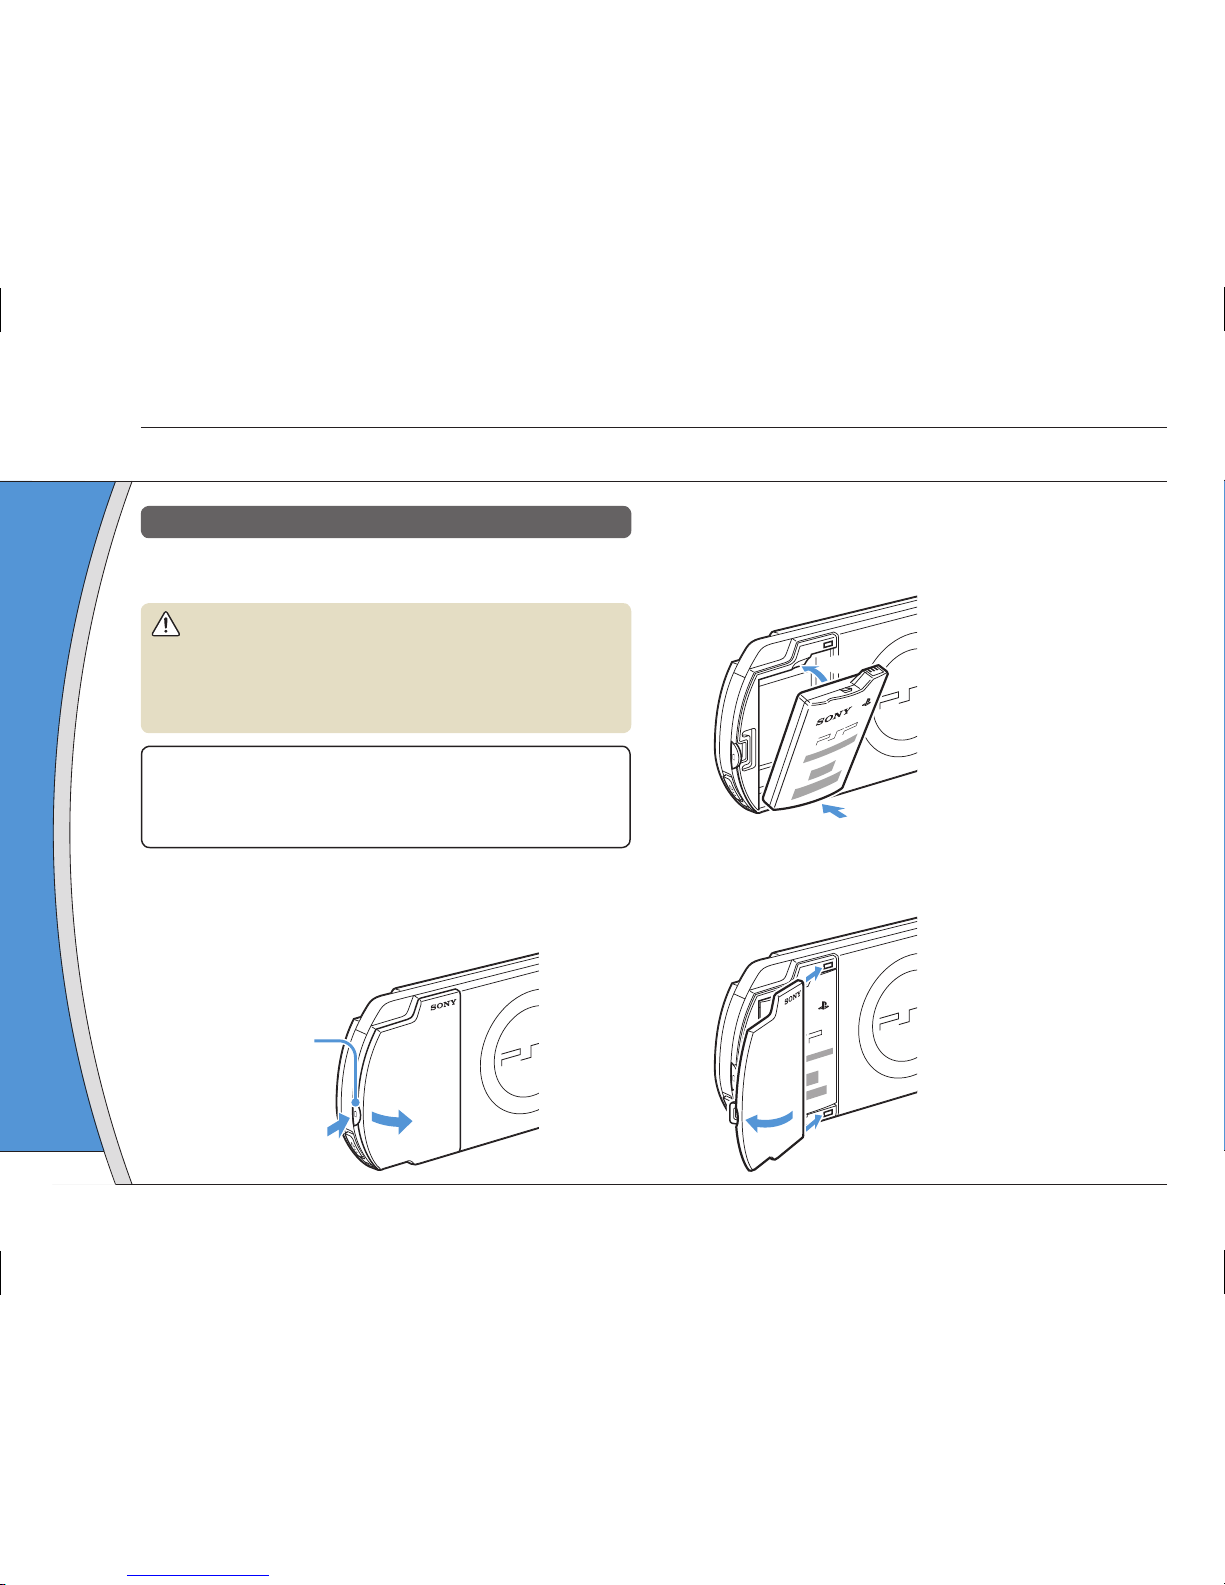
1 Remove the battery cover.
While holding down the release button, slide the battery
cover in the direction of the arrow.
2
1
Release button
2 Insert the battery pack.
Align the bottom surface of the battery pack with the
system to attach the battery.
1
2
Align the tabs of the battery cover with the system and
snap it in place.
4
3
6
Page 7
DE
IT
NL
PT
PSP-2001 3-218-749-11(1) US/FR/ES
FR
US
ES
Preparation
Preparing the PSP® system for use
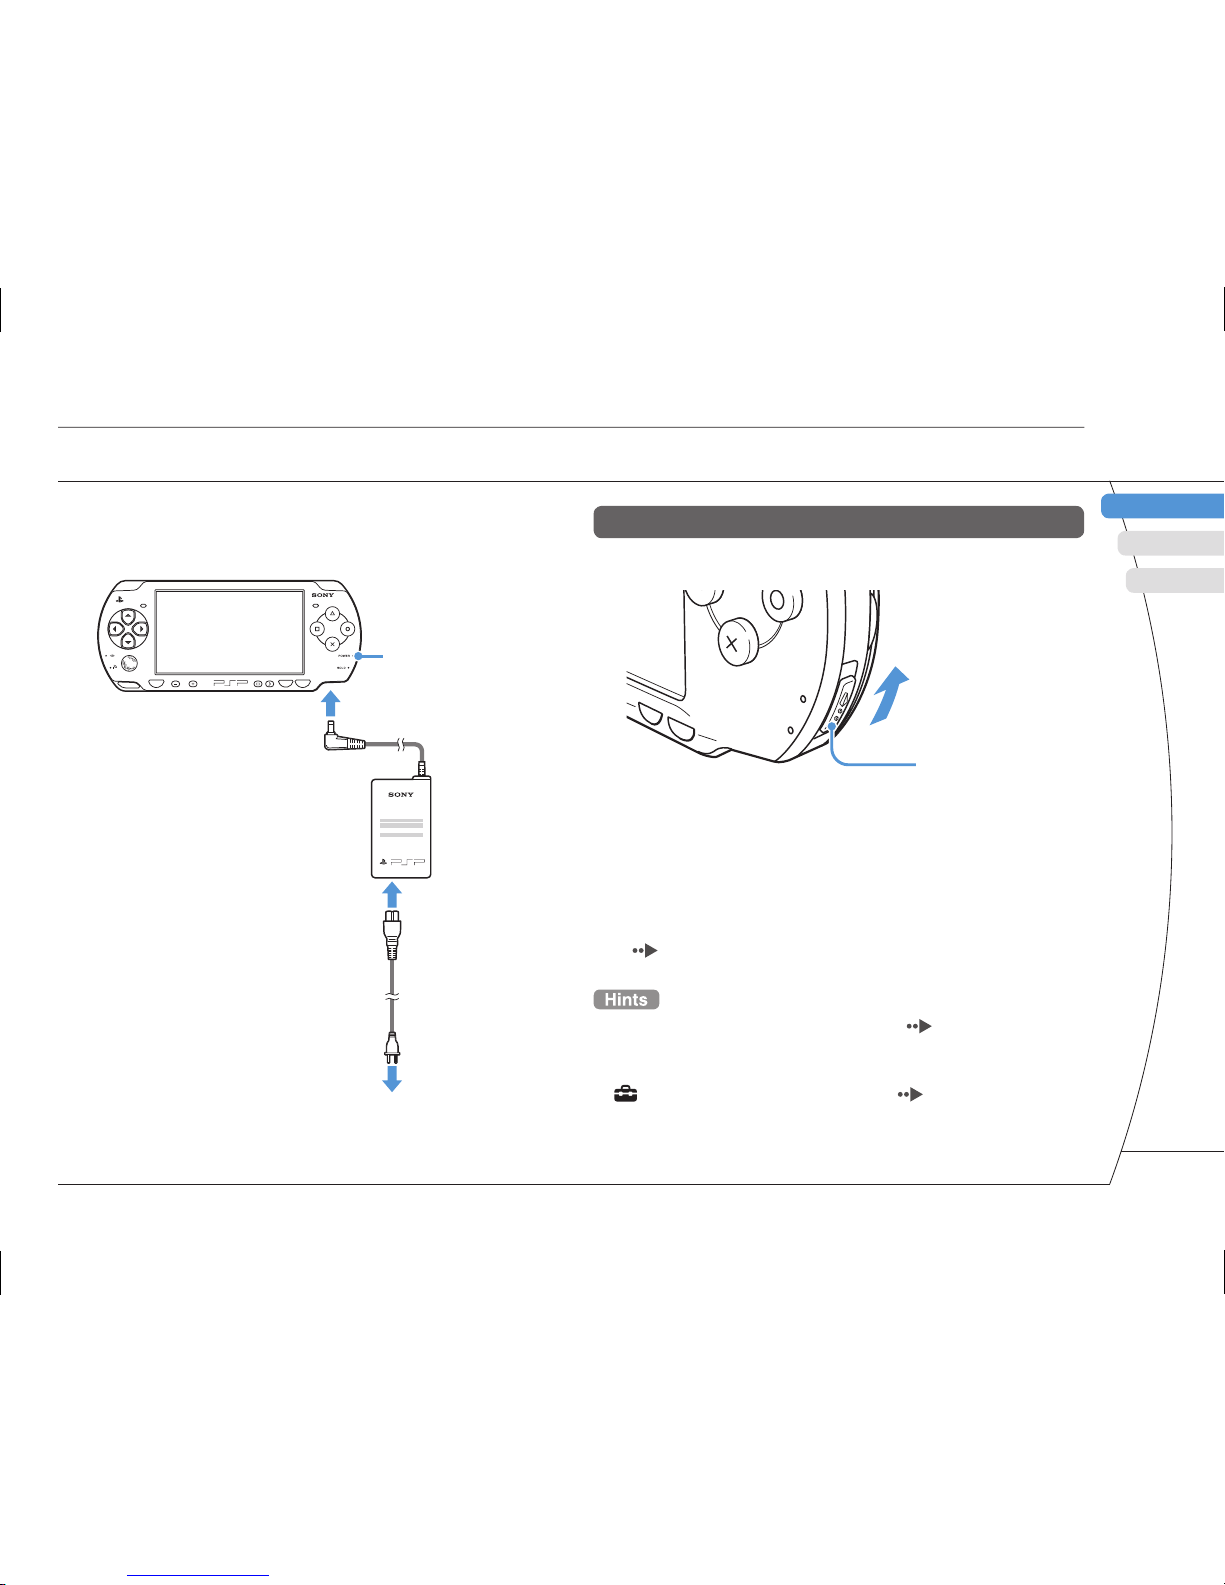
3 Attach the AC adaptor to charge the
battery.
The power indicator lights up in
orange, indicating that charging
has begun. The power indicator
will turn off when the battery is
fully charged.
Power indicator
To electrical
outlet
HOME SELECT START
VOL
2
1
3
Initial setup
1 Slide the power/hold switch up.
Power/hold switch
P
O
W
ER
HO
L
D
S
T
A
RT
S
E
LE
C
T
The power indicator lights up in green, and the initial
setup screen is displayed.
2 Follow the on-screen instructions to
make the initial settings.
When you have completed initial setup, the home menu
(
page 2) is displayed.
• See "Using the on-screen keyboard" ( page 26) for
information on entering characters.
• Settings made during initial setup can be changed later in
(Settings). See the user's guide (
page 25) for
details.
7
Page 8

PSP-2001 3-218-749-11(1) US/FR/ES
HOME SELECT START
VOL
03
Part names and functions
Preparation
System
WLAN switch (top)
Power/hold switch
(right side)
(
page 10)
Hold indicator
( page 10)
Power indicator
( page 10)
LCD screen
L button
Directional buttons
Memory Stick Duo™
access indicator
( page 13)
WLAN access indicator
Lights up when using the
wireless LAN feature
Analog stick
Strap holder
Home button
Displays the home menu
Volume - button
Volume + button
Start button
Select button
R button
button
button
button
button
Sound button
( page 9)
Display button
( page 9)
H
O
M
E
USB connector (top)
Left speaker
Right speaker
8
Page 9
DE
IT
NL
PT
PSP-2001 3-218-749-11(1) US/FR/ES
FR
US
ES
Using the sound button
Press and release
Each time you press the button, the tone
changes among HEAVY
POPS
JAZZ
UNIQUE OFF. *1
Press for more
than one second
The sound is muted. *2
*1 : The tone can be changed only when using headphones.
Also, the tone setting is temporarily set to "OFF" during
gameplay.
*2 : To clear muting, press the sound button again.
Using the display button
Press and release
Each time you press the button, the
display changes among three levels of
screen brightness. *1
Press for more
than one second
The backlight turns off and the screen
goes blank. *2
Press for more
than fi ve seconds
The system switches to video output
mode (
page 18).
*1 : The highest level (level 4) can be selected only while the
PSP
®
system is plugged in using the AC adaptor.
*2 : To turn the backlight back on, press any of the PSP
®
system buttons.
Preparation
Part names and functions
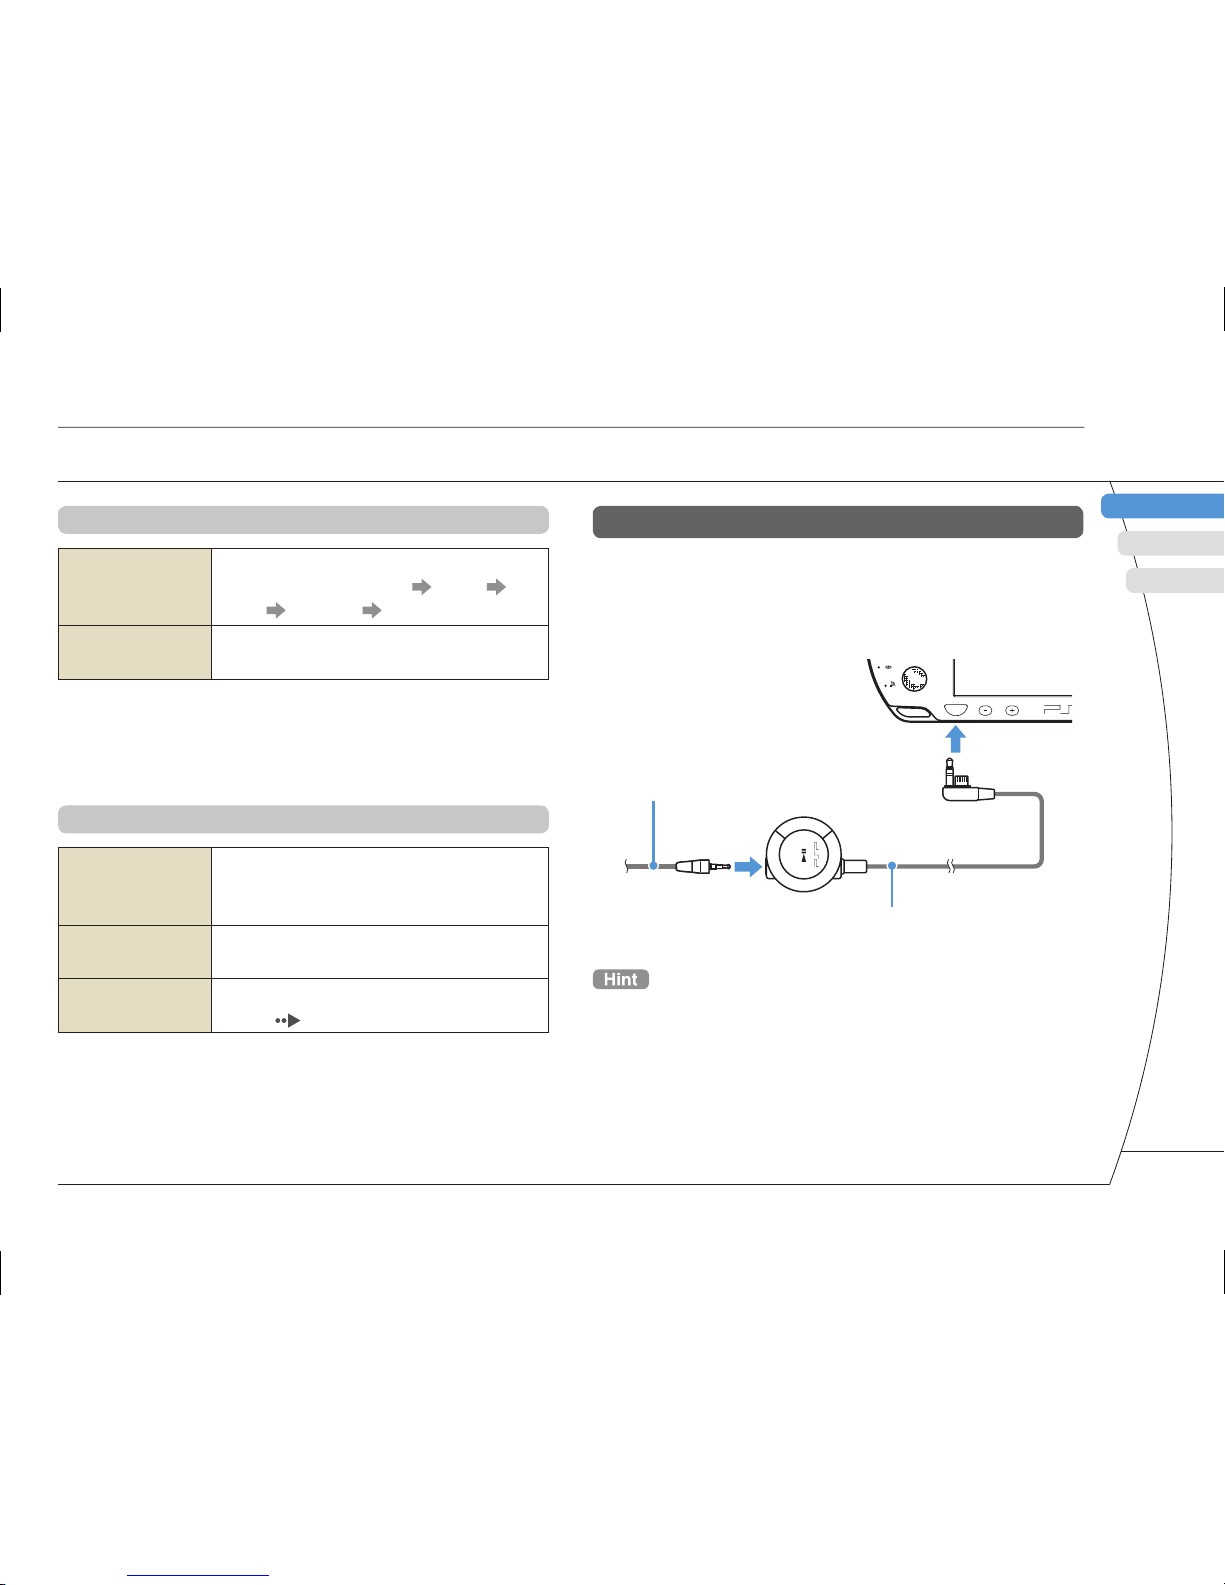
Headphones with remote control
You can connect the PSP-2000 series headphones
with remote control (sold separately). You can also
connect commercially available headphones (with a
stereo mini plug).
HOME
VOL
2
1
Headphones
Remote control
The PSP-1000 series remote control cannot be used with the
PSP-2000 series system.
9
Page 10
PSP-2001 3-218-749-11(1) US/FR/ES
04
Basic operations
Use the power/hold switch to turn the system on or
off, or to put it into sleep or hold mode.
PO
WER
HOL
D
STAR
T
S
E
L
E
C
T
A
B
C
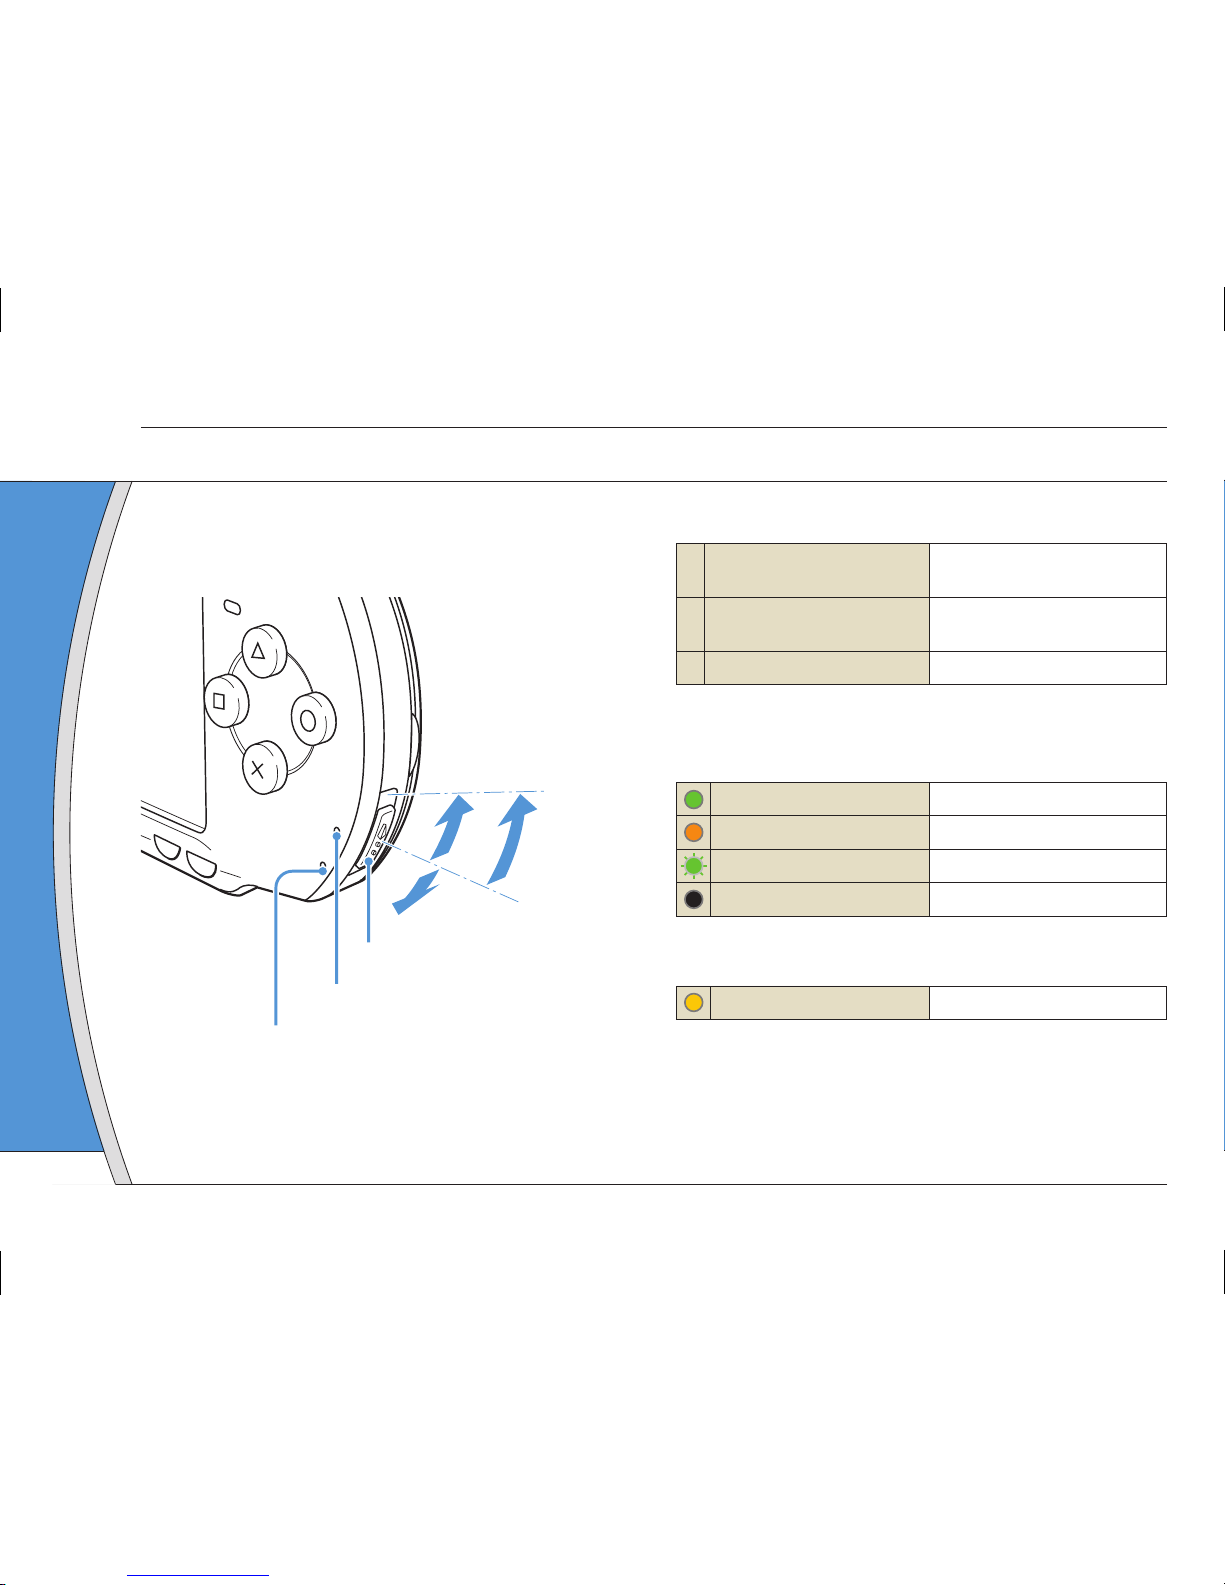
Power/hold switch
Power indicator
Hold indicator
Power/hold switch
A
Turning the system on /
Putting into sleep mode
Slide up
B Turning the system off
Slide up and hold for more
than three seconds
C Locking the system buttons*
Slide down
*All operations using system buttons are locked.
Power indicator
Solid green
Power on
Solid orange
Charging
Flashing green
Charge level is low
Light off
Power off/in sleep mode
Hold indicator
Solid yellow
In hold mode
Power and sleep mode functions
10
Page 11
DE
IT
NL
PT
PSP-2001 3-218-749-11(1) US/FR/ES
FR
US
ES
Basic operations
Sleep mode
If the PSP® system is switched to sleep mode, the
software that is playing will be paused. When sleep
mode is cleared, you can begin playback from the
point where the system entered sleep mode.
• To clear sleep mode, slide the power/hold switch up again.
During video or audio playback, you can press the
button of the remote control to clear sleep mode.
• Some software may prevent the system from entering sleep
mode.
Power and sleep mode functions
11
Page 12
PSP-2001 3-218-749-11(1) US/FR/ES
05
Playing content
Basic operations
UMD™ content
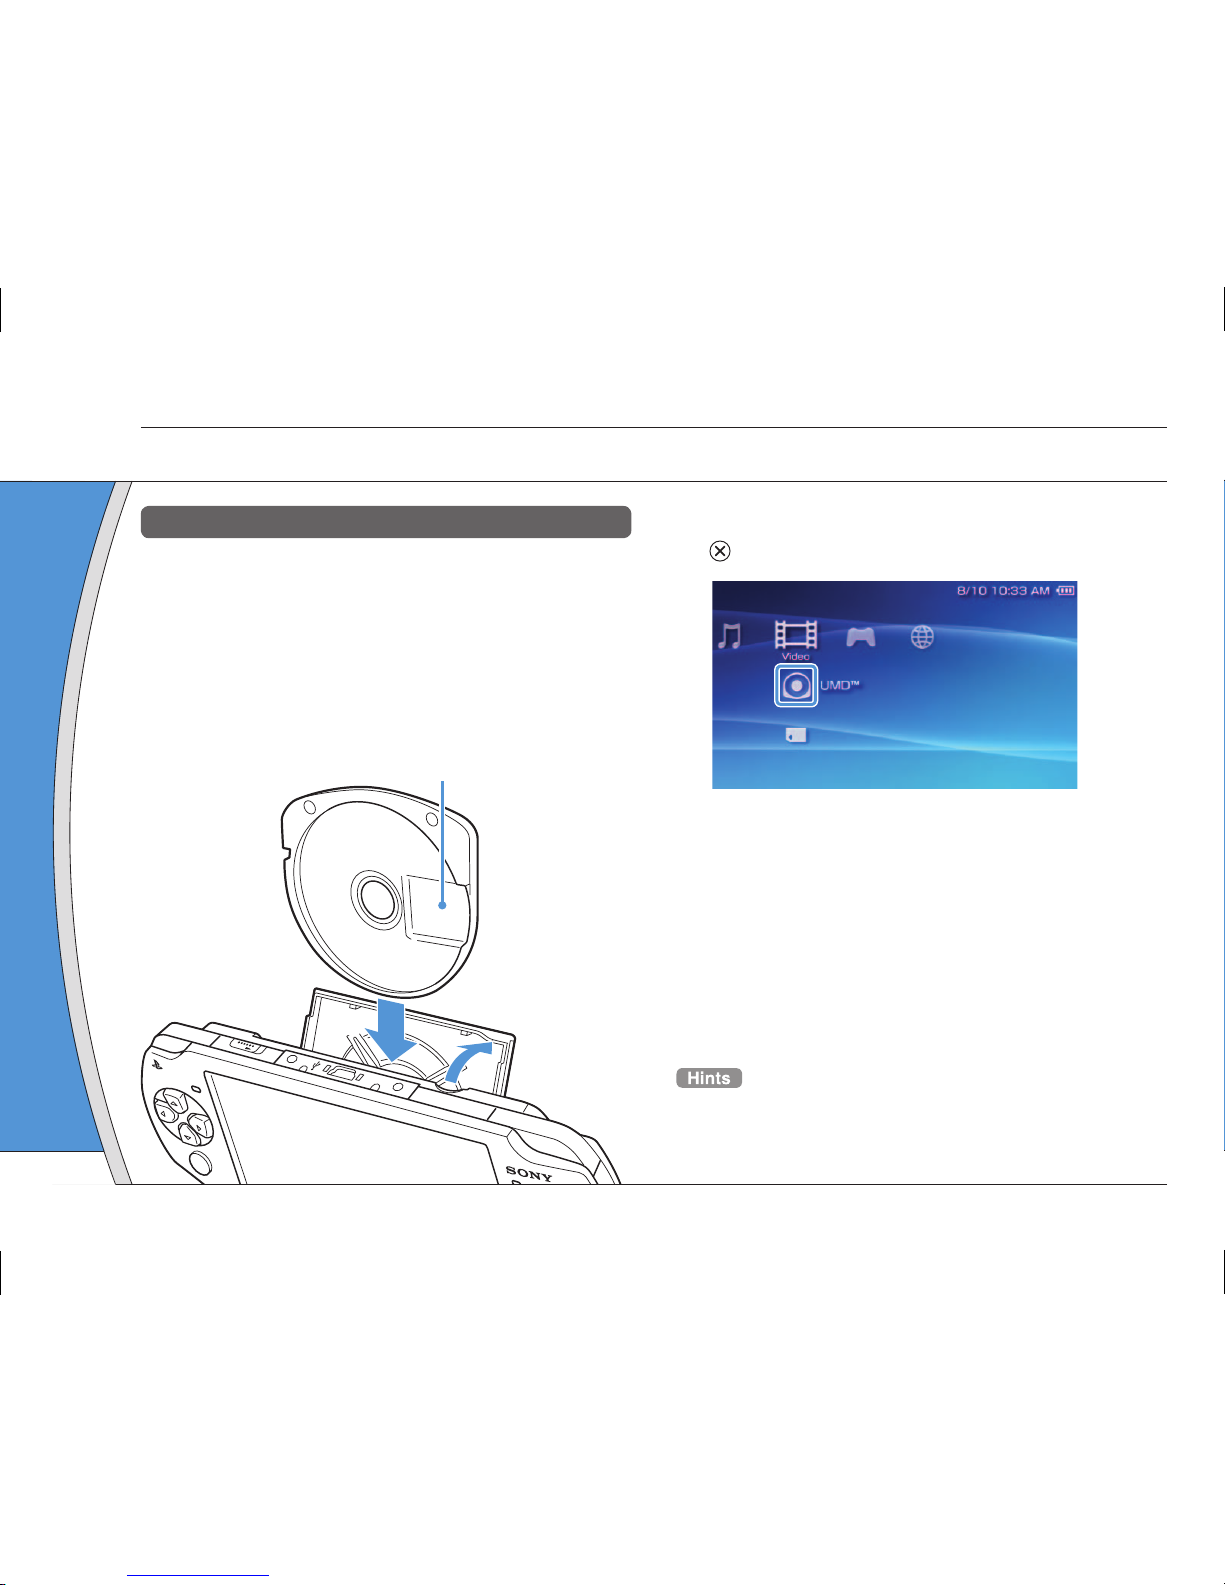
1 Place your fi nger in the indentation on
the top of the system to open the disc
cover.
2 Insert a UMD™ and close the disc cover.
Check that the disc cover is tightly closed.
The icon is displayed in the home menu.
W
L
A
N
1
2
Do not touch the recorded surface.
3 Select the icon, and then press the
button.
Playback begins.
• Press the home button to quit a game.
• To remove the UMD™, stop playback and then open the
disc cover.
12
Page 13
DE
IT
NL
PT
PSP-2001 3-218-749-11(1) US/FR/ES
FR
US
ES
Basic operations
Playing content
Content on Memory Stick Duo™ media (sold
separately)
Warning
Keep Memory Stick Duo™ media out of the reach of small
children, as the media could be swallowed by accident.
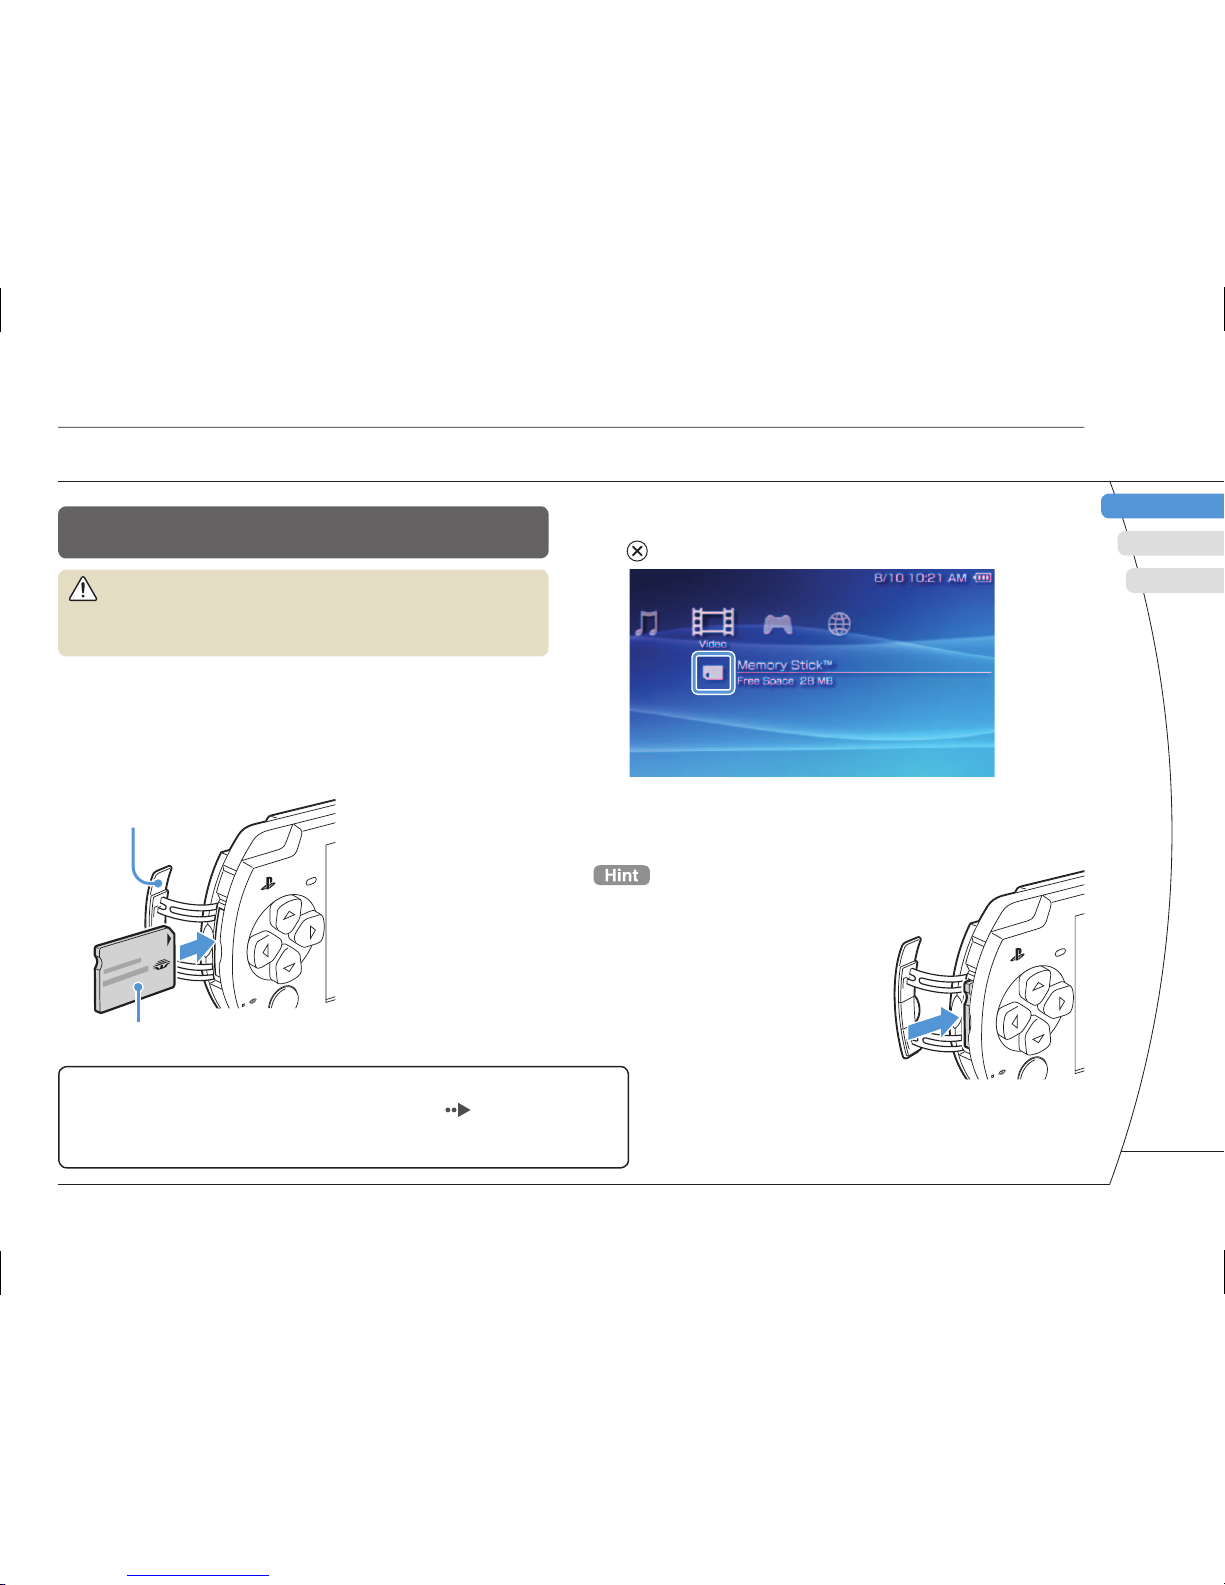
1 Open the slot cover.
2 Press the Memory Stick Duo™ media
until fully inserted.
The icon is displayed in the home menu.
Slot cover
Front side
3 Select the icon, and then press the
button.
A list of content that can be played is displayed.
To remove the Memory Stick Duo™
media, press the media once in the
direction of the arrow.
Notice
When the Memory Stick Duo™ access indicator ( page 8) is lit, do
not eject the Memory Stick Duo™ media, turn off the system, or put the
system into sleep mode. Doing so may cause data loss or corruption.
13
Page 14

PSP-2001 3-218-749-11(1) US/FR/ES
06
Checking the battery charge level
Basic operations
Methods of charging the battery
You can use either of the following methods to charge
the battery.
Using the AC adaptor
When you connect the AC adaptor to the PSP® system
and insert the plug for the power cord into an electrical
socket, charging will begin (
page 6).
Using a USB cable (sold separately)
Use a USB cable to connect the PSP® system to a device
equipped with a USB connector, such as a personal
computer. When you turn on the PSP
®
system and select
(USB Connection) under (Settings), the power
indicator will turn orange and charging will begin.
• You can connect a Mini-B (5-pin) type USB cable to the
USB connector of the PSP® system.
• For details about the charging time or duration, refer to the
supplied Safety & Support manual.
Battery charge level
There is plenty of power left.
The battery is getting low.
The battery has almost run out.
No battery power remains. The power indicator
fl ashes green. Recharge the battery.
Depending on the usage conditions and environmental
factors, the charge level display may vary from the actual
charge level.
14
Page 15
DE
IT
NL
PT
PSP-2001 3-218-749-11(1) US/FR/ES
US
FR
ES
07
Copying music/videos/images
Basic operations
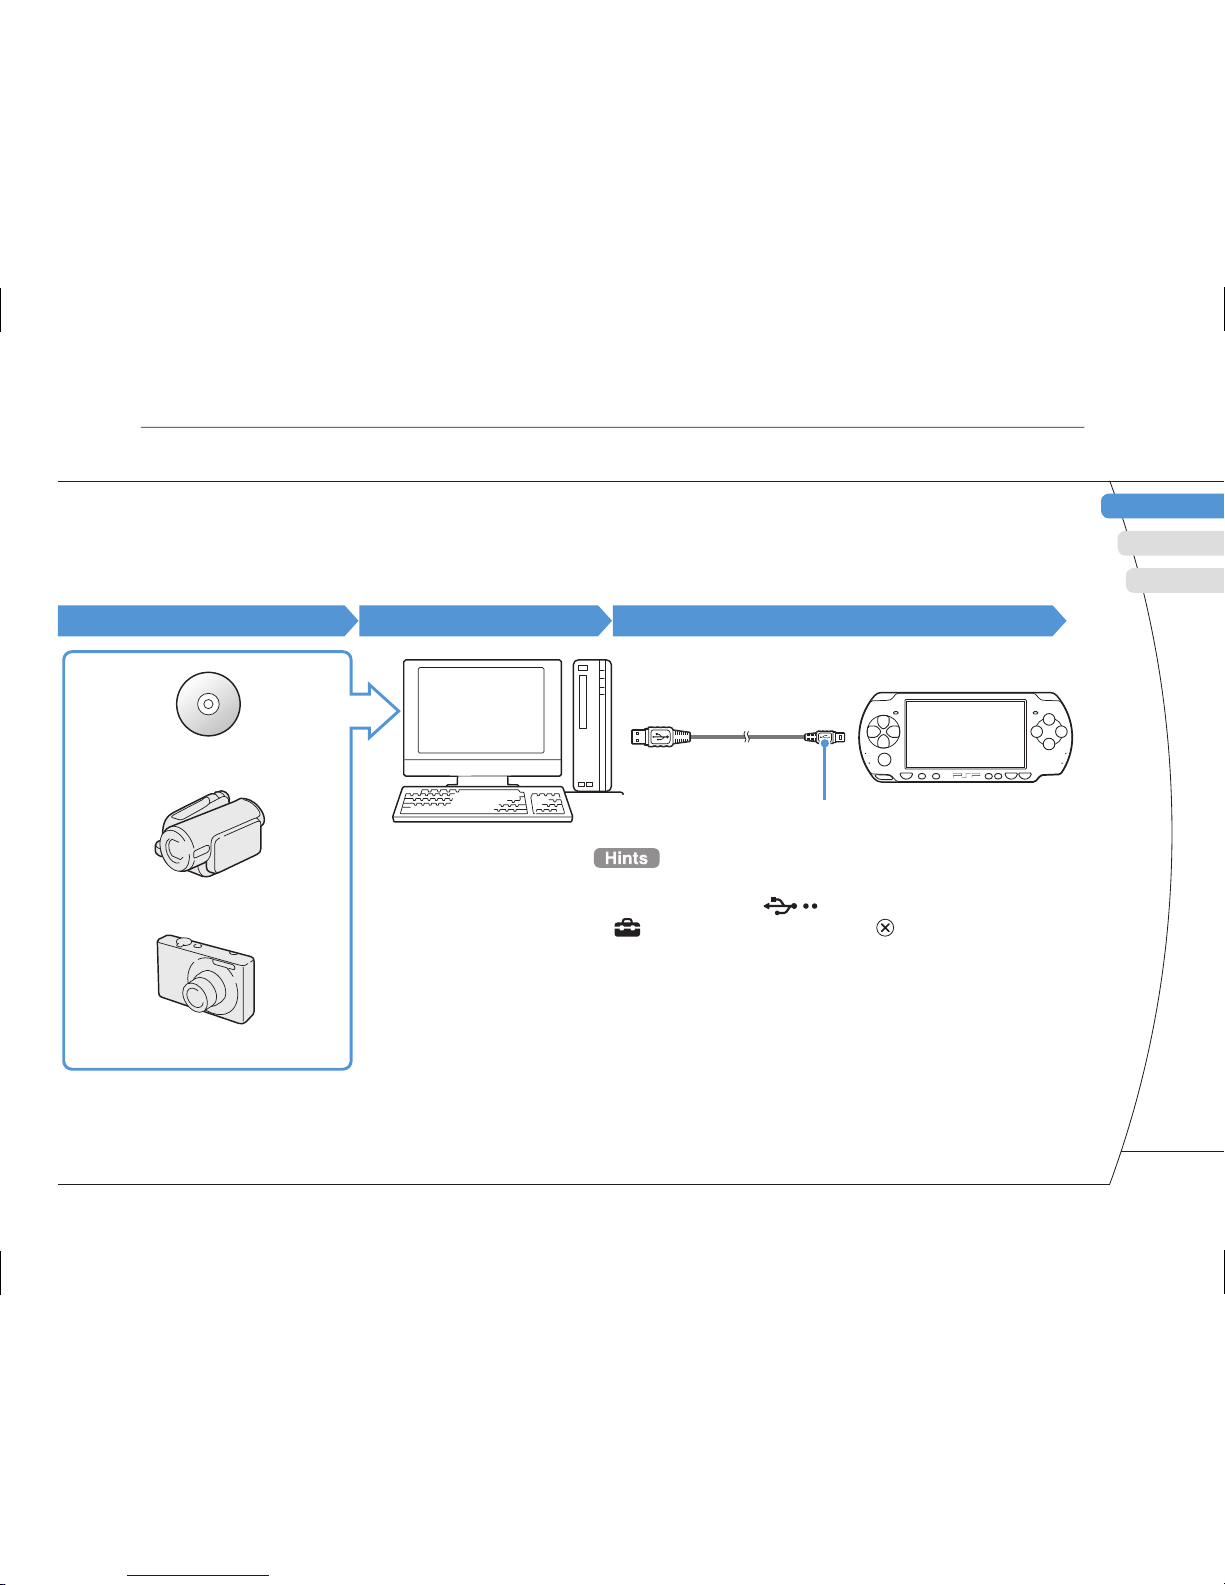
Copy music/video/image fi les to Memory Stick Duo™ media and play or view fi les on the PSP® system.
Copy methods vary depending on the device and software in use as well as fi le type. The following instructions
are based on the most common copying methods.
Music/video/image source
To a PC
To a PSP
®
system
Examples:
Audio CD
Digital video camera
Digital still camera
PC
USB cable
Mini-B (5-pin) type
• If using a USB cable, connect the cable to the PSP® system
and the PC, select (USB Connection) under
(Settings) and then press the button.
• You can connect to a PC with an operating system that
supports the USB mass storage class.
• Instead of a USB cable, you can use a Memory Stick USB
reader/writer (not included) or a PC with a Memory Stick™
slot.*
* A Memory Stick Duo Adaptor (model number MSAC-M2: a
Sony product sold separately) is required if your device
can handle only a standard-size Memory Stick™.
15
Page 16
PSP-2001 3-218-749-11(1) US/FR/ES
Basic operations
Copying music/videos/images
Copying music fi les
Example: Importing music tracks from an audio CD
1. Import
Use compatible software to import music tracks from an
audio CD to a PC.
2. Copy
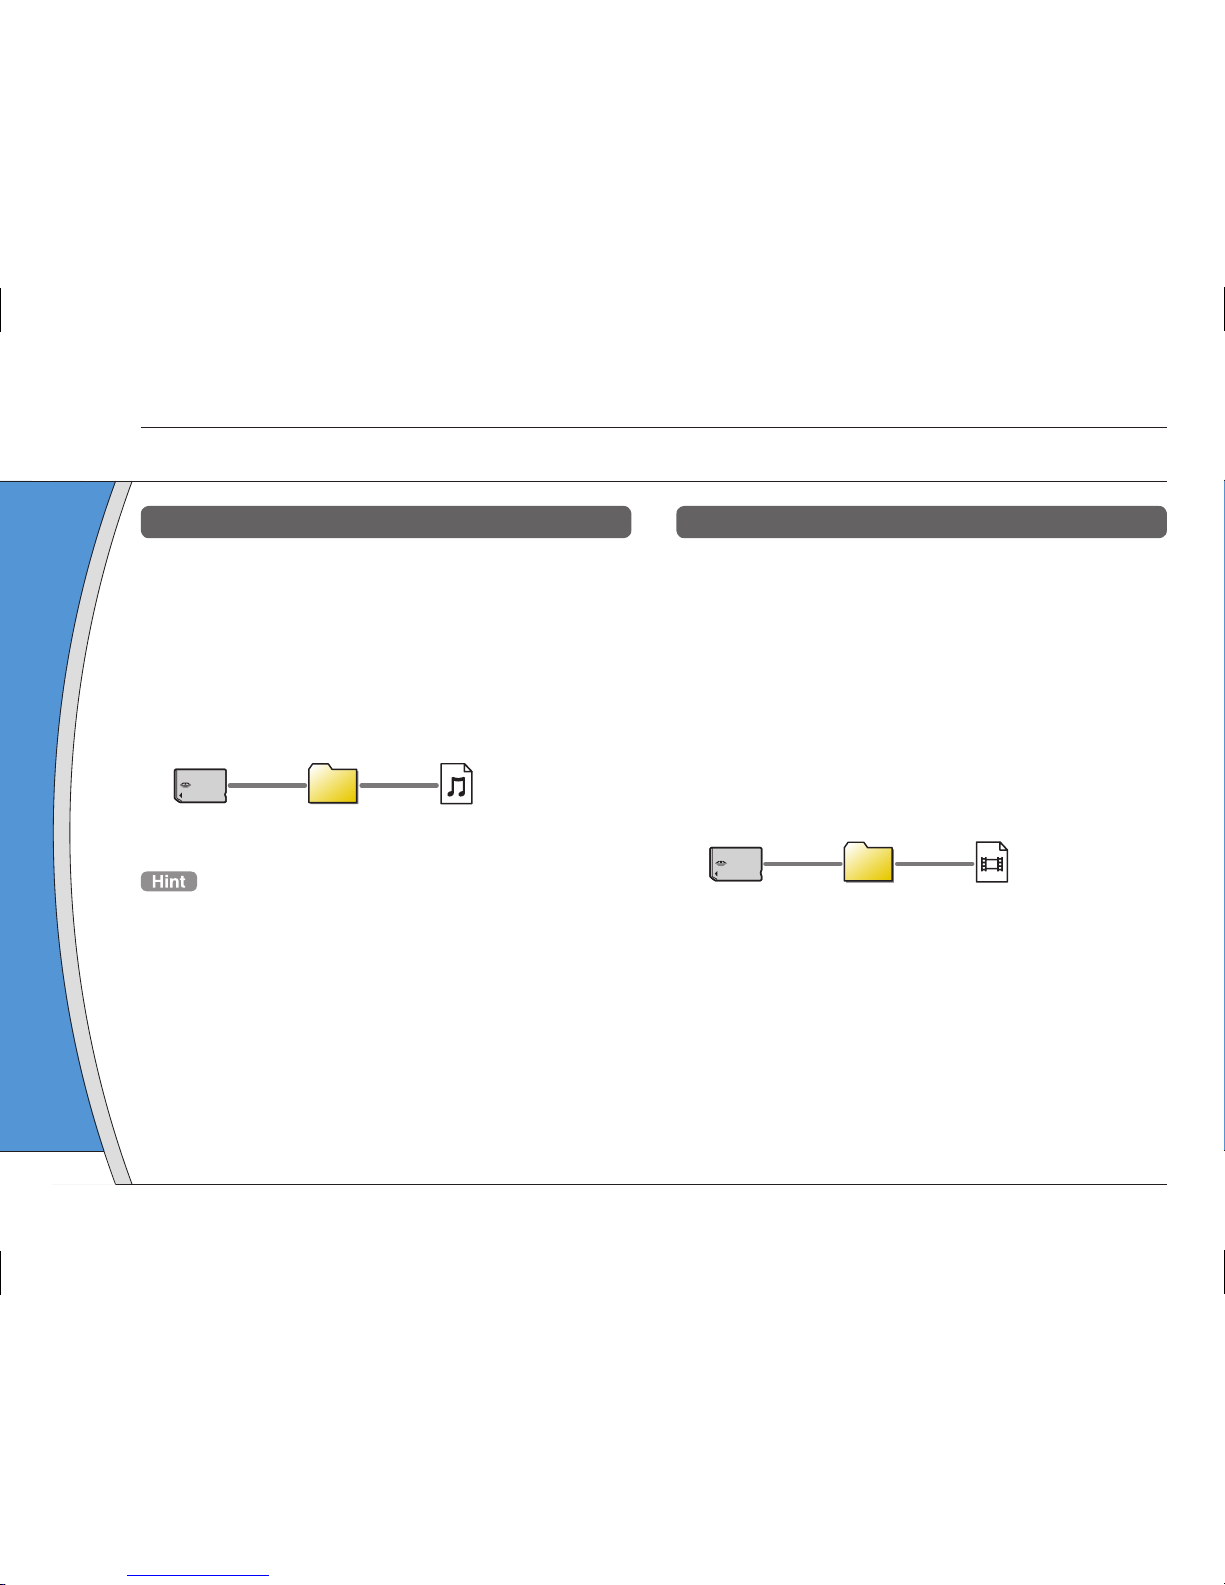
Create a folder named "MUSIC" on Memory Stick Duo™
media using a PC, and then save music fi les in the folder.
MUSIC
File formats that can be played include MP3, AAC, and
ATRAC.
Copying video fi les
Example: Importing video from a digital video camera
1. Import
Import video to a PC.
Import methods vary depending on the device in use. For
details, refer to the instructions supplied with the device.
2. Convert/Copy
Use compatible software to convert the video to a fi le
format that can be played on the PSP
®
system. Then,
create a folder named "VIDEO" on the Memory Stick
Duo™ media and save the video fi les in the folder.
VIDEO
16
Page 17
DE
IT
NL
PT
PSP-2001 3-218-749-11(1) US/FR/ES
FR
US
ES
Basic operations
Copying music/videos/images
Copying image fi les
Example: Importing images from a digital still camera
1. Import
Import images to a PC.
Import methods vary depending on the device in use. For
details, refer to the instructions supplied with the device.
2. Copy
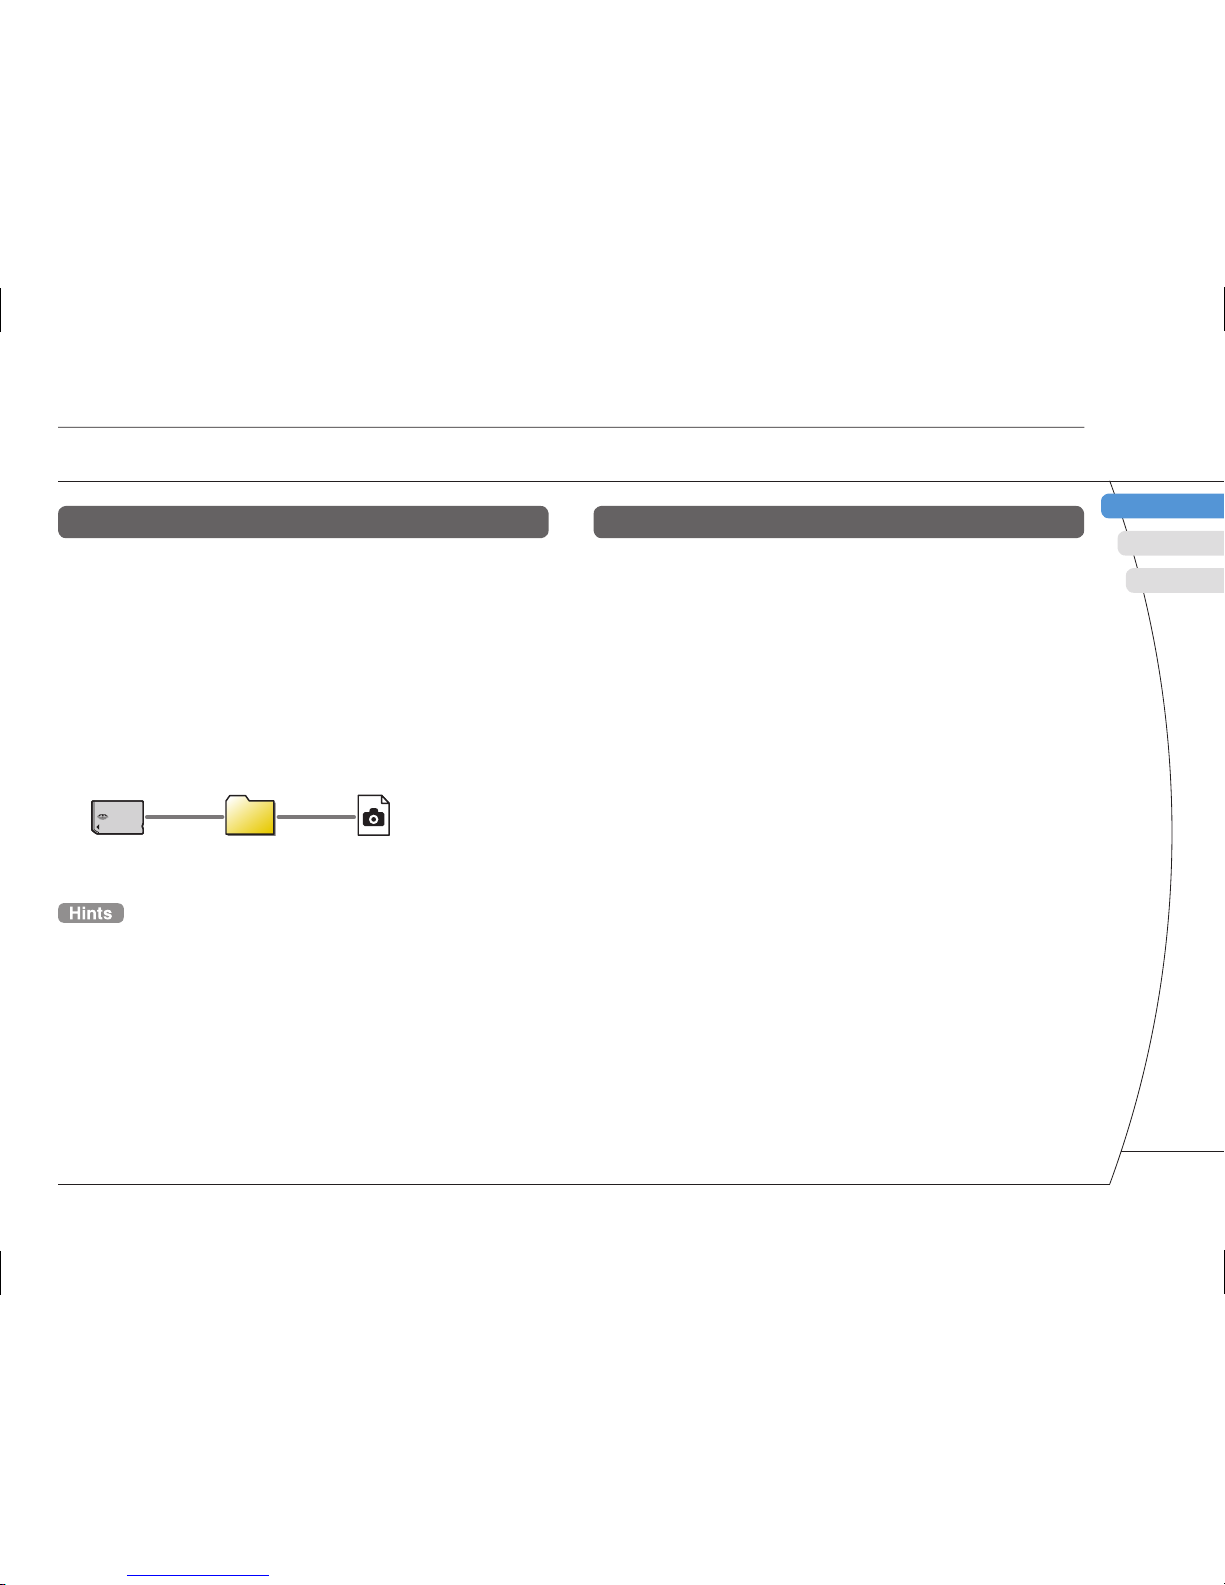
Create a folder named "PICTURE" on Memory Stick Duo™
media using a PC, and then save image fi les in the folder.
PICTURE
• If using a digital still camera that supports Memory Stick
Duo™ media, you can view images by inserting the media
from the camera directly into the PSP® system.
• You can view image fi les in formats such as JPEG (DCF 2.0/
Exif 2.21 compliant), TIFF and GIF.
Conversion software
PC software such as that listed below*1 can be used
to copy fi les. When you use the following software to
copy fi les to Memory Stick Duo™ media, the
necessary folders are created automatically.
• Media Manager for PSP
®
(PlayStation®Portable) System
You can use this software to convert music, video and
image fi les to the required formats.
• SonicStage
You can use this software to import music fi les from an
audio CD to your PC.
• Image Converter*
2
You can use this software to convert video fi les to an MP4
format that can be played on the PSP® system.
*1 All Sony products sold separately
*
2
Image Converter software version 1.5 or earlier is not
compatible with the PSP® system.
17
Page 18
PSP-2001 3-218-749-11(1) US/FR/ES
Basic operations
Outputting video to a TV
08
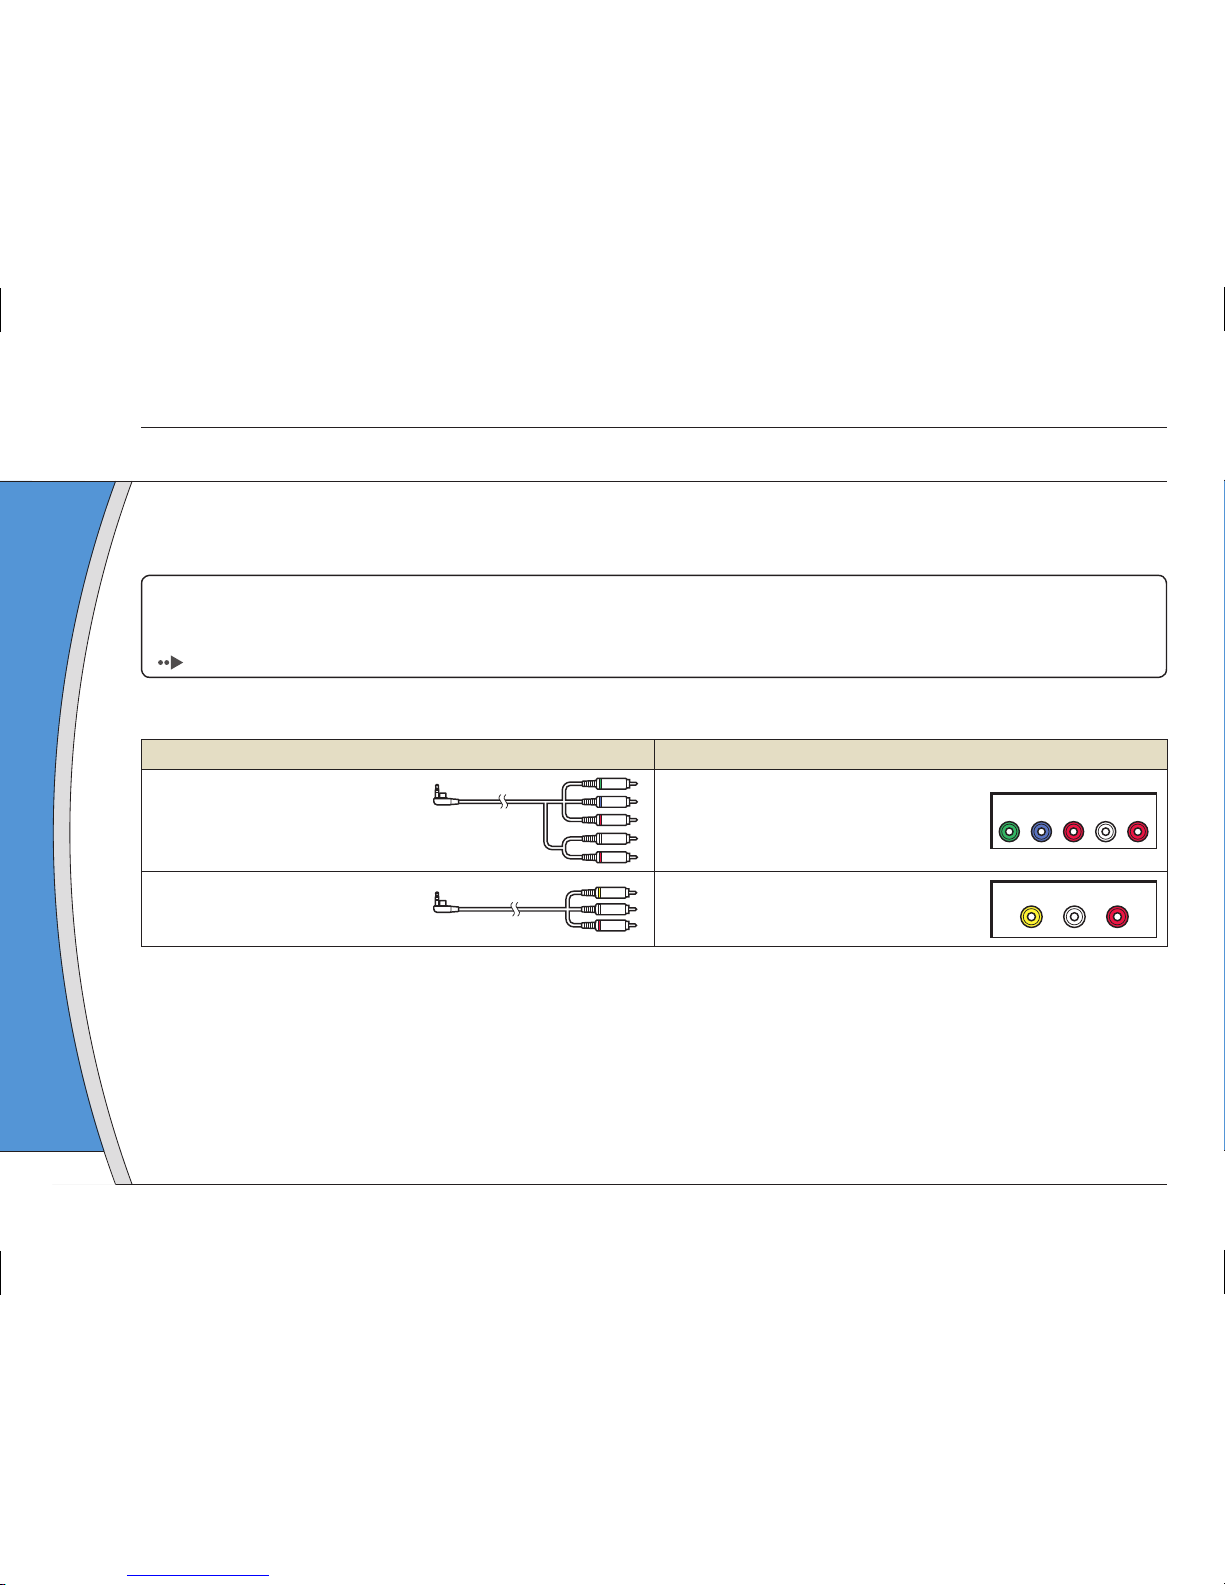
You can output PSP® system video to a TV using a video output cable (sold separately). You can view
UMD™VIDEO or video that was saved on Memory Stick Duo™ media. Select a cable suited for the TV in use.
Notice
Video from games can be output only when the TV in use and the cable connecting it support progressive mode screen display.
Also, video may not be able to be output to the TV for some functions other than games. For details, see the user's guide
( page 25).
Video output cable types
Cable type Input connector on the TV
Component AV cable
Component VIDEO IN connectors
YLRPR/C
R
PB/C
B
COMPONENT VIDEO IN AUDIO IN
AV cable* VIDEO IN connector (composite)
VIDEO L-AUDI O-R
* Progressive video cannot be output.
O
18
Page 19
DE
IT
NL
PT
PSP-2001 3-218-749-11(1) US/FR/ES
FR
US
ES
Basic operations
Outputting video to a TV
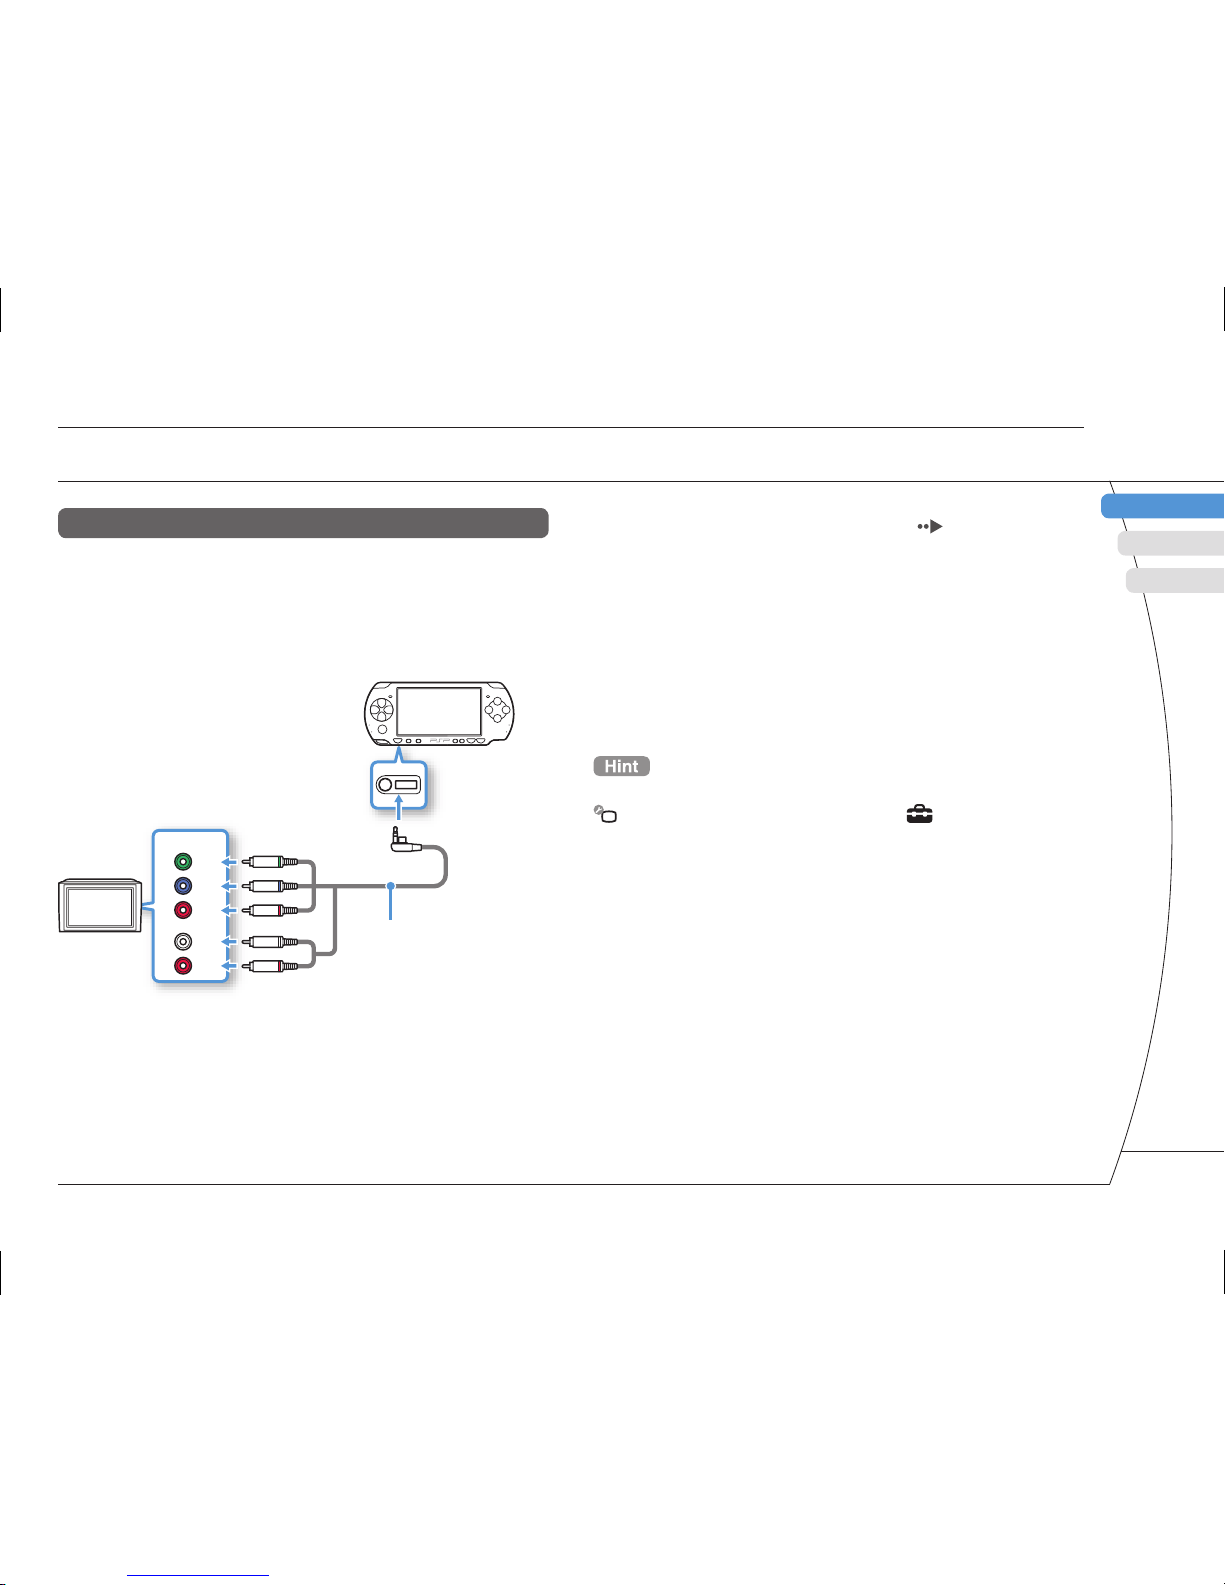
Outputting to a TV
1 Connect the PSP
®
system to the TV using
a video out cable (sold separately).
Example: Connecting the PSP® system to a TV with
component video input connectors
COMPONENT
VIDEO IN
AUDIO IN
L
R
Y
P
B/CB
PR/C
R
Component VIDEO
IN connectors
TV
Component AV cable
(sold separately)
2 Adjust the video input setting for the TV.
Set to the input connectors in use.
3 Turn on the PSP
®
system ( page 10),
and then press and hold the display
button on the system front for at least 5
seconds.
Video from the PSP® system will be displayed on the TV.
Clearing video output
To clear video output, press the display button again.
You can change video output or adjust settings in
(Connected Display Settings) under (Settings).
19
Page 20
PSP-2001 3-218-749-11(1) US/FR/ES
Warning
Turn off the WLAN switch when in crowded places, such as
in a crowded train. If a person nearby is using a pacemaker,
it is possible that the radio waves could affect the
pacemaker.
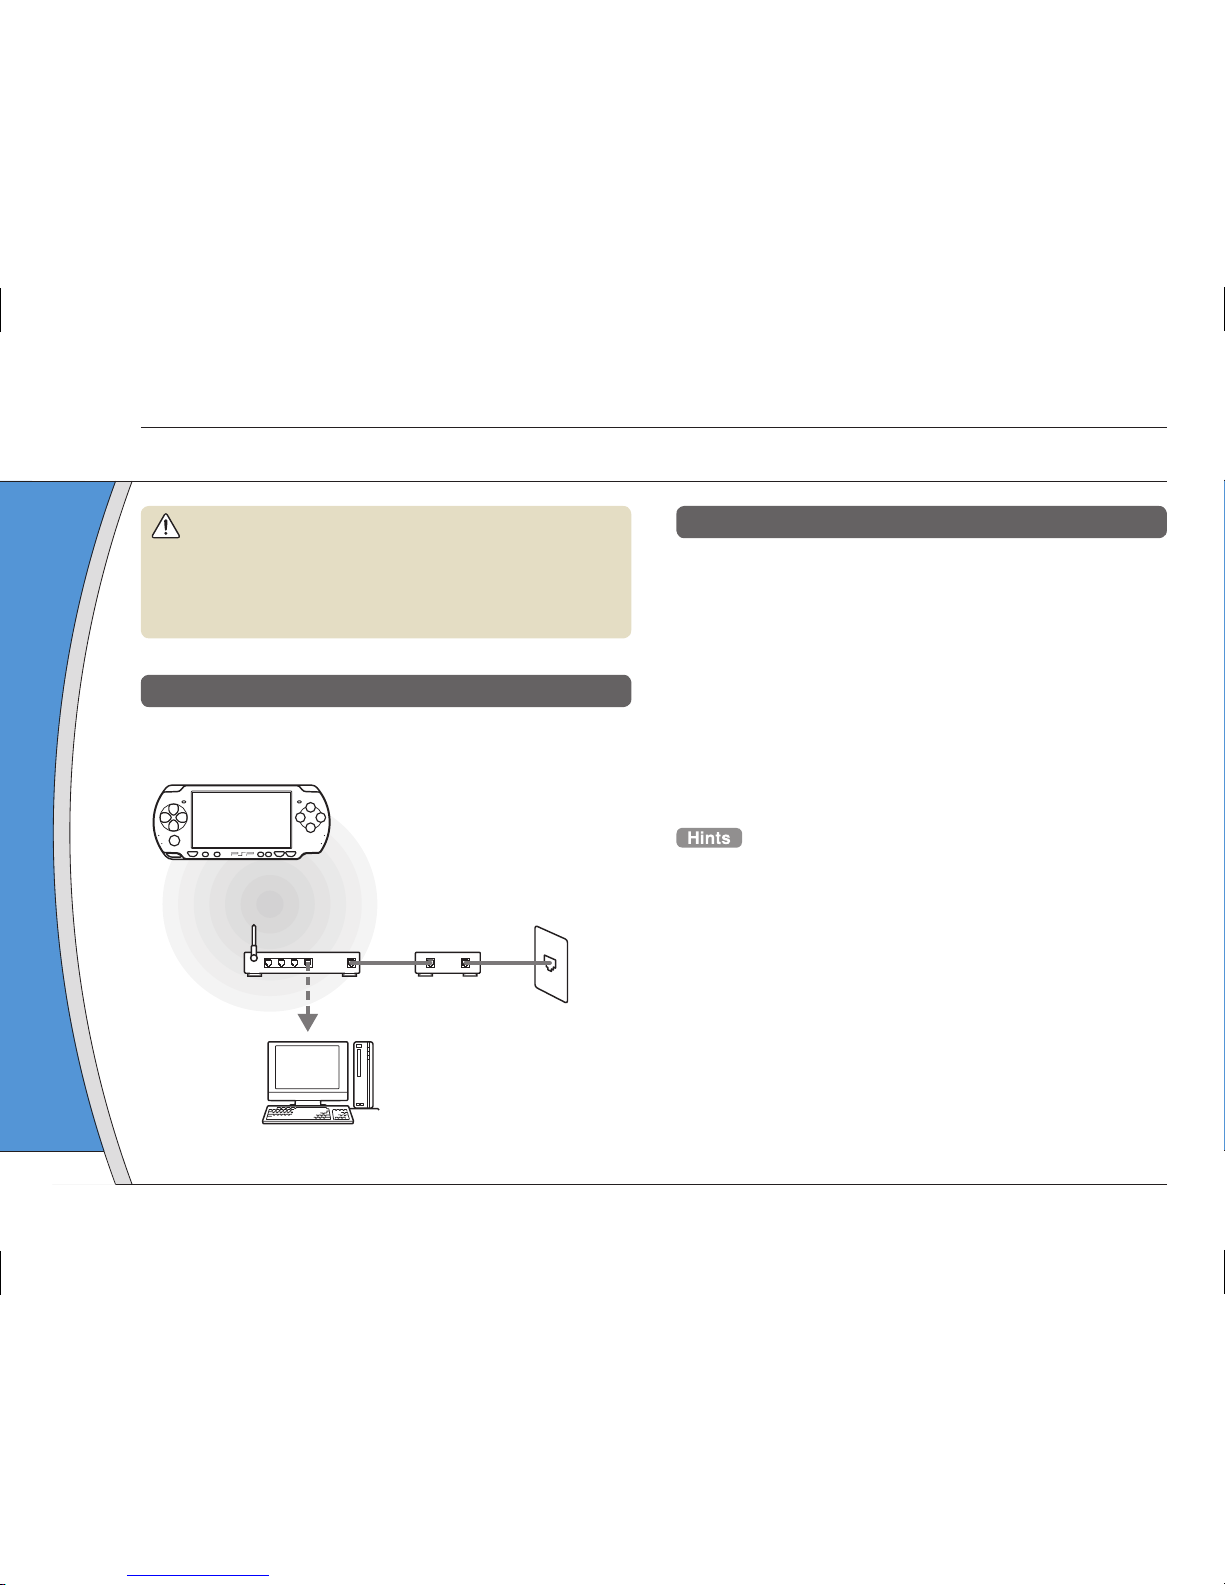
Example of a network confi guration
Network equipment connections and setup methods
vary depending on the equipment used.
Access point or
wireless router
Network device
such as a DSL or
cable modem
Example of a common
network confi guration
Internet line
PC
Required items
The following items are generally required to set up
the system to connect to a network.
• Subscription to an Internet service provider
• A network device, such as a DSL or cable modem
• A WLAN access point or a wireless broadband
router
• Settings for the access point (SSID, WEP key, WPA
key, etc. as specifi ed when the access point was
confi gured)
• An access point is a device used to connect to a wireless
network.
• A wireless broadband router is a device that includes both
router and access point functions. A router is required if you
are connecting a PC and the PSP
®
system to one Internet
line at the same time.
• SSID, WEP and WPA keys are types of wireless network
information. They may be required when connecting to an
access point or a router. This information is generally set in
the access point or router using a PC. For details, refer to
the instructions supplied with the access point or router.
• User is responsible for Internet service fees.
Network
Adjusting network settings
09
20
Page 21
DE
IT
NL
PT
PSP-2001 3-218-749-11(1) US/FR/ES
FR
US
ES
Network
Adjusting network settings
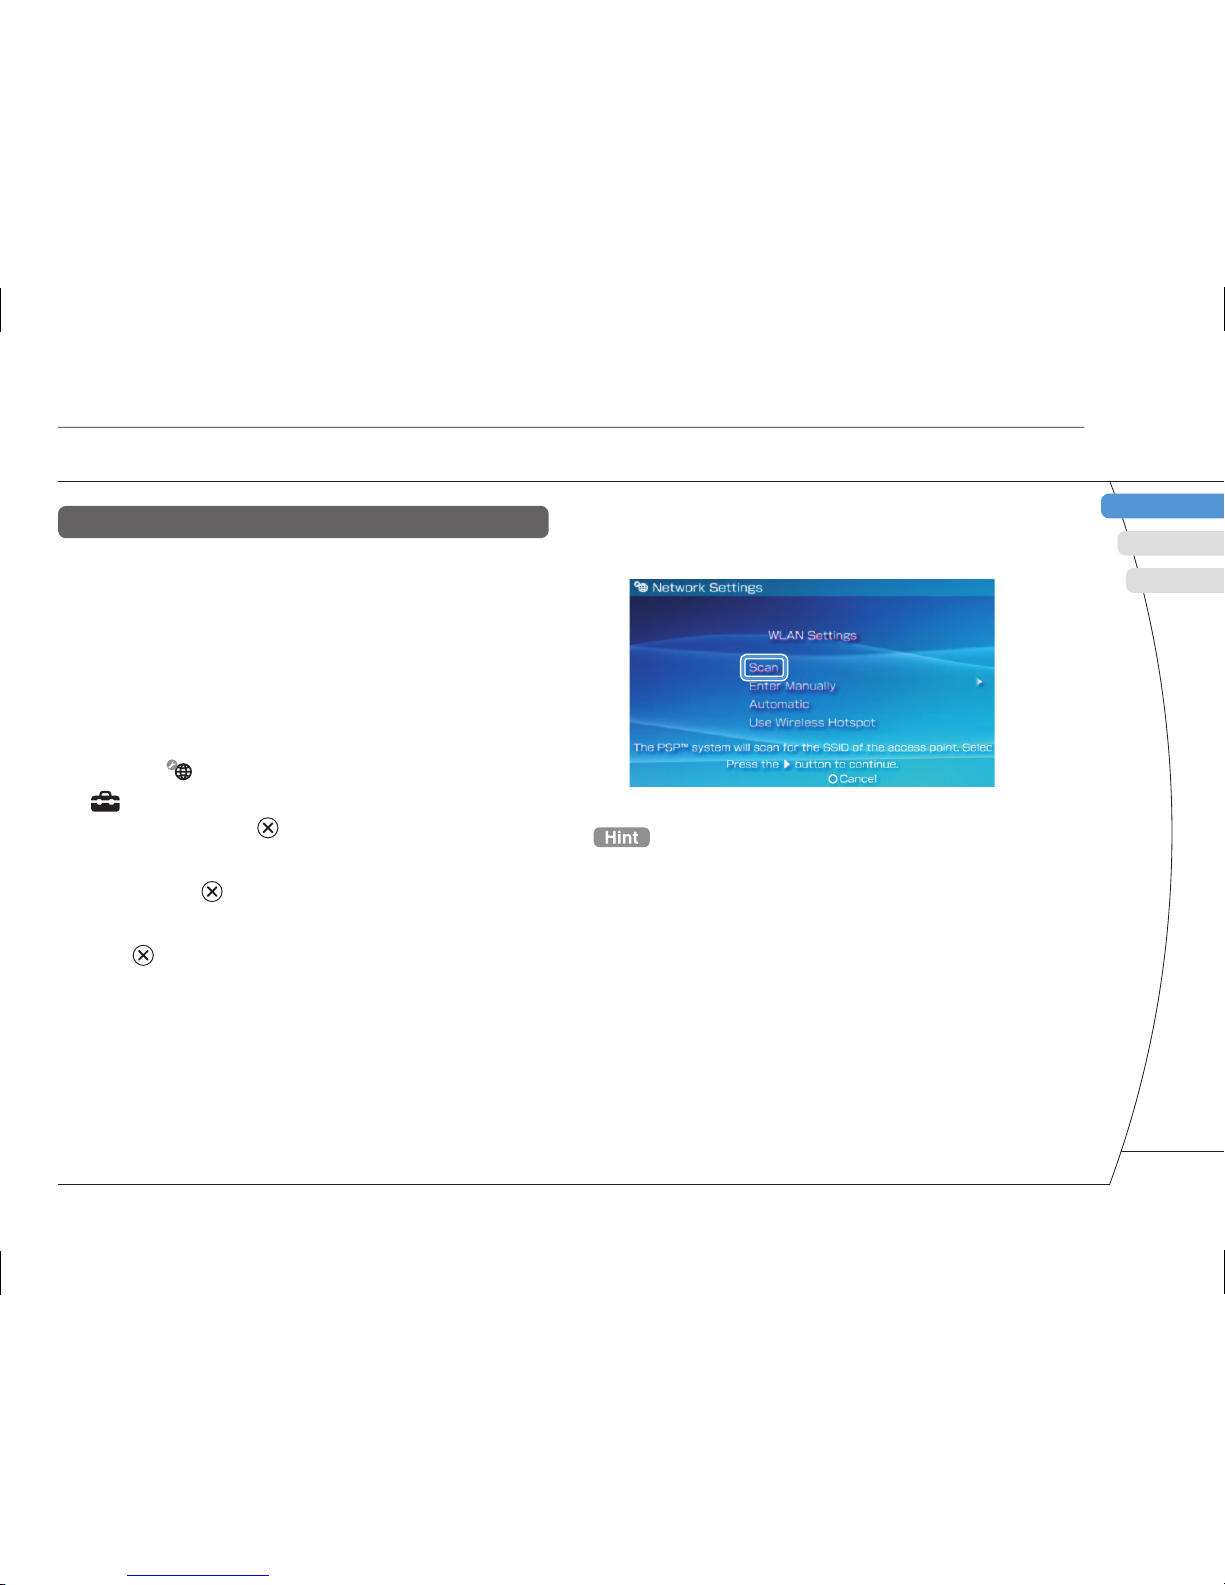
4 Select "Scan", and then press the
right button.
When using an access point that supports automatic setup,
select "Automatic" and then follow the on-screen instructions to
automatically complete the necessary settings. For information
on access points that support automatic setup, contact the
access point retailer.
Creating a new network connection
You can adjust network settings to connect to an
access point and save the network connection data
on the system. Network settings may vary depending
on the equipment in use and the network
environment. The following instructions are based on
the most common network confi guration and may not
apply to all installations.
1 Select (Network Settings) under
(Settings) from the home menu, and
then press the button.
2 Select "Infrastructure Mode", and then
press the button.
3 Select "New Connection", and then press
the button.
21
Page 22
PSP-2001 3-218-749-11(1) US/FR/ES
Network
Adjusting network settings
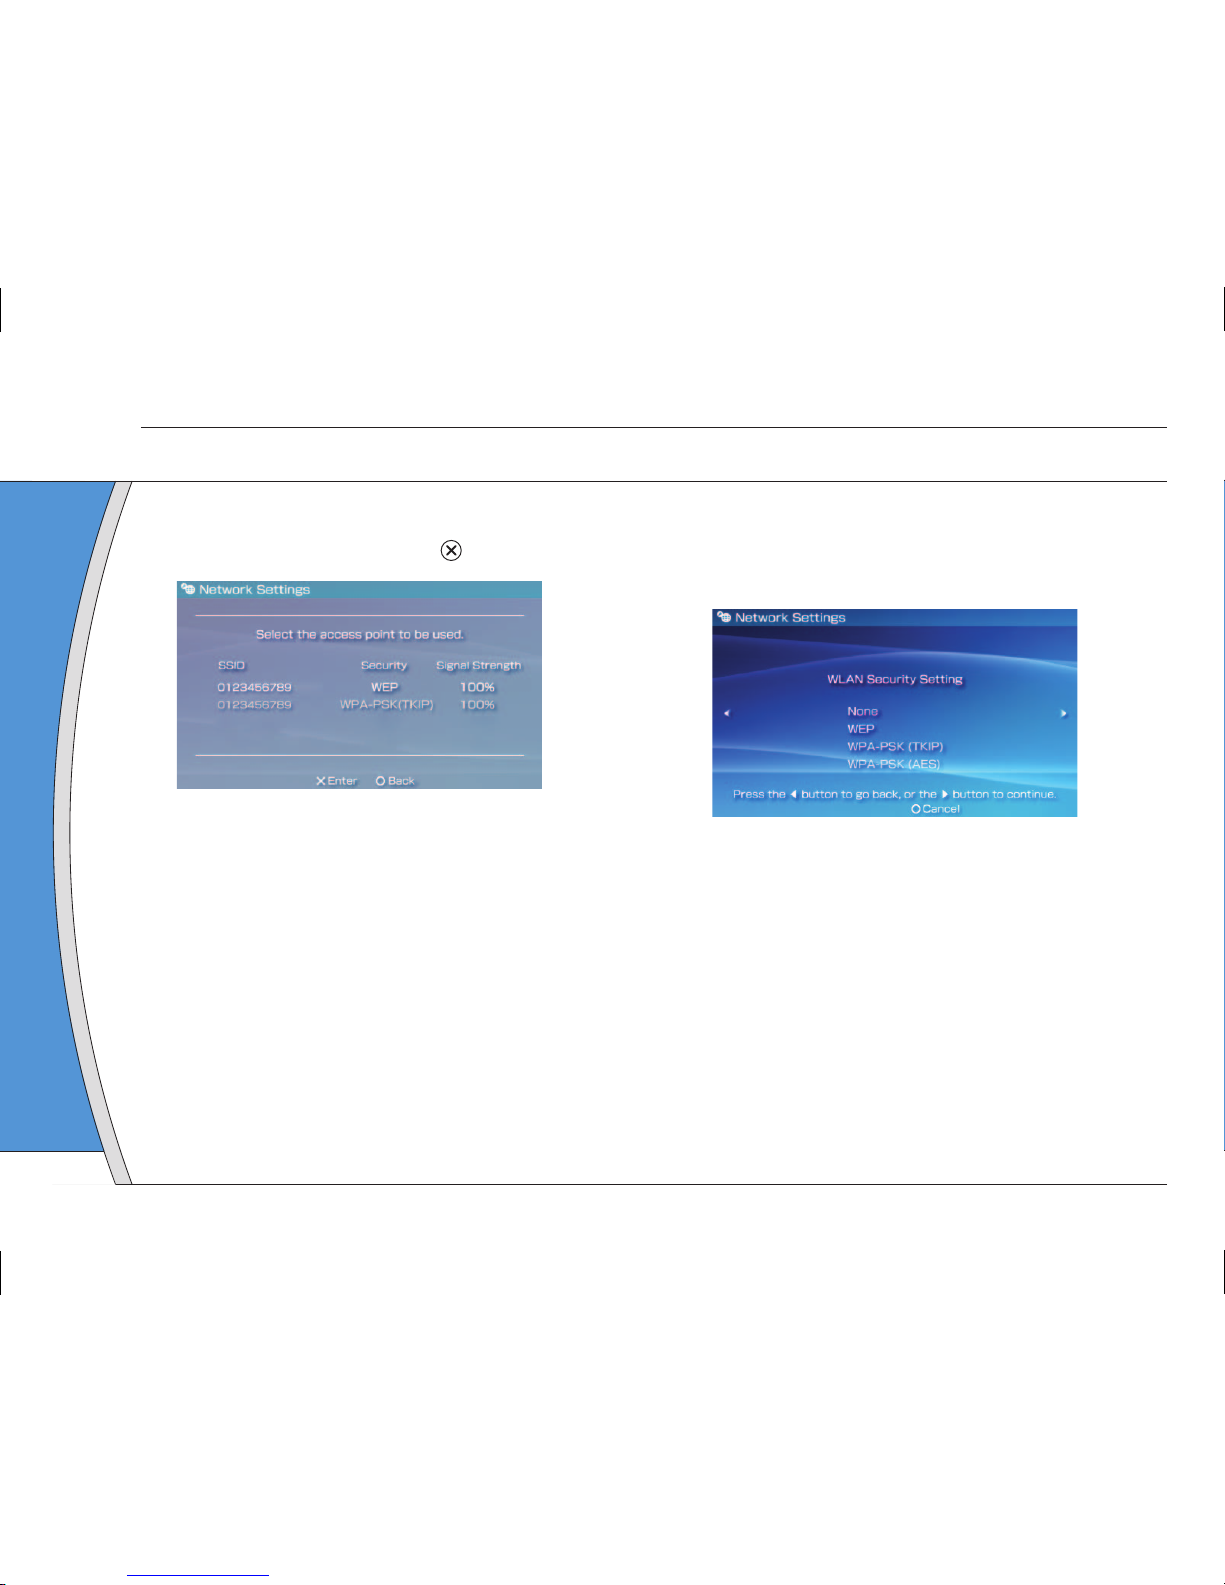
5 Select the access point that you want to
use, and then press the button.
An SSID is a code or a name that is assigned to the
access point. If you do not know which SSID to use or if
the SSID is not displayed, contact the person who set up
or maintains the access point.
6 Confi rm the SSID for the access point,
and then press the right button.
7 Select the security settings as
necessary, and then press the right
button.
Security settings vary depending on the access point in
use. To determine which settings to use, contact the
person who set up or maintains the access point.
8 Enter the encryption key, and then press
the right button.
The encryption key fi eld will display an asterisk (*) for
each character you enter. If you do not know the key,
contact the person who set up or maintains the access
point.
22
Page 23
DE
IT
NL
PT
PSP-2001 3-218-749-11(1) US/FR/ES
FR
US
ES
11 Check the setting list.
The setting values you entered are displayed. Follow the
on-screen instructions to complete your network settings.
• If the connection test fails, follow the on-screen instructions
to check the settings. Network settings for the connection
can be changed from the options menu. For additional
information, refer to the instructions supplied with the access
point or router, or contact your Internet service provider.
• Depending on the access point in use, you may need the
MAC address for your system when connecting to a
network. You can fi nd the MAC address under (Settings)
(System Settings) "System Information".
• For additional information on network settings, refer to the
online user's guide (
page 25).
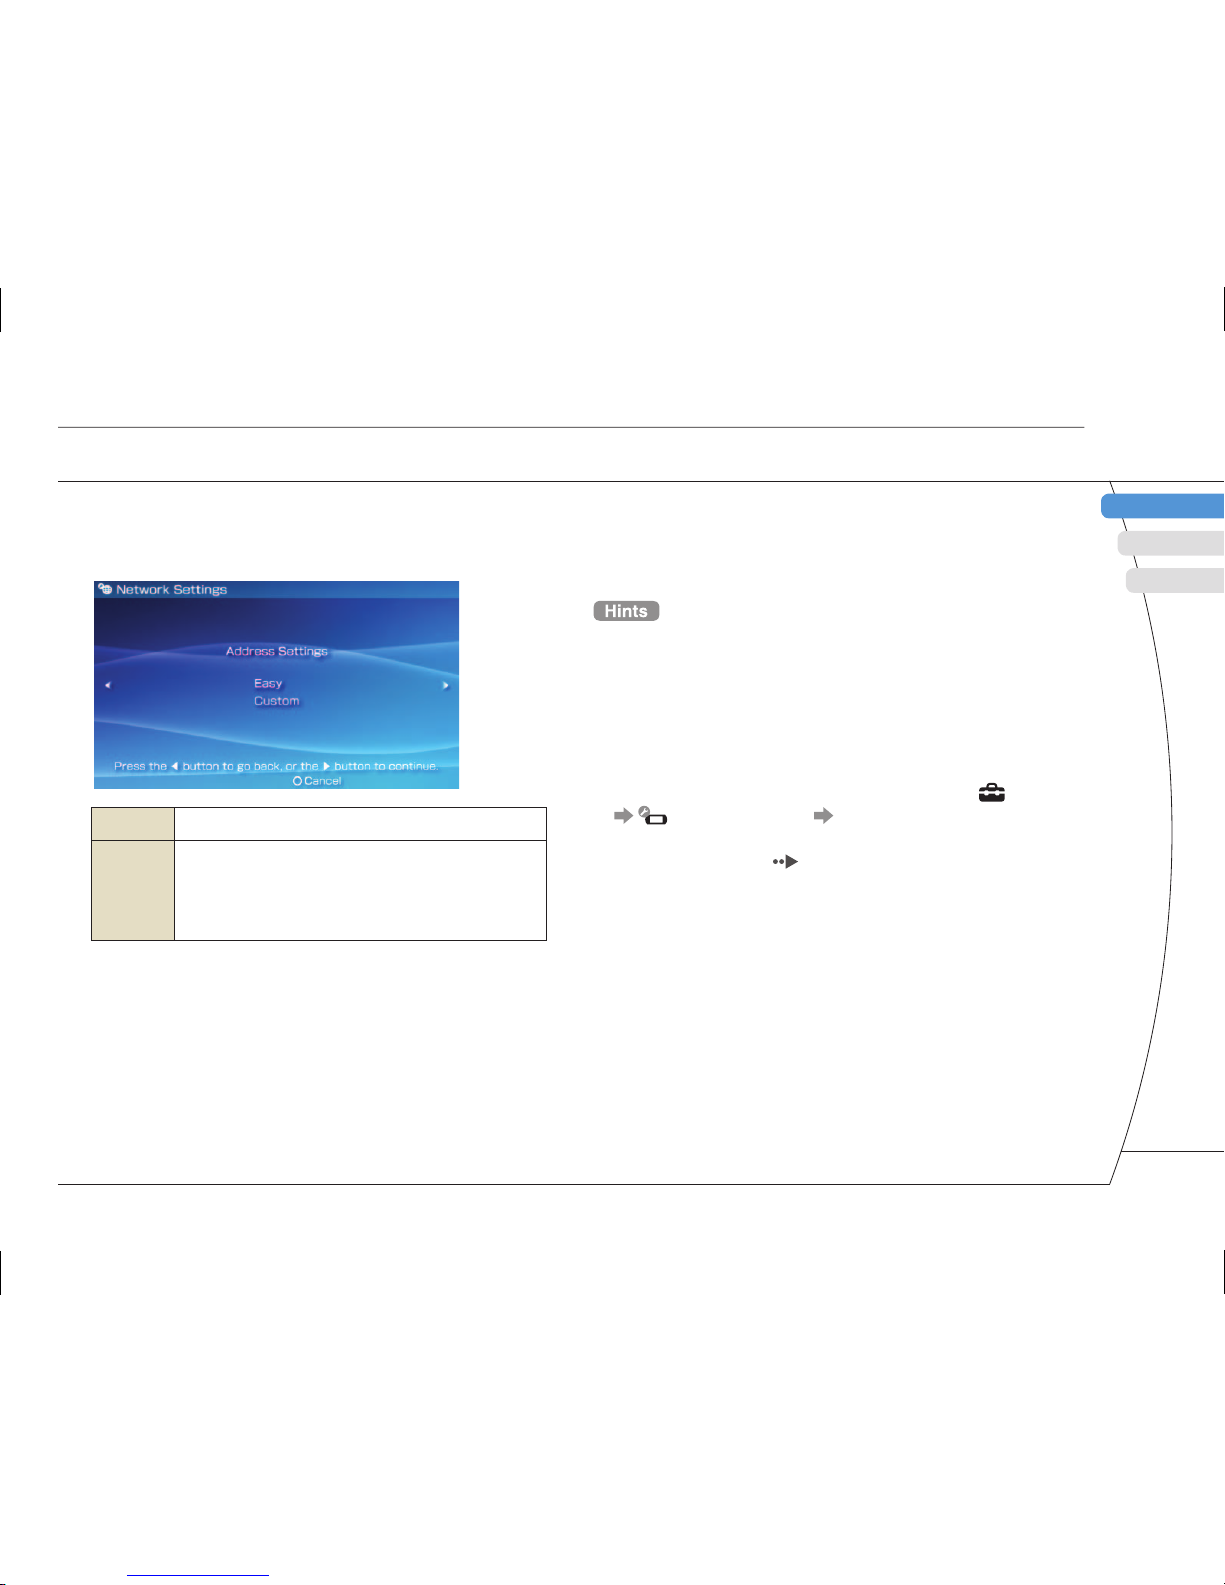
9 Select "Easy" or "Custom" and adjust
settings as necessary.
Easy
Basic settings are set automatically.
Custom
You can manually enter detailed settings
information. For information on settings, refer
to the instructions supplied by the Internet
service provider or with the network device.
If you select "Custom", follow the on-screen instructions
and adjust settings as necessary.
10 Check the connection name, and then
press the right button.
You can revise the connection name to use any name you
like.
Network
Adjusting network settings
23
Page 24
PSP-2001 3-218-749-11(1) US/FR/ES
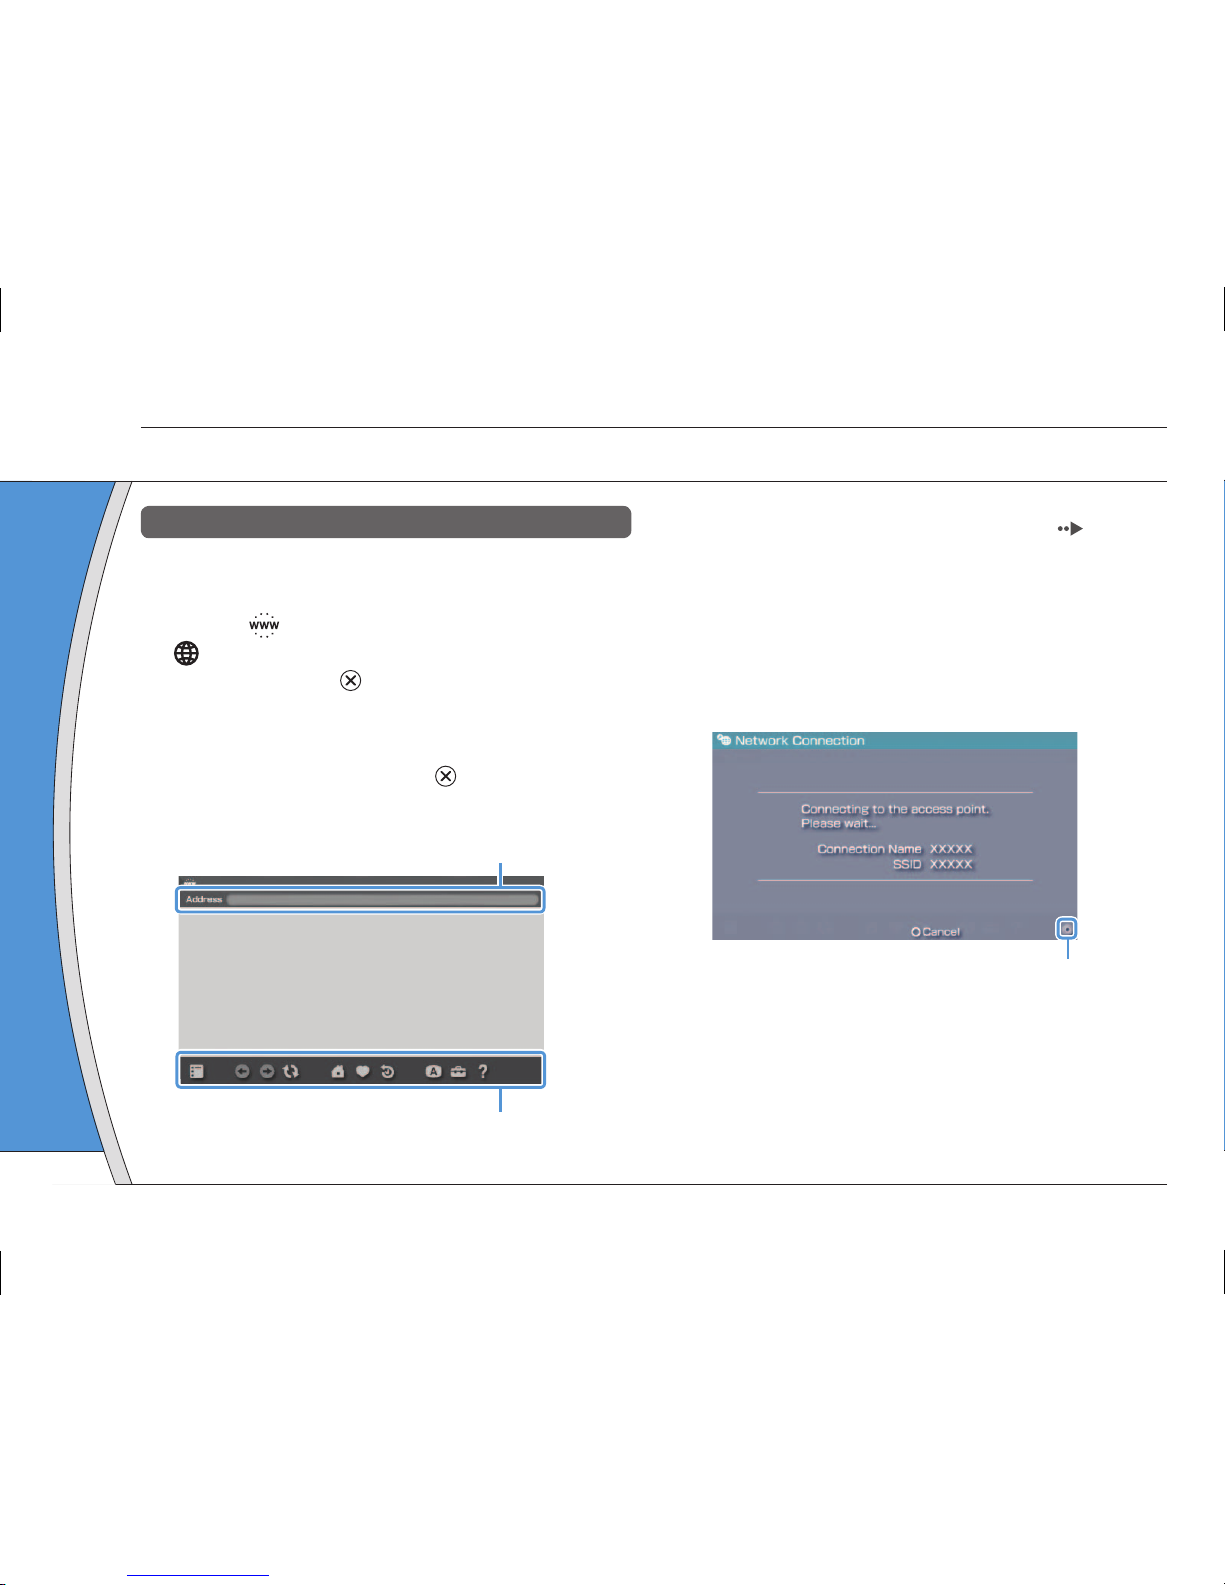
4 Using the on-screen keyboard ( page
26), enter the address for the Web page.
After you have entered the address, the PSP® system will
connect to the Internet. While the page is loading, the
busy icon is displayed in the lower right corner of the
screen.
When a connection is successfully established, the Web
page will be displayed.
Busy icon
Using the Internet browser
1 Check that you have access to a wireless
network.
2 Select (Internet Browser) under
(Network) from the home menu, and
then press the button.
The Internet browser starts.
3 Using the up button, select the address
bar, and then press the button.
The on-screen keyboard is displayed.
Address bar
Menu bar
Network
Connecting to the Internet
10
24
Page 25
DE
IT
NL
PT
PSP-2001 3-218-749-11(1) US/FR/ES
FR
US
ES
Basic operations of the Internet browser
button +
analog stick
Scroll in any direction
button +
directional button
Scroll by screen
L button
Go back to the previous page
button
Toggle the menu bar* on and off
* From the menu bar, you can access various features and
settings such as "Back" and "Close Page".
• If you try to open a Web page using the Internet browser
when a connection to the Internet has not been established,
the system will automatically try to connect to the Internet.
• With the default setting, the most recently used connection
will be automatically selected when connecting to the
Internet.
Viewing the online user's guide
You can use the Internet browser to view the online
user's guide for the PSP
®
(PlayStation®Portable)
system.
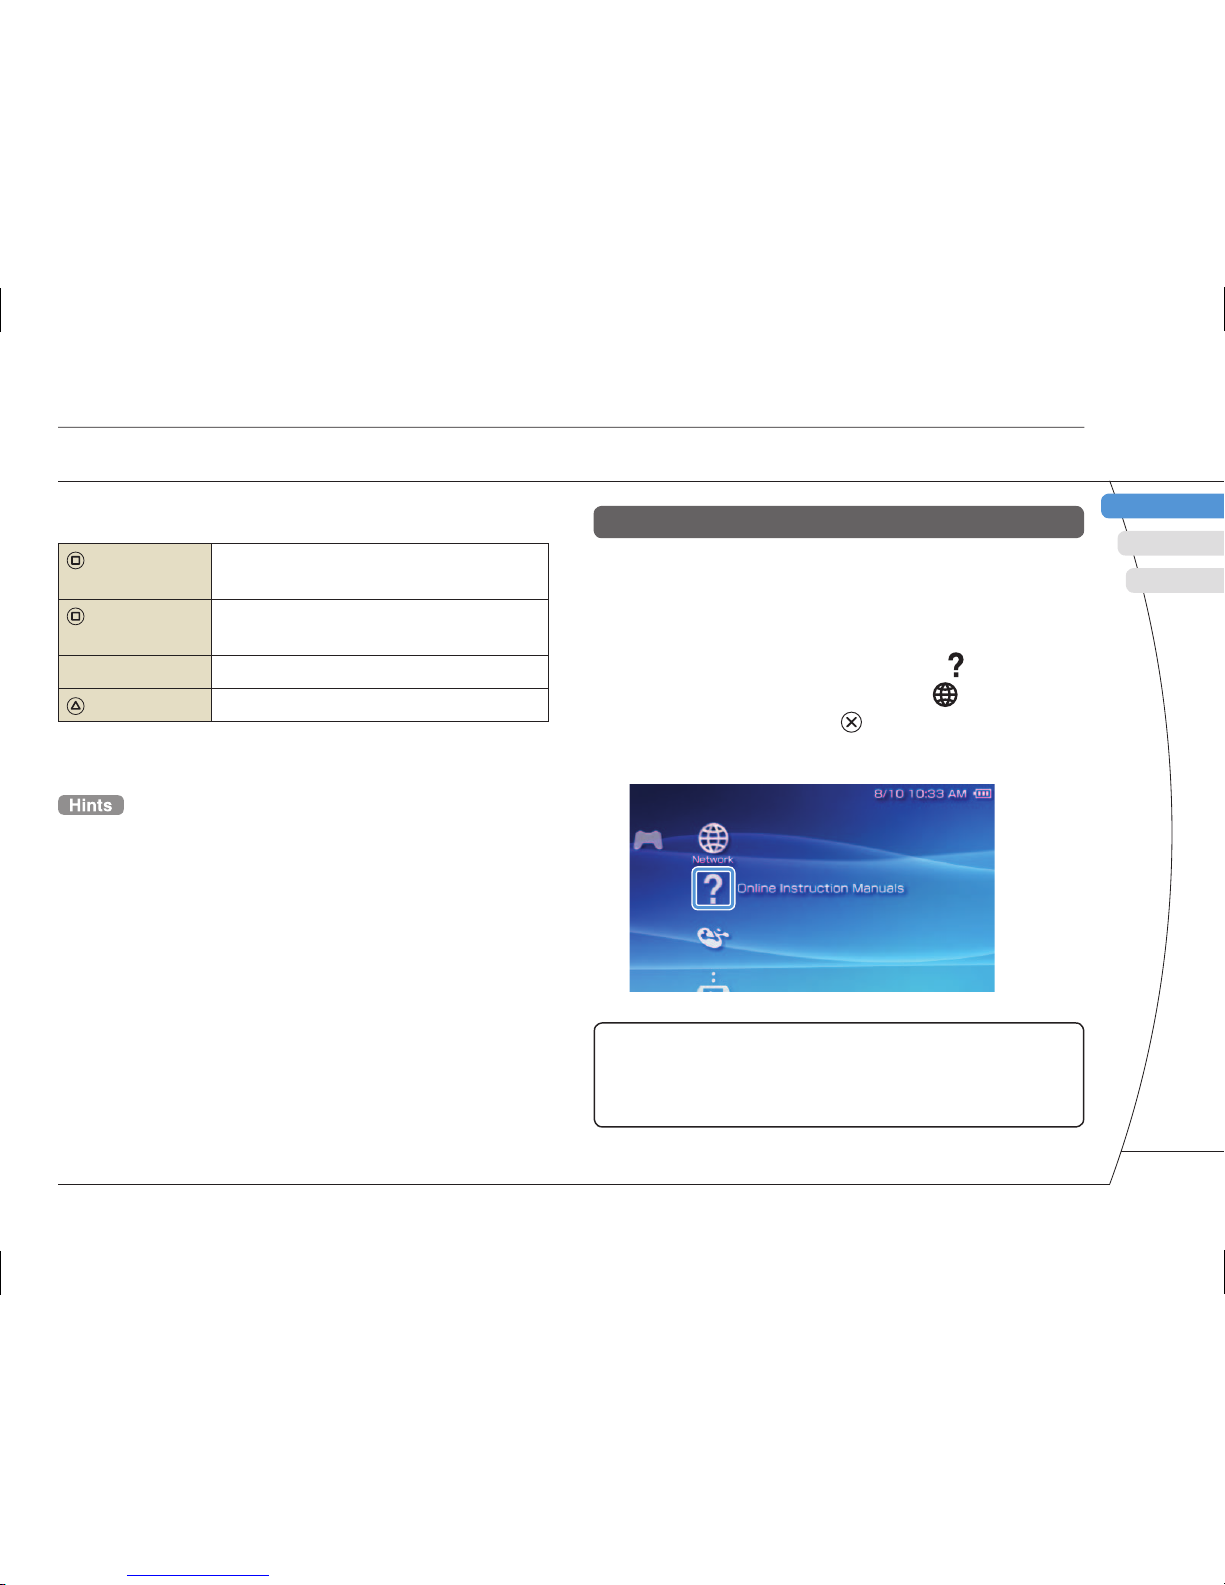
1 From the home menu, select (Online
Instruction Manuals) under (Network),
and then press the button.
The user's guide page is displayed.
PSP® system software user's guide
http://manuals.playstation.net/document/
The user's guide can also be viewed using your PC's Web
browser.
Network
Connecting to the Internet
25
Page 26
PSP-2001 3-218-749-11(1) US/FR/ES
11
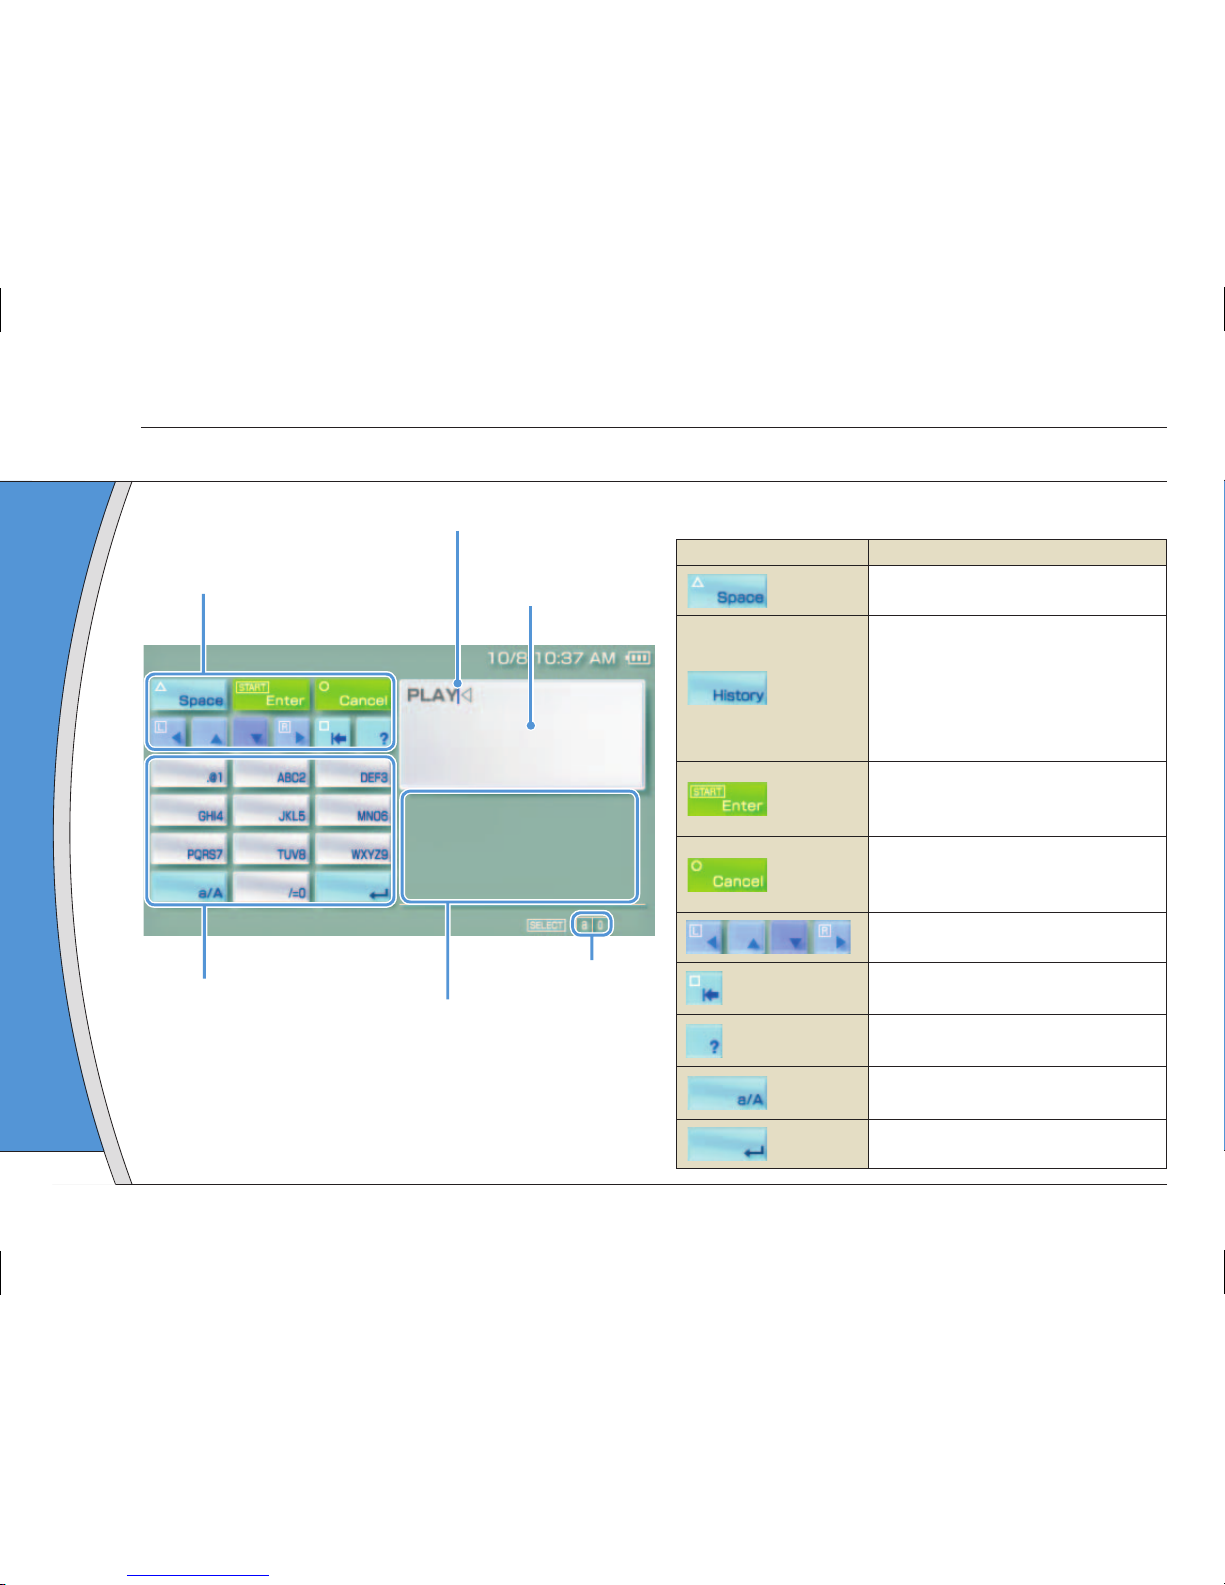
Keyboard
Text entry fi eld
(displays characters
as they are entered)
Cursor
Function keys
Alphabet/symbol keys
Text entry options
Input mode display
Control panel item list
Keyboard keys Function
Enters a space
When entering text in the Internet
browser address fi eld, previously
entered addresses are displayed.
Addresses are displayed only when
input mode is set to Web address
shortcuts.
Confi rms characters that have been
typed but not entered, and exits the
keyboard
Cancels characters that have been
typed but not entered, and exits the
keyboard
Moves the cursor
Deletes the character to the left of
the cursor
Displays a diagram showing the
system buttons and their usage
Switches between upper and lower
case
Enters a line break
Using the on-screen keyboard
26
Page 27
DE
IT
NL
PT
PSP-2001 3-218-749-11(1) US/FR/ES
FR
US
ES
Keyboard
Entering characters
This section will demonstrate how to enter text using
the word "FUN" as an example.
1 Select "DEF3", and then press the
button several times until "F" is
displayed.
Each time you press the button, the character that is
entered in the text entry fi eld is switched.
2 Select "TUV8", and then press the
button several times until "U" is
displayed.
3 Select "MNO6", and then press the
button several times until "N" is
displayed.
4 Select "Enter", and then press the
button.
The characters you entered will be confi rmed. Select
"Enter" again, and then press the
button to exit the
keyboard.
If you select the a/A key while entering characters, you can
switch between upper and lower case.
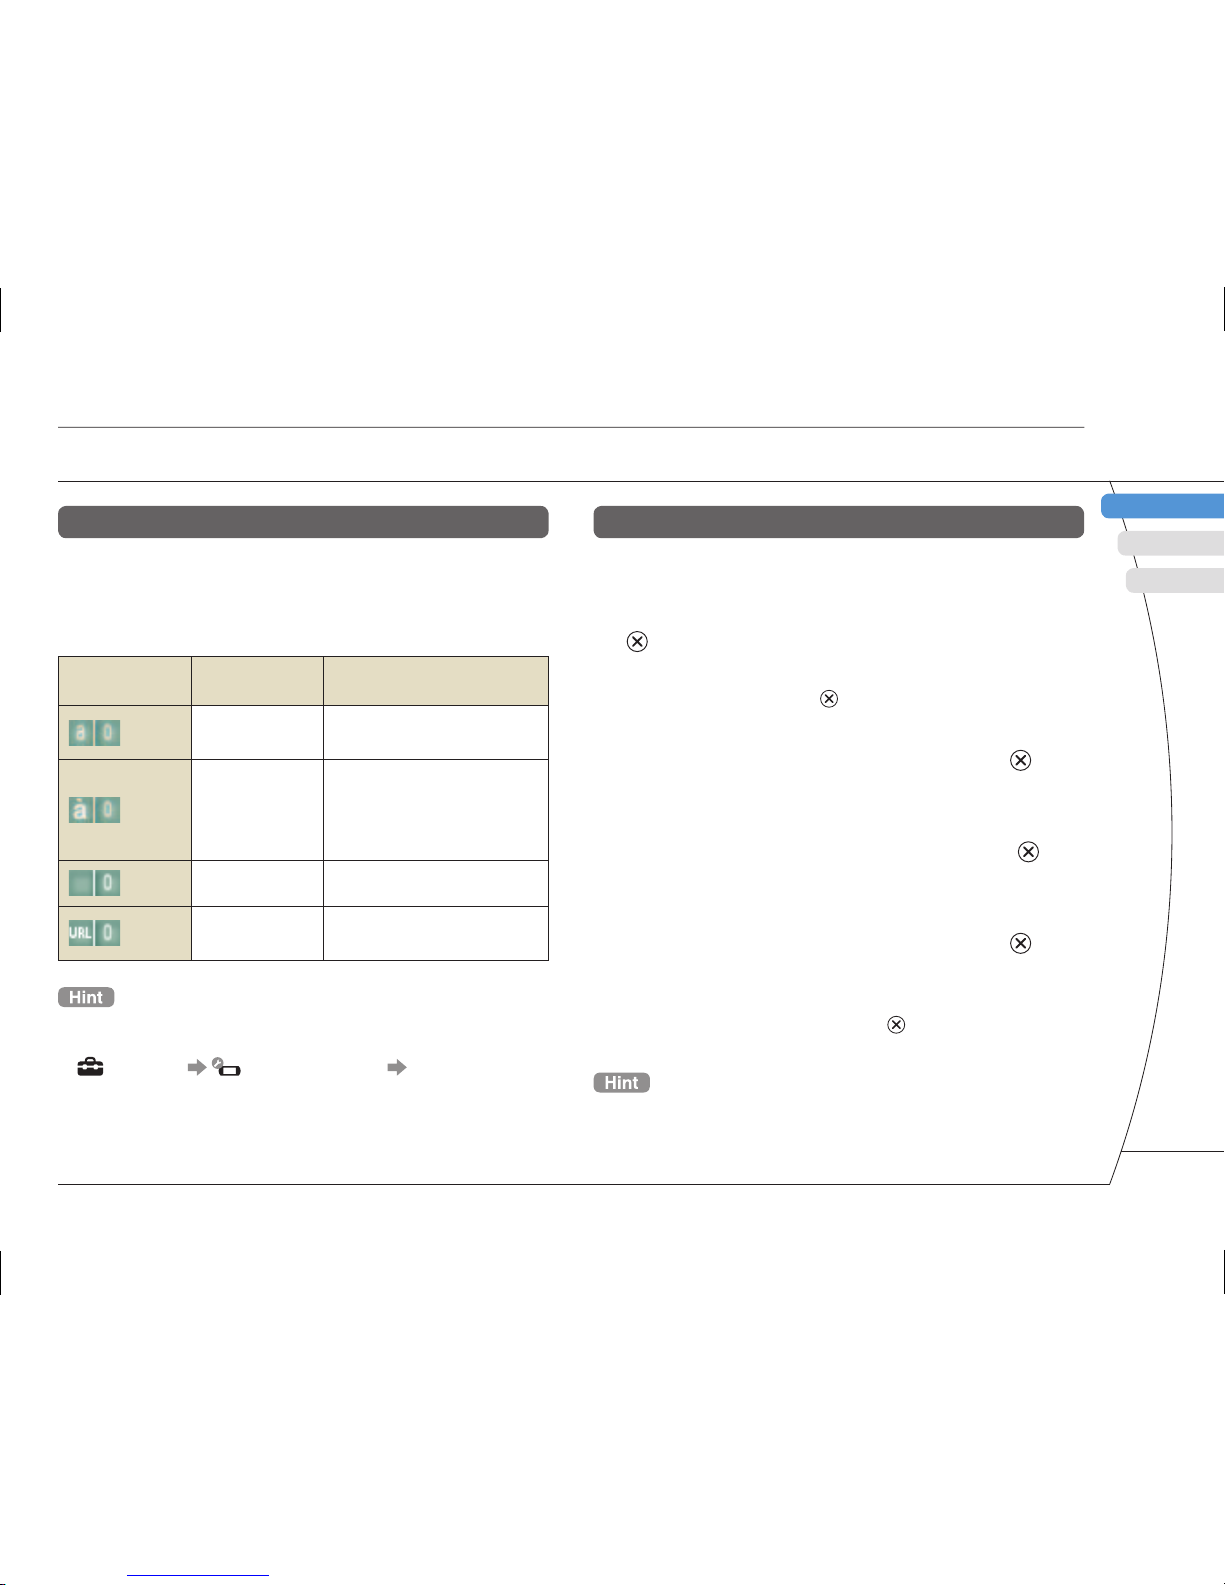
Switching input mode
The number of input modes available varies
depending on the language selected. Each time you
press the select button, the input mode changes
among the options in the diagram below:
Input mode
display
Input mode
Examples of characters you
can enter
Letters and
numbers
a b c d e
Letters and
numbers (with
accented
letters)
é í ó ç ñ
Numbers only 1 2 3 4 5
Web address
shortcuts
.com .ne .html .gif
The language for the on-screen keyboard is linked to the
System Language. You can set the system language by going
to (Settings) (System Settings) "System
Language".
Example: If "System Language" is set to "Français," you can
enter text in French.
Using the on-screen keyboard
27
Page 28
PSP-2001 3-218-749-11(1) US/FR/ES
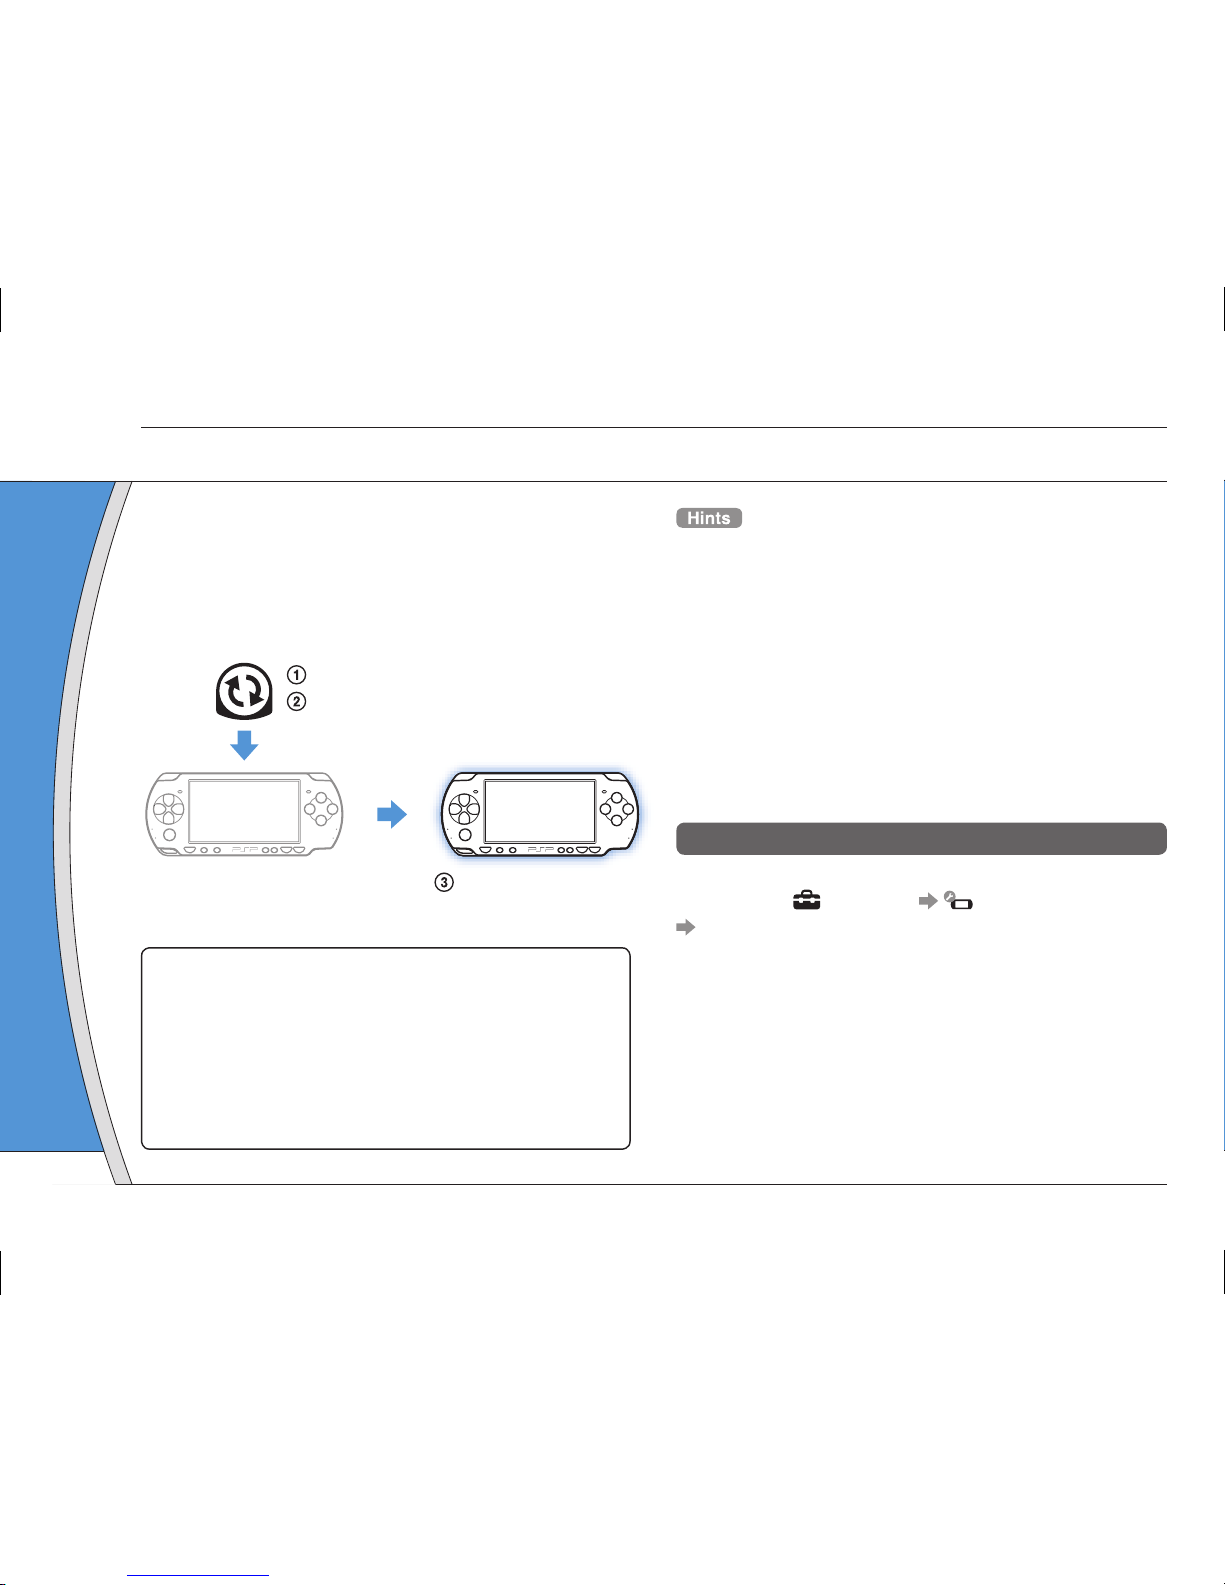
Software updates may include security patches, new
or revised settings and features, and other items,
which will change your current operating system. It is
recommended that you always maintain your system
to use the latest version of the system software.
Obtain update data.
Use the update data to overwrite the
existing system software.
The system software is
updated.
Notice
During an update:
• Do not remove the UMD™.
• Do not turn off the system.
• Do not disconnect the AC adaptor.
If an update is cancelled before completion, the system
software may become damaged, and the system may
require servicing or exchange.
• For the latest information on updates, visit
http://www.us.playstation.com/psp
• Depending on the software title, you may not be able to
play without fi rst updating the PSP
®
system software.
• After you have updated the system software, you cannot go
back to an earlier version.
• Before starting, check that the battery is charged. You may
not be able to start an update if the battery charge level is
low.
• It is recommended that you use the AC adaptor when
updating the system software.
Checking the system software version
You can check system software version information
by selecting
(Settings) (System Settings)
"System Information". The current version is
displayed in the "System Software" fi eld.
12
PSP® system updates
Updating the system software
28
Page 29
DE
IT
NL
PT
PSP-2001 3-218-749-11(1) US/FR/ES
FR
US
ES
Update methods
You can perform an update in any of the following
ways.
With an Internet connection
Network Update
Update using the PSP® system's wireless LAN
feature.
By selecting
(Network Update) under
(Settings), you can connect to the Internet and
update your system to the latest system software.
Update using a PC
Update using a PC to download update data from the
Internet. For detailed instructions, visit
http://www.us.playstation.com/psp
Without an Internet connection
Update using a UMD™
You can update using a UMD™ that contains update
data.
1 Connect the AC adaptor to the PSP
®
system.
2 Insert a UMD™ that contains update
data.
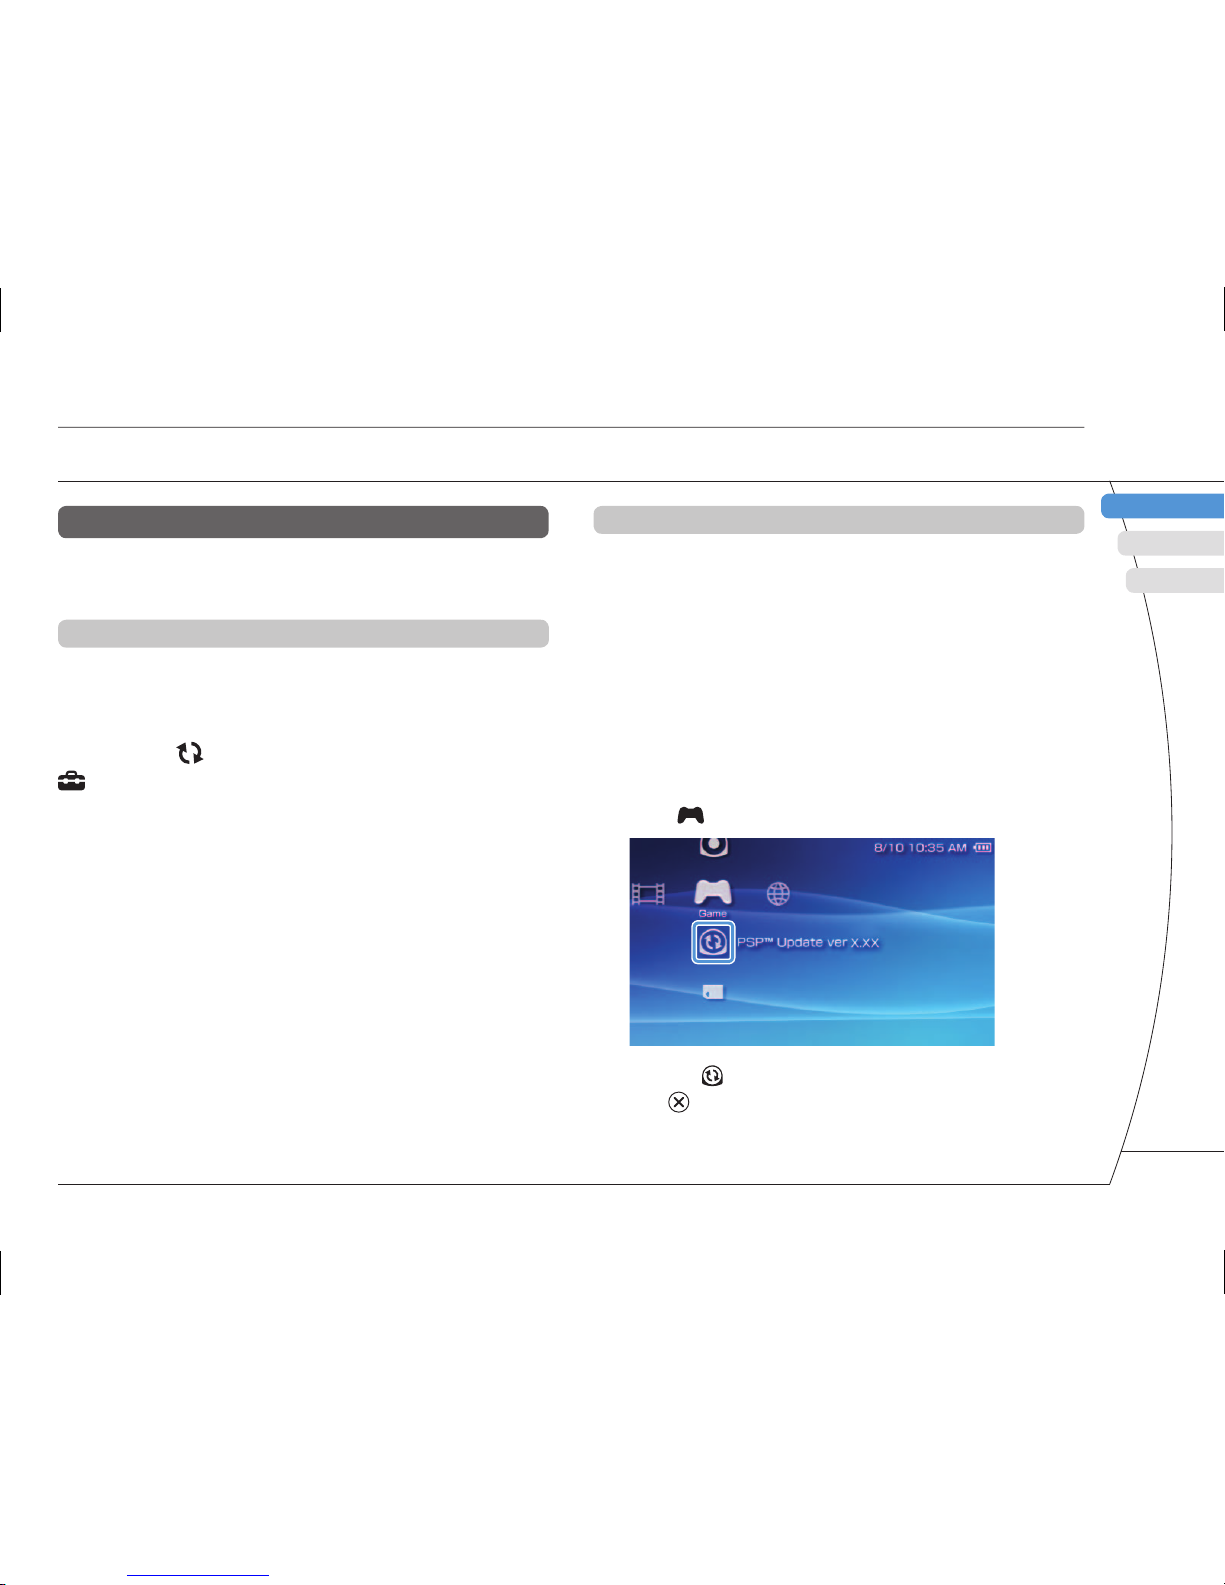
The update data icon and version number are displayed
under
(Game) in the home menu.
3 Select (PSP™ Update), and then press
the button.
The update begins. Follow the on-screen instructions to
complete the update.
PSP® system updates
Updating the system software
29
Page 30
PSP-2001 3-218-749-11(1) US/FR/ES
The PSP® system includes a parental control feature.
You can use this feature to set a password and limit
the playback of content restricted by a parental
control level (games, videos and other content). By
setting the parental control level on the system, you
can prevent the playback of restricted content by
children.
About parental control levels
Parental control levels on the PSP® system
The parental control level of the system can be either
turned off or set to one of 11 different levels.
Off
Turns off parental control
11-1
Sets the level of content to be restricted. A setting
of "1" is the most restrictive; "11" is the least
restrictive.
The default setting for the menu item is "9".
The combination of the parental control levels of both
the PSP
®
system and the content determine whether
the content can be viewed.
13
Security settings
Example: If the parental control level of the system is
set to "7", content with a level from "1" to "7" can be
played on the system.
Parental control levels on content
Games
Most game packaging displays a symbol to indicate
the age group that is appropriate to play the game.
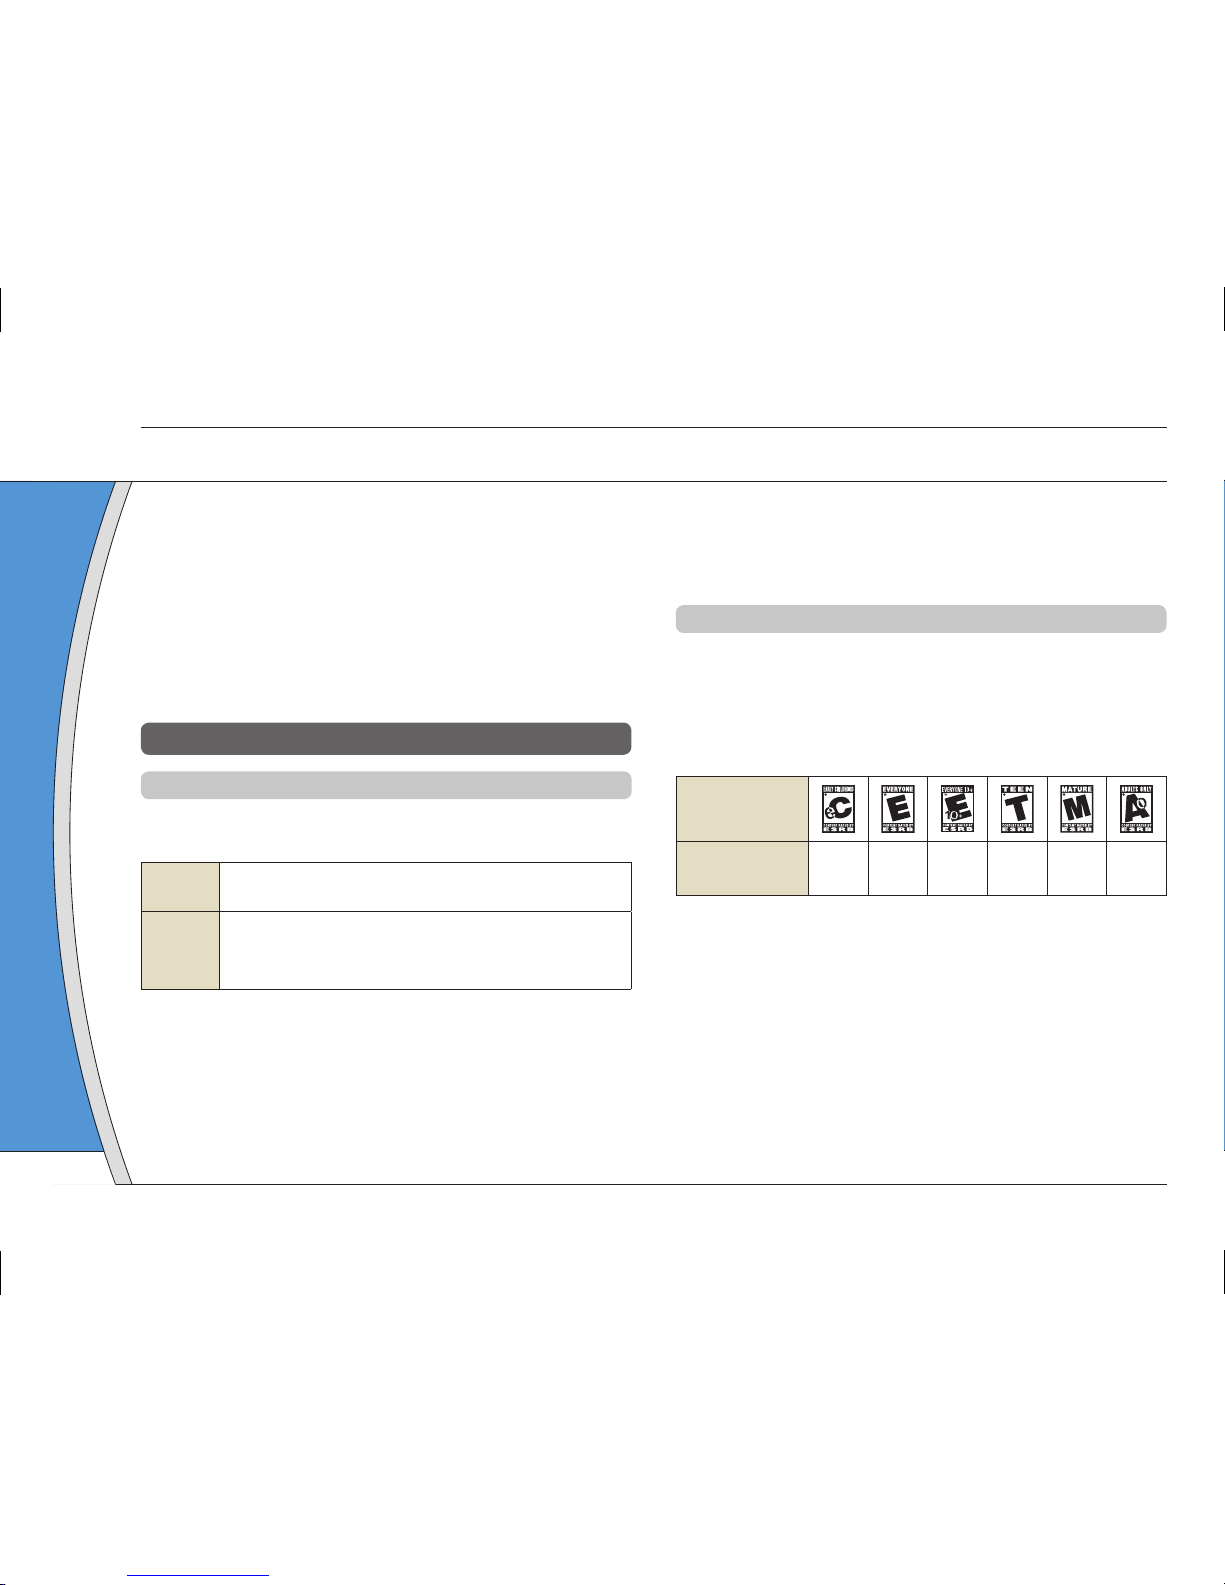
The symbols correspond to the parental control levels
set on the games as shown below:
Age group
Game parental
control level
2345910
Based on information at time of publication. For information
about games and related ESRB ratings, visit our Web site at
http://www.us.playstation.com/psp. For the latest information
about the ESRB rating system, visit http://www.esrb.org.
Setting the parental control level
30
Page 31
DE
IT
NL
PT
PSP-2001 3-218-749-11(1) US/FR/ES
FR
US
ES
Video
Parental control levels for video content vary
depending on the content.
In some regions, movies are given ratings based on a
system operated by the Motion Picture Association.
For details, visit http://www.mpaa.org (United States)
or http://www.cmpda.ca (Canada).
• The parental control level can be checked under
"Information" in the options menu.
• Content that has been restricted by the parental control
feature is displayed as
(Restricted Content).
• Adults Only or AO ratings are rare. PlayStation
®
does not
publish Adults Only games.
Security settings
Setting the parental control level
1 Select "Parental Control Level" from
(Security Settings) under (Settings) in
the home menu, and then press the
button.
The password entry screen is displayed.
2 Using the directional buttons, enter the
4-digit password, and then press the
button.
When entering a password for the fi rst time after
purchase, enter "0000".
3 Select a level, and then press the
button.
The parental control level is set.
To change the password, select "Change Password" under
(Settings) (Security Settings).
Setting the parental control level
31
Page 32
PSP-1001 3-218-749-11(1) US/FR/ES
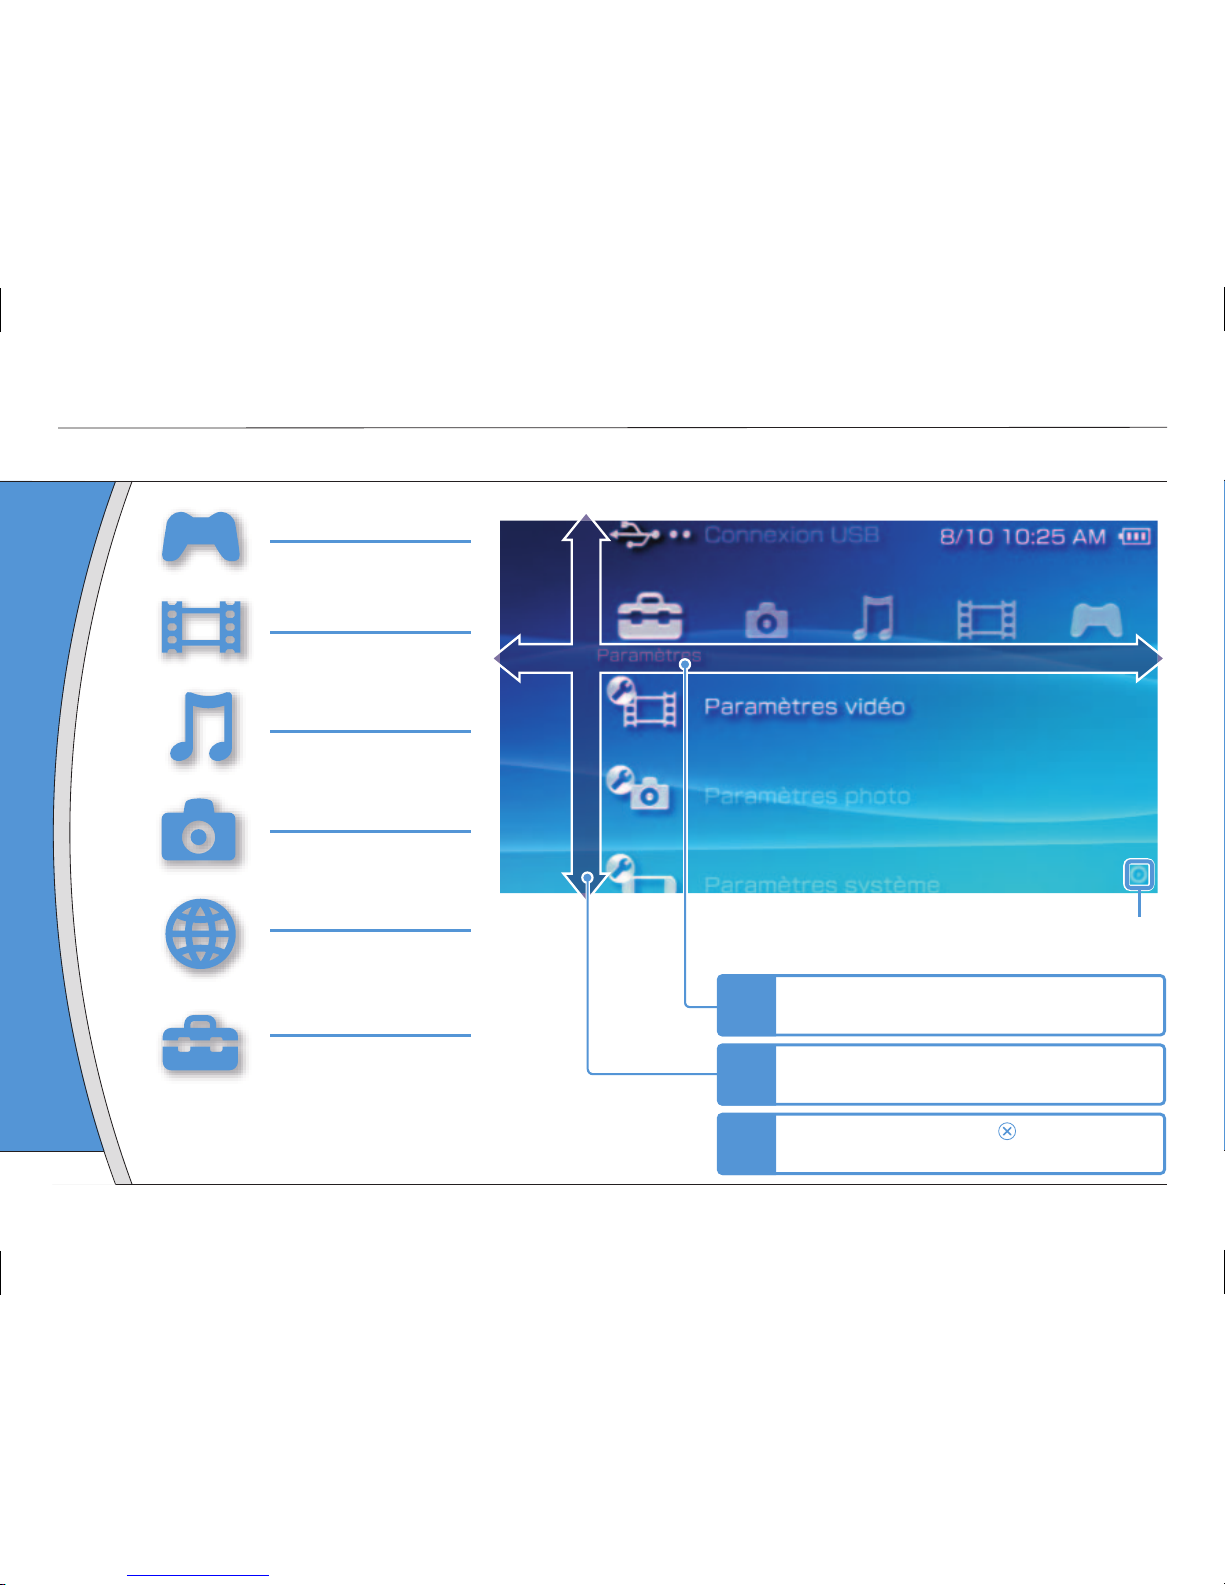
Utilisation du menu d'accueil
Introduction
Icône Occupé :
Cette icône s'affi che pendant le chargement d'une page.
Catégorie
1
Sélectionnez une catégorie à l'aide de
la touche gauche ou droite.
2
Sélectionnez un élément à l'aide de la
touche haut ou bas.
3
Appuyez sur la touche pour
confi rmer l'élément sélectionné.
Option
GAME
Comment jouer
VIDÉO
Lecture de vidéo
MUSIQUE
Lecture de musique
PHOTO
Affi chage d'images
RÉSEAU
Connexion à Internet
PARAMÈTRES
Défi nition des paramètres
du système PSP
®
Les icônes affi chées dans le menu d'accueil varient
selon la version du logiciel système.
32
Page 33
DE
IT
NL
PT
PSP-1001 3-218-749-11(1) US/FR/ES
US
FR
ES
HOME SELECT START
VOL
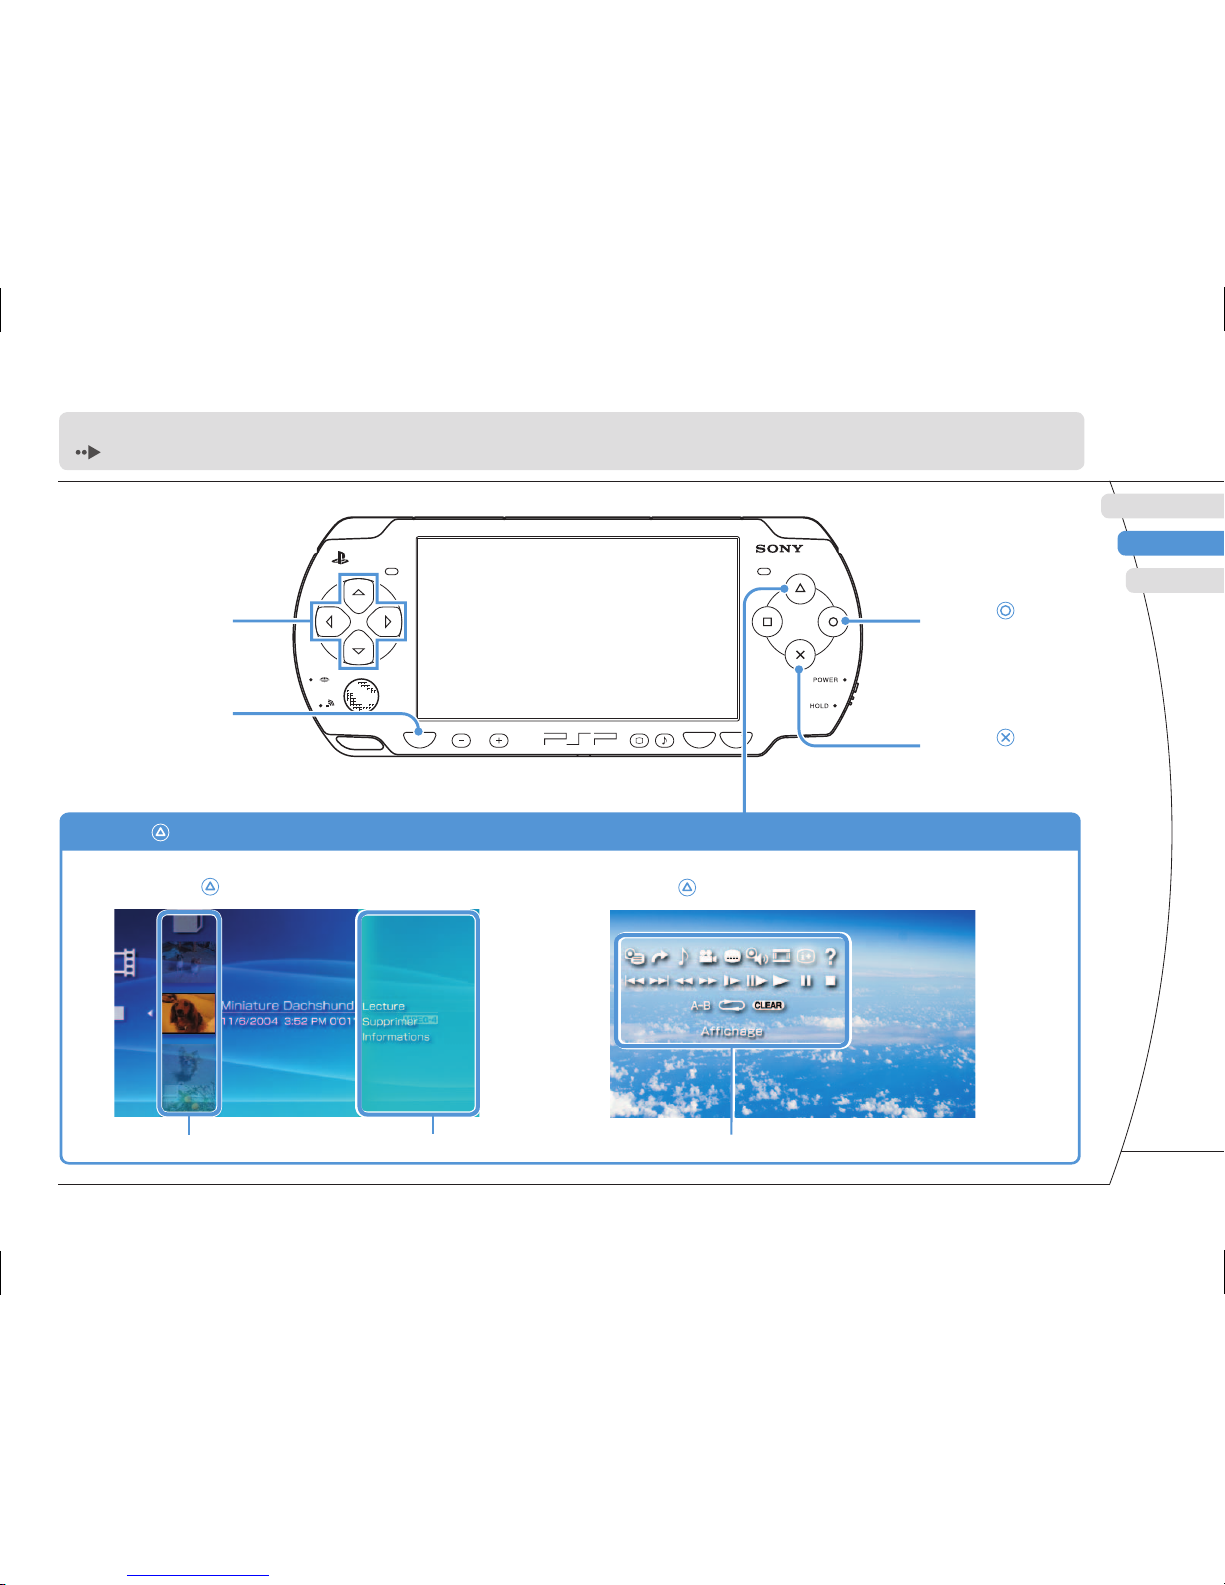
Ce document décrit l'utilisation de base du système PSP®. Pour plus d'informations, reportez-vous au mode d'emploi en ligne
( page 55) : http://manuals.playstation.net/document/
Touches
directionnelles :
Permettent de
sélectionner des
catégories/éléments
Touche :
Annule les opérations
sélectionnées
Touche :
Confi rme les éléments
sélectionnés
Touche HOME
(accueil) :
Revient au menu
d'accueil.
Sélectionnez une icône, puis appuyez sur
la touche pour affi cher le menu d'options.
Pendant la lecture d'un contenu, appuyez sur la
touche
pour affi cher le panneau de commandes.
Touche
: Affi che le menu d'options/panneau de commandes
Icônes Menu d'options Panneau de commandes
33
Page 34
PSP-1001 3-218-749-11(1) US/FR/ES
01
Vérifi cation du contenu de la boîte
Préparation
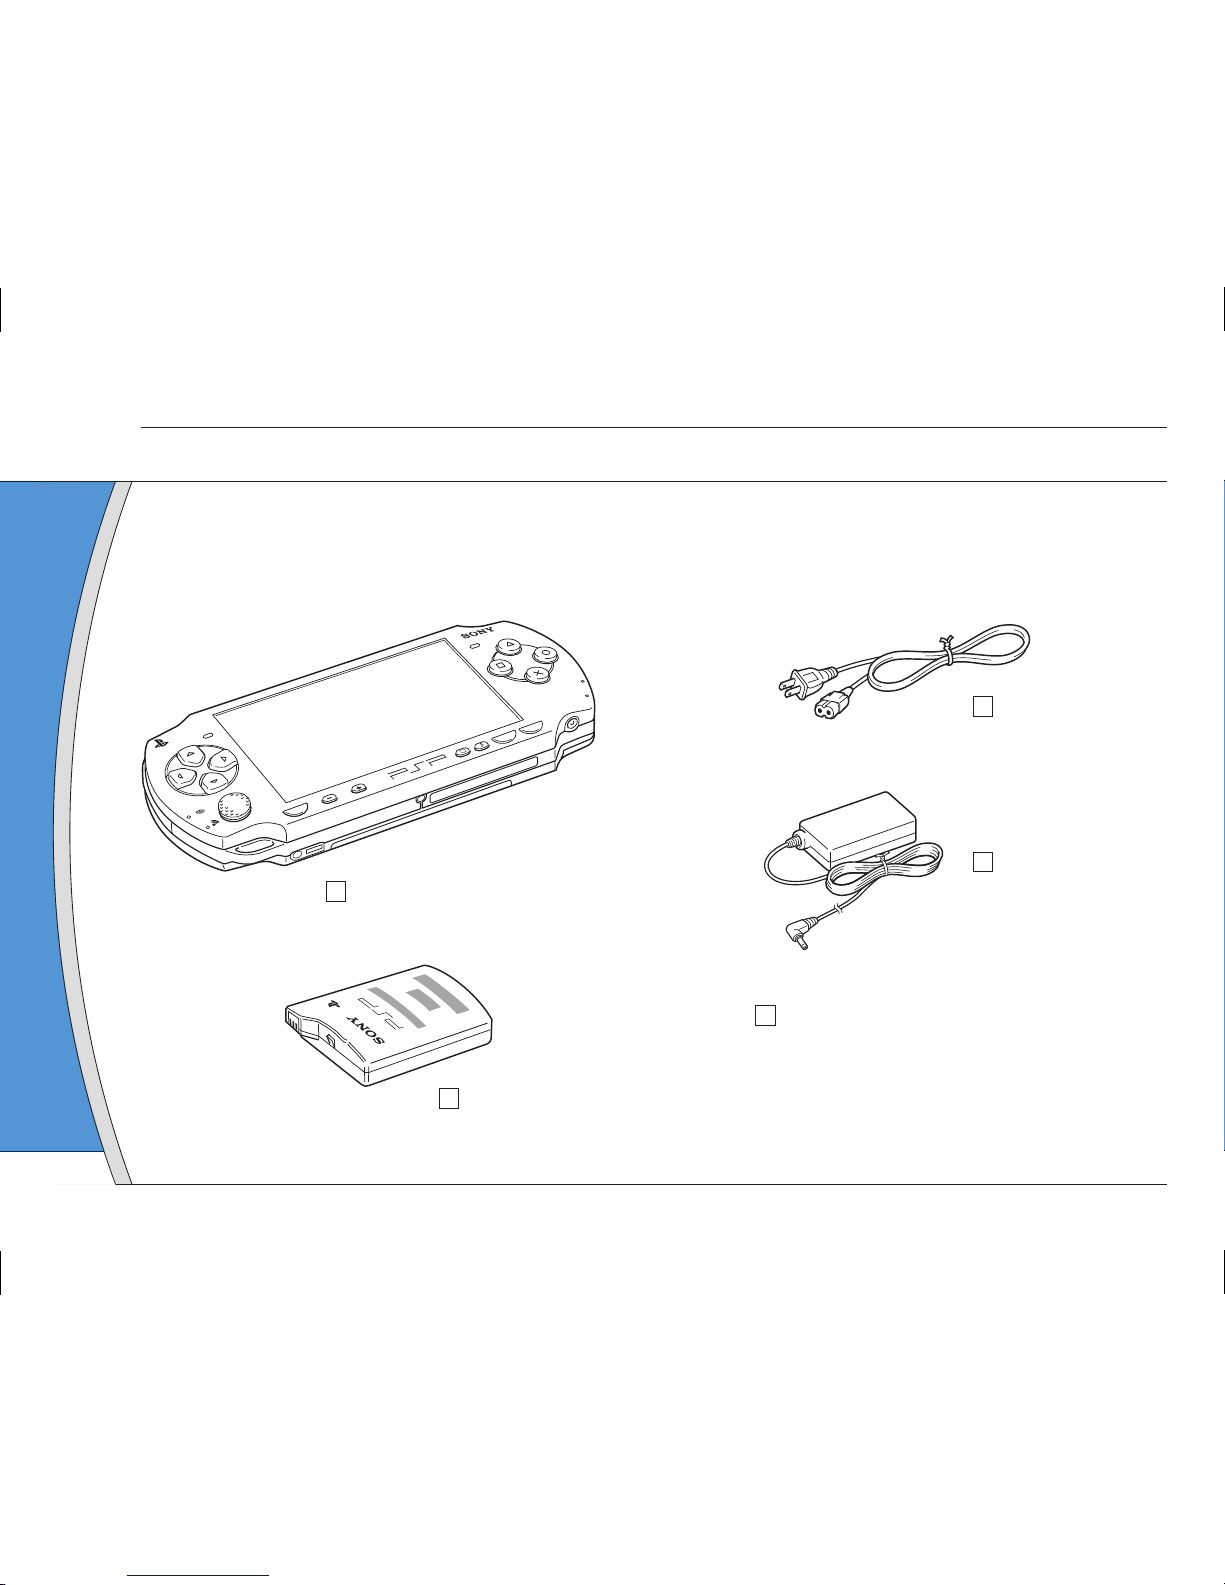
Système PSP® (PlayStation®Portable)
Vérifi ez que vous êtes en possession des éléments suivants.
Si certains éléments sont absents, contactez notre ligne d'assistance technique au 1-800-345-7669.
Des éléments supplémentaires peuvent être fournis avec certains modèles de ce produit. Vérifi ez le contenu
indiqué sur l'emballage du produit.
Bloc-batterie
Adaptateur AC
Cordon
d'alimentation
Documentation
P
OWE
R
HO
L
D
S
E
L
E
C
T
H
OME
V
O
L
S
T
A
R
T
34
Page 35
DE
IT
NL
PT
PSP-1001 3-218-749-11(1) US/FR/ES
US
FR
ES
Préparation
Vérifi cation du contenu de la boîte
À propos de la documentation du système PSP
®
La documentation du système PSP® est constituée
des éléments suivants :
• Sécurité et support technique
Avant d'utiliser le produit, commencez par lire attentivement
la documentation. Elle contient des informations de sécurité
relatives à l'utilisation du système PSP®, au dépannage, aux
caractéristiques, etc.
• Aide-mémoire (le présent document)
Ce document contient des informations relatives à
l'utilisation de base du système PSP®.
• Mode d'emploi
(http://manuals.playstation.net/document/)
Ce document en ligne est accessible par l'intermédiaire
d'Internet et contient des informations détaillées au sujet de
l'utilisation du logiciel système PSP® ( page 55).
35
Page 36
PSP-1001 3-218-749-11(1) US/FR/ES
02
Préparation du système PSP® en vue de son utilisation
Préparation
Recharge de la batterie
Avant la première utilisation du système PSP® après l'achat,
procédez de la manière suivante pour charger la batterie.
Attention
• La sortie de la prise de courant doit être installée près de
l'équipement et doit être facile d'accès.
• Ne branchez pas le cordon d'alimentation du système
PSP
®
sur une prise électrique avant d'avoir effectué tous
les autres raccordements.
Avis
Avant d'insérer le bloc-batterie, repérez les numéros de modèle
et de série situés à l'intérieur du compartiment de la batterie du
système et notez les numéros pour en disposer à l'avenir.
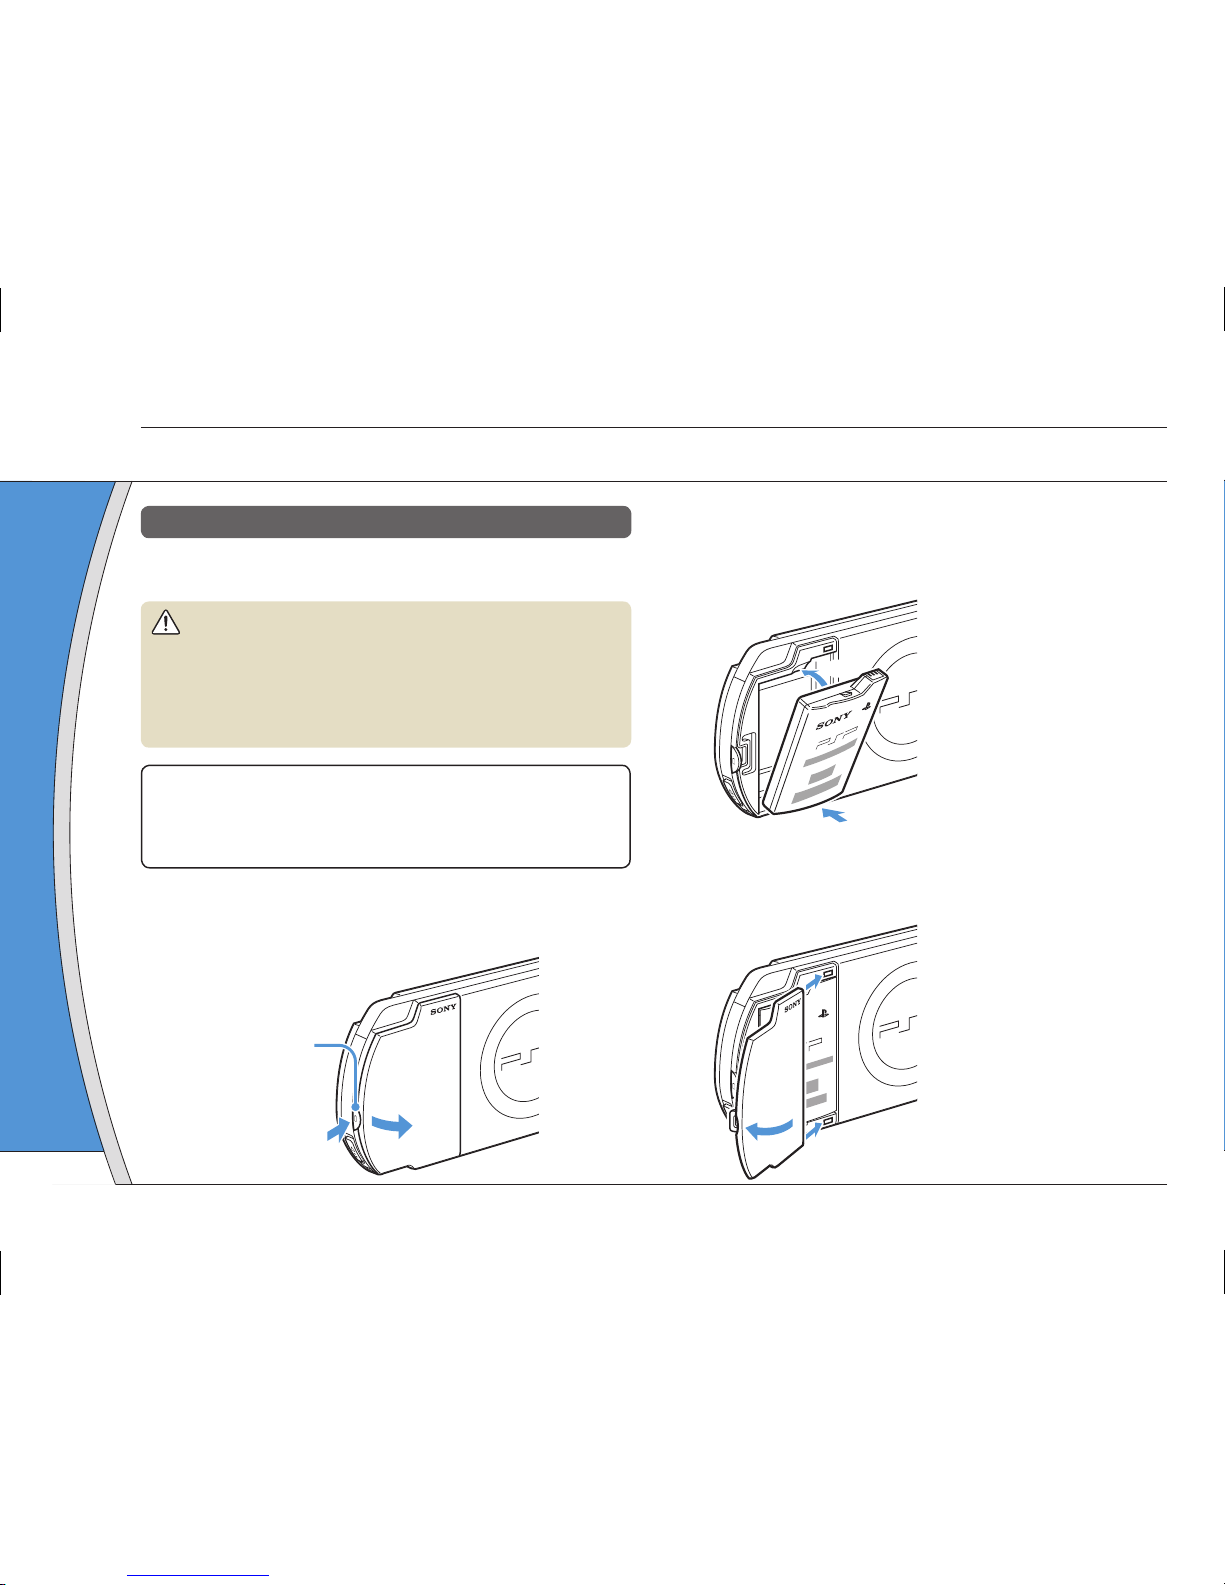
1 Retirez le couvercle de la batterie.
En maintenant le bouton de déverrouillage enfoncé, faites
glisser le couvercle de la batterie dans le sens de la fl èche.
2
1
Bouton de
déverrouillage
2 Insérez le bloc-batterie.
Alignez la surface inférieure du bloc-batterie sur le
système pour fi xer la batterie.
1
2
Alignez les pattes du couvercle de la batterie sur le
système jusqu'à ce qu'il s'enclenche.
4
3
36
Page 37
DE
IT
NL
PT
PSP-1001 3-218-749-11(1) US/FR/ES
US
FR
ES
Préparation
Préparation du système PSP® en vue de son utilisation
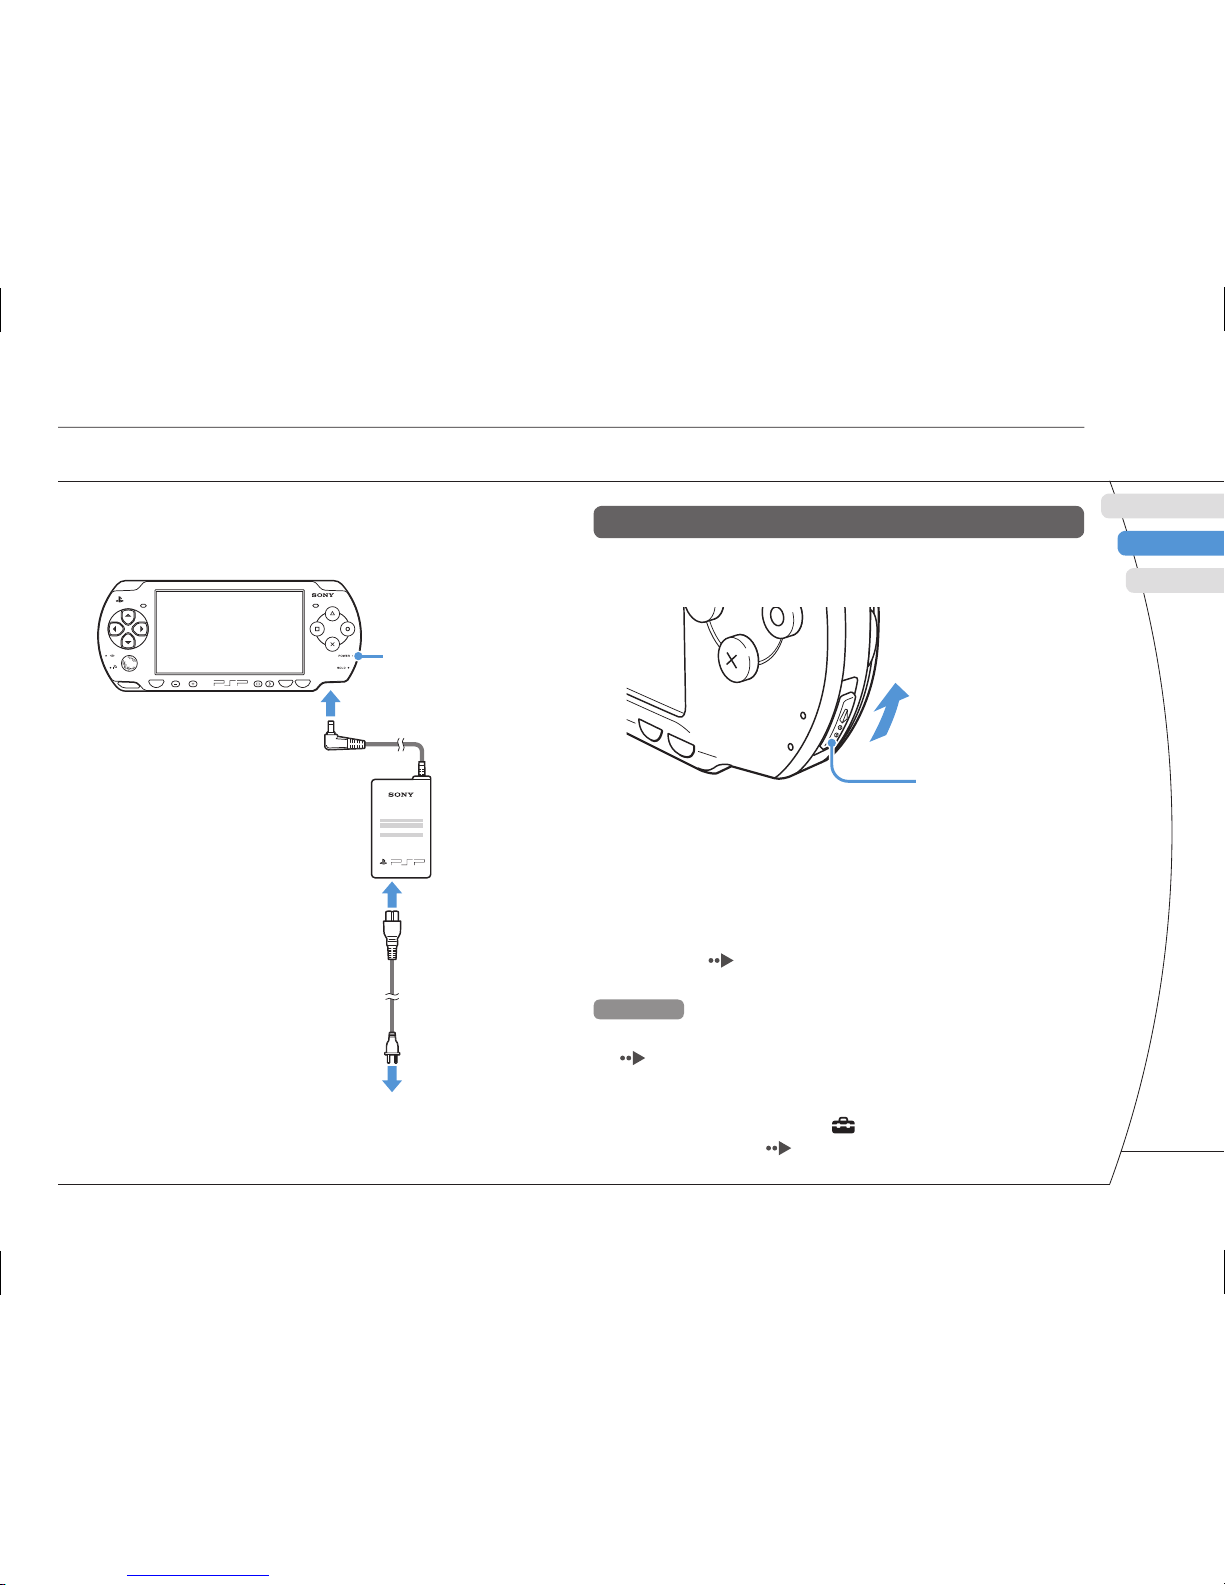
3 Raccordez l'adaptateur AC pour charger
la batterie.
L'indicateur POWER (alimentation)
s'allume en orange pour indiquer
que le chargement a commencé.
L'indicateur POWER (alimentation)
s'éteint lorsque la batterie est
complètement chargée.
Indicateur
POWER
(alimentation)
Vers la prise
électrique
HOME SELECT START
VOL
2
1
3
Confi guration initiale
1
Faites glisser l'interrupteur POWER/
HOLD (alimentation/bloquer) vers le haut.
Interrupteur
POWER/HOLD
(alimentation/
bloquer)
POWER
HOL
D
S
T
A
RT
S
E
LE
CT
L'indicateur POWER (alimentation) s'allume en vert et
l'écran de confi guration initiale s'affi che.
2 Suivez les instructions qui s'affi chent
pour défi nir les paramètres initiaux.
Une fois la confi guration initiale terminée, le menu
d'accueil (
page 32) s'affi che.
Conseils
• Reportez-vous à la section "Utilisation du clavier virtuel"
( page 56) pour plus d'informations sur la saisie des
caractères.
• Les paramètres défi nis pendant la confi guration initiale
peuvent être modifi és dans (Paramètres). Reportez-vous
au mode d'emploi (
page 55) pour plus d'informations.
37
Page 38
PSP-1001 3-218-749-11(1) US/FR/ES
03
Noms et fonctions des composants
Préparation
Système
HOME SELECT START
VOL
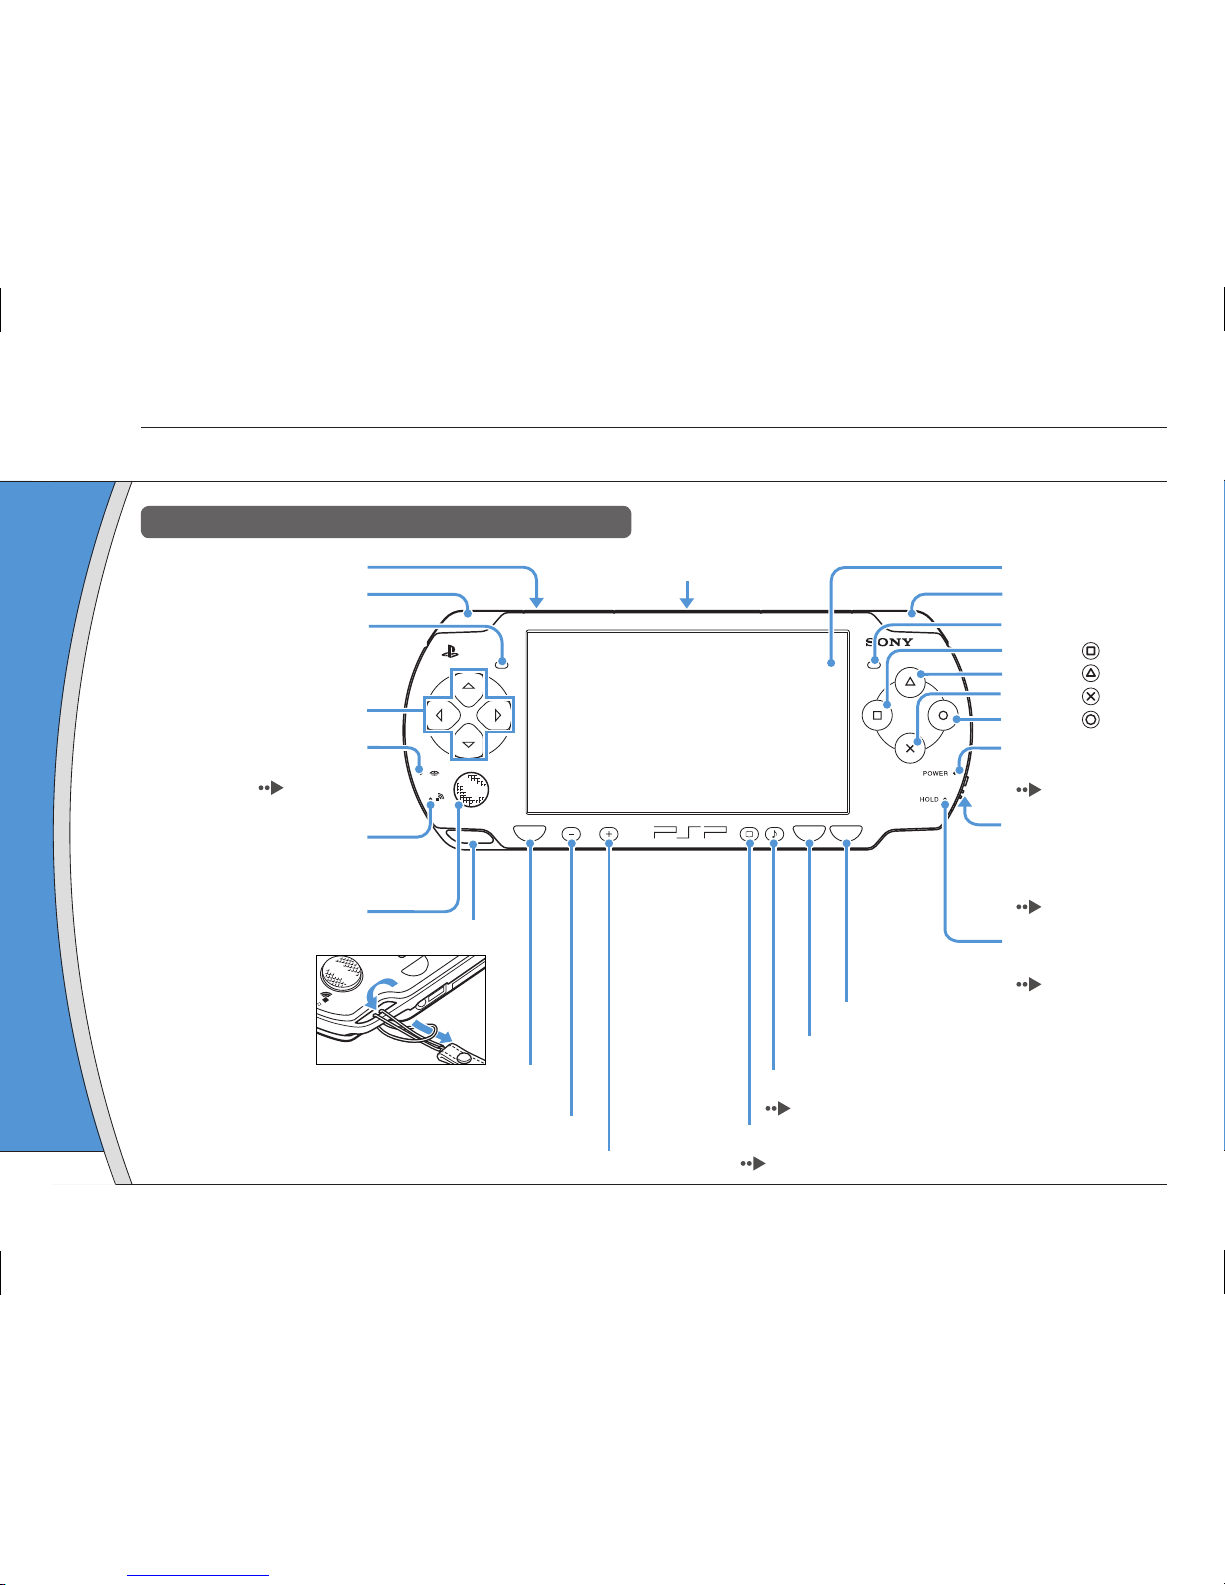
Interrupteur WLAN (haut)
Interrupteur
POWER/HOLD
(alimentation/
bloquer) (côté droit)
(
page 40)
Indicateur HOLD
(bloquer)
( page 40)
Indicateur POWER
(alimentation)
( page 40)
Écran LCD
Touche L
Touches directionnelles
Indicateur d'accès
Memory Stick Duo™
( page 43)
Indicateur d'accès WLAN
S'allume lors de l'utilisation de la
fonction LAN sans fi l
Pad analogique
Attache pour sangle
Touche HOME (accueil)
Affi che le menu d'accueil
Touche volume –
Touche volume +
Touche START (mise en marche)
Touche SELECT (sélection)
Touche R
Touche
Touche
Touche
Touche
Touche son
( page 39)
Touche écran
( page 39)
H
O
M
E
Connecteur USB (haut)
Haut-parleur gauche
Haut-parleur droit
38
Page 39
DE
IT
NL
PT
PSP-1001 3-218-749-11(1) US/FR/ES
US
FR
ES
Utilisation de la touche son
Appuyez et
relâchez
À chaque appui de la touche, la tonalité
change comme suit : HEAVY
POPS
JAZZ UNIQUE OFF. *1
Appuyez pendant
plus d'une seconde
Le son est coupé. *2
*1 : La tonalité ne peut être modifi ée que si vous utilisez les
écouteurs. En outre, le réglage de la tonalité est
temporairement réglé sur "OFF" pendant le jeu.
*2 :
Pour rétablir le son, appuyez de nouveau sur la touche son.
Utilisation de la touche écran
Appuyez et
relâchez
À chaque appui de la touche, vous
accédez à un des trois niveaux de
luminosité de l'écran. *1
Appuyez pendant
plus d'une seconde
Le rétro-éclairage se désactive et l'écran
s'éteint. *2
Appuyez pendant plus
de cinq secondes
Le système bascule vers le mode de
sortie vidéo (
page 48).
*1 : Le niveau le plus élevé (niveau 4) ne peut être sélectionné
que lorsque le système PSP
®
est alimenté par
l'intermédiaire de l'adaptateur AC.
*2 : Pour rétablir le rétro-éclairage, appuyez sur n'importe
quelle touche du système PSP
®
.
Préparation
Noms et fonctions des composants
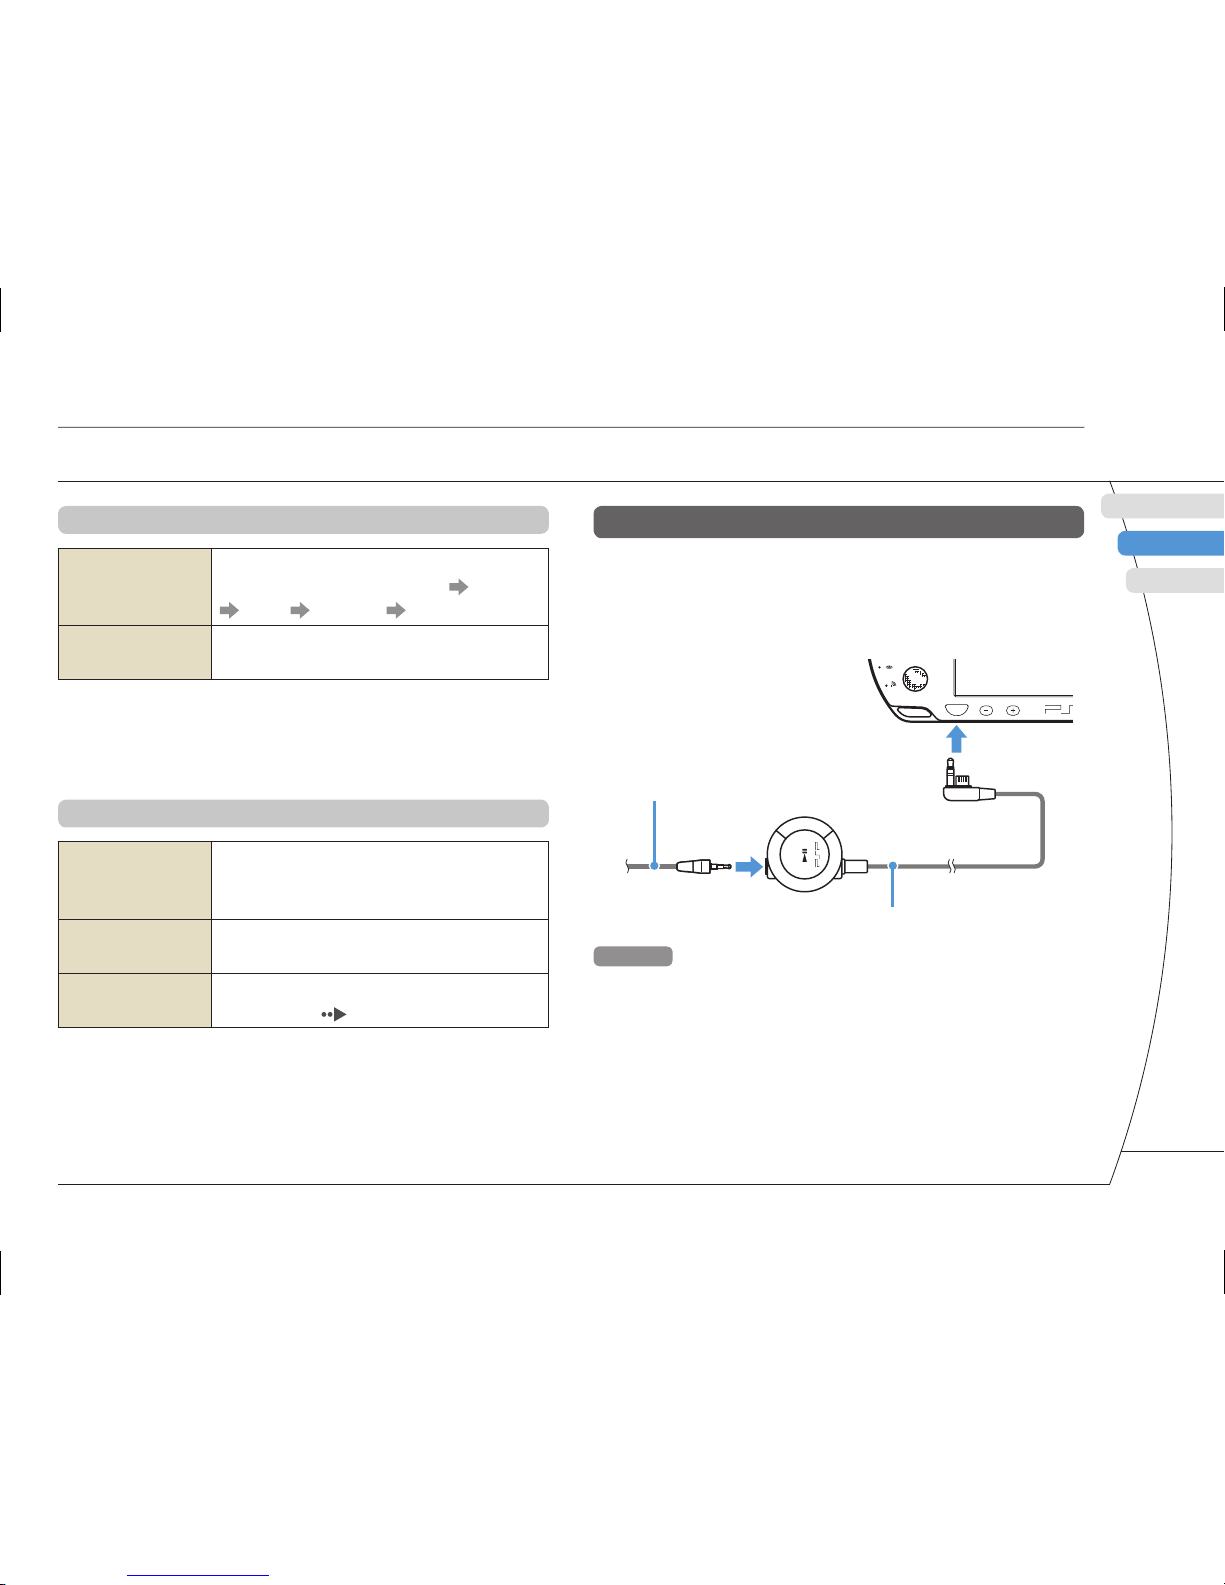
Écouteurs avec télécommande
Vous pouvez raccorder les écouteurs avec
télécommande PSP-2000 (vendus séparément). Vous
pouvez aussi raccorder des écouteurs (avec minifi che stéréo) disponibles dans le commerce.
HOME
VOL
2
1
Écouteurs
Télécommande
Conseil
La télécommande de la série PSP-1000 n'est pas compatible
avec le système de la série PSP-2000.
39
Page 40
PSP-1001 3-218-749-11(1) US/FR/ES
04
Opérations de base
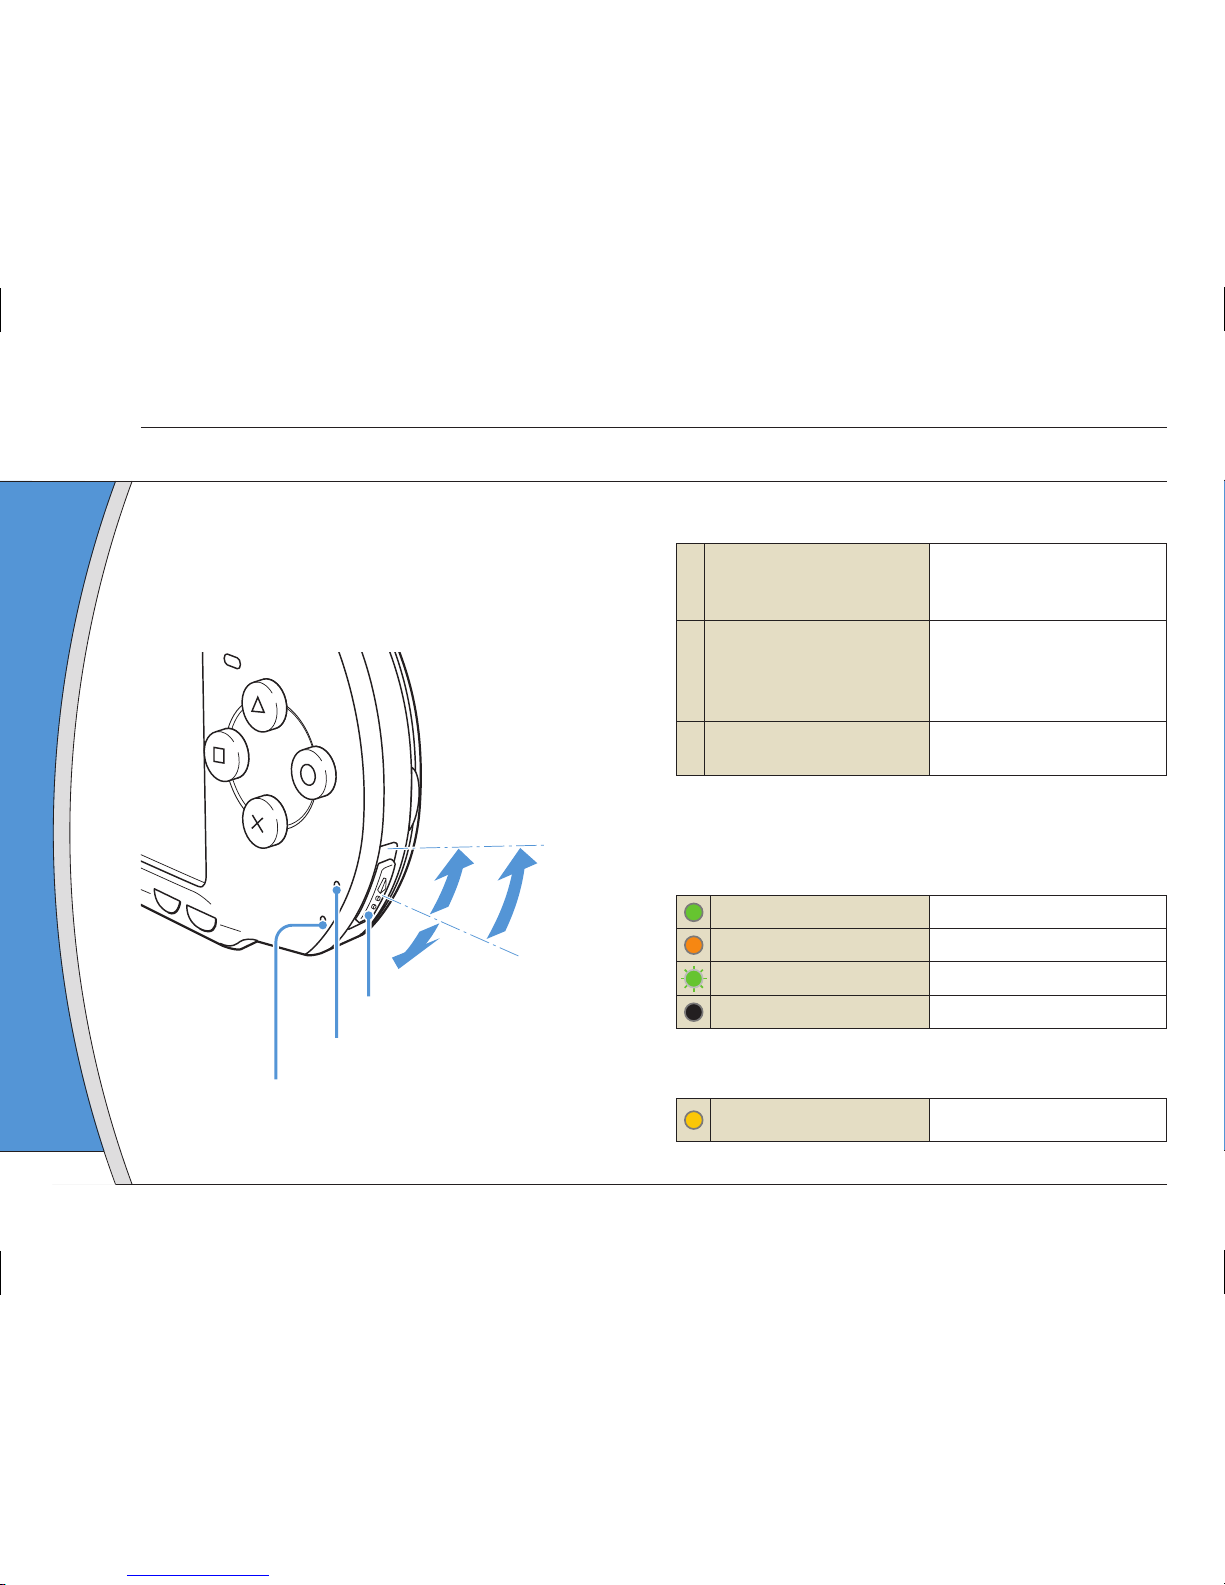
Utilisez l'interrupteur POWER/HOLD (alimentation/
bloquer) pour mettre le système sous ou hors tension,
ou encore pour le mettre en mode veille ou en mode
d'attente.
PO
WER
HOL
D
STAR
T
S
E
L
E
C
T
A
B
C
Interrupteur POWER/HOLD
(alimentation/bloquer)
Indicateur POWER (alimentation)
Indicateur HOLD (bloquer)
Interrupteur POWER/HOLD (alimentation/bloquer)
A
Mise sous tension du
système / Passage en mode
veille
Faites glisser vers le haut
B
Mise hors tension du
système
Faites glisser vers le haut et
maintenez dans cette
position pendant plus de
trois secondes
C
Verrouillage des touches du
système*
Faites glisser vers le bas
* Toutes les touches du système sont verrouillées et n'ont plus
aucun effet.
Indicateur POWER (alimentation)
Allumé en vert
Sous tension
Allumé en orange
Chargement en cours
Clignotant en vert
Faible niveau de charge
Éteint
Hors tension/en mode veille
Indicateur HOLD (bloquer)
Allumé en jaune
En mode d'attente
Fonctions du mode de marche et du mode veille
40
Page 41
DE
IT
NL
PT
PSP-1001 3-218-749-11(1) US/FR/ES
US
FR
ES
Opérations de base
Mode veille
Si vous mettez le système PSP® en mode veille, le
logiciel en cours est suspendu. Lorsque le mode
veille est annulé, le logiciel reprend là où le système
est passé en mode veille.
Conseils
• Pour annuler le mode veille, faites glisser de nouveau
l'interrupteur POWER/HOLD (alimentation/bloquer) vers le
haut. Pendant la lecture vidéo ou audio, vous pouvez
appuyer sur la touche de la télécommande pour
annuler le mode veille.
• Certains logiciels peuvent empêcher le système de passer
en mode veille.
Fonctions du mode de marche et du mode veille
41
Page 42
PSP-1001 3-218-749-11(1) US/FR/ES
05
Lecture de contenus
Opérations de base
Contenu sur support UMD™
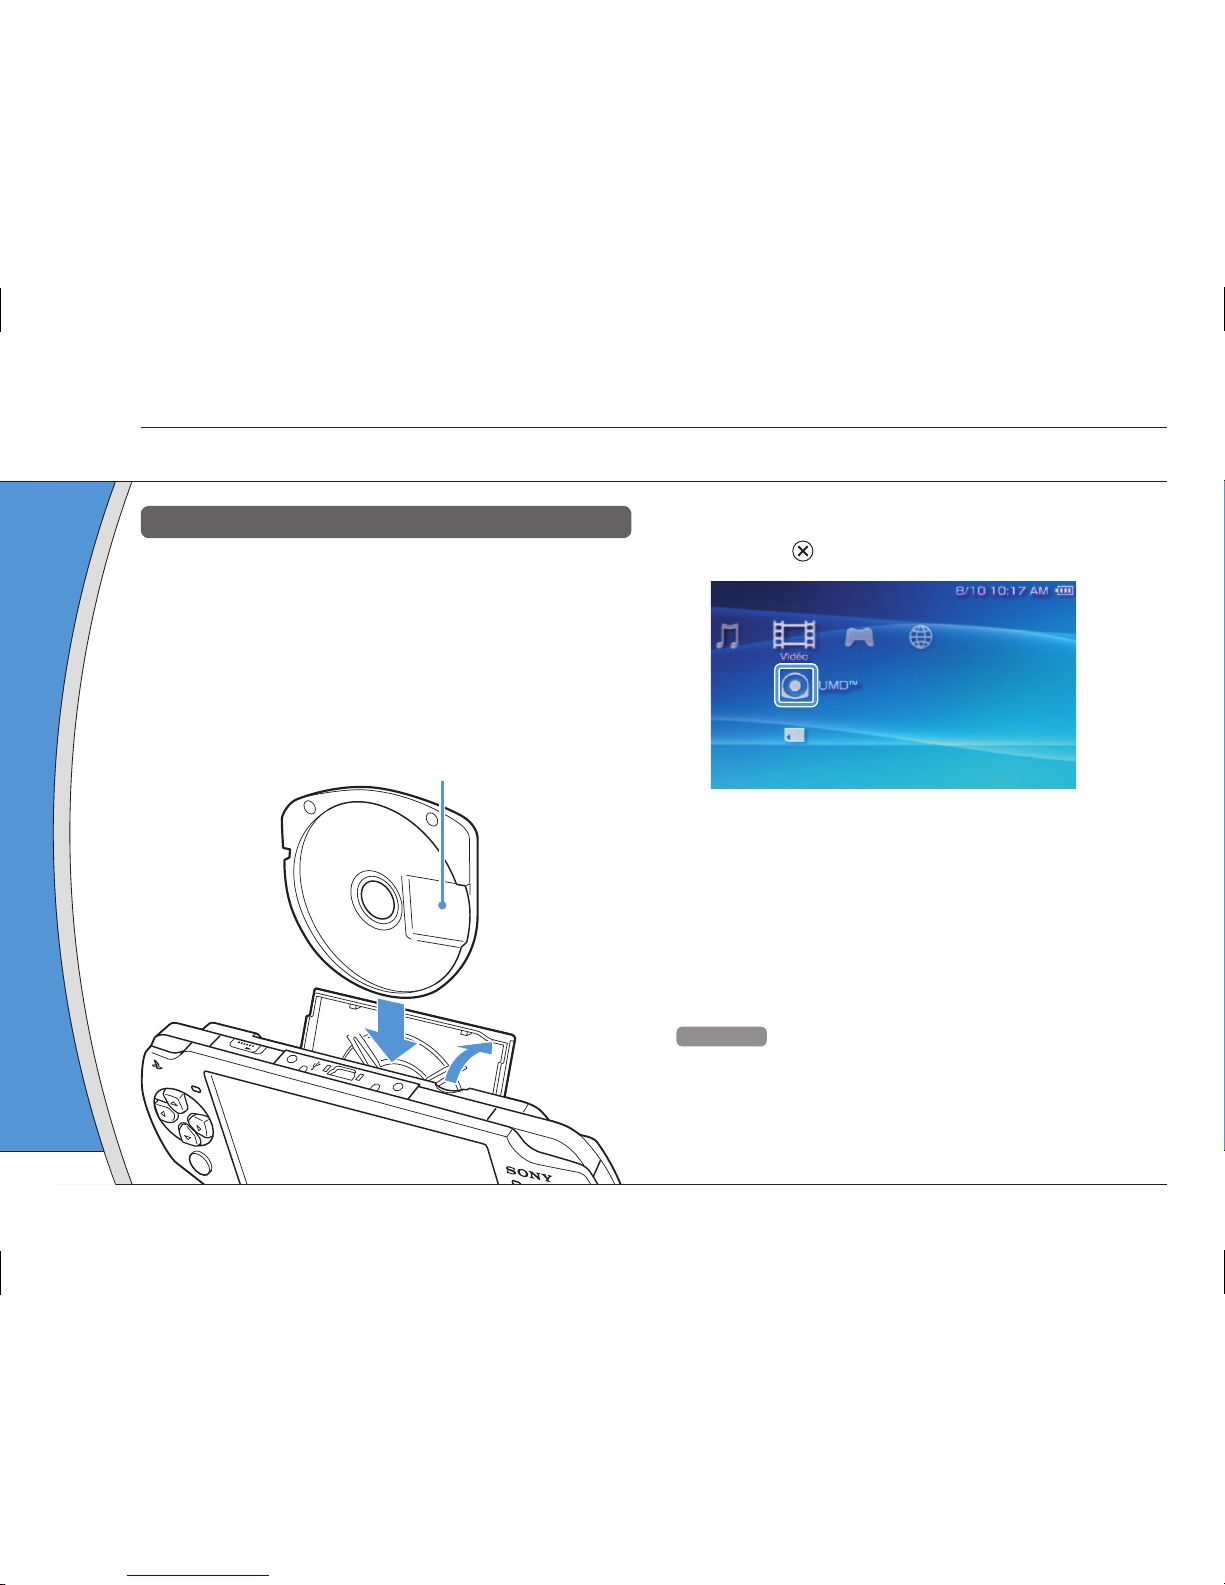
1 Placez le doigt dans la découpe sur le
dessus du système pour ouvrir le
couvercle du compartiment à disque.
2 Insérez un support UMD™ et fermez le
couvercle du compartiment à disque.
Vérifi ez que le couvercle du compartiment à disque est bien fermé.
L'icône s'affi che dans le menu d'accueil.
W
LA
N
1
2
Ne touchez pas la surface enregistrée.
3 Sélectionnez l'icône, puis appuyez sur la
touche .
La lecture démarre.
Conseils
• Appuyez sur la touche HOME (accueil) pour quitter un jeu.
• Pour retirer le support UMD™, arrêtez la lecture et ouvrez le
couvercle du compartiment à disque.
42
Page 43
DE
IT
NL
PT
PSP-1001 3-218-749-11(1) US/FR/ES
US
FR
ES
Opérations de base
Lecture de contenus
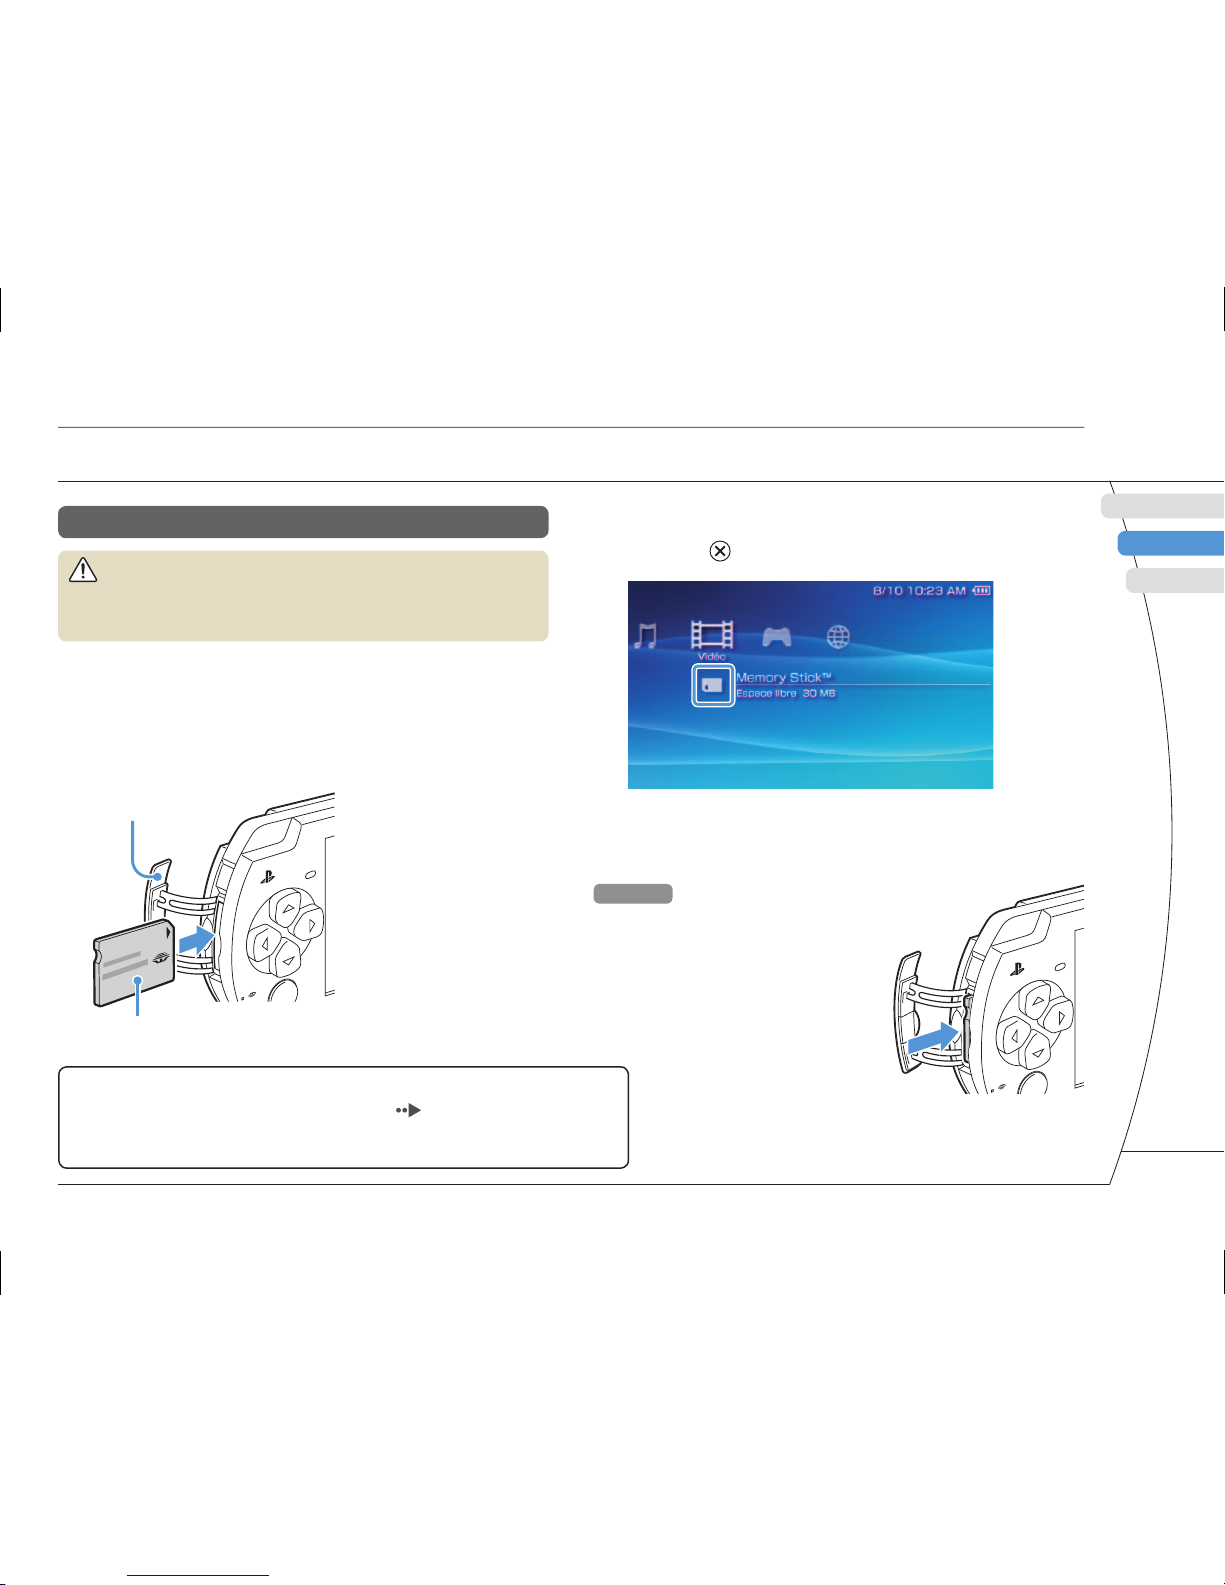
Contenu sur support Memory Stick Duo™ (vendu séparément)
Avertissement
Maintenez les supports Memory Stick Duo™ hors de portée des
jeunes enfants, car ils risquent de les avaler accidentellement.
1 Ouvrez le couvercle de fente.
2
Appuyez sur le support Memory Stick Duo™
jusqu'à ce qu'il soit complètement inséré.
L'icône s'affi che dans le menu d'accueil.
Avant
Couvercle de fente
Avis
Lorsque l'indicateur d'accès Memory Stick Duo™ ( page 38) est allumé, n'éjectez
pas le support Memory Stick Duo™, ne mettez pas le système hors tension et ne le
placez pas en mode veille. Cela pourrait entraîner la perte ou l'altération de données
.
3 Sélectionnez l'icône, puis appuyez sur la
touche .
La liste du contenu à lire s'affi che.
Conseil
Pour retirer le support Memory
Stick Duo™, appuyez une fois sur
celui-ci dans le sens de la fl èche.
43
Page 44
PSP-1001 3-218-749-11(1) US/FR/ES
06
Vérifi cation du niveau de charge de la batterie
Opérations de base
Méthodes de charge de la batterie
Vous pouvez utiliser une des méthodes suivantes
pour charger la batterie.
Utilisation de l'adaptateur AC
Lorsque vous raccordez l'adaptateur AC au système PSP®
et que vous insérez la fi che du cordon d'alimentation dans
une prise électrique, le chargement commence (
page
36).
Utilisation d'un câble USB (vendu
séparément)
Utilisez un câble USB pour raccorder le système PSP® à
un périphérique équipé d'un connecteur USB, notamment
un ordinateur personnel. Lorsque vous mettez le système
PSP
®
sous tension et que vous sélectionnez
(Connexion USB) sous
(Paramètres), l'indicateur
POWER (alimentation) vire à l'orange et le chargement
commence.
Conseils
• Vous pouvez raccorder un câble USB de type Mini-B
(5 broches) au connecteur USB du système PSP®.
• Pour plus de détails sur le moment ou la durée de
chargement, reportez-vous au manuel Sécurité et support
technique fourni.
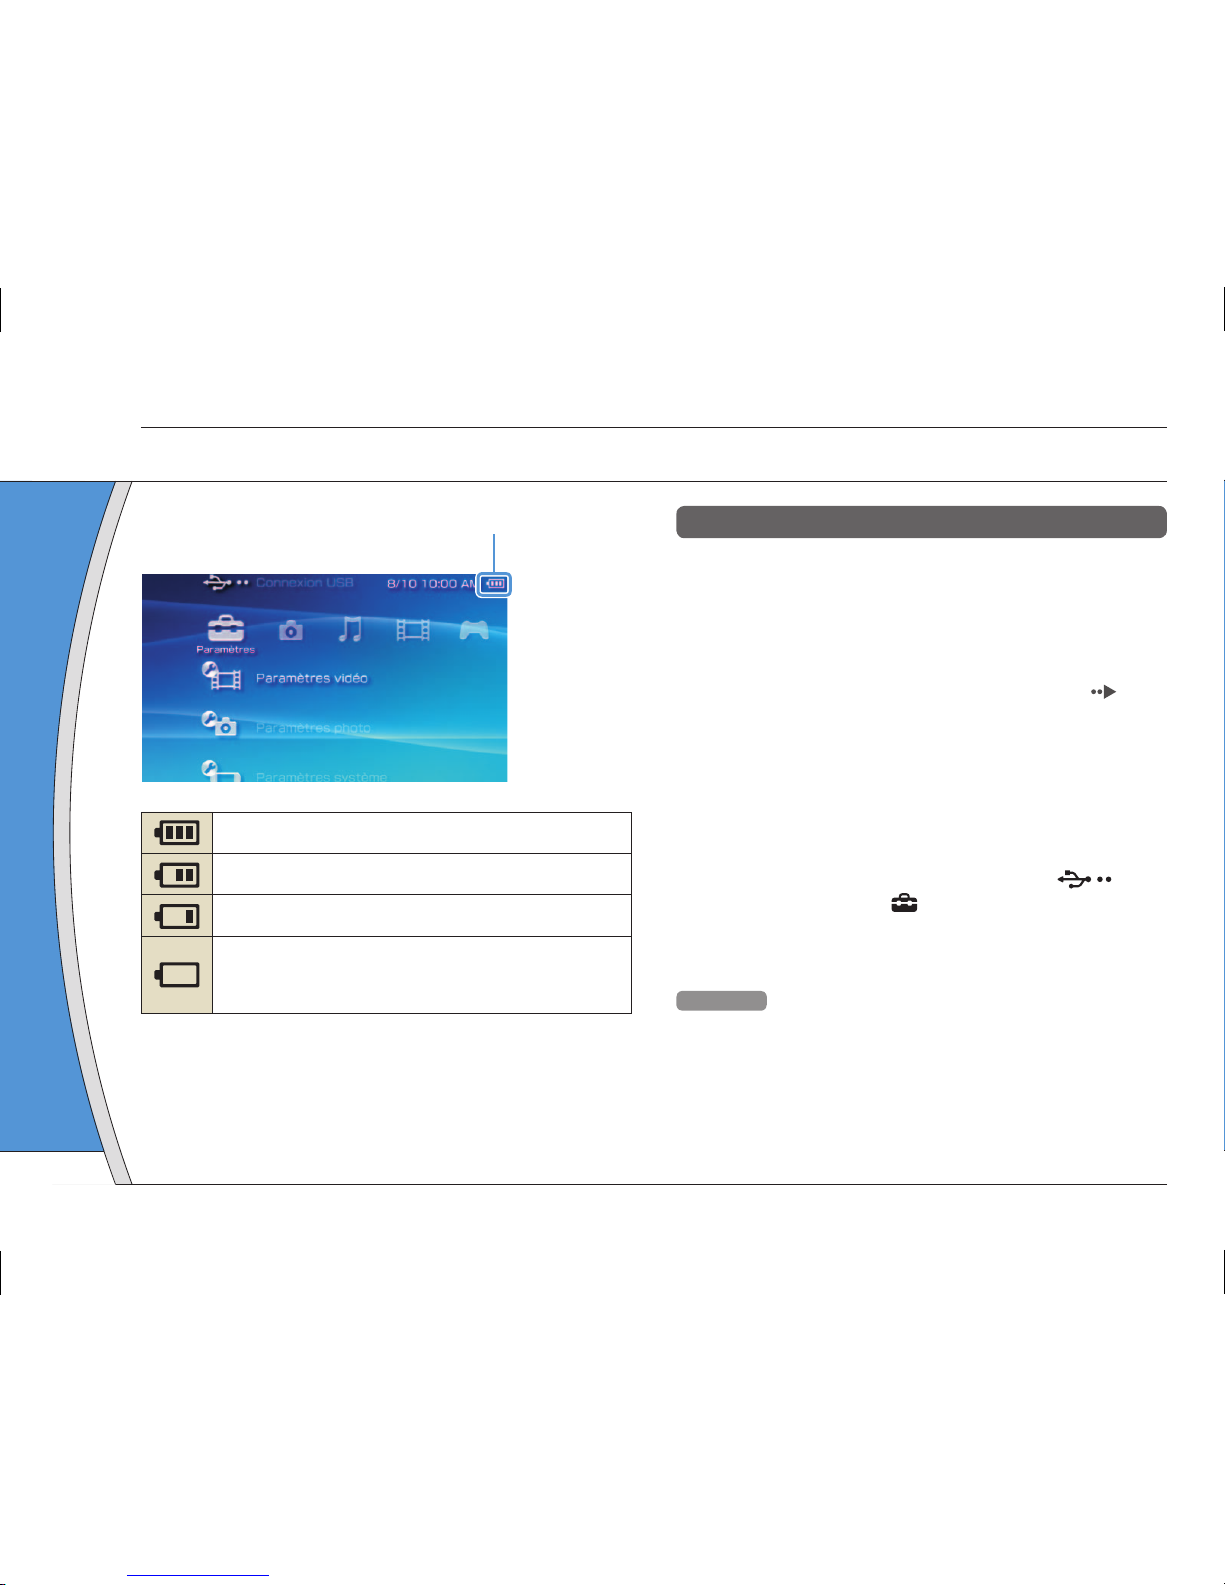
Niveau de charge de la batterie
Il reste beaucoup de puissance.
Le niveau de la batterie est faible.
La batterie est presque épuisée.
La batterie est épuisée. L'indicateur POWER
(alimentation) clignote en vert. Rechargez la
batterie.
Selon l'environnement et les conditions d'utilisation, le niveau
de charge affi ché peut être différent du niveau de charge réel.
44
Page 45
DE
IT
NL
PT
PSP-1001 3-218-749-11(1) US/FR/ES
US
FR
ES
07
Copie de musique/vidéos/images
Opérations de base
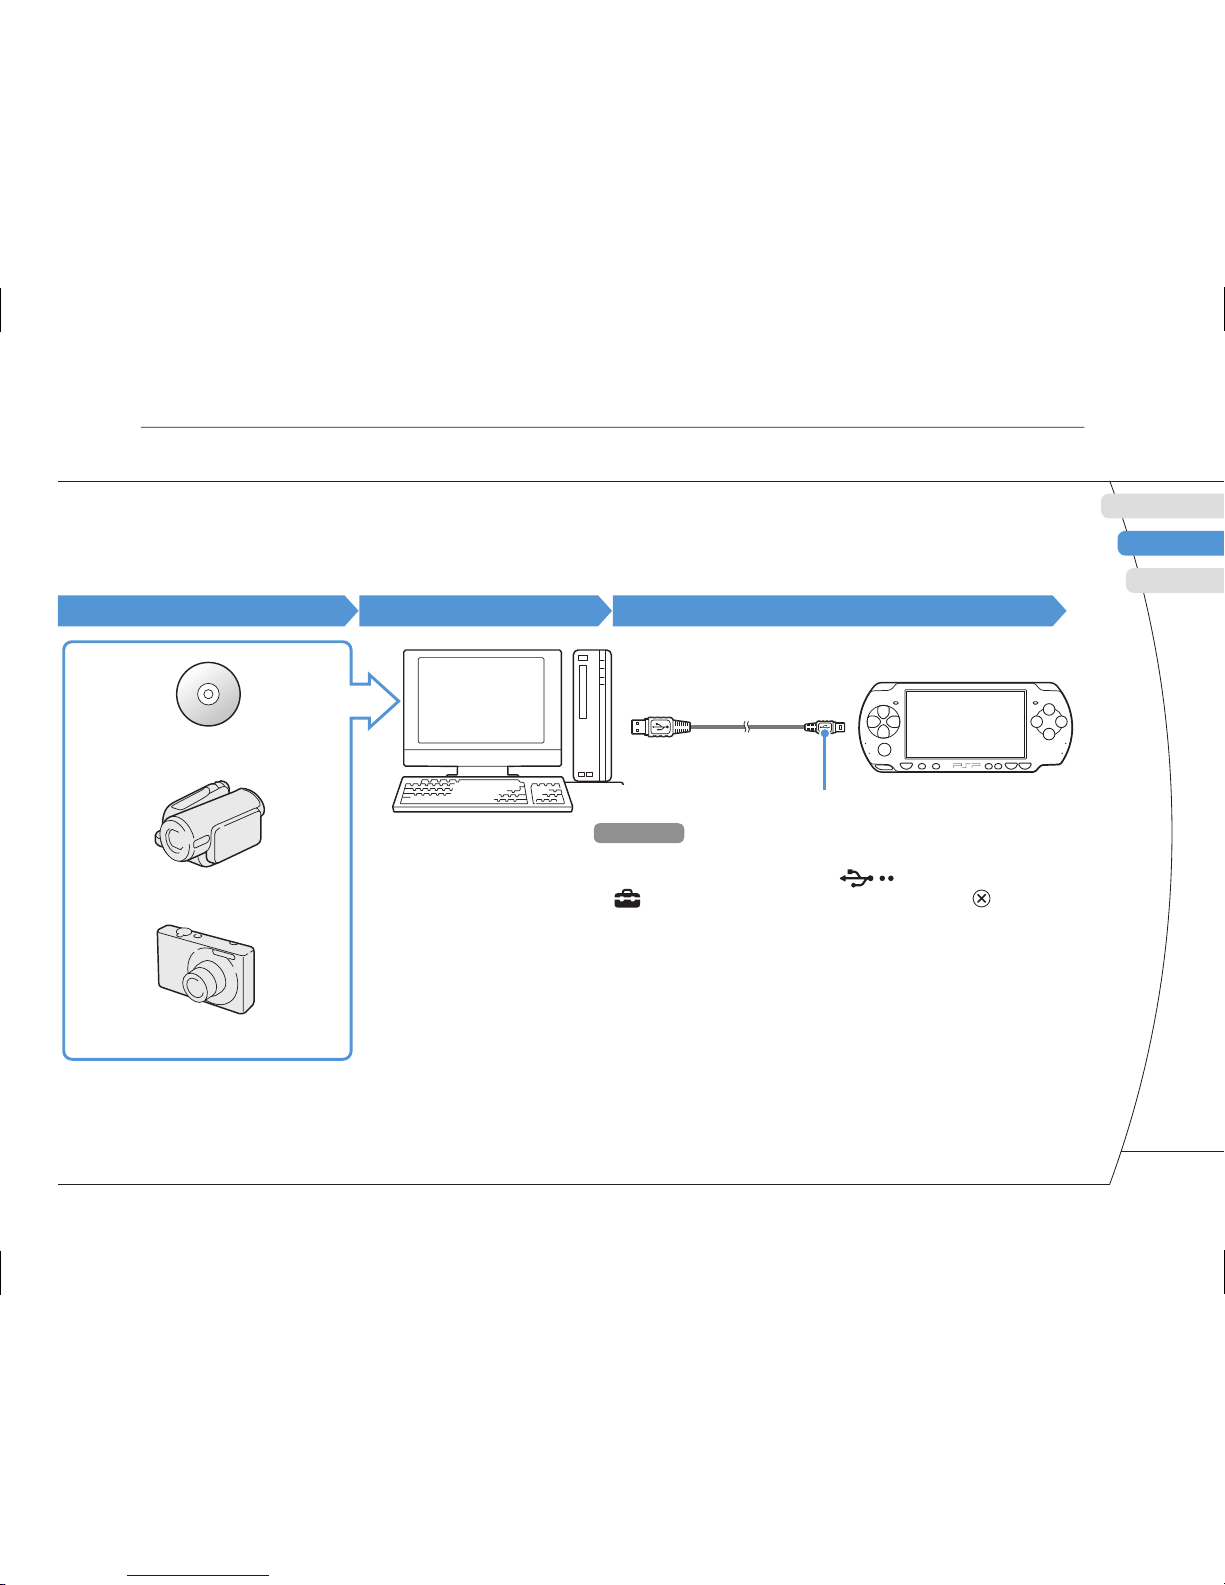
Copiez des fi chiers musicaux/vidéo/image sur un support Memory Stick Duo™, puis lisez-les sur le système PSP®.
Les méthodes de copie varient en fonction du périphérique et du logiciel, ainsi que du type de fi chier. Les
instructions suivantes s'appliquent aux méthodes de copie les plus courantes.
Source musicale/vidéo/images
Vers un PC
Vers un système PSP
®
Exemples :
CD audio
Caméscope numérique
Appareil photo numérique
PC
Câble USB
Type Mini-B (5 broches)
Conseils
• Si vous utilisez un câble USB, raccordez-le au système
PSP
®
et au PC, sélectionnez (Connexion USB) sous
(Paramètres), puis appuyez sur la touche .
• Vous pouvez effectuer le raccordement à un PC qui
supporte un système d'exploitation prenant en charge la
classe de stockage en masse USB.
• Plutôt qu'un câble USB, vous pouvez utiliser un lecteur/
graveur USB de Memory Stick (non fourni) ou un PC équipé
d'une fente pour Memory Stick™.*
* Vous devez disposer d'un adaptateur Memory Stick Duo
(code de produit MSAC-M2 : produit Sony vendu
séparément) si votre périphérique ne prend en charge
que les Memory Stick™ de format standard.
45
Page 46
PSP-1001 3-218-749-11(1) US/FR/ES
Opérations de base
Copie de musique/vidéos/images
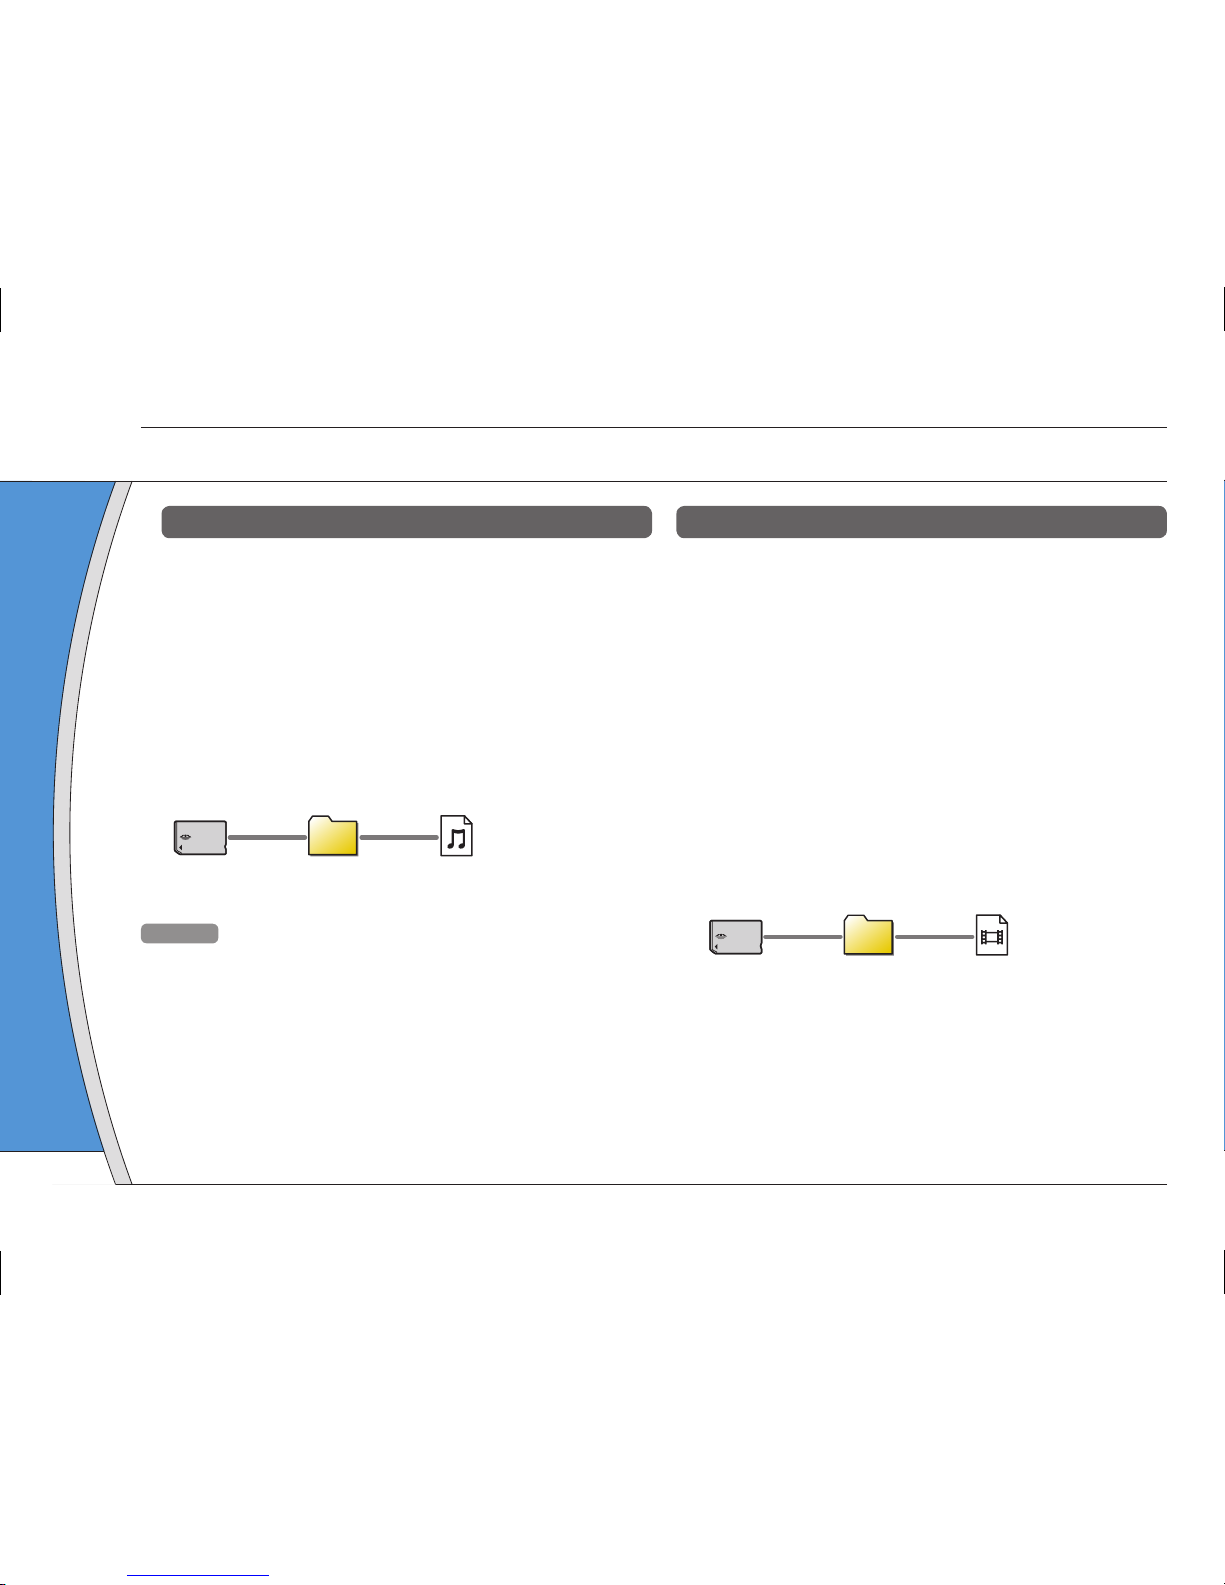
Copie de fi chiers musicaux
Exemple : Importation de pistes musicales d'un CD
audio
1. Importer
Utilisez un logiciel compatible pour importer des pistes
musicales d'un CD audio vers un PC.
2. Copier
Créez un dossier appelé "MUSIC" sur le support Memory
Stick Duo™ à l'aide d'un PC, puis enregistrez des fi chiers
musicaux dans ce dossier.
MUSIC
Conseil
Parmi les formats de fi chiers reconnus pour la lecture, citons
MP3, AAC et ATRAC.
Copie de fi chiers vidéo
Exemple : Importation d'une vidéo à partir d'un
caméscope numérique
1. Importer
Importez la vidéo vers un PC.
Les méthodes d'importation varient selon le périphérique
utilisé. Pour plus d'informations, reportez-vous aux
instructions qui accompagnent le périphérique.
2. Convertir/Copier
Utilisez un logiciel compatible pour convertir la vidéo en
un format de fi chier reconnu par le système PSP
®
. Ensuite,
créez un dossier appelé "VIDEO" sur le support Memory
Stick Duo™ et enregistrez les fi chiers vidéo dans ce
dossier.
VIDEO
46
Page 47
DE
IT
NL
PT
PSP-1001 3-218-749-11(1) US/FR/ES
US
FR
ES
Opérations de base
Copie de musique/vidéos/images
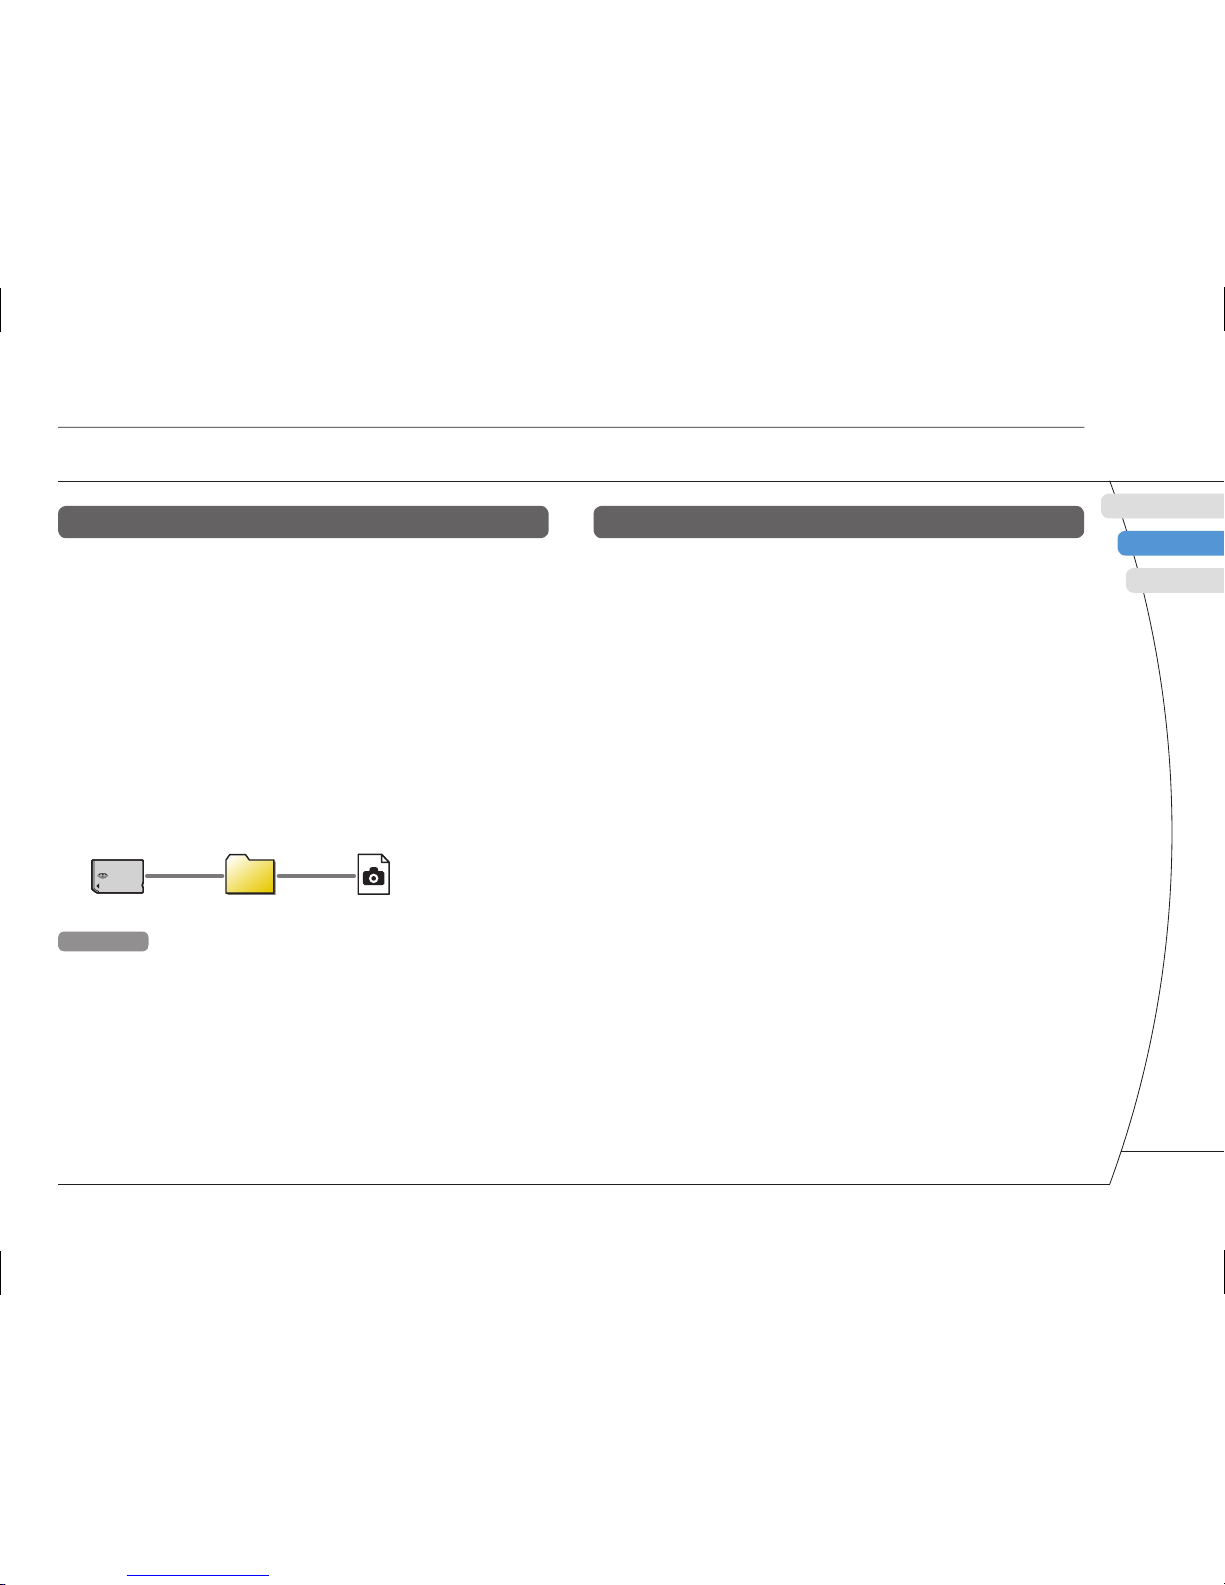
Copie de fi chiers d'images
Exemple : Importation d'images à partir d'un
caméscope numérique
1. Importer
Importez des images vers un PC.
Les méthodes d'importation varient selon le périphérique
utilisé. Pour plus d'informations, reportez-vous aux
instructions qui accompagnent le périphérique.
2. Copier
Créez un dossier appelé "PICTURE" sur le support
Memory Stick Duo™ à l'aide d'un PC, puis enregistrez des
fi chiers d'images dans ce dossier.
PICTURE
Conseils
• Si vous utilisez un appareil photo numérique qui accepte
les supports Memory Stick Duo™, vous pouvez affi cher les
photos en insérant le support de l'appareil photo
directement dans le système PSP®.
• Vous pouvez affi cher les fi chiers d'images dans différents
formats, notamment JPEG (compatible DCF 2.0/Exif 2.21),
TIFF et GIF.
Logiciel de conversion
Des logiciels PC, tels que ceux indiqués ci-dessous*1
peuvent être utilisés pour copier des fi chiers. Lorsque
vous copiez des fi chiers sur un support Memory Stick
Duo™ à l'aide du logiciel ci-dessous, les dossiers
requis sont automatiquement créés.
• Media Manager for PSP® (PlayStation®Portable)
Vous pouvez utiliser ce logiciel pour convertir des fi chiers
musicaux, vidéo et d'images dans les formats requis.
• SonicStage
Vous pouvez utiliser ce logiciel pour importer des fi chiers
musicaux d'un CD audio vers votre PC.
• Image Converter*
2
Vous pouvez utiliser ce logiciel pour convertir des fi chiers
vidéo vers le format MP4 en vue de leur lecture sur le
système PSP®.
*1 Tous produits Sony vendus séparément
*
2
Le logiciel Image Converter version 1.5 ou antérieure n'est
pas compatible avec le système PSP®.
47
 Loading...