

Page 1

4-668-080-11 (1)
Wireless LAN Card
Operating Instructions
PEGA-WL100
2002 Sony Corporation
Page 2

Owner’s Record
The model number and serial number are located at the rear of the
product. Record the model number and the serial number in the space
provided below. Refer to them whenever you call upon your Sony
dealer regarding this product.
Model Number : PEGA-WL100
Serial Number : __________________
For the customers in USA and Canada :
NOTICE
This equipment has been tested and found to comply with the limits
for a Class B digital device, pursuant to part 15 of the FCC Rules.
These limits are designed to provide reasonable protection against
harmful interference in a residential installation.
This equipment generates, uses and can radiate radio frequency
energy and, if not installed and used in accordance with the
instructions, may cause harmful interference to radio
communications.
However, there is no guarantee that interference will not occur in a
particular installation. If this equipment does cause harmful
interference to radio or television reception, which can be determined
by turning the equipment off and on, the user is encouraged to try to
correct the interference by one or more of the following measures:
— Reorient or relocate the receiving antenna.
— Increase the separation between the equipment and receiver.
— Connect the equipment into an outlet on a circuit different from
that to which the receiver is connected.
— Consult the dealer or an experienced radio/TV technician for help.
FCC WARNING
Changes or modifications not expressly approved by the party
responsible for compliance could void the user’s authority to operate
the equipment.
2
Page 3
Declaration of Conformity
Trade Name : SONY
Model No. : PEGA-WL100
Responsible Party : Sony Electronics Inc.
Address : 1 Sony Drive, Park Ridge, NJ 07656 USA
Telephone No. : 201-930-6972
This device complies with part 15 of the FCC Rules.
Operation is subject to the following two conditions:
(1) This device may not cause harmful interference, and
(2) this device must accept any interference received, including
interference that may cause undesired operation.
FCC Radiation Exposure Statement:
This transmitter complies with FCC radiation exposure limits set forth
for an uncontrolled environment. To comply with the FCC RF
exposure compliance requirements, no change to the antenna or the
device is permitted. Any change to the antenna or the device could
result in the device exceeding the RF exposure requirements and void
user. In addition, this transmitter must not be co-located or operating
in conjunction with any other antenna or transmitter.
The term “IC:” before the radio certification number only signifies
that Industry Canada technical specifications were met.
Operation is subject to the following two conditions: (1) this device
may not cause interference, and (2) this device must accept any
interference, including interference that may cause undesired
operation of the device.
L’utilisation de ce dispositif est autorisée seulement aux conditions
suivantes: (1) il ne doit pas produire de brouillage et (2) l’utilisateur
du dispositif doit être prêt à accepter tout brouillage radioélectrique
reçu, même si ce brouillage est susceptible de compromettre le
fonctionnement du dispositif.
Continued on next page
3
Page 4

To prevent radio interference to the licensed service, this device is
intended to be operated indoors and away from windows to provide
maximum shielding. Equipment (or its transmit antenna) that is
installed outdoors is subject to licensing.
Pour empêcher que cet appareil cause du brouillage au service faisant
l’objet d’une licence, il doit être utilisé à l’intérieur et devrait être placé
loin des fenêtres afin de fournir un écran de blindage maximal. Si le
matériel (ou son antenne d’émission) est installé à l’extérieur, il doit
faire l’objet d’une licence.
This Class B digital apparatus complies with Canadian ICES-003.
Cet appareil numérique de la classe B est conforme à la norme NMB003 du Canada.
For the customers in European countries :
Sony hereby declares that this product is in compliance with the
essential requirements and other relevant provisions of European
Directive 1999/5/EC.
In some countries the use of the Wireless LAN Card is restricted.
Before using it, make sure you read the regulation leaflet of this
product.
Warnings
• In some situations or environments, the use of the IEEE 802.11b
technology might be restricted by the proprietor of the building or
responsible representatives of the organization, for example on board of
airplanes, in hospitals or in any other environment where the risk of
interference with other devices or services is perceived or identified as
harmful.
• If you are uncertain about the policy applying to the use of IEEE 802.11b
technology in a specific organization or environment, you are
encouraged to first ask for authorization prior to switching it on.
• Consult your physician or the manufacturer of personal medical devices
(pacemakers, hearing aids, etc.) regarding any restrictions on the use of
IEEE 802.11b technology.
4
Page 5
• Sony, , CLIÉ, , CLIÉ GEAR, , , Jog
Dial and Memory Stick are trademarks of Sony Corporation.
• Palm OS and HotSync are registered trademarks of Palm, Inc. or its
subsidiaries. Palm Desktop and HotSync logo are trademarks of Palm, Inc. or
its subsidiaries.
• Microsoft, Windows and Windows NT are registered trademarks of Microsoft
Corporation in the United States and/or other countries.
• Adobe and Adobe Acrobat Reader are trademarks of Adobe Systems
Incorporated.
• All other names of systems, products and services are trademarks of their
respective owners. In the manual, the TM or ® marks are not specified.
Before using the PEGA-WL100, be sure to read the End User Software License
Agreement that accompanies it.
• Copyright laws prohibit reproducing the software or the manual
accompanying it in whole or in part, or renting the software without the
permission of the copyright holder.
• In no event will SONY be liable for any financial damages, or loss of
profits, including claims made by third parties, arising out of the use of the
software supplied with this unit.
• If a problem occurs with this product as a result of defective
manufacturing, SONY will replace it. However, SONY bears no other
responsibility.
• The software provided with this unit cannot be used with other units.
• Please note that, due to continued efforts to improve quality, the software
specifications may be changed without notice.
• Operation of this unit with software other than that provided is not
covered by the warranty.
5
Page 6

Table of Contents
Introduction ................................................................................................... 7
Names of Parts .............................................................................................. 9
Inserting/Removing the Wireless LAN Card ........................................ 10
Installing the Software ............................................................................... 12
Performing Communications via a Wireless LAN Access Point
(Infrastructure Mode) .............................................................................. 14
Basic Settings ..................................................................................... 14
Advanced Settings ............................................................................20
Connecting your CLIÉ Handheld to a Wireless LAN ...........................21
Performing Communications Directly between your CLIÉ Handheld
and Another Device on a Wireless LAN (Ad-Hoc Mode) .................23
Basic Settings ..................................................................................... 23
Connecting your CLIÉ Handheld to Another Device on a
Wireless LAN ................................................................................. 30
Performing a HotSync Operation via a Network with a Wireless
LAN Card ................................................................................................. 32
Troubleshooting .......................................................................................... 34
Precautions on Use ..................................................................................... 37
Specifications ...............................................................................................38
6
Page 7
Introduction
This product is a Wireless LAN Card for the Sony Personal
Entertainment Organizer (mentioned as CLIÉ handheld after this) of
the Palm OS 5 (ver5.0).
This product complies with IEEE 802.11b* and allows you to access
the Internet wirelessly in locations where there is a Wi-Fi certified
wireless LAN access point.
* Wi-Fi certified.
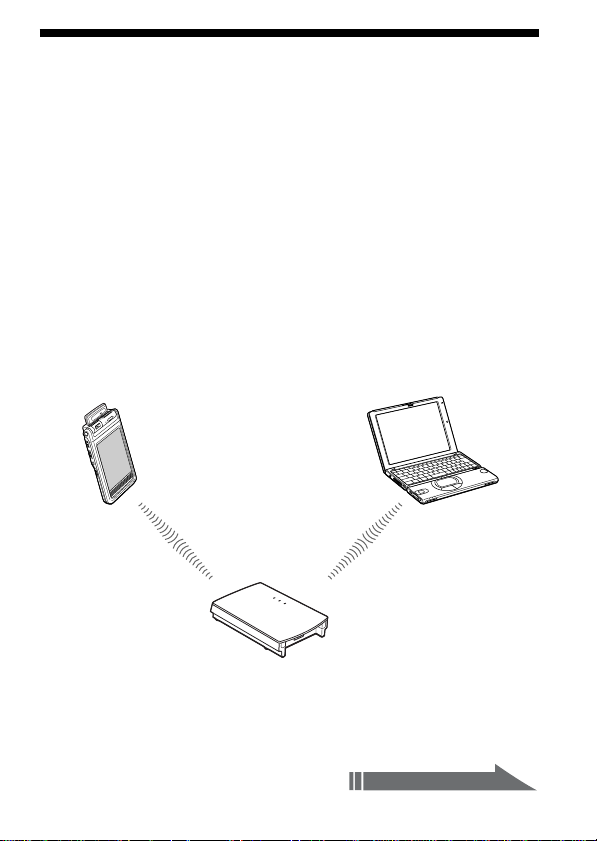
Performing a HotSync operation
You can perform a HotSync operation via a network (synchronize
data wirelessly) between your CLIÉ handheld and a personal
computer. For details on HotSync operation, see the Operating
Instructions of your CLIÉ handheld.
PEGA-WL100 and CLIÉ handheld
LAN access point
Personal computer
Continued on next page
7
Page 8
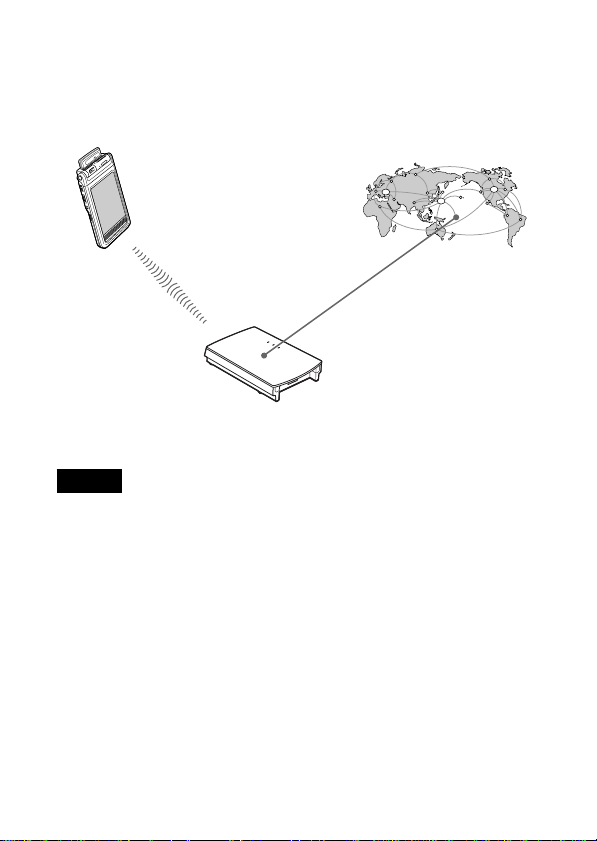
Accessing the Internet
You can access the Internet from your CLIÉ handheld in which this
Wireless LAN card is inserted through a LAN access point, and enjoy
browsing various websites or sending/receiving email.
Internet
PEGA-WL100
and CLIÉ
handheld
LAN access point
Notes
• To access the Internet through a LAN access point, you need to be a subscriber
to a telecommunications company and an Internet Service Provider (ISP) in
advance.
• You may need a personal computer to set a wireless LAN. For details, see the
Operating Instructions of your wireless LAN access point.
8
Page 9
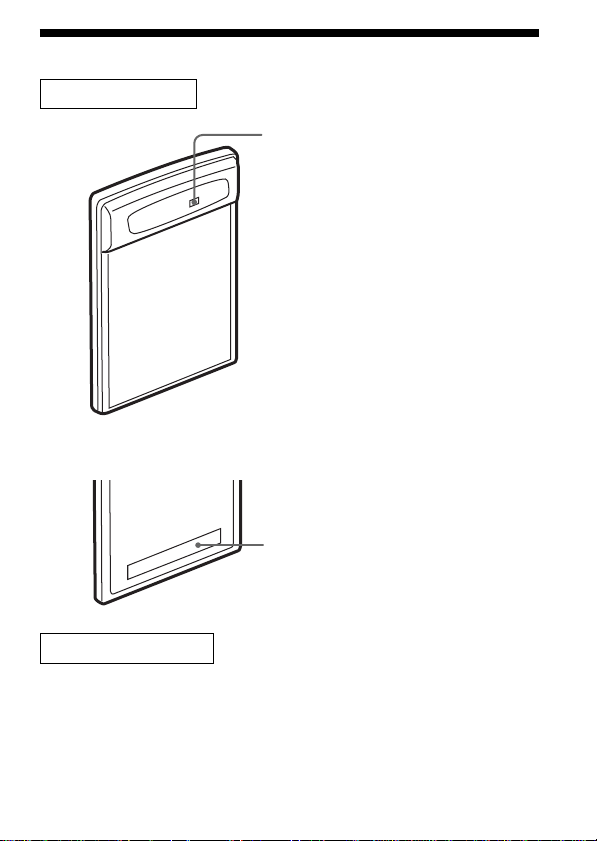
Names of Parts
Wireless LAN Card
Front
Rear
LED indicator
Blinks slowly while your CLIÉ
handheld is connected to an access
point, etc.
Blinks rapidly during data transfer.
(Flashing speed varies depending on
the amount of data being transferred).
Does not blink when your CLIÉ
handheld is not connected to an access
point, etc.
MAC Address
This address may be used by your
System Administrator.
Other items included
CD-ROM (1)
Hard case (1)
Operating Instructions (1)
Warranty card (1)
End-User’s License Agreement (1)
9
Page 10
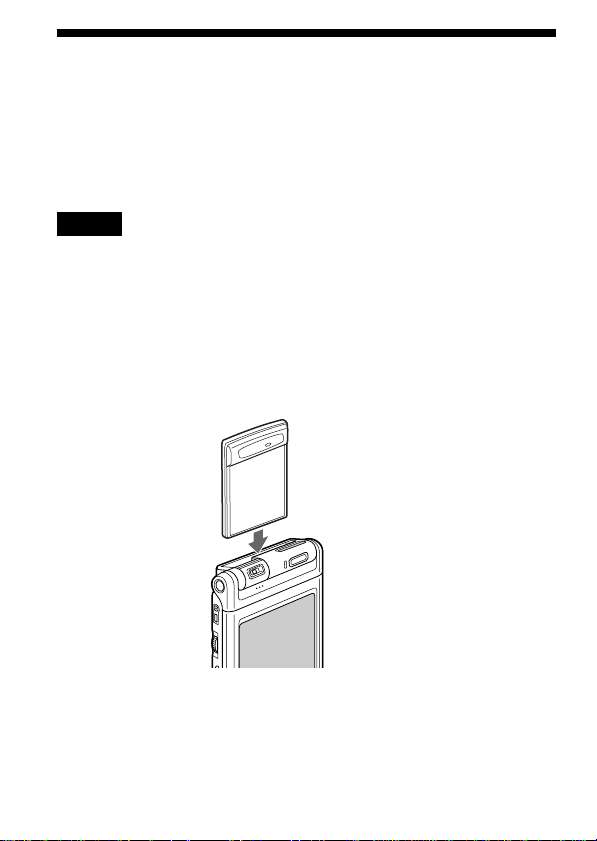
Inserting/Removing the Wireless LAN
Card
Inserting the Wireless LAN card in your CLIÉ
handheld
Insert the Wireless LAN card in Wireless Communication Slot of the
CLIÉ handheld.
Notes
• Insert the Wireless LAN card straight in Wireless Communication Slot of the
CLIÉ handheld.
• Do not insert the Wireless LAN card in the wrong way. Forcing it in the
wrong way will damage it and cause a malfunction.
• You may be unable to use the Wireless LAN card when the remaining power
of the battery in the CLIÉ handheld is low. Before using, charge the battery
fully.
Insert the Wireless LAN card
all the way into the slot until
it fully mates with the
connector.
10
Page 11

Removing the Wireless LAN card from your CLIÉ
handheld
After use, terminate communications. Then, pull the wireless LAN
card up straight.
When using this Wireless LAN card with a
Flip&Rotate style CLIÉ handheld
Do not rotate the display when the wireless LAN card is inserted in
the Wireless Commnunication Slot of the CLIÉ handheld. This may
press the display panel against the Wireless LAN card and cause a
malfunction.
Note
During communication, do not remove the Wireless LAN card or subject the
CLIÉ handheld to excessive shock.
11
Page 12

Installing the Software
When you try to perform wireless LAN communications for the first
time after inserting the Wireless LAN card in your CLIÉ handheld,
you need to install the Wireless LAN utility in your CLIÉ handheld.
You can install the Wireless LAN utility by using the supplied CDROM.
Note
Before installation, it is necessary to have Palm Desktop for CLIÉ installed and
to perform a HotSync operation. Connect the CLIÉ handheld to a Windows
computer, using a cradle, etc. For details on how to connect the CLIÉ handheld
to the computer, see the Operating Instructions of your CLIÉ handheld.
1 Perform a soft reset on your CLIÉ handheld.
For details on how to perform a soft reset, see the Operating
Instructions of your CLIÉ handheld.
2 Insert the supplied CD-ROM in the CD-ROM drive of
your Windows computer.
The installer starts and the initial screen appears.
Tip
If the installer does not start automatically, double-click [setup] (setup.exe)
which can be found in the CD-ROM.
3 Proceed with the installation, following the installer’s
instructions.
On the user name selection screen, select a user’s name.
Note
If you want to use more than one CLIÉ handheld, you need to install this
utility in each CLIÉ handheld.
12
Page 13

4 Click [Done] when the installer-closing screen appears.
Your computer is ready to install the Wireless LAN utility to your
CLIÉ handheld. In the next step, you will perform a HotSync
operation to carry out the installation.
5 Click the icon on the task tray that is located in the
lower right corner of the Windows display on your
computer.
Check that [Local USB] is ticked in the shortcut menu on the
display.
Tip
If you cannot find the icon on the task tray, click [Programs] ([All
Programs] in Windows
Manager] to start up the HotSync manager, from the [Start] menu.
®
XP), [Sony Handheld], and then [HotSync
6 Execute a local HotSync operation on your CLIÉ
handheld.
The Wireless LAN utility is installed into your CLIÉ handheld.
Note
Part of this software application extends into the system of CLIÉ handheld.
Therefore, it cannot be uninstalled.
After you perform a hard reset
Be sure to reinstall this utility.
After a hard reset, normally, the backup data in a personal computer
is automatically restored to your CLIÉ handheld through a HotSync
operation. However, this utility restores only the setting file when a
HotSync operation is performed, and it does not restore the utility
itself. Therefore, it is necessary to reinstall this utility after a hard
reset.
13
Page 14

Performing Communications via a
Wireless LAN Access Point
(Infrastructure Mode)
You can wirelessly access the Internet or perform communications
with other communication device through a wireless LAN access
point.
Basic Settings
Before setting
You first need to input a couple of values to set the wireless LAN access point
you use. Check the following values in advance.
[NetworkID (SSID)]: It is also called ESS-ID or Network Name.
[WEP (Wired Equivalent Privacy)]: It is also called Encryption.
For details, ask your System Administrator. When you have a wireless LAN
access point for your personal use, refer to the operating instructions of the
wireless LAN access point.
Note
The Wireless LAN card uses the 1-11 channels (2.4 GHz band of frequencies). If
your access point uses the 12-14 channels, it is impossible to perform
communications using the Wireless LAN card.
1 Insert the Wireless LAN card in Wireless
Communication Slot of your CLIÉ handheld.
2 Tap the [Prefs] icon on the home screen of your CLIÉ
handheld.
The [Preferences] screen appears.
3 Tap V in the upper right corner of the screen, and
select [Network].
The [Network] screen appears.
14
Page 15

4 Tap V of [Service], and select [Wireless LAN].
5 Tap [Details...] in the lower left corner of the screen.
The [Wireless LAN Setup] screen appears.
6 Tap [Create].
A new input screen of [Wireless LAN Setup] appears.
Check that [Infrastructure] is selected (highlighted) in
[ConnectMode]. If it is not selected, tap [Infrastructure] to select it.
Continued on next page
15
Page 16

Tip
Tapping the mark in the upper right corner of the screen shows a brief
explanation for the setting.
7 Enter a profile name in [ProfileName].
Specify a name freely according to the name of the other
communication device, access point, etc.
8 Enter a network ID in [NetworkID (SSID)].
Network ID (SSID) is fixed on the part of the access point you use.
Be sure to enter the network ID (SSID) that is specified by your
access point.
Note
Network ID is case-sensitive between capital letters and small letters. Be careful
when entering a Network ID.
16
Page 17

9 Select the encryption level in [WEP].
WEP (encryption level) is fixed depending on the access point you
use. Be sure to select the encryption that is used by your access
point.
Tip
When you select [None] in [WEP], you do not need to enter a WEP key. In
this case, skip the next step, and go to Step 11.
10
Enter a WEP key.
The WEP key is fixed, depending on the access point you use. Be
sure to enter the WEP key that is specified by your access point.
b
Continued on next page
17
Page 18

When you select 40/64bit: alphanumeric string (5 characters)
Enter a 5-digit password using alphabet (a-z), numbers (0-9) and
symbols.
When you select 40/64bit: hexadecimal notation (10 figures
(Hex))
Enter a 10-digit password using alphabet (a-f) and numbers
(0-9).
When you select 104/128bit: alphanumeric string (13 characters)
Enter a 13-digit password using alphabet (a-z), numbers
(0-9) and symbols.
When you select 104/128bit: hexadecimal notation (26 figures
(Hex))
Enter a 26-digit password using alphabet (a-f) and numbers
(0-9).
Note
WEP key distinguishes between capital letters and small letters. Be careful
when entering a WEP key.
Tips
• WEP key is the function that encrypts data that are to be sent by radio
waves.
• Depending on the manufacturer, the above WEP keys may be assigned a
different name.
11
Tap [OK].
The basic settings are completed by the profile name you set in
Step 7.
12
Tap the Home icon on your CLIÉ handheld.
The home screen appears.
18
Page 19

Modifying the settings
1 Tap the [Prefs] icon on the home screen of your CLIÉ handheld.
The [Preferences] screen appears.
2 Tap V in the upper right corner of the screen, and select
[Network].
The [Network] screen appears.
3 Tap V of [Service], and select [Wireless LAN].
4 Tap [Details...] in the lower left corner of the screen.
The [Wireless LAN Setup] screen appears.
5 Tap V below [ProfileName], and select the profile name you
want to modify.
6 Tap [Edit] at the bottom of the screen.
The [Wireless LAN Setup] input screen appears.
7 Modify the settings.
8 Tap [OK].
9 Tap the Home icon.
The home screen appears.
Deleting the profile you have set
1 In Step 6 of “Modifying the settings” above, tap [Delete] at the
bottom of the screen.
The selected profile is deleted.
2 Tap [OK].
3 Tap the Home icon.
The home screen appears.
Note
Do not modify the settings while the Wireless LAN card is being connected to
the wireless LAN access point.
19
Page 20

Advanced Settings
Setting a network manually
When it is necessary to set a network IP address or DNS address,
follow the procedure below.
1 Tap [Advanced Setup] in the lower right corner of the
[Wireless LAN Setup] input screen.
2 Tap the checkbox of [Auto] in [IP Address] or [DNS
Address], and remove the tick.
The IP Address input screen or the DNS Address input screen appears.
3 Enter necessary addresses.
4 Tap [OK] when you complete the setting.
Disabling the power saving mode
1 Tap [Advanced Setup] in the lower right corner of the [Wireless
LAN Setup] input screen.
2 Tap the checkbox of [Enable] in [PowerSaveMode], and remove
the tick.
The power saving mode is disabled.
Tip
When the communication conditions are not good, you can disable the
power saving mode to maximize the battery power and achieve better
communications. However, it will make the battery life shorter.
Normally, the power saving mode is recommended.
20
Page 21

Connecting your CLIÉ Handheld to a Wireless LAN
1 Insert the Wireless LAN card in Wireless
Communication Slot of your CLIÉ handheld.
2 Tap the [Prefs] icon on the home screen of your CLIÉ
handheld.
The [Preferences] screen appears.
3 Tap V in the upper right corner of the screen, and
select [Network].
The [Network] screen appears.
4 Tap V of [Service], and select [Wireless LAN].
Tip
If you have set only one profile, go to Step 8.
Continued on next page
21
Page 22

5 Tap [Details...] in the lower left corner of the screen.
The [Wireless LAN Setup] screen appears.
6 Tap V below [Profile Name], and select the profile
name you want to use.
7 Tap [OK].
The [Preferences] screen appears again.
8 Tap [Connect] at the bottom of the screen.
Your CLIÉ handheld begins to connect to a wireless LAN.
When a connection is established, start up the application you
like.
22
Page 23

Performing Communications Directly
between your CLIÉ Handheld and
Another Device on a Wireless LAN
(Ad-Hoc Mode)
Your CLIÉ handheld can communicate directly with another device
on a wireless LAN without using a wireless LAN access point.
The Ad-hoc mode settings and communications require network knowledge.
Basic Settings
1 Insert the Wireless LAN card in Wireless
Communication Slot of your CLIÉ handheld.
2 Tap the [Prefs] icon on the home screen of your CLIÉ
handheld.
The [Preferences] screen appears.
3 Tap V in the upper right corner of the screen, and
select [Network].
The [Network] screen appears.
4 Tap V of [Service], and select [Wireless LAN].
Continued on next page
23
Page 24

5 Tap [Details...] in the lower left corner of the screen.
The [Wireless LAN Setup] screen appears.
6 Tap [Create].
A new input screen of [Wireless LAN Setup] appears.
Tip
Tapping the mark in the upper right corner of the screen shows a brief
explanation for the setting.
7 Enter a profile name in [ProfileName].
Specify a name freely according to the name of the other
communication device, access point, etc.
24
Page 25

8 Enter a network ID in [NetworkID (SSID)].
Specify an alphanumeric string freely. The same network ID
(SSID) needs to be entered in both your CLIÉ handheld and the
other communication device.
9 Select the encryption level in [WEP].
Be sure to select the same encryption level for both your CLIÉ
handheld and the other communication device.
Tip
When you select [None] in [WEP], you do not need to enter a WEP key. In
this case, skip the next step, and go to Step 11.
Continued on next page
25
Page 26

10
Enter a WEP key.
Be sure to enter the same WEP key in both your CLIÉ handheld
and the other communication device.
For details on WEP key, see pages 17-18.
b
11
Tap [Adhoc] in [ConnectMode].
The Ad-hoc mode is selected as the connection type.
26
Page 27

12
Tap V of [ch] below [Adhoc], and select a channel.
Be sure to select the same channel for both your CLIÉ handheld
and the other communication device. Select a channel from 1 to
11.
13
Tap [Advanced Setup] in the lower right corner of the
screen.
14
Tap the checkbox of [Auto] in [IP Address], and remove
the tick.
The IP address input screen appears.
Note
Ad-hoc mode may not be established if “Auto” is checked.
The connection works only when both of the PC without DHCP and CLIÉ
handheld select “Auto”. Most of the time, user has to enter static IP on CLIÉ
handheld for the Ad-hoc mode.
Continued on next page
27
Page 28

15
Enter an IP address and a sub-netmask.
Enter different IP addresses in your CLIÉ handheld and the other
communication device.
Enter the same Subnet mask in your CLIÉ handheld and the other
communication device.
(Eg.)
IP address CLIÉ handheld: 192.168.0.1
Other device: 192.168.0.2
Subnet mask CLIÉ handheld/other device:
Tip
Enter a gateway address if necessary. When it is necessary to enter a DNS
address, tap and tick the checkbox of [Auto] in [DNS Address] before
entering the DNS address.
16
Tap [OK].
The [Wireless LAN Setup] screen appears.
255.255.255.0
Note
User has to find the Subnet mask from the
PC that he/she wants to connect to. The
following is referred to find Subnet mask on
a PC.
Windows 98 and Windows ME:
From [Start] c [Run...] c type in ‘winipcfg’ c
the [IP configuration] dialog box appears c
check the IP address and Subnet mask.
Windows 2000 and Windows XP:
From [Start] c [Run...] c type in ‘cmd’ c type
‘ipconfig/all’ c check the IP address and
Subnet mask.
17
Tap [OK].
The settings are completed in the profile name you set in Step 7.
18
Tap the Home icon on your CLIÉ handheld.
The home screen appears.
28
Page 29

Modifying the settings
1 Tap the [Prefs] icon on the home screen of your CLIÉ handheld.
The [Preferences] screen appears.
2 Tap V in the upper right corner of the screen, and select
[Network].
The [Network] screen appears.
3 Tap V of [Service], and select [Wireless LAN].
4 Tap [Details...] in the lower left corner of the screen.
The [Wireless LAN Setup] screen appears.
5 Tap V below [ProfileName], and select the profile name you
want to modify.
6 Tap [Edit] at the bottom of the screen.
The [Wireless LAN Setup] input screen appears.
7 Modify the settings.
8 Tap [OK].
9 Tap the Home icon.
The home screen appears.
Deleting the profile you have set
1 In Step 6 of “Modifying the settings” above, tap [Delete] at the
bottom of the screen.
The [Delete Profile] confirmation dialog window appears.
2 Tap [OK] to confirm deletion or [Cancel] to cancel the deletion.
3 Tap the Home icon.
The home screen appears.
Note
Do not modify the settings while the Wireless LAN card is being connected to
the wireless LAN access point.
Continued on next page
29
Page 30

Connecting your CLIÉ Handheld to Another Device
on a Wireless LAN
1 Insert the Wireless LAN card in Wireless
Communication Slot of your compatible CLIÉ handheld.
2 Tap the [Prefs] icon on the home screen of your CLIÉ
handheld.
The [Preferences] screen appears.
3 Tap V in the upper right corner of the screen, and
select [Network].
4 Tap V of [Service], and select [Wireless LAN].
Tip
If you have set only one profile, go to Step 8.
30
Page 31

5 Tap [Details...] in the lower left corner of the screen.
The [Wireless LAN Setup] screen appears.
6 Tap V below [Profile Name], and select the profile
name you want to use.
7 Tap [OK].
The [Preferences] screen appears again.
8 Tap [Connect] at the bottom of the screen.
Your CLIÉ handheld begins to connect to a wireless LAN.
When a connection is established, start up the application you like.
31
Page 32

Performing a HotSync Operation via a
Network with a Wireless LAN Card
This Wireless LAN card can be used in various ways. For example,
you can perform a HotSync operation with a Windows computer via a
wireless LAN. Follow the procedures below.
Preparing your computer
1 Click the icon in the Windows task tray (bottom-right corner
of the taskbar) and select [Network] from the shortcut menu.
2 Click the icon in the Windows task tray again and select
[Setup] from the shortcut menu.
The [Setup] screen is displayed.
3 Click the [Network] tab, then click the check box next to the
user name for HotSync.
4 Click [TCP/IP Settings], and enter a Subnet Mask.
5 Click [OK].
6 Connect your CLIÉ handheld to your computer, and perform a
HotSync operation.
The computer information is transferred to your CLIÉ handheld.
When you perform a HotSync operation via a wireless LAN, your
CLIÉ handheld identifies the computer based on the information
transferred.
Preparing your CLIÉ handheld
Follow the steps below to set up your CLIÉ handheld for a HotSync
operation via a wireless LAN.
1 Select [Wireless LAN] in [Service] on the [Network] screen of
[Preferences], and select a profile name for a HotSync operation
on the [Wireless LAN details] screen.
For details, see the Steps 1 to 6 of “Connecting your CLIÉ Handheld
to a Wireless LAN” on pages 21 and 22.
32
Page 33

2 Rotate the Jog Dial navigator to select HotSync and press the
Jog Dial navigator on the Application Launcher screen.
The [HotSync] screen is displayed.
You can also tap the [HotSync] icon to display the HotSync screen.
3 Tap the Menu icon, and tap [Primary PC Setup] from the
[Option] menu.
4 Check that correct data is entered in [Primary PC Address] and
[Subnet Mask(optional)], and tap [OK].
5 Tap the Menu icon, and tap [Modem Sync Prefes] from the
[Option] menu.
6 Tap [Network], and tap [OK].
7 When the HotSync screen appears, tap [Modem], and then tap
[Select Service].
8 Tap V of [Service], select [Wireless LAN], and tap [Done].
Tip
It is unnecessary to enter a telephone number in [Enter phone #].
Note
It is also necessary to select [Wireless LAN] in [Service] on the [Network] screen
of the [Preferences] that can be started from the home screen.
Performing a HotSync operation
When you finish the preparation of your CLIÉ handheld and your
computer, tap the [HotSync] icon on the [HotSync] screen.
Your CLIÉ handheld automatically connects to the network and
begins a HotSync operation.
When communication is not possible
Following the above Step 3, erase the [Primary PC Name].
33
Page 34

Troubleshooting
If any problem occurs, for example, if communication is not possible,
or if the unit does not operate normally, please check the points listed
in this troubleshooting guide.
Visit Sony CLIÉ support website:
Customers in USA, Canada and Mexico:
http://www.ita.sel.sony.com/support/clie/access/
Customers in European Countries:
http://www.clie-link.com/
Customers in Asia-Pacific Countries:
http://vaio-online.sony.com/clie/
If the problem persists, contact the Sony dealer where you purchased
this product or a Sony service representative serving your area.
Symptom
Your CLIÉ handheld
does not recognize this
Wireless LAN card.
(Although connection
has started, the LED
indicator on the
Wireless LAN card
does not flash.)
You cannot connect
your CLIÉ handheld to
an access point.
34
Cause/Remedy
• The Wireless LAN card is not installed
correctly in your CLIÉ handheld.
p Insert the Wireless LAN card into
Wireless Communication Slot of your
compatible CLIÉ handheld in the
correct way until it fully mates with the
connector.
• A service other than [Wireless LAN] is
selected in the [Network] of [Preferences].
p Select [Wireless LAN] in [Service].
• A wrong profile is selected.
p Check the [Profile Name] you have
selected on the [Wireless LAN Setup]
screen.
• The settings for communications are not
correct.
p Check the settings of Network ID, WEP
key, etc.
Page 35

Symptom
You cannot connect
your CLIÉ handheld to
an access point.
You cannot access the
Internet.
The data transfer rate is
slow.
Cause/Remedy
• Your CLIÉ handheld and the access point
are placed too far apart.
p Decrease the distance between them.
• There is an obstacle that could block off
radio waves (e.g., metal plate, concrete
block) between your CLIÉ handheld and
the access point.
p Move your CLIÉ handheld and/or the
access point to different places.
p Disable the power saving mode.
(This will increase the power
consumption. Be careful of the
remaining battery power).
•
The channels of the access point are not set
at 1-11.
p Change the channel setting of the access
point.
• The access point you are using is not
configured for internet access.
p Connect the access point to the Internet,
following the operating instructions of
the access point.
•
There is a mistake in the Network settings.
p Ask your System Administrator about
the settings.
• Some other access points are interfering
with communication.
p Change the channel number of the
access point you are using. For details
on how to change the setting, see the
Operating Instructions of your access
point.
• The access point is being heavily used.
p Wait a while and try access again.
Continued on next page
35
Page 36

Symptom
The data transfer rate is
slow.
You forget a WEP
(encryption) key.
You cannot send or
receive email.
You cannot perform a
HotSync operation.
You cannot browse
homepages.
Cause/Remedy
• There is an obstacle that could block off
radio waves (e.g., metal plate, concrete
block) between your CLIÉ handheld and
the access point.
p Move your CLIÉ handheld and/or the
access point to a different place.
p Disable the power saving mode.
(This will increase the power
consumption. Be careful of the
remaining battery power).
• There is a device operating at the 2.4 GHz
band of frequencies (microwave oven,
Bluetooth-enabled device, etc.) around
the CLIÉ handheld.
p Increase the distance between the
device and the CLIÉ handheld or turn
off the power of the device.
p After changing all the settings of the
access point to its factory default setting,
set the access point again.
To restore the default settings, see the
operating instructions of the access point.
p Check the settings of the emailing
software you are using.
For details on how to set the emailing
software, see its operating instructions.
p Check the settings of HotSync.
For details on how to set HotSync, see the
operating instructions supplied with your
CLIÉ handheld.
p Check the settings of the web browser
you are using.
For details on how to set the web
browser, see its operating instructions.
Tip
You can view the data of the communication preferences.
While performing communications using your CLIÉ handheld in which this
Wireless LAN card is inserted, show the [Network] screen of [Preferences].
Select [Option] on the menu, then select [View Log].
36
Page 37

Precautions on Use
Handling this Wireless LAN Card
•Do not subject the card to excessive shock, and take care not to drop
it to prevent malfunction.
•Do not use or store this unit in locations subject to:
- extremely high temperature, such as in direct sunlight or near a
heater.
- excessive dust
- high humidity
- vibrations
- poor ventilation
It may cause a malfunction.
•Do not use the card in a shaky, unstable place.
•Do not put a metal object such as a metal clip etc. inside the card.
•When inserting the card in the CLIÉ handheld, take care not to force
it in the wrong way. It may cause a malfunction.
•When there is a device operating at the 2.4 GHz band of frequencies
around the CLIÉ handheld, the card and the CLIÉ handheld may not
work correctly.
Condensation
Condensation is a phenomenon that occurs when moisture in the air
becomes water drops when it contacts a metal plate etc. Condensation
may occur on the surface or inside of the Wireless LAN Card on
occasions when you quickly move it from a cold place to a warm
place, when you turn on the heater in the room on a cold, winter
morning. Using the Wireless LAN Card with condensation on it may
cause a malfunction. If condensation occurs on the Wireless LAN
Card, leave it without turning on the power of the CLIÉ handheld
until the condensation disappears.
37
Page 38

Specifications
Power source
Powered by CLIÉ handheld
Power consumption
When transmitting: Approx. 560 – 920 mW (typ)*
Idle: Approx. 90 mW (typ)*
* At the default setting
(Note: The Wireless LAN card consumes no electricity when the LED
Dimensions
Mass
Maximum communication range
Supported protocol
Applied standard
Frequency band
WEP (data encryption)
Modulation method
Operating temperature
1)
Actual range will vary depending on factors such as obstacles between
indicator is off.)
Approx. 1 11/16 × 2 1/4 × 1/4 in. (width/length/thickness)
(42.8 × 55.4 × 5.9 mm)
Approx. 0.5 oz (14 g)
1)
Indoor: 300 ft. (90 m)
Outdoor: 1000 ft. (300 m)
TCP/IP
IEEE 802.11b
2.4 GHz band (1 – 11 channels, ISM band)
128-bit/40-bit
DS-SS (in conformity to IEEE 802.11b)
41 ˚F – 95 ˚F (5 ˚C – 35 ˚C)
devices, magnetic fields around a microwave oven, static electricity,
interference, radio wave conditions, reception sensitivity or antenna
performance, or the operating system or software application, etc.
Design and specifications are subject to change without notice.
38
Page 39

39
Page 40

Customer Support
For the latest support information,
check our official Sony CLIÉ Web site
Customers in USA, Canada and Mexico:
http://www.ita.sel.sony.com/support/clie/access/
Customers in European Countries:
http://www.clie-link.com/
Customers in Asia-Pacific Countries
http://vaio-online.sony.com/clie/
Printed on 100% recycled paper using
VOC (Volatile Organic Compound)-free
vegetable oil based ink.
Printed in Japan
 Loading...