

Page 1

4-659-577-12 (1)
Memory Stick
Camera Module
Operating Instructions
PEGA-MSC1
2001 by Sony Corporation
Page 2

Before operating the unit, please read these instructions thoroughly, and retain
them for future reference.
If you have a question about this product, call the Sony Customer Information
Center at keep on next line 1-877-760-7669; or write to the Sony Customer
Information Center at 12451 Gateway Boulevard, Fort Myers, FL 33913. The
number below is for FCC-related matters only.
Declaration of Conformity
Trade Name: SONY
Model No.: PEGA-MSC1
Responsible Party: Sony Electronics Inc.
Address: 680 Kinderkamack Road, Oradell, NJ 07649 USA
Telephone No.: 201-930-6972
This device complies with part 15 of the FCC Rules.
Operation is subject to the following two conditions:
(1) This device may not cause harmful interference, and
(2) ThisThis device must accept any interference received,including interference
that may cause undesired operation.
CAUTION
Any changes or modifications not expressly approved in this manual could void
your authority to operate this equipment.
Note:
This equipment has been tested and found to comply with the limits for a Class
B digital device, pursuant to Part 15 of the FCC Rules. These limits are designed
to provide reasonable protection against harmful interference in a residential
installation. This equipment generates, uses, and can radiate radio frequency
energy and, if not installed and used in accordance with the instructions, may
cause harmful interference to radio communications. However, there is no
guarantee that interference will not occur in a particular installation. If this
equipment does cause harmful interference to radio or television reception,
which can be determined by turning the equipment off and on, the user should
try to correct the interference by one or more of the following measures:
– Reorient or relocate the receiving antenna.
– Increase the separation between the equipment and receiver.
– Connect the equipment into an outlet on a circuit different from that to which
the receiver is connected.
– Consult the dealer or an experienced radio/TV technician for help.
2
Page 3

This Class B digital apparatus complies with Canadian ICES-003.
Cet appareil numerique de la classe B est conforme a la norme NMB-003 du
Canada.
This equipment complies with EMC regulations when used in the following
circumstances:
• Residential area
• Business district
• Light-industry district
(This equipment complies with the EMC standard regulations EN55022 Class B.)
Trademarks
- Sony, the Sony logo, CLIÉ, the CLIÉ logo, CLIÉ GEAR, the CLIÉ GEAR logo,
CLIÉ Paint, Jog Dial, Memory Stick, Magic Gate Memory Stick, and
PictureGear are the trademark of Sony Corporation.
- Microsoft and Windows are trademarks or registered trademarks of Microsoft
Corporation in the U.S. and other countries.
- Palm OS, Graffiti, and HotSync are registered trademarks of Palm, Inc., or its
subsidiaries. Palm Desktop and the HotSync logo are trademarks of Palm, Inc.,
or its subsidiaries.
- All other system names and model names are trademarks of their respective
owners. In the text of this Operating Manual,
Before using this camera, be sure to read the supplied End-User’s License
Agreement.
TM
and ® marks are not used.
PNotes
• Menus shown in the instructions may differ slightly from the actual menus in
the software.
• The explanations in the instructions assume a good understanding of the
operations of Windows. For information on the operation of your computer
and operating system, see their respective manuals.
3
Page 4

Table of Contents
Before You Begin
What you can do with the Memory Stick Camera Module............................5
Read the following before using your camera ................................................. 5
Check the items supplied .................................................................................... 6
Identifying the parts............................................................................................. 7
Installing the necessary software ....................................................................... 8
Recording
Attaching the camera to your CLIÉ handheld ................................................. 9
Recording images with the camera.................................................................. 11
Recording an image of yourself ............................................................. 13
“Memory Stick” Camera application .................................................... 14
How to read the online manual........................................................................ 16
Viewing recorded images..................................................................................17
Playing back recorded images (PictureGear Pocket) .......................... 17
Drawing on recorded images (CLIÉ Paint) .................................................... 19
Additional Information
Precautions .......................................................................................................... 20
Cleaning ............................................................................................................... 22
Specifications....................................................................................................... 23
Troubleshooting.................................................................................................. 24
4
Page 5

BBefore You Begin
What you can do with the Memory Stick Camera Module
You can record still images with this camera. (The images are recorded in
PictureGear Pocket (PGP) format and stored in your CLIÉ handheld.)
There is a wide range of uses for your recorded images, including:
•Attach them to email with CLIÉ Mail, or draw and paint on them with
CLIÉ Paint.
•Make a slide show with Photo Stand.
•Use PictureGear Pocket to convert your images to DCF, the standard
format for digital still cameras, and manipulate them with other graphics
programs on your personal computer.
Read the following before using your camera
This camera works only with the CLIÉ handheld. It cannot be used with
any other Memory Stick equipment, such as personal computers.
This camera is not compatible with the following CLIÉ
models:
PEG-S300 series and N700 series (OS Version 3.x)
PictureGear Pocket Version 2.1 or higher is required.
If you have version 2.0 or earlier of PictureGear Pocket installed in your
CLIÉ handheld, install PictureGear Pocket Version 2.1 from the supplied
installation CD-ROM. For installation instructions, please refer to the
"Installing the necessary software" (page 8) in this Operating Manual.
Before You Begin
5
Page 6
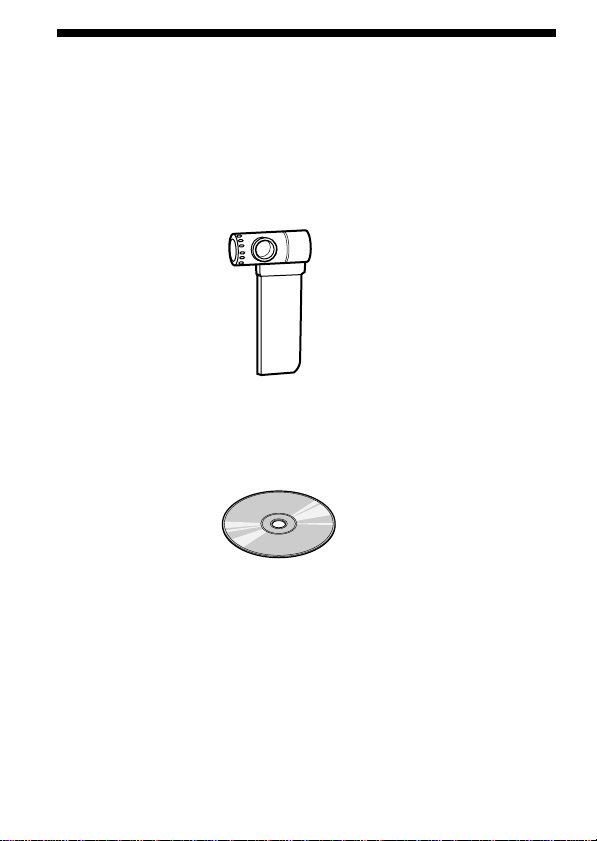
Check the items supplied
Check to make sure the package contains all of the following items.
If any items are missing, contact your Sony dealer or local authorized Sony
service facility.
Memory Stick Camera Module (PEGA-MSC1)
Installation CD-ROM (1)
Operating Instructions for PEGA-MSC1 (1)
Hard case (1)
Warranty card (1)
End-User’s License Agreement (1)
6
Page 7
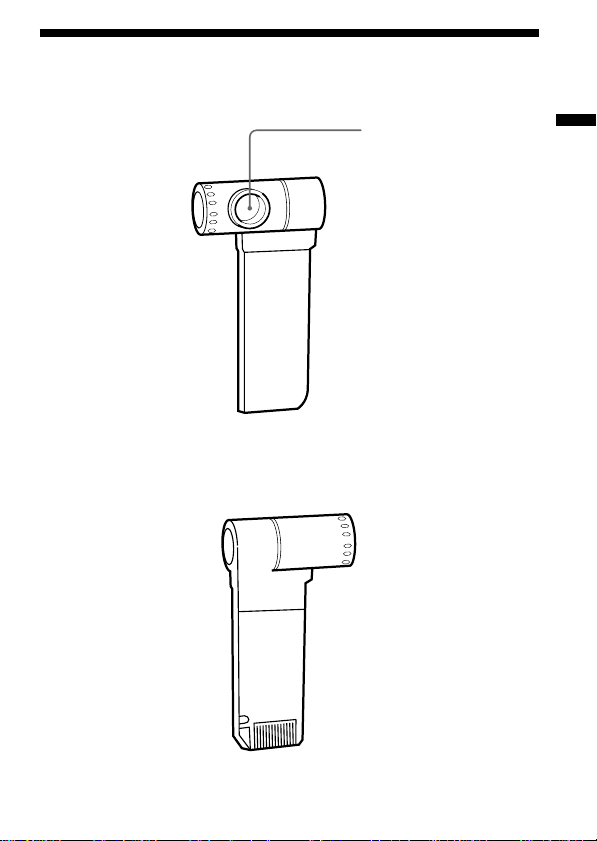
Identifying the parts
Front
Rear
Lens
Before You Begin
7
Page 8

Installing the necessary software
Before using the Memory Stick Camera Module, install the “Memory
Stick” Camera application software and the PictureGear Pocket Version 2.1
software into your CLIÉ handheld from the supplied CD-ROM.
To install this software, you need a Windows computer which has the
CLIÉ Palm Desktop software installed and which has a connection to your
CLIÉ handheld. Make sure that the local HotSync between the Windows
computer and the CLIÉ handheld works properly.
1 Insert the supplied installation CD-ROM into the CD-ROM
drive of your Windows computer.
The initial installation screen appears.
2 Click [Installation of software for Memory Stick Camera
Module].
The installer submenu appears.
3 Select the software you wish to install.
Select PictureGear Pocket Version 2.1* (required) and CLIÉ Paint
(optional).
* This step is not necessary if PictureGear Pocket Version 2.1 or above
is already installed on your CLIÉ handheld.
4 Click [Install].
5 Select your user name from the user list.
6 Click [Exit].
7 Press the HotSync button on the cradle.
HotSync starts and the software is transmitted to your CLIÉ handheld.
8
Page 9
BRecording
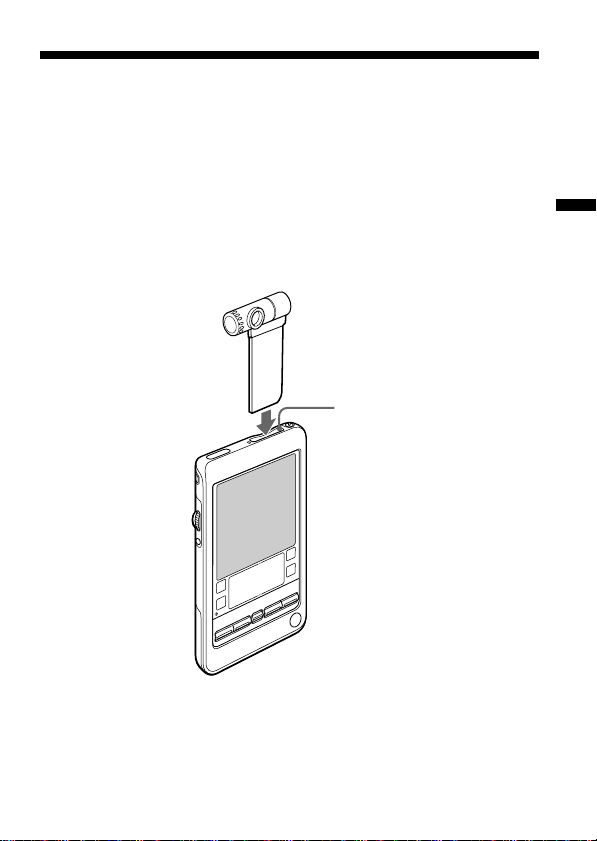
Attaching the camera to your CLIÉ handheld
Before using your camera for the first time, be sure to install the necessary
software onto your CLIÉ handheld before attaching the camera. For details
on the installation procedure, refer to “Installing the necessary software”
(page 8).
Insert the camera firmly into the Memory Stick slot of your CLIÉ
handheld in the direction shown below.
Memory Stick slot
Recording
PNote
Do not insert or remove the camera while starting or closing the
camera’s software, or the CLIÉ handheld may behave unpredictably.
9
Page 10

Attaching the camera to your CLIÉ handheld
(Continued)
Disconnecting the camera
To disconnect the camera, close the “Memory Stick” Camera application
and then remove the camera by pushing it in once (1) and pulling it
straight up out of the memory stick slot of the CLIÉ handheld (2).
1
2
PNote
Pulling up on the camera without first pushing it in may damage both the
camera and the Memory Stick slot of the CLIÉ handheld.
When not in use
When you are not using the camera, remove it from the CLIÉ handheld,
and put it into the supplied hard case.
10
Supplied hard
case
Page 11

Recording images with the camera
You can record images with the camera by inserting it into the CLIÉ
handheld and using the “Memory Stick” Camera application. For the
installation procedure for the “Memory Stick” Camera application, refer to
“Installing the necessary software” (page 8).
1 Attach this camera to CLIÉ handheld.
You can insert the camera without turning off the power of the CLIÉ
handheld. For details, refer to “Attaching the camera to your CLIÉ
handheld” (page 9).
2 Start the “Memory Stick” Camera application.
Inserting the camera to CLIÉ handheld, or tapping the icon starts
the “Memory Stick” Camera application.
For details, refer to “Recording images” in the Operating Manual for
the “Memory Stick” Camera application, included in PDF format on
the CD-ROM.
3 Aim the lens at whatever you want to take a picture of.
Recording
11
Page 12

Recording images with the camera (Continued)
4 Tap the CAPTURE button on the screen with the stylus to
record an image.
You can also record images by pressing the Jog Dial navigator.
Saving an image in the CLIÉ handheld may take a few moments.
For more details on this process, refer to “Recording images” in the
Operating Manual for the “Memory Stick” Camera application,
included in PDF format on the CD-ROM.
After recording images with the camera
Tap the Home icon to close “Memory Stick” Camera application, and
then disconnect the camera from the CLIÉ handheld.
12
Page 13

Recording an image of yourself
While looking through the finder of the camera, you can record yourself by
turning the lens toward you.
To prevent images from being inverted or reversed, the camera
automatically enters the inversion/mirror-reverse mode when you turn it
toward yourself. This mode is canceled when the camera is put back into
the normal position.
PNote
Although images are reversed in the finder, they are recorded normally
without being reversed.
Recording
13
Page 14

Recording images with the camera (Continued)
“Memory Stick” Camera application
The following is a brief explanation of the screen that appears when you
start the “Memory Stick” Camera application.
To set each function, tap the buttons on the screen with the stylus or use
the Jog Dial navigator.
For detailed procedures, refer to the Operating Manual for the “Memory
Stick” Camera application, included in PDF format on the CD-ROM.
Displays the remaining
amount of battery power.
Indicates the
remaining number
of images you can
Indicates the
current Jog
Dial function.
Finder
Displays the
image the
camera is
currently seeing.
record with the
amount of memory
currently available
in the CLIÉ
handheld.
14
Page 15

Initial setting button
Takes you to a screen where you can adjust various camera
settings, including the capture sound, the white balance, and
the effect setting.
Brightness button
Sets the brightness.
Image size button
Toggles between the 160 x 120 and 320 x 240 image modes.
Whichever image mode you choose, the image displayed on
the screen of the CLIÉ handheld remains the same size.
CAPTURE button
Tap this button to record an image.
Viewer starting button
Starts the PictureGear Pocket software to play back recorded
images.
Timer button
Tap this button to record an image with the timer. After the
timer button lights in orange, press the capture button. An
image will be recorded automatically in about 10 seconds.
This feature allows you time to enter the scene and be
included in the picture.
Recording
15
Page 16

How to read the online manual
Detailed information on the “Memory Stick” Camera application,
PictureGear Pocket application, and CLIÉ Paint is provided in the online
manual on the supplied CD-ROM.
To view the online manual, the Adobe Acrobat Reader version 4.0 or
higher, must be installed on your computer.
1 Insert the supplied CD-ROM into your computer’s CD-ROM
drive .
The install screen appears automatically.
2 Click Manuals.
3 Double-click an appropriate PDF-formatted manual.
• For "Memory Stick" Camera Application, select [Memory Stick
Camera Manual.pdf].
• For PictureGear Pocket, select [PictureGear Pocket Manual.pdf].
• For CLIÉ Paint, select [CLIÉ Paint Manual.pdf].
If the Acrobat Reader software is not installed or is a version
earlier than 4.0
1 Insert the supplied CD-ROM into your computer’s CD-ROM
drive.
The install screen appears automatically.
2 Click Exit.
3 Double-click the My Computer icon on your Windows
desktop.
4 Right-click the CD-ROM drive icon, and click Open from the
shortcut menu.
5 Double-click the PC folder.
6 Double-click the Acrobat folder.
7 Double-click the ar500enu.exe to install Acrobat Reader onto
your computer.
16
Page 17

Viewing recorded images
Storage format for recorded images
Images recorded with this camera using the “Memory Stick” Camera
application are saved in PictureGear Pocket (PGP) format. To manipulate
images with other graphics programs on your personal computer, use
PictureGear Pocket to convert them to DCF, the standard format for digital
still cameras. For more details, refer to the Operating Manual for
PictureGear Pocket, included in PDF format on the CD-ROM.
Playing back recorded images (PictureGear Pocket)
To play back a recorded image, you can directly start PictureGear Pocket
from the “Memory Stick” Camera application screen.
Tap the icon on the lower right of the screen of the “Memory
Stick” Camera application.
PictureGear Pocket starts in camera application mode and displays a
recorded image.
Recording
17
Page 18

Viewing recorded images (Continued)
PNote
When you want to use all features of PictureGear Pocket, tap the Home
button on CLIÉ handheld to go to the Home screen. By tapping the
icon on the Home screen, PictureGear Pocket starts in full function mode.
For further details on the operation of PictureGear Pocket, please refer to
the Operating Manual for PictureGear Pocket, included in PDF format on
the CD-ROM.
To return to the “Memory Stick” Camera application
Tap the icon on the PictureGear Pocket application screen.
You can also return to the “Memory Stick” Camera application by pressing the
BACK button on CLIÉ handheld.
18
Page 19

Drawing on recorded images (CLIÉ Paint)
You can draw pictures and letters on recorded images with the stylus.
Tap the icon on the lower right of the screen when a
recorded image is shown on PictureGear Pocket in full function
mode.
CLIÉ Paint starts, allowing you to draw on the image shown on the screen.
PNote
The icon is not shown on PictureGear Pocket when it is in camera
application mode.
For details on this operation, please refer to the Operating Manual for
CLIÉ Paint, included in PDF format on the CD-ROM.
Recording
19
Page 20

BAdditional Information
Precautions
Storing the Memory Stick Camera Module
•When you are not using the Memory Stick Camera Module, remove it
from the CLIÉ handheld, and store it in the supplied hard case.
•Carrying your CLIÉ handheld with the Memory Stick Camera Module
inserted may damage both the camera and the Memory Stick slot of the
CLIÉ handheld.
Places to avoid with the Memory Stick Camera
Module
Avoid the following situations both when using or storing the Memory
Stick Camera Module:
•Extremely hot places
Car interiors, for example, may become extremely hot in direct sunlight.
If the Memory Stick Camera Module is left inside, it may be damaged.
•Direct sunlight or heat-generating equipment
•Sandy places.
Do not expose the Memory Stick Camera Module to sand or dust. Such
conditions may damage the Memory Stick Camera Module beyond
possibility of repair.
•Facing the sun
Allowing the lens to face the sun for extended periods can damage the
Memory Stick Camera Module. Avoid this when leaving the Memory
Stick Camera Module outside or near a window.
On operation
•Do not lay any objects on top of the Memory Stick Camera Module.
•Avoid forcing the Memory Stick Camera Module to change temperature
rapidly. Extreme temperature changes can cause moisture to condense
inside the camera, and using the camera with condensed moisture inside
can damage it. When you must take the camera between temperature
extremes, such as taking it from a cold outdoor setting into a heating
building, do not turn the camera on immediately. Give the moisture time
to evaporate.
20
Page 21

The lens
Do not touch the lens of the Memory Stick Camera Module.
On handling CD-ROM discs
For the safety of data recorded on the disc, note the following.
•Do not attach paper or anything else to
the disc, and do not scratch its surface.
•When you hold the disc, do not touch
the unlabeled side (playback side).
•Do not store the disc in dusty places, in direct sunlight, near heatgenerating equipment, or in a humid area.
•Store the disc inside its case.
Additional Information
21
Page 22

Cleaning
Cleaning the Memory Stick Camera Module
To clean the Memory Stick Camera Module, wipe it with a soft, dry cloth.
If more aggressive cleaning is necessary, use a soft cloth lightly moistened
with a mild detergent solution. Do not use a thinner, benzine, or alcohol,
which can damage the camera's finish.
Cleaning the lens
To clean the lens of the Memory Stick Camera Module, use a blower brush
or a soft brush.
Cleaning the CD-ROM disc
Fingerprints or dust may cause errors when the disc is read. To clean the
disc, wipe the disc gently with a soft cloth, always moving from the center
of the disc to its outer edge.
22
Page 23

Specifications
Imaging device
1/6 type, 100,000 pixel, CMOS image sensor
Lens
F2.8
f=2.65 mm
Shutter speed
Automatic
Capture size
160 × 120 pixels, 320 × 240 pixels
Maximum outside dimensions (approx.)
1.42 in. (width) × 3.07 in. (height) × 0.71 in. (depth) (36 × 78 × 18 mm)
Weight (approx.)
0.4 oz (12 g) (Camera Module Only)
Operating temperature
41° F to 95° F (5° C to 35° C)
Operation time (at 77° F (25° C))
Approximately 120 minutes (for a fully-charged CLIÉ handheld is used
continuously with the backlight on)
Supplied Accessories
Installation CD-ROM
Case
Design and specifications are subject to change without notice.
Operations cannot be guaranteed for all computers running in the
recommended environment.
Additional Information
23
Page 24

Troubleshooting
Try the solutions listed below before calling for service. If there is still a
problem after trying these solutions, call your Sony dealer or local
authorized Sony Service facility.
Symptom
Nothing is displayed in
the window.
Warning of memory
shortage is displayed, and
images cannot be
recorded.
Any operation does not
work.
There are lateral stripes, a
ring-shaped pattern, or
lighting spots on the
display.
Remedy
t Slide the HOLD switch on the CLIÉ
handheld to cancel the HOLD
function.
t Reset the software. Refer to the
supplied operating instructions for an
explanation of this procedure.
t Delete unnecessary images in
PictureGear Pocket.
t Delete unnecessary data in other
applications.
t Delete unnecessary applications from
your CLIÉ handheld.
t You cannot perform any other
operations while images are being
recorded. Try again after the recording
process has ended.
t Slide the HOLD switch on the CLIÉ
handheld to cancel the HOLD
function.
t Reset the software. Refer to the
supplied operating instructions for an
explanation of this procedure.
t The display image may be distorted
due to conditions such as the
temperature or the lighting. Try
moving the camera to different
temperature or lighting conditions.
24
Page 25

Note
There are thousands of applications designed for the Palm OS. We do not
support applications produced by other companies (including HACK software
and DA software).
If you have difficulty with an application produced by another company,
consult the developer or the seller of the application.
Additional Information
25
Page 26

26
Page 27

Additional Information
27
Page 28

Customer Support in USA and Canada
For the latest support information,
check our official Sony CLIÉ Web site
http://www.ita.sel.sony.com/support/clie/access/
Sony Corporation Printed in Japan
Printed on recycled paper
 Loading...