

Page 1
PROFESSIONAL DISC DRIVE UNIT
PDW-U2
電気製品は、安全のための注意事項を守らないと、
火災や人身事故になることがあります。
このオペレーションマニュアルには、事故を防ぐための重要な注意事項と製品
の取り扱いかたを示してあります。このオペレーションマニュアルをよくお読
みのうえ、製品を安全にお使いください。お読みになったあとは、いつでも見
られるところに必ず保管してください。
OPERATION MANUAL
[Japanese/English]
1st Edition (Revised 1)
Page 2
日本語
安全のために
電気製品は、安全のための注意事項を守らないと、火災
や感電などにより死亡や大けがなど人身事故につながる
ことがあり、危険です。
事故を防ぐために次のことを必ずお守りください。
安全のための注意事項を守る
5 〜 7 ページの注意事項をよくお読みください。
定期点検を実施する
長期間安全に使用していただくために、定期点検を実施
することをおすすめします。点検の内容や費用について
は、ソニーのサービス担当者または営業担当者にご相談
ください。
故障したら使用を中止する
ソニーのサービス担当者、または営業担当者にご連絡く
ださい。
万一、異常が起きたら
異常な音、におい、煙が出たら
m
1 電源を切る。
2 電源コードや接続ケーブルを抜く。
3 ソニーのサービス担当者、または営業担当者に修理を
依頼する。
警告表示の意味
オペレーションマニュアル
および製品では、次のよう
な表示をしています。表示
の内容をよく理解してから
本文をお読みください。
この表示の注意事項を守ら
ないと、火災や感電などに
より死亡や大けがなど人身
事故につながることがあり
ます。
この表示の注意事項を守ら
ないと、感電やその他の事
故によりけがをしたり周辺
の物品に損害を与えたりす
ることがあります。
注意を促す記号
行為を禁止する記号
行為を指示する記号
炎が出たら
m
すぐに電源を切り、消火する。
安全のために
2
Page 3
目次
第 1 章 概要
警告................................................................................. 5
注意................................................................................. 6
その他の安全上のご注意 .........................................................7
1-1特長...............................................................................8
1-2使用例 ...........................................................................8
1-3推奨ソフトウェア .........................................................9
1-3-1ソフトウェア一覧..................................................... 9
第 2 章 各部の名称と働き
2-1前面パネル ..................................................................11
2-2後面パネル ..................................................................13
第 3 章 準備
3-1ソフトウェアのインストール .....................................14
3-1-1Windows の場合 ..................................................... 14
3-1-2Macintosh の場合 ................................................... 14
3-2接続と設定 ..................................................................15
3-2-1コンピューターとの接続 ........................................ 15
3-3電源の準備 ..................................................................16
3-4ディスクの取り扱い.................................................... 16
3-4-1読み出し・書き込み可能なディスク ...................... 16
3-4-2取り扱い上の注意................................................... 17
3-4-3誤消去を防止するには............................................ 17
3-4-4ディスクを出し入れするには................................. 18
3-4-5電源が供給されない状態でディスクを取り出すには
.................................................................................. 18
JP
目次
3
Page 4

第 4 章 ソフトウェアを使う
4-1ユーティリティーソフトウェアの起動と終了 ............20
4-1-1起動 / 表示する ...................................................... 20
4-1-2コンソールウィンドウを閉じる
(Windows のみ)........................................................ 20
4-1-3終了する ................................................................. 20
付録
使用上のご注意................................................................... 22
結露について................................................................... 22
仕様..................................................................................... 22
目次
4
Page 5
警告
電源コードを傷つけない
電源コードを傷つけると、火災や感電の原因となることが
あります。
• 設置時に、製品と壁やラック、棚などの間に、はさみ込
んだりしない。
• 電源コードを加工したり、傷つけたりしない。
• 重いものをのせたり、引っ張ったりしない。
• 熱器具に近づけたり、加熱したりしない。
• 電源コードを抜くときは、必ずプラグを持って抜く。
万一、電源コードが傷んだら、お買い上げ店またはソニー
のサービス窓口に交換をご依頼ください。
油煙、湯気、湿気、ほこりの多い場所には設置し
ない
上記のような場所や取扱説明書に記されている使用条件以
外の環境に設置すると、火災や感電の原因となることがあ
ります。
電源コードのプラグおよびコネクターは突き当た
るまで差し込む
真っ直ぐに突き当たるまで差し込まないと、火災や感電の
原因となります。
警告
5
Page 6
注意
指定の電源コードを使う
指定以外の電源コードを使用すると、火災や感電の原因となる
ことがあります。
内部に水や異物を入れない
水や異物が入ると火災や感電の原因となります。
万一、水や異物が入ったときは、すぐに電源を切り、電源コー
ドや接続コードを抜いて、ソニーのサービス担当者または営業
担当者にご相談ください。
不安定な場所に設置しない
ぐらついた台の上や傾いたところに設置すると、倒れたり落ち
たりしてけがの原因となることがあります。また、設置・取り
付け場所の強度を充分にお確かめください。
製品の上に乗らない、重い物を載せない
倒れたり、落ちたり、壊れたりして、けがの原因となることが
あります。
分解や改造をしない
分解や改造をすると、火災や感電、けがの原因となること
があります。
内部の点検や修理は、お買い上げ店またはソニーのサービ
ス窓口にご依頼ください。
指定の電源で使用する
付属の AC アダプターでお使いください。
付属以外の製品でのご使用は、火災の原因となります。
コード類は正しく配置する
電源コードや接続ケーブルは、足に引っかけると本機の落下や
転倒などによりけがの原因となることがあります。十分注意し
て接続・配置してください。
6
注意
Page 7

ファンが止まったままの状態で使用しない
ファンが止まると、前面パネルの ERROR/ALARM インジ
ケーターが赤く点滅します。そのまま使用し続けると、火災の
原因となることがあります。ソニーのサービス担当者または営
業担当者にご相談ください。
その他の安全上のご注意
日本国内で使用する電源コードセットは、電気用品安全法
で定める基準を満足した承認品が要求されます。ソニー推
奨の電源コードセットをご使用ください。
警告
設置の際には、容易にアクセスできる固定配線内に専用遮断
装置を設けるか、使用中に、容易に抜き差しできる、機器に
近いコンセントに電源プラグを接続してください。
万一、異常が起きた際には、専用遮断装置を切るか、電源プ
ラグを抜いてください。
ご注意
注意
ここに規定した以外の手順による制御および調整は、危険な
レーザー放射の被爆をもたらします。
レーザー特性
波長 400 〜 410nm
発振形態 連続
レーザー出力 280mW(max.ofpulsepeak)、150mW
(max.ofCW)
本機は「クラス 1 レーザー製品」です。
その他の安全上のご注意
7
Page 8
第 1 章 概要
概要
1-1 特長
本機の特長は以下のとおりです。
• すべての XDCAM フォーマットに対応
• フォーマット混在記録対応
• 4 層 Write-Once(以下、WO)ディス
クに対応
• USBインターフェースによるITフレン
ドリーシステムを採用
• ユーザーデータをコンピューターの
データとして記録可能
• 高速な転送速度を実現
• 小型、軽量のフィールド仕様
• ユーティリティーソフトウェアによる
コンピューターからのメニュー操作が
可能
• 簡易な XDCAM プレビュー環境が構築
可能
第章
1
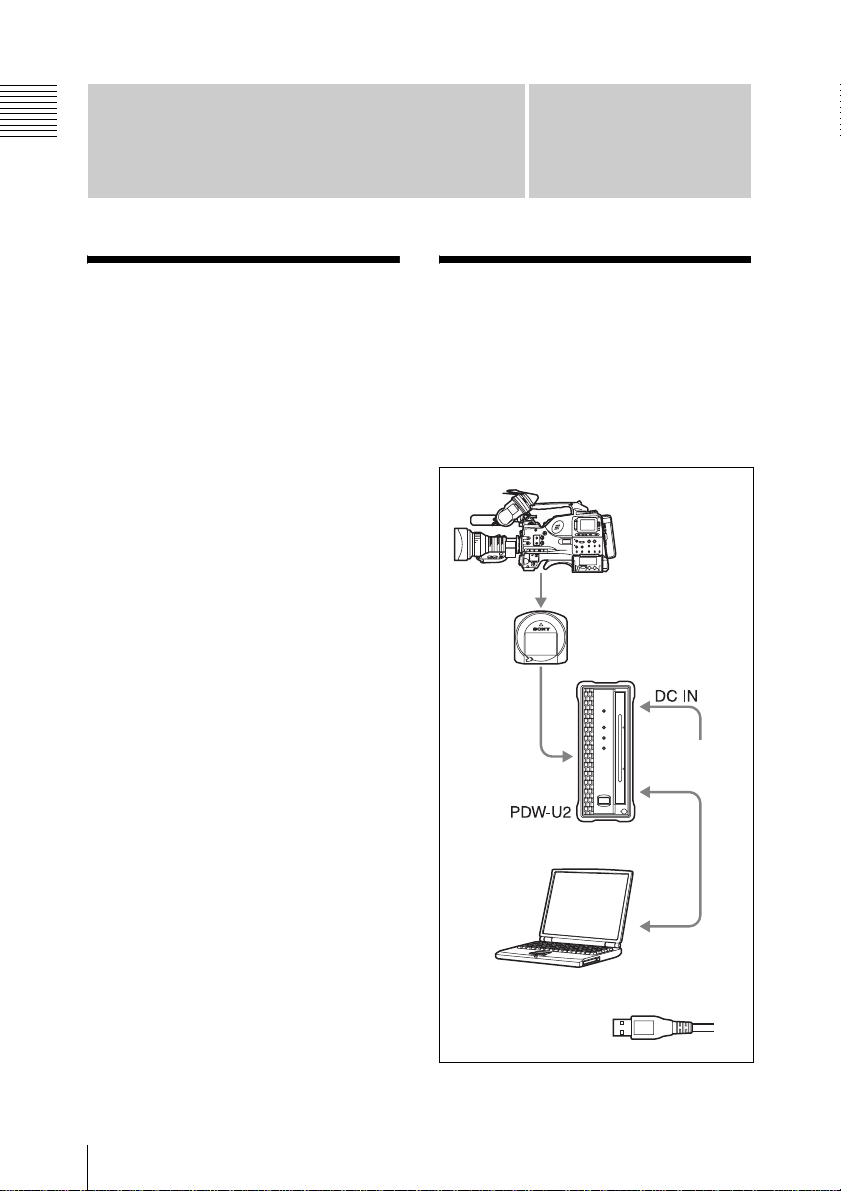
1-2 使用例
次図は、XDCAM カムコーダーで収録し
た素材を、本機に接続したコンピュー
ターで読み出しおよび書き込みを行うシ
ステムの例です。
XDCAM
カムコーダー
プロフェッショナル
ディスク
DC 電源
1-1特長/1-2使用例
8
読み出し / 書き込み
USB 端子へ
ノートタイプコンピューター
1USB ケーブル
1
Page 9
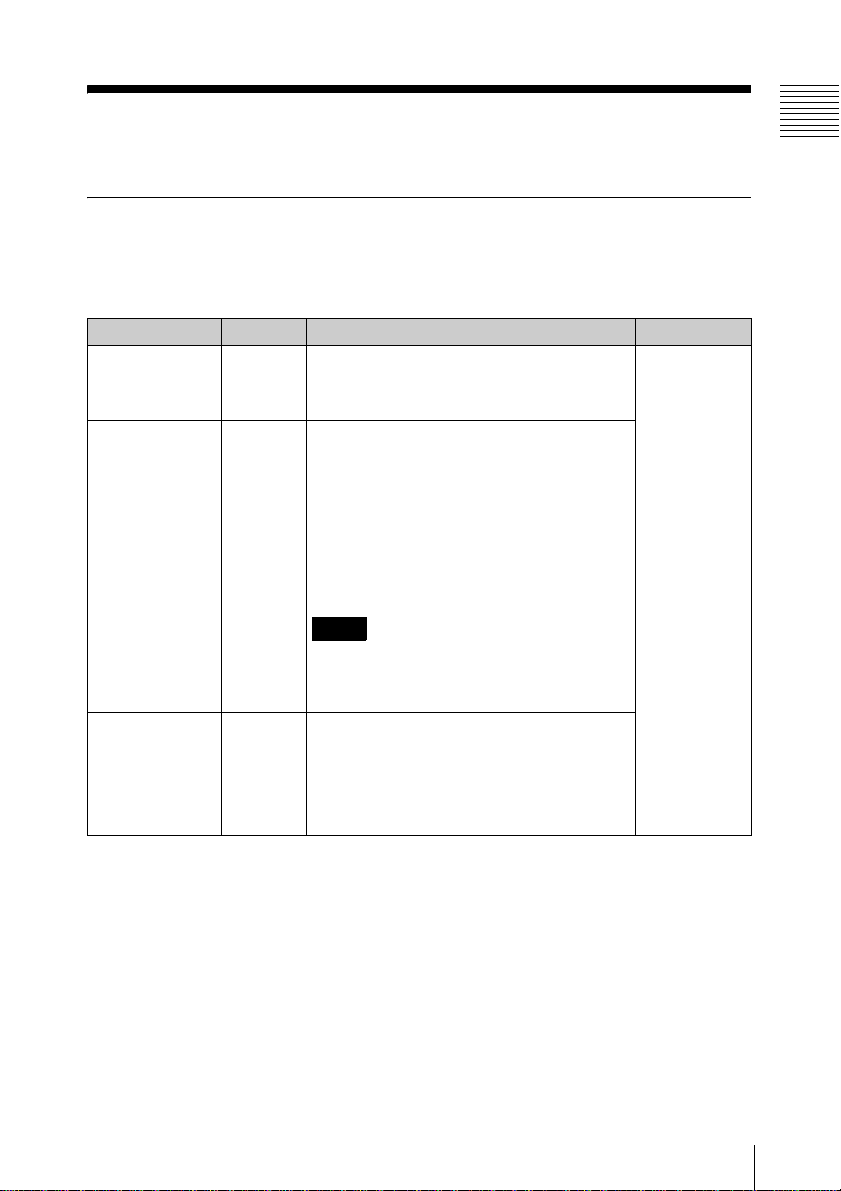
1-3 推奨ソフトウェア
1-3-1 ソフトウェア一覧
本機を使用する際には、以下のソフトウェアをソニープロフェッショナル / 業務用製品
サイトからダウンロードしてください。
ソフトウェア 対象 OS 機能 入手先
XDCAMDrive
Software
ユーティリティー
ソフトウェア
(XDCAMDrive
Utility)
ContentBrowser Windows/
Windows/
Macintosh
Windows/
Macintosh
Macintosh
本機をコンピューターと接続し、XDCAM で
記録されたビデオやオーディオのデータをファ
イルとして扱うための基本ソフトウェアです。
本機に接続したコンピューター上で、以下の機
能を実行できます。
• 機器およびディスク情報の表示
• ディスクのフォーマットや修復
• ファームウェアの更新
• 各種の設定
• ファイナライズ(4 層 WO ディスクのみ対応)
ご注意
ユーティリティーソフトウェアは、XDCAM
DriveSoftware をインストールすることによっ
て自動的にインストールされます。
プロフェッショナルディスクに記録されたク
リップを、閲覧、操作するソフトウェアです。
ContentBrowser の概要とインストール方法に
ついては、ソニープロフェッショナル / 業務用
製品サイト
a)
をご覧ください。
ソニープロ
フェッショナ
ル / 業務用製
品サイトから
ダウンロード
第 1 章 概要
a)
a) ソニープロフェッショナル /業務用製品サイト
・ USA http://pro.sony.com
・ Canada http://www.sonybiz.ca
・ LatinAmerica http://sonypro-latin.com
・ Europe http://www.pro.sony.eu
・ Japan http://www.sonybsc.com
・ Asia http://pro.sony-asia.com
・ Korea http://bp.sony.co.kr
・ China http://pro.sony.com.cn
1-3推奨ソフトウェア
9
Page 10

動作環境
上記の推奨ソフトウェアの機能および動
第 1 章 概要
作環境についての詳細は、下記のファイ
ルまたはマニュアルをご覧ください(各
ソフトウェアのダウンロードページで入
手できます)。
XDCAMDriveSoftware:
ReadMe.txt
ContentBrowser:
インストレーションガイド
1-3推奨ソフトウェア
10
Page 11
各部の名称と働き
第章
2
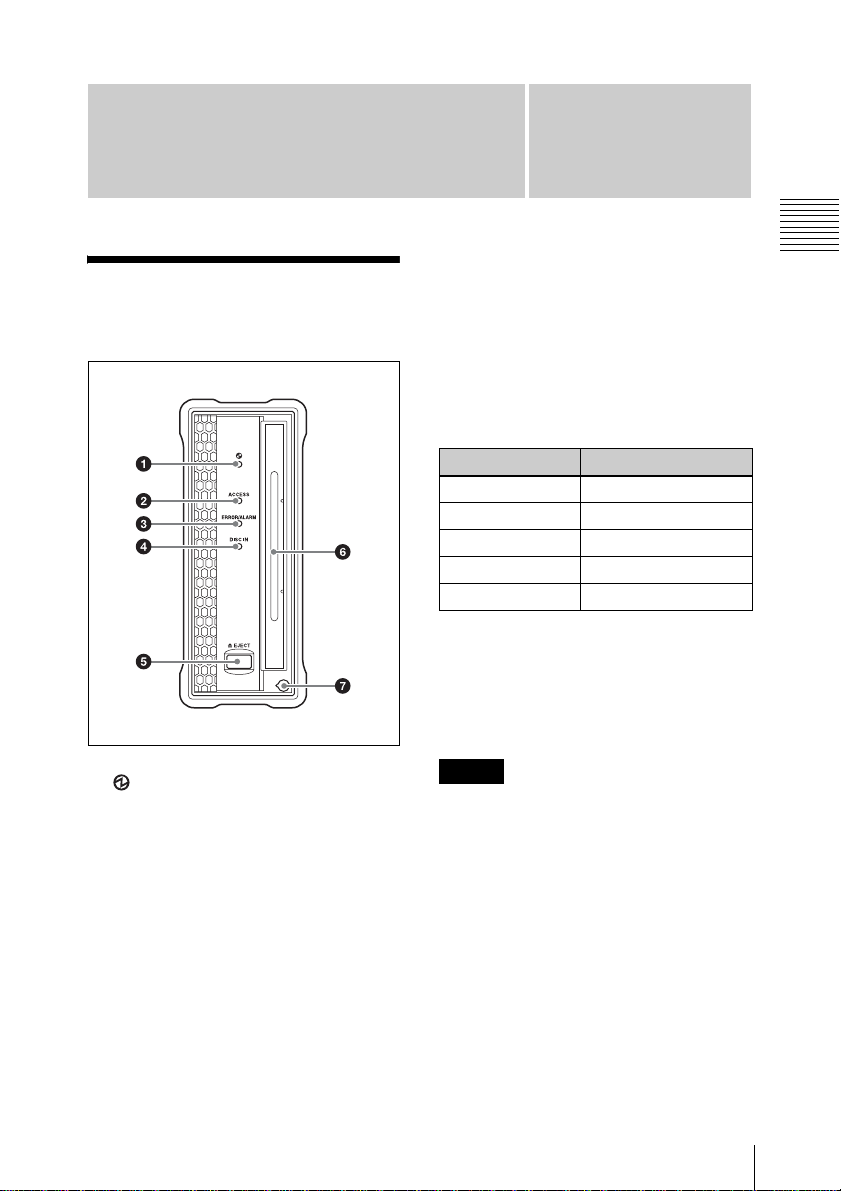
2-1 前面パネル
a (電源)インジケーター
後面の 1(電源)ボタンがオンに設定さ
れているとき、緑で点灯します。
b ACCESS(アクセス)インジケー
ター
コンピューターからディスクにアクセス
しているとき、青で点滅します。
ただし、アクセス終了後にディスクへの
管理情報の書き込みが保留されている間
は、1秒間隔で点滅します。
保留されている間も、ディスクの取り出
しやコンピューターからの操作は可能で
す。
管理情報の書き込みが行なわれた後、操
作した処理が行われます。
管理情報の書き込みが保留される時間
は、以下のとおりです。
ディスク 書き込み保留時間
PFD23 約5秒
PFD23A 約 5 秒
PFD50DLA 約 5 秒
PFD100TLA 約 5 秒
PFD128QLW 約 4 分
上記の書き込み保留時間が経過すると、
ディスクの取り出しやコンピューターか
らの操作を行わなくとも、管理情報の書
き込みが行われます。
ご注意
ACCESS インジケーター点灯中および点
滅中に後面の 1(電源)ボタンをオフに
したり電源コードおよび USB ケーブル
を抜いたりしないでください。ディスク
内のデータが破壊される恐れがありま
す。
c ERROR/ALARM(エラー / ア
ラーム)インジケーター
本機に異常が発生すると、次表のように
赤で点滅します。
第 2 章 各部の名称と働き
2-1前面パネル
11
Page 12
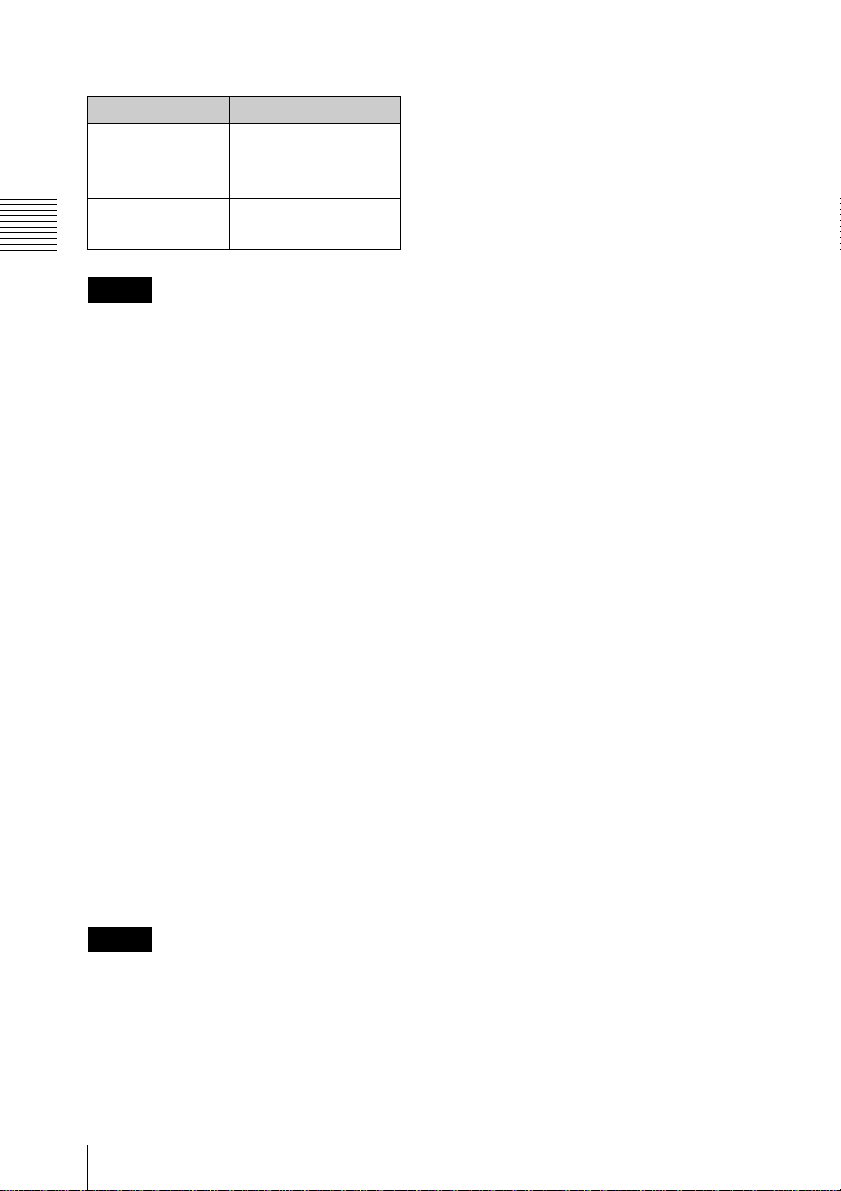
インジケーター 意味
0.25 秒間隔で点滅 エラー(主にハード
ウェアに起因する異常)
が発生した。
1 秒間隔で点滅 上記以外のアラームが
第 2 章 各部の名称と働き
発生した。
ご注意
アラームの内容によっては、インジケー
ターが 5 秒間だけ点滅する場合がありま
す。
◆ 本機で発生したアラームは、ユーティリ
ティーソフトウェアのアラームログで確認す
ることができます。詳しくは、ユーティリ
ティーソフトウェアのヘルプをご覧ください。
◆ インジケーターが 0.25 秒間隔で点滅してい
て、かつアラームログで確認できない異常は、
故障の可能性があります。このような場合は、
ソニーのサービス担当者にご連絡ください。
異常な状態が解消されると、インジケー
ターは消灯します。
• 本機を Macintosh に接続しているとき
は、このボタンは無効になります。
f ディスク挿入部
ラベル面を右側にしてディスクを挿入し
ます(18 ページ参照)。
g マニュアルイジェクト機構部
◆ 詳しくは、「3-4-5電源が供給されない状態で
ディスクを取り出すには」(18 ページ)をご
覧ください。
d DISCIN(ディスクイン)インジ
ケーター
本機にディスクが挿入されているとき、
緑で点灯します。
e EJECT(ディスク排出)ボタン
ディスクを取り出します(18 ページ参
照)。
ご注意
• このボタンはディスクアクセス中は無
効になります。ディスクアクセスを停
止してから取り出すか、コンピュー
ターからの操作でディスクを取り出し
てください。
2-1前面パネル
12
Page 13
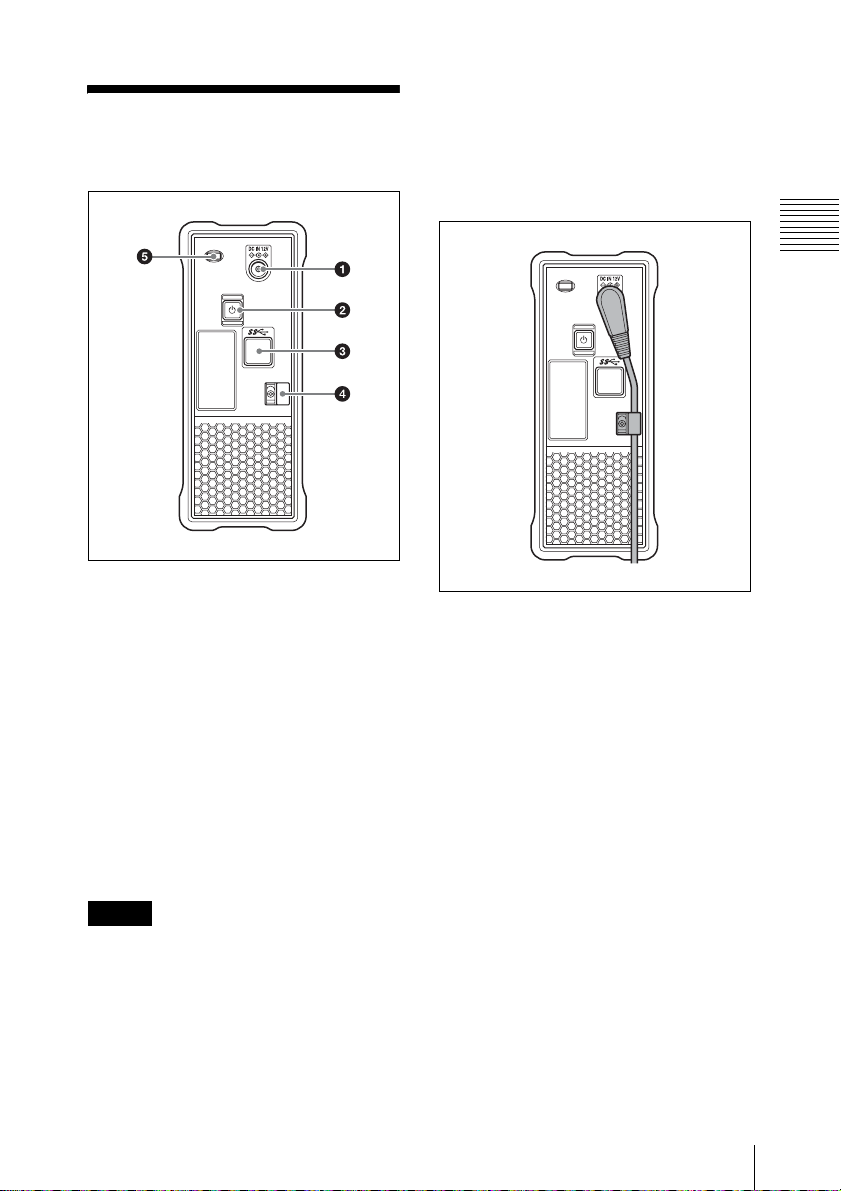
2-2 後面パネル
a DC 電源入力端子
付属の AC アダプターと電源コード(別
売)を使って AC 電源に接続します。
b 1(電源)ボタン
電源を ON/OFF します。
c USB 端子(SuperSpeedUSB
(USB3.0)対応)
付属の USB ケーブルを使ってコン
ピューターに接続します。
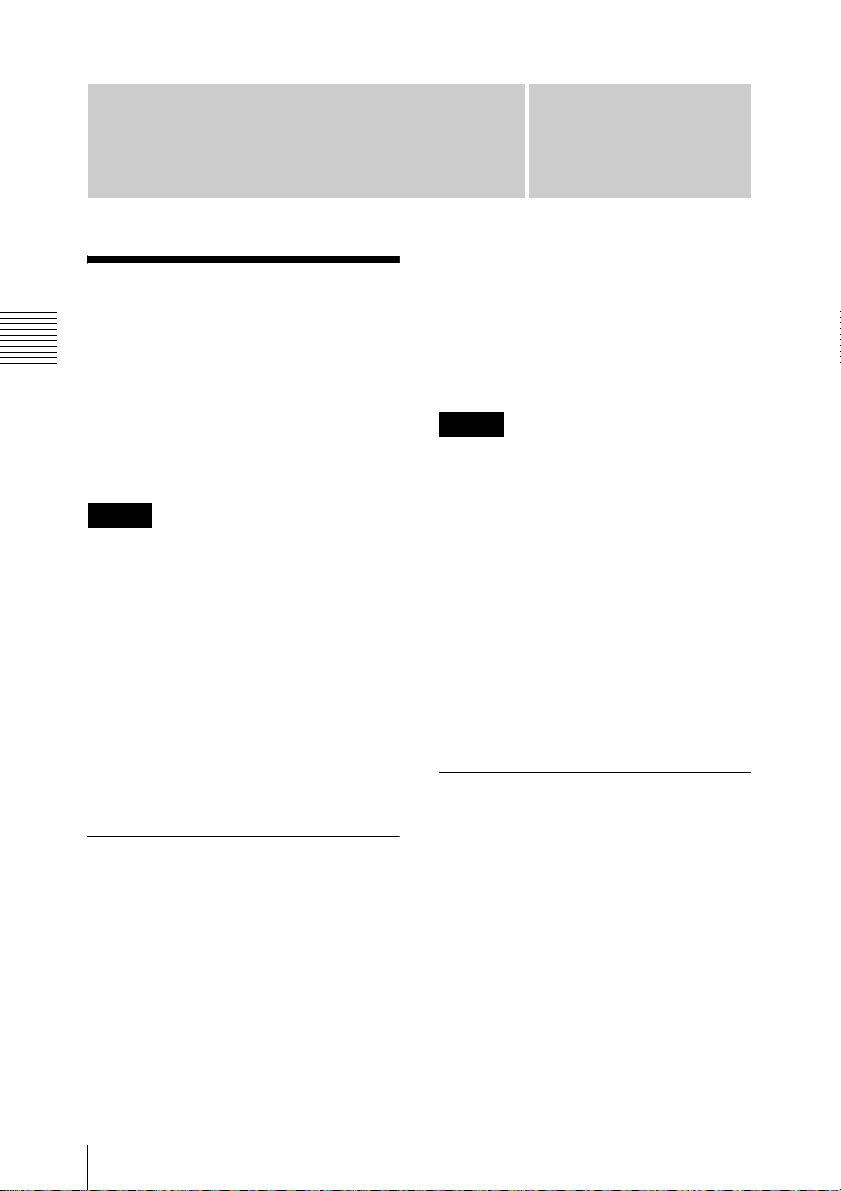
d ケーブルクランパー
AC アダプターのケーブルを固定するた
めに使用します。
図のようにケーブルクランパーにケーブ
ルを挟み込んでください。
第 2 章 各部の名称と働き
e 盗難防止キー取り付け穴
市販の盗難防止キーを取り付けることが
できます。
◆ 盗難防止キーの使いかたについては、ご使用
になる盗難防止キーに付属の説明書をご覧く
ださい。
ご注意
USB 端子を使って接続したコンピュー
ターの映像 / 音声が出力されないとき
は、USB ケーブルを外して、もう一度
まっすぐに接続し直してください。
2-2後面パネル
13
Page 14
準備
3-1 ソフトウェア のインストール
第 3 章 準備
第章
3
ダウンロードしたファイルを実行し、順
次表示される画面に従って操作すると、
XDCAMDriveSoftware に続いて、ユー
ティリティーソフトウェアがインストー
ルされます。
本機を使用するためには、本機を接続す
るコンピューターに各ソフトウェアをあ
らかじめインストールしておきます。
ご注意
XDCAMDriveSoftware と、一部のアン
チウイルスソフトウェア、スパイウェア
ツール、OS 標準以外の UDF2.5 ファイ
ルシステムドライバーを含む製品とを同
時にインストールすると、動作が不安定
になる場合があります。
インストールが正しく終了できない場合
は、それらのソフトウェアの競合や設定
をご確認のうえ、再度インストールを
行ってください。
3-1-1 Windows の場合
XDCAMDriveSoftware と
ユーティリティーソフトウェア
をインストールするには
ソニープロフェッショナル / 業務用製品
サイト(9 ページ)から XDCAMDrive
Software をダウンロードしてください。
ご注意
• バージョンの古い XDCAMDrive
Software がインストールされている場
合、アンインストールが必要です。新
しいバージョンをインストールする前
に、コントロールパネルの「プログラ
ムの追加と削除」から、Sony
XDCAMDriveSoftware を削除し、必
ずコンピューターを再起動してくださ
い。
• インストールを実行すると、それ以前
の設定項目の値は初期化されます。
3-1-2 Macintosh の場 合
XDCAMDriveSoftware と
ユーティリティーソフトウェア
をインストールするには
ソニープロフェッショナル / 業務用製品
サイト(9 ページ)から Content
Browser をダウンロードしてください。
ダウンロードしたファイルを解凍して、
インストールパッケージを実行し、順次
表示される画面に従って操作すると、
3-1ソフトウェアのインストール
14
Page 15
XDCAMDriveSoftware に続いて、ユー
ティリティーソフトウェアがインストー
ルされます。
3-2 接続と設定
ご注意
XDCAMDriveSoftware およびユーティ
リティーソフトウェアはインストールに
よって上書きされます。Ver.1.0 のユー
ティリティーソフトウェアを工場出荷時
とは異なる場所にインストールして使用
されていた場合は、手動で削除してくだ
さい。
また、Ver.2.1 以降の設定項目は、新しい
バージョンのユーティリティーソフト
ウェアをインストールした後も継承され
ます。
3-2-1 コンピューターと の接続
本機とコンピューターを接続することに
よって、ユーティリティーソフトウェア
や他のソフトウェアを使用することがで
きます。
◆ 接続例は「1-2使用例」(8 ページ)をご覧く
ださい。
ご注意
• あらかじめ、XDCAMDriveSoftware
(14 ページ参照)をインストールする
必要があります。
• Windows 搭載のコンピューターに接続
されている PDW-U2 の接続を解除す
る場合は、コンピューター側で「ハー
ドウェアの安全な取り外し」を実行後
にケーブルを抜いてください。
• Windows 搭載のコンピューターにディ
スクを入れたまま起動すると、コン
ピューターの起動が正常に行えなかっ
たり、起動が遅くなったりすることが
あります。
第 3 章 準備
3-2接続と設定
15
Page 16
3-3 電源の準備
本機は AC アダプターを電源として使用
します。
本機後面の DC 電源入力端子(13 ペー
ジ)に付属の AC アダプターと電源コー
ド(別売)を接続します。
ご注意
第 3 章 準備
本機は、USB ケーブルを通じて給電する
ことはできません。
3-4 ディスクの取 り扱い
3-4-1 読み出し・書き込 み可能なディスク
本機では、以下の ProfessionalDisc(プ
ロフェッショナルディスク)の読み出し
および書き込みが可能です。
ディスク 作成可能な
ファイル数
PFD23 5,000 21GB
PFD23A 5,000 21GB
PFD50DLA 6,000 46GB
PFD100TLA 20,000 92GB
PFD128QLW 20,000 120GB
ご注意
• 本機では、以下のディスクの読み出し
および書き込みはできません。
- Blu-rayDisc
- ProfessionalDiscforData
• PFD128QLW は 4 層 WO ディスクのた
め、以下の点に注意してください。
- 書き込んだファイルを削除しても、
空き領域は増えません。
- 再フォーマットを行っても空き領域
は増えません。
- ファイルの書き込みを繰り返すと、
ディスク上の追記リソース領域
(ディスクの管理情報などを書き込
む領域)も消費されます。追記リ
ソース領域の空きがなくなると、
ファイル書き込み用の空き領域が
ユーザーデータ
に記録できる最
大データ容量
3-3電源の準備/3-4ディスクの取り扱い
16
Page 17
残っていても、書き込みができなく
なる場合があります。
- ファイナライズ後は書き込みができ
なくなります。
• それぞれのディレクトリーに格納され
ているファイルの種類によって、実行
できる操作が異なります。詳しくは、
ユーティリティーソフトウェアのヘル
プをご覧ください。
3-4-2 取り扱い上の注意
取り扱いかた
プロフェッショナルディスクはカート
リッジに収納されているため、ほこりや
指紋を気にせずに手軽に取り扱えるよう
に設計されています。ただし、落下等に
より強い衝撃をカートリッジに与える
と、破損、ディスクへの傷の原因となる
こともあります。傷などがつくと、録画
できなくなったり、録画した内容を再生
できなくなることがありますので、取り
扱いには充分注意し、大切に保管してく
ださい。
• カートリッジ内のディスクには直接触
れないでください。
• 故意にシャッターを開けると破損の原
因になります。
• カートリッジを分解しないでくださ
い。
• インデックスシールは付属のシールを
推奨します。正しい位置にお貼りくだ
さい。
• カートリッジにほこりなどが入る可能
性のあるところには放置しないでくだ
さい。
• カートリッジはケースに入れて保存し
てください。
お手入れのしかた
• カートリッジ表面についたほこりやゴ
ミは、乾いた布で軽くふき取ってくだ
さい。
• 結露した場合は、十分乾いてからご使
用ください。
3-4-3 誤消去を防止する には
ディスクの記録内容を誤って消してしま
うのを防ぐには、次図のようにディスク
下面(ラベル面の裏側)にある記録禁止
タブを矢印の方向に設定しておきます。
ディスク下面 記録禁止タブ
記録禁止タブの
設定
このつめを矢印の方向に
スライドさせる。
第 3 章 準備
保管のしかた
• 直接日光が当たるところなど、温度の
高いところや湿度の高いところには置
かないでください。
記録可の状態
記録禁止の状態
3-4ディスクの取り扱い
17
Page 18
3-4-4 ディスクを出し入 れするには
ディスクの出し入れは、後面パネルの
1(電源)ボタンをオンにしてインジ
ケーターを点灯させた状態で、次図に示
すように行ってください。
DISCIN インジケーター
挿入するには
ラベル面を右側に
第 3 章 準備
して挿入する。
ディスクが引き込
まれます。
3-4-5 電源が供給されな い状態でディスクを取り 出すには
電源が供給されない場合、EJECT ボタ
ンを押してもディスクを取り出すことが
できなくなります。このような場合は、
緊急の処置として以下のように手動で取
り出してください。
1
本機の電源を切る。
2
前面パネルのマニュアルイジェクト
機構部のキャップを図のように開け
る。
取り出すには
EJECT ボタンを押
a)
す。
ディスクが挿入されているとき、DISCIN イ
ンジケーターが点灯します。
a) Windows の場合のみ
ご注意
• 本機をMacintoshに接続しているとき、
フォーマットされていないディスクを
本機に挿入した場合は、ユーティリ
ティーソフトウェアを使って排出して
ください。
• コンピューター側のソフトウェアで
ディスク上のファイルを操作している
間は、ディスクの排出が制限されま
す。
開ける
回す
3
穴に直径4mm以下のドライバーなど
を、パネル前面に対して垂直に差し
込む。
4
内部のマニュアルイジェクトレバー
を 10mm前後押し込んでから、離
す。
ご注意
ドライバーなどを斜めに差し込んだ
り、強く押しすぎないようにしてく
ださい。
3-4ディスクの取り扱い
18
Page 19
5
ディスクが排出されるまで、手順 4
を繰り返す。
ご注意
繰り返す回数のめやすは約 80 回で
す。
ディスクを取り出した後、レバーを
元に戻す必要はありません。電源を
入れることにより、再び通常どおり
動作するようになります。
6
キャップを元に戻す。
第 3 章 準備
3-4ディスクの取り扱い
19
Page 20
ソフトウェアを使う
ユーティリティーソフトウェアのホーム
4-1 ユーティリ ティーソフトウェ アの起動と終了
画面が表示されます。
4-1-2 コンソールウィン ドウを閉じる(Windows のみ)
第章
4
4-1-1 起動 / 表示する
第 4 章 ソフトウェアを使う
あらかじめ本機とコンピューターを接続
しておきます。
◆ 接続については、「3-2-1コンピューターとの
接続」(15 ページ)をご覧ください。
Windows の場合
本機に接続したコンピューターで以下の
いずれかを実行します。
• タスクトレイの Utility アイコンをダブ
ルクリックする。またはアイコンを右
クリックして表示されるメニューから
「コンソールを開く」を選択する。
• デスクトップにショートカットアイコ
ンを作成している場合は、アイコンを
ダブルクリックする。
• [スタート ] ボタンをクリックし、「Sony
XDCAMDrive」>「XDCAMDrive
Utility」を選択する。
Macintosh の場合
ユーティリティーソフトウェアをインス
トールしたフォルダーを開き、XDCAM
DriveUtility をダブルクリックします。
本機に接続したコンピューターで以下の
いずれかを実行します。
• ウィンドウ右上の×(閉じる)ボタン
をクリックする。
• タイトルバーを右クリックして表示さ
れるコンテキストメニューから「閉じ
る」を選択する。
• 本ソフトウェアが選択された状態で、
Alt + F4 キーを押す(Alt キーを押し
たまま F4 キーを押す)。
• メニューバーから「表示(V)」→「終
了(X)」を選択する。
4-1-3 終了する
Windows の場合
タスクトレイの Utility アイコンを右ク
リックして、表示されるメニューから、
「XDCAMDriveUtilitySoftware を終了
する」を選択します。
4-1ユーティリティーソフトウェアの起動と終了
20
Page 21

Macintosh の場合
XDCAMDriveUtility メニューから
「XDCAMDriveUtility を終了する」を
選択します。
第 4 章 ソフトウェアを使う
4-1ユーティリティーソフトウェアの起動と終了
21
Page 22
付録
使用上のご注意
結露について
本機を冷たい場所から暖かい場所へ移し
たり、湿気の多い場所で使用したりする
と、空気中に含まれる水蒸気が、光学
ピックアップに水滴となって付着するこ
とがあります。これを結露といい、この
ような状態で本機を使用すると読み出し
や書き込みが正常に行われない可能性が
付録
あります。
結露に対処する方法として、以下の点に
ご注意ください。
• 結露の可能性のある状況で本機を移動
するときは、あらかじめディスクを挿
入しておいてください。
仕様
一般
電源 DC12V
消費電力 19W
動作温度 5°C〜40°C
保存温度 − 20°C〜+60°C
動作湿度 20%〜 90%(相対湿度)
質量 1.7kg
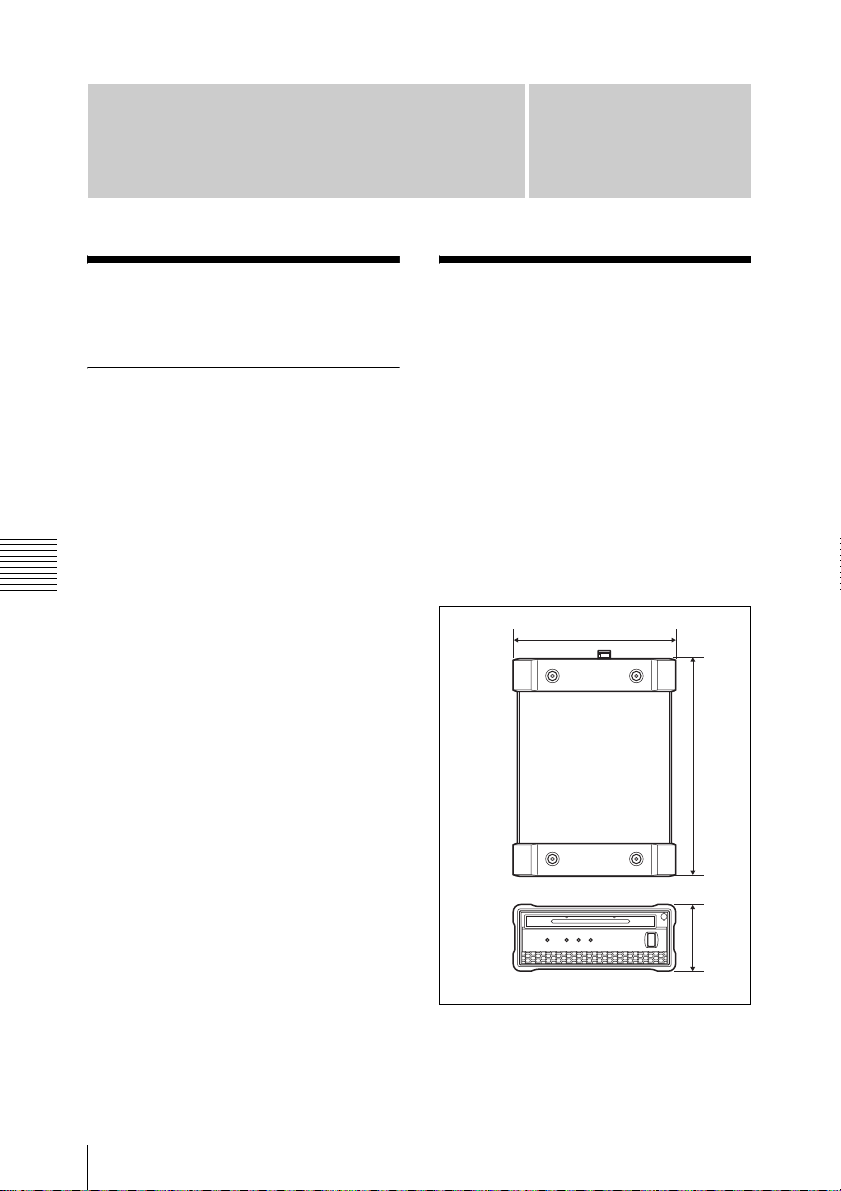
外形寸法(幅 / 高さ / 奥行き)
67.4 × 164 × 219mm
164
219 67.4
使用上のご注意/仕様
22
単位:mm
Page 23

システム
読み出し / 書き込みフォーマット
ビデオ
MPEGHD(50/35/25/
18Mbps)、MPEGIMX
(50/40/30Mbps)、DVCAM
(25Mbps)
プロキシビデオ
MPEG-4
オーディオ
MPEGHD:16bits/48kHz
(2/4ch)または 24bits/
48kHz(8ch)
MPEGIMX:16bits/48kHz
(8ch)または 24bits/48kHz
(4ch)
DVCAM:16bits/48kHz
(4ch)
プロキシオーディオ
A-law(8ch,8bits、8kHz)
記録 / 再生時間(1 層ディスク)
MPEGHD422
50Mbps:約 43 分
MPEGHD
35Mbps:約 65 分
25Mbps:約 85 分
18Mbps:約 112 分
MPEGIMX
50Mbps:約 45 分
40Mbps:約 55 分
30Mbps:約 68 分
DVCAM:約 85 分
記録 / 再生時間(2 層ディスク)
MPEGHD422
50Mbps:約 95 分
MPEGHD
35Mbps:約 145 分
25Mbps:約 190 分
18Mbps:約 248 分
MPEGIMX
50Mbps:約 100 分
40Mbps:約 120 分
30Mbps:約 150 分
DVCAM:約 185 分
記録/再生時間(3 層 RE ディスク)
MPEGHD422
50Mbps:約 190 分
MPEGHD(4ch)
35Mbps:約 290 分
25Mbps:約 380 分
18Mbps:約 496 分
MPEGHD(2ch)
35Mbps:約 300 分
25Mbps:約 400 分
18Mbps:約 530 分
MPEGIMX
50Mbps:約 200 分
40Mbps:約 240 分
30Mbps:約 300 分
DVCAM:約 370 分
記録 / 再生時間(4 層 WO ディスク)
MPEGHD422
50Mbps:約 240 分
MPEGHD
35Mbps:約 360 分
25Mbps:約 480 分
18Mbps:約 600 分
MPEGIMX
50Mbps:約 240 分
40Mbps:約 300 分
30Mbps:約 360 分
DVCAM:約 450 分
ご注意
記録条件により、上記に記載した
時間と異なる場合があります。
付録
仕様
23
Page 24
入出力端子
USB 端子(SuperSpeedUSB(USB3.0)
対応)
付属品
オペレーションマニュアル(1)
AC アダプター
サービスパーツ番号:
1-492-005-1x(1)
USB ケーブル
サービスパーツ番号:
1-839-351-1x(1)
別売りアクセサリー
電源コード(125V/6A、2m)
サービスパーツ番号:
1-792-549-1x
プロフェッショナルディスクPFD23A
2 層プロフェッショナルディスク
付録
PFD50DLA
3 層プロフェッショナルディスク
PFD100TLA
4 層プロフェッショナルディスク(ライ
トワンス型)PFD128QLW
• 必ず事前に記録テストを行い、正常
に記録されていることを確認してく
ださい。本機や記録メディア、外部
ストレージなどを使用中、万一これ
らの不具合により記録されなかった
場合の記録内容の補償については、
ご容赦ください。
• お使いになる前に、必ず動作確認を
行ってください。故障その他に伴う
営業上の機会損失等は保証期間中お
よび保証期間経過後にかかわらず、
補償はいたしかねますのでご了承く
ださい。
仕様および外観は、改良のため予告なく
変更することがありますが、ご了承くだ
さい。
この装置は、クラス A 情報技術装置で
す。この装置を家庭環境で使用すると
電波妨害を引き起こすことがあります。
この場合には使用者が適切な対策を講
ずるよう要求されることがあります
仕様
24
VCCI-A
Page 25
English
WARNING
To reduce the risk of fire or electric shock,
do not expose this apparatus to rain or
moisture.
To avoid electrical shock, do not open the
cabinet. Refer servicing to qualified
personnel only.
WARNING
When installing the unit, incorporate a
readily accessible disconnect device in the
fixed wiring, or connect the power plug to
an easily accessible socket-outlet near the
unit. If a fault should occur during
operation of the unit, operate the disconnect
device to switch the power supply off, or
disconnect the power plug.
WARNING: THIS WARNING IS
APPLICABLE FOR USA ONLY.
If used in USA, use the UL LISTED power
cord specified below.
DO NOT USE ANY OTHER POWER
CORD.
Plug Cap Parallel blade
(NEMA 1-15P Configuration)
Cord Type NISPT-2 or SPT-2, two
16 or 18 AWG wires
Length Minimum 1.5 m (4 ft. 11in.),
Less than 2.5 m (8 ft. 3in.)
Rating Minimum 7A, 125V
Using this unit at a voltage other than 120V
may require the use of a different line cord
or attachment plug, or both. To reduce the
risk of fire or electric shock, refer servicing
to qualified service personnel.
WARNING: THIS WARNING IS
APPLICABLE FOR OTHER
COUNTRIES.
1. Use the approved Power Cord (2-core
mains lead) / Appliance Connector / Plug
that conforms to the safety regulations of
each country if applicable.
2. Use the Power Cord (2-core mains lead) /
Appliance Connector / Plug conforming
to the proper ratings (Voltage, Ampere).
If you have questions on the use of the
above Power Cord / Appliance Connector /
Plug, please consult a qualified service
personnel.
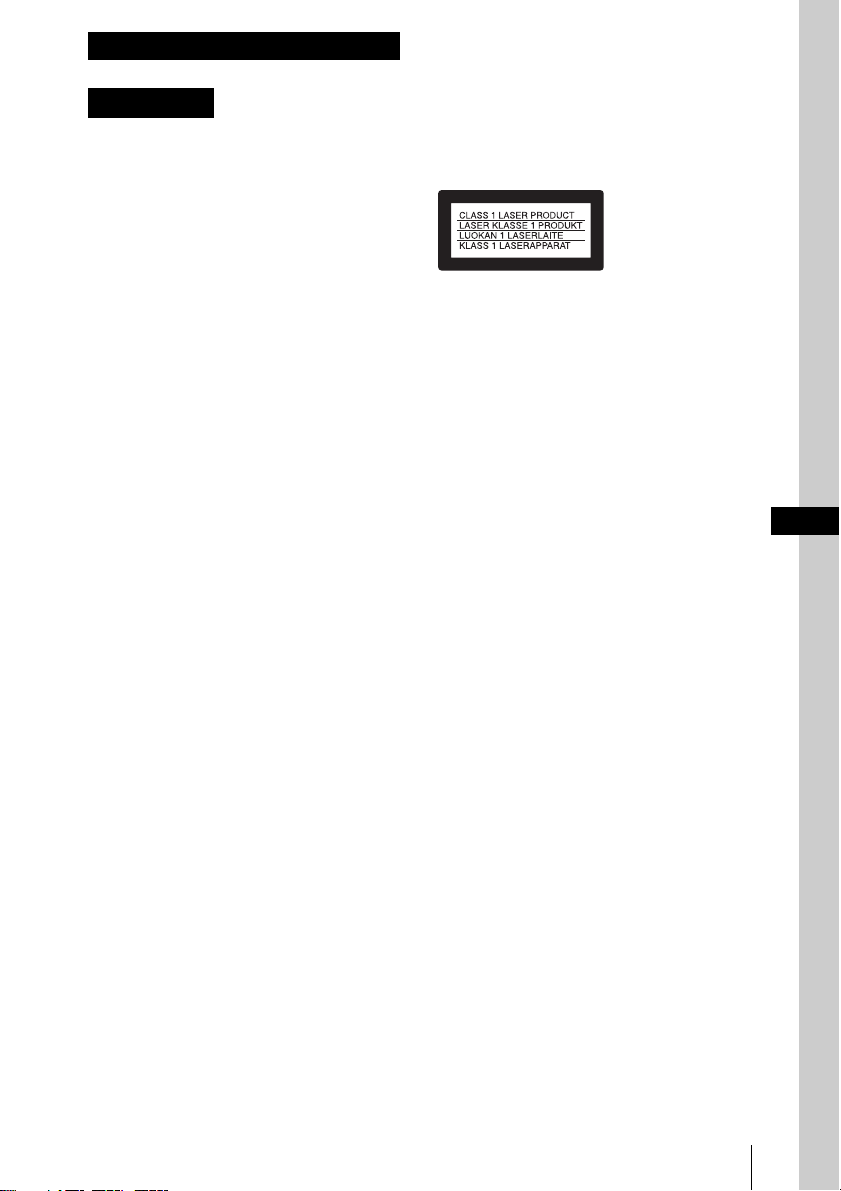
This Professional Disc Drive Unit is
classified as a CLASS 1 LASER
PRODUCT.
Denna hårddiskenhet för professionella
klassificeras som en LASERPRODUKT
AV KLASS 1.
Tämä ammattimainen levyasema on
luokiteltu 1. LUOKAN
LASERTUOTTEEKSI.
Laser Diode Properties
Wavelength: 400 to 410 nm
Emission duration: Continuous
Laser output power: 280 mW (max. of
pulse peak), 150 mW (max. of CW)
Standard: IEC60825-1 (2007)
Egenskaber for laserdiode
Bølgelængde: 400 til 410 nm
Strålingsvarighed: Kontinuerlig
Afgivet lasereffekt: 280 mW (maks
stråletoppunkt), 150 mW (maks ved
kontinuerlig stråling)
Standard: IEC60825-1 (2007)
Egenskaper for laserdiode
Bølgelengde: 400 til 410 nm
Strålingsvarighet: Uavbrutt
Utgangseffekt for laser: 280 mW (maks
stråletoppunkt), 150 mW (maks ved
kontinuerlig stråling)
Standard: IEC60825-1 (2007)
Laserdiod - Egenskaper
Våglängd: 400 - 410 nm
Strålningens varaktighet: Kontinuerlig
Lasereffekt: 280 mW (max. pulstopp),
150 mW (max. vid kontinuerlig våg)
Standard: IEC60825-1 (2007)
GB
25
Page 26
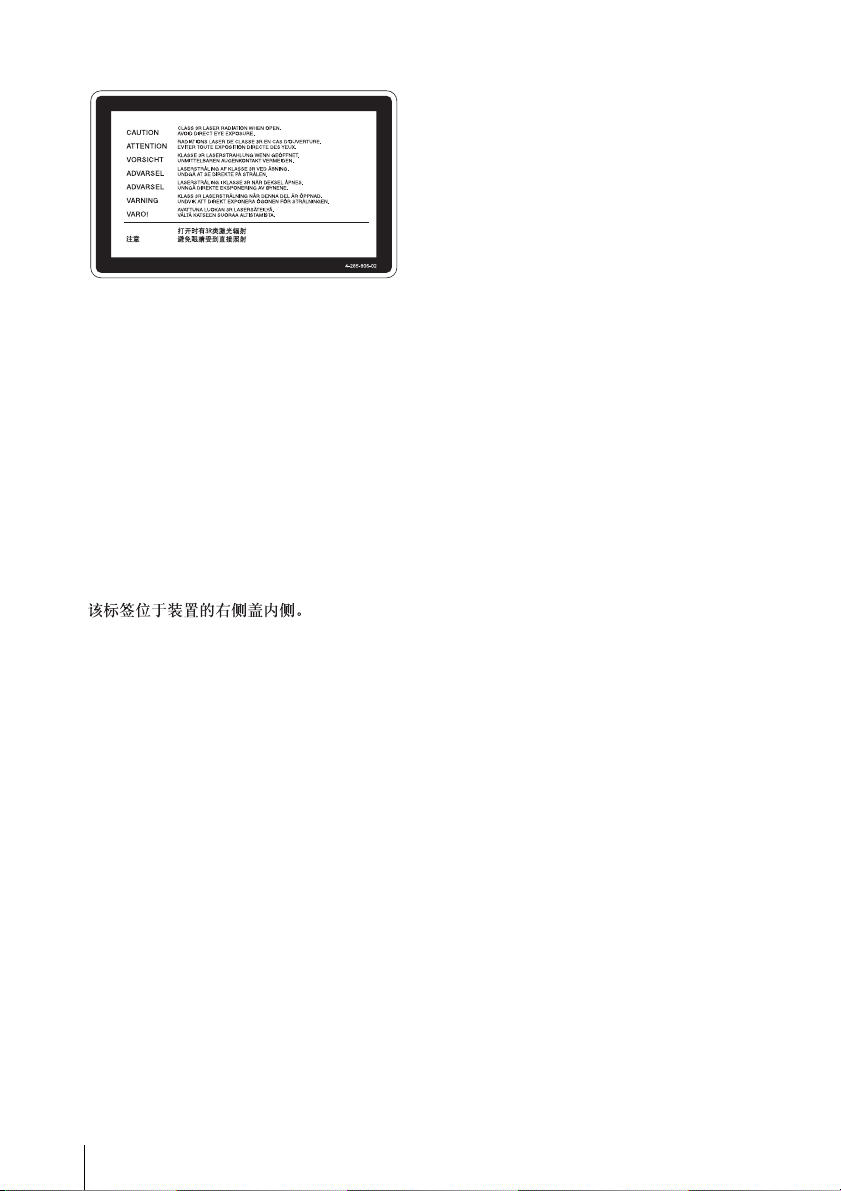
This label is located inside the right side
cover of the unit.
Denna etikett finns på den inre högra sidan
av enheten.
Denne mærkat sidder på højre side inde i
drevenheden.
Tämä kyltti sijaitsee laitteen kotelon
sisäpinnan oikealla puolella.
Dette merket er plassert til høyre på
innsiden av enheten.
CAUTION
The use of optical instruments with this
product will increase eye hazard.
CAUTION
Use of controls or adjustments or
performance of procedures other than those
specified herein may result in hazardous
radiation exposure.
VAROITUS!
LAITTEEN KÄYTTÄMINEN MUULLA
KUIN TÄSSÄ KÄYTTÖOHJEESSA
MAINITULLA TAVALLA SAATTAA
ALTISTAA KÄYTTÄJÄN
TURVALLISUUSLUOKAN 1
YLITTÄVÄLLE NÄKYMÄTTÖMÄLLE
LASERSÄTEILYLLE.
VARNING
OM APPARATEN ANVÄNDS PÅ
ANNAT SÄTT ÄN I DENNA
BRUKSANVISNING SPECIFICERATS,
KAN ANVÄNDAREN UTSÄTTAS FÖR
OSYNLIG LASERSTRÅLNING, SOM
ÖVERSKRIDER GRÄNSEN FÖR
LASERKLASS 1.
For the customers in the USA
This equipment has been tested and found
to comply with the limits for a Class A
digital device, pursuant to Part 15 of the
FCC Rules. These limits are designed to
provide reasonable protection against
harmful interference when the equipment is
operated in a commercial environment.
This equipment generates, uses, and can
radiate radio frequency energy and, if not
installed and used in accordance with the
instruction manual, may cause harmful
interference to radio communications.
Operation of this equipment in a residential
area is likely to cause harmful interference
in which case the user will be required to
correct the interference at his own expense.
You are cautioned that any changes or
modifications not expressly approved in
this manual could void your authority to
operate this equipment.
All interface cables used to connect
peripherals must be shielded in order to
comply with the limits for a digital device
pursuant to Subpart B of Part 15 of FCC
Rules.
This device complies with Part 15 of the
FCC Rules. Operation is subject to the
following two conditions: (1) this device
may not cause harmful interference, and (2)
this device must accept any interference
received, including interference that may
cause undesired operation.
For the customers in Canada
This Class A digital apparatus complies
with Canadian ICES-003.
26
Page 27

For the customers in Europe,
Australia and New Zealand
WARNING
This is a Class A product. In a domestic
environment, this product may cause radio
interference in which case the user may be
required to take adequate measures.
For the customers in Europe
This product has been manufactured by or
on behalf of Sony Corporation, 1-7-1
Konan Minato-ku Tokyo, 108-0075 Japan.
Inquiries related to product compliance
based on European Union legislation shall
be addressed to the authorized
representative, Sony Deutschland GmbH,
Hedelfinger Strasse 61, 70327 Stuttgart,
Germany. For any service or guarantee
matters, please refer to the addresses
provided in the separate service or
guarantee documents.
This apparatus shall not be used in the
residential area.
AVERTISSEMENT
Afin de réduire les risques d’incendie ou
d’électrocution, ne pas exposer cet appareil
à la pluie ou à l’humidité.
Afin d’écarter tout risque d’électrocution,
garder le coffret fermé. Ne confier
l’entretien de l’appareil qu’à un personnel
qualifié.
AVERTISSEMENT
Lors de l’installation de l’appareil,
incorporer un dispositif de coupure dans le
câblage fixe ou brancher la fiche
d’alimentation dans une prise murale
facilement accessible proche de l’appareil.
En cas de problème lors du fonctionnement
de l’appareil, enclencher le dispositif de
coupure d’alimentation ou débrancher la
fiche d’alimentation.
AVERTISSEMENT
1. Utilisez un cordon d’alimentation (câble
secteur à 2 fils)/fiche femelle/fiche mâle
conformes à la réglementation de sécurité
locale applicable.
2. Utilisez un cordon d’alimentation (câble
secteur à 2 fils)/fiche femelle/fiche mâle
avec des caractéristiques nominales
(tension, ampérage) appropriées.
Pour toute question sur l’utilisation du
cordon d’alimentation/fiche femelle/fiche
mâle ci-dessus, consultez un technicien du
service après-vente qualifié.
Pour les clients au Canada
Cet appareil numérique de la classe A est
conforme à la norme NMB-003 du Canada.
Pour les clients en Europe,
Australie et Nouvelle-Zélande
AVERTISSEMENT
Il s’agit d’un produit de Classe A. Dans un
environnement domestique, cet appareil
peut provoquer des interférences radio,
dans ce cas l’utilisateur peut être amené à
prendre des mesures appropriées.
27
Page 28
Pour les clients en Europe
Ce produit a été fabriqué par ou pour le
compte de Sony Corporation, 1-7-1 Konan
Minato-ku Tokyo, 108-0075 Japon. Toutes
les questions relatives à la conformité des
produits basées sur la législation
européenne doivent être adressées à son
représentant, Sony Deutschland Gmbh,
Hedelfinger Strasse 61, 70327 Stuttgart,
Allemagne. Pour toute question relative au
Service Après-Vente ou à la Garantie,
merci de bien vouloir vous référer aux
coordonnées qui vous sont communiquées
dans les documents « Service » (SAV) » ou
Garantie.
Ne pas utiliser cet appareil dans une zone
résidentielle.
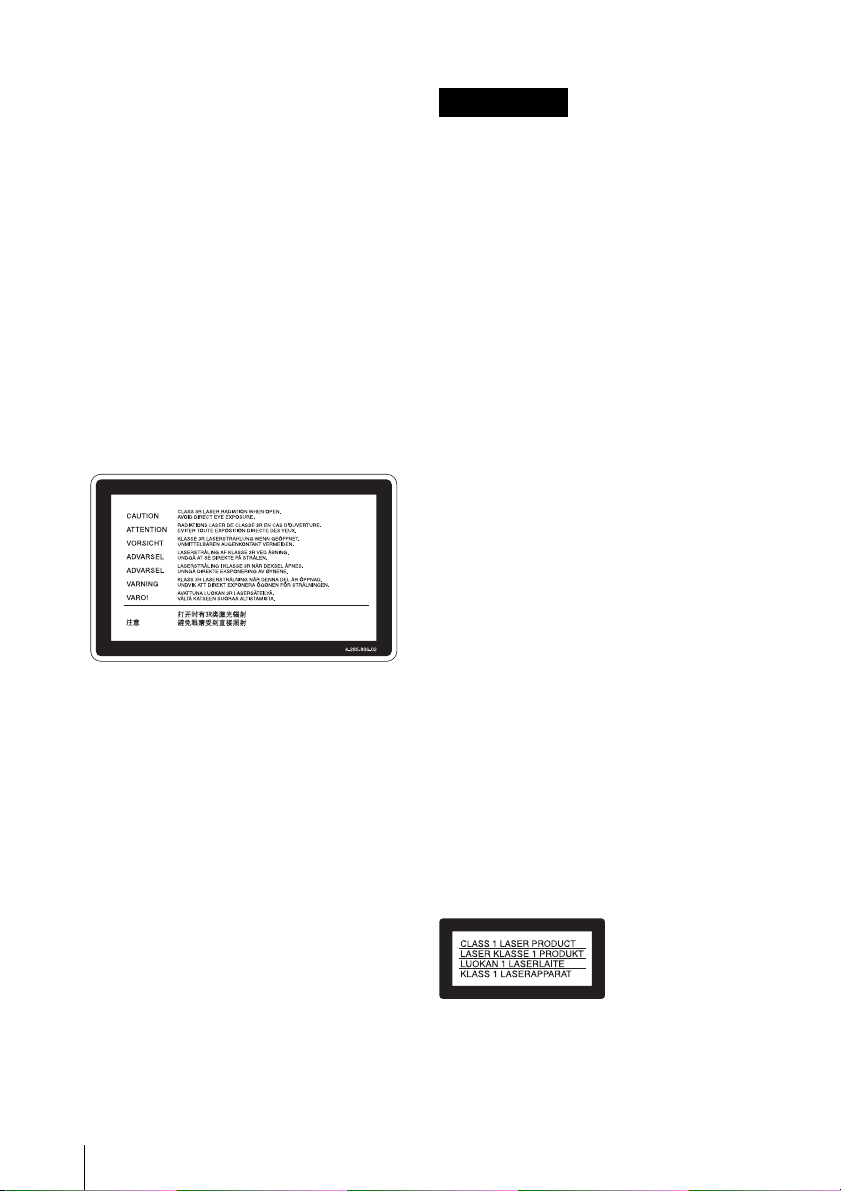
Cette étiquette est placée sur le panneau
latéral de droite de l’unité.
WARNUNG
Um die Gefahr von Bränden oder
elektrischen Schlägen zu verringern, darf
dieses Gerät nicht Regen oder Feuchtigkeit
ausgesetzt werden.
Um einen elektrischen Schlag zu
vermeiden, darf das Gehäuse nicht geöffnet
werden. Überlassen Sie Wartungsarbeiten
stets nur qualifiziertem Fachpersonal.
WARNUNG
Beim Einbau des Geräts ist daher im
Festkabel ein leicht zugänglicher
Unterbrecher einzufügen, oder der
Netzstecker muss mit einer in der Nähe des
Geräts befindlichen, leicht zugänglichen
Wandsteckdose verbunden werden. Wenn
während des Betriebs eine
Funktionsstörung auftritt, ist der
Unterbrecher zu betätigen bzw. der
Netzstecker abzuziehen, damit die
Stromversorgung zum Gerät unterbrochen
wird.
WARNUNG
1. Verwenden Sie ein geprüftes Netzkabel
(2-adriges Stromkabel)/einen geprüften
Geräteanschluss/einen geprüften Stecker
entsprechend den
Sicherheitsvorschriften, die im
betreffenden Land gelten.
2. Verwenden Sie ein Netzkabel (2-adriges
Stromkabel)/einen Geräteanschluss/
einen Stecker mit den geeigneten
Anschlusswerten (Volt, Ampere).
Wenn Sie Fragen zur Verwendung von
Netzkabel/Geräteanschluss/Stecker haben,
wenden Sie sich bitte an qualifiziertes
Kundendienstpersonal.
28
Dieses Professional Disc-Laufwerk ist als
LASERPRODUKT DER KLASSE 1
eingestuft.
Page 29
Daten der Laserdiode
Wellenlänge: 400 bis 410 nm
Emissionsdauer: Ununterbrochen
Laser-Ausgangsleistung: 280 mW (max.
Impulsspitze), 150 mW (max.
Dauerstrich)
Standard: IEC60825-1 (2007)
Für Kunden in Europa,
Australien und Neuseeland
WARNUNG
Dies ist eine Einrichtung, welche die FunkEntstörung nach Klasse A besitzt. Diese
Einrichtung kann im Wohnbereich
Funkstörungen verursachen; in diesem Fall
kann vom Betreiber verlangt werden,
angemessene Maßnahmen durchzuführen
und dafür aufzukommen.
Für Kunden in Europa
Dieses Produkt wurde von oder für Sony
Corporation, 1-7-1 Konan Minato-ku
Tokio, 108-0075 Japan hergestellt. Bei
Fragen zur Produktkonformität auf
Grundlage der Gesetzgebung der
Europäischen Union kontaktieren Sie bitte
den Bevollmächtigten Sony Deutschland
GmbH, Hedelfinger Strasse 61, 70327
Stuttgart, Deutschland. Für Kundendienst
oder Garantieangelegenheiten wenden Sie
sich bitte an die in den Kundendienst- oder
Garantiedokumenten genannten Adressen.
Dieser Apparat darf nicht im Wohnbereich
verwendet werden.
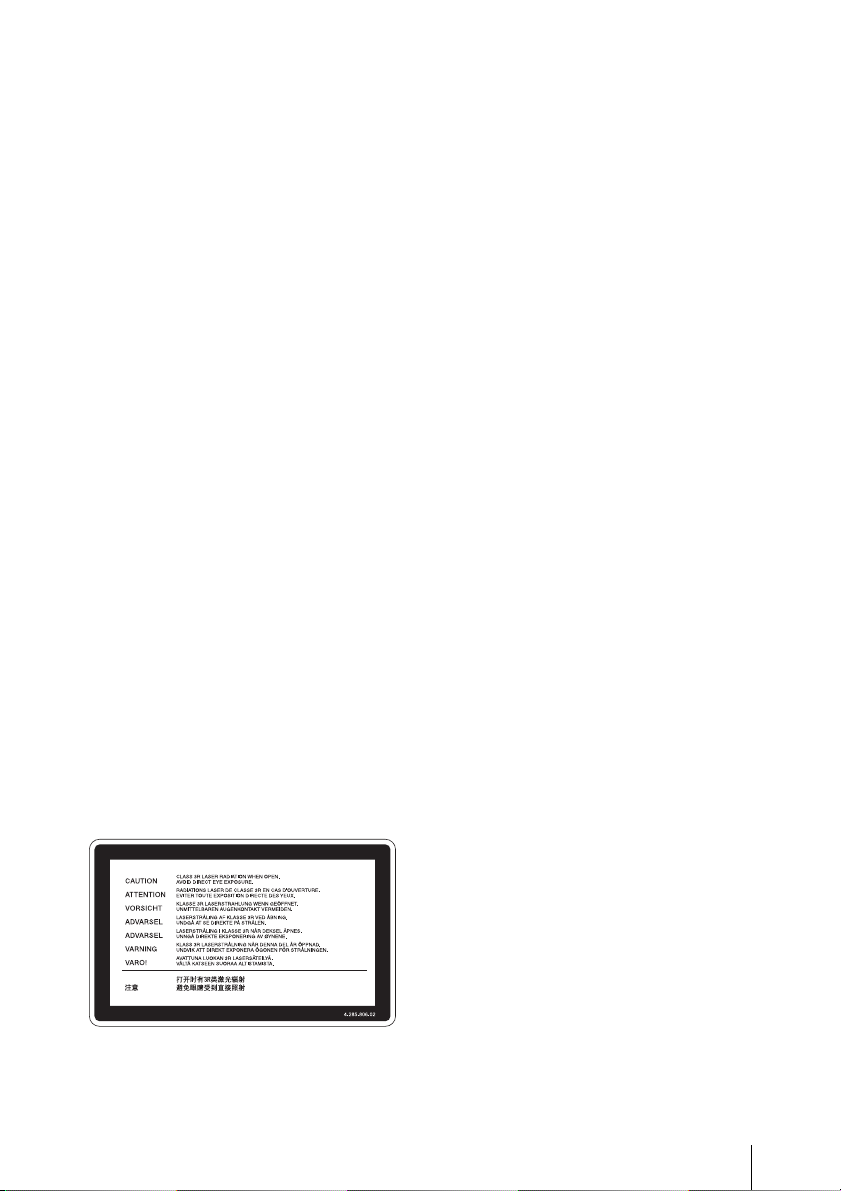
Dieser Aufkleber befindet sich auf der
Innenseite der rechten Seitenabdeckung der
Einheit.
29
Page 30

Table of Contents
Chapter 1 Overview
1-1 Features ....................................................................................32
1-2 Example of Use ........................................................................32
1-3 Recommended Software .........................................................33
1-3-1 List of Software..............................................................33
Chapter 2 Names and Functions of Parts
2-1 Front Panel...............................................................................35
2-2 Rear Panel................................................................................36
Chapter 3 Preparations
3-1 Software Installation ...............................................................38
3-1-1 Windows Installation .....................................................38
3-1-2 Macintosh Installation....................................................38
3-2 Connections and Settings........................................................39
3-2-1 Connecting to a Computer .............................................39
3-3 Power Preparations.................................................................39
3-4 Handling Discs .........................................................................40
3-4-1 Discs Used for Reading and Writing .............................40
3-4-2 Notes on Handling..........................................................40
3-4-3 Write-Protecting Discs...................................................41
3-4-4 Loading and Unloading Discs........................................41
3-4-5 To Eject Discs with the Unit Powered Off.....................41
Chapter 4 Using the Software
4-1 Starting and Exiting the Utility Software..............................43
4-1-1 Starting/Displaying ........................................................43
4-1-2 Closing the Console Window without Exiting from
4-1-3 Exiting............................................................................43
Table of Contents
30
Resident Mode (Windows only)......................................43
Page 31

Appendix
Important Notes on Operation .................................................... 45
Condensation ...........................................................................45
Specifications................................................................................. 45
Table of Contents
31
Page 32
Chapter 1 Overview
Overview
1-1 Features
The features of the PDW-U2 include the
following.
• Supported for all XDCAM formats
• Supported for mixed format recording
mode
• Supported for quad-layer Write-Once
(WO) disc
• IT-friendly system through USB
interface
• User data recording as computer data
• High data transfer rates
• Lightweight and compact field
specification
• Menu operation from a computer using
the utility software
• XDCAM preview environment
Chapter
1
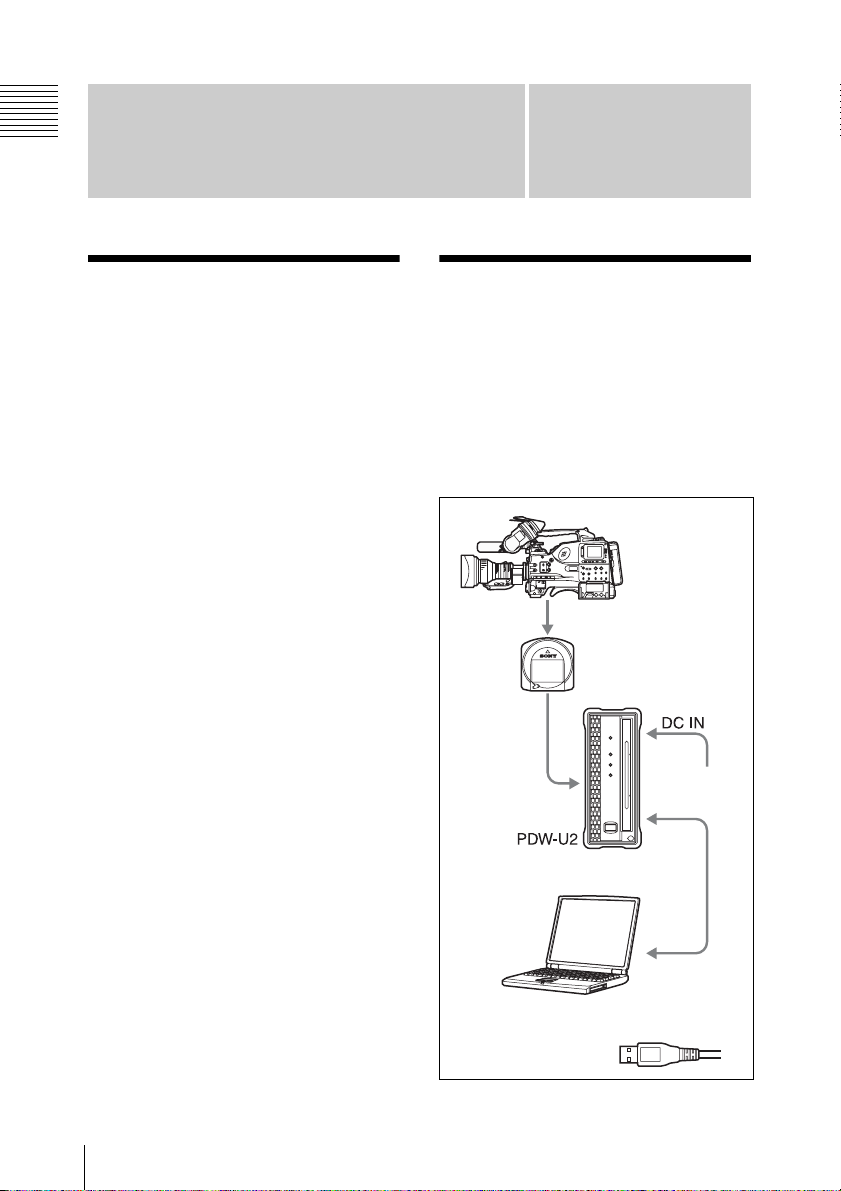
1-2 Example of Use
The following figure shows an example
system for reading or writing material
recorded with a XDCAM camcorder on a
computer connected to this unit.
XDCAM
camcorder
Professional Disc
1-1 Features / 1-2 Example of Use
32
DC power
supply
Reading/Writing
1
To USB
connector
Laptop computer
1 USB cable
Page 33
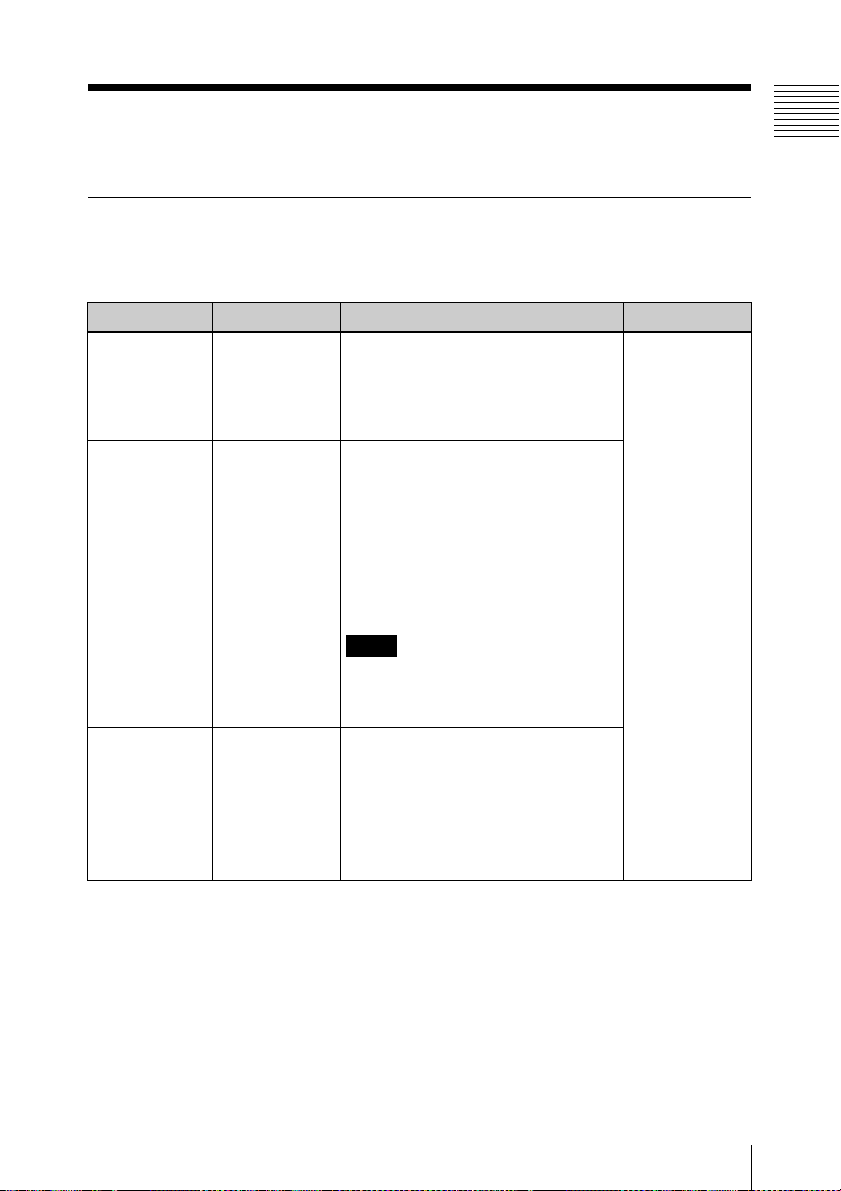
1-3 Recommended Software
1-3-1 List of Software
Download the following software from the Sony Professional Products site for use with this
unit.
Software Supported OS Function Source
XDCAM Drive
Software
Utility Software
(XDCAM Drive
Utility)
Content
Browser
Windows/
Macintosh
Windows/
Macintosh
Windows/
Macintosh
Basic software that allows you to
connect this unit to a computer and
handle video and audio data
recorded with an XDCAM
camcorder as files.
Provides the following functions on
a computer connected to this unit.
• Displaying device and disc
information
• Disc format and recovery
• Firmware updates
• Making settings
• Finalize discs (when using a
quad-layer WO disc)
Note
The Utility Software is installed
automatically when you install the
XDCAM Drive Software.
Allows you to view and operate on
clips recorded on Professional
Discs.
For an overview of the Content
Browser and installation
instructions, visit the Sony
Professional products web site
a)
.
Download from
the Sony
Professional
Products site
a)
Chapter 1 Overview
a) Sony Professional Products site
• USA http://pro.sony.com
• Canada http://www.sonybiz.ca
• Latin America http://sonypro-latin.com
• Europe http://www.pro.sony.eu
• Japan http://www.sonybsc.com
• Asia http://pro.sony-asia.com
• Korea http://bp.sony.co.kr
• China http://pro.sony.com.cn
1-3 Recommended Software
33
Page 34

System Requirements
For details on the functions of the above
Chapter 1 Overview
recommended software and their system
requirements, refer to the following file and
manual (available on the download page of
each respective software).
XDCAM Drive Software:
ReadMe.txt
Content Browser:
Installation Guide
1-3 Recommended Software
34
Page 35
Names and Functions
of Parts
2-1 Front Panel
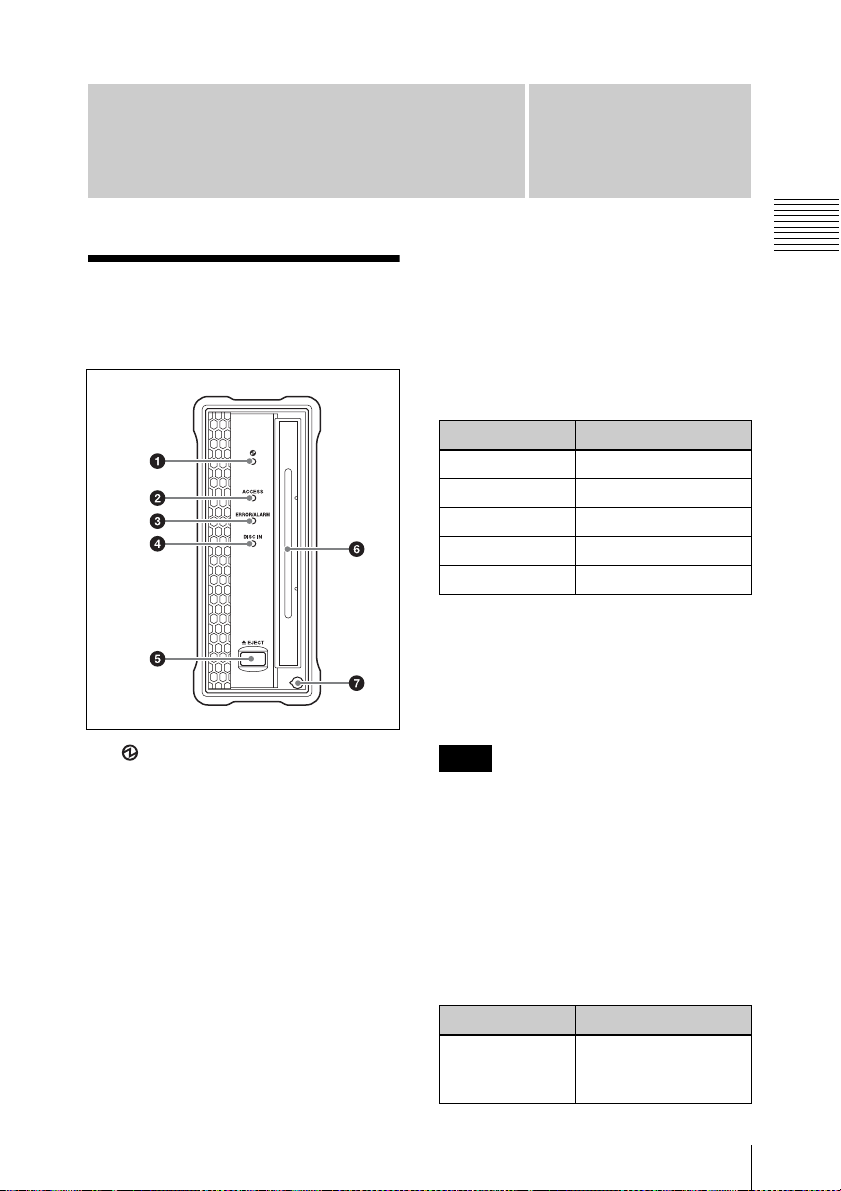
a (power) indicator
Lights green when the 1 (power) button on
the rear panel is on.
b ACCESS indicator
Flashes blue when the disc is being
accessed from the computer.
However, this indicator flashes once a
second while writing the disc management
data to the disc is being held after the disc
access is finished.
During this data write hold time, you can
still perform the operations including
ejection of the disc and an operation from
the computer.
Chapter
If you perform an operation during the data
write hold time, the operation is actually
processed after the disc management data
writing is completed.
The duration when the disc management
data writing is being held varies with the
disc type as shown below.
Disc Data write hold time
PFD23 Approx. five seconds
PFD23A Approx. five seconds
PFD50DLA Approx. five seconds
PFD100TLA Approx. five seconds
PFD128QLW Approx. four minutes
Upon expiration of the data write hold time
shown above, the disc management data
writing begins even if you do not eject the
disc or perform any operation from the
computer.
Note
Do not press the 1 (power) button on the
rear panel to turn off, or do not disconnect
either the power cord or USB cable while
the ACCESS indicator is lighting or
flashing. Doing so may lead to a loss of data
on the disc.
c ERROR/ALARM indicator
If a fault occurs in the unit, this flashes red,
as shown in the following table.
Indicator Meaning
Flashing four
times a second
2
An error occurred
(principally a
hardware default).
Chapter 2 Names and Functions of Parts
2-1 Front Panel
35
Page 36
Indicator Meaning
Flashing once a
second
An alarm not listed
above occurred.
Note
The indicator may flash only for five
Chapter 2 Names and Functions of Parts
seconds depending on the alarm.
You can check alarms generated by this unit, using
the alarm log of the utility software. For details,
refer to the help file of the utility software.
If the indicator is flashing four times a second, and
it is not possible to check the alarm log, a
malfunction may have occurred. In this case, contact
your Sony service representative.
When the error is eliminated, the indicator
goes off.
d DISC IN indicator
Lights green when a disc is loaded.
2-2 Rear Panel
e EJECT button
Ejects a disc (see page 41).
Notes
• This button is disabled while the disc is
being accessed. Either stop accessing the
disc before ejecting, or eject by an
operation from the computer.
• When this unit is connected to a
Macintosh computer, this button is
disabled.
f Disc slot
With the label surface on the right, insert
the disc (see page 41).
g Manual eject mechanism
For details, see 3-4-5 “To Eject Discs with the Unit
Powered Off” (page 41).
2-2 Rear Panel
36
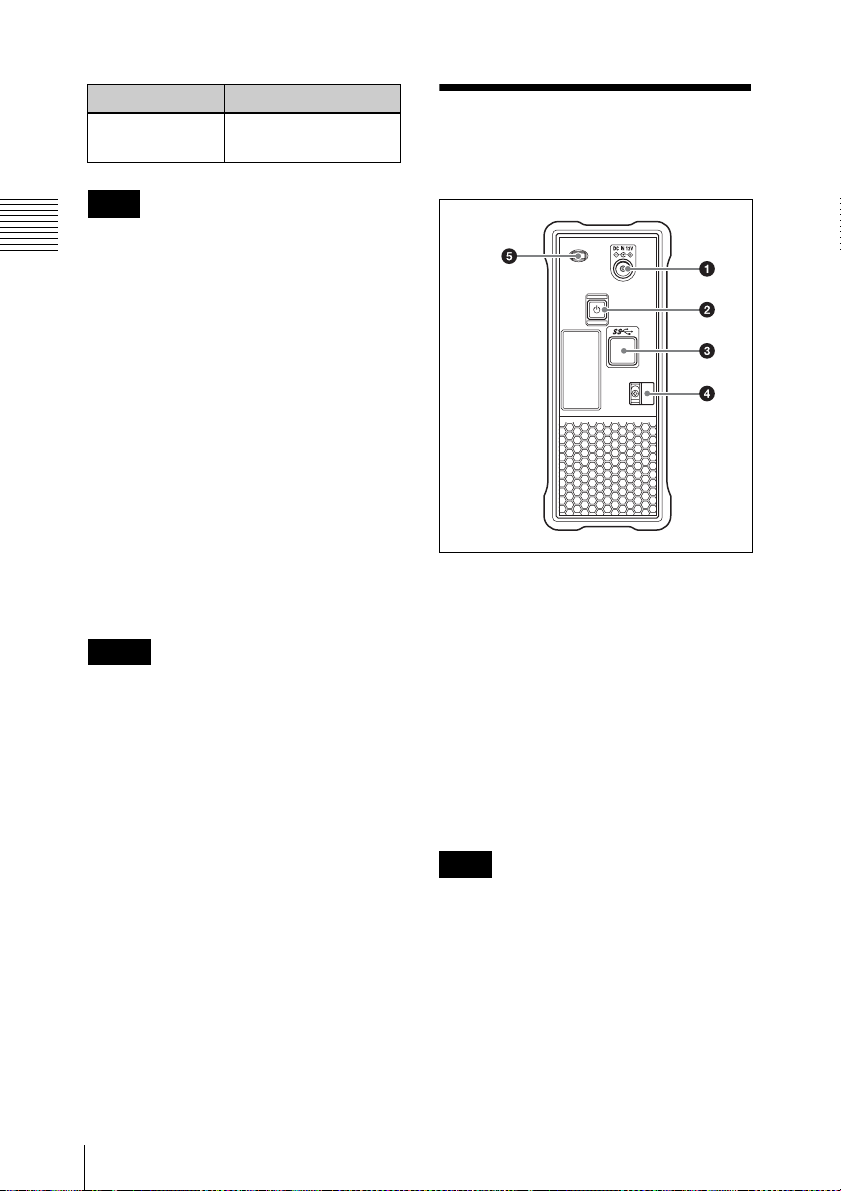
a DC power inlet connector
Connect to the AC power using the supplied
AC adaptor and a power cord (not
supplied).
b 1 (power) button
This switches the power on and off.
c USB connector (Super-speed USB
(USB 3.0))
Use the supplied USB cable to connect to
the computer.
Note
If the video and audio are not output on a
computer connected using the USB
connector, try disconnecting the USB cable,
and reconnect making sure it is correctly
inserted.
d Cable clamper
Use this clamper to fix the cable of the AC
adaptor.
Page 37
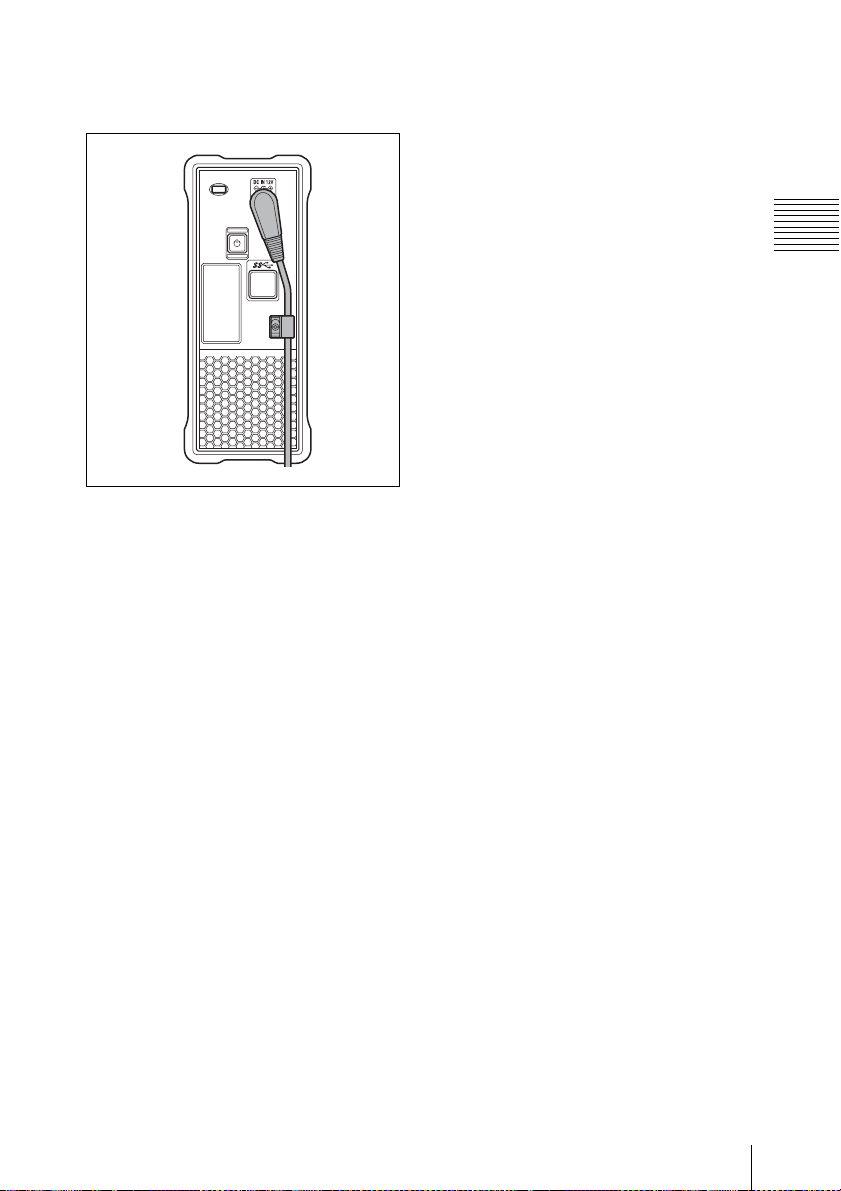
Clip the cable with the clamper as shown in
the following figure.
e Security slot
You can fit a commercially available
security cable into this slot.
For information about how to use your security
cable, refer to the instructions provided with the
security cable.
Chapter 2 Names and Functions of Parts
2-2 Rear Panel
37
Page 38
Preparations
3-1 Software
Installation
Chapter 3 Preparations
To use this unit, the necessary software
must first be installed on the computer to
which it is connected.
Note
Operation of the XDCAM Drive Software
may be unstable if it is installed together
with some anti-virus software, spy-ware
tools, or UDF2.5 file system drivers other
than the operating system standard.
If the installation cannot be completed
successfully, check the settings for conflicts
with this other software, then try
reinstalling.
3-1-1 Windows Installation
To install the XDCAM Drive
Software and utility software
Download the XDCAM Drive Software
from the Sony Professional products web
site (page 33).
Run the downloaded file and follow the
instructions that appear on the screen to
install both the XDCAM Drive Software
and the Utility Software.
Chapter
Notes
• If an old version of the XDCAM Drive
Software is already installed, it must be
uninstalled before you install the new
version. Use “Add or Remove Programs”
on the Control Panel to remove the old
version of the Sony XDCAM Drive
Software. After doing so, be sure to
restart the computer.
• After installation, the previous settings
return to their default values.
3
3-1-2 Macintosh Installation
To install the XDCAM Drive
Software and utility software
Download the Content Browser from the
Sony Professional products web site
(page 33).
Extract the downloaded file, run the
installation package, and follow the
instructions that appear on the screen to
install both the XDCAM Drive Software
and the Utility Software.
Note
Installing the XDCAM Drive Software and
utility software overwrites a previous
installation.
If you are using version 1.0 of the utility
software installed somewhere other than the
factory default, remove it manually.
Settings from version 2.1 and later are
preserved after the new installation.
3-1 Software Installation
38
Page 39
3-2 Connections
3-3 Power
and Settings
3-2-1 Connecting to a Computer
By connecting this unit to a computer, you
can use the utility software, and the other
software.
For a connection example, see 1-2 “Example of
Use” (page 32).
Notes
• The XDCAM Drive Software (see
page 38) must be installed in advance.
• To disconnect the PDW-U2 from a
Windows computer, run the “Safely
Remove Hardware” dialog, and then
disconnect the cable.
• If you start a Windows computer with the
supplied Professional Disc Drive Unit
CD-ROM loaded, the computer may fail
in normal operation or run sluggishly.
Preparations
This unit can be powered by AC adaptor.
Connect the supplied AC adaptor and a
power cord (not supplied) to the DC power
inlet connector (page 36) on the rear panel
of the unit.
Chapter 3 Preparations
Note
It is not possible to power this unit through
a USB cable.
3-2 Connections and Settings / 3-3 Power Preparations
39
Page 40
3-4 Handling
Discs
• The operation which you can execute
varies depending on the file type stored in
each directory. For details, refer to the
help file of the utility software.
3-4-2 Notes on Handling
3-4-1 Discs Used for Reading and Writing
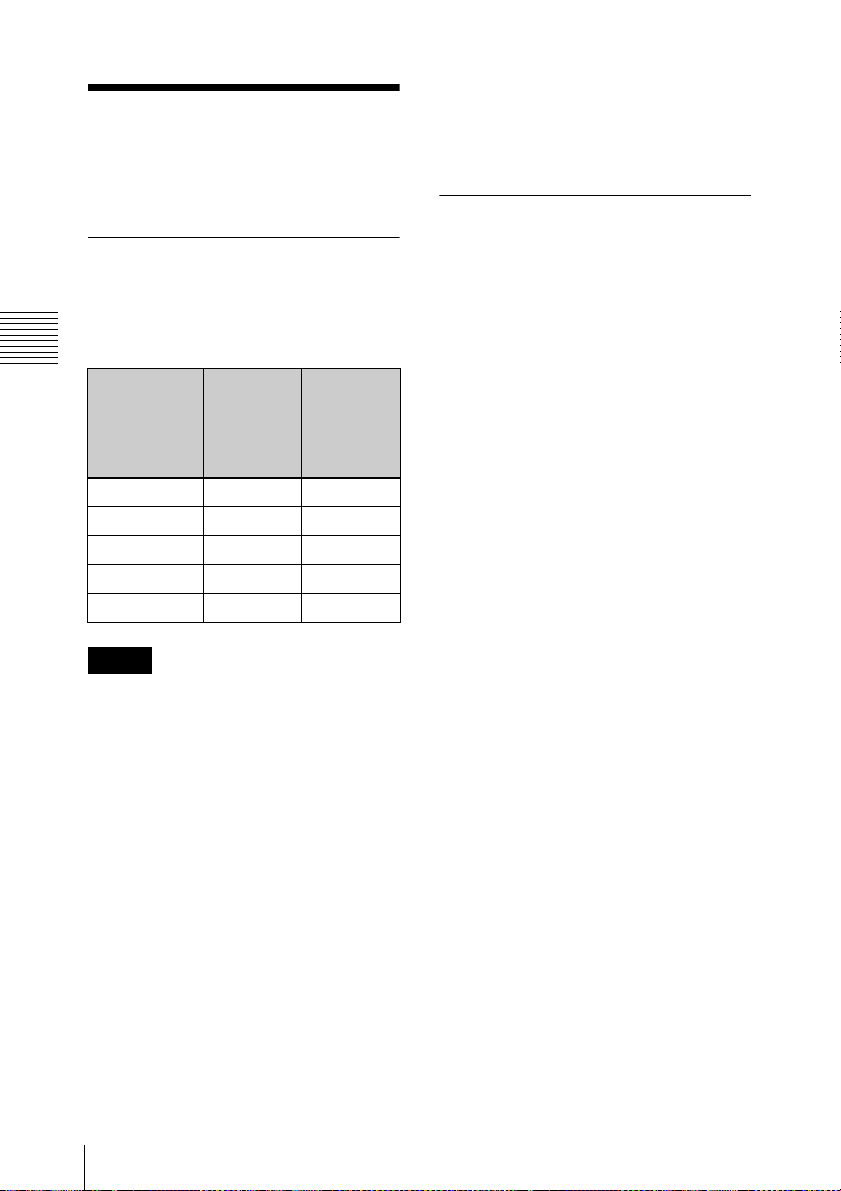
This unit uses the following professional
discs for reading and writing:
Chapter 3 Preparations
Disc No. of files
which can
be created
PFD23 5,000 21 GB
PFD23A 5,000 21 GB
PFD50DLA 6,000 46 GB
PFD100TLA 20,000 92 GB
PFD128QLW 20,000 120 GB
Notes
• This unit cannot read or write the
following discs.
- Blu-ray Disc
- Professional Disc for Data
• PFD128QLW is a quad-layer WO disc.
Pay due attention to the following points.
- Even if you delete any files written to
the disc, no available storage space
will be increased.
- Reformatting the disc will not increase
the available storage space.
- Repetitive file writing will consume
the recordable resource space (for
writing the disc management data, etc.)
on the disc. If no available recordable
resource space is left on the disc, file
writing may be disabled even with
sufficient available storage space
remaining.
- No file can be written after the disc is
finalized.
Max. data
capacity
for user
data
recording
Handling
The Professional Disc is housed in a
cartridge, and is designed to allow handling
free of risk from dust or fingerprints.
However, if the cartridge is subjected to a
severe shock, for example by dropping it,
this can result in damage or scratching of
the disc. If the disc is scratched, it may be
impossible to record video/audio, or to play
back the content recorded on the disc. The
discs should be handled and stored
carefully.
• Do not touch the surface of the disc itself
within the cartridge.
• Deliberately opening the shutter may
cause damage.
• Do not disassemble the cartridge.
• The supplied adhesive labels are
recommended for indexing discs. Apply
the label in the correct position.
Storage
• Do not store discs where they may be
subjected to direct sunlight, or in other
places where the temperature or humidity
is high.
• Do not leave cartridges where dust may
be able to gain ingress.
• Store cartridges in their cases.
Care of the discs
• Remove dust and dirt on the outside of a
cartridge using a soft dry cloth.
• If condensation forms, allow ample time
to dry before use.
3-4 Handling Discs
40
Page 41
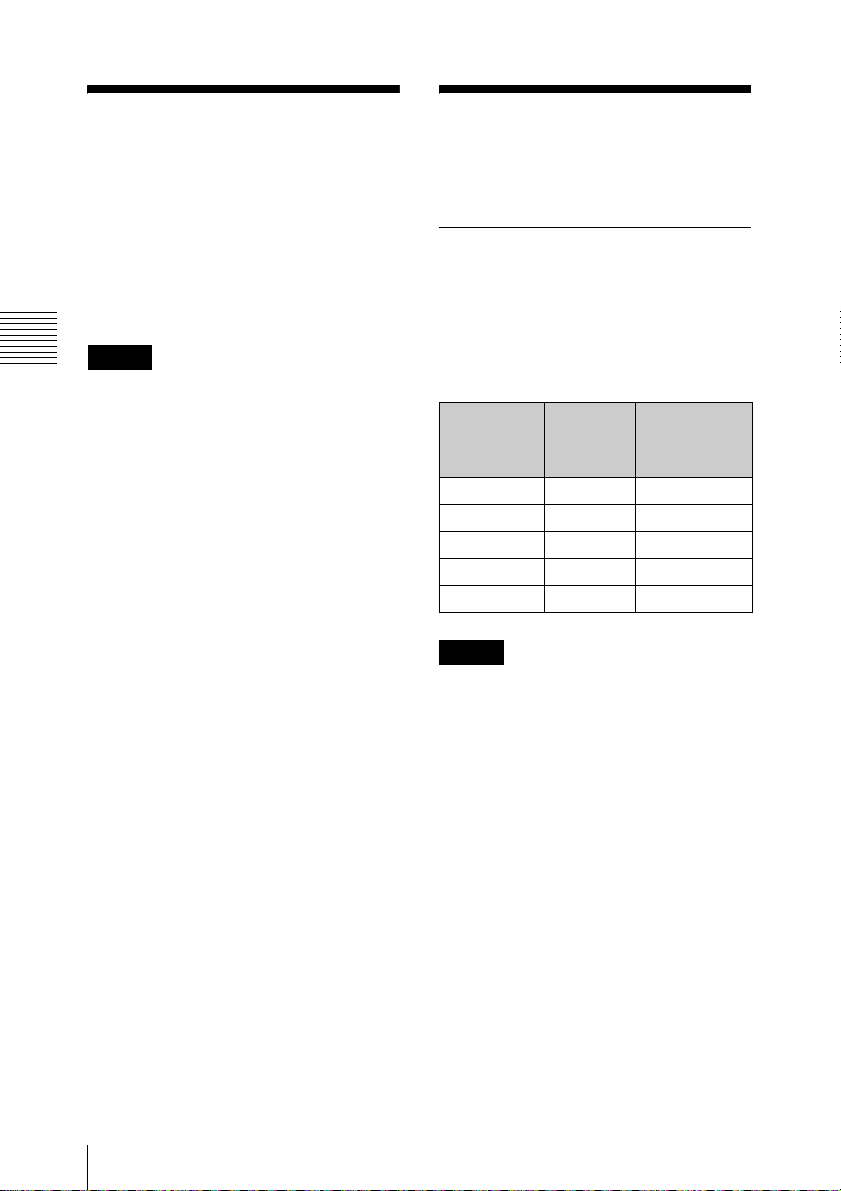
3-4-3 Write-Protecting Discs
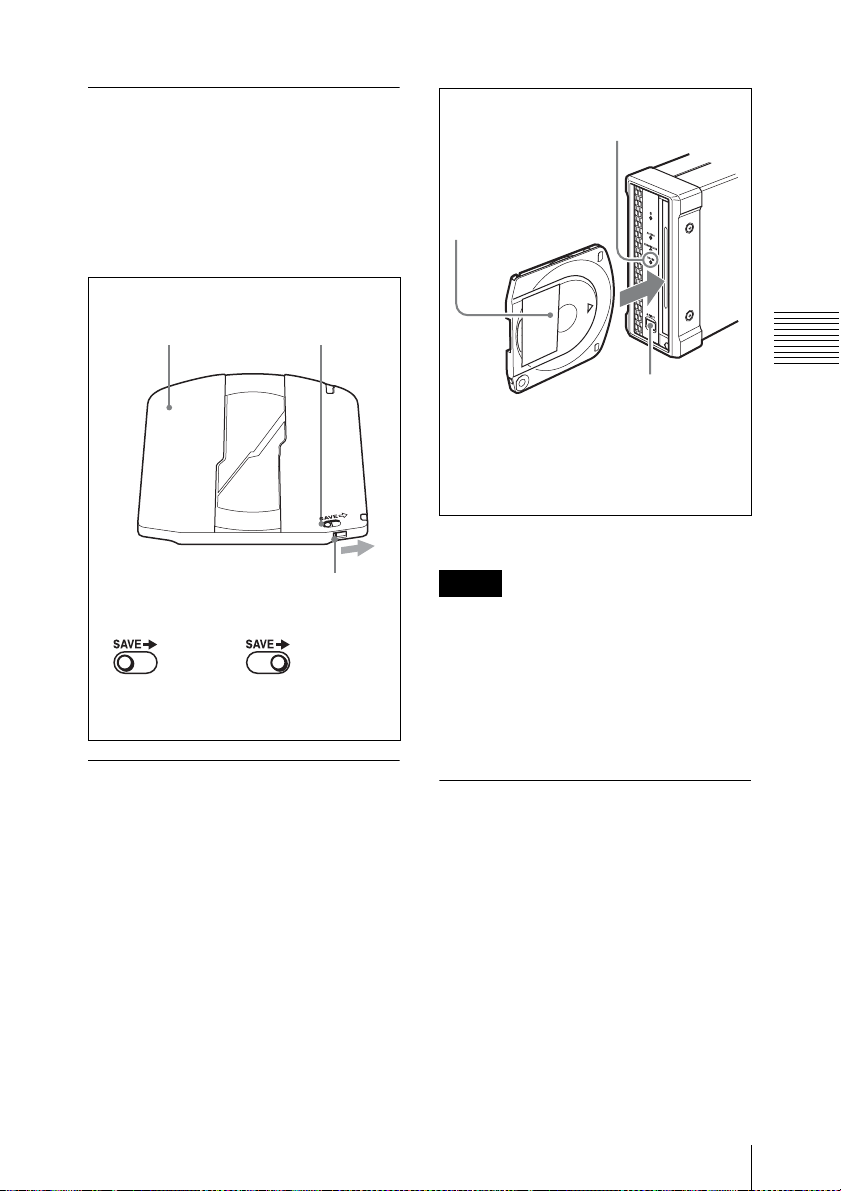
To protect the content recorded on the disc
from accidental erasure, move the writeprotect tab on the lower surface of the disc
in the direction of the arrow, as shown in the
following figure.
Lower surface
of the disc
Write Inhibit tab
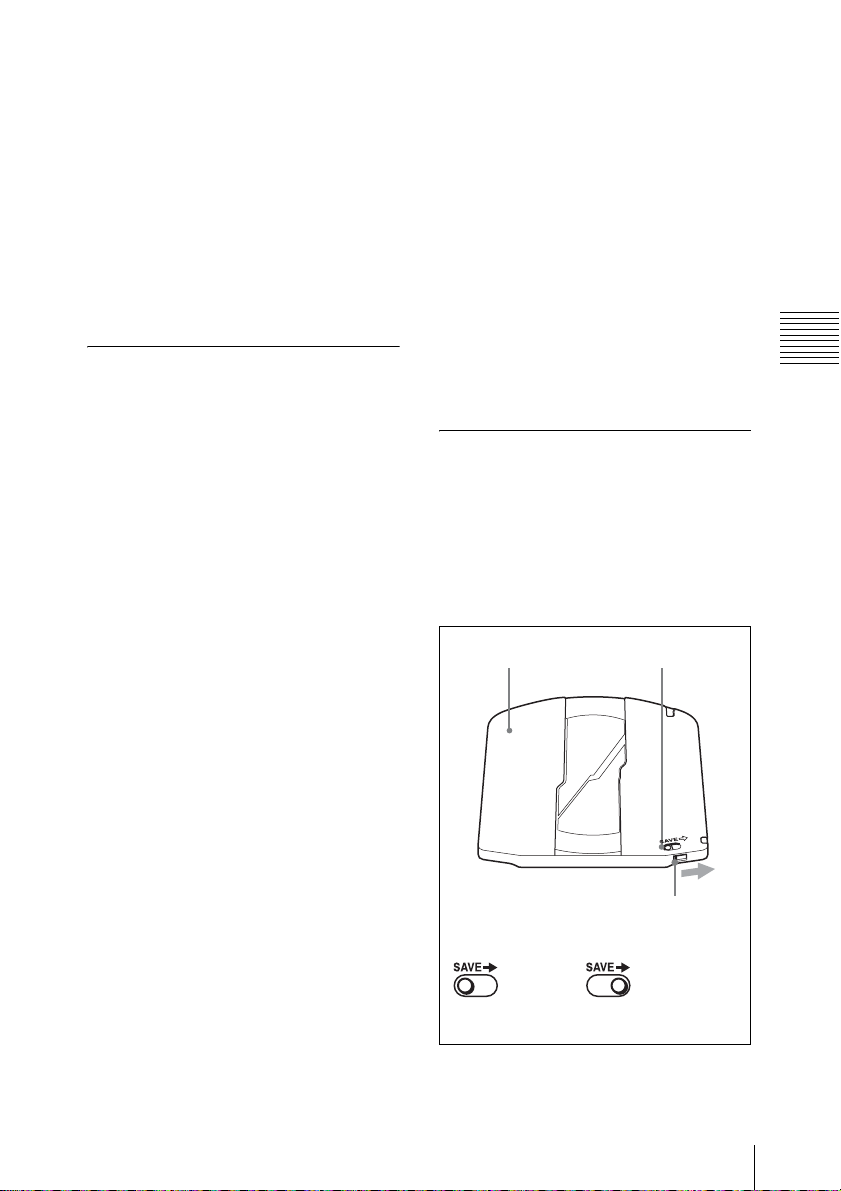
DISC IN indicator
To load
With the label
surface on the right,
insert the disc.
The disc is drawn in.
To unload
Press the EJECT
a)
button.
When a disc is loaded, the DISC IN
indicator lights.
a) Windows only
Chapter 3 Preparations
Write Inhibit
tab settings
Recording
enabled
Slide in the direction
of the arrow
Recording
disabled
3-4-4 Loading and Unloading Discs
To load and unload a disc, press 1 (power)
button to turn the unit on and light the
indicator, and follow the procedures
indicated in the next illustration.
Notes
• If you load an unformatted disc into the
unit connected to a Macintosh computer,
use the utility software to unload the disc.
• When a file on the disc is being operated,
disc unloading is restricted by the
software on the Windows/Macintosh
computer.
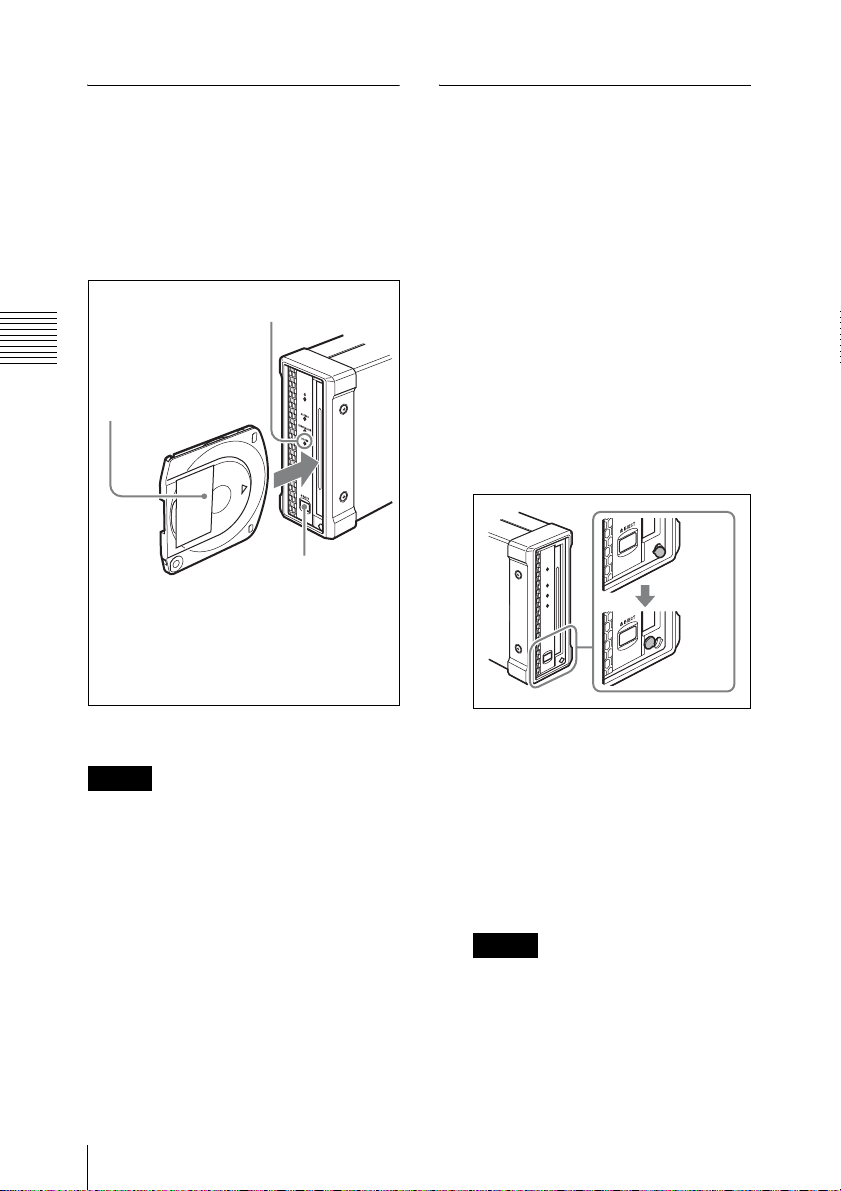
3-4-5 To Eject Discs with the Unit Powered Off
When the power is not supplied, it may not
be possible to eject discs by pressing the
EJECT button. In these situations, you can
use the following as an emergency
procedure to eject a disc manually.
1 Power the unit off.
2 Uncover the manual eject mechanism
in the front panel as shown in the
figure.
3-4 Handling Discs
41
Page 42
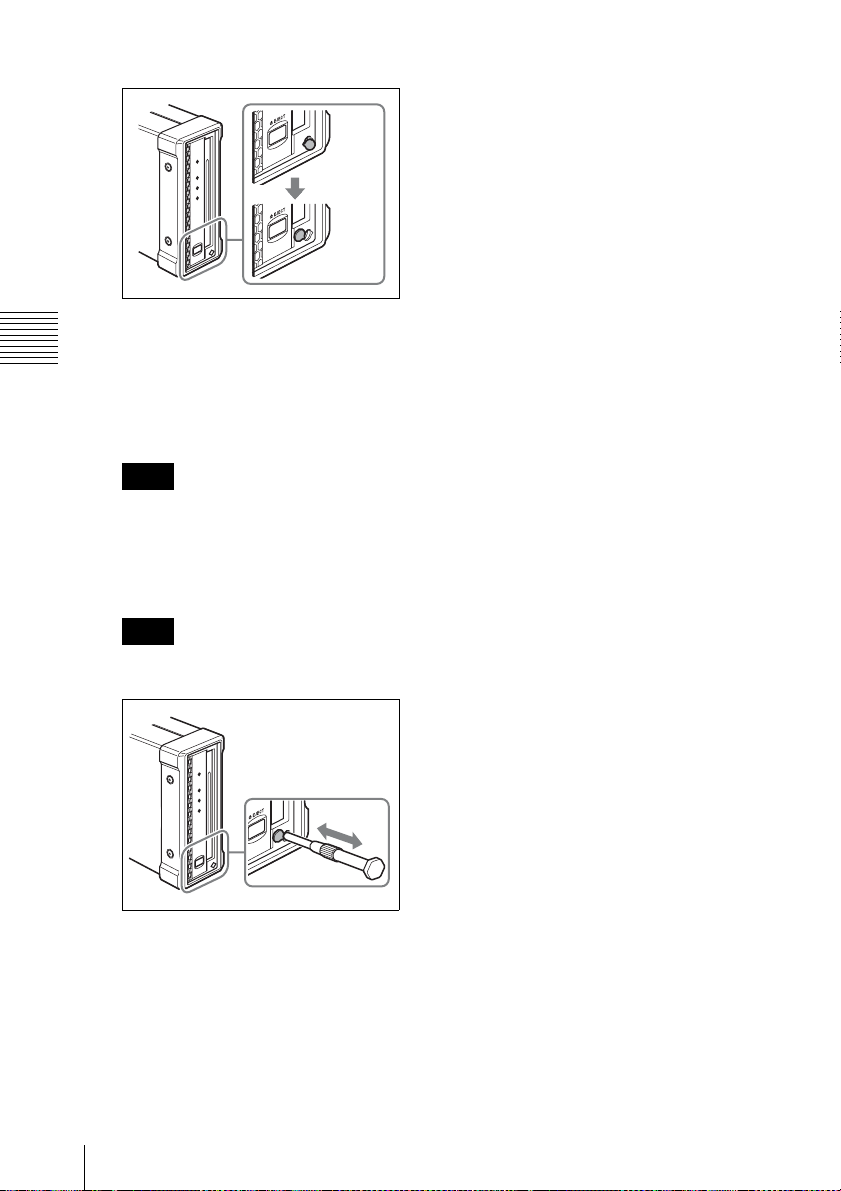
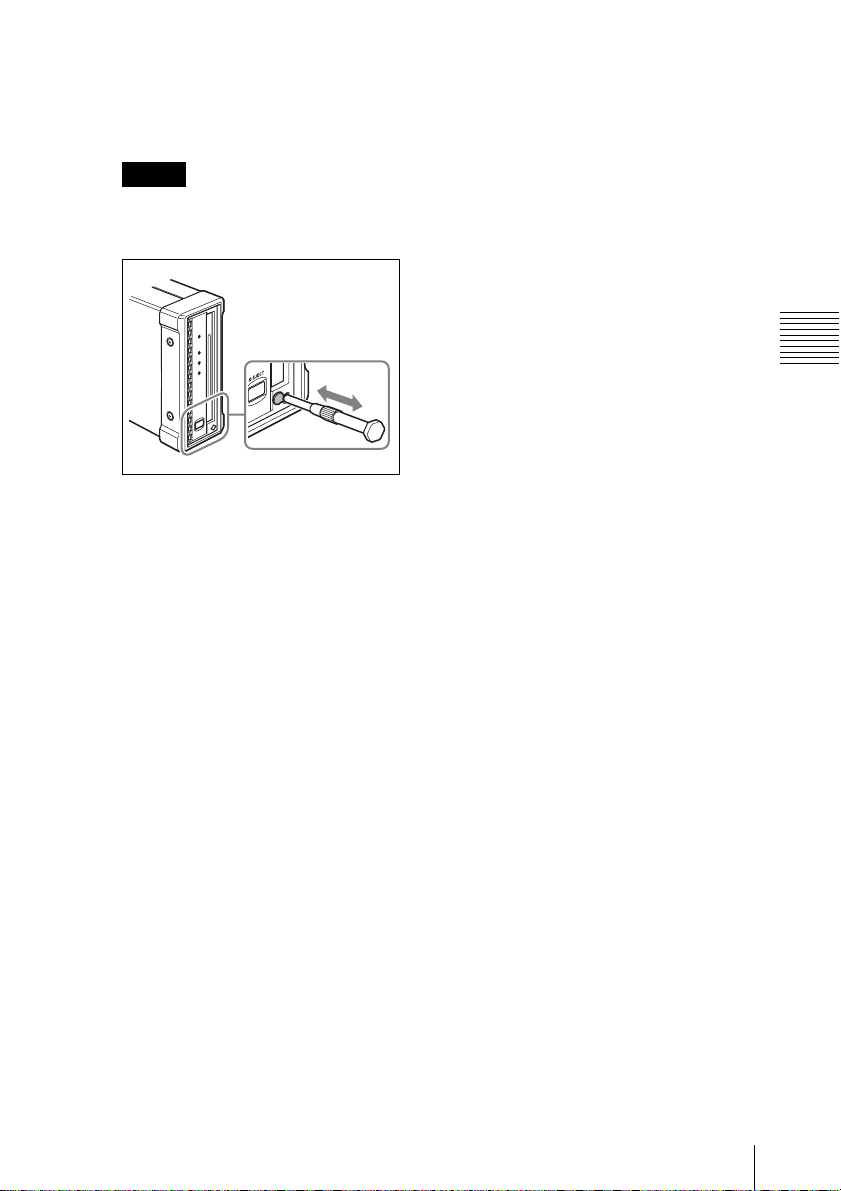
3 Straight insert a Phillips screwdriver 4
Chapter 3 Preparations
mm or less in diameter or the like to the
hole.
4 Push the internal manual eject lever 10
mm or so, and release it.
Note
Be careful not to insert the screwdriver
at an oblique angle or use excessive
force to push the lever.
5 Repeat Step 4 until the disc is ejected.
Note
You may need to repeat the step about
80 times.
Open
Turn
After ejecting the disc, it is not
necessary to return the lever to its
original position. The next time the
unit is powered on, normal operation
will resume.
6 Replace the cover.
3-4 Handling Discs
42
Page 43
Using the Software
4-1 Starting and
Chapter
This displays the home window of the
utility software.
4
Exiting the Utility
Software
4-1-1 Starting/Displaying
First make sure that this unit is connected to
the computer.
For connection details, see 3-2-1 “Connecting to a
Computer” (page 39).
On a Windows computer
With the computer connected to this unit,
carry out any of the following.
• Double click the Utility icon which
appears in the task tray. Alternatively,
right click the icon to open the menu, and
select “Open Console” from the menu.
• If you created a shortcut icon on the
desktop when you installed this software,
double click the icon.
• Click the [Start] button on the computer
and then select “Sony XDCAM Drive”>
“XDCAM Drive Utility”.
Note
You must log on to the computer as a user
with Computer Administrator privileges to
be able to change the settings in the User
Settings screen of the utility software.
Chapter 4 Using the Software
4-1-2 Closing the Console Window without Exiting from Resident Mode (Windows only)
With the computer connected to this unit,
carry out any of the following.
• Click the × (close) button in the top right
corner of the window.
• Right click the title bar and select
“Close” from the context menu.
• With this software activated, press Alt +
F4 (press the F4 key while holding down
the Alt key).
• Select “View”> “Close” from the menu
bar.
4-1-3 Exiting
On a Macintosh computer
Open the folder in which the utility
software is installed, and then double click
on the executable file of the Utility
Software.
On a Windows computer
Right click the Utility icon in the task tray
and select “Exit XDCAM Drive Utility
Software”.
4-1 Starting and Exiting the Utility Software
43
Page 44

On a Macintosh computer
Select “Quit XDCAM Drive Utility
Software” from the XDCAM Drive Utility
menu.
Chapter 4 Using the Software
4-1 Starting and Exiting the Utility Software
44
Page 45

Appendix
Important Notes on Operation
Condensation
When this unit is moved from a cold place
to a warmer place, or operated in high
humidity, condensation may form on the
optical pickup. If the unit is operated in this
state, it may make correct reading and
writing impossible.
Note the following points, to avoid
problems with condensation.
• If moving the unit in conditions where
condensation is possible, make sure the
disc is inserted in advance.
Specifications
General
Power requirements
DC 12 V
Power consumption
19 W
Operating temperature
5ºC to 40ºC (41ºF to 104ºF)
Storage temperature
–20ºC to +60ºC (–4ºF to
+140ºF)
Operating relative humidity
20% to 90%
Less than 90%
Mass 1.7 kg (3 lb 12 oz)
External dimensions (w/h/d)
67.4 × 164 × 219 mm
3
/4 × 61/2 × 85/8 inches)
(2
Appendix
Important Notes on Operation / Specifications
45
Page 46
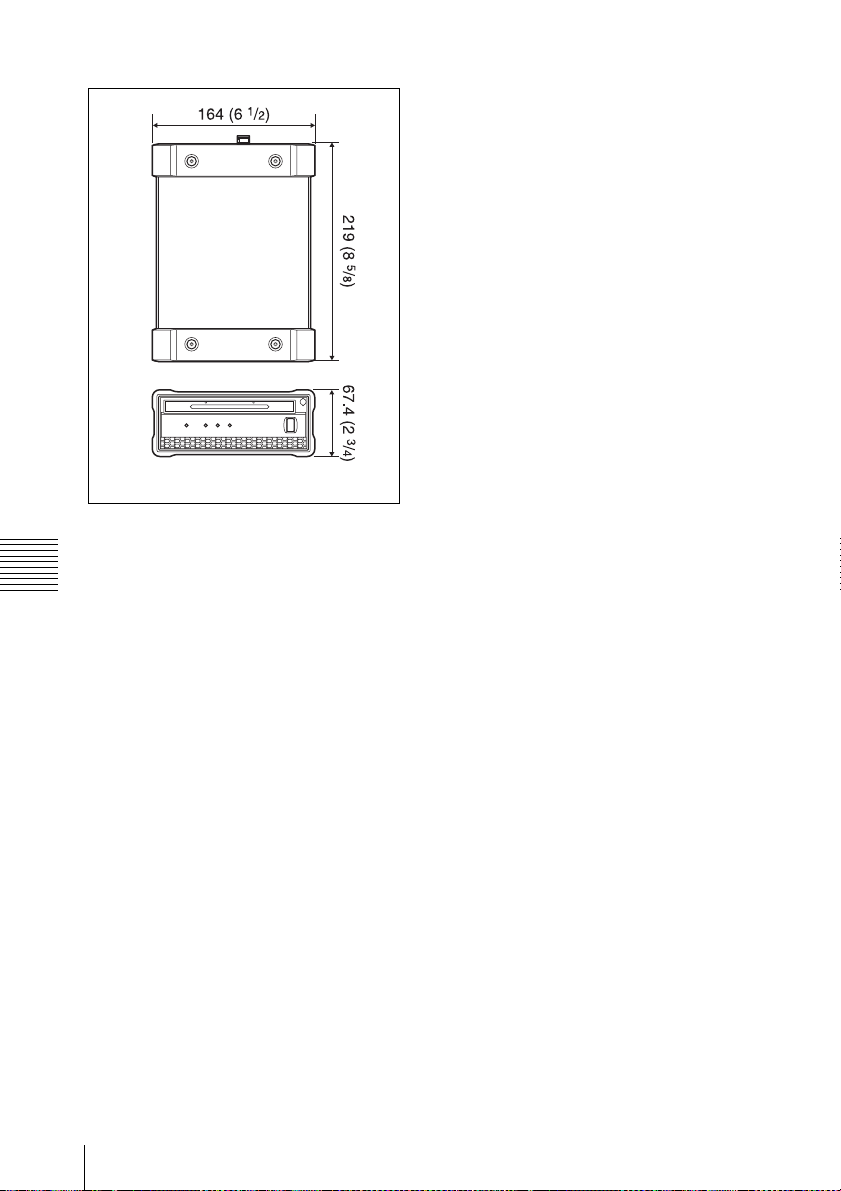
Unit: mm (inches)
System
Reading/Writing formats
Appendix
Video
MPEG HD (50/35/25/18
Mbps), MPEG IMX (50/
40/30 Mbps), DVCAM
(25 Mbps)
Proxy video
MPEG-4
Audio
MPEG HD: 16 bits/48 kHz (2/
4ch) or 24 bits/48 kHz
(8ch)
MPEG IMX: 16 bits/48 kHz
(8 ch) or 24 bits/48 kHz
(4 ch)
DVCAM: 16 bits/48 kHz (4 ch)
Proxy audio
A-law (8 channels, 8 bits, 8
kHz)
Recording/Playback times (single layer
disc)
MPEG HD422
50 Mbps: Approx. 43 min.
MPEG HD
35 Mbps: Approx. 65 min.
25 Mbps: Approx. 85 min.
18 Mbps: Approx. 112 min.
MPEG IMX
50 Mbps: Approx. 45 min.
40 Mbps: Approx. 55 min.
30 Mbps: Approx. 68 min.
DVCAM: Approx. 85 min.
Recording/Playback times (dual-layer disc)
MPEG HD422
50 Mbps: Approx. 95 min.
MPEG HD
35 Mbps: Approx. 145 min.
25 Mbps: Approx. 190 min.
18 Mbps: Approx. 248 min.
MPEG IMX
50Mbps: Approx. 100 min.
40Mbps: Approx. 120 min.
30Mbps: Approx. 150 min.
DVCAM: Approx. 185 min.
Recording/Playback times (triple-layer RE
disc)
MPEG HD422
50Mbps: Approx. 190 min.
MPEG HD (4ch)
35Mbps: Approx. 290 min.
25Mbps: Approx. 380 min.
18Mbps: Approx. 496 min.
MPEG HD (2ch)
35Mbps: Approx. 300 min.
25Mbps: Approx. 400 min.
18Mbps: Approx. 530 min.
MPEG IMX
50Mbps: Approx. 200 min.
40Mbps: Approx. 240 min.
30Mbps: Approx. 300 min.
DVCAM: Approx. 370 min.
Recording/Playback times (quad-layer WO
disc)
MPEG HD422
50Mbps: Approx. 240 min.
46
Specifications
Page 47
MPEG HD
35Mbps: Approx. 360 min.
25Mbps: Approx. 480 min.
18Mbps: Approx. 600 min.
MPEG IMX
50Mbps: Approx. 240 min.
40Mbps: Approx. 300 min.
30Mbps: Approx. 360 min.
DVCAM: Approx. 450 min.
Note
Actual time may differ from the
values shown above depending on
the recording conditions.
Output/input connector
USB Connector (Super-Speed USB (USB
3.0) support)
Accessories supplied
Operation manual (1)
AC adaptor
Part No. 1-492-005-1x (1)
USB cable
Part No. 1-839-351-1x (Sony) (1)
Accessories not supplied
AC power cord
• For the customers in the U.S.A. and
Canada
Part No. 1-757-562-1x (125 V, 7 A, about
2.0 m)
• For the customers in European countries
Part No. 1-575-131-8x (250 V, 2.5 A,
about 2.0 m)
PFD23A Professional Disc
PFD50DLA Dual-layer Professional Disc
PFD100TLA Triple-layer Professional disc
PFD128QLW Quad-layer Professional
Disc (write-once type)
Notes
• Always make a test recording, and
verify that it was recorded successfully.
SONY WILL NOT BE LIABLE FOR
DAMAGES OF ANY KIND
INCLUDING, BUT NOT LIMITED
TO, COMPENSATION OR
REIMBURSEMENT ON ACCOUNT
OF FAILURE OF THIS UNIT OR ITS
RECORDING MEDIA, EXTERNAL
STORAGE SYSTEMS OR ANY
OTHER MEDIA OR STORAGE
SYSTEMS TO RECORD CONTENT
OF ANY TYPE.
• Always verify that the unit is operating
properly before use. SONY WILL NOT
BE LIABLE FOR DAMAGES OF
ANY KIND INCLUDING, BUT NOT
LIMITED TO, COMPENSATION OR
REIMBURSEMENT ON ACCOUNT
OF THE LOSS OF PRESENT OR
PROSPECTIVE PROFITS DUE TO
FAILURE OF THIS UNIT, EITHER
DURING THE WARRANTY
PERIOD OR AFTER EXPIRATION
OF THE WARRANTY, OR FOR ANY
OTHER REASON WHATSOEVER.
Appendix
Design and specifications are subject to
change without notice.
Specifications
47
Page 48

Appendix
48
Specifications
Page 49

このマニュアルに記載されている事柄の
著作権は当社にあり、説明内容は機器購
入者の使用を目的としています。
従って、当社の許可なしに無断で複写し
たり、説明内容(操作、保守等)と異な
る目的で本マニュアルを使用することを
禁止します。
The material contained in this manual
consists of information that is the property
of Sony Corporation and is intended solely
for use by the purchasers of the equipment
described in this manual.
Sony Corporation expressly prohibits the
duplication of any portion of this manual or
the use thereof for any purpose other than
the operation or maintenance of the
equipment described in this manual without
the express written permission of Sony
Corporation.
Page 50
Sony Corporation
PDW-U2
(SYM)
4-291-936-02(1)
Printed in Japan
2012.10 32
© 2011
 Loading...