


VAIO Digital Studio™
Computer User Guide


CONTENTS
WELCOME....................................................7
LOCATING CONTROLS AND
CONNECTORS.............................................9
Front Panel Overview................................................11
Back Panel Overview ................................................14
Remote Control Overview ........................................16
VAIO AV APPLICATIONS..........................19
Working with Digital Video......................................21
Working with Still Images ........................................23
DigitalPrint Software.................................................26
DVgate Software .......................................................35
MovieShaker Software..............................................41
Smart Capture Software ............................................52
SonicStage Software .................................................61
Additional Software Information ..............................72
3

VAIO Digital Studio Computer User Guide
CONFIGURING YOUR
VAIO COMPUTER......................................73
About Your Hard Disk Drive Partition..................... 74
i.LINK Compatibility................................................ 75
VAIO Action Setup .................................................. 77
To Change The Sony Software
Window Design ........................................................79
SYSTEM AND
APPLICATION RECOVERY CD(S)............81
To Use The System Recovery CD(s)........................82
To Use The Application Recovery CD(s)................. 84
FREQUENTLY ASKED QUESTIONS ........87
About VAIO Digital Studio
Computer Functions..................................................88
About Changing Your System’s
Default Settings......................................................... 91
About Your System Recovery CDs .......................... 92
About Using The Optical Disc Drive(s) ................... 93
About The Speakers.................................................. 96
About The Modem.................................................... 97
About The Microphone.............................................99
About The Mouse And Keyboard...........................100
About Using A Peripheral Device .......................... 101
4

CONTENTS
NOTES ON USE .......................................103
About The Power Source ........................................105
About Disposing Of The Lithium Battery...............106
About Handling The Computer System ..................107
About Upgrading Your Computer System..............109
About Handling A Monitor (Display).....................110
About DVD, CD, And Floppy Disk Media.............111
About Support Resources........................................112
INDEX .......................................................115
5

VAIO Digital Studio Computer User Guide
6

WELCOME
Thank you for purchasing your Sony VAIO® computer! Your new
computer is a superb blend of high technology and easy-to-use
functionality. The information provided here is designed to help you to
become familiar with the hardware and software applications included
with your system.
7

VAIO Digital Studio Computer User Guide
8

LOCATING CONTROLS AND
CONNECTORS
Your computer may not be equipped with all of the hardware features
shown in this section. To view the specific hardware configuration for
your system, see the online specifications sheet.
❑ Front Panel Overview
❑ Back Panel Overview
❑ Remote Control Overview
9

VAIO Digital Studio Computer User Guide
10

Front Panel Overview
Front Panel Overview
The front panel of your VAIO Digital Studio™ Computer enables access to the
optical and floppy disk drives. On certain models, the front panel also provides
access to Giga Pocket Personal Video Recorder jacks and ports, Universal Serial
Bus (USB), and i.LINK® ports to connect compatible peripheral devices.
✍ i.LINK is a trademark of Sony used only to designate that a product contains an
IEEE 1394 connection. The i.LINK connection may vary, depending on the software
applications, operating system, and compatible i.LINK devices. All products with an
i.LINK connection may not communicate with each other.
Please refer to the documentation that came with your compatible i.LINK device for
information on operating conditions and proper connection. Before connecting
compatible i.LINK devices to your system, such as an optical or hard disk drive,
confirm their operating system compatibility and required operating conditions.
11
VAIO Digital Studio Computer User Guide
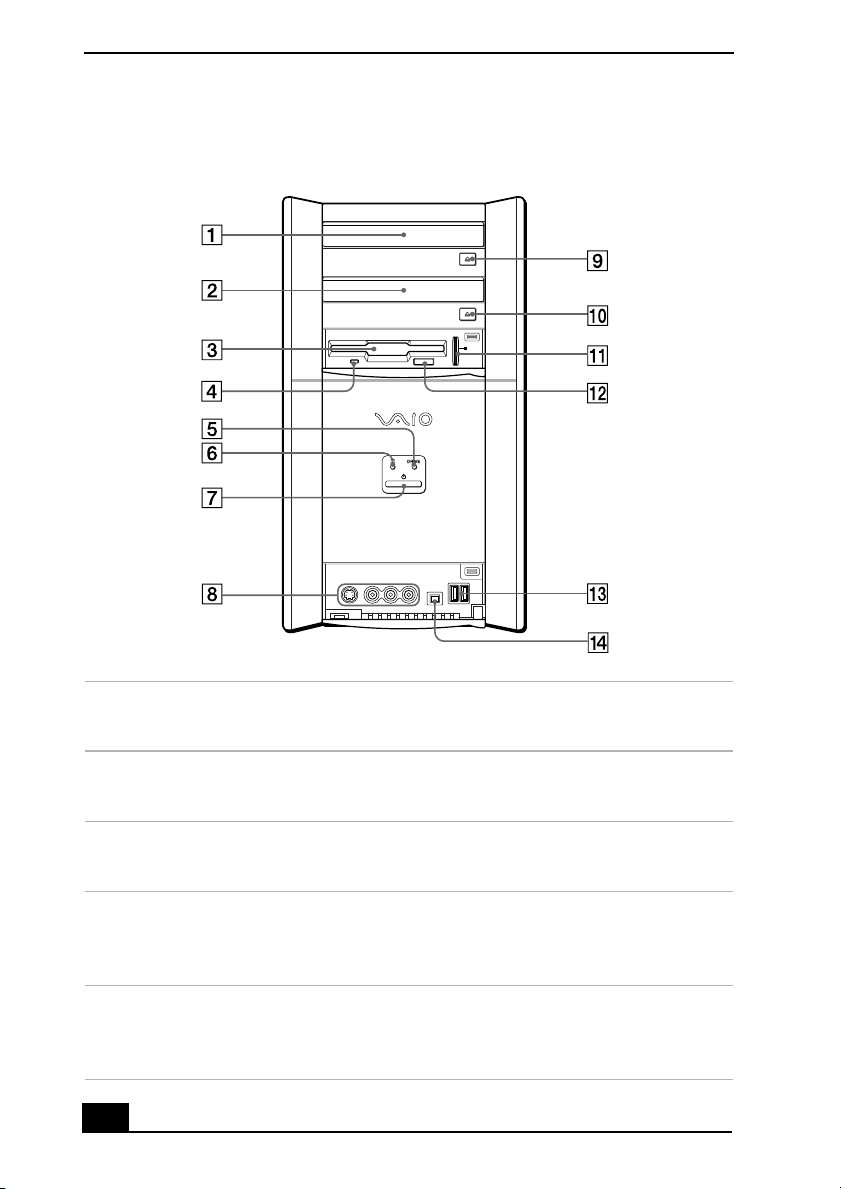
Front panel (Model equipped with Giga Pocket features)
1 Optical drive 1
See the online specifications sheet for optical drive information.
2 Optical drive 2
See the online specifications sheet for optical drive information.
3 Floppy disk drive
Reads and writes data from and to a 3.5-inch floppy disk.
4 Floppy disk drive access indicator light
Lights in green while reading and writing data from and to a floppy
disk.
5 Optical drive access indicator light
Lights in amber while reading and writing data from and to the optical
drives.
12

6 Hard disk drive access indicator light
Lights in amber while reading and writing data from and to the hard
disk.
7 Power switch and indicator light
Turns the computer on and off. The indicator light is blue while the
power is on and amber when the computer is in Stand by mode.
8 (For models equipped with Giga Pocket features)
S-video In jack
Connection for an S-video cable (optional).
Video In jack
Connection for a video cable (supplied).
Audio L In jack/Audio R In jack
Connection for an audio cable (supplied).
9 Optical drive 1 eject button
Ejects a disc from Optical drive 1.
10 Optical drive 2 eject button
Ejects a disc from Optical drive 2.
Front Panel Overview
11 Memory Stick slot
Reads and writes data from and to a Memory Stick® media.
12 Floppy disk eject button
Ejects a floppy disk from the floppy disk drive.
13 Universal Serial Bus (USB) ports (2)
Connections for compatible USB devices.
14 i.LINK (4-pin) port (IEEE 1394)
Connection for a compatible digital device.
✍ For your convenience, your computer includes Giga Pocket, USB, and i.LINK ports and
jacks on both the front and back panels. (A 4-pin i.LINK port is located on the front
panel and a 6-pin i.LINK port is located on the back.)
13
VAIO Digital Studio Computer User Guide
Back Panel Overview
The back panel of your computer contains the ports for supplied and optional
accessories. The icons on the back panel locate and identify the ports on your
computer.
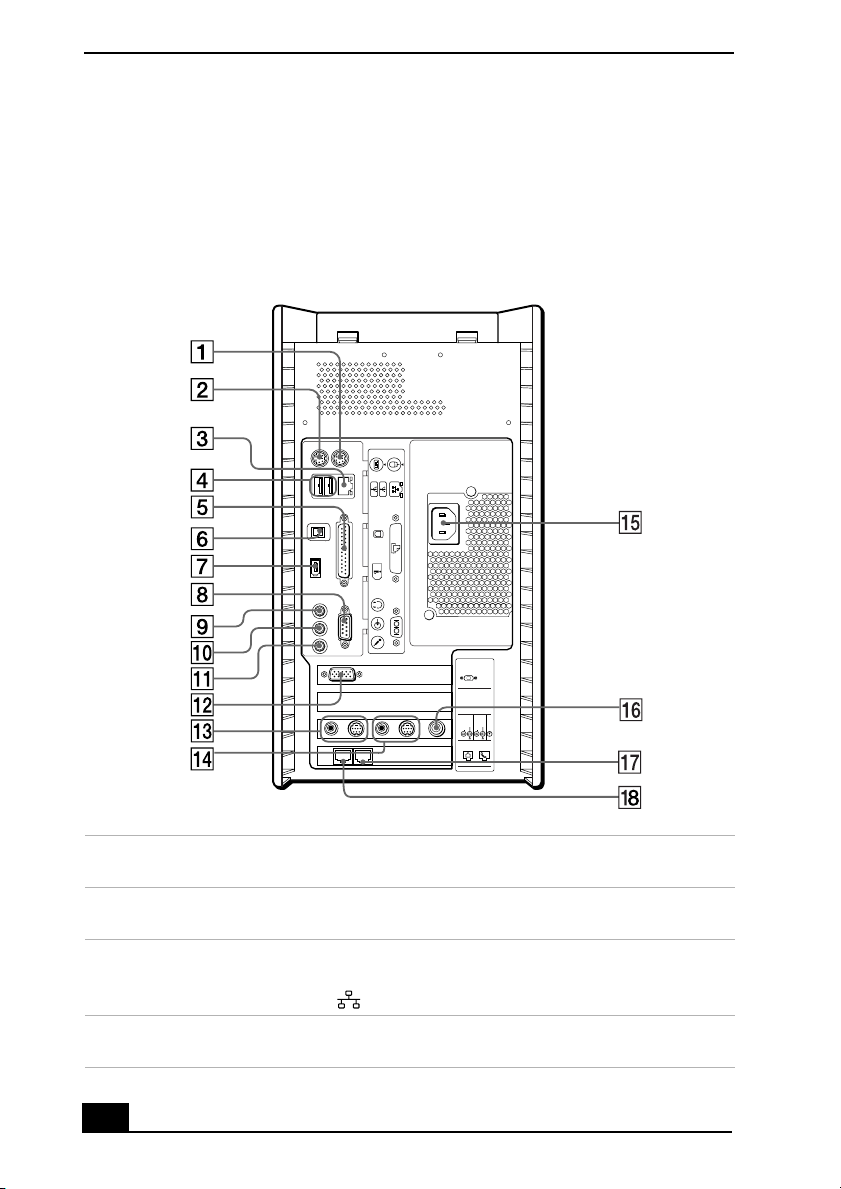
Back panel (Model equipped with Giga Pocket features)
KEYBOARD
MOUSE
USB NETWORK
ACT
LINK
PRINTER
OPTICAL
OUT
i.LINK
S400
HEADPHONES
SERIAL
LINE IN
MIC
4
MONITOR
3
VIDEO
VIDEO 1
OUTPUT
INPUT
2
S VIDEO
S VIDEO
/
VIDEO
/
VIDEO
VHF
/UHF
AUDIO
AUDIO
1
LINE
TELEPHONE
1Mouse port
Connection for a PS/2® mouse.
2 Keyboard port
Connection for a PS/2 keyboard.
3 Ethernet port
Connection for a 10BASE-T/100BASE-TX Ethernet.
(The port marked with (Network) is for LAN connections only.)
4 Universal Serial Bus (USB) ports (2)
Connection for a compatible USB device.
14

5 Printer port
Connection for a parallel device, such as a printer or scanner.
6 S/P DIF optical out port
Connection for a digital audio or optical device.
7 i.LINK 6-pin port (IEEE 1394)
Connection for a compatible digital device such as a Sony Digital
Handycam
®
camcorder.
8 Serial port
Connection for a compatible serial device, such as a digital still camera.
9 Headphones jack
Connection for the supplied speakers or optional headphones.
10 Line In jack
Connection for an audio device.
11 Microphone jack
Connection for a microphone (optional).
12 Monitor port
Connection for a standard display.
13 (For models equipped with Giga Pocket features)
Audio Out jack
Connection for an audio cable (supplied).
Video/S-video Out jack
Connection for a video cable adapter (supplied) or an S-video cable
(optional).
14 (For models equipped with Giga Pocket features)
Audio In jack
Connection for an audio cable (supplied).
Video/S-video In jack
Connection for a video cable adapter (supplied) or an S-video cable
(optional).
15 AC Input port
Connection for the supplied power cord.
16 (For models equipped with Giga Pocket)
VHF/UHF port
Connection for a coaxial cable (supplied).
17 Telephone jack
Connection for a telephone cable (optional) to the computer.
18 Modem line jack
Connection for the modem (supplied) cable to the wall jack.
Back Panel Overview
15
VAIO Digital Studio Computer User Guide
Remote Control Overview
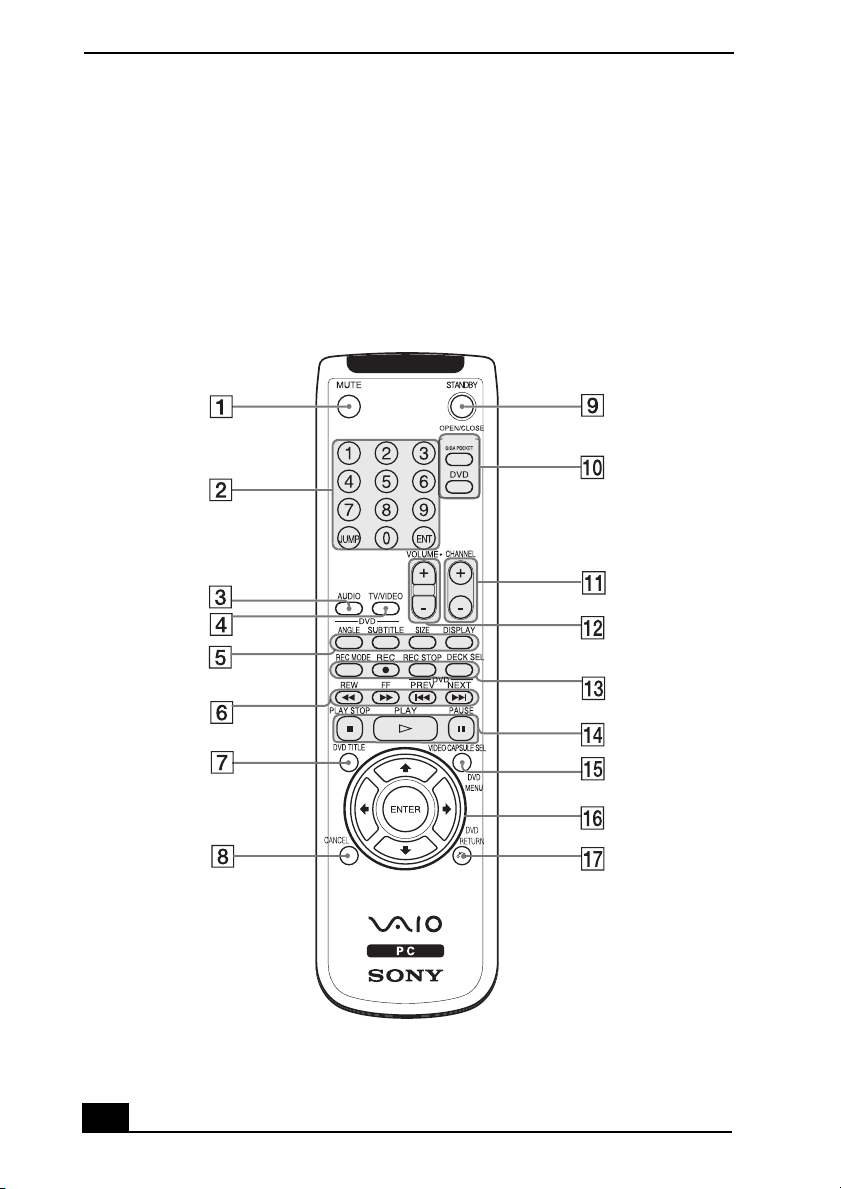
The features of the Giga Pocket™ Personal Video Recorder system are
controlled with the remote control (supplied). The remote control can start and
stop video recording and playback, select channels, and set viewing preferences.
This section describes the basic functions of your remote control.
Remote Control Features
16

1 MUTE button
Press to turn off the sound. Press again to restore the sound.
2 Channel number buttons
Press to select specific channels. (Press the ENT button to activate
channel selection.)
JUMP button
Press to return to the previous channel. Press again to return to the current
channel.
ENT button
Press to activate channel selection. See Channel number buttons.
3 AUDIO button
Press to view available sound mode options on the monitor/display.
4 TV/VIDEO button
Press to change the on-screen image from the TV/Recording deck to
external video equipment, such as your VCR.
5 DVD angle button
Not available for Giga Pocket functions. See the DVD player software
instructions for more information.
DVD Subtitle button
Not available for Giga Pocket functions. See the DVD player software
instructions for more information.
SIZE button
Press to view Giga Pocket in full-screen size. Press again to return the
view to its original size.
DISPLAY button
Press to display the TV/Recording deck and playback deck screens. Press
again to hide these views.
6 REW and FF buttons
Press to rewind or fast-forward video content, during Video Capsules
playback.
PREV and NEXT buttons
Not available for Giga Pocket functions.
7 DVD TITLE button
Not available for Giga Pocket functions. See the DVD player software
instructions for more information.
8 CANCEL button
Press to close any error message dialog box. The window returns to its
original size when displayed in full-screen mode.
Remote Control Overview
17

VAIO Digital Studio Computer User Guide
9 STANDBY button
Press to place the system into Stand by mode.
10 GIGA POCKET button
Press to launch Giga Pocket. Press again to exit Giga Pocket.
DVD button
Press to launch the DVD player software. Press again to exit the DVD
player software.
11 CHANNEL button
Press to switch channels automatically (no number input required).
12 VOLUME button
Press to raise or lower the volume.
13 REC Mode button
Press to select the recording mode.
REC and REC STOP buttons
Press the REC button to record TV programs being viewed on the
TV/Recording deck. Press REC STOP to stop recording.
DECK SEL button
Press to select the TV/Recording deck or playback deck.
14 PLAY STOP, PLAY and PAUSE buttons
Press to stop playback, begin playback and pause playback of Video
Capsules on the playback deck.
15 VIDEO CAPSULE SEL/DVD MENU button
Press to display the “Select Video Capsules” window. Press again to
minimize the window.
16 Direction and ENTER buttons
Press a direction arrow to select a cabinet or Video Capsule in the “Select
Video Capsule” window. Press ENTER or the right direction arrow to
select a cabinet or Video Capsule.
17 DVD RETURN button
Not available for Giga Pocket functions. See the DVD player software
instructions for more information.
✍ For more details about the function buttons on your remote control, see the Giga
Pocket Help.
18

VAIO AV APPLICATIONS
Your VAIO® computer is preconfigured with a collection of audio and
video (AV) applications that make it easy to use advanced multimedia
technology. This section describes the VAIO® AV applications.
✍ Your computer may not be supplied with all of the software applications listed,
depending on the system configuration you purchased.
Your computer’s visual presentation of the VAIO AV applications may not appear
exactly as shown in this section, depending on the specific computer model you
purchased.
Overview of Preinstalled Software
DigitalPrint
Sony Electronics Inc.
DigitalPrint image management software makes it easy and fun to import, edit,
and organize your digital pictures in a photo album for rich digital printing to any
standard color laser or inkjet printer. DigitalPrint can also be used to make
custom CD labels for your audio CDs.
DVgate
Sony Electronics Inc.
Connect a compatible digital video camera to your computer’s i.LINK® port and
capture video clips and still images. You can edit clips from your video, add new
clips, and combine clips into new movie segments. You can also save your
images in a variety of popular file formats.
MovieShaker™
Sony Electronics Inc.
MovieShaker software creates personal movies that have transitions, background
music, special effects, and text. Just import your video clips, and “shake” with a
click of the mouse. Your personal movies are easy to create and fun to share with
family and friends.
™
19

VAIO Digital Studio Computer User Guide
Smart Capture
Sony Electronics Inc.
Smart Capture software is a fun new way to send multimedia messages via
e-mail. It manages the i.LINK® connection between your computer and a Sony
digital Handycam® camcorder that supports the i.LINK® interface. Smart
Capture enables you to capture compressed video or still images and save them
to your hard disk drive or share them via e-mail. A smart solution for computer,
network, and digital audio and video convergence.
SonicStage™
Sony Electronics Inc.
The SonicStage jukebox application gives you all the tools you need to manage
music on your computer. SonicStage software sports high-quality digital audio
storage, a music visualizer, a sleek player skin design, audio CD burning
capability (on computer models that include a CD recording device), and a
parametric equalizer for fine-tuning audio playback.
20

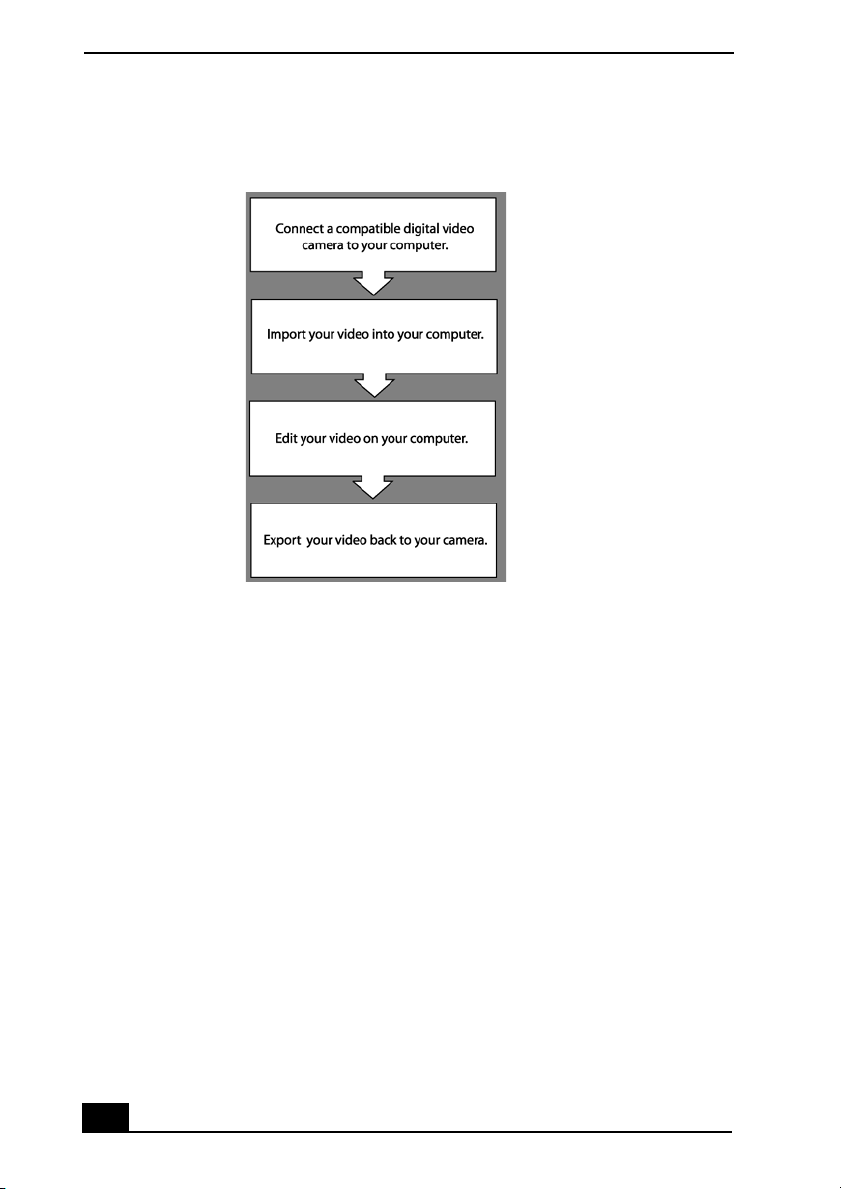
Working with Digital Video
Working with Digital Video
The multimedia software preinstalled on your VAIO® computer makes it easy to
import and edit videos from a compatible digital video (DV) or MICROMV™
*
camera or camcorder equipped with an i.LINK® connector. After editing your
creations, you can export them back to your DV device.
With MovieShaker™ software , you can arrange your video clips, still
images, and sound files yourself into a finished movie or let the Shake function
create a polished video for you by automatically combining your video clips, still
images, and sound with video effects and transitions.
DVgate™ software offers advanced video import and export features, as
well as precise editing. DVgate software provides complete control over all
aspects of capturing, editing, and exporting digital video.
On selected VAIO® computer models also include Adobe® Premiere® LE
software , a popular video editing application that is both powerful and easy
to use. For more information about this software, refer to the Adobe Premiere LE
Help.
All of these software applications use the same basic procedures for importing,
editing, and exporting.
✍ i.LINK is a trademark of Sony used only to designate that a product contains an
IEEE 1394 connection. The i.LINK connection may vary, depending on the software
applications, operating system, and compatible i.LINK devices. All products with an
i.LINK connection may not communicate with each other.
Please refer to the documentation that came with your compatible i.LINK device for
information on operating conditions and proper connection. Before connecting
compatible i.LINK devices to your system, such as an optical or hard disk drive,
confirm their operating system compatibility and required operating conditions.
* MICROMV cameras are not supported on C1-series notebook models.
21
VAIO Digital Studio Computer User Guide
The Video Editing Process
1 Connect a compatible digital video (DV) or MICROMV™ camera or
camcorder to your computer using an i.LINK® cable.
2 Start the video editing software.
3 Use the video editing software to capture video clips from the DV device.
4 Use the video editing software to assemble the clips into a finished movie.
5 Use the video editing software to export the finished movie back to the DV
device.
You can also save finished movies to your computer’s hard disk drive or to a CD.
22

Working with Still Images
Working with Still Images
The Microsoft® Windows® XP operating system and the multimedia software
preinstalled on your VAIO® computer make it easy to import, edit, and print
your photographs and other images.
To import still images
There are a variety of ways to bring still images into your computer depending
upon whether you have a digital camera or a traditional film camera.
If you have a digital camera:
❑ Connect directly to your computer using the Microsoft® Windows® XP
operating system which already contains all the necessary software to import
pictures from many newer USB (Universal Serial Bus) digital cameras.
Simply connect a USB cable (optional) between your camera and computer,
and Windows XP takes you through the steps for sending your pictures from
the digital camera to your computer.
❑ Other digital cameras store pictures on floppy disks, Memory Stick®, or
other storage media that you can insert into the appropriate drive on your
computer.
When the storage media is inserted into your computer, you can copy your
pictures to your hard disk drive.
❑ If your digital camera does not have a USB connection or is not directly
supported by the Windows XP operating system, refer to the manual that
accompanied your camera for details on how to connect your camera to your
computer and transfer images.
23

VAIO Digital Studio Computer User Guide
If you have a traditional film camera:
❑ To send traditional printed photographs to your computer, use a scanning
equipment.
A scanning equipment connects to your computer, converts your pictures to
an electronic format which enables them to be stored on your computer. The
Windows XP operating system has the software that is compatible with
many brands of scanning equipment. When you connect your scanning
equipment to your computer, Windows XP takes you through the installation
process. To use scanning equipment that is not directly supported by
Windows XP, follow the instructions in the manual that accompanied your
scanning equipment.
❑ Many companies that develop traditional film photographs, can provide a
CD-ROM or floppy disk containing digital copies of your pictures. Consult
your film developer for details.
To edit still images
After you have transferred your images to your computer, you can use
image-editing software to enhance them. You can perform traditional darkroom
tasks such as resizing, cropping, and altering colors. You can also add creative
touches such as painting on top of your photographs, adding text, or combining
multiple photographs into one.
Adobe® Photoshop® Elements (or Adobe® Photoshop® Elements Trial
Ve r si o n
*
, on some models) is powerful yet easy-to-use image-editing
software that comes preinstalled on your computer. It includes a wide range of
tools for enhancing your images and offers extensive online help to enable you to
make the most of your pictures.
Another option for simple image-editing tasks is the Windows® Paint program.
Starting Adobe Photoshop Elements software
1 Click Start on the Windows® taskbar, and click All Programs.
2 Point to Adobe, point to Photoshop Elements, and click Adobe Photoshop
Elements.
* Adobe® Photoshop® Elements Trial Version offers a limited evaluation period, after which
you can purchase the software for a special price.
24

Working with Still Images
Viewing the Adobe Photoshop Elements Help
1 Start Adobe Photoshop Elements.
2 On the Help menu, click Help Contents...
Starting Windows Paint software
❑ Click Start on the Windows taskbar, click All Programs, point to
Accessories, and click Paint.
Printing Still Images
There are a variety of options for printing your digital images:
❑ You can print most images directly from the Microsoft® Windows® XP
operating system by right-clicking the icon for the image and clicking Print
from the shortcut menu. The Photo Printing Wizard appears and walks you
through the process of printing your image.
❑ If you are editing an image in Adobe® Photoshop® Elements, you can print
your image by clicking Print... on the File menu.
❑ The DigitalPrint software that is preinstalled on your computer offers
powerful printing options. You can create and print photo albums with
customized designs. You can arrange multiple copies of an image or even
different images on a single page to save on printing costs. For more
information about using DigitalPrint software, refer to the DigitalPrint
section of this guide and the DigitalPrint software Help.
25

VAIO Digital Studio Computer User Guide
DigitalPrint Software
DigitalPrint is designed to creatively manage your digital pictures. With the
easy-to-use features, you can quickly load images from your digital camera or
camcorder, print high-quality photos, and make personalized photo albums and
labels to share with friends and family.
DigitalPrint main window
Using PhotoCapture
Capture and import your digital pictures from your digital camera or camcorder
into your computer. You can select your favorite pictures and place them in
handy folders for future use.
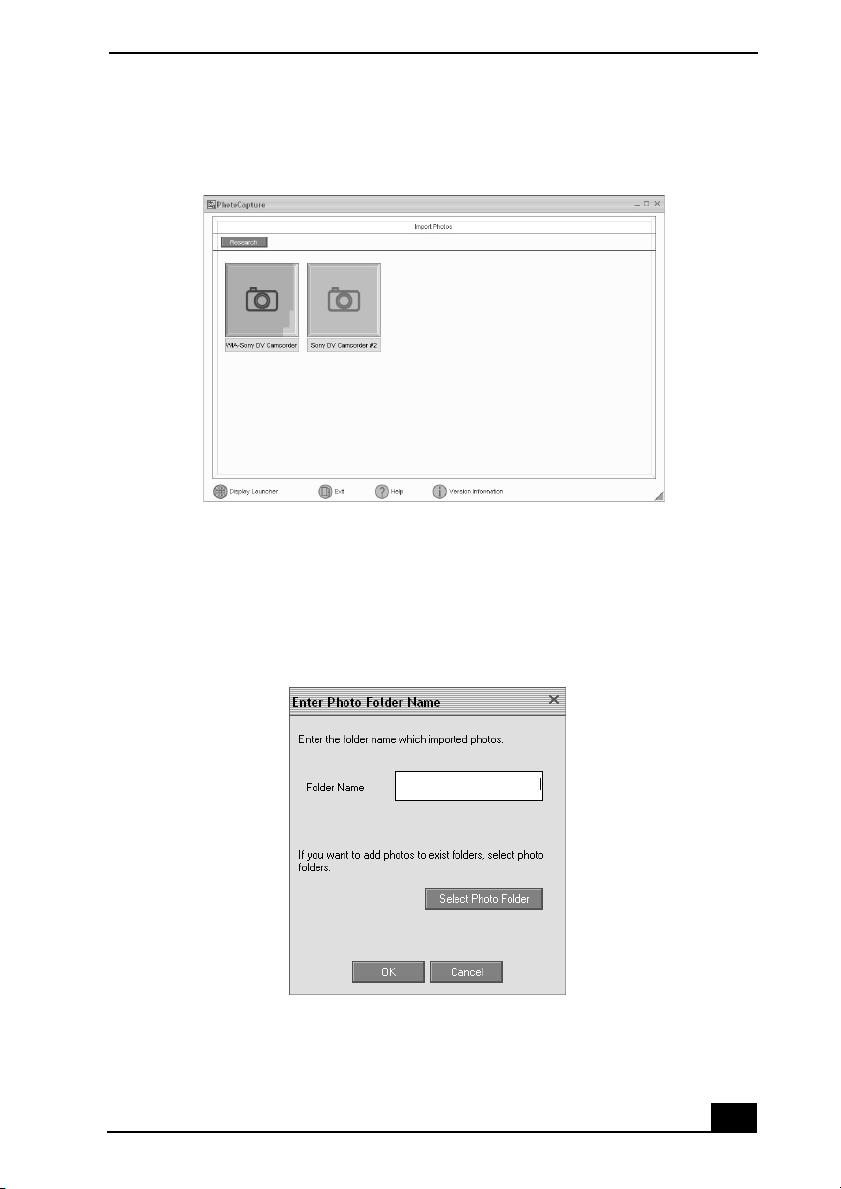
1 Click the (Import) icon to open the PhotoCapture window. Your
connected digital camera, camcorder, or Memory Stick® media is indicated
in the window.
✍ Connect your digital camera, camcorder, or insert your Memory Stick media in your
computer.
26
DigitalPrint Software
PhotoCapture window
2 Click the camera icon to open the Enter Photo Folder Name dialog box. You
can enter a name for a new folder or click Select Photo Folder to import your
pictures to an existing folder. Click OK.
Enter Photo Folder Name dialog box
27

VAIO Digital Studio Computer User Guide
3 Click Capture to capture still images. You can preview a thumbnail version
of your pictures in the selection view window.
Capture Pictures from Video window
4 Select the desired pictures, and click Get Pictures. The PhotoCapture picture
editor window appears.
5 Click View to see an enlarged version of a selected picture. You can click the
(Rotate) icons to change the position of a selected picture. Click
Delete to eliminate any unwanted pictures.
PhotoCapture editing window
28

DigitalPrint Software
Using PhotoCollection
You can select and print your favorite digital pictures, using your computer and
home printer.
1 Click the (Photo) icon to open the PhotoCollection window. A list of
folders is displayed on the left side of the window, with the folder contents
displayed as thumbnail pictures on the right.
PhotoCollection window
2 Select the desired folder. From the thumbnail view, click to select the
pictures you want to print.
29
VAIO Digital Studio Computer User Guide
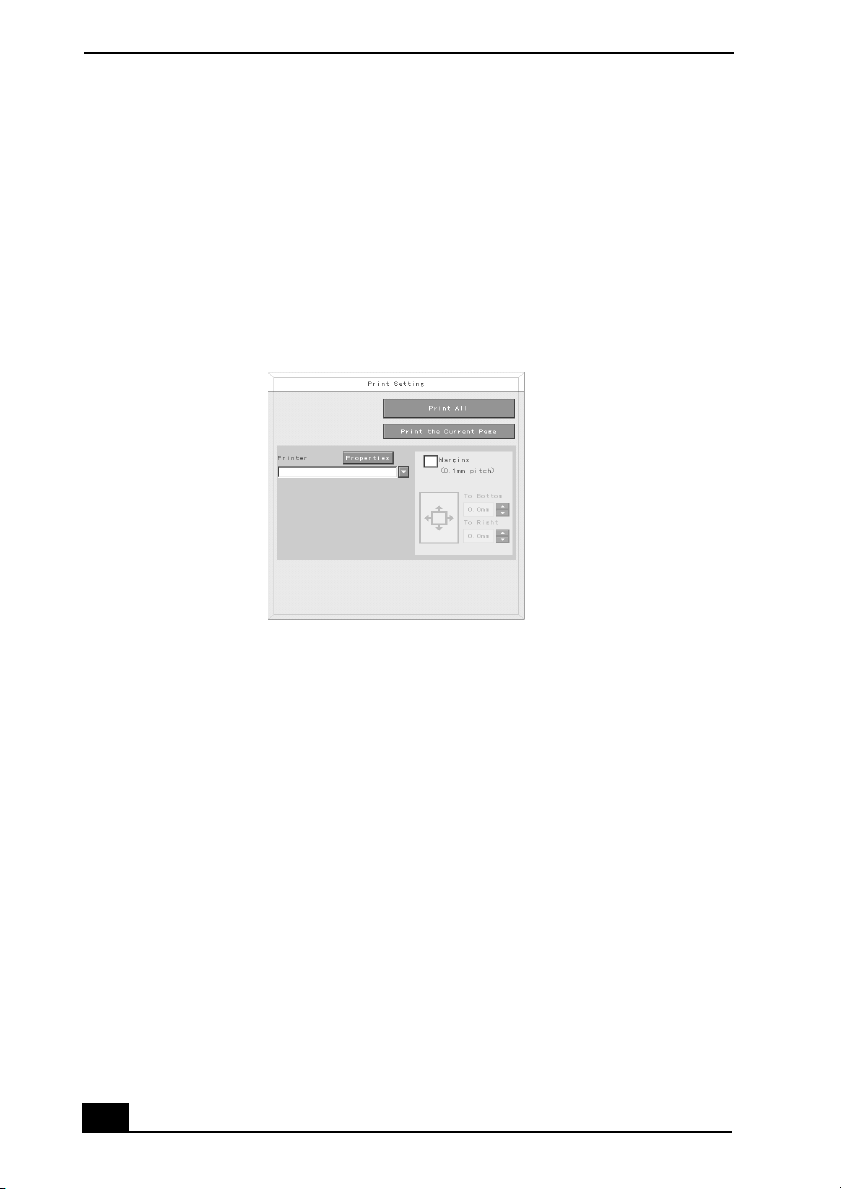
3 Click Photo Print at the top of the window. Use the scroll arrows to select the
number of prints you want to make. Click OK.
4 Select the paper format based on the picture positioning desired. A layout
preview is displayed on the left side of the window.
5 Use the configuration buttons and drop-down lists to select the printer and to
set margins.
Printer and Paper selection window
6 Click Print All to print all pages, or click Print the selected page only to print
a specific page of photos.
30

DigitalPrint Software
Using PhotoDecor
You can decorate your favorite photos with clip art, stamps, or your own drawing
talent. Add, remove, and change your designs to create your own unique photo
art.
1 Click the (Edit) icon to open the PhotoDecor - New PhotoDecor
window. A list of folders is displayed on the left side of the window, with the
folder contents displayed as thumbnail pictures on the right.
PhotoDecor-New PhotoDecor window
2 Select the desired folder. From the thumbnail view, click to select the
pictures you want to decorate. The PhotoDecor editing window appears.
3 Use the decoration features on the right side of the window by clicking on
the desired decoration icon and dragging the decoration onto your photo.
4 Click Print when your photo is ready to be printed. You can save your
decorated pictures before printing. Name the new picture, and click Save.
✍ The default location for your saved decorated pictures is in the Decorated Photos
folder, which can be viewed from the PhotoDecor - New PhotoDecor window.
31

VAIO Digital Studio Computer User Guide
Using PhotoAlbum
Capture your special photos in an organized photo album. You can share your
custom-made photo albums with friends and family.
1 Click the (Album) icon to open the PhotoAlbum - New Album
window.
PhotoAlbum - New Album window
✍ If you want to work on a previously created album, do not click Create New Album.
Instead, select the desired album from the Album Collection view on the right side of
the window.
2 Click Create New Album. The Select Photo window appears.
3 Select the photos you want to include in your album from the available
folders displayed. Click List to select individual pictures from each folder.
The Select Design window appears.
4 Select a design template for your album. Use the scroll bar to see all
available designs. When you have selected a design, the Select Layout
window appears.
5 Select a page layout for your album. A preview of your selected design and
page layout is displayed. Scroll through the album using the book icons at
the bottom of the window.
32

DigitalPrint Software
6 Click Page List to edit your album. Customize your album by adding more
pictures, decorations, or comments, or by deleting pages.
7 You can save your album before printing by clicking Save.
8 Click Print. Select an album type, and click Print again.
✍ For information on stitching your album, click Stitch Album. See the DigitalPrint Help
for more details.
Using LabelMaker
Use LabelMaker to design original labels to personalize your media, such as
Memory Stick® media, CDs, or video cassettes.
1 Click the (Label) icon to open the Label - New Label window.
Label - New Label window
2 Click an icon to select a media type. A new window opens.
3 Click the paper layout icon. The Select Design window appears.
33

VAIO Digital Studio Computer User Guide
4 Select a design template. Use the decoration and customization features on
the right by clicking an icon and dragging it onto your template.
✍ A new window appears, enabling you to list the contents of your audio or video media.
You can create a song or video list, depending on the type of media label being
created.
Design Edit window
5 Click Print to complete the label-making process. Use the configuration
buttons and drop-down lists to select the printer and to set margins.
✍ For detailed information on using DigitalPrint software, see DigitalPrint Help.
34

DVgate Software
DVgate Software
DVgate™ software offers control over all aspects of capturing, trimming, and
combining digital video clips captured from a compatible digital video (DV)
camera or camcorder. After combining your clips into a finished movie, you can
export it back to your compatible DV device.
This guide provides a general overview about using the DVgate software. For
details about connecting your DV device to your computer, refer to the manual
that accompanied your device and the VAIO® User Guide, located online in
VAIO Help and Support.
✍ The DVgate software does not support MICROMV™ video cameras.
Connecting a DV camcorder
Turn off the power to your camcorder before connecting it to your computer.
After connecting the device, turn its power back on. You do not need to turn off
the computer when connecting the camcorder.
Capturing digital video
1 Plug an i.LINK® cable (optional) into the i.LINK port on your computer and
the i.LINK port on compatible DV device.
2 Turn on your compatible DV device, insert a videotape, and set the device to
recording mode. On some device models this is called VCR or VTR mode.
3 On your computer, click Start, click All Programs, point to DVgate, and then
click DVgate Motion.
The DVgate Motion software starts.
4 Select Import - Auto from the MODE list in the DVgate Motion window,
and click SCAN.
The DVgate Motion software scans your tape and creates a list of video clips
to be captured. The list appears in the IN/OUT list window.
✍ You can manually specify video clips to be captured while viewing playback of your
tape in the monitor window. For details, refer to the DVgate Motion Help.
35

VAIO Digital Studio Computer User Guide
5 If necessary, edit the list of video clips to be captured.
To delete a clip from the list, click it, and click Delete.
Change the order in which clips are be captured by dragging them up or
down the list.
6 To capture all the video clips on the IN/OUT list, click Capture All.
✍ To capture an individual clip, click it in the IN/OUT list window and click Capture.
The Save as a file window appears. This window enables you identify a
location on your hard disk drive where the video clips are be saved. In most
cases, the default location of your D: drive partition is a good choice. You
can also specify how DVgate Motion names your clip files.
7 Click Save. The Batch capturing... window appears, and DVgate Motion
captures your video clips to you hard disk drive.
Editing digital video
DVgate software enables you to combine your captured video clips into a single
movie. Trim the beginning and end of each clip, to include only those scenes you
desire.
1 Click Start, click All Programs, point to DVgate, and click DVgate
Assemble. DVgate Assemble starts.
2 Click Add. The Add dialog box appears.
3 In the Add dialog box, select the video clip files you want to include in your
combined movie, and click Open.
You can select multiple clips by holding down the Ctrl key and clicking
several files.
Your selected clips appear in the Assemble list in the DVgate Assemble
window.
36

DVgate Software
4 If necessary, edit the order of clips in the Assemble list.
The combined movie combines clips in the order they appear in the
Assemble list, starting from the top.
❑ To rearrange the order, drag clips up and down the list.
❑ To remove a clip from the list, click it, and click Delete.
❑ To copy a clip, click it, click Copy on the Edit menu, click the location
on the list where you want the copy to be placed, and click Insert on the
Edit menu.
5 If necessary, trim your video clips to include only the scenes you want
included in the final movie.
1 Double-click on a clip. The clip opens in the DVgate Assemble - Clip
window.
2 Drag the slider in the middle of the window to the point in the clip
where your chosen scene begins. Click Begin.
3 Drag the slider to the point in the clip where your chosen scene ends.
Click End.
To view only the trimmed clip, make sure the Begin-End check box is not
selected, and use the control buttons to play your clip. (If the Begin-End
check box is selected, the entire clip plays.)
You can also set the begin and end points for your scene by playing the clip
with the control buttons and clicking Begin and End when the clip reaches
your chosen begin and end points.
4 Click OK to save your changes and close DVgate Assemble - Clip
window.
6 When you have set the order of your clips and trimmed them to include only
the scenes you want, you can preview the entire finished movie by clicking
Preview All in the main DVgate window.
7 Click Output All to save your finished movie to your hard disk drive. The
Save As dialog box appears.
37

VAIO Digital Studio Computer User Guide
8 Select a location to which to save your movie. Type a name for your movie,
and click Save.
✍ If you wish to export your movie to your DV camera, be sure to select AVI file (*.avi) in
the Save as type: box before saving your movie.
To export a finished movie to your DV device
After you have created a finished movie, you can export it back to your
compatible DV device.
1 Make sure your device is set to recording mode. On some devices this is
called VCR or VTR mode.
2 Turn on your DV device, and insert a videotape.
3 On your computer, click Start, click All Programs, point to DVgate, and then
click DVgate Motion. The DVgate Motion software starts.
4 Select Export - Auto from the Mode list in the DVgate Motion window.
In the DVgate Motion - AVI file list window, click Add. The Add dialog box
appears.
If the DVgate Motion - AVI file list window is not open, click List on the
Window menu.
5 In the Add dialog box, select the movie file you want to export, and click
Open.
The Add dialog box closes, and your selected movie appears in the Record
list in the DVgate Motion - AVI file list window.
6 Click Record All. The Output dialog box appears.
7 Click OK. The Output dialog box closes, and recording to your DV device
begins.
38

DVgate Software
To use DVgate software to record AVI files to tape
✍ You can record only AVI files. MPEG files cannot be recorded.
❑ Do not use DVgate™ software when the connected DV device is in Timer
Recording mode, as this could produce a malfunction in the device.
❑ Avoid recording problems, such as a single frame appearing in multiple
frames, by closing other applications on your system while recording.
❑ You cannot use multiple audio modes on the same tape. If you have AVI files
that use different audio modes, the files cannot be recorded at the same time,
but must be recorded separately.
❑ The DVgate software does not support AVI files that are smaller than 4 MB.
❑ The DVgate software does not support hard disk compression.
❑ To maximize recording capabilities, video and audio data are not available
while you are recording.
❑ If the DVgate software indicates that frames are dropped, try closing all open
applications or defragment your hard drive.
39

VAIO Digital Studio Computer User Guide
Additional information about DVgate™ software
❑ Under the Microsoft® Windows® XP operating system, do not capture DV-
AVI video files to the root directory (the top level) of your hard disk drive.
Instead, create a folder and capture files to this folder.
❑ Do not use DVgate™ software when the connected DV device is in Timer
Recording mode, as this may produce a malfunction in the device.
❑ Video captures larger than 2 GB (9 minutes and 30 seconds) are
automatically continued in a second file.
❑ You can record stereo audio (stereo 1) while capturing video, or you can add
audio on the stereo 2 track after capturing the video data.
❑ You cannot use different audio modes on the same tape. Perform a separate
capture for each audio mode you wish to use.
❑ DVgate software does not support hard disk compression. Do not use disk
compression if you are planning to work with DVgate software.
❑ Title data is saved in the flash memory of a DV device and is not transferred
to tape by DVgate software.
❑ Disable your screen saver program to avoid interruption during your capture
sessions.
❑ The drop frame compensation feature does not provide accurate
compensation adjustments for tapes recorded in LP mode.
❑ The information displayed by the capture progress indicator may not be
accurate for tapes that are recorded using a mixture of both SP and LP
modes.
❑ Keep the video head of your DV device properly cleaned. Anomalies that
you see in captured data may be due to dust or other particles on the video
head.
❑ The last frame captured is one frame before your selected [OUT] point. The
frame you see immediately after clicking the [OUT] button is not captured.
40

MovieShaker Software
MovieShaker Software
MovieShaker™ software can be used to create fun and innovative movies
without any previous knowledge of film editing. In a few simple steps, you can
turn a collection of video clips, still images, and audio files into a finished movie
with special effects and music. You can save your personal video creation in a
format that is compatible with most computers or save it to a tape in your
compatible digital video (DV) or MICROMV™ video camera or camcorder.
✍ The process for capturing digital video from a MICROMV™ camera differs from the
process for DV described here. For information about capturing video using a
MICROMV camera, refer to the MovieShaker Help.
This guide provides a general overview about using MovieShaker software. For
detailed information, refer to the MovieShaker Help. For details about
connecting your digital video device to your computer, refer to the manual that
accompanied your camera and the VAIO® User Guide, located in online VAIO
Help and Support.
41

VAIO Digital Studio Computer User Guide
MovieShaker software main window
Shake
tab/tray
Import clip tray
Capture
tab/tray
Edit
tab/tray
Working panel
Effect tray
42
Story Board tray

MovieShaker Software
Capturing digital video
1 Plug an i.LINK® cable (optional) into the i.LINK port on your computer and
the i.LINK port on a compatible digital video (DV) device.
2 Turn on your compatible DV camera, insert a videotape, and set the camera
to recording mode. On some camera models this is called VCR or VTR
mode.
3 On your computer, click Start, click All Programs, point to MovieShaker,
and click MovieShaker. The MovieShaker software starts.
4 In MovieShaker, click the (Capture) tab.
5 In MovieShaker, click the Play button.
Video from the videotape plays in the monitor window. If necessary, use the
control buttons at the bottom of the Capture panel to rewind or fast-forward
the videotape in your camera to reach the video clip you want to capture.
6 When the video reaches the point at which you want to start capturing video,
click Capture.
7 When the video reaches the end of the clip you want to capture, click Stop
Capture.
When capturing is completed, a dialog box appears displaying the progress
of importing the video clip.
When importing is completed, the imported clip appears in the Clip tray at
the left of the MovieShaker window.
Use the control buttons at the bottom of the Capture panel to rewind and
fast-forward the videotape in your camera to reach each clip you want to capture.
Repeat steps 5 through 7, to capture and import each clip to the Clip tray.
43

VAIO Digital Studio Computer User Guide
Editing captured video clips
1 After capturing your video clips to the Clip tray, click the (edit) tab.
2 Drag your clips from the Clip tray to the Story Board panel at the bottom of
the MovieShaker™ window in the order you want them to appear in the
finished movie.
The Story Board panel represents the time sequence of your movie. You can
change the sequence of the clips on the Story Board panel by dragging them
to your desired location.
You can trim the beginning and end of any clip on the Story Board by
clicking it and moving the orange triangles on the Edit panel to set the start
and end point of the clip. Only the portion of the clip between the orange
triangles appears in the final movie.
3 To add transitions between clips on the Story Board panel, click Transition at
the right of the MovieShaker window to open the Transition tray, and drag a
transition from the list to the space between two clips on the Story Board.
4 To preview the entire movie, click the Story Board panel above the first clip
so that a white triangle appears above the clip, and click the Play button on
the Edit panel.
The entire movie, including transitions, plays in the monitor window.
After arranging, trimming and placing transitions in your video clips, you can
export your finished movie back to your DV device.
Exporting a finished movie to your DV camera
After you have created a finished movie, you can export it back to your
compatible DV or MICROMV™ device.
1 Make sure your camera is set to recording mode. On some devices this is
called VCR or VTR mode.
2 Turn on your DV or MICROMV device, and insert a videotape.
3 In MovieShaker, click Export in the lower right corner of the Story Board
tray.
44

MovieShaker Software
4 Select Export to external device, and click Next. A message box appears,
alerting you that exporting video can take a long time. Click Yes.
5 The Export to DV device wizard appears. Follow the on-screen instructions
to complete the exporting process.
Creating movies with MovieShaker software
Using your imported clips, you can create a short movie using the Shake feature.
The Shake feature selects clips from the Story Board tray, adds effects, and
combines them randomly into a 30-second movie. After you “Shake” your video,
you can edit it by adding effects and text, by adjusting the color and contrast, and
by modifying its length.
Importing images and sound clips
1 Click . The Import file browser window appears.
2 Find the clips you want to add.
3 Click the clips. The files are added to the Import clip tray.
4 Repeat this process to gather each of the images and video and sound clips
you want to use in your movie.
✍ You can delete a clip from the Import clip tray by dragging the clip’s icon to the trash
icon located on the Edit tray of the working panel.
Importing image or sound files that are over 30 seconds in length may cause
the MovieShaker software to stop responding.
45

VAIO Digital Studio Computer User Guide
Using the Shake feature
1 Click the Shake tab. The Shake tray appears
2 Select a mood by clicking a face in the Shake pattern tray.
Shake tray
Shake tab
Shake!
button
Playback
buttons
Shake
pattern tray
3 Click the Shake! button. A 30-second movie is automatically generated.
4 Optional: Add text to your new movie by clicking on the Input button.
5 To preview, rewind, or fast forward your movie, use the Playback buttons.
✍ Scenes created with the Shake feature begin with a black screen in the Shake tray
window. Your scenes appear during movie playback.
You can improve the image quality produced by the Shake feature by turning off the
“Shorten the Shake time” feature in the General panel of the
time required to shake your movie increases if this option is selected. See the Menu
reference section of the MovieShaker Help for details.
46
Setting dialog box. The

MovieShaker Software
Adding effects to a scene or a clip
1 Double-click or drag the desired clip or scene to move it to the Story Board
tray.
2 Click the Effect button on the Effect tray.
Effect tray window (Effect button selected)
Effect
button
Effect
icons
Additional
effects
3 Drag the Effect icon you want to add from the Effect tray to the Effect
palette on the Edit tray.
4 Click the Play button on the Edit tray to preview the effect. The added effect
previews on the clip displayed in the Effect tray window.
✍ A preview of the added effect is displayed in the Effect tray window. You can eliminate
an effect by dragging it from the Effect palette to the trash icon on the Edit tray. See
the MovieShaker Help file for more information on adjusting effect duration and
replaying clips and scenes.
47

VAIO Digital Studio Computer User Guide
Adding text effects to a scene or clip
1 Double-click or drag the clip or scene to move it to the Story Board tray.
2 Click Text on the Editing tray.
Effects Tray (Text button selected)
3 Click Text Setting to create customized text. The Text Setting dialog box
appears. Enter your text, and select the font, size, color, and positioning for
your text.
4 Drag the Text effect icon you want to add from the Effect tray to the Effect
palette on the Edit tray.
5 Click the Play button on the Edit tray to preview the text effect. The clip
displays the text effect in the Effect tray window.
✍ A preview of the added text and text effect is displayed in the Effects tray window.
From the Edit tray, you can eliminate a text effect by dragging it from the Effect palette
to the trash icon. See the MovieShaker Help file for more information on adjusting Text
effects.
48

MovieShaker Software
Saving a movie
1 Verify that the movie or clips you want to save are located on the Story
Board tray.
2 Click Export on the Story Board tray.
3 Select the format in which you want the movie to be saved.
✍ You can click on each export format to view its description and use.
Export window
4 Click Next.
5 Confirm that you want to continue.
6 Locate the folder to which you want to save the file, name your file, and
click Save.
✍ The time required to export your movie file varies with the format selected. See the
Help file for more information on exporting a movie.
49

VAIO Digital Studio Computer User Guide
Using the ImageStation online service with MovieShaker
software
ImageStationSM is an online service that enables you to store your pictures and
movies on the Internet to share with family and friends. The ImageStation service
requires an Internet connection and registration for the Web-based service. You
must be connected to the Internet before uploading your pictures or movies using
the MovieShaker software and ImageStation applications.
To upload MovieShaker files
1 Locate the clips or video files that you want to upload to the ImageStation
service, and import them to the Import Clip tray.
2 Drag the desired clips or video files to the Story Board tray.
3 Click the Export button. The Export window appears.
4 Select MPEG1 (ImageStation), and click Next.
✍ The MovieShaker application creates a temporary file to store your images prior to
uploading to the ImageStation service. This file is deleted after the upload process.
5 If you are a registered member, provide your login name and password.
For first-time users, click Register to ImageStation. The ImageStation
service registration wizard appears and guides you through the initial
registration process. Follow the on-screen instructions.
50

MovieShaker Software
ImageStation Login window
6 When the ImageStation application on your computer connects with
ImageStation online, your files are uploaded to the Web site. The Image
Uploader window appears and displays the Internet connection and upload
status.
Image Uploader window
7 Go to http://www.imagestation.com to view your uploaded pictures or
movies. Follow the on-screen instructions to access your ImageStation
account.
✍ The ImageStation Web site may ask you to complete a full login again if your current
session is not active.
51

VAIO Digital Studio Computer User Guide
Smart Capture Software
Smart Capture manages the i.LINK® connection between your computer and a
i.LINK compatible digital camera or camcorder. You can capture and enhance
video or still images to share with your family and friends over the Internet or
through e-mail.
✍ i.LINK is a trademark of Sony used only to designate that a product contains an
IEEE1394 connection. The i.LINK connection may vary, depending on the software
applications, operating system and compatible i.LINK devices. All products with an
i.LINK connection may not communicate with each other.
Please refer to the documentation that came with your compatible i.LINK device for
information on operating conditions and proper connection. Before connecting i.LINK
compatible devices to your system, such as an optical disc drive or hard disk drive,
confirm their operating system compatibility and required operating conditions.
Smart Capture main window
1
52
2
3
4
5
6

Smart Capture Software
1 Mode indicator
Displays the current mode (Still or
Net Movie).
2 Mode dial
Switches Smart Capture from Still
mode to Net Movie mode with a
single click of your mouse.
3 Options button
Displays the configuration options
available for either Still or Net
Movie mode.
Effects button
Displays the special effects that you
can apply to your pictures or video
clips.
The Smart Capture main window opens with a blue screen image, indicating that
there is no data input from a digital camera or camcorder. When you connect
your digital camera or camcorder to your system with an i.LINK® cable and turn
it on, an image appears in the main window. Some cameras and camcorders need
to have recording media inserted before an image can be displayed in the Smart
Capture window. Consult the manual supplied with your digital camera or
camcorder for more information.
4 Help button
Connects you directly to the online
Smart Capture Help.
5 Capture button
Captures your individual still
images in the same manner as a
camera. You can select different
characteristics for the Capture
button when capturing a Net Movie.
6 Image window
Displays the still or video image
from your digital camera or
camcorder.
Using Still Mode
1 Click Start in the Windows® taskbar, and click All Programs.
2 Point to Smart Capture, and click Smart Capture. The Smart Capture main
window appears.
3 Connect your i.LINK compatible digital camera or camcorder to your
computer with an i.LINK cable (optional). An image appears in the Smart
Capture main window.
4 Check that the Mode dial is set to Still. Click the Mode dial to switch
between Still mode and Net Movie mode.
53

VAIO Digital Studio Computer User Guide
5 Click Options to view the available options for your still image capture. The
Still Image Options window appears.
Still Image Options window
The Still Image Options window has four tabs:
❑ Capturing Mode — You can choose between Normal, Self-timer, or
Panorama Capture modes.
❑ Image Size — Select the image size, horizontal by vertical, in pixels.
❑ Image Quality — Set the quality of your captured pictures by selecting
Fine, Standard, or Economy image quality.
❑ Destination — Select a file destination for your pictures.
6 Click Effects to select a special image effect. The Effect Settings window
appears. Use the drop-down list to view and customize the available effects.
Effect Settings window
✍ You can use a different special effect for each picture, or you can remove all special
effects by clicking No Effects.
54

Smart Capture Software
To capture a picture in Still mode
1 Use your digital camera or camcorder to locate the image you want to
capture. When you see the desired image in the Smart Capture window, click
Capture. The Still Viewer window appears. You can capture a single picture
or several pictures at once.
Still Viewer window
2 Click the arrows or drag the scroll bar to view the pictures. As each image is
captured, it appears in the Still Viewer window with a text balloon to add
your comments and an identifying number in the viewer queue.
To manage pictures in Still mode
In the Still Viewer window, you can perform various functions using the task
buttons:
❑ Delete — Discard any or all of your still images by clicking Delete. Select a
single image or all and the image(s) are removed from the Still Viewer
window.
❑ Upload — Send your still images online to the ImageStation Web site to
share with your family and friends. The ImageStation service stores your
still images online when you become a registered user. See “Using the
ImageStation online service with Smart Capture software.”
55

VAIO Digital Studio Computer User Guide
❑ Mail — E-mail your still images to your family and friends. Click Mail, and
your e-mail application launches with a new message window containing the
still image as an attachment.
❑ Save — Click Save to save your still image to a location of your choice.in
any of a variety of formats
✍ You must be connected to the Internet before attempting to upload or e-mail your still
images or videos.
Using Net Movie Mode
1 Click Start in the Windows taskbar, click All Programs, point to Smart
Capture, and click Smart Capture. The Smart Capture main window appears.
2 Connect your i.LINK compatible digital camcorder to your computer with
an i.LINK® cable (optional). An image appears in the Smart Capture main
window.
3 Verify that the Mode dial is set to Net Movie. Click the Mode dial to switch
between Still mode and Net Movie mode.
4 Click Options to view the available options for your movie capture. The
Recording Options window appears.
Recording Options window
Format tab view
56
Capture Button tab view

Smart Capture Software
The Recording Options window has three tabs:
❑ Format — You can adjust the compression rate for your movies in
MPEG1 format or choose the AVI option for no compression. You can
also set the maximum recording time for your movie capture.
❑ Destination — Select a file destination for your movies when recording
video clips.
❑ Capture Button — Set the characteristics of the software’s on-screen
Capture button. You can start and stop recording by clicking Capture
(this is the default characteristic). You can select Anti-Ground Shooting,
which allows recording to occur only while you click and hold the
Capture button. Recording stops when you release the button.
5 Click Effects to select a special image effect. The Effect Settings window
appears. Use the drop-down list to view and customize the available effects.
✍ You can remove all special effects by clicking the No Effects button.
To capture a movie in Net Movie mode
1 Use your digital camcorder to locate the view(s) you want to capture. When
you see the desired view in either the Smart Capture window or your
camcorder’s viewfinder, click Capture to begin recording your movie. The
Movie Player window appears.
Movie Player window
57

VAIO Digital Studio Computer User Guide
2 Click Capture when you have finished recording your movie. The first frame
of your movie appears in the Movie Player window. You can record a movie
for approximately 30 seconds. The Movie Player feature automatically stops
recording when this time limit is reached.
✍ If you have set the Capture button to use the Anti-Ground setting, you must click and
hold the Capture button to record your movie.
3 You can review your movie from the Movie Player window by using the
play/pause and stop buttons. Click the arrows or drag the scroll bar to view
your movie. Each frame is displayed with an identifying number in the
queue.
To manage your movie in Net Movie mode
From the Movie Player window you can perform various functions using the task
buttons:
❑ Delete — Discard any frame or the entire movie by clicking Delete. The
frame or movie is removed from the Movie Player window.
❑ Upload — Send your movies online to the ImageStation Web site to share
with your family and friends. The ImageStationSM service stores your
movies online when you become a registered user. See “Using the
ImageStation online service with Smart Capture software.”
❑ Mail — E-mail your movies to family and friends. Click Mail, and your e-
mail application launches with a new message window containing the movie
as an attachment.
❑ Save — Click Save to compress and save your movie to a location of your
choice in any of a variety of formats.
Using the ImageStation online service with Smart Capture
software
ImageStationSM is an online service that allows you to store your pictures and
movies on the Internet to share with family and friends. The ImageStation service
requires an Internet connection and registration for the Web-based service. You
must be connected to the Internet before uploading your pictures or movies with
Smart Capture and ImageStation applications.
58

Smart Capture Software
To upload with Movie Player
1 Click UPLOAD in the Movie Player window to begin transfer of your movie
to the ImageStation Web site. The Image Uploader window appears and
displays the Internet connection and upload status.
Image Uploader window
2 Click to see thumbnail previews of your pictures or movies.
✍ The ImageStation preview feature is available when you upload two or more pictures
or a movie. No preview is shown if a single picture is being uploaded.
To upload with Still Viewer
1 Click UPLOAD in the Still Viewer window. The ImageStation Login
window appears.
ImageStation Login window
59

VAIO Digital Studio Computer User Guide
2 For first-time users, the ImageStation
through the initial registration process. Follow the on-screen instructions. If
you are already a registered member, provide your login name and password.
The Image Uploader window appears.
3 From the Still Viewer window, click UPLOAD to transfer your pictures or
movies to the ImageStation Web site. The Image Uploader window displays
your Internet connection and upload status. Click to see thumbnail
previews of your pictures or movies.
SM
registration wizard guides you
✍ The ImageStation preview feature is available when you upload two or more pictures
or a movie. No preview is shown if a single picture is being uploaded.
4 Go to http://www.imagestation.com to view your uploaded pictures or
movies. Follow the on-screen instructions to access your ImageStation
account. The ImageStation Web site may ask you to complete a full login
again, if your current session is not active.
✍ It is recommended that your movie file size not exceed 254 MB if compressed or 2 GB
if not compressed. Large movie files take longer to upload to the ImageStation Web
site.
60

SonicStage Software
SonicStage Software
The SonicStage™ software included with your computer is a powerful
digital music management system that enables you work with digital music from
audio CDs and from the Internet. You can play music on your computer, create
custom audio CDs, and check music out to portable digital music devices, such
as Net MD™ players and Network Walkman™ Digital Music Players.
SonicStage software employs Sony’s OpenMG™ copyright protection
technology and advanced ATRAC3™ audio file format to allow you to enjoy
digital music while protecting the rights of copyright holders.
You can enjoy digital music with SonicStage software in a wide variety of ways:
❑ Play and record music from audio CDs
SonicStage software enables you to play your audio CDs and record audio
tracks to your computer. Music tracks recorded to your computer can be
combined into Playlists and checked out to portable music devices so you
can take your music with you.
❑ Create custom audio CDs
On computer models equipped with a CD recording device, you can create
custom audio CDs from your SonicStage Playlists, mixing tracks from
different sources and artist.
❑ Make backup copies of your audio CDs
On computer models equipped with a CD recording device, SonicStage
software’s Backing Up Audio CDs utility makes it easy to create backup
copies of your audio CDs.
❑ Use Playlists to organize and manage your music
SonicStage software’s powerful, hierarchical Playlist feature enables you to
organize the music you’ve imported into the SonicStage program. You can
create lists of songs categorized by artist or genre and place a shortcut to a
list onto your Microsoft® Windows® desktop for one-click playback of your
favorite music.
61

VAIO Digital Studio Computer User Guide
❑ Download music from Electronic Music Distribution (EMD) services on the
Internet
*
EMD services are Internet-based subscription services that enable you to
download music tracks from the World Wide Web. SonicStage software
enables you to download music tracks, include them in your Playlists, and
check them out to your portable digital music devices.
❑ Import audio files from your computer
SonicStage software enables you to import MP3 and WAV audio files stored
on your computer so they can be added to Playlists and recorded to CD (on
computer models equipped with a CD recording device).
❑ Enjoy karaoke-like effects during music playback
The Vocal Canceler effect can suppress the vocal track from most music
during playback. This effect also enables you to shift the pitch of music to
suit your vocal range. Used together, these features make it easy to sing
along with your favorite music, turning your computer into a karaoke
system.
❑ Enjoy a Visualizer light show during music playback
The Visualizer feature of SonicStage software performs a colorful light show
on your computer’s screen to match your music as it plays.
✍ To learn more about using the SonicStage software, refer to the SonicStage Help.
The SonicStage Tutorial provided in the SonicStage Help gets you started with
common tasks and directs you to the information you need.
* Use of an EMD service requires Internet access and separate subscription to the EMD
service. The SonicStage software supports only EMD services that are compatible with
OpenMG™ technology. See the SonicStage Help for details.
62

SonicStage Software
Starting SonicStage Software
1 Click Start in the Windows taskbar, and click All Programs.
2 Point to SonicStage, and click SonicStage.
3 When you have registered with CDDB, the Confirm the setup of
SonicStage... dialog box appears.
4 Click Yes to continue.
To view the SonicStage software Help
1 Start SonicStage.
2 On the Help menu, click SonicStage Help.
To view the Tutorial page
1 Start SonicStage.
2 On the Help menu, click Tutorial.
63

VAIO Digital Studio Computer User Guide
SonicStage feature tabs (Main window)
❑ CD tab — The contents of your inserted audio CD are displayed,
enabling functions such as recording to the computer’s hard disk drive.
❑ Import tab — Import MP3, WAV or audio files on your computer to
a Playlist.
❑ Playlist tab — View the available Playlists as tree + list or list only.
❑ Transfer tab — View the available Playlists on your computer. You
can transfer the audio files to an external device or media.
❑ Device/Media tab — View the status of your audio files,
connected external device, or inserted media.
❑ Internet tab — The browser view displays your connection to the
Internet, enabling you to locate audio files and use EMD services.
SonicStage main window
Playlist view
64
1
2
3
4
5 6
7

SonicStage Software
1 Feature tabs
Changes the screen view according
to the selected feature.
2 Player control buttons
Controls playback functions, such
as play, pause, stop, fast forward,
and reverse. You can increase or
decrease volume and switch view
modes.
3 Playlist drop-down list
(Playlist view)
Displays available playlists and
audio files.
4 File tree view (Playlist view)
Displays the Playlists available on
your computer, enabling you to
locate your audio files. Expand the
views for the file list or Playlist
drop-down using the Playlist switch
button.
Recording from a CD
5 Tutorial
Click to open or close the Tutorial
feature.
6 Internet address drop-down list
(Playlist view)
Displays Internet addresses
associated with the currently
selected song. Click Go to URL
link to immediately connect to the
Internet address displayed in the
drop-down list.
7 File list view (Playlist view)
Displays the contents of the Playlist
selected in the file tree view.
You can record songs from audio CDs and add them to playlists in SonicStage
software.
✍ When you record from an audio CD from your optical disc drive for the first time, the
CD Drive Optimization dialog box appears. Click Start to verify your optical disc drive.
After the verification is performed, recording begins.
1 Insert an audio CD into your computer’s optical disc drive.
2 Click the CD tab.
3 Use the drop-down lists to select the ATRAC3 bit rate, CD drive, and Record
To destin ation .
65

VAIO Digital Studio Computer User Guide
CD tab window
4 You can identify specific tracks on your CD by clearing the check marks
from the tracks you don’t want to record. You can clear all selected tracks by
selecting the empty check box next to Select All, and then selecting the
tracks you want to record.
If your Internet connection is active, you can use the (CD Info) button to
view the name of your CD and its song titles.
✍ The CDDB® (Compact Disc Database) Music Recognition Service registration wizard
enables you to register with CDDB. You need Internet access from your computer to
register and use this service. For more information regarding CDDB registration, click
the Help button.
✍ The CD Info button feature is not supported for all audio CDs.
5 Click (Rec to Jukebox) to begin recording. When the recording is
finished, the new playlist appears in the File tree view of the Playlist
window.
66

SonicStage Software
To make a backup copy of an audio CD
On computer models equipped with a CD recording device, such as a CD-RW or
DVD-RW optical drive, you can use the Backing Up Audio CDs utility to make a
backup copy of an audio CD.
On computer models that have both a read-only optical drive (CD-ROM or
DVD-ROM) and a read/write optical drive (CD-RW or DVD-RW), you can
make a copy with one click.
✍ On computer models with only one optical drive, you must exchange the original
source CD for a blank CD-R or CD-RW disc, when prompted during the copying
process.
1 Quit the SonicStage application, if it is open.
2 Click Start, click All Programs, and then point to SonicStage.
3 Click Backing up Audio CDs. The Backing Up Audio CDs utility starts.
4 On computer models that have both a read-only optical drive and a
read/write drive, place the original source CD into the read-only drive.
5 On computer models that have both a read-only optical drive and a
read/write drive, insert a blank CD-R or CD-RW media into the read/write
drive.
6 Make sure your read-only drive is selected in the Retrieve from: drive list.
7 On computer models that have both a read-only optical drive and a
read/write drive, make sure your read/write drive is selected in the
Write to: drive list.
67

VAIO Digital Studio Computer User Guide
8 Click Start. The audio data is read from the original source audio CD.
❑ On computer models that have both a read-only optical drive and a
read/write drive, the data is immediately written to the blank CD-R or
CD-RW disc. The Copy Successful message appears. The backup copy
is finished.
❑ On computer models equipped with a single read/write drive
1 When the Reading Complete message appears, remove the original
source CD from the read/write drive and insert a blank CD-R or
CD-RW disc.
2 Click OK. The audio data is written to the blank CD-R or CD-RW
disc when the Copy Successful message appears.
Transferring songs (Check-In/Check-Out)
You can transfer songs between the playlists in the SonicStage software and
external devices or media. For more information on using your external devices
or media, see the instructions supplied with the device or media.
These instructions are for using the Check-In/Check-Out “1-step” method. For
information on using another method, see “Changing the check-in/check-out
settings” in the SonicStage software Help.
Check-Out
1 Connect the external device or insert the media into your computer.
2 Click the Transfer tab to display the Transfer window. Your computer
automatically recognizes the connected external device or media and lists
the content information in a new panel on the right side of the Transfer
window.
68

SonicStage Software
Transfer window
3 Select the Playlist that contains the song that you want to check out. The
songs in the playlist are shown in the Playlist view panel located in the
center of the Transfer window.
4 From the Playlist view panel, select the song to be checked out. To check out
more than one song at a time, hold down the Ctrl key and select the
additional songs.
5 Click (Out), or drag the song to the desired position in the song list of the
external device or media. Check Out begins.
✍ To cancel Check Out, click (Stop), or click Cancel in the Processing dialog box that
is displayed during the Check Out process.
Check In
✍ The songs that you transfer to external devices or media can only be checked in to the
hard drive of the same computer from which the songs were checked out.
1 Connect the external device or insert the media into your computer.
2 Click the Transfer tab to display the Transfer window. Your computer
automatically recognizes the connected external device or media and lists
the content information in a new panel on the right side of the Transfer
window.
69

VAIO Digital Studio Computer User Guide
3 Select the song to be checked in from the song list of the external device or
media. To check in more than one song at a time, hold down the Ctrl key and
click the additional songs.
4 Click (In), or drag the song(s) to the Playlist view panel. If you want to
check in all of the songs in the external device or media, click (In All).
Check In begins.
✍ To cancel Check In, click (Stop), or click Cancel in the Processing dialog box that
is displayed during the Check In process.
For more information about using SonicStage software, go to the SonicStage
Help. You can access Help as follows:
1 Click the Start button in the Windows taskbar, and click All Programs.
2 Point to SonicStage, and click SonicStage Help.
70

SonicStage Software
Additional features
❑ SonicStage Tutorial — SonicStage features are described in the Tutorial.
The user-friendly interface instructs you on how to use all SonicStage
features.
❑ SonicStage Backup Tool — You can back up and restore music, graphics,
and information data managed by SonicStage software. You must be
connected to the Internet to use the SonicStage Backup Tool.
❑ Import audio files in various formats — You can import audio files in
various formats, such as the MP3 or WAV standards. You can also import
audio files that comply with the Microsoft® Windows Media™
Technologies (WMT) standard, identified by .asf or .wma extensions.
Manage your audio files through the Playlist feature of SonicStage software.
❑ Manage imported songs on the Playlist — Additional features are
available when you register your imported songs through the Playlist feature
of the SonicStage software. You can manage your music by creating your
own list of songs categorized by genre or artist, displaying your song list in
the Playlist feature, and arranging your songs in a customized order using the
Playlist folders. Edit your music by combining multiple songs into a single
song, or divide one song into two, by using the Combine and Divide
features.
❑ Simple mode — The main SonicStage window viewed in Simple mode, is a
smaller, compact version of Full mode. This may be convenient when you
want to listen to music with SonicStage software, while using other
applications, or whenever you feel the Full mode view is intrusive. The
design of the main SonicStage window in simple mode can be changed by
selecting a new “Skin,” which enhances the window’s appearance. The
Simple mode feature enables you to perform playback operations only.
71

VAIO Digital Studio Computer User Guide
Additional Software Information
VAIO Edit Components Software
VAIO Edit Components is a software plug-in for Adobe® Premiere® software
that provides maximum compatibility and video quality for capturing video from
your Sony digital camcorder. If your VAIO® computer does not have Adobe®
Premiere® software preinstalled and you subsequently purchase and install
Adobe® Premiere® software, install this software plug-in to ensure maximum
compatibility with Sony digital camcorders.
To install VAIO Edit Components
1 Insert your Application Recovery CD #1 into your optical drive.
✍ For some VAIO® computer models, the VAIO Edit Components installer is on the #2
or #3 Application Recovery CD (ARCD).
2 Click Start, click My Computer, and click your optical drive.
3 Click Support, and click VEC.
4 Double-click Setup.
The VAIO Edit Components installation wizard starts.
5 Follow the on-screen instructions in the installation wizard to complete the
installation.
6 Restart your computer when prompted to do so.
72

CONFIGURING YOUR VAIO
COMPUTER
This section provides basic information on maintaining your computer's
hard disk drive performance, using i.LINK devices, and changing default
settings.
❑ About Your Hard Disk Drive Partition
❑ i.LINK Compatibility
❑ VAIO Action Setup
❑ To Change The Sony Software Window Design
73

VAIO Digital Studio Computer User Guide
About Your Hard Disk Drive Partition
To improve the performance of Sony audio and video software applications, the
hard disk drive on your computer has been formatted with two partitions, C and
D. Some Sony software applications save files to the D partition. This prevents
large video captures from consuming the available space on your C partition.
To maintain optimum system performance, you should defragment your
computer’s D partition regularly.
Defragmenting your hard disk drive
If you encounter frame dropping while recording digital video onto your hard
disk drive, defragmentation may be necessary.
1 Deactivate your screen saver and close other open applications, if applicable.
2 Click Start in the Windows taskbar and select All Programs.
3 Point to Accessories, point to System Tools, and then select Disk
Defragmenter.
The Disk Defragment dialog box appears.
4 Select Action from the menu bar and click Analyze.
✍ It may take more than a couple of hours to complete defragmentation, depending on
the data capacity and current utilization of your computer’s hard disk drive(s).
74

i.LINK Compatibility
i.LINK Compatibility
Your VAIO computer may include either 4-pin or 6-pin, or both types, of i.LINK
ports.
A 4-pin i.LINK port cannot supply power to a connected device.
A 6-pin i.LINK port can:
❑ supply power from the computer to the connected device if the device is
equipped with a 6-pin connector.
❑ supply 10V to 12V.
The total power supplied by the 6-pin i.LINK port cannot exceed 6 watts.
The following i.LINK 400 Mbps cables are available and recommended for use
with your computer: VMC-IL4415, VMC-IL4435, VMC-IL4615, VMC-IL4635,
VMC-IL6615, and VMC-IL6635.
Sony computer supplies, accessories, and peripherals can be purchased from your
local retailer, from the Sony VAIO Direct Web site at http://vaio.sonystyle.com,
or by calling 1-888-315-7669 (toll free).
✍ i.LINK is a trademark of Sony used only to designate that a product contains an
IEEE 1394 connection. The i.LINK connection may vary, depending on the software
applications, operating system and compatible i.LINK devices. All products with an
i.LINK connection may not communicate with each other.
Please refer to the documentation that came with your compatible i.LINK device for
information on operating conditions and proper connection. Before connecting
compatible i.LINK devices to your system, such as an optical or hard disk drive,
confirm their operating system compatibility and required operating conditions.
75

VAIO Digital Studio Computer User Guide
Connecting an i.LINK (IEEE 1394) device
1 Use the symbol to locate the i.LINK port on your compatible i.LINK
device and on your computer. Plug the i.LINK cable connector into this port.
2 Plug the other end of the cable into the corresponding 4- or 6-pin i.LINK
port on your computer.
✍ See the instructions that came with your i.LINK device for more information on
installation and use.
76

VAIO Action Setup
VAIO Action Setup
VAIO® Action Setup manages the settings for your computer’s Shortcut keys
(S Keys).
Shortcut Keys
The programmable S Keys are set to launch the following applications:
❑ S1 — Microsoft® Outlook® Express
❑ S2 — Microsoft® Internet Explorer
❑ S3 — SonicStage™
❑ S4 — DigitalPrint
❑ S5 — MovieShaker™
❑ S5 — Giga Pocket (On selected models equipped with Giga Pocket
features.)
❑ S6 — VAIO® Help and Support
77

VAIO Digital Studio Computer User Guide
Changing the settings of the S keys
You can reprogram the S keys to launch other applications.
1 Click Start in the Windows taskbar and select All Programs.
2 Select VAIO Action Setup, then click VAIO Action Setup.
✍ You can also double-click the VAIO Action Setup icon, located in the Windows
taskbar, to launch VAIO Action Setup.
3 Click the S Key you want to change.
4 From the Select Application dialog box, click the option for the desired type
of function. The corresponding applications appear in the list box on the
right.
5 Select an application from the list. Click Next.
✍ You can drag an application to place it into the list box.
6 The Confirmation Application Name window appears. Click Next.
7 You may now type a new name and description, if desired. Then click
Finish.
78

To Change The Sony Software Window Design
To Change The Sony Software Window Design
You can select from different window designs for certain Sony software
applications and create your own personal computing environment.
Changing the window design
1 Click Start in the Windows taskbar and select the Control Panel.
2 Click Other Control Panel Options.
3 Click UI Design Selector.
4 Click << or >> and select the desired design.
5 Click Apply.
6 The “UI Design Selector” window design changes. The window design for
your Sony software will match the “UI Design Selector” window.
7 To try another selection, click << or >>, then click Apply.
8 When you have made your selection, click OK. The UI Design Selector
closes and the Sony software window design displays.
✍ You may only use this feature with compatible UI Design Selector software.
79

VAIO Digital Studio Computer User Guide
80

SYSTEM AND APPLICATION
RECOVERY CD(S)
You can restore your system, individual software applications, or drivers,
using the Recovery CDs.
❑ To Use The System Recovery CD(s)
❑ To Use The Application Recovery CD(s)
81

VAIO Digital Studio Computer User Guide
To Use The System Recovery CD(s)
The System Recovery CD utility formats your hard disk drive and restores the
operating system and all the original, preinstalled software applications. If the
operating system or applications become corrupted or are erased, you can restore
your computer to the original factory settings. The System Recovery CD can
only be used to restore the hard disk drive of the Sony computer you purchased.
The System Recovery process removes all software that you may have
installed since you started using your computer. Reinstall any applications
that were not included with the computer when you purchased it.
If you experience a problem with your computer, reinstalling an individual
application or device driver may correct the problem. You may not need to
recover the entire contents of your hard drive.
✍ Use the Application Recovery CD(s) to reinstall individual applications.
When you successfully complete your system recovery, you are prompted to
complete the Windows registration process.
System Recovery options
System drive recovery
All data on Drive C is deleted. The factory default settings and software
applications are restored on this drive only.
Change partition size
All partitions, custom installations, and changes are removed from the hard disk
drive. You can set the partition sizes for both the Drive C and Drive D. The
original, preinstalled operating system and software applications are restored.
Recovery to original factory defaults
All data and partitions are removed from the hard disk drive. All original factory
settings, operating system, and preinstalled software is restored.
The System Recovery utility does not back up your system's data. If you wish
to retain your system data, perform a back up to an external media.
82

To Use The System Recovery CD(s)
Using the System Recovery CD(s)
Your system may take a few minutes to load necessary files. A blue screen
appears during the downloading process.
1 Insert the System Recovery CD in your computer’s optical drive.
The System Recovery utility starts from the optical drive. The first CD must
be in the drive when you turn on your computer.
✍ If your system is equipped with two optical drives, insert the System Recovery CD into
the upper optical drive.
2 Turn off your computer.
3 Wait 30 seconds and turn on your computer. Your screen displays the
downloading progress, “Starting VAIO Recovery Utility.”
4 The VAIO System Recovery Utility dialog box appears. Click Next.
5 At the pop-up prompt, select Yes to begin the system recovery process.
Follow the on-screen instructions.
✍ Your system may include one or more System Recovery CDs. If you have more than
one System Recovery CD, insert the first CD to run the System Recovery program.
You are prompted to insert the next CD(s) once the information from the first CD has
been installed.
The recovery process takes approximately 30 to 60 minutes to complete.
After recovering your system using the System Recovery CD(s), you may be prompted
to insert your Application Recovery CD(s) after restarting Windows. Use the
Application Recovery CD(s) to complete full restoration of your system.
83

VAIO Digital Studio Computer User Guide
To Use The Application Recovery CD(s)
The Application Recovery CD utility enables you to reinstall individual software
applications, individual drivers, and to repair software applications if they
become corrupted or are erased. You can reinstall a software application or driver
to correct a problem that you are experiencing with your computer, peripheral
hardware, or specific software application. You may not need to reinstall the
entire contents of your hard drive.
✍ If you need to reinstall all of the software that shipped with your computer, use the
System Recovery CD(s).
You must be in Windows to run the Application Recovery CD utility.
Reinstalling software applications
1 Turn on your computer. If your computer is already on, save and close all
open applications.
2 When the Windows desktop appears, insert the Application Recovery CD #1
into your computer’s optical drive. The Application Recovery utility loads
automatically.
✍ If your system is equipped with two optical drives, insert the Application Recovery CD
into the upper optical drive.
3 When the Application Recovery menu appears, follow the on-screen
instructions to complete the recovery process.
If you have any questions about using the Application Recovery CD(s), visit
http://www.sony.com/pcsupport, or contact Sony Customer Support at
1-888-4-SONY-PC.
84

To Use The Application Recovery CD(s)
Reinstalling device drivers
1 Turn on your computer. If your computer is already on, close all
applications.
2 When the Windows desktop appears, insert the Application Recovery CD #1
into the optical disc drive. The Application Recovery utility main window
appears. Click OK to exit the utility.
3 Without removing the Application Recovery CD from the optical drive,
click Start in the Windows taskbar and then click Control Panel. The Control
Panel window appears.
4 Click Performance and Maintenance and click System. The System
Properties dialog box appears.
5 From the Hardware tab, click Device Manager.
6 Click to select the unknown device or the device that requires the driver
installation. The unknown device(s) is identified by a yellow question mark.
7 From the Action menu, click Uninstall. This removes the device driver from
your system. Click OK. Repeat for each device driver as necessary. Restart
your computer.
8 Click Start in the Windows taskbar, select Turn Off Computer, and then click
Restart.
9 When the desktop displays, remove the Application Recovery CD from the
optical drive.
✍ Your system includes one or more Application Recovery CDs. Insert Application
Recovery CD #1, to start the application or driver recovery process. You are prompted
to insert the next CD(s), depending on the software application or driver you wish to
restore.
85

VAIO Digital Studio Computer User Guide
86

FREQUENTLY ASKED
QUESTIONS
This section describes how to troubleshoot common problems you may
encounter when using your computer. Many problems have simple
solutions, so try these suggestions before using Support Resources. Your
computer may not be supplied with all of the features discussed in this
section, depending on the system configuration you purchased. To view
the specific configuration for your computer, see the online specifications
sheet.
❑ About VAIO Digital Studio Computer Functions
❑ About Changing Your System’s Default Settings
❑ About Your System Recovery CDs
❑ About Using The Optical Disc Drive(s)
❑ About The Speakers
❑ About The Modem
❑ About The Microphone
❑ About The Mouse And Keyboard
❑ About Using A Peripheral Device
87

VAIO Digital Studio Computer User Guide
About VAIO Digital Studio Computer Functions
My computer does not start.
❑ Check that the computer is plugged into a power source and that it is turned
on. Check that the power light is lit on the front panel of the computer.
❑ Confirm that a disk is not in the floppy disk drive (unless you are using a
bootable floppy disk).
❑ Confirm that a CD is not in an optical drive (unless you are using a bootable
CD).
❑ Confirm that the power cord and all cables are connected firmly.
❑ If you plugged the computer into a power strip or Uninterruptible Power
Supply (UPS), make sure the power strip or UPS is turned on and working.
❑ Check that the monitor is plugged into a power source and turned on. Check
that the brightness and contrast controls are adjusted correctly. See the
manual that came with your display for details.
❑ Check that the computer is not in stand by mode.
Why did my computer or software application stop responding?
You can try to locate and close the software application that has stopped
responding.
1 Press the Ctrl+Alt+Delete keys. The Windows Task Manager window
appears.
2 From the Applications tab, locate the application that has the status message,
“Not responding.”
3 Select the application that has a Not Responding status and click End Task.
Windows attempts to close the application.
If your computer does not respond or the application does not close, try the
following steps:
1 Save any open files, if possible.
2 Press the Alt+F4 keys. The Turn Off Computer window appears.
3 Click Restart.
88

About VAIO Digital Studio Computer Functions
If your computer still does not respond and you cannot restart, shut down your
computer by pressing and holding the power switch for more than six seconds.
If the software application continues to stop responding or causes your computer
to stop responding, contact the software publisher or designated technical support
provider.
Pressing and holding the power switch for more than six seconds, may result
in the loss of data from files that are currently open.
Why does the Windows operating system stop responding during shutdown?
The Windows operating system may not shut down properly for many reasons,
including incompatible or conflicting drivers, damaged files, or non-responsive
hardware. For troubleshooting information, you can search Windows Help.
1 Click Start in the Windows taskbar and select VAIO Help and Support. The
VAIO Help and Support Center appears.
2 Select Fixing a Problem and then select Startup and Shut Down problems. A
list of specific problem topics appears on the right side of the dialog box.
3 Select Startup and Shutdown Troubleshooter. Follow the on-screen
instructions according to your specific situation.
I cannot find the Windows taskbar.
The Windows taskbar may be hidden or minimized.
❑ Use the mouse to locate a hidden taskbar by pointing to the left, right, top,
and bottom edges of the screen. The taskbar appears when the cursor is
placed over its location.
1 Right-click on the taskbar and select Properties from the shortcut menu.
2 Clear the check box for Autohide the taskbar, then click OK.
❑ Use the mouse to locate a minimized taskbar by pointing to the left, right,
top and bottom edges of the display screen. The taskbar has been located
when the cursor changes to a double arrow cursor. Left-click and drag away
from the edge of the display screen. The minimized taskbar resizes and
becomes visible.
89

VAIO Digital Studio Computer User Guide
Why is my system running slowly?
❑ The system responsiveness varies depending with the number of
applications that are open and running. Close any applications that you are
not currently using.
❑ Increasing the system memory may also help. For information on installing
memory, please see the online VAIO User Guide.
90

About Changing Your System’s Default Settings
About Changing Your System’s Default Settings
How do I change the parallel port type to ECP, EPP, or bi-directional?
You can change the parallel port type using the System Setup utility (CMOS
Setup Utility). To access System Setup:
1 Click Start in the Windows taskbar and select Turn Off Computer. Select
Restart.
2 When the Sony screen displays, press the F2 key on your keyboard.
3 Select the Advanced tab from the Setup Utility screen.
4 Select “I/O Device Configuration” and press Enter.
5 Use the arrow keys to highlight Parallel Port Mode and press Enter.
✍ You can toggle between the Normal (bi-directional), EPP, ECP, and ECP+EPP options
using the directional arrow keys.
6 Select the desired setting displays, and press Enter.
7 Press the F10 key to Save and Exit.
How do I change the video resolution of my display?
1 Click Start in the Windows taskbar and then select Control Panel.
2 Select Appearances and Themes, then select “Change the screen resolution.”
3 Click the Settings tab.
4 Change the Screen resolution and Color quality to the desired levels.
5 Click Apply and then click OK.
91

VAIO Digital Studio Computer User Guide
About Your System Recovery CDs
My files are corrupted or deleted. How do I recover software applications that
came with my computer?
See “Reinstalling software applications” in the online User Guide for more
information.
My drivers are corrupted or deleted. How do I recover drivers that came with my
computer?
See “Reinstalling device drivers” in the online User Guide for more information.
How do I access the reinstallation information in the online User Guide?
You can view this online information by following these steps:
1 Click Start in the Windows taskbar, then click VAIO Help and Support.
2 From the VAIO Help and support menu, click VAIO User Guide.
3 Click to open the “System and Application Recovery CD(s)” link. The
subtopics displays in the right-side frame.
4 Click the desired subtopic to view specific information.
92

About Using The Optical Disc Drive(s)
About Using The Optical Disc Drive(s)
✍ Your computer may not be equipped with all of the hardware features listed in this
section. To view the specific hardware configuration for your system, see the online
specifications sheet.
Why doesn’t my optical drive tray open?
Use the Eject button
1 Make sure the computer is turned on.
2 Press the Eject button on the drive.
Use the My Computer icon
1 Click Start in the Windows taskbar, then select My Computer.
2 Right-click the appropriate optical drive icon.
3 Select Eject from the shortcut menu.
✍ Avoid using adhesive labels to identify your CD or DVD media. Adhesive labels may
come off while the CD or DVD media is in use in your optical drive(s) and may cause
damage to the unit.
Why can’t I play a DVD or CD media?
❑ After inserting your optical disc, wait a few seconds for it to be detected
before trying to access it.
❑ Verify that the disc is in the tray with the label side facing up.
❑ Install your CD or DVD software according to the manufacturer’s
instructions.
❑ If your drive reads some DVDs or CDs, but not others, check the shiny side
of the disc for dirt or scratches.
✍ To recover the CD or DVD software applications that are preinstalled on your
computer, see “Reinstalling software applications” in the online User Guide for more
information.
93

VAIO Digital Studio Computer User Guide
Why isn’t my DVD playing properly?
If a region code warning appears when you are using the DVD player
application, it may be that the region code of the DVD you are trying to play is
incompatible with the region code setting of your optical drive. A region code is
listed on the disc packaging. Region code indicators such as “1” or “ALL” are
labeled on some DVDs to indicate the type of player that can play the disc.
Unless a “1” or “ALL” appears on the DVD or on its packaging, you cannot play
the disc on this system.
If you hear audio but cannot see video, your computer’s video resolution may be
set too high. To improve video resolution, verify that your screen area is set to
1024 x 768, using 32-bit color (preset factory default). To check your video
resolution, see the Troubleshooting topic, “How do I change the video resolution
of my display?”
If you see video but cannot hear audio, check all of the following:
❑ Verify that your DVD player’s mute feature is turned off.
❑ Check the master volume setting in the Audio Mixer.
❑ Check the volume settings on your computer speakers.
❑ Check the connections between your speakers and the computer.
❑ Verify that drivers are installed properly, by following these steps:
1 Click Start in the Windows taskbar, then select Control Panel.
2 Click Performance and Maintenance and then click Systems. The
System Properties dialog box appears.
3 Select the Hardware tab and then select the Device Manager button to
view installed drivers.
A dirty or damaged disc may also cause the computer to stop responding while it
tries to read the disc. If necessary, remove the disc and check that it is not dirty or
damaged.
✍ To recover the CD or DVD software applications that are preinstalled on your
computer, see “Reinstalling software applications” in the online User Guide for more
information.
94

About Using The Optical Disc Drive(s)
When I click an application icon, the message, “You must insert the application
CD into your drive” appears and the software does not start.
❑ Some software applications require specific files that are located on the
application’s CD-ROM. Insert the disc and try starting the program again.
❑ Check to make sure you inserted the CD-ROM with the label side facing up.
Why doesn't my optical drive (DVD-RW) record to CD-RW media at higher
speeds?
If you are having difficulty formatting CD-RW media for recording purposes, try
changing the write speed to a lower setting. Your media must support writing
speeds at 2X or lower.
See the Help or documentation that came with your CD or DVD recording
software application for details on adjusting the write speed settings.
✍ Your DVD-RW drive does not support high-speed writing to a CD-RW media. Verify
that your CD-RW media supports writing speeds of 2X or lower.
Why doesn't my optical drive (CD-RW) record to CD-RW media?
If you are having difficulty with writing, erasing, or formatting on your CD-RW
media, the reason may be that the media is not compatible with your high-speed
CD-RW drive. Try using CD-RW media that is identified as “high-speed” (4X or
higher) for maximum performance and compatibility.
95

VAIO Digital Studio Computer User Guide
About The Speakers
Why is there no sound in any application?
❑ Check that the speakers are plugged into the Headphones jack.
❑ If your speakers have a mute button, verify that it is turned off.
❑ If your speakers are powered by batteries, verify that the batteries are
inserted properly and that they are charged.
❑ If your speakers use an external power source, verify that the power cord is
plugged into a grounded wall outlet or power strip.
❑ If your speakers have volume control, check the volume level.
❑ You cannot hear sound from your speakers if headphones are connected to
your computer.
❑ If the software application you are using has its own volume control, check
that the volume is turned up.
❑ Check the volume controls in the Windows® operating system using these
steps:
1 Click Start in the Windows taskbar, then select Control Panel.
2 Select Sounds, Speech, and Audio Devices, then click “Adjust the
system volume.”
3 From the Volume tab, adjust the Device volume by moving the slider
bar to the desired sound level. Verify that the Mute option is not
selected.
❑ Check that the Mute check box is not selected in the Windows volume
control.
✍ You may need to reinstall the sound drivers. See “Reinstalling device drivers” in the
online User Guide for more information.
96

About The Modem
About The Modem
How do I change my modem to rotary or Touch-Tone dialing?
1 Click Start in the Windows taskbar, then click Control Panel.
2 Click Printers and Other Hardware, then click Phone and Modem options.
3 From the Dialing Rules tab, click Edit. The Edit Location dialog box
appears.
4 Select the Tone or Pulse option. Click OK.
Why is my modem connection slow?
Many factors influence modem connection speed:
❑ Telephone line noise
❑ Incompatibility with other telephone equipment such as fax machines or
other modems.
❑ Internet Service Providers (ISP) connection capability may vary.
If you think your modem is not connecting properly to other PC-based modems,
fax machines, or your ISP, check the following:
❑ Contact your telephone company and ask them to verify that your telephone
line is free from line noise.
❑ If your problem is fax-related, check that there are no problems with the fax
machine you are calling and that it is compatible with fax modems.
❑ For optimum performance, verify that your ISP point of presence (POP)
telephone number is compliant with V.90 standards.
❑ If you are having a problem connecting with your ISP, check that they are
not experiencing technical problems.
❑ Try connecting your modem through another telephone line, if available.
97

VAIO Digital Studio Computer User Guide
Why doesn’t my modem work properly?
Your modem may be experiencing equipment or software conflicts. If your
modem is not functioning properly, check the following:
❑ Check that the telephone line is plugged into the Line jack.
❑ Check that the telephone line is working properly. You can verify the line by
plugging in an external device such as a standard telephone or fax machine
and listening for a dial tone.
❑ Check that the access telephone number (POP) is correct.
❑ All software applications that are preinstalled by Sony are compatible with
your computer’s modem. If you have installed other software, contact the
software publisher for information on how to configure the software in order
to recognize the modem.
❑ If it appears that your modem is not functioning properly, check the device
status.
1 Click Start in the Windows taskbar, then click Control Panel.
2 Click Printers and Other Hardware and then select Phone and Modem
Options.
3 From the Modems tab, click to select your modem.
4 Click Properties. The Modem Properties window appears.
5 Review the information in the Device status section. If your modem is
not working properly, click the Troubleshoot button. The VAIO Help
and Support Center window appears.
6 Follow the on-screen instructions to resolve the problem.
✍ You may need to reinstall the modem drivers. See “Reinstalling device drivers” in the
online User Guide for more information.
98

About The Microphone
About The Microphone
Why doesn’t my microphone work properly?
Check that the microphone is plugged into the Microphone jack.
Why is my microphone so sensitive to background noise?
If you find there is too much background noise when you record sound, you
should adjust the microphone gain by following these steps:
1 Click Start in the Windows taskbar, then click Control Panel.
2 Click Sounds, Speech, and Audio Devices, then click Sounds and Audio
Devices.
3 From the Audio tab, locate the Sound recording section and click Volume.
The Recording Control dialog box appears.
4 Select the Options menu and click Properties. The Properties dialog box
appears.
5 In the section, “Adjust volume for,” select the Recording option. Click OK.
6 From the Recording Control dialog box, decrease the microphone volume
level by moving the slider bar down.
7 Close the Recording Control dialog box and then close the Sounds and
Audio Devices Properties window.
99

VAIO Digital Studio Computer User Guide
About The Mouse And Keyboard
Why doesn’t my mouse work properly?
❑ Check that the mouse is plugged securely into the Mouse port.
❑ Save and close all open applications. Turn off your computer, wait
approximately 10 seconds, and then restart your computer.
❑ There may be dust or dirt inside the mouse mechanism. To clean the mouse,
follow these steps:
1 Save and close all applications, and turn off your computer.
2 Turn the mouse upside down.
3 Remove the mouse ball cover on the back of the mouse by turning
clockwise the ring that covers the mouse ball.
4 Turn the mouse upright, and drop the mouse ball into your hand.
5 Using a piece of tape, remove any dust or dirt on the mouse ball and
inside the mouse ball socket.
6 Return the mouse ball to the socket, and replace the mouse ball cover.
Secure the cover by turning the ring counter-clockwise.
✍ You may need to reinstall the mouse drivers. See “Reinstalling device drivers” in the
online User Guide for more information.
How do I set up my mouse for left-hand use?
1 Click Start in the Windows taskbar, then click Control Panel.
2 Click Printers and Other Hardware, then click Mouse. The Mouse Properties
dialog box appears.
3 From the Buttons tab, select “Switch primary and secondary buttons” under
the Button Configuration options.
4 Click Apply, then click OK.
Why doesn’t my keyboard work properly?
❑ Check that the keyboard is securely plugged into the Keyboard port.
❑ Save and close all open applications. Turn off your computer, wait
approximately 10 seconds, and then restart your computer.
100
 Loading...