

Page 1

Sony PC User Guide
PCV-210/PCV-230
SONY«
Page 2

Notice to Users
© 1998 Sony Electronics Inc. All rights
reserved. This manual and the software
described herein, in whole or in part, may
not be reproduced, translated, or reduced
to any machinemeadable form without
prior written approval
SONY ELECTRONICS INC. PROVIDES
NO WARRANTY WITH REGARD TO
THIS MANUAL, THE .SOFTWARE, OR
OTHER INFORMATION CONTAINED
HEREIN AND HEREBY EXPRESSLY
DISCLAIMS ANY IMPLIED
WARRANTIES OR MERCHANTABILITY
OR FITNESS FOR ANY PARTICULAR
PURPOSE WITH REGARD TO THIS
MANUAL, THE SOFTWARE, OR SUCH
OTHER INFORMATION. IN NO EVENT
SHALL SONY ELECTRONICS INC. BE
LIABLE FOR ANY INCIDENTAL,
CONSEQUENTIAL, OR SPECIAL
DAMAGES, WHETHER BASED ON
TORT, CONTRACT, OR OTHERWISE,
ARISING OUT OF OR IN CONNECTION
WITH THIS MANUAL, THE SOFTWARE,
OR OTHER INFORMATION
CONTAINED'HEREIN OR THE USE
THEREOF.
Sony Electronics Inc. reserves the right to
make any modification to this manual or
the information contained herein at any
time without notice. The software
described herein may also be governed by
the terms of a separate user license
agreement.
Sony and VAIO are trademarks of Sony.
Windows and the Windows 95 logo are
registered trademarks of Microsoft
Corporation. Intel, MMX, ProShare, and
Pentium are trademarks of Intel
Corporation. K56flex is a trademark of
Lucent Technologies Inc. and Rockwell
International. All other trademarks are
trademarks of their respective owners.
Safety Information
Owner’s Record
The model number and serial number are
located on the back of your Sony PC.
Record the serial number in the space
provided here. Refer to the model and
serial number when you call your Sony
Service Center.
Model Number: PCV-210/ PCV-230
Serial Number:
_______________ _____
WARNING
□ To prevent fire or shock hazard, do
not expose your Sony PC to rain or
moisture.
□ Never install modem or telephone
wiring during a lightning storm.
□ Never install telephone jacks in wet
locations unless the jack is specifically
designed for wet locations
□ Never touch uninsulated telephone
wire or terminals unless the telephone
line has been disconnected at the
network interface.
□ Use caution when installing or
modifying telephone lines.
□ Avoid using the modem during an
electrical storm.
□ Do not use the modem or a telephone
to report a gas leak in the vicinity of
the leak.
! The use of optical instruments
with this product will increase eye
hazard.
Page 3

Regulatory Information
Declaration of Conformity
Trade Name: SONY
Model No.: PCV-210/PCV-230
Responsible Party:
Address:
Telephone No: 201-930-6970
This device complies with Part 15 of
FCC Rules. Operation is subject to
the two following conditions: (1)
This device may not cause harmful
interference, and (2) this device
must accept any interference
received, including interference that
may cause undesired operation.
This equipment has been tested and found
to comply with the limits for a Class B
digital device, pursuant to Part 15 of the
Rules. These limits are designed to provide
reasonable protection against harmful
interference in a residential installation.
This equipment generates, uses, and can
radiate radio frequency energy and, if not
installed and used in accordance with the
instructions, may cause harmful
interference to radio communications.
However, there is no guarantee that
interference will not occur in a particular
installation. If this equipment does cause
harmful interference to radio or television
Sony Electronics Inc.
I Sony Drive
Park Ridge, NJ 07656
reception, which can be determined by
turning the equipment off and on, the user
is encouraged to try to correct the
interference by one or more of the
following measures:
□ Reorient or relocate the receiving
antenna.
□ Increase the separation between the
equipment and the receiver.
□ Connect the equipment into anoutlet
on a circuit different from that to
which the receiver is connected.
□ Consult the dealer or an experienced
radio/TV technician forhclp.
You are cautioned that any changes or
modifications not expressly approved in
this manual could void yourauthority to
operate this equipment.
Only peripherals (computer input/output
devices, terminals, printers, etc.) that
comply with FCC Class B limits may be
attached to this computer product.
Operation with non-compliant peripherals
is likely to result in interference to radio
and television reception.
All cables used to connect peripherals must
be shielded and grounded. Operation with
cables, connected to peripherals, that are
not shielded and grounded, may result in
interference to radio and television
reception.
Page 4

FCC Part 68
This equipment compiles with Part 68 of
the FCC ruies. The ringer equivaience
number (REN) and the FCC registration
number are printed on the modem board. If
requested, this information must be
supplied to the telephone company.
The REN is used to determine the quantity
of devices which may be connected to the
phone line. Excessive REN's on the
telephone line may result in the devices not
ringing in response to an incoming call In
most, but not all areas, the sum of the
REN's should not exceed Five (5.0). To be
certain of the number of devices that may
be connected to the line, as determined by
the total REN's, contact the telephone
company to determine the maximum REN
for the calling area.
This modem uses the USOC RJ-11
telephone jack.
If this equipment causes harm to the
telephone network, the telephone company
will, when practical, notify you in advance
that temporary discontinuance of service
may be required. If advance notice isn't
practical, the telephone company will
notify you as soon as possible. Also, you
will be advised of your right to file a
complaint with the FCC if you believe it is
necessary.
The telephone company may make
changes in its facilities, equipment,
operations or procedures that could affect
the operations of the equipment. If this
happens, the telephone company will
notify you in advance, in order for you to
make the necessary modifications
in order to maintain uninterrupted service.
If trouble is experienced with this modem,
for repair or warranty information, please
contact 1-888-4SONY-PC. or write to the
Sony Customer Information Center, One
Sony Drive, Park Ridge, Nj 07656.
This equipment cannot be used on
telephone-company-provided coin service.
Connection to Party Line Service is subject
to state tariffs.
Repair of the modem should be made only
by a Sony Service Center or Sony
authorized agent. For the Sony Service
Center nearest you, call
1 888-4SONY-PC (1-888-476-6972).
Telephone Consumer Protection Act of 1991
The Telephone Consumer Protection Act of
1991 makes it unlawful for any person to
use a computer or other electronic device to
send any message via a telephone facsimile
machine unless such message clearly
contains, in a margin at the top or bottom
of each transmitted page or on the first
page of the transmission, the date and time
it is sent and an identification of the
business, other entity, or individual
sending the message, and the telephone
number of the sending machine or such
business, other entity, or individual.
In order to program this information into
your facsimile, see your fax software
documentation.
^ You are cautioned that any changes or
modifications not expressly approved
in this manual could void your
authority to operate this equipment.
IV
Page 5

Contents
Welcome
About This User Guide............................................................................2
Setting Up Your Sony PC
Unpacking Your PC................................................................................ 3
Choosing a Location for Your PC...........................................................4
Back Panel Overview
Connecting the Sony Multimedia Computer Display
Connecting a Display, Speakers, and a Microphone.............................8
Connecting the Optional Palmrest.........................................................9
Connecting the Keyboard and Mouse
Connecting the Phone Line and Phone...............................................11
Connecting the Power Cords................................................................12
Connecting Additional Components...................................................13
Connecting a Television (Audio/Video Out)
Connecting a Printer.......................................................................17
Connecting a Joystick or MIDI Instrument..................................18
Connecting a Universal Serial Bus (USB) Device
Connecting a Digital Camera or Other Serial Peripheral
Starting Your Sony PC...........................................................................21
Registering Windows® 95.....................................................................22
Registering Your PC...............................................................................23
Accessing the Diskette and CD-ROM Drives
Shutting Down Your Sony PC
...............................................................................
..........................
.................................................
..............................
.......................
.....................................
..............................................................
............
6
7
10
14
19
20
24
26
V
Page 6

Getting Started With VAIO Space
About the Navigation Toolbar
Using VAIO Space..................................................................................29
Starting VAIO Space
Using the Software Center
Using the Audio/Video (A/V) Center...........................................29
Using the Communication Center
Using the Help Center....................................................................30
Using the Tool Center.....................................................................30
Using the VAIO Space Menu
Exiting VAIO Space........................................................................31
.............................................................
.......................................................................
...........................................................
...............................................
........................................................
Introducing the Sony AA/ Suite
Using the Mixer...................................................................................... 34
Using the CD Player...............................................................................36
Playing an Audio CD......................................................................36
Naming a CD
Naming CD Tracks..........................................................................39
Creating CD Playlists......................................................................40
Removing Tracks from a CD Playlist
Using the WAV Player
Playing a WAV File.........................................................................43
Creating WAV Playlists..................................................................45
Playing a WAV Playlist
Removing Files from a WAV Playlist...........................................48
Using AudioView...................................................................................49
Editing a WAV File
Recording a WAV File....................................................................55
Using the MIDI Player...........................................................................56
Playing a MIDI File
Creating MIDI Playlists..................................................................58
Playing a MIDI Playlist...................................................................60
Removing Files from a MIDI Playlist...........................................61
Recording a MIDI File
Using the Video Player..........................................................................63
Creating Video Playlists.................................................................63
Playing a Video Playlist..................................................................66
Removing Files from a Video Playlist..........................................67
...................................................................................
...........................................
........................................................................
..................................................................
.........................................................................
.........................................................................
....................................................................
28
29
29
30
31
38
42
43
47
49
56
62
vi
Page 7

Using the Communication Center
Opening and Closing the Communication Center............................69
Getting Started with the Communication Center
Communication Center Main Screen..................................................71
Getting Help.....................................................................................72
Using Mailboxes and Greetings...........................................................72
Accessing Mailboxes.......................................................................73
Adding a Mailbox............................................................................73
Accessing Mailbox Options............................................................74
Mailbox Passwords
Setting the Default Mailbox
Deleting a Mailbox
Mailbox Greetings...........................................................................76
Accessing Mailboxes Remotely
Using Messages
Accessing Messages
Message Folders..............................................................................81
Managing Messages........................................................................82
Sending Faxes...................................................................................83
Filling in the Send Fax Dialog........................................................86
Using the Group Feature................................................................88
Sending a Data File..........................................................................89
Filling in the Send Data Dialog
Receiving Faxes...............................................................................91
Placing and Receiving Phone Calls
Telephone Options
Using the Phone Book............................................................................97
Accessing the Phone Book
Managing Phone Book Entries
Filling in the Phone Book Entry Dialog........................................98
Using Video Phone
Setting Up Your Computer to Use Video Phone
Making and Receiving a Video Call...........................................101
Sending a Snapshot..................................................................... 103
Receiving a Snapshot....................................................................104
Viewing Saved Snapshots
Using Video Phone Help..............................................................105
Improving Video Quality.............................................................106
Connection Quality Indicator......................................................106
......................................................................................
.........................................................................
...........................................................
..........................................................................
.....................................................
........................................................................
.....................................................
.....................................................
.........................................................................
.............................................................
......................................................
..............................................................................
............................................................
.............................
......................
Contents
70
74
75
75
78
80
80
90
94
95
97
97
100
100
105
vii
Page 8

I;
■
Getting Help
Calling SOS........................................................................................... 109
Troubleshooting.................................................................................. 112
Using the System Recovery CDs
Using the Application Recovery CDs
.......................................................
...............................................
Upgrading and Maintaining Your Sony PC
Removing the Cover............................................................................120
Inserting an Add-in Board..................................................................123
Adding Memory...................................................................................127
Replacing the Lithium Battery
Replacing the Cover
............................................................................
...........................................................
Computer Basics
Using the Keyboard........................................................................... 135
Using the Mouse
Setting Up the Mouse for Left-Hand Use
Using the CD-ROM Drive
Using the Diskette Drive.....................................................................140
.........
.........................................................................137
...............
..................................................................139
..................
115
117
129
132
138
Other Information
Notes on Use
On the Power Source.................................................................. 141
On Disposal of the Lithium Battery............................................142
On Handling
On Installation
On Moisture Condensation..........................................................144
On Upgrading the System
On Using the Hard Disk Drive.................................................. 145
On Handling Diskettes.................................................................145
On Handling CD-ROM Discs..................................................... 145
On Cleaning CD-ROM Discs
........................................................................................
..................................................................................
...............................................................................
...........................................................
.......................................................
141
143
143
144
146
Index..............................................................................................147
VIII
Page 9

Welcome
Congratulations on your purchase of the Sony PC. Sony has
combined leading-edge technology in audio, video, computing, and
communications to provide you with state-of-the-art personal
computing.
Here are just some of the features your Sony PC has to offer.
□ Exceptional performance: Your PC includes a fast Intel® Pentium® II
processor, a 24x (maximum) CD-ROM drive, and a 33.6 kbps DSVD
(Digital Simultaneous Voice Data) modem with KSGflex™ technology.
□ Sony audio and video quality: Dynamic high-fidelity audio sound
system (PCI/32-bit), high-powered 3-D graphics (AGP) and “Sony-
Tuned” MPEG digital video playback enable you to take advantage
of today’s advanced multimedia applications, games, and
entertainment software,
□ Preinstalled software titles: Your Sony PC includes more than 30
best-selling creativity and entertainment software titles that allow
you to create music, enhance and share your photos, learn about the
world, and play games featuring 3-D graphics.
□ Windows® 95: Your system includes the latest operating system
from Microsoft.
□ VAIO™ Space: Sony’s original navigation utility, which helps you
locate and launch applications quickly and easily.
□ Sony AfV Suite: Enjoy all of your PC’s audio and visual capabilities
with component-like applications that allow you to mix your own
sounds and play audio CDs and audio files (MIDI and WAV).
□ Communications: Access popular online services, browse the
Internet, and use Video Phone, the built-in speakerphone, answering
machine, and fax features.
□ Excellent customer support: Access Sony Online Support 24 hours a
day, seven days a week. The SOS software enables a support
representative to talk to you on the phone, perform remote
diagnostics on your PC, and send you updates, all through a single
phone call.
Page 10

About This User Guide
This guide offers a quick introduction and reference to your
Sony PC.
□ Setting Up Your Sony PC shows you how to connect the standard
components of your system—generally in under 15 minutes. This
section also explains how to connect additional components, such as
a TV, printer, MIDI instrument, joystick, and a digital camera.
□ Getting Started with VAIO Space describes how to use VAIO Space
to quickly and easily find and launch the applications on your Sony
PC.
□ Introducing the Sony A/V Suite describes how to use the audio and
video components of the Sony A/V Suite. For instance, learn how to
listen to your favorite CDs while you work on the computer.
□ Using the Communication Center explains how to use the features
of the telephony software, including Video Phone.
□ Getting Help explains the support options available to you, shows
you how to use the Sony Online Support service, and offers basic
troubleshooting tips.
□ Upgrading and Maintaining Your Sony PC Illustrates how to install
an add-in card and memory, as well as how to change the lithium
battery in your PC.
□ Computer Basics shows new computer users how to use a mouse,
keyboard, CD-ROM, and diskette drive.
□ Other Information provides facts and advice about using your PC.
Page 11

Setting Up Your Sony PC
Your Sony PC comes with the software titles preinstalled on your hard
disk drive. Just follow these simple steps to connect the cables and turn
on the PC, and your Sony PC is ready to use.
Unpacking Your PC
Remove the following items from the box:
System Unit
Display
(Sold Separately)
Power Cord
Phone Cable
You can find the complete list of the items that come with your PC in the
About Your Sony PC guide, located in the Sony folder in the Windows Start
menu.
If you purchased a Sony Multimedia Computer Display, it includes built-in speakers and a
microphone. For other displays, you may need separate speakers and a microphone to use the
Sony PC's audio features.
Page 12
Choosing a Location for Your PC
Here are some things to consider when planning your workspace:
□
Stable work surface—Use a stable work surface large enough to
support the computer, the display, and other equipment.
□
Ventilation—Leave at least eight inches of space on the left and back
sides of your PC to enable proper ventilation.
□
Placement of the keyboard, mouse, and other input devices—Place
your keyboard, mouse, and other input devices so that your arms and
hands are in a relaxed, comfortable position. The keyboard should be
directly in front of you. Adjust the level of the keyboard so that your
lower arms are parallel to the floor. Keep your wrists in a relaxed
position when you’re using the keyboard—not angled up or down.
Use the palmrest only briefly, for resting. While typing, never use the
palmrest or rest your hands on the table. Position the mouse at the
same level as the keyboard. Hold the mouse with a relaxed hand, and
use your whole arm to move it. Take breaks during sessions with
your PC. Excessive use of the mouse or a joystick may strain muscles
or tendons.
Page 13

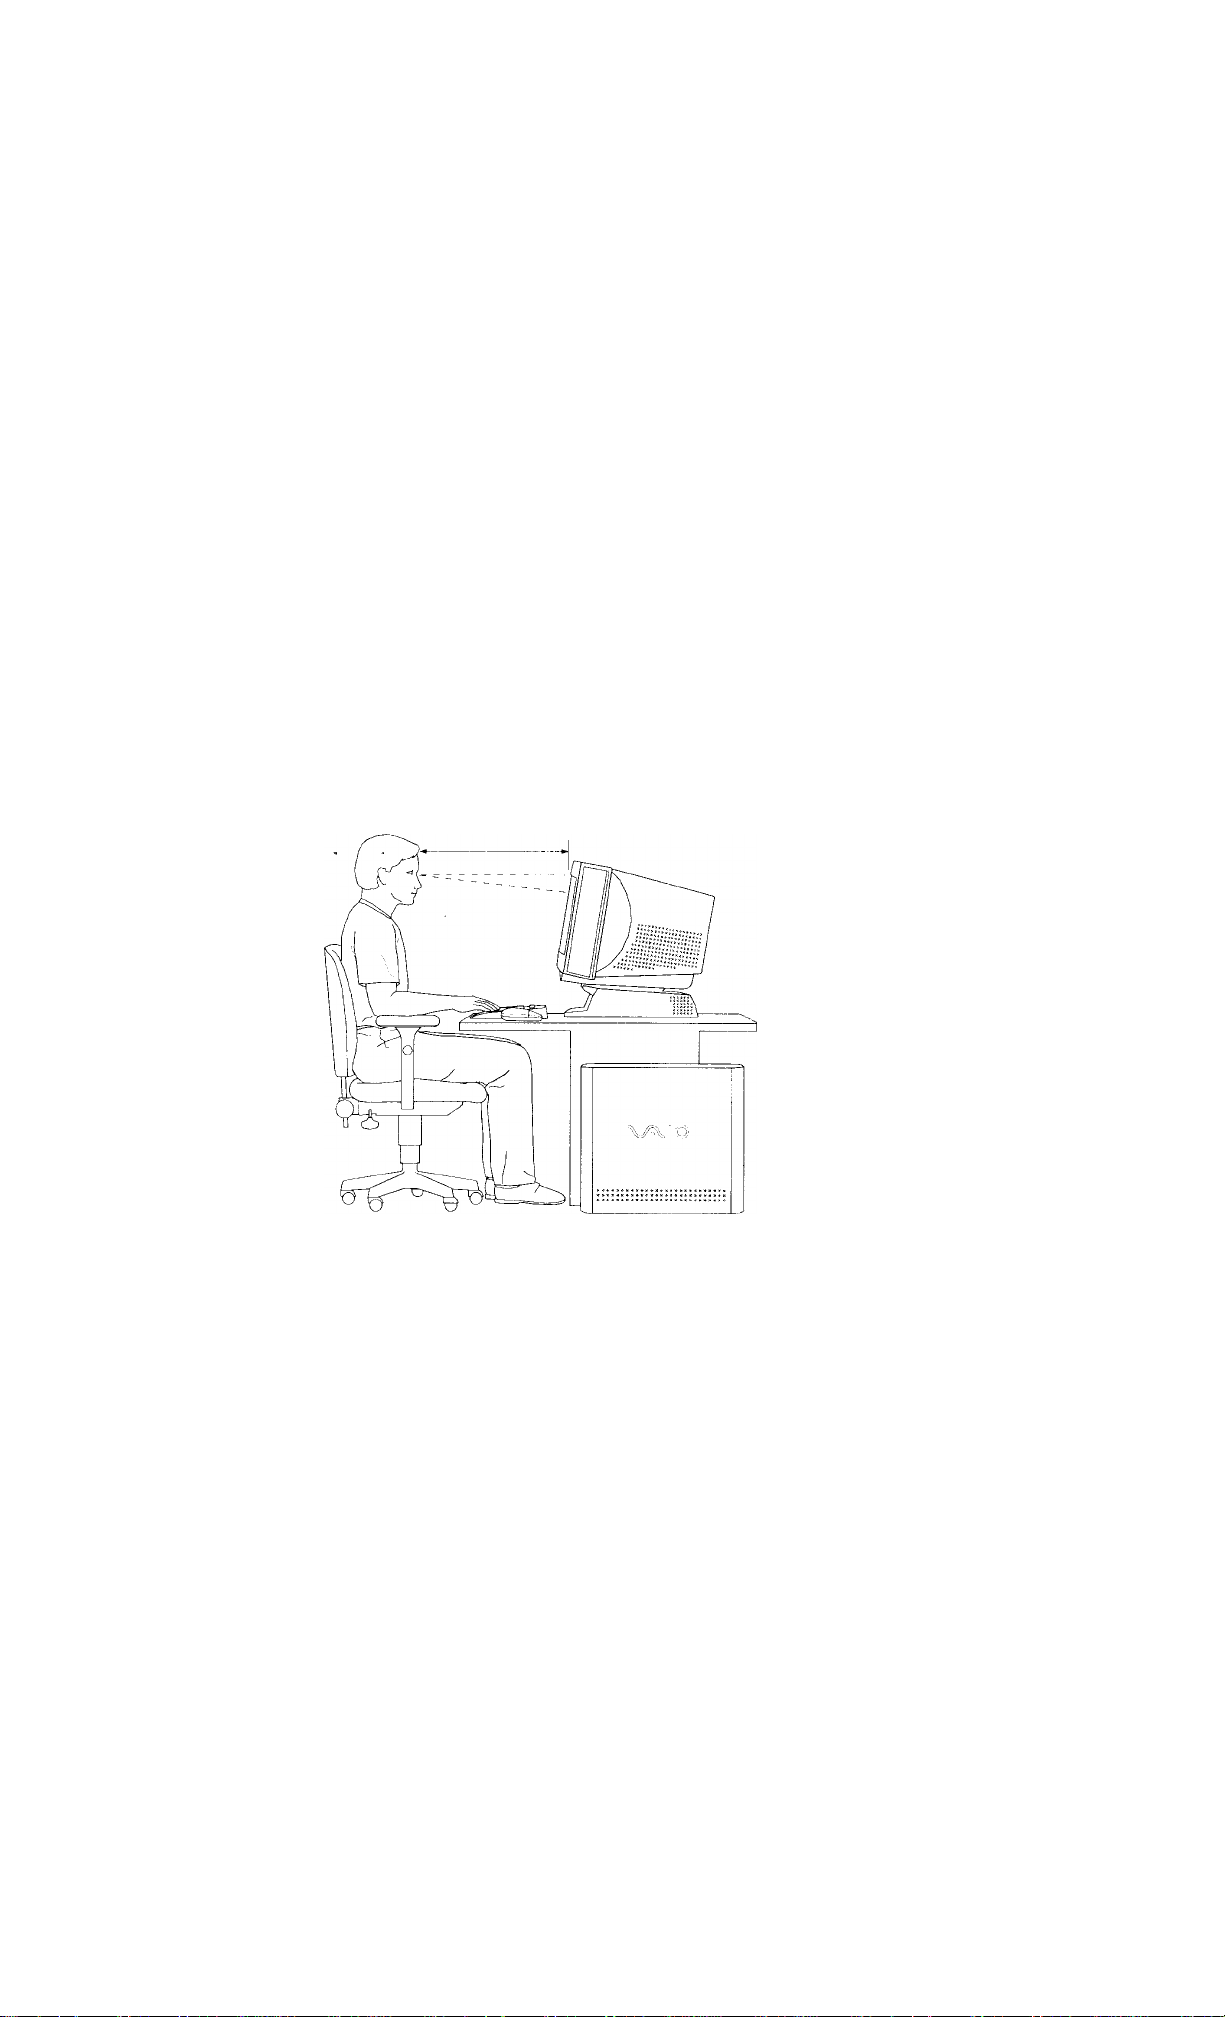
Choosing a Location for Your PC
□ Furniture and posture—Sit in a chair with good back support and
armrests. Adjust the level of the chair so your feet are flat on the floor.
A footrest may make you more comfortable. Sit in a relaxed, upright
posture—avoid slouching forward or leaning far backward.
□ Viewing angle of the display—Position the display 18 to 26 inches
directly in front of you, with the top of the screen at or a little below
eye level. Use the display’s tilting feature to find the best position.
You can reduce eye strain and muscle fatigue by placing the display
in the proper position.
□ Lighting—Choose a location where windows and lights do not create
glare and reflection on the display. Use indirect lighting to avoid
bright spots on the display. You can also purchase accessories for
your display that help reduce glare. Proper lighting adds to your
comfort and work effectiveness.
Page 14

Back Panel Overview
The back panel of your Sony PC contains the connectors where you plug
in supplied and optional accessories. The icons on the back panel serve as
a map to help you locate the connectors on your PC.
Power
Voltage Switch
Composite Video Out
■ S VIDEO Out
Monitor
Microphone
Game/MIDI
Line In
Phones
^ To maximize available resources, the Serial 2 port on your Sony PC is disabled by default. You
can enable the Serial 2 port by using the BIOS setup utility. For detaih^ee "Accessing the
BIOS Setup Utility" in the online Sony PC Reference Manual.
Page 15
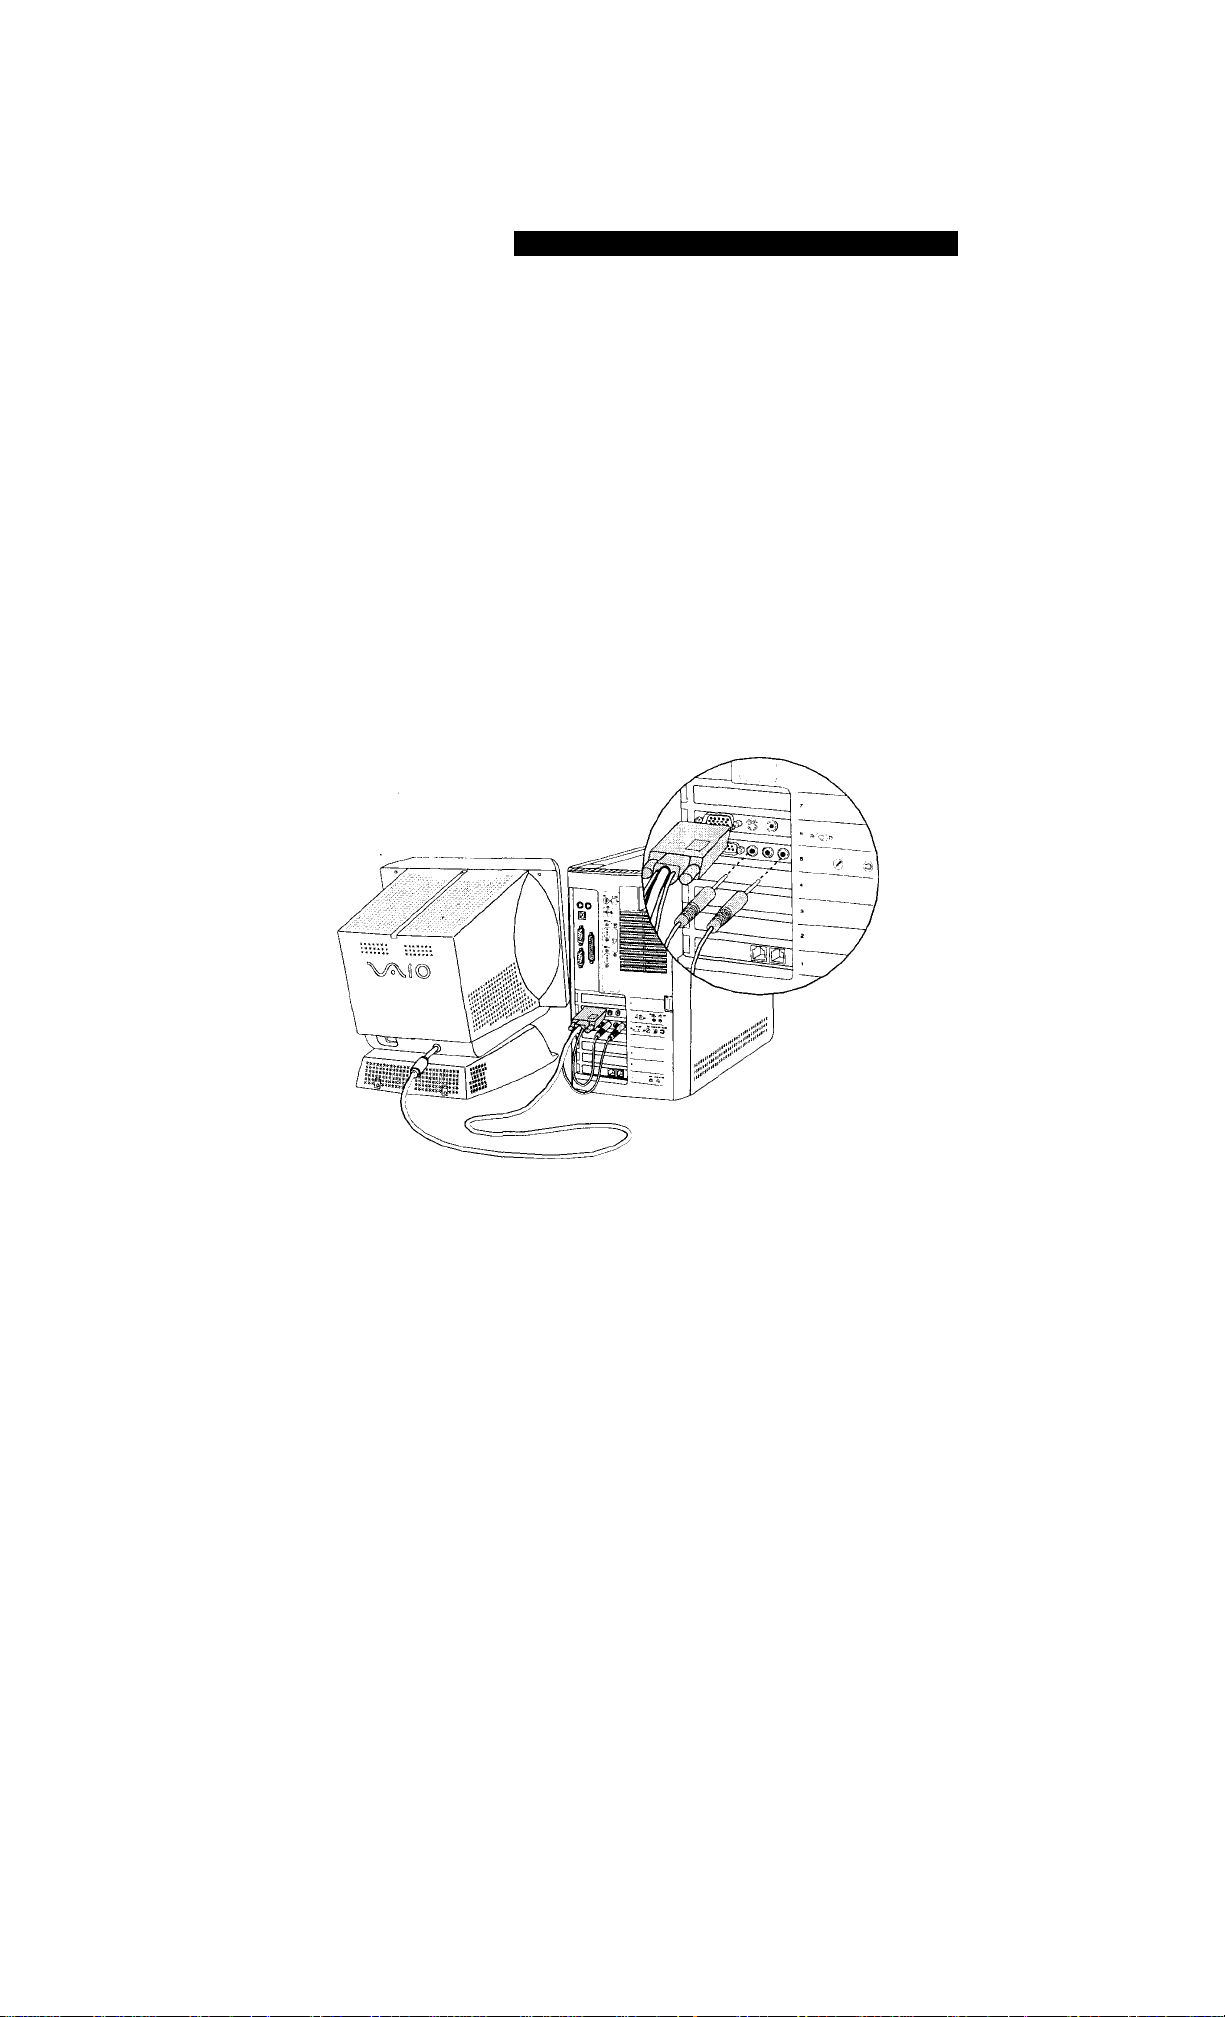
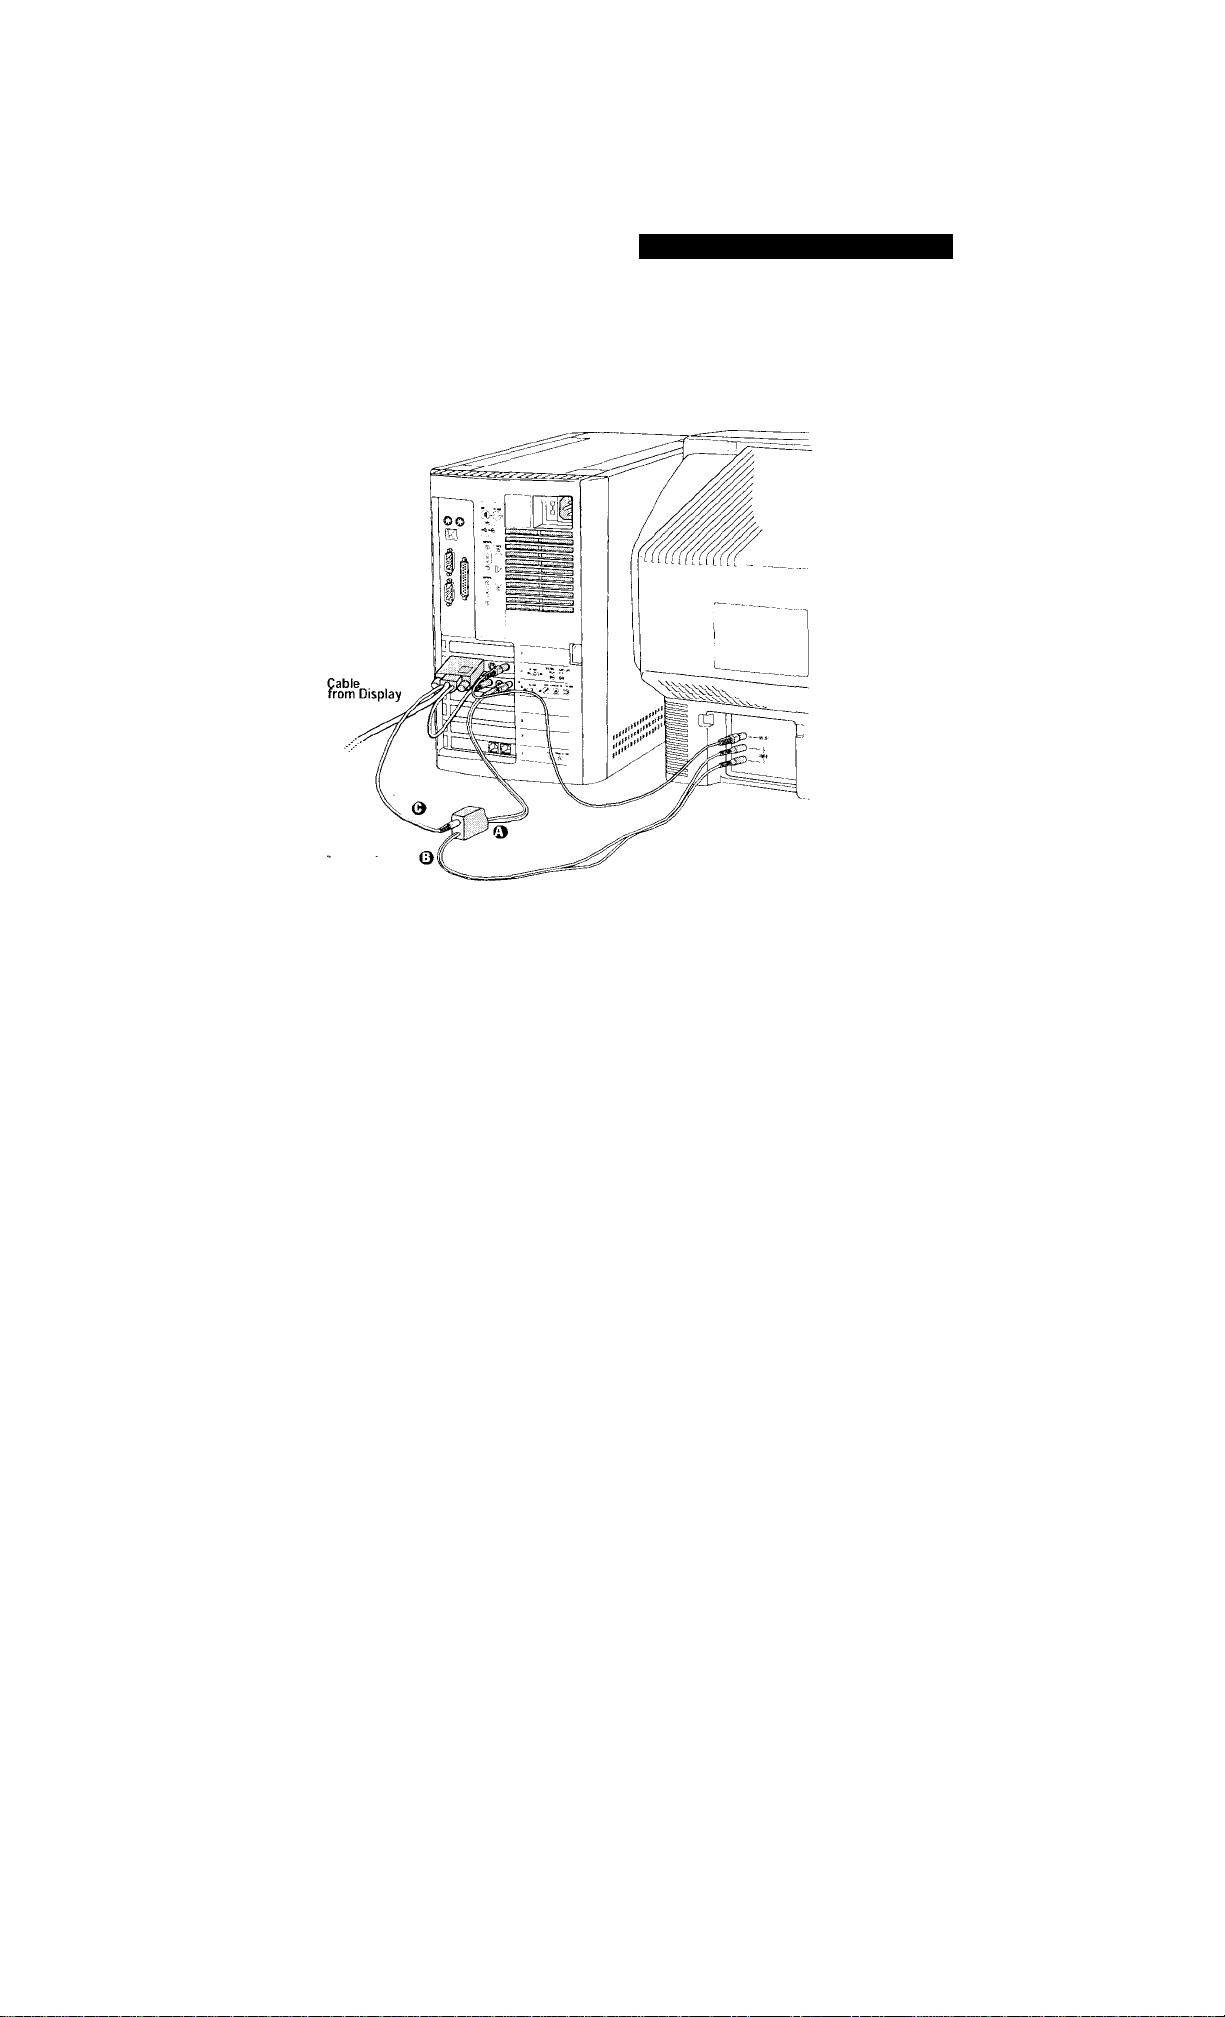
Connecting the Sony Multimedia Computer Display
Connecting the Sony
Multimedia Computer Display
The Sony Multimedia Computer Display (sold separately) is an
integrated audio/video unit with built-in speakers and a microphone.
Follow these steps to connect it to your PC.
Aj If you're connecting the Sony PC to a TV or other video component, see "Connecting a
Television (AudioA/ideo Out)" on page 14.
1 Use the blue (3 symbol to locate the MONITOR connector. Plug the
blue display cable into this connector, and then tighten the two
screws to secure the cable.
2 Use the green Q symbol to locate the PHONES connector. Plug the
green speaker cable into this connector.
3 Use the red y* symbol to locate the MIC connector. Plug the red
microphone cable into this connector.
See the manual that came with your Sony Multimedia Computer Display for more information
on setting up and using the display.
Page 16

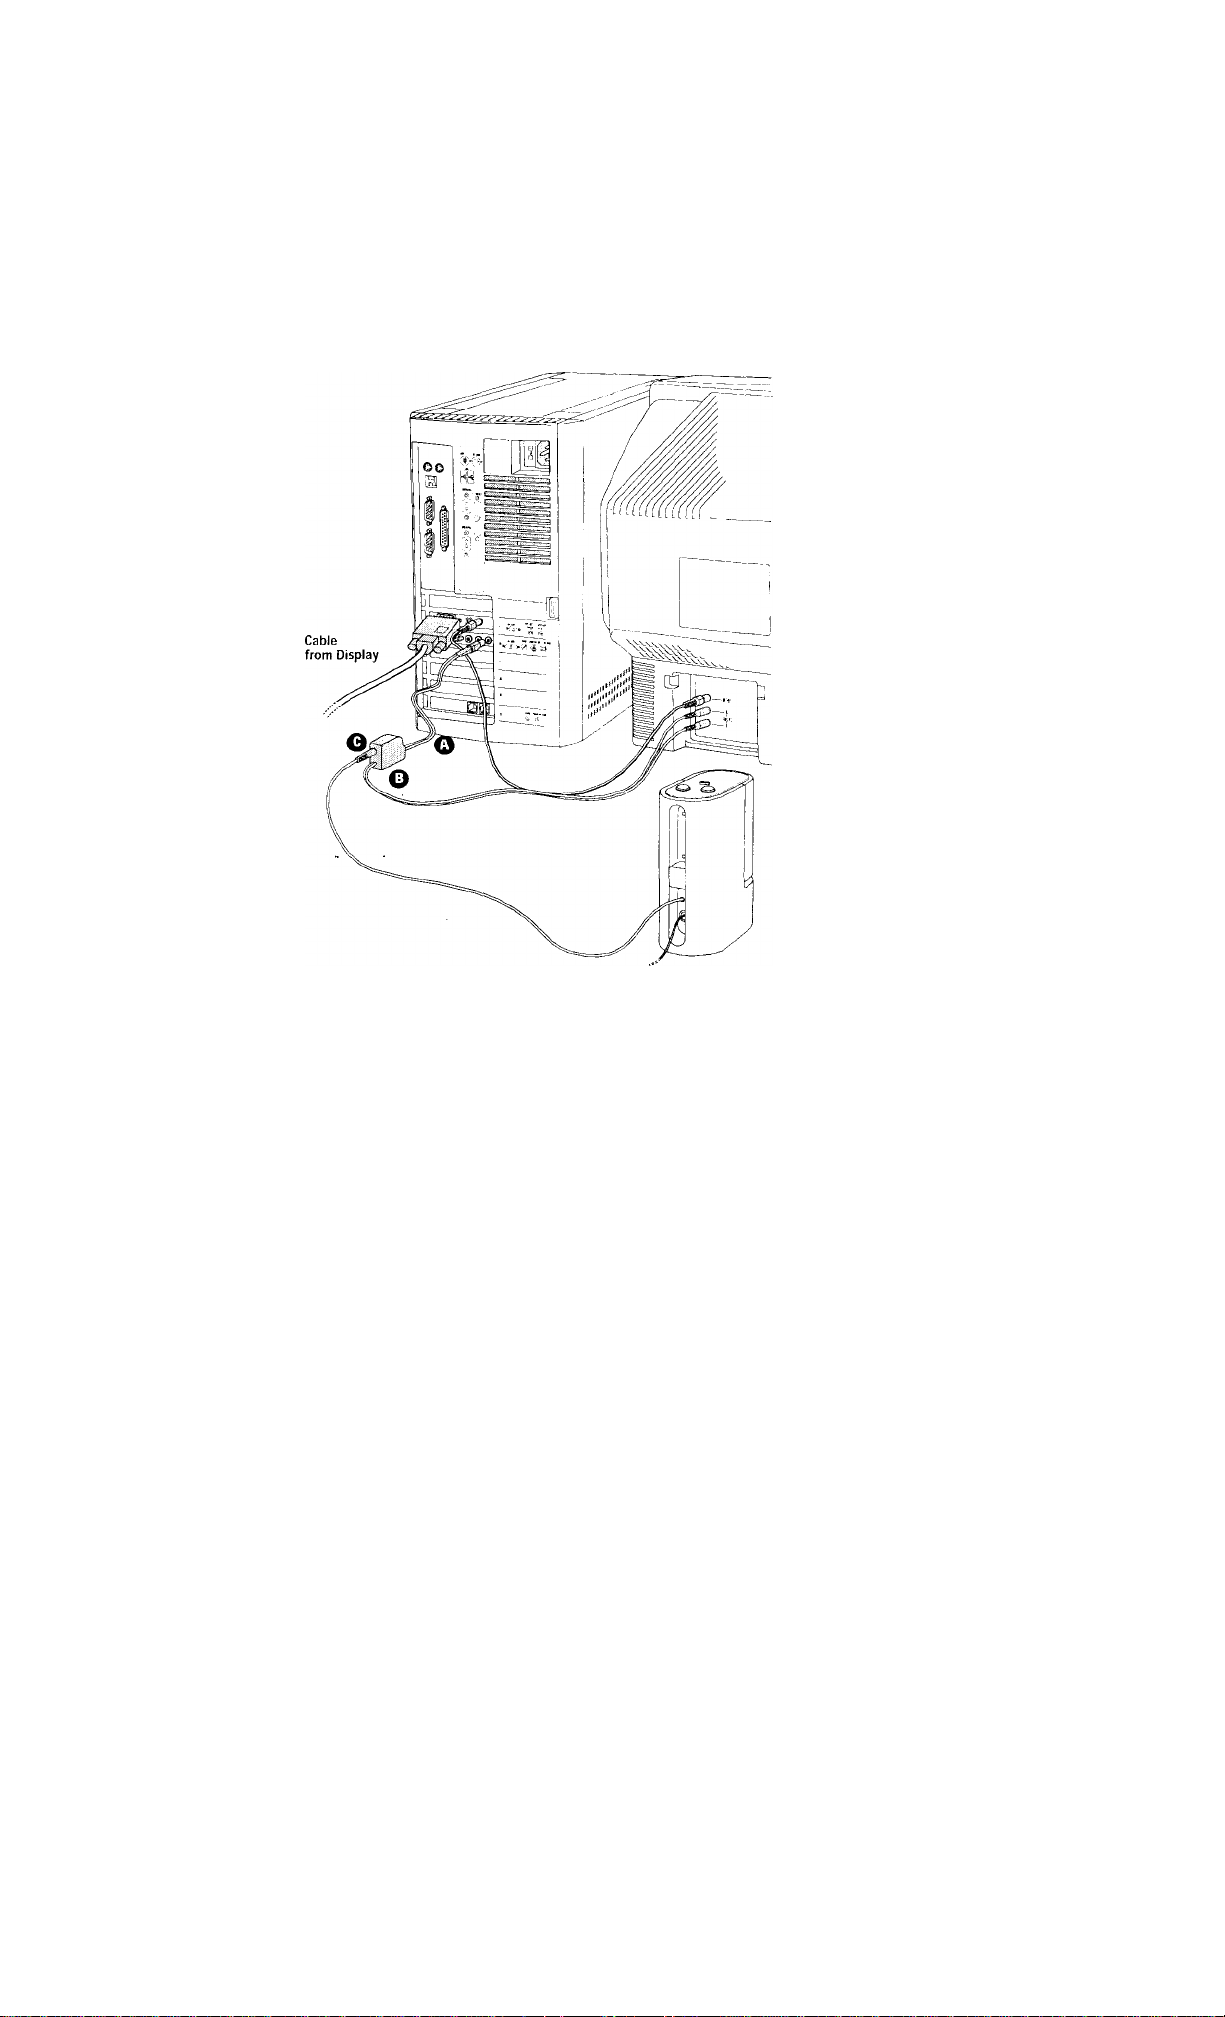
Connecting a Display, Speakers, and a Microphone
If you did not purchase the Sony Multimedia Computer Display, you
need speakers and a microphone to use the Sony PC’s audio features.
^ If you're connecting the Sony PC to a TV or other video component, see "Connecting a
Television (Audio/Video Out)" on page 14.
Make sure your speakers are designed for computer use. See the manuals that came with your
display, speakers, and microphone for more information on setting them up and using them.
1 Use the blue Q symbol to locate the MONITOR connector. Plug the
display cable into this connector, and then tighten the two screws to
secure the cable.
2 Use the green H symbol to locate the PHONES connector. Plug the
speaker cable into this connector.
3 Use the red y* to locate the MIC connector. Plug the microphone cable
into this connector.
Page 17
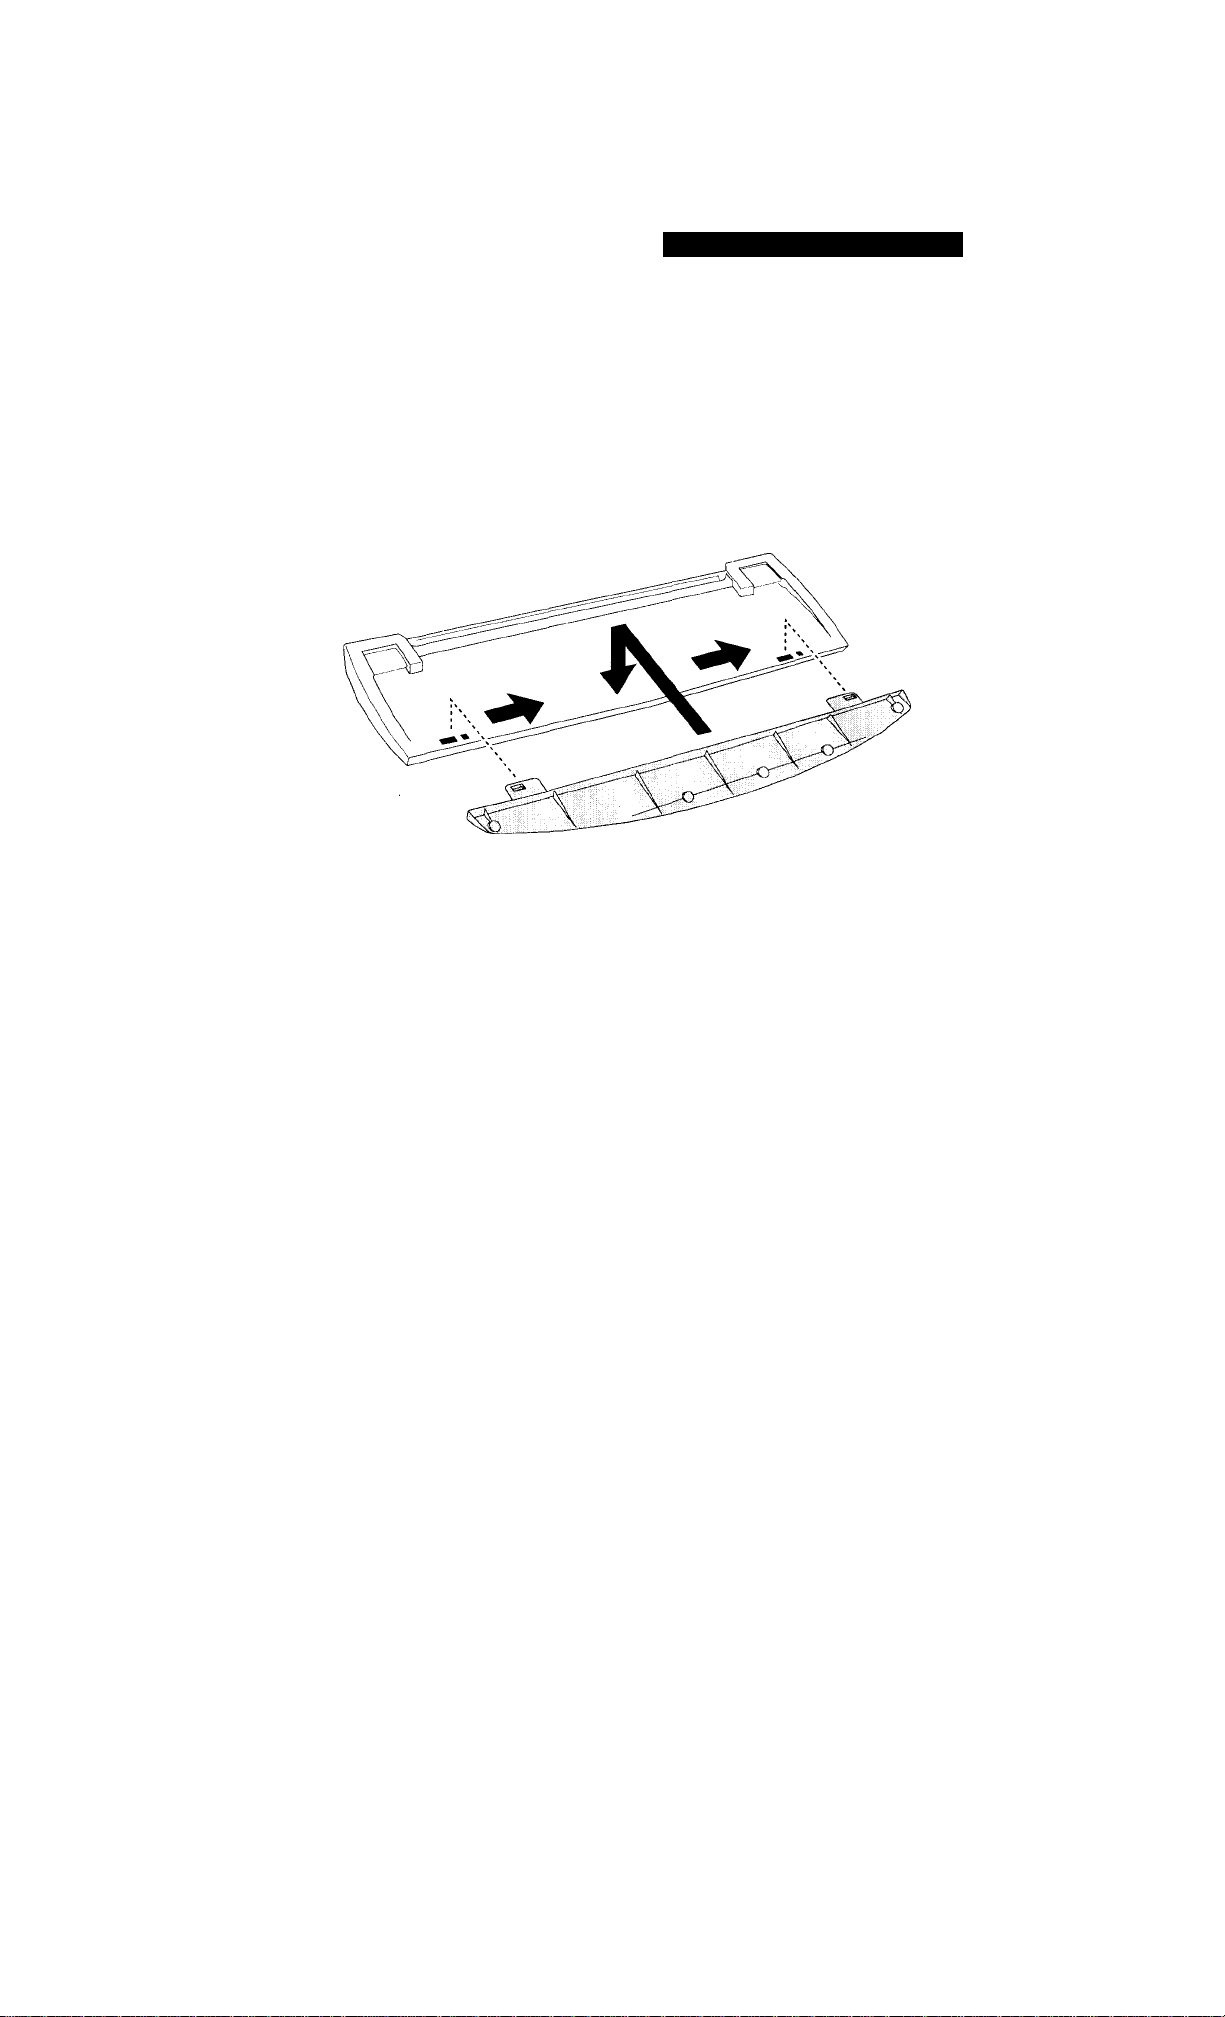
Connecting the Optional Palmrest
Connecting the Optional Palmrest
Your Sony PC is equipped with an optional palmrest that you can attach
to your keyboard. Follow these steps to connect the palmrest.
1 Place the keyboard and palmrest upside down on a flat surface.
2 Insert the latching posts on the palmrest into the openings on
the keyboard.
3 Move the palmrest to the right until you feel it snap into place.
Do not keep your wrists on the palmrest while typing; use the palmrest briefly only
when resting.
To remove the palmrest
1 Turn the keyboard and palmrest upside down.
2 Push down on the palmrest, and then move it to the left.
3 Lift the palmrest away from the keyboard.
Page 18

Connecting the Keyboard and Mouse
Follow these steps to connect the keyboard and mouse.
1 Use the purple IVLjVl symbol to locate the KEYBOARD connector. Plug the
purple keyboard cable into this connector.
2 Use the blue-green CB" symbol to locate the MOUSE connector and
insert the blue-green mouse cable into this connector.
^ See "Computer Basics" on page 135 for more information on setting up and using the
keyboard and mouse.
10
Page 19

Connecting the Phone Line and Phone
Connecting the Phone Line and Phone
You need to connect the phone line and phone to take advantage of online
services, the Internet, and Sony Online Support. The phone line also
enables you to register your PC and software online.
There are two phone jacks on the back panel. Follow these steps to
connect your phone line and phone.
1
Unplug your phone from the wall jack and plug it into the TELEPHONE
jack on the PC.
2
Plug one end of the phone cable that came with your system into the
LINE jack and the other end into the wall jack.
^ Your Sony PC does not work with party lines, cannot be connected to a coin-operated
telephone, and may not work with multiple phone lines or a private branch exchange (PBX).
11
Page 20
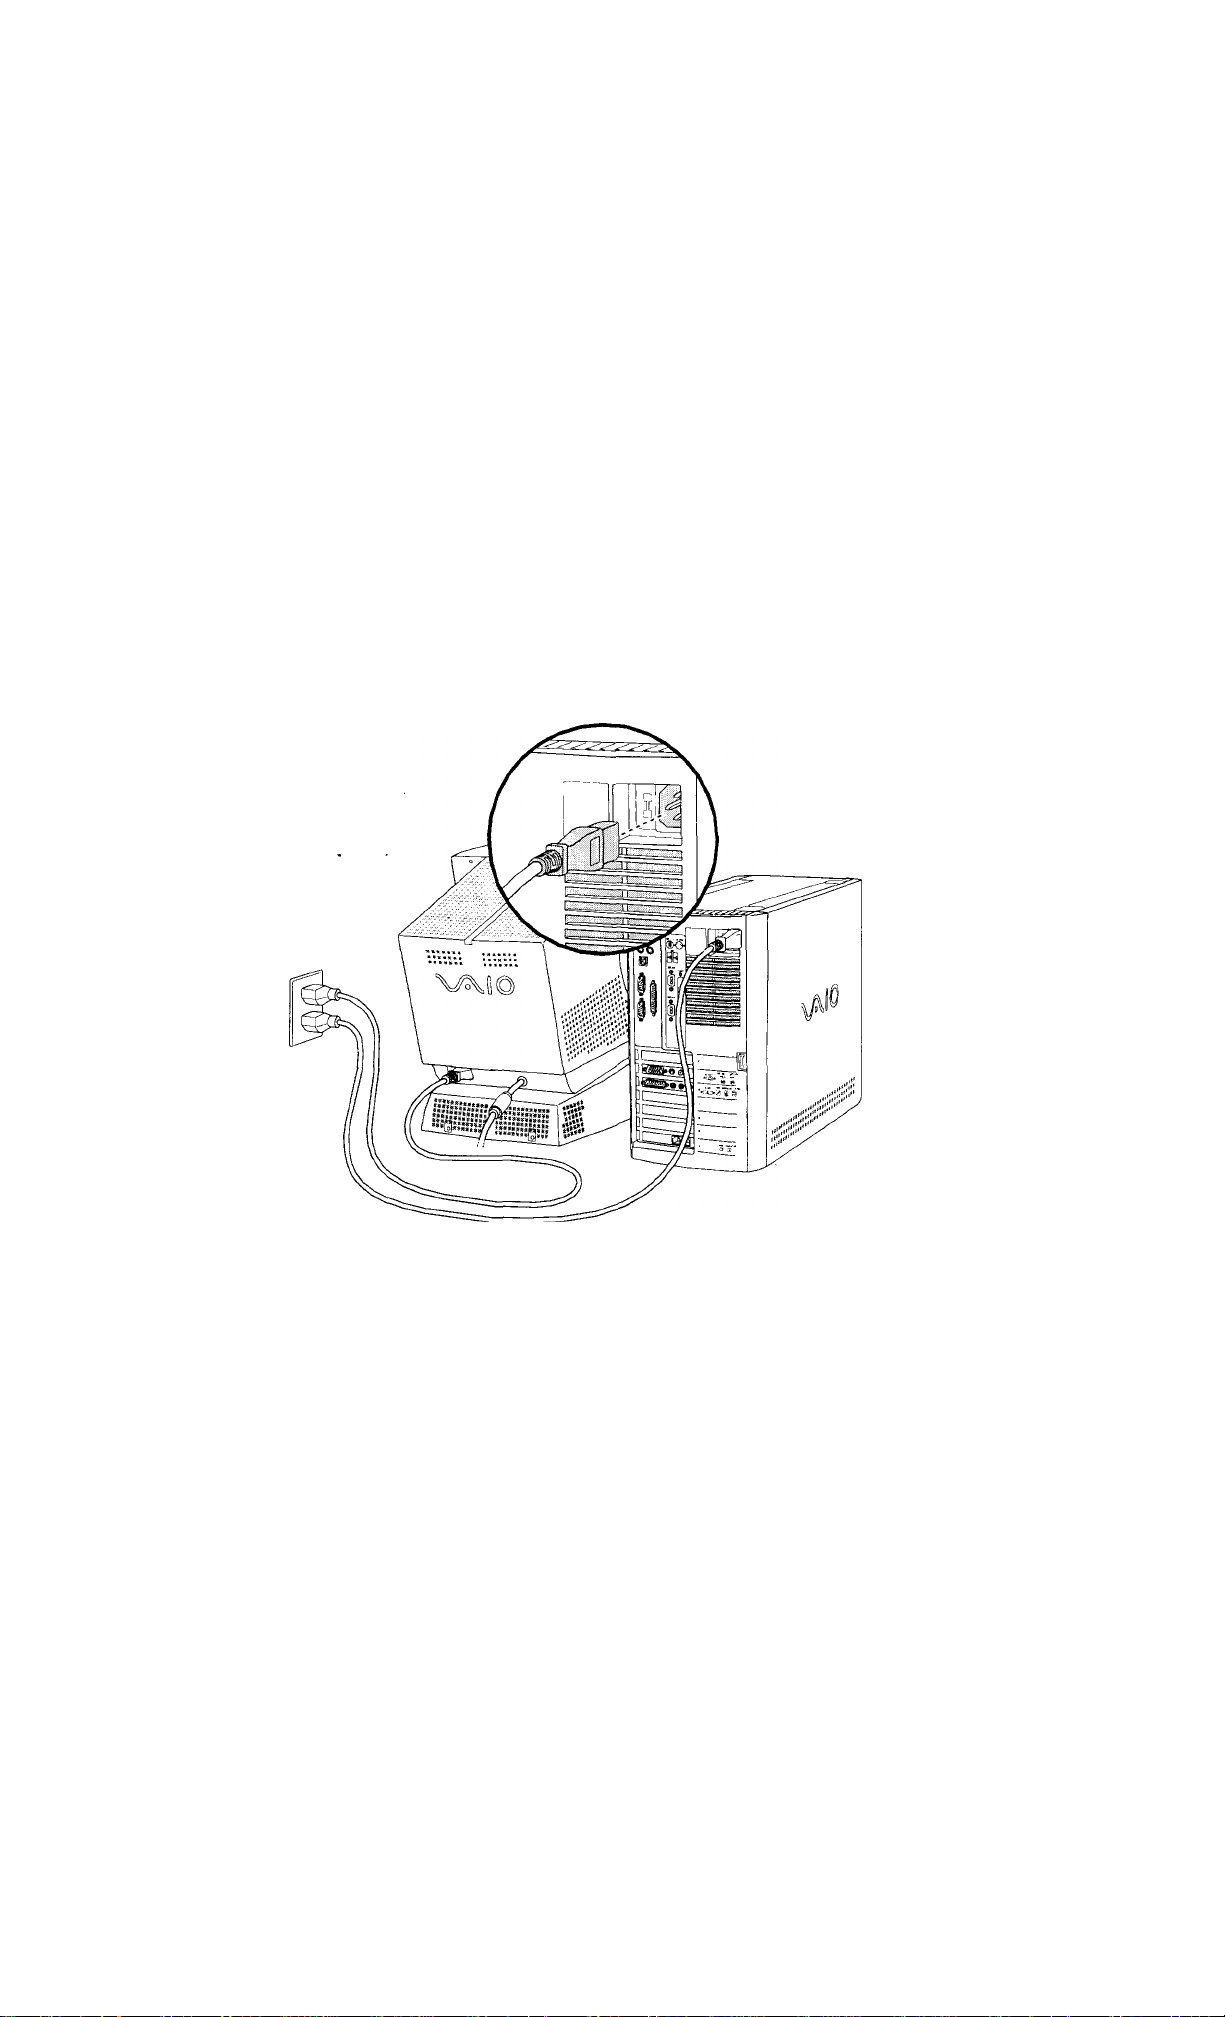
Connecting the Power Cords
Your Sony PC is shipped with the voltage switch set to 115 volts. This is
the correct setting for most homes and businesses in North America. If
you use the PC in a location that requires 230 volts, change the setting to
230 volts by moving the switch up.
! Do not use your Sony PC with the incorrect voltage setting; this may damage
the PC.
Follow these steps to connect the power cords.
1 Plug the power cord into the connector on the PC.
2 If necessary, plug the display power cord into the display.
3 Plug both the display and power cords into a grounded AC wall
outlet, power strip, or Uninterruptible Power Supply,
12
Page 21

Connecting Additional Components
Connecting Additional Components
You can add functionality to your Sony PC by connecting any of the
following peripherals.
Connecting
Television
Printer
Joystick
MIDI device
Universal Serial
Bus (USB) device
Serial device
Enables You To For
Send audio and video from
the PC to the TV
Print documents from the PC See page
Connect a joystick, which
enhances game playing
Connect MIDI instruments See
Connect USB devices See page
Connect serial devices, such
as a digital camera
Details
See page 14
See page
page 18
See page 20
1~7
l9
13
Page 22

Connecting a Television (AudioA/ideo Out)
Connecting a television to your Sony PC enables you to send audio and
video from the PC to the television. (You will be able to watch video and
hear audio on both the PC and the television.)
You can also connect the Sony PC to a camcorder, VCR, or other video component that has a
video in or S VIDEO in connector.
If your system includes the Sony Multimedia Computer Display:
1 Use the yellow [p symbol to locate the composite VIDEO OUT connector
on the PC. Plug either end of the yellow video cable into this
connector. Then plug the other end of the cable into the TV’s VIDEO IN
connector.
If your TV has an S VIDEO in connector, use the S VIDEO cable to connect the PC's
S VIDEO out jack to the TV's S VIDEO inJack. S VIDEO provides a better picture than a
conventional video connection.
2 Use the green Q symbol to locate the PHONES connector on the PC.
Plug the black end of the audio splitter cable O into this connector.
Then plug the red and white ends of the audio splitter cable O into
the TV’s AUDIO IN connectors. (This enables you to hear audio on the
multimedia monitor as well as on your TV.)
14
Page 23
[M
Connecting Additional Components
3 Plug the green audio plug from the display cable into the connector
on the audio splitter cable O. Then use the red y>* symbol to locate
the MIC connector on the PC. Plug the red microphone cable from the
display cable into this connector.
Back of TV
If your system does not include the Sony Multimedia Computer Display:
1 Use the yellow (p symbol to locate the composite VIDEO OUT connector
on the PC. Plug either end of the yellow video cable into this
connector. Then plug the other end of the cable into the TV’s VIDEO IN
connector.
^ If your TV has an S VIDEO in connector, use the S VIDEO cable to connect the PC's
S VIDEO out jack to the TV's S VIDEO inJack. S VIDEO provides a better picture than a
conventional video connection.
2 Use the green O symbol to locate the PHONES connector on the PC.
Plug the black end of the audio splitter cable O into this connector.
Then plug the red and white ends of the audio splitter cable O into
the TV’s AUDIO IN connectors.
15
Page 24
3 Plug the speaker cable into the connector on the audio splitter cable
o
Back of TV
16
Page 25
Connecting Additional Components
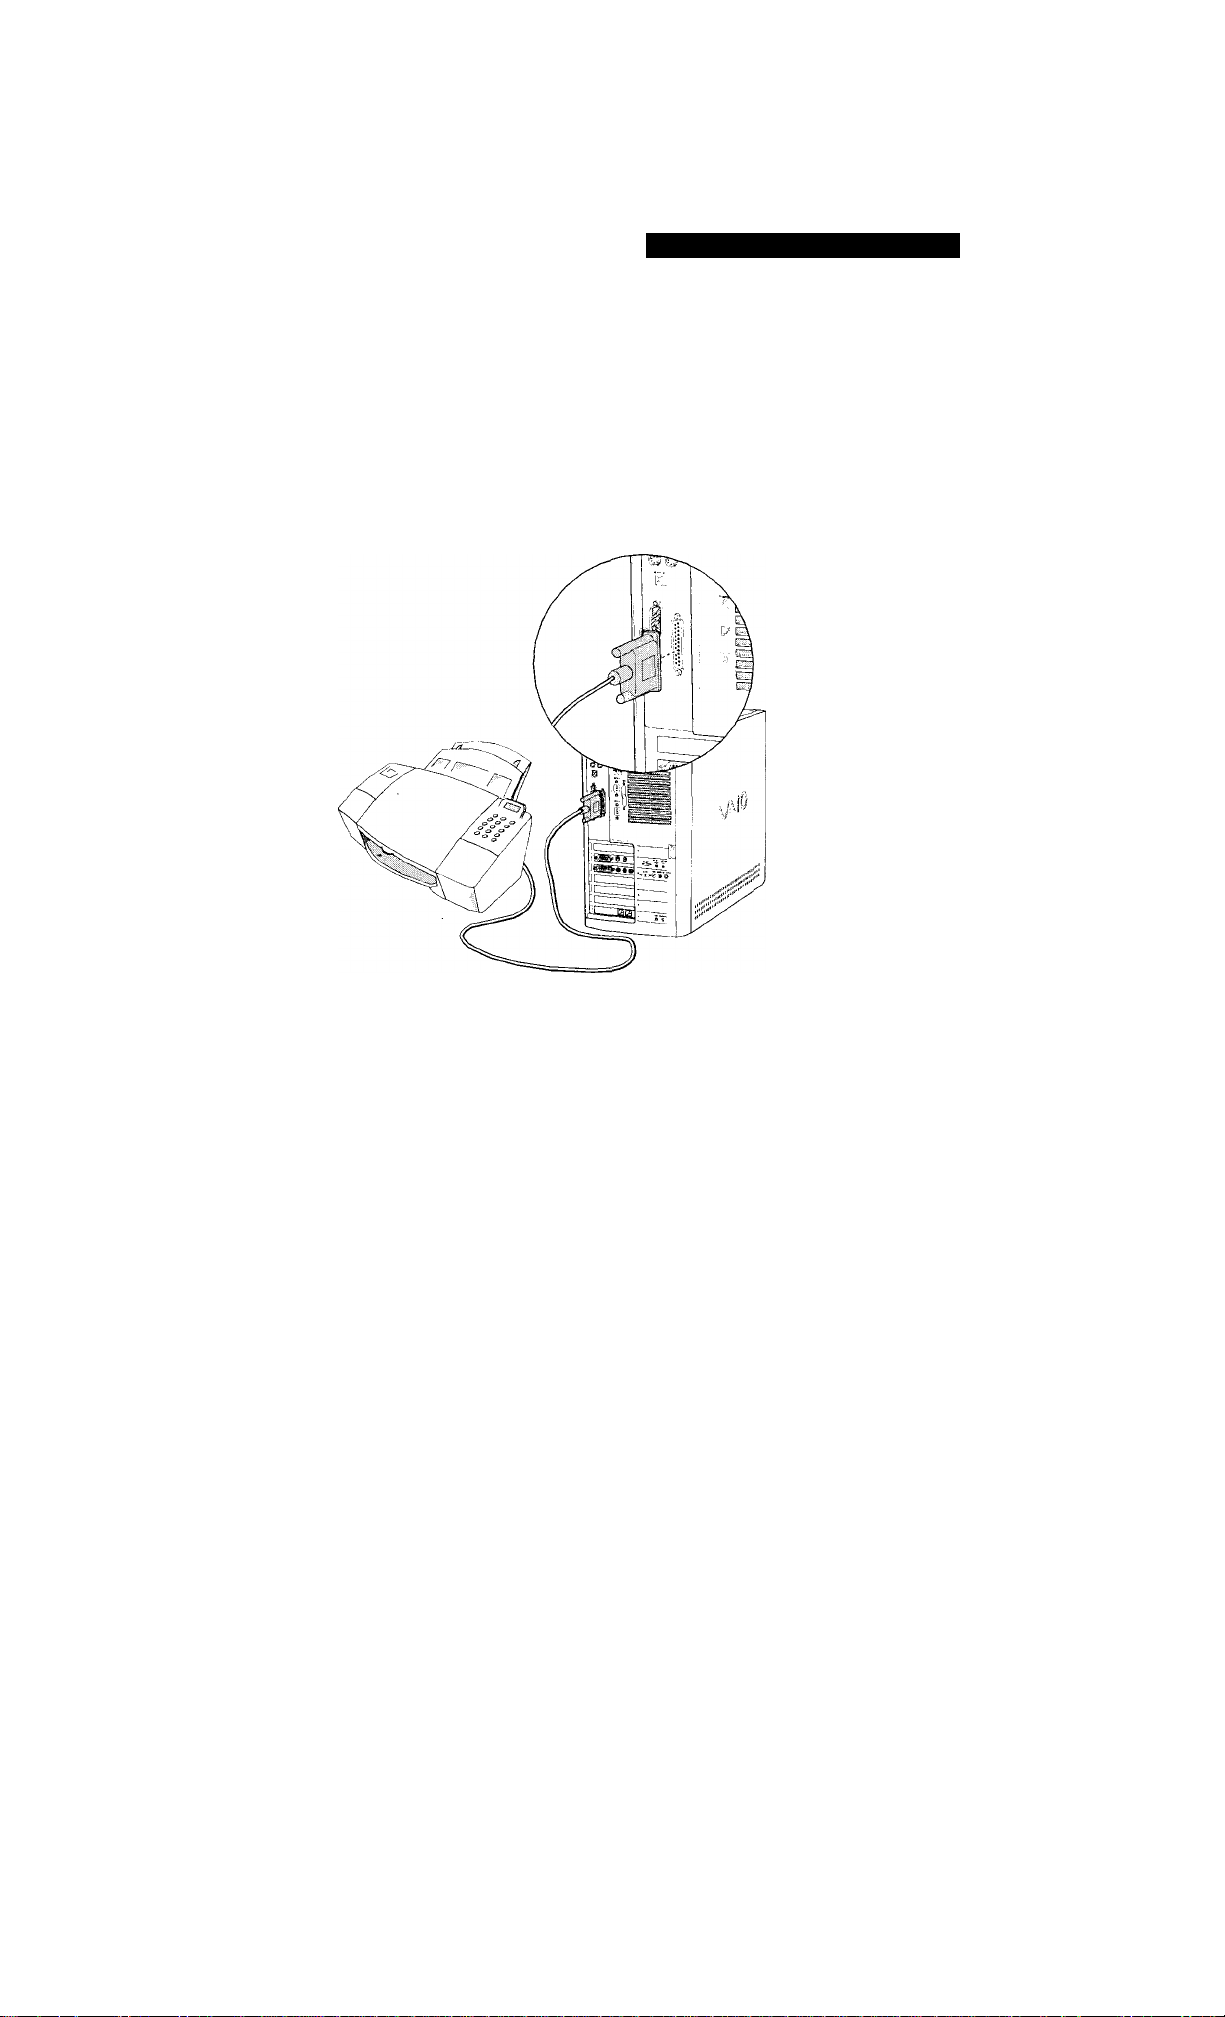
Connecting a Printer
You can connect a printer to your Sony PC to print documents from
your PC.
1 Use the dark grey symbol to locate the PRINTER connector. Plug the
printer cable into this connector.
2 If necessary, plug one end of the printer power cord into the
printer, and the other end into a grounded AC wall outlet, power
strip, or Uninterrupted Power Supply,
^ See the manual that came with your printer for more information on setting it up
and using it.
17
Page 26
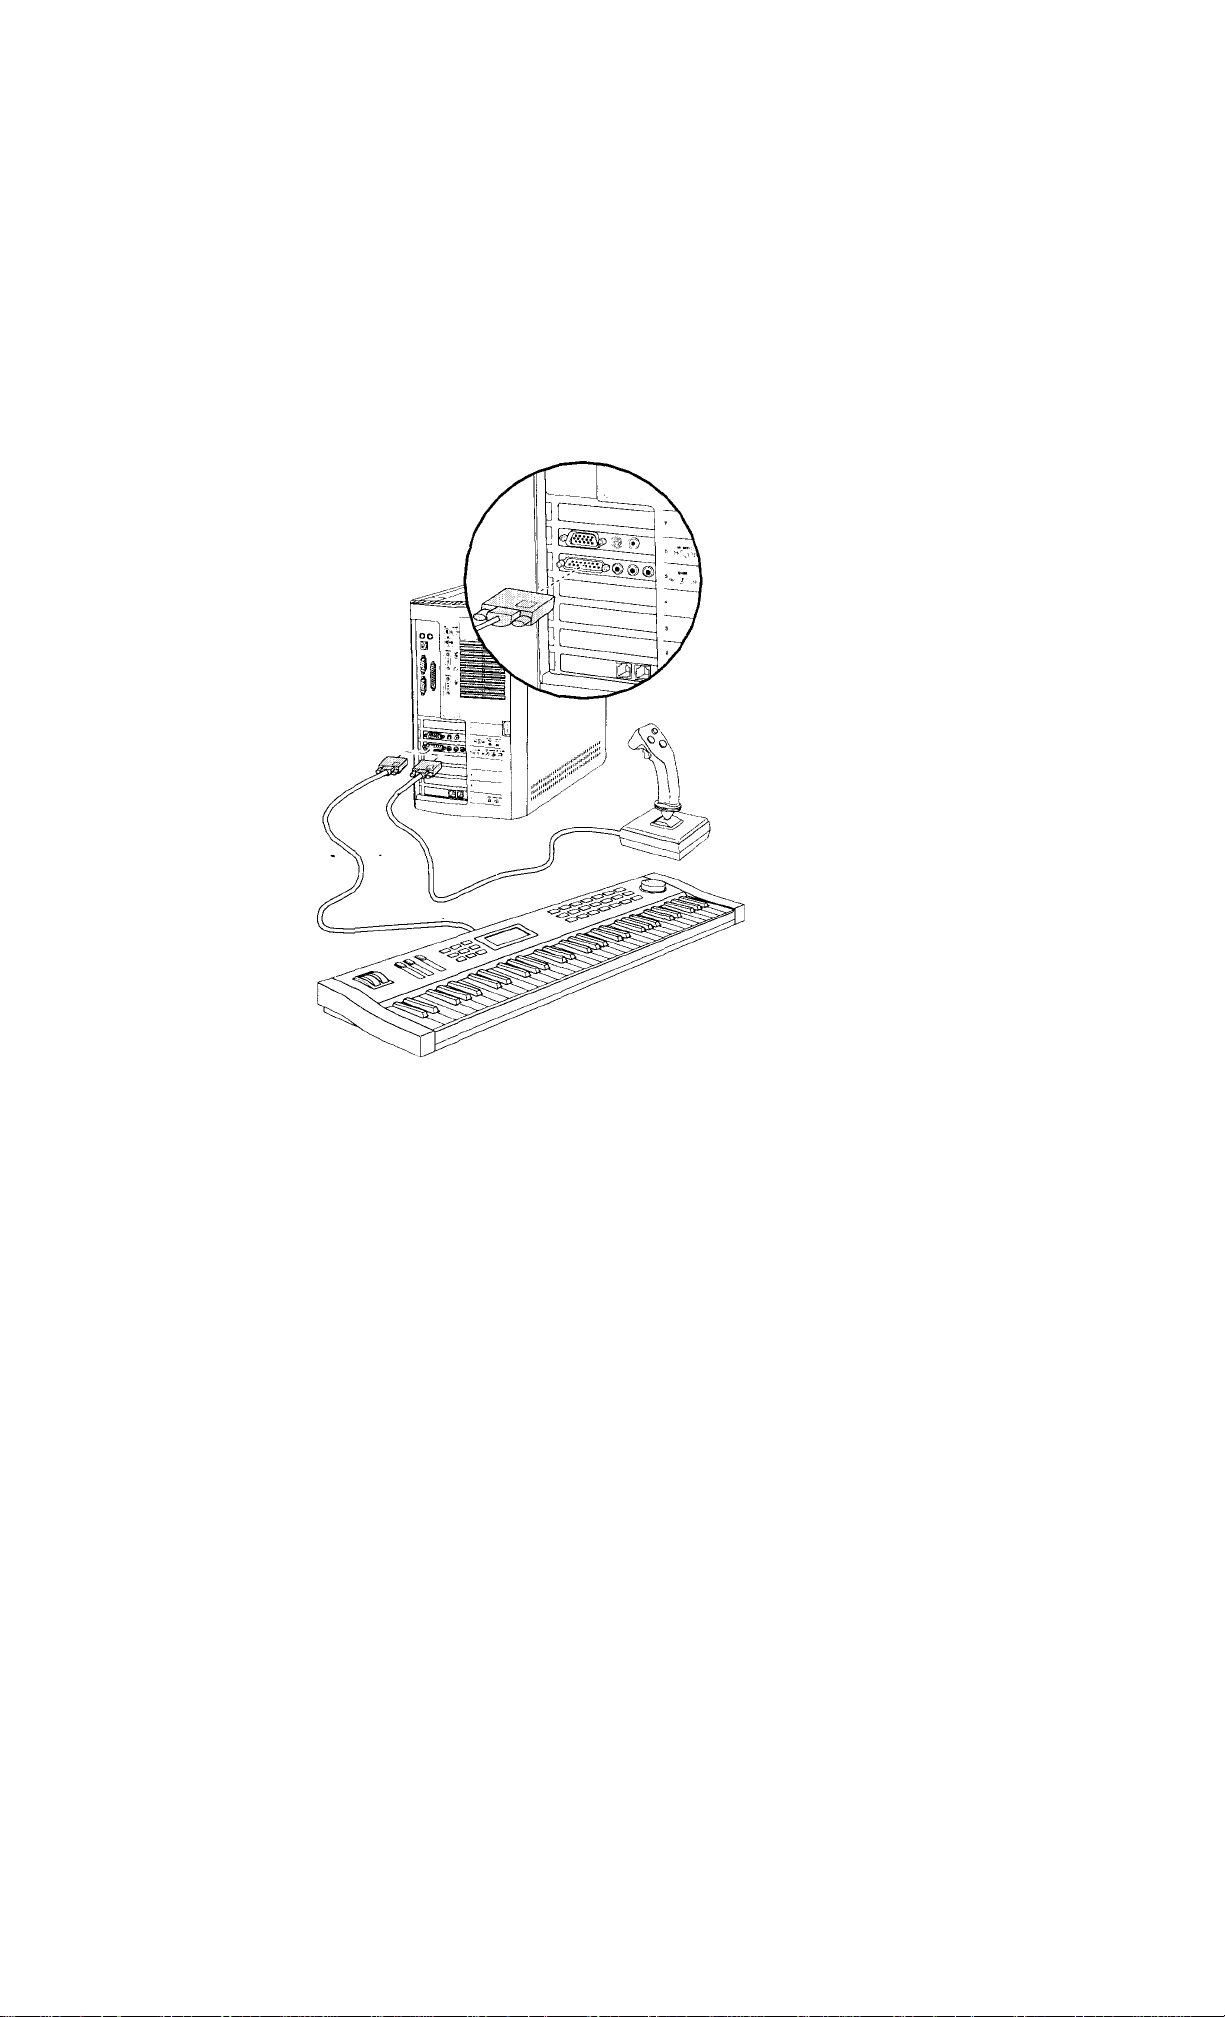
Connecting a Joystick or MIDI Instrument
You can connect a joystick or MIDI instrument to your Sony PC. You can
also purchase an adapter to connect additional devices.
□ Use the dark grey ^ symbol to locate the GAME connector. Plug
the joystick or MIDI cable into this connector.
^ Your MIDI instrument may have a different type of cable which requires an
adapter. See the manual that came with yourjoystick or MIDI instrument for more information
on setting it up and using it. ., ,
18
Page 27
Connecting Additional Components
Connecting a Universal Serial Bus (USB) Device
You can connect a USB device to your Sony PC.
□ Use the dark grey symbol to locate the USB connector. Plug
the USB cable into this connector.
^ USB ports are included to provide state-of-the-art technology. Your operating system supports
a limited number of USB devices. You may need to install software (device drivers) to use your
USB device.
See the manual that came with your USB device for more information on setting it up and
using it.
19
Page 28
Connecting a Digital Camera or Other Serial Peripheral
You can connect other computer peripherals, such as Sony 's digital still
camera, to the PC’s serial port.
□ Plug the serial cable from the digital camera into the serial port.
See the manual that came with your digital camera for more information on setting it up and
using it.
20
Page 29

Starting Your Sony PC
Starting Your Sony PC
After you connect all the cables and accessories to your Sony PC, you’re
ready to turn on the PC.
1 Press the power switch on the display to turn on the power.
2 Press the power switch on the upperdeft panel of the PC to turn on
the power.
^ See "Shutting Down Your Sony PC" on page 26 for instructions on turning off
your PC.
21
Page 30

Registering Windows® 95
The first time you turn on your Sony PC, you need to complete a few
steps to register and configure the Windows 95 software that is already
installed on your PC. You do not need to repeat these steps each time you
turn on your computer.
You must register Windows 95 before you can use your PC.
The on-screen instructions guide you through the registration and
configuration process. The following is an overview of the process.
1 Gathering information:
□ Enter your name.
□ Read and accept the License Agreement.
□ Enter your Certificate of Authenticity number located on the
cover of the Introducing Windows 95 manual.
2 Windows 95 setup:
□ Click the Finish button on the Windows 95 Setup Wizard screen.
3 Selecting your computer settings:
□ ' If necessary change the Time Zone, Date and Time on the Date/
Time Properties screen.
4 Learning about Windows 95:
□ If you want, take the tour of Windows 95.
22
Page 31

Registering Your PC
Registering Your PC
Take advantage of Sony’s commitment to quality customer support and
receive these benefits by registering your Sony PC:
□ Sony Online Support—Talk to a Support Representative to
troubleshoot problems you may be having with your PC.
□ One-year parts and limited labor warranty—Protect your
investment. See the Limited Warranty Card for details.
□ On-site service—Provides convenient resolution of problems.
Follow these steps to use the Sony PC online registration service.
You must connect your phone and phone line before using any online service including the
online registration service. See "Connecting the Phone Line and Phone" on page 11.
1 Enter the information requested on the first online registration form.
Press the TAB key to move from box to box.
2 Click the Next button to advance to the next form.
3 Complete the remaining forms by clicking the Next button each time
you complete a form.
4 Click the Register Now button to register your PC. The Sony PC
automatically transfers your registration information using your
built-in modem and a toll-free telephone number.
23
Page 32

Accessing the Diskette and CD-ROM Drives
You need to open the front panel to access the diskette and CD-ROM
drives. Follow these steps to open and close the front panel.
1 Push in the lower front panel on your PC.
2 Slide the upper panel down to reveal the CD-ROM and diskette
drives.
24
Page 33

m
Accessing the Diskette and CD-ROM Drives
3 After you finish using the drives, slide the upper panel up until you
see the lower panel click into place.
^ If you are using software that can eject CD-ROM disks, be sure to leave the front panel open.
25
Page 34

Shutting Down Your Sony PC
When you're ready to turn off your PC, use the following procedure.
! To avoid the potential loss of data, do not press the power switch before you
shut down the PC.
To shut down your PC
1 Click the Start button on the Windows 95 taskbar to open the Start
menu.
2 Click Shut Down at the bottom of the Start menu to display the Shut
Down Windows dialog box.
f»b«l Dfi«an
Aw ijm 3SMW i&a
,IEZ1. J„^iJ
3 Click Shut Down the Computer.
4 Click Yes.
A Respond to any prompts about saving documents.
5 Wait for your PC to turn off automatically.
6 Turn off the display and any other peripherals connected to your PC.
26
Page 35

Getting Started With VAIO Space
VAIO Space is an application that organizes the preinstalled applications
on your Sony PC, making it easier for you to find and launch an
application.
When you open VAIO Space, the launch pad appears at the top of your
screen. Using the launch pad is similar to using the Windows 95 taskbar.
The launch pad has dedicated launch buttons that lead you to specific
VAIO Space screens.
There are five dedicated launch buttons on the launch pad.
Button Launches Description
Software Center Contains icons for all your preinstalled
applications. These applications are organized
by category and appear as buttons on the left
side of the VAIO Space screen.
A/V Center Launches audio/video applications included
with your Sony PC.
Communication
Center
Help Center
Tool Center Provides tools that help you analyze and fix
Provides access to various forms of
communication, such as fax, the Internet, and
voice mail, all from a single application.
Contains links to various sources of help for
your Sony PC.
system-related problems.
27
Page 36

When you click a button on the launch pad, you open a VAIO Space
screen that displays category buttons on the left and a navigation toolbar
at the top. The category buttons are explained directly on the screen. Just
click any button to see an explanation of what that category offers.
About the Navigation Toolbar
Each VAIO Space screen (with the exception of the A/V Center) contains
a toolbar with five navigation buttons. If you are comfortable navigating
within a Web browser, you already know how this works.
Button
Description
Goes to the previous screen. When you first open a screen,
the first page has no previous page, so this button is
inactive until you go to another screen. This is sometimes
called the “Back” or “Previous” button.
Goes to the next screen in a sequence. The sequence is the
same as the buttons on the left, from top to bottom. This is
sometimes called the “Next” button.
Goes to the first screen. This is the same as clicking the top
button on the left. This is sometimes called the “Home”
button.
Closes the screen. This is sometimes called the “Exit” or
“Close” button.
Displays the launch pad on the left side of the screen or
hides it if it is already displayed. When displayed, the
launch pad becomes part of every screen. The information
pane on the right changes widtfi when you toggle the
launch pad on and off. The launch pad behaves differently
when it is part of the screen. Each new VAIO Space screen
that you launch replaces the current screen.
28
Page 37

Using VAIO Space
Using VAIO Space
The following describes how to use VAIO Space.
Starting VAIO Space
To start VAIO Space:
□ Double-click the VAIO Space icon on the Windows desktop.
Using the Software Center
To launch the Software Center:
□ Click the Software Center button on the launch pad.
To launch an application from the Software Center:
1 Click the desired category button on the left side of the screen.
2 Double-click an icon on the right side of the screen to launch that
application.
To add an application icon to the Software Center:
1 Click the category where you want to add the application icon.
2 Drag an application icon from anywhere within Windows 95 and
drop it onto the right side of the screen.
Using the Audio/Video (A/V) Center
To launch the A/V Center:
□ Click the A/V Center button on the launch pad.
To display the video player:
□ Click anywhere in the VIDEO cabinet on the left side of the screen.
To display the audio/video components:
□ Click anywhere in the AUDIO cabinet on the right side of the screen.
To open the playlist:
□ Click the Hi icon.
29
Page 38

Using the Communication Center
To launch the Communication Center:
□ Click the Communication Center button on the launch pad.
To launch the Communication Center application (integrated fax, voice mail, and Internet browser):
□ Click the Communication Center icon on the Communication Center
screen.
To access Sony EZ Internet:
□ Click the Sony EZ Internet button on the left side of the screen.
To access Club VAIO:
□ Click the Club VAIO button on the left side of the screen.
To access the Internet:
LI Click the Internet button on the left side of the screen.
Using the Help Center
To launch the Help Center:
□ Click the Help Center button on the launch pad.
To access help:
Ü Click the appropriate button on the left side of the screen, then follow
the instructions on that screen.
Using the Tool Center
To launch the Tool Center:
□ Click the Tool Center button on the launch pad.
To access specific tools:
□ Click the Tool Center button on the left side of the screen, then
double-click an icon on the screen to launch that tool.
To customize VAIO Space:
□ Click the VAIO Space Customization button on the left side of the
screen, then follow the instructions on that screen.
30
Page 39

Using VAIO Space
Using the VAIO Space Menu
To use the VAIO Space menu:
□ Right click the launch pad background and choose a menu item.
□ Select Always on top to display the launch pad on top of all other
applications.
□ Select Autohide to automatically display and hide the launch pad
when you move the mouse pointer to and from the top of the screen,
respectively.
□ Select About to view version information.
□ Select Minimize to reduce the launch pad to a button on the Windows
taskbar.
Exiting VAIO Space
To exit VAIO Space:
□ Right-click the launch pad background and select Exit.
31
Page 40

32
Page 41

Introducing the Sony AA/ Suite
The Sony A/V Suite provides an integrated suite of software that gives
you complete control of the audio/video features of your Sony PC. The
intuitive, “home stereo component” interface offers you a familiar set of
sound and video controls.
You can access the Sony A/V Suite from the AV Center on the Start menu.
The Sony A/V Suite includes the following audio and video components.
Component Description
CD Player Plays audio tracks from your CD-ROM drive.
See “Using the CD Player” on page 36.
WAV Player Plays, records, and edits WAVE (.WAV) sound files.
See “Using the WAV Player” on page 43.
MIDI Player Plays, records, and edits MIDI (.MID) music files
using external MIDI instruments. See "Using the MIDI
Player” on page 56.
Mixgr , Controls the volume and effect(s) levels for sound files,
videos, audio tracks, and other devices. See “Using the
Mixer” on page 34.
Video Player Plays AVI (.AVI) and MPEG (.MPG and .DAT) videos
on your Sony PC screen. See “Using the Video Player”
on page 63.
The CD, WAV, MIDI, and Video Players enable you to create playlists.
Playlists let you save a selection of tracks or files you want to hear or view
so that you can reuse them later.
^ Some components and players in the A/V Suite have buttons with indicator lights. These
components are active when the light is on.
33
Page 42

Using the Mixer
The Mixer enables you to control your Sony PC’s sound sources for
Windows multimedia and sound programs. The Mixer has individual
controls for:
□ Master (all sources) volume level
^ Use the Master setting to override the individual settings for the other players and
devices.
□
CD Player volume level
□
WAV Player volume level
□
MIDI Player volume level
□
Line output level
□
Recording level volume
□
Recording input selection: MIC, CD, Line
□
Effects: 3-D, reverb, chorus
: Do not use headphones the first time you use the Mixer. The default audio
settings may be loud enough to cause hearing problems or discomfort when
played through headphones. Listening to loud music with headphones or using
headphones for an extended period of time may also cause hearing problems
or discomfort.
^ If you change an A/V player's volume setting, the Mixer display updates automatically.
Likewise, if you change the Mixer volume settings for an A/V player, the player's volume
setting updates automatically.
34
Page 43

Using the Mixer
To change the Mixer volume setting
1 Click the Mixer on the A/V Wall or double-click the speaker icon on
the Windows 95 taskbar.
2 Drag the slider(s) to set the volume for the selected sound source.
move both sliders at the same time that slider
3 Repeat step 2 until you are satisfied with the resulting sound.
^ To toggle the sound on and off, Click H (Mute) for the specified source.
To add special effects
1 Click the Effects button to open the Effects panel.
:rvrm ,
2 Use the buttons and sliders on the Effects panel to add special effects.
3 After you finish, click the Effects button to close the Effects panel.
Effects Panel Functions
To Do This
Add a 3-D effect Click the
Add a reverb effect Click the
Add a chorus effect Click the
Adjust the amount of reverb Drag the
Adjust the reverb delay Drag the
Adjust the amount of chorus Drag the
Adjust the chorus frequency Drag the
Adjust the depth of the chorus Drag the
3-D button.
Reverb button.
Chorus button.
Reverb Level slider.
Delay slider.
Hours Level slider.
Frequency slider.
Depth slider.
35
Page 44

Using the CD Player
The CD Player plays regular audio CDs in your Sony PC's CD-ROM
drive. It features the same type of functionality as an ordinary CD player
(such as Next Track and Shuffle Play). You can also create temporary
playlists of your favorite songs for the current listening session.
C25Z3
Playing an Audio CD
You can play an audio CD at any time, as long as you’re not currently
running a CD-ROM program. You can even close the CD Player window
while listening to a CD. If the CD has a playlist, the player plays the
selected tracks. For more information about playlists, see “Creating CD
Playlists” on page 40.
To play an audio CD
1 Click the CD Player on the A/V Wall.
2 Click i: "m »1 (Eject) to open the CD tray.
3 Place an audio CD in the CD tray, and then click I 1 (Eject) again
to close the tray.
4 Click I » I (Play).
The CD Player displays the track name and number, the CD name,
the elapsed time, and a rotating CD that indicates the CD is playing.
______
QsiXzhJ LsJLhJ l±
The CD and track names appear as "untitled" until you name them. (See "Naming a
CD" on page 38 and "Naming CD Tracks" on page 39 for details.)
36
_______
......
Page 45

Other CD Player Functions
Using the CD Player
Action
Toggle the sound on and off
Stop play
Pause play
Go to the next track
Go to the beginning of the
current track
Rewind the current track
Fast forward the current track
Play the tracks in random order
Adjust the volume
Create or update a playlist
Play an intro to each track in
the playlist
Play the current playlist tracks
in the order in which they
appear
Continuously play (“loop") the
current playlist tracks in the
order in which they appear
Open or close the CD tray
Procedure
Click MUTE.
Click (Stop).
Click (Pause).
Click 1 I (Next).
Click [^3 (Previous).
Click and hold \jm_ j (Rewind).
Click and hold (Fast Forward).
Click SHUFFLE.
Drag the CD volume sliders on the CD
Player or the Mixer. See “ Using the Mixer”
on page 34.
Click PLAYLIST See “Creating CD
Playlists" on page 40.
Click INTRO.
Click CONTINUE.
Click REPEAT.
Click
3 (Eject).
^ To open the CD tray when you do not have a CD in the tray, press the Eject button on the
front panel of the PC.
37
Page 46

Naming a CD
If you name the CD, the CD Player stores this information and
remembers it whenever you play the CD.
To name a CD
1 Click the CD Player on the A/V Wall.
2 Click the PLAYLIST button to display the CD Playlist Edit
dialog box.
3 Click the Name CD button to display the Name CD dialog box.
■ m
1
4
Type the name of the CD.
5
Click the OK button to save the CD name and return to the
CD Playlist Edit dialog box.
The CD name now appears in the CD Name box.
Click the OK button to return to the CD Player.
The CD resumes playing and the name now appears in the
CD Player display.
38
Page 47

Using the CD Player
Naming CD Tracks
You can name the tracks on a CD as well. The CD Player stores this
information and remembers it whenever you play
the CD.
To name tracks on a CD
Click the CD Player on the A/V Wall.
1
Click the PLAYLIST button to display the CD Playlist Edit
2
dialog box.
Click the Name Track button to display the Name Track
dialog box.
4
Type the name of the track.
Click the Next button to name the next (or another) track.
5
•Repeat this step for other tracks you want to name.
Click the OK button to save the track name(s) and return to the
CD Playlist Edit dialog box.
The track names now appear in the CD Tracks list.
If you have a playlist for this CD, the track names also appear in the Playlist.
7 Click the OK button to return to the CD Player.
The CD resumes playing and the current track name now appears in
the CD Player.
39
Page 48

Creating CD Playlists
You can create a temporary playlist of the tracks you want to play during
your current listening session. You can customize the list to include only
your favorite tracks or all tracks on the CD.
To create and customize a CD playlist
1 Click the CD Player on the A/V Wall.
2 Click the PLAYLIST button to display the CD Playlist Edit
dialog box.
. ' nma to loiriB - raj
ijteaJ
CaMTiMt» Imititm
ly
faWlMiAt rm nm
40
Page 49

3 Select the tracks you want to add to the playlist:
Using the CD Player
Action
Copy one track in the
CD Tracks list to the
playlist
Copy all tracks in the
CD Tracks list to the
playlist
Copy a range of tracks
in the CD Tracks list to
the playlist
Copy selected tracks
in the CD Tracks list to
the playlist
Procedure
Double-click the track, or select the track and
then click j: ii ■ (Add Selection)
Click
Press the SHIFT key on the keyboard while
clicking the first and last tracks in the range,
and then dick (Add Selection).
Press the CTRL key on the keyboard while
clicking each track, and then click ply (Add
Selection).
(Add All Files).
4 Click the OK button to save the temporary playlist.
You can add CD tracks to a playlist by opening the playlist and selecting the tracks
you want to add as described in step 3.
41
Page 50

Removing Tracks from a CD Playlist
If you don’t want to listen to specific tracks on a CD, you can remove
them from the temporary playlist.
To remove a track from a CD playlist
1 Click the CD Player on the A/V Wall,
2 Click the PLAYLIST button to display the CD Playlist Edit
dialog box.
3 Select the tracks you want to remove from the playlist;
Action Procedure
Remove one track Click the track, and then click
from the playlist (Delete Selection).
Remove all tracks Click fWj (Delete All Selections),
from the playlist
4 Click the OK button to save the temporary playlist.
42
Page 51

Using the WAV Player
Using the WAV Player
The WAV Player lets you record and play WAV sounds (such as your own
voice). You can make playlists of your favorite sounds to play during
current and future listening sessions. You can also use the WAV Player to
edit sounds. See “Using AudioView” on page 49 for details.
cr-g—.i rrar
Playing a WAV File
You can open and play individual WAV files, or you can create a list of
specific WAV files to play.
To play a WAV file
1 Click the WAV Player on the A/V Wall.
2 Click PLAYLIST to display the WAV Playlist dialog box.
t ' "m "'t '.lSwrpS“
3 Select a WAV file from the Name list.
4 Click I'lyil (Play) to hear the sound.
5 Click the OK button to return to the WAV player.
43
Page 52

Other WAV Player Functions
Action
Toggle the sound on
and off
Stop play
Pause play
Create or update
a playlist
Go to the next file in
the playlist
Go to the beginning
of the current file in
the playlist
Rewind the current
file
Fast forward the
current file
Play the playlist files
in random order
Adjust the volume
Play an intro to each
file in the playlist
Play the current
playlist files in the
order in which they
appear
Continuously play
(“loop”) the current
playlist files in the
order in which they
appear
Record a WAV sound
Edit a WAV sound
Procedure
Click MUTE^
Click |j|f| (Stop).
Click (Pause).
Click PLAYLIST. See “Creating WAV Playlists” on
page 45.
Click I i (Next).
Click lji?J (Previous).
Click and hold 1 '** ) (Rewind).
Click and hold I (Fast Forward).
Click SHUFFLE.
Drag the WAV volume sliders on the WAV Player
or the Mixer. See “Using the Mixer” on page 34.
Click INTRO.
Click CONTINUE.
Click REPEAT.
Click jpP] (Record). See "Recording a WAV File” on
page 55.
Click AUDIOVIEW to launch AudioView. See
“Editing a WAV File” on page 49.
44
Page 53

Using the WAV Player
Creating WAV Playlists
You can create or customize a playlist of the WAV files you want to play
(such as animal sounds or funny noises). You can add files one at a time,
or you can add a group of files.
To create and customize a WAV playlist
1 Click the WAV Player on the A/V Wall.
2 Click the PLAYLIST button to display the WAV Playlist dialog box.
linteyiSte:«
i 1
i mm
- r **&«(
:: J ; 1. .
____
.
g
EZD
1 1
fai:
' il^^KS^SStttKKKKK^^
__
I»»«
M:
M
iJ
k
m
45
Page 54

3 Select the WAV files you want to add to the playlist, changing drives
and folders as necessary:
Action
Copy one file in the
Names list to the
playlist
Copy all files in the
Names list to the
playlist
Copy a range of files
in the Names list to
the playlist
Copy selected files in
the Names list to the
playlist
Find all WAV files on
the selected drive
^ To play a sound file, select the file, and then click Ea (Play). To play the files you
select automatically, click (Automatically Play Highlighted File).
Procedure
Double-click the file, or select the file and then
click j (Add Selection).
Click 1»^ (Add All Files).
Press the SHIFT key on the keyboard while
clicking the first and last files in the range, and
then click p#“'] (Add Selection).
Press the CTRL key on the keyboard while
clicking each file, and then click p5™l
(Add Selection).
Click p7| (Search Selected Drive).
4 Click (Save File), and then type a file name,
A) Change drives and folders, as necessary, to save the file to the correct location. The
sound playlist file extension defaults automatically to VSL.
5 Click the OK button to save the file.
^ You can add WAV files to a playlist by opening the playlist and selecting the files you
want to add. To remove files from a playlist, see "Removing Files from a WAV
Playlist" on page 48.
46
Page 55

Using the WAV Player
Playing a WAV Playlist
If you have more than one WAV playlist, you must select which list you
want to play. If you have only one playlist, just click j > | (Play) on the
WAV Player,
To play a WAV playlist
1 Click the WAV Player on the A/V Wall.
2 Click the PLAYLIST button to display the WAV Playlist dialog box.
3 Click (Open File), and then select the file you want to open.
Change drives and folders, as necessary, to select a file.
4 Click the OK button to open the file and return to the WAV Playlist
dialog box.
5 Click the OK button to return to the WAV Player.
6 Click I ^ I (Play) to hear the sounds in the playlist.
47
Page 56

Removing Files from a WAV Playlist
If you don’t want to hear specific files in a WAV playlist, you can remove
them from the list.
To remove files from a WAV playlist
Click the WAV Player on the A/V Wall.
1
Click the PLAYLIST button to display the WAV Playlist dialog box.
2
3
Select the WAV files you want to remove from the playlist:
Action Procedure
Remove one file from
the playlist
Remove all files from
the playlist
4
Click (Save File), and then type a new file name or select the
name of the current playlist.
Click the OK button to save the file.
5
^ If you selected the name of the current playlist, click the Yes button in the next dialog
box, which asks whether you want to overwrite the file.
Select the file, and then click ( »^|
(Delete Selection).
Click [ISh] (Delete All Selections).
48
Page 57

' !'1
Using AudioView
Using AudioView
AudioView enables you to edit WAV sounds using common editing
functions, such as cut, copy, and paste. Other editing functions include
sound mixing and changing playback volumes. You can record and edit
new WAV sounds as well.
EM
Editing a WAV File
You can edit a WAV file to remove dead (flat) spots and to rearrange
and mix sounds. Most editing requires selecting start and end points of a
segment or range that you want to change.
^ if you choose AUDIOVIEW when a WAV file is already open, the current WAV file appears.
To cut and paste data
1 Click the WAV Player on the A/V Wall.
2 Click the AUDIOVIEW button to display AudioView.
3 Open the File menu and select Open to display the file you want to
edit.
49
Page 58

4 Click I ► I (Play) to hear the sound.
raw
'fi
l._
L*.L"r + h
.■ ■ ■ ■ ■ « ■ I ■ ■ ■ . . ■ ■ IlilHiH
I
5 Select the segment you want to cut. See “Segment Selection
Functions” below for details.
Segment Selection Functions
Action
Select a segment
Select the entire file
Select a segment as
you listen
Make rough
adjustments to the
selected segment
Make precise
adjustments to the
selected segment
50
Procedure
Click the Start point in the graphic display, drag the
mouse to the right to the desired End point, and then
release.
Double-click anywhere in the graphics display, or
open the Edit menu and select Select All.
Play the file. When you hear the sound you want to
use as the Start Point, hold down the (Select
Range During Playback) as the passage plays.
Release the button at the end of the desired segment,
and then click nn (Stop).
Hold down the SHIFT key on the keyboard, place the
mouse cursor at the desired location and then click.
Click anywhere on the Range Start or Range End
areas (to the left and right of |^3. respectively).
Then click the up or down arrow to adjust the time
by 1/lOOth second.
Page 59

Using AudioView
After you select the segment, the display highlights the segment. Note the numbers in the
Range Start and Range End marker boxes. Ibese numbers can help you select the same
segment again.
For example, to select this segment
Start Point:
Click here.
End Point:
Drag the mouse to here,
then release.
6 Click I jt I (Cut).
^ If you want to paste the data into another WAV file, open that file now.
7 -If you want to move the segment, click the location where you want
to paste the data, and then click ¡3 (Paste).
8 Click ( »..I (Play) to hear the edited sound.
9 When you’re ready to save the new sound, open the File menu and
select Save As..and then type a file name.
Change drives and folders, as necessary, to save the file to the correct location.
10 Click the OK button to save the file.
51
Page 60

To copy and paste data
1
Click the WAV Player on the A/V Wall.
Click the AUDIOVIEW button to display AudioView.
2
3
Open the File menu and select Open to display the file you want to
edit.
[iiOIXri' LH.-i. -r*- mmrn lal* mtm
i : ...........................................................! . ........................................................... !
f flB B
4
Click ["'»■ ""I (Play) to hear the sound.
5
Select the segment you want to copy, and then click (Copy). See
"Segment Selection Functions” on page 50 for details.
The display highlights the selected segment.
^ If you want to paste the data into another WAV file, open that file now.
If you want to move the segment, click the location where you want
to paste the data, and then click (Paste).
7
Click ri‘1 (Play) to hear the edited sound.
8
When you’re ready to save the new sound, open the File menu and
select Save As..., and then type a file name.
^ Change drives and folders, as necessary, to save the file to the correct location. ~
Click the OK button to save the file.
52
Page 61

Other AudioView Edit Functions
Using AudioView
Action
Stop play
Pause play
Rewind the current sound
Fast forward the current sound
Adjust the volume
Select a segment or range
Play the selected segment
Delete all data except a
selected segment
Adjust the volume (amplitude)
of a selected segment
Echo a selected segment
Remove background noise
Adjust thé volume (amplitude)
and improve the signal-to-noise
ratio of a sound recorded at too
low a level
Fade in or fade out a
selected segment
Undo the last edit or
transform operation
Zoom in on a selected segment
Zoom out of a selected segment
Procedure
Click !■ _] (Stop).
Click [:ti: I (Pause).
Click and hold F’***^! (Rewind).
Click and hold F»* I (Fast Forward).
Drag the WAV volume sliders on the WAV
Player or the Mixer. See “Using the Mixer”
on page 34.
See “Segment Selection Functions” on
page 50.
Click l»*-li (Play Range).
Click (Trim).
Click (Scale).
Click rn (Echo).
Click j vl (Noise Gate) to find every
sample in the selected segment with an
amplitude below a specific amount.
Click [Mj (Normalize).
Click (Fade).
Click 0 (Undo).
Click ^ (Zoom In).
Click Bil (Zoom Out).
53
Page 62

Other AudioView Functions—Edit and Transforms Menus
Action
Insert silence (dead or flat spot)
Copy a file to the Clipboard
Save contents of the Clipboard
to a file
Combine (mix) two sounds by
copying one sound over the
other
Locate and display the highest
volume level (amplitude)
within a selected segment
Change positive amplitude
values to negative, and vice
Center the display for a sound
recorded with an offset or
adjust the offsets of a file after
cutting and pasting data from
different files
Paste a selected segment
backwards -
Fade out the current file, fade in
the data currently in the
Clipboard, and then combine
the sounds
Reduce a sound’s sample rate
by 50 percent
Convert a 16-bit file to 8-bit
format
Change a stereo file into a
mono file
Convert an 8-bit PCM WAV file
to Sound Blaster® VOC format
Convert a VOC file to 8-bit
PCM WAV format
Change the sample rate
Procedure
Open the Edit menu and select Insert Silence.
Open the Edit menu and select Load File into
Clipboard.
Open the Edit menu and select Save
Clipboard, and then specify the file name.
Copy or cut a segment, select a segment in
the file you want to mix, and then open the
Edit menu and select Mix Paste.
Open the Transforms menu and select
Find Peak.
Open the Transforms menu and select
Invert Samples.
Open the Transforms menu and select
DC Offset.
Open the Transforms menu and select
Reverse.
Open the Transforms menu and select
Crossfade.
Open the Transforms menu and select
Flalve Sample Rate.
Open the Transforms menu and select
16 8 Bits.
Open the Transforms menu and select
Stereo Mono.
Open the Transforms menu and select
WAV ^ VOC.
Open the Transforms menu and select
VOC ^ WAV.
Open the Tranforms menu and select
Change Speed.
54
For additional information about how to use these functions, see the online help.
Page 63

m
Using AudioView
Recording a WAV File
You can make WAV recordings easily using the WAV Player or
AudioView.
1
Select an input source (such as Mic or CD) in the Mixer and set its
record volume level. See “Using the Mixer” on page 34 for details.
If you want to record from the CD-ROM drive or from an external
source (such as a tape deck), find the selection you want to record.
Click (Record) on the WAV Player or AudioView display. The red
light blinks, indicating that the player is in Record
Standby mode.
Click I |j;)| (Play) to begin recording. Speak into the microphone or
start playing the material you prepared in step 2.
If necessary, click [ff] (Pause) to pause temporarily during recording.
Click [2 (Pause) again to resume recording.
Be sure to use the (Pause) button to resume recording. If you click
(Record)to resume recording, you erase the existing recording and start a
new one.
6 , Click >1 (Stop) after you finish recording.
7 If you are using AudioView to record, the display shows a graphical
representation of the recording.
8 Click m (Play) to hear the recording.
^ You can repeat steps 2 through 8 until you are ready to save the recording.
9 When you’re ready to save the recording, open the File menu and
select Save, and then type a file name.
^ Change drives and folders, as necessary, to save the file to the correct location. If you
don't want to save the recording, record over it or close the file,
10 Click the OK button to save the file.
55
Page 64

Using the MIDI Player
The MIDI Player plays and records standard MIDI (.MID) music files.
You can also make playlists of your favorite music to play during current
and future listening sessions.
... I - r«
SmSStSli GSSSi
•nulTMr
rw {SX»] [23is3hCEEI3
The MIDI player also includes the MIDI Orchestrator, a tool that enables
you to record and play as many as 16 tracks. You can access the MIDI
Orchestrator by clicking the MIDI ORCH button on the MIDI Player. For
more information about using the MIDI Orchestrator, see the online help.
Playing a MIDI File
You can open and play individual MIDI files, or you can create a list of
specific MIDI files to play.
To play a MIDI file
1 Click the MIDI Player on the A/V Wall.
2 Click PLAYLIST to display the MIDI Playlist dialog box.
wmm
■ seniit
3 Select a MIDI file from the Name list.
4 Click I (Play) to hear the music.
56
Page 65

5 Click the OK button to return to the MIDI player.
Other MIDI Player Functions
Using the MIDI Player
Action
Mute the sound
Stop play
Pause play
Create or update a playlist
Go to the next file in the playlist
Go to the beginning of the
current file in the playlist
Rewind the current file
Fast forward the current file
Play the playlist files in
random order
Adjust the volume
Play an intro to each file in
the playlist
Play the current playlist files in
the order in which they appear
Continuously play (“loop”) the
current playlist files in the
order in which they appear
Record a MIDI music file
Procedure
Click MUTE.
Click F] (Stop).
Click mu (Pause).
Click PLAYLIST See “Creating MIDI
Playlists” on page 58.
Click [i*r] (Next).
Click (Previous).
Click and hold I I (Rewind).
Click and hold |
(Fast Forward).
Click SHUFFLE.
Drag the MIDI volume sliders on the
MIDI Player or the Mixer. See “Using the
Mixer” on page 34.
Click INTRO.
Click CONTINUE.
Click REPEAT
Click I * [ (Record). See “Recording;
MIDI File” on page 62.
..........................................
57
Page 66

Creating MIDI Playlists
You can create or customize a playlist of the MIDI files you want to play
(such as files of an individual composer or files from your own recording
sessions). You can add files one at a time, or you can add a group of files.
To create and customize a MIDI playlist
1 Click the MIDI Player on the A/V Wall.
2 Click the PLAYLIST button to display the MIDI Playlist dialog box.
a
»w*:!
ig
LiEXfiJ
OS
■ 31:
gfi
............................
[ :.m.m
^ To play a music file, select the file, and then click m (Play), To play the files you
select automatically, clickQ (Automatically Play Highlighted File).
58
Page 67

3 Select the MIDI files you want to add to the playlist, changing drives
and folders, as necessary:
Action
Copy one file in the
Names list to the
playlist
Copy all files in the
Names list to the
playlist
Copy a range of files
in the Names list to
the playlist
Copy selected file in
the Names list to the
playlist
Find all MIDI files on
the selected drive
Procedure
Double-click the file, or select the file, and then
click 1 ie I (Add Selection).
Click (Add All Files).
Press the SHIFT key on the keyboard while
clicking the first and last files in the range, and
then click r%3 (Add Selection).
Press the CTRL key on the keyboard while
clicking each file, and then click ["WJ
(Add Selection).
Click yT| (Search Selected Drive).
4 Click I H j (Save File), and then type a file name.
^ Change drives and folders, as necessary, to save the file to the correct location. The
MIDI playlist file extension defaults automatically to VML.
5 Click the OK button to save the file.
^ You can add MIDI files to a playlist by opening the playlist and selecting the files you
want to add. To remove files from a playlist, see" Removing Files from a MIDI
Playlist" on page 61.
59
Page 68

Playing a MIDI Playlist
If you have more than one MIDI playlist, you must select which list you
want to play. If you have only one playlist, just click | ► [ (Play) on the
MIDI Player.
To play a MIDI playlist
1 Click the MIDI Player on the A/V Wall.
2 Click the PLAYLIST button to display the MIDI Playlist dialog box.
3 Click n5~l (Open File), and then select the file you want to open.
^ Change drives and folders, as necessary, to select a file.
4 Click the OK button to open the file and return to the MIDI Playlist
dialog box.
5 Click the OK button to return to the MIDI Player.
6 Click m (Play) to hear the music in the playlist.
60
Page 69

Using the MIDI Player
Removing Files from a MIDI Playlist
If you don’t want to hear specific files in a MIDI playlist, you can remove
them from the list.
To remove files from a MIDI playlist
1 Click the MIDI Player on the A/V Wall.
2 Click the PLAYLIST button to display the MIDI Playlist dialog box.
3 Select the MIDI files you want to remove from the playlist:
Action Procedure
Remove one file from
the playlist
Remove all files from
the playlist
Select the file, and then click | jta {
(Delete Selection).
Click (Delete All Selections).
4 Click rW~1 (Save File), and then type a new file name or select the
name of the current playlist.
5 Click the OK button to save the file.
^ If you selected the name of the current playlist, click the Yes button in the next dialog
box, which asks whether you want to overwrite the file.
61
Page 70

Recording a MIDI File
You can make MIDI recordings easily using the MIDI Player and
a MIDI instrument. Before you record a MIDI file, you must connect a
MIDI instrument to the MIDI interface connector on the back panel
of your Sony PC (see “Connecting a Joystick or MIDI Instrument” on
page 18).
1 Click the MIDI Player on the A/V Wall.
2 Click m (Record). The red light blinks, indicating that the MIDI
Player is in Record Standby mode.
3 Click I (Play) to begin recording, and then start playing the MIDI
instrument.
4 If necessary, click [jT] (Pause) to pause temporarily during recording.
Click (Pause) again to resume recording.
^ Be sure to use the (Pause) button to resume recording. If you click
(Record) to resume recording, you erase the existing recording and start a
new one.
5 After you finish recording, click (Stop).
6 Cjick I > t (Play) to hear the recording.
^ You can repeat steps 1 through 6 until you are ready to save the recording.
7 When you’re ready to save the recording, open the file menu and
select Save, and then type a file name.
^ Change drives and folders, as necessary, to save the file to the correct location. If you
don't want to save the recording, record over it or close the file.
8 Click the OK button to save the file.
Click the MIDI ORCH button for additional control over recording options.
62
Page 71

M
Using the Video Player
Using the Video Player
The Video Player plays AVI (.AVI) and MPEG (.MPG and .DAT) videos
on your Sony PC. You can use it to make playlists of your favorite videos
to play during current and future viewing sessions. You can view
playlists in a small window or in a full screen as a screen saver.
wimm
Creating Video Playlists
You can create a playlist of your favorite video files or of specific types
of video files (such as movie clips or software demos).
To create and customize a video playlist
*l Click the Video Player on the A/V Wall.
2 Click the PLAYLIST button to display the Video Playlist dialog box.
t »ft .rt;M .-..i
PASTi; Ail
TA.jJASrVV't.H
il tm
- - '
H
rWTW~\
L<a.i
imi
.nri
.
QS]
r
CEZE^ZC^
63
Page 72

3 Select the video files you want to add to the playlist, changing drives
and folders, as necessary:
Action
Copy one file in the
Names list to the
playlist
Copy all files in the
Names list to the
playlist
Copy a range of files
in the Names list to
the playlist
Copy selected files in
the Names list to the
playlist
Find all video files on
the selected drive
Procedure
Double-click the file, or select the file and then
click j1i”~I (Add Selection).
Click
Press the SHIFT key on the keyboard while
clicking the first and last files in the range, and
then click |~iri (Add Selection).
Press the CTRL key on the keyboard while
clicking each file, and then click
(Add Selection).
Click (Search Selected Drive).
(Add All Files).
4 Click r~|5"l (Save File), and then type a file name.
^ Change drives and folders, as necessary, to save the file to the correct location. The
video playlist file extension defaults automatically to VVL.
5 Click the OK button to save the file.
^ You can add Video files to a playlist by opening the playlist and selecting the files you
want to add. To remove files from a playlist, see "Removing Fiies from a Video
Playlist" on page 67,
64
Page 73

m
Other Video Player Functions
Using the Video Player
Action
Change between full-screen,
auto-size, and user-size mode
Stop full-screen play
Mute the sound
Stop play
Pause play
Go to the next video in the
playlist
Go to the beginning of the
current video in the playlist
Rewind the current video
Fast forward the current video
Play the playlist videos in
random order
Adjust the volume
Play an intro to each file in
the playlist
Play the current playlist files in
the order in which they appear
Continuously play (“loop") the
current playlist files in the
order in which they appear
Procedure
Click SCREEN.
Click anywhere on the screen.
Click MUTE.
Click I (Stop).
Click (Pause).
Click I (Next).
Click (Previous).
Click and hold
Click and hold
Click SHUFFLE.
Drag the volume sliders on the Video
File Player.
Click INTRO.
Click CONTINUE.
Click REPEAT.
I (Rewind).
(Fast Forward).
65
Page 74

Playing a Video Playlist
If you have more than one Video playlist, you must select which list
you want to play. If you have only one playlist, just click ["7^ (Play) on
the Video Player.
To play a video playlist
1 Click the Video Player on the A/V Wall.
2 Click the PLAYLIST button to display the Video Playlist dialog box.
3 Click ; IP I (Open File), and then select the file you want to open.
^ Change drives and folders, as necessary, to select a file.
4 Click the OK button to open the file and return to the Video Playlist
dialog box.
5 Click the OK button to return to the Video Player.
6 Click [ .k: I (Play) to begin viewing the videos in the selected playlist.
66
Page 75

Using the Video Player
Removing Files from a Video Playlist
If you don’t want to view specific files in a Video playlist, you can remove
them from the list.
To remove files from a video playlist
1
Click the Video Player on the A/V Wall.
2
Click the PLAYLIST button to display the Video Playlist dialog box.
Select tbe video files you want to remove from the playlist:
3
Action Procedure
Remove one file from
the playlist
Remove all files from
the playlist
4
Click ~~j§n (Save File), and then type a new file name or select the
name of the current playlist.
5
Click the OK button to save tbe file.
Ai If you selected the name of the current playlist, click the Yes button in the next dialog
box, which asks whether you want to overwrite the file.
Select the file, and then click rjj~1
(Delete Selection).
Click
(Delete All Selections).
67
Page 76

68
Page 77

Using the
Communication Center
The Communication Center is a complete, powerful, flexible, yet simple^
to-use communications system.
You can use the Communication Center as a speakerphone and as a full-
featured answering machine with multiple mailboxes and optional
password protection.
The Phone Book allows you to speed dial frequently used numbers. You
can create recipient groups, which streamlines the process of sending
messages.
You can send and receive faxes, and data files, and attach documents to
your faxes.
Other features include:
IJ Video Phone, which allows you and a caller to see each other on the
screen, provided you have the required hardware and the other caller
has a modem, video camera, and compatible software
□ 'Voicemail
□ Pager notification
□ Message forwarding
Opening and Closing the Communication Center
To Open the Communication Center
□ From the Start menu, select Online Center/Communication Center/
Communication Center.
If this is the first time you are using the Communication Center, the
Setup Wizard is displayed.
If you have used the Communication Center before, the Main screen is
displayed (page 71).
69
Page 78

To Close the Communication Center
1 Click the button on the Main screen.
2 Click Yes to close the Communication Center.
Getting Started with the Communication Center
The first time you start the Communication Center, the Setup Wizard is
displayed, and you are prompted to provide information that the
Communication Center needs to configure your system properly. To
reconfigure the Communication Center later, you can run the Setup
Wizard again.
To Access the Setup Wizard
1 Click the MENU button on the Main screen and choose Configure.
2 Select Setup Wizard... to open the Setup Wizard.
3 Follow the Wizard’s instructions to change your settings as needed.
To Choose a Communication Device
While configuring the Communication Center, you will be prompted to
select a communication device. To use the modem supplied with your
computer, accept the default device, LT Win Modem.
70
Page 79

J
Communication Center Main Screen
Communication Center Main Screen
You can access most of the Communication Center's features from the
Main screen, including: placing and receiving calls, sending faxes,
checking your messages, and using your Phone Book.
Access other featuresn
Control menu
Mailbox name
Access messages
Status
Open phone pad
Dial pad
Telephone Options
Access Video Phone-
Help
Minimize
Close
Number of new
messages
Digital display
Volume control
Access phone book
Compose and send a fax
The dial pad allows you to quickly enter phone numbers. Click the DIAL
button to place the call. Information on the status of your call, along with
date and time, the name of the current mailbox, and the number of
messages, is displayed on the digital display.
Many features of the Communication Center are available in a variety of
ways. There are buttons on the Main screen that take you directly to your
messages, the phone book, quick fax, and Video Phone. The
Communication Center’s main screen expands into a phone pad when
you click the left edge of the Main screen. By clicking on the title of the
expanded screen you can toggle through expanded screens.
71
Page 80

The MENU button gives you access to other features, such as adding
mailboxes, recording and changing greetings, setting up special services
for your callers, and customizing the Communication Center.
Getting Help
^ Although this manual includes instructions for the most commonly used features and
functions of the Communication Center, you will find more detailed instructions on
advanced features by using the program's on-line help.
While using the Communication Center, you can access online help by;
□ Pressing FI from the Main Screen or when viewing a dialog box.
□ Clicking the MENU button on the Main screen and selecting Help.
□ Clicking the Bl button on the Main screen.
Using Mailboxes and Greetings
Mailboxes organize messages for each Communication Center user.
When you start the Communication Center, one mailbox is automatically
created for you. You can add other mailboxes at any time. Mailboxes
come with a pre-recorded greeting. You can record your own greeting or
choose one of the existing greetings.
When a caller calls into the Communication Center, the default mailbox
answers the call. Callers can then leave a message in this mailbox, or
transfer to another mailbox. You can set up the Communication Center to
answer all types of incoming calls, or to answer only fax or only data
calls.
72
Page 81

Using Mailboxes and Greetings
Accessing Mailboxes
Ü Click the MENU button on the Main screen, choose Configure and
select Mailboxes. The Mailboxes screen is displayed.
Click the title to switch
among the screens for
Mailboxes, Messages,
Phonebook, and
Greetings.
The Mailboxes screen displays a list of all mailboxes, including the name
of each rhailbox, its extension number, and the number of new messages.
Before you can access mailbox messages, record greetings, or change
mailbox options for a mailbox, you need to select the mailbox. To select
the mailbox, click the mailbox from the list of mailboxes on this screen.
The selected mailbox is displayed on the Main screen above the new
message indicator.
Adding a Mailbox
You can add up to 50 mailboxes. If you have multiple mailboxes, you
must designate a default mailbox.
□ Click Add on the Mailboxes screen or
□ Click the DO button on the Mailboxes screen and select Add or
□ Right-click on the expanded screen and select Add
The Mailbox Wizard is displayed to guide you through the process of
setting up the mailbox. Follow the Wizard’s instructions to add a mailbox.
73
Page 82

Accessing Mailbox Options
You can customize mailbox options. For example, you can change a
mailbox extension, assign or change passwords, specify a length and
number of messages. To customize your mailbox:
□ Click the MENU button on the Main screen and select Options...
□ Click the DO button on the Mailboxes screen and select Options...
□ Right-click on the mailbox and select Options...
Mailbox Passwords
You can assign passwords to protect against unauthorized access to your
mailbox. Local passwords prevent access to your mailbox from your
computer; remote passwords prevent access to your mailbox from a
remote telephone.
Keep the following in mind when working with passwords:
Ü Remote passwords must be numeric and four-digits long. Remote
passwords cannot begin with a 0 (zero).
□ Local passwords can be any letters, symbols or numbers, and up to
eight characters long. Local passwords are case sensitive.
□ You can set different passwords for remote and local mailbox access.
□ Do not forget your local password. You will not be able to access the
mailbox from your computer if you forget its local password. If you
forget your local password, you must reinstall the Communication
Center using the Application Recovery CD (see “Using the
Application Recovery CDs” on page 117). Be sure to select the option
“I want to save my old information, but clear all passwords.” This
will preserve your messages.
□ If you forget your remote password, you can re-configure the mailbox
by running the Setup Wizard, and re-entering the remote password.
74
Page 83

Using Mailboxes and Greetings
Setting the Default Mailbox
If you have more than one mailbox, you must set one as the default
mailbox. The default mailbox is used to answer all incoming calls and to
instruct callers how to transfer to other mailboxes or services.
The default mailbox is indicated by a yellow border around its icon on the
Mailboxes screen.
1 Click the MENU button on the Main screen, choose Configure and
select Mailboxes. The Mailboxes screen is displayed.
2 Select the mailbox you want to set as the default.
3 Click the DO button on the Mailboxes screen and select Set Default
(or right-click on the mailbox and select Set Default).
Â) You can right-click on the mailbox that you want to set as the default and select Set Default
from the pop-up menu.
Deleting a Mailbox
When you delete a mailbox, all messages and information in the mailbox
are also deleted.
^ You cannot delete the default mailbox. If you want to delete a mailbox that is the default
mailbox, first set a different mailbox as the default,
1 Click the MENU button on the Main screen, choose Configure and
select Mailboxes. The Mailboxes screen is displayed.
2 Select the mailbox you want to delete.
3 If the mailbox has a local password, enter the password.
4 Click the DELETE button on the Mailboxes screen (or right-click on
the mailbox and select Delete).
5 Click Yes to delete the mailbox.
75
Page 84

Mailbox Greetings
A mailbox greeting plays for your callers when the Communication
Center answers a call. Your mailbox contains several pre-recorded
greetings that tell callers how to leave a message, transfer to other
mailboxes, and access other services. Each new mailbox you create
contains a pre-recorded greeting that tells callers how to leave a message
for this mailbox. You can listen to the pre-recorded greetings and decide if
you want to use one of them as your default greeting or record your own
greeting.
Accessing Greetings
1 Click the MENU button on the Main screen, choose Configure and
select Greetings,
2 Select the Greetings tab. The list of greetings available in the mailbox
is displayed.
The Greeting screen displays a list of all the greetings available for this
mailbox, along with the information about this recording. The yellow
border around the greeting icon indicates the default greeting for this
mailbox.
76
Page 85

Using Mailboxes and Greetings
To Play a Greeting
□ Click the PLAY button on the Greetings screen (or double-click on the
greeting). The selected greeting is played.
To Record a Greeting
Your greeting can instruct callers to press the pound key (#) after
recording their message. This allows them to hear more options, such as
marking the message “urgent.”
1 On the Greetings screen, click the REG button to start recording and
begin speaking into the computer’s microphone.
2 When you finish speaking, click the STOP button to end the
recording.
3 The greeting is recorded and added to the list of greetings for the
mailbox.
i&) To record and edit greetings with higher audio quality, use the AudioView
application (see" Using AudioView" on page 49). After saving the greeting as a file,
you can copy it to the Communication Center Greetings list. Click the Do button from
the Greetings section, and then select Copy From File.
If you want the new greeting to play for your callers, you can make it
■ the default greeting for the mailbox.
To Set the Default Greeting
You must set a default greeting for every mailbox that has more than one
greeting.
When the Communication Center answers an incoming call, the default
mailbox’s default greeting is played. If a caller transfers to another
mailbox, that mailbox’s default greeting is played.
The default greeting is indicated by a yellow border around its icon on
the Greetings screen.
□ Click the DO button on the Greetings screen and select Set Default.
The selected greeting is set as the default for the current mailbox.
□ Right-click on the greeting and select Set Default.
77
Page 86

To Delete a Greeting
You cannot delete the default greeting. If you want to delete a greeting
that is the default greeting, first set a different greeting as the default.
1 Select the greeting you want to delete.
2 Click the DELETE button on the Greetings screen or click the DO
button on the Greetings screen and select Delete (or right-click and
select Delete).
3 Click OK.
The selected greeting is deleted.
Accessing Mailboxes Remotely
You can retrieve your messages, record greetings, and access mailbox
contents and other services from any touch tone telephone using the
Communication Center remote access feature. You can access mailboxes
remotely by pressing keys on the remote telephone (DTMF tones).
To Access the Default Mailbox
1 Dial the telephone number of your Communication Center system.
The default mailbox’s greeting answers the call.
2 While the default greeting is playing:
□ If the mailbox has a remote password, press the star (*) key, enter
the password, then the pound key (#).
or
□ If the mailbox does not have a remote password, press the star
key (■ *) followed by the pound key (#).
The Main Menu options are played.
3 Follow the Main Menu instructions to listen to messages or to access
other services.
78
Page 87

Using Mailboxes and Greetings
To Access a Different Mailbox
1 Dial the telephone number of your Communication Center system.
The default mailbox's greeting answers the call.
2 While the default greeting is playing, dial that mailbox extension
number.
The mailbox greeting starts playing.
3 While the mailbox greeting is playing:
□ If the mailbox has a remote password, press the star (*) key, enter
the password, then the pound key (#).
or
□ If the mailbox does not have a remote password, press the star
key (*) followed by the pound key (#),
The Main Menu options are played.
4 Follow the Main Menu instructions to listen to messages or to access
other services.
79
Page 88

Using Messages
An incoming fax or data file is placed in the default mailbox. Faxes and
data files that you send or schedule to be sent are also stored as messages
in your mailbox. This makes it easy for you to manage all
communications activities from one place.
Accessing Messages
If you have multiple mailboxes, you first need to select the mailbox in
which you want to access messages.
1 Click the MENU button on the Main screen, point to Mailboxes, and
select the mailbox in which you want to access messages.
2 Click the MESSAGE button on the Main screen.
3 The Messages screen is displayed.
80
Page 89

Using Messages
Message Folders
In Message folders, each message type (audio, fax, and data) are
represented by an icon. Message folders are organized as follows:
□ New messages are stored in the New folder.
□ Messages you have played or saved are moved to the Old folder.
□ Messages scheduled for future transmission are stored in the Outbox
folder (with a Pending status) until they are sent,
□ Successfully transmitted and canceled messages are stored in the Sent
folder.
□ Unsuccessfully transmitted messages are stored in the Outbox folder
(with a Pending status). The Communication Center attempts to send
the message up to a maximum number of tries you have specified. If,
after the maximum number of attempts, transmission is still
unsuccessful, these messages are marked as unsuccessful, and moved
to the Sent folder.
□ You can move fax, data and voice messages you want to save for
future reference to the Cabinet folder.
81
Page 90

To Play or View Messages
The digital display on the Main screen displays the number of new
messages in the current mailbox. After you play each new message, the
indicator is updated, and the messages are moved to the Old folder.
1 Click the MESSAGE button on the Main screen.
The Messages screen is displayed.
2 Select a message you want to play or view from any folder.
3 Click the PLAY button on the Messages screen or click the DO button
on the Messages screen and select Open (or right-click on this
message and select Open).
After each new message is played, it is moved to the Old folder.
^ If you are sharing a mailbox, you may want to copy a message from the Old folder to the
New folder. Just right-click on the message, select Copy, point to Mailbox, and select the
mailbox. Or, click Do, then select Copy.
Managing Messages
You can copy fax, voice, and data messages, view detailed information on
a message, delete a message from the mailbox, and forward it to another
mailbox.
1 Click the MESSAGE button on the Main screen.
The Messages screen is displayed.
2 Click the DO button on the Messages screen (or right-click).
3 Choose a command from the selection.
82
Page 91

Using Messages
Sending Faxes
You can use the Communication Center to send faxes in a number of
different ways;
□ Quick Fax — available directly on the Main screen, for sending a
short one page fax. You can also attach a document to a fax.
□ Fax from any Windows application — by using an application’s Print
command.
□ Fax by “drag and drop” — for faxing any file that supports OLE or
one of the Communication Center's messages. Just drag the file from
the desktop to the Communication Center interface.
When you send a fax, select the Communication Center Fax printer driver
as the current printer. By changing the properties of the Communication
Center Fax printer, you can change characteristics of how the fax is
transmitted.
Before sending out your first fax, you may want to check the different
options available in the Fax options dialog. (Click the MENU button on
tbe Main screen and select Options..., then select the Fax tab.)
To Configure Communication Center Fax
1 Click Start on the Windows 95 taskbar.
2 Point to Settings, then click Printers.
The Printers.screen is displayed.
3 Select Communication Center Fax. If it is not the default printer, you
may want to select Set as Default from the File menu.
4 Select Properties from the File menu.
The Communication Center Fax Properties dialog is displayed.
83
Page 92

You can modify the following options:
Option
Specify how faxes are
positioned on the page
Change paper size
Specify the resolution at
which faxes are sent
Improve display of gray
shading in graphics
Specify how dark to
print graphics
Restore the original
printer settings
Description
Change Portrait or Landscape orientation on the
Paper tab.
Change Paper size on the Paper tab
The following paper sizes are supported:
□ Letter (8.5"xir') (default)
□ Legal (8.5’’xl4”)
□ A4 (210x297 mm)
Change resolution on the Graphics tab.
□ High sends the highest quality image.
□ Low sends a lower quality image and reduces
transmission time.
Change dithering on the Graphics tab,
□ Use None if you want no dithering.
□ Use Coarse if your resolution setting is 300 dpi
or higher.
□ Use Fine if your resolution setting is 200 dpi or
lower.
□ Use Line art if your graphics include well-
defined borders between black, white and gray
shadings.
□ Use Error diffusion if your graphics do not
have sharp, well-defined edges.
The best settings for printing graphics in the
Communication Center faxes is Fine dithering with
Current intensity set at 190.
Change Intensity on the Graphics tab.
Click Restore Defaults on the Device Options tab
84
Page 93

Using Messages
To Send a Quick Fax
The easiest way to send a fax is Quick Fax — a short, one page message.
You can attach a document to a Quick Fax.
1 Click the QUICK FAX button on the Main screen.
The Send Fax dialog is displayed.
2 Fill in the recipient information and type your message in the Note
field. This note will appear on the cover page of your fax.
For more information about the Send Fax dialog, see “Filling in the
Send Fax Dialog” on page 86.
3 Click Send Fax Now.
The Communication Center begins sending the fax. To stop
transmission, click Cancel.
To Send a Fax from Another Application
You can fax a document from any Windows application that supports the
Print command (e.g., your word processing or spreadsheet program).
1 Open the Windows program and create or open the document you
want to fax.
2 .Select Print or the equivalent command from the program’s File
menu.
The prograrn’s Print dialog is displayed.
3 Select Communication Center Fax as the current printer.
4 Click OK or the program’s equivalent command to print the
document.
The Send Fax dialog is displayed.
5 Fill in the Send Fax dialog.
For more information, see “Filling in the Send Fax Dialog” on
page 86.
6 Click Send Fax Now.
The Communication Center begins sending the fax. To stop transmission,
click Cancel.
^ Faxes cannot exceed 100 pages.
85
Page 94

Filling in the Send Fax Dialog
The Send Fax dialog appears when you send a fax, either from the
Communication Center or from another program.
I£1 CS?
tcMHmw
* t>ac4><rl!
eg:::
J
To send a fax, you must specify at least the recipient’s fax number.
The following fields and buttons are available on the Send Fax dialog:
Option
Use Cover Page
High Resolution
First Name, Last
Name, Country Code,
Area Code,
Fax Number
Documents
Description
Lets you use a cover page with space for a note up
to 23 lines long. Quick Faxes always use a cover
page.
When the light is on, indicates that a fax will be
sent at high resolution.
Recipient information. To send a fax, you must
specify at least the recipient’s fax number.
Lets you attach documents to the fax. A green light
indicates that the fax contains attachments (dick
the button to see the list of attached documents).
86
Page 95

m
Using Messages
Option
Phones...
Add Recipient
Delete Recipient
Save Phone
Note
Send Fax Now
View
Print to File
Options...
Schedule Fax
To File Cabinet
Cover Page...
Cancel
Description
Lets you use your Phone Book to fill in the recipient
information. Make sure a fax number is entered in
the Fax field. You may need to edit a recipient’s
entry in your Phonebook to add a fax number (see
page 98).
Lets you address the fax to several people. To add
multiple recipients, fill in the recipient information
and click Add Recipient, then repeal for each
recipient.
You can create Groups in your Phone Book to send faxes
to people who frequently receive the same information.
See "Using the Group Feature” on page 88.
Deletes the selected recipient from the list.
Adds recipient information to your Phone Book.
Type the information to put on the fax cover page
or the Quick Fax message. The note cannot exceed
23 lines.
Sends the fax.
Opens the Fax Viewer displaying the fax.
Copies the fax to a location you specify in .tif file
format.
Lets you change fax options.
Lets you schedule the fax for future transmission.
Copies the fax to the Cabinet folder of the current
mailbox.
Lets you select and view fax cover pages.
Closes the Send Fax dialog without sending the fax.
87
Page 96

Using the Group Feature
To create or change a Group:
1 Click the PHONEBOOK button on the Main screen to open the Phone
Book.
2 Click the EDIT button on the Phone Book expanded panel (or right-
click the name of the person you would like to add to the group) and
select Edit from the pop-up menu that appears.
3 Make sure that a fax number has been entered in the Fax field.
4 Click the Groups button.
5 If you are creating a new group, click the New Group button and
enter the name of the group.
The Group Membership field lists all the groups to which this person
belongs. The Available Groups field lists all the groups to which this
person does not belong.
6 To add this person to a group, select the group from the Available
Groups list and click the ADD button.
To remove this person from a group, select the group from the Group
Membership list and click the DELETE button.
To send a fax to the group:
1 Click the QUICK FAX button.
2 Click the PHONES button.
3 Click the SELECT button.
4 Click the Group Membership drop-down box and select the group to
which you would like to send the fax.
5 Click OK.
6 Click All in List.
88
Page 97

Using Messages
Sending a Data File
You can use drag-and-drop to send a file or a Communication Center
message (except a fax) to any computer that is capable of receiving a data
file, such as one running the Communication Center, a terminal program,
or a BBS.
You can drag-and-drop directly from any application that supports object
linking and embedding (OLE), the Windows Explorer, the desktop, or
any Communication Center folder.
^ Before sending data files, make sure that the computer to which you are sending the file is
running and is ready to receive data.
I
1 Drag the icon of the file or the Communication Center message
(except a fax) you want to send onto the Main screen.
The Send File dialog is displayed.
3
----------- -
_________
1
_________
1
1 ii iiSiiiiliiiiPrSfSililii:.
2
Click Send as Data.
The Send Data dialog is displayed.
3
Fill in the Send Data dialog.
For more information, see “Filling in the Send Data Dialog” on
page 90.
4 Click Send Data Now.
The Communication Center begins sending the data file. To cancel
transmission, click the FiANGUP button on the Main screen (or click
CANCEL on the data transfer box).
89
Page 98

Filling in the Send Data Dialog
The Send Data dialog appears when you send or resend data.
To send data, you must specify at least the recipient’s data number.
The following fields and buttons are available on the Send Data dialog.
Option
First Name, Last Name
Country Code, Area
Code, Data Number
Phones...
Save Phone
Add Recipient
Delete Recipient
Send Data Now
Schedule Data...
Options...
Description
Recipient information.
Lets you use your Phone Book to fill in the recipient
information. Make sure a Data Number is entered in
the Data field. You may need to edit a recipient’s
entry in your Phonebook to add a data number (see
page 98).
Adds recipient information to your Phone Book.
Lets you address the data file to several people. To
add multiple recipients, fill in the recipient
information and click Add Recipient, then repeat for
each recipient.
Ai You can create Groups in your Phone Book to send data
files to people who frequently receive the same information.
See " Using the Group Feature" on page 88.
Deletes the selected recipient from the list.
Sends the data file.
Lets you schedule future data transmission.
Lets you change data options.
90
Page 99

Using Messages
Option
Cancel
To Record a Message
Description
Closes the Send Data dialog without sending the data
file.
1 Click the MESSAGE button on the Main screen.
The Messages screen is displayed. You can record a message in the
New folder or in the Cabinet folder.
2 Click the REC button on the Messages screen to start recording the
message, and begin speaking.
3 Click the STOP button on the Messages screen to finish recording.
Receiving Faxes
When the Communication Center is on, it receives faxes automatically.
The Fax Operation screen is displayed when an incoming call is from a
fax machine. You can also receive faxes manually when you are online.
New faxes are stored in the New folder of the default mailbox. Faxes you
have viewed or saved are moved to the Old folder.
To Receive Faxes Manually
□ While you are online, click the MENU button on the Main screen,
choose Tools and select Manual Fax Receive.
91
Page 100

To Forward Faxes
You can forward incoming faxes to another fax number automatically.
Select Options from the main menu and choose the Forwarding tab. Click
the Fax Forwarding button. To enable forwarding, change the Never
Forward option to Forward All. Then enter the fax number to which faxes
should be forwarded and click OK. To disable fax forwarding, change the
Forward All option back to Never Forward.
To Print a Fax
You can print the current fax or an existing fax using Fax Viewer.
1 Click the MESSAGE button on the Main screen, select the fax you
want to print from any folder and click the PLAY button (or rightclick and select Open) or click View... on the Send Fax dialog.
The Fax Viewer is displayed.
2 Click the PRINT button (or select Print from the File menu).
^ Make sure that the Communication Center Fax is not selected as the current printer.
Printing to the Communication Center Fax will send the fax.
3 Click OK.
The fax is printed on the selected printer.
0^ If you have difficulty printing a fax, right-click on the fax and select Copy to File. Double
click on the copy of the file. The Wang Imaging for Windows 95 application opens. Then
select Print from the File menu.
92
 Loading...