

Page 1
4-230-059-11(1)
Digital Link Manager
for LISSA
Version 1.0E
Operating Instructions
Mode d’emploi
Bedienungsanleitung
Manual de instrucciones
PCLK-LSA1
GB
FR
DE
ES
2000 Sony Corporation
Page 2

• Duplication of any or all of the contents of
this software and instruction manual or
lending of this software to third parties
without the express permission of the
copyright holder is strictly prohibited by
copyright law.
• Sony cannot be held liable in any way for
monetary losses, lost profits or claims from
third parties arising from the use of this
software.
• Should any manufacturing defects occur,
Sony’s responsibility shall be limited solely
to replacing said defective merchandise.
• This software is approved for use only with
the specified equipment.
• Sony reserves the right to change software
specifications without prior notice.
Program © 2000 Sony Corporation
Documentation © 2000 Sony
Corporation
© 2000 Sony Corporation All rights
reserved.
• Microsoft, MS-DOS and Windows are the
registered trademarks of U.S. Microsoft
Corporation in the U.S. and other
countries.
• IBM and PC/AT are the registered
trademarks of U.S. International Business
Machines Corporation.
• All other names of systems, products and
services are trademarks of their respective
owners. In the manual, the TM or ® mark
are not specified.
• Adobe® and Adobe® Acrobat® Reader are
trademarks of Adobe Systems
Incorporated.
• is the registered trademarks of
Sony Corporation.
Table of contents
Getting started
Overview .............................................. 3
System requirements................... 4
Notes ............................................. 4
Preparation
Checking the supplied items.............. 5
About this manual ............................... 6
Using the on-line manual........... 6
Using the Help ............................. 7
Installing a software ............................ 8
Installing the Digital Link
Manager................................ 8
Installing the Adobe Acrobat
Reader ................................. 13
Uninstalling a software ............ 14
Connections ........................................ 15
Starting the software ......................... 16
Quitting the software ........................ 17
Additional Information
Troubleshooting ................................. 18
GB
2
Page 3

Getting started
Overview
This software allows you to use your computer to control STR-LSA1,
CDP-LSA1 and MDS-LSA1 that are connected to your computer by
i.LINK connecting cables.
• Control LISSA-series components from your computer through an
i.LINK connecting cable.
• Enter text through the computer keyboard for recording to various
media.
• Edit MDs while viewing the computer’s display.
• Enjoy easy recording by performing a drag and drop from a CD to an
MD.
• Select a radio station from the computer.
• Edit and memory preset radio stations from the computer.
• Enjoy easy recording from a radio onto an MD.
• Check a variety of information with the computer’s display.
• Make the settings for each connected component from your
computer.
• Adjust the sound from the computer.
Getting started
GB
GB
3
Page 4

System requirements
Digital Link Manager (Ver. 1.0E) requires the following hardware and
software.
s IBM PC/AT (or compatible) personal computer (This software does
not run on the Macintosh.)
— Recommended models:
— i.LINK connector (or i.LINK card)
— Free hard disc space:
— Video board and display driver:
— CD-ROM drive (for software installation)
s OS : Windows98 Second Edition/Windows2000 (This
s Video monitor: VGA (640 × 480 pixels), 65,536 colours or more
Notes
VAIO notebooks sold in Europe from summer
2000 (PCG-X29, PCG-F701, PCG-F707,
PCG-F707K, PCG-F709, PCG-F709K,
PCG-Z600NE, PCG-Z600NEK, PCG-SR1K,
PCG-C1XD) and later models.
10 MB or more
VGA (640 × 480 pixels), 65,536 colours or more
software does not run on Microsoft Windows3.1,
Windows95 or WindowsNT.)
• This software does not support the transmission of music data from
your computer to an i.LINK component, or from an i.LINK
component to your computer.
• This software can be used only with STR-LSA1, CDP-LSA1 and
MDS-LSA1.
• We recommend that this software be used within a configuration
consisting of one STR-LSA1, one CDP-LSA1 and one MDS-LSA1.
GB
4
Page 5

Preparation
Checking the supplied items
Make sure that you have received the following supplied items with the
PCLK-LSA1. If anything is missing, please contact the shop where you
purchased this kit or your nearest Sony dealer.
• i.LINK connecting cable (1)
• Digital Link Manager CD-ROM (1)
• Operating instructions
• Warranty card
Getting started/Preparation
Preparation
GB
5
Page 6
About this manual
This manual explains how to install the Digital Link Manager.
The latest information about this software can be found in the
“Readme.txt” file in the supplied CD-ROM.
After installing the software, you can use the on-line manual and the
help.
Using the on-line manual
Before you use the on-line manual, Adobe Acrobat Reader (Adobe
Systems Incorporated) must be installed in your computer. If it is not,
do the procedure “Installing the Adobe Acrobat Reader” on page 13.
With the computer turned on, do the following:
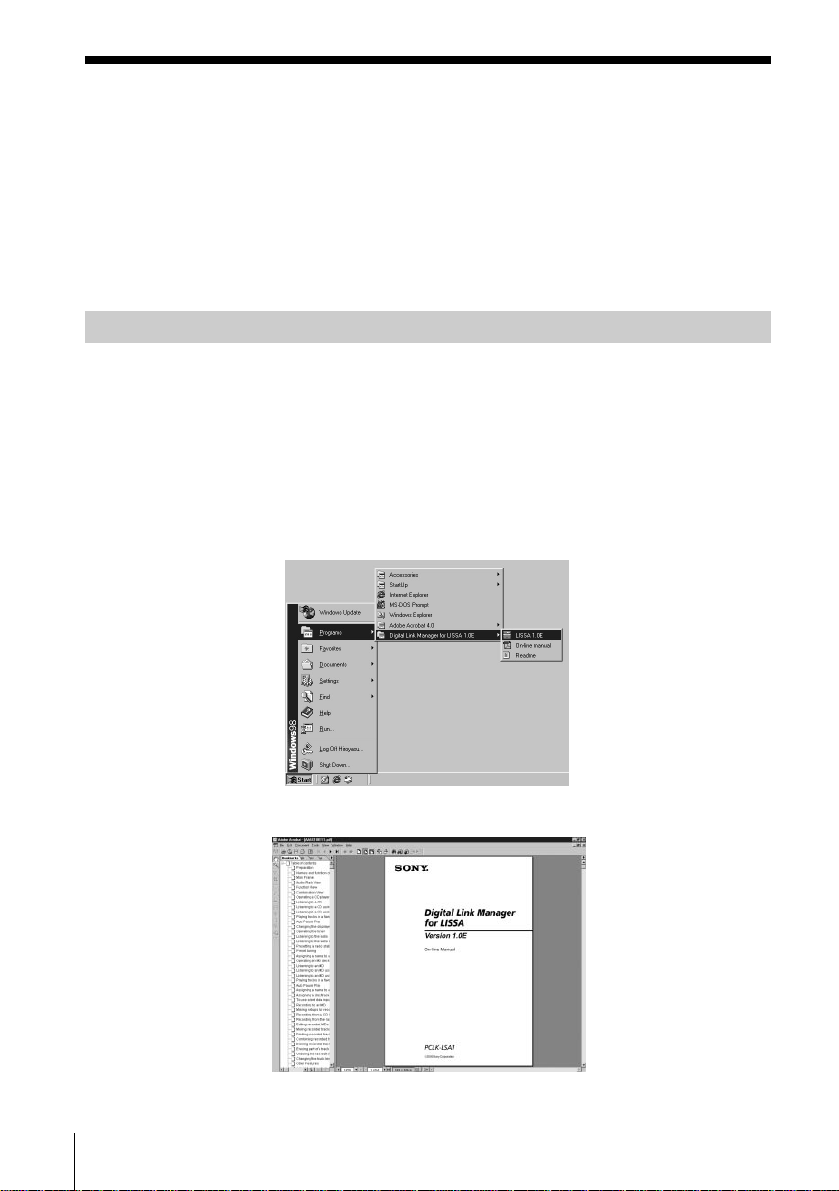
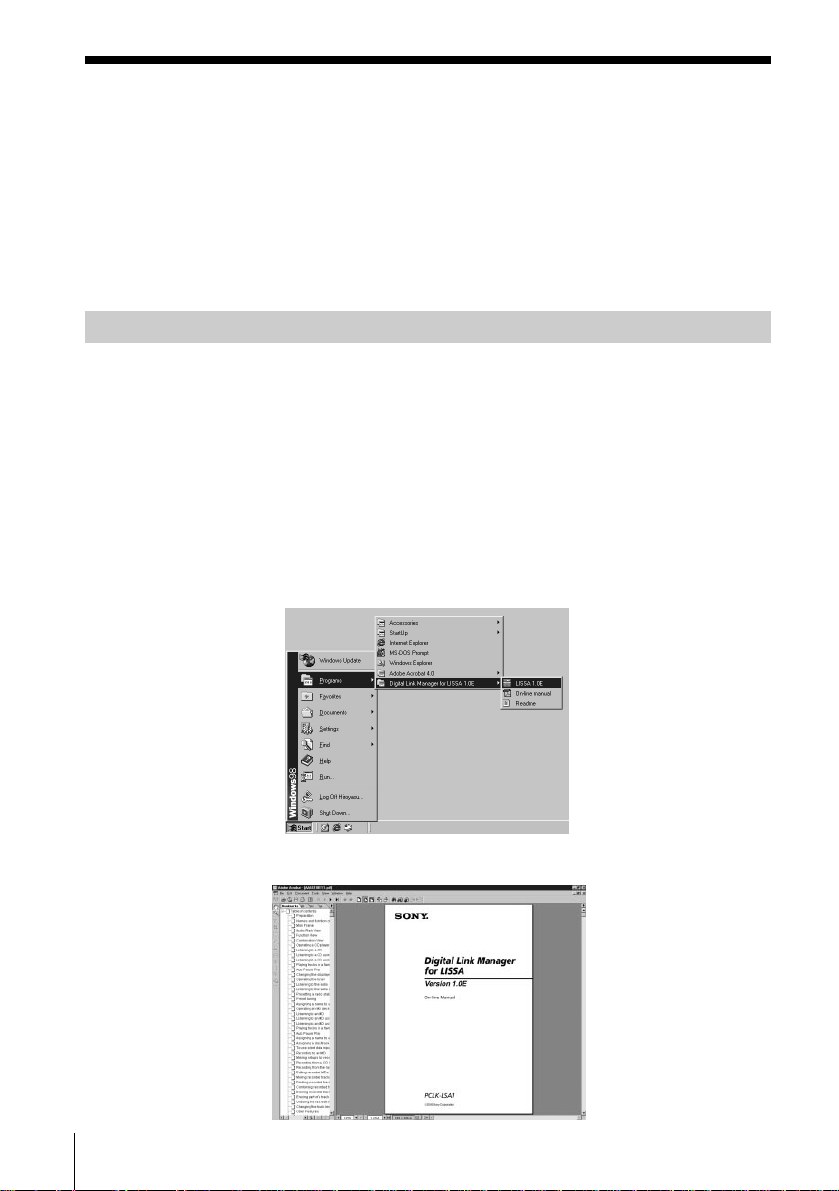
, To open the on-line manual, click “Start”, point to “Program”,
point to “Digital Link Manager for LISSA 1.0E”, and then click
“On-line manual”.
The cover page appears in the display.
GB
6
Page 7
Using the Help
Note
Help exists only in English.
Operating instructions in other languages can be found in the on-line
manual (page 6).
Opening the table of contents of Help
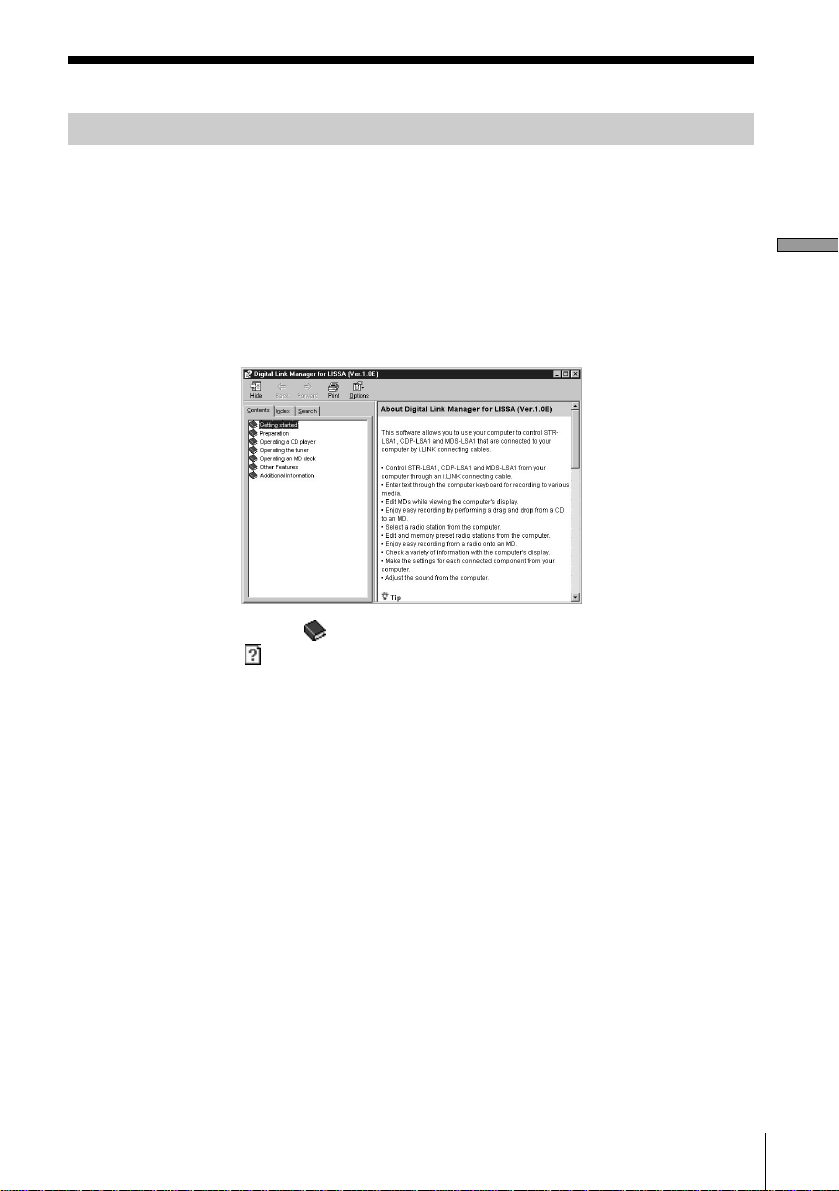
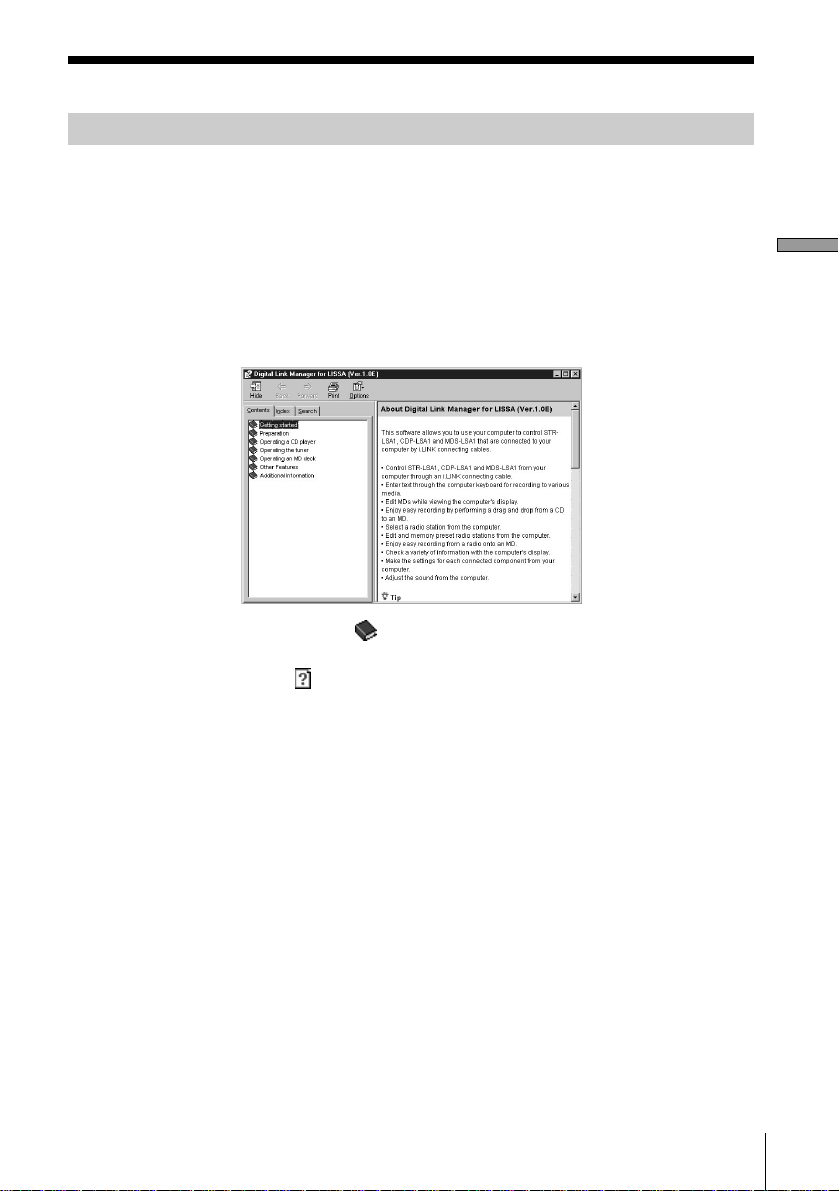
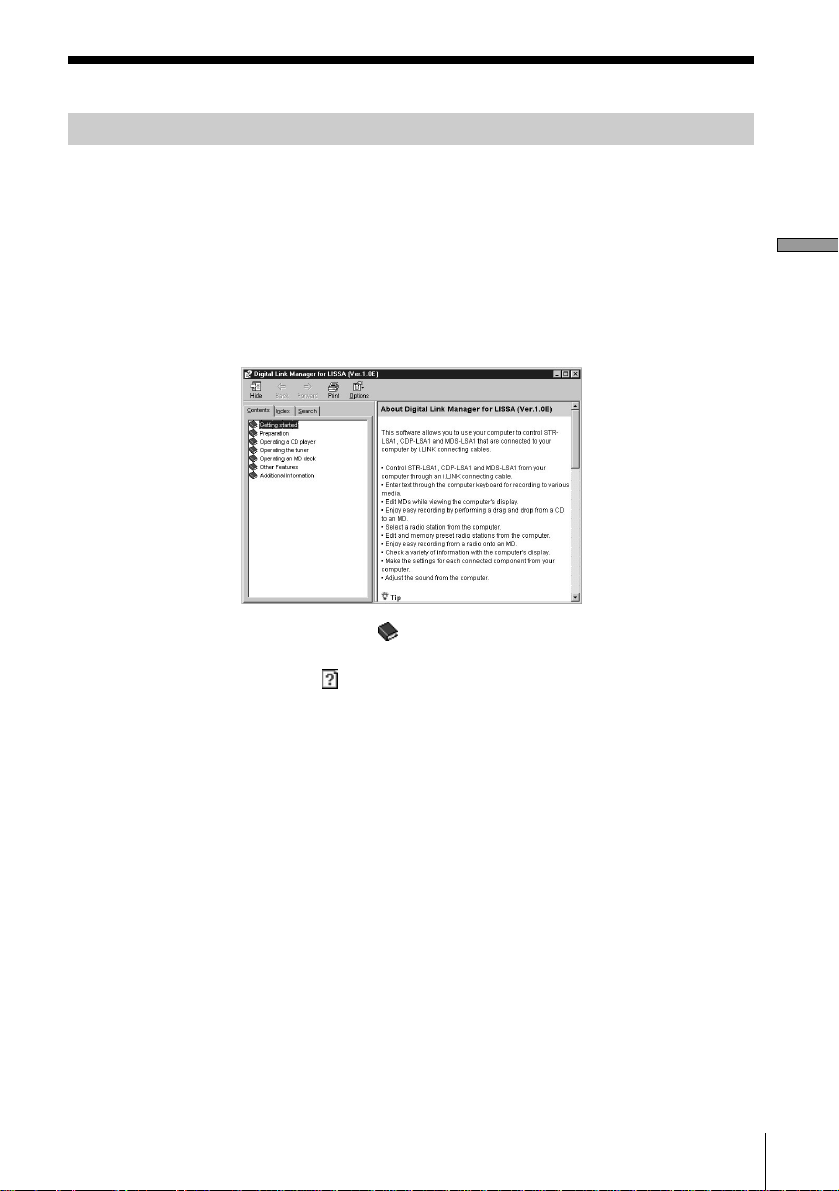
Click the Help button on the Main Window, and the table of contents of
Digital Link Manager will be opened.
• Double-click , and the titles of the items contained in it appear.
• Click
• Click an underline in the explanation, and the page of the related
explanation appears.
Preparation
, and an explanation of the item appears.
Searching by Keywords
Click the “Index” tab in the above search topic window, and the table of
contents disappears and a list of keywords appears.
To search for a keyword, enter the word by which you want to search
or scroll the list of keywords.
To view the explanation on a keyword, select the keyword from the list
of keywords and click “Display”.
GB
7
Page 8
Installing a software
Follow the procedures given below to install a software onto your
computer’s hard disc. Set the computer to the operation mode before
proceeding.
Note
Be sure to install this software before connecting an i.LINK
component to your computer. If not, this software may not function
properly.
Installing the Digital Link Manager
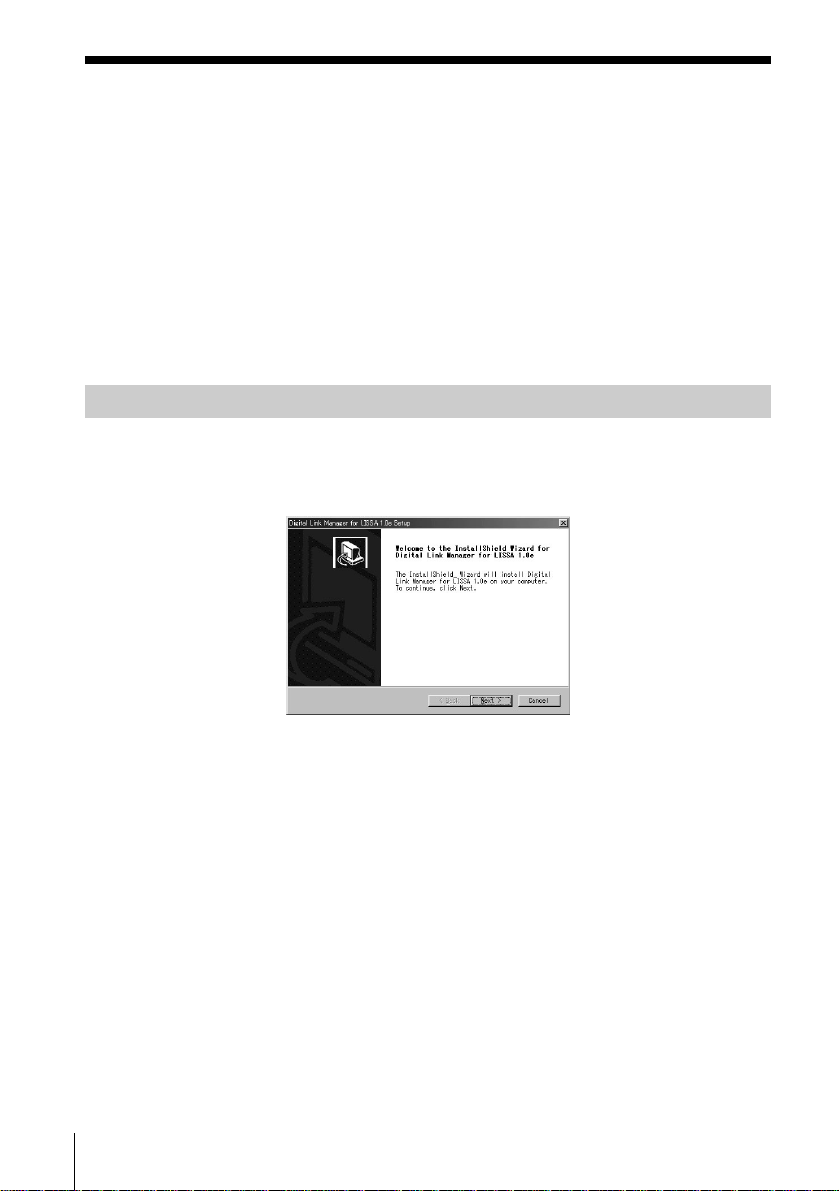
1 Insert the supplied CD-ROM into the computer.
The setup window appears.
Carefully read the precautions which appear.
If the window does not appear, do the following operations.
1 Click “Start”, point to “Settings”, and then click
“Control Panel”.
The control panel is opened.
2 Double-click “Add/Remove Programs”.
The “Add/Remove Programs Properties” window appears.
3 Click “Install .......”, and then click “Next” after the “Install
Program From Floppy Disk or CD-ROM” window appears.
The installer on the CD-ROM will be detected automatically and
the “Run Installation Program” window appears.
GB
8
Page 9
4 Check that “X:\Setup.exe” (X means the drive name of the
CD-ROM) is displayed in the “Command line for installation
program” and click “Finish”.
The installer starts up.
After a while, the setup programme is started.
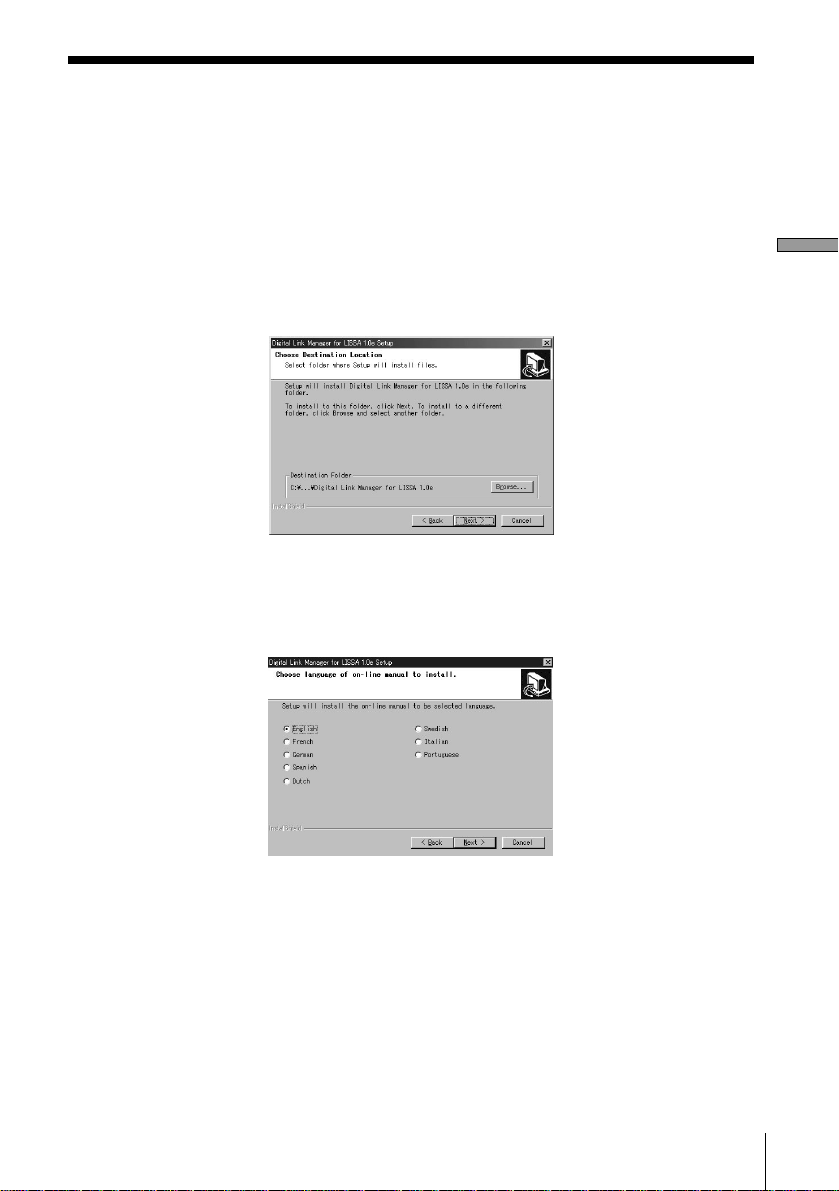
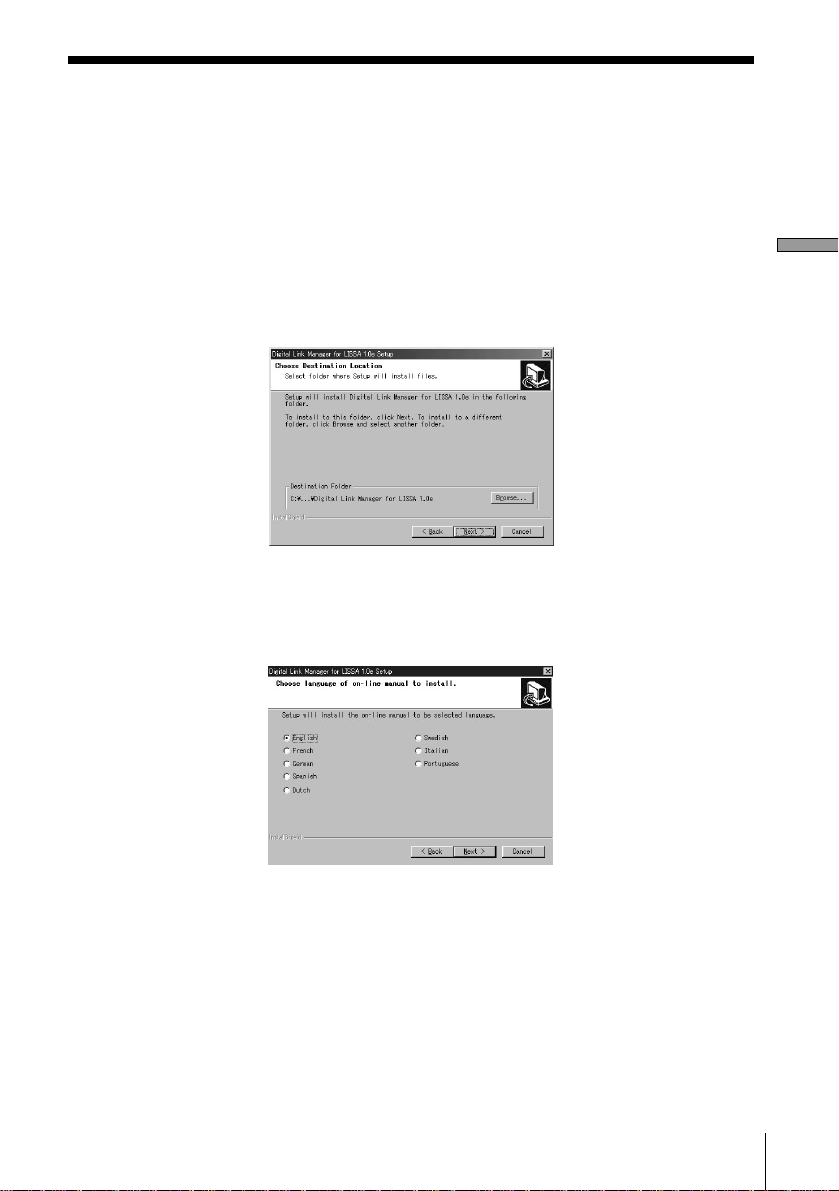
2 Click “Next”.
The window for selecting a destination appears.
To change a destination folder, click “Browse ...” and select a folder
in which you want to install this software.
3 Click “Next”.
Preparation
Select from the list the desired language version of the on-line
manual to be installed.
(continued)
GB
9
Page 10
Installing the Digital Link Manager (continued)
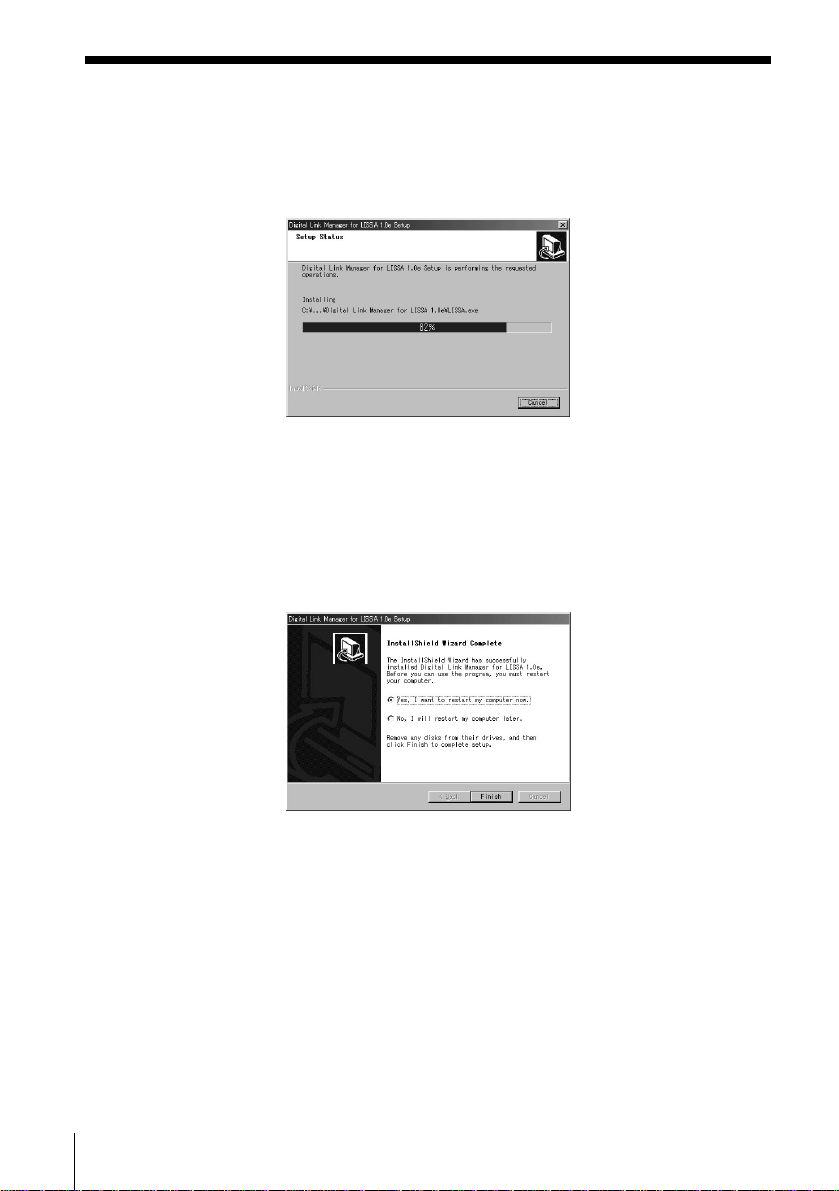
4 Click “Next”.
The process of installing the software on the hard disc starts.
The Digital Link Manager folder is created in the folder in which
this software is installed.
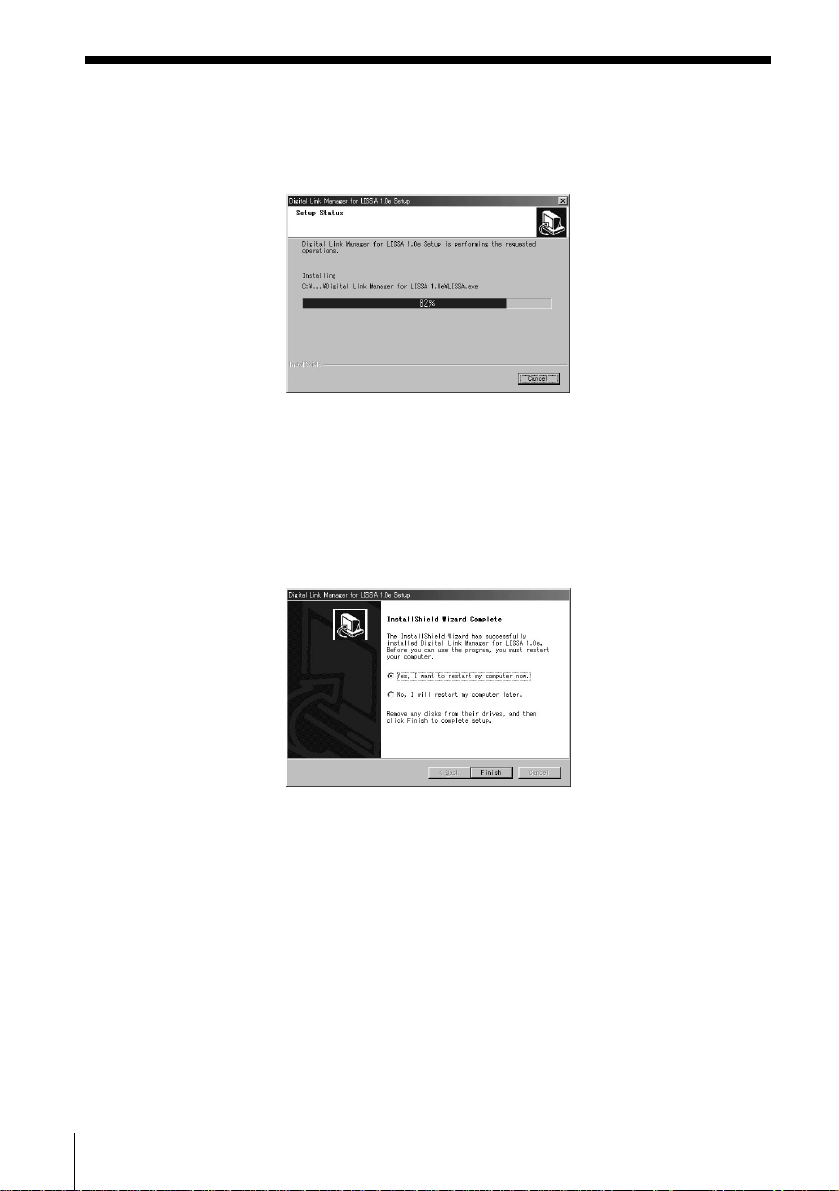
5 Click “Finish” after the window for finishing the installation
procedure appears.
A “Readme.txt” file is opened.
Be sure to read the precautions which appear.
6 Close the “Readme.txt” file.
The window for restarting the computer appears.
10
7 Eject the CD-ROM and restart the computer.
This completes the setup process.
Be sure to restart the computer. If not, the software will not
function properly.
GB
Page 11
Notes
• Installing the software creates a folder. Because this software uses
this folder, please do not erase, move, or change the contents of this
folder.
• When you connect STR-LSA1, CDP-LSA1 or MDS-LSA1 to your
computer for the first time, and the operating system on your
computer is Windows2000, a message may appear requesting that
you insert the supplied CD-ROM. Follow the on-screen instructions
at this time.
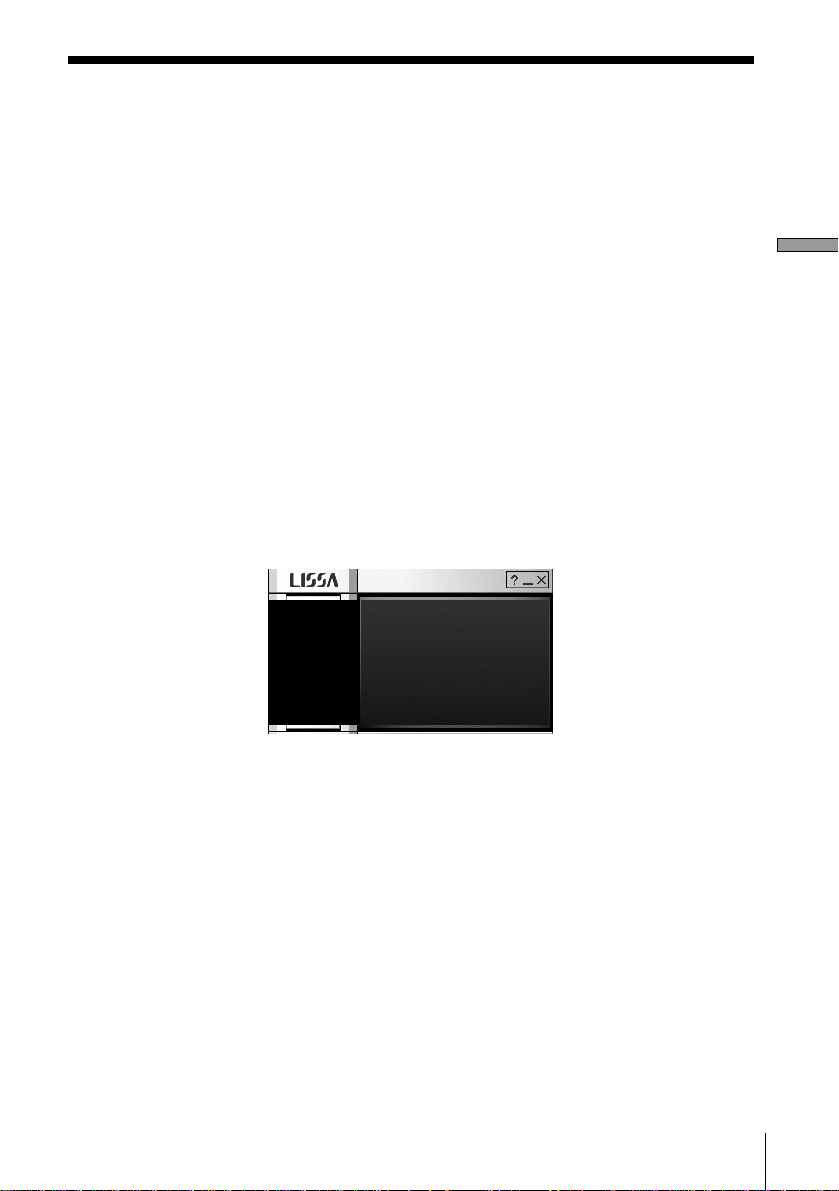
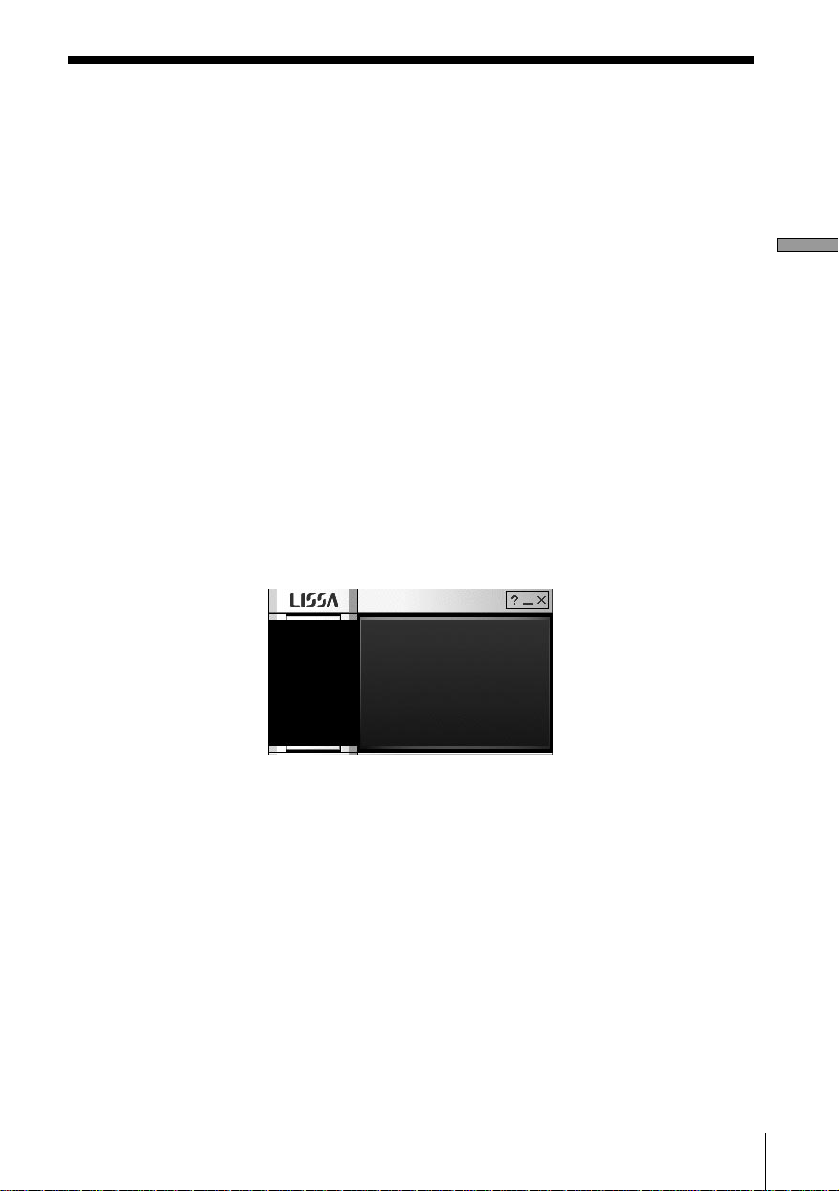
If nothing appears in the Audio Rack View when you start
up the software for the first time
When you start up the Digital Link Manager, the icons of the connected
components will not appear in the Audio Rack View and the window shown
below will appear if:
• you connected the LISSA-series components to your computer before you
installed the Digital Link Manager.
• you connected the LISSA-series components to your computer after you
installed the Digital Link Manager, but you did not restart the computer.
Preparation
If the window appears when you are using Windows98 Second Edition
1 Disconnect all i.LINK devices from the computer.
2 Do the procedure “Uninstalling a software” on page 14 to uninstall the
software.
3 Do the procedure “Installing the Digital Link Manager” on page 8 to re-install
the software.
4 Restart the computer.
(continued)
11
GB
Page 12
Installing the Digital Link Manager (continued)
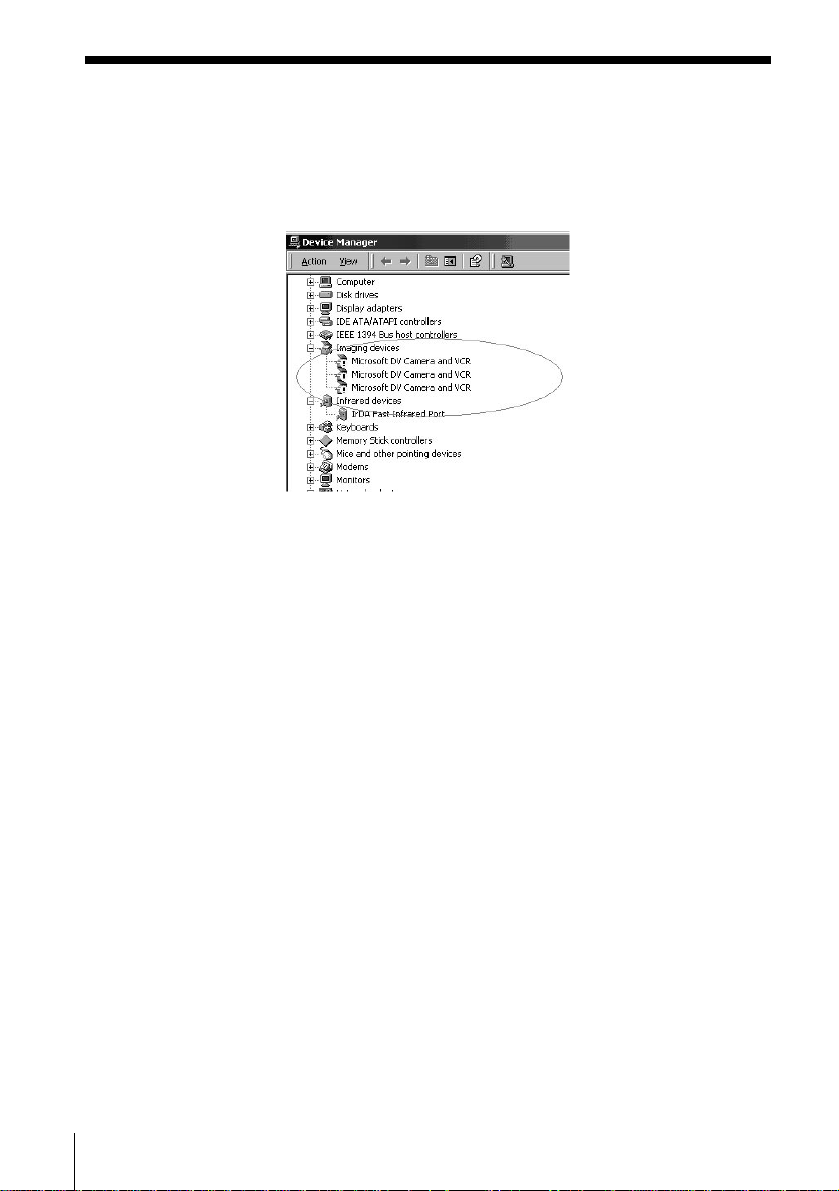
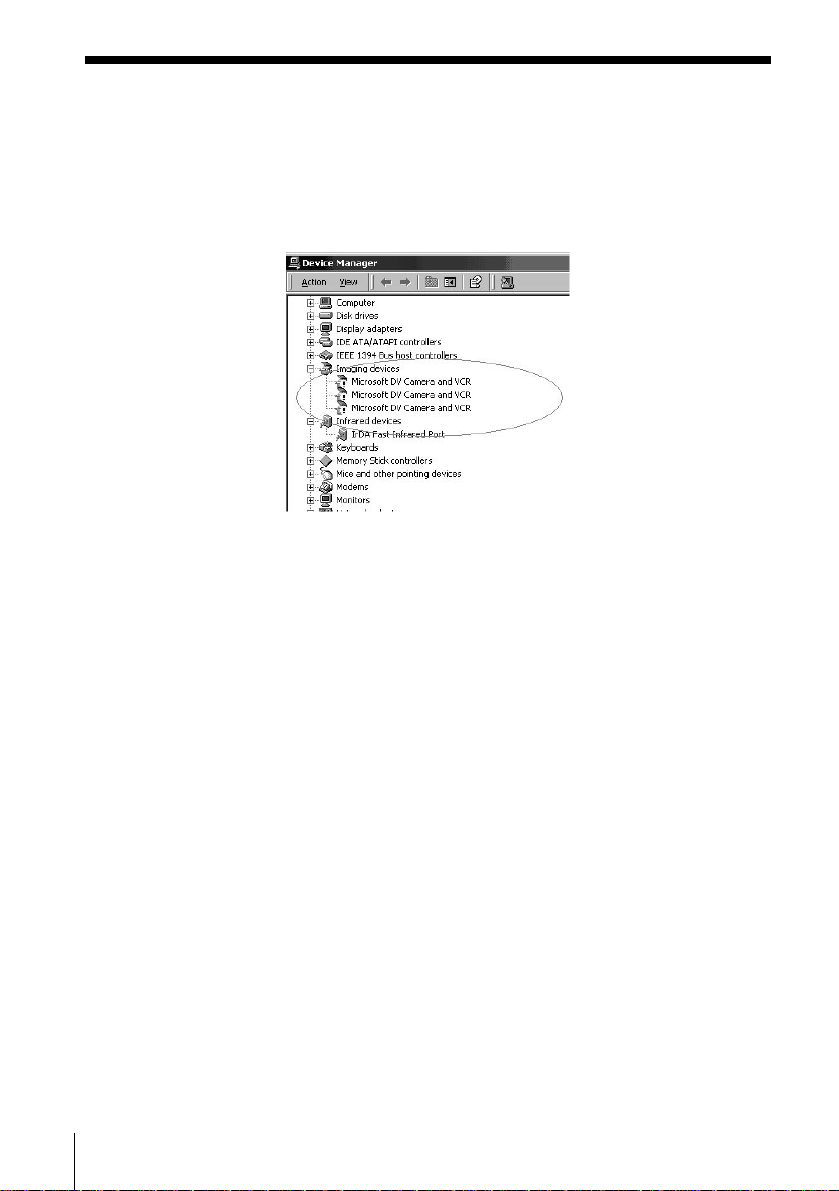
If the window appears when you are using Windows2000
1 Disconnect all i.LINK devices from the computer, and then reconnect only the
LISSA-series components to the computer.
2 Right-click “My Computer”, select “Properties”, click the “Hardware” tab,
and then click “Device Manager” to open the “Device Manager” window.
3 Double-click “Microsoft DV Camera and VCR”, click the “Driver” tab in the
“Properties” window, and then click “Update Driver” to update the driver.
4 Select “Sony i.LINK device (xxx-LSA1)” (xxx, indicated as MDS, CDP or STR,
is the model name of the LISSA-series component) in the window as the
driver.
5 Restart the computer.
12
GB
Page 13
Installing the Adobe Acrobat Reader
You must install the Adobe Acrobat Reader in your computer in order
to open the on-line manual.
Only the English version of Adobe Acrobat Reader 4.0 is provided in
the Acrobat directory on the supplied CD-ROM. Different language
versions of Adobe Acrobat Reader 4.0 are available at the Adobe
website (http://www.adobe.com/). Download the desired version
from the website and install it.
The following procedure is for installing the English version of Adobe
Acrobat Reader 4.0.
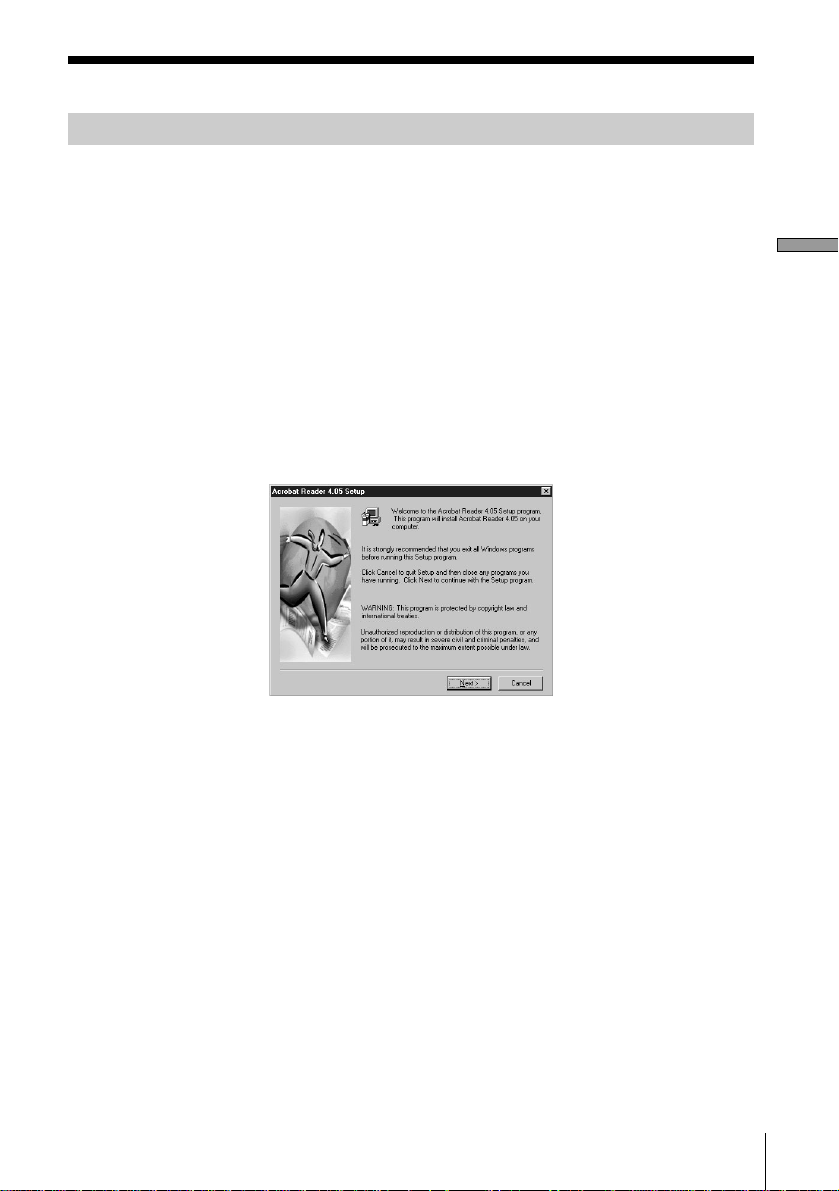
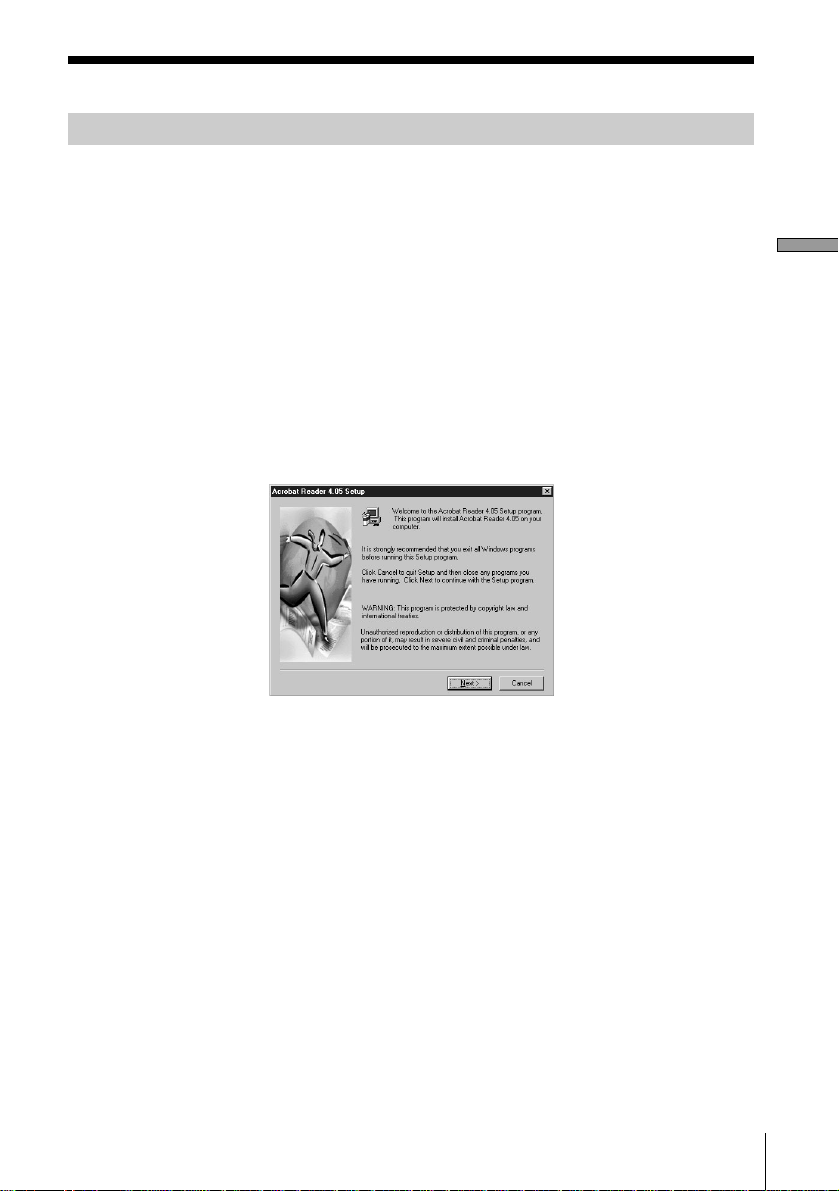
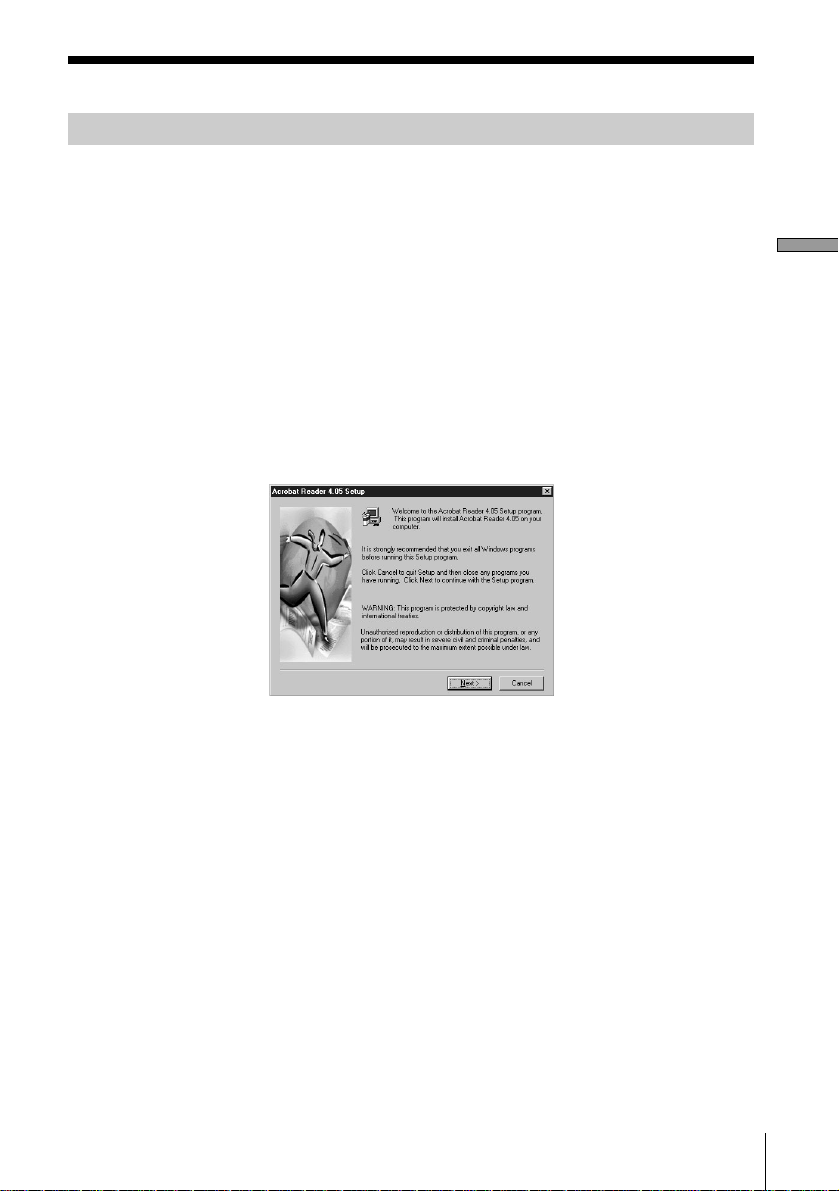
1 Double-click “ar405eng.exe” in the Acrobat directory.
The Set up Adobe Acrobat Reader appears.
Carefully read the precautions which appear.
Preparation
If you do not want to install it, click “Cancel”.
Note
When you have already installed the Adobe Acrobat Reader 3.0 in
your computer, “Warning” appears.
In this case, uninstall the Adobe Acrobat Reader 3.0 and restart
your computer. Installing the Adobe Acrobat Reader 4.0 after
restart, “Warning” does not appear.
2 Follow the instructions that appear in the display to install the
application.
13
GB
Page 14

Uninstalling a software
If you do not need the Digital Link Manager or Adobe Acrobat Reader,
uninstall a software as follows:
1 Select the control panel and display it.
Click “Start”, point to “Settings”, and then click “Control Panel” to
open the control panel.
2 Double-click “Add/Remove Programs”.
The “Add/Remove Programs Properties” window appears.
3 Click “Digital Link Manager for LISSA 1.0E” or “Adobe Acrobat
Reader 4.0” in the programme list below.
4 Click “Add/Remove”.
5 Click “OK” in the “Confirm File Deletion” window.
Uninstaller starts up and the software selected in step 3 is deleted
automatically.
14
GB
Page 15
Connections
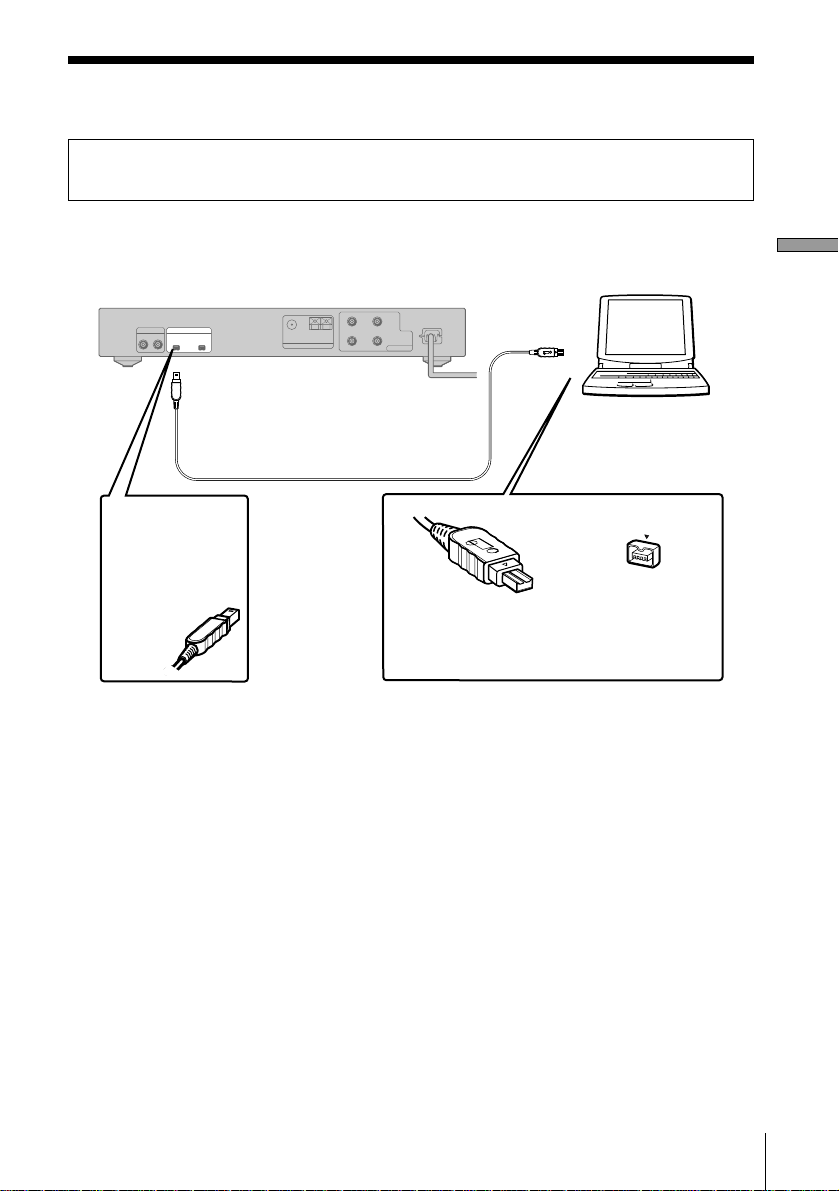
Do not connect an i.LINK component to your computer before installing this
software.
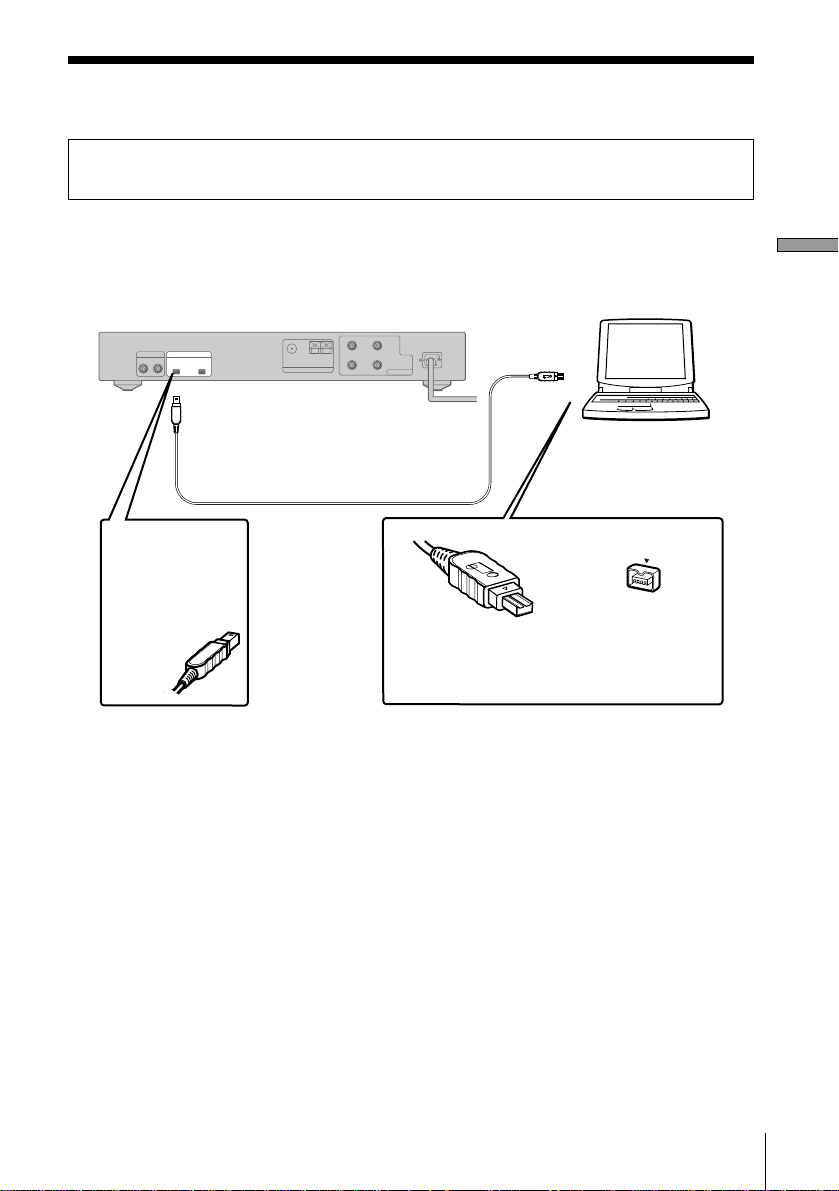
Connect a LISSA-series component to your computer with an i.LINK connecting
cable.
Preparation
Example: Connecting the STR-LSA1
?
v v
To i.LINK S200
connector
i.LINK connecting cable
Insert the plug
deeply into the
matching
connector with
the logotype
facing down.
Notes
• Different models of personal computers refer to their i.LINK connectors with
different connector names. For further information, refer to the instruction
manual of your computer.
• Match the orientation of the cable plug with that of the connector on the main
unit when plugging the cable into the computer. The orientation of the
connector differs according to the computer.
• Be sure to plug in the cable straight. Plugging in the cable at an angle may
damage the jack or the plug.
• Do not insert any metal objects into an i.LINK connector. Short-circuit may
occur resulting in damage.
• It may not be possible to use the supplied i.LINK connecting cable with
certain VAIO series models. If your model is one of these, please use the
optional i.LINK connecting cable (4 pins-6 pins).
Computer
?
To the computer’s
i.LINK connector
Computer
?
Match the orientation of the connectors
and insert the plug deeply into the
matching connector.
15
GB
Page 16
Starting the software
Notes
• Before starting the software, be sure to set all the power control
functions in the “Power Properties” window to off.
• Do not turn on or off the computer during recording on MDS-LSA1.
If you do so, the recording may not be done properly.
• Only the following buttons on the deck or remote can be used to
operate MDS-LSA1 while the software is running:
x, A, DISPLAY, HX, N, X, ./>, m/M, PLAY MODE
• MDS-LSA1 will not be automatically attached* if you start the
software while MDS-LSA1 is in the middle of the CD Synchrorecording. To attach this component, start the software after first
stopping the CD Synchro-recording, or wait until the CD Synchrorecording ends and then use the right-click menu in the Audio Rack
View to attach the component.
* •When you select “Attach”, the specified component is attached to the
i.LINK configuration, allowing you to check the condition of the
component and control it.
•Only one STR-LSA1 can be attached at a time.
, Click “Start”, point to “Program”, point to “Digital Link
Manager for LISSA 1.0E”, and then click “LISSA 1.0E”.
This software is then started and the Digital Link Manager Main
Window appears.
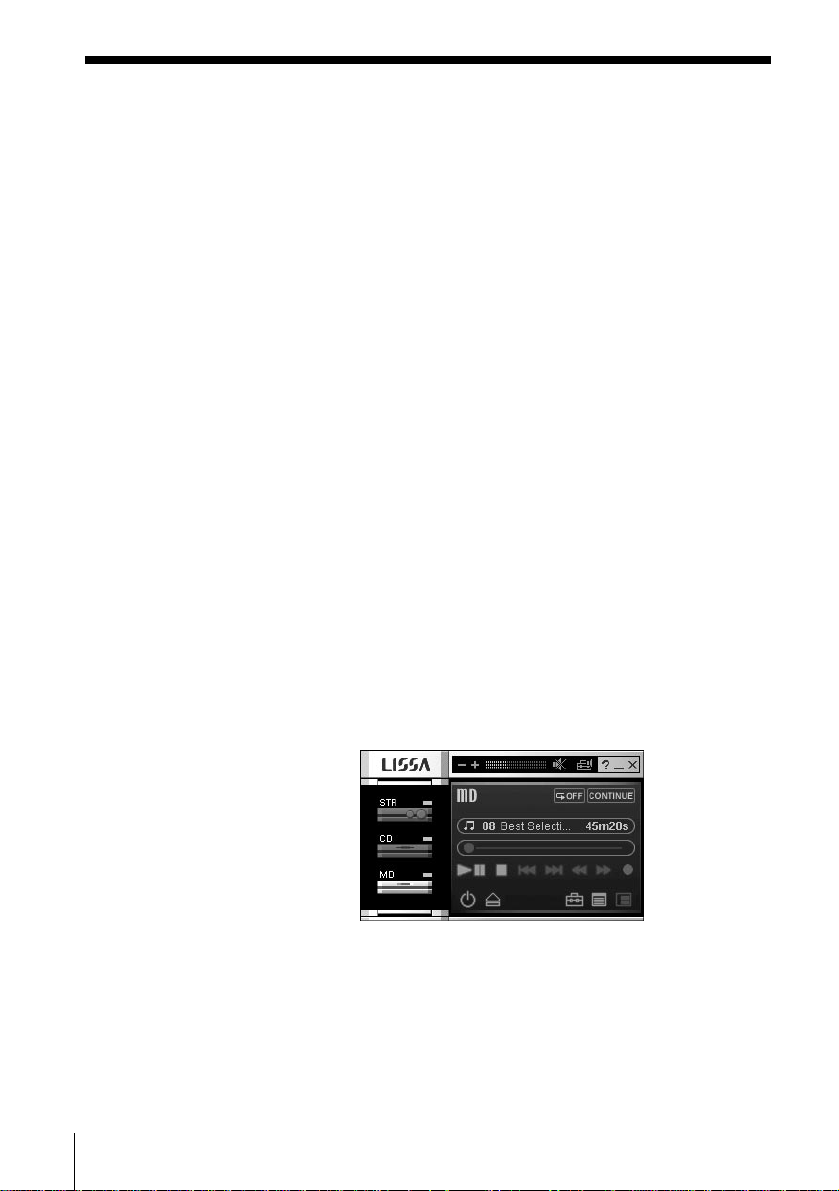
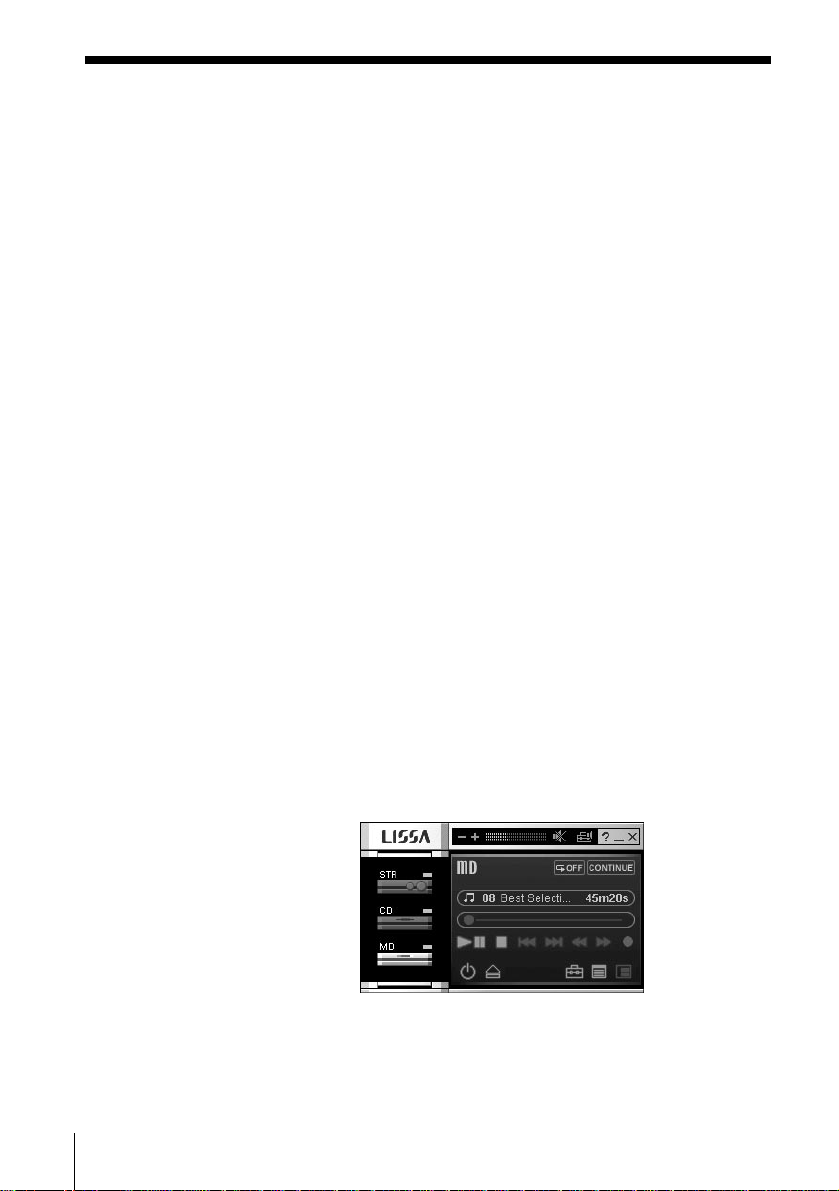
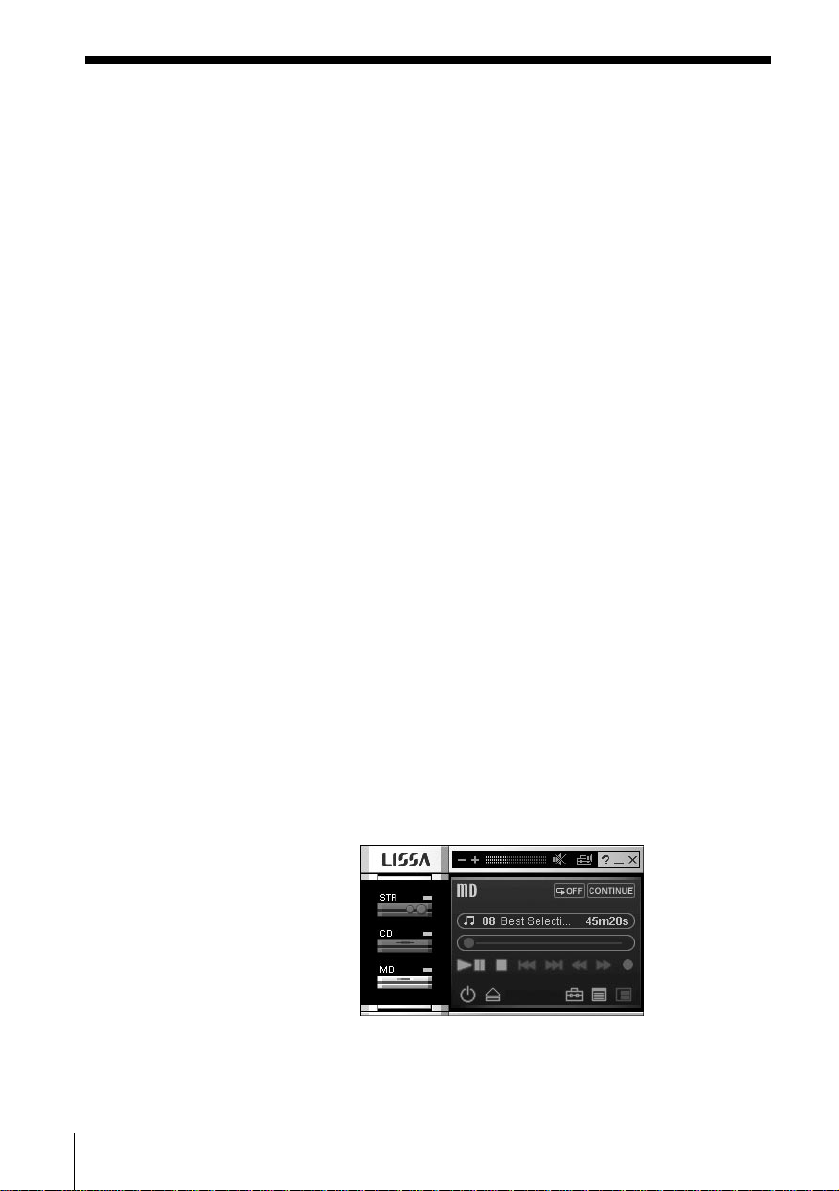
When you start the software, the following display appears (when
MD is selected as the sound source):
16
If nothing appears in the Audio Rack View when you start up the
software for the first time, see page 11.
GB
Page 17

Quitting the software
, Click in the Main Window.
Preparation
17
GB
Page 18

Additional Information
Troubleshooting
If you experience any of the following difficulties while using this
software, use this troubleshooting guide to remedy the problem.
Should any problem persist, consult your nearest Sony dealer.
Please also refer to your computer’s manual, as well as the
“Readme.txt” file installed on the hard disc with the software.
Problem Cause/countermeasure
No screen response or screen error. t Turn off and on the i.LINK component, and then
Character input, recording, editing,
etc. cannot be done.
An i.LINK component does not
respond.
Displayed name of MD or CD does
not match the disc’s data.
restart the Digital Link Manager.
t Start up another application often used and check if
the computer functions properly.
t After uninstalling (page 14), try re-installing (page
8).
The MD write protect tab may be set for write protect.
t Slide the write protect tab so that recording is
possible.
The MD may probably be a commercial playback-only
MD (an MD with prerecorded tracks).
t Character input, recording, editing, etc. are not
possible in commercial playback-only MDs.
t Make sure that i.LINK connecting cables are
connected properly (page 15).
t Disconnect i.LINK connecting cables and then
reconnect them.
t Restart the Digital Link Manager.
18
GB
Page 19

Additional Information
19
GB
Page 20

• La copie d’une partie ou de la totalité de ce
logiciel et du mode d’emploi, ou le prêt de
ce logiciel à un tiers, sans la permission
expresse du détenteur du droit d’auteur,
sont strictement interdits par la loi sur les
droits d’auteur.
• Sony n’assume aucune responsabilité de
quelque nature que ce soit pour les pertes
financières, les pertes de bénéfices ou les
plaintes de tiers, émanant de l’utilisation
de ce logiciel.
• En cas de défaut de fabrication, la
responsabilité de Sony se limite
uniquement au remplacement de la
marchandise défectueuse.
• Ce logiciel ne doit être employé qu’avec
l’équipement spécifié.
• Sony se réserve le droit de modifier sans
préavis les spécifications de ce logiciel.
Programme © 2000 Sony Corporation
Documentation © 2000 Sony
Corporation
© 2000 Sony Corporation – Tous droits
réservés
Table des matières
Informations préliminaires
Aperçu ................................................... 3
Configuration du système.......... 4
Remarques.................................... 4
Préparatifs
Contrôle des articles fournis .............. 5
A propos de ce manuel ....................... 6
Utilisation du manuel en ligne....
Utilisation de l’aide ..................... 7
Installation d’un logiciel ..................... 8
Installation de Digital Link
Manager................................ 8
Installation de Adobe Acrobat
Reader ................................. 13
Désinstallation d’un logiciel .... 14
Raccordements ................................... 15
Lancement du logiciel ....................... 16
Fermeture du logiciel ........................ 17
6
• Microsoft, MS-DOS et Windows sont des
marques déposées de U.S. Microsoft
Corporation, enregistrées aux États-Unis et
dans d’autres pays.
• IBM et PC/AT sont des marques déposées
de U.S. International Business Machines
Corporation.
• Tous les autres noms de systèmes, produits
et services sont des marques de fabrique de
leurs détenteurs respectifs. Dans ce manuel
TM
ou ® ne sont pas spécifiés.
• Adobe® et Adobe® Acrobat® Reader sont
des marques de fabrique de Adobe
Systems Incorporated.
• est une marque déposée de Sony
Corporation.
FR
2
Informations complémentaires
Guide de dépannage ......................... 18
Page 21

Informations préliminaires
Aperçu
Informations préliminaires
Ce logiciel permet d’utiliser un ordinateur pour contrôler les appareils
STR-LSA1, CDP-LSA1 et MDS-LSA1 raccordés à cet ordinateur par des
câbles de liaison i.LINK.
• Contrôler les appareils LISSA depuis votre ordinateur via un câble de
liaison i.LINK.
• Saisir du texte au clavier de l’ordinateur pour l’enregistrer sur
différents supports.
• Editer des MD sur l’écran de l’ordinateur.
• Enregistrer des CD sur des MD par simple tirer-déposer.
• Sélectionner une station radio depuis l’ordinateur.
• Editer et mémoriser des stations préréglées radio depuis l’ordinateur.
• Enregistrer une émission radio sur un MD.
• Vérifier un certain nombre d’informations sur l’écran de l’ordinateur.
• Effectuer différents réglages pour les appareils raccordés à
l’ordinateur.
• Régler le son de l’ordinateur.
FR
FR
3
Page 22

Configuration du système
Le matériel et le logiciel suivants sont nécessaires pour pouvoir utiliser
le logiciel Digital Link Manager (Ver 1.0E).
s Ordinateur IBM PC/AT (ou compatible) (Ce logiciel ne fonctionne
pas sur Macintosh).
— Modèles recommandés:
Portables VAIO commercialisés en Europe à partir
de l’été 2000 (PCG-X29, PCG-F701, PCG-F707,
PCG-F707K, PCG-F709, PCG-F709K, PCG-Z600NE,
PCG-Z600NEK, PCG-SR1K, PCG-C1XD) et
modèles ultérieurs.
— Connecteur i.LINK (ou carte i.LINK)
— Espace libre sur le disque dur:
10 Mo ou plus
— Carte vidéo et pilote d’affichage:
VGA (640 × 480 pixels), affichage de 65 536
couleurs ou plus
— Lecteur CD-ROM (pour l’installation du logiciel)
s Système d’exploitation:
Windows98 Seconde édition/Windows2000 (Ce
logiciel ne fonctionne pas sur Microsoft
Windows3.1, Windows95, WindowsNT.)
s Ecran vidéo: VGA (640 × 480 pixels), affichage de 65 536
couleurs ou plus
Remarques
• Ce logiciel ne permet pas de transmettre des données musicales de
l’ordinateur à l’appareil i.LINK raccordé, ou de l’appareil i.LINK à
l’ordinateur.
• Le logiciel ne peut être utilisé qu’avec les appareils STR-LSA1,
CDP-LSA1 et MDS-LSA1.
• Il est conseillé d’utiliser ce logiciel pour une configuration consistant
en un STR-LSA1, un CDP-LSA1 et un MDS-LSA1.
FR
4
Page 23

Préparatifs
Contrôle des articles fournis
Assurez-vous que les articles suivants accompagnent le PCLK-LSA1. Si
certains articles devaient manquer, veuillez contacter le magasin où
vous avez acheté ce kit ou le revendeur Sony le plus proche.
• Câble de liaison i.LINK (1)
• CD-ROM Digital Link Manager (1)
• Mode d’emploi
• Carte de garantie
Informations préliminaires/Préparatifs
Préparatifs
FR
5
Page 24
A propos de ce manuel
Ce manuel explique comment installer le logiciel Digital Link Manager.
Le fichier “Readme.txt” fourni avec le CD-ROM contient des
informations de dernière minute sur ce logiciel.
Après l’installation du logiciel, vous pouvez utiliser le manuel en ligne
et l’aide.
Utilisation du manuel en ligne
Avant d’utiliser le manuel en ligne, vous devez installer Adobe Acrobat
Reader (Adobe Systems Incorporated) sur votre ordinateur, s’il n’est
pas déjà installé. La marche à suivre pour l’installation est indiquée
dans “Installation de Adobe Acrobat Reader” à la page 13.
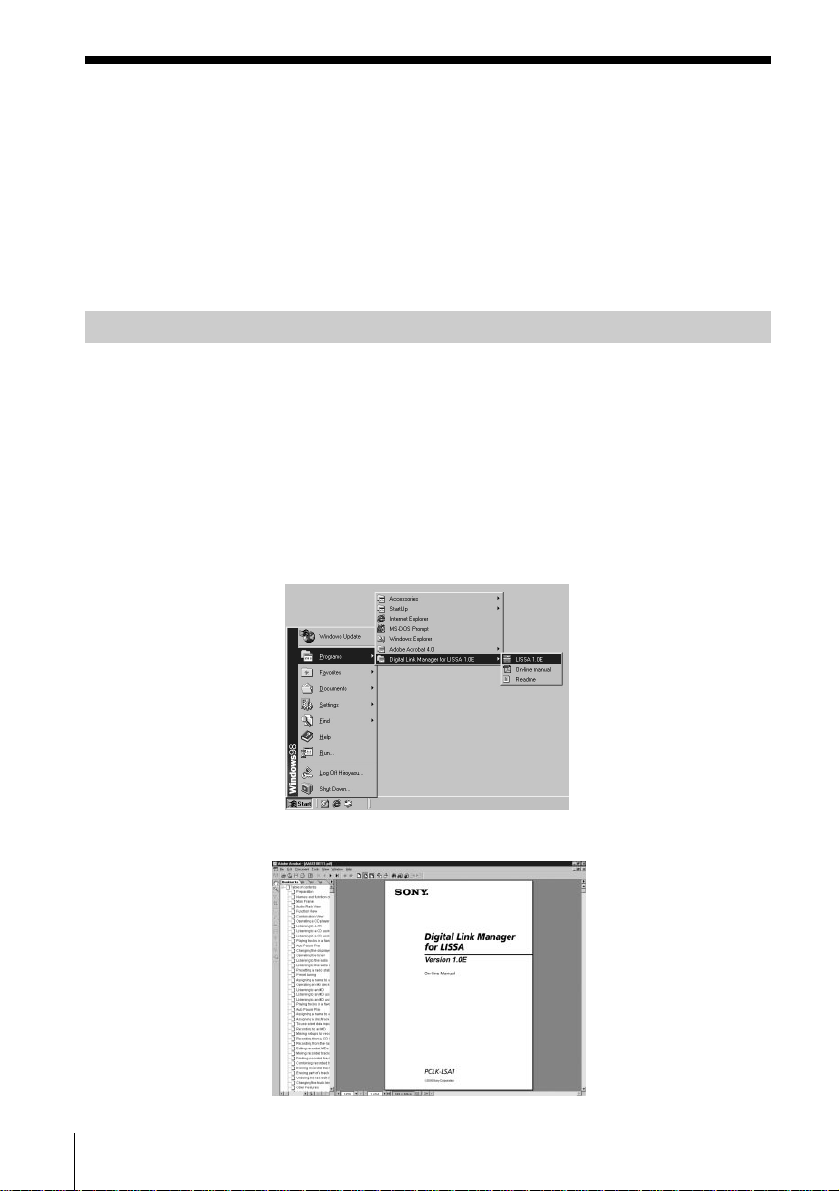
Après avoir allumé l’ordinateur, procédez de la façon suivante.
, Pour ouvrir le manuel en ligne, cliquez sur “Start”, pointez sur
“Program”, puis sur “Digital Link Manager for LISSA 1.0E”, puis
cliquez sur “On-line manual”.
La page de couverture suivante apparaît.
FR
6
Page 25
Utilisation de l’aide
Remarque
Il n’existe qu’une version anglaise de l’aide.
Seul le manuel en ligne contient des instructions dans d’autres langues
(page 6).
Ouverture du sommaire de l’aide
Cliquez sur le bouton d’aide sur la fenêtre principale pour afficher le
sommaire de Digital Link Manager.
• Double-cliquez sur pour afficher les titres des rubriques du
sommaire.
• Cliquez sur
• Cliquez sur un mot souligné dans l’explication pour afficher la page
d’explication correspondante.
Préparatifs
pour afficher l’explication de cette rubrique.
Recherche par mots clés
Cliquez sur l’onglet “Index” dans la boîte de dialogue de recherche par
thème. Le sommaire disparaît et une liste de mots clés s’affiche.
Pour rechercher un mot clé, écrivez le mot et faites défiler la liste de
mots clés qui apparaît.
Pour lire l’explication de ce mot, sélectionnez le mot clé dans la liste et
cliquez sur “Display”.
FR
7
Page 26

Installation d’un logiciel
Pour installer un logiciel sur votre disque dur, effectuez les opérations
suivantes. Mettez l’ordinateur en marche avant de commencer.
Remarque
L’appareil i.LINK ne doit pas être raccordé à l’ordinateur au moment
de l’installation du logiciel, sinon le logiciel ne fonctionnera pas
correctement.
Installation de Digital Link Manager
1 Insérez le CD-ROM fourni dans l’ordinateur.
La fenêtre suivante apparaît.
Lisez attentivement les précautions qu’elle contient.
Si la fenêtre n’apparaît pas, effectuez les opérations suivantes.
1 Cliquez sur “Start”, pointez sur “Settings”, puis cliquez sur
“Control Panel”.
Le panneau de configuration s’ouvre.
2 Double-cliquez sur “Add/Remove Programs”.
La fenêtre “Add/Remove Programs Properties” apparaît.
3 Cliquez sur “Install …..”, puis sur “Next” après l’affichage de la
fenêtre “Install Program From Floppy Disk or CD-ROM”.
L’installateur enregistré sur le CD-ROM est automatiquement
détecté et la fenêtre “Run Installation Program” apparaît.
FR
8
Page 27
4 Vérifiez que “X:\Setup.exe” (X correspondant au nom de lecteur
du CD-ROM) est affiché dans “Command line for installation
program” et cliquez sur “Finish”.
L’installation commence.
Un instant plus tard, le programme d’installation démarre.
2 Cliquez sur “Next”.
La fenêtre de sélection de la destination apparaît.
Pour changer le dossier de sélection, cliquez sur “Browse…” et
sélectionnez le dossier où vous voulez installer le logiciel.
3 Cliquez sur “Next”.
Préparatifs
Sélectionnez la langue souhaitée pour le manuel en ligne à installer.
(voir page suivante)
FR
9
Page 28

Installation de Digital Link Manager (suite)
4 Cliquez sur “Next”.
L’installation du logiciel sur le disque dur commence.
Le dossier Digital Link Manager est créé dans le dossier où le
logiciel a été installé.
5 Cliquez sur “Finish” lorsque la fenêtre de fin d’installation
apparaît.
Un fichier “Readme.txt” s’ouvre.
Lisez bien les précautions qui apparaissent.
6 Fermez le fichier “Readme.txt”.
La fenêtre de redémarrage de l'ordinateur apparaît.
10
7 Ejectez le CD-ROM et redémarrez l'ordinateur.
L’installation est entièrement terminée à ce moment.
Veillez à redémarrer l'ordinateur, sinon le logiciel ne fonctionnera
pas correctement.
FR
Page 29

Remarques
• Un dossier est créé lors de l’installation du logiciel. Veuillez ne pas
effacer ni déplacer ce dossier et ne pas en modifier le contenu, car il
est utilisé par le logiciel.
• La première fois que vous reliez un STR-LSA1, un CDP-LSA1 et un
MDS-LSA1 à votre ordinateur, un message vous demandant d’insérer
le CD-ROM fourni apparaîtra si votre ordinateur fonctionne sous
Windows2000. Dans ce cas, suivez les instructions qui apparaissent.
Si rien n’apparaît sur l’affichage du rack audio au premier
démarrage du logiciel
Au démarrage du Digital Link Manager, les icônes des composants connectés
n’apparaîtront pas sur l’affichage du rack audio, et la fenêtre indiquée cidessus apparaîtra si:
• vous avez raccordé des composants de série LISSA à votre ordinateur après
l’installation de Digital Link Manager.
• vous avez connecté des composants de série LISSA à votre ordinateur après
l’installation de Digital Link Manager, mais vous n’avez pas redémarré votre
ordinateur.
Préparatifs
Si la fenêtre apparaît quand vous utilisez Windows98 Seconde édition
1 Déconnectez tous les dispositifs i.LINK de votre ordinateur.
2 Exécutez la procédure “Désinstallation d’un logiciel” de la page 14 pour
désinstaller le logiciel.
3 Exécutez la procédure “Installation de Digital Link Manager” de la page 8
pour réinstaller le logiciel.
4 Redémarrez votre ordinateur.
(voir page suivante)
11
FR
Page 30

Installation de Digital Link Manager (suite)
Si la fenêtre apparaît quand vous utilisez Windows2000
1 Déconnectez tous les dispositifs i.LINK de votre ordinateur, puis reconnectez-
y uniquement les composants de la série LISSA.
2 Cliquez de la touche droite sur “My Computer”, sélectionnez “Properties”,
cliquez sur l’onglet “Hardware”, puis sur “Device Manager” pour ouvrir la
fenêtre “Device Manager”.
3 Double-cliquez sur “Microsoft DV Camera and VCR”, cliquez sur l’onglet
“Driver” dans la fenêtre “Properties”, puis sur “Update Driver” pour mettre
à jour le pilote.
4 Sélectionnez “Sony i.LINK device (xxx-LSA1)” (xxx indiqué MDS, CDP ou
STR, est le nom de mode du composant de série LISSA) dans la fenêtre
comme pilote.
5 Redémarrez votre ordinateur.
12
FR
Page 31
Installation de Adobe Acrobat Reader
Vous devez installer Adobe Acrobat Reader sur l’ordinateur pour
pouvoir ouvrir le manuel en ligne.
Seule la version anglaise de Adobe Acrobat Reader 4.0 est fournie dans
le répertoire de Acrobat sur le CD-ROM. Les versions de Adobe
Acrobat Reader 4.0 dans d’autres langues sont disponibles sur le site
Internet de Adobe (http//www.adobe.com/). Téléchargez la version
souhaitée et installez-la.
La procédure suivante décrit l’installation de la version anglaise de
Adobe Acrobat Reader 4.0.
1 Double-cliquez sur “ar405eng.exe” dans le répertoire Acrobat.
La fenêtre d’installation d’Adobe Acrobat Reader s’ouvre.
Lisez attentivement les précautions qu’elle contient.
Préparatifs
Si vous ne voulez pas l’installer, cliquez sur “Cancel”.
Remarque
Si Adobe Acrobat Reader 3.0 est déjà installé sur votre ordinateur,
“Warning” apparaîtra.
Dans ce cas, désinstallez Adobe Acrobat Reader 3.0 et redémarrez
votre ordinateur. “Warning” n’apparaîtra plus lors de l’installation
de Adobe Acrobat Reader 4.0.
2 Suivez les instructions qui apparaissent à l’écran pour installer
l’application.
13
FR
Page 32

Désinstallation d’un logiciel
Lorsque vous n’avez plus besoin de Digital Link Manager ou de Adobe
Acrobat Reader, désinstallez-les en procédant de la façon suivante:
1 Sélectionnez le panneau de configuration et ouvrez-le.
Cliquez sur “Start”, pointez sur “Settings” puis sur “Control Panel”
pour ouvrir le panneau de configuration.
2 Double-cliquez sur “Add/Remove Programs”.
La fenêtre “Add/Remove Programs Properties” apparaît.
3 Cliquez sur “Digital Link Manager for LISSA 1.0E” ou sur “Adobe
Acrobat Reader 4.0” dans la liste de programmes.
4 Cliquez sur “Add/Remove”.
5 Cliquez sur “OK” dans la fenêtre “Confirm File Deletion”.
Le désinstallateur se met en marche et le logiciel sélectionné à
l’étape 3 est automatiquement supprimé.
14
FR
Page 33
Raccordements
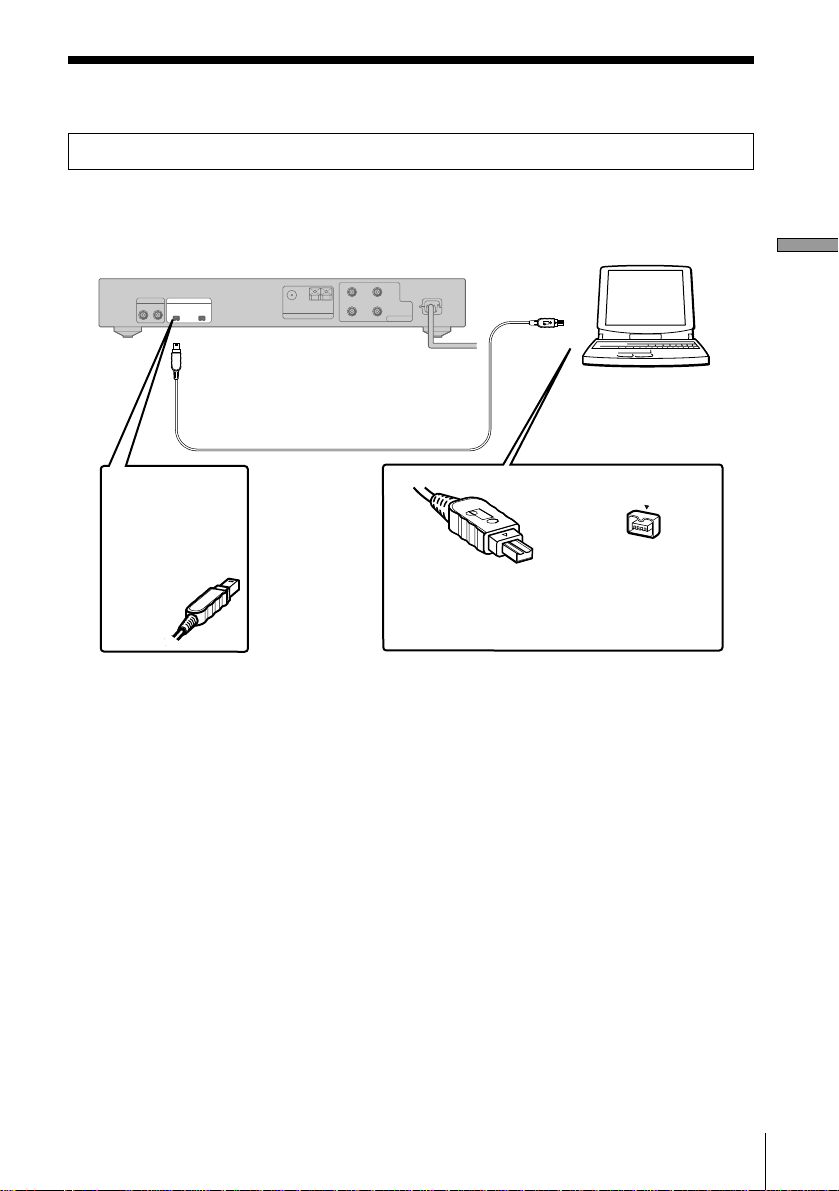
Ne pas relier d’appareils i.LINK à l’ordinateur avant l’installation du logiciel.
Raccordez un appareil LISSA à votre ordinateur à l’aide d’un câble de liaison i.LINK.
Exemple: Raccordement du STR-LSA1
?
v v
Au connecteur
i.LINK S200
Câble de liaison i.LINK
Insérez la fiche à
fond dans le
connecteur
approprié en
dirigeant la
marque vers le
bas.
Remarques
• Sur certains modèles d’ordinateur, le nom du connecteur i.LINK peut être
différent. Pour de plus amples informations, reportez-vous au mode d’emploi
de votre ordinateur.
• L’orientation du connecteur varie selon les ordinateurs. Lorsque vous
branchez la fiche sur le connecteur de l’ordinateur, veillez à l’orienter
correctement.
• Assurez-vous que le cordon reste bien droit lorsque vous branchez la prise.
S’il est de biais, la prise et le connecteur, ou le cordon peuvent être
endommagés.
• N’introduisez pas d’objets métalliques dans le connecteur i.LINK. Un courtcircuit peut se produire et causer des dommages.
• Avec certains modèles VAIO, il n’est pas possible d’utiliser le câble i.LINK
fourni. Le cas échéant, utilisez un câble i.LINK optionnel (4 broches-6
broches).
Ordinateur
?
Au connecteur
i.LINK de
l’ordinateur
Ordinateur
?
Orientez la fiche correctement et insérezla à fond dans le connecteur approprié.
Préparatifs
15
FR
Page 34
Lancement du logiciel
Remarques
• Avant de lancer le logiciel, veillez à désactiver toutes les fonctions de
contrôle d’alimentation dans la fenêtre “Power Properties”.
• N’allumez et n’éteignez pas l’ordinateur pendant l’enregistrement
sur le MDS-LSA1, sinon l’enregistrement ne s’effectuera pas
correctement.
• Seules les touches suivantes de la platine ou de la télécommande
peuvent être utilisées pour le contrôle du MDS-LSA1 lorsque
lelogiciel est en marche:
x, A, DISPLAY, HX, N, X, ./>, m/M, PLAY MODE
• Le MDS-LSA1 ne sera pas automatiquement connecté* si vous lancez
le logiciel au milieu de l’enregistrement synchro de CD. Pour
connecter cet appareilz, lancez lelogiciel après avoir arrêté
l’enregistrement synchro de CD, ou attendez que l’enregistrement
soit terminé et utilisez le menu contextuel sur l’affichage du rack
audio pour connecter les appareils.
* •Lorsque vous sélectionnez “Attach”, l’appareil spécifié estconnecté à la
configuration i.LINK, ce qui permet de vérifier l’état de l’appareil et de le
contrôler.
•Un seul STR-LSA1 peut être raccordé à la fois.
, Cliquez sur “Start”, pointez sur “Program” et cliquez sur
“Digital Link Manager for LISSA 1.0E” puis cliquez sur
“LISSA 1.0E”.
Le logiciel se met en marche et la fenêtre principale de Digital Link
Manager apparaît.
Lorsque vous démarrez le logiciel, l’affichage suivant apparaît (si la
fonction MD a été sélectionnée comme source sonore):
16
Si rien n’apparaît sur l’affichage du rack audio au premier
démarrage du logiciel, consultez la page 11.
FR
Page 35

Fermeture du logiciel
, Cliquez sur dans la fenêtre principale.
Préparatifs
17
FR
Page 36

Informations complémentaires
Guide de dépannage
Si une difficulté quelconque se présente pendant l’utilisation de ce
logiciel, référez-vous à ce guide pour la résoudre.
Si le problème persiste, consultez votre revendeur Sony.
Reportez-vous sinon au mode d’emploi de votre ordinateur ainsi qu’au
fichier “Readme.txt” installé sur le disque dur avec le logiciel.
Problème Cause/Solution
Aucune réponse de l’écran ou erreur
d’écran.
La saisie de caractères,
l’enregistrement, l’édition, etc. sont
impossibles.
Un appareil i.LINK ne répond pas.
Les noms affichés des MD ou CD ne
correspondent pas aux données des
disques.
t Eteignez et rallumez l’appareil i.LINK, puis
redémarrer Digital Link Manager.
t Lancez une autre application que vous utilisez
souvent et vérifiez si l’ordinateur fonctionne
normalement.
t Après avoir désinstallé le logiciel (page 14), essayez
de le réinstaller (page 8).
Le taquet de protection contre l’écriture du MD a peutêtre été tiré pour interdire l’enregistrement.
t Faites glisser le taquet de protection contre l’écriture
pour que l’enregistrement soit possible.
Le MD est probablement prévu pour la lecture
seulement (MD avec plages préenregistrées).
t La saisie de caractères, l’enregistrement, l’édition,
etc. sont impossibles sur les MD de lecture vendus
dans le commerce.
t Assurez-vous que les câbles de liaison i.LINK sont
raccordés correctement (page 15).
t Débranchez les câbles de liaison i.LINK puis
rebranchez-les.
t Redémarrez Digital Link Manager.
18
FR
Page 37

Informations complémentaires
19
FR
Page 38

• Eine vollständige oder teilweise
Vervielfältigung dieser Software und der
Bedienungsanleitung sowie das Verleihen
dieser Software an Dritte ohne
ausdrückliche Genehmigung des
Urheberrechtsinhabers verstößt gegen das
Urheberrechtsgesetz und ist streng
verboten.
• Sony übernimmt keinerlei Haftung für
finanzielle Verluste, Gewinnverluste oder
Schadensersatzforderungen Dritter, die
sich aus dem Gebrauch dieser Software
ergeben.
• Für den Fall von Herstellungsfehlern
beschränkt sich die Verantwortung der
Firma Sony ausschließlich auf den Ersatz
der defekten Ware.
• Diese Software ist nur für den Gebrauch
mit der angegebenen Ausrüstung
zugelassen.
• Sony behält sich das Recht vor,
Änderungen an den SoftwareSpezifikationen ohne Vorankündigung
vorzunehmen.
Program © 2000 Sony Corporation
Documentation © 2000 Sony
Corporation
© 2000 Sony Corporation. Alle Rechte
vorbehalten.
• Microsoft, MS-DOS und Windows sind
eingetragene Warenzeichen der US
Microsoft Corporation in den USA und
anderen Ländern.
• IBM und PC/AT sind eingetragene
Warenzeichen der U.S. International
Business Machines Corporation.
• Alle anderen Systemnamen,
Produktnamen und Anbieternamen sind
Warenzeichen der betreffenden Eigner. Die
Kennzeichnungen TM und ® werden in der
Anleitung weggelassen.
• Adobe® und Adobe® Acrobat® Reader sind
Warenzeichen der Adobe Systems
Incorporated.
• ist ein eingetragenes Warenzeichen
der Sony Corporation.
Inhaltsverzeichnis
Vor dem Betrieb
Überblick............................................... 3
Systemvoraussetzungen............. 4
Hinweise ....................................... 4
Vorbereitung
Überprüfung der mitgelieferten
Teile ............................................... 5
Zu dieser Anleitung ............................ 6
Verwendung der Online-
Anleitung ............................. 6
Verwendung des
Hilfesystems ........................ 7
Installation des Programms ............... 8
So wird der Digital Link Manager
installiert............................... 8
So wird der Adobe Acrobat
Reader installiert ............... 13
Deinstallieren des
Programms......................... 14
Anschluß ............................................. 15
Starten des Programms..................... 16
Beenden des Programms .................. 17
Zusatzinformationen
Störungsüberprüfung ....................... 18
DE
2
Page 39

Vor dem Betrieb
Überblick
Mit diesem Programm können Sie Geräte STR-LSA1, CDP-LSA1 und
MDS-LSA1, die über i.LINK-Kabel angeschlossen sind, von einem
einem Computer aus steuern.
• Steuern von Geräten der LISSA-Serie vom Computer aus über
i.LINK-Kabel.
• Texteingabe über die Computer-Tastatur.
• Editieren von MDs auf dem Computer-Bildschirm.
• Einfaches Überspielen einer CD auf eine MD durch Ziehen und
Ablegen.
• Senderwahl vom Computer aus.
• Speichern von Sendern und Ändern der Senderspeicherung vom
Computer aus.
• Einfaches Aufnehmen eines Radioprogramms auf MD.
• Anzeigen verschiedener Informationen auf dem ComputerBildschirm.
• Steuerung der angeschlossenen Geräte vom Computer aus.
• Einstellung des Tons vom Computer aus.
Vor dem Betrieb
DE
DE
3
Page 40

Systemvoraussetzungen
Damit der Digital Link Manager (Version 1.0E) auf Ihrem Computer
läuft, müssen Hardware und Software die folgenden Anforderungen
erfüllen.
s IBM PC/AT (oder kompatibler) Computer. (Das Programm läuft
nicht auf Macintosh-Computern.)
— Empfohlene Modelle:
— i.LINK-Anschluß (oder i.LINK-Karte)
— Festplatten-Speicherplatz:
— Grafikkarte und Bildschirmtreiber:
— CD-ROM-Laufwerk (zur Installation des Programms)
s Betriebssystem : Windows98 Second Edition/Windows2000.
s Monitor: VGA (640 x 480 Pixel), 65.536 Farben oder mehr
VAIO Notebook-Computer, die in Europa ab
Sommer 2000 im Handel erhältlich sind
(PCG-X29, PCG-F701, PCG-F707, PCG-F707K,
PCG-F709, PCG-F709K, PCG-Z600NE,
PCG-Z600NEK, PCG-SR1K, PCG-C1XD) und
spätere Modelle.
10 MB oder mehr
VGA (640 x 480 Pixel), 65.536 Farben oder mehr
(Unter Microsoft Windows3.1, Windows95 und
WindowsNT läuft das Programm nicht.)
Hinweise
• Eine Musikdatenübertragung vom Computer zu einem i.LINK-Gerät
oder umgekehrt wird nicht vom Programm unterstützt.
• Das Programm ermöglicht nur eine Steuerung der Geräte STR-LSA1,
CDP-LSA1 und MDS-LSA1.
• Wir empfehlen, das Programm zur Steuerung einer Anlage zu
benutzen, die aus einem STR-LSA1, einem CDP-LSA1 und einem
MDS-LSA1 besteht.
DE
4
Page 41

Vorbereitung
Überprüfung der mitgelieferten Teile
Vergewissern Sie sich, daß die folgenden Teile im Lieferumfang des
PCLK-LSA1 enthalten sind. Sollte ein Teil fehlen, wenden Sie sich an
das Geschäft, in dem Sie dieses Kit gekauft haben, oder an den
nächsten Sony Händler.
• i.LINK-Kabel (1)
• Digital Link Manager CD-ROM (1)
• Bedienungsanleitung
• Garantiekarte
Vor dem Betrieb/Vorbereitung
Vorbereitung
DE
5
Page 42
Zu dieser Anleitung
Diese Anleitung behandelt die Installation des Digital Link Manager.
Die aktuellsten Informationen zum Programm finden Sie in der
„Readme.txt“-Datei auf der mitgelieferten CD-ROM.
Nach dem Installieren des Programms stehen Ihnen die OnlineAnleitung und das Hilfesystem zur Verfügung.
Verwendung der Online-Anleitung
Die Online-Anleitung steht nur zur Verfügung, wenn zuvor Adobe
Acrobat Reader (Adobe Systems Incorporated) im Computer installiert
wurde. Führen Sie gegebenenfalls den unter „So wird der Adobe
Acrobat Reader installiert“ auf Seite 13 behandelten Vorgang aus.
Wenn Sie die Online-Anleitung verwenden wollen, führen Sie bei
eingeschaltetem Computer den folgenden Vorgang aus:
, Klicken Sie auf „Start“, wählen Sie „Program“ und dann „Digital
Link Manager for LISSA 1.0E“, und klicken Sie auf „On-line
manual“, um die Online-Anleitung zu öffnen.
Die Übersichtsseite erscheint.
DE
6
Page 43
Verwendung des Hilfesystems
Hinweis
Das Hilfesystem ist nur in Englisch verfügbar.
Informationen in anderen Sprachen finden Sie in der Online-Anleitung
(Seite 6).
Öffnen der Liste mit den Hilfethemen
Klicken Sie im Hauptfenster auf die Hilfetaste. Eine Liste mit den
Hilfethemen zum Digital Link Manager öffnet sich.
• Doppelklicken Sie auf , um die Titel dieses Themenkomplexes
anzuzeigen.
• Klicken Sie auf
• Klicken Sie auf einen unterstrichenen Textteil, um die
Erläuterungsseite zu diesem Textteil abzurufen.
, um die Hilfe zu einem Thema anzuzeigen.
Vorbereitung
Suchen mit Schlüsselwörtern
Klicken Sie in der obigen Themendialogbox auf das Register „Index“.
Das Inhaltsverzeichnis verschwindet dann, und statt dessen erscheint
eine Liste mit den Schlüsselwörtern.
Geben Sie das gewünschte Schlüsselwort ein, oder rollen Sie die Liste,
um das Schlüsselwort zu suchen.
Um den Erläuterungstext zum Schlüsselwort anzuzeigen, wählen Sie
das Schlüsselwort in der Liste, und klicken Sie auf „Display“.
DE
7
Page 44

Installation des Programms
Nachdem der Computer betriebsbereit ist, installieren Sie das
Programm wie folgt auf die Festplatte.
Hinweis
Beim Installieren darf kein i.LINK-Gerät am Computer
angeschlossen sein. Ansonsten läuft das Programm nicht richtig.
So wird der Digital Link Manager installiert
1 Legen Sie die mitgelieferte CD-ROM in das Laufwerk ein.
Das Setup-Fenster erscheint.
Lesen Sie die Hinweise sorgfältig durch.
Erscheint das Fenster nicht, verfahren Sie wie folgt:
1 Klicken Sie auf „Start“, wählen Sie „Settings“, und klicken Sie
dann auf „Control Panel“.
Das Control Panel öffnet sich.
2 Doppelklicken Sie auf „Add/Remove Programs“.
Die Dialogbox „Add/Remove Programs Properties“ erscheint.
3 Klicken Sie auf „Install .......“ und dann, nachdem sich das
„Install Program From Floppy Disk or CD-ROM“-Fenster
geöffnet hat, auf „Next“.
Der Installationsassistent auf der CD-ROM wird automatisch
aktiviert, und das „Run Installation Program“-Fenster öffnet
sich.
DE
8
Page 45

4 Vergewissern Sie sich, daß „X:\Setup.exe“ (X ist der Name des
CD-ROM-Laufwerks) in der „Command line for installation
program“ angezeigt wird, und klicken Sie dann auf „Finish“.
Der Installationsassistent startet.
Kurze Zeit später startet das Setup-Programm.
2 Klicken Sie auf „Next“.
Eine Dialogbox zur Wahl des Ziels erscheint.
Wenn Sie den Zielordner ändern wollen, klicken Sie auf
„Browse...“, und wählen Sie den Ordner, in dem das Programm
installiert werden soll.
3 Klicken Sie auf „Next”.
Vorbereitung
Wählen Sie die gewünschte Sprachversion des zu installierenden
Online-Handbuchs aus der Liste aus.
(Bitte wenden.)
DE
9
Page 46
So wird der Digital Link Manager installiert (Fortsetzung)
4 Klicken Sie auf „Next“.
Auf der Festplatte wird der Ordner Digital Link Manager erzeugt
und das Programm in diesem Ordner installiert.
5 Wenn das Fenster zum Beenden der Installation erscheint, klicken
Sie auf „Finish“.
Eine „Readme.txt“-Datei öffnet sich.
Lesen Sie die Informationen durch.
6 Schließen Sie die „Readme.txt“-Datei.
Das Fenster zum erneuten Hochstarten des Computers erscheint.
10
7 Nehmen Sie die CD-ROM heraus, und starten Sie den Computer
neu hoch.
Die Installation ist damit beendet.
Der Computer muß unbedingt neu hochgestartet werden, sonst
läuft das Programm nicht richtig.
DE
Page 47
Hinweise
• Beim Installieren des Programms wird ein neuer Ordner angelegt. Da
dieser vom Programm benötigt wird, darf er nicht gelöscht,
verschoben oder inhaltlich verändert werden.
• Wenn Sie unter Windows2000 die Geräte STR-LSA1, CDP-LSA1 und
MDS-LSA1 zum ersten Mal an den Computer anschließen, werden
Sie möglicherweise durch eine Meldung aufgefordert, die
mitgelieferte CD-ROM einzulegen. Folgen Sie dann den
Bildschirmanweisungen.
Wenn beim erstmaligen Starten der Software in der
Audiotrack-Übersicht nichts angezeigt wird
Wenn Sie den Digital Link Manager starten, werden die Ikone der
angeschlossenen Geräte in der Audiotrack-Übersicht nicht angezeigt und das
unten dargestellte Fenster erscheint, wenn:
• Sie die Geräte der LISSA-Serie erst nach der Installation des Digital Link
Manager an Ihren Computer angeschlossen haben.
• Sie die Geräte der LISSA-Serie erst nach der Installation des Digital Link
Manager an Ihren Computer angeschlossen haben, jedoch den Computer
nicht neu hochgestartet haben.
Vorbereitung
Wenn dieses Fenster erscheint, während Sie Windows98 Second Edition
verwenden
1 Trennen Sie die Anschlüsse aller i.LINK-Geräte vom Computer.
2 Machen Sie die Installation der Software rückgängig, indem Sie nach
Anweisungen unter „Deinstallieren des Programms” auf Seite 14 vorgehen.
3 Führen Sie die erneute Installation der Software durch, indem Sie nach
Anweisungen unter „So wird der Digital Link Manager installiert” auf Seite 8
vorgehen.
4 Starten Sie den Computer neu hoch.
(Bitte wenden.)
11
DE
Page 48
So wird der Digital Link Manager installiert (Fortsetzung)
Wenn dieses Fenster erscheint, während Sie Windows2000 verwenden
1 Trennen Sie die Anschlüsse aller i.LINK-Geräte vom Computer und schließen
Sie nur die Geräte der LISSA-Serie wieder an den Computer an.
2 Rechter Mausklick auf „My Computer”, wählen Sie „Properties”, klicken Sie
auf „Hardware” und dann auf „Device Manager”, um „Device Manager”Fenster zu öffnen.
3 Doppelklick auf „Microsoft DV Camera and VCR”, dann klicken Sie auf
„Driver” im „Properties”-Fenster und dann auf „Update Driver”, um den
Treiber zu aktualisieren.
4 Wählen Sie im Fenster als Treiber „Sony i.LINK device (xxx-LSA1)” (xxx, als
MDS, CDP oder STR angegeben, ist die Modellbezeichnung des Gerätes der
LISSA-Serie).
5 Starten Sie den Computer neu hoch.
12
DE
Page 49
So wird der Adobe Acrobat Reader installiert
Die Online-Anleitung kann nur geöffnet werden, wenn der Adobe
Acrobat Reader im Computer installiert ist.
Im Acrobat-Ordner der mitgelieferten CD-ROM ist nur die englische
Version des Adobe Acrobat Reader 4.0 vorhanden. Andere
Sprachversionen des Adobe Acrobat Reader 4.0 können Sie auf der
Adobe-Website (http://www.adobe.com/) herunterladen und
installieren.
Die folgende Anleitung gilt für die englische Version des Adobe
Acrobat Reader 4.0.
1 Doppelklicken Sie im Acrobat-Ordner auf „ar405eng.exe”.
Das Adobe Acrobat Reader Setup-Fenster erscheint.
Lesen Sie die Hinweise sorgfältig durch.
Vorbereitung
Wenn keine Installation ausgeführt werden soll, klicken Sie auf
„Cancel“.
Hinweis
Wenn in Ihrem Computer bereits der Adobe Acrobat Reader 3.0
installiert ist, erscheint „Warning“.
Deinstallieren Sie in einem solchen Fall den Adobe Acrobat Reader
3.0, starten Sie Ihren Computer neu hoch, und installieren Sie den
Adobe Acrobat Reader 4.0 erneut. „Warning“ erscheint dann nicht
mehr.
2 Zur Installation des Programms folgen Sie den Anweisungen auf
dem Bildschirm.
13
DE
Page 50

Deinstallieren des Programms
Wenn Sie den Digital Link Manager oder den Adobe Acrobat Reader
nicht mehr benötigen, deinstallieren Sie das Programm wie folgt:
1 Wählen Sie wie folgt das Control Panel:
Klicken Sie auf „Start“, wählen Sie „Settings“, und klicken Sie dann
auf „Control Panel“.
2 Doppelklicken Sie auf „Add/Remove Programs“.
Die Dialogbox „Add/Remove Programs Properties“ erscheint.
3 Klicken Sie in der Programmliste auf „Digital Link Manager for
LISSA 1.0E“ oder „Adobe Acrobat Reader 4.0“.
4 Klicken Sie auf „Add/Remove“.
5 Klicken Sie im „Confirm File Deletion“-Fenster auf „OK“.
Der Deinstallationsassistent startet, und das im Schritt 3 gewählte
Programm wird gelöscht.
14
DE
Page 51
Anschluß
Schließen Sie das i.LINK-Gerät erst an den Computer an, nachdem Sie das
Programm installiert haben.
Schließen Sie die Geräte der LISSA-Serie über i.LINK-Kabel an Ihren Computer an.
Beispiel: Anschluß an STR-LSA1
?
v v
An i.LINK S200Buchse
i.LINK-Kabel
Computer
?
An i.LINK-Buchse
des Computers
Vorbereitung
Den Stecker mit
dem Logo nach
unten fest in die
Buchse
einstecken.
Hinweise
• Die Bezeichnung der i.LINK-Buchse kann von Computer zu Computer
verschieden sein. Einzelheiten entnehmen Sie bitte dem Handbuch Ihres
Computers.
• Achten Sie sorgfältig darauf, den Stecker richtig herum einzustecken. Die
Ausrichtung kann je nach Computer verschieden sein.
• Stecken Sie den Stecker gerade ein. Durch verkantetes Einstecken kann die
Buchse oder der Stecker beschädigt werden.
• Stecken Sie keine Metallgegenstände in die i.LINK-Buchse, da es sonst durch
Kurzschluß zu Beschädigungen kommen kann.
• Bei bestimmten Geräten der VAIO-Serie kann das mitgelieferte i.LINK-Kabel
nicht verwendet werden. Es wird stattdessen ein getrennt erhältliches 4-Pol-6Pol i.LINK-Kabel benötigt.
Computer
?
Den Stecker richtig ausgerichtet fest in
die Buchse einstecken.
15
DE
Page 52

Starten des Programms
Hinweise
• Schalten Sie alle Stromsteuerfunktionen im „Power Properties”-
Fenster aus, bevor Sie das Programm starten.
• Schalten Sie während der Aufnahme mit dem MDS-LSA1 den
Computer nicht ein oder aus, da sonst die Aufnahme nicht richtig
ausgeführt wird.
• Während das Programm läuft, können am MD-Deck MDS-LSA1 und
an der Fernbedienung nur die folgenden Tasten benutzt werden:
x, A, DISPLAY, HX, N, X, ./>, m/M, PLAY MODE.
• MDS-LSA1 wird nicht automatisch aktiviert*, wenn sich der
MDS-LSA1 beim Starten des Programms gerade im CD-SynchroAufnahmebetrieb befindet. Zum Aktivieren dieses Geräts müssen Sie
vor dem Starten des Programms die CD-Synchro-Aufnahme stoppen
oder abwarten, bis die CD-Synchro-Aufnahme beendet ist, dann in
der Audiorack-Übersicht mit der rechten Maustaste klicken und in
dem sich öffnenden Menü die Geräte aktivieren.
* •Bei Wahl von „Attach” wird das betreffende Gerät der i.LINK-
Konfiguration aktiviert. Der Zustand des Geräts kann dann überprüft und
das Gerät kann gesteuert werden.
•Nur jeweils ein STR-LSA1 kann regietriert werden.
, Klicken Sie auf „Start“, wählen Sie dann „Program“ und
„Digital Link Manager for LISSA 1.0E“, und klicken Sie
auf „LISSA 1.0E“.
Das Digital Link Manager-Programm wird gestartet, und das
Hauptfenster erscheint.
Wenn Sie nach dem Starten als Programmquelle die Option MD
gewählt haben, erscheint folgende Anzeige:
16
Wenn beim erstmaligen Starten der Software in der AudiotrackÜbersicht nichts angezeigt wird, siehe Seite 11.
DE
Page 53

Beenden des Programms
, Klicken Sie auf im Hauptfenster.
Vorbereitung
17
DE
Page 54

Zusatzinformationen
Störungsüberprüfung
Sollte es beim Betrieb des Programms zu Problemen kommen,
versuchen Sie, das Problem anhand der folgenden Liste zu beheben.
Falls dies nicht gelingt, wenden Sie sich an den nächsten Sony Händler.
Nehmen Sie bitte auch das Handbuch Ihres Computers und die Datei
„Readme.txt“ auf der Festplatte zur Hilfe.
Problem Ursache/Abhilfe
Keine oder falsche Anzeige auf dem
Bildschirm.
Zeicheneingabe, Aufnahme, Editieren
usw. ist nicht möglich.
Das i.LINK-Gerät reagiert nicht. t Sicherstellen, daß die i.LINK-Kabel richtig
Der angezeigte MD- oder CD-Name
stimmt nicht mit den aufgezeichneten
Daten überein.
t Das i.LINK-Gerät einmal aus und wieder
einschalten, dann den Digital Link Manager neu
starten.
t Eine häufig verwendete Applikation starten und
prüfen, ob der Computer einwandfrei funktioniert.
t Das Programm deinstallieren (Seite 14) und
anschließend neu installieren (Seite 8).
Die MD-Schreibschutzlamelle ist möglicherweise auf
„schreibgeschützt“ geschoben.
t Verschieben Sie die Schreibschutzlamelle, so dass
eine Aufnahme möglich ist.
Eine handelsübliche, nur für Wiedergabe bestimmte MD
(vorbespielte MD) wird möglicherweise gerade
verwendet.
t Zeicheneingabe, Aufnahme, Editieren usw. ist mit
vorbespielten MDs nicht möglich.
angeschlossen sind (Seite 15).
t Die i.LINK-Kabel einmal abtrennen und wieder
anschließen.
t Den Digital Link Manager neu starten.
18
DE
Page 55

Zusatzinformationen
19
DE
Page 56

• La duplicación parcial o total del contenido
de este software y del manual de
instrucciones, así como el prestar este
software a terceros sin el permiso expreso
del propietario de los derechos de autor
está estrictamente prohibida por las leyes
de derechos de autor.
• En ninguna circunstancia Sony se hará
responsable por las pérdidas monetarias, ni
las pérdidas de beneficios de terceros que
puedan surgir de la utilización de este
software.
• En caso de cualquier producto de
fabricación, la responsabilidad de Sony se
limitará exclusivamente al reemplazo de la
mercancía defectuosa.
• Este software ha sido aprobado para
utilizarse solamente con el equipo
especificado.
• Sony se reserva el derecho de cambiar las
especificaciones del software sin previo
aviso.
Programa © 2000 Sony Corporation
Documentación © 2000 Sony
Corporation
© 2000 Sony Corporation Reservados
todos los derechos.
• Microsoft MS-DOS y Windows son marcas
registradas de U.S. Microsoft Corporation
en EE.UU. y en otros países.
• IBM y PC/AT son marcas registradas de
U.S. Iternational Business Machines
Corporation.
• Todos los demás nombres de sistemas,
productos, y servicios son marcas
comerciales de sus respectivos
propietarios. En el manual no se
especifican las marcas TM ni ®.
• Adobe® y Adobe® Acrobat® Reader son
marcas registradas de Adobe Systems
Incorporated.
• es marca registrada de Sony
Corporation.
ES
2
Índice
Preparativos
Descripción general ............................. 3
Requisitos del sistema ................ 4
Notas ............................................. 4
Preparativos
Comprobación de los accesorios
suministrados............................... 5
Acerca de este manual ........................ 6
Utilización del manual en línea ...
Utilización de la ayuda............... 7
Instalación del software ...................... 8
Instalación de Digital Link
Manager................................ 8
Instalación de Adobe Acrobat
Reader ................................. 13
Desinstalación del software ..... 14
Conexiones ......................................... 15
Inicio del software ............................. 16
Salida del software ............................ 17
Información adicional
Solución de
problemas ............ Contraportada
6
Page 57

Preparativos
Descripción general
Este software le permitirá utilizar su PC para controlar el STR-LSA1,
CDP-LSA1, y MDS-LSA1 conectados a su PC con cables conectores
i.LINK.
• Controlar componentes de la serie LISSA desde su PC a través de un
cable conector i.LINK.
• Introducir texto a través del teclado de su PC para grabar en varios
medios.
• Editar minidiscos contemplando el monitor de su PC.
• Grabar fácilmente realizando el arrastre y soltado de un disco
compacto a un minidisco.
• Seleccionar una emisora de radiodifusión desde su PC.
• Editar y memorizar emisoras de radiodifusión desde su PC.
• Grabar fácilmente de la radio a un minidisco.
• Comprobar gran variedad de información en el monitor de su PC.
• Realizar ajustes de cada uno de los componentes conectados desde su
PC.
• Ajustar el sonido desde su PC.
Preparativos
ES
ES
3
Page 58

Requisitos del sistema
Digital Link Manager (Ver. 1.0E) requiere el hardware y software
siguientes.
s PC PC/AT IBM (o compatible) (Este software no funcionará con
Macintosh.)
— Modelo recomendado:
— Conector i.LINK (o tarjeta i.LINK)
— Espacio libre de disco duro:
— Tarjeta de vídeo y controlador de monitor:
— Unidad de CD-ROM (para instalación del software)
s Sistema operativo:
s Monitor de vídeo:
PC tipo libreta VAIO vendidos en Europa a partir
del verano del 2000 (PCG-X29, PCG-F701,
PCG-F707, PCG-F707K, PCG-F709, PCG-F709K,
PCG-Z600NE, PCG-Z600NEK, PCG-SR1K,
PCG-C1XD) y modelos posteriores.
10 MB o más
VGA (640 × 480 píxeles), 65.536 colores o más
Windows98 Second Edition/Windows2000 (Este
software no funcionará con Microsoft
Windows3.1, Windows95, ni WindowsNT.)
VGA (640 × 480 píxeles), 65.536 colores o más
Notas
• Este software no soporta la transmisión de datos de música de su PC
a un componente i.LINK, ni viceversa.
• Este software solamente podrá utilizarse con un STR-LSA1,
CDP-LSA1, y MDS-LSA1.
• Le recomendamos que utilice este software dentro de una
configuración compuesta por un STR-LSA1, un CDP-LSA1, y un
MDS-LSA1.
ES
4
Page 59

Preparativos
Comprobación de los accesorios suministrados
Compruebe si ha recibido los accesorios siguientes suministrados con el
PCLK-LSA1. Si falta alguno, póngase en contacto con el establecimiento
en el que haya adquirido este juego o con su proveedor Sony.
• Cable conector i.LINK (1)
• CD-ROM Digital Link Manager (1)
• Manual de instrucciones
• Tarjeta de garantía
###Getting started/Preparation###Preparativos/Preparativos
Preparativos
ES
5
Page 60

Acerca de este manual
En este manual se explica cómo instalar Digital Link Manager.
La información más reciente sobre este software se encuentra en el
archivo “Readme.txt” del CD-ROM suministrado.
Después de haber instalado el software, podrá utilizar el manual y la
ayuda en línea.
Utilización del manual en línea
Antes de utilizar el manual en línea tendrá que instalar Adobe Acrobat
Reader (Adobe Systems Incorporated) en su PC. Si no está instalado,
realice el procedimiento de “Instalación de Adobe Acrobat Reader” de
la página 13.
Con la alimentación de su PC conectada, realice lo siguiente:
, Para abrir el manual en línea, haga clic en “Start”, apunte
“Program”, apunte “Digital Link Manager for LISSA 1.0E”, y por
último en “On-line manual”.
En el visualizador aparecerá la portada.
ES
6
Page 61
Utilización de la ayuda
Nota
La ayuda solamente existe en inglés.
Las instrucciones de operación en otros idiomas se encuentran en el
manual en línea (página 6).
Apertura del índice de ayuda
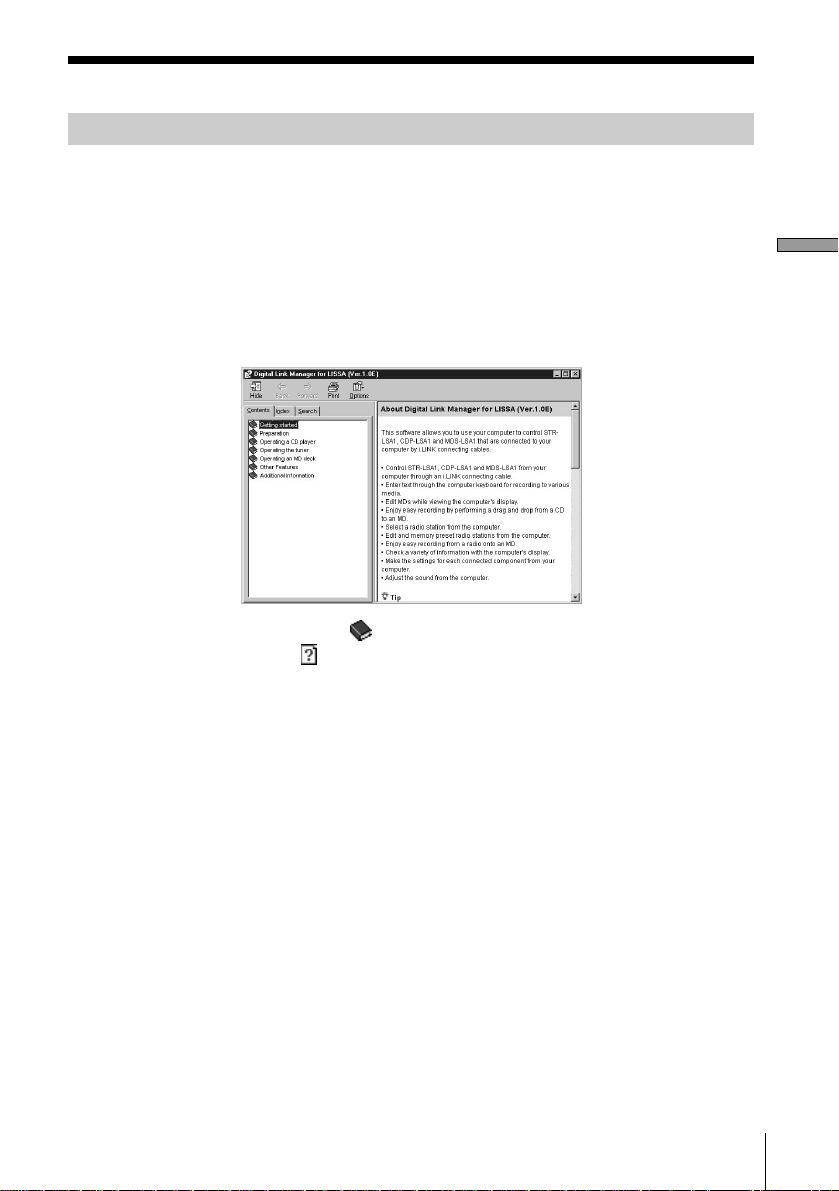
Haga clic en el botón Help de Main Window, y se abrirá el índice de
Digital Link Manager.
• Haga doble clic en , y aparecerán los títulos de dicho índice.
• Haga clic en
• Haga clic en algo subrayado de la explicación, y se visualizará la
página de la explicación relacionada.
, y aparecerá la explicación sobre tal elemento.
Preparativos
Búsqueda mediante palabras clave
Haga clic en la ficha “Index” de la ventana de tópicos de búsqueda,
desaparecerá el índice, y aparecerá una lista de palabras clave.
Para buscar mediante una palabra clave, introduzca la palabra con la
que desee buscar o desplácese por la lista de palabras clave.
Para ver la explicación sobre una palabra clave, selecciónela de la lista
de palabras clave y haga clic en “Display”.
ES
7
Page 62

Instalación del software
Para instalar este software en el disco duro de su PC, realice los
procedimientos indicados a continuación. Antes de proseguir, ponga
su PC en el modo de operación.
Nota
Cerciórese de instalar este software ante conectar un componente
i.LINK a su PC. En caso contrario el software no funcionaría.
Instalación de Digital Link Manager
1 Inserte el CD-ROM suministrado en su PC.
Aparecerá la ventana de configuración.
Lea cuidadosamente las precauciones que aparezcan.
Si no aparece la ventana de configuración, realice las operaciones
siguientes.
1 Haga clic en “Start”, apunte “Settings”, y después en “Control
Panel”.
Se abrirá el panel de control.
2 Haga doble clic en “Add/Remove Programs”.
Aparecerá la ventana “Add/Remove Programs Properties”.
3 Haga clic en “Install .......”, y a continuación en “Next” después
de que haya aparecido la ventana “Install Program From Floppy
Disk or CD-ROM”.
El instalador del CD-ROM se detectará automáticamente, y
aparecerá la ventana “Run Installation Program”.
ES
8
Page 63

4 Compruebe si está visualizándose “X:\Setup.exe” (X significa el
nombre de la unidad del CD-ROM) en “Command line for
installation program”, y haga clic en “Finish”.
Se iniciará el instalador.
Después de un momento, se iniciará el programa de configuración.
2 Haga clic en “Next”.
Aparecerá la ventana de selección del destino.
Para cambiar la carpeta de destino, haga clic en “Browse ...” y
seleccione la carpeta en la que desee instalar este software.
3 Haga clic en “Next”.
Preparativos
Seleccione de la lista la versión del idioma deseado para el manual
en línea a instalar.
(Continúa)
ES
9
Page 64
Instalación de Digital Link Manager (continuación)
4 Haga clic en “Next”.
Se iniciará el proceso de instalación en el disco duro.
Se creará la subcarpeta Digital Link Manager en la carpeta en la
que haya instalado el software.
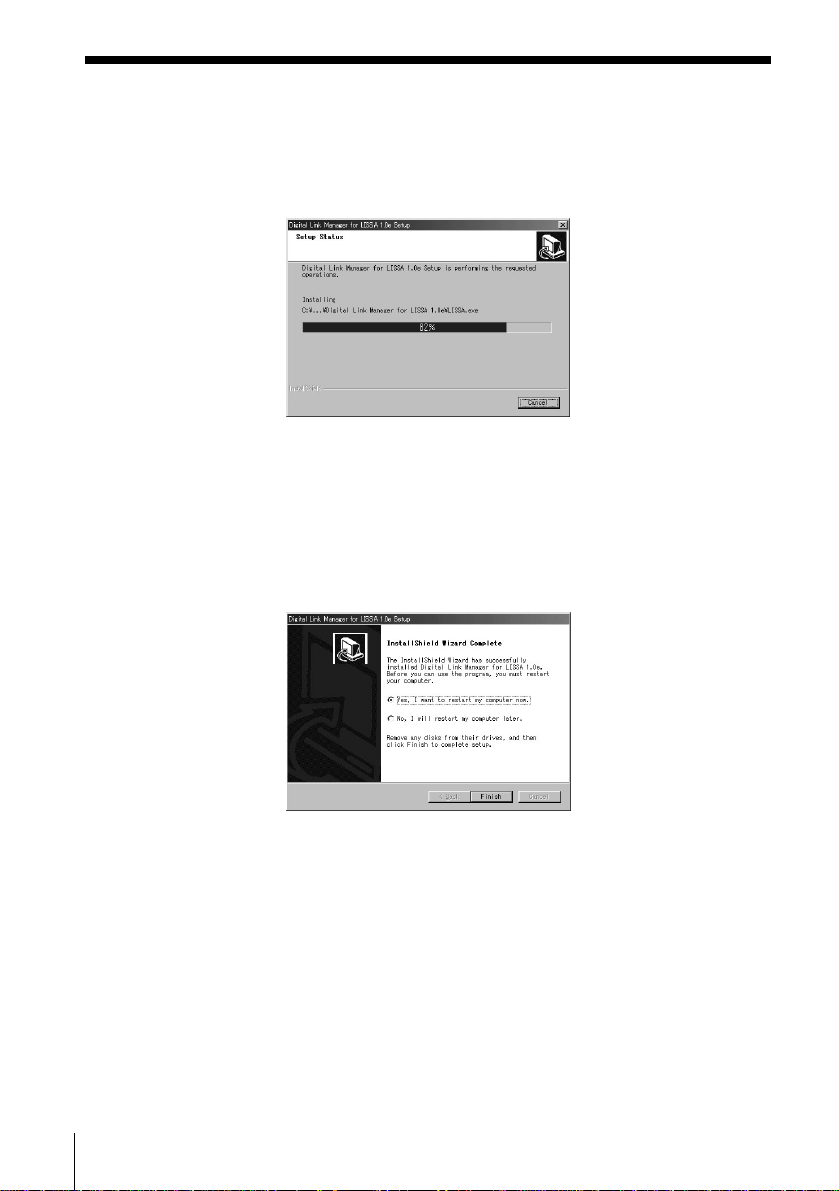
5 Haga clic en “Finish” después de que aparezca la ventana de
finalización del procedimiento de instalación.
Se abrirá el archivo “Readme.txt”.
Cerciórese de leer las instrucciones que aparezcan.
6 Cierre el archivo “Readme.txt”.
Aparecerá la pantalla para reinicio de su PC.
10
7 Expulse el CD-ROM y reinicie su PC.
Esto finalizará el proceso de configuración.
Cerciórese de reiniciar su PC. Si no lo hace, el software o
funcionará adecuadamente.
ES
Page 65

Notas
• La instalación del software creará una carpeta. Como este software
utiliza esta carpeta, no la borre, mueva, ni cambie su contenido.
• Cuando conecte el STR-LSA1, el CDP-LSA1, o el MDS-LSA1 a su PC
por primera vez, y el sistema operativo de su ordenador sea
Windows2000, puede aparecer un mensaje solicitándole que inserte el
CD-ROM suministrado. En este caso, siga las instrucciones de la
pantalla.
Si no aparece nada en Audio Rack View cuando utilice el
software por primera vez
Cuando utilice el Digital Link Manager, los iconos de los componentes
conectados no aparecerán en el Audio Rack View y la siguiente ventana
aparecerá si:
• se conectaron los componentes de la serie LISSA en su ordenador
después de instalar el Digital Link Manager.
• se conectaron los componentes de la serie LISSA en su ordenador
después de instalar el Digital Link Manager, pero no volvió a hacer
funcionar el ordenador.
Preparativos
Si aparece la ventana cuando se utiliza el Windows98 Second Edition
1 Desconecte todos los equipos i.LINK de su ordenador.
2 Realice el procedimiento de “Desinstalación del software” en la página 14
para desinstalar el software.
3 Realice el procedimiento de “Instalación de Digital Link Manager” en la
página 8 para volver a instalar el software.
4 Vuelva a hacer funcionar el ordenador.
(Continúa)
11
ES
Page 66
Instalación de Digital Link Manager (continuación)
Si aparece la ventana cuando se utiliza el Windows2000
1 Desconecte todos los equipos i.LINK del ordenador y vuelva a conectar sólo
los componentes de la serie LISSA en su ordenador.
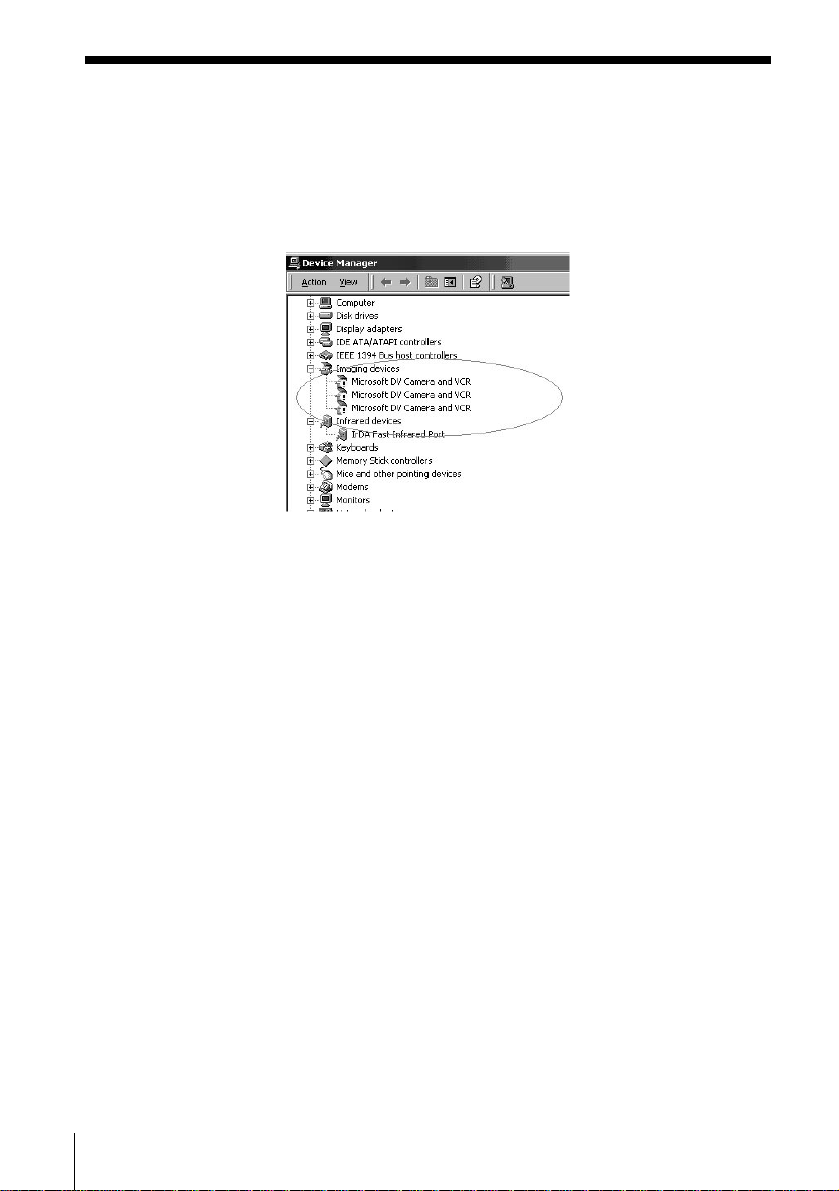
2 Haga clic en el lado derecho sobre “My Computer”, seleccione “Properties”,
haga clic en la ficha “Hardware” y haga clic en “Device Manager” para abrir
la ventana “Device Manager”.
3 Haga doble clic en “Microsoft DV Camera and VCR”, haga clic en la ficha
“Driver” de la ventana “Properties” y haga clic en “Update Driver” para
actualizar el controlador.
4 Seleccione “Sony i.LINK device (xxx-LSA1)” (el xxx indica MDS, CDP o STR,
el nombre del modo del componente de la serie LISSA) en la ventana, como
controlador.
5 Vuelva a hacer funcionar el ordenador.
12
ES
Page 67

Instalación de Adobe Acrobat Reader
Usted tendrá que instalar Adobe Acrobat Reader en su PC para poder
abrir el manual en línea.
Solamente en la versión inglesa de Adobe Acrobat Reader 4.0 se
suministra el directorio Acrobat, que se proporciona con el CD-ROM.
Las versiones en diferentes idiomas de Adobe Acrobat Reader 4.0 están
disponibles en el sitio Web de Adobe (http://www.adobe.com/).
Descargue la versión deseada del sitio Web, e instálela.
Realice el procedimiento siguiente para instalar la versión en inglés de
Adobe Acobat Reader 4.0.
1 Haga doble clic en “ar405eng.exe” del directorio de Acrobat.
Aparecerá la ventana de instalación de Adobe Acrobat Reader.
Lea cuidadosamente las precauciones que aparezcan.
Preparativos
Si no desea realizar la instalación, haga clic en “Cancel”.
Nota
Si en su PC está instalado Adobe Acrobat Reader 3.0, aparecerá
“Warning”. En este caso, desinstale Adobe Acrobat Reader 3.0 y
reinicie su PC. Si instala Adobe Acrobat Reader 4.0 después de
reiniciar su PC, no aparecerá “Warning”.
2 Para instalar la aplicación, siga las instrucciones que aparezcan en
la pantalla.
13
ES
Page 68

Desinstalación del software
Si no necesita Digital Link Manager o Adobe Acrobat Reader,
desinstálelo de la forma siguiente:
1 Seleccione, y haga que se visualice, el panel de control.
Haga clic en “Start”, apunte “Settings”, y después en “Control
Panel” para abrir el panel de control.
2 Haga doble clic en “Add/Remove Programs”.
Aparecerá la ventana “Add/Remove Programs Properties”.
3 Haga clic en “Digital Link Manager for LISSA 1.0E” o “Adobe
Acrobat Reader 4.0” de la lista de programas.
4 Haga clic en “Add/Remove”.
5 Haga clic en “OK” de la ventana “Confirm File Deletion”.
Se iniciará el desinstalador y el software seleccionado en el paso 3
se borrará automáticamente.
14
ES
Page 69
Conexiones
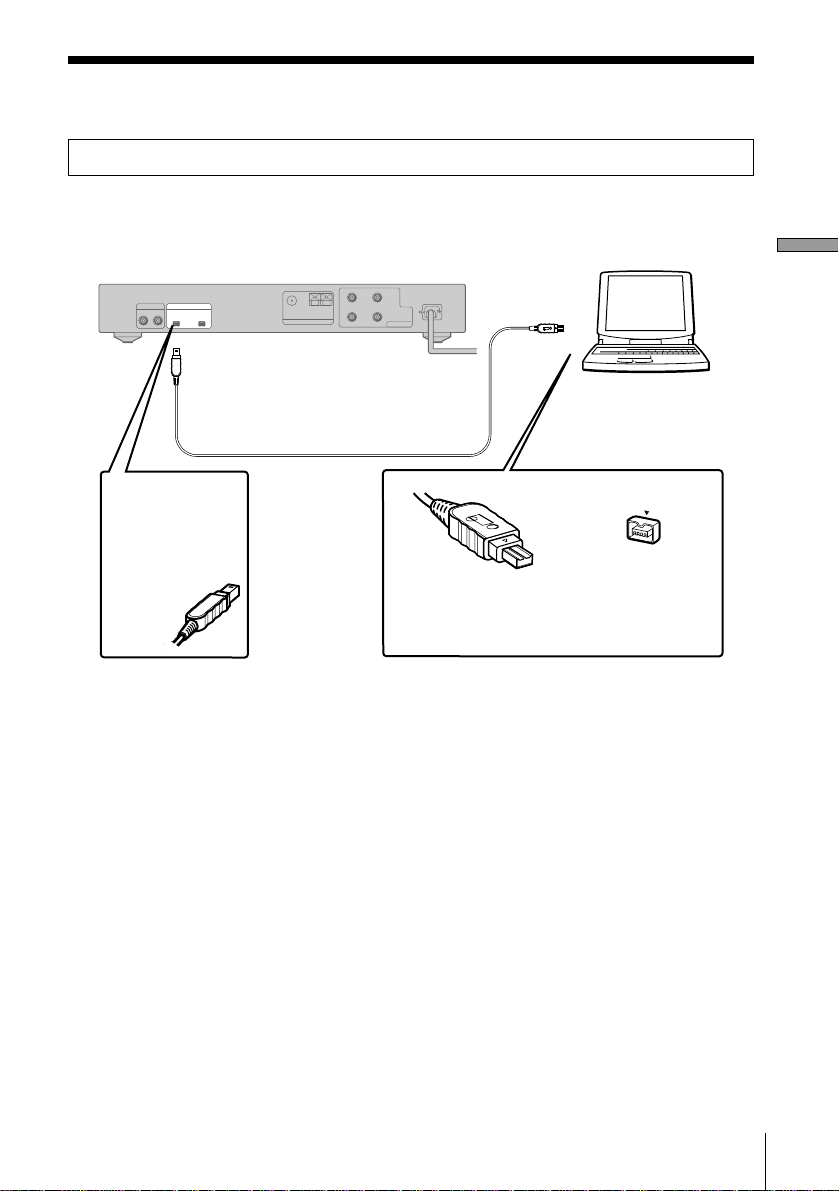
No conecte un componente i.LINK a su PC antes de instalar el software.
Conecte el componente de la serie LISSA a su PC con un cable conector i.LINK.
Ejemplo: Conexión del STR-LSA1
?
v v
Al conector
i.LINK S200
Cable conector i.LINK
Inserte a
fondo el
conector
macho en el
hembra con el
logotipo
encarado
hacia
abajo.
Notas
• Los diferentes modelos de PC poseen nombres distintos para sus conectores
i.LINK. Para más información, consulte el manual de instrucciones de su PC.
• Cuando realice la conexión, haga coincidir la orientación del conector del
cable con el de su PC. La orientación del conector variará de acuerdo con el
PC.
• Cerciórese de insertar la clavija en forma recta. Si la insertarse inclinada,
podría dañar la clavija y la toma.
• No inserte ningún objeto metálico en los conectores. Si lo hiciese, podría
provocar cortocircuitos y causar daños.
• Quizás no pueda utilizar el cable conector i.LINK suministrado con ciertos
modelos de VAIO. Si su modelo es uno de éstos, utilice un cable conector
i.LINK opcional (4-6 contactos).
PC
?
Al conector i.LINK
de su PC
PC
?
Haga coincidir la orientación de los
conectores e inserte a fondo el conector
macho en el hembra correspondiente.
Preparativos
15
ES
Page 70
Inicio del software
Notas
• Antes de iniciar el software cerciórese de desactivar todas las
funciones de control de la ventana “Power Properties”.
• No desconecte la alimentación de su PC durante la grabación en el
MDS-LSA1. Si lo hiciese, la grabación no podría realizarse
correctamente.
• Mientras esté utilizando el software solamente funcionarán las teclas
del deck o del mando a distancia siguientes para hacer funcionar el
MDS-LSA1:
x, A, DISPLAY, HX, N, X, ./>, m/M, PLAY MODE
• El MDS-LSA1 no se conectarán automáticamente* si inicia el software
mientras el MDS-LSA1 esté en medio de la grabación sincronizada
con un disco compacto. Para conectar este componente, inicie el
software después de haber parado la grabación sincronizada con un
disco compacto, o espere hasta que finalice tal grabación y después
utilice el menú que aparece al hacer clic con el botón derecho en
Audio Rack View para conectar el component.
* •Cuando seleccione “Attach”, el componente especificado se vinculará a la
configuración i.LINK, permitiéndole comprobar la condición del
componente y controlarlo.
•En este momento solamente podrá conectar el STR-LSA1.
16
, Haga clic en “Start”, apunte “Program”, apunte “Digital
Link Manager for LISSA 1.0E”, y después haga clic en
“LISSA 1.0E”.
Este software se iniciará y aparecerá la ventana principal de Digital
Link Manager.
Cuando inicie el software, aparecerá la visualización siguiente
(cuando haya seleccionado el minidisco como fuente de sonido):
Si no aparece nada en el Audio Rack View cuando utilice el
software por primera vez, consulte la página 11.
ES
Page 71

Salida del software
, Haga clic en de la ventana principal.
Preparativos
17
ES
Page 72

Información adicional
Solución de problemas
Si experimenta cualquiera de las dificultadas siguientes al utilizar este
software, use esta guía de solución de problemas para remediar el
problema. Si cualquier problema persiste, consulte a su proveedor
Sony.
Consulte también el manual de instrucciones de su PC, así como el
archivo “Readme.txt” instalado en el disco duro con el software.
Problema Causa/solución
La pantalla no responde o tiene
errores.
No se pueden introducir
caracteres, grabar, editar, etc.
El componente i.LINK no
responde.
El nombre visualizado del
minidisco o del disco compacto
no corresponde con los datos
del disco.
t Desconecte y vuelva a conectar la alimentación del
componente i.LINK, y después reinicie Digital Link
Manager.
t Inicie otra aplicación utilizada a menudo para comprobar
si su PC funciona adecuadamente.
t Pruebe desinstalando (página 14) y volviendo a instalar
(página 8).
La lengüeta de protección contra grabación del minidisco
puede estar en la posición de protección contra escritura.
t Deslice la lengüeta de protección contra grabación hasta la
posición que permita grabar.
Es posible que el minidisco solamente pueda reproducirse
(minidisco con canciones previamente grabadas).
t La introducción de caracteres, la grabación, la edición, etc.
no serán posibles con minidiscos para reproducción
solamente.
t Cerciórese de que los cables conectores i.LINK estén
adecuadamente conectados (página 15).
t Desconecte los cables conectores i.LINK y después vuelva
a conectarlos
t Reinicie Digital Link Manager.
Sony Corporation Printed in Japan
ES
72
 Loading...