

Sony PCG-XG39, PCG-XG38K, PCG-XG38, PCG-XG39K User Manual

VAIO® Notebook
User Guide
PCG-XG38/PCG-XG38K/
PCG-XG39/PCG-XG39K
VAIO Notebook User Guide
Notice to Users
© 2000 Sony Electronics Inc. All rights
reserved. This manual and the software
described herein, in whol e or in part, may not
be reproduced, transl at ed, or reduced to any
machine-readable form without prior written
approval.
SONY ELECTRONICS INC. PROVIDES NO
WARRANTY WITH REGARD TO THIS
MANUAL, THE SOFTWARE, OR OTHER
INFORMA TION CONT AINED HEREIN AND
HEREBY EXPRESSLY DISCLAIMS ANY
IMPLIED WARRANTIES OF
MERCHANTABILITY OR FITNESS FOR
ANY PARTICULAR PURPOSE WITH
REGARD TO THIS MANUAL, THE
SOFTWARE, OR SUCH OTHER
INFORMATION. IN NO EVENT SHALL
SONY ELECTRONICS INC. BE LIABLE
FOR ANY INCIDENTAL,
CONSEQUENTIAL, OR SPECIAL
DAMAGES, WHETHER BASED ON TORT,
CONTRACT, OR OTHERWISE, ARISING
OUT OF OR IN CONNECTION WITH THIS
MANUAL, THE SOFTWARE, OR OTHER
INFORMATION CONTAINED HEREIN OR
THE USE TH EREOF.
Sony Electronics Inc. reserves the right to make
any modification to this man ua l or the
information containe d herein at any time
without notice. The software described herein is
governed by the terms of a separate user license
agreement.
This product contains software owned by Sony
and licensed by third parti es. U s e of suc h
software is subject to the terms and conditions
of license agreements enclosed w it h this
product. Some of the softwar e m ay not be
transported or used outside the United States.
Software specifications are subject to change
without notic e and may not necessarily be
identical to current retail versi ons.
Updates and additions to softwar e m ay re qu ire
an additional charge. Subscripti ons to online
service providers may require a fee and credit
card information. Financial services may
require prior arrangements with participating
financial in stitutions.
As an ENERGY STAR
Partner, Sony Corporation
has determined that this
product meets the
NERGY STAR
E
guidelines for energy
efficiency.
NERGY STAR Office
The International
Equipment Program is an international program
that promotes energy saving through the use of
computers and other office equipment. The
program backs the development and
dissemination of product s with func ti ons that
effectively reduce energy consumption. It is an
open system in which business propriet ors c an
participate voluntarily. The targeted products
are office equipment s u ch as computers,
displays, printers, facsimiles an d copiers. Their
standards and logos are uniform among
participating nations.
registered mark.
This product incorporates copyright protection
technology that is pr otected by method claims
of certain U.S. patents and other intellectual
property rights owned by Macrovision
Corporation and other rights owners. Use of this
copyright protection technology must be
authorized by Macrovision Corporation, and is
intended for home and other limited viewing
uses only unless otherwise autho rized by
Macrovision Corporati on. Reverse engineering
or disassembly is prohibited .
Sony, i.LINK, MovieShaker, PictureGear,
DVgate, Mavica, Handycam, Jog Dial, Media
Bar, VAIO and the VAIO logo are trademarks of
Sony Corporation. Microsoft, Windows Me,
E
NERGY ST AR is a U.S.
E
2
Windows Media, Windows, Windows NT, and
the Wind ows logo are reg is tered trademarks o f
Microsoft Corporation. Intel, SpeedStep, and
Pentium are trademarks of Intel Corporation.
PS/2 is registered trademar k of IBM.
All other trademarks are trademarks of their
respective owners.
Safety Info r mation
Owner’s Record
The model num b er and serial numb er are
located on the bottom of your Sony VAIO
Notebook. Record the serial number in the
space provided here. Refer to th e model and
serial number when you call your Sony Service
Center.
Model Number: PCG-851A, PCG-8512, PCG852A, PCG-8522
Serial Number:_________ _______________
WARNING
To prevent fire or shock hazard,
❑
do not expose your notebook to
rain or moisture.
To avoid electrical shock, do not
❑
open the cabinet. Refer servicing
to qualified personn el only.
Never install modem or telephone
❑
wiring during a lightning storm.
Never install telephone jacks in
❑
wet locations unless the jack is
specifically designed for wet
locations.
Never touch unin sula ted
❑
telephone wire or terminals
unless the telephone line has been
disconnected at the network
interface.
Use caution when installing or
❑
modifying teleph one li nes.
A void using the modem dur ing an
❑
electrical storm.
Do not use the modem or a
❑
telephone to report a gas leak in
the vicinity of the leak.
A socket outlet should be as close
❑
as possible to the unit and easily
accessible.
To change backup battery.
Please contact your nearest
Sony Service Center.
The use of optic al instruments
with this product will increase
eye hazard. As the laser beam
used in this product is harmful
to the eyes, do not attempt to
disassemble the cabinet. Refer
servicing to qualified personnel
only.
For DVD-ROM: Danger - Visible
and invisible laser radiatio n
when open. Avoid direct
exposure to beam.
DANGER: Visible and invisible
laser radiation when open.
Avoid direct exposur e to beam.
Caution: To reduce the risk of
fire, use only No. 26 AWG or
larger telecommunication line
cord
3

VAIO Notebook User Guide
AVERTISSEMENT
Pour prévenir tout risque
❑
d’incendie ou d’électrocution,
garder cet appareil à l’abri de la
pluie et de l’humidité.
Pour prévenir tout risque
❑
d’électrocution, ne pas ouvrir le
châssis de cet appareil et ne
confier son entretien qu’à une
personne qualifiée
Ne jamais effectuer l’installation
❑
de fil modem ou télép hone durant
un orage électrique.
Ne jamais effectuer l’installation
❑
d’une prise téléphonique dans un
endroit mouillé à moins que la
prise soit conçue à cet effet.
Ne jamais toucher un fil
❑
téléphonique à découvert ou un
terminal à moins que la ligne
téléphonique n’ait été débranché
de l’interface réseau.
Soyez très prudent lorsque vous
❑
installez ou modifiez les lignes
téléphoniques.
Évitez d’utiliser le modem durant
❑
un orage électrique.
N’utilisez pas le modem ni le
❑
téléphone pour prévenir d’une
fuite de gaz vous êtes près de la
fuite.
L’appareil doit être le plus près
❑
possible d’une prise murale pour
en faciliter l’accès.
Pour changer la pile de
rechange, veuillez contacter
votre centre de service Sony le
plus près.
Comme le faisceau laser utilisé
par cet appareil est dangereux
pour les yeux, ne tentez pas de
démonter le boîtier. Confiez
l’entretien de cet appareil
exclusivement au personnel
qualifié. Adressez-vous a un
agent de service qualifié.
Pour les DVD-ROM : DANGER :
Radiation laser visible et
invisible si ou vert. Evitez
l’exposition directe au faisceau.
Attention : Afin de réduire les
risques d'incendie, n'utilisez
qu'un cordon de co mmu nica tion
N0. 26 AWG ou plus gros.
If you have questions about this product, you
can reach the Sony Customer Information
Service Center at 1-888-4SONYPC; or write to
the Sony Customer Informat ion Service Center
at 12451 Gateway Blvd., Ft. Myers, FL 33913
or find Sony Customer Se rvice on the web at:
http://www.sony.com/pcsupport
4
Regulatory Information
Declaration of Conformity
Trade Name: SONY
Model No.: PCG-851A, PCG-
8512, PCG-852A,
PCG-8522
Responsible Party: Sony Electronics Inc.
Address: 1 Sony Drive
Park Ridge, NJ 07656
Telephone: 201-930-6972
This phone number is for FCC -re lated
matters only.
This device complies wit h Part 15 of the
FCC rules. Operation is subject to the
following two conditions:
(1) This device may not cause harmful
interference, and
(2) this device must accept any interferenc e
received, including interference that ma y
cause undesired operation.
This equipment has been tested and found to
comply with the limits for a Class B digital
device, pursuant to Part 15 of the Rules. Thes e
limits are designed to provide reasonable
protection again st harmful interference i n a
residential ins tallation. This equipment
generates, uses, and can radiate radio frequency
energy and, if not install ed and used in
accordance with the inst ructions, may cause
harmful interference to radio communi cations.
However , there is no guarantee that interference
will not occur in a particular installation. If this
equipment does cause harmful interference to
radio or tel evision reception, which ca n be
determined by turning the equipment off and
on, the user is encouraged to try to correct the
interference by one or more of the following
measures:
Reorient or relocate the receiving
❑
antenna.
Increase the separation between
❑
the equipment and the receiver.
Connect the equipment into an
❑
outlet on a circuit different from
that to which the receiver is
connected.
Consult the dealer or an
❑
experienced radio/TV technician
for help.
You are cautioned that any cha nge s or
modifications not expressly approved in this
manual could void your authority to operate this
equipment.
Only peripherals (comput er input/output
devices, terminals, printers, etc.) that comply
with FCC Class B limits ma y be atta ched to th is
computer product. Operation with noncompliant peri pherals is likely to res u l t in
interference to radio and television reception.
All cables used to connec t pe ripherals must be
shielded and grounded. Operation with cables,
connected to peripherals, that are not shielded
and grounded, may result in interference to
radio and television reception.
FCC Part 68
This equipment complies with Part 68 of the
FCC rules. On the bottom of this equipment is a
label that contains, among other inform ation,
the FCC equivalence number (REN) for thi s
equipment. If req uested, this information must
be provided to th e telephone company.
This modem uses the USOC RJ-11 telephone
jack.
5

VAIO Notebook User Guide
The REN is used to determine the quantit y of
devices which may be connected to the
telephone line. Excessive RENs on the
telephone line may result in the devices not
ringing in response to an incomi ng ca l l. In
most, but not all areas, the sum of the RENs
should not exceed five (5.0). To be certain of the
number of devices that may be connected to the
line, as determined by the total RENs, contact
the telephone company to determine the
maximum REN for the calling area.
If the terminal equi pm ent causes harm to the
telephone network, the telephone company will
notify you in advance that te mporary
discontinuance of service may be require d. But
if advance notice is not practical, the telephone
company will notify the customer as soon as
possible. Also, you will be advised of your right
to file a complain t with the FCC if you believe
it is necessary.
The telephone company may make changes in
its facilities, equipment, operations, or
procedures that could affect the operations of
the equipment. If this happens, the telephone
company will provide advance notice in order
for you to make the necessary modifications in
order to maintain unint errupted service.
If trouble is experienced with this equipment,
you can reach the Sony Customer Information
Service Center at 1-888-4SONYPC; or write to
the Sony Customer Information Servi c e Ce nt er
at 12451 Gateway Blvd., Ft. Myers, FL 33913
or find Sony Customer Se rvice on the web at:
http://www.sony.com/pcsupport
Repair of this equipment should be made only
by a Sony Service Center or Sony authorized
agent. For the Sony Service Center nearest you,
call 1-888-4SONYPC (1-888-476-6 972).
This equipment can not be use d on public coin
service provided by th e telephone company.
Connection to Party Line Servic e is subj e ct to
state and possible provincial ta riffs. (Cont ac t
the state or provinci al utility service
commission, public service commission or
corporation commi ssion for information.)
Telephone Consumer
Protection Act of 1991
(United States)
The Telephone Consumer Protection Act of
1991 makes it unlawful for any person to use a
computer or other electronic device to send any
message via a telephone facsimile machine
unless such mess ag e clearly contains, in a
margin at the top or bottom of each transmitted
page or on the first page of the transmission, the
date and time it is sent and an identification of
the business, other entity, or individual sending
the message, and t he t el ephone number of the
sending machine or such business, ot he r entity,
or individual.
In order to program this information into your
facsimile machine, see your fax software
documentation.
Telephone Consumer
Guidelines (Canada)
Please refer to your tele phone directory under
‘Privacy Issues’ and/or ‘Terms of Service.’ For
more detailed information please contact:
CRTC
Terrasses de la Chaudière, Tour centrale 1
promenade du Portage, 5ième étage Hull PQ
K1A 0N2.
This Class B digital app ar atus complies with
Canadian ICES-003.
Cet appareil numérique de la classe B est
conforme à la norme NMB-00 3 du Canada.
6
DISPOSAL OF LITHIUM ION
BATTERY
You can return your unwanted lithium ion
batteries to your nearest Sony Service Center or
Factory Service Center.
In some areas the disposal of lithium
✍
ion batteries in household or
business trash may be prohibited.
For the Sony Service Center nearest you call 1888-476-6972 in the United States or 1-800961-7669 in Canada.
Do not handle damaged or
leaking lithium ion batteries.
Ne pas manipuler les batteries
au lithium-ion qui fui ent ou sont
endommagées.
Danger of expl os io n if battery is
incorrectly replaced. Replace
only with the same or equivalent
type recommend ed by the
manufacturer. Discard used
batteries according to the
manufacturer’s instructions.
Une batterie non co n for m e
présente un danger d’explosion.
La remplace r seulemen t par une
batterie identique ou de type
équivalent recommandé par le
fabricant. Évacuer les batteries
usées selon les direct ives du
fabricant.
The battery pack used in this
device may present a fire or
chemical burn hazard if
mistreated. Do not
disassemble, heat above 212×F
(100×C) or incinerate.
Dispose of used battery
promptly.
Keep away from children.
La manutention incorrecte du
module de batt erie de cet
appareil prés ente un risque
d’incendie ou de brûlures
chimiques. Ne pas démonter,
incinérer ou exposer à une
température d e plus de 100°C.
Évacuer promptement la
batterie usée. Garder hors de
portée des enfants.
INDUSTRY CANADA NOTICE
NOTICE: The Industry Canada label i dentifies
certified equipmen t. This certification m ea ns
that the equipm ent meets certain
telecommunications network protective,
operational, and safet y requirements as
prescribed in the approp riate Terminal
Equipment Technical Requir em ents
document(s). The Department does not
guarantee the equipment will operate to the
user’s satisfaction.
Before installing this equ ipment, users should
ensure that it is pe rm is s ible to be connected to
the faciliti es of the local telecommunic ations
company. The equipment must also be installed
using an acceptable method of connection.
The custom er s h ould be aware that compliance
with the above conditions may not prevent
degradation of service in some situ ations.
7

VAIO Notebook User Guide
Repairs to certified equipment should be
coordinated by a representative designated by
the supplier. Equipment malfu n ct ions or any
repairs or alterations made by the user to this
equipment may give the telecommunicati ons
company cause to request that the user
disconnect the eq uipment.
Users should ensure for their own protection
that the electrical ground connecti ons of t he
power utility, telephone lines, and internal
metallic water pi p e syst em, if present, are
connected together. This precaution may be
particularly impo rt ant in rural areas.
Caution: Users should not attempt to make such
connections themse lves , but shoul d contact the
appropriate elect ri c inspection authorit y, or
electrician, as appropriate.
NOTICE: The Ringer Equivalence Number
(REN) assigned to each terminal device
provides an indication of the maximum number
of terminals allowed to be connected to a
telephone inte rface. The terminat ion on an
interface may cons ist of any combination of
devices subject only to the requirement that the
sum of the Ringer Equivalence Numbers of all
the devices does not exceed 5. The Ringer
Equivalence Number for this equipment is 0. 3.
AVIS DE L’INDUSTRIE
CANADA
AVIS: L’étiquette d’Industrie Canada identifie
le matériel homologué.
Cette étiquett e cer tifie que le matéri el est
conforme aux normes de protection,
d’exploitation et de sécuri té des réseaux de
télécommunications, c om m e le pre scrivent les
documents concernant les exigences techniques
relatives au matériel terminal. Le Ministère
n’assure toutefois pas que le ma tériel
fonctionnera à la satisfaction de l’utilisateur.
Avant d’instal le r ce materiel, l’uti li sa teur doit
s’assurer qu’il est perm is de le raccorder aux
installations de l’entreprise locale de
télécommunication. Le materiel doit egalement
être installé en suivant une méthode acceptée de
raccordement.
L’abonné ne doit pas oublier qu’il est possible
que la conformité aux conditions énoncé es cidessus n’empêche pas la dégradation du service
dans certaines situations.
Les réparations de matériel homologué doivent
être coordonnées par un repré sentant désigné
par le fournisseur. L’entreprise de
télécommunications peut demander à
l’utilisateur de débrancher un appareil à la suite
de réparations ou de modifications effectuées
par l’utilisateur ou à cau s e de mauvais
fonctionnement.
Pour sa propre protecti on, l’utilisateur doi t
s’assurer que tous les fils de mise à la terre de la
source d’énergie él ectrique, des lign es
téléphoniques et des canal isations d’eau
métalliques, s’il y en a, sont raccordés
ensemble. Cett e p réc au tion e st pa rt ic uliè r ement
importante dans les régions rurales.
Avertissement: L’utilisateur ne doit pas tenter
de faire ces raccordements lui-même; il doit
avoir recours à un service d’inspection des
installations électriques, ou à un électricie n,
selon le cas.
AVIS: L’indice d’équivalence de la sonnerie
(IES) assigné à chaque dispositif terminal
indique le nombre maximal de terminaux qui
peuvent être raccordés à une interface.La
terminaison d’une interface téléphonique peu t
consister en une combination de quelques
dispositifs, a la seule condition que la somme
d’indices d’équ ivalence de la s onnerie de tous
les dispositifs n’excède pas 5. L ’indice
d’équivalence de la sonnerie de ce materiel est
de 0.3.
8

Contents
Welcome ....................................................11
Features ....................................................................11
Unpacking Your VAIO® Notebook ........................1 2
Ergonomic Considerations .......................................14
Setting Up Your VAIO® Notebook ..........19
Locating the Controls and Connectors .....................19
Connecting a Power Source ............................... ......23
Starting Your Computer ...........................................29
Shutting Down Your Computer ...............................30
Using Your VAIO® Notebook ..................33
Using the Keyboard .... ....... ...... ....... ...... ....... ....... ......33
Replacing a Keycap ..................................................38
Using the Touchpad ....................... ...... ....... ....... ......40
Using the Floppy Disk Drive ...................................41
Using the DVD-ROM Drive ....................................46
Using PC cards ..................................... ....... ....... ......51
Using Infrared Communication Devices ..................54
Using a Second Battery Pack ...................................56
Using the Weight Saver .................. ...... ....... ....... ......59
Removing the
Optional Hard Drive (PCGA-HDX10) ....................60
Using Smart Connect .............. ....... ...... ....... ....... ...... 6 1
9

VAIO Notebook User Guide
Connecting an i.LINK®-compatible Device ...........62
VAIO® Action Setup ..............................................65
Using Power Saving Modes .....................................69
Connecting Peripheral Devices ..............71
Connecting a Phone Line .........................................72
Using the Mini Docking Station ..............................73
Connecting a Printer to Your Computer ..................86
Connecting an External Display ..............................87
Connecting External Speakers .................................90
Connecting an External Microphone .......................91
Connecting a Universal Serial Bus (USB) Device
(Mouse or Keyboard) ...............................................92
Adding Memory .......................................................93
About the Software on Your Computer ...................98
About Your Recovery CDs ....................................102
For Answers to Your Software Questions .............102
Software Information .............................105
MovieShaker™ ...................................................... 105
PictureGear™ ........................................................108
Troubleshooting ..................................... 111
Using the System and Application Recovery CDs 122
Supplemental Information .....................................125
Getting Help ...........................................................126
Specifications ......................................... 127
Index ........................................................ 131
10

Welcome
Congratulations on your purchase of the Sony VAIO® Notebook . Sony has
combined leading-edge technology in audio, video, computing, and
communications to provide you with state-of-the-art personal computing.
Features
For a complete description of the specifications of your VAIO® notebook,
✍
“Specifications” on page 127.
❑ Exceptional performance —
Pentium® III Processor featuring Intel® SpeedStep™ technology and a V.90
compatible K56flex modem.
❑ Portability —
AC power.
❑ Sony audio and video quality —
you to take advantage of today’s advanced multimedia applications, games,
and entertainment software.
❑ Microsoft® Windows® operating system —
Windows® Millennium Edition or Windows® 2000 Professional.
❑ Communications —
mails, browse the Internet, and use the dialing and fax features.
* Actual upload and download sp eeds may vary due to line conditions, ISP support, and gov-
ernment regulations.
The rechargeable battery pack provides hours of use without
Access popular online services, send and receive e-
Your computer includes a Mobile Intel®
*
A high-resolution LCD screen enables
Your system includes
11
VAIO Notebook User Guide
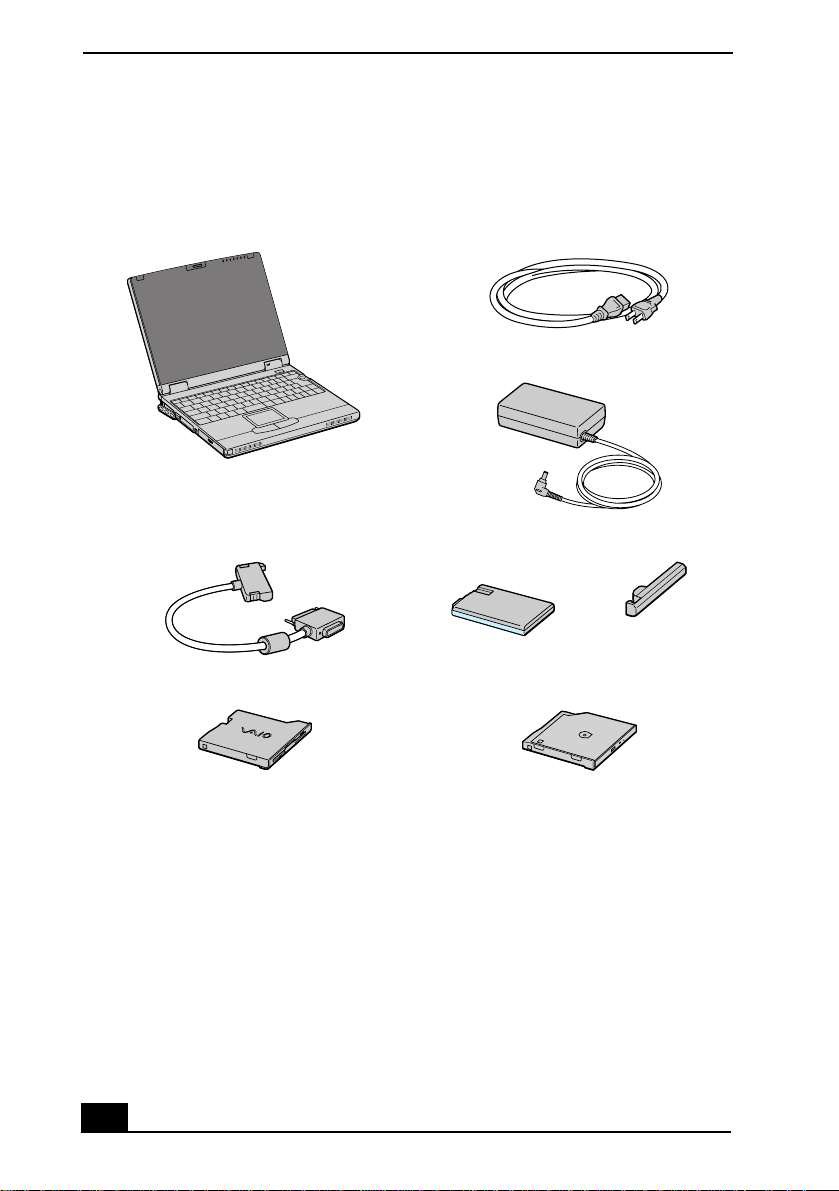
Unpacking Your VAIO® Notebook
Remove the fol l owing hardware items from the bo x:
Main unit Pow er cor d
AC adapter
FDD cable Rechargeable
battery pack
Floppy disk drive (FDD) DVD-ROM drive
Weight saver
Manuals
❑ VAIO® User Guide —
supplementary updates and so ft ware information. This manual describes the
features and specifications of your notebook, the applications included with
your system, how to contact software vendors, and solve common problems.
❑ Microsoft® Window s® Mill ennium Edition Getting Started manual
Microsoft® Windows® 2000 Professional Getting Started manual —
Explains how to use the basic features of this latest Windows operating
system.
Contains information on setting up your notebook,
or
12

Software CDs
Unpacking Your VAIO® Notebook
❑ Microsoft® Word 2000 —
Allows you to reinstall Microsoft Word to the
Sony computer you purchased.
Recovery CDs
❑ System Recovery CD(s) —
shipped with your computer if they become corru pted or are erased. It can be
used only to restore the hard disk of the Sony computer you purchased.
❑ Application Recovery CD(s) —
applications or device drivers if they are corrupted or erased.
Allows you to restore the software titles that
Allows you to reinstall individual
Other
Setting up your VAIO® Notebook (poster)
❑
Packet containing special product offers
❑
13
VAIO Notebook User Guide
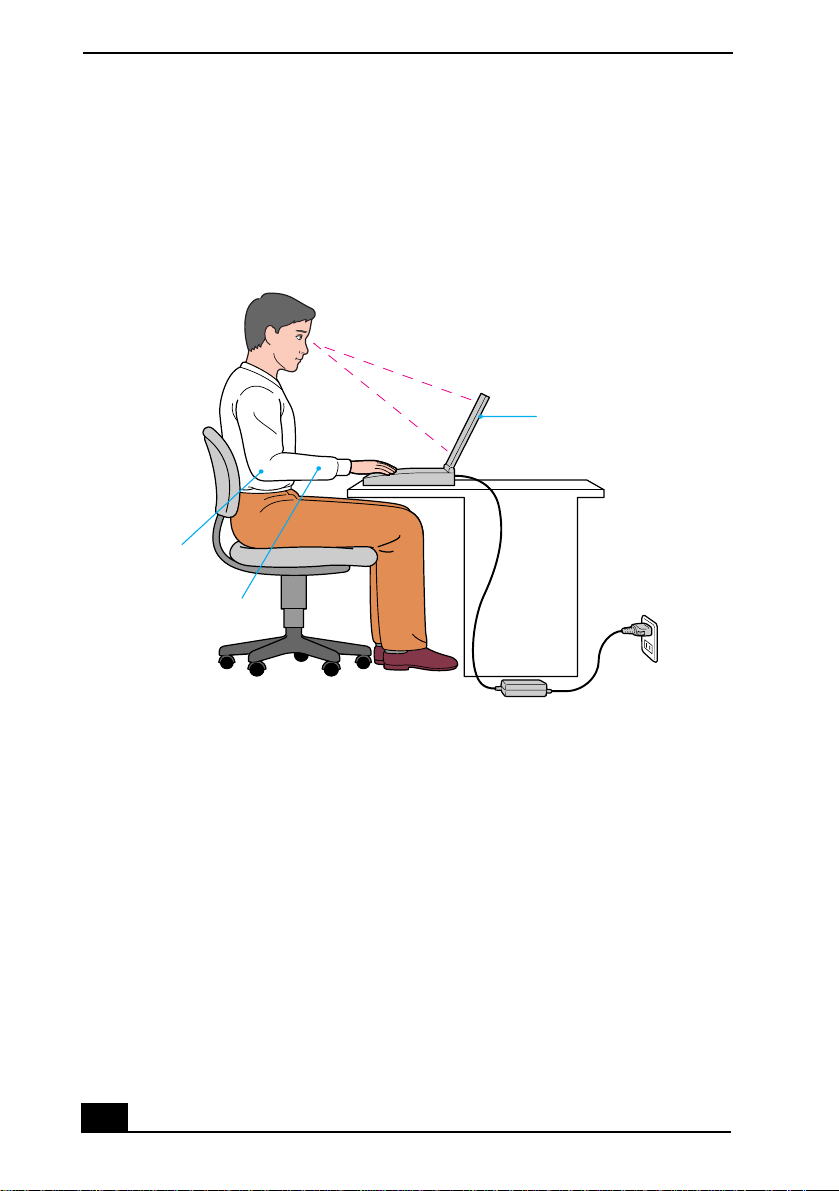
Ergonomic Considerations
You will be using your notebook computer as a portable device in a variety of
environments. Whenever possible, you should attempt to apply the following
ergonomic considerations to both stationary and portable environments.
Ergonomic Position
Computer positioned
directly in front of you
Arms at desk
level
Wrists relaxed
and flat
❑ Position of your computer —
Place the computer directly in front of yo u as
you work. Keep your forearms horizontal, with your wrists in a neutral,
comfortable position while using the keyboard, touchpad, or external mouse.
Let your upper arms hang naturally at your sides. Take breaks during
sessions with your computer. Excessive use of the computer may strain
muscles or tendons.
❑ Furniture and posture —
Sit in a chair with good back support and
armrests. Adjust the level of the chair so your feet are flat on the floor. A
footrest may make you more comfortable. Sit in a relaxed, upright posture
and avoid slouching forward or leaning far backward.
14

Ergonomic Considerations
❑ Viewing angle of the computer’s display —
Use the display’s tilting
feature to find the best position. You can reduce eye strain and muscle
fatigue by adjusting the tilt of the display to the proper position. Adjust the
brightness setting of the disp lay also.
❑ Lighting —
Choose a location where windows and lights do not create glare
and reflection on the display. Use indirect lighting to avoid bright spots on
the display. You can also purchase accessories for your display that help
reduce glare. Proper lighting adds to your comfort and work effectiveness.
❑ Placement of an external display —
When using an external display, set
the display at a comfortable viewing distance. Make sure the display screen
is at eye level or slightly lower when you are sitting in front of the monitor.
Notes on setup
Do not place your computer in a location subject to:
❑
Heat sources, such as radiators or air ducts
❑
Direct sunlight
❑
Excessive dust
❑
Moisture or rain
❑
Mechanical vibration or shock
❑
Strong magnets or speakers that are not magnetically shielded
❑
Ambient temperature of more than 95º F (35º C) or less than
❑
18º F (10º C)
High humidity
❑
Do not place electronic equipment near your computer. The computer’s
❑
electromagnetic field may cause a malfunction.
Provide adequate air circulation to prevent internal heat buildup. Do not
❑
place your computer on porous surfaces such as rugs or blankets, or near
materials such as curtains or draperies that may block its ventilation slots.
Leave a space of at least 8 inches (20 cm) behind the back panel of the
computer.
If the computer is brought directly from a cold location to a warm one,
❑
moisture may condense inside your computer. In this case, allow at least an
hour before turning on your computer. If any problems occur, unplug your
computer, and contact your Sony Service Center.
15

VAIO Notebook User Guide
The computer uses high-frequency radio sig nals and may cause interferen ce
❑
to radio or TV reception. Should this occur, relocate the computer a suitable
distance away from the set.
Use only specified peripheral equipment and interface cables; otherwise,
❑
problems may result.
Do not use cut or damaged connection cables.
❑
If the telephone company makes a service call to your home or office and
❑
determines that your computer is responsible for a problem, the telephone
company may bill you for the service call. Also, if you do not disconnect
your computer when it is adversely affecting the telephone line, the
telephone company has the right to disconnect your service until you correct
the problem.
Handling your notebook
Clean the cabinet with a soft, dry cloth or a soft cloth lightly moistened with
❑
a mild detergent solution. Do not use any type of abrasive pad, scouring
powder, or solvent such as alcohol or benzine, as these may damage the
finish of your computer.
Should any solid object or liquid fall into the computer, shut down your
❑
computer and then unplug it. You may want to ha v e the computer checked b y
qualified personnel before operating it any further.
Do not drop the computer or place heavy objects on top of the computer.
❑
Make sure to disconnect the power cord before cleaning the computer.
❑
A v oid rubbing the LC D screen as this can damage the screen. Use a soft, dry
❑
cloth to wipe the LCD screen.
Handling the LCD screen
Do not leave the LCD facing the sun as it can damage the LCD. Be careful
❑
when using the computer near a window.
Do not scratch the LCD or exert pressure on it. This could cause
❑
malfunction.
Using the computer in low temperature conditions may produce a residual
❑
image on the screen. This is not a malfunction. When the computer returns to
normal temperature, the screen returns to normal.
16
Ergonomic Considerations
The screen becomes warm during operation. This is normal and does not
❑
indicate a malfunction.
The LCD is manu factured using high-precision technology. You may,
❑
however, see tiny black points and/or bright points (red, blue, or green) that
continuously appear on the LCD. This is a normal result of the
manufacturing process and does not indicate a malfunction.
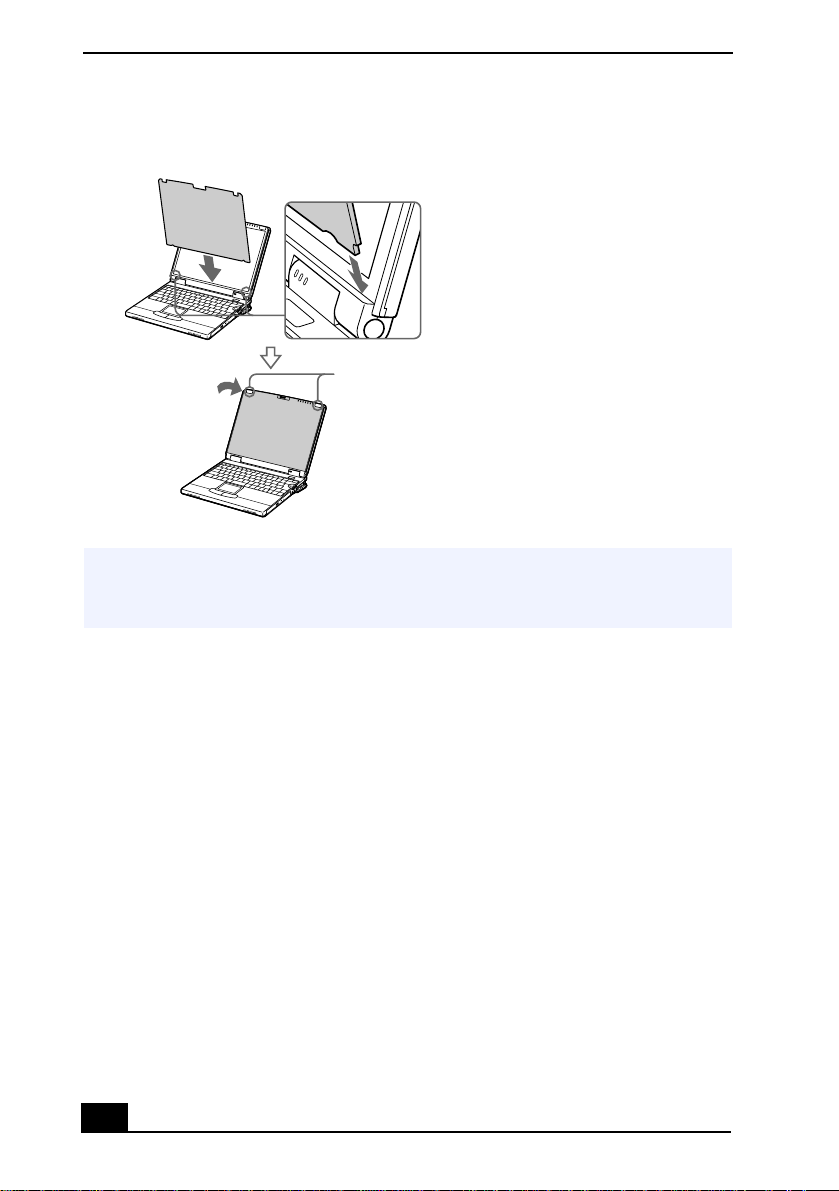
Cleaning the display filter
Remove the clips on the top of the display before removing the optional
1
display filter as illustrated below.
Display Filter Clips
clips
Hold the display filter by its sides to avoid leaving fingerprints on the display
2
filter .
Wipe off the fingerprints left on the display filter with the filter cleaner. You
3
can use commercially available cleaners.
Do not use solvents such as alcohol or thinner, as they may cause damage to the
✍
surface of the display filter. When using other chemical solvents, read the instructions
thoroughly.
Insert the bottom of the display filter into the groove at the bottom of the
4
display as illustrated below. Insert the display filter so that the clips’
protruding parts face left.
Turn 90° to lock it in place.
5
17
VAIO Notebook User Guide
Installing Display Filter
clips
Sony computer supplies, accessories, and peripherals can be purchased from your
✍
local retailer or by accessing the Sony VAIO Direct Website
(http://vaio.so nystyle.com/), or by calling 1-888-315-7669 (toll free).
18
Setting Up Your VAIO® Notebook
This section describes how to start using your computer and how to use your
computer’ s internal an d e xternal devices, such as the touchpad, floppy disk d ri v e,
and DVD-ROM drive.
Locating the Controls and Connectors
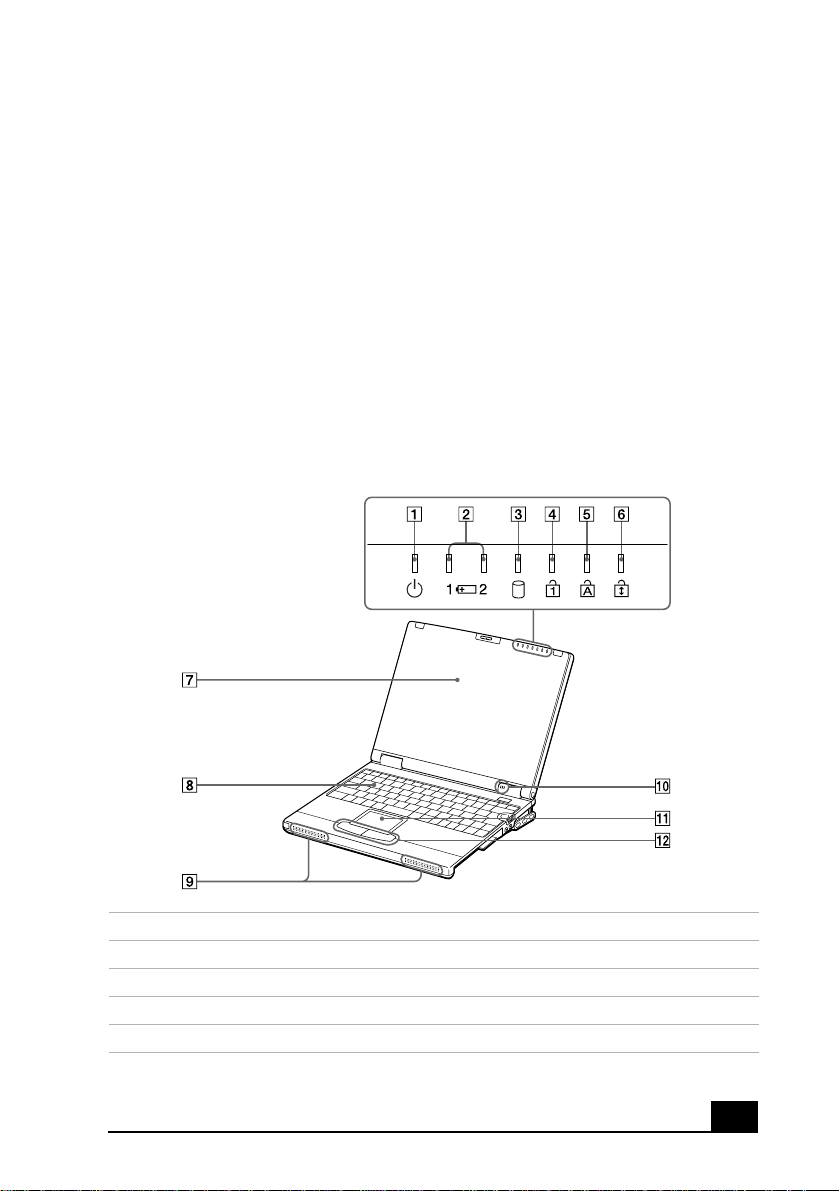
Front
1 Power indicator
2 Battery 1 and 2 indicators
3 Hard disk drive indicator
4 Num Lock indicator
5 Caps Lock indicator
19
VAIO Notebook User Guide
6 Scroll Lock indicator
7 LCD (Liquid Crystal Display) screen
8 Keyboard
9 Speakers
10 Internal microphone
11 Touchpad
12 Left/right butto ns
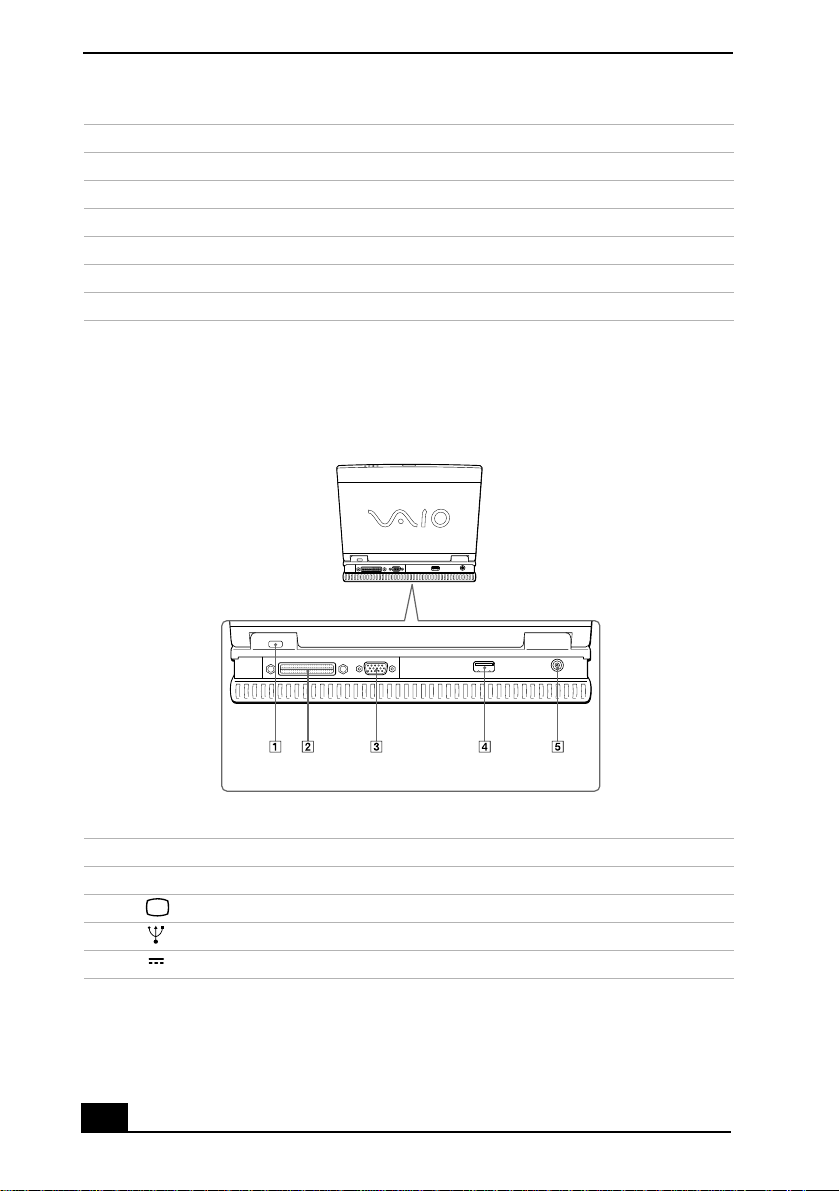
Back
1 Infrared port co nnector
2 Docking /Floppy disk drive connector
3 Monitor connector
4 USB connector
5 DC In connector
20
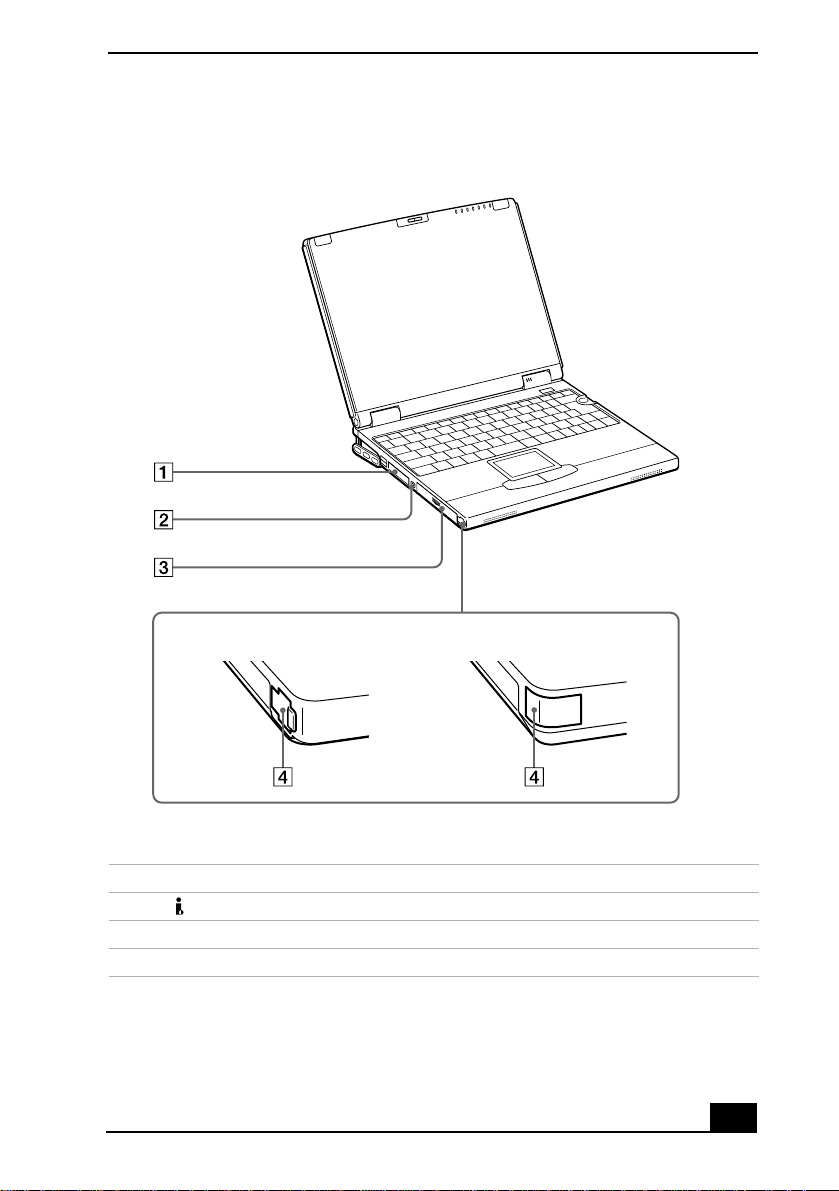
Left
Locating the Controls and Connectors
(PCG-XG38/PCG-XG38K)(PCG-XG39/PCG-XG39K)
1 PC card slots
*
2 i.LINK® (IEEE1394) S400 connector
3 Battery bay
4 Phone line jack
* i.LINK is a trademark of SONY used only to designate that the unit contains an IEEE1394
connector. All produc ts wit h an i.LINK connector may not c ommunicate with eac h other.
21
VAIO Notebook User Guide
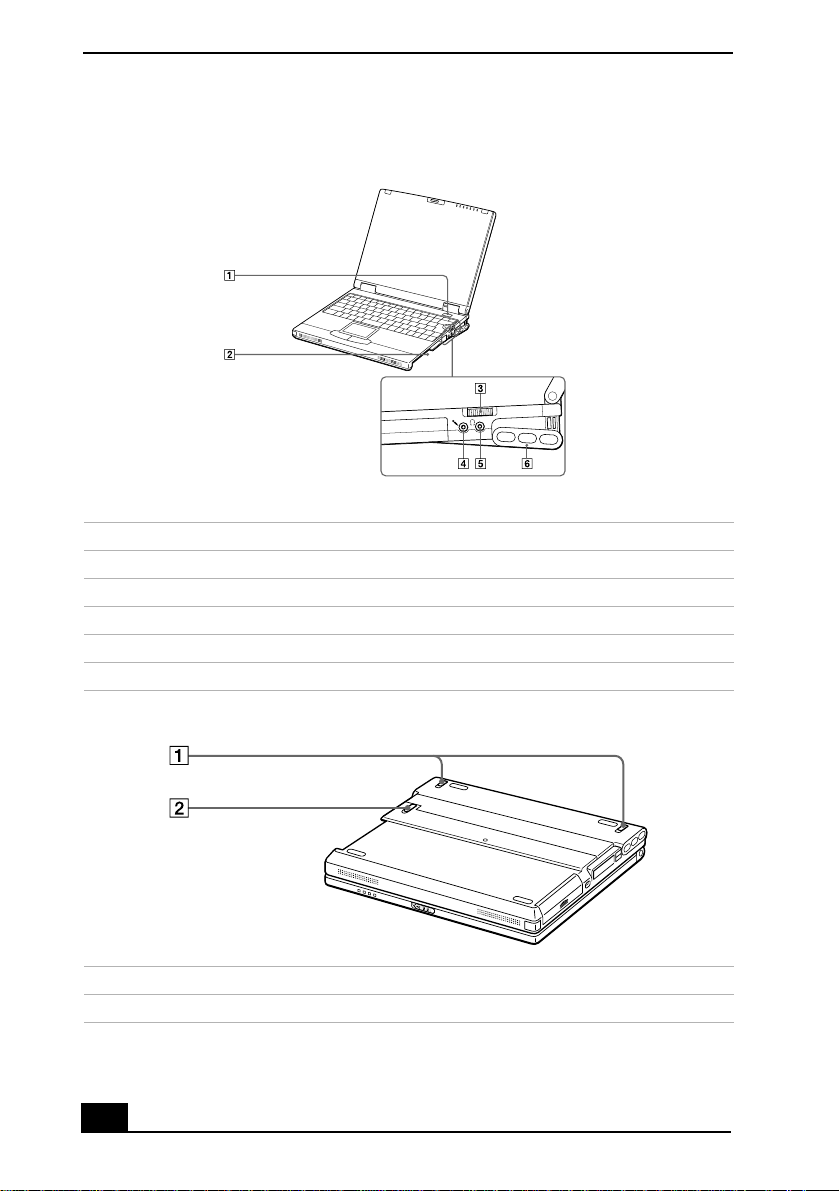
Right
1 Power button
2 Multipurpose bay
3 Jog Dial™ control
4 Microphone connector
5 Headphone connector
6 Intercooler flap
Bottom
1 Intercooler flap lever
2 Multipurpose bay release lever
22
Connecting a Power Source
Connecting a Power Source
You can use either AC power or a rechargeable battery pack as a power source.
Using the AC Adapter
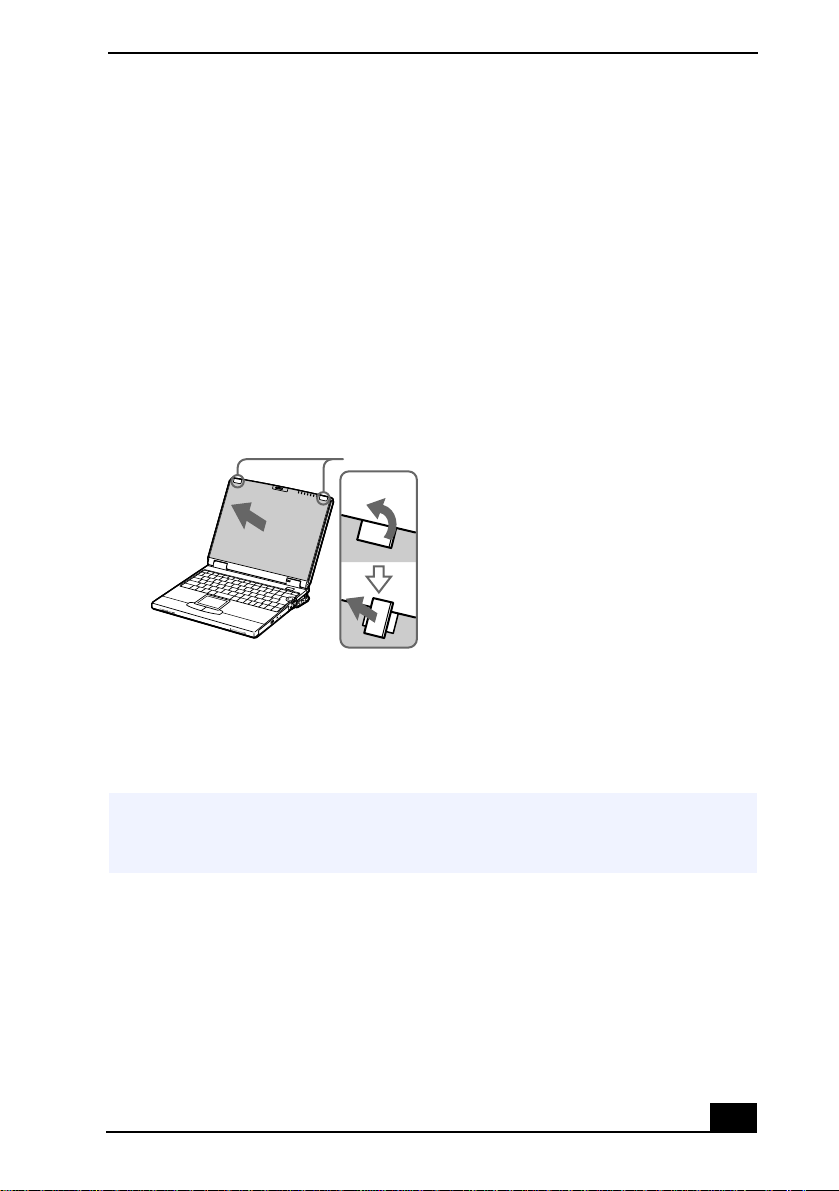
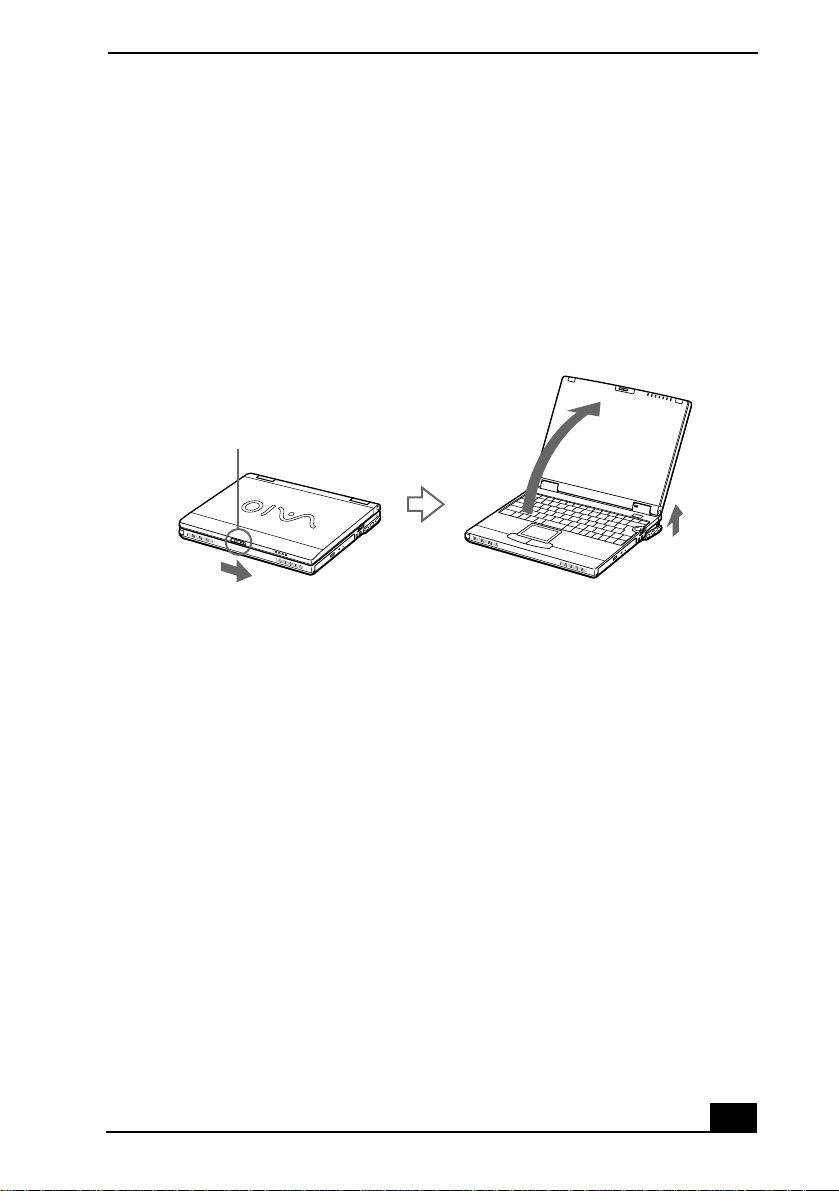
Slide the LCD lock lever to your right.
1
Open the computer.
2
Opening your Computer
LCD lock lever
Plug the cable attached to the AC adapter into the DC In connector on the
3
back of the computer.
Plug one end of the power cord into the AC adapter.
4
Plug the other end of the power cord into an electrical outlet.
5
23
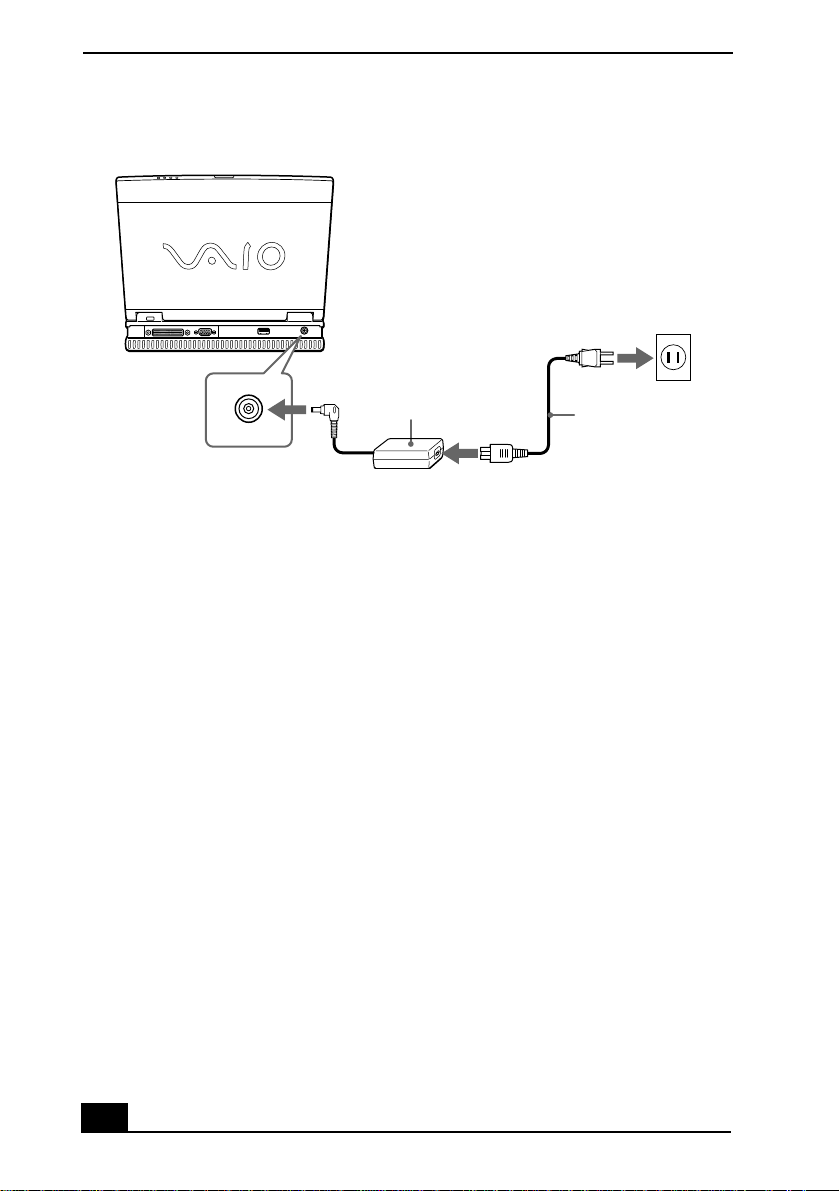
VAIO Notebook User Guide
Connecting the AC Adapter
Notebook
AC adapter (supplied)
DC In
Power cord (supplied)
Notes on the AC Adapter
Your computer ope rates on 100V-240V AC 50/60 Hz.
❑
Do not share the AC outlet with other power-consuming equipment, such as
❑
a copy machine or shredder.
You can purchase a power strip with a surge protector. This device prevents
❑
damage to your computer caused by sudden power surges such as those that
may occur during an electrical storm.
Do not place heavy objects on the power cord.
❑
To disconnect the cord, pull it out by the plug. Never pull the cord itself.
❑
Unplug your computer from the wall outlet if yo u will not be using the
❑
computer for a long time.
When the AC adapter is not used, unplug it from the AC outlet.
❑
Use only the AC adapter supplied. Do not use any other AC adapter.
❑
Using Battery Power
You can use one or two battery packs as a source of power. The second battery
pack inserts into the drive bay on the right side of the computer. (See “Using a
Second Battery Pack” on page 56.) Additional battery packs are available as a
separate option.
24
Connecting a Power Source
The battery pack that comes with your computer is not fully charged at the time
of purchase. Follow the steps below to insert and charge the battery pack.
To insert the battery pack
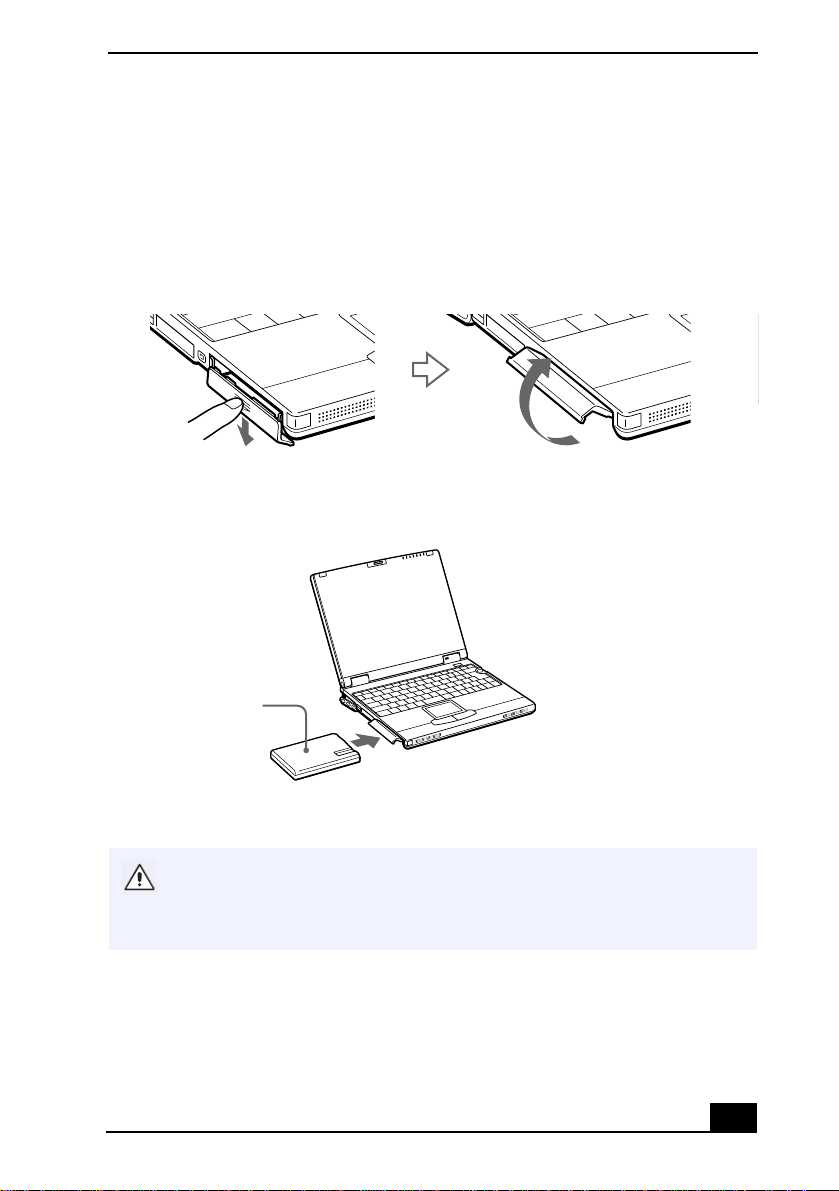
Open the cover of the battery bay on the left side of the computer.
1
Battery Bay
Insert the battery pack into the battery bay.
2
Inserting Battery Pack
Battery pack
(supplied)
Label side fac ing down
Close the cover of the battery bay until it clicks.
3
If the Mini Docking Station is attached to your computer, do not insert or
remove the battery pack. Lifting and turning the com pu ter with the Mini
Docking Station attached may cause the Mini Docking Station to disconnect
from the computer.
25
VAIO Notebook User Guide
To charge the battery pack
Connect the AC adapter to the computer.
1
Insert the battery pack.
2
The computer automatically charges the battery (the battery indicator light flashes in a
✍
double blink pattern as the battery charges).
When the battery is 85% full, the battery indicator light turns o ff. This
3
process takes approximately two hours.
To charge the battery completely, continue charging for an additional hour. See
✍
“Displaying Detailed Battery Information” in the online manual Customizing Your
VAIO® Notebook.
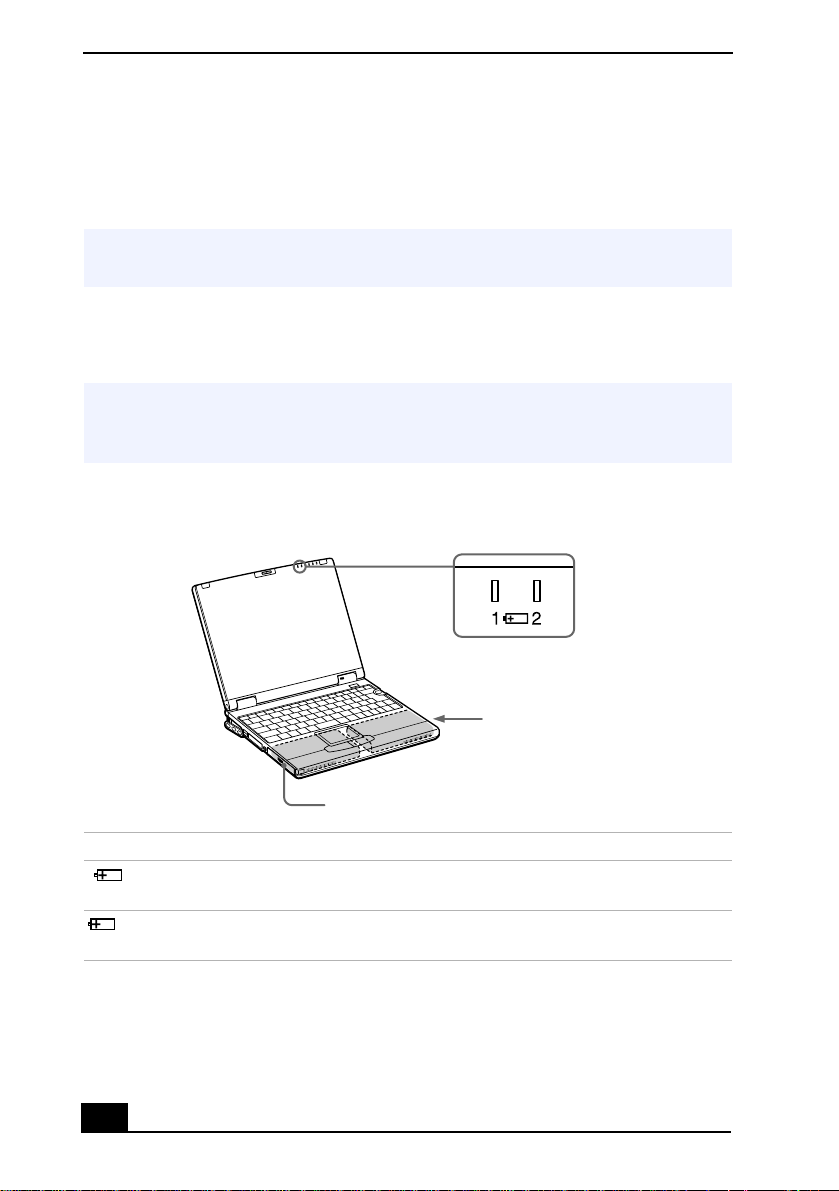
Battery Indicator Lights (2)
Battery indicators
Battery I ndicator Meaning
1
2
Indicates the status of the battery pack in the batte ry ba y on the
left side of the computer.
Indicates the status of the battery pack in the drive bay on the
right side of the computer.
26
Battery pack (supplied)
Secondary battery pack
(optional)

Connecting a Power Source
Battery Indicator
Light Status Meaning
On The computer is using battery power.
Single blink When BOTH the Battery indicator and Power indicator single-
blink, the battery is running out of po wer.
Double blink The battery is charging.
Off The computer is using AC power.
To remove the battery pack
Open the cover of the battery bay.
1
Pull out the battery pack.
2
Removing the Battery Pack
Close the cover of the battery bay.
3
You will lose data if you remove the battery pack while the computer is on and
not connecte d to the AC adapter or if you remove the battery while the
computer is in power saving mode.
Notes on battery
To determine the remaining battery charge, see “Displaying Battery
❑
Information” in the online manual
When the battery is runnin g out of po wer, both the battery indicator light and
❑
Customizing Your VAIO® No tebook
power indicator light blink.
.
27

VAIO Notebook User Guide
When the computer is directly connected to AC power and a battery pack is
❑
in the battery bay, it uses power from the AC outlet.
Keep the battery pack in the computer while it is directly connected to AC
❑
power . The battery pack continues to char ge while you are using the computer.
If the battery level falls below 10%, you should either attach the AC adapter
❑
to recharge the battery or shut down your computer and insert a fullycharged battery.
You can extend battery life by changing the power management modes in the
❑
Power Management utility. See “Using Power Saving Modes” on page 69.
The battery pack supplied with your computer is a lithium-ion b attery and
❑
can be recharged at any time. Charging a partially discharged battery does
not affect battery life.
For some softwar e appli cati ons and s ome per i pher a l d evices, your computer
❑
may not enter System Hibernation mode when the battery life is low. To
avoid loss of data when using battery power, you should save your data
frequently and manually activate a power management mode, such as
System Suspend or System Hibernation.
Never leave the battery pack in temperatures above 140° F (60° C), such as
❑
under direct sunlight or in a car parked in the sun.
Battery life is shorter in a cold environment. This is due to decreased battery
❑
efficiency at low temperatures.
Charge the batteries at temperatures between 50° F and 80° F (10° C to
❑
30 °C). Lower temperatures require a longer charging time.
While the battery is in use or being discharged, the battery pack heats up.
❑
This is normal and is not cause for con cern.
Keep the battery pack away from all sources of heat.
❑
Keep the battery pack dry.
❑
Do not open or tr y to disassemble th e battery pack.
❑
Do not expose the battery pack to any mechanical shock.
❑
If you are not using the computer for an extended period of time, remove the
❑
battery pack from the computer to prevent damage to the battery.
If, after fully charging the battery pack, the battery power is still low, the
❑
battery pack may be reaching the end of its life and should be replaced.
If you have not used the battery pack for a considerable amount of time,
❑
recharge the battery.
28

Starting Your Computer
Starting Your Computer
Slide the LCD lock lever in the direction of the arrow, and lift the cover.
1
Opening the Computer
LCD lock lever
Press the power button of the computer until the green power indicator light
2
turns on.
(Windows Me only) When starting your notebook for the first time, the VAIO
InitManager dialog box will appear . Please select “OK” to begin initial setup. If
you do not execute the initial setup, you cannot use part of VAIO original
hardware functio ns such a s Jog Dial, Po wer Ma nagem ent tool, s croll function of
touchpad, and keyboard shortcut key function combined wi th the Fn key.
Power Button
Power indicator
Power button
If you press the power button for more than four seconds, the computer turns off.
✍
29
VAIO Notebook User Guide
If necessary, adjust the brightness controls for the LCD display:
3
Decrease brightness, press Fn+F5 and then the down or left arrow key.
❑
Increase brightness, press Fn+F5 and then the up or right arrow key.
❑
When connecting the supplied AC adapter to an AC outlet that has more than
two outlets, do not plug the AC adapter into an outlet that is obstructed by
another adapter. To prevent fire or electrical shock, the adapter must be firmly
plugged into the outlet. If ne cessary, use a separate AC outlet.
Shutting Down Your Computer
To avoid potential loss of data, follow these steps to shut down your computer.
Click the Start button on the Windows taskbar.
1
Click Shut Down at the bottom of the Start menu to display the Shut Down
2
Windows dialog box.
Select Shut down.
3
Click OK.
4
Respond to all prompts that warn you to save your documents..
✍
Wait for your computer to turn off automatically. The power indicator
5
(green) turns off.
Turn off any peripherals connected to your computer.
6
During a period of inactivity, you can conserve battery life by using System Suspend
✍
mode. See “System Susp end Mode” on page 69.
30
 Loading...