

Page 1

Welcome
Congratulations on your purchase of this Sony VAIO® computer, and welcome to the online VAIO® Computer User Guide.
This user guide provides detailed information on all aspects of using your new VAIO computer, from keyboard functions to
preinstalled software programs.
In the left navigation window, click the topics you want to learn more about, and that information will be displayed in this
main window.
View the Electronic Flyer, which provides updates and supplemental information about your computer.
Page 1
Page 2

Powering Your Computer
Your VAIO® computer comes with a battery and an AC adapter. This chapter explains how to install and use these supplied
accessories to power your computer. It also describes ways you can efficiently utilize the battery as a power source.
Page 2
Page 3

Using AC Power
The supplied battery is not charged when you receive your computer. To charge the battery and begin using the computer
immediately, insert the battery into the computer and use the supplied AC adapter as a power source. The computer
automatically charges the installed battery while it uses AC power.
Page 3
Page 4
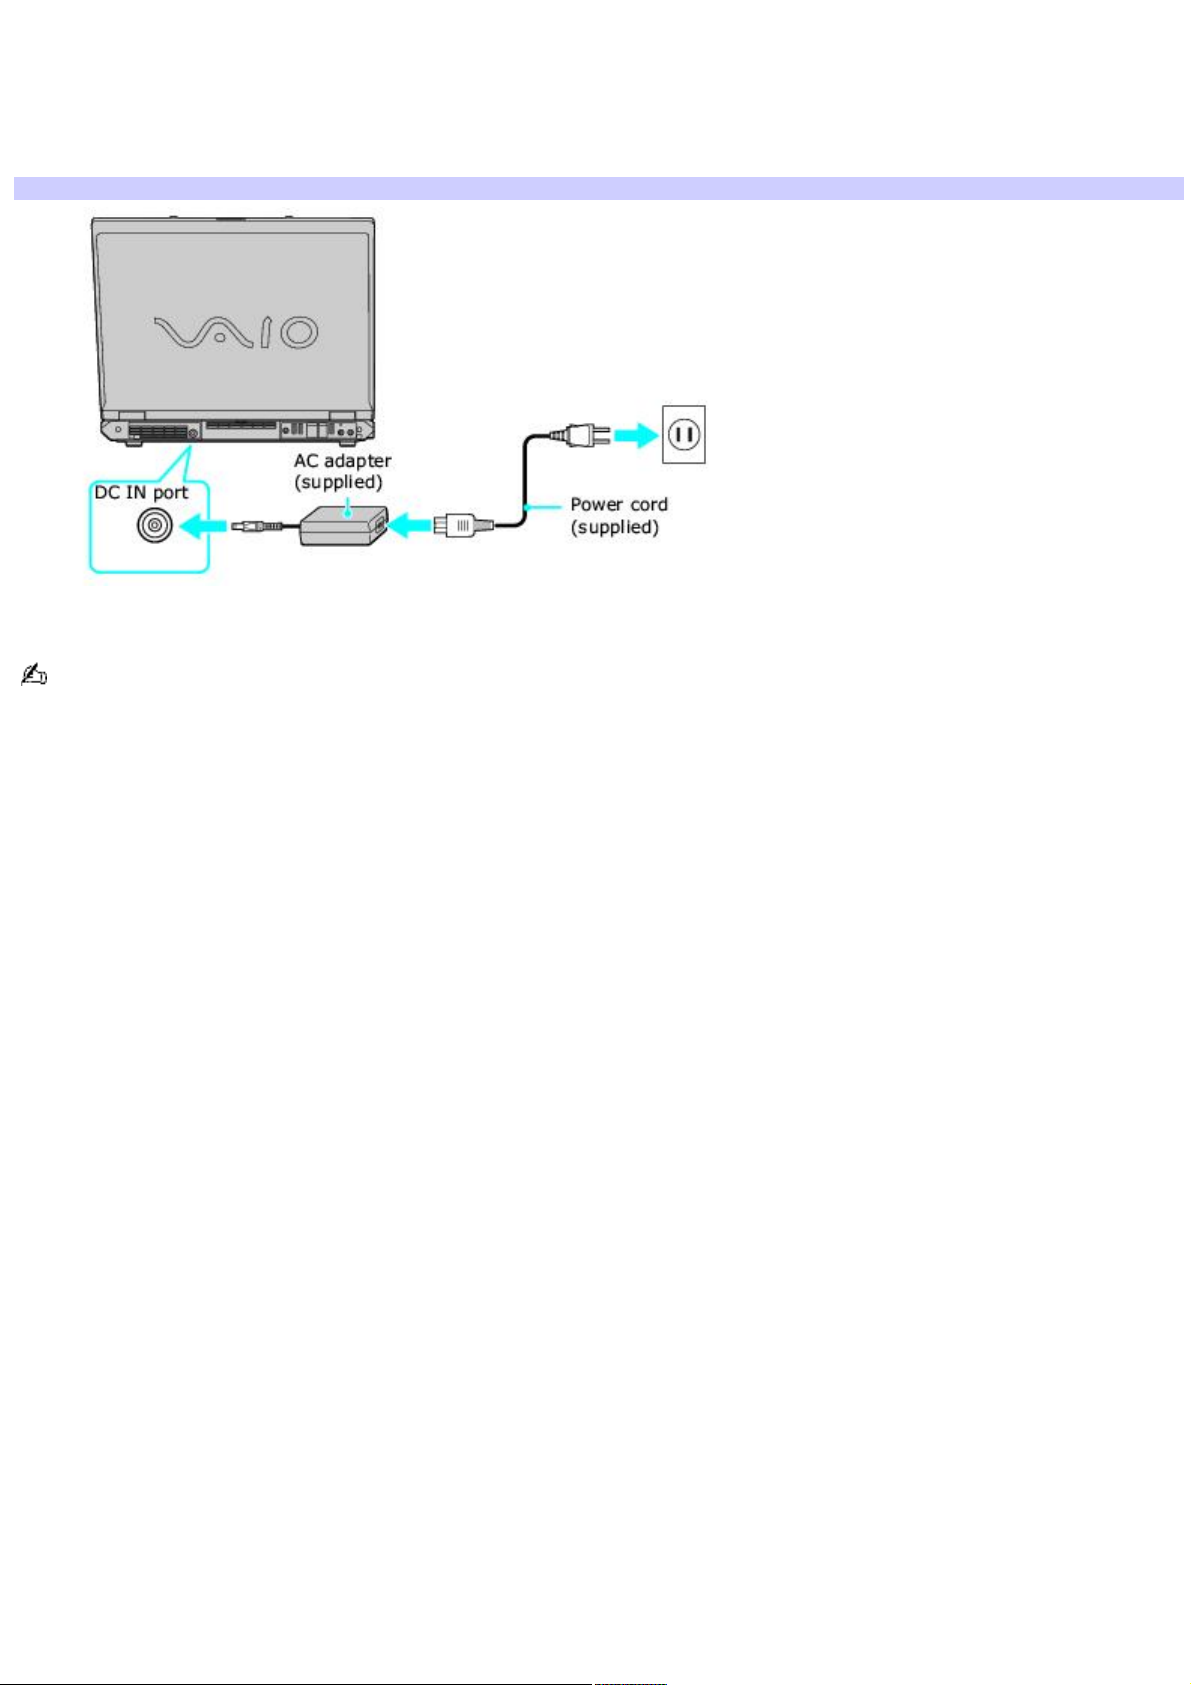
Connecting the AC adapter
To connect the AC adapter
1.
Plug the AC adapter cable into the DC IN port.
Connecting the AC Adapter to the Computer
2.
Plug the power cord into the AC adapter and an AC outlet.
Use only the supplied AC adapter with your computer.
Page 4
Page 5
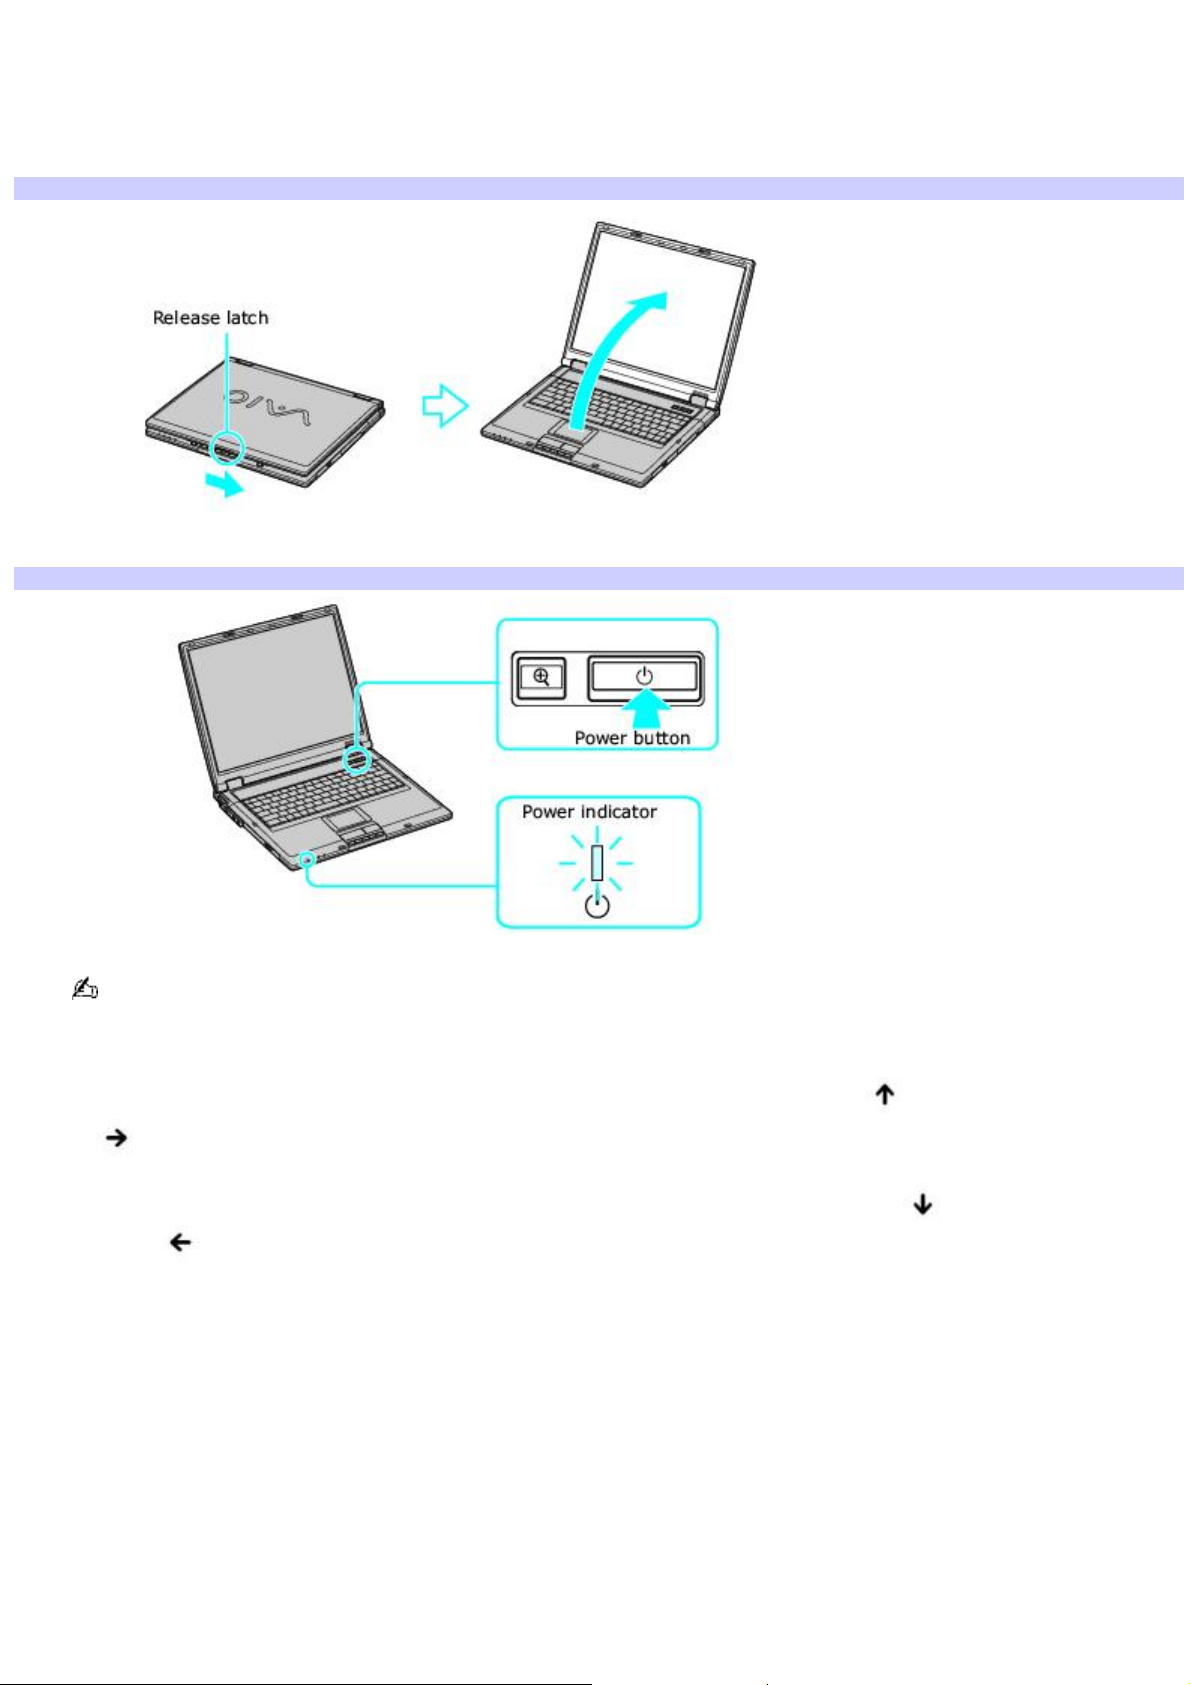
Turning on the computer
To open and turn on the computer
1.
Slide the cover release latch and lift the cover while holding the bottom of the computer firmly.
Opening the Computer
2.
Press the power button until the power indicator turns on.
Turning on the Computer
If you continue to press the power button, the computer turns off.
3.
If the computer screen is too dark or too bright, follow these steps to adjust the brightness:
To increase brightness, press the Fn and F5 keys, and then press the Up Arrow or the Right Arrow
key.
To decrease brightness, press the Fn and F5 keys, and then press the Down Arrow or the Left
Arrow key.
Page 5
Page 6

Using the Battery
Your computer, depending on the model you purchased, may come equipped with one battery bay and one multipurpose
bay that supports a second battery. If your computer comes with two bays, you can purchase a second rechargeable
battery to extend your computing time. For information on how to extend the life of the battery, see Conserving Battery
Power for more information.
When operating your computer on battery power, your computer's CPU speed is reduced.
The battery that comes with your computer is not fully charged at the time of purchase.
The brightness of your computer screen automatically dims when you switch from AC power to battery power. To
increase the brightness, press the Fn and F5 keys, and then press the Up Arrow or Right Arrow key.
Page 6
Page 7
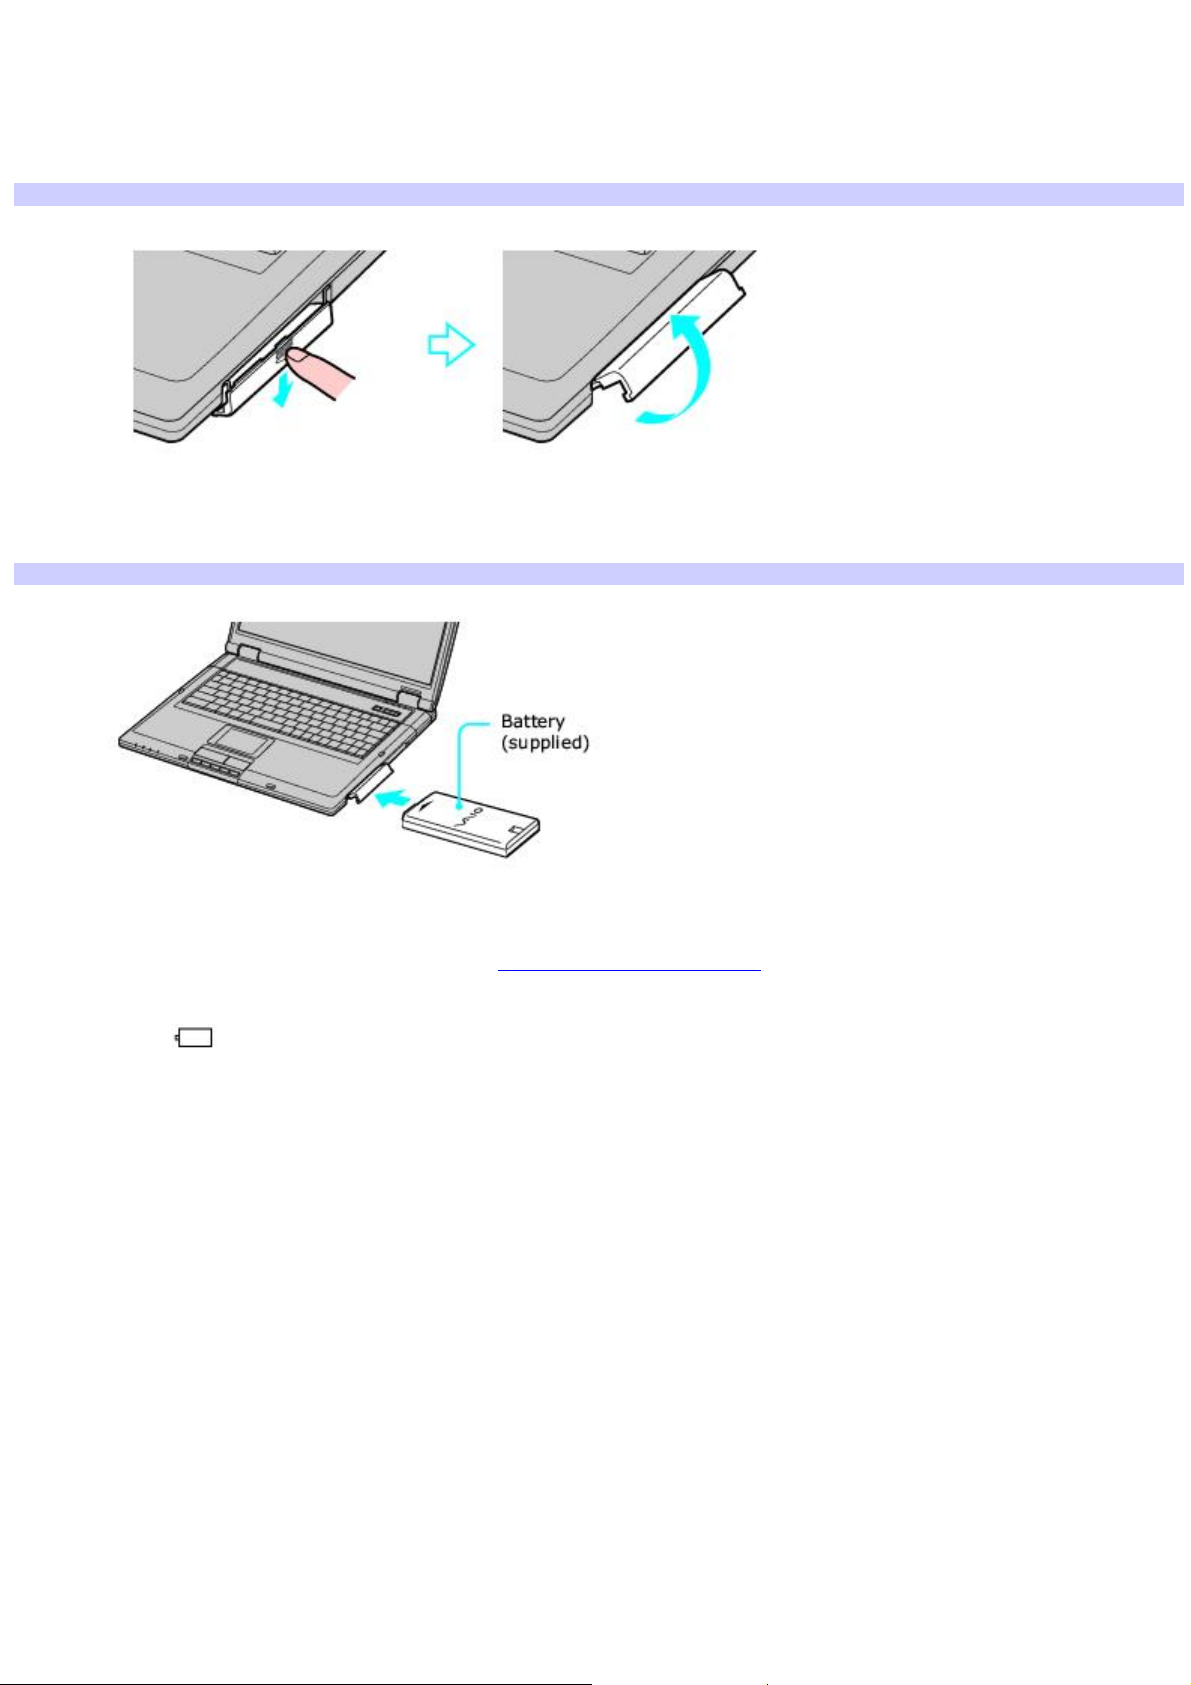
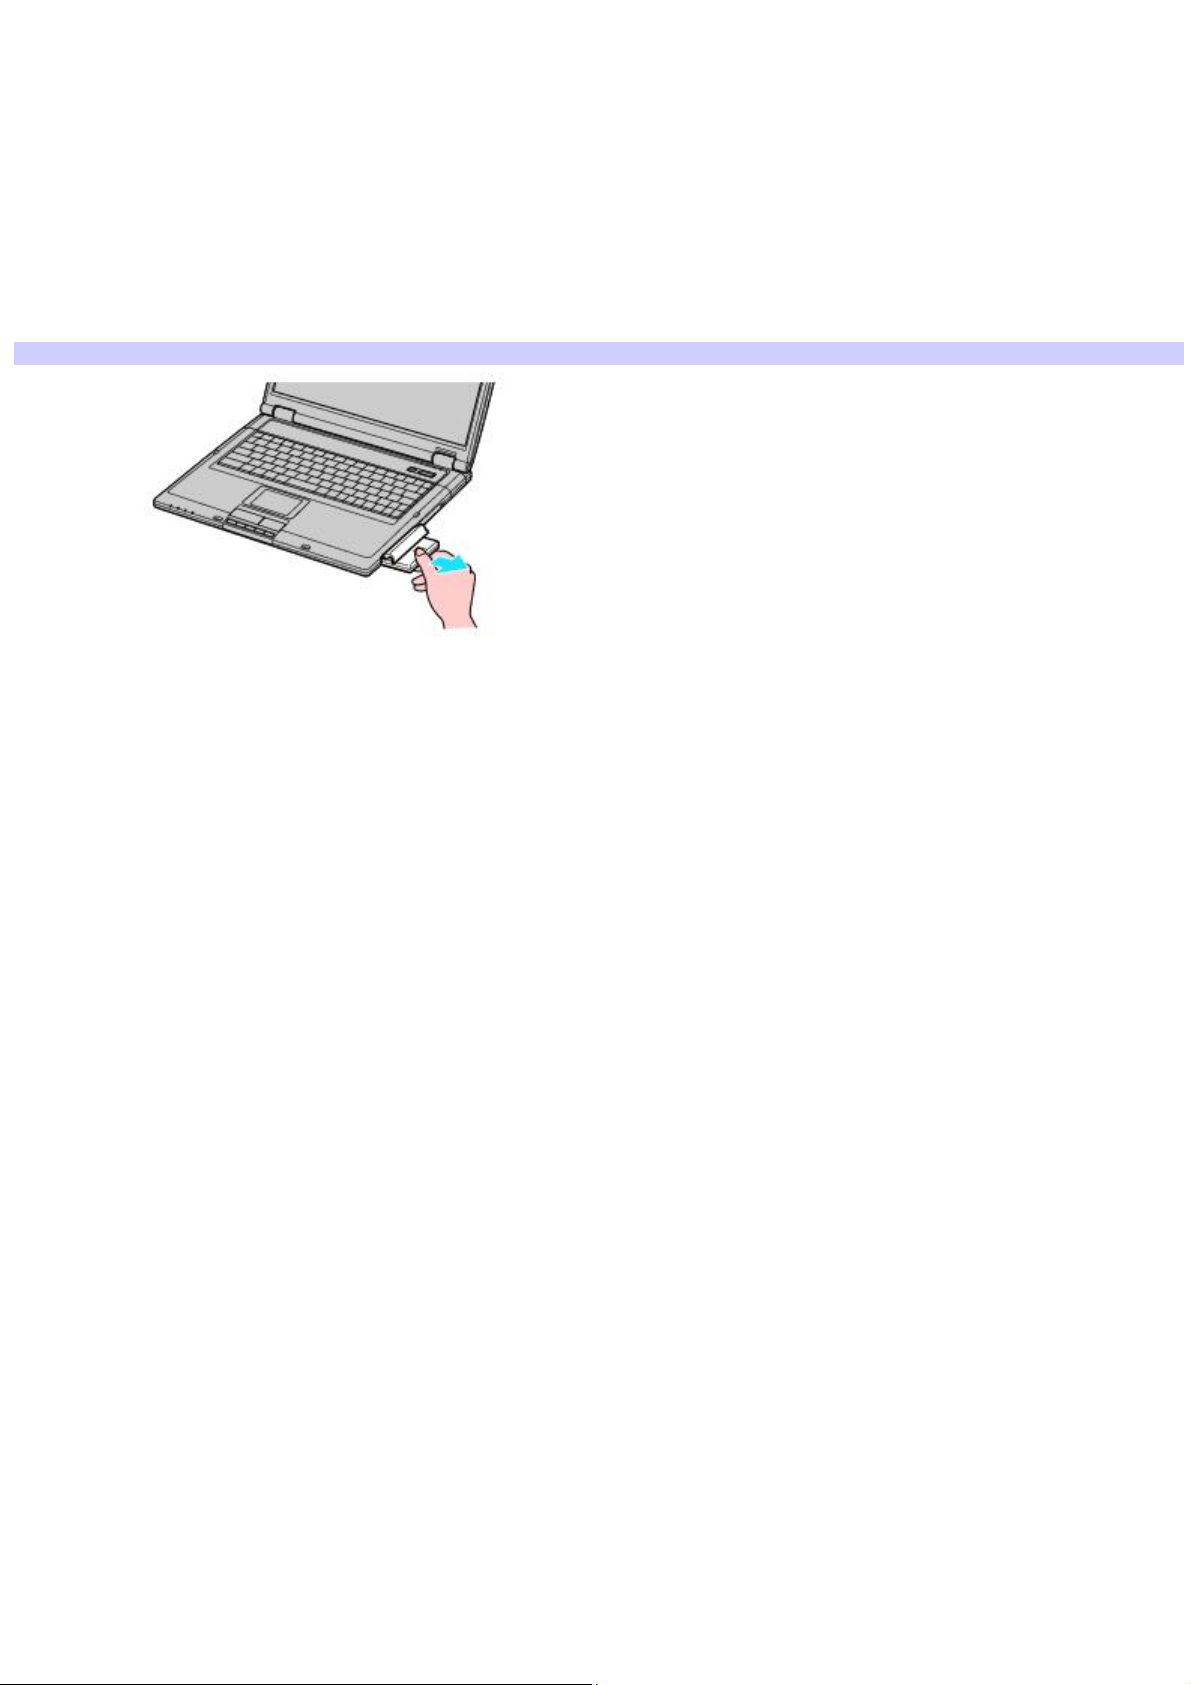
To insert and charge the battery
1.
Open the computer lid.
2.
Push the battery bay cover down to open it. The battery bay cover swings out but does not detach from the
computer.
Opening the Battery Bay
3.
Slide the battery (with the logo facing up) into the battery bay. If the computer is on, it automatically detects the
battery.
Inserting the Battery
4.
Push the battery bay cover up until it clicks into place.
5.
Connect the AC adapter to the computer. See Connecting the AC adapter.
Once you connect the AC adapter to the computer, the battery begins to charge whether the computer is on or off. The
battery indicator shows the battery status. The indicator blinks as the battery charges.
Page 7
Page 8
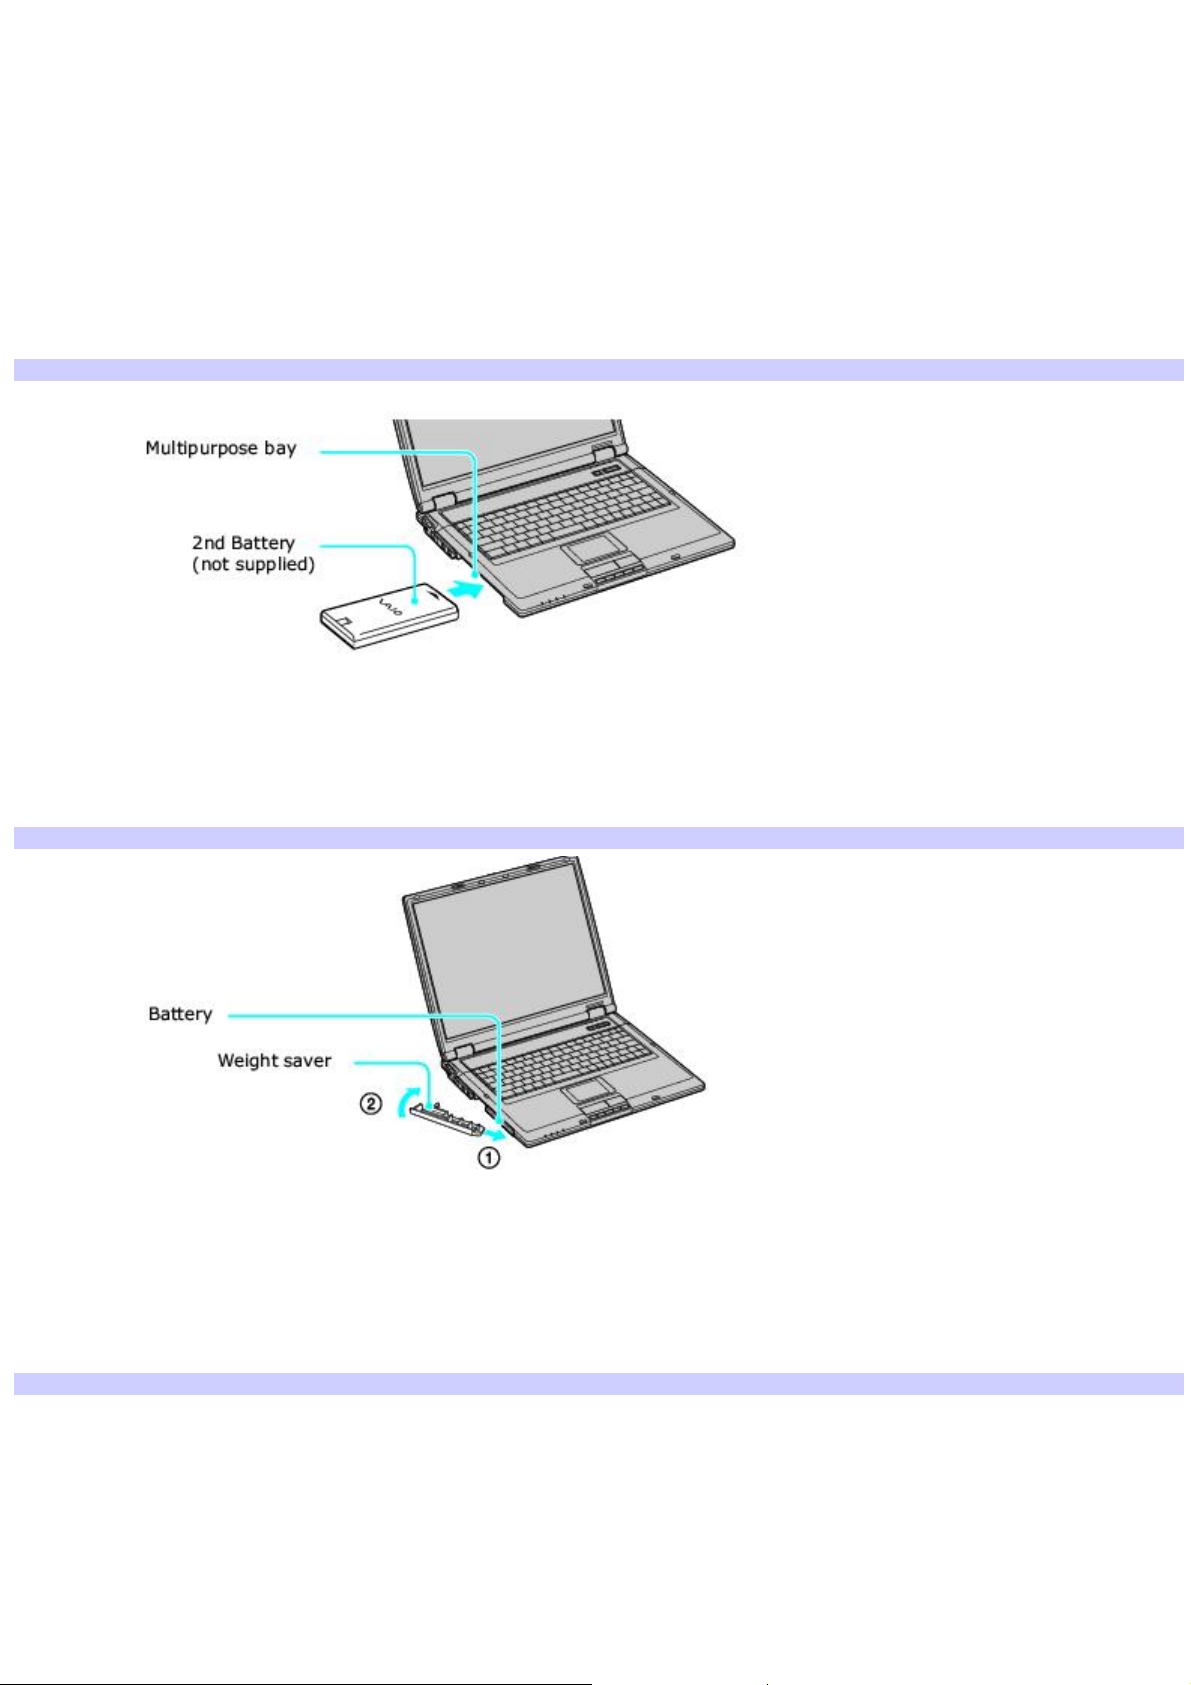
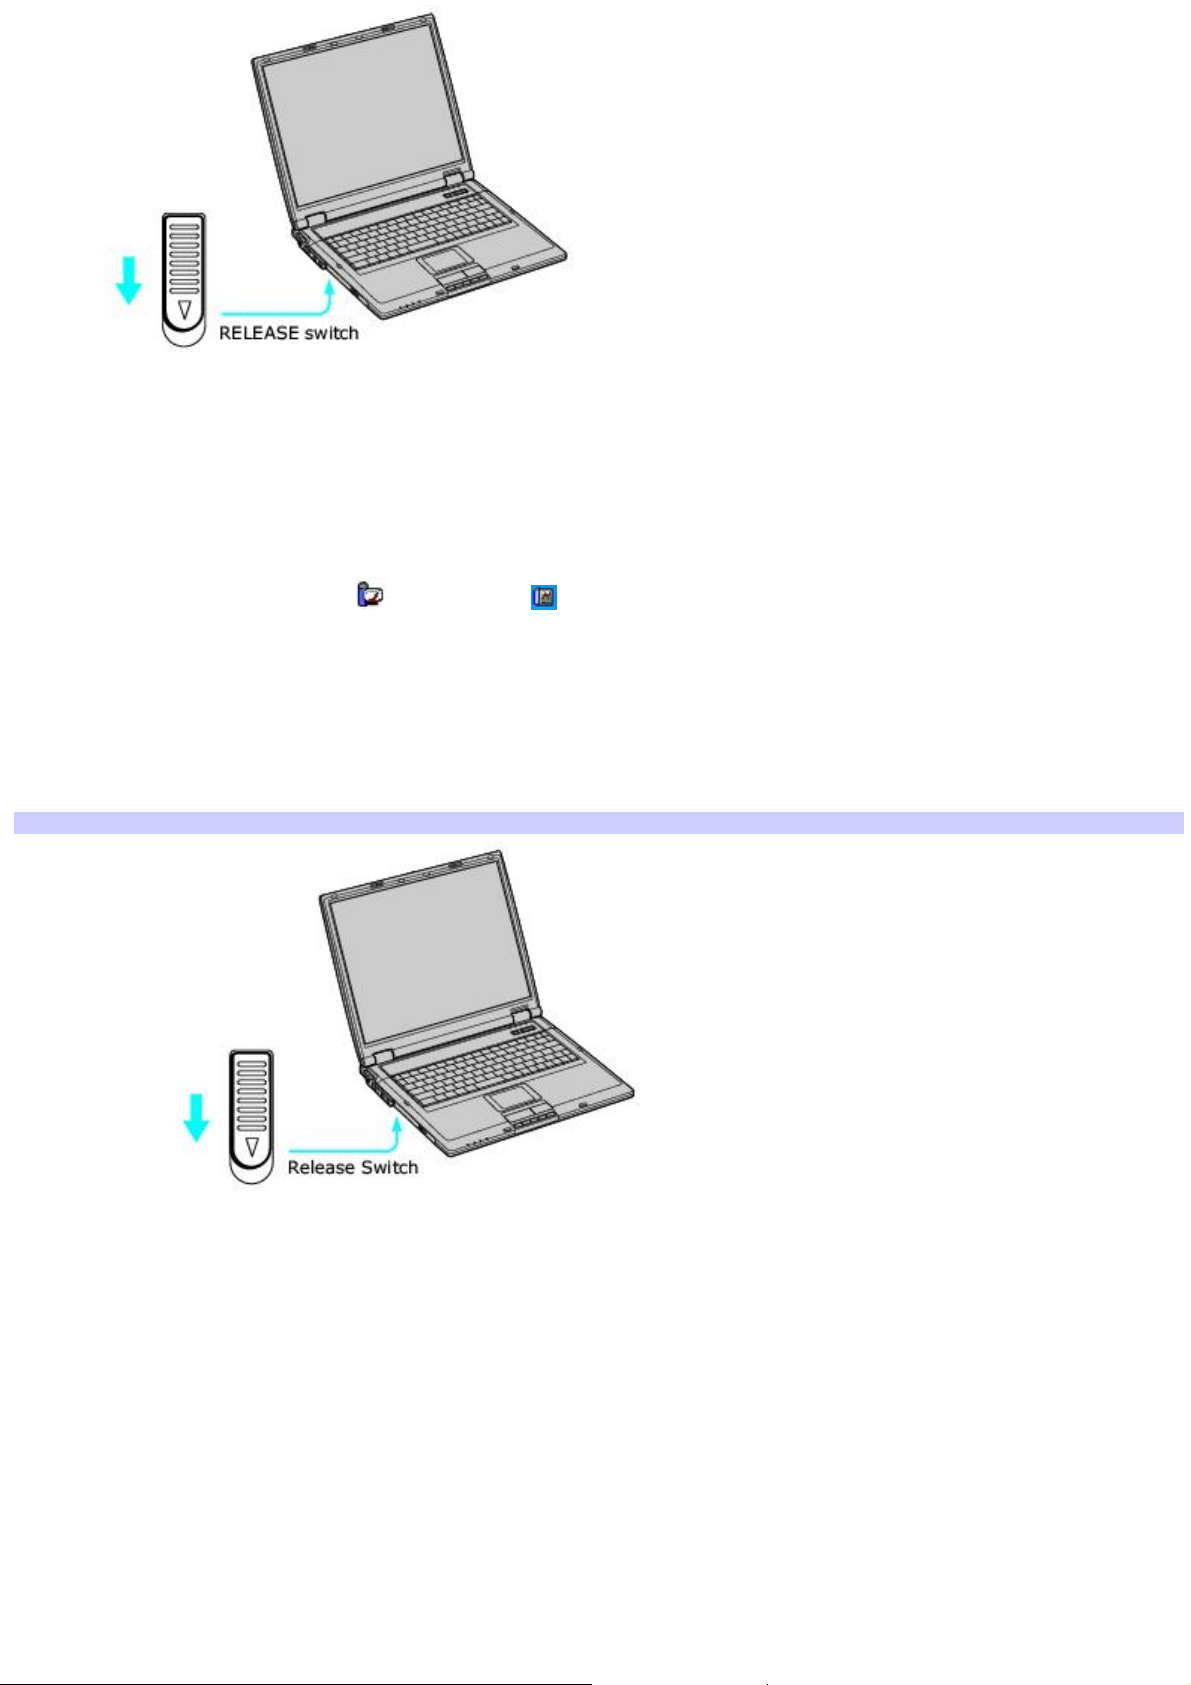
Using a second battery
To insert a second battery
1.
If another device is in the multipurpose bay, remove that device by performing the following steps:
1.
Locate the release switch on the bottom of the computer.
2.
While holding the release switch in the Release position, pull out the device from the multipurpose
bay.
2.
Insert the battery into the multipurpose bay. When the computer uses the second battery, the Battery 2
indicator turns on.
Inserting the Second Battery
3.
Slide the weight saver in the direction of the arrow until it clicks into place. The weight saver stabilizes the
battery.
Inserting the Weight Saver
4.
Lock the weight saver RELEASE switch.
Locking the Weight Saver
Page 8
Page 9
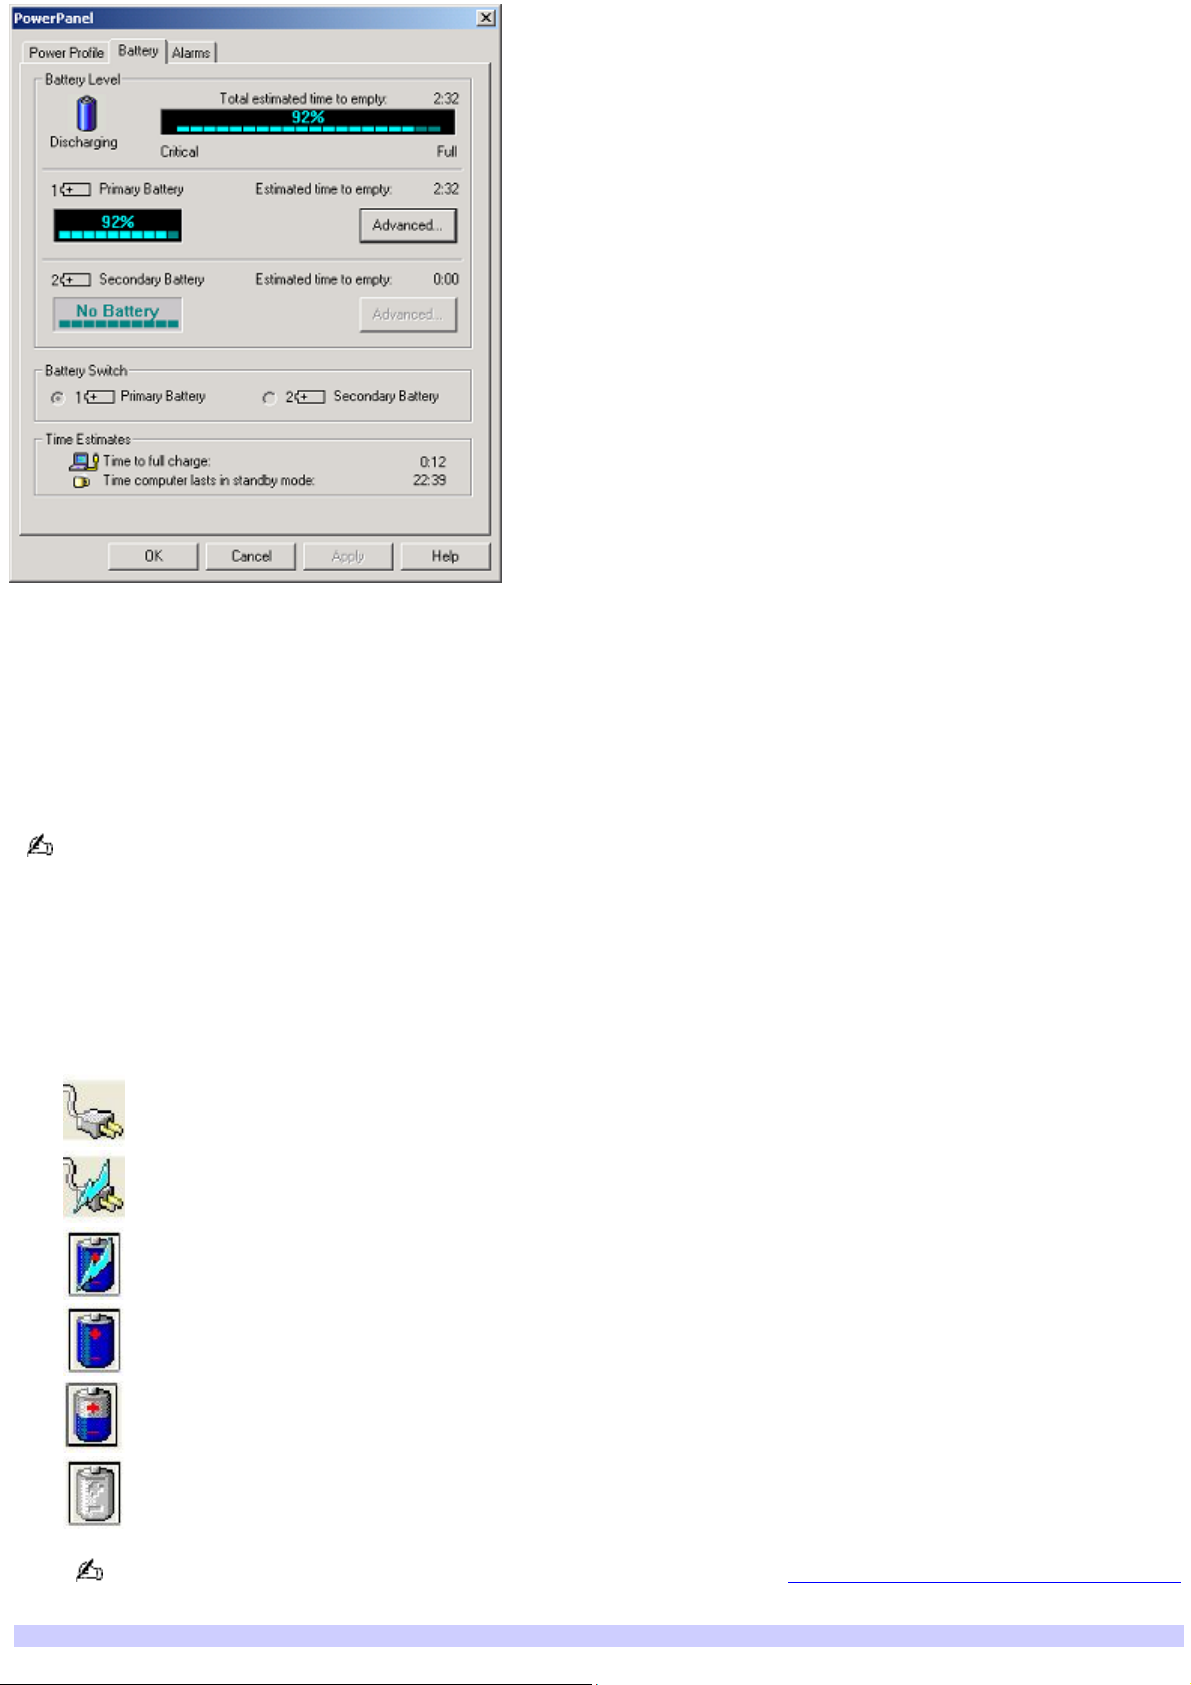
To remove the second battery
1.
Make sure the Battery 2 indicator is off and the Battery 1 indicator is on or the computer is connected to AC
power. If the Battery 2 indicator is on:
1.
Double-click the CPU icon or Profile icon , depending on the model you purchased. The
PowerPanel dialog box appears.
2.
On the Battery tab, click Primary Battery in the Battery Switch box.
3.
Click OK.
2.
Turn the computer over, and unlock the weight saver and the multipurpose bay using the release switch on the
bottom of the computer.
Unlocking the Second Battery
3.
Pull the weight saver and battery gently from the multipurpose bay.
4.
Insert the weight saver into the multipurpose bay to protect the bay.
Page 9
Page 10

Conserving Battery Power
You may use the power saving modes and PowerPanel utility to conserve battery power. Conserving battery power may
significantly extend your computing time, depending on how you use your computer.
Page 10
Page 11

Using power saving modes
In addition to the normal operating mode, which allows you to turn off specific devices to save power, your computer has
two distinct power saving modes: Standby and Hibernate. Use the Standby and Hibernate power saving modes to override
a power profile setting and initiate immediate action.
Standby — Saves the state of the system and peripheral devices in memory (RAM). Power consumption is reduced
to a minimum. The system remains on, and the computer screen (LCD) is off.
Hibernate — Saves the state of the system and peripheral devices to the hard disk. Power consumption is reduced
to the lowest possible setting without being completely off. Hibernate mode consumes the lowest level of power.
Your computer enters Hibernate mode when the remaining battery charge drops below 5 percent, regardless of the
setting you select.
Since some programs and peripheral devices prevent the system from entering Hibernate mode, save your data
frequently to avoid data loss.
To activate Standby mode
1.
Press the Fn and Esc keys. The power indicator blinks in this mode.
2.
Press any key to return to normal mode.
To activate Hibernate mode
1.
Press the Fn and F12 keys. Do not move the computer until the power indicator turns off.
2.
Press the power button to return to normal mode.
If your computer does not activate Hibernate mode, see Battery for more information.
Page 11
Page 12

Using PowerPanel utility
The PowerPanel utility enables you to select and customize a predefined power management profile to conserve battery
life. The following table describes all the predefined power management profiles in PowerPanel. You can customize the
settings for all the following profiles, except the Disable Power Management profile.
Profile
Icon Description
Maximum Performance
Provides the best system performance but conserves minimal power.
Maximum Battery Life
Provides power saving features to give you maximum battery life and good performance. It slows the computer and puts it
into Standby mode after a specified time.
Ultimate Battery Life1
Extends the Maximum Battery Life by stopping power to the optical drive and Memory Stick® media slot.
Power Management Off
Disables all power management settings, such as Standby and Hibernate modes. You cannot change the settings of this
profile.
AC Power
Indicates when AC power is in use. Similar to Power Management Off and the Standby mode after a half hour. Power
Management automatically loads the AC profile unless you disable this feature.
Games
Disables the display and the Hard Disk Standby timer.
Presentation
Keeps the display on at all times while conserving power. This option is ideal for slide show presentations. You can
establish settings for LCD (Video) Standby, Hard Disk Standby, and Standby mode to optimize power management for your
system.
Camera
Optimizes performance and power requirements for camera usage.
DVD
Optimizes performance and power requirements for DVD usage.
Word Processing
Optimizes power management with longer time-outs on the hard disk and display screen. You can also establish settings
for LCD (Video) Standby, Hard Disk Standby, and Standby mode to optimize power management for your system.
Spreadsheet
Optimizes performance and power requirements for spreadsheet programs.
Communications
Extends battery life by initiating a quick display time-out. The Internal modem remains powered on. You can also establish
settings for LCD (Video) Standby, Hard Disk Standby, and Standby mode to optimize power management for your system.
Automatic Profile Selection
Automatically selects a profile suitable for active software programs.
Page 12
Page 13

1
Do not choose the A utomatic P rofile Selection when c onnected to A C power.
To select a profile
1.
Right-click the CPU icon or Profile icon , depending on the model you purchased. See Locating battery
information for Battery icon descriptions.
2.
Select Profiles, and click the profile on the shortcut menu. The profile settings are implemented instantly. See
Using PowerPanel utility for descriptions of available profiles.
When you use the battery to power your computer, your system automatically selects the Maximum Battery Life power
management profile by default. If you select a different power management profile while using battery power, that profile is
selected automatically the next time you use the battery to power your computer.
See PowerPanel Help for information on customizing the power management profiles.
To customize your profile settings
You can customize your profile settings to sustain enough power for a particular computing function.
1.
Right-click the CPU icon or Profile icon , depending on the model you purchased.
2.
Select Edit/Create Profiles from the shortcut menu.
3.
In the left panel, select the profile you want to change.
4.
In the right panel, right-click the setting under System, LCD(Video), Hard Disk, or Other Devices that you want
to change. See the following table for a description of each power management setting.
5.
Make your changes from the drop-down menu.
6.
Click File, and click Save.
Power Management Setting Description
CPU Control1 Controls the processor speed. You can select either Performance, Adaptive, or Battery Life. These
selections are listed in order from the greatest to least amount of power consumed.
System
Standby Timer Controls the time it takes the system to activate the Standby mode when it is idle. The longer you
allow the computer to sit idle while it is not in a power saving mode the more power the computer consumes.
Hibernate
Timer Controls the time it takes the system to activate the Hibernate mode when it is idle. The longer you allow the
computer to sit idle while it is not in a power saving mode the more power the computer consumes. Hibernate mode
conserves more power than Standby mode.
Thermal
Control Strategy1 (On selected models) Controls the speed of the processor fan. You can set the fan speed to different
levels. Level 1 (Quiet) conserves the most power.
Lid Close Action Controls the state of your system when the lid of the computer is closed. You can select either
Standby, Hibernate, or LCD Off.
Hibernate on Low Battery Controls the state of your system when the battery power is low. You can turn this setting
On or Off. Selecting On conserves the most power when the battery is low.
LCD
Page 13
Page 14

Brightness Controls the brightness of the computer screen (LCD). You can select a brightness level of one to nine. The
darker you set the computer screen the more power you conserve.
LCD Standby Timer Controls the time it takes the system to turn off power to the computer screen (LCD) when the
system is idle. The system itself still functions on full power.
HDD Standby Timer Controls the time it takes the system to turn off power to the hard disk drive when the system is
idle. This setting only turns off power to the hard disk drive.
i.LINK Port Controls power to the i.LINK® port. Disabling power to the i.LINK port conserves power.
Memory Stick Port Power-saving Controls power to the Memory Stick media slot. Disabling power to the Memory Stick
media slot conserves power.
Optical Drive Power-Saving Controls power to the optical drive. Disabling power to the optical drive conserves power.
1
Slows the process or s peed.
Page 14
Page 15

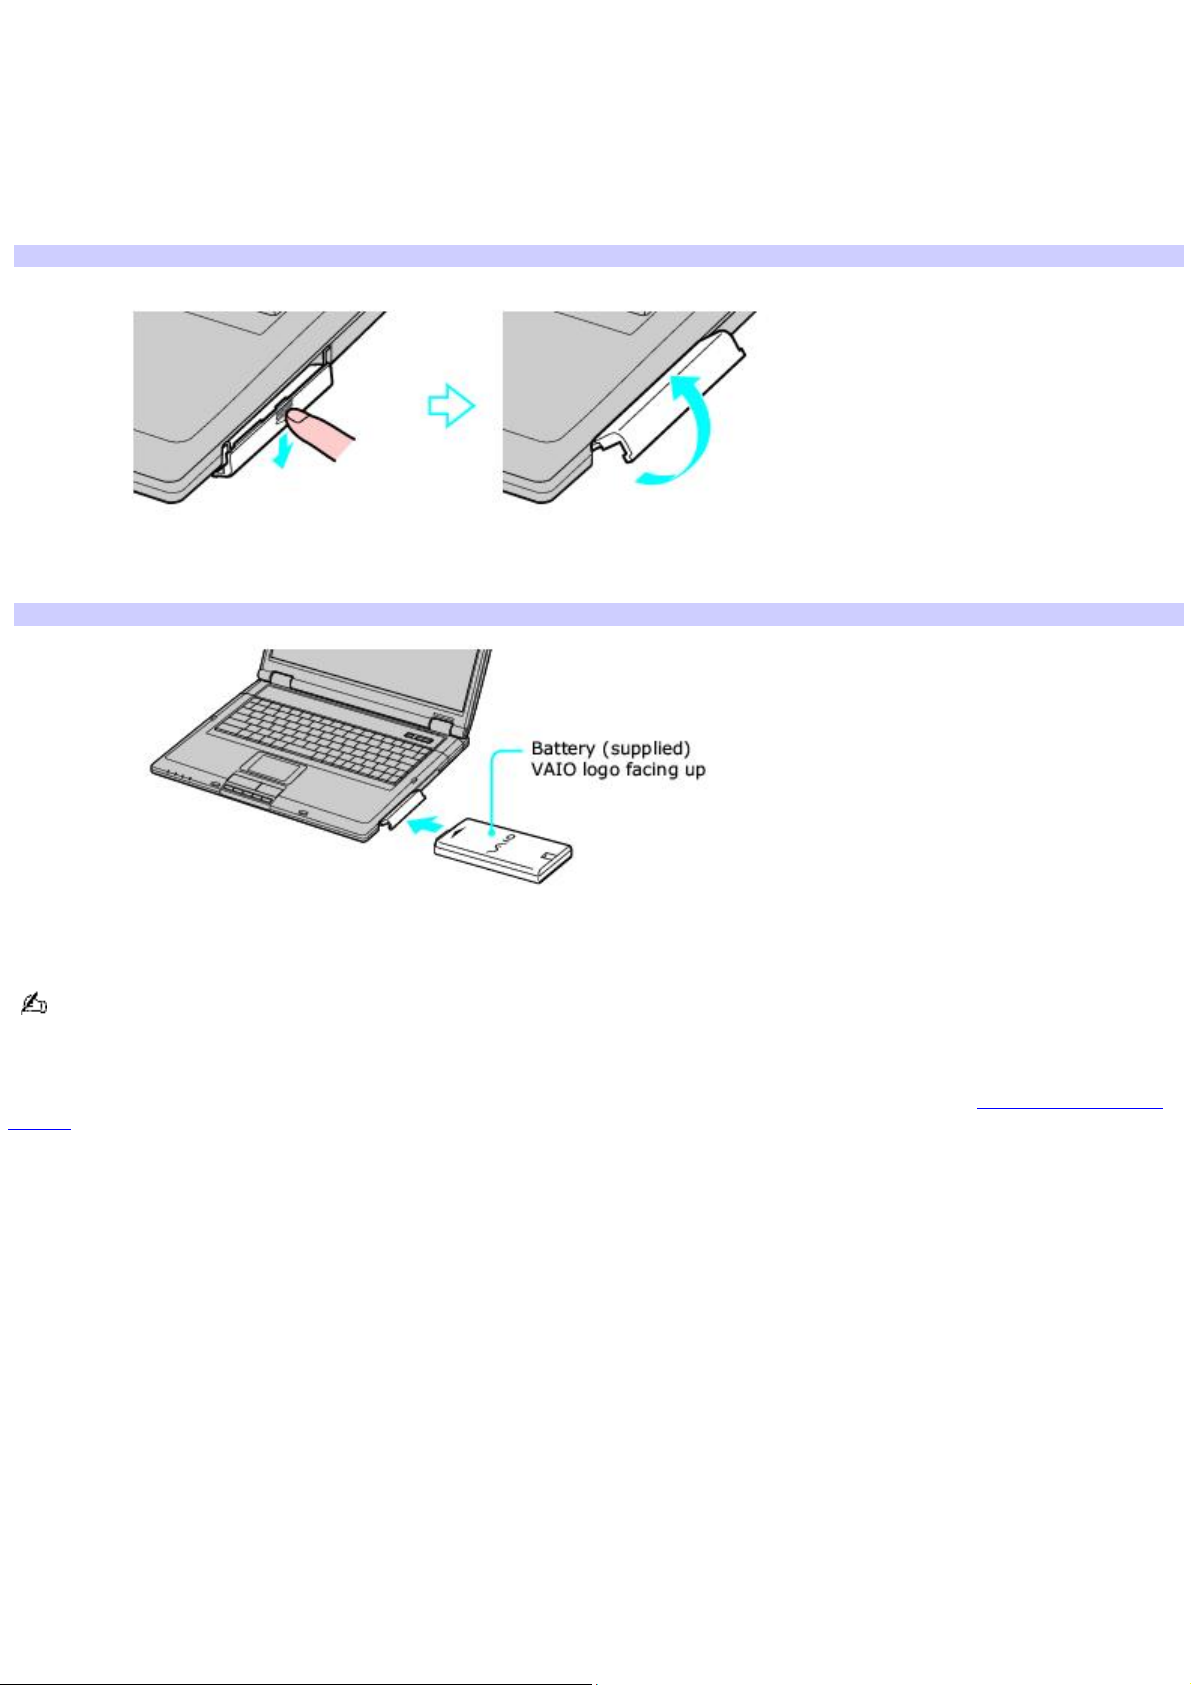
Locating battery information
You can view the remaining battery charge and miscellaneous battery information on the Battery Information toolbar, the
PowerProfile window, and the Power Meter window.
The Battery icons that appear on the Battery Information toolbar and PowerPanel window indicate the current status of
the installed battery.
Battery icon Charge status
Charging
Fully charged
Discharging
No battery
To view the Battery Information toolbar
1.
Right-click the center of the Windows® taskbar.
2.
Select Toolbars from the shortcut menu, and click Battery Information. The Battery Information toolbar
appears on the taskbar.
The total charge remaining in the battery is listed in percent and real-time values.
Battery Information Toolbar*
* T he Battery I nformation T oolbar may appear s lightly different on your c omputer, depending on the number of batteries your c omputer s upports .
Percentage indicator — Displays the percentage of the remaining charge.
Time indicator — Displays estimated time (hours : minutes) remaining before the battery fully discharges, also
known as the time-to-empty.
To close the Battery Information toolbar
1.
Right-click the Battery Information toolbar.
2.
Select Toolbars from the shortcut menu, and click to cancel Battery Information. The Battery Information
toolbar disappears from the taskbar.
To view the PowerPanel window
Double-click the CPU icon or Profile icon , depending on the model you purchased. The PowerPanel window
appears.
PowerPanel*
Page 15
Page 16
* T he P owerP anel window may appear s lightly different on your c omputer, depending on the number of batteries your c omputer s upports .
Power Profile— Displays the power management settings for various devices on your system. You can change the
settings to conserve power.
Battery tab — Displays the total charge remaining in the battery. You can click Advanced for specific information on
the battery.
Alarms tab — Displays the alarm settings, which notify you when the battery is fully charged or too low. You can
change your computer's alarm settings on this window.
Click Help in the lower right corner of the window for more information.
To view the Power Meter window
1.
Double-click the Power icon. The Power Meter window appears. You can also rollover the Power icon to view the
remaining battery charge.
Power icon Power status
Computer is using AC power.
Computer is using AC power and charging the battery.
Battery is charging.
Battery is fully charged.
Battery is discharging.
No battery is inserted in the computer.
If the Power icon is not displayed on the Taskbar Notification area, see To display the Power icon on the taskbar.
Power Meter
Page 16
Page 17

To display the Power icon on the taskbar
1.
Click Start on the Windows® taskbar, point to Settings, and click Control Panel.
2.
Click Power Options. The Power Options Properties window appears.
3.
Select the Advanced tab, and then select Always show icon on the taskbar in the Options box. The power icon
appears on the taskbar. See the power icon descriptions above for more information.
Page 17
Page 18
Inserting a battery
To insert a battery
1.
Lift the lid of the computer.
2.
Push the battery bay cover down to open it. The battery bay cover swings out but does not detach from the
computer.
Opening the Battery Bay
3.
Slide the battery into the battery bay. If the computer is on, it automatically detects the battery.
Inserting a Battery
4.
Push the battery bay cover up until it clicks into place.
If a port replicator is attached to your computer, do not insert or remove the battery. Lifting and turning the computer
with a port replicator attached could cause a temporary loss of power.
Some programs and peripheral devices prevent the system from automatically entering Hibernate. If you are using battery
power, save your data frequently to avoid data loss and manually activate a power saving mode. See Using power saving
modes for more information.
Page 18
Page 19
Removing a battery
If you are not using the computer for an extended period of time, remove the battery from the computer to avoid damaging
the battery. Remove the battery when the computer is off.
To remove a battery
1.
Make sure the computer is off.
2.
Push the battery bay cover down to open it.
3.
Pull the battery out of the battery bay.
Remov ing a Battery
4.
Push in and lift up the battery bay cover until it clicks into place.
Page 19
Page 20
Charging a battery
You will need to charge the battery if battery power drops below 10 percent or you have not used the battery for a long
time. The lithium-ion battery supplied with your computer may be recharged at any time, whether you wait until the battery
is completely or partially discharged. Charging a partially discharged battery does not affect battery life. If you charge the
battery and find that battery power is still low, the battery may be reaching the end of its life, and you may need to replace
it.
The battery supplied with your computer is not charged at the time of purchase.
To charge a battery
You can charge the battery when the computer is on or off. However, the battery will charge faster when the computer is
off. Charging the battery takes several hours. See your VAIO® Computer Specifications for the approximate time needed to
charge your battery.
Charge the battery at temperatures between 50°F and 80°F (10°C to 30°C). Lower temperatures require more time
to charge.
1.
Insert the battery into the battery bay. If you want to charge more than one battery, insert the second battery
into the computer. See To insert a second battery for more information.
2.
Connect the AC adapter to the computer. The computer automatically charges the battery as long as the
computer is using AC power.
The battery indicator blinks while the battery charges. The battery indicator stops blinking when the battery is fully
charged.
When using two batteries, the battery you insert first charges first. The second battery you insert begins charging
when the first battery is 85 percent charged.
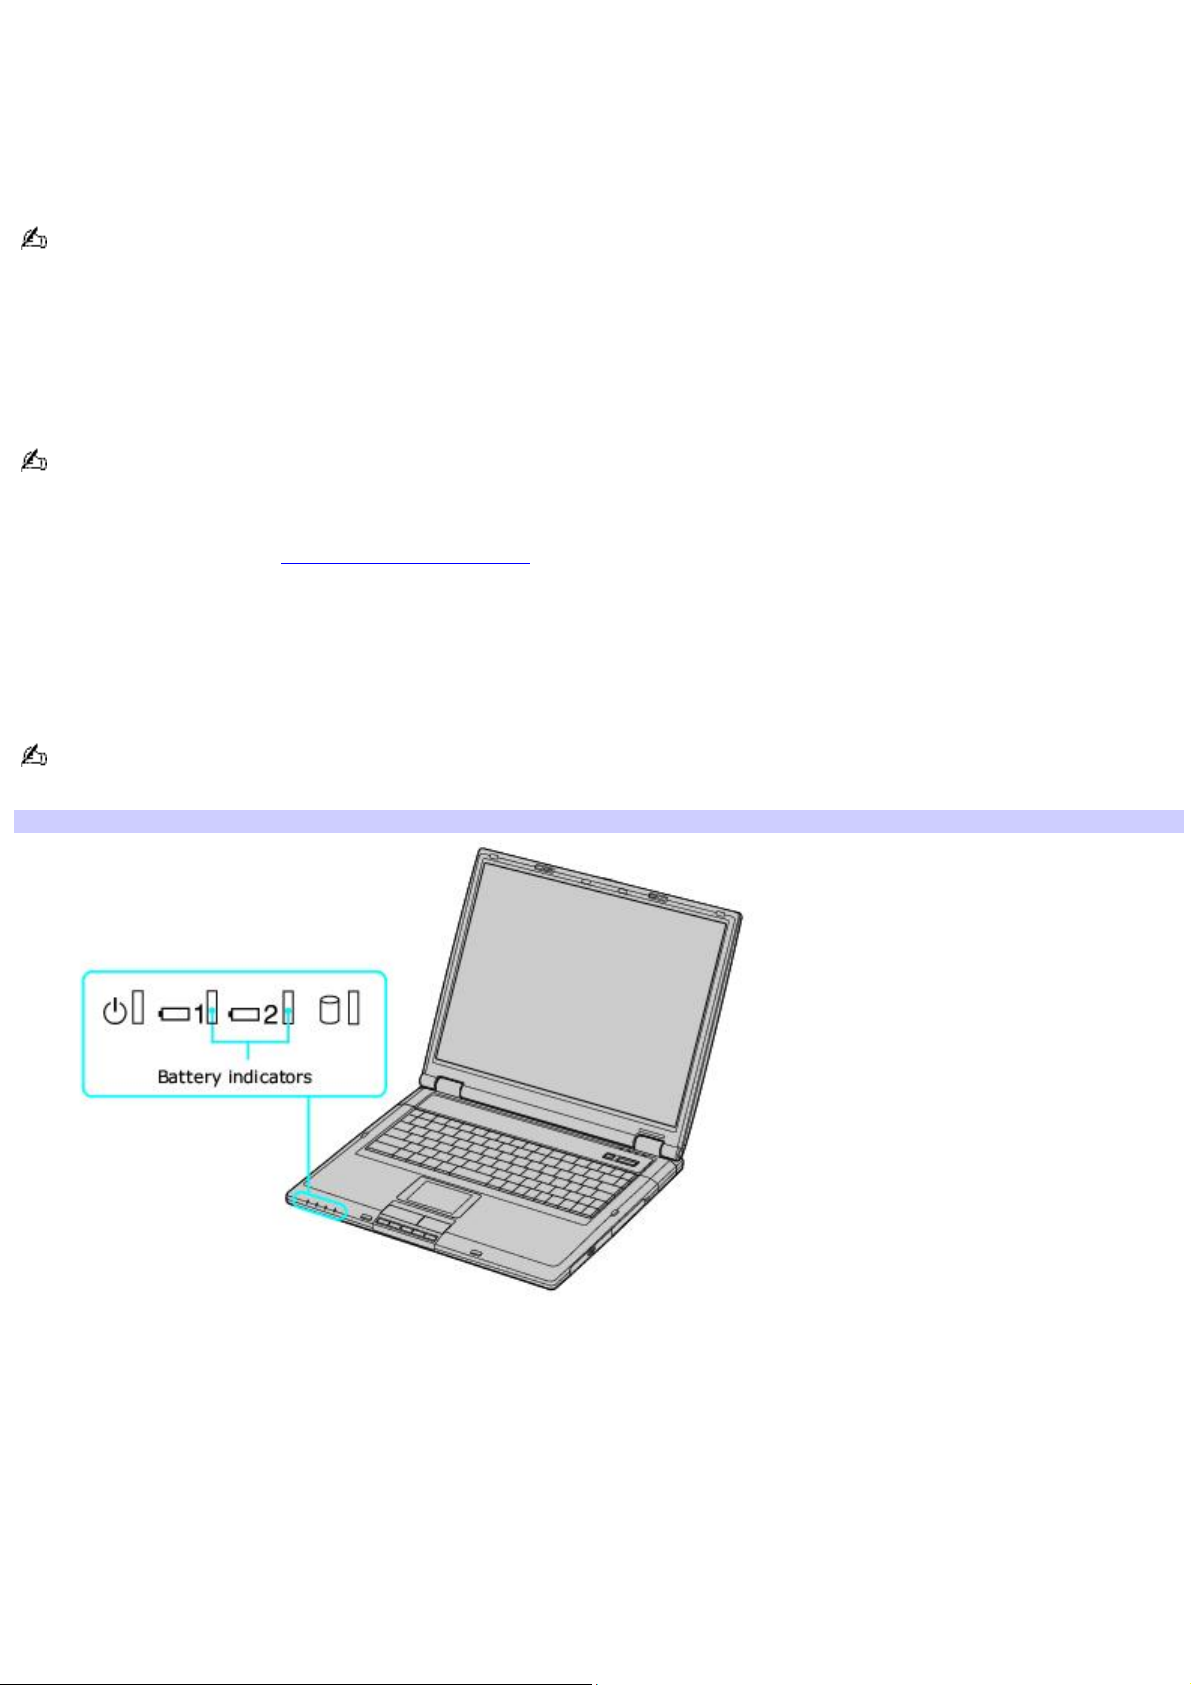
Battery Indicators
Battery indicator status Description
On The computer is using battery power.
Single blink The battery is running out of power.
Double blink The battery is charging.
Off The computer is using AC power.
Page 20
Page 21

Notes on batteries
Never leave the battery in temperatures above 140°F (60°C), such as under direct sunlight or in a car parked in the
sun.
While the battery is in use or being discharged, the battery heats up. This is normal and is not cause for concern.
Keep the battery away from heat sources.
Keep the battery dry.
Do not open or disassemble the battery.
Do not expose the battery to any mechanical shock.
Battery life is shorter in a cold environment because of decreased battery efficiency at low temperatures.
Page 21
Page 22

Using Audio-Video Features
Using Special Buttons
Depending on the model you purchased, your VAIO® computer is equipped with a variety of audio- and video-oriented
function buttons: Volume Up and Down, and Magnify screen.
Page 22
Page 23

Using Audio-Video Features
Using Special Buttons
Depending on the model you purchased, your VAIO® computer is equipped with a variety of audio- and video-oriented
function buttons: Volume Up and Down, and Magnify screen.
Page 23
Page 24
About the special buttons
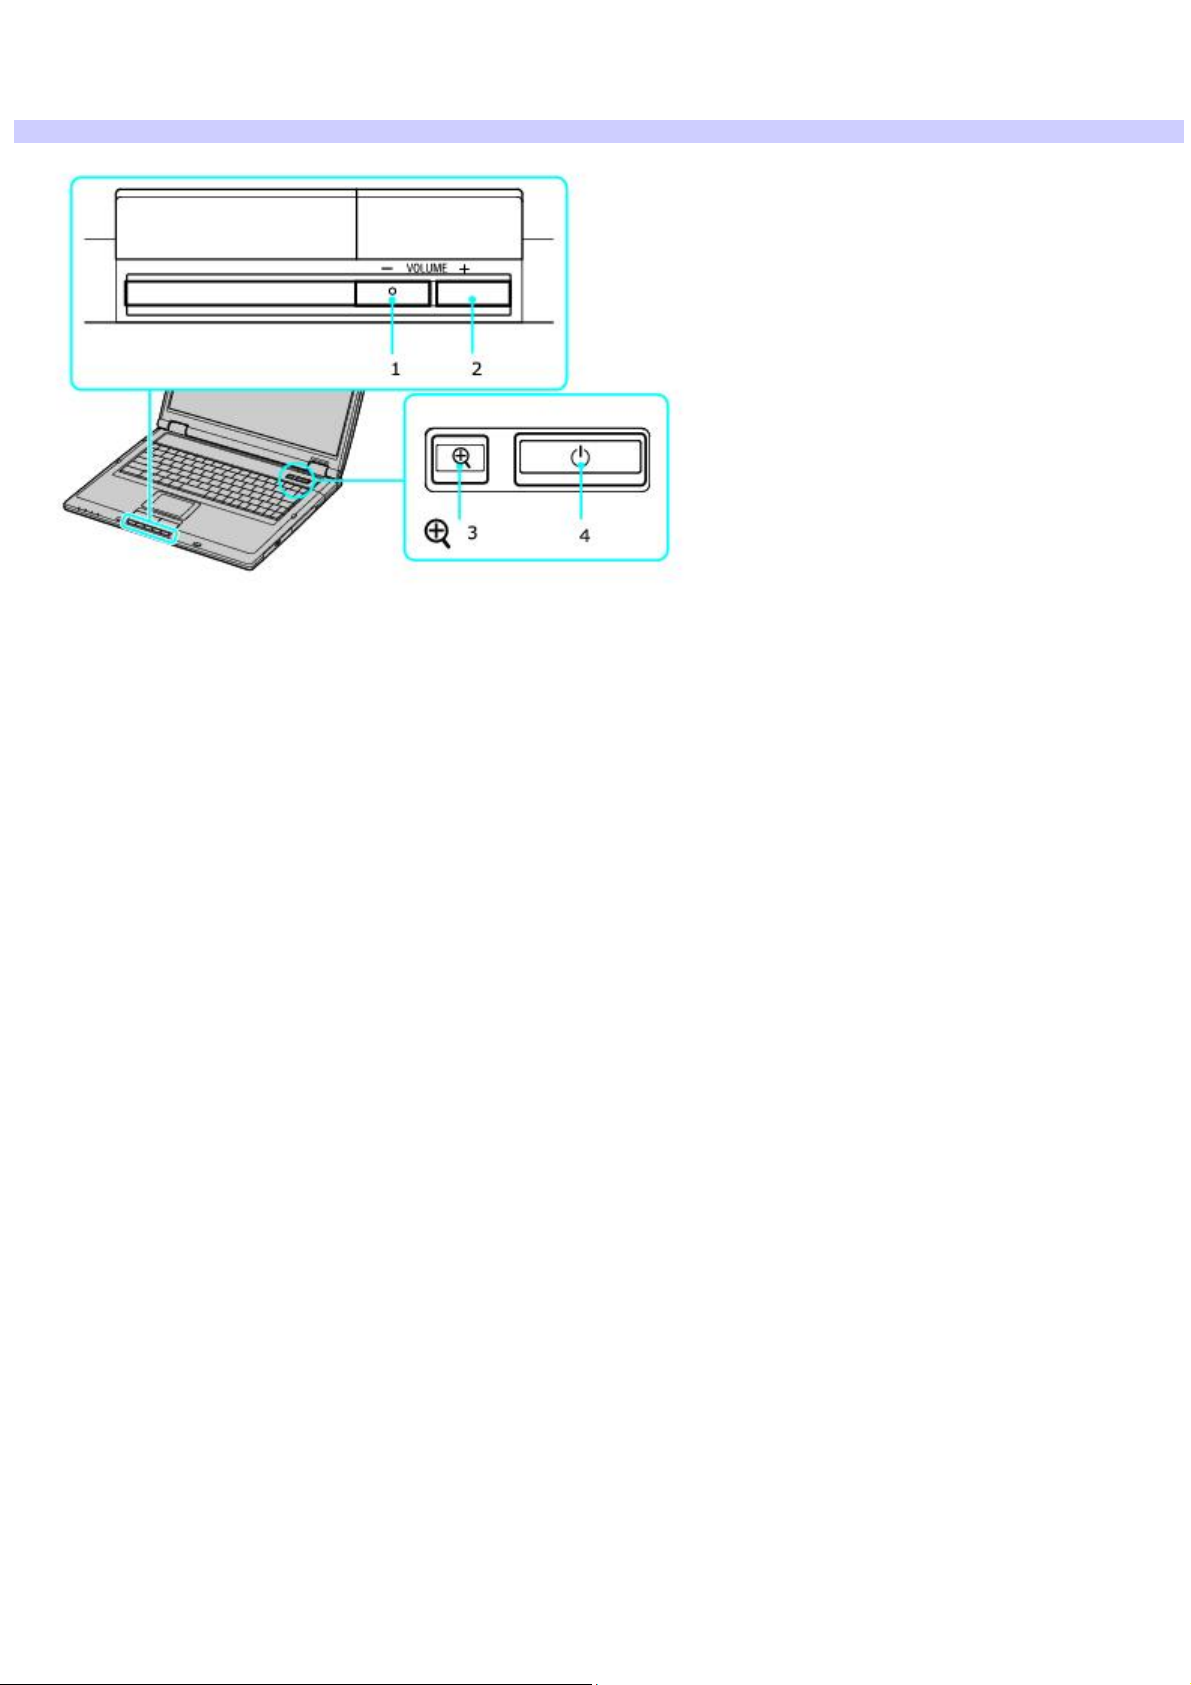
The following information shows where the special buttons are located, and briefly describes their functionality.
Special Buttons
Number Type of Button
1 Volume Down. The Volume Up and Down buttons control the audio output on your computer.
2 Volume Up. The Volume Up and Down buttons control the audio output on your computer.
3 Magnify. The Magnify button, located next to the computer's power button, works as a screen resolution toggle
button. By pressing it, you can alternate between different screen resolutions.
4 Power. The Power button turns your computer on or off.
Page 24
Page 25

Using i.LINK Digital Video Recorders
You can connect a digital video (DV) recorder, such as an i.LINK®1 digital video camera recorder, to the i.LINK® S400 (IEEE
1394) port on your computer. The i.LINK digital-video camera recorder is an external device that enables you to record and
view digital images.
1
i.LINK is a trademark of Sony us ed to des ignate that a produc t c ontains an I E E E 1 3 9 4 c onnector. T he i.LINK connection may vary, depending on the
software application, operating system, and c ompatible i.LI N K devices. A ll products with an i.LI N K c onnec tion may not c ommunic ate with eac h other. Refer
to the documentation that came with your compatible i.LIN K devic e for more information on operating c onditions and proper c onnec tion. Before c onnecting
compatible i.LI N K P C peripherals to your s ystem, s uch as a C D-RW or hard dis k drive, c onfirm their operating s ys tem c ompatibility and required operating
conditions.
Page 25
Page 26
Connecting an i.LINK digital video recorder
You can connect an i.LINK digital video (DV) recorder when the computer is on or off. Connecting the DV recorder when the
computer is in a power saving mode (Standby or Hibernate) may cause the computer to malfunction.
Before you connect an i.LINK digital video recorder
Do not connect more than one digital video camera recorder at a time. The preinstalled programs on your computer
will not recognize multiple cameras.
Do not connect an external device that requires power from the i.LINK port. The i.LINK port does not supply power
to the external device.
The i.LINK port supports transfer rates of up to 400 Mbps; however, the actual transfer rate is the lowest transfer
rate of the external device.
The i.LINK features available may vary depending on the programs you use. See the help guide that accompanied
your program for more information.
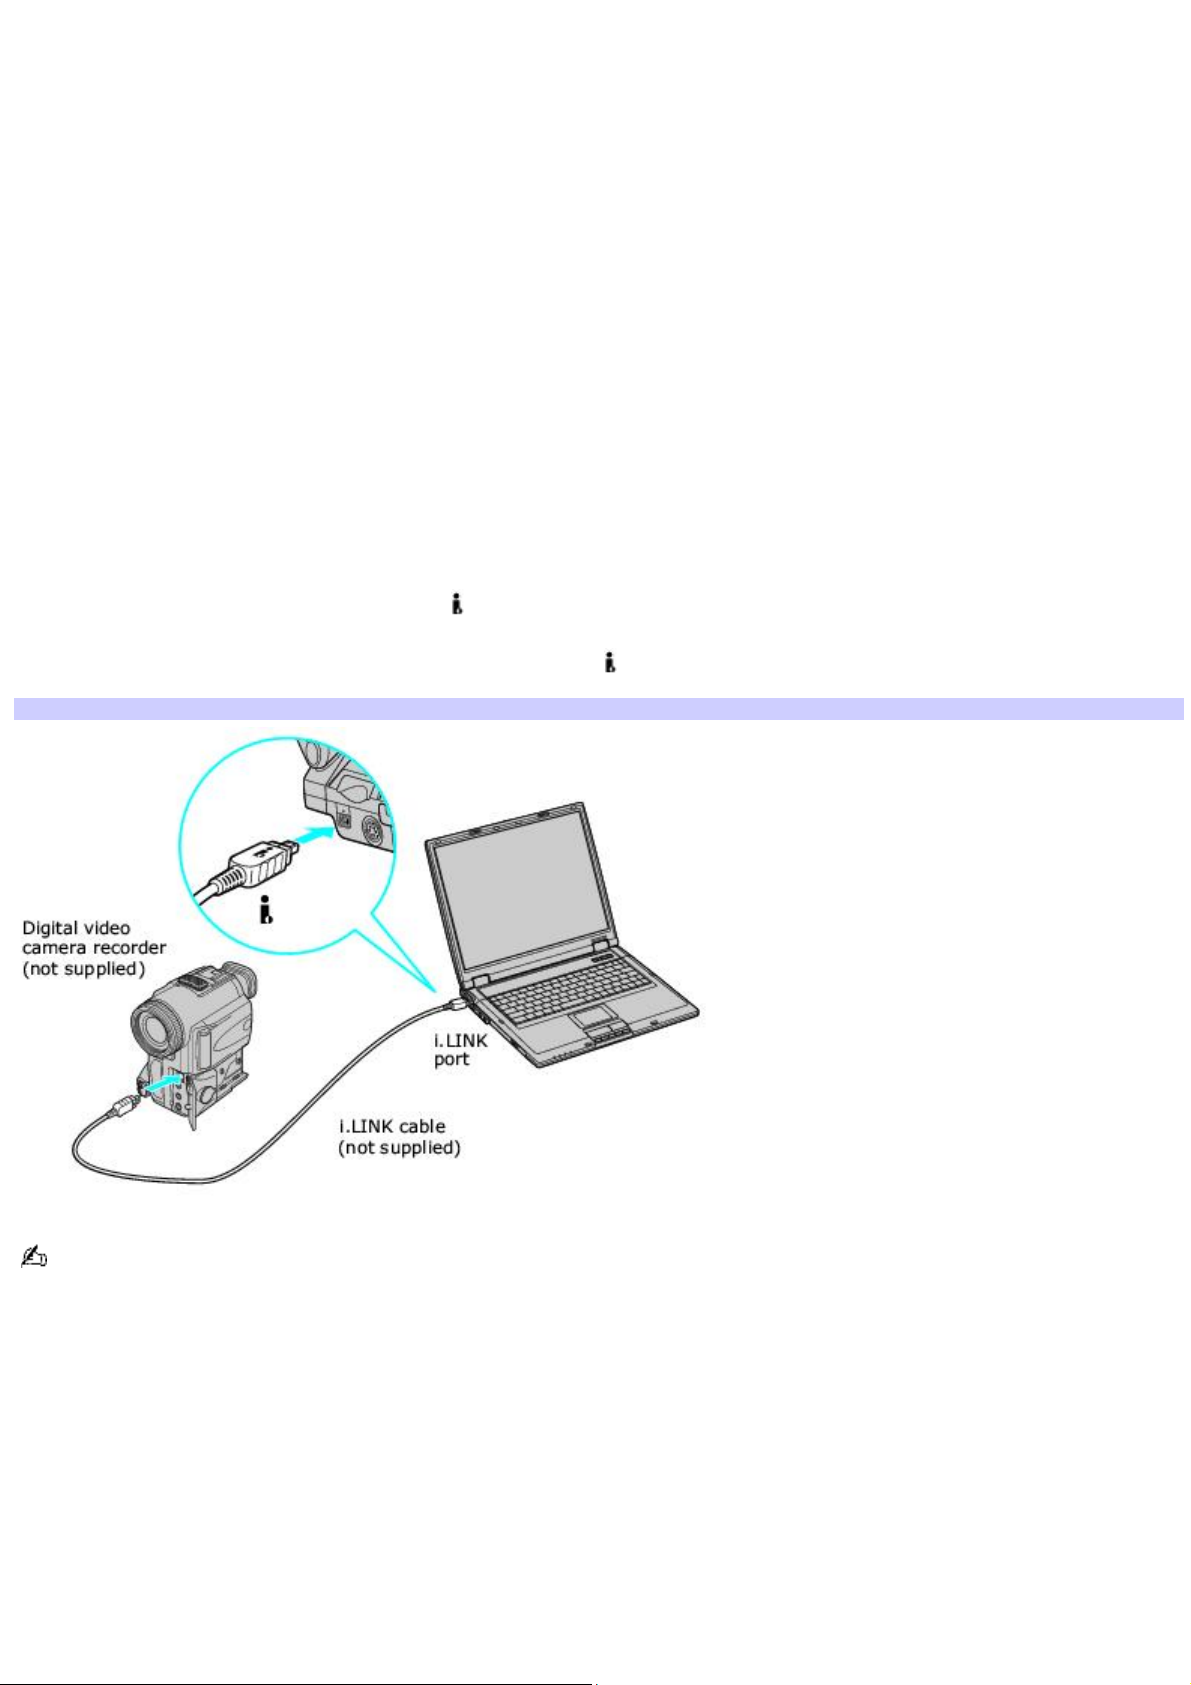
To connect an i.LINK digital video recorder
1.
Turn on the digital video (DV) device and the computer.
2.
Plug the i.LINK® cable into the i.LINK port on the DV device.
3.
Plug the other end of the i.LINK cable into the i.LINK port on your computer.
Connecting an i.LINK Digital Video Camera Recorder
See the guide that accompanied your digital video camera recorder for more information on its installation and use.
Page 26
Page 27

Disconnecting the i.LINK digital video recorder
You can disconnect the digital video recorder while the computer is on or off. Simply unplug the i.LINK cable from the i.LINK
port on the computer. Disconnecting the cable when the computer is in a power saving mode (Standby or Hibernate) may
cause the computer to malfunction.
Page 27
Page 28

Using a digital video camera recorder
Your computer comes with preinstalled driver software that is compatible with most Sony digital video camera recorders. If
you purchased a camera that comes with its own driver software, install these drivers before you use the camera.
To view images
To view images captured by your digital video camera recorder, do the following:
Click Start, and click Programs. Select a program in which to view your images.
Page 28
Page 29

Using Computer Monitors, Projectors, and TVs
You can connect an external display (such as a computer monitor or a projector) to your computer.
Page 29
Page 30

Connecting a computer monitor
Your computer can display images to the computer screen (LCD), to an external computer monitor, or to both the LCD and
external monitor while your computer is on.
To connect a computer monitor
1.
Make sure the computer monitor is plugged into an AC outlet.
2.
Plug the display cable into the Monitor (VGA) port on the computer.
3.
If it is not already on, turn on the computer monitor.
4.
Press the Fn+F7 keys to toggle the display between your computer, the monitor, or both the computer and
monitor.
You cannot use the Monitor (VGA) port on your computer when a port replicator is connected to the computer. Use the
Monitor (VGA) port on the port replicator instead.
Page 30
Page 31

Connecting a multimedia device
Connecting a Computer Monitor
You can connect a multimedia device, such as a multimedia computer monitor or projector, to your computer. Connecting a
multimedia device enables you to display images on your computer screen (LCD), the multimedia device, or both.
For information on connecting a TV to your computer, see Playing DVDs.
To connect a multimedia computer monitor or projector
1.
Plug the device into an AC outlet.
2.
Plug the device cable into the Monitor (VGA) port on your computer. If you are using a multimedia computer
monitor, which has built-in speakers and a microphone, plug the audio cable into the Headphone jack on your
computer to hear sound.
To locate the Monitor port and Headphone jack, see "Locating Controls and Ports" in the "Setting Up" chapter of
your printed VAIO® Computer Quick Start.
3.
Turn on the device (if it is not already on), and then turn on your computer.
Connecting a Projector
Page 31
Page 32

4.
Press the Fn+F7 key combination to toggle the display between your computer, the monitor, or both. See
Selecting a display for more information.
See the guide that accompanied your projector for more information on its installation and use.
Page 32
Page 33

Connecting your computer to a TV
Your computer is equipped with an A/V OUT jack, which enables you to connect your computer to a TV. To locate the A/V
OUT jack on your computer, see the Connecting a TV illustration below or "Locating Controls and Ports" in the "Setting Up"
chapter of your printed VAIO® Computer Quick Start.
To connect a TV to your computer
1.
Locate the A/V OUT jack on the computer.
2.
Plug one end of an audio-video (AV) cable (not supplied) into the A/V OUT jack.
3.
Plug the other end of the AV cable into the audio and video ports on the TV.
Connecting a TV
4.
Switch the TV input channel to external input.
See the guide that accompanied your TV for information on how to switch to external input.
Page 33
Page 34

Selecting a display
You can connect external displays to your computer while it is on. When you connect an external display (projector,
computer monitor, or TV) to your computer, you can switch the display between the computer screen (LCD), the external
display, or both, using shortcut keys.
Shortcut keys Result
Fn+F7 Toggles the display between the computer screen (LCD), a connected TV, and both the LCD and TV.
Select one display (LCD or TV) when playing a DVD. Connect the TV cable before you turn on the computer; otherwise,
Fn+F7 will not work. You cannot use the Fn+F7 function to switch between LCD and TV once a DVD is inserted into the
optical drive.
You may not be able to display the computer screen (LCD) and an external display or projector at the same time,
depending on the types of computer displays and projectors you are using.
Page 34
Page 35

Disconnecting a computer monitor or projector
You can disconnect the external computer monitor or projector by unplugging the monitor (VGA) cable from your computer's
port. Disconnecting the external display when the computer is in a power saving mode (Standby or Hibernate) may cause
the computer to malfunction.
Page 35
Page 36

Using Speakers
Your computer comes with built-in stereo speakers. If you wish to enhance the sound quality of your computer, you can
purchase and connect external speakers. If you want to purchase speakers, make sure the speakers are designed for
computer use. You can shop Sony online at http://www.sonystyle.com/vaio or contact your local retailer.
Page 36
Page 37

Connecting speakers
You can connect speakers to your computer to enhance the sound quality of your computer.
Do not place floppy disks on the speakers. The speakers' magnetic field may damage the data stored on the
floppy disks.
To connect speakers to your computer
1.
Turn down the volume of the speakers.
2.
Plug the speaker cable into the Headphone jack on the computer.
3.
Plug the other end of the speaker cable into the speaker.
Connecting Speakers
See the guide that accompanied your speakers for more information on its installation and use.
Page 37
Page 38

Disconnecting speakers
You can disconnect external speakers when the computer is on or off. Simply unplug the speaker cable from the Headphone
jack on the computer.
Page 38
Page 39

Adjusting the volume
To adjust the volume for playing CDs and DVDs, use the Volume icon on the Windows® taskbar or the Volume Up and
Down buttons. Adjusting the volume for playing CDs or DVDs does not adjust the volume for recording sound files.
You can only adjust the recording volume in the Recording Control window. See Using a microphone to record sound
for instructions on how to open this window.
To adjust the volume of your speakers
1.
Right-click the Volume icon on the Windows® taskbar, and select Open Volume Controls. The Volume
Control window appears.
2.
Click and drag the Volume Control slider up to increase volume and down to decrease volume.
3.
Click to cancel any Mute check boxes that are selected.
Sound device Function
Volume Control Adjust the sound level from the speakers or headphones.
Wave Adjust the wavfile sound or the system sound of Windows, and the volume of the CD in the optical drive.
SW Synth Adjusts the internal or external synthesizer volume.
Microphone Adjust the internal or external microphone volume.
Telephony Adjust the modem or telephone volume.
PC Beep Adjust the beep sound when inserting or removing the PC Card and other devices.
Line1 Adjusts the sensitivity of input volume.
1
O n s elected models only.
As a shortcut, you can press the Fn+F4 keys and the Up Arrow or Right Arrow keys to change the volume
setting. You can also press the Fn+F3 keys to toggle the mute option on and off.
Page 39
Page 40

Enabling the audio feature
If you do not hear sound when playing a CD or DVD, you may need to enable the audio feature.
To enable the audio feature
1.
Click Start on the Windows® taskbar, point to Settings, and click Control Panel.
2.
Click System. The System Properties window appears.
3.
Select the Hardware tab, and click Device Manager. The Device Manager window, which lists the hardware
devices, appears.
4.
Double-click the name of the optical drive, such as DVD/CD-ROM drives.
5.
Double-click the listed drive name, and click the Properties tab.
6.
Click the Enable digital CD audio for this CD-ROM device check box if it is not already selected.
Page 40
Page 41

Using Microphones
You can connect an external microphone to your computer to enhance the sound input to your computer. Make sure your
microphone is designed for computer use. If you wish to purchase a microphone, shop Sony online at
http://www.sonystyle.com/vaio or contact your local retailer.
Page 41
Page 42

Connecting a microphone
Plug the microphone cable into the Microphone jack1 on the computer.
Connecting a Microphone
1
A protruding dot located next to the Microphone jac k dis tinguis hes this jac k from the H eadphone jac k.
Page 42
Page 43

Disconnecting a microphone
You can disconnect an external microphone when the computer is on or off. Simply unplug the microphone cable from the
Microphone jack on the computer.
Page 43
Page 44

Using a microphone to record sound
You can record messages, memos, etc. by connecting a microphone to the Microphone jack on your computer.
To record from a microphone
1.
Double-click the Volume icon on the Windows® taskbar. The Volume Control window appears.
2.
From the Options menu, click Properties. The Properties dialog box appears.
3.
Click to select the Recording option in the Adjust volume for box, and click OK. The Recording Control window
appears.
4.
Click the Select check box at the bottom of the Microphone column, if it is not already selected. Close the
Recording Control window.
5.
Click Start, and select Programs, Accessories, Entertainment, and then Sound Recorder. The Sound - Sound
Recorder window appears.
For help using Sound Recorder, click Help in the Sound Recorder window.
To adjust the volume for recording sound
You can only adjust the volume for recording in the Recording Control window.
1.
Right-click the Volume icon on the taskbar, and select Adjust Audio Properties.
2.
On the Audio tab, click Volume in the Sound recording box. The Recording Control window appears.
3.
Click and drag the Microphone slider up to increase volume and down to decrease volume.
Page 44
Page 45

VAIO AV Applications
Your VAIO® computer is preconfigured with a collection of audio and video (AV) applications that make it easy to use
advanced multimedia technology. This section describes the VAIO® AV applications.
Your computer may not be supplied with all of the software applications listed, depending on the system
configuration you purchased.
Your computer's visual presentation of the VAIO AV applications may not appear exactly as shown in this section,
depending on the specific computer model you purchased.
Page 45
Page 46

Overview of Preinstalled Software
Some or all of the following software may be preinstalled on your VAIO® PC.
Drag'n Drop CD
DigiOn, Inc., and Easy Systems Japan Ltd.
Drag'n Drop CD software is designed to make CD creation simple. You can create your own audio or data CDs that can be
read in most audio CD players or personal computers. With Drag'n Drop CD software, you can also back up CDs.
Drag'n Drop CD+DVD
DigiOn, Inc., and Easy Systems Japan Ltd.
Drag'n Drop CD+DVD software is designed to make CD and DVD creation simple. You can create you own audio or data CDs
and data DVDs. These discs can be read in most audio CD players or personal computers. With Drag'n Drop CD+DVD
software, you can also back up CDs.
DVgate
Sony Electronics Inc.
Connect a compatible digital video camera to your computer's i.LINK® port and capture video clips and still images. You can
edit clips from your video, add new clips, and combine clips into new movie segments. You can also save your images in a
variety of popular file formats.
MovieShaker
Sony Electronics Inc.
MovieShaker software creates personal movies that have transitions, background music, special effects, and text. Just
import your video clips, and "shake" with a click of the mouse. Your personal movies are easy to create and fun to share
with family and friends.
Network Smart Capture
Sony Electronics Inc.
Network Smart Capture captures images and video from any Sony Digital Camcorder that supports a standard i.LINK
connection. Send your video or still images through e-mail or upload them to the ImageStation(SM) service. You can use the
Web camera function to automatically upload your captured images.
PictureGear Studio
Sony Electronics Inc.
PictureGear Studio still image management software displays still images from your hard drive or a Sony digital still camera.
The still images appear in a convenient light-table format so that you can easily view the contents of an entire folder, create
your own photo albums and make prints.
SonicStage
Sony Electronics Inc.
The SonicStage jukebox application gives you all the tools you need to manage music on your computer. SonicStage
software sports high-quality digital audio storage, a music visualizer, a sleek player skin design, and a parametric equalizer
for fine-tuning audio playback.
Page 46
Page 47

Creating DVDs
The information provided here applies to VAIO® computers that are equipped with a DVD-RW or a DVD±RW drive. This
drive, along with the preinstalled DVD and CD burning software make it easy to create DVDs and CDs. For a listing of DVD
and CD burning software preinstalled on your computer, see your online specifications sheet.
The DVD-RW or DVD±RW drive and DVD creation software included with your VAIO® computer make it easy to create DVDs
and CDs.
With these tools, you can create:
Music CDs that can be played on computers with CD or DVD drives and on many home CD and DVD players.
Data DVDs containing computer files that you can use on many computers with DVD drives.
Data CDs containing computer files that you can use on computers with CD or DVD drives.
For more information about disc formats, recording media types, and compatibility with different playback equipment, see
About DVD and CD Media, Formats, and Compatibility.
Your VAIO computer includes software programs for creating all of these types of discs. Different VAIO computer models
include different combinations of disc-creation software.
Your VAIO computer model includes only selected software programs from the following list.
Data CD and DVD and Music CD Creation Software
Drag'n Drop CD+DVD (on VAIO notebook DVD-RW and DVD±RW models)
Drag'n Drop CD+DVD brings a unique drag-and-drop approach to the creation of data CDs and DVDs and music CDs.
Three icons, Music, DISC Backup, and Data are available on the desktop. Just drag data files, music files, or a CD or
DVD that you want to back up to the appropriate icon, insert a blank disc, and click the record button.
Page 47
Page 48

About DVD and CD Media, Formats, and Compatibility
Use the information in this section as a guide to which type of blank recording media and which kind of playback equipment
you can use with different disc formats.
Selecting DVD and CD media
Using Compatible Playback Equipment
Appending Data to a Data DVD
Page 48
Page 49

Selecting DVD and CD media
Use the correct recording media for successful recording projects. DVDs and CDs look similar, but different formats have
different capabilities. To increase compatibility with other playback equipment, use high-quality writable media.
The table below indicates the appropriate media types for each kind of disc-recording project supported by your DVD-RW
and DVD±RW drive.
Media and Drive Data DVD Music and Data CD
DVD-R for General DVD-RW DVD+R DVD+RW CD-R CD-RW
DVD-RW Drive Yes Yes No No Yes Yes
DVD±RW Drive Yes Yes Yes Yes Yes Yes
Your DVD-RW and DVD±RW drives can use these types of writable media:
DVD-R for General
DVD Recordable media for General use is DVD media that you can write to, but which cannot be erased. With your
DVD-RW and DVD±RW drives, you can write information to a DVD-R disc until the disc is full, but not erase or
overwrite any existing data. DVD-R for General media is correct for data DVD projects. (Do not confuse DVD-R for
General discs with DVD-R for Authoring discs, which are a special media made for commercial DVD production and
equipment.)
DVD-RW
DVD Rewritable media is DVD media that you can write to, erase, and write to again. With your DVD-RW and
DVD±RW drives and DVD-RW media, you can record information to the same disc again and again, although you
must erase existing information from the disc before each recording session. DVD-RW media is correct for data DVD
projects.
DVD+R
DVD+R Recordable media is DVD media that you can write to, but which cannot be erased. With your DVD±RW drive,
you can write information to a DVD+R disc until the disc is full, but not erase or overwrite any existing data. (Certain
software applications and disc formatting, may permit the addition of information to a DVD+R disc that already has
data on it.) DVD+R media is correct for data DVD projects.
DVD+RW
DVD+RW Rewritable media is DVD media that you can write to, erase, and write to again. With DVD±RW media, you
can record information to the same disc again and again. (Certain software applications and disc formatting, may
permit the addition of information to a DVD+RW disc that already has data on it.) DVD+RW media is correct for data
DVD projects.
CD-R
CD Recordable media is CD media that you can write to, but which cannot be erased. (Certain software applications
and disc formatting, may permit the addition of information to a CD-R disc that already has data on it.) CD-R media is
correct for music and data CD projects.
CD-RW
CD Rewritable media is CD media that you can write to, erase, and write to again. (Certain software applications
and disc formatting, may permit the addition of information to a CD-RW disc that already has data on it.) CD-RW
media is correct for music and data CD projects.
There are a variety of CD and DVD media types that you cannot write to with your DVD-RW or DVD±RW drive (although,
depending upon how a particular disc was recorded, your DVD-RW or DVD±RW drive may be able to read some of these
media types). Media types your DVD-RW or DVD±RW drive cannot write to include:
CD-ROM
DVD-R for Authoring
DVD-RAM
Page 49
Page 50

DVD-ROM
Even with the proper type of media, the quality of manufacture and compatibility with different equipment varies from
manufacturer to manufacturer and even from disc to disc from the same manufacturer. If you are confident you are using
the proper type of disc for your project and you are having trouble recording information or playing a disc, try a different
disc or a different brand of disc.
Page 50
Page 51

Using Compatible Playback Equipment
The table below gives a general idea of the compatibility of disc formats with different playback equipment. Compatibility
between a specific disc and a specific kind of playback equipment cannot be guaranteed. Some older computer CD drives
cannot read data CD-R and CD-RW discs.
Use this table as a general guide to formats and equipment that works together, but refer to the specifications of your
equipment for detailed information. To be completely sure about a combination of media, disc format, and equipment, you
must test that specific combination.
PLAYBACK EQUIPMENT MEDIA AND FORMAT
Music CD Data DVD Data CD
Computer DVD drive yes varies1 yes
Computer CD drive yes no yes
DVD player varies no no
Audio CD player varies1 no no
1
Some audio C D players (partic ularly older models) c annot read C D-R or C D-RW media. Refer to the specifications of your equipment for c ompatibility
information.
Page 51
Page 52

Appending Data to a Data DVD
When creating a data DVD you can choose whether to keep the writing session open to make a disc appendable.
Appendable Writing
With this option more data may be added to a disc as long as there is space available. The recording session stays
open until the disc is full. Although the space on the disc may be used efficiently, a disc written incrementally may
not be compatible with all DVD drives.
Non-appendable Writing
With this option all the data is written at one time and the session is closed, even if there is more space available
on the disc. No further data may be stored on the disc. Non-appendable discs are more compatible with different
DVD drives.
The table below describes the writing method for different media types for appendable and non-appendable writing.
Writing Method
Media Type Appendable Non-appendable
DVD-R
DVD-RW Not currently supported Disc at once
DVD+R Multi-session Disc at once
DVD+RW Single-session Disc at once
The format will be UDF with Joliet in every case. UDF (Universal Disk Format) is a File System. Joliet is an extension of the
ISO 9660 standard to allow CDs to be written using long filenames and Unicode on Windows.
N ot c urrently s upported
Disc at once
Page 52
Page 53

Creating Data DVDs with Drag'n Drop CD+DVD
Drag'n Drop CD+DVD brings a unique drag-and-drop approach to the creation of data CDs and DVDs and music CDs. Three
icons, Music, DISC Backup, and Data are the interface for Drag'n Drop software. Just drag data files, music files, or a CD or
DVD that you want to back up to the appropriate icon, insert a blank disc, and click the record button.
Drag'n Drop CD+DVD desktop icons
The Using Drag'n Drop CD+DVD Software section describes the steps for starting the Drag'n Drop CD+DVD software,
viewing the program's online Help.
This guide provides only general information about starting and using Drag'n Drop CD+DVD software. For detailed
information about creating DVDs and CDs with Drag'n Drop CD+DVD software, consult the program's online Help.
Page 53
Page 54

Using Drag'n Drop CD+DVD Software
To start Drag'n Drop CD+DVD
1.
Click Start in the Windows® taskbar, and click All Programs.
2.
Point to Drag'n Drop CD+DVD, and click Drag'n Drop CD+DVD.
Drag'n Drop CD+DVD starts, and the three Drag'n Drop CD+DVD icons (Music, DISC Backup, and Data) appear on
your desktop.
To view the online Help for Drag'n Drop CD+DVD
The online Help for Drag'n Drop CD+DVD provides detailed information about using the program.
1.
Click Start in the Windows® taskbar, and click Programs.
2.
Point to Drag'n Drop CD+DVD, and click Drag'n Drop CD+DVD Help.
Page 54
Page 55

Working with Digital Video
The multimedia software preinstalled on your VAIO® computer makes it easy to import and edit videos from a compatible
digital video (DV) or MICROMV 1 camera equipped with an i.LINK®2 connector. After editing your creations, you can export
them back to your video camera.
With MovieShaker software , you can arrange your video clips, still images, and sound files yourself into a finished
movie, or let the Shake function use the files you've selected to create a polished video for you by automatically combining
your video clips, still images, and sound with video effects and transitions.
DVgate software offers advanced and powerful video import and export features, as well as precise editing. DVgate
software provides complete control over all aspects of capturing, editing, and exporting digital video.
Selected VAIO® computer models also include Adobe® Premiere® LE software , a popular video editing application that
is both powerful and easy to use. For more information about this software, refer to the online Help for Adobe Premiere LE
software.
Whichever software you choose, the basic process of importing, editing, and exporting is the same.
The Video Editing Process
1.
Connect a compatible digital video (DV) or MICROMV camera to your computer using an i.LINK® cable.
2.
Start the video editing software.
3.
Use the video editing software to capture video clips from the DV camera.
4.
Use the video editing software to assemble the clips into a finished movie.
5.
Use the video editing software to export the finished movie back to the video camera.
You can also save finished movies to your hard disk drive for use on the World Wide Web, to send to others by e-mail, or to
distribute on CD-ROM (on computer models that include a CD-recording device).
1
M I C ROM V c ameras are not s upported on C 1 -series notebook models .
2
i.LINK is a trademark of Sony us ed to des ignate that a produc t c ontains an I E E E 1 3 9 4 c onnection. The i.LINK c onnec tion may vary, depending on the
software applications, operating s ys tem, and i.LI N K devic es. A ll produc ts with an i.LI N K c onnec tion may not c ommunic ate with eac h other. P leas e refer to
the documentation that came with your i.LIN K devic e for information on operating c onditions and proper c onnec tion. Before c onnec ting c ompatible i.LI NK P C
peripherals to your s ystem, s uc h as a C D-RW or hard dis k drive, c onfirm their operating s ys tem c ompatibility and required operating conditions.
Page 55
Page 56

Editing Video with MovieShaker Software
MovieShaker software can be used to create fun and innovative movies without any previous knowledge of film editing. In
a few simple steps, video files can be created from video clips and still images with added special effects and music.
This guide provides only a simple overview of using the MovieShaker software. For more detailed information, refer to the
online Help within the MovieShaker software. For details regarding connecting your digital video camera to your computer,
refer to the manual that accompanies your camera and the online User Guide that accompanies your computer
This guide provides only a simple overview of using the MovieShaker software. For more detailed information, refer to
the online Help within the MovieShaker software. For details regarding connecting your digital video camera to your
computer, refer to the manual that accompanies your camera and the online User Guide that accompanies your computer.
To capture digital video with MovieShaker software
The process for capturing digital video from a MICROMV camera differs from the process for DV described here.
For information about capturing video from a MICROMV camera, refer to the online Help within the MovieShaker software.
Video capture from MICROMV cameras with MovieShaker software is not supported on C1-series notebook models.
1.
Plug an i.LINK® cable (not supplied) into the i.LINK port on your computer and the i.LINK port on a compatible
digital video (DV) camera.
2.
Turn on your compatible DV camera, insert a videotape, and set the camera to recording mode. On some camera
models this is called VCR or VTR mode.
3.
On your computer, click Start, click Programs, point to MovieShaker, and click MovieShaker.
The MovieShaker software starts.
4.
In the MovieShaker program, click the (Capture) tab.
5.
In the MovieShaker program, click the Play button.
Video from the videotape plays in the monitor window. If necessary, use the videocassette recorder-style
buttons at the bottom of the Capture panel to rewind or fast-forward the videotape in your camera to reach the
video clip you want to capture.
6.
When the video reaches the point at which you want to start capturing video, click Capture.
7.
When the video reaches the end of the clip you want to capture, click Stop Capture.
When capturing is completed, a dialog box appears displaying the progress of importing the video clip.
When importing is completed, the imported clip appears in the Clip tray at the left of the MovieShaker window.
Use the videocassette recorder-style buttons at the bottom of the Capture panel to rewind and fast-forward the videotape
in your camera to reach each clip you want to capture. For each clip, repeat steps 5 through 7, above, to capture the clip
and import it to the Clip tray.
To edit video clips with MovieShaker software
1.
After capturing your video clips to the Clip tray, click the (edit) tab.
2.
Drag your clips from the Clip tray to the Story Board panel at the bottom of the MovieShaker window in the
order you want them to appear in the finished movie.
The Story Board panel represents the time sequence of your movie. You can change the sequence of the clips
on the Story Board panel by dragging them to your desired location.
You can trim the beginning and end of any clip on the Story Board by clicking it and moving the orange triangles
on the Edit panel to set the start and end point of the clip. Only the portion of the clip between the orange
Page 56
Page 57

triangles will appear in the final movie.
3.
To add professional-looking transitions between clips on the Story Board panel, click Transition at the right of
the MovieShaker window to open the Transition tray, and drag a transition from the list to the space between
two clips on the Story Board.
4.
To preview the entire movie, click the Story Board panel above the first clip so that a white triangle appears
above the clip, and click the Play button on the Edit panel.
The entire movie, including transitions, plays in the monitor window.
After you have arranged and trimmed your video clips and placed transitions between them, you are ready to export your
finished movie back to your digital video camera.
You can learn about other MovieShaker editing features, including adding effects, narration, and text titles to your
clips, in the online Help in MovieShaker software.
MovieShaker software's Shake feature can automatically combine your video clips into a finished movie with transitions,
effects, and music. Refer to the online Help in MovieShaker software for details.
To export a finished movie to your digital video camera
After you have created a finished movie, you can export it back to your compatible digital video (DV) or MICROMV camera.
1.
Make sure your camera is set to recording mode. On some camera models this is called VCR or VTR mode.
2.
Turn on your DV or MICROMV camera, and insert a videotape.
3.
In the MovieShaker program, click Export in the lower right corner of the Story Board tray.
4.
Select Export to external device, and click Next.
5.
A message appears alerting you that exporting video can take a long time. Click Yes.
6.
The Export to DV device wizard appears. Follow the instructions in the wizard to complete the exporting
process.
Page 57
Page 58

Editing Video with DVgate Software
DVgate software offers professional-level control over all aspects of capturing, trimming, and combining digital video clips
from a compatible digital video (DV) camera. After you have combined your clips into a finished movie, you can export it back
to your compatible digital video camera.
The DVgate software does not support MICROMV video cameras.
This guide provides only a simple overview of using the DVgate software. For more detailed information, refer to the online
Help within the DVgate software. For details regarding connecting your digital video camera to your computer, refer to the
manual that accompanies your camera and the online User Guide that accompanies your computer.
To capture digital video with DVgate software
1.
Plug an i.LINK® cable (not supplied) into the i.LINK port on your computer and the i.LINK port on a compatible
digital video (DV) camera.
2.
Turn on your compatible DV camera, insert a videotape, and set the camera to recording mode. On some camera
models this is called VCR or VTR mode.
3.
On your computer, click Start, click Programs, point to DVgate, and click DVgate Motion.
The DVgate Motion software starts.
4.
Select IMPORT - Auto from the MODE list in the DVgate Motion window, and click SCAN.
The DVgate Motion software scans your tape and creates a list of video clips to be captured. The list appears in
the IN/OUT list window.
You can also manually specify video clips to be captured while viewing playback of your tape in the Monitor
window. For details, refer to the online Help within DVgate Motion software.
5.
If necessary, edit the list of video clips to be captured.
To delete a clip from the list, click it, and click DELETE.
Change the order in which clips will be captured by dragging them up and down the list.
6.
To capture all the video clips on the IN/OUT list, click CAPTURE ALL.
To capture an individual clip, click it in the IN/OUT list window and click CAPTURE.
The Save as a file window appears. This window enables you specify a location on your hard disk drive where
the video clips will be saved. In most cases, the default location of your D: drive partition is a good choice. You
can also specify how DVgate Motion software will name your clip files.
7.
Click Save.
The Batch capturing... window appears, and DVgate Motion software captures your video clips to you hard disk
drive.
To edit digital video with DVgate software
DVgate software enables you to combine your captured video clips into a single movie. You can also trim the beginning and
end of each clip, so you only include the scenes you desire.
1.
Click Start, click Programs, point to DVgate, and click DVgate Assemble.
DVgate Assemble starts.
2.
Click ADD.
The ADD dialog box appears.
3.
In the ADD dialog box, select the video clip files you want to include in your combined movie, and click Open.
Page 58
Page 59

You can select multiple clips by holding down the Ctrl key and clicking several files.
Your selected clips appear in the Assemble list in the DVgate Assemble window.
4.
If necessary, edit the order of clips in the Assemble list.
For the combined movie, clips are combined in the order they appear in the Assemble list, starting from the top.
To rearrange the order, drag clips up and down the list.
To remove a clip from the list, click it, and click DELETE.
To copy a clip, click it, click Copy on the Edit menu, click the location on the list where you want the copy
to be placed, and click Insert on the Edit menu.
5.
If necessary, trim your video clips to include only the scenes you want included in the final movie.
Double-click a clip.
The clip opens in the DVgate Assemble - Clip window.
Drag the slider in the middle of the window to the point in the clip where your chosen scene begins.
Click BEGIN.
Drag the slider to the point in the clip where your chosen scene ends.
Click END.
To view your trimmed clip, make sure the BEGIN-END check box is selected, and use the
videocassette recorder-style buttons to play your clip. (If the BEGIN-END check box is not selected,
the entire clip, rather than the trimmed clip, will play.)
You can also set the begin and end points for your scene by playing the clip with the videocassette
recorder-style buttons and clicking BEGIN and END when the clip reaches your chosen begin and end
points.
Click OK to save your changes and close DVgate Assemble - Clip window.
6.
When you have set the order of your clips and trimmed them to include only the scenes you want, you can
preview the entire finished movie by clicking PREVIEW ALL in the main DVgate window.
7.
Click OUTPUT ALL to save your finished movie to your hard disk drive.
The Save As dialog box appears.
8.
Select a location to which to save your movie, type a name for your movie, and click Save.
If you intend later to export your movie to your digital video camera, be sure to select AVI file (*.avi) in the Save as
type: box before saving your movie.
To export a finished movie to your digital video camera
After you have created a finished movie, you can export it back to your compatible digital video (DV) camera.
1.
Make sure your camera is set to recording mode. On some camera models this is called VCR or VTR mode.
2.
Turn on your DV camera, and insert a videotape.
3.
On your computer, click Start, click Programs, point to DVgate, and click DVgate Motion.
The DVgate Motion software starts.
4.
Select EXPORT - Auto from the MODE list in the DVgate Motion window.
5.
In the DVgate Motion - AVI file list window, click ADD.
If the DVgate Motion - AVI file list window is not open, click List on the Window menu.
Page 59
Page 60

The ADD dialog box appears.
6.
In the ADD dialog box, select the movie file you want to export, and click Open.
The ADD dialog box closes, and your selected movie appears in the Record list in the DVgate Motion - AVI file
list window.
7.
Click RECORD ALL.
The Output dialog box appears.
8.
Click OK.
The Output dialog box closes, and recording to your DV camera begins.
DVgate software is a powerful program for managing digital video that offers a wide range of features. This guide
provides only an overview of the basic process of editing video with the DVgate software. For more detailed information,
refer to the online Help within the DVgate software.
Page 60
Page 61

Working with Still Images
The Microsoft® Windows® 2000 operating system and the multimedia software preinstalled on your VAIO® computer make it
easy to import, edit, and print your photographs and other images.
Page 61
Page 62

Importing Still Images
There are a variety of ways to bring still images into your computer. Which approach is right for you depends upon whether
you have a digital camera or a traditional film camera.
Many digital cameras connect directly to your computer.
The Microsoft® Windows® 2000 operating system already contains all the necessary software to import pictures from
many newer USB (Universal Serial Bus) digital cameras. Simply connect a USB cable between your camera and
computer, and Windows XP operating system walks you through getting your pictures from the camera to your
computer.
PictureGear Studio software, preinstalled on your VAIO® computer, can help you import images from your digital
camera and then manage, manipulate, and print them. For details about using PictureGear Studio, refer to the
PictureGear Studio section of this guide under the VAIO AV Applications heading.
Other digital cameras store pictures on floppy disks or Memory Stick® media that you can remove from the camera
and insert into your computer.
Once the floppy disk or Memory Stick media is inserted into your computer, you can copy your pictures to your hard
disk drive just as you would copy any computer file.
If your digital camera does not have a USB connection or is not directly supported by the Windows 2000 operating
system, refer to the manual that accompanied your camera to learn how to connect your camera to your computer
and transfer images.
If you want to get traditional printed photographs into your computer, use a scanner.
A scanner is a device that connects to your computer, "takes a picture" of your pictures, and stores them on your
computer. The Windows 2000 system operating system already contains the software to work with many popular
scanners. Simply connect your scanner to your computer, and Windows 2000 walks you through installing the
scanner. To use scanners not directly supported by the Windows XP operating system, follow the instructions in the
manual that accompanied your scanner.
Many companies that develop traditional film photographs can, for an additional fee, provide a CD-ROM or floppy
disk containing digital copies of your pictures. Consult your film developer for details.
Page 62
Page 63

Editing Still Images
After you have gotten your images into your computer, you can use image-editing software to enhance them. You can
perform traditional darkroom tasks such as resizing, cropping, and altering colors. You can also add creative touches such
as painting on top of your photographs, adding text, or combining multiple photographs into one.
Adobe® Photoshop® Elements software (or Adobe® Photoshop® Elements Trial Version1, on some models) is powerful
yet easy-to-use image-editing software that comes preinstalled on your computer. It includes a wide range of tools for
enhancing your images and offers extensive online help so even novices can make the most of their pictures.
As well as enabling you to import and print your images, PictureGear Studio software, preinstalled on your VAIO
®
computer, enables you to create your own unique photo art by adding comments, custom backgrounds, clip art, and stamps
to your digital images.
Another option for simple image-editing tasks is the Windows Paint program.
To start Adobe Photoshop Elements software
1.
Click Start on the Windows® taskbar, and click Programs.
2.
Point to Adobe, point to Photoshop Elements, and click Adobe Photoshop Elements.
To view the Adobe Photoshop Elements online Help
1.
Start Adobe Photoshop Elements.
2.
Click the Help menu, and click Help Contents...
To start PictureGear Studio software
1.
Click Start on the Windows® taskbar, and click Programs.
2.
Point to PictureGear Studio, and click PictureGear Studio.
To view the PictureGear Studio online Help
1.
Start PictureGear Studio.
2.
Click the ? button on the PictureGear Studio start screen.
To view help from other PictureGear Studio screens, click the Help menu, and select Help.
To start Paint
Click Start on the Windows taskbar, click Programs, point to Accessories, and click Paint.
1
A dobe® P hotos hop® E lements T rial V ers ion offers a limited evaluation period, after whic h you c an purc has e the s oftware for a s pec ial price.
Page 63
Page 64

Printing Still Images
Many of today's inexpensive computer printers can print images as sharp and bright as professionally developed film
photos.
There are a variety of options for printing your digital images:
You can print most images directly from the Microsoft® Windows® XP operating system by right-clicking the icon for
the image and clicking Print from the shortcut menu. The Photo Printing Wizard appears and walks you through
printing your image.
If you are editing an image in Adobe® Photoshop® Elements, you can print your image by clicking Print... on the File
menu.
The PictureGear Studio software that is preinstalled on your computer offers a range of powerful printing
options. You can create and print photo albums with interesting, customizable designs. You can design original
postcards, calendars, art, and labels. For more information about using PictureGear Studio software, refer to the
PictureGear Studio section of this guide and PictureGear software's online Help file.
To start PictureGear Studio software
1.
Click Start on the Windows® taskbar, and click Programs.
2.
Point to PictureGear Studio, and click PictureGear Studio.
To view the PictureGear Studio online Help
1.
Start PictureGear Studio.
2.
Click the ? button on the PictureGear Studio start screen.
To view help from other PictureGear Studio screens, click the Help menu, and select Help.
Page 64
Page 65

Working with Digital Music
The SonicStage software included with your computer is a powerful digital music management system that enables
you work with digital music from audio CDs and from the Internet. You can play music on your computer, create custom
audio CDs, and check music out to portable digital music devices, such as Net MD players and Network Walkman Digital
Music Players.
SonicStage software employs Sony's OpenMG copyright protection technology and advanced ATRAC3 audio file format to
allow you to enjoy digital music while protecting the rights of copyright holders.
You can enjoy digital music with SonicStage software in a wide variety of ways:
Play and record music from audio CDs
SonicStage software enables you to play your audio CDs and record audio tracks to your computer. Music tracks
recorded to your computer can be combined into Playlists and checked out to portable music devices so you can
take your music with you.
Create custom audio CDs
On computer models equipped with a CD recording device, you can create custom audio CDs from your SonicStage
Playlists, mixing tracks from different sources and artist.
Make backup copies of your audio CDs
On computer models equipped with a CD recording device, SonicStage software's Backing Up Audio CDs utility
makes it easy to create backup copies of your audio CDs.
Use Playlists to organize and manage your music
SonicStage software's powerful, hierarchical Playlist feature enables you to organize the music you've imported into
the SonicStage program. You can create lists of songs categorized by artist or genre and place a shortcut to the list
onto your desktop with Microsoft® Windows® operating system for one-click playback of your favorite music.
Download music from Electronic Music Distribution (EMD) services on the Internet1
Electronic Music Distribution services are Internet-based subscription services that allow you download music tracks
from the World Wide Web. SonicStage software enables you to download music tracks, include them in your
Playlists, and check them out to your portable digital music devices.
Import audio files from your computer
SonicStage software enables you to import MP3 and WAV audio files stored on your computer so they can be added
to Playlists and recorded to CD (on computer models equipped with a CD recording device).
Enjoy karaoke-like effects during music playback
The Vocal Canceler effect can suppress the vocal track from most music during playback. This effect also enables you
to shift the pitch of music to suit your vocal range. Used together, these features make it easy to sing along with
your favorite music, turning your computer into a karaoke system.Vocal Canceler works only with stereo music clips.
Enjoy a Visualizer light show during music playback
The Visualizer feature of SonicStage software performs a colorful light show on your computer's screen to match
your music as it plays.
To learn more about using the SonicStage software, refer to the online Help within the SonicStage program.
The Tutorial page within SonicStage software can help you get started. The Tutorial page lists common tasks and directs
you to the part of the SonicStage software that performs the task you would like to do.
To start SonicStage software
1.
Click Start on the Windows® taskbar, and click Programs.
2.
Point to SonicStage, and click SonicStage.
To view the SonicStage software online Help
Page 65
Page 66

1.
Start SonicStage.
2.
On the Help menu, click SonicStage Help.
To make a backup copy of an audio CD
On computer models equipped with a CD recording device, you can use the Backing Up Audio CDs utility to make a backup
copy of an audio CD.
On computer models that have both a read-only optical drive and an optical writing drive, you can make a copy with one
click.
On computer models with only one optical drive, you must swap the original CD for a blank CD-R disc when requested to do
so in the middle of the copying process.
1.
Quit SonicStage, if it is running.
2.
Click Start, click Programs, point to SonicStage, click SonicStage, and click Backup tool.
The SonicStage Backup tool utility starts.
3.
Insert the CD you want to make a backup of into your CD drive.
Insert the CD into the optical drive you use to read CDs. Depending upon your computer model, this may be a
CD-ROM drive, CD-RW drive, a DVD-ROM drive, a DVD-RW drive, or a Combo Drive.
On computer models that have both a read-only optical drive (CD-ROM or DVD-ROM) and an optical writing drive
(CD-RW or DVD-RW), put the CD into the read-only optical drive.
4.
On computer models that have both a read-only optical drive (CD-ROM or DVD-ROM) and an optical writing drive
(CD-RW or DVD-RW), insert a blank CD-R disc into the optical writing drive.
5.
Make sure your CD drive is selected in the Retrieve from: drive list.
6.
On computer models that have both a read-only optical drive (CD-ROM or DVD-ROM) and an optical writing drive
(CD-RW or DVD-RW), make sure your optical writing drive is selected in the Write to: drive list.
7.
Click Start.
The audio data is read from your audio CD.
On computer models that have both a read-only optical drive (CD-ROM or DVD-ROM) and an optical writing drive
(CD-RW or DVD-RW), the data is immediately written to the blank CD-R disc. The Copy Successful message
appears. The backup copy is finished.
On computer models that have only a single optical drive (CD-RW, DVD-RW, or Combo Drive), the Reading
completed message appears after the data is read from the original CD.
8.
If a Reading complete message appears, remove the original source CD from the optical writing drive and insert
a blank CD-R disc.
9.
Click OK.
The audio data is written to the blank CD-R disc.
The Copy Successful message appears.
The backup copy is complete.
1
U s e of an E M D service requires I nternet access and s eparate s ubs c ription to the E M D s ervice. T he Sonic Stage software s upports only EMD services
compatible with O penM G technology. Refer to the online Help within the SonicStage software for details .
Page 66
Page 67

DVgate Software
For detailed information about using DVgate software, refer to the online Help within the DVgate software.
Connecting a digital video camcorder
Turn off the power to your digital video camcorder before connecting it to your computer. After connecting the device, turn
its power back on. You do not need to turn off the computer when connecting the camcorder.
DVgate software does not support MICROMV digital video cameras.
To use DVgate software with a digital video camcorder
Under the Microsoft® Windows® 2000 operating system, do not capture DV-AVI video files to the root directory (the
top level) of your hard disk drive. Instead, create a folder and capture files to this folder.
Do not use DVgate software when the connected digital video device is in Timer Recording mode, as this may
produce a malfunction in the device.
Video captures larger than 2 GB (9 minutes and 30 seconds) are automatically continued in a second file.
You can record stereo audio (stereo 1) while capturing video, or you can add audio on the stereo 2 track after
capturing the video data.
You cannot use different audio modes on the same tape. Perform a separate capture for each audio mode you wish
to use.
DVgate software does not support hard disk compression. Do not use disk compression if you are planning to work
with DVgate software.
Title data is saved in the flash memory of a digital video camera and is not transferred to tape by DVgate software.
Disable your screen saver program to avoid interruption during your capture sessions.
The drop frame compensation feature does not provide accurate compensation adjustments for tapes recorded in
LP mode.
The information displayed by the capture progress indicator may not be accurate for tapes that are recorded using a
mixture of both SP and LP modes.
Keep the video head of your digital video device properly cleaned. Anomalies that you see in captured data may be
due to dust or other particles on the video head.
The last frame captured is one frame before your selected [OUT] point. The frame you see immediately after clicking
the [OUT] button is not captured.
To use DVgate software to record AVI files to tape
You can record only AVI files. MPEG files cannot be recorded.
Do not use DVgate software when the connected digital video device is in Timer Recording mode, as this could
produce a malfunction in the device.
Avoid recording problems, such as a single frame appearing in multiple frames, by closing other applications on your
system while recording.
You cannot use multiple audio modes on the same tape. If you have AVI files that use different audio modes, the
files cannot be recorded at the same time, but must be recorded separately.
The DVgate software does not support AVI files that are smaller than 4 MB.
The DVgate software does not support hard disk compression.
To maximize recording capabilities, video and audio data are not available while you are recording.
If the DVgate software indicates that frames are dropped, try closing all open programs or defragmenting your hard
drive.
Page 67
Page 68

MovieShaker Software
MovieShaker software can be used to create fun and innovative movies without any previous knowledge of film editing. In
a few simple steps, you can turn a collection of video clips, still images, and audio files into a finished movie with special
effects and music. You can save your personal video creation in a format that is compatible with most computers or save it
to a tape in your compatible digital video (DV) or MICROMV 1 video camera.
MovieShaker software m ain window
1
M I C ROM V c ameras are not s upported on C 1 -series notebook models .
Page 68
Page 69

Creating movies with MovieShaker software
Using your imported clips, you can create a short movie using the Shake feature. The Shake feature selects clips from the
Story Board tray, adds effects, and combines them randomly into a 30-second movie. After you "Shake" your video, you can
edit it by adding effects and text, by adjusting the color and contrast, and by modifying its length.
Importing images and sound clips
1.
Click . The Import file browser window appears.
2.
Find the clips you want to add.
3.
Click the clips. The files are added to the Import clip tray.
4.
Repeat this process to gather each of the images and video and sound clips you want to use in your movie.
You can delete a clip from the Import clip tray by dragging the clip's icon to the trash icon located on the Edit tray of
the working panel.
Importing image or sound files that are over 30 seconds in length may cause the MovieShaker software to stop
responding.
Using the Shake feature
1.
Click the Shake tab. The Shake tray appears
2.
Select a mood by clicking a face in the Shake pattern tray.
Shake tray
3.
Click the Shake! button. A 30-second movie is automatically generated.
4.
Optional: Add text to your new movie by clicking on the Text button.
5.
To preview, rewind, or fast forward your movie, use the Playback buttons.
Scenes created with the Shake feature begin with a black screen in the Shake tray window. Your scenes appear
during movie playback.
You can improve the image quality produced by the Shake feature (at the cost of longer Shake times) by turning off the
"Shorten the Shake time" feature in the General panel of the Setting dialog box. See the Menu reference section of the
online Help file for details.
Adding effects to a scene or a clip
Page 69
Page 70

1.
Double-click or drag the desired clip or scene to move it to the Story Board tray.
2.
Click the Effect button on the Effect tray.
Effect tray window (Effect button selected)
3.
Drag the Effect icon you want to add from the Effect tray to the Effect palette on the Edit tray.
4.
Click the Play button on the Edit tray to preview the effect. The added effect previews on the clip displayed in
the Effect tray window.
A preview of the added effect is displayed in the Effect tray window. You can eliminate an effect by dragging it from
the Effect palette to the trash icon on the Edit tray. See the online Help file for more information on adjusting effect
duration and replaying clips and scenes.
Adding text effects to a scene or clip
1.
Double-click or drag the clip or scene to move it to the Story Board tray.
2.
Click Text on the Editing tray.
Effects Tray (Text button selected)
3.
Click Text Setting to create customized text. The Text Setting dialog box appears. Enter your text, and select
the font, size, style, color, and positioning for your text.
4.
Drag the Text effect icon you want to add from the Effects tray to the Effect palette on the Edit tray.
Page 70
Page 71

5.
Click the Play button on the Edit tray to preview the text effect. The clip displays the text effect in the Effect tray
window.
A preview of the added text and text effect is displayed in the Effects tray window. From the Edit tray, you can
eliminate a text effect by dragging it from the Effect palette to the trash icon. See the online Help file for more information
on adjusting Text effects.
Saving a movie
1.
Verify that the movie or clips you want to save are located on the Story Board tray.
2.
Click Export on the Story Board tray.
3.
Select the format in which you want the movie to be saved.
You can click on each export format to view its description and use.
Export window
4.
Click Next.
5.
Confirm that you want to continue.
6.
Locate the folder to which you want to save the file, name your file, and click Save.
The time required to export your movie file will vary with the format selected. See the online Help file for more
information on exporting a movie.
Page 71
Page 72

Using the ImageStation online service with MovieShaker software
ImageStationSM is an online service that allows you to store your pictures and movies on the Internet to share with family
and friends. The ImageStation service requires an Internet connection and registration for the Web-based service. You
must be connected to the Internet before uploading your pictures or movies using the MovieShaker software and
ImageStation applications.
To upload MovieShaker files
1.
Locate the clips or video files that you want to upload to the ImageStationSM service, and import them to the
Import Clip tray.
2.
Drag the desired clips or video files to the Story Board tray.
3.
Click the Export button. The Export window appears.
4.
Select MPEG1 (ImageStation), and click Next.
The MovieShaker application creates a temporary file to store your images prior to uploading to the ImageStation
service. This file is deleted after the upload process.
5.
If you are a registered member, provide your login name and password.
For first-time users, click Register to ImageStation. The ImageStation service registration wizard appears and
guides you through the initial registration process. Follow the on-screen instructions.
Im ageStation Login window
6.
When the ImageStation application on your computer connects with ImageStation online, your files are uploaded
to the Web site. The Image Uploader window appears and displays the Internet connection and upload status.
Im age Uploader window
7.
Go to http://www.imagestation.com to view your uploaded pictures or movies. Follow the on-screen instructions
to access your ImageStationSM account.
The ImageStation Web site may ask you to complete a full login again if your current session is not active.
Page 72
Page 73

SonicStage Software
SonicStage software is a jukebox application that enables you to play and record from audio CDs and import digital
audio files while maintaining copyright information. Taking advantage of Sony's copyright-protected ATRAC3 format for
high-quality digital audio storage, SonicStage sports a music visualizer, a sleek player skin design, and a parametric
equalizer for fine-tuning audio playback.
This SonicStage software does not support CD backup, custom audio CD creation or custom MP3 CD creation with CD-R
and CD-RW media.
Page 73
Page 74

Electronic Music Distribution (EMD) Services
EMD enables you to download music files via the Internet. To use Internet services that are compatible with the SonicStage
software, you need:
Access to the Internet from your computer. Sign up with an Internet Service Provider (ISP) and configure your
computer for Internet access before using EMD services.
An EMD service provider. Consult the provider for service information.
Page 74
Page 75

Starting SonicStage Software
1.
Click Start in the Windows taskbar, and point to All Programs.
2.
Point to SonicStage, and click SonicStage.
3.
When you have registered with CDDB, the Confirm the setup of SonicStage... dialog box appears.
4.
Click Yes to continue.
SonicStage feature tabs (Main window)
CD tab — The contents of your inserted audio CD are displayed, enabling functions such as recording to the
computer's hard disk drive.
Import tab — Import MP3, WAV or audio files on your computer to a Playlist.
Playlist tab — View the available Playlists as tree + list or list only.
Transfer tab — View the available Playlists on your computer. You can transfer the audio files to an
external device or media.
Device/Media tab — View the status of your audio files, connected external device, or inserted
media.
Internet tab — The browser view displays your connection to the Internet, enabling you to locate audio
files and use EMD services.
SonicStage m ain window
1 Feature tabs
Changes the screen view according to the selected feature. 5 Tutorial
Click to open or close the Tutorial feature.
2 Player control buttons
Page 75
Page 76

Controls playback functions, such as play, pause, stop, fast forward, and reverse. You can increase or decrease volume and
switch view modes. 6 Internet address drop-down list (Playlist view)
Displays Internet addresses associated with the currently selected song. Click Go to URL link to immediately connect to the
Internet address displayed in the drop-down list.
3 Playlist drop-down list (Playlist view)
Displays available playlists and audio files. 7 File list view (Playlist view)
Displays the contents of the Playlist selected in the file tree view.
4 File tree view (Playlist view)
Displays the Playlists available on your computer, enabling you to locate your audio files. Expand the views for the file list or
Playlist drop-down using the Playlist switch button.
Page 76
Page 77

Recording from a CD
You can record songs from audio CDs and add them to playlists in SonicStage software.
When you record from an audio CD from your optical disc drive for the first time, the CD Drive Optimization dialog box
appears. Click Start to verify your optical disc drive. After the verification is performed, recording begins.
1.
Insert an audio CD into your computer's optical disc drive.
2.
Click the CD tab.
3.
Use the drop-down lists to select the ATRAC3 bit rate, CD drive, and Record To destination.
CD tab window
4.
You can identify specific tracks on your CD by clearing the check marks from the tracks you don't want to record.
You can clear all selected tracks by selecting the empty checkbox next to Select All, and then selecting the
tracks you want to record.
If your Internet connection is active, you can use the (CD Info) button to view the name of your CD and its
song titles.
The CDDB® (Compact Disc Database) Music Recognition Service registration wizard enables you to register with
CDDB. You need Internet access from your computer to register and use this service. For more information regarding
CDDB registration, click the Help button.
The CD Info button feature is not supported for all audio CDs.
5.
Click (Rec to Jukebox) to begin recording. When the recording is finished, the new playlist appears in the
File tree view of the Playlist window.
Page 77
Page 78

Transferring songs (Check-In/Check-Out)
You can transfer songs between the playlists in the SonicStage software and external devices or media. For more
information on using your external devices or media, see the instructions supplied with the device or media.
These instructions are for using the Check-In/Check-Out "1-step" method. For information on using another method, see
"Changing the check-in/check-out settings" in the SonicStage software online Help file.
Check-Out
1.
Connect the external device or insert the media into your computer.
2.
Click the Transfer tab to display the Transfer window. Your computer automatically recognizes the connected
external device or media and lists the content information in a new panel on the right side of the Transfer
window.
Transfer window
3.
Select the Playlist that contains the song that you want to check out. The songs in the playlist are shown in the
Playlist view panel located in the center of the Transfer window.
4.
From the Playlist view panel, select the song to be checked out. To check out more than one song at a time,
hold down the Ctrl key and select the additional songs.
5.
Click (Out), or drag the song to the desired position in the song list of the external device or media. Check
Out begins.
To cancel Check Out, click (Stop), or click Cancel in the Processing dialog box that is displayed during the
Check Out process.
Check In
The songs that you transfer to external devices or media can only be checked in to the hard drive of the same
computer from which the songs were checked out.
1.
Connect the external device or insert the media into your computer.
2.
Click the Transfer tab to display the Transfer window. Your computer automatically recognizes the connected
external device or media and lists the content information in a new panel on the right side of the Transfer
window.
3.
Select the song to be checked in from the song list of the external device or media. To check in more than one
song at a time, hold down the Ctrl key and click the additional songs.
4.
Click (In), or drag the song(s) to the Playlist view panel. If you want to check in all of the songs in the
external device or media, click (In All). Check In begins.
Page 78
Page 79

To cancel Check In, click (Stop), or click Cancel in the Processing dialog box that is displayed during the Check In
process.
For more information about using SonicStage software, go to the online SonicStage Help. You can access the online help file
as follows:
1.
Click the Start button in the Windows taskbar, and point to Programs.
2.
Point to SonicStage, and click SonicStage Help.
Page 79
Page 80

Additional features
SonicStage Tutorial — SonicStage features are described in the Tutorial. The user-friendly interface instructs you on
how to use all SonicStage features.
SonicStage Backup Tool — You can back up and restore music, graphics, and information data managed by
SonicStage software. You must be connected to the Internet to use the SonicStage Backup Tool.
Import audio files in various formats — You can import audio files in various formats, such as the MP3 or WAV
standards. You can also import audio files that comply with the Microsoft® Windows Media Technologies (WMT)
standard, identified by .asf or .wma extensions. Manage your audio files through the Playlist feature of SonicStage
software.
Manage imported songs on the Playlist — Additional features are available when you register your imported songs
through the Playlist feature of the SonicStage software. You can manage your music by creating your own list of
songs categorized by genre or artist, displaying your song list in the Playlist feature, and arranging your songs in a
customized order using the Playlist folders. Edit your music by combining multiple songs into a single song, or divide
one song into two, by using the Combine and Divide features.
Simple mode — The main SonicStage window viewed in Simple mode, is a smaller, compact version of Full mode.
This may be convenient when you want to listen to music with SonicStage software, while using other applications,
or whenever you feel the Full mode view is intrusive. The design of the main SonicStage window in simple mode can
be changed by selecting a new "Skin," which enhances the window's appearance. The Simple mode feature enables
you to perform playback operations only.
Page 80
Page 81

Network Smart Capture
Network Smart Capture manages the i.LINK®1 connection between your computer and an i.LINK interface compatible digital
camera or camcorder. You can capture and enhance video or still images to share with your family and friends over the
Internet or through e-mail.
The Network Smart Capture main window
Capturing still images
Capturing movie clips
Capturing Web camera images
Applying effects to your images and movies
Managing your images and movies
Using the ImageStation online service
Getting more help
Refer to the documentation that came with your compatible i.LINK device for information on operating conditions and proper
connection. Before connecting i.LINK interface compatible peripherals to your computer, such as an optical drive or hard disk
drive, make sure they are compatible with your computer's Microsoft® Windows® operating system and verify the required
operating conditions of the devices.
1
i.LINK is a trademark of Sony us ed only to des ignate that a produc t c ontains an I E E E 1 3 9 4 c onnection. The i.LINK c onnec tion may vary, depending on the
software applications, operating s ys tem and c ompatible i.LI NK devices. A ll products with an i.LI N K c onnec tion may not c ommunic ate with eac h other.
Page 81
Page 82

The Network Smart Capture main window
Network Smart Capture opens with a pre-installed video clip in the Finder Window, indicating there is no data input from a
digital camera or camcorder. When you connect your digital camera or camcorder to your system with an i.LINK® cable and
turn it on, an image appears in the main window. Some cameras and camcorders need to have recording media inserted
before an image can be displayed in the Finder Window. Consult the manual supplied with your digital camera or camcorder
for more information.
Consult the picture and table below for a description of icons and buttons on the main window.
Network Smart Capture Main Window
Button or Icon Description
1 Finder Window Displays images in real-time
2 Help icon Displays Help documentation
3 Data list Displays thumbnails of captured images
4 Display Image icon Opens captured images in the Finder Window
5 Save As icon Enables you to save an image to your hard disk
6 Send by e-mail icon Attaches a captured image to an e-mail
7 Upload to Image Station icon Sends captured images to ImageStation
SM
online folder
8 Delete icon Deleted captured images
9 Select Effect icon Enables you to customize an image
10 Change Setting icon Enables you to set preferences
11 Capture button Records the image in the Finder Window
Page 82
Page 83

12 Web Camera button Captures still images according to specified settings
13 Movie Mode button Captures moving images
14 Still Mode button Captures still images
Page 83
Page 84

Capturing still images
The following information tells you how to set preferences and capture a still image.
To set Still mode preferences
1.
Open Network Smart Capture:
(Microsoft® Windows® XP) From the Start menu, click All Programs, Network Smart Capture, and click
Network Smart Capture from the submenu.
(Microsoft® Windows® 2000) From the Start menu, click Programs, Network Smart Capture, and click
Network Smart Capture from the submenu.
2.
Connect your i.LINK® interface compatible digital camera or camcorder to your computer with an i.LINK cable
(optional). An image appears in the Finder Window.
3.
Click Still near the upper-left of the screen.
4.
Click the Change Setting icon near the bottom of the screen to view setting options for your still image
capture. The Still Image Setting window appears.
Still Im age Setting Window
The Still Image Options window has three tabs:
Basic — Choose between Normal or Self-timer capture modes, and select a folder destination for your
images.
Capturing Format — Select the image size in pixels, and adjust the image quality.
Common — Enable or disable the sound and animation effects; enable or disable sample movie sound;
and enable or disable automatic dialup connection for uploading images.
5.
Click each tab to view options and set preferences. To apply effects to an image, see Applying effects to your
images and movies.
To capture an image in Still mode
1.
Use your digital camera or camcorder to locate the image you want to capture. When you see the desired image
in the Finder Window, click Capture. You can capture a single image or several image at once.
Your captured images are stored as thumbnail images in the Display List to the right of the Finder Window.
Im age in Finder Window
Page 84
Page 85

2.
Click the thumbnail images or arrows to the right of the Finder Window to view your captured images. As each
image is captured, it appears in the Finder Window.
Page 85
Page 86

Capturing movie clips
The following information tells you how to set preferences and capture movie clips.
To set Movie mode preferences
1.
Open Network Smart Capture:
(Microsoft® Windows® XP) From the Start menu, click All Programs, Network Smart Capture, and click
Network Smart Capture from the submenu.
(Microsoft® Windows® 2000) From the Start menu, click Programs, Network Smart Capture, and click
Network Smart Capture from the submenu.
2.
Connect your i.LINK interface compatible digital camcorder to your computer with an i.LINK® cable (optional). An
image appears in the Finder window.
3.
Click Movie to activate Movie mode.
4.
Click the Change Setting icon to view the available options for your movie capture. The Movie Clip Setting
window appears.
Movie Clip Setting Window
The Movie Clip Setting window has three tabs:
Basic — Select a folder destination for your movies when recording video clips.
Capturing Format — Adjust the image quality, reduce noise, and set the maximum recording time for
your movie capture.
Common — Enable or disable the sound and animation effects; enable or disable sample movie sound;
and enable or disable automatic dialup connection for uploading images.
5.
Click each tab to view options and set preferences. To apply effects to an movie, see Applying effects to your
images and movies.
You can remove all special effects by clicking the No Effects button.
To capture a movie in Movie mode
1.
Use your digital camcorder to locate the view(s) you want to capture. When you see the desired view in either
the Finder Window or your camcorder's viewfinder, click Record to begin recording your movie. The Movie Player
icon appears.
2.
Click Stop when you have finished recording your movie. The first frame of your movie appears in the Data list to
the right of the Finder Window. Network Smart Capture automatically stops recording according to the recording
time set in the Movie Clip Setting window.
3.
You can review your movie in the Finder Window by double-clicking the movie thumbnail in the data list.
Page 86
Page 87

Capturing Web camera images
The following information tells you how to set preferences and capture an image.
To set Web camera mode preferences
1.
Open Network Smart Capture:
(Microsoft® Windows® XP) From the Start menu, click All Programs, Network Smart Capture, and click
Network Smart Capture from the submenu.
(Microsoft® Windows® 2000) From the Start menu, click Programs, Network Smart Capture, and click
Network Smart Capture from the submenu.
2.
Click Web camera to activate Web camera mode.
3.
Click the Change Setting icon to view the available options for your image capture. The Web Camera
Setting window appears.
Web Camera Setting Window
The Web Camera Setting window has five tabs:
Basic — Select a folder destination to store your images and choose your dial-up setting.
Capture Interval — Set your Web camera to capture images at intervals or whenever there is
movement.
Send — Set image upload preferences.
Capturing Format — Select the image size in pixels, and adjust the image quality.
Common — Enable or disable the sound and animation effects; enable or disable sample movie sound;
and enable or disable automatic dialup connection for uploading images.
4.
Click each tab to view options and set preferences. To apply effects to an image, see Applying effects to your
images and movies.
Page 87
Page 88

Applying effects to your images and movies
You can add effects to real-time images or movies displayed in the Finder Window. You can also use a different effect for
each picture.
To open the Effect Setting window
1.
Click the Select Capture Window icon near the bottom of the screen to open the drop-down list of effects.
Click to select digital zoom, effect, or no effect from the list. The Effect Setting window appears.
Effect Selection Window
2.
Use the Previous Page or Next Page button to view the sample effects and click the sample to select it.
3.
Click Properties to adjust settings for the effect you select.
4.
Click OK.
To remove an effect
Select No Effect from the drop-down list.
Page 88
Page 89

Managing your images and movies
The task buttons to the right of the Network Smart Capture window enable you to perform various functions with your
images or movies.
Display Image — Opens captured images in the Finder Window.
Save As — Save still images in JPEG format and movie images in MPEG format to your desired location.
Send by e-mail — Launches your e-mail program with a new message window containing the still image as an
attachment.
Upload to ImageStationSM — Send your still images online to the ImageStationSM Web site to share with your family
and friends. The ImageStation service stores your still images online when you become a registered user. See Using
the ImageStation online service.
Delete — Discards any or all of your still images.
You must be connected to the Internet before attempting to upload or e-mail your still images or videos.
Page 89
Page 90

Using the ImageStation online service
ImageStationSM is an online service that allows you to store your images and movies on the Internet to share with family
and friends. The ImageStation service requires an Internet connection and registration for the Web-based service. You
must be connected to the Internet before uploading your images or movies with Smart Capture and ImageStation
programs.
The ImageStation preview feature is available when you upload two or more pictures or a movie. No preview is shown
if a single picture is being uploaded.
To upload images and movies to the ImageStationSM Web site
1.
Click the ImageStation icon on the right side of the screen. The ImageStation Login window appears.
Im ageStation Login Window
For first-time users, the ImageStation
SM
registration wizard guides you through the initial registration
process. Click Register to ImageStation, and follow the on-screen instructions.
If you are already a registered member, type your login name and password, and click Login.
It is recommended that your movie file size not exceed 254 MB if compressed or 2 GB if not compressed. Large
movie files take longer to upload to the ImageStation Web site.
2.
Go to http://www.imagestation.com to view your uploaded pictures or movies. Follow the on-screen instructions
to access your ImageStation account. The ImageStation Web site may ask you to complete a full login again, if
your current session is not active.
Page 90
Page 91

Getting more help
For more information about Network Smart Capture, see the program's online Help.
To view the online help
(Microsoft® Windows® XP) From the Start menu, click All Programs, Network Smart Capture, and click Help from the
submenu.
(Microsoft® Windows® 2000) From the Start menu, click Programs, Network Smart Capture, and click Help from the
submenu.
Click the Help icon on the Network Smart Capture window.
Network Smart Capture Help icon
Page 91
Page 92

PictureGear Studio Software
PictureGear Studio software is designed to creatively manage your digital pictures. With its easy-to-use features, you can
quickly load images from your digital camera or camcorder, print high-quality photos, create custom labels, and design
personalized photo albums or binders to share with friends and family.
PictureGear Studio main window
Photo albums, binders, and photo collections can only be viewed or edited using PictureGear Studio software. To share
a PictureGear Studio creation over the Internet or by using another computer, use the Export feature. See the section, To
export a photo album.
Page 92
Page 93

Using the Import Photo feature
Capture and import the pictures from your digital camera or camcorder to your computer. You can select your favorite
pictures and place them in handy folders for future use.
1.
Click Start in the Windows taskbar, and point to All Programs.
2.
Point to PictureGear Studio, and click PictureGear Studio.
3.
Click Import Photo. Your connected digital camera, camcorder, or Memory Stick® media is displayed in a Select
Device window.
Connect your digital camera or camcorder to your computer, or insert your Memory Stick media into the
appropriate slot, before attempting to import pictures.
Select Device window
4.
Click List to view all pictures that are located on the device or media. Make your selections and click Import
Selected Photos. A Specify Folder window appears.
Specify Folder window
5.
Select a folder option. If you are importing to a new folder, type in the folder name before clicking Start
Importing. An Adjust window appears.
Adjust window
Page 93
Page 94

6.
Click to make any desired adjustments to the pictures. The Adjust window displays an enlarged version of the
picture on the right and thumbnail versions on the left.
Save to relocate the individual picture to a new folder.
Delete to remove the picture from the photo collection.
Rotate to change the picture's position.
Trim to crop the picture or capture a specific area.
7.
Click Finish Importing to save the imported pictures in a photo collection.
Page 94
Page 95

Using the PhotoCollection feature
You can organize and manage your imported pictures on your computer's hard drive or from your ImageStationSM account.
1.
Click PhotoCollection. A list of available photo sources is displayed on the left, with the selected source's
contents displayed as thumbnail pictures on the right.
PhotoCollection window
2.
From the thumbnail view, click to select pictures. Hold down the Ctrl key while clicking, to select several pictures.
Press the Ctrl+A keys to select all of the photos in a folder.
3.
Manage your pictures with these additional tools and features:
Rotate to change the picture's position.
View to enlarge a thumbnail view.
Slideshow to place the selected pictures into an organized slideshow, customizing the slideshow
settings with the icon toolbar at the top of the slideshow screen.
Print to set up your photos and select paper to make prints.
Page 95
Page 96

Using the Binder feature
You can add comments to your favorite photos, add custom backgrounds, clip art, and stamps, or showcase your own
drawing talent. Add, remove, or change your designs to create your own unique photo art.
1.
Click Binder. A list of binder styles is displayed on the left. When you add your pictures to a binder, they are
displayed as thumbnails on the right.
Binder window
You can create your own custom binder styles by clicking Create Title.
2.
Select a binder style, then click New Page. Available photo sources are displayed as thumbnails.
3.
Click to select a photo. An information form appears.
4.
Fill in your information and click OK. An art palette window appears.
To create an original page with art or stamps, use the decoration features on the right by clicking on the desired
feature and applying it to your photo.
5.
Click Save to add the new page to your binder.
Page 96
Page 97

Using the PhotoAlbum feature
Organize your memorable photos in an electronic photo album. You can share your custom photo albums with friends and
family.
1.
Click PhotoAlbum.
PhotoAlbum window
2.
Click New Album. The Select Photo area appears.
If you want to work on a previously created album, do not click Create New Album. Instead, select the desired
album from the Album Collection view on the right side of the window.
3.
To select the photos you want to include in your album from available folders, click List. The Photo List window
appears.
Photo List window
4.
Click Create the Album with the selected photo(s) after making your picture selection(s). A Select Design
window appears.
Select Design window
Page 97
Page 98

5.
Click to select a design layout for your album. Use the scroll bar to view all available album designs. A Select
Layout window appears.
Select Layout window
6.
Click to select a page layout for your album. Use the scroll bar to view all available layout designs. A preview of
your selected design and page layout is displayed.
Scroll through your album using the book icons at the bottom of the window.
Album prev iew window
Page 98
Page 99

7.
Click Edit Album to make changes to your album. Customize your album by adding more pictures, pages,
decorations, or comments, or by deleting pages.
Click Edit Page to customize a page in your album. You can customize with your own drawing, stamps or other
decorations.
8.
Click Save. The Save Album dialog box appears.
9.
Enter a name for your album and click OK.
Photo albums can only be viewed or edited using PictureGear Studio software. To share a PictureGear Studio creation
over the Internet or by using another computer, use the Export feature.
To export a photo album
There are three export formats available:
Export as a Flash File to create a small file that can be viewed using Microsoft® Internet Explorer.
Export as a Light Package to create a compressed file that can be viewed on a computer.
Export as a Full Package to create an uncompressed file to be saved to recordable media, such as a CD-R/CD-RW
or Memory Stick® media.
Export your completed photo album to enable viewing over the Internet, with another computer, or saving to a recordable
media.
1.
Create a photo album, as described in Using the PhotoAlbum feature.
2.
Click Export. A Select Format window appears.
Select Format window
Page 99
Page 100

3.
Click to select an export format. A Select Folder window appears.
Select Folder window
4.
Click Browse and navigate to the destination folder. Enter a file name, if desired.
5.
Click Export. A progress window appears briefly.
Finish Exporting window
6.
An export completion message window appears, displaying the file name and file size. Click Return to Edit Album
Screen.
Page 100
 Loading...