

Page 1

Welcome
Congratulations on your purchase of this Sony VAIO® computer, and welcome to the online VAIO® Computer User Guide.
This user guide provides detailed information on all aspects of using your new VAIO computer, from keyboard functions to
preinstalled software programs.
In the left navigation window, click the topics you want to learn more about, and that information will be displayed in this
main window.
View the Electronic Flyer, which provides updates and supplemental information about your computer.
View the VAIO® Computer Specifications, which lists your computer's hardware specifications and preinstalled software
information, such as descriptions and contact information.
Page 1
Page 2

Powering Your Computer
Your VAIO® computer comes with a battery and an AC adapter. This chapter explains how to install and use these supplied
accessories to power your computer. It also describes ways you can efficiently utilize the battery as a power source.
Using AC Power
Using Batteries
Conserving Battery Power
Page 2
Page 3

Using AC Power
The supplied battery is not charged when you receive your computer. To use your computer immediately, use the supplied
AC adapter as a power source. The computer charges the battery while you use AC power. See Using Batteries for more
information on installing and using batteries.
Connecting the AC adapter
Turning on the computer
Page 3
Page 4
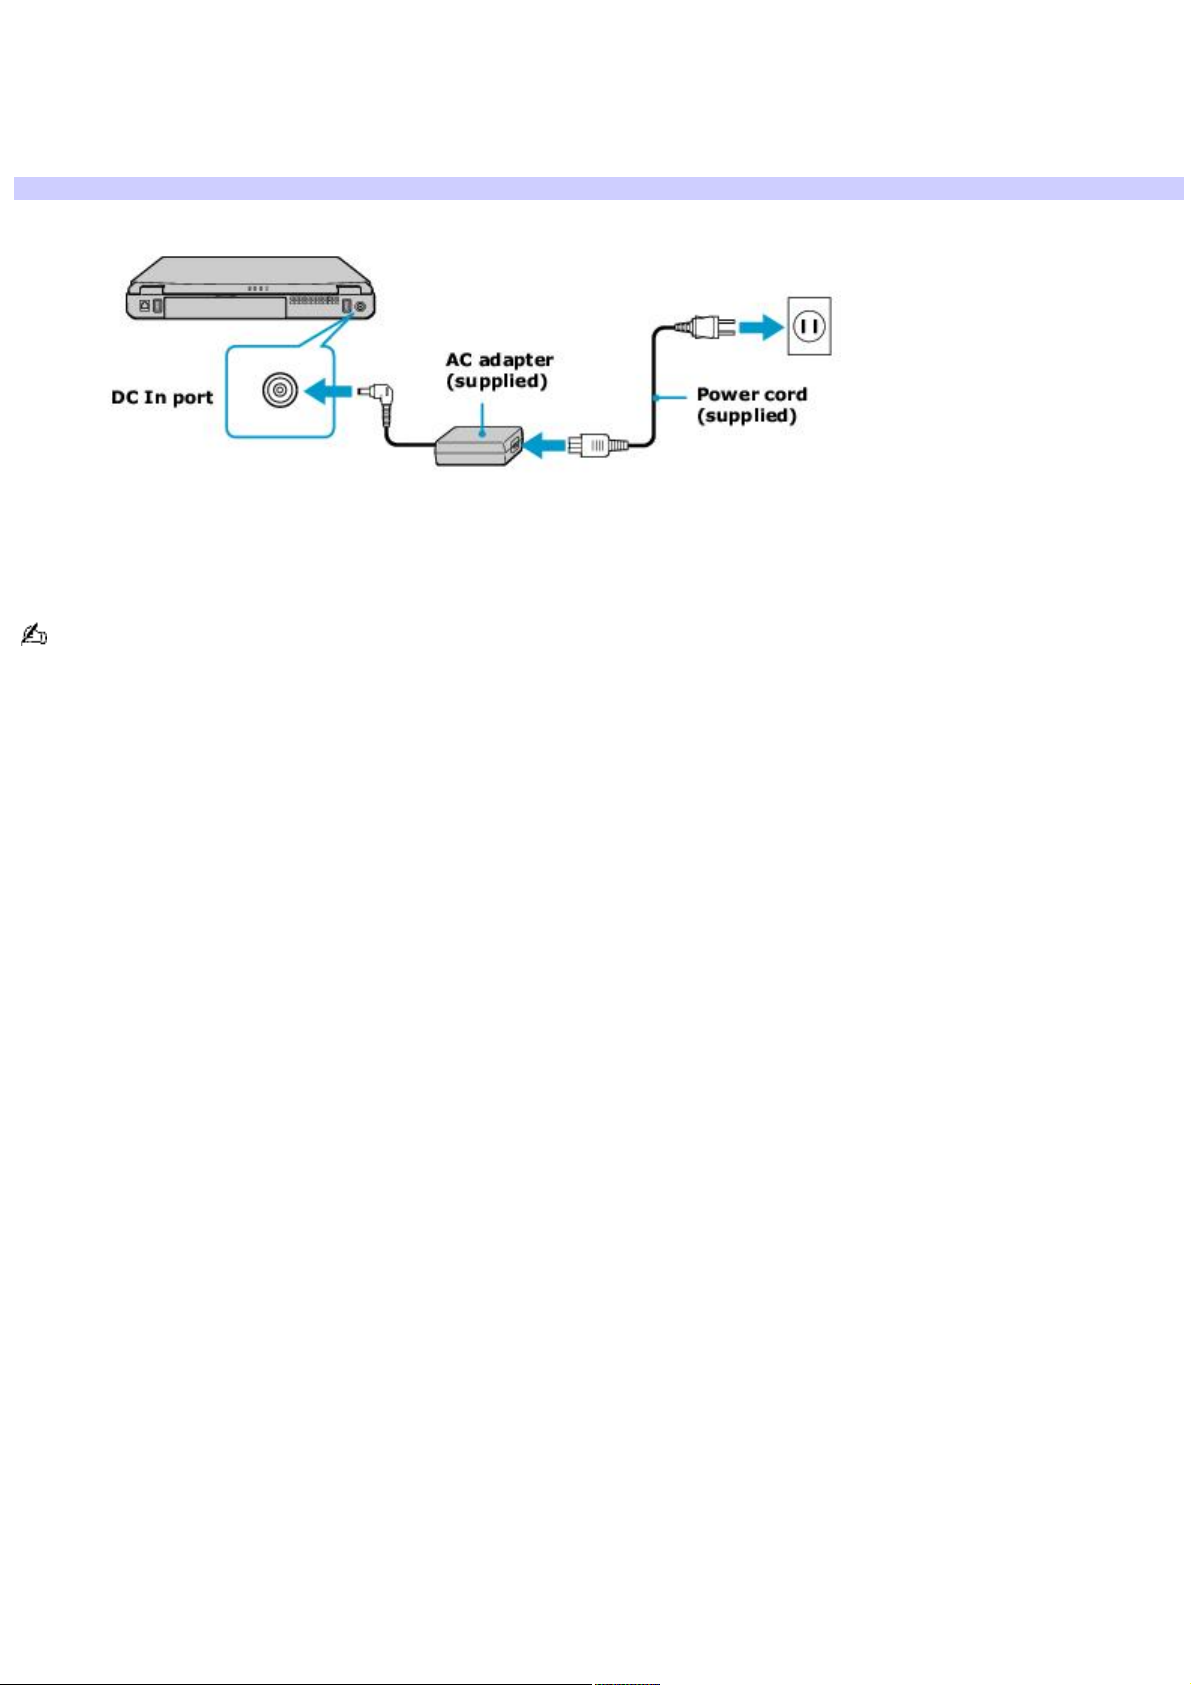
Connecting the AC adapter
To connect the AC adapter
1.
Plug the cable attached to the AC adapter into the DC In port on your computer or docking station.
Connecting the AC Adapter to the Computer
2.
Plug one end of the power cord into the AC adapter, and plug the other end into an AC outlet.
Use only the supplied AC adapter with your computer.
Page 4
Page 5
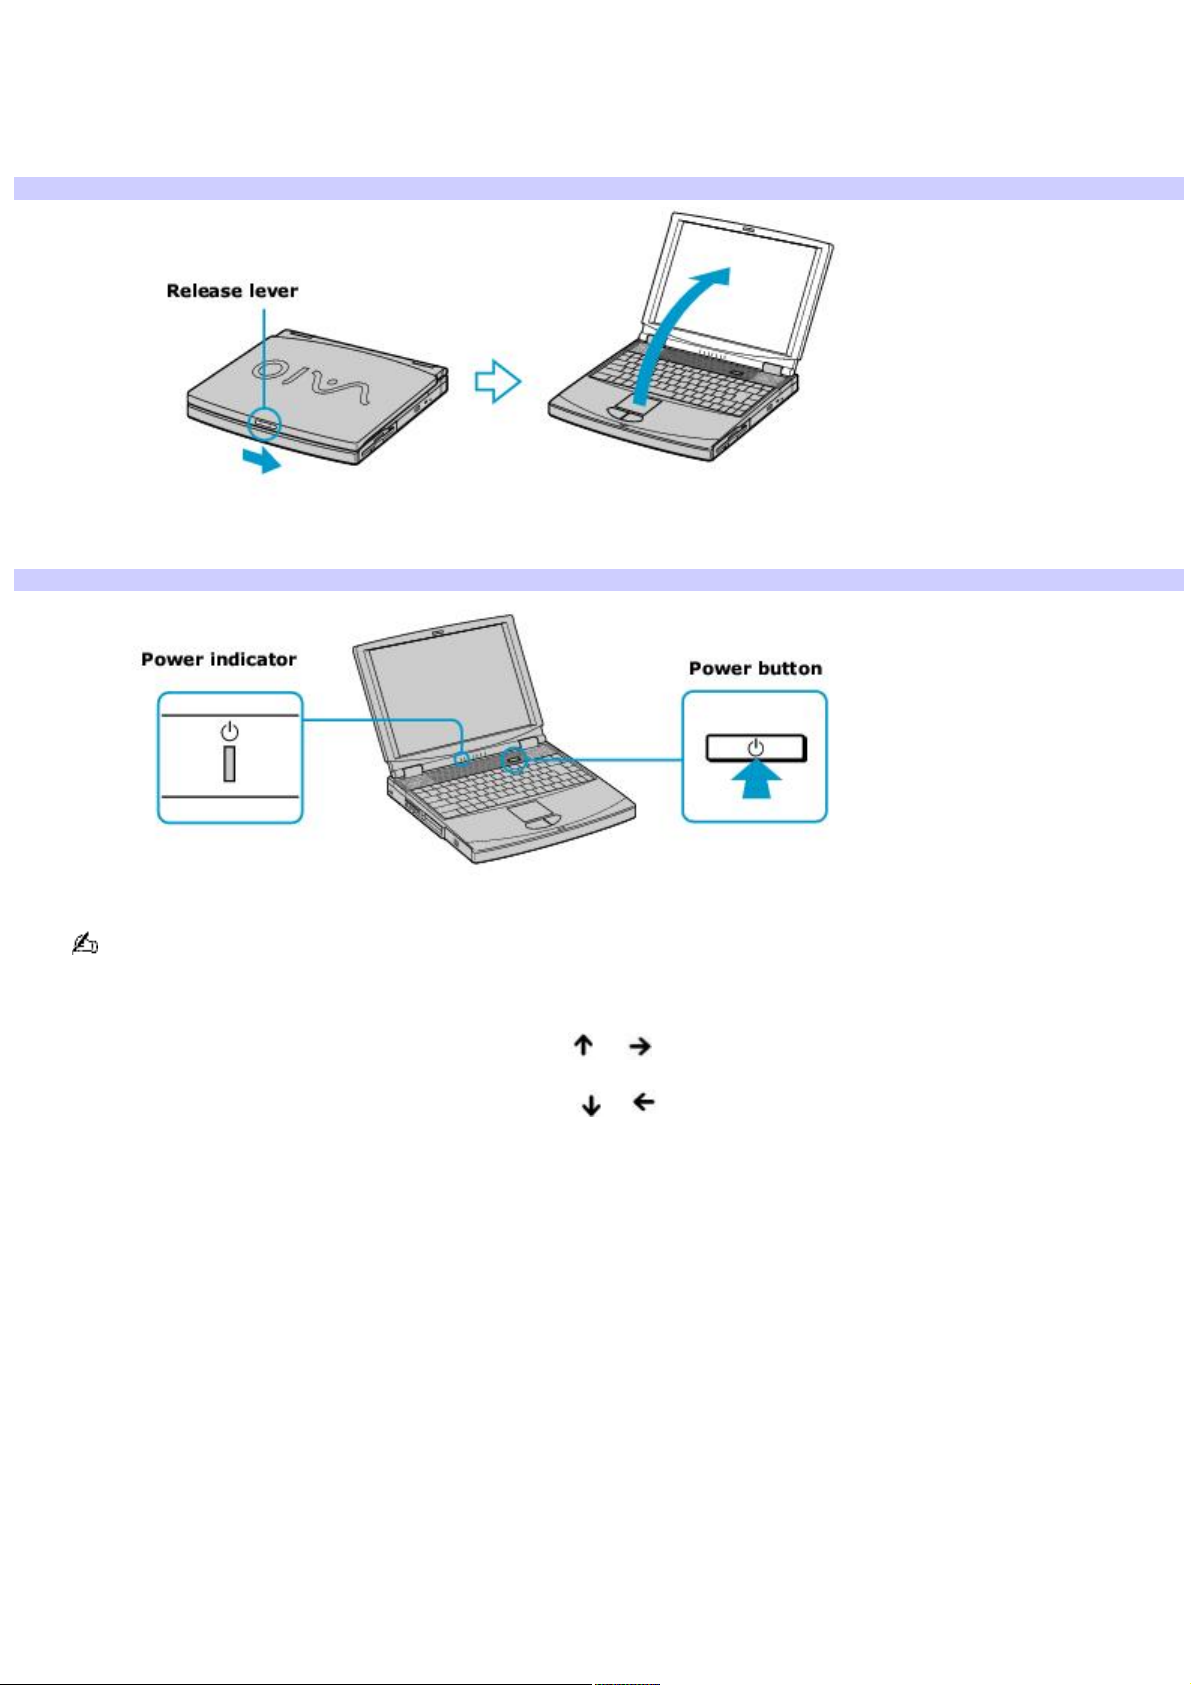
Turning on the computer
To turn on the computer
1.
Slide the release lever to the right, and lift the cover while holding the bottom of the computer firmly.
Opening the Computer
2.
Press the power button until the green power indicator lights up.
Turning on the Computer
If you hold the power button down for more than four seconds, the computer turns off.
3.
If necessary, adjust the brightness controls for the LCD display as follows:
To increase light intensity, press Fn+F5 and then or .
To decrease light intensity, press Fn+F5 and then or .
Page 5
Page 6

Using Batteries
A battery is an auxiliary power source you can use when your computer is not plugged into an AC outlet. Your computer
may come equipped with one or two battery bays, depending on the model you purchased. If your computer comes with
two battery bays, you can purchase a second rechargeable battery to extend your computing time. Regardless how many
batteries you use, you can always extend the life of the battery by conserving power. See Conserving Battery Power for
more information.
Inserting a battery
Removing a battery
Using a second battery
Displaying battery information
Charging a battery
Notes on batteries
Frequently asked questions
The battery that comes with your computer is not fully charged at the time of purchase.
Page 6
Page 7
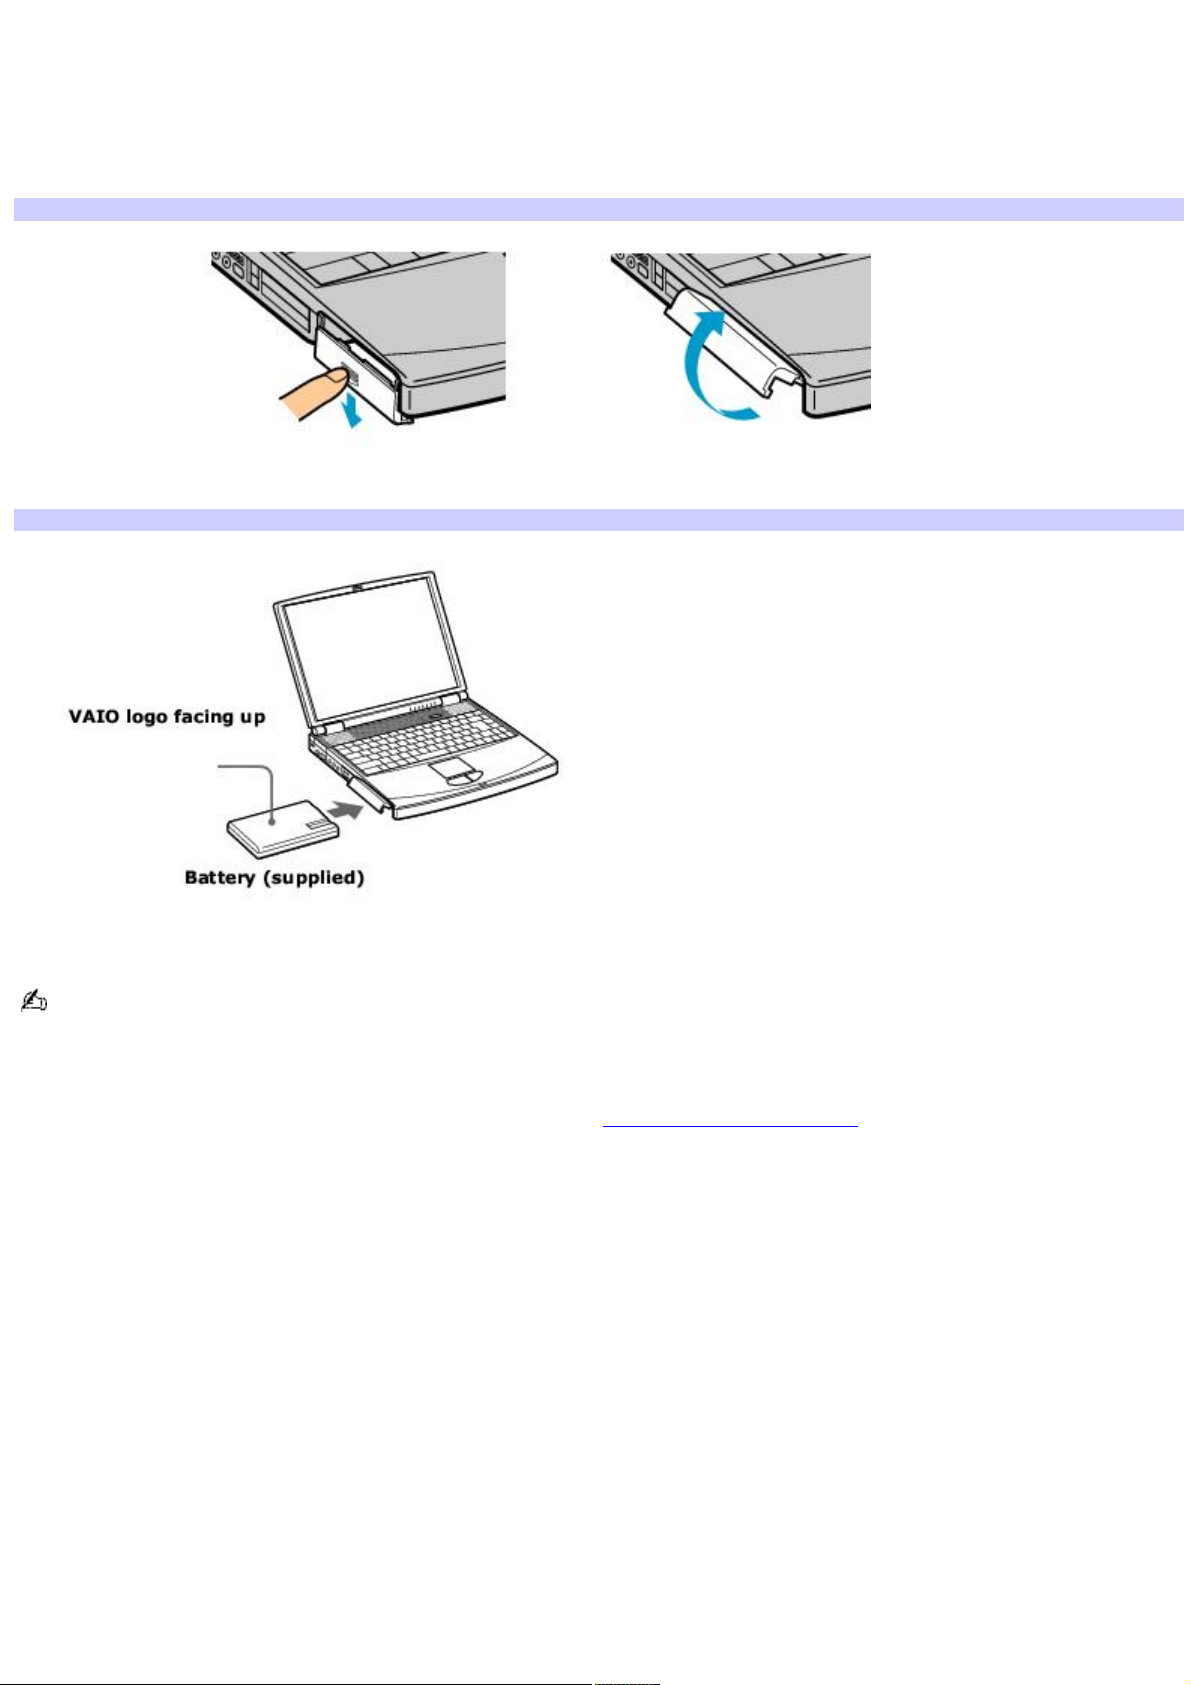
Inserting a battery
To insert a battery
1.
Push the battery bay cover down to open it. The battery bay cover swings out but does not detach from the
computer.
Opening the Battery Bay
2.
Slide the battery into the battery bay. If the computer is on, it automatically detects the battery.
Inserting a Battery
3.
Push the battery bay cover up until it clicks into place.
If the port replicator is attached to your computer, do not insert or remove the battery. Lifting and turning the
computer with the port replicator attached could cause a temporary loss of power.
For some software programs and some peripheral devices, your computer may not enter Hibernate mode when the battery
life is low. To avoid loss of data when using battery power, you should save your data frequently and manually activate a
power management mode, such as Standby or Hibernate. See Using power saving modes for more information.
Page 7
Page 8
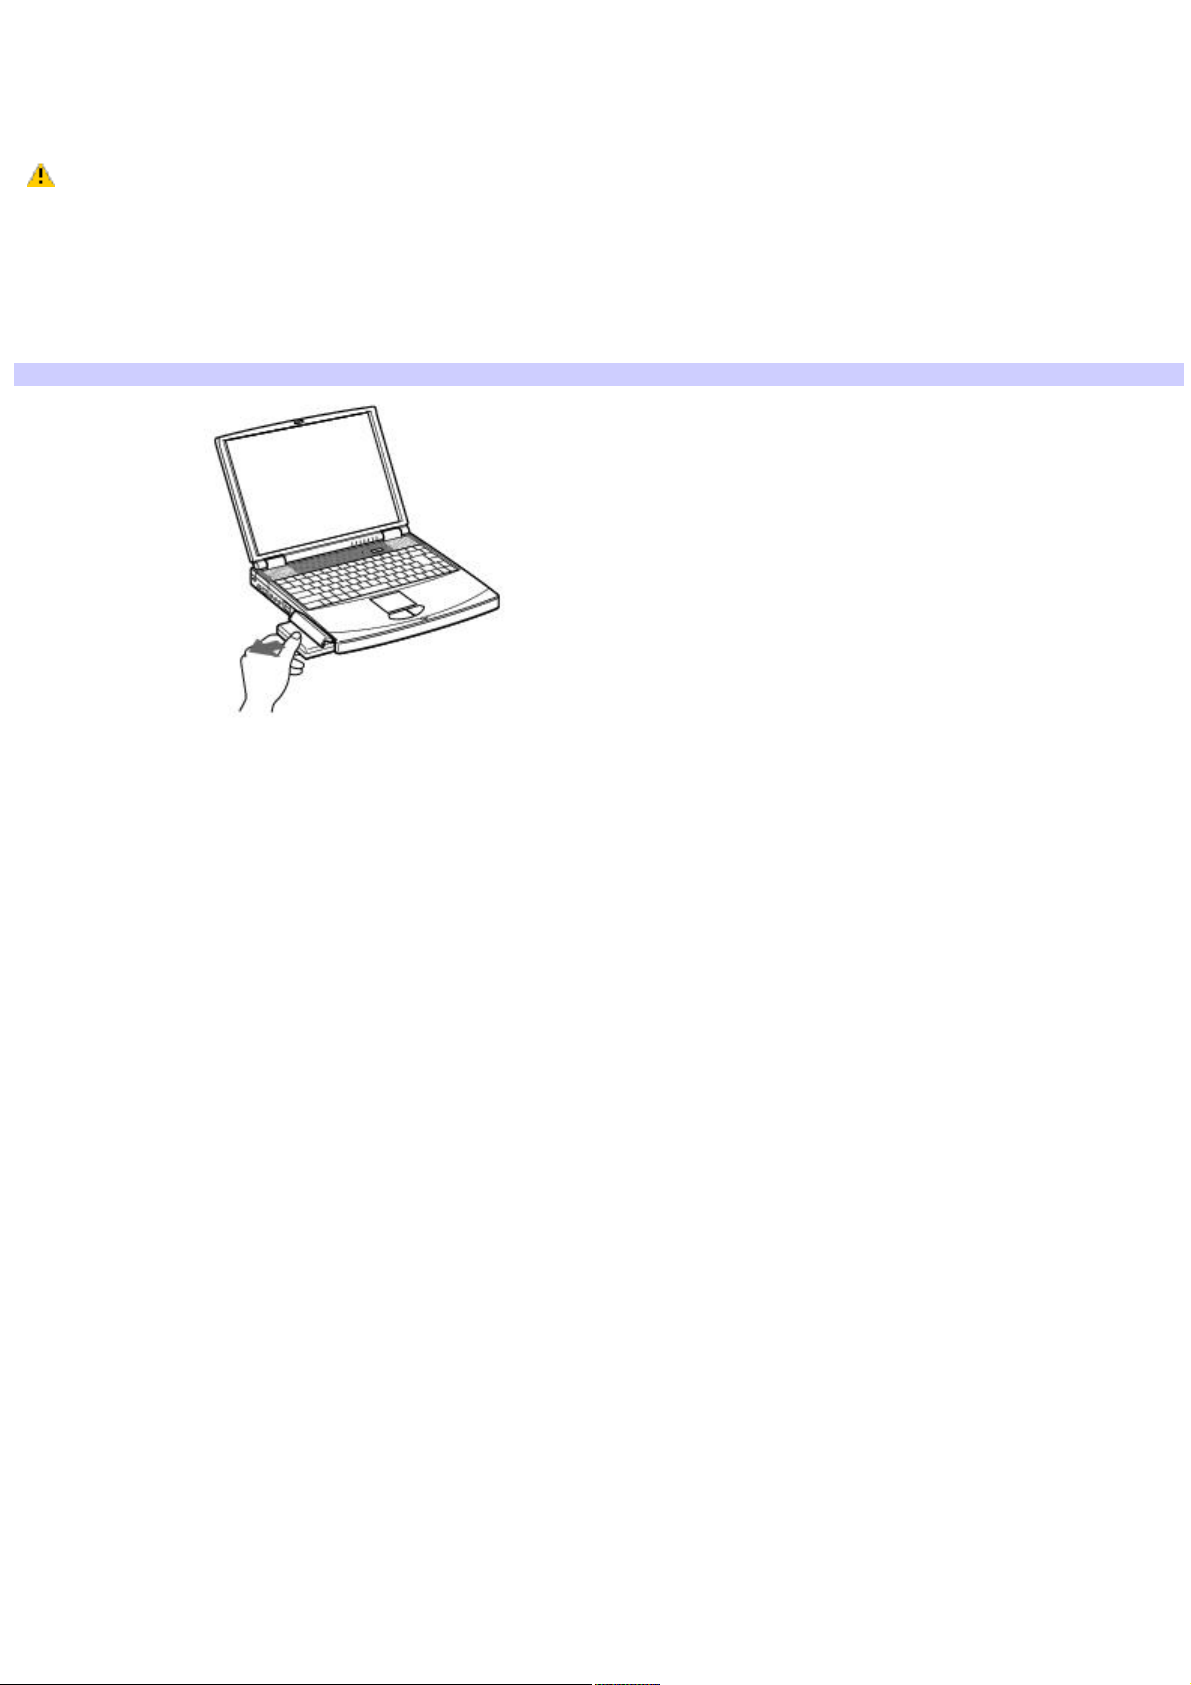
Removing a battery
If you are not using the computer for an extended period of time, remove the battery from the computer to avoid damaging
the battery. You can remove the battery when the computer is on or off.
If the computer is on, connect the AC adapter and exit a power saving mode before you remove the battery.
To remove a battery
1.
Push the battery bay cover down to open it.
2.
Pull the battery out of the battery bay.
Remov ing a Battery
3.
Push in and lift up the battery bay cover until it clicks into place.
Page 8
Page 9
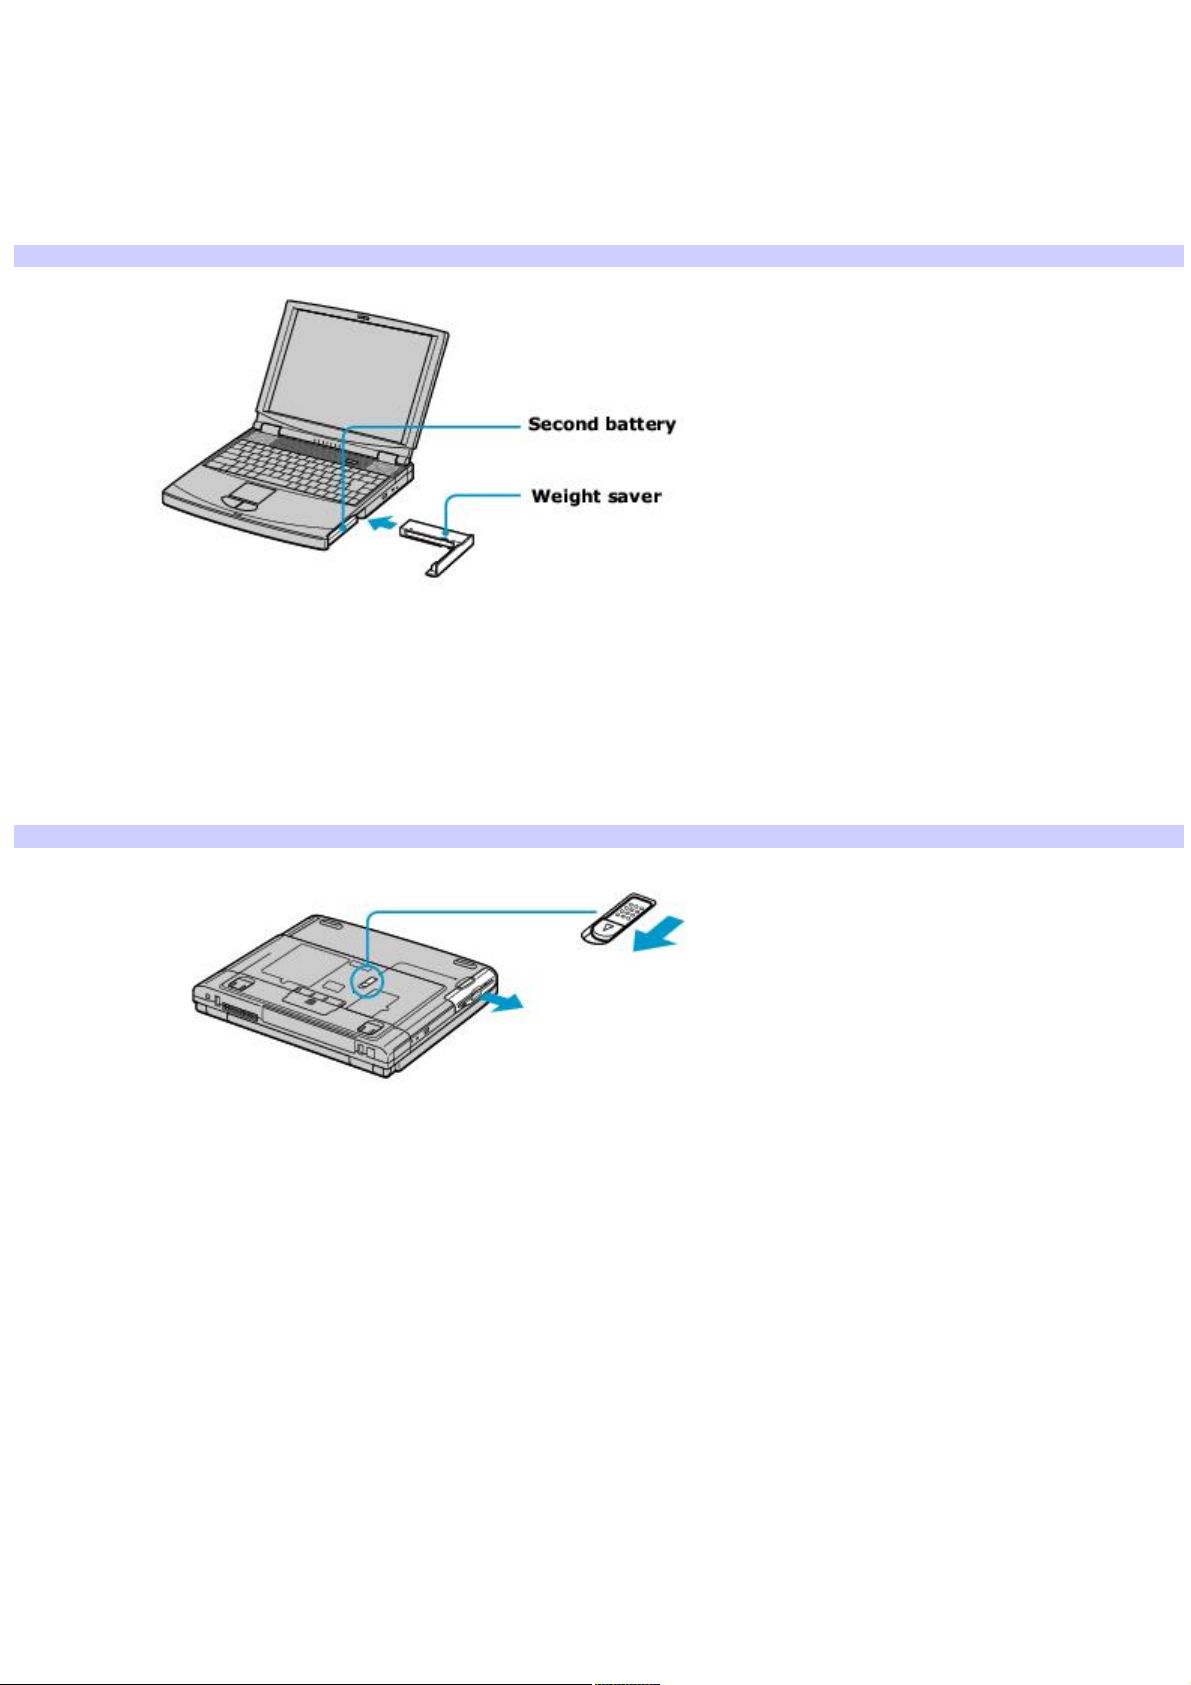
Using a second battery
To insert a second battery
1.
If another device is in the multipurpose bay, remove that device.
2.
Insert the battery into the multipurpose bay, and insert the weight saver. The battery 2 indicator turns on when
the computer uses that battery.
Second Battery in Multipurpose Bay
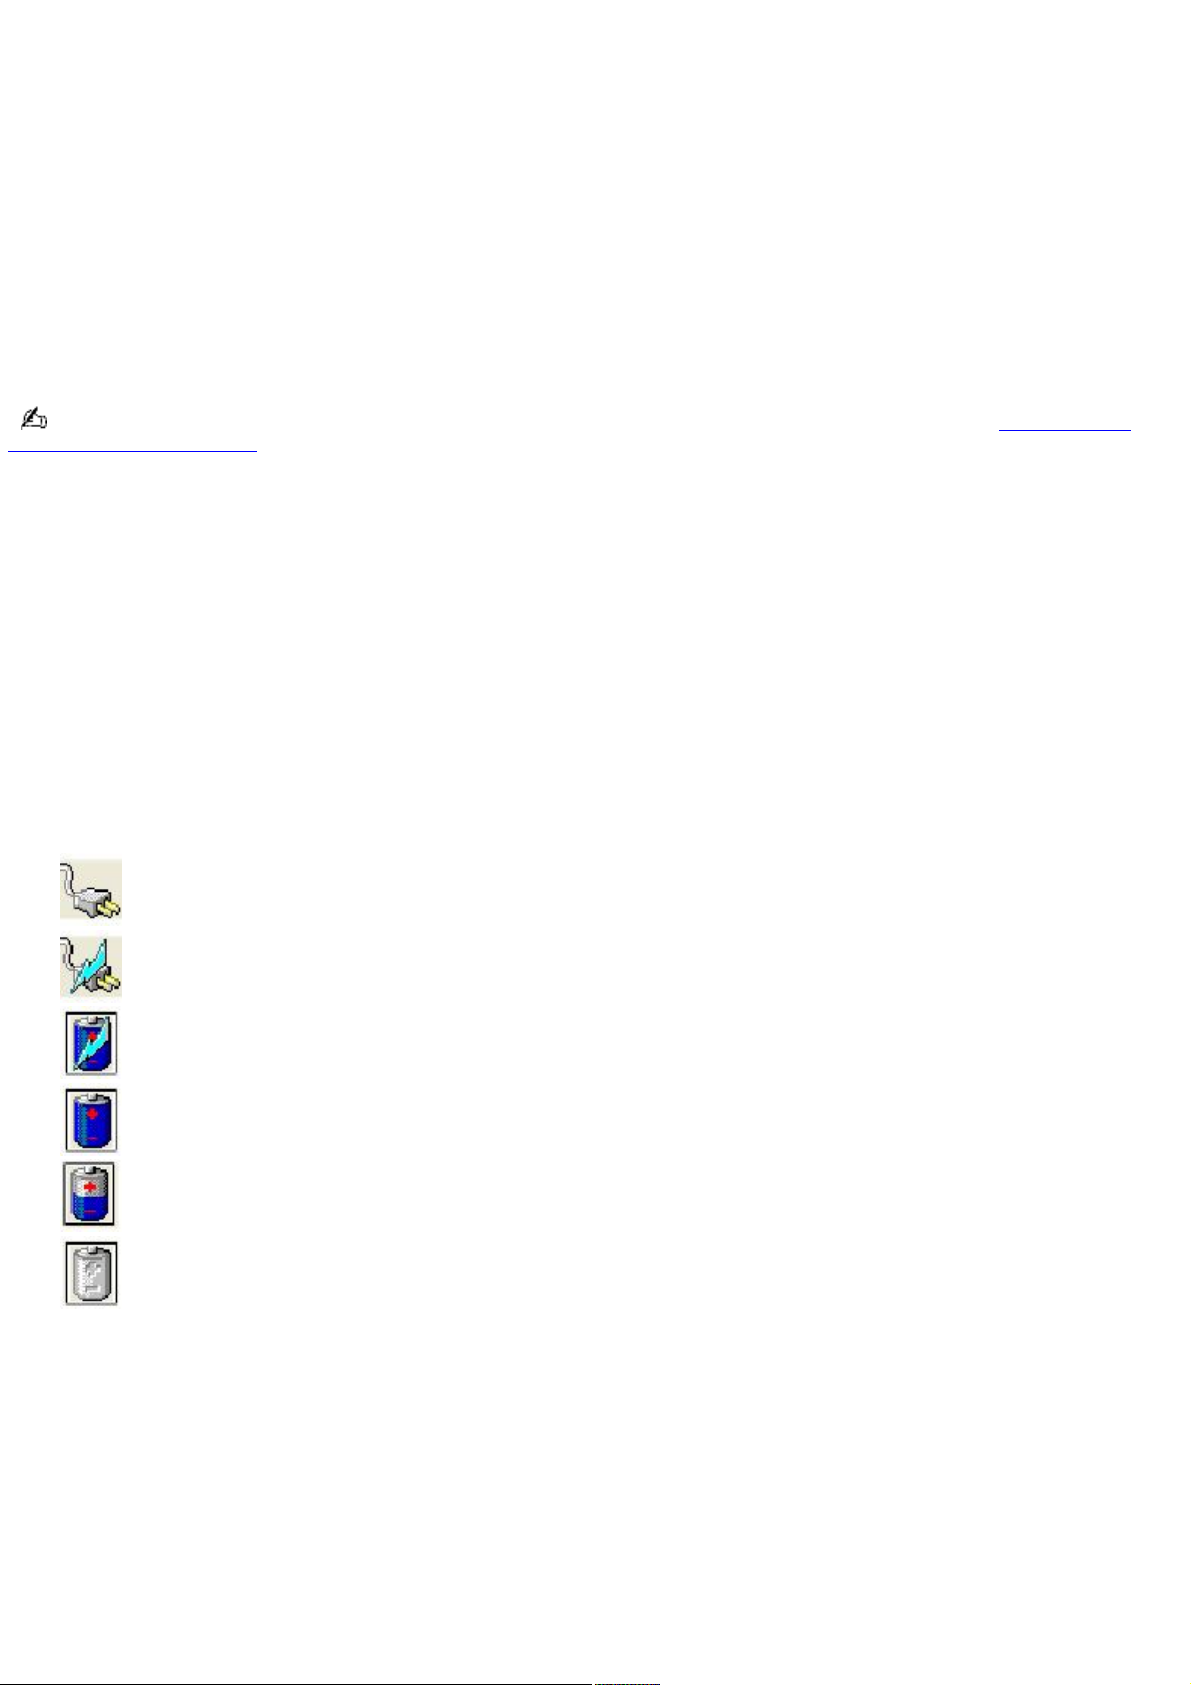
To remove the second battery
1.
Make sure the indicator of the battery you are not removing is on. If the indicator of the battery you are
removing is on, right-click the battery icon on the taskbar, and click Switch discharge battery.
2.
Turn the computer over, and slide the multipurpose bay Release lever in the direction of the arrow to unlock the
battery.
Multipurpose Bay Release Lever
3.
Pull the battery gently from the multipurpose bay. If the battery was installed with the weight saver, pull the
weight saver and battery from the multipurpose bay.
4.
Insert the weight saver into the multipurpose bay to protect the bay.
Page 9
Page 10
Displaying battery information
You can display information for each of the batteries installed in your computer.
To display battery information
1.
Click Start on the Windows® taskbar, and click Control Panel.
2.
Click Performance and Maintenance, and click Power Options. The Power Options Properties window
appears.
3.
Select the Power Meter tab. The total remaining battery charge is listed as a percentage. If your computer
comes with more than one battery, you have the option of viewing information on both batteries or just the
primary battery.
You may also use the power icon on the Windows® taskbar to quickly view battery information. See To display the
power icon on the taskbar for instructions on how to set up this shortcut.
To display the power icon on the taskbar
1.
Click Start on the Windows® taskbar, and click Control Panel.
2.
Click Performance and Maintenance, and click Power Options. The Power Options Properties window
appears.
3.
Select the Advanced tab, and then select Always show icon on the taskbar in the Options box. The power icon
appears on the taskbar. See the power icon descriptions for more information.
You can rollover the power icon to view the remaining battery charge, and you can double-click the power icon to
open the Power Meter window, which also displays the remaining battery charge.
Power icon Power status
Computer is using AC power.
Computer is using AC power and charging the battery.
Battery is charging.
Battery is fully charged.
Battery is discharging.
No battery is inserted in the computer.
Page 10
Page 11
Charging a battery
You will need to charge the battery if battery power drops below 10 percent or you have not used the battery for a
considerable amount of time. The lithium-ion battery supplied with your computer may be recharged at any time, whether
you wait until the battery is completely or partially discharged. Charging a partially discharged battery does not affect
battery life. If you charge the battery and find that battery power is still low, the battery may be reaching the end of its life,
and you may need to replace it.
The battery supplied with your computer is not charged at the time of purchase.
To charge a battery
You can charge the battery when the computer is on or off. However, the battery will charge faster when the computer is
off. Charging the battery takes several hours. See your VAIO® Computer Specifications for the approximate time needed to
charge your battery.
Charge the batteries at temperatures between 50°F and 80°F (10°C to 30°C). Lower temperatures require a longer
charging time.
1.
Insert the battery into the battery bay. If you want to charge more than one battery, insert the second battery
into the computer. See Inserting a battery for more information.
2.
Connect the AC adapter to the computer. The computer automatically charges the battery as long as the
computer is using AC power.
The battery indicator blinks in a double pattern while the battery charges. The battery indicator stops blinking when the
battery is 85 percent full. To ensure the battery is 100 percent full, continue charging it for at least an additional hour after
the indicator stops blinking.
When using two batteries, the battery you insert first charges first. The second battery you insert begins charging
when the first battery is 85 percent full.
Battery Indicator
Battery Indicator Status Description
On The computer is using battery power.
Single blink The battery is running out of power.
Double blink The battery is charging.
Off The computer is using AC power.
Page 11
Page 12

Notes on batteries
Never leave the battery in temperatures above 140° F (60° C), such as under direct sunlight or in a car parked in
the sun.
While the battery is in use or being discharged, the battery heats up. This is normal and is not cause for concern.
Keep the battery away from all sources of heat.
Keep the battery dry.
Do not open or disassemble the battery.
Do not expose the battery to any mechanical shock.
Battery life is shorter in a cold environment because of decreased battery efficiency at low temperatures.
Page 12
Page 13

Frequently asked questions
How do I know when the battery is charged?
To determine the remaining battery charge, see "Displaying Battery Information" in the online VAIO® Computer User Guide
for more information.
When is the computer using AC power?
When the computer is directly connected to the AC adapter, it uses AC power, even if a battery is installed.
When should I recharge the battery?
When the battery level falls below 10 percent.
When both the battery and power indicators blink.
When you have not used the battery for a considerable amount of time.
Page 13
Page 14

Conserving Battery Power
You may use the power saving modes and power schemes to conserve battery power. Conserving battery power may
significantly extend your computing time, depending on how you use your computer.
Using power saving modes
Using power schemes
Frequently asked questions
Page 14
Page 15

Using power saving modes
In addition to the normal operating mode, which allows you to turn off specific devices, your computer has two distinct
power saving modes: Standby and Hibernate. You can use the Standby and Hibernate power saving modes to override a
profile setting or initiate an immediate action.
Standby — Saves the state of the system and peripheral devices in memory (RAM). Power consumption reduces to a
minimum, and the system remains on.
Hibernate — Saves the state of the system and peripheral devices in the Save to Disk Partition on the hard disk
and power is turned off. Power consumption reduces to a minimum, and the system is turned off. Hibernate mode
consumes the lowest level of power. The computer automatically enters Hibernate mode when the remaining
battery charge drops below 5 percent, regardless of the setting you select.
To activate Standby mode
1.
Press the key combination Fn+Esc or Fn+F12. The amber power indicator flashes in this mode.
2.
Press any key to return to Normal mode.
To activate Hibernate mode
1.
Press the power button and release it immediately. Do not move the computer until the power indicator turns
off.
2.
Press the power button to return to normal mode.
If the computer does not activate Hibernate mode, see Frequently asked questions for more information.
Page 15
Page 16

Using power schemes
You can use the preset power schemes or you can customize the power scheme settings to conserve power. By using the
power schemes, you control the power supplied to different devices in your computer, such as the LCD screen and the hard
disk drive. You also control when the computer activates a power saving mode (Standby or Hibernate).
To set your battery alarm
You can set your computer to notify you when your battery charge reaches a certain level.
1.
Click Start on the Windows® taskbar, and click Control Panel.
2.
Click Performance and Maintenance, and click Power Options. The Power Options Properties window
appears.
3.
Select the Alarms tab, and then select the type of alarm you want the computer to activate: a low battery alarm
or a critical battery alarm.
4.
Drag the slider to the battery level at which you want the computer to activate the alarm. The Low battery
alarm is set to 10 percent, and the Critical battery alarm is set to 3 percent by default.
To further customize your alarm settings, click Alarm Action. Here, you can select the type of alarm you want the
computer to activate and how you want the computer to respond to the alarm.
To select a power scheme
1.
Click Start on the Windows® taskbar, and click Control Panel.
2.
Click Performance and Maintenance, and click Power Options. The Power Options Properties window appears
with the Power Schemes tab selected.
3.
Select a power scheme from the drop-down power schemes list. Each power scheme is preset to utilize your
power supply efficiently, according to your computing functions. Select the power scheme that best explains how
you want to use your computer.
4.
Click Apply. The computer detects your changes.
To create a power scheme
1.
Click Start on the Windows® taskbar, and click Control Panel.
2.
Click Performance and Maintenance, and click Power Options. The Power Options Properties window appears
with the Power Schemes tab selected.
You can also right-click the power icon on the Windows® taskbar, and select Adjust Power Properties to open
the Power Options Properties window.
3.
Select your changes from the drop-down lists in the Settings for....power scheme box, and click Save As in the
Power schemes box. The Save Scheme window appears.
4.
Type a name for your customized power scheme, and click OK. The power scheme you created appears in the
Power schemes box.
If you want to delete a power scheme, select the power scheme and click Delete. When the Delete Scheme window
appears, click Yes.
To customize your power properties
1.
Click Start on the Windows® taskbar, and click Control Panel.
2.
Click Performance and Maintenance, and click Power Options. The Power Options Properties window
appears.
If you want to access the power scheme information quickly from the Windows® taskbar, see To display the
power icon on the taskbar for more information.
Page 16
Page 17

3.
Select the Advanced tab, and select your changes from the drop-down lists in the Power buttons box. See
Frequently asked questions for information on how Standby and Hibernate modes affect power consumption.
4.
Click Apply. The computer detects your changes.
To activate Hibernate mode, you must first enable the Hibernate mode. See To activate Hibernate mode for more
information.
Page 17
Page 18

Frequently asked questions
Can my computer enter Hibernate mode while using battery power?
For some software programs and some peripheral devices, your computer may not enter Hibernate mode when the battery
life is low. To avoid loss of data when using battery power, you should save your data frequently and manually activate a
power management mode, such as Standby or Hibernate.
When should I replace the battery?
If, after fully charging the battery, the battery power is still low, the battery may be reaching the end of its life and should
be replaced.
Why is the battery warm?
While the battery is in use or being discharged, the battery heats up. This is normal and is not cause for concern.
Page 18
Page 19

Internet and Network Connections
Internet Connections
Network Connections
Connecting another VAIO Computer
Page 19
Page 20

Internet Connections
This section describes the basic steps for setting up your dial-up or Ethernet connection to the Internet. The New
Connection Wizard guides you through the process of connecting to the Internet and choosing an Internet service provider
(ISP) or setting up an existing account. When you connect to the Internet, you can register your VAIO® computer, use online
services, and gain access to Sony Computing Support.
Setting up a dial-up Internet connection
Setting up an Ethernet Internet connection
Customizing your Internet connection
Frequently asked questions
Page 20
Page 21
Setting up a dial-up Internet connection
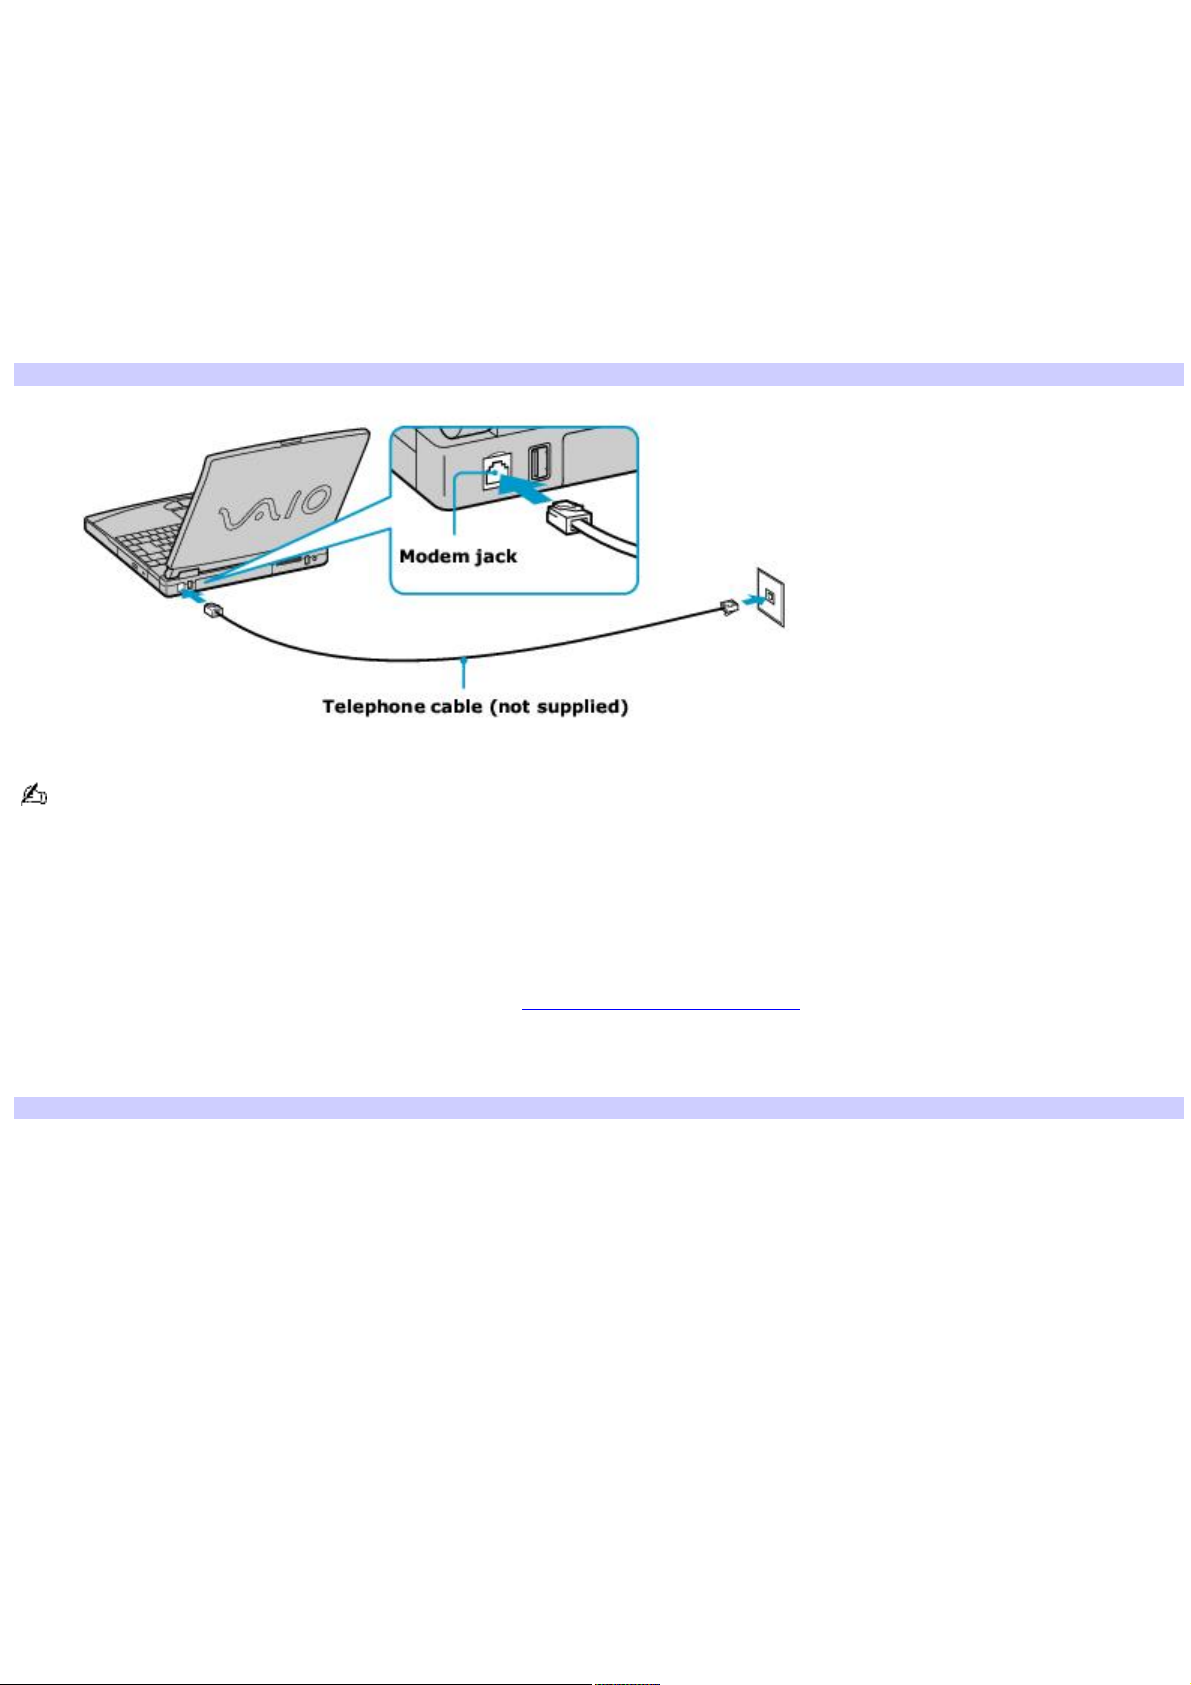
Before you can connect to the Internet, you need to connect your computer to a telephone jack via a telephone cable (not
supplied). Once you have set up your telephone cable, you're ready to connect to the Internet.
To connect a telephone cable
1.
Locate the Modem jack on your computer. For location information, see Locating Ports and Controls in the Setting
Up chapter of your printed VAIO® Computer Quick Start guide.
2.
Plug one end of the telephone cable into the Modem jack. Make sure it clicks into place.
3.
Plug the other end into the wall jack.
Connecting a Telephone Cable
Your computer does not work with party lines, cannot be connected to a coin-operated telephone, and may not
work with multiple telephone lines or a private branch exchange (PBX). Some of these connections may result in excess
electrical current and could cause a malfunction in the internal modem.
If you connect a telephone cable coming through a splitter, the modem or connected device may not work properly.
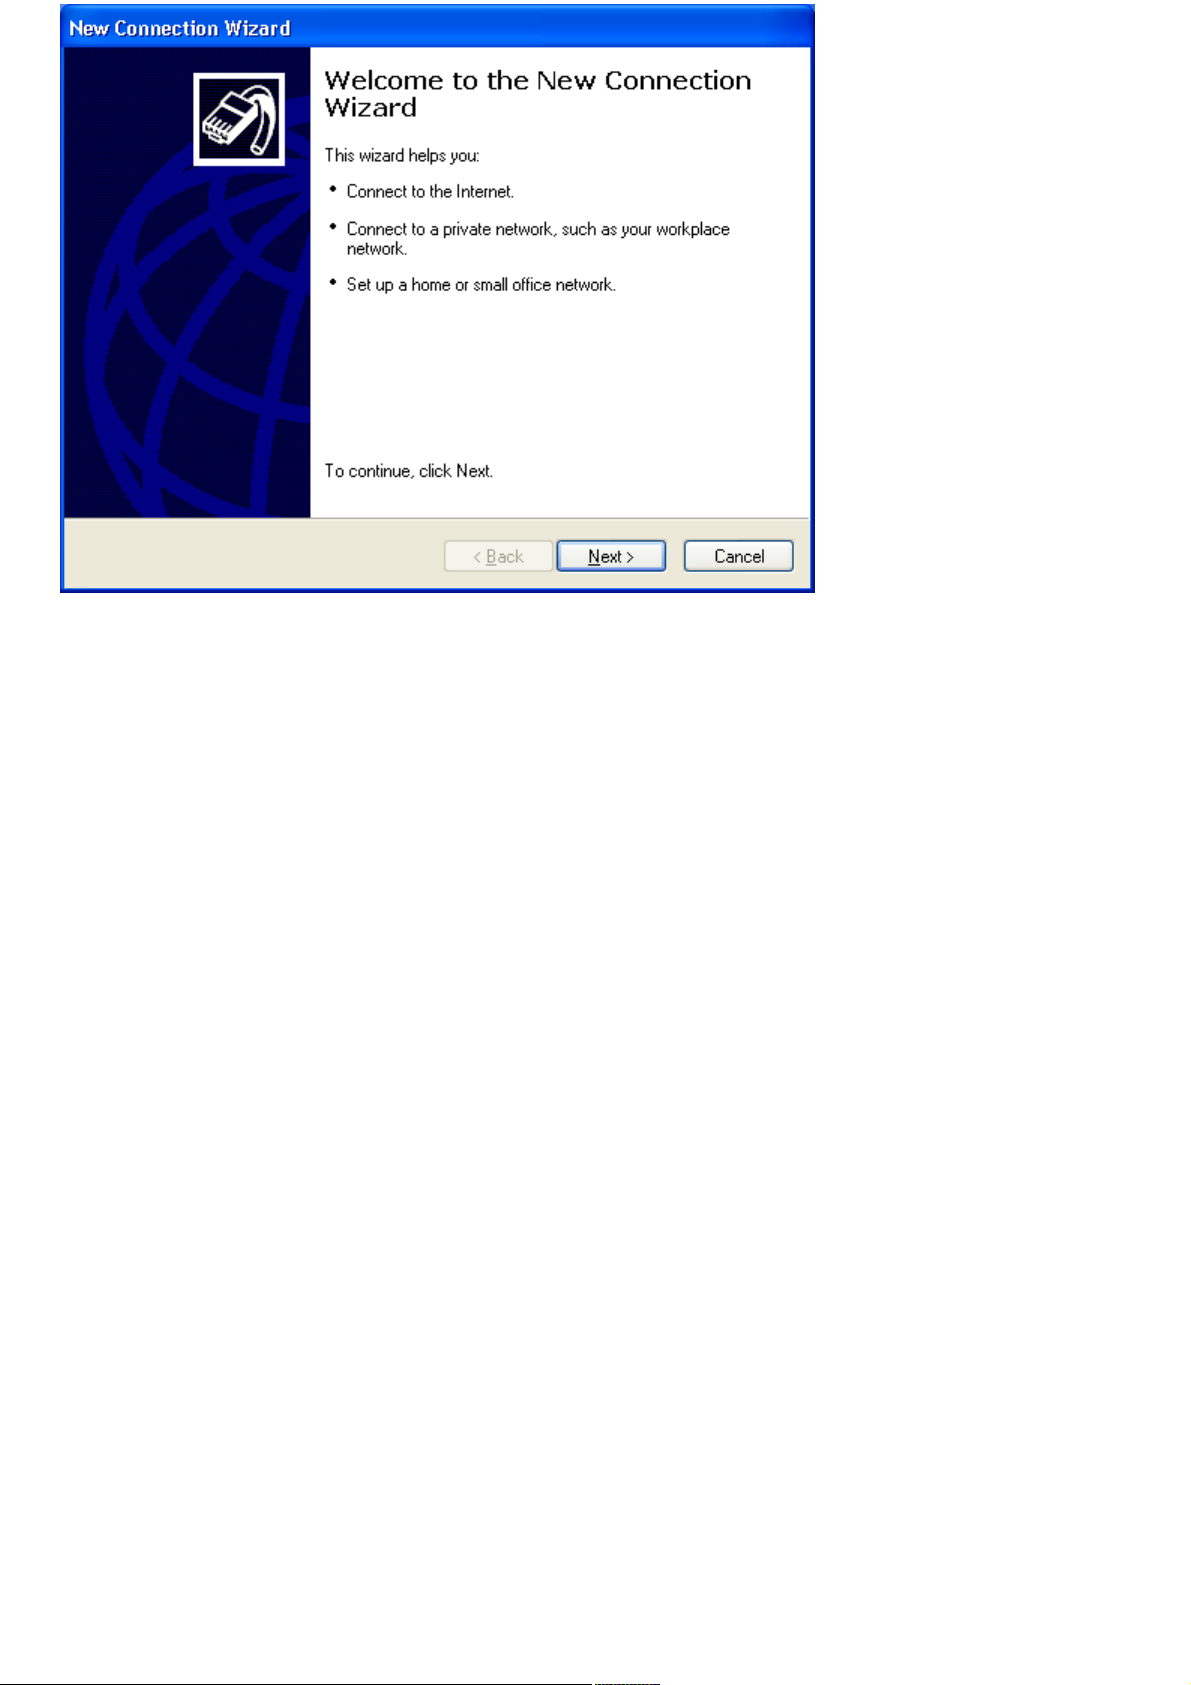
To set up a dial-up connection to the Internet
1.
Connect your computer to a telephone jack. See To connect a telephone cable for more information.
2.
Click Start, point to All Programs, Accessories, Communications, and click New Connection Wizard. The New
Connection Wizard appears.
The New Connection Wizard
Page 21
Page 22

3.
Click Next.
4.
If it is not already selected, click to select Connect to the Internet, and click Next.
5.
Follow the on-screen instructions.
Page 22
Page 23
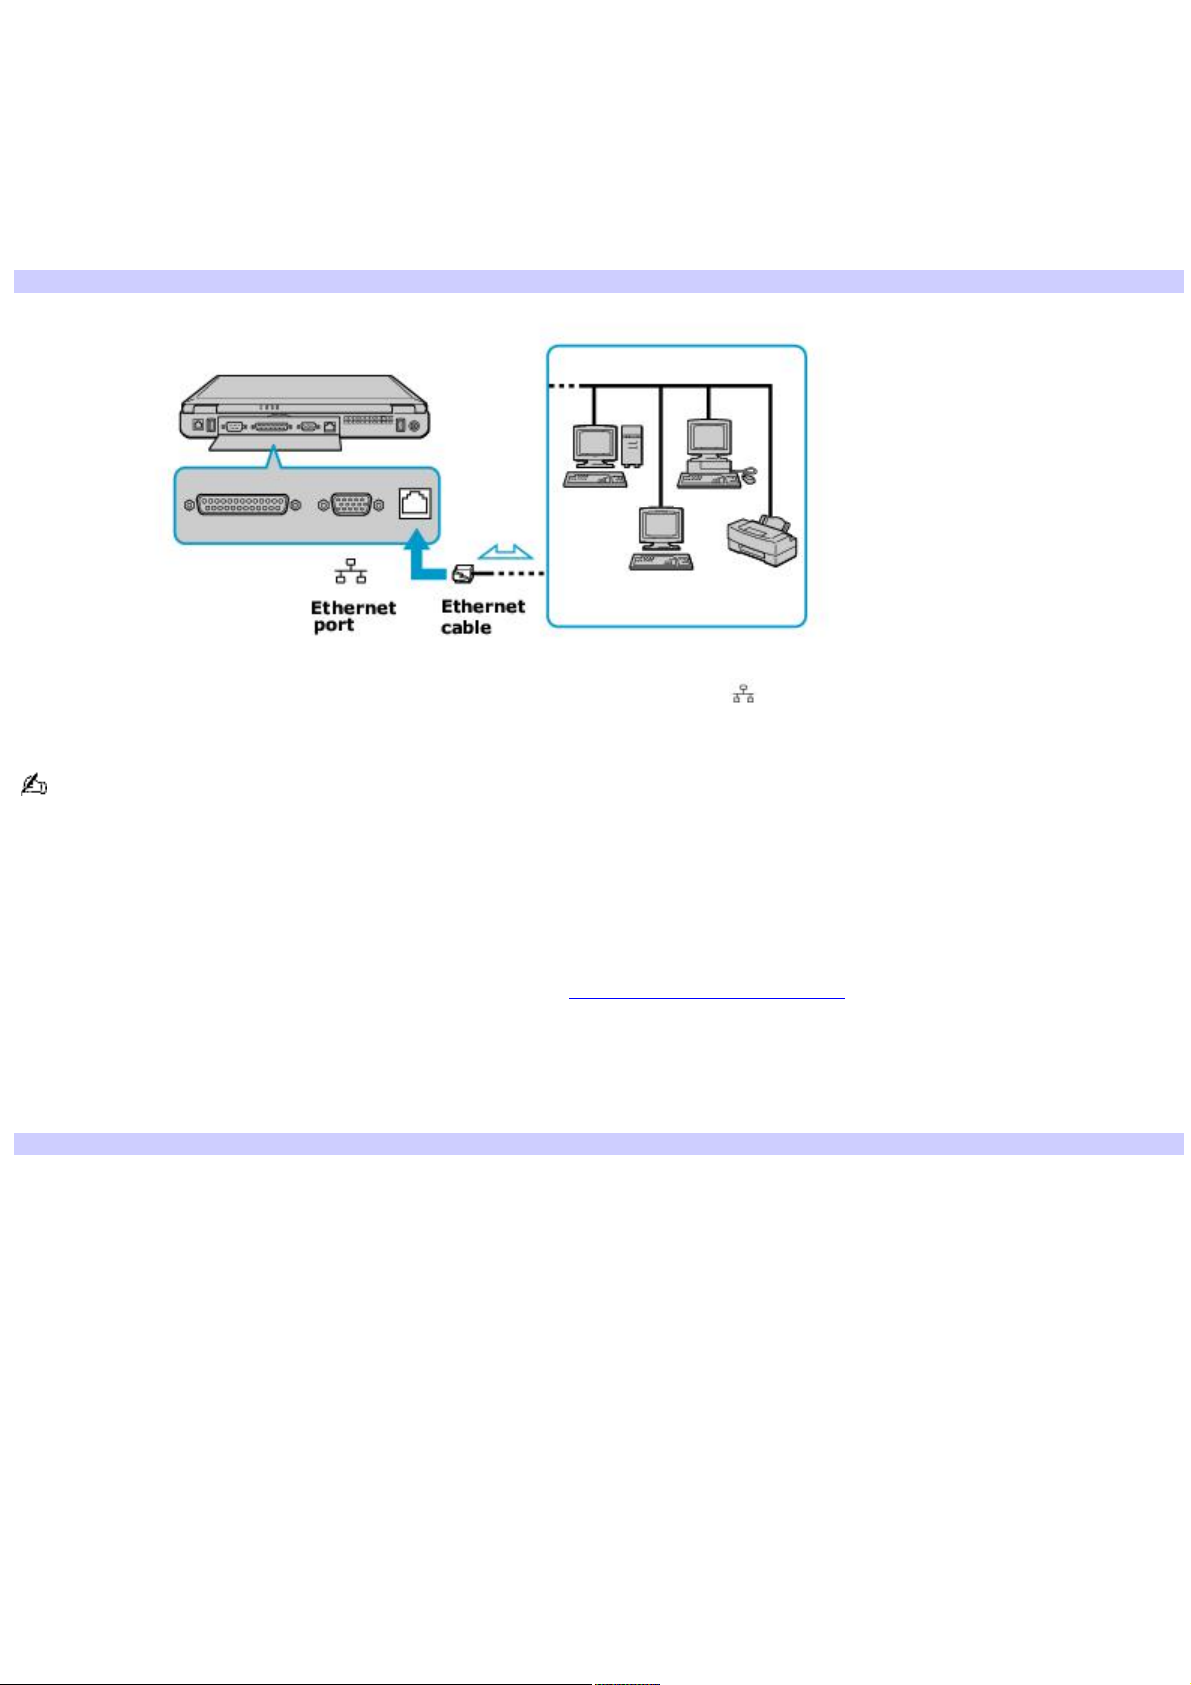
Setting up an Ethernet Internet connection
Your computer accommodates both 10BASE-T and 100BASE-TX Ethernet connections, with data transfer speeds of between
10 and 100 Mbps, depending on the line conditions and Ethernet cable.
To connect an Ethernet cable
1.
Locate the Ethernet port on your computer. For location information, see Locating Ports and Controls in the
Setting Up chapter of your printed VAIO® Computer Quick Start guide.
Connecting an Ethernet Cable
2.
Plug one end of the Ethernet cable into your computer's Ethernet port and the other into the network
connection.
Your computer does not work with party lines, cannot be connected to a coin-operated telephone, and may not
work with multiple phone lines or a private branch exchange (PBX). Some of these connections may result in excess
electrical current and could cause a malfunction in the internal modem.
If you connect a telephone cable via a splitter, the modem or connected device may not work properly.
To set up an Ethernet connection to the Internet
1.
Connect your computer to a network connection. See To connect an Ethernet cable for more information.
2.
Click Start, point to All Programs, Accessories, Communications, and click New Connection Wizard. The New
Connection Wizard appears.
3.
The Location Information window may appear on the screen as well. Follow those instructions as necessary.
The New Connection Wizard
Page 23
Page 24
4.
Click Next.
5.
If it is not already selected, click to select Connect to the Internet, and click Next.
6.
Follow the on-screen instructions.
Page 24
Page 25

Customizing your Internet connection
The Internet Properties dialog box enables you to change the way you view the Internet. You can change your home page,
fonts, language, and colors. You can also regulate content and set your browsing preferences.
To open the Internet Properties dialog box
1.
Click Start on the Windows® taskbar, and then Control Panel.
2.
Click Network and Internet connections, and then Internet Options. The Internet Properties dialog box
appears.
Page 25
Page 26

Frequently asked questions
Why doesn't my modem work?
Make sure the telephone cable is plugged into the cable jack. See To connect a telephone cable for more
information.
Make sure the telephone cable is working by plugging the cable into an ordinary telephone and listening for a dial
tone.
Make sure the telephone number the program is dialing is correct.
Make sure the software you are using is compatible with the computer's modem. (All preinstalled Sony programs are
compatible.)
If you are still experiencing problems, use the supplied Application Recovery CD(s) to reinstall the modem drivers.
See Using the Application Recovery CD(s) for more information.
Why is my modem connection slow?
Your computer is equipped with a V.90 compatible modem. Many factors may influence modem connection speed, including
telephone line noise or compatibility with telephone equipment, such as fax machines or other modems. If you think your
modem is not connecting properly to other PC-based modems, fax machines, or your Internet Service Provider (ISP), follow
these steps:
Ask your telephone company to verify your telephone line is free of any line noise.
If your problem is fax-related, make sure there are no problems with the fax machine you are calling and that it is
compatible with fax modems.
If you are having a problem connecting with your ISP, make sure the ISP is not experiencing technical problems.
If you have a second telephone cable available, try connecting the modem to that cable.
Page 26
Page 27
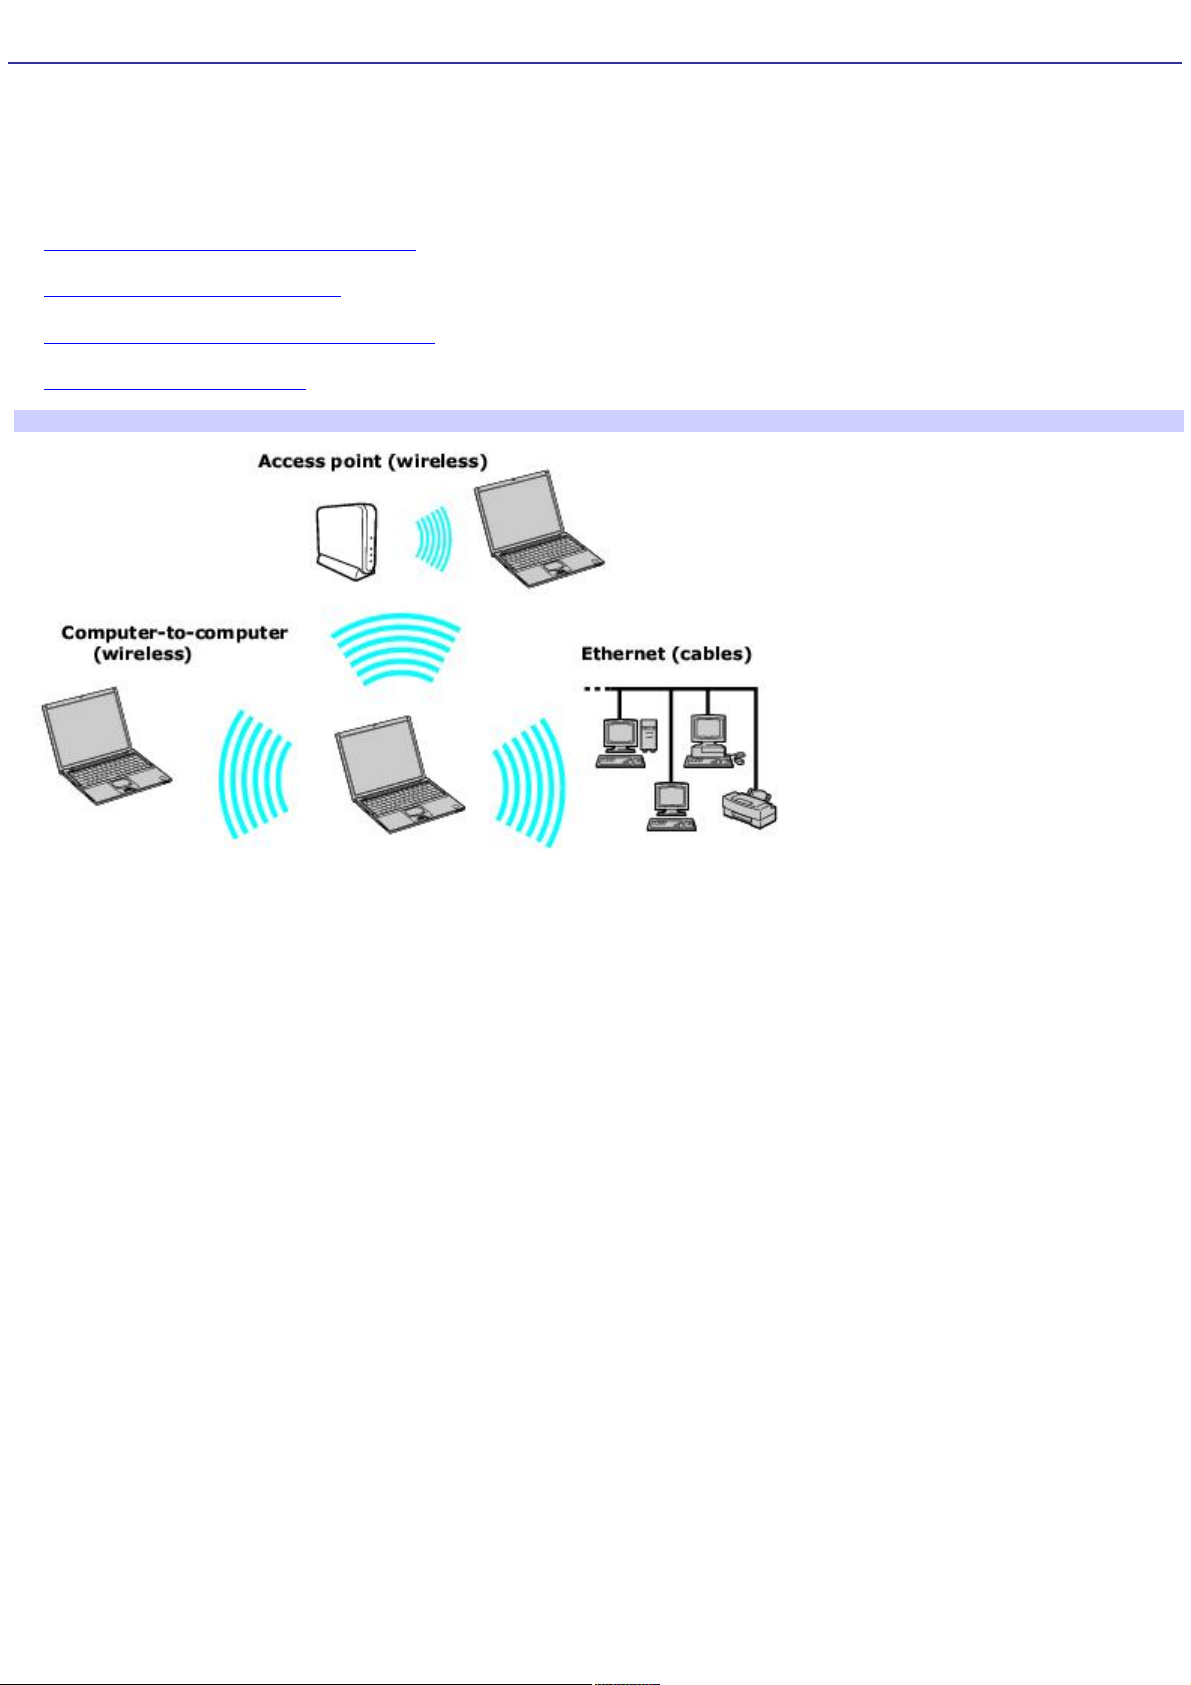
Network Connections
With a Sony computer, you can easily set up or connect to a variety of networks. The New Connection Wizard and Network
Setup Wizard make it easy to gain access to remote and local area networks (LANs) using wireless, Ethernet, or dial-up
connections.
For more information about networking, click Start, Help and Support, and then Networking and the Web.
Using Ethernet and dial-up connections
Using wireless LAN connections
Checking your network connection status
Frequently asked questions
Types of Networks
Page 27
Page 28
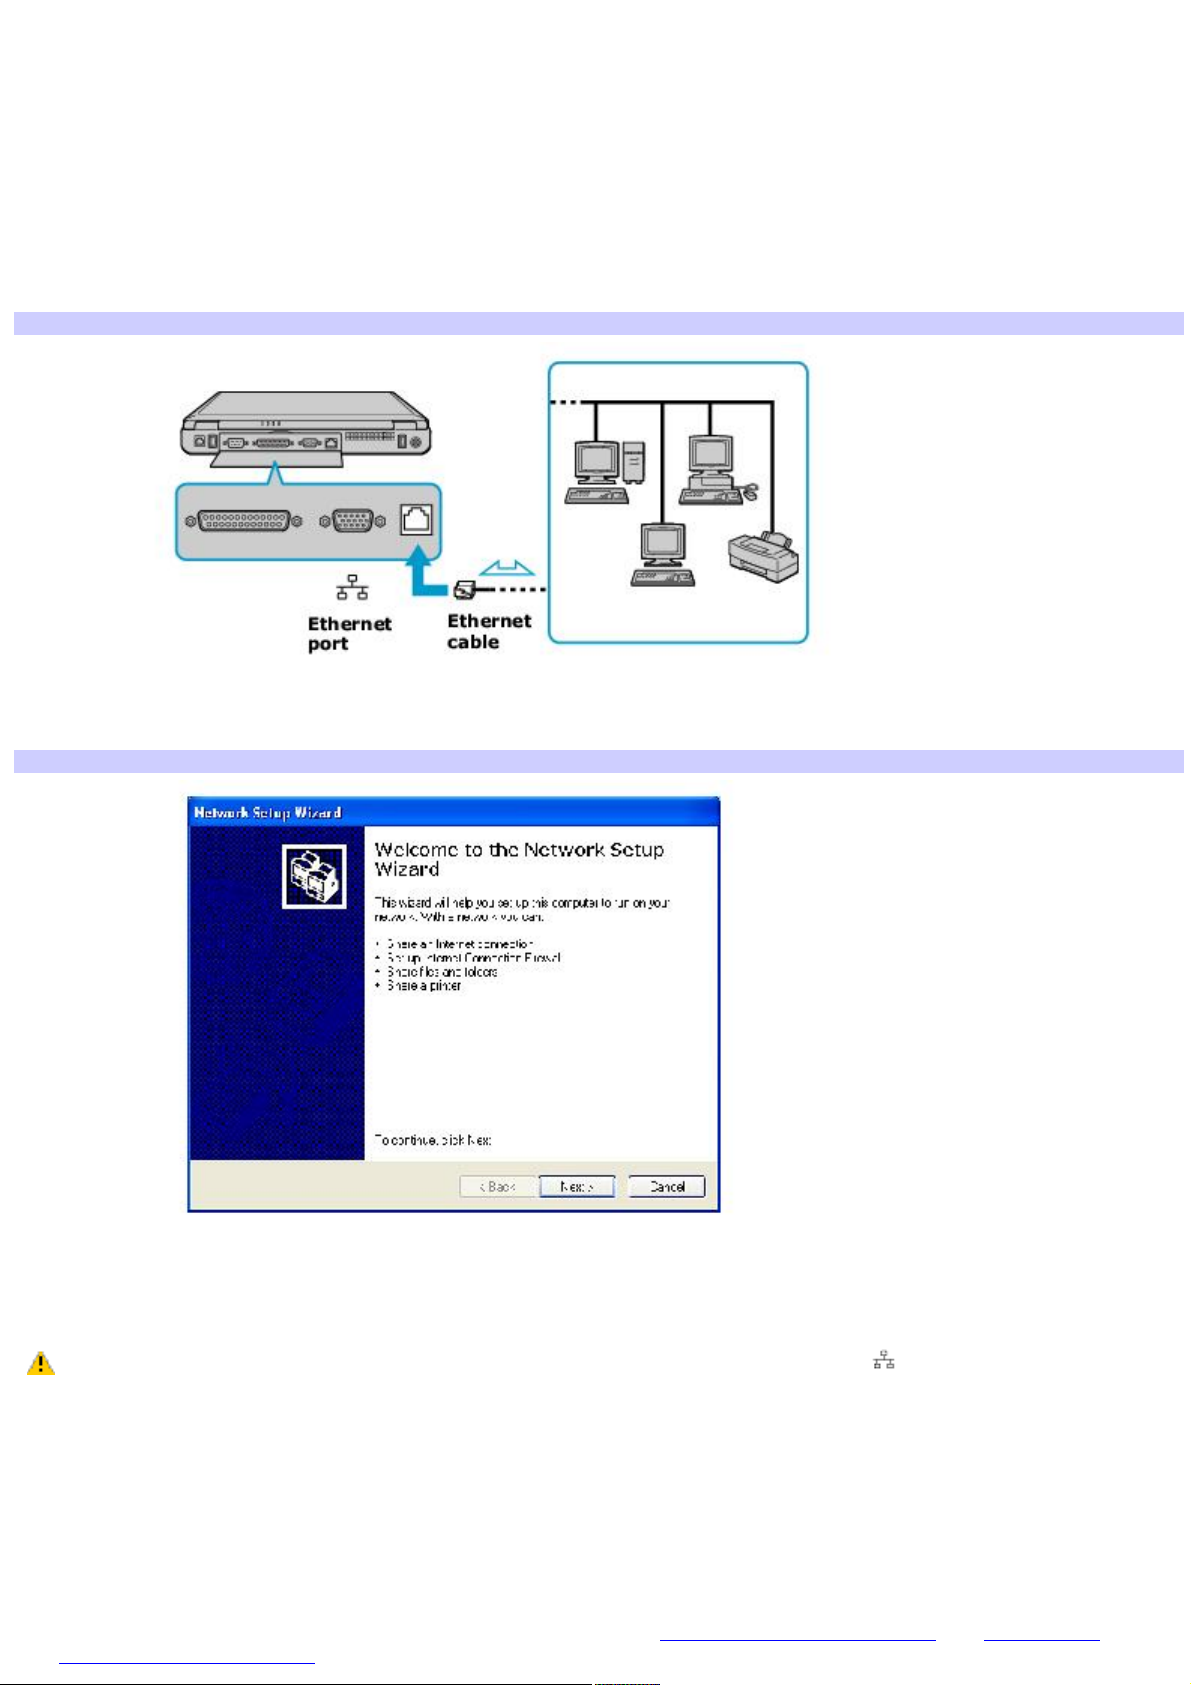
Using Ethernet and dial-up connections
Local area networks (LANs) comprise a group of computers and associated devices within a small geographic area, such as
a home or office building. For setting up LANs, Ethernet is a widely installed technology. Your computer accommodates both
10BASE-T and 100BASE-TX Ethernet connections, with data transfer speeds of between 10 and 100 Mbps, depending on
the Ethernet cable.
To set up an Ethernet LAN
1.
Plug one end of the Ethernet cable into your computer's Ethernet port and the other into the network
connection.
Connecting an Ethernet Cable
2.
Click Start, point to All Programs, Accessories, Communications, and click Network Setup Wizard. The
Network Setup Wizard appears.
The Network Setup Wizard
3.
Click Next.
4.
Follow the on-screen instructions.
Warning: Only connect 10BASE-T and 100BASE-TX cables to the Ethernet port . Do not connect any other
type of network cable or any telephone cable. Connecting cables other than those listed above may result in an
electric current overload and could cause a malfunction, excessive heat, or fire in the port. To connect the unit to the
network, contact your network administrator.
You can connect to your company network from a remote location and use data, applications, and network resources. See
Microsoft® Windows® Help by clicking Help and Support for the Start menu, and then clicking Networking and the Web in
the left panel.
To connect to a remote network using a telephone or Ethernet cable
1.
Connect an Ethernet or telephone cable to your computer. See To connect an Ethernet cable and Setting up a
dial-up Internet connection for more information.
Page 28
Page 29

2.
From the Start menu, point to All Programs, Accessories, Communications, and click New Connection Wizard.
3.
Click Next. If you are prompted to the Local Information dialog box, follow the on-screen instructions.
4.
Click Connect to the network at my workplace, and then click Next.
5.
Follow the on-screen instructions.
6.
Ask your network administrator for the detailed settings and devices needed to connect to an existing network.
Page 29
Page 30
Using wireless LAN connections
A wireless local area network (LAN) is a network in which you can connect to a LAN through a wireless (radio) connection.
You can opt to purchase a Sony Wireless LAN Access Point to set up a LAN.
The Wireless LAN Access Point is designed for building a wireless LAN environment. Because a wireless LAN configuration
requires no wiring, you can operate multiple computers more freely than ever before.
You can also purchase an external Wireless LAN PC Card separately. The Wireless LAN PC Card is designed for a wireless
LAN environment. You can use the Wireless LAN PC Card with or without the access point.
Most Sony Wireless LAN devices support the IEEE 802.11b standard. Devices connecting to a Wireless LAN using the IEEE
802.11a standard cannot connect to devices using the IEEE 802.11b standard.
For more information on Sony Wireless LAN, go to http://www.sonystyle.com/vaio.
There are two types of wireless connections:
An infrastructure network is one that extends an existing wired local network to wireless devices by providing an
access point. The access point bridges the wireless and wired LAN and acts as a central controller for the Wireless
LAN. The access point coordinates transmission and reception from multiple wireless devices within a specific range.
A computer-to-computer (ad-hoc) network is one in which a local network is created only by the wireless devices
themselves, with no other central controller or access point. Each device communicates directly with other devices in
the network. You can set up an ad-hoc network easily at home.
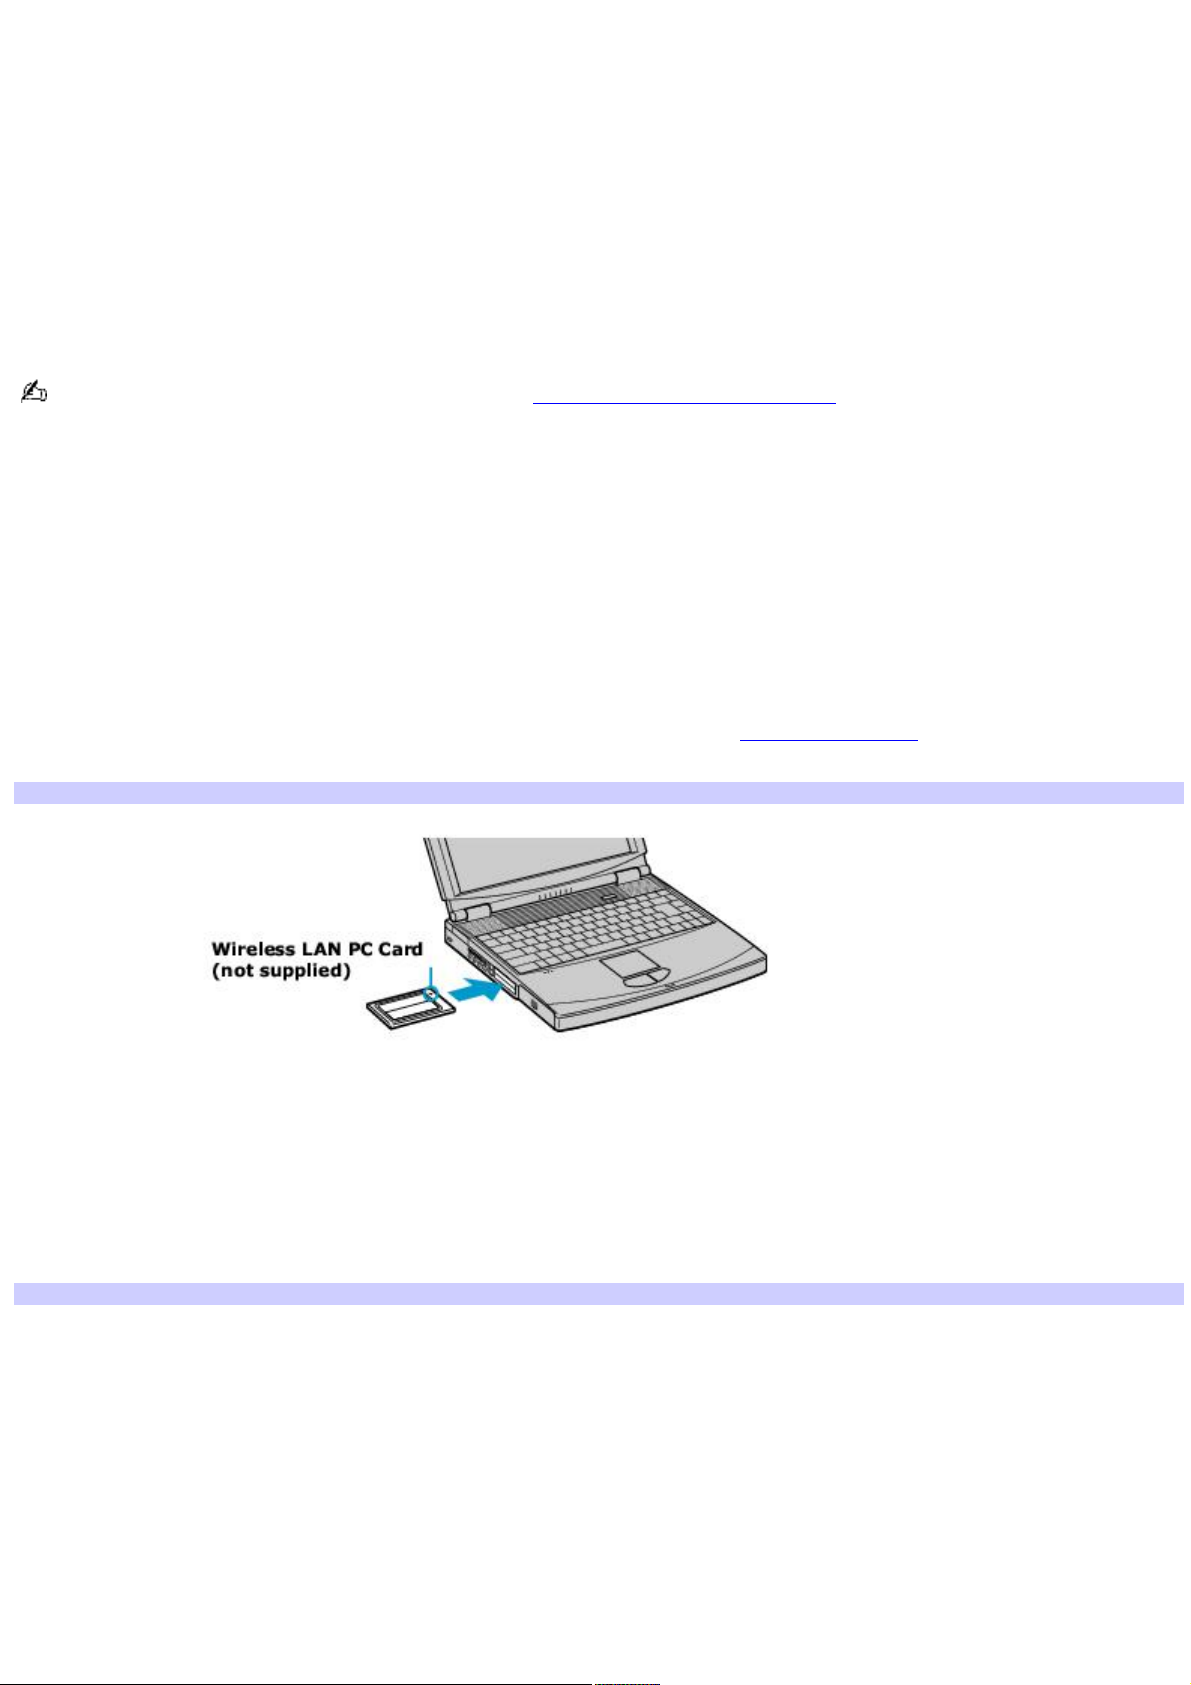
To connect to an existing wireless network
1.
Insert a Wireless LAN PC Card (not supplied) into the PC Card slot. See Inserting PC Cards for more information.
The Wireless LAN indicator on the card lights up.
Connecting to a Wireless LAN
2.
From the Start menu, click Control Panel.
3.
Click Network and Internet Connections, and then click Network Connections.
4.
Double-click Wireless Network Connection. The Connect to Wireless Network dialog box appears.
Connecting to a Wireless LAN
Page 30
Page 31

5.
Select a network from the Available networks list box.
6.
Type the network key of the available network in the Network key box. See your network administrator for this
information.
7.
Click Connect.
To set up a wireless network
1.
Insert a Wireless LAN PC Card into the PC Card slot. See Inserting PC Cards for more information.
The Wireless LAN indicator lights up.
2.
From the Start menu, click Control Panel, Network and Internet Connections, and then click Network
Connections.
3.
Right-click Wireless Network Connection, and select Properties. The Wireless Network Connection Properties
dailog box appears.
4.
Click the Wireless Networks tab, and then click Add. The Wireless Network Properties dialog box is updated.
Setting Wireless Network Connection Properties
5.
Type up to 32 ASCII characters in the Network name (SSID) box.
6.
Click to select the Data encryption (WEP enabled) check box.
Page 31
Page 32

7.
Click to select the Network Authentication (Shared mode) check box.
8.
Click to cancel the The key is provided for me automatically check box.
9.
Type between 5 and 13 ASCII characters or 10 to 26 hexadecimal characters in the Network key box.
10.
Click OK. Your new network name appears in the Preferred networks list box.
To set up a computer-to-computer (ad-hoc) network
1.
Insert a Wireless LAN PC Card into the PC Card slot. See Inserting PC Cards for more information.
The Wireless LAN indicator lights up.
2.
From the Start menu, click Control Panel, Network and Internet Connections, and then click Network
Connections. The Network Connections window appears.
3.
Right-click Wireless Network Connection, and select Properties. The Wireless Network Connection Properties
dailog box appears.
4.
Click the Wireless Networks tab, and then click Add. The Wireless Network Properties dialog box is updated.
Setting Wireless Network Connection Properties
5.
Type up to 32 ASCII characters in the Network name (SSID) box.
6.
Click to select the Data encryption (WEP enabled) check box.
7.
Click to select the Network Authentication (Shared mode) check box.
8.
Click to cancel the The key is provided for me automatically check box.
9.
Type between 5 to 13 ASCII characters or 10 to 26 hexadecimal characters in the Network key box.
10.
Click to select the This is a computer-to-computer (ad-hoc) network; wireless access points are not used
check box.
11.
Click OK. Your new network name appears in the Preferred networks window.
To disconnect from a wireless network
For computers with built-in Wireless LAN functionality, open the Wireless Network Connection Status window, and
click Disable. See Checking your network connection status. Move the Wireless LAN switch to the OFF position. The
Wireless LAN indicator turns off.
For Wireless LAN PC Card connections, open the Wireless Network Connection Status window, and click Disable.
See Checking your network connection status. Follow these steps to remove the Wireless LAN PC Card:
Page 32
Page 33

1.
Double-click the Safely Remove Hardware icon on the taskbar. The Safely Remove Hardware window
appears.
2.
Select the appropriate device name in the Hardware devices window, if it is not already selected, and click
Stop. The Stop a Hardware device window appears.
3.
Make sure the appropriate device name is selected, and click OK. A message appears stating it is now safe to
remove the hardware device.
4.
Remove the PC Card. See "Removing a PC Card" for more information.
Turning off the Wireless LAN functionality while accessing remote documents, files, or resources may
result in data loss.
Page 33
Page 34

Checking your network connection status
Whether you have a wireless, Ethernet, or dial-up connection, you can check the status of that connection by
double-clicking the Wireless Network Connection icon on your taskbar. The Wireless Network Connection Status
window opens.
Wireless Network Connection Status Window
Page 34
Page 35

Frequently asked questions
Why can't my computer connect to a Wireless LAN Access Point?
Connection availability is affected by distance and obstructions. You may need to move your computer away from
obstructions or closer to any access point you may be using.
Make sure the Wireless LAN PC Card is properly inserted.
Make sure power to the access point is on.
Make sure the access point is displayed in the Available networks window.
1.
From the Start menu, click Control Panel, Network and Internet Connections, and then Network
Connections.
2.
Right-click Wireless Network Connection, and select Properties. The Wireless Network Connection
Properties dialog box appears.
3.
Select the Wireless Networks tab, and make sure the access point is displayed in the Available
networks box. If it is not displayed, see To connect to an existing wireless network for more information.
Make sure the encryption key is correct.
Why can't I access the Internet?
Make sure the Wireless LAN PC Card is properly inserted into the PC Card slot.
Check the access point settings. Refer to the instructions supplied with the access point.
Make sure your computer and the access point are connected to one another.
Move your computer away from obstructions or closer to any access point you may be using.
Make sure your computer is properly configured for Internet access.
Why is the data transfer speed slow?
The Wireless LAN data transfer speed is affected by distance and obstructions between devices and access points.
Other factors include device configurations, radio conditions, and software compatibility. To maximize the data
transfer speed, move your computer away from obstructions or closer to any access point you may be using.
If you are using a Wireless LAN Access Point, the device may be temporarily overloaded depending on the number
of other devices communicating via the access point.
If your access point interferes with other access points, change the access point channel. See your access point
instructions for more information.
Why is the communication speed interrupted or slowed down when MPEG2 data is transferred?
The typical effective data transfer speed via an access point is 4-5 Mbps when adhering to the IEEE 802.11b standard.
High-rate stream transfers with MPEG2 data may lower this rate.
How do I avoid data transfer interruptions?
Data transfer interruptions may occur with large files or use of microwaves and cordless telephones when
connected to an access point.
Move the computer closer to the access point.
Make sure the access point connection is intact.
1.
From the Start menu, click Control Panel, Network and Internet Connections. The Network and
Internet Connections window appears.
2.
Click Network Connections. The Network Connections window appears.
3.
Check the connection status.
Page 35
Page 36

Change the access point channel. See your access point instructions for more information.
Can I connect to an IEEE 802.11a device?
Most Sony Wireless LAN devices support the IEEE 802.11b standard. Devices connecting to a Wireless LAN using the IEEE
802.11a standard cannot connect to devices using the IEEE 802.11b standard.
What are channels?
Wireless LAN communication occurs on divided frequency bands known as channels. Third-party Wireless LAN Access Point
channels may be preset to different channels from Sony devices.
If you are using a Wireless LAN Access Point, refer to connectivity information contained in your access point instructions.
Page 36
Page 37

Connecting another VAIO Computer
The preinstalled Microsoft® Windows® XP operating system enables you to connect a compatible i.LINK®1 cable (not supplied)
between your VAIO computer and another compatible computer.
Connecting VAIO computers
Disconnecting VAIO computers
Frequently asked questions
1
i.LINK is a trademark of Sony us ed to des ignate that a produc t c ontains an I E E E 1 3 9 4 c onnection. T he i.LIN K c onnec tion may vary, depending on the
software programs, operating system, and c ompatible i.LI N K devic es. A ll products with an i.LI N K c onnec tor may not c ommunic ate with eac h other. Refer to
the documentation that came with your compatible i.LIN K devic e for information on operating c onditions and proper c onnec tion. Before c onnecting
compatible i.LI N K P C peripherals to your system, s uc h as a C D-RW or hard dis k drive, c onfirm their operating s ystem c ompatibility and required operating
conditions.
Page 37
Page 38

Connecting VAIO computers
When you connect two VAIO computers, you can use one computer to edit, copy, or delete files on the other computer. You
can also print from a printer attached to either computer.
To connect VAIO computers
1.
Plug one end of the i.LINK® cable into the i.LINK port on each computer.
2.
Click Start on the Windows® taskbar, and click Control Panel.
3.
Click Network and Internet Connections, and click Set up or change your home or small office network. The
Network Setup Wizard appears.
The Network Setup Wizard window
4.
Follow the on-screen Network Setup Wizard instructions.
5.
When you are prompted, type in a unique computer name for each computer. You will use this unique name to
differentiate the two computers once they are networked together.
The Workgroup name should remain the same for the two networked computers.
6.
When you finish the Network Setup Wizard on-screen instructions, click Start on the Windows® taskbar and
click My Computer.
7.
Click My Network Places in the Other Places menu. The My Network Places window appears.
8.
Click View workgroup computers in the Network Tasks menu. The computers that are networked under the
same workgroup name are displayed in this window.
Connecting Another Computer
Page 38
Page 39

Disconnecting VAIO computers
You can disconnect two VAIO computers when the computers are on or off.
To disconnect VAIO computers when the computers are on
1.
Close all open files that are shared with the connected computers.
2.
Unplug the i.LINK cable from the i.LINK port on each computer.
To disconnect VAIO computer when the computers are off
Unplug the i.LINK cable from the i.LINK port on each computer.
Page 39
Page 40

Frequently asked questions
Why can't I establish a connection between two VAIO computers?
Your computer may not recognize an i.LINK1 connection if the i.LINK cable is not plugged securely into the i.LINK
ports. Disconnect the i.LINK cable and securely reconnect it to both computers. If neither computer responds after a
few moments, restart both computers.
If the computers do not recognize the i.LINK connection after resuming from a power saving mode (Standby or
Hibernate), restart both computers.
1
i.LINK is a trademark of Sony us ed only to des ignate that a produc t c ontains an I E E E 1 3 9 4 c onnection. T he i.LIN K c onnec tion may vary, depending on the
software applications, operating s ys tem, and c ompatible i.LI NK devices. A ll products with an i.LI N K c onnec tion may not c ommunic ate with eac h other. Refer
to the documentation that came with your compatible i.LIN K devic e for information on operating c onditions and proper c onnec tion. Before c onnecting
compatible i.LI N K P C peripherals to your system, s uc h as C D-RW or hard dis k drive, c onfirm their operating s ys tem c ompatibility and required operating
conditions.
Page 40
Page 41

CDs, DVDs, and Optical Drives
Using the Optical Disc Drive
Inserting and Ejecting CDs or DVDs
Copying and Playing CDs
Playing DVDs
Page 41
Page 42

Using the Optical Disc Drive
Your notebook comes with an optical disc drive. Depending on the system you purchased, your optical disc drive is either a
CD-RW/DVD Combo Drive or a DVD-ROM drive.
Page 42
Page 43
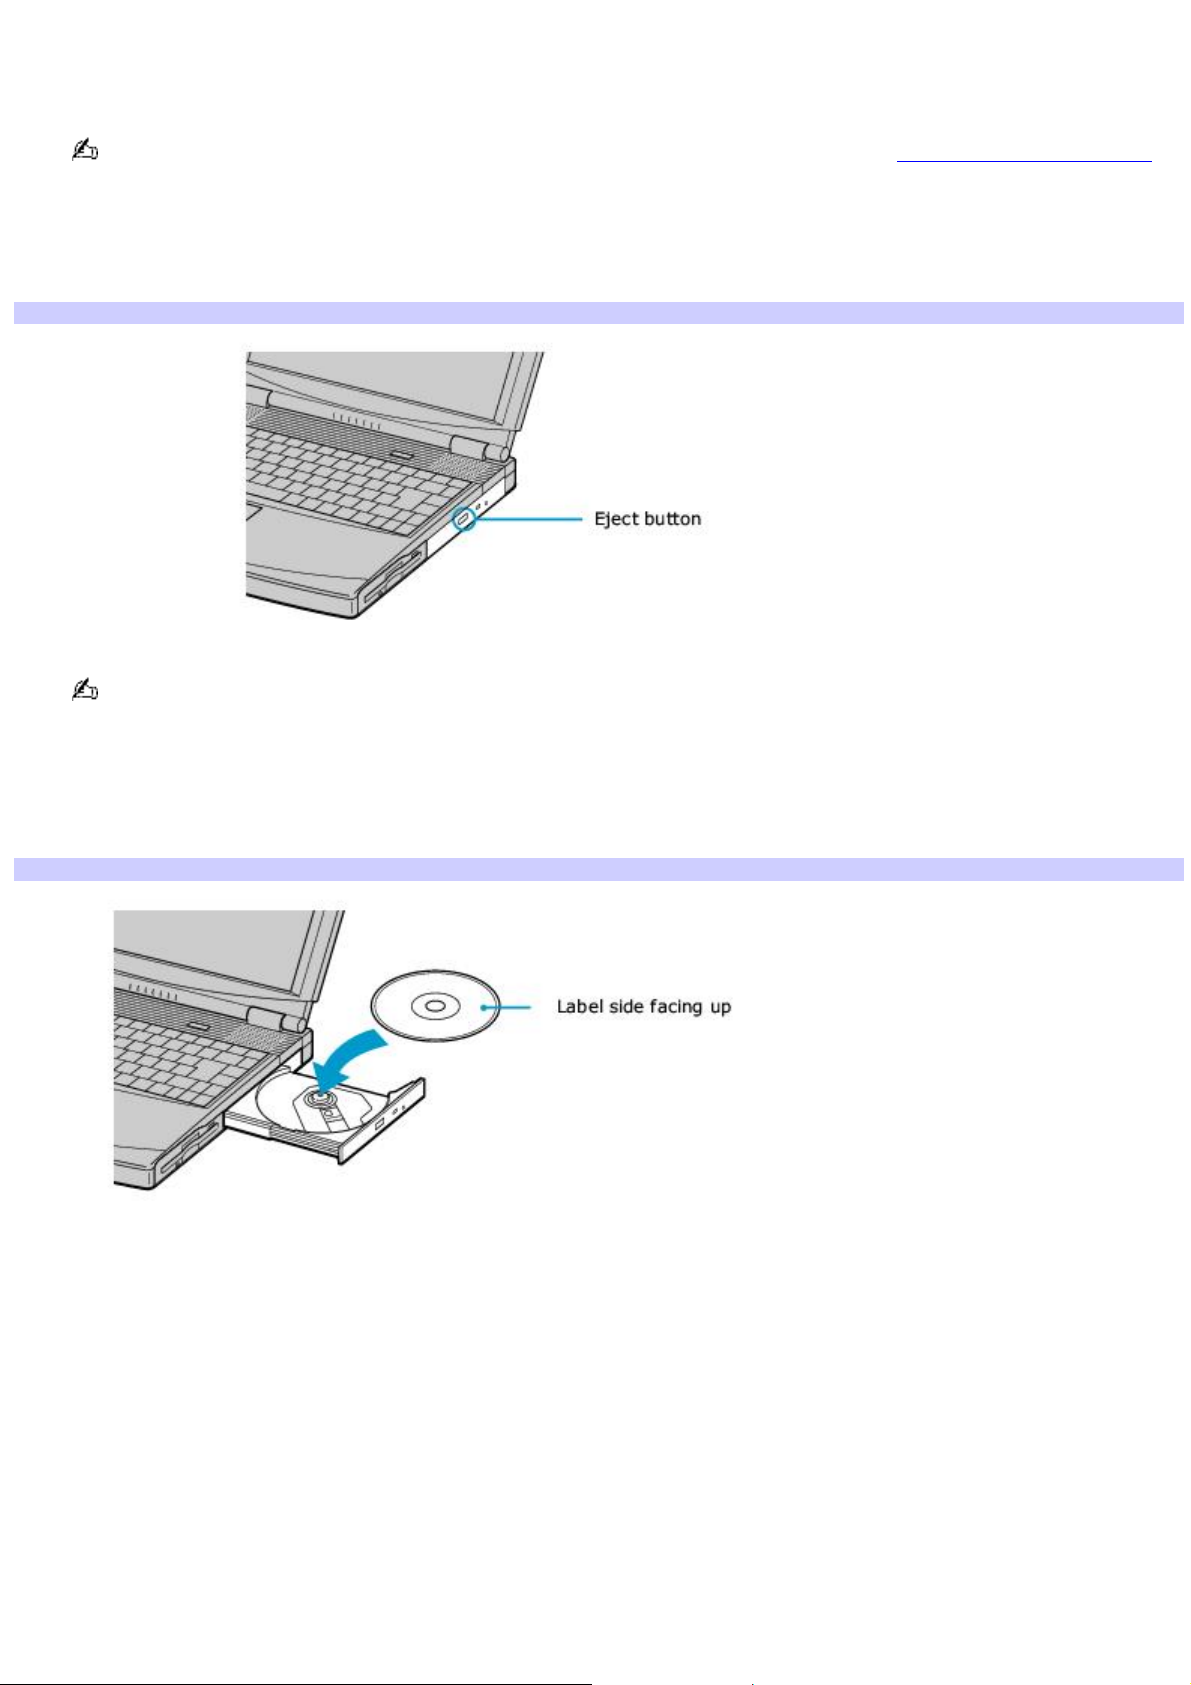
To insert a disc
1.
Turn on the notebook.
When the notebook is in Standby or Hibernate mode, you cannot insert a disc. See Using power saving modes
for more information on Standby and Hibernate modes.
2.
Press the Eject button to open the optical drive.
The tray slides out.
Ejecting the tray
Avoid using adhesive labels to identify your discs. Adhesive labels may come off while the disc is in use in your
optical drive, and may damage the unit.
3.
Place an optical disc on the tray with the label side facing up. For DVDs that can be played on both sides, the
side of the disc facing up is the side that plays.
4.
Press the disc onto the hub until the disc clicks securely into place.
Inserting an optical disc
5.
Close the tray by pushing it gently.
Page 43
Page 44

To eject a disc
When you finish using a disc, wait until the LED indicator turns off, and then press the Eject button to remove the disc.
When the notebook is in a power saving mode, you cannot remove an optical disc. See Using power saving modes for more
information about power saving modes.
If the optical disc does not slide out when you press the Eject button, turn off the notebook and insert a thin, pointed
object (such as a paper clip) into the manual eject hole.
Make sure to seat the disc firmly over the hub fingers. If you do not seat the disc firmly, you could damage your
optical drive and you may not be able to open the tray.
Manual eject hole
Page 44
Page 45

To play a DVD
To play a DVD, you may use the optical disc drive and the preinstalled WinDVD® application. For more information on
WinDVD, see the Help menu WinDVD application.
Before you use the optical disc drive to play a DVD, quit any open applications.
Your optical drive can read most DVD-R media. When you are ready to play a DVD, read the suggestions below to maximize
your video viewing experience.
If you connect your notebook to a TV display, you may need to adjust the display resolution. Read the suggestions
below to set the display resolution to the proper dimensions. Also see Selecting a Display Mode for more
information.
You cannot use the Fn + F8 function to switch between LCD and TV once a DVD is inserted into the optical drive.
Change the settings to disable the screen saver and the virus checker.
Some discs recorded at 20 or 24 bits may produce noise while playing. If you have audio devices
connected, this could damage your hearing and the speakers. Reduce the volume before playing a DVD.
Do not switch between LCD and the external display while the DVD is playing. This may cause a malfunction, and you
may need to restart the DVD software.
Do not switch the power saving modes while you are playing the DVD.
Do not use memory-resident utility software to speed up disc access. This may cause the notebook to malfunction.
Page 45
Page 46

Notes on CD and DVD discs
Do not drop or bend the disc.
Do not touch the surface of the disc. Fingerprints and dust on the surface of a disc may cause reading errors. Proper
care of the disc is essential to maintain its reliability. Do not use solvents such as benzine, thinner, commercially
available cleaners or anti-static spray, as they may cause damage to the disc.
For normal cleaning, hold the disc by its edge and use a soft cloth to wipe the surface from the center out.
If the disc is badly soiled, moisten a soft cloth with water, wring it out well, and use it to wipe the surface of the disc
from the center out. Wipe off any remaining moisture with a dry, soft cloth.
Page 46
Page 47

To write data to a CD-RW or CD-R disc1
You can use Sony SonicStage and Microsoft® Windows® XP to write data to a CD-R or CD-RW disc. To create a CD-R disc that
is readable in a CD-ROM drive, make sure that you finish the writing process before ejecting the disc. For more information,
see the instructions included with Windows® XP.
Notes on writing data to a CD-RW or CD-R disc
For optimal writing speed, deactivate the screen saver and exit anti-virus software before writing data to a disc.
For best results, use CD-Rs that are compatible with 8x speed.
Your notebook does not support 1x writing speed.
If your notebook computer has preinstalled Microsoft® Office applications, such as Excel, Word, and Outlook, turn off
the FindFast application.
Do not strike or shake the notebook while writing data to a disc.
Always use the AC adapter as the power source for your notebook if you are writing data to a CD-RW or CD-R disc.
Using battery power may result in data transfer failure.
1
For notebook models equipped with a C D-RW/DV D C ombo Drive.
Page 47
Page 48

Inserting and Ejecting CDs or DVDs
Avoid using adhesive labels to identify your CDs or DVDs. Adhesive labels may damage the optical drive if they come
off while the disc is in the drive.
To insert a CD or DVD
1.
Turn on the computer, and exit a power saving mode (Standby or Hibernate) if one is active. For more
information on power saving modes, see Using power saving modes for more information.
2.
Press the Eject button on the optical drive cover to open the drive tray. The drive tray slides out.
Ejecting the drive tray
3.
Place a disc on the drive tray with the label facing up.
You can play some DVDs on both sides. Insert this type of DVD with the side you want to play facing up.
Inserting a Disc
4.
Press the disc onto the hub until the disc clicks securely into place.
If you do not seat the disc firmly over the hub, the disc may come loose while it is in the drive. A loose
disc may damage the optical drive and make opening the drive tray difficult.
5.
Push the drive tray gently to close it. The Busy indicator on the drive flashes while your computer is reading data
from the drive.
To ejecting a CD or DVD
1.
Turn on the computer, and exit a power saving mode (Standby or Hibernate) if one is active. See Using power
saving modes for more information on power saving modes.
2.
Close all software programs that are open from the optical drive, and wait for the LED indicator to turn off.
3.
Press the Eject button on the optical drive cover to open the drive tray. The drive tray slides out.
If the Eject button does not work, turn off the computer and insert a thin, straight object (such as a paper clip)
into the manual eject hole next to the Eject button.
Page 48
Page 49

4.
Lift the disc from the drive.
5.
Push the drive tray gently to close it.
Page 49
Page 50

Copying and Playing CDs
Your optical drive can read CDs and DVDs. The type of optical drive installed in or connected to your computer may vary,
depending on the model you purchased. If you are using a CD-RW/DVD Combo Drive, you can write data to CD-Rs and
CD-RWs.
Playing CDs
Copying files to a CD-RW or CD-R
Do not remove the optical drive when the computer is in a power saving mode (Standby or Hibernate). Doing
so may cause the computer to malfunction.
If you plan to use an external optical drive, connect the drive before you begin.
Page 50
Page 51

Playing CDs
To play an audio CD
1.
Insert the disc into the optical drive. See To insert a CD or DVD.
2.
Click to select an option in the Audio CD window.
3.
Click OK.
To adjust the volume for playing CDs and DVDs
Some software programs have built-in volume controls, which you can adjust. If there are no volume controls, then you can
adjust the volume of your computer's built-in speakers by doing one of the following:
Using the Function keys. An on-screen display appears notifying you when a change occurs.
To increase volume, press Fn+F4, then or .
To decrease volume, press Fn+F4, then or .
Using the Volume icon.
1.
Double click the Volume icon on the Windows® taskbar. The Volume Control dialog box appears.
2.
In the Volume Control and AC Audio columns, move the Volume sliders up to increase the volume and down to
decrease the volume.
Page 51
Page 52

Copying files to a CD-RW or CD-R1
Before you write data to a CD-RW or CD-R, read the following notes to avoid a computer malfunction and ensure the best
writing results:
Deactivate the screen saver and exit anti-virus software.
Deactivate memory-resident disc utilities to avoid data loss.
Turn off the FindFast application if your computer has preinstalled Microsoft® Office applications, such as Excel, Word,
and Outlook.
Connect and use the AC adapter to power your computer.
Use CD-Rs that are compatible with 8x speed.
Your computer does not support 1x writing speed.
Insert the disc into the optical drive and use the preinstalled Sony SonicStage software.
For instructions on using SonicStage software
1.
Click Start and then Help and Support.
2.
Click VAIO Multimedia Software, and then VAIO AV Applications.
3.
Click SonicStage Software.
4.
Once you finish copying files to a CD-R that is readable in a CD-ROM drive, click Finish to complete the writing
process before you eject the disc from the optical drive.
Do not strike or shake the computer while writing data to a disc.
1
For computer models equipped with a C D-RW/DV D C ombo Drive.
Page 52
Page 53

Playing DVDs
You can play DVDs in your computer's optical drive and view the video on a TV. The type of optical drive installed in or
connected to your computer may vary, depending on the model you purchased.
Connecting Your Computer to a TV
Watching DVDs on a TV
Disconnecting the TV from the computer
Frequently asked questions
Page 53
Page 54

Connecting Your Computer to a TV
In order to connect your computer to a TV, your computer must have an AV Out jack. Not all VAIO® notebook models are
equipped with an AV Out jack. For more information, see Locating Controls and Ports in the Setting Up chapter of your
printed online VAIO® Computer User Guide.
To connect a TV to your computer
1.
Turn off the computer.
2.
Locate the AV Out jack on the computer.
3.
Plug one end of an audio-video (AV) cable into the AV Out jack.
4.
Plug the other end of the AV cable into the video-in ports on the TV.
Connecting a TV
5.
Switch the TV input channel to external input.
See the manual that came with your peripheral device for more information on its installation and use.
Page 54
Page 55

Watching DVDs on a TV
Do not remove the optical drive when the computer is in a power saving mode (Standby or Hibernate). Doing
so may cause the computer to malfunction.
Before you play a DVD, read the following notes to avoid a computer malfunction and ensure the best writing results.
To play a DVD
1.
Disable the screen saver and the virus checker.
2.
Select a display. Press the Fn+F8 key combination to select either the LCD or an external display. See Selecting
a Display Mode for more information.
The Fn+F8 key combination will not work once a DVD is inserted into the optical drive. Switching the
display while a DVD is playing may cause the computer to malfunction, and you may need to restart the DVD
software.
3.
Connect the TV to the computer. See Connecting Your Computer to a TV for more information.
4.
Restart the computer and wait for it to restart.
5.
Insert the DVD into the optical drive. The preinstalled DVD software launches the video automatically. See
Software overview for a description of your preinstalled DVD software. For more detailed instructions on how to
use the preinstalled DVD software, see the help file that is included with the DVD software.
Systems equipped with a CD-RW/DVD Combo Drive can read most DVD-R media, but systems equipped with a
DVD-ROM drive cannot read DVD-R media.
Some discs recorded at 20 or 24 bits may produce noise while playing. If you have audio devices
connected, this may damage your hearing and the speakers. Reduce the volume before playing a DVD.
Do not switch the power saving modes while you are playing the DVD.
Do not use memory-resident utility software to speed up disc access. This may cause the computer to malfunction.
Page 55
Page 56

Disconnecting the TV from the computer
If the computer is turned off, unplug the audio-video cable connector from the AV Out port on the computer.
Page 56
Page 57

Frequently asked questions
How do I maintain CDs and DVDs?
Avoid touching the surface of the disc with your fingers. Fingerprints and dust on the surface of the disc may cause
reading errors.
To clean the disc, hold the edge of the disc, and use a soft cloth to wipe the surface from the center out. If the disc
is badly soiled, moisten a soft cloth with water, wring it out well, and use it to wipe the surface of the disc from the
center out. Wipe off any remaining moisture with a dry, soft cloth.
Do not clean the disc with solvents (such as benzine, thinner, commercially available cleaners, or anti-static spray),
which may damage the disc.
Do not drop or bend the disc.
Why can't I view the entire DVD video display on a TV screen?
You may not be able to view the entire video display on a TV because the display resolution is not properly set. To adjust
the display resolution, see Selecting a Display Mode. It is recommended that you adjust the display resolution to 1024 x
768 or smaller, depending on the size of the external display screen.
Why does my computer freeze when I try to read a disc?
The disc your computer is trying to read may be dirty or damaged. Restart the computer, and eject the disc from the optical
drive. Examine the disc for dirt or damage. If the disc is dirty, see Notes on CD and DVD discs for instructions on how to
clean it.
Why did the computer (LCD) screen go blank?
Your computer screen may go blank if the computer has lost power or is in a power saving mode (Standby or
Hibernate).
Make sure the computer is plugged into a power source and is turned on. The power indicator on the
computer will be on if the computer is on.
Make sure the battery is inserted properly and is charged.
If the computer is in LCD (Video) Standby mode, press any key to activate the computer screen.
If the display mode is set to external display (such as TV), press and hold the Fn key while you press F7 several
times.
Why don't my changes appear on the computer (LCD) screen?
You may need to refresh the computer screen. Press the Windows key and press the D key twice.
How do I adjust the image on the TV screen?
Use the controls on your external display to adjust the image. See the manual that came with your display for more
information.
How do I change the video resolution on the TV screen?
The video may not appear on the entire TV screen if your computer resolution is set to 1024 x 768 or greater. To change
the video resolution, follow these instructions:
If you are using a TV Out jack, plug the TV Out jack into the computer before you start the computer. Also, set the
screen resolution to 640 x 480 dots.
1.
Right-click the desktop, and select Properties from the drop-down list. The Display Properties dialog box
appears.
2.
Click the Settings tab.
Page 57
Page 58

3.
Move the screen resolution slider to the left to reduce the size and to the right to increase the size of the video
resolution.
How do I switch the computer (LCD) screen from LCD to TV?
See Selecting a Display Mode for instructions on how to switch the display mode to LCD and TV.
Page 58
Page 59

Printer Connections
Printing With Your Computer
Page 59
Page 60

Printing With Your Computer
You can connect a universal serial bus (USB) printer or a parallel port printer to your computer. To print properly, the printer
you connect must be compatible with the Microsoft® Windows® operating system installed on your computer.
Connecting a printer
Disconnecting a printer
Frequently asked questions
Page 60
Page 61

Connecting a printer
Your computer is compatible with many popular printers. In many cases, you can simply connect the printer to the computer
and begin printing. Some printers require separate driver software installation. See the instructions that accompanied your
printer for more information. If you cannot print once you have connected your computer to your printer, see Frequently
asked questions in this section for more information.
To connect a USB printer
1.
Locate a USB port on the computer and the printer.
2.
Plug the USB cable into the USB port on your computer.
3.
Plug the other end of the USB cable into the USB port on the printer.
Connecting a USB Printer Cable
See the manual that came with the USB printer for more information on its installation and use.
To connect a parallel port printer
1.
Locate the Printer port on your computer.
2.
Plug the printer cable into the Printer port on your computer
3.
Plug the other end of the printer cable into the port on the printer.
Connecting a Parallel Port Printer
Page 61
Page 62

See the manual that came with the parallel port printer for more information on its installation and use.
Page 62
Page 63

Disconnecting a printer
If your computer is turned off, simply unplug the printer cable from your computer's USB or Printer port.
Page 63
Page 64

Frequently asked questions
Why can't I print a document?
Make sure the printer is turned on, and the printer cable is securely connected to the ports on your printer and
computer.
Make sure the printer is compatible with the Microsoft® Windows® operating system installed on your computer.
You may need to install the printer software drivers before you use the printer. See the instructions that came with
your printer for information about installing these drivers.
If the printer is not functioning after the computer resumes from a power saving mode (Standby or Hibernate), reset
the printer connection.
1.
Click Start, and click Control Panel.
2.
Click Printers and Other Hardware, and click Printers and Faxes.
3.
Right-click the printer icon that is not functioning, and select Properties to open the Properties window.
4.
Click OK.
Change the default printer port setting, although this setting is generally correct for most printers.
1.
Click Start, and click Control Panel.
2.
Click Performance and Maintenance, and click System. The System Properties dialog box appears.
3.
Select the Hardware tab, and click Device Manager. The Device Manager window appears.
4.
Double-click Ports (COM&LPT), and double-click ECP Printer Port (LPT1).
5.
Select the Port Settings tab, and select a different LPT Port Number.
Page 64
Page 65

Computer Features
Using the Keyboard
Using the Touchpad
Using the Multilingual User Interface Language Option
Changing the window design of Sony software
Page 65
Page 66

Using the Keyboard
Your keyboard is very similar to a typewriter's, but your computer keyboard has additional keys that perform specific
computer-related tasks.
Key locations and descriptions
Combinations and functions with the Windows key
Indicators
Combinations and functions with the Fn key
Page 66
Page 67

Key locations and descriptions
Keyboard
Key Description
Numeric keypad Contains the keys found on a typical calculator. Use the numeric keypad area to type numbers or to
perform mathematical calculations such as addition and subtraction. Numbers appear on the front beveled edge of the
numeric keys. Press the Num Lock key to activate the numeric keypad. (When you do so, the Num Lock indicator lights up.)
Press the Num Lock key again to deactivate the numeric keypad.
Arrow keys The Left, Right, Up, and Down arrow keys move the pointer on the screen and also function as the Home,
End, Page Up, and Page Down keys, respectively.
Correction keys The Insert, Back Space, and Delete keys enable you to make corrections in your documents.
Function keys The 12 function keys along the top of the keyboard are used to perform designated tasks. For example, in
many applications, F1 is the Help key. The task associated with each function key may vary from one application to the
next.
Escape key The Esc (Escape) key is used to cancel commands.
Print Screen key The Print Screen key takes an electronic snapshot of the screen and moves it to the Clipboard. You
can then paste the screen shot into a document and print it.
Operator keys
(Shift, Ctrl, Alt keys) Several keys are always used with at least one other key: Ctrl, Alt, and Shift. When held down with
another key, the Ctrl (Control) and Alt (Alternate) keys offer another way to give commands. For example, in many
applications, instead of choosing the Save command from a menu, you can hold down Ctrl and press S (referred to as
Ctrl+S). The Shift key operates the same way as on a typewriter; it is used to produce capital letters or special symbols
such as @ and $.
Windows key
Page 67
The key with the Windows® operating system logo displays the Start menu; it is the equivalent of clicking
Page 68

Start on the taskbar. See Combinations and functions with the Windows key for more information.
Fn key The Fn key is used in combination with other keys to issue commands. See Combinations and functions with
the Fn key for more information.
Applications key
The Applications key displays a shortcut menu of context-sensitive choices. Pressing this key is the equivalent
of clicking the right mouse button.
Page 68
Page 69

Combinations and functions with the Windows key
Combination Function
+ F1 Displays VAIO Help and Support Center window.
+ Tab Switches the selected button on the taskbar.
+ D Displays the desktop.
+ E Displays My Computer window.
+ F Displays the Search Results window, where you can find a file or folder. This is the equivalent of selecting
Search from the Start menu.
+ Ctrl + F Displays the Search Results - Computers window, where you can locate other computers. This is the
equivalent of selecting Search, and then Computer from the Start menu.
+ M Minimizes all displayed windows.
Shift + + M Returns all minimized windows to their previous size.
+ R Displays the Run window. This is the equivalent of selecting Run from the Start menu.
Fn + + Insert Displays the System Properties window. This is the equivalent of selecting Control Panel, and then
System from the Start menu.
Page 69
Page 70

Indicators
Indicator Function
Power
Lights up when the power to the computer is turned on, flashes in Standby mode, and turns off when the
computer is in Hibernate mode or powered off.
Battery
Lights up when the computer is using battery power, flashes when the battery is running out of power,
double-flashes when the battery is charging.
Hard disk
Lights up when data is read from or written to the hard disk drive. Do not enter Standby mode or turn off the
computer when this indicator light is on.
Num Lock
Lights up when the number keys area in the numeric keypad are active. When the indicator is off, the
alphanumeric character keys in the keypad area are active.
Caps Lock
Lights up when the letters appear in uppercase as you type. The Shift key lowers the case of typed letters
when Caps Lock is on. When the indicator is off, the letters appear in lower case as you type (unless you hold down the
Shift key).
Scroll Lock
Lights up when the screen scrolls differently. (Exactly how it scrolls depends on the specific application. This
function does not work with all applications.) When the indicator is off, information moves across the display normally.
Page 70
Page 71

Combinations and functions with the Fn key
If you switch user identities during a computing session, the Fn+F7 key functionality (if available on your computer) will
be interrupted. To switch to an external display or monitor, see Selecting a Display Mode for more information.
Combinations/
Feature Function
Fn+ (F3)
Mute On/Off Toggles the built-in speaker off and on.
Fn+ (F4)
Speaker volume Adjusts the built-in speaker volume. An on-screen display appears notifying you when a change
occurs.
To increase volume, press Fn+F4, then or .
To decrease volume, press Fn+F4, then or .
Fn+ (F5)
Brightness control Adjusts the brightness of the LCD.
To increase light intensity, press Fn+F5 and then or .
To decrease light intensity, press Fn+F5 and then or .
Fn+ / (F7)
Switch to the external monitor/LCD Toggles between the LCD, a connected external display, and both the LCD and
external display.
Select one display at a time to playback DVDs.Connect the cable before you turn on the computer, otherwise Fn+F7 will not
work.
Fn+ only/
(F8)
Control AV out Toggles between LCD-only, external-only, and dual LCD/TV display modes.
Select one display at a time to playback DVDs.Connect the cable before you turn on the computer, otherwise Fn+F8 will not
work. You cannot use the Fn+F8 function to switch between LCD and TV once a DVD is inserted into the optical drive.
Fn+ (F12)
Standby Puts the system into Standby mode, a power management state. To return the system to the active
state, press any key or press the power button.
Fn + Esc
Standby Puts the system into Standby mode, a power management state. To return the system to the active
state, press any key or press the power button.
Fn + E Ejects the CD.
Page 71
Page 72

Using the Touchpad
The keyboard contains a pointing device called a touchpad. You can point to, select, drag, and scroll objects on the screen
using the built-in touchpad.
Describing touchpad actions
Customizing the touchpad
Frequently asked questions
Page 72
Page 73

Describing touchpad actions
Touchpad
Action Description
Point Slide one finger on the touchpad to place the pointer on an item or object.
Click Press the left button once.
Double-click Press the left button twice.
Right-click Press the right button once. In many applications, this action displays a shortcut menu of context-sensitive
choices.
Drag Slide one finger while pressing the left button.
Scroll Move your finger along the right edge of the touchpad to scroll vertically. Move your finger along the bottom to
scroll horizontally. (The scroll function is available only with programs that support a touchpad scroll feature.)
Page 73
Page 74

Customizing the touchpad
Mouse Properties lets you customize your touchpad, such as enable or disable the touchpad. The Mouse Properties dialog
box enables you to set your touchpad and mouse preferences, such as changing pointers, enabling or disabling the tapping
feature, clicking both buttons simultaneously, and adjusting the touchpad speed.
To open the Mouse Properties dialog box
Right-click the Touchpad icon on the Windows® taskbar, and click Mouse Properties from the shortcut menu.
The Mouse Properties dialog box appears.
Page 74
Page 75

Frequently asked questions
Why doesn't the touchpad work?
You may have disabled the touchpad without connecting a mouse to the computer. See Customizing the touchpad.
Restart the computer to activate the touchpad again.
If your touchpad is interpreting a single tap as a double-click, adjust the button assignments. Follow these steps:
1.
Press the Windows key . The Start menu appears.
2.
Press the Up Arrow key to select All Programs, and press Enter.
3.
Press the Up Arrow key to select Sony Notebook Setup, and press Enter. A submenu appears with
Sony Notebook Setup preselected.
4.
Press Enter. The Sony Notebook Setup dialog box appears.
5.
Press the Right Arrow key to select the Touchpad tab, and press Alt+S simultaneously. The Mouse
Properties dialog box appears.
6.
Make sure the Buttons tab is open, and press the Up and Down Arrow keys to change the button
assignments. Press the Tab key to move between drop-down menus.
7.
Press Enter to save your changes and close the dialog box.
If you are still experiencing problems, make sure another mouse was not installed.
You may need to use your Application Recovery CD(s) to reinstall the mouse drivers. See Using the Application
Recovery CD(s) for more information.
Why doesn't the pointer move when I use the touchpad?
Try restarting your computer. Follow these steps:
1.
Press the Windows key .
2.
Press U. The Turn off computer window opens.
3.
Press R to restart the computer.
If the computer does not restart,
1.
Press Ctrl+Alt+Delete simultaneously. The Windows Task Manager window appears.
2.
Press Alt to highlight the menu bar, and press the Right Arrow key to select Shut Down.
3.
Press Enter.
4.
Press R to restart the computer.
If you still cannot restart your computer, press and hold the power button for more than four seconds to turn off the
computer.
If the pointer does not move while playing a disc, press Ctrl+Alt+Delete simultaneously to stop playback and
restart the computer.
You may need to use your supplied Application Recovery CD(s) to reinstall the touchpad or mouse drivers. See Using
the Application Recovery CD(s) for more information
Page 75
Page 76

Using the Multilingual User Interface Language Option
(Windows® XP Pro only) After you have initially setup your new VAIO® computer, you can change the language displayed in
Microsoft® Windows® XP Professional operating system. The multilingual user interface (MUI) language option changes the
text controlled by Windows XP Professional operating system. Menus, help files, and icons generated by Windows XP
Professional are shown in your selected language. All other software applications are displayed in English as the default
language.
The multilingual user interface language option is not designed to replace a localized version of the Microsoft Windows
XP Professional operating system. Under certain conditions, some third-party software applications may not function
properly.
To Change the Language Option
1.
Click Start in the Windows® taskbar, then click Control Panel.
2.
Click Date, Time, Language and Regional Options, then click Regional and Language Options. The Regional
and Language Options dialog box appears.
3.
Click the Languages tab.
4.
From the Language used in menus and dialogs drop-down menu, select the desired language:
English
francais
Português
español
5.
Click Apply, and then click OK.
6.
The Change Regional Options pop-up window appears. Click OK.
7.
Click Start in the Windows® taskbar, then click Logoff. Restart your computer.
Additional users can also change to their desired language(s) without effecting your existing language settings.
Page 76
Page 77

Changing Numbers, Currency, Time, and Date Formats
You can change your operating system's number, currency, time and date formats to coordinate with your chosen country
or language settings.
To change these formats
1.
Click Start in the Windows taskbar, then click Control Panel.
2.
Click Date, Time, Language and Regional Options, and then click Regional and Language Options. The
Regional and Language Options dialog box appears.
3.
From the Regional Options tab, click the Standards and formats drop-down menu to view the available country
choices. Select the desired country.
4.
Click Customize to change the number, currency, time, and date settings.
5.
Click Apply, and then OK.
Page 77
Page 78

Changing the window design of Sony software
This feature is available with UI Design Selector-compatible software only.
To change the window design
1.
Click Start, and then Control Panel.
2.
In the left panel, click Switch to Classic View.
3.
Double-click UI Design Selector.
4.
Click << or >> and select a design.
5.
Click Apply. The UI Design Selector window design changes. The window design for your Sony software will
match the UI Design Selector window.
6.
Click OK.
Page 78
Page 79

Connecting Mice and Keyboards
Using External Mice and Keyboards
Page 79
Page 80

Using External Mice and Keyboards
You can connect a universal serial bus (USB) mouse or keyboard to your computer. To function properly, the device you
connect must be compatible with the Microsoft® Windows® operating system installed on your computer. For information
about you're computer's built-in keyboard and key functions, see Using the Keyboard in the Computer Features chapter.
Connecting a Mouse or Keyboard
Disconnecting a mouse or keyboard
Frequently asked questions
Page 80
Page 81

Connecting a Mouse or Keyboard
Your computer is compatible with many popular mice and keyboards. The New Hardware Wizard guides you through the
software installation process. Some devices require separate driver software installation. See the instructions that
accompanied your mouse or keyboard for more information. If the mouse or keyboard does not work once you have
connected it to your computer, see Frequently asked questions for more information.
Your computer can be turned on or off when connecting a mouse or keyboard.
To connect a USB mouse or keyboard to your computer
1.
Locate the USB port on your computer, port replicator, or docking station.
2.
Plug the USB cable into the USB port on the computer. (One USB port supports one USB device.)
The New Hardware Wizard appears.
3.
Follow the on-screen instructions to complete the installation process.
Connecting a USB Mouse or Keyboard
See the manual that came with your mouse or keyboard for more information on its installation and use.
Page 81
Page 82

Disconnecting a mouse or keyboard
You can disconnect a USB mouse or keyboard when the computer is turned on or off. Disconnecting the USB mouse or
keyboard when the computer is in a power saving mode (Standby or Hibernate) may cause the computer to malfunction.
To disconnect the USB mouse or keyboard when the computer is off
Unplug the USB cable from the USB port on the computer.
Page 82
Page 83

Frequently asked questions
Why doesn't the computer recognize the USB mouse?
Make sure the mouse is securely plugged into the USB port. See Connecting a Mouse or Keyboard for more
information.
You may need to install or reinstall the mouse driver software. Use the supplied Application Recovery CD to install
the drivers. See Using the Application Recovery CD(s) for more information.
Why doesn't the pointer move when I use the USB mouse?
Make sure another mouse was not installed.
You may need to install or reinstall the mouse driver software. Use the supplied Application Recovery CD(s). See
Using the Application Recovery CD(s) for more information.
If you are playing a disc, press the Ctrl+Alt+Delete keys simultaneously to stop playback and restart the computer.
If you still cannot use the pointer, turn off and restart the computer. You can turn off the computer three different
ways.
1.
Press the Windows key , and press U. When the Turn off computer window opens, press R.
2.
Press the Ctrl+Alt+Delete keys simultaneously. When the Windows Task Manager window appears,
press the Alt key to highlight the menu bar, and press the Right Arrow key to select Shut Down.
Press Enter, and then press R.
3.
Press and hold the power button for more than four seconds.
Page 83
Page 84

PC Cards and Floppy Disk Drives
Using Floppy Disk Drives
Using PC Cards
Page 84
Page 85

Using Floppy Disk Drives
Your computer comes with a floppy disk drive in the multipurpose bay.
To insert a disk
1.
Hold the disk with the label side facing up.
2.
Gently insert the disk into the drive until it clicks into place.
Inserting the floppy disk drive
To remove a disk
1.
Wait until the LED indicator light turns off and then press the Eject button to remove the disk.
Remov ing a disk
Do not push the eject button when the LED indicator is turned on. Otherwise, data may be lost.
To remove the floppy disk drive
1.
Turn off the notebook.
2.
There is a RELEASE lever on the bottom of the computer. Slide this lever in the direction of the arrow.
Multipurpose bay release lever
Page 85
Page 86

3.
Slide the drive out of the multipurpose bay.
4.
Insert the weight saver. See Using a second battery for details.
To reinsert the floppy disk drive
1.
Turn off the notebook.
2.
If another device is in the multipurpose bay, remove the device. See Using a second battery for details.
3.
Insert the floppy disk drive, with the VAIO label facing up, into the multipurpose bay until the RELEASE lever locks
into place.
Inserting the floppy disk drive
Page 86
Page 87

Frequently asked questions
Why is the drive unable to write data to a floppy disk?
The floppy disk drive cannot write data to a disk if it is inserted into the drive improperly. See Using Floppy Disk Drives for
instructions on how to insert the disk properly. If the disk is inserted properly and you are still unable to write data to it,
the disk may be write-protected. You can either use a floppy disk that is not write-protected or disable the write-protect
feature.
Page 87
Page 88

Using PC Cards
Your computer includes one or more PC Card slots. A PC Card enables you to connect portable external devices such as
another hard disk drive or a PC Network Interface Card (NIC) to connect to a network.
See your VAIO® Computer Specifications for the type of PC Card that is compatible with your computer. These slots are
compatible with CardBus. If your computer has more than one PC Card slot, use the lower slot for Type III PC Cards. You do
not need to turn off your computer to insert or remove a PC Card.
Inserting PC Cards
Removing PC Cards
Frequently asked questions
Page 88
Page 89

Inserting PC Cards
Your computer may contain PC Card slot protectors. Remove these protectors before you insert a PC Card into the slot.
See To remove slot protectors.
To insert a PC Card
1.
Make sure the front label of the PC Card is facing up.
2.
Push the PC Card gently into the slot. The PC Card is automatically detected by your system. The Safely Remove
Hardware icon appears on the taskbar, indicating your system detected the PC Card.
Do not force a PC Card into the slot. It may damage the connector pins.
When a PC Card is inserted, do not place your computer in a bag or case. Pressure or shock to a PC Card may damage
your computer.
Touching the head of the PC Card will not damage to the connector pins, but damage may occur if the head of the PC
Card is sticking out of the PC Card slot while the computer is being transported.
Inserting a PC Card
Page 89
Page 90

Removing PC Cards
You can remove PC Cards while the computer is on or off. PC Cards draw power from the computer when they are inserted
into the PC Card slot, whether or not you use the card.
If you are not using your PC Card and you are using a battery as a power source, remove the PC Card from the PC Card
slot to conserve battery power.
To remove a PC Card while your computer is on
1.
Double-click the Safely Remove Hardware icon on the taskbar. The Safely Remove Hardware dialog box
appears.
2.
Click to select the PC Card in the Hardware devices window, if it is not already selected.
3.
Click Stop. The Stop a Hardware device window appears.
4.
Make sure the PC Card is selected, and click OK. A message appears stating it is safe to remove the hardware
device.
5.
Push the Release button. The Release button pops out.
6.
Push the Release button a second time. The PC Card pops out.
7.
Gently pull the card out of the slot.
To remove a PC Card while the computer is off
1.
Push the Release button once. The Release button pops out.
2.
Push the Release button a second time. The PC Card pops out.
3.
Gently pull the card out of the slot.
To remove slot protectors
1.
Push the Release button once. The Release button pops out.
2.
Push the Release button a second time. The slot protector pops out.
3.
Pull the protector out of the slot. If you use a Type III PC Card, you need to remove both the top and bottom PC
Card slot protectors.
To disconnect a PC Card
1.
Close any active programs to help prevent data loss.
2.
Double-click the Safely Remove Hardware icon on the taskbar. The Safely Remove Hardware window
appears.
3.
Select the PC Card drive in the Hardware devices window, if it is not already selected.
4.
Click Stop. The Stop a Hardware device window appears.
5.
Make sure the PC Card drive is selected, and click OK. A message appears stating it is now safe to remove the
hardware device.
6.
Eject the PC Card from the PC Card slot.
Page 90
Page 91

Frequently asked questions
Why doesn't my PC Card work?
Make sure the PC Card is inserted properly. See To insert a PC Card for more information.
Make sure the PC Card is compatible with the Microsoft® Windows® operating system installed on your computer.
Make sure any necessary drivers were installed properly.
Why doesn't my computer recognize attached devices?
For some PC Cards, if you alternate between normal power operation and the Standby or Hibernate modes while the card
is inserted into the PC Card slot, the computer may not recognize the PC Card or the connected device. Restart your
computer.
Why can't I insert my PC Card?
Make sure you are orienting the card correctly. See To insert a PC Card for more information.
Check the manual that came with your PC Card for more information on its use.
You may not be able to use some PC Cards or some functions of the PC Card with this computer.
Why does an exclamation mark (!) appear on the Device Manager tab in the System Properties dialog box?
You may not be using the most recent software driver provided by the PC Card manufacturer. Make sure the necessary
drivers are installed. You may need to remove the software driver, and reinstall it.
Page 91
Page 92

Audio and Video Connections
Using i.LINK Digital-Video Recorders
Using Computer Monitors and Projectors
Using Speakers
Using Microphones
Page 92
Page 93

Using i.LINK Digital-Video Recorders
You can connect an i.LINK®1 digital-video (DV) recorder, such as an i.LINK digital video camera recorder, to the i.LINK® S400
(IEEE 1394) port on your computer, port replicator, or docking station. The i.LINK digital video camera recorder is an
external device that allows you to record images digitally.
Connecting an i.LINK digital video recorder
Disconnecting the i.LINK digital video recorder
Using a digital video camera recorder
Notes on connecting an i.LINK device
Frequently asked questions
1
i.LINK is a trademark of Sony us ed to des ignate that a produc t c ontains an I E E E 1 3 9 4 c onnector. T he i.LINK c onnec tion may vary, depending on the
software application, operating system, and c ompatible i.LI N K devices. A ll products with an i.LI N K c onnec tion may not c ommunic ate with eac h other. Refer
to the documentation that came with your compatible i.LIN K devic e for more information on operating c onditions and proper c onnec tion. Before c onnecting
compatible i.LI N K P C peripherals to your system, s uc h as a C D-RW or hard dis k drive, c onfirm their operating s ystem c ompatibility and required operating
conditions.
Page 93
Page 94
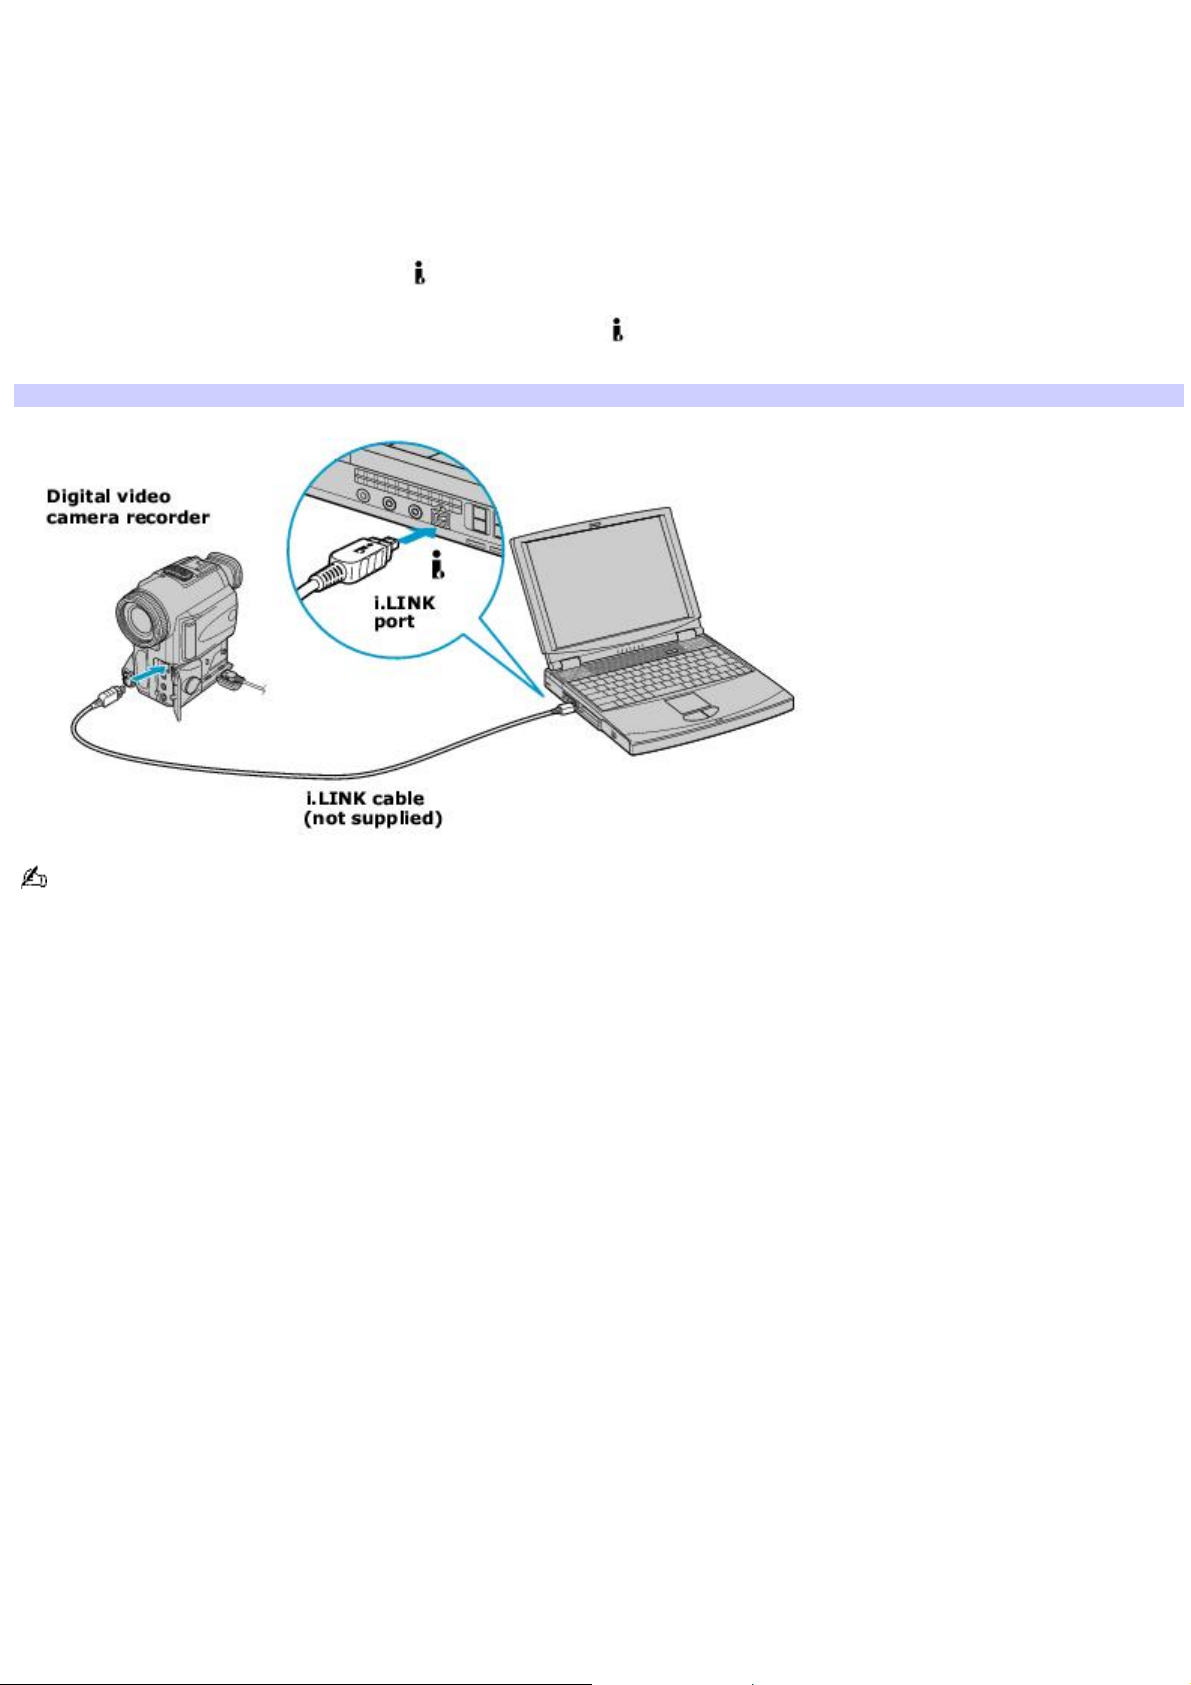
Connecting an i.LINK digital video recorder
You can connect an i.LINK digital video (DV) recorder when the computer is powered on or off. Connecting the DV recorder
when the computer is in a power saving mode (Standby or Hibernate) may cause the computer to malfunction.
To connect an i.LINK digital video recorder
1.
Turn on the DV device and the computer.
2.
Plug the i.LINK® cable into the i.LINK / DC In/Out port on the DV device.
3.
Plug the other end of the i.LINK cable into the i.LINK port on your computer, port replicator, or docking
station. The Found New Hardware window appears on the lower right corner of your screen.
Connecting an i.LINK Digital Video Camera Recorder
See the manual that came with your digital video camera recorder for more information on its installation and use.
Page 94
Page 95

Disconnecting the i.LINK digital video recorder
You can disconnect the i.LINK digital video recorder when the computer is powered on or off. Disconnecting the DV device
when the computer is in a power saving mode (Standby or Hibernate) may cause the computer to malfunction.
To disconnect the i.LINK DV recorder when the computer is off
1.
Turn off the computer and the i.LINK DV device.
2.
Unplug the i.LINK cable from the i.LINK / DC In/Out port on the computer.
Page 95
Page 96

Using a digital video camera recorder
Your computer comes with preinstalled driver software that is compatible with most Sony digital video camera recorders. If
you purchased a camera that comes with its own driver software, install these drivers before you use the camera.
To view images
You can view the images captured by your digital video camera recorder three different ways. Select one set of instructions
from the following list:
If your digital video camera recorder is compatible with the preinstalled software, the Digital Video Device window
appears when you connect the camera to the computer. Select the program you want to use in this window, and
click OK.
Click Start, and click All Programs. Select a software program in which to view your images.
Click Start, and click Experience VAIO. Click Movies, and select a program in which to view your images.
Page 96
Page 97

Notes on connecting an i.LINK device
Do not connect more than one digital video camera recorder at a time. The software supplied with your computer
will not recognize multiple cameras.
Do not connect an external device that requires power from the i.LINK port. The i.LINK port cannot supply power to
the external device.
The computer supports transfer rates up to 400 Mbps; however, the actual transfer rate is the lowest transfer rate
of the external device.
The i.LINK features available may vary depending on the software applications you use. See the documentation that
accompanied your software for more information.
Page 97
Page 98

Frequently asked questions
Why can't I use the DV recorder?
You may not be able to use the DV recorder and the message, DV equipment seems to be disconnected or turned off may
appear for the following reasons:
The DV recorder was not connected properly. See Using i.LINK Digital- Video Recorders for more information.
The i.LINK cable connectors are not plugged securely into the ports on the computer and the camera. Unplug the
connectors, and plug them in again.
Multiple i.LINK®1 devices are connected to the computer. The software supplied with your computer will not recognize
multiple i.LINK devices. Turn off your computer and all connected devices. Disconnect the devices that are not in use.
See Using i.LINK Digital-Video Recorders for instructions on reconnecting the i.LINK device.
1
i.LINK is a trademark of Sony us ed only to des ignate that a produc t c ontains an I E E E 1 3 9 4 c onnection. T he i.LIN K c onnec tion may vary, depending on the
software applications, operating s ys tem, and c ompatible i.LI NK devices. A ll products with an i.LI N K c onnec tion may not c ommunic ate with eac h other. Refer
to the documentation that came with your compatible i.LIN K devic e for information on operating c onditions and proper c onnec tion. Before c onnecting
compatible i.LI N K P C peripherals to your system, s uc h as C D-RW or hard dis k drive, c onfirm their operating s ys tem c ompatibility and required operating
conditions.
Page 98
Page 99

Using Computer Monitors and Projectors
You can connect an external display (such as a computer monitor or a projector) to your computer, port replicator, or
docking station.
Connecting a computer monitor
Connecting a multimedia computer monitor
Connecting a projector
Selecting a Display Mode
Disconnecting a computer monitor or projector
Page 99
Page 100

Connecting a computer monitor
You can display the images on your computer's LCD screen onto an external computer monitor. The external monitor
displays the operations you perform on your computer.
To connect a computer monitor
1.
Make sure the computer monitor is plugged into an AC outlet.
2.
Turn off the computer.
3.
Plug the display cable connector into the Monitor (VGA) port on the computer.
4.
Turn on the computer monitor (if it is not already on), and then turn on the computer.
5.
Press the Fn+F7 key combination to toggle the display between your computer and the monitor. See Selecting a
Display Mode for more information.
Connecting a Computer Monitor
Page 100
 Loading...