


About the software on
your Sony notebook
PCG-FX800 series
N

Read this first
nN
1
Read this first
Notice
This pr oduct c ont ai ns s of twa r e owned by Sony and lice nsed by third parti es . Us e of su c h s of t ware is subject t o t he ter ms and conditions
of lice nce agreements enc lo sed w ith this pro duct . Softwar e specificati ons ar e subject to change without notice and m ay not necessarily
be identical to current retail versions. Updates and additions to software may require an additional charge. Subscriptions to online
service providers may require a fee and credit card information. Financial services may require prior arrangements with participating
finan c ial in s ti tuti o ns.
© 2002 Sony Corporation. All rights reserv ed.
Reproduction in whole or in part without permission is prohibited.
End user software licence agreement
About the software on your Sony notebook
This End User Software Licence Agreement (the EULA) is a legal agreement between you and Sony Corporation (hereinafter referred
to as Sony), a cor por a t io n or ganized unde r J apanese Law, t he m anufactur er of y our Sony comput er s y stem ( t he SO NY HARD WAR E).
Please read this EULA carefully before installing or using the software distributed together with this EULA (the SONY SOFTWARE). By
insta ll ing or using the SONY SOFT W ARE, you agree to be bound by th e term s of th is EULA. You may use th e SONY SOFTWARE only in
connection with the use of the SONY HARDWARE. SONY SOFTWARE is licensed; not sold.
Notwithstanding the foregoing, software distributed together with separate End User Software Licence Agreement (the Third Party
EULA), including but not l imited to Windows® operatin g system provided by Micr osoft Corporat ion, shall be covered by the Third Pa rty
EULA.
If you do not agree to the terms of this EULA, please return the SONY SOFTWARE together with the SONY HARDWARE to the place
where y ou obt ained it.
1. Licence. This SONY SOFTWARE and the related documentation are licensed to you by Sony. This EULA allows you to us e the SONY
SOF TW AR E f or your p erson al use for a s in gle SONY H ARD WA RE outside a netwo rk and o nly to m ake on e c opy o f th e SONY SO FTWA RE
in machin e-re ad a ble form for back- up purp o ses o nly.

Read this first
About the software on your Sony notebook
nN
2
2. Restrictions. The SONY SOFTWARE contains copyri ght ed m a te rial and other propr i e t ary mat e r ial . In order to protec t them , and
except as permitted by applicable law, you may not decompile, reverse engineer or disassemble the SONY SOFTWARE in whole or in
part. Except for the transfer of the SONY SOFTWARE together with the SONY HARDWARE and prior agreement of the recipient to be
bound by th e terms and conditions of this EULA, you may not sell or rent the SONY SOFTWARE and its copy to any third party.
3. Limited Warranty. Sony warrants the media on which the SONY SOFTWARE is recorded to be free from physical defects for a period
of ninet y (90) days from th e da t e of pu rchase as evid enc ed by a co py of the re ce i pt . Duri ng t he appl ica ble war ran ty period, Sony will
replace free of charge such media prov ed to be defective, provid ed they are returned pr operly packag ed to the place where you
obtained it, together with your name, address, and proof of date of purchase. Sony will have no respons ibil ity to repl ac e media
damaged by accident, abuse, or misapplication. The above limited warranty replaces all other representations, conditions and
warra nt ies , whet her ex pr es s or impl ied, by statut e or otherw ise and Sony expressly disclaims all other warranties and all conditions
inclu ding, but not lim it ed t o, the im pl ied warrant ies and/or c ondi t ions of satis fa ctor y quality and fit ness for a part icul a r purpose. The
term s o f th is limited w a rranty do not af fect or pr ejudice yo ur s tatut or y r i ght s a s an ultimate consum e r, neither do t hey limit or e xc l ude
any liabi l it y for deat h or pe rsonal inju ry caus ed by th e negli genc e of Sony.
4. Termination. This EULA is effective until terminated. You may terminate this EULA at any time by destroying the SONY SOFTWARE,
related document at ion, and all copies thereof. This EULA will terminat e immedi at ely withou t notice from Sony, if you fail to comply
with any provision of this EULA. Upon termination you must destroy the SONY SOFTWARE, related documentation, and all copies
thereof.
5. Governing Law . This EULA shall be governed by and construed in accordance with the laws of Japan.
Should you have any questions concerning this EULA or t his limited warranty, please refer to the Customer Service Guide on how to
contact V AI O-Lin k.
Read this first
nN
3
About the software on your Sony notebook
ENERGY STAR
As an ENERGY STAR® Partner, Sony h a s determined that th is produ ct me ets th e ENERGY STAR® guidelines for energy ef ficien c y. The
Internat ional ENERGY STAR® Office Eq uipment Program is an international program that promotes energy saving through the use
of comput e r s and their office equip m e nt . The progr a m bac ks the development and dissemi nat ion of produ cts wi t h fun c tions th at
effec t ively reduc e ene r gy co ns um pt io n. It is an ope n s ystem in w hich busines s pro pr ietor s can participate voluntaril y. The targeted
prod ucts a r e of fic e equipment such as comput er s, displays, printers, facs imiles and copiers. The ir s tan da r ds and logo s are uni form
among participating nations.
ENERGY STAR is a U.S. registered m ark.
®

Read this first
nN
4
Trademarks
Sony, DigitalPri nt , DVgate, i.LINK, ISP Selector, MovieShaker , Smart Captur e, SonicS tage, Sony Style Imagin g, UI Design Selector, VAIO
Edit Components, Memory Stick, the Memory Stick logo,VAIO System Information, VAIO and the VAIO logo are tradem arks of Sony
Corporation.
Microsoft, Windows and Windows XP l ogo are registered trademarks of Microsoft Corporation.
i.LINK is a trademark of Sony used to designate that a product contai ns an IEEE1394-connection.
Adobe, Adobe Photos hop E l ements and Adobe Acr obat Read er are trademarks of Adobe S ys t ems Incorpor a t ed.
QuickTime and the QuickT ime logo ar e tradem ar k s use d under li c enc e. Q uickTime is registered in the U.S. and othe r count r i e s.
RealPlayer is a trademark or registered trad emark of RealNetwor ks, Inc. in the U.S. and other countries.
Symantec Norton An tiVir us is a trademar k of Symantec Corporat ion .
WinDVD is a trademark of InterVideo, Inc.
About the software on your Sony notebook
All other names of systems, products and services are trademarks of their respective owners. In the manual, the ™ or ® marks are not
specified.
Speci f icat i ons are s ubj ec t to change w it hout notic e.

Registering your VAIO
Registering your VAIO
It only takes a few momen ts to regis te r your S ony VAI O computer .
By register in g yo ur comput er , you can take adva ntage of So ny’s c om mit m ent to quality c us to mer suppor t
and receive the following benefits:
❑ Club VA IO – Online support, tutorials, tips and tricks, news, news forums, c ompetitions, free downloads
and software updates.
❑ VAIO-Link – If you are experiencing any problems with your computer, you can check the VAIO-Link
website fo r a possibl e solution: http://www.vaio-link.com.
❑ Guarantee – Protect your investment. See the Guarantee sheet for the te rms and condition s a nd re fer
to your Troubleshooting Guide for mor e inform at ion .
To register your Sony VAIO comp ut er , proceed as follow s:
1 Connect your phone line and set up a modem connection (see Configuring your modem (page 57)).
About the software on your Sony notebook
2 Double-cl ick t he VA IO O nline Registration icon on the deskto p.
3 Select your language and click Next.
4 Select the Register Now option button and click Next.
You get to the website https://registration.sonystyle-europe.com/vaio/registration.asp.
5 Fill in your first and last name, the serial number of your computer and the place where you live.
6 Click Submit.
Your VAIO is registered.
✍ You can only register if you have administrator rights on your computer.
nN
5
About the software on your computer
About the software on your computer
Your Sony computer is ready to help you work, play, learn, and communicate as soon as you turn it on. This
section gi ves you an overvi ew of what you can do with the software on your co mp uter.
Sony software
DigitalPrint
Sony Electronics
DigitalPrint is easy-to-use software designed to help you get the most enjoyment out of your photographs
taken with a digit al cam era or taken from a CD, floppy disk or Memor y Sti ck™ . With Di gi ta lPrint, you can
easily load photos into your computer, create photo albums, labels and make prints.
nN
6
About the software on your Sony notebook
DVgate
Sony Electronics
DVgate is a kit of 3 complementary applications: DVgate Motion, DV gate Still, and DVgate Assemble. This
collectio n make s it easy to select and edit digital video clips, then bring th em together in to a professionallooking hom e video. Use i. LIN K™ to connect your digit a l vide o camera, and the computer opera t es as an
editing desk that can capture, preview, cut and assemble your selection and save the sequences in AVI or
MPEG 1 & 2 formats. DVgate Still displays digital video images sent from a digital videocassette recorder or
a digital video camera recorder (only possible if you have DV In/Out on your camera or at least a DV Out for
DV Gate Still), and saves them as graphic files on your hard drive.
About the software on your computer
ISP Selector
Sony Electronics
With the ISP Selec tor you can eas il y inst all the Int ern et Servi ce Provi der you want to use. Just choos e y our
country and your language from the d rop-down lists and the available providers will appear. Cli ck the
Install button next to the ISP and the installation begins .
✍ Once you have selected your country, you can only set up ISPs for that country.
MovieShaker
Sony Electronics
MovieShaker® creates personal movies - complete with transitions, specia l effects , background music, and
text. All you do is import your clips, pick the tune you want and MovieShaker® does the rest. You can also
choose to take contr ol and produce your very own movie. You choos e the exact clips or der , special effec t s,
About the software on your Sony notebook
and transitions. You can also import your own music and MovieShaker® will auto matically ma tch the length
of the song to the length of your movie.
Smart Capture
Sony Electronics
Connect a digital camera to your computer to shoot still images and video clips, which you can view or send
by e-mail. The Smart Capture Finder displays images from the camera and allows you to adjust the settings
or create effects. Smart Captu re enables y ou to capture images via i.LINK™ compatib le devi c es or create a
panora ma pic tu re using th e panor am a assi st fu nct ion.
nN
7
About the software on your computer
SonicStage
Sony Electronics
SonicStage is software using the OpenMG technology, a copyright protection technology developed by Sony
Corpo rati on and des ig ned t o all ow recor di ng a nd playb a ck of di gital musi c data on a perso nal computer .
Once the data is encrypted and recorded onto the hard disk, SonicStage technology allows it to be played
back on the PC but prevents unaut horized distr ib ut ion . The purpos e of So nicSt age t ec hnol ogy is t o create
an environment in which larger quantities of high-quality music can be distribu ted without subsequent
unaut hori ze d dist ribu tion of the music file s.
The SonicSt age soft w ar e encrypts and ma nages mu sic files either dow nloaded to a personal com put er by
using the EMD services or adopt ed (or c re ate d) fro m your ow n CD or the Internet.
Sony Style Imaging (shortcut on the deskt op)
Sony Electronics
About the software on your Sony notebook
Sony Style Imaging is an easy way to share your digital pictures and videos with family and friends. Use Sony
Style Imaging with the and MovieShaker software to make the most of your images and movies. When you
sign up as a Sony Style Imaging member, you can store your pictures and even order prints.
Go to the follow ing websi te to join for FREE :
http://www.sonystyle-imaging.com
nN
8
About the software on your computer
UI Design Selector
Sony Electronics
You can chang e the wind ow desi gn of the Sony s of twar e comp at ibl e with UI Desi gn Select or .
VAIO Edit Components (available on the application CD-ROM)
Designed as a plug-in for Adobe® Premiere®, VAIO Edit Components includes special features to support
your i.LINK™-DV devices, so you can produce superior quality home movies even after editing. Now you can
control th e DV device from your co mp ut er, impo rt and e dit the movie , and then expo rt it back to the DV
device. To be able to use the Sony software VAIO Edit Components, you must first install Adobe® Premiere®
version 6.0* on your computer.
* available for purchase.
VAIO System Information
About the software on your Sony notebook
Sony Electronics
Thanks to V AI O System Informati on, you can chec k th e p roduct in formation (model name, se rial n um ber ,
BIOS version, OS version and OS serial number) and the system information (CPU, clock frequency, system
memory an d cache memory) of your not eboo k at all times.
nN
9
Product Recovery CD- RO Ms
Sony Corporat ion
The P roduct Recove ry C D -R OM s a ll ow y o u to re insta l l t he system, the softwa re sh ipp ed w ith y ou r co mp ute r
and the bundled device drivers if they are corrupted or accidentally erased. Reinstalling an individual device
driver may correct a proble m you are experien ci ng wi th your comp ut er, wi th out you having to recove r th e
entire system.
! You can only use the Recovery CD-ROMs on the Sony computer you purchased, and not on any other Sony PC or other manufacturer's PC.

About the software on your computer
Operating system and other pre-installed software
Windows® XP Home E dition
Microsoft Corporation
Microsoft® Windows®XP Home Ed itio n allows y o u to enjo y a new lev e l o f rel iability that helps you r
computer stay up and running. If anything does go wrong, you can quickly roll back to the state your system
was in when all was well. The new, simpl er vis ual design lets you us e your com puter the way you want. If
you share a computer wit h othe r users , you can eac h enjoy your ow n per sonal pref er enc es bec aus e this
Windows® operating system enables your computer to handle multiple activities at the same time.
Windows®XP Home Edition automatica lly shields your computer from unauthorized access when you are
on the Internet.
For questions and technical assi st a nce, go onl i ne to:
http://support.microsoft.com/directory
About the software on your Sony notebook
Inte r n et Ex plo r e r 6. 0
Microsoft Corporation
Internet Explorer is the Microsoft Internet browser allowing you to surf the World Wide Web. The Setup
Wizard configures your computer to connect automatically to your service provider. A full e-mail package
enables you to send and receive mail - including attached fil es - across the Internet. NetMeeting, Outlook
Express and Mic ro soft Chat are just some of the component s bundled with Internet Ex pl or er 6.0. Inte rn et
Explorer 6.0 also includes 128-bit encrypt io n, the hig hes t possi ble lev el of prote cti on f or all your Internet
communications, including credit card use and financial transactions. A complete online tutorial helps new
users be come comfort a ble using th e Interne t.
For questions and technical assi st a nce, go onl i ne to:
http://support.microsoft.com/directory
nN
10
About the software on your computer
Adobe® Acrobat® Reade r 5.0
Adobe Systems Incorporated
Acrobat® Reader software allows you to view, navigate, and print electronic documents in Adobe Portable
Docum ent Format (P D F), an open fil e format that is inte nd e d to preserve the confo rmi ty of doc um ents
created on all maj or computer platfo rms. Once Ac robat® Reader is installed, you can open and view PDF files
from withi n your Web brows er by clicking a PDF file embedded in an HTML file. You quickly see the first
page while the rest of the document is being downloaded.
For questions and technical assi st a nce, go onl i ne to:
http://www.adobe.com
Adobe® Photoshop® Elements
Adobe Systems Incorporated
About the software on your Sony notebook
Adobe® Photoshop® Elements software introduces the next generation of image editing with powerful new
features that offer something for every user. Delivering the broadest and most productive toolset available,
Photoshop® Elements helps you explore your creativity, work at peak efficiency, and achieve the highest
quality results across all image med ia.
For questions and technical assi st a nce, go onl i ne to:
http://www.adobe.com
nN
11
QuickTime 5.0
Apple
QuickTime is the Apple technology that makes video, sound, music, 3D and virtual reality come alive for your
Internet browser and Windows.
For furth er in fo rmation, see th e websi te at:
http://www.apple.com/quicktime

About the software on your computer
RealPlayer
RealNetworks
RealPlayer is the RealNetworks video and audio player, which lets you access 2,500 radio stations featuring
music, news and sp or ts.
For furth er in fo rmation, see th e websi te at:
http://www.real.com
Symantec Norton AntiVirus (as a setup file on the hard drive)
Symantec
This software package includes a 90-day free subsc r ipti on t o virus defini tion updates.
With Norto n AntiV irus, you can scan fil es , fold ers, or entire drive s fo r viruse s, and quara ntin e in fecte d fil es
for subm iss io n to th e Syma n tec AntiVirus Re sea rch Ce n ter (SARC). File s sub mit te d to S A RC are a nal yz ed and
About the software on your Sony notebook
the resu lts are reported auto maticall y within seve n days. When you conf igure Norton AntiVirus ad equately,
your com puter is safe. Norto n AntiV i ru s can aut om atically check boot re cord s fo r viruse s a t syste m startup,
check p rograms fo r viruses at the time yo u u se them, scan a l l local hard drives for vi ru ses once per week, a n d
monit or yo u r comp u ter for any acti v it y th a t m ig ht indi cate the work of a v irus in action. I t can also scan files
you downl oad fro m the Inter net and c heck floppy di s ks for boot virus es when you use the m.
You must launch t he Nort on An ti Vi r us installation, and you wi ll th en be pro mp ted to update the v irus
defini tion s. This is normal as new viruse s will have come out since y o ur VAIO left th e fact or y.
For more informati on, see the online help files and the websit e at:
http://www.symantec.com/techsupp
nN
12
About the software on your computer
VAIO Web Phone
CallServe Com m uni c at ions Ltd.
Once you have purchased the USB telephone, this Internet Telephone enables you to make telephone calls
from your PC via the Internet to any other phone. You can make internati onal calls at significant ly lo wer
prices and make phone calls and surf the web at the same time - on just one phone line.
For more informati on, see the online help files and the websit e at:
http://www.callserve.com/EN/help/index.asp
WinDVD
Inte rV ideo, Inc.
InterVideo Inc.'s WinDVD is a simple-to-use DVD player. WinDVD combines all the features you would expect
to find on a standard consumer DVD player, in addition to some very advanced functionalities, full precision
About the software on your Sony notebook
video decoding, a choice of user interfaces, and video display options. You can play DVD movies, interactive
DVD titles, MPEG video content, video and audio CDs. WinDVD automatically determines the type of disc in
the DVD drive and uses the correct playback method.
For questions and technical assi st a nce, go onl i ne to:
http://www.intervideo.com
nN
13

Using Video software
Using Video software
The followin g video s of t ware appl icat i ons are insta ll ed on your VAIO:
❑ DVgate (page 14)
❑ MovieShaker (page 28)
❑ Smart Capture (page 33)
Using DVgate
DVgate is a software application that enables you to capture and then edit images taken with digital video
devices (DV devices), such as digital video camera recorders, on your personal computer. It also gives you the
ability to output the edited material for recording on a DV device.
With DVgate, you can easil y per fo rm image edi t ing with your c omput er and a DV device.
About the software on your Sony notebook
DVgate consists of 3 applications:
❑ DVgate Motion;
❑ DVgate Still;
❑ DVgate Assemble.
✍ Depending on the computer settings, frames may be lost during video capture and frame duplication when recording edited video. Please make sure
you configure your computer according to the recommended settings to prevent this from happening. To configure your computer to use DVgate, refer
to the O nline help of DVgate.
nN
14

Using Video software
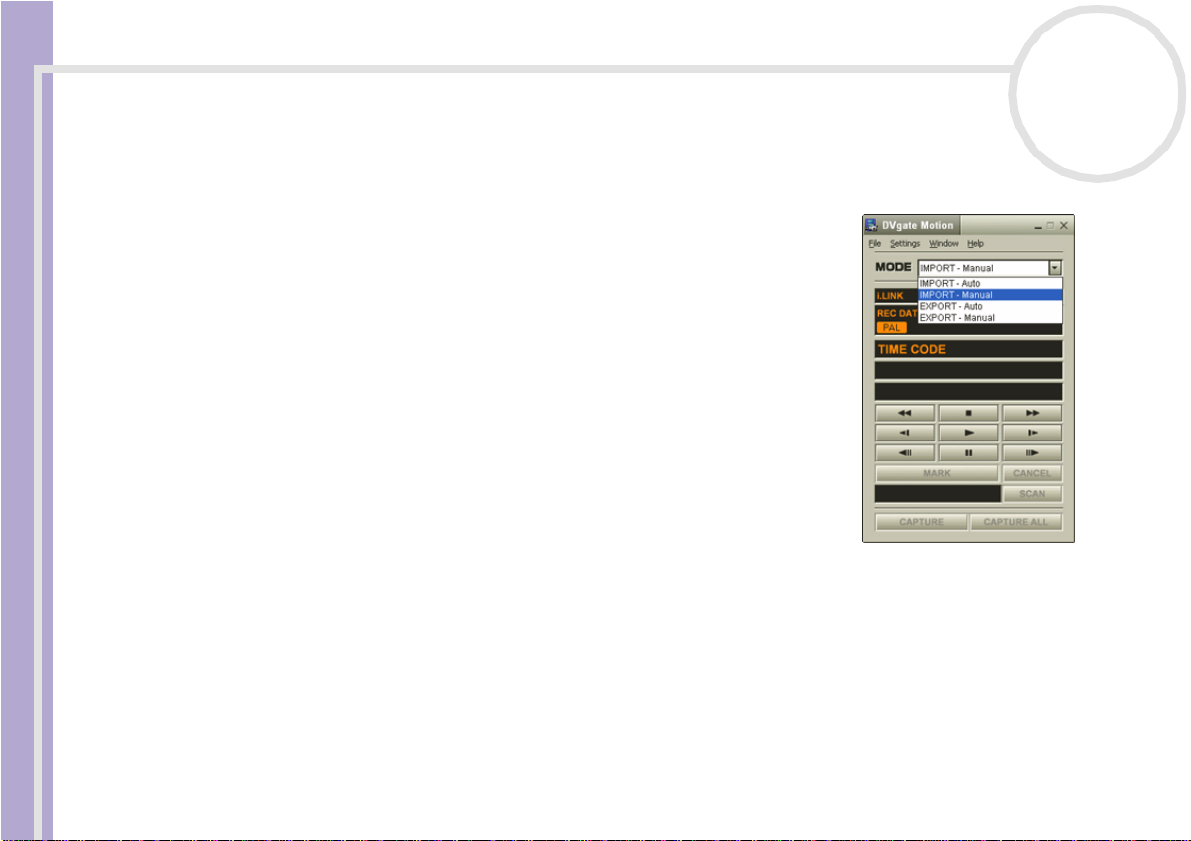
Using DVgate Motion
With DVgate Mo tion y ou can c apt ur e video and r ec ord edited videos on a DV device.
❑ Capturing video:
You can automatically or manually capture any scene or portion of the images recorded on a DV
device, such as a digital video camera recorder. What is more, you can spe cify the exact scenes that you
want to captur e while wa tch ing the tape playback on the monitor. You can then choos e t o save the
selected scenes as separate files or as one file.
❑ Recording edited video on a DV device
You can record the edited vid eo on tape using a DV devi ce, suc h as a digital vi deo ca mera rec or der *,
conne cted to the compu ter. With DVg ate , you ar e not limited to recording single clips, but you can
record a series of clips on the DV device at one time.
To launch DVga te Motio n, proc eed as follows:
1 Connect the camera to the computer with th e i.LINK™ cable and turn on the came ra.
About the software on your Sony notebook
2 Click Start, All Programs, DVgate, DVgate Motion.
DVgate Motion and the Monitor windows appear.
* The digital video camera recorder must have a DV-IN connector.
nN
15
Using Video software
Capturing videos
You can automat ically or manual ly import videos onto your com put er .
To automatically import vid eos onto you r comput er , proceed as follows:
1 Launch DVgate Motion.
2 Click the down arrow and select Import-Auto from the Mode drop-
down list.
Use the DVgate camera controls buttons to play, rewind or fast
forward the ta pe to the select ed tim e co de to begin capt ur in g.
3 Press Play to start the video .
The video begi ns to play in the Monitor window.
4 Click Mark to mark th e begin ni ng of the firs t segmen t.
The first frame of the segment to be captured, is displayed in the In/
Out list window.
About the software on your Sony notebook
Click Mark again to mark the end of th e segment to cap ture.
The last frame of the segment to be captured, is displayed in the In/
Out list window.
Continue t o mark as many s egm ent s as you want.
5 Click Capture to import the selected video segment or click Captu re All to import them all at once.
The Save as a file window appears.
6 Select the location to save the file.
7 Click the Save butt on.
DVgate captures the segments.
The Capturing complete message appears.
8 Click OK in the DVgate Motion window to fin ish.
Information about the capturing process is displayed in the Report window.
9 Click OK.
nN
16

Using Video software
10 Exit DVgate Mo tion.
The Dvmotion2 window appear s on th e screen.
You can then save the In/Out list, which al lows you to captur e th e same v ideo seque nc es later on, or
change the In/Out se tti ngs.
✍ Make sure that the camera is in Video Tape Recorder mode (VTR) when capturing or playing back video from or to a tape.
If you want to manually import video onto your computer, ref er to the DVgate online help file.
Recording edited videos on a DV device
To record edited videos on a DV device, proceed as follows:
1 Adjust th e record ing cor re ction valu es .
2 Add files to the Record List.
3 Record rem ot ely or manu all y the video on th e DV devi ce .
Adjusting the record ing cor rectio n val u es
About the software on your Sony notebook
To ensure accu racy in the recording, you can specify recording correction values. Adjustment o f the
recordin g corre ct ion values is especially i mp or tan t when per for ming s pli ce reco rding. You can choose to
specify the va lues yourself or to have them automatically adjusted by using the automatic cali bration
feature. The values generated by the automatic calibration feature are usually correct.
To automatically adjust the recordi ng corre cti on valu es, p roce e d as follows :
1 Launch DVgate Motion.
2 Click the down arrow and select Export - Auto from the Mode drop-dow n list.
3 Select Adjust on Recording… from the Settings menu.
The Adjust on Recording dialog box appears.
4 Click the AutoAdjust button.
DVgate Mot ion activ ate s th e connect ed DV device and auto matically finds th e adjustme n t va lue s.
5 Click OK.
✍ To manually adjust the recording correction v alues, ref er to the DVgate online help file.
nN
17

Using Video software
Adding files to the Record List
To add files to the Record List, proceed as follows:
1 Launch DVgate Motion.
2 Click Add in the DVgate M otion – AV I file list.
The Add dialog box appears.
3 Select a file and click Open.
The specifie d fil e is added and th e seri al number, first and last images , time code, file le ngt h and fil e
name are displ ayed.
★ DVgate Motion adds all serial numbered files with the same name if you select Ad d all divided files s ave d w it h t he same na me. Serial numbered
files are created when yo u speci fy t o save file s as multiple files in D Vg a t e Motion and DVgate Assemble.
✍ All newly added files are appended to the end of the list.
You can drag multip le fi les a t one tim e; howe ver, the order in whic h the y ar e adde d is unp red ic ta bl e.
You can record AVI files with different sound modes on a DV device, but about one second of no sound (depending on the DV device) may oc cur at
About the software on your Sony notebook
the point where the sound modes change.
You can only add AVI files using DV Codec as video compression; MPEG files are not supported.
When recording a video sequ ence, make sure that all images are saved in the same mode . Recording in different m odes might cause sound or ima ge
distortions during playback. After adding the files you want to the Record List, you can still change the order of the files, add or delete files.
nN
18

Using Video software
After ad ding the files to the Record List, you can still change the order of the files, add or delete files.
To change the order of the files in the Record List , proceed as follows:
1 Click the file you w ant to move while holding down the mou se butt on.
2 Drag the file to the appropriate position and then release the mouse button.
To remove a file from the Record List, pro ceed as fol lows :
1 Click the file you want to remove.
2 Click Delete.
The removed file is fil led by the subsequent file and the files are renumbered.
Click Delete All when to remove all files.
✍ You can select multiple AVI or still picture files from the Record List by clicking them while holding down the <Shift> or <Ctrl> key.
When you move multiple files, they are all moved together.
You can undo chan ge s by choosing Undo from the Edit menu immediately after inserting, moving or deleting (a) file(s).
About the software on your Sony notebook
You can save a Record List for future use. Record List files can only be used in DVgate Motion.
To preview a clip, proc eed as follo ws:
1 Selec t t h e file you wan t to pr e v iew in the DVgate Motion – AVI file list window.
2 Click Preview.
The Monitor window and the Preview window appear.
The Monitor window shows the first frame of the file.
Click on the Pre vious File button or on the Next File butt on to selec t the file you want to preview.
Click Preview All to previe w all the files shown in the list.
✍ Previous File and Nex t Fi le are buttons for moving the preview from one selected file to another. They are not for designed for navigation purposes
wit hin the list. Conseq uently, you cannot cl ick on them when only on e file is selected. Whe n yo u select on ly one file, Previous File and Next File
do not function.
nN
19

Using Video software
Recording on t he DV devi c e
You can automat ical l y or manual ly expor t video s fro m your com put er to a DV device.
To automatically export videos from your computer to a DV device, proceed as follows:
1 Connect the camera to the computer with th e i.LINK™ cable and turn on the came ra.
2 Launch DVgate Motion.
3 Click the down arrow and select Export-Auto fro m th e Mode drop-down list.
4 Click the Add button in the DVgate Motion - AVI fi le list window and select the video file you want
to export.
5 Click Record or Record All.
The Output dialog box appears.
6 Select the Add blank image opti on but t on.
❑ You can add blank frame(s) during recording if you select the Append option button in the Output
About the software on your Sony notebook
❑ You can specify the length of a blank image by entering the number of frames in the Length box in
7 Click OK.
The Output dialog box closes and recording starts.
Video sequences are recorded on t he DV devic e in the orde r in which they are arranged in the Record
List.
★ Clicking Record All will send all the video files shown in the Record List to the connected device. Clicking Record will send onl y the video file s
selected fr om the Record List to the connected device.
nN
20
di a log bo x .
Blank frame(s ) can be placed in the following locations:
Head: A blank image is plac ed bef ore the sta rt of the vid eo seq uence dur ing recording.
Tail: A blank imag e is placed af t er the end of the video se quenc e dur i ng recording.
Both: Blank images are placed bef ore the start and aft er the end of the vid eo seq uence dur i ng
recording.
the Output dialog box.

Using Video software
✍ Even if you specify not to add blank frames, several blank frames are always placed at the end of the recorded segment regardless of the settings.
This is to prevent image noise from being recorded when recording stops.
Do not quit or log off from Windows
Disable the screen saver in Windows
Do not start other applications or move any active window while recording.
Recording from the very beginning of the tape may not be successful if you record by controlling the video device through DVgate Mo t i o n.
Do not turn the power switch on the digital video camera recorder to Camera or turn it off whil e DVg ate Mo tio n is recording. Never switch the input
sources when recording on a digital videocassette recorder as this might prevent recording.
If you want to export manually videos from your computer to a DV device, refer to the DVgate online help file.
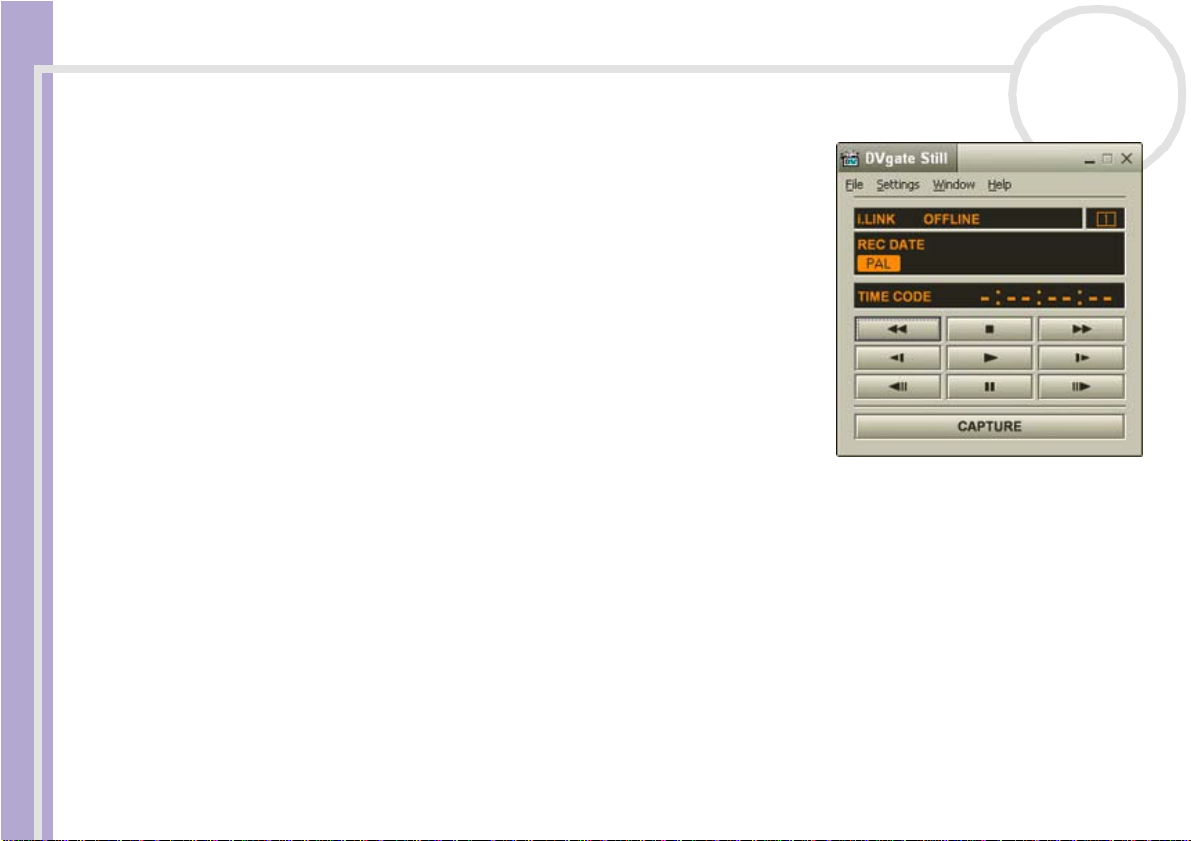
Using DVgate Still
DVgate S til l is an applicati o n tha t disp lays dig ital video image s sent from DV devices such as a digital
videocas s ette rec or der or a digital vi deo c ame ra rec order and th at captur es them as still pi ctu re s.
The followin g fun cti ons are featured:
About the software on your Sony notebook
❑ Control the connected DV device and display a video image on the screen of your VAIO.
❑ Capture 30 frames of still pictures in total with respectively 15 frames in the forward and backward
directions.
❑ Capture onl y one frame of a still pictur e.
❑ Save a captur ed still pict ure in BMP, JPEG, GIF or DVF format.
✍ The sound recorded with the image, is not played.
®
while recording. Otherwise, recording will fail.
®
.
nN
21

Using Video software
Capturing pict ures
There are two capt ure modes in DVgate Still: the Co ntinuous Ca pture mode and the Single Frame
Capture mode.
❑ Continuous Capture mode:
If you captur e pict ur es during Play mode, you can capture 30 frames of still pictures in total with
respectively 15 frames in the forward and backward directions. All stil l pictures already captured, are
lost. If you capture during Pause mode, you can capture only one frame of a still pictur e.
✍ Immediately after you capture during Play mode in Continuous Capture mode, the DV device pauses.
❑
Single Frame Capture mode:
You can capture one frame of a still pictur e. The capt ur ed resul t is the same even if you captu re during
Play or Pause mode.
✍ Capturing 30 frames in Continuous Capture mode repla ces all 30 fr a mes. Ca pturing only o ne frame over wr ites the fir st frame of the still picture,
capturing the next frame overwrites the second frame, and so on.
About the software on your Sony notebook
To toggle bet ween Continuous Capture mode and Single Frame Capture mode, proceed as follows:
1 Click Settings in the DVgate Still window.
2 Choose Capture…
The Capture Settings window appear s.
3 Select the Captu re frame s conti nu ous ly opt ion button to captur e in Continuous Capture mode.
Clear the Capture frames continuously option butt on t o captu re i n Si ngle Frame Capture mode.
nN
22
Using Video software
To capture pict ur es , proceed as follo ws:
1 Connect the DV device to your computer .
2 Launch DV gate Still (Start/All Programs/DVgate/DVgate
Still).
The DVgate Still window appears.
3 Set the DV device to the Play or Pause mode.
The video image appe ars in the Monitor window.
4 Click the Capture but t on.
The video image in the Monitor window is bei ng ca pt ur ed.
✍ Dragging the slider in the Capture window to the left or right lets you display the still
picture before or after the current one.
! If you exit DVgate Still with ou t sav ing the cap t ured st ill pic t ure, it is cleared.
! Even if you attempt to capture continuous pictures, you may not be able to capture some
About the software on your Sony notebook
frames. In this case, exit all applications other than DVgate Still and then retry to capture
them.
nN
23
Using Video software
Sav in g t he capt ured pi ctures
You can save th e still pictures displayed in the DVgate Still - Still window in either one of the follo wing
formats: BMP, JPG, GIF o r DVF.
To save the captured pictures, proceed as follows:
1 Launch DV gate Still and capture images.
2 In the DVgate Still - Still window, select a still picture you want to
save.
3 Click the Save but ton.
The Save As dialog box appears.
Use the Location to Save drop-down list to sel ect a folde r.
Select a file format fro m the File Format dr op-down list.
4 Click Save.
The captured picture is saved.
About the software on your Sony notebook
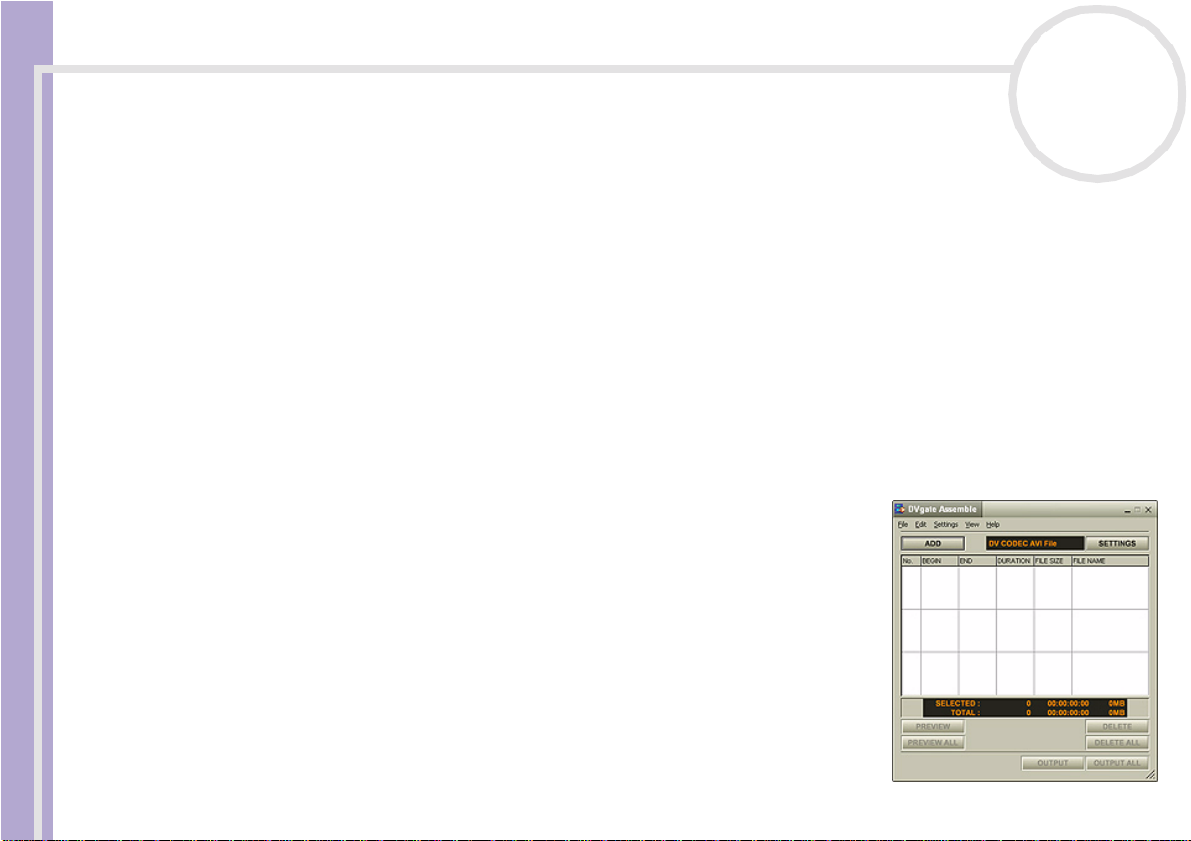
Using DVgate Assemble
DVgate Ass em ble enab les you to edit video files an d still image fil e s captured wit h DVga te Moti on and
DVgate Still. Afterwards you can splice them together to form one single file. You can save the resulting
spliced video sequences as AVI, MPEG1, or MPEG2 format files.
To launch DVgate Assemble, proceed as follows:
1 Click Start.
2 Point to All Programs, DVgate and then to DVgate Assemble.
The DVgate Assemble main window appears.
nN
24
Using Video software
Using DVgate Assemble
DVgate Ass em ble enab les you to edit video files an d still image fil e s captured wit h DVga te Moti on and
DVgate Still. Afterwards you can splice them together to form one single file. You can save the resulting
spliced vid eo seq uences as AVI, MPEG1, or MP EG2 for mat fil es.
To launch DVgate Assemble, proceed as follows:
1 Click Start.
2 Point to All Programs, DVgate and then to DVgate Assemble.
The DVgate Assemble main window appears.
Creating an Assemble List
You can create an Assemble List with files you want to spl ice together. Afterward s you can always edit the
Assembl e List by changi ng t he ord er of the files and adding or deleting fi l es.
About the software on your Sony notebook
To add files to an Assemble List, proceed as fo llows:
1 Launch DVgate Assemble.
2 Click the Add button.
The Add dialog box appears.
3 Choose AVI file in the Files of type drop- down bo x .
If y ou selec t Add all divided files saved with the same name,
DVgate Assemble will add all seria l numbered fil es with the same name
to the list. Serial numbered files are files that are created when DVgate
Motion saves files that are split and applies co nsecutive numbers to
them. The n u mbe rs o f the sp li t fi les h a ve 4 d igits and i ncr eas e one u nit
at a time starting with 0001.
4 Select a file and click Open.
The AVI file is added to the list.
nN
25
 Loading...