

Page 1

nN
About the Software on
your Sony Notebook
Computer
PCG-F807K / PCG-F808K / PCG-F809K
Page 2

About the Software on your Notebook Computer
nN
2
NOTICE
This product contains software owned by Sony and licensed by third parties. Use of
such software is subject to the terms and conditions of license agreements enclosed
with this product. Software specifications are subject to change without notice and
may not necessarily be identical to current retail versions.
Updatesandadditionstosoftwaremayrequireanadditionalcharge.Subscriptions
to online service providers may require a fee and credit card information. Financial
services may require prior arrangements with participating financial institutions.
© 2000 Sony Corporation All rights reserved.
Reproduction in whole or in part without permission is prohibited.
End User Software License Agreement
This End User Software License Agreement (the "EULA") is a legal agreement between you and Sony
Corporation (hereinafter referred to as "SONY"), a corporation organized under Japanese Law, the
manufacturer of your SONY computer system (the "SONY HARDWARE"). Please read this EULA carefully
before installing or using the software distributed together with this EULA (the "SONY SOFTWARE"). By
installing or using the SONY SOFTWARE, you agree to be bound by the terms of this EULA. You may use
the SONY SOFTWARE only in connection with the use of the SONY HARDWARE. SONY SOFTWARE is
licensed not sold.
Notwithstanding the foregoing, software distributed together with separate End User Software License
Agreement (the "Third Party EULA"), including but not limited to Windows® operating system provided
by Microsoft Corporation, shall be covered by the Third Party EULA.
If you do not agree to the terms of this EULA, please return the SONY SOFTWARE together with the SONY
HARDWARE to the place where you obtained it.
Page 3

About the Software on your Notebook Computer
nN
1. License. This SONY SOFTWARE and the related documentation are licensed to you by SONY. This
EULA allows you to use the SONY SOFTWARE for your personal use for a single SONY HARDWARE
outside a network and only to make one copy of the SONY SOFTWARE in machine-readable form forbackup purposes only.
2. Restrictions. The SONY SOFTWARE contains copyrighted material and other proprietary material. In
order toprotect them, and except as permittedby applicable law, you may notdecompile, reverseengineer
or disassemble the SONY SOFTWARE in whole or in part. Except for the transfer of the SONY SOFTWARE
together with the SONY HARDWARE and prior agreement of the recipient to be bound by the terms and
conditions of this EULA, you may not sell or rent the SONY SOFTWARE and its copy to any third party.
3.LimitedWarranty.SONYwarrantsthemediaonwhichtheSONYSOFTWAREisrecordedtobefreefrom
physicaldefectsforaperiodofninety(90)daysfromthedateofpurchaseasevidencedbyacopyofthe
receipt. During the applicable warranty period, SONY will replace free of charge such media that proved
to be defective; provided they are returned properly packaged to the place where you obtained it,together
with your name, address, and proof of date ofpurchase.SONY willhave no responsibilityto replace media
damaged by accident, abuse, or misapplication. The above limited warranty replaces all other
representations,conditions and warranties, whether express or implied, by statute or otherwise andSONY
expressly disclaims all other warranties and all conditions including, but not limited to, the implied
warranties and/or conditions of satisfactory quality and fitness for a particular purpose. The terms of this
limited warranty do not affect or prejudice your statutory rights as an ultimate consumer, neither do they
limit or exclude any liability for death or personal injury caused by the negligence of SONY.
4. Termination. This EULA is effective until terminated. You may terminate this EULA at any time by
destroying the SONY SOFTWARE, related documentation, and all copies thereof. This EULA will
terminate immediately without notice from SONY, if you fail to comply with any provision of this EULA.
Upon terminationyou must destroy the SONY SOFTWARE, related documentation, and all copies thereof.
5. Governing Law. This EULA shall be governed by and construed in accordance with the laws of Japan.
Should you have any questions concerning this EULA or this limited warranty, please refer to the
Customer Service Guide on how to contact VAIO-Link.
3
Sony, DVgate, i.LINKTM, Mavica, PictureGear, Visual Flow,Smart Capture, SmartConnect, SmartConnect
Monitor, Memory Stick and the Memory Stick logo, VAIO and the VAIO logo are trademarks of Sony
Corporation.
Windows and the Windows 98 logos are registered trademarks of Microsoft Corporation.
Page 4

About the Software on your Notebook Computer
nN
All other trademarks are trademarks of their respective owners.
Specifications are subject to change without notice.
As an Energy Star Partner, Sony has determined that this product meets the Energy Star guidelines for
energy efficiency.
The International EnergyStar OfficeEquipment Program is an international program that promotes energy
saving through the use of computers and their office equipment. The program backs the development and
dissemination of products with functions that effectively reduce energy consumption. It is an open system
in which business proprietors can participate voluntarily. The targeted products are office equipment such
as computers, displays, printers, facsimiles and copiers. Their standards and logos are uniform among
participating nations.
Energy Star is an U.S. registered mark.
4
Page 5

About the Software on Your Notebook Computer
Sony software
About the Software on Your
Notebook Computer
Your Sony notebook computer is ready to help you work, play, learn, and
communicate as soon as you turn it on. This section gives you an overview of the
activities you can perform with your software titles.
For general information and technical assistance, please refer to your Customer Service
Guide.
Sony software
PictureGear
Sony Electronics
Create your own environment with the Digital Image Library (photos, backgrounds,
About the Software on your Notebook Computer
wallpapers, slide shows, etc). PictureGear is your assistant for creating and implementing
personal screen savers, panoramas (combined images)... You can even animate your preferred
gifs with Gif Animation Tools, create labels for all your medias with PictureGear Label Maker,
or play back movies in a variety of formats.
For details, please read the PictureGear Help file.
nN
5
Page 6

About the Software on Your Notebook Computer
Sony software
DVgate
Sony Electronics
DVgate is a kit of 3 complementary applications: DVgate Motion, DVgate Still, and DVgate
Assemble.
Edit the rushes you have shot with your digital video camera recorder using this video-capture
About the Software on your Notebook Computer
application, specially tuned for high-quality numeric movies. When connected to your camera
via i.LINK
your selection and save the sequences in AVI format.
Attaching a DV device to the i.LINK
captured to your hard drive. DVgate Still displays digital video images sent from a digital video
cassette recorder or a digital video camera recorder, and captures them as still pictures on your
notebook computer.
For details, please read the DVgate Help file.
Media Bar (DVD Player / MD Player)
Sony Electronics
The Media Bar is a commandand control center designedto assist you in organizing andplaying
your entire collection of audio and video files. The Media Bar allows you to play audio CDs,
video CDs, and DVDs in the DVD-ROM drive or play audio or video files in various formats on
your hard drive. Video images are displayed in a separate Movie window, which you can move
and resize (to full screen).
When you connect a Sony MD deck that includes a CONTROL A1 or Control A1 II jack to your
computer, you can use MD Player to operate the MD deck from the computer.
In addition to the normal MD playback operations, you can edit MiniDiscs
computer's display and input disk names and track names using the computer's keyboard.
If you connect a Sony CD Player that includes a CONTROL A1 or Control A1 II jack to the MD
deck, you can also operate the CD player (playback) from the computer and carry out drag-anddrop recording from a CD to an MD.
For details, please read the Media Bar Help file.
See also MiniDisc Deck with MD Player in your Hardaware guide.
TM
, your computer operates as an editing desk that can preview, cut and assemble
TM
nN
connector enables you to transfer the images you have
®
while viewing the
6
Page 7

About the Software on Your Notebook Computer
Sony software
MovieShaker
Sony Electronics
MovieShaker®creates personal movies - complete with transitions, special effects, background
music, and text. All you do is import your clips, pick the tone you want and MovieShaker
the rest. You can also choose to take control and produce your very own movie. You choose the
About the Software on your Notebook Computer
exact clips order, special effects, and transitions. You can also import your own music and
MovieShaker
Smart Capture
Sony Electronics
Connect a digital camera to your computer to shoot still images and video clips, which you can
view or send by e-mail. The Smart Capture Finder displays images from the camera and allows
you to adjust the settings or create effects.
Smart Capture enables you to capture images via i.LINK™ compatible devices or create a
panorama picture using the panorama assist function.
See the chapter "Using Smart Capture" or the Smart Capture Help file for more details.
Smart Connect and Smart Connect Monitor
Sony Electronics
With Smart Connect and Smart Connect Monitor you can copy, edit or delete files on another
VAIO computer (equipped with Smart Connect) connected to your computer with an i.LINK
cable.
You can also print a document on a printer connected to another VAIO computer.
®
will automatically match the length of the song to the length of your movie.
nN
®
7
does
™
Page 8
About the Software on Your Notebook Computer
Sony software
VAIO Action Setup
Sony Electronics
VAIO Action Setup gives you control on the Programmable Power Keys. You can choose to start
any application you want, establish a dialup connection or read e-mails by simply pressing a
Programmable Power Key in combination with one or several control keys. See the chapter
"Starting your favorite softwarewith VAIO Action Setup" or the VAIO Action Setup Help file for
details.
VisualFlow
Sony Electronics
VisualFlow allows you to browse interactively through the contents of your Memory Sticks
(optional). VisualFlow can display Memory Stick files in a variety of ways, and allows you to
play / display still images, movies or sound files within VisualFlow or with other software.
For details, please read the VisualFlow Help file.
BatteryScope
Sony Electronics
BatteryScope is a flexible battery management system that gathers critical information from the
battery in your notebook computer, processes it, and displays the information on the screen in a
About the Software on your Notebook Computer
way that is easy to understand. See the chapter "Displaying Battery information" or the
BatteryScope Help file for details.
nN
8
PowerPanel
Sony Electronics
The PowerPanel utility controls the power management of your notebook computer and
provides key information about system activity and battery life. Automatic power management
selects the most appropriate profile, depending on the application you’re working with and the
conditions of use.
See the "PowerPanel" chapter or the PowerPanel Help file for details.
Page 9

About the Software on Your Notebook Computer
Sony software
Sony Notebook Setup
Sony Electronics
Use the Sony Notebook Setup to confirm system information, specify preferences for system
behavior, and change hardware settings for your Sony Notebook computer.
For more information, read the help file of Sony Notebook Setup.
UI Design Selector
Sony Electronics
You can change the window design of the Sony Software compatible with UI Design selector.
Product Recovery CD-ROMs
Sony ITE
The Product Recovery CD-ROMs allow you to reinstall the system or individual device drivers
if they are corrupted or accidentally erased. Reinstalling an individual device driver may correct
a problem you are experiencing with your computer, and you may not need to recover the entire
system.
! You can only use the Recovery CD-ROMs on the Sony notebook you purchased, and not on any other Sony PC
or other manufacturer's PC.
About the Software on your Notebook Computer
nN
9
Page 10

About the Software on Your Notebook Computer
Operating System and other pre-installed software
Operating System and other pre-installed software
Windows®2000
Microsoft Corporation
Microsoft®Win dow s®2000 makes your computer work better by integrating tightly with the
About the Software on your Notebook Computer
Internet and networks and providing better system performance and easier system diagnostics
and maintenance. With Windows
latest graphics, sound, and multimedia technologies, easy addition and removal of peripheral
devices, and the convergence of the TV and PC in your home. This exciting new operating
system builds on the groundbreaking features introduced with Windows
Win dows
technologies. For questions and technical assistance, go online to:
http://support.microsoft.com/directory/
®
2000 maintains the best support for older Windows-based applications and
Internet Explorer 5.0
Microsoft Corporation
Internet Explorer is the Internet browser of Microsoft. The Setup Wizard configures your
computer to connect automatically to the service provider of your choice. A full e-mail package
enables you to send and receive mail - including attached files - across the Internet. NetMeeting,
Outlook Express and Microsoft Chat are just some of the components bundled with Internet
Explorer 5.0. A complete online tutorial helps new users become comfortable using the Internet.
For questions and technical assistance, go online to:
http://support.microsoft.com/directory/
®
2000, your system plays better as well with support for the
nN
®
NT.At thesame time,
10
Page 11

About the Software on Your Notebook Computer
Operating System and other pre-installed software
Adobe® Acrobat® Reader 4.1
Adobe Systems Incorporated
Acrobat Reader software allows you to view, navigate, and print electronic documents in Adobe
Portable Document Format (PDF), an open file format that is intended to preserve the fidelity of
documents created on all major computer platforms. Once Acrobat Reader is installed, you can
open and view PDF files from within your Web browser by clicking on a PDF file embedded in
an HTML file. You quickly see the firstpage while the rest of the documentis being downloaded.
For questions and technical assistance, go online at
http://www.adobe.com
Premiere® LE
Adobe Systems Incorporated
Synchronized with DVgate Motion, Microsoft video and Quicktime software, Adobe Premiere
lets you capture, record, create and play movies with video, sound, animations, photographs,
drawings, text and other material by using nothing more than your computer.
A setof windows allows you to plan a construction,import clips, edit and build your own movie
with preset or your own special effects. Different tools help you to prepare your images for
editing on tape or CD-ROM.
When re-installing, please enter the serial number : MSM420B7147938-145.
About the Software on your Notebook Computer
For questions and technical assistance, go online at
http://www.adobe.com
* Only available on the PCG-F808K and the PCG-F809K.
nN
11
Page 12

About the Software on Your Notebook Computer
Operating System and other pre-installed software
QuickTime 4.1.2
Apple
QuickTimeis the Appletechnology that makes video, sound, music, 3D and virtual reality come
alive for your Internet browser and Windows.
For further information, see the web site at:
http://www.apple.com/quicktime/
RealPlayer 7.0
RealNetworks
RealPlayer is the RealNetworks video and audio player which lets you access 2,500 radio
stations featuring music, news and sports.
For further information, see the web site at:
http://www.real.com
RealProducer 6.1
RealNetworks
RealProducer is the streaming media authoring tool of RealNetworks: It lets you create audio
and video for your Web pages.
For further information, see the web site at:
About the Software on your Notebook Computer
http://www.real.com
nN
12
Page 13
Using Smart Capture
You can capture still images
from i.LINK™ compatible
devices. For connecting the
device, refer to Connecting a
Digital Video Camera
Recorder in your Notebook
Computer user guide. Also
consult the Smart Capture
online help for information on
installation and use.
About the Software on your Notebook Computer
nN
13
Using Smart Capture
YoucanuseSmartCapturetoshootstillimagesandrecordvideoclipsfromadigital
camera connected to your computer.
Capturing a still image
1 Launch Smart Capture from the Start menu, in Programs / Smart Capture / Smart
Capture.
2 The finder window appears, displaying the image of the subject.
3 Adjust the focus on the subject you want to shoot.
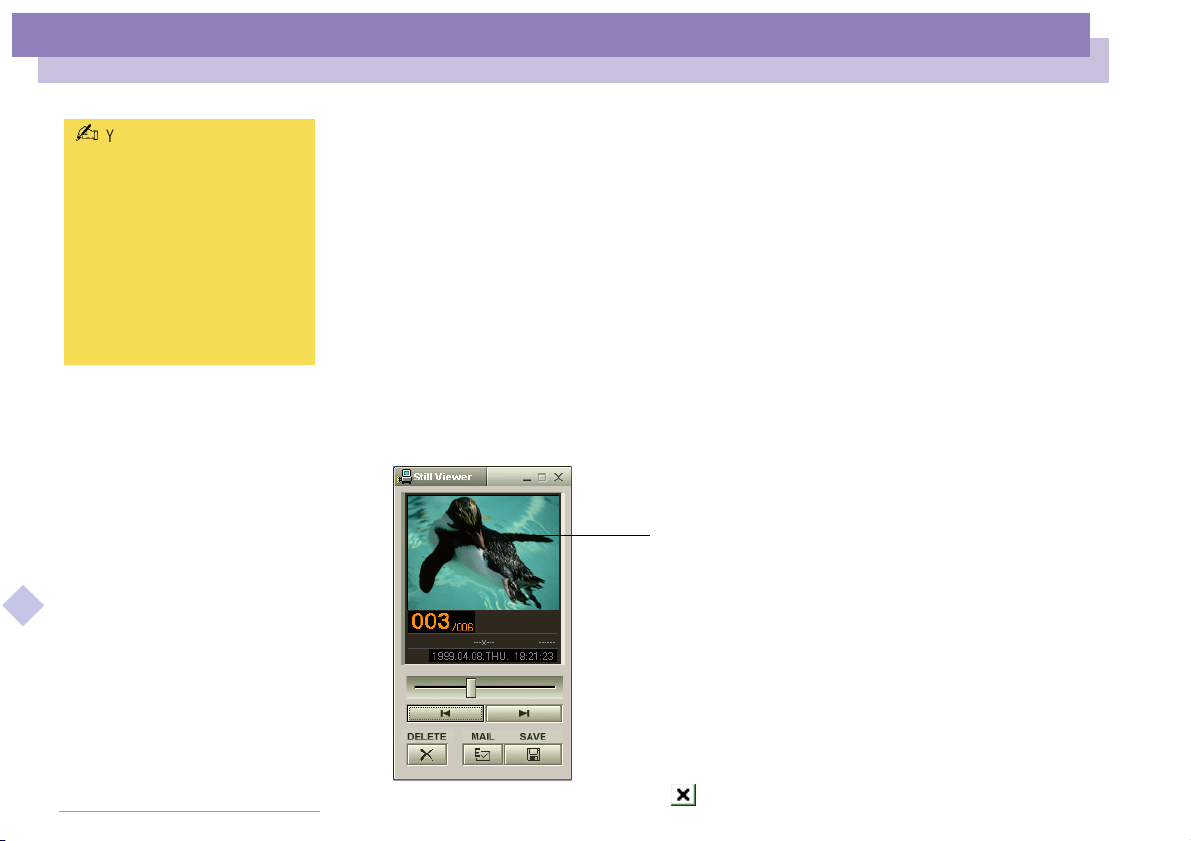
4 Click the Capture button in the Smart Capture window. The Still Viewer window
appears with the image you shot in the Still Image Display area.
Captured still image
5 To en d Smart Capture click the button in the top right corner of the window.
Page 14
Using Smart Capture
nN
14
About the Software on your Notebook Computer
See the Smart Capture software
online help for more information
on installation and use.
You can capture the following
still images sizes : 640 x 480,
320 x 240, 160 x 120, 80 x 60,
and 40 x 30 pixels.
When capturing a small
resolution image (i.e. 80 x 60 or
40 x 30 pixels) , the displayed
image on the finder window may
appear blurred.
A gap may appear when a rapidmoving object is displayed.
However this is not a
malfunction.
You can create a panorama
picture by using PictureGear 2.5
or higher.
See the software online help for
information on installation and
use.
You can capture still images and
video clips from a digital video
camera using Smart Capture.
Displaying the captured images in Still Viewer
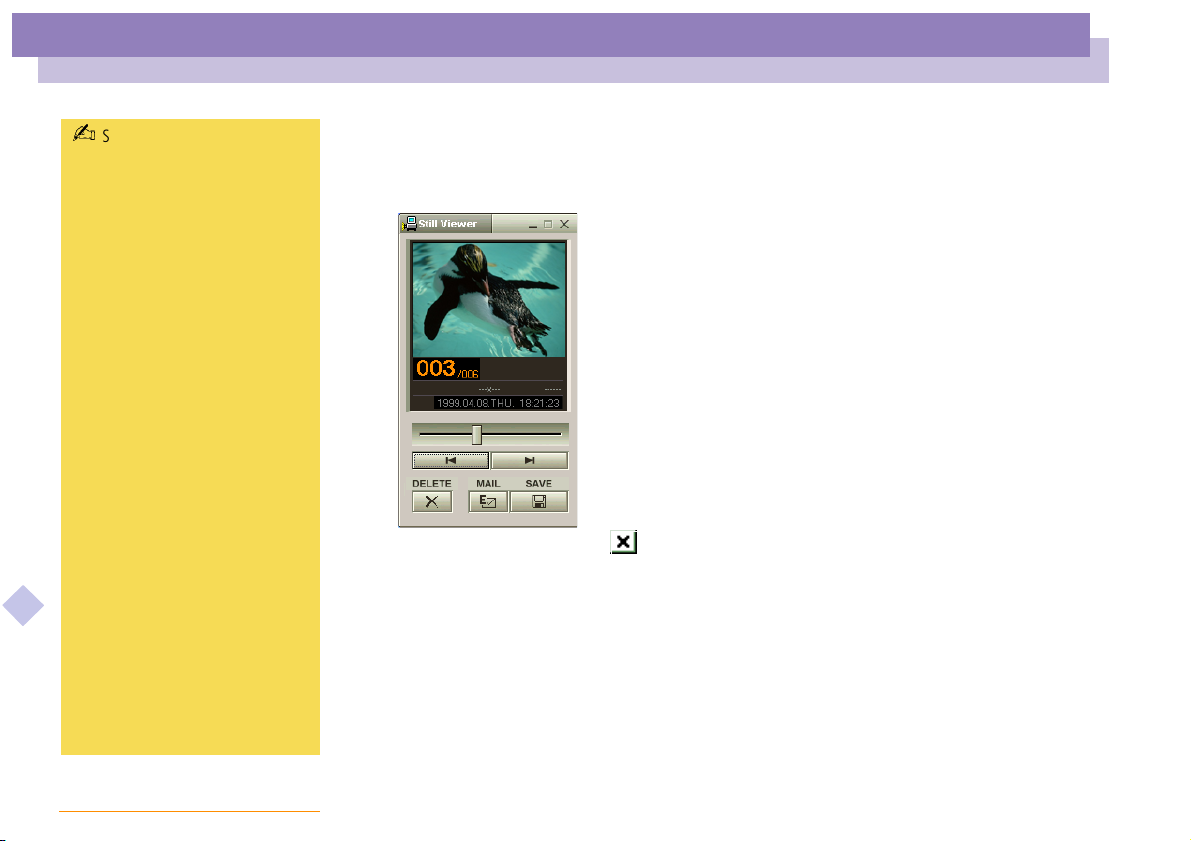
From the Startmenu, select Programs - Smart Capture and click Still Viewer.Youcan
display, save or delete your images or send them by e-mail.
To en d Still Viewer click the button.
Page 15
Using Smart Capture
nN
15
About the Software on your Notebook Computer
You need to set up MAPI when
using the e-mail software. See
the manual supplied with the
e-mail software for more
information on sending
e-mails.
To send a still image via e-mail
1 Click the Start button on the Windows
®
taskbar.
2 Point to Programs and click Smart Capture.
3 Click Still Viewer.
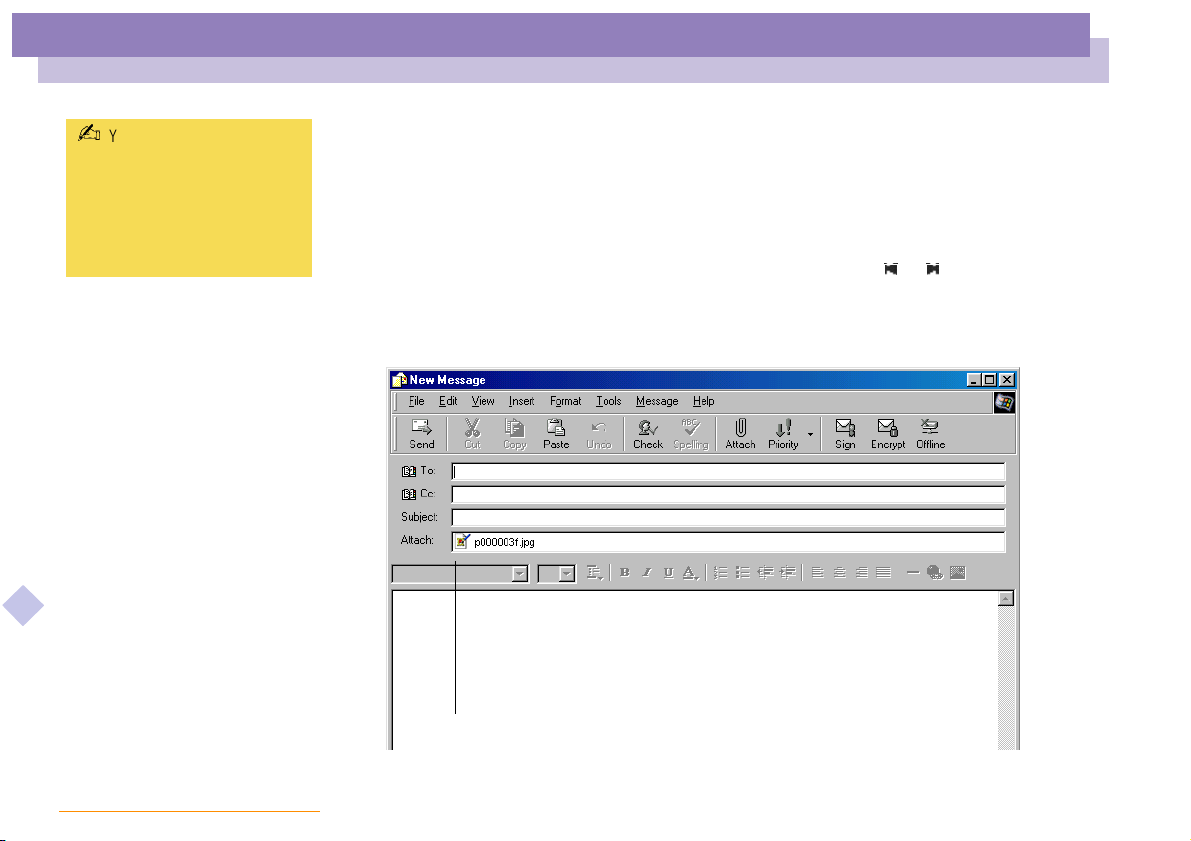
4 Select the still image you want to send via e-mail, using or .
5 Click Mail. Your e-mail window appears with the selected file attached to your
message.
Still image selected
6 Send the e-mail.
Page 16
Using Smart Capture
nN
16
About the Software on your Notebook Computer
You can shoot video clips in the
following formats :
Non-compressed :
Video 160 x 120, 24 bits,
max. 10 frames/sec.
Audio PCM, 11.025 kHz,
16 bits, monophonic
Compressed :
Video MPEG1 160 x 112,
maximum of 30 frames/
sec (effective maximum
equivalent to 10 frames/
sec).
Audio MPEG1, 44.1 kHz
(effective maximum
equivalent to 11.025
kHz), monophonic.
A gap may appear when a
rapid-moving object is
displayed. However this is not
a malfunction.
Shooting a video clip
You can use Smart Capture to shoot (capture) video clips with a Video Camera
connected to your computer, as well as play them or send them via e-mail.
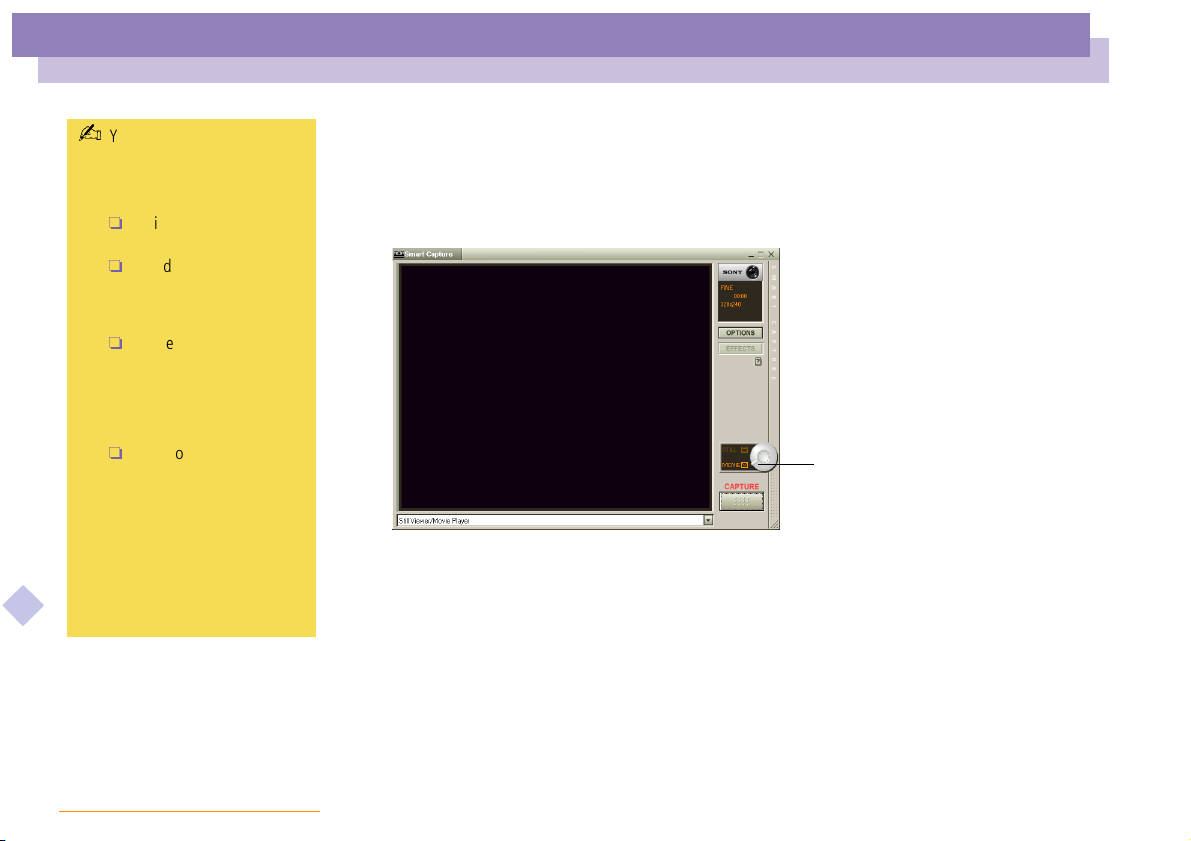
1 Launch Smart Capture. Select Movie using the Switch Capture Mode button.
Click here
2 Theimagewillappearinthefinder.Turnthecameratowardsthesubject.
3 Adjust the image.
4 Click the Capture button to shoot a video clip (you can shoot up to 60 seconds,
according to the settings you chose in the Recording options section).
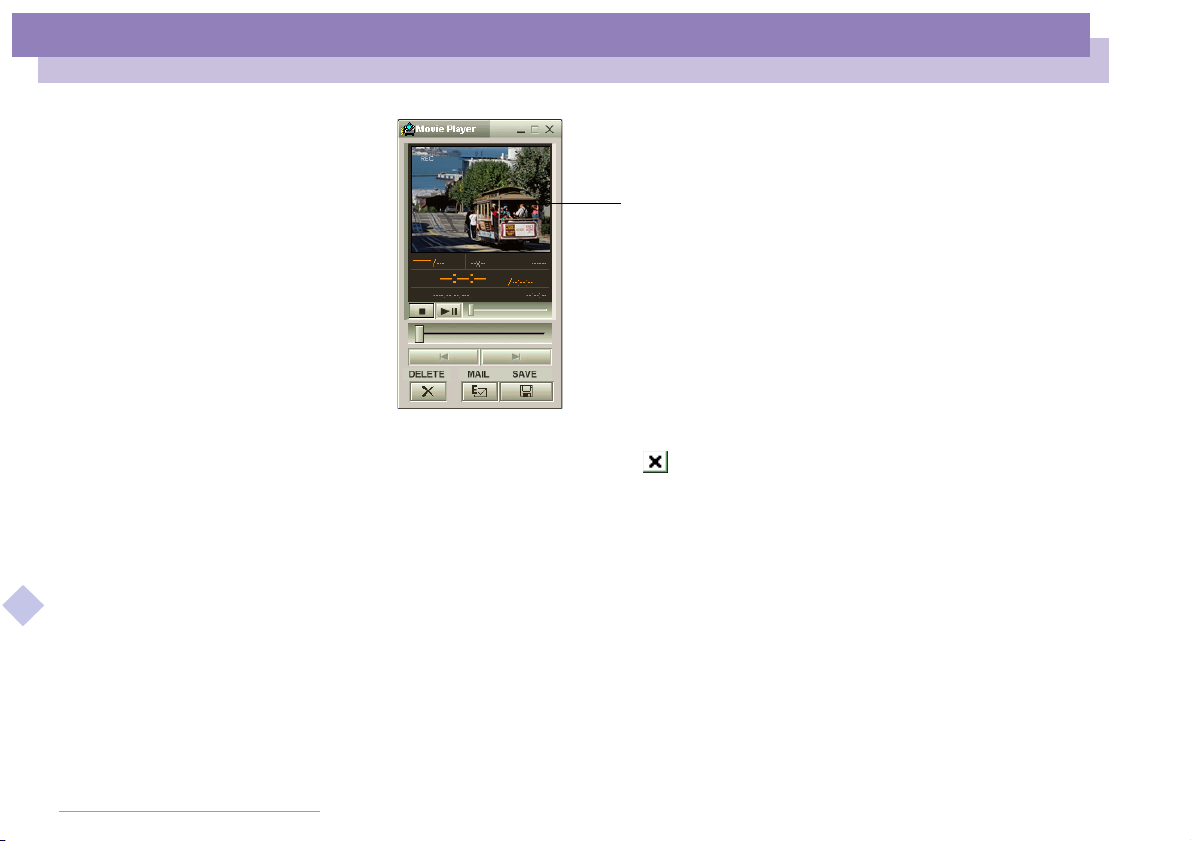
5 Click the Capture button when finished. The Movie Player window opens and the
captured video clip appears in the Movie Player window.
Page 17
Using Smart Capture
About the Software on your Notebook Computer
nN
Captured video clip
6 Click B to playback the images. Click X to pause, x to stop playback.
7 To en d Smart Capture,click .
17
Page 18
Using Smart Capture
About the Software on your Notebook Computer
nN
To playback captured video clips
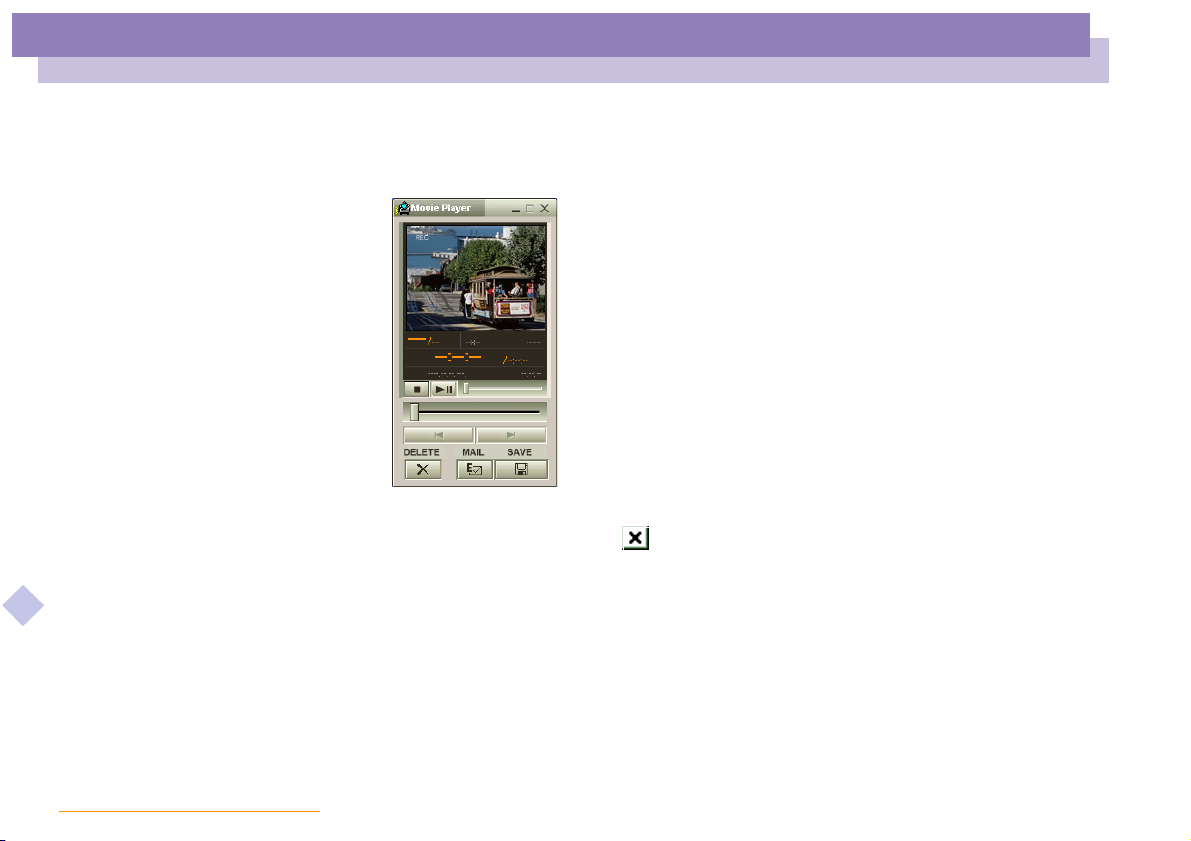
1 Start the Movie Player software.
2 Click B to playback the images. Click X to pause, x to stop playback.
3 To end Movie Player click .
To send a video clip via e-mail
If you shoot a video clip in a low resolution format, you can send it by e-mail.
1 Click the Start button on the Windows
®
taskbar.
18
2 Point to Program and then Smart Capture.
3 Click Movie Player.
4 Click Mail.
Page 19
Using Smart Capture
nN
19
About the Software on your Notebook Computer
See the manual supplied with
the e-mail software for more
information on sending
e-mails.
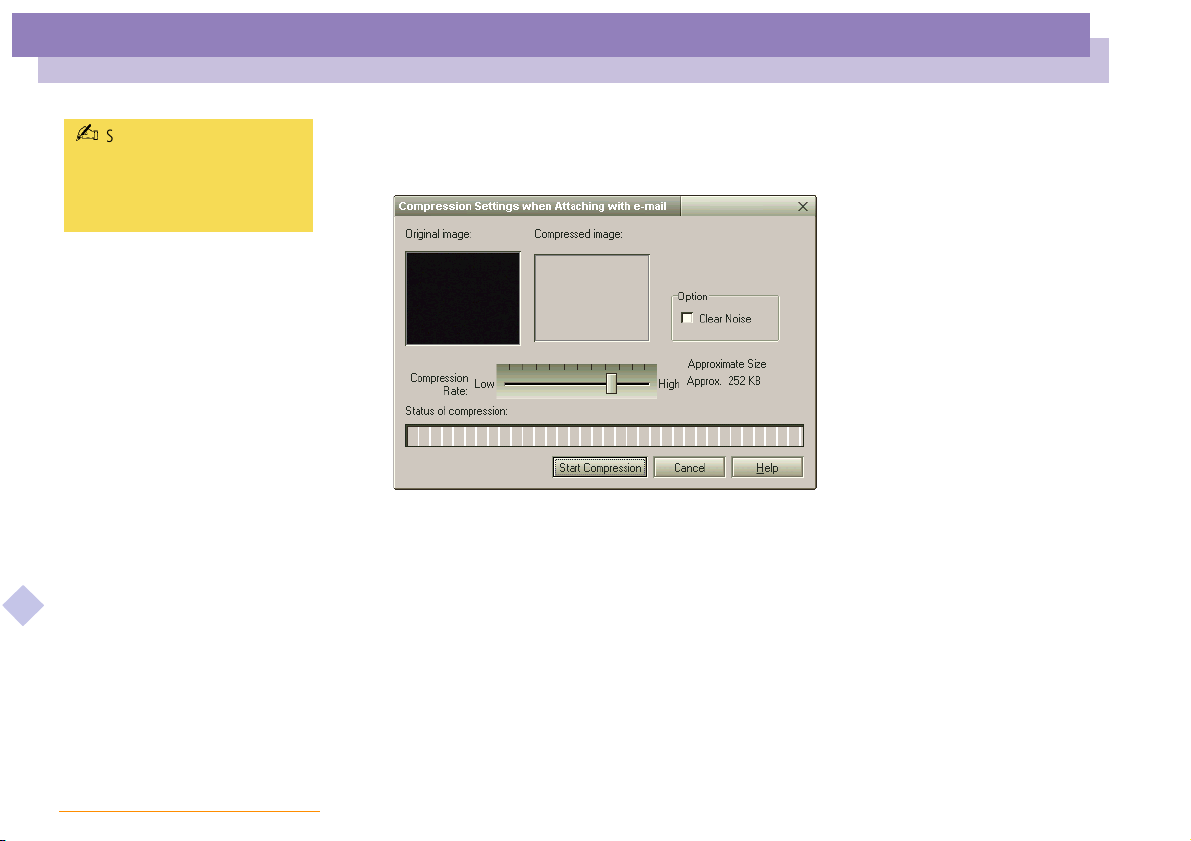
5 The Compression Settings window opens.
6 Choose the compression rate by moving the slider.
7 Click Start Compression. When compression is completed, a window message
will ask you if you want to attach the file to your e-mail.
8 Accept and send the e-mail.
Page 20

Customizing Your Notebook Computer
Customizing Your Notebook
Computer
The following sections briefly describe how to change the main settings of your
notebook computer. Among other things, you will learn how to prepare your modem
for use, how to use and customize the look of your Sony software and utilities, and you
will be introduced to the different display modes available through ATI Rage Mobility
®
AGP
.
For more detailed information, you can also refer to the Help systems of the software.
About the Software on your Notebook Computer
nN
20
Page 21
Customizing Your Notebook Computer
Configuring the modem for use
nN
21
About the Software on your Notebook Computer
* Before applying new country
settings, please make sure your
phone line is disconnected from
your VAIO notebook.
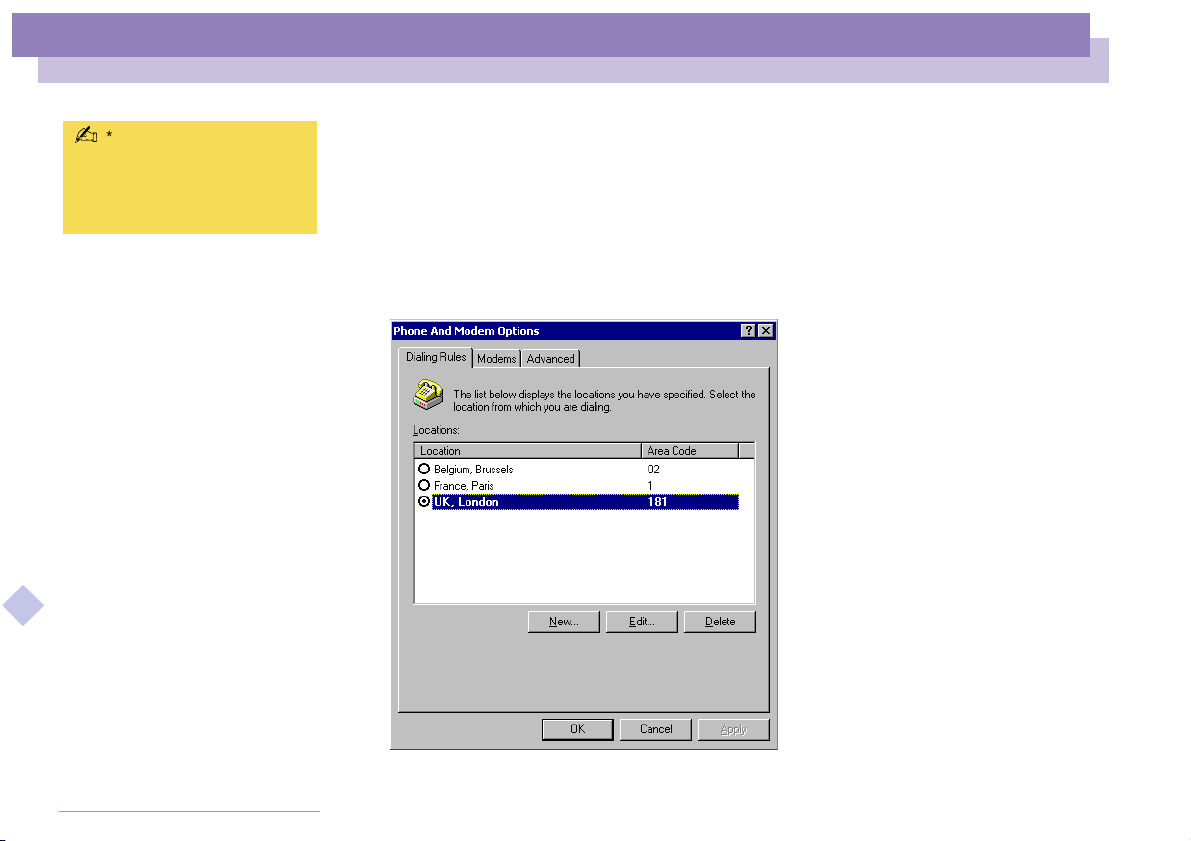
Configuring the modem for use
Before you can start using your internal modem, or each time you use your modem
while travelling, make sure that the country of the active location defined in Phone and
Modem Options matches the country you are dialing from.
1 Click Start,pointtoSettings, and click Control Panel.
2 Double-click Phone and Modem Options.
3 Double-click the currently selected location on the Dialing Rules tab. If more than
one location is available, double-click the location that is highlighted.
Page 22
Customizing Your Notebook Computer
Configuring the modem for use
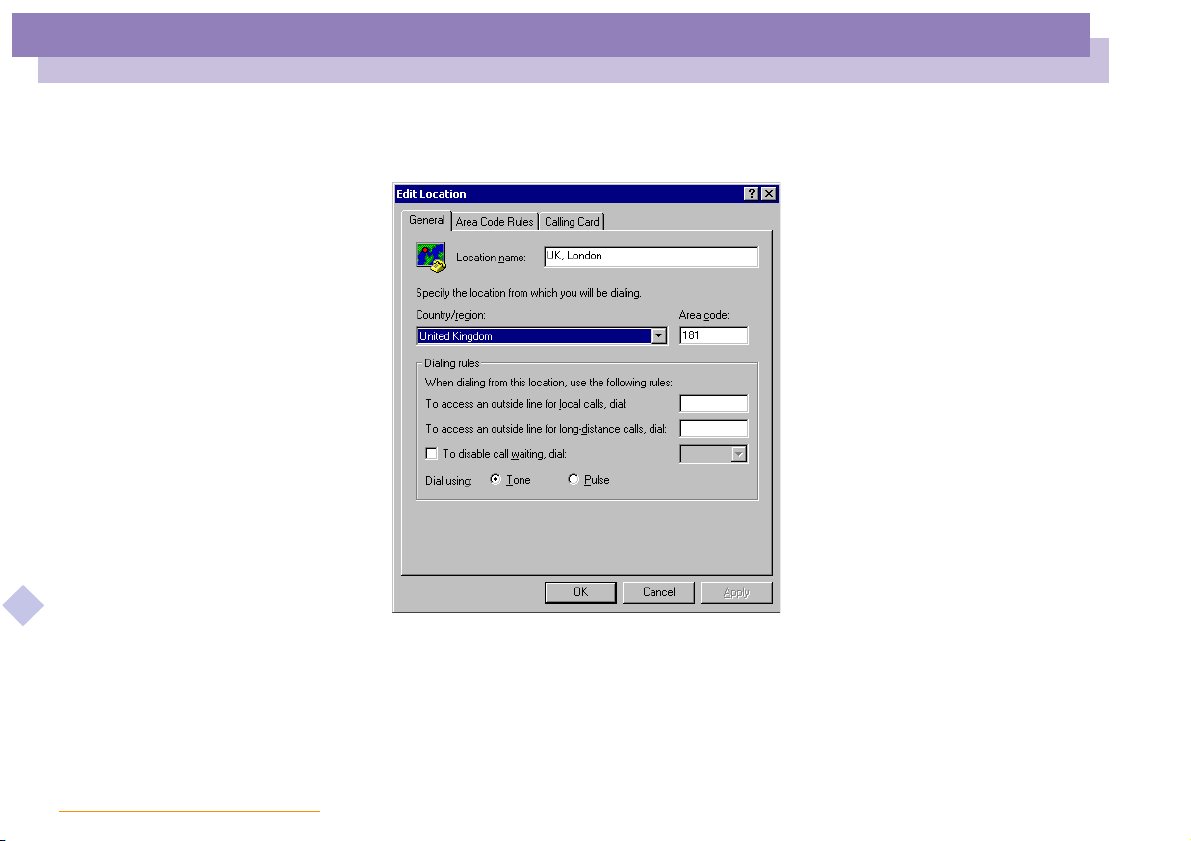
4 The Edit Location dialog appears. Check the country/region settings, and make
sure it matches the place you are dialing from.
About the Software on your Notebook Computer
nN
22
5 If you modified your location settings, click Apply on the Dialing Rules tab, and
then click OK.
Page 23

Customizing Your Notebook Computer
Changing the window design with UI Design Selector
Changing the window design with UI Design Selector
You can change the window design of Sony software compatible with UI Design
Selector.
1 Click Start,pointSettings,thenclickControl Panel.
2 Open UI Design Selector.
3 Click on << or >> and select the design you like.
4 Click Apply.
5 The UI Design Selector window design changes, to give you a preview of the
design you chose for the Sony Software.
6 To try another design, click on << or >>.
7 Once you are satisfied with your choice, click OK.
8 UI Design Selector closes and changes the window design of Sony software as you
selected.
About the Software on your Notebook Computer
nN
23
Page 24
Customizing Your Notebook Computer
Sony Notebook Setup
Sony Notebook Setup
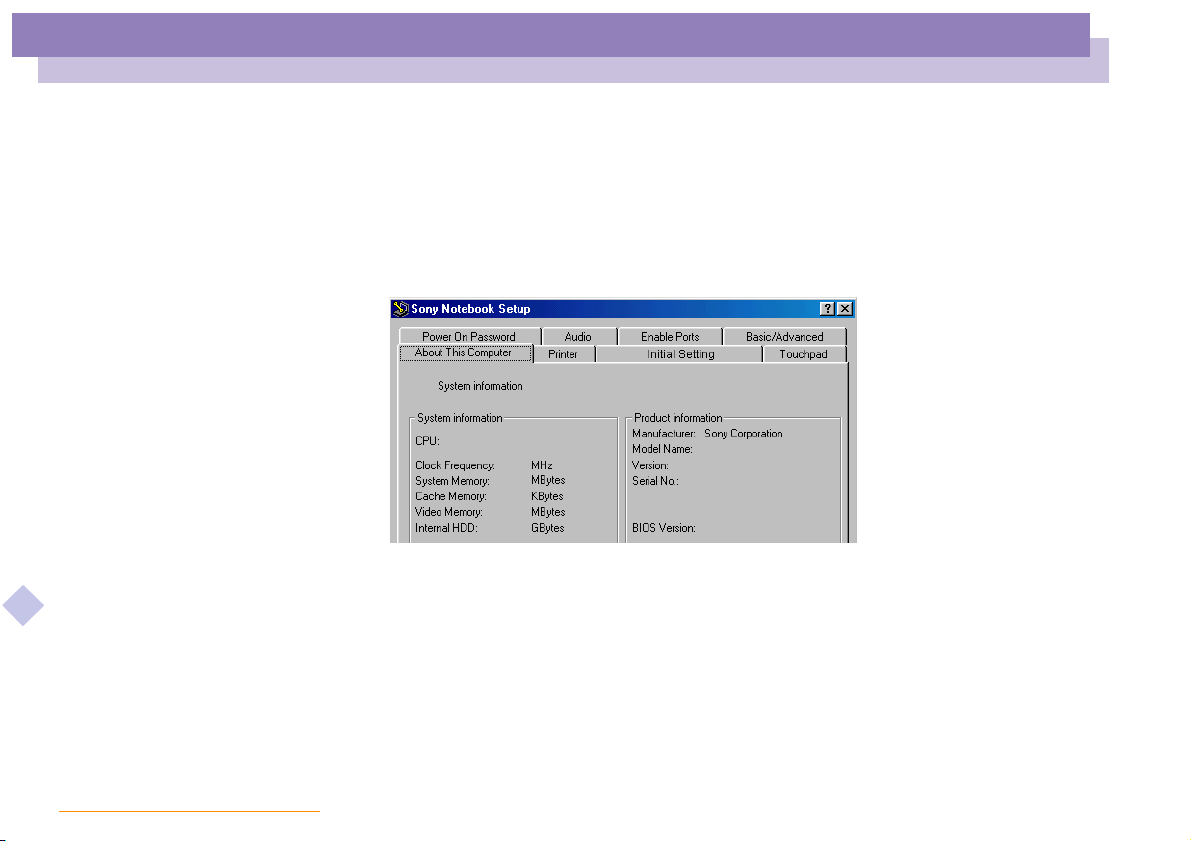
To display the Sony Notebook Setup screen:
1 Click the Start button on the Windows
2 In Programs,selectSony Notebook Setup.TheBasic window appears; you can
then enhance the features by clicking the Basic / Advanced tab.
®
taskbar.
nN
24
About the Software on your Notebook Computer
3 Select the tab for the item you want to change.
4 After you finish, click OK.
Page 25

Customizing Your Notebook Computer
Sony Notebook Setup
nN
25
About the Software on your Notebook Computer
For more information about
each option, click Help on the
Notebook Setup screen to
display the help file.
Notebook Setup Tabs
Tab Desc ripti on
About This Computer
Printer
Initial Setting
To uc h p ad
Power On Password
Enable Ports
Basic/Advanced
Display system information, including memory capacity,
serial number, and BIOS version.
Select printer port mode settings.
Select the drive and device order you wish to use for
loading the operating system. You can specify the Hard
Disk Drive as well as other drives inserted into your
computer. You can change the volume of the sounds heard
when the operating system is loading.
You can disable your touchpad by connecting an optional
mouse to your computer’s mouse port (PS/2 or USB). You
can also customize the settings of your mouse using the
mouse utility.
Set the password to secure your computer.
Disabling ports releases resources to the system. To change
the serial, view Resources, infrared settings, click Advanced
on the Basic/ Advanced tab.
Toggle between Advanced mode (additional screens with
advanced settings) and Basic mode of display. Advanced
mode includes Serial and View Resources tabs.
Page 26
Customizing Your Notebook Computer
PowerPanel
nN
26
About the Software on your Notebook Computer
When you use the battery pack
as power source, your system
selects the Maximum Battery
Life power management profile
by default. If you select a
different power management
profile while using battery
power, the same profile will be
automatically selected the next
time you use the battery pack
to power your computer.
PowerPanel
Controlling Power Management
The PowerPanel utility controls the power management of your notebook computer
and provides key information about system activity and battery life. In combination
with BatteryScope, the automatic power management selects the most advantageous
profiles, or lets you customize the profiles you choose, according to your own needs,
with the goal of extended battery life.
PowerPanel main features
Automatic Profile Selection (APS) based on the currently active application
Ability to select special Power Profiles manually from the menu
Ability to edit and create new profiles
A toolbar shared with BatteryScope
Works in harmony with Windows settings.
To activate PowerPanel
When you start the computer, the PowerPanel icon appears in the task tray by
default.
When pointing on the PowerPanel icon, you will see a tooltip with the active
Power Management profile.
You can select a power profile from the menu or a Power Management profile by
right-clicking this icon.
You c an u se t he P ow erP an el ’s toolbar as well:
Page 27
Customizing Your Notebook Computer
PowerPanel
1 Right click the task bar at the bottom of the screen.
2 Select Too l ba r s from the shortcut menu, then click PowerPanel.
3 The PowerPanel appears on the task bar( you can change it into a floating window
by dragging and dropping it on your desktop).
4 Click the button you want to set.
5 The appropriate Power Management command will be activated.
Power Management Profiles
PowerPanel provides several predefined power management profiles. Each profile
consists of a group of specific power management settings that are designed to meet
specific power management goals, ranging from maximum power management to no
power management.
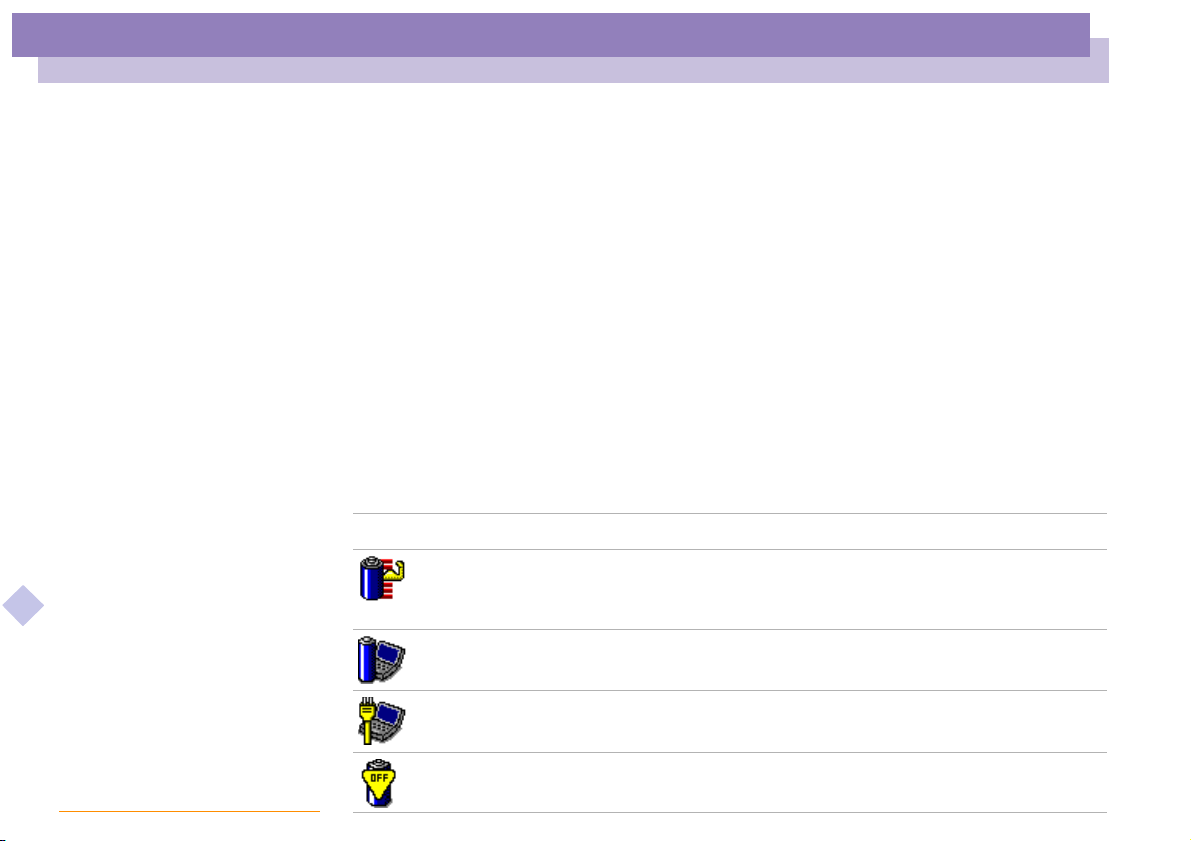
Main preset profiles
Icon Description
nN
27
About the Software on your Notebook Computer
Maximum Battery Life – Provides power saving features to give you maximum
battery life and good performance. It reduces the brightness of the display and puts
it into System Suspend mode after a specified time period.
Maximum Performance – Provides the best system performance while still
conserving power.
AC Power – The power management state when AC power is in use. PowerPanel
automatically loads the AC profile unless you disable this feature.
Power Management Off – Turns off all power management features such as System
Idle, System Suspend and Hibernation modes.
Page 28
Customizing Your Notebook Computer
PowerPanel
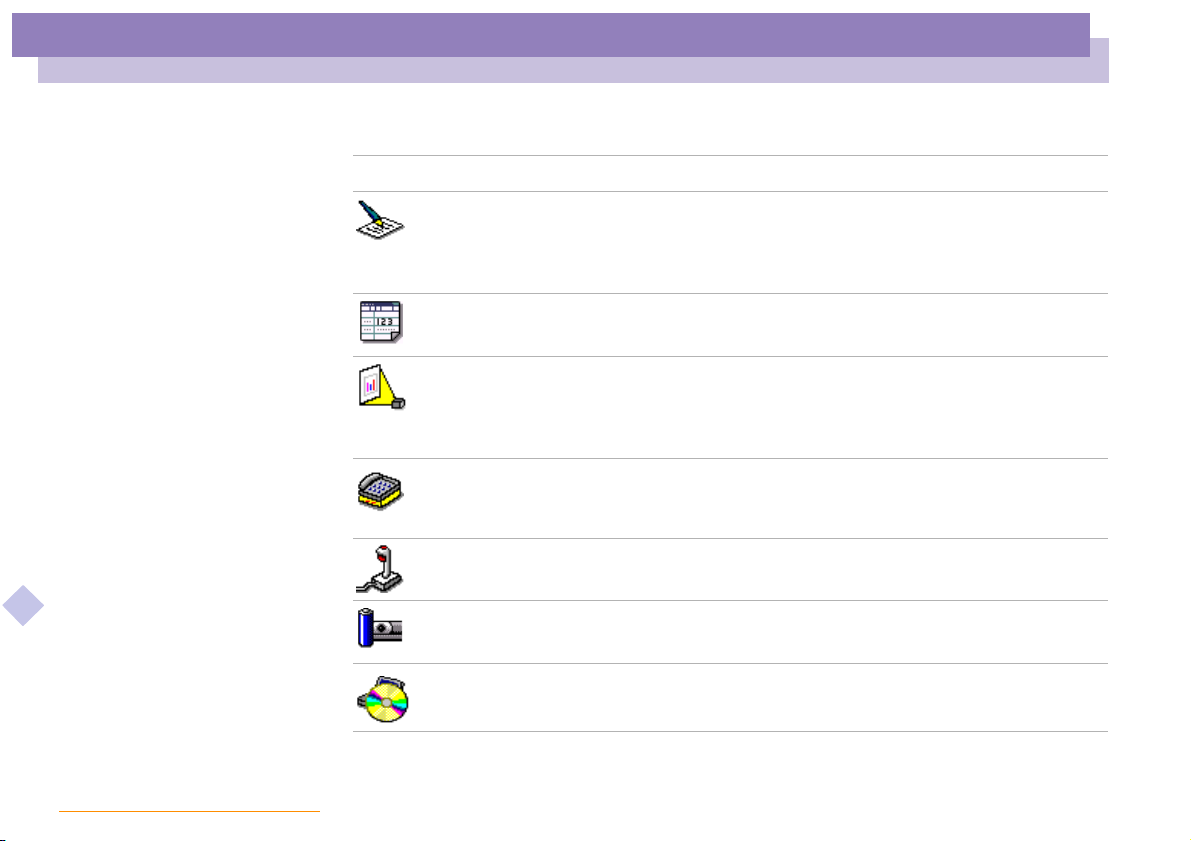
Other preset profiles
Icon Description
Wor d P ro ce ss in g – Optimizes power management with longer timeouts on the hard
disk and display screen. You can also establish settings for LCD (Video) Standby,
Hard Disk Standby, and System Suspend to optimize power management for your
system.
Spreadsheet – Reduces the LCD brightness to “medium”, as your software doesn’t
require higher performance. The sleep timer is activated.
Presentation – Keeps the display on at all times while it conserves power. This
option is ideal for slide show presentations. You can establish settings for LCD
(Video) Standby, Hard Disk Standby, and System Suspend to optimize power
management for your system.
Communications – Extends battery life by initiating a quick display time-out. You
can also establish settings for LCD (Video) Standby, Hard Disk Standby, and System
Suspend to optimize power management for your system.
nN
28
About the Software on your Notebook Computer
Games – Disables the display and the Hard Disk Spindle Down timer.
Camera – Optimizes performance and power requirements for camera usage.
DVD – Optimizes performance and power requirements for DVD usage.
Page 29

Customizing Your Notebook Computer
PowerPanel
Power Management Commands
PowerPanel provides power management commands that you can use to activate
specific power management functions and to control power for a specific device. You
might use these commands when you want to override a profile setting or initiate an
immediate action, such as putting the system into Video Standby mode before the
Video Standby timer expires.
Icon Description
System Idle - This mode is convenient if you do not need to use your computer for
a short period. The hard disk and the video display enter a low power state and the
CPU clock and processor stop. To return the system to the active state, press any key
or the power switch on your computer.
System Suspend – Puts the system into System Suspend mode, a power
management state that saves the state of the system and peripheral devices in
memory (RAM). Power consumption reduces to a minimum, and the system
remains on. To return the system to the active state, press any key or the power
About the Software on your Notebook Computer
switch on your computer.
System Hibernation – Provides for the lowest level of power consumption. The
system writes the state of the system and peripheral devices to the hard disk and
turns off the system power. To return the system to the original state, use the power
switch to turn on power.
nN
29
Page 30
Customizing Your Notebook Computer
PowerPanel
Automatic Profiles Selection (APS)
A Power Profile is a set of timer values for a variety of system devices. PowerPanel
automatically selects the profile associated with the application you are using and
changes profiles as you switch between applications.
The Power Management lets your system enter energy saving modes by levelling
some energy consuming parameters, such as LCD brightness, or hard disk activity.
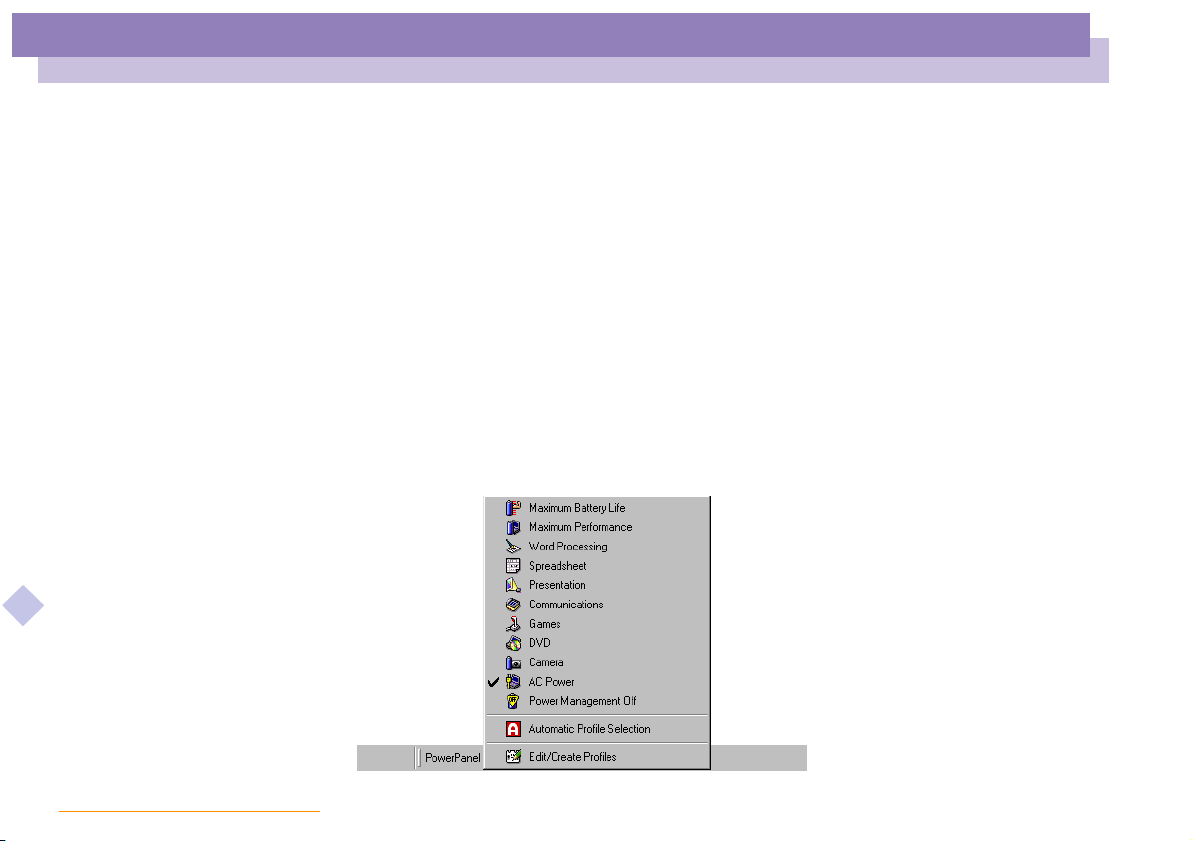
Choosing Automatic Profiles
By right-clicking the PowerPanel icon on the task tray, you can choose Automatic
Profile Selection: this automatically enables PowerPanel set the power management
settings.
You can also display the power management settings by clicking the first icon on the
PowerPanel taskbar:
About the Software on your Notebook Computer
nN
30
Page 31
Customizing Your Notebook Computer
PowerPanel
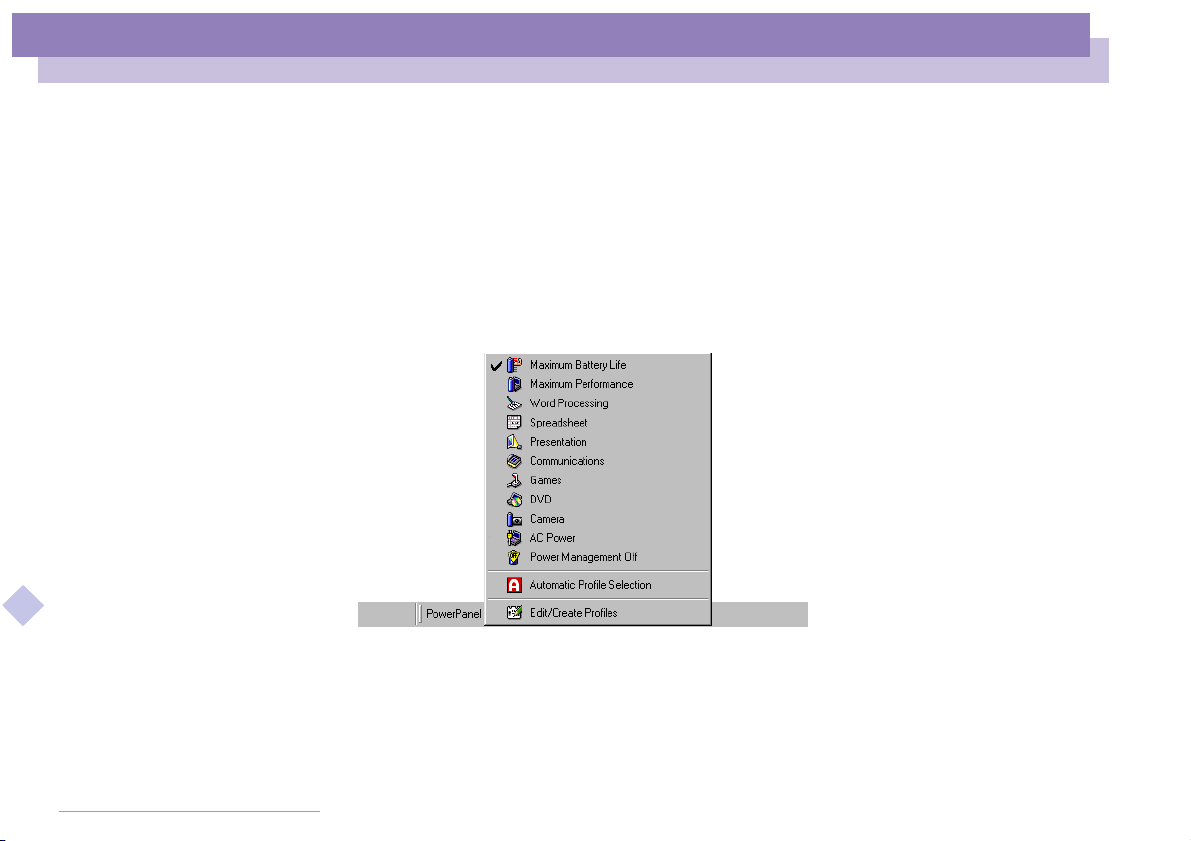
Customizing PowerPanel
You can customize the PowerPanel toolbar to suit your portable computing needs.
You can edit the pre-defined Power Management settings or create newprofiles. Please
refer to PowerPanel Help for more information.
Saving Battery Power
When using the notebook computer with a battery, the CPU can be set to Maximum
BatteryLifemodetosavebatterypower.
About the Software on your Notebook Computer
nN
31
Page 32
Customizing Your Notebook Computer
PowerPanel
Viewing the PowerPanel icon
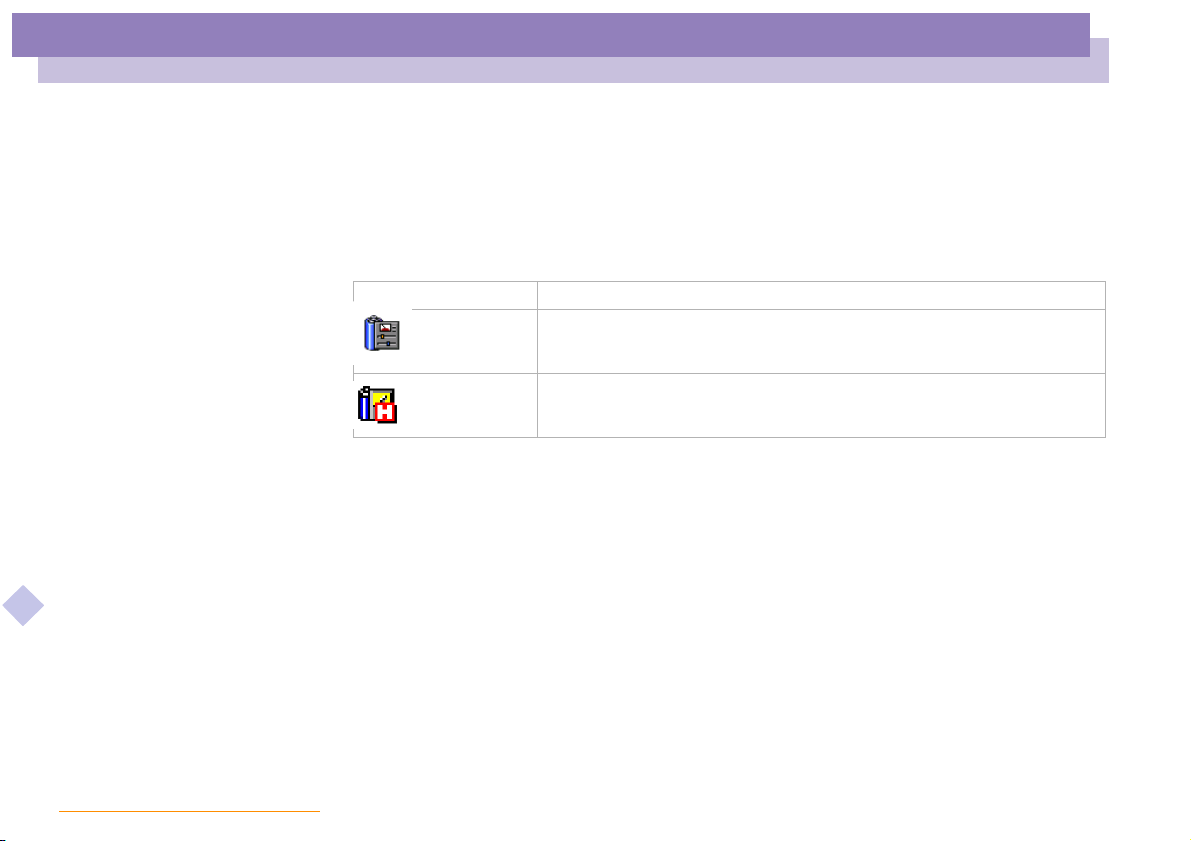
The PowerPanel icon (displayed in the task tray) indicates the level of performance of
the CPU.
Displayed icons and meanings :
PowerPanel icon CPU performance
* For details, please refer to the Specifications chapter.
About the Software on your Notebook Computer
nN
Battery Optimized Performance- Used with a battery. The CPU
operates at Low Speed.*
Maximum Performance- Used with the AC adapter.
The CPU operates at High Speed.*
32
Page 33

Customizing Your Notebook Computer
Displaying Battery Information
Displaying Battery Information
You can display detailed information for the batteries used in your computer. The
following sections briefly describe how to display your computer’s general battery
information. You can also refer to the BatteryScope Help for more detailed
information.
Activating BatteryScope
To activate BatteryScope
When you start your computer, the BatteryScope icon appears in the task tray by
default.
When pointing on the BatteryScope icon, you will see a ToolTip indicating the
total capacity remaining in the battery and the estimated time until the battery
fully discharges.
You can display a detailed battery information window by double-clicking the
icon.
About the Software on your Notebook Computer
You can use the BatteryScope toolbar as well:
1 Right click the taskbar at the bottom of the screen.
nN
33
2 Select Toolbars from the shortcut menu, then click BatteryScope ( you can change
it into a floating window by dragging and dropping it on your desktop).
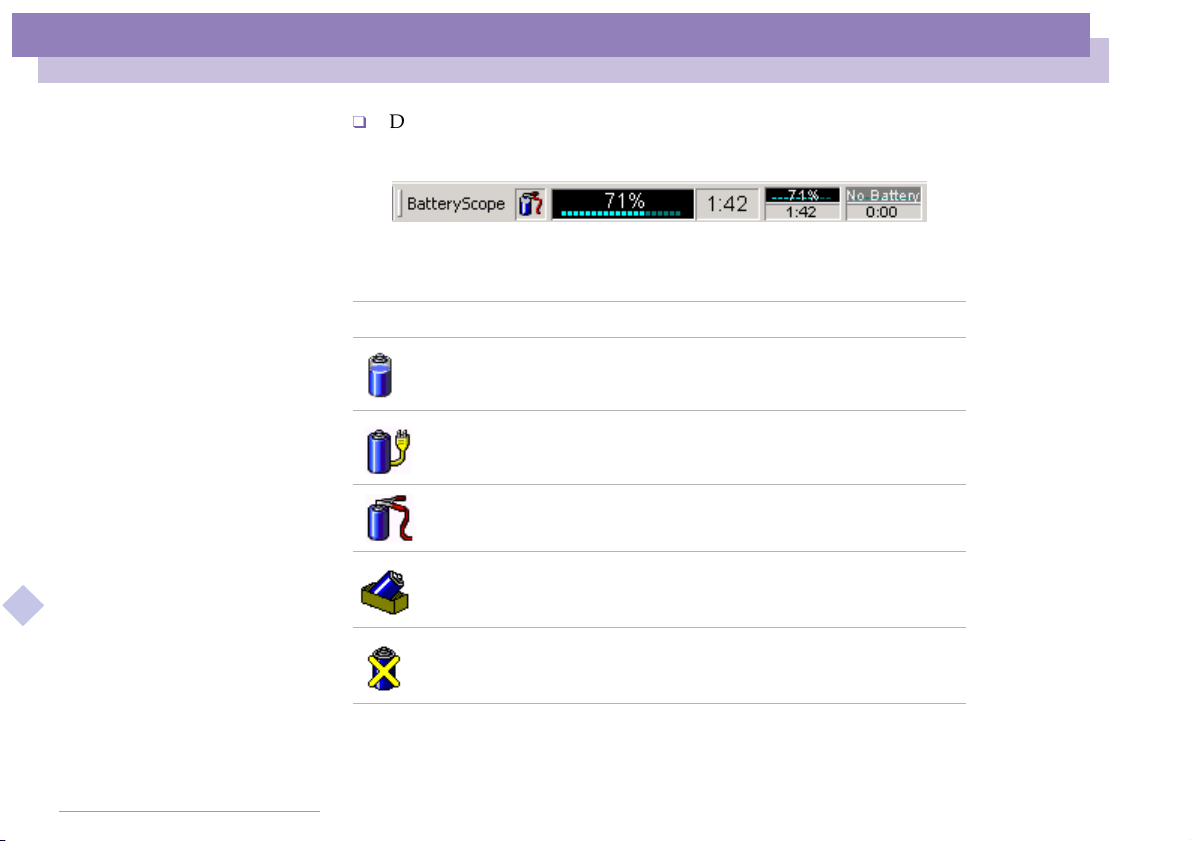
You can also view battery gauges on the shared PowerPanel and BatteryScope toolbar.
Percentage indicator
Displays the percentage of the remaining capacity.
Time indicator
Page 34
Customizing Your Notebook Computer
Displaying Battery Information
Displays estimated time (hours/minutes) remaining before the battery fully
drains, also referred to as the time-to-empty.
Battery Icon Descriptions
Battery icon Battery status
Discharging
Fully charged
Charging
nN
34
About the Software on your Notebook Computer
Not in use
No battery
Page 35
Customizing Your Notebook Computer
Displaying Battery Information
Displaying Detailed Battery Information
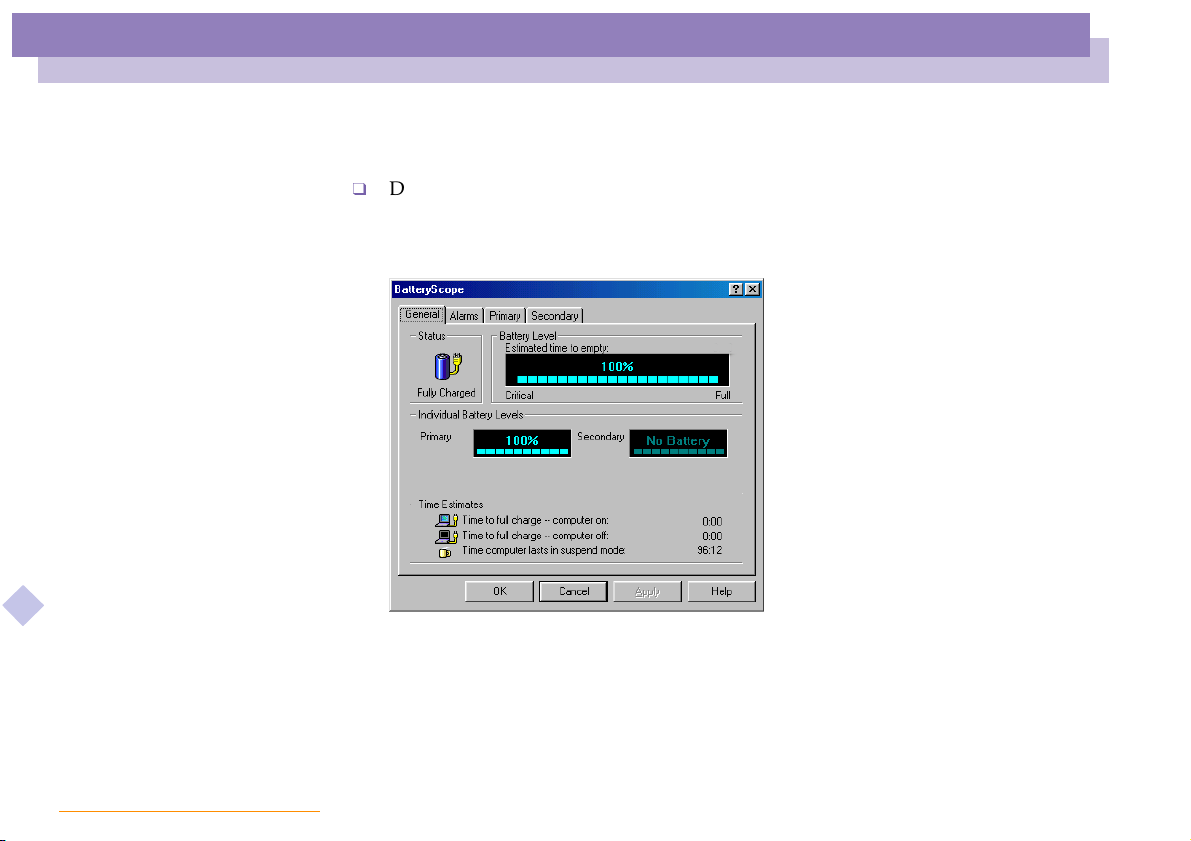
You can obtain detailed information about the batteries.
Double-click the battery icon on the task tray to display the BatteryScope window.
The screen appears displaying the General tab,which contains information suchas the
estimated time-to-empty and charging time.
About the Software on your Notebook Computer
nN
35
To display information on individual batteries
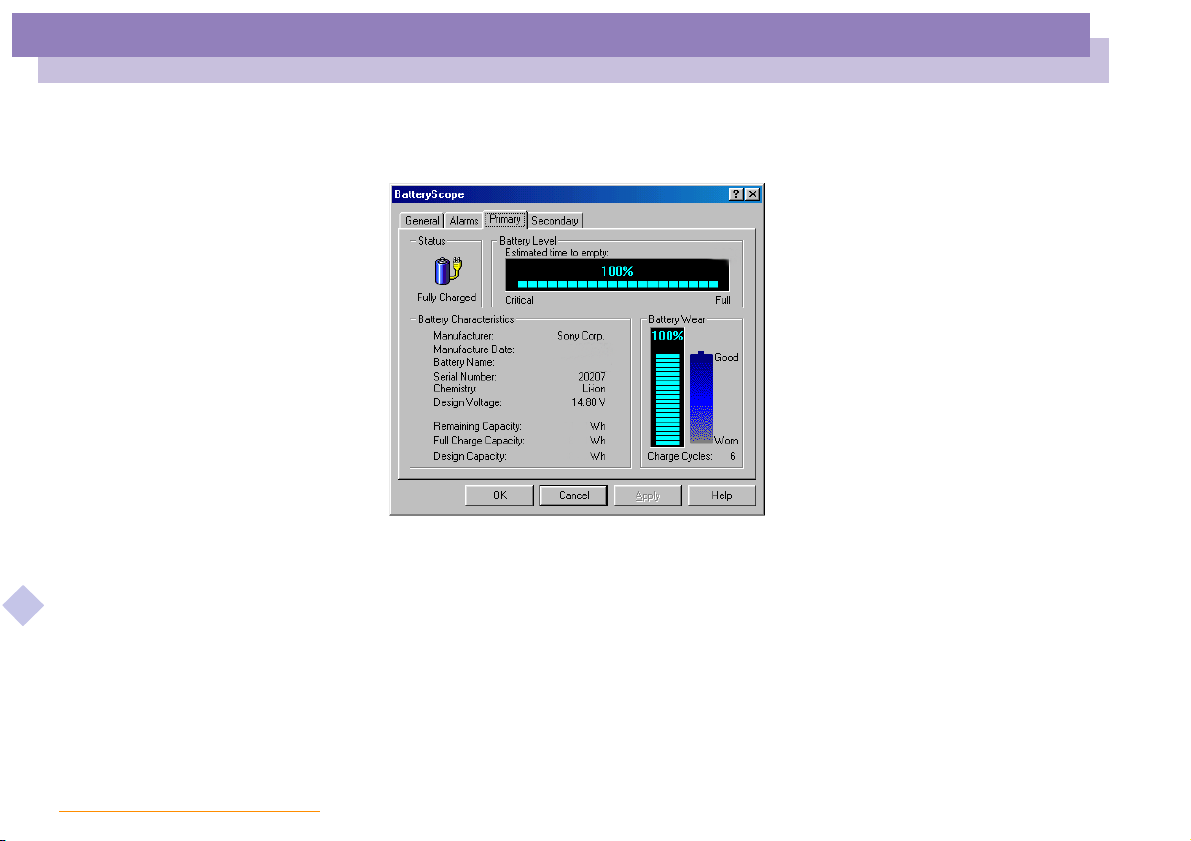
1 Click the Primary tab to display information for the battery in the bay on the left
side.
2 Click the Secondary tab to display information for the battery in the bay on the
right side.
Page 36
Customizing Your Notebook Computer
Displaying Battery Information
3 You can display the information about each battery, such as estimated time-to-
empty or product information.
To customize the BatteryScope application bar and alarm system
About the Software on your Notebook Computer
You can customize the BatteryScope toolbar to suit your portable computing needs as
well as to modify the alarm settings. Please refer to the BatteryScope Help for more
information.
nN
36
Page 37
Customizing Your Notebook Computer
Starting Your Favorite Software With VAIO Action Setup
Starting Your Favorite Software With VAIO Action Setup
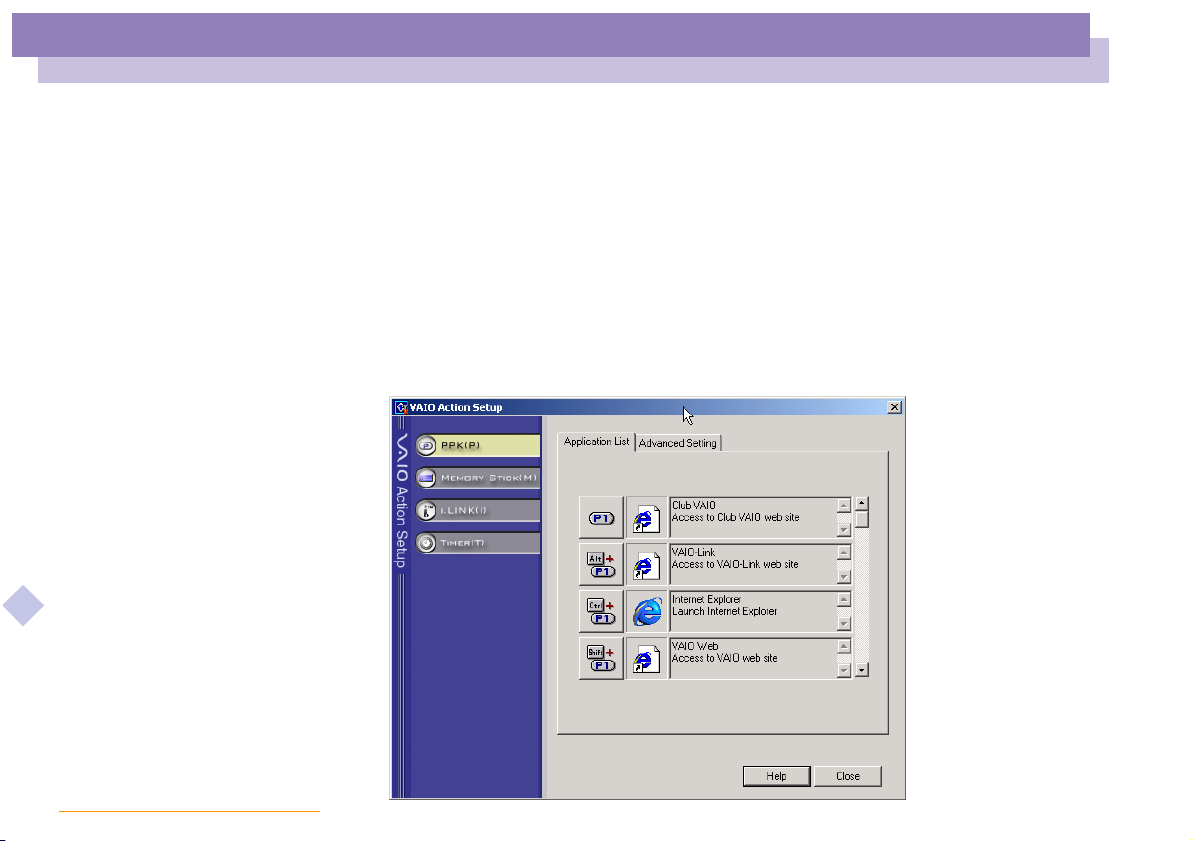
The VAIO Action Setup software enables you to start your favorite software by simply
pressing a programmable power key.
This section briefly describes how to use programmable power keys.You canalso refer
to the VAIO Action Setup Help for more detailed information.
Using the VAIO Action Setup screen
1 Double-click the VAIO Action Setup icon on the task tray. The VA I O A c t i o n
Setup screen appears.
About the Software on your Notebook Computer
nN
37
Page 38

Customizing Your Notebook Computer
Starting Your Favorite Software With VAIO Action Setup
2 Click on the icon representing the key combination you want to use to launch
automatically your application. The Select Application screen appears.
3 Select the application you need by using the browse options to the left. Click Next.
4 Confirm the name and path of the selected application, and click Next.
5 Select the configuration name for the selected application, and enter a description
if needed.
6 Click Finish.
Using the internal timer
You can use the internal timer to start software at a specific time. The timer can start
applications even when the computer is in System Hibernation Mode.Formore
information, read the VAIO Action Setup online help.
About the Software on your Notebook Computer
nN
38
Page 39

Customizing Your Notebook Computer
Selecting the Display mode
nN
39
About the Software on your Notebook Computer
For more information on your
Ati Rage graphic chip, go to
Start, select Settings and
then click Control Panel.
Double-click on the Display
icon and select the Settings
tab where you click on the
Advanced button.
Besides the normal display
colors (256 colors, High color
(16 bit) and True color (24 bit),
you have now a new one: True
color (32 bit).
Selecting the Display mode
This notebook computer uses the ATI video controller. You can select which display is
used when the computer is connected to an external display.
1 Click the Start button, select Settings and then click Control Panel.
2 The Control Panel appears.
3 Double-click Display.
4 The Display Properties dialog box appears.
5 Click the Settings tab.
6 Click the Advanced button.
7 The ATI Rage Mobility AGP dialog box appears.
8 If you cannot see the movie on the external display, click the Displays tab in order
to set the external display to the primary display.
9 Go to the Panel section.
10 Set the external display to the primary display by clicking on the Secondary check
mark.
11 The primary display is set.
12 Consult the Online Help files of the ATI video controller for detailed information
on its features and properties.
Page 40

Using the Product Recovery CD-ROMs
nN
40
About the Software on your Notebook Computer
You can only use these
Recovery CD-ROMs on the Sony
notebook you purchased and
not on any other Sony PC or
other manufacturer's PC!
To perform a system recovery,
the notebook should not be
docked (port replicator).
For more information about
using your DVD-ROM, read the
corresponding chapter in this
user guide or the manual
supplied with your peripheral.
The recovery process takes
between 10 to 20 minutes to
complete.
Using the Product Recovery
CD-ROMs
The following sections describe how to use the Recovery CD-ROMs.
You will find a set of two Recovery CD-ROMs in your Product Recovery Pack:
The System Recovery CD-ROM (vol. 1 of 2) and System Recovery CD-ROM
(vol. 2 of 2).
The system recovery process allows you to reinstall an image of the hard disk as it was
when you started using your notebook computer.
Use the System Recovery CD in the following cases:
In the event of a serious system crash,
If you want to modify the size of your partitions,
Reinstall an individual driver if a device is not functioning properly.
! Applying a system recovery means that you will lose all your data stored on your C: drive (and your D: drive if
you modify partition settings). Therefore, before applying a system recovery, copy your data to an external
disk.
! CAUTION: make sure that your computer is connected to AC (not the battery) before you attempt a system
recovery.
! CAUTION: when the recovery is performed, you must remove the recovery CD-ROM from the drive before
restarting the computer.
Page 41

Using the Product Recovery CD-ROMs
nN
41
About the Software on your Notebook Computer
Please note that only the
Advanced Recovery allows
you to select the size of the C:
partition when starting a
recovery. When recovering your
system, you also need to choose
between FAT32 and NTFS for
the file management system
you want to use. The default
option is FAT32. The Standard
Recovery always chooses
FAT32.
Performing a system recovery
Use this option only when your system is seriously damaged, e.g. if Windows®does
not work any more, or your PC behaves abnormally, etc. The system recovery will
completely reinstall the originally configured system on your C: drive. Your D: drive
data will not be deleted if you choose to keep the same partition settings. If you decide
to modify the size of your partitions, the existing data on both drives (C: and D:) will
be deleted.
When performing a system recovery, you have the choice between a Standard
Recovery and an Advanced Recovery.
When choosing a Standard Recovery, you leave the current partition sizes untouched.
When choosing an Advanced Recovery, you can adapt the partition sizes.
Procedure for starting a Standard System Recovery
1 Take the System Recovery CD-ROM (vol. 1 of 2).
2 Turn on your computer (using AC power only) and insert the System Recovery
CD-ROM in the CD-ROM drive.
3 Shut down your computer (Start/Shut Down/Shut Down).
4 Wait ten seconds and turn your computer back on.
5 On the first screen that appears, press S (Standard).
6 The System Recovery CD screen appears, asking you if you are really sure you
want to continue. Click Y (Yes). You will be asked again wheter you are really sure.
Confirm.
Page 42

Using the Product Recovery CD-ROMs
nN
42
About the Software on your Notebook Computer
By default, your notebook
computer’s file management
system is FAT32. Only the
Advanced Recovery allows
you to format your files using
either FAT32 or NTFS. You can
change your FAT32 file system
to NTFS at any time. However,
make sure you fully understand
the concept of file management
system under Windows
before switching from FAT32 to
another file management
system. For more information,
carefully read the Windows
2000 documentation and/or ask
your system or network
administrator.
You can only convert from
FAT32 to NTFS, but not from
NTFS to FAT32.
®
2000
Procedure for starting an Advanced System Recovery
1 Take the System Recovery CD-ROM (vol. 1 of 2).
2 Turn on your computer (using AC power only) and insert the System Recovery
CD-ROM in the CD-ROM drive.
3 Shut down your computer (Start/Shut Down/Shut Down).
4 Wait ten seconds and turn your computer back on.
5 On the first screen that appears, press A (Advanced).
6 The System Recovery CD screen appears, asking you what to do with the
partitions on your hard disk. At this stage you have 3 options available.
®
Recovering the system without changing partitions
Recovering the system with modified partition sizes
Aborting the recovery process
Recovering the system without changing partitions
1 Press C to keep your current partitions. This is the recommended option if you do
not need to modify the partition sizes and if you want to restore your C: drive
while keeping the data on your D: drive untouched.
2 Press G to proceed with the system recovery.
3 Select the file system you want to use: FAT32 or NTFS.
4 Follow the instructions on the screen.
5 When the recovery process is finished, remove the Recovery CD-ROM from the
drive and press any key to restart your notebook computer.
Page 43

Using the Product Recovery CD-ROMs
Recovering the system with modified partition sizes
1 Press P to modify partitions on your notebook computer. Select this option only if
you need change the sizes of your partitions. Please note that this option will
delete all existing data both on the C: and D: drives before starting the recovery.
2 On the next screen, press Y to confirm the deletion of the current partitions.
3 The next screen displays a selection of sizes for your new C: drive. According to
the option you select, the recovery process will create 1 or 2 partitions on the hard
disk. (For more details on partitions, see the chapter About the Partitions of your
Hard Disk Drive)
4 Confirm your selection on the next screen and wait until the new partitions are
created and the notebook computer reboots.
5 Then follow the steps described in the previous section Recovering the system
without changing partitions.
Aborting the recovery process
About the Software on your Notebook Computer
The recovery process always warns you when the decision you are asked to take
cannot be undone. Whenever possible, the recovery screens allow you either to go back
to the previous screen, or to abort the recovery process.
nN
43
If your computer does not start the system recovery utility.
PleaserefertoyourCustomerServiceGuidetocontactVAIO-Link.
Page 44

Using the Product Recovery CD-ROMs
Reinstalling a device driver
Reinstalling a device driver
nN
44
About the Software on your Notebook Computer
Some applications or peripherals require specific drivers which you won’tfindinthe
Win dows
pre-installed applications, you can use the System Recovery CD-ROM (vol. 2 of 2).
1 First check whether the driver you plan to reinstall is on the System Recovery CD-
®
drivers folder. To help you find or restore typical drivers needed by your
ROM. Only device drivers that are not delivered with Windows
the Drivers directory.
®
can be found in
2 Check all underlying sub-directories for the appropriate driver.
3 Next, launch the Add/Remove Hardware wizard (click Start,pointtoSettings /
Control Panel, and then double-click on Add/Remove Hardware) to install the
appropriate device.
Page 45
About the Partitions of your Hard Disk Drive
Default disk space allocation
While you can perform a
system recovery and change
the partition settings in order
to have one C: drive only, this
option is not recommended for
using video editing
applications like DVgate. For
more information, see the
DVgate online help
(Recommended settings topic).
About the Software on your Notebook Computer
About the Partitions of your Hard
Disk Drive
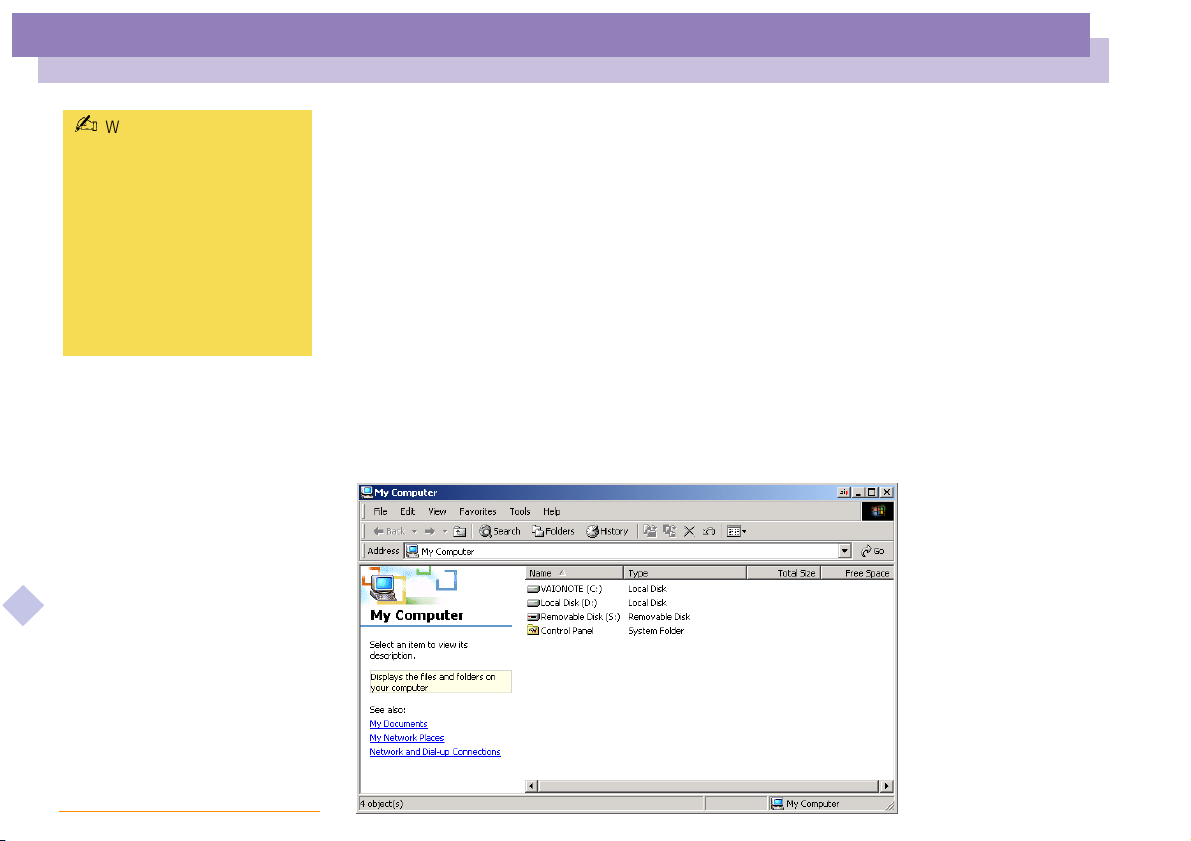
In My Computer or Windows Explorer, you may have noticed the My Computer
availability of two drives (C: and D:): your hard disk drive comes from the factory with
2 logical partitions: this does not mean that your computer contains two physical hard
disks.
Default disk space allocation
When you start using your notebook computer, your C: drive contains all the files
required by Windows and other pre-installed software, while the D: drive comes
empty. The D: drive is the ideal storage space for all your documents, especially big
ones like digital motion pictures captured with DVgate.
nN
45
Page 46

About the Partitions of your Hard Disk Drive
How to use your partitioned drives
How to use your partitioned drives
In order to avoid mishandling or malfunction of your software and files, please take
the following precautions:
To optimize data storage, use the C: drive to install new applications, and save all
your documents to the D: drive. Moreover, doing so will prevent the loss of your
documents in the case you need to perform a system recovery.
Do not try to add, delete, or resize partitions unless you really need it. Changing
partition settings might delete all your files on the hard disk.
If you need to perform a system recovery, but do not want to loose all the data
stored on your hard disk, copy all the files you want to keep on the D: drive.
During the system recovery process, choose to keep the current partition
information. Doing so will keep your D: drive unchanged after the recovery
process. For more information on the recovery process, see the Using the Product
Recovery CD-ROMs chapter.
If you do need to change the size of your partitions, you can do so by performing
a systemrecovery. In this case,it is importantto note that alldata onyour hard disk
About the Software on your Notebook Computer
will be deleted. If you need to keep existing files, be sure to backup them up before
performing the system recovery. For moreinformationon the recovery process, see
the Using the Product Recovery CD-ROMs chapter.
nN
46
SID
 Loading...