


®
VAIO Notebook
User Guide
PCG-F420/PCG-F480/PCG-F490
®
Notice to Users
© 2000 Sony Electronics Inc. All rights
reserved. This manual and the software
described herein, in whole or in part, may
not be reproduced, translated, or reduced
to any machine-readable form without
prior written approval.
SONY ELECTRONICS INC. PROVIDES
NO WARRANTY WITH REGARD TO
THIS MANUAL, THE SOFTWARE, OR
OTHER INFORMATION CONTAINED
HEREIN AND HEREBY EXPRESSLY
DISCLAIMS ANY IMPLIED
WARRANTIES OF MERCHANTABILITY
OR FITNESS FOR ANY PARTICULAR
PURPOSE WITH REGARD TO THIS
MANUAL, THE SOFTWARE, OR SUCH
OTHER INFORMATION. IN NO EVENT
SHALL SONY ELECTRONICS INC. BE
LIABLE FOR ANY INCIDENTAL,
CONSEQUENTIAL, OR SPECIAL
DAMAGES, WHETHER BASED ON
TORT, CONTRACT, OR OTHERWISE,
ARISING OUT OF OR IN CONNECTION
WITH THIS MANUAL, THE SOFTWARE,
OR OTHER INFORMATION
CONTAINED HEREIN OR THE USE
THEREOF.
Sony Electronics Inc. reserves the right to
make any modification to this manual or
the information contained herein at any
time without notice. The software
described herein is governed by the terms
of a separate user license agreement.
This product contains software owned by
Sony and licensed by third parties. Use of
such software is subject to the terms and
conditions of license agreements enclosed
with this product. Some of the software
may not be transported or used outside the
United States. Software specifications are
subject to change without notice and may
not necessarily be identical to current retail
versions.
Updates and additions to software may
require an additional charge. Subscriptions
to online service providers may require a
fee and credit card information. Financial
services may require prior arrangements
with participating financial institutions.
As an ENERGY STA R
Partner, Sony Corporation
has determined that this
E
product meets the
S
TAR guidelines for energy
efficiency.
The International ENERGY STAR Offi ce
Equipment Program is an international
program that promotes energy saving
through the use of computers and other
office equipment. The program backs the
development and dissemination of
products with functions that effectively
reduce energy consumption. It is an open
system in which business proprietors can
participate voluntarily. The targeted
products are office equipment such as
computers, displays, printers, facsimiles
and copiers. Their standards and logos are
uniform among participating nations.
E
NERGY STAR is a U.S. registered mark.
Sony, i.LINK, Memory Stick, VAIO and the
VAIO logo are trademarks of Sony
Corporation. Windows, Windows NT, and
the Windows logo are registered
trademarks of Microsoft Corporation. Intel,
SpeedStep, and Pentium are trademarks of
Intel Corporation.
This product incorporates copyright
protection technology that is protected by
method claims of certain U.S. patents and
other intellectual property rights owned by
Macrovision Corporation and other rights
owners. Use of this copyright protection
technology must be authorized by
Macrovision Corporation, and is intended
for home and other limited viewing uses
only unless otherwise authorized by
Macrovision Corporation. Reverse
engineering or disassembly is prohibited.
All other trademarks are trademarks of
their respective owners.
NERGY

Owners Record
The model number and serial number are
located on the bottom of your Sony VAIO
Notebook. Record the serial number in the
space provided here. Refer to the model
and serial number when you call your
Sony Service Center.
For DVD-ROM: As the laser beam
!
used in the DVD-ROM drive is
®
harmful to the eyes, do not
attempt to disassemble the drive
cabinet. Refer servicing to
qualified personnel only.
Model Number: PCG-F420/PCG-F480/
PCG-F490
Serial Number:________________________
Safety Information
WARNING
❏
To prevent fire or shock hazard, do
not expose your notebook computer
to rain or moisture.
❏
To avoid electrical shock, do not open
the cabinet. Refer servicing to
qualified personnel only.
❏
Never install modem or telephone
wiring during a lightning storm.
❏
Never install telephone jacks in wet
locations unless the jack is specifically
designed for wet locations.
❏
Never touch uninsulated telephone
wire or terminals unless the telephone
line has been disconnected at the
network interface.
❏
Use caution when installing or
modifying telephone lines.
❏
Avoid using the modem during an
electrical storm.
❏
Do not use the modem or a telephone
to report a gas leak in the vicinity of
the leak.
❏
A socket outlet should be as close as
possible to the unit and easily
accessible.
AVERTISSEMENT
❏
Pour prévenir tout risque d’incendie
ou d’électrocution, garder cet appareil
à l’abri de la pluie et de l’humidité.
❏
Pour prévenir tout risque
d’électrocution, ne pas ouvir le châssis
de cet appareil et ne confier son
entretien qu’à une personne qualifiée.
❏
L’appareil doit être le plus près
possible d’une prise murale pour en
faciliter l’accès.
To change the backup battery,
!
please contact your nearest Sony
Service Center.

For questions regarding your product
y
or for the Sony Service Center nearest
you, call 1-888-476-6972 in the United
States or 1-800-961-7669 in Canada.
The number below is for FCC related
matters only.
Regulatory Information
.
Declaration of Conformit
Trad e Nam e: SO NY
Model No: PCG-F420/PCG-F480/
PCG-F490
Responsible Party:
Sony Electronics Inc.
Address:
1 Sony Drive
Park Ridge, NJ 07656
Telephone No.: 201-930-6972
This device complies with Part 15 of
the FCC rules. Operation is subject
to the following two conditions: (1)
This device may not cause harmful
interference, and (2) this device
must accept any interference
received, including interference
that may cause undesired
operation.
turning the equipment off and on, the user
is encouraged to try to correct the
interference by one or more of the
following measures:
❏
Reorient or relocate the receiving
antenna.
❏
Increase the separation between the
equipment and the receiver.
❏
Connect the equipment into an outlet
on a circuit different from that to
which the receiver is connected.
❏
Consult the dealer or an experienced
radio/TV technician for help.
You are cautioned that any changes or
modifications not expressly approved in
this manual could void your authority to
operate this equipment.
Only peripherals (computer input/output
devices, terminals, printers, etc.) that
comply with FCC Class B limits may be
attached to this computer product.
Operation with non-compliant peripherals
is likely to result in interference to radio
and television reception.
All cables used to connect peripherals must
be shielded and grounded. Operation with
cables, connected to peripherals, that are
not shielded and grounded, may result in
interference to radio and television
reception.
This equipment has been tested and found
to comply with the limits for a Class B
digital device, pursuant to Part 15 of the
Rules. These limits are designed to provide
reasonable protection against harmful
interference in a residential installation.
This equipment generates, uses, and can
radiate radio frequency energy and, if not
installed and used in accordance with the
instructions, may cause harmful
interference to radio communications.
However, there is no guarantee that
interference will not occur in a particular
installation. If this equipment does cause
harmful interference to radio or television
reception, which can be determined by
FCC Part 68
This equipment complies with Part 68 of
the FCC rules. On the bottom of this
equipment is a label that contains, among
other information, the FCC equivalence
number (REN) for this equipment. If
requested, this information must be
provided to the telephone company.
This modem uses the USOC RJ-11
telephone jack.

The REN is used to determine the quantity
of devices which may be connected to the
telephone line. Excessive RENs on the
telephone line may result in the devices not
ringing in response to an incoming call. In
most, but not all areas, the sum of the RENs
should not exceed five (5.0). To be certain
of the number of devices that may be
connected to the line, as determined by the
total RENs, contact the telephone company
to determine the maximum REN for the
calling area.
If the terminal equipment causes harm to
the telephone network, the telephone
company will notify you in advance that
temporary discontinuance of service may
be required. But if advance notice is not
practical, the telephone company will
notify the customer as soon as possible.
Also, you will be advised of your right to
file a complaint with the FCC if you believe
it is necessary.
The telephone company may make
changes in its facilities, equipment,
operations or procedures that could affect
the operations of the equipment. If this
happens, the telephone company will
provide advance notice in order for you to
make the necessary modifications in order
to maintain uninterrupted service.
This equipment cannot be used on public
coin service provided by the telephone
company. Connection to Party Line Service
is subject to state and possible provincial
tariffs. (Contact the state or provincial
utility service commission, public service
commission, or corporation commission,
for information.)
Telephone Consumer
Protection Act of 1991
(United States)
The Telephone Consumer Protection Act of
1991 makes it unlawful for any person to
use a computer or other electronic device to
send any message via a telephone facsimile
machine unless such message clearly
contains, in a margin at the top or bottom
of each transmitted page or on the first
page of the transmission, the date and time
it is sent and an identification of the
business, other entity, or individual
sending the message, and the telephone
number of the sending machine or such
business, other entity, or individual.
In order to program this information into
your facsimile machine, see your fax
software documentation.
If trouble is experienced with this
equipment, please contact 1-888-4SONYPC
(1-888-476-6972), or write to the Sony
Customer Information Center, One Sony
Drive, Park Ridge, NJ 07656, for repair
and/or warranty information. If the trouble
is causing harm to the telephone network,
the telephone company may request that
you remove the equipment from the
network until the problem is resolved.
Repair of this equipment should be made
only by a Sony Service Center or Sony
authorized agent. For the Sony Service
Center nearest you, call 1-888-4SONYPC
(1-888-476-6972).
Telephone Consumer
Guidelines (Canada)
Please refer to your telephone directory
under ‘Privacy Issues’ and/or ‘Term s of
Service.’ For more detailed information,
please contact:
CRTC
Terrasses de la Chaudiére, Tour centrale
1 promenade du Portage, 5 étage Hull PQ
K1A 0N2.
This Class B digital apparatus complies
with Canadian ICES-003.
Cet àppareil numérique de la classe B est
conforme à la norme NMB-003 du Canada.

DISPOSAL OF LITHIUM ION
BATTERY
You can return your unwanted lithium ion
batteries to your nearest Sony Service
Center or Factory Service Center.
In some areas the disposal of lithium ion
✍
batteries in household or business trash
may be prohibited.
For the Sony Service Center nearest you,
call 1-888-476-6972 in the United States or
1-800-961-7669 in Canada
Do not handle damaged or leaking
!
lithium ion batteries.
Ne pas manipuler les batteries au
!
lithium-ion qui fuient ou sont
endommagées.
Danger of explosion if battery is
!
incorrectly replaced. Replace only
with the same or equivalent type
recommended by the
manufacturer. Discard used
batteries according to the
manufacturers instructions.
.
The battery pack used in this
!
device may present a fire or
chemical burn hazard if mistreated.
Do not disassemble, heat above
212°F (100°C) or incinerate.
Dispose of used battery promptly.
Keep away from children.
La manutention incorrecte du
!
module de batterie de cet appareil
présente un risque d'incendie ou
de brûlures chimiques. Ne pas
démonter, incinérer ou exposer à
une température de plus de 100°C.
Évacuer promptement la batterie
usée. Garder hors de portée des
enfants.
INDUSTRY CANADA NOTICE
NOTICE: The Industry Canada label
identifies certified equipment. This
certification means that the equipment
meets certain telecommunications network
protective, operational and safety
requirements as prescribed in the
appropriate Terminal Equipment Technical
Requirements document(s). The
Department does not guarantee the
equipment will operate to the user’s
satisfaction.
Une batterie non conforme
!
présente un danger d'explosion.
La remplacer seulement par une
batterie identique ou de type
équivalent recommandé par le
fabricant. Évacuer les batteries
usées selon les directives du
fabricant.
Before installing this equipment, users
should ensure that it is permissible to be
connected to the facilities of the local
telecommunications company. The
equipment must also be installed using an
acceptable method of connection.
The customer should be aware that
compliance with the above conditions may
not prevent degradation of service in some
situations.

Repairs to certified equipment should be
coordinated by a representative designated
by the supplier. Equipment malfunctions
or any repairs or alterations made by the
user to this equipment may give the
telecommunications company cause to
request that the user disconnect the
equipment.
Users should ensure for their own
protection that the electrical ground
connections of the power utility, telephone
lines and internal metallic water pipe
system, if present, are connected together.
This precaution may be particularly
important in rural areas.
Caution: Users should not attempt to make
such connections themselves, but should
contact the appropriate electric inspection
authority, or electrician, as appropriate.
NOTICE: The Ringer Equivalence Number
(REN) assigned to each terminal device
provides an indication of the maximum
number of terminals allowed to be
connected to a telephone interface. The
termination on an interface may consist of
any combination of devices subject only to
the requirement that the sum of the Ringer
Equivalence Numbers of all the devices
does not exceed 5. The Ringer Equivalence
Number for this equipment is 0.4.
AVIS DE LINDUSTRIE
Avan t d ’installer ce matériel, l’utilisateur
doit s’assurer qu’il est permis de le
raccorder aux installations de l’entreprise
locale de télécommunication. Le matériel
doit également être installé en suivant une
méthode acceptée de raccordement.
L’abonné ne doit pas oublier qu’il est
possible que la conformité aux conditions
énoncées ci-dessus n’empêche pas la
dégradation du service dans certaines
situations.
Les réparations de matériel homologué
doivent être coordonnées par un
représentant désigné par le fournisseur.
L’entreprise de télécommunications peut
demander à l’utilisateur de débrancher un
appareil à la suite de réparations ou de
modifications effectuées par l’utilisateur ou
à cause de mauvais fonctionnement.
Pour sa propre protection, l’utilisateur doit
s’assurer que tous les fils de mise à la terre
de la source d’énergie électrique, des lignes
téléphoniques et des canalisations d’eau
métalliques, s’il y en a, sont raccordés
ensemble. Cette précaution est
particulièrement importante dans les
régions rurales.
Avertissement: L’utilisateur ne doit pas
tenter de faire ces raccordements lui-même;
il doit avoir recours à un service
d’inspection des installations électriques,
ou à un électricien, selon le cas.
CANADA
AVI S: L’étiquette d’Industrie Canada
identifie le matériel homologué.
Cette étiquette certifie que le matériel est
conforme aux normes de protection,
d’exploitation et de sécurité des réseaux de
télécommunications, comme le prescrivent
les documents concernant les exigences
techniques relatives au matériel terminal.
Le Ministère n’assure toutefois pas que le
matériel fonctionnera à la satisfaction de
l’utilisateur.
AVI S: L’indice d’équivalence de la sonnerie
(IES) assigné à chaque dispositif terminal
indique le nombre maximal de terminaux
qui peuvent être raccordés à une interface.
La terminaison d’une interface
téléphonique peut consister en une
combination de quelques dispositifs, à la
seule condition que la somme d’indices
d’équivalence de la sonnerie de tous les
dispositifs n’excède pas 5. L’indice
d’équivalence de la sonnerie de ce matériel
est de 0.4.


Contents
Welcome............................................................................... 1
Features ............................................................................................. 1
Unpacking Your Notebook ............................................................ 2
Manuals .................................................................................................2
Recovery CDs .......................................................................................2
Software CDs ........................................................................................3
Other ......................................................................................................3
Using Your Notebook .......................................................... 5
Locating Controls and Connectors................................................ 5
Front.......................................................................................................5
Left .........................................................................................................6
Right.......................................................................................................7
Back .......................................................................................................7
Bottom....................................................................................................8
Connecting a Power Source ...........................................................9
Using the AC Adapter.........................................................................9
Starting Your Computer ............................................................... 13
Shutting Down Your Computer .................................................. 14
Registering Your Computer .........................................................15
Using the Keyboard....................................................................... 16
Combinations and Functions with the Windows Key .................18
Indicators.............................................................................................19
VAIO Action Setup........................................................................ 22
Programmable Power Keys..............................................................22
Internal Timer.....................................................................................22
Using the Touchpad ...................................................................... 23
Using the Floppy Disk Drive ....................................................... 24
EN

N
VAIO® Notebook User Guide
Using the DVD-ROM/CD-ROM .................................................26
Using PC Cards ..............................................................................30
Using Smart Connect .....................................................................33
Using Infrared Communication Devices ....................................34
Using Power Saving Modes..........................................................36
Normal Mode .....................................................................................36
System Idle Mode ..............................................................................36
System Suspend Mode ......................................................................37
System Hibernation Mode................................................................37
Using a Second Battery Pack ........................................................38
Using the Weight Saver.................................................................41
Connecting Peripheral Devices ......................................... 43
Connecting a Phone Line ..............................................................44
Connecting the Port Replicator ....................................................45
Connecting a Printer ......................................................................49
Connecting an External Display...................................................50
Connecting an External Mouse or Keyboard .............................53
Connecting External Speakers......................................................54
Connecting an External Microphone...........................................55
Connecting a Digital Video Camera Recorder...........................56
Connecting a Universal Serial Bus (USB) Device ......................57
Troubleshooting ................................................................ 59
Power Management...........................................................................66
Using the System and Application Recovery CDs....................67
Using the System Recovery CD(s)...................................................67
Using the Application Recovery CD(s)...........................................69
Adding Memory................................................................. 71
Specifications ..................................................................................75
Index................................................................................... 79

Welcome
Congratulations on your purchase of the Sony VAIO® notebook. Sony has
combined leading-edge technology in audio, video, computing, and
communications to provide you with state-of-the-art personal
computing.
Features
For a complete description of the specifications of your VAIO® notebook, see page 75.
✍
❑
Exceptional performance: Your notebook includes a fast Intel
Pentium® III processor and a V.90 compatible modem.*
❑
Portability: The rechargeable battery pack provides hours of use
without AC power.
❑
Sony audio and video quality: High-quality MPEG1/MPEG2 video,
which supports full-screen display and enables you to take
advantage of today’s advanced multimedia applications, games, and
entertainment software. MPEG2 is not available on the PCG-F420.
❑
Multimedia features: Enjoy the stereo speakers or use a headphone
(not supplied) to listen to audio and video CDs.
❑
Microsoft® Windows® operating system: Your system includes the
latest operating system from Microsoft.
❑
Communications: Access popular online services, send e-mail,
browse the Internet, and use fax features.
❑
Digital Versatile Disc (DVD): This new optical storage technology
that provides increased storage capacity and a rich multimedia
computing experience. DVD-ROM drives play both DVD-ROM and
CD-ROM discs. Not available on PCG-F420.
®
* Actual upload and download speeds may vary due to line conditions, ISP support, and government
regulations.
VAIO® Notebook User Guide
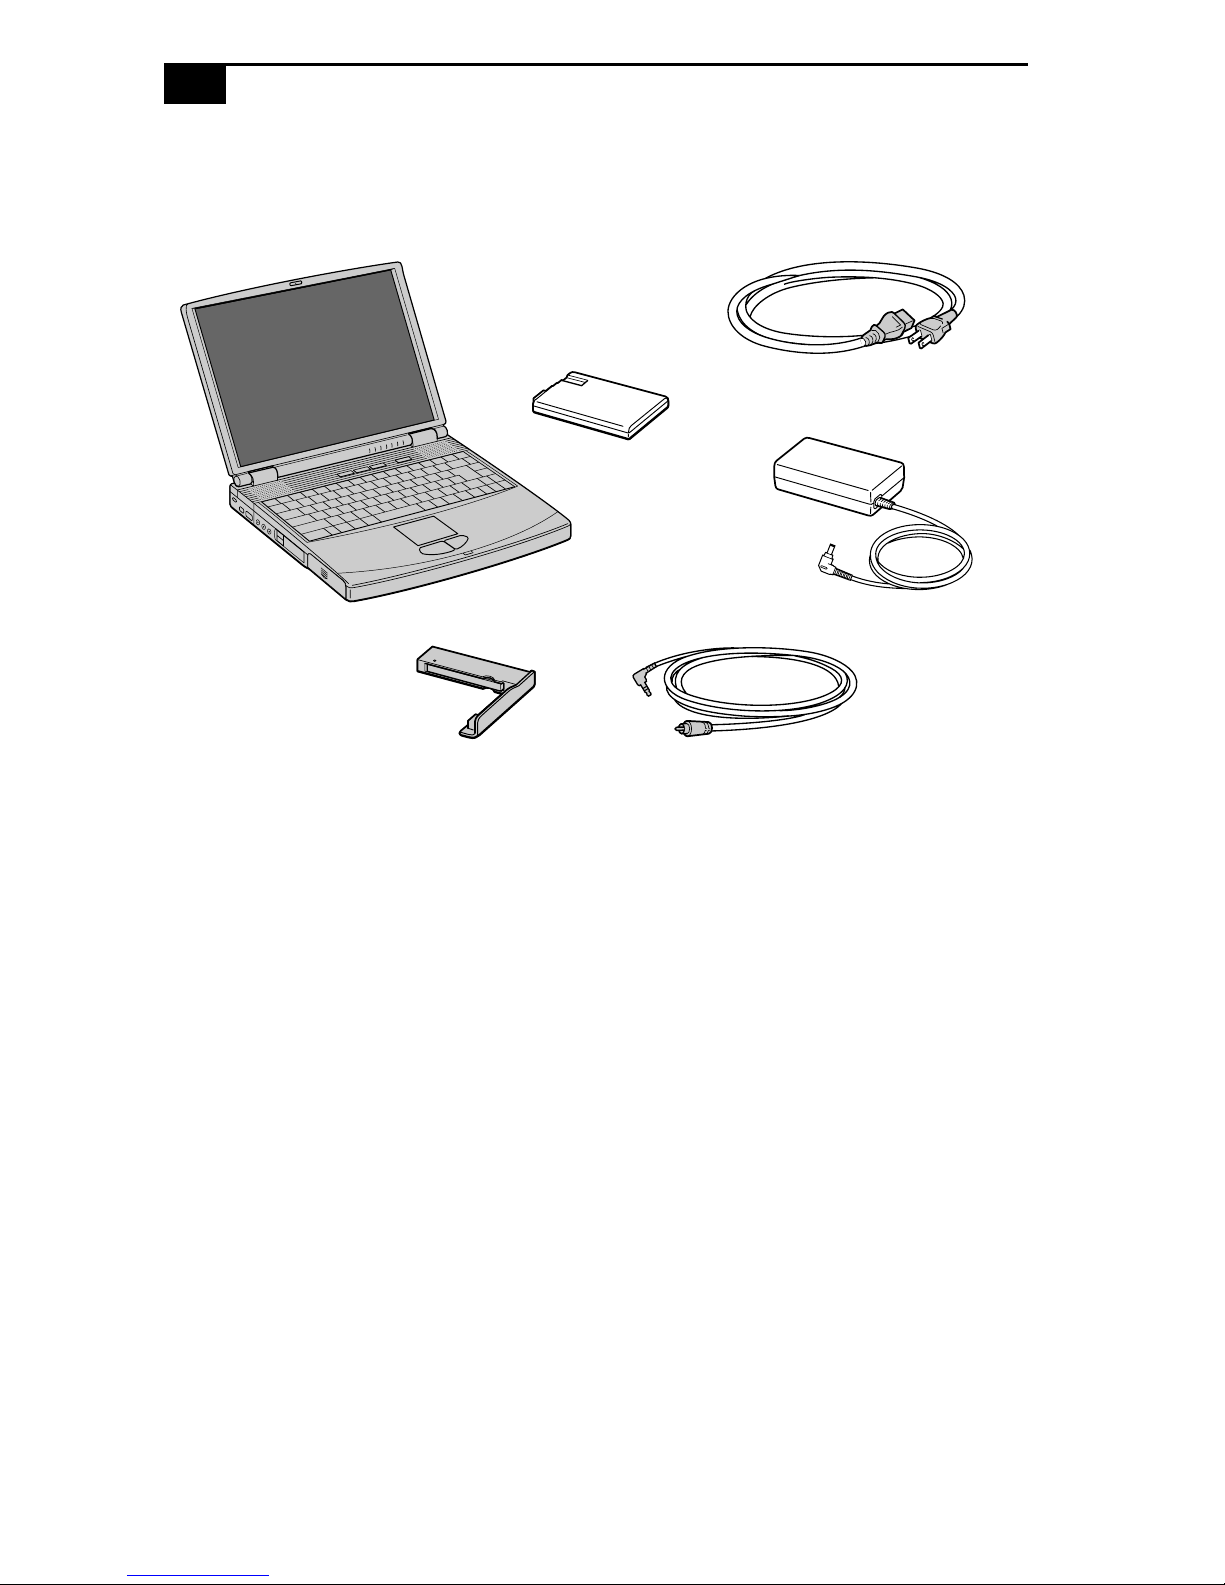
Unpacking Your Notebook
Remove the following hardware items from the box:
Main unit
The removable floppy disk drive is located in the multipurpose bay.
Rechargeable
battery pack
Weight saver
Power cord
AC adapter
Video cable
Manuals
❑
Read Me First contains Frequently Asked Questions, the most up-todate information on using your computer, and software support
information.
❑
The VA I O
®
Notebook User Guide (this manual) contains information on
how to get the most from your computer, find help, and solve
common problems. It also includes product specifications.
❑
The VAIO® Consumer Information Guide contains ergonomic
considerations and your computer’s limited warranty statement.
❑
The Microsoft
features of the Windows
®
Getting Started manual explains how to use the basic
®
operating system.
Recovery CDs
❑
System Recovery CD(s)
❑
Application Recovery CD(s)

Software CDs
❑
Microsoft® Word 2000
Other
❑
Setting up your VAIO® Notebook (poster)
❑
Packet containing special product offers
Unpacking Your Notebook
!

"
Using Your Notebook
This section describes how to start using your computer and how to use
your computer’s internal and external devices such as the touchpad,
floppy disk drive, and CD-ROM or DVD-ROM drive.
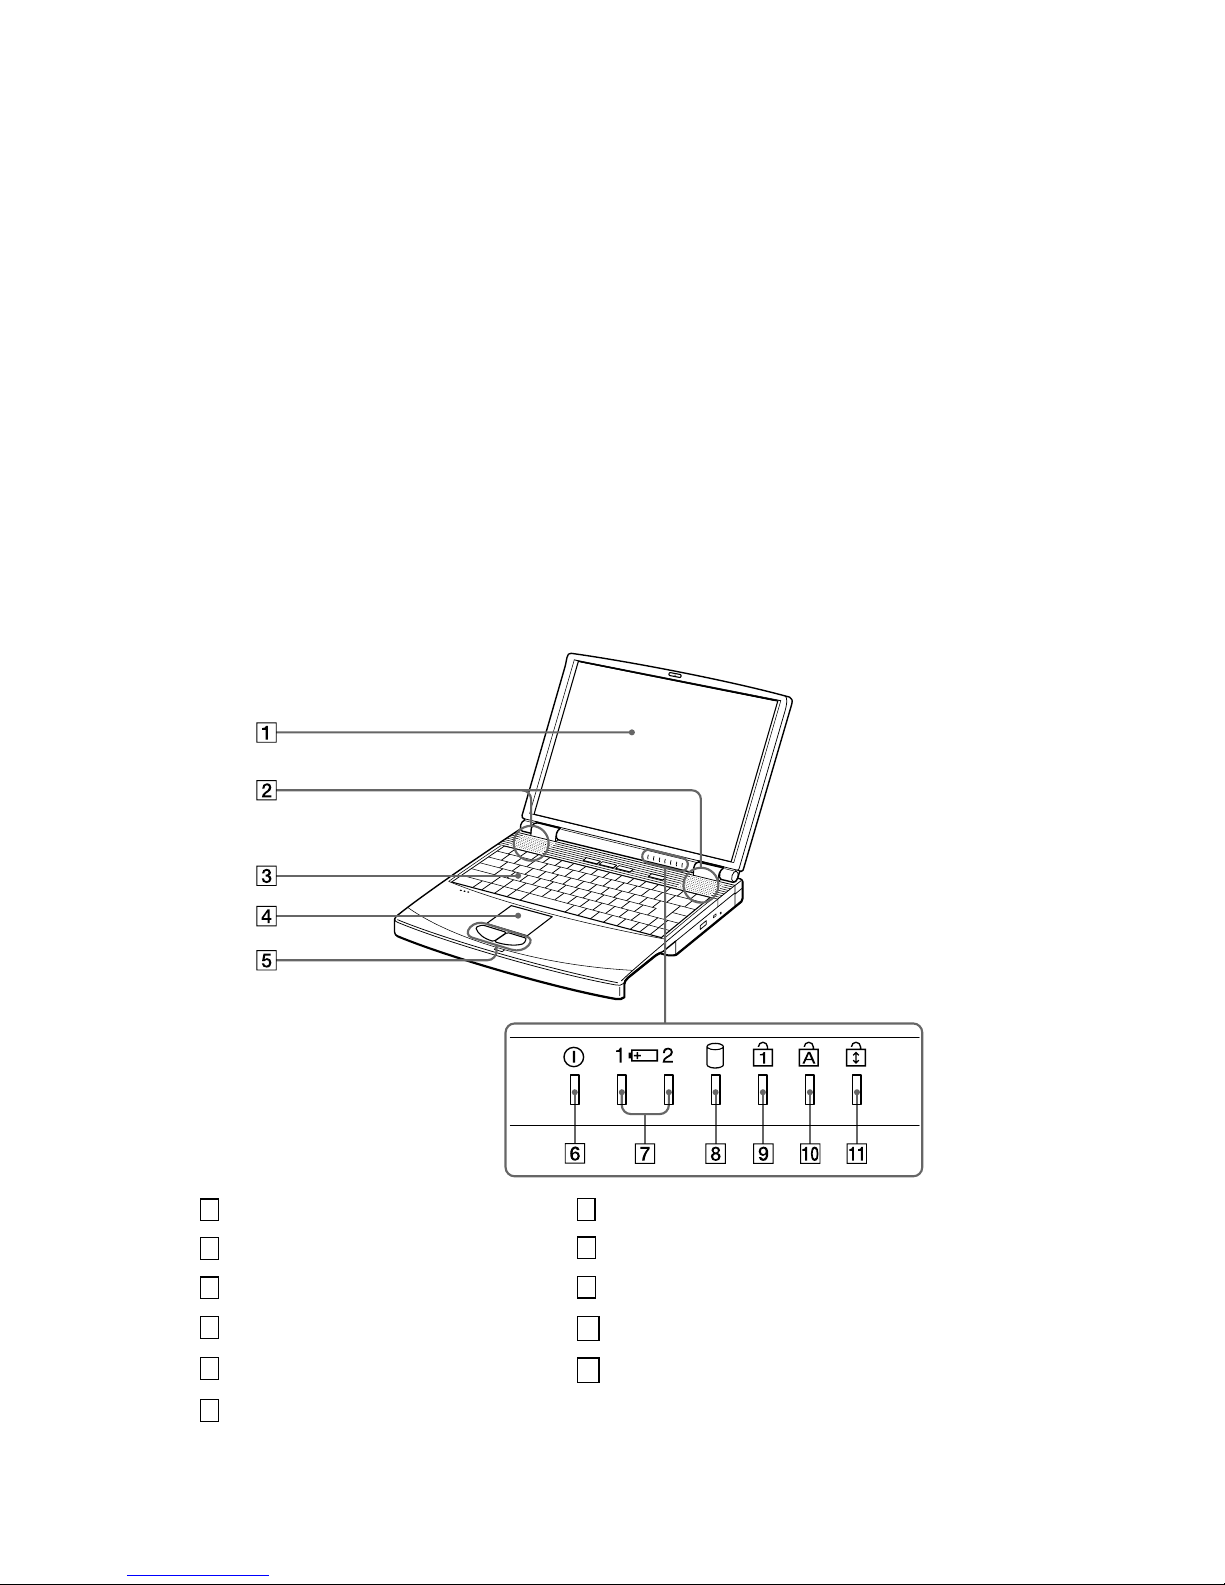
Locating Controls and Connectors
Front
1
LCD (Liquid Crystal Display) screen (page 20) Battery 1 and 2 indicators (pages 11, 19)
2
Speakers (pages 20, 54) Hard disk drive indicator (page 19)
3
Keyboard (page 16) Num Lock indicator (page 19)
4
Touchpad (page 23) Caps Lock indicator (page 19)
5
Left/right buttons (page 23) Scroll Lock indicator (page 19)
6
Power indicator (page 11)
7
&
'
10
11
#
$
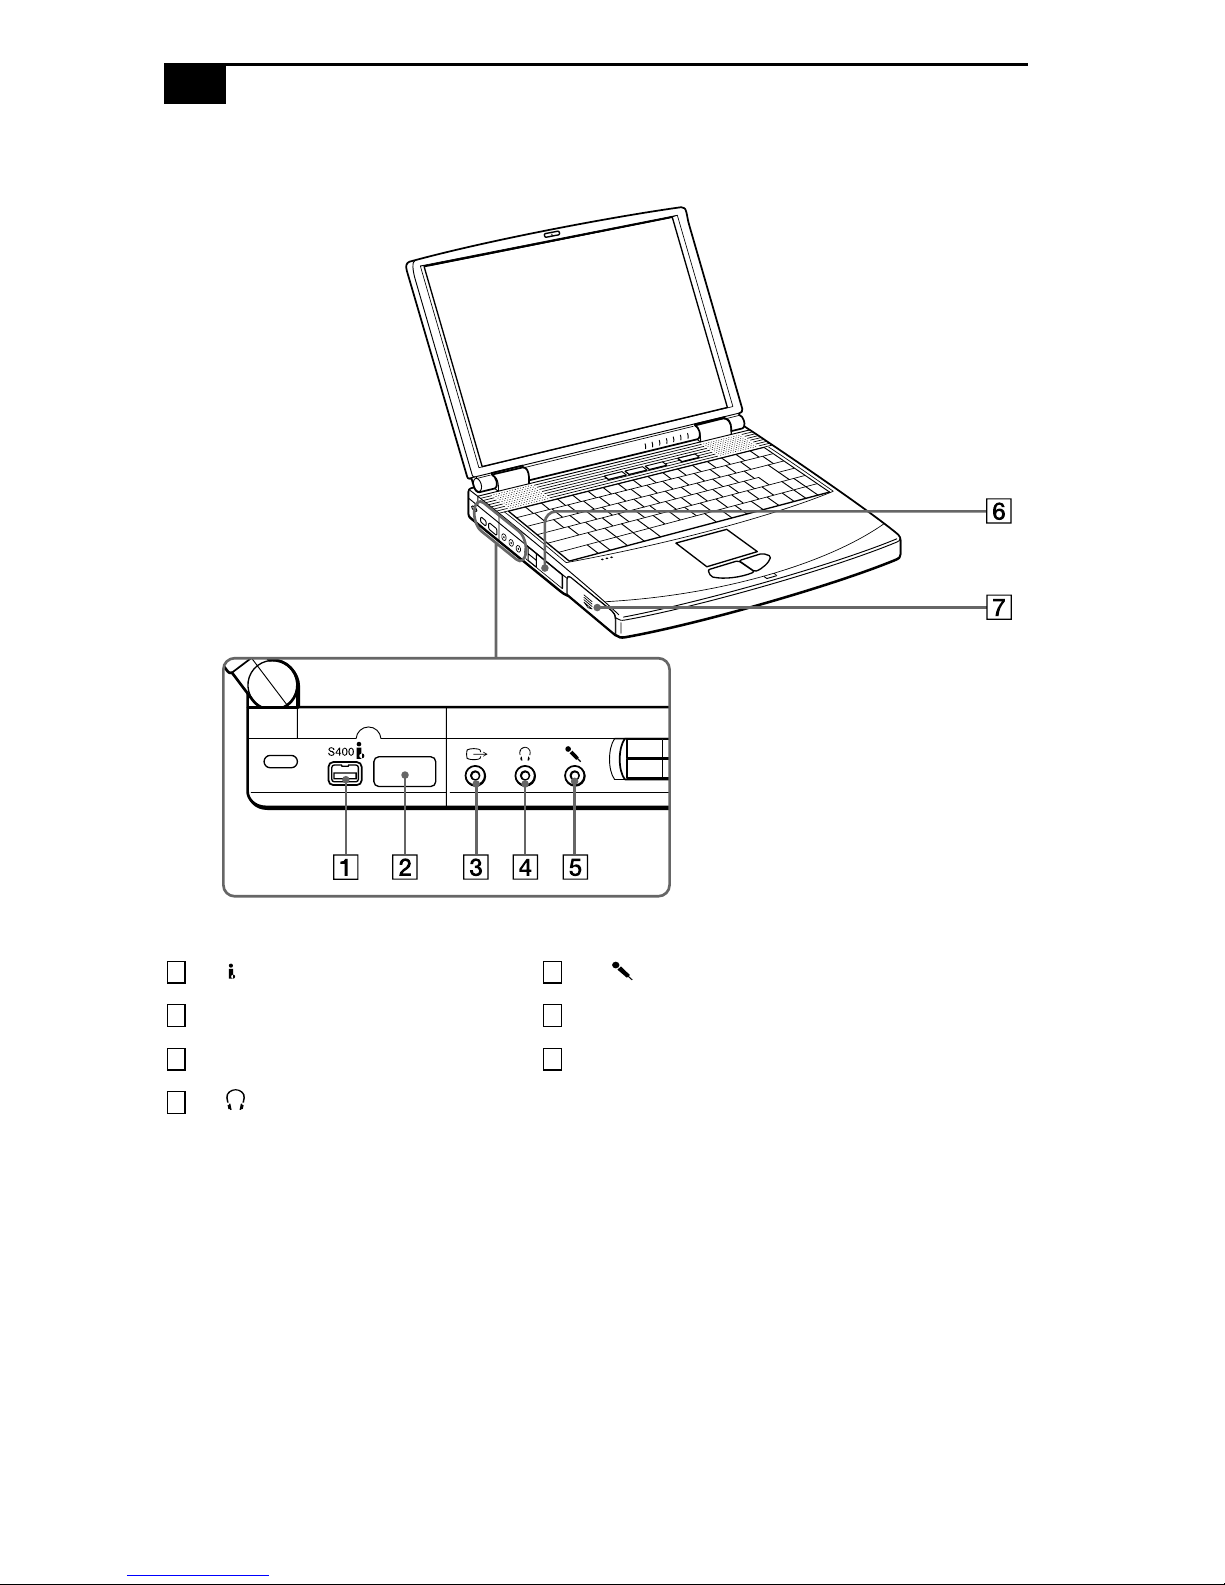
Left
VAIO® Notebook User Guide
1 5
2 6
3 7
4
S400 i.LINK® connector (page 56) Microphone connector (pages 51, 55)
Infrared port (page 34) PC card slots (page 30)
Video out Battery bay (page 10)
Headphone connector (pages 51, 54)
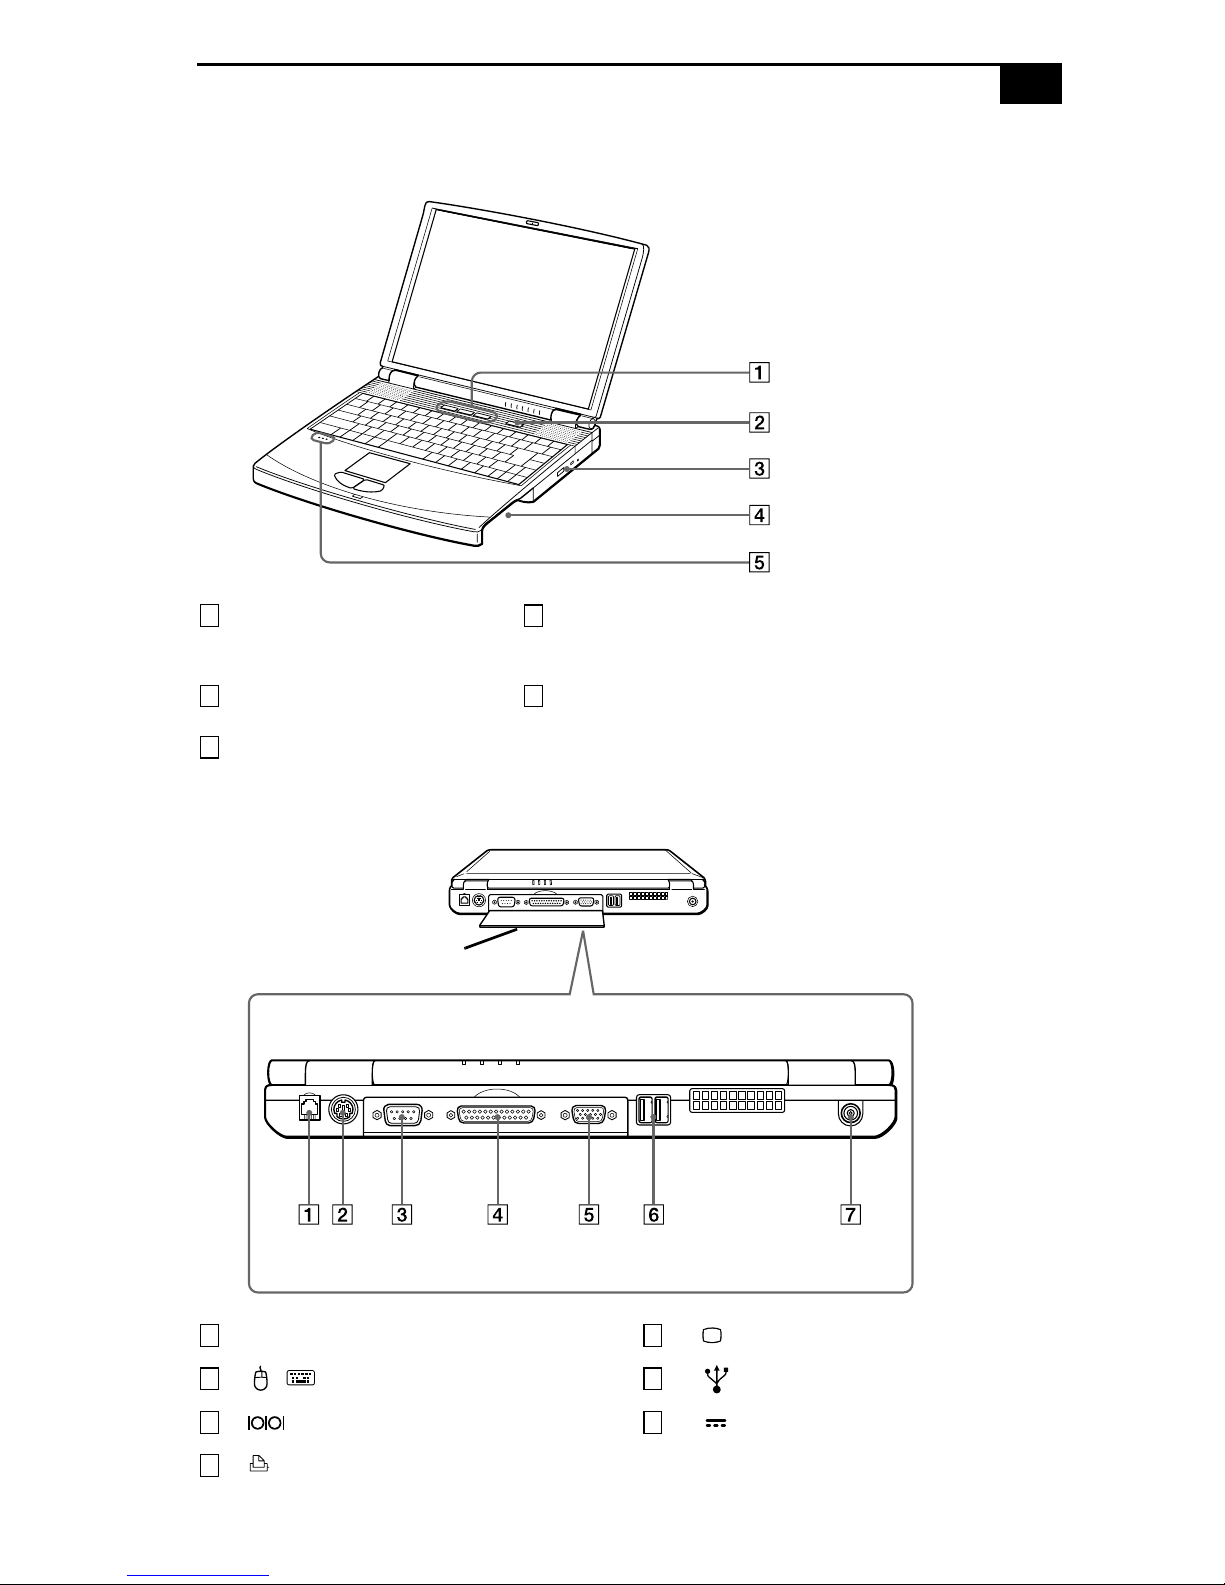
Right
5
637
Locating Controls and Connectors
%
PPK buttons (see the online
1
document Customizing Your VAIO
Notebook for information on use)
Power button Internal microphone
2 5
DVD-ROM drive (CD-ROM drive on
3
PCG-F420) (page 26)
®
Multipurpose bay (pages 24, 38, 41)
4
Back
cover
Modem jack (page 44)
1
2
4
/ Mouse/Keyboard connector (page 53)
Serial connector
Printer connector (page 49)
Monitor connector (page 50)
USB connectors (page 57)
DC In connector (page 9)
&
VAIO® Notebook User Guide
There is a ventilation slot located between the USB connector and the DC In connector. Do
✍
not cover the ventilation slot when your computer is on.
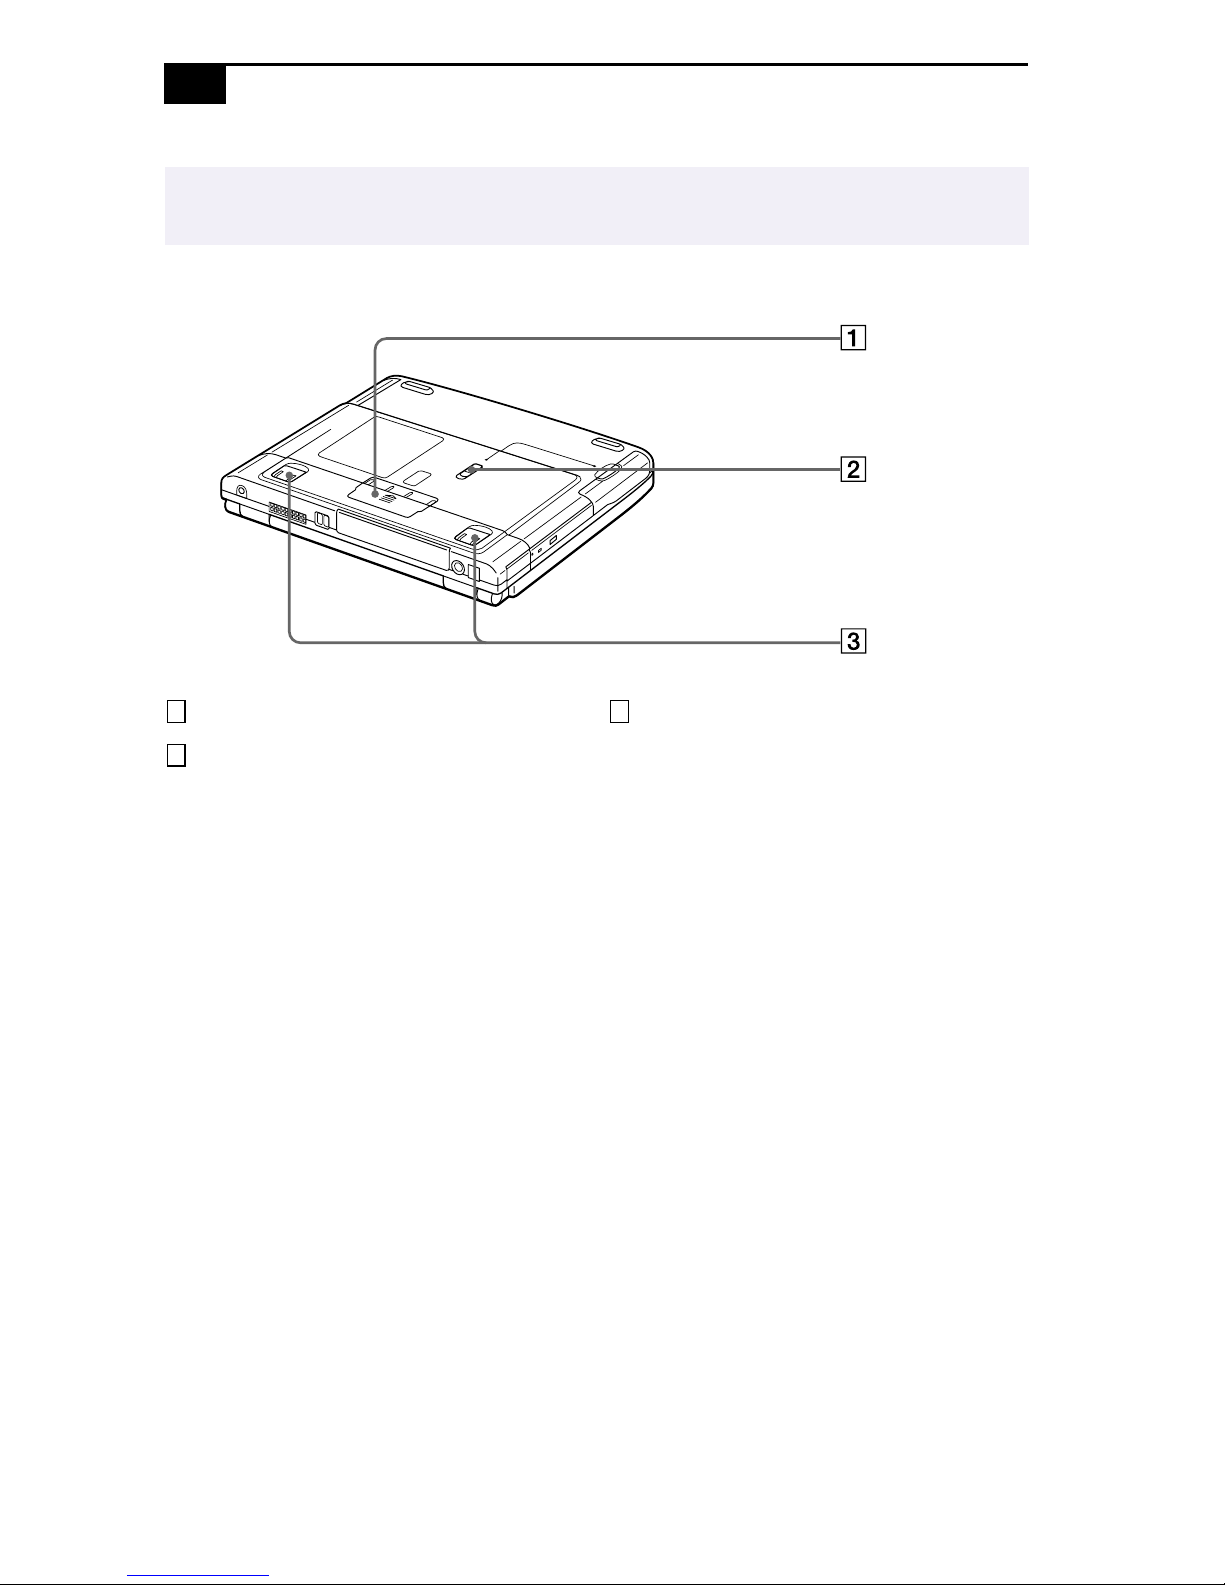
Bottom
Port replicator connector cover (pages 46, 48) Tilt stands
1 3
Multipurpose bay RELEASE lever (pages 40, 42)
2
Connecting a Power Source
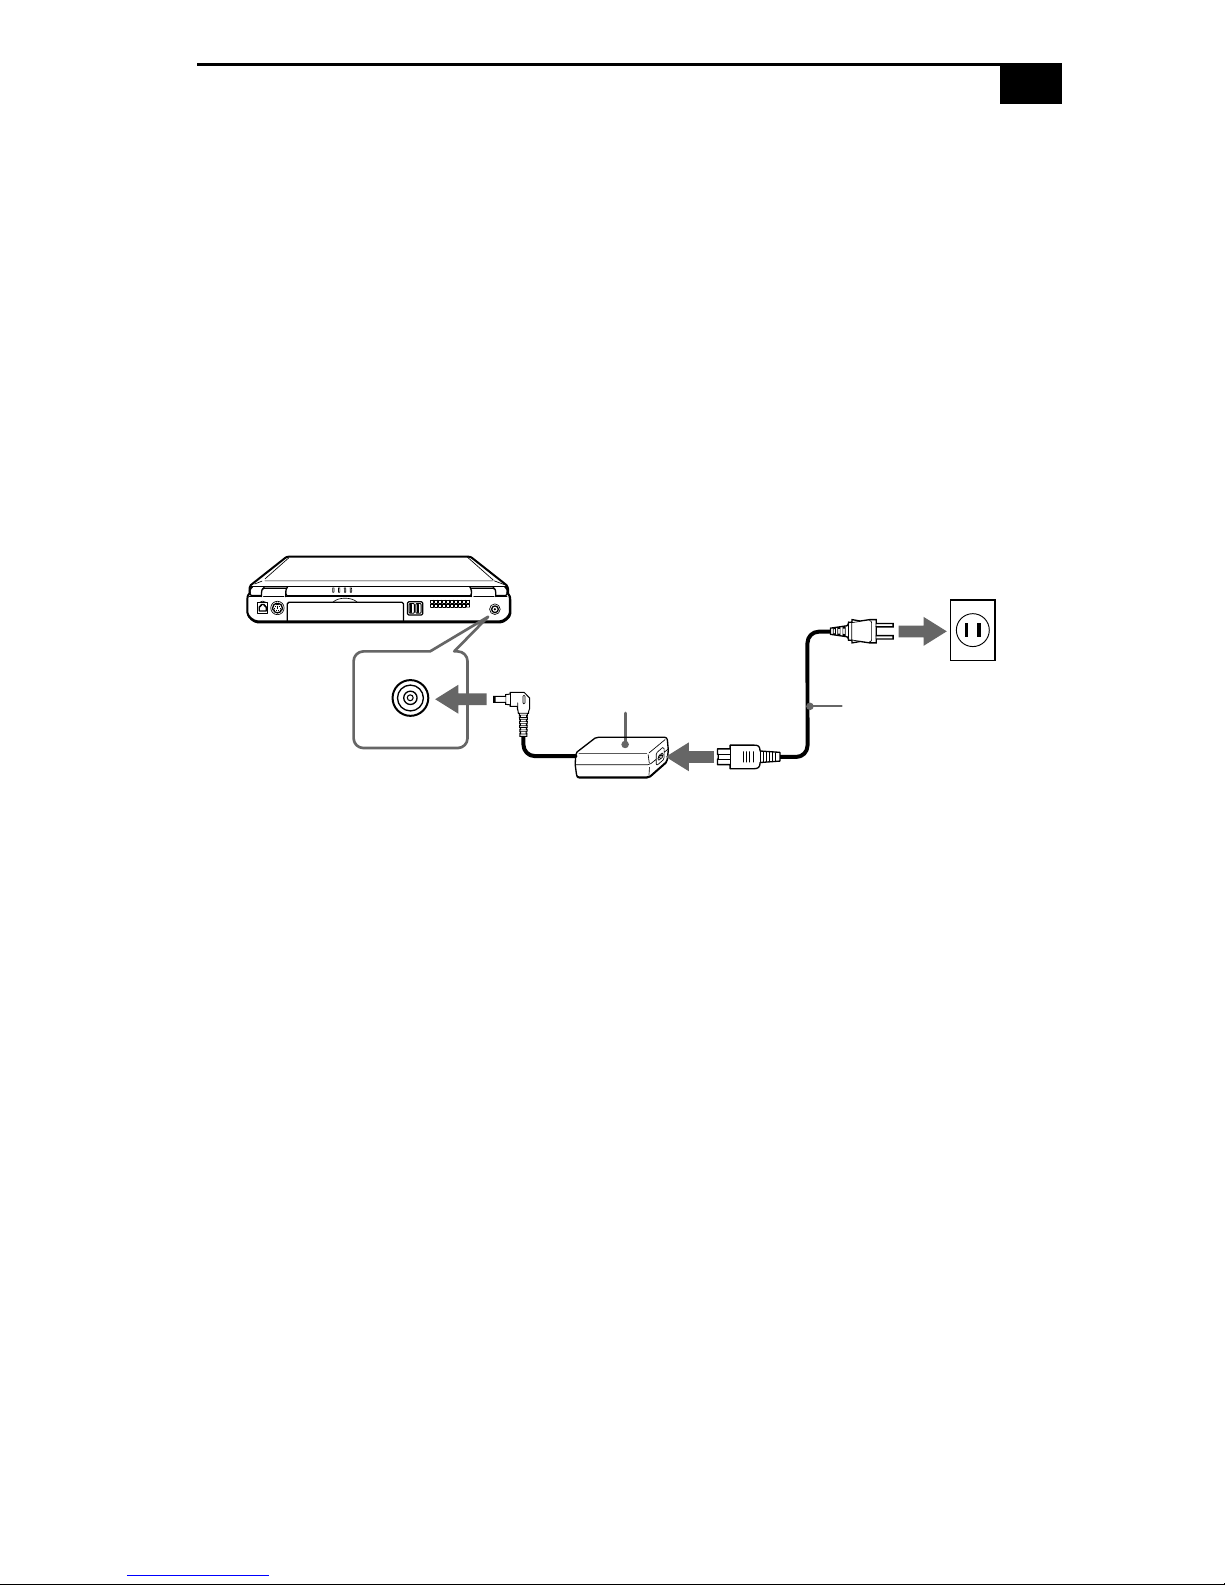
'
Connecting a Power Source
You can use either AC power or a rechargeable battery pack as a power
source.
Using the AC Adapter
1
Plug the cable attached to the AC adapter into the DC In connector on
the computer.
2
Plug one end of the power cord into the AC adapter.
3
Plug the other end of the power cord into an AC outlet.
Notebook
DC In
AC adapter
(supplied)
Power cord (supplied)
VAIO® Notebook User Guide
Using Battery Power
You can use one or two battery packs as a source of power. The second
battery pack inserts into the multipurpose bay on the right side of the
computer. (See “Using Power Saving Modes” on page 36.) Additional
battery packs are available as a separate option.
The battery pack that comes with your computer is not fully charged at
the time of purchase. Follow the steps below to insert and charge the
battery pack.
To insert the battery pack
1
Open the cover of the battery bay.
2
Insert the battery pack into the battery bay on the left side of the
computer.
Battery pack
(supplied)
Label side facing down
3
Close the cover of the battery bay until it clicks.
✍
When attaching your computer to the port replicator, do not attempt to insert or remove the
battery pack. Lifting and turning the computer with a port replicator attached could cause a
temporary loss of power.
To charge the battery pack
1
Connect the AC adapter to the computer.
2
Insert the battery pack.
Connecting a Power Source
The computer automatically charges the battery (the battery indicator
light flashes in a double-blink pattern as the battery charges). When the
battery is 85 percent full, the battery indicator light turns off. This
process takes approximately two hours. To charge the battery
completely, continue charging for an additional hour. See “Displaying
Detailed Battery Information” in the online document Customizing Your
VA I O
®
Notebook for information on checking the battery life.
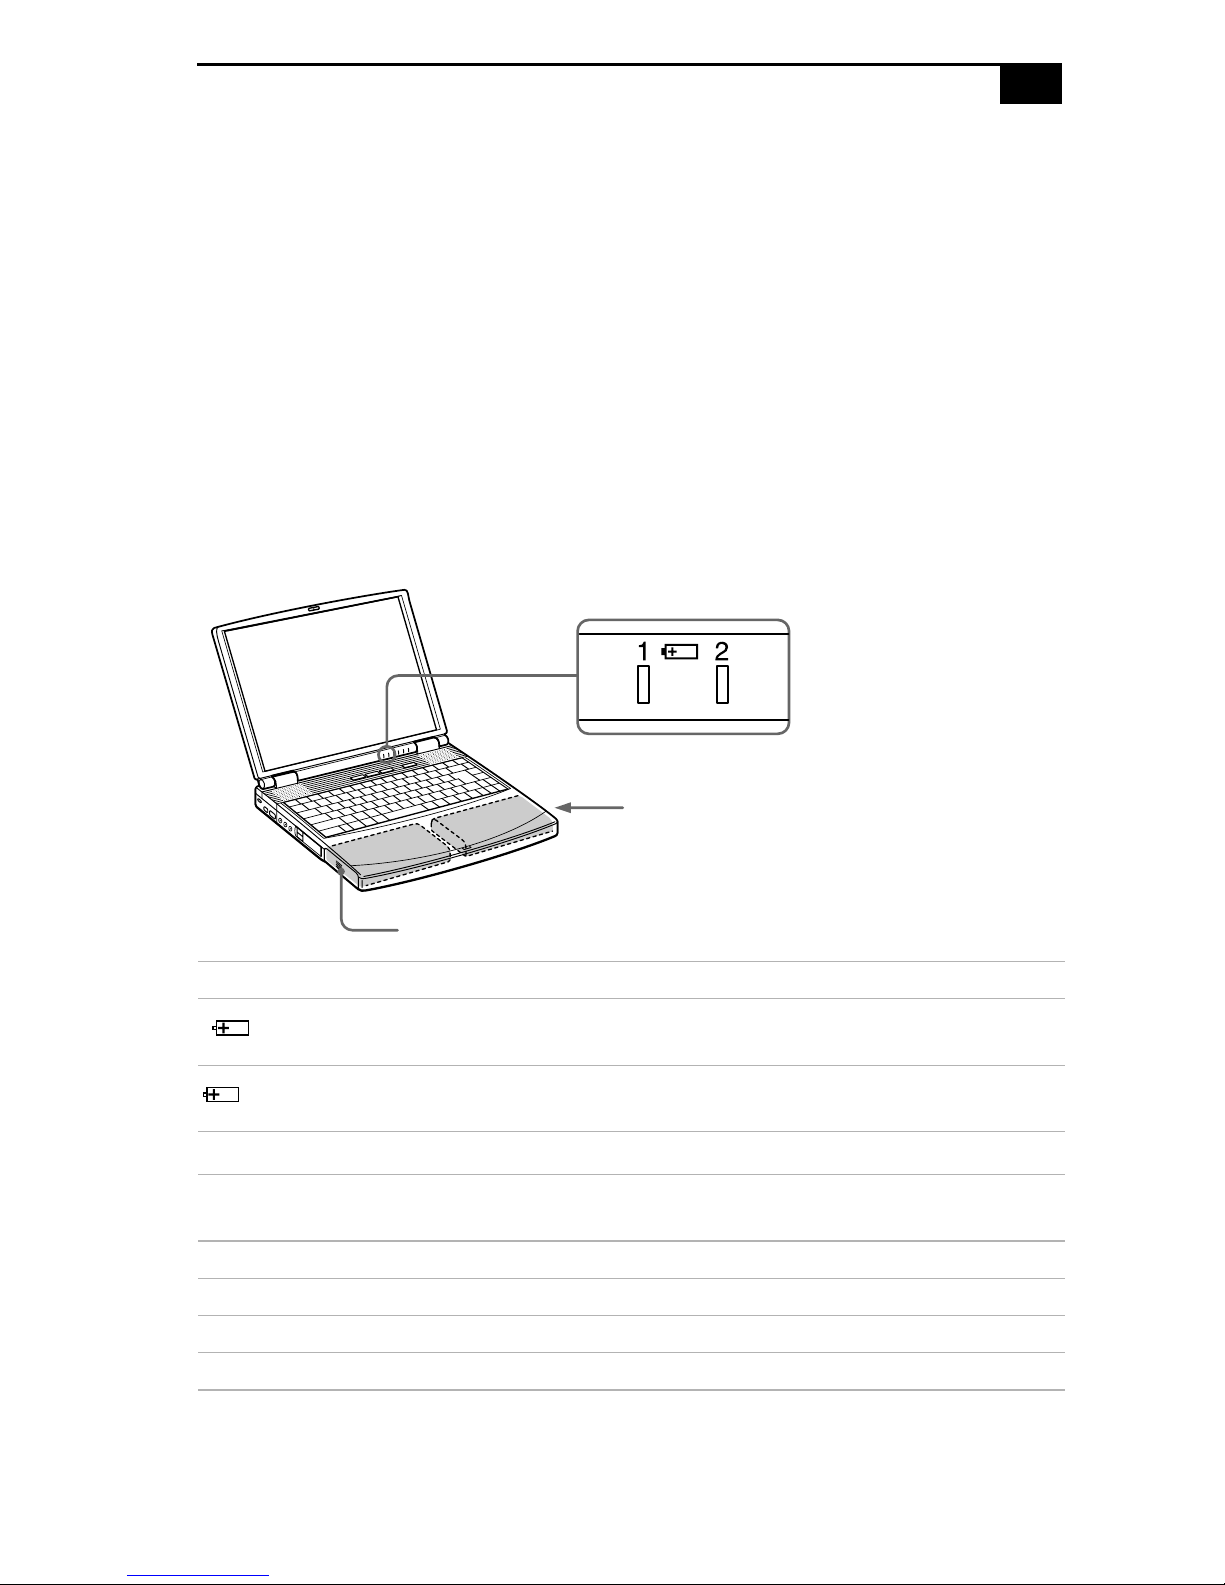
There are two battery indicator lights on the computer:
Battery indicators
Secondary battery pack
(not supplied)
Battery pack (supplied)
Battery Indicator Meaning
1
2
Battery Indicator
Light Status Meaning
On The computer is using battery power.
Single blink The battery is running out of power.
Double blink The battery is charging.
Off The computer is using AC power.
Indicates the status of the battery pack in the battery bay
on the left side of the computer.
Indicates the status of the battery pack in the
multipurpose bay on the right side of the computer.
VAIO® Notebook User Guide
When the battery power is running low, both the battery and power indicators blink.
When the computer is directly connected to AC power and has a battery pack in the battery
bay, it uses power from the AC outlet.
See Using a Second Battery Pack on page 38 for information on installing and charging a
battery pack in the multipurpose bay.
Keep the battery pack in the computer while it is directly connected to AC power. The battery
pack continues to charge while you are using the computer.
If the battery level falls below 10%, you should either attach the AC adapter to recharge the
battery or shut down your computer and insert a fully charged battery.
You can extend battery life by changing the power-management modes in the PowerPanel
utility. See Using Power Saving Modes on page 36.
The battery pack supplied with your computer is a lithium ion battery and can be recharged at
any time. Charging a partially discharged battery does not affect battery life.
The battery indicator light is on while you use the battery pack as a power source. When
battery life is nearly depleted, the battery indicator starts flashing.
For some software applications and some peripheral devices, your computer may not enter
System Hibernation mode when the battery life is low. To avoid loss of data when using
battery power, you should save your data frequently and manually activate a powermanagement mode, such as System Suspend or System Hibernation.
To remove the battery pack
1
Open the cover of the battery bay.
2
Pull out the battery pack.
3
Close the cover of the battery bay.
You may lose data if you remove the battery pack while the computer is on and
!
not connected to the AC adapter or if you remove the battery while the
computer is in System Suspend mode.
Starting Your Computer
Starting Your Computer
1
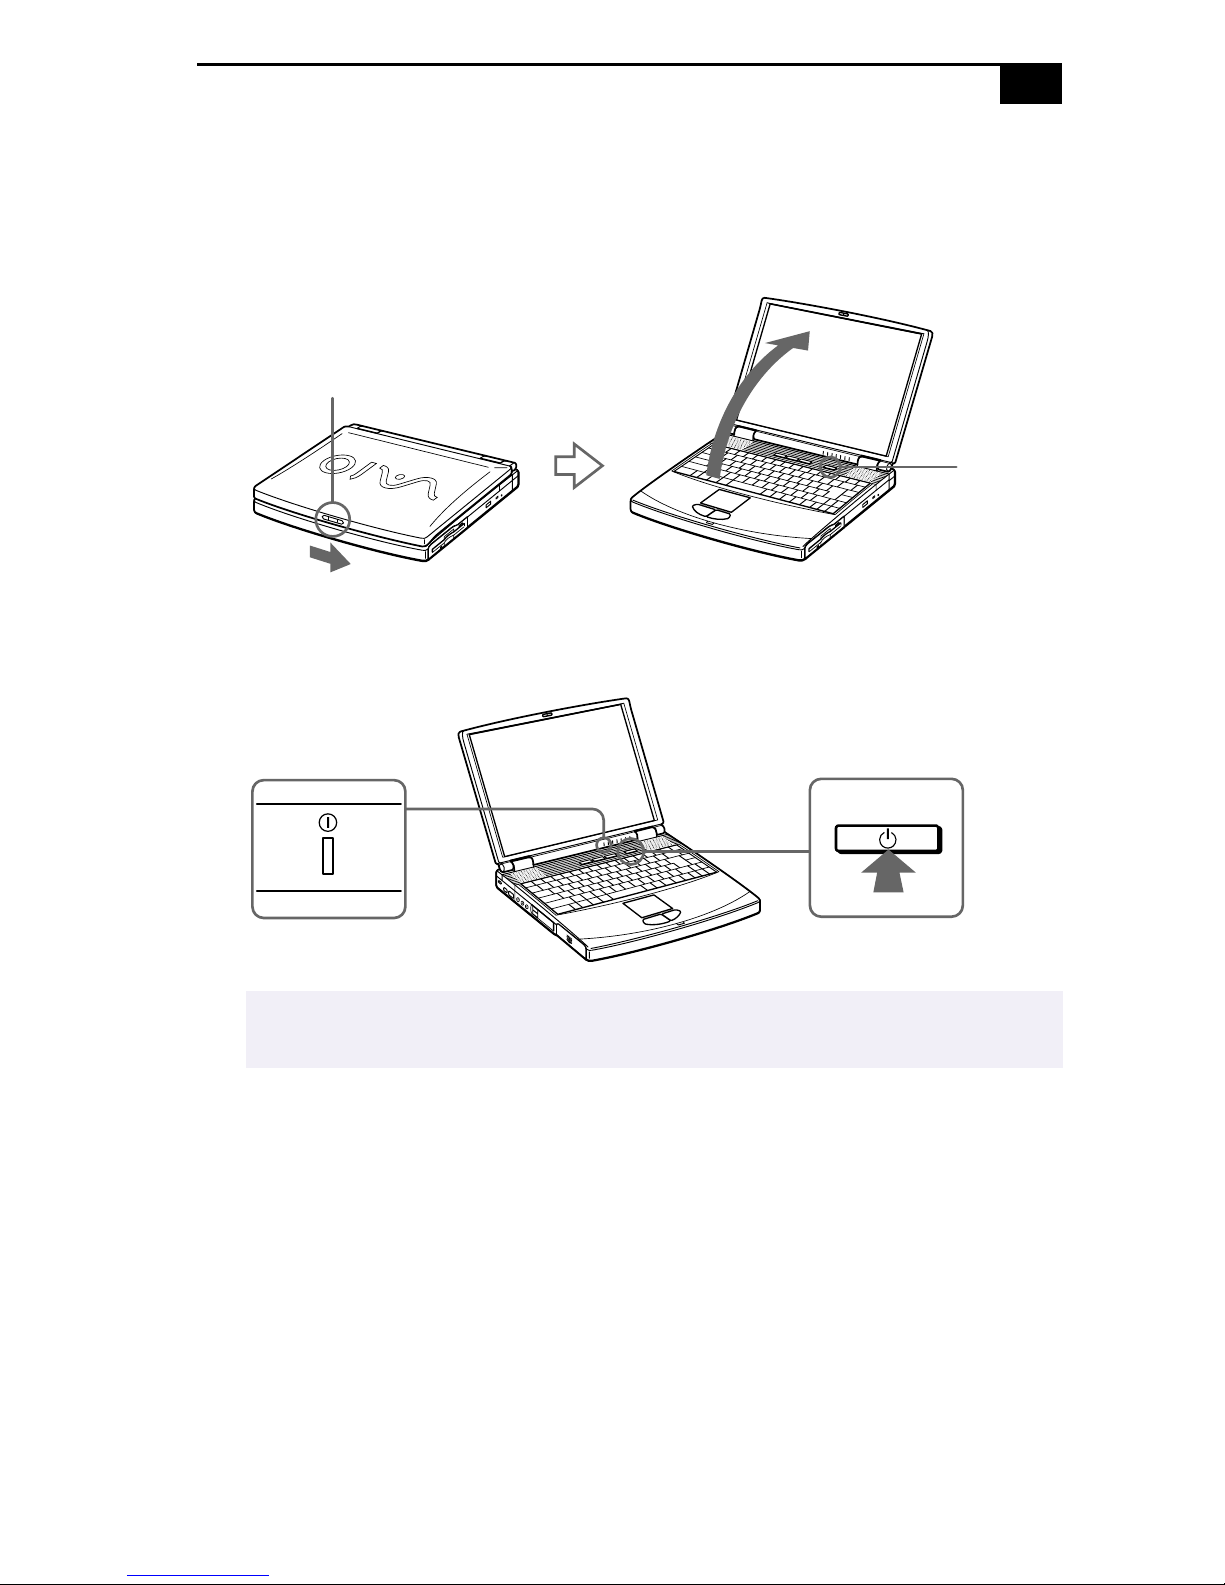
Slide the LCD lock lever in the direction of the arrow, and lift the
cover.
LCD lock lever
2
Press the power button on top of the computer until the green power
indicator light turns on.
!
Power
button
Power indicator
✍
If you hold the power button in the On position for more than four seconds, the
computer turns off.
3
If necessary, adjust the brightness controls for the LCD display. To
Power button
decrease the brightness, press Fn+F5 and then the down or left arrow
key. To increase the brightness, press Fn+F5 and then the up or right
arrow key.
"
VAIO® Notebook User Guide
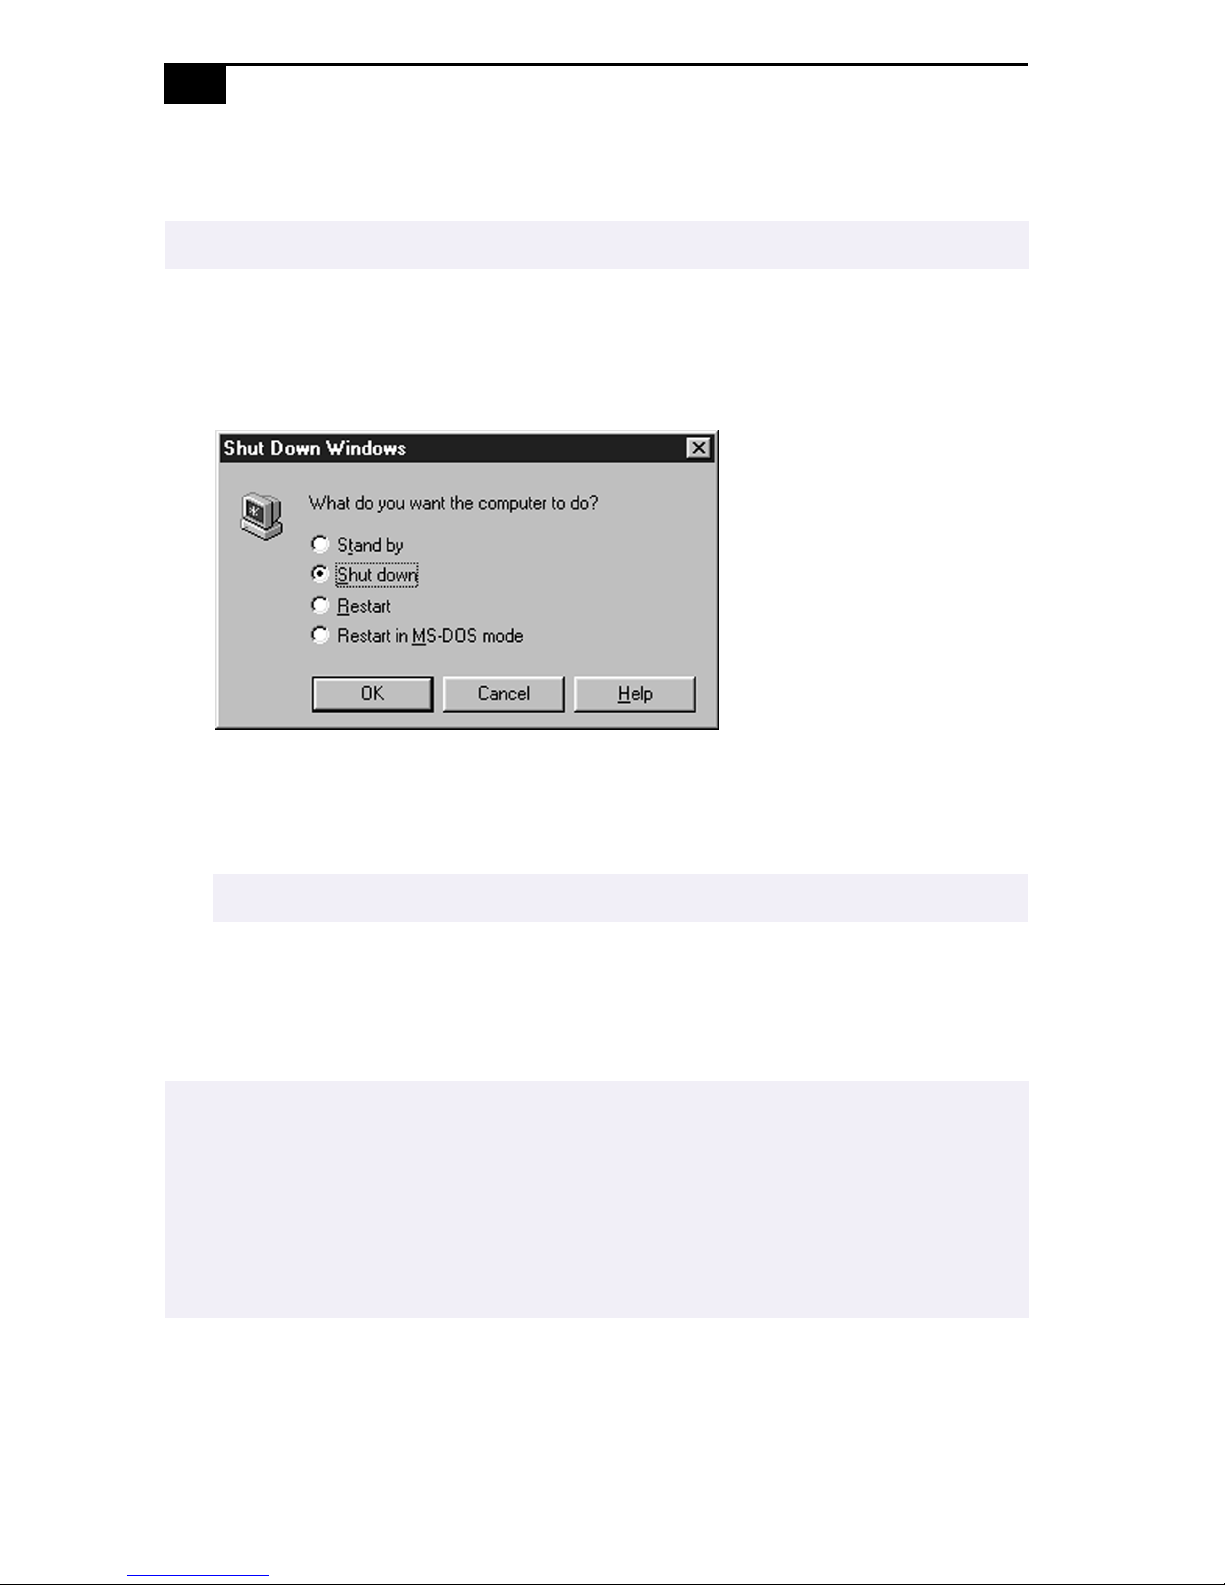
Shutting Down Your Computer
To avoid potential loss of data, follow these steps to shut down your computer.
!
1
Click the Start button on the Windows® taskbar.
2
Click Shut Down at the bottom of the Start menu to display the Shut
Down Windows dialog box.
3
Select Shut down.
4
Click OK.
✍
Respond to any prompts warning you to save documents.
5
Wait for your computer to turn off automatically. The power indicator
(green) turns off.
6
Turn off any peripherals connected to your computer.
✍
If you are unable to shut down your computer using the steps described above, press the
Ctrl+Alt+Delete keys at the same time to restart the computer. If you are unable to restart the
computer in this way, you can press the power button and hold it for four seconds. This
operation may result in data loss.
During a period of inactivity, you can conserve battery life by using System Suspend mode. See
Controlling Power Management in the online document
Notebook.
Customizing Your VAIO
®

Registering Your Computer
#
Registering Your Computer
You can take advantage of Sony’s commitment to quality customer
support and receive the following benefits by registering your computer
with Sony.
❑
Sony Customer Support – Talk to a Support Representative to
troubleshoot problems you may be having with your computer.
❑
Extended Limited Warranty – Protect your investment. Extend your
Warranty nine months for a total of 12 months from the original date
of purchase when you register your computer.
❑
Express service – Provides a fast and direct return of your VAIO
notebook to Sony for service of your computer.
If you have not already registered, follow these steps to use your
notebook’s online registration service.
✍
You must connect your phone line before using any online services, including the online
registration service. See Connecting a Phone Line on page 44.
1
Click the Sony VAIO Registration icon on the VAIO desktop.
2
Enter the information requested on the first online registration form.
Press the Tab key to move from box to box.
3
Click the Next button to advance to the next form.
4
Complete the remaining forms by clicking the Next button each time
you complete a form.
The computer automatically transfers your registration information using
your built-in modem and a toll-free telephone number.
$
VAIO® Notebook User Guide
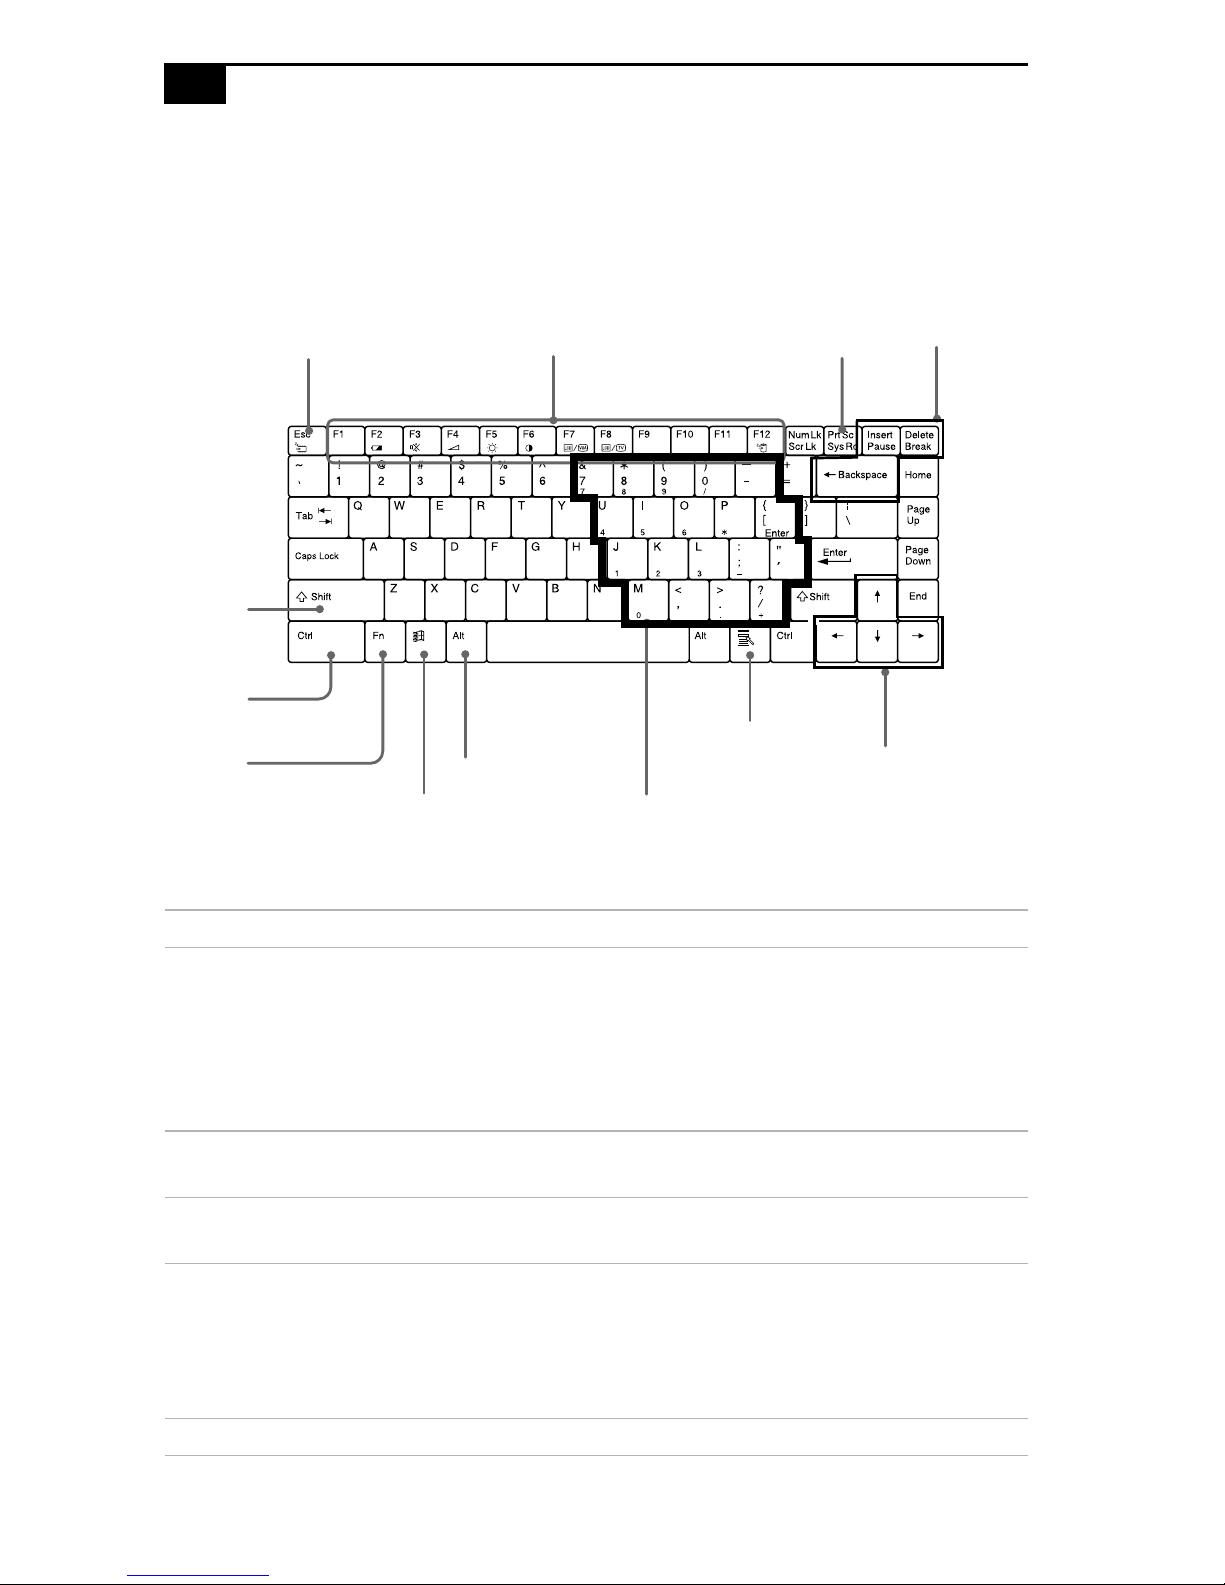
Using the Keyboard
Your keyboard is very similar to a typewriter’s, but the keyboard has
additional keys that perform specific computer-related tasks.
Correction
keys
Shift key
Escape Key
Function keys
Print Screen key
Ctrl key
Applications key
Fn key
Alt key
Windows key
Numeric keypad area
Navigation
keys
Key Description
Numeric keypad
area
Contains the keys found on a typical calculator. Use the
numeric keypad area to type numbers or to perform
mathematical calculations such as addition and
subtraction. Note that you must press the Num Lock key
to activate the numeric keypad. (When you do so, the
Num Lock light will be on.)
Navigation keys Several keys are devoted to moving the cursor on the
screen.
Correction keys The Insert, Back Space, and Delete keys enable you to
make corrections in your documents.
Function keys The twelve function keys along the top of the keyboard
are used to perform designated tasks. For example, in
many applications, F1 is the Help key. The task associated
with each function key may vary from one application to
the next.
Escape key The Esc (Escape) key is used to cancel commands.
Using the Keyboard
Key Description
Print Screen key The Print Screen key takes an electronic snapshot of the
screen and places it in the Windows Clipboard. You can
then paste the screen shot into a document and print it.
Operator keys Several keys are always used with at least one other key:
Ctrl, Alt, and Shift. When held down with another key,
the Ctrl (Control) and Alt (Alternate) keys offer another
way to give commands. For example, in many
applications, instead of choosing the Save command from
a menu, you can hold down Ctrl and press S (referred to
as Ctrl+S). The Shift key operates the same way as on a
typewriter; it is used to produce capital letters or special
symbols such as @ and $.
Windows key The key with the Windows logo displays the Windows
Start menu; it is the equivalent of clicking the Start button
on the taskbar. See “Combinations and Functions with
the Windows Key” on page 18.
%
Fn key The Fn key is used in combination with other keys to
issue commands. See “Combinations and Functions with
the Fn Key” on page 20.
Applications key The Applications key displays a shortcut menu of
context-sensitive choices. Pressing this key is the
equivalent of clicking the right mouse button.

&
VAIO® Notebook User Guide
Combinations and Functions with the Windows Key
Combination Function
+ F1 Displays Windows Help.
+ Tab Switches the selected button on the taskbar.
+ E Displays Windows Explorer.
+ F Displays the Windows Find: All Files window to find
a file or folder. This is the equivalent of selecting Find
and then Files or Folders from the Start menu.
+ Ctrl + F Displays the Windows Find: Computer window
where you can locate other computers. This is the
equivalent of selecting Find and then Computer from
the Start menu.
+ M Minimizes all displayed windows.
Shift + + M Returns all minimized windows to their previous
size.
+ R Displays the Run window. This is the equivalent of
selecting Run from the Start menu.
Fn + + Insert Displays the Properties window. This is the
equivalent of double-clicking the System icon in the
Control Panel.
Using the Keyboard
'
Indicators
Indicator Function
Power Light is green when the power to the computer is turned
on. Light is red in System Idle mode, and flashes red
in System Suspend mode. The light turns off when the
computer is in System Hibernation mode or powered off.
Battery 1 Indicates the status of the battery inserted in the battery
1
Battery 2 Indicates the status of the battery inserted in the
2
Hard disk Lights when data is being read from or written to the
bay on the left side of the computer.
multipurpose bay on the right side of the computer.
hard drive. Do not enter System Suspend mode or turn
off the computer when this indicator light is on.
Light On Off
Num Lock The number keys in the
numeric keypad are active.
The alphanumeric character
keys in the keypad area are
active.
Caps Lock The letters appear in
uppercase as you type. The
Shift key lowers the case of
Letters appear in lower case as
you type (unless you hold
down the Shift key).
typed letters when Caps
Lock is on.
Scroll Lock The screen scrolls differently.
(Exactly how it scrolls
Information moves across the
display normally.
depends on the specific
application. It has no effect in
many applications.)

➜
➜
VAIO® Notebook User Guide
Combinations and Functions with the Fn Key
Combinations/
Feature Function
Fn+ (ESC)
System Suspend
Fn+ (F2)
Display power source
status
Fn+ (F3)
Mute On/Off
Fn+ (F4)
Speaker volume
Fn+ (F5)
Brightness control
Fn+ (F6)
Contrast control
Puts the system into System Suspend mode, a powermanagement state. To return the system to the active
state, press any key or press the power button on your
computer.
Displays the power source status, as in the example
below:
Using AC
power
Charging a
battery pack
Toggles the built-in speaker off and on.
Adjusts the built-in speaker volume.
To increase volume, press Fn+F4, then or ➜.
➜
➜
To decrease volume, press Fn+F4, then or .
Adjusts the brightness of the LCD.
To increase light intensity, press Fn+F5 and then or ➜.
➜
➜
To decrease light intensity, press Fn+F5 and then or .
Adjust the screen contrast (PCG-F420 only).
Fn+ / (F7)
LCD
Switch to the
external monitor/LCD
Fn+ only/
LCD
(F8)
Control TV out
Toggles through the LCD, external display (connected to
the Monitor connector) and both LCD and external
display.
Only LCD
LCD and external display
Only external display
Toggles between LCD-only and dual LCD/TV display
modes.
LCD and external display
Only LCD

Combinations/
Feature Function
Using the Keyboard
Fn+ (F12)
System Hibernation
Fn+D
Video standby
Fn+F
Change the
display size
Fn+S
System Idle
Some functions are not available until Windows launches.
✍
Provides for the lowest level of power consumption.
When you execute this command, the state of the system
and state of the peripheral devices are written to the
hard disk and the system power is turned off. To return
the system to its original state, use the power button to
turn on power.
Turns off the LCD to save power. To turn the LCD back
on, press any key.
Zooms the display size in or out when the display is set
to a low resolution.
Puts the system into System Idle mode, a powermanagement state. To return the system to the active
state, press any key.

VAIO® Notebook User Guide
VAIO Action Setup
VAIO Action Setup manages the settings for your computer's
Programmable Power Keys (PPK), and internal timer. An overview of
each of these functions is provided below. For more information on
changing the settings using VAIO Action Setup, from the Start menu, go
to Programs, VAIO Action Setup, VAIO Action Setup.
Programmable Power Keys
Your Sony computer comes with technology that allows you to get to
your favorite applications easily. The three Programmable Power Keys
(PPK) at the top of you keyboard are shortcut buttons that can be
programmed to carry out a variety of computer operations automatically.
If you wish, you can use the VAIO Action Setup software to change the
Programmable Power Keys’ preset functions. See the online document
Customizing Your VAIO
®
Notebook for details.
Internal Timer
The VAIO Action Setup software allows you to set your computer’s
internal timer to launch certain applications automatically. The timer can
start applications even when the computer is in the System Hybernation
Mode.
Some software applications take longer than others to launch. It is advisable to confirm in
✍
advance the amount of time your selected application takes to start.

Using the Touchpad
!
Using the Touchpad
The keyboard contains a cursor-pointing device called a touchpad. You
can point to, select, drag, and scroll objects on the screen using the built-in
touchpad.
Pointer
Touc hp ad
Left button
Action Description
Point Slide one finger on the touchpad to place the pointer on an item
or object.
Click Press the left button once.
Double-click Press the left button twice.
Right-click Press the right button once. In many applications, this action
displays a shortcut menu of context-sensitive choices.
Drag Slide one finger while pressing the left button.
Scroll Move your finger along the right edge of the touchpad to scroll
vertically. Move your finger along the bottom to scroll
horizontally. (The scroll function is available only with
applications that support a touchpad scroll feature.)
Right button
See Mouse Help for information on touchpad features, such as clicking both buttons
✍
simultaneously, adjusting touchpad speed, and Easy Launcher functions. To access Mouse
Help, click the Start button, select Settings, and then Control Panel. Click the Mouse icon in
the Control Panel and click the Help button.

"
VAIO® Notebook User Guide
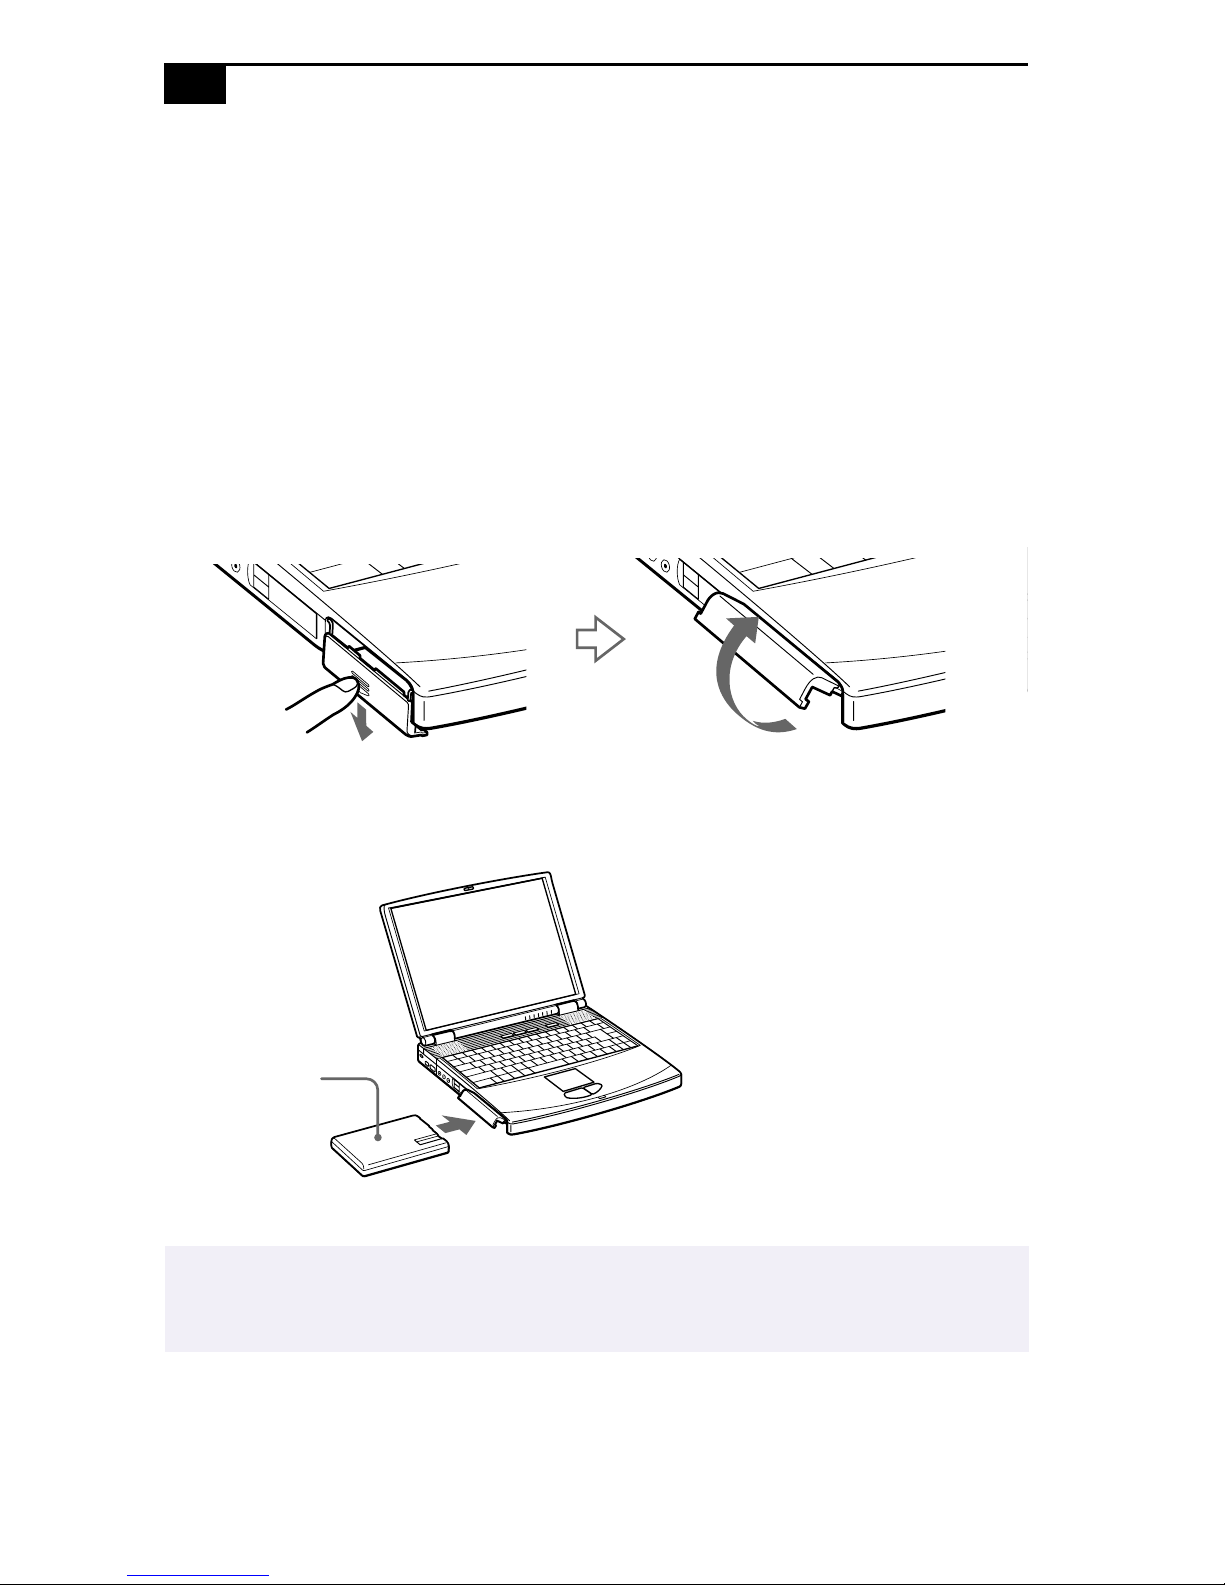
Using the Floppy Disk Drive
The computer comes with the floppy disk drive in the multipurpose bay.
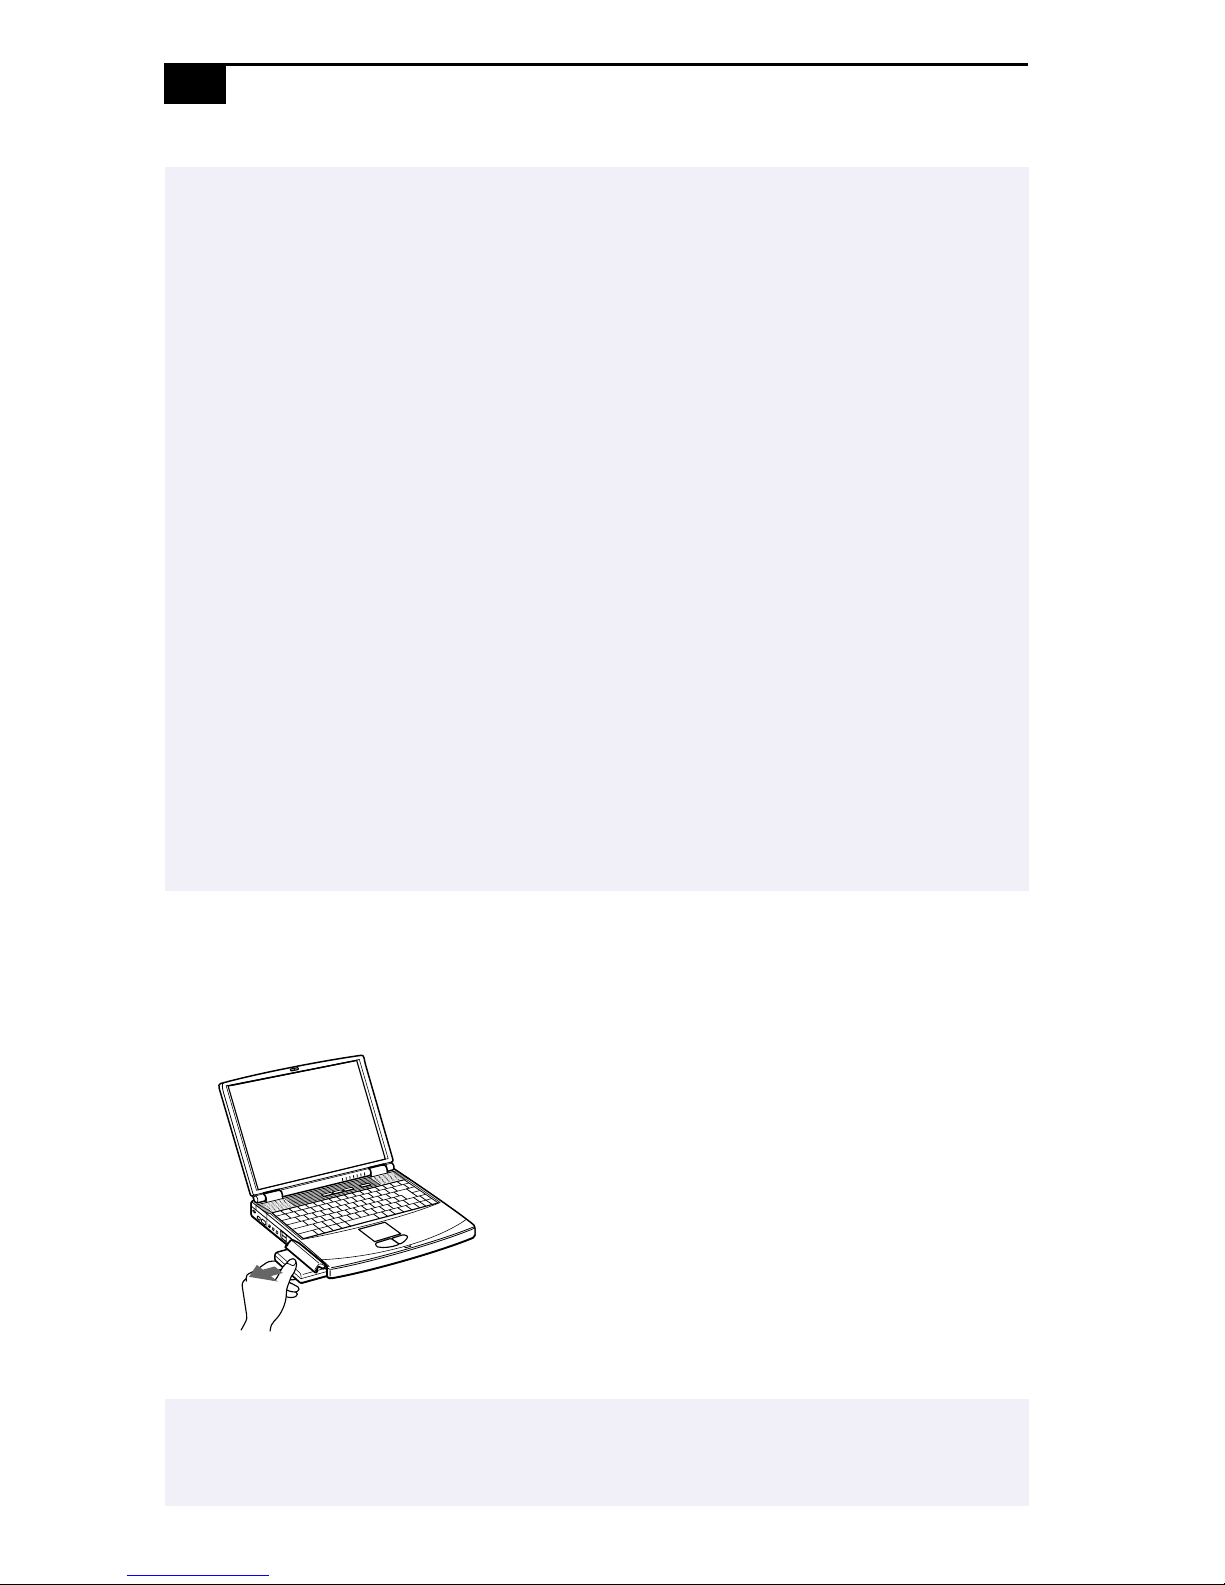
To insert a diskette
1
Hold the diskette with the label side facing up.
2
Gently push the diskette into the drive until it clicks into place.
Diskette
Floppy disk drive
To remove a diskette
❑
When you finish using the diskette, wait until the LED indicator light
turns off and then press the Eject button to remove the diskette.
✍
Do not press the Eject button when the LED indicator is turned on. Otherwise, data may be lost.
Eject button
LED indicator

Using the Floppy Disk Drive
To remove the floppy disk drive
1
Tur n off the co mpu ter.
2
There is a RELEASE lever on the bottom of the computer. Slide this
lever in the direction of the arrow.
Multipurpose RELEASE lever
3
Slide the drive out of the multipurpose bay.
4
Insert the weight saver. See “Using the Weight Saver” on page 41.
#
To reinsert the floppy disk drive
1
Tur n off the co mpu ter.
2
If another device is in the multipurpose bay, remove the device. See
“To remove the floppy disk drive” on page 25 or “To rem ove the
second battery pack” on page 40.
3
Insert the floppy disk drive into the multipurpose bay with the VAIO
label facing up. Continue pushing the drive into the bay until the
RELEASE lever locks into place.
Multipurpose bay
Floppy disk drive

$
VAIO® Notebook User Guide
Using the DVD-ROM/CD-ROM
Your computer comes with a either a CD-ROM or DVD-ROM drive. The
DVD-ROM drive plays both DVD-ROMs and CD-ROMs.
To insert a disc
1
Turn on the computer.
✍
When the computer is in System Suspend or System Hibernation mode, you cannot
insert a disc. See Controlling Power Management in the online document
®
Customizing Your VAIO
System Hibernation modes.
2
Press the Eject button to open the the CD-ROM or DVD-ROM drive.
The tray slides out.
Notebook
for more information on System Suspend and
Eject button
3
Place a DVD-ROM/CD-ROM in the tray with the label side facing
up. For DVD-ROMs which can be played on both sides, the side of
the disc facing up is the side that plays. Push the disc onto the hub
until the disc clicks into place.
Label side
facing up

Using the DVD-ROM/CD-ROM
4
Close the tray by pushing it gently.
✍
Be sure to seat the disc firmly over the hub fingers. If you do not seat the disc firmly, you could
damage your DVD-ROM/CD-ROM drive and you may not be able to open the tray.
When you finish using a disc, wait until the LED indicator light turns off, then press the Eject
button to remove the disc.
When the computer is in System Suspend or System Hibernation mode, you cannot remove a
disc. See Controlling Power Management in the online document
Notebook
If the disc does not come out when you press the Eject button, turn off the computer and
insert a thin, pointed object into the manual eject hole.
for more information about System Suspend and System Hibernation modes.
Customizing Your VAIO®
%
To play DVD-ROMs (PCG-F490/PCG-F480 only)
To achieve optimum performance when playing DVD-ROMs, you should
use the following recommendations: Your computer should not
be connected to the port replicator while playing DVD movies or using
DVD applications. Close any open applications before playing a DVD
movie.
✍
For PCG-F480 only. The DVD player automatically adjusts the screen properties when you play
a DVD movie. Depending on the display setup properties you have selected, you may need to
use the Fn + F command to expand the movie to full-screen size.
✍
When playing DVD movies on battery power, set the power management profile to DVD. With
other profiles, the movies are choppy. As an alternative, you can set the power management
profile to Automatic Profile Selection, which will cause the DVD profile to be selected
automatically whenever you insert a DVD. See Controlling Power Management in the
®
online document
management profile.
Customizing Your VAIO
Notebook
for information on how to set the power

&
Playing a DVD
❑
VAIO® Notebook User Guide
You can play DVDs using a DVD-ROM drive and the Media Bar
software. See the online manual that came with the Media Bar
software for details.
❑
For PCG-F420/PCG-F480 only. While playing a DVD, the display
mode is 1024 x 768 dots and the number of colors is set to 256. This
improves play performance.
Some discs recorded at 20 or 24 bits may produce noise while playing. If you
!
have audio devices connected, this may cause damage to your hearing and the
speakers. Reduce the volume before playing such discs.
You cannot switch between LCD and TV if you press Fn+F8 when a DVD is
!
inserted in the DVD-ROM drive.
If you have connected a TV, follow the instructions in “Selecting the
Display Mode” in the online document Customizing Your VAIO
®
Notebook.
For the PCG-F490, when a TV is connected, a part of the video screen will
not appear with the factory setting. Adjust the display resolution to 640 x
480 as described in the online document Customizing Your VAIO
®
Notebook.
To play DVDs in Normal Display Mode (For PCG-F420/PCG-F480)
To play DVDs in a display mode of 1024 x 768 (16 bits):
1
Click Stop in the DVD Player window. If you have maximized the
DVD player window, right-click the window to display the pop-up
menu. Choose “Show the control area on top” to display the DVD
player window forward.
2
Click Setting to display the DVD Settings window.

Using the DVD-ROM/CD-ROM
'
3
Remove the check from “Set to display 256 colors when playing back
a DVD.”
4
Click OK to confirm the setting.
To display wallpaper while playing a DVD (For PCG-F480 only)
1
Follow the instructions in “To play DVDs in Normal Display Mode
(For PCG-F420/PCG-F480)” on page 28, or
2
Follow step 1 and step 2 of “To play DVDs in Normal Display Mode
(For PCG-F420/PCG-F480)” on page 28, then remove the check from
the check box labeled “Do not show wallpaper when playing back
DVD.”

!
VAIO® Notebook User Guide
Using PC Cards
Your computer includes two PC card slots. PC cards allow you to connect
portable external devices such as another hard disk drive, or to connect a
network.
✍
The PC card slots can accommodate two Type I or two Type II PC cards, or one Type III PC
card. These slots are compatible with Card Bus.
Some PC cards may require that you disable idle devices when using the PC card. You can use
Sony Notebook Setup to disable devices. See Displaying the Sony Notebook Setup Screen
®
in the online document
Be sure to use the most recent software driver provided by the PC card manufacturer.
If an ! mark appears on the Device Manager tab in the System Properties dialog box,
remove the software driver and then reinstall it.
You may not be able to use some PC cards or some functions of the PC card with this
computer.
Customizing Your VAIO
Notebook
for details.
To insert a PC card
Use the lower slot for Type III PC cards.
✍
You do not need to shut down the computer before inserting or removing a PC card.
1
Pull the PC card release button out from the computer and push it in
toward the computer.

Using PC Cards
2
Remove the PC card slot protector.
When you use a Type III PC card, you need to remove both the top
and bottom PC card slot protectors.
!
3
Insert the PC card into the PC card slot, front label facing up. Gently
push the card into the slot until the card is fixed into the connector.
The release button comes out.
Insert with the
arrow facing forward
PC card
✍
Do not force a card into the slot as this may damage the connector pins. If you have difficulty
inserting a card, check that you are inserting the card with the correct orientation. See the
manual that came with your PC card for more information on use.
For some PC cards, if you alternate between normal power operation and the System Suspend
or System Hibernation power-management modes while the card is inserted, you may find
that a device connected to your system is not recognized. Reboot your system to correct the
problem.

!
To remove a PC card
1
2
3
4
5
VAIO® Notebook User Guide
Close any applications that are using the PC card.
Click the PC card icon in the taskbar and close the card window.
Pull the PC card release button up and press it in toward the
computer.
Gently grasp the card and pull it out.
Insert the PC card slot protector back into the empty slot.

Using Smart Connect
!!
Using Smart Connect
The preinstalled Smart Connect software allows you to use an i.LINK
cable (not supplied) to connect your VAIO notebook to another VAIO
computer that also has Smart Connect. You can then use one computer to
copy, delete, and edit files on the other computer. You can also print from
a printer attached to either computer.
When you use Smart Connect to connect two VAIO computers, you must assign each
✍
computer a unique name by which it can be identified when the two computers are
networked.
See the Smart Connect online help for more information.
i.LINK cable
i.LINK cables compatible with your VAIO notebook include cables with
the following part numbers: VMC-IL4415 (a 1.5-meter cable with a 4-pin
connector at each end), VMC-IL4615 (a 1.5 meter-cable with a 4-pin
connector at one end and a 6-pin connector at the other), and
VMC-IL4408A (a 0.8-meter cable with a 4-pin connector at each end).

!"
VAIO® Notebook User Guide
Using Infrared Communication Devices
Your computer includes an infrared port, located on the left side. You can
use this port to communicate with other infrared-equipped devices with
compatible protocols, such as a digital still camera or other computers.
To use infrared communication with another computer
Align the infrared ports on the two computers so that they are in a
direct line.

Using Infrared Communication Devices
Infrared communication capability can be turned on and off. By default, it is not enabled
✍
when your system is shipped. To enable infrared use, click the infrared icon in the Windows
Control Panel and select the Enable infrared communication check box on the Options tab.
You can disable infrared communication when you are not using it to conserve battery life.
Use the infrared icon in the Windows Control Panel to enable and disable infrared
communication. Do not use the icon in the taskbar.
Check the Status tag of the Infrared Monitor in the Windows Control Panel to determine if the
infrared device is detected.
If the two devices are too far apart or too close together, data transfer may be interrupted or
there may be noise in the transmission.
Do not cover the infrared ports with your hand or any other object.
Avoid direct sunlight, fluorescent light, or flashing incandescent light near the infrared ports.
The active area of infrared transmission extends about 39 3/8 inches (1 meter) with a radius of
approximately 15 degrees.
!#
h
c
n
i
/
3
8
9
3
approximately
15 degrees
)
m
1
(
s
e
Infrared port

!$
VAIO® Notebook User Guide
Using Power Saving Modes
When you use a battery as the source of power for your computer, you
can take advantage of power management settings to conserve battery
life. In addition to the normal operating mode, which allows you to turn
off specific devices, your computer has three distinct power saving
modes: System Idle, System Suspend, and System Hibernation. When
using battery power, you should be aware that the computer
automatically enters System Hibernation mode when the remaining
battery charge drops below 5 percent, regardless of the power
management setting you select.
If the battery level falls below 10 percent, you should either attach the AC adapter to
✍
recharge the battery or shut down your computer and insert a fully charged battery.
Normal Mode
This is the normal state of your computer when it is in use. The green
power indicator light is on in this mode. To save power, you can turn off a
specific device such as the LCD or the hard disk.
System Idle Mode
This mode is convenient if you do not need to use your computer for a
brief period. The hard disk and video display enter a low power state,
and the CPU clock and processor stop. The power indicator light is tan in
this mode.
To activate System Idle mode
Press Fn+S, or use the PowerPanel utility.
To return to normal mode
Press any key.

Using Power Saving Modes
!%
System Suspend Mode
The computer saves the current state of the system in RAM and switches
off power to the CPU. The tan power indicator light flashes in this mode.
To activate System Suspend mode
Press Fn+Esc, or press the power button and release it immediately. You
can also use the PowerPanel utility to enter System Suspend mode.
To return to normal mode
Press any key.
System Hibernation Mode
The state of the system is saved on the hard drive and power is turned off.
The power indicator light is off in this mode.
To activate System Hibernation mode
Press Fn+F12. The “Save to Disk Manager” screen appears, and then the
computer enters System Hibernation mode. You can also use the
PowerPanel utility to enter System Hibernation mode.
To return to normal mode
Turn on the computer by pressing the power button. The computer
returns to its previous state.
When returning from System Hibernation mode, the system status stored on the hard disk is
✍
erased and the computer starts normally if you press the power button and hold for more
than four seconds.
❑
Time to return to normal mode
System Idle requires less time than System Suspend, and System
Suspend requires less time than System Hibernation.
❑
Power consumption
System Idle uses more power than System Suspend, and System
Suspend uses more power than System Hibernation.

!&
VAIO® Notebook User Guide
Using a Second Battery Pack
You can purchase a second rechargeable battery pack. With two battery
packs, you can extend the time that you use your computer with battery
power. When using two battery packs, the battery pack you insert first
charges first. The battery pack you insert second charges when the first
battery pack is 85 percent full. You can monitor which battery pack is
charging by observing the battery indicator lights.
To insert a second battery pack
1
If another device is in the multipurpose bay, remove the device. See
“To remove the floppy disk drive” on page 25.
2
Insert the battery pack into the multipurpose bay.
If the battery is being used, the battery 2 indicator light turns on.
Multipurpose bay
Battery pack
Label side facing down
3
Attach the weight saver to the computer to stabilize the battery pack.
There is a RELEASE lever on the bottom of the weight saver. Slide the
lever toward the front of the computer to lock the weight saver. See
also “Using the Weight Saver” on page 41.
Battery pack
Weight saver

Using a Second Battery Pack
!'
To charge the second battery pack
Keep the battery pack in the computer while it is connected to AC power.
The battery indicator flashes while the battery is charging. See also “To
charge the battery pack” on page 11 for more information.
Battery indicators
Second battery pack
(not supplied)
Battery pack (supplied)
To determine the amount of time the battery lasts, see Displaying Battery Information in
✍
the online document Customizing Your VAIO® Notebook.

"
To remove the second battery pack
VAIO® Notebook User Guide
If you attach two battery packs, you can remove either of them without
shutting down the computer. When removing one battery pack, make
sure that the other battery pack’s indicator light is on. If the indicator light
of the battery pack you are removing is on, right-click the battery icon on
the task tray and click the “Switch discharge battery” option.
1
There is a Release lever on the bottom of the weight saver. To remove
the battery pack, slide this lever in the direction of arrow 1, then slide
the RELEASE lever on the bottom of the computer in the direction of
arrow 2.
Arrow 1: Weight saver Release lever
Arrow 2: RELEASE lever
2
Remove the weight saver, and then pull out the battery pack.
3
Reinsert the weight saver. See “Using the Weight Saver” on page 41.

Using the Weight Saver
Using the Weight Saver
The weight saver protects the multipurpose bay when it is empty.
To attach the weight saver
1
If another device is in the multipurpose bay, remove the device. See
“To remove the floppy disk drive” on page 25 or “To rem ove the
second battery pack” on page 40.
2
Fold out the hinged arm of the weight saver and then push on the
hinged arm to lock it into place. Slide the weight saver in the
direction of the arrow until it clicks.
"
3
Manually lock the weight saver’s Release lever.
Weight saver (supplied)

To remove the Weight Saver
1
There is a release lever on the bottom of the weight saver. To remove
the weight saver, slide this lever in the direction of arrow 1, then slide
the Release lever on the bottom of the computer in the direction of
arrow 2.
Arrow 1: Weight saver Release lever
Arrow 2: Release lever
2
After removing the weight saver, pull out the weight saver’s hinged
arm and fold it into the weight saver.
"

Connecting Peripheral Devices
You can add functionality to your computer by connecting any of these
peripherals:
❑
Phone line (page 44)
❑
Port replicator (page 45)
❑
Printer (page 49)
❑
External display (page 50)
❑
External mouse or keyboard (page 53)
❑
External speakers (page 54)
❑
External microphone (page 55)
❑
Digital video camera recorder (page 56)
❑
Universal Serial Bus (USB) device (page 57)
Before you connect peripherals, turn off the computer and all peripherals.
✍
You do not need to turn off your computer to connect USB devices.
Connect the power cord only after connecting all cables.
Turn on the computer only after turning on all peripherals.
"!

""
VAIO® Notebook User Guide
Connecting a Phone Line
You need to connect a phone line to take advantage of online services and
the Internet.
✍
In order to register your Sony VAIO notebook, register your software online, and use Sony
Customer Support, you must connect to a phone line. You must register your computer to
receive the extended warranty.
1
Plug one end of the phone cable into the phone line jack on the
computer.
Phone line jack
Wall jack
Phone cable (not supplied)
2
Plug the other end into the wall jack.
✍
Your computer does not work with party lines, cannot be connected to a coin-operated
telephone, and may not work with multiple phone lines or a private branch exchange (PBX).
Some of these connections may result in excess electrical current and could cause a
malfunction in the internal modem.

Connecting the Port Replicator
52637
Connecting the Port Replicator
Your notebook supports the use of an optional port replicator
(PCGA-PRF1A). Attaching a port replicator enables you to connect
additional peripherals to your computer.
"#
1
4
✍
Network (Ethernet)
Monitor (page 50) Printer (page 49)
Serial
/ Mouse/Keyboard (page 53)
The port replicator can be powered only with an AC power adapter. Do not remove the AC
USB (page 57)
DC In (page 9)
adapter from the port replicator or the AC outlet while using the port replicator; this may
cause data damage or hardware malfunctions.
When you attach your computer to the port replicator for the first time, the installation of the
network driver starts automatically.

"$
To attach your computer to the port replicator
VAIO® Notebook User Guide
To supply power to your computer while it is connected to the port
replicator, you can connect the AC adapter directly to the port replicator.
✍
When attaching your computer to the port replicator, do not attempt to insert or remove the
battery pack. Lifting and turning the computer with an attached port replicator could cause a
temporary loss of power.
1
Turn off your computer and disconnect all peripherals.
2
On the bottom of the computer, slide the port replicator connector
cover open.
Port replicator connector
3
Attach the bottom of the computer to the port replicator connector
until it clicks.
Notebook
Port replicator

Connecting the Port Replicator
"%
4
Plug the cable attached to the AC adapter into the
DC IN
connector on
the port replicator. Plug the power cord into the AC adapter and an
AC outlet.
AC adapter
✍
Use the AC adapter that comes with your computer or the optional Sony PCGA-ACX1
adapter.
Power cord
The power indicator light turns green.
5
Tur n on th e comp ute r.
Release lever
Power
Port replicator connector

"&
To remove your computer from the port replicator when the power is off
1
2
VAIO® Notebook User Guide
Turn off your computer and the connected peripherals.
Pull the levers on each side of the port replicator to disengage the
computer from the port replicator.
Lever
3
Lift the computer away from the port replicator.
4
Close the port replicator connector cover on the bottom of your
computer.
.
✍
It is extremely important to close the port replicator connector cover after removing your
computer from the port replicator. If the cover is left open, dirt may get inside and damage
the computer.

Connecting a Printer
"'
Connecting a Printer
You can connect a Windows 98-compatible printer to your computer to
print documents.
To connect a printer
❑
Use the symbol to locate the Printer connector. Plug the printer
cable (supplied with the printer) into this port on the computer.
Power cord
Printer
to
Printer
See the manual that came with your printer for more information on installation and use.
✍
Printer cable
(supplied with the printer)
If your printer stops functioning after resuming from a power-saving mode, see I cannot
print on page 66.
Before using the printer, you may need to change the Printer setting in the Sony Notebook
Setup software. See Displaying the Sony Notebook Setup Screen in the online document
®
Customizing Your VAIO
Notebook.

#
VAIO® Notebook User Guide
Connecting an External Display
You can connect an external display to your notebook. For example, you
can use the computer with any of the following:
❑
Computer display (monitor) (page 50)
❑
Multimedia computer display (page 51)
❑
Projector (page 51)
To connect a computer display
❑
Use the symbol on the back of the computer to locate the Monitor
connector. Plug the display cable (not supplied) into this connector on
the back of the computer.
❑
If necessary, plug one end of the display power cord into the display,
and the other end into an AC outlet.
Computer display
Power cord
to
Monitor
See the manual that came with your computer display for more information on installation
✍
and use.
Display cable (not supplied)

Connecting an External Display
To connect a multimedia computer display
You can connect the notebook to a multimedia computer display that
includes built-in speakers and a microphone.
1
Use the symbol to locate the Monitor connector. Plug the display
cable into this connector.
2
Use the symbol to locate the Headphone connector. Plug the
speaker cable into this connector.
3
Use the symbol to locate the Microphone connector. Plug the
microphone cable into this connector.
✍
See the manual that came with your multimedia computer display for more information on
installation and use.
To connect a projector
You can use a projector, such as the Sony LCD Projector, as an external
display.
#
Projector
to
to
Monitor
RGB signal cable
✍
See the manual that came with your projector for more information on installation and use.
Audio cable (not supplied)
Power cord

#
VAIO® Notebook User Guide
To select a display
When you connect an external display to the monitor connector, you can
toggle the output between the Liquid Crystal Display (LCD), the external
monitor, or both devices.
Use the
Fn+F7
keys to select a display. See also “Selecting the Display
Mode” in the online document Customizing Your VAIO
information.
To Press Result
Switch to an
external
display
Fn+F7 Toggles between the LCD, the external display
connected to the Monitor connector, or both
the LCD and external display.
Only LCD
LCD and external display
Only external display
®
Notebook for more

Connecting an External Mouse or Keyboard
Connecting an External Mouse or Keyboard
You can connect a PS/2® -style mouse or keyboard.
Plug the keyboard cable or mouse cable into this connector with
the mark facing up.
Mouse
or Keyboard
#!
To connect both a mouse and keyboard at the same time, use the optional
PS/2 division connector.
See Using the Keyboard on page 16 for more information on using the keyboard.
✍
See the manual that came with your mouse or keyboard for more information on installation
and use.
Before you connect or disconnect the mouse or keyboard, turn off the computer.
Do not connect or disconnect the PS/2 device (keyboard or mouse) when the computer is on.
It may cause malfunction.
The Sony USB mouse PCGA-UMS1 (not supplied) is a USB device. So you must connect it to
the USB connector.

#"
VAIO® Notebook User Guide
Connecting External Speakers
You can enhance the sound quality of your computer by connecting
external speakers.
Make sure your speakers are designed for computer use.
✍
Turn down the volume of the speakers before you turn them on.
Do not place diskettes on the speakers; the speakers magnetic field may damage the data on
the diskettes.
To connect external speakers
❑
Use the symbol to locate the Headphone connector. Plug the
speaker cable into this connector.
Speakers
Speaker cable
to
Headphone
See the manual that came with your speakers for more information on installation and use.
✍
(supplied with speakers)

Connecting an External Microphone
Connecting an External Microphone
You can enhance the quality of sound input by using an external
microphone.
Make sure your microphone is designed for computer use. The microphone should be
✍
compliant with the plug-in power microphone.
To connect an external microphone
❑
Use the to locate the Microphone connector. Plug the microphone
cable into this connector.
Microphone
##
to
Microphone
See the manual that came with your microphone for more information on installation and
✍
use.

#$
VAIO® Notebook User Guide
Connecting a Digital Video Camera Recorder
You can connect an i.LINK-enabled digital video camera recorder to
the S400 i.LINK
To connect a digital video camera recorder
❑
Plug one end of the i.LINK cable (not supplied) into the i.LINK
connector on the left side of the computer and the other end into the
DV In/Out connector on the digital video camera recorder.
Digital video
camera recorder
®
(IEEE-1394) connector.
to i.LINK
to DV In/Out
i.LINK cable
(not supplied)
The Sony digital video camera recorder is pictured; you may need to connect your camera
✍
differently.
On Sony digital video cameras, connectors labeled DV In/Out or i.LINK are i.LINKcompatible.
See the manual that came with your digital video camera recorder for more information on
installation and use.
Do not connect more than one digital video camera at a time. The software supplied with your
computer will not recognize multiple cameras.
The i.LINK connector on the computer does not supply power to external devices. If the
external device requires power from the i.LINK connector, you cannot use the device with the
computer.
The computer supports transfer rates up to 400 Mbps; however, the actual transfer rate is the
lowest transfer rate of the external device.
The i.LINK features available may vary depending on the software applications you use. See
the documentation that came with your software for more information.

Connecting a Universal Serial Bus (USB) Device
Connecting a Universal Serial Bus (USB) Device
You can connect a USB device to your computer.
To connect a USB device
❑
Use the symbol to locate the USB connector. Plug one end of the
USB cable into this port and the other end into the USB device.
USB device
#%
to
USB
USB connecting cable
(not supplied)
You can use the optional Sony USB mouse PCGA-UMS1 with this
computer. The USB mouse software driver is preinstalled in the
computer. Therefore, you only need to plug the USB mouse into the USB
connector.
See the manual that came with your USB device for more information on installation and use.
✍

#&

Troubleshooting
This section describes how to solve common problems you may
encounter when using your computer. Many problems have simple
solutions, so try these suggestions before you call Sony Customer
Support.
When you reconnect devices be sure to turn off the computer as described in Shutting Down
✍
Your Computer on page 14. Turning off the computer using other methods may result in
data loss.
My computer does not start
❑
Check that the computer is plugged into a power source and that it is
turned on. Check that the power indicator on the front panel of the
computer indicates that the power is on.
❑
Check that the battery packs are inserted properly and that they are
charged.
❑
Make sure there is no diskette in the floppy disk drive.
❑
Confirm that the power cord and all cables are connected firmly, as
described in “Connecting Peripheral Devices” on page 43.
❑
If you plugged the computer into a power strip or UPS, make sure the
power strip or UPS is turned on and working.
❑
If you are using an external display, check that it is plugged into a
power source and turned on. Check that the brightness and contrast
controls are adjusted correctly. See the manual that came with your
display for details.
❑
Moisture condensation may have occurred. Do not use the computer
for at least one hour and then turn on the computer.
#'

$
❑
VAIO® Notebook User Guide
When the internal backup battery is low on power, it may not be able
to start your system properly. The message “Press <F1> to resume,
<F2> to setup” would appear at the bottom of the display. Should this
happen:
1
Press F2. The BIOS Setup menu appears.
2
Set the date (month/day/year). Press Enter to move to the next
item. To enter 01/31/2000, for example, type 1, press Enter, type
31, press Enter, type 2000, then press Enter.
3
Press Ð to select System Time, then set the time (hour: minute:
second). Press Enter to move to the next item.
Î
4
Press
The message “Load default configuration now?” appears.
5
Check that Yes is selected, and press the Enter key. If No is
selected, press
to select Exit, then press Ð to select Get Default Values.
Í
to select Yes.
6
Select Exit (Save Changes), then press the Enter key. The message
“Save Configuration changes and exit now?” appears.
7
Check that Yes is selected, then press the Enter key. The computer
restarts.
When I turn on my computer, the message Operating system not found
appears and Windows does not start
❑
Check the floppy disk drive to see if a non-bootable diskette is in the
drive.
❑
If a non-bootable diskette is in the drive, turn off the computer,
remove the diskette, and then turn on the computer again. Confirm
that Windows starts properly. If Windows still does not start, follow
the procedure below to initialize the BIOS.
❑
If the floppy disk drive is empty, follow the steps below to initialize
the BIOS:
1
Remove any peripheral devices connected to the computer.
2
Turn the computer off and then turn it on again.
3
Turn on the computer and press the F2 key when the Sony logo
appears. The BIOS setup menu screen appears.
4
Press the arrow keys to select the Exit menu.

Troubleshooting
5
Press the arrow keys to select Get Default Values and then press
the Enter key. The message “Load default configuration now?”
appears.
6
Check that Yes is selected, then press the Enter key.
7
Press the arrow keys to select Exit (Save Changes) and then press
the Enter key. The message “Save configuration changes and exit
now?” appears.
8
Check that Yes is selected, then press the Enter key. The computer
restarts.
If your computer still displays the message “Operating system not
found” and Windows does not start, contact Sony Customer Support.
My LCD does not display anything
❑
Check that the computer is plugged into a power source and that it is
turned on. Check that the power indicator on the front panel of the
computer is on.
$
❑
Check that the battery packs are inserted properly and that they are
charged.
❑
The computer may be in LCD (Video) Standby mode. Press any key
to activate the display.
The screen image on my external display is not centered or sized properly
Use the controls on your external display to adjust the image. See the
manual supplied with your display for more information.
My computer locks up
❑
Try restarting the computer. On the Windows taskbar, click the Start
button, click Shut Down, and then click Restart the computer.
❑
If you cannot restart as described in the preceding step, you can
restart the computer by pressing Ctrl+Alt+Delete.
❑
If the previous step does not work, press the power button and hold it
for at least four seconds. This turns off the power.
❑
If your computer locks up while playing a DVD-ROM/CD-ROM,
stop the DVD-ROM/CD-ROM, and restart the computer by pressing
Ctrl+Alt+Delete.
✍
Pressing Ctrl+Alt+Delete may result in data loss in files that are currently open.

$
My software program locks up or crashes
VAIO® Notebook User Guide
Contact the software publisher or designated provider for technical
support. See either the printed or the online version of Read Me First for a
complete list of phone numbers.
My DVD-ROM drive tray does not open
❑
Make sure the computer is turned on.
❑
Press the Eject button on the DVD-ROM drive.
❑
If the Eject button does not work, you can open the tray by inserting a
sharp, pointed object into the hole to the right of the Eject button.
I cannot play a CD-ROM
❑
Make sure the label of the CD-ROM is facing up.
❑
If the CD-ROM requires software, make sure the software is installed
according to the program’s instructions.
❑
Moisture condensation may have occurred. Leave the computer for at
least 1 hour while the computer is turned on.
❑
Clean the CD-ROM.
❑
Check the speaker volume.
I cannot play a DVD-ROM
❑
If a region code warning appears when you are using the DVD
player, it could be that the DVD-ROM you are trying to play is
incompatible with the DVD-ROM drive in your notebook. The region
code is listed on the disc’s packaging.
❑
If you hear audio but cannot see video, your computer’s video
resolution may be set too high. For best results, change the Windows
Control Panel/Display/Settings to 800 x 600 using 256 colors.
❑
If you see video but cannot hear audio, check all of the following:
Make sure your DVD player’s mute setting is off. Check the master
volume setting in the audio Mixer. If you have connected speakers
externally, check the volume settings in your computer speakers and
check the connections between your speakers and the computer.
Check the Windows Control Panel/System/Device Manager to see
that the drivers are installed properly.
❑
A dirty or damaged disc may cause the computer to “hang” while it
tries to read the disc. If necessary, reboot the computer, remove the
disc, and then check that it is not dirty or damaged.

Troubleshooting
➜
When I click an application icon a message appears, such as You must insert
the application CD into your CD-ROM drive, and the software does not start
❑
Some titles require specific files that are located on the application’s
$!
CD-ROM. Insert the disc and try starting the program again.
❑
Make sure you place the disc in the tray with the label side facing up.
My floppy disk drive cannot write to a diskette
❑
If the diskette is write-protected, disable the write-protect feature or
use a diskette that is not write-protected.
❑
Check that the diskette is properly inserted into the floppy disk drive.
My speakers have no sound
❑
If the built-in speakers are turned off, press Fn+F3 to turn on the
speakers.
❑
If the speaker volume is turned to the minimum, press Fn+F4, and
then press
➜
to increase the volume.
or
❑
If your computer is powered by batteries, check that the battery packs
are inserted properly and that they are charged.
❑
If you are using an application that has its own volume control, check
that the volume is turned up.
❑
Check the volume controls in Windows 98.
❑
If you connect external speakers, check that the speakers are properly
connected and the volume is turned up. If the speakers have a mute
button, make sure it is off. If the speakers are powered by batteries,
check that the batteries are inserted properly and that they are
charged.
❑
If you have connected an audio cable to the Headphone connector,
disconnect the cable.
My modem does not work
❑
Check that the phone line is plugged into the line jack. See
“Connecting a Phone Line” on page 44 for details.
❑
Check that the phone line is working. You can check the line by
plugging in an ordinary phone and listening for a dial tone.
❑
Check that the phone number the program is dialing is correct.
❑
Check that the software you are using is compatible with the
notebook modem. (All preinstalled programs are compatible.) Call
the software publisher or Sony Customer Support.

$"
My modem connection is slow
VAIO® Notebook User Guide
The computer’s modem uses V.90 technology. Many factors influence
modem connection speed, including telephone line noise or compatibility
with telephone equipment (such as fax machines or other modems). If
you think your modem is not connecting properly to other PC-based
modems, fax machines, or your Internet Service Provider, check the
following:
❑
Have your phone company check that your phone line is free from
any line noise.
❑
If your problem is fax-related, check that there are no problems with
the fax machine you are calling and that it is compatible with fax
modems.
❑
If you are having a problem connecting with your Internet Service
Provider (ISP), check that the ISP is not experiencing technical
problems.
❑
If you have a second phone line available, try connecting the modem
to that line.
My microphone does not work
If you are using an external microphone, check that the microphone is
plugged into the Microphone connector. See “Connecting an External
Microphone” on page 55 for details.
My mouse does not work
❑
If you are using an external mouse, check that the mouse is plugged
into the mouse connector. See “Connecting an External Mouse or
Keyboard” on page 53 for details.
❑
If you connected an external mouse while your computer is on, you
must restart your computer.
❑
If you are using an optional Sony USB mouse PCGA-UMS1, check
that the mouse is plugged into the USB connector.
My touchpad does not work
You may have disabled the touchpad while no mouse was connected to
the computer. If so, you must restart the computer to make the touchpad
work again.

Troubleshooting
I cannot use DV devices. The message DV equipment seems to be
disconnected or turned off appears.
❑
Check that the DV device is turned on and that the cables are
$#
properly connected.
❑
If you are using multiple i.LINK® devices, the combination of the
connected devices may cause unstable operation. In this case, turn off
the power to all connected devices and disconnect unused devices.
Check the connection, then turn on the power again.
My touchpad interprets a single tap as a double-click
Click the Mouse icon in the Control Panel and then change the button
assignments in the Mouse Properties dialog box. One of the buttons is
assigned to the double-click action.
My computer does not shut down
It is best to shut down your computer using the Shut Down command on
the Windows Start menu. Using other methods, including those listed
here, may result in loss of unsaved data. If the Shut Down command does
not work properly, follow these steps:
❑
Restart the computer by pressing Ctrl+Alt+Delete. If this does not
work, press the power button and hold it for at least four seconds to
turn off the power.
❑
Unplug the computer from the AC adapter and remove the battery
pack from your computer.
My PC card is not working
❑
Make sure the PC card is compatible with Windows.
❑
Use the Sony Notebook Setup utility to disable devices you are not
currently using.
The sound of my computers fan is too loud
Use the PowerPanel utility to change the Thermal Control Strategy
setting to Quiet. This setting slows down the CPU fan speed. See the
PowerPanel Help for more information.

$$
I cannot print
❑
❑
VAIO® Notebook User Guide
The default setting for the printer port mode is correct for most
printers. If you cannot print, try changing the printer port mode. In
Sony Notebook Setup, select the Printer tab. If the printer port mode
is set to ECP, change it to bidirectional. If the printer port mode is set
to bidirectional, change it to ECP. See “Displaying the Sony Notebook
Setup Screen” in the online document Customizing Your VAIO
Notebook for details on using Sony Notebook Setup.
Your connected printer may not function after the computer resumes
from a power-saving mode. When this occurs, follow the procedures
below to reset the printer connection:
1
Right-click the My Computer icon on the desktop, and then select
Properties.
2
Click the Device Manager tab.
®
3
Select Refresh, and then click OK. The printer should now
function properly.
Power Management
The operating system may become unstable if a lower power state such as
system hibernation is initiated and then changed before the operating
system completely enters the lower power state. To restore the computer
to its normal operating stability, close all open applications, press the
power button, and hold it for four seconds or more to completely shut
down the computer.

Using the System and Application Recovery CDs
$%
Using the System and Application Recovery CDs
The following sections describe how to use the System Recovery and
Application Recovery utilities.
Using the System Recovery CD(s)
You can reinstall software titles that shipped with your computer if they
are corrupted or accidentally erased. You may not need to recover the
entire contents of your hard drive. If you experience a problem with your
computer, reinstalling an individual device driver or software title may
correct the problem. Use the Application Recovery CD(s) to reinstall
individual applications or device drivers. See “Using the Application
Recovery CD(s)” on page 69.
The System Recovery CD contains a backup copy of all the software
originally installed on your hard disk drive. It can be used only to
recover the hard disk of the notebook you purchased.
The System Recovery utility gives you three options:
❑
Full Restore without Format restores all the software titles that
originally came with your computer without formatting the hard
disk. Word 2000 must be restored from the enclosed CD-ROM.
❑
Full Restore with Format formats the hard disk drive and then
restores all the original software. If your hard drive is partitioned into
C and D drives, the computer offers you the option to reformat the
drive into a single partition. Word 2000 must be restored from the
enclosed CD-ROM.
❑
Operating System Only restores the Windows
®
operating system,
the notebook utility programs, and the device drivers that shipped
with your computer.
If you choose the Full Restore with Format or Operating System Only option,
!
your hard disk will be formatted, which removes all the information on the hard
disk drive. You will lose any software you have installed and any other files you
have created since you started to use your computer. This means you will have to
reinstall any applications that were not included with the computer when you
purchased it. If you choose the Full Restore without Format option, you may
need to reinstall applications that were not included with the computer when
you purchased it. If you have any questions on using the System Recovery CD,
contact Sony Customer Support.

$&
To use the System Recovery CD(s)
1
✍
2
3
4
5
VAIO® Notebook User Guide
Insert the Sony System Recovery CD in the CD-ROM/DVD-ROM
drive.
The System recovery utility boots from the DVD-ROM drive. It must be in the DVD-ROM drive
when you turn on the computer.
Shut down your computer as described in “Shutting Down Your
Computer” on page 14.
Wait four seconds and turn on your computer.
Click OK to signify you have read and accept the Microsoft End-User
License Agreement.
When the System Recovery menu appears, follow the on-screen
instructions to complete the recovery process.
✍
Your system may include one or two System Recovery CDs. If you have two System Recovery
CDs, insert the first CD to run the System Recovery program. You are prompted to insert the
second CD once the information from the first CD has been installed.
The recovery process takes 30 to 60 minutes to complete.
If your computer does not start from the Recovery CD
1
Press the power button and hold it for more than four seconds to turn
off the computer.
2
Turn on the computer. When the Sony logo is displayed, press the F2
key. The BIOS setup menu screen appears.
3
Press the arrow keys to select the Exit menu.
4
Press the arrow keys to select Get Default Values and then press the
Enter key. The message “Load default configuration now?” appears.
5
Check that Yes is selected, then press the Enter key.
6
Press the arrow keys to select Exit (Save Changes) and then press the
Enter key. The message “Save configuration changes and exit now?”
appears.
7
Check that Yes is selected, then press the Enter key. The computer
restarts from the Recovery CD.

Using the System and Application Recovery CDs
$'
Using the Application Recovery CD(s)
The Application Recovery CD(s) allows you to reinstall individual
applications and device drivers if they are corrupted or accidentally
erased. Reinstalling an individual device driver or software title may
correct a problem you are experiencing with your computer, and you may
not need to recover the entire contents of your hard drive. If you do need
to reinstall all the software titles that shipped with your computer, use the
System Recovery CD(s). See “Using the System Recovery CD(s)” on
page 67.
You can also use the Application Recovery CD to install Windows NT
Workstation 4.0 drivers on your computer.
✍
You must be in Windows to run the Application Recovery CD. The application will not run from
DOS. If you have any questions on using the Application Recovery CD, contact Sony Customer
Support.
To use the Application Recovery CD(s)
1
Turn on your computer. If your computer is already on, close all
applications.
2
When the Windows desktop appears, insert the Sony Application
Recovery CD in the DVD-ROM drive. The Application Recovery
utility loads automatically.
3
When the Application Recovery menu appears, select the icon for the
application you want to restore and then follow the on-screen
instructions to complete the recovery process.
®
✍
Your system may include one or two Application Recovery CDs. If you have two Application
Recovery CDs, insert the first CD to run the Application Recovery program. You may be
prompted to insert the second CD, depending on the application you wish to restore.

%

Adding Memory
In the future you may want to install memory modules to expand the
functionality of your computer. You can increase memory up to 256 MB
(128 MB x 2), by installing optional memory modules. For PCG-F490, 128
MB of memory are already installed (128 MB x 1). For PCG-F480 and
PCG-F420, 64 MB of memory are already installed (64 MB x 1). You can
add an expansion memory module in a slot. 64 MB and 128 MB
expansion memory modules are available as optional memory modules.
For memory upgrades, use only PC-100 SDRAM SO-DIMM (gold lead
contacts). Sony computer supplies, accessories, and peripherals can be
purchased from your Sony-authorized dealer or by contacting Sony at
http://www.sony.com/accessories.
The size of your memory may differ if you purchased a specially configured system.
✍
!
Make sure you observe the proper safety precautions when you install memory
modules in your computer. See the bulleted list below. Be careful when adding
memory. Mistakes when installing or removing a memory module may cause a
malfunction.
❑
The procedures described below assume familiarity with the general
terminology associated with personal computers and with the safety
practices and regulatory compliance required for using and
modifying electronic equipment.
❑
Disconnect the system from its power source and from any
telecommunications links, networks, or modems before you open the
system or follow any of the procedures described below. Failure to do
so may result in personal injury or equipment damage.
%

%
❑
VAIO® Notebook User Guide
Electrostatic discharge (ESD) can damage memory modules and
other components. Perform the procedures described below only at
an ESD workstation. If such a station is not available, do not work in
a carpeted area, and do not handle materials that produce or hold
static electricity (cellophane wrappers, for example). Ground yourself
by maintaining contact with an unpainted metal portion of the
chassis while performing the procedure.
❑
Do not open the memory module package until you are ready to
install the module. The package protects the module from ESD.
❑
Use the special bag for preventing ESD or use aluminum foil when
you store the memory module.
PCG-F480/PCG-F420
Typical expansion memory configuration
Total System Memory
(MB)
Slot 1 (MB) Slot 2 (MB)
128 64 64
192 64 128
256 128 128
PCG-F490
Typical expansion memory configuration
Total System Memory
(MB)
192 128 64
256 128 128
To remove a memory module
1
Shut down your computer and disconnect all peripheral devices,
Slot 1 (MB) Slot 2 (MB)
such as your printer.
2
Unplug the computer and remove the battery packs.

Adding Memory
3
Wait until the computer cools down. Then unscrew the screw at the
bottom of your computer. Loosen the screw with an appropriate
screwdriver.
screw
4
Touch a metal object (such as the connector panel on the back of your
computer) to discharge static electricity.
5
Remove the memory module.
%!
2 Pull the memory module in
the direction of the arrow.
6
Tighten the screw on the bottom of the computer.
✍
Your computer comes with a memory module installed in the memory slot. To upgrade your
memory you will need to remove this module from the slot before installing your upgrade
memory.
To install a memory module
1
Follow steps 1 to 4 of “To remove a memory module.”
2
Remove the memory module from its packaging.
1 Pull the tabs in the direction of the arrows.
The memory module is released.

%"
3
VAIO® Notebook User Guide
Install the memory module.
1 Slide the memory module into the slot. 2 Press the module into place until it clicks.
4
Tighten the screw on the bottom of the computer.
To view the amount of memory
1
Turn on the computer.
2
Click the Start button, point to VAIO, and click “Sony Notebook
Setup.”
The Sony Notebook Setup screen appears.
3
Click the “About This Computer” tab to view the amount of system
memory. If the additional memory is not shown, repeat steps 1-4 in
“To install a memory module.”

Specifications
Specifications
Model PCG-F420 PCG-F480 PCG-F490
Processor
Hard Disk Drive
450 MHz* Pentium
III
6.0 GB
®
600 MHz* Pentium®
III with Speed
Step™ Tech nolo gy
†
12.0 GB
†
650 MHz* Pentium®
III with Speed
Step™ Techn olo gy
18.1 GB
%#
†
Standard RAM
LCD Screen
L2 Cache Memory
MPEG
Graphics
Sound Capabilities
Diskette Drive
CD-ROM Drive
DVD-ROM Drive
Laser Diode
Properties
Modem
64 MB SDRAM,
expandable to
256 MB
64 MB SDRAM,
expandable to
256 MB
128 MB SDRAM,
expandable to
256 MB
13.0” SVGA HPA 15.0” XGA TFT 15.0” XGA TFT
256 KB (on die) 256 KB (on die) 256 KB (on die)
MPEG1 MPEG1 and MPEG2 Digital Video; supports
full-screen playback
128-bit accelerator with 2.5 MB Video RAM 6MB video,
supports 3D
graphics
16-bit CD-quality stereo sound
Removable 3.5” 1.44 MB
Reads CD data from
10.3X to 24X
variable transfer
Reads CD data from 10.3X to 24X variable transfer rate.
rate.
‡
‡
Reads DVD
data from 1.7X to 4X variable transfer rate.**
CD-ROM drive
wave length 795 nm;
DVD-ROM drive wave length 780 nm and
650 nm; laser output 4.59 µW
laser output 16.5 µW
K56flex™ technology/V.90 compatible modem
††
Infrared
Drive Bay
Expansion
Capabilities
Built-in Capabilities
Telecommunication
Capabilities
Supports 4 Mbps, 1.1 Mbps, and 115 Kbps IrDA Standard
Supports floppy disk drive (included)
Supports second rechargeable battery (optional)
Type II PC cards and
Type III PC card
Card Bus support
Microphone
Stereo speakers
Digital touch pad
Data and fax send/receive
††

%$
VAIO® Notebook User Guide
Model PCG-F420 PCG-F480 PCG-F490
Connection
Capabilities
Supplied
Accessories
Service
Limited Warranty
Power
Requirements
2 USB ports
i.LINK
Serial port
Keyboard/mouse (PS/2
®
-style)
VGA monitor
Video out
Parallel (printer)
Phone line (RJ-11)
Microphone
Headphone
Port replicator
Infrared port
Video cable
Floppy disk drive
Rechargeable battery
AC adapter and power cord
Weig ht s ave r
90-day limited express service
‡‡
Extendible to one year from original date
of purchase upon registration
90-day parts/labor standard
‡‡
Extendible to one year from original
date of purchase upon registration
49.5 watts maximum (19.5V DC/AC 120-240V)
Power
Management
Battery
Dimensions
Weight
Operating
Tempera tu re
Operating
Humidity
Storage
Tempera tu re
Storage Humidity
Energy Star compliant
Advanced Configuration and Power Interface (ACPI)
Lithium-ion, supports dual battery operation
12.7”(w) x 1.4”(h)***x
10.4”(d)
12.8”(w) x 2.1”(h)***x 10.5”(d)
(324 x 54.1 x 265.5 mm)
(324 x 37.9 x 265.5 mm)
7.0 lbs. (3.2 kg)
(with battery and
weight saver)
7.4 lbs. (3.4 kg)
7.3 lbs. (3.3 kg) (with battery and weight
saver)
7.7 lbs. (3.5 kg) (with battery and floppy disk
drive)
(with battery and
floppy disk drive)
41º F to 95º F (+5º C to 35º C) temperature gradient less than 18º F (10º
C) per hour
20% to 80% (not condensed), provided that humidity is less than 65%
at 95º F (35º C), hygrometer reading of less than 84º F (29º C)
-4º F to 140º F (-20º C to 60º C), temperature gradient less than 18º F
(10º C) per hour
10% to 90% (not condensed) provided that humidity is less than 20%
at 140º F (60º C), hygrometer reading of less than
95º F (35º C)
* MHz denotes microprocessor internal clock speed; other factors may affect application performance.
The size of your hard disk may differ if you purchased a specially configured system. GB means one billion
bytes when referring to hard drive capacity. Accessible capacity may vary.
‡
Data on a CD-ROM is read at a variable transfer rate, ranging from 10.3X at the innermost track to 24X at

Specifications
%%
the outermost track (the data transfer standard 1X rate is 150 kbytes/s). The average data transfer rate is
17.2X or 2580 kbytes/s.
**
Data on a DVD-ROM is read at a variable transfer rate, ranging from 1.7X at the innermost track to 4X at
the outermost track (the data transfer standard 1X rate is 1392 kbytes/s). The average data transfer
standard is approximately 2.85X or 3823 kbytes/s. A DVD-ROM drive reads data on a CD-ROM at a
variable transfer rate, ranging from 10.3X at the innermost track to 24X at the outermost track. The
average data transfer rate is approximately 17.15X or 2936 kbytes/s or 2576 kbytes/s.
††
Maximum speed for faxing is 14.4 kbps. Your modem is capable of downloading at maximum of 56 kbps
using K56flex technology or V.90. Your online service or Internet Service Provider, however, may not
support this technology or operate at this speed.
‡‡
Certain restrictions apply.
***
Height measured at thickest point. Thinnest height for PCG-F420 is 37.9mm; thinnest height for
PCG-F480 is 54.1mm; and thinnest height for PCG-F490 is 54.1mm.
If a region code warning appears when you are using the DVD player, it could be that the DVD-ROM you are
trying to play is incompatible with the DVD-ROM drive in your VAIO notebook. Region code indicators such
as a 1 or ALL are labeled on some DVDs to indicate what type of player can play the discs. Unless a 1
or ALL is labeled on your DVDs or on the packaging, you cannot play the disc on this player.
Specifications are subject to change without notice.

%&

Index
A
AC adapter #,
AC power
adding
hardware
memory
peripherals
printers
adjusting
brightness !,
contrast
Alt key
%
Application Recovery CD
Applications key
attaching port replicator
'
'
"!
%
"!
"'
%
B
battery packs #,
charging ,
indicator light status
indicator lights #, , ',
inserting
inserting into battery bay
loading
power status
rechargeable
removing , !&,
brightness
adjusting !,
built-in speakers
See also speakers
buttons
Eject $,
#
left
#
right
!'
'
"
#
%
"$
$'
!&
Start (Windows 98)
"
C
cables
phone
power cord
cameras
digital video recorder
canceling commands
Caps Lock
indicator light
CD-ROM/DVD-ROM discs
ejecting
inserting
troubleshooting
charge status indicator light
charging battery packs ,
choosing
power source
coin-operated telephones
computer
lithium ion battery
setting up
starting
troubleshooting #', $,
unpacking
connecting
coin-operated telephones
digital video recorder
external keyboard
external speakers
hard drives
microphone
monitor "#,
mouse
#
'
#$
%
#
'
%
$
$
!'
""
LE
#
!
#$
"#
#"
!
##
#
"#
$
""
%'

&
VAIO® Notebook User Guide
multimedia computer display
multiple phone lines
network !,
"#
party phone lines
""
PBX
phone line
""
port replicator "#,
power source
printer
"'
projector
USB device
weight saver
'
#
#%
"
""
""
"$
connectors
DC In
headphone
i.LINK
infrared
keyboard #, %,
Line In
microphone
monitor
mouse %,
network
Printer %,
printer
Serial port
USB %,
', "#
$
$
!"
"#
$
$
"#
"#
"#
"'
"'
"#
"#
contrast
adjusting
correction keys $,
Ctrl key
%
cursor-movement keys
%
%
D
DC In ',
digital still camera
digital video camera
disconnecting port replicator
diskettes
display
"#
!"
#$
ejecting
"
inserting into drive
troubleshooting
options
#
$!
See also monitor
selecting
#
"
"&
#
disposal of lithium ion battery
LE
drives
floppy disk
#
installing additional hard disk
DV devices
troubleshooting
DV In/Out
#$
$#
DVD-ROM drive
closing tray
opening tray
using
$
%
$
DVD-ROM drive tray
troubleshooting
$
DVD-ROM/CD-ROM discs
troubleshooting
$
E
Eject button ", $,
ejecting
battery packs
CD-ROM/DVD-ROM discs
diskettes
weight saver
Energy Star
Escape key
EE
$
expansion memory configuration
Express Service technical support
external devices
display
#
See also monitor
speakers ,
%
"
"
"
#"
F
$#
fan
faxes
laws governing
floppy disk drive
#
cable
disconnecting
troubleshooting
Fn
Fn key
%
combination commands
function keys $,
L
#
#
$!
%
!
%
%
#

Index
&
H
hard drives
indicator light
installing additional
headphone connector $,
#, '
!
#
Help
Mouseware
!
I
i.LINK $,
IEEE-1394
indicator lights
infrared communication devices
infrared port
infrared transmission
input devices
Insert key
inserting
installing
interference
internal microphone
internal speakers
#$
#$
'
battery #, , ',
Caps Lock #,
charge status
hard drive #,
Num Lock #,
power
#
Scroll Lock #,
other computers
!"
active distance
troubleshooting
EL
%
battery pack
!&
'
'
'
'
!"
!#
!#
CD-ROM/DVD-ROM discs
diskettes into drive
hard drives
hardware
!
"!
memory module
peripherals
"!
EL
"
%!
%
See speakers
K
keyboard %,
connector #,
"#
%
!"
$
L
#
LCD
lock lever
!
selecting to display output
troubleshooting
$
LCD (Video) Standby mode
LED indicator
left button
"
#
lever
!
LCD
weight saver release
Limited Warranty card
Line In
$
"
#
Liquid Crystal Display screen
See LCD
lithium ion battery
disposal
safety precautions
LE
LE
loading
battery pack
M
memory module
expansion
installing
removing
microphone
connecting
connector
internal
troubleshooting
modem
laws governing
troubleshooting
monitor %,
connecting
connector
selecting
switching among
mouse
connector
troubleshooting
Mouse Properties screen
%
%!
%
$
##
#
%
$"
L
$!
"#
#
#
#
%
$"
!
#
$

&
VAIO® Notebook User Guide
Mouseware
accessing help
features
!
!
multimedia computer display
multiple phone lines
""
N
navigation keys $,
network
connecting
connector
port replicator
Notebook Computer
Num Lock
#
indicator light
numeric keypad area
%
!
"#
"#
#
'
$
O
opening
DVD-ROM drive tray
operator keys
output devices
adding
%
EL
"'
$
P
party phone lines
""
PBX
PC card
inserting
release button
removing
slot protector
!
slots
troubleshooting
phone
#
cable
connecting line
""
jack
laws governing
port replicator
connecting "#,
disconnecting
"&
lever
network
""
!
!
!
!
$#
""
L
"$
"&
"#
#
power
power saving modes
power sources
Print Screen key
printer
Printer connector %, "#,
'
'
cord
indicator light
switch
!
#
!$
System Hibernation ,
System Idle ,
System Suspend
Video Standby
connecting
%
connecting "#,
connector
"'
port
troubleshooting
!$
!%
'
%
"'
"'
$$
"'
!%
Programmable Power Keys (PPK),
using
projector
#
R
radio interference
rechargeable battery packs ',
recharging battery packs
Recovery CD
registering
your computer
removing
battery packs
diskettes
floppy disk drive
memory module
replacing
battery packs
restoring data
right button
#
EL
$'
#
"
#
%
!&
$'
S
screen
See LCD
Scroll Lock
indicator light
#
'

Index
&!
second battery pack ,
!&
selecting
display
LCD
monitor
power source
Serial connector
Shift key
#
#
#
"#
%
Shut Down Windows dialog box
shutting down
troubleshooting
speakers
#
built-in
#
external
switching
troubleshooting
volume
Specifications
Start button
"
#"
"
$#
$!
%#
starting
computer
startup problems
!
"
switching
display
monitor
System Hibernation mode ,
System Idle mode ,
System Recovery CD
System Suspend mode ,
!%
!$
$%
!%
"
V
ventilation slot
video camera
Video Standby mode
viewing the amount of memory
volume control
of fan
troubleshooting
&
#$
$#
$!
W
warranty
weight saver
Windows 98
#
attaching
connecting
fold-out arm
removing
Control Panel
Explorer
Find window
help
%
key
!&
"
"
"
!#
&
&
&
key combinations
Start button
taskbar ",
"
$
&
%"
T
touchpad #, !,
troubleshooting
startup ",
turning on
computer
TV
interference
$"
#'
#'
!
EL
U
unpacking the computer
USB
connecting
connector %, "#,
mouse
#%
#%
#%

&"
 Loading...