

Page 1

Sony Notebook User Guide
PCG-C1VFK/PCG-C1VFLK
N
Page 2

Read this first
Sony Notebook User Guide
nN
2
Read this first
Notice
© 2001 Sony Corporation. All rights reserved.
This manual and the software described herein, in whole or in part, may not be reproduced, translated, or reduced to any machine-
readable form without prior written approval.
Sony Corporation provides no warranty with regard to this manual, the software, or other information contained herein and hereby
expressly disclaims any implied warranties or merchantability or fitness for any particular purpose with regard to this manual, the
software or such other information. In no event shall Sony Corporation be liable for any incidental, consequential, or special damages,
whether based on tort, contract, or otherwise, arising out of or in connection with this manual, the software, or other information
contained herein or the use thereof.
Macrovision: This product incorporates copyright protection technology that is protected by method claims of certain U.S. patents and
other intellectual property rights owned by Macrovision Corporation and other rights owners. Use of this copyright protection
technology must be authorized by Macrovision Corporation, and is intended for home and other limited viewing uses only unless
otherwise authorized by Macrovision Corporation. Reverse engeneering or dissambly is prohibited.
Sony Corporation reserves the right to make any modification to this manual or the information contained herein at any time without
notice. The software described herein is governed by the terms of a separate user license agreement.
Sony, DVgate, i.LINK™
are trademarks of Sony Corporation. i.LINK™ is the name for the IEEE 1394-1995 standards and their revisions.
Microsoft, Windows and the Windows logo, Windows Media and Outlook are trademarks or registered trademarks of U.S. Microsoft
Corporation in the U.S. and other countries.
®
, Adobe® Acrobat® Reader, Adobe® Premiere® are trademarks of Adobe Systems Incorporated.
Adobe
QuickTime and the QuickT ime logo are trademarks used under license. QuickTime is registered in the U.S. and other countries.
RealPlayer is a trademark or registered trademark of RealNetworks, inc. in the U.S. and other countries.
PowerPanel is a trademark of U.S. Phoenix Technologies Corporation.
and the i.LINK logo, JogDial™ , PictureGear, Memory Stick and the Memory Stick logo, VAIO and the VAIO logo
Page 3

Read this first
Sony Notebook User Guide
nN
3
Transmeta, the Transmeta logo, Crusoe, the Crusoe logo, Code Morphing™ Software, Long Run ™ Power Management and
combinations thereof are trademarks of Transmeta Corporation in the USA and other countries.
All other names of systems, products and services are trademarks of their respective owners. In the manual, the ™ or
specified.
Specifications are subject to change wit hout notice.
As an E
NERGY STAR Partner, Sony has determined that this product meets the ENERGY STAR guidel ine s for energy efficie nc y.
The International E
NERGY STAR Office Equipment Program is an international program that promotes energy saving through the use of
computers and their office equipment. The program backs the development and dissemination of products with functions that
effectively reduce energy consumption. It is an open system in which business proprietors can participate voluntarily. The targeted
products are office equipment such as computers, displays, printers, facsimiles and copiers. Their standards and logos are uniform
among partici pating nations.
NERGY STAR is a U.S. registered mark.
E
®
marks are not
Page 4

Read this first
Sony Notebook User Guide
nN
4
Safety in formation
Owner's record
The model number and serial number are located on the bottom of your Sony notebook. Record the serial number in the space provided
here. Refer to the model and serial number when you call VAIO-Link.
Serial number:_ _______________________
Model number:
PCG-161M/PCG-163M
Warnings
General
❑ Opening the unit, for whatev er reason , coul d lead to da m ages that are no t cover e d by the guarantee.
❑ To avoid electrica l shock, do not open the cabi net. Refer servicing to qualified pers onnel only.
❑ To prevent fire or shock hazard, do not exp os e yo ur VAIO not ebo ok to rain or mo is ture .
❑ Av oid using the modem dur i ng a stor m .
❑ Do not use the modem or a telephon e to report a gas le ak in the vicinity of the leak.
Audio/video
❑ Audio and pi ctu re di stortion may oc cur if this equip m ent is position ed in close proxi m ity to any
equipment emitting electromagnetic radiation .
Page 5

Read this first
Sony Notebook User Guide
nN
5
Connectivity
❑ Never install mod em or tel ephone wiring du ri ng a sto rm .
❑ Never install teleph one jacks in wet loca tions unless the jack is spec ifically designed for w et lo cati on s.
❑ Use caution when insta lli ng or modifyin g tel e ph one lines.
❑ Use your notebook only with the supplied AC adapter. To disconnect your notebook completely from
mains voltage, unplug the AC adapter.
❑ Please make sure that the socket outlet is easily accessible.
❑ Never touch uni nsu lat ed tel e ph one wire or termina ls unle ss the tel e ph one line has been disconnected
at the network interface.
Hard disk drive
The magneti c properties of some objec ts can have serious conseque nces for your hard disk drive. They can
erase the data on the hard drive and cause the computer to malfunction. Do not place your computer near
or on any objects which emit magnetic fields, mainly:
❑ TV sets,
❑ Speakers,
❑ Magnets,
❑ Magnetic bracelets.
Page 6
Read this first
Sony Notebook User Guide
nN
6
Regulatory information
This product conforms to the following European Directives:
73/23 /EEC (Low Vo ltage Directive)
89/336/EEC, 92/31/EEC (EMC Directives)
93/68 /EEC (C E Markin g Directive)
1999/5/EC (radio equipment and telecommunications terminal equipment Directive)
This product complies with EN 55022 Class B and EN 55024 for use in following areas: residential, commercial and light-industrial.
This product has been tested and found compliant with the limits set out in the EMC Directive for using connection cables shorter than
3 metres (9.8 feet).
!
Page 7

Read this first
Sony Notebook User Guide
nN
7
Disposing of lithi um ion batteries
Do not handl e da ma g e d or le ak i ng l ith iu m ion batteries. Dispo se of promptly and properly at end-of-life.
Danger of explos io n if th e battery is incorrectly rep laced. Replace only with the sam e or equ ival ent type
recommended by the manufacturer. Discard used batteries according to the manufacturer’s instructi on s.
The battery pack used in this d evic e may present a fire or chemical burn haz ard if mistreated. Do not
disassemble, heat above 60°C (140°C) or incinerate.
Keep away from children.
Your noteboo k is equ ip pe d wi th an inte rnal bac k up memory battery. For ch anging this battery, plea se
contact VAIO-Link:
http://www.vaio-link.com
In some areas the di sposal of lithium io n batteries in hou sehold or busine ss w a ste m ay be prohibited .
Use the public collect io n system .
Page 8

Welcome
Sony Notebook User Guide
nN
8
Welcome
Congratu lati ons on purchasing a Sony VAI O notebook . Sony has combine d le a di ng -e dge technology in
audio, vide o, computing a nd communi cations to prov i de y ou w ith sta te- of-the-a rt personal com puting.
Here are just some of the feat ures yo ur V AIO noteb oo k has to offer.
❑ Excepti o nal performanc e - Your PC includes a fast pr ocessor.
❑ Portability - The rechargeable batter y pa ck provides ho urs of us e wi thout AC pow er.
❑ Sony audio an d video quality - A high-resolution LCD screen enables you to take advantage of today’s
advanced multimed ia appl icati on s, gam es, and entertainment softwar e .
❑ Multimedia features – Enjoy the speake rs to liste n to aud io and video CDs.
❑ Interconnectivity – Your computer has Me m o ry St ic k
Sony’s new universal storage medium . i.LINK is a bidi rec tio nal digi tal inte rfac e for exch ang in g data.
❑ Windows
❑ Communications - Access popular online services, send and receive e-mails, browse the Internet...
❑ Excellent customer s uppor t - If you are experiencing any problems with your computer, please check
®
- Your system includes the latest operating system from M icrosoft.
the VAIO-Link website for a possible solution:
http://www.vaio-link.com
Before contacting VAIO-Link, you may try to solve the problem by reading the User Guide or the manuals
and help files for the peripherals or softw are.
TM
and i.LINKTM functionalities. Memory Stick is
Page 9

Welcome
Sony Notebook User Guide
nN
9
Documentation pack
Printed documentation
❑ A Gett i ng Starte d brochure, where you find a brief descr ip tio n of the items in your box and som e
specifications of yo ur no tebook. This also offers a quic k guide to setting up your comp uter.
❑ A Customer Gui de, where you find all the bas ic inform ati on to start using your not ebook.
❑ Your Sony Guarantee conditions.
❑ A Safety Regulations Guide for your in forma tion.
Online documentation
1 The Sony Notebook User Guide:
❑ Using Your Sony Notebook shows you how to use the standard components of your system.
❑ Connecting Peripheral Devices explains how you ca n add functionality by connecting va riou s
peripherals.
❑ Getting Help explains the support options available to you, and offers basic troubleshooting tips.
❑ Precautions provides facts and advice a b out using you r notebook.
❑ Specifications provides details on your computer, drivers and accessories.
2 Refer to your Sof tware Guide fo r inform at io n on the bun dle d so ftw are and the Son y ap plicati ons .
❑ About the Sof tware is a short descriptio n of th e fe atur es of the software pre- instal le d on y ou r
system.
❑ Customizing your notebook explains how to set your sy stem and power managem e nt .
❑ Using the Pr oduct Recov ery CD-ROMs explains how to perform a system and application recovery.
3 Consult the Online Help files of the software you are usin g fo r detai le d in form a tio n on features and
troubleshooting.
Page 10
Welcome
Sony Notebook User Guide
nN
10
4 Refer to the Microsoft Quick Start manual for more in formation on Wi nd ow s.
Your notebook and its accessories
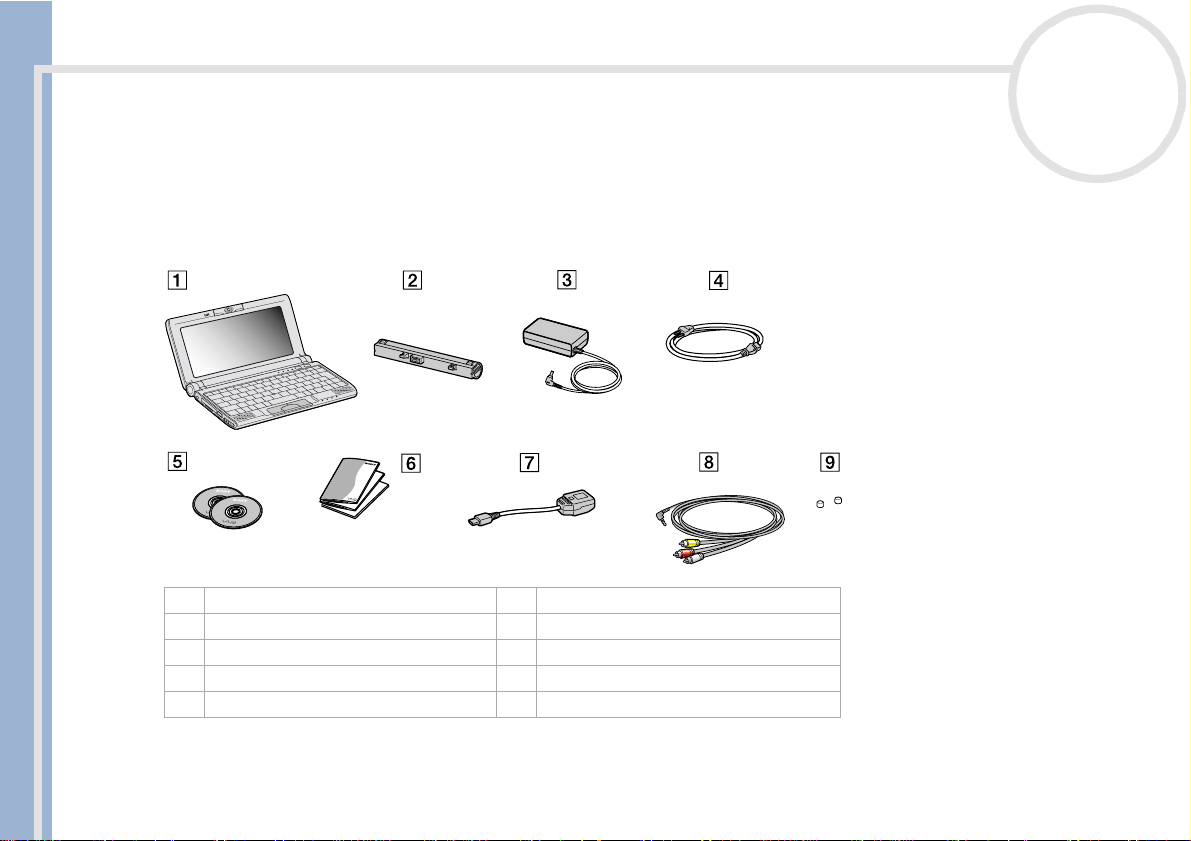
Remove the follow in g har dw are it em s from th e box :
1 main unit 6 documentation pack
2 rechargeable battery pack 7 display adapter
3 AC adapter 8 AV cable
4 power cord 9 pointing stick covers
5 product recovery CD-ROMs
Page 11
Welcome
Sony Notebook User Guide
nN
11
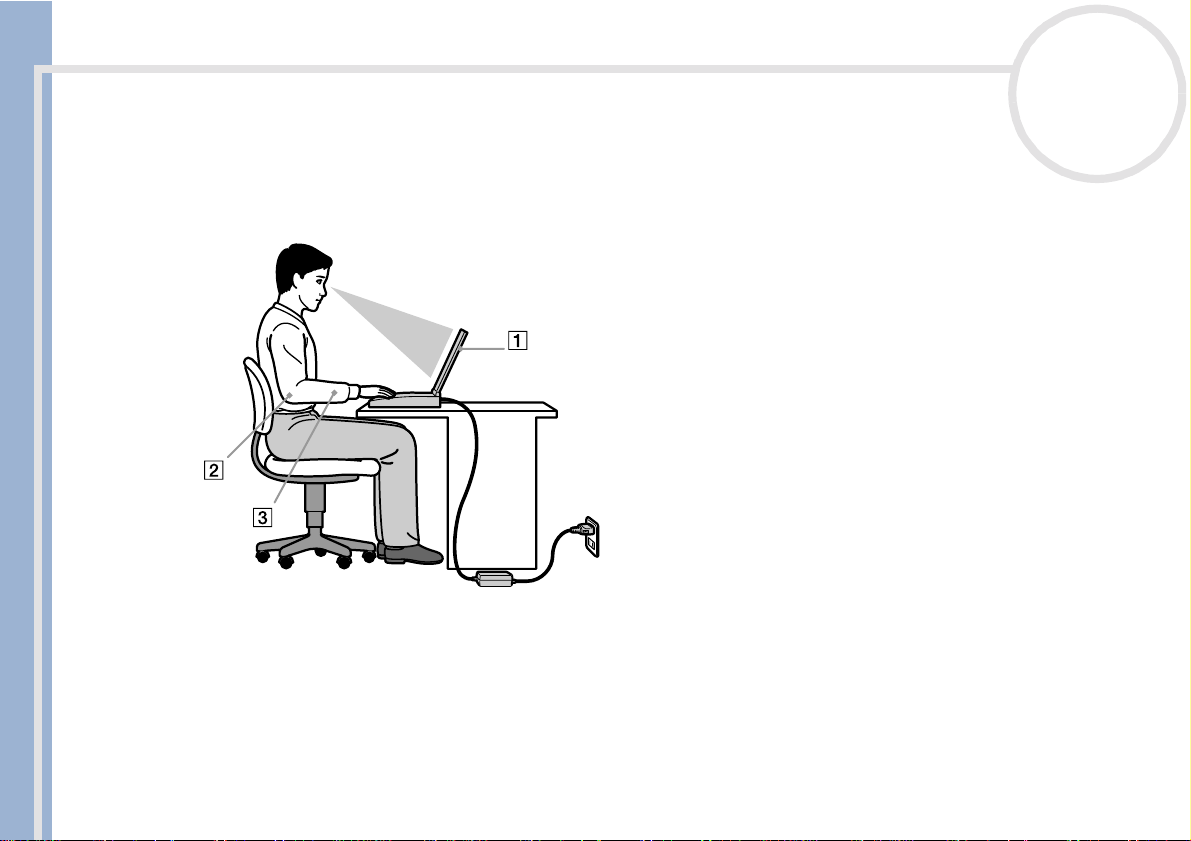
Ergonomic cons iderations
❑ You wil l be u sing your no t e book a s a po r table d e v ice in a v a riety of e nvironmen ts. Wh e neve r po ssible,
you should att e m pt to ta ke a cc oun t of the following er go nom i c c onsideration s to both stationary and
portable environments:
❑ Position of your comput e r – Place the computer directly in front of you (1). Keep your forearms
horizontal (2), with your wrists in a neutral, comfortable position (3) while using the keyboard,
touchpad, or ex ternal mouse . Le t your upper arms ha ng na tu ral ly at yo ur si des. Have brea ks during
sessions with your computer. Excessive use of the computer may strain muscles or tendons.
❑ Furnit ure an d postu re – Sit in a chair with good back support. Adjust the level of the chair so your feet
are flat on the floor. A footrest ma y make you more comfo rtable. Sit in a relaxed, uprig ht po stu re and
avoid slouching forward or leaning far backwards.
Page 12

Welcome
Sony Notebook User Guide
nN
12
❑ Vie wi ng an gle o f th e co mpu ter ’s display – Use the display’s tilting feature to find the best position.
You can reduce eye strain and muscle fatigue by adjusting the tilt of the display to the proper position.
Adjust the brightn e ss set ting of the display as well.
❑ Lighting – Choose a locat io n wh ere windows and lights do not create gl are and reflection on the
display. Use indirect lighting to avoi d brig ht sp ots on the display. You can also purchase acces sori es for
your display that help reduce glare. Proper lighting adds to your comfort and work effectiveness.
❑ Placement of an external display – When using an external display, set the display at a comfortable
viewing distance. Make sure the di sp lay sc reen is at eye lev el or slight ly lower when you are si tting in
front of the display.
Page 13
Using your notebook
Using your notebook
This section describes how to start using y ou r com p uter and how to use your computer’s internal and
external devices.
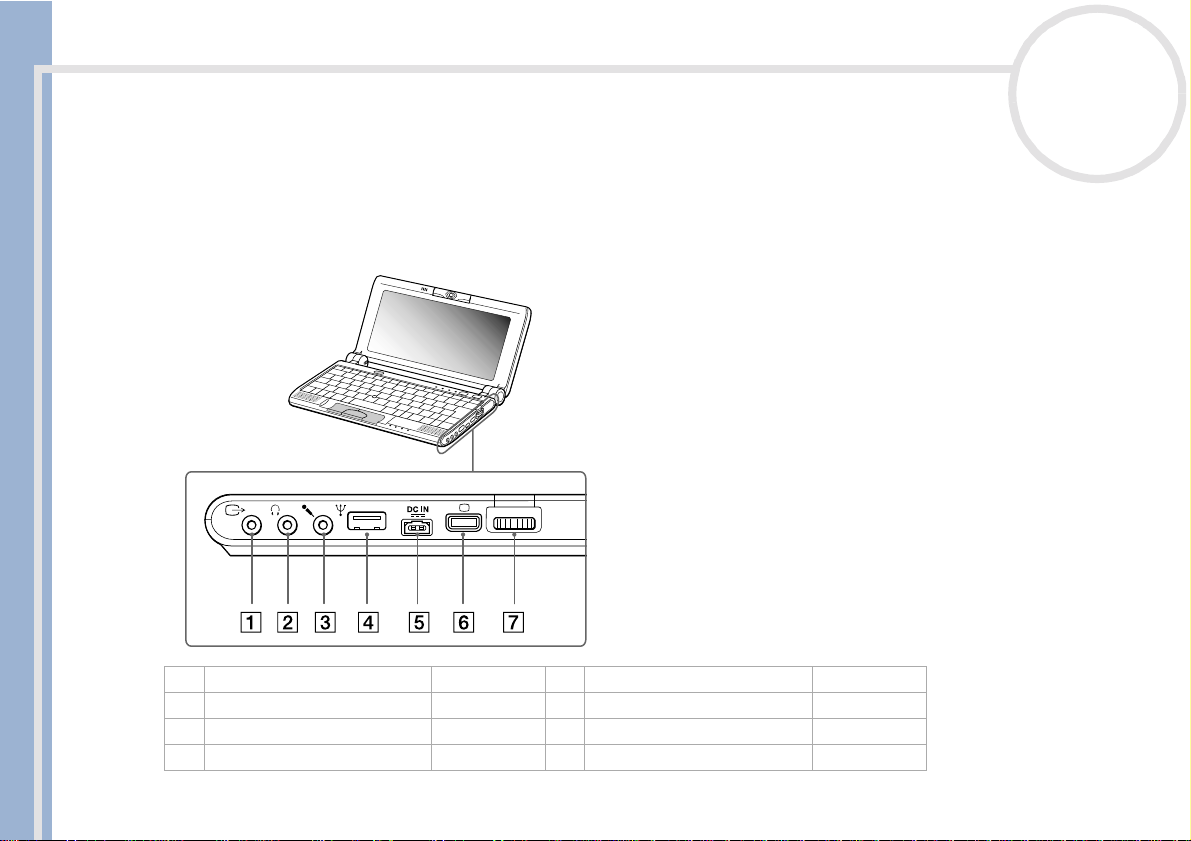
Locating controls and connectors
Right
Sony Notebook User Guide
nN
13
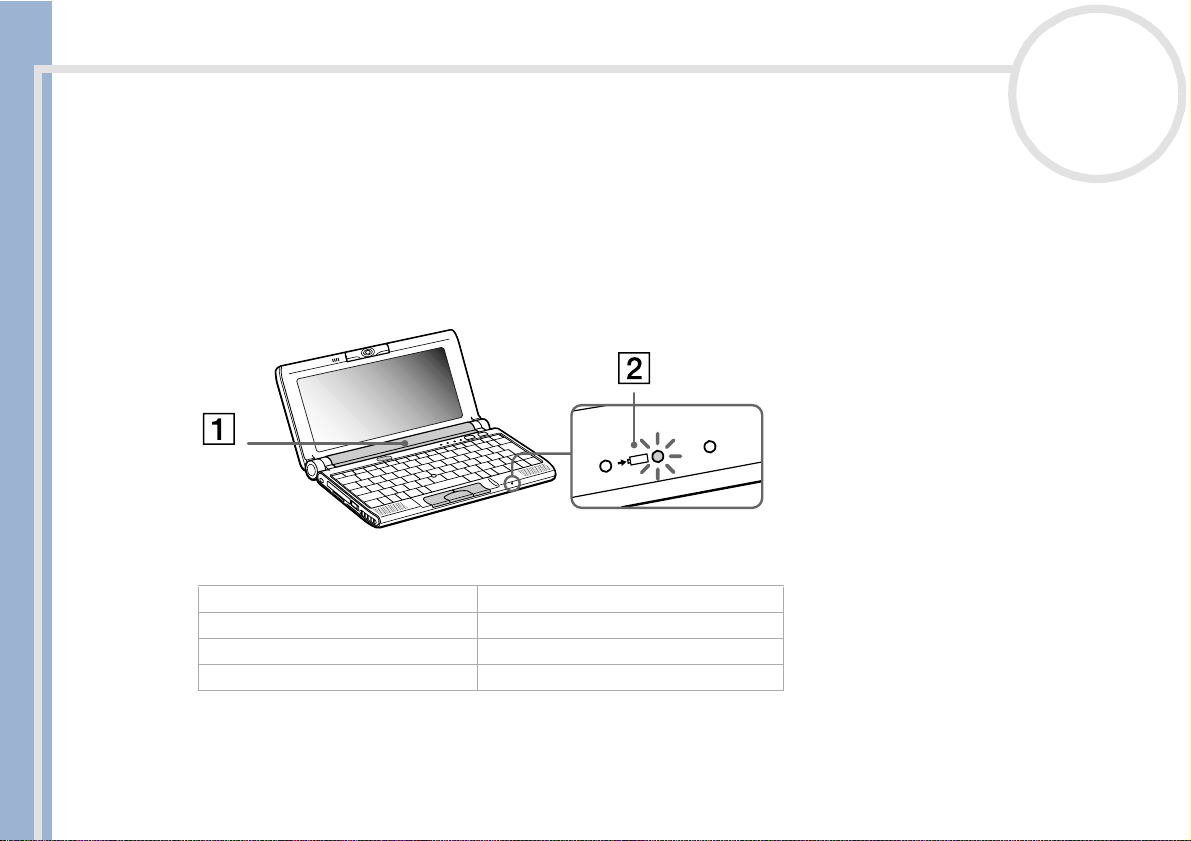
1 AV out connector (page 49) 5DC In (page17)
2 headphone connector (page 51) 6 Mini VGA out connector (page47)
3 microphone connector (page 52) 7Jog Dial (page31)
4USB connector (page 53)
✍ AC adapter mains connector and power cord: hazardous voltage, according to EN 60950.
All connectors for this notebook are selv (Safety Extra Low Voltage), according to EN 60950.
Page 14
Using your notebook
Left
Sony Notebook User Guide
nN
14
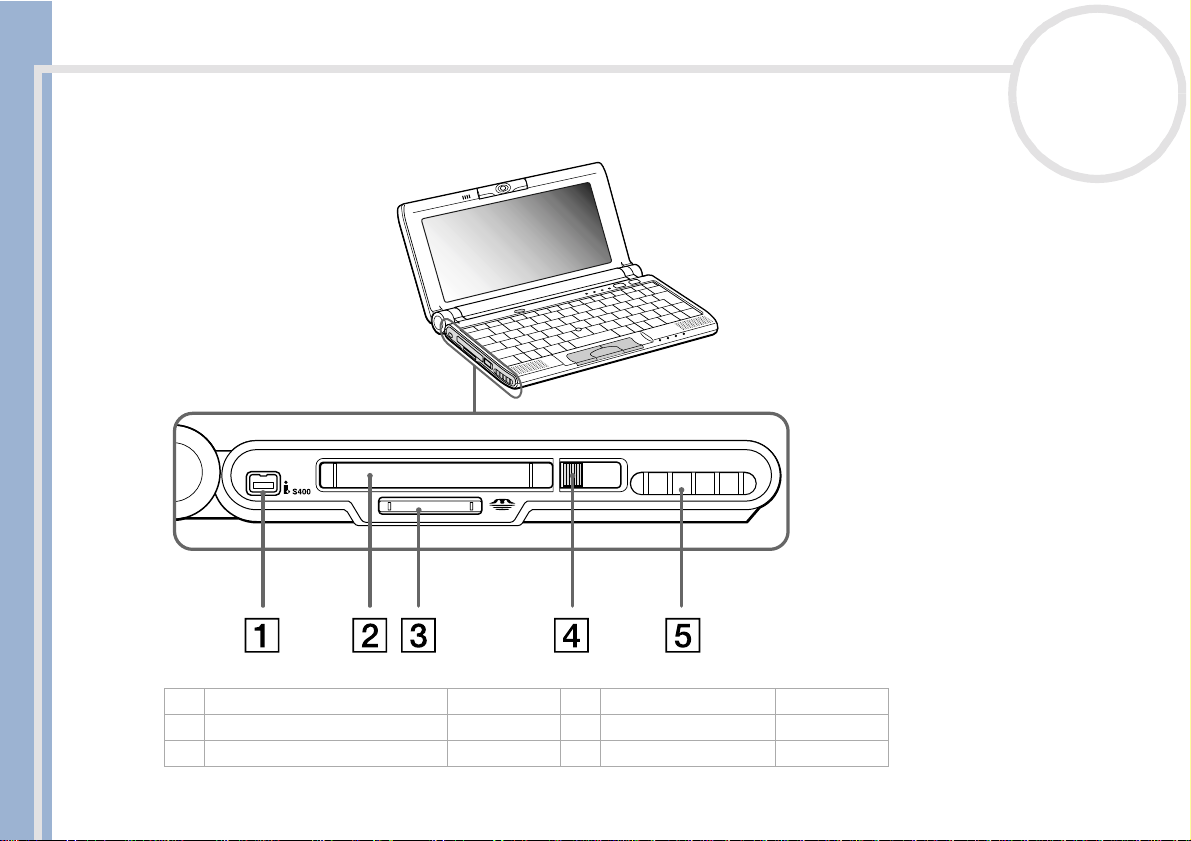
1 S400 i.LINK™ connector (page 61) 4 RELEASE button (page 36)
2 PC Card slot (page 35) 5 ventilation slot
3 MagicGate Memory Stick™ slot (page 37)
✍ There is a ventilation slot located near the PC Card slot. Do not cover the ventilation slot when the notebook is in use.
Page 15

Using your notebook
Front
Sony Notebook User Guide
1 built-in camera (Motion Eye) (page 42) 9 Caps Lock indicator (page27)
2 microphone (page 52) 10 Scroll Lock indicator (page27)
3Bluetooth™ power button* (page 59) 11 power button (page21)
4 pointing device (page 29) 12 capture butto n (page42)
5 speaker (page 26) 13 power indicator (page27)
6 left/center/right buttons (page 29) 14 battery indicator (page27)
7 MagicGat e Me mo ry Stic k ™
8 Num Lock indicator (page 27) 16 Bluetooth™ indicator* (page27)
* The Bluetooth ™ availability depends on the model and your country of residence.
nN
15
(page 37) 15 hard disk drive indicator (page 27)
indicator
Page 16
Using your notebook
Bottom
Sony Notebook User Guide
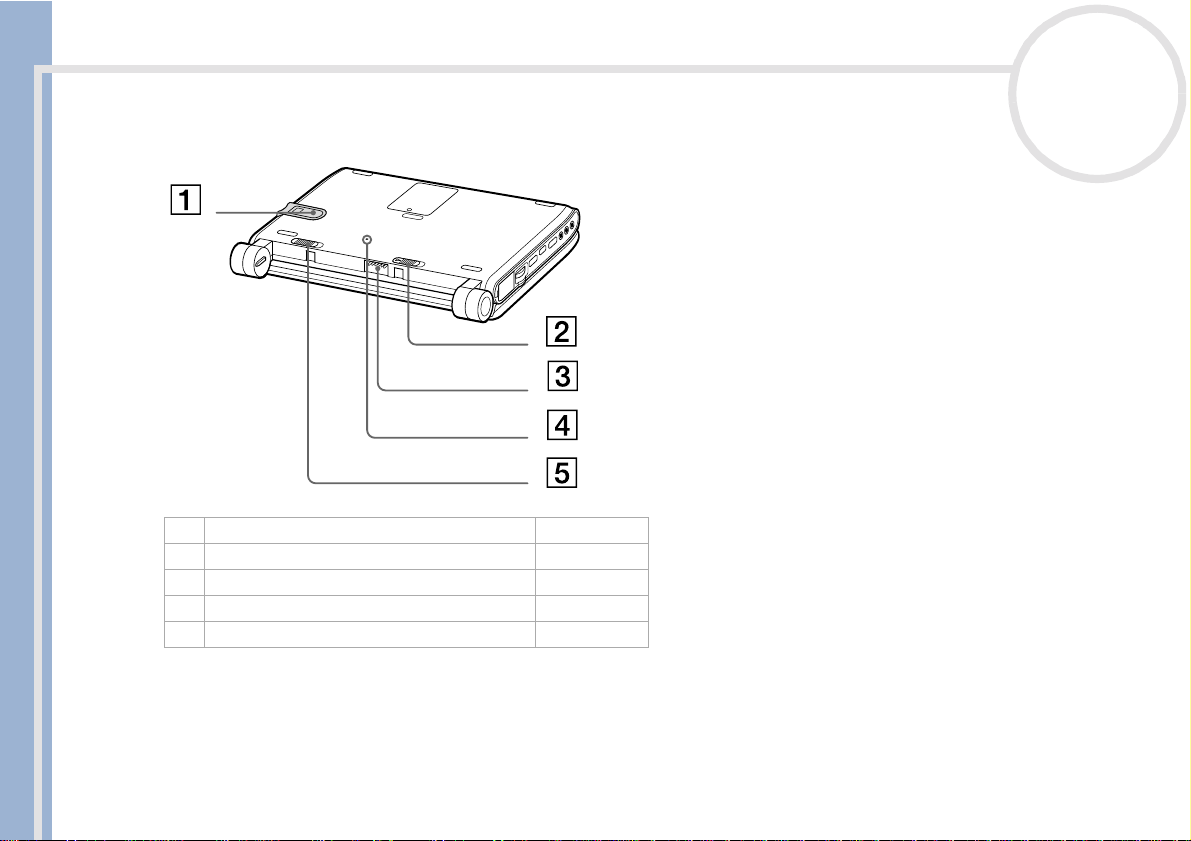
1 MagicGat e Me mo ry Stic k ™ slot window (page 37)
2 battery release lever (page 18)
3 reset switch
4 battery connector (page 18)
5 battery lock lever (page 18)
nN
16
Page 17
Using your notebook
Connecting a power source
You can use either an AC adapter or a rechargeab le ba ttery pac k as a pow er sou rc e.
Using the AC adapter
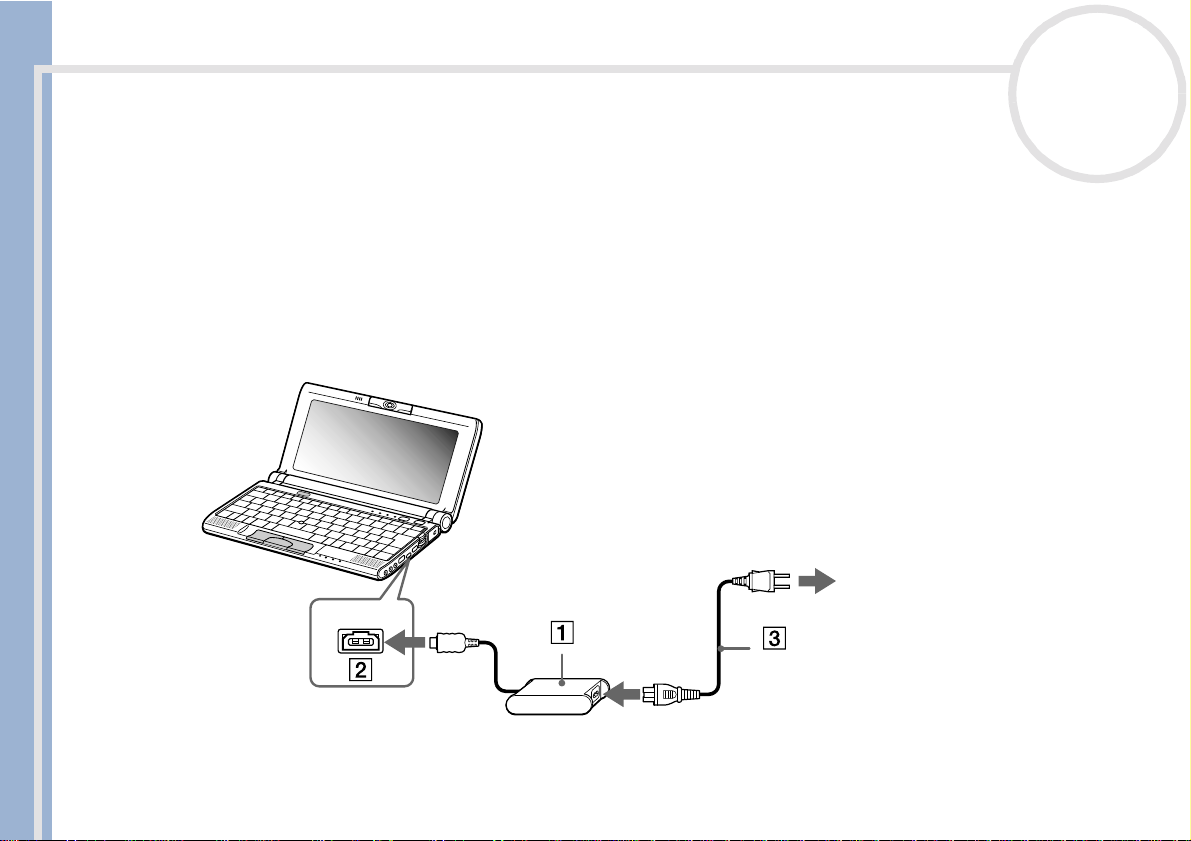
To use the AC adapter, proceed as follows:
1 Plug the cable attached to the AC adapter (1) into the DC In con nec tor (2) on th e computer.
Sony Notebook User Guide
2 Plug one end of the power cord (3) into the AC adapter.
3 Plug the other end of th e pow er co rd into an AC outlet.
nN
17
✍ Use your notebook only with the supplied AC adapter.
To disconnect your notebo ok completely from mains voltage, unp lug the AC adapter.
Make sure that the socket outlet is easily accessible.
Page 18
Using your notebook
Using the battery pack
You can use a battery pac k as a source of power .
The battery pack sup pl ied wi th your computer is no t ful ly ch arged at the time of purch ase.
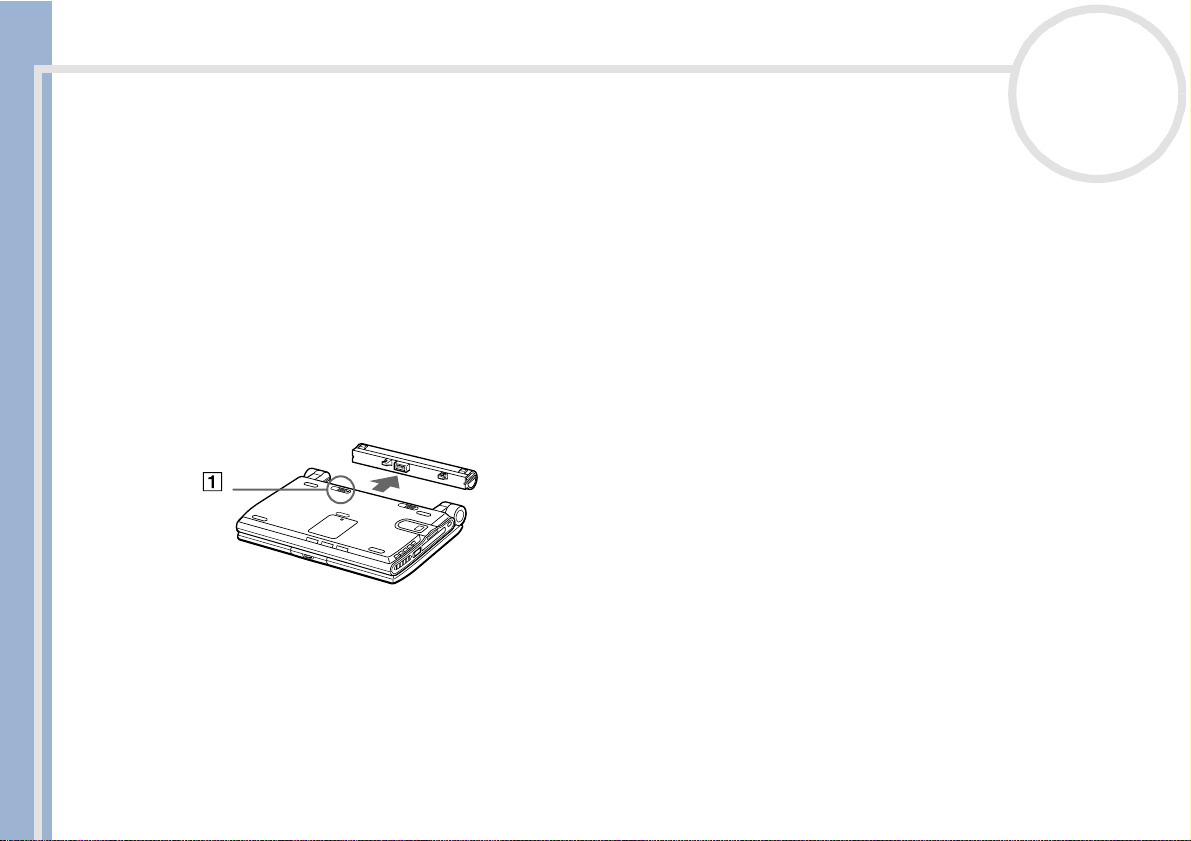
Inserting the ba ttery pac k
To insert the battery, proc eed as foll ow s:
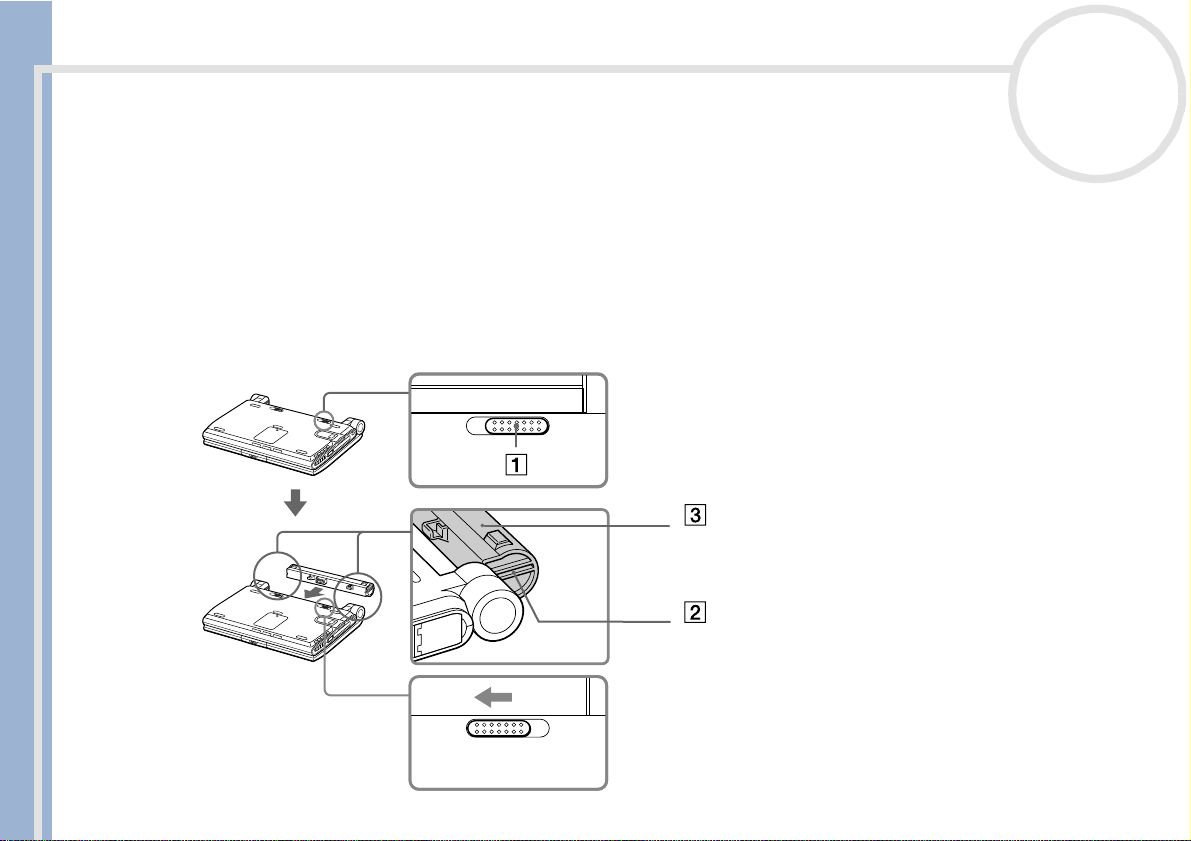
1 Move the lock lever (1) on th e bott om of th e computer to the Unlock position.
Sony Notebook User Guide
2 Align the grooves (2) and tabs on the battery (3) with the tabs and notches on the back of the computer ,
3 Slide the lock lever into the Lock position to secure the battery on the computer.
and then slide the ba ttery tow a rd s the co m pu ter until it clicks into place.
✍ When the computer is directly connected to AC power
LOCK UNLOCK
and has a battery pac k inserted in the battery bay, it uses
power from the AC outlet.
! Make sure the cover is closed before inserting the battery
pack.
nN
18
LOCK UNLOCK
Page 19
Using your notebook
Charging the ba ttery pack
To charge the battery pac k, proceed as fol l ows:
1 Connect the AC adapter to the comp uter.
2 Insert the battery pack.
Sony Notebook User Guide
nN
19
The computer automat ica lly char ges th e batte ry (1) (the battery indi cato r (2) light flashes in a double
blink pattern as the battery charges). When the battery is 85% full, the battery indicator light turns off.
This process takes approxim ately one an d a half hours. To charge the battery completely, continue
charging for an a d ditional hou r.
battery indicator light status meaning
on The computer is using battery power.
single blink The battery is running out of power.
double blin k The battery is chargi ng.
off The computer is using AC power.
✍ When the battery is running out of power, both the battery and power indica tors blink.
Keep the battery pack in the computer while it is directly connected to AC power. The battery pack continues to charge while you are using the
computer.
Page 20
Using your notebook
nN
20
If the battery level falls to below 10%, you should either attach the AC adapter to recharge the battery or shut down your computer and insert a fully
charged bat tery.
You can extend battery life by changing the power management modes in the PowerPanel utility.
The battery pack supplied with your computer is a li thium ion battery and c an be recharged any time. Charging a pa rtially discharged battery does
not affect battery life.
The batter y indica tor light is on whil e you use the b attery pack as a power source . Wh en the b attery l ife is nearly depl eted, the batt er y indi cato r star t s
flashing.
Sony Notebook User Guide
Removing the ba ttery pac k
To remove the batt ery pac k , proceed as follows:
1 T urn off the computer.
2 Slide the release lever (1) to the Unlock position and slide the battery away from the computer.
✍ You may lose data if you remove the battery pack while the computer is on and not connected to the AC adapter or if you remove the battery while
the computer is in Standby mode.
Page 21
Using your notebook
Starting your notebook
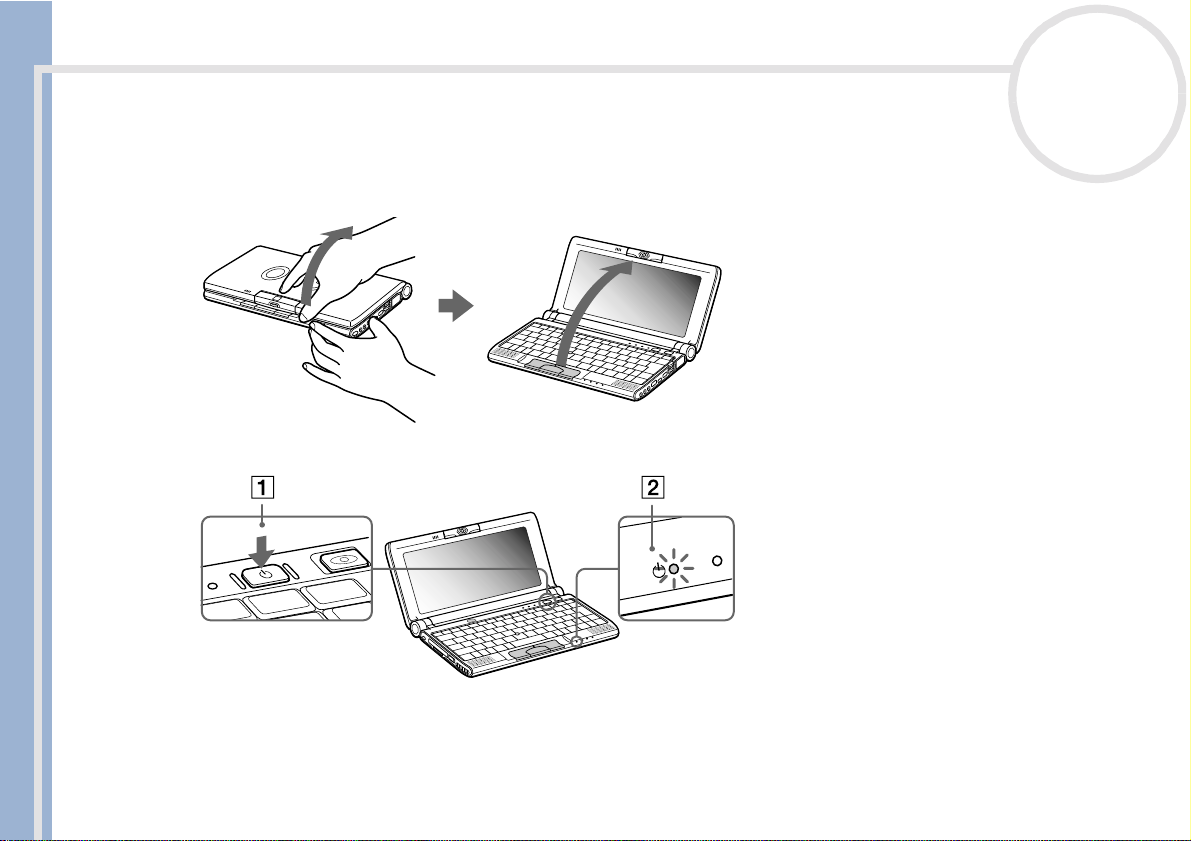
To start you r computer, proce ed as follows:
1 Hold the bottom of the c om pu ter fi rm l y and open the cover.
Sony Notebook User Guide
2 Press the power button (1) of the compu ter un til the green power ind i cato r light (2) turns on.
nN
21
3 If necessary, press <Fn>+<F5> to adjust the brightness controls for the LCD display. To increase the
brightness, use the up or right arr ow keys. To decrease, use the down or left arrow keys.
✍ If you hold the power switch in the on position for more than four seconds, the computer will turn off.
Do not grab the camera lens when opening the cover, you may break the camera.
Page 22

Using your notebook
Shutting down your notebook
It is important tha t yo u shut down your computer properl y in or der not to lose unsaved data.
To shut down your computer, proceed as follows:
1 Click the Start button on th e Wi ndo ws
2 Click Shut Down.
Sony Notebook User Guide
3 Select Shut down.
4 Click OK.
5 Wait for your compu ter to turn off automatically.
6 Turn off any peripheral connected to you r comp ut er.
7 To close your co m puter, make sure th at the tabs on both sides of t he di splay panel cli ck in to the grabs.
✍ Respond to any prompts warning you to save docum ents.
nN
22
®
taskbar.
The Shut Down dialog box appears.
The power indicator turns off.
If you are un able to shut down your computer:
- close all software in use,
- remove the PC Cards if inserted,
- disconnect any USB devices,
- Then press the <Ctrl>+<Alt>+<Delete> keys at the same ti me; the Task Manager appears, allowing you to close open applicatio ns and to shut
down the computer . If this does not work, you can press the power switch and hold for four seconds. This will shut down the computer. This operation
may re sult in dat a loss.
Do not close the cover whe n the built-in camera is turned to the outside.
During a period of inactivity, you can conserve battery life by using Standby mode.
Page 23

Using your notebook
Registering yo ur notebook
You can take advantage of Sony’s com m itme n t to quality custom er support and recei ve the fol lo wi n g
benefits by regi ste r in g y our computer :
❑ VAIO-Link – If you are experiencing any problems with your computer , you can check the VAIO-Link web
❑ Guarantee – Protect your investment. See the Guarantee sheet for the terms and conditions and refer
Sony Notebook User Guide
To register your Son y Notebook, procee d as fol lows:
1 Click on the Welcome bu tton on your desktop,
2 Click Next,
3 Click Internet,
4 Fill in your Registration card fields,
5 Scroll down to the bottom of the form and click Send,
6 Click OK.
✍ You must connect your phone line before using any online services, in cluding the online registration s ervice.
nN
23
site for a possible solution:
http://www.vaio-link.com
to your Customer Se rvi ce Gui de fo r m ore information.
To access the on line Registration web page, you must have a connection to the Internet.
Page 24

Using your notebook
Using the keyboard
Your keyboard is very similar to a deskt op com pu ter’s, but the keyboa rd has addi ti onal keys that perform
specific notebook-related tasks.
Sony Notebook User Guide
nN
24
Keys Descriptions
Escape key (1) The <Esc> (Escape) key is used to cancel commands.
Page 25
Using your notebook
Keys Descriptions
Function keys (2) The twelve function keys along the top of the keyboard are used to perform designated
Print Screen key (3) The <Print Screen> key takes an electronic snapshot of the screen and moves it to the
Correction keys (4) The <Insert>, <Back Space> and <Delete> keys enable you to make corrections.
Sony Notebook User Guide
Fn key (5) The <Fn> key is used in combination with other keys to execute commands.
Navigation keys (6) These keys enable you to move the cursor on the screen.
Numeric keypad area (8) Contains the keys found on a typ ical calculator. Use the numeric keypad area to type
Operator keys (9) Several keys are always used with at least one other key: <Ctrl>, <Alt>, and <Shift>.
nN
25
tasks. For example, in many applications, <F1> is the Help key. The task associated with
each function key may vary from one application to the next.
Windows Clipboard. Yo u can then paste the screenshot into a document and print it.
Application key (7) The Application key displays a shortcut menu; pressing this key is equivalent to clicking the
right mouse button.
numbers or to perform mathematical calculations such as addition and subtraction. Note
that you must press the <Num Lock> key to activate the numeric keypad. When you do
so, the <Num Lock> indicator illuminates.
When held down with another key, the <Ctrl> (Control) and <Alt> (Alternate) keys offer
anothe r way to exe cute commands. For example, in many appl ications, inst ead of
choosing the Save command from a men u, you can hold down <Ctrl> and press S
(referred to as <Ctrl>+<S>). The <Shift> key is used to produce capital letters or special
symbols such as @ and $.
Windows
®
key (10) The key wit h the Windows®logo displa ys the Win dow s®Start menu; it is equivalent to
clicking the Start button on the taskbar.
Page 26
Using your notebook
Combinations and functions with the Windows key
Combinations Functions
+ F1 Displays Windows He lp.
+ Tab Switches the selected button on the taskbar.
+ E Displays Windows Explorer.
+ F Displays the Search Results window to find a file or folder .
Sony Notebook User Guide
+ Ctrl + F Displays the Search Results - Computer window where you can loc a te othe r
+ M Minimizes all displayed windows.
Shift + + M Retu rns all mini mized windows to their previous size.
+ R Displays the Run
+ Insert Displays the Sys tem Prop er ties window. This is equivalent to double-clicking the
nN
26
This is equivalent to selecting Search and then For files or Folders from the Start
menu.
computers.
window. This is equival ent t o select in g Run from the Start menu.
System icon in the Control Panel.
Page 27
Using your notebook
Indicators
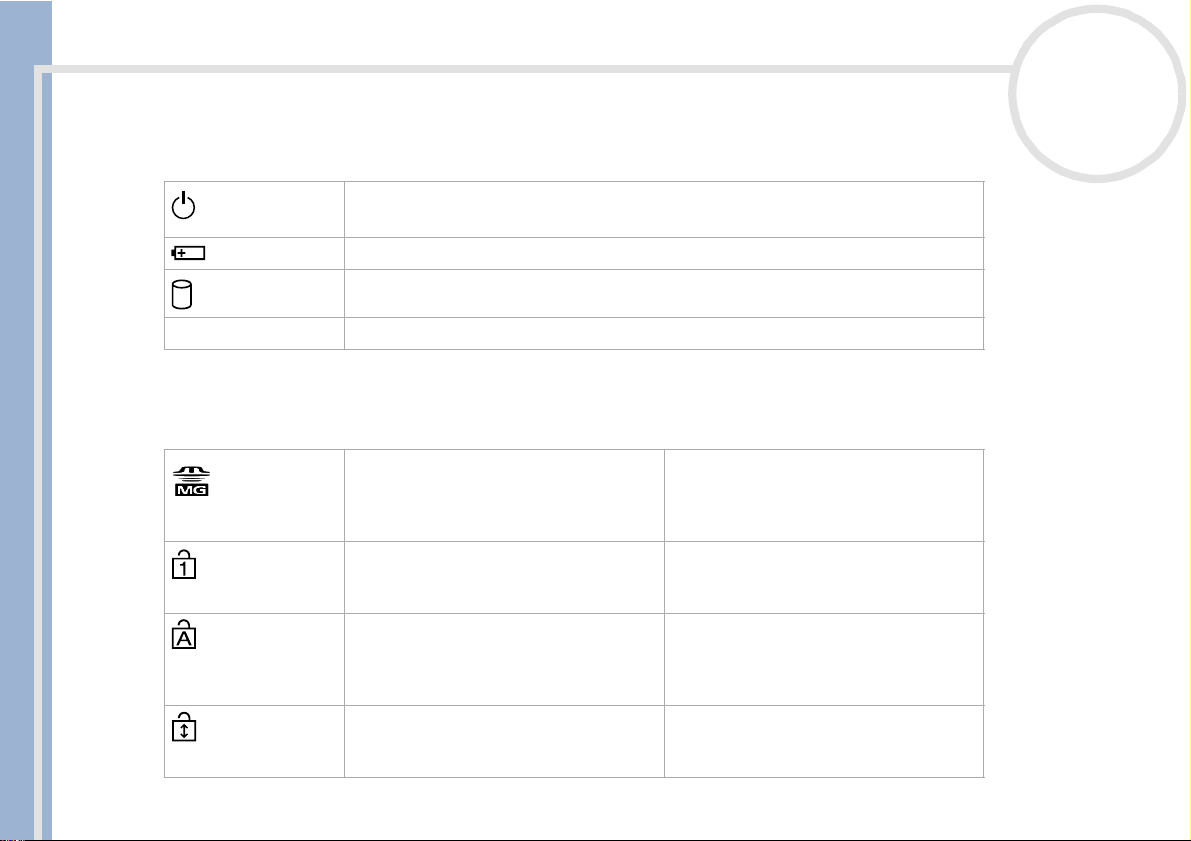
Indicator Functions
nN
27
power Power on: lights green.
Standby mode: flashe s umbe r.
battery Indicates the status of the battery inserted in the computer.
hard disk Turns on when data is read from or written to the hard drive.
Sony Notebook User Guide
Bluetooth™* Turns on when the Bluetooth™ function is in use.
*The Bluetooth™ availability depends on the model and your cou ntry of residenc e.
Light On Off
MagicGate
Memory Stick™
Num Lock Turns on when the number keys in the
Caps Lock Turns on when the letters appear in
Scroll Lock Turns on when the screen scrolls
Data is read from or written to the
Memory Stick. Do not enter Standby
mode or turn off the computer when this
indicator light is on.
numeric keypad are acti ve.
uppercase as you type. The <Shift> key
lowers the case of typed letters when
Caps Lock is on.
differently (depends on the application,
no effect in many applications.)
The Memory Stick is not bei ng acc ess e d.
Tur ns off when the alphanumeric
charac t e r ke ys i n t he ke yp ad area are
active.
Tur ns off when the letters appear in
lowercase as you type (unless you hold
down the <Shift> key).
Tur ns off when the information moves
across the display normally.
Page 28

Using your notebook
Combinations and functions with the Fn key
Combinations/ Feature Functions
Fn + (ESC) Standby mode Puts the system into Standby mode, a power management state.
Fn + (F3) speaker switch Toggles the built-in speaker on and off.
Fn + (F4) speaker volume Adjusts the built-in speaker volume.
Sony Notebook User Guide
Fn + (F5) brightness control Adjusts the brightness of the LCD.
nN
28
To return the system to the active state, press any key.
To increase volume, press <Fn>+<F4> and then or
To decrease volume, press <Fn>+<F4> and then or
To increase light intensity, press <Fn>+<F5> and then or
To decrease light intensity, press <Fn>+<F5> and then or
Fn + / (F7)
switch to the external display
Fn + / (F8)
switch to the external display
Fn + (F12) Hibernate mode Provides for the lowest level of power consumption. When you execute this command, the
<Fn>+<B> : Bass Boost Toggles the Bass Boost function off and on. This feature is available with headphones only.
Toggles between the LCD, external display (connected to the Monitor connector) and both
LCD and external display.
Toggles between the LCD and both LCD and TV.
states of the system and of the peripheral devices are written to the hard disk and the
system power is turned off. To return the system to its original state, use the power switch
to turn on the power.
✍ Some functions are not available un til Windows is launched.
Page 29

Using your notebook
Using the pointing device
The stick on the keyboard is a cursor-pointing device. You can point to, select, drag, and scroll objects on the
screen using the stick.
Sony Notebook User Guide
Action Description
point Press the st ick (1) in the appropriate direction to position the pointer (2) on an item or object.
click Press the left button (3) once.
double-click Press the left button twice.
right-click Press the right button (4) once. In many applications, this action displays a shortcut menu.
drag Press the stick in the appropriate direction to position the pointer on an item or object. While
scroll Press the stick while pressing the center button.
✍ The scroll function is available only with applications that support a scroll-pointing feature.
nN
29
holding the left button, press the stick, then let it go where needed.
Page 30

Using your notebook
Replacing the pointing stick cover
You can remove th e cove r (1) and repl ace i t with an additional stick co ve r sup plied wi th your computer.
Sony Notebook User Guide
nN
30
Page 31

Using your notebook
Using Jog Dial
Your computer is equipped with a Jog Dial (1) o n the r ig ht s id e of yo ur c omp ute r . Yo u c an t urn ( 2) and/ or
press (3) the Jog Dial to scroll the window , select a softw are, adj ust the internal speaker volume, etc.
Sony Notebook User Guide
nN
31
Page 32

Using your notebook
The Jog Dial wi ndow is always displayed on the screen. Th is win dow has two mo des: Launcher mode or
Guide mode.
Sony Notebook User Guide
nN
32
The Jog Dial window is in Launcher mode until you start an application or the Jog Dial
window becomes active. When an arrow appears next to an item in the Jog Dial
window, you can display a submenu for that item by selecting it and pressing the Jog
Dial.
The Jog Dial window switches to Guide mode when you start an application and its
window becomes acti v e. De p e nd in g on the applicati on, the Jog Dial wi nd ow displays
different commands that you can select or execute by rotating or pressing the Jog Dial.
✍ You can adjust the siz e of the Jog Dial window or close it. To display the Jog Dial window, double-click or on
the taskbar.
Page 33

Using your notebook
To use the Jog Dial in Launcher mode, proce ed as follo w s:
1 Click the Jog Dial window or press the Jog Dial while pressing the <Ctrl> key to switch to Launcher
2 Turn the Jog Dial to select an item, then press the Jog Dial.
Sony Notebook User Guide
3 Turn or press the Jog Dial to use the Jog Dial function.
4 To select another item, switch to Lau nc her mod e and repeat th is p roc edu re.
nN
33
mode.
The Jog Dial window switches to Guide mode, and show s the Jog Dial function.
Page 34

Using your notebook
Software supporting Jog Dial
If the Sony software supporting the Jog Dial i s activ e, you can use Jog Dial functions allocated to each
software.
Software not supporting Jog Dial
If the software in use does not support the Jog Dial, you can scroll the windo w o r adju st the window size
as described below :
Sony Notebook User Guide
Action Description
Turn the Jog Dial Scrolls the window vertically. When several windows are
Press the Jog Dial Maximizes the size of the active window. Press again to
nN
34
displayed, the last selected window will be scrolled.
return to its normal size.
Press <Alt> and the Jog Dial Minimi zes the si ze of the active window. Press both <Alt>
Press <Shift> and the Jog Dial Ends software or programs in use.
and the Jog Dial again to return to its normal size.
Page 35

Using your notebook
Using PC Cards
Your computer includes a PC Card slot. PC Cards allow you to conn ec t port abl e ex ternal devices.
Inserting a PC Card
To insert a PC Card, proceed as follows:
1 Insert the PC Card into the PC Card sl ot, fron t lab e l faci ng up (1).
Sony Notebook User Guide
2 Gently push the ca rd into the slot until the card is fixe d into the connector.
✍ Some PC Cards may require you to disable idle devices when using the PC Card. You can use Sony Notebook Setu p to disable devices.
nN
35
Be sure to use the most recent software driver provided by the PC Card manufacturer.
If an “!” mark appears on the Device Manager tab in the System Properties dialog, remove the software driver a n d then reinstal l it.
You do not need to s hut down th e compute r before inserting or removing a PC Card.
Do not force a card into the slot. It may damage the connector pins. If you have difficulty inserting a card, check that you are inserting the card in the
correct direction. See the manual supplied with your PC Card for more information on use.
For some PC Cards, if you alternate between normal power operation and the Standby or Hibernate power management modes while the card is
inserted , you may find that a device connected to your system is not recognized. Reb oot your system to c o rrect the problem.
Do not put your notebook in a bag or a case with a PC Card inserted in the slot. Pressure or shock to the PC Card may damage your notebook.
Page 36

Using your notebook
Removing a PC Card
If you unplug this dev i ce fro m the co mputer when turned on, your system might crash and you m ig ht lose
data that yo u did not save before.
If your comput er is tu rned off, you do not have to follow these instruction s.
To remove a PC Card, proceed as follows :
1 Double-click in the task bar.
Sony Notebook User Guide
2 Select the ha rdware you want to unplug and click Stop.
3 Confirm the device to stop and click OK.
4 Click OK.
5 Click Close to close the Unplug or Eject Hardware dialog box.
6 Eject the PC Card release button (1) and then press it to eject the card.
7 Gently pre ss the card and pull it out.
nN
36
The Unplug or Eject Hardware window appears.
The Stop a Ha rdware dev i c e di a lo g bo x appe ars.
A Safe to Remove Hardware window appears, confirming the device can be safely removed from the
system.
✍ While the card is inserted, your computer may
not enter the Hibernate power management mode.
It may enter Standby mode. It is recommended to
remove the card when your computer enters the
Hibernate mode by pressing <Fn> + <F12> keys
or by using the PowerPanel util ity , and when it i s set
to enter Hibernate automatically while using a
battery as the source of power.
You may not be able to use some PC Cards or some
functions within the PC Card with this comput er.
Close all the applications that use the PC Card before
removing the card. Otherwise, data may be lost.
Page 37

Using your notebook
Using Memory Stick™
This compact, portable, and versatile recording medium has a data capacity exceeding that of a floppy disk.
The Memory Stick™ is specially designed for exchanging and sharing digital data with compatible products.
Because it is removable, it can be used for external data storage.
✍ When the Memory Stick™ erasure prevention switch is set to LOCK, data cannot be recorded or erased.
Sony Notebook User Guide
nN
37
You can enjoy images that you ha ve recorded with a Memory Stick™ compatible video camera recorder or a digital still camera.
Before using Memory Sticks™, you should back up important data.
Only the MagicGate Memory Stick™ can be use d with copyri ght prote cted data like music.
To avoid damag ing data:
- Do not remove a Memory Stick™ or turn off the power while the access light is on.
- Do not use Memory Sticks™ in locations that are subject to static electricity or electrical noise.
- Do not touch the Memory Stick™ connector with your finger or metallic objects.
- Do not attach labels oth er than the supplied labe l to a Memory Stick™.
- Do not bend, drop, or apply strong shock to Memory Sticks™.
- Do not disassemble or modify Memory Sticks™.
- Do not allow Memory Sticks™ to get wet.
- Do not use or store Memory Sticks™ in a location that is subje ct to:
- Extremely high temperatures, such as in a car parked in the sun
- Direct sunlight
To prolong the life of Memory Sticks™, use the suppl ied storage case.
Page 38

Using your notebook
Types of Memory Stick™ media
Two types of Memory Sti c k™ are available. The first type, MagicGate Memory Stick™ (her eafter
referred as MG Memor y Stic k), is provided with copyright protection. The second type, simply referred to
as Memor y St i c k™, does not have the same copyri gh t pro tec tion as MagicGate.
You can use bo th types with your notebo ok.
For music, which requires copyright protection, you can only use MG Memory Stick with y our note book.
You can also use MagicGate-com p ati ble dev ices to recor d and playback music when they are connect ed to
Sony Notebook User Guide
your computer.
You can stor e mi x ed data on the MG Memory Stick. For example, you can copy an image on to an
MG Memory Sti ck that already contains music.
What is MagicGate?
MagicGate is cop yrig ht protection that co nsi sts of authentificati on a nd encryp tio n tec hn ol og y.
Authentification technology ensures that protected content is only transferred between compliant devices
and media. Protected content is recorded and transferred in an encrypted format to prevent unauthorized
duplication or playback.
✍ An MG Memory Stick can be recognized from its mark.
nN
38
Copyright protected music data cannot be checked out to a Memory Stick™ other than an MG Memory Stick.
The recor ded music is limited to private use o nly . The u se of music for any p urpose other than the intended use requires the p ermi ssi on of th e co py righ t
holders.
Sony is not responsible for music files that are not saved on your computer due to unsuccessful recording from CDs or unsuccessful downloading of
music.
Page 39

Using your notebook
Inserting a Memory Stick™
To insert a Memory Stic k™, proc eed as fo llow s:
1 Gently insert your Memory Stick™ (1), front label facing down, until it clicks in to place.
Sony Notebook User Guide
When the Memor y Stick™ i s connec ted properly, you can see the contents of the card by clickin g the
Removabl e Disk (S:) icon.
If you cannot find the Rem ovable Disk (S:) ic on in My Computer on the desktop, procee d a s fol lo ws :
1 Go to Control Panel.
2 Double-click the System ic o n.
3 Click Hardware, then Device Manager.
4 Select the d evice.
5 Click Action and then Scan fo r hardware changes.
!
! If your computer is in Ultimate Battery Life mode, Memory Stick™ cannot be used. Sel ect another mode.
nN
39
Hold the Memory Stic k™ with the arrow pointing in the correct dir ection and turn the label side down when you insert it into the slot. To avoid
damaging the computer or the Memory Stick™, do not force the Memory Stick™ into the slot if it does not insert smoothly.
Page 40

Using your notebook
Removing a Memory Stick™
To remove a Memory Stick™, proceed as follows:
1 Make sure the access light is off and gently press the Memory Stick™ inwar ds .
2 When it comes out, pu ll it out.
✍ Always remove the Memory Stick
Sony Notebook User Guide
! To prevent the possible loss of data, do not remove a Memory Stick™ when the Memory Stick™ access light is on. Large image files require more
Write-protecting a Memory Stick™
Memory Sticks™ are designed with an erasure prevention switch to protect valuable data from accidental
erasure or overwriting.
To write-protect a Memory Stick™, proceed as follows:
Move the tab to the rig ht or l eft to set or release write-prot ecti on .
When the erasure prevention switch is off, data ca n be sav ed on the Memory Stick™. When the erasure
prevention switch is on, data can be read from but not saved on the Memory Stick™.
nN
40
The Memory Stick™ window closes automatically when you remove the Memory Stick™.
™
gently, or it may pop out unexpectedly.
It is recommend ed to remo ve the Memory Stick™ before shutting down the computer.
time to store on a Mem o ry Stick™, so always check the Memory Stick™ access indicator and make sure that it is off before y o u remove the
Memory Stick
™
.
Page 41

Using your notebook
Formatting a Memory Stick™
Memory Sticks™ are formatted for imme d ia te use w hen you pur ch ase them . If you need to reformat a
Memory Stick, use the Memory Stick F o rm atter software provided with your notebook. For more details
about using Mem o ry Stick For m atter, refer to the help files.
To format a Memory Stick™, proceed as follows:
1 Insert the Memory Stic k™ into the notebook.
Sony Notebook User Guide
2 Click the Start button, poi nt to Programs, click Memory Stick Utility and then click Memory Stick
3 Click Start Formatter.
!
nN
41
Formatter.
Memory Stick Form atter starts.
If you format a Memory Stick™ that already contains data, all the data (including music data) will be erased. Confirm that the Memory Stick™ does
not contain files that you want to keep.
Page 42

Using your notebook
Using the MOTION EYE built-in camera
Your computer includes a built-in MOTI ON EY E camer a. You can us e the camer a to shoot sti ll images and
record video clips.
Capturing still images
To capture a still image, proceed as follows:
nN
42
Sony Notebook User Guide
1 Press the Capture button (1).
The Smart C ap ture application starts.
2 Select St ill Viewer/Mo vi e Player from the ap plicati on list.
3 Select STILL with the Capture mode button.
The Finder window appears.
Page 43

Using your notebook
4 Turn the Mot ion Eye lens toward s the subject.
Sony Notebook User Guide
5 Adjust the focus ring.
6 Click the Capture button on the comp uter.
✍ Do not touch the camera lens.
nN
43
The Still Viewer window appears and displ ays the c aptu red image .
Do not po int the camera towards the sun.
If you turn the lens inw ards, Smart Capture goes into mirror m o de. You can use the mirror mode to ta ke a s till image of yourself. A mirror image
appears in the finder window of the display while shooting. However, after capturing, a normal image appears.
You can capture the following still images sizes: 640 x 480, 320 x 240, 160 x 120 and 80 x 60.
You cannot detach the camera.
Smart Capture is not available while another software that u ses the built-in camera is in use. Close this software before using Smart Capture.
You cannot transfer still images or video clips from the built-in camera while y ou are transferring files usin g i.LINK™ devices via the i.LINK™ cable.
Page 44

Using your notebook
Using power saving modes
When you use a battery as the source of power for your computer, you can take advantage of power
manag eme nt set ti ngs to cons e rv e ba tte ry lif e. In addi t ion to the norm al op e rat i ng mo de, whic h a ll ows yo u
to turn off specifi c de vices, your computer has two disti nc t pow er sav i ng modes: Standby mode and
Hibernate mode.
When using battery power, you should be aware that the computer automatically enters Hibe rnate mode
when the remai ni ng battery charge drop s bel ow 7 percent, regardle ss of th e pow er m a na gem e n t setti ng
Sony Notebook User Guide
you select.
✍ If the b a t ter y le v e l falls to below 10 pe r ce n t, yo u sh ou ld e it her attach the AC ad ap ter to recharge th e ba ttery or shut do wn y o ur computer and insert
Using Normal mode
This is the normal state of your computer when it is in use. The green power indicator light is on in this mode.
To save power, you can turn off a specific devi ce suc h as th e LC D or the har d di sk.
Using Standby mode
The computer saves the current state of th e system in RAM and switch es off pow er to the CPU. The um ber
power light flashes in this mode.
nN
44
a fully char ged battery.
To activate Standby mode, proceed as follows:
Use the PowerPanel utility.
To return to Normal mode, proceed as follows:
Press any key.
Page 45

Using your notebook
Using Hibernate mode
The state of the system is saved on the hard disk and power is turned off. The power indicator light is off in
this mode.
To activate Hibernate mode, proceed as follows:
Press <Fn>+<F12>.
Or,
Sony Notebook User Guide
Use the PowerPanel utility.
To return to Normal mode, proceed as follows:
Turn on the computer by pressing the power button.
The computer return s to its previous state.
✍ When the computer is in Hibernate mode, you cannot insert a disk.
nN
45
Hibernate mode requires more time than Standby mode to be activated.
It takes more time to return to Normal mode from Hibernate mode than from Standby mode.
Hibernate mode uses less power than Standby mode.
Page 46

Connecting peripheral devices
Connecting peripheral devices
You can add functionality to your computer by connecting or using any of these peripherals and enjoy the
software desc ri bed in the Ab ou t the software on your So ny Notebook user gui de:
Connecting an external di sp lay (page 47)
Connecting external speakers (pag e 51)
Connecting an externa l mic ro phone (page 52)
Sony Notebook User Guide
Connecting a Universal S eri al Bu s ( U SB) dev ic e (page 53)
Using a CD-R OM drive (page 57)
Connecting a printer (page 58)
Connecting a Bluetooth™ device to your notebook* (page 59)
Connecting an i.LINK™ device (page 61)
* The Bluetooth ™ availability depends on the model and your country of residence.
nN
46
Page 47

Connecting peripheral devices
Connecting an externa l display
You can co nnect an exter nal display to your notebook . For e xa m pl e, yo u ca n use yo ur computer wit h the
following devices:
❑ Compute r di spl ay ;
❑ TV;
❑ Projector.
Sony Notebook User Guide
nN
47
Page 48

Connecting peripheral devices
Connecting a computer display
To connect a computer display, proceed as follows:
1 Plug the supplied display adapter (1) into the notebook’s mini VGA Out connector and the display cable
to the VGA Out connector of the display adapter.
2 If necessary, plug one end of the display power cord (2) into the di spl ay, and the other end (3) into an
AC outlet.
Sony Notebook User Guide
nN
48
✍ Before y ou connect peripherals, turn off the computer and all peripherals.
Connect the powe r cord only after connecting all cable s.
Turn on the computer only after turning on all peripherals.
Page 49

Connecting peripheral devices
Connecting a TV
To connect a TV to your notebook, proceed as foll ow s:
1 Plug the supplied AV cable (1) in to th e computer’s AV out connecto r (yell ow ).
2 Plug the three-pin jack of the AV cable to the TV as shown below.
Sony Notebook User Guide
✍ 640x480 dots of your computer screen will be displayed on TV. The rest can be seen by scrolling.
nN
49
T
Page 50

Connecting peripheral devices
Connecting a projector
To connect a projector, proceed as follows:
1 Plug the display adapter (1) into the computer’s mini VGA Out connector and the display signal cable (2)
to the VGA Out connector of the display adapter.
2 Plug the speaker audio cable (3) into the earphone connector identified by the symbol.
3 Plug the microph on e cab le into the micropho ne co nn ecto r id enti fi ed by the the sy m bo l.
Sony Notebook User Guide
nN
50
Page 51

Connecting peripheral devices
Connecting external speakers
You can enh a nc e the so und quality of yo ur co m puter by connecting external spe ake rs.
To connect external speakers, proceed as follows:
1 Plug the speaker cable (1) into the earphone conn ecto r (2).
2 Plug the other end of the speaker cable into the external speaker .
3 Turn down the volume of the sp eakers before you turn them on .
Sony Notebook User Guide
nN
51
✍ Make sure your speakers are designed for computer use.
Do not place diskettes on the speakers; their magnetic field may damage the data on the diskettes.
Page 52

Connecting peripheral devices
Connecting an external microphone
Your VAIO notebook contains an internal microphone. If you need to use a sound input device, for example
to chat on the Internet, you can also plug in an external microphone.
To connect an external microphone, proceed as follows:
Plug the microphone cable (1) into the microph on e connector (2) identified by the symbol. .
Sony Notebook User Guide
nN
52
✍ Make sure your microphone is designed for com p uter use.
Page 53

Connecting peripheral devices
Connecting a Universal Serial Bus (USB) device
You can co nnect a USB dev i ce ( e.g. mouse, flo ppy di sk dri v e…) to your computer.
You do not ne ed to shut down the computer before conne c tin g or d isc onnecting a U S B peri pheral.
When you start your notebook with a USB hub connected to it, make sure that a device is connected to the
USB hub. If you e nc ounter problems booti ng w hen a USB hub is con ne c ted to your notebo ok, unplug th e
hub and rebo ot.
nN
53
Sony Notebook User Guide
Connecting a USB mouse
To connect a USB mouse, proceed as follows:
Plug the USB cable (1) into the USB connector (2) identified by the symbol.
✍ You can connect the optional Sony USB mouse (PCGA-UMS1
series). As the driver for this mouse is preinstalled on your
computer, you can use the mouse by just connecting it.
Your computer does not include any Se rial or PS/2 connector s.
Page 54

Connecting peripheral devices
Using a USB floppy disk drive
You can connect a floppy disk drive to the USB connector on your computer.
Connecting the floppy disk drive
To connect the floppy disk drive, proc eed as follows:
Plug the floppy disk drive cable (1) into the USB connector (2) identified by the symbol. The VAIO logo on
Sony Notebook User Guide
the disk drive shoul d be facing up.
nN
54
Page 55

Connecting peripheral devices
Inserting a diskette
To insert a diskette, proceed as follows:
1 Hold the diskette (2 ) wit h the label side facing up.
2 Gently push the diskette into the drive (1) until it clicks into place.
Sony Notebook User Guide
Removing a diskette
To remove a diskette, proceed as follows:
When you finish using the diskette, wait until the LED indicator (2) turns off and then press the Eject button
(1) to remove the diskette.
nN
55
✍ Before pressing the Eject button, make sure that the LED indicator is turned off.
If the diskette doe s not come out by pressing the Eject button, disconnect the floppy disk drive from the computer.
! Do not press the Eject button while the LED indicator is on. It may damage the diskette.
Page 56

Connecting peripheral devices
Removin g the fl op py di sk dri v e
To rem ov e the floppy disk drive, proceed as follows:
❑ If your compute r is on , w ait un ti l the LED in di ca tor turns off and then unpl u g the U S B cab le from the
computer . If the floppy disk drive is not removed properly, your system may crash and you may lose data
that y ou did not save before.
❑ If your computer is off, you can dire c tl y un pl ug the USB cab le from the com puter.
✍ To carry your floppy disk drive when you have finish ed using it, fold the floppy disk cable into the compartme nt on the side of the floppy disk drive.
Sony Notebook User Guide
nN
56
Page 57

Connecting peripheral devices
Using a CD-ROM drive
You can co nnect a CD-ROM dri v e to y our noteboo k to re ad CD-ROMs, Audio-CD s an d CD E x tras.
Connecting the CD-ROM drive
To connect the CD-ROM drive, proceed as foll ow s:
1 Insert the CD-ROM card into the PC Card slot with the SONY log o fac ing up.
Sony Notebook User Guide
2 If this is not the case, try to reinsert the CD-ROM card.
✍ You cannot insert a disk when the computer is in Standby or Hibernate mode.
Removi ng the CD-ROM drive
If yo u un plug the CD-R OM dr ive from t he comput er when turne d o n, yo ur sy ste m migh t cr ash and y ou m ight
lose data that you did not save before. If your comp uter is turned off, you do no t hav e to fo ll ow these
instructions.
To remove the CD-ROM drive, proceed as fo llow s:
1 Double-click in the taskbar.
The Unplug or Eject Hardware window appears.
2 Select the ha rdware you want to unplug and click Stop.
The Stop a Ha rdware dev i c e di a lo g bo x appe ars.
3 Confirm the device to stop and click OK.
The Safe to Remove Hardwa re window appears, confirming the device can be safely removed from
the system.
4 Click OK.
5 Click Close to close the Unplug or Eject Hardware dialog box.
6 Remove the device safely.
nN
57
Page 58

Connecting peripheral devices
Connecting a printer
You can co nnect a Windows-compatible prin ter to y our computer to print documents.
Connecting a printer using the USB connector
You can co nnect a USB printer compati bl e wi th y ou r version of Win dows to your co m puter.
To connect a printer using the U SB connecto r, proceed as follows:
Sony Notebook User Guide
Plug an optional US B pr in ter cab le (1) into the USB conn ec tor ( 2) ide ntifi ed by the symbol on your
computer and printer.
nN
58
✍ Before using the p rinter, you may need to change the Printer settings in the Sony Notebook Setup software.
Turn off your computer and the printer, unplug the AC adapter and the power cord before connecti ng the printer.
Page 59

Connecting peripheral devices
Connecting a Bluetooth™ device to your notebook*
The Bluetooth™ wireless technolo gy* enables you to est abl ish a wi rele ss co m m uni c atio n between your
notebook and other Bluetooth™ devices such as a notebook, a mobile phone or a modem station without
any cable within a 10 to 100 metres range in op en space.
All Bluetooth™ communica tions are made i n conjun ction with the BlueSpace software.
Sony Notebook User Guide
✍ The 2.4 GHz band which Bluetooth™ devices or wireless LAN devices use is used by various devices. Bluetooth™ de vices use the technology to
minimize the interference from other devices that use the same wavelength. However communication speed and distances can be inferior. Interference
from other devices may also stop communications.
! The Bluetooth™ functions may not work depending on the devices or the software version used.
! When you purchase Bluetooth™ devices, check their operating conditions.
nN
59
* The Bluetooth ™ availability depends on the model and your country of residence.
Page 60

Connecting peripheral devices
Bluetooth™ security*
The Bluetooth™ wireless technology has an authentification fun cti on whi ch allow s y ou to make sure with
whom you communicate. With the authentification function, you can avoid any anonymous Bluetooth™
device to access your notebook.
The first time two Blu etooth™ devices c om municate, a commo n Pass key shou ld be determined for both
devices to be registered. Once a device is registered, there is no need to reenter the Passkey.
You can ch ange your settin gs in order not to be di sco v er ed by other Bluetooth™ devic es or y ou can set a
limit. For more information, see the BlueSpace online hel p.
Sony Notebook User Guide
* The Bluetooth ™ availability depends on the model and your country of residence.
nN
60
Page 61

Connecting peripheral devices
Connecting an i.LINK™ device
Your computer includes an i.LINK™ (IEEE1394) connector, which you can use to connect to an i.LINK™ device
such as a digital video cam era rec ord er or to connect two VAI O no tebooks in order to cop y, del ete or edit
files.
The i.LINK™ connector of your notebook does no t supply power to external devices gen eral ly powered by
i.LINK™ connectors.
The i.LINK™ connector supports transfer rates up to 400 Mbps; however, the actual transfer rate depends
Sony Notebook User Guide
on the transfer rate of the external device.
i.LINK™ cables compatible with your VAIO notebook include cables with the following part numbers:
VMC-IL4415A (a 1.5 meter cable with a 4-pin connect or at each end ), VMC-I L4 408Seri es (a 0.8 meter c able
with a 4-pin connector at each end).
✍ An i. LINK™ connection with ot her compatible devices is not fully guarantee d .
The i . LINK™ connection varies de pending on the software applications, operating system and i. LINK™-compatible devices you use. Refer to the
documentation that came with your software for more information.
Check the working conditions and OS compatibility of i.LINK™-compatible PC peripherals (HDD, CD-RW drive etc.) before you connect them to your
notebook.
nN
61
Page 62

Connecting peripheral devices
Connecting a digital video camera record er
To connect a digital video cam e ra recorder , pro ceed as follows:
1 Plug one end of the i.LINK™ cable (1) into the i.L INK™ connector (2) of the computer and the other end
into the DV Out con nec tor (3) on the digi tal vid eo c a me ra rec ord er.
Sony Notebook User Guide
nN
62
2 Launch the DV g ate application.
✍ On Sony digital video cameras, connectors labeled DV Out, DV In/Out or i.LINK™ are i.LINK™-compatible.
The Sony digita l video camera recorder is an example; you r digital video camera recorder may need to be connected differently.
™
If your digital video camera recorder includes a Memory Stick
simply copy images on the Memory Stick
™
, then insert it into the Memory Stick™ slot of your computer.
slot, you can copy im ages from it to your computer via a M emory Stick™. To do so,
Page 63

Connecting peripheral devices
Connecting two VAIO notebooks
nN
63
With Smart Connect you can copy, edit or delete files on another VAIO computer (equipped with Smart
Connect) connected to your computer with an i.LINK
™
cable (1) (not supplied).
You can als o pri nt a document on a printer connected to an other VAIO computer.
Sony Notebook User Guide
✍ When you use Smart Connect to connect two VAIO computers, you must assign each computer a unique name by which it can be identified when
the two computers are networked.
Page 64

Getting help
Sony Notebook User Guide
nN
64
Getting help
This section describes how to ge t help and suppo rt from Sony, as we ll as trou bl e sho oting tips for your
computer.
Sony support opti ons
Sony provid es sev eral support optio ns for your com pu te r.
Printed documentation supplied with your notebook
❑ The Customer G uide explains how to start your computer and use the basic functions. This guide gives
you the informat ion to acc ess VAIO-Li nk.
❑ The Getting Started gives you a list of the items you fi nd in the box and a summa r y of the bundled
applications.
Online user guides on your computer's hard drive
❑ The Hardware guide explains how to use your computer , connect peripheral devices. It gives you a
packing list and the list of specific ations of your co mputer and accessories.
❑ The Software guide lists the pre-installed software titles and explains how to use the utility programs
and perform basic computer tasks.
❑ The Customer Service Guide gives you complete informati on on the VAIO-L in k Se rv ices.
Other sources of information
❑ The online help files that accompany y our pre- installed software co ntai n i nstr uctions on using the
software.
Page 65

Getting help
nN
65
❑ VAIO-Link website: if you ha ve an y prob lem w ith your compu te r, you can access the VAIO-Link web
site. Go to:
http://www.vaio-link.com
❑ VAIO-Link Response Centre: Before contacting VAIO-Link Response Centre, try to solve the problem
by reading the User Guides and help files for the peripherals or software.
✍ You need to plug in the phone line and configure your m odem for use before using the communication features described in this manual.
Sony Notebook User Guide
Troubleshooting
This section describes how to sol v e comm on problem s y ou might encounte r w hen using you r not e bo ok .
Many problems have simple solut io ns. Plea se, try th ese suggestions before contacting VAI O-L i nk.
About the computer and software (pag e 66)
About Blue tooth™* (page 69)
About the display (page 71)
About CD-ROMs and diskettes (page 72)
About the MOTION EYE camera (page 73)
About sound (page 74)
About peripher als (page 75)
About digital video captures and DVgate (page 76)
* The Bluetooth ™ availability depends on the model and your country of residence.
Page 66

Getting help
Sony Notebook User Guide
nN
66
About the computer and software
My computer does not start
❑ Check that the computer is plugg ed in to a power source and that it is turned on.
❑ Check that the power indicator on th e front panel of the computer indicates that the power is on.
❑ Check that the battery pac ks are inserted properly and that the y are charg ed.
❑ Make sure there is no diskette in the floppy disk drive.
❑ Confirm that the power cord and all cables are connected firmly.
❑ If you have plugged the computer into a UPS, make sure the UPS is turned on and works.
❑ If you are using an external display, check that it is plugged into a power source and turn ed on . Chec k
that you have switched to the external display and that the brightness and contrast controls are adjusted
correctly.
❑ Moisture condensation may have occurred. Do not use the computer for at least one hour and then turn
it on.
❑ When the internal backup battery is low on power, it may not be able to start your system properly.
The message Press <F1> to resume, <F2> to se tup appears at startup
If the floppy disk drive is empty, proceed as follows to in itialize the BIOS:
1 T urn off the computer.
2 Remove any peripheral devices connected to the computer.
3 T urn on the computer and press <F2> when th e Sony lo go appear s.
The BIOS setup menu screen appears.
4 Press the arrow keys to select the Exit menu.
Page 67

Getting help
Sony Notebook User Guide
nN
67
5 Press the arrow keys to select Get Default Values and then press <Enter>. The message Load default
configuration now? appears.
6 Make sure that [Yes] is selected and then press <Enter>.
7 Press the arrow keys to select Exit (save changes) and then press <Enter>.
The message Save configurati o n change s a nd exit now? appears.
8 Make sure that [Yes] is selected and then press <Enter>.
9 Restart the computer by pressing <Ctrl> + <Alt> + <Delete> and by choo si ng Shut Down.
My computer does not shut down
®
It is recommended to shut down your computer using the Shut Down command on the Windows
Start
menu. Using other methods, including those listed here, may result in loss of unsaved data. If the Shut
Down comm and does not wo rk properly, proceed as follows:
❑ Restart the computer by pressing <Ctrl> + <Alt> + <Delete> and by choo sin g Shut Down.
❑ If this does not work, press the power switch and hold it for at least four seconds, this turns off the power.
❑ Unplug the computer from the AC adapter and remove the battery pack from your comp uter.
My comput er locks up
❑ If you suspect one app lication is locking y our syst em , you can try to sto p it . To do this, press
<Ctrl>+<Alt>+<Delete> once, click Task Manager, select the application or the process that is locking
your system, and then click End Task.
❑ If the above method does not work or you do not know which application is locking your system, restart
the computer. On the Windows
®
taskbar , click the Start button, click Shut Down, and then select Shut
Down in the list and click OK.
❑ If the above method does no t work, press the power sw it ch and hold it for at least four second s. This
turns off the power.
Page 68

Getting help
nN
68
❑ If your computer locks up while playing a CD - ROM, stop the CD- ROM, and sh ut down the computer by
pressing <Ctrl>+<Alt>+<Delete>, and then click Shut Down.
My software program locks up or crashes
Contact the so ftware publis he r or designated provider for technical support.
The pointer in the display moves on its own
Sony Notebook User Guide
A « drift » has occurred. However, this is not a malfunction. The pointer will stabilize if you do not touch the
stick for a few seconds.
My mouse does not work
❑ Check that the m ouse is plugged into the USB connector.
❑ If you are using an optional Sony USB mouse, check that the approp ri ate driver and mouse war e are
properly in sta lled.
The key top comes off
Put it back where it was and press it until it clicks.
If you take off the key top intentionally or press it excessively when you replace it, it may cause a
malfunction. Handle it with care.
Page 69

Getting help
Sony Notebook User Guide
nN
69
About Bluetooth™*
* The Bluetooth ™ availability depends on the model and your country of residence.
I cannot use th e Blu etooth™ fun cti on
❑ If the Bluetooth™ LED is off, press the Bluetooth™ pow er button for two seco nds to turn the LED on .
❑ You cannot use the Bluetooth™ function when the co m puter is in a power saving mode . Return to
normal mode and then press the Bluetooth™ power button.
❑ You may not be a ble to use the Bluetooth™ function if you choose the minimum CPU performance
feature in PowerPanel. Select another mode. See the PowerPanel online help for more details.
❑ Y ou may not be able to use the Bluetooth™ function if you choose Ultimate Battery Life in PowerPanel.
Select another mode. See the PowerPanel online hel p fo r mo re de tails.
The Bluetooth™ devi ce with whi ch I want to commun icate ca nnot be found
❑ Check tha t the Bl ue tooth™ fu nc tio n of th e dev ice wi th which yo u wan t to communicate i s on. See the
other device ’s manual for more det a ils.
❑ If the device with which you want to communicate is already communicating with another Bluetooth™
device, it ma y not be found or it may no t be abl e to co m m unicate with yo ur no te b ook.
The data transfer rate is slow
The data transfer speed depends on the obstacles and/or the distance between the two devices, but also on
the radio wave quality, the operating system or the software used. Try to move your notebook or try to place
the two devices closer.
Page 70

Getting help
Sony Notebook User Guide
nN
70
I cannot comm un ic ate wi th the other device altho ugh the di stance between bo th devices is within 100
metres
❑ The data transfer distance can be shorter than 100 metres depending on existing obstacles between the
two devices, on rad io wave qu ality, on the operating sy stem or th e softw are used. Try to move your
notebook or to place both de vi ces closer.
❑ If the device with which you want to communicate is already communicating with another Bluetooth™
device, it ma y not be found or it may no t be abl e to co m m unicate with yo ur no te b ook.
❑ Check tha t the Bl ue tooth™ fu nc tio n of th e dev ice wi th which yo u wan t to communicate i s on. See the
other device ’s manual for more det a ils.
I cannot stop the Bl uetooth™ fu nc tio n
❑ Press the Bluetooth™ power button for at least four secon ds an d m ake sure that the Bluetooth™ LED
turns off.
❑ If the above method does no t work, press the power sw it ch and hold it for at least four second s. This
turns off the power.
I cannot co nnect to anoth er Bl ue t ooth™ device using services provided by another Bluetooth™ devi ce
You can co nnect to anoth er Bl ue tooth™ dev i ce only by using the serv i ces provided by yo ur no te bo ok . Se e
BlueSpace help and the other Bluetooth™ device’s manual for details.
Page 71

Getting help
Sony Notebook User Guide
nN
71
About the display
My LCD do es not display anything
❑ Check that the computer is plugg ed in to a power source and that it is turned on.
❑ Check that the power indicator on the front panel of the computer is on.
❑ Check that the battery pac ks are inserted properly and that the y are charg ed.
❑ Adju st the bright ness of the LCD.
❑ The computer may be in LCD (video) standby mode. Press any key to activate the display.
❑ The display mode may be set to external display mode. Press and hold the <Fn> key while pressing <F7>
several times.
The screen image on my external display is not centered or sized properly
Use the controls on your external disp lay to ad ju st the i m age.
The window I have just cl osed cont inues to appear on my LCD
®
Press the <Windows
The video image on my screen is too dark
> key and the <D> key twice to refresh the screen.
If an external displa y is co nn ected to the monitor connector, di sco nnect the display.
I cannot displ ay M OTI ON EY E m ov ie s, DV D videos or finder im ages simulta neously on my notebook LCD
display and on an external disp lay
You cannot display tho se imag es on both displ ays . Please select just one display .
Page 72

Getting help
Sony Notebook User Guide
nN
72
About CD-ROMs and diskettes
My CD-ROM drive tray does not open
❑ Make sure the computer is turn ed on .
❑ Press the Eject button on the optical device drive.
❑ If the Eject button does not wor k, y ou can open the tray by inserting a shar p, poi nted object into the
hole to the right of the Eject button.
I cannot play a CD-ROM disc
❑ Make sure the label of the CD is facing up.
❑ If the CD requires software, make sure the softw are is installed according to the instructions of the
program.
❑ Check the volume of your speakers.
❑ Clean the CD.
❑ Moisture cond ensat io n m ay have occur red. Lea ve the computer for at least on e hou r wh ile it is turned
on.
My floppy disk drive cannot write to a diskette
❑ The diskette is write-protected. Disa ble the wr ite-prot ect fea ture or use a diskette that is not write -
protected.
❑ Check that the disket te is pro perly inserted into the floppy disk driv e.
Page 73

Getting help
Sony Notebook User Guide
nN
73
When I double-click an application icon, a message such as 'You must insert the application CD into your
CD-ROM drive' appears and the software does not start.
❑ Some titles require sp ecifi c files th at a re located on the applicati on CD -ROM. Insert the CD an d try
starting the prog ram agai n.
❑ Make sure you place the disk in the tray with th e lab el side fac ing up .
When I remove the Me mory Stick™, an error message appears
™
Insert the Memory Stick
in the slot again and press <Enter>. Wait until the active application finishes, then
remove the Memory Stick™. If the message con fir m s eject of the Memory Stick™, click OK.
About the MOTION EYE camera
There is a vertical line when shooting a bright subject with a dark background using MOTION EYE
This is a phenomenon called “smear”. It is not a malfunction.
The image in the view fi nde r of Smart Capture is rou gh
If you are shooti ng a subject in rapid m ovement, t here may be a gap. How e v er, thi s is no t a ma lfu nc tio n.
The images captured with MOTIO N EYE are not clear
❑ Shooting under fluorescent light may result in reflections.
❑ Red or green noises may occur if the captured images include dark parts.
❑ Check that the lens of the MOTION EYE is clean.
❑ Use the focus ring to focus adjustment.
Page 74

Getting help
Sony Notebook User Guide
nN
74
There are picture gaps and sound gaps wh en importing video images
Gaps may occur based on the effect settings in Smart Capture.
The MOTION EYE does not show any images
❑ Check that other software such as Smart Capture does not use the MOTION EYE.
❑ Depending on monitor mode, color palette and other causes, the video memory is running out and the
camera image is not displayed. Reduce the color palette or monitor resolution.
❑ Start the camera sett in g uti lity and selec t Default.
❑ If the above countermeasures do not work, restart the computer .
About sound
My speakers a re not producin g so und
❑ The built-in speakers m ay be turn ed off. Press <Fn>+<F3> to turn on the speakers.
❑ The speaker volume may be turned to the minimum. Press <Fn>+<F4>, and then press or to increase
the volume.
❑ If your computer is powered by battery, check that the battery is inserted properly and that it is charged.
❑ If you are using an application that has its own vol ume co nt rol , chec k that the volu m e is turned up.
❑ Check the volume controls in Windows
❑ If you use external speakers, check that the sp eakers are properly connected an d the volume is turned
up. If the speakers have a mute butto n, mak e sure it is off. If batteries pow er the speakers, check that
the batteries are inserted pr ope rly and that they are charged.
❑ If you have connected an audio cable to the headphone connector, disconnect the cable.
®
.
Page 75

Getting help
Sony Notebook User Guide
nN
75
My microp hone does not work
If you are using an external microphone, check that the microphone is plugged into the microphone
connector.
An error message appears when using v oice-related software programs
❑ Double-click Yamaha DS-XG Audio Config in Cont rol Panel. Open the Echo tab an d desel ect the
Enable check box. Click OK.
❑ If you are using several voi ce-related softwa re programs at the same time , close them.
About peripherals
I cannot use DV devic es. The me ssage DV equipmen t seem s to be dis con nec ted or turned off appears
❑ Check that the DV device is turned on and that th e cables are prop erly co nn ect ed.
❑ If you are us ing mult iple i .LINK™ devices, the combination of the connected devices may cause unstable
operation. In this case, turn off the power of all connected devices and disconnect unused devices. Check
the connection and then turn on the powe r a gain.
My PC Card is not working
❑ Make sure the PC card is compatibl e with you r ver sion of W indo ws
❑ Use the Sony Notebook Setup utility to disable devices you are not currently using.
❑ If you are using two PC cards, use the Sony Notebook Setup utility to disable the devices you are not
currently using.
®
.
Page 76

Getting help
Sony Notebook User Guide
nN
76
I cannot print
❑ Check that all the cables of the printer are co rrec tl y conn ect ed.
❑ Check that your printer is correctly configured and that you have up-to-date drivers. If needed, contact
your dealer.
About digital video captures and DVgate
While I am recordin g imag es to a di gi tal video dev ice using DVgate, my system displ ay s the message
Recording to DV device failed. Check the power and cable connections to the DV device and try the
operation again...
Close all open applications and restart your computer. Frequent recording of images to a digital video device
while using DVg a te sometimes caus es thi s erro r.
Page 77

Precautions
Sony Notebook User Guide
nN
77
Precautions
This section describes safe ty gui delines and pre cautions to help yo u pro te c t yo ur co m puter from potential
damage.
Your notebook and memory modules use high precision components and electronic connectors technology.
To avoid the invalidation of your guaran tee by mis han dlin g, it is recommen ded that:
❑ You co ntac t your deal er to instal l a new me mory mod ul e.
❑ You do not install it yourself, if you are not familiar with upgrading memory on a notebook.
❑ Yo u do not touch the co nn e ct ors or open the me m ory pa n e l .
Please contact VAIO-Link i f you need assi stan ce.
Page 78

Precautions
Sony Notebook User Guide
nN
78
Placing a key top
If the enter or the space key comes off, replace the key top as shown below. If another key top comes off,
put it where it was and push until it clicks into place.
To replace a key top, proceed as follows:
1 Remove the wire (1) und er the key top if necessary.
2 Insert each side of the wire in to one hook (2).
3 Make sure the center of the key top is aligned with the center underneath and press the key top until it
fits.
Enter key:
Space key:
✍ Do not take off the key top intention ally. It may cause
malfunction.
Handle the key top with care; your computer may be
damaged if you press it to excess.
Page 79

Precautions
Sony Notebook User Guide
nN
79
Other pr ec a ut io ns
On handling the LCD screen
❑ Do not leave the LCD facing the sun as it can damage the LCD. Be careful when using the computer near
a window.
❑ Do not scratch the LCD or exert pressure on it. This co ul d cau se m alf un cti on .
❑ Using the computer in low temperat ure cond it ions may produc e a residual imag e on th e scree n. This is
not a malfunction. When the computer returns to normal temperature, the screen returns to normal.
❑ A residual image may appear on the screen if the same image is displayed for a lengthy period of time.
The residual image disappears in a while. You can use a screensaver to prevent residual images.
❑ The screen becomes war m duri ng operati on. Thi s is norm al and do es no t indi cate a malfun ction .
❑ The LCD is manufactured usin g hi gh-precisio n technology. You ma y, however, see tiny black points and /
or bright points (red, blue, or green) that continuously appear on the LCD. This is a normal result of the
manufac turi ng process and do es not indicate a m alfunction .
❑ Avoid rubbing the LCD screen, as this can damage the screen. Use a soft, dry cloth to wipe the LCD screen.
On using power source
❑ Your computer operates on 100V-240V AC 50/60 Hz.
❑ Do not share the AC outlet with other power-consuming equipment, such as a photocopier or shredder.
❑ Yo u can pur chase a power strip with a surge protector. This device prevents damage to your computer
caused by sudde n power surges such as tho se that m ay oc cur duri ng a n electri ca l sto rm .
❑ Do not place heavy objects on the po we r cord.
❑ T o disconnect the cord, pull it out by the plug. Never pull the cord itself.
❑ Unplug your computer from the wall outlet, if you will not be using the computer for a long time.
Page 80

Precautions
Sony Notebook User Guide
nN
80
❑ When the AC adapter is no t used, unplug it from the A C ou tle t.
❑ Use only the supplied AC adapter. Do not use any other AC adapter.
On handling your notebook
❑ Clean the cabinet with a soft, dry cloth or a soft cloth lightly moistened with a mild detergent solution.
Do not use any type of abrasive pad, scouri ng powder, or solvent such as alcohol or benzine, as these
may damage the finish of your com p ute r.
❑ Should any soli d obje ct or liquid fall int o the comp u ter, shut down your computer and then unplug it.
Yo u m ay want to have the com puter check ed b y qu a l ified personne l before operating it any furthe r.
❑ Do not drop the computer or pl ace heavy obje c ts on top of the comp uter.
❑ Do not place your computer in a location sub jec t to:
❑ Heat source s, su ch as rad ia tors or air du cts ,
❑ Direct sunligh t,
❑ Excessive du st,
❑ Moisture or rai n,
❑ Mechanical vibration or shock,
❑ Strong magn ets or sp eakers that are no t m agn eti cally shiel ded ,
❑ Ambient temperature of more than 35ºC or less t han 10ºC,
❑ High humi dity.
❑ Do not place electronic equipment near your computer . The electromagnetic field of your computer may
cause a malfunction.
❑ Provide adequate air circulation to prevent that internal heat builds up. Do not place your computer on
porous surfaces such as rugs or blankets, or near material such as curtains or draperies that may block its
ventilation sl ots.
Page 81

Precautions
Sony Notebook User Guide
nN
81
❑ The computer uses high-fr equ enc y ra dio signal s and may ca use inter feren ce to radi o or TV recep tion.
Should this occur, relocate the computer a suitable distance away from the set.
❑ Use only specified peripheral equipmen t and int erfac e cab les; oth erw is e, problem s may resu lt.
❑ Do not use cut or damaged connection cables.
❑ Yo ur computer cannot be co nn e ct e d to a coin-ope rate d te lep hone, and may not work with a pri v a te
branch exchange (PBX).
❑ If the computer is brought directly from a cold location to a warm one, moisture may condense inside
your computer. In this case, allow at least one hour befor e turn ing on your com put er. If any problem
occurs, unplug your co m puter and con ta c t VAIO- Link.
❑ Make sure to disconnect the power cord before cleaning the computer.
On handling diskettes
❑ Do not open the shutter man ual ly an d tou ch the surface of the diskette.
❑ Keep diskettes away from magnets.
❑ Keep diskettes away from direct sunl ig ht an d other heat sources.
On handling CD-ROM discs
❑ Do not touch th e surface of the disc.
❑ Do not drop or bend the disc.
❑ Fingerprints and dust on the surface of a disk m a y cause read errors. Proper care of the disc is essent ial
to maintain its reliability. Do not use solvents such as benz in e , th in ner, commercially available clea ners
or anti-static spray, as they may cause damage to the disc.
❑ For normal cleanin g, hol d the disc by its edge and use a soft clo th to wip e the su rfac e from the center
out.
Page 82

Precautions
Sony Notebook User Guide
nN
82
❑ If the disc is badly soiled, moisten a soft cloth with water, wring it out well, and use it to wipe the surface
of the disc from th e cent er out. Wipe off any remaini ng mo is ture with a dry soft clo th.
On using the battery pack
❑ Never leave the battery pack in tempe ratures above 60°C, such as in a car parked in the su n or under
direct sunlight.
❑ Battery life is shorter in a cold environment. This is due to decreased battery efficiency at low
temperatures.
❑ Charge the batteries at temperatures between 10° C to 30°C. Lower temperatures require a longer
charging time.
❑ While the battery is in use or being discharged, the battery pack heats up. This is normal and is not cause
for concern.
❑ Keep the battery pack aw ay from all sources of heat.
❑ Keep the battery pac k dry.
❑ Do not open or try to disassemble the battery pack.
❑ Do not expose the battery pack to any mechanical shock.
❑ If you are not using the com pu ter for an extended pe riod of time, remove the battery pack from th e
computer to pre ve nt dam age to the batte ry.
❑ If, after fully charging the battery pack, the battery power is still low, the battery pack may be reaching
the end of its life and should be replaced.
❑ Yo u do not need to discharge the battery before rec har gi ng.
❑ If you have not used the battery pack for a considerable amount of time, recharge the battery.
Page 83

Precautions
nN
83
On using earphones
❑ Road safety – Do not use earphones while driving, cycling, or operating any motorized vehicle. It may
create a traffic hazard and is illegal in some areas. It can also be potentially dangerous to play loud music
while walking , espe cial ly at ped e strian crossings.
❑ Preventing hearing damage – Avoid using earphones at high volume. Hearing experts advise against
conti nuous , loud a n d e x t e nded p lay. If you exp e r ience a ringing in yo u r e a rs, red u ce the volum e or
discontinu e use.
Sony Notebook User Guide
On handling Memory Stick™
❑ Do not touch th e con nec tor with your fing er or m e tallic object s.
❑ Use only the la bel supplied with the Memory Stic k™ as a label.
❑ Do not bend, dr op, or apply strong shock to the M em ory S tick ™.
❑ Do not disassemble or modify Memory Sticks™.
❑ Do not let cards ge t wet.
❑ Do not use or store Memory Sticks™ in a loca tio n sub je ct to :
❑ Extremely high temperatures, such as in a car parked in the sun,
❑ Direct sunligh t,
❑ High humi dity or near cor rosi v e substances.
❑ Use the storage case su ppl i ed wi th the Me m o ry Stick™.
Page 84

PCG-C1VFK specifications
PCG-C1VFK specifications
Product name PCG-C1VFK
nN
84
Oper ating sy stem
Processor
Sony Notebook User Guide
Hard disk dr ive
Standard RAM
Maximum RAM
LCD screen
L2 cache memor y
MPEG
Graphics
ATI Rage Chipset with 8 MB Video RAM and 3D acclerator
Sound capabilities
Expansion capabilities
Built-in capabilities
Microphone, stereo speakers, MOTION EYE camera, pointing device,
Special buttons
Connection capabilities on notebook
VGA monitor, projector or television, MagicGate Memory Stick™ or
Memory Stick™, external speakers, microphone, USB, Type II PC Cards,
Microsoft® Windows® 2000 Professional
Crusoe™ Processor
TM5600 667 MHz
15 GB
128 MB SDRAM
192 MB
8.95’’ TFT display Ultra Wide XGA
512 KB (C PU integr ation)
MPEG 2 Digital Video Supports full-screen playback
16-bit CD-quality stereo sound
One PCMCIA type II Card and Card bus supp or t
Jog Dial, MagicGate Memory Stick™
Jog Dial, Capture, Bluetooth™
i.LINK™ (IEEE1394) S400
Page 85

PCG-C1VFK specifications
Product name PCG-C1VFK
nN
85
Supplied acces sories
Service
Guarantee
Power source
Sony Notebook User Guide
Power management
Battery
rechargeable battery, AC adapter, power cord, display adapter,
spare stick covers, AV cable
‡ 1 year free VAIO-Link S ervice
‡ 1 year guarantee (parts and labour)
16 V DC/AC 100-240V
Energy Star compliant
ACPI (Advanced Configuration & Power Interface)
Lithium ion
Dimensions
Width
Height
Depth
248 mm
27 mm
152 mm
Weight
With battery
Operating temperature
Storage temperature
Operating humidity
Storage humidity
+5°C to +35°C (temperature gradient less than 10°C/hour)
-20°C to +60°C (temperature gradient less than 10°C/hour)
20% to 80% (not condensed), provided that humidity is less than 65%
at +35°C (hygrometer reading of less than 29°C)
10% to 90% (not condensed), provided that humidity is less than 20%
at +60°C (hygrometer reading of less than 35°C)
990 g
Page 86

PCG-C1VFK specifications
Product name PCG-C1VFK
nN
86
Wireless communicati on:
Method of communication
Maximum communication speed
Output
Communication distance
Bluetooth™ standard Ver. 1.0B
Approx. 723 kbps
Bluetooth™ standard Power Class1
Approx. 100 – 10 m (open space)
Sony Notebook User Guide
Compatible Bluetooth profile
Usable frequency band
Bundled software
MOTION EYE camera
Image device
Lens
White balance
Shutt er spee d
Video capture
format size
2.4 GHz band (2.400 GHz – 2.4835 GHz)
1/6 inch, progr essive scan 350,000 pixels CCD
Focus distance: f = 2.8 mm, F = 2.8 mm
(f = 39 mm translated to a 35 mm camera)
Motion JPEG/JPEG / size:VGA hVGA qVGA
Generic Access Profile
Service Discovery Application Profile
Serial Port Profile
Dial-up Networ k in g Profile
BlueSpace, Vi sualShare
350,00 0 pix el s ( sq ua r e pix e ls )
Automatic/Indoor/Outdoor/Hold
Auto/1/50/Hold
YUY2/24 bit RGB
Displayed frames
30 frames/s. max (overlay)
Page 87

PCG-C1VFK specifications
Product name PCG-C1VFK
nN
87
Captured frames
‡ See our special Guarantee extension conditions.
Specifications are subject to chan ge without notice.
30 frames/s. max. (320 x 240 motion JPEG)
15 frames/s. max. (640 x 480 motion JPEG)
Sony Notebook User Guide
Page 88

PCG-C1VFLK specifications
PCG-C1VFLK specifications
Product name PCG-C1VFLK
nN
88
Oper ating sy stem
Processor
Microsoft® Windows® 2000 Professional
Crusoe™ Processor
TM5600 667 MHz
Sony Notebook User Guide
Hard disk dr ive
Standard RAM
Maximum RAM
LCD screen
L2 cache memor y
MPEG
Graphics
Sound capabilities
Expansion capabilities
Built-in capabilities
Special buttons
8.95’’ TFT display Ultra Wide XGA
512 KB (C PU integr ation)
MPEG 2 Digital Video Supports full-screen playback
ATI Rage Chipset with 8 MB Video RAM and 3D acclerator
16-bit CD-quality stereo sound
One PCMCIA type II Card and Card bus supp or t
Microphone, stereo speakers, MOTION EYE camera, pointing device, Jog
Dial, MagicGate Memory Stick™
15 GB
128 MB SDRAM
192 MB
Jog Dial, Capture
Page 89

PCG-C1VFLK specifications
Product name PCG-C1VFLK
nN
89
Connection capabilities on notebook
Supplied acces sories
Service
Sony Notebook User Guide
Guarantee
Power source
Power management
Battery
VGA monitor, projector or television, MagicGate Memory Stick™ or Memory
Stick™, external speakers, microphone, USB, Type II PC Cards, i.LINK™
(IEEE1394) S400
rechargeable battery, AC adapter, power cord, display adapter , spare stick
covers, AV cable
‡ 1 year free VAIO-Link S ervice
‡ 1 year guarantee (parts and labour)
16 V DC/AC 100-240V
Energy Star compliant
ACPI (Advanced Configuration & Power Interface)
Lithium ion
Dimensions
Width
Height
Depth
248 mm
27 mm
152 mm
Weight
With battery
Operating temperature
Storage temperature
Operating humidity
+5°C to +35°C (temperature gradient less than 10°C/hour)
-20°C to +60°C (temperature gradient less than 10°C/hour)
20% to 80% (not condensed), provided that humidity is less than 65% at
+35°C (hygrometer reading of less than 29°C)
980 g
Page 90

PCG-C1VFLK specifications
Product name PCG-C1VFLK
nN
90
Storage humidity
MOTION EYE camera
Image device
Lens
Sony Notebook User Guide
White balance
Shutt er spee d
Video capture
format size
Displayed frames
Captured frames
‡ See our special Guarantee extension conditions.
Specifications are subject to chan ge without notice.
10% to 90% (not condensed), provided that humidity is less than 20% at
+60°C (hygrometer reading of less than 35°C)
350,00 0 pix el s ( sq ua r e pix e ls )
1/6 inch, progr essive scan 350,000 pixels CCD
Focus distance: f = 2.8 mm, F = 2.8 mm
(f = 39 mm translated to a 35 mm camera)
Automatic/Indoor/Outdoor/Hold
Auto/1/50/Hold
YUY2/24 bit RGB
Motion JPEG/JPEG / size:VGA hVGA qVGA
30 frames/s. max (overlay)
30 frames/s. max. (320 x 240 motion JPEG)
15 frames/s. max. (640 x 480 motion JPEG)
Page 91

nN
91
INDEX
A
AC adapter 5, 17
air circulation 80
Alt key 25
application key 25
Sony Notebook User Guide
AV out connector 13
B
Bass Boost 28
battery
charging the 19
inserting the 18
battery charging status 19
battery connector 16
battery indicator 15
battery lock lever 16
battery release lever 16
Bluetooth™ indicator 15
Bluetooth™ power button 15
bri ghtness contr ol 28
built-in camera 15
button
capture 15
power 15
, 19, 27
RELEASE 14
buttons
left/center/right 15
C
cable
i.LINK 62
microphone 52
printer 58
speaker 51
camera 62
built-in 15
Caps Lock indicator 15
capture button 15
CD-ROM drive 57
charging status 19
combination controls 26
connector
AV out 13
battery 16
DC In 17
earphone 51
headphone 13
i.LINK 14
microphone 13
mini VGA o ut 13
USB 13
copyright 2
, 52
, 27
, 28
correction keys 25
Ctrl key 25
Cust o mer Gu id e 64
Cust o mer Ser vice G uide 64
D
DC In 13, 17
digital video camera 62
diskette
inserting a 55
removing a 55
display 47
computer 47
DVgate 62
E
earphone connector 51
Energy Star guidelines 3
ergonomic considerations 11
Esca p e key 24
external
microphone 52
speaker 51
Page 92

nN
92
F
floppy disk drive
connecting a USB 54
removing a USB 56
Fn key 25
function keys 25
Sony Notebook User Guide
G
guarantee 4, 23
, 28
H
hard disk drive indicator 15, 27
headphone connector 13
help 64
Hibernate mode 28
, 45
I
i.LINK cable 62
i.LINK connector 14
indicator
battery 15
Bluetooth™ 15
Caps Loc k 15
hard disk drive 15
MagicGate Memory Stick™ 27
, 19, 27
, 27
, 27
Num Lo ck 15
power 15
Scroll Lock 15
Insert key 25
, 27
, 27
, 27
J
Jog Dial 13, 31
K
key
Alt 25
application 25
Ctrl 25
Escape 24
Fn 25
, 28
Insert 25
Print Screen 25
Shift 25
Windows 25
keyboard 24
, 26
L
left/center/right buttons 15
lever
battery lock 16
battery release 16
lithium ion battery 7
M
Macrovision 2
MagicGate Memory Stick slot win dow
16
MagicGate Memory Stick™ 14
MagicGate Memory Stick™ indicator
15
, 27
Memory Stick 37
inserting a 39
removing a 40
Memory Stick™
MagicGate 14
microphone 15
cable 52
connector 52
microphone connector 13
mini VGA out connector 13
modem 4
moisture condensation 81
monitor 47
mouse 53
, 52
, 52
, 5
N
nav igation keys 25
Page 93

nN
93
Normal mode 44
Num Lock 25
Num Lock indicator 15
numeric keypad 25
O
operator keys 25
Sony Notebook User Guide
P
PC Card
removing a 36
PC Card slot 14
peripherals 46
pointing device 15
power button 15
power indicator 15
power saving modes 44
precautions 77
Print Screen key 25
printer 58
printer cable 58
projector 47
, 35
, 27
, 27
regulatory information 6
RELEASE button 14
reset switch 16
S
safety information 4
Scroll Lock indicator 15
Shift key 25
slot
PC Car d 14
ventilation 14
slot window
MagicGate Memory Stick 16
Smart Connect 63
Software guide 64
speaker 15
cable 51
speaker switch 28
speaker volume 28
specifications 84
Standby mode 28
switch
reset 16
speaker 28
, 35
, 51
, 88
, 44
, 27
troubleshooting 65
TV 47
U
USB 53
USB connector 13
USB floppy disk drive 54
USB mouse 53
V
VAIO-Link 65
VAIO-Link Response Centre 65
ventilation 80
ventilation slot 14
video camera 62
W
warnings 4
Windows key 25
, 26
R
registration 23
T
technical specifications 84, 88
 Loading...