

Page 1

User GuideHardware GuideOperating
Instructions - Hardware GuideUser
Guide
N
Page 2

Personal Computer
VGN-GS SeriesVGN-GS SeriesVGN-GS100 Series
2
nN
Page 3

Contents
Before Use .........................................................................................................................................................................7
Notice...........................................................................................................................................................................7
E
NERGY STAR ...............................................................................................................................................................8
Documentation .............................................................................................................................................................9
Ergonomic Considerations.........................................................................................................................................12
Getting Started .................................................................................................................................................................14
Locating Controls and Ports.......................................................................................................................................14
About the Indicator Lights ..........................................................................................................................................19
Connecting a Power Source ......................................................................................................................................21
Using the Battery Pack ..............................................................................................................................................22
Shutting Down Your Computer Safely .......................................................................................................................29
Using Your VAIO Computer .............................................................................................................................................31
Using the Keyboard ...................................................................................................................................................32
Using the Touch Pad .................................................................................................................................................34
Using Special-function Buttons ..................................................................................................................................35
Using the Optical Disc Drive ......................................................................................................................................37
Using the PC Card .....................................................................................................................................................45
Using the Memory Stick .............................................................................................................................................48
Using the SD Memory Card .......................................................................................................................................52
Using the Internet.......................................................................................................................................................55
Using the Network (LAN) ...........................................................................................................................................57
3
nN
Page 4

4
nN
Using the Wireless LAN (WLAN) ...............................................................................................................................58
Using the Bluetooth Function.....................................................................................................................................64
Using Peripheral Devices .................................................................................................................................................70
Connecting External Speakers ..................................................................................................................................70
Connecting an External Display.................................................................................................................................71
Selecting Display Modes............................................................................................................................................75
Using the Multiple Monitors Function .........................................................................................................................76
Connecting an External Microphone..........................................................................................................................78
Connecting a Universal Serial Bus (USB) Device......................................................................................................79
Connecting a Printer ..................................................................................................................................................82
Customizing Your VAIO Computer ..................................................................................................................................83
Setting the Password .................................................................................................................................................83
Using Fingerprint Authentication................................................................................................................................94
Using the Trusted Platform Module (TPM)...............................................................................................................103
Setting Up Your Computer with the VAIO Control Center........................................................................................108
Using the VAIO Status Monitor ................................................................................................................................109
Using the Power Saving Modes...............................................................................................................................109
Managing Power with the VAIO Power Management ..............................................................................................114
Protecting Data from Unauthorized Use ..................................................................................................................115
Protecting the Hard Disk ..........................................................................................................................................117
Configuring Your Modem .........................................................................................................................................119
Upgrading Your VAIO Computer....................................................................................................................................121
Adding and Removing Memory................................................................................................................................122
Page 5

5
nN
Precautions ....................................................................................................................................................................127
Handling the LCD Screen ........................................................................................................................................127
Using the Power Source ..........................................................................................................................................128
Handling Your Computer .........................................................................................................................................129
Handling the Liquid-resistant Structure....................................................................................................................132
Handling Floppy Disks .............................................................................................................................................135
Handling Discs .........................................................................................................................................................135
Using the Battery Pack ............................................................................................................................................136
Using Headphones ..................................................................................................................................................138
Handling the Memory Stick ......................................................................................................................................138
Handling the Hard Disk ............................................................................................................................................139
Updating Your Computer .........................................................................................................................................140
Troubleshooting .............................................................................................................................................................142
Computer .................................................................................................................................................................143
System Security .......................................................................................................................................................152
Battery......................................................................................................................................................................153
Internet.....................................................................................................................................................................154
Networking ...............................................................................................................................................................156
Bluetooth Technology ..............................................................................................................................................160
Optical Discs ............................................................................................................................................................164
Display .....................................................................................................................................................................168
Printing.....................................................................................................................................................................171
Microphone ..............................................................................................................................................................173
Mouse ......................................................................................................................................................................174
Page 6

6
nN
Speakers..................................................................................................................................................................175
Touch Pad................................................................................................................................................................177
Keyboard..................................................................................................................................................................177
Floppy Disks ............................................................................................................................................................178
PC Cards .................................................................................................................................................................179
Audio/Video..............................................................................................................................................................181
Memory Stick ...........................................................................................................................................................182
Peripherals ...............................................................................................................................................................184
Support Options .............................................................................................................................................................186
Sony Support Information ........................................................................................................................................186
Trademarks ....................................................................................................................................................................191
Page 7

7
nN
Before Use
Before Use
Congratulations on your purchase of this Sony VAIO® computer, and welcome to the on-screen User Guide. Sony has
combined leading-edge technology in audio, video, computing, and communications to provide state-of-the-art personal
computing experience.
!
External views illustrated in this manual may look slightly different from those of your computer.
Information in the supplied manuals including this User Guide is intended for users of the VAIO computers with the Microsoft® Windows Vista®
32-bit operating system. You may find differences in the information when your computer comes preinstalled with the 64-bit operating system.
Notice
© 2009 Sony Corporation. All rights reserved.
This manual and the software described herein, in whole or in part, may not be reproduced, translated, or reduced to any
machine-readable form without prior written approval.
Sony Corporation provides no warranty with regard to this manual, the software, or other information contained herein and
hereby expressly disclaims any implied warranties or merchantability or fitness for any particular purpose with regard to this
manual, the software, or such other information. In no event shall Sony Corporation be liable for any incidental, consequential,
or special damages, whether based on tort, contract, or otherwise, arising out of or in connection with this manual, the
software, or other information contained herein or the use thereof.
In the manual, the ™ or ® marks are not specified.
Sony Corporation reserves the right to make any modification to this manual or the information contained herein at any time
without notice. The software described herein is governed by the terms of a separate user license agreement.
Page 8
8
nN
Before Use
Sony Corporation is not liable and will not compensate for any lost recordings made to your computer, external recording
media, or recording devices or any relevant losses, including when recordings are not made due to reasons including your
computer failure, or when the contents of a recording are lost or damaged as a result of your computer failure or repair
undertaken to your computer. Sony Corporation will not restore, recover, or replicate the recorded contents made to your
computer, external recording media, or recording devices under any circumstances.
Except IRX-4590_BGN
ENERGY STAR
As an ENERGY STAR Partner, Sony has determined that this product meets the ENERGY STAR guidelines for energy
efficiency.
The International ENERGY STAR Office Equipment Program is an international program that promotes energy saving
through the use of computers and office equipment. The program backs the development and dissemination of products with
functions that effectively reduce energy consumption.
For detailed information on the ENERGY STAR Program, visit the following web sites:
❑ http://www.energystar.gov
❑ http://www.eu-energystar.org
(USA)
(Europe)
Page 9
9
nN
Before Use
This computer is designed in compliance with the ENERGY STAR standards and delivered with the following power saving
settings:
❑ The LCD backlight is turned off automatically after about 15 minutes of inactivity.
❑ The computer enters Sleep mode automatically after about 30 minutes of inactivity.
Press any key to bring the computer back into Normal mode.
For detailed information on power saving modes, see Using the Power Saving Modes (page 109).
Except IRX-4590_END
Documentation
Your documentation includes printed information and user guides to read on your VAIO computer.
Printed Documentation
US model_BGN
❑ Quick Start Guide — Contains an overview of components connection, set-up information, etc.
❑ Safety Information — Contains safety guidelines and owner information.
US model_END
GVD model_BGN
❑ Specifications sheet — Contains a table of specifications, etc.
❑ Troubleshooting and Recovery Guide — Contains solutions to problems other than those you encounter during normal
operation, an explanation of how to make a backup copy of your data and recover your computer system, and sources of
support information.
❑ Safety Regulations
Page 10
10
nN
Before Use
GVD model_END
Non-printed Documentation
US model_BGN
❑ User Guide (this manual) — Explains features of your computer. It also includes information on solving common
problems.
✍
To go to web sites described in this manual by clicking their respective URLs beginning with http://, your computer must be connected to the Internet.
❑ Specifications — The online specifications describe the hardware and software configurations of your VAIO computer.
To view the online specifications:
1 Connect to the Internet.
2 Go to the Sony online support web site at the following URLs:
http://esupport.sony.com/EN/VAIO/
http://www.sony.ca/support/
for customers in Canada
http://esupport.sony.com/LA/
http://esupport.sony.com/BR/
Except IRX-4590_BGN
❑ VAIO Recovery Center User Guide — Provides information about restoring individual software programs, hardware
drivers, and drive partition(s) or your entire hard disk drive to the original factory settings.
for customers in USA
for customers in Spanish-speaking Latin American countries or areas
for customers in Brazil
Except IRX-4590_END
IRX-4590_BGN
❑ VAIO Recovery Center User Guide — Provides information about restoring individual software programs, hardware
drivers, and drive partition(s) or your entire built-in storage device to the original factory settings.
Page 11
11
nN
Before Use
IRX-4590_END
To access this on-screen guide:
1 Click Start and Help and Support.
2 Click Use my VAIO.
3 Click VAI O Recovery Center User Guide.
Help and Support
Help and Support is easy to access and provides a single location for general information and technical assistance for your
VAIO computer. Choose from the following categories to find the answers you need.
To access Help and Support, click Start and Help and Support.
❑ Get started with my VAIO
Get help with Internet and wireless setup, security setup, personalizing your VAIO computer, and creating recovery DVDs
and more.
❑ Use my VAIO
Access your VAIO user guide, interactive help in the form of VAIO tutorials, how-to articles, the VAIO technology page,
specifications, and system and software information.
❑ Troubleshoot my VAIO
Maintain and troubleshoot your VAIO computer with VAIO Care, system restore, backup and recovery, and contact Sony
support.
US model_END
Except US model_BGN
❑ Hardware Guide (this manual) — Explains features of your computer. It also includes information on solving common
problems. The Hardware Guide is provided in PDF format for easy browsing and printing.
Page 12
12
nN
Before Use
✍
To go to web sites described in this manual by clicking their respective URLs beginning with http://, your computer must be connected to the Internet.
❑ Software Guide — Provides specific information on certain preinstalled software on your computer.
❑ Important Notice — Provides information on specific items concerning your computer.
Except US model_END
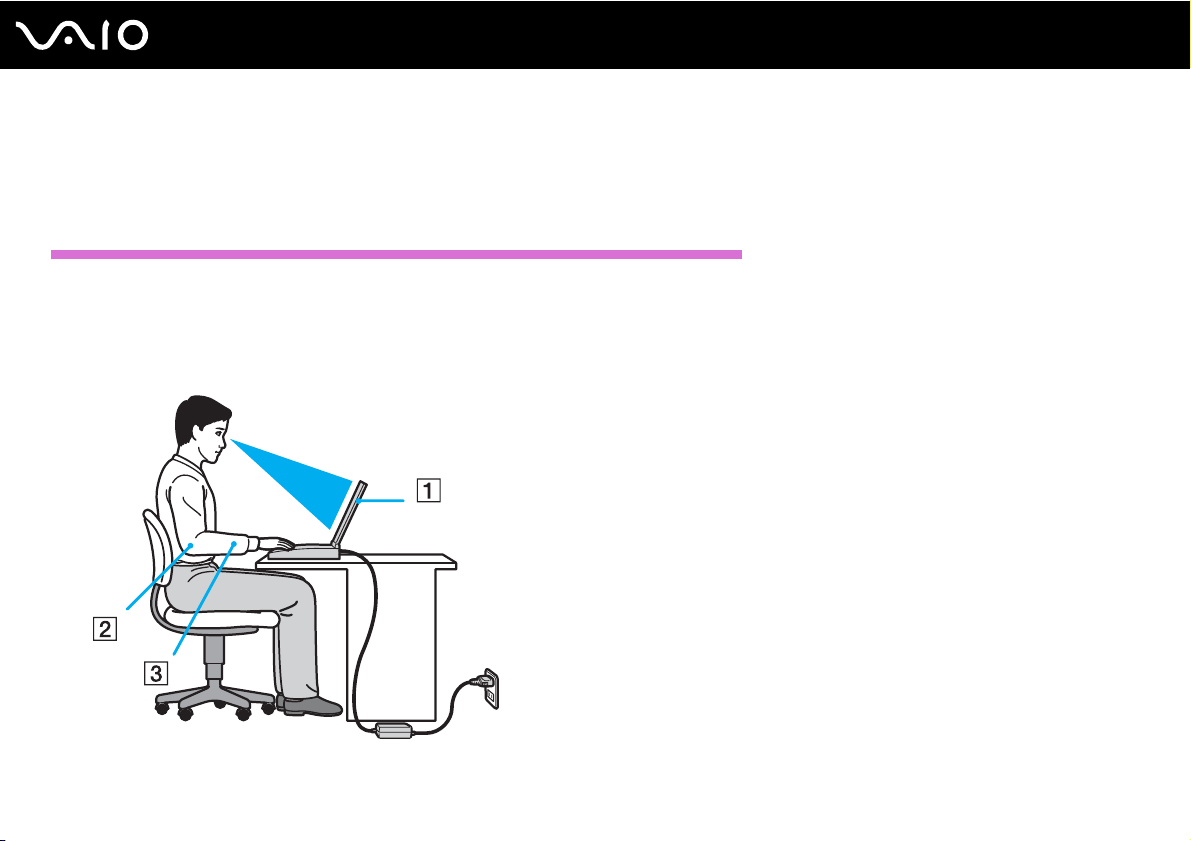
Ergonomic Considerations
You will be using your computer as a portable device in a variety of environments. Whenever possible, you should attempt
to take account of the following ergonomic considerations for both stationary and portable environments:
Page 13

13
nN
Before Use
❑ Position of your computer – Place the computer directly in front of you (1). Keep your forearms horizontal (2), with your
wrists in a neutral, comfortable position (3) while using the keyboard, touch pad, or external mouse. Let your upper arms
hang naturally at your sides. Take frequent breaks while using your computer. Excessive use of the computer may strain
eyes, muscles, or tendons.
❑ Furniture and posture – Sit in a chair with good back support. Adjust the level of the chair so your feet are flat on the
floor. A footrest may make you more comfortable. Sit in a relaxed, upright posture and avoid slouching forward or leaning
far backwards.
❑ Viewing angle of the computer's display – Use the display's tilting feature to find the best position. You can reduce eye
strain and muscle fatigue by adjusting the tilt of the display to the proper position. Adjust the brightness level of the display
as well.
❑ Lighting – Choose a location where windows and lights do not cause glare and reflection on the display. Use indirect
lighting to avoid bright spots on the display. Proper lighting adds to your comfort and work efficiency.
❑ Positioning an external display – When using an external display, set the display at a comfortable viewing distance.
Make sure the display screen is at eye level or slightly lower when you are sitting in front of the monitor.
Page 14
Getting Started
Getting Started
This section describes how to get started using your VAIO computer.
US model_BGN
!
Before starting your computer for the first time, do not connect any other hardware that did not originally come with your computer. Be sure to start
up your computer with only the supplied accessories connected and set up your system. Upon completion, connect one device (for example, a printer,
an external hard disk drive, a scanner, and so on) at a time, following the manufacturers' instructions.
US model_END
Except GVD model_BGN
❑ Locating Controls and Ports (page 14)
Except GVD model_END
❑ About the Indicator Lights (page 19)
❑ Connecting a Power Source (page 21)
❑ Using the Battery Pack (page 22)
❑ Shutting Down Your Computer Safely (page 29)
Except GVD model_BGN
14
nN
Locating Controls and Ports
Take a moment to identify the controls and ports shown on the following pages.
!
The appearance of your computer may be different from those illustrated in this manual due to variations in specifications. It may also vary in some
countries or areas.
Page 15
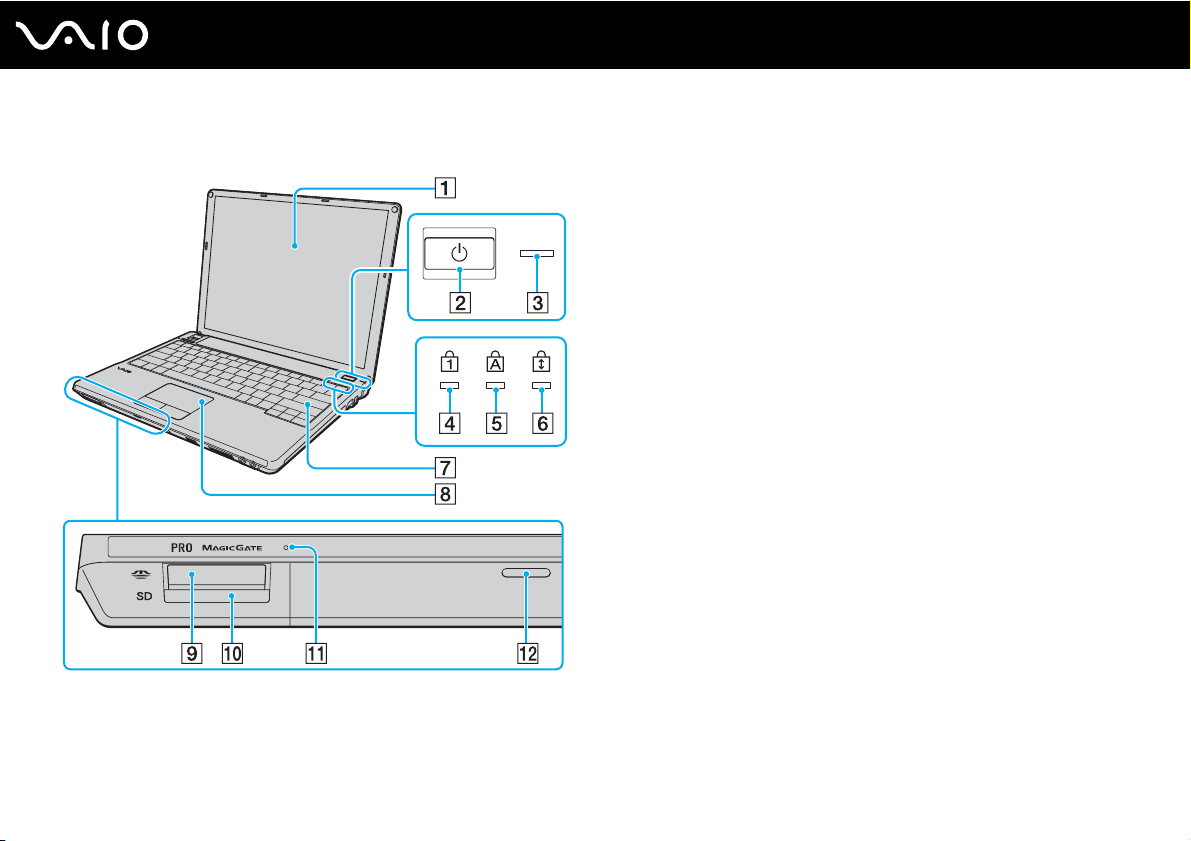
Front
15
nN
Getting Started
A LCD screen (page 127)
B Power button
C Power indicator (page 19)
D Num lock indicator (page 19)
E Caps lock indicator (page 19)
F Scroll lock indicator (page 19)
G Keyboard (page 32)
H Touch pad (page 34)
I Memory Stick slot
J SD memory card slot (page 52)
K Media Access indicator (page 19)
L Drain hole (page 132)
* Your computer supports both the standard-size Memory Stick and the Duo-
size Memory Stick.
*
(page 48)
Page 16
Getting Started
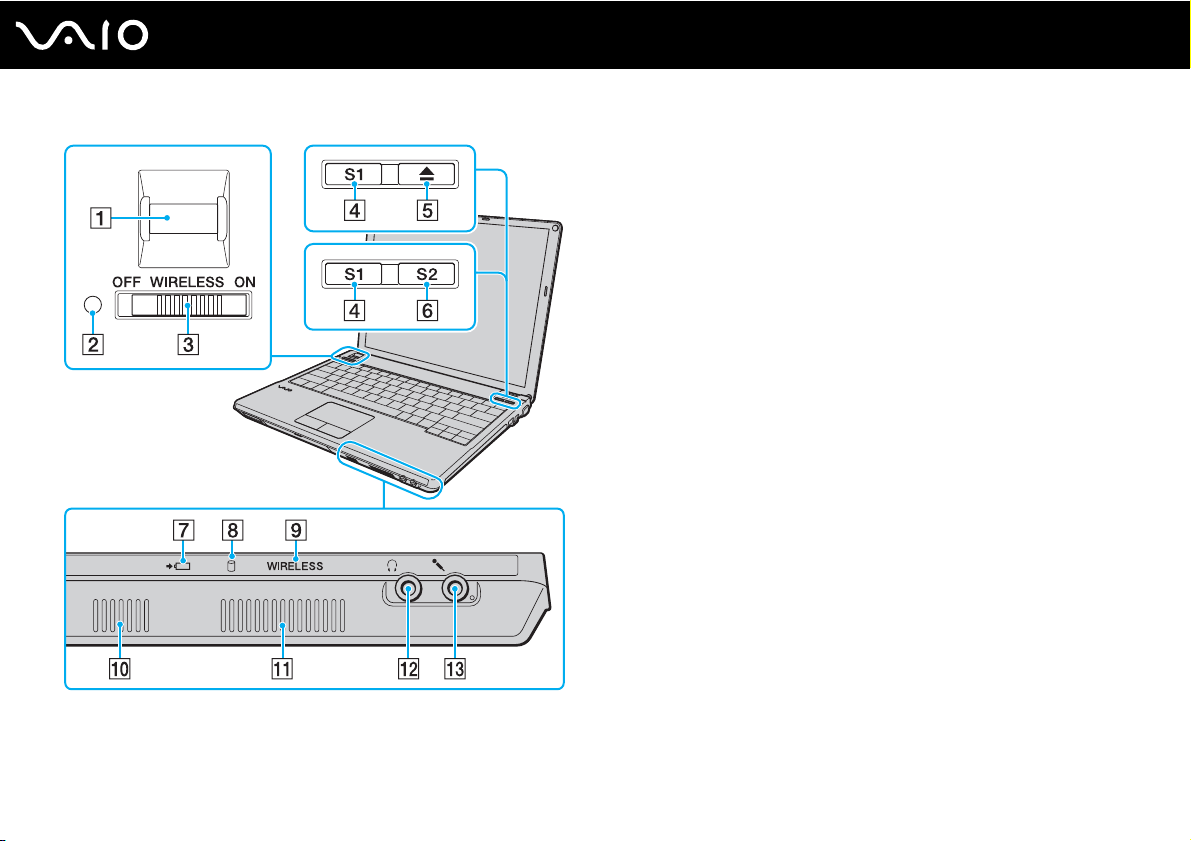
Fingerprint sensor (page 94)
A
B Ambient light sensor (page 169)
Measures ambient light intensity for automatically adjusting the
LCD brightness to the optimum level.
C WIRELESS switch (page 58)
D S1 button (page 35)
*2
(page 35)
*1
(page 35)
E Drive eject button
F S2 button
G Charge indicator (page 19)
H Hard disk drive
*3
/Optical disc drive indicator (page 19)
I WIRELESS indicator (page 19)
J Built-in speaker (monaural)
K Air vent
L Headphones jack (page 70)
M Microphone jack (page 78)
*1
On models with a built-in optical disc drive.
*2
On models without a built-in optical disc drive.
*3
The storage device configuration of your computer may include a built-in
flash memory storage drive depending on the model you purchased. See the
online specifications to find out about your configuration.
16
nN
Page 17
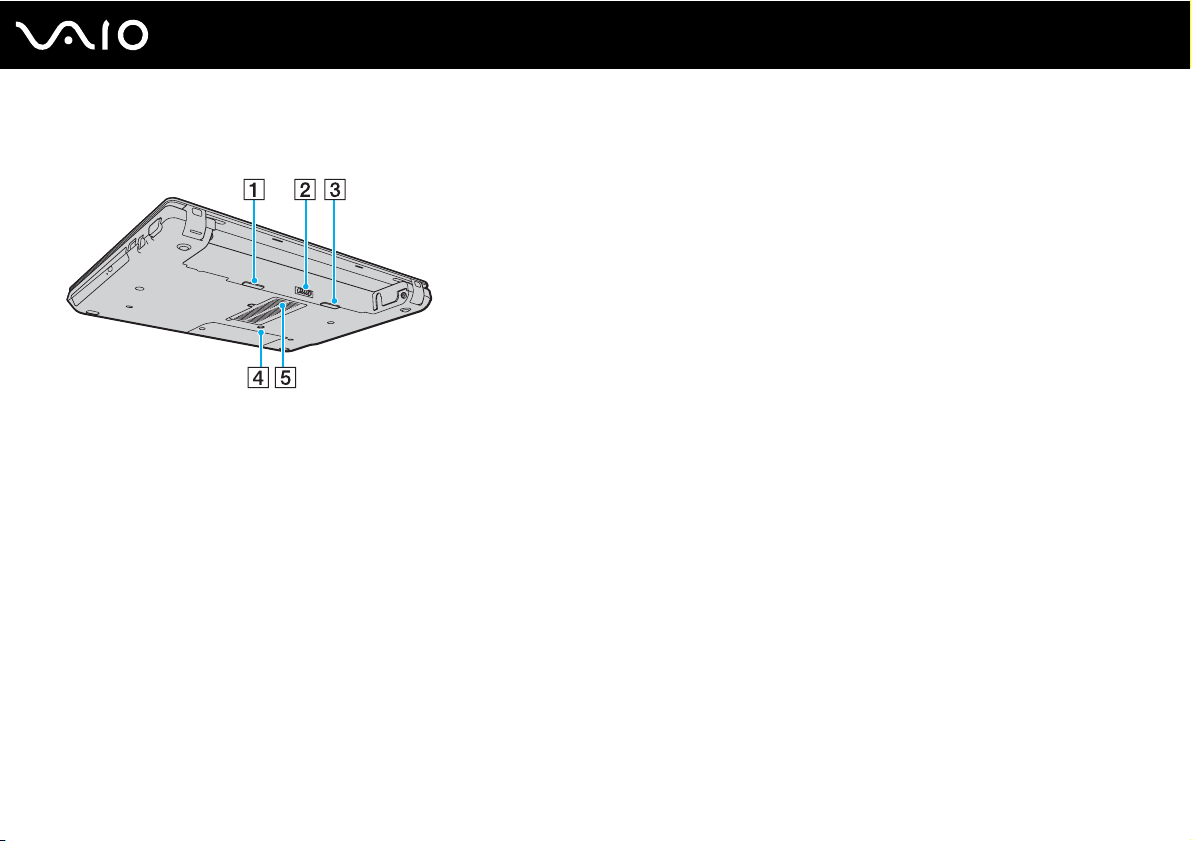
Back
A Battery RELEASE latch (page 28)
B Battery connector (page 22)
C Battery LOCK switch (page 23)
D Drain hole (page 132)
E Air vent
17
nN
Getting Started
Page 18
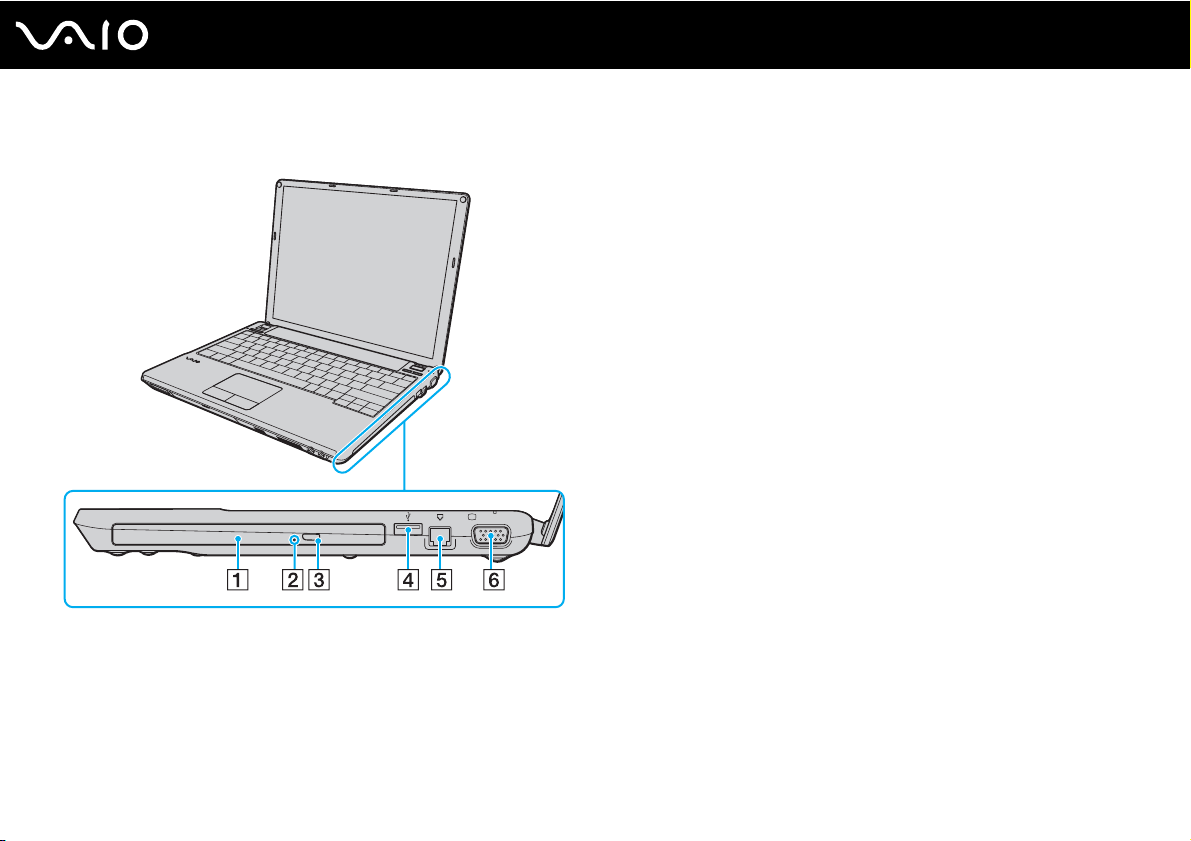
Right
18
nN
Getting Started
A Optical disc drive
*1
(page 37)
B Manual eject hole (page 164)
C Substitute drive eject button (page 37)
D Hi-Speed USB (USB 2.0) port
*2
(page 79)
E Modem port (page 55)
F Monitor port (page 72)
*1
On selected models only.
*2
Supports high-/full-/low- speeds.
Page 19
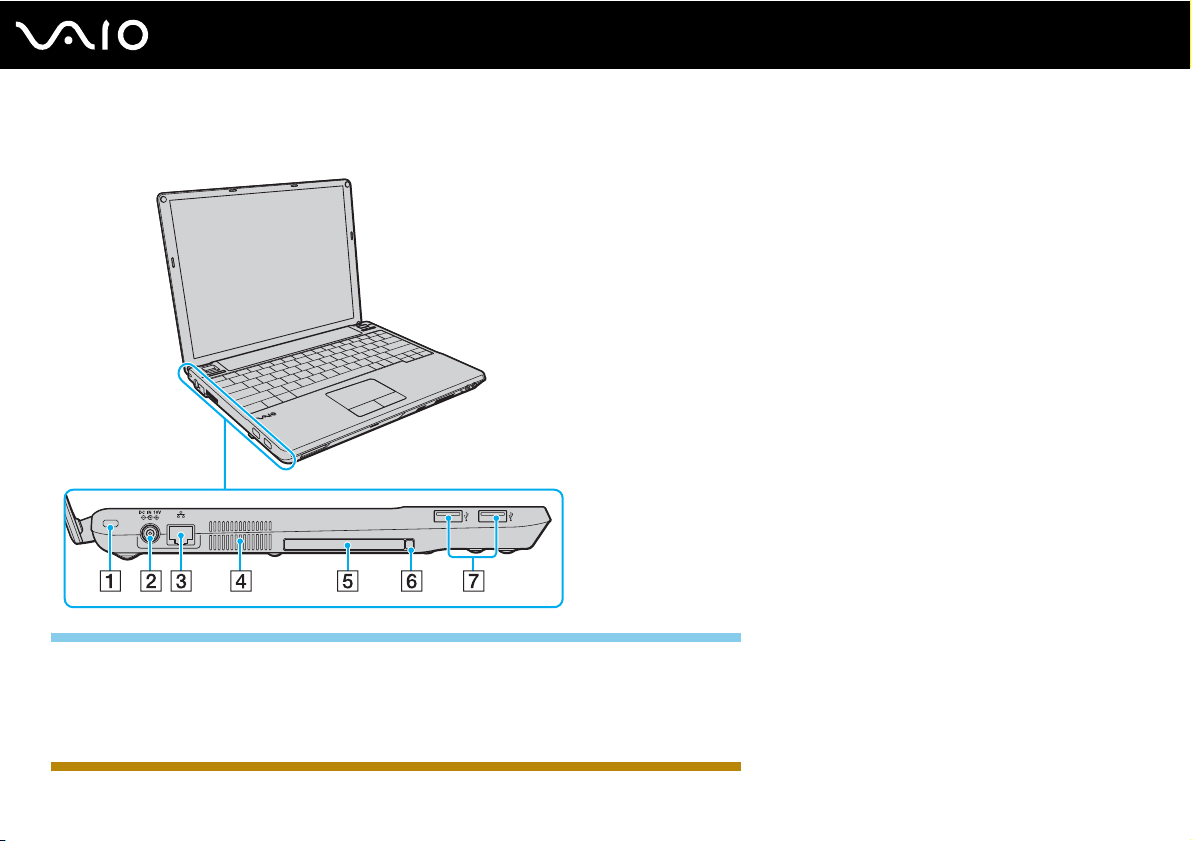
Left
A Security slot
B DC IN port (page 21)
C Network (Ethernet) port (page 57)
D Air vent
E PC Card slot (page 45)
F PC Card release button (page 47)
G Hi-Speed USB (USB 2.0) ports
* Support high-/full-/low- speeds.
*
(page 79)
19
nN
Getting Started
Except GVD model_END
About the Indicator Lights
Your computer is equipped with the following indicator lights:
IRX-4590_BGN
Page 20
Getting Started
US model_BGN
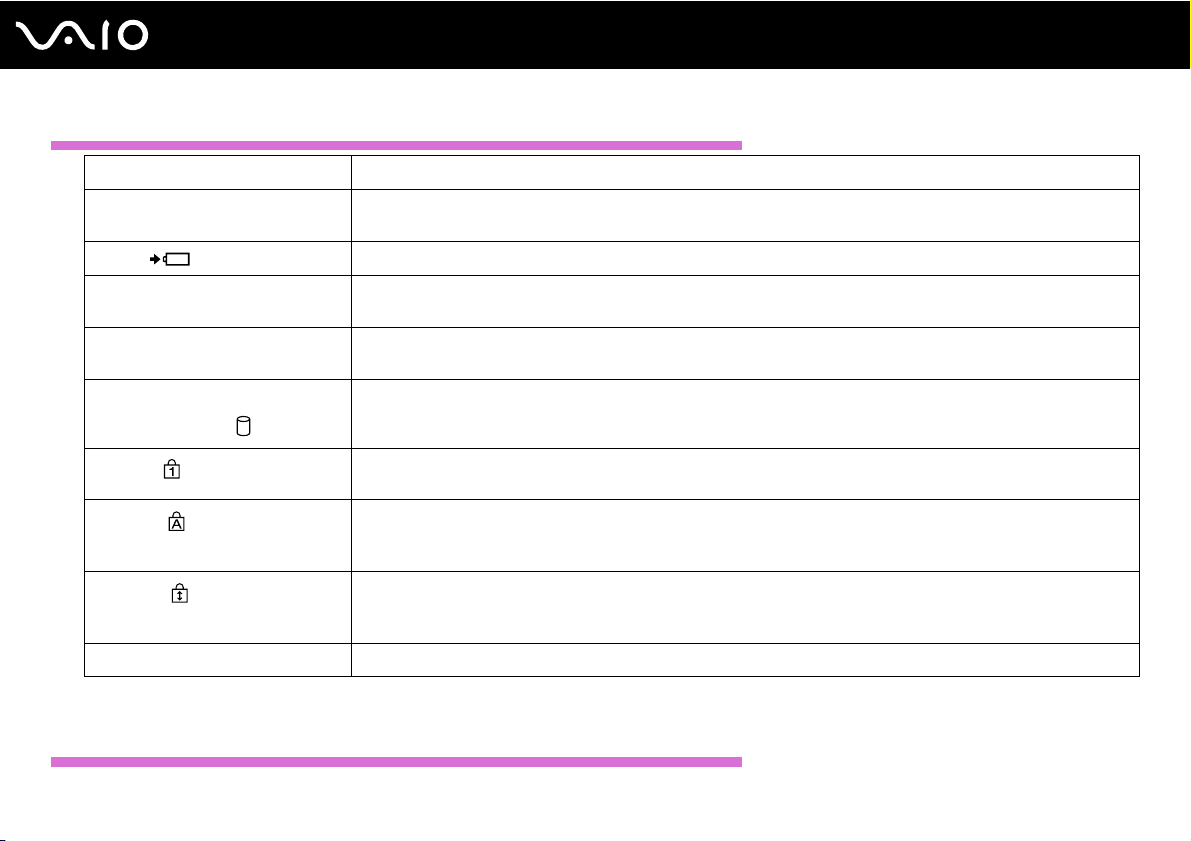
Indicator Functions
Power 1 Illuminates in green when the computer is on, blinks slowly in orange while the computer is in Sleep mode, and
turns off when the computer is off or in Hibernate mode.
Charge
Media Access Illuminates while data is being read from or written to a memory card. (Do not place the computer into Sleep
Optical disc drive
Hard disk drive
*1
*2
/Optical disc drive*1
Num lock
Caps lock
Scroll lock
WIRELESS Illuminates when the WIRELESS switch is turned on.
*1
On selected models only.
*2
The storage device configuration of your computer may include a built-in flash memory storage drive depending on the model you purchased. See the online
specifications to find out about your configuration.
US model_END
Illuminates while the battery pack is charging. See Charging the Battery Pack (page 25) for more information.
mode or turn it off when this indicator is lit.) When the indicator is unlit, the memory card is not in use.
Illuminates while the drive is reading or writing data. When the indicator is unlit, the optical disc media is not in
use.
Illuminates while the drive is reading or writing data. Do not place the computer into Sleep mode or turn it off
when this indicator is lit.
Press the Num Lk key to activate the numeric keypad. Press it a second time to deactivate the numeric keypad.
The numeric keypad is not active when the indicator is unlit.
Press the Caps Lock key to type letters in uppercase. Letters appear in lowercase if you press the Shift key
while the indicator is lit. Press the key a second time to turn off the indicator. Normal typing resumes when the
Caps lock indicator is unlit.
Press the Fn+Scr Lk keys to change how you scroll the display. Normal scrolling resumes when the Scroll lock
indicator is unlit. The Scr Lk key functions differently depending on the program you are using and does not
work with all programs.
20
nN
Page 21
Getting Started
GVD model_BGN
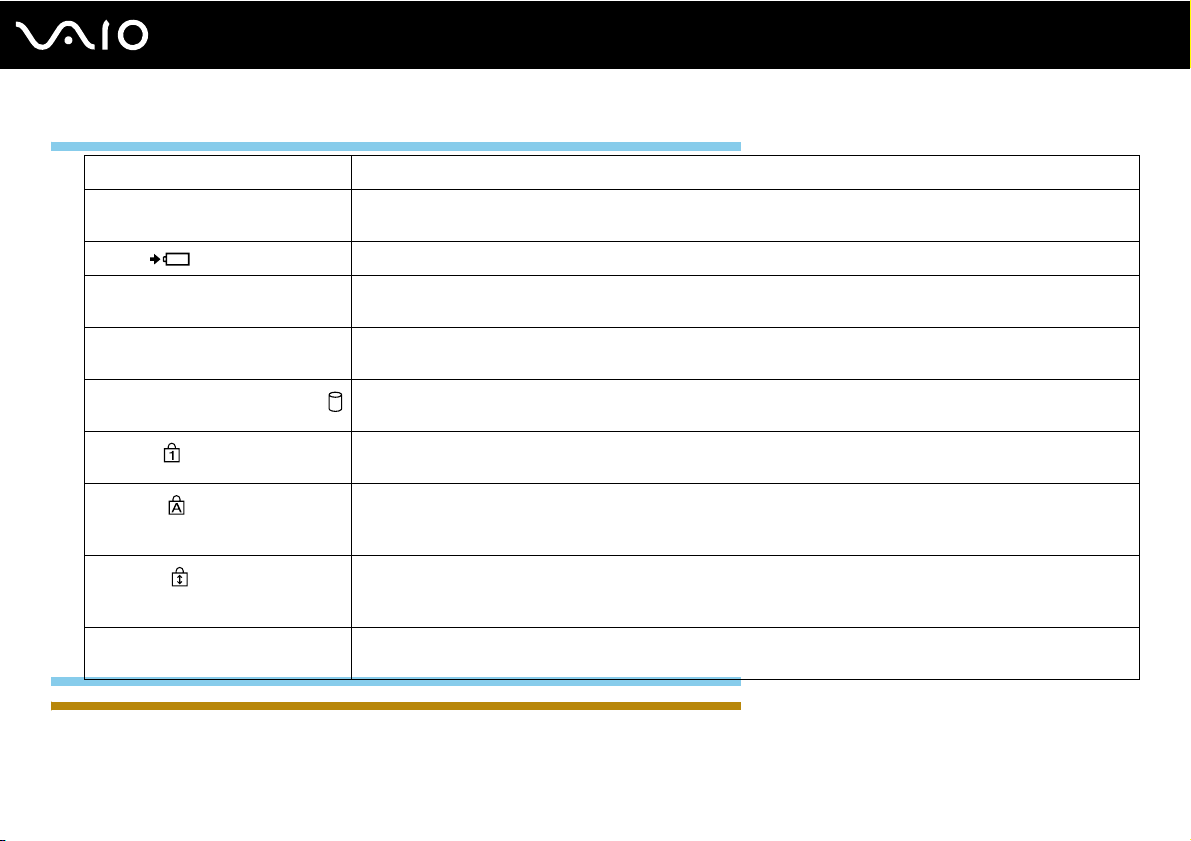
Indicator Functions
Power 1 Illuminates in green when the computer is on, blinks slowly in orange while the computer is in Sleep mode, and
turns off when the computer is off or in Hibernate mode.
Charge
Media Access Illuminates while data is being read from or written to a memory card. (Do not place the computer into Sleep
Optical disc drive Illuminates while the drive is reading or writing data. When the indicator is unlit, the optical disc media is not in
Hard disk drive/Optical disc drive
Num lock
Caps lock
Scroll lock
WIRELESS Illuminates when the WIRELESS switch is turned on, provided that one or more wireless options are enabled
GVD model_END
IRX-4590_END
Illuminates while the battery pack is charging. See Charging the Battery Pack (page 25) for more information.
mode or turn it off when this indicator is lit.) When the indicator is unlit, the memory card is not in use.
use.
Illuminates while the drive is reading or writing data. Do not place the computer into Sleep mode or turn it off
when this indicator is lit.
Press the Num Lk key to activate the numeric keypad. Press it a second time to deactivate the numeric keypad.
The numeric keypad is not active when the indicator is unlit.
Press the Caps Lock key to type letters in uppercase. Letters appear in lowercase if you press the Shift key
while the indicator is lit. Press the key a second time to turn off the indicator. Normal typing resumes when the
Caps lock indicator is unlit.
Press the Fn+Scr Lk keys to change how you scroll the display. Normal scrolling resumes when the Scroll lock
indicator is unlit. The Scr Lk key functions differently depending on the program you are using and does not
work with all programs.
in the VAIO Smart Network window.
Connecting a Power Source
21
nN
You can use either an AC adapter or a rechargeable battery pack for supplying power to your computer.
Page 22
Using the AC Adapter
✍
Use only the supplied AC adapter for your computer.
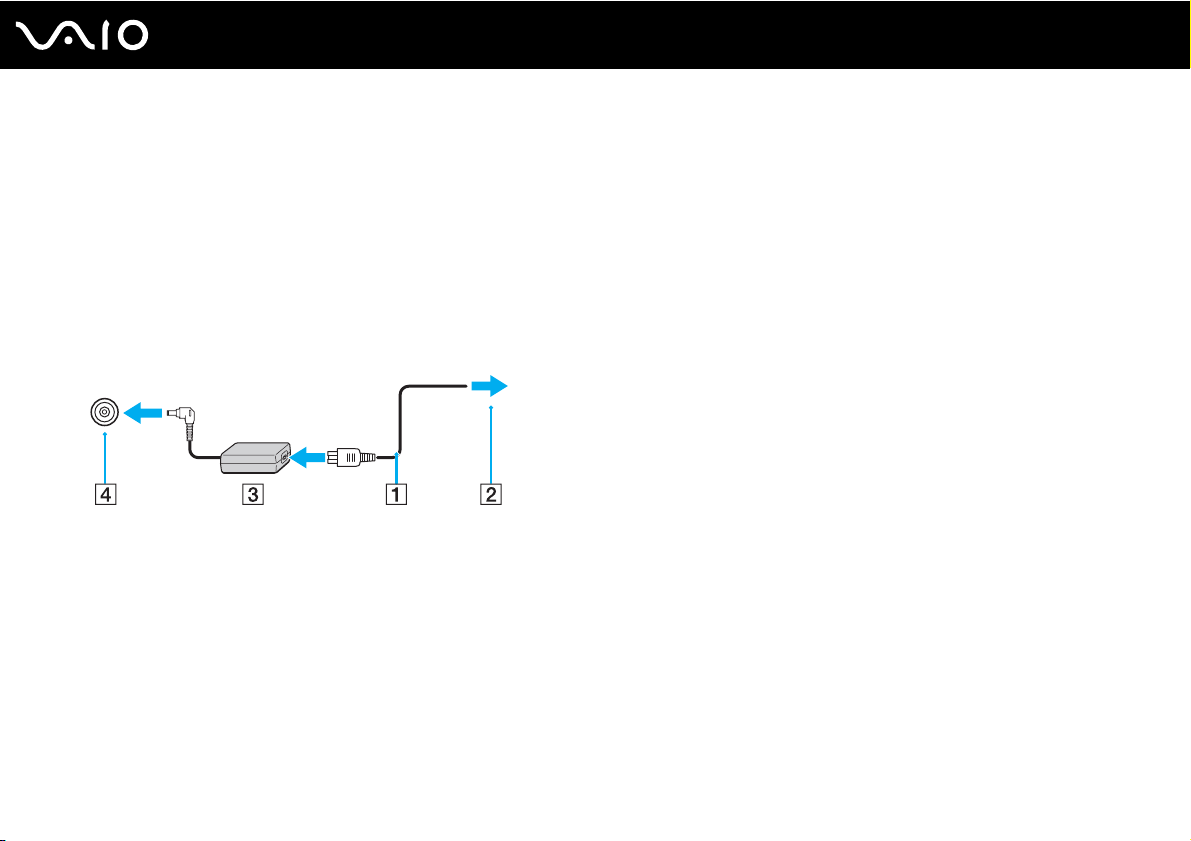
To use the AC adapter
1 Plug one end of the power cord (1) into the AC adapter (3).
2 Plug the other end of the power cord into an AC outlet (2).
3 Plug the cable connected to the AC adapter (3) into the DC IN port (4) on the computer.
!
The shape of the DC In plug varies depending on the AC adapter.
✍
To disconnect your computer completely from AC power, unplug the AC adapter.
22
nN
Getting Started
Make sure that the AC outlet is easily accessible.
If you do not intend to use your computer for a long period of time, place the computer into Hibernate mode. See Using Hibernate Mode (page 112).
Using the Battery Pack
The battery pack supplied with your computer is not fully charged at the time of delivery.
Page 23
Installing the Battery Pack
IRX-4590_BGN
To install the battery pack
!
Be careful not to hit the LCD screen with the battery pack while installing it.
1 Turn off the computer and close the LCD screen lid.
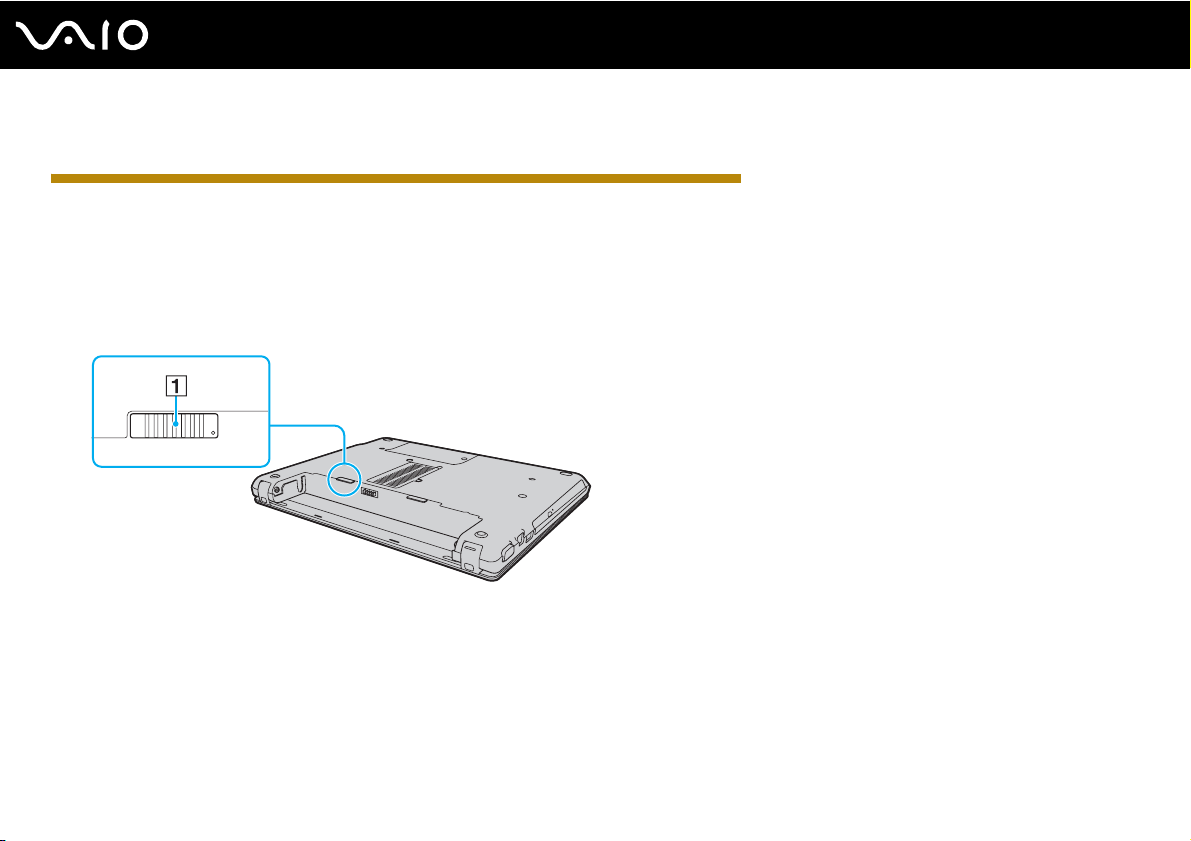
2 Slide the battery LOCK switch (1) outward.
23
nN
Getting Started
3 Slide the battery pack diagonally into the battery compartment until the projections (2) on either side of the battery
compartment fit into the U-shaped cuts (3) on either side of the battery pack.
Page 24
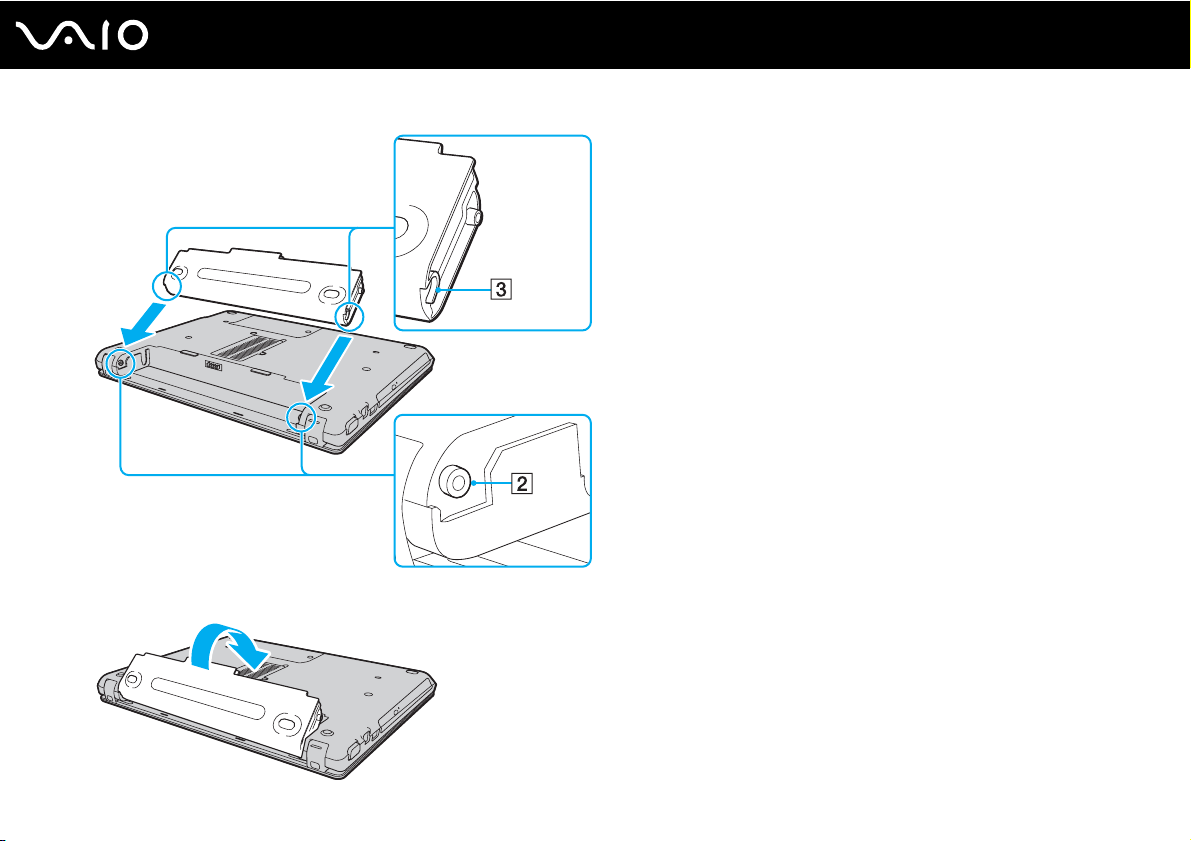
4 Push the battery pack down into the compartment until it clicks into place.
24
nN
Getting Started
Page 25
Getting Started
5 Slide the battery LOCK switch inward to secure the battery pack on the computer.
IRX-4590_END
✍
When your computer is directly connected to AC power and has a battery pack installed, it uses power from the AC outlet.
US model_BGN
!
This computer is designed to operate only with genuine Sony battery packs.
US model_END
GVD model_BGN
!
For your safety, it is highly recommended that you use genuine Sony rechargeable battery packs and AC adapters that meet the quality assurance
standards and supplied by Sony for your VAIO computer. Some VAIO computers may operate only with genuine Sony battery packs.
GVD model_END
Charging the Battery Pack
The battery pack supplied with your computer is not fully charged at the time of delivery.
To charge the battery pack
1 Install the battery pack.
2 Connect the computer to a power source with the AC adapter.
The charge indicator light turns on while the battery pack is charging. When the battery pack charges close to the
maximum charge level you selected with the battery charge functions, the charge indicator turns off. To select your desired
maximum charge level, see Using the Battery Charge Functions (page 27).
25
nN
Page 26
26
nN
Getting Started
Charge indicator status Meaning
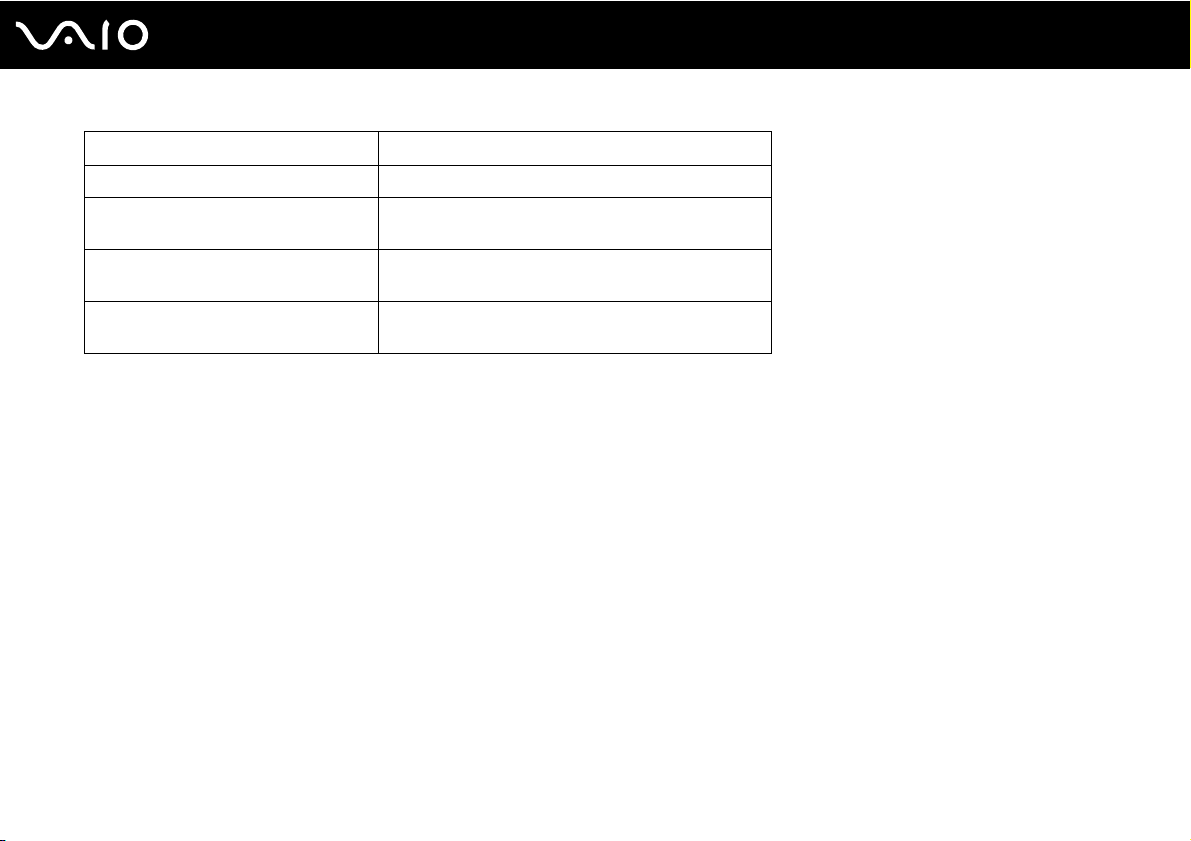
Lit in orange The battery pack is charging.
Blinks along with the green power
indicator
Blinks along with the orange power
indicator
Blinks fast in orange A battery error has occurred due to a failed battery
The battery pack is running out of power. (Normal
mode)
The battery pack is running out of power. (Sleep mode)
pack or an unlocked battery pack.
!
Charge the battery pack as described in this manual from your first battery charge.
✍
Keep the battery pack in your computer while it is directly connected to AC power. The battery pack continues to charge while you are using the
computer.
If the battery charge level falls below 10%, you should either connect the AC adapter to recharge the battery pack or shut down your computer and
install a fully charged battery pack.
Your computer is supplied with a lithium ion battery pack and can be recharged any time. Charging a partially discharged battery pack does not affect
the life of battery.
While some software applications or peripheral devices are in use, your computer may not enter Hibernate mode even when the remaining battery life
is short. To avoid loss of data when using battery power, you should save your data frequently and manually activate a power management mode, such
as Sleep or Hibernate.
If the battery pack wears out when the computer enters Sleep mode, you will lose all unsaved data. Going back to the previous work state is impossible.
To avoid loss of data, you should save your data frequently.
When your computer is directly connected to AC power and has a battery pack installed, it uses power from the AC outlet.
Page 27
27
nN
Getting Started
Using the Battery Charge Functions
You can customize the current battery charging method using the Battery Charge Functions. To make the life of battery
longer, enable the battery care function.
To enable the battery care function
Except US model_BGN
1 Click Start , All Programs, and VAIO Control Center.
Except US model_END
Except GVD model_BGN
1 Click Start, All Programs, and VAIO Control Center.
Except GVD model_END
2 Click Power Management and then Battery Charge Functions.
3 Click Advanced.
4 Click to select the Enable Battery Care Function check box.
5 Select the desired maximum charge level.
6 Click OK.
To check the battery charge capacity
Follow steps 1 to 3 in To enable the battery care function above and check detailed information. If the battery charge
capacity is low, replace the battery pack with a new genuine Sony battery pack.
Page 28
28
nN
Getting Started
Using the Battery Life Conserving Wallpaper
You can conserve your battery life just by setting the specific wallpaper as your desktop background.
To set the battery life conserving wallpaper
1 Click Start, All Programs, and VAIO Control Center.
2 Click Display and then Long Battery Life Wallpaper Setting.
3 Click Set Long Battery Life Wallpaper.
At the confirmation prompt, click OK.
Removing the Battery Pack
!
You may lose data if you remove the battery pack while your computer is on and not connected to the AC adapter or if you remove the battery pack
while the computer is in Sleep mode.
IRX-4590_BGN
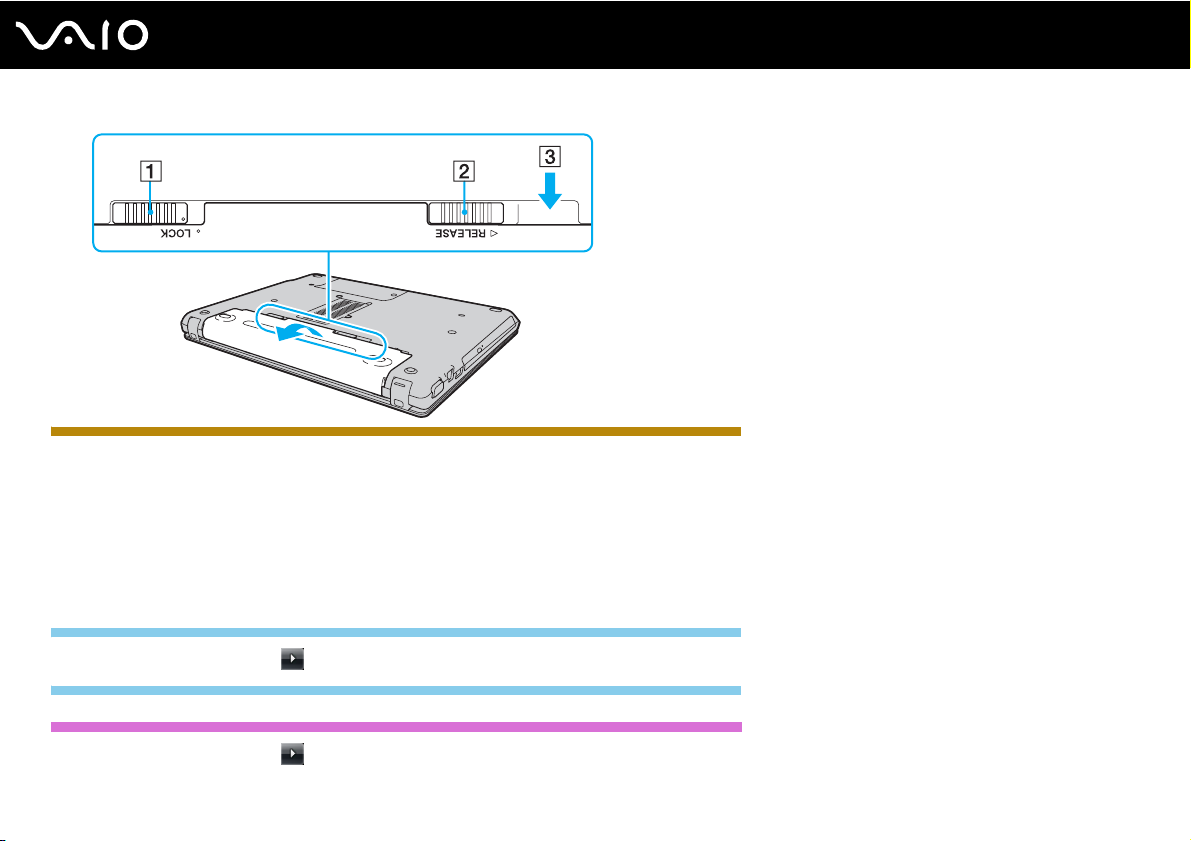
To remove the battery pack
1 Turn off the computer and close the LCD screen lid.
2 Slide the battery LOCK switch (1) outward.
3 Slide and hold the battery RELEASE latch (2), put your fingertip underneath the tab (3) on the battery pack, and lift the
battery pack in the direction of the arrow, and then slide it away from the computer.
Page 29
IRX-4590_END
Shutting Down Your Computer Safely
To avoid losing unsaved data, be sure to shut down your computer properly, as described below.
To shut down your computer
1 Turn off any peripherals connected to the computer.
Except GVD model_BGN
29
nN
Getting Started
2 Click Start, the arrow next to the Lock button, and then Shut Down.
Except GVD model_END
Except US model_BGN
3 Click Start, the arrow next to the Lock button, and then Shut Down.
Page 30

30
nN
Getting Started
Except US model_END
4 Respond to any prompts warning you to save documents or to consider other users and wait for the computer to turn off
automatically.
The power indicator light turns off.
Page 31
31
nN
Using Your VAIO Computer
Using Your VAIO Computer
Except GVD model_BGN
This section describes how to get the most out of using your VAIO computer.
Except GVD model_END
Except US model_BGN
Once you have read and followed the information in the printed specifications sheet, you can start using your VAIO computer
safely and confidently.
Read on to get the most out of using the computer.
Except US model_END
❑ Using the Keyboard (page 32)
❑ Using the Touch Pad (page 34)
❑ Using Special-function Buttons (page 35)
❑ Using the Optical Disc Drive (page 37)
❑ Using the PC Card (page 45)
❑ Using the Memory Stick (page 48)
❑ Using the SD Memory Card (page 52)
❑ Using the Internet (page 55)
❑ Using the Network (LAN) (page 57)
❑ Using the Wireless LAN (WLAN) (page 58)
❑ Using the Bluetooth Function (page 64)
Page 32
nN
Using Your VAIO Computer
Using the Keyboard
Your keyboard is very similar to a desktop computer keyboard, but has additional keys that perform model-specific tasks.
Combinations and Functions with the Fn Key
✍
Some keyboard functions can be used only after the operating system is finished launching.
IRX-4590_BGN
US model_BGN
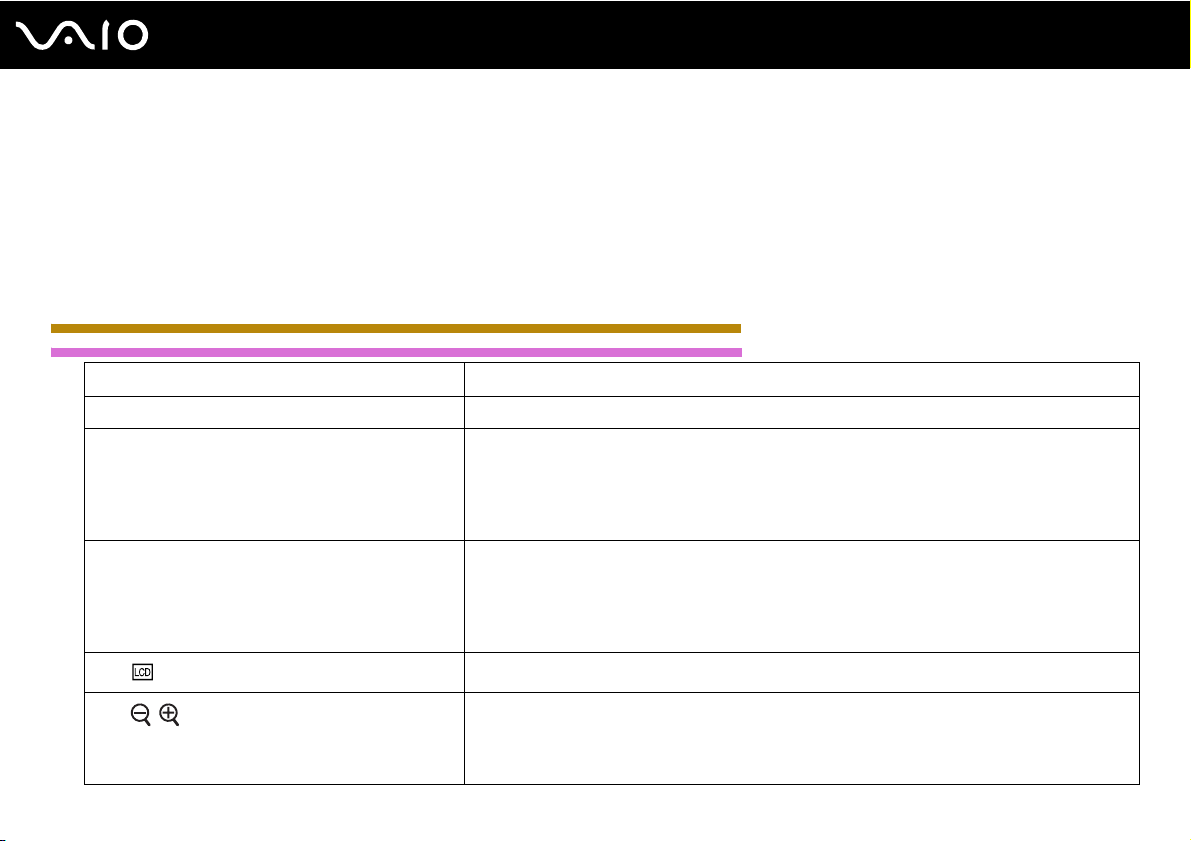
Combinations/Feature Functions
Fn + % (F2): speaker switch Turns on and off the built-in speaker and the headphones.
Fn + 2 (F3/F4): speaker volume Changes the built-in speaker volume level.
Fn + 8 (F5/F6): brightness control Changes the LCD brightness of your computer screen.
Fn + /T (F7): display output
Fn + / (F9/F10): zoom
To increase the volume, keep pressing the Fn+F4 keys or press the Fn+F4 keys and then the
M or , key.
To decrease the volume, keep pressing the Fn+F3 keys or press the Fn+F3 keys and then the
m or < key.
To increase lighting intensity, keep pressing the Fn+F6 keys or press the Fn+F6 keys and then
the M or , key.
To decrease lighting intensity, keep pressing the Fn+F5 keys or press the Fn+F5 keys and then
the m or < key.
Toggles among your computer screen, an external display, and simultaneous output to both.
Changes the size of an image or a document displayed on some software.
To make the view look smaller and further away (zoom out), press the Fn+F9 keys.
To make the view look bigger and closer (zoom in), press the Fn+F10 keys.
See the help file included with the VAIO Control Center for more information.
32
Page 33
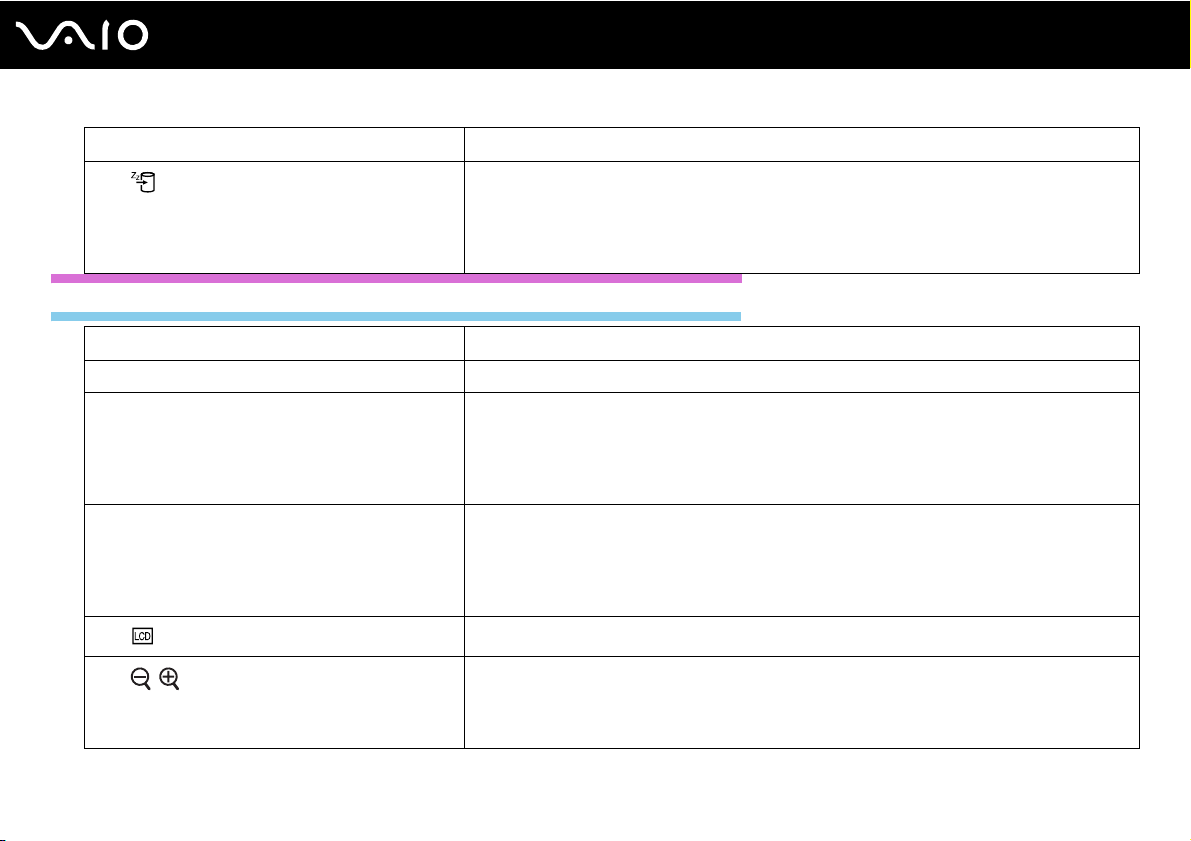
Combinations/Feature Functions
Fn + (F12): hibernate
US model_END
GVD model_BGN
Provides the lowest level of power consumption. When you execute this command, the states
of the system and the connected peripheral devices are saved to the built-in storage device and
the system power is turned off. To return the system to its original state, use the power button
to turn on the power.
For details on power management, see Using the Power Saving Modes (page 109).
Combinations/Feature Functions
Fn + % (F2): speaker switch Turns on and off the built-in speaker and the headphones.
Fn + 2 (F3/F4): speaker volume Changes the built-in speaker volume level.
Fn + 8 (F5/F6): brightness control Changes the LCD brightness of your computer screen.
Fn + /T (F7): display output
Fn + / (F9/F10): zoom
To increase the volume, keep pressing the Fn+F4 keys or press the Fn+F4 keys and then the
M or , key.
To decrease the volume, keep pressing the Fn+F3 keys or press the Fn+F3 keys and then the
m or < key.
To increase lighting intensity, keep pressing the Fn+F6 keys or press the Fn+F6 keys and then
the M or , key.
To decrease lighting intensity, keep pressing the Fn+F5 keys or press the Fn+F5 keys and then
the m or < key.
Toggles among your computer screen, an external display, and simultaneous output to both.
Changes the size of an image or a document displayed on some software.
To make the view look smaller and further away (zoom out), press the Fn+F9 keys.
To make the view look bigger and closer (zoom in), press the Fn+F10 keys.
See the help file included with the VAIO Control Center for more information.
33
nN
Using Your VAIO Computer
Page 34
Using Your VAIO Computer
Combinations/Feature Functions
Fn + (F12): hibernate
GVD model_END
IRX-4590_END
Provides the lowest level of power consumption. When you execute this command, the states
of the system and the connected peripheral devices are saved to the hard disk drive and the
system power is turned off. To return the system to its original state, use the power button to
turn on the power.
For details on power management, see Using the Power Saving Modes (page 109).
Using the Touch Pad
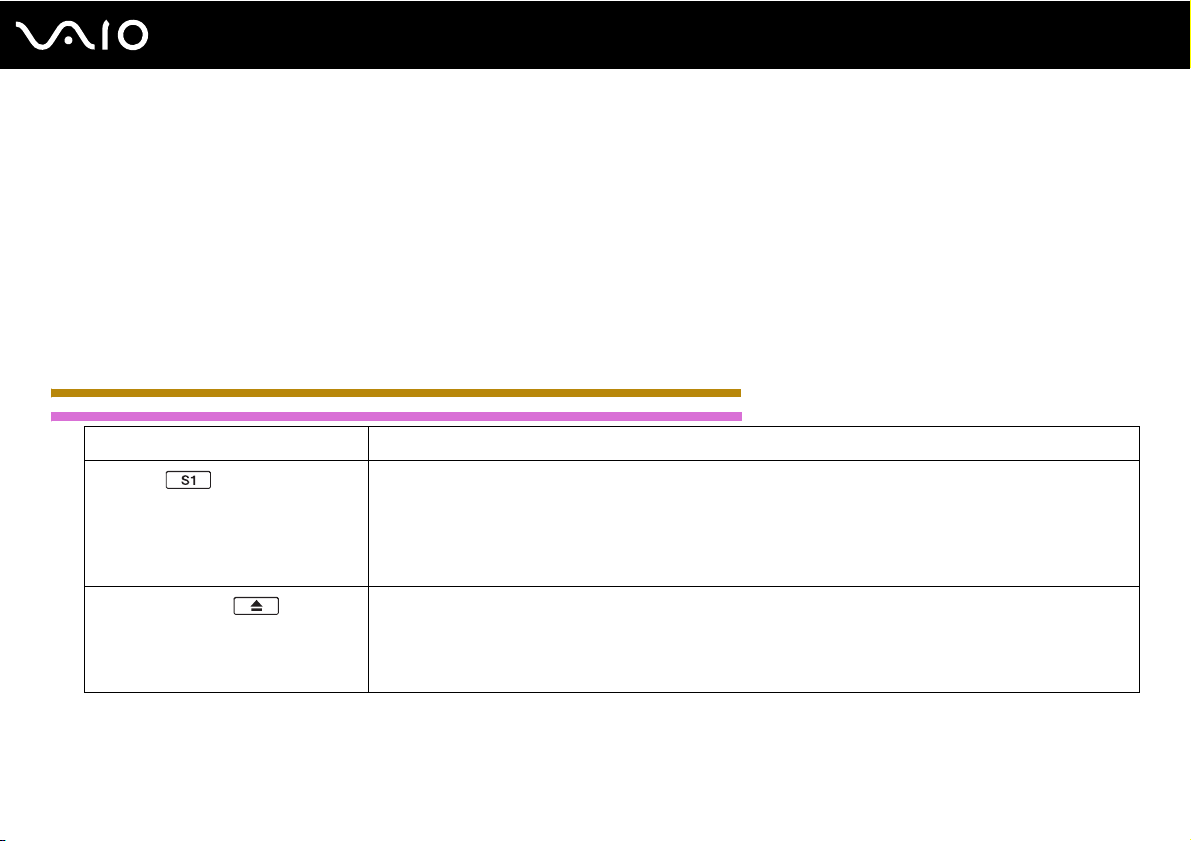
You can point to, select, drag, and scroll objects on the screen using the touch pad.
Action Description
Point Slide your finger on the touch pad (1) to place the pointer (2) on an item or object.
Click Press the left button (3) once.
Double-click Press the left button twice.
Right-click Press the right button (4) once. In many applications, this action displays a shortcut menu.
Drag Slide your finger on the touch pad while pressing the left button.
Scroll Slide your finger along the right edge of the touch pad to scroll vertically. Slide your finger along the bottom edge to scroll
horizontally (the scroll function is available only with applications that support a touch pad scroll feature).
34
nN
Page 35
Using Your VAIO Computer
✍
You can disable/enable the touch pad while a mouse is connected to your computer. To change the touch pad settings, click Start, All Programs, VAIO
Control Center, Keyboard and Mouse and Pointing Device.
!
Be sure to connect a mouse before disabling the touch pad. If you disable the touch pad before connecting a mouse, you will be able to use only the
keyboard for pointer operations.
Using Special-function Buttons
Your computer is equipped with special buttons to help you use specific functions of the computer.
IRX-4590_BGN
US model_BGN
Special-function button Functions
S1 button
Drive eject button
*1
By default, the S1 button turns the volume on and off.
✍
The default button assignment may be different from the above. To change the S1 button assignment, press and hold the
button or launch and navigate through the VAIO Control Center to display the setup window. See the help file included with
the VAIO Control Center for the S1 button assignment.
Ejects the optical disc drive tray.
If this button does not work, try the substitute drive eject button on the optical disc drive.
35
nN
✍
If you disable the drive eject button in the BIOS setup screen, the button works as the S2 (muting) button.
Page 36
Special-function button Functions
S2 button*2
*1
On models with a built-in optical disc drive.
*2
On models without a built-in optical disc drive.
US model_END
GVD model_BGN
36
nN
Using Your VAIO Computer
By default, the S2 button displays the VAIO Presentation Support window to select the display method in
Presentation mode between Mirror and Extend Desktop. Selecting any display method places your
computer into Presentation mode. In Presentation mode, some functions of the computer that may disturb a
presentation are disabled, such as a screen saver, the power saving modes, and system message
generation. In addition, you can use handy functions for the presentation, for example, displaying a document
for quick reference and the mirror image of the external display simultaneously on the computer. To bring the
computer back into Normal mode, press this button once again.
✍
The default button assignment may be different from the above. To change the S2 button assignment, press and hold either
button or launch and navigate through the VAIO Control Center to display the setup window. See the help file included with
the VAIO Control Center for the S2 button assignment.
To change the Presentation mode settings, click Start, Control Panel, Mobile PC, and Adjust settings before giving a
presentation under Windows Mobility Center, and change the settings in the Presentation Settings window.
Page 37
Special-function button Functions
S1 button
Drive eject button
By default, the S1 button displays the VAIO Presentation Support window to select the display method in
Presentation mode between Mirror and Extend Desktop. Selecting any display method places your
computer into Presentation mode. In Presentation mode, some functions of the computer that may disturb a
presentation are disabled, such as a screen saver, the power saving modes, and system message
generation. In addition, you can use handy functions for the presentation, for example, displaying a document
for quick reference and the mirror image of the external display simultaneously on the computer. To bring the
computer back into Normal mode, press this button once again.
✍
The default button assignment may be different from the above. To change the S1 button assignment, press and hold either
button or launch and navigate through the VAIO Control Center to display the setup window. See the help file included with
the VAIO Control Center for the S1 button assignment.
To change the Presentation mode settings, click Start, Control Panel, Mobile PC, and Adjust settings before giving a
presentation under Windows Mobility Center, and change the settings in the Presentation Settings window.
Ejects the optical disc drive tray.
If this button does not work, try the substitute drive eject button on the optical disc drive.
✍
If you disable the drive eject button in the BIOS setup screen, the button works as the S2 (muting) button.
37
nN
Using Your VAIO Computer
GVD model_END
IRX-4590_END
Using the Optical Disc Drive
GVD model_BGN
Your computer is equipped with an optical disc drive.
GVD model_END
Page 38
38
nN
Using Your VAIO Computer
US model_BGN
Your computer may be equipped with an optical disc drive. See the online specifications to find out whether your model is
equipped with the optical disc drive.
US model_END
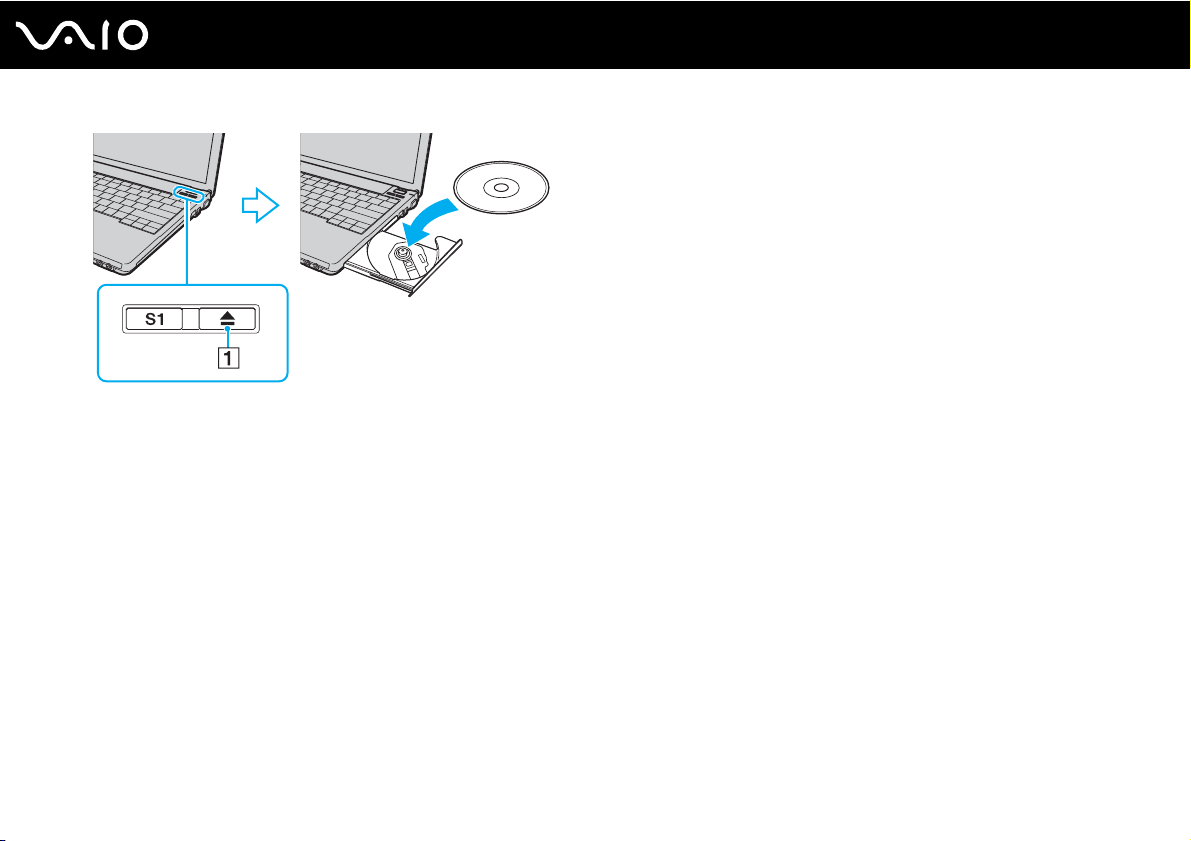
To insert a disc
1 Turn on the computer.
2 Press the drive eject button (1) to open the drive.
The drive tray slides out.
✍
If the drive eject button does not work, try the substitute drive eject button on the optical disc drive.
If the power supply to the optical disc drive is disabled by the VAIO Power Management, it will take a while to eject the drive tray. The substitute drive
eject button is disabled when the optical disc drive is not powered.
When recovering your system, turn on your computer and press the substitute drive eject button on the optical disc drive. Insert your recovery disc
into the optical disc drive, turn off the computer, and then turn on the computer again to start the recovery process.
3 Place a disc in the middle of the drive tray with the label side facing upward and gently push it down until the disc clicks
into place.
Page 39
Using Your VAIO Computer
4 Close the drive tray by pushing it in gently.
!
Do not remove the optical disc when your computer is in a power saving mode (Sleep or Hibernate). Doing so may cause the computer to malfunction.
You cannot use optical discs if you disable the optical disc drive in the BIOS setup screen. To enable the drive, follow the steps and the tip in Disabling
Built-in Devices (page 115).
✍
If you use an external optical disc drive, connect the drive before you launch any preinstalled disc operation program.
39
nN
Reading and Writing Optical Discs
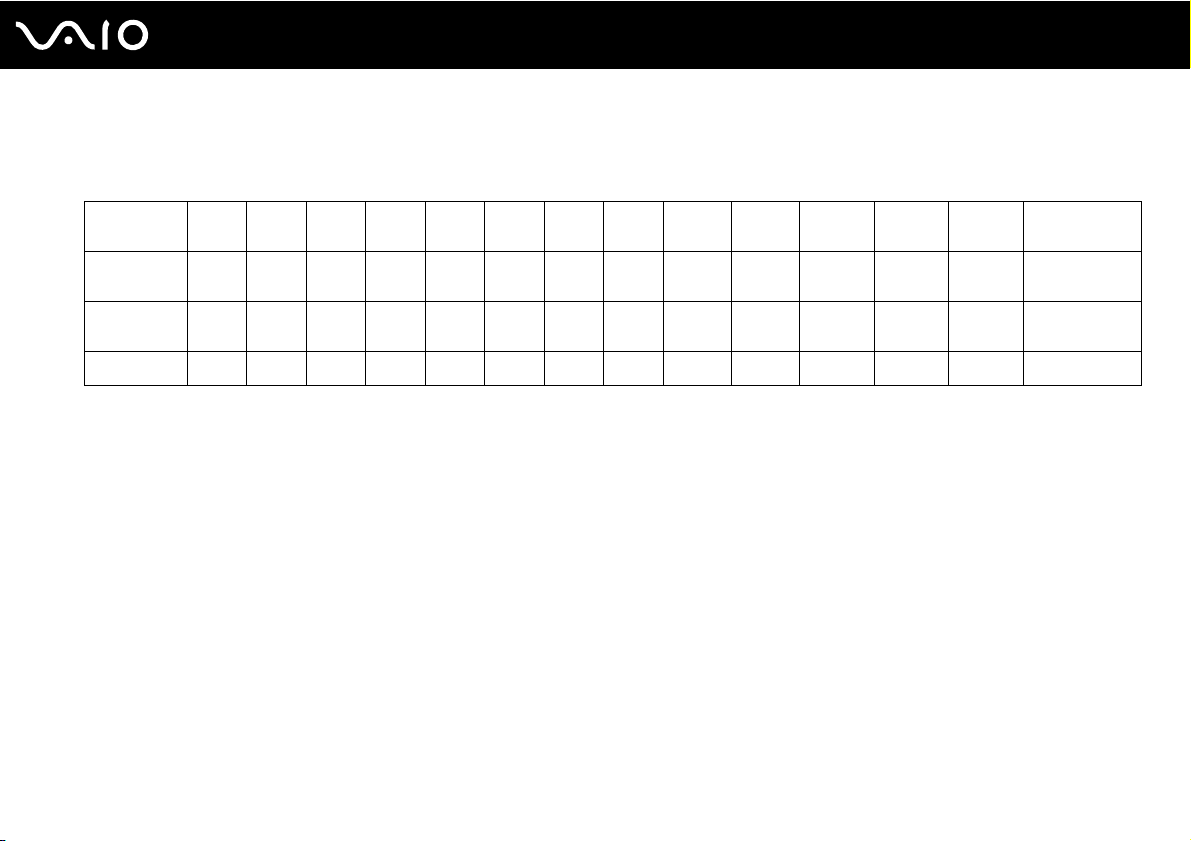
Your computer plays and records CDs, DVDs, and Blu-ray Disc™ media, depending on the model you purchased. Check your
specifications for the type of optical disc drive installed on your model.
Use the table below to see which types of media your optical disc drive supports.
Page 40
Using Your VAIO Computer
PR: playable and recordable
P: playable but not recordable
–: not playable or recordable
CD-
Video CDMusic CDCD
ROM
DVD± RW/
PPPPPRPP–
±R DL/RAM
Blu-ray Disc
PPPP
Combo
Blu-ray DiscPPPP
*1
Supports writing data to DVD-R discs compliant with DVD-R for General Version 2.0/2.1.
*2
Supports writing data to DVD-RW discs compliant with DVD-RW Version 1.1/1.2.
*3
The DVD±RW/RAM disc drive on your computer does not support the DVD-RAM cartridge. Use non-cartridge discs or discs with a removable cartridge.
*4
Writing data to single-sided DVD-RAM discs (2.6 GB) compliant with DVD-RAM Version 1.0 is not supported.
DVD-RAM Version 2.2/12X-SPEED DVD-RAM Revision 5.0 disc is not supported.
*5
Writing data to DVD+R DL (Double Layer) discs is available only on discs supporting DVD+R DL (Double Layer) recording.
*6
Writing data to DVD-R DL (Dual Layer) discs is available only on discs supporting DVD-R DL (Dual Layer) recording.
*7
Supports writing data to BD-R Version 1.1 discs (single-layer discs with the capacity of 25 GB, dual-layer discs with the capacity of 50 GB) and BD-RE Version 2.1
discs (single-layer discs with the capacity of 25 GB, dual-layer discs with the capacity of 50 GB).
*8
BD-R stands for Blu-ray Disc-Recordable in Version 1.1 format.
*9
BD-RE stands for Blu-ray Disc-Rewritable in Version 2.1 format.
*10
The Blu-ray Disc drive on your computer does not support BD-RE Disc media in Version 1.0 format and Blu-ray Disc media with a cartridge.
*11
BD-R LTH TYPE media is not supported on the models with certain types of the Blu-ray Disc drive.
*12
Writing data to Ultra Speed CD-RW discs is not supported on the models with certain types of the Blu-ray Disc drive.
Extra
CD-R/RWDVD-
ROM
*12
PPP
PR
*12
PPP
PR
DVDVideo
BD-
DVD-R /RWDVD+R/RWDVD+R DLDVD-R DLDVD-
ROM
PR
PR
PR
*1 *2
*1 *2
*1 *2
PR
PR
PR
PR
PR
PR
*5
*5
*5
PR
PR
PR
*3 *4
*3 *4
*3 *4
BD-R
–
P
*7 *10 *11
PR
RAM
*6
PR
*6
PR
*6
PR
40
nN
*8
*9
/RE
Page 41

41
nN
Using Your VAIO Computer
!
This product is designed to play back discs that conform to the Compact Disc Digital Audio standard specifications (CD Standard). A DualDisc is a two
sided disc product with a DVD recorded layer on one side and a digital audio layer on the other side. Be aware that the audio side (non-DVD side) of a
DualDisc may not play on this product because it does not conform to the CD Standard.
When you buy pre-recorded or blank discs for use with your VAIO computer, be sure to read the notices on the disc package carefully to check both
playback and recording compatibility with your computer's optical disc drives. Sony does NOT guarantee the compatibility of VAIO optical disc drives
with discs that are not compliant with the official "CD," "DVD," or "Blu-ray Disc" standard. USING NON-COMPLIANT DISCS CAN CAUSE FATAL DAMAGE
TO YOUR VAIO PC OR CREATE SOFTWARE CONFLICTS AND CAUSE SYSTEM HANGING.
For inquiries about disc formats, contact the individual publisher of the pre-recorded disc or the manufacturer of the recordable disc.
✍
8 cm disc writing is not supported.
!
To play copyright protected Blu-ray Disc media continuously, update the AACS key. The AACS key update requires the Internet access.
As with other optical media devices, circumstances may limit compatibility or prevent Blu-ray Disc media playback. VAIO computers may not support
movie playback on packaged media recorded in AVC or VC1 format at high bit rates.
Region settings are required for some contents on DVDs and BD-ROM Disc media. If the region setting on the optical disc drive does not match the
region coding on the disc, playback is not possible.
Unless your external display is compliant with the High-bandwidth Digital Content Protection (HDCP) standard, you cannot play or view the contents
on copyright protected Blu-ray Disc media.
Some contents may restrict video output to standard definition or prohibit analog video output. It is strongly recommended that a digital HDCPcompliant environment be implemented for optimum compatibility and viewing quality.
Do not use memory-resident utility software while the optical disc drive is playing a disc or writing data to a disc. This may cause your computer to
malfunction.
Page 42
42
nN
Using Your VAIO Computer
Notes on writing data to a disc
❑ Only use circular discs. Do not use discs in any other shape (star, heart, card, etc.), as this may damage the optical disc
drive.
❑ Do not strike or shake your computer while the optical disc drive is writing data to a disc.
❑ Do not plug or unplug the AC adapter while the optical disc drive is writing data to a disc.
Notes on playing discs
To achieve optimum performance when playing discs, you should follow these recommendations.
❑ Some CD players and computer optical disc drives may not be able to play audio CDs created with the CD-R or CD-RW
media.
❑ Some DVD players and computer optical disc drives may not be able to play DVDs created with the DVD+R DL, DVD-R
DL, DVD+R, DVD+RW, DVD-R, DVD-RW, or DVD-RAM media.
❑ Depending on system environment, you may find sound interruptions and/or dropped frames during AVC HD playback.
❑ Do not place your computer into either of the power saving modes while your computer is playing a disc.
US model_BGN
❑ Region code indicators are labeled on the discs or packages to indicate in which region and on what type of player you
can play the disc. If the region code indicates "all," you can play this disc in most regions of the world. If the region code
for your residence area is different from the label, you cannot play the disc on your computer.
US model_END
GVD model_BGN
❑ Region code indicators are labeled on the discs or packages to indicate in which region and on what type of player you
can play the disc. If the region code indicates "all," you can play this disc in most regions of the world. If the region code
for your residence area is different from the label, you cannot play the disc on your computer.
Page 43
Using Your VAIO Computer
To find out the region code for your residence area, see the following table.
Residence area Region code Residence area Region code Residence area Region code
Australia* 4 China 6 Hong Kong* 3
India* 5 Indonesia* 3 Japan* 2
Korea 3 Kuwait 2 Malaysia* 3
New Zealand* 4 Philippines* 3 Saudi Arabia* 2
Singapore* 3 South Africa* 2 Taiwan 3
Thailand 3 United Arab Emirates* 2 Vietnam 3
* A region code is not assigned to your computer's optical disc drive by default.
If it is your first time to play a DVD video on your computer, follow these steps before inserting the disc:
1 Click Start and Computer.
2 Right-click the optical disc drive icon and select Properties.
3 Click the Hardware tab.
4 Select your optical disc drive from the All disk drives list and click Properties.
5 Click the DVD Region tab.
6 Select an appropriate region from the list and click OK.
43
nN
!
You can change the region code only a limited number of times. When you have exceeded this number, the drive's region code is permanently assigned
and you will not be able to change it again. Reconfiguring your computer does not reset this count.
If you change the region code while the WinDVD or WinDVD BD software is running, restart the software or eject the disc and re-insert it to make the
new setting effective.
Page 44
Using Your VAIO Computer
GVD model_END
Playing CDs
To play an audio CD
1 Insert a disc into the optical disc drive.
2 If nothing appears on the desktop, click Start, All Programs, and the desired CD software to play the CD.
If the Audio CD window appears, click to select an option.
Copying Files to CDs
To copy files to a disc
1 Insert a recordable disc into the optical disc drive.
If the AutoPlay window appears, click Burn files to disc and follow the on-screen instructions until the empty disc folder
appears.
2 Open the folder that contains the file(s) you want to copy and drag them to the empty disc folder.
3 Close the disc folder.
Playing DVDs
44
nN
To play a DVD
1 Close all running software applications.
2 Insert a DVD into the optical disc drive.
3 If nothing appears on the desktop, click Start, All Programs, and the desired DVD software to play the DVD.
Page 45
45
nN
Using Your VAIO Computer
For instructions on how to use the software, see the help file included with your DVD software.
Copying Files to DVDs
To copy files to a disc
1 Connect the AC adapter to the computer.
2 Close all running software applications.
3 Insert a recordable disc into the optical disc drive.
4 If nothing appears on the desktop, click Start, All Programs, and the desired DVD burning software to copy files to the
disc.
For instructions on how to use the software, see the help file included with your DVD burning software.
Using the PC Card
PC Cards allow you to connect portable external devices to your computer.
IRX-4590_BGN
!
You cannot use PC Cards if you disable the PC Card slot in the BIOS setup screen or the power supply to the slot on the VAIO Power Management tab
in the Power Options window. To enable the slot, follow the steps and the tip in Disabling Built-in Devices (page 115), or see Managing Power with
the VAIO Power Management (page 114).
IRX-4590_END
Page 46
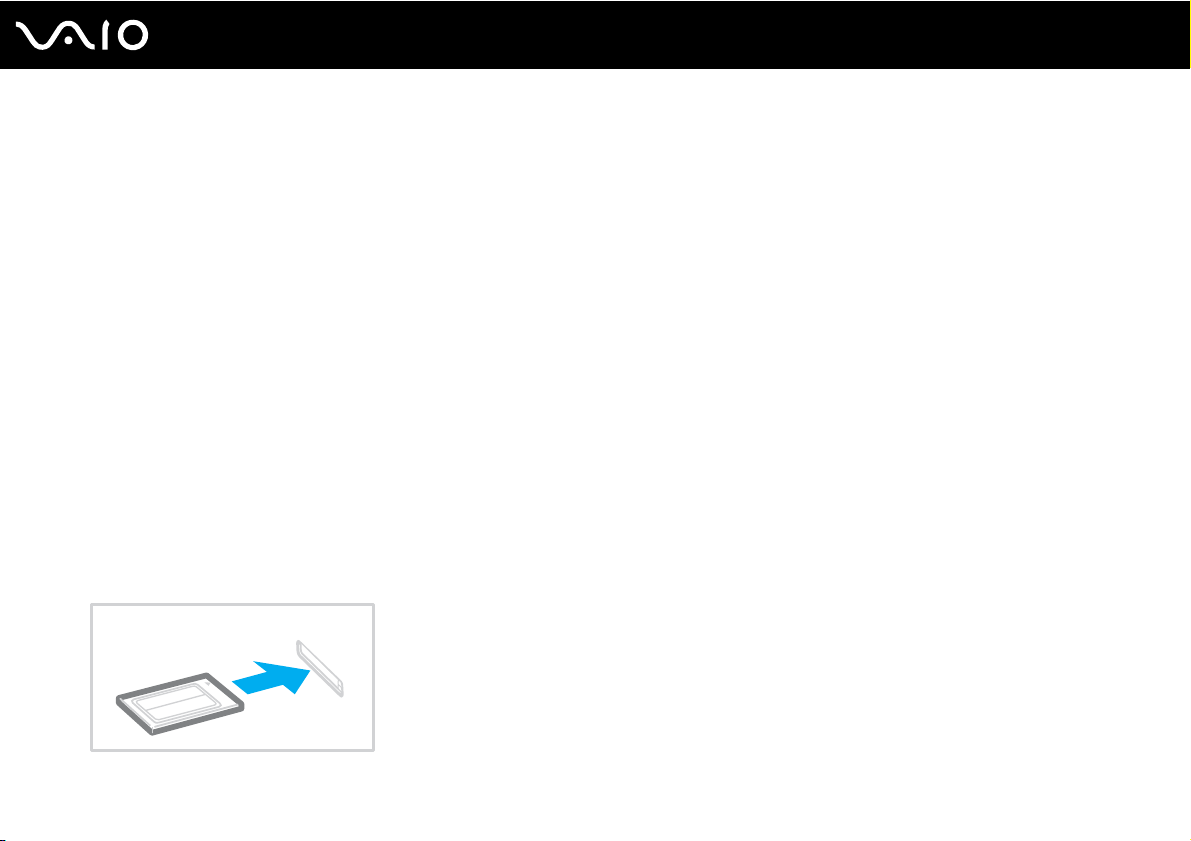
Inserting a PC Card
!
Your computer is supplied with a slot protector in the PC Card slot. Remove the slot protector before you use the slot.
Some PC Cards or their functions may not be compatible with your computer.
✍
You do not need to shut down your computer before inserting or removing a PC Card.
To insert a PC Card
1 Locate the PC Card slot.
1 Push the PC Card release button so that the release button pops out.
2 Push the PC Card release button a second time so that the PC Card slot protector pops out.
3 Gently take hold of the protector and pull it out of the slot.
4 Insert the PC Card into the PC Card slot with the front label facing upward.
5 Gently push the PC Card into the slot all the way in.
The PC Card is automatically detected by your system.
The Safely Remove Hardware icon appears on the taskbar.
46
nN
Using Your VAIO Computer
Page 47

47
nN
Using Your VAIO Computer
✍
Some devices may not function properly if you continuously switch to Normal mode from Sleep or Hibernate mode. For some PC Cards, if you alternate
between Normal mode and Sleep or Hibernate mode while the card is inserted, you may find that the device connected to your system through the PC
Card is not recognized. Restart your system to correct the problem.
While the card is inserted, your computer may not enter Hibernate mode but Sleep mode. We recommend that you remove the card if you want the
computer to enter Hibernate mode.
Make sure you use the latest software driver provided by the PC Card manufacturer.
Do not force a PC Card into the slot. It may damage the connector pins. If you have difficulty inserting a PC Card, check that you are inserting the PC
Card in the correct direction. See the manual that came with your PC Card for more information.
Removing a PC Card
Follow the steps below to remove the PC Card while your computer is on. If it is not removed properly, your system may not
work properly.
!
Insert the PC Card slot protector to block any particles from entering the slot when not using a PC Card. Before moving your computer, be sure to insert
the PC Card slot protector into the slot.
To remove a PC Card
✍
To remove a PC Card when your computer is off, skip steps 1 to 7.
1 Double-click the Safely Remove Hardware icon on the taskbar.
2 Select the hardware you want to unplug.
3 Click Stop.
The Stop a Hardware device window appears.
Page 48

48
nN
Using Your VAIO Computer
4 Confirm that the device can be safely removed from the system.
5 Click OK.
A message appears stating it is now safe to remove the hardware device.
6 Click OK.
7 Click Close to close the Safely Remove Hardware window.
8 Push the PC Card release button so that the release button pops out.
9 Push the PC Card release button a second time so that the PC Card pops out.
10 Gently take hold of the PC Card and pull it out of the slot.
11 If the PC Card release button is still out, push it back in all the way to the end.
Using the Memory Stick
The Memory Stick is a compact, portable, and versatile IC recording media especially designed for exchanging and sharing
digital data with compatible products, such as digital cameras, mobile phones, and other devices. Because it is removable,
it can be used for external data storage.
Before You Use the Memory Stick
The Memory Stick slot on your computer can accommodate both standard- and Duo-size media and supports Memory Stick
PRO, Memory Stick PRO Duo, and Memory Stick PRO-HG Duo with high-speed data transfer and large data capacity
capabilities.
✍
You can insert a Duo-size Memory Stick directly into the Memory Stick slot without using a Memory Stick Duo adaptor.
!
Before using a Memory Stick Micro (M2), be sure to insert it into an M2 Standard-size adaptor or M2 Duo adaptor. If you insert the media directly into
the Memory Stick slot without the adaptor, you may not be able to remove it from the slot.
Page 49
nN
Using Your VAIO Computer
For the latest information about the Memory Stick, visit the Memory Stick web site at http://www.memorystick.com/en/.
!
Your computer has been tested and found compatible with Sony branded Memory Stick with capacity of up to 16 GB that are available as of September
2008. However, not all the Memory Stick that meet the same specifications as the compatible media are guaranteed of compatibility.
Inserting a Memory Stick with multiple conversion adaptors is not guaranteed of compatibility.
MagicGate is the general name of the copyright protection technology developed by Sony. Use a Memory Stick with the MagicGate logo to use this
feature.
Except for your personal use, it is against the copyright law to use any audio and/or image data you recorded without prior consent from the respective
copyright holders. Accordingly, the Memory Stick with such copyrighted data can be used only within the law.
The Memory Stick slot on your computer does not support 8-bit parallel data transfer (high-speed data transfer).
The Memory Stick Micro in an M2 Duo adaptor may not operate properly if it is additionally inserted into a Memory Stick Duo adaptor.
IRX-4590_BGN
You cannot use a Memory Stick if you disable the Memory Stick slot in the BIOS setup screen or the power supply to the slot on the VAIO Power
Management tab in the Power Options window. To enable the slot, follow the steps and the tip in Disabling Built-in Devices (page 115), or see
Managing Power with the VAIO Power Management (page 114).
49
IRX-4590_END
Inserting a Memory Stick
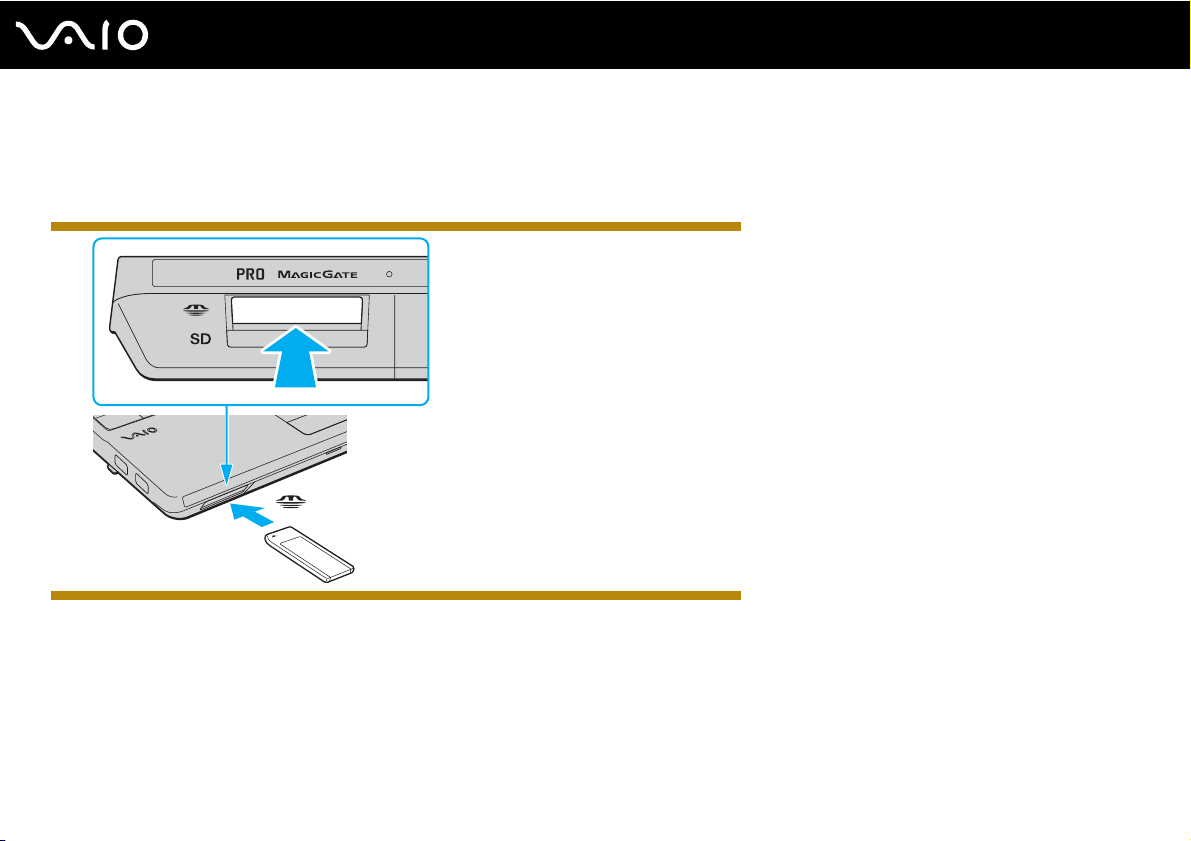
To insert a Memory Stick
1 Locate the Memory Stick slot.
2 Hold the Memory Stick with the arrow facing upward and pointing toward the slot.
Page 50
Using Your VAIO Computer
3 Carefully slide the Memory Stick into the slot until it clicks into place.
The Memory Stick is automatically detected by your system and the contents on the Memory Stick are displayed. If
nothing appears on the desktop, click Start, Computer, and double-click the Memory Stick icon.
IRX-4590_BGN
50
nN
IRX-4590_END
!
Be sure to hold the Memory Stick with the arrow pointing in the correct direction as you insert it into the slot. To avoid damaging your computer or the
media, do not force the Memory Stick into the slot if you cannot insert it smoothly.
Do not insert more than one Memory Stick into the slot. Improper insertion of the media may damage both your computer and the media.
To view the contents on the Memory Stick
1 Click Start and Computer to open the Computer window.
Page 51

Using Your VAIO Computer
2 Double-click the Memory Stick icon to view the list of data files saved in the Memory Stick.
To format a Memory Stick
The Memory Stick has been formatted in the factory default setting and is ready for use.
If you want to reformat the media with your computer, follow these steps.
!
Be sure to use the device that is designed to format the media and supports the Memory Stick when formatting the media.
Formatting the Memory Stick erases the entire data on the media. Before formatting the media, make sure that it does not contain your valuable data.
Do not remove the Memory Stick from the slot while formatting. This could cause a malfunction.
1 Carefully slide the Memory Stick into the slot until it clicks into place.
2 Click Start and Computer to open the Computer window.
3 Right-click the Memory Stick icon and select Format.
4 Click Restore device defaults.
!
The size of the allocation unit and file system may change.
Do not select NTFS from the File system drop-down list as it may cause a malfunction.
51
nN
✍
The formatting process will be completed more quickly if you select Quick Format in Format options.
5 Click Start.
6 Follow the on-screen instructions.
!
It may take time to format the Memory Stick depending on the media type.
Page 52

nN
Using Your VAIO Computer
Removing a Memory Stick
!
Do not remove the Memory Stick while the Media Access indicator light is lit. If you do, you may lose data. Large volumes of data may take time to
load, so make sure the indicator is unlit before removing the Memory Stick.
To remove a Memory Stick
1 Check that the Media Access indicator light is unlit.
2 Push in the Memory Stick toward the computer and release.
The Memory Stick ejects.
3 Pull the Memory Stick out of the slot.
!
Always remove the Memory Stick gently, or it may pop out unexpectedly.
Using the SD Memory Card
Your computer is equipped with an SD memory card slot. You can use this slot to transfer data among digital cameras,
camcorders, music players, and other audio/video devices.
Before You Use the SD Memory Card
52
The SD memory card slot on your computer supports the following memory cards:
❑ SD memory card
❑ SDHC memory card
❑ MultiMediaCard (MMC)
For the latest information on compatible memory cards, see Sony Support Information (page 186) to visit the appropriate
support web site.
Page 53
Using Your VAIO Computer
!
Your computer has been tested and found compatible only with major memory cards available as of September 2008. However, not all memory cards
that meet the same specifications as the compatible media are guaranteed of compatibility.
Always insert the correct memory card into the SD memory card slot.
SD memory cards with capacity of up to 2 GB and SDHC memory cards with capacity of up to 32 GB have been tested and found compatible with your
computer.
The SD memory card slot on your computer does not support the high-speed data transfer feature of the SD memory card and the SDHC memory card.
Do not attempt to insert an SD memory card or SD memory card adaptor of a different type into the SD memory card slot. An incompatible memory
card or memory card adaptor may cause difficulty in removing from the slot and can cause damage to your computer.
Use care when inserting or removing an SD memory card from the SD memory card slot. Do not force the SD memory card in or out of the slot.
IRX-4590_BGN
You cannot use an SD memory card if you disable the SD memory card slot in the BIOS setup screen or the power supply to the SD memory card slot
on the VAIO Power Management tab in the Power Options window. To enable the slot, follow the steps and the tip in Disabling Built-in Devices (page
115), or see Managing Power with the VAIO Power Management (page 114).
IRX-4590_END
Inserting an SD Memory Card
53
nN
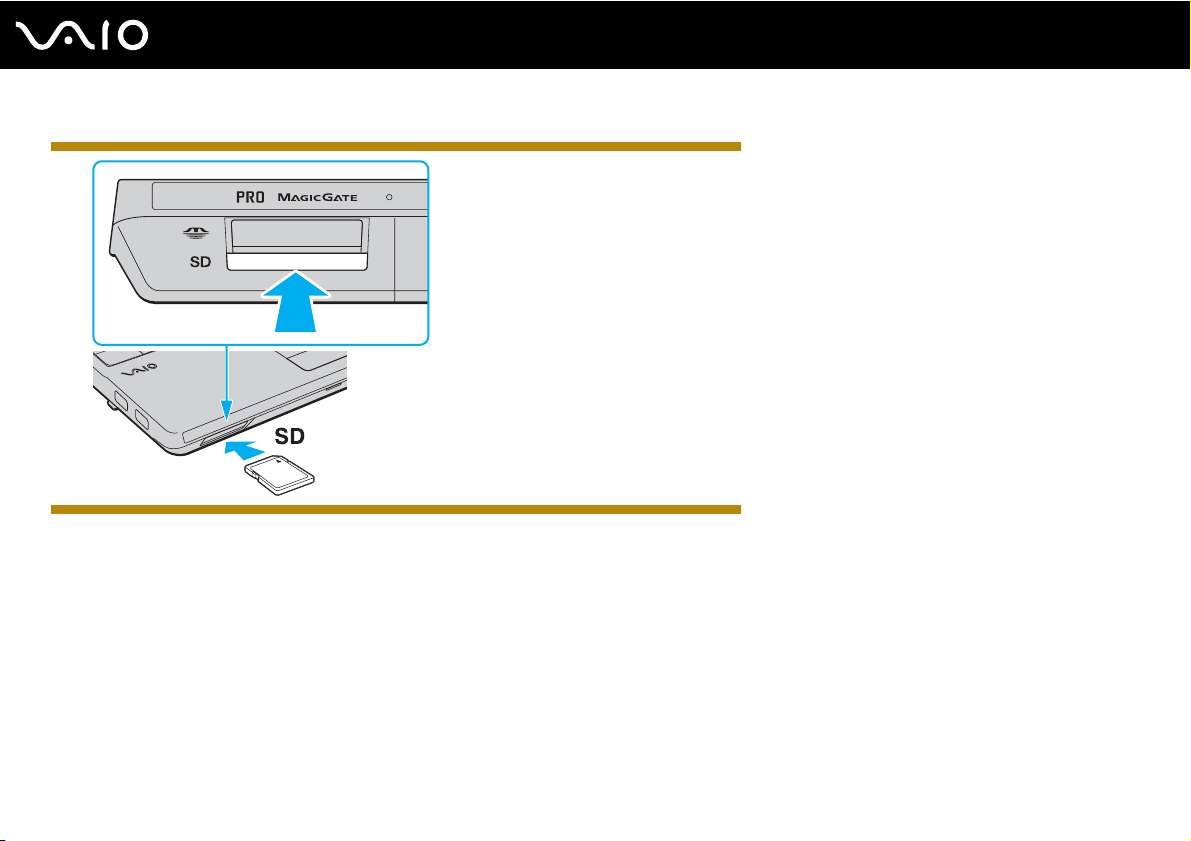
To insert an SD memory card
1 Locate the SD memory card slot.
2 Hold the SD memory card with the arrow facing upward and pointing toward the slot.
3 Carefully slide the SD memory card into the slot until it clicks into place.
Do not force the card into the slot.
Page 54
IRX-4590_BGN
IRX-4590_END
✍
If the SD memory card does not go into the slot easily, remove it gently and verify you are inserting it in the proper direction.
Removing an SD Memory Card
54
nN
Using Your VAIO Computer
!
Do not remove an SD memory card while the Media Access indicator light is lit. If you do, the card or its data may become damaged.
To remove an SD memory card
1 Check that the Media Access indicator light is unlit.
Page 55
55
nN
Using Your VAIO Computer
2 Push in the SD memory card toward the computer and release.
The SD memory card ejects.
3 Pull the SD memory card out of the slot.
Using the Internet
Before using the Internet, you need to sign up with an Internet Service Provider (ISP) and set up devices required for
connecting your computer to the Internet.
The following types of Internet connection services may be available from your ISP:
❑ Fiber to the Home (FTTH)
❑ Digital Subscriber Line (DSL)
❑ Cable modem
❑ Satellite
❑ Dial-up
For detailed information on devices required for the Internet and how to connect your computer to the Internet, ask your ISP.
✍
To connect your computer to the Internet using the wireless LAN function, you need to set up the wireless LAN network. See Using the Wireless LAN
(WLAN) (page 58) for more information.
!
When you connect your computer to the Internet, be sure to take appropriate security measures to protect the computer against online threats.
Except GVD model_BGN
If your computer is not equipped with a built-in modem, you may need to connect an external modem device, for example a USB telephone modem, a
DSL modem, or a cable modem, to your computer. For the detailed instructions on connection setups and modem configuration, see the manual that
came with your modem. To find out whether your computer is equipped with a built-in modem, see the online specifications.
Page 56
Using Your VAIO Computer
Except GVD model_END
Except US model_BGN
If your computer is not equipped with a built-in modem, you may need to connect an external modem device, for example a USB telephone modem, a
DSL modem, or a cable modem, to your computer. For the detailed instructions on connection setups and modem configuration, see the manual that
came with your modem. To find out whether your computer is equipped with a built-in modem, see the printed specifications sheet.
Except US model_END
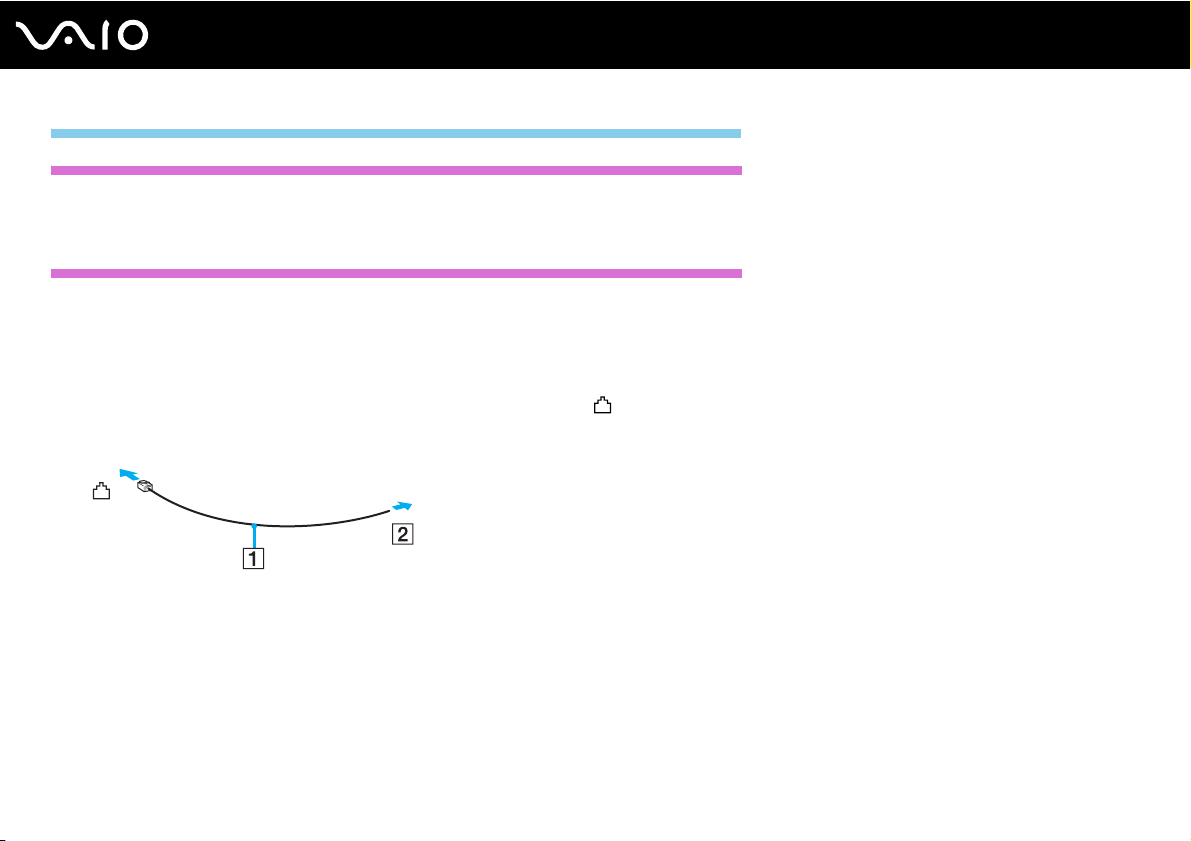
To connect a telephone cable
!
The following procedure applies to models with a built-in modem only.
1 Plug one end of the phone cable (1) into the modem port on the computer.
2 Plug the other end into the wall jack (2).
56
nN
✍
Your computer does not work with party lines, cannot be connected to a coin-operated telephone, and may not work with multiple telephone lines or a
private branch exchange (PBX). Some of these connections may result in excess electrical current and could cause a malfunction in the built-in modem.
If you connect a telephone cable coming through a splitter, the modem or connected device may not work properly.
To set up a dial-up connection to the Internet
!
The following procedure applies to models with a built-in modem only.
Page 57
57
nN
Using Your VAIO Computer
1 Click Start and Control Panel.
2 Click Connect to the Internet under Network and Internet.
The Connect to the Internet window appears.
3 Click Dial-up.
4 Follow the on-screen instructions.
Using the Network (LAN)
Except IRX-4590_BGN
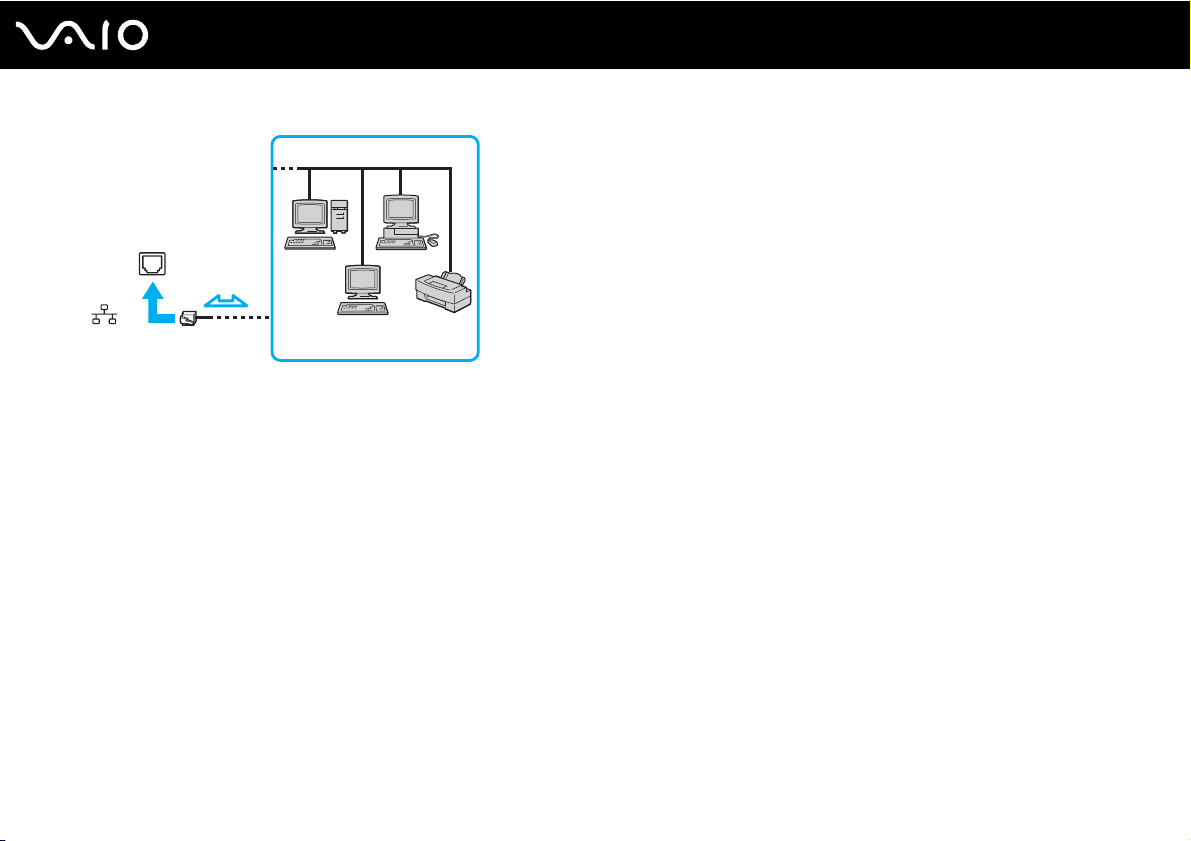
You can connect your computer to 1000BASE-T/100BASE-TX/10BASE-T type networks with an Ethernet network cable.
Connect one end of a network cable (not supplied) to the network (Ethernet) port on the computer and the other end to your
network. For detailed settings and devices needed to connect to the network, ask your network administrator.
Except IRX-4590_END
IRX-4590_BGN
You can connect your computer to 1000BASE-T/100BASE-TX/10BASE-T type networks with an Ethernet network cable.
Connect one end of a network cable (not supplied) to the network (Ethernet) port on the computer and the other end to your
network. For detailed settings and devices needed to connect to the network, ask your network administrator.
!
You cannot access Ethernet networks if you disable the network (Ethernet) port in the BIOS setup screen. To enable the port, follow the steps and the
tip in Disabling Built-in Devices (page 115).
IRX-4590_END
Page 58
Using Your VAIO Computer
✍
Your computer can be connected to the network with the default settings.
!
Do not plug a telephone cable into the network (Ethernet) port on your computer.
If the network (Ethernet) port is connected to one of the telephone lines mentioned below, high electric current to the port may cause damage,
overheating, or fire.
- Home (intercom speakerphone) or business-use telephone lines (multi-line business telephone)
- Public telephone subscriber line
- PBX (private branch exchange)
Using the Wireless LAN (WLAN)
58
nN
Using the Wireless LAN (WLAN), all your digital devices with the built-in WLAN function communicate freely with each other
through a network. A WLAN is a network in which a user can connect to a Local Area Network (LAN) through a wireless (radio)
connection. This eliminates the need to pull cables or wires through walls and ceilings.
Page 59
59
nN
Using Your VAIO Computer
The WLAN supports all normal Ethernet connectivity, but with the added benefits of mobility and roaming. You can still access
information, Internet/intranet and network resources, even in the middle of a meeting, or as you move from one place to
another.
You can communicate without an access point, which means that you can communicate with a limited number of computers
(ad-hoc). Or you can communicate through an access point, which allows you to create a full infrastructure network.
IRX-4590_BGN
!
You cannot access wireless networks if you disable the wireless LAN function in the BIOS setup screen. To enable the function, follow the steps and
the tip in Disabling Built-in Devices (page 115).
IRX-4590_END
US model_BGN
To use the wireless LAN function
To use the wireless LAN function, you first need to set up the wireless LAN function. For setting up and using the wireless
LAN function, search for wireless LAN information using Windows Help and Support. To open Windows Help and
Support, click Start and Help and Support.
!
Be sure to turn on the WIRELESS switch before starting the wireless LAN function.
You cannot select the 5 GHz band, which is used for the IEEE 802.11a standard, on ad-hoc networks.
The IEEE 802.11n draft standard, using the 2.4 GHz or 5 GHz band, is not available on ad-hoc networks.
US model_END
US model_BGN
✍
In some countries, using WLAN products may be restricted by the local regulations (e.g. limited number of channels). Therefore, before activating the
WLAN function, read the Safety Information carefully.
Page 60
Using Your VAIO Computer
US model_END
Except US model_BGN
✍
In some countries, using WLAN products may be restricted by the local regulations (e.g. limited number of channels). Therefore, before activating the
WLAN function, read the Safety Regulations carefully.
Except US model_END
WLAN uses the IEEE 802.11a*/b/g standard or the IEEE 802.11n* draft standard, which specifies the used technology. The standard includes the
encryption methods: Wired Equivalent Privacy (WEP), which is a security protocol, Wi-Fi Protected Access 2 (WPA2), and Wi-Fi Protected Access
(WPA). Proposed jointly by the IEEE and Wi-Fi Alliance, both WPA2 and WPA are specifications of standards based on interoperable security
enhancements that increase the level of data protection and access control for existing Wi-Fi networks. WPA has been designed to be forward
compatible with the IEEE 802.11i specification. It utilizes the enhanced data encryption TKIP (Temporal Key Integrity Protocol) in addition to user
authentication using 802.1X and EAP (Extensible Authentication Protocol). Data encryption protects the vulnerable wireless link between clients and
access points. Besides that, there are other typical LAN security mechanisms to ensure privacy, such as: password protection, end-to-end encryption,
virtual private networks, and authentication. WPA2, the second generation of WPA, provides stronger data protection and network access control and
is also designed to secure all versions of 802.11 devices, including 802.11b, 802.11a, 802.11g, and 802.11n draft standard, multi-band and multi-
mode. In addition, based on the ratified IEEE 802.11i standard, WPA2 provides government grade security by implementing the National Institute of
Standards and Technology (NIST) FIPS 140-2 compliant AES encryption algorithm and 802.1X-based authentication. WPA2 is backward compatible
with WPA.
Except GVD model_BGN
* See the online specifications to find out whether your model supports the IEEE 802.11a standard and/or the IEEE 802.11n draft standard.
60
nN
Except GVD model_END
Except US model_BGN
* See the printed specifications sheet to find out whether your model supports the IEEE 802.11a standard and/or the IEEE 802.11n draft standard.
Page 61
Using Your VAIO Computer
Except US model_END
The IEEE 802.11b/g standard is a wireless LAN standard, using the 2.4 GHz band. The IEEE 802.11g standard provides high-speed communications,
faster than the IEEE 802.11b standard.
The IEEE 802.11a standard is a wireless LAN standard, using the 5 GHz band.
The IEEE 802.11n draft standard is a wireless LAN standard, using the 2.4 GHz or 5 GHz band.
Wireless LAN devices using the 2.4 GHz band cannot communicate with devices using the 5 GHz band because the frequencies are different.
The 2.4 GHz band used by wireless LAN compatible devices is also used by other various devices. Although technologies to minimize interference from
other devices that use the same band are employed on wireless LAN compatible devices, such interference may cause lower communication speed,
narrower communication range, or broken wireless connections.
The communication speed varies depending on the distance between communication devices, existence of obstacles between such devices, the device
configuration, the radio conditions, and the software in use. In addition, communications may be cut off depending on the radio conditions.
The communication range varies depending on the actual distance between communication devices, existence of obstacles between such devices, the
radio conditions, the ambient environment that includes existence of walls and materials of such walls, and the software in use.
Actual communication speed may not be as fast as the one displayed on your computer.
61
nN
Deploying IEEE 802.11b and IEEE 802.11g products on the same wireless network may reduce the communication speed due to radio interference.
Taking this into consideration, the IEEE 802.11g products are designed to reduce the communication speed to ensure communications with
IEEE 802.11b products. When the communication speed is not as fast as expected, changing the wireless channel on the access point may increase
the communication speed.
Except US model_BGN
Page 62
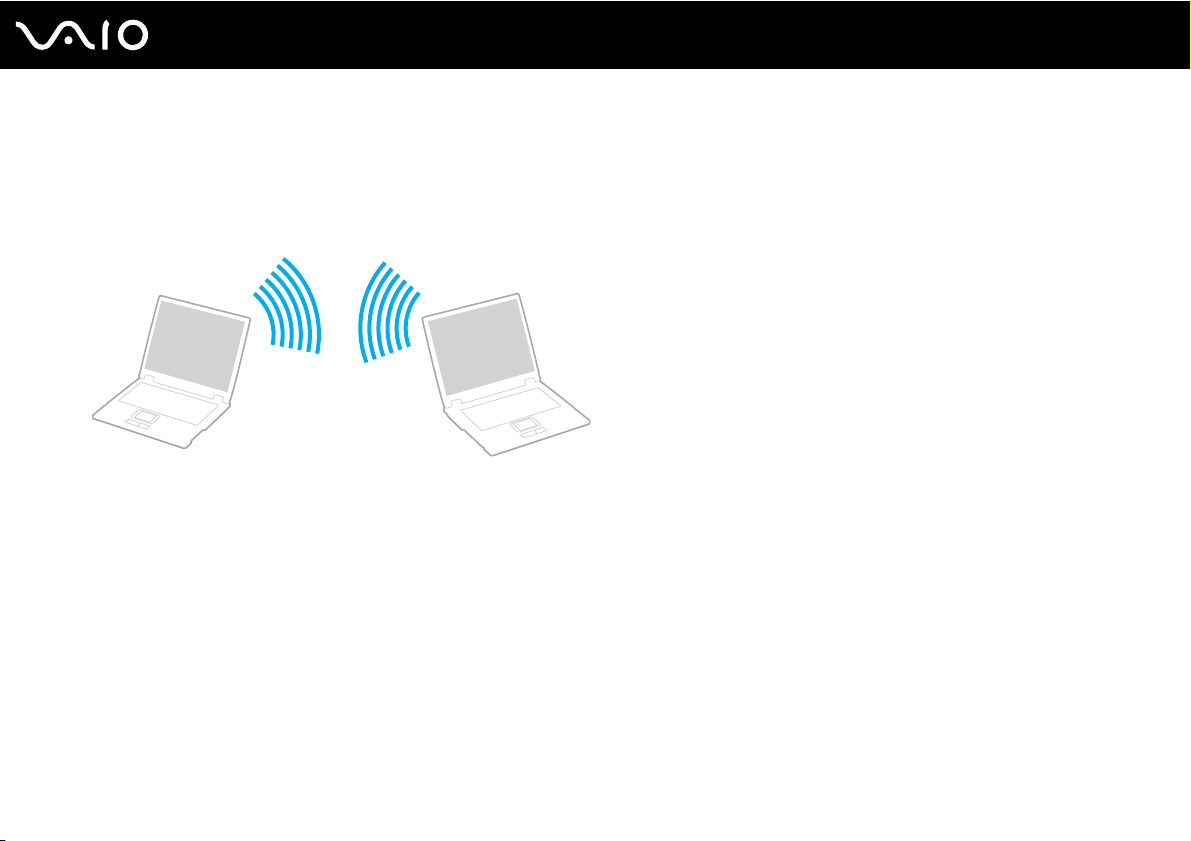
62
nN
Using Your VAIO Computer
Communicating without an Access Point (Ad-hoc)
An ad-hoc network is a network in which a LAN is created only by wireless devices themselves, with no other central controller
or access point. Each device communicates directly with other devices in the network. You can set up an ad-hoc network
easily at home.
To communicate without an access point (ad-hoc)
!
You cannot select the 5 GHz band, which is used for the IEEE 802.11a standard, on ad-hoc networks.
The IEEE 802.11n draft standard, using the 2.4 GHz or 5 GHz band, is not available on ad-hoc networks.
1 Turn on the WIRELESS switch.
2 Click the button next to or above your desired wireless option(s) in the VAIO Smart Network window.
Make sure the WIRELESS indicator light turns on.
3 Click Start and Control Panel.
4 Click View network status and tasks under Network and Internet.
5 Click Set up a connection or network in the left pane.
The Set up a connection or network window appears.
Page 63
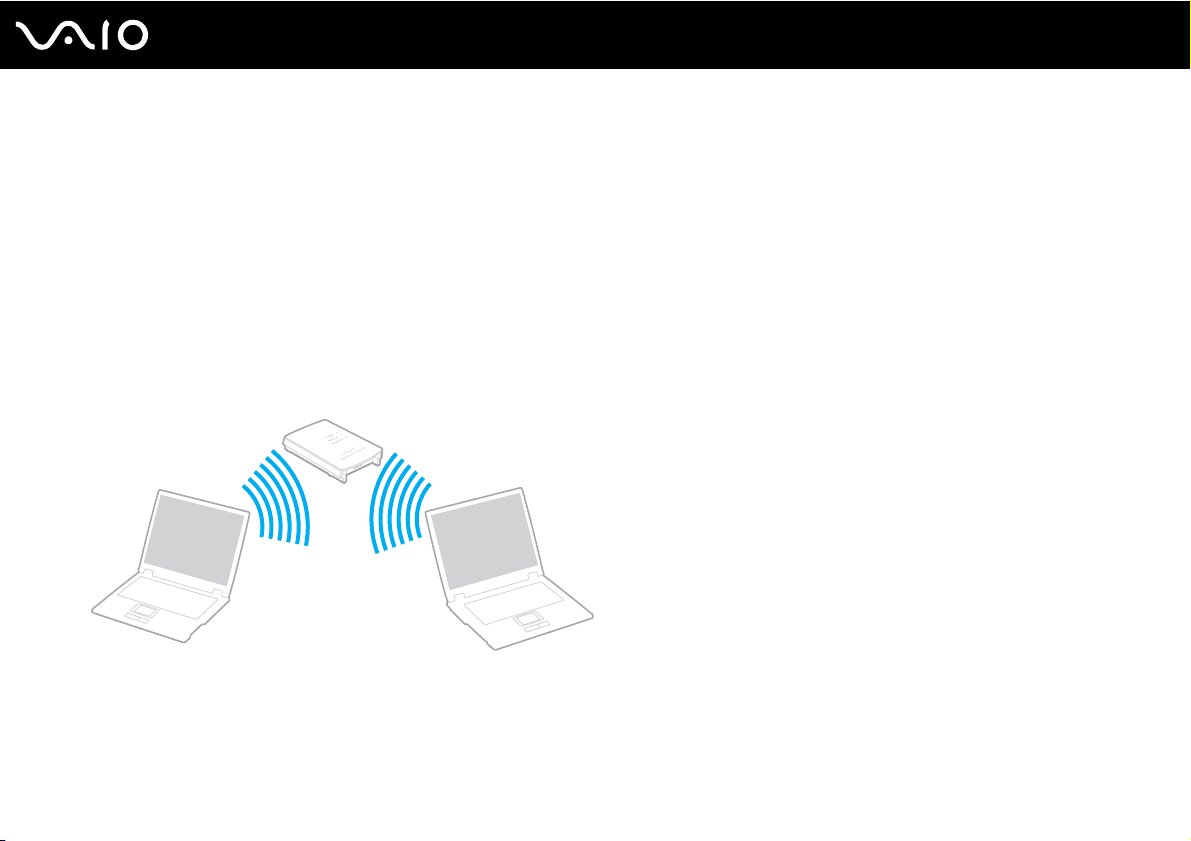
63
nN
Using Your VAIO Computer
6 Select an option to specify the ad-hoc network settings and click Next.
7 Follow the on-screen instructions.
Communicating with an Access Point (Infrastructure)
An infrastructure network is a network that extends an existing wired local network to wireless devices by providing an access
point (not supplied). The access point bridges the wireless and wired LAN and acts as a central controller for the wireless
LAN network. The access point coordinates transmission and reception from multiple wireless devices within a specific range.
The access point will select which channel to use on an infrastructure network.
!
For details on how to select the channel that will be used by the access point, see the manual that came with your access point.
To connect to a wireless network
1 Make sure an access point is set up.
See the manual that came with your access point for more information.
2 Turn on the WIRELESS switch.
Page 64
Using Your VAIO Computer
3 Click the button next to or above your desired wireless option(s) in the VAIO Smart Network window.
Make sure the WIRELESS indicator light turns on.
!
Wireless LAN communication (IEEE 802.11a standard) using only the 5 GHz band, available on selected models only, is disabled by default. To enable
5 GHz band communication, you need to select the option to use the 5 GHz band or both the 2.4 GHz and 5 GHz bands on the WLAN tab in the VAIO
Smart Network settings window.
4 Right-click or on the taskbar and select Connect to a network.
5 Select the desired access point and click Connect.
✍
For WPA-PSK or WPA2-PSK authentication, you must enter a passphrase. The passphrase is case sensitive and must be a text string between 8 and
63 characters in length or a hexadecimal string of 64 characters.
Stopping Wireless LAN Communications
To stop wireless LAN communications
Click the button next to or above the WLAN icon in the VAIO Smart Network window.
!
Turning off the wireless LAN function while accessing remote documents, files, or resources may result in data loss.
Except US model_END
Using the Bluetooth Function
US model_BGN
64
nN
You can establish wireless communications between your computer and other Bluetooth® devices such as another computer
or a mobile phone. You can transfer data between these devices without cables at a range of up to 33 feet (10 meters) in an
open area.
Page 65
65
nN
Using Your VAIO Computer
To use the Bluetooth function
To use the Bluetooth function, you first need to set up the Bluetooth function. For setting up and using the Bluetooth function,
search for Bluetooth information using Windows Help and Support. To open Windows Help and Support, click Start and
Help and Support.
!
Be sure to turn on the WIRELESS switch before starting the Bluetooth function.
US model_END
GVD model_BGN
You can establish wireless communications between your computer and other Bluetooth® devices such as another computer
or a mobile phone. You can transfer data between these devices without cables at a range of up to 10 meters in an open area.
GVD model_END
Except US model_BGN
To start Bluetooth communications
1 Turn on the WIRELESS switch.
2 Click the button next to or above the Bluetooth icon in the VAIO Smart Network window.
Make sure the WIRELESS indicator light turns on.
Except US model_END
Notes on using the Bluetooth function
❑ The data transfer rate varies, depending on the following conditions:
❑ Obstacles, such as walls, located between devices
❑ Distance between devices
❑ Material used in walls
Page 66

66
nN
Using Your VAIO Computer
❑ Proximity to microwaves and cordless telephones
❑ Radio frequency interference and other environmental conditions
❑ Device configuration
❑ Type of software application
❑ Type of operating system
❑ Use of both wireless LAN and Bluetooth functions at the same time on your computer
❑ Size of file being exchanged
❑ Large files may occasionally be corrupted during continuous transfer due to limitations of the Bluetooth standard and
electromagnetic interference in the environment.
❑ All Bluetooth devices must be certified to make sure that the applicable standard requirements are maintained. Even if
standards are met, individual device performance, specifications, and operation procedures can vary. Data exchange may
not be possible in all situations.
❑ Video and audio may not be synchronized if you play videos on your computer with audio output from a connected
Bluetooth device. This is a frequent occurrence with Bluetooth technology and is not a malfunction.
❑ The 2.4 GHz band, with which Bluetooth devices or wireless LAN devices work, is used by various devices. Bluetooth
devices use the technology to minimize the interference from other devices that use the same wave length. Simultaneous
use of the Bluetooth function and wireless communication devices, however, may cause radio interference and result in
reduced communication speeds and distances than the standard values.
❑ The Bluetooth function may not work with other devices, depending on the manufacturer or the software version employed
by the manufacturer.
❑ Connecting multiple Bluetooth devices to your computer may cause channel congestion, resulting in poor performance
of the devices. This is normal with Bluetooth technology and is not a malfunction.
Page 67

67
nN
Using Your VAIO Computer
Bluetooth Security
The Bluetooth wireless technology has an authentication function, which allows you to determine with whom you choose to
communicate. With the authentication function, you can prevent any anonymous Bluetooth devices from accessing your
computer.
The first time two Bluetooth devices communicate, a common passkey (a password required for authentication) should be
determined for both devices to be registered. Once a device is registered, there is no need to re-enter the passkey.
✍
The passkey can be different each time, but must be the same at both ends.
For certain devices, such as a mouse, no passkey can be entered.
Communicating with Another Bluetooth Device
You can connect your computer to a Bluetooth device such as another computer, a mobile phone, a PDA, a headset, a
mouse, or a digital camera without the use of any cables.
Page 68
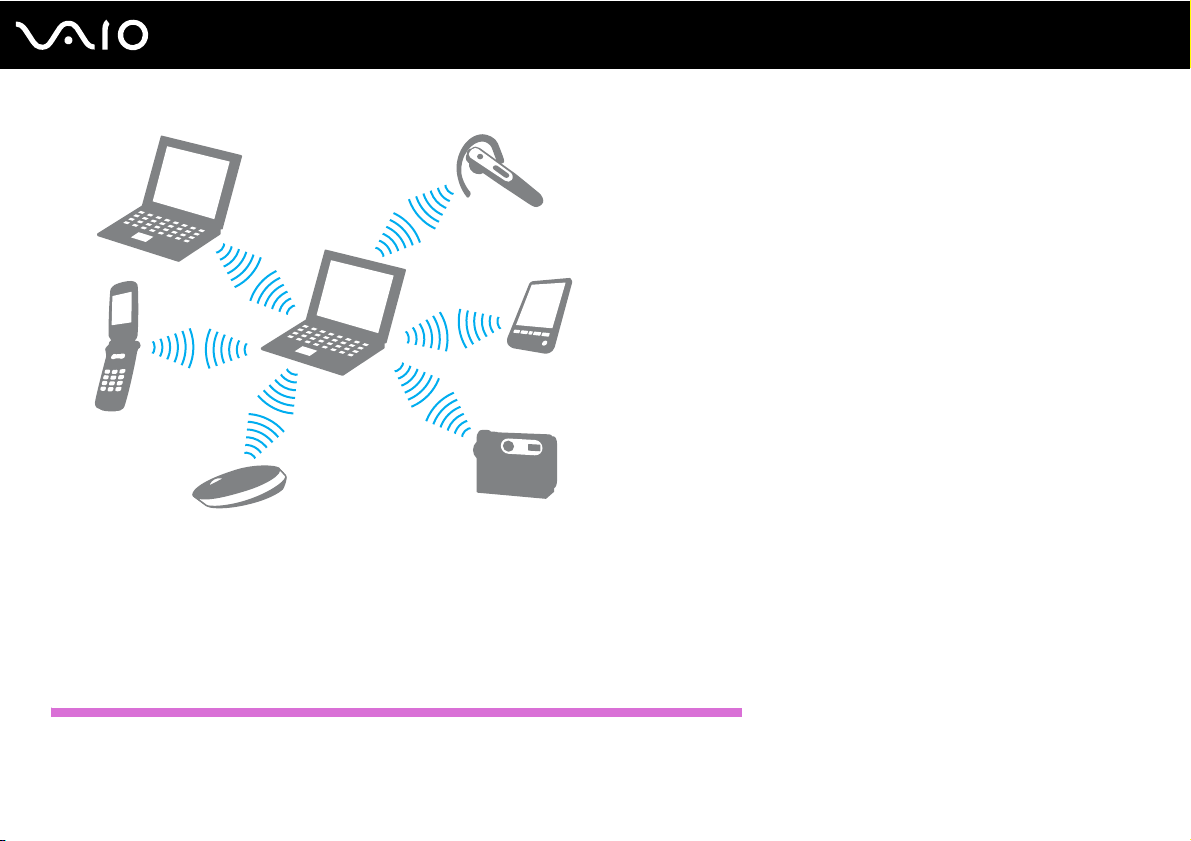
68
nN
Using Your VAIO Computer
To communicate with another Bluetooth device
To communicate with another Bluetooth device, you first need to set up the Bluetooth function. For setting up and using the
Bluetooth function, search for Bluetooth information using Windows Help and Support. To open Windows Help and
Support, click Start and Help and Support.
!
Be sure to turn on the WIRELESS switch before starting the Bluetooth function.
Except US model_BGN
Page 69
Stopping Bluetooth Communications
To stop Bluetooth communications
1 Turn off the Bluetooth device that is communicating with your computer.
2 Click the button next to or above the Bluetooth icon in the VAIO Smart Network window.
Except US model_END
69
nN
Using Your VAIO Computer
Page 70
70
nN
Using Peripheral Devices
Using Peripheral Devices
You can add functionality to your VAIO computer by using the various ports on the computer.
❑ Connecting External Speakers (page 70)
❑ Connecting an External Display (page 71)
❑ Selecting Display Modes (page 75)
❑ Using the Multiple Monitors Function (page 76)
❑ Connecting an External Microphone (page 78)
❑ Connecting a Universal Serial Bus (USB) Device (page 79)
❑ Connecting a Printer (page 82)
Connecting External Speakers
You can connect external sound output devices (not supplied), such as speakers or headphones, to your computer.
Except IRX-4590_BGN
Since your computer is capable of outputting digital signals through the OPTICAL OUT port, you can connect an S/PDIF
device such as digital headphones or an AV amplifier to the port and enhance the sound quality of your computer. For more
information, see the manual that came with your S/PDIF device.
!
To hear sound from the S/PDIF device connected to the OPTICAL OUT port, you need to change the sound output device. For the detailed instructions,
see How do I change the sound output device? (page 181).
Except IRX-4590_END
Page 71
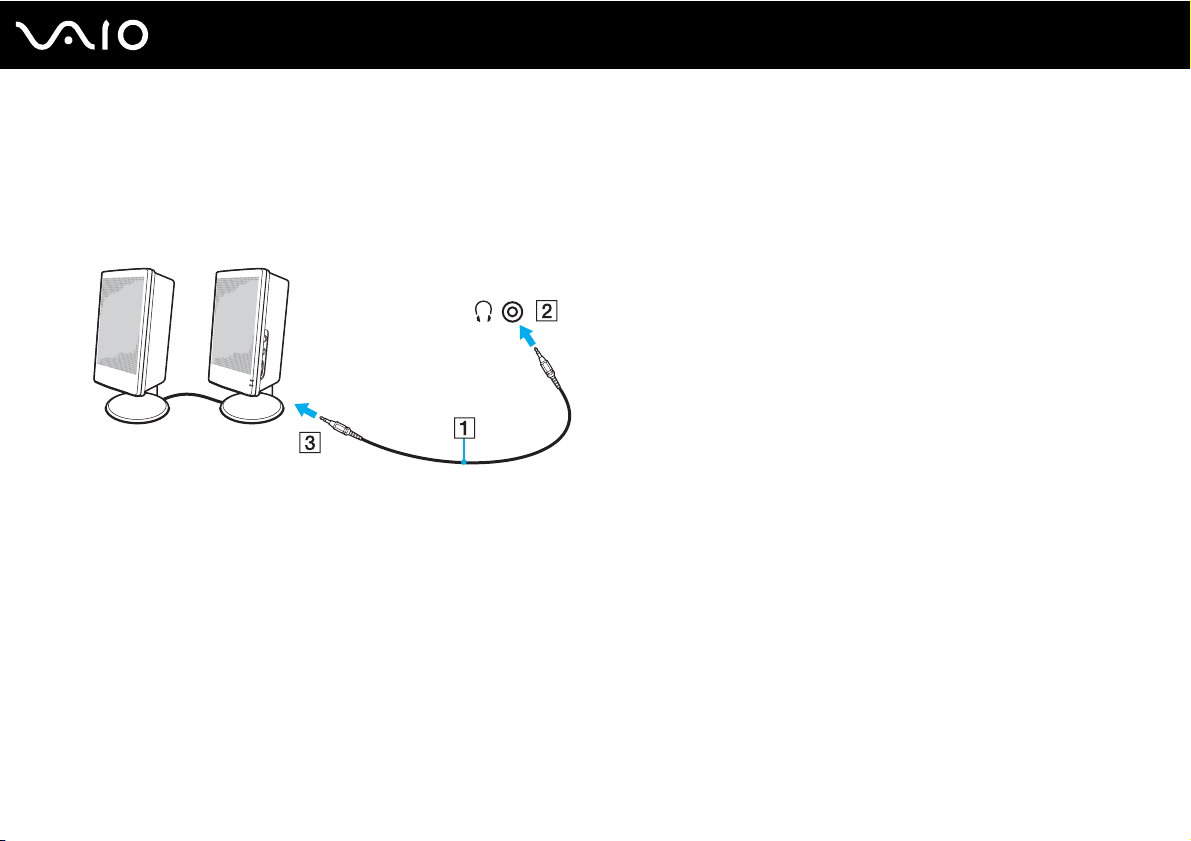
To connect external speakers
1 Plug the speaker cable (1) (not supplied) into the headphones jack (2) i.
2 Plug the other end of the speaker cable to the external speaker (3).
3 Turn down the volume of the speakers before you turn them on.
✍
Make sure your speakers are designed for computer use.
!
Do not place floppy disks on the speakers. Their magnetic field may damage the data on the disks.
Connecting an External Display
71
nN
Using Peripheral Devices
You can connect an external display (not supplied) to your computer. For example, you can use the computer with a computer
display or a projector.
✍
Connect the power cord of your external display after connecting all other cables.
Page 72
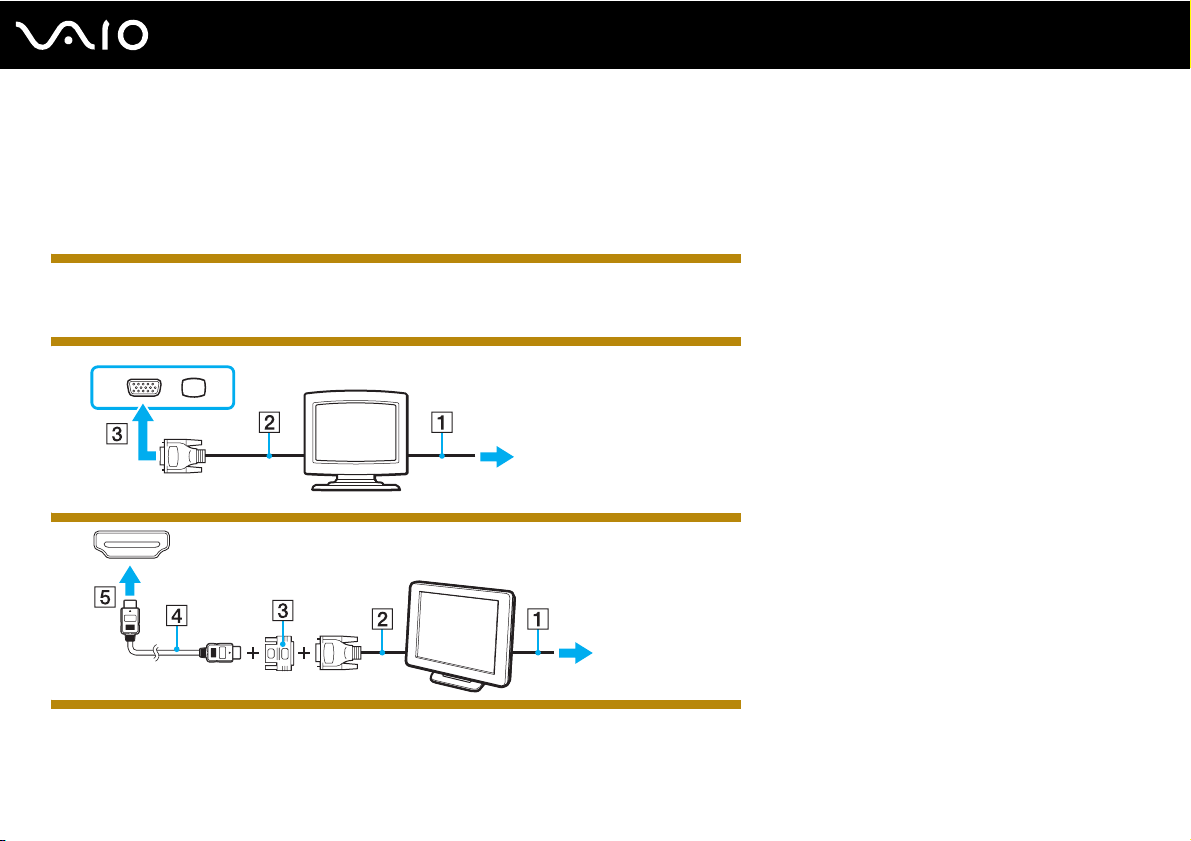
Using Peripheral Devices
Connecting a Computer Display
You can connect a computer display (monitor) to your computer.
To connect a computer display
IRX-4590_BGN
1 If necessary, plug one end of the display's power cord (1) into your display, and the other end into an AC outlet.
2 Plug the display cable (2) (not supplied) into the monitor port (3) a on the computer.
IRX-4590_END
Except IRX-4590_BGN
72
nN
Except IRX-4590_END
Page 73
Using Peripheral Devices
Connecting a Multimedia Computer Display
Except IRX-4590_BGN
You can connect a multimedia computer display that includes built-in speakers and a microphone to your computer.
Except IRX-4590_END
IRX-4590_BGN
You can connect a multimedia computer display that includes a built-in speaker and a microphone to your computer.
IRX-4590_END
To connect a multimedia computer display
1 Plug the power cord of your multimedia computer display (1) into an AC outlet.
2 Plug the display cable (2) (not supplied) into the monitor port (3) a on the computer.
3 Plug the speaker cable (4) (not supplied) into the headphones jack (5) i on the computer.
4 Plug the microphone cable (6) (not supplied) into the microphone jack (7) m on the computer.
73
nN
Page 74
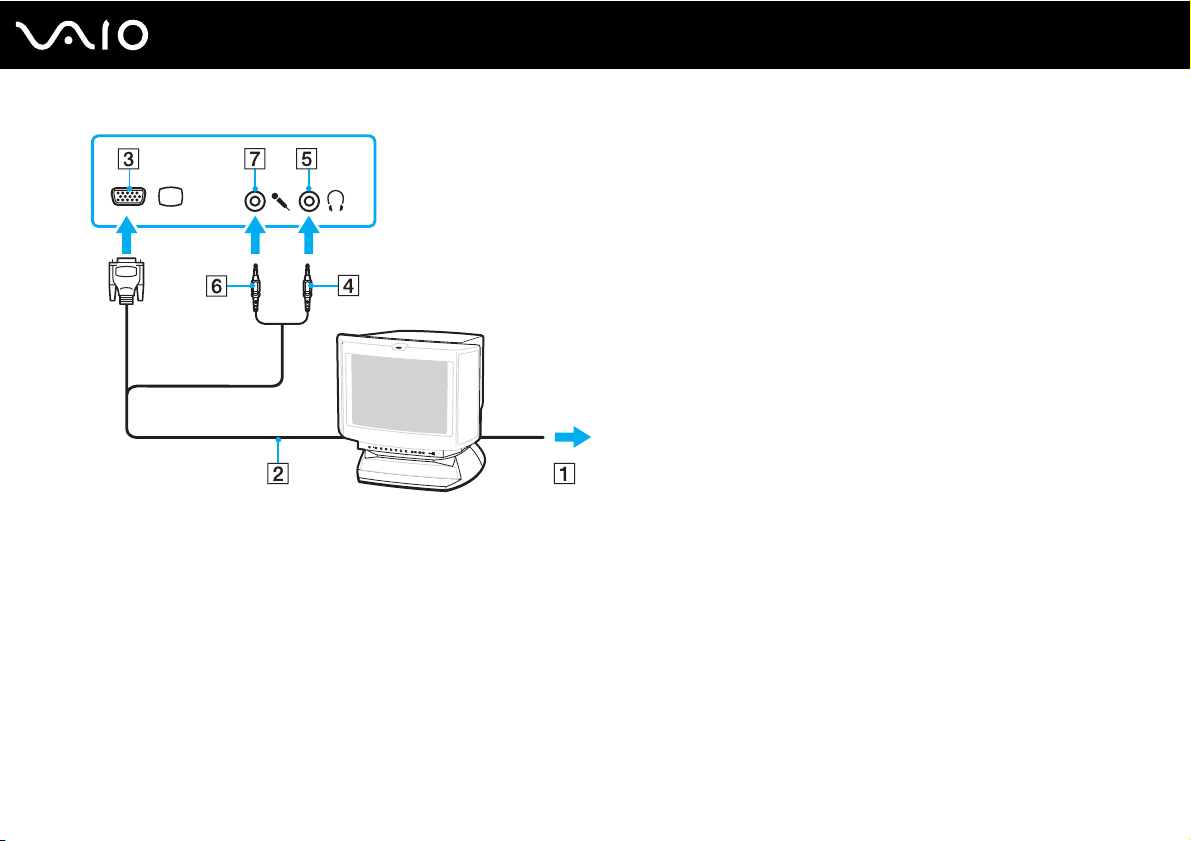
Connecting a Projector
You can connect a projector (for example, the Sony LCD projector) to your computer.
74
nN
Using Peripheral Devices
To connect a projector
1 Connect the power cord (1) of your projector into an AC outlet.
2 Plug a display cable (2) (not supplied) into the monitor port (3) a on the computer.
3 Plug an audio cable (4) (not supplied) into the headphones jack (5) i on the computer.
4 Plug the display cable and the audio cable into the port and jack on the projector (6).
Page 75
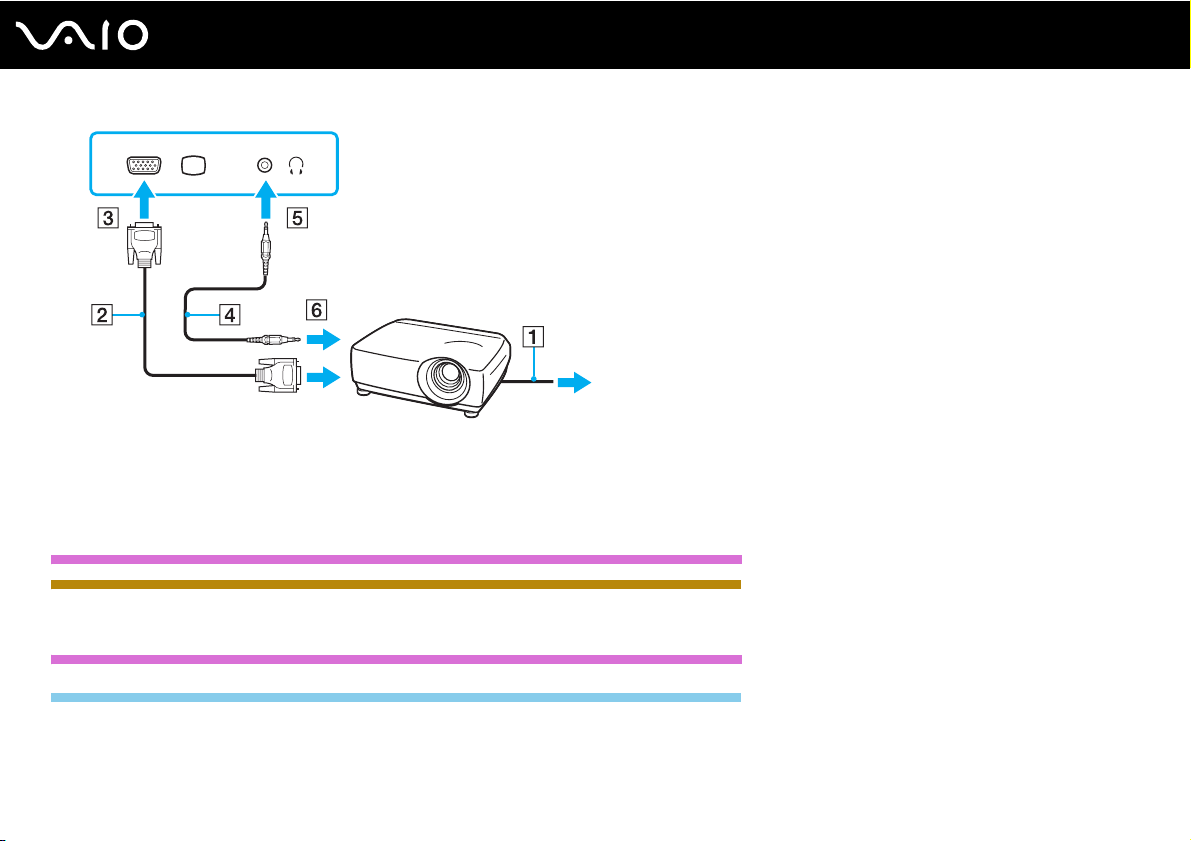
75
nN
Using Peripheral Devices
Selecting Display Modes
You can select which display to use as the primary monitor when an external display (desktop monitor, etc.) is connected to
your computer.
US model_BGN
Except IRX-4590_BGN
The procedure for selecting a display depends on the video controller used in the computer. See the online specifications for
detailed information on the video controller.
US model_END
GVD model_BGN
The procedure for selecting a display depends on the video controller used in the computer. See the printed specifications
sheet for detailed information on the video controller.
Page 76
76
nN
Using Peripheral Devices
GVD model_END
Except IRX-4590_END
If you want to work on your computer screen and the external display at the same time, see Using the Multiple Monitors
Function (page 76) for more information.
To select a display
IRX-4590_BGN
1 Right-click on the desktop and select Personalize.
2 Click Display Settings.
3 Follow the on-screen instructions to change the settings.
✍
You may not be able to display the same contents on your computer screen and the external display or projector at the same time, depending on the
type of your external display or projector.
Before turning on your computer, turn on the external display.
IRX-4590_END
Using the Multiple Monitors Function
The Multiple Monitors function allows you to distribute portions of your desktop across separate displays. For example, if you
have an external display connected to the monitor port, your computer screen and the external display can function as a
single desktop.
You can move the cursor from one display to the other. This allows you to drag objects, such as an open application window
or a toolbar, from one display to the other.
Page 77
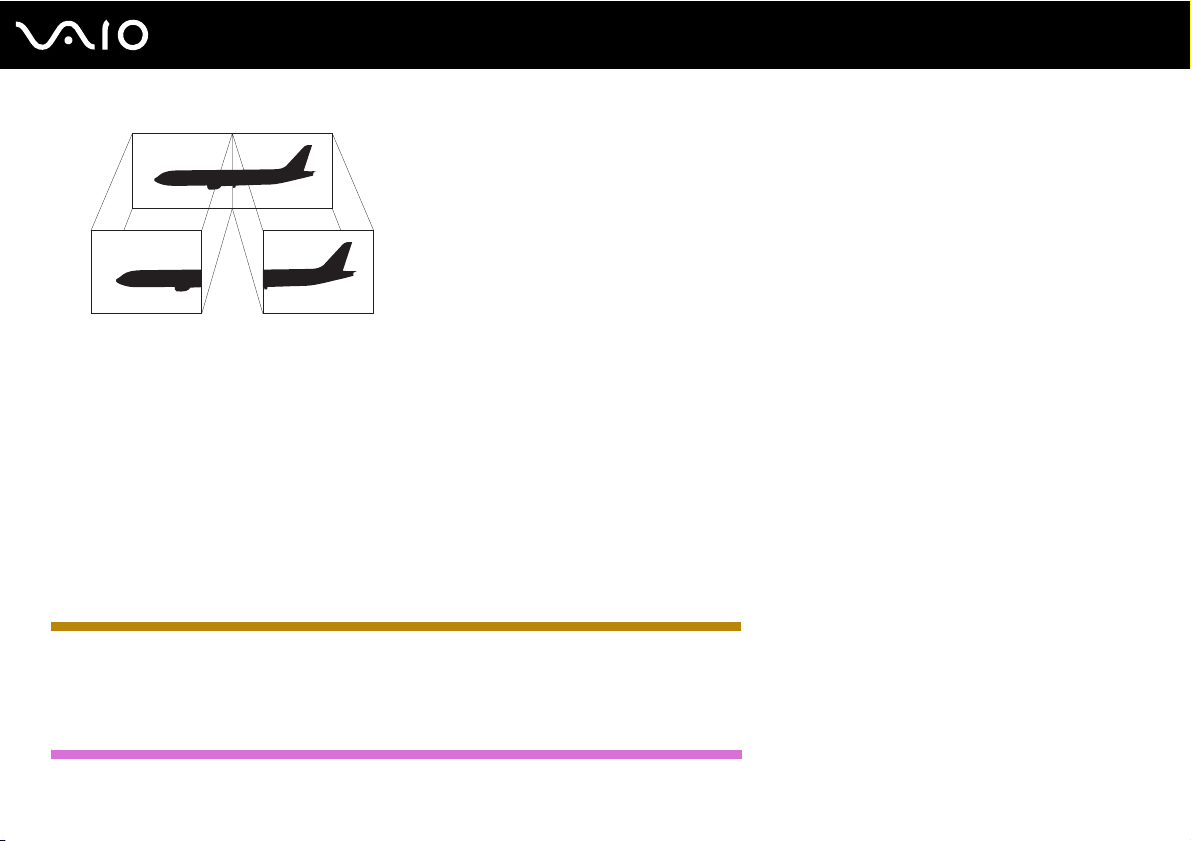
Using Peripheral Devices
✍
Your external display may not support the Multiple Monitors function.
Certain software applications may not be compatible with Multiple Monitors settings.
Make sure that your computer does not enter Sleep or Hibernate mode while you are using the Multiple Monitors function. Otherwise, the computer
may not return to Normal mode.
If you set different colors on each display, do not expand a single window across two displays. Otherwise, your software may not work properly.
Set fewer colors or a lower resolution for each display.
To use the Multiple Monitors function
IRX-4590_BGN
1 Right-click on the desktop and select Personalize.
2 Click Display Settings.
3 Follow the on-screen instructions to change the settings.
US model_BGN
77
nN
Page 78
78
nN
Using Peripheral Devices
✍
You can also change the S1/S2* button assignment to activate the Multiple Monitors function with the S1/S2 button. To change the S1/S2 button
assignment, press and hold either button to display the window for changing the assignment. For details on the S1/S2 button, see Using Special-
function Buttons (page 35).
*The S2 button is available on models without a built-in optical disc drive only.
US model_END
GVD model_BGN
✍
You can also change the S1 button assignment to activate the Multiple Monitors function with the S1 button. To change the S1 button assignment,
press and hold the button to display the window for changing the assignment. For details on the S1 button, see Using Special-function Buttons (page
35).
GVD model_END
Additionally, you can set the display colors and resolution for each display and customize the Multiple Monitors function.
IRX-4590_END
Connecting an External Microphone
If you need to use a sound input device (for example, to chat over the Internet), you need to plug in an external microphone
(not supplied).
To connect an external microphone
Plug the microphone cable (1) into the microphone jack (2) m.
Page 79
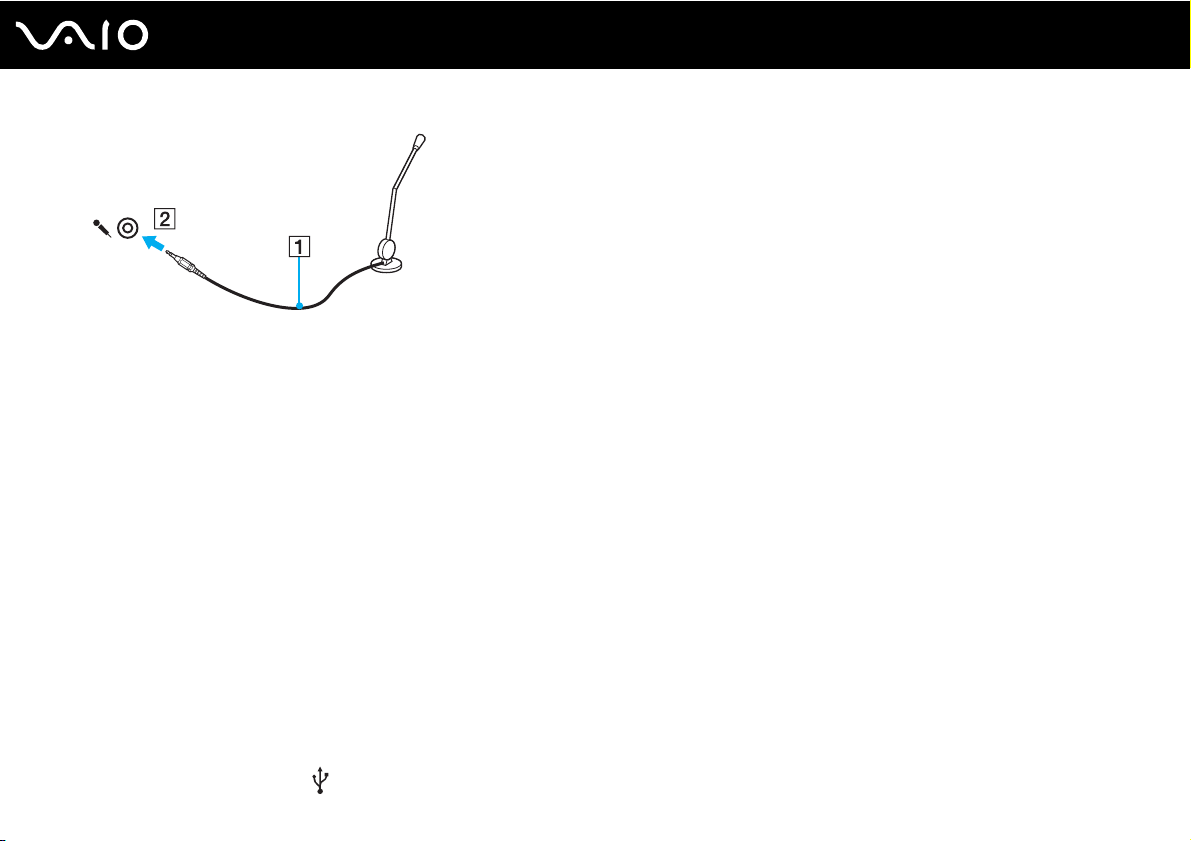
Using Peripheral Devices
✍
Make sure your microphone is designed for computer use.
Connecting a Universal Serial Bus (USB) Device
To protect your computer and/or USB devices from damage, observe the following:
❑ When moving the computer with USB devices connected, avoid exposing the USB ports to shock or impact.
❑ Do not put the computer into a bag or carrying case when it has USB devices connected.
!
You cannot use any connected USB devices if you disable the USB ports in the BIOS setup screen. To enable the ports, follow the steps and the tip in
Disabling Built-in Devices (page 115).
79
nN
If the use of USB ports is restricted by the USB Access Restriction Setting utility, you may not be able to use any connected USB devices. For changing
the setting, see Restricting USB Access (page 116).
Connecting a USB Mouse
To connect a USB mouse
1 Choose the USB port (1) you prefer to use.
Page 80
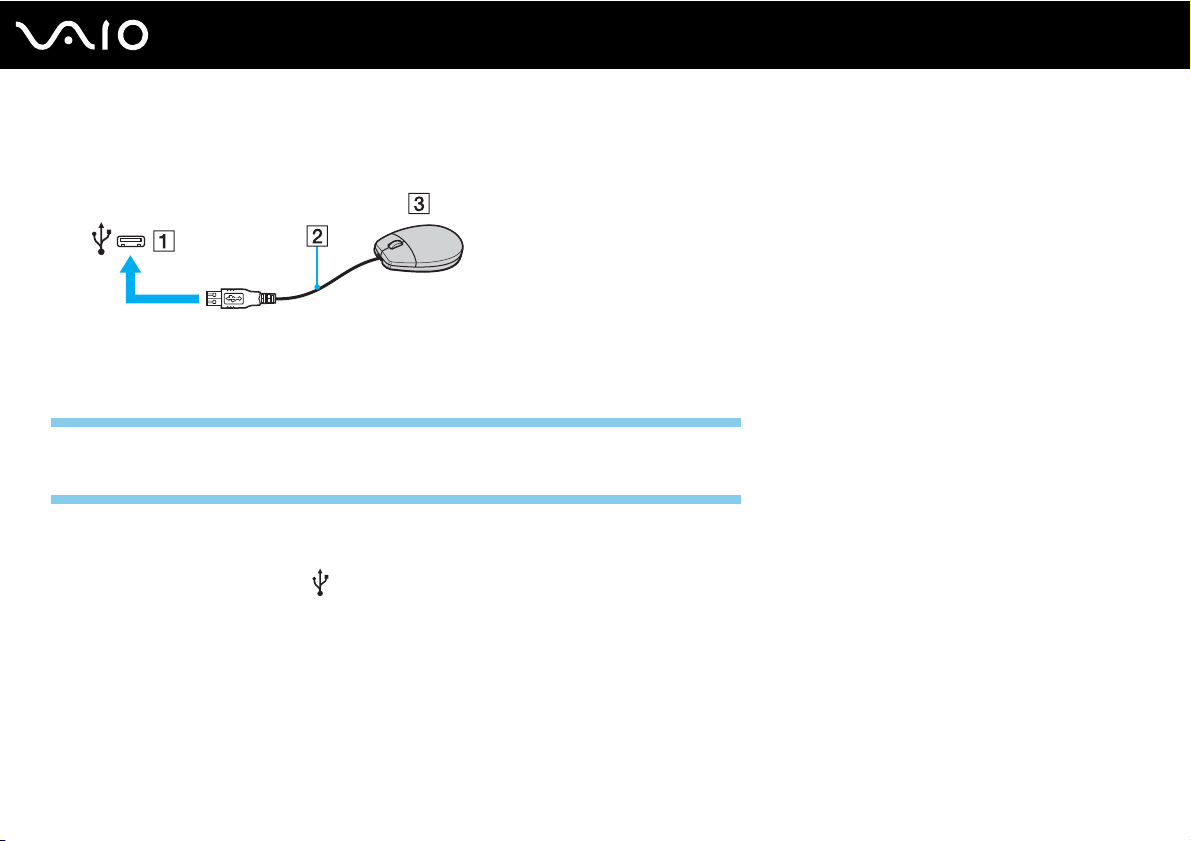
2 Plug the USB mouse cable (2) into the USB port.
You can now use your USB mouse (not supplied) (3).
Connecting a USB Floppy Disk Drive
You can purchase a USB floppy disk drive and connect it to your computer.
GVD model_BGN
✍
The optional USB floppy disk drive may not be available in some countries or regions.
GVD model_END
To connect a USB floppy disk drive
1 Choose the USB port (1) you prefer to use.
2 Plug the USB floppy disk drive cable (2) into the USB port.
Your USB floppy disk drive (3) is now ready for use.
80
nN
Using Peripheral Devices
Page 81
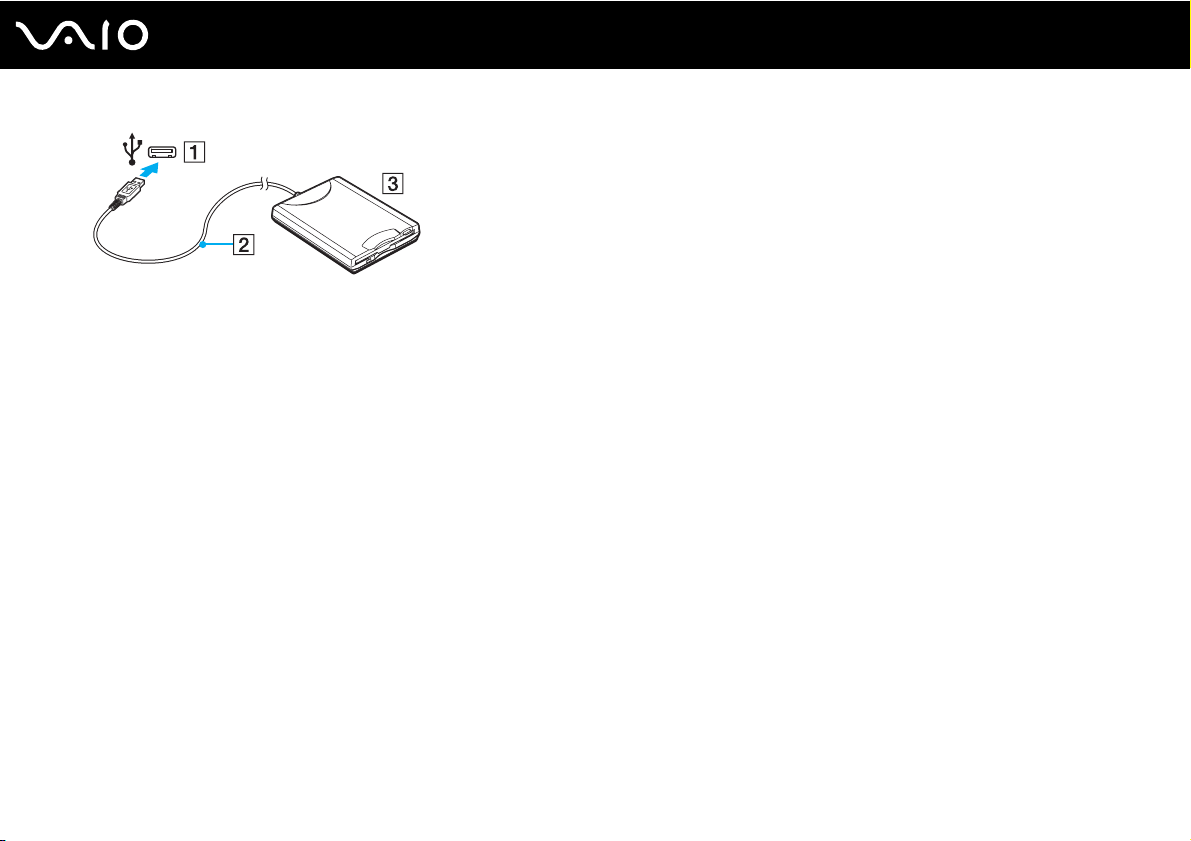
81
nN
Using Peripheral Devices
!
When using a USB floppy disk drive, do not apply force to the USB port. This may cause a malfunction.
Disconnecting a USB floppy disk drive
You can disconnect a USB floppy disk drive when your computer is on or off. Disconnecting the drive when the computer is
in a power saving mode (Sleep or Hibernate) may cause the computer to malfunction.
To disconnect a USB floppy disk drive
✍
To disconnect a USB floppy disk drive when your computer is off, skip steps 1 to 5.
1 Close all programs accessing the floppy disk drive.
2 Double-click the Safely Remove Hardware icon on the taskbar.
3 Select the floppy disk drive you want to unplug.
4 Click Stop.
5 Follow the on-screen instructions to remove the floppy disk drive.
6 Disconnect the floppy disk drive from the computer.
Page 82
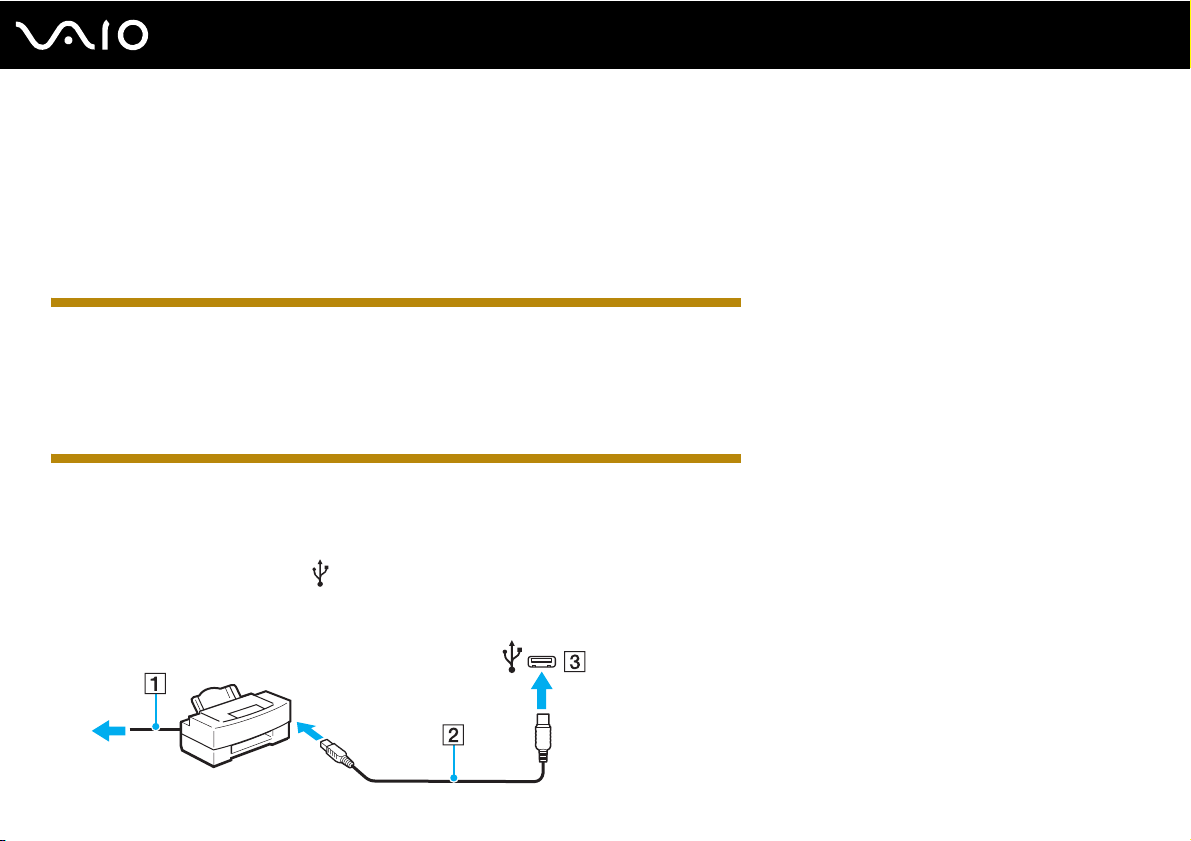
Using Peripheral Devices
Connecting a Printer
You can connect a Windows-compatible printer to your computer to print documents.
Connecting a Printer Using the USB Port
You can connect a USB printer compatible with your version of Windows to the computer.
IRX-4590_BGN
!
You cannot use the connected USB printer if you disable the USB ports in the BIOS setup screen. To enable the ports, follow the steps and the tip in
Disabling Built-in Devices (page 115).
If the use of USB ports is restricted by the USB Access Restriction Setting utility, you may not be able to use the connected USB printer. For changing
the setting, see Restricting USB Access (page 116).
IRX-4590_END
To connect a printer using the USB port
1 Plug the power cord (1) of your printer into an AC outlet.
2 Choose the USB port (3) you prefer to use.
3 Plug one end of a USB printer cable (2) (not supplied) into the USB port and the other end to your printer.
82
nN
Page 83
83
nN
Customizing Your VAIO Computer
Customizing Your VAIO Computer
This section briefly describes how to change the main settings of your VAIO computer. Among other things, you will learn
how to use and customize the look of your Sony software and utilities.
❑ Setting the Password (page 83)
❑ Using Fingerprint Authentication (page 94)
❑ Using the Trusted Platform Module (TPM) (page 103)
❑ Setting Up Your Computer with the VAIO Control Center (page 108)
❑ Using the VAIO Status Monitor (page 109)
❑ Using the Power Saving Modes (page 109)
❑ Managing Power with the VAIO Power Management (page 114)
❑ Protecting Data from Unauthorized Use (page 115)
❑ Protecting the Hard Disk (page 117)
Except US model_BGN
❑ Configuring Your Modem (page 119)
Except US model_END
Setting the Password
US model_BGN
In addition to the Windows password, you can use BIOS functions to set two types of passwords to protect your computer:
the power-on password and the hard disk password.
Page 84
84
nN
Customizing Your VAIO Computer
Once you have set the power-on password, you will be prompted to enter the password after the VAIO logo appears to start
your computer. The power-on password allows you to protect your computer from unauthorized access.
The hard disk password provides additional security for the data stored on your built-in storage device. If you set the hard
disk password, other users will not be able to access the data without knowing the password, even if the password-protected
built-in storage device is removed from your computer and is installed in another computer.
US model_END
GVD model_BGN
In addition to the Windows password, you can use BIOS functions to set two types of passwords to protect your computer:
the power-on password and the hard disk password.
Once you have set the power-on password, you will be prompted to enter the password after the VAIO logo appears to start
your computer. The power-on password allows you to protect your computer from unauthorized access.
The hard disk password provides additional security for the data stored on your hard disk drive. If you set the hard disk
password, other users will not be able to access the data without knowing the password, even if the password-protected hard
disk drive is removed from your computer and is installed in another computer.
GVD model_END
Adding the Power-on Password
The power-on password is provided to protect your computer from unauthorized access.
There are two types of the power-on passwords: the machine password and the user password. The machine password is
provided for users with administrative rights on the computer to change all the setup options in the BIOS setup screen, as
well as to start the computer. The user password is provided for the standard users to allow for changing some of the BIOS
setup options, as well as starting the computer. To set the user password, you must first set the machine password.
Page 85
85
nN
Customizing Your VAIO Computer
!
Once you have set the power-on password, you cannot start your computer without entering the password. Be sure not to forget the password. Write
down your password and keep it safe and private from other people.
If you forget the power-on password and need assistance to reset it, a password reset fee will be charged, and your computer may need to be sent in
for service to reset the password.
IRX-4590_BGN
✍
If you have set the power-on password in conjunction with the fingerprint authentication function, you can substitute fingerprint authentication for
password entry when turning on your computer. For more information, see Using Fingerprint Authentication (page 94).
IRX-4590_END
To add the power-on password (machine password)
1 Turn on the computer.
2 Press the F2 key when the VAIO logo appears.
The BIOS setup screen appears. If not, restart the computer and press the F2 key several times when the VAIO logo
appears.
3 Press the < or , key to select Security to display the Security tab, select Set Machine Password, and then press the
Enter key.
4 On the password entry screen, enter the password twice and press the Enter key.
The password can be up to 32 alphanumeric characters (including spaces) long.
5 Select Password when Power On under Security and press the Enter key.
6 Change the setting from Disabled to Enabled.
7 Press the < or , key to select Exit, select Exit Setup, and then press the Enter key.
At the confirmation prompt, press the Enter key.
Page 86

86
nN
Customizing Your VAIO Computer
To add the power-on password (user password)
!
Make sure you set the machine password before setting the user password.
1 Turn on the computer.
2 Press the F2 key when the VAIO logo appears.
The BIOS setup screen appears. If not, restart the computer and press the F2 key several times when the VAIO logo
appears.
3 Enter the machine password and press the Enter key.
4 Press the < or , key to select Security to display the Security tab, select Set User Password, and then press the
Enter key.
5 On the password entry screen, enter the password twice and press the Enter key.
The password can be up to 32 alphanumeric characters (including spaces) long.
6 Press the < or , key to select Exit, select Exit Setup, and then press the Enter key.
At the confirmation prompt, press the Enter key.
Changing/Removing the Power-on Password
To change or remove the power-on password (machine password)
1 Turn on the computer.
2 Press the F2 key when the VAIO logo appears.
The BIOS setup screen appears. If not, restart the computer and press the F2 key several times when the VAIO logo
appears.
3 Enter the machine password and press the Enter key.
Page 87
87
nN
Customizing Your VAIO Computer
4 Press the < or , key to select Security to display the Security tab, select Set Machine Password, and then press the
Enter key.
5 On the password entry screen, enter the current password once and a new password twice, and then press the Enter key.
To remove the password, leave the Enter New Password and Confirm New Password fields blank and press the Enter
key.
6 Press the < or , key to select Exit, select Exit Setup, and then press the Enter key.
At the confirmation prompt, press the Enter key.
To change or remove the power-on password (user password)
1 Turn on the computer.
2 Press the F2 key when the VAIO logo appears.
The BIOS setup screen appears. If not, restart the computer and press the F2 key several times when the VAIO logo
appears.
3 Enter the user password and press the Enter key.
4 Press the < or , key to select Security to display the Security tab, select Set User Password, and then press the
Enter key.
5 On the password entry screen, enter the current password once and a new password twice, and then press the Enter key.
To remove the password, leave the Enter New Password and Confirm New Password fields blank and press the Enter
key.
6 Press the < or , key to select Exit, select Exit Setup, and then press the Enter key.
At the confirmation prompt, press the Enter key.
Adding the Hard Disk Password
Except IRX-4590_BGN
Page 88
88
nN
Customizing Your VAIO Computer
The hard disk password provides additional security for the data stored on your hard disk drive. If you enable the hard disk
password, this adds an extra level of security.
When adding the hard disk password, you must set both the master and user passwords. The master password is provided
for users with administrative rights on the computer to reset the user password in the BIOS setup screen. The user password
is provided to lock your hard disk drive. Once you set the user password, you will have to enter the password along with the
power-on password (if set), after the VAIO logo appears.
Except IRX-4590_END
IRX-4590_BGN
GVD model_BGN
The hard disk password provides additional security for the data stored on your hard disk drive. If you enable the hard disk
password, this adds an extra level of security.
When adding the hard disk password, you must set both the master and user passwords. The master password is provided
for users with administrative rights on the computer to reset the user password in the BIOS setup screen. The user password
is provided to lock your hard disk drive. Once you set the user password, you will have to enter the password along with the
power-on password (if set), after the VAIO logo appears.
GVD model_END
US model_BGN
The hard disk password provides additional security for the data stored on your built-in storage device. If you enable the hard
disk password, this adds an extra level of security.
When adding the hard disk password, you must set both the master and user passwords. The master password is provided
for users with administrative rights on the computer to reset the user password in the BIOS setup screen. The user password
is provided to lock your built-in storage device. Once you set the user password, you will have to enter the password along
with the power-on password (if set), after the VAIO logo appears.
US model_END
Page 89
Customizing Your VAIO Computer
IRX-4590_END
Except IRX-4590_BGN
!
You cannot start your computer with the master password.
If you forget the master password or the keyboard fails, which is critical to password entry, no bypass is possible and the data stored on the hard disk
drive will not be accessible. There is NO RESET of this password. You will have to replace the hard disk drive at your own expense and lose all the data
originally stored on the hard disk drive. Be sure to write down the master password and keep it safe and private from other people.
Except IRX-4590_END
IRX-4590_BGN
!
You cannot start your computer with the master password.
GVD model_BGN
If you forget the master password or the keyboard fails, which is critical to password entry, no bypass is possible and the data stored on the hard disk
drive will not be accessible. There is NO RESET of this password. You will have to replace the hard disk drive at your own expense and lose all the data
originally stored on the hard disk drive. Be sure to write down the master password and keep it safe and private from other people.
GVD model_END
US model_BGN
89
nN
If you forget the master password or the keyboard fails, which is critical to password entry, no bypass is possible and the data stored on the built-in
storage device will not be accessible. There is NO RESET of this password. You will have to replace the built-in storage device at your own expense and
lose all the data originally stored on the device. Be sure to write down the master password and keep it safe and private from other people.
US model_END
IRX-4590_END
Page 90

90
nN
Customizing Your VAIO Computer
✍
If you have set the hard disk password in conjunction with the fingerprint authentication function, you can substitute fingerprint authentication for
password entry when turning on your computer. For more information, see Using Fingerprint Authentication (page 94).
To add the hard disk password
1 Turn on the computer.
2 Press the F2 key when the VAIO logo appears.
The BIOS setup screen appears. If not, restart the computer and press the F2 key several times when the VAIO logo
appears.
✍
If you have set the power-on password, enter your power-on password.
3 Press the < or , key to select Security to display the Security tab, select Hard Disk Password, and then press the
Enter key.
The Hard Disk Password entry screen appears.
4 Select Enter Master and User Passwords and press the Enter key.
5 Select Continue on the warning screen and press the Enter key.
6 Enter the master password twice and press the Enter key.
The password should be up to 32 alphanumeric characters (including spaces) long.
7 Enter the user password twice and press the Enter key.
The password should be up to 32 alphanumeric characters (including spaces) long.
8 At the confirmation prompt, press the Enter key.
9 Press the Esc key and then the < or , key to select the Exit tab.
10 Press the M or m key to select Exit Setup and press the Enter key.
At the confirmation prompt, press the Enter key.
Page 91

91
nN
Customizing Your VAIO Computer
Changing/Removing the Hard Disk Password
To change the hard disk password
1 Turn on the computer.
2 Press the F2 key when the VAIO logo appears.
The BIOS setup screen appears. If not, restart the computer and press the F2 key several times when the VAIO logo
appears.
✍
If you have set the power-on password, enter your power-on password.
3 Press the < or , key to select Security to display the Security tab, select Hard Disk Password, and then press the
Enter key.
The Hard Disk Password entry screen appears.
4 Select Change Master Password or Change User Password and press the Enter key.
5 Enter the current password once and then a new password twice.
6 Press the Enter key.
7 Press the Enter key when the success message appears.
8 Press the Esc key and then the < or , key to select the Exit tab.
9 Press the M or m key to select Exit Setup and press the Enter key.
At the confirmation prompt, press the Enter key.
To remove the hard disk password
1 Turn on the computer.
Page 92

92
nN
Customizing Your VAIO Computer
2 Press the F2 key when the VAIO logo appears.
The BIOS setup screen appears. If not, restart the computer and press the F2 key several times when the VAIO logo
appears.
✍
If you have set the power-on password, enter your power-on password.
3 Press the < or , key to select Security to display the Security tab, select Hard Disk Password, and then press the
Enter key.
The Hard Disk Password entry screen appears.
4 Select Enter Master and User Passwords and press the Enter key.
5 Enter the current password for Enter Current Hard Disk Master Password and press the Enter key.
6 Press the Enter key without entering any letter for the remaining fields.
7 Press the Enter key when the success message appears.
8 Press the Esc key and then the < or , key to select the Exit tab.
9 Press the M or m key to select Exit Setup and press the Enter key.
At the confirmation prompt, press the Enter key.
Adding the Windows Password
The Windows password comes in handy when you have to share a single computer with other people. By setting the Windows
password, you can protect your user account from unauthorized access.
Entry of the Windows password will be prompted after you select your user account.
!
Be sure not to forget the password. Write down your password and keep it safe and private from other people.
Page 93

Customizing Your VAIO Computer
✍
If you have set the Windows password in conjunction with the fingerprint authentication function, you can substitute fingerprint authentication for
password entry when turning on your computer. For more information, see Using Fingerprint Authentication (page 94).
To add the Windows password
1 Click Start and Control Panel.
2 Click User Accounts and Family Safety or User Accounts.
3 Click User Accounts.
4 Click Create a password for your account under Make changes to your account.
5 In the New password and Confirm new password fields, enter the password for your account.
6 Click Create password.
✍
See Windows Help and Support for more information on the Windows password.
Changing/Removing the Windows Password
To change the Windows password
1 Click Start and Control Panel.
2 Click User Accounts and Family Safety or User Accounts.
3 Click User Accounts.
4 Click Change your password.
5 In the Current password field, enter your current password.
6 In the New password and Confirm new password fields, enter a new password.
93
nN
Page 94

94
nN
Customizing Your VAIO Computer
7 Click Change password.
To remove the Windows password
1 Click Start and Control Panel.
2 Click User Accounts and Family Safety or User Accounts.
3 Click User Accounts.
4 Click Remove your password.
5 In the Current password field, enter the current password that you want to remove.
6 Click Remove password.
Using Fingerprint Authentication
Your computer is equipped with a fingerprint sensor to provide you with additional convenience. A small horizontal bar located
at the upper left of the keyboard is the sensor of the fingerprint reader and will be referred to as the fingerprint sensor
hereinafter.
Once you have registered your fingerprint(s), the fingerprint authentication function offers:
❑ A substitute for password entry
❑ Logging onto Windows (page 100)
If you have registered your fingerprints for your user account, you can substitute fingerprint authentication for
password entry when logging onto Windows.
❑ Power-on Security feature (page 100)
If you have set the power-on password (page 84), you can substitute fingerprint authentication for password entry
when starting your computer.
Page 95
95
nN
Customizing Your VAIO Computer
❑ Password Bank for quick web site access (page 101)
You can substitute fingerprint authentication for entering information (user accounts, passwords, etc.) required to access
the password-protected web sites.
❑ File Safe feature to encrypt/decrypt data (page 101)
With the File Safe feature, you can encrypt files and folder to create an encrypted archive. To decrypt or access such
encrypted archives, you can use the fingerprint authentication or enter the password you specified for encryption.
❑ Application launcher function for quick application access (page 101)
Once you have assigned an application to your finger, you can then swipe the finger across the fingerprint sensor to
launch the assigned application.
Precautions on Using Fingerprint Authentication
❑ The fingerprint authentication technology does not ensure complete user authentication or complete protection of your
data and hardware.
Sony assumes no liability for any problems and damages arising out of your use of or inability to use the fingerprint sensor.
❑ The fingerprint recognition rate depends on your operating conditions and varies among individuals as well.
Except IRX-4590_BGN
❑ Be sure to make a backup copy of the data stored on the hard disk drive, especially in the encrypted archives created
with the File Safe feature, before sending your computer for repair.
Sony assumes no liability for any loss or modification of your data that might have occurred during the course of repair.
Except IRX-4590_END
IRX-4590_BGN
US model_BGN
❑ Be sure to make a backup copy of the data stored on the built-in storage device, especially in the encrypted archives
created with the File Safe feature, before sending your computer for repair.
Sony assumes no liability for any loss or modification of your data that might have occurred during the course of repair.
Page 96
96
nN
Customizing Your VAIO Computer
US model_END
GVD model_BGN
❑ Be sure to make a backup copy of the data stored on the hard disk drive, especially in the encrypted archives created
with the File Safe feature, before sending your computer for repair.
Sony assumes no liability for any loss or modification of your data that might have occurred during the course of repair.
GVD model_END
IRX-4590_END
Except IRX-4590_BGN
❑ In case the hard disk drive has to be initialized, for example after the repair work, the fingerprint templates will be lost.
You will have to register them all over again.
Except IRX-4590_END
IRX-4590_BGN
US model_BGN
❑ In case the built-in storage device has to be initialized, for example after the repair work, the fingerprint templates will be
lost. You will have to register them all over again.
US model_END
GVD model_BGN
❑ In case the hard disk drive has to be initialized, for example after the repair work, the fingerprint templates will be lost.
You will have to register them all over again.
GVD model_END
IRX-4590_END
❑ The maintenance and management of data concerning fingerprint authentication must be carried out at your own risk.
Sony assumes no liability for any defects arising out of your data maintenance and management.
Except IRX-4590_BGN
Page 97
97
nN
Customizing Your VAIO Computer
❑ Before disposing of your computer or transferring it to a third person, it is strongly recommended you erase the fingerprint
data registered on the fingerprint sensor after erasing the data stored on your hard disk drive. See Erasing the
Registered Fingerprints (page 102) for the detailed procedure.
Except IRX-4590_END
IRX-4590_BGN
US model_BGN
❑ Before disposing of your computer or transferring it to a third person, it is strongly recommended you erase the fingerprint
data registered on the fingerprint sensor after erasing the data stored on your built-in storage device. See Erasing the
Registered Fingerprints (page 102) for the detailed procedure.
US model_END
GVD model_BGN
❑ Before disposing of your computer or transferring it to a third person, it is strongly recommended you erase the fingerprint
data registered on the fingerprint sensor after erasing the data stored on your hard disk drive. See Erasing the
Registered Fingerprints (page 102) for the detailed procedure.
GVD model_END
IRX-4590_END
❑ A fingerprint sensor may malfunction or be damaged if you scratch its surface with:
❑ a solid or sharp-pointed object
❑ fine objects, for example swiping a finger covered with dirt across the fingerprint sensor
❑ Discharge static electricity from your finger by touching a metallic object especially during dry seasons (e.g. winter) before
scanning your fingerprint. Static electricity may cause the fingerprint sensor to malfunction.
Registering a Fingerprint
To use the fingerprint authentication function, you must register your fingerprint(s) in your computer.
Page 98

Customizing Your VAIO Computer
✍
Set the Windows password on your computer before registration. See Adding the Windows Password (page 92) for the detailed instructions.
To register a fingerprint
!
Up to 10 fingerprints can be registered for each user and up to 21 fingerprints can be registered for logging onto your system using the Power-on
Security feature. You can also select the fingerprint you want to use for the Power-on Security feature later.
1 Click Start, All Programs, Protector Suite QL, and Control Center.
2 Click Fingerprints and Initialize.
3 Follow the on-screen instructions.
✍
For detailed information, see the help file.
If you have failed to register a fingerprint, follow these steps to try again.
1 Place the top joint of your finger on the fingerprint sensor (1).
IRX-4590_BGN
98
nN
Page 99
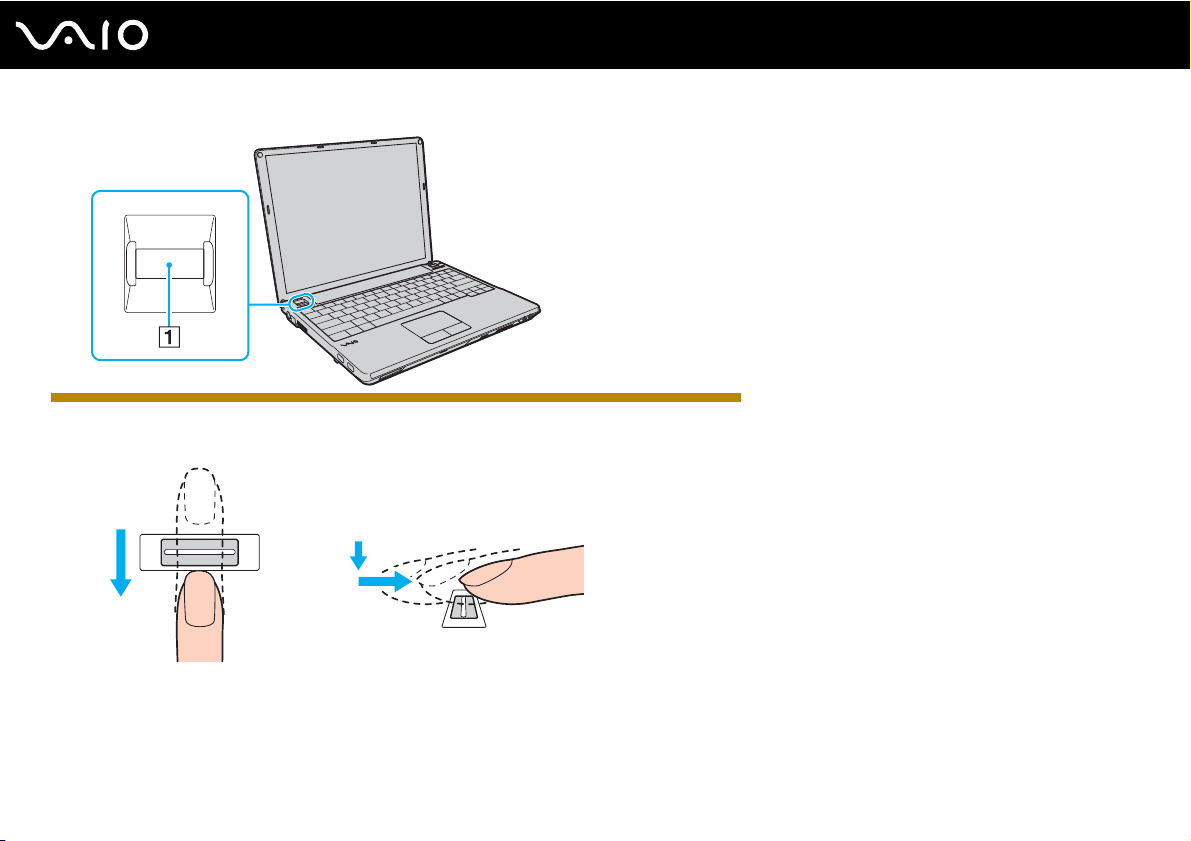
IRX-4590_END
2 Swipe your finger perpendicularly across the fingerprint sensor.
99
nN
Customizing Your VAIO Computer
Page 100

100
nN
Customizing Your VAIO Computer
!
Place your fingertip flat in the center of the fingerprint sensor.
Scan your fingerprint from the top joint of the finger to the fingertip.
Keep your finger in contact with the fingerprint sensor while swiping.
Fingerprint registration may fail if you move your finger too fast or too slow. Let the fingerprint sensor take about one second to scan your fingerprint.
You may not be able to register and/or have your fingerprint(s) recognized if your finger is excessively dry or wet, wrinkled, injured, dirty, etc.
Register more than one fingerprint in case that the fingerprint sensor fails to recognize the fingerprint.
Be sure to clean your fingertip(s) and the fingerprint sensor before swiping in order to keep good recognition performance.
Logging Onto Your System
To use the fingerprint authentication function in place of password entry to log onto your system, you need to set the poweron, hard disk, and Windows passwords and configure your computer for fingerprint authentication.
For setting the power-on, hard disk, and Windows passwords, see Setting the Password (page 83).
For detailed information, see the help file included with the Protector Suite QL.
Logging onto Windows
If you have registered your fingerprints for your user account, you can substitute fingerprint authentication for Windows
password entry. To log onto Windows, swipe the registered finger across the fingerprint sensor when the Windows log-on
screen appears.
 Loading...