

Sony NWZ-W252BLK Operation Guide
1 2 3
Operation Guide
©2010 Sony Corporation Printed in Malaysia
Supplied Software
The software is stored in the built-in flash memory of the player, and includes
the following items:
Content Transfer
WALKMAN Guide
Operation Guide, etc.
For details on how to install, see “How to Install the Bundled Software
(Operation Guide included).”
To view the Operating Guide (PDF file) on your computer, Adobe Acrobat
Reader 5.0 or later, or Adobe Reader is required. You can download a free copy
of Adobe Reader from the Internet.
4-180-851-45(1)
NWZ-W252
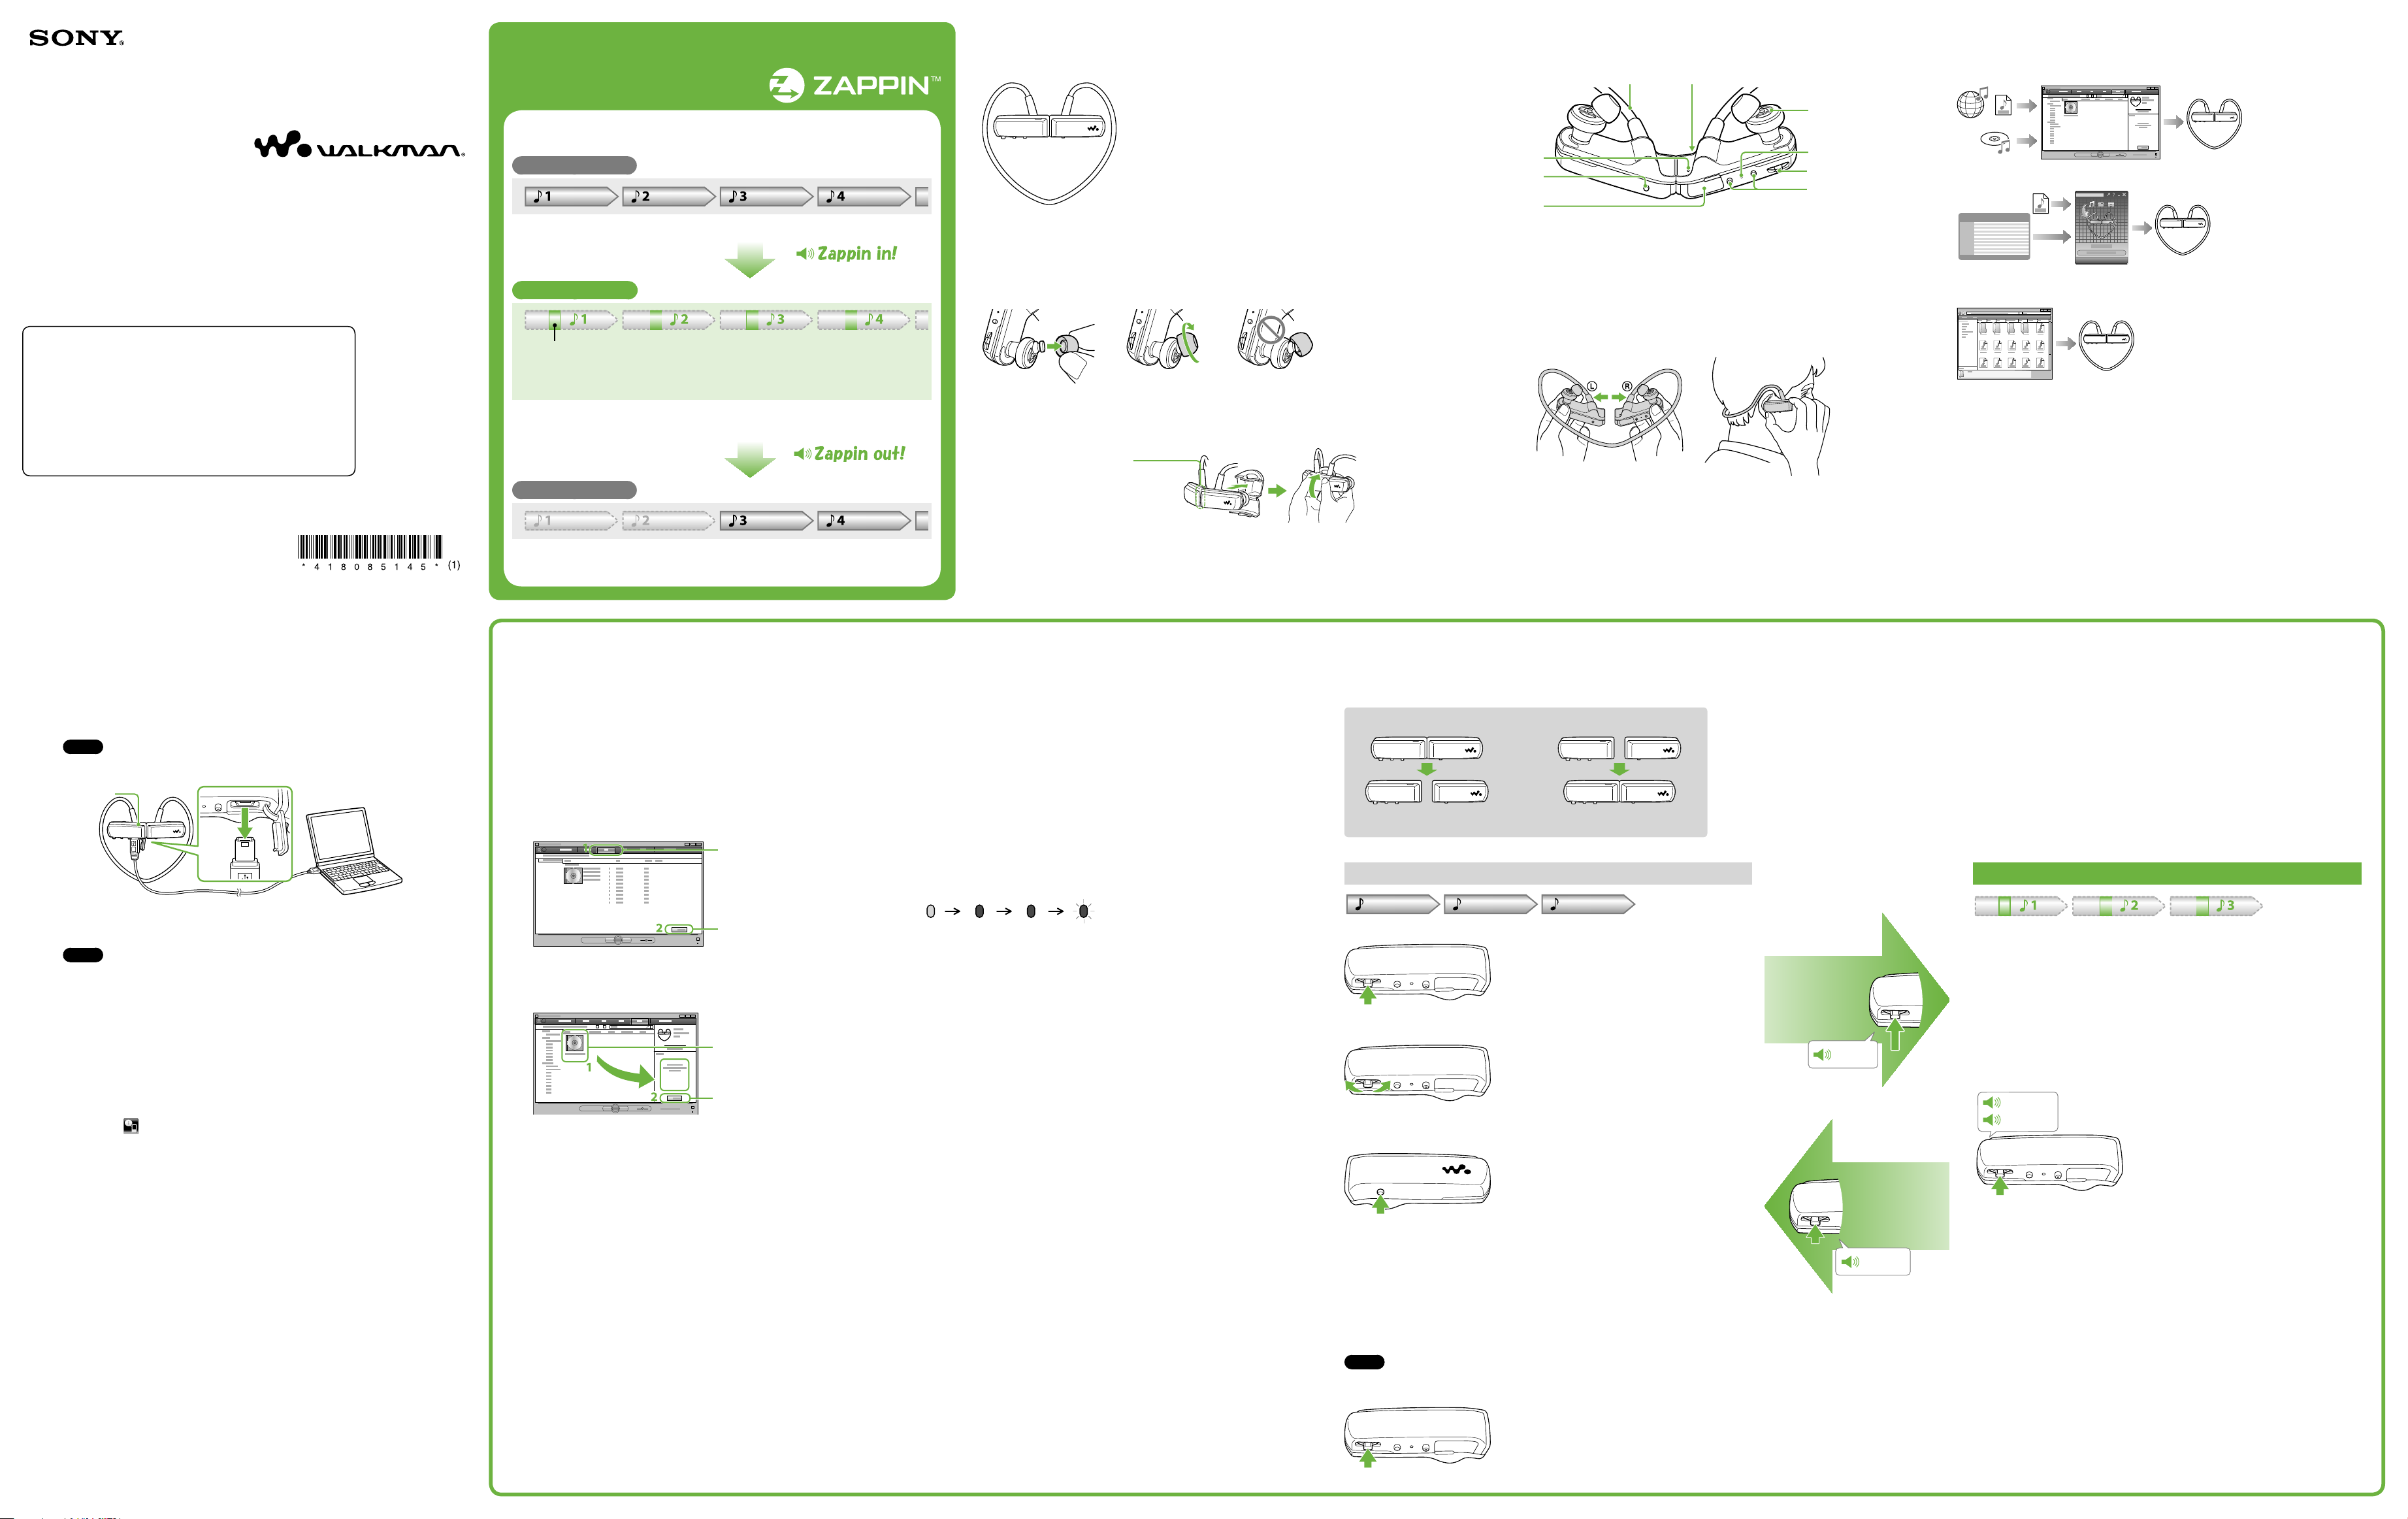
What is ZAPPIN Playback?
ZAPPIN enables sequential playback of song clips at a preset duration.
Normal playback
Changes to ZAPPIN.
ZAPPIN playback
Short recognizable clips of songs (such as the most melodic or rhythmical section)
The ZAPPIN playback time for song clips can be set to either “Short” or “Long.”
Returns to normal playback and restarts playback of
the current song from the beginning.
Normal playback
3 Playing Music” for details on operations.
See “
Checking Supplied Accessories
This player (1)• Earbuds (Size S, L) (Supplied in pairs)
How to install the earbuds
At purchase, M size earbuds are installed (S and L sizes are also supplied). To enjoy better sound quality,
change the size of the earbuds or adjust the earbud position to fit in your ears comfortably and snugly.
When you change the earbuds, twist while installing them firmly on the player to prevent the earbud from
detaching and remaining in your ear.
If an earbud becomes damaged, optional earbuds (EP-EX1) are available for purchase.
How to store the player into the holder
To prevent magnetic leakage, store the player in the supplied holder whenever carrying or when not using
the player.
The magnet is on the right side.
Do not place credit cards or ATM cards,
etc. (magnetic coded cards) near the
player when it is not stored in the
holder to prevent damage to the
magnetic coding on the cards.
•
Operation Guide (this manual) (1)
•
USB cable* (1)
•
Holder (1)
•
Notes on Water Resistant Specifications (1)
•
* Use only the supplied USB cable.
Hold the player by the holder and
close the holder until it clicks.
Parts and Controls
Neckband
OPR (Operation)
lamp
SHUF(Shuffle)/
PLAYLISTS button
USB jack cover
How to place the player on your ears
Check the left (L) and right (R) parts of the player.
Separate the left and right parts.
These parts are magnetically coupled.
Hang the neckband over the back of your neck and ears, and place the earbuds into
your ears.
Status lamp
Headphone
section
RESET button
Jog lever
VOL+*/- button
* There is a tactile dot on the
button. Use it to help with
button operations.
Three Ways to Transfer Music
From CDs, etc., using Windows Media Player 11 or 12
From iTunes*
*1 Content Transfer supports data transfer from iTunes 9.0 to the player.
By drag-and drop using Windows Explorer
To play back the most melodic and rhythmical song clips
When you transfer songs using Content Transfer software with the 12 TONE ANALYSIS set to “Automatic” or
“Always ON,” the information of the most recognizable sections based on melody and rhythm will be found and
added to each song. Then, the most melodic and rhythmical clips from each song can be played back sequentially
during ZAPPIN playback.
Content Transfer is included with the player. For details on how to install Content Transfer, see
Install the Bundled Software.”
1
, etc., using Content Transfer
“How to
How to Install the Bundled
Software (Operation Guide included)
Connect the player to a running computer using the USB cable.
Note
Use only the supplied USB cable.
Status lamp
Select the following order with the computer.
Select “start” – “My Computer” or “Computer” – “WALKMAN” – “Storage Media.”
Note
W
hen you use the player for the first time, or if you have not used the player for a long time, the
player may take some minutes to be recognized by the computer.
Double-click “Setup.exe.”
The install wizard appears.
When you execute “Setup.exe,” the “Setup.exe” file and “Install” folder stored in the “Storage Media” folder of
the player are copied to your computer for backup, and WALKMAN Guide and Content Transfer are installed to
your computer.
Follow the on-screen instructions.
After executing “Setup.exe,” the WALKMAN Guide shortcut appears on the desktop of your computer.
With the player connected to your computer, when installation of bundled software is completed, Content
Transfer starts automatically.
Double-click (WALKMAN Guide) on the desktop to start the WALKMAN Guide.
Hints
You can start the WALKMAN Guide and Content Transfer from the “start” menu (displayed by clicking
“start”).
If you delete the “Setup.exe” file and “Install” folder in the player by formatting the built-in flash memory
of the player, copy this data from the “Backup” folder on the computer to your player. Then connecting the
player to the computer to be installed, follow the above procedure from step to install.
The backup data is preserved in the following “C” drive on your computer by the default install setting.
C:\Program Files\Sony\WALKMAN Guide\NWZ-W250\Backup
What can you do with the WALKMAN Guide ?
The WALKMAN Guide includes the following items:
Operation Guide
Customer Registration Link
Customer Support Site Link
Other useful Links
Includes link information, etc., on the download site.
The bundled items differ depending on the country/region of purchase.
Hint
After executing “Setup.exe” you can use the free space in the “Storage Media” folder more effectively by
formatting the built-in flash memory of the player. To format the built-in flash memory of the player, see
“Formatting the player” on the reverse side.
to the USB connector
1 Importing and
Transferring Music
This section describes the procedures from “Three Ways to Transfer Music” above.
For details on the procedures or , see the reverse side.
You can transfer songs to the player using Windows Media Player on your computer.
Here we describe how to import and transfer songs using Windows Media Player 11.
Import songs from CDs, etc., to Windows Media Player on the computer.
For details on how to import songs from CDs, etc., refer to the Help of Windows Media
Player. You do not need to re-import songs that have previously been imported to
Windows Media Player.
1 Click “Rip.”
2 Click here to start importing.
Connect the player to the computer by using the USB cable.
Transfer songs from Windows Media Player to the player.
The status lamp blinks brightly while transferring songs to the player.
1 Choose albums, etc.
2 Click here to transfer to the player.
Hint
See also
reverse side.
“Hint about transferring music” and “Notes about transferring music” on the
2 Preparing the Player
Charging the player
Upon purchase, first, charge the player.
Connect the player to a running computer using the USB cable.
If a screen appears presenting a choice of actions, click “Cancel.”
Charging starts. The status lamp blinks slowly during charging. When charging is
completed, the status lamp will stop blinking and light dimly while the player is connected
to the computer. For details about charging time and the battery duration, see
“Specifications” on the reverse side.
Checking the remaining battery power
Remaining battery power is indicated in the OPR lamp. When the OPR lamp changes to
red, recharge the battery.
Green*
* Blinks at about 5 second intervals.
Red*
Quick red
blinkingOrange*
When the battery is used up, the
OPR lamp blinks red quickly and
a long beep is heard. You cannot
operate the player.
3 Playing Music
Turning on the player
Separate.
Press the jog lever to start playback.
Normal playback
Playing songs
Press the jog lever upward.
Skipping to the previous/next song
Move the jog lever to (backward) or (forward).
Move and hold the jog lever to skip to the beginning of the previous or next folder.
Shuffle playback
Press the SHUF(Shuffle)/PLAYLISTS button to play back songs in random order.
During shuffle playback, you cannot skip to the previous or next folder, even if you move and
hold the jog lever.
Playing a playlist
Press and hold the SHUF(Shuffle)/PLAYLISTS button to play a playlist.
Move and hold the jog lever to (backward) or (forward) to skip to the beginning of the
previous/next playlist.
To return to playback of all the songs transferred to the player, press and hold the SHUF(Shuffle)/
PLAYLISTS button during playback of a playlist.
Note
When you play a playlist, only the songs registered in the playlist are played back repeatedly.
To stop playback
Turning off the player
Unite.
Changing to
ZAPPIN playback
Press and hold the
jog lever during
playback until
“Zappin in” is heard.
Zappin in
Returning to
normal playback
Press the jog lever
during ZAPPIN
playback.
Zappin out
Hints
When you press the jog lever upward or move it forward/backward after separating the left and
right parts of the player, the player will turn on and start playback. If you want to skip to the
previous/next song, move the jog lever after playback starts.
After you press the jog lever, the OPR lamp blinks green and red alternately and the beep is heard
repeatedly until the playback starts. Please wait until the OPR lamp blinking and the beeping
stops.
See also “Hints about playing music” on the reverse side.
ZAPPIN playback
The player plays back song clips for about 4 seconds each.
If the most recognizable passage of the song cannot be found, the song is played back from about
the 45 second point from the beginning. If the length of the song is under about 45 seconds, the
song is played back from some point before the end of the song.
Skipping to the previous/next song, shuffle playback, or playlist
playback during ZAPPIN playback
You can skip to the previous/next song, play back songs in random order, or play a playlist.
The method of operation is the same as for normal playback.
Changing the playback time of song clips in ZAPPIN playback
The playback time for song clips can be set to either “Long” or “Short.”
Zappin long
Zappin short
Press and hold the jog lever until either voice
guidance is heard.
To stop playback completely during ZAPPIN playback
Press the jog lever to return to normal playback, then press the jog lever again.
When you press and hold the jog lever until
the voice guidance of “Zappin long” is
heard, the playback time of song clips
changes to about 15 seconds (Long). When
you press and hold the jog lever until
“Zappin short” is heard during “Long”
playback, the playback time of song clips
returns to about 4 seconds (Short).
Press the jog lever upward.
Hint about transferring
music
For details on operating Windows Media Player, refer
to the Help of the software or visit the following
website:
http://www.support.microsoft.com/
Notes about transferring
music
When you transfer songs from Windows Media
Player to the player, you cannot use Content Transfer.
You cannot operate the player during USB
connection.
Do not disconnect the USB cable while the status
lamp blinks brightly. Otherwise, data being
transferred or stored on the player may be damaged.
If you transfer songs using Windows Media Player,
the songs will not be analyzed by 12 TONE
ANALYSIS. The 12 TONE ANALYSIS function is
loaded with Content Transfer, which can analyze the
sound patterns of songs.
You cannot delete the transferred songs on the player
directly. When you delete songs from the player, use
the software you used to transfer the songs, or
Windows Explorer.
Hints about playing music
When playback of the last song is finished, the player
automatically restarts playback from the first song
and continues in sequential order.
The playback time of the song clips is set to “Zappin
short” by default. You can change the setting to
“Zappin long.”
If you turn off the player by uniting the left and right
parts during ZAPPIN playback, the player starts
ZAPPIN playback the next time that you turn on and
start playback.
Songs stored on the player are played back in the
order of the file or folder names (in numerical or
alphabetical order). Also, in the overall hierarchy of
all files and folders, songs belonging to each folder
are played back in their hierarchical order.
If you rename the files or folders on the player, the
playback order of the songs can be changed.
However, the renamed files or folders on the player
are recognized as different from those of the original
name, so the files or folders of the original name are
transferred to the player again.
On other operations
Adjusting the volume
Adjust the volume with the VOL+/- button. The
volume can be adjusted in 31 steps: from 0 to 30.
“15” is set by default.
If you turn off the player with the volume set to “0,”
the volume will be automatically set to “1” when
you start playback next time.
Limiting the volume
(AVLS (volume limit))
If you set AVLS (Automatic Volume Limiter
System) to on, you can limit the maximum volume
to prevent auditory disturbance or distraction, and
listen to music at a comfortable volume level.
AVLS is set to off by default.
1 Unite the left and right parts to turn off
the player.
2 Separate the left and right parts.
3 Press and hold the jog lever for about
5 seconds while pressing the VOL+
button, until the status lamp lights.
The status lamp turns off when you release the jog
lever and the VOL+ button. The OPR lamp blinks
green 2 times and AVLS is set to on.
The volume is kept to a moderate level.
To return the setting of AVLS to off, repeat steps 1
to 3. When AVLS is set to off, the OPR lamp blinks
red 2 times in step 3.
Using Content Transfer
You can transfer songs using iTunes or Windows
Explorer by dragging and dropping to Content
Transfer.
Notes
Content Transfer cannot transfer DRM songs to the
player.
You cannot delete the transferred songs on the player
directly. When you delete songs from the player, use
Content Transfer.
Transferring songs from iTunes
through Content Transfer
Drag and drop the songs that you want to transfer
to Content Transfer. For details on the operation of
iTunes, refer to the Help of the software.
Note
For details on restrictions on transferring songs from
iTunes, visit the support web sites (
support web sites”).
“Customer
Transferring songs using Windows
Explorer
There are 2 ways to transfer songs using Windows
Explorer as follows:
Drag and drop songs that you want to transfer to
Content Transfer.
Drag and drop songs directly to “My Computer” or
“Computer” – “WALKMAN” – “Storage Media” –
“MUSIC.”
Notes
The songs transferred directly by dragging and
dropping to the player are not analyzed through 12
TONE ANALYSIS.
The folders up to the 8th level under “Storage Media”
can be recognized.
Formatting the player
If you format the player, all data will be erased and
all settings will be returned to the default status.
Notes
Formatting is available only while playback is
stopped.
If the OPR lamp lights red due to low remaining
battery power, the player cannot be formatted.
All data stored on the player will be erased.
The Content Transfer software included with the
player will also be deleted. If necessary, download
Content Transfer from the customer support web
site.
The settings of shuffle playback, playlist playback,
ZAPPIN playback, and AVLS (volume limit) also
return to their defaults.
1 Unite the left and right parts to turn off
the player.
2 Separate the left and right parts.
3 Press and hold the jog lever for about 15
seconds until the status lamp blinks
quickly.
Release the jog lever. The OPR lamp lights red.
4 Move the jog lever forward or backward
within 30 seconds after the OPR lamp
lights red.
The status lamp turns off. The OPR lamp lights
alternately green and red each time you move the
jog lever.
5 Press the jog lever while the OPR lamp
lights green.
The OPR lamp blinks green quickly and formatting
is executed. When the OPR lamp turns off,
formatting is complete.
If you press the jog lever while the OPR lamp lights
red, or if 30 seconds have passed, formatting will be
canceled.
Upgrading the player’s
firmware
You can update the player’s firmware, allowing you
to add new features to the player. For details about
the latest firmware information and how to install
it, visit the customer support web site.
1 Download the update program to the
computer from the web site.
2 Connect the player to the computer by
using the USB cable, and then start up
the update program.
3 Follow the on-screen instructions to
update the player’s firmware.
Displaying the player information
Before updating the firmware, check the player’s
information, such as the model name, etc. To check
the information, connect the player to the computer
by using the USB cable, and open “information.txt”
in “My Computer” or “Computer” – “WALKMAN.”
Troubleshooting
If the player does not function as expected, try the
following steps to resolve the issue.
1 Find the symptoms of the issue in
“Symptoms and remedies,” and try any
corrective actions listed.
2 Connect the player to the computer by
using the USB cable to charge the
battery.
You may be able to resolve some issues by charging
the battery.
3 Press the RESET button with a small pin,
etc., only when playback is stopped.
If you press the RESET button while operating the
player, stored data and settings on the player may
be deleted.
4 Look for information about the issue on
the support web sites
(
“Customer support web sites”).
5 If the approaches listed above fail to
resolve the issue, consult your nearest
Sony dealer.
Symptoms and remedies
The player cannot charge the battery.
The player is not connected to the USB cable
properly.
Disconnect the USB connection, and then
reconnect it.
Use the supplied USB cable.
The battery is charged in an ambient temperature out
of the range of 5 °C (41 °F) to 35 °C (95 °F).
Charge the battery in an ambient temperature of
5 °C (41 °F) to 35 °C (95 °F).
Your computer is not on.
Turn on the computer.
Your computer has entered sleep or hibernation
status.
Release the computer from sleep or hibernation
status.
If the symptom that you encountered does not apply
to those listed above, press the RESET button, and
then reconnect the USB connection.
The player does not work. (It does not
respond to any button operations.)
The left and right parts of the player are united.
Separate them and press the jog lever.
The remaining battery power is low or insufficient.
Charge the battery by connecting the player to the
computer (
side).
The player is connected to the computer via USB
connection.
Disconnect the USB connection, then operate the
player.
Charging completes very quickly.
If the battery is already almost fully charged when
charging begins, little time is needed to reach full
charge.
The player takes a long time to start.
It may take time to start if many files or folders are
stored. While starting, the player makes the startup
sound.
The OPR lamp blinks red, a long beep is
heard, and the player does not turn on.
Remaining battery is low.
Recharge the battery (
the front side).
Battery life is short.
The operating temperature is below 5 °C (41 °F).
Battery life becomes shorter as a result of the
battery characteristics. This is not a malfunction.
Battery charging time is not sufficient.
Charge the battery until the status lamp lights. The
status lamp blinks slowly during charging.
You have not used the player for a prolonged period.
The efficiency of the battery will be improved by
repeatedly charging and discharging it.
When usable battery life becomes half the usual time,
even after charging the battery fully, the battery
should be replaced.
Consult your nearest Sony dealer.
“Charging the player” on the front
“Charging the player” on
The computer does not recognize the
player.
The player is not connected to the computer by using
the supplied USB cable.
Connect the player to the computer by using the
supplied USB cable. If you use a USB cable other
than the supplied one, it may not connect to the
computer properly and the computer may not
recognize the player.
The player is not connected to the supplied USB
cable properly.
Connect the player to the supplied USB cable
properly and firmly. Charging will start (the status
lamp blinks slowly) even if the connection was not
done properly, but there is a possibility that the
computer has not recognized the player. In such
case, disconnect the player from the supplied USB
cable and then connect to the supplied USB cable
again.
Remaining battery is low.
Recharge the battery. When you use the player for
the first time, or if you have not used the player for
a long time, it may take some minutes to be
recognized by the computer, even if charging (the
status lamp blinks slowly) has already started.
Check whether the computer has recognized the
player about 5 minutes after the connecting the
player to the computer.
Data cannot be transferred to the
player from your computer.
The player is not connected to the USB cable
properly.
Disconnect the USB cable, and then reconnect it.
There is not enough free space in the built-in flash
memory.
Delete any unnecessary data from the built-in flash
memory using your computer to increase free
space.
A maximum of 2,640 songs and 500 folders can be
transferred to the player.
Songs with a limited playing period or playing count
may not be transferred due to restrictions set by
copyright holders. For details on the settings of each
audio file, contact the distributor.
You may be attempting to transfer a file that is not in
a playable format.
Transfer files in a playable format (
file format”).
“Supported
The OPR lamp lights red, a short
double-beep is heard repeatedly, and
no data is played/the player does not
turn on.
You are trying to play an unsupported format or
DRM file.
Transfer files in a playable format (
file format”). If files that cannot be played are
unnecessary, delete them from the player.
Formatting the player failed to complete, or you
formatted the player on the computer.
Retry formatting the player (
player”).
There is no song that can be played on the player.
Transfer data to the player.
“Supported
“Formatting the
There is no sound.
The volume level is set to zero.
Turn the volume up.
There is insufficient volume.
AVLS (volume limit) is enabled.
Disable AVLS (volume limit) (
volume (AVLS (volume limit))”).
“Limiting the
The OPR lamp lights red while playing
back and the voice guidance of
“EXPIRED” is heard.
The playback limitation period of the song has
expired, or the playback limitation count has been
reached, based on subscription conditions, etc.
Visit the distributor’s website from which you
purchased the song, and update it.
If the song is unnecessary, delete it from the player.
Playback starts without performing
the playback operation.
If you move the jog lever to any direction when the
player is turned off, the player will turn on, and start
playback.
The most melodic and rhythmical clip
of a song is not played back in ZAPPIN
playback.
The song was not analyzed by the 12 TONE
ANALYSIS.
Transfer songs using Content Transfer which will
analyze songs by 12 TONE ANALYSIS.
Check that 12 TONE ANALYSIS is set to
“Automatic” or “Always ON.”
Information on the most melodic or rhythmical
section cannot be added to linear PCM (.wav) files.
Playlist playback does not start when
you press and hold the SHUF (Shuffle)/
PLAYLISTS button.
Playlists have not been transferred to the player.
Playback changes from playlist
playback to playback of all songs in
the player after you delete songs from
the player.
If the deleted songs are in a playlist, the playlist will
also be deleted from the player.
Precautions
“FOR UNITED STATES CUSTOMERS. NOT
APPLICABLE IN CANADA, INCLUDING IN THE
PROVINCE OF QUEBEC.
POUR LES CONSOMMATEURS AUX ÉTATSUNIS. NON APPLICABLE AU CANADA, Y
COMPRIS LA PROVINCE DE QUÉBEC.”
The following FCC statement applies only to the
version of this model manufactured for sale in the
USA. Other versions may not comply with FCC
technical regulations.
NOTE:
This equipment has been tested and found to
comply with the limits for a Class B digital device,
pursuant to Part 15 of the FCC Rules. These limits
are designed to provide reasonable protection
against harmful interference in a residential
installation. This equipment generates, uses and
can radiate radio frequency energy and, if not
installed and used in accordance with the
instructions, may cause harmful interference to
radio communications. However, there is no
guarantee that interference will not occur in a
particular installation. If this equipment does cause
harmful interference to radio or television
reception, which can be determined by turning the
equipment off and on, the user is encouraged to try
to correct the interference by one or more of the
following measures:
Reorient or relocate the receiving antenna.
Increase the separation between the equipment and
receiver.
Connect the equipment into an outlet on a circuit
different from that to which the receiver is
connected.
Consult the dealer or an experienced radio/TV
technician for help.
You are cautioned that any changes or modifications
not expressly approved in this manual could void your
authority to operate this equipment.
If you have any questions about this
product:
Visit: www.sony.com/walkmansupport
Contact: Sony Customer Information Service
Center at 1-(866)-456-7669
Write: Sony Customer Information Service Center
12451 Gateway Blvd., Fort Myers, FL 33913
Declaration of Conformity
Trade Name: SONY
Model No.: NWZ-W252
Responsible Party: Sony Electronics Inc.
Address: 16530 Via Esprillo, San Diego,
Telephone Number: 858-942-2230
This device complies with Part 15 of the FCC
Rules. Operation is subject to the following two
conditions: (1) this device may not cause harmful
interference, and (2) this device must accept any
interference received, including interference that
may cause undesired operation.
Owner’s Record
The model and serial numbers are located on the
back of the player. Record them in the space
provided below. Refer to these numbers in the
spaces whenever you call upon your Sony dealer
regarding this product.
Model No. ________________________
Serial No. ________________________
Notice for customers: the following
information is only applicable to
equipment sold in countries applying
EU directives
The manufacturer of this product is Sony
Corporation, 1-7-1 Konan, Minato-ku, Tokyo, 1080075 Japan. The Authorized Representative for
EMC and product safety is Sony Deutschland
GmbH, Hedelfinger Strasse 61, 70327 Stuttgart,
Germany.
For any service or guarantee matters please refer to
the addresses given in separate service or guarantee
documents.
At high volume, prolonged listening
to the personal audio player can
damage the user’s hearing.
Information for safety
On charging the battery
Do not leave the player connected for extended
periods to a laptop computer that is not connected to
AC power, because the player may discharge the
computer’s battery.
Charging time may vary, depending on the
conditions under which you use the battery.
If you do not intend to use the player for over half a
year, charge the battery at least once per 6 to 12
months for the battery maintenance.
CA 92127 U.S.A.
On safety
Be sure not to short-circuit the terminals of the
player with other metallic objects.
Do not touch the rechargeable battery with bare
hands if it is leaking. Since battery liquid may remain
in the player, consult your nearest Sony dealer if the
battery has leaked. If the liquid gets into your eyes,
do not rub your eyes as it may lead to blindness.
Wash out your eyes with clean water, and consult a
doctor.
Also, if the liquid gets on to your body or clothes,
wash it off immediately. If you do not, it may cause
burns or injury. If you get burned or injured by the
liquid from the battery, consult a doctor.
Do not put any foreign object in the player. Doing so
may cause fire or electric shock.
If this occurs, turn off the player immediately, and
consult your nearest Sony dealer or Sony Service
Center.
Do not put the player into fire.
Do not take apart or remodel the player. Doing so
can result in electric shock. Consult your nearest
Sony dealer or Sony Service Center for exchange of
rechargeable batteries, internal checks or repair.
On installation
Do not put any heavy object on top of the player or
apply a strong shock to the player. It may cause a
malfunction or damage.
Never use the player where it will be subjected to
extremes of light, temperature, moisture or vibration.
The player may become discolored, distorted or
damaged.
Never leave the player exposed to high temperature,
such as in a car parked in the sun or under direct
sunlight.
Do not leave the player in a place subject to excessive
dust.
Do not leave the player on an unstable surface or in
an inclined position.
If the player causes interference to radio or television
reception, turn the player off and move it away from
the radio or television.
If you want to separate the left and right parts of the
player, make sure to hold them each.
Pulling the neckband may cause damage to the
neckband.
The earbuds may deteriorate due to long-term
storage or use.
Do not put any cards such as cash cards or credit
cards with magnetic coding near the player whenever
the player is not stored in the supplied holder.
Otherwise, your cards may become impaired due to
the player’s magnetic effect.
Note on static electricity
In particularly dry air conditions, mild tingling may
be felt on your ears. This is a result of static
electricity accumulated in the body, and not a
malfunction of the player.
The effect can be minimized by wearing clothes
made from natural materials.
On heat build-up
Heat may build up in the player while charging if it is
used for an extended period of time.
On safe listening
Do not use the player while operating a motorized
vehicle, it may create a traffic hazard and is illegal in
many areas.
Avoid using the player during sporting competition
to avoid injury.
Road safety
Avoid listening to the player in situations where
hearing must not be impaired.
Preventing hearing damage
Avoid using the player at a high volume. Hearing
experts advise against continuous, loud and extended
play. If you experience a ringing in your ears, reduce
the volume or discontinue use.
Do not turn the volume up high all at once. Turn up
the volume gradually so that loud sound will not hurt
your ears.
Caring for others
Keep the volume at a moderate level. This will allow
you to hear outside sounds and to be considerate to
the people around you.
Warning
If there is lightning when you are using the player,
take off the player immediately.
If you experience an allergic reaction to the player,
stop using them at once and contact a doctor.
On the use
Do not use this player while driving, cycling, or
operating any motorized vehicle. You should exercise
extreme caution or discontinue use in potentially
hazardous situations.
Refrain from using the player according to the in-
flight announcements during take off or landing in
an aircraft.
Note that condensation may form temporarily in
cases such as when the player is moved quickly from
a low-temperature environment to a high
temperature environment or used in a room that has
a heater just turned on. Condensation creates a
phenomenon where moisture in the air adheres to
surfaces such as metal panels, etc., and then changes
to liquid.
If condensation forms in the player, leave it turned
off until the condensation disappears. If you use the
player with condensation present, a malfunction may
result.
On software
Copyright laws prohibit reproducing the software or
the manual accompanying it in whole or in part, or
renting the software without the permission of the
copyright holder.
In no event will SONY be liable for any financial
damage, or loss of profits, including claims made by
third parties, arising out of the use of the software
supplied with this player.
The software provided with this player cannot be
used with equipment other than that to which it is so
designated.
Please note that, due to continued efforts to improve
quality, the software specifications may be changed
without notice.
Operation of this player with software other than
that provided is not covered by the warranty.
The ability to display the languages on supplied
software will depend on the installed OS on your
computer. For better results, please ensure that the
installed OS is compatible with the desired language
you want to display.
We do not guarantee all the languages will be able
to be displayed properly on the supplied software.
User-created characters and some special
characters may not be displayed.
The explanations in this manual assume that you are
familiar with the basic operations of Windows.
For details on the use of your computer and
operating system, please refer to the respective
manuals.
The recorded song is limited to private use only. Use
of the song beyond this limit requires permission of
the copyright holders.
Sony is not responsible for incomplete recording/
downloading or damaged data due to problems of
the player or computer.
About sample data*
The player is pre-installed with sample data.
If you delete the sample data, you cannot restore it,
and we will not supply any replacement data.
*1 In some countries/regions some sample data is not
installed.
1
Water resistant
specifications
(Please read before
using the player)
Scenarios*
You can use the player while jogging or walking in
the rain.
You can continue to use the player if you get sweaty.
After using the player, you can wash it with normal
temperature fresh water or gently running tap
2
water.*
*1 Do not use the player in places that can be hazardous if
you do not hear outside sounds.
In all of the situations above, use the player with the
USB jack cover closed securely.
*2 Follow the instructions described in “Cleaning after
use” in the separate sheet “Notes on Water Resistant
Specifications.”
Water resistant
performance of this player
The water resistant specifications*1 of this player are
equivalent to IEC60529 “Degrees of protection
against ingress of water (IP Code)” IPX5*2 that
specifies as “Degrees of protection against ingress of
water,” but is not completely water-tight.
*1 The water resistant specifications are met only when
the USB jack cover of the player is closed securely.
Furthermore, the headphone sections are not watertight.
*2 IPX5 (Degrees of protection against jets of water) :
The player will maintain its operability even when
exposed to direct jet streams of water from any
direction in the situation where that approximately
12.5 L/min of water is supplied for periods for more
than 3 minutes from a distance of about 3 m by using
a nozzle with an inner diameter of 6.3 mm.
Do not drop the player into water by intent, and do
not use the player underwater.
The supplied USB cable is not water resistant. Before
charging the player, be sure that the player or the
location used for charging is not wet.
Depending on usage, water may enter the inside of
the player and it may cause a fire, electric shock, or
malfunction.
Before using the player, please read and understand
the following information thoroughly.
Liquids that the water resistant performance
specifications apply to
Applicable: fresh water, tap water, sweat
Not applicable : liquids other than those above
(Examples: soapy water, detergent water, water with
bath agents, shampoo, hot spring water, pool water,
seawater, etc.)
The water resistant performance of the player is
based on our measurements under the conditions
described above.
Note that malfunctions as a result of water
immersion caused by misuse by the customer are
not covered by the warranty.
Before using the player, please read the separate
sheet “Notes on Water Resistant Specifications” in
addition to this manual.
1
Specifications
Supported file format
Audio Formats (Codec)
Media File format: MP3 (MPEG-1
Layer3) file format
MP3
WMA
AAC-LC*
Linear PCM
*1 Sampling frequency may not correspond to all
encoders.
*2 Copyright protected AAC-LC files cannot be played
back.
*3 Non-standard bit rates or non-guaranteed bit rates are
included depending on the sampling frequency.
Maximum recordable number of songs
and time (Approx.)
The approximate times are based on the case in which
you transfer only 4 minutes songs in the MP3 format.
Other playable audio file format song numbers and
times may differ from MP3 format.
Bit rate Songs Time
48 kbps 1,250 83 hr. 20 min.
64 kbps 940 62 hr. 40 min.
128 kbps 470 31 hr. 20 min.
256 kbps 235 15 hr. 40 min.
320 kbps 185 12 hr. 20 min.
1,411kbps
(Linear PCM)
Headphones
Type: Closed, dynamic
Driver unit: 13.5 mm, dome type (CCAW adopted)
Capacity (User available capacity)*
2 GB (Approx. 1.68 GB = 1,812,660,224 bytes)
*1 Available storage capacity of the player may vary.
A portion of the memory is used for data management
functions.
Interface
USB mini-B connector
Hi-Speed USB (USB 2.0 compliant)
Operating temperature
5 °C to 35 °C (41 °F to 95 °F)
Power source
Built-in rechargeable lithium-ion battery
USB power (from a computer via the supplied USB
cable)
Charging time
USB-based charging
Approx. 1.5 hours
Quick charge
Approx. 3 minutes charge enables up to approx. 90
minutes playback.
Battery life (continuous playback)
The time below may differ depending on ambient
temperature or the status of use.
Playback at MP3 128 kbps: Approx. 11 hours
Playback at WMA 128 kbps: Approx. 11 hours
Playback at AAC-LC 128 kbps: Approx. 9 hours
Playback at Linear PCM 1,411 kbps: Approx. 11 hours
Mass
Approx. 43 g (Approx. 1.6 oz)
File extension: .mp3
Bit rate: 32 to 320 kbps (Supports
variable bit rate (VBR))
Sampling frequency*1: 32, 44.1, 48 kHz
Media File format: ASF file format
File extension: .wma
Bit rate: 32 to 192 kbps (Supports
variable bit rate (VBR))
Sampling frequency*1: 44.1 kHz
* Compatible with WM-DRM 10
Media File format: MP4 file format
File extension: .mp4, .m4a, .3gp
Bit rate: 16 to 320 kbps (Supports
2
variable bit rate (VBR))*
Sampling frequency*1: 8, 11.025, 12,
16, 22.05, 24, 32, 44.1, 48 kHz
Media File format: Wave-Riff file
format
File extension: .wav
Bit rate: 1,411 kbps
Sampling frequency*1: 44.1 kHz
40 2 hr. 40 min.
3
1
System requirements
Computer
IBM PC/AT or compatible computer preinstalled with
the following Windows operating systems*1:
Windows XP Home Edition (Service Pack 2 or later) /
Windows XP Professional (Service Pack 2 or later)*
Windows Vista Home Basic (Service Pack 1 or later) /
Windows Vista Home Premium (Service Pack 1 or
later) /
Windows Vista Business (Service Pack 1 or later) /
Windows Vista Ultimate (Service Pack 1 or later) /
Windows 7 Home Basic /
Windows 7 Home Premium /
Windows 7 Professional /
Windows 7 Ultimate
Not supported by OSs other than above
*1 Excluding OS Versions not supported by Microsoft
*2 Excluding 64-bit OS Versions
CPU: Pentium® III 450 MHz or higher for
Windows XP/800 MHz or higher for Windows Vista/
1 GHz or higher for Windows 7
RAM: 256 MB or more for Windows XP/512 MB or
more for Windows Vista/1 GB or more for
Windows 7 32-bit versions/2 GB or more for
Windows 7 64-bit versions
Hard Disk drive: 380 MB or more of available space
Display:
Screen Resolution: 800 600 pixels (or higher)
(recommended 1,024 768 or higher)
Colors: 8 bit or higher (16 bit recommended)
CD-ROM drive (supporting Digital Music CD
playback capabilities using WDM)
To create original CDs, a CD-R/RW drive is required.
Sound board
USB port (Hi-Speed USB is recommended.)
Internet Explorer 7.0 or 8.0 and Windows Media
Player 11 or 12 are required.
Broadband Internet connection is required to use
Electronic Music Distribution (EMD) or to visit the
web site.
We do not guarantee operation for all computers even
if they meet the above System requirements.
Not supported by the following environments:
Personally constructed computers or operating
systems
An environment that is an upgrade of the original
manufacturer-installed operating system
Multi-boot environment
Multi-monitor environment
Macintosh
Design and specifications are subject to change without
notice.
2
/
Customer support web sites
If you have any questions or issues with this
product, or would like information on compatible
items with this product, visit the following Web
sites.
For customers in the USA:
http://www.sony.com/walkmansupport
For customers in Canada:
http://www.sony.ca/ElectronicsSupport/
For customers in Europe:
http://support.sony-europe.com/DNA
For customers in Latin America:
http://www.sony-latin.com/index.crp
For customers in other countries/regions:
http://www.sony-asia.com/support
For customers who purchased the overseas models:
http://www.sony.co.jp/overseas/support/
 Loading...