

Page 1
Interchangeable Lens
Digital Camera
Instruction Manual
Parts and controls
Triple-dial-control
Custom key assignment
AF/MF button/AEL button
Operations
E-mount
NEX-7
Others
Page 2

Table of contents
This [Operations] describes basic operation of the camera, and some advanced
operations using the major functions. See [Getting Started] for information on
how to set up the camera, and the [Handbook] on the CD-ROM (supplied) for
more detailed functions and operations.
Getting Started Handbook
Operations
(This manual)
Parts and controls
Recording........................................................................... 5
Playback............................................................................. 7
Setup .................................................................................. 8
Triple-dial-control
Triple-dial-control operation ............................................. 10
Functions of the control dials ........................................... 12
Settings modes available................................................. 13
Custom key assignment
Assigning the functions to the custom keys..................... 22
Functions that can be assigned ....................................... 23
AF/MF button/AEL button
Switching the focusing mode with the AF/MF button ....... 27
GB
Locking the AE with AEL button ....................................... 28
2
Page 3

Others
Menu list............................................................................ 30
The unique digital shooting functions............................... 39
α Handbook...................................................................... 42
Restriction of the functions ............................................... 43
Number of recordable images.......................................... 46
List of icons on the screen ................................................ 49
Troubleshooting................................................................ 52
Specifications ................................................................... 53
Index................................................................................. 56
GB
3
Page 4

Parts and controls
All the major parts of your camera, and controls and
buttons that are used for recording, playback, and
setups are described here.
Page 5
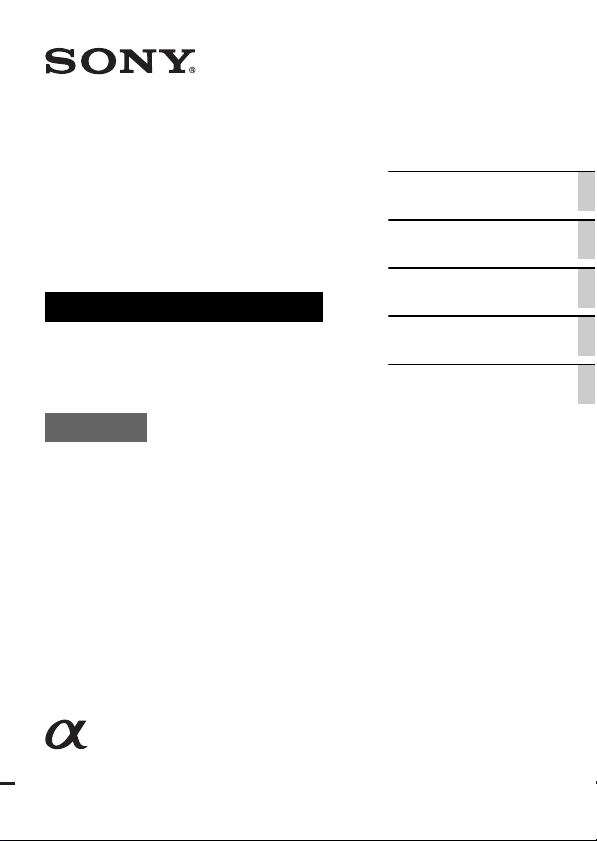
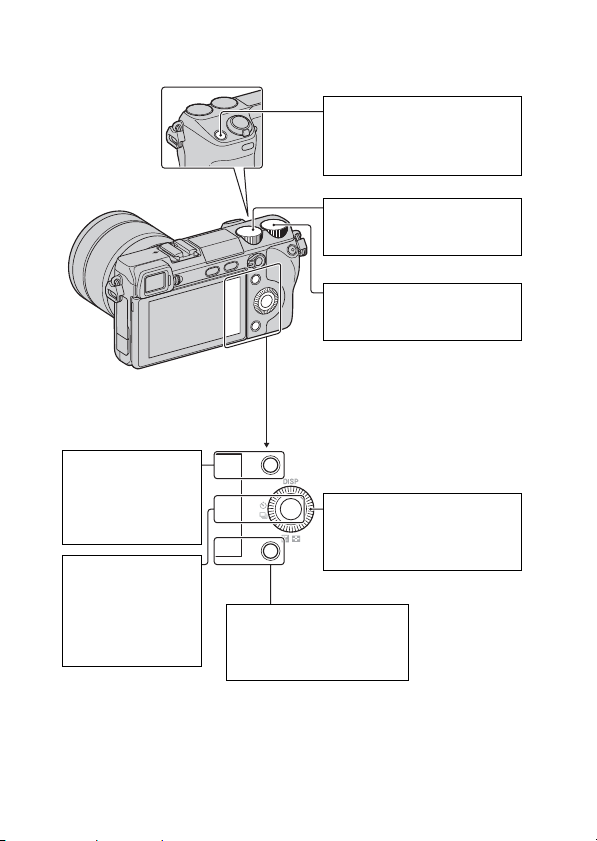
Recording
Navigation button
Selects the adjustment settings for the
Triple-dial-control operation.
Control dial R
Sets the items that appear at the top right of the screen.
Control dial L
Sets the items that appear at the top left of the screen.
ON/OFF (Power) switch
Turns on the camera at ON, off
the camera at OFF.
Parts and controls
Shutter button
Shoots still images.
Allows you to focus on the
subject when it is pressed half
way down.
Zoom ring
Zooms in or out the subject (when
a zoom lens is used).
GB
5
Page 6
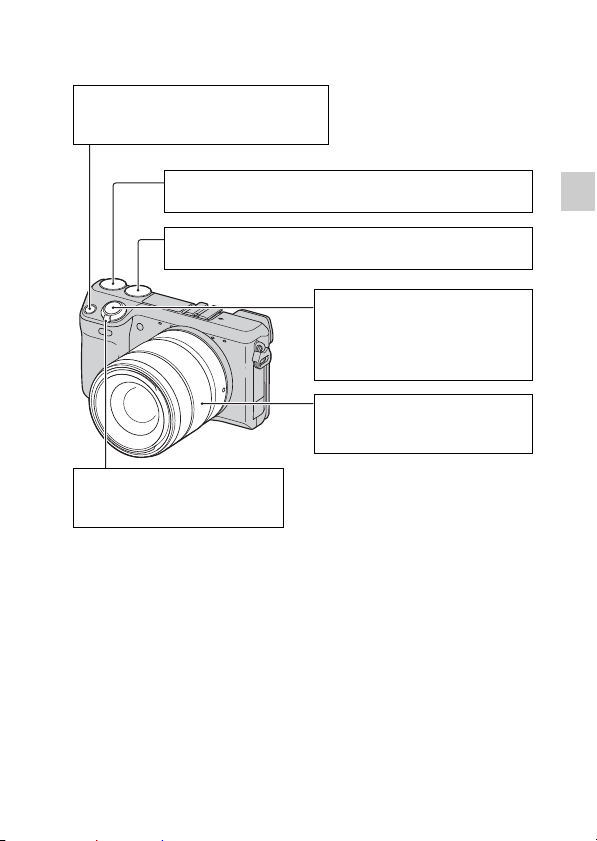
(Flash pop-up) button*
Pops up the built-in flash.
Press the button when you want to fire the flash.
Push the flash down to retract it when you do not
want to fire the flash (page 44).
MOVIE button
Records movies.
Pressing this button again
stops recording (page 41).
AF/MF button/AEL button
At AF/MF, the focusing mode
switches between auto and
manual while the button is held
down (page 27).
At AEL, AE is locked while the
button is held down (page 28).
button
Selects the drive
mode.
button
Compensates for the exposure.
* Be careful as the flash pops up when you press the button. Retract the flash when
you are not using it. Be careful not to pinch your finger when you push the flash
down.
GB
DISP button
Switches the screen display.
Control wheel
Sets the items that appear to
the right of the screen. Turn
the control wheel.
6
Page 7
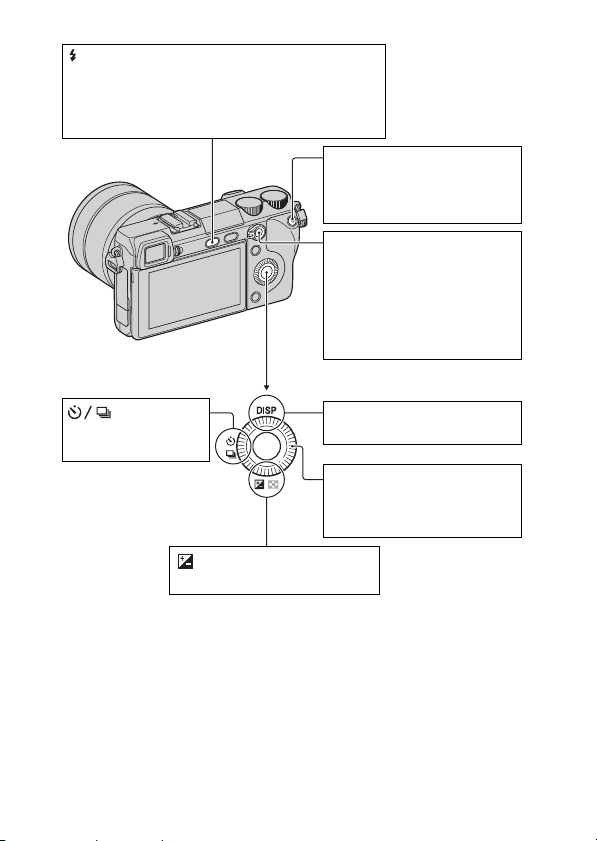
Playback
(Playback) button
Switches between the
shooting mode and the
playback mode.
DISP button
Switches the screen
display.
button
Displays the image
index.
(Delete) button
Deletes the image when is
displayed at the lower right
corner of the screen.
Control wheel
Selects the image.
(Enlarge Image) button
Enlarges the image on the
screen when it is pressed
while is displayed at the
center on the right side of the
screen.
Turning the control wheel
adjusts the scaling.
Parts and controls
GB
7
Page 8
Setup
Soft key A
Activates the
function displayed at
the upper right
corner of the screen.
Soft key C
Activates the
function displayed at
the center on the
right side of the
screen.
Navigation button
Selects the adjustment
settings for the Triple-dialcontrol operation.
Control dial L
Sets the items that appear at
the top left of the screen.
Control dial R
Sets the items that appear at
the top right of the screen.
Control wheel
Sets the items that appear to
the right of the screen. Turn
the control wheel.
Soft key B
Activates the function
displayed at the lower right
corner of the screen.
GB
8
Page 9

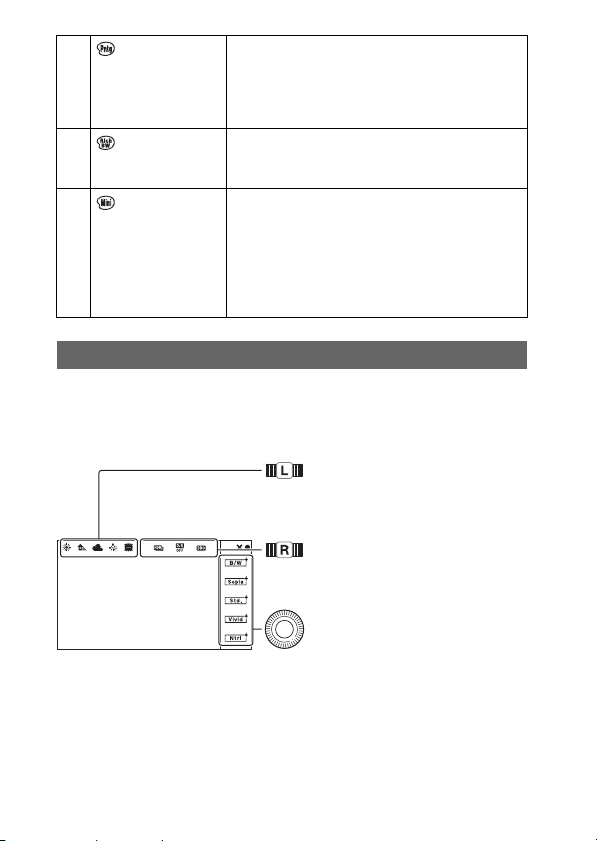
Triple-dial-control
The Triple-dial-control allows you to adjust the
various shooting settings quickly and intuitively,
using the 3 dials and the Navigation button.
Page 10
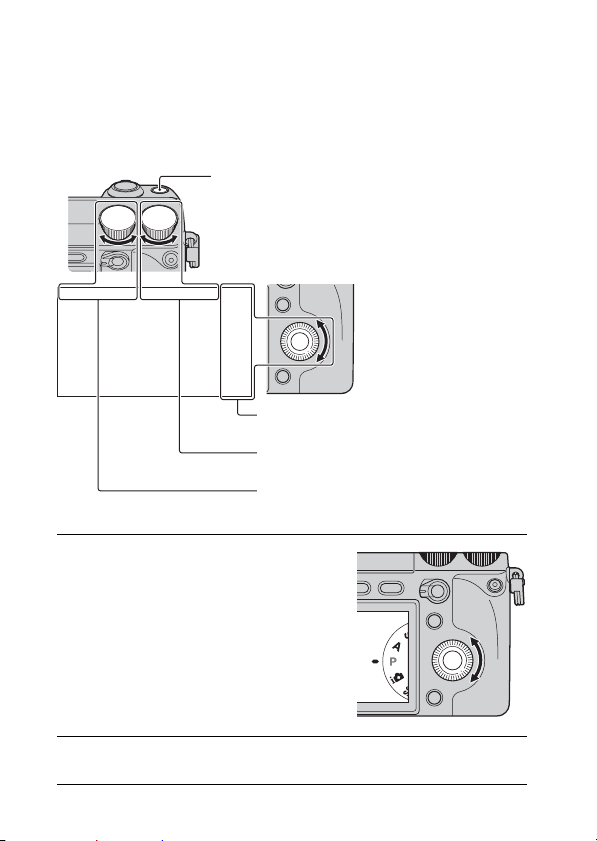
Triple-dial-control operation
The Triple-dial-control allows you to adjust or set various shooting adjustment
items, simultaneously, on a single screen.
Even though you can set these functions separately on the menu screen, using
the Triple-dial-control, you can adjust these functions interactively on the
same screen.
Navigation button
Items to be set by turning the control
wheel
Items to be set by turning the control dial
R
Items to be set by turning the control dial
L
Press the center of the control
1
wheel, and turn it to select a
shooting mode from P, A, S,
or M.
When [Soft key C Setting] is set to
[Custom], select a shooting mode by
MENU t [Shoot Mode].
Press the Navigation button to select the desired settings.
2
GB
10
Page 11
Set each settings by turning the control dials L/R and the
3
control wheel.
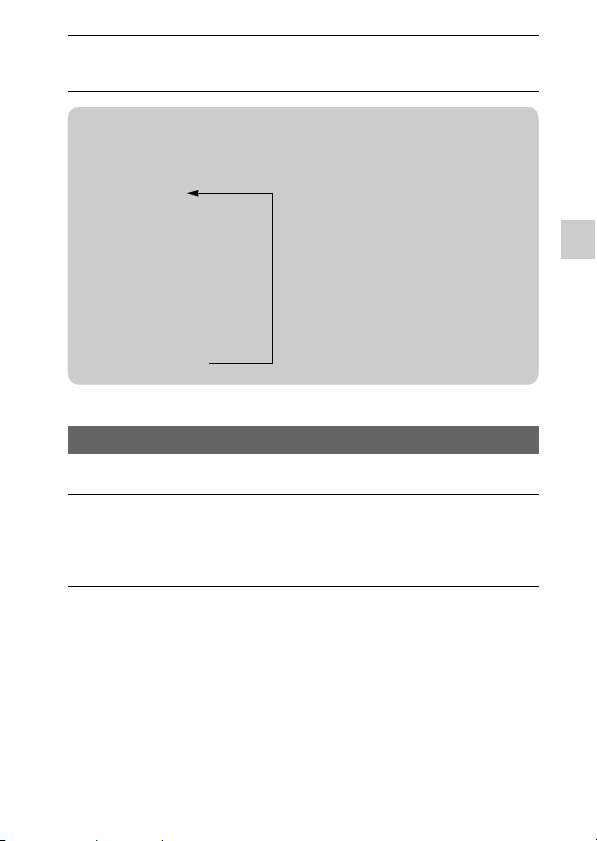
z Navigation button
Each time you press the button, the item toggles as follows.
Exposure Settings
r
Focus Settings
r
White Balance Settings
r
D-Range Settings
r
Creative Style Settings
Preventing the dials from operating incorrectly
You can lock the control dials L/R and the control wheel.
Hold the Navigation button down.
1
To unlock them, hold the Navigation button down again.
You can set to lock the control wheel only, or not to lock any of them by
selecting MENU t [Setup] t [Dial/Wheel Lock].
In addition, [Picture Effect Settings] and
[Custom Settings] are available. You can
select the settings you want to use by
selecting MENU t [Setup] t [Function
Settings].
The Exposure Settings is permanent and
cannot be altered.
Triple-dial-control
GB
11
Page 12

Functions of the control dials
The control dials and the control wheel have different tasks, depending on the
“Settings” currently in effect.
See “Settings modes available” (pages 13 to 20) for more details.
Control dial L Control dial R Control wheel
Exposure Settings* Shutter speed/
Focus Settings (AF
mode)
Focus Settings (MF
mode)
White Balance
Settings
D-Range Settings DRO level/HDR
Creative Style
Settings
Picture Effect
Settings**
Custom Settings** Custom Settings 1
* Permanent item
** This item cannot be selected in the default setting. You can add it by MENU t
[Setup] t [Function Settings].
Aperture/Program
shift
Focus area Flexible spot
Enlarging position
(up/down)
Mode/Color
temperature
level
Mode Option Option
Mode Option –
mode
Aperture/
Exposure
compensation
position (right/
left)
Enlarging position
(right/left)
Color temperature
(B-A)
Exposure
compensation
Custom Settings 2
mode
ISO
Flexible spot
position (up/
down)
Enlarging position
(up/down)
Color temperature
(G-M)
Mode
Custom Settings 3
mode
12
GB
Page 13
Settings modes available
What you can set with each Settings mode are described here.
indicates the default setting.
Exposure Settings
Shooting mode Control dial L Control dial R Control wheel
Manual Exposure Shutter speed Aperture ISO
Shutter Priority Shutter speed Exposure
compensation
Aperture Priority Aperture Exposure
compensation
Program Auto Program shift Exposure
compensation
• You can set the exposure compensation by turning the control dial R when [Anti
Motion Blur], [Sweep Panorama], or [3D Sweep Panorama] is selected.
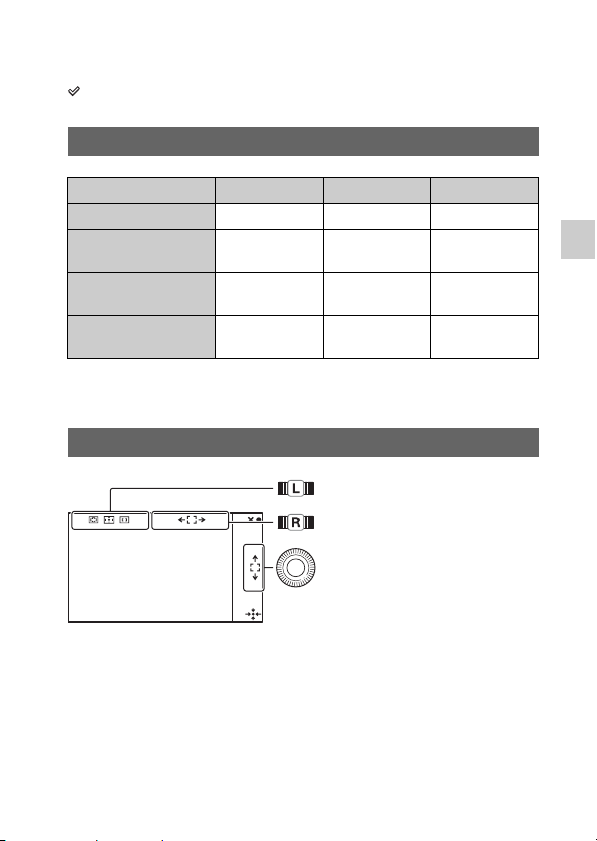
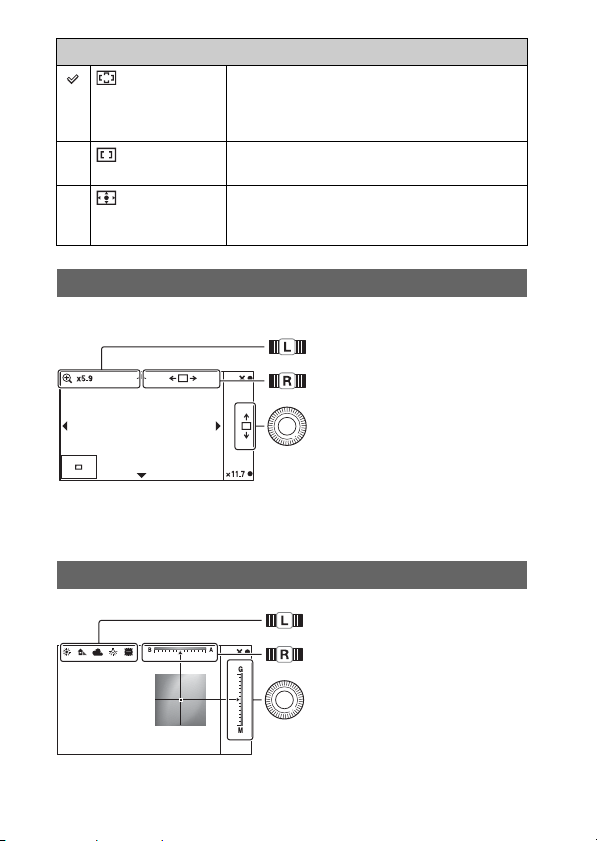
Focus Settings (AF mode)
Set [Autofocus Area].
In [Flexible Spot], move the area
right or left.
In [Flexible Spot], turn it to move
the area up or down, and press
the top/bottom/right/left to finely
adjust the area.
ISO
ISO
ISO
Triple-dial-control
GB
13
Page 14
Control dial L
(Multi) The camera uses the 25 AF areas and focuses
(Center) The camera uses the AF area located in the center
(Flexible Spot) Moves the focusing area to focus on a small subject
automatically.
• When the Face Detection function is active, AF
operates with priority on faces.
area exclusively.
or narrow area. Press soft key B to bring the
focusing area back to the center.
Focus Settings (MF mode)
You can set the enlarged position for manual focusing.
Move the enlarged position up or
down.
Move the enlarged position right
or left.
Move the enlarged position up or
down.
Press the top/bottom/right/left to
finely adjust the position.
You can adjust the scaling with soft key B or C.
White Balance Settings
Set the mode.
14
Adjust the color between B (blue)
and A (amber).
Adjust the color between G
(green) and M (magenta).
GB
Page 15

Control dial L
AWB (Auto WB) The camera automatically detects a light source and
(Daylight) If you select an option to suit a specific light source,
(Shade)
(Cloudy)
(Incandescent)
(Fluor.: Warm
White)
(Fluor.: Cool
White)
(Fluor.: Day
White)
(Fluor.:
Daylight)
(Flash)
(C.Temp./Filter) Adjusts the color temperature depending on the light
(Custom) Allows to use the white balance setting retained by
adjusts the color temperature.
the color temperature is adjusted for the light source
(preset white balance).
source. Achieves the effect of CC (Color
Compensation) filters for photography. To select a
color temperature, press soft key B followed by
turning the control dial L.
[Custom Setup].
z Setting the custom white balance
Selecting [Custom] with the control dial L and pressing soft key B will display
the [Custom Setup] screen. Hold the camera so that the white area fully covers
the AF area located in the center, and then press the shutter button down. The
calibrated values are stored for later use.
Triple-dial-control
GB
15
Page 16
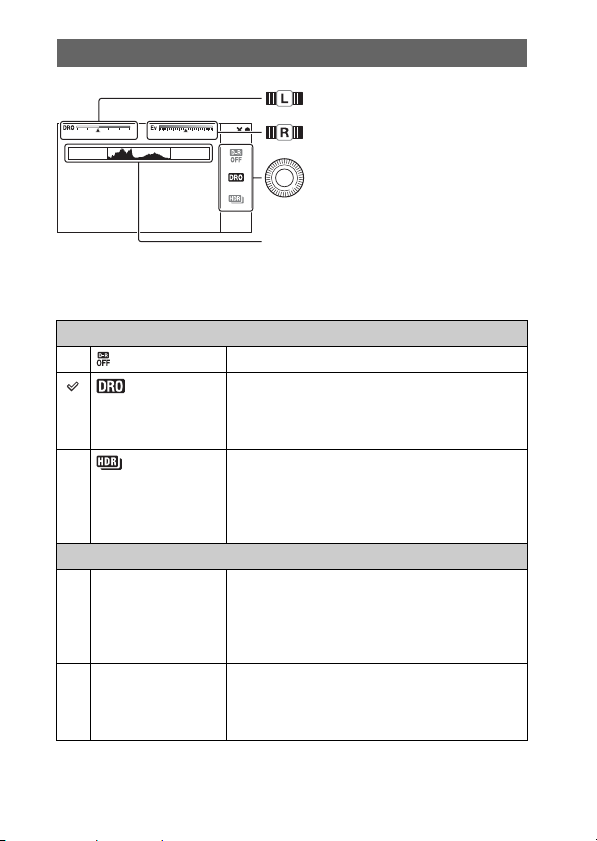
D-Range Settings
This figure shows the histogram before
the D-Range Optimizer or the Auto HDR
was applied, not that of the image that will
actually be shot.
Control wheel
(Off) Does not use [DRO/Auto HDR].
(D-Range
Opt.)
(Auto HDR) Shoots 3 images with different exposures, and then
Control dial L
AUTO, Lv1 – Lv5
(D-Range Opt.)
AUTO, 1.0 EV – 6.0
EV (Auto HDR)
By dividing the image into small areas, the camera
analyzes the contrast of light and shadow between
the subject and the background, producing the
image with the optimal brightness and gradation.
overlays the bright area of the under exposed image
and the dark area of the over exposed image to
create an image with rich gradation. 1 image with
proper exposure and 1 overlaid image are recorded.
Using the D-Range Optimizer, optimizes the
gradations of a recorded image in each area of the
image. Select the optimal level between Lv1 (weak)
and Lv5 (strong). Automatically adjusted at
[AUTO].
Using the Auto HDR, sets the exposure difference,
based on the contrast of the subject. Select the
optimal level between 1.0 EV (weak) and 6.0 EV
(strong). Automatically adjusted at [AUTO].
Set the optimum level.
Set the exposure compensation
value (–5.0 EV to +5.0 EV).
Set the mode.
16
GB
Page 17

z To use the D-Range Settings effectively
By combining the DRO/Auto HDR manual setting (exposure difference/
DRO-Level) and the exposure compensation, you can control the range of the
contrast of light and shadow (gradations) to be reproduced.
With DRO, set a DRO-Level to reproduce the shadow side, and set a minus
value of exposure compensation to reproduce the light side. A large minus
compensation and DRO-Level setting may cause noise. It is recommended that
you check the result first, by enlarging the playback image, etc.
With Auto HDR, set the exposure difference to adjust the overall reproduction
range, and shift the range towards light side (minus compensation) or shadow
side (plus compensation) with the exposure compensation.
Creative Style Settings
Set the mode.
Adjust the contrast, saturation, or
sharpness.
Select the contrast, saturation, or
sharpness.
Control dial L
(Standard) For shooting various scenes with rich gradation and
beautiful colors.
(Vivid) The saturation and contrast are heightened for
shooting striking images of colorful scenes and
subjects such as flowers, spring greenery, blue sky,
or ocean views.
(Neutral) The saturation and sharpness are lowered for
capturing images in a quiet tone. This is also
suitable for capturing image material to be modified
with a computer.
Triple-dial-control
GB
17
Page 18
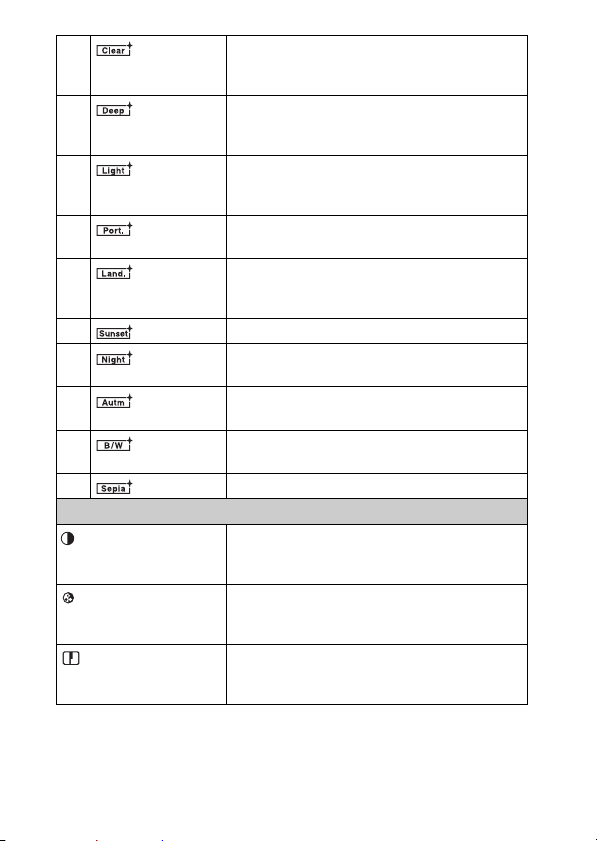
(Clear) For capturing images in a clear tone with limpid
(Deep) For capturing images with deep and dense color
(Light) For capturing images with bright and uncomplicated
(Portrait) For shooting the skin color in a soft tone, ideally
(Landscape) The saturation, contrast, and sharpness are
(Sunset) For shooting the beautiful red of the setting sun.
(Night
Scene)
(Autumn
leaves)
(Black &
White)
(Sepia) For capturing images in sepia monotone.
Control wheel
(Contrast) The higher the value selected, the more the
(Saturation) The higher the value selected, the more vivid the
(Sharpness) The higher the value selected, the more the contours
colors in the highlighted area, suitable for capturing
radiant light.
expressions, suited to capturing the solid presence
of the subject.
color expressions, suited to capturing refreshingly
light ambience.
suited for shooting portraits.
heightened for shooting vivid and crisp scenery.
Distant landscapes also stand out more.
The contrast is attenuated for capturing a nightscape
that is more faithful to the real view.
For capturing autumn scenes, vividly highlighting
the red and yellow of coloring leaves.
For shooting images in black and white monotone.
difference of light and shadow is accentuated, thus
making an impact on an image.
color. When a lower value is selected, the color of
the image is restrained and subdued.
are accentuated, and the lower the value selected,
the more the contours are softened.
18
GB
Page 19
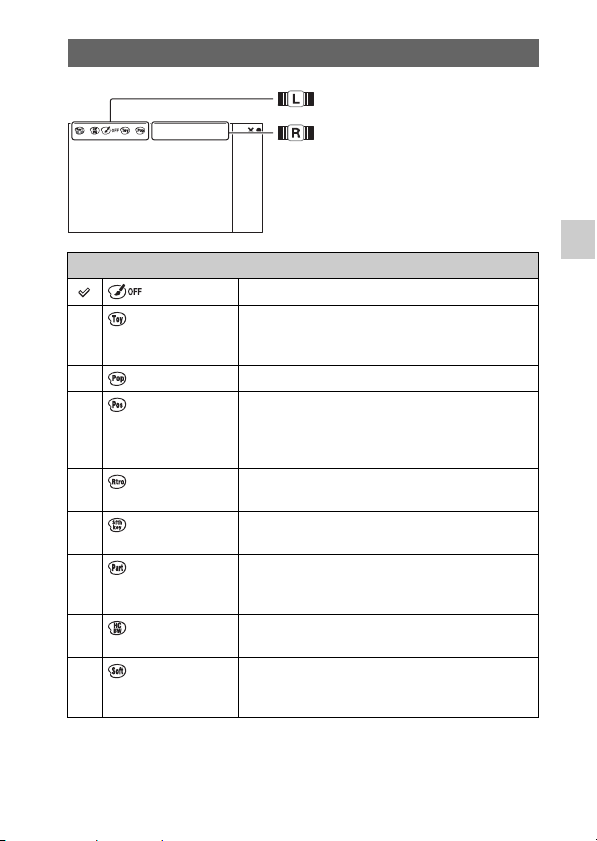
Picture Effect Settings
Set the mode.
Set the option.
Control dial L
(Off) Does not use the Picture Effect function.
(Toy Camera) Creates the look of a Toy Camera photo with shaded
(Pop Color) Creates a vivid look by emphasizing color tones.
(Posterization) Creates a high contrast, abstract look by heavily
(Retro Photo) Creates the look of an aged photo with sepia color
(Soft High-key) Creates an image with the indicated atmosphere:
(Partial Color) Creates an image which retains a specific color, but
(High Contrast
Mono.)
(Soft Focus) Creates an image filled with a soft lighting effect.
corners and pronounced colors.
You can set the color tone with the control dial R.
emphasizing primary colors, or in black and white.
You can select primary colors or black and white
with the control dial R.
tones and faded contrast.
bright, transparent, ethereal, tender, soft.
converts others to black and white.
You can select a color with the control dial R.
Creates a high-contrast image in black and white.
You can set the intensity of the effect with the
control dial R.
Triple-dial-control
GB
19
Page 20
(HDR Painting) Creates the look of a painting, enhancing the colors
(Rich-tone
Mono.)
(Miniature) Creates an image which enhances the subject
and details.
The camera releases the shutter 3 times.
You can set the intensity of the effect with the
control dial R.
Creates an image in black and whi te with rich
gradation and reproduction of details. The camera
releases the shutter 3 times.
vividly, with the background defocused
considerably. This effect may often be found in
pictures of miniature models.
You can select the area to be in focus with the
control dial R. The focus on other areas is greatly
reduced.
Custom Settings
You can change the mode of the function assigned to [Custom Settings 1, 2, 3].
Assign the function by selecting MENU t [Setup] t [Function Settings] t
[Custom Settings 1, 2, 3].
Change the mode of the function
assigned to [Custom Settings 1].
The default setting is [White
Balance].
Change the mode of the function
assigned to [Custom Settings 2].
The default setting is [DRO/Auto
HDR].
Change the mode of the function
assigned to [Custom Settings 3].
The default setting is [Creative
Style].
When [Creative Style] or [White Balance] is assigned to [Custom Settings 3],
you can make a fine adjustment with soft key B.
GB
20
Page 21

Custom key assignment
You can assign the functions you frequently use to
any one of 4 keys. This will be handy as you can call
up the function by just pressing the key.
Page 22

Assigning the functions to the custom keys
You can assign the functions you use
frequently to the right key of the control
wheel, soft key C, soft key B and AF/
MF button.
Select MENU.
1
Select [Setup] t [Custom Key Settings].
2
Select the function to be assigned.
3
Press the key to call up the function assigned to the key.
4
AF/MF button
MENU
Soft key C
Soft key B
Right key
22
GB
Page 23

Functions that can be assigned
The functions that can be assigned to each key are as follows.
indicates the default setting.
AF/MF button
AF/MF control
MF Assist
Focus Settings
Right Key Setting
Shoot Mode White Balance
AF/MF Select Metering Mode
Autofocus Mode DRO/Auto HDR
Autofocus Area Picture Effect
Precision Dig. Zoom Creative Style
Face Detection Flash Mode
Smile Shutter Flash Compensation
Soft Skin Effect MF Assist
Quality Focus Settings
ISO Not set
Custom key assignment
GB
23
Page 24

Soft key B Setting
Shoot Mode White Balance
AF/MF Select Metering Mode
Autofocus Mode DRO/Auto HDR
Autofocus Area Picture Effect
Precision Dig. Zoom Creative Style
Face Detection Flash Mode
Smile Shutter Flash Compensation
Soft Skin Effect MF Assist
Quality Focus Settings
ISO Not set
Soft key C Setting
Shoot Mode
Custom
[Custom] of [Soft key C Setting]
You can set this item when you set [Soft key C Setting] to [Custom].
The selected items are displayed at the bottom of the screen, when you select
CUSTOM with soft key C (the center of the control wheel).
Select the desired item by pressing the right/left of the control wheel.
24
Custom items (Custom 1 to 5)
GB
Page 25

AF/MF Select
Autofocus Mode
Autofocus Area
Face Detection
Smile Shutter
Soft Skin Effect
Quality
ISO ([Custom 1] default setting)
White Balance ([Custom 2] default setting)
Metering Mode
DRO/Auto HDR ([Custom 3] default setting)
Picture Effect
Creative Style
Flash Mode
Not set ([Custom 4/5] default setting)
Custom key assignment
GB
25
Page 26

AF/MF button/AEL button
You can switch focusing between auto and manual
temporarily with the AF/MF button. You can lock
the AE with the AEL button.
Page 27

Switching the focusing mode with the AF/MF button
The focusing mode switches from auto or direct manual to manual, and from
manual to auto.
Set the AF/MF/AEL switch
1
lever to AF/MF.
The button becomes the AF/MF
button.
Press the AF/MF button.
2
The focusing mode switches while the button is held down (the default
setting).
You can make the focusing mode to remain switched even if you remove
your finger from the button by selecting MENU t [Setup] t [AF/MF
control].
z Useful functions in the manual focusing mode
You can select the following items by selecting MENU t [Setup].
MF Assist
Enlarges the image to make manual-focusing easier. The image is enlarged by
5.9 times or 11.7 times. You can also use this with the direct manual focus
function.
Peaking Level/Peaking Color
Enhances the outline of in-focus ranges with a specific color, and allows you to
confirm the focus easily.
AF/MF button/AEL button
GB
27
Page 28

Locking the AE with AEL button
Set the AF/MF/AEL switch
1
lever to AEL.
The button becomes the AEL (AE
lock) button.
Focus on the spot for which you want to set the exposure.
2
Press the AEL button.
3
The exposure is locked and (AE lock) lights up.
Holding the AEL button down, focus on your desired
4
subject and shoot.
You can keep the AE locked until you press the AEL button again by
selecting MENU t [Setup] t [AEL].
28
GB
Page 29

Others
You will find all the setting items available (Menu),
certain unique functions, the screen display,
specifications, etc. here.
Page 30

Menu list
You can select and use various functions from the menu.
When you press MENU, 6 menu items; [Shoot Mode], [Camera], [Image
Size], [Brightness/Color], [Playback], and [Setup], appear on the screen.
You can set various functions in each item. Items that cannot be set in the
context are displayed in gray.
Shoot Mode
Allows you to select a shooting mode, such as exposure mode, panoramic,
Scene Selection.
Intelligent Auto/Manual Exposure/Shutter Priority/Aperture Priority/Program
Auto
Scene Selection Portrait/Landscape/Macro/Sports Action/Sunset/Night
Anti Motion Blur See page 40.
Sweep Panorama See page 39.
3D Sweep Panorama See page 39.
Portrait/Night Scene/Hand-held Twilight
30
GB
Page 31

Camera
Allows you to set shooting functions, such as continuous shooting, self-timer,
remote-control shooting, and flash.
Drive Mode Single Shooting/Cont. Shooting/Spd Priority Cont./
Self-timer/Self-timer(Cont)/ Bracket: Cont./Remote
Cdr.
Flash Mode Flash Off/Autoflash/Fill-flash/Slow Sync./Rear Sync./
Wireless
AF/MF Select Autofocus/DMF/Manual Focus
Autofocus Area Multi/Center/Flexible Spot
Autofocus Mode Single-shot AF/Continuous AF
Object Tracking On/Off
Prec. Dig. Zoom Max. 10 times
Face Detection On (Regist. Faces)/On/Off
Face Registration New Registration/Order Exchanging/Delete/Delete
All
Smile Shutter On/Off
Soft Skin Effect On/Off
LCD Display (DISP) Graphic Display/Display All Info./Big Font Size
Disp./No Disp. Info./Live View Priority/Level/
Histogram/For viewfinder
Finder Display(DISP) Disp. Basic Info/Level/Histogram
DISP Button(Monitor) Graphic Display/Display All Info./Big Font Size
Disp./No Disp. Info./Live View Priority/Level/
Histogram/For viewfinder
Others
GB
31
Page 32

Image Size
Allows you to set the image size and aspect ratio, etc.
Still
Image Size 3:2: L: 24M/M: 12M/S: 6M
Aspect Ratio 3:2/16:9
Quality RAW/RAW & JPEG/Fine/Standard
3D Panorama
Image Size 16:9/Standard/Wide
Panorama Direction Right/Left
Panorama
Image Size Standard/Wide
Panorama Direction Right/Left/Up/Down
Movie
File Format AVCHD
Record Setting AVCHD: 24M (FX)
The interlace or progressive figure varies depending on the countries/regions.
1)
60i/60p or 50i/50p
2)
60i or 50i
3)
60p or 50p
4)
24p or 25p
16:9: L: 20M/M: 10M/S: 5.1M
1)
/MP4
2)
(FX)
4)
/17M (FH)
/17M (FH)2)/28M (PS)3)/24M
4)
MP4: 1440×1080 12M/VGA 3M
32
GB
Page 33

Brightness/Color
Allows you to make brightness settings such as metering mode, and color
settings such as white balance.
Exposure Comp. –5.0EV to +5.0EV
ISO ISO AUTO/100 - 16000
White Balance Auto WB/Daylight/Shade/Cloudy/Incandescent/
Fluor.: Warm White/Fluor.: Cool White/Fluor.: Day
White/Fluor.: Daylight/Flash/C.Temp./Filter/Custom/
Custom Setup
Metering Mode Multi/Center/Spot
Flash Comp. –3.0EV to +3.0EV
DRO/Auto HDR Off/D-Range Opt./Auto HDR
Picture Effect Off/Toy Camera/Pop Color/Posterization/Retro
Photo/Soft High-key/Partial Color/High Contrast
Mono./Soft Focus/HDR Painting/Rich-tone Mono./
Miniature
Creative Style Standard/Vivid/Neutral/Clear/Deep/Light/Portrait/
Landscape/Sunset/Night Scene/Autumn leaves/Black
& White/Sepia
Others
GB
33
Page 34

Playback
Allows you to set playback functions.
Delete Multiple Img./All in Folder/All AVCHD view files
Slide Show Repeat/Interval/Image Type
View Mode Folder View(Still)/Folder View(MP4)/AVCHD View
Image Index 6 Images/12 Images
Rotate Counterclockwise
Protect Multiple Img./Cancel All Images/Cancel All
3D Viewing 3D playback on 3D TV
Enlarge Image Enlarging the playback image
Volume Settings 0 to 7
Specify Printing DPOF Setup/Date Imprint
Display Contents Display Info./Histogram/No Disp. Info.
Movies(MP4)/Cancel All AVCHD view files
34
GB
Page 35

Setup
Allows you to make more detailed shooting settings, or change the camera
settings.
Shooting Settings
AEL Sets how the AEL button works.
(Hold/Toggle)
AF/MF control Sets how the AM/FM button works.
(Hold/Toggle)
Dial/Wheel Lock Sets whether or not to lock the control dials and the
control wheel.
(All/Control Wheel/Off)
AF Illuminator Sets the AF illuminator to assist auto-focusing in dim
places.
(Auto/Off)
Red Eye Reduction Provides pre-flash before shooting when using the
flash, to prevent eyes from being shot in red.
(On/Off)
FINDER/LCD Setting Sets how to switch between the viewfinder and the
LCD monitor.
(Auto/Viewfinder/LCD Monitor)
Live View Display Allows you to choose whether or not to show the
value of exposure compensation, etc. on the screen
display.
(Setting Effect ON/Setting Effect OFF)
Auto Review Sets the display time of the image right after shooting.
(10 Sec/5 Sec/2 Sec/Off)
Grid Line Turns on the grid line that helps you to adjust the
composition of images.
(Rule of 3rds Grid/Square Grid/Diag. + Square Grid/
Off)
Others
GB
35
Page 36

Peaking Level Enhances the outline of in-focus ranges with a specific
Peaking Color Sets the color used for the peaking function.
MF Assist Displays an enlarged image when focusing manually.
MF Assist Time Sets the length of time the image will be shown in an
Color Space Changes the range of color reproduction.
SteadyShot Sets camera shake compensation.
Release w/o Lens Sets whether or not to release the shutter when there is
Eye-Start AF Sets whether or not to use autofocus when you look
Front Curtain Shutter Sets whether or not to use the electronic front curtain
Long Exposure NR Sets the noise reduction processing for long exposure
High ISO NR Sets the noise reduction processing for high ISO
Lens Comp.: Shading Compensates for the shaded corners of the screen.
Lens Comp.: Chro.
Aber.
Lens Comp.: Distortion Compensates for distortion of the screen.
Movie Audio Rec Sets the sound for movie recording.
GB
Wind Noise Reduct. Reduces wind noise during movie recording.
36
color.
(High/Mid/Low/Off)
(White/Red/Yellow)
(On/Off)
enlarged form.
(No Limit/5 Sec/2 Sec)
(sRGB/AdobeRGB)
(On/Off)
no lens.
(Enable/Disable)
through the viewfinder.
(On/Off)
shutter function.
(On/Off)
shootings.
(On/Off)
sensitivity shootings.
(High/Normal/Low)
(Auto/Off)
Reduces the color deviation at the corners of the
screen.
(Auto/Off)
(Auto/Off)
(On/Off)
(On/Off)
Page 37

AF Micro Adj. Finely adjusts the autofocused position, when using
the LA-EA2 Mount Adaptor (sold separately).
(AF Adjustment Setting/amount/Clear)
Main Settings
Menu start Selects a first-displayed menu from the top menu or
the last menu screen.
(Top/Previous)
Function Settings Sets the functions to call up for the Triple-dial-control.
(Function Settings 1 to 4/Custom Settings 1 to 3/
Function Settings Start)
Custom Key Settings Assigns functions to the various keys.
(AF/MF button/Right Key Setting/Soft key B Setting/
Soft key C Setting/Custom)
Beep Selects the sound produced when you operate the
camera.
(On/Off)
Language Selects the language used on the screen.
Date/Time Setup Sets the date and time.
Area Setting Selects the area where you are using the camera.
Help Guide Display Turns the Help Guide on or off.
(On/Off)
Power Save Sets the time to turn the camera to the power save
mode.
(30 Min/5 Min/1 Min/20 Sec/10 Sec)
LCD Brightness Sets the brightness of the LCD monitor.
(Auto/Manual/Sunny Weather)
Viewfinder Bright. Sets the brightness of the viewfinder.
(Auto/Manual)
Display Color Selects the color of the LCD monitor.
(Black/White)
Wide Image Selects a method to display wide images.
(Full Screen/Normal)
Playback Display Selects the method used to play back portrait images.
(Auto Rotate/Manual Rotate)
HDMI Resolution Sets resolution when connected to HDMI TV.
(Auto/1080p/1080i)
CTRL FOR HDMI Sets whether or not to operate the camera with a
“BRAVIA” Sync-compliant TV’s Remote Control.
(On/Off)
Others
GB
37
Page 38

USB Connection Selects the method used for a USB connection.
Cleaning Mode Allows you to clean the image sensor.
Version Displays the version of the camera and the lens.
Demo Mode Sets whether or not to display the demonstration with
Reset Default Resets the camera to the factory-settings.
Memory Card Tool
Format Formats the memory card.
File Number Selects the method used for assigning file numbers to
Folder Name Selects the folder name format.
Select Shoot. Folder Selects the recording folder.
New Folder Creates a new folder.
Recover Image DB Repairs the image database file when inconsistencies
Display Card Space Displays the remaining recording time of movies and
Eye-Fi Setup*
Upload Settings Sets the upload function of the camera when an
* Appears when an Eye-Fi card (sold separately) is inserted in the camera. Do not
use an Eye-Fi card inserted in the camera on an airplane. If there is an Eye-Fi
card inserted in the camera, set [Upload Settings] to [Off].
Eye-Fi cards can be used only in the countries/regions where they were
purchased. Use Eye-Fi cards in accordance with the law of the countries/regions
where you purchased the card.
(Auto/Mass Storage/MTP)
movies.
(On/Off)
images.
(Series/Reset)
(Standard Form/Date Form)
are found.
the recordable number of still images on the memory
card.
Eye-Fi card is used.
(On/Off)
38
GB
Page 39

The unique digital shooting functions
Here we will introduce some of the unique functions achieved by full use of
Sony imaging technology.
Sweep Panorama/3D Sweep Panorama
While you pan or tilt the camera, the camera shoots several images and
composes them into a panoramic image. Sweep panorama mode allows you to
shoot wide, panoramic scenes that cannot fit all at one time on the screen,
without any breaks and discontinuity.
In 3D sweep panorama mode, applying the sweep panorama technology, the
camera shoots separate images, one to be viewed by the left eye and the other
by the right eye, then combines them so that they look like a 3D image.
Select MENU t [Shoot Mode] t [Sweep Panorama] or
1
[3D Sweep Panorama].
Shoot the subject, following
2
the guidance on the LCD
monitor.
The gray area on the left side of the
screen is not recorded.
Others
Guidance bar
GB
39
Page 40

z Tips for shooting a panoramic image
Pan the camera in an arc with a constant velocity and in the same direction as the
indication on the LCD monitor. [Sweep Panorama] is better suited for still
subjects, rather than moving ones.
Vertical direction
Anti Motion Blur
The camera combines 6 shots at high speed into 1 still image, so camera shake
is reduced while also preventing noise. By treating the person (subject) in the
foreground and the background separately, both camera shake and subject blur
are reduced. Avoiding use of the flash prevents over-exposure.
Horizontal direction
Radius as short as possible
Select MENU t [Shoot Mode] t [Anti Motion Blur].
1
GB
40
Page 41

z The difference between [Anti Motion Blur] and
[Hand-held Twilight] functions
Just as with [Anti Motion Blur], the camera combines 6 shots into 1 still image
with [Hand-held Twilight] in [Scene Selection].
[Hand-held Twilight] is designed to be used when shooting a dark scene, such as
a scene shot at night. When it becomes dark and camera-shake is likely to occur,
the camera automatically increases the sensitivity and shoots at a shutter speed
that reduces the effect of camera shake.
[Anti Motion Blur] is designed to be used when shooting a subject in low light,
such as when shooting indoors. The camera automatically increases the
sensitivity and shoots the subject at a high speed shutter setting to reduce the
blur caused by movement of the subject.
Manual movie recording
In the P, A, S, or M mode, you can adjust the exposure even when recording
movies. This enables you to produce more creative expression, by reducing the
focus on the background, adjusting the brightness, etc.
Press the MOVIE button.
1
Adjust the exposure by using the control dials L/R and the
2
control wheel.
The items that can be adjusted vary depending on the shooting mode
(page 13).
Note
• The sound of the lens and the camera in operation will also be recorded.
Others
GB
41
Page 42

α Handbook
Refer to “α Handbook” included on the CD-ROM (supplied) for in-depth
instructions on the many functions of the camera.
For Windows users
Turn on your computer, and insert the CD-ROM (supplied)
1
into the CD-ROM drive.
Click [Handbook].
2
Click [Install].
3
Start “α Handbook” from the shortcut on the desktop.
4
For Macintosh users
Turn on your computer, and insert the CD-ROM (supplied)
1
into the CD-ROM drive.
Select the [Handbook] folder and copy “Handbook.pdf”
2
stored in the [GB] folder to your computer.
After copying is complete, double-click “Handbook.pdf.”
3
42
GB
Page 43

Restriction of the functions
Functions available for each shooting mode
The functions you can use depend on the selected shooting mode.
In the table below, indicates the function available. – indicates the function
not available.
The functions you cannot use are displayed in gray on the screen.
Shoot Mode Exposure
(Intelligent
Auto)
(Sweep
Panorama)
(3D Sweep
Panorama)
(Anti Motion
Blur)
SCN
(Scene
Selection)
Comp.
Self-timer Cont.
Shooting
Face
Detection
Picture Effect
––
––––
––––
–– –
–––
––
–––
–––
–––
–––
––– –
–––
P
(Program Auto)
A
(Aperture
Priority)
S
(Shutter Priority)
M
(Manual
Exposure)
–
Note
• The functions available may be limited also by conditions other than the shooting
mode.
Others
GB
43
Page 44

Flash modes available
The flash modes you can select depend on the shooting mode and functions
selected.
In the table below, indicates the function available. – indicates the function
not available.
The flash modes you cannot select are displayed in gray on the screen.
Shoot Mode Flash Off Autoflash Fill-flash Slow Sync. Rear Sync. Wirel ess
(Intelligent
Auto)
(Sweep
Panorama)
(3D Sweep
Panorama)
(Anti Motion
Blur)
SCN
(Scene
Selection)
P
(Program Auto)
A
(Aperture
Priority)
S
(Shutter Priority)
M
(Manual
Exposure)
–––––
–––––
–––––
– –––
– –––
– –––
–––––
–––––
––– ––
––
––
––
––
––––
–––
–––
44
GB
Page 45

Notes
• The flash modes may be limited also by conditions other than the shooting mode.
• Even if you select a workable flash mode, the flash does not fire unless it is raised.
• You cannot use the wireless flash with the built-in flash. Use a wireless lighting
ratio control flash (sold separately) or a wireless flash (sold separately).
Others
GB
45
Page 46

Number of recordable images
Once you insert a memory card into the
camera and set the power switch to ON,
the number of images that can be
recorded (should you continue to shoot
using the current settings) is displayed
on the LCD monitor.
Note
• When “0” (the number of recordable images) flashes in yellow, the memory card
is full. Replace the memory card with another one, or delete images in the current
memory card.
Number of still images and time of movies that
can be recorded on a memory card
Still images
The table shows the approximate number of still images that can be recorded
on a memory card formatted with this camera. The values are defined using
Sony standard memory cards for testing. The values may vary depending on
the shooting conditions.
Image size: L 24M
Aspect ratio: 3:2*
Capacity
Quality
Standard 335 680 1350 2750 5500
Fine 205 410 830 1650 3300
RAW & JPEG 54 105 220 440 880
RAW 74 145 300 600 1200
* When [Aspect Ratio] is set to [16:9], you can record more images than the
numbers shown in the table above (except for [RAW]).
2GB 4GB 8GB 16GB 32GB
(Units: images)
46
GB
Page 47

Movies
The table below shows the approximate recording times available. These are
the total times for all movie files. Continuous recording is possible for
approximately 29 minutes per recording. The maximum size of an MP4 movie
file is about 2 GB.
Capacity
Record Setting
60i 24M(FX)
50i 24M(FX)
60i 17M(FH)
50i 17M(FH)
60p 28M(PS)
50p 28M(PS)
24p 24M(FX)
25p 24M(FX)
24p 17M(FH)
25p 17M(FH)
1440×1080 12M 20 m 40 m 1 h 20 m 2 h 45 m 5 h 30 m
VGA 3M 1 h 10 m 2 h 25 m 4 h 55 m 10 h 20 h
Note
• The recording time of movies varies because the camera is equipped with VBR
(Variable Bit Rate) which automatically adjusts image quality depending on the
shooting scene. When you record a fast-moving subject, the image is clearer but
the recording time is shorter because a lot of memory needed to record. The
recording time also vary depending on the shooting condition or your subject or
the setting of image quality/size.
2GB 4GB 8GB 16GB 32GB
10 m 20 m 40 m 1 h 30 m 3 h
10 m 30 m 1 h 2 h 4 h 5 m
9 m 15 m 35 m 1 h 15 m 2 h 30 m
10 m 20 m 40 m 1 h 30 m 3 h
10 m 30 m 1 h 2 h 4 h 5 m
(h (hour), m (minute))
Others
GB
47
Page 48

Number of still images that can be recorded
using a battery pack
The approximate number of images that can be recorded is as follows when
you use the camera with the battery pack (supplied) at full capacity.
Note that the actual numbers may be less depending on the conditions of use.
LCD monitor mode Approx. 430 images
Viewfinder mode Approx. 350 images
• The number was estimated with a battery pack at full capacity and under the
following conditions:
– At an ambient temperature of 25°C (77°F).
– [Quality] is set to [Fine].
– [Autofocus Mode] is set to [Single-shot AF].
– Shooting takes place once every 30 seconds.
– The flash strobes with every second shot.
– The power is turned off then on again once every 10 shots.
– Using a battery pack that is charged for an hour after the CHARGE lamp goes
out.
– Using Sony “Memory Stick PRO Duo” media (sold separately).
• The measurement method is based on the CIPA standard.
(CIPA: Camera & Imaging Products Association)
48
GB
Page 49

List of icons on the screen
Icons are displayed on the screen to indicate the camera status.
You can change the screen display using DISP (Display Contents) on the
control wheel.
Shooting standby
A
Display Indication
P A S M
Shoot Mode
Movie recording
Playback
24M 20M 12M
10M 6M 5.1M
RAW RAW+J
FINE STD
100 Number of
Scene Selection
Scene Recognition
Aspect ratio of
still images
Image size of still
images
Image quality of
still images
recordable still
images
Others
GB
49
Page 50

Display Indication
60i/50i
60i/50i
60p/50p
24p/25p
24p/25p
123Min Recordable time
100%
GB
Recording mode
of movies
Memory card/
Upload
of movies
Remaining battery
Flash charge in
progress
AF illuminator
Live view
Does not record
sound during
movie recording
SteadyShot/
SteadyShot
warning
Control dials L/R
Overheating
warning
Database file full/
Database file error
Dial/wheel lock
View mode
50
Display Indication
101-0012 Playback folder –
File number
Protect
Print order
B
Display Indication
Soft keys (MENU/
Shooting mode/
Delete/Enlarge)
C
Display Indication
±0.0
Flash Mode/Red
Eye Reduction
Drive Mode
Focus mode
Flash
compensation
Metering Mode
Focus area mode
Object Tracking
Face Detection
Soft Skin Effect
Page 51

Display Indication
AWB
7500K
A7 G7
White Balance
DRO/Auto HDR
Creative Style
Picture Effect
Smile detection
sensitivity
indicator
D
Display Indication
z
1/125 Shutter speed
F3.5 Aperture value
±0.0
Focus status
Metered manual
Display Indication
±0.0
ISO400 ISO sensitivity
REC 0:12 Recording time of
2011-1-1
9:30AM
12/12 Image number/
Exposure
compensation
AE lock
Shutter speed
indicator
Aperture indicator
the movie (m:s)
Recorded date/time
of the image
Number of images
in the view mode
Appears when HDR
did not work on the
image.
Appears when
Picture Effect did
not work on the
image.
Histogram
Others
GB
51
Page 52

Troubleshooting
If you experience trouble with the camera, try the following solutions.
Check the items in “Troubleshooting” in the
1
“α Handbook” (PDF) included on the CD-ROM (supplied).
Remove the battery pack, wait for about 1 minute,
2
re-insert the battery pack, then turn on the power.
Reset the settings (page 38).
3
Consult your Sony dealer or local authorized Sony service
4
facility.
52
GB
Page 53

Specifications
Camera
[System]
Camera type: Interchangeable lens
digital camera
Lens: E-mount lens
[Image sensor]
Image sensor: 23.5 × 15.6 mm (APS-C
format) CMOS image sensor
Total pixel number of image sensor:
Approx. 24 700 000 pixels
Effective pixel number of camera:
Approx. 24 300 000 pixels
[Anti-dust]
System: Charge protection coating on
Optical Filter and ultrasonic
vibration mechanism
[Auto focus system]
System: Contrast detection system
Sensitivity range: EV0 to EV20 (at ISO
100 equivalent, with F2.8 lens)
[Exposure control]
Metering method: 1 200-segment
metering by the image sensor
Metering range: EV0 to EV20 (at ISO
100 equivalent, with F2.8 lens)
ISO sensitivity (Recommended
exposure index): Auto, ISO 100 to
16000
Exposure compensation: ±5.0 EV (1/3
EV step)
[Shutter]
Type: Electronically-controlled,
vertical-traverse, focal-plane type
Speed range: 1/4000 second to 30
seconds, BULB (1/3 EV step)
Flash sync speed: 1/160 second
[Recording media]
“Memory Stick PRO Duo” media,
SD card
[Electronic viewfinder]
Type: Electronic viewfinder (Organic
Electro-Luminescence)
Screen size: 1.3 cm (0.5 type)
Total number of dots: 2 359 296 dots
Frame coverage: Approx. 100%
Magnification: 1.09 × with 50 mm lens
at infinity, –1 m
Eye point: Approx. 23 mm from the
eyepiece, 21 mm from the eyepiece
frame at –1 m
Dioptor adjustment: –4.0 m–1 to
+1.0 m
–1
(diopter)
–1
–1
(diopter)
[LCD monitor]
LCD panel: 7.5 cm (3.0 type) TFT
drive
Total number of dots: 921 600 (640 × 3
(RGB) × 480) dots
[Input/output terminals]
USB: miniB
HDMI: HDMI type C minijack
[Power]
Used battery pack: Rechargeable
battery pack NP-FW50
[Others]
Exif Print: Compatible
PRINT Image Matching III:
Compatible
Dimensions (CIPA compliant):
Approx. 119.9 mm × 66.9 mm ×
42.6 mm (4 3/4 inches × 2 3/4
inches × 1 11/16 inches) (W/H/D)
Others
GB
53
Page 54

Mass (CIPA compliant):
Approx. 350 g (12.3 oz)
(including battery and “Memory
Stick PRO Duo” media)
Approx. 291 g (10.3 oz)
(camera only)
Operating temperature: 0°C to 40°C
(32°F to 104°F)
File format:
Still image: JPEG (DCF Ver. 2.0,
Exif Ver. 2.3, MPF Baseline)
compliant, DPOF compatible
3D still images: MPO (MPF
Extended (Disparity Image))
compliant
Movie (AVCHD format):
AVCHD format Ver.2.0
compatible
Video: MPEG-4 AVC/H.264
Audio: Dolby Digital 2ch
Dolby Digital Stereo Creator
• Manufactured under license from
Dolby Laboratories.
Movie (MP4 format):
Video: MPEG-4 AVC/H.264
Audio: MPEG-4 AAC-LC 2ch
USB communication: Hi-Speed USB
(USB 2.0)
[Flash]
Flash guide number: GN 6 (in meters at
ISO 100)
Recycling time: Approx. 4 seconds
Flash coverage: Covering 18 mm lens
(focal length that the lens indicates)
Flash compensation: ±3.0 EV (1/3 EV
step)
Flash range (m):
ISO F2.8 F3.5 F5.6
100 1 - 2.1 1 - 1.7 1 - 1.1
200 1 - 3 1 - 2.4 1 - 1.5
400 1.4 - 4.3 1.1 - 3.4 1 - 2.1
GB
800 2 - 6.1 1.6 - 4.8 1 - 3
54
Flash range (feet):
ISO F2.8 F3.5 F5.6
100 3.3 - 6.9 3.3 - 5.6 3.3 - 3.6
200 3.3 - 9.8 3.3 - 7.9 3.3 - 4.9
400 4.6 - 14 3.6 - 11 3.3 - 6.9
800 6.6 - 20 5.2 - 16 3.3 - 9.8
Battery charger BC-VW1
Input rating: 100 V – 240 V AC,
50 Hz/60 Hz, 4.2 W
Output rating: 8.4 V DC, 0.28 A
Operating temperature range: 0°C to
40°C (32° to 104°F)
Storage temperature range: –20°C to
+60°C (–4°F to +140°F)
Maximum dimensions: Approx. 63 ×
95 × 32 mm (2 1/2 × 3 3/4 × 1 5/16
inches) (W/H/D)
Mass: Approx. 85 g (3 oz)
Rechargeable battery pack
NP-FW50
Used battery: Lithium-ion battery
Maximum voltage: DC 8.4 V
Nominal voltage: DC 7.2 V
Maximum charge voltage: DC 8.4 V
Maximum charge current: 1.02 A
Capacity: Typical 7.7 Wh (1 080 mAh)
Minimum 7.3 Wh (1 020 mAh)
Maximum dimensions:
Approx. 31.8 × 18.5 × 45 mm
(1 5/16 × 3/4 × 1 13/16 inches)
(W/H/D)
Mass: Approx. 57 g (2.1 oz)
Lens (NEX-7K only)
E18 – 55 mm zoom lens
Equivalent 35 mm-format focal
1)
length
Lens groups-elements: 9-11
Angle of view
Minimum focus
Maximum magnification: 0.3×
Minimum f-stop: f/22 - f/32
: 27 - 82.5 mm
1)
: 76° - 29°
2)
: 0.25 m (0.82 ft)
Page 55

Filter diameter: 49 mm
Dimensions (max. diameter × height):
Approx. 62.0 × 60.0 mm
(2 1/2 × 2 3/8 inches)
Mass: Approx. 194 g (6.8 oz)
Compensation effect
1)
The values for equivalent 35 mmformat focal length and angle of
view are based on digital cameras
equipped with an APS-C sized
image sensor.
2)
Minimum focus is the shortest
distance from the image sensor to
the subject.
3)
Shutter speed (differs with shooting
conditions)
3)
: Approx. 4 steps
Design and specifications are subject
to change without notice.
On focal length
The picture angle of this camera is
narrower than that of a 35 mm-format
film camera. You can find the
approximate equivalent of the focal
length of a 35 mm-format film camera,
and shoot with the same picture angle,
by increasing the focal length of your
lens by half.
For example, by using a 50 mm lens,
you can get the approximate equivalent
of a 75 mm lens of a 35 mm-format
film camera.
On image data
compatibility
• This camera conforms with DCF
(Design rule for Camera File system)
universal standard established by
JEITA (Japan Electronics and
Information Technology Industries
Association).
• Playback of images recorded with
your camera on other equipment and
playback of images recorded or
edited with other equipment on your
camera are not guaranteed.
Others
GB
55
Page 56

Index
Numerics
3D Sweep Panorama.................... 39
A
AE lock .................................. 28, 35
AEL.............................................. 35
AF Illuminator ............................. 35
AF Micro Adj. ............................. 37
AF/MF control....................... 27, 35
AF/MF Select............................... 31
Anti Motion Blur ......................... 40
Aperture Priority.................... 13, 30
Area Setting ................................. 37
Aspect Ratio................................. 32
Auto Review ................................ 35
Autofocus Area...................... 13, 31
Autofocus Mode .......................... 31
B
Beep ............................................. 37
C
Cleaning Mode............................. 38
Color Space.................................. 36
Control wheel......................... 6, 7, 8
Creative Style......................... 17, 33
CTRL FOR HDMI....................... 37
Custom key assignment ............... 22
Custom Key Settings ................... 22
Custom Settings........................... 20
D
Date/Time Setup.......................... 37
Delete....................................... 7, 34
Demo Mode ................................. 38
Dial/Wheel Lock.......................... 35
DISP Button(Monitor) ................. 31
Display Card Space...................... 38
Display Color............................... 37
GB
D-Range Settings......................... 16
56
Drive Mode ................................. 31
DRO/Auto HDR.......................... 33
E
Enlarge Image ......................... 7, 34
Exposure compensation ........ 13, 33
Eye-Fi Setup................................ 38
Eye-Start AF................................ 36
F
Face Detection............................. 31
Face Registration......................... 31
File Format.................................. 32
File Number ................................ 38
Finder Display(DISP).................. 31
FINDER/LCD Setting................. 35
Flash ........................................ 6, 44
Flash Comp. ................................ 33
Flash Mode.................................. 31
Focus Settings (AF mode)........... 13
Focus Settings (MF mode).......... 14
Folder Name................................ 38
Format ......................................... 38
Front Curtain Shutter................... 36
Function Settings......................... 37
G
Grid Line ..................................... 35
H
Handbook .................................... 42
Hand-held Twilight..................... 41
HDMI Resolution........................ 37
Help Guide Display..................... 37
High ISO NR............................... 36
I
Icons ............................................ 49
Image index................................... 7
Image Size................................... 32
Page 57

Intelligent Auto............................ 30
ISO............................................... 33
Program Auto........................ 13, 30
Protect ......................................... 34
L
Language...................................... 37
LCD Brightness ........................... 37
LCD Display (DISP).................... 31
Lens Comp.: Chro. Aber.............. 36
Lens Comp.: Distortion ............... 36
Lens Comp.: Shading................... 36
Live View Display....................... 35
Long Exposure NR ...................... 36
M
Manual Exposure ................... 13, 30
Manual movie recording.............. 41
Menu ............................................ 30
Menu start .................................... 37
Metering Mode ............................ 33
MF Assist............................... 27, 36
MF Assist Time ........................... 36
Movie....................................... 6, 41
Movie Audio Rec......................... 36
N
New Folder .................................. 38
Number of recordable images...... 46
O
Object Tracking ........................... 31
P
Panorama ..................................... 39
Panorama Direction..................... 32
Peaking Color ........................ 27, 36
Peaking Level ........................ 27, 36
Picture Effect ......................... 19, 33
Playback......................................... 7
Playback Display......................... 37
Playback zoom............................... 7
Power ............................................. 5
Power Save .................................. 37
Prec. Dig. Zoom........................... 31
Q
Quality......................................... 32
R
Record Setting............................. 32
Recording...................................... 5
Recover Image DB...................... 38
Red Eye Reduction...................... 35
Release w/o Lens......................... 36
Reset Default............................... 38
Rotate .......................................... 34
S
Scene Selection ........................... 30
Screen display ..................... 6, 7, 49
Select Shoot. Folder .................... 38
Setup............................................ 35
Shutter Priority ...................... 13, 30
Slide Show .................................. 34
Smile Shutter............................... 31
Soft key ......................................... 8
Soft Skin Effect........................... 31
Specifications.............................. 53
Specify Printing........................... 34
SteadyShot................................... 36
Sweep Panorama......................... 39
T
Triple-dial-control....................... 10
U
Upload Settings........................... 38
USB Connection.......................... 38
V
Version........................................ 38
View Mode.................................. 34
Viewfinder Bright. ...................... 37
Volume Settings.......................... 34
Others
GB
57
Page 58

W
White Balance........................ 14, 33
Wide Image.................................. 37
Wind Noise Reduct...................... 36
Z
Zoom.............................................. 5
58
GB
Page 59

GB
59
Others
Page 60

60
GB
Page 61

GB
61
Others
Page 62

62
GB
Page 63

GB
63
Others
Page 64

Additional information on this product and
answers to frequently asked questions can be
found at our Customer Support Website.
Printed using VOC (Volatile Organic
Compound)-free vegetable oil based ink.
NEX-7
©2011 Sony Corporation Printed in Thailand
4-408-688-11(1)
 Loading...