

Page 1
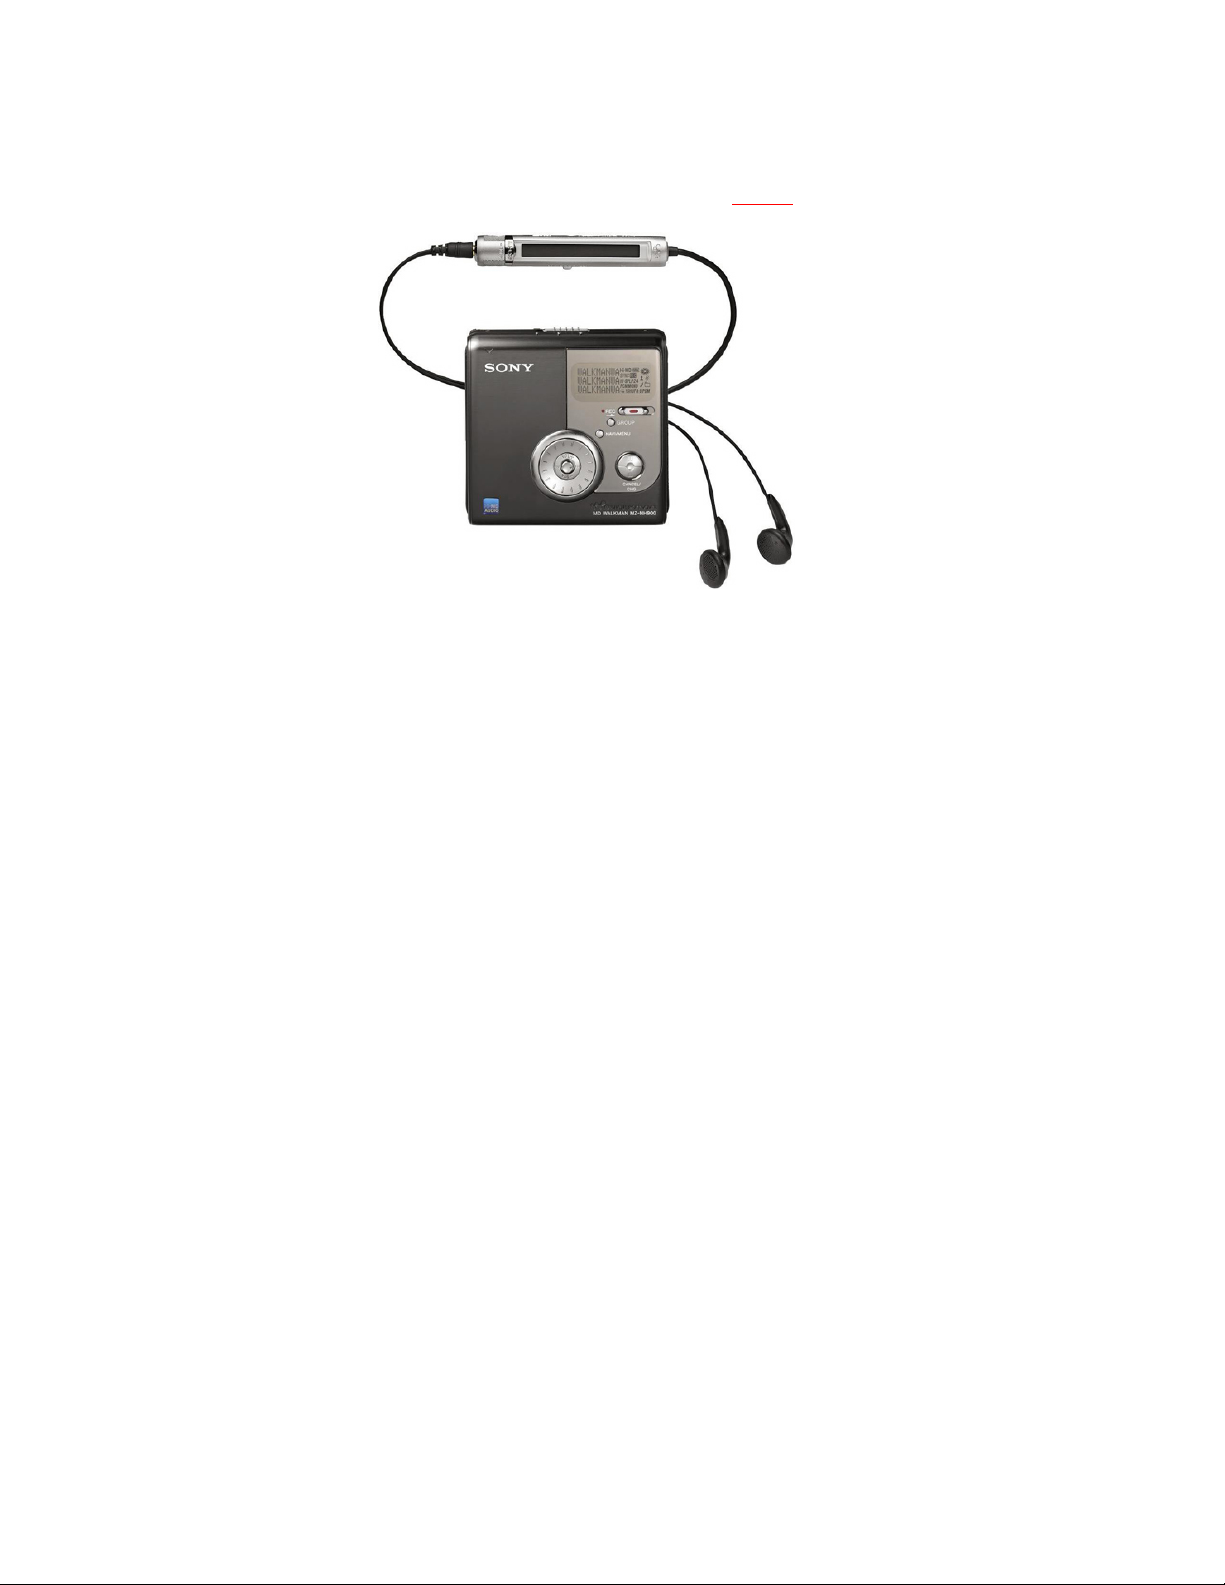
Recording with the Sony MZ-NH-900
Set-Up Steps for MD Mode Only
The HiMD recorders can record in two formats: the higher quality HiMD
format or the Standard MD SP format. They can also record on both the
old, “MD” discs and the new HiMD discs. The separate set-up steps for
the Hi-MD mode follow these below.
These steps are for MD Disc mode, NOT Hi-MD !!
Files created in the MD format cannot be transferred digitally via
SoundStage and a USB cable on a PC. MD format recordings have to be
transferred in real time on the Transfer platform in B-18 or via a analog
cable. Format Your Discs should be formatted in HiMD mode unless you
have a special reason to use MD mode.
Recording Kit: Sony MZ-NH900 recorder; 110 A.C. power Supply;
Charging cradle; USB cable; AA battery holder (detachable); Sony MDRV600 Headphones or similar. 1- Rode NT4 stereo mic or 1- stereo pair
of Sound Professional Binaural mics.
With a Sound Devices Preamp Some Sony MZ-NH900 recorders will
become available alone and some will be in backpack kits using the
MP-2 or Mix Pre mic preamps and condenser mics-- probably the Rode
NT1A’s and the CAD 179’s. The later kits can only be checked-out to
students who have taken Field Audio 420 or are enrolled in 460 and
receive a demo.
Set-Up Steps for the Sony MZ-NH900 MD Recorder
It is very important to go through theses steps every time before you
start recording and, preferably, before you even set off to record. Take
some time to practice placing the recorder into manual record gain
mode because you’ll need to be able to do this quickly and confidently
in the field. If you fail to do some of the below steps, your recording
can suffer in terms of quality and in some cases, it won’t be able to be
imported into a computer without a lot of extra work or maybe, not at
all.
Page 2
Page 3
Perform these steps with No Disc in the Recorder:
3.
+
3.
Page 4

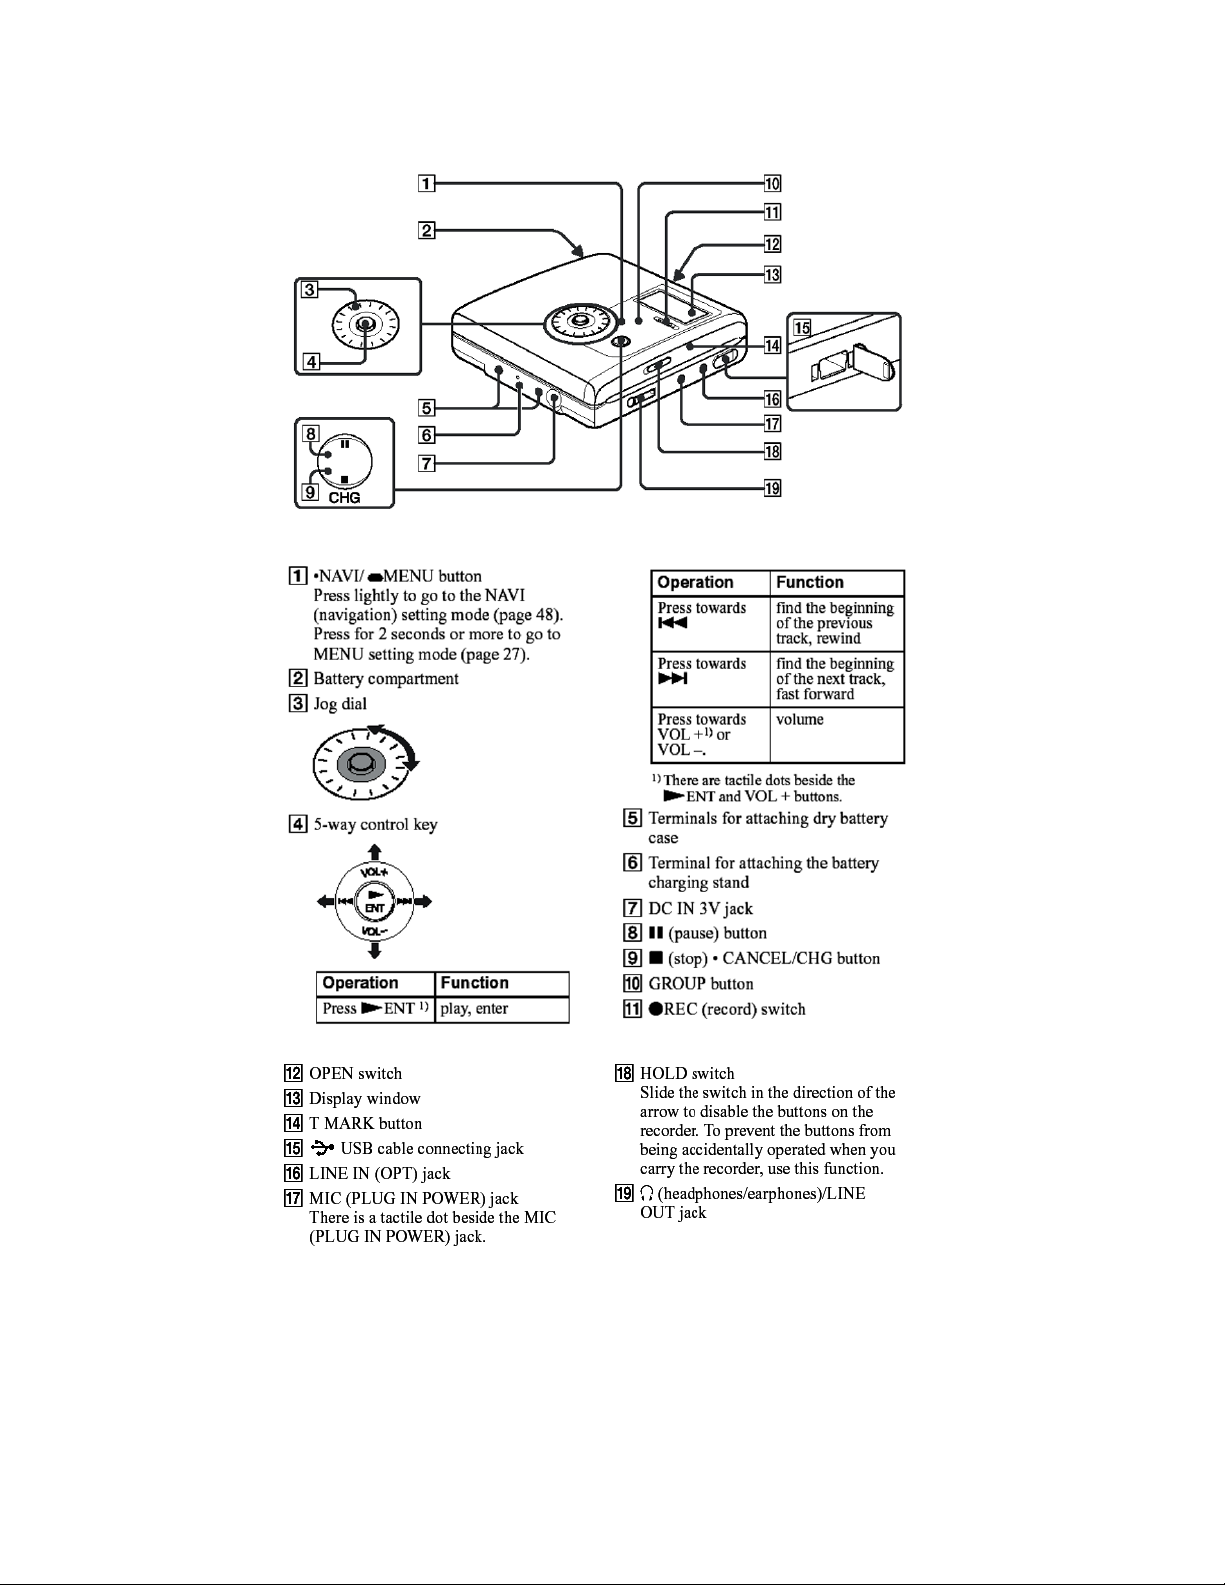
4. Set to Advanced Menu Mode Press and hold the Navi/Menu button
for 2 seconds until the menu window activates. Rotate the circular jog
wheel until the word, "Option," is blinking. Press down on the small
ENTER button (the button in the middle of the Jog wheel) to select
“Option.” Rotate the jog wheel until the word "Advanced" is blinking
and select it by pressing ENTER. You cannot access manual record
gain unless it is in this mode.
“EOR” (EDIT; OPTION; RECORD SET)
5. Format Disc in MD format (this erases everything that is already
recorded on the disk) Press and hold the Navi/Menu button for 2
seconds until the menu window activates. Rotate jog wheel to EDIT,
select it by pressing the ENTER button in the center of the Jog
Wheel. Under Edit-> select Format-> and blinking “Yes.” If there is
no “Format” option provided, select “Erase All.” "Disc Mode" is
blinking. Select “Disc Mode” by pressing ENTER. Jog until the word,
“MD” is blinking. Select it with ENTER.
6. Set Disc Mode in MD format Press and hold the Navi/Menu button for
2 seconds until the menu window activates. Rotate jog wheel to
Option, select it by pressing the ENTER button in the center of the
Jog Wheel. Under Option-> select Disc Mode-> and blinking “MD.”
7. Set Record Mode to SP Press and hold the Navi/Menu button for 2
seconds until the menu window activates. Rotate Jog Wheel until
"REC Set" is blinking and press Enter. Select “Rec Mode” and then
“SP.”
8. Look at the Menu window. The Record Mode should show “MD” and
“SP. If the window shows HiMD or LP2, re-do the above steps 5 and
7.
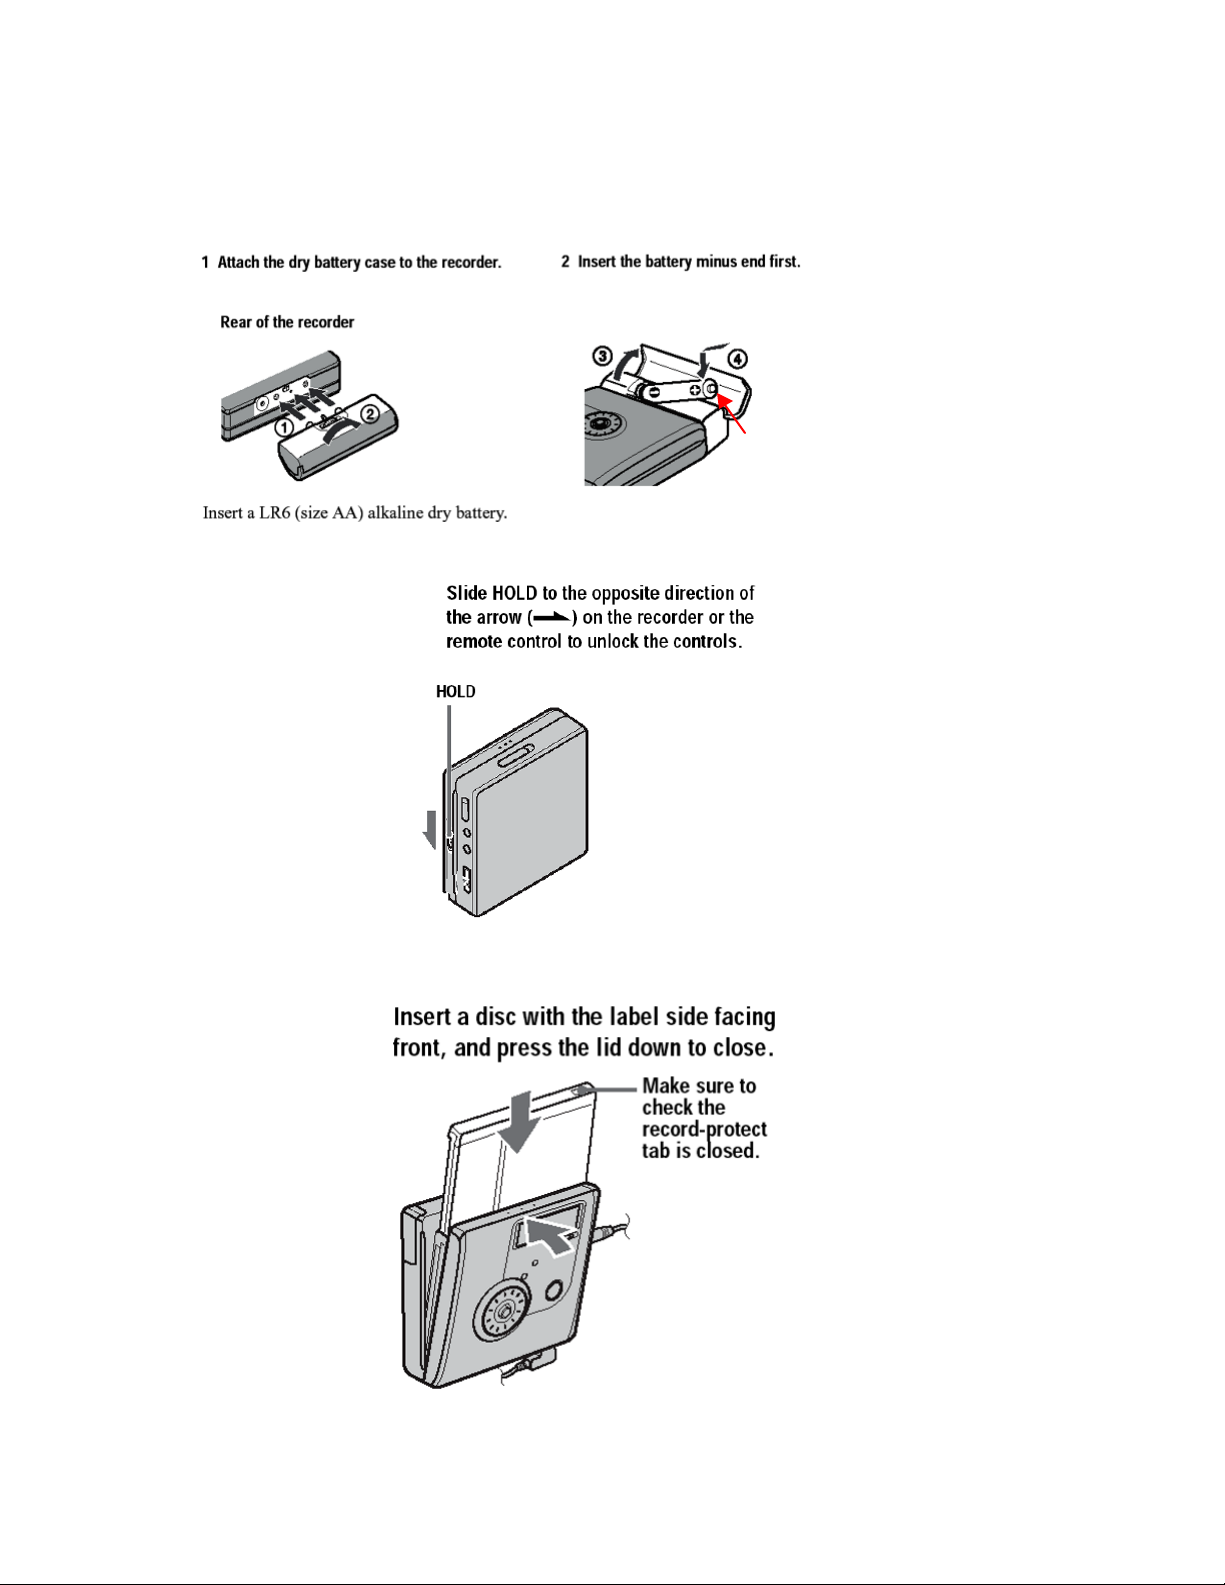
9. Install a fresh, alkaline, 9 volt battery into the Rode NT-4 mic by unscrewing the lower section of the body and sliding the battery into the
cavity (terminals first). Check for correct polarity (+ to + and – to –).
Secure the battery in place with the flexible spring clip and screw the
sections back together.
Page 5

10. Slip the mic back into the shock mount and attach the fake fur
jacket. The Rode NT-4 mic is very sensitive to hand-holding and the
slightest amount of wind. Unless you are mounting it on a mic stand
indoors, the results are likely to be disappointing without a shock
mount/zepplin.
11. Its best to turn ON the mic before plugging it in to the Recorder. The
switch is on the Mic body ON. When the NT4 is switched ON, the red
battery status light should illuminate for about 1 second and turn off. If
the L.E.D. remains illuminated significantly longer, the battery should be
replaced. Life expectancy for a high quality alkaline battery is in excess
of 400 hours. If left ON, the battery power will be unnecessarily
depleted.
12. Attach the XLR-> 1/8” stereo mini-plug cable to the end of the
NT4 mic. Plug the mini-plug connector into the RED mic in jack on
the Sony Recorder and the headphones into the black headphone
jack.
13. Set/Check Mic Sensitivity (Low or HI) Press and hold the
Navi/Menu button for 2 seconds until the menu window activates. Use
Jog Wheel to navigate to "Rec Set" and then "Mic Sens." Select
"High" if you are recording ambience or "Low" if you are recording
close voice or loud sound effects.
14. Set in Manual Record Level Mode Unfortunately, one cannot go
directly into Manual Record Mode; you must go into Auto Gain mode,
MIC IN
Headphone OUT
Page 6
place it in pause and then use the menu to change to Manual
Record level. Push the RED REC button down and slide the button to
the right to put the recorder in instant record mode (auto gain).
Press on the PAUSE BUTTON. Press and hold the Navi/Menu button
for 2 seconds until the menu window activates. Rotate jog wheel until
"REC Set" is blinking. Select “REC Volume,” and then “Manual.” You
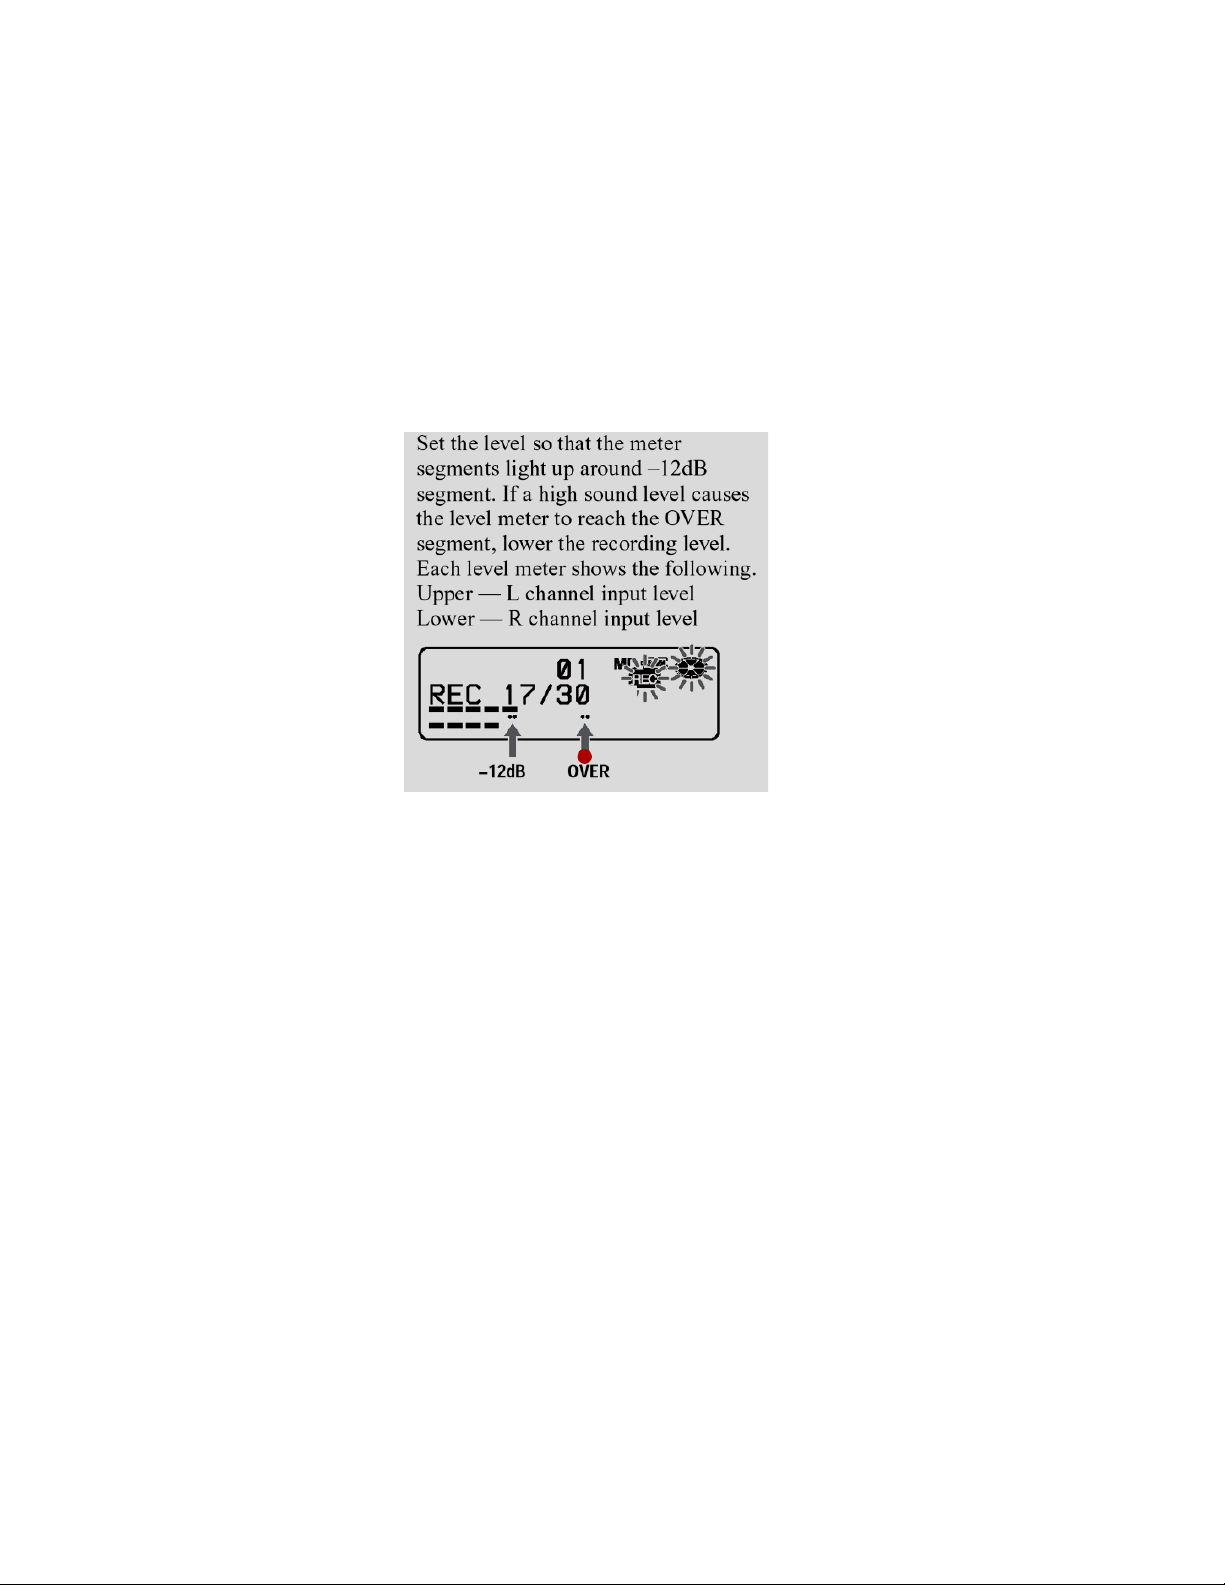
can now adjust Record Level manually with the Jog Wheel. Set the
record level gain so the normal volume "peaks" cause about 1/2 of
the segments to come on (turn black). Notice that the overmodulation segment occurs right under the “0” of “30.”
You can change the record level as the deck while recording if
necessary.
15. To start recording, press again on the Pause button. When you are
ready to stop recording, press on the PAUSE button again. Try to
not stop the recorder with the STOP button unless you are taking a
break because this will take the deck out of Manual Record Level
mode. Note that the recorder jumps to unused disc space when a
new recording is started. Recordings are organized into “groups.” A
‘Group” includes all the tracks made with the pause button. Pressing
STOP will cause a new “group” to be created the next time the a
recording is made on the disc.
16. To raise the headphone volume, press on the top edge of the
ENTER button and on the lower edge to lower the headphone
volume. This may take some practice.
17. You can create a marker for a new track as the Recorder is running
by pressing the "T mark" button above the mic input jack. This will
create a new track at this point making it much easier to locate later.
18. Allow the Record to Save the Files. After pressing STOP, the
recorder needs to write the file to the disk in order to save it. DO
NOT remove the disk or turn off the power to the unit by removing
the battery or power cord during this phase or you will lose the
recordings on the disc.
Page 7

19. Playing Recordings. Insert the disc, press the left or right edge of
the ENTER button to shuffle through your tracks.
20. Prevent accidental erasure of recorded discs by sliding the white tab
on the rear edge of the disc until the slot is open.
21. Disc Capacities: A standard MD disk has a capacity of 74-80
minutes recorded in SP mode. (Don't record in the LP mode, the
quality is compromised!)
Page 8

Sony MZ-NH-900
Hi-MD and MD format Recorder
Set-Up Steps for HiMD Record Mode Only
The HiMD recorders can record in two formats: the HiMD format which
can create a 16bit PCM file on HiMD disks and the older MD SP format
which uses compression.
Most users will want to record on HiMD formatted disks because, in
addition to better quality, one can transfer the files digitally to a PC
using a USB transfer cable and Sony’s Soundstage/Wave Converter
software v3.2.
You can obtain higher resolution files and digital transfer capability
using the older MD discs but the discs must be formatted to HiMD
before recorded upon.
You also cannot make USB digital transfers of a recordings made onto
an older MD disc unless the disk is reformatted into the HiMD format.
There is a PC computer in B-56 or B-18 for making the digital transfers
from the Sony NH-900 itself. You must use a Mac compatible HiMD
recorder and disks recorded on this Mac compatible recorders (models
MZ-M100 or MZ-M10) to be able to transfer HiMD recordings directly to a
Mac. HiMD disks recorded on a PC compatible HiMD recorder like the
NH-900 must be transferred on a PC platform.
Set-Up Steps for the Sony MZ-NH900 MD Recorder
It is very important to go through these steps before you start recording
and, preferably, before you set off to your location. Take some time to
practice placing the recorder into manual record gain mode because
you’ll need to be able to do this quickly and confidently in the field. If
you fail to do some of the below steps, your recording can suffer in
terms of quality and in some cases, it may not be able to be digitally
imported into a computer.
Page 9

Page 10

Perform these steps with No Disc in the Recorder:
4. Set to Advanced Menu Mode, Press and hold the Navi/Menu button
for 2 seconds until the menu window activates. Rotate the circular jog
wheel until the word, "Option," is blinking. Press down on the small
ENTER button (the button in the middle of the Jog wheel) to select
“Option.” Rotate the jog wheel until the word "Advanced" is blinking
and select it by pressing ENTER. You cannot access manual record
gain unless it is in this mode.
5. Insert disk you wish to record on into the recorder with the metal
slide on top and to the right.
+
3.
Page 11

The “EOR” Steps
EDIT, OPTION and RECORD SET
6. Depending on the type and state of your disk, follow one of these
steps:
a) If you are recording onto new or blank 1GB HiMD disk, go to step
8.
b) If you are recording on a 1GB HiMD disk that you wish to remove
all previous tracks from before you begin, press and hold the
Navi/Menu button for 2 seconds until the menu window activates.
Rotate jog wheel to EDIT, select it by pressing the ENTER button
in the center of the Jog Wheel. Under Edit-> Erase-> All Erase>Yes. After the while it will indicate "No Tracks." Skip to step 8.
c) If you are recording onto a blank, older MD disk, press and hold
the Navi/Menu button for 2 seconds until the menu window
activates. Rotate jog wheel to EDIT, select it by pressing the
ENTER button in the center of the Jog Wheel. Under Edit->
Format-> Yes. After the while it will indicate "No Tracks."
7. Set Disc Mode in HiMD format Press and hold the Navi/Menu button
for 2 seconds until the menu window activates. Rotate jog wheel to
Option, select it by pressing the ENTER button in the center of the
Jog Wheel. Under Option-> select Disc Mode-> and blinking “HiMD.”
Page 12

8. There are two suggested recording modes PCM and HiSP, PCM is the
highest quality mode. A 1GB disk will hold 92 minutes at the PCM
quality and 8 hours at the HiSP quality. An older, smaller MD disk will
hold 38 minutes of PCM quality and 74 minutes of HiSP quality.
a) To Set Record Mode to PCM. Press and hold the Navi/Menu button
for 2 seconds until the menu window activates. Rotate Jog Wheel
until "REC Set" is blinking and press Enter. Select “Rec Mode” and
then “PCM.”
b) To Set Record Mode to HiSP. Press and hold the Navi/Menu button
for 2 seconds until the menu window activates. Rotate Jog Wheel
until "REC Set" is blinking and press Enter. Select “Rec Mode” and
then “HiSP” Do not use the HiLP mode unless you purposely
want poorer quality.
8. Look at the Menu window. The Record Mode should show “Hi-MD”
and either “PCM” or HiSP. If the window shows “MD” or SP, re-do the
above steps, 6-8.
10. Install a fresh, alkaline, 9 volt battery into the Rode NT-4 mic by unscrewing the lower section of the body and sliding the battery into the
cavity (terminals first). Check for correct polarity (+ to + and – to –).
Secure the battery in place with the flexible spring clip and screw the
sections back together.
11. Slip the mic back into the shock mount and attach the fake fur
jacket. The Rode NT-4 mic is very sensitive to hand-holding and the
slightest amount of wind. Unless you are mounting it on a mic stand
indoors, the results are likely to be disappointing without a shock
mount/zepplin. If your mic doesn’t not have a shockmount/zepplin,
consider making one yourself. Here are some pictures of the shockmounts with car wqash mitt zeppelins we made in October 2005 for
the 420 Field Audio Class:
http://www.uwm.edu/~type/Mic
Preamps/DIY_NT4_3inchPVC_ShockZep/DIY_NT4_3inchPVC_ShockZep.html
PCM
Hi-MD
Page 13

12. Its best to turn ON the mic before plugging it in to the Recorder. The
switch is on the Mic body ON. When the NT4 is switched ON, the red
battery status light should illuminate for about 1 second and turn off. If
the L.E.D. remains illuminated significantly longer, the battery should be
replaced. Life expectancy for a high quality alkaline battery is in excess
of 400 hours. If left ON, the battery power will be unnecessarily
depleted.
13. Attach the XLR end of the XLR5-> 1/8” stereo mini-plug cable into
the tail of the NT4 mic. Plug the mini-plug connector into the RED
mic in jack on the Sony Recorder and the headphones into the
black headphone jack.
14. Set/Check Mic Sensitivity (Low or HI) Press and hold the
Navi/Menu button for 2 seconds until the menu window activates. Use
Jog Wheel to navigate to "Rec Set" and then "Mic Sens." Select
"High" if you are recording ambience or "Low" if you are recording
close voice or loud sound effects.
15. Set in Manual Record Level Mode Unfortunately, one cannot go
directly into Manual Record Mode; you must go into Auto Gain mode,
place it in pause and then use the menu to change to Manual
Record level. Push the RED REC button down and slide the button to
the right to put the recorder in instant record mode (auto gain).
Press on the PAUSE BUTTON. Press and hold the Navi/Menu button
for 2 seconds until the menu window activates. Rotate jog wheel until
"REC Set" is blinking. Select “REC Volume,” and then “Manual.” You
can now adjust Record Level manually with the Jog Wheel. Set the
record level gain so the normal volume "peaks" cause about 1/2 of
the segments to come on (turn black). Notice that the overmodulation segment occurs right under the “0” of “30.”
MIC IN
Headphone OUT
Page 14

You can change the record level as the deck while recording if
necessary.
16. To start recording, press again on the Pause button. When you are
ready to stop recording, press on the PAUSE button again. Try to not
stop the recorder with the STOP button unless you are taking a
break because this will take the deck out of Manual Record Level
mode. Note that the recorder jumps to unused disc space when a
new recording is started. Recordings are organized into “groups.” A
‘Group” includes all the tracks made with the pause button. Pressing
STOP will cause a new “group” to be created the next time the a
recording is made on the disc.
17. To raise the headphone volume, lift up on the top edge of the
ENTER button or on the lower edge to lower the headphone volume.
18. You can create a marker for a new track as the Recorder is running
by pressing the "T mark" button above the mic input jack. This will
create a new track at this point making it much easier to locate later.
19. Allow the Recorder to Save the Files. After pressing STOP, the
recorder needs to write the file to the disk in order to save it. DO
NOT remove the disk or turn off the power to the unit by removing
the battery or power cord during this phase or you will lose the
recordings on the disc.
20. Playing Recordings. Insert the disc, press the left or right edge of
the ENTER button to shuffle through your tracks.
21. Prevent accidental erasure of recorded discs by sliding the white tab
on the rear edge of the disc until the slot is open.
Page 15

USB Cable Transfer of MZ-NH-900 Sound files
using Sonic Stage 3.2
The below steps are for PC compatible only not for the Mac Compatible HiMD recorders
There should be PC computers in MIT B-18 and B-56 with the necessary software
installed.
1. Your material must have been made with a PC compatible HiMD recorder
like the NH-900 on a HiMD-formatted disk.
2. Start or restart the PC. Log on to the PC as "student" under the PSOA
MITB…" option. Leave the password window blank..
3. Connect your Sony HiMD recorder to the AC power supply that’s with the
platform or in your recorder kit. Do not perform the below steps running
on battery power! Connect your Sony Hi-MD recorder to the PC using the
USB cable that with the platform or in your Recorder Kit. The USB port is
next to the mouse port on the rear of the PC.
4. Open the folder on the desktop named, "Converted Wav Files here." If
there are any files in this folder, drag them to the Recycle bin and empty
the bin.
5. Launch the SonicStage v3.2 software using the Icon on the desktop.
6. Click on the “TRANSFER” button towards the top right of the SS window.
Slide in the HiMD formatted disk you wish to transfer sound files from.
After the disk mounts, your recordings should show as one or more
‘Untitled” folders on the right side (the HiMD disc side). Click on the
folders and open them. If you scroll the Transfer window view to the right,
you can see the duration of each track in minutes and the mode (PCM or
HiSP) it was recorded in.
7. To help ID the files, you can rename them in SS before you transfer
them. To listen to a sound file, click on it once and press the > play
button. (A pair of headphones need to be plugged into the jack in the
rear of the PC in order to hear it). Stop playing the file. To rename it,
click on a sound file's name in the HiMD disk list, press F2, and type the
new name in the title bar. EG: “20050203MT_UrbanNitePres” Do not
exceed 23 characters or it will have to ne renamed before importing it
into Logic.
8. If there are more than a few ".oma" transfer files in the "My Library" side
of the SS window., select them, click on the "X"-looking icon at the
bottom of the window on the PC side. Select the "remove and delete
option" and click OK. The sound files should disappear from the left
window. In the top right hand of the My Library window there's a free
space meter. You need at least 2GB to transfer a 1GB disk recorded in
PCM mode and 5GB to transfer a disk recorded in the HiSP mode.
9. Hold on the Control Key and select the files you wish to transfer from your
HiMD disc in the right panel. You can also use "select all" or cick on the
Page 16

folder if you want every file in that folder. When you are sure you have
selected all of the one's you want, click the Red Transfer button (left
facing arrow). The transfer process takes about 40-50 minutes for the
transfer and wav conversion of a full 1GB disk.
10. Be very careful to not disconnect the HiMD recorder or its power or the
PC’s power during this transfer process.
11. Sonicstage v3.2 will first create ".oma" files and then convert them into
.wav files automatically. You can play the oma files on the My Library
side to hear that they transferred okay. Note that "Wav" files are
compatible with Mac and Logic, not ".oma"'s.
12. Look at the list of new tracks in My Library. Are any longer than 190
minutes each? (These can only be created by recording takes longer
than 3 hours in HiSP mode) if so, go to the next steps.
13. Dividing a recording that is longer than 190 minutes. You'll need to
"divide" any ".oma" (or "My Library" side) file into two smaller parts so
none of the parts is longer than 190 minutes. Using the "divide"
command in SonicStage doesn't destroy any material, it splits the file
into two parts. (If you don't reduce length, the .wav file will be longer
than 2GB and will show as "damaged" when trying to import it into Logic.
If you don't notice this before, you can re-transfer the files and perform
the below steps).
a) Look in the folder named, "Converted Wav Files Here." Your
converted wav files should be in here. If any of the files in this
folder are larger than 2GB (or >2,000,000 KB). Make a note of its
exact name and length in minutes and drag it to the Recycling Bin.
You'll probably need to empty the bin.
b) Look in the My Library side of SonicStage and find the (large) file
with the same name as the one larger than 2GB. Ifs its larger than
360 minutes, it will have to be divided into three parts.
c) To divide a file in half, make sure its not playing and select it. Under
Edit select, Divide." This will open up a work window. Slide the upper
slider about midway and select "Start Divide." Next it will show you
the length of the first segment created by the divide. If its less than
2GB, click on OK. A new segment will be created in the Library. If
the second segment is still longer then 190 minutes, divide the 2nd
segment with the previous steps.
14. Converting the New, >2GB Segments into .wav files. Select all of the
segments that need new .wav files made. Under Tools, select "Save in
.Wav Format." Click create and navigation window will open . In this
window create a new folder inside of the "My Music" folder and label it
something like, "New Sm Wavs-- can toss." SonicStage will make these
new smaller omas into wav files in this folder.
15. Next, save all of your .wav files to disk.
Page 17

Making PC and Mac Compatible Data Disks with Nero
These steps assume you have already created .wav files on a PC that
are ready to be saved to disk. If any of your sound files is larger than
700mb, use a DVD-R blank. DVD-R will hold a little over 4.3 GB.
1. Launch Nero by double-clicking on its icon on the desktop.
2. Steps for making a data CD-R’s (max 700mb capacity)
a) In the New Compilation Window that opens, select CD in upper left
hand corner.
b) In the vertical window on the left, select CD-ROM [ISO] (the top
one in the list).
c) In the middle window, click on the ISO tab at the top. In the
settings window, check these: Data mode: Mode 1; File System:
iso9660 only; File Name Length: Max of 11 =8+3 chars (level 1);
Character Set: ISO9660 [standard ISO CD-Rom); Turn off all
relaxed restrictions.
d) Click on “New” in upper Right Corner.
e) Click on the title bar next to the disk icon in the window that opens
and type in a name that is not in excess of 11 characters in
length, e.g. “CD001_Jones”
f) To add .wav files from SonicStage to this CD-R disk, open the
folder on the desktop, “Converted .WAV files here.” And drag all
of the files that you wish to copy from this folder into the far left
panel of the Nero window. They will appear in the middle pane.
g) Click on the disk icon with the Red Flame to initiate the last step.
h) Click on the ISO tab to make sure your settings haven’t changed.
Click “Burn.”
3. Steps for making data DVD-R’s (max 4.3GB capacity)
a) In the New Compilation Window that Opens, select DVD in upper
left hand corner.
b) In the vertical window on the left, scroll and select DVD-ROM
(UDF)
c) In the middle window, UDF partition type: Physical partition; File
System Version: UDF 1.02. Force DVD: leave box unchecked..
d) Click on “New” in upper Right Corner.
e) Click on the title bar next to the disk icon in the window that opens
and type in a name that is not in excess of 11 characters in
length, e.g. “DVD001_Jones”
f) To add .wav files from SonicStage to this DVD-R disk, open the
folder on the desktop, “Converted .WAV files here.” And drag all
of the files that you wish to copy from this folder into the far left
panel of the Nero window. They will appear in the middle pane.
g) Click on the disk icon with the Red Flame to initiate the last step.
h) Click on the UDF tab to make sure your settings haven’t changed.
Click “Burn.” Insert a blank DVD-R disc when prompted.
Page 18

i) At the prompt regarding burning option, select “Burn without
multi-session.”
j) While it is burning, click in the box for “verify written data.”
Importing/Splitting the files into Logic
4. On the Mac desktop, drag the folder named, "DragToYour HardDrive" to
make a copy of it onto a partition of your FireWire Hard drive.
5. Open the folder inside named, "Field Recordings" (on the copy you just
made to your FW drive)
6. Insert your CD/DVD with your .wav sound files into the Mac disk tray (the
open CD/DVD tray button is the UP arrow in the top right hand corner of
the KEYBOARD)
7. Double click on the CD or DVD icon after it mounts on the desktop. Select
all (Apple-A) of the .wav files on the disc and click-drag (copy) them into
the "Field Recordings" folder. The copy process will take a while to
complete.
8. After the copying is complete, eject the CD/DVD by pressing the open tray
button (up arrow) in the top right hand corner of the KEYBOARD)
9. Name the Logic Session doc in the folder on your drive something like,
"Voice Edit 01" and launch Logic by double clicking on this doc.
10. Open the "Field Recording" folder again and again select all of the files.
Drag them into Logic's "Audio" window (lower left corner of the screen
usually). When the prompt requests permission to convert the files, allow
it. This step creates split" files with the ”.L” and “.R “endings. (If the
name of a file is too short, shorten it in the finder before dragging it into
the Logic Audio window.)
11. Save your Logic project after all of the audio files are imported.
12. Make a CD or DVD copy of all audio files you have to rename either for
ID or to shorten their title length. Hang onto your transfers CD’s/DVD’s
because you may need them to restore your edit should a file become
corrupt.
You are now ready to start editing that material as “split” audio files in Logic.
The “Mid” channel of M-S recordings should be the “.L” channel.
“05420FieldRecordingHndBk” HiMD updates for SS3.2 10/05
 Loading...