

SONY MZ-N520 User Manual
3-265-345-11(1)
_
_
Portable
MiniDisc Recorder
Operating Instructions
Recorder Operation ____________________________
Software Operation _____________________________
page 10
page 68
“WALKMAN” is a registered trademark of Sony Corporation to
represent Headphone Stereo products. is a
trademark of Sony Corporation.
MZ-N520
© 2004 Sony Corporation

WARNING
To prevent fire or shock hazard, do
not expose the unit to rain or
moisture.
Do not install the appliance in a
confined space, such as a bookcase or
built-in cabinet.
To prevent fire, do not cover the
ventilation of the apparatus with news
papers, table clot hs, curtains, etc. And
don’t place lighted candles on the
apparatus.
To prevent fire or shock hazard, do not
place objects filled with liquids, such as
vases, on the apparatus.
Certain countries may regulate disposal of
the battery used to power t his product.
Please consult with your local authority.
Caution
The use of optical instruments with this
product will incre as e eye hazard.
Information
IN NO EVENT SHALL SELLER BE
LIABLE FOR ANY DIRECT,
INCIDENTAL OR
CONSEQUENTIAL DAMAGES OF
ANY NATURE, OR LOSSES OR
EXPENSES RESULTING FROM
ANY DEFECTIVE PRODUCT OR
THE USE OF ANY PRODUCT.
The validity of the CE marking is
restricted to only th ose countries where i t
is legally enforced, mainly in the
countries EEA (European Economic
Area).
CAUTION
RADIATION WHEN OPEN
AVOID EXPOSURE TO BEAM
CAUTION
LASER RADIA TION WHEN OPEN
DO NOT VIEW DIRECTLY WITH
OPTICAL INSTRUMENTS
— INVISIBLE LASER
— CLASS 1M INVISIBLE
2

Notice for users
On the supplied software
• Copyright laws prohibit reproducing the
software or the manual accompanying it
in whole or in part, or renting the
software without the permission of the
copyright holder.
• In no event will SONY be liable for any
financial damage, or loss of profits,
including claims made by third parties,
arising out of the use of the software
supplied with this recorder.
• In the event a problem occurs with this
software as a result of defective
manufacturing, SONY will replace it.
However, SONY bears no other
responsibility.
• The software provided with this
recorder cannot be used with equipment
other than that which is so designated.
• Please note that, due to continued efforts
to improve quality, the software
specifications may be changed without
notice.
• Operation of this reco rder with soft ware
other than that provided is not covered
by the warranty.
Notes
• The recorded music is limited to private use
only. Use of the music beyond this limit
requires permission of the copyright holders.
• Sony is not responsible for mu sic files that
cannot be saved on your computer due to
unsuccessful recording from a CD or from
music downloading.
• SonicStage, MD Simple Burner,
OpenMG, Magic Gate, MagicGate
Memory Stick, Memory Stick, Net MD,
ATRAC, ATRAC3, ATRAC3plus and
their logos are trademarks of Sony
Corporation.
• Microsoft, Windows, Windows NT and
Windows Media are trademarks or
registered trademarks of Microsoft
Corporation in the United States and /or
other countries.
• IBM and PC/AT are registered
trademarks of In ternational Bus iness
Machines Corpo ra ti on.
• Macintos h i s a t r ademark of Apple
Computer, Inc. in the United States and/
or other count ries.
• MMX and Pentiu m ar e tr ademarks or
registered trademarks of Intel
Corporation.
• All other trademar ks and registered
trademarks are tra demarks or registered
trademarks of their respective holders.
• ™ and ® marks are omitted in this
manual.
• CD and music-related da ta fr om
Gracenote, Inc., copyright © 2000-2003
Gracenote. Gracenote CDDB
R
Client
Software, copyright 200 0- 2003
Gracenote. This product and service
may practice one or more of the
following U.S. Patents: #5,987,525;
#6,061,680; #6,154,773, #6,161,132,
#6,230,192, #6,230,207, #6,240,459,
#6,330,593 and othe r pat ents issued or
pending.
Gracenote an d CDDB ar e registered
trademarks of Gracenote. The
Gracenote logo and l ogotype, the
Gracenote CDDB logo, and the
“Powered by Gracenote” logo are
trademarks of Gracenote.
Program © 2001, 2002, 2003, 2004
Sony Corporation
Documentatio n © 2004 Sony Corporation
3

Table of contents
Recorder Operation
Looking at controls ............................. ............11
Getting started ...............................................14
Recording an MD right away! .........................17
Playing an MD right away! ..............................20
Various ways of recording ..............................22
Viewing various informat ion ..................... .... ... ...................... .... ... .......22
To start/stop recording in sync with the sound source
(Synchro-recording) ........................................................................23
Long-time recording (MDLP) ..............................................................24
Recording from a TV or a radio (Analog Recording) ..........................25
Adding track marks while recording ....................................................25
Adding track marks manually ........................................................25
Adding track marks automatically (Auto Time Mark) ...................26
Adjusting the recording level manually ................................................27
Various ways of playback ..............................28
Viewing various informat ion ..................... .... ... ...................... .... ... .......28
Selecting the play mode ........................................................................29
Listening to selected tracks only (Bookm ark Pla y) ..................... ...29
Adjusting treble or bass (Digital Sound Preset) ....................................30
Selecting the sound quality .............................................................30
Adjusting the sound quality ............................................................31
4

Editing recorded tracks ..................................32
Before editing ............................ ...................... ... .... ...................... ... .... .32
Labeling recordings (Name) ................................................................32
Labeling ......................................................................................... 32
Moving recorded tracks (Move) .......................................................... 33
Dividing a track (Divide) ..................................................................... 34
Dividing a track directly ................................................................ 35
Combining tracks (combine) ................................................................ 35
Erasing tracks and a whole disc contents (Erase) ................................ 36
To erase a track .............................................................................. 36
To erase the whole disc ..................................................................3 7
Using the group function ................................38
What is the group function? ................................................................. 38
Recording tracks using the group function .......................................... 38
Recording a track to a new group .................................................. 38
Recording a track to an existing group .......................................... 39
Playing groups ......................................................................................39
Playing a track in group play .........................................................39
Selecting the play mode for group play (Group Play Mode) ........ 40
Editing groups ........................... .... ..................... .... .... ..................... .... .40
Assigning tracks or groups as a new group (Group Setting) ......... 40
Releasing a group setting ............................................................... 41
Labeling recorded groups ..............................................................42
Moving a track in a disc with group setting ................................... 42
Changing the order of a group on a disc (Group Move) ................43
To erase a group ............................................................................. 44
Other operations .............................................45
Useful settings ............................... ... .... ...................... ... ...................... .45
How to use the menu items .............................. .... ..................... .... .47
Turning off the beep sound ............................................................ 48
Recording without overwriting existing material ..........................48
Creating a new group when recording ...........................................48
Starting the playback quickly (Qu ick Mod e ) ................. ................48
Protecting your hearing (AVLS) ....................................................49
List of menus ................................. ... ...................... .... ... ................50
5

Power sources ................................................52
Battery life ......................................................................................52
Additional information ....................................53
Precautions ............................................................................................53
Specifications ........................................................................................56
Troubleshooting and explanations .................57
Troubles and solutions ..........................................................................57
While charging ......................... ...................... .... ..................... .... ...57
While recording .............................................. .... ... ...................... ...57
While playing .................... .... ... ...................... .... ... ...................... ...59
While Editing ..................... ...................... ... .... ...................... ... .......60
While using group function ....................................... .....................61
Others .............................................................................................62
Messages ...............................................................................................63
Explanations ..........................................................................................66
6

Software Operation
What you can do with MD Simple Burner/
SonicStage ...................................................... 68
What you can do with MD Simple Burner .................................... 68
What you can do with SonicStage ................................................. 68
Basic operational flow using an MD Walkman .............................69
Installing .........................................................70
Providing the required system environment ........................................ 70
System requirements ............................................... .... ... .... ............70
Installing the software onto your com pu te r ........................................ .71
Connecting the MD Walkman to your computer .................................73
Using MD Simple Burner .................................74
Recording by computer operations ......................................................74
The window for recording all tracks on the CD ................ .... ........ 74
The window for recording selected tracks from an audio CD ....... 7 5
Using SonicStage ...........................................76
Importing audio data ............................... ...................... .... ...................76
Transferring audio data from your computer to the MD Walkman ..... 78
Transferring back audio data from the MD Walkman to
your computer ................................................................................. 80
Transferring from the MD Walkman back to your computer ........ 80
Using SonicStage Help ........................................................................ 82
To display SonicStage Help ...........................................................82
Understanding SonicStage Help .................................................... 83
Searching for a word inside an explanatio n ................... .... ............ 83
Referring to SonicStage Help .............................................................. 84
Importing audio data to the computer ............................................ 84
Listening to audio data on the computer ........................................84
Managing and editing imported track s ..................................... ..... 84
Backing up audio data .................................................................... 85
Troubleshooting ............................................................................. 85
When you want to know ................................................................ 85
7

Other information ...........................................86
Uninstalling SonicStage/MD Simple Burner ........................................86
On copyright protection ........................................................................87
Troubleshooting ....................................................................................88
The software cannot be installed onto your computer ....................89
Using a MD Walkman connected to the computer ........................90
Index .....................................................................................................91
8
Before using this product
This manual explains the recorder operations and the installation and basic use of the
supplied software. For details on the various opera t io ns, refer to the pages in di cated below.
When using the recorder
Recorder Operation (pages 10 to 67)
Pages 10 to 67 in this manual explain th e use of the Net MD as
an ordinary MiniDisc Walkman.
3-265-345-11(1)
Portable
MiniDisc Recorder
Operating Instructions
Recorder Operation __________________________________
Software Operation __________________________________
page10
page68
Troubleshooting and explanations (page 57)
This section shows the troubles you may find while using the
recorder, and their solutions.
“WALKMAN” is a registered trademark of Sony Corporation to
represent Headphone Stereo products. is a
trademark of Sony Corporation.
MZ-N520
©2002 Sony Corporation
When using the Net MD (the recorder) connected to your
computer
Software Operation (pages 68 to 90)
Pages 68 to 90 in this manual explain the installation and basic operations of the supplied
SonicStage software. Refer to these page s fo r details.
Other information (page 8 6)
This section shows the tr oubles you may find whil e us ing the SonicStage software, and
their solutions. It also has the list of frequently asked questions and answers.
SonicStage Ver. 2.0 Help
This is an online help that you can view on your com put er
screen.
Refer to online help for details on the use of the software. To
display the help w in d ow, see page 82.
Notes on the “Software Operation” section
• The displayed items in th e il lustrations that appear in th is section may diff e r fro m th e act u a l i tem s
displayed by the software.
• Explanations in this section assume familiarity with basic Windows operations. For details on the use
of your computer and the operating syste m, ple a se refer to the r es pe ct ive manuals.
• Explanations in this section cover general Net MD products. For this reason, some explanations (and
some illustrations) may not be applicable to your Net MD. Please refer to the operating instructions of
your Net MD as well.
9
Checking the supplied accessories
AC power adaptor (1)
Dedicated USB ca ble (1)
Optical cabl e (1 )
Battery carrying case (1)
CD-ROM (SonicStage Ve r. 2.0 and MD Simple Burner Ver. 2.0) (1)*
Carrying pouch (1) (European m odel only)
∗Do not play a CD-ROM on an audio CD player.
NH-7WMAA Nickel metal
hydride rechargeabl e
battery (1)
Headphones /ear phone s wit h
a remote control (1)
10
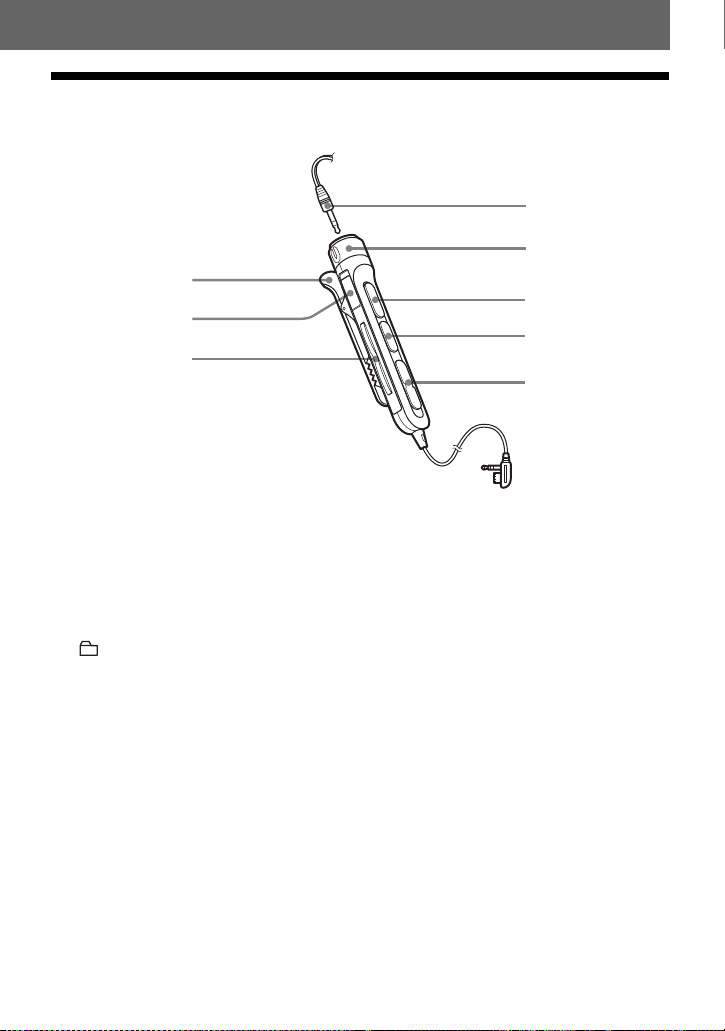
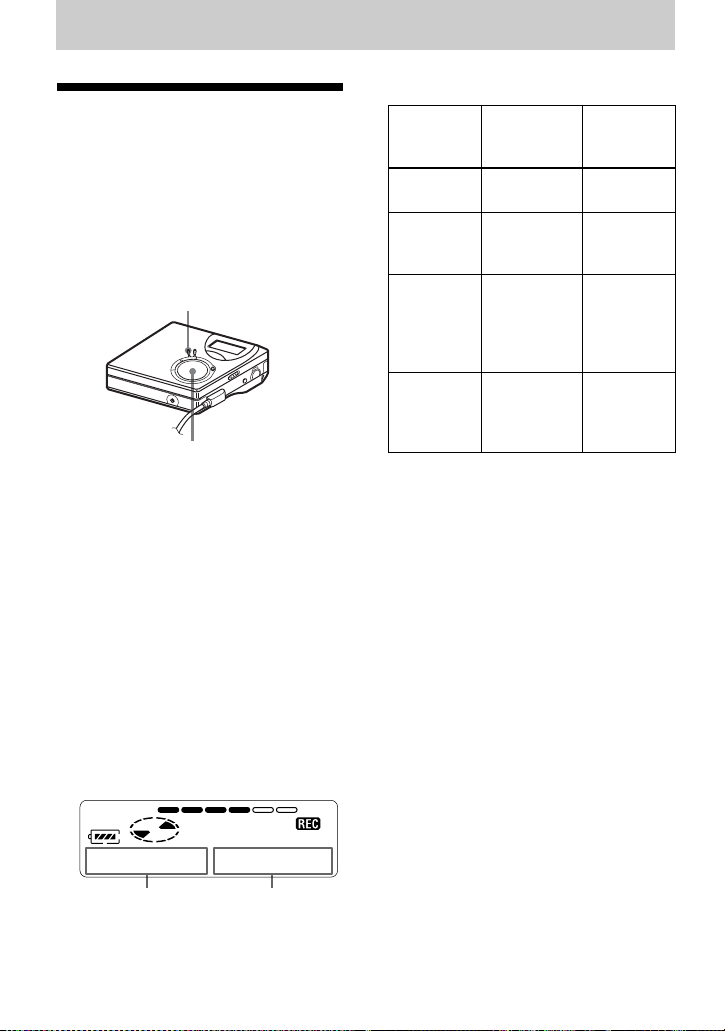
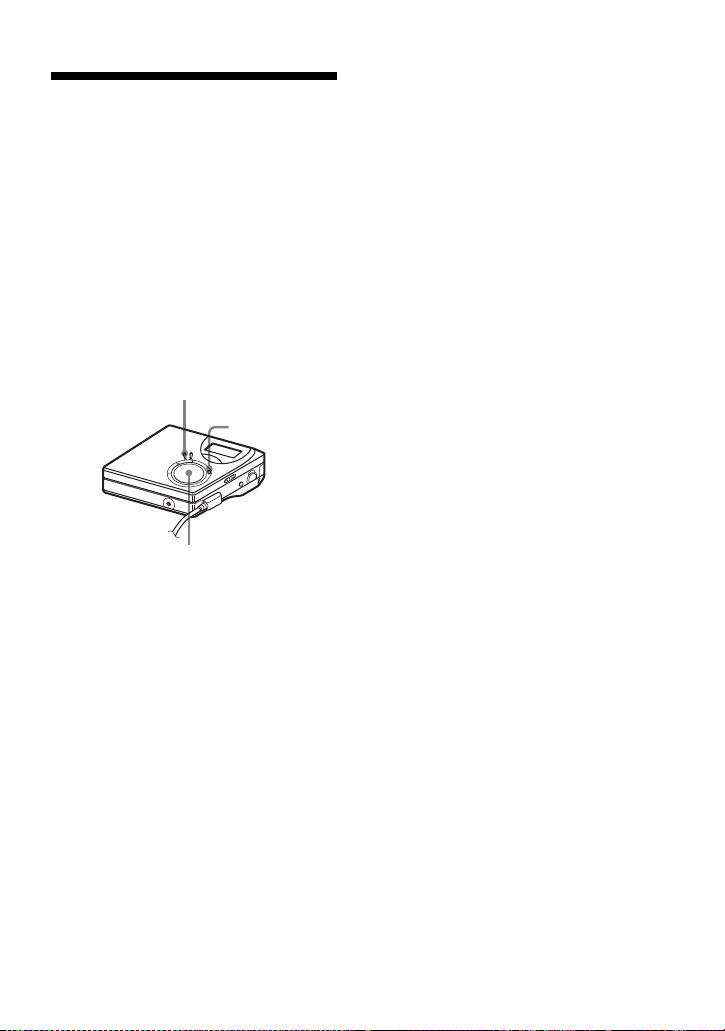
Looking at controls
The recorder
Recorder Operation
A Display window
B GROUP button
C X (pause) button
D END SEARCH button
E MENU button
F OPEN button
G VOL +
H 4-way control key
*
, – button
* VOL + has a tactile dot.
ENTER • N*
.,> (search/AMS)
x • CANCEL/CHG (stop/cancel/
charge)
* N has a tactile dot.
I REC (record) • T MARK button
J USB connecting jack
K Handstrap hole
Use the hole to attach your own strap.
L Battery compartment (at the bottom)
M LINE IN (OPTICAL) jack
N HOLD switch
To prevent the buttons from being
accidentally operated when you carry
the recorder, use this function.
O i (headphones/earph ones) jack
P DC IN 3V jack
11

The display window of the recorder
12 3
45 6 7
LP2.4 1 2
qaq;9qsqd
A MONO (monaural) indication
B LP mode indication
C Sound indications
D Disc indication
Shows that the disc is rotating for
recording or playing an MD.
E Level meter
Shows the volume of the MD being
played or recorded.
F Disc name/track name indication
Lights up when labeling a disc or a
track.
G SYNC (synchro -r ecording) indication
H REC indication
Lights up while recording. Wh en
flashing, the recorder is in record
standby mode.
8
SOUND
I Battery indication
Shows approximate battery condition.
J : Indication for remaining pl ay in g
time of the current track or of the disc
: Indication for remaining
recordable time of the disc
K Time display
L Character information display
Displays the disc and track names,
error messages, track numbers, etc.
M Play mode indications
Shows the play mode (shuffle play,
repeat play, group play, bookmark
play, etc.) of the MD.
12
The headphones/earphones with a remote control
4
5
1
2
3
6
7
8
A Clip
B HOLD switch
To prevent the buttons from being
accidentally operated when you car ry
the recorder, use this function.
C (group) +, – button
D Headphones/earphones
Can be replaced with optional
headphones/earphones.
E Volume Control (VOL+, –)
Turn to adjust the volume.
F NX* (to press): play, pause
∗ NX has a tactile dot.
G x (stop) button
H ., > (search/AMS) butto n
13
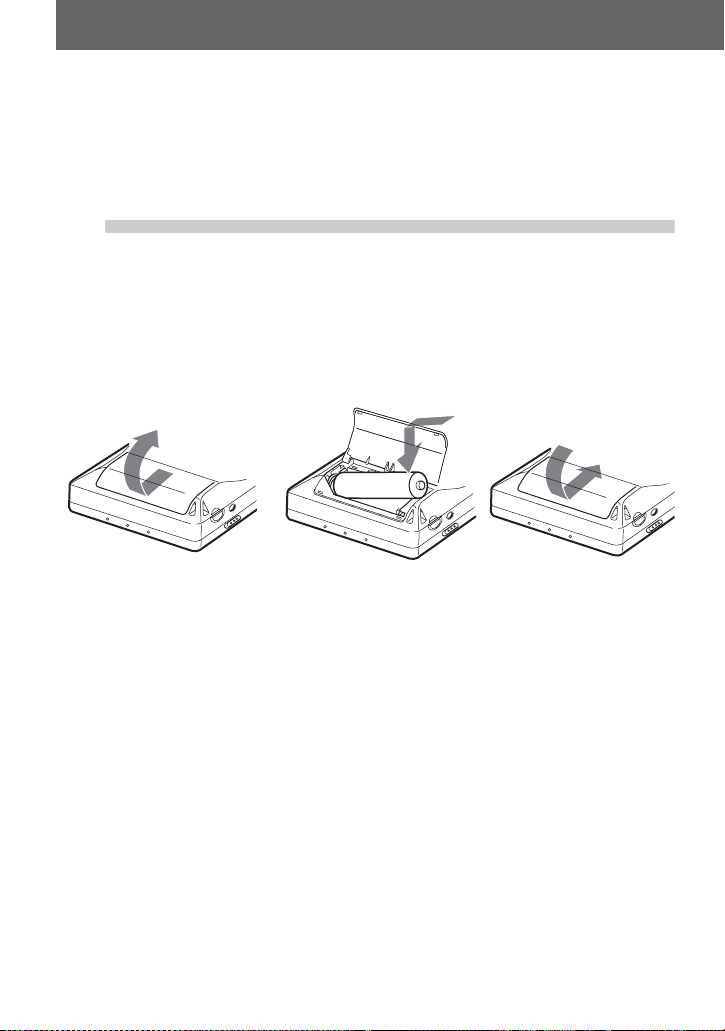
Getting started
Charge the rechar g eab le ba tter y b efore usin g. Ev en if the rec har geab le
battery is not charged, you can use the recorder as long as the AC
power adaptor is connected.
1
Using the dry battery
Insert one LR6 (size A A ) alkaline dry batter y ( not supplied) instead of the rechargeable
battery.
Insert the rechargeable battery.
Slide OPEN to open the
battery compartment lid.
Insert the NH-7WMAA
rechargeable battery minus
end first.
E
e
Close the lid.
14
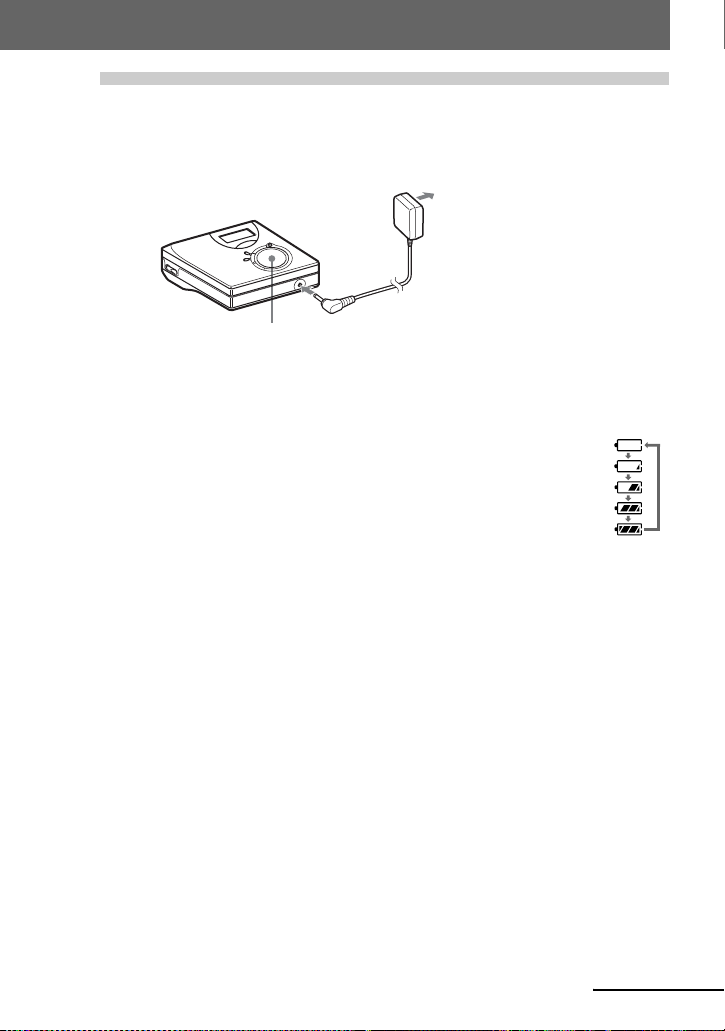
2
Charge the rechargeable battery.
to a wall
outlet
AC power adaptor
4-way control key
(x • CANCEL/ CHG)
to DC IN 3V
1 Connect the AC power adaptor to DC IN 3V.
2 Press x • CANCEL/CHG while the recorder is stopped.
“Charge” flashes, e appears in the dis play, and charging st ar ts . When c har g ing
is completed, the battery ind ication disappears.
Full charging of a complete ly disc ha rged rec ha rgeabl e battery takes about 2
hours.
3 Disconnect the AC power adaptor.
For models supplied with the AC plug adaptor
If the AC power adaptor does not fit the wall outlet, use the AC plug adaptor.
Note
Charge the battery at a temperature of +5°C (+41°F) to +40°C (+104°F). The charging time may vary,
depending on the surroundin g tem pe r at ure .
continued
15
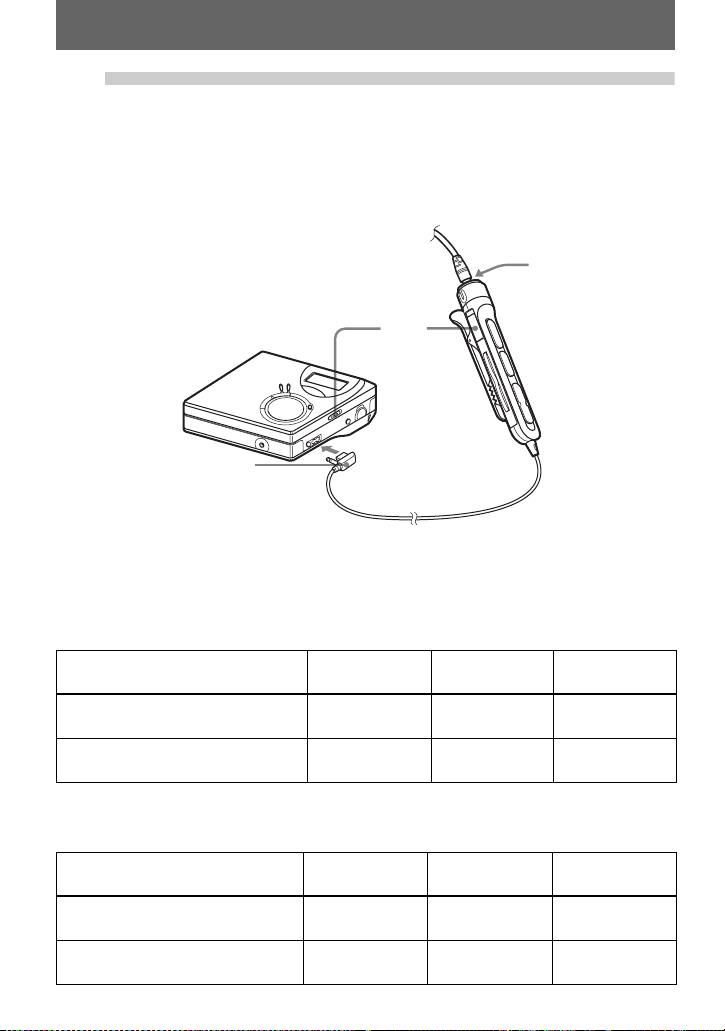
3
Make connections and unlock the
controls.
1 Connect the headphones/earphones
with the remote control to i.
Connect firmly
Battery life
For details, refer to “Battery life” (page 52).
When recording
Batteries SP
NH-7WMAA nickel metal hydride
rechargeable battery
LR6 (SG)
Sony alkali ne dry battery
Stereo
6910
10 14 18.5
2 Slide HOLD to the opposite direction of
the arrow (.) to un lock the contr ols.
Connect firmly
HOLD
To i
(Unit: Approx. hours)
LP2
Stereo
LP4
Stereo
When playing
Batteries SP
NH-7WMAA nickel metal
hydride rechargeable battery
LR6 (SG)
Sony alkali ne dry battery
16
(Unit: Approx. hours)
Stereo
15 16 20
42 48 56
LP2
Stereo
LP4
Stereo
Recording an MD right away!
This section explains the basic procedure for making digital
recordings using an optical cable connected to a CD player, Digital
TV or other digital equipment. For oth er rec ording operations, see
“Various ways of recording” (page 22).
1
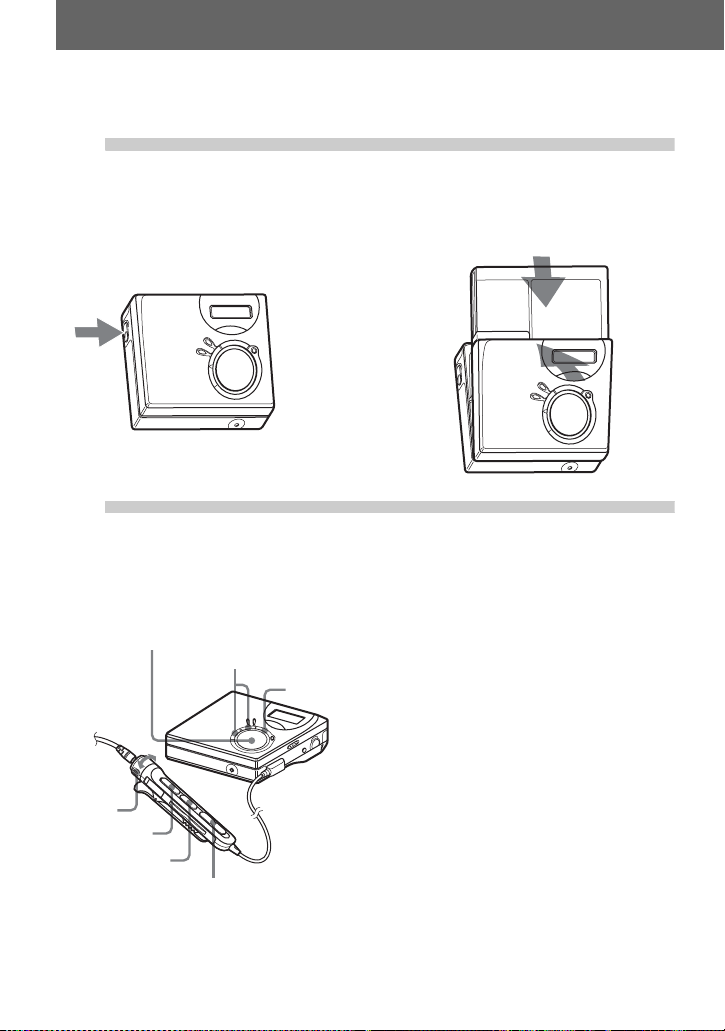
1 Press OPEN to open the lid. 2 Insert an MD with the label side facing
Insert an MD.
front, and press the lid down to close.
Make sure to
check the
record-protect
tab is closed.
continued
17
2
to a
wall
outlet
Make connections.
(Insert the cables
firmly and completely into the appropriate jacks.)
Portable
CD player, MD
player, DVD
video play er, etc.
AC power
adaptor
to DC IN 3V
Optical plug
to LINE IN (OPTICAL)
to a digital (optical ) out jack
Optical mini-plug
Optical cable*
∗ See “Optional
accessories” (page56).
CD player,
etc.
3
Record an MD.
1 Set the sound source you want to record
END SEARCH
MENU
REC • T MARK
to pause.
2 While the recorder is stopped, hold
down REC • T MARK and press N.
The recorder st arts recording.
3 Play the source you want to record.
Track marks ar e au tomatically adde d at
the same point as the sound source.
4-way control key
(N, ., >,
Note
If you record on a previously recor ded disc, the reco rder is fact ory set to ov erwrite t he entire content s of
the disc. If you want the recording to start after the existing contents, do the procedure “Recording
without overwriting existing material” ( pa ge 48) before doing step 3, “Record an MD.” (page 18).
x)
To stop recording, press x.
18

To Press
Record from the end of the
current contents
1)
Record over partway
through the previous
recording
1)
Pause Press X
Press END SEARCH, press N while holding down REC •
T MARK
1)
.
Press N or press . or > to find the start point of
recording, and then press x to stop.
Press
N while holding down REC • T MARK.
2)
.
Press X again to resume recording.
Remove the MD Press x and open the lid.3) (The lid does not open w hile
“Edit” flashing in the display.)
1)
If “R-Posi” is set to “Fr End”, recording operati ons will always start from the end of the previously
recorded material without pressing th e END SEARC H button (page 48).
2)
A track mark is added at the point where you press X a gain to r es ume r ecor ding while pausing; thus
the remainder of the track will be counted as a new track.
3)
If you open the lid while “R-Posi” is set to “FrHere”, recording will begin from the top of the disc the
next time you record. Check the point to start recording on the dis pl ay .
If the recording does not start
• Make sure the recorder is not locked (pages
11, 16).
• Make sure the MD is not record-protected
(pages 17, 54).
• Premastered MDs cannot be recorded over.
Notes
• Do not change the rechargeable battery during
operation even if the recorder is connected to
AC power adaptor. The operation may stop.
• “Edit” flashes wh il e data of the reco rd ing (the
track’s start and end points, etc.) is being
recorded. Do not move the recorder or
disconnect the power source while the
indication is flashing in the display.
• If the power supply is disrupt ed (i.e. the
battery is removed or becomes exhausted o r
the AC power adaptor is di sconnected) during
a recording or editing operation, or while
“Edit” appears in the di s play, it will not be
possible to open the lid until power is restored.
• Note the following whe n re c o r ding from a
portable CD player:
—Some portable CD players ma y not be
capable of digital out when the AC power
adaptor is disconnected. If this is the case,
connect the AC power adaptor to the
portable CD player and use it on AC power
as the power source.
—On some portable CD pl ayers, optical
output may not be possible when using an
anti-skip function (e.g., ESP* or GPRO T ECTION). If thi s is the cas e, t urn off
the anti-skip functio n.
∗ Electronic Shock Prot e ction
z
• The recording level is adju ste d automatically.
To adjust the level manually, see “Adjusting
the recording level manual ly” (page 27).
• You can monitor the sound during recording.
Connect the headphones/earphones with
remote control to i and adjust the volume by
turning towards VOL + or – (pressing VOL +
or – on the recorder). This does not affect the
recording level.
19
Playing an MD right away!
1
Insert an MD.
1 Press OPEN to open the lid. 2 Insert an MD with the label side f acing
front, and press the lid down to close.
2
Play an MD.
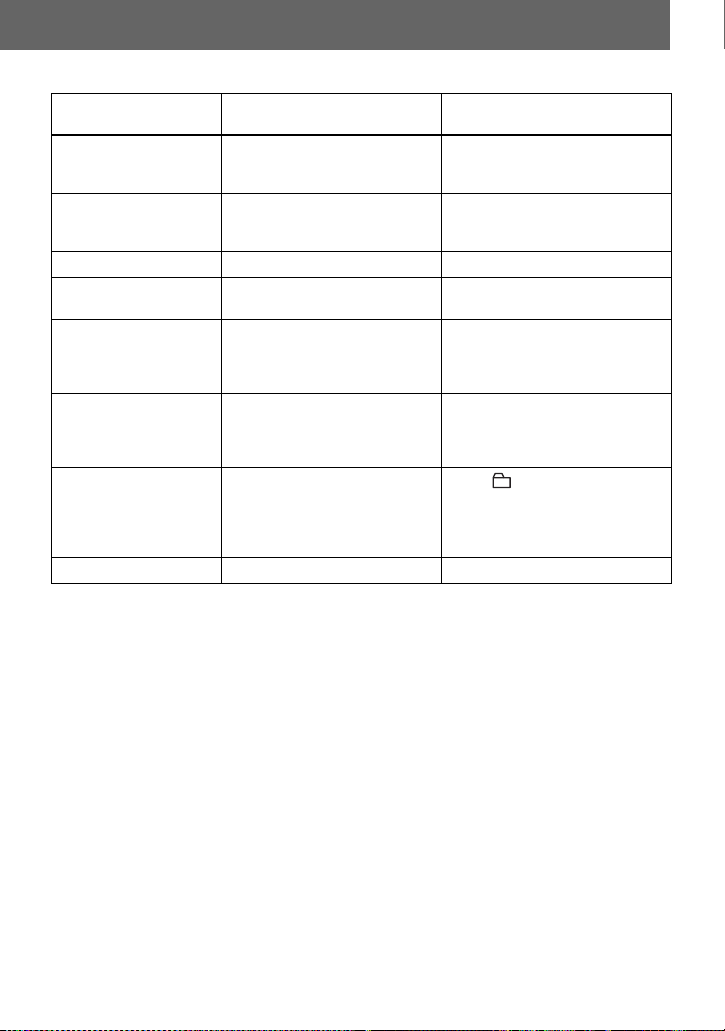
1 Press N on the recorder.
4-way control key
(N, ., >,
Volume
Control
NX
x)
VOL+, –
X
x
., >
(Press NX on the remote control.)
A short beep sounds in the headphones/
earphones.
2 Press VOL + or – to adjust the volume
on the recorder.
(Turn the volume control towards VOL +
or – on the remote control. )
The volume will be show n in the
display.
To stop play, press x.
A long beep sounds in the headphones/
earphones when you operate. After you stop the
recorder, the recorder will automatically turn
off in about 10 seconds (when using battery) or
about 3 minutes (when using an AC power
adaptor).
Playback starts from the point you last stopped
playing.
To start with the f irst track of the disc, p ress N
on the recorder or NX on the remote control
for 2 seconds or more.
20
To Operation on the
Pause Press X. Pre s s X again to
recorder
resume play.
Operation on th e remote
control
Press NX.
Press NX again to resume
play.
Cue to the current
track or the previous
Press ..
Press . repe at edly.
Press ..
Press . re peatedly.
track
Cue to the next track Press >.Press >.
Go backwards or
Press and hold . or >. Pr es s a nd hold . or >.
forward while playing
Search for a specific
position while viewing
a elapsed time
(Time Search)
Search for a specific
track while viewing
Press and hold . or >
while pausing.
Press and hold . or >
while the recorder is st opped.
Press and hold . or >
while pausing.
Press and hold . or >
while the recorder is stopped.
track numbers
(Index Search)
Cue to the beginning
of the every 10th track
(only during playback
of the disc with no
group settings
1)
)
Remove the MD Press x and open the lid.
1)
For more details, see “Using the group f unc tion” (page 38).
2)
Once you open the lid, the point to start play will change to the beginning of the first track.
If the play does not start
Make sure the recorder i s no t lo cked (pages 11,
16).
Note
The playback sound may skip if:
• the recorder receives stronger continuous
shock.
• a dirty or scratched MD is played.
— Press + or – button.
2)
Press x and open the lid.
21
Various ways of recording
Viewing various information
You can check the remain in g t im e , track
number, etc. when recordi ng or during
stop. Group-related items appear only
when a track with group settings is played
and then stopped.
MENU
4-way control key
(ENTER • N, ., >)
1 Press MENU.
2 Press . or > repeatedly until
“DISP” appears in the display, and
then press ENTER.
3 Press . or > repeatedly until
the information you want appears in
the display, and then press ENTER.
Each time you p ress . or >, the
display changes as follows:
LapTim t RecRem t
GP Rem t AllRem
Display window on the recorder
Display: A/B
B
(selected
item)
—
LapTim
RecRem Remaining
GP Rem Remaining
AllRem Remaining
Note
Depending on whether the group function is
used or not, the operating conditio ns, and th e
disc settings, you may not be able to select
certain indications or the indicat ions ma y
appear different.
z
For more details about the indications in the
display while playing, see “Viewing various
information” (page 28).
AB (After a
Elapsed time Track
time for
recording
time after
the current
track in a
group
time after
the current
location
few
seconds)
number
Track
number
Group
name
Disc name
22
AB
When you press ENTER, A and B
appear in the disp la y.
To start/stop recording in sync with the sound source (Synchro-recording)
During sync hro-recording, the recorder
starts and stops record ing i n sy nc with th e
sound source. Whe n recording from
digital equipment (such as a CD player) ,
you can omit operating both the recorder
and the sound source, and easily m ake
digital recording. You can make synchrorecording only when the optical cable is
connected.
MENU
REC • T MARK
4-way control key
(ENTER • N, ., >, x)
1 Make connection s.
Use the appropr i at e optical cable to
suit the source equipment. Connect
the cable firmly to the appropriate
jacks.
2 While the recorder is stopped, press
MENU.
3 Press . or > repeatedly until
“R-SET” appears in the display, and
then press ENTER.
4 Press . or > repeatedly until
“SYNC-R” ap pears in the display,
and then press ENTER.
5 Press . or > repeatedly until
“ON” appears in the display, and then
press ENTER.
6 Press N while pressing REC •
T MARK.
The recorder stands by for recording.
7 Play the source you want to record.
The recorder starts recording
automatically when it receives the
playing sound. “REC” light up in the
display.
To stop recording
Press x.
z
When there is no sound from the player for
about 3 seconds during synchro-recording, the
recorder goes into the standby mod e
automatically. When the sou nd comes from the
player again, the recorder resumes synchrorecording. If the recorder is kept in the standby
mode for 5 minutes o r longer , the reco rder sto ps
automatically.
Notes
• The pause function cannot be turned on or off
manually during synchro-recording. Press
to stop recording.
• Do not switch the “SYNC-R” setting while
recording. Recording may not be done
properly.
• Even when there is no sound on the sound
source, there may be cases when recordin g
does not pause automatically during synchrorecording due to the noise level emitted from
the sound source.
• If a silent portion is encountered for
approximately 2 seconds during syn chrorecording from a sound source other than a
CD or an MD, a new track mark is
automatically added at the point where the
silent portion ends.
x
23

Long-time recording (MDLP)
Select each recording mode according to
the recording time that you want.
Stereo re cording is p ossible at 2 times
(LP2) or 4 times (LP4) the normal
(stereo) recording time. Monaural
recording at 2 times normal reco rding
time is also possible.
MDs recorded in monaural, LP2, or
LP4 mode can be played back only
on MD players or recorders with
monaural, LP2, or LP4 playback
mode.
MENU
REC • T MARK
4-way control key
(ENTER • N, ., >, x)
1 Press MENU.
2 Press . or > repeatedly until
“R-SET” appears in the display, and
then press ENTER.
3 Press . or > repeatedly until
“R-MODE” appears in the display,
and then press ENTER.
4 Press . or > repeatedly to
select the desired recording mode,
and then press ENTE R.
Recording
mode
SP stereo SP Approx. 80
LP2 stereo LP2 Approx. 160
LP4 stereo LP4 Approx. 320
Monaural
1)
For better sound quality, record in nor m al
stereo (
2)
If you record a stereo source in monaural, the
sounds from left and right will be mixed.
3)
When using an 80-minute recordable MD
Display
1)
window
on the
recorder
2)
MONO Approx. 160
stereo) or LP2 stereo mode.
Recording
3)
time
min.
min.
min.
min.
5 Press N while pressing REC •
T MARK.
The recording s ta rt s.
6 Play the source you want to record.
To st op recording
Press x.
The recorder keeps the setting of the
recording mode when you record the next
time.
z
Audio components that support the LP2 stereo
or LP4 stereo modes are indicated by the
or logo marks.
24
Notes
• It is recommended that you use the AC power
adaptor for long record ings.
• When you record in LP4 mode, momenta r y
noise may be produced on ver y rare o ccasi ons
with certain sound sources. This is because of
the special digital audio compression
technology that enables a recordi ng time 4
times longer than normal. If noise is produced,
it is recommended that you record in normal
stereo or LP2 mode to obtain better sound
quality.
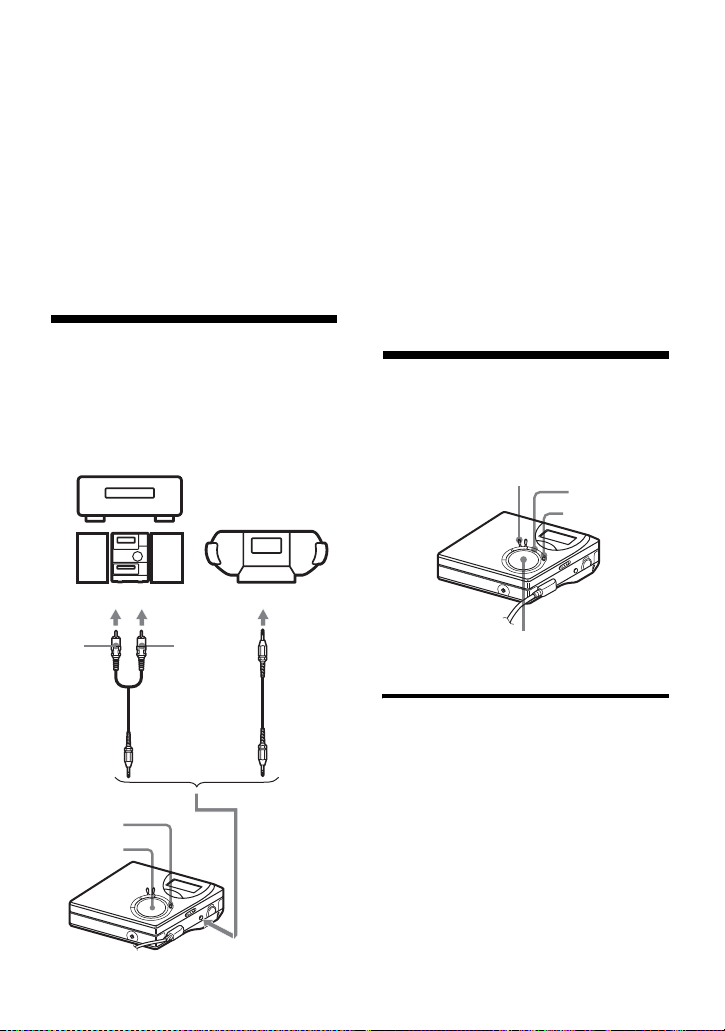
Recording from a TV or a radio (Analog Recording)
This section explains how to record from
an analog equipment such as a cassette
recorder, a radio, or TV.
TV, Cassette
recorder, etc.
to LINE OUT jacks, etc.
1 Make connections .
Use the appropriate connecting cord
to suit the source equipment*. When
connecting the cable, make sure to
insert the connectors firmly.
∗ For details, see “Optional accessories”
(page 56).
2 Press N while pressing REC •
T MARK.
The recording starts.
3 Play the source you want to record.
Adding track marks while recording
You can add track marks (track number)
while recordin g.
MENU
X
T MARK
L
(white)
REC •
T MARK
N
R (red)
Line cable
RK-G129/G136,etc
4-way control key
(ENTER • N, ., >, x)
Adding track marks manually
1 While the reco rder is re cord in g, pres s
T MARK.
to LINE IN
(OPTICAL)
25

Adding track marks automatically (Auto Time Mark)
Use this feature to add track marks
automatically at specified intervals when
recording throu gh the analog input
connector. This function is convenient for
recording long period of time, such as
lectures, meetings, etc.
1 While the recorder is recording or in
recording pause, press MENU.
2 Press . or > repeat edly
“R-SET” appears in the display, and
then press ENTER.
3 Press . or > repeat edly
“TimeMk” appears in the disp lay, and
then press ENTER.
“OFF” appears in the display.
4 Press > to show “ON” in the
display, and then press ENTER.
5 Press . or > repeatedly until
the desired time interval appears in
the display, and then press ENTER.
Pressing . or > changes the
time setting (Time:) by 1 minute,
within the range of 1 to 99 minutes.
To cancel Auto Time Mark
Select “OFF” in ste p 4 or st op recording.
Example: Eight minut es of r ec ording has
been completed when the Auto Time
Mark time interval is set to 5 minutes.
A track mark will be added at the 8minute point (after the start of recording)
and after each 5-minute interval
thereafter.
When the time interval set for Auto
Time Mark exceeds the elapsed
recording time:
The recorder adds track marks w hen the
set Auto Time Mark time interval has
elapsed.
Example: Three m i nutes of recordin g has
been completed when the Auto Time
Mark time interval is set to 5 minutes.
A track mark will be added at the 5minute point (after the start of recording)
and after each 5-minute interval
thereafter.
z
“T” appears after the track displ a y on the
recorder for track marks added by Auto Time
Mark.
Notes
• If you add a track mark by pressing T MARK
or X (pause), etc , whil e reco rding , Auto Time
Mark will begin automatically adding a track
mark each time the selected time interval has
elapsed.
• The setting will be lost when the recording
stopped.
Using Auto Time Mark to add
track marks while recording
When the elapsed recording time
exceeds the time interval for Auto
Time Mark:
The recorder adds track marks at the point
you set the time interval and from that
point the recorder adds a track mark
whenever the time interval has elapsed.
26

Adjusting the recording level manually
The sound level is adjusted automatically
while recordin g. If necessary, you can set
the recording level manually during both
analog and digit a l recording.
MENU
X
REC • T MARK
7 While observing the lev el meter in t he
display, adjust the recording level by
pressing . or >.
Set the level so that the maximum
input lights up th e fifth s egme nt on
the level meter.
If the sixth segment lights up, lower
the level by pressing ..
fifth segment
4-way control key
(ENTER • N, ., >, x)
1 While pressing X, press REC •
T MARK.
The recorder stands by for recording.
2 Press MENU.
3 Press . or > repeatedly until
“R-SET” appears in the display, and
then press ENTER.
4 Press . or > repeatedly until
“RecVol” appears in the display, and
then press ENTER.
5 Press . or > repeatedly until
“Manual” appears in the display, and
then press ENTER.
6 Play the source.
Recording does not start in this step.
If your source is an externally
connected component, be sure to cue
the source to th e beginnin g of the
material to be recorded before you
start playback.
8 Press X again to start recording.
To switch back to automatic
level control
Select “Auto” in step 5.
Notes
• You cannot adjust the left and right c ha nne l
levels separately.
• Once you stop recording, the recorder will
rever t to au toma ti c recor di ng level adju stm en t
mode the next time you start a recordin g
operation.
• To adjust the recording level manually during
synchro-recording, do steps 1 to 7 of the
procedure in this sec tion with “SYNC-R” is
set to “OFF”. Then change the “SYNC-R”
setting to sync “ON”, and start recordi ng
(page 23).
27
Various ways of playback
AB
Viewing various information
You can check the track or disc name,
track number, the elapse d play ing time of
the current track, the number of the tracks
recorded on th e MD, the gr ou p nam e, and
the total number of tracks in a group.
MENU
4-way control key
(ENTER • N, ., >, x)
1 While playing, pr ess MENU.
2 Press . or > repeatedly until
“DISP” appears in the display, and
then press ENTER.
3 Press . or > repeatedly until
the information you want appears in
the display, and then press ENTER.
Each time you p ress . or >, the
display changes as follows:
LapTim t 1 Rem t
GP Rem t AllRem
Display window on the recorder
Indication: A/B
B
(Selected
item)
LapTim Elapsed time Track
1 Rem Remaining
GP Rem Remaining
AllRem Remaining
Note
Depending on whether group play or normal
play is selected, the operating c ondi tions, and
the disc settings, you ma y n ot be able to select
certain indications or the indicat ions ma y
appear different.
z
If you want to check the rema ining time or the
recording position while recordi ng or in sto p
mode, see “Viewing various information”
(page 22).
AB (After
time of the
current track
time after the
current track
in a group
time after the
current
location
a few
seconds)
number
Track
number
Group
name
Disc name
When you press ENTER, A and B
appear in the disp la y.
28
Selecting the play
A
B
mode
You can sele ct from vario us play modes
such as repeat p la y, shuffle play, or
bookmark play.
MENU
4-way control key
(ENTER • N, ., >, x)
1 While the recorder is playing, press
MENU.
2 Press . or > repeatedly until
“P-MODE” flash es in t he displ ay , and
then press ENTE R ag ain.
3 Press . or > repeatedly to
select play mode, and then press
ENTER.
Display window on the recorder
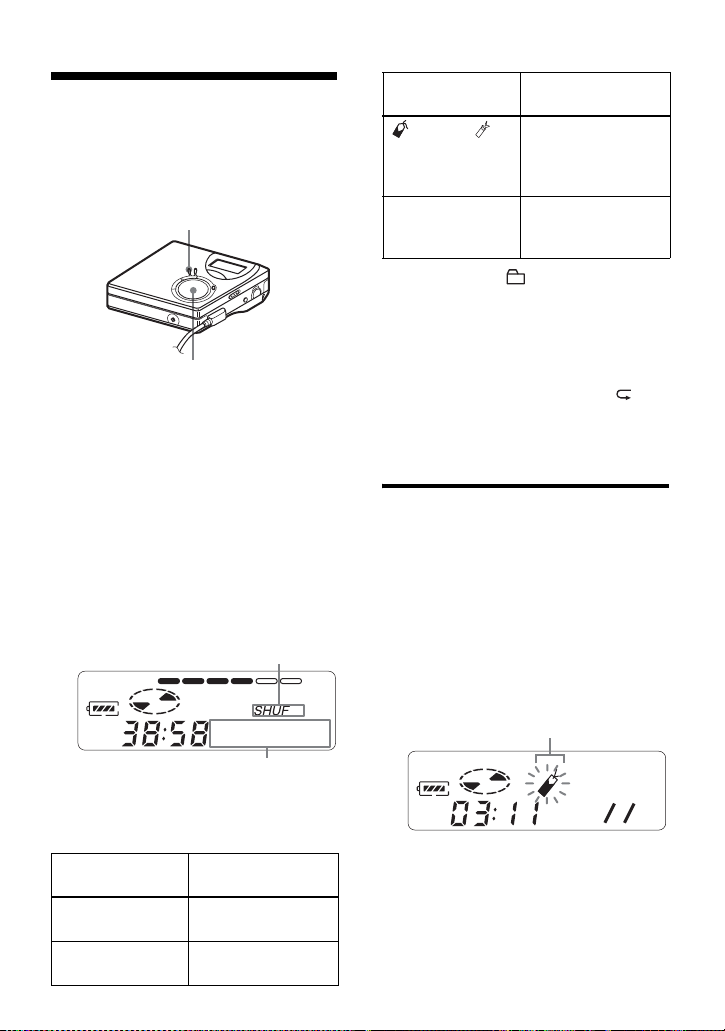
Shuff
Indication A/
1)
B
TrPLAY/ Bookmarked tracks
Shuff/ SHUF All the tracks are
1)
Group play mode ( ) appears whenever you
play a disc with group settings. For more
details, see “Selecting the play mode for group
play (Group Play Mode)” (page 40).
Play mode
play back in order
of their track
number.
played in random
order
4 Select “RepON” (playing a track
repeatedly) or “RepOFF”.
When you select “Re pO N ”, “ ”
appears on A and the playback
repeats with the play mode selecte d in
step 2.
Listening to selected tracks only (Bookmark Play)
You can bookmark track s on a disc and
play them only. The sequence of
bookmarked tracks cannot be changed.
To bookmark the tracks
1 While playing the tr ack you want to
bookmark, press and hold N for 2 seconds
or more.
Flashing slowly
When you press >, B changes.
When you press EN TE R, A appears.
Indication A/
1)
B
Normal/— All the tracks are
1 Trk/1 A single track is
Play mode
played once.
played once.
B 007
The first track of the bookmark play is set.
2 Repeat step 1 to bookmark other tracks.
You can bookmark up to 20 tracks.
29
 Loading...