

Sony MZ-N510 User Manual

3-249-510-12(1)
_
_
Portable
MiniDisc Recorder
Operating Instructions
Recorder Operation ____________________________
Software Operation _____________________________
page 11
page 68
“WALKMAN” is a registered trademark of Sony Corporation to
represent Headphone Stereo products. is a
trademark of Sony Corporation.
MZ-N510
© 2002 Sony Corporation

WARNING
To prevent fire or shock hazard, do
not expose the unit to rain or
moisture.
Do not install the appliance in a
confined space, such as a bookcase or
built-in cabinet.
To prevent fire, do not cover the
ventilation of the apparatus with news
papers, table cloths, curtains, etc. And
don’t place lighted candles on the
apparatus.
To prevent fire or shock hazard, do not
place objects filled with liquids, such as
vases, on the apparatus.
Certain countries may regulate disposal of
the battery used to power this product.
Please consult with your local authority.
Caution
The use of optical instruments with this
product will increase eye hazard.
CAUTION
RADIATION WHEN OPEN
AVOID EXPOSURE TO BEAM
— INVISIBLE LASER
Information
IN NO EVENT SHALL SELLER BE
LIABLE FOR ANY DIRECT,
INCIDENTAL OR
CONSEQUENTIAL DAMAGES OF
ANY NATURE, OR LOSSES OR
EXPENSES RESULTING FROM
ANY DEFECTIVE PRODUCT OR
THE USE OF ANY PRODUCT.
The validity of the CE marking is
restricted to only those countries where it
is legally enforced, mainly in the
countries EEA (European Economic
Area).
• SonicStage, OpenMG and the OpenMG
logo, MagicGate, Net MD and the Net
MD logo are trademarks of Sony
Corporation.
• Microsoft, Windows, Windows NT and
Windows Media are trademarks or
registered trademarks of Microsoft
Corporation in the United States and /or
other countries.
• IBM and PC/AT are registered
trademarks of International Business
Machines Corporation.
• Macintosh is a trademark of Apple
Computer, Inc. in the United States and/
or other countries.
• MMX and Pentium are trademarks or
registered trademarks of Intel
Corporation.
• All other trademarks and registered
trademarks are trademarks or registered
trademarks of their respective holders.
• ™ and ® marks are omitted in this
manual.
2

Notice for users
On the supplied software
• Copyright laws prohibit reproducing the
software or the manual accompanying it
in whole or in part, or renting the
software without the permission of the
copyright holder.
• In no event will SONY be liable for any
financial damage, or loss of profits,
including claims made by third parties,
arising out of the use of the software
supplied with this recorder.
• In the event a problem occurs with this
software as a result of defective
manufacturing, SONY will replace it.
However, SONY bears no other
responsibility.
• The software provided with this
recorder cannot be used with equipment
other than that which is so designated.
• Please note that, due to continued efforts
to improve quality, the software
specifications may be changed without
notice.
• Operation of this recorder with software
other than that provided is not covered
by the warranty.
Program © 2001, 2002 Sony Corporation
Documentation © 2002 Sony Corporation
3

Table of contents
Recorder Operations
Looking at controls .........................................12
Getting started ...............................................15
Recording an MD right away! .........................18
Playing an MD right away! ..............................21
Various ways of recording ..............................23
Viewing various information ................................................................23
To start/stop recording in sync with the sound source
(Synchro-recording) ........................................................................24
Long-time recording (MDLP) ..............................................................25
Recording from a TV or a radio (Analog Recording) ..........................26
Adding track marks while recording ....................................................26
Adding track marks manually ........................................................26
Adding track marks automatically (Auto Time Stamp) .................27
Adjusting the recording level manually ................................................28
Various ways of playback ..............................29
Viewing various information ................................................................29
Selecting the play mode ........................................................................30
Listening to selected tracks only (Bookmark Play) ........................30
Adjusting treble or bass (Digital Sound Preset) ....................................31
Selecting the sound quality .............................................................31
Adjusting the sound quality ............................................................32
4

Editing recorded tracks ..................................33
Before editing ....................................................................................... 33
Labeling recordings (Name) ................................................................ 33
Labeling ......................................................................................... 33
Moving recorded tracks (Move) .......................................................... 34
Dividing a track (Divide) ..................................................................... 35
Dividing a track directly ................................................................ 36
Combining tracks (combine) ................................................................ 36
Erasing tracks and a whole disc contents (Erase) ................................ 37
To erase a track .............................................................................. 37
To erase the whole disc .................................................................. 38
Using the group function ................................ 39
What is the group function? ................................................................. 39
Recording tracks using the group function .......................................... 39
Recording a track to a new group .................................................. 39
Recording a track to an existing group .......................................... 40
Playing groups ...................................................................................... 40
Playing a track in group play ......................................................... 40
Selecting the play mode for group play (Group Play Mode) ........ 41
Editing groups ...................................................................................... 41
Assigning tracks or groups as a new group (Group Setting) ......... 41
Releasing a group setting ............................................................... 42
Labeling recorded groups .............................................................. 43
Moving a track in a disc with group setting ................................... 43
Changing the order of a group on a disc (Group Move) ................ 44
To erase a group ............................................................................. 45
Other operations .............................................46
Useful settings ...................................................................................... 46
How to use the menu items ............................................................ 48
Turning off the beep sound ............................................................ 49
Recording without overwriting existing material .......................... 49
Creating a new group when recording ........................................... 49
Starting the playback quickly (Quick Mode) ................................. 49
Protecting your hearing (AVLS) .................................................... 50
5

Power sources ................................................53
Battery life ......................................................................................53
Additional information ....................................54
Precautions ............................................................................................54
Specifications ........................................................................................56
Troubleshooting and explanations .................57
Troubles and solutions ..........................................................................57
While charging ...............................................................................57
While recording ..............................................................................57
While playing .................................................................................59
While Editing ..................................................................................60
While using group function ............................................................61
Others .............................................................................................62
Messages ...............................................................................................63
Explanations ..........................................................................................66
6

Software Operation
What is a Net MD? ..........................................69
Basic Operations ............................................70
Basic operational flow using the Net MD ............................................ 70
Providing the required system environment ........................................ 71
System requirements ...................................................................... 71
Installing the software onto your computer ......................................... 72
Before installing the software ........................................................ 72
Installing SonicStage Ver.1.5 ........................................................ 73
Connecting the Net MD to your computer ........................................... 75
Storing audio data to your computer .................................................... 76
Starting SonicStage ........................................................................ 76
Recording audio CDs to the hard disk drive .................................. 77
Labeling audio data ........................................................................ 79
Transferring audio data from your computer to the
Net MD (Check-out) ....................................................................... 80
Checking out audio files to the Net MD ........................................ 80
Listening to an MD .............................................................................. 83
Listening to an MD with the Net MD connected to the
Listening to an MD with the Net MD disconnected from the
computer ......................................................................... 83
computer ......................................................................... 83
Advanced operations ......................................84
Using other functions! .......................................................................... 84
Using the SonicStage online help .................................................. 84
7

Other information ...........................................86
Settings and Precautions .......................................................................86
Settings according to OS ................................................................86
For users with OpenMG Jukebox, SonicStage, or SonicStage
Premium installed on their computer ..............................88
Note on hard disk drive space ........................................................89
Notes on system suspend/hibernation mode ...................................89
Backing up the audio data ..............................................................89
Uninstalling the SonicStage software ...................................................90
For Windows XP users ...................................................................90
For Windows Millennium Edition/Windows 98 Second Edition
For Windows 2000 users ................................................................91
Troubleshooting ....................................................................................92
If your computer does not recognize the Net MD ..........................94
If the installation was not successful ..............................................94
Information and explanations ...............................................................96
Net MD FAQ ..................................................................................96
On copyright protection ..................................................................98
Glossary ..............................................................................................100
Index ...................................................................................................102
users .................................................................................90
8

9

Before using this product
This manual explains the recorder operations and the installation and basic use of the
supplied SonicSta ge s oftware. For details on the various ope rations, refer to the pag es
indicated below.
When using the recorder
Recorder Operation (pages 11 to 67)
Pages 11 to 67 in this manual explain the use of the Net MD as
an ordinary Mini D i sc Walkman.
Troubleshooting and explanations (page 57)
3-249-510-11(1)
Portable
MiniDisc Recorder
Operating Instructions
Recorder Operation __________________________________
Software Operation __________________________________
page11
page68
This section shows the troubles you may find while usi ng the
recorder, and their solutions.
“WALKMAN” is a registered trademark of Sony Corporation to
represent Headphone Stereo products. is a
trademark of Sony Corporation.
MZ-N510
©2002 Sony Corporation
When using the Net MD (the recorder) connected to your
computer
Software Operation (pages 68 to 101)
Pages 68 to 101 in this manual ex plain th e inst allat ion and ba sic oper ations of the su pplied
SonicStage software. Refer to these pages for details.
Other information (page 86)
This section shows the tr oubles you may find while using the SonicStage software, and
their solutions. It al so has the list of frequently asked questions and answers.
SonicStage Ver. 1.5 Help
This is an online help that you can view on your computer
screen.
Refer to online help for details on the us e of the software. To
display the help window, see page 84.
Notes on the “Software Operation” section
• The displ aye d it ems in the illustrations that appear in this sec tion may differ from the actual items
displayed by the software.
• Explanations in this section assume familiarity with basic Windows operations. For details on the use
of your computer and the operating system, please refer to the respective manuals.
• Explanati ons in this section cover general Net MD products. For th is r eason, some explanations (and
some illustrations) may not be applicable to your Net MD. Please refer to the operating instructions of
your Net MD as well.
10
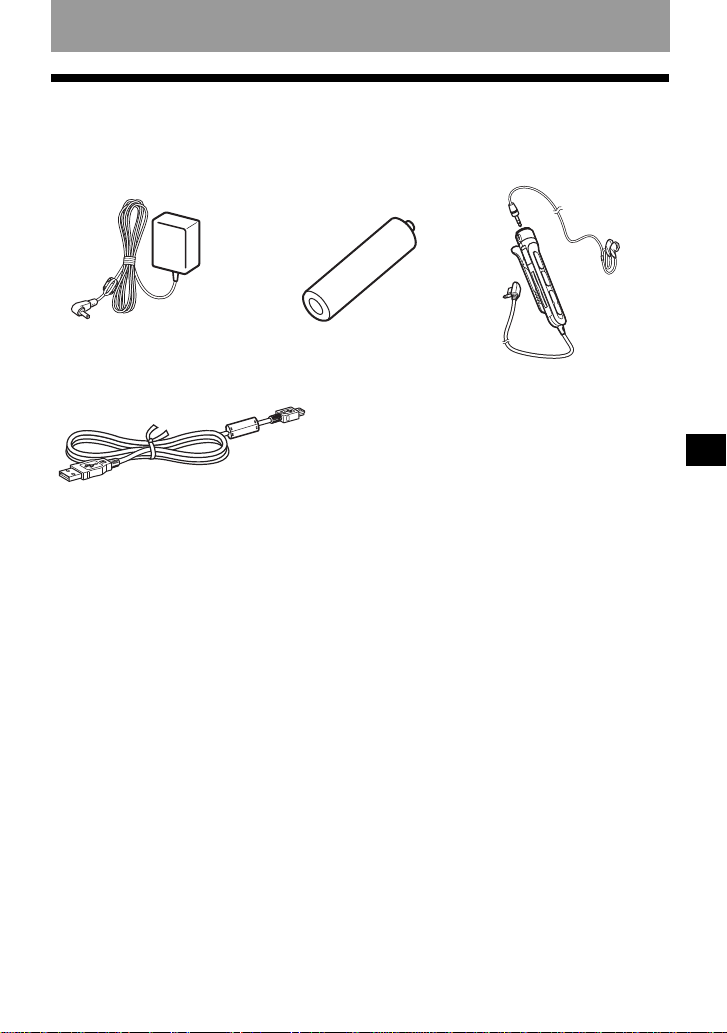
Checking the supplied accessories
AC power adaptor (1)
Dedicated USB ca bl e (1)
Optical cable (1)
Battery carrying case (1)
CD-ROM (SonicStage Ver. 1.5) (1)*
Carrying case with a belt clip (1) (European model only)
∗Do not play a CD- ROM on an audio CD playe r.
NH-7WMAA Nickel metal
hydride rechargeabl e
battery (1)
Headphones /ear phone s wit h
a remote control (1)
Recorder Operation
11

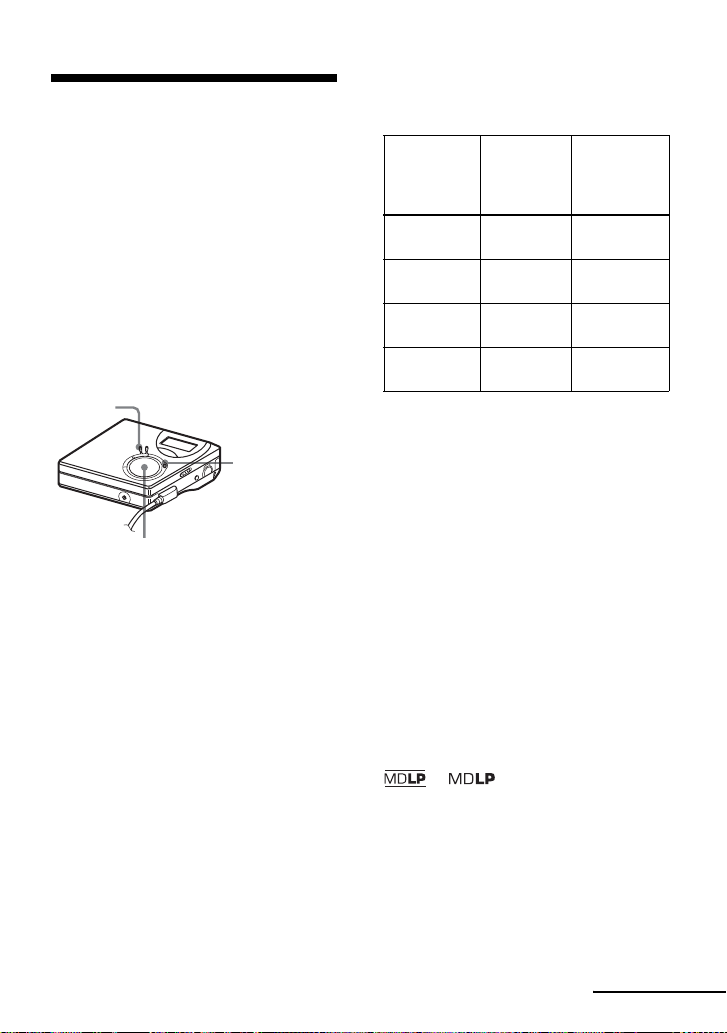
Looking at controls
The recorder
A Display window
B GROUP button
C X (pause) button
D END SEARCH button
E MENU button
F OPEN button
G VOL +
H 4-way control key
*
, – button
* VOL + has a tact ile dot.
ENTER • N*
.,> (search/AMS)
x • CANCEL/CHG (stop/cancel/
charge)
* N has a tactil e dot.
12
I REC (recor d) • T MARK button
J US B connecting jack
K Ha ndstrap hole
Use the hole to attach your own strap.
L Battery compartment (at the bottom)
M LINE IN (OPTICAL) jack
N HOLD switch
To prevent the buttons from being
accidentally operated when you carry
the recorder, use this function.
O i (headphones/earphones) jack
P DC IN 3V jack

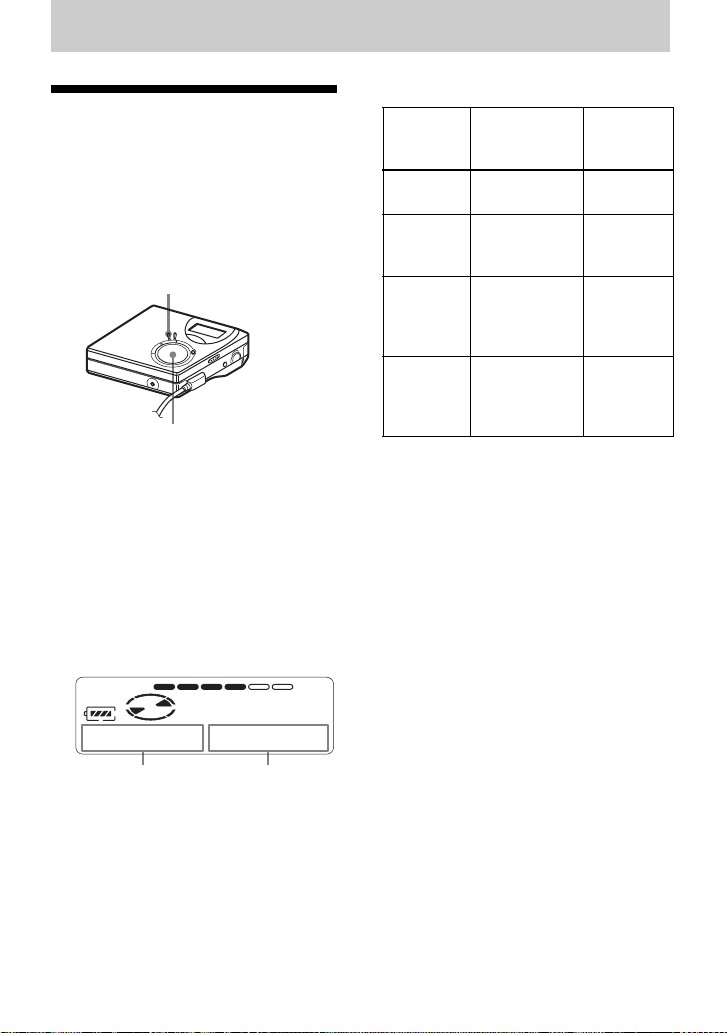
The display window of the recorder
12 3
45 6 7
LP2.4 1 2
qaq;9qsqd
A MONO (monaural) indication
B LP mode indication
C Sound indications
D Disc indication
Shows that the disc is rotatin g for
recording or playing an MD.
E Level meter
Shows the volume of the MD being
played or record ed.
F Disc nam e/track name indication
Lights up when labeling a disc or a
track.
G SYNC (synchro-recording) indication
H REC indication
Lights up while recording. When
flashing, the re corder is in record
standby mode.
8
SOUND
I Battery indication
Shows approximate battery cond ition.
J : Indication for remaining playing
time of the current track or of the disc
: Indication for remaining
recordable time of the disc
K Time display
L Character information display
Displays the disc and track names,
error message s, t rack numbers, et c.
M Play mode indications
Shows the play mode (shuffle play,
repeat play, group play, bookmark
play, etc.) of the MD.
13
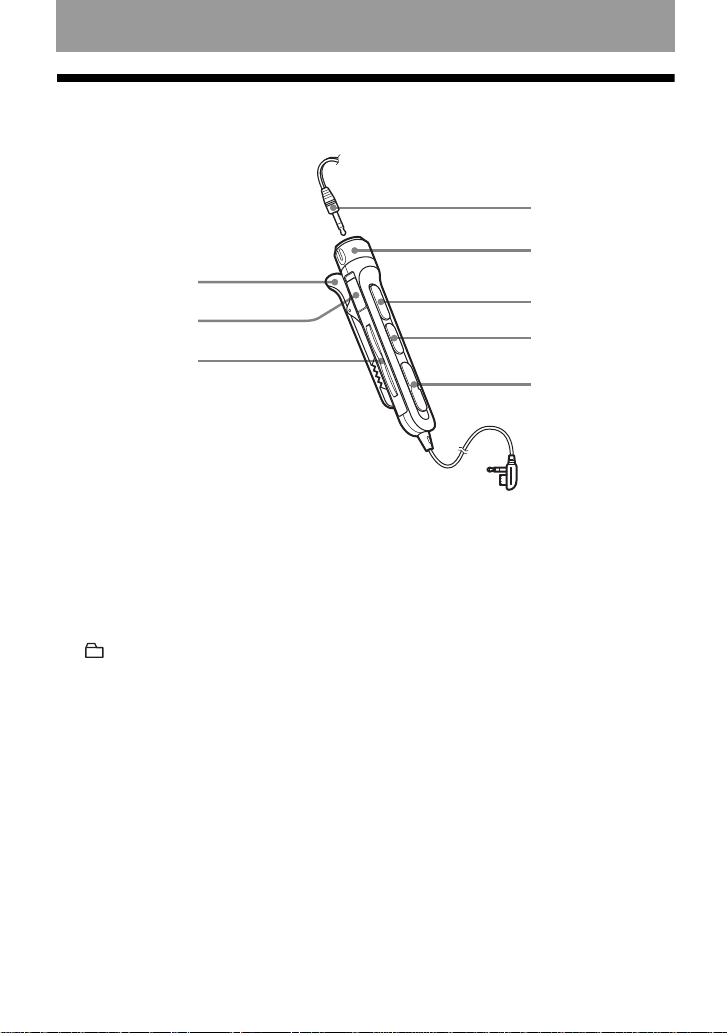
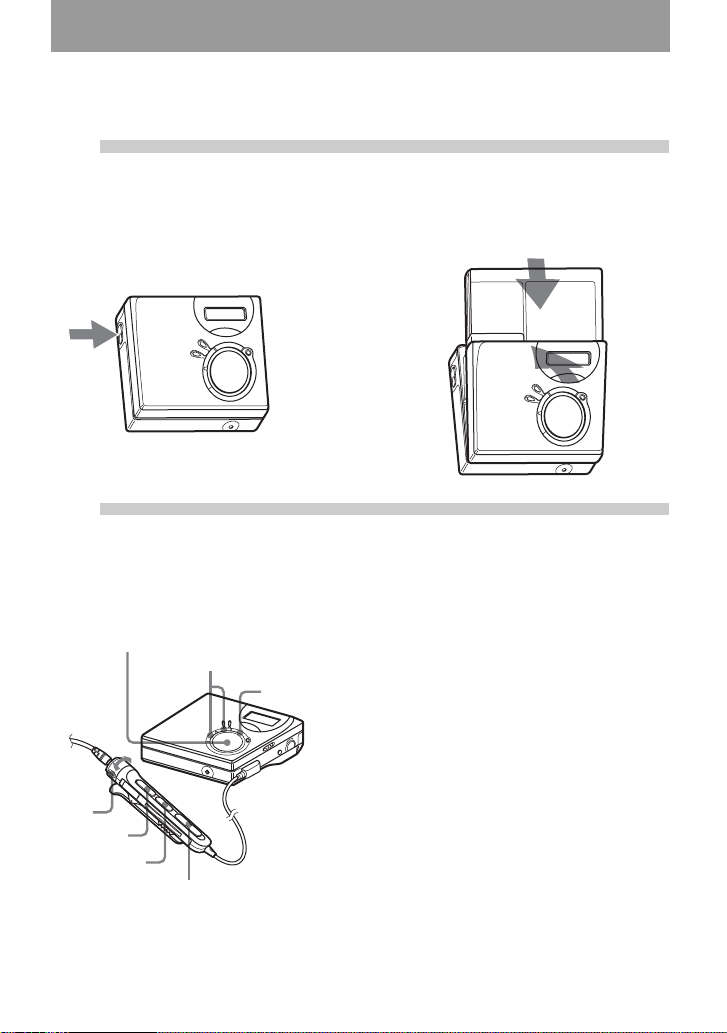
The headphones/earphones with a remote control
4
5
1
2
3
6
7
8
A Clip
B HOLD switch
To prevent the buttons from being
accidentally operated when you carry
the recorder, use this function.
C (group) +, – button
14
D Headphones/earphones
Can be replaced wit h optional
headphones/earphones.
E Volume Control (VOL+, –)
Turn to adjust the v olume .
F NX* (to press ): play, pause
∗ NX has a tactile dot.
G x (stop) button
H ., > (search/A M S) button
Getting started
Charge the rechar geable bat tery before usi ng. Even if the rechar geabl e
battery is not charged, you can use the recorder as long as the AC
power adaptor is connected.
1
Using the dry battery
Insert one LR6 ( si ze AA) alkaline dry battery (not suppl ie d) instead of the rech argeable
battery.
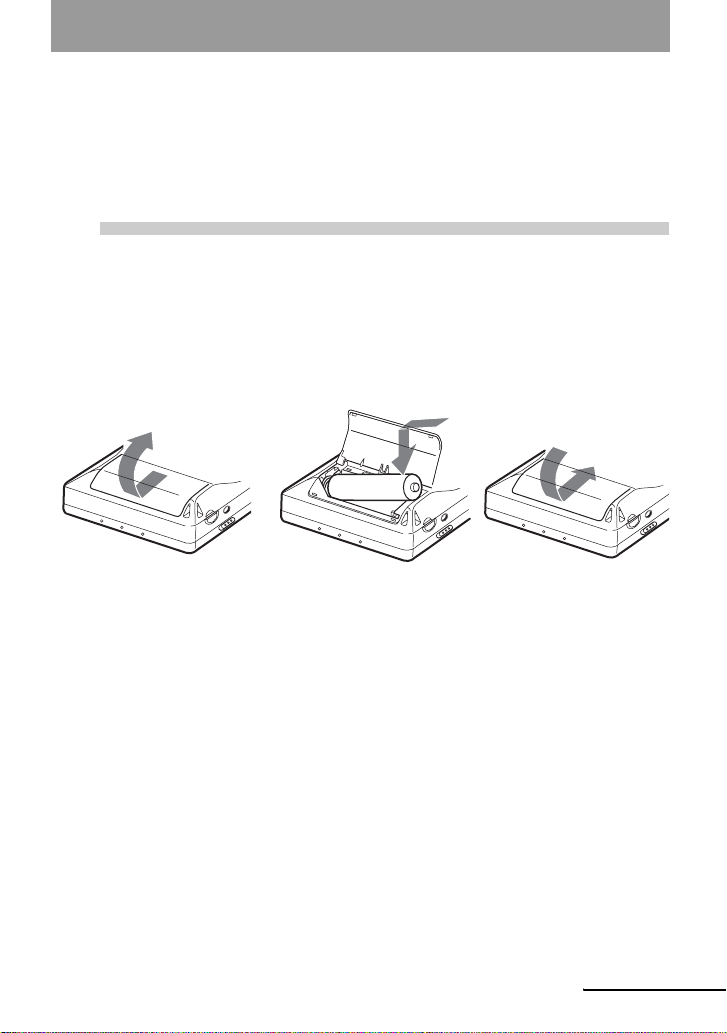
Insert the rechargeable battery
Slide OPEN to open the
battery compartment lid.
Insert the NH-7WMAA
rechargeable batter y minus
end first.
E
e
Close the lid.
continued
15
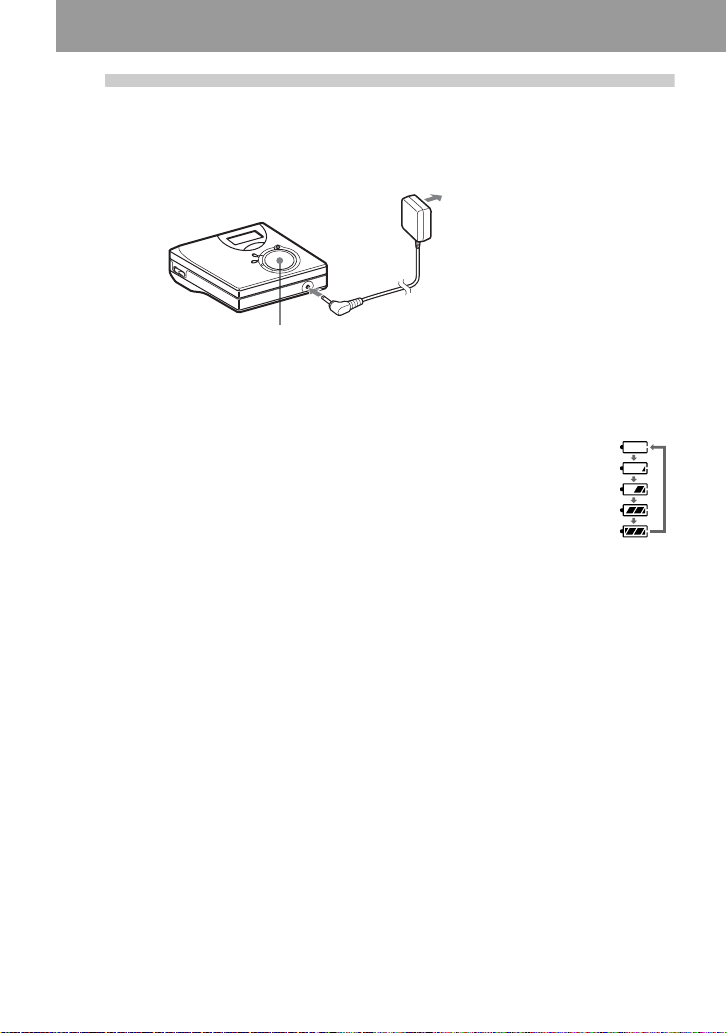
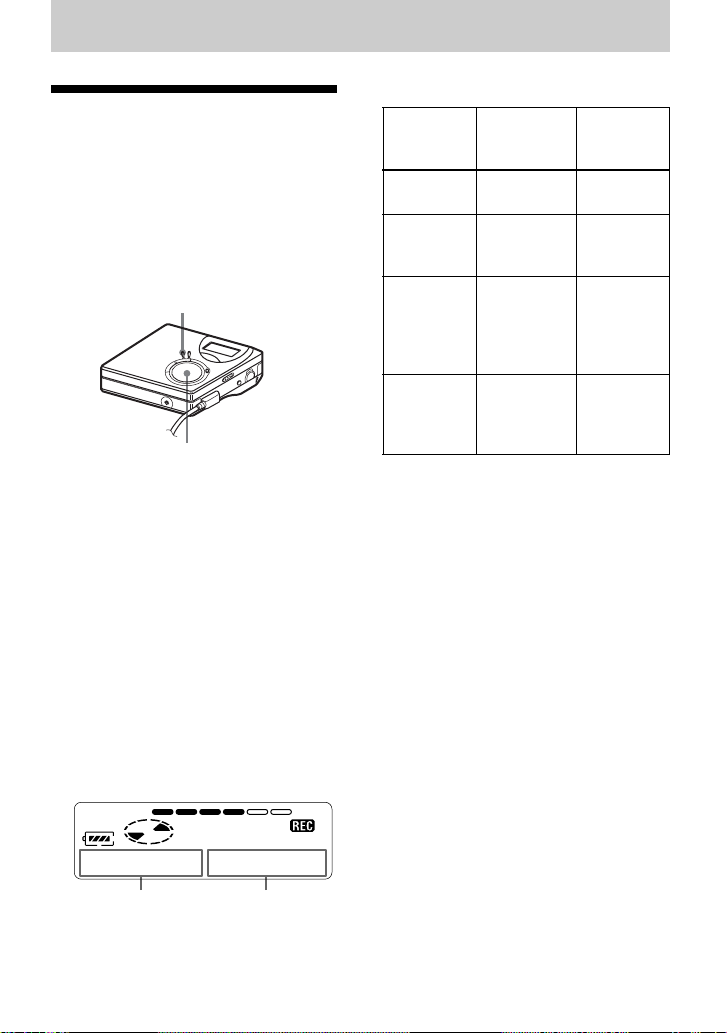
2
Charge the rechargeable battery.
to a wall
outlet
AC power adaptor
4-way control key
(x • CANCEL/CHG)
to DC IN 3V
1 Connect the AC power adaptor to DC IN 3V.
2 Press x • CANCEL/CHG while the recorder is stopped.
“Charge” flas hes, e appears in the display, and charging starts. When charging
is completed, the battery indication disappears.
Full charging of a completely discharged rechargeable battery takes about 2
hours.
3 Disconnect the AC power adaptor.
For models supplied with the AC plug adaptor
If the AC power adaptor does not fit the wall outlet, use the AC plug adaptor.
Note
Charge the battery at a temperature of +5°C (+41°F) to +40°C (+104°F). The charging time may vary,
depending on the surrounding tempe rature.
16

3
Make connections and unlock the
controls.
1 Connect the headphones/earphones
with the remote control to i.
Connect firmly
Battery life
For details, refer to “Batte ry life” (page 53)
When recording
Batteries SP
NH-7WMAA nickel metal hydride
rechargeable battery
LR6 (SG)
Sony alkaline dry battery
Stereo
6910
10 14 18.5
2 Slide HOLD to the opposite direction of
the arrow (.) to unlock the controls.
Connect firmly
HOLD
To i
(Unit: Approx. hours)
LP2
Stereo
LP4
Stereo
When playing
Batteries SP
NH-7WMAA nickel metal
hydride rechargeable battery
LR6 (SG)
Sony alkaline dry battery
(Unit: Approx. hours)
Stereo
15 16 20
42 48 56
LP2
Stereo
LP4
Stereo
17
Recording an MD right away!
This section explains the basic procedure for making digital
recordings using an optical cable connected to a CD player, Digital
TV or other digital equipment. For other recording operations, see
“Various ways of recording” (page 23).
1
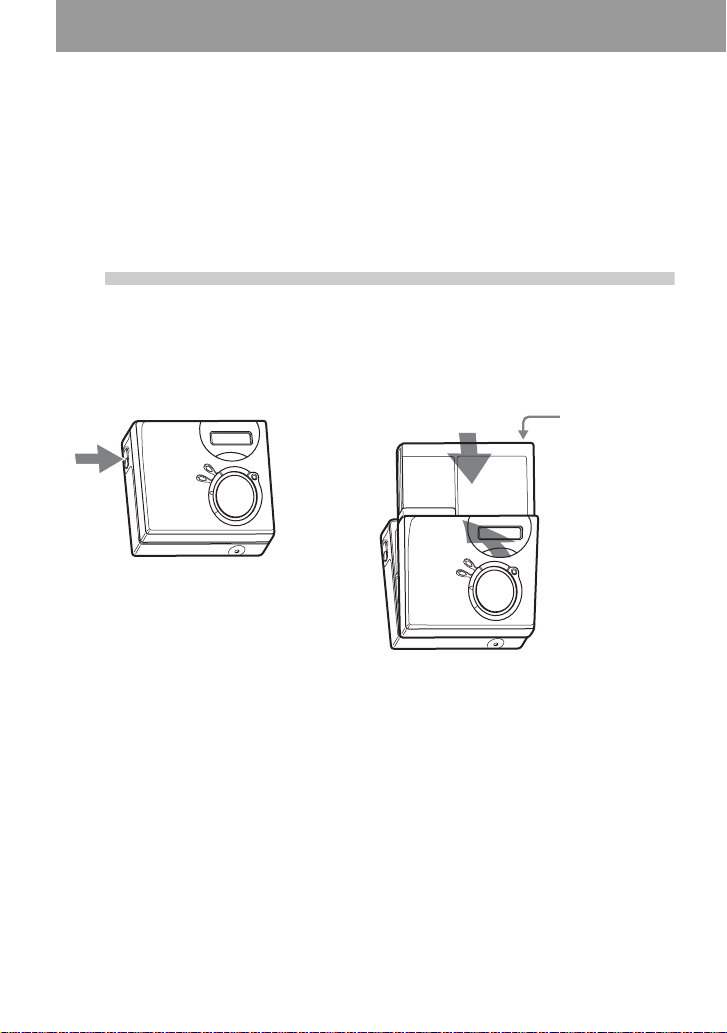
1 Press OPEN to open the lid. 2 Insert an MD with the label side facing
Insert an MD.
front, and press the lid down to close.
Make sure to
check the
record-protect
tab is closed.
18

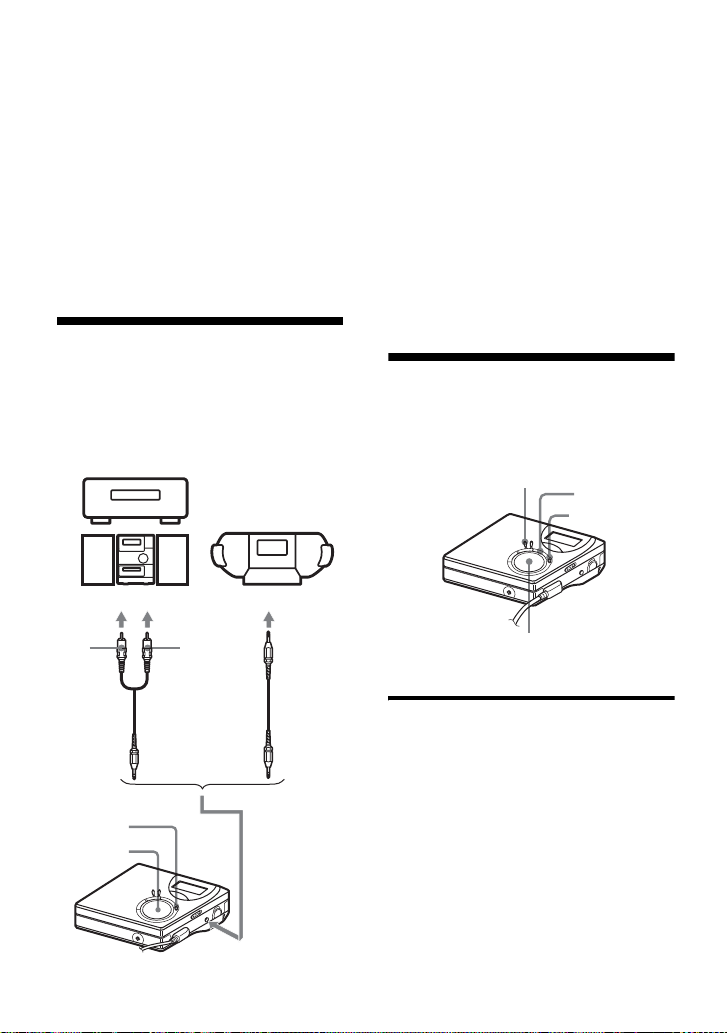
2
to a
wall
outlet
Make connections.
(Insert the cables
firmly and completely into the appropriate jacks.)
Portable
CD player, MD
player, DVD
video player, etc.
AC power
adaptor
to DC IN 3V
Optical plug
to LINE IN (OPTICAL)
to a digital (optical) out jack
Optical mini-plug
Optical cable*
∗ See “Optional
accessories” (page56).
CD player,
etc.
3
Record an MD.
1 Set the sound source you want to record
END SEARCH
MENU
REC • T MARK
to pause.
2 While the recorder is stopped, hold
down REC • T MARK and press N.
The recorder starts recording.
3 Play the source you want to record.
Track marks are automatical ly a dded at
the same point as the sound source .
4-way control key
N, ., >,
Note
If you record on a previously recorded disc, the recorder is factory set to overwrite the entire contents of
the disc. If you want the recording to start after the existing contents, do the procedure “Recording
without overwriting existing material” (page49) before doing step 3, “Record an MD.” (page19).
x
To stop recording, press x.
19

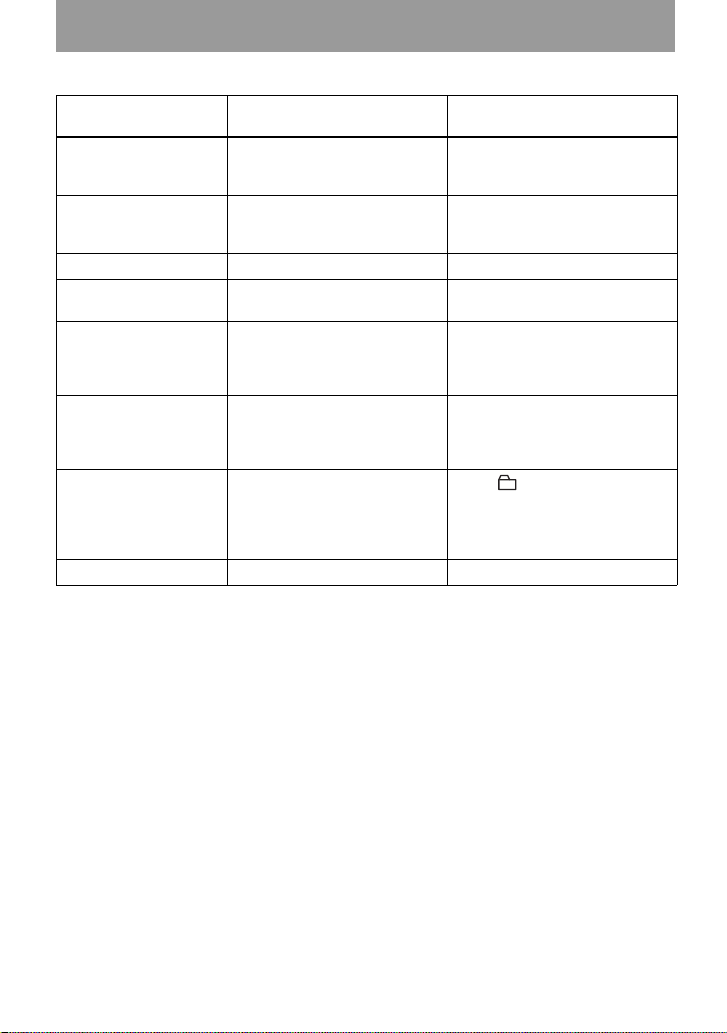
To Press
Record from th e end of the
current contents
1)
Record over partway
through the previous
recording
1)
Pause Press X
Press END SEARC H, press N while holding down REC •
T MARK
1)
.
Press N or press . or > to find the start point of
recording, and then press x to stop.
Press
N while holding down R EC • T MA RK.
2)
.
Press X again to resume record in g.
Remove the MD Press x and open the lid.3) (The lid does not open while
“TOC Edit” flashing in the display.)
1)
If “R-Posi” is set to “Fr End”, recording operations will always start from the end of the previously
recorded material without pressing the END SEARCH button (page 49).
2)
A track mark is added at the point where you press X again to resume recording while pausing; thus
the remainder of the track will be counted as a new track.
3)
If you open the lid while “R-Posi” is set to “FrHere”, recording will begin from the top of the disc the
next time you record. Check the point to start recording on the display.
If the recording does not start
• Make s u re the reco rder is not locked (pages
12, 17).
• Make sure the MD is not record-protected
(pages 18, 55).
• Premastered MDs cannot be recorde d over.
Notes
• Do not change the rechargeable battery during
operation even if the recorder is connected to
AC power adaptor. The operation may stop.
• “Edit” flashes while data of the recording (the
track’s start and end points, etc.) is being
recorded. Do not move the recorder or
disconnec t the power source while the
indication is flashing in th e dis pla y.
• If the power supply is disrupte d (i. e. the
battery is removed or becomes exhausted or
the AC power adaptor is disconnected) during
a recording or editing operat io n , or while
“Edit” appears in th e display, it will not be
possible to open the lid until power is restored.
• Note the following when recording from a
portable CD player:
—Some portable CD players may not be
capable of digital out when the AC power
adaptor is disconnected. If this is the case,
connect the AC power adaptor to the
portable CD player and use it on AC power
as the power source.
—On some portable CD players, optical
output may not be possible when using an
anti-skip function (e.g., ESP* or GPROTECTION). If this is the ca s e , tur n off
the anti-skip function.
∗ E lect r onic Sh oc k Prote c ti on
z
• The recording level is adjusted automatically.
To adjust the level manually, see “Adjusting
the recording level manually” (page 28).
• You can monitor the sound during recording.
Connect the headphones/ea rphone s with
remote control to i and adjust the volume by
turning towards VOL + or – (pressing VOL +
or – on the recorder). This does not affect the
recording level.
20
Playing an MD right away!
1
Insert an MD.
1 Press OPEN to open the lid. 2 Insert an MD with the label side facing
front, and press the lid down to close.
2
Play an MD.
1 Press N on the recorder.
4-way control key
(N, ., >,
Volume
Control
NX
x)
VOL+, –
X
x
., >
(Press NX on the remote control.)
A short beep sounds in the head phones/
earphones.
2 Press VOL + or – to adjust the volume
on the recorder.
(Turn the volume control towards VOL +
or – on the remote control.)
The volume will be shown in the
display.
To stop play, press x.
A long beep sounds in the headphones/
earphones when you operate. After you stop the
recorder, the recor d e r will automati ca lly turn
off in about 10 seconds (when using batteries)
or about 3 minutes (when using an AC power
adaptor).
Playback starts from the po int you last stopped
playing.
To s tart with the firs t track of the disc, pr ess N
on the recorder or NX on the remote control
for 2 seconds or more.
21
To Operation on the
Pause Press X. Press X again to
recorder
resume play.
Operation on the remot e
control
Press NX.
Press NX again to resume
play.
Cue to the current
track or the pr evious
Press ..
Press . repeatedly .
Press ..
Press . repeat edl y.
track
Cue to the next track Press >.Press >.
Go backwards or
Press and hold . or >. Press and hold . or >.
forward while playing
Search for a specific
position while viewing
a elapsed time
(Time Search)
Search for a specific
track while viewing
Press and hold . or >
while pausin g.
Press and hold . or >
while the recorder is stopped.
Press and hold . or >
while pausing.
Press and hold . or >
while the recorder is stopped.
track numbers
(Index Search)
Cue to the beginning
of the every 10th track
(only during playback
of the disc with no
group settings
1)
)
Remove the MD Press x and open the lid.
1)
For more details, see “Using the group f unc tion” (page 39).
2)
Once you open the lid, the point to start pl ay will c ha nge to the beg inni ng of the fi rst tr ack.
If the play does not start
Make sure the recorder i s not lo cked (pages 12,
17).
Note
The playback sound may skip if:
• the recorde r rece ives stronger co ntinuous
shock.
• a dirty or scratched MD is played.
— Press + or – button
2)
Press x and open the lid.
22
Various ways of recording
Viewing various information
You can check the remaining time, track
number, etc. when recording or during
stop. Group-rel ated items appear on l y
when a track wit h grou p set tin gs is pl ayed
and then stopped.
MENU
4-way control key
(ENTER • N, ., >)
1 Press MENU.
2 Press . or > repeatedly until
“DISP” appears in the display, and
then press ENTER.
3 Press . or > repeatedly until
the informat ion you want appears in
the display, and then press ENTER.
Each turn changes the display as
follows:
LapTim t RecRem t
GP Rem t AllRem
Display window on the recorder
Display: A/B
B
(selected
item)
—
LapTim
RecRem Remaining
GP Rem Remaining
AllRem Remaining
Note
Depending on whether the group functio n is
used or not, the operating conditions, and the
disc settings, you may not be able to se lect
certain indication s or the indications may
appear different.
z
For more details about the indications in the
display while playing, see “Viewing various
information” (page 29).
AB (After a
Elapsed time Track
time for
recording
time after
the current
track in a
group
time after
the current
location
few
seconds)
number
Track
number
Group
name
Disc name
AB
When you press ENTE R, A and B
appear in the display.
23

To start/stop recording in sync with the sound source (Synchro-recording)
During synchro-recording, th e recorder
starts and stops recording in sync with the
sound source. When recording from
digital equipment (such as a CD player),
you can omit operating both the recorder
and the sound sour ce, and easily mak e
digital record in g. You can make synchrorecording only when the optical cable is
connected.
MENU
REC • T MARK
4-way control key
(ENTER • N, ., >, x)
1 Make connections.
Use the appropriate optical cable to
suit the source equipment. Connect
the cable firmly to the appropriate
jacks.
2 While the r ecorder is stopped, press
MENU.
3 Press . or > repeatedly until
“R-SET” appears in the display, and
then press ENTER.
4 Press . or > repeatedly until
“SYNC-R” appear s i n the display,
and then press ENTER.
5 Press . or > repeatedly until
“ON” appears in the display, and then
press ENTER.
6 Press N while pressing REC •
T MARK.
The recorder st ands by for recording.
7 Play the source you want to record.
The recorder st ars recording
automatically when it receives the
playing sound. “REC” light up in the
display.
To stop recording
Press x.
z
When there is no sound from th e pl ay er fo r
about 3 seconds during synchro-recor ding, the
recorder goes into the standby mode
automatically. When the sound comes from the
player again, the recorder resumes synchrorecording. If the recorder is kept in th e st an dby
mode for 5 minutes or longer, the recorder stops
automatically.
Notes
• The pause function cannot be turned on or off
manually during synchro-recording. Press
to stop recording.
• Do not switch the “SYNC-R” setting while
recording. Recording may not be done
properly.
• Even when there is no sound on the sound
source, there may be cases when recording
does not pause automatically during synchrorecording due to the noise level emitted from
the sound source.
• If a silent porti on is e nc ountered for
approximately 2 seconds during synchrorecording from a sound source oth er tha n a
CD or an MD, a new track mark is
automatically adde d at th e p oi n t wh ere th e
silent portion ends.
x
24
Long-time recording (MDLP)
Select each recording mode according to
the recording time that you want.
Stereo recording is possible at 2 times
(LP2) or 4 times (LP4) the normal
(stereo) recording time. Monaural
recording at 2 times normal recording
time is also possible.
MDs recorded in monaural, LP2, or
LP4 mode can be played back only
on MD players or recorders wi th
monaural, LP2, or LP4 playback
mode.
MENU
REC • T MARK
4-way control key
(ENTER • N, ., >, x)
1 Press MENU.
2 Press . or > repeatedly until
“R-SET” appears i n th e di splay, and
then press ENTER.
3 Press . or > repeatedly until
“R-MODE” appears in t he display,
and then press ENTER.
4 Press . or > repeatedly to
select the desi red recording mo de,
and then press ENTER.
Recording
mode
SP stereo SP Approx. 80
LP2 stereo LP2 Approx. 160
LP4 stereo LP4 Approx. 320
Monaural
1)
For better sound quality, record in normal
stereo (
2)
If you record a stereo source in monaural, the
sounds from left and right will be mixed.
3)
When using an 80-minute recordable MD
Display
1)
window
on the
recorder
2)
MONO Approx. 160
stereo) or LP2 stereo mode.
Recording
3)
time
min.
min.
min.
min.
5 Press N while pressing REC •
T MARK.
The recording starts.
6 Play the source you want to record.
To stop recording
Press x.
The recorder keep s the setting of the
recording mode when yo u reco rd the nex t
time.
z
Audio components that support the L P2 stereo
or LP4 stereo modes are indi cated by the
or logo marks.
continued
25
Notes
• It is recommended that you use the AC power
adaptor for long recordings.
• When you record in LP4 mode, momentary
noise may be produced on very rare occasions
with certain sound sources. This is because of
the special dig ital audio compr ession
technology that enab les a recording time 4
times longer than normal. If noise is produced,
it is recommended that you record in normal
stereo or LP2 mode to obtain better sound
quality.
Recording from a TV or a radio (Analog Recording)
This section explains how to record from
an analog equipment such as a cassette
recorder, a radio, or TV.
TV, Cassette
recorder, etc.
to LINE OUT jacks, etc.
1 Make connections.
Use the appropriate connecting cord
to suit the source equipment*. When
connecting the ca bl e, make sure to
insert the connectors firmly.
∗ For det ails, see “Optional accessories”
(page 56)
2 Press N while pressing REC •
T MARK.
The recording s tarts.
3 Play the source you want to record.
Adding track marks while recording
You can add track marks (track number)
while recording.
MENU
X
T MARK
26
L
(white)
REC •
T MARK
N
R (red)
Line cable
RK-G129/G136,etc
4-way control key
(ENTER • N, ., >, x)
Adding track marks manually
1 While the recorder i s rec or ding , pr es s
T MARK.
to LINE IN
(OPTICAL)

Adding track marks automa tically (Auto Time Stamp)
Use this feature to add track marks
automatically at specified intervals when
recording through the analog input
connector. This function is convenient for
recording long period of time, such as
lectures, meetings, etc.
1 While the recorder is recording or in
recording pause, press MENU.
2 Press . or > repeatedly
“R-SET” appears in the display, and
then press ENTER.
3 Press . or > repeatedly
“TimeMk” appears in the display, and
then press ENTER.
“OFF” appears in th e di splay.
4 Press > to show “ON” in the
display, and then press ENTER.
5 Press . or > repeatedly until
the desired time interval appears in
the display, and then press ENTER.
Pressing . or > changes the
time setting (Time:) by 1 minute,
within the range of 1 to 99 minutes.
To cancel Auto Time Stamp
Select “OFF” in step 4 or stop recording.
Example: Eight minutes of recording has
been completed when the Auto Time
Stamp time interval is set to 5 minutes.
A track mark will be added at the 8minute point (after the start of recording)
and after each 5-m i nute interval
thereafter.
When the time interval set for Auto
Time Stamp exceeds the elapsed
recording time:
The recorder ad ds track marks when the
set Auto Time Stamp time interval has
elapsed.
Example: Three minutes of recording has
been completed when the Auto Time
Stamp time interval is set to 5 minutes.
A track mark will be added at the 5minute point (after the start of recording)
and after each 5-m i nute interval
thereafter.
z
“T” appears after the track display on the
recorder for track marks added by Auto Time
Stamp.
Notes
• If you add a track mark by pressing T MARK
or X (pause), etc, while recordi ng, Auto T ime
Stamp will begin automatically adding a track
mark each time the selected time inter val h as
elapsed.
• The setting will be lost when the recording
stopped.
Using Auto Time Stamp to add
track marks while recording
When the elapsed recording time
exceeds the time interval for Auto
Time Stamp:
The recorder adds t rack marks at th e poi nt
you set the time interval and from that
point the recorder adds a track mark
whenever the time inte rval has elapsed.
27

Adjusting the recording level manually
The sound level is adjusted automatically
while recording. If necessary, you can set
the recording level manual ly during both
analog and digital recording.
MENU
X
REC • T MARK
7 While observing the level me ter in the
display, adjust the recording level by
pressing . or >.
Set the level so that the maximum
input lights up the fifth segment on
the level meter.
If the sixth segment lights up, lower
the level by pressin g ..
fifth segment
4-way control key
(ENTER • N, ., >, x)
1 While pressing X, press REC •
T MARK.
The recorder stands by for recording.
2 Press MENU.
3 Press . or > repeatedly until
“R-SET” appears in the display, and
then press ENTER.
4 Press . or > repeatedly until
“RecVol” appears in the dis play, and
then press ENTER.
5 Press . or > repeatedly until
“Manual” appears in the display, and
then press ENTER.
6 Play the source.
Recording does not start in this step.
If your source is an externa lly
connected com ponent, be sure to c ue
the source to the beginn in g of the
material to be recorded be fore you
start playback.
8 Press X again to start recording.
To switch back to automatic
level control
Select “Auto” in step 5.
Notes
• You cannot adjust the left and right channel
levels separately.
• If you press x during recording operation, the
recorder will revert to automatic recording
level adjustment mode the next time you sta r t
a recording operation.
• To adjust the recording level manually during
synchro-recording, do steps 1 to 7 of the
procedure in this sect ion w ith “SYNC-R” is
set to “OFF ”. Then change the “SYNC- R”
setting to sync “ON”, and start recording
(page 24).
28
Various ways of playback
AB
Viewing various information
You can chec k the track or disc name,
track number, the elapsed pl aying time of
the current track, the number of the tr acks
recorded on the MD, the group name, and
the total number of tracks in a group.
MENU
4-way control key
(ENTER • N, ., >, x)
1 While playing, press MENU.
2 Press . or > repeatedly until
“DISP” appears in the display, and
then press ENTER.
Each time you press . or >, the
display chan ges as the follows:
Display window on the recorder
Indication: A/B
B
(Selected
item)
LapTim Elapsed time Track
1 Rem Remaining
GP Rem Rem ai ni ng
AllRem Remaining
Note
Depending on whether group play or normal
play is selecte d, the operating cond itions, and
the disc settings, you may not be able to select
certain indication s or the indications may
appear different.
z
If you want to check the remaining time or the
recording position while record ing or in stop
mode, see “Viewing various information”
(page 23).
AB (After
time of the
current track
time after the
current track
in a group
time after the
current
location
a few
seconds)
number
Track
number
Group
name
Disc name
29

Selecting the play
A
B
mode
You can select from various pl ay modes
such as repeat play, shuffle play, or
bookmark play.
MENU
4-way control key
(ENTER • N, ., >, x)
1 While the recorder is playing, press
MENU.
2 Press . or > repeatedly until
“P-MODE” flashe s in th e displ ay , a nd
then press ENTER again.
3 Press . or > repeatedly to
select play mode, and then press
ENTER.
Display window on the recorder
Indication A/
1)
B
1 Trk/1 A single track is
TrPLAY/ Bookmarked tracks
Shuff/SHUF All the tracks are
1)
Group play mode ( ) appears whenever you
play a disc with group settings. For more
details, see “Selecting the play mode for group
play (Group Play Mode)” (page 41).
Play mode
played once.
play back in order
of their track
number.
played in random
order
4 Select “R epON” (playing a track
repeatedly) or “RepOFF”.
When you select “RepON”, “ ”
appears on A and the playback
repeats with the play mode selected in
step 2.
Listening to selected tracks only (Bookmark Play)
You can bookmark tracks on a disc and
play them only. The sequence of
bookmarked tracks cannot be changed.
Shuff
When you press >, B changes.
When you press ENTER, A appears.
Indication A/
1)
B
Normal/— All the tracks are
30
Play mode
played once.
To bookmark the tracks
1 While playing the tra ck you want to
bookmark, press and hold N for 2 seconds
or more.
Flashing slowly
B 007
The first track of the bookmark play is set.
2 Repeat step 1 to bookmark other tr a ck s.
You can bookmark up to 20 tracks.
 Loading...