

Sony MVS-8400, MVS-8300, MVS-8200 Operating Manual
Mobile DVD
System
2-159-612-11 (1)
Operating Instructions
Mode d’emploi
Owner’s Record
The model and serial numbers are located on the top of the unit.
Record these numbers in the space provided below.
Refer to these numbers whenever you call upon your Sony dealer regarding this
product.
Model No. MV-900SDS Serial No.
For installation and connections, refer to “Connections” on page 35.
En ce qui concerne l’installation et les raccordements, reportez-vous à la section
« Raccordements », page 35.
US
FR
MV-900SDS
© 2004 Sony Corporation
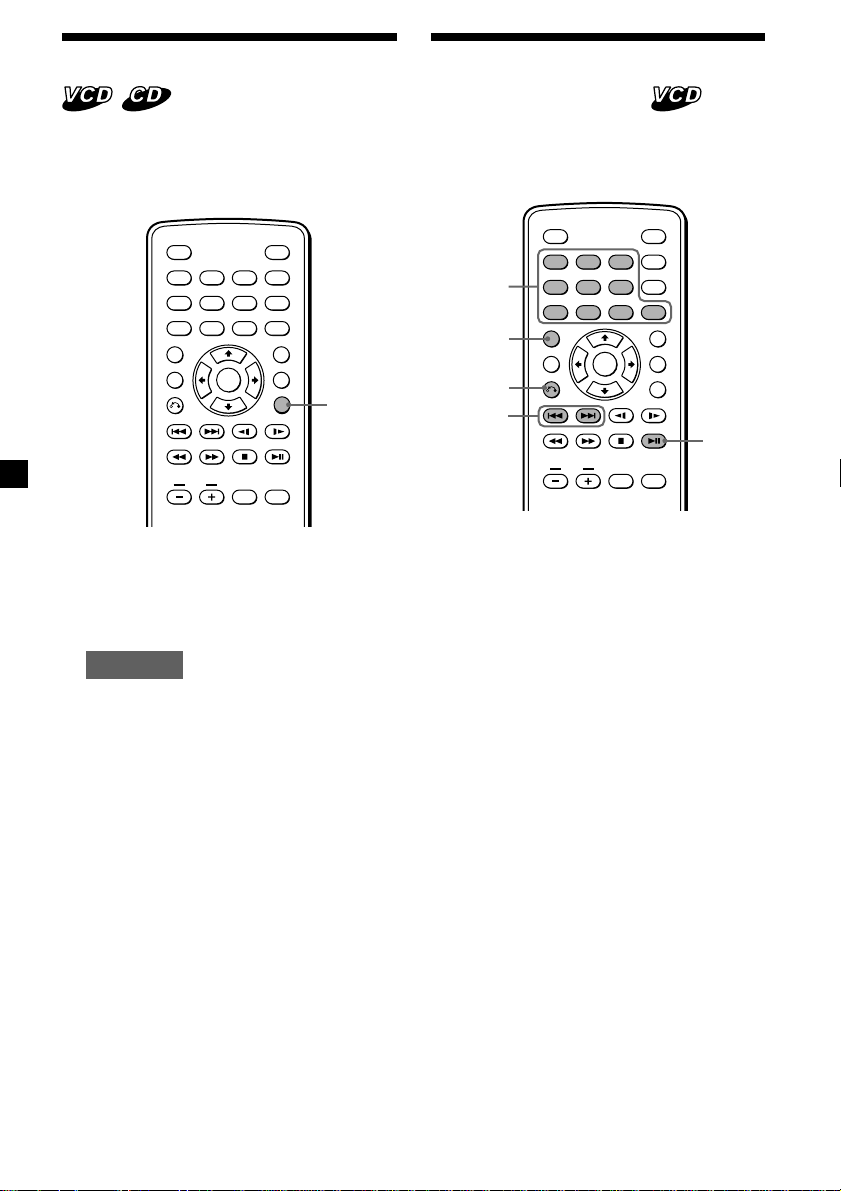
Warning
CAUTION
The use of optical instruments with this
product will increase eye hazard.
CAUTION
Use of controls or adjustments or
performance of procedures other than
those specified herein may result in
hazardous radiation exposure.
DANGER INVISIBLE
This is located on the drive unit's internal
chassis.
To prevent fire or shock hazard, do not
expose the unit to rain or moisture.
LASER RADIATIONWHEN OPEN.
AVOID DIRECT EXPOSURE TO BEAM.
Warning
This equipment has been tested and found to
comply with the limits for a Class B digital
device, pursuant to Part 15 of the FCC Rules.
These limits are designed to provide
reasonable protection against harmful
interference in a residential installation. This
equipment generates, uses, and can radiate
radio frequency energy and, if not installed
and used in accordance with the instructions,
may cause harmful interference to radio
communications. However, there is no
guarantee that interference will not occur in a
particular installation. If this equipment does
cause harmful interference to radio or
television reception, which can be determined
by turning the equipment off and on, the user
is encouraged to try to correct the interference
by one or more of the following measures:
— Reorient or relocate the receiving
antenna.
— Increase the separation between the
equipment and receiver.
— Connect the equipment into an outlet on
a circuit different from that to which the
receiver is connected.
— Consult the dealer or an experienced
radio/TV technician for help.
You are cautioned that any changes or
modifications not expressly approved in this
manual could void your authority to operate
this equipment.
For the customers in the United
States
This product contains mercury. Disposal of
this product may be regulated if sold in the
This symbol is intended to
alert the user to the presence of
uninsulated “dangerous
voltage” within the product’s
enclosure that may be of
sufficient magnitude to
constitute a risk of electric
shock to persons.
This symbol is intended to
alert the user to the presence of
important operating and
maintenance (servicing)
instructions in the literature
accompanying the appliance.
United States. For disposal or recycling
information, please contact your local
authorities or the Electronics Industries
Alliance (http://www.eiae.org).
2

Table of Contents
Welcome !................................................................... 4
Precautions ................................................................ 4
About this manual .................................................... 7
About discs this player can play ............................ 7
Resetting the player .................................................. 9
Location of controls ................................................ 10
Operation for Monitor
Opening the display monitor ........................... 13
Selecting the input source ................................. 14
Selecting the color system ................................. 14
Changing the player and monitor settings .... 15
Use of Headphones
Listening with the headphones ........................ 18
Various Playback
Playing a disc ...................................................... 19
Playing a “Memory Stick” ................................ 21
Displaying elapsed time ................................... 22
Changing the subtitle language ....................... 23
Using a DVD menu ............................................ 24
Changing the audio language .......................... 25
Changing angles ................................................. 25
Changing the audio output .............................. 26
Using the PBC (Playback Control) function ... 26
Changing Setup
Setting the aspect ratio for the TV screen
— TV SCREEN .............................................. 27
Displaying the multi-angle notice
— ANGLE MARK ........................................ 28
Setting the screen saver
— SCR SAVER ............................................... 28
Selecting the speaker mode
— SPEAKER SETUP..................................... 29
Selecting the audio output mode
— AUDIO OUT ............................................. 29
Selecting the compression setting for the sound
— DYNAMIC ................................................ 30
Selecting the audio language for DVD
— AUDIO ...................................................... 30
Displaying the subtitles for DVD
— SUBTITLE ................................................. 31
Selecting the DVD menu language
— DISC MENU ............................................. 31
Preparing for the initial parental setting ........ 32
Returning this player to the factory setting
— DEFAULTS................................................ 34
Setting the menu display for MP3/JPEG/
MPEG1 files
— SMART NAVI ........................................... 34
Connections
Installation diagram .......................................... 35
Connection diagram .......................................... 36
Additional Information
Maintenance........................................................ 38
Notes on discs ..................................................... 40
About MP3 files .................................................. 41
About “Memory Stick” ..................................... 42
Specifications ...................................................... 44
Tr oubleshooting.................................................. 45
Error display ....................................................... 47
Language Code List ........................................... 48
3
Welcome !
Precautions
Thank you for purchasing this Sony Mobile
DVD System. You can enjoy its various
features even more with:
•DVD/Video CD/Audio CD playback.
•MP3/JPEG file encoded disc playback.
•MP3/JPEG/MPEG1 file encoded “Memory
Stick” playback.
•Support DTS/Dolby Digital through optical
digital output terminal.
•Supplied controller accessory
Card remote commander
RM-X137
Before operating the player, please read this
operating instructions thoroughly and retain it
for future reference.
Copyrights
This product incorporates copyright protection
technology that is protected by method claims
of certain U.S. patents, other intellectual
property rights owned by Macrovision
Corporation, and other rights owners. Use of
this copyright protection technology must be
authorized by Macrovision Corporation, and is
intended for home and other limited viewing
uses only unless otherwise authorized by
Macrovision Corporation. Reverse engineering
or disassembly is prohibited.
•“Memory Stick,” and “MagicGate
Memory Stick” are trademarks of Sony
Corporation.
•“Memory Stick Duo” and “ ”
are trademarks of Sony Corporation.
•“MagicGate” and “ ” are
trademarks of Sony Corporation.
•“Memory Stick PRO” and “ ”
are trademarks of Sony Corporation.
Manufactured under license from Dolby
Laboratories. “Dolby”, “Pro Logic”, and the
double-D symbol are trademarks of Dolby
Laboratories.
“DTS,” “DTS Digital Surround” and “DTS
Digital Out” are trademarks of Digital Theater
Systems, Inc.
To avoid the risk of serious injury or accident,
read the following precautions before
installing and operating the player.
For driver's safety
Comply with your local traffic rules and
regulations.
•While driving
— The driver must not watch or operate the
player. It may lead to distraction and
cause an accident.
— The driver must not use the headphones.
It may lead to distraction and cause an
accident.
Park the car in a safe place when the
driver watch and operate the player or use
the headphones.
•After installing
— Do not hang onto the monitor.
— Do not insert your hands, fingers or
foreign objects into the player. It may
cause injury or damage to the player.
— Take care not to bump your head against
the monitor when getting up from the
back seat.
— Keep small articles out of the reach of
children.
•If the player does not work, check the
connections first. If everything is in order,
check the fuse.
•If your car was parked in direct sunlight,
allow the player to cool off before operating
it.
•Avoid installing the player in places:
— subject to temperature below 0 °C (32 °F)
or above 45 °C (113 °F)
— subject to direct sunlight
— near heat sources (such as heaters)
— exposed to rain or moisture
— exposed to excessive dust or dirt
— subject to excessive vibration
— subject to heat:
Keep the player away from nearby hot
vehicle components that heat up over
time such as hoses, high current wires,
and braking systems components. Make
sure to leave enough room for ventilation
on openings and slots to protect from over
heating.
If you have any questions or problems
concerning the player, please consult your
nearest Sony dealer.
4
On heat build-up
Heat may build up in the player if it is used for
an extended period of time. This, however, is
not a malfunction.
Moisture condensation
On a rainy day or in a very damp area,
moisture condensation may occur inside the
lenses. Should this occur, the player will not
operate properly. In such a case, remove the
disc and wait for about an hour until the
moisture has evaporated.
On installation
•Installing this unit requires technical
expertise.
This unit should be installed by a qualified
technician or service personnel.
To maintain high sound quality
Be careful not to splash juice or other soft
drinks onto the player or discs.
Notes on cordless stereo
headphones
• For your safety, do not use the headphones
while driving your car.
•When the headphones are not to be used for
a long period of time, remove the battery to
avoid damage caused by battery leakage and
subsequent corrosion.
•Do not leave the headphones in a location
subject to direct sunlight, heat or moisture (It
is recommended to use the headphones at a
temperature of between 5 ˚C and 35 ˚C (41 ˚F
and 95 ˚F)).
• If the headphones are used while exposed to
direct sunlight, sensitivity of the infrared
receptor may deteriorate, and inferior quality
sound may result.
•Do not drop, hit or otherwise subject
headphones to strong shocks of any kind.
This could damage the product.
•If you leave the headphones in direct
sunlight, on a dash board etc., the battery
may leak and burst, and cause an injury.
•If you try to install this unit by yourself, do it
properly, referring to the installation and
wiring diagrams in this operating manual.
Improper installation may result in fire or
electric shock.
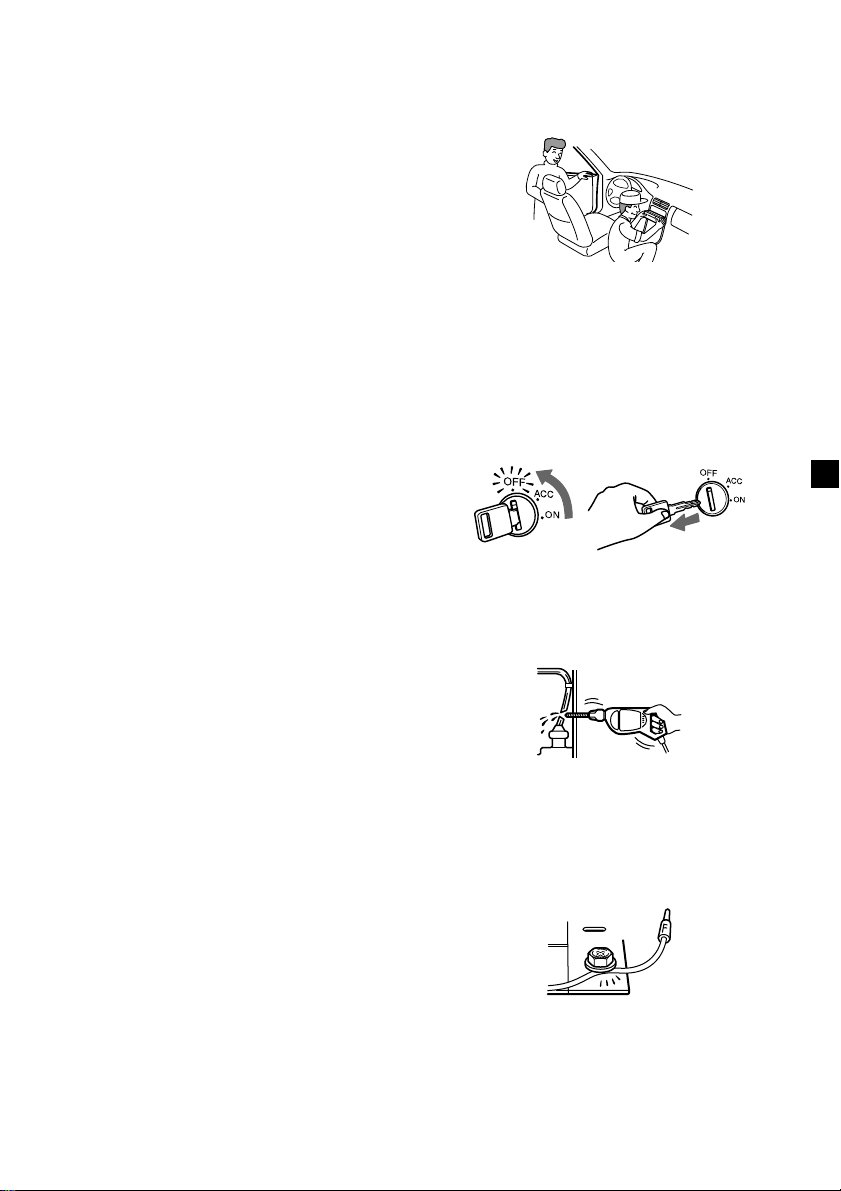
•Before installation, be sure to turn the
ignition switch to the OFF position or take
the key out. Installing this unit with the
ignition on may cause battery drain or a
short circuit.
•Do not damage any pipes, tubes, the fuel
tank or electric wiring when installing this
unit. This can cause a fire. If you drill a hole
in car panels, make sure that any hidden car
parts will not be damaged.
•Do not use any nuts or bolts for safety
devices such as steering linkage, fuel supply
or braking systems. This can cause a fire or
an accident.
•Take care to prevent cords and wires from
getting tangled or crimped in the moving
portion of a seat rail.
continue to next page t
5
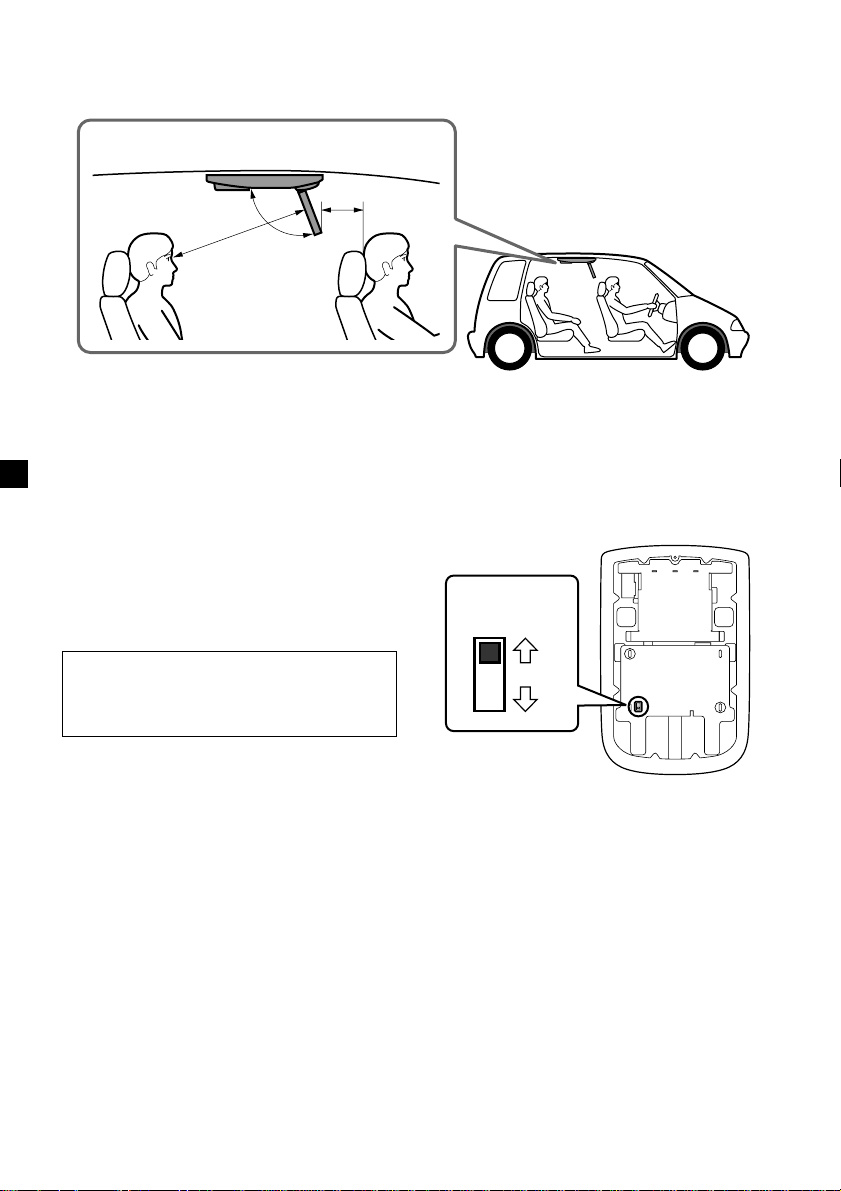
Where to install
Before installing this unit, please check your local traffic rules and regulations. Follow the diagram
below to install this unit in a suitable position in your car.
Do not install this unit where:
— It will obstruct the driver’s view when the
monitor is in either the open or closed
position.
— It will obstruct the operation of the airbag
system.
— It will obstruct the operation of the
vehicle, especially the steering wheel, shift
lever, or brake pedal.
—A driver or passengers may injure
themselves when getting into or out of the
car.
If you have any questions or problems
concerning your unit that are not covered
in this manual, please consult your
nearest Sony dealer.
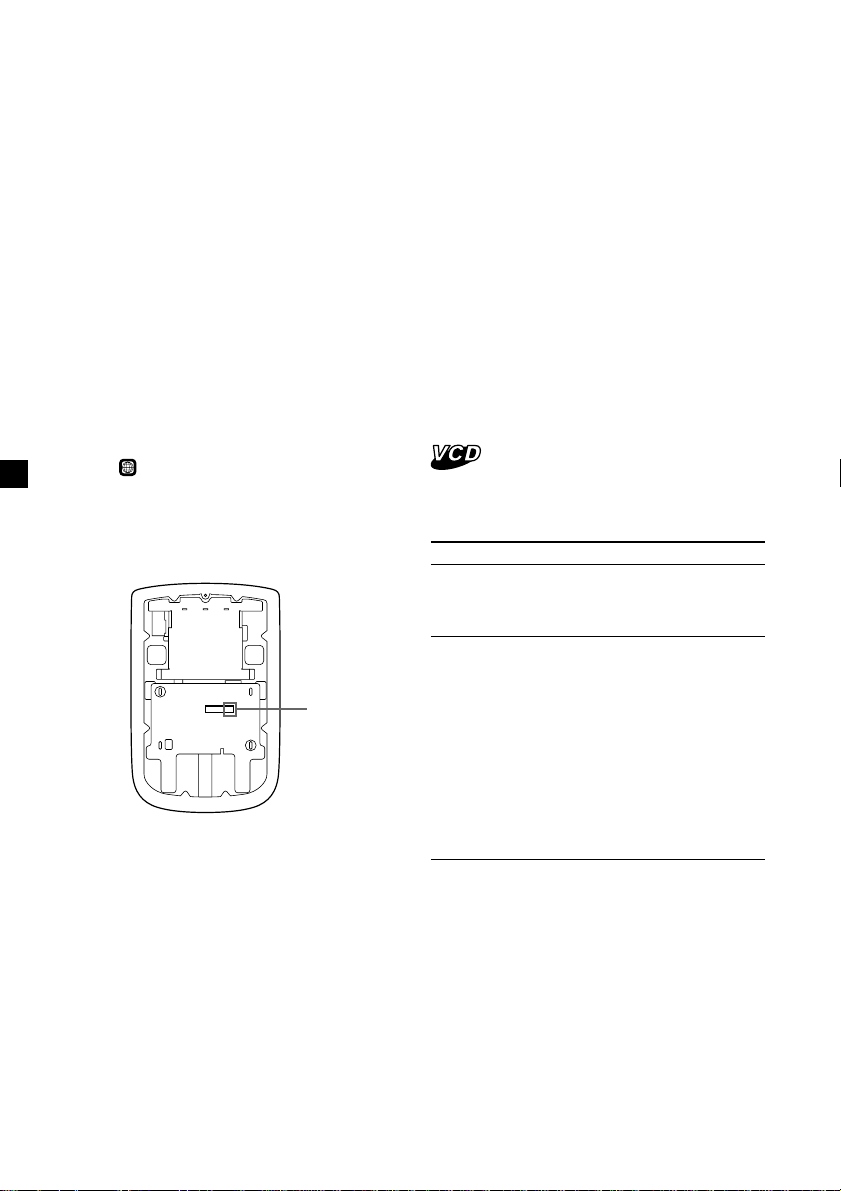
Before installing
Make sure that the POWER SELECT switch is
set to the correct position.
A*: If your car has an accessory position on
the ignition key.
B : If your car has no accessory position on
the ignition key.
* A is the factory preset position.
When the POWER SELECT switch is
set to B
Press (POWER) on the player to turn on.
The player does not turn on by pressing
(POWER) on the card remote commander.
POWER SELECT
switch
B
A
Note
Be sure to turn off the player after driving your
car.
To turn off the player, follow the operations
below:
– Press (POWER) on the player.
– Press (POWER) on the card remote commander.
If the power is left on, it will cause battery drain.
6
About this manual
Conventions
•Instructions in this manual describe how to
use the player and the cordless stereo
headphones.
•The icons below are used in this manual:
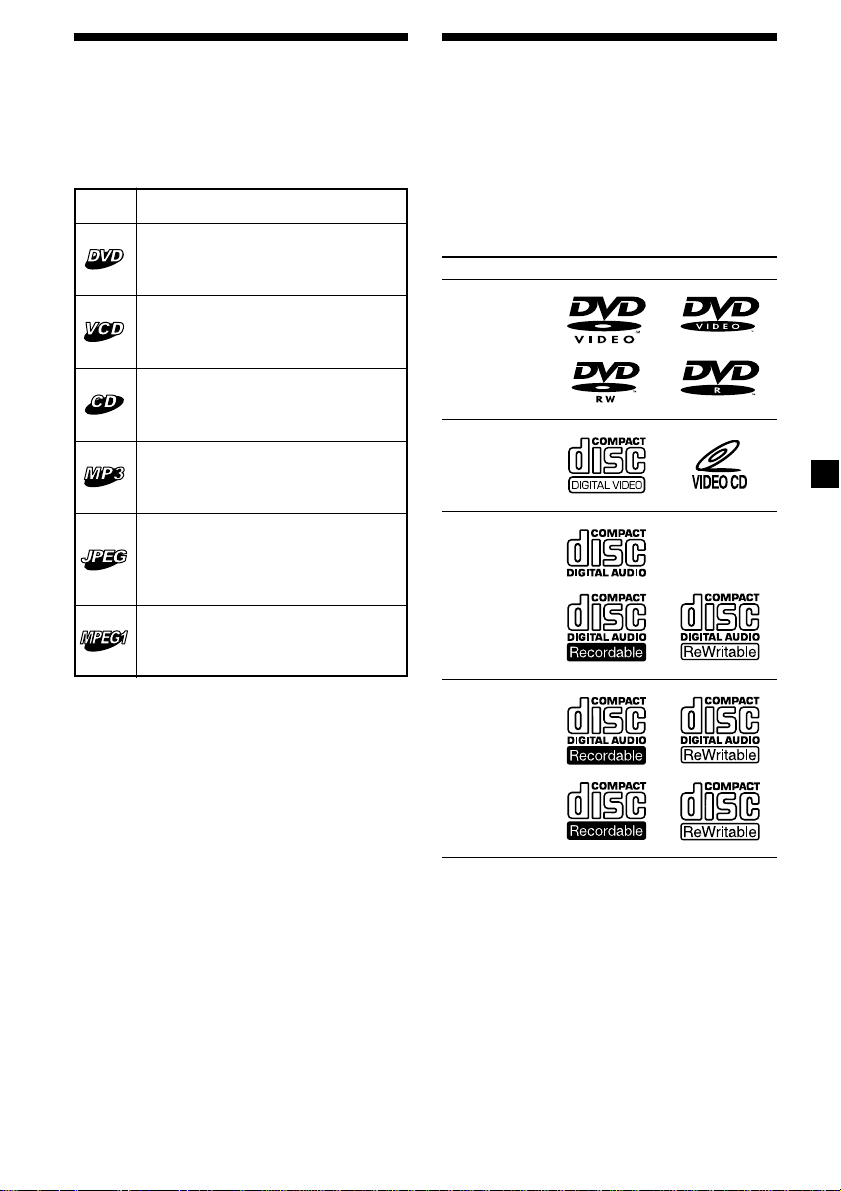
Icon Meaning
Functions available for DVD
VIDEOs or DVD-Rs/DVD-RWs in
video mode
Functions available for Video CDs
or CD-Rs/CD-RWs in video CD
format
Functions available for music CDs
or CD-Rs/CD-RWs in music CD
format
About discs this player can
play
This player can play the following discs:
•DVD
•DVD-R/DVD-RW
•Video CD
•Audio CD
•CD-R/CD-RW
Disc type Label on the disc
DVD VIDEOs
Functions available for files in MP3
format stored on CD-ROMs/CDRs/CD-RWs and “Memory Stick”
Functions available for files in
JPEG format stored on CD-ROMs/
CD-Rs/CD-RWs and “Memory
Stick”
Functions available for files in
MPEG1 format stored in “Memory
Stick”
Video CDs
Audio CDs
MP3 files/
JPEG files
“DVD VIDEO,” “DVD-R” and “DVD-RW” are
trademarks.
continue to next page t
7
Notes on CD-Rs (recordable CDs)/
CD-RWs (rewritable CDs)/DVD-Rs
(recordable DVDs)/DVD-RWs
(rewritable DVDs)
•Some CD-Rs/CD-RWs/DVD-Rs/DVD-RWs
(depending on the equipment used for its
recording or the condition of the disc) may
not play on this player.
•You cannot play a CD-R/CD-RW/DVD-R/
DVD-RW that is not finalized*.
•You cannot play a CD-R/CD-RW that is
recorded in Multi Session.
•You can play MP3/JPEG files recorded on
CD-ROMs, CD-Rs, and CD-RWs.
* A process necessary for a recorded CD-R/CD-RW
disc to be played on the audio CD player.
Region code of DVDs this player
can play
This player has a region code printed on the
rear of the player and will only play DVDs that
are labeled with identical region codes. DVDs
ALL
labeled
If you try to play any other DVD, the message
“REGION ERROR” will appear on the screen.
Depending on the DVD, the region code
indication may not appear even if the DVD is
prohibited by area restrictions.
will also be played on this player.
Region
code
Cautions
• This player CANNOT play these discs.
— DVD-Audio — DVD-RAM
— DVD-ROM — CD-G
— SVCD — CD-I
— Photo-CD — VSD
— Active-Audio (Data)
— CD-Extra (Data)
— Mixed CD (Data)
— CD-ROM (the data other than the MP3/JPEG
file)
— DVD-RW recorded in VR mode
• This product incorporates copyright protection
technology that is protected by method claims of
certain U.S. patents and other intellectual
property rights owned by Macrovision
Corporation and other rights owners. Use of this
copyright protection technology must be
authorized by Macrovision Corporation, and is
intended for home and other limited viewing
uses only unless otherwise authorized by
Macrovision Corporation. Reverse engineering or
disassembly is prohibited.
Note on PBC (Playback Control)
This player conforms to Ver. 1.1 and Ver. 2.0 of
Video CD standards. You can enjoy two kinds
of playback according to the disc type.
Disc type
Video CDs without
PBC functions
(Ver. 1.1 discs)
Video CDs with
PBC functions
(Ver. 2.0 discs)
You can
Video playback (moving
pictures) as well as music.
•Interactive software
with menu screens
displayed on the
monitor
(PBC Playback, page
26).
•Video playback
functions.
•High-resolution still
pictures if they are
included on the disc.
8
Note on DTS-encoded CDs
When playing DTS*-encoded CDs, excessive
noise will be heard from the analog stereo
outputs. To avoid possible damage to the
audio system, the consumer should take
proper precautions when the analog stereo
outputs of this player are connected to an
amplification system. To enjoy DTS Digital
Surround™ playback, an external 5.1-channel
DTS Digital Surround™ decoder system must
be connected to the digital output of this
player.
* “DTS,” “DTS Digital Surround” and “DTS Digital
Out” are trademarks of Digital Theater Systems,
Inc.
Terms for discs
DVD structure
Disc
Title
Chapter
Resetting the player
Before operating the player for the first time,
or after replacing the car battery, or after
changing the connections, you must reset the
player.
Press (RESET) with a pointed object, such as a
ball-point pen. Pushing it with force by using a
needle may damage the player.
RESET
Video CD/Audio CD structure
Disc
Track
•Title
The longest section of a picture or music
feature on a DVD, e.g., a movie for video
software, or an album for audio software, etc.
• Chapter
Sections of a picture or a music feature that
are smaller than titles. A title is composed of
several chapters. Each chapter is assigned a
chapter number enabling you to locate the
chapter you want. Depending on the disc,
chapters may not be recorded.
• Track
Sections of a picture or a music feature on a
Video CD/Audio CD. Each track is assigned
a track number enabling you to locate the
track you want.
• Scene
On a Video CD with PBC (Playback Control)
functions, the menu screens, moving pictures
and still pictures are divided into sections
called “scenes.” Each scene is assigned a
scene number enabling you to locate the
scene you want.
Notes
• When you press (RESET), some of the previous
settings may be lost. If this occurs, make the
settings again.
• It takes about 10 seconds for the player to reset
itself after pressing (RESET). Do not insert a disc
during this time. If you do, the player may not be
reset properly.
9
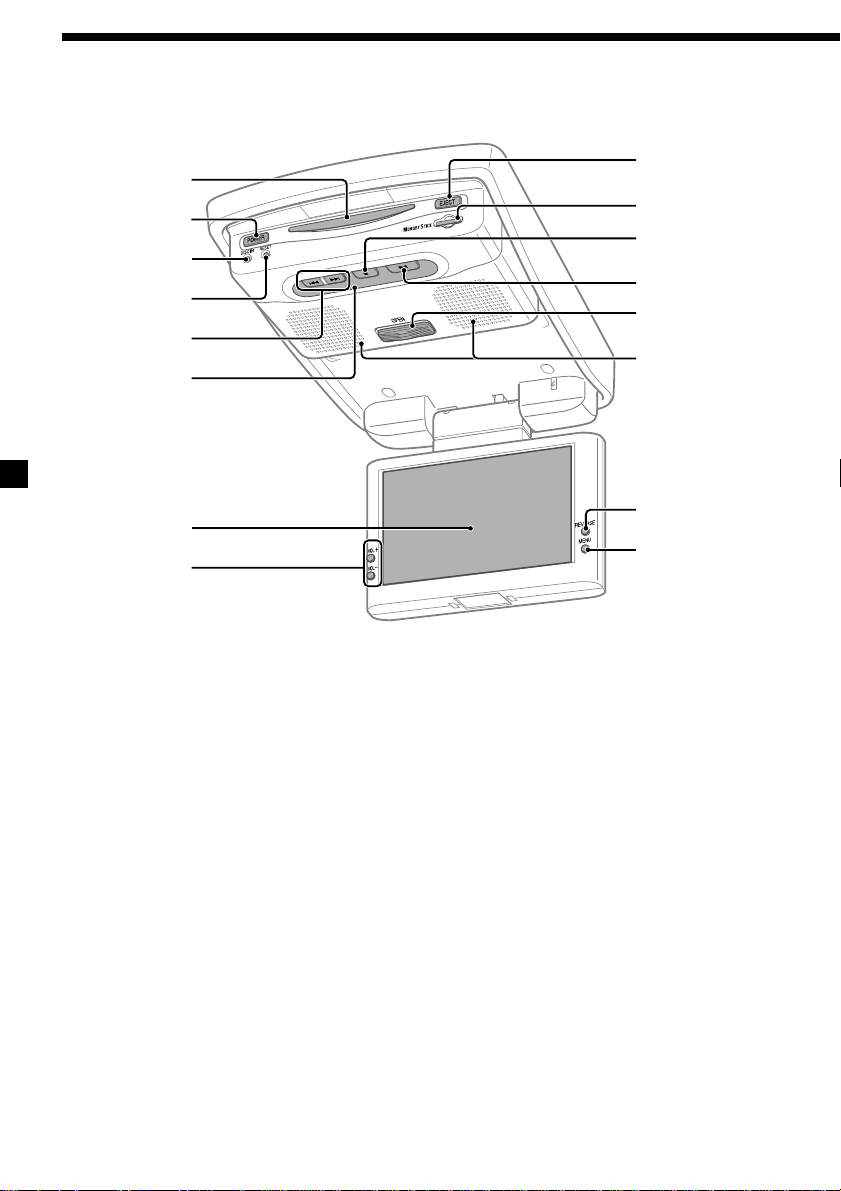
Location of controls
1
2
3
4
5
6
7
8
Refer to the pages listed for details.
1 Disc slot
2 POWER (on/off) button 13, 14, 19
To turn on/off the player.
3 DISC IN light
When a disc is in the player, the DISC IN
light glows orange.
4 RESET button 9
5 . (previous)/> (next) buttons 20,
22
6 Receptor for the card remote
commander/Transmitter for the cordless
headphones
7 Monitor
8 VOL +/– buttons 14, 15
To turn up or down the volume or to select
the item during menu operation.
9
0
qa
qs
qd
qf
qg
qh
XVM-R90D
9 EJECT button 20
Available to eject a disc from the player
even when the player is turned off.
q; “Memory Stick” slot 21
qa x (stop) button 20, 22
qs u (play/pause) button 20, 22
qd OPEN button 13
Slide to open the monitor.
qf Speakers (left/right)
qg REVERSE button 13, 15
To switch images upside down and
reverse the output of the audio channels.
qh MENU button 15
To make various display settings and FM
transmitter setting.
Note
Even when the player is turned off by pressing
(POWER), you can eject a disc from the player,
though you cannot insert a disc.
10
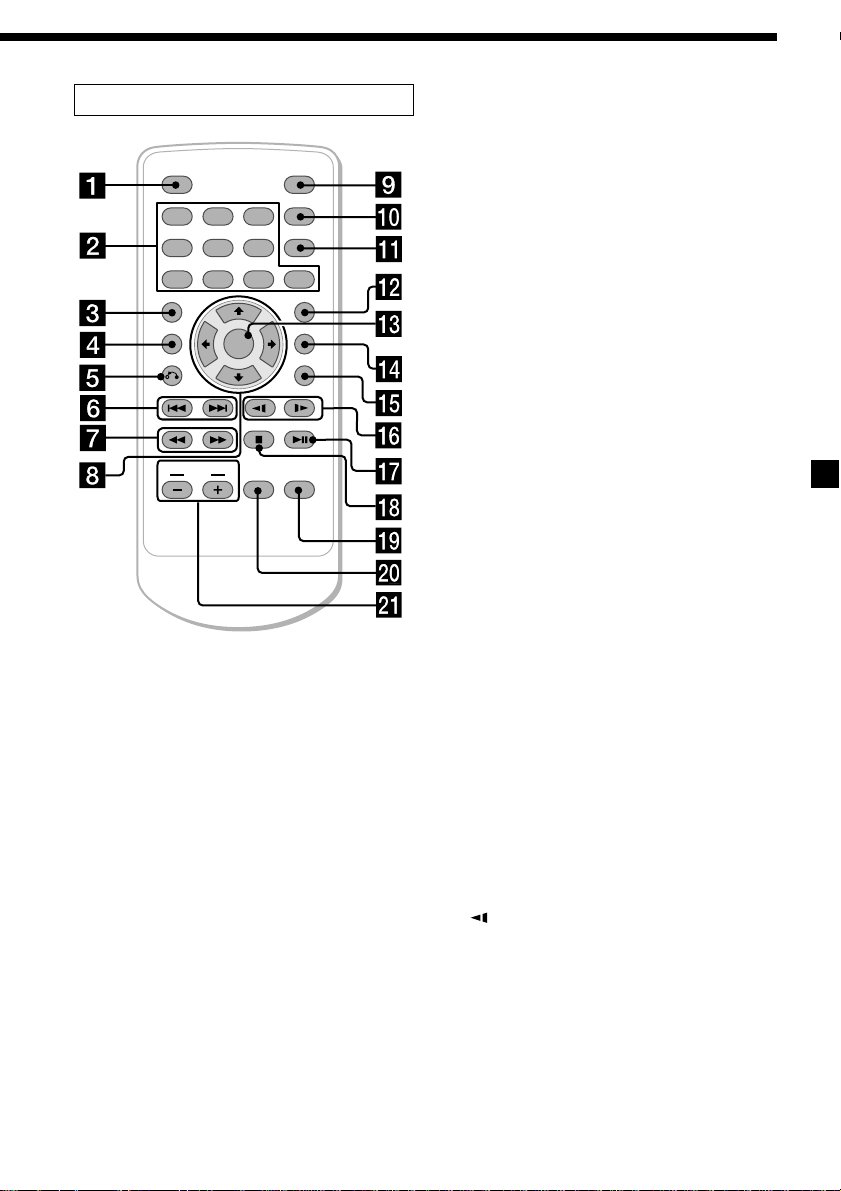
Card remote commander RM-X137
ENTER
INPUT
POWER
SEARCH
CLEAR
SUBTITLE
ANGLE
AUDIO
SETUP
DISPLAY
123
456
7 890
TOP MENU
MENU
VOL
Refer to the pages listed for details.
1 DISPLAY button 22
To display the time information of the disc.
2 Number buttons (0 to 9) 19, 21, 26, 27
3 TOP MENU button 24, 26
To display the top menu of a recorded
DVD.
4 MENU button 24
To display the recorded DVD menu, or to
turn on/off the PBC (Playback control)
menu of a Video CD.
5 O (return) button 26
6 ./> (previous/next) buttons 19,
21, 26
7 m (fast reverse)/
M (fast forward) buttons 19, 21
8 M/,/m/< buttons 19, 21, 24, 27
9 POWER (on/off) button 14, 19
To turn on/off the player.
q; SEARCH button 19
To specify a desired point on a disc by
chapter, title, or track.
qa CLEAR button
The corresponding buttons of the card
remote commander control the same
functions as those on the player.
Instructions in this manual describe how to use
the player by mainly using the card remote
commander.
Tip
Refer to “Replacing the lithium battery” for details
on how to replace the battery (page 38).
qs SUBTITLE button 23
To change the subtitle language while
playing a DVD.
qd ENTER button 19, 24, 27
To enter a setting.
qf ANGLE button 25
To select the multiple angles of view while
playing a DVD.
qg AUDIO button 25, 26
To change the audio output/audio
language.
qh (slow reverse)/y (slow forward)
buttons 19, 21
qj u (play/pause) button 19, 21, 26
qk x (stop) button 19, 21
ql SETUP button 27
Used to perform menu operations.
w; INPUT button 14, 21
To select the input source.
wa VOL (–/+) buttons 19
To turn up or down the volume.
continue to next page t
11
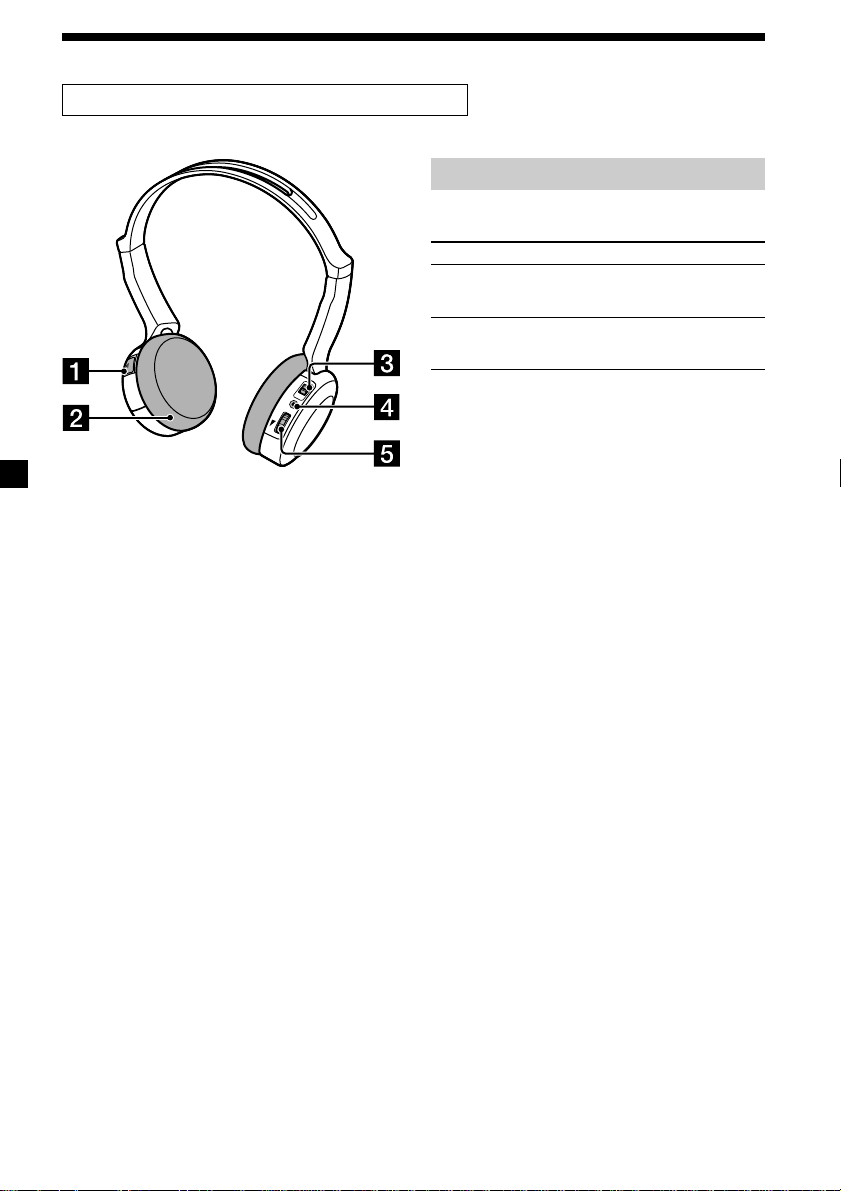
Cordless Stereo Headphones MDR-IF0140
N
E
P
O
1 Battery compartment lid 39
To set a battery, open the lid.
2 Ear pad 40
The ear pads are replaceable.
3 Power (ON/OFF) switch 18
4 POWER indicator 18
When the power switch of the headphones
is set to ON, the POWER indicator lights
up in red.
5 VOL control dial 18
To adjust the volume level from 0 to 10.
O
N
O
F
F
POW
ER
VOL
Battery life
Size AAA dry battery (1) is supplied with the
headphones.
Battery Approx. hours*
Sony alkaline battery 60 hours*
LR03/AM-4 (N)
Sony manganese battery 28 hours*
R03/UM-4 (NU)
*1at 1 kHz, 1 mW+1 mW output
2
Time stated above may vary, depending on the
*
temperature or conditions of use.
Tip
Refer to “Replacing the battery” for details on
how to replace the battery (page 39).
2
2
1
12
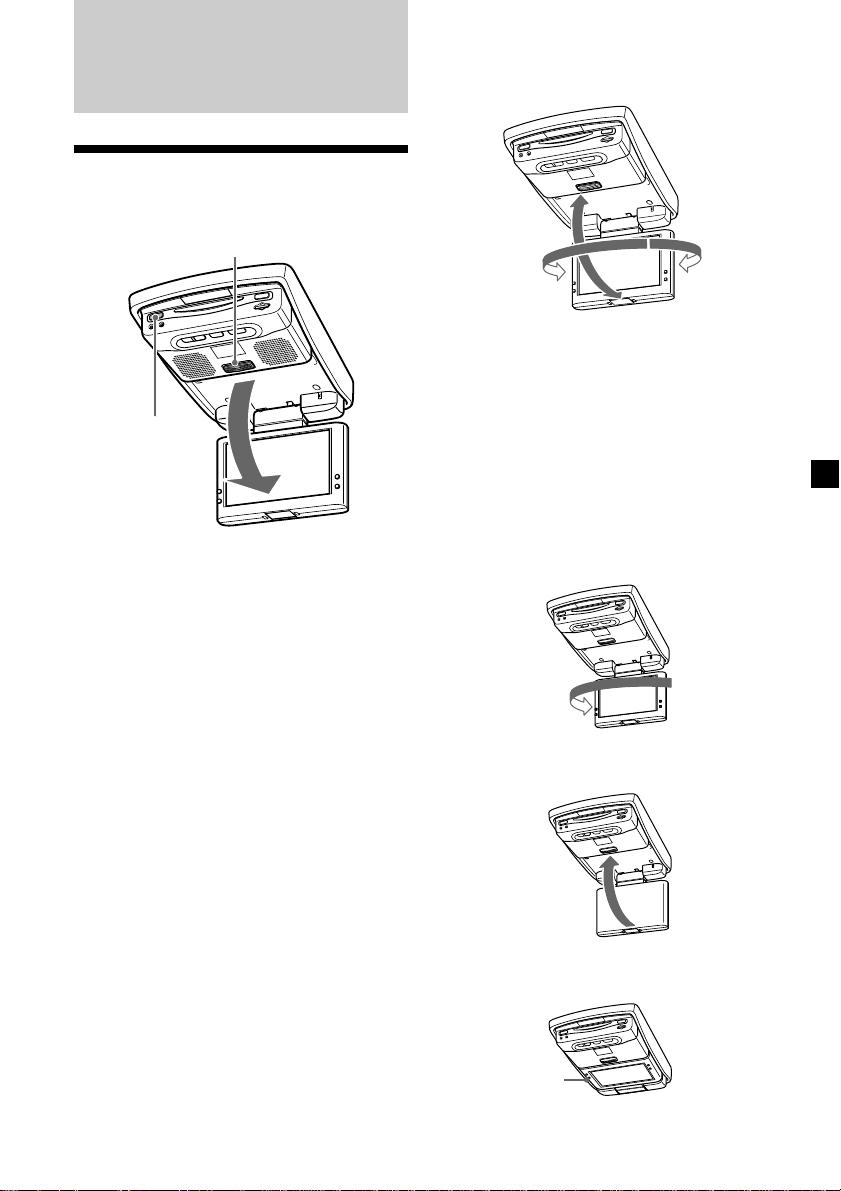
Operation for Monitor
Opening the display
monitor
OPEN
POWER
1 Slide (OPEN) to the front, and open the
display monitor.
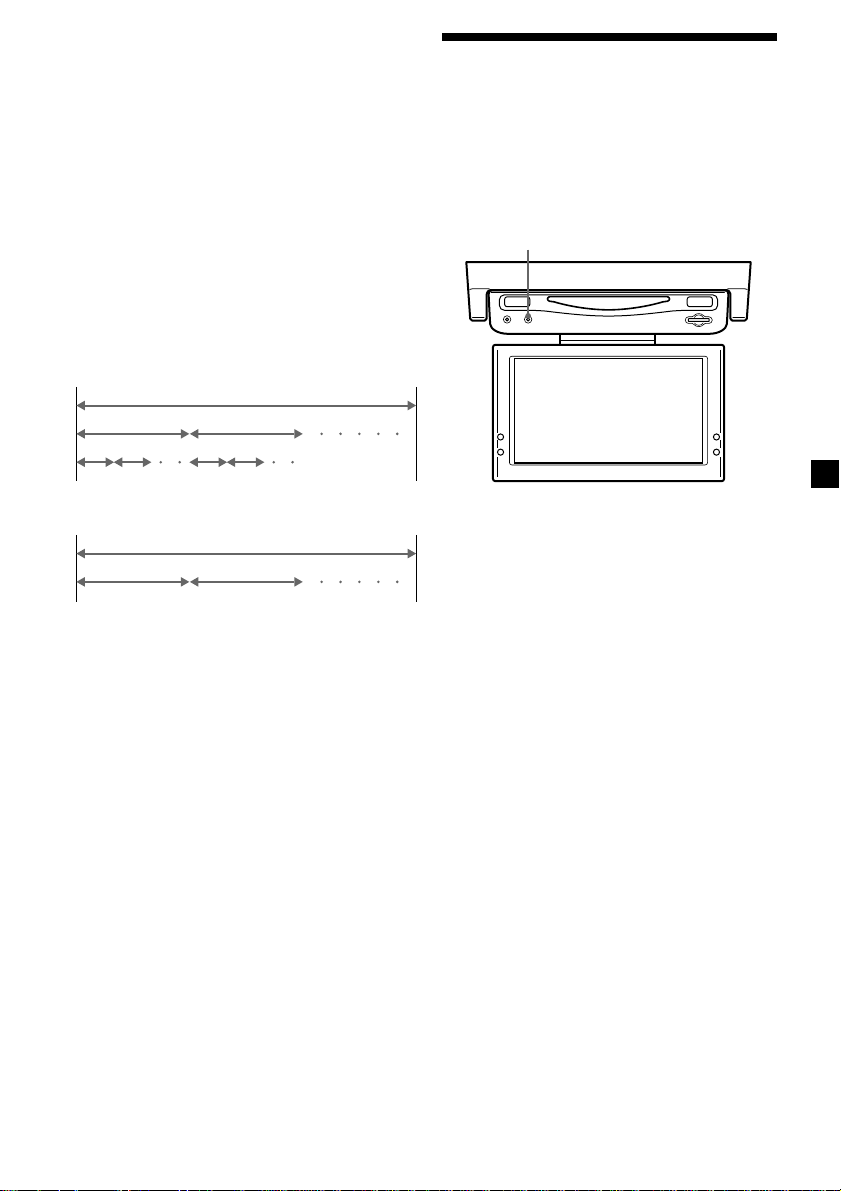
Adjusting the tilt and swivel
The display monitor can be adjusted within the
angles shown.
120˚
180˚
Tips
• Before closing the display monitor, make sure
that the monitor is turned and facing the
enclosure (you will hear a click).
• The monitor stores the input mode you set, even
if you turn off the monitor.
The reverse position of the display monitor
You can close with the LCD surface out after
turning around 180 degrees, and images on the
screen can be turned upside down by pressing
(REVERSE). Each time you press (REVERSE),
the reverse screen mode switches between on
and off.
30˚
2 Press (POWER) to turn on the player.
Tip
If your car has no ACC (accessory) position on the
ignition key switch and you set the POWER SELECT
switch to the B position, the player does not turn
on by pressing (POWER) on the card remote
commander (page 6).
Returning the display monitor to its
enclosure
Close the display monitor until it clicks.
Notes
• Be careful not to catch your finger in the display
monitor when closing.
• Do not put any foreign objects between the LCD
panel and the enclosure when closing.
180˚
x
x
REVERSE
13

Selecting the input source
Selecting the color system
You can select the input source for the
monitor.
ENTER
INPUT
POWER
SEARCH
CLEAR
0
SUBTITLE
ANGLE
AUDIO
SETUP
POWER
INPUT
DISPLAY
123
456
789
TOP MENU
MENU
VOL
1 Press (POWER) to turn on the player.
The current input source (DVD) appears on
the screen for 5 seconds.
2 Press (INPUT) repeatedly to select the
input source.
Each time you press (INPUT), the indication
changes as follows:
DVD y VIDEO
Be sure to change the input source setting
to “DVD” to play a disc or “Memory Stick”
with this player.
Note
When you play a “Memory Stick,” set the input
source to “DVD.”
Tip
If your car has no ACC (accessory) position on the
ignition key switch and you set the POWER SELECT
switch to the B position, the player does not turn
on by pressing (POWER) on the card remote
commander (page 6).
The player detects the color system of the
input video signal (NTSC or PAL) and changes
the setting automatically (auto mode).
Do the steps below to change the color system
setting for the input video signal manually.
POWER VOL +/–
1 Press (POWER) to turn on the player.
The current input channel (DVD) appears
on the screen for 5 seconds.
2 Within 5 seconds, press (VOL) (+) or
(VOL) (–) repeatedly to select “NTSC” or
“PAL.”
Note
When changed manually, color system setting for
the input video signal does not return to auto
mode until the player is turned off or input
channel setting is changed. Therefore, when it is
set to “PAL,” the DVD recorded in NTSC system
cannot be viewed on the monitor of the player
unless you turn off the player, then turn it on
again.
14

Changing the player and
monitor settings
To deactivate the cordless
headphones
1 Press (MENU) repeatedly to select “IR
HP.”
IR HP; On
Press
+
/
–
or MENU.
2 Press (VOL) (+) or (VOL) (–) to select
“off.”
MENUREVERSEVOL +/–
Turning off the speaker sound
from the player
1 Press (MENU) repeatedly to select
“Speaker.”
Each time you press (MENU), the setting
screen changes as follows:
Speaker t IR HP t FM Modulator t
Picture t Brightness t Color t
Hue* t Dimmer t Video Adjust t
Mode t Blue Back t Menu Off
* “Hue” appears only when the NTSC color
system is selected (page 14).
Speaker; On
Press
+
/
–
or MENU.
2 Press (VOL) (+) or (VOL) (–) to select
“off.”
Setting the FM modulator
You can transmit the audio signals to the FM
radio and output the signals from the car
stereo. Do the procedure below to turn on or
off the FM modulator and select the frequency.
1 Press (MENU) repeatedly to select “FM
Modulator.”
2 Press (VOL) (+) or (VOL) (–) to select
“Low,” “Middle,” “High,” or “Off.”
Select the FM modulator output level
according to the input sensitivity of the car
stereo’s radio.
3 To select the frequency, press
(REVERSE).
The “Frequency” screen appears.
Frequency 88.3MHz
Press
+
/
–
, MENU or Rev.
4 Press (VOL) (+) or (VOL) (–) to select the
frequency.
The settable range is 88.3 MHz to 89.9 MHz,
in 0.2 MHz steps.
continue to next page t
15
Notes
• When the output level is set to “High” in step 2,
noise may be heard.
• If noise is heard due to the interference with the
local FM broadcast, change the FM transmission
frequency.
• When the FM modulator is turned off, you
cannot change the frequency setting.
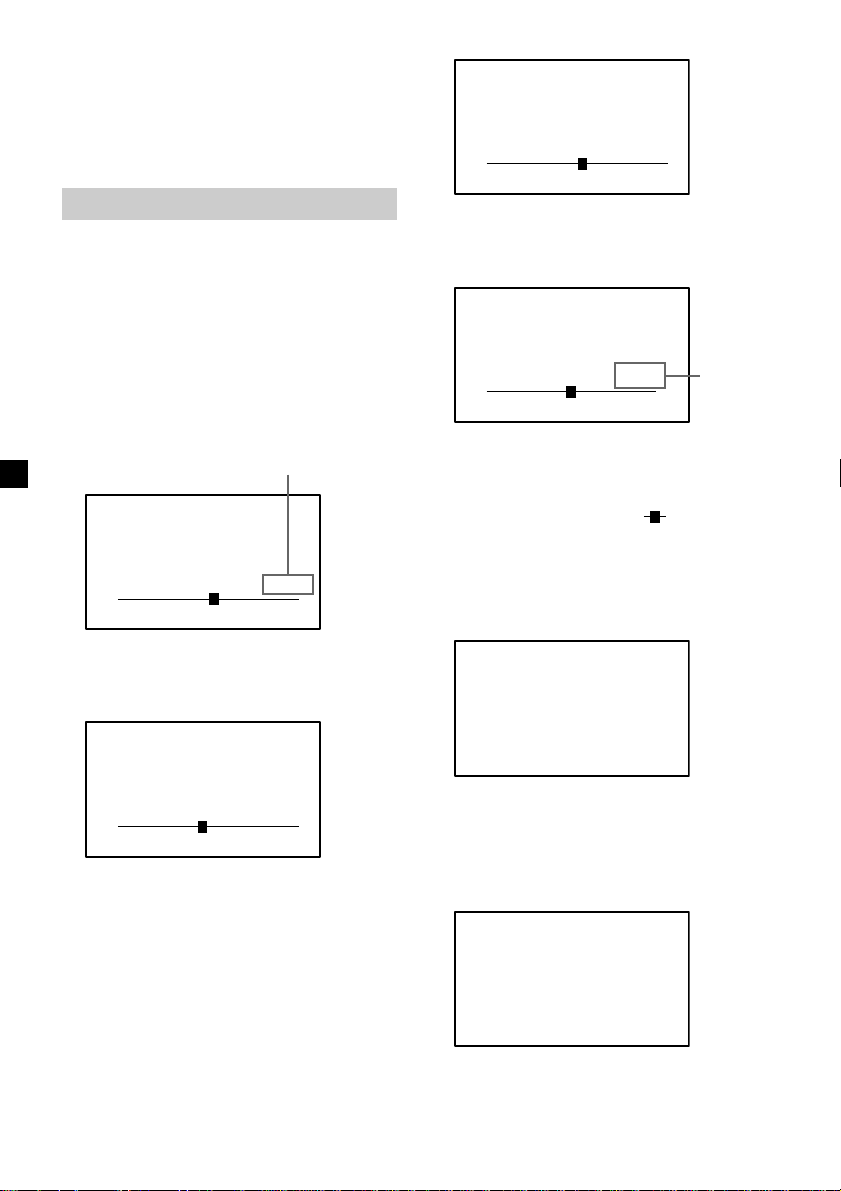
Changing the display settings
You can adjust the display settings manually if
the display is hard to see from the position
where you are seated.
1 Press (MENU) repeatedly to select the
desired item.
When “Color” is selected;
Color 32
Press
Press (VOL) (+) : to increase color intensity.
Press (VOL) (–) : to decrease color intensity.
When “Hue”*1 is selected;
+
/
–
or MENU.
2 Press (VOL) (+) or (VOL) (–) to adjust to
the desired setting.
When “Picture” is selected;
The setting value of the item
selected appears in this area.
Picture 32
Press
Press (VOL) (+) : to increase the contrast.
Press (VOL) (–) : to decrease the contrast.
When “Brightness” is selected;
Brightness 32
Press
Press (VOL) (+) : to brighten the contrast.
Press (VOL) (–) : to darken the picture.
+
/
–
+
/
–
or MENU.
or MENU.
Hue CTR
Press
Press (VOL) (+) : to increase the saturation.
Press (VOL) (–) : to decrease the saturation.
*1“Hue” is adjustable only when the NTSC
color system is selected.
2
“CTR” appears only when is in the
*
center of the bar.
When “Dimmer” is selected;
Press (VOL) (+) or (VOL) (–) to select “On.”
The brightness of the screen will be
adjusted automatically.
Dimmer; On
Press
When “Video Adjust” is selected;
Press (VOL) (+) or (VOL) (–) to select
“Reset.”
“Picture,” “Brightness,” “Color,”
“Hue,” and “Dimmer” settings will be
reset to the factory preset level.
+
/
–
+
/
–
or MENU.
or MENU.
2
*
16
Video Adjust;
Reset
Press
+
/
–
or MENU.
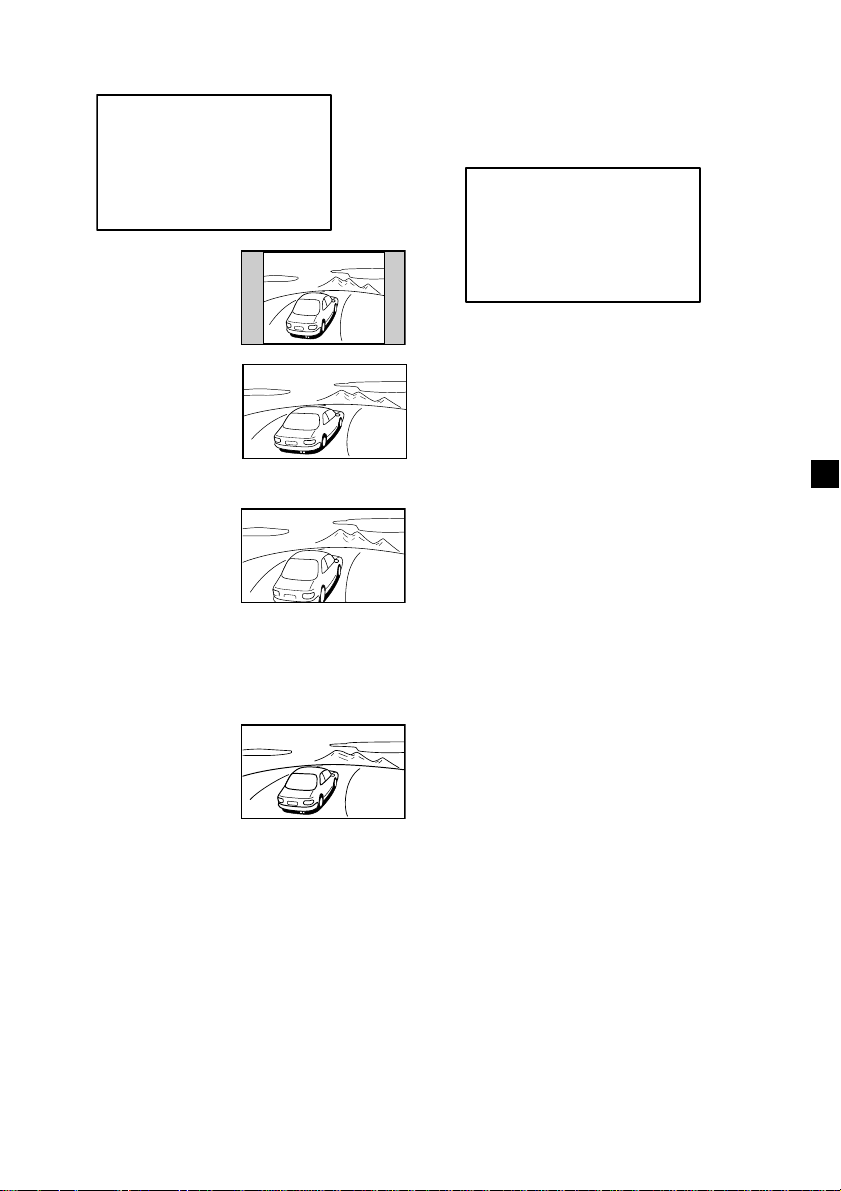
When “Mode” is selected;
“Normal,” “Full,” “Zoom,” or “Wide” can
be set as the screen mode.
Mode; Full
Press
+
/
–
or MENU.
When “Blue Back” is selected;
Press (VOL) (+) or (VOL) (–) to select “On.”
The blue background screen appears when
no signal, or a weak signal is received.
When a continuously weak video signal is
received, the blue background may flicker.
If this occurs, set to off.
•“Normal”
An image with
an aspect ratio of
4 to 3 (regular
image).
•“Full”
An image with
an aspect ratio of
4 to 3 enlarged to
the left and right
edges of the
screen.
•“Zoom”
An image with
an aspect ratio of
4 to 3 enlarged to
the left and right
edges of the
screen, with the
overflowing
parts (top and
bottom) cut off to
fill the screen.
•“Wide”
An image with
an aspect ratio of
4 to 3, with only
the left and right
sides of the
image being
enlarged to fill
the screen.
Blue Back; On
Press
+
/
–
or MENU.
17
Use of Headphones
Listening with the
headphones
Before listening
•The transmitter for the cordless headphones
is on the player. See the location of controls
for the player (page 10).
•To prevent your ears from being damaged,
first lower the volume.
1 Turn on the player.
2 Set the power switch to ON on the right
housing of the headphones.
The headphones turn on and the POWER
indicator glows red.
Power (ON/OFF)
switch
POWER indicator
3 Put on the headphones.
Be sure to put the right housing (R) on your
right ear and the left housing (L) on your
left ear.
4 Start playback on the player.
5 Turn the VOL control dial to adjust the
volume.
If the infrared sensors of the headphones
are covered by your hands when adjusting
the volume, the attenuate function will be
activated and volume cannot be adjusted.
To adjust the volume, move nearer toward
the transmitter of the monitor, or orient the
infrared emitters on the left housing
towards the transmitter of the monitor.
Notes
• The volume of the headphones cannot be
adjusted with the player or card remote
commander. Use the volume control on the
headphones.
• When the headphones are not to be used for a
long period of time, remove the battery to avoid
damage caused by battery leakage and
subsequent corrosion.
• Do not leave the headphones in a location
subject to direct sunlight, heat or moisture (It is
recommended to use the headphones at a
temperature of between 5 ˚C and 35 ˚C (41 ˚F and
95 ˚F)).
• If the headphones are used while exposed to
direct sunlight, sensitivity of the infrared
receptor may deteriorate, and inferior quality
sound may result.
• Do not drop, hit or otherwise subject
headphones to strong shocks of any kind. This
could damage the product.
• If you leave the headphones in direct sunlight,
on a dash board etc., the battery may leak and
burst, and cause an injury.
Sound is automatically
attenuated if noise increases
— Attenuate function
If the infrared rays are obstructed, or the
headphones are used outside their effective
range, noise will increase and sound will
become hard to hear. To avoid potential ear
damage as a result of noise, this function
attenuates any sound in the headphones.
Sound is automatically restored when you
move nearer to the transmitter or remove the
obstruction.
After listening
Take off the headphones, and then turn off the
power (Noise may occur if you turn off the
monitor before taking off the headphones).
18
VOL control dial
Various Playback
This chapter describes various functions for
playback.
The JPEG files are displayed as a slide
show.
If the “SMART NAVI” menu display
appears, press the number buttons or M/
,/m/< buttons to select the desired
folder/file (page 21) (MP3/JPEG only).
3 Press (VOL) (+) or (VOL) (–) to adjust the
volume.
Playing a disc
ENTER
ENTER
INPUT
INPUT
POWER
POWER
SEARCH
SEARCH
CLEAR
CLEAR
0
0
SUBTITLE
SUBTITLE
ANGLE
ANGLE
AUDIO
AUDIO
SETUP
SETUP
POWER
SEARCH
ENTER
/y
u
x
DISPLAY
DISPLAY
123
Number
buttons
M/m
</,
123
456
456
789
789
TOP MENU
TOP MENU
MENU
MENU
./>
m/M
VOL
VOL –/+
VOL
1 Press (POWER) to turn on the player.
The monitor turns on and the green light of
the POWER button on the player lights up.
2 Insert the disc (labeled side up) into the
player.
To turn off the power
Press (POWER) so that the green light of the
POWER button on the player turns off.
Notes
• The volume of the headphones cannot be
adjusted with the player or card remote
commander. Use the volume control on the
headphones.
• Even when the player is turned off, you can eject
a disc from the player, though you cannot insert
a disc.
• Read the instruction manual supplied with the
disc to play with this player.
• When you play an 8-cm disc (e.g., CD-single), be
sure to insert it to the center area of the disc slot.
• Depending on the recording method used on the
disc, it may take a minute or more before
playing.
• Depending on the condition of the disc, it may
not play back (page 40).
•A high-bit rate MP3 file such as 320 kbps may not
play back properly.
• When “SMART NAVI” is set to “NO MENU” (page
34), if the last track/file of an Audio CD/MP3/JPEG
disc has finished, playback restarts from the first
track/file.
continue to next page t
Playback starts automatically.
If a disc is already inserted or playback
does not start automatically, press u to
start playback.
19

Operation for playback
To Do this
Stop playback Press x*
Eject the disc Press (EJECT) on the
player
Pause Press u*
Press again to
resume playback
Go to the next chapter, Press >
track, or scene
Go back to the Press .
preceding chapter,
track, or scene
Fast forward/ Press M/m while
fast reverse playing*3 *
Slow forward Press y/ while
(DVD/Video CD only)/ playing*3 *
Slow reverse
(DVD only)
*1If the resume playback function is activated, you
can resume playback later by pressing u. For
details, see “Resume playback” (page 20).
2
“PAUSE” is displayed on the screen.
*
3
No sound is output during fast forward/fast
*
reverse or slow forward/slow reverse.
*4 A disc other than a DVD returns to normal
playback when a track/MP3 file finishes.
1
2
4
4
Searching a chapter/title/track
directly
1 During playback or pause, press
(SEARCH) to display search screen.
•DVD
When you press < or ,, the search
screen toggles between Title and Chapter.
•Video CD (only when PBC is off)/Audio
CD
The track search screen appears.
Resume playback
1 During playback, press x to stop.
The player memorizes the point where
playback is stopped.
•DVD/Video CD/Audio CD
“PRESS PLAY TO CONTINUE” flashes
on the screen.
2 Press u to start playback.
When resume playback is activated,
playback starts from the point where
playback is stopped. When resume
playback is deactivated, playback starts
from the beginning.
•MP3
When resume playback is activated,
playback starts from the beginning of the
MP3 file (track) during which you
stopped playback.
Notes
• When you play back a “Memory Stick,” the
resume function is deactivated. Even if a disc is
being played, the resume function is deactivated
when a “Memory Stick” is inserted in the player.
• To deactivate the resume function, press x again
while playback is stopped or eject the disc from
the player.
• The player stores the point where you stopped
playback for the disc currently in the player.
• The resume function will be deactivated:
— when the disc is ejected.
• If the resume function is activated during fast/
slow forward or fast/slow reverse playback,
normal playback starts when you press u.
2 Press the number buttons to enter the
desired chapter/title/track number.
3 Press (ENTER).
Note
You cannot set “0.”
20
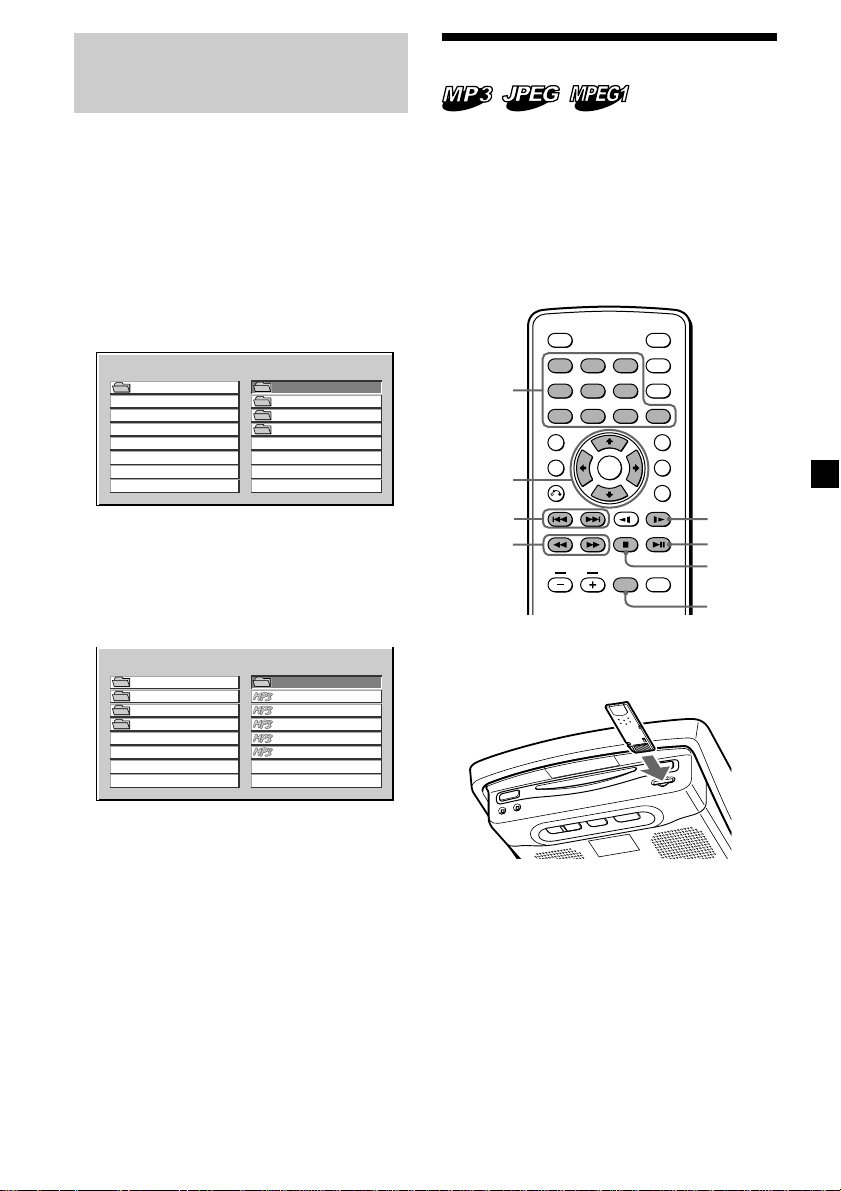
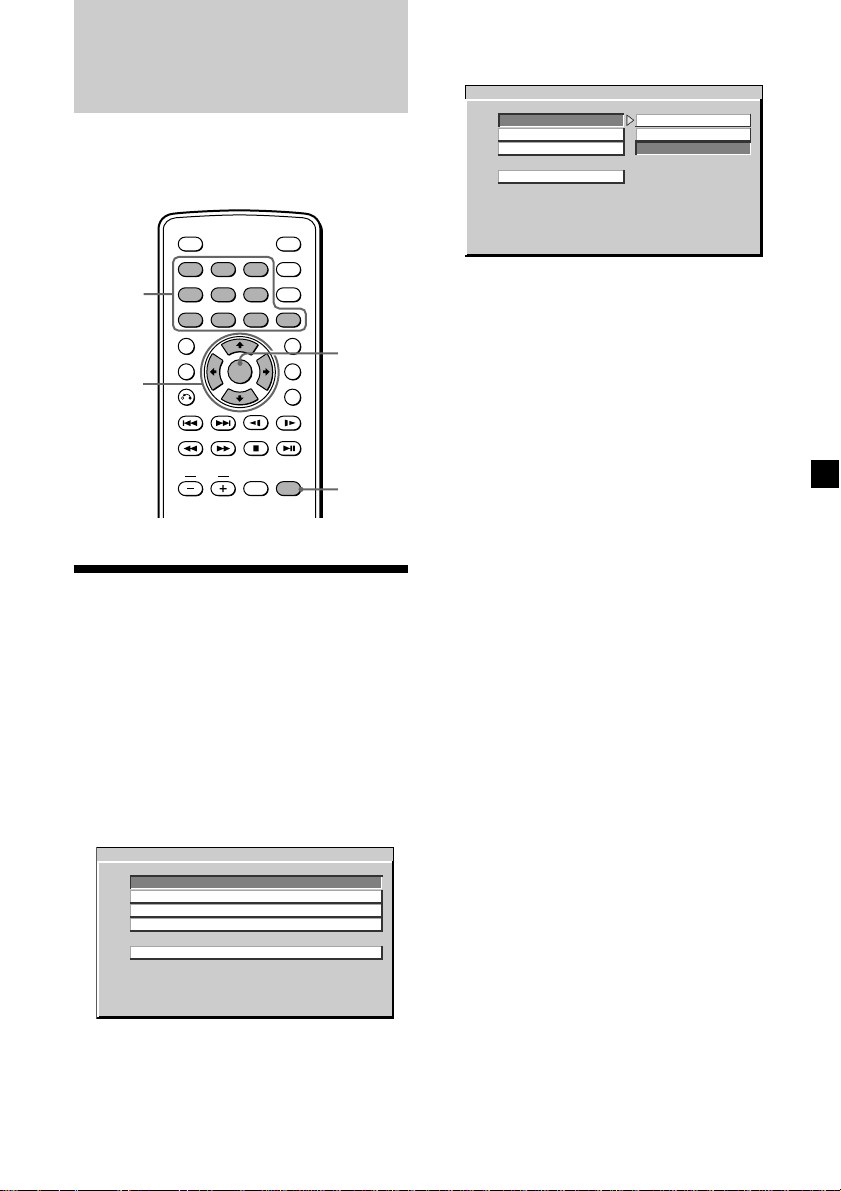
MP3/JPEG/MPEG1* file
playback with the menu
display
If you have set “SMART NAVI” to “WITH
MENU” (page 34) and play media containing
MP3/JPEG/MPEG1* files, the menu display
for folder names and MP3/JPEG/MPEG1* file
names will appear. You can easily search the
desired MP3/JPEG/MPEG1* file with the
“SMART NAVI” menu display.
1 Insert media containing MP3/JPEG/
MPEG1* files in this player.
The “SMART NAVI” menu display
appears.
ROOT
SMART NAVI
ROOT
FOLDER 1
FOLDER 2
FOLDER 3
0
1
2
3
2 Press the number buttons to select the
desired folder.
M/,/m/< buttons are also available to
select the desired folder.
If you select the folder 1, the MP3/JPEG/
MPEG1* file names in the folder 1 appear.
ROOT
FOLDER 1
FOLDER 2
FOLDER 3
SMART NAVI
_ _
SCHUBERT
BACH
MOZART
CHOPIN
BRAHMS
0
1
2
3
4
5
Playing a “Memory Stick”
You can playback MP3/JPEG/MPEG1 files in
a “Memory Stick.”
Notes
• “Memory Stick Duo” and “Memory Stick PRO”
cannot be used.
• Data playback that requires MagicGate functions
cannot be performed.
• Some MPEG1 files may not play back properly
due to the way they were recorded.
ENTER
INPUT
POWER
SEARCH
CLEAR
0
SUBTITLE
ANGLE
AUDIO
SETUP
y
u
x
INPUT
DISPLAY
Number
buttons
M/m
</,
123
456
789
TOP MENU
MENU
./>
m/M
VOL
1 Insert a “Memory Stick” into the player
until it clicks.
3 Press the number buttons to select the
desired MP3/JPEG/MPEG1* file.
M/,/m/< buttons are also available to
select the desired MP3/JPEG/MPEG1* file.
Playback starts.
To turn off the menu display for MP3/JPEG/
MPEG1* files, set “SMART NAVI” to “NO
MENU” (page 34).
* Only when a “Memory Stick” is played.
Notes
• To deactivate the resume function, press x again
while playback is stopped or eject the disc from
the player.
• Some MPEG1 files may not play back properly
due to the way they were recorded.
2 Press (INPUT) repeatedly to select
“DVD.”
Playback starts automatically.
The JPEG files are displayed as a slide
show.
If the “SMART NAVI” menu display
appears, press the number buttons or M/
,/m/< buttons to select the desired
folder/file (page 21).
continue to next page t
21
Note
Depending on the recording method and size of
data, it may take some time before playback of the
first track/file.
Displaying elapsed time
To eject the “Memory Stick”
Push in the “Memory Stick” momentarily, then
remove it.
Notes
• Insert the “Memory Stick” in the correct
direction.
• Do not forcefully remove the “Memory Stick.”
Operation for playback
To Do this
Stop playback Press x
Pause Press u*
Go to the next file Press >
Go back to the Press .
preceding file
Fast forward/ Press M/m while
fast reverse playing*2 *
(MP3/MPEG1 only)
Slow forward Press y while
(MPEG1 only) playing*2 *
1
3
3
You can display the elapsed time and the
remaining time of DVDs, Video CDs and
Audio CDs.
ENTER
INPUT
POWER
SEARCH
CLEAR
0
SUBTITLE
ANGLE
AUDIO
SETUP
DISPLAY
DISPLAY
123
456
789
TOP MENU
MENU
VOL
During playback, press (DISPLAY).
The elapsed time or the remaining time is
displayed at the upper left.
Each time you press (DISPLAY), the display
changes as follows:
• DVD
*1“PAUSE” is displayed on the screen.
2
No sound is output during fast forward/fast
*
reverse or slow forward.
*3The “Memory Stick” returns to normal playback
when the MP3/MPEG1 file finishes.
22
T0ITLE 01/01 CHAPTER 002/005
0:24:50
T0ITLE REMA I
1:25:41
C0HAPT R ELA SED
0:01:48
C0HAPT R REMEAIN
0:03:26
OFF
* The format of the sound source (Dolby D,
DTS, or LPCM) may appear.
Dolby D
*
N
Dolby D
*
EP
Dolby D
*
Dolby D
*

• Video CD (when PBC is set to OFF)/CD
S0INGLE
ELA SEDP
0:00:12
SINGLE0REMA I
0:04:45
T0OTAL ELA SED
0:06:32
T0OTAL REMAI N
0:41:15
OFF
N
P
Changing the subtitle
language
Some DVDs have recorded subtitles in one or
more languages. You can turn the subtitles on
or off, or change the subtitle language on such
DVDs.
ENTER
INPUT
POWER
SEARCH
CLEAR
0
SUBTITLE
ANGLE
AUDIO
SETUP
SUBTITLE
DISPLAY
123
456
789
TOP MENU
MENU
VOL
During playback, press (SUBTITLE).
The subtitle language is displayed at the
upper left.
Example: a subtitle language display
SUBTITLE 02/32 : ENGLISH
Each time you press (SUBTITLE), the
language switches within the list of subtitle
languages recorded on the disc.
When the display for the language code
appears, input the language code
corresponding to the desired language
(page 48).
Notes
• You can also change the subtitle languages by
changing Setup*. See “Displaying the subtitles
for DVD — SUBTITLE” (page 31).
* You can change to a specific subtitle language
using a setup menu, only if the language is
included in both the disc and the setup screen.
• If you want to hide the subtitles, press
(SUBTITLE) repeatedly to select “OFF.”
• This function varies or may not work, depending
on the DVD.
23
Using a DVD menu
With some DVDs you can use the original
menu such as title menu and DVD menu. You
can play your favorite scene or song by
selecting titles of songs and scenes during a
DVD playback. You can select an item, subtitle
language, audio language etc. by selecting a
DVD menu. The contents of title menus and
DVD menus differ, depending on the DVD.
There may be some DVDs which have no
recorded menus.
Using the MENU button
Some DVDs have more comprehensive Menu
that includes such things as the audio
languages, subtitle languages, titles, and
chapters, etc.
1 During a DVD playback, press (MENU).
The DVD menu is displayed.
2 Press M/,/m/< to select the desired
item.
ENTER
INPUT
POWER
SEARCH
CLEAR
SUBTITLE
ANGLE
AUDIO
SETUP
ENTER
M/m
</,
TOP MENU
MENU
DISPLAY
123
456
7890
TOP MENU
MENU
VOL
Using the TOP MENU button
Some DVDs have a title menu. From the title
menu you can select a title for playback. Titles
are the longest sections of a picture or music
feature on a DVD, e.g., a movie, or an album
for audio software, etc. The TOP MENU
button is available to display the initial menu
screen.
1 During DVD playback, press (TOP MENU).
The top menu (titles) is displayed.
* The contents of the top menu differ,
depending on the DVD.
3 Press (ENTER).
If additional selection screens appear,
repeat step 2 and 3.
Notes
• Some DVDs do not have a DVD menu and on
some DVDs, the contents of the DVD menu and
title menu are the same.
• On some DVDs, “DVD Menu” may be expressed
as “MENU.”
• On some DVDs, “Press ENTER” may be expressed
as “Press SELECT” in step 3.
• The contents of the DVD menu differ, depending
on the DVD.
• Read the instruction manual supplied with a
DVD.
2 Press M/,/m/< to select the desired
title.
3 Press (ENTER).
The title you selected starts to play.
24
Changing the audio
language
Some DVDs have multiple audio languages
you can choose from.
ENTER
INPUT
POWER
SEARCH
CLEAR
0
SUBTITLE
ANGLE
AUDIO
SETUP
AUDIO
DISPLAY
123
456
789
TOP MENU
MENU
VOL
During playback, press (AUDIO)
repeatedly to select the desired audio
language.
The current audio language is displayed at
the upper left.
Example: an audio language display
AUDIO 1/2: Dolby D 5.1 ENGLISH
The format of the sound source
(Dolby D, DTS, or LPCM) may appear.
When the display for the language code
appears, input the language code
corresponding to the desired language
(page 48). When the same language is
displayed two or more times, the DVD is
recorded in multiple audio format.
Notes
• You can switch the audio language only if
multiple audio languages are recorded on the
DVD.
• You can also change the audio languages by
using the DVD menu (page 24) or the setup
screen* (page 30).
* You can change to a specific audio language
using a setup screen, only if the language is
included in both the disc and the setup screen.
• This function varies or may not work, depending
on the DVD.
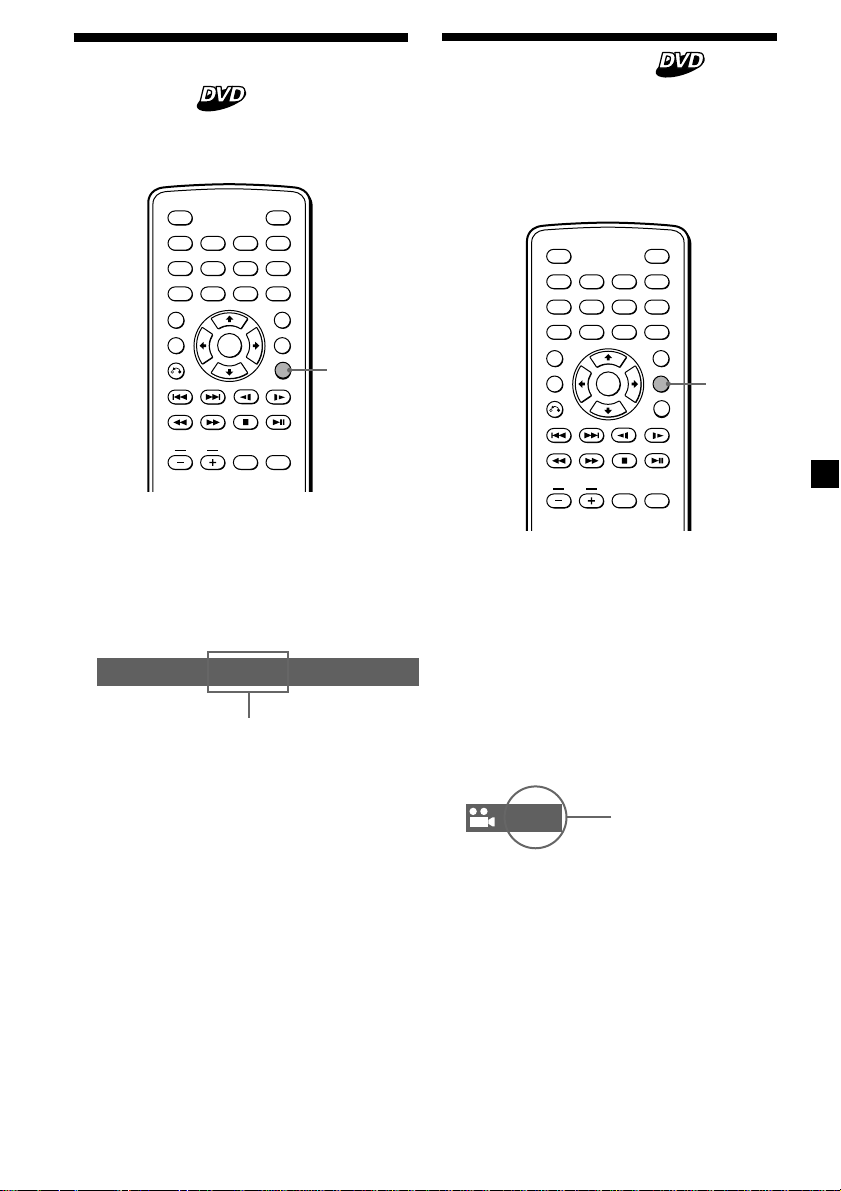
Changing angles
Some DVDs have multiple alternative angles
recorded for certain scenes. If you have set
“ANGLE MARK” to “ON” (page 28), a notice
appears for 3 seconds at the scene. If “ANGLE
MARK” is not set to “ON,” the notice does not
appear at the scene.
DISPLAY
123
456
789
TOP MENU
MENU
VOL
1 During playback of a DVD having
multiple alternative angles recorded,
press (ANGLE)when a notice appears.
The number of the currently selected angle
is displayed at the upper right.
2 Press (ANGLE) repeatedly to select your
favorite angle number, while the angle
number is displayed.
Each time you press (ANGLE), the angle
number switches.
3 / 5
Notes
• You can switch the angle only if multiple angles
are recorded on the DVD.
• The total number of recorded angles differs
depending on the DVD and scene.
• You can only switch the angle during normal
playback. You cannot switch the angle during
fast forward/reverse playback.
• When the selected scene with multi angles
appears, the angle is automatically switched to
the angle number you selected in step 2.
• This function varies or may not work, depending
on the DVD.
POWER
SEARCH
CLEAR
0
SUBTITLE
ANGLE
ENTER
AUDIO
SETUP
INPUT
The angle number
you have currently
selected/the total
number of multiple
alternative angles
ANGLE
25
Changing the audio output
You can select the desired audio output from
“STEREO,” “L-MONO,” “R-MONO,” or “MIXMONO”during Video CD or Audio CD
playback.
Using the PBC (Playback
Control) function
During playback of a PBC compatible Video
CD, you can display the PBC menu and select
the item from the menu.
ENTER
INPUT
POWER
SEARCH
CLEAR
0
SUBTITLE
ANGLE
AUDIO
SETUP
AUDIO
DISPLAY
123
456
789
TOP MENU
MENU
VOL
1 During playback, press (AUDIO).
The current output is displayed at the
upper left.
Example: an audio output display
L-MONO
2 Press (AUDIO) to select the desired
output from “STEREO,” “L-MONO,” “RMONO,” or “MIX-MONO” while the
output is displayed.
Each time you press (AUDIO), the output
switches.
ENTER
POWER
SEARCH
CLEAR
0
SUBTITLE
ANGLE
AUDIO
Number
buttons
TOP MENU
O
DISPLAY
123
456
789
TOP MENU
MENU
./>
u
INPUT
VOL
SETUP
1 Insert a Video CD, then press (TOP MENU)
repeatedly to select “PBC ON.”
Depending on the Video CD, the PBC menu
may be displayed automatically after
inserting a Video CD.
Each time you press (TOP MENU), the PBC
menu function turns on or off.
2 Press u.
The PBC menu is displayed.
3 While the PBC menu screen is displayed;
— press the number buttons to select the
number of the desired item.
— press ./> to go to the previous/
next page.
Button functions vary or may not work,
depending on the Video CD.
26
Notes
• To display the PBC menu during playback of a
Video CD, press (TOP MENU) repeatedly to select
“PBC ON,” then press u.
• During playback of a Video CD with “PBC ON,”
press the number buttons or ./> to change
the item. The PBC menu is not displayed but the
item you selected starts to play.
• During playback of a Video CD with “PBC ON,”
press O (return) to display the PBC menu.
• The PBC menus differ, depending on the Video
CD. Read the instruction manual supplied with
the Video CD.
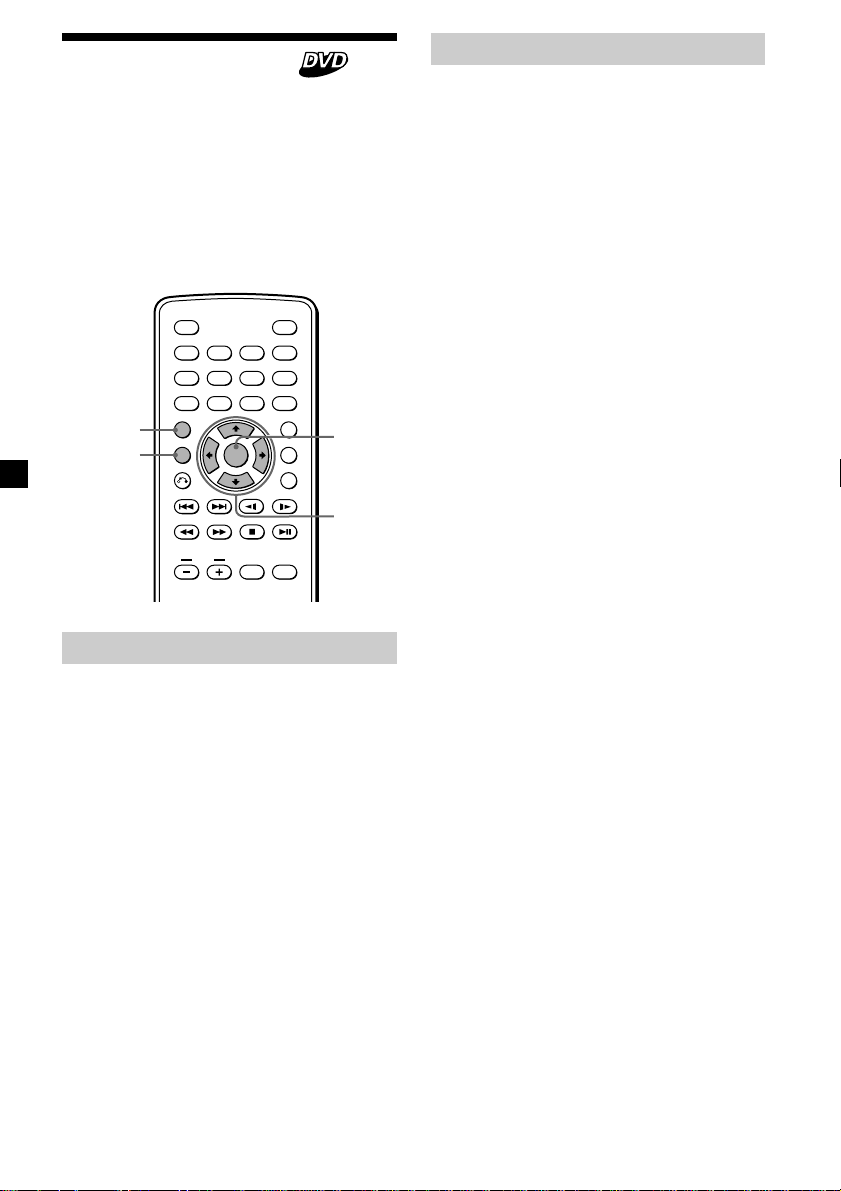
Changing Setup
You can set up and adjust this player using the
on-screen setup menu. Most settings need to
be set when you first use this player.
3 Press M or m repeatedly to select “TV
DISPLAY,” then press ,.
-- GENERAL PAGE - -
TV DISPLAY
ANGLE MARK
SCR SAVER
MAIN PAGE
4:3 PS
4:3 LB
16:9 WIDE
ENTER
INPUT
POWER
SEARCH
CLEAR
0
SUBTITLE
ANGLE
AUDIO
SETUP
ENTER
Number
buttons
M/m
</,
DISPLAY
123
456
789
TOP MENU
MENU
VOL
SETUP
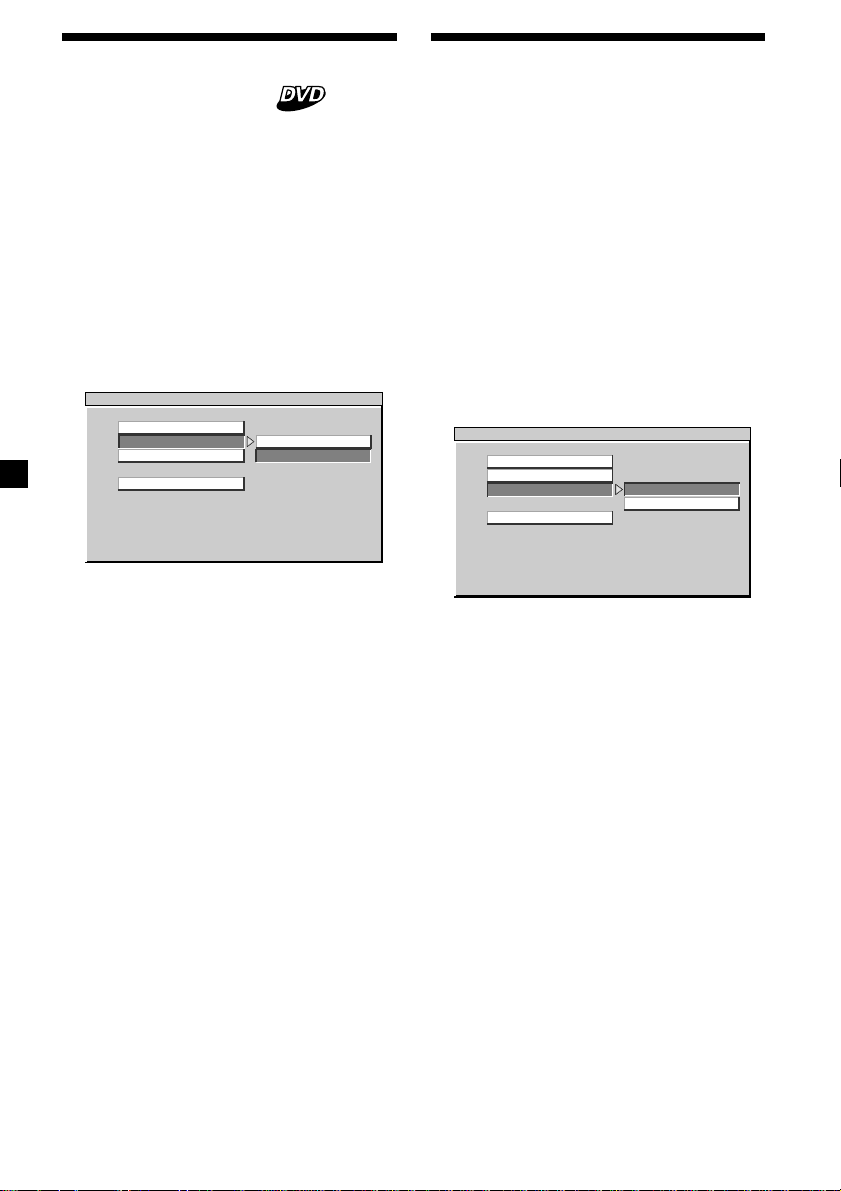
Setting the aspect ratio
for the TV screen
— TV SCREEN
When you connect the player to a TV to watch
the DVD on TV screen, make this setting
according to the type of the TV screen.
1 Press (SETUP).
The main page for setup appears.
“PREFERENCES” is only available when
playback is stopped.
SETUP MENU -- MAIN PAGE
GENERAL SETUP
SPEAKER SETUP
AUDIO SETUP
PREFERENCES
EXIT SETUP
WIDE SCREEN TV
4 Press M or m repeatedly to select “4:3
PS,” “4:3 LB,” or “16:9 WIDE.”
5 Press (ENTER).
To return to normal play screen, press
(SETUP) anytime.
Note
To return to the main page for setup, press M/m/<
repeatedly to select “MAIN PAGE,” then press
(ENTER).
GENERAL SETUP
2 Press M or m repeatedly to select
“GENERAL SETUP,” then press (ENTER).
27
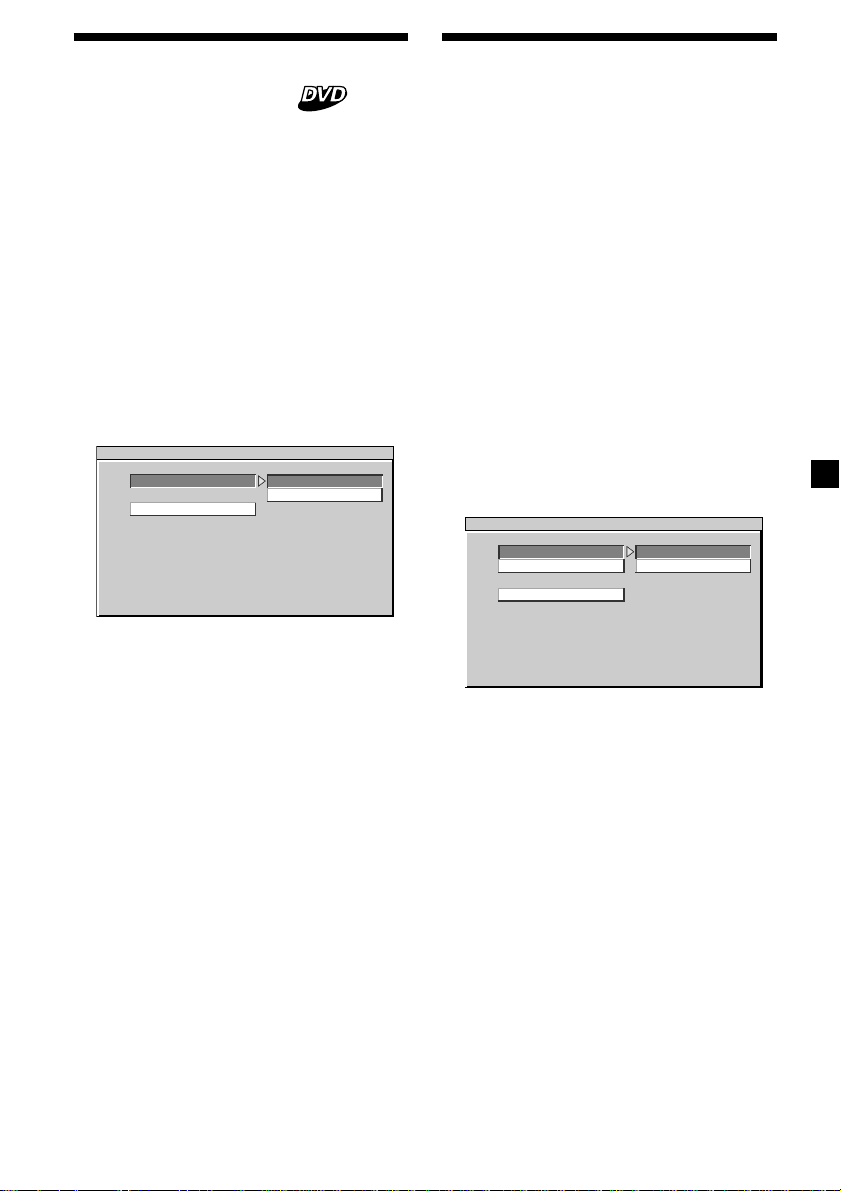
Displaying the multi-angle
notice — ANGLE MARK
Setting the screen saver
— SCR SAVER
If various angles (multi-angles) for a scene are
recorded on the DVD and you have set the
“ANGLE MARK” to “ON,” a notice appears at
the scene.
1 Press (SETUP).
The main page for setup appears.
2 Press M or m repeatedly to select
“GENERAL SETUP,” then press (ENTER).
3 Press M or m repeatedly to select “ANGLE
MARK,” then press ,.
-- GENERAL PAGE - -
TV DISPLAY
ANGLE MARK
SCR SAVER
MAIN PAGE
TURN ANGLE MARK OFF
ON
OFF
4 Press M or m repeatedly to select “ON.”
5 Press (ENTER).
“ANGLE MARK ON” is displayed at the
lower left on the monitor.
If you set the “SCR SAVER” setting to “ON,”
the screen saver image appears when you
leave the player in pause or stop mode for
more than 15 minutes. The screen saver will
help prevent the monitor from becoming
damaged.
1 Press (SETUP).
The main page for setup appears.
2 Press M or m repeatedly to select
“GENERAL SETUP,” then press (ENTER).
3 Press M or m repeatedly to select “SCR
SAVER,” then press ,.
-- GENERAL PAGE - -
TV DISPLAY
ANGLE MARK
SCR SAVER
MAIN PAGE
SCREEN SAVER ON
ON
OFF
4 Press M or m repeatedly to select “ON.”
5 Press (ENTER).
To turn off the multi-angle notice, select “OFF”
in step 4.
To return to normal play screen, press
(SETUP) anytime.
Note
To return to the main page for setup, press M/m/<
repeatedly to select “MAIN PAGE,” then press
(ENTER).
28
To turn off the screen saver setting, select
“OFF” in step 4.
To return to normal play screen, press
(SETUP) anytime.
Note
To return to the main page for setup, press M/m/<
repeatedly to select “MAIN PAGE,” then press
(ENTER).
Selecting the speaker
mode — SPEAKER SETUP
Selecting the audio output
mode — AUDIO OUT
You can select the speaker mode setting from
“LT-RT” or “STEREO.” The downmix function is used to create stereo (2-channel) signals
from more than 5 separated digital signals of a
source.
LT-RT: theater downmix mode.
STEREO: stereo downmix mode.
1 Press (SETUP).
The main page for setup appears.
2 Press M or m repeatedly to select
“SPEAKER SETUP,” then press (ENTER).
3 Press M or m repeatedly to select
“DOWNMIX,” then press ,.
-- SPEAKER SETUP PAGE - -
DOWNMIX
MAIN PAGE
SET STEREO DOWNMIX
STEREO
LT/ RT
4 Press M or m repeatedly to select the
desired item from “STEREO” or “LT/RT”
You can select the audio output setting from
“S/PDIF/RAW” or “S/PDIF/PCM.”
S/PDIF (Sony/Philips Digital Interface) is a
standard of audio transfer file format. S/PDIF
allows the transfer of audio, however, signal
quality may be degraded.
S/PDIF/RAW: outputs the original audio data
S/PDIF/PCM: outputs the sampling of the
in S/PDIF format.
original audio data in S/PDIF
format.
1 Press (SETUP).
The main page for setup appears.
2 Press M or m repeatedly to select “AUDIO
SETUP,” then press (ENTER).
3 Press M or m repeatedly to select “AUDIO
OUT,” then press ,.
-- AUDIO SETUP - -
AUDIO OUT
DYNAMIC
MAIN PAGE
RAW DATA VIA SPDIF
S/PDIF/RAW
S/PDIF/PCM
5 Press (ENTER).
“LT/RT DOWNMIX” is displayed at the
lower left on the monitor, for example if
you select “LT/RT” in step 4.
To return to normal play screen, press
(SETUP) anytime.
Note
To return to the main page for setup, press M/m/<
repeatedly to select “MAIN PAGE,” then press
(ENTER).
4 Press M or m repeatedly to select the
desired item from “S/PDIF/RAW” or
“S/PDIF/PCM.”
5 Press (ENTER).
“S/PDIF/RAW OUTPUT” is displayed at
the lower left on the screen, for example if
you select “S/PDIF/RAW” in step 4.
To return to normal play screen, press
(SETUP) anytime.
Note
To return to the main page for setup, press M/m/<
repeatedly to select “MAIN PAGE,” then press
(ENTER).
29
 Loading...