

Sony MVC-FDR3, MVC-FDR1, MVC-FDR1E, MVC-FDR3E User Manual
3-862-980-11 (1)
Digital Still Image
Capture Adaptor
Operating Instructions
Manual de instrucciones
MVC-FDR3/FDR3E
MVC-FDR1/FDR1E
EN
ES
MVC-FDR3/FDR3E
©1998 by Sony Corporation
WARNING
To prevent fire or shock hazard,
do not expose the unit to rain or
moisture.
For the Customers in the U.S.A.
and CANADA
This symbol is intended to alert
the user to the presence of
uninsulated “dangerous
voltage” within the product’s
enclosure that may be of
sufficient magnitude to
constitute a risk of electric shock
to persons.
This symbol is intended to alert
the user to the presence of
important operating and
maintenance (servicing)
instructions in the literature
accompanying the appliance.
CAUTION
TO PREVENT ELECTRIC SHOCK, MATCH WIDE
BLADE OF PLUG TO WIDE SLOT. FULLY INSERT.
You are cautioned that any changes or modifications
not expressly approved in this manual could void
your authority to operate this equipment.
Note:
This equipment has been tested and found to
comply with the limits for a Class B digital device,
pursuant to Part 15 of the FCC Rules. These limits
are designed to provide reasonable protection
against harmful interference in a residential
installation. This equipment generates, uses, and can
radiate radio frequency energy and, if not installed
and used in accordance with the instructions, may
cause harmful interference to radio
communications. However, there is no guarantee
that interference will not occur in a particular
installation. If this equipment does cause harmful
interference to radio or television reception, which
can be determined by turning the equipment off and
on, the user is encouraged to try to correct the
interference by one or more of the following
measures:
– Reorient or relocate the receiving antenna.
– Increase the separation between the equipment
and receiver.
– Connect the equipment into an outlet on a circuit
different from that to which the receiver is
connected.
– Consult the dealer or an experienced radio/TV
technician for help.
DISPOSAL OF LITHIUM ION
BATTERY.
LITHIUM ION BATTERY.
DISPOSE OF PROPERLY.
You can return your unwanted lithium ion batteries
to your nearest Sony Service Center or Factory
Service Center.
Note: In some areas the disposal of lithium ion
batteries in household or business trash may
be prohibited.
For the Sony Service Center nearest you call 1-800222-SONY (United States only)
For the Sony Factory Service Center nearest you call
416-499-SONY (Canada only)
Caution:Do not handle damaged or leaking lithium
ion battery.
2-EN
Owner’s Record
The model and serial number are located on the
inside of the front shell. Record the serial number in
the space provided below.
Refer to these numbers whenever you call upon
your Sony dealer regarding this product.
Model No. ___________ Serial No. _____________

Table of contents
NOTICE FOR THE CUSTOMERS IN
THE UNITED KINGDOM
A moulded plug complying with BS 1363 is fitted to
this equipment for your safety and convenience.
Should the fuse in the plug supplied need to be
replaced, a 5 AMP fuse approved by ASTA or BSI
to BS 1362, (i.e., marked with 2 or @ mark) must
be used.
If the plug supplied with this equipment has a
detachable fuse cover, be sure to attach the fuse
cover after you change the fuse. Never use the
plug without the fuse cover. If you should lose
the fuse cover, please contact your nearest Sony
service station.
ATTENTION:
The electromagnetic fields at the specific
frequencies may influence the picture of
this unit.
Before using the image capture adaptor .. 4
Preparation ................................................... 7
1 Connect to the TV........................... 7
2 Turn on the power ......................... 7
3 Insert the floppy disk until it
clicks ................................................. 8
Setting the date and time ..................... 9
Recording images ...................................... 11
Connection ........................................... 11
Recording ............................................. 12
Viewing images ......................................... 16
Playing back six images at a time
(INDEX screen) ............................. 17
Viewing images using a personal
computer .............................................. 18
Changing the mode settings .................... 20
Using the battery pack .............................. 23
Changing the lithium battery .................. 26
Precautions ................................................. 28
Troubleshooting......................................... 29
Self-diagnosis display ............................... 30
Specifications.............................................. 31
Parts identifications................................... 32
Index ............................................................ 35
EN
F
ES
• IBM PC/AT is a registered trademark of
International Business Machines Corporation of
the U.S.A.
• MS-DOS and Windows are registered trademarks
licensed to Microsoft Corporation, registered in
the U.S.A. and other countries.
• Macintosh is a trademark licensed to Apple
Computer, Inc., registered in the U.S.A. and other
countries.
• All other product names mentioned herein may
be the trademarks or registered trademarks of
their respective companies.
Furthermore, “TM” and “
in each case in this manual.
” are not mentioned
3-EN

Before using the image capture adaptor
This digital still image capture adaptor uses a floppy disk to store the images.
Use the following floppy disk type.
• Size: 3.5-inch
• Type: 2HD
• Capacity: 1.44 MB
• Format: MS-DOS format (512 bytes × 18 sector)
If you use a 3.5-inch 2HD floppy disk other than described above, format it using this
unit or a personal computer.
Be sure to read before using the image capture adaptor
Image recording format on this image capture adaptor
The image data recorded with this image capture adaptor is compressed and recorded
in JPEG format. Extension of the file is “.JPG”. For details, see page 19.
Precaution on copyright
Television programs, films, video tapes, floppy disk, and other materials may be
copyrighted. Unauthorized recording of such materials may be contrary to the
provision of the copyright laws.
Notes on the Operating Instructions
• The instructions in this operating instructions are for the four models listed below.
Before you start reading this operating instructions and operating the unit, check the
model number by looking at the bottom of the image capture adaptor.
• The MVC-FDR3/FDR3E is the model used for illustration purposes. Otherwise, the
model name is indicated in the illustrations. Any differences in operation are clearly
indicated in the text, for example, “MVC-FDR3/FDR3E only.”
As you read through this manual, buttons and settings on the image capture adaptor
are shown in capital letters.
e.g., Press REC.
Types of differences
Model number MVC-FDR1 MVC-FDR1E MVC-FDR3 MVC-FDR3E
LCD screen No No Yes Yes
TV color system NTSC PAL NTSC PAL
4-EN

Power sources
You can use your digital still image capture adaptor in any country or area with the
supplied AC power adaptor within 100 V to 240 V AC, 50/60 Hz.
Use a commercially available AC plug adaptor [a], if necessary, depending on the
design of the wall outlet [b].
AC power adaptor
(supplied)
Note on TV color systems
TV color systems differ from country to country.
MVC-FDR1/FDR3 is an NTSC system image capture adaptor.
MVC-FDR1E/FDR3E is a PAL system image capture adaptor.
To record TV programs, etc., or to view the image on a TV, use a correct color system
TV.
Check the following list.
NTSC system
Bahama Islands, Bolivia, Canada, Central America, Chile, Colombia, Ecuador, Jamaica,
Japan, Korea, Mexico, Peru, Surinam, Taiwan, the Philippines, the U.S.A., Venezuela,
etc.
PAL system
Australia, Austria, Belgium, China, Czech Republic, Denmark, Finland, Germany, Great
Britain, Holland, Hong Kong, Italy, Kuwait, Malaysia, New Zealand, Norway, Portugal,
Singapore, Slovak Republic, Spain, Sweden, Switzerland, Thailand, etc.
PAL-M system
Brazil
PAL-N system
Argentina, Paraguay, Uruguay
SECAM system*
Bulgaria, France, Guiana, Hungary, Iran, Iraq, Monaco, Poland, Russia, Ukraine, etc.
[a]
[b]
EN
F
ES
* If your TV color system is SECAM, set the monitor image select switch to the
SOURCE position as described on page 15.
5-EN

Before using the image capture adaptor
Precautions
Do not shake or strike the image capture adaptor
Malfunctions, inability to record images or to use floppy disks, image and memory data
breakdown, damage or loss may occur.
Do not get the image capture adaptor wet
If moisture condensation occurs, refer to “Precautions” on page 28 and follow
instructions on how to remove the condensation before using.
Back up recommendations
To avoid the potential risk of data loss always copy (back up) data to a disk.
6-EN
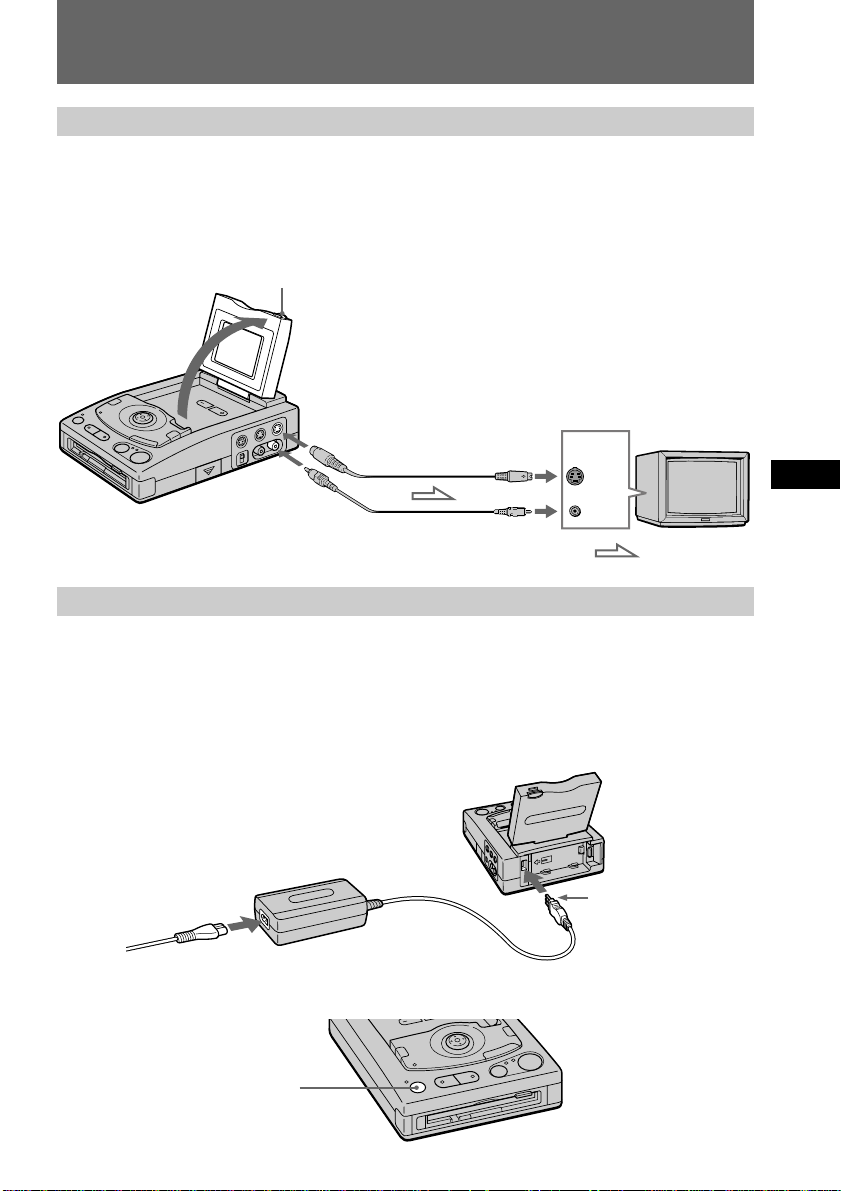
Preparation
1 Connect to the TV.
To view the image recorded on a floppy disk and/or the on-screen display, connect the
TV as shown below. You can view higher quality images with S video cable connection.
For MVC-FDR3/FDR3E only
You can view the image on the LCD screen instead of connecting the unit to the TV.
LCD lock release button
VIDEO
OUT
2 Turn on the power.
In advance:
For MVC-FDR1/FDR1E Turn on the TV and set the TV/VCR selector on the TV
For MVC-FDR3/FDR3E Press the LCD lock release button and open the LCD
(1) Connect the AC power adaptor to the
power cord and to the image capture
adaptor.
(2) Connect the power cord to the wall outlet.
(3) Press POWER.
S VIDEO OUT
S video cable
(not supplied)
Video cable
(supplied)
to VCR.
panel.
S
VIDEO
IN
VIDEO IN
INPUT
S VIDEO
VIDEO
Arrow mark
: Signal flow
EN
F
ES
POWER
7-EN
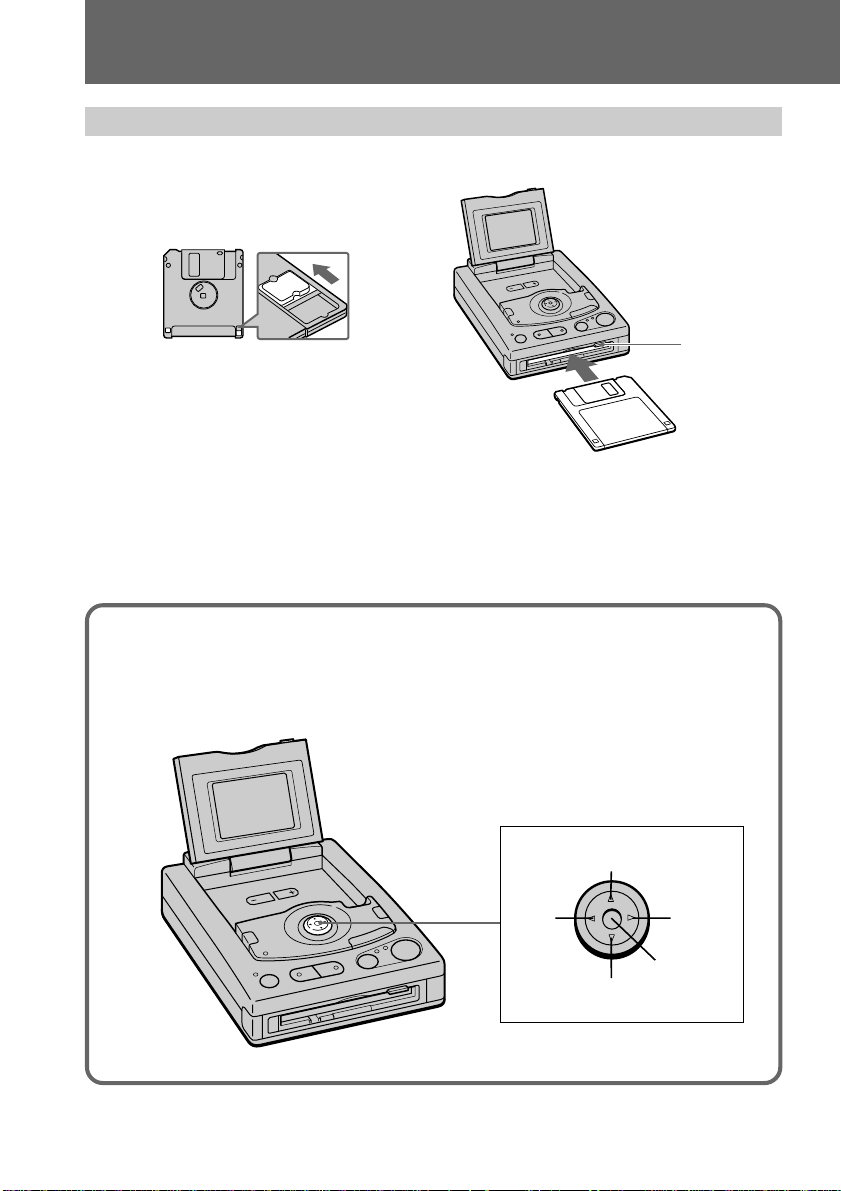
Preparation
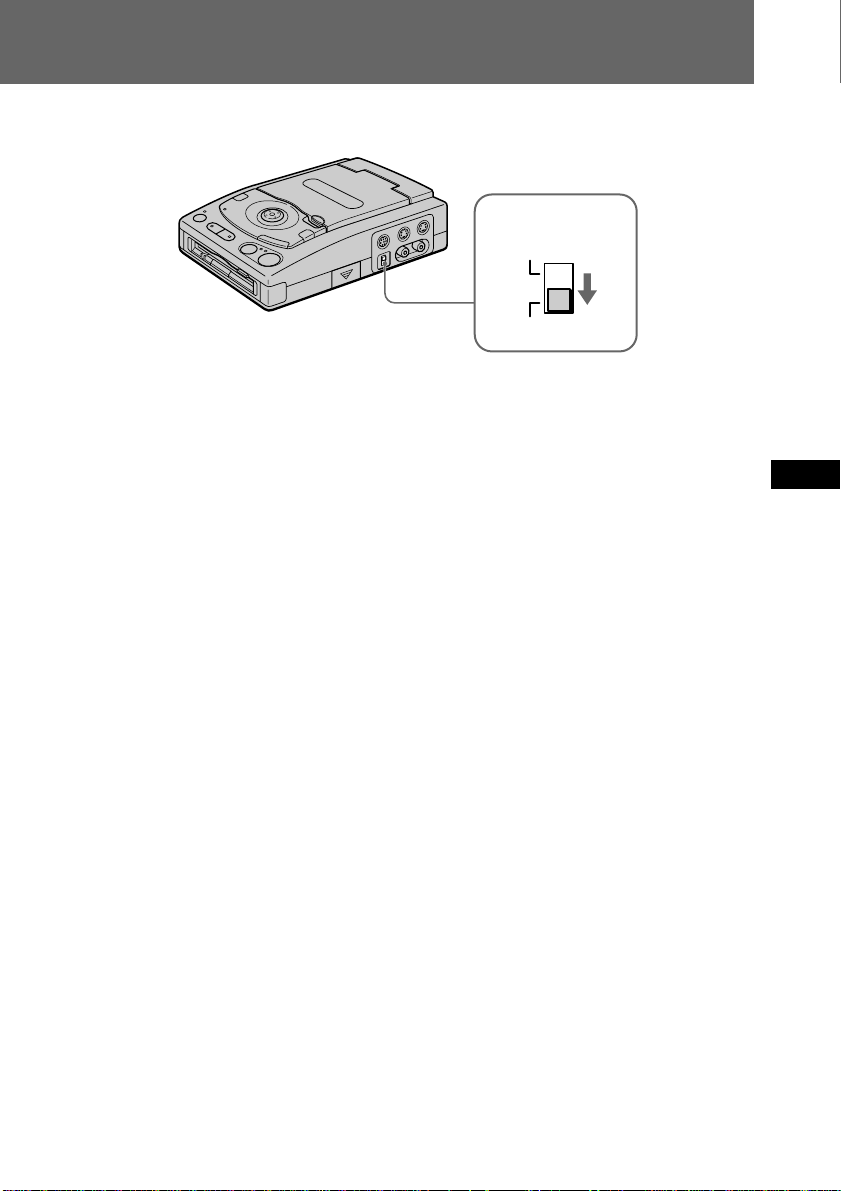
3 Insert the floppy disk until it clicks.
Before inserting, check that the write protect tab is set to the recordable position.
To view the image, see page 16.
Slide the tab to shut the opening.
To eject the floppy disk
Press the floppy disk eject button.
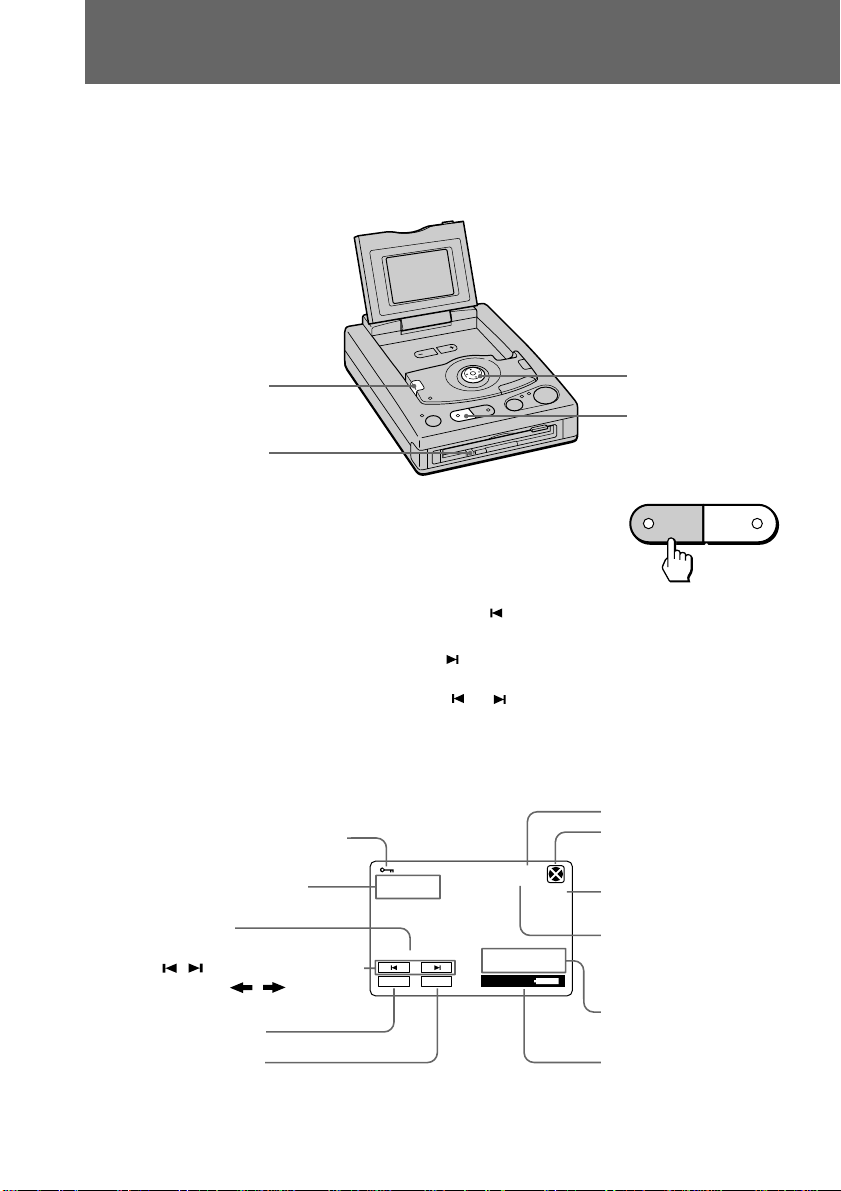
Using the control button
You can select an item in the menu which appears on the LCD screen by
pressing the upper, lower, left or right side of the control button. When an
item is selected, the color of the item changes from blue to yellow. To enter
your selection, press the center of the control button.
Floppy disk
eject button
8-EN
Left
Up
Right
Execute
Down
Setting the date and time
To store the file in the MS-DOS system, you need to set the date and time. Otherwise,
the file will be stored with wrong date and time, and the CLOCK SET menu will appear
each time you turn on the power.
When you use the image capture adaptor for the first time
Since the CLOCK SET menu appears when you turn on the power, skip steps (2) and (3)
below.
(1) Press POWER to turn on the power.
If the “I” indicator appears on the LCD screen, replace the lithium battery
according to the procedures on page 26.
(2) Select “MENU” with the control button, then press it.
The menu appears on the LCD screen.
To cancel menu screen, select “
with the control button, then press it.
RETURN”
EN
F
MENU
(3) Select “CLOCK SET” with the control button, then press it.
CLOCK SET
COMMANDER
BEEP
FILE NUMBER
FORMAT DISK
BITMAP
QUALITY
RETURN
CLOCK SET
Y/M/D M/D/Y D/M/Y
1998 1 8 10: 20
ENTER
CANCEL
(4) Select the desired display of the date with the control button, then press it.
Y/M/D (year/month/day)
M/D/Y (month/day/year)
D/M/Y (day/month/year)
Continued to the next page
ES
AM
9-EN

Preparation
(5) Select the date and time with the control button, then press it.
The item to be changed is indicated with 4/$.
Select number by pressing the upper side or
lower side of the control button, then press it
to enter the number.
After entering the number, 4/$ moves to
the next item.
When you selected “D/M/Y,” set the time on
a 12-hour cycle.
12:00 AM stands for midnight.
12:00 PM stands for noon.
(6) Select “ENTER” with the control button, then press it to start the clock.
To cancel setting the date and time
Select “CANCEL” with the control button, then press it.
CLOCK SET
Y/M/D
1998 1 8 10: 20
AM
10-EN
Recording images
You can record images from TV, video equipment, video game, etc., on a floppy disk in
the form of a still image.
Connection
Connect the source to be recorded as shown below. Then, turn on the power and insert
the floppy disk (p. 7 - 8).
You can record higher quality images with S video cable connection.
For MVC-FDR1/FDR1E:
If you want to check the image during recording, connect the TV as shown on page 7 in
addition to the below connection.
STANDBY
MEMORY
FIELD/FRAME
REC
VIDEO
IN
S VIDEO
IN
S video cable
(not supplied)
Video cable
(supplied)
S
VIDEO
OUT
VIDEO
OUT
OUTPUT
S VIDEO
VIDEO
EN
F
ES
: Signal flow
11-EN
Recording images
Recording
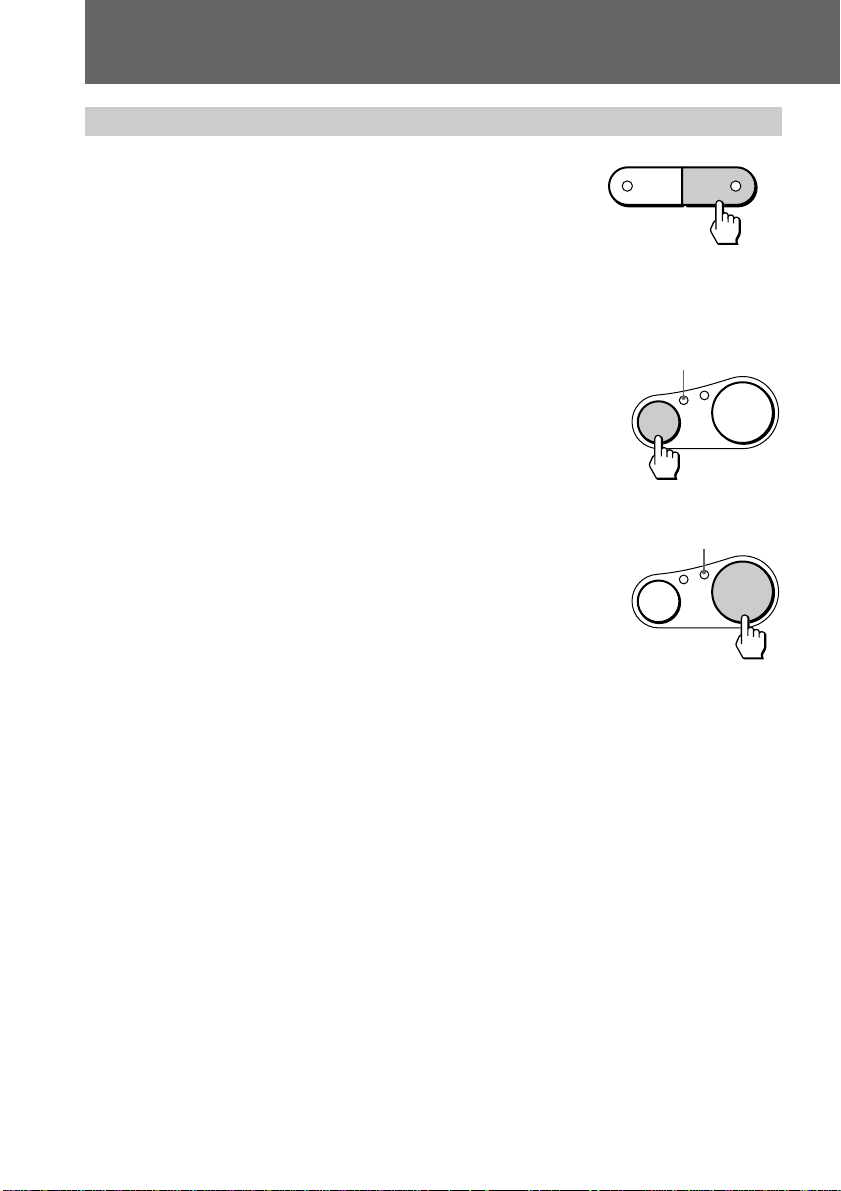
(1) Press STANDBY.
The STANDBY lamp lights up.
(2) Start playing back the source to be recorded.
The image from the TV or video equipment appears
on the LCD screen.
MODE SELECT
PLAY
STANDBY
(3) Press MEMORY when you want to record.
MEMORY lamp
The captured image becomes still. [MEMORY] appears
on the LCD screen and the MEMORY lamp lights up.
MEMORY
REC
(4) Press REC.
The captured image is recorded on the floppy disk.
REC lamp
During recording, the REC lamp flashes, “RECORDING”
appears and the remaining disk capacity indicator
appears on the LCD screen.
Note
When the REC lamp is flashing, be sure not to shake or strike the unit. Do not press the
floppy disk eject button, turn off the power or disconnect the power source.
MEMORY
REC
If you don’t want to record the captured image in step 3
Press MEMORY again. [MEMORY] disappears and the image being played back appears
on the LCD screen.
If the captured image is blurred in step 3
Press FIELD/FRAME repeatedly until [FIELD] appears. Then press REC (step 4).
Normally record in the [FRAME] mode so that you can record fine images. To select the
[FRAME] mode, press FIELD/FRAME repeatedly until [FRAME] appears.
12-EN
The number of images you can record on a floppy disk
The number of images you can record is different depending on image quality and
subject complexity.
Image quality MVC-FDR1/FDR1E MVC-FDR3/FDR3E
STANDARD: about 30 – 40 images about 20 – 30 images
FINE: about 15 – 20 images about 10 – 15 images
BITMAP: 1 image 1 image
Change the disk when the remaining disk capacity indicator is empty and flashes.
The image quality is set to FINE and BITMAP is set to OFF at the factory. You can
change the image quality and BITMAP in the menu (page 20).
Note
If you attempt to record more than 55 images, “DISC FULL” appears on the LCD screen
and you cannot record the image even when the remaining disc capacity indicator is not
empty.
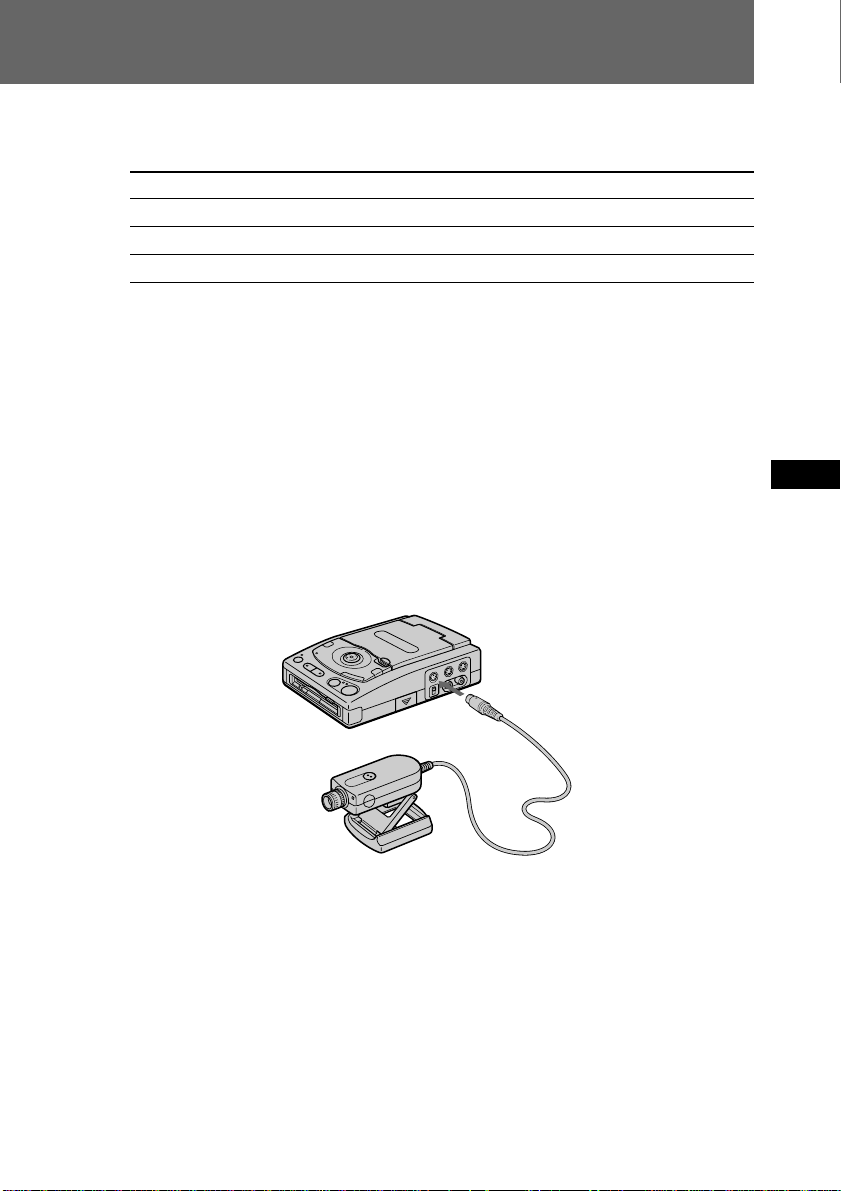
By connecting the Sony Color Video Camera CCD-Z7/Z7E
The specially designed Sony Color Video Camera CCD-Z7/Z7E is available to use with
the unit.
You can take a picture using the camera and record it on the floppy disk in the unit.
Refer to the operating instructions of the camera for further information.
CAMERA
EN
F
ES
13-EN

Recording images
If two or three source units are connected
The signal input to the CAMERA jack has priority, followed by the S VIDEO jack, and
then the VIDEO jack.
If a camera is connected, only the image from the camera appears.
If both the S VIDEO and VIDEO jacks are connected to video equipment, only the
image from the S VIDEO jack appears.
Adjusting the brightness of the LCD screen (MVC-FDR3/FDR3E
only)
Press the BRIGHT +/– buttons.
The indicators during recording
The indicators are not recorded.
BRIGHT +/–
14-EN
MEMORY indicator
FRAME or FIELD
mode indicator
Number of recorded image
LCD screen birghtness
level (MVC-FDR3/
FDR3E only)
Remaining battery time
indicator
To turn off the indicators
Press DISPLAY.
MENU
DISPLAY
MEMORY FRAME
40min
FINE
11
BMP
Image quality
Disk remaining
capacity indicator
BITMAP indicator
(This appears only
when BITMAP is set to
ON.)
If noise or black stripes appear on the image
(1) Set the monitor image select switch to the SOURCE position.
NORMAL
SOURCE
(2) Check the connection:
• If you connect the source to be recorded to the CAMERA or VIDEO IN jack, connect
the TV to the VIDEO OUT jack. You cannot view the image if the TV is connected to
the S VIDEO OUT jack.
• If you connect the source to be recorded to the S VIDEO IN jack, connect the TV to
the S VIDEO OUT jack. You cannot view the image if the TV is connected to the
VIDEO OUT jack.
Note
No on-screen display appears even if you press the DISPLAY button. However, you can
display the menu by pressing the control button instead of by selecting MENU on the
screen. The menu appears with a blue background.
EN
F
ES
15-EN
Viewing images
You can view the still images recorded using this unit or a digital still camera on the
LCD screen (MVC-FDR3/FDR3E only) or the TV. You can also play back six images at
a time from the floppy disk (INDEX screen).
To view on the TV, connect the TV as shown on page 7.
Turn on the power and insert the floppy disk.
DISPLAY
Control button
PLAY
ACCESS lamp
(1) Press PLAY.
The PLAY lamp lights up.
(2) To display the preceding image, select “
” with the control button, then press
MODE SELECT
PLAY
STANDBY
it.
To display the next image, select “
” with the control button, then press it.
When the indicators on the LCD screen are not displayed, press the left or right
side of the control button, or press
or of the Remote Commander, to
display the preceding or next image.
Note
When the ACCESS lamp is flashing, be sure not to shake or strike the unit. Do not turn
the power off or disconnect the power source.
The indicators during playback
Protected image indicator
Slide show indicator
File name
/
buttons (single screen
mode) or
/
buttons
(INDEX screen mode)
MENU button
INDEX button
To turn off the indicators
SLIDE SHOW 15/20
PAUSE
MENU INDEX
1998 2 16MVC-015F
40min
FINE
12:30PM
Image quality
Remaining disk capacity
BITMAP indicator
appears when BITMAP
BMP
file of the image is
available.
Image number/Number
of stored images in the
floppy disk
Recording date of the
image
Remaining battery time
indicator
Press DISPLAY.
16-EN
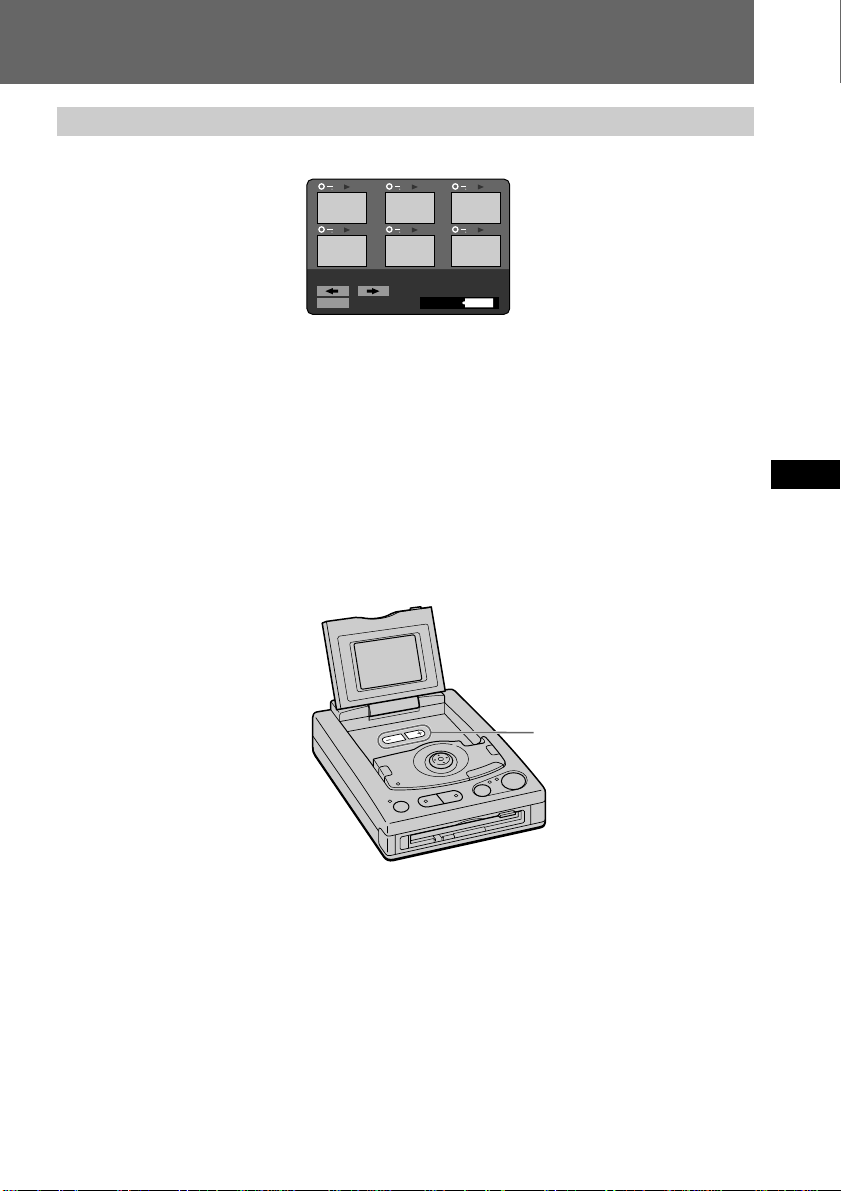
Playing back six images at a time (INDEX screen)
Select “INDEX” with the control button, then press it.
13
14
15
MVC-018S
MENU
18/29
17
999min
16
1998 2 16
12:30PM
18
The ” mark appears on the image that is displayed before changing to INDEX screen
mode.
• To display the following 6 images, select “b” with the control button, then press it.
• To display the preceding 6 images, select “B” with the control button, then press it.
• To return to the normal playback screen (SINGLE screen), select an image with the
control button, then press it.
• The number displayed at the upper right side of the image shows the recording order
on the disk. It is different from the file number (p. 19).
Adjusting the brightness of the LCD screen (MVC-FDR3/FDR3E
only)
Press the BRIGHT +/– buttons.
BRIGHT +/–
EN
F
ES
17-EN

Viewing images using a personal computer
The image data recorded with this unit is compressed and stored in JPEG format. If
BITMAT is set to ON in the menu when you record the image, the data is stored also in
BITMAP format.
This data can be viewed using a personal computer which has the JPEG or BITMAP
view ability application installed. For detailed procedures using image data with an
application, refer to the aplication instruction manual.
Floppy disk which was
recorded using this unit
Example: personal computer with Windows 95 installed
(1) Start up Windows 95 and insert the floppy disk into the disk drive of the
personal computer.
(2) Open “My computer” and double-click “3.5 inch FD”.
(3) Double-click the desired data file.
18-EN

Image file
File name and extension
The images recorded on this unit are given the file names “MVC-xxxF” or “MVC-xxxS.”
“xxx” stands for a number between 001 to 999.
“F” stands for FINE and is given when the picture quality is set to FINE in the menu.
“S” stands for STANDARD and is given when the picture quality is set to STANDARD
in the menu.
The extension is “BMP” or “JPG.”
“BMP” is given to the BITMAP file* recorded when the BITMAP is set to “ON” in the
menu.
“JPG” is given to the image data compressed in JPEG format.
When the unit records the images with either of the above extensions, the extension
“411” for index screen is recorded automatically at the same time. You can display this
index screen data only on this unit.
Example
MVC-001S.BMP Image file (recorded as BITMAP file)
MVC-001S.JPG Image file (compressed and recorded in JPEG format)
MVC-001S.411 Index screen data of MVC-001S
EN
F
* When the image recorded as a BITMAP file, it is recorded also in JPEG format.
Number of the file name
The number of the file name is reset to “001” each time you change the floppy disk.
If the floppy disk already has image files recorded, the file number starts from the
number following the last file number.
If you want to continue to number the files sequentially in a new floppy disk, set FILE
NUMBER to SERIES in the menu.
Recommended OS/applications example
OS
• Windows 3.1
• Windows 95 or later
Applications
• Microsoft Internet Explorer etc.
Note
For Macintosh, you can use the floppy disk recorded with this unit using the PC
Exchange with Mac OS system 7.5 or higher. A viewing application for Macintosh is
also necessary to view images.
ES
19-EN

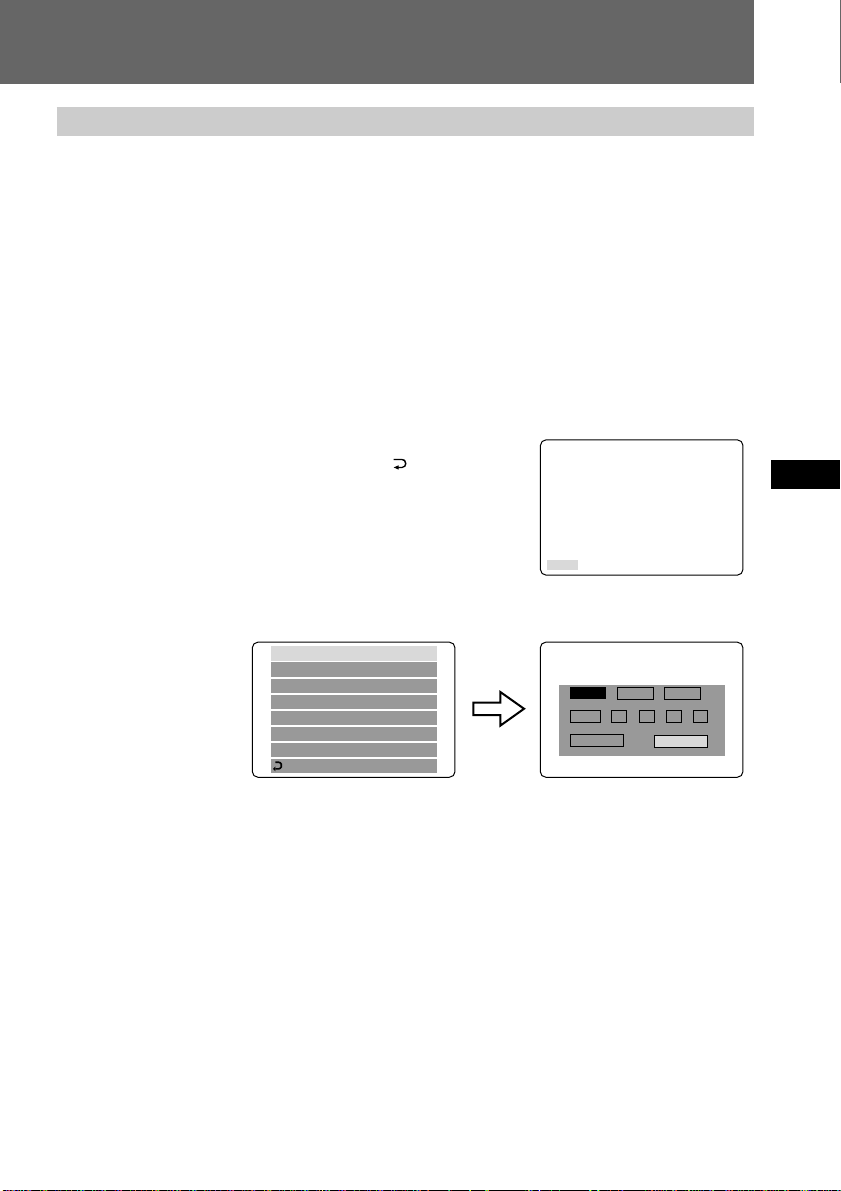
Changing the mode settings
(1) Select MENU with the control button, then press it.
The menu appears.
STANDBY mode PLAY mode
CLOCK SET
COMMANDER
BEEP
FILE NUMBER
FORMAT DISK
BITMAP
QUALITY
RETURN
(2) Select the desired item with the control button, then press it.
The selected item changes from blue to yellow. When the control button is
pressed, only the item is left on the screen.
(3) Change the setting with the control button, then press it.
When the setting is finished, the menu screen disappears.
To cancel changing the mode settings
Select “ RETURN” or “CANCEL” with the control button, then press it. The screen
returns to the menu screen. To turn off the menu screen, select “ RETURN” with the
control button, then press it.
Setting the mode of each item
The unit is set to the settings marked with * (asterisk) at the factory.
CLOCK SET
COMMANDER
BEEP
SLIDE SHOW
FORMAT DISK
DELETE
PROTECT
RETURN
20-EN
Items for both STANDBY and PLAY modes
CLOCK SET
Select this item to set the date and time. See page 9.
COMMANDER <ON*/OFF>
• Select ON when using the supplied Remote Commander.
• Select OFF if the unit operates incorrectly when using a Remote Commander of other
equipment. You cannot use the supplied Remote Commander when OFF is selected.
BEEP <ON*/OFF>
• Select ON so that beeps sound when you press the buttons.
• Select OFF to turn the beep sound off.

Items in STANDBY mode only
FILE NUMBER <SERIES/NORMAL*>
• Select SERIES to continue to number the image files sequentially from one floppy
disks to another.
• Select NORMAL to number the image files from 001 in each floppy disk.
Notes on the SERIES setting
• The image files are numbered up to 999 irrespective of turning the power on/off.
• If you record the files with file numbers exceeding 900 and eject the floppy disk,
the file number is reset to 001. The file number starts from 001 in the new floppy
disk. If the floppy disk already has image files recorded, the file number starts
from the number following the last file number.
BITMAP <ON/OFF*>
• Select ON to record the image as a BITMAP file. The image is not compressed and
therefore the data is large. The file extension is “BMP.”
• Select OFF not to record the image as a BITMAP file.
If you set BITMAP to ON
• When the image recorded as a BITMAP file, it is recorded also in JPEG format with
the extension “JPG.”
• You cannot play back the BITMAP file with this unit. The unit displays the image
recorded in JPEG format instead of the BITMAP file.
• You can record only one image as a BITMAP file with this unit.
QUALITY <STANDARD/FINE*>
• Select STANDARD to record an image in standard quality.
• Select FINE to record a image in high quality.
See page 13 for the number of recordable images in each mode.
EN
F
ES
Items in PLAY mode only
SLIDE SHOW <20 S/10 S/5 S/NORMAL PLAY*>
You can play back all images in the floppy disk in a continuous loop.
• Select 20 S to play back images with 20-second intervals.
• Select 10 S to play back images with 10-second intervals.
• Select 5 S to play back images with 5-second intervals.
• Select NORMAL PLAY to cancel SLIDE SHOW playback.
To start SLIDE SHOW playback, select ( on the screen with the control button and
press it. To pause the playback, select P with the control button and press it.
On the Remote Commander, press (/P to start SLIDE SHOW and press (/P again
to pause the playback. You can start and pause the playback by pressing (/P
repeatedly.
To return to normal playback, select NORMAL PLAY.
Continued to the next page
21-EN

Changing the mode settings
FORMAT DISK <OK/CANCEL*>
• Select OK to format floppy disks.
• Select CANCEL to cancel formatting.
Formatting erases all information on the floppy disk, including the protected image
data. Check the contents of the disk before formatting.
Be sure that the battery is fully charged when formatting a floppy disk. Formatting
takes about 2 minutes maximum.
PROTECT
To prevent accidental erasure, you can protect the image.
In SINGLE screen mode:
• Select ON to protect the image on the screen.
• Select OFF* to cancel protecting the image.
In INDEX screen mode:
• Select ALL to protect all images.
• Select SELECT to protect or cancel protecting the selected image.
To do this,
1 Select the image by moving ” with the control button, and press it.
H appears on the upper left side of the image.
2 Select “ENTER” at the lower left of the screen with the control button, then press
it.
Note
You cannot delete a protected image. To delete a protected image, cancel the
protection first.
DELETE
You can delete images you do not want to keep any longer. Once you delete an image,
you cannot restore it. Check the images carefully before deleting them.
In SINGLE screen mode:
• Select OK to delete the image on the screen.
• Select CANCEL* to cancel deleting the image.
In INDEX screen mode:
• Select ALL to delete all images.
• Select SELECT to delete the selected image.
To do this,
1 Select the image by moving ” with the control button, and press it.
The number of selected image changes color.
Press again to cancel deleting. The number returns to normal display.
2 Select “ENTER” at the lower left of the screen with the control button, then press
it.
Note
You cannot delete a protected image. To delete a protected image, cancel the
protection first.
22-EN
 Loading...