

Page 1
3-866-779-13 (1)
Digital Still Camera
Operating Instructions
Manual de instrucciones
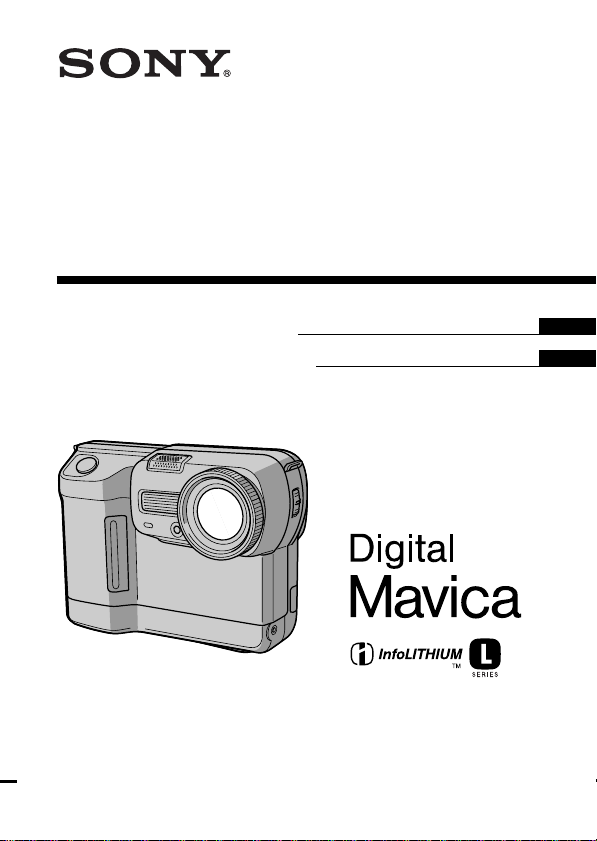
MVC-FD88
MVC-FD83/FD88
©1999 by Sony Corporation
GB
ES
Page 2
English
Operating instructions
Before operating the unit, please read this manual thoroughly,
and retain it for future reference.
The instructions in this manual are for the two models: MVC-FD83,
MVC-FD88
The MVC-FD88 is the model used for illustration purposes.
Otherwise, the model name is indicated in the illustrations. Any
differences in operation are clearly indicated in the text, for example,
“MVC-FD83 only.”
Before you start reading this manual and operating the unit, check
the model number.
As you read through this manual, buttons and settings on the
camera are shown in capital letters.
e.g. Press FLASH.
WARNING
To prevent fire or shock hazard,
do not expose the unit to rain or moisture.
This symbol is intended to alert the user to the presence of
uninsulated “dangerous voltage” within the product’s
enclosure that may be of sufficient magnitude to constitute a
risk of electric shock to persons.
This symbol is intended to alert the user to the presence of
important operating and maintenance (servicing) instructions
in the literature accompanying the appliance.
2-GB
Page 3

Owner’s Record
The model and serial numbers are located on the bottom. Record the serial
number in the space provided below. Refer to these numbers whenever you
call upon your Sony dealer regarding this product.
Model No. MVC-FD
Serial No.
CAUTION
Never expose the battery pack to temperatures above 140°F (60°C), such as in
a car parked in the sun or under direct sunlight.
TO PREVENT ELECTRIC SHOCK, DO NOT USE THIS POLARIZED AC
PLUG WITH AN EXTENSION CORD, RECEPTACLE OR OTHER OUTLET
UNLESS THE BLADES CAN BE FULLY INSERTED TO PREVENT BLADE
EXPOSURE.
You are cautioned that any changes or modifications not expressly approved
in this manual could void your authority to operate this equipment.
Note:
This equipment has been tested and found to comply with the limits for a
Class B digital device, pursuant to Part 15 of the FCC Rules. These limits are
designed to provide reasonable protection against harmful interference in a
residential installation. This equipment generates, uses, and can radiate radio
frequency energy and, if not installed and used in accordance with the
instructions, may cause harmful interference to radio communications.
However, there is no guarantee that interference will not occur in a particular
installation. If this equipment does cause harmful interference to radio or
television reception, which can be determined by turning the equipment off
and on, the user is encouraged to try to correct the interference by one or more
of the following measures:
– Reorient or relocate the receiving antenna.
– Increase the separation between the equipment and receiver.
– Connect the equipment into an outlet on a circuit different from that to
which the receiver is connected.
– Consult the dealer or an experienced radio/TV technician for help.
3-GB
Page 4

For the Customers in the United States and CANADA
DISPOSAL OF LITHIUM ION BATTERY.
LITHIUM ION BATTERY.
DISPOSE OF PROPERLY.
You can return you unwanted lithium ion batteries to your nearest Sony
Service Center or Factory Service Center.
Note: In some areas the disposal of lithium ion batteries in household or
business trash may be prohibited.
For the Sony Service Center nearest you call
1-800-222-SONY (United States only)
For the Factory Service Center nearest you call
416-499-SONY (Canada only)
Caution: Do not handle damaged or leaking lithium ion batteries.
NOTICE FOR THE CUSTOMERS IN THE UNITED
KINGDOM
A moulded plug complying with BS 1363 is fitted to this equipment for your
safety and convenience.
Should the fuse in the plug supplied need to be replaced, a 5 AMP fuse
approved by ASTA or BSI to BS 1362, (i.e., marked with
must be used.
If the plug supplied with this equipment has a detachable fuse cover, be
sure to attach the fuse cover after you change the fuse. Never use the plug
without the fuse cover. If you should lose the fuse cover, please contact
your nearest Sony service station.
or mark)
For the customers in Germany
Directive: EMC Directive 89/336/EEC
This equipment complies with the EMC regulations when used under the
following circumstances:
• Residential area
• Business district
• Light-industry district
(This equipment complies with the EMC standard regulations EN55022
Class B.)
92/31/EEC
ATTENTION
The electromagnetic fields at the specific frequencies may influence the
picture and sound of this camera.
4-GB
Page 5

Be sure to read before using your camera
Trial recording
Before you record one-time events, you may want to make a trial
recording to make sure that the camera is working correctly.
No compensation for contents of the recording
Contents of the recording cannot be compensated for if recording or
playback cannot be made due to a malfunction of the camera, floppy
disk, etc.
Precaution on camera care
The LCD screen is manufactured using high- precision technology.
However, there may be some tiny black spots and/or bright spots
(red, blue or green in color) that constantly appear on the LCD
screen. These spots occur normally in the manufacturing process
and do not affect the recorded picture in any way. Effective number
of pixels is 99.99% or more.
Do not place your camera so as to point the LCD screen toward the
sun. The inside of the LCD screen may be damaged.
Precaution on copyright
Floppy disks, television programs, films, video tapes, and other
materials may be copyrighted. Unauthorized recording of such
materials may be contrary to the provisions of the copyright laws.
5-GB
Page 6

Table of contents
Before using your camera....................................................................... 8
Parts identification .................................................................................. 9
Basic operations
Preparation ...................................................................................... 12
1: Charging the battery pack........................................... 12
2: Installing the battery pack .......................................... 13
3: Setting the date and time ............................................ 15
Recording and playing back images............................................ 17
1: Recording still images ................................................. 17
2: Recording moving images .......................................... 18
3: Playing back still images ............................................. 20
4: Playing back moving images ...................................... 21
Battery life/No. of images that can be
recorded/played back ..................................................... 23
Viewing images using a personal computer ....................... 25
Playing back JPEG files with Microsoft Office .................... 26
Advanced operations
Various recording ........................................................................... 27
Focusing manually .................................................................. 27
Recording images in macro ................................................... 28
Adjusting the white balance .................................................. 29
Enjoying Picture Effect ........................................................... 30
Using the PROGRAM AE function....................................... 31
Selecting image quality (QUALITY)..................................... 33
Selecting image size ................................................................ 34
Selecting recording mode (REC MODE).............................. 35
Various playback ............................................................................ 38
Playing back multiple images at a time (INDEX) ............... 38
Playing back images in a continuous loop
– SLIDE SHOW ................................................................. 39
Preventing accidental erasure – PROTECT ......................... 41
Deleting images – DELETE .................................................... 44
6-GB
Page 7

Copying images – COPY ........................................................ 46
Copying all the infomation in your floppy disk
– DISK COPY .................................................................... 48
Formatting a floppy disk – FORMAT .................................. 49
Writing a print mark on an image ........................................ 50
Using image data with other equipment ............................. 52
Changing the mode settings ......................................................... 53
Setting the mode of each item ............................................... 54
Additional information
Precautions ...................................................................................... 60
Troubleshooting.............................................................................. 62
Self-diagnosis display .................................................................... 64
Specifications................................................................................... 65
Warning messages................................................................... 66
Index ................................................................................................. 67
• IBM PC/AT is a registered trademark of International Business Machines
Corporation of the U.S.A.
• MS-DOS and Windows are registered trademarks licensed to Microsoft
Corporation, registered in the U.S.A. and other countries.
• Netscape Navigator is a trademark of Netscape Communications
Corporation.
• Macintosh is a trademark licensed to Apple Computer, Inc., registered in the
U.S.A. and other countries.
• All other product names mentioned herein may be the trademarks or
registered trademarks of their respective companies.
Furthermore, “TM” and “” are not mentioned in each case in this manual.
7-GB
Page 8

Before using your camera
This digital still camera uses a floppy disk as a medium for
recording images.
Use the following floppy disk type:
•Size: 3.5 inch
•Type: 2HD
•Capacity: 1.44 MB
•Format: MS-DOS format (512 bytes × 18 sectors)
When using 3.5 inch, 2HD floppy disk other than described above,
format it using the camera or personal computer.
Do not shake or strike the unit
Malfunctions, inability to record images as well as inability to use
floppy disks or image and memory data breakdown, damage or loss
may occur.
Do not get the unit wet
When taking pictures outdoors in the rain or under similar
conditions, be careful not to get the unit wet.
If moisture condensation occurs, refer to page 61 and follow
instructions on how to remove it before using.
Do not insert the floppy disk forcefully
Insert the floppy disk carefully into the digital still camera. You may
not be able to remove the floppy disk if you insert it forcefully.
Back up recommendations
To avoid the potential risk of data loss always copy (back up) data to
disk.
Supplied accessories
Power cord (1 set) NP-F330 battery pack (1)
A/V connecting cable (1) Lens cap (1)
Shoulder strap (1) String for lens cap (1)
Battery charger (1)
8-GB
Page 9

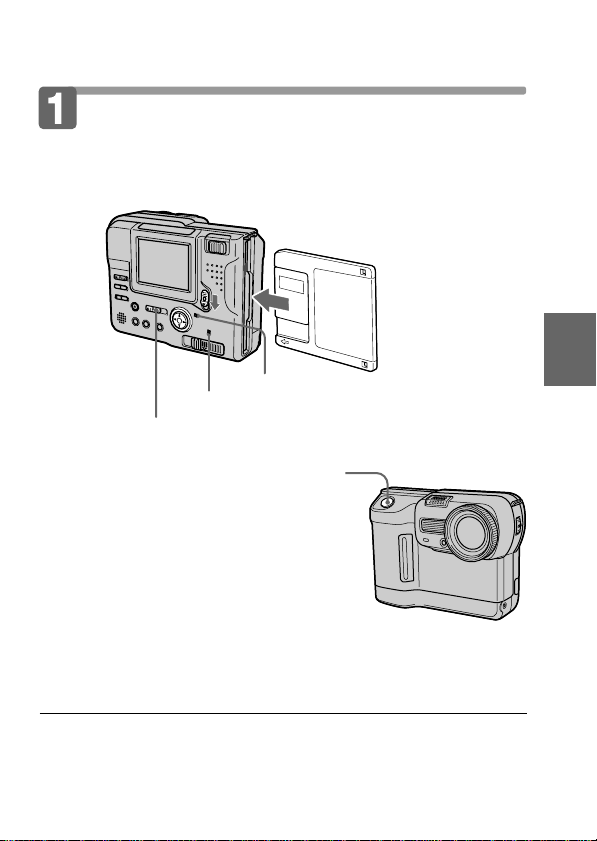
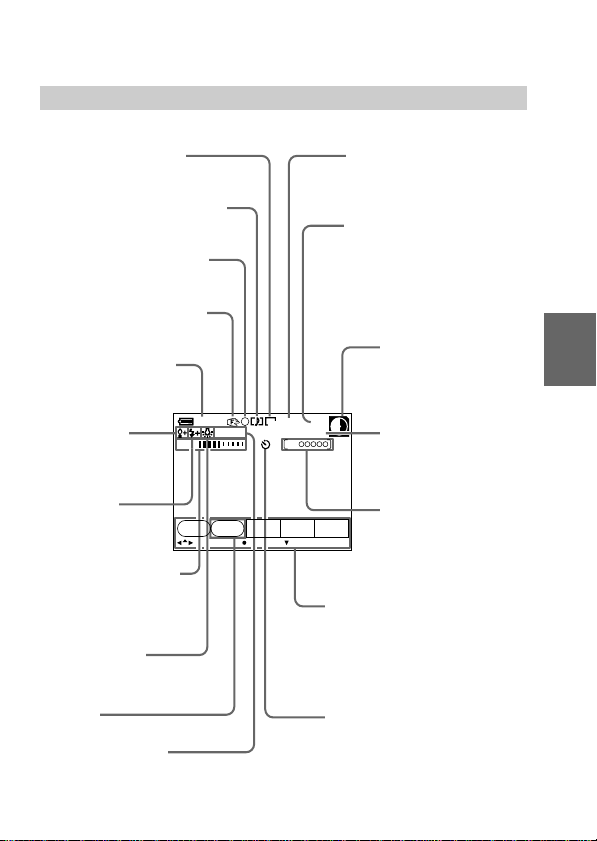
Parts identification
See pages in ( ) for more details.
Microphone
Do not touch when
recording.
Shutter button (17, 18)
Self-timer lamp
The lamp keeps on
blinking until recording
starts after the shutter
button is depressed.
Slot for AC
power adaptor cord
Flash emitter (11)
Photocell window
for flash
Do not block when
recording.
Tripod receptacle
Make sure that the length of
the tripod screw is less than
7/32 inch (6.5 mm).
Lens
Focus ring (27)
FOCUS AUTO/
MANUAL switch
(27)
Lens cap
A/V OUT Jack
Audio is monaural.
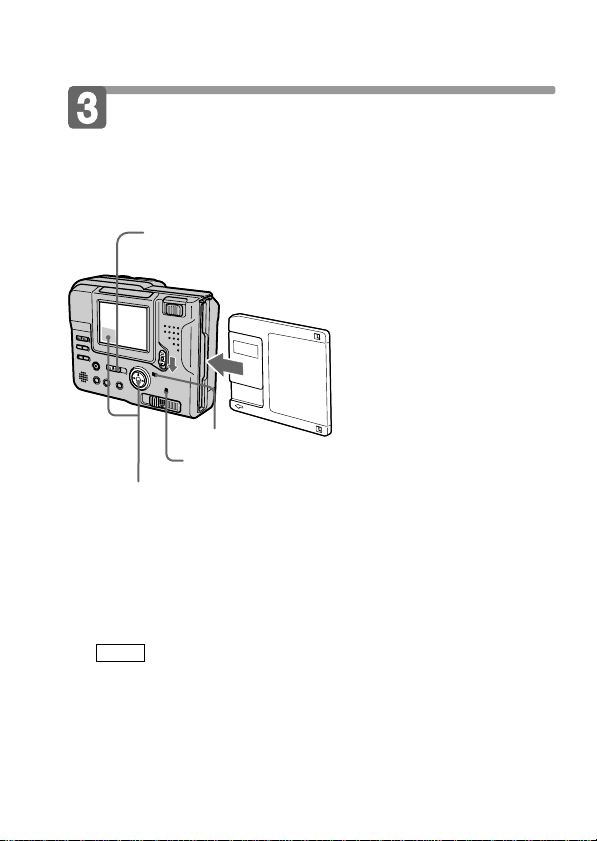
To insert the floppy disk
Insert the floppy disk until it clicks.
EJECT lock
DISK EJECT lever
To remove the floppy disk
While sliding EJECT lock down, slide DISK EJECT in the direction of the
arrow.
Before inserting, check that the
write protect tab set to the
recording position.
9-GB
Page 10
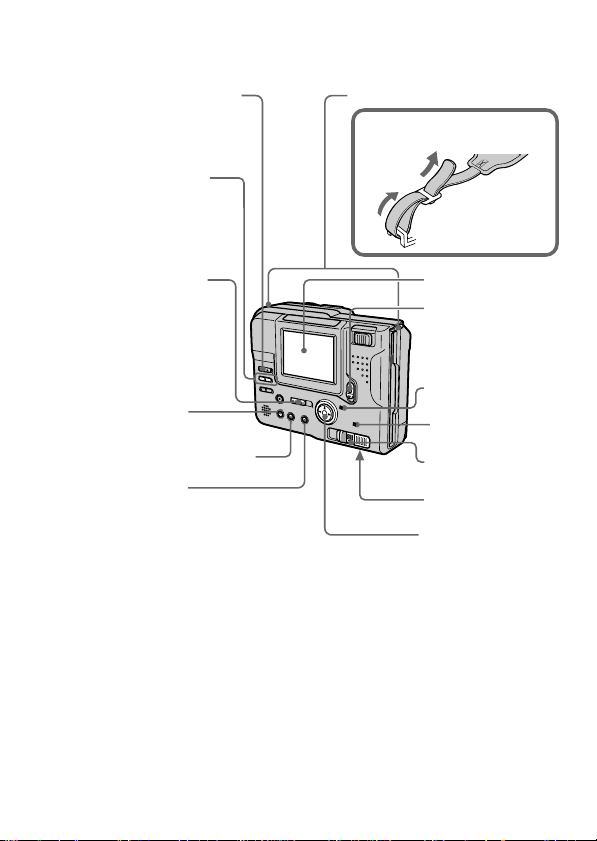
k Parts identification
LCD BACK LIGHT switch
Normally select ON.
Set to OFF to save
the battery.
BRIGHT +/– button
Press to adjust the
brightness of the
LCD screen.
PLAY/STILL/MOVIE
switch (17, 18, 20)
PICTURE EFFECT
button (30)
PROGRAM AE button (31)
DISPLAY button
Press to display or turn off the
indicators on the LCD screen.
The indicators do not go off in the
following modes:
Program AE, Picture effect, Manual
focus, Zoom, AE Lock, Self-timer,
Flash, Adjusting the exposure, Flash
level, and White balance.
Hooks for strap
Attaching the shoulder
strap
LCD screen
POWER switch
Slide down to
turn on/off the
power.
POWER lamp
ACCESS lamp
(17, 20)
DISK EJECT lever
(8)
Battery cover/
PUSH button (13)
Control button
10-GB
Page 11
Photocell window
for LCD screen
The LCD screen becomes
brighter when exposed to
sunlight.
VOLUME +/– button
Press to adjust the
volume of the speaker.
FLASH/CHARGE lamp
Speaker
FLASH button
Auto is set at the factory.
Each time you press the button, the
flash mode changes as follows:
Auto (no indication) t forcedflash t
no flash t Auto
In auto mode, the flash goes off
automatically according to the
brightness of the surroundings.
The subject must be 1 5/8 feet to 8
1/3 feet (0.5 m to 2.5 m) away.
When you record using the flash
and conversion lens (not supplied),
an eclipse may occur.
Zoom lever
Floppy disk
slot
POWER lamp
(17, 20)
Self-timer
Select SELFTIMER from the menu
bar with the control button, then
press z.
About 10 seconds after you press
the shutter button, the subject is
recorded.
Control button
Upper side
Left
side
Lower side
Right
side
Press to
execute.
Function of the control button
You can execute the functions by
pressing the upper, lower, left or right
(v/V/b/B) side of the control
button. When an item is selected in
the menu, the color of the item
changes from blue to yellow. To enter
your selection, press the center of the
control button (z).
11-GB
Page 12

Preparation
Charging the battery pack
To charge the battery pack, use the battery charger. Your camera
operates only with the “InfoLITHIUM” battery pack (L series)
“InfoLITHIUM” is a trade mark of Sony Corporation.
1 Connect the power cord
to a wall outlet.
2 Insert the battery pack
in the direction of the
V mark. Slide it down
until it clicks.
To remove the battery pack
Slide up the battery pack.
Charging time
Battery Full charge* Normal charge**
NP-F330 (Supplied) 210 min. 150 min.
NP-F550 240 min. 180 min.
Approximate minutes to charge a discharged battery pack using the
battery charger BC-V615/BC-V615A. (Lower temperatures require a
longer charging time.)
* Charging for about one hour after the CHARGE lamp goes out.
**Charging just until the CHARGE lamp goes out.
CHARGE lamp
(orange)
The CHARGE lamp
(orange) lights up.
Charging begins.
Battery charger
12-GB
Page 13
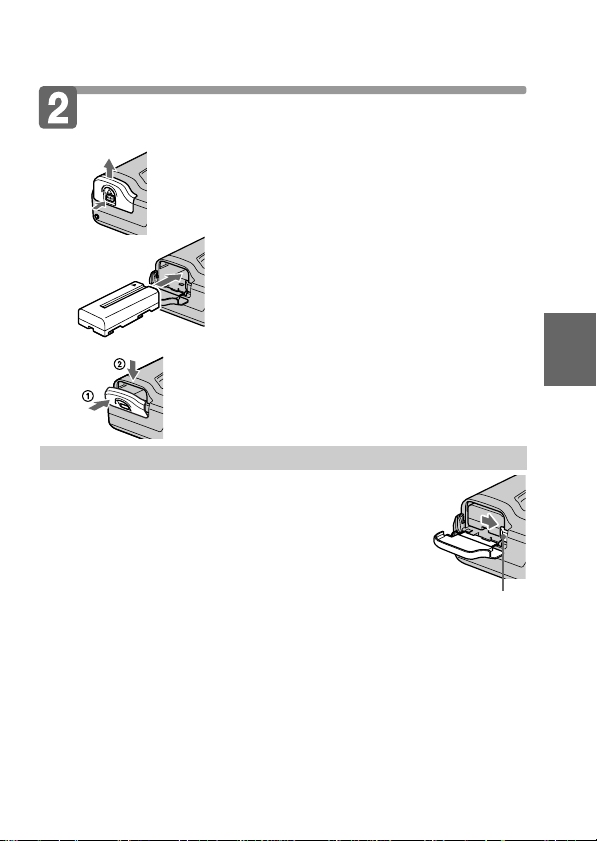
Installing the battery pack
1 Open the battery cover.
Slide the battery cover in the
direction of the arrow pressing
PUSH button.
(base)
2 Install the battery pack.
Insert the battery pack with the V
mark facing toward the battery
compartment.
3 Close the cover.
Press the cover until it clicks.
To remove the battery pack
Open the battery cover. While sliding the battery
release lever rightward, remove the battery pack.
Be careful not to drop the battery pack when removing.
Battery release lever
Basic operations
13-GB
Page 14

k Preparation
Remaining battery time indication
This camera shows on the LCD panel how many minutes you can still keep on
recording or playing back images*. Note, however, that the time might not be
displayed correctly under some use conditions or in some environments.
* The time displayed during recording or during playback refers to the time
for which the battery lasts if you simply keep the camera on or if you simply
keep it displaying images without performing any operation.
Auto power-off function
During recording if you leave the camera inactive for about 3 minutes while
the power is on, the camera turns off automatically to prevent wearing down
the battery.
About the power source
This camera can be powered from the following three power
sources:
•InfoLITHIUM battery* NP-F330 (supplied)/F550 (not supplied)
•AC power adaptor AC-VQ800 (not supplied)
•DC power adaptor DC-VQ800 (not supplied)
When you use the camera for a long time, we recommend you to
power the camera from a wall outlet with the AC power adaptor.
*What is “InfoLITHIUM” ?
The “InfoLITHIUM” is a lithium ion battery pack which can exchange data
such as battery consumption with compatible equipment. This unit is
compatible with the “InfoLITHIUM” battery pack (L series). Your camera
operates only with the “InfoLITHIUM” battery. “InfoLITHIUM”battery packs
have the
“InfoLITHIUM” is a trademark of Sony Corporation.
mark.
14-GB
Page 15

Setting the date and time
When you use the camera first, set the date and time.
The date and time are necessary for MS-DOS format recording. If
they are not set, incorrect date and time are recorded, and CLOCK
SET screen in step 5 appears whenever you turn on the camera in
STILL/MOVIE mode.
1 Slide the POWER switch down to turn on the power.
The POWER lamp lights up.
2 Press v of the control button.
The menu bar appears on the LCD
screen.
INDEX FILEDELETE SETUP
SELECT OK
3 Select “SETUP” with the control button, then press z.
INDEX FILEDELETE SETUP
SELECT OK
4 Select “CLOCK SET” from the menu bar with the
control button, then press z.
VIDEO OUT
/LANGUAGE
CLOCK SET
BEEP
MENU BAR OFF
Basic operations
VIDEO OUT
/LANGUAGE
JAN 1 1999
CLOCK SET
12 : 00 : 00AM
BEEP
INDEX FILEDELETE SETUP
SELECT OK
CLOCK SET
1999JAN AM: 1 12 00
SELECT/ADJUST OK
Y/M/D
M/D/Y
D/M/Y
ENTER
CANCEL
15-GB
Page 16
k Preparation
5 Select the desired display of the date with the control
button, then press z.
Y/M/D (year/month/day)
M/D/Y (month/day/year)
D/M/Y (day/month/year)
CLOCK SET
1999 AM: 1 1 12 00
SELECT/ADJUST OK
Y/M/D
M/D/Y
D/M/Y
ENTER
CANCEL
6 Select the date and time with the control button, then
press z.
The item to be changed is indicated
with v/V. Select number by pressing
the upper side or lower side of the
control button, then press it to enter the
number.
After entering the number, v/V moves
to the next item.
CLOCK SET
1999 AM: 1 1 12 00
SELECT/ADJUST OK
Y/M/D
M/D/Y
D/M/Y
ENTER
CANCEL
When “D/M/Y” is selected, set the
time on a 24-hour cycle.
7 Select “ENTER” with the control button, then press z
at the desired moment to begin clock movement.
CLOCK SET
1999 PM: 7 4 10 30
SELECT/ADJUST OK
To cancel setting the date and time
Select “CANCEL” with the control button, then press z.
16-GB
Y/M/D
M/D/Y
D/M/Y
ENTER
CANCEL
Page 17
Recording and playing back images
Recording still images
To record the images, slide the POWER switch down to turn on the
power (The POWER lamp lights up) and insert the floppy disk until
it clicks.
ACCESS lamp
POWER lamp
1 Set PLAY/STILL/MOVIE to STILL.
2 Press the shutter button halfway
down.
The AE lock indicator z (green) flashes.
When AE (auto exposure), AWB (auto
white balance) and AF (auto focus) are
frozen, the AE lock indicator stops flashing.
3 Press the shutter button fully
down.
The image is recorded on the disk.
The number of images you can record on a floppy disk
About 8 – 12 images(FD83)/6 – 10 images(FD88) with all default settings.
(p. 36)
Note
When the image is recorded on the disk, the ACCESS lamp flashes.
When the ACCESS lamp is flashing, never shake or strike the unit. Also, do
not turn the power off or remove the battery pack or floppy disk. Otherwise,
an image data breakdown may occur and the floppy disk may become
unusable.
17-GB
Basic operations
Page 18
k Recording and playing back images
Recording moving images
1 Set PLAY/STILL/MOVIE to MOVIE.
2 Press the shutter button fully down momentarily.
The image and sound are recorded for the length which you select in
the file menu: 5 seconds, 10 seconds, 15 seconds.
Hold the shutter button fully down.
The image and sound are recorded until you release it.
Maximum 60 seconds when recording 160 × 112 size
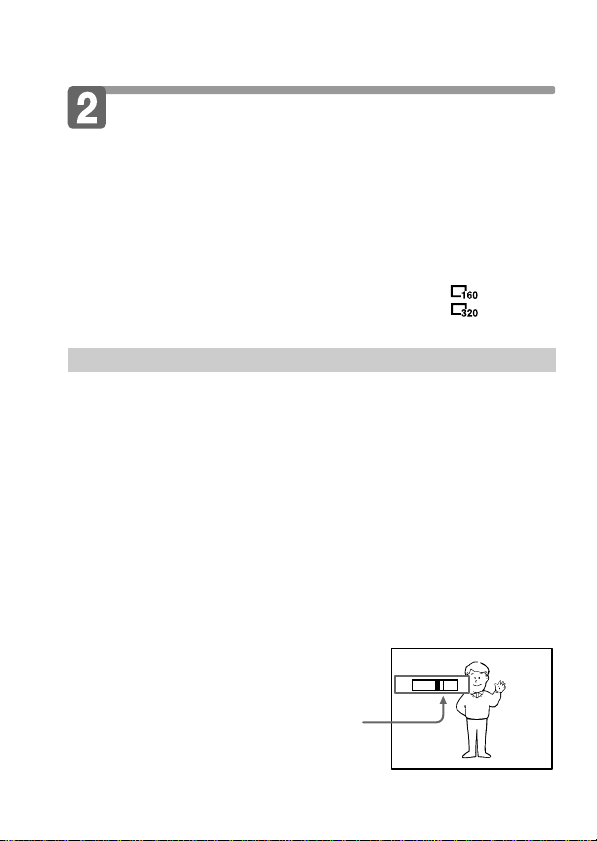
Using the zoom feature
Move the power zoom lever a little for a slower zoom. Move it
further for a faster zoom.
Using the zoom function sparingly results in better-looking recordings.
“T” side: for telephoto (subject appears closer)
“W” side: for wide-angle (subject appears farther away)
If you cannot get a sharp focus, move the power zoom lever to the “W”
side until the focus is sharp. You can shoot a subject that is at least about
25 cm (FD83)/90 cm (FD88) away from the lens surface in the telephoto
position, or about 25 cm away in the wide-angle position. When the
subject is too close to focus on, refer to p. 28.
Digital zoom starts to function when zoom exceeds 3× (FD83)/8× (FD88).
The picture quality deteriorates as you go toward the “T” side. Set
DIGITAL ZOOM to OFF in the MENU settings. Otherwise the digital
zoom activates without notice (p. 55).
Digital zoom does not work for moving
images.
15 seconds when recording 320 × 240 size
W
T
18-GB
The right side of the bar shows
the digital zooming zone.
Page 19
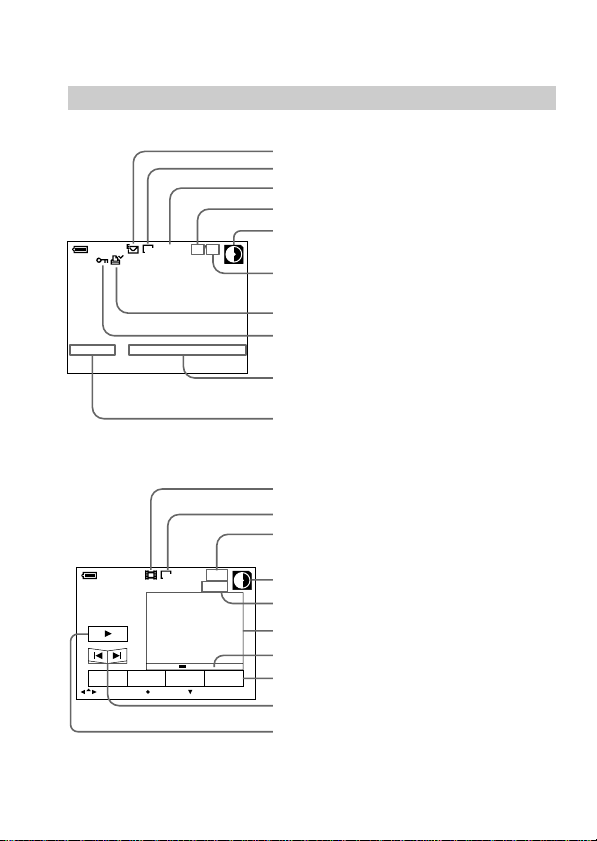
The indicators during recording
The indicators on the LCD screen are not recorded.
Image size indicator
Image quality indicator
Recording mode indicator
AE/Focus lock indicator
Manual focus indicator
Remaining battery
time indicator
120
min
Program AE
indicator
BRT
+1.0
EV
Flash level
indicator
SELF
MACRO
TIMER
SELECT OK
Picture effect*/LCD
bright level indicator*/
Volume level indicator*/Zoom indicator*
White balance
indicator
MACRO
EV level indicator
* Only displayed during operation.
1280
FINE
REC
15s
Number of stored
images
Remaining disk
capacity indicator
0:03
10
Self-diagnosis
function indicator/
Recording time
indicator
Recording time
SETUPCAMERAFILE
MENU BAR OFF
indicator
Menu bar/Guide menu
They appears by pressing v
of the control button and
disappears by pressing V of
the control button.
Self-timer indicator
Basic operations
19-GB
Page 20
k Recording and playing back images
Playing back still images
To view the recorded images on the LCD screen, slide POWER
down to turn on the power (The POWER lamp lights up) and insert
the floppy disk until clicks.
1 Set PLAY/STILL/MOVIE to PLAY.
The ACCESS lamp flashes and the last recorded
image appears on the LCD screen.
POWER lamp
ACCESS lamp
2 Press v of the control button.
The menu bar appears on the LCD screen.
3 Select the recorded image with the control button.
Select the button on the LCD screen with the control button, then
press z.
'b : To display the preceding recorded image.
B' : To display the next image.
: To display six recorded images at a time
INDEX
(INDEX screen).
You can select the image with b/B of the control button if you turn
off the menu bar.
20-GB
Page 21

Playing back moving images
1 Set the PLAY/STILL/MOVIE to PLAY.
The last recorded image appears on the LCD screen.
The image recorded in MOVIE mode is displayed one-size
smaller than the other normal-sized images.
2 Press v of the control button to display the menu bar
on the LCD screen.
3 Select the recorded moving image with the control
button.
Select fast-forward/rewind
buttons on the LCD screen
with the control button, then
press z.
'b : To display the preceding
recorded image.
B' : To display the next image.
: To display six recorded images at a time (INDEX
INDEX
screen).
Select the image with b/B of the control button, and then press z to
play back moving images and sounds if you turn off the menu bar.
4 Select the B (playback) button on the screen with the
control button, then press z.
Moving images and sound are played back.
Note
• The images recorded by this camera may not be played back correctly by
MVC-FD5/FD7/FD51/FD71/FD73/FD81/FD91/FDR1/FDR3.
• This camera cannot play back the image size which is more than 1600 × 1200.
120
min
INDEX FILEDELETE SETUP
SELECT OK
160
6/8
MENU BAR OFF
Basic operations
21-GB
Page 22
k Recording and playing back images
The indicators during playback
During playback still images (STILL)
Recording mode indicator
Image size indicator
Image quality
Image number
Remaining disk capacity indicator
min
FINE
11/12
1280
120
Number of stored images in a floppy
disk
Print mark indicator
MVC-011S
12:00AM1999 7 4
Protect indicator
Recording date of the playback image/
Menu bar/Guide menu
File name
During playback moving images (MOVIE)/Still images with
sounds (VOICE)
Moving image file indicator
Image size indicator
Image number/Number of stored
image in a floppy disk
120
min
6 / 8
320
0
:
10
Remaining disk capacity indicator
Counter
Playback image*
Play bar
INDEX FILEDELETE SETUP
SELECT OK
MENU BAR OFF
Menu bar and guide menu
Fast-forward/rewind buttons
Playback/playback pause button
B is displayed during stop, and X during
playback.
* When playing back a VOICE file, the playback image is full-screen.
22-GB
Page 23

Battery life/No. of images that can be recorded/played back
STILL mode
Battery Battery life No. of images
NP-F330 Continuous recording* 55 (50) 550 (500)
(Supplied) Continuous playing** 65 (60) 1700 (1500)
NP-F550 Continuous recording* 120 (110) 1200 (1050)
Approximate battery life and no. of images that can be recorded/played back
at a temperature of 77°F (25°C), 640 × 480 image size, in NORMAL recording
and STANDARD quality mode. Numbers in parentheses indicate the time
when using a normally charged battery. If you record other than 640 × 480 size
images or use the flash, the no. of images that can be recorded is reduced from
the above figures by about 20%.
* Recording at about 5 second intervals
** Playing back single image at about 2 second intervals
Continuous playing** 140 (130) 3600 (3200)
(min.) (record/playback)
Basic operations
23-GB
Page 24

k Recording and playing back images
MOVIE mode
Battery Battery life No. of images*
NP-F330 Continuous recording 75 (65) 55 (45)
(Supplied)
NP-F550 Continuous recording 160 (140) 120 (100)
Approximate minutes that can be recorded at a temperature of 77°F (25°C)
and 160 × 112 image size. Numbers in parentheses indicate the time when you
use a normally charged battery.
• Battery life and no. of images will be decreased if you use the camera in a
cold environment or while you repeat turning the power on/off and
zooming.
• The capacity of a floppy disk is limited. The above figures are a guide when
continuously recording/playing back while replacing the floppy disks.\
* For 5 sec. REC
(min.) (record)
24-GB
Page 25

Viewing images using a personal computer
With this camera, the still image data is compressed in JPEG format
and move image data is compressed with MPEG-1 format. These
data can be viewed using a personal computer which installed JPEG
and MPEG browsing software as Microsoft Internet Explorer 4.0. For
further information to use the browsing software, refer to the
personal computer instruction manual.
Example: personal computer with Windows 95/98 installed
1 Start up personal computer and insert the floppy
disk into the disk drive of the personal
computer.
2 Open “ My computer” and double click
“
3.5 inch FD (A:)”.
3 Double-click the desired data file.
Recommended OS/applications example
OS
Windows 3.1, Windows 95/98 or later, Windows NT 3.51 or later,
etc.
applications
Microsoft Internet Explorer 4.0, Netscape Navigator etc.
To display the image list, double-click “MAVICA.HTM” of the
floppy disk recorded with this camera if your personal computer is
installed with a browser such as Microsoft Internet Explorer.
Basic operations
25-GB
Page 26

k Recording and playing back images
Notes
•To play back an MPEG file, install Active Movie Player (Direct Show).
• For playing back a file recorded in MOVIE or VOICE mode, first copy it to
the hard disk of the personal computer. If you play back the file from a
floppy disk, the picture and sound may break off.
• You cannot play back an MPEG file with Windows 3.1.
• For Macintosh, you can use the floppy disk recorded with this camera using
the PC Exchange with Mac OS system 7.5 or higher. A viewing application
for Macintosh is also necessary for viewing images. To play back an MPEG
file, install Quick Time 3.0.
Playing back JPEG files with Microsoft
Office
Example: Using Excel
1 Select “Insert” on the main menu.
2 Point to “Picture” to display the popup menu.
3 Select “From File” to display the File Manager
dialog box.
4 Select “ 3.5 inch FD (A:)”.
5 Select the desired file to insert.
6 Select “Insert” to insert the file selected.
26-GB
Page 27
V arious recor ding
FOCUS
AUTO/
MANUAL
Focus ring
PROGRAM AE
PICTURE EFFECT
Focusing manually
1 Set FOCUS AUTO/MANUAL to MANUAL.
9 appears on the LCD screen.
2 Turn the focus ring to achieve a sharp focus.
9 changes as follows:
: when recording a distant subject
: when the subject is too close to focus on
To reactivate auto focusing, set FOCUS AUTO/MANUAL to
AUTO.
Note
When recording in relatively dark environment, it is recommended to record
after focusing manually, or set PROGRAM AE to Panfocus mode.
Advanced operations
27-GB
Page 28
k Various recording
Recording images in macro
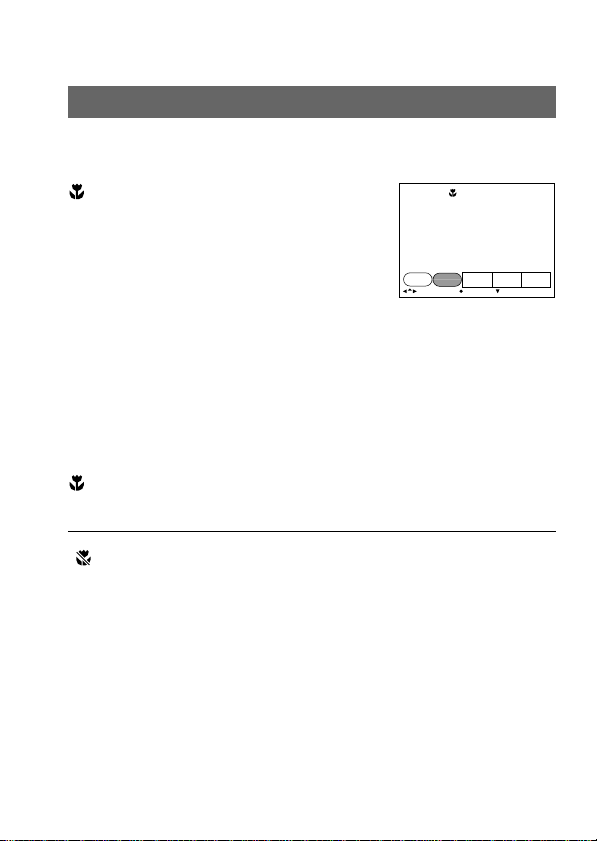
Select MACRO from the menu bar with the control
button, then press z
appears on the LCD screen.
SELF
MACRO
TIMER
MENU BAR OFFSELECT OK
You can shoot a subject that is about 1cm(FD83)/4cm(FD88) away
from the lens surface in the wide-angle position.
To cancel the macro mode
Select MACRO from the menu bar again with the control button,
then press z.
disappears.
Note
You cannot record images in macro with following PROGRAM AE modes
appears on the LCD screen):
(
• Sunset & Moon mode
• Landscape mode
• Panfocus mode
28-GB
SETUPCAMERAFILEMACRO
Page 29

Adjusting the white balance
White balance adjustment makes white subject look white and
allows more natural color balance for camera recording. Normally
white balance is automatically adjusted.
1 Set PLAY/STILL/MOVIE to STILL or MOVIE, then
press v of the control button.
The menu bar appears on the LCD screen.
2 Select CAMERA with control button, then press
z.
3 Select WHITE BALANCE with control button, then
press z.
4 Select desired white balance, then press z.
AUTO:
to adjust the white balance automatically
IN DOOR (n) :
• if the lighting conditions, like those at a party, are changing
• if the picture is being taken in a studio lit by TV lighting
• if the subject is being lit by sodium- or mercury-vapor lamps
OUT DOOR ( ) :
• at night-time with neon or fireworks in the picture
• at sunset or sundown
• under daytime-fluorescent light
Advanced operations
HOLD:
to record a single-colored subject or background
5 Press V of the control button repeatedly.
The camera menu dissapears.
29-GB
Page 30

k Various recording
Enjoying Picture Effect
Press PICTURE EFFECT repeatedly to select the
desired picture effect mode.
NEG. ART: The color and brightness of the picture is reversed.
SEPIA: The picture is sepia.
B&W: The picture is monochrome (black and white).
SOLARIZE: The light intensity is more clear, and the picture
To cancel picture effect
Press PICTURE EFFECT repeatedly until the indicator on the LCD
screen goes out. When you turn the power off or set PLAY/STILL/
MOVIE to PLAY, the picture effect is automatically cancelled.
looks an illustlation.
30-GB
Page 31

Using the PROGRAM AE function
You can select one of six PROGRAM AE (Auto Exposure) modes to
suit your shooting situation, referring to the following.
Press PROGRAM AE repeatedly to select the desired
PROGRAM AE mode.
Spot light-metering mode
For recording subjects with backlight or strong contrast between
subjects and background. Use this mode to take a picture with
the appropriate exposure for just the point you want to focus on.
LCD screen
Spot light-metering range
Low Lux 1 mode
For making subjects brighter in insufficient light.
Low Lux 2 mode
For recording a dark picture more brightly, or making the
movement of the subject brighter seem lively.
Sunset & Moon mode
For recording subjects in dark environments such as sunsets,
fireworks, neon signs, or general night views.
Landscape mode
For distant subjects such as mountains behind an obstacle such
as a window or screen.
Panfocus mode
For changing the subject to focus on quickly and simply (from
close subjects to distant subjects). Or, for recording with flash in
a dark place where it is hard to bring the camera into focus.
Advanced operations
31-GB
Page 32

k Various recording
To cancel PROGRAM AE
Press PROGRAM AE repeatedly until the indicator on the LCD
screen goes out.
Notes on focus settings
• You can focus only on distance subjects in Sunset & Moon and Landscape
modes.
• In Panfocus mode, the zoom position and focus are fixed.
• When you record in the Low Lux 1/Low Lux 2 mode, we recommend that
you use a tripod to compensate for camera-shake.
• Set the flash mode to forced-flash
mode:
Low Lux 1 mode, Low Lux 2 mode, Sunset & Moon mode, or Landscape
mode.
• When you record in the Low Lux1/Low Lux2 mode, the picture may
become coarse momentarily just before your camera focuses on a subject in
the auto mode. This is not a malfunction.
when you use flash in the following
32-GB
Page 33

Selecting image quality (QUALITY)
You can select one of two available image quality modes. The
number of images you can record is different depending on which
image quality mode you select.
1 Set PLAY/STILL/MOVIE to STILL, then press v of
the control button.
The menu bar appears on the LCD screen.
2 Select FILE with the control button, then press z.
The FILE menu appears on the screen.
3 Select QUALITY with the control button, then
press z.
FINE:Use this mode when giving priority to image quality.
STANDARD: Use this mode as a standard image quality.
4 Select image quality with the control button,
then press z.
5 Press V of the control button repeatedly.
The menu bar disappears from the screen.
Advanced operations
33-GB
Page 34

k Various recording
Selecting image size
You can change the image size for your purpose.
1 Set PLAY/STILL/MOVIE to MOVIE or STILL, then
press v of the control button.
The menu bar appears on the LCD screen.
2 Select FILE with the control button, then press z.
The FILE menu appears on the screen.
3 Select IMAGE SIZE with the control button, then
press z.
Items for STILL mode
1280 × 960 : Records a 1280 × 960 JPEG file. (FD88 only)
1216 × 912 : Records a 1216 × 912 JPEG file. (FD83 only)
1024 × 768 : Records a 1024 × 768 JPEG file.
640 × 480 : Records a 640 × 480 JPEG file.
Items for MOVIE mode
320 × 240 : Records a 320 × 240 MPEG file.
160 × 112 : Records a 160 × 112 MPEG file.
4 Select the desired image size with the control
button, then press z.
5 Press V of the control button repeatedly.
The menu bar disappears from the screen.
34-GB
Page 35

Selecting recording mode (REC MODE)
You can record a still image and sound togeter or a still image which
is suitable for e-mail transmission.
1 Set PLAY/STILL/MOVIE to STILL, then press v of
the control button.
The menu bar appears on the LCD screen.
2 Select FILE with the control button, then press z.
The FILE menu appears on the screen.
3 Select REC MODE with the control button, then
press z.
VOICE : Records a still image and sound together besides a
JPEG file.
E-MAIL : Records a 320 × 240 JPEG file besides a selected image
size. E-mail files are suitable for e-mail transmission
because they contain compressed data.
NORMAL: Records a JPEG file in selected image size.
4 Select the desired recording mode with the
control button, then press z.
5 Press V of the control button repeatedly.
The menu bar disappears from the screen.
Advanced operations
35-GB
Page 36

k Various recording
Recording Image Recorded file File name can be recorded
mode size (ex.)* on a floppy disk
NORMAL **1280 JPEG (1280 × 960) 001F.JPG
× 6 – 10 4 – 6
960 For index screen 001F.411
***1216 JPEG (1216 × 912) 001F.JPG
× 8 – 12 5 – 8
912 For index screen 001F.411
1024 JPEG (1024 × 768) 001F.JPG
× 10 – 16 6 – 8
768 For index screen 001F.411
640 JPEG (640 × 480) 001F.JPG
× 25 – 40 15 – 20
480 For index screen 001F.411
E-MAIL **1280 JPEG (1280 × 960) 001F.JPG
× JPEG (320 × 240) 001E.JPG 5 – 10 3 – 6
960 For index screen 001F.411
***1216 JPEG (1216 × 912) 001F.JPG
× JPEG (320 × 240) 001E.JPG 7 – 12 4 – 8
912 For index screen 001F.411
1024 JPEG (1024 × 768) 001F.JPG
× JPEG (320 × 240) 001E.JPG 9 – 14 5 – 7
768 For index screen 001F.411
640 JPEG (640 × 480) 001F.JPG
× JPEG (320 × 240) 001E.JPG 20 – 35 12 – 15
480 For index screen 001F.411
VOICE JPEG (1280 × 960) 001F.JPG
**1280 MPEG audio
× with still image 001A.MPG 3 – 6 2 – 5
960 (320 × 240)
For index screen 001F.411
JPEG (1216 × 912) 001F.JPG
***1216 MPEG audio
× with still image 001A.MPG 4 – 7 3 – 6
912 (320 × 240)
For index screen 001F.411
No. of images that
MVC– STANDARD FINE
36-GB
Page 37

JPEG (1024 × 768) 001F.JPG
1024 MPEG audio
× with still image 001A.MPG 4 – 9 3 – 6
768 (320 × 240)
For index screen 001F.411
JPEG (640 × 480) 001F.JPG
640 MPEG audio
× with still image 001A.MPG 5 – 14 4 – 10
480 (320 × 240)
For index screen 001F.411
* If you record images in STANDARD quality mode, the last character of file
name will be “S”. (ex. MVC-001S.JPG)
** MVC-FD88 only
*** MVC-FD83 only (Interpolated Mega Pixel Images)
Notes
• The file data for index screen is a available only on this camera.
• If you attempt to record 55 images or above, “DISK FULL” appears on the
LCD screen and you cannot record the image even when the remaining disk
capacity indicator is not emptied.
320 × 240 size E-mail files are stored in another folder. The compression
•
ratio is standard and does not depend on the image quality settings.
• When the remaining disk capacity indicator flashes, image and sound data
cannot be recorded.
Advanced operations
37-GB
Page 38

V arious playback
Playing back multiple images at a time (INDEX)
You can play back six recorded images at a time. You can also select
a specific image from the six images and enlarge it to full-size. This
function is useful for searching for an image you want from all the
recorded images.
1 Set PLAY/STILL/MOVIE to PLAY, then press v of
the control button.
The menu bar appears on the LCD screen.
2 Select INDEX with the control button, then press
z.
Six images are displayed at a time (INDEX screen).
: Moving image file
: Still image with sound file
: E-mail mode file
: Print mark
- : Protect mark
Showing the position of an image
whose number is displayed
To display other six images
Select v/V at the lower left on the screen with b of the control
button, then press v/V of the control button.
v Displays preceding six images
V Displays following six images
1999 7 4 12:30PMMVC-011S
RETURN
SELECT SINGLE DISPLAY
FILEDELETE SETUP
To return to the normal playback screen (Single screen)
Select the desired image with the control button, then press z.
38-GB
Page 39

Playing back images in a continuous loop – SLIDE SHOW
1 Press v of the control button to display the
menu bar.
2 Select “FILE” with the control button, then press
z.
3 Select “SLIDE SHOW” with the control button,
then press z.
DISK TOOL
SLIDE SHOW
COPY
PRINT MARK
PROTECT
INDEX FILEDELETE SETUP
SELECT OK
SELECT OK
SLIDE SHOW
INTERVAL
REPEAT
CANCELSTAR T
30 SEC
OFFON
4 Enter each item with the control button, then
press z.
INTERVAL :3 seconds, 5 seconds, 10 seconds, 30 seconds,
REPEAT ON : Repeat play back until “CANCEL” is selected (up
OFF : Slide show ends after all images are played back.
1 minute.
to 20 minutes).
5 Select “START” with the control button, then
press z.
Slide show starts.
To turn off the indicators on the LCD screen, press V of the
control button or DISPLAY.
Advanced operations
39-GB
Page 40

k Various playback
To cancel setting the slide show
Select CANCEL with the control button in step 5, then press z.
Operation during slide show
Pause: Select X with the control button, then press z.
Start: Select N with the control button, then press z.
Display the preceding or next image: Press ?b or B? on the LCD
screen or control panel.
40-GB
Page 41

Preventing accidental erasure – PROTECT
To prevent accidental erasure, you can protect all or selected image.
In single mode
1 Set PLAY/STILL/MOVIE to PLAY, then display the
images to protect.
2 Press v of the control button.
The menu bar appears on the LCD screen.
3 Select FILE with the control button, then press z.
The FILE menu appears on the screen.
4 Select PROTECT with the control button, then
press z.
5 Select ON with the control button, then press z.
The displayed image is protected.
6 Press V of the control button repeatedly.
- appears on the protected image.
The menu bar disappears from the screen.
Advanced operations
41-GB
Page 42

k Various playback
To release protection
Select OFF with the control button in step 5, then press z.
In INDEX mode
1 Display the INDEX screen.
2 Select PROTECT of the FILE menu with the control
button, then press z.
The FILE menu appears on the LCD screen.
3 Select ALL to protect (or unprotect) all images,
or SELECT to protect (or unprotect) selected
images with the control button, then press z.
<When selecting ALL>
To protect all images
Select ON with the control button, then press z.
PROTECT: ALL
ON
FORMAT
OFF
PRINT MARK
CANCEL
PROTECT
SELECT
To release protection of all images
Select OFF with the control button, then press z.
FILEDELETE SETUPRETURN
SINGLE DISPLAY
42-GB
Page 43

<When selecting SELECT>
To protect images
0001-0006/0040
SELECT OK
ENTERPROTECT CANCEL
1 Select the image to protect with the control button,
then press z.
The - (green) appears on the selected image.
2 After selecting all images to protect, select ENTER with
the control button, then press z.
The color of the - changes from green to white.
To release protection
Select the image to unprotect in the step 1. And select ENTER with
the control button, then press z.
Advanced operations
43-GB
Page 44

k Various playback
Deleting images – DELETE
You can delete all or selected images that you no longer want to
keep.
In single mode
1 Set PLAY/STILL/MOVIE to PLAY.
2 Press v of the control button.
The menu bar appears on the LCD screen.
3 Select DELETE with the control button, then
press z.
4 Select ON with the control button, then press z.
The displayed image is deleted.
In INDEX mode
1 Display the INDEX screen.
2 Select DELETE with the control button, then
press z.
3 Select ALL to delete all images or SELECT to
delete selected images with the control button,
then press z.
44-GB
Page 45

<When selecting ALL>
Select OK with the control button, then press z.
DELETE ALL ?
OK
ALL
SELECT
CANCEL
SELECT
FILEDELETE SETUPRETURN
OK
<When selecting SELECT>
0001-0006/0040
SELECT OK
ENTERDELETE CANCEL
1 Select the image to delete with the control button,
then press z.
The (green) appears on the selected image.
2 After selecting all images to delete, select ENTER with
the control button, then press z.
The selected images are deleted.
To cancel deleting
Select CANCEL with the control button, then press z.
Notes
•You cannot delete protected images even if you select ALL in the
DELETE menu.
•You cannot select protected images when you select SELECT in the
DELETE menu.
Advanced operations
45-GB
Page 46

k Various playback
Copying images – COPY
In single mode
1 Set PLAY/STILL/MOVIE to PLAY.
2 Press v of the control button.
The menu bar appears on the LCD screen.
3 Select FILE with the control button, then press z.
The FILE menu appears on the screen.
4 Select COPY with the control button, then press
z.
5 Select OK with the control button, then press z.
“FILE ACCESS” appears, and then “CHANGE
FLOPPY DISK” is displayed.
6 Eject the floppy disk.
“INSERT FLOPPY DISK” is displayed.
7 Insert another floppy disk until you hear it clicks.
“RECORDING” is displayed.
8 Once copying is completed, the message
“COMPLETE” is displayed.
To copy images to another floppy disk, select “CONTINUE”
with the control button and repeat the operations in steps 6
through 8 above.
To discontinue copying, select EXIT with the control button.
46-GB
Page 47

In INDEX mode
1 Display the INDEX screen.
2 Select FILE with the control button, then press z.
The FILE menu appears on the screen.
3 Select COPY with the control button, then press
z.
4 Select ALL or SELECT.
5 Select OK if you select ALL in step 4. Otherwise
select the image you want to copy with the
control button, then press z to display the
the image. And repeat the same procedure until
you select all images to copy, then select ENTER
with the control button.
“FILE ACCESS” appears, and then “CHANGE FLOPPY DISK” is
displayed.
on
6 Eject the floppy disk.
“INSERT FLOPPY DISK” is displayed.
7 Insert another floppy disk until you hear it clicks.
“RECORDING” is displayed.
8 Once copying is completed, the message
“COMPLETE” is displayed.
To copy images to another floppy disk, select CONTINUE with
the control button and repeat the procedures in steps 6 through 8
above.
To discontinue copying, select EXIT with the control button.
Notes
• When you copy to the floppy disk which has a small remaining capacity,
“DISK FULL” may appear on the LCD screen.
• To discontinue copying onto a floppy disk, change PLAY/STILL/MOVIE
mode or turn off your camera.
47-GB
Advanced operations
Page 48

k Various playback
Copying all the infomation in your floppy disk – DISK COPY
You can copy to another disk not only the images you have recorded
with your camera but also various files you have created in other
software with your PC.
1 Press v of the control button.
The menu bar appears on the LCD screen.
2 Select FILE with the control button, then press z.
The FILE menu appears on the screen.
3 Select DISK COPY, then OK.
“FILE ACCESS” is displayed.
4 When “CHANGE FLOPPY DISK” is displayed, eject
the floppy disk.
5 When “INSERT FLOPPY DISK” is displayed, insert
another disk.
“RECORDING” is displayed.
6 Once copying is completed, the message
“COMPLETE” is displayed.
To copy all the infomation to another floppy disk, select
CONTINUE with the control button and repeat the procedures
in steps 2 through 4 above.
To discontinue copying, select EXIT with the control button.
Notes
• With copying disk, all information saved on the recipient floppy disk are
erased to be replaced by newly written data including the protected image
data. Check the contents of the disk before copying disk.
• To discontinue copying onto a floppy disk, change PLAY/STILL/MOVIE
mode or turn off your camera.
• Be sure to use the formatted floppy disk to carry out DISK COPY.
48-GB
Page 49

Formatting a floppy disk – FORMAT
1 Press v of the control button.
The menu bar appears on the LCD screen.
2 Select FILE with the control button, then press z.
The FILE menu appears.
3 Select FORMAT in the DISK TOOL with the control
button, then press z.
4 Select OK with the control button, then press z.
To cancel formatting
Select CANCEL with the control button in step 4, then press z.
Note
• When you format a floppy disk, all data stored in the floppy disk will be
deleted. Check the contents of the floppy disk before formatting. Note that
even protected images will be deleted.
• Make sure if the battery pack is charged enough before formatting.
Formatting takes about 30 seconds.
Advanced operations
49-GB
Page 50

k Various playback
Writing a print mark on an image
You can specify the recorded still image to print out. This function is
useful for printing out still images to print out.
Your camera conforms with the DPOF (Digital Print Order Format)
standard for specifying the still images to print out.
In single mode
1 Set PLAY/STILL/MOVIE to PLAY, and display the
image to write a print mark.
2 Press v of the control button.
The menu bar appears on the LCD screen.
3 Select FILE with the control button, then press z.
The FILE menu appears on the LCD screen.
4 Select PRINT MARK with the control button, then
press z.
5 Select ON with the control button, then press z.
DISK ACCESS appears on the LCD screen.
6 Press V of the control button repeatedly.
The menu bar disappears from the scree.
To cancel the print mark
Select OFF with the control button in step 5, then press z.
50-GB
Page 51

In INDEX mode
1 Display INDEX screen.
2 Select FILE with the control button, then press z.
The FILE menu appears on the screen.
3 Select PRINT MARK with the control button, then
press z.
The FILE menu appears on the LCD screen.
4 Select ALL to cancel a print mark on all images
or SELECT to write (or cancel) a print mark on
selected images with the control button, then
press z.
<When selecting ALL>
To cancel the all print marks
Select OFF with the control button, then press z.
PRINT MARK: ALL
OFF
FORMAT
CANCEL
PRINT MARK
PROTECT
SELECT
FILEDELETE SETUPRETURN
OK
<When selecting SELECT>
To write a print mark
1 Select the image to write a print mark with the control
button, then press z.
The (green) appears on the selected image.
2 After selecting all the images to write a print mark,
select ENTER with the control button, then press it.
The color of changes from green to white.
To cancel the selected print mark
Select the images to cancel in step 1.
And select ENTER with the control button, then press z.
51-GB
Advanced operations
Page 52

k Various playback
Using image data with other equipment
Viewing the images on TV
Connect the camera to the TV that has a video and audio input jack.
Adjust VIDEO OUT (NTSC/PAL) in the menu settings before
viewing the images on TV. (p. 56, 58, 59)
A/V connecting cable
(supplied)
to A/V OUT
1 Connect the A/V OUT jack of the camera to the
video and audio input jack of the TV.
2 Set the TV/VIDEO input select on the TV to VIDEO.
3 Start playback on the camera.
Playback picture appears on the TV screen.
Notes
• Before making connections, turn off each equipment. After connections are
completed, turn on each equipment.
• When you use the camera with connecting other equipment for a long time,
use the AC power adaptor/charger (not supplied).
• You cannot use a TV that has an antenna (aerial) connector only.
• Beep does not sound when connecting with the A/V connecting cable.
• When the audio input jack of TV is stereo type, connect the audio plug of the
A/V connecting cable to a audio input jack (white) of TV.
• When you record images connecting your camera with TV, the sound is
muted.
• When you connect the A/V connecting cable to TV, the display of your
camera turns off.
52-GB
Page 53

Changing the mode settings
1 Press v of the control button.
The menu bar appears on the LCD screen.
Items in STILL or
MOVIE mode
Items in PLAY mode
(SINGLE screen)
Items in PLAY mode
(INDEX screen)
SELF
TIMER
INDEX FILEDELETE SETUP
SETUPCAMERAFILEMACRO
MENU BAR OFFSELECT OK
SELECT OK
MENU BAR OFF
1999 7 4 12:30PMMVC-011S
RETURN
SELECT SINGLE DISPLAY
FILEDELETE SETUP
2 Select desired item with the control button, then
press z.
When an item is selected, the color of
the item changes from blue to yellow.
V
I
DEO OUT
/LANGUAGE
CLOCK SET
BEEP
INDEX FILEDELETE SETUP
OK
SELECT
3 Change the setting with the control button, then
press z.
When the setting is finished, the menu screen returns to the
screen of step 1.
To cancel changing the mode settings
Press V of the control button. The screen returns to the menu screen.
To cancel the menu screen, press V of the control button repeatedly.
53-GB
Advanced operations
Page 54

k Changing the mode settings
Setting the mode of each item
z is set at the factory.
Menu items that can be modified differ depending on the setting of
the MODE selector. The LCD screen shows only the items you can
operate at the moment.
Items in STILL or MOVIE mode
Menu Item1 Item2 Setting Meaning
SELF
TIMER
MACRO
FILE DISK
TOOL
FILE SERIES
NUMBER
IMAGE z
SIZE
(in STILL z
mode)
FORMAT
DISKCOPY
CANCEL
ON
OFF
OK
CANCEL
OK
CANCEL
z
NORMAL
1280 × 960
1216 × 912
1024 × 768
640 × 480
To record with self-timer. (p. 11)
To record in macro
To record normally
To format the floppy disk loaded
in the camera
“FORMATTING” is displayed
during formatting, then it
disappears after the completion.
To cancel formatting
To copy all data stored in a floppy
disk to another
To cancel copying all data stored
in a floppy disk to another
To cancel formatting or copying all
data stored in a floppy disk to
another
To put numbers into files in
sequence even if the floppy disk is
changed
To reset the numbering of files
each time the floppy disk changed
To record a 1280 × 960 JPEG image
(FD88 only)
To record a 1216 × 912 JPEG image
(FD83 only)
To record a 1024 × 768 JPEG image
To record a 640 × 480 JPEG image
54-GB
Page 55

Menu Item1 Item2 Setting Meaning
IMAGE 320 × 240
SIZE z 160 × 112
(in MOVIE
mode)
QUALITY
REC VOICE
MODE
(in STILL
mode)
REC 15 SEC
TIME SET
(in MOVIE
mode)
CAMERA
DIGITAL
ZOOM OFF
WHITE z AUTO
BALANCE
FINE
z
STANDARD
E-MAIL
z
NORMAL
10 SEC
z 5 SEC
z ON
IN DOOR
OUT DOOR
HOLD
To record a 320 × 240 MPEG image
To record a 160 × 112 MPEG image
To give priority to image quality
To record as a standard image
quality
To record a still image and sound
together besides a JPEG file
Press the shutter button down
momentarily.
The sound is recorded for 5
seconds.
Hold the shutter button down.
The sound is recorded until you
release it. (Maximum 40 seconds)
To record a 320 × 240 JPEG file.
E-mail files are suitable for e-mail
transmission because they contain
compressed data.
To record a JPEG file in selected
image size
To record a moving image for 15
seconds
To record a moving image for 10
seconds
To record a moving image for 5
seconds
To turn on digital zoom
To turn off digital zoom
See page 29 for more information.
Advanced operations
55-GB
Page 56

k Changing the mode settings
Menu Item1 Item2 Setting Meaning
FLASH HIGH
LEVEL
EXPOSURE
SETUP DEMO* z
MODE
VIDEO NTSC
OUT
/ z
LANGUAGE
CLOCK
SET
BEEP
* Only when you use the AC adaptor (not supplied), DEMO MODE appears
in the menu.
DEMO MODE will be canceled if you turn off your camera.
z
NORMAL
LOW
+1.5 to –1.5
STBY/ON
OFF
PAL
ENGLISH
JPN
SHUTTER
z ON
OFF
To make the flash level higher
than normal
To record normally
To make the flash level lower than
normal
To adjust exposure
To make the demonstration
appear
To deactivate the demonstration
mode
To set the video signal NTSC
mode
To set the video signal PAL mode
To display menu items in English
/
To display menu items in Japanese
To set the date and time
To turn off the beep only
To turn on the beep and shutter
sound
To turn off the beep and shutter
sound
56-GB
Page 57

Items in PLAY (single) mode
Menu Item1 Item2 Setting Meaning
INDEX
DELETE OK
FILE DISK
TOOL
SLIDE
SHOW REPEAT
COPY OK
PRINT ON
MARK
PROTECT
FORMAT
DISKCOPY
CANCEL
CANCEL
OK
CANCEL
OK
CANCEL
INTERVAL
START
CANCEL
CANCEL
z OFF
ON
z OFF
To display six recorded images at
a time
To delete a displayed image
To cancel deleting the image
To format the floppy disk loaded
in the camera
“FORMATTING” is displayed
during formatting, then it
disappears after the completion.
To cancel formatting
To copy all data stored in a floppy
disk to another
To cancel copying all data stored
in a floppy disk to another
To cancel formatting or copying all
data stored in a floppy disk to
another
To set an interval between images
To repeat the slide show (up to
about 20 minutes)
To start the slide show
To cancel the slide show and the
setting of the slide show
To copy a displayed image
To cancel copying the image
To write the print mark on the
image
To delete the print mark
To protect the display image
To release protection of the image
Advanced operations
57-GB
Page 58

k Changing the mode settings
Menu Item1 Item2 Setting Meaning
SETUP VIDEO NTSC
OUT
/ z
LANGUAGE
CLOCK
SET
BEEP
PAL
ENGLISH
JPN
SHUTTER
z ON
OFF
To set the video signal NTSC
mode
To set the video signal PAL mode
To display menu items in English
/
To display menu items in Japanese
To set the date and time
To turn off the beep only
To turn on the beep and shutter
sound
To turn off the beep and shutter
sound
Items in PLAY (INDEX) mode
Menu Item1 Item2 Setting Meaning
RETURN
DELETE
ALL OK
z SELECT
FILE DISK
TOOL
FORMAT
DISKCOPY
CANCEL
CANCEL
OK
CANCEL
OK
CANCEL
OK
CANCEL
To return to the single screen
To delete all images
To cancel deleting image
To delete selected images
To cancel deleting the images
To format the floppy disk loaded
in the camera
“FORMATTING” is displayed
during formatting, then it
disappears after the completion.
To cancel formatting
To copy all data stored in a floppy
disk to another
To cancel copying all data stored
in a floppy disk to another
To cancel formatting or copying all
data stored in a floppy disk to
another
58-GB
Page 59

Menu Item1 Item2 Setting Meaning
COPY ALL OK
SELECT
CANCEL
PRINT ALL OFF
MARK
SELECT
CANCEL
PROTECT
SETUP VIDEO NTSC
OUT
LANGUAGE
CLOCK
SET
BEEP
ALL ON
SELECT
CANCEL
/ z
CANCEL
ENTER
CANCEL
CANCEL
ENTER
CANCEL
OFF
CANCEL
ENTER
OFF
PAL
ENGLISH
JPN
SHUTTER
z ON
OFF
To copy all images
To cancel copying the images
To copy selected images
To cancel copying the images
To cancel copying the images
To delete print marks on all
images
To cancel deleting print marks
To write print marks on selected
images
To cancel writing print marks
To cancel writing or deleting print
marks
To protect all images
To release protection on all images
To cancel protecting or releasing
protection
To protect selected images or
releasing protection on selected
images
To cancel protecting selected
images or releasing protection
To cancel protecting images or
releasing protection of images
To set the video signal NTSC
mode
To set the video signal PAL mode
To display menu items in English
To display menu items in Japanese
/
To set the date and time
To turn off the beep only
To turn on the beep and shutter
sound
To turn off the beep and shutter
sound
Advanced operations
59-GB
Page 60

Precautions
On cleaning
Cleaning the LCD screen
Wipe the screen surface with a LCD cleaning kit (not supplied) to
remove fingerprints, dust, etc.
Cleaning the camera surface
Clean the camera surface with a soft cloth slightly moistened with
water. Do not use any type of solvent such as alcohol or benzene as
it may mar the finish of the casing.
Using the camera on a sandy beach or in a dusty place
Do not let sand get into the camera. Sand or dust may cause the unit
to malfunction, and sometimes this malfunction cannot be repaired.
Concerning floppy disks
To protect data recorded on floppy disk, note the following:
• Avoid storing floppy disks near magnets or magnetic fields such
as those of speakers and televisions, permanent erasure of disk
data may result.
• Avoid storing floppy disks in areas subject to direct sunlight or
sources of high temperature, such as a heating device. Floppy disk
warping or damage may result, rendering the disk useless.
• Avoid contact with the disk’s surface by opening the disk shutter
plate. If the disk’s surface becomes blemished, data may be
rendered unreadable.
• Avoid getting liquids on the floppy disk.
• Be sure to use a floppy disk case to ensure protection of important
data.
• Use only a 2HD or a 2DD dried type disk head cleaner when
cleaning the disk drive.
•Even when you use a 3.5 inch 2HD floppy disk, image data may
not be recorded and/or displayed depending on the using
environment. In this case, use other brand disks.
60-GB
Page 61

Operational temperature recommendations
This camera’s operational temperature is between 32°F to +104°F
(0°C to +40°C). Do not use this camera in extreme climates outside
the operational temperature range.
Moisture condensation
If the camera is brought directly from a cold to a warm location, or is
placed in a very damp room, moisture may condense inside or
outside the camera. Should this occur, the camera will not operate
properly. In this case, remove the floppy disk, turn off the camera,
and wait about an hour for the moisture to evaporate.
To prevent moisture condensation
When bringing the camera from a cold place to a warm place, put
the camera in a plastic bag and allow it to adapt to room conditions
over a period of time.
1 Be sure to tightly seal the plastic bag containing the camera.
2 Remove the bag when the air temperature inside it has reached
the temperature surrounding it (about 1 hour).
Additional information
61-GB
Page 62

Troubleshooting
Should any problem persist after you have made those checks,
consult your nearest Sony dealer. If “C: ss: ss” appears on the
LCD screen, the self-diagnosis function has worked. See page 64.
Symptom Cause and/or Solution
The camera does not
work.
You cannot record
images.
The picture is noisy.
The picture is too dark.
The flash does not work.
Incorrect date and time
are recorded.
Vertical streaks appear
when shooting a very
bright subject.
• The camera does not operate when using a
battery pack that is not an “InfoLITHIUM”
battery pack.
t Use an “InfoLITHIUM” battery pack.
(p. 14)
• The floppy disk is not installed properly.
t Remove the disk and reinstall it. (p. 9)
• PLAY/STILL/MOVIE is not set to STILL or
MOVIE.
t Set it to STILL or MOVIE. (p. 17, 18)
• No floppy disk has been installed.
t Install a formatted floppy disk.
• The tab on the disk is set to the non-recording
position.
t Set it to the recording position. (p. 9)
• The camera is placed near a TV or other
equipment that uses strong magnets.
t Place the camera away from the TV, etc.
• You are shooting a subject with the light source
behind the subject or light is insufficient.
t Adjust brightness of the image. (p. 56)
• The LCD screen adjustment is too dark.
t Adjust brightness. (p. 10)
• The no flash mode is set.
t
Set it to the AUTO or forced-flash mode. (p. 11)
• The date and time are not set.
t Set the date and time. (p. 15)
• The smear phenomenon.
t The camera is not malfunctioning.
62-GB
Page 63

Symptom Cause and/or Solution
The battery life
deteriorates too fast.
Zoom does not work.
You cannot play back the
images on the LCD
screen.
The picture and sound
break off when you play
back the images using a
personal computer.
You cannot play back the
image using a personal
computer.
You cannot delete an
image.
The power turns off
automatically.
The picture does not
appear on the TV screen.
The picture does not
appear on the LCD
screen.
SLIDE SHOW stops automatically.
FILE ERROR appears on
the LCD screen.
Digital zoom does not
work.
• The ambient temperature is too low.
• Charging of the battery pack is not enough.
t Charge the battery pack fully.
• The battery pack has served its time.
t Replace the battery pack with a new one.
• Panfocus mode in PROGRAM AE is working.
t Cancel it. (p. 31)
• PLAY/STILL/MOVIE is not set to PLAY.
t Set it to PLAY. (p. 20, 21)
• The battery is dead.
t Use a charged battery pack.
• The image file is on a floppy disk.
t Copy to the hard disk of a personal computer.
Then play back the image from the hard disk.
(p. 25)
• Contact your personal computer maker or
software maker.
• The image is protected.
t Cancel the protection of the image. (p. 41)
• If you leave the camera inactive in STILL/
MOVIE mode for about 3 minutes while the
power is on, it turns off automatically to prevent
wearing down the battery.
t Turn the power on.
• VIDEO OUT setting is not correct.
t Change the setting. (p. 56, 58, 59)
• The A/V connecting cable is connected.
t Disconnect the A/V connecting cable.
• The maximum length to play back is about 20
minutes.
t Set REPEAT to ON again if you continue
SLIDE SHOW. (p. 39)
• Image size is bigger than 1600 × 1200.
t You cannot play back the image on your
camera.
• PLAY/STILL/MOVIE is set to MOVIE.
t Set to STILL.
Additional information
63-GB
Page 64

Self-diagnosis display
The camera has a self-diagnosis
display. This function displays
the camera condition with fivedigits (a combination of a letter
and figures) on the LCD screen.
If this occurs, check the
following code chart. The fivedigit display informs you of the
camera’s current condition. The
last two digits (indicated by
ss) will differ depending on
the state of the camera.
First three digits Cause and/or Corrective Action
C:32:ss
C:13:ss
C:61:ss
E:61:ss
E:63:ss
E:91:ss
•Trouble is with the disk drive.
tTurn the power off and on again.
•An unformatted disk is installed.
tFormat the disk. (p. 49)
•An unusable disk with the camera is
installed.
tChange the disk. (p. 9)
•A camera malfunction which you can not
reverse has occurred.
tContact your Sony dealer or local
Self-diagnosis display
•C: 13: ss/C: 32: ss
You can reverse the camera
malfunction yourself.
•E: ss: ss/C: 61: ss
Contact your Sony dealer or
local authorized Sony service
facility.
authorized Sony service facility and
inform them of the five digits.
(example: E:61:10)
64-GB
Page 65

Specifications
System
Image device FD83: 1/3-inch CCD FD88: 1/3.6-inch CCD
Lens FD83: 3× FD88: 8×
Precision digital zoom FD83: 6 × FD88: 16 ×
Exposure control Automatic exposure
White balance Automatic, Indoor, Outdoor, Hold
Data compression Movie : MPEG-1 Standard format
Memory Floppy disk:
Flash Recording distance limitations:
Output jack
A/V OUT jack (monaural) MINI JACK
LCD screen
Screen size 2.5 inch
LCD panel TFT
Total dot number 84260 dots
General
Application Sony battery pack NP-F330/F550
Power requirements 7.2 V (battery pack)
Power consumption (During shooting)
Operation temperature 32°F to +104°F (0°C to +40°C)
Storage temperature –4°F to 140°F (–20°C to 60°C)
Dimensions FD83: Approx. 5 5/8 × 4 1/4 × 2 1/2 in.
Mass FD83: Approx. 1 lb. 7 oz. (660 g) (including battery
Microphone Electret condenser microphone
Speaker Dynamic Speaker
FD83: f = 5.2 – 15.6 mm (37 – 111 mm, when
converted to the equivalent of a 35 mm still
camera)
FD88: f = 4.75 – 38 mm (41 – 328mm, when
converted to the equivalent of a 35 mm still
camera)
FD83: F2.0 – 2.1 FD88: F2.8 – 3.0
Still : JPEG
Audio with still image : MPEG audio (mono)
3.5 inch 2HD MS-DOS format (1.44 MB)
1 5/8 – 8 1/3ft. (0.5 – 2.5 m)
Video: 1 Vp-p, 75 ohms, unbalanced,
sync negative
Audio: 327mV, (at termination impedance more
than 47 kilohoms) Output impedance
with less than 2.2 kiloms
3.8 W
(142 × 106.5 × 63 mm) (w/h/d)
FD88: Approx. 5 5/8 × 4 1/4 × 2 7/8 in.
(142 × 106.5 × 72.8 mm) (w/h/d)
pack NP-F330, floppy disk, shoulder strap and
lens cap)
FD88: Approx. 1 lb.7oz. (670g) (including battery
pack NP-F330, floppy disk, shoulder strap and
lens cap)
(continued on the following page)
65-GB
Additional information
Page 66

k Specifications
BC-V615/V615A battery charger
Power requirements 100 – 240 V AC, 50/60 Hz
Output voltage DC OUT: 8.4 V, 0.6 A
Operation temperature 0°C to 40°C (32°F to 104°F)
Storage temperature –20°C to 60°C (–4°F to 140°F)
Dimensions Approx. 56 × 44 × 107 mm (w/h/d)
Mass Approx. 120 g (4.2 oz.)
NP-F330 battery pack
Battery used Lithium-ion type battery
Output voltage DC8.4 V (Maximum)
Capacity 5.0 WAh
Supplied accessories See page 8.
Design and specifications are subject to change without notice.
(2 1/4 × 1 3/4 × 4 1/4 in.)
DC7.2 V (Nominal)
Warning messages
Various messages appear on the LCD screen. Check them with the
following list.
Message
DRIVE ERROR
NO DISK
DISK ERROR
DISK TYPE ERROR
DISK PROTECT
DISK FULL
NO FILE
FILE ERROR
FILE PROTECT
Meaning
Trouble is with the disk drive.
No disk has been inserted.
Trouble is with the disk.
The floppy disk loaded is not MS-DOS
formatted (512 bytes × 18 sectors).
The 2DD floppy disk is inserted.
The tab on the disk is set to the non-recording
position.
The disk is full.
No image has been recorded on the disk.
Trouble has occurred during playback.
The image is protected.
66-GB
Page 67

Index
A
AC power adaptor .................. 14
Adjusting brightness
LCD screen............................ 10
Image ..................................... 56
Adjusting the exposure.......... 56
AE (auto exposure) ................. 17
Auto power-off function........ 14
B, C
Battery pack ....................... 12, 13
Battery charger ........................ 12
BEEP ............................. 56, 58, 59
Charging .................................. 12
Cleaning ................................... 60
CLOCK SET ............................. 15
Control button......................... 11
COPY ........................................ 46
D, E
DELETE.................................... 44
DEMO MODE ......................... 56
DIGITAL ZOOM .............. 18, 55
DISK TOOL ................. 54, 57, 58
DPOF ........................................ 50
E-MAIL..................................... 35
F
FILE NUMBER ........................ 54
FLASH LEVEL ........................ 56
Floppy disk .......................... 9, 60
FORMAT.................................. 49
Full charge ............................... 12
I, J
INDEX screen .......................... 38
Indicators on the LCD
screen ............................... 19, 22
“InfoLITHIUM” battery
pack ........................................ 14
JPEG .................................... 25, 35
L, M
Manual focusing ..................... 27
Menu......................................... 53
Moisture condensation .......... 61
MPEG ........................... 25, 34, 36
N, P
Normal charge ........................ 12
Photocell window ................... 11
PICTURE EFFECT .................. 30
Playing back
Moving image ...................... 21
Still image ............................. 20
PROGRAM AE........................ 31
PROTECT................................. 41
Q, R
QUALITY ................................. 33
REC MODE.............................. 35
Recording
Moving image ...................... 18
Still image ............................. 17
Remaining battery indicator
... 19, 22
S, T
Self-diagnosis display ............ 64
Self timer .................................. 11
Setting the date and time ....... 15
SLIDE SHOW .......................... 39
Troubleshooting...................... 62
U, V
Using flash ............................... 11
Viewing images using a
personal computer ............... 25
VOICE ...................................... 35
W, Z
Warning messages.................. 66
Zoom ........................................ 18
67-GB
Additional information
Page 68

Español
Manual de instrucciones
Antes de utilizar la unidad, lea detenidamente este manual de
instrucciones y consérvelo para futuras referencias.
Las instrucciones de este manual son para dos modelos: MVC-FD83
y MVC-FD88.
Para fines de ilustración, en este manual se utiliza el modelo MVCFD88.
De lo contrario, en l ilustraciones se indicará el modelo. Cualquier
diferencia en la operación se indicará en el texto, por ejemplo,
“MVC-FD83 solamente”.
Antes de leer este manual y de utilizar la unidad, compruebe el
número del modelo.
En este manual, las teclas y los ajustes de la cámara se indican en
mayúsculas.
P. ej., Presione FLASH.
Para evitar incendios o el riesgo de electrocución, no exponga la
unidad a la lluvia ni a la humedad.
Para evitar descargas eléctricas, no abra la unidad.
En caso de avería, solicite sólo los servicios de personal
cualificado.
ATENCIÓN
ADVERTENCIA
Los campos magnéticos de frecuencias específicas pueden influir en
las imágenes y sonidos de esta cámara.
2-ES
Page 69

Cerciórese de leer esto antes de utilizar su cámara
Grabación de prueba
Antes de grabar acontecimientos irrepetibles, realice una grabación
de prueba para comprobar si la cámara está trabajando
correctamente.
No se ofrecerá ninguna compensación por el
contenido de la grabación
El contenido de la grabación no podrá compensarse si ésta o la
reproducción no pueden hacerse debido al mal funcionamiento de la
cámara, el disquete, etc.
Precauciones sobre la utilización de la cámara
La pantalla de cristal líquido se ha fabricado utilizando tecnología
de gran precisión. Sin embargo, es posible que en la pantalla de
cristal líquido aparezcan constantemente puntos finos y/o brillantes
(rojos, azules, o verdes). Estos puntos ocurren normalmente en le
proceso de fabricación y no afectan de ninguna forma las imágenes
grabadas. El número efectivo de pixeles (elementos de imagen) es
del 99,99% o más.
No coloque la cámara de forma que la pantalla de cristal líquido
quede apuntando hacia el sol. El interior de la pantalla de cristal
líquido podría dañarse.
Precaución sobre los derechos de autor
Los disquetes, programas y películas de televisión, las cintas de
vídeo, y otros materiales, pueden tener reservado el derecho de
reproducción. La grabación no autorizada de tales materiales puede
ir en contra de lo dispuesto por las leyes sobre derechos de autor.
3-ES
Page 70

ÍNDICE
Antes de utilizar su cámara.................................................................... 6
Identificación de partes........................................................................... 7
Operaciones básicas
Preparativos .................................................................................... 10
1: Carga de la batería ....................................................... 10
2: Instalación de la batería............................................... 11
3: Introducción de la fecha y la hora............................. 13
Grabación y reproducción de imágenes ..................................... 15
1: Grabación de imágenes fijas ....................................... 15
2: Grabación de imágenes en movimiento ................... 16
3: Reproducción de imágenes fijas................................. 18
4: Reproducción de imágenes en movimiento ............. 19
Duración de la batería/N.° de imágenes que podrán
grabarse/reproducirse .................................................... 21
Contemplación de imágenes utilizando un PC .................. 23
Reproducción de archivos JPEG con Microsoft OFFICE ... 24
Operaciones avanzadas
Varias funciones para grabación .................................................. 25
Enfoque manual....................................................................... 25
Grabación de imágenes en macro ......................................... 26
Ajuste del equilibrio del blanco............................................. 27
Disfrute de efectos de imagen ............................................... 28
Utilización de la función de exposición automática
programada (PROGRAM AE) ........................................ 29
Selección de la calidad de las imágenes (QUALITY) ......... 31
Selección del tamaño de la imagen ....................................... 32
Selección del modo de grabación
(REC MODE)..................................................................... 33
Varias funciones para reproducción............................................ 36
Reproducción de múltiples imágenes al mismo tiempo
(INDEX) ............................................................................. 36
Reproducción de imágenes en bucle continuo
– SLIDE SHOW ................................................................. 37
4-ES
Page 71

Protección contra el borrado accidental
– PROTECT ....................................................................... 39
Borrado de imágenes – DELETE ........................................... 42
Copia de imágenes – COPY ................................................... 44
Copia de toda la información en su disquete
– DISK COPY .................................................................... 46
Formateo de un disquete – FORMAT .................................. 47
Escritura de una marca de impresión en una imagen ....... 48
Utilización de datos de imágenes con otros equipos ......... 50
Cambio de los ajustes de los modos ............................................ 51
Ajuste del modo de cada ítem ............................................... 52
Información adicional
Precauciones.................................................................................... 58
Solución de problemas................................................................... 60
Visualización de autodiagnóstico ................................................ 62
Especificaciones .............................................................................. 63
Mensajes de aviso .................................................................... 64
Índice alfabético .............................................................................. 65
• IBM PC/AT es marca registrada de International Business Machines
Corporation de EE.UU.
• MS-DOS y Windows son marcas registradas con licencia de Microsoft
Corporation, registradas en EE.UU. y otros países.
• Netscape Navigator es marca comercial de Netscape Communications
Corporation.
• Macintosh es marca con licencia de Apple Computer, Inc., registrada en
EE.UU. y otros países.
• Todos los demás nombres de productos mencionados aquí son marcas
comerciales o registradas de sus respectivas compañías.
Además, “TM” y “” no se mencionan en cada caso en este manual.
5-ES
Page 72

Antes de utilizar su cámara
Esta cámara digital utiliza disquetes (discos floppy) como medio de
grabación de imágenes.
Utilice el tipo de disquete siguiente:
•Tamaño: 3,5 pulgadas
•Tipo: 2HD
•Capacidad: 1,44 MB
•Formato: MS-DOS (512 bytes × 18 sectores)
Para utilizar un disquete de 3,5 pulgadas, 2HD, que no sea como el
descrito arriba, formatéelo utilizando la cámara o su PC.
No sacuda ni golpee la cámara
Si lo hiciese, podría producirse un mal funcionamiento, la
imposibilidad de grabación de imágenes o de utilización de
disquetes, o la pérdida de imágenes o de datos de la memoria,
daños, o pérdidas.
Evite que la cámara se humedezca
Cuando fotografíe en exteriores, bajo la lluvia o en condiciones
similares, tenga cuidado de que no se humedezca la unidad.
Si se produce condensación de humedad, consulte la página 59 y
siga las instrucciones sobre cómo eliminarla antes de utilizar la
unidad.
No inserte a la fuerza el disquete
Inserte cuidadosamente el disquete en la cámara digital. Si insertase
el disquete a la fuerza quizás no pudiese extraerlo.
Haga copias de protección
Para evitar el riesgo de pérdida de datos copie siempre los datos en
un disquete.
Accesorios suministrados
Cable de alimentación (1 juego) Batería NP-F330 (1)
Cable conector de audio/vídeo (1) Tapa para el objetivo (1)
Bandolera (1) Cinta de la tapa para el
Cargador de baterías (1) objetivo (1)
6-ES
Page 73

Identificación de partes
Para más detalles, consulte las páginas de ( ).
Micrófono
No lo toque durante la grabación.
Botón disparador
(15, 16)
Lámpara del
autodisparador
La lámpara parpadeará
hasta que comience la
grabación después de
haber presionado el
botón disparador.
Ranura para el
cable del adaptador
de alimentación de CA
Emisor del flash (9)
Ventanilla de la fotocélula
para flash
No la bloquee cuando
fotografíe.
Para insertar el disquete
Inserte el disquete hasta que chasquee.
Antes de insertarlo, cerciórese de
que la lengüeta de seguridad esté
en la posición de posibilidad de
grabación.
Anillo de enfoque (25)
Toma de salida de
audio/vídeo (A/V OUT)
El sonido será
monoaural.
Rosca para trípode
Cerciórese de que la longitud
del tornillo del trípode sea
inferior a 6,5 mm.
Objetivo
Selector de enfoque
automático/manual
(FOCUS AUTO/
MANUAL) (25)
Tapa del objetivo
Mando de
bloqueo de expulsión (EJECT)
Palanca de expulsión del disco (DISK EJECT)
Para extraer el disquete
Manteniendo EJECT hacia abajo, deslice DISK EJECT en el sentido de la
flecha.
7-ES
Page 74

k Identificación de partes
Interruptor de
iluminación de fondo de
la pantalla de cristal
líquido (LCD BACK LIGHT)
Normalmente déjelo en
ON. Póngalo en OFF para
ahorrar batería.
Botón del brillo
(BRIGHT +/–)
Presiónelo para ajustar
el brillo de la pantalla
de cristal líquido.
Selector de
reproducción/imagen
fija/cine (PLAY/STILL/
MOVIE) (15, 16, 18)
Botón de efectos
de imagen
(PICTURE EFFECT) (28)
Tecla de exposición
automática programada
(PROGRAM AE) (29)
Tecla de visualización (DISPLAY)
Presiónela para hacer que los
indicadores aparezcan/
desaparezcan en/de la pantalla de
cristal líquido.
Los indicadores no desaparecerán en los modos siguientes: Exposición
automática programada, efectos de imagen, enfoque manual, Zoom,
bloqueo de la exposición automática, autodisparador, flash, ajuste de la
exposición, nivel de flash, y equilibrio del blanco.
Ganchos para la bandolera
Colocación de la
bandolera
Pantalla de cristal
líquido
Interruptor de
alimentación (POWER)
Deslícelo hacia abajo
para conectar/
desconectar la
alimentación.
Lámpara de
alimentación
(POWER)
Lámpara de acceso
(ACCESS) (15, 18)
Palanca de
expulsión del disco
(DISK EJECT) (6)
Cubierta de la
batería/mando de
apertura (PUSH) (11)
Mando de control
8-ES
Page 75

Ventanilla de fotocélula para
Palanca del zoom
la pantalla de cristal líquido
La pantalla de cristal líquido
se volverá más brillante
cuando la exponga al sol.
Botón +/– del volumen
(VOLUME +/–)
Presiónelo para ajustar el
volumen del altavoz.
Lámpara indicadora
de carga del flash
(FLASH/CHARGE)
Altavoz
Tecla del flash (FLASH)
En fábrica se ha ajustado auto.
Cada vez que la presione, el
modo del lash cambiará de la
forma siguiente:
auto (sin indicación) t flash
forzado t
sin flash t auto
En el modo auto, el flash se apagará automáticamente de acuerdo
con el brillo del entorno.
El motivo deberá estar de 0,5 a 2,5 m de distancia.
Cundo fotografíe utilizando el flash y un objetivo de conversión
(no suministrado), puede ocurrir un eclipse.
Autodisparador
Seleccione SELFTIMER de la barra
de menú con el mando de control,
y después presione z.
Unos 10 segundos después de
haber presionado el botón
disparador, el motivo se grabará.
Ranura para
el disquete
Lámpara
indicadora
de la
alimentación
(POWER)
(15, 18)
Mando de control
Parte superior
Parte
izquierda
Parte inferior
Parte
derecha
Presione
para
ejecutar.
Función del mando de control
Usted podrá ejecutar funciones
presionando la parte superior,
inferior, izquierda, o derecha (v/V/
b/B) del mando de control. Cuando
seleccione un elemento del menú, su
color cambiará de azul a amarillo.
Para introducir su selección, presione
el centro del mando de control (z).
9-ES
Page 76

Preparativos
Carga de la batería
Para cargar la batería, utilice el cargador de baterías. Su cámara
solamente funcionará con baterías “InfoLITHIUM” (serie L).
“InfoLITHIUM” es marca comercial de Sony Corporation.
1 Conecte el cable de alimentación
en un tomacorriente.
2 Inserte la batería en el
sentido de la marca V.
Deslícela hacia abajo
hasta que chasquee.
Lámpara
indicadora de
carga (CHARGE)
(anaranjada)
La lámpara
CHARGE
(anaranjada) se
encenderá. Se
iniciará la carga.
Cargador de
baterías
Para extraer la batería
Deslice la batería hacia arriba.
Tiempo de carga
Batería Carga completa* Carga normal**
NP-F330 (suministrada) 210 min. 150 min.
NP-F550 240 min. 180 min.
Minutos aproximados para cargar una batería descargada utilizando el
cargador de baterías BC-V615/BC-V615A. (A bajas temperaturas, el
tiempo de carga será mayor.)
* Carga durante aproximadamente una hora después de que se haya
apagado la lámpara CHARGE.
** Carga hasta que se apague la lámpara CHARGE.
10-ES
Page 77

Instalación de la batería
1 Abra la cubierta de la batería.
Deslice la cubierta de la batería en el
sentido de la flecha presionando el
(base)
mando PUSH.
2 Instale la batería.
Insértela con la marca V encarada
hacia el compartimiento de la
batería.
3 Cierre la cubierta.
Presione la cubierta hasta que
chasquee.
Para extraer la batería
Abra la cubierta de la batería. Deslizando la
palanca de liberación de la batería, extraiga ésta.
Tenga cuidado de no dejar caer la batería cuando la
extraiga.
Palanca de liberación de la batería
Operaciones básicas
11-ES
Page 78

kPreparativos
Indicación de duración restante de la batería
Esta cámara muestra en el panel de cristal líquido cuántos minutos puede
continuar la grabación o la reproducción*. Sin embargo, tenga en cuenta que
es posible que el tiempo no se visualice correctamente en ciertas condiciones o
entornos.
* El tiempo visualizado durante la grabación o la reproducción se refiere al
tiempo de duración de la batería con la alimentación de la cámara conectada
o simplemente si hace que se visualicen continuamente imágenes sin realizar
ninguna otra operación.
Función de desconexión automática de la alimentación
Durante la grabación, si deja la cámara inactiva durante unos 3 minutos con la
alimentación conectada, ésta se desconectará automáticamente para evitar la
descarga de la batería.
Fuentes de alimentación
Esta cámara podrá utilizarse con las tres fuentes de alimentación
siguientes:
•Batería InfoLITHIUM* NP-F330 (suministrada)/F550 (no
suministrada)
•Adaptador de alimentación AC-VQ800 (no suministrado)
•Adaptador de alimentación de CC DC-VQ800 (no suministrado)
Cuando vaya a utilizar la cámara durante mucho tiempo, le
recomendamos que la alimente de la red con el adaptador de CA.
*¿Qués es “InfoLITHIUM” ?
“InfoLITHIUM” es una batería de iones de litio que puede intercambiar datos,
tales como el consumo de la batería, con equipos compatibles. Esta unidad es
compatible con baterías “InfoLITHIUM” (serie L). Su cámara solamente
funcionará con baterías “InfoLITHIUM”. Las baterías “InfoLITHIUM” poseen
la amrca .
“InfoLITHIUM” es marca comercial de Sony Corporation.
12-ES
Page 79

Introducción de la fecha y la hora
Antes de utilizar la cámara por primera vez, introduzca la fecha y la
hora.
La fecha y la hora serán necesarias para la grabación en formato
MS-DOS. Si no están correctamente ajustadas, se grabarán la fecha y
la hora incorrectas, y aparecerá la pantalla CLOCK SET en el paso 5
cada vez que ponga la cámara en el modo STILL/MOVIE.
1 Deslice el interruptor POWER hacia abajo para conectar
la alimentación.
La lámpara POWER se encenderá.
2 Presione v del mando de control.
En la pantalla de cristal líquido parecerá
la barra de menú.
INDEX FILEDELETE SETUP
SELECT OK
3 Seleccione “SETUP” con el mando de control y presione
z.
INDEX FILEDELETE SETUP
SELECT OK
4 Seleccione “CLOCK SET” de la barra de menú con el
mando de control y después presione z.
VIDEO OUT
/LANGUAGE
CLOCK SET
BEEP
MENU BAR OFF
Operaciones básicas
VIDEO OUT
/LANGUAGE
JAN 1 1999
CLOCK SET
12 : 00 : 00AM
BEEP
INDEX FILEDELETE SETUP
SELECT OK
CLOCK SET
1999JAN AM: 1 12 00
SELECT/ADJUST OK
Y/M/D
M/D/Y
D/M/Y
ENTER
CANCEL
13-ES
Page 80

k Preparativos
5 Seleccione la visualización deseada de la fecha con el
mando de control, y después presione z.
Y/M/D (año/mes/día)
M/D/Y (mes/día/año)
D/M/Y (día/mes/año)
CLOCK SET
1999 AM: 1 1 12 00
SELECT/ADJUST OK
Y/M/D
M/D/Y
D/M/Y
ENTER
CANCEL
6 Seleccione la fecha y la hora con el mando de control, y
después presione z.
El ítem a cambiarse se indicará con
v/V. Seleccione el número
presionando la parte superior o inferior
del mando de control, y después
presiónelo para introducir el número.
Después de haber introducido el
CLOCK SET
1999 AM: 1 1 12 00
SELECT/ADJUST OK
Y/M/D
M/D/Y
D/M/Y
ENTER
CANCEL
número, v/V se moverá al ítem
siguiente.
Cuando haya seleccionado
“D/M/Y”, ajuste la hora según el ciclo
de 24 horas.
7 Seleccione “ENTER” con el mando de control, y después
presione z en el momento deseado para poner en
funcionamiento el reloj.
CLOCK SET
1999 PM: 7 4 10 30
SELECT/ADJUST OK
Para cancelar el ajuste de la fecha y la hora
Seleccione “CANCEL” con el mando de control, y después
presione z.
14-ES
Y/M/D
M/D/Y
D/M/Y
ENTER
CANCEL
Page 81

Grabación y repr oducción de imágenes
Grabación de imágenes fijas
Para grabar imágenes, deslice el interrupotor POWER hacia abajo a
fin de conectar la alimentación (se encenderá la lámpara indicadora
POWER) e inserte un disquete hasta que chasquee.
Lámpara indicadora POWER
Lámpara ACCESS
1 Ponga PLAY/STILL/MOVIE en STILL.
2 Presione el botón disparador
hasta la mitad de su recorrido.
Parpadeará el indicador de bloqueo de
exposición automática (AE) z (verde).
Cuando AE (exposición automática), AWB
(equilibrio automático del blanco), y AF
(enfoque automático) se congelarán y el
indicador de bloqueo de AE dejará de
parpadear.
3 Presione a fondo el botón
disparador.
La imagen se grabará en el disco.
Número de imágenes que podrán grabarse en un disquete
Unas 8 - 12 imágenes (FD83)/6 - 10 imágenes (FD88) con todos los ajustes
predeterminados. (p. 34)
Nota
Cuando una imagen se grabe en el disco, la lámpara ACCESS parpadeará.
Cuando la lámpara ACCESS esté parpadeando, no sacuda ni golpee la cámara.
Tampoco desconecte la alimentación, ni extraiga la batería ni el disquete. De lo
contrario, se interrumpirían los datos de la imagen y el disquete podría quedar
inservible.
15-ES
Operaciones básicas
Page 82

k Grabación y reproducción de imágenes
Grabación de imágenes en
movimiento
1 Ponga PLAY/STILL/MOVIE en MOVIE.
2 Presione momentáneamente a fondo el botón
disparador.
Se grabarán la imagen y el sonido durante la duración seleccionada
en el menú de archivo: 5, 10, o 15 segundos.
Mantenga presionado a fondo el botón disparador.
Se grabarán la imagen y el sonido hasta que lo suelte.
Máximo de 60 segundos cuando grabe en el tamaño 160 × 112
Utilización de la función del zoom
Mueva lentamente la palanca del zoom motorizado para realizar
un zoom lento. Muévala rápidamente para un zoom más
rápido.
La utilización con moderación del zoom resultará en grabaciones con
mejor aspecto.
Lado “T” : para telefoto (el motivo aparecerá más cercano)
Lado “W” : para gran angular (el motivo aparecerá más alejado)
Si no puede enfocar bien, mueva la palanca del zoom hacie al lado “W”
hasta enfocar nítidamente. Usted podrá fotografiar un motivo que esté a
25 cm (FD83)/90 cm (FD88) por lo menos de la superficie del objetivo en
la posición de telefoto, y aproximadamente 25 cm en la posición de gran
angular. Si el motivo está demasiado cerca como par poder enfocarlo,
consulte la página 26.
El zoom digital comenzará a funcionará cuando sobrepase 3 aumentos
(FD83)/8 aumentos (FD88).
La calidad de la imagen se deteriorará a medida que pase al lado “T”.
Ajuste DIGITAL ZOOM a OFF en los ajustes
de MENU. De lo contrario, el zoom digital se
activaría sin aviso (p. 53).
El zoom digital no trabajará para imágenes en
movimiento.
15 segundos cuando grabe en el tamaño 320 × 240
W
La parte derecha de la
barra mustra la zona de
zoom digital.
T
16-ES
Page 83

Indicadores durante la grabación
Los indicadores de la pantalla de cristal líquido no se grabarán.
Indicador del tamaño de la
imagen
Indicador del modo de
grabación
Indicador de bloqueo de
exposición automática/
enfoque
Indicador de enfoque
manual
Indicador de tiempo
restante de la batería
120
min
Indicador de
exposición
BRT
+1.0EV
1280
automática
programada
Indicador de nivel
del flash
SELF
MACRO
TIMER
SELECT OK
Indicador de efecto de
imagen*/Indicador de
nivel de brillo de la
pantalla de cristal
líquido*/Indicador de
volumen*/Indicador de
zoom*
Indicador de
equilibrio del blanco
MACRO
Indicador de nivel del visor
electrónico
* Solamente se visualizará durante la operación.
Indicador de calidad de
la imagen
Número de imágenes
almacenadas
Indicador de
capacidad restante
del disco
Indicador de
FINE
REC
15s
0:03
función de
10
autodiagnóstico/
Indicador de tiempo
de grabación
Indicador de tiempo
de grabación
SETUPCAMERAFILE
MENU BAR OFF
Barra del menú/Guía del
menú
Aparecerán al presionar v
del mando de control y
desaparecerán al presionar V
del mismo.
Indicador del
autodisparador
Operaciones básicas
17-ES
Page 84

k Grabación y reproducción de imágenes
Reproducción de imágenes fijas
Para contemplar las imágenes grabadas en la pantalla de cristal
líquido, deslice POWER hacia abajo a fin de conectar la alimentación
(se encenderá la lámpara POWER) e inserte el disquete hasta que
chasquee.
1 Ponga PLAY/STILL/MOVIE en PLAY.
La lámpara ACCESS parpaderá y la última imagen
grabada aparecerá en la pantalla de cristal líquido.
Lámpara POWER
Lámpara ACCESS
2 Presione v del mando de control.
En la pantalla de cristal líquido aparecerá la barra de menú.
3 Seleccione la imagen grabada con el mando de control.
Seleccione la tecla de la pantalla de cristal líquido con el mando
de control, y después presione z.
'b : Para hacer que se visualice la imagen grabada anterior.
B' : Para hacer que se visualice la imagen grabada siguiente.
: Para hacer que se visualicen 6 imágenes a la vez
INDEX
(pantalla INDEX).
Usted podrá seleccionar la imagen con b/B del mando de control si
ha desactivado la barra del menu.
18-ES
Page 85

Reproducción de imágenes en
movimiento
1 Ponga PLAY/STILL/MOVIE en PLAY.
La última imagen grabada aparecerá en la pantalla de cristal
líquido.
La imagen grabada en el modo MOVIE se visualiza en un
tamaño más pequeño que las otras imágenes de tamaño normal.
2 Presione v del mando de control para hacer que en la
pantalla de cristal líquido aparezca la barra de menú.
3 Seleccione las imágenes en movimiento grabadas con
el mando de control.
Seleccione los botones de
avance rápido/rebobinado de
la pantalla de cristal líquido
con el mando de control, y
después presione z.
'b : Para hacer que se visualice
la imagen previamente grabada.
B' : Para hacer que se visualice la imagen siguiente.
: Para hacer que se visualicen seis imágenes grabadas a la
INDEX
vez (pantalla INDEX).
Seleccione la imagen con b/B del mando de control, y después
presione z para reproducir las imágenes en movimiento y los
sonidos si ha desactivado la barra del menú.
4 Seleccione el botón B (reproducción) de la pantalla con
el mando de control, y después presione z.
Se reproducirán las imágenes en movimiento y el sonido.
Nota
• Las imágenes grabadas con esta cámara no podrán reproducirse
correctamente con los modelos MVC-FD5/FD7/FD51/FD71/FD73/FD81/
FD91/FDR1/FDR3.
• Esta cámara no podrá reproducir imágenes con un tamaño de más de 1600 ×
1200.
120
min
INDEX FILEDELETE SETUP
SELECT OK
160
6/8
MENU BAR OFF
19-ES
Operaciones básicas
Page 86

k Grabación y reproducción de imágenes
Indicadores durante la reproducción
Durante la reproducción de imágenes fijas (STILL)
Indicador de modo de grabación
Indicador de tamaño de la imagen
Calidad de la imagen
Número de imagen
Indicador de capacidad restante del
120
min
FINE
11/12
1280
disquete
Número de imágenes almacenadas
en el disquete
Indicador de marca de impresión
MVC-011S
12:00AM1999 7 4
Indicador de protección
Fecha de grabación de la imagen
reproducida/Barra de menú/Menú guía
Nombre de archivo
Durante la reproducción de imágenes en movimiento (MOVIE)/
imágenes fijas con sonido (VOICE)
Indicador de archivo de imágenes en movimiento
Indicador de tamaño de la imagen
Número de imagen/Número de
imágenes almacenadas en el disquete
120
min
6 / 8
320
0
:
10
Indicador de capacidad restante del
disquete
Contador
Imagen en reproducción*
Barra de reproducción
INDEX FILEDELETE SETUP
SELECT OK
MENU BAR OFF
Barra de menú y menú guía
Botones de avance rápido/rebobinado
Botón de reproducción/reproducción en pausa
Durante el modo de parada se visualizará B, y durante el
de reproducción X.
* Cuando reproduzca un archivo VOICE, la imagen aparecerá en la pantalla
completa.
20-ES
Page 87

Duración de la batería/N.° de imágenes
que podrán grabarse/reproducirse
Modo STILL
Batería Duración de N.° de imágenes
NP-F330 Grabación continua* 55 (50) 550 (500)
(suministrada)
NP-F550 Grabación continua* 120 (110) 1200 (1050)
Duración de la batería y número de imágenes, aproximados, que podrán
grabar/reproducirse a una temperatura de 25°C, tamaño de imagen de
640 × 480 en grabación NORMAL y en calidad STANDARD. Los números
entre paréntesis indican la duración cuando se utilice una batería
normalmente cargada. Si graba imágenes del tamaño de diferente a 640 × 480,
o utiliza el flash, el número de imágenes que podrán grabarse se reducirá de
los valores anteriores en aproximadamente un 20%.
* Grabación a intervalos de unos 5 segundos
** Reproducción de una sola imagen a intervalos de unos 2 segundos
Reproducción continua** 65 (60) 1700 (1500)
Reproducción continua** 140 (130) 3600 (3200)
la batería (min.)
(grabación/reproducción)
Operaciones básicas
21-ES
Page 88

k Grabación y reproducción de imágenes
Modo MOVIE
Batería Duración de la N.° de imágenes*
NP-F330 Grabación continua 75 (65) 55 (45)
(suministrada)
NP-F550 Grabación continua 160 (140) 120 (100)
Minutos aproximados que puede grabarse a una temperatura de 25°C y
tamaño de imagen de 160 × 112. Los números entre paréntesis indican el
tiempo cuando emplea una batería cargada con normalidad.
• La duración de la batería y el número de imágenes se reducirán si utiliza la
cámara en climas fríos, y si repite las operaciones de conexión/desconexión
de la alimentación y del zoom.
• La capacidad de un disquete es limitada. Los valores indicados arriba son
solamente una guía cuando grabe/reproduzca continuamente
reemplazando disquetes.
* Para el modo 5 sec. REC
batería (min.) (grabación)
22-ES
Page 89

Contemplación de imágenes utilizando
un PC
Con esta cámara, los datos de las imágenes fijas se comprimen en el
formato JPEG y los datos de las imágenes en movimiento se
comprimen en el formato MPEG-1. Estos datos pueden verse
empleando un PC que tenga instalado un programa para JPEG y
MPEG. Como pueda ser el Microsoft Internet Explorer 4.0. Con
respecto a los procedimientos detallados sobre la utilización de estos
programas, consulte el manual de instrucciones de su PC.
Ejemplo: PC con Windows 95/98 instalado
1 Inicie su PC e insértele el disquete en la unidad
de disquete.
2 Abra “ Mi PC” y haga doble clic en “ Disco
de 3 1/2 [A:]”.
3 Haga doble clic en el archivo de datos deseado.
Ejemplo de OS/aplicaciones recomendados
OS (Sistema operativo)
Windows 3.1, Windows 95/98 o posterior, Windows NT 3.51 o
posterior, etc.
Aplicaciones
Microsoft Internet Explorer 4.0, Netscape Navigator, etc.
Si su PC tiene instalados programas tales como Microsoft Internet
Explorer, haga doble clic en “MAVICA.HTM” del disquete grabado
con esta cámara para visualizar la lista de imágenes.
Operaciones básicas
23-ES
Page 90

k Grabación y reproducción de imágenes
Notas
• Para reproducir un archivo MPEG, instale Active Movie Player (Direct
Show).
• Para reproducir un archivo grabado en el modo MOVIE o VOICE, cópielo
primero al disco duro del PC. Si reproduce este archivo desde un disquete,
es posible que se rompan la imagen y sonido.
• Con Windows 3.1 no podrá reproducir un archivo MPEG.
• Para Macintosh, podrá utilizar el disquete grabado con esta cámara usando
PC Exchange con el sistema Mac OS 7.5 o posterior. También necesitará una
aplicación de contemplación de imágenes para Macintosh. Para reproducir
un archivo MPEG, instale Quick Time 3.0.
Reproducción de archivos JPEG con
Microsoft OFFICE
Ejemplo: Utilizando Excel
1 Seleccione “Insert” en el menú principal.
2 Apunte a “Picture” para hacer que se visualice el
menú emergente.
3 Seleccione “From File” para hacer que se
visualice el cuadro de diálogo File Manager.
4 Seleccione “ 3.5 inch FD (A:)”.
5 Seleccione el archivo que desee insertar.
6 Seleccione “Insert” para insertar el archivo
seleccionado.
24-ES
Page 91

V arias funciones para grabación
FOCUS
AUTO/
MANUAL
Anillo de
PROGRAM AE
PICTURE EFFECT
Enfoque manual
1 Ponga FOCUS AUTO/MANUAL en MANUAL.
En la pantalla de cristal líquido aparecerá 9.
2 Gire el anillo de enfoque hasta enfocar
nítidamente.
9 cambiará de la forma siguiente:
: cuando fotografíe un motivo distante
: cuando el motivo esté demasiado cerca como para enfocarlo
Para reactivar el enfoque automático, ponga FOCUS AUTO/
MANUAL en AUTO.
Nota
Cuando grabe en un lugar relativamente obscuro, se recomienda hacerlo
utilizando el enfoque manual. O ajuste PROGRAM AE el modo de enfogue
universal.
enfoque
Operaciones avanzadas
25-ES
Page 92

k Varias funciones para grabación
Grabación de imágenes en macro
Seleccione MACRO de la barra de menú con el
mando de control, y después presione z.
En la pantalla aparecerá .
SELF
TIMER
MACRO
SETUPCAMERAFILEMACRO
MENU BAR OFFSELECT OK
Usted podrá fotografiar un motivo situado a aproximadamente 1 cm
(FD83)/4 cm (FD88) de la superficie del objetivo en la posición de
gran angular.
Para cancelar el modo de macro
Vuelva a seleccionar MACRO en la barra de menú, y después
presione z.
desaparecerá.
Nota
Usted no podrá grabar imágenes en el modo macro con los modos de
exposición automática programada siguientes (En la pantalla aparecerá
• Modo de puesta del sol e iluminación solar
• Modo de paisaje
• Modo de enfoque universal
):
26-ES
Page 93

Ajuste del equilibrio del blanco
El ajuste del equilibrio del blanco le permitirá hacer que un motivo
blanco se vea blanco, y obtener un equilibrio natural entre los
colores para la fotografía. Normalmente el equilibrio del blanco se
ajustará de forma automática.
1 Ajuste PLAY/STILL/MOVIE a STILL o MOVIE, y
después presione v del mando de control.
En la pantalla de cristal líquido aparecerá la barra de menú.
2 Seleccione CAMERA con el mando de control, y
después presione z.
3 Seleccione WHITE BALANCE con el mando de
control, y después presione z.
4 Select desired white balance, then press z.
AUTO:
para ajustar automáticamente el equilibrio del blanco
IN DOOR (n) :
• si las condiciones de iluminación cambian, como en una fiesta
• si fotografía en un estudio con iluminación para televisión
• si el motivo está iluminado con lámparas de vapor de sodio o mercurio
OUT DOOR ( ) :
• por la noche, con anuncios de neón o fuegos artificiales en la fotografía
• al atardeder
• con iluminación de una lámara fluorescente durante el día
Operaciones avanzadas
HOLD:
para fotografiar un motivo o un fondo de un solo color
5 Presione repetidamente V del mando de control.
El menú de la cámara desaparecerá.
27-ES
Page 94

k Varias funciones para grabación
Disfrute de efectos de imagen
Presione repetidamente PICTURE EFFECT para
seleccionar el modo de efecto de imagen deseado.
NEG. ART: El color y el brillo de la imagen se invierte.
SEPIA: La imagen es de color sepia.
B&W: La imagen es monocroma (blanco y negro).
SOLARIZE: La intensidad de la luz es más clara, y la imagen
Para cancelar el efecto de imagen
Presione repetidamente PICTURE EFFECT hasta que el indicador
desaparezca de la pantalla de cristal líquido. Cuando desconecte la
alimentación o ponga PLAY/STILL/MOVIE en PLAY, el efecto de
imagen se cancelará automáticamente.
parece una ilustración.
28-ES
Page 95

Utilización de la función de exposición
automática programada (PROGRAM AE)
Usted podrá seleccionar uno de seis modos de exposición
automática programada (PROGRAM AE) de acuerdo con la
situación, refiriéndose a los siguiente.
Presione repetidamente PROGRAM AE para
seleccionar el modo de exposición automática
programada deseado.
Modo de medición con foco
Para fotografiar motivos con iluminación de fondo o contraste
intenso entre dichos motivos y el fondo. Utilice este modo para
fotografiar con la exposición apropiada el punto que desee
enfocar.
Pantalla de cristal líquido
Modo de baja iluminación 1
Alcance de la medición con foco
Para fotografiar motivos más brillantes con iluminación
insuficiente.
Modo de baja iluminación 2
Para fotografiar imágenes obscuras con más brillo, o para hacer
que el movimiento del motivo parezca más natural.
Modo de puesta del sol e iluminación lunar
Para fotografiar motivos en entornos obscuros, como en puestas
del sol, fuegos artificiales, letreros de neón, o vistas nocturnas en
general.
Modo de paisaje
Para fotografiar motivos distantes, como montañas, o motivos
situados detrás de un obstáculo como una ventana o una red.
Modo de enfoque universal
Para fotografiar cambiando el motivo que desee enfocar (de
cercano a distante) rápida y fácilmente. O para fotografiar con
flash en un lugar obscuro cuando sea difícil enfocar.
29-ES
Operaciones avanzadas
Page 96

k Varias funciones para grabación
Para cancelar la exposición automática programada
Presione repetidamente PROGRAM AE hasta que desaparezca el
indicador de la pantalla de cristal líquido.
Notas sobre los ajustes del enfoque
• Usted solamente podrá enfocar motivos distantes en el modo de puesta del
sol e iluminación lunar, y en el de paisaje.
• En el modo de enfoque universal, la posición del zoom y el enfoque estarán
fijos.
• Cuando fotografíe en el modo de baja iluminación 1/baja iluminación 2, le
recomendamos que utilice un trípode para compensar las sacudidas de la
cámara.
• Ajuste el modo del flash a flash forzado cuando utilice el flash
modos siguientes:
Modo de baja iluminación 1, modo de baja iluminación 2, modo de puesta
de sol e iluminación lunar, y modo de paisaje.
• Cuando grabe en el modo Low Lux1/Low Lux2, la imagen puede aparecer
basta momentáneamente justamente antes de que la cámara enfoque un
motivo en el modo automático. Esto no significa mal funcionamiento.
en los
30-ES
Page 97

Selección de la calidad de las imágenes
(QUALITY)
Usted podrá seleccionar uno de dos modos de calidad de imágenes.
El número de imágenes que podrá grabar dependerá del modo de
calidad de imágenes que haya seleccionado.
1 Ajuste PLAY/STILL/MOVIE a STILL, y después
presione v del mando de control.
En la pantalla de cristal líquido aparecerá la barra de menú.
2 Seleccione FILE con el mando de control, y
después presione z.
En la pantalla de cristal líquido aparecerá el menú FILE.
3 Seleccione QUALITY con el mando de control, y
después presione z.
FINE :Utilice este modo para dar prioridad a la calidad de las
imágenes.
STANDARD: Utilice este modo para elegir la calidad estándar
de las imágenes.
4 Seleccione la calidad de las imágenes con el
mando de control, y después presione z.
5 Presione repetidamente V del mando de control.
La barra de menú desaparecerá de la pantalla.
Operaciones avanzadas
31-ES
Page 98

k Varias funciones para grabación
Selección del tamaño de la imagen
Usted podrá cambiar el tamaño de la imagen de acuerdo con su
finalidad.
1 Ajuste PLAY/STILL/MOVIE a MOVIE o STILL, y
después presione v del mando de control.
En la pantalla de cristal líquido aparecerá la barra de menú.
2 Seleccione FILE con el mando de control, y
después presione z.
En la pantalla de cristal líquido aparecerá el menú FILE.
3 Seleccione IMAGE SIZE con el mando de control,
y después presione z.
Ítemes para el modo STILL
1280 × 960 : Graba un archivo JPEG de 1280 × 960. (FD88
1216 × 912 : Graba un archivo JPEG de 1216 × 912. (FD83
1024 × 768 : Graba un archivo JPEG de 1024 × 768.
640 × 480 : Graba un archivo JPEG de 640 × 480.
Ítemes para el modo MOVIE
320 × 240 : Graba un archivo MPEG de 320 × 240.
160 × 112 : Graba un archivo MPEG de 160 × 112.
solamente)
solamente)
4 Seleccione el tamaño de imagen deseado con el
mando de control, y después presione z.
5 Presione repetidamente V del mando de control.
La barra de menú desaparecerá de la pantalla.
32-ES
Page 99

Selección del modo de grabación
(REC MODE)
Usted podrá grabar una imagen fija y sonido a la vez, o una imagen
fija adecuada para la transmisión por correo electrónico (e-mail).
1 Ajuste PLAY/STILL/MOVIE a STILL, y después
presione v del mando de control.
En la pantalla de cristal líquido aparecerá la barra de menú.
2 Seleccione FILE con el mando de control, y
después presione z.
En la pantalla de cristal líquido aparecerá el menú FILE.
3 Seleccione REC MODE con el mando de control, y
después presione z.
VOICE : Graba una imagen fija y sonido a la vez, además de un
archivo JPEG.
E-MAIL : Graba un archivo JPEG de 320 × 240 además del
tamaño de imagen seleccionado. Los archivos
E-MAIL son adecuados para la transmisión de correo
electrónico porque contienen datos comprimidos.
NORMAL :Graba un archivo JPEG en el tamaño de imagen
seleccionado.
4 Seleccione el tamaño de imagen deseado con el
mando de control, y después presione z.
5 Presione repetidamente V del mando de control.
La barra de menú desaparecerá de la pantalla.
Operaciones avanzadas
33-ES
Page 100

k Varias funciones para grabación
Modo de
grabación
NORMAL **1280 JPEG (1280 × 960) 001F.JPG
E-MAIL **1280 JPEG (1280 × 960) 001F.JPG
Tamaño de
imagen
960 de índice 001F.411
***1216 JPEG (1216 × 912) 001F.JPG
912 de índice 001F.411
1024 JPEG (1024 × 768) 001F.JPG
768 de índice 001F.411
640 JPEG (640 × 480) 001F.JPG
480 de índice 001F.411
960 de índice 001F.411
***1216
912
1024
768
640
480
VOICE JPEG (1280 × 960) 001F.JPG
**1280
960
***1216
912
Archivo
grabado
× Para la pantalla 6 – 10 4 – 6
× Para la pantalla 8 – 12 5 – 8
× Para la pantalla 10 – 16 6 – 8
× Para la pantalla 25 – 40 15 – 20
JPEG (320 × 240)
×
Para la pantalla
JPEG (1216 × 912) 001F.JPG
JPEG (320 × 240)
×
Para la pantalla
de índice 001F.411
JPEG (1024 × 768) 001F.JPG
JPEG (320 × 240)
×
Para la pantalla
de índice 001F.411
JPEG (640 × 480) 001F.JPG
JPEG (320 × 240)
×
Para la pantalla
de índice 001F.411
MPEG audio
con imagen fija
×
(320 × 240)
Para la pantalla
de índice 001F.411
JPEG (1216 × 912) 001F.JPG
MPEG audio
con imagen fija
×
(320 × 240)
Para la pantalla
de índice 001F.411
Nombre de
(extensión)*
001E.JPG 5 – 10 3 – 6
001E.JPG 7 – 12 4 – 8
001E.JPG 9 – 14 5 – 7
001E.JPG 20 – 35 12 – 15
001A.MPG 3 – 6 2 – 5
001A.MPG 4 – 7 3 – 6
34-ES
archivo
MVC– STANDARD FINE
Núm. de imágenes
que podrán grabarse
en un disquete
 Loading...