

Page 1
3-862-941-11 (1)
Digital Still Camera
Operating Instructions
Mode d'emploi
Manual de instrucciones
MVC-FD51
©1998 by Sony Corporation
EN
F
ES
Page 2
English
Operating instructions
Before operating the unit, please read this manual thoroughly,
and retain it for future reference.
WARNING
To prevent fire or shock hazard,
do not expose the unit to rain or moisture.
This symbol is intended to alert the user to the presence of
uninsulated “dangerous voltage” within the product’s
enclosure that may be of sufficient magnitude to constitute a
risk of electric shock to persons.
This symbol is intended to alert the user to the presence of
important operating and maintenance (servicing) instructions
in the literature accompanying the appliance.
Owner’s Record
The model and serial numbers are located on the bottom. Record the serial
number in the space provided below. Refer to these numbers whenever you
call upon your Sony dealer regarding this product.
Model No. MVC-FD51
Serial No.
2-EN
Page 3

CAUTION
Never expose the battery pack to temperatures above 140°F (60°C), such as in
a car parked in the sun or under direct sunlight.
TO PREVENT ELECTRIC SHOCK, DO NOT USE THIS POLARIZED AC
PLUG WITH AN EXTENSION CORD, RECEPTACLE OR OTHER OUTLET
UNLESS THE BLADES CAN BE FULLY INSERTED TO PREVENT BLADE
EXPOSURE.
You are cautioned that any changes or modifications not expressly approved
in this manual could void your authority to operate this equipment.
Note:
This equipment has been tested and found to comply with the limits for a
Class B digital device, pursuant to Part 15 of the FCC Rules. These limits are
designed to provide reasonable protection against harmful interference in a
residential installation. This equipment generates, uses, and can radiate radio
frequency energy and, if not installed and used in accordance with the
instructions, may cause harmful interference to radio communications.
However, there is no guarantee that interference will not occur in a particular
installation. If this equipment does cause harmful interference to radio or
television reception, which can be determined by turning the equipment off
and on, the user is encouraged to try to correct the interference by one or more
of the following measures:
– Reorient or relocate the receiving antenna.
– Increase the separation between the equipment and receiver.
– Connect the equipment into an outlet on a circuit different from that to
which the receiver is connected.
– Consult the dealer or an experienced radio/TV technician for help.
For the Customers in the United States and CANADA
DISPOSAL OF LITHIUM ION BATTERY.
LITHIUM ION BATTERY.
DISPOSE OF PROPERLY.
You can return you unwanted lithium ion batteries to your nearest Sony
Service Center or Factory Service Center.
Note: In some areas the disposal of lithium ion batteries in household or
business trash may be prohibited.
For the Sony Service Center nearest you call
1-800-222-SONY (United States only)
For the Factory Service Center nearest you call
416-499-SONY (Canada only)
Caution: Do not handle damaged or leaking lithium ion batteries.
3-EN
Page 4

NOTICE FOR THE CUSTOMERS IN THE UNITED KINGDOM
A moulded plug complying with BS 1363 is fitted to this equipment for your
safety and convenience.
Should the fuse in the plug supplied need to be replaced, a 5 AMP fuse
approved by ASTA or BSI to BS 1362, (i.e., marked with 2 or @ mark)
must be used.
If the plug supplied with this equipment has a detachable fuse cover, be
sure to attach the fuse cover after you change the fuse. Never use the plug
without the fuse cover. If you should lose the fuse cover, please contact
your nearest Sony service station.
ATTENTION
The electromagnetic fields at the specific frequencies may influence
the picture of this camera.
• IBM PC/AT is a registered trademark of International Business Machines
Corporation of the U.S.A.
• MS-DOS and Windows are registered trademarks licensed to Microsoft
Corporation, registered in the U.S.A. and other countries.
• Macintosh is a trademark licensed to Apple Computer, Inc., registered in the
U.S.A. and other countries.
• All other product names mentioned herein may be the trademarks or
registered trademarks of their respective companies.
Furthermore, “TM” and “” are not mentioned in each case in this manual.
4-EN
Page 5

Table of contents
Be sure to read before using your camera 6
Before using your camera 7
Getting started 8
Preparation 8
Step 1: Charging the battery pack 9
Step 2: Installing the battery pack 10
Step 3: Setting the date and time 12
Basic operations 15
Recording images 15
The indicators during recording 18
Adjusting the brightness of the LCD screen 19
Flash/Self-timer 19
Adjusting the exposure 20
Watching images on the LCD screen 21
The indicators during playback 22
Adjusting the brightness of the LCD screen 22
Playing back 6 recorded images at a time
(INDEX screen) 23
Protecting images 24
Deleting images 27
Viewing images using a personal computer 31
Advanced operations 32
Changing the mode settings 32
Enjoying Picture Effect 35
Additional information 36
Changing the lithium battery in the camera 36
Precautions 37
Troubleshooting 39
Self-diagnosis display 41
Specifications 42
Parts identification 43
Index 46
MVC-FD51(U/C-E)
Table of contents 5
5-EN
Page 6

Be sure to read before using your
camera
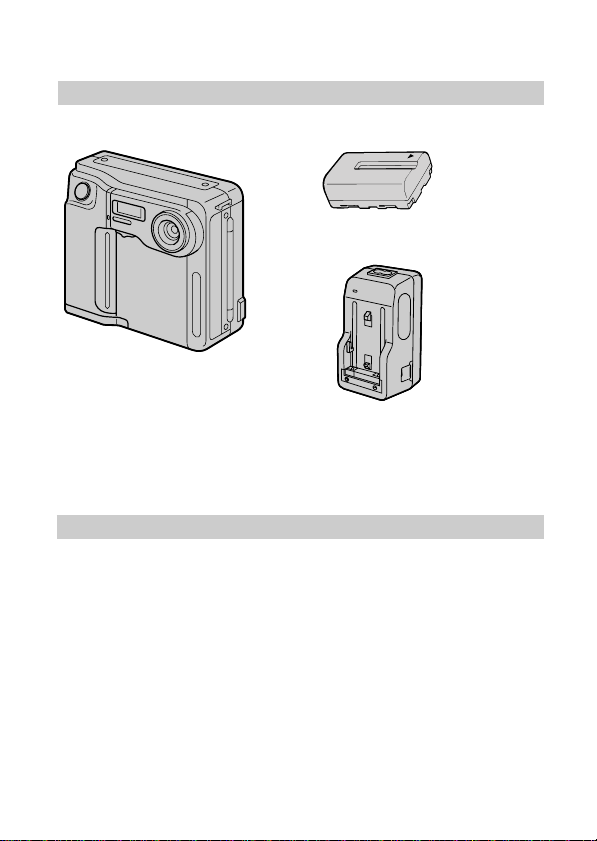
Checking supplied accessories (see page 8)
Digital still camera (1) Battery charger (1)
Power cord (1 set) NP-F330 battery pack (1)
Shoulder strap (1)
Image recording format on this camera
The image data recorded with this camera is compressed and
recorded in JPEG format. Extension of the file is “.JPG”. For details,
see page 31.
Power sources
This camera operates only with the “InfoLITHIUM” battery pack*
NP-F330 (supplied)/F530/F550 and the AC power adaptor
AC-V700. If you use any other battery or power sources to operate
your camera, the camera may not operate.
Trial recording
Before you record one-time events, you may want to make a trial
recording to make sure that the camera is working correctly.
No compensation for contents of the recording
Contents of the recording cannot be compensated for if recording or
playback is not made due to a malfunction of the camera, floppy
disk, etc.
Precaution on copyright
Television programs, films, video tapes, floppy disk, and other
materials may be copyrighted. Unauthorized recording of such
materials may be contrary to the provision of the copyright laws.
* “InfoLITHIUM” battery pack
The “InfoLITHIUM” is a lithium ion battery pack which can exchange data
with compatible equipment about its battery consumption.
”InfoLITHIUM” is a trademark of Sony Corporation.
6-EN
Page 7

Before using your camera
This digital still camera uses a floppy disk as media.
Use the following floppy disk type.
•Size: 3.5 inch
•Type: 2HD
•Capacity: 1.44 MB
•Format: MS-DOS format (512 bytes × 18 sector)
When using 3.5 inch, 2HD floppy disk other than described above,
format it using the camera or personal computer.
Do not shake or strike the unit
Malfunctions, inability to record images as well as inability to use
floppy disks or image and memory data breakdown, damage or loss
may occur.
Do not get the unit wet
This unit is an electronic device, do not allow it to get wet. When
shooting in the rain or outdoors, be careful not allow water to get on
or into the unit. When moving this unit from one atmospheric
condition to another, moisture may condense inside or outside the
camera. If this occurs refer to page 38 and follow instructions on
how to remove it before using.
Back up recommendations
To avoid the potential risk of data loss always copy (back up) data to
disk.
As you read through this manual, buttons and settings on the
camera are shown in capital letters.
e.g., Press FLASH.
7-EN
Page 8
Preparation
What you need
Digital Still Camera
Floppy disk (not supplied)
3.5 inch, 2HD (1.44 MB)
Preparation outlines
The clock is not set at the factory. Be sure to set the clock before
using your camera.
1 Charge the battery pack. (p. 9)
2 Install the battery pack. (p. 10)
This camera operates by battery pack. Install a fully charged
battery pack.
3 Set the date and time. (p. 12)
The date and time data are necessary for MS-DOS format
recording. If they are not set, incorrect date and time are
recorded. The CLOCK SET screen appears whenever you turn
on the camera in CAMERA mode.
8-EN
Battery pack (NP-F330)
Battery charger (BC-V615)
Power cord
Shoulder strap
Page 9
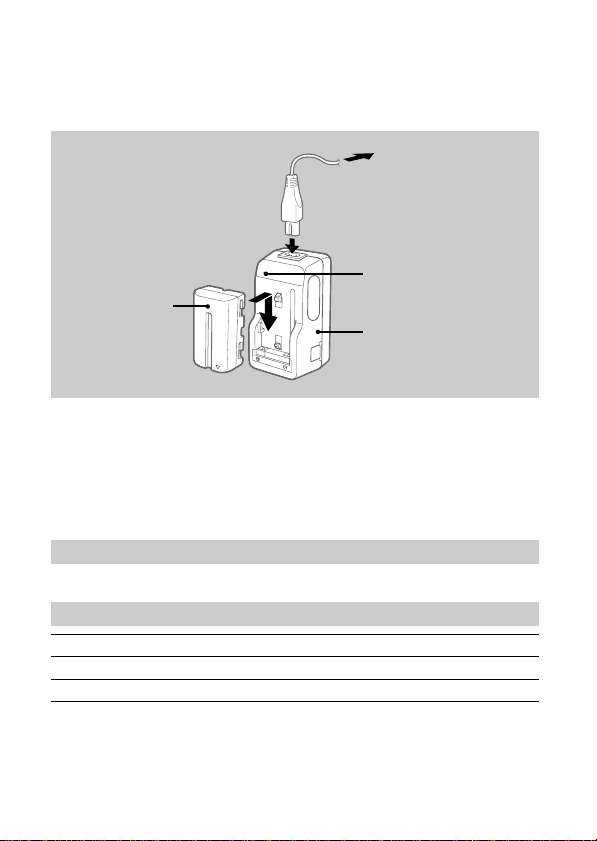
Step 1: Charging the battery pack
To charge the battery pack, use the battery charger. For details, refer
to the instruction manual of the battery charger.
to wall outlet
1
CHARGE lamp
Battery pack
2
1 Connect the power cord to a wall outlet.
2 Insert the battery pack in the direction of the $
mark. Slide it down until it clicks.
The CHARGE lamp (orange) lights up. Charging begins.
To remove the battery pack
Slide up the battery pack.
Charging time
Battery NP-F330 NP-F530 NP-F550
Full charge* 210 min. 225 min. 240 min.
Normal charge** 150 min. 165 min. 180 min.
Approximate minutes to charge an empty battery pack using the battery
charger BC-V615. (Lower temperatures require a longer charging time.)
* Charging for about one hour after the CHARGE lamp goes out.
** Charging just until the CHARGE lamp goes out.
(orange)
Battery charger
9-EN
Page 10
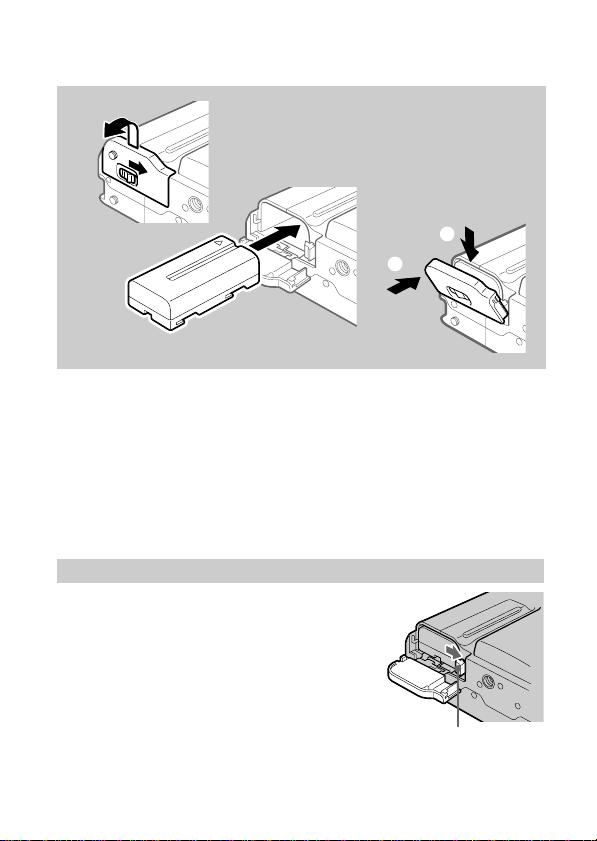
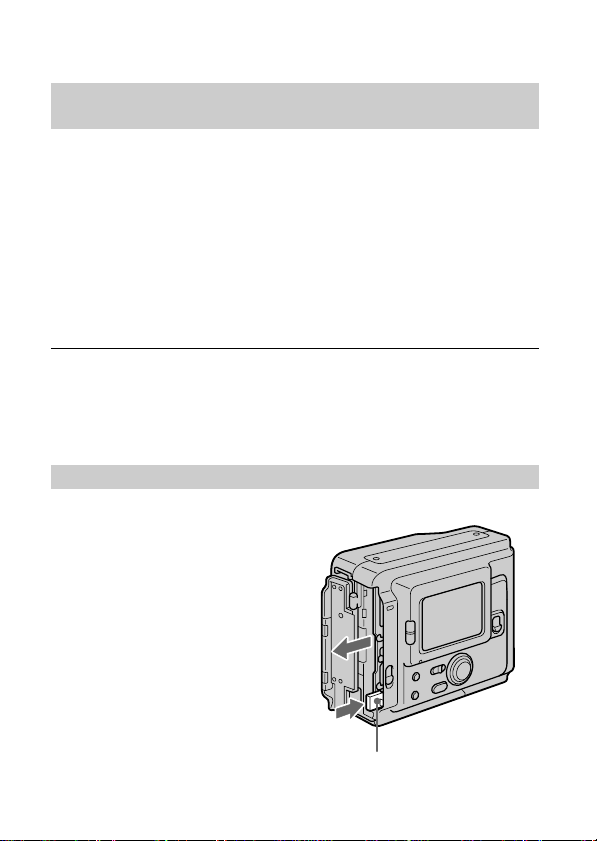
Step 2: Installing the battery pack
1
2
3
(base)
1 While sliding OPEN (BATT) in the direction of the
arrow, open the battery cover.
2 Insert the battery pack with the $ mark facing
toward the battery compartment.
3 Close the cover until it clicks.
To remove the battery pack
Open the battery cover. While
sliding the battery release
lever rightward, remove the
battery pack.
Be careful not to drop the battery pack when
removing.
2
1
10-EN
Battery release lever
Page 11

Battery life/No. of images that can be recorded/
played back
Battery Battery life No. of images
(min.) (record/playback)
NP-F330 Unusing the flash
(Supplied) Using the flash
Continuous playing
Continuous recording
Continuous recording
NP-F530
Unusing the flash
Using the flash
Continuous playing
Continuous recording
NP-F550
Unusing the flash
Using the flash
Continuous playing
1)
2)
3)
2)
3)
2)
3)
85 (80) 620 (580)
85 (80) 380 (360)
120 (110) 900 (820)
1)
120 (105) 880 (770)
115 (100) 520 (450)
165 (145) 1230 (1080)
1)
150 (140) 1100 (1020)
145 (135) 660 (610)
210 (195) 1570 (1460)
Approximate battery life and No. of images that can be recorded/played back
under the temperature of 77°F (25°C). Numbers in parentheses indicate the
time when you use a normally charged battery.
1)
Recording at about 10 second intervals
2)
Recording at about 15 second intervals
3)
Playing back single image at about 10 second intervals
• Battery life and No. of images will be decreased if you use the camera in a
cold environment or while you repeat turning the power on/off.
• Battery life and No. of images above are a guide with using some floppy
disks.
¡ Notes on remaining battery time indication
Remaining battery time is displayed on the LCD screen*. However, the
indication may not be displayed properly, depending on using conditions
and circumstances.
* During recording, remaining battery time is displayed while the power
is on. During playback, it is displayed with the image on the LCD
screen.
¡ Auto power-off function
During recording if you leave the camera inactive for about 3 minutes
while the power is on, the camera turns off automatically to prevent
wearing down the battery.
11-EN
Page 12
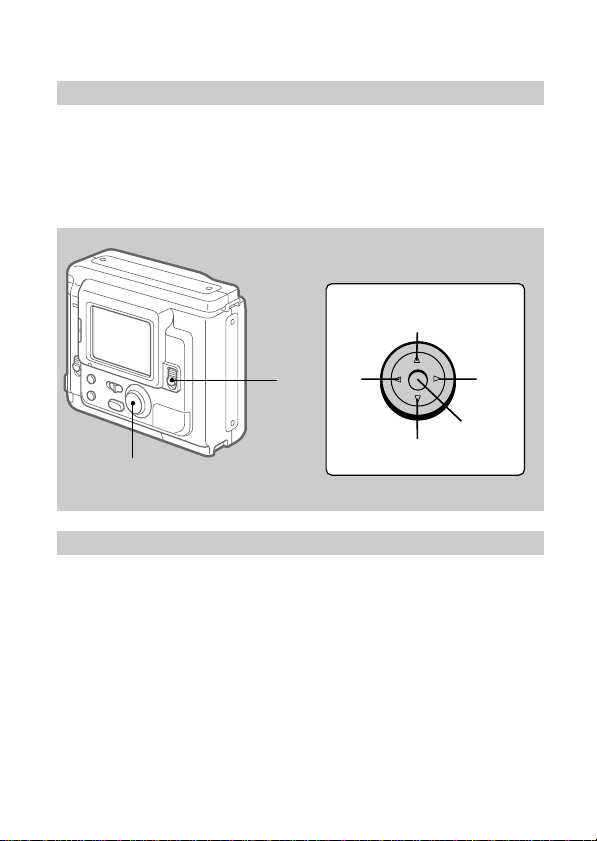
Step 3: Setting the date and time
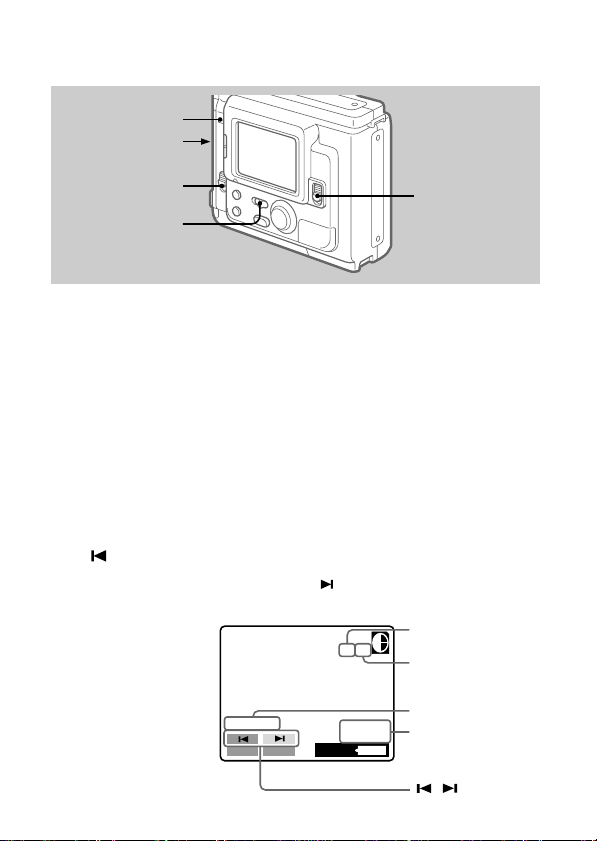
Function of the control button
You can select an item in the menu which appears on the LCD
screen by pressing the upper, lower, left or right side of the control
button. When an item is selected, the color of the item changes from
blue to yellow. To enter your selection, press the center of the
control button.
Control button
Upper side
Left
side
1
Lower side
2
When you use the camera first
With the floppy disk inserted (p. 15) and the power turned on, as in
step 1, the clock set screen appears. If this occurs, follow the
procedures from step 4.
Right
side
Press to
execute.
1 Slide POWER down to turn on the power.
If the “I” indicator appears on the LCD screen, replace the
lithium battery according to the procedures on page 36.
12-EN
Page 13
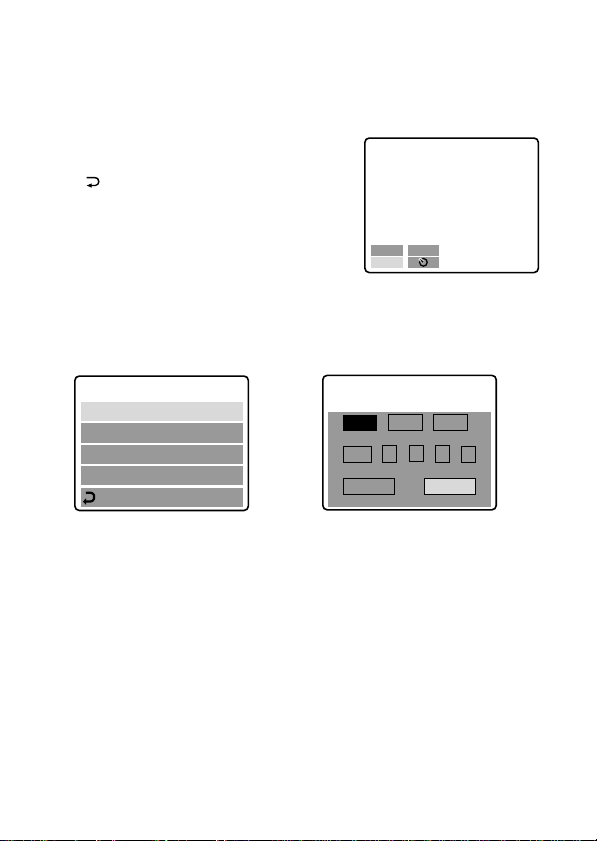
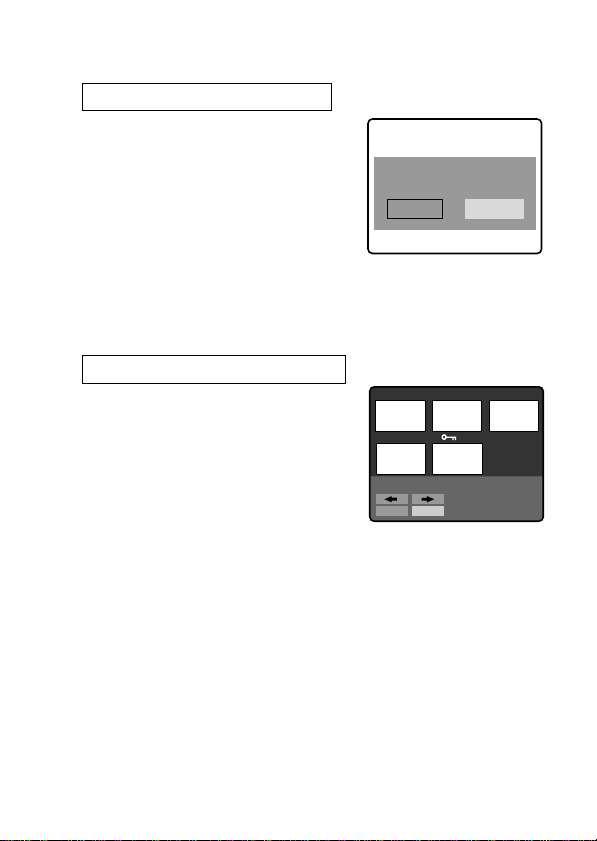
2 Select “MENU” with the control button, then
press it.
The menu appears on the LCD screen.
To cancel menu screen, select
“ RETURN” with the control button,
then press it.
+
–EV
EV
MENU
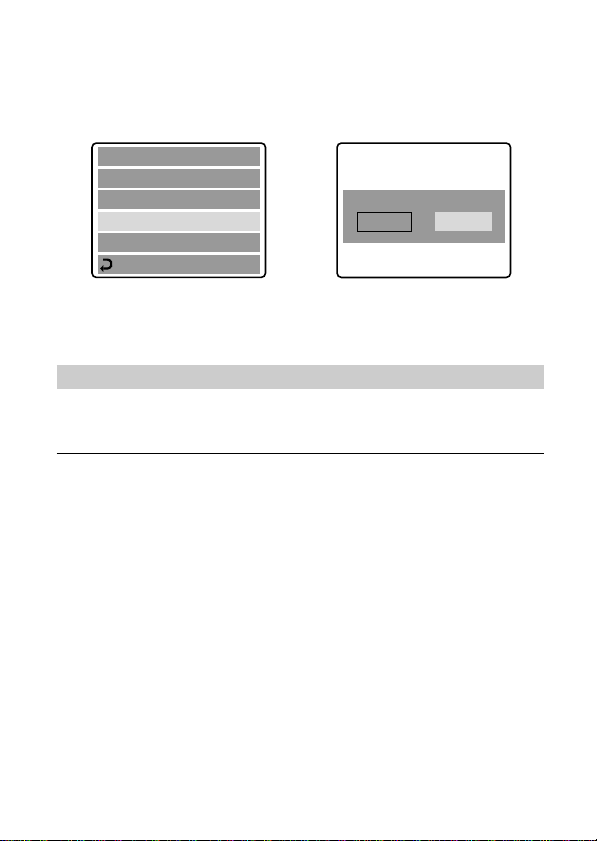
3 Select “CLOCK SET” with the control button,
then press it.
CLOCK SET
BEEP
FIELD/FRAME
QUALITY
RETURN
÷
CLOCK SET
Y/M/D M/D/Y D/M/Y
1998 1 8 10: 20
ENTER
CANCEL
AM
4 Select the desired display of the date with the
control button, then press it.
Y/M/D (year/month/day)
M/D/Y (month/day/year)
D/M/Y (day/month/year)
13-EN
Page 14

÷Step 3: Setting the date and time
5 Select the date and time with the control button,
then press it.
The item to be changed is indicated
with 4/$. Select number by pressing
the upper side or lower side of the
control button, then press it to enter
the number.
After entering the number, 4/$
moves to the next item.
When “D/M/Y” is selected, set the
time on a 24-hour cycle.
CLOCK SET
Y/M/D
1998 1 8 10: 20
AM
6 Select “ENTER” with the control button, then
press it at the desired moment to begin clock
movement.
To cancel setting the date and time
Select “CANCEL” with the control button, then
press it.
14-EN
Page 15
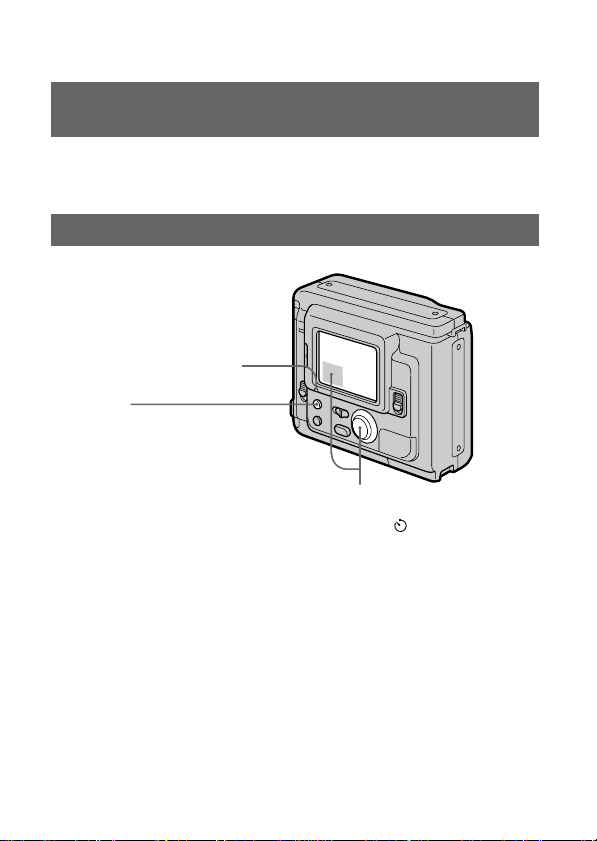
Recording images
3.5 inch, 2 HD (1.44 MB), MS-DOS format floppy disk is necessary
for recording.
6,7
Macro switch
ACCESS
lamp
BRIGHT (brightness of the
LCD screen) +/– button
4,5
321
DISPLAY button
1 Slide POWER down to turn on the power.
2 Set PLAY/CAMERA to CAMERA.
The image captured by the lens and “NO DISK” appear on the
LCD screen.
3 Slide OPEN in the direction of the arrow and
open the floppy disk cover.
The screen turns blue and “COVER OPEN” appears.
15-EN
Page 16

÷Recording images
4 Insert the floppy disk until it clicks.
Before inserting, check that the write
protect tab set to the recordable
position.
5 Close the cover.
STD
11
Image quality
indicator
Remaining disk
capacity
indicator
No. of recorded
images
AE lock indicator
(Green)
The image appears
on the LCD screen.
–EV
MENU
+
EV
120min
6 Press the shutter button halfway down.
The AE lock indicator r (green) appears on the LCD screen. AE
(auto exposure) and AWB (auto white balance) are frozen.
7 Press the shutter button fully down.
The image is recorded on the disk.
The ACCESS lamp flashes, the remaining disk capacity indicator
rotates and “RECORDING” appears on the LCD screen.
Note
When the ACCESS lamp is flashing, never shake or strike the unit. As well do
not open the floppy disk cover, turn the power off or remove the battery pack.
Otherwise, the image data breakdown may occur.
16-EN
Page 17
The number of images you can record on a floppy
disk
The number of images you can record is different depending on
which image quality mode you select and subject complexity.
STANDARD about 30 – 40 images
FINE about 15 – 20 images
Change the disk when the remaining disk capacity indicator is
emptied and flashes.
The image quality mode is set at the factory to STANDARD (p. 33).
Notes
• If you attempt to record 55 images or above, DISK FULL appears on the
LCD screen and you cannot record the image even when the remaining disc
capacity indicator is not emptied.
• When the remaining disk capacity indicator flashes, image data cannot be
recorded and INDEX screen may not be displayed.
To remove the floppy disk
Open the floppy disk cover and press EJECT.
EJECT button
17-EN
Page 18
÷Recording images
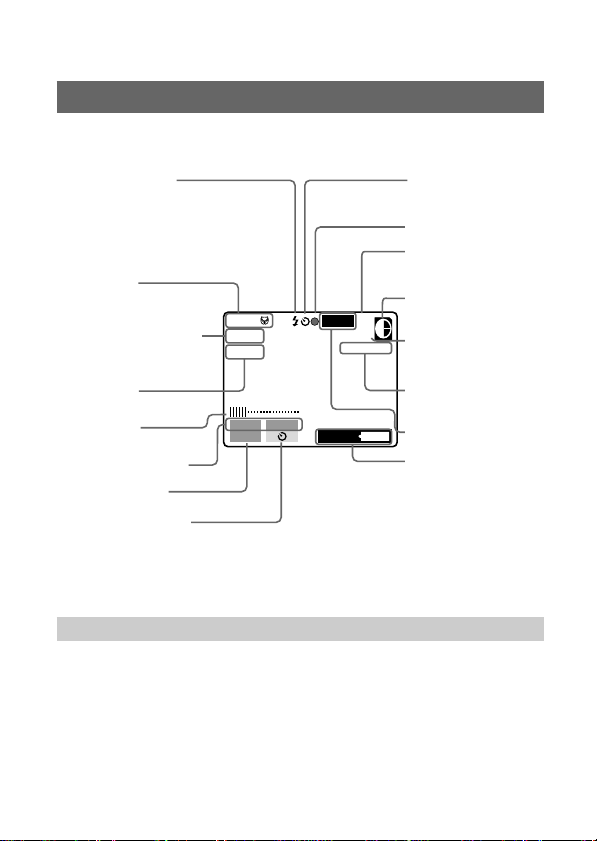
The indicators during recording
The indicators on the LCD screen are not recorded.
Flash indicator
Self-timer
indicator
AE lock indicator
Macro shooting
indicator
Exposure indicator
Picture effect
indicator
LCD brightness
indicator*
Adjusting the
exposure button
MENU button
MACRO
+1.5EV
SEPIA
–EV
MENU
FRAME STD
E : 61 : 01
+
EV
120min
Image quality
indicator
Remaining disk
capacity indicator
11
No. of stored
images
Self-diagnosis
function indicator
FRAME indicator
Remaining
battery time
indicator
Self-timer button
* Displayed when pressed only.
To go off the indicators
Press DISPLAY.
The indicators do not go off in the following modes:
Picture effect, Macro, AE Lock, Self-timer, Flash, FRAME and
Adjusting the exposure.
18-EN
Page 19
Adjusting the brightness of the LCD
screen
Use the BRIGHT +/– button.
Flash/Self-timer
FLASH CHARGE lamp
Flash
Press FLASH.
When the blinking FLASH
CHARGE lamp lights up, you
can shoot images using the
flash.
To cancel flash mode, press it
again.
•The subject must be 1 5/8 feet to 10 feet (50 cm to 3 m) away from
the flash.
•If flash is used in FRAME mode, the image is recorded in FIELD
mode. The FRAME indicator flashes on the LCD screen (p. 33).
Self-timer
Select with the control
button, then press it.
About 10 seconds after
you press the shutter
button, the subject is
recorded.
19-EN
Page 20
÷Recording images
Adjusting the exposure
Select “+EV” or “–EV” with the control button, then press it to select
the desired value.
To raise the exposure value (brighten the picture): +EV
To lower the exposure value (darken the picture): –EV
Selected value
+1.5EV
–EV
MENU
+
EV
The EV (exposure value) can be adjusted –1.5EV to +1.5EV.
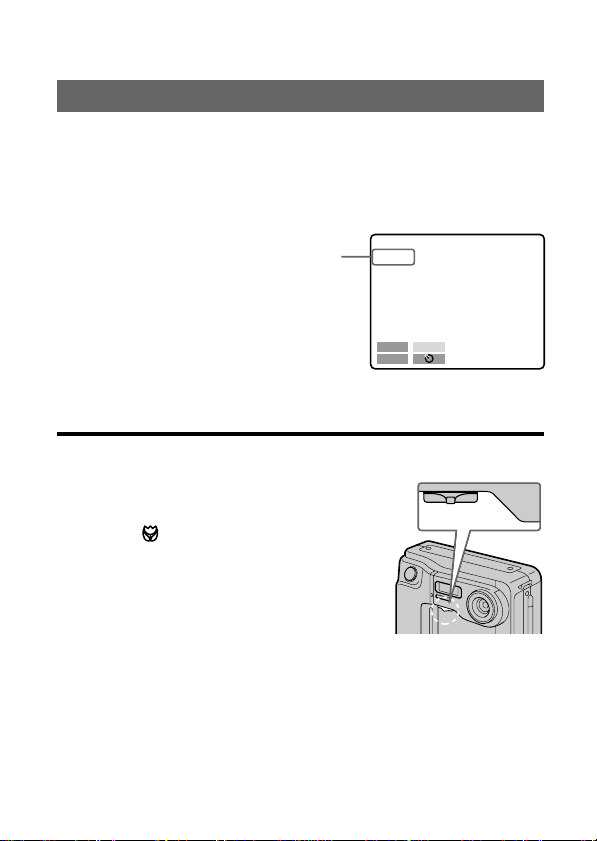
¡ When the subject is too close to focus on
Move the macro switch on the front of the
camera to the “MACRO” side, and then focus
on the subject. The macro indicator
MACRO
can shoot a subject that is about 3 to 9 inches
(about 8 to 25 cm) or more away from the lens
surface in macro mode.
Put back the switch until it clicks after macro
recording, or you may not be able to focus on
a distant subject.
appears on the LCD screen. You
cMACRO
20-EN
Page 21
Watching images on the LCD screen
ACCESS lamp
3
2
1
4
1 Slide POWER down to turn on the power.
2 Slide OPEN in the direction of the arrow and
open the floppy disk cover.
3 Insert the floppy disk until it clicks, then close
the cover.
4 Set PLAY/CAMERA to PLAY.
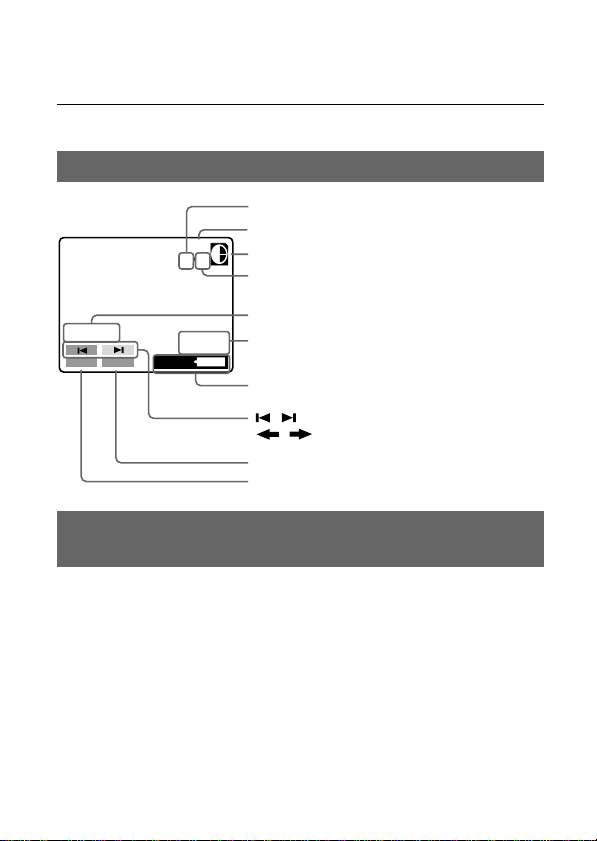
The last recorded image appears on the LCD screen.
5 To display the preceding recorded image, select
“ ” with the control button, then press it.
To display the next image, select “ ” with the control button,
then press it. When the indicators on the LCD screen are not
displayed,
press the left or
right side of the
control button
to display the
preceding or
next image.
MVC-011S
MENU
INDEX
120min
STD
11/11
1998 7 4
12:30PM
Image number
Number of stored
images in the
floppy disk
File name
Recording date
of the playback
image
/ buttons
21-EN
Page 22
÷Watching images on the LCD screen
Note
When the ACCESS lamp is flashing, never shake or strike the unit. As well do
not open the floppy disk cover, turn the power off or remove the battery pack.
The indicators during playback
Image number
Image quality indicator
Remaining disk capacity indicator
11/11
STD
Number of stored images in the
floppy disk
File name
MVC-011S
MENU
INDEX
120min
1998 7 4
12:30PM
Recording date of the playback
image
Remaining battery time indicator
/ buttons (Single screen mode)/
/ buttons (Index screen mode)
INDEX button
MENU button
Adjusting the brightness of the LCD
screen
Use the BRIGHT +/– button.
22-EN
Page 23
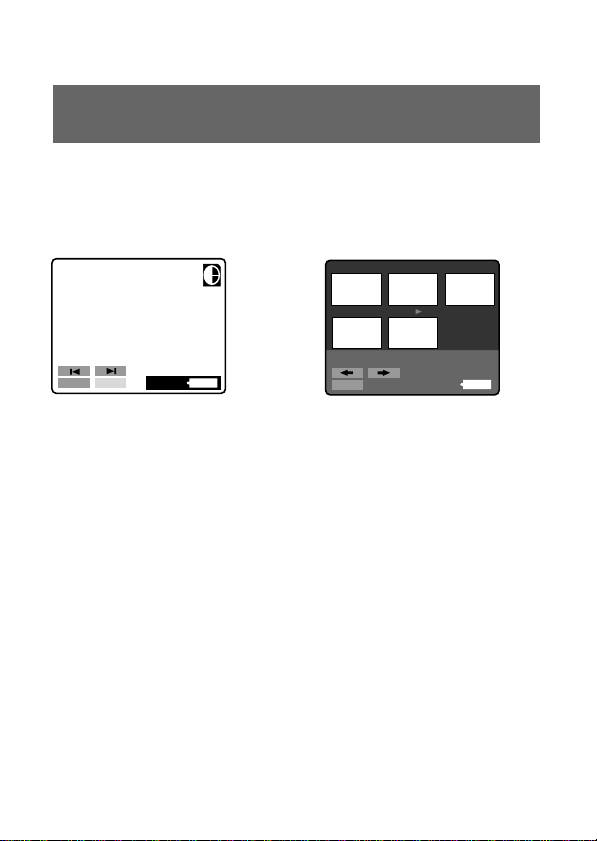
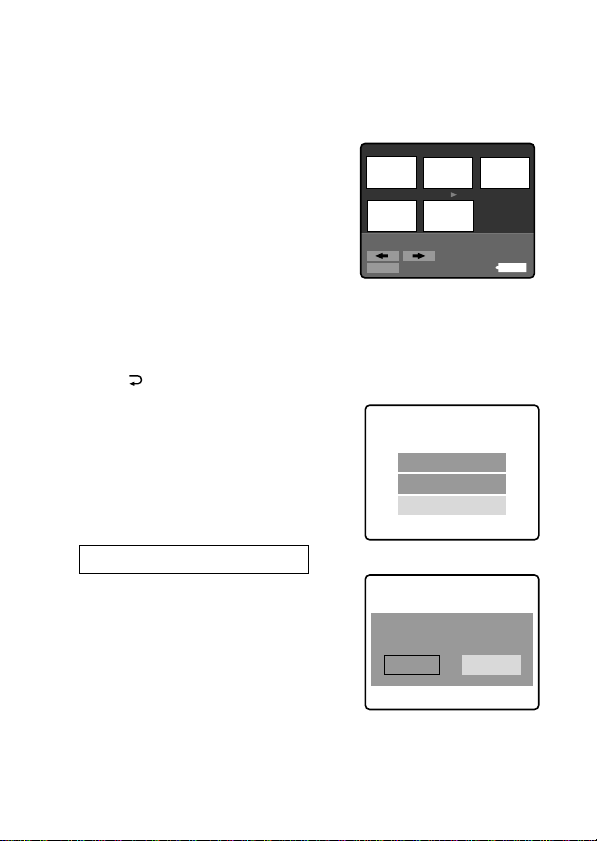
Playing back 6 recorded images at a time
(INDEX screen)
Select “INDEX” with the control button, then press
it.
The ” mark appears on the image that is displayed before changing
to INDEX screen mode.
7
11/11
STD
10 11
89
÷
MVC-011S
MENU
INDEX
• To display the following 6 images, select “b” with the control button, then
press it.
• To display the preceding 6 images, select “B” with the control button, then
press it.
• To return to the normal playback screen (SINGLE screen), select an image
with the control button, then press it.
• The number displayed at the upper right side of the image shows the
recording order on the disk. It is different from the file name (p. 31).
120min
1998 7 4
12:30PM
MVC-011S
MENU
11/11
120min
1998 7 4
12:30PM
23-EN
Page 24

÷Watching images on the LCD screen
Protecting images
To prevent accidental erasure, you can protect the image.
In SINGLE screen mode
1 Display the image you want to protect.
2 Select “MENU” with the control button, then
press it.
The menu appears on the LCD screen. To cancel menu screen,
select “
RETURN
” with the control button, then press it.
3 Select “PROTECT” with the control button, then
press it.
The red r mark shows the current setting.
CLOCK SET
BEEP
FORMAT DISK
DELETE
PROTECT
RETURN
÷
PROTECT
r
ON
r
OFF
RETURN
4 Select “ON” with the control button, then press
it.
The protect mark H appears on the upper left side of the image.
To cancel protecting image
Select “ RETURN” with the control button, then press it. The
screen returns to the menu screen.
24-EN
Page 25
To cancel protection of the image
Select “OFF” in step 4 with the control button, then press it.
Note
When you format the disk, the contents of the whole disk, including the
protected image data, are erased.
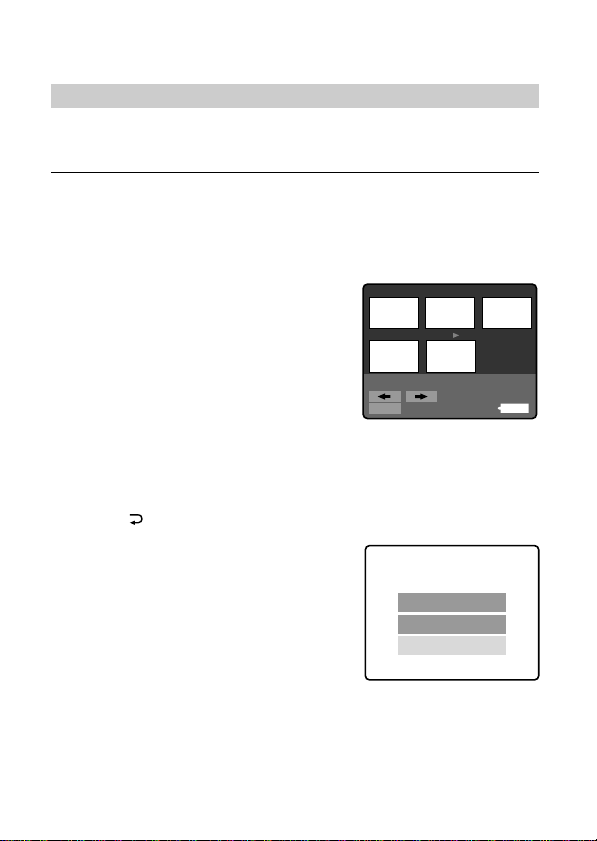
In INDEX screen mode – Protecting all or selected images
7
1 Select “INDEX” with the
89
control button, then press
it to enter INDEX screen
10 11
mode.
MVC-011S
MENU
11/11
1998 7 4
120min
2 Select “MENU” with the control button, then
press it.
The menu appears on the LCD screen. To cancel menu screen,
select “ RETURN” with the control button, then press it.
3 Select “PROTECT” with the
control button, then press it.
PROTECT
ALL
SELECT
CANCEL
12:30PM
25-EN
Page 26
÷Watching images on the LCD screen
4 Protecting all the images
1 Select “ALL” with the
control button, then press
it.
2 Select “OK” with the
control button, then press
it.
The screen returns to the index
screen.
When you cancel the menu screen, H appears on the upper
left side of all the images.
Protecting selected images
1 Select “SELECT” with the
control button, then press
it.
“PROTECT” appears on the LCD
screen.
2 Use the control button to display the red ”
mark at the image you want to protect.
H appears on the upper left side of the image.
To cancel protecting, press the control button
so that the “H” indicator goes out.
To display preceding or following 6 images, select “B” or “b”
with the control button, then press it.
3 Select “ENTER” with the control button, then
press it.
PROTECT
ALL ?
OK
7
10 11
PROTECT
ENTER
CANCEL
7-11
CANCEL
89
26-EN
Page 27

To cancel protection of the image in INDEX screen
mode
Follow the procedures of “Protecting selected images”. In step 2,
select the images you want to cancel protection with the control
button, then press it.
The “H” indicator at the upper left side of the image disappears.
When you have finished the cancelling, select “ENTER” with the
control button, then press it.
To cancel protecting image
Select “CANCEL” with the control button, then press it. The screen
returns to the menu screen.
Deleting images
You can delete images you do not want to keep any longer.
In SINGLE screen mode
1 Display the image you want to delete.
2 Select “MENU” with the control button, then
press it.
The menu appears on the LCD screen. To cancel menu screen,
select “ RETURN” with the control button, then press it.
27-EN
Page 28
÷Watching images on the LCD screen
3 Select “DELETE” with the control button, then
press it.
CLOCK SET
BEEP
FORMAT DISK
DELETE
÷
DELETE ?
OK
CANCEL
PROTECT
RETURN
4 Select “OK” with the control button, then press
it.
To cancel deleting image
Select “CANCEL” in step 4 with the control button, then press it.
Notes
• You cannot delete a protected image. To delete protected image, cancel their
protection first.
• Once you delete an image, you cannot restore it. Check the images to delete
carefully before deleting them.
28-EN
Page 29
In INDEX screen mode – Deleting all or selected images
7
1 Select “INDEX” with the
89
control button, then press
it to enter INDEX screen
10 11
mode.
MVC-011S
MENU
11/11
120min
2 Select “MENU” with the control button, then
press it.
The menu appears on the LCD screen. To cancel menu screen,
select “
3 Select “DELETE” with the
control button, then press
it.
RETURN
” with the control button, then press it.
DELETE
ALL
SELECT
CANCEL
4 Deleting all the images
1 Select “ALL” with the
control button, then
press it.
2 Select “OK” with the
control button, then
press it.
The screen turns to blue and “NO FILE” appears.
DELETE
ALL ?
OK
CANCEL
1998 7 4
12:30PM
29-EN
Page 30

÷Watching images on the LCD screen
Deleting selected images
7
1 Select “SELECT” with the
89
control button, then
DELETE
ENTER
10 11
CANCEL
7-11
press it.
“DELETE” appears on the LCD
screen.
2 Use the control button to display the red ”
mark at the image you want to delete.
The selected image number reverses color.
To cancel deleting, press the control button.
The image number display returns to normal.
To display the preceding or following 6 images, select “B” or
“b” with the control button, then press it.
3 Select “ENTER” with the control button, then
press it.
The selected images are deleted and the image numbers
move up.
To cancel deleting image
Select “CANCEL” with the control button, then press it. The screen
returns to the menu screen.
Notes
• Even when you select “ALL”, you cannot delete the protected image.
• When you select “SELECT” , you cannot select a protected image.
• To delete protected image, cancel their protection first.
• Once you delete an image, you cannot restore it. Check the images to delete
carefully before deleting them.
30-EN
Page 31

Viewing images using a personal
computer
The image data recorded with this camera is compressed in JPEG
format. This data can be viewed using a personal computer which
has JPEG view ability application installed such as Microsoft
Internet Explorer. For detailed procedures using image data with an
application, refer to the personal computer instruction manual.
Example: personal computer installed Windows 95
1 Start up Windows 95 and insert the floppy disk
into the disk drive of the personal computer.
2 Open “My computer” and double click “3.5 inch
FD”.
3 Double-click the desired data file.
On file format
This camera compresses image data in JPEG format (extension .JPG)
and simultaneously records file data (extension .411) for index
screen. The index screen data is available only on this camera.
Example
MVC-001F.JPG: Data file name of image
MVC-001F.411: Data file name for index screen
Recommended OS/applications example
OS
Windows 3.1, Windows 95, Windows NT 3.51 or later etc.
applications
Microsoft Internet Explorer etc.
Note
For Macintosh, you can use the floppy disk recorded with this camera using
the PC Exchange with Mac OS system 7.5 or higher. A viewing application for
Macintosh is also necessary for viewing images.
31-EN
Page 32

Changing the mode settings
1 Select “MENU” with the control button, then
press it.
The menu appears on the LCD screen.
CAMERA mode PLAY mode
CLOCK SET
BEEP
FIELD/FRAME
QUALITY
RETURN
2 Select desired item with the control button, then
press it.
When an item is selected, the color of the item changes from blue
to yellow.
3 Change the setting with the control button, then
press it.
When the setting is finished, menu screen disappears from the
LCD screen.
To cancel changing the mode settings
Select “ RETURN” or “CANCEL” with the control button, then
press it. The screen returns to the menu screen. To cancel menu
screen, select “ RETURN” with the control button, then press it.
CLOCK SET
BEEP
FORMAT DISK
DELETE
PROTECT
RETURN
32-EN
Page 33

Setting the mode of each item
Items in CAMERA mode
QUALITY < STANDARD*/ FINE >
•Select STANDARD as a standard image quality. (about 30 - 40
images can be recorded on 1 floppy disk)
•Select FINE when giving priority to image quality. (about 15 - 20
images can be recorded on 1 floppy disk)
Number of images can be recorded is different depending on subjects.
FIELD/FRAME*
•Normally select FIELD. The camera compensates for camerashake.
•Select FRAME for high quality recording. Care for camera-shake in
this mode.
If flash is used in FRAME mode, the image is recorded in FIELD mode. The
FRAME indicator flashes on the LCD screen.
When recording fast-moving subjects in FRAME mode, the recorded image is
blurry.
Items in PLAY mode
PROTECT
Select this item to protect images. See page 24.
DELETE
Select this item to delete images. See page 27.
FORMAT <OK/CANCEL>
•Select OK to format floppy disks.
•Select CANCEL to cancel formatting.
Formatting erases all information on the floppy disk, including the protected
image data. Check the contents of the disk before formatting.
Be sure that the battery is fully charged when formatting a floppy disk.
Formatting takes about 3 minutes maximum.
33-EN
Page 34

÷Changing the mode settings
Items for both CAMERA and PLAY modes
BEEP <ON*/OFF>
Normally select ON.
Select OFF to turn the beep sound off.
CLOCK SET
Select this item to set the date and time. See page 12.
* is set at the factory.
34-EN
Page 35

Enjoying Picture Effect
PICTURE EFFECT button
Press PICTURE EFFECT repeatedly to select the
desired picture effect mode.
PASTEL: Emphasize contrast and gives picture animation-like
NEG. ART: The color and brightness of the picture is reversed.
SEPIA: The picture is sepia.
B&W: The picture is monochrome (black and white).
To cancel picture effect
Press PICTURE EFFECT repeatedly until the indicator on the LCD
screen goes out. When you turn the power off or set CAMERA/
PLAY to PLAY, the picture effect is automatically cancelled.
colors.
35-EN
Page 36

Changing the lithium battery in the
camera
When the lithium battery becomes weak or dead, the “I” indicator
flashes on the LCD screen. In this case, replace the battery with a
Sony CR2025 or Duracell DL-2025 lithium battery. Use of any other
battery may present a risk of fire or explosion.
When installing the lithium battery, keep the battery pack attached.
Otherwise, you will need to reset the date and time retained by the
lithium battery.
1 Slide the lid of the lithium
battery compartment down
and open it.
2 Push the lithium battery once
and push it out from the
holder.
3 Install the lithium battery with
the positive (+) side facing out.
4 Close the lid.
WARNING
The battery may explode if mistreated. Do not recharge, disassemble, or
dispose of in fire.
CAUTION
Danger of explosion if battery is incorrectly replaced.
Replace only with the same type recommended by the manufacturer.
Discard used batteries according to the manufacturer’s instructions.
36-EN
Page 37

Precautions
On cleaning
Cleaning the LCD screen
Wipe the screen surface with a LCD cleaning kit (not supplied) to
remove fingerprints, dust, etc.
Cleaning the camera surface
Clean the camera surface with a soft cloth slightly moistened with
water. Do not use any type of solvent such as alcohol or benzene as
it may mar the finish of the casing.
Using the camera on a sandy beach or in a dusty place
Do not let sand get into the camera. Sand or dust may cause the unit
to malfunction, and sometimes this malfunction cannot be repaired.
Concerning floppy disks
To protect data recorded on floppy disk, note the following:
• Avoid storing floppy disks near magnets or magnetic fields such
as those of speakers and televisions, permanent erasure of disk
data may result.
• Avoid storing floppy disks in areas subject to direct sunlight or
sources of high temperature, such as a heating device. Floppy disk
warping or damage may result, rendering the disk useless.
• Avoid contact with the disk’s surface by opening the disk shutter
plate. If the disk’s surface becomes blemished, data may be
rendered unreadable.
• Avoid getting liquids on the floppy disk.
• Be sure to use a floppy disk case to ensure protection of important
data.
• Use only a 2HD type disk head cleaner when cleaning the disk
drive.
•Even when you use a 3.5 inch 2HD floppy disk, image data may
not be recorded and/or displayed depending on the using
environment. In this case, use other brand disks.
37-EN
Page 38

÷Precautions
Operational temperature recommendations
This camera’s operational temperature is between 32°F to +104°F
(0°C to +40°C). Do not use this camera in extreme climates such as
that of a hot beach or a skiing resort.
Moisture condensation
If the camera is brought directly from a cold to a warm location, or is
placed in a very damp room, moisture may condense inside or
outside the camera. Should this occur, the camera will not operate
properly. In this case, remove the floppy disk, turn off the camera,
and open the floppy disk cover and wait about an hour for the
moisture to evaporate.
To prevent moisture condensation
When bringing the camera from a cold place to a warm place, put
the camera in a plastic bag and allow it to adapt to room conditions
over period of time.
1 Be sure to tightly seal the plastic bag containing the camera.
2 Remove the bag when the air temperature inside it has reached
the temperature surrounding it (about 1 hour).
Notes on lithium battery
•Keep the lithium battery out of the reach of children.
Should the battery be swallowed, immediately consult a doctor.
•Wipe the battery with a dry cloth to assure a good contact.
•Do not hold the battery with metallic tweezers, otherwise a shortcircuit may occur.
•Note that the lithium battery has a positive (+) and a negative (–)
terminals. Be sure to install the lithium battery so that terminals on
the battery match the terminals on the camera.
38-EN
Page 39

Troubleshooting
Should any problem persist after you have made those checks,
consult your nearest Sony dealer. If “C: ππ: ππ” appears on the
LCD screen, the self-diagnosis function has worked. See page
41.
Symptom Cause and/or Solution
The camera does not
work.
You cannot record
images.
The picture is out of
focus.
The picture is noisy.
• The battery is dead.
n Use a charged battery pack. (p. 9)
• The camera does not operate when using a
battery pack that is not an “InfoLITHIUM”
battery pack.
n Use an “InfoLITHIUM” battery pack. (p. 6)
• The floppy disk is not installed properly.
n Remove the disk and reinstall it. (p. 16)
• PLAY/CAMERA is not set to CAMERA.
n Set it to CAMERA. (p. 15)
• Floppy disk is full.
n Delete certain images you do not want to
keep, and then start recording. (p. 27)
n Change the floppy disk.
• The battery is dead.
n Use a charged battery pack.
• No disk has been inserted.
n Insert a disk.
• The disk which cannot be used with the camera
is installed.
n Use 2HD, 1.44MB, MS-DOS formatted disk.
(p. 7)
• The tab on the disk is set to the writing
impossible position.
n Set it to the writing possible position. (p. 16)
• The macro switch is set to MACRO.
n Turn the switch to the normal recording
position. (p. 20)
• The camera is placed near a TV or other
equipment that uses strong magnets.
n Place the camera away from the TV, etc.
39-EN
Page 40

÷Troubleshooting
Symptom Cause and/or Solution
The picture is too dark.
Incorrect date and time
are recorded.
Vertical streaks appear
when shooting a very
bright subject.
The battery life
deteriorates too fast.
You cannot play back the
images.
You cannot delete an
image.
The power turns off
automatically.
• You are shooting a subject with the light source
behind the subject or light is insufficient.
n Adjust brightness of the image. (p. 20)
• The LCD screen is adjusted too dark.
n Adjust brightness. (p. 19, 22)
• The date and time are not set.
n Set the date and time. (p. 12)
• The smear phenomenon.
n The camera is not malfunctioning.
• The ambient temperature is too low.
• Charging of the battery pack is not enough.
n Charge the battery pack fully.
• The battery pack has served its time.
n Replace the battery pack with a new one.
• PLAY/CAMERA is not set to PLAY.
n Set it to PLAY. (p. 21)
• The battery is dead.
n Use a charged battery pack.
• The image is protected.
n Cancel the protection of the image. (p. 25)
• If you leave the camera inactive in CAMERA
mode for about 3 minutes while the power is
on,it turns off automatically to prevent wearing
down the battery.
n Turn the power on.
40-EN
Page 41

Self-diagnosis display
C:32:ππ
The camera has a self-diagnosis
display. This function displays
the camera condition with fivedigits (a combination of a letter
and figures) on the LCD screen.
If this occurs check the
following code chart. The fivedigit display informs you of the
camera current condition. The
last two digits (indicated by
ππ) will differ depending on
the state of the camera.
First three digits Cause and/or Corrective Action
C:32:ππ
C:13:ππ
E:91:ππ
E:61:ππ
•Trouble is with the disk drive.
nChange the disk. Then turn the power
•The unformatted disk is installed.
nFormat the disk. (p. 33)
•The unusable disk with the camera is
installed.
nChange the disk. (p. 14, 15)
•A camera malfunction which you can not
reverse has occurred.
nContact your Sony dealer or local
Self-diagnosis display
•C: ππ: ππ
You can reverse the camera
malfunction yourself.
•E: ππ: ππ
Contact your Sony dealer or
local authorized Sony service
facility.
off and on again.
authorized Sony service facility and
inform them of the five digits.
(example: E:61:10)
41-EN
Page 42

Specifications
System
Image device 1/4-inch CCD
Lens f=4.8 mm (47 mm, when converted into a 35 mm
Exposure control Automatic exposure
White balance Automatic
Data compression Standard JPEG
Image capacity Number of the pictures stored on 1 floppy disk
Image size 640 x 480 (VGA)
Memory Floppy disk:
Flash Recording distance limitations:
LCD screen
Screen size 2.5 inch
LCD panel TFT
Total dot number 61380 dots
General
Application Sony battery pack NP-F330/F530/F550
Power requirements 7.2 V (battery pack)
Power consumption (During shooting)
Operation temperature 32°F to 104°F (0°C to +40°C)
Storage temperature –4°F to +140°F (–20°C to +60°C)
Dimensions Approx. 5 x 4 3/8 x 2 1/2 in.
Mass Approx. 21 1/6 oz. (470 g) (excluding batteries
Supplied accessories See page 8.
Design and specifications are subject to change without notice.
still camera)
F2.0
STANDARD: about 30 – 40 pictures
FINE: about 15 – 20 pictures
3.5 inch 2HD MS-DOS format (1.44 MB)
0.5 – 3 m (1 5/8 – 10 ft.)
3.2 W
(126.5 x 110.5 x 62.5 mm) (w/h/d)
and floppy disks)
42-EN
Page 43

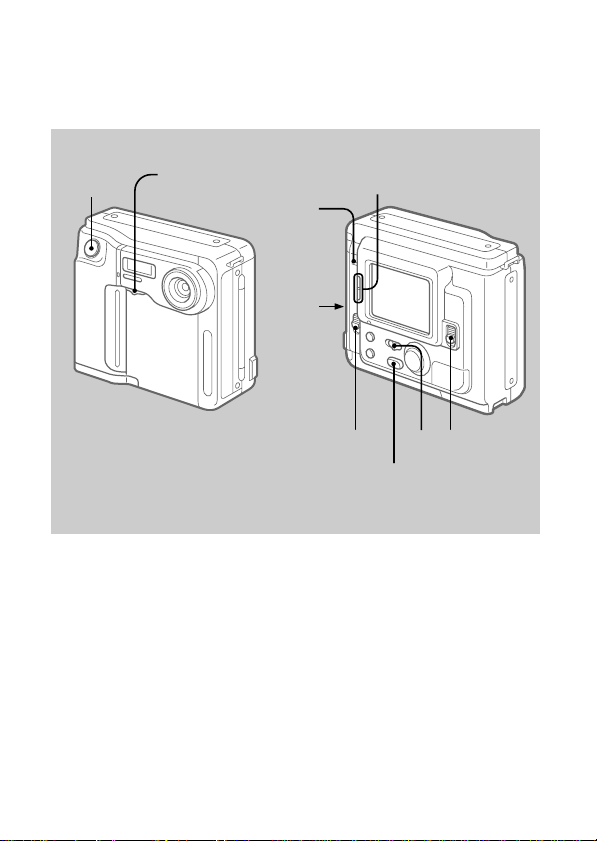
Parts identification
See pages in ( ) for more details.
Shutter button
(15)
Flash emitter (19)
Self-timer lamp
(19)
Photocell window
Hook for strap
Lens
Macro switch
(20)
To use the AC power
adaptor, remove this part.
Pass the cord through here
and close the battery cover.
Tripod receptacle
Make sure that the length of the
tripod screw is less than 7/32
inch (6.5 mm).
43-EN
Page 44

÷Parts identification
ACCESS lamp (16)
BRIGHT +/–
button (19, 22)
OPEN button
(15)
FLASH button
(19)
PLAY/CAMERA
switch (15, 21)
PICTURE EFFECT
button (35)
DISPLAY button (18)
LCD screen
Hook for strap
POWER switch
(12)
Control button
(12)
Lithium battery
compartment (36)
Hook for strap
Battery cover/
OPEN (BATT)
button (10)
44-EN
Page 45

Attaching the shoulder strap
Attach the supplied shoulder strap to the hooks for strap.
÷÷
Warning messages
Various messages appear on the LCD screen. Check them with the
following list.
Message
DRIVE ERROR
NO DISK
DISK ERROR
DISK PROTECT
DISK FULL
NO FILE
FILE ERROR
FILE PROTECT
COVER OPEN
i
Meaning
Trouble is with the disk drive.
No disk has been inserted.
Trouble is with the disk.
Unusable disk with the camera is installed.
The tab on the disk is set to the writing
impossible position.
The disk is full.
No image has been recorded on the disk.
Trouble has occurred during playback.
The picture is protected.
The disk cover is not closed.
The battery is weak.
45-EN
Page 46

Index
A
Adjusting brightness
LCD screen ...................... 19, 22
Image ...................................... 15
Adjusting the exposure..........20
AE (auto exposure).................16
Auto power-off function........11
B, C, D
Battery pack ........................... 6, 8
Battery charger .......................... 9
Beep .......................................... 34
Charging .................................... 9
Cleaning ................................... 37
Control button.........................12
Delete........................................27
F
Floppy disk ................................ 7
Format Disk ............................. 33
Full charge ................................. 9
I
Image quality .......................... 33
INDEX screen .......................... 23
Indicators on the LCD
screen ............................... 18, 22
InfoLITHIUM battery pack .....6
J, L
JPEG ...................................... 6, 31
Lithium battery .......................36
M
Menu.........................................33
Moisture condensation .......... 38
N, P
Normal charge .......................... 9
Picture effect ............................ 35
Playing back ............................ 21
Protect.......................................24
R
Recording.................................15
Recording in macro ................20
Remaining battery indicator ..
11
S, T
Self-diagnosis display ............41
Self timer .................................. 19
Setting the date and time ....... 12
Troubleshooting......................39
U, V
Using flash ............................... 19
Viewing images using a
personal computer ............... 31
W, Z
Watching on the LCD screen
................................................21
Warning messages..................45
46-EN
Page 47

47-EN
Page 48

Français
Mode d’emploi
Avant la mise en service de cet appareil, prière de lire attentivement
le mode d’emploi et de le conserver pour toute référence future.
Pour éviter tout risque d’incendie ou de décharge électrique, ne
pas exposer cet appareil à la pluie ou à l’humidité.
Pour éviter tout risque de décharge électrique, ne pas ouvrir le
coffret de cet appareil et ne confier son entretien qu’à un
personnel qualifié.
ATTENTION
POUR PREVENIR LES CHOCS ELECTRIQUES, NE PAS UTILISER CETTE
FICHE POLARISEE AVEC UN PROLONGATEUR, UNE PRISE DE
COURANT OU UNE AUTRE SORTIE DE COURANT, SAUF SI LES LAMES
PEUVENT ETRE INSEREES A FOND SANS EN LAISSER AUCUNE PARTIE
A DECOUVERT.
DEPOT DES BATTERIES AU LITHIUM-ION
DEPOSEZ LES BATTERIES AU LITHIUM-ION AUX ENDROITS
RECOMMANDES.
Vous pouvez rapporter les batteries au lithium-ion dans un centre de Service
Sony ou dans un point de ramassage.
Remarque: Dans certains pays, il est interdit de jeter les batteries au lithium-
Pour connaître le centre de Service Sony le plus proche de chez vous,
composez le 1-800-222-SONY (Etats-Unis uniquement)
Pour connaître le point de ramassage le plus proche de chez vous, composez
le 416-499-SONY (Canada uniquement)
Avertissement: Ne pas utiliser des batteries au lithium-ion qui sont
ion avec les ordures ménagères ou dans les poubelles de bureau.
endommagées ou qui fuient.
ATTENTION
Les champs électromagnétiques émettant certaines fréquences
peuvent perturber l’image de l’appareil photo.
AVERTISSEMENT
2-F
Page 49

Table des matières
Lisez soigneusement avant d’utiliser votre appareil 4
Avant d’utiliser votre appareil 6
MVC-FD51(F)
Table des matières 3
Préparatifs 7
Avant de commencer 7
Etape 1: Recharge de la batterie 8
Etape 2: Mise en place de la batterie 9
Etape 3: Réglage de la date et de l’heure 11
Opérations de base 14
Enregistrement d’images 14
Les indicateurs pendant l’enregistrement 17
Réglage de la luminosité de l’écran LCD 18
Flash/Retardateur 18
Réglage de l’exposition 19
Visionnage des images sur l’écran LCD 20
Les indicateurs pendant la lecture 21
Réglage de la luminosité de l’écran LCD 21
Lecture simultanée de 6 images enregistrées
Protection des images 23
Effacement d’images 26
Visionnage d’images avec un ordinateur personnel 30
(écran INDEX) 22
Opérations avancées 31
Changement des réglages de mode 31
Utilisation déffets picturaux 34
Informations complémentaires
Remplacement de la pile au lithium dans l’appareil 35
Précautions 36
Guide de dépannage 38
Afficheur d’autodiagnostic 40
Spécifications 41
Nomenclature 42
Index 45
3-F
Page 50

Lisez soigneusement avant d’utiliser
votre appareil
Vérification des accessoires fournis (voir page 7)
Appareil photo numérique (1) Chargeur de batterie (1)
Cordon d’alimentation (1) Batterie rechargeable NP-F330 (1)
Bandoulière (1)
Format d’enregistrement des images sur cet appareil
Les données d’images enregistrées avec cet appareil sont
compressées et enregistrées dans le format JPEG. L’extension de
fichier est “.JPG”. Pour les détails, voir page 30.
Sources d’alimentation
Cet appareil fonctionne seulement avec la batterie rechargeable NPF330 (fournie)/F530/F550 “InfoLITHIUM”* et l’adaptateur secteur
AC-V700. Si vous utilisez une autre batterie ou source
d’alimentation pour faire fonctionner votre appareil, il est possible
que l’appareil ne fonctionne pas.
Essai d’enregistrement
Avant d’enregistrer des événements importants, vous voudrez sans
doute faire un essai pour vérifier si l’appareil fonctionne
correctement.
*Batterie rechargeable “InfoLITHIUM”
La batterie “InfoLITHIUM” est une batterie rechargeable au lithium-ion qui
peut échanger des informations sur la consommation d’énergie avec les
appareils compatibles.
“InfoLITHIUM” est une marque de fabrique de Sony Corporation.
4-F
Page 51

Pas de dédommagement pour la perte du contenu
d’un enregistrement
Aucune compensation ne pourra être accordée si la lecture ou
l’enregistrement a été impossible à cause d’un mauvais
fonctionnement de l’appareil, d’une disquette, etc.
Remarques sur les droits d’auteur
Les émissions de télévision, les films, les cassettes vidéo et autres
enregistrements peuvent être protégés par des droits d’auteur.
La copie non autorisée de ces enregistrements peut être contraire
aux lois sur la propriété artistique.
• IBM PC/AT est une marque déposée de International Business Machines
Corporation des Etats-Unis.
• MS-DOS et Windows sont des marques déposées sous licence de Microsoft
Corporation, enregistrées aux Etats-Unis et dans d’autres pays.
• Macintosh est une marque déposée sous licence de Apple Computer Inc.,
enregistrée aux Etats-Unis et dans d’autres pays.
• Tous les autres noms de produits mentionnés dans le présent mode d’emploi
peuvent être des marques de fabrique ou des marques déposées de leurs
fabricants respectifs.
En outre, “TM” et “” ne sont pas mentionnés dans chaque cas dans ce
mode d’emploi.
5-F
Page 52

A vant d’utiliser votre appar eil
Cet appareil photo numérique utilise une disquette pour le stockage
des images.
Utilisez le type de disquette suivant.
•Taille: 3,5 pouces
•Type: 2HD
•Capacité: 1,44 Mo
•Format: MS-DOS (512 octets x 18 secteurs)
Si vous souhaitez utiliser une disquette 2HD de 3,5 pouces autre que
celle décrite ci-dessus, formatez-la en utilisant l’appareil photo
numérique ou un ordinateur personnel.
Ne pas heurter ni secouer l’appareil
Un dysfonctionnement, l’impossibilité d’enregistrer des images ou
d’utiliser une disquette et la destruction, la corruption ou la perte
des données d’image mémorisées peuvent survenir.
Ne pas mouiller l’appareil
Cet appareil est un dispositif électronique. A ce titre. il ne doit pas
être mouillé. Pendant une prise de vues sous la pluie ou en plein air,
veillez à ce qu’il n’y ait pas d’eau à la surface ou à l’intérieur de
l’appareil. Quand vous exposez l’appareil à des changements
atmosphériques, de l’humidité risque de se condenser à l’intérieur
ou à l’extérieur de l’appareil. Dans ce cas, reportez-vous à la page 37
et suivez les instructions sur la façon d’éliminer l’humidité avant
d’utiliser l’appareil.
Conseil pour la sauvegarde des données
Pour éviter le risque potentiel de perte de données, copiez toujours
(sauvegardez) les données sur une disquette.
Tout au cours de ce mode d’emploi les touches et réglages de
l’appareil sont indiqués en majuscules.
Par ex. Appuyez sur FLASH.
6-F
Page 53

Avant de commencer
Matériel nécessaire
Appareil photo numérique
Disquette (non fournie)
3,5 pouces, 2HD (1,44 Mo)
Aperçu des préparatifs
L’horloge n’est pas réglée en usine. N’oubliez pas de la régler avant
d’utiliser l’appareil.
1 Recharge de la batterie. (p. 8)
2 Mise en place de la batterie. (p. 9)
Cet appareil fonctionne sur batterie. Installez une batterie
complètement chargée.
3 Réglage de la date et de l’heure. (p. 11)
Les données de date et d’heure sont nécessaires pour
l’enregistrement en format MS-DOS. Si ce réglage n’est pas
effectué, une date et une heure incorrectes seront enregistrées.
L’écran CLOCK SET apparaît chaque fois que vous allumez
l’appareil en mode CAMERA.
Batterie rechargeable (NP-F330)
Chargeur de batterie (BC-V615)
Cordon d’alimentation
Bandoulière
7-F
Page 54

Etape 1: Recharge de la batterie
Pour charger la batterie, utilisez le chargeur de batterie. Pour les
détails, reportez-vous au mode d’emploi du chargeur de batterie.
à une prise murale
1
Batterie
rechargeable
2
Témoin CHARGE
(orange)
Chargeur de batterie
1 Raccordez le cordon d’alimentation à une prise
murale.
2 Insérez la batterie rechargeable dans le sens
indiqué par le symbole $. Poussez la batterie
vers le bas jusqu’à ce qu’elle s’encliquette.
Le témoin CHARGE (orange) s’allume. La recharge commence.
Pour retirer la batterie rechargeable
Faites-la glisser vers le haut.
Temps de recharge
Batterie rechargeable NP-F330 NP-F530 NP-F550
Recharge complète* 210 min. 225 min. 240 min.
Recharge normale** 150 min. 165 min. 180 min.
Temps approximatif en minutes pour charger une batterie vide avec le
chargeur de batterie BC-V615. (A basse température, le temps de recharge
augmente.)
* Recharge pendant une heure environ après l’extinction du témoin CHARGE.
**Recharge jusqu’à ce que le témoin CHARGE s’éteigne.
8-F
Page 55

Etape 2: Mise en place de la batterie
1
2
3
(base)
1 Tout en faisant glisser OPEN (BATT) dans le sens
de la flèche, ouvrez le couvercle du logement de
la batterie.
2 Insérez la batterie rechargeable avec le symbole
$ tourné vers le logement.
3 Fermez le couvercle jusqu’à ce qu’il
s’encliquette.
Pour retirer la batterie rechargeable
Ouvrez le couvercle du logement
de la batterie. Tout en faisant
glisser le levier de libération de
la batterie vers la droite, retirez
la batterie rechargeable.
Faites attention à ne pas laisser tomber la batterie
rechargeable quand vous la retirez.
2
1
Levier de libération de
la batterie
9-F
Page 56

÷Etape 2: Mise en place de la batterie
Autonomie de la batterie/Nombre d’images pouvant
être enregistrées ou lues
Batterie Autonomie Nombre d’images
rechargeable de la (enregistrement/
NP-F330 Sans utilisation du flash
(fournie) Avec utilisation du flash
NP-F530
NP-F550
Autonomie approximative de la batterie et nombre d’images pouvant être
enregistrées /lues à une température de 25° C (77° F). Les chiffres entre
parenthèses indiquent le temps quand vous utilisez une batterie chargée
normalement.
1)
2)
3)
• L’autonomie de la batterie et le nombre d’images diminueront si vous
• L’autonomie de la batterie et le nombre d’images indiqués ci-dessus sont
Enregistrement continu
Lecture continue
Enregistrement continu
Sans utilisation du flash
Avec utilisation du flash
Lecture continue
Enregistrement continu
Sans utilisation du flash
Avec utilisation du flash
Lecture continue
Enregistrement à 10 secondes d’invervalle environ
Enregistrement à 15 secondes d’invervalle environ
Lecture d’une seule image à 10 secondes d’invervalle environ
utilisez l’appareil par temps froid ou si effectuez des mise sous/hors tension
répétées.
3)
3)
3)
donnés à titre d’exemple pour certaines disquettes.
batterie (min.) lecture)
1)
85 (80) 620 (580)
2)
85 (80) 380 (360)
120 (110) 900 (820)
1)
120 (105) 880 (770)
2)
115 (100) 520 (450)
165 (145) 1230 (1080)
1)
150 (140) 1100 (1020)
2)
145 (135) 660 (610)
210 (195) 1570 (1460)
¡ Remarques sur l’indication du temps restant de la batterie
Le temps restant est affiché sur l’écran LCD*, mais l’indication peut ne
pas être très exacte, selon les conditions et circonstances.
* Pendant l’enregistrement, le temps restant de la batterie est affiché
quand l’appareil est allumé. Pendant la lecture, il est affiché avec
l’image sur l’écran LCD.
¡ Fonction de mise hors tension automatique
Au cours de l’enregistrement, si vous laissez l’appareil inactif pendant 3
minutes environ, alors qu’il est sous tension, il s’éteindra de lui-même
pour éviter une usure de la batterie.
10-F
Page 57

Etape 3: Réglage de la date et de l’heure
Fonctions de la touche de commande
Vous pouvez sélectionner un paramètre dans le menu qui apparaît
sur l’écran LCD en appuyant sur le côté supérieur, inférieur, gauche
ou droit de la touche de commande. Quand un paramètre est
sélectionné, la couleur du paramètre change du bleu au jaune. Pour
valider votre sélection, appuyez au centre de la touche de
commande.
Touche de commande
Côté supérieur
Côté
1
gauche
Appuyez pour
Côté inférieur
l’exécution des
instructions.
2
Quand vous utilisez d’abord l’appareil
La disquette étant insérée (p. 14) et l’appareil allumé, comme à
l’étape 1, l’écran de réglage de l’horloge apparaît. Dans ce cas,
passez directement à l’étape 4 ci-après.
1 Poussez POWER vers le bas pour mettre
l’appareil sous tension.
Si l’indicateur “I” apparaît sur l’écran LCD, remplacez la pile au
lithium en suivant la procédure décrite à la page 35.
Côté
droit
11-F
Page 58

÷Etape 3: Réglage de la date et de l’heure
2 Sélectionnez “MENU” avec la touche de
commande, puis appuyez sur la touche.
Le menu apparaît sur l’écran LCD.
Pour quitter le menu, sélectionnez
“ RETURN” avec la touche de
commande, puis appuyez sur la
touche.
+
–EV
EV
MENU
3 Sélectionnez “CLOCK SET” avec la touche de
commande, puis appuyez sur la touche.
CLOCK SET
BEEP
FIELD/FRAME
QUALITY
RETURN
÷
CLOCK SET
Y/M/D M/D/Y D/M/Y
1998 1 8 10: 20
ENTER
CANCEL
AM
4 Sélectionnez l’affichage de la date souhaité avec
la touche de commande, puis appuyez sur la
touche.
Y/M/D (année/mois/jour)
M/D/Y (mois/jour/année)
D/M/Y (jour/mois/année)
12-F
Page 59

5 Sélectionnez la date et l’heure avec la touche de
commande, puis appuyez sur la touche.
Le paramètre à régler est indiqué avec
4/$. Sélectionnez les chiffres en
appuyant sur le côté supérieur ou
inférieur de la touche de commande,
puis appuyez sur la touche pour
enregistrer les chiffres.
Après avoir enregistré les chiffres,
4/$ se déplace vers le paramètre
suivant.
Quand “D/M/Y” est sélectionné, réglez l’heure dans le système
de 24 heures.
CLOCK SET
Y/M/D
1998 1 8 10: 20
6 Sélectionnez “ENTER” avec la touche de
commande, puis appuyez sur la touche au moment souhaité pour mettre en marche l’horloge.
Pour annuler le réglage de la date et de l’heure
Sélectionnez “CANCEL” avec la touche de
commande, puis appuyez sur la touche.
AM
13-F
Page 60

Enregistrement d’images
Une disquette 3,5 pouces, 2HD (1,44 MB), de format MS-DOS est
nécessaire pour l’enregistrement.
Touche BRIGHT +/–
(luminosité de l’écran LCD)
6,7
Commutateur macro
Témoin
ACCESS
4,5
321
Touche DISPLAY
1 Poussez POWER vers le bas pour mettre
l’appareil sous tension.
2 Réglez PLAY/CAMERA sur CAMERA.
L’image capturée par l’objectif et “NO DISK” apparaissent sur
l’écran LCD.
3 Poussez OPEN dans le sens de la flèche et ouvrez
le couvercle du logement de la disquette.
L’écran devient bleu et “COVER OPEN” apparaît.
14-F
Page 61

4 Insérez la disquette jusqu’à ce qu’elle
s’encliquette.
Avant d’insérer la disquette,
vérifiez si l’onglet de
protection à l’écriture est
bien en position
d’enregistrement.
5 Fermez le couvercle.
L’image apparaît sur l’écran LCD.
Indicateur de qualité de l’image
STD
Indicateur de capacité restante
11
de la disquette
Nombre d’images enregistrées
Indicateur de verrouillage AE
–EV
MENU
+
EV
120min
(réglage automatique de
l’exposition) (vert)
6 Appuyez à moitié sur le déclencheur
d’obturateur.
L’indicateur de verrouillage AE r (vert) apparaît sur l’écran
LCD. Les réglages AE (réglage automatique de l’exposition) et
AWB (balance automatique des blancs) sont figés.
7 Appuyez complètement sur le déclencheur
d’obturateur.
L’image est enregistrée sur la disquette.
Le témoin ACCESS clignote, l’indicateur de capacité restante de
la disquette tourne et “RECORDING” apparaît sur l’écran LCD.
15-F
Page 62

÷ Enregistrement d’images
Remarque
Quand le témoin ACCESS clignote, ne jamais secouer ni heurter l’appareil. Ne
pas ouvrir non plus le couvercle du logement de la disquette, ne pas éteindre
l’appareil et ne pas retirer la batterie rechargeable. Autrement, les données
d’image pourraient être détruites.
Nombre d’images pouvant être enregistrées sur une
disquette
Le nombre d’images pouvant être enregistrées dépend du mode de
qualité d’image sélectionné et de la complexité du sujet.
STANDARD (normal) environ 30 - 40 images
FINE (haute résolution) environ 15 - 20 images
Changez la disquette quand l’indicateur de capacité restante de la
disquette est vide et clignote. Le mode de qualité d’image est réglé
en usine sur STANDARD (p. 32).
Remarques
• Si vous essayez d’enregistrer plus de 55 images, “DISK FULL” apparaîtra
sur l’écran LCD et vous ne pourrez pas enregistrer l’image, même si
l’indicateur de capacité restante de la disquette n’est pas vide.
• Si l’indicateur de capacité restante de la disquette clignote, les données
d’images ne pourront pas être enregistrées et l’écran INDEX ne sera peutêtre pas affiché.
Pour retirer la disquette
Ouvrez le couvercle du
logement de la disquette et
appuyez sur EJECT.
16-F
Touche EJECT
Page 63

Les indicateurs pendant l’enregistrement
Les indicateurs sur l’écran LCD ne sont pas enregistrés.
Indicateur de flash
Indicateur de prise de
vues macro
Indicateur
d’exposition
Indicateur d’effet
pictural
Indicateur de
luminosité de
l’écran LCD*
Touche de réglage
de l’exposition
MACRO
+1.5EV
SEPIA
–EV
MENU
+
EV
Indicateur de retardateur
Indicateur de verrouillage
AE (réglage automatique
de l’exposition)
Indicateur de
qualité de l’image
Indicateur de
FRAME STD
E : 61 : 01
120min
capacité restante
de la disquette
11
Nombre d’images
stockées
Afficheur
d’autodiagnostic
Indicateur FRAME
Indicateur de
temps restant de
la batterie
Touche MENU
Touche de retardateur
* Affiché seulement à la pression.
Pour éteindre les indicateurs
Appuyez sur DISPLAY.
Les indicateurs ne s’éteignent pas dans les modes suivants:
Effet pictural, macro, verrouillage AE, retardateur, flash, FRAME et
réglage de l’exposition.
17-F
Page 64

÷Enregistrement d’images
Réglage de la luminosité de l’écran LCD
Utilisez la touche BRIGHT +/–.
Flash/Retardateur
Témoin FLASH CHARGE
Flash
Appuyez sur FLASH.
Quand le témoin clignotant
FLASH CHARGE brille en
continu, vous pouvez
prendre des photos avec le
flash.
Pour quitter le mode de
flash, appuyez de nouveau
sur cette touche.
Retardateur
Sélectionnez avec la touche de
commande, puis appuyez sur la
touche.
Environ 10 secondes après que
vous avez appuyé sur le
déclencheur d’obturateur, le sujet
est enregistré.
•Le sujet doit se trouver entre 50 cm et 3 m (1 5/8 pieds et 10 pieds)
du flash.
•Si le flash est utilisé en mode FRAME, l’image sera enregistrée en
mode FIELD. L’indicateur FRAME clignotera sur l’écran LCD
(p. 32).
18-F
Page 65

Réglage de l’exposition
Sélectionnez “+EV” ou “–EV” avec la touche de commande, puis
appuyez sur la touche pour sélectionner la valeur souhaitée.
Pour augmenter la valeur d’exposition
(rendre l’image plus claire): +EV
Pour diminuer la valeur d’exposition
(rendre l’image plus sombre): –EV
Valeur sélectionnée
La valeur d’exposition (EV) peut être
réglée de –1.5EV à +1.5EV.
¡ Quand le sujet est trop près pour que la mise au point soit
possible.
Réglez le commutateur macro à l’avant de
l’appareil sur MACRO et faites la mise au
point sur le sujet. Le témoin de macro
MACRO
pouvez photographier un sujet qui se trouve
entre 8 et 25 cm environ (entre 3 et 9 pouces
environ) de la surface de l’objectif en mode
macro.
Remettez le commutateur dans sa position
d’origine jusqu’à ce qu’il s’encliquette après
l’enregistrement macro, sinon vous ne pourrez pas faire la mise au point
d’un sujet éloigné.
apparaît sur l’écran LCD. Vous
+1.5EV
–EV
MENU
+
EV
cMACRO
19-F
Page 66

Visionnage des images sur l’écran
LCD
Témoin ACCESS
3
2
1
4
1 Poussez POWER vers le bas pour mettre
l’appareil sous tension.
2 Poussez OPEN dans le sens de la flèche et ouvrez
le couvercle du logement de la disquette.
3 Insérez la disquette jusqu’à ce qu’elle
s’encliquette, puis fermez le couvercle.
4 Réglez PLAY/CAMERA sur PLAY.
La dernière image enregistrée apparaît sur l’écran LCD.
5 Pour afficher l’image enregistrée précédente,
sélectionnez “
puis appuyez sur la touche.
Pour afficher l’image suivante, sélectionnez “ ” avec la touche
de commande, puis appuyez sur la touche. Si les indicateurs de
l’écran LCD ne
sont pas affichés,
appuyez sur le
côté gauche ou
droit de la
touche de
commande pour
afficher l’image
précédente ou
suivante.
” avec la touche de commande,
Numéro de
l’image
Nombre d’images
stockées dans la
disquette
Num du fichier
Date
d’enregistrement
de l’image de
lecture
MVC-011S
MENU
INDEX
Touches /
120min
STD
11/11
1998 7 4
12:30PM
20-F
Page 67

Remarque
Quand le témoin ACCESS clignote, ne jamais secouer ni heurter l’appareil. Ne
pas ouvrir non plus le couvercle du logement de la disquette, ne pas éteindre
l’appareil et ne pas retirer la batterie rechargeable.
Les indicateurs pendant la lecture
Numéro de l’image
Indicateur de qualité de l’image
11/11
STD
Indicateur de capacité restante de la
disquette
Nombre d’images stockées dans la
disquette
Num du fichier
MVC-011S
MENU
INDEX
120min
1998 7 4
12:30PM
Date d’enregistrement de l’image
de lecture
Indicateur de temps restant de la
batterie
Touches / (mode d’écran
SINGLE)/Touches / (mode
d’écran INDEX)
Touche INDEX
Touche MENU
Réglage de la luminosité de l’écran LCD
Utilisez la touche BRIGHT +/–.
21-F
Page 68

÷ Visionnage des images sur l’écran LCD
Lecture simultanée de 6 images
enregistrées (écran INDEX)
Sélectionnez “INDEX” avec la touche de commande,
puis appuyez sur la touche.
Le symbole ” apparaît sur l’image qui est affichée avant le passage
en mode d’écran INDEX.
7
11/11
STD
10 11
89
÷
MVC-011S
MENU
INDEX
120min
1998 7 4
12:30PM
• Pour afficher les 6 images suivantes, sélectionnez “b” avec la touche de
commande, puis appuyez sur la touche.
• Pour afficher les 6 images précédentes, sélectionnez “B” avec la touche de
commande, puis appuyez sur la touche.
• Pour revenir à l’écran de lecture normale image par image (écran SINGLE),
sélectionnez une image avec la touche de commande, puis appuyez sur la
touche.
• Le numéro affiché dans le coin supérieur droit de l’image montre l’ordre
d’enregistrement sur la disquette. Il est différent du nom de fichier (p. 30).
MVC-011S
MENU
11/11
120min
1998 7 4
12:30PM
22-F
Page 69

Protection des images
Vous pouvez protéger une image contre un effacement accidentel.
En mode d’écran SINGLE
1 Affichez l’image que vous souhaitez protéger.
2 Sélectionnez “MENU” avec la touche de
commande, puis appuyez sur la touche.
Le menu apparaît sur l’écran LCD. Pour quitter le menu,
sélectionnez “ RETURN” avec la touche de commande, puis
appuyez sur la touche.
3 Sélectionnez “PROTECT” avec la touche de
commande, puis appuyez sur la touche.
Le symbole r rouge désigne le réglage actuel.
CLOCK SET
BEEP
FORMAT DISK
DELETE
PROTECT
RETURN
÷
PROTECT
r
ON
r
OFF
RETURN
4 Sélectionnez “ON” avec la touche de commande,
puis appuyez sur la touche.
Le symbole de protection H apparaît dans le coin supérieur
gauche de l’image.
Pour annuler l’opération
Sélectionnez “ RETURN” avec la touche de commande, puis
appuyez sur la touche. Le menu est de nouveau affiché sur l’écran.
23-F
Page 70

÷ Visionnage des images sur l’écran LCD
Pour annuler la protection de l’image
Sélectionnez “OFF” à l’étape 4 avec la touche de commande, puis
appuyez sur la touche.
Remarque
Quand vous formatez la disquette, le contenu de la disquette entière, y
compris les données de l’image protégée, est effacé.
En mode d’écran INDEX—Protection de toutes les images ou
des images sélectionnées
7
1 Sélectionnez “INDEX” avec la
89
touche de commande, puis
appuyez sur la touche pour
10 11
entrer en mode d’écran
INDEX.
MVC-011S
MENU
11/11
120min
1998 7 4
12:30PM
2 Sélectionnez “MENU” avec la touche de
commande, puis appuyez sur la touche
Le menu apparaît sur l’écran LCD. Pour quitter le menu,
sélectionnez “ RETURN” avec la touche de commande, puis
appuyez sur la touche.
3 Sélectionnez “PROTECT” avec la touche de
commande, puis appuyez sur la touche.
PROTECT
ALL
SELECT
CANCEL
24-F
Page 71

4 Protection de toutes les images
1 Sélectionnez “ALL” avec la
touche de commande,
puis appuyez sur la
touche.
2 Sélectionnez “OK” avec la
PROTECT
ALL ?
OK
CANCEL
touche de commande,
puis appuyez sur la
touche.
L’écran INDEX est affiché de nouveau.
Quand vous avez quitté le menu, H apparaît dans le coin
supérieur gauche de toutes les images.
Protection des images sélectionnées
7
1 Sélectionnez “SELECT”
avec la touche de
commande, puis appuyez
10 11
89
sur la touche.
“PROTECT” apparaît sur l’écran
LCD.
PROTECT
ENTER
CANCEL
7-11
2 Utilisez la touche de commande pour afficher
le symbole rouge ” sur l’image que vous
souhaitez protéger.
H apparaît dans le coin supérieur gauche de l’image.
Pour annuler la protection, appuyez sur la
touche de commande afin que l’indicateur
“H” s’éteigne.
Pour afficher les 6 images précédentes ou suivantes,
sélectionnez “B” ou “b” avec la touche de commande, puis
appuyez sur la touche.
3 Sélectionnez “ENTER” avec la touche de
commande, puis appuyez sur la touche.
25-F
Page 72

÷ Visionnage des images sur l’écran LCD
Pour annuler la protection de l’image en mode
d’écran INDEX
Suivez la procédure de “Protection des images sélectionnées”. A
l’étape 2, sélectionnez les images dont vous souhaitez annuler la
protection avec la touche de commande, puis appuyez sur la touche.
L’indicateur “H” dans le coin supérieur gauche de l’image
disparaît. Quand vous avez fini l’annulation, sélectionnez “ENTER”
avec la touche de commande, puis appuyez sur la touche.
Pour annuler l’opération
Sélectionnez “CANCEL” avec la touche de commande, puis
appuyez sur la touche. Le menu est de nouveau affiché sur l’écran.
Effacement d’images
Vous pouvez effacer les images que vous ne voulez plus conserver.
En mode d’écran SINGLE
1 Affichez l’image que vous souhaiter effacer.
2 Sélectionnez “MENU” avec la touche de
commande, puis appuyez sur la touche.
Le menu apparaît sur l’écran LCD. Pour quitter le menu,
sélectionnez “ RETURN” avec la touche de commande, puis
appuyez sur la touche.
26-F
Page 73

3 Sélectionnez “DELETE” avec la touche de
commande, puis appuyez sur la touche.
CLOCK SET
BEEP
FORMAT DISK
DELETE
÷
DELETE ?
OK
CANCEL
PROTECT
RETURN
4 Sélectionnez “OK” avec la touche de commande,
puis appuyez sur la touche.
Pour annuler l’effacement de l’image
Sélectionnez “CANCEL” à l’étape 4 avec la touche de commande,
puis appuyez sur la touche.
Remarques
• Vous ne pouvez pas effacer une image protégée. Pour effacer une image
protégée, commencez par annuler sa protection.
• Une fois que vous avez effacé une image, vous ne pouvez pas la récupérer.
Vérifiez soigneusement les images à effacer avant de les effacer.
27-F
Page 74

÷ Visionnage des images sur l’écran LCD
En mode d’écran INDEX—Effacement de toutes les images
ou des images sélectionnées
7
1 Sélectionnez “INDEX” avec la
touche de commande, puis
appuyez sur la touche pour
10 11
89
entrer en mode d’écran
INDEX.
MVC-011S
MENU
11/11
120min
1998 7 4
12:30PM
2 Sélectionnez “MENU” avec la touche de
commande, puis appuyez sur la touche
Le menu apparaît sur l’écran LCD. Pour quitter le menu,
sélectionnez “ RETURN” avec la touche de commande, puis
appuyez sur la touche.
3 Sélectionnez “DELETE” avec
la touche de commande, puis
appuyez sur la touche.
DELETE
ALL
SELECT
CANCEL
4 Effacement de toutes les images
1 Sélectionnez “ALL” avec la
touche de commande, puis
appuyez sur la touche.
2 Sélectionnez “OK” avec la
touche de commande, puis
appuyez sur la touche.
L’écran devient bleu et “NO FILE” apparaît.
DELETE
ALL ?
OK
CANCEL
28-F
Page 75

Effacement des images sélectionnées
7
1 Sélectionnez “SELECT”
avec la touche de
commande, puis appuyez
10 11
89
sur la touche.
“DELETE” apparaît sur l’écran
LCD.
DELETE
ENTER
CANCEL
7-11
2 Utilisez la touche de commande pour afficher
le symbole rouge ” sur l’image que vous
souhaitez effacer.
La couleur du numéro de l’image sélectionnée est inversée.
Pour annuler l’opération, appuyez sur la
touche de commande
L’affichage du numéro de l’image redevient normal.
Pour afficher les 6 images précédentes ou suivantes,
sélectionnez “B” ou “b” avec la touche de commande, puis
appuyez sur la touche.
3 Sélectionnez “ENTER” avec la touche de
commande, puis appuyez sur la touche.
Les images sélectionnées sont effacées et les numéros
d’images sont décalés vers le haut.
Pour annuler l’opération
Sélectionnez “CANCEL” avec la touche de commande, puis
appuyez sur la touche. Le menu est de nouveau affiché sur l’écran.
Remarques
• Même si vous sélectionnez “ALL”, vous ne pouvez pas effacer l’image
protégée.
• Quand vous sélectionnez “SELECT”, vous ne pouvez pas choisir une image
protégée.
• Pour effacer une image protégée, commencez par annuler sa protection.
• Une fois que vous avez effacé une image, vous ne pouvez pas la récupérer.
Vérifiez soigneusement les images à effacer avant de les effacer.
29-F
Page 76

Visionnage d’images avec un
ordinateur personnel
Les données d’image enregistrées avec cet appareil sont compressées
dans le format JPEG. Ces données peuvent être visualisées à l’aide
d’un ordinateur personnel équipé d’un logiciel de visualisation
JPEG tel que Internet Explorer de Microsoft. Pour la procédure
détaillée d’utilisation des données d’image avec un logiciel, veuillez
vous reporter au mode d’emploi de l’ordinateur personnel.
Exemple: Ordinateur personnel avec Windows 95
1 Lancez Windows 95 et insérez la disquette dans
le lecteur de disquette de l’ordinateur personnel.
2 Ouvrez “My computer” et double-cliquez “3.5
inch FD”.
3 Double-cliquez le fichier de données souhaité.
En ce qui concerne le format de fichier
Cet appareil compresse les données d’image dans le format JPEG
(extension .JPG) et enregistre simultanément les données de fichier
(extension .411) pour l’index. Les données de l’index sont
disponibles seulement sur cet appareil.
Exemple
MVC-001F.JPG: Nom du fichier de données de l’image
MVC-001F.411: Nom du fichier de données pour l’index
Système d’exploitation recommandé/exemples de
logiciels
Système
Windows 3.1, Windows 95, Windows NT 3.51 ou plus récent, etc.
Logiciels
Internet Explorer de Microsoft etc.
Remarque
Pour les Macintosh, vous pouvez utiiser la disquette enregistrée avec cet
appareil à l’aide de PC Exchange et du système Mac OS système 7.5 ou plus
récent. Un logiciel de visualisation pour Macintosh est aussi nécessaire pour
regarder les images.
30-F
Page 77

Changement des réglages de mode
1 Sélectionnez “MENU” avec la touche de
commande, puis appuyez sur la touche.
Le menu apparaît sur l’écran LCD.
Mode CAMERA
(enregistrement)
Mode PLAY (lecture)
CLOCK SET
BEEP
FIELD/FRAME
QUALITY
RETURN
CLOCK SET
BEEP
FORMAT DISK
DELETE
PROTECT
RETURN
2 Sélectionnez le paramètre souhaité avec la
touche de commande, puis appuyez sur la touche.
Quand un paramètre est sélectionné, sa couleur change du bleu
au jaune.
3 Changez le réglage avec la touche de
commande, puis appuyez sur la touche.
Quand le réglage est terminé, le menu disparaît de l’écran LCD.
Pour annuler le changement des réglages de mode
Sélectionnez “ RETURN” ou “CANCEL” avec la touche de
commande, puis appuyez sur la touche. Le menu est de nouveau
affiché sur l’écran. Pour quitter le menu, sélectionnez “ RETURN”
avec la touche de commande, puis appuyez sur la touche.
31-F
Page 78

÷ Changement des réglages de mode
Réglage de chaque paramètre ou fonction
Réglages en mode CAMERA
QUALITY <STANDARD*/FINE>
•Sélectionnez STANDARD comme qualité d’image normale.
(Environ 30 - 40 images peuvent être enregistrées sur 1 disquette.)
•Sélectionnez FINE pour donner la priorité à la qualité des images.
(Environ 15 - 20 images peuvent être enregistrées sur 1 disquette.)
Le nombre d’images pouvant être enregistrées dépend des sujets.
FIELD/FRAME*
•Normalement, sélectionnez FIELD. L’appareil compensera les
bougés.
•Sélectionnez FRAME pour un enregistrement de haute qualité.
Faites attention aux bougés de l’appareil dans ce mode.
Si le flash est utilisé en mode FRAME, l’image sera enregistrée en mode
FIELD. L’indicateur FRAME clignotera sur l’écran LCD.
Si vous enregistrez en mode FRAME des sujets se déplaçant rapidement,
l’image enregistrée sera floue.
Réglages en mode PLAY
PROTECT
Sélectionnez cette fonction pour protéger les images. Voir page 23.
DELETE
Sélectionnez cette fonction pour effacer les images. Voir page 26.
FORMAT <OK/CANCEL>
•Sélectionnez OK pour formater les disquettes.
•Sélectionner CANCEL pour annuler le formatage.
Le formatage efface toutes les informations sur la disquette, y compris les
données des images protégées. Vérifiez le contenu de la disquette avant de la
formater.
Assurez-vous que la batterie est complètement chargée avant de formater une
disquette. Le formatage prend au maximum 3 minutes environ.
32-F
Page 79

Réglages pour les modes CAMERA et PLAY à la fois
BEEP <ON*/OFF>
Normalement, sélectionnez ON.
Sélectionnez OFF pour ne pas entendre le signal sonore.
CLOCK SET
Sélectionnez cette fonction pour régler la date et l’heure. Voir page
11.
* Réglage en usine.
33-F
Page 80

Utilisation déffets picturaux
Touche PICTURE EFFECT
Appuyez de façon répétée sur PICTURE EFFECT pour
sélectionner l’effet pictural souhaité.
PASTEL: Le contraste de l’image est accentué et les couleurs
NEG. ART: Les couleurs et la luminosité de l’image sont
SEPIA: L’image prend la couleur sépia.
B&W: L’image devient monochrome (noir et blanc).
Pour annuler l’effet pictural
Appuyez de façon répétée sur PICTURE EFFECT jusqu’à ce que
l’indicateur sur l’écran LCD s’éteigne. Quand vous mettez l’appareil
hors tension ou réglez CAMERA/PLAY sur PLAY, l’effet pictural
est annulé automatiquement.
de l’image ressemblent à celles d’un dessin animé.
inversées.
34-F
Page 81

Remplacement de la pile au lithium
dans l’appareil
Quand la pile au lithium faiblit ou est épuisée, l’indicateur “I”
clignote sur l’écran LCD. Vous devez alors remplacer la pile par une
pile au lithium neuve, Sony CR2025 ou Duracell DL-2025.
L’utilisation de tout autre type de pile présente un risque d’incendie
ou d’explosion.
Lorsque vous remplacez la pile au lithium, laissez la batterie
rechargeable en place, sinon vous devrez régler à nouveau la date et
l’heure mémorisées.
1 Faites glisser le couvercle du
logement de la pile au lithium et
ouvrez-le.
2 Appuyez une fois sur la pile et
sortez-la du porte-pile.
3 Installez la pile au lithium avec la
borne positive (+) tournée vers
l’extérieur.
4 Refermez le couvercle.
AVERTISSEMENT
La pile peut exploser en cas de mauvaise manipulation. Ne pas la recharger, la
démonter ni la jeter au feu.
ATTENTION
Il y a danger d’explosion si la pile n’est pas mise en place correctement.
Remplacez-la uniquement par une pile du même type conseillée par le
fabricant.
Jetez les piles usées conformément aux instructions du fabricant.
35-F
Page 82

Précautions
Nettoyage
Nettoyage de l’écran LCD
Essuyez la surface de l’écran avec une trousse de nettoyage pour
écran LCD (non fournie) afin d’éliminer les traces de doigts, la
poussière, etc.
Nettoyage de la surface de l’appareil
Nettoyez la surface de l’appareil avec un chiffon doux légèrement
mouillé. N’utilisez aucun type de solvant tel que l’alcool ou le
benzène qui risquent d’abîmer la finition.
Utilisation de l’appareil sur une plage sableuse ou dans
un endroit poussiéreux
Protégez l’appareil du sable. Le sable et la poussière peuvent
provoquer des dégâts irréparables.
Disquettes
Pour protéger les données enregistrées sur une disquette, soyez
attentif aux points suivants:
•Evitez de laisser les disquettes à proximité d’un aimant ou d’un
champ magnétique comme ceux des haut-parleurs et des
téléviseurs, car les données de la disquette pourraient être effacées
irrémédiablement.
•Evitez de laisser les disquettes exposées à la lumière directe du
soleil ou à des sources de température élevée, telles qu’un
dispositif de chauffage. Les disquettes risquent de se gondoler ou
d’être endommagées, devenant ainsi inutilisables.
•Evitez tout contact avec la surface de la disquette en ouvrant la
fenêtre d’accès. Si la surface de la disquette présente un défaut, les
données peuvent être illisibles.
•Evitez toute projection de liquide sur la disquette.
•Utilisez toujours un étui avec les disquettes pour protéger les
données importantes.
•Utilisez uniquement un produit de nettoyage pour tête de lecteur
de disquette de type 2HD.
•Même quand vous utilisez une disquette 3,5 pouces, 2HD, les
données d’image peuvent ne pas être enregistrées et/ou ne pas
être affichées suivant l’environnement de fonctionnement. Dans ce
cas, utilisez des disquettes d’une autre marque.
36-F
Page 83

Température de fonctionnement conseillée
La température de fonctionnement de cet appareil est comprise entre
0°C et 40°C (32°F et 104°F). Ne pas utiliser cet appareil sous des
climats extrêmes comme sur une plage chaude ou dans une station
de sports d’hiver.
Condensation d’humidité
Si vous apportez l’appareil directement d’un endroit froid dans une
pièce chaude, ou si vous le placez dans une pièce très humide, de
l’humidité risque de se condenser à l’intérieur ou à la surface de
l’appareil. Si le cas se présente, l’appareil ne fonctionnera pas
correctement. Retirez alors la disquette, mettez l’appareil hors
tension et laissez le couvercle du logement de la disquette ouvert
pendant une heure environ afin que l’humidité s’évapore.
Pour éviter la condensation d’humidité
Lorsque vous transportez l’appareil d’un endroit froid dans une
pièce chaude, protégez-le dans un sac en plastique et laissez-le un
moment s’adapter à la température de la pièce.
1 Fermez hermétiquement le sac en plastique contenant l’appareil.
2 Enlevez l’appareil du sac lorsque la température de l’air à
l’intérieur du sac est la même que la température ambiante (au
bout d’une heure environ).
Remarques sur la pile au lithium
•Gardez la pile au lithium hors de portée des enfants.
Si la pile était avalée, consultez immédiatement un médecin.
•Essuyez la pile avec un chiffon sec pour améliorer le contact.
•Ne pas saisir la pile avec des pincettes métalliques, sinon un courtcircuit pourrait se produire.
•La pile au lithium a une borne positive (+) et une borne négative
(–). Veillez à installer la pile de telle manière que les bornes de la
pile correspondent aux bornes de l’appareil.
37-F
Page 84

Guide de dépannage
Si un problème persiste après que vous avez effectué les
vérifications suivantes, contactez votre revendeur Sony le plus
proche. Si “C: ππ: ππ” apparaît sur l’écran LCD,
l’autodiagnostic a fonctionné. Voir page 40.
Symptôme Causes et/ou solutions
L’appareil ne
fonctionne pas.
Vous ne pouvez pas
enregistrer d’images.
L’image n’est pas
nette.
L’image présente du
bruit.
• La batterie est épuisée.
n Utilisez une batterie chargée. (p. 8)
• L’appareil ne fonctionne pas quand vous utilisez une
batterie rechargeable qui n’est pas du type
“InfoLITHIUM”.
Utilisez une batterie “InfoLITHIUM”. (p. 4)
n
• La disquette n’est pas installée correctement.
n Retirez la disquette et remettez-la en place. (p. 15)
• PLAY/CAMERA n’est pas réglé sur CAMERA.
n Réglez-le sur CAMERA. (p. 14)
• La disquette est pleine.
n Effacez quelques images que vous ne souhaitez
pas conserver, et commencez l’enregistrement.
(p. 26)
n Changez la disquette.
• La batterie est épuisée.
n Utilisez une batterie chargée.
• Aucune disquette n’a été insérée.
n Insérez une disquette.
• Une disquette qui ne peut pas être utilisée avec cet
appareil est en place.
n Utilisez une disquette 2HD, 1,44 Mo formatée
MS-DOS. (p. 6)
• L’onglet de protection à l’écriture est en position
d’interdiction d’écriture.
n Réglez-le sur la position d’autorisation d’écriture
(enregistrement). (p. 15)
• Le commutateur macro est réglé sur MACRO.
n Réglez le commutateur sur la position
d’enregistrement normal. (p. 19)
• L’appareil est près d’un téléviseur ou d’un autre
appareil utilisant des aimants puissants.
n Eloignez l’appareil du téléviseur, etc.
38-F
Page 85

Symptôme Causes et/ou solutions
L’image est trop
sombre.
La date et l’heure
enregistrées ne sont
pas correctes.
Des bandes
verticales
apparaissent quand
vous photographiez
un sujet très
lumineux.
La batterie s’épuise
trop vite.
Vous ne pouvez pas
visualiser les
images.
Vous ne pouvez pas
effacer une image.
L’appareil s’éteint
automatiquement.
• Le sujet est photographié à contre-jour ou la lumière
est insuffisante.
n Ajustez la luminosité de l’image. (p. 19)
• L’écran LCD est trop sombre.
n Réglez sa luminosité. (p. 18, 21)
• La date et l’heure ne sont pas réglées.
n Réglez la date et l’heure. (p. 11)
• Un effet de rémanence en est la cause.
n Ce n’est pas un signe de mauvais fonctionnement
de l’appareil.
• La température ambiante est trop basse.
• La batterie n’a pas été assez chargée.
n Rechargez la batterie complètement.
• La batterie a atteint la limite de sa durée de vie.
n Remplacez la batterie par une neuve.
• PLAY/CAMERA n’est pas réglé sur PLAY.
n Réglez-le sur PLAY. (p. 20)
• La batterie est épuisée.
n Utilisez une batterie chargée.
• L’image est protégée.
n Annulez la protection de l’image. (p. 24)
• Si vous laissez l’appareil inactif en mode CAMERA
pendant environ 3 minutes alors qu’il est sous
tension, il s’éteindra de lui-même pour éviter l’usure
de la batterie.
n Mettez l’appareil sous tension.
39-F
Page 86

Afficheur d’autodiagnostic
C:32:ππ
L’appareil est équipé d’un
afficheur d’autodiagnostic. La
fonction d’autodiagnostic
permet l’affichage d’un code à
cinq caractères (combinaison
d’une lettre de l’alphabet et de
chiffres) sur l’écran LCD pour
décrire l’état de l’appareil. Si le
code à cinq caractères est
affiché, reportez-vous au
tableau suivant. Les deux
derniers chiffres (indiqués par
ππ) varient en fonction de
l’état de l’appareil.
Trois premiers caractères Causes et/ou solutions
C:32:ππ
C:13:ππ
E:91:ππ
E:61:ππ
•Le problème vient du lecteur de disquette.
nChangez de disquette et mettez
l’appareil hors tension, puis de nouveau
sous tension.
•Une disquette non formatée est installée.
nFormatez la disquette (p. 32).
•Une disquette qui ne peut pas être utilisée
avec l’appareil est en place.
nChangez la disquette (p. 13, 14).
•Un dysfonctionnement de l’appareil que
vous ne pouvez pas corriger vient de
survenir.
nContactez votre revendeur Sony ou un
centre de réparation agréé Sony et
signalez-leur le code d’avertissement à
cinq caractères. (Exemple: E:61:10)
40-F
Afficheur d’autodiagnostic
• C:ππ:ππ
Vous pouvez éliminer la
cause du dysfonctionnement
vous-même.
• E:ππ:ππ
Contactez votre revendeur
Sony ou un centre de
réparation agréé Sony.
Page 87

Spécifications
Système
Dispositif d’image CCD (dispositif à transfert de charge) 1/4 pouce
Objectif f=4,8 mm (47 mm, converti en focale d’appareil
Contrôle de l’exposition Exposition automatique
Balance des blancs Automatique
Compression des données JPEG standard
Capacité d’images Nombre d’images stockées dans 1 disquette
Format de l’image 640 x 480 (VGA)
Mémoire Disquette:
Flash Plage de distances pour l’enregistrement:
Ecran LCD
Taille de l’écran 2,5 pouces
Panneau LCD TFT
Nombre total de points 61380 points
Généralités
Application Batterie rechargeable Sony NP-F330/F530/F550
Alimentation 7,2 V (batterie rechargeable)
Consommation électrique (Pendant la prise de vues)
Température de fonctionnement
Température d’entreposage –20°C à +60°C (–4°F à +140°F)
Dimensions Env. 5 x 4 3/8 x 2 1/2 pouces
Poids Env. 21 1/6 on. (470 g) (sans les piles ni la
Accessoires fournis Voir page 7.
La conception et les spécifications sont sujettes à modifications sans préavis.
photo 24 x 36)
F2,0
STANDARD: environ 30 - 40 images
FINE: environ 15 - 20 images
3,5 pouces 2HD format MS-DOS (1,44 Mo)
0.5 – 3 m (1 5/8 – 10 pieds)
3,2 W
0°C à 40°C (32°F à 104°F)
(126,5 x 110,5 x 62,5 mm) (l/h/p)
disquette)
41-F
Page 88

Nomenclature
Voir les pages entre parenthèses ( ) pour plus de détails.
Déclencheur
d’obturateur (14)
Flash (18)
Témoin de
retardateur (18)
Cellule
photoélectrique
Commu-tateur
macro (19)
Pour utiliser l’adaptateur secteur,
enlevez cette pièce. Faites passer le
cordon ici et fermez le couvercle du
logement de batterie.
Douille de trépied
Assurez-vous que la vis du trépied
ne dépasse pas 6,5 mm (7/32
pouces).
Crochet pour la
bandoulière
Objectif
42-F
Page 89

Témoin ACCESS
(15)
Touche BRIGHT +/–
(18, 21)
Touche OPEN
(14)
Touche FLASH
(18)
Commutateur
PLAY/ CAMERA
(14, 20)
Touche PICTURE
EFFECT (34)
Touche DISPLAY (17)
Ecran LCD
Crochet pour la
bandoulière
Interrupteur
d’alimentation
POWER (11)
Touche de
commande (11)
Logement de la pile
au lithium (35)
Crochet pour la
bandoulière
Couvercle du
logement de la
batterie/Touche
OPEN (BATT) (9)
43-F
Page 90

÷ Nomenclature
Fixation de la bandoulière
Fixez la bandoulière fournie aux crochets prévus à cet effet.
÷÷
Messages d’avertissement
Des messages variés apparaissent sur l’écran LCD. Vérifiez leur
signification dans la liste suivante.
Message
DRIVE ERROR
NO DISK
DISK ERROR
DISK PROTECT
DISK FULL
NO FILE
FILE ERROR
FILE PROTECT
COVER OPEN
i
44-F
Signification
Le problème vient du lecteur de disquette.
Aucune disquette n’a été insérée.
Le problème vient de la disquette.
Une disquette qui ne peut pas être utilisée avec cet
appareil est en place.
L’onglet de protection à l’écriture est en position
d’interdiction d’écriture.
La disquette est pleine.
Aucune image n’a été enregistrée sur la disquette.
Un problème est survenu pendant la lecture.
L’image est protégée.
Le couvercle du logement de la disquette n’est pas
fermé.
La batterie est faible.
Page 91

Index
A
Afficheur d’autodiagnostic ... 40
B
Batterie rechargeable ............ 4, 7
Batterie rechargeable
InfoLITHIUM .........................4
C, D
Chargeur de batterie ................ 8
Condensation d’humidité .....37
Disquette .................................... 6
E, F
Effacement ............................... 26
Effet pictural ............................ 34
Enregistrement ........................ 14
Enregistrement macro............ 19
Exposition automatique.........15
Formatage ................................32
G, I, J
Guide de dépannage ..............38
INDEX (écran) ......................... 22
Indicateur de capacité restante
de la batterie ......................... 10
Indicateurs sur l’écran LCD
..........................................17, 21
J, L
JPEG ...................................... 4, 30
Lecture......................................20
M
Menu.........................................32
Messages d’avertissement ..... 44
Mise hors tension automatique
................................................10
N, P, Q
Nettoyage.................................36
Pile au lithium ......................... 35
Protection ................................. 23
Qualité de l’image .................. 32
R, S
Recharge.....................................8
Recharge complète ................... 8
Recharge normale ..................... 8
Réglage de la date et de l’heure
................................................11
Réglage de la luminosité
Ecran LCD ......................18, 21
Image ..................................... 14
Réglage de l’exposition .......... 19
Retardateur .............................. 18
Signal sonore (BEEP)..............33
T, U, V, Z
Touche de commande ............ 11
Utilisation du flash ................. 18
Visionnage des images avec un
ordinateur personnel ........... 30
Visionnage sur l’écran LCD
................................................20
45-F
Page 92

Español
Manual de instrucciones
Antes de utilizar la unidad, lea detenidamente este manual, y
consérvelo para futuras referencias.
Para evitar incendios o el riesgo de electrocución, no exponga la
unidad a la lluvia ni a la humedad.
Para evitar descargas eléctricas, no abra la unidad. En caso de
avería, solicite sólo los servicios de personal cualificado.
FROMA DE DESHACERSE DE LAS PILAS DE IONES DE LITIO
PILA DE IONES DE LITIO
FORMA APROPIADA DE DESHACERSE DE LAS PILAS
ADVERTENCIA
Usted podré devolver las pilas de pilas de iones de litio a un centro
de reparaciones Sony o a una feabrica Sony.
Nota: En ciertas zonas puede estar prohibido tirar las pilas de iones
de litio a la basura.
Para información sobre el centro de reparaciones Sony más cercano,
llame a 1-800-222-SONY (EE.UU. solamente)
Para información sobre lafábrica Sony más cercana,
llame a 416-499-SONY (Canadá solamente)
Precaución: No utilice pilas de iones de litio danadas o con fugas
de electrólito.
ATENCIÓN
Los campos magnéticos de frecuencias específicas pueden influir en
las imágenes de esta cámara.
• IBM PC/AT es marca registrada de International Business Machines
Corporation de EE.UU.
• MS-DOS y Windows son marcas registradas con licencia de Microsoft
Corporation, registradas en EE.UU. y otros países.
• Macintosh es marca con licencia de Apple Computer, Inc., registrada en
EE.UU. y otros países.
• Todos los demás nombres de productos mencionados aquí son marcas
comerciales o registradas de sus respectivas compañías.
Además, “TM” y “” no se mencionan en cada caso en este manual.
2-ES
Page 93

Índice
Cerciórese de leer esto antes de utilizar su cámara 4
Antes de utilizar su cámara 5
MVC-FD51(ES)
Índice 3
Preparativos 6
Preparativos 6
Paso 1: Carga de la batería 7
Paso 2: Instalación de la batería 8
Paso 3: Ajuste de la fecha y la hora 10
Operaciones básicas 13
Grabación de imágenes 13
Indicadores durante la grabación 16
Ajuste del brillo de la pantalla de cristal líquido 17
Flash/Autodisparador 17
Ajuste de la exposición 18
Contemplación de imágenes en la pantalla de cristal líquido 19
Indicadores durante la reproducción 20
Ajuste del brillo de la pantalla de cristal líquido 20
Reproducción simultánea de 6 imágenes grabadas
Protección de imágenes 22
Borrado de imágenes 25
Contemplación de imágenes utilizando un ordenador
(Pantalla INDEX) 21
personal 29
Operaciones avanzadas 30
Cambio de los ajustes de los modos 30
Disfrute de efectos de imagen 33
Información adicional 34
Cambio de la pila de litio de la cámara 34
Precauciones 35
Solución de problemas 37
Visualización de autodiagnóstico 39
Especificaciones 40
Identificación de partes 41
Índice alfabético Contraportada
3-ES
Page 94

Cerciórese de leer esto antes de
utilizar su cámara
Comprobación de los accesorios suministrados
(consulte la página 6)
Cámara digital (1) Cargador de baterías (1)
Cable de alimentación (1 juego) Batería NP-F330 (1)
Bandolera (1)
Formato de grabación de imágenes de esta cámara
Los datos de imágenes grabados con esta cámara se comprimen y
graban en formato JPEG. La extensión del archivo es “.JPG”. Con
respecto a los detalles, consulte la página 29.
Fuentes de alimentación
Esta cámara solamente funciona con una batería “InfoLITHIUM”*
NP-F330 (suministrada)/F530/F550 y el adaptador de alimentación
de CA AC-V700. Si utiliza cualquier otra batería o fuente de
alimentación, la cámara puede no funcionar.
Grabación de prueba
Antes de grabar acontecimientos irrepetibles, realice una grabación
de prueba para comprobar si la cámara está trabajando
correctamente.
No hay compensación por el contenido de la grabación
El contenido de la grabación no puede compensarse si ésta o la
reproducción no se realiza debido al mal funcionamiento de la
cámara, el disquete, etc.
Precaución sobre los derechos de autor
Los programas y películas de televisión, las cintas de vídeo, y otros
materiales pueden tener reservado el derecho de reproducción. La
grabación no autorizada de tales materiales puede ir en contra de lo
dispuesto por las leyes sobre derechos de autor.
* Batería “InfoLITHIUM”
La “InfoLITHIUM” es una batería de iones de litio que puede intercambiar
datos con equipos compatibles sobre su consumo.
“InfoLITHIUM” es marca comercial de Sony Corporation.
4-ES
Page 95

Antes de utilizar su cámara
Esta cámara digital utiliza disquetes (discos floppy) como medio de
grabación.
Utilice el tipo de disquete siguiente:
•Tamaño: 3,5 pulgadas
•Tipo: 2HD
•Capacidad: 1,44 MB
•Formato: MS-DOS (512 bytes x 18 sectores)
Para utilizar un disquete de 3,5 pulgadas, 2HD, que no sea el
descrito arriba, formatéelo utilizando la cámara o un ordenador
personal.
No sacuda ni golpee la cámara
Si lo hiciese, podría producirse un mal funcionamiento, la
imposibilidad de grabación de imágenes o de utilización de
disquetes, la pérdida de imágenes o de datos de la memoria, daños o
pérdidas.
Evite que la unidad se humedezca
Ésta cámara es un dispositivo electrónico, no permita que se
humedezca. Cuando la utilice en exteriores o bajo la lluvia, tenga
cuidado para que no entre en contacto con el agua. Cuando traslade
esta unidad de una condición atmosférica a otra, es posible que se
condense humedad en su interior o exterior. Cuando ocurra esto,
consulte la página 36 y siga las instrucciones sobre cómo eliminarla
antes de utilizar la cámara.
Haga copias de protección
Para evitar el riesgo de pérdida de datos, copie siempre los datos en
un disquete.
En este manual, las teclas y ajustes de la cámara se indican en
mayúsculas.
P. ej., Presione FLASH.
5-ES
Page 96

Preparativos
Componentes necesarios
Cámara digital
Disquete (no suministrado)
3,5 pulgadas, 2HD (1,44 MB)
Descripción de los preparativos
El reloj no ha sido ajustado en fábrica. Cerciórese de ajustarlo antes
de utilizar la cámara.
1 Cargue la batería. (p. 7)
2 Instale la batería. (p. 8)
Esta cámara funciona con una batería. Instale una batería
completamente cargada.
3 Ajuste la fecha y la hora. (p. 10)
La fecha y la hora son necesarias para la grabacíon en formato
MS-DOS.
Si no las ajusta, se grabarán una fecha y una hora incorrectas. La
pantalla CLOCK SET aparecerá cada vez que conecte la
alimentación de la cámara.
Batería (NP-F330)
Cargador de baterías (BC-V615)
Cable de alimentación
Bandolera
6-ES
Page 97

Paso 1: Carga de la batería
Para cargar la batería, utilice el cargador de baterías. Con respecto a
los detalles, consulte el manual de instrucciones del cargador de
baterías.
a un tomacorriente
de CA
1
Lámpara CHARGE
Batería
2
1 Conecte el cable de alimentación a un
tomacorriente de CA.
2 Inserte la batería en el sentido de la marca $.
Deslícela hacia abajo hasta que chasquee.
La lámpara CHARGE (anaranjada) se encenderá. Se iniciará la
carga.
Para extraer la batería
Deslice la batería hacia arriba.
Tiempo de carga
Batería NP-F330 NP-F530 NP-F550
Carga completa* 210 min. 225 min. 240 min.
Carga normal** 150 min. 165 min. 180 min.
Minutos aproximados para cargar una batería vacía utilizando el adaptador de
alimentación de BC-V615. (A bajas temperaturas, el tiempo de carga será
mayor.)
* Carga durante aproximadamente una hora después de que se haya apagado
la lámpara CHARGE.
** Carga hasta que se apague la lámpara CHARGE.
(anaranjada)
Cargador de baterías
7-ES
Page 98

Paso 2: Instalación de la batería
1
2
1
2
(Base)
1 Deslizando OPEN (BATT) en el sentido de la
flecha, abra la cubierta de la batería.
2 Inserte la batería con la marca $ encarada hacia
el compartimiento de la batería.
3 Cierre la cubierta hasta que chasquee.
Para extraer la batería
Abra la cubierta de la batería.
D slizando la palanca de
liberación de la batería hacia la
derecha, extraiga ésta.
Tenga cuidado de no dejar caer la batería cuando
la extraiga.
3
Palanca de liberación
de la batería
8-ES
Page 99

Duración de la batería/Número de imágenes que
podrán grabar/reproducirse
Batería Duración Núm. de imágenes
NP-F330 Sin utilizar el flash
(
suministrada
NP-F530
NP-F550
Duración aproximada de la batería y el número de imágenes que pueden
graber/reproducirse con una temperatura de 25°C. Los números entre
paréntesis indican el tiempo cuando utilice una batería normalmente cargada.
1)
Grabación a intervalos de unos 10 segundos
2)
Grabación a intervalos de unos 15 segundos
3)
Reproducción de una sola imagen a intervalos de unos 10 segundos
• La duración de la batería y el número de imágenes serán más cortos si utiliza
la cámara en un ambiente frío, o si repite las operaciones de conexión/
desconexión de la alimentación.
• La duración de la batería y el número de imágenes indicados arriba son una
guía cuando se utilizan ciertos disquetes.
Grabación continua
) Utilizando el flash
Reproducción continua
Grabación continua
Sin utilizar el flash
Utilizando el flash
Reproducción continua
Grabación continua
Sin utilizar el flash
Utilizando el flash
Reproducción continua3)210 (195) 1570 (1460)
de la (grabación/
pila (min.) reproducción)
1)
2)
1)
2)
1)
2)
85 (80) 620 (580)
85 (80) 380 (360)
3)
120 (110) 900 (820)
120 (105) 880 (770)
115 (100) 520 (450)
3)
165 (145) 1230 (1080)
150 (140) 1100 (1020)
145 (135) 660 (610)
¡ Nota sobre la indicación del tiempo restante de la batería
durante la grabación
El tiempo restante de la batería se visualizará en la pantalla de cristal
líquido*. Sin embargo, la indicación puede no visualizarse correctamente
dependiendo de las condiciones de utilización y las circunstancias.
* Durante la grabación, el tiempo restante de la batería se visualizará
mientras la alimentación esté conectada. Durante la reproducción, se
visualizará con la imagen en la pantalla de cristal líquido.
¡ Función de desconexión automática de la alimentación
Si deja la cámara inactiva durante unos 3 minutos con la alimentación
conectada, la alimentación se desconectará automáticamente para evitar
que se descargue la batería.
9-ES
Page 100

Paso 3: Ajuste de la fecha y la hora
Función del mando de control
Usted podrá seleccionar un ítem del menú que aparece en la pantalla
de cristal líquido presionando la parte superior, inferior, izquierda, o
derecha del mando de control. Cuando seleccione un ítem, el color
del mismo cambiará de azul a amarillo. Para introducir su selección,
presione el centro del mando.
Mando de control
Parte superior
1
Parte
izquierda
Parte inferior
Parte
derecha
Presione
para
ejecutar.
2
Cuando utilice la cámara por primera vez
Inserte el disquete (p. 13) y conecte la alimentación, como en el paso
1, y aparecerá la pantalla de ajuste del reloj. Siga los procedimientos
desde el paso 4.
1 Deslice POWER hacia abajo para conectar la
alimentación.
Si en la pantalla de cristal líquido aparece el indicador “I”,
reemplace la pila de litio de acuerdo con los procedimientos de
la página 34.
10-ES
 Loading...