

Sony MVC-FD5, MVC-FD7 Operating Instruction
3-860-624-15 (1)
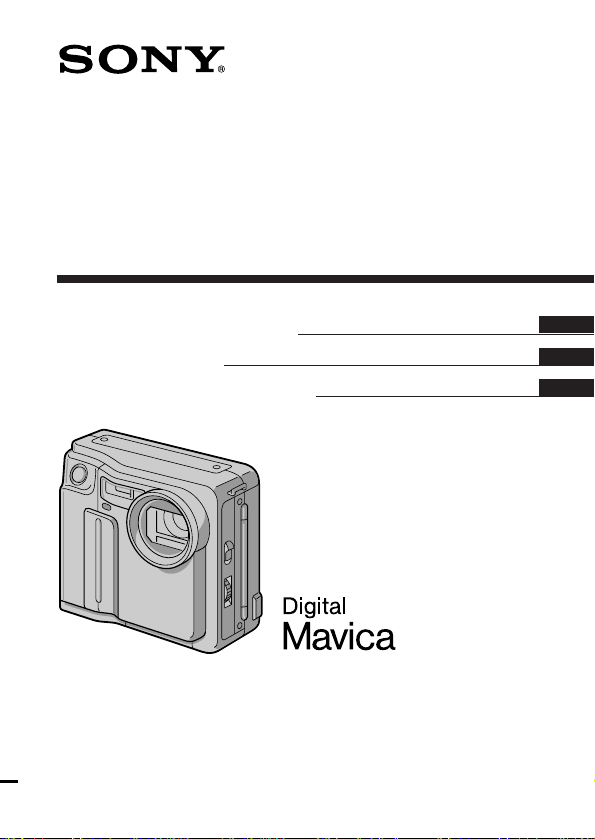
Digital Still Camera
Operating Instructions
Mode d'emploi
Manual de instrucciones
MVC-FD7
MVC-FD5
MVC-FD7
©1997 by Sony Corporation
EN
F
ES
English
Operating instructions
Before operating the unit, please read this manual thoroughly,
and retain it for future reference.
WARNING
To prevent fire or shock hazard,
do not expose the unit to rain or moisture.
This symbol is intended to alert the user to the presence of
uninsulated “dangerous voltage” within the product’s
enclosure that may be of sufficient magnitude to constitute a
risk of electric shock to persons.
This symbol is intended to alert the user to the presence of
important operating and maintenance (servicing) instructions
in the literature accompanying the appliance.
Owner’s Record
The model and serial numbers are located on the bottom. Record the serial
number in the space provided below. Refer to these numbers whenever you
call upon your Sony dealer regarding this product.
Model No. MVC-
Serial No.
2-EN

CAUTION
Never expose the battery pack to temperatures above 140°F (60°C), such as in
a car parked in the sun or under direct sunlight.
TO PREVENT ELECTRIC SHOCK, DO NOT USE THIS POLARIZED AC
PLUG WITH AN EXTENSION CORD, RECEPTACLE OR OTHER OUTLET
UNLESS THE BLADES CAN BE FULLY INSERTED TO PREVENT BLADE
EXPOSURE.
You are cautioned that any changes or modifications not expressly approved
in this manual could void your authority to operate this equipment.
Note:
This equipment has been tested and found to comply with the limits for a
Class B digital device, pursuant to Part 15 of the FCC Rules. These limits are
designed to provide reasonable protection against harmful interference in a
residential installation. This equipment generates, uses, and can radiate radio
frequency energy and, if not installed and used in accordance with the
instructions, may cause harmful interference to radio communications.
However, there is no guarantee that interference will not occur in a particular
installation. If this equipment does cause harmful interference to radio or
television reception, which can be determined by turning the equipment off
and on, the user is encouraged to try to correct the interference by one or more
of the following measures:
– Reorient or relocate the receiving antenna.
– Increase the separation between the equipment and receiver.
– Connect the equipment into an outlet on a circuit different from that to
which the receiver is connected.
– Consult the dealer or an experienced radio/TV technician for help.
For the Customers in the United States and CANADA
DISPOSAL OF LITHIUM ION BATTERY.
LITHIUM ION BATTERY.
DISPOSE OF PROPERLY.
You can return you unwanted lithium ion batteries to your nearest Sony
Service Center or Factory Service Center.
Note: In some areas the disposal of lithium ion batteries in household or
business trash may be prohibited.
For the Sony Service Center nearest you call
1-800-222-SONY (United States only)
For the Factory Service Center nearest you call
416-499-SONY (Canada only)
Caution: Do not handle damaged or leaking lithium ion batteries.
3-EN

NOTICE FOR THE CUSTOMERS IN THE UNITED KINGDOM
A moulded plug complying with BS 1363 is fitted to this equipment for your
safety and convenience.
Should the fuse in the plug supplied need to be replaced, a 5 AMP fuse
approved by ASTA or BSI to BS 1362, (i.e., marked with 2 or @ mark)
must be used.
If the plug supplied with this equipment has a detachable fuse cover, be
sure to attach the fuse cover after you change the fuse. Never use the plug
without the fuse cover. If you should lose the fuse cover, please contact
your nearest Sony service station.
• IBM PC/AT is a registered trademark of International Business Machines
Corporation of the U.S.A.
• MS-DOS and Windows are registered trademarks licensed to Microsoft
Corporation, registered in the U.S.A. and other countries.
• Macintosh is a trademark licensed to Apple Computer, Inc., registered in the
U.S.A. and other countries.
• All other product names mentioned herein may be the trademarks or
registered trademarks of their respective companies.
Furthermore, “TM” and “” are not mentioned in each case in this manual.
4-EN

Table of contents
Be sure to read before using your camera 6
Before using your camera 7
Getting started
Preparation 9
Step 1: Charging the battery pack 10
Step 2: Installing the battery pack 11
Step 3: Setting the date and time 13
Basic operations
Recording images 16
The indicators during recording 19
Adjusting the brightness of the LCD screen 20
Flash/Zoom/Self-timer 20
Adjusting the exposure 21
Watching images on the LCD screen 22
The indicators during playback 23
Adjusting the brightness of the LCD screen 23
Playing back 6 recorded images at a time
(INDEX screen) 24
Protecting images 25
Deleting images 28
Viewing images using a personal computer 32
Advanced operations
Changing the mode settings 33
Using various functions for recording (MVC-FD7 only) 36
Additional information
Changing the lithium battery in the camera 38
Precautions 39
Troubleshooting 41
Self-diagnosis display 43
Specifications 44
Parts identification 45
Index 47
5-EN

Be sure to read before using your
camera
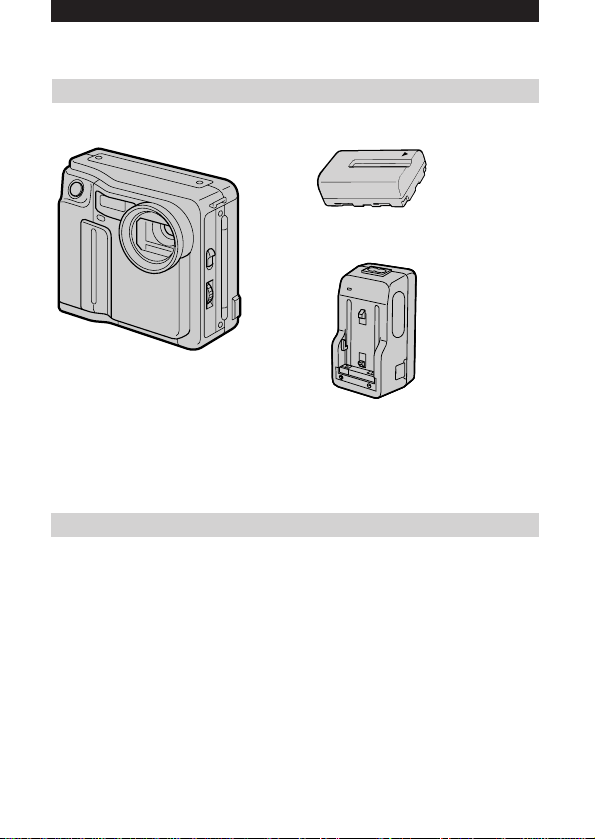
Checking supplied accessories (see page 9)
Digital still camera (1) Battery charger (1)
Power cord (1 set) NP-F530 battery pack (1)
Shoulder strap (1) Lens cap (1) (MVC-FD7 only)
Image recording format on this camera
The image data recorded with this camera is compressed and
recorded in JPEG format. Extension of the file is “.JPG”. For details,
see page 32.
Power sources
This camera operates only with the “InfoLITHIUM” battery pack
NP-F530*. If you use any other battery or power sources to operate
your camera, the camera may not operate.
Trial recording
Before you record one-time events, you may want to make a trial
recording to make sure that the camera is working correctly.
No compensation for contents of the recording
Contents of the recording cannot be compensated for if recording or
playback is not made due to a malfunction of the camera, floppy
disk, etc.
Precaution on copyright
Television programs, films, video tapes, floppy disk, and other
materials may be copyrighted. Unauthorized recording of such
materials may be contrary to the provision of the copyright laws.
* “InfoLITHIUM” battery pack
The “InfoLITHIUM” is a lithium ion battery pack which can exchange data
with compatible equipment about its battery consumption.
”InfoLITHIUM” is a trademark of Sony Corporation.
6-EN

Before using your camera
This digital still camera uses a floppy disk as media.
Use the following floppy disk type.
•Size: 3.5 inch
•Type: 2HD
•Capacity: 1.44 MB
•Format: MS-DOS format (512 bytes × 18 sector)
When using 3.5 inch, 2HD floppy disk other than described above,
format it using the camera or personal computer.
Do not shake or strike the unit
Malfunctions, inability to record images as well as inability to use
floppy disks or image and memory data breakdown, damage or loss
may occur.
Do not get the unit wet
This unit is an electronic device, do not allow it to get wet. When
shooting in the rain or outdoors, be careful not allow water to get on
or into the unit. When moving this unit from one
atmospheric condition to another, moisture may condense inside or
outside the camera. If this occurs refer to page 40 and follow
instructions on how to remove it before using.
Back up recommendations
To avoid the potential risk of data loss always copy (back up) data to
disk.
7-EN

÷Before using your camera
•The instructions in this manual are for the two models listed
below. Before you start reading this manual and operating the
unit, check your model number by looking at the bottom of your
camera.
•The MVC-FD7 is the model used for illustration purposes.
Otherwise, the model name is indicated in the illustrations. Any
differences in operation are clearly indicated in the text, for
example, “MVC-FD7 only.”
As you read through this manual, buttons and settings on the
camera are shown in capital letters.
e.g., Press FLASH.
Types of differences
Model number MVC-FD5 MVC-FD7
Macro shooting Macro switch Auto
Zoom – r
Manual focusing – r
Picture effect – r
Program AE – r
8-EN
Preparation
What you need
Digital Still Camera
(MVC-FD7)
Floppy disk (not supplied)
3.5 inch, 2HD (1.44 MB)
Preparation outlines
The clock is not set at the factory. Be sure to set the clock before
using your camera.
1 Charge the battery pack. (p. 10)
2 Install the battery pack. (p. 11)
This camera operates by battery pack. Install a fully charged battery pack.
3 Set the date and time. (p. 13)
The date and time data are necessary for MS-DOS format recording. If
they are not set, incorrect date and time are recorded. The CLOCK SET
screen appears whenever you turn on the camera in CAMERA mode.
Battery pack (NP-F530)
Battery charger (BC-V615)
Power cord
Shoulder strap
Lens cap (MVC-FD7 only)
9-EN
Step 1: Charging the battery pack
To charge the battery pack, use the battery charger. For details, refer
to the instruction manual of the battery charger.
to wall outlet
1
CHARGE lamp
Battery pack
2
1 Connect the power cord to a wall outlet.
2 Insert the battery pack in the direction of the $
mark. Slide it down until it clicks.
The CHARGE lamp (orange) lights up. Charging begins.
To remove the battery pack
Slide up the battery pack.
Charging time
Full charge* 225 min.
Normal charge** 165 min.
Approximate minutes to charge an empty battery pack using the
battery charger BC-V615. (Lower temperatures require a longer
charging time.)
* Charging for about one hour after the CHARGE lamp goes out.
** Charging just until the CHARGE lamp goes out.
(orange)
Battery charger
10-EN
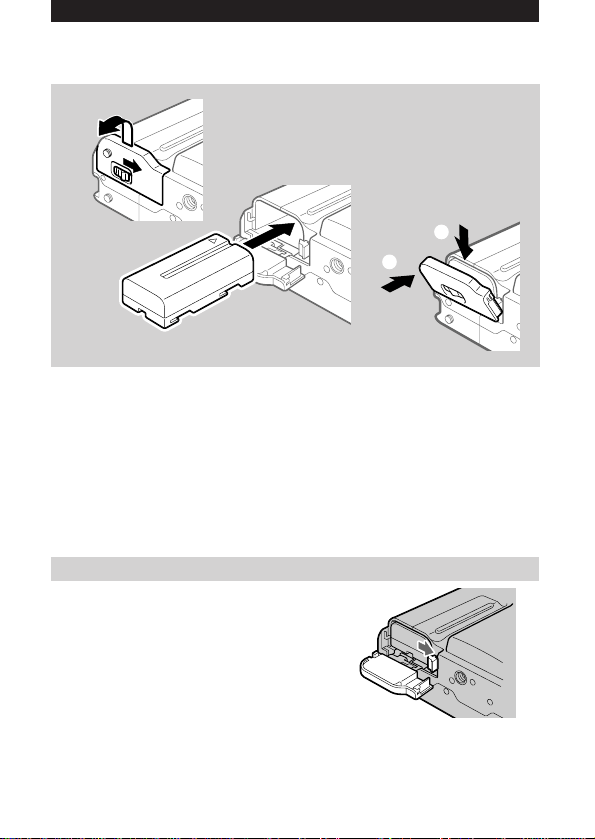
Step 2: Installing the battery pack
1
2
3
(base)
1 While sliding OPEN (BATT) in the direction of the
arrow, open the battery cover.
2 Insert the battery pack with the $ mark facing
toward the battery compartment.
3 Close the cover until it clicks.
To remove the battery pack
Open the battery cover.
While sliding BATT
rightward, remove the
battery pack.
Be careful not to drop the battery pack
when removing.
2
1
11-EN

÷ Step 2: Installing the battery pack
Battery life/No. of images that can be recorded/
played back
MVC-FD5
Battery life No. of images
(min.) (record/playback)
Continuous recording
Unusing the flash* 95 (80) 540 (450)
Using the flash** 85 (75) 320 (280)
Continuous playing*** 125 (110) 750 (650)
MVC-FD7
Battery life No. of images
(min.) (record/playback)
Continuous recording
Unusing the flash* 90 (70) 500 (400)
Using the flash** 70 (60) 280 (240)
Continuous playing*** 120 (105) 720 (620)
Approximate battery life and No. of images that can be recorded/played back
under the temperature of 77°F (25°C) using NP-F530. Numbers in parentheses
indicate the time when you use a normally charged battery.
* Recording at about 10 second intervals
** Recording at about 15 second intervals
*** Playing back single image at about 10 second intervals
• Battery life and No. of images will be decreased if you use the camera in a
cold environment or while you repeat turning the power on/off and
zooming (MVC-FD7 only).
• Battery life and No. of images above are a guide with using some floppy
disks.
¡ Notes on remaining battery time indication
Remaining battery time is displayed on the LCD screen*. However, the
indication may not be displayed properly, depending on using conditions
and circumstances.
* During recording, remaining battery time is displayed while the power
is on. During playback, it is displayed with the image on the LCD
screen.
¡ Auto power-off function
During recording if you leave the camera inactive for about 3 minutes
while the power is on, the camera turns off automatically to prevent
wearing down the battery.
12-EN
Step 3: Setting the date and time
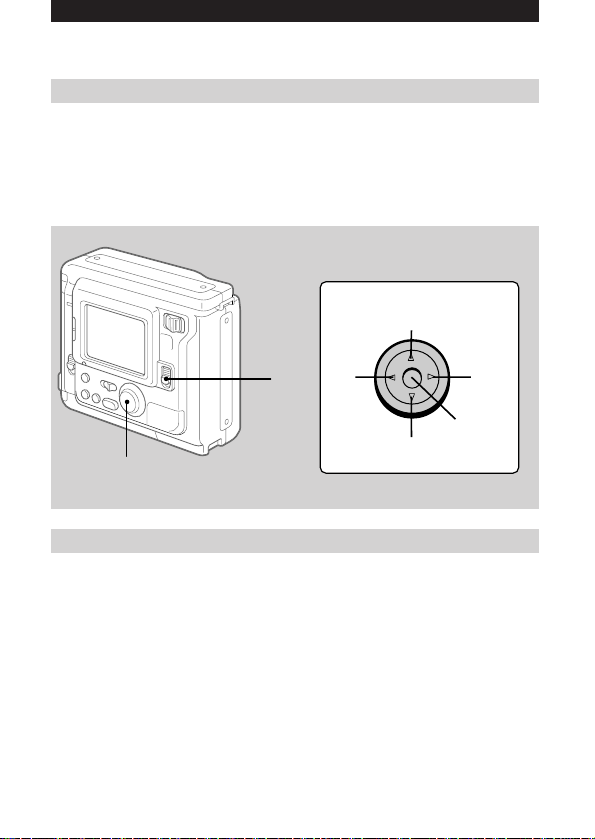
Function of the control button
You can select an item in the menu which appears on the LCD
screen by pressing the upper, lower, left or right side of the control
button. When an item is selected, the color of the item changes from
blue to yellow. To enter your selection, press the center of the
control button.
Control button
Upper side
Left
side
1
Lower side
2
When you use the camera first
With the floppy disk inserted (p.16) and the power turned on, as in
step 1, the clock set screen appears. If this occurs, follow the
procedures from step 4.
Right
side
Press to
execute.
1 Slide POWER down to turn on the power.
If the “I” indicator appears on the LCD screen, replace the
lithium battery according to the procedures on page 38.
13-EN
÷ Step 3: Setting the date and time
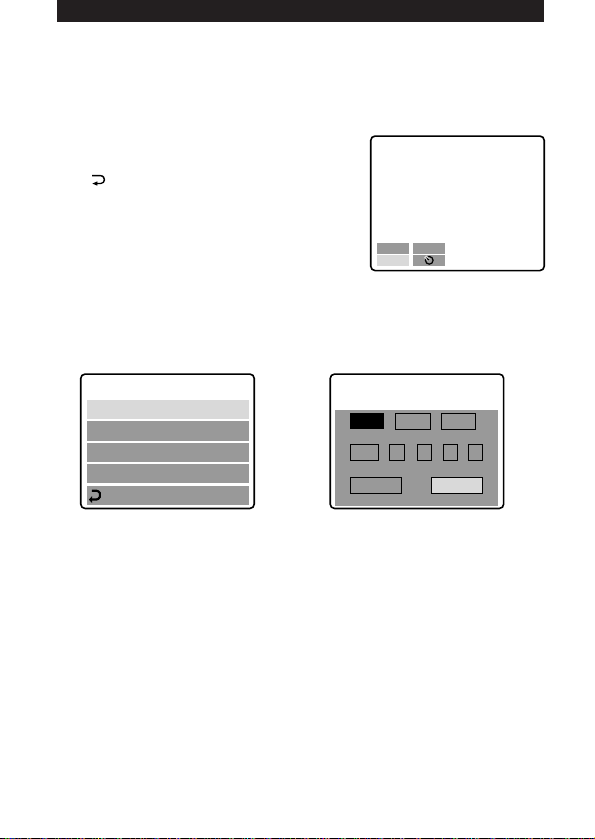
2 Select “MENU” with the control button, then
press it.
The menu appears on the LCD screen.
To cancel menu screen, select
“ RETURN” with the control button,
then press it.
+
–EV
EV
MENU
3 Select “CLOCK SET” with the control button,
then press it.
CLOCK SET
BEEP
FIELD/FRAME
QUALITY
RETURN
÷
CLOCK SET
Y/M/D M/D/Y D/M/Y
1997 1 8 10: 20
ENTER
CANCEL
AM
4 Select the desired display of the date with the
control button, then press it.
Y/M/D (year/month/day)
M/D/Y (month/day/year)
D/M/Y (day/month/year)
14-EN

5 Select the date and time with the control button,
then press it.
The item to be changed is indicated
with 4/$. Select number by pressing
the upper side or lower side of the
control button, then press it to enter
the number.
After entering the number, 4/$
moves to the next item.
When “D/M/Y” is selected, set the
time on a 24-hour cycle.
CLOCK SET
Y/M/D
1997 1 8 10: 20
AM
6 Select “ENTER” with the control button, then
press it at the desired moment to begin clock
movement.
To cancel setting the date and time
Select “CANCEL” with the control button, then
press it.
15-EN
 Loading...