

Sony MVC-CDZOO/CD300, MVC-CD2OO, MVC-CD300 Operating Instructions Manual
3-067-951-l l(1)
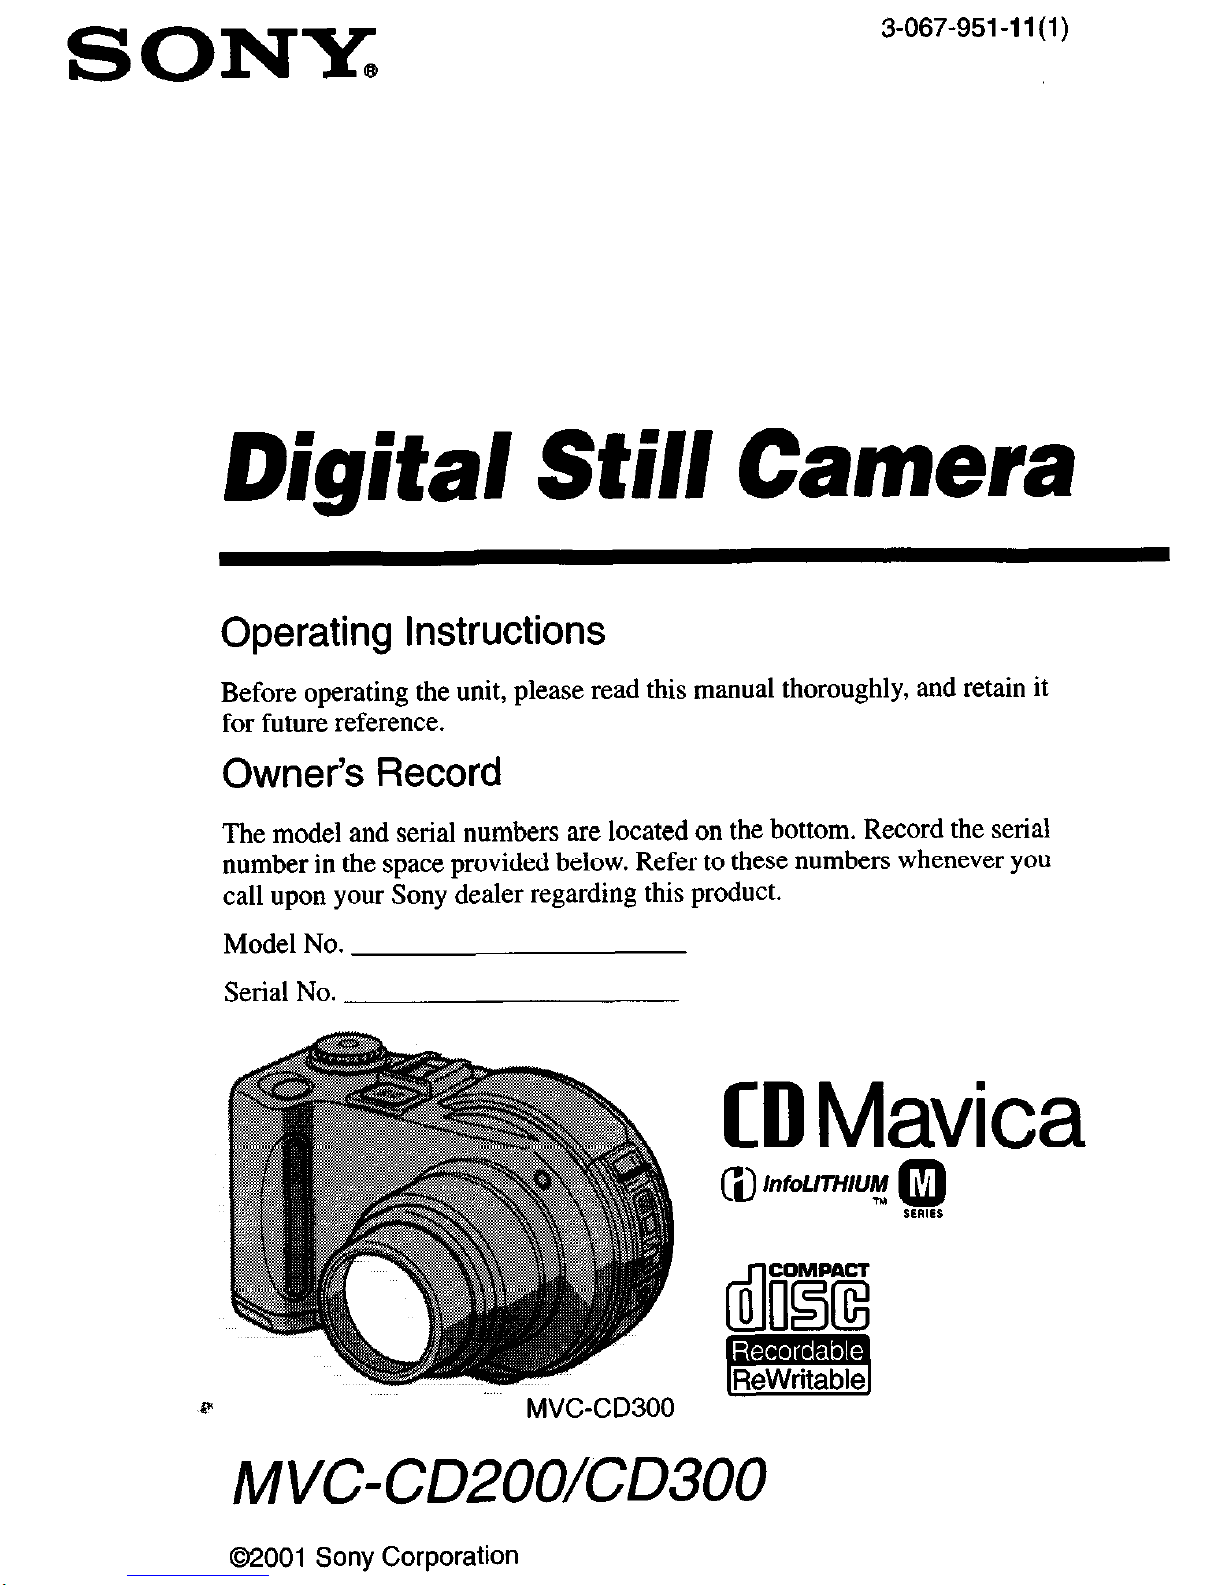
Digital Still Camera
Operating Instructions
Before operating the unit, please read this manual thoroughly, and retain it
for future reference.
Owner’s Record
The model and serial numbers are located on the bottom. Record the serial
number in the space provided below. Refer to these numbers whenever you
call upon your Sony dealer regarding this product.
Model No.
Serial No.
pi
MVGCD300
CD Mavica
m 4
InfoLfTHfLlM
MVC-CDZOO/CD300
02001 Sony Corporation
Regulatory Information
Declaration of Conformity
Trade Name:
SONY
Model No.:
MVC-CD200
Responsible Party: Sony Electronics Inc.
Address:
680 Kinderkamack
Road, Oradell, NJ
07649
U.S.A.
Telephone No.:
201-930-6972
This device complies with Part 15 of the
FCC Rules. Operation is subject to the
following two conditions: (1) This device
may not cause harmful interference, and
(2) this device must accept any
interference received, including
interference that may cause undesired
operation.
lo prevent fire or shock hazard, do
not expose the unit to rain or
moisture.
This symbol is intended to
alert the user to the presence
of uninsulated “dangerous
voltage” within the
product’s enclosure that
may be of sufficient
magnitude to constitute a
risk of electric shock to
persons.
n
This symbol is intended to
I
alert the user to the presence
of important operating and
maintenance (servicing)
l
instructions in the literature
accompanying the
appliance.
CAUTION
The use of optical instruments with this
product will increase eye hazard. As the
laser beam used in this camera is harmful to
eyes, do not attempt to disassemble the
cabinet.
Refer servicing to qualified personnel only.
If you have any questions about this product,
you ma&call:
Sony Customer Information Center
l-800-222~SONY (7669)
The number below is for the FCC related
matters only.
CAUTION
J
You are cautioned that any changes or
modifications not expressly approved
in this manual could void your
authority to operate this equipment.
Declaration of Conformity
Trade Name: SONY
Model No.:
MVCCD300
Responsible Party: Sony Electronics Inc.
Address:
680 Kinderkamack
Road, Oradell, NJ
07649
U.S.A.
Telephone No.: 201-930-6972
This device complies with Part 15 of the
FCC Rules. Operation is subject to the
following two conditions: (1) This device
may not cause harmful interference, and
(2) this device must accept any
interference received, including
interference that may cause undesired
operation.
Note:
This equipment has been tested and found to
comply with the limits for a Class B digital
device, pursuant to Part 15 of the FCC
Rules. These limits are designed to provide
reasonable protection against harmful
interference in a residential installation. This
equipment generates, uses, and can radiate
radio frequency energy and, if not installed
and used in accordance with the
instructions, may cause harmful interference
to radio communications. However. there is
2

no guarantee that interference will not occur
in a particular installation. If this equipment
does cause harmful interference to radio or
television reception, which can be
determined by turning the equipment off and
on, the user is encouraged to try to correct
the interference by one or more of the
following measures:
-Reorient or relocate the receiving antenna.
-Increase the separation between the
equipment and receiver.
-Connect the equipment into an outlet on
a circuit different from that to which the
receiver is connected.
-Consult the dealer or an experienced
radio/TV technician for help.
The supplied interface cable must be used
with the equipment in order to comply with
the limits for a digital device pursuant to
Subpart B of Part 15 of FCC Rules.
About Ferrite Core
Be sure to attach the supplied ferrite core to
the cable of the AC power adaptor. This
ferrite core can reduce noises. Refer to the
addendum for the details.
DISPOSAL OF LITHIUM ION
BATTERY.
LITHIUM ION BATTERY.
DISPOSE OF PROPERLY.
You can return your unwanted lithium ion
batteries to your nearest Sony Service
Center or Factory Service Center.
Note:
In some areas the disposal of lithium ion
batteries in household or business trash may
be prohibited.
For the Sony Service Center nearest you call
I-SOO-222-SONY (United States only)
For the Sony Factory Service Center nearest
you call 416-4?-SONY (Canada only)
Caution:
Do not handle damaged or leaking lithium
ion battery.
A moulded plug complying with BS 1363 is
fitted to this equipment for your safety and
convenience.
Should the fuse in the plug supplied need to
be replaced, a 5 AMP fuse approved by
ASTA or BSI to BS 1362, (i.e. marked with
v or 8 mark) must be used.
If the plug supplied with this equipment has
a detachable fuse cover, be sure to attach the
fuse cover after you change the fuse. Never
use the plug without the fuse cover. If you
should lose the fuse cover, please contact
your nearest Sony service station.
Directive:EMC Directive 89/336/EEC,
9213
I/EEC
This equipment complies with the EMC
regulations when used under the following
circumstances:
l Residential area
l Business district
l Light-industry district
(This equipment complies with the EMC
standard regulations EN55022 Class B.)
Attention
The electromagnetic fields at the specific
frequencies may influence the picture and
sound of this camera.
This product has been tested and found
compliant with the limits sets out on the
EMC Directive for using connection cables
shorter than 3 meters (9.8 feet).
3
Operating instructions
Before operating the unit, please read this
manual thoroughly, and retain it for future
reference.
The instructions in this manual are for the
two models: MVCCD200, MVC-CD300.
The MVC-CD300 is the model used for
illustration purposes.
Otherwise, the model name is indicated in
the illustrations. Any differences in
operation are clearly indicated in the text,
for example, “MVC-CD300 only.”
As you read through this manual, buttons
and settings on the camera are shown in
capital letters.
e.g. Press DISPLAY/LCD BACK LIGHT
ON/OFF.
This digital still camera uses 8 cm CD-Rsl
CD-RWs as recording media. “CD-R” or
“CD-RW” mentioned above is indicated as
“disc” in this manual. When a distinction
between CD-Rs and CD-RWs is necessary,
“disc” is indicated as “CD-R’ or “CD-RW.”
l
We reconnnend that you
use this camera with
Mavlca discs*.
l
While the image is being
recorded on the disc, the
ACCESS lamp lights up
(red). When this lamp is
lit, do not shake or strike
the camera.
* The Mavica disc is an 8 cm CD-R/CD-RW
with the Mavica logo.
Trial recording
Before you record one-time events, you may
want to make a trial recording to make sure
that the camera is working correctly.
No compensation for contents of
the recording
Contents of the recording cannot be
f+ompensated for if recording or playback is
not made due to a malfunction of your
camera or recording medium, etc.
Notes on image data compatibility
This camera conforms with the Design rule
for Camera File system universal standard
established by the JEITA (Japan Electrics
and Information Technology Industries
Association).
Precaution on copyright
Television programs, films, video tapes, and
other materials may be copyrighted.
Unauthorized recording of such materials
may be contrary to the provision of the
copyright laws.
Do not shake or strike the camera
In addition to malfunctions and inability to
record images, this may render the discs
unusable or image data breakdown,
damage
or loss may occur.
LCD screen, finder (only models
with a finder) and lens
l The LCD screen and the finder are
manufactured using extremely highprecision technology so over 99.99% of
the pixels are operational for effective use.
However, there may be some tiny black
points and/or bright points (white, red,
blue or green in color) that constantly
appear on the LCD screen and the finder.
These points are normal in the
manufacturing process and do not affect
the recording in any way.
l Be careful when placing the camera near a
window or outdoors. Exposing the LCD
screen, the tinder or the lens to direct
sunlight for long periods may cause
malfunctions.
Do not get the camera wet
When taking pictures outdoors in the rain or
under similar conditions, be careful not to
get the camera wet. If moisture
condensation occurs, refer to page 87 and
follow the instructions on how to remove it
before using the camera.
Back up recommendation
To avoid the potential risk of data loss,
always copy (back up) data to a disc.
When the camera is used for long
periods
Note that the camera body may become
hot.
Handling of the movable lens
This camera uses a movable lens. Be
careful
not to strike or apply excessive force to the
lens portion.
Table of contents
Introduction . . . . . . . . . . . . . . . . . . . . . . . . . . . . . . . . . . . . . . . . 6
Identifying the parts ............................ 7
Preparing the power supply ................ 9
Setting the date and time
..................
14
Inserting a disc
..................................
16
b Recording
Initializing a disc (INITIALIZE) . . 18
Recording still images . . . . . . . . . . . . . . . . . . . . . . 20
Recording moving images . . . . . 26
F Playback
Playing back still images . . . . . 28
Playing back moving images . . . 29
Preparation for viewing images using a
computer . . . . . . . . . . . . . . . . . . . . . . . . . . . . . . . . . . . . 3 1
Viewing images using a computer . . . 35
Image file storage destinations and
image file names . . . . . . . 43
Recording text documents (TEXT) . ..61
Recording still images as uncompressed
files (TIFF) . . . . . . . . . . . . . . . . . . . . . . . . . . . . . . . . . 62
Recording three images with the
exposure shifted (only for MVC-
CD300) (EXP BRKTG) . . . . . . . . . . . . . 63
Creating Clip Motion Files . . . . . . . . . . . . . . . . 64
Setting the distance to the subject . . ...66
Recording images in macro . . . 66
Adjusting the exposure
(EXPOSURE) . . . . . . . . . . . 67
Adjusting the white balance
(WHITE BALANCE) . . . . . . . . . . . . . . . . . 68
Enjoying picture effects
(P. EFFECT) . . . . . . . . . . . . . . . . . . . . . . . . . . . . . . . 69
Recording the date and time on the still
image (DATE/TIME) . . . . . . . . . .70
Using the Spot light-metering function 71
b Various playback
Playing back three or nine images at
once . . . . . . . . . . . . . . . . . . . . . . . . . . . . . . . . . . . . . . . . . . . . 72
Enlarging a part of the still image
(Zoom and trimming) . . . . 73
Plavine back the still imaees in order
-(SLIDE) . . . .T . . . 74
Rotating a still image (ROTATE) . . ...75
Viewing images on a TV screen . 76
Before performing
advanced operations
How to use the mode dial
. . . . . . . . . . . . . . . . . 4.5
How to use the control button . . 46
How to use the jog dial . . . . . . . . . . . . . . . . . . . . . 48
Menu settings . . . . . . . . . . . . . . . . . . . . . . . . . . . . . . . . . . . . 49
Setting the image size
(IMAGE SIZE) . . . . . . . . . . . . . . . . . . . . . . . . . . 53
b Various recording
Recording with the exposure fixed
(AE LOCK) . . . . . . . . . . . . 55
Recording with the manual adjustments
. . . . . . . . . . . . . . . . . . . . . 56
Recording images according to shooting
conditions
(SCENE SELECTION) . . . . . . . . . . . . . 58
Recording three images continuously
(B ‘RST)
u (on y for MVC-CD300) . . . . . . . . . . . . . 59
Recording still images for e-mail
(E-MAIL) . . . . . . . . . . . . . . . . . . . . . . . . . . . . . . . . . . . 59
Adding audio files to still images
(VOICE) . . . . . . . . . . . . . . . . . . . . . . . . . . . . . . . . . . . . 60
F Editing
Deleting images (DELETE) . . . . . . . . . . . . . . 77
Preventing accidental erasure
(PROTECT) . . . . . . . . . . . . . . . . .78
Changing the recorded still image size
(RESIZE) . . . . . . . . . . . . . . . . . . . . . . 80
Selecting still images to print
(PRINT) . . . . . . . . . . . . . . . . . . . . . . . . . . . . . . . . . . . . . . 81
Formatting a CD-RW . . . . . . . 82
Changing the setup settings
(SET UP) . . . . . . . 84
.,:
‘__
Precautions ....................................... .87
On discs ............................................ .89
Using your camera abroad ............... .90
About “InfoLITHIUM” battery pack 91
Troubleshooting ............................... .93
Warning and notice messages ........ ,100
Self-diagnosis display .................... ,102
Specifications ................................. ,103
LCD screen indicators .................... .105
Index ................................... Back cover
5
introduction
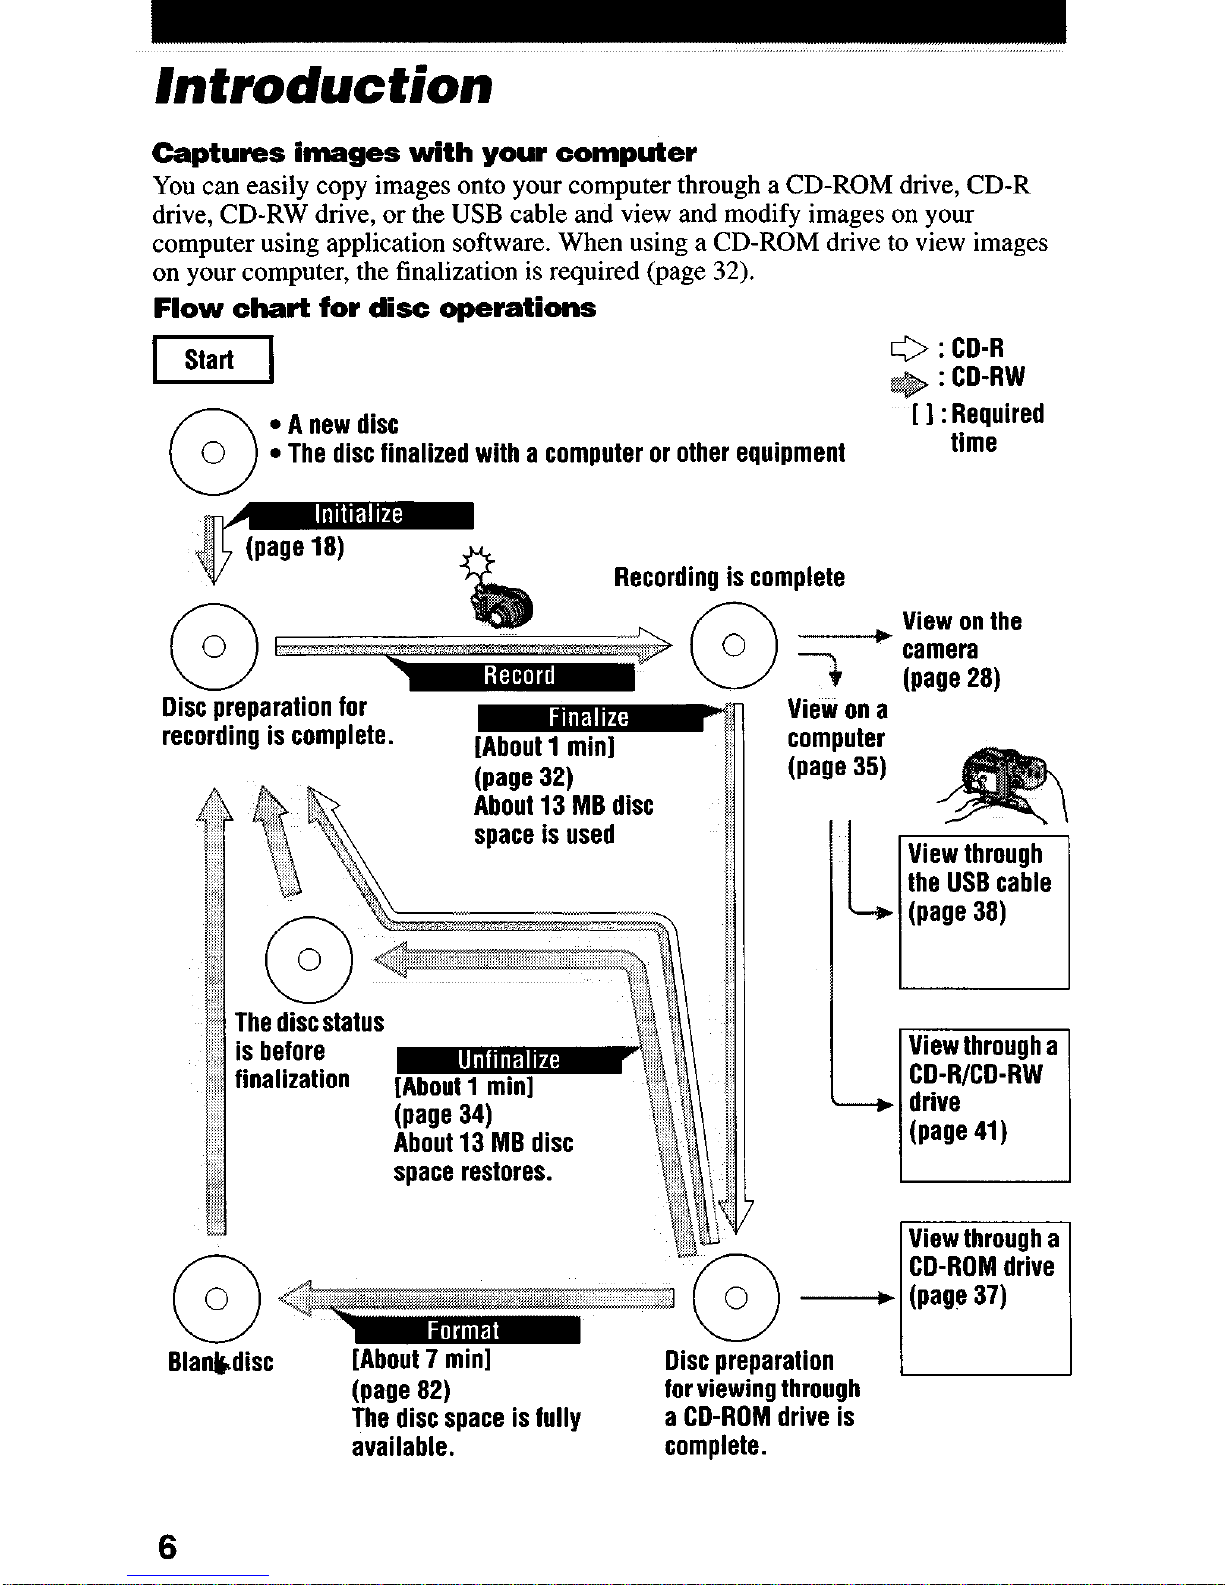
Captures images with your computer
You can easily copy images onto your computer through a CD-ROM drive, CD-R
drive, CD-RW drive, or the USB cable and view and modify images on your
computer using application software. When using a CD-ROM drive to view images
on your computer, the finalization is required (page 32).
Flow chart for disc operations
piq
0 : CD-R
: CD-RW
: Required
l
The disc finalized with a computer or other equipment
time
Recording is complete
Disc preparation for
recording is complete.
Blaedisc
[About 7 minl
(paw
82)
The disc space is fully
available.
Disc preparation
for viewing through
a CD-ROM drive is
complete.
6
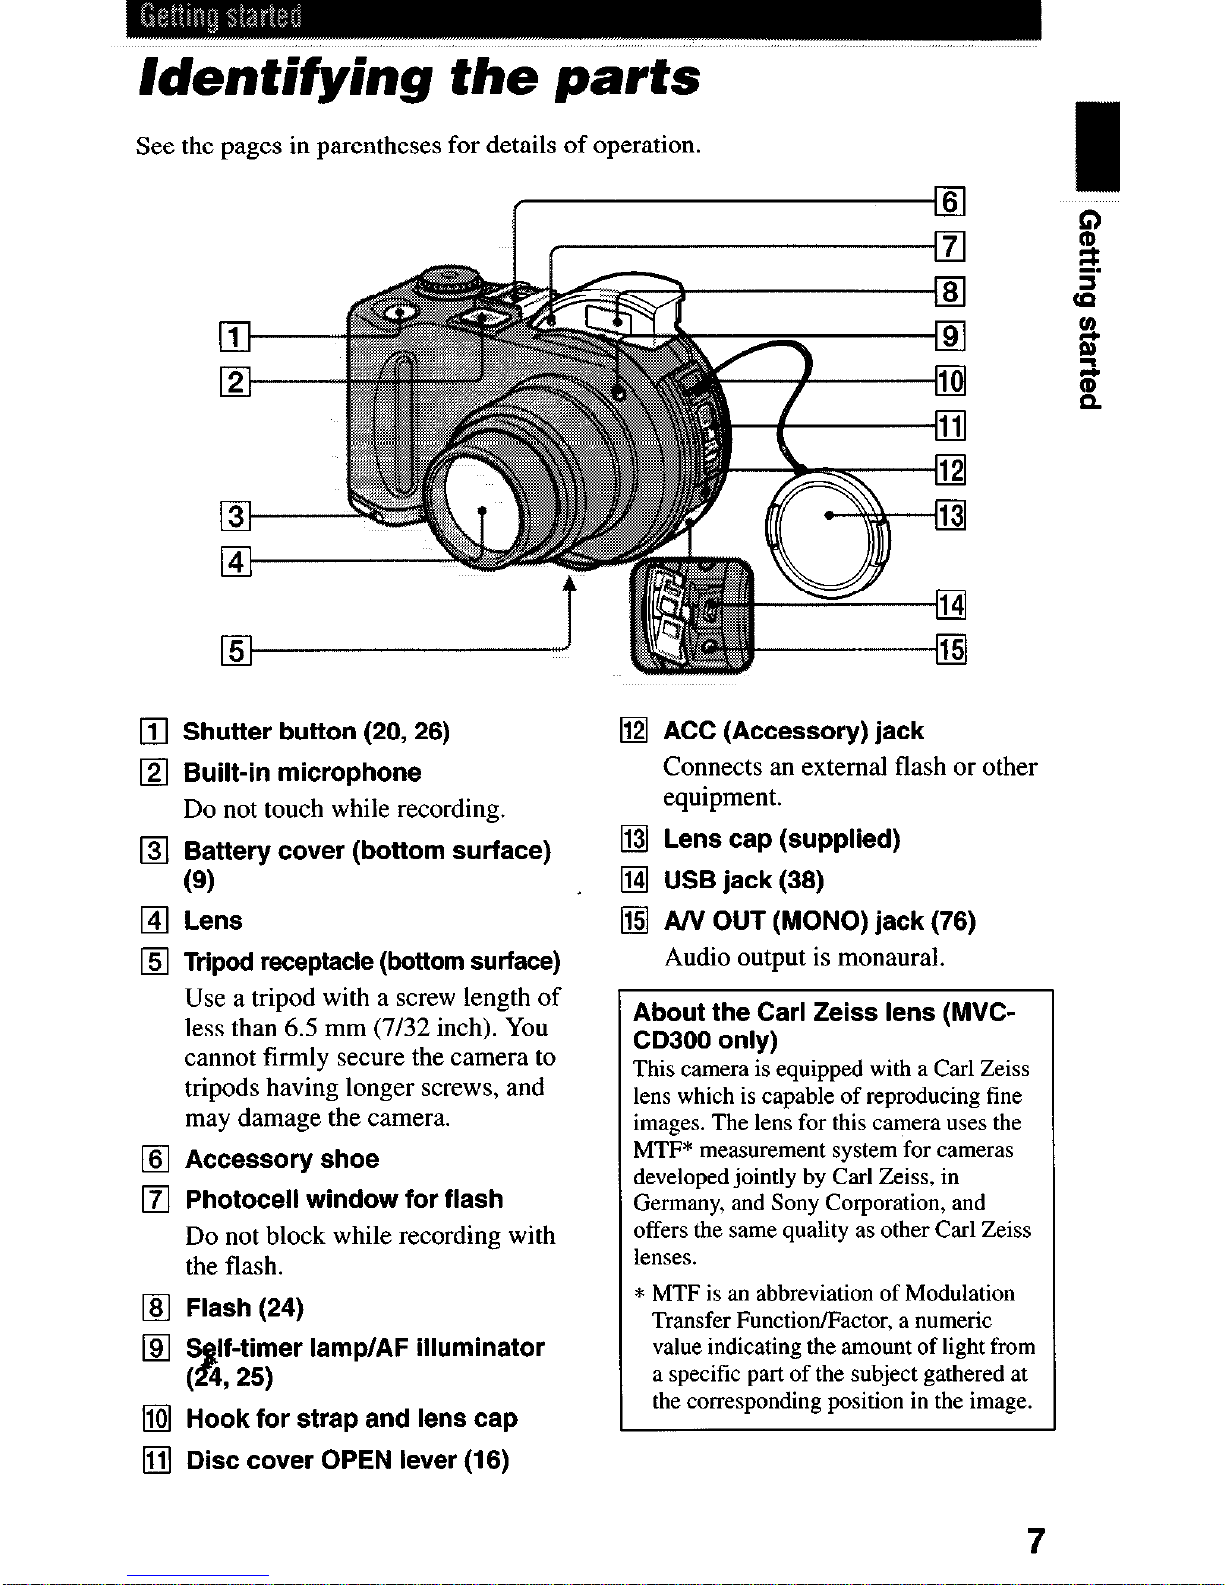
Identifying the parts
See the pages in parentheses for details of operation.
d
q
Shutter button (20,26)
q
Built-in microphone
Do not touch while recording.
q
Bgery cover (bottom surface)
q
Lens
q
Tripod receptacle (bottom surface)
Use a tripod with a screw length of
less than 6.5 mm (7/32 inch). You
cannot firmly secure the camera to
tripods having longer screws, and
may damage the camera.
q
Accessory shoe
q
Photocell window for flash
Do not block while recording with
the flash.
q
Flash (24)
q
?
If-timer IamplAF illuminator
( 4925)
q
Hook for strap and lens cap
q
Disc cover OPEN lever (16)
q
ACC (Accessory) jack
Connects an external flash or other
equipment.
q
Lens cap (supplied)
q
USB jack (36)
q
AN OUT (MONO) jack (76)
Audio output is monaural.
About the Carl Zeiss lens (MVCCD300 only)
This camera is equipped with a Carl Zeiss
lens which is capable of reproducing fine
images. The lens for this camera uses the
MTF* measurement system for cameras
developed jointly by Carl Zeiss, in
Germany, and Sony Corporation, and
offers the same quality as other Carl Zeiss
lenses.
* MTF is an abbreviation of Modulation
Transfer FunctioniFactor, a numeric
value indicating the amount of light from
a specific part of the subject gathered at
the corresponding position in the image.
7
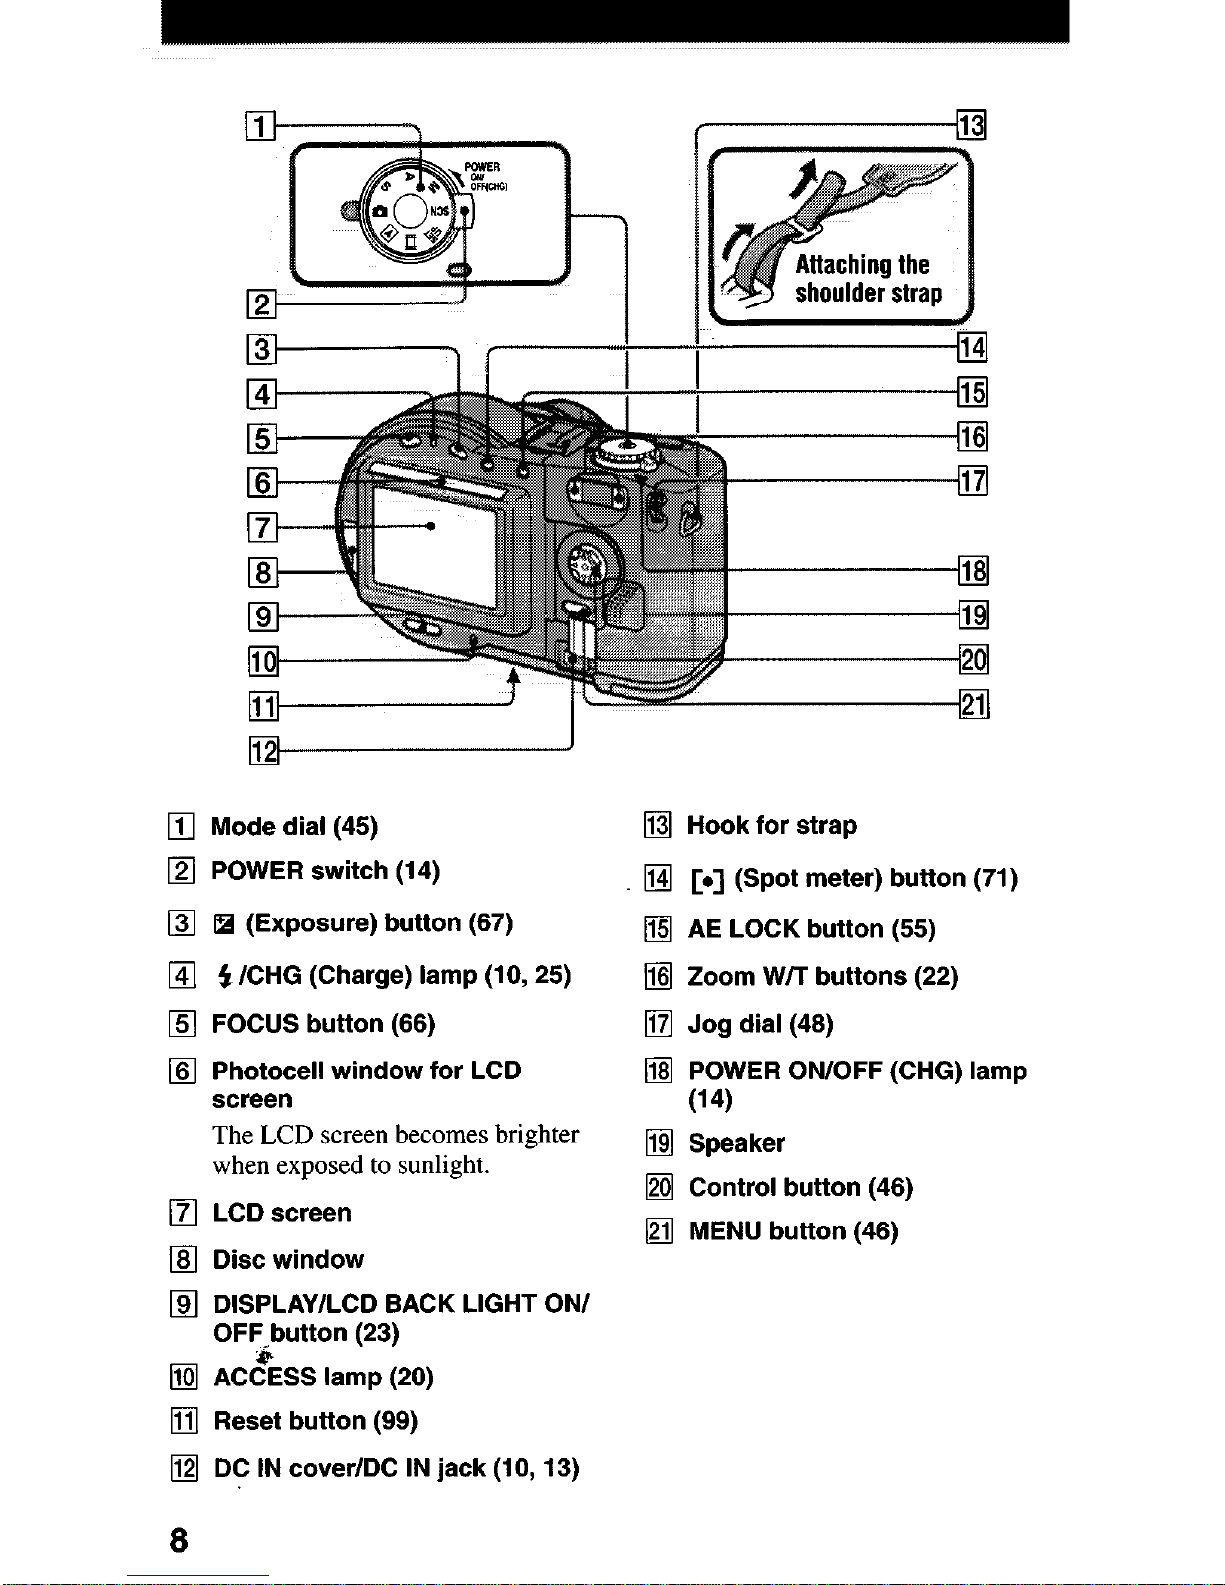
IA-
Mode dial (45)
POWER switch (14)
q
(Exposure) button (67)
$ /CHG (Charge) lamp (10,25)
FOCUS button (66)
Photocell window for LCD
screen
The LCD screen becomes brighter
when exposed to sunlight.
LCD screen
Disc window
DISPLAY/LCD BACK LIGHT ON/
OFF-button (23)
AC&S lamp (20)
Hook for strap
[a] (Spot meter) button (71)
AE LOCK button (55)
Zoom W/T buttons (22)
Jog dial (48)
POWER ON/OFF (CHG) lamp
(14)
Speaker
Control button (46)
MENU button (46)
q Reset button (99)
q DC IN cover/DC IN jack (10,13)
8
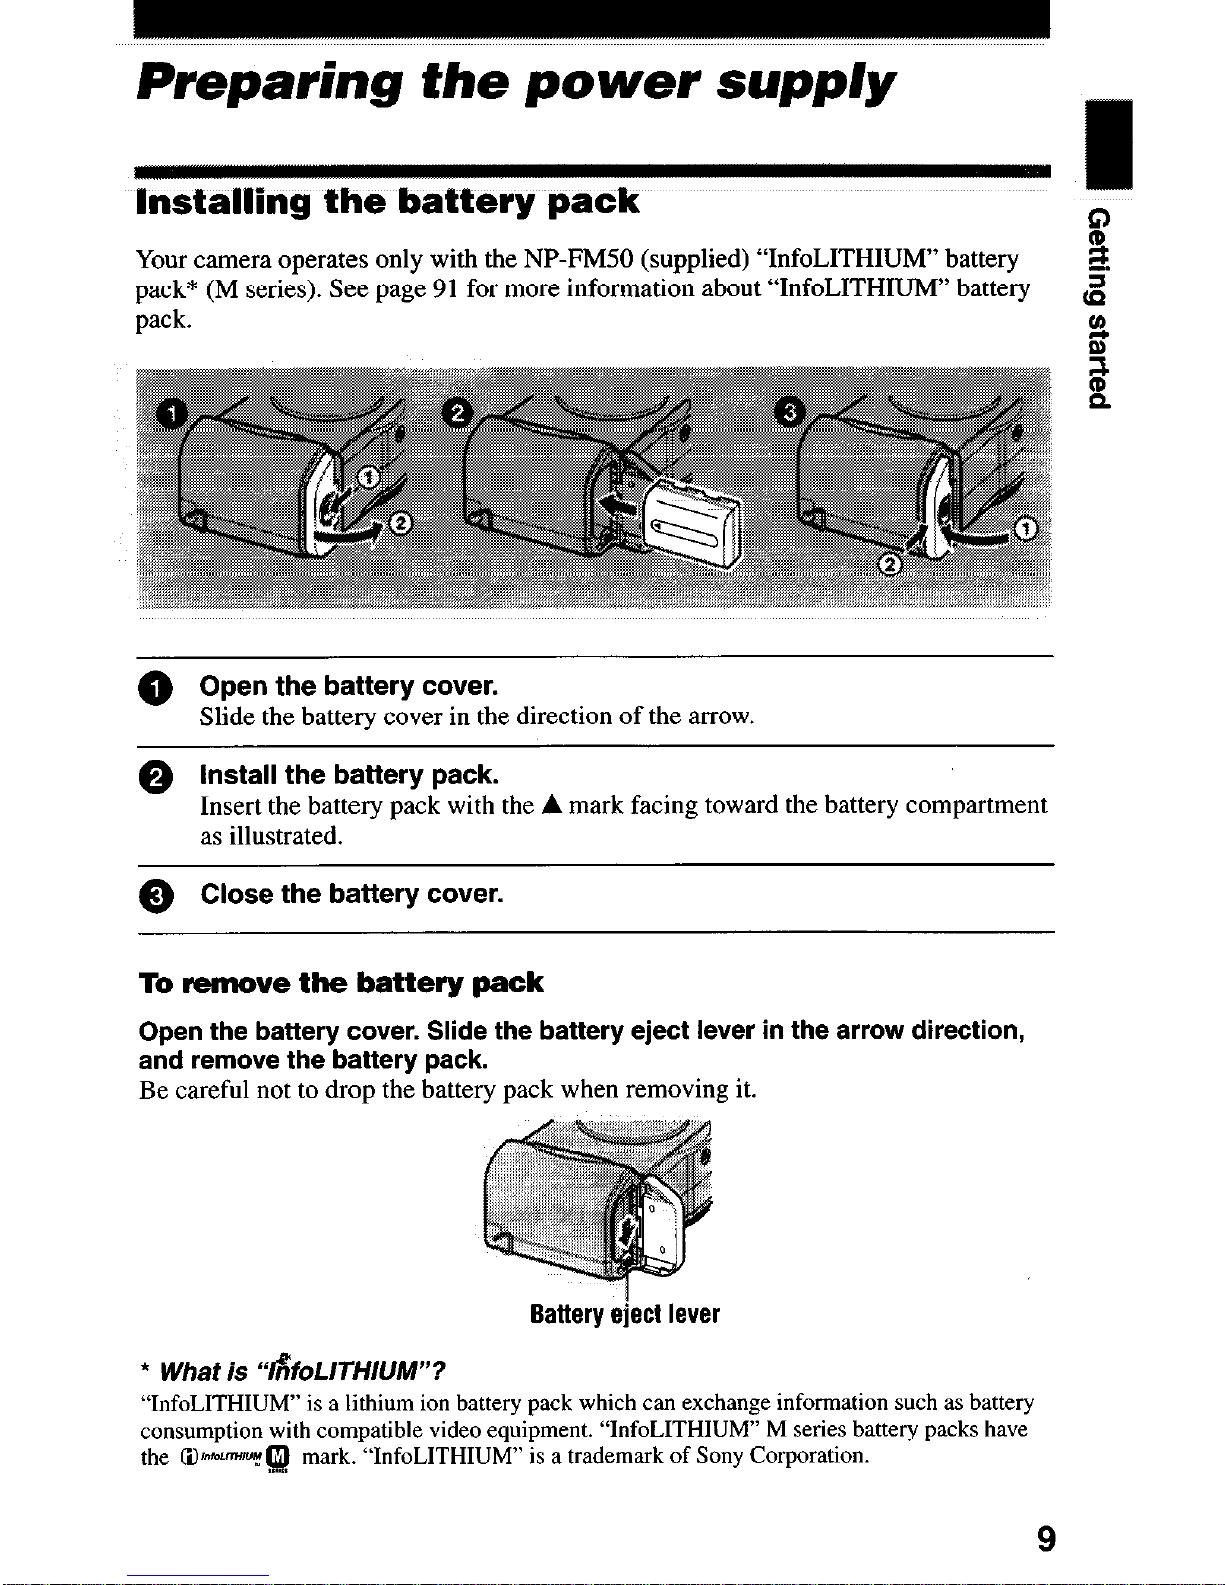
Preparing the power supply
installing the battery pack
Your camera operates only with the NP-PM50 (supplied) “InfoLITHIUM” battery
3.
pack* (M series). See page 91 for more information about “InfoLITHIUM” battery
z
pack.
@ Open the battery cover.
Slide the battery cover in the direction of the arrow.
@ Install the battery pack.
Insert the battery pack with the A mark facing toward the battery compartment
as illustrated.
0 Close the battery cover.
To remcve the battery pack
Open the battery cover. Slide the battery eject lever in the arrow direction,
and remove the battery pack.
Be careful not to drop the battery pack when removing it.
Battery eject lever
* What is “Vi?foLITHIlJM”?
“InfoLITHIUM” is a lithium ion battery
pack
which can exchange information such as battery
consumption with compatible video equipment. “InfoLITHIUM” M series battery packs have
the @-?a mark. “InfoLITHIUM” is a trademark of Sony Corporation.
.,*,,*
9
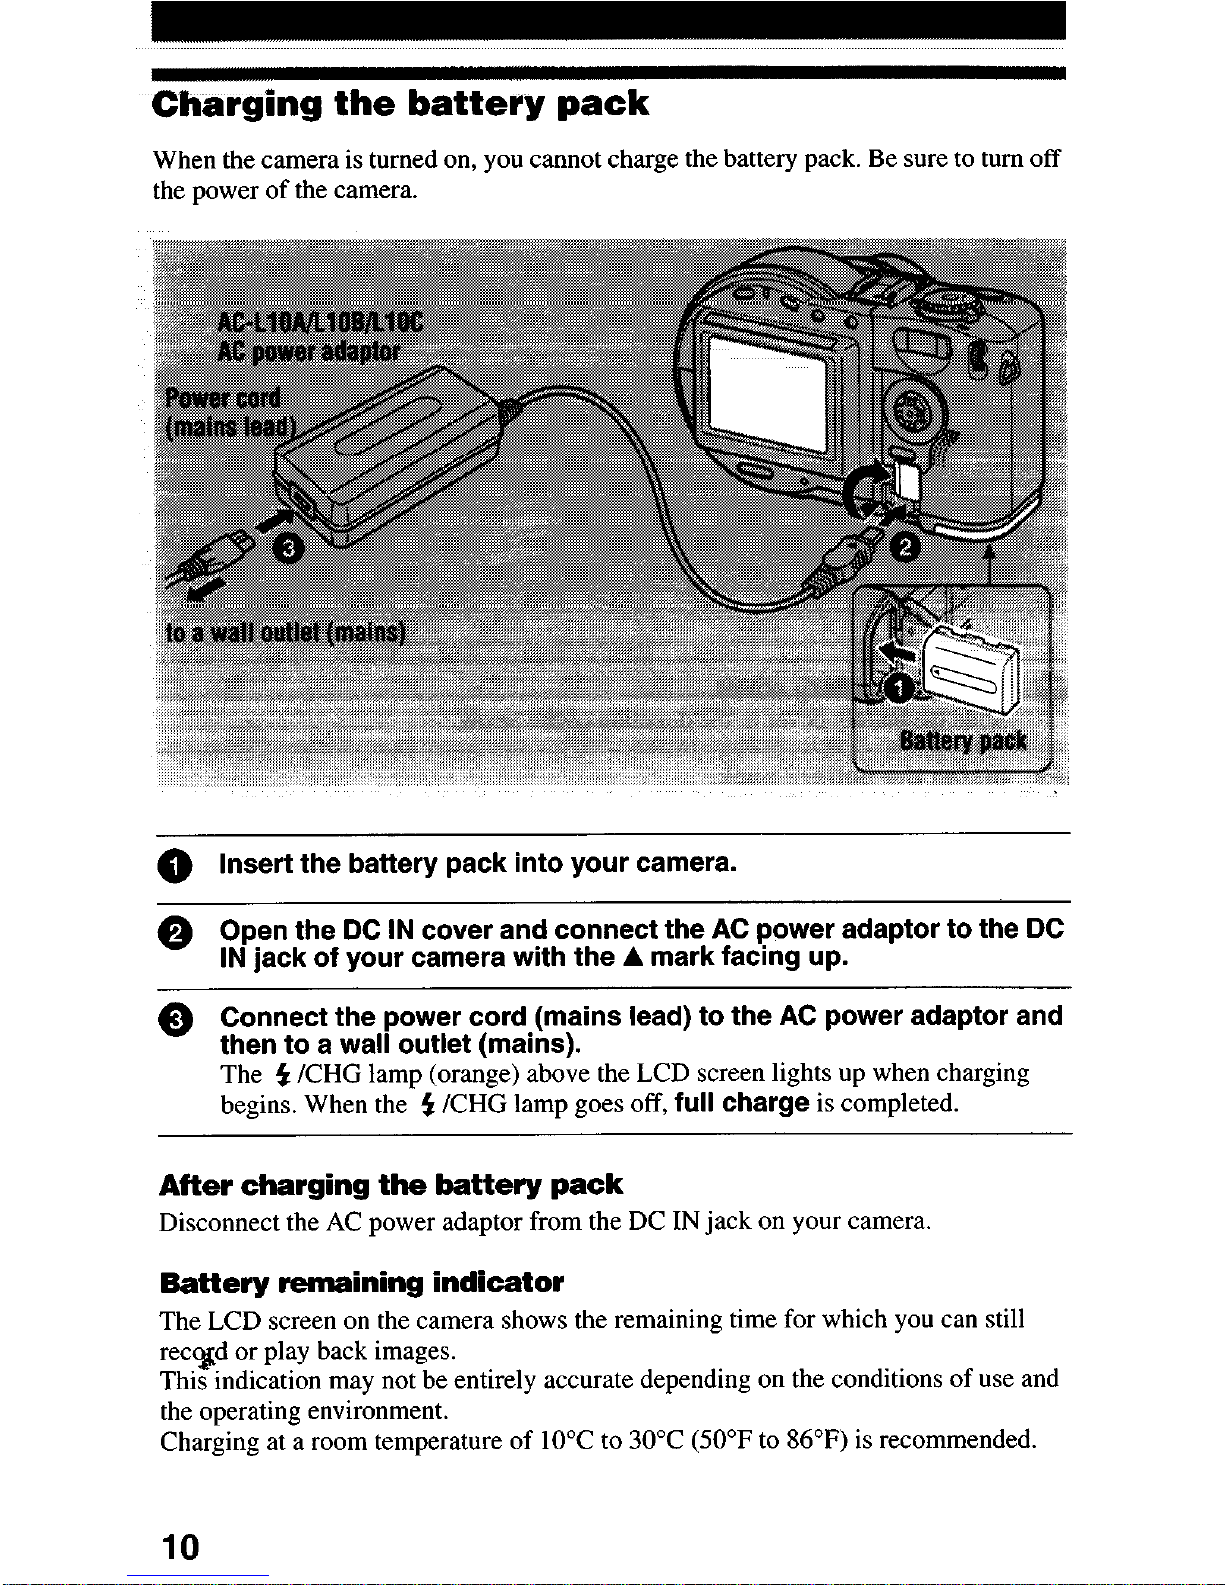
Charging the battery pack
When the camera is turned on, you cannot charge the battery pack. Be sure to turn off
the power of the camera.
0 Insert the battery pack into your camera.
0 Open the DC IN cover and connect the AC power adaptor to the DC
IN jack of your camera with the A mark facing up.
0 Connect the power cord (mains lead) to the AC power adaptor and
then to a wall outlet (mains).
The 5 /CHG lamp (orange) above the LCD screen lights up when charging
begins. When the 5 KHG lamp goes off, full charge is completed.
After charging the battery pack
Disconnect the AC power adaptor from the DC IN jack on your camera.
Battery remaining indicator
The LCD screen on the camera shows the remaining time for which you can still
recsd or play back images.
This indication may not be entirely
accurate depending on the conditions of use and
the operating environment.
Charging at a room temperature of 10°C to 30°C (50°F to 86°F) is recommended.
10
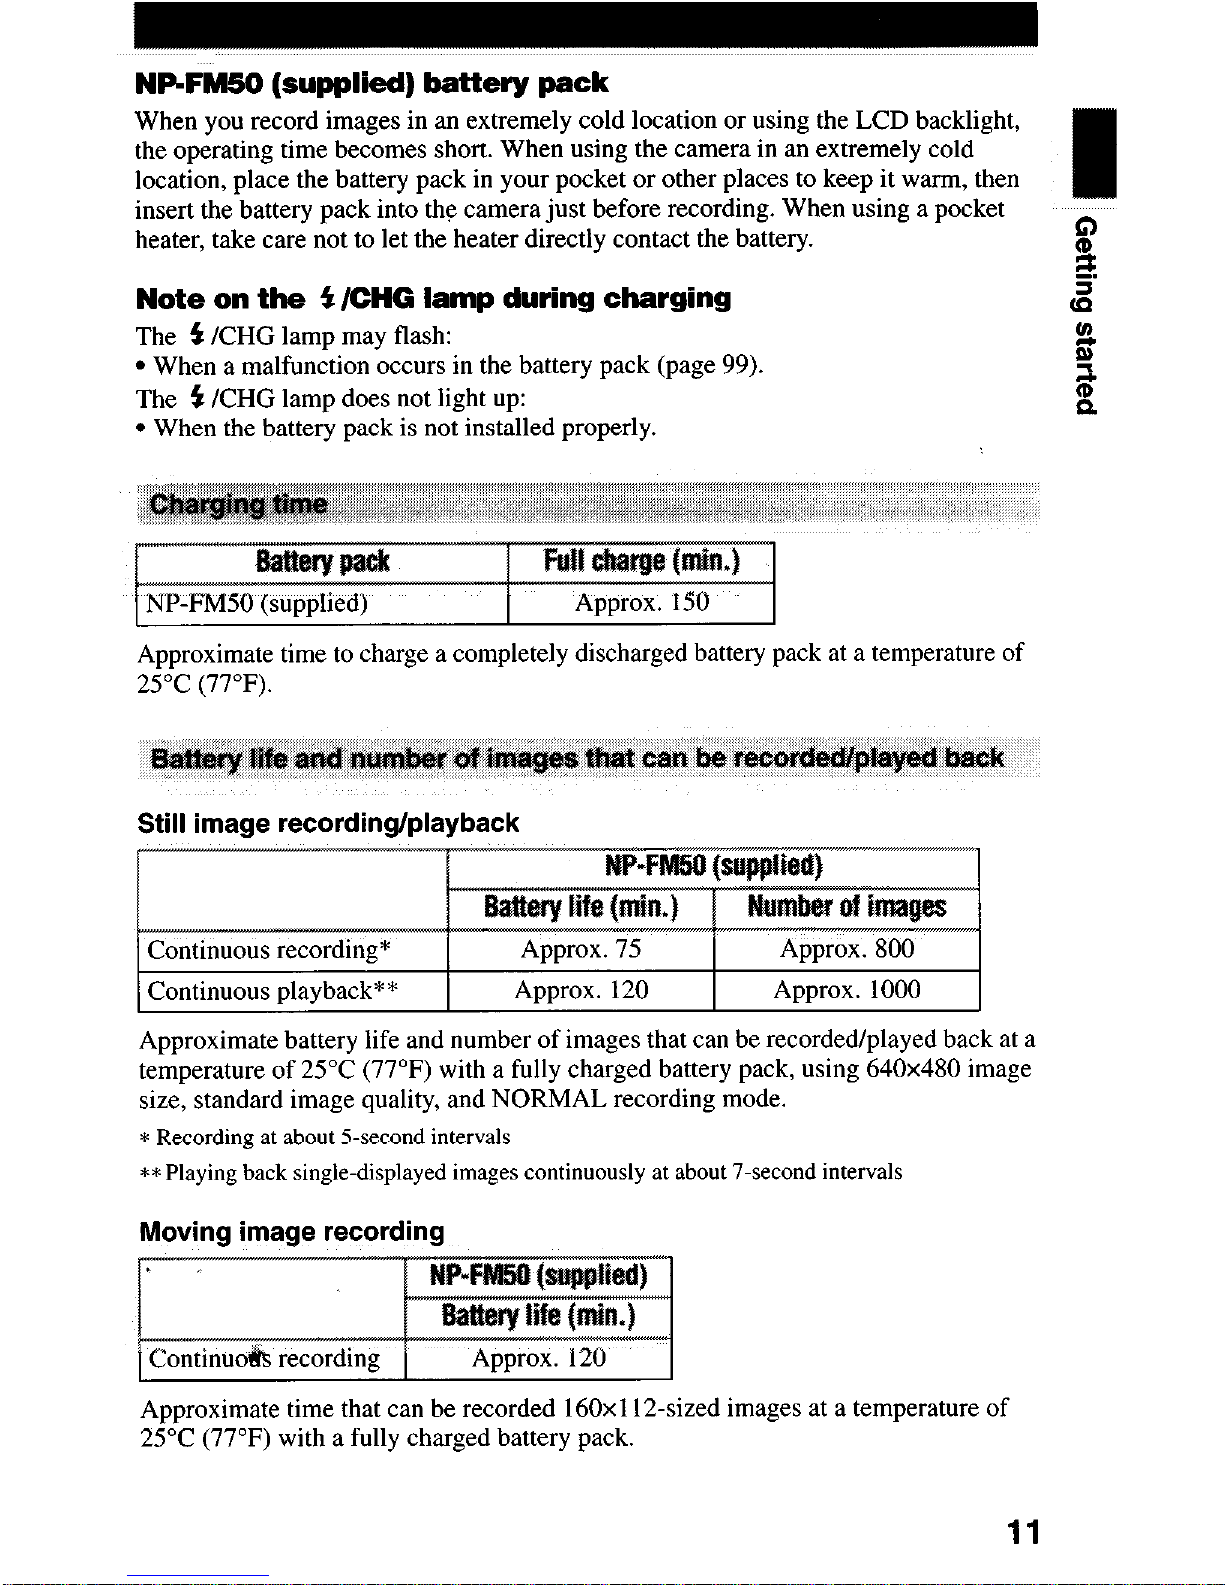
NPFM50 (supplied) battery pack
When you record images in an extremely cold location or using the LCD backlight,
the operating time becomes short. When using the camera in an extremely cold
location, place the battery pack in your pocket or other places to keep it warm, then
insert the battery pack into the camera just before recording. When using a pocket
heater, take care not to let the heater directly contact the battery.
g
Note on the 5 /CHG lamp during charging
tz
The 5 KHG lamp may flash:
l
When a malfunction occurs in the battery pack (page 99).
The f /CHG lamp does not light up:
l
When the battery pack is not installed properly.
b
Approximate time to charge a completely discharged battery pack at a temperature of
25°C (77°F).
Still image recording/playback
Continuous playback**
Approx. 120 Approx. 1000
Approximate battery life and number of images that can be recorded/played back at a
temperature of 25°C (77°F) with a fully charged battery pack, using 640x480 image
size, standard image quality, and NORMAL recording mode.
* Recording at about Ssecond intervals
**Playing back single-displayed images continuously at about 7-second intervals
Moving image recording
1 Contint& recording 1
Approx. 120 1
Approximate time that can be recorded 160x 112-sized images at a temperature of
25°C (77°F) with a fully charged battery pack.
11

Notes
l The battery life and number of images will be decreased when using at low temperature, using
the flash, turning the power on/off frequently, or using the zoom.
l The numbers of images shown on tables above are as a guide. The numbers may be smaller
depending on conditions.
l If sufficient battery remaining time is indicated but the power runs out soon, fully charge the
battery so that the correct battery remaining time appears.
l Do not short the DC plug of the AC power adaptor with a metallic object, as this may cause a
malfunction.
12

Using the AC power adaptor
@ Open the DC IN cover and connect the AC power adaptor to the DC
IN jack of your camera with the A mark facing up.
0 Connect the power cord (mains lead) to the AC power adaptor and
then to a wall outlet (mains).
Using a car battery
Use a Sony DC adaptor/charger.
Using your camera abroad
For details, see page 90.
When using the AC power adaptor
Be sure to use it near the wall outlet (mains). If a malfunction occurs, disconnect the
plug from the wall outlet (mains).
13
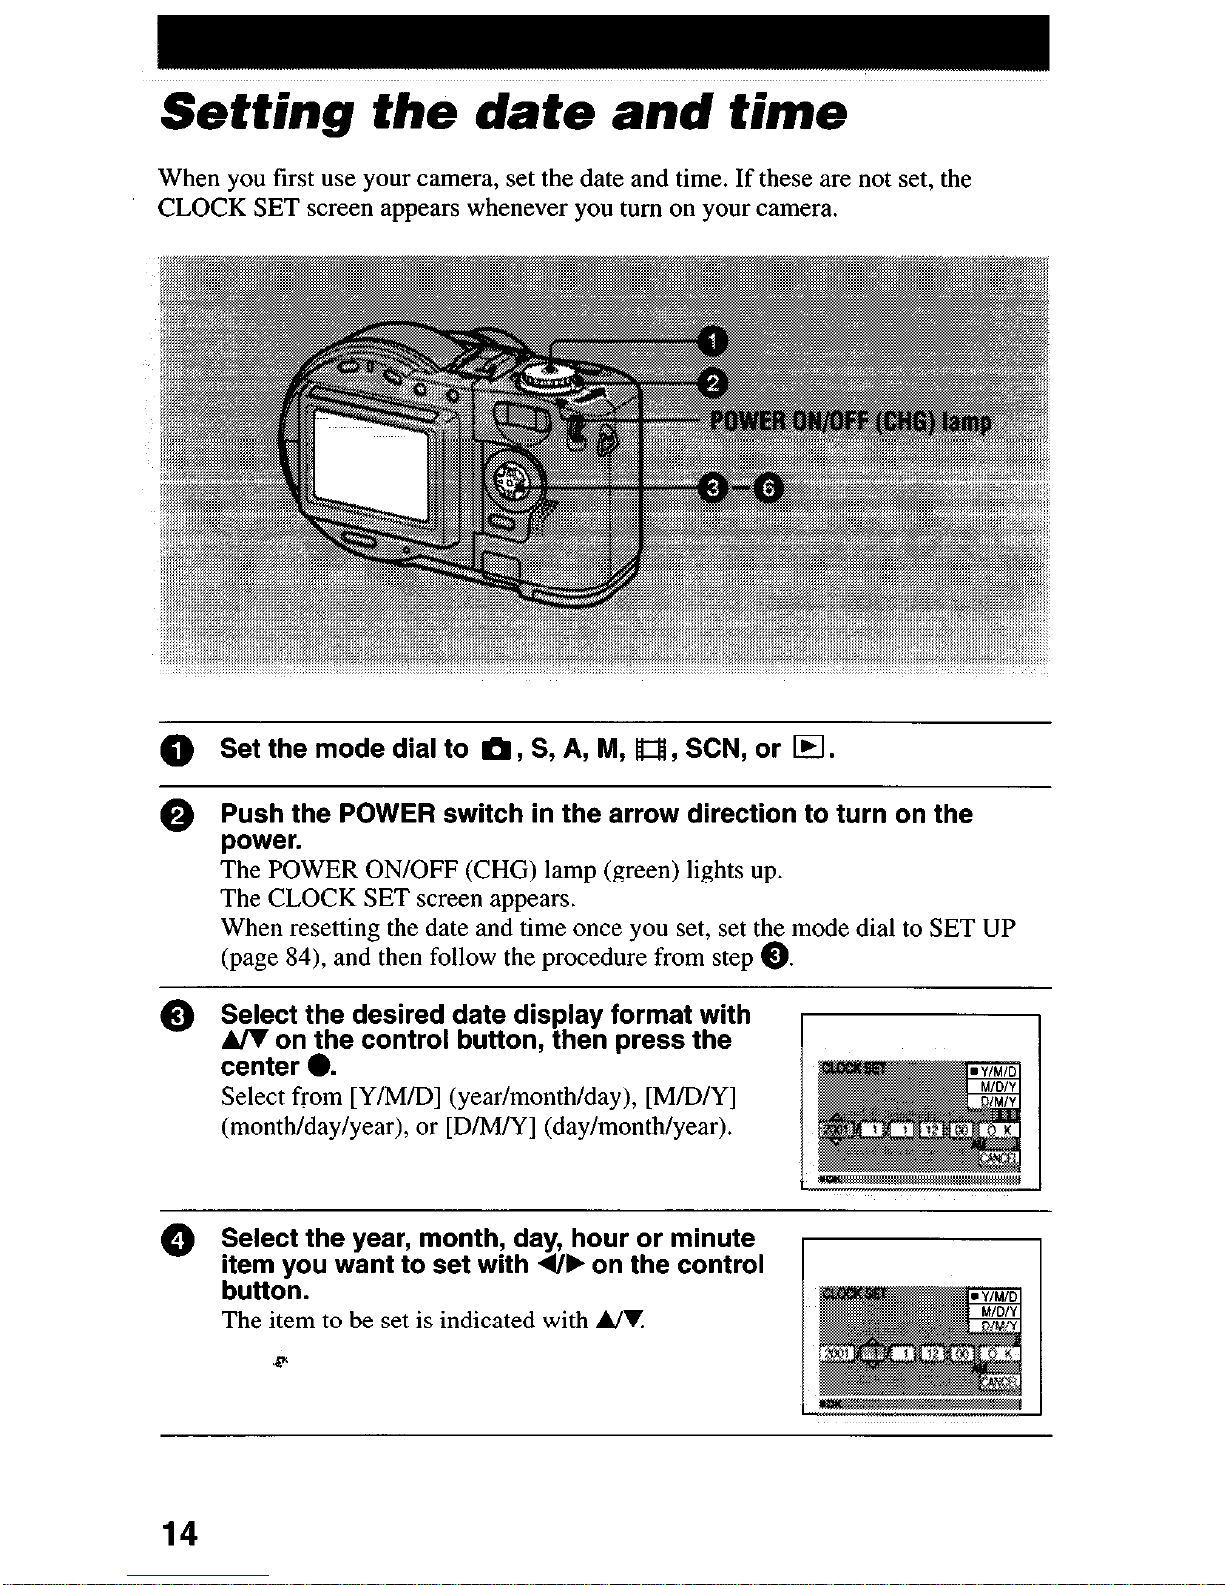
Setting the date and time
When you first use your camera, set the date and time. If these are not set, the
CLOCK SET screen appears whenever you turn on your camera.
@ Set the mode dial to m, S, A, M, a, SCN, or
q
.
0 Push the POWER switch in the arrow direction to turn on the
power.
The POWER ON/OFF (CHG) lamp (green) lights up.
The CLOCK SET screen appears.
When resetting the date and time once you set, set the mode dial to SET UP
(page 84) and then follow the procedure from step 0.
0 Select the desired date display format with
AIV on the control button, then press the
center 0.
Select from [Y/M/D] (year/month/day), [M/D/Y]
(month/day/year), or [D/M/Y] (day/month/year).
0 Select the year, month, day, hour or minute
item you want to set with 4+ on the control
button.
The item to be set is indicated with &I.
F
14
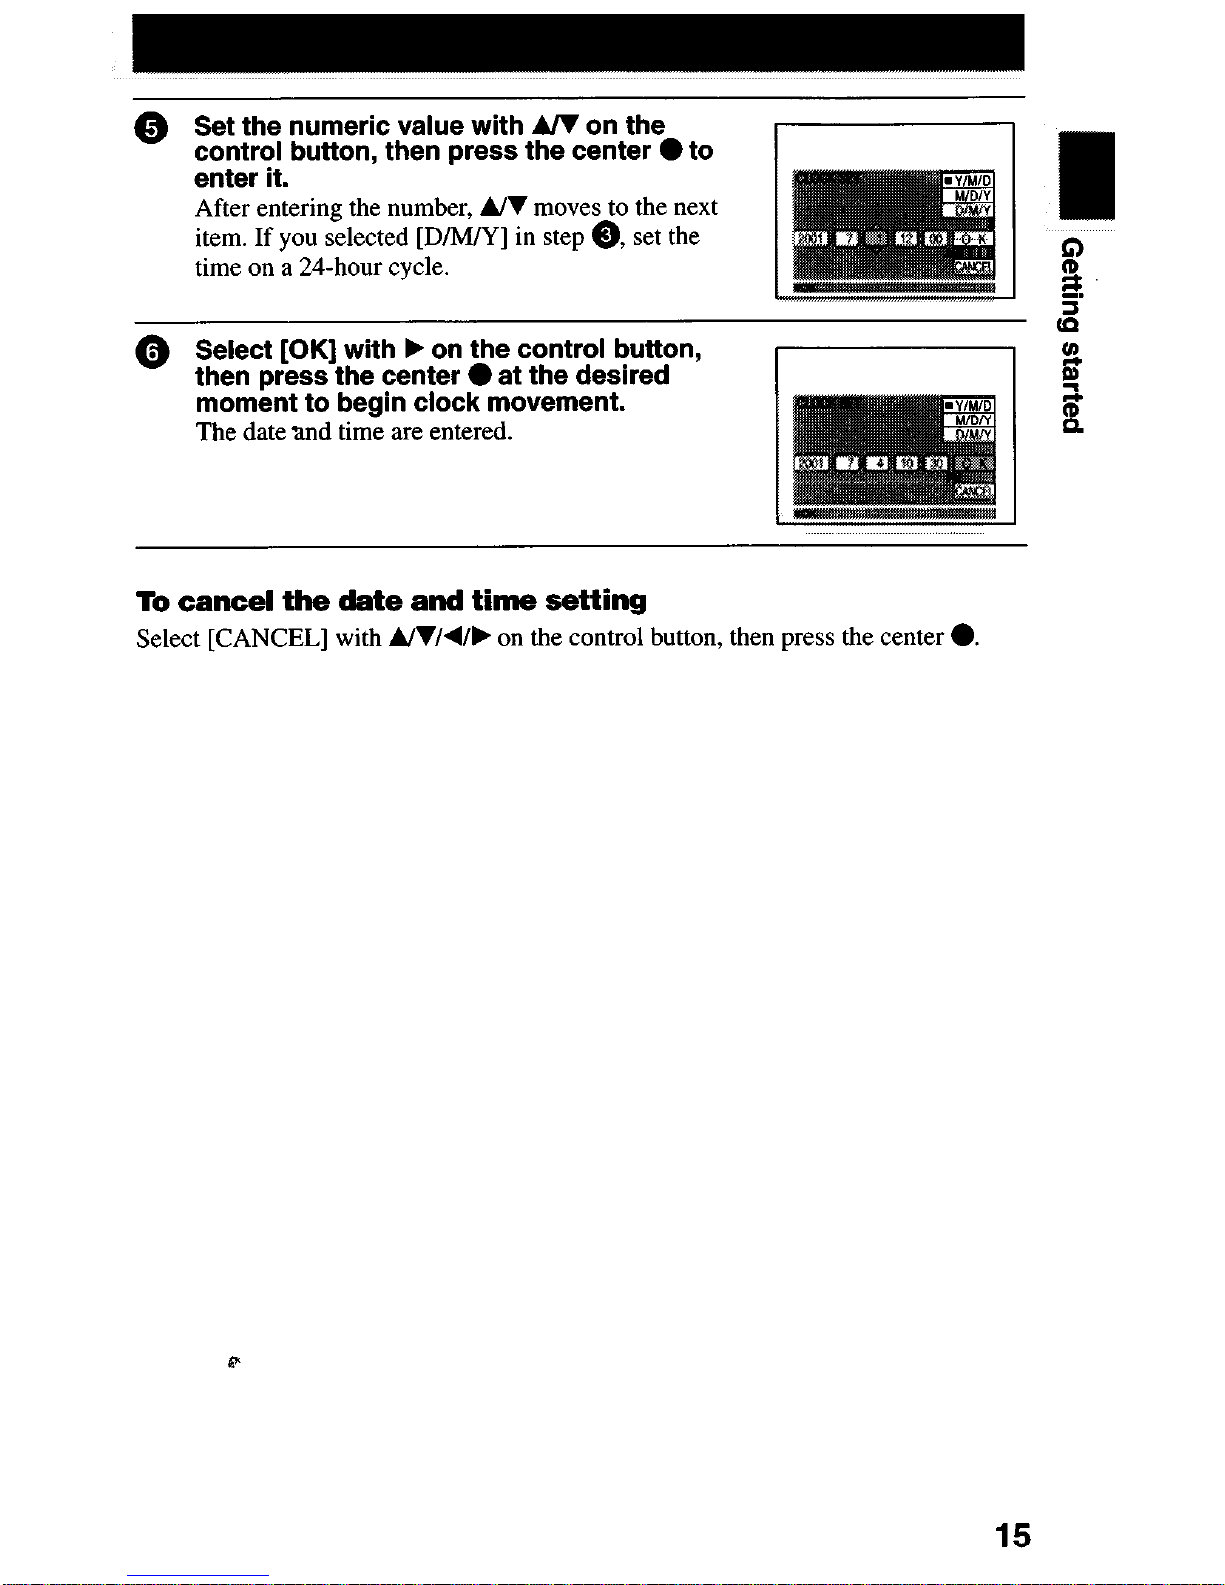
@ Set the numeric value with A/V on the
control button, then press the center 0 to
enter it.
After entering the number, A/I moves to the next
item. If you selected [D/M/Y] in step 0, set the
time on a 24-hour cycle.
0 Select [OK] with F on the control button,
u,
then press the center 0 at the desired
B
moment to begin clock movement.
2
The date and time are entered.
b
To cancel the date and time setting
Select [CANCEL] with A/I/d/b on the control button, then press the center 0.
P
15

n use only the 8 cm CD-Rs or 8 cm CD-RWs that have these
0 While sliding the lock tab to the left, slide down the disc cover
OPEN lever.
Open the disc cover by your hand after the cover is unlocked.
0 Place a disc with the printed side up.
Push down the center of the disc until it clicks. When installing, do not push
with too much force and do not touch the pickup lens.
0 Close tile disc cover.
16

While sliding the lock tab to t
the disc cover after the cover is unlocked. Then, remove the disc as illustrated below.
.
Notes
l Before removing the disc, be sure to check that the disc is not rotating.
l Do not open the disc cover while the ACCESS lamp is lit. If you do, the recorded image may be
damaged or the disc may become unusable.
l When writing data on a disc or conhecting with a computer using the USB connection, the disc
cover OPEN lever is locked.
17
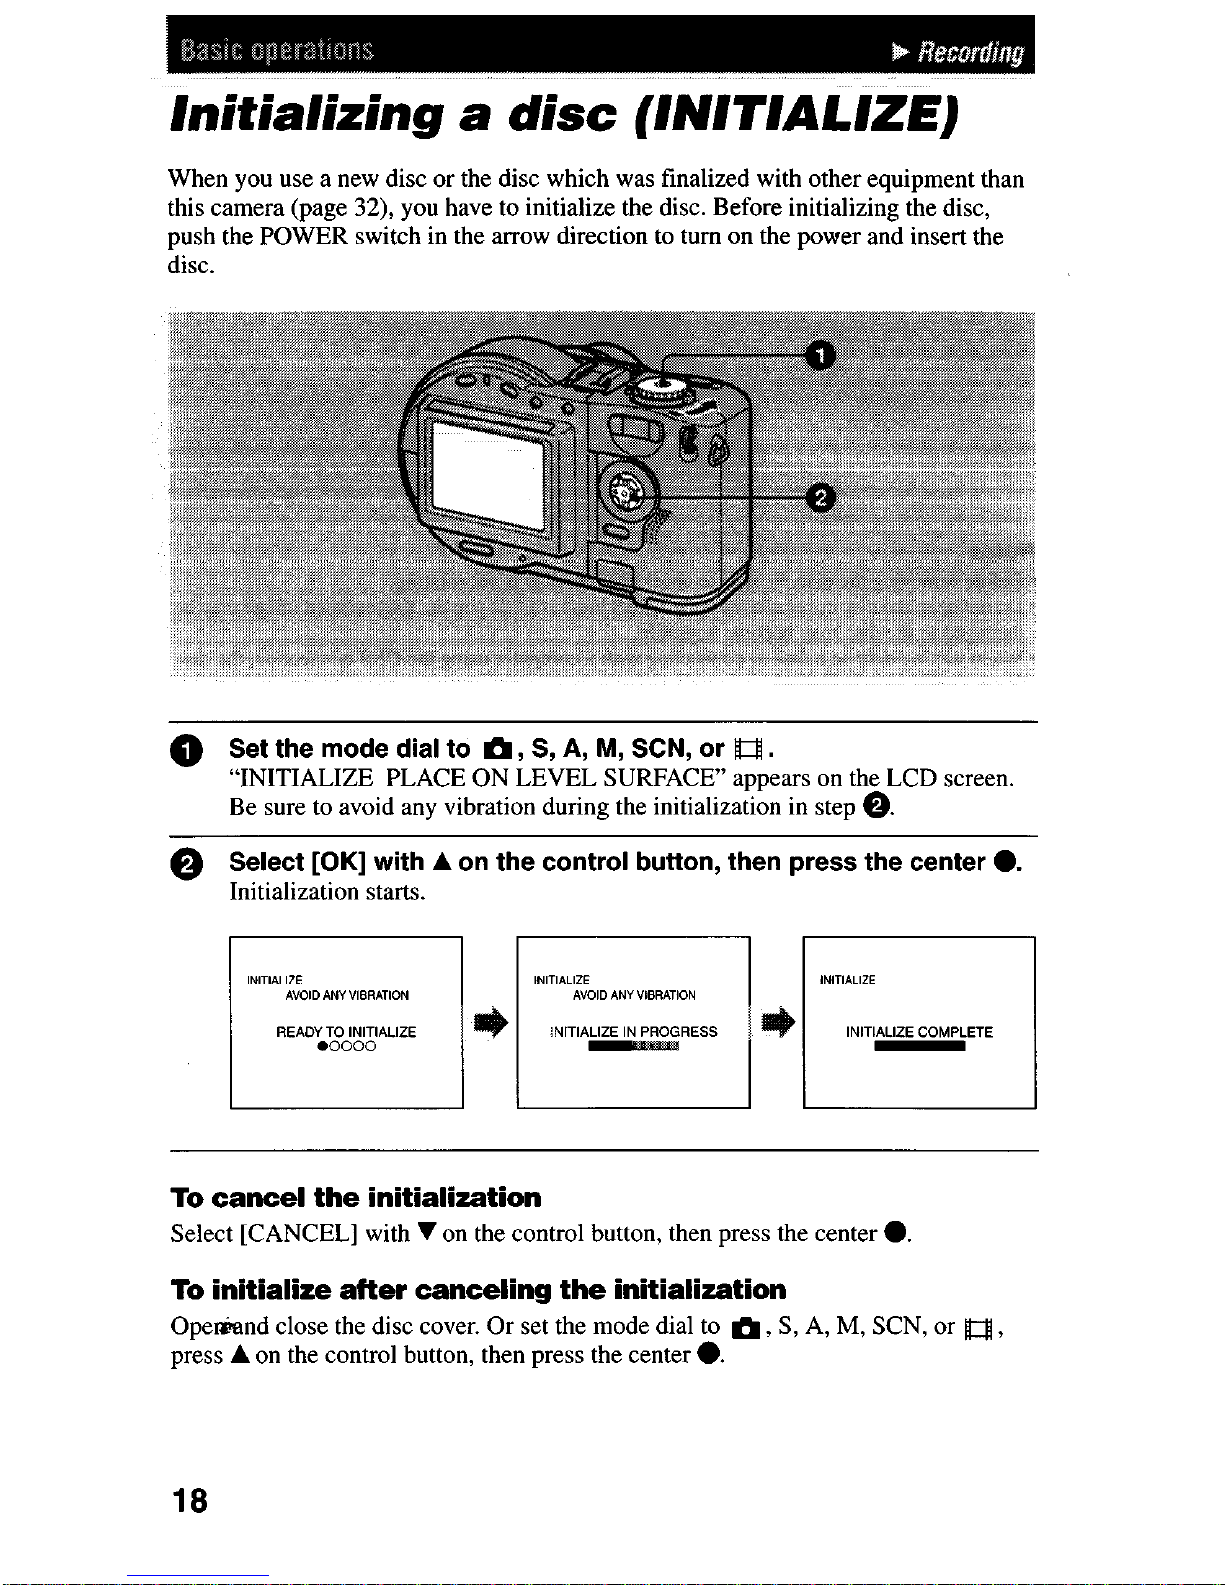
Initializing a disc (INITIALIZE)
When you use a new disc or the disc which was finalized with other equipment than
this camera (page 32), you have to initialize the disc. Before initializing the disc,
push the POWER switch in the arrow direction to turn on the power and insert the
disc.
0 Set the mode dial to m, S, A, M, SCN, or ll3.
“INITIALIZE PLACE ON LEVEL SURFACE” appears on the LCD screen.
Be sure to avoid any vibration during the initialization in step 0.
0 Select [OK] with A on the control button, then press the center 0.
Initialization starts.
To cancel the initialization
Select [CANCEL] with v on the control button, then press the center 0.
To initialize after canceling the initialization
Opekand close the disc cover. Or set the mode dial to m, S, A, M, SCN, or [#1,
press A on the control button, then press the center 0.
18
what is initialization?
The initialization is required to record images on a disc.
In case that you have executed the finalization (page 32) using the camera to view
images on a CD-ROM drive, the initialization is automatically executed. You can
continuously record images. When executing the finalization using a computer or
other equipment, execute the initialization to record new images. Images recorded
before finalization will remain on the disc.
Tip
You can also execute the initialization using [ @ ] (DISC TOOL) in the setup settings
(page 84).
F
19

Recording still images
Still images are recorded in JPEG format. Before recording still images, push the
POWER switch in the arrow direction to turn on the power and insert a disc.
@ Set the mode dial to m, S, A, M, or SCN.
Press and hold the shutter button halfway down.
The beeps sound. However,
the image has not been recorded yet.
While the
AE/AF lock indicator
is flashing, the camera automatically adjusts the
exposure and focus of
e captured image. When th
era finishes the
automatic adjustments,
the AE/AF lock indicator
ps flashing, then
lights up, and the camera is ready for recording.
If you release the shutter button, the recording will be canceled.
AE/AF lock indicator (green)
flashes -+ lights up
20
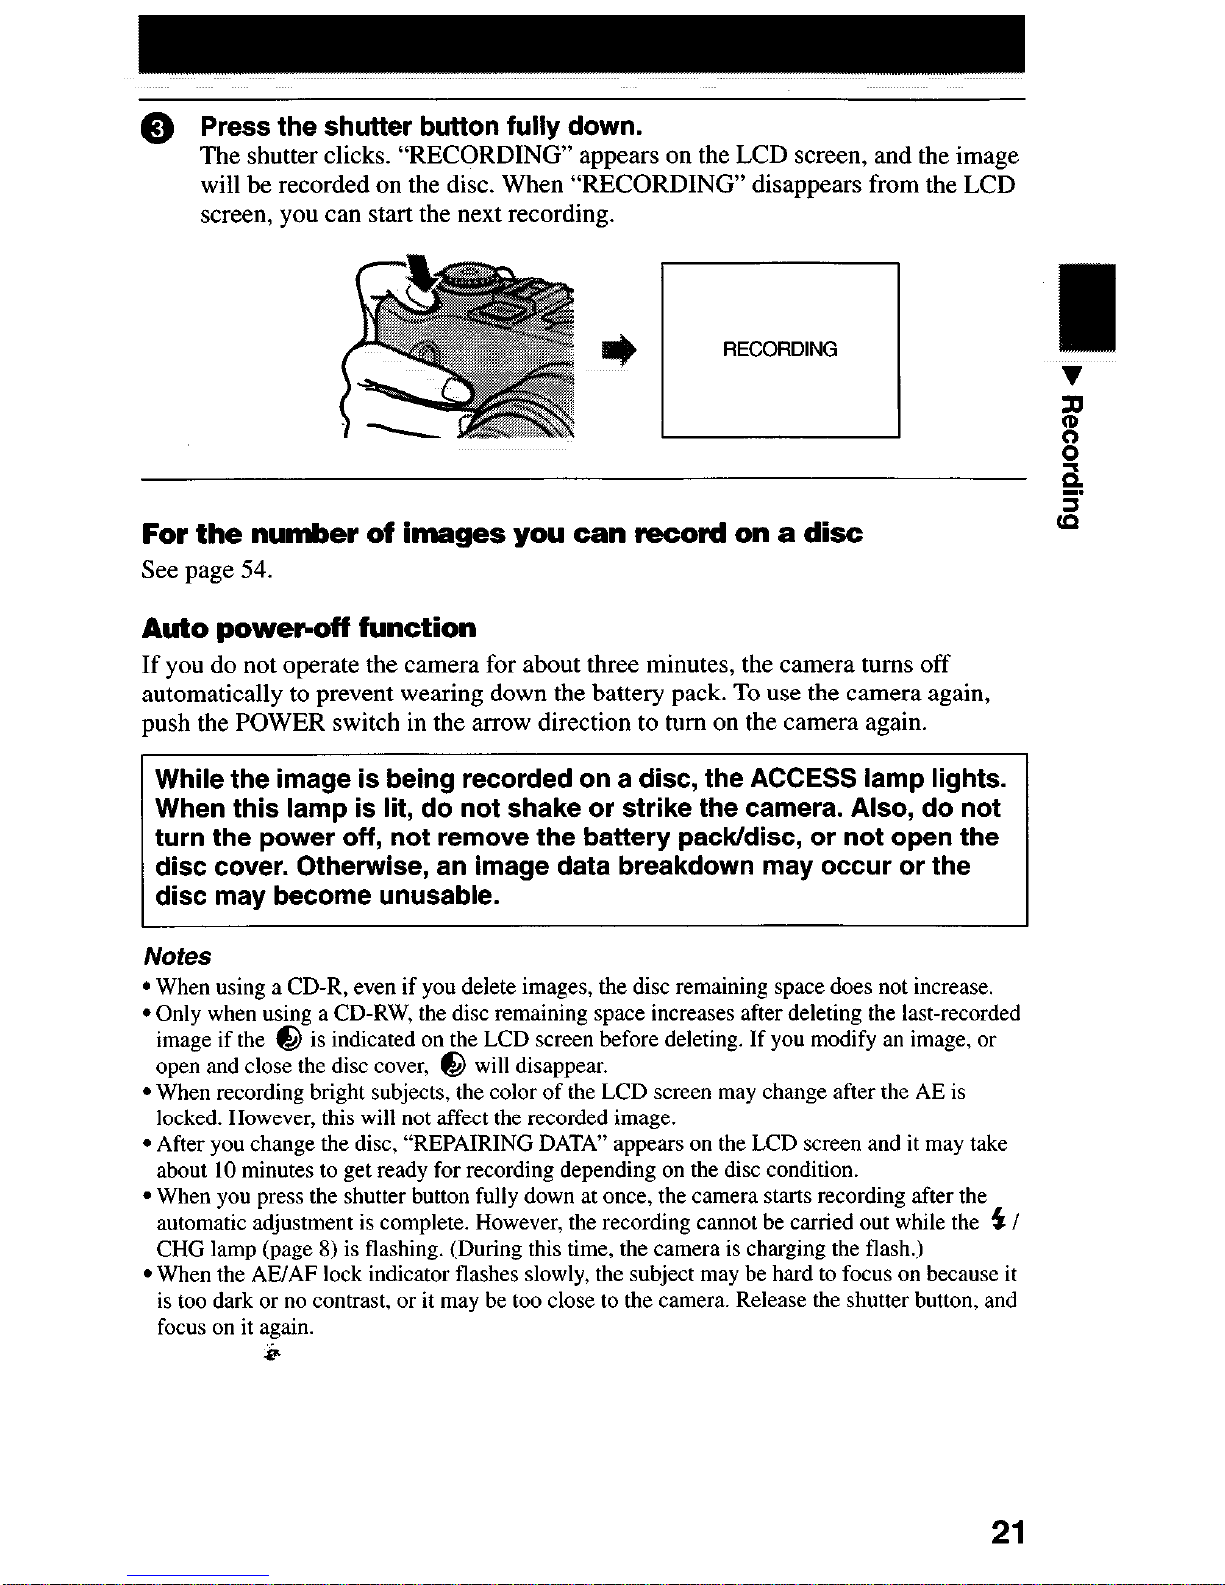
@ Press the shutter button fully down.
The shutter clicks. “RECORDING” appears on the LCD screen, and the image
will be recorded on the disc. When “RECORDING” disappears from the LCD
screen, you can start the next recording.
For
the number of images you can record on a disc
See page 54.
Auto powepoff function
If you do not operate the camera for about three minutes, the camera turns off
automatically to prevent wearing down the battery pack. To use the camera again,
push the POWER switch in the arrow direction to turn on the camera again.
While the image is being recorded on a disc, the ACCESS lamp lights.
When this lamp is lit, do not shake or strike the camera. Also, do not
turn the power off, not remove the battery pack/disc, or not open the
disc cover. Otherwise, an image data breakdown may occur or the
disc may become unusable.
Notes
l When using a CD-R, even if you delete images, the disc remaining space does not increase.
l Only when using a CD-RW, the disc remaining space increases after deleting the last-recorded
image if the @ is indicated on the LCD screen before deleting. If you modify an image, or
open and close the disc cover, @ will disappear.
l When recording bright subjects, the color of the LCD screen may change after the AE is
locked. However, this will not affect the recorded image.
l After you change the disc, “REPAIRING DATA” appears on the LCD screen and it may take
about 10 minutes to get ready for recording depending on the disc condition.
l When you press the shutter button fully down at once, the camera starts recording after the
automatic adjustment is complete. However, the recording cannot be carried out while the 5 /
CHG lamp (page 8) is flashing. (During this time, the camera is charging the flash.)
l When the AE/AF lock indicator flashes slowly, the subject may be hard to focus on because it
is too dark or no contrast, or it may be too close to the camera. Release the shutter button, and
focus on it again.
i
21
You can check the last recorded image by clearing the menu from the screen
(page 46) and pressing 4 (0) on the control button.
To return to the normal recording mode: press the shutter button lightly, or press
4 (0) again.
To delete the image: 1. Press MENU. 2. Select [DELETE] with ., then press the
center 0. 3. Select [OK] with A, then press the center 0.
Adiust the brightness with the [LCD BRIGHTNESS] item in the setup settings
(page 85). This adjustment does not affect the brightness of the images recorded on
the disc.
To turn off the LCD backlight
Press DISPLAY/LCD BACK LIGHT ON/OFF repeatedly to turn off the LCD
backlight (page 23). The battery life will be longer.
,,* ,,,+ ,’ ,““/ _,,, ‘,,.,il*,-i**iii//./.
‘r I,>&., pi y:,: *
/ ..,&,,,,~*~~~ _,,, ,,,,*e ,*^rr,s
,,i%,-,< *, ,<__ ,*,,,*,*/,*,*r ,*,
e I, ,,_,, ! y 6 I
_,__ ____ ,,,,,, I ,,,,, *;%_ ,,,, <<<,,,/,,: r;,“!:~~‘r~;,..‘..‘: .<*a, /,:,
__ *
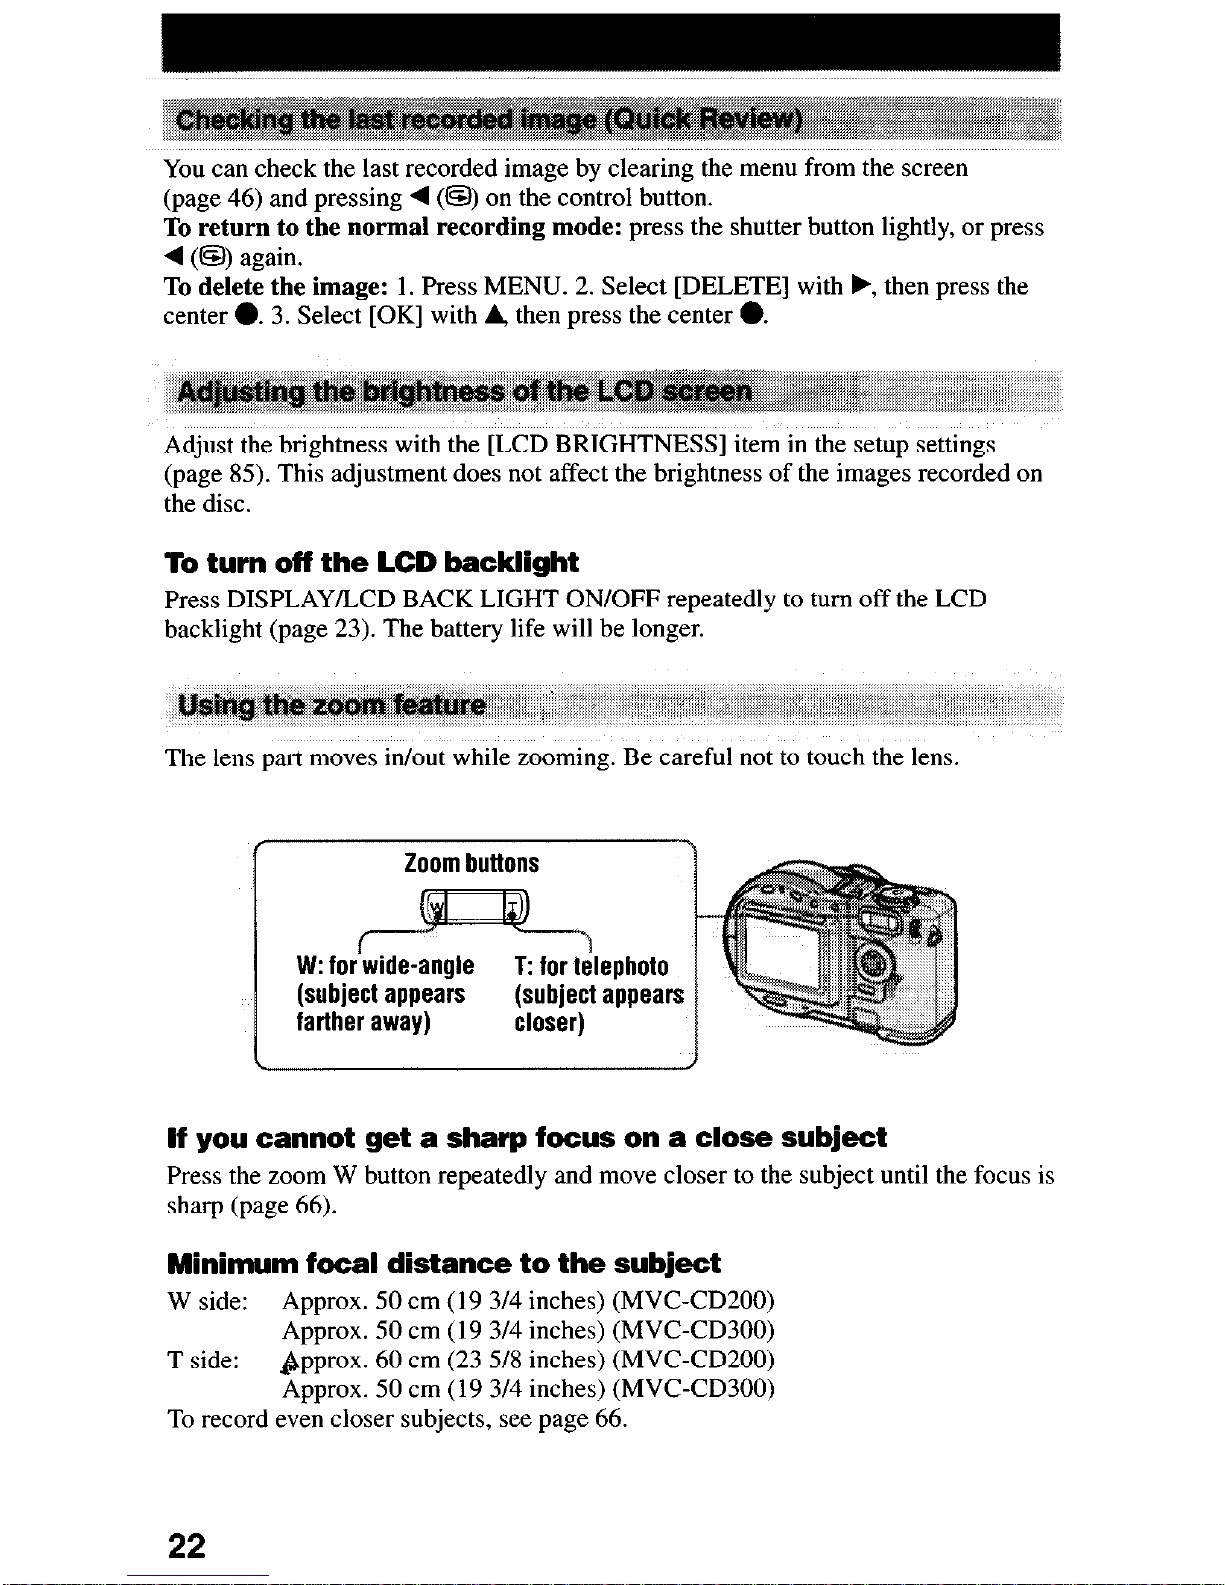
The lens part moves in/out while zooming. Be careful not to touch the lens.
Zoom buttons
If you cannot get a sharp focus on a close subject
Press the zoom W button repeatedly and move closer to the subject until the focus is
sharp (page 66).
Minimum focal distance to the subject
W side:
Approx. 50 cm (19 3/4 inches) (MVC-CD200)
Approx. 50 cm (19 3/4 inches) (MVC-CD300)
T side:
&pprox. 60 cm (23 5/8 inches) (MVC-CDZOO)
Approx. 50 cm (19 3/4 inches) (MVC-CD300)
To record even closer subjects, see page 66.
22
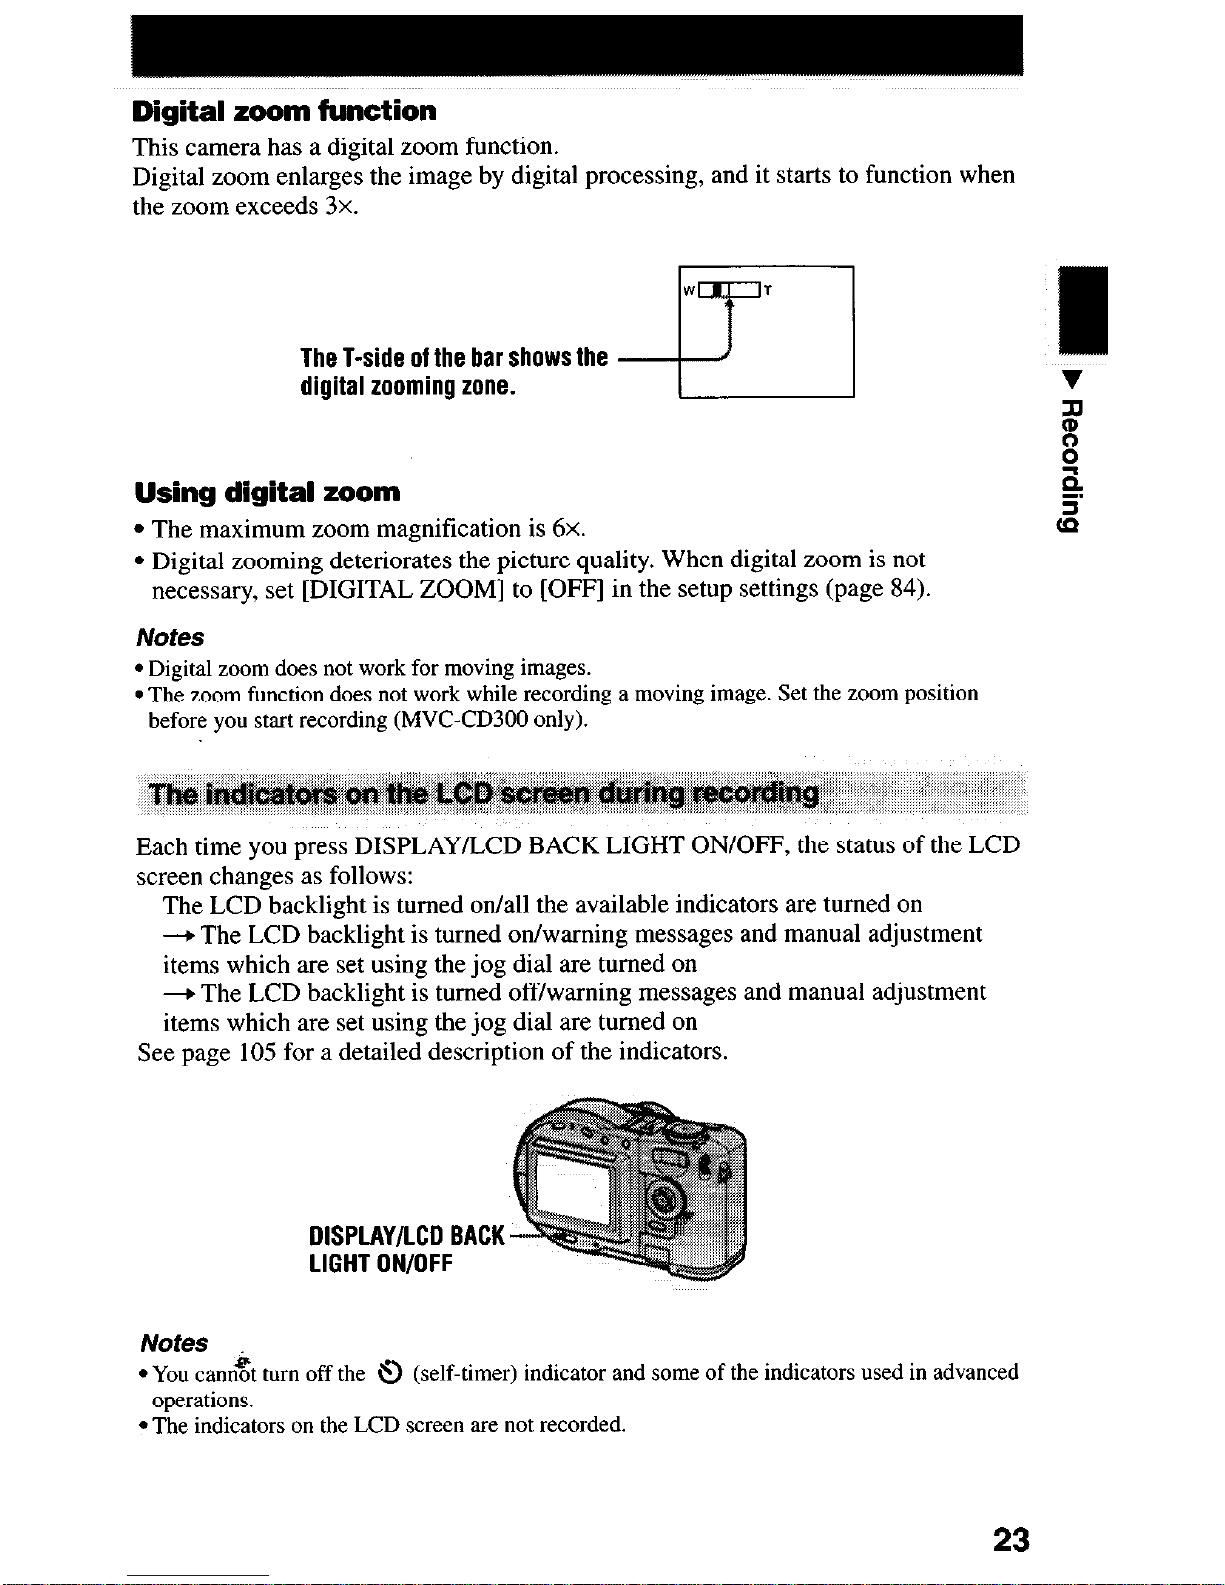
Digital zoom function
This camera has a digital zoom function.
Digital zoom enlarges the image by digital processing, and it starts to function when
the zoom exceeds
3x.
The T-side of the bar shows the
digital zooming zone.
Using digital zoom
l
The maximum zoom magnification is
6x.
l
Digital zooming deteriorates the picture quality. When digital zoom is not
necessary, set [DIGITAL ZOOM] to [OFF] in the setup settings (page 84).
Notes
l
Digital zoom does not work for moving images.
l
The zoom function
does
not work while recording a moving image. Set the zoom position
before you start recording (MVC-CD300 only).
,,, ,,, ,,
,,,_ ,,, _,,_ _____ ,,,
*‘:.. :/7: _, ‘,_I
, ,,
Each time you press DISPLAY/LCD BACK LIGHT ON/OFF, the status of the LCD
screen changes as follows:
The LCD backlight is turned on/all the available indicators are turned on
+ The LCD backlight is turned on/warning messages and manual adjustment
items which are set using the jog dial are turned on
-+ The LCD backlight is turned off/warning messages and manual adjustment
items which are set using the jog dial are turned on
See page 105 for a detailed description of the indicators.
DISPLAY/LCD BACK
LIGHT ON/OFF
Notes
l You can& turn off the 0 (self-timer) indicator and some of the indicators used in advanced
operations.
l
The indicators on the LCD screen are not recorded.
23
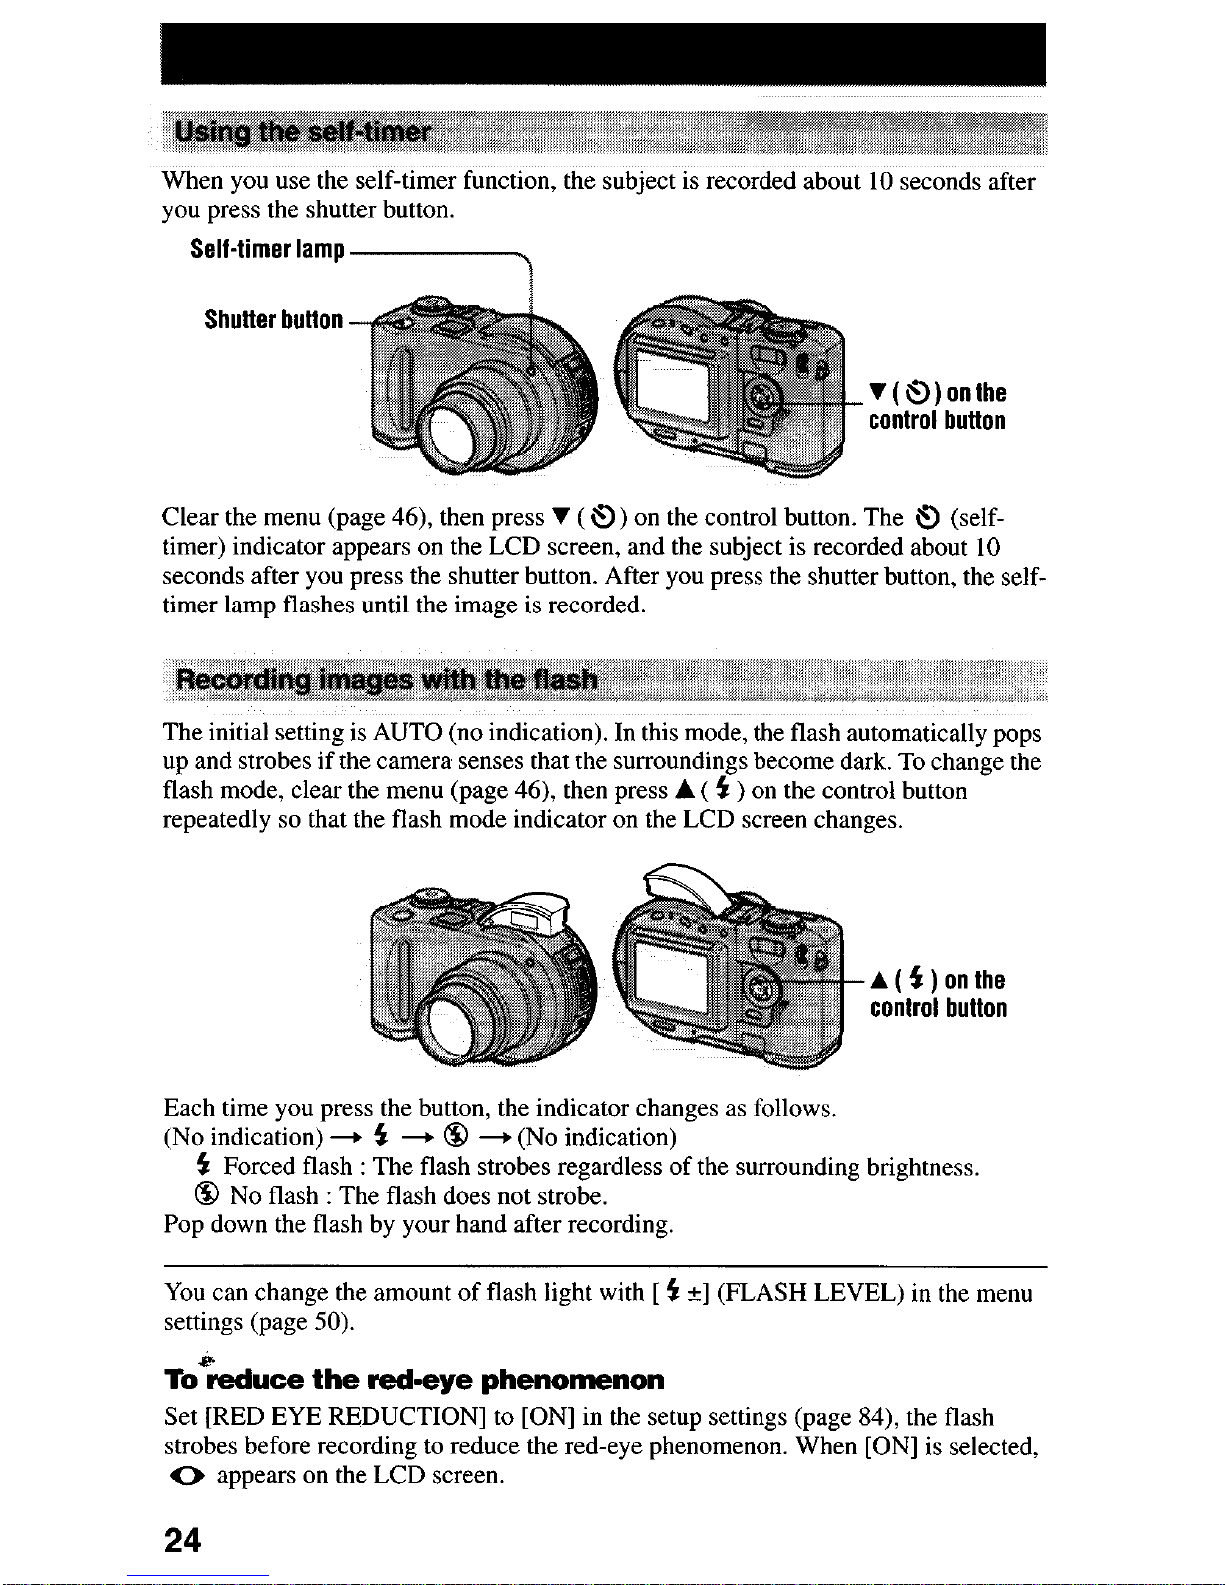
When you use the self-timer function, the subject is recorded about 10 seconds after
you press the shutter button.
Shutter button
V(@)onthe
control button
Clear the menu (page 46), then press v ( 0) on the control button. The 0 (self-
timer) indicator appears on the LCD screen, and the subject is recorded about 10
seconds after you press the shutter button. After you press the shutter button, the selftimer lamp flashes until the image is recorded.
up and strobes if the camera senses that the surroundings become dark. To change the
flash mode, clear the menu (page 46), then press A ( f ) on the control button
repeatedly so that the flash mode indicator on the LCD screen changes.
A ( 5 ) on the
control button
Each time you press the button, the indicator changes as follows.
(No indication) + 5 -+ 8 + (No indication)
5 Forced flash : The flash strobes regardless of the surrounding brightness,
8 No flash : The flash does not strobe.
Pop down the flash by your hand after recording.
You can change the amount of flash light with [ 5 +] (FLASH LEVEL) in the menu
settings (page 50).
To%?duce the red-eye phenomenon
Set [RED EYE REDUCTION] to [ON] in the setup settings (page 84) the flash
strobes before recording to reduce the red-eye phenomenon. When [ON] is selected,
0 appears on the LCD screen.
24
Notes
l When [ISO] is set to [AUTO] in the menu settings (page 49), the recommended shooting
distance is 0.3 to 2.5 m (11 7/8 inches to 8 l/3 feet) (MVC-CD200) or 0.3 to 3.0 m (11 7/S
inches to 9 feet 10 l/8 inches) (MVC-CD300). When it is not set to [AUTO], the flash may be
ineffective even if the flash level is changed.
l Attaching a conversion lens (optional) may block the light from the flash and the recorded
image may be eclipsed.
l You cannot use the built-in flash and an external strobe (optional) at the same time.
l The RED EYE REDUCTION function may not produce the desired red-eye reduction effects
depending on individual differences, the distance to the subject, if the subject does not see the
pre-strobe, or other conditions.
v
l Red-eye reduction effects are also difficult to obtain if you select a slow shutter speed in shutter
speed priority mode.
z
l The flash effect is not obtained easily when you use forced flash in a bright location.
8
l While charging the flash, the 5 /CHG lamp flashes. After the charging is complete, the lamp a
goes out. 5
l The flash does not function when recording moving images or recording in EXP BRKTG or *
BURST mode (MVCCD300 only) (pages 59.63).
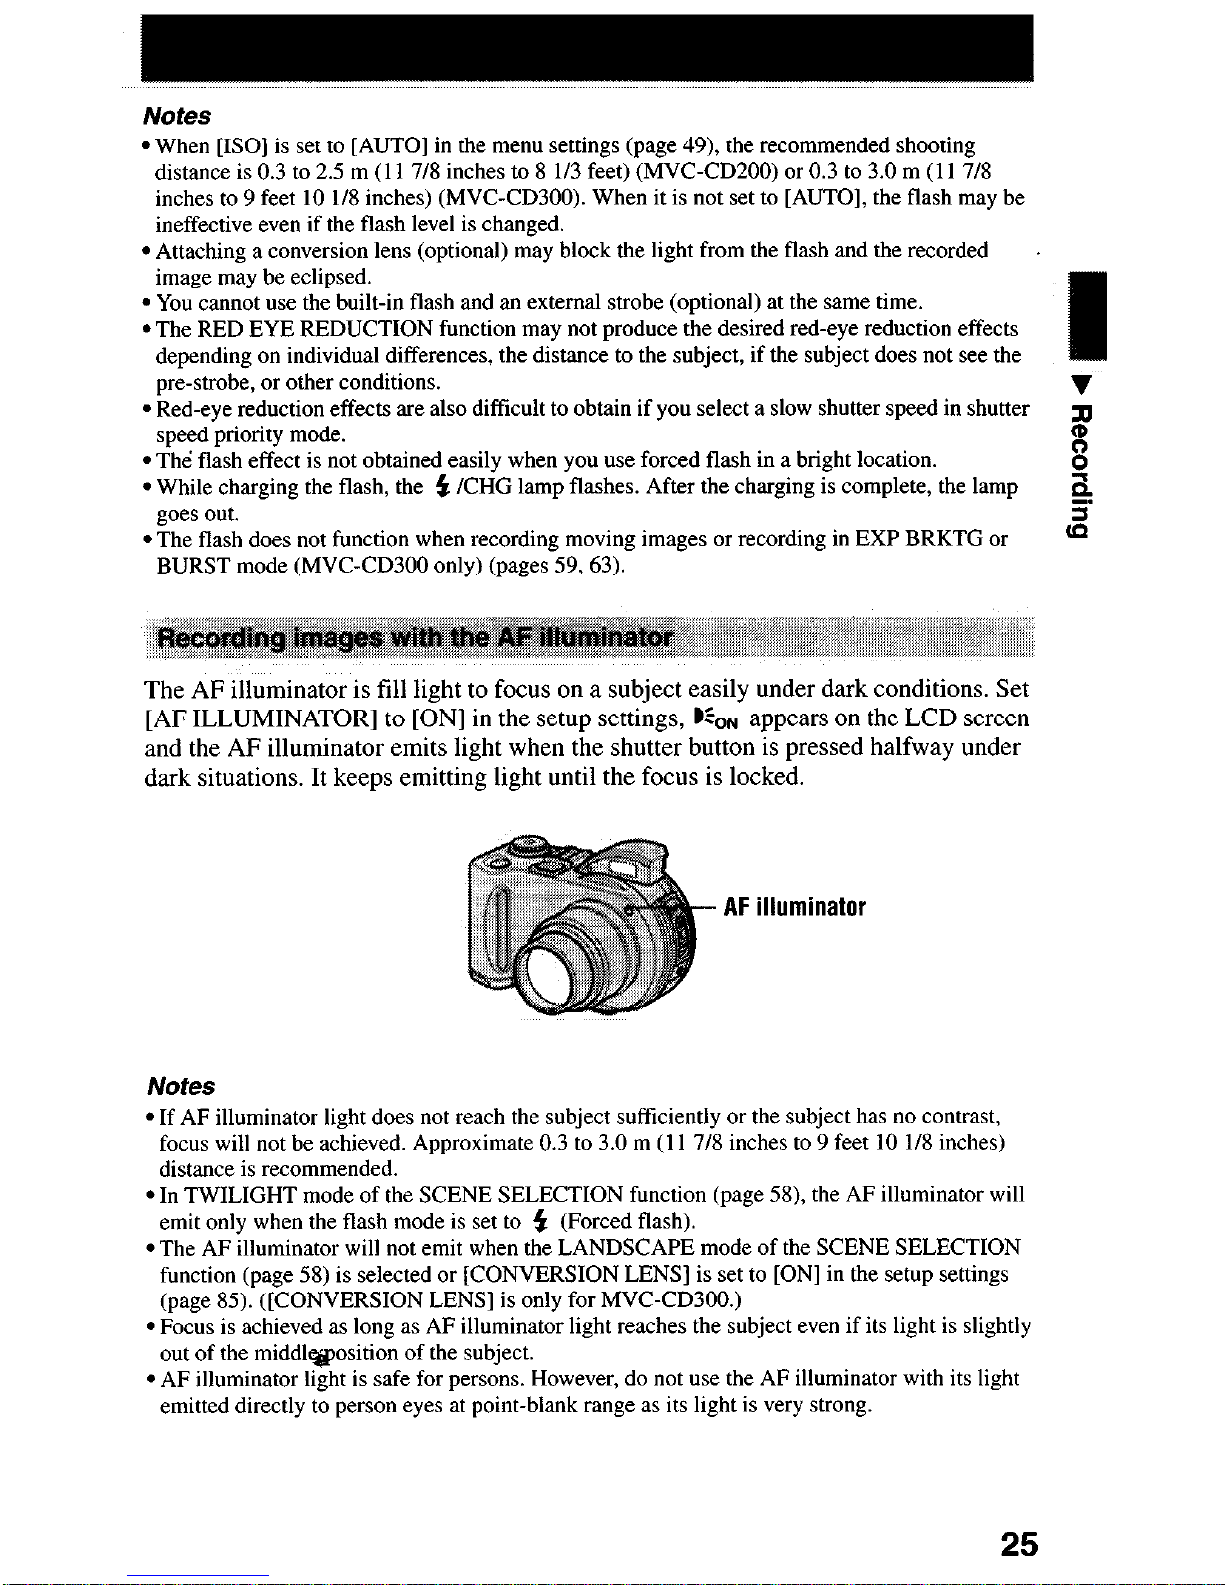
The AF illuminator is fill light to focus on a subject easily under dark conditions. Set
[AF ILLUMINATOR] to [ON] in the setup settings, Dzo~ appears on the LCD screen
and the AF illuminator emits light when the shutter button is pressed halfway under
dark situations. It keeps emitting light until the focus is locked.
AF illuminator
Notes
l If AF illuminator light does not reach the subject sufficiently or the subject has no contrast,
focus will not be achieved. Approximate 0.3 to 3.0 m (11 7/8 inches to 9 feet 10 l/S inches)
distance is recommended.
l In TWILIGHT mode of the SCENE SELECTION function (page 58) the AF illuminator will
emit only when the flash mode is set to 5 (Forced flash).
l The AF illuminator will not emit when the LANDSCAPE mode of the SCENE SELECTION
function (page 58) is selected or [CONVERSION LENS] is set to [ON] in the setup settings
(page 85). ([CONVERSION LENS] is only for MVCCD300.)
l Focus is achieved as long as AF illuminator light reaches the subject even if its light is slightly
out of the middlwosition of the subject.
l AF illuminator light is safe for persons. However, do not use the AF illuminator with its light
emitted directly to person eyes at point-blank range as its light is very strong.
25
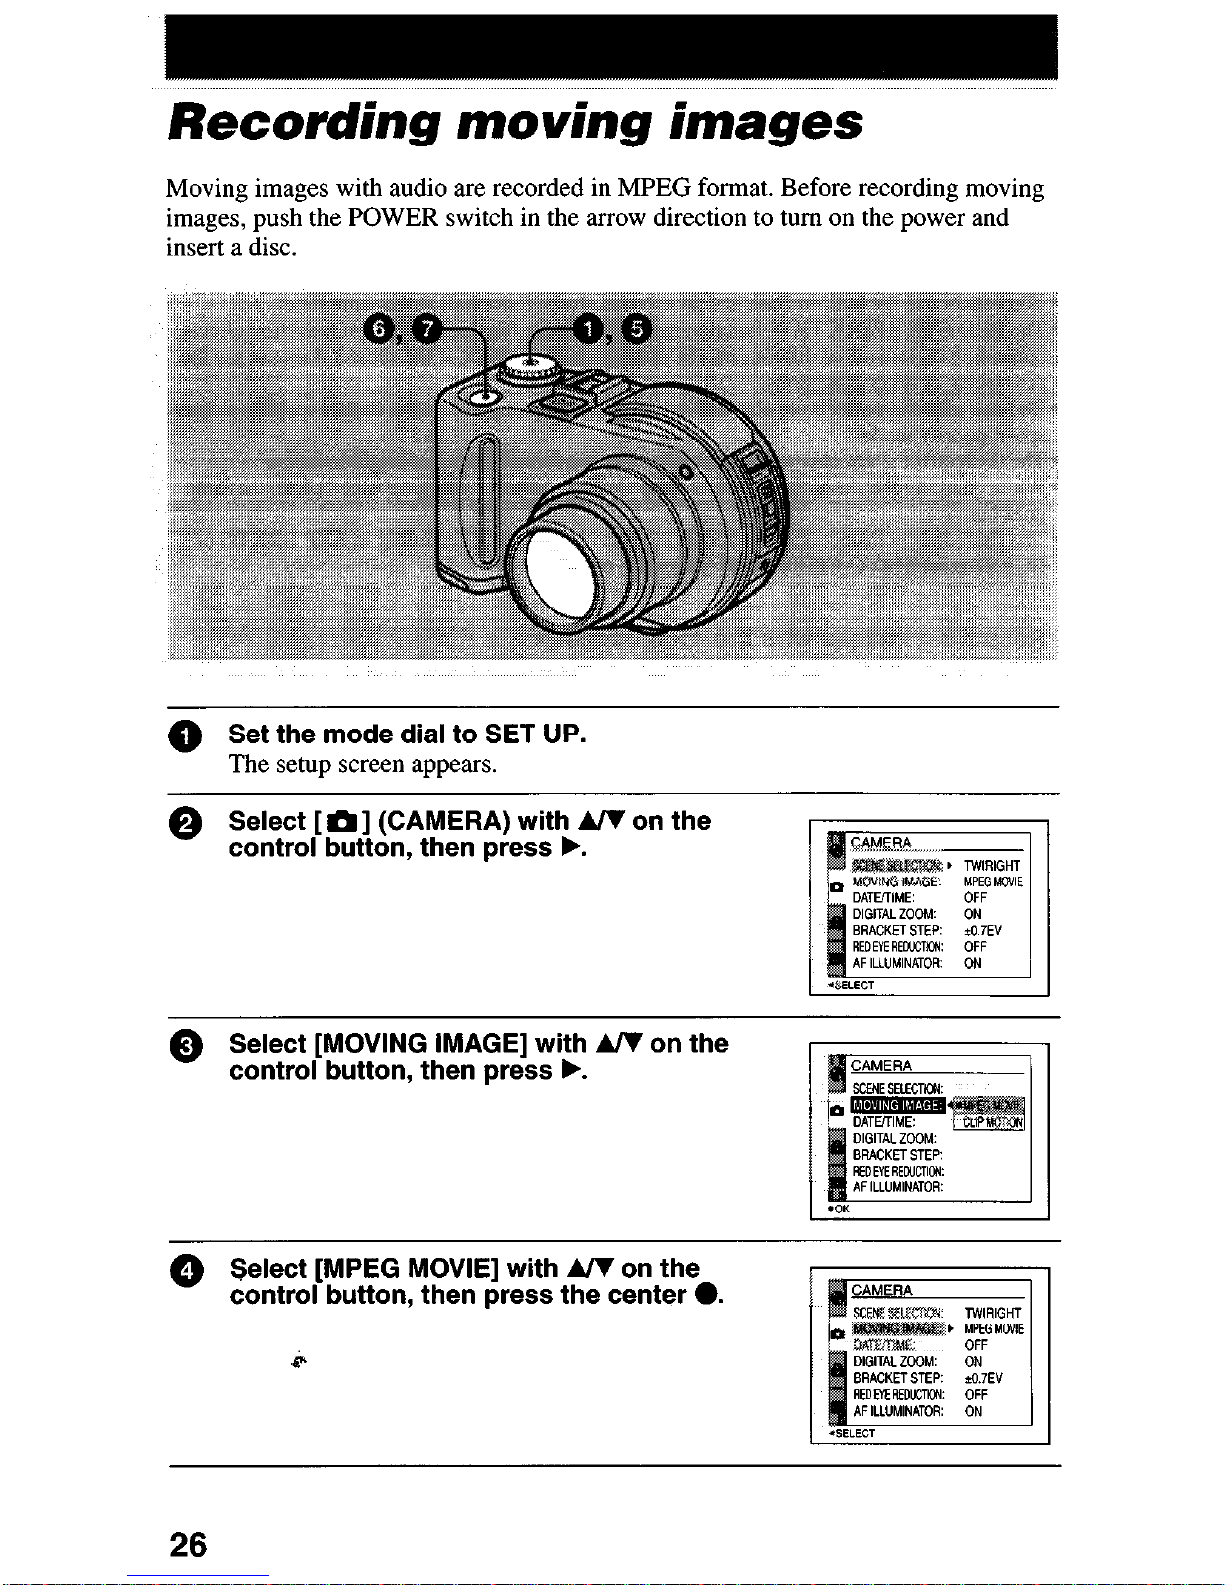
Recording moving images
Moving images with audio are recorded in MPEG format. Before recording moving
images, push the POWER switch in the arrow direction to turn on the power and
insert a disc.
@ Set the mode dial to SET UP.
The setup screen appears.
0
0
Select [m] (CAMERA) with UI on the
control button, then press F.
Select [MOVING IMAGE] with UI on the
control button, then press F.
0 Select [MPEG MOVIE] with UI on the
control button, then press the center 0.
26

_-- ,,,,,,,,,,,,,,,,,,,,,,,,,...
0 Set the mode dial to ‘Cl.
The preparation for recording a moving image is complete.
0 Press the shutter button fully down.
“REP’ appears
on the LCD screen and the image and sound are recorded on the
disc. --
@ Press the shutter button fully down again to stop recording.
The recording automatically stops in the following time even if you do not
‘I
press the shutter button again.
When selecting the 320 (HQ) size: Approximate 15 seconds
When selecting the 320x240 size: Approximate 1 minute
When selecting the 160x112 size: Approximate 4 minutes
.
%
8
For details on the image size, see “Setting the image size (IMAGE SIZE)” on
page 53.
See pages 22 to 24.
Press DISPLAY/LCD BACK LIGHT ON/OFF to turn on/off the indicators on the
LCD screen.
These indicators are not recorded. See page 105 for a detailed description of the
indicators.
27
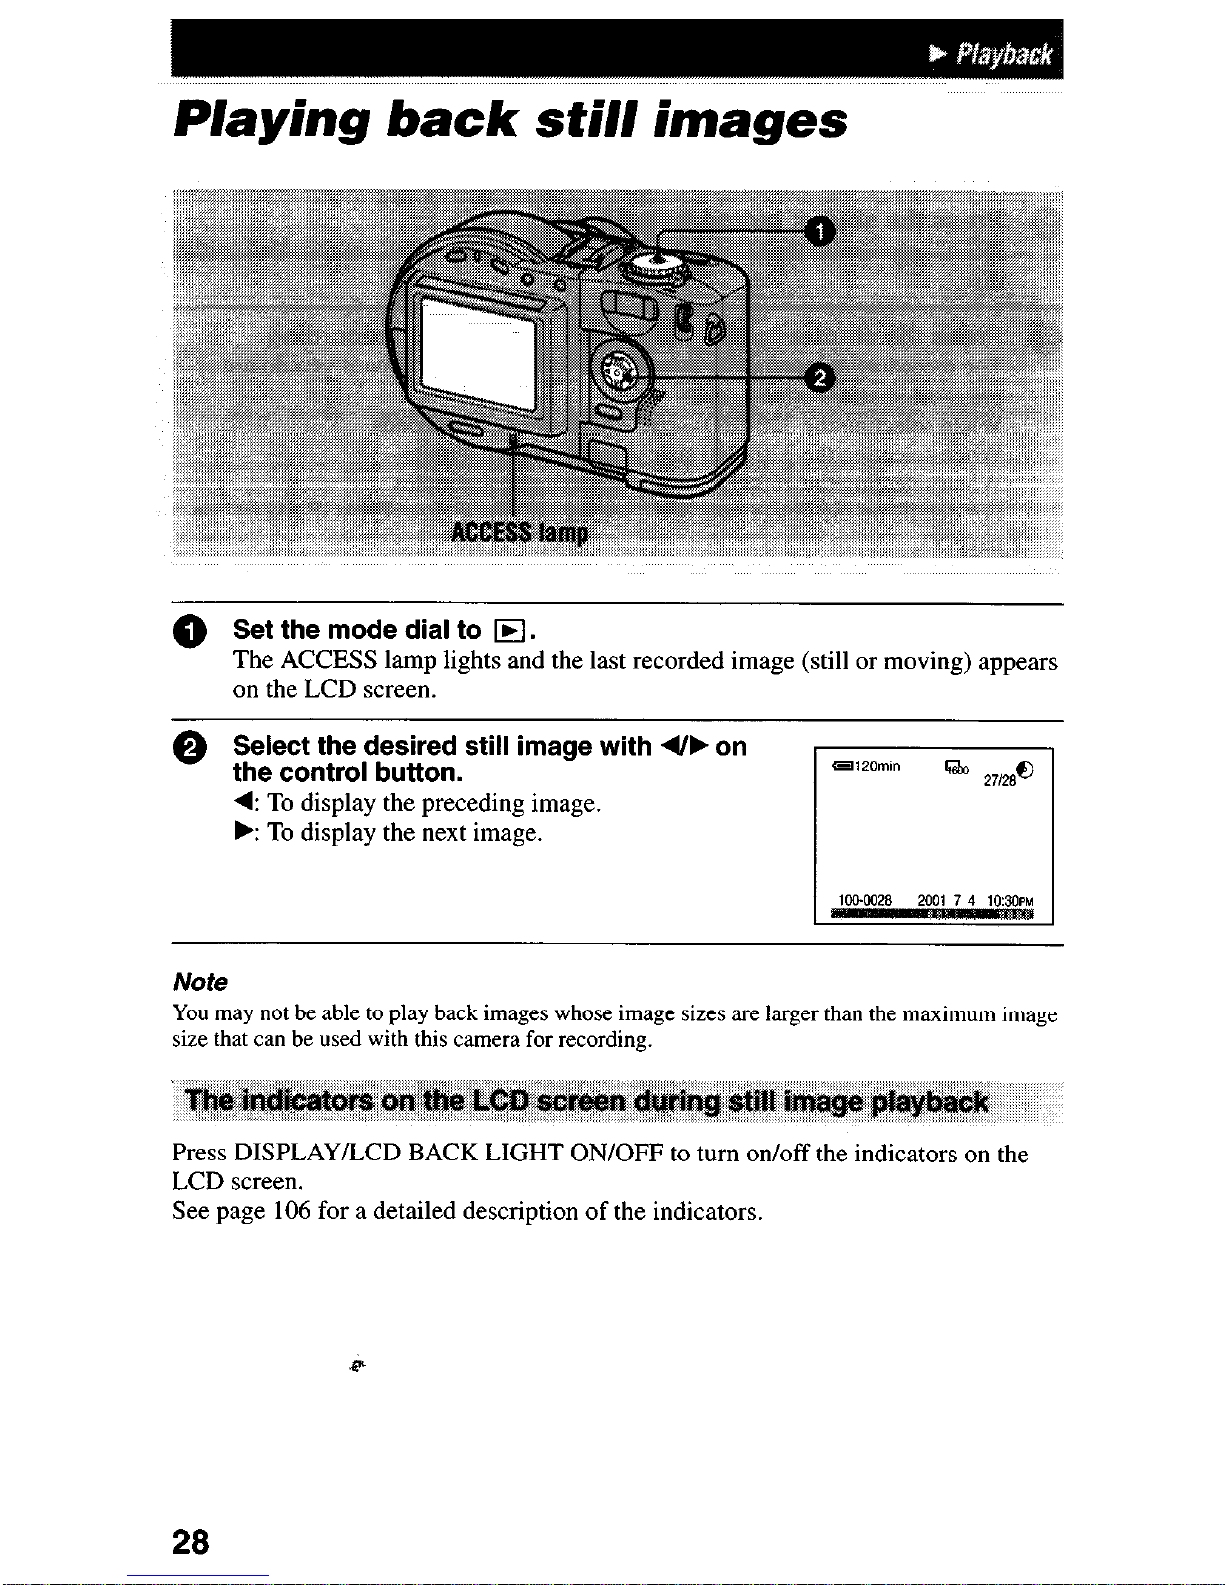
Playing back still images
0 Set the mode dial to FJ.
The ACCESS lamp lights and the last recorded image (still or moving) appears
on the LCD screen.
@ Select the desired still image with 4/b on
the control button.
4: To display the preceding image.
k To display the next image.
Note
You may not be able to play back images whose image sizes are larger than the maximum image
size that can be used with this camera for recording.
,,,, ,, ,_ I_
,,, ,,
Press DISPLAY/LCD BACK LIGHT ON/OFF to turn on/off the indicators on the
LCD screen.
See page 106 for a detailed description of the indicators.
28
,,“” ,,,,,,,,,,,,,,,_.,...,,,....
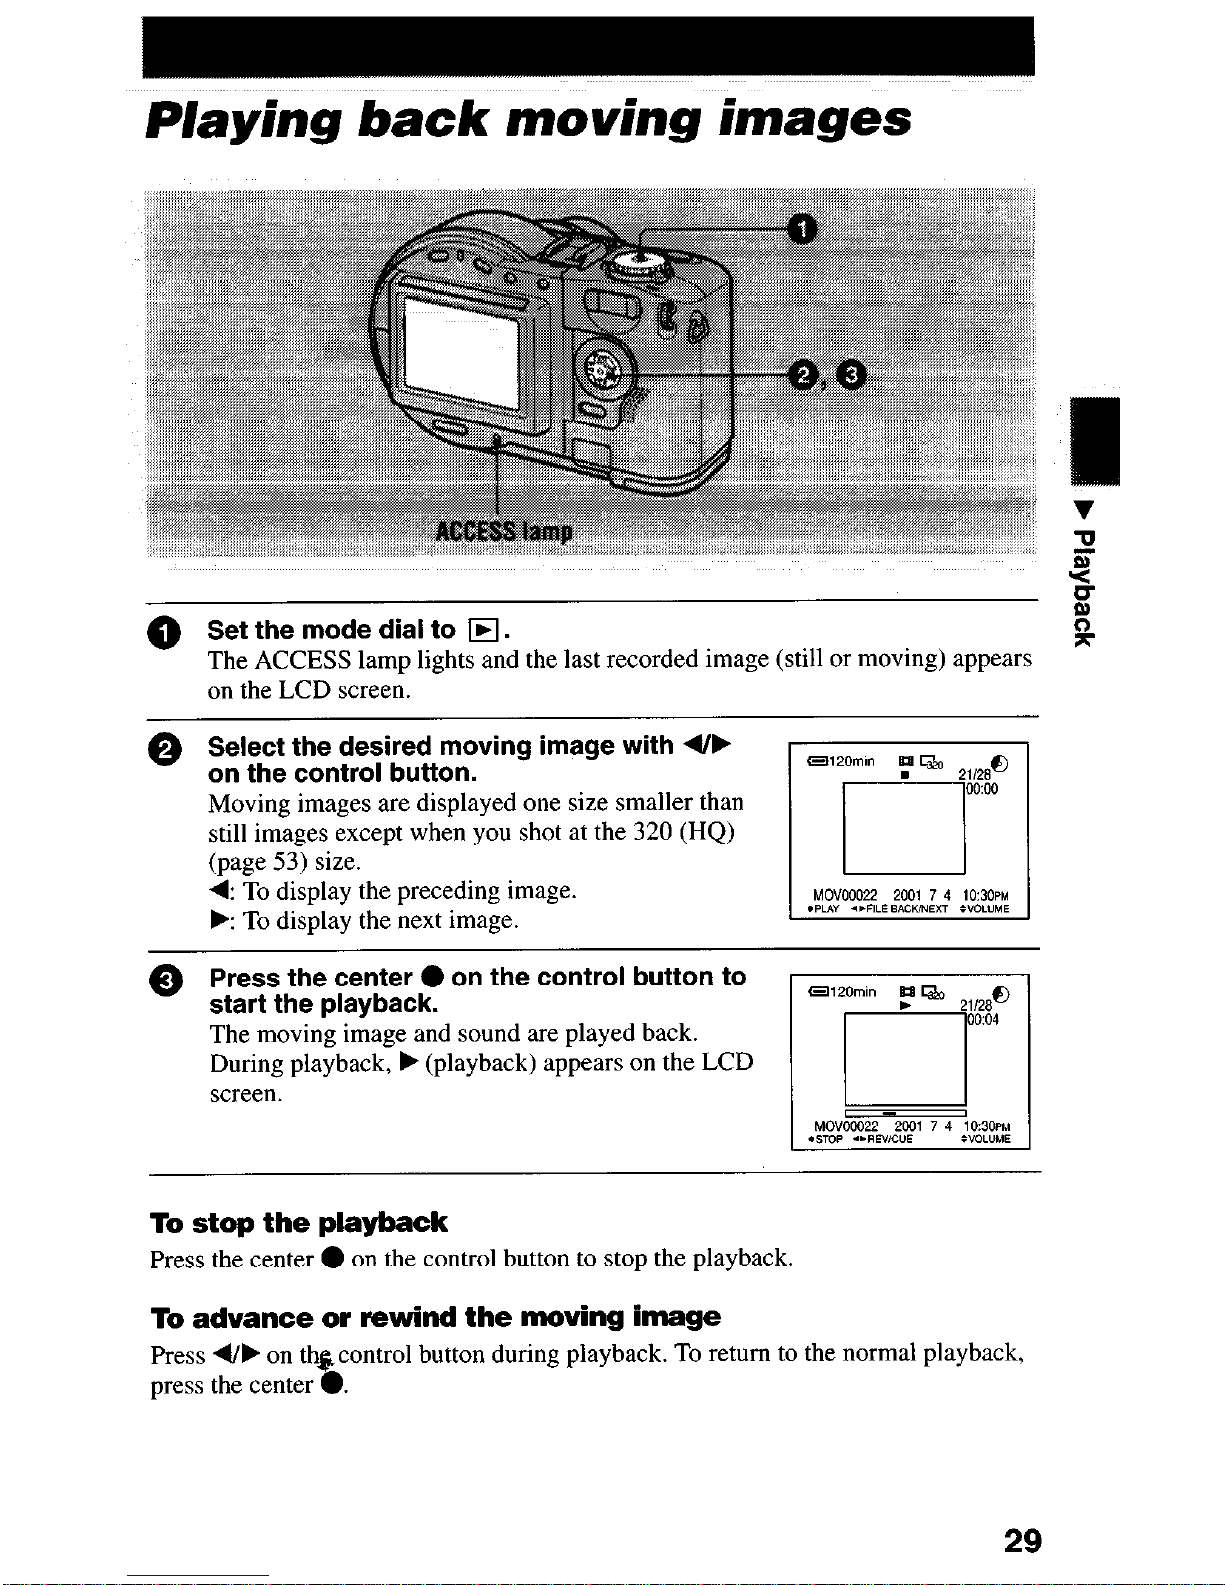
Waying back moving images
@ Set the mode dial to
q
.
k
The ACCESS lamp lights and the last recorded image (still or moving) appears
on the LCD screen.
0 Select the desired moving image with 4fF
on the control button.
Moving images are displayed one size smaller than
still images except when you shot at the 320 (HQ)
(page 53) size.
4: To display the preceding image.
F: To display the next image.
0 Press the center 0 on the control button to
start the playback.
The moving image and sound are played back.
During playback, b (playback) appears on the LCD
screen.
To stop the playback
Press the center l on the control button to stop the playback
To advance or rewind the moving image
Press 4//, on thgcontrol button during playback. To return to the normal playback,
press the center 0.
29
::~~~~~:
,, ,, ,, ,,, ,, _a__
“< _a, ,i<,,, __ i /_/ * x// ,
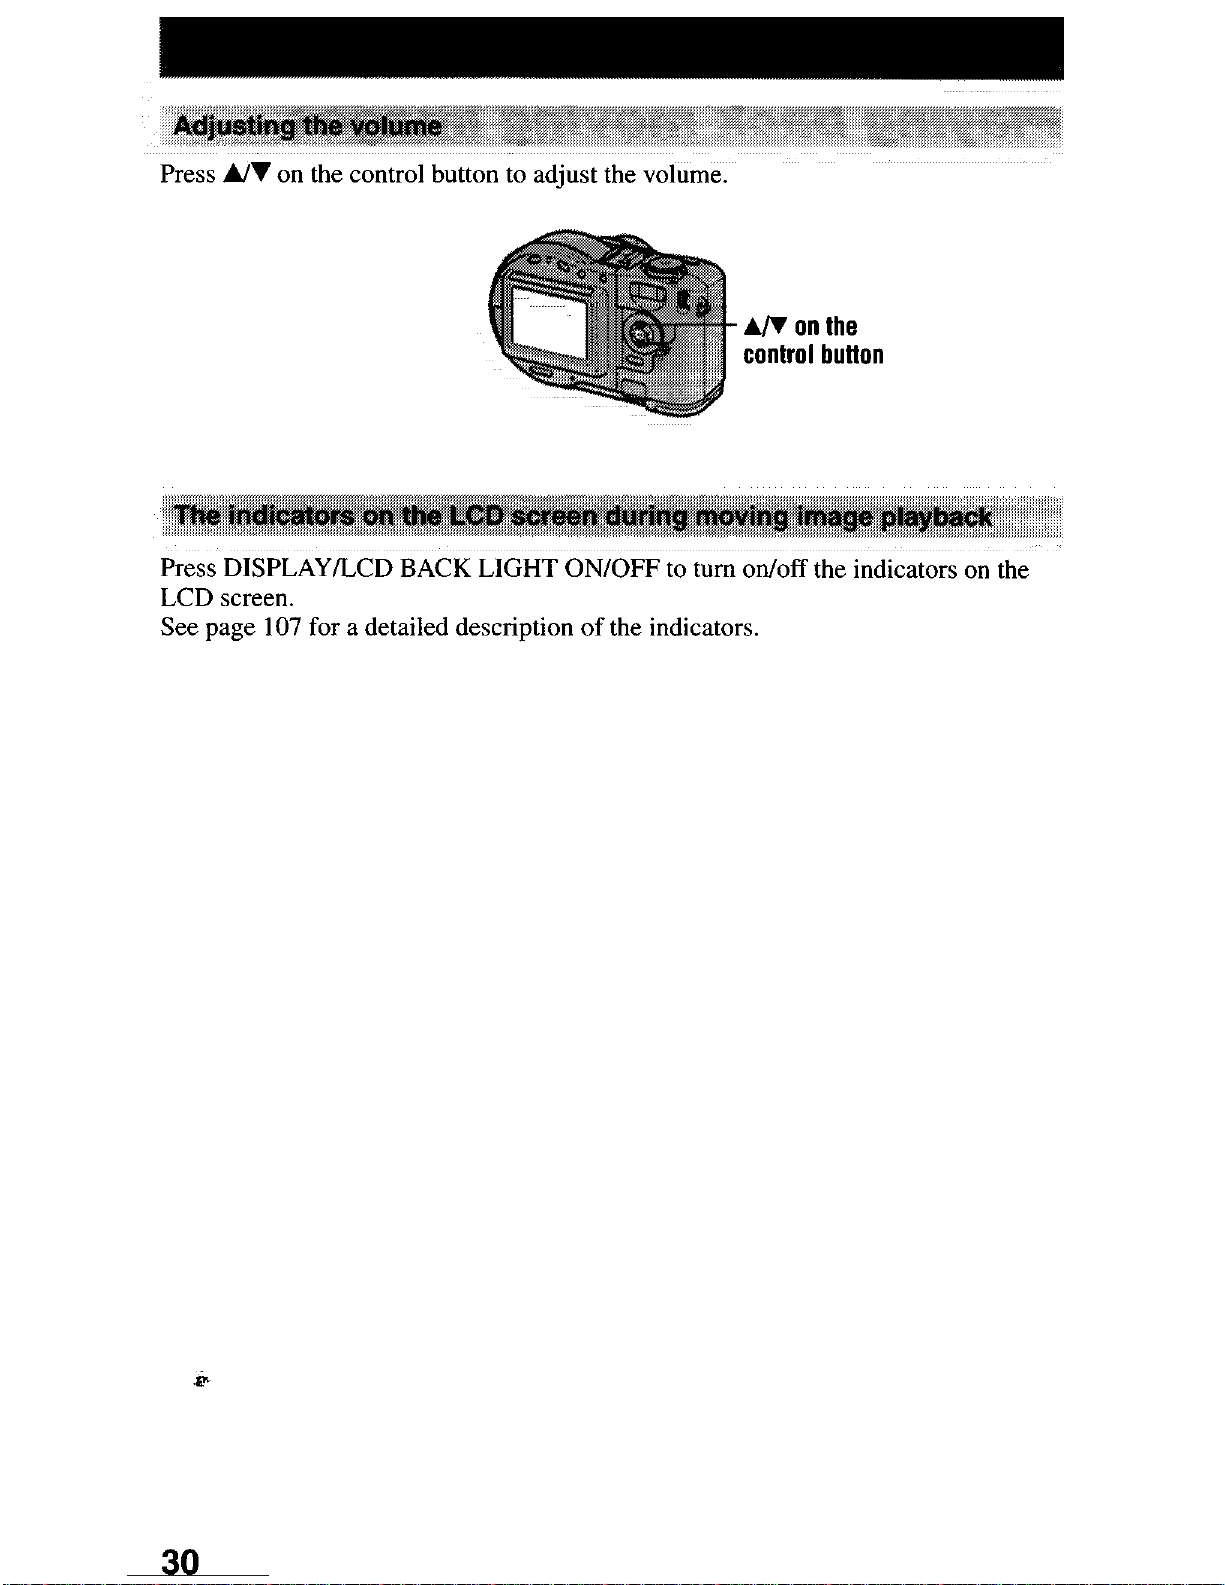
Press A/I on the control button to adjust the volume.
A/V on the
control button
Press DISPLAY/LCD BACK LIGHT ON/OFF to turn on/off the indicators on the
LCD screen.
See page 107 for a detailed description of the indicators.
30
 Loading...