

Page 1
3-078-362-11 (1)
Memory Stick
Reader/Writer
Operating Instructions
Mode d’emploi
MSAC-US2
2002 Sony Corporation
US
FR
Page 2
English
Before operating the unit, please read this instructions thoroughly, and
retain it for future reference.
For the customers in U.S.A.
If you have any questions about this product, you may call:
Sony Customer Information Center 1-800-222-SONY(7669)
The number below is for the FCC related matters only.
Regulatory Information
Trade Name : SONY
Model : MSAC-US2
Responsible Party : Sony Electronics lnc.
Address : 680 Kinderkamack Road, Oradell,
Telephone number : 201-930-6972
This device complies with Part 15 of the FCC Rules. Operation is
subject to the following two conditions: (1) This device may not cause
harmful interference, and (2) this device must accept any interference
received, including interference that may cause undesired operation.
Declaration of Conformity
NJ, 07649 USA
MSAC-US2
Tested To Comply
With FCC Standards
FOR HOME OR OFFICE USE
CAUTION
You are cautioned that any changes or modifications not expressly approved
in this manual could void your authority to operate this equipment.
2-US
Page 3

Note:
This equipment has been tested and found to comply with the limits for a
Class B digital device, pursuant to Part 15 of the FCC Rules. These limits
are designed to provide reasonable protection against harmful interference
in a residential installation. This equipment generates, uses, and can
radiate radio frequency energy and, if not installed and used in accordance
with the instructions, may cause harmful interference to radio
communications. However, there is no guarantee that interference will not
occur in a particular installation. If this equipment does cause harmful
interference to radio or television reception, which can be determined by
turning the equipment off and on, the user is encouraged to try to correct
the interference by one or more of the following measures:
– Reorient or relocate the receiving antenna.
– Increase the separation between the equipment and receiver.
– Connect the equipment into an outlet on a circuit different from that to
which the receiver is connected.
– Consult the dealer or an experienced radio/TV technician for help.
The specified extension cable (supplied) must be used with the equipment
in order to comply with the limits for a digital device pursuant to Subpart
B of Part 15 of FCC Rules.
For the customers in Canada
This class B digital apparatus complies with Canadian ICES-003.
You can connect this unit to a personal computer so that data in a “Memory
Stick” can be transferred to the personal computer at high speed. You can also
use a “Memory Stick” as a removable disk.
This manual describes how to connect this unit, how to install the driver, how to
use and customer service.
3-US
Page 4

Precautions
When using this unit, please keep the following in mind.
• When either using or storing this unit, avoid the following locations. Damage
or deformation of the unit could result.
- Near open flames or in closed locations like the inside of automobiles in the
summer sun where temperatures are very high.
- In direct sunlight or near heating equipment.
• If the unit becomes dirty, wipe it clean with a soft, dry cloth. Do not use
benzene, alcohol, or thinners to clean it. This could lead to deformation or
damage to the unit.
• If problems occur with the “Memory Stick” you are using, and recording and
playback do not work properly, the images you have recorded previously are
not warranteed.
• If you set the switch provided on the “Memory Stick” to prevent accidental
recording or erasure to the “LOCK” position, you cannot record or erase data.
• If any foreign object gets into the Memory Stick slot, push the shutter open
and remove it.
• Before you set your computer to Standby/Suspend modes or reboot your
computer, remove the “Memory Stick” from the unit.
“Memory Stick,” “MagicGate Memory Stick,” and “Memory Stick Duo,” as well
as
, are trademarks of the Sony Corporation.
®
Microsoft
trademarks of Microsoft Corporation in the United States and/or other
countries.
Macintosh, iMac, Mac OS and QuickTime are trademarks of Apple Computer,
Inc.
QuickTime and the QuickTime logo are trademarks used under license.
QuickTime is a trademark and registered trademark in the United States and
other countries.
MMX
Corporation.
All other company names and product names mentioned here may be the
trademarks or registered trademarks of their respective companies.
PIXELA ImageMixer for Sony is produced by PIXELA Corporation.
, Windows® and Windows Media are registered trademarks or
®
and Pentium® are registered trademarks or trademarks of Intel
About Formatting “Memory Stick”s
When “Memory Stick”s are shipped from the factory, they are already
formatted to a special standard format. When you format “Memory Stick”s, we
recommend formatting them on the device you are using so that they are
compatible when used on “Memory Stick”-compatible device.
4-US
Page 5

Cautions When Formatting “Memory Stick”s on a Personal Computer
Pay attention to the following points when formatting “Memory Stick”s on the
personal computer, for example, that you are using.
• Operation of “Memory Stick”s formatted on Windows machines is not
guaranteed on “Memory Stick”-compatible device. To use a “Memory Stick”
that has been formatted on a Windows machine, the “Memory Stick” must be
reformatted on “Memory Stick”-compatible device. Note, that, in this case all
data stored on the “Memory Stick” will be lost.
• “Memory Stick” formatted on a Macintosh sometimes cannot be used on
“Memory Stick”-compatible device. Do not format “Memory Stick” on the
Macintosh.
5-US
Page 6

Table of Contents
Before You Begin
Checking the accessories ..................................................................................... 7
Parts identification ............................................................................................... 8
Installation and Operation
For Windows ......................................................................................................... 9
Installing USB driver software .................................................................... 9
Installing Image Transfer and PIXELA ImageMixer for Sony ............. 11
Connecting the unit to a personal computer .......................................... 14
Recommended connections ....................................................................... 17
Precautions to be taken when connecting this unit to a computer...... 18
Inserting a “Memory Stick” ....................................................................... 20
Confirming the insert ................................................................................. 20
Copying images using Image Transfer .................................................... 21
Removing a “Memory Stick” .................................................................... 22
For Macintosh ..................................................................................................... 24
Installing USB driver software .................................................................. 24
Inserting a “Memory Stick” ....................................................................... 25
Removing a “Memory Stick” .................................................................... 26
PIXELA ImageMixer for Sony .......................................................................... 27
Installing editorial and image materials on your computer ................. 27
Installing images from a “Memory Stick” ............................................... 28
Additional Information
The “Memory Stick” .......................................................................................... 29
Troubleshooting.................................................................................................. 31
Specifications....................................................................................................... 32
6-US
Page 7
BBefore You Begin
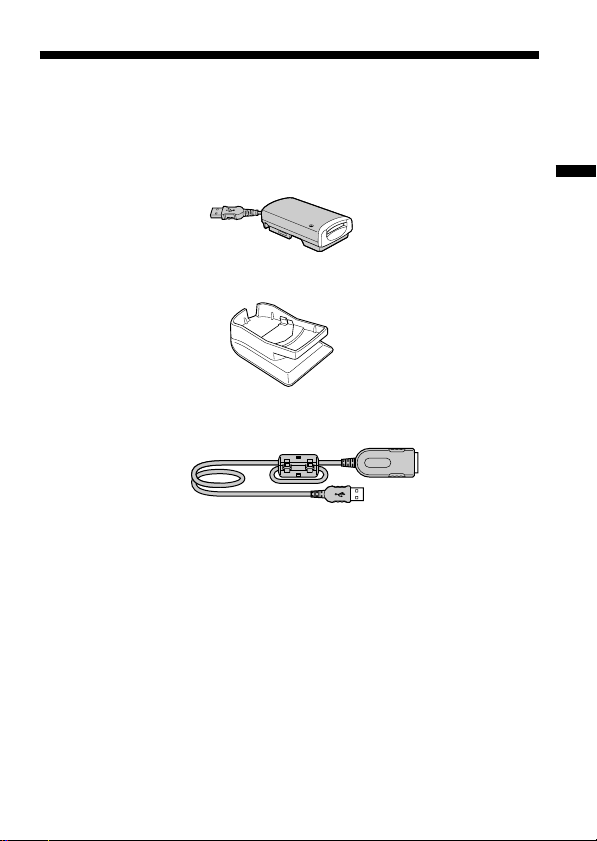
Checking the accessories
Make sure that you have all the accessories bellow.
•Memory Stick Reader/Writer (1)
•Stand (1)
•Specified extension cable (1)
•CD-ROM (SPVD-008 USB DRIVER) (1)
This CD-ROM contains the following software:
- USB DRIVER
- Image Transfer
- PIXELA ImageMixer for Sony
•Operating Instructions (1)
•Warranty (1)
Before You Begin
7-US
Page 8
Parts identification
USB plug
(plug A)
Receptacle A
Access lamp
USB plug
(plug A)
Access lamp
USB jack
USB jack
USB plug
(plug A)
About the specified extension cable
USB plug (plug A): Plug this into the USB jack of your computer. If your
Receptacle A: Plug this into the USB plug of this unit.
computer has more than one USB jack, you can use any of
them.
PNotes
• The access lamp lights or flashes when you access data on a “Memory Stick.”
When you are accessing data on a “Memory Stick,” never remove the
“Memory Stick,” turn off the power of your computer, or do not disconnect
the USB plug or specified extension cable from this unit. This may damage the
“Memory Stick.”
• When you remove the USB cable or the specified extension cable, grasp the
plug, not the cable.
• Do not bend the cable unnecessarily, or apply excessive force to it. This may
result in damage to the cable.
• Do not use the specified extension cable as an extension cable for any other
device.
8-US
Page 9

BInstallation and Operation
For Windows
First, you must install the USB driver software in the package on the
personal computer you are using. Follow the procedure below to install
the USB driver software.
Installing USB driver software
Turn on the computer to start Windows.
At this stage, do not connect the unit to the personal computer yet. If any
applications are running, close them down.
– For Windows Me/XP –
You do not need to install the USB driver (SPVD-008 USB DRIVER) from
the CD-ROM supplied with the unit. The unit will work using the
standard Windows driver.
If you are using Windows XP, you must log on using administrator’s
privileges.
Go on to page 11, [Installing Image Transfer and PIXELA
ImageMixer for Sony].
– For Windows 98/98SE/2000 –
At this stage, do not connect the unit to the personal computer yet. If any
applications are running, close them down.
If you are using Windows 2000, you must log on using administrator’s
privileges.
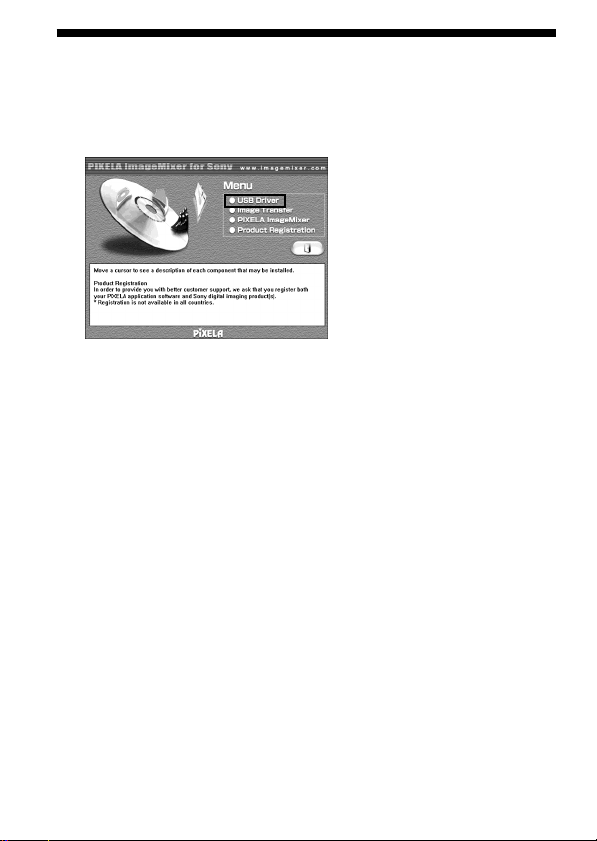
1 Insert the USB driver software CD-ROM (SPVD-008 USB
DRIVER) into the CD-ROM drive.
If the title screen does not appear, follow the procedures given below.
1 Double-click “My Computer.”
2 Double-click CD-ROM (ImageMixer [E:])*.
* The drive symbol [E:] may differ depending on your computer.
The title screen will appear after a short wait.
Installation and Operation
9-US
Page 10
For Windows (continued)
2 Click “USB Driver” on the screen.
The “Welcome to the InstallShield Wizard for the Sony USB Driver”
window appears.
3 Click “Next.”
The “Note on installing the USB driver” window appears.
4 After reading the information, click “Next.”
5 Follow the on-screen instructions, then close the installation
wizard.
Select “Yes, I want to restart my computer now.”
Then, click “OK.”
The USB driver will be enabled after you reboot your computer.
Do not remove CD-ROM from the CD-ROM drive yet.
10-US
Page 11
Installing Image Transfer and
PIXELA ImageMixer for Sony
The “Image Transfer” software enables you to automatically transfer
(copy) recorded images in a “Memory Stick” to your computer.
The “PIXELA ImageMixer for Sony” software enables you to easily view
the images that have been copied to your computer.
PNote
You cannot register this software.
If you are using Windows 2000/XP, you must log on using administrator’s
privileges.
PNote
Set the screen resolution of your display to 800 × 600, and be sure the color
setting is 16-bit High Color (65,000 colors or above), or above. If the
resolution is less than 800 × 600, and the color setting is 256 colors, or below,
the title screen will not display at installation.
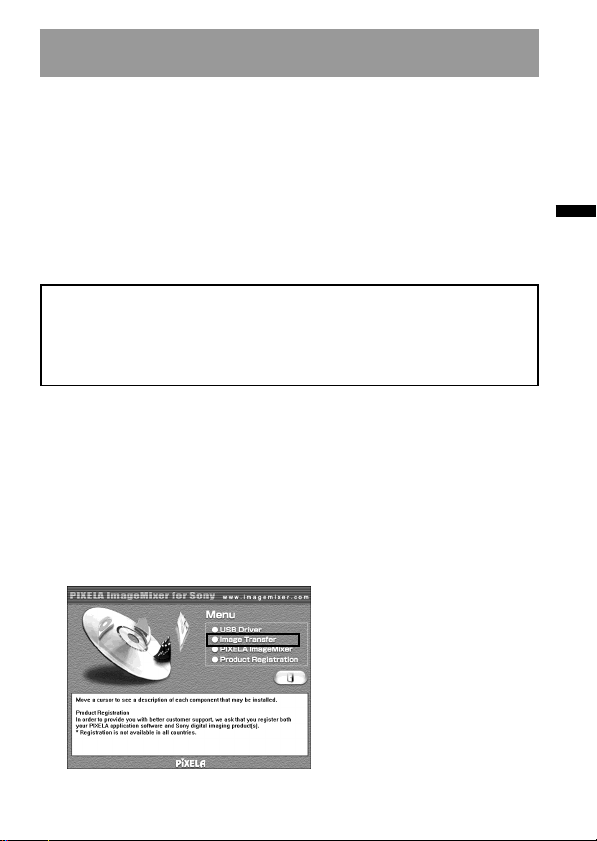
Image Transfer
1 Display the CD-ROM’s title page on your screen as follows.
1 Double-click “My Computer.”
2 Double-click CD-ROM (ImageMixer [E:])*.
* The drive symbol [E:] may differ depending on your computer.
The title screen will appear after a short wait.
2 Click “Image Transfer” on the screen.
Installation and Operation
11-US
Page 12
For Windows (continued)
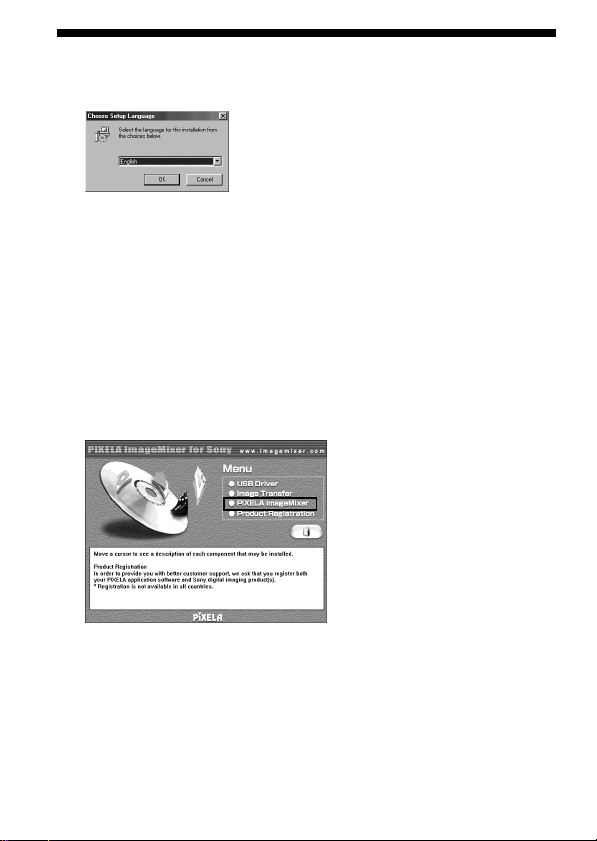
3 Select a language, then click “OK.”
4 Following the on-screen instructions, install the application.
Reading the instructions carefully, proceed with the installation.
PNote
Read the “License Agreement” carefully, then click “Yes” if you agree.
5 Following the on-screen instructions, click “Next” to complete
the installation.
PIXELA ImageMixer for Sony
6 Click “PIXELA ImageMixer” on the screen.
7 Select a language, then click “OK.”
8 Following the on-screen instructions, install the application.
Read the “License Agreement” carefully, then click “Yes” if you agree.
12-US
Page 13
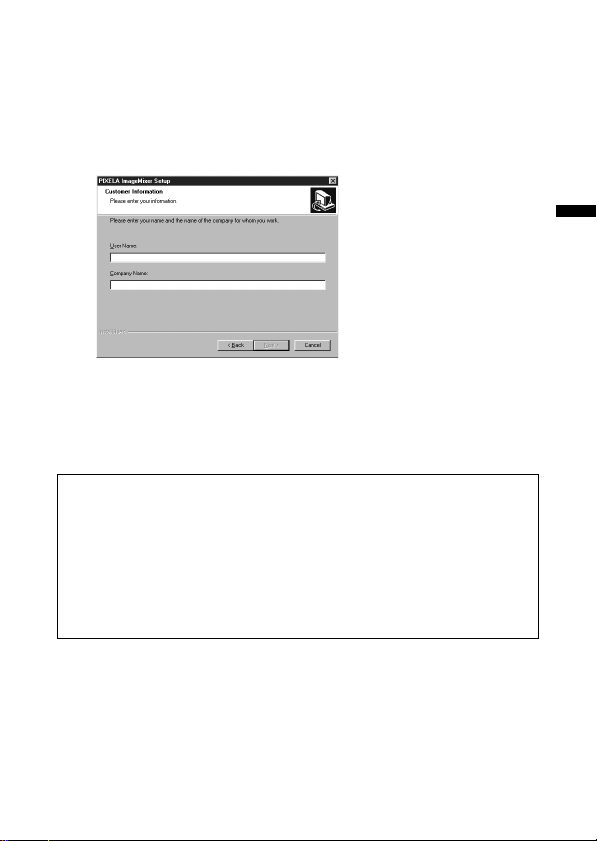
9 Enter user information.
1 Enter your name and the name of the company for which you
work.
PNote
If you do not have a company name to enter, enter your name
instead.
2 Click “Next.”
10
Following the on-screen instructions, complete the
installation.
The title screen will appear. Close the screen, and remove the CDROM from your computer.
If the DirectX (Version 8.0a or higher) has not been installed on your
computer, the “Information” screen will appear.
Follow the instructions starting from step 11 to complete the
installation.
- For Windows XP -
Those using Windows XP do not need to install DirectX. Close the
title screen, then remove the CD-ROM from your computer.
Installation and Operation
11
Click “OK.”
Read “License Agreement” carefully, then click “Yes.”
13-US
Page 14

For Windows (continued)
12
Click “Install.”
The installation begins. You may see “Installing Microsoft DirectX”
displayed.
13
Confirm that the DirectX setup screen is displayed, then click
“OK.”
The computer will be restarted.
The “PIXELA ImageMixer for Sony” will be enabled after you reboot
your computer.
14
Remove the CD-ROM from the CD-ROM drive.
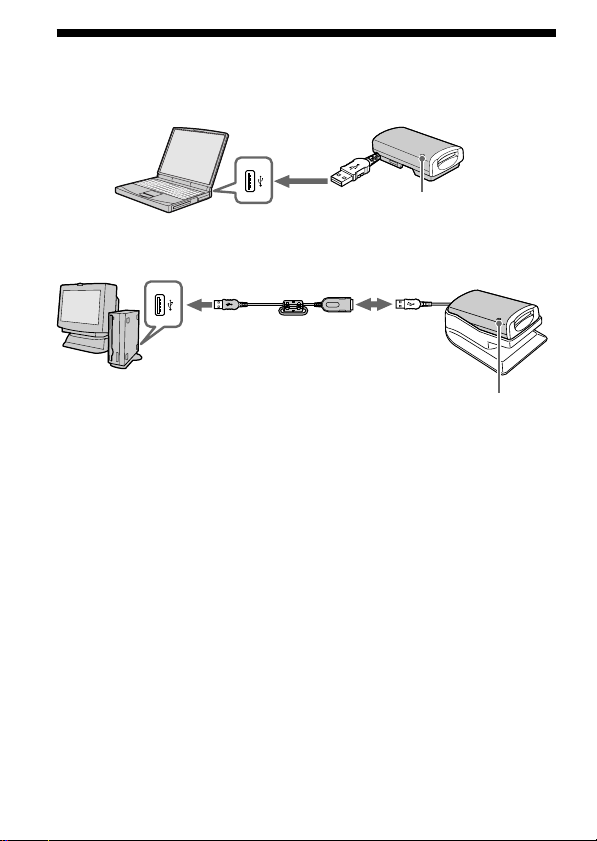
Connecting the unit to a personal computer
Connect the USB plug of this unit to the USB jack of your personal
computer.
If you are using a laptop computer
After connecting the USB plug of this unit (plug A) to the USB jack of the
computer, go on to page 17, [Recommended connections].
If you are using a desktop computer
After first connecting this unit and the specified extension cable, connect
the USB plug of the specified extension cable (plug A) to the USB jack of
the computer.
- For Windows 98SE/2000/Me/XP -
Installation of the USB hub begins automatically. Go on to page 17,
[Recommended connections].
- For Windows 98 -
Following the instructions given on the screens shown below, install the
USB hub.
14-US
Page 15
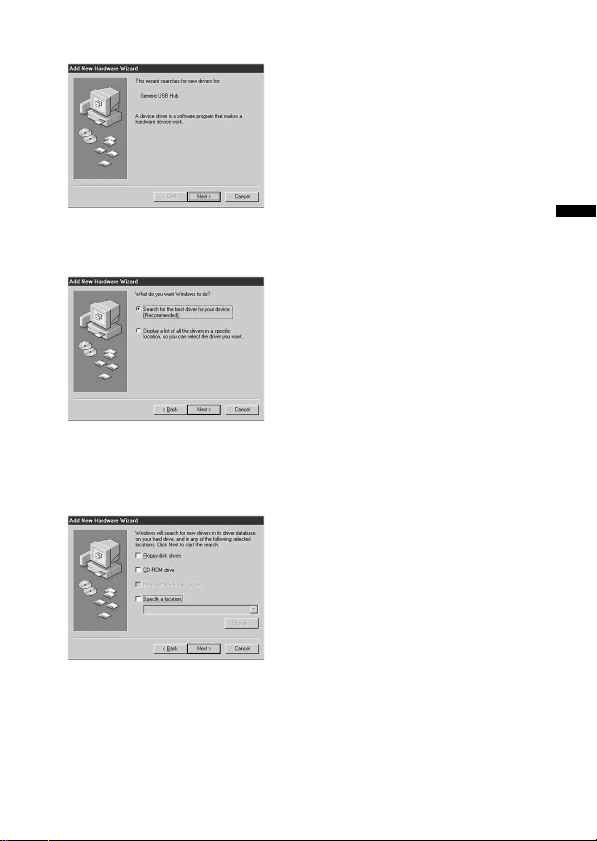
1 Click “Next.”
2 Select “Search for the best driver for your device
(Recommended),” and click “Next.”
3 Click “Next” without entering any checkmarks.
The installation begins. The “Add New Hardware Wizard” starts for
the second time.
Installation and Operation
15-US
Page 16
For Windows (continued)
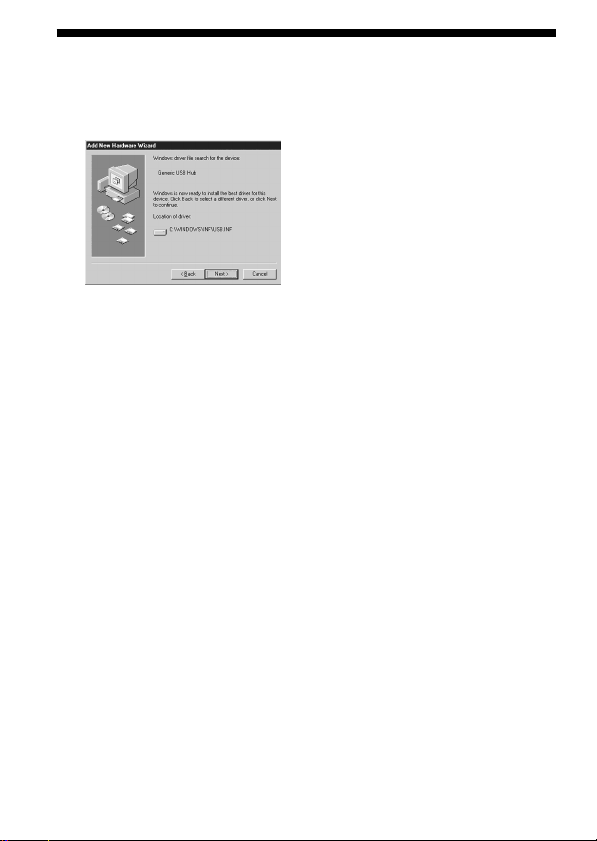
4 Follow the on-screen instructions until the installation is
completed.
PNotes
• If you are using a computer where a completely new copy of Windows 98 has
been installed, a message that prompts you to install a Windows 98 CD-ROM
may appear on the screen. In this case, follow the instructions given, and go on
installing the USB hub.
• The location of the USB jack differs depending on your computer.
• If you are using a computer with more than one USB jack, do not connect any
devices other than a standard mouse and a keyboard to the main computer
when using this unit. Also, when using a desktop computer, connect this unit
directly to one of the computer's USB jacks. For more details, see page 17,
[Recommended connections].
16-US
Page 17
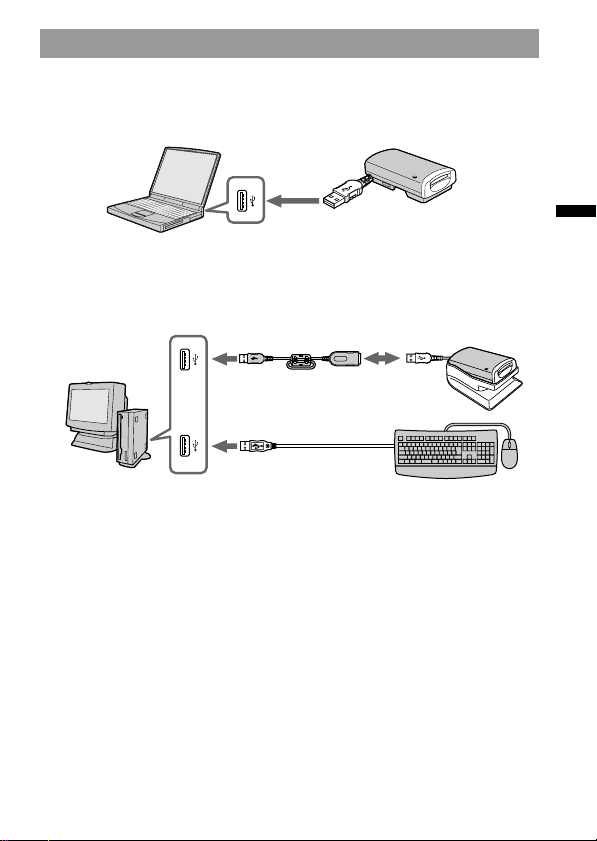
Recommended connections
Operation when connected as follows has been confirmed.
When this unit is connected to the USB jack on the personal
computer, and nothing is connected to the other USB jack:
When a USB keyboard is connected to the USB jack on a personal
computer on which a USB keyboard and mouse are equipped as
standard, and this unit is connected to the other USB jack using
the specified extension cable:
Installation and Operation
2
Make the connections in the
following order: 1 t 2.
PNotes
• In either the Windows or Macintosh environments, proper operation cannot
be guaranteed when you have two or more USB devices connected to one
personal computer, depending on the USB devices than are used
simultaneously.
• If you connect this unit through a hub other than the specified extension cable,
proper operation is not guaranteed. Be sure to use the specified extension
cable.
• Proper operation cannot be guaranteed on some computers even though they
may be equipped with the recommended environment.
• If you connect another “Memory Stick”-equipped device, in addition to this
unit, to one personal computer, you cannot access two or more “Memory
Stick”-equipped devices at the same time. Remove the “Memory Stick” from
this unit, or turn the other device(s) off.
• Be sure to connect this unit directly to the USB jack of the personal computer
itself. If you connect it through the USB jack of a keyboard or through a USB
hub, proper operation is not guaranteed.
1
17-US
Page 18

For Windows (continued)
Precautions to be taken when connecting this
unit to a computer
Removing the plug of the cable from its holder
Grasp both sides of the USB plug to remove the end of the cable from the
unit.
PNote
Do not remove the end of the cable by pulling on the cable itself.
Putting away the cable
First, insert the end of the USB plug (plug A) into the unit, and then stow
the rest of the cable.
Match this part
to stow the cable.
2
1
1
2
18-US
Fit the plug and the cable
into the groove provided,
the cable to fit it in.
Page 19
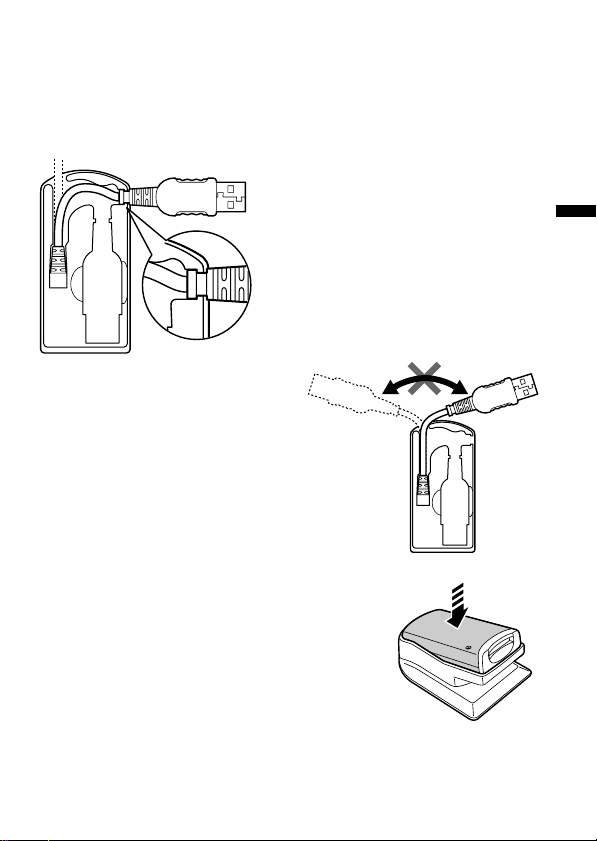
To change the position of the cable emanating from the unit
Because you can change the position of the cable emanating from the unit
as shown in the illustration, change it to suit the location or position of the
USB hub on your computer. When using a USB hub located on the right
side of a laptop computer, adjust the cable so that it comes out of the side
of the unit.
When the cable comes out of the side of the
unit, note how the groove in the plug fits
into the locking slot of the unit itself.
PNote
Do not apply unnecessary force or bend
the cable. This may cause unif failure.
Using the stand provided
When you use the stand provided with the unit,
push the unit (down) firmly until it is all the way
in.
Installation and Operation
19-US
Page 20
For Windows (continued)
Inserting a “Memory Stick”
Make sure the “Memory Stick” is pointed in the proper direction, then
insert it into the slot in the unit.
When you use the unit for the first time, the installation process for the
“Memory Stick” driver will automatically start.
When you insert the “Memory Stick” into the unit, the access lamp
lights or flashes.
PNote
The access lamp lights or flashes when the “Memory Stick” is being accessed.
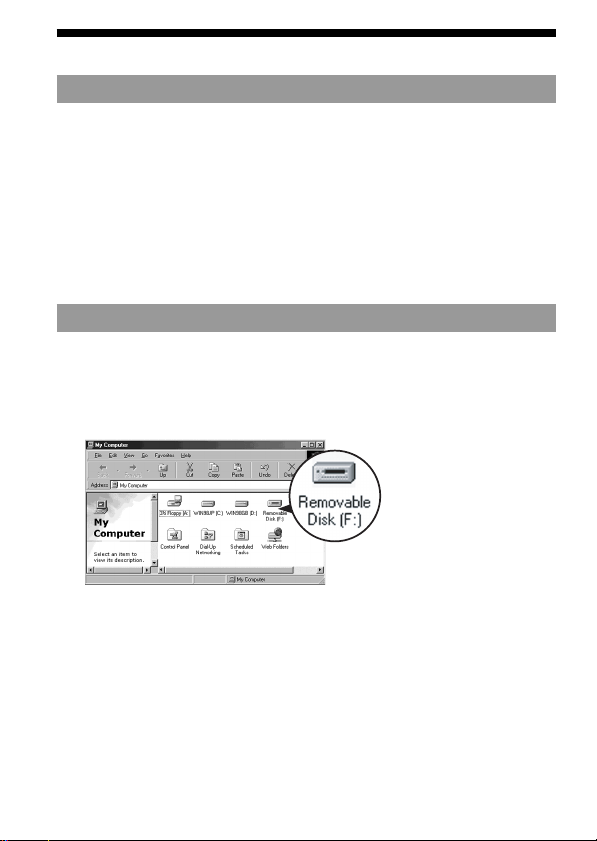
Confirming the insert
1 Double click “My computer.”
The “My computer” folder appears.
2 Confirm that a new “Removable Disk” icon is displayed.
“Removable Disk (F:)” shown on the screen represents this unit, connected to
your computer. Depending on the number and configuration of drives on the
computer you are using, (F:) may be replaced by another letter.
If the “Removable Disk” icon is displayed, the connection process has been
completed.
It may take a little time until the “Removable Disk” icon is displayed.
– For Windows XP Users –
With Windows XP, in place of a “Removable Disk” icon, a Sony Memory
Stick icon appears.
20-US
Page 21
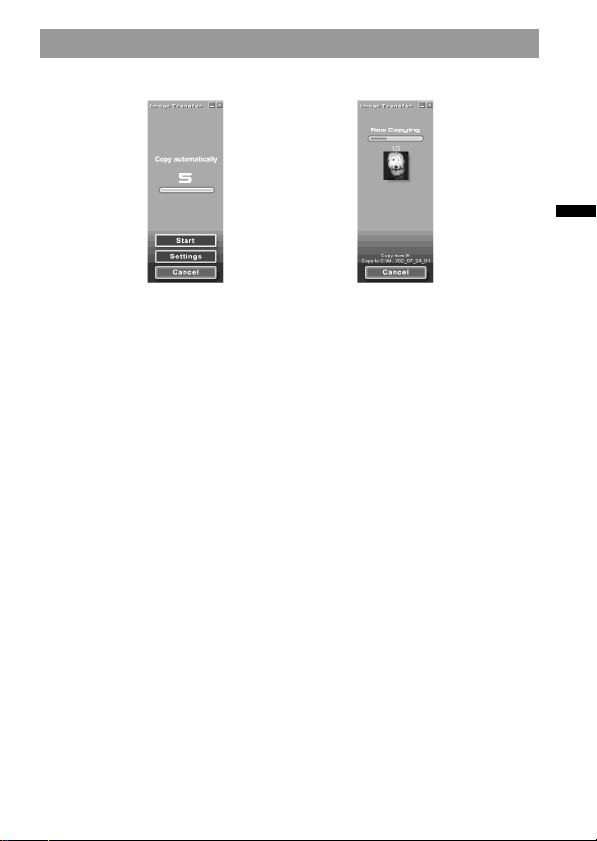
Copying images using Image Transfer
– For Windows 98/98SE/2000/Me –
,
After you connect the unit to your computer and insert the “Memory
Stick” into the unit, “Image Transfer” launches and the images are
automatically copied to your computer. When copying is complete,
“Image Transfer” automatically launches and a list of images appears.
• Normally “Image Transfer” and “Date” folders are created inside the “My
Documents” folder, and all of the image files are copied into these folders.
• You can change the “Image Transfer” settings on the settings screens.
Deleting Image Transfer
Select [My Computer] t [Control Panel] t [Add/Remove programs],
and delete [Image Transfer].
– For Windows XP –
Windows XP is set so that the OS Auto Playback Wizard activates. Follow
the procedures below to cancel the settings.
PNote
This procedure does not need to be performed for subsequent image
downloads.
Installation and Operation
1 Connect the unit to your computer and insert the “Memory
Stick” into the unit.
2 Click “Start,” then click “My Computer.”
3 Right-click “Sony Memory Stick,” then click “Properties.”
21-US
Page 22

For Windows (continued)
4 Cancel the setting.
1 Set “Content type” to “Pictures.”
2 Check “Select an action to perform” under “Actions” select
“Take no action,” then click “Apply.”
3 Set “Content type” to “Video files” and “Mixed content,” and
repeat step 2.
4 Click “OK.”
The “properties” screen closes.
5 Remove and then re-insert the “Memory Stick.”
“Image Transfer” starts up automatically and the images are
automatically copied to the computer.
Removing a “Memory Stick”
– For Windows Me/2000/XP –
After the copying of image data is complete, those using Windows Me/
2000/XP must follow the procedures outlined below before removing the
“Memory Stick,” and before disconnecting this unit from the computer.
1 Click the “Remove Hardware” icon located in the Task tray at
the bottom right-hand corner of the screen.
A message will appear.
2 Click on the little message [e.g., Stop USB Disk-Drive (F:)*]
that appears over the Task tray. The message will differ
slightly depending on which version of Windows you are
using.
After a little while, a message appears.
* The drive letter that appears (e.g., (F:)) will differ depending on the
configuration of the computer you are using.
22-US
Page 23

3 Click “OK.”
Now you can remove the “Memory Stick” from the unit, and
disconnect the unit from the computer safely.
– For Windows 98/98SE –
Those using Windows 98/98SE do not need to follow above procedures.
Installation and Operation
23-US
Page 24

For Macintosh
If you are using Mac OS 9.1/9.2/Mac OS X (v10.0/v10.1), you do not need
to install a USB driver. Just connect this unit to your computer, and it will
be recognized as a drive.
PNotes
• Image Transfer does not support any version of the Mac OS.
• PIXELA ImageMixer for Sony does not support the Mac OS X operating
system.
Installing USB driver software
– For Mac OS 8.5.1/8.6/9.0 –
Follow the steps outlined below.
1 Turn on your computer.
2 Insert the supplied CD-ROM (SPVD-008 USB DRIVER) into your
computer’s CD-ROM drive.
After a short wait, a software application screen appears.
3 On the software application screen, click the USB Driver
button.
4 Double-click the hard disk icon of the device where your
operating system is installed.
5 Drag the two files below from the window opened in step 3,
and drop them on the system folder icon showing in the
window opened in step 4.
• Sony Peripheral USB Driver
• Sony Peripheral USB Shim
6 When the message is displayed, click “OK.”
The USB driver will be installed on your computer.
7 Close the software application window.
8 Remove the CD-ROM from the drive in your computer.
24-US
Page 25

9 Reboot your computer.
10
Connect the USB plug on this unit to the USB jack on your
computer.
Inserting a “Memory Stick”
Insert a “Memory Stick” after your Macintosh has started up.
1 When you insert a “Memory Stick” into this unit, a Memory
Stick icon appears on the desktop.
2 Open the Memory Stick icon.
You can access the data.
The folders stored in the “Memory Stick” cannot be copied
You may not be able to copy the whole of folder on “Memory Stick” at
once to the hard disk on the Macintosh. In this case, open the folder first
and copy only the contents in the folder.
PNotes
•It may take a little while until the Memory Stick icon appears.
• The icon will differ depending on which version of the Macintosh operating
system you are using.
• For details on how to connect this unit and your computer, see page 17,
[Recommended connections] and see page 18, [Precautions to be taken when
connecting this unit to a computer].
Installation and Operation
25-US
Page 26

For Macintosh (continued)
Removing a “Memory Stick”
When you want to remove a "Memory Stick" from this unit, follow the
procedure below.
– For Mac OS 8.5.1/8.6/9.0/9.1/9.2 –
1 Close all software running on this unit.
2 Make sure that the access lamp is not lit.
3 Drag the Memory Stick icon to the trashcan. Or, while the
Memory Stick icon is selected, select “Eject” from the Special
menu at the top left of the screen.
4 Remove the “Memory Stick” from this unit.
– For Mac OS X (v10.0/v10.1) –
Before you remove the “Memory Stick,” be sure to turn the computer off.
26-US
Page 27

PIXELA ImageMixer for Sony
Installing editorial and image materials on
your computer
From among the images on the “Memory Stick,” you can choose editorial
materials you want to use on your computer. This is done from the
“Capture mode screen.”
Installation and Operation
Click the (Capture Environment)
button on the “Main Selector” screen,
and the “Capture mode screen”
appears.
Status bar
When you place the
mouse pointer over an
icon or a button, an
explanation of its function
appears here.
Capture mode selector
Select an input mode
based on the editorial
materials you want to
install on your
computer.
27-US
Page 28

PIXELA ImageMixer for Sony (continued)
Installing images from a “Memory Stick”
1 Click on the “Capture mode selector” (Digital Camera
Import Mode) button.
2 Click the (Refresh) button, the thumbnails of the images
stored in the “Memory Stick” will be listed.
3 Click on the images you want to install on your computer.
4 Click the album where you want to store them.
5 Click the (Import) button.
PNote
No sound is emitted while the image files are being transferred.
Thumbnail list window
For details on how to edit your images, refer to the “Online
Help”
Advice on how to use PIXELA ImageMixer for Sony, called “Online Help”
(a set of operating instructions you can view on the screen), has been
prepared for you.
Click the menu items in the following order, and the “Online Help” item
you want is displayed.
1) [Start] t 2) [Program] t 3) [PIXELA] t 4) [ImageMixer] t 5) [Image
Mixer Help] t 6) the “Online Help” item you want to consult.
28-US
Page 29

BAdditional Information
The “Memory Stick”
A “Memory Stick” is small and light, but it has far more storage capacity
than a floppy diskette. It is the IC storage media for the new century.
Not only can you exchange data between “Memory Stick” compatible
devices, but you can also use a “Memory Stick” as a convenient external
data storage device that can be easily connected and disconnected.
There are two types of “Memory Stick,” an ordinary “Memory Stick,” and
a “Memory Stick” with built-in copyright protection technology
(“MagicGate”*).
* “MagicGate” is a special coding technique that provides the basis for
copyright protection technology.
In addition to an ordinary “Memory Stick,” there is also a “Memory Stick
Duo” that is 1/3 the size and 1/2 the weight of an ordinary “Memory
Stick.”
For this unit, you can use either a “Memory Stick” or a “Memory Stick
Duo.”
The “MagicGate Memory Stick”
A “MagicGate Memory Stick” can record either images or music.
Copyright protected music data recorded in a “MagicGate Memory Stick”
cannot be transferred from this unit to a personal computer. Also,
copyright protected music data saved on the hard disk of a personal
computer cannot be transferred to a “Memory Stick” via this unit.
Additional Information
29-US
Page 30

The “Memory Stick” (continued)
The Memory Stick Duo Adaptor
If you use a “Memory Stick Duo” in this unit, be sure to mount it in the
Memory Stick Duo Adaptor supplied with the “Memory Stick Duo.”
PNotes
• When you mount a “Memory Stick Duo” in a Memory Stick Duo Adaptor, be
sure to mount it correctly.
• When you mount a “Memory Stick Duo” in a Memory Stick Duo Adaptor to
use it in the unit, be sure to do so correctly. Mounting it the wrong way may
damage the unit or any attached devices.
• Do not insert a Memory Stick Adaptor into a “Memory Stick”-compatible
device when there is no “Memory Stick Duo” mounted in the adaptor. Doing
so may damage the unit or any attached devices.
Keep the following in mind when using a “Memory Stick”
When the access lamp is lit, or is flashing, do not remove the “Memory
Stick” from this unit. Doing so may damage the data.
30-US
Page 31

Troubleshooting
Symptom
You cannot install the
USB driver software.
You cannot start up your
computer.
(Windows)
Memory Stick icon does
not appear in Explorer or
My Computer.
(Windows)
Memory Stick icon does
not appear.
(Macintosh)
Cause/Solution
•The specified extension cable is not
correctly connected.
t Connect correctly. (page 17)
•Device other than this unit is connected
to the USB jack on the personal
computer.
t Disconnect or turn off the USB
devices except this unit.
•“Memory Stick” is not in the unit.
t Insert “Memory Stick” into the unit.
•You have started up your computer
with a “Memory Stick” inserted in this
unit.
t Remove the “Memory Stick” from
the unit, and then start up your
computer again.
•The connection between the personal
computer and the unit is not correct.
t Connect the cable correctly. (page 17)
•“Memory Stick” is not in the unit.
t Insert “Memory Stick” into the unit.
•The connection between the personal
computer and the unit is not correct.
t Connect the cable correctly. (page 17)
•“Memory Stick” is not in the unit.
t Insert “Memory Stick” into the unit.
Additional Information
31-US
Page 32

Specifications
Memory Stick Reader/Writer
Interface: USB interface
Transfer rate: Max. 12 Mbps
“Memory Stick” access speed: Approx. 6.4 Mbps (reading in)
(Measured using a Sony VAIO PCG-747)
Power, general
Operating voltage: 4.75 V to 5.25 V (Bus Power)
Power consumption: Action 100 mA
Standby Max. 500 µA
Dimensions: Approx. 36 × 17.5 × 73 mm
(Approx. 1 7/16 × 23/32 × 2 7/8 in.)(w/h/d)
Mass: Approx. 35 g (1.3 oz)(not including “Memory Stick”)
Environmental specification:
Temperature 0 ˚C to 40 ˚C (32 ˚F to 104 ˚F)
(condensation not allowed)
USB Drivers
Windows
• Compatible operating systems: Microsoft® Windows® 98/ Windows
98SE/ Windows® 2000 Professional/ Windows® Millennium Edition/
Windows® XP Home Edition/ XP Professional
All of the above must be pre-installed versions of the respective
operating system.
* Proper operation of the software is not guaranteed on upgraded
versions of any of the operating systems listed above.
• Recommended CPU: MMX® Pentium® 200MHz or above.
• Other equipment required: devices equipped with a standard USB
jack, a CD-ROM drive.
* To play movies saved in a “Memory Stick,” you must have
Windows® Media Player installed.
* For Windows® Millennium Edition/ Windows® XP Home Edition/
XP Professional, a USB driver is not required.
®
32-US
Page 33

Macintosh
•Compatible operating systems: A factory-installed version of Mac OS
8.5.1 / 8.6 / 9.0 / 9.1 / 9.2 / Mac OS X (v10.0/v10.1)
* However, if you have an “iBook,” or a “Power Mac G4,” with a
factory-installed version of Mac OS 8.6, or an iMac with a slotloading CD-ROM, upgrade to Mac OS 9.0/9.1.
•Other equipment required: devices equipped with a standard USB
jack, a CD-ROM drive.
* To play movies saved in a “Memory Stick,” you must have
QuickTime 3, or later, installed.
* For Mac OS 9.1 / 9.2 / Mac OS X (v10.0/v10.1), a USB driver is not
required.
Image Transfer/PIXELA ImageMixer for Sony
• PIXELA ImageMixer for Sony does not support the Macintosh OS X
operating system.
• Image Transfer is only compatible with the Windows® operating
system.
Windows
• Compatible operating systems: Microsoft® Windows® 98/ Windows
98SE/ Windows® 2000 Professional/ Windows® Millennium Edition/
Windows® XP Home Edition/ XP Professional
• Recommended CPU: MMX® Pentium® 200MHz or above.
• Software required: DirectX 8.0a, or later. (Because the application uses
DirectX technology, you must have it installed when you use the
software.)
• Memory: 64 MB, or more. (128 MB or more is recommended.)
• Hard disk space: the program requires about 200 MB of free disk space
to install, but it is recommended that you have 1 GB or above of usable
disk space. (This may change depending on the size of the movie files
you want to edit.)
• Display: A video card with 4 MB or more of video RAM, a screen
resolution of 800 × 600 or more, 16-bit High color (65,000 colors, or
more) or higher, and support for DirectDraw drivers.
• Sound card: 16-bit stereo sound card and speakers.
• Other equipment required: devices equipped with a standard USB
jack, a CD-ROM drive.
Additional Information
®
33-US
Page 34

Specifications (continued)
Macintosh
• Compatible operating systems: Mac OS 8.5.1 / 8.6 / 9.0 / 9.1 / 9.2
(Mac OS X (v10.0/v10.1) is not supported.)
• Memory: 64 MB, or more.
• Software required: QuickTime 4, or later.
• Hard disk space: the program requires about 100 MB of free disk space
to install, but it is recommended that you have 1 GB or above of usable
disk space. (This may change depending on the size of the movie files
you want to edit.)
• Display: A screen resolution of 800 × 600, or higher, with 32,000 colors,
or more.
• Other equipment required: a CD-ROM drive.
34-US
Page 35

35-US
Additional Information
Page 36

Français
Avant la mise en service de cet appareil, prière de lire attentivement ce mode
d’emploi que l’on conservera pour toute référence future.
Pour les clients au Canada
Cet appareil numérique de la class B est comforme à la norme NMB-003 du
Canada.
Cet appareil peut être raccordé à un ordinateur pour transférer les données d’un
“Memory Stick” rapidement sur un ordinateur. Le “Memory Stick” pourra aussi
être utilisé comme disque amovible.
Ce manuel indique comment raccorder cet appareil, comment installer le pilote
et commet utiliser le service clientèle.
Précautions
Lors de l’utilisation de cet appareil, gardez à l’esprit les mises en garde
suivantes :
• Evitez de faire fonctionner l’appareil ou de l’entreposer dans les endroits
suivants car l’appareil pourrait être endommagé ou déformé :
-à proximité d’une flamme nue ou dans des endroits clos tels que l’intérieur
d’un véhicule garé en plein soleil où la température peut être très élevée ;
-à la lumière directe du soleil ou à proximité d’un appareil de chauffage.
• Si l’appareil est sale, essuyez-le avec un chiffon doux et sec. Ne le nettoyez pas
avec de la benzine, de l’alcool ou un diluant. Cela pourrait entraîner la
déformation de l’appareil ou l’endommager.
• Si des problèmes se produisent avec le “Memory Stick” en cours d’utilisation
et que les fonctions d’enregistrement et de lecture ne fonctionnent pas
correctement, les images enregistrées précédemment ne sont pas garanties.
• Si vous réglez le commutateur du “Memory Stick” sur la position “LOCK”
pour éviter tout enregistrement ou suppression accidentelle, l’enregistrement
et la suppression de données sont impossibles.
• Si un corps étranger pénètre dans la fente du Memory Stick, ouvrez
l’obturateur en le poussant, puis retirez-le.
• Avant de régler l’ordinateur en mode de veille/d’hibernation ou de
redémarrer votre ordinateur, retirez le “Memory Stick” de l’appareil.
2-FR
Page 37

“Memory Stick”, “MagicGate Memory Stick”, et “Memory Stick Duo”, ainsi que
, sont des marques commerciales de Sony Corporation.
®
Microsoft
, Windows® et Windows Media sont des marques déposées ou des
marques commerciales de Microsoft Corporation aux Etats-Unis et/ou dans
d’autres pays.
Macintosh, iMac, Mac OS et QuickTime sont des marques commerciales
d’Apple Computer, Inc.
QuickTime et le logo QuickTime sont des marques commerciales utilisées sous
licence.
QuickTime est une marque commerciale et une marque déposée aux Etats-Unis
et dans d’autres pays.
®
MMX
et Pentium® sont des marques déposées ou des marques commerciales
d’Intel Corporation.
Tous les autres noms de compagnies et de produits mentionnés dans ce manuel
peuvent être des marques commerciales ou des marques déposées de leurs
compagnies respectives.
PIXELA ImageMixer for Sony est un produit de PIXELA corporation.
A propos du formatage des “Memory Stick”
Les “Memory Stick” sortant d’usine sont livrés déjà formatés selon un format
standard spécifique. Lors du formatage d’un “Memory Stick”, il est
recommandé de le formater sur l’appareil que vous utilisez, de manière à ce
qu’il soit compatible lors d’une utilisation sur un appareil compatible “Memory
Stick”.
Précautions à prendre lors du formatage d’un “Memory Stick” sur un
ordinateur personnel
Faites attention aux points suivants lors du formatage d’un “Memory Stick”, sur
l’ordinateur personnel que vous utilisez, par exemple.
• Le fonctionnement d’un “Memory Stick” formaté sur un appareil fonctionnant
sous Windows n’est pas garanti sur un appareil compatible “Memory Stick”.
Pour utiliser un “Memory Stick” formaté avec un appareil fonctionnant sous
Windows, reformatez le “Memory Stick” sur un appareil compatible
“Memory Stick”. Remarquez que, dans ce cas, toutes les données enregistrées
sur le “Memory Stick” seront perdues.
• Un “Memory Stick” formaté sur un appareil fonctionnant sous Macintosh ne
peut pas toujours être utilisé sur un appareil compatible “Memory Stick”. Ne
formatez pas le “Memory Stick” sur un appareil fonctionnant sous Macintosh.
3-FR
Page 38

Table des matières
Préparation
Vérification de la présence des accessoires....................................................... 5
Identification des pièces ...................................................................................... 6
Installation et utilisation
Pour les appareils fonctionnant sous Windows............................................... 7
Installation du logiciel de pilote USB......................................................... 7
Installation de Image Transfer et de PIXELA ImageMixer
for Sony ................................................................................................... 9
Raccordement de l’appareil à un ordinateur personnel........................ 12
Raccordements recommandés .................................................................. 15
Précautions à prendre lors du raccordement de cet appareil à un
ordinateur ............................................................................................. 16
Insertion d’un “Memory Stick” ................................................................ 18
Confirmation de l’insertion ....................................................................... 18
Copie d’images à l’aide d’Image Transfer............................................... 19
Retrait d’un “Memory Stick” .................................................................... 20
Pour les appareils fonctionnant sous Macintosh ........................................... 22
Installation du logiciel de pilote USB....................................................... 22
Insertion d’un “Memory Stick” ................................................................ 23
Retrait d’un “Memory Stick” .................................................................... 24
PIXELA ImageMixer for Sony .......................................................................... 25
Installation de matériel d’édition et d’images sur votre ordinateur ... 25
Installation d’images à partir d’un “Memory Stick” ............................. 26
Informations complémentaires
Le “Memory Stick” ............................................................................................. 27
Dépannage ........................................................................................................... 29
Spécifications....................................................................................................... 30
4-FR
Page 39

BPréparation
Vérification de la présence des
accessoires
Assurez-vous que vous possédez tous les accessoires cités ci-dessous.
•Lecteur/Enregistreur pour Memory Stick (1)
•Support (1)
•Câble rallonge spécifié (1)
•CD-ROM (SPVD-008 USB DRIVER) (1)
Ce CD-ROM contient les logiciels suivants :
- PILOTE USB
- Image Transfer
- PIXELA ImageMixer for Sony
•Mode d’emploi (1)
•Garantie (1)
Préparation
5-FR
Page 40

Identification des pièces
Fiche USB
(fiche A)
Prise A
Voyant d’accès
Fiche USB
(fiche A)
Voyant d’accès
Prise USB
Prise USB
Fiche USB
(fiche A)
A propos du câble rallonge spécifié
Fiche USB (fiche A): Branchez cette fiche dans la prise USB de votre ordinateur.
Prise A: Branchez cette prise dans la prise USB de votre ordinateur.
Si votre ordinateur possède plus d’une prise USB, vous
pouvez utiliser n’importe laquelle.
PRemarques
• Le voyant d’accès s’allume ou clignote lorsque vous accédez aux données d’un
“Memory Stick”. Lors de l’accès aux données d’un “Memory Stick”, ne retirez
jamais le “Memory Stick”, ne mettez pas votre ordinateur hors tension et ne
déconnectez pas la fiche USB ou le câble rallonge spécifié de cet appareil. Vous
risqueriez d’endommager le “Memory Stick”.
• Lors du retrait du câble USB ou du câble rallonge spécifié, tirez sur la fiche,
jamais sur le câble lui-même.
• Ne pliez pas le câble plus que nécessaire et ne le soumettez pas à une force
excessive. Vous risqueriez d’endommager le câbles.
• N’utilisez pas le câble rallonge spécifié en tant que câble rallonge pour
quelque autre périphérique que ce soit.
6-FR
Page 41

BInstallation et utilisation
Pour les appareils fonctionnant sous
Windows
Vous devez tout d’abord installer le logiciel de pilote USB sur l’ordinateur
personnel que vous utilisez. Suivez la procédure ci-dessous pour installer
le logiciel de pilote USB.
Installation du logiciel de pilote USB
Allumez votre ordinateur pour lancer Windows.
L’appareil ne doit pas encore être raccordé à l’ordinateur. Quittez toutes
les applications en cours.
– Pour Windows Me et XP –
Vous n’avez pas besoin d’installer le pilote USB (SPVD-008 USB DRIVER)
à partir du CD-ROM fourni avec l’appareil. L’appareil fonctionne avec un
pilote standard pour Windows.
Si vous utilisez Windows XP, vous devez ouvrir une session de travail en
tant qu’administrateur.
Passez à la page 9, [Installation de Image Transfer et de PIXELA
ImageMixer for Sony].
– Pour Windows 98, 98SE et 2000 –
L’appareil ne doit pas encore être raccordé à l’ordinateur. Quittez toutes
les applications en cours.
Si vous utilisez Windows 2000, vous devez ouvrir une session de travail en
tant qu’administrateur.
I
nstallation et utilisation
1 Insérez le CD-ROM contenant le logiciel de pilote USB (SPVD-
008 USB DRIVER) dans le lecteur de CD-ROM.
Si l’écran de titre ne s’affiche pas, suivez les procédures indiquées cidessous.
1 Double-cliquez sur “My Computer”.
2 Double-cliquez sur CD-ROM (ImageMixer [E:])*.
* Le symbole du lecteur [E:] peut être différent selon l’ordinateur
utilisé.
L’écran de titre s’affiche au bout de quelques instants.
7-FR
Page 42

Pour les appareils fonctionnant sous Windows (suite)
2 Cliquez sur “USB Driver” sur l’écran.
La boîte de dialogue “Welcome to the InstallShield Wizard for the
Sony USB Driver” s’affiche.
3 Cliquez sur “Next”.
La boîte de dialogue “Note on installing the USB driver” s’affiche.
4 Après avoir lu les informations, cliquez sur “Next”.
5 Suivez les instructions à l’écran, puis fermez l’assistant
d’installation.
Sélectionnez “Yes, I want to restart my computer now”.
Cliquez ensuite sur “OK”.
Redémarrez votre ordinateur pour que le pilote USB puisse être activé.
Ne retirez pas encore le CD-ROM du lecteur de CD-ROM.
8-FR
Page 43

Installation de Image Transfer et de PIXELA
ImageMixer for Sony
Le logiciel “Image Transfer” vous permet de transférer automatiquement
par copie les images enregistrées sur un “Memory Stick” vers votre
ordinateur.
Le logiciel “PIXELA ImageMixer for Sony” vous permet de visionner
aisément les images copiées vers votre ordinateur.
PRemarque
Vous ne pouvez pas enregistrer ce logiciel.
Si vous utilisez Windows 2000 ou XP, vous devez ouvrir une session de
travail en tant qu’administrateur.
PRemarque
Réglez la résolution de l’écran à 800 × 600, puis assurez vous que le réglage
des couleurs est de 16-bit High Color (65 000 couleurs ou plus) ou supérieur.
Si la résolution est inférieure à 800 × 600 et que le réglage des couleurs est de
256 couleurs ou inférieur, l’écran de titre ne s’affiche pas à l’installation.
Image Transfer
1 L’affichage de la page de titre du CD-ROM sur votre écran se
fait de la manière suivante.
1 Double-cliquez sur “My Computer”.
2 Double-cliquez sur CD-ROM (ImageMixer [E:])*.
* Le symbole du lecteur [E:] peut être différent selon l’ordinateur
utilisé.
L’écran de titre s’affiche au bout de quelques instants.
I
nstallation et utilisation
9-FR
Page 44

Pour les appareils fonctionnant sous Windows (suite)
2 Cliquez sur “Image Transfer” sur l’écran.
3 Sélectionnez une langue, puis cliquez sur “OK”.
4 Suivez les instructions à l’écran, puis installez l’application.
Effectuez l’installation tout en lisant attentivement les instructions.
PRemarque
Lisez attentivement le “License Agreement”, puis cliquez sur “Yes” si
vous acceptez ces conditions.
5 En suivant les instructions à l’écran, cliquez sur “Next” pour
terminer l’installation.
10-FR
Page 45

PIXELA ImageMixer for Sony
6 Cliquez sur “PIXELA ImageMixer” sur l’écran.
7 Sélectionnez une langue, puis cliquez sur “OK”.
8 Suivez les instructions à l’écran pour installer l’application.
Lisez attentivement le “License Agreement”, puis cliquez sur “Yes” si
vous acceptez ces conditions.
9 Saisissez les informations relatives à l’utilisateur.
1 Saisissez votre nom ainsi que le nom de l’entreprise pour
laquelle vous travaillez.
PRemarque
S’il n’y a aucun nom d’entreprise à saisir, saisissez votre nom à
la place.
2 Cliquez sur “Next”.
I
nstallation et utilisation
11-FR
Page 46

Pour les appareils fonctionnant sous Windows (suite)
10
En suivant les instructions à l’écran, terminez l’installation.
L’écran de titre apparaît. Fermez la fenêtre à l’écran et retirez le CDROM de votre ordinateur.
Si DirectX (version 8.0a ou plus récente) a déjà été installé sur votre
ordinateur, l’écran “Information” s’affiche.
Pour terminer l’installation, suivez les directives commençant à
l’étape 11.
- Pour Windows XP -
Les utilisateurs de Windows XP n’ont pas besoin d’installer DirectX.
Fermez l’écran de titre et retirez le CD-ROM de votre ordinateur.
11
Cliquez sur “OK”.
Lisez attentivement le “License Agreement”, puis cliquez sur “Yes”.
12
Cliquez sur “Install”.
L’installation commence. Il est possible que “Installing Microsoft
DirectX” s’affiche.
13
Vérifiez que l’écran de réglage DirectX est affiché, puis cliquez
sur “OK”.
L’ordinateur redémarre.
Redémarrez votre ordinateur pour que le “PIXELA ImageMixer for
Sony” puisse être activé.
14
Retirez le CD-ROM du lecteur de CD-ROM.
Raccordement de l’appareil à un ordinateur
personnel
Branchez la fiche USB de cet appareil à la prise USB de votre ordinateur
personnel.
12-FR
Page 47

Si vous utilisez un ordinateur portable
Après avoir raccordé la fiche USB de cet appareil (fiche A) à la prise USB
de l’ordinateur, passez à la page 15 [Raccordements recommandés].
Si vous utilisez un ordinateur de bureau
Après avoir raccordé cet appareil et le câble rallonge spécifié, raccordez la
fiche USB du câble rallonge spécifié (fiche A) à la prise USB de
l’ordinateur.
- Pour Windows 98SE, 2000, Me et XP -
L’installation du concentrateur USB commence automatiquement. Passez à
la page 15 [Raccordements recommandés].
- Pour Windows 98 -
En suivant les instructions données sur les écrans indiqués ci-dessous,
installez le concentrateur USB.
1 Cliquez sur “Next”.
2 Sélectionnez “Search for the best driver for your device
(Recommended)”, puis cliquez sur “Next”.
I
nstallation et utilisation
13-FR
Page 48

Pour les appareils fonctionnant sous Windows (suite)
3 Cliquez sur “Next” sans cocher aucune case.
L’installation commence. L’assistant “Add New Hardware Wizard” se
lance pour la deuxième fois.
4 Suivez les instructions à l’écran jusqu’à ce que l’installation
soit terminée.
PRemarques
• Si vous utilisez un ordinateur fonctionnant sous une version complètement
nouvelle de Windows 98, un message vous invitant à installer un CD-ROM de
Windows 98 s’affiche à l’écran. Dans ce cas, suivez les instructions fournies,
puis commencez l’installation du concentrateur USB.
• L’emplacement de la prise USB dépend du modèle de votre ordinateur.
• Si vous utilisez un ordinateur comportant plusieurs prises USB, ne raccordez
pas d’autres appareils qu’une souris standard et un clavier à l’ordinateur
principal lorsque vous utilisez cet appareil. De même, lorsque vous utilisez un
ordinateur de bureau, raccordez cet appareil directement à l’une des prises
USB de votre ordinateur. Pour plus de détails, voir page 15 [Raccordements
recommandés].
14-FR
Page 49

Raccordements recommandés
Fonctionnement lorsque le raccordement comme suit a été confirmé.
Lorsque cet appareil est raccordé à la prise USB de votre ordinateur
personnel et que rien n’est raccordé à l’autre prise USB :
Lorsqu’un clavier USB est raccordé à la prise USB d’un ordinateur
personnel sur lequel un clavier et une souris USB sont installés en
série et que cet appareil est raccordé à l’autre prise USB à l’aide
du câble rallonge spécifié :
I
nstallation et utilisation
2
Effectuez les raccordements
dans l’ordre suivant: 1 t 2.
PRemarques
• Sous une configuration Windows ou Macintosh, un fonctionnement correct ne
peut pas être garanti lorsque deux périphériques USB ou plus sont raccordés à
l’ordinateur personnel, en fonction des périphériques USB utilisés
simultanément.
• Si vous connectez cet appareil via un concentrateur autre que le câble rallonge
spécifié, son bon fonctionnement n’est pas garanti. Assurez-vous d’utiliser le
câble rallonge spécifié.
• Le bon fonctionnement ne peut pas être garanti sur certains ordinateurs,
même s’ils sont équipés de la configuration recommandée.
• Si vous raccordez un autre périphérique équipé d’un “Memory Stick”, en plus
de ce périphérique, sur un même ordinateur personnel, vous ne pouvez
accéder qu’à un seul périphérique “Memory Stick” à la fois. Retirez le
“Memory Stick” de ce périphérique ou mettez l’autre ou les autres
périphérique(s) hors tension.
• Assurez-vous de raccorder cet appareil directement à la prise USB de
l’ordinateur personnel lui-même. Si vous connectez cet appareil via la prise
USB d’un clavier ou via un concentrateur USB, son fonctionnement correct
n’est pas garanti.
1
15-FR
Page 50

Pour les appareils fonctionnant sous Windows (suite)
Précautions à prendre lors du raccordement
de cet appareil à un ordinateur
Retrait de la fiche du câble de son support de maintien
Retirez l’extrémité du câble de l’appareil en tirant en même temps sur les
deux côtés de la fiche USB.
PRemarque
Ne retirez pas l’extrémité du câble en tirant sur le câble lui-même.
Rangement du câble
Insérez d’abord l’extrémité de la fiche USB (fiche A) dans l’appareil, puis
rangez le reste du câble.
Pour le ranger, adaptez
cette partie à celle
correspondante dans le
boîtier.
2
1
1
2
16-FR
Insérez la fiche et le câble dans la
rainure fournie. Le câble doit
s’insérer facilement dedans.
Page 51

Pour modifier la position du câble sortant de l’appareil
Etant donné que vous pouvez modifier la position du câble sortant de
l’appareil, tel qu’indiqué dans l’illustration, changez sa position pour
l’adapter à l’emplacement ou à la position du concentrateur USB sur votre
ordinateur. Lors de l’utilisation d’un concentrateur USB situé sur le côté
droit d’un ordinateur portable, ajustez le câble de manière à ce qu’il sorte
sur le côté de l’appareil.
Lorsque le câble sort sur le côté de
l’appareil, notez de quelle manière la
rainure de la fiche s’adapte dans la fente de
verrouillage de l’appareil.
PRemarque
Ne pas plier le câble plus que nécessaire
et ne pas le soumettre à une force
excessive. Cela pourrait entraîner une
panne de l’appareil.
I
nstallation et utilisation
Avec le support fourni
Lorsque vous utilisez le support fourni avec
l’appareil, poussez fermement l’appareil vers le
bas jusqu’à ce qu’il soit enfoncé complètement.
17-FR
Page 52

Pour les appareils fonctionnant sous Windows (suite)
Insertion d’un “Memory Stick”
Assurez vous que le “Memory Stick” est pointé dans le bon sens, puis
insérez-le dans la fente de l’appareil prévue à cet effet.
Lorsque vous utilisez l’appareil pour la première fois, le processus d’installation
du pilote “Memory Stick” démarre automatiquement.
Lorsque vous insérez le “Memory Stick” dans l’appareil, le voyant
d’accès s’allume ou clignote.
PRemarque
Le voyant d’accès s’allume ou clignote lorsque les données du “Memory Stick”
sont en cours de lecture.
Confirmation de l’insertion
1 Double-cliquez sur “My Computer”.
Le dossier “My Computer” s’affiche.
2 Vérifiez qu’une nouvelle icône “Removable Disk” est affichée.
“Removable Disk (F:)” affichée à l’écran représente cet appareil, raccordé à votre
ordinateur. Selon le numéro et la configuration des lecteurs de l’ordinateur
utilisé, (F:) peut être remplacé par une autre lettre.
Si l’icône “Removable Disk” est affichée, le processus de connexion est terminé.
L’affichage de l’icône “Removable Disk” peut prendre un petit moment.
– Pour les utilisateurs de Windows XP –
Sous Windows XP, au lieu d’une icône de “Removable Disk”, une icône de
Memory Stick Sony s’affiche.
18-FR
Page 53

Copie d’images à l’aide d’Image Transfer
– Pour Windows 98, 98SE, 2000 et Me –
,
Après avoir raccordé l’appareil à votre ordinateur et inséré le “Memory
Stick” dans l’appareil, “Image Transfer” se lance et les images sont
automatiquement copiées sur votre ordinateur. Lorsque la copie est
terminée, “Image Transfer” se lance automatiquement et une liste
d’images s’affiche.
• Normalement, des dossiers “Image Transfer” et “Date” sont créés dans le
dossier “My Documents” et tous les fichiers image sont copiés dans ces
dossiers.
• Vous pouvez modifier les réglages de “Image Transfer” sur les écrans de
réglages.
Suppression de Image Transfer
Sélectionnez [My Computer] t [Control Panel] t [Add/Remove
programs], puis supprimez [Image Transfer].
– Pour Windows XP –
Windows XP est réglé de manière à ce que l’assistant de lecture
automatique de votre système d’exploitation soit activé. Pour annuler les
réglages, suivez les procédures ci-dessous.
I
nstallation et utilisation
PRemarque
Cette procédure n’est pas nécessaire pour les téléchargements d’images
ultérieurs.
1 Raccordez l’appareil à votre ordinateur et insérez le “Memory
Stick” dans l’appareil.
19-FR
Page 54

Pour les appareils fonctionnant sous Windows (suite)
2 Cliquez sur le bouton “Start” et sélectionnez “My Computer”.
3 Cliquez avec le bouton droit de la souris sur “Sony Memory
Stick”, puis cliquez sur “Properties”.
4 Annulez le réglage.
1 Réglez “Content type” sur “Pictures”.
2 Cochez “Select an action to perform” sous “Actions”,
sélectionnez “Take no action”, puis cliquez sur “Apply”.
3 Réglez “Content type” sur “Video files” et “Mixed content”,
puis répétez l’étape 2.
4 Cliquez sur “OK”.
L’écran “properties” se ferme.
5 Retirez et réinsérez le “Memory Stick”.
“Image Transfer” se lance automatiquement et les images sont
automatiquement copiées sur l’ordinateur.
Retrait d’un “Memory Stick”
– Pour Windows Me, 2000 et XP –
Lorsque la copie des données image est terminée, et avant de déconnecter
cet appareil de l’ordinateur, les utilisateurs de Windows Me, 2000 ou XP
doivent suivre les procédures indiquées ci-dessous avant de retirer le
“Memory Stick”.
1 Cliquez sur l’icône “Remove Hardware” située dans la barre
des tâches dans le coin inférieur droit de l’écran.
Un message s’affiche.
20-FR
Page 55

2 Cliquez sur le petit message [p. ex., Stop USB Disk-Drive (F:)*]
s’affichant au-dessus de la barre des tâches. Le message
diffère légèrement selon la version de Windows utilisée.
Au bout d’un certain temps, un message s’affiche.
* La lettre du lecteur qui s’affiche (p. ex. (F:)) diffère selon la
configuration de l’ordinateur utilisé.
3 Cliquez sur “OK”.
Vous pouvez maintenant retirer le “Memory Stick” de l’appareil et
déconnecter l’appareil de l’ordinateur en toute sécurité.
– Pour Windows 98 et 98SE –
Les utilisateurs de Windows 98 ou 98SE n’ont pas besoin de suivre les
procédures ci-dessus.
I
nstallation et utilisation
21-FR
Page 56

Pour les appareils fonctionnant sous
Macintosh
Si vous utilisez Mac OS 9.1/9.2/Mac OS X (v10.0/v10.1), vous n’avez pas
besoin d’installer de pilote USB. Raccordez simplement cet appareil à votre
ordinateur qui le reconnaîtra comme lecteur.
PRemarques
• Image Transfer ne prend en charge aucune version de Mac OS.
• PIXELA ImageMixer for Sony ne prend pas en charge le système
d’exploitation Mac OS X.
Installation du logiciel de pilote USB
– Pour Mac OS 8.5.1, 8.6 et 9.0 –
Suivez les étapes indiquées ci-dessous.
1 Mettez votre ordinateur sous tension.
2 Insérez le CD-ROM fourni (SPVD-008 USB DRIVER) dans le
lecteur de CD-ROM de votre ordinateur.
Au bout d’un certain temps, un écran d’application logicielle
s’affiche.
3 Sur l’écran d’application logicielle, cliquez sur le bouton de
pilote USB.
4 Double-cliquez sur l’icône de disque dur de l’appareil sur
lequel votre système d’exploitation est installé.
5 Sélectionnez les deux fichiers sous la fenêtre ouverte à l’étape
3 et déplacez-les sur l’icône de dossier système affichée dans
la fenêtre ouverte à l’étape 4.
• Sony Peripheral USB Driver
• Sony Peripheral USB Shim
6 Lorsque le message s’affiche, cliquez sur “OK”.
Le pilote USB est installé sur votre ordinateur.
7 Fermez la fenêtre d’application logicielle.
22-FR
Page 57

8 Retirez le CD-ROM du lecteur de votre ordinateur.
9 Redémarrez l’ordinateur.
10
Branchez la fiche USB de cet appareil à la prise USB de votre
ordinateur.
Insertion d’un “Memory Stick”
Insérez un “Memory Stick” après le démarrage de votre Macintosh.
1 Lorsque vous insérez un “Memory Stick” dans cet appareil,
l’icône de Memory Stick s’affiche sur le bureau de votre
ordinateur.
2 Double-cliquez sur l’icône de Memory Stick.
Vous avez alors accès aux données.
Les dossiers copiés sur le “Memory Stick” ne peuvent pas être copiés
Il se peut que vous ne puissiez pas copier en une seule fois la totalité d’un
dossier d’un “Memory Stick” sur le disque dur du Macintosh. Dans ce cas,
ouvrez d’abord le dossier et copiez uniquement le contenu du dossier.
PRemarques
• L’affichage de l’icône du “Memory Stick” peut prendre un petit moment.
• L’icône diffère selon la version du système d’exploitation Macintosh en cours
d’utilisation.
• Pour plus de détails sur le raccordement de cet appareil sur votre ordinateur,
reportez-vous à la page 15 [Raccordements recommandés] et à la page 16
[Précautions à prendre lors du raccordement de cet appareil à un ordinateur].
I
nstallation et utilisation
23-FR
Page 58

Pour les appareils fonctionnant sous Macintosh (suite)
Retrait d’un “Memory Stick”
Pour retirer un “Memory Stick” de cet appareil, suivez la procédure cidessous.
– Pour Mac OS 8.5.1, 8.6, 9.0, 9.1 et 9.2 –
1 Quittez toutes les applications logicielles en cours sur cet
appareil.
2 Assurez-vous que le voyant d’accès est éteint.
3 Sélectionnez l’icône de Memory Stick et déplacez-la sur la
poubelle. Pendant que l’icône Memory Stick est sélectionnée,
vous pouvez également sélectionner “Eject” à partir du menu
spécial dans le coin supérieur droit de l’écran.
4 Retirez le “Memory Stick” de cet appareil.
– Pour Mac OS X (v10.0/v10.1) –
Avant de retirer le “Memory Stick”, assurez-vous de mettre l’ordinateur
hors tension.
24-FR
Page 59

PIXELA ImageMixer for Sony
Installation de matériel d’édition et d’images
sur votre ordinateur
Parmi les images du “Memory Stick”, vous pouvez choisir le matériel
d’édition que vous souhaitez utiliser sur votre ordinateur. Vous pouvez
effectuer cette opération à partir de l’écran “Capture mode screen”.
I
nstallation et utilisation
Cliquez sur le bouton
(Environnement de capture) sur
l’écran “Main Selector”, puis l’écran
“Capture mode screen” s’affiche.
Barre d’état
Lorsque vous placez le
pointeur de la souris sur
une icône ou un bouton,
une explication de sa
fonction s’affiche à cet
endroit.
Sélecteur de mode de
capture
Sélectionnez un mode
d’entrée basé sur les
matériaux d’édition que
vous souhaitez installer sur
votre ordinateur.
25-FR
Page 60

PIXELA ImageMixer for Sony (suite)
Installation d’images à partir d’un
“Memory Stick”
1 Cliquez sur le bouton (mode d’import pour appareil photo
numérique) “Capture mode selector”.
2 Cliquez sur le bouton (rafraîchir), les vignettes des
images enregistrées sur le “Memory Stick” s’affichent dans
une liste.
3 Cliquez sur les images à installer sur votre ordinateur.
4 Cliquez sur l’album où vous souhaitez les copier.
5 Cliquez sur le bouton (import).
PRemarque
Aucun son n’est émis pendant le transfert des fichiers d’images.
Fenêtre de la liste par vignettes
Pour plus de détails sur comment éditer vos images, reportezvous à “Online Help”
Une liste de conseils sur la manière d’utiliser PIXELA ImageMixer for
Sony, appelée “Online Help” (liste de directives pouvant être visionnées à
l’écran) a été préparée pour vous.
Cliquez sur les éléments de menu dans l’ordre suivant, puis l’élément de
“Online Help” souhaité s’affiche.
1) [Start] t 2) [Program] t 3) [PIXELA] t 4) [ImageMixer] t 5) [Image
Mixer Help] t 6) l’élément de “Online Help” que vous souhaitez
consulter.
26-FR
Page 61

BInformations complémentaires
Le “Memory Stick”
Un “Memory Stick” est petit et léger, mais peut contenir bien plus de
données qu’une disquette. IC’est le support de stockage à circuit intégré
du nouveau millénaire.
Non seulement vous pouvez échanger des données entre les appareils
compatibles “Memory Stick”, mais vous pouvez également utiliser un
“Memory Stick” en tant qu’appareil de stockage de données pouvant
facilement être raccordé et déconnecté.
Il existe deux types de “Memory Stick”, un “Memory Stick” ordinaire et un
“Memory Stick” comportant une technologie de protection des droits
d’auteur intégrée (“MagicGate”*).
* “MagicGate” est une technologie d’encodage spéciale offrant une base
pour la technologie de protection des droits d’auteur.
En plus du “Memory Stick”, ordinaire, il existe également un “Memory
Stick Duo”, moitié moins lourd qu’un “Memory Stick” ordinaire et dont la
taille équivaut à 1/3 de celle d’un “Memory Stick” ordinaire.
Pour cet appareil, vous pouvez utiliser soit un “Memory Stick ” ou un
“Memory Stick Duo”.
Le “MagicGate Memory Stick”
Un “MagicGate Memory Stick” peut comporter soit des images soit de la
musique. Les données de musique dont les droits d’auteurs sont protégés
enregistrées sur un “MagicGate Memory Stick” ne peuvent pas être
transférées de cet appareil sur un ordinateur personnel. De même, les
données de musique dont les droits d’auteurs sont protégés enregistrées
sur le disque dur d’un ordinateur personnel ne peuvent pas être
transférées sur un “Memory Stick” via cet appareil.
27-FR
Informations complémentaires
Page 62

Le “Memory Stick” (suite)
L’adaptateur de “Memory Stick Duo”
Si vous utilisez un “Memory Stick Duo” dans cet appareil, assurez-vous de
le monter sur l’adaptateur de Memory Stick Duo fourni avec le “Memory
Stick Duo”.
PRemarques
• Lorsque vous montez un “Memory Stick Duo” sur un adaptateur de Memory
Stick Duo, assurez-vous de le monter correctement.
• Lorsque vous montez un “Memory Stick Duo” sur un adaptateur de Memory
Stick Duo pour l’utiliser sur l’appareil, assurez-vous de le monter
correctement. Si le “Memory Stick Duo” est monté dans le mauvais sens,
l’appareil ou les périphériques qui y sont connectés peuvent être
endommagés.
• N’insérez pas d’adaptateur de Memory Stick dans un appareil compatible
“Memory Stick” lorsque aucun “Memory Stick Duo” n’est monté sur
l’adaptateur. Cela pourrait endommager l’appareil ou les périphériques qui y
sont connectés.
Lors de l’utilisation d’un “Memory Stick”, garder à l’esprit les
mises en garde suivantes :
Lorsque le voyant d’accès est allumé ou qu’il clignote, ne pas retirer le
“Memory Stick” de l’appareil. Vous risqueriez d’endommager les données.
28-FR
Page 63

Dépannage
Symptômes
Vous ne pouvez pas
installer le logiciel du
pilote USB.
Vous ne pouvez pas
démarrer votre
ordinateur.
(Windows)
L’icône de Memory Stick
ne s’affiche pas dans
“Explorer” ou “My
Computer”.
(Windows)
L’icône du Memory Stick
ne s’affiche pas.
(Macintosh)
Cause/Solution
•Le câble rallonge spécifié n’est pas
raccordé correctement.
t Raccordez-le correctement. (page 15)
•Un appareil autre que celui-ci est
raccordé à la prise USB de l’ordinateur
personnel.
t Déconnectez ou mettez hors tension
tous les périphériques USB autres
que cet appareil.
•Le “Memory Stick” n’est pas inséré dans
l’appareil.
t Insérez un “Memory Stick” dans
l’appareil.
•Vous avez démarré votre ordinateur
avec un “Memory Stick” inséré dans cet
appareil.
t Retirez le “Memory Stick” de
l’appareil, puis redémarrez votre
ordinateur.
•La connexion entre l’ordinateur
personnel et l’appareil n’est pas correcte.
t Raccordez le câble correctement.
(page 15)
•Le “Memory Stick” n’est pas inséré dans
l’appareil.
t Insérez un “Memory Stick” dans
l’appareil.
•La connexion entre l’ordinateur
personnel et l’appareil n’est pas correcte.
t Raccordez le câble correctement.
(page 15)
•Le “Memory Stick” n’est pas inséré dans
l’appareil.
t Insérez un “Memory Stick” dans
l’appareil.
Informations complémentaires
29-FR
Page 64

Spécifications
Lecteur/Enregistreur pour Memory Stick
Interface: Interface USB
Taux de transfert : 12 Mbps max.
Vitesse d’accès au “Memory Stick” : Env. 6,4 Mbps (lecture)
(Mesure effectuée pendant l’utilisation du VAIO PCG-747)
Alimentation, général
Tension de fonctionnement : 4,75 V à 5,25 V (alimentation par bus)
Consommation électrique : En fonctionnement 100 mA
Dimensions : Environ 36 x 17,5 x 73 mm
(Environ 1 7/16 × 23/32 × 2 7/8 po) (l/h/p)
Poids : Env. 35 g (1,3 oz) (sans le “Memory Stick”)
Spécifications d’environnement :
Température 0 °C à 40 °C (32 °F à 104 °F)
(condensation non permise)
Pilotes USB
Windows
• Systèmes d’exploitation compatibles : Microsoft® Windows® 98,
Windows® 98SE, Windows® 2000 Professionnel, Windows
Millennium Edition, Windows® XP Edition familiale, XP Professionnel
Tous les systèmes cités précédemment doivent être des versions
pré-installées de leur système d’exploitation respectif.
* Un bon fonctionnement du logiciel n’est pas garanti sur les versions
mises à niveau des systèmes d’exploitation cités précédemment.
• Unité centrale recommandée : MMX® Pentium® 200 MHz ou
supérieur.
• Autres appareils requis : Appareils équipés d’une prise USB standard,
un lecteur de CD-ROM.
* Pour que le visionnage des films sauvegardés sur un “Memory
Stick” soit possible, Windows® Media Player doit être installé.
* Pour Windows® Millennium Edition, Windows® XP Edition
familiale et XP Professionnel, il n’est pas nécessaire d’avoir un pilote
USB installé.
En veille 500 µA max.
®
30-FR
Page 65

Macintosh
• Systèmes d’exploitation compatibles : Version installée par défaut de
Mac OS 8.5.1, 8.6, 9.0, 9.1, 9.2 et Mac OS X (v10.0/v10.1)
* Cependant, si vous utilisez un “iBook” ou un “Power Mac G4”, avec
une version installée par défaut de Mac OS 8.6 ou un iMac équipé
d’un lecteur de CD-ROM à fente, effectuez une mise à niveau pour
passer à Mac OS 9.0 ou 9.1.
• Autres appareils requis : Appareils équipés d’une prise USB standard,
un lecteur de CD-ROM.
* Pour que le visionnage des films sauvegardés sur un “Memory
Stick” soit possible, QuickTime 3 ou plus récent, doit être installé.
* Pour Mac OS 9.1, 9.2 et Mac OS X (v10.0/v10.1), il n’est pas
nécessaire d’avoir un pilote USB installé.
Image Transfer et PIXELA ImageMixer for Sony
• PIXELA ImageMixer for Sony ne prend pas en charge le système
d’exploitation Macintosh OS X.
• Image Transfer est compatible uniquement avec le système
d’exploitation Windows®.
Windows
• Systèmes d’exploitation compatibles : Microsoft® Windows® 98,
Windows® 98SE, Windows® 2000 Professionnel, Windows
Millennium Edition, Windows® XP Edition familiale, XP Professionnel
• Unité centrale recommandée : MMX® Pentium® 200 MHz ou
supérieur.
• Logiciel requis : DirectX 8.0a ou plus récent. (Etant donné que
l’application utilise la technologie DirectX, celle-ci doit être installée
lorsque vous utilisez le logiciel.)
• Mémoire : 64 Mo ou plus. (Une mémoire de 128 Mo ou plus est
recommandée.)
• Espace mémoire du disque dur : L’installation du programme
nécessite environ 200 Mo d’espace mémoire libre, mais il est
recommandé de laisser un espace mémoire libre de 1 Go ou plus.
(L’espace libre nécessaire peut changer selon la taille des fichiers de
films à éditer.)
• Affichage : Une carte vidéo avec 4 Mo ou plus de mémoire vive vidéo,
une résolution d’écran de 800 × 600 ou plus, 16-bit High color (65 000
couleurs ou plus) ou supérieur et la prise en charge des pilotes
DirectDraw.
• Carte son : Carte son stéréo 16 bits et haut-parleurs.
• Autres appareils requis : Appareils équipés d’une prise USB standard,
lecteur de CD-ROM.
®
Informations complémentaires
31-FR
Page 66

Spécifications (suite)
Macintosh
• Systèmes d’exploitation compatibles : Mac OS 8.5.1, 8.6, 9.0, 9.1 et 9.2
(Mac OS X (v10.0/v10.1) n’est pas pris en charge.
• Mémoire : 64 Mo ou plus.
• Logiciel requis : QuickTime 4 ou plus récent.
• Espace mémoire du disque dur : L’installation du programme
nécessite environ 100 Mo d’espace mémoire libre, mais il est
recommandé de laisser un espace mémoire libre de 1 Go ou plus.
(L’espace libre nécessaire peut changer selon la taille des fichiers de
films à éditer.)
• Affichage : Une résolution d’écran de 800 × 600 ou plus, avec 32 000
couleurs ou plus.
• Autres appareils requis : Un lecteur de CD-ROM.
32-FR
Page 67

33-FR
Informations complémentaires
Page 68

Sony Electronics Inc.:
Customer Support
If you have any questions/comments related to this product,
please visit our Customer Support website at
http://www.sel.sony.com/SEL/service/conselec/
(If you do not have internet access, please call 1-800-22 SONY.)
Sony Corporation Printed in Japan
 Loading...