

Sony MSAC-PC3 User Manual [en, de, es, fr]
3-078-326-13 (1)
Memory Stick
PC Card Adaptor
Operating Instructions
Mode d’emploi
Manual de instrucciones
Bedienungsanleitung
MSAC-PC3
2002 Sony Corporation Printed in Japan
Printed on 100% recycled paper using
VOC (Volatile Organic Compound)-free
vegetable oil based ink.
English
Before operating the unit, please read this instructions thoroughly, and
retain it for future reference.
For the customers in U.S.A.
THIS DEVICE COMPLIES WITH PART 15 OF THE FCC RULES.
OPERATION IS SUBJECT TO THE FOLLOWING TWO CONDITIONS:
(1) THIS DEVICE MAY NOT CAUSE HARMFUL INTERFERENCE, AND
(2) THIS DEVICE MUST ACCEPT ANY INTERFERENCE RECEIVED,
INCLUDING INTERFERENCE THAT MAY CAUSE UNDESIRED
OPERATION.
CAUTION
You are cautioned that any changes or modifications not expressly
approved in this manual could void your authority to operate this
equipment.
Note:
This equipment has been tested and found to comply with the limits for a
Class B digital device, pursuant to Part 15 of the FCC Rules. These limits are
designed to provide reasonable protection against harmful interference in a
residential installation. This equipment generates, uses, and can radiate
radio frequency energy and, if not installed and used in accordance with the
instructions, may cause harmful interference to radio communications.
However, there is no guarantee that interference will not occur in a
particular installation. If this equipment does cause harmful interference to
radio or television reception, which can be determined by turning the
equipment off and on, the user is encouraged to try to correct the
interference by one or more of the following measures:
– Reorient or relocate the receiving antenna.
– Increase the separation between the equipment and receiver.
– Connect the equipment into an outlet on a circuit different from that to
which the receiver is connected.
– Consult the dealer or an experienced radio/TV technician for help.
For the customers in Canada
This Class B digital apparatus complies with Canadian ICES-003.
For the customers in U.S.A. and Canada
LIMITED WARRANTY
If this product should prove defective in workmanship or material during the
period of 1 year from the date of original purchase at retail, the same will be
replaced by either the Seller, or Sony Electronics, Inc. or Sony of Canada,
Ltd.
SUCH REPLACEMENT SHALL BE THE SOLE REMEDY OF THE
CONSUMER, AND THERE SHALL BE NO LIABILITY ON THE PART OF
THE MANUFACTURER, DISTRIBUTOR OR SELLER FOR ANY LOSS OR
DAMAGE, DIRECT OR CONSEQUENTIAL, ARISING OUT OR THE USE
OF, OR INABILITY TO USE, THIS PRODUCT.
Some states of the United States do not allow the exclusion of incidental or
consequential damages, so the above exclusion may not apply to you.
This warranty gives you specific legal rights and you may also have other
rights which vary from state to state in the United States, Puerto Rico or
from province to province in Canada.
In the United States, contact: Sony Electronics Inc.,
Sony Building, 680 Kinderkamack Road, Oradell, New Jersey 07649.
In Canada, contact: Sony of Canada Ltd.,
115 Gordon Baker Road, Toronto, Ontario, M2H 3R6 CANADA.
• “Memory Stick,” “Memory Stick Duo,” “Memory Stick PRO,” “Memory Stick PRO
Duo,” “MagicGate,” “MagicGate Memory Stick,” “MagicGate Memory Stick Duo”
and are trademarks of Sony Corporation.
• Microsoft, and Windows are registered trademarks of Microsoft Corporation in the
United States and/or other countries.
• Macintosh and MacOS are registered trademarks of Apple Computer, Inc. in the
United States and/or other countries.
• All other company names and product names mentioned here may be the
trademarks or registered trademarks of their respective companies.
The symbols for ™ and ® are omitted in these instructions.
On “Memory Stick”
What is “Memory Stick”?
“Memory Stick” is a new-generation IC storage media that is ultra-small and
lightweight and has far greater storage capacity than floppy disks. It can be used
not only for transferring data between “Memory Stick” compatible products, but
also as a removable, external storage media for storing data.
“Memory Stick” is available in standard size and a smaller size called “Memory
Stick Duo.” When “Memory Stick Duo” is inserted into a Memory Stick Duo
Adaptor, the size becomes the same as the standard-sized “Memory Stick” to
allow use with products that are compatible with the standard-sized “Memory
Stick.”
“Memory Stick” types that can be used with this
unit
The following types of “Memory Stick” are available to suit your needs.
“Memory Stick PRO”
“Memory Stick PRO” is a “Memory Stick” with the “MagicGate*” copyright
protection technology, and can only be used with “Memory Stick PRO”
compatible devices.
“Memory Stick” (“MagicGate”/High-Speed data transfer
compatible)
This is a “Memory Stick” with the “MagicGate*” copyright protection
technology, and supports High-Speed data transfer. You can use this unit with
any “Memory Stick”/“Memory Stick PRO” compatible devices. (The transfer
speed varies depending on the “Memory Stick” compatible device used.)
“Memory Stick”
A “Memory Stick” that allows recording of all kinds of data with the exception
of data requiring copyright protection technology (“MagicGate*”).
“MagicGate Memory Stick”
This is a “Memory Stick” featuring built-in copyright protection technology
(“MagicGate*”).
* “MagicGate” is a copyright protection technology using encryption
technology.
This unit does not have “MagicGate” installed, and so does not support
recording or playback of data that requires “MagicGate.”
Formatting of “Memory Stick”
This deletes all the data recorded on a “Memory Stick.” When formatting a
“Memory Stick,” be sure to format on the “Memory Stick” compatible products.
Besides, when formatting a “Memory Stick” on a computer, use the “Memory
Stick Formatter” software program. You can get the “Memory Stick Formatter”
at the following Web Site.
http://www.sony.net/Products/mssupport/
PNote
If you format a “Memory Stick” that contains recorded data, the already recorded data
will be deleted. Be careful not to inadvertently delete important data.
Precautions on use of “Memory Stick”
A
“Memory Stick” “Memory Stick Duo”
• Do not touch the terminal (A in diagram) with your hand or any metal object.
• Do not apply excessive pressure when writing on the label space (B in
diagram) of the “Memory Stick” or the Memo Area (C in diagram) of the
“Memory Stick Duo.”
• Do not bend, drop or expose to impact the “Memory Stick.”
how to affix labels
B
A
C
• Do not dismantle or modify the “Memory Stick.”
• Do not allow water onto the “Memory Stick.”
• Recorded data may be damaged or lost in the following situations:
– If you remove the “Memory Stick” or switch off this unit while writing or
reading data.
– If you use this unit where it is subject to static electricity or electrical noise.
• We recommend that you backup important data.
• We can not accept responsibility in the event that data is lost or damaged and
the unit is damaged while using this unit.
• Data which is copyright protected with “MagicGate” can only be handled by a
“MagicGate Memory Stick.”
• Keep the “Memory Stick” in the case supplied when carrying or storing it.
• Do not use or store in the following places:
– Where the temperature can get very high, such as inside a car or in strong
sunshine.
– In direct sunlight.
– In high humidity or near corrosive substances.
• Moving the LOCK switch to the locked position prevents
recording, editing or deleting.
* There is no LOCK switch on certain “Memory Stick.”
When using a “Memory Stick” with no LOCK switch,
be careful not to accidentally edit or delete data.
• Use a sharp pointed object to move the LOCK switch.
• When using “Memory Stick Duo”/“Memory Stick PRO
Duo” with this unit, make sure the “Memory Stick
Duo”/“Memory Stick PRO Duo” has been inserted into
the Memory Stick Duo Adaptor before starting to use.
• Confirm that the “Memory Stick” is positioned correctly
before inserting for use.
• Do not insert the Memory Stick Duo Adaptor into
“Memory Stick” compatible products when no “Memory Stick Duo”/
“Memory Stick PRO Duo” is inserted into the Memory Stick Duo Adaptor. If
used in these ways, malfunctions may occur.
“Memory Stick”
“Memory Stick Duo”
LOCK (write protect) switch
When using this unit with a “Memory Stick” that has a LOCK switch, release the
LOCK switch. Do not use with the LOCK switch in the locked position.
Checking the supplied accessories
• Memory Stick PC Card Adaptor (1)
• Specified Storage Case (1)
• Operating Instructions (1)*
* Four operating instructions are supplied depending on the area.
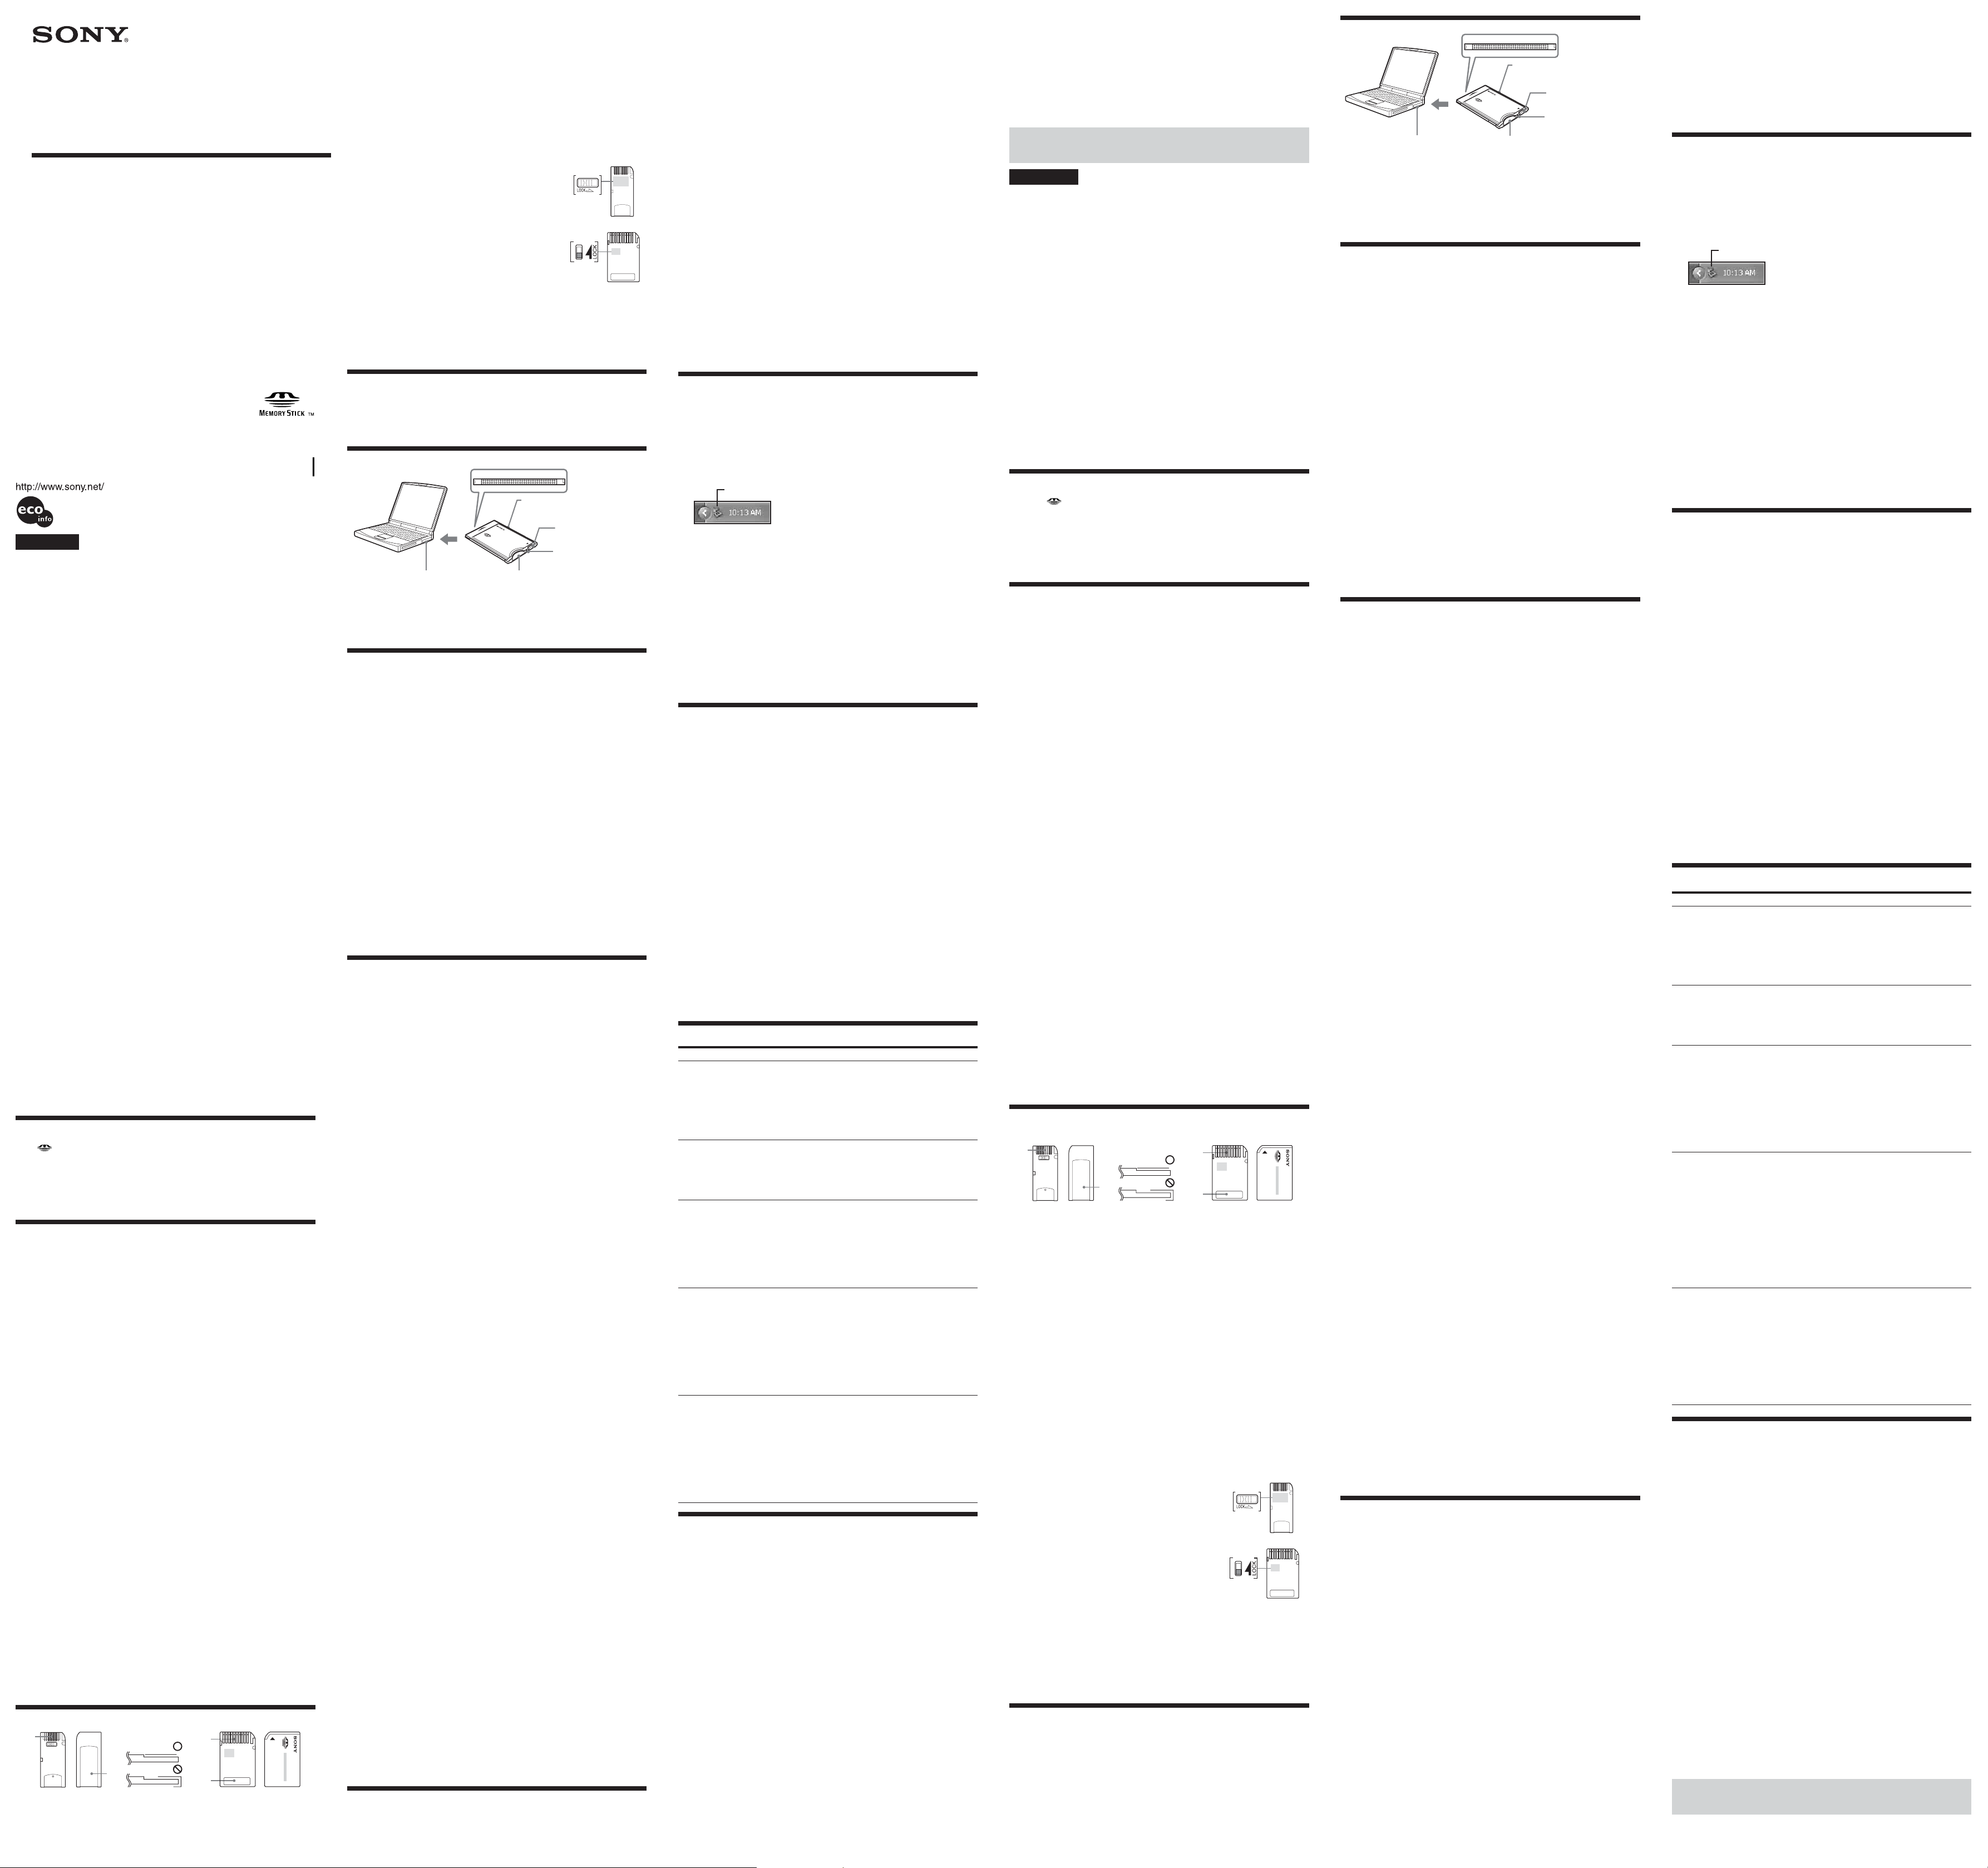
Parts identification
Serial number (An 8-digit
number printed on the frame)
The Memory Stick eject
button
Access lamp
The slot based on
PNote
The access lamp lights while the “Memory Stick” is being accessed. Never remove the
“Memory Stick,” turn off the computer, or remove the PC card adaptor, while the
access lamp is on. The data on the “Memory Stick” might be destroyed.
PC Card Type II
The Memory Stick
socket
BHow to Use (When using Windows)
Connecting this unit to your computer
1 Turn on your computer, and start up Windows.
2 Insert the PC Card Adaptor with a “Memory Stick” attached to your
computer firmly.
PNotes
• Make sure that the “Memory Stick” is positioned correctly when inserting.
• The place of the PC card slot on the computer differ with the computers.
• Not all operations are guaranteed on all computers running under the recommended
environment.
3 Open the additional hardware wizard and begin driver installation.
Depending on your operating system, driver installation may start
automatically, or the wizard may not start up.
Follow the instructions on the screen and click on the [Next] button to carry
out driver installation.
4 Select “Search for the best driver for your device [Recommended]”
and click on [Next].
5 Do not check anything. Click on [Next].
6 Select “The updated driver [Recommended] Standard IDE/ESDI Hard
Disk Controller.”
7 Follow the instructions on the screen and click on [Next].
8 Click on the [Finish] button. Driver installation is now complete.
You can now use the unit.
PNote
Start up the additional hardware wizard when you first use this unit, and when you
first use a “Memory Stick” with a different capacity.
Confirming that connections are
completed
1 Open the “My Computer” folder.
1 Double-click “My Computer.”
2 The “My Computer” folders appear.
2 Confirm that the newly recognized “Sony MemoryStick (F:)” icon is
shown.
This “Sony MemoryStick (F:)” icon indicates this unit connected to the
computer. Depending on the computer used, the drive letter (F:) may be
different.
The connection is completed when the “Sony MemoryStick (F:)” icon is
shown.
It may take a little while before the “Sony MemoryStick (F:)” icon appears.
PNotes
• If the “Sony MemoryStick (F:)” icon is not shown, the Device driver may not be
installed correctly. Perform the procedures from “When the Removable Disk is not
indicated.”
• “Sony MemoryStick (F:)” may be displayed as “Removable Disk (F:)” and icons may
differ depending on the type of OS and the “Memory Stick” you are using.
• When using another “Removable Disk,” plural “Removable Disk” icons appear.
• The “Memory Stick” may be recognized as “Local Disk (F:)” depending on the
“Memory Stick” you are using, though this will cause no problems in terms of use.
When using Windows 98/Windows 98SE/Windows Me, please refer to “When
Using Windows 98/Windows 98SE/Windows Me” described below and change
disk settings from “Local Disk” to “Removable Disk.”
This will cause no problems in terms of use, but settings cannot be changed to
“Removable Disk” when the “Memory Stick” is recognized as a “Local Disk” in
Windows 2000/Windows XP. In this case, unlocking the LOCK switch when using
the “Memory Stick” is recommended (“Precautions on use of “Memory Stick””).
– When Using Windows 98/Windows 98SE/Windows Me –
When first using the unit, it will appear in the “My Computer” folder as a “Local
Disk” and not as a “Removable Disk.” There are no problems in terms of use
when it is used like this, though a blue screen may appear when it is used with
the LOCK switch in the locked position and a warning may appear. In this event,
use of the “Memory Stick” with the disk drive settings changed from “Local
Disk” to “Removable Disk” as shown below is recommended.
1 Insert the unit with the “Memory Stick” inserted into your
computer and install drivers (“Connecting this unit to your
computer”). When drivers are already installed, insert the unit with
the “Memory Stick” inserted into your computer and perform
operations according to the following steps.
2 After installation is complete, write down the drive letter assigned
to the “Memory Stick.” You can check the drive letter by opening
“My Computer” from the desktop.
3 Open the “Control Panel” from the [Settings] in the [Start] menu.
4 Double-click [System].
5 Select the [Device Manager] tab from “System Properties” and
double-click [Disk drives].
6 Search for the drive assigned to the unit in several [GENERIC IDE
DISK TYPE XX] (XX is a 2-digit number or a “=” sign and a singledigit number). Search for the drive in question as follows.
1 Select the first [GENERIC IDE DISK TYPE XX], and click [Properties].
2 After opening the “Properties” window, click the [Settings] tab.
3 Check the text box for the “Current drive letter assignment,” if the drive
letter assigned to the unit is the same, then the selected device drive is
the drive assigned to the unit. If the drive letters are different, click
[Cancel], close the properties screen, select the next [GENERIC IDE DISK
TYPE XX], and check it by following the same steps.
4 Keep repeating these steps until you find the drive assigned to the unit.
7 After you have checked the drive assigned to the unit, check
“Removable” in the settings screen and remove the check from “Int
13 unit.”
8 Click [OK] and close the properties screen.
9 Click [OK] and close the system properties screen.
10The message for you to restart your computer will be displayed,
so click [Yes] and restart your computer.
11After restarting your computer, open “My Computer” and check
to see if the drive assigned to the unit has been changed to
“Removable Disk (X:)” (X is the drive letter assigned to the unit). If
the drive has not been changed, settings are not reflected, so
change settings again starting at step 3 above.
PNotes
• The drive assigned to the unit and the drive number (the XX portion in [GENERIC
IDE DISK TYPE XX]) may differ when you restart your computer.
• When first using a “Memory Stick” of a different capacity with this unit, settings
must be changed in the same manner after driver installation is complete.
When the Removable Disk is not indicated
A separate Device driver may already have been installed. Connect this unit to
your computer, insert a “Memory Stick” into the unit and then perform the
following procedure.
1 Open the “System Properties” from the “Control Panel.”
2 Check if the Device driver has already been installed.
–
When using Windows 2000/Windows XP
1 Click the [Hardware] tab on the “System Properties” screen.
2 Click [Device Manager].
3 Click [View].
4 Click [Devices by type].
5 Check whether [! SONY-Memory Stick] preceded by the “!” symbol is
shown.
– When using Windows 98/Windows 98SE/Windows Me –
1 Click the [Device Manager] tab on the “System Properties” screen.
2 Check whether [! SONY-Memory Stick] preceded by the “!” symbol is
shown.
–
3 Delete the driver if installed.
If you use the procedure described in Step 2 and find that [! Sony-Memory
Stick] is shown, a separate device driver has already been installed.
Use the following procedure to delete this driver.
Do not delete other devices than [! Sony-Memory Stick].
1 Click on [! Sony-Memory Stick].
2 Click on [Remove]. The “Confirm Device Removal” screen appears.
3 Click the [OK] button. The device is removed.
4 Close the “System Properties” screen.
5 Restart your computer after disconnecting this unit from the computer.
Install the Device driver again by performing the procedure from
“Connecting this unit to your computer.”
PNotes
• If you delete other devices than [! SONY-Memory Stick] your computer may no
longer operate normally.
• The computer recognizes the “Memory Stick” with different capacity as the
different device.
• [! Sony-Memory Stick] may be displayed as the following depending on the type
of OS and the “Memory Stick” you are using.
[!Sony Memory Stick]
[!Standard IDE/ESDI Hard Disk Controller]
[!PCMCIA IDE/ATAPI Controller]
Disconnecting this unit from your
computer
After copying of the image data is completed, perform the procedure described
below before removing the “Memory Stick” from this unit and removing this
unit from the computer.
The screens shown in Windows XP are used in the following explanations.
The screens may differ slightly with the type of OS used.
1 Click the “Unplug or Eject Hardware” icon in the task tray in the
lower right corner of the screen.
Click this icon.
2 Click “Safely remove Sony Memory Stick-Drive (F:).”
PNote
The drive letter may be displayed as one of the following depending on the OS
and “Memory Stick” you are using.
[Sony-Memory Stick Drive (F:)]
[Standard IDE/ESDI Hard Disk Controller Drive (F:)]
[PCMCIA IDE/ATAPI Controller (F:)]
3 “Sony Memory Stick can be removed safely” will be displayed.
At this point, data is safe even if the unit is unplugged from the computer.
*The display may differ depending on the OS you are using.
4 Remove this unit from the computer by pressing the eject button
on the PC Card Slot.
PNote
Do not remove the “Memory Stick” from the unit while the access lamp is flashing
or “Memory Stick” data may be corrupted.
BHow to Use (When using Macintosh)
Connecting this unit to your computer and
installing drivers
It can be used with OS standard device drivers.
Perform operations according to the following steps.
1 Turn on the power to your computer and start up the MacOS.
2 Firmly insert the unit with the “Memory Stick” attached until it
reaches the back of your computer’s PC card slot.
For connection of the unit to your computer, refer to “Connecting this unit to
your computer.”
3 Driver installation will start automatically and drivers will be
installed on your computer.
4 When driver installation is complete, a Memory Stick icon will be
displayed on your desktop and you can use the unit.
Disconnecting this unit from your
computer
1 Close the software using this product.
2 Make sure that the unit’s access lamp is not lit.
3 Move the Memory Stick icon to the [Trash].
When the Memory Stick icon is selected, choose “Uninstall” in the
[Special] menu at the top left of the screen.
4 Remove the unit from your computer.
PNote
Do not remove the “Memory Stick” from the unit while the access lamp is flashing or
“Memory Stick” data may be corrupted.
Troubleshooting
Symptom
The [Removable Disk]
icon is not displayed.
The access lamp blinks
when a “Memory Stick”
is inserted.
Reading data on the
“Memory Stick,” writing
data to the “Memory
Stick,” and copying may
cause a blue screen and
warning to appear.
Writing data to or
deleting data from the
“Memory Stick” may
appear to be taking
place, but the data on the
“Memory Stick” has not
been changed.
The “Memory Stick” can
not be ejected from the
Memory Stick PC Card
Adaptor.
Specifications
Memory Stick PC Card Adaptor
Interface: PCMCIA ATA 16 bit (PC Card Type II)
Required system construction
Recommended Windows environment
OS: Microsoft Windows 98/Windows 98 Second Edition (Windows 98SE)/
Windows Millennium Edition (Windows Me)/Windows 2000
Professional (Windows 2000)/Windows XP Home Edition/
XP Professional (Windows XP)
Microsoft Windows CE/1.0/2.0/2.11/3.0
Recommended Macintosh environment
OS: Mac OS 8.5~9.2.2/X (v10.1.2~10.2.2)
PNotes
• The operating systems mentioned above must be installed on the computer when
shipped from the factory.
• Operation is not guaranteed for upgraded operating systems even if they are among
those mentioned above.
• PC Card Slot which is compatible with PC Card Type II as standard equipment.
• Operation is not guaranteed for all computers even if they comply with the
recommended environments.
Cause/Solution
• Not connected correctly.
t Connect correctly. (“Connecting this unit to your
computer”)
• The Device driver is not installed.
t Install the Device driver in the right way.
(“Connecting this unit to your computer”)
•“Memory Stick” is not inserted.
t Insert a “Memory Stick.”
• Foreign matter adhering to the connector section of
the “Memory Stick.”
t Check whether dust or dirt is adhering to the
connector section of the “Memory Stick.”
Remove any foreign matter and insert the
“Memory Stick” again.
• The “Memory Stick” is write protected.
t Unlock the LOCK switch. (“Precautions on use
of “Memory Stick””)
• The “Memory Stick” is set as a “Local Disk” (When
Using Windows 98/Windows 98SE/Windows Me).
t Change the drive settings for the “Memory
Stick” to “Removable Disk”. (“Confirming that
connections are completed” - When Using
Windows 98/Windows 98SE/Windows Me -)
• The “Memory Stick” is write protected.
t Unlock the LOCK switch. (“Precautions on use
of “Memory Stick””)
t Do not write to the “Memory Stick” with the
LOCK switch in the locked position.
• The “Memory Stick” is set as a “Local Disk” (When
Using Windows 98/Windows 98SE/Windows Me).
t Change the drive settings for the “Memory
Stick” to “Removable Disk”. (“Confirming that
connections are completed” - When Using
Windows 98/Windows 98SE/Windows Me -)
• The eject button is pushed into the PC card.
t Hold the “Memory Stick” between your fingers
and pull it out.
t The Memory Stick PC card Adaptor is not
damaged.
You can continue to use it, after removing the
“Memory Stick.”
t It may happen if you insert the “Memory Stick”
in this unit while pressing the panel part of this
unit strongly. Do not press it when you insert
the “Memory Stick” in.
Operating voltage DC 3.3 V/5.0 V
Power consumption Max. 90 mA DC
External dimensions Approx. 54
(2 1/4
Mass Approx. 30 g (1.06 oz)
(not including “Memory Stick”)
Operating conditions Temperature 0 °C to 60 °C (32 °F to 140 °F)
Humidity 20 % to 80 %
Design and specifications are subject to change without notice.
If you have any questions/comments related to this product, please visit
our Customer Support website at
http://www.sony.net/memorystick/supporte
× 5.0 × 85.6 mm
× 2 × 3 3/8 in.) (W × H × D)
(no condensation)
(no condensation)
Français
Avant d’utiliser cet appareil, veuillez lire attentivement ces explications, puis
conservez-les de manière à pouvoir les consulter.
Pour les clients au Canada
Cet appareil numérique de la classe B est conforme à la norme NMB-003 du
Canada.
Pour les clients aux Etatus-Units et au Canada
GARANTIE RESTREINE
Si ce produit est reconnu défectueux par sa main d’œuvre ou ses matériaux
dans pendant un an suivant sa date d’achat au détail, il sera remplacé soit
par le Marchand,
soit par Sony Electronics Inc. ou par Sony du Canada Ltée.
UN TEL REMPLACEMENT SERA L’UNIQUE RECOURS DU
CONSOMMATEUR, ET NI LE FABRICANT, NI LE DISTRIBUTEUR, NI LE
VENDEUR NE SAURAIENT ETRE TENUS RESPONSABLES DE TOUTE
PERTE OU DE TOUT DOMMAGE, DIRECT OU CONSEQUENT,
RESULTANT DE L’USAGE OU DE L’IMPOSSIBILITE D’USAGE, DE CE
PRODUIT.
Certains états aux États-Unis ne permettent pas l’exclusion des dommages
conséquents ou fortuits. Dans ces cas, cette exclusion ne s’applique pas.
Cette garantie donne des droits légaux spécifiques au consommateur qui
peut avoir aussi d’autres droits, variant d’un état à autre aux États-Unis, à
Porto Rico ou d’une province à l’autre au Canada.
Aux États-Unis, s’adresser á: Sony Electronics Inc.,
Sony Building, 680 Kinderkamack Road, Oradell, New Jersey 07649.
Au Canada, s’adresser à: Sony du Canada Ltée.,
115 Gordon Baker Road, Toronto, Ontario, M2H 3R6 CANADA.
•« Memory Stick », « Memory Stick Duo », « Memory Stick PRO », « Memory Stick
PRO Duo », « MagicGate », « MagicGate Memory Stick », « MagicGate Memory Stick
Duo » et
• Microsoft et Windows sont des marques déposées de Microsoft Corporation aux
États-Unis et/ou dans d’autres pays.
• Macintosh et Mac OS sont des marques déposées de Apple Computer Inc., aux ÉtatsUnis et/ou dans d’autres pays.
• Tous les autres noms de compangies et noms de produits, mentionnés dans cette
brochure, peuvent être des marques de fabrique ou des marques déposées de leurs
détenteurs respectifs.
Les symboles ™ et ® sont supprimés dans la présente brochure.
sont des marques de fabrique de Sony Corporation.
A propos des « Memory Stick »
Qu’est-ce qu’un « Memory Stick » ?
Le « Memory Stick » est un nouveau support d’enregistrement à circuit intégré,
minuscule et léger, dotée d’une capacité de stockage bien supérieure à celle des
disquettes. Ce support peut être utilisé non seulement pour l’échange de
données entre divers produits compatibles avec les « Memory Stick », mais aussi
comme support de stockage, amovible.
Les « Memory Stick » existent en deux tailles, les « Memory Stick » de taille
standard et les « Memory Stick Duo » de plus petite taille. Les « Memory Stick
Duo » peuvent être insérés dans un adaptateur de Memory Stick Duo et utilisés
sur les appareils compatibles avec les « Memory Stick » standard.
Types de « Memory Stick » pouvant être utilisés
avec cet appareil
Les types de « Memory Stick » suivants sont proposés pour convenir à vos
besoins.
« Memory Stick PRO »
Le « Memory Stick PRO » est une « Memory Stick » incorporant la technologie de
protection des copyrights « MagicGate* » et ne pouvant être utilisé qu’avec les
appareils compatibles avec les « Memory Stick PRO ».
« Memory Stick » (compatible avec un transfert de données
ultrarapide /« MagicGate »)
Il s’agit d’un « Memory Stick » intégrant la technologie antipiratage
« MagicGate* » et supportant un transfert de données ultrarapide. Cet appareil
peut être utilisé avec les appareils compatibles avec les « Memory Stick »/
« Memory Stick PRO ». (La vitesse de transfert dépend de l’appareil sur lequel le
« Memory Stick » est utilisé.)
« Memory Stick »
Ce type de « Memory Stick » permet d’enregistrer toutes sortes de données à
l’exception de données exigeant la technologie de protection des droits d’auteur
« MagicGate* ».
« MagicGate Memory Stick »
Ce type de « Memory Stick » intègre la technologie de protection des droits
d’auteur « MagicGate* ».
*« MagicGate » est une technologie antipiratage à base de cryptage.
Cet article n’intègre pas de technologie « MagicGate » et ne prend donc pas en
charge l’enregistrement ni la lecture de données exigeant la technologie
« MagicGate ».
Formatage d’un « Memory Stick »
Cette opération efface toutes les données enregistrées sur un « Memory Stick ».
Lors du formatage d’un « Memory Stick », veillez à le faire sur des produits
compatibles avec « Memory Stick ». En outre, si vous formatez un « Memory
Stick » sur un ordinateur, utilisez le logiciel « Memory Stick Formatter » que
vous pouvez télécharger en accédant au site web suivant :
http://www.sony.net/Products/mssupport/
PRemarque
Si vous formatez un « Memory Stick » sur lequel des données sont enregistrées, elles
seront effacées. Soyez donc prudent pour ne pas éliminer des données importantes par
inadvertance.
Précautions concernant l’emploi des
« Memory Stick »
A
« Memory Stick » « Memory Stick Duo »
• Ne touchez pas la borne (A sur l’illustration) avec les doigts ou un objet
métallique.
• N’appuyez pas fort lorsque vous écrivez sur l’emplacement réservé au nom
(B sur le schéma) du « Memory Stick » ou la zone de mémo (C sur le schéma)
du « Memory Stick Duo ».
• Ne pliez pas, ne laissez pas tomber et ne heurtez pas le « Memory Stick ».
• Ne démontez pas et ne modifiez pas le « Memory Stick ».
• Ne mouillez pas le « Memory Stick ».
• Des données enregistrées risquent d’être endommagées, voire perdues, dans
les cas suivants:
– Vous retirez le « Memory Stick » hors de cette unité ou vous la mettez hors
tension pendant l’écriture ou la lecture de données.
– Vous utilisez cette unité là où elle est soumise à de l’électricité statique ou des
parasites électriques.
• Nous recommandons d’effectuer une copie de sauvegarde de vos données
importantes.
• Nous n’assumons pas de responsabilité si des données sont endommagées ou
perdues et si l’unité est endommagée pendant l’emploi de cette unité.
• Des données dont les droits d’auteur sont protégés par « MagicGate » ne
peuvent être traitées que par un « MagicGate Memory Stick ».
• Placez le « Memory Stick » dans son étui lors de son transport ou pour son
rangement.
• N’utilisez pas et ne rangez pas des « Memory Stick » dans les endroits suivants :
– Là où la température peut monter fortement, comme dans un véhicule ou en
plein soleil.
– Sous les rayons directs du soleil.
– Dans un endroit très humide ou près de substances corrosives.
• Mis en position de verrouillage, le commutateur LOCK
empêche l’enregistrement, l’édition ou la suppression
de données.
* Il n’y a pas de commutateur LOCK sur certains
« Memory Stick ». Lorsque vous utilisez un « Memory
Stick » sans commutateur LOCK, faites attention de
ne pas modifier ou supprimer des données par
inadvertance.
• Utilisez un objet pointu pour déplacer le commutateur
LOCK.
• Avant d’utiliser un « Memory Stick Duo »/« Memory
Stick PRO Duo » avec cet appareil, n’oubliez pas
d’insérer le « Memory Stick Duo »/« Memory Stick
PRO Duo » dans l’adaptateur de Memory Stick Duo.
• Assurez-vous que le « Memory Stick » est bien orienté
avant de l’insérer.
• N’insérez pas l’adaptateur sans « Memory Stick Duo »/« Memory Stick PRO
Duo » dans les produits compatibles avec les « Memory Stick ». Ceci peut
entraîner une panne.
Commutateur LOCK (protection de l’écriture)
Lorsque vous utilisez cet article avec un « Memory Stick » muni d’un
commutateur LOCK, libérez le commutateur LOCK. N’utilisez pas cet article
avec le commutateur LOCK en position de verrouillage.
Où coller les étiquettes
B
A
C
« Memory Stick »
« Memory Stick Duo »
Vérification des accessoires fournis
• Adaptateur de carte PC Memory Stick (1)
• Étui rangement spécifié (1)
• Mode d’emploi de l’appareil (1)*
* Quatre modes d’emploi sont fournis selon la région de commercialisation.
Nomenclature
Numéro de série (Un numéro de
8 chiffres, imporimé sur le cadre)
Bouton d’éjection de
Memory Stick
Voyant d’accès
Fente basée sur
Carte PC de Type II
PRemarque
Le voyant d’accès s’allume pendant l’accès à la carte « Memory Stick ». Pendant que ce
voyant est allumé, ne retirez jamais le « Memory Stick », ne mettez jamais l’ordinateur
hors tension et ne retirez jamais l’adaptateur de carte PC, car les données présentes sur
le « Memory Stick » pourraient en être endommagées.
Prise Memory Stick
BUtilisation de l’appareil
(avec Windows)
Raccordement de l’appareil à l’ordinateur
1 Mettez votre ordinateur sous tension et lancez Windows.
2 Dans votre ordinateur, insérez fermement l’adaptateur de carte PC,
portant un « Memory Stick ».
PRemarques
• Avant son insertion, assurez-vous que le « Memory Stick » est correctement
positionnee.
• L’emplacement de la fente pour Carte PC varie selon les ordinateurs.
• Toutes les opérations ne sont pas garanties sur tous les ordinateurs, même utilisés
dans l’environnement recommandé.
3 Ouvrez l’assistant supplémentaire et lancez l’installation du logiciel
de pilotage.
Selon le système d’exploitation, il se peut que l’installation du logiciel de
pilotage commence automatiquement ou que l’assistant ne soit pas lancé.
Suivez les explications apparaissant sur l’écran et cliquez sur le bouton
[Next] pour effectuer l’installation du pilote.
4 Sélectionnez « Search for the best driver for your device
[Recommended] » et cliquez sur [Next].
5 Ne cochez rien. Cliquez sur [Next].
6 Sélectionnez « The updated driver [Recommended] Standard IDE/
ESDI Hard Disk Controller ».
7 Suivez les explications apparaissant sur l’écran et cliquez sur le
bouton [Next].
8 Cliquez sur le bouton [Finish]. L’installation du logiciel de pilotage
est ainsi terminée.
Désormais, vous pouvez utiliser l’appareil.
PRemarque
Lancez l’assistant de matériel supplémentaire lors de la première utilisation de
l’appareil et quand vous utilisez pour la première fois un « Memory Stick » d’une
capacité différente.
Vérification des connexions
1 Ouvrez le dossier « My Computer ».
1 Double-cliquez sur « My Computer ».
2 Les dossiers figurant dans le poste de travail apparaissent.
2 Assurez-vous que l’icône du « Sony MemoryStick (F:) » apparaît.
L’icône du « Sony MemoryStick (F:) » indique que l’appareil est raccordé à
l’ordinateur. La désignation du lecteur (F:) peut être différente sur certains
ordinateurs.
La connexion est terminée lorsque l’icône du « Sony MemoryStick (F:) »
apparaît.
Il faut attendre un instant pour que l’icône apparaisse.
PRemarques
• Si l’icône « Sony MemoryStick (F :) » n’apparaît pas, c’est que le pilote de l’appareil
n’est peut-être pas installé correctement. Procédez comme indiqué dans « Si l’icône
du disque amovible n’apparaît pas ».
• Le message « Sony MemoryStick (F:) » peut être affiché comme « Removable Disk
(F:) » et les icones peuvent différer selon le type de système d’exploitation et de
« Memory Stick » utilisé.
• Si vous utilisez un autre « Removable Disk », il se peut que plusieurs icônes
« Removable Disk » apparaissent.
• Selon le « Memory Stick » utilisé, il se peut que le « Memory Stick » soit identifié
comme « Local Disk (F:) », mais ceci ne sera pas cause de problèmes à l’emploi.
Lorsque vous utilisez Windows 98/Windows 98SE/Windows Me, comme indiqué
co-dessous, remplacez le réglage de « Local Disk » par « Removable Disk ».
Vous ne rencontrerez pas de problèmes d’utilisation, mais les réglages ne peuvent
pas être changés à « Removable Disk » lorsque le « Memory Stick » est identifié
comme un « Local Disk » sous Windows 2000/Windows XP. Dans ce cas, il est
conseillé de débloquer le commutateur LOCK lorsque vous utilisez le « Memory
Stick » (« Précautions concernant l’emploi des « Memory Stick » »).
– A l’emploi de Windows 98/Windows 98SE/Windows Me –
Lors de la première utilisation de l’appareil, il apparaît dans le dossier « My
Computer » comme un « Local Disk » et non comme un « Removable Disk ».
Vous n’éprouverez pas de difficultés lorsqu’il est utilisé ainsi, mais un écran bleu
peut apparaître lorsqu’il est utilisé alors que le commutateur LOCK se trouve à
la position verrouillé et un message avertisseur risque d’apparaître. Dans ce cas,
l’emploi du « Memory Stick » après avoir changé les réglages du lecteur de
« Local Disk » à « Removable Disk » est recommandé. Procédez comme suit pour
ce changement.
1 Insérez dans votre ordinateur l’unité où est installé le « Memory
Stick » et installez les logiciels de pilotage (« Raccordement de
l’appareil à l’ordinateur »). Si ces logiciels de pilotage sont déjà
installés, insérez dans votre ordinateur l’unité où est installé le
« Memory Stick » et effectuez les opérations Nextes.
2 Une fois que l’installation est achevée, inscrivez la lettre du lecteur,
affectée au « Memory Stick ». Vous pouvez vérifier cette lettre en
ouvrant « My Computer » sur votre ordinateur.
3 Ouvrez le « Control Panel » sous [Settings] dans le menu [Start].
4 Double-cliquez sur [System].
5 Sélectionnez l’onglet [Device Manager] sous « System Properties »
et double-cliquez sur [Disk drives].
6 Recherchez le lecteur affecté à l’unité sous les divers [GENERIC IDE
DISK TYPE XX] (XX étant un nombre de 2 chiffres ou un signe « = »
et un nombre d’un chiffre). Recherchez comme suit le lecteur en
question.
1 Sélectionnez le premier [GENERIC IDE DISK TYPE XX] et cliquez sur
[Properties].
2 Après ouverture de la fenêtre « Properties », cliquez sur l’onglet des
[Settings].
3 Vérifiez dans la boîte de texte « Current drive letter assignment ». Si la
lettre de lecteur affectée à l’unité est la même, le lecteur de périphérique
sélectionné sera le lecteur affecté à l’unité. Si les lettres des lecteurs sont
différentes, cliquez sur [Cancel], renfermez l’écran des propriétés,
sélectionnez le [GENERIC IDE DISK TYPE XX] Next et vérifiez en
effectuant les mêmes démarches.
4 Répétez ces démarches jusqu’à ce que vous trouviez le lecteur affecté à
l’unité.
7 Après avoir coché le lecteur affecté à l’unité. cochez « Removable »
sur l’écran de réglage et décochez « Int 13 unit ».
8 Cliquez sur [OK] et refermez l’écran des propriétés.
9 Cliques sur [OK] et refermez l’écran des propriétés du système.
10Le message vous invitant à remettre votre ordinateur en marche
est affiché; cliquez sur [Yes] et relancez votre ordinateur.
11Après avoir relancé votre ordinateur, ouvrez « My Computer » et
vérifiez si le lecteur affecté à l’unité a été changé à « Removable
Disk (X:) » (X étant la lettre du lecteur affecté à l’unité). Si le
lecteur n’a pas été changé, les réglages ne sont pas reflétés. Vous
devez donc les changer en recommençant à l’étape 3 ci-dessus.
PRemarques
• Le lecteur affecté à l’unité et le numéro de lecteur (la partie XX dans [GENERIC IDE
DISK TYPE XX]) peuvent être différents lors de la remise en marche de votre
ordinateur.
• Lors de l’utilisation d’un « Memory Stick » d’une capacité différente avec cette unité,
les réglages doivent être changés de la même façon après que l’installation du
logiciel de pilotage est terminée.
Si l’icône du disque amovible n’apparaît
pas
Il se peut qu’un autre gestionnaire de périphérique ait déjà été installé. Dans ce
cas, raccordez l’appareil à l’ordinateur, insérez un « Memory Stick » dans
l’appareil et effectuez les opérations Nextes.
1 Ouvrez le menu « System Properties » à partir du « Control Panel ».
2 Vérifiez si un gestionnaire de périphérique est déjà installé.
–
Lorsque vous utilisez Windows 2000/Windows XP
1 Cliquez sur l’onglet [Hardware] sur l’écran « System Properties ».
2 Cliquez sur [Device Manager].
3 Cliquez sur [View].
4 Cliquez sur [Devices by type].
5 Vérifiez si [! SONY-Memory Stick] précédé du point d’interrogation
apparaît.
– Si vous utilisez Windows 98/Windows 98SE/Windows Me –
1 Cliquez sur l’onglet [Device Manager] sur l’écran « System Properties ».
2 Vérifiez si vous voyez [! SONY-Memory Stick] précédé du point
d’interrogation.
–
3 Supprimez le pilote s’il est installé.
Si vous utilisez la procédure décrite à l’Étape 2 et que vous constatez que
[! Sony-Memory Stick] apparaît, c’est qu’un gestionnaire de périphérique
différent a déjà été installé.
Procédez de la façon Nexte pour supprimer ce pilote.
Ne pas supprimer d’autres pilotes que le [! Sony-Memory Stick].
1 Cliquez sur [! Sony-Memory Stick].
2 Cliquez sur [Remove]. L’écran « Confirm Device Removal » apparaît.
3 Cliquez sur le bouton [OK]. Le pilote est supprimé.
4 Fermez l’écran « System Properties ».
5 Redémarrez votre ordinateur après avoir débranché l’appareil de
l’ordinateur.
Installez à nouveau le gestionnaire de périphérique en effectuant les
démarches sous « Raccordement de l’appareil à l’ordinateur ».
PRemarques
• Si vous supprimez d’autres périphériques que [! SONY-Memory Stick],
l’ordinateur risque de ne plus fonctionner correctement.
• L’ordinateur identifie un « Memory Stick » dont la capacité est différente comme
étant un périphérique différent.
• Le message [! Sony-Memory Stick] peut apparaître comme suit selon le type de
système d’exploitation et le « Memory Stick » que vous utilisez.
[! Sony Memory Stick]
[! Standard IDE/ESDI Hard Disk Controller]
[! PCMCIA IDE/ATAPI Controller]
Débranchement de l’appareil de
l’ordinateur
A la fin de la copie des données d’image, effectuez les démarches décrites
ci-après avant de retirer le « Memory Stick » hors de l’appareil et de retirer
l’appareil hors de l’ordinateur.
Les écrans représentés ici sont ceux de Windows XP.
Selon le système d’exploitation utilisé, ils peuvent être légèrement différents.
1 Cliquez sur l’icône « Unplug or Eject Hardware » dans le plateau de
tâches dans le coin inférieur droit de l’écran.
Cliquez sur cette icône.
2 Cliquez sur « Safely remove Sony Memory Stick-Drive (F:) ».
PRemarque
Selon le système d’exploitation et le « Memory Stick » utilisé, la lettre du lecteur
peut être affichée comme indiqué ci-après.
[Sony-MemoryStick Drive (F:)]
[Standard IDE/ESDI Hard Disk Controller Drive (F:)]
[PCMCIA IDE/ATAPI Controller (F:)]
3 Le message « Sony Memory Stick can be removed safely » est
affiché.
A ce stade, les données seront en sécurité, même si l’appareil est débranché
de l’ordinateur.
* Selon le système d’exploitation utilisé, il se peut que cet affichage soit
différent.
4 Retirez cet appareil hors de l’ordinateur en actionnant le bouton
d’éjection sur la fente de Carte PC.
PRemarque
Ne retirez pas le « Memory Stick » hors de l’appareil pendant que le voyant
d’accès clignote car les données qui y sont mémorisées seraient détruites.
BUtilisation de l’appareil
(À l’emploi d’un Macintosh)
Raccordement de l’appareil sur
l’ordinateur et installation des
gestionnaires
Il peut être utilisé avec les gestionnaires de périphériques standards.
Effectuez les opérations selon les étapes Nextes.
1 Mettez votre ordinateur sous tension et lancez le système MacOS.
2 Insérez fermement l’appareil dans lequel le « Memory Stick » est
installé jusqu’au fond de la fente de carte PC de votre ordinateur.
Pour raccorder l’appareil à l’ordinateur, voir « Raccordement de l’appareil à
l’ordinateur ».
3 L’installation du gestionnaire commence automatiquement et les
gestionnaires seront installés sur votre ordinateur.
4 Lorsque l’installation du gestionnaire est achevée, une icone
Memory Stick apparaît sur le bureau et vous pouvez utiliser
l’appareil.
Débranchement de cet appareil et de votre
ordinateur
1 Refermez le logiciel utilisant ce produit.
2 Assurez-vous que le voyant d’accès de l’appareil est éteint.
3 Déplacez l’icone Memory Stick dans la [Trash].
Lorsque l’icone Memory Stick est sélectionnée, choisissez
« Uninstall » sous le menu [Special] dans le coin supérieur gauche
de l’éran.
4 Retirez l’appareil hors de votre ordinateur.
PRemarque
Ne retirez pas le « Memory Stick » hors de l’appareil pendant que le voyant d’accès
clignote car les données qui y sont mémorisées seraient détruites.
En cas de problème
Symptôme
L’icône du [Removable
Disk] n’apparaît pas.
Le témoin d’accès
clignote lorsqu’un
« Memory Stick » est
inséré.
La lecture, l’écriture et la
copie de données sur le
« Memory Stick » fait
apparaître un écran bleu
et un message
d’avertissement.
L’écriture de données ou
leur effacement du
« Memory Stick » semble
avoir lieu, mais les
données ne sont pas
changées sur le
« Memory Stick ».
Le « Memory Stick » ne
peut pas être éjecté hors
de l’adaptateur de Carte
PC Memory Stick.
Spécifications
Adaptateur de Carte PC Memory Stick
Interface: PCMCIA ATA 16 bits (Carte PC de Type II)
Éléments requis pour la construction du système
Environnement Windows recommandé
Système d’exploitation : Microsoft Windows 98/Windows 98 Second
Edition (Windows 98SE)/Windows Millennium Edition (Windows
Me)/Windows 2000 Professional (Windows 2000)/Windows XP Home
Edition/XP Professional (Windows XP)
Microsoft Windows CE/1.0/2.0/2.11/3.0
Environnement Macintosh recommandé
Système d’exploitation : Mac OS 8.5~9.2.2/X (v10.1.2~10.2.2)
PRemarques
• Les systèmes d’exploitation mentionnés ci-dessus doivent être installés en usine sur
l’ordinateur.
• Le fonctionnement n’est pas garanti pour les mises à jour avec les systèmes
mentionnés ci-dessus.
• Fente de Carte PC compatible avec une Carte PC de Type II comme équipement
standard.
• Le fonctionnement ne peut pas être garanti pour tous les ordinateurs conformes à
l’environnement recommandé.
Tension de fonctionnement : CC 3,3 V/5,0 V
Consommation : Max. 90 mA CC
Dimensions externes : Approx. 54 × 5,0 × 85,6 mm
Poids Approx. 30 g (1,06 on.) (sans « Memory Stick »)
Conditions de fonctionnement : Température 0 °C à 60 °C (32 °F à 140 °F)
La conception et les spécifications peuvent être modifiées sans avis préalable.
Pour toute question ou commentaire au sujet de cet appareil, consultez
notre site web Service Clientèle à
http://www.sony.net/memorystick/supporte
Cause/Solution
•L’appareil est mal raccordé.
t Raccordez-le correctement. (« Raccordement de
l’appareil à l’ordinateur »)
•Le pilote n’est pas installé.
t Installez le pilote en utilisant le CD-ROM fourni.
(« Raccordement de l’appareil à l’ordinateur »)
•Aucun « Memory Stick » inséré.
t Insérez un « Memory Stick ».
•Des matières adhèrent au connecteur du « Memory
Stick ».
t Vérifiez si le connecteur n’est pas sale ou
poussiéreux.
Enlevez ces matières et insérez de nouveau le
« Memory Stick ».
•Le « Memory Stick » est protégé contre l’écriture.
t Débloquez le commutateur LOCK.
(« Précautions concernant l’emploi des
« Memory Stick » »)
•Le « Memory Stick » est réglé sur « Local Disk » (à
l’emploi de Windows 98/Windows 98SE/Windows
Me).
t Changez à « Removable Disk » (« Vérification
des connexions » – A l’emploi de Windows 98/
Windows 98SE/Windows Me –) le réglage de
lecteur pour le « Memory Stick ».
• Le « Memory Stick » est protégé contre l’écriture.
t Débloquez le commutateur LOCK.
(« Précautions concernant l’emploi des
« Memory Stick » »)
t Ne faites pas d’écriture sur le « Memory Stick »
lorsque le commutateur LOCK est à la position
verrouillée.
• Le « Memory Stick » est réglé comme « Local Disk »
(à l’emploi de Windows 98/Windows 98SE/
Windows Me).
t Changez à « Removable Disk » (« Vérification
des connexions » – A l’emploi de Windows 98/
Windows 98SE/Windows Me –) le réglage de
lecteur pour le « Memory Stick ».
•Le bouton d’éjection est poussé dans la carte PC.
t Tenez le « Memory Stick » entre les doigts et
retirez-le.
t L’adaptateur de carte PC Memory Stick n’est pas
endommagé.
Vous pouvez continuer à l’utiliser après avoir
retiré le « Memory Stick ».
t Ceci peut se produire si vous insérez le
« Memory Stick » dans cet appareil en appuyant
fortement sur le panneau de l’appareil. N’y
appuyez pas lorsque vous insérez le « Memory
Stick ».
(2 1/4 × 2 × 3 3/8 po.) (l × h × p)
(condensation non permise)
Humidité 20 % à 80 %
(condensation non permise)
Español
Antes de utilizar la unidad, lea detenidamente este manual de instrucciones y
consérvelo para futuras referencias.
• “Memory Stick”, “Memory Stick Duo”, “Memory Stick PRO”, “Memory Stick PRO
Duo”, “MagicGate”, “MagicGate Memory Stick”, “MagicGate Memory Stick Duo”, y
son marcas comerciales de Sony Corporation.
• Microsoft y Windows son marcas registradas de Microsoft Corporation en Estados
Unidos y/u otros países.
• Macintosh y MacOS son marcas registradas de Apple Computer, Inc. en Estados
Unidos y/u otros países.
• Todos los demás nombres de compañías y nombres de productos pueden ser marcas
comerciales o registradas de sus respectivas compañías.
En estas instrucciones se omiten los símbolos ™ y ® .
Acerca del “Memory Stick”
¿Qué es “Memory Stick”?
“Memory Stick” es una nueva generación de medio de almacenamiento en
circuito integrado, de tamaño ultra pequeño y muy ligero, que posee mayor
capacidad de almacenamiento que los disquetes. Este medio puede utilizarse no
solamente para transferir datos entre productos compatibles con “Memory
Stick”, sino también como medio de almacenamiento externo extraíble para el
almacenamiento de datos.
El “Memory Stick” está disponible en tamaño estándar y en un tamaño menor
que se denomina “Memory Stick Duo”. Cuando se inserte un “Memory Stick
Duo” en un adaptador para Memory Stick Duo, el tamaño del mismo se
convertirá en el de un “Memory Stick” estándar para poder utilizarse con
productos compatibles con el “Memory Stick” de tamaño estándar.
Tipos de “Memory Stick” que pueden utilizarse con
esta unidad
Existen los tipos siguientes de “Memory Stick” para hacer frente a sus
necesidades.
“Memory Stick PRO”
“Memory Stick PRO” es un “Memory Stick” con la tecnología de protección de
derechos de autor “MagiGate*”, y solamente podrá utilizarse con dispositivos
compatibles con “Memory Stick PRO”.
“Memory Stick” (“MagicGate”/compatible con transferencia de
datos a alta velocidad)
Éste es un “Memory Stick” con la tecnología de protección de derechos de autor
“MagicGate*”, compatible con la transferencia de datos a alta velocidad. Usted
podrá utilizar esta unidad con cualquier dispositivo compatible con “Memory
Stick”/“Memory Stick PRO”. (La velocidad de transferencia variará
dependiendo del dispositivo compatible con “Memory Stick” utilizado.)
“Memory Stick”
“Memory Stick” que permite grabar cualquier tipo de datos con la excepción de
los que requieran la tecnología de protección de derechos de autor
(“MagicGate*”).
“MagicGate Memory Stick”
Éste es un “Memory Stick” que se caracteriza por su tecnología incorporada de
protección de derechos de autor (“MagicGate*”).
* “MagicGate” es una tecnología de protección de derechos de autor que utiliza
la tecnología de cifrado.
Esta unidad no tiene instalado “MagicGate”, y por lo tanto no es compatible
con la grabación ni la reproducción de datos que requieran “MagicGate”.
Formateo de un “Memory Stick”
Esto borrará todos los datos grabados en el “Memory Stick”. Cuando formatee
un “Memory Stick”, cerciórese de hacerlo en productos compatibles con
“Memory Stick”. Además, cuando formatee un “Memory Stick” en un
ordenador, utilice el programa de software “Memory Stick Formatter”. Usted
podrá obtener el “Memory Stick Formatter” en el sitio de la Web siguiente:
http://www.sony.net/Products/mssupport/
PNota
Si formatea un “Memory Stick” que contenga datos grabados, éstos se borrarán.
Tenga cuidado para no borrar inadvertidamente datos importantes.
Precauciones sobre la utilización de
“Memory Stick”
A
“Memory Stick” “Memory Stick Duo”
• No toque los terminales (A de la ilustración) con las manos ni con objetos
metálicos.
• No aplique fuerza excesiva cuando escriba en el espacio para la etiqueta (B de
la ilustración) del “Memory Stick” o en el área de memorando (C de la
ilustración) del “Memory Stick Duo”.
• No doble, deje caer, ni exponga a golpes el “Memory Stick”.
• No desmonte ni modifique el “Memory Stick”.
• No permita que entre agua en el “Memory Stick”.
• Los datos grabados podrán dañar o perderse en las situaciones siguientes:
– Si extrae el “Memory Stick” o desconecte la alimentación de esta unidad
durante la escritura o la lectura de datos.
– Si utiliza esta unidad sometida a electricidad estática o ruido eléctrico.
• Le recomendamos que haga una copia de protección de sus datos importantes.
• Nosotros no aceptaremos ninguna responsabilidad en caso de que los datos se
pierdan o dañen, o se dañe esta unidad cuando esté utilizándola.
• Los datos que estén protegidos por derechos de autor con “MagicGate”
solamente podrán manejarse mediante un “MagicGate Memory Stick”.
• Para transportar o guardar el “Memory Stick”, métalo en la caja suministrada
con el mismo.
• No lo utilice ni guarde en los lugares siguientes:
– Donde la temperatura pueda aumentar mucho, como en el interior de un
automóvil, o bajo la luz solar intensa.
– Bajo la luz solar directa.
– En lugares con gran humedad o cerca de substancias corrosivas.
• Moviendo el mando LOCK hasta la posición de bloqueo,
se impedirá la grabación, la edición, y el borrado.
* En ciertos “Memory Stick” no existe mando LOCK.
Cuando utilice un “Memory Stick” sin mando LOCK,
tenga cuidado de no editar ni borrar accidentalmente
datos.
• Utilice un objeto puntiagudo para mover el mando
LOCK.
• Cuando utilice un “Memory Stick Duo”/“Memory Stick
PRO Duo” con esta unidad, cerciórese de insertar el
“Memory Stick Duo”/“Memory Stick PRO Duo” en el
adaptador para Memory Stick Duo antes de comenzar a
utilizarlo.
• Confirme que el “Memory Stick” esté correctamente
ubicado antes de insertarlo para utilizarlo.
• No inserte el adaptador para Memory Stick Duo en productos compatibles con
“Memory Stick” cuando no haya insertado “Memory Stick Duo”/“Memory
Stick PRO Duo” en dicho adaptador. Si lo utilizase de esta forma, podría
producirse un mal funcionamiento.
Mando de protección contra escritura (LOCK)
Cuando utilice esta unidad con una “Memory Stick” que posea mando LOCK,
póngalo en la posición de desbloqueo. No la utilice con el mando LOCK en la
posición de bloqueo.
Cómo pegar etiquetas
B
A
C
“Memory Stick”
“Memory Stick Duo”
Comprobación de los accesorios
suministrados
• Adaptador de tarjeta PC para Memory Stick (1)
• Estuche almacenamiento especificado (1)
• Manual de instrucciones (1)*
* Dependiendo del área se suministran cuatro manuales de instrucciones.
Identificación de partes
Número de serie (Número de 8
dígitos impreso en el bastidor)
Botón de expulsión del
Memory Stick
Lámpara indicadora de
acceso
Ranura basada en
PNota
La lámpara indicadora de acceso permanecerá encendida mientras se esté realizando
el acceso al “Memory Stick”. No extraiga nunca el “Memory Stick”, no desconecte la
alimentación del PC, ni extraiga el adaptador de tarjeta PC mientras la lámpara
indicadora de acceso esté encendida.
PC Card Type II
Receptáculo para
Memory Stick
BForma de utilización
(En el caso de Windows)
Conexión de esta unidad a su PC
1 Conecte la alimentación de su PC, e inicie Windows.
2 Inserte firmemente en su PC el adaptador de tarjeta PC con el
“Memory Stick” fijado.
PNotas
• Cerciórese de que el “Memory Stick” esté colocado correctamente cuando lo inserte.
• El lugar de la ranura para tarjeta PC de su PC puede diferir de acuerdo con el tipo de
PC.
• No se garantizan todas las operaciones en todos los PC que trabajen con el entorno
recomendado.
3 Abra el asistente de hardware horizontal y comience la instalación
del controlador.
Dependiendo de su sistema operativo, la instalación del controlador puede
iniciarse automáticamente, o es posible que no se inicie el asistente.
Para realizar la instalación del controlador, siga las instrucciones de la
pantalla y haga clic en el botón [Next].
4 Seleccione “Search for the best driver for your device
[Recommended]” y haga clic en [Next].
5 No ponga ninguna marca de verificación. Haga clic en [Next].
6 Seleccione “The updated driver [Recommended] Standard IDE/ESDI
Hard Disk Controller”.
7 Siga las indicaciones de la pantalla y haga clic en [Next].
8 Haga clic enel botón [Finish]. De esta forma habrá finalizado la
instalación del controlador.
Ahora podrá utilizar la unidad.
PNota
Inicie el asistente del hardware adicional cuando utilice esta unidad por primera vez, y
cuando comience a utilizar un “Memory Stick” con diferente capacidad.
Confirmación de las conexiones
1 Abra la carpeta “My Computer”.
1 Haga doble clic en “My Computer”.
2 Aparecerá la carpeta de “My Computer”.
2 Compruebe si aparece el icono “Sony MemoryStick (F:)”
nuevamente reconocido.
Este icono de “Sony MemoryStick (F:)” indica que esta unidad está
conectada al PC. Dependiendo del PC utilizado, la lera de la unidad (F:)
puede ser diferente.
La conexión se habrá completado cuando aparezca el icono de “Sony
MemoryStick (F:)”.
Es posible que el icono de “Sony MemoryStick (F:)” tarde un poco en
aparecer.
PNotas
• Si no aparece el icono de “Sony MemoryStick (F:)”, es posible que el controlador de
dispositivo no esté correctamente instalado. Realice los procedimientos a partir de
“Cuando no se visualice el disco extraíble”.
• Es posible que se visualice “Sony MemoryStick (F:)” como “Removable Disk (F:)” y
los iconos pueden diferir dependiendo del tipo de sistema operativo y del “Memory
Stick” que esté utilizando.
• Cuando utilice otro “Removable Disk”, aparecerán varios iconos de “Removable
Disk”.
• El “Memory Stick” puede reconocerse como “Local Disk (F:)” dependiendo del
“Memory Stick” que esté utilizando, aunque esto no causará problemas en términos
de utilización. Cuando utilice Windows 98/Windows 98SE/Windows Me, consulte
“Cuando utilice Windows 98/Windows 98SE/Windows Me” que se describe a
continuación, y cambie los ajustes de disco de “Local Disk” a “Removable Disk”.
Esto no causará problemas en términos de utilización, pero los ajustes no podrán
cambiarse a “Removable Disk” cuando el “Memory Stick” se reconozca como “Local
Disk” en Windows 2000/Windows XP. En este caso, se recomienda desbloquear el
mando LOCK cuando se utilice el “Memory Stick” (“Precauciones sobre la
utilización de “Memory Stick””).
– Cuando utilice Windows 98/Windows 98SE/Windows Me –
Cuando utilice por primera vez la unidad, ésta aparecerá en la carpeta “My
Computer” como “Local Disk” y no como “Removable Disk”. No habrá
problemas en términos de utilización cuando se use de esta forma, aunque es
posible que aparezca una pantalla azul cuando se utilice con el mando LOCK en
la posición de bloqueo y puede aparecer una advertencia. En este caso, se
recomienda utilizar el “Memory Stick” con los ajustes de unidad de disco
cambiados de “Local Disk” a “Removable Disk” como se indica a continuación.
1 Inserte la unidad con el “Memory Stick” insertado en su PC e instale
los controladores (“Conexión de esta unidad a su PC”). Si los
controladores ya están instalados, inserta la unidad con el
“Memory Stick” insertado en su PC y realice las operaciones de
acuerdo con los pasos siguientes.
2 Una vez finalizada la instalación, escriba la letra de la unidad
asignada al “Memory Stick”. Usted podrá comprobar la letra de la
unidad abriendo “My Computer” desde el escritorio.
3 Abra “Control Panel” desde [Settings] del menú [Start].
4 Haga doble clic en [System].
5 Seleccione la ficha [Device Manager] de “System Properties” y haga
doble clic en [Disk drives].
6 Busque la letra asignada a la unidad en los deversos [GENERIC IDE
DISK TYPE XX] (XX es un número de 2 dígitos o un signo “=” y un
solo dígito). Busque la letra en cuestión de la forma siguiente.
1 Busque el primer [GENERIC IDE DISK TYPE XX], y haga clic en
[Properties].
2 Después de haberse abierto la ventana de “Properties”, haga clic en la
ficha de [Settings].
3 Ponga una marca de verificación en el cuadro de texto “Current drive
letter assignment”, si la letra asignada a la unidad es la misma, la unidad
de dispositivo será el asignado a la unidad. Si las letras de las unidades
son diferentes, haga clic en [Cancel], cierre la pantalla de propiedades,
seleccione el siguiente [GENERIC IDE DISK TYPE XX], y pógale una
marca de verificación siguiendo los mismos pasos.
4 Repita estos pasos hasta encontrar la letra asignada a la unidad.
7 Después de haber puesto una marca de verificación en la letra
asignada a esta unidad, ponga una marca de verificación en
“Removable” en la pantalla de configuración y quite la marca de
verificación de “Int 13 unit”.
8 Haga clic en [OK] y cierre la pantalla de propiedades.
9 Haga clic en [OK] y cierre la pantalla de propiedades del sistema.
10Se visualizará el mensaje para reiniciar su PC. Haga clic en [Yes] y
reinicie su PC.
11Después de haber reiniciado su PC, abra “My Computer” y
compruebe si la letra asignada a la unidad ha cambiado a
“Removable Disk (X:)” (X es la letra asignada a la unidad). Si la
letra no ha cambiado, los ajustes no se reflejarán, por lo que
tendrá que volver a realizarlos comenzando en el paso 3 anterior.
PNotas
• La letra y el número asignados a la unidad (la parte XX de [GENERIC IDE DISK
TYPE XX]) pueden diferir cuando reinicie su PC.
• Cuando utilice por primera vez un “Memory Stick” de diferente capacidad con esta
unidad, los ajustes deberán cambiarse de la misma forma después de haber
finalizado la instalación del controlador.
Cuando no se visualice el disco extraíble
Puede ser que ya esté instalado otro controlador de dispositivo. Conecte esta
unidad a su PC, inserte un “Memory Stick” en la unidad y después realice el
procedimiento siguiente.
1 Abra “System Properties” desde “Control Panel”.
2 Compruebe si el controlador de dispositivo ya está instalado.
–
Cuando utilice Windows 2000/Windows XP
1 Haga clic en la ficha [Hardware] de la pantalla “System Properties”.
2 Haga clic en [Device Manager].
3 Haga clic en [View].
4 Haga clic en [Devices by type].
5 Compruebe si ha aparecido [! SONY-Memory Stick] precedido por el
signo “!”.
– Cuando utilice Windows 98/Windows 98SE/Windows Me –
1 Haga clic en la ficha [Device Manager] de la pantalla de “System
Properties”.
2 Compruebe si ha aparecido [! SONY-Memory Stick] precedido por el
signo “!”.
–
3 Borre el controlador si está instalado.
Si utiliza el procedimiento descrito en el paso 2 y confirma que se ha
mostrado [! Sony-Memory Stick], ya estará instalado un controlador de
dispositivo separado.
Realice lo siguiente para borrar este controlador.
No borre otros dispositivos más que [! Sony-Memory Stick].
1 Haga clic en [! Sony-Memory Stick].
2 Haga clic en [Remove]. Aparecerá la pantalla de “Confirm Device
Removal”.
3 Haga clic en el botón [OK]. El dispositivo se eliminará.
4 Cierre la pantalla de “System Properties”.
5 Reinicie su PC después de haber desconectado esta unidad del PC.
Vuelva a instalar el controlador de dispositivo realizando el procedimiento
desde “Conexión de esta unidad a su PC”.
PNotas
• Si borra otros dispositivos que no sean [! SONY-Memory Stick], es posible que
su PC no funcione normalmente.
• El PC reconocerá el “Memory Stick” con capacidad diferente si el dispositivo es
distinto.
• Dependiendo del sistema operativo y del “Memory Stick” que esté utilizando,
es posible que [! Sony-Memory Stick] se visualice de la forma siguiente.
[! Sony Memory Stick]
[! Standard IDE/ESDI Hard Disk Controller]
[! PCMCIA IDE/ATAPI Controller]
Desconexión de la unidad de su PC
Después de haber finalizado la copia de los datos de imágenes, realice el
procedimiento descrito a continuación antes de extraer el “Memory Stick” de
esta unidad y de extraer esta unidad del PC.
En las explicaciones siguientes se utilizan las pantallas de Windows XP.
Las pantallas pueden diferir ligeramente con el tipo de sistema operativo
utilizado.
1 Haga clic en el icono de “Unplug or Eject Hardware” de la bandeja
de tareas de la esquina inferior derecha de la pantalla.
Haga clic en este icono.
2 Haga clic en “Safely remove Sony Memory Stick-Drive (F:)”.
PNota
La letra de la unidad puede ser diferente a la siguiente dependiendo del sistema
operativo y del “Memory Stick” que esté utilizando.
[Sony-Memory Stick Drive(F:)]
[Standard IDE/ESDI Hard Disk Controller Drive (F:)]
[PCMCIA IDE/ATAPI Controller (F:)]
3 Se visualizará “Sony Memory Stick can be removed safely”.
En este punto, los datos estarán seguros aunque desconecte la unidad del
PC.
* La visualización puede diferir dependiendo del sistema operativo que esté
utilizando.
4 Extraiga esta unidad del PC presionando el botón de expulsión de
la ranura para tarjeta PC.
PNota
No extraiga el “Memory Stick” de la unidad mientras esté parpadeando la
lámpara indicadora de acceso ya que los datos del “Memory Stick” podrían
corromperse.
BForma de utilización
(Cuando utilice Macintosh)
Conexión de la unidad a su PC e
instalación de los controladores
Puede utilizarse con controladores de dispositivos estándar del sistema
operativo.
Realice las operaciones de acuerdo con los pasos siguientes.
1 Conecte la alimentación de su PC e inicie MacOS.
2 Inserte firmemente la unidad con el “Memory Stick” instalado hasta
que alcance la parte posterior de la ranura para tarjeta PC.
Con respecto a la conexión de la unidad a su PC , consulte “Conexión de esta
unidad a su PC”.
3 La instalación de los controladores se iniciará y los controladores se
instalarán en su PC.
4 Cuando finalice la instalación de los controladores, se visualizará un
icono de Memory Stick en el escritorio y usted podrá utilizar la
unidad.
Desconexión de esta unidad de su PC
1 Cierre el software utilizando este producto.
2 Cerciórese de que la lámpara indicadora de acceso no esté
encendida.
3 Mueva el icono del Memory Stick hasta [Trash].
Cuando seleccione el icono del Memory Stick, elija “Uninstall” del
menú [Special] de la parte superior izquierda de la pantalla.
4 Extraiga la unidad de su PC.
PNota
No extraiga el “Memory Stick” de la unidad mientras esté parpadeando la lámpara
indicadora de acceso ya que los datos del “Memory Stick” podrían corromperse.
Solución de problemas
Síntoma
No se visualiza el icono
de [Removable Disk].
La lámpara de acceso
parpadea al insertar un
“Memory Stick”.
La lectura de datos de un
“Memory Stick”, la
escritura de datos en un
“Memory Stick”, y la
copia causan la aparición
de una pantalla azul de
una advertencia.
La escritura o el borrado
de datos en/de un
“Memory Stick” parece
que tarda tiempo, pero
los datos del “Memory
Stick” no han cambiado.
El “Memory Stick” no
puede extraerse del
adaptador de tarjeta PC
para Memory Stick.
Especificaciones
Adaptador de tarjeta PC para Memory Stick
Interfaz: PCMCIA ATA, 16 bits (PC Card Type II)
Construcción de sistema pequerida
Entorno recomendado para Windows
OS: Microsoft Windows 98/Windows 98 Second Edition (Windows 98SE)/
Windows Millennium Edition (Windows Me)/Windows 2000
Professional (Windows 2000)/Windows XP Home Edition/XP
Professional (Windows XP)
Microsoft Windows CE/1.0/2.0/2.11/3.0
Entorno recomendado para Macintosh
OS: Mac OS 8.5~9.2.2/X (v10.1.2~10.2.2)
PNotas
• Los sistemas operativos mencionados arriba deberán estar instalados en su PC al
salir de fábrica.
• La operación no se garantizará para sistemas operativos actualizados incluso aunque
sean los mencionados arriba.
• La ranura para tarjeta PC compatible con PC Card Type II como equipo estándar.
• La operación no se garantiza para todos los PC incluso aunque estén de acuerdo con
el entorno mencionado.
Tensión de alimentación 3,3/5,0 V cc
Consumo 90 mA cc como máximo
Dimensiones externas Aprox. 54 × 5,0 × 85,6 mm (an × al × prf)
Masa Aprox. 30 g (excluyendo el “Memory Stick”)
Condiciones de funcionamiento Temperatura 0 °C a 60 °C
El diseño y las especificaciones están sujetos a cambio sin previo aviso.
Si tiene alguna duda o pregunta acerca de este producto, visite nuestro sitio
de Internet de apoyo a los clientes en
http://www.sony.net/memorystick/supporte
Causa/Solución
• La conexión no es correcta.
t Conecte correctamente. (“Conexión de esta
unidad a su PC”)
• El controlador no está instalado.
t Instálelo desde el CD-ROM suministrado.
(“Conexión de esta unidad a su PC”)
• No hay “Memory Stick” insertado.
t Inserte un “Memory Stick”.
• Hay materias extrañas adheridas a la sección del
conector del “Memory Stick”.
t Compruebe si la sección del conector del
“Memory Stick” tiene polvo o está sucia.
Elimine cualquier materia extraña y vuelva a
insertar el “Memory Stick”.
• El “Memory Stick” está protegido contra escritura.
t Desbloquee el mando LOCK. (“Precauciones
sobre la utilización de “Memory Stick””)
• El “Memory Stick” está ajustado como “Local Disk”
(Cuando utilice Windows 98/Windows 98SE/
Windows Me).
t Cambie los ajustes de unidad para el “Memory
Stick” a “Removable Disk”. (“Confirmación de
las conexiones” – Cuando utilice Windows 98/
Windows 98SE/Windows Me –)
• El “Memory Stick” está protegido contra escritura.
t Desbloquee el mando LOCK. (“Precauciones
sobre la utilización de “Memory Stick””)
t No escriba en un “Memory Stick” con el mando
LOCK en la posición de bloqueo.
• El “Memory Stick” está ajustado como “Local Disk”
(Cuando utilice Windows 98/Windows 98SE/
Windows Me).
t Cambie los ajustes de unidad para el “Memory
Stick” a “Removable Disk”. (“Confirmación de
las conexiones” – Cuando utilice Windows 98/
Windows 98SE/Windows Me –)
•El botón de expulsión está presionado en la tarjeta
PC.
t Sujete el “Memory Stick” entre sus dedos y tire
del él hacia fuera.
t El adaptador de tarjeta PC para Memory Stick no
está dañado.
Usted podrá continuar utilizándolo después de
haber extraído el “Memory Stick”.
t Esto puede suceder si usted inserta el “Memory
Stick” en esta unidad presionando con fuerza la
parte del panel de la misma. No la presione
cuando inserte el “Memory Stick”.
(condensación no permitida)
Humedad 20 % a 80 %
(condensación no permitida)
Deutsch
Lesen Sie vor dem Betrieb diese Anleitung sorgfältig durch, und bewahren Sie
sie zum späteren Nachschlagen gut auf.
• „Memory Stick“, „Memory Stick Duo“, „Memory Stick PRO“, „Memory Stick
PRO Duo“, „MagicGate“, „MagicGate Memory Stick“, „MagicGate Memory
Stick Duo“ und sind Warenzeichen der Sony Corporation.
• Microsoft und Windows sind eingetragene Warenzeichen der Microsoft
Corporation in den USA und/oder anderen Ländern.
• Macintosh und MacOS sind eingetragene Warenzeichen der Apple Computer,
Inc. in den USA und/oder anderen Ländern.
• Die anderen erwähnten Firmen- und Produktnamen sind zum Teil
Warenzeichen und eingetragene Warenzeichen der betreffenden Firmen.
Die Kennungen ™ und ® werden in der Anleitung weggelassen.
Der „Memory Stick“
Was ist ein „Memory Stick“?
Ein „Memory Stick“ ist neues IC-Speichermedium, das trotz der ultrakompakten
Abmessungen und des äußerst geringen Gewichts eine größere
Speicherkapazität besitzt als eine Diskette. Sie können den „Memory Stick“ als
auswechselbares Speichermedium verwenden oder die Daten vom „Memory
Stick“ auf zu kompatiblen Geräten übertragen.
Im Handel ist neben dem normalen „Memory Stick“ auch eine Kompaktversion,
der „Memory Stick Duo“ erhältlich. Wird der „Memory Stick Duo“ in einen
speziellen Adapter, der die Größe des normalen „Memory Stick“ besitzt,
eingesetzt, ist er mit dem normalen „Memory Stick“ kompatibel.
Die verwendbaren „Memory Stick“
Die folgenden „Memory Stick“ können verwendet werden.
„Memory Stick PRO“
Ein „Memory Stick PRO“ ist ein „Memory Stick“ mit der
Kopierschutztechnologie „MagicGate*“ und kann nur in einem „Memory Stick
PRO“-kompatiblen Gerät verwendet werden.
„Memory Stick“ („MagicGate“/High-Speed-Datentransferkompatibel)
Dieser „Memory Stick“ arbeitet mit der Urheberrechtsschutztechnologie
„MagicGate*“ und unterstützt High-Speed-Datentransfer. Er kann in jedem
„Memory Stick“/„Memory Stick PRO“-kompatiblen Gerät verwendet werden.
(Die Transfergeschwindigkeit hängt vom „Memory Stick“-kompatiblen Gerät
ab.)
„Memory Stick“
Ein „Memory Stick“ ermöglicht das Aufnehmen aller Datentypen mit Ausnahme
von Daten, die mit einem Urheberrechtschutz („MagicGate*“) versehen sind.
„MagicGate Memory Stick“
Dieser „Memory Stick“ arbeitet mit der Urheberrechtsschutztechnologie
„MagicGate*“.
* „MagicGate“ ist ein Kopierschutz mit Verschlüsselungstechnologie.
Dieses Gerät besitzt keine „MagicGate“-Funktion. Die Aufnahme und
Wiedergabe von Daten mit „MagicGate“ wird nicht unterstützt.
Formatieren eines „Memory Stick“
Beim Formatieren werden alle Daten auf dem „Memory Stick“ gelöscht. Zum
Formatieren verwenden Sie einen „Memory Stick“ Sie ein „Memory Stick“kompatibles Gerät. Wenn Sie einen „Memory Stick“ mit einem Computer
formatieren, verwenden Sie das Programm „Memory Stick Formatter“. Den
„Memory Stick Formatter“ können Sie auf der folgenden Web-Site
herunterladen:
http://www.sony.net/Products/mssupport/
PHinweis
Beim Formatieren werden die Daten auf dem „Memory Stick“ gelöscht. Achten Sie
sorgfältig darauf, dass keine wichtigen Daten gespeichert sind.
Wichtige Hinweise zum „Memory Stick“
A
„Memory Stick“ „Memory Stick Duo“
• Berühren Sie die Anschlusskontakte (A in der Abbildung) nicht mit der Hand
oder einem Metallgegenstand.
• Achten Sie darauf, dass Sie nicht zu fest drücken, wenn Sie das Label-Feld (B
in der Abildung) des „Memory Stick“ oder das Memo-Feld (C in der
Abildung) des „Memory Stick Duo“ beschriften.
• Verbiegen Sie den „Memory Stick“ nicht, lassen Sie ihn nicht fallen, und stoßen
Sie ihn nirgends an.
• Versuchen Sie nicht, den „Memory Stick“ auseinanderzubauen oder
Änderungen an ihm vorzunehmen.
• Achten Sie darauf, dass der „Memory Stick“ nicht mit Wasser in Kontakt
kommt.
• In folgenden Fällen kann es zu Beschädigungen der Daten kommen:
– Wenn beim Lesen/Schrieben von Daten der „Memory Stick“
herausgenommen oder das Gerät ausgeschaltet wird.
– Wenn der Adapter statischer Aufladung oder Störeinstrahlungen ausgesetzt
ist.
• Legen Sie von wichtigen Daten stets eine Sicherungskopie an.
• Bei Verlust und Beschädigung der Daten sowie bei einer Beschädigung des
Geräts übernimmt Sony keine Haftung.
• Daten mit dem Urheberrechtsschutz „MagicGate“ können nur von einem
„MagicGate Memory Stick“ verarbeitet werden.
• Bewahren Sie den „Memory Stick“ beim Transport und bei Nichtverwendung
in der mitgelieferten Schutztasche auf.
• An den folgenden Plätzen sollte die Einheit weder verwendet noch aufbewahrt
werden:
– Plätze mit hohen Temperaturen, wie sie beispielsweise auch in einem in der
Sonne geparkten Auto auftreten können.
– Plätze, die direktem Sonnenlicht ausgesetzt sind.
– Plätze, die Feuchtigkeit und korrosionsfördernden Substanzen ausgesetzt
sind.
• Wenn der LOCK-Schalter aktiviert ist, kann nicht aufgenommen, editiert oder
gelöscht werden.
* Einige „Memory Stick“ besitzen keinen LOCK-Schalter.
Achten Sie bei solchen „Memory Stick“ darauf, dass Sie
nicht versehentlich Daten löschen oder ändern.
• Verwenden Sie zum Umstellen des LOCK-Schalters
einen spitzen Gegenstand.
• Wenn Sie einen „Memory Stick Duo“/„Memory Stick
PRO Duo“ in diesem Gerät verwenden wollen, müssen
Sie ihn in den Memory Stick Duo-Adapter einsetzen.
• Achten Sie auf richtige Ausrichtung.
• Setzen Sie den Memory Stick Duo-Adapter nicht ohne
den „Memory Stick Duo“/„Memory Stick PRO Duo“ in
das „Memory Stick“-kompatible Gerät ein. Ansonsten
kann es zu Fehlfunktionen kommen.
LOCK-Schalter (Schreibschutzschalter)
Bei Verwendung eines „Memory Stick“ mit LOCK-Schalter schalten Sie den
LOCK-Schalter aus. Der LOCK-Schalter darf nicht eingeschaltet sein.
Anbringen eines
Aufklebers
B
A
C
„Memory Stick“
„Memory Stick Duo“
Überprüfen des mitgelieferten Zubehörs
• Memory Stick PC-Kartenadapter (1)
• Spezielle Schutzhülle (1)
• Bedienungsanleitung (1)*
* Je nach Gebiet sind vier verschiedene Bedienungsanleitungen mitgeliefert.
Bezeichnung der Teile
Seriennummer (8-stellige Zahl
am Rahmen)
Memory StickAuswurftaste
Zugriffslampe
PC Card Type II-kompatibler
Kartenschacht
PHinweis
Während des Zugriffs auf den „Memory Stick“ leuchtet die Zugriffslampe. Bei
leuchtender Lampe darf der „Memory Stick“ oder der PC-Kartenadapter nicht
herausgenommen und der Computer nicht ausgeschaltet werden. Ansonsten gehen
die Daten des „Memory Stick“ möglicherweise verloren.
Memory Stick-Schacht
BVerwendung (unter Windows)
Anschluss des Geräts an den Computer
1 Schalten Sie den Computer ein, und starten Sie Windows.
2 Schieben Sie den PC-Kartenadapter mit eingesetztem „Memory
Stick“ fest in den Computer ein.
PHinweise
• Setzen Sie den „Memory Stick“ richtig herum ein.
• Der PC-Kartenschacht befindet sich je nach Computer an einer anderen Stelle.
• Auch wenn die obigen Anforderungen erfüllt sind, ist in einigen Fällen kein Betrieb
gewährleistet.
3 Öffnen Sie den Hardware-Assistenten, und beginnen Sie mit der
Installation des Treibers.
Je nach dem Betriebssystem startet die Treiberinstallation möglicherweise
automatisch oder der Hardware-Assistent startet nicht.
Folgen Sie den Anweisungen auf dem Bildschirm, und klicken Sie auf die
Schaltfläche [Next], um die Treiberinstallation auszuführen.
4 Wählen Sie „Search for the best driver for your device
[Recommended]“, und klicken Sie auf [Next].
5 Klicken Sie auf [Next], ohne die Kontrollkästchen zu aktivieren.
6 Wählen Sie „The updated driver [Recommended] Standard IDE/ESDI
Hard Disk Controller“.
7 Folgen Sie den Anweisungen auf dem Bildschirm, und klicken Sie
auf [Next].
8 Klicken Sie auf die Schaltfläche [Finish]. Der Treiber ist damit
installiert.
Die Einheit ist betriebsbereit.
PHinweis
Starten Sie den Hardware-Assistenten, wenn Sie die Einheit zum ersten Mal
verwenden oder wenn Sie einen „Memory Stick“ mit anderer Kapazität verwenden.
So können Sie den einwandfreien
Anschluss überprüfen
1 Öffnen Sie den Ordner „My Computer“.
1 Doppelklicken Sie auf „My Computer“.
2 Der „My Computer“ öffnet sich.
2 Vergewissern Sie sich, dass das neue Symbol „Sony MemoryStick
(F:)“ eingerichtet worden ist.
Wenn Sie das Gerät richtig an den Computer angeschlossen haben, enthält
das Fenster das Wechselmedium „Sony MemoryStick (F:)“. Je nach Ihrem
Computer wird statt des Namens (F:) eventuell ein anderer Name
verwendet.
Möglicherweise dauert es einige Zeit, bis die das Symbol „Sony
MemoryStick (F:)“ erscheint.
Erst wenn dieses Symbol angezeigt wird, ist der Anschluss hergestellt.
PHinweise
• Wenn das „Sony MemoryStick (F:)“-Symbol nicht erscheint, wurde der GeräteTreiber möglicherweise nicht richtig installiert. Verfahren Sie in einem solchen wie
unter „Wenn die „Diskette“ nicht angezeigt wird“ beschrieben.
• Je nach dem verwendeten Betriebssystem und dem „Memory Stick“ erscheint
manchmal statt „Removable Disk (F:)“ die Anzeige „Sony MemoryStick (F:)“, und
möglicherweise ist auch das Symbol unterschiedlich.
• Wenn Sie noch weitere Wechs verwenden, erscheinen mehrere „Removable Disk“Symbole.
• Je nach dem Typ des „Memory Stick“ wird der „Memory Stick“ möglicherweise als
„Local Disk (F:)“ identifiziert; auf den Betrieb hat dies keinen Einfluss. Wenn Sie
Windows 98/Windows 98SE/Windows Me verwenden, lesen Sie bitte den
nachfolgenden Abschnitt „Bei Verwendung von Windows 98/Windows 98SE/
Windows Me“, um von „Local Disk“ auf „Removable Disk“ umzuschalten.
Wird der „Memory Stick“ unter Windows 2000/Windows XP als „Local Disk“
identifiziert, ist keine Umschaltung auf „Removable Disk“ möglich. Auf den Betrieb
hat dies jedoch keinen Einfluss. Wir empfehlen, in einem solchen Fall den LOCKSchalter des „Memory Stick“ auszuschalten („Wichtige Hinweise zum „Memory
Stick““).
- Bei Verwendung von Windows 98/Windows 98SE/Windows Me -
Bei der ersten Verwendung der Einheit erscheint sie im Ordner „My Computer“
als „Local Disk“ (nicht als „Removable Disk“). Auf den Betrieb hat dies keinen
Einfluss. Wenn jedoch der LOCK-Schalter aktiviert ist, kann sich der Bildschirm
blau färben und eine Warnmeldung erscheinen. In einem solchen Fall empfehlen
wir, wie folgt von „Local Disk“ auf „Removable Disk“ umzuschalten:
1 Setzen Sie die Einheit mit dem „Memory Stick“ in den Computer
ein, und installieren Sie die Treiber („Anschluss des Geräts an den
Computer“). Wenn die Treiber bereits installiert sind, brauchen Sie
nur die Einheit mit dem „Memory Stick“ in den Computer
einzusetzen. Führen Sie anschließend die folgenden Schritte aus.
2 Notieren Sie sich den Laufwerknamen, der dem „Memory Stick“
zugeteilt wurde. Um den Namen zu ermitteln, öffnen Sie auf dem
Desktop den Ordner „My Computer“.
3 Zeigen Sie im [Start]-Men auf [Settings] und öffnen Sie die „Control
Panel”.
4 Doppelklicken Sie auf [System].
5 Wählen Sie im Fenster „System Properties“ die Registerkarte
[Device Manager], und doppelklicken Sie auf [Disk drives].
6 Suchen Sie in [GENERIC IDE DISK TYPE XX] (XX steht für eine
2stellige Zahl oder Rür„=“ mit einer einstelligen Zahl) wie folgt das
Laufwerk aus, das dieser Einheit zugeteilt wurde.
1 Wählen Sie den ersten [GENERIC IDE DISK TYPE XX], und klicken Sie
auf [Properties].
2 Klicken Sie im Fenster „Properties“ auf die Registerkarte [Settings].
3 Aktivieren Sie das Kontrollkästchen bei „Current drive letter
assignment“ Sind die Laufwerknamen unterschiedlich, klicken Sie auf
[Cancel], schließen Sie das Fenster „Eigenschaften“, wählen Sie den
nächsten [GENERIC IDE DISK TYPE XX], und führen Sie die
Überprüfung erneut aus.
4 Wiederholen Sie diesen Vorgang, bis das dieser Einheit zugeteilte
Laufwerk gefunden ist.
7 Aktivieren Sie auf der Registerkarte „Einstellungen“ das
Kontrollkästchen „Removable“, und deaktivieren Sie das
Kontrollkästchen „Int 13 unit“.
8 Klicken Sie auf [OK], um das Fenster „Eigenschaften“ zu schließen.
9 Klicken Sie auf [OK], um das Fenster „Systemeigenschaften“ zu
schließen.
10Eine Aufforderung zum erneuten Hochstarten des Computers
erscheint. Klicken Sie auf [Yes], um den Computer neu
hochzustarten.
11Nachdem Sie den Computer neu hochgestartet haben, öffnen Sie
„My Computer“, und vergewissern Sie sich, dass nun die Einheit
als „Removable Disk (X:)“ (X steht für den der Einheit zugeteilten
Namen) angezeigt wird. Hat sich der Laufwerkname nicht
geändert, beginnen Sie erneut mit dem obigen Schritt 3, um die
Einstellung zu ändern.
PHinweise
• Der dieser Einheit zugeteilte Laufwerkname und die Laufwerknummer (XX bei
[GENERIC IDE DISK TYPE XX]) können nach dem erneuten Hochstarten des
Computers unterschiedlich sein.
• Wird ein „Memory Stick“ mit anderer Kapazität in dieser Einheit verwendet, müssen
Sie nach der Treiberinstallation die Einstellungen wie oben erläutert ändern.
Wenn die „Diskette“ nicht angezeigt wird
Möglicherweise ist bereits ein Geräte-Treiber installiert. Schließen Sie in einem
solchen Fall das Gerät an den Computer an, setzen Sie den „Memory Stick“ in
das Gerät ein, und führen Sie den folgenden Vorgang aus:
1 Öffnen Sie in der „Control Panel“ das Fenster „System Properties“.
2 Überprüfen Sie, ob bereits ein Geräte-Treiber installiert ist.
–
Unter Windows 2000/Windows XP
1 Im Fenster „System Properties“ auf die Registerkarte [Hardware]
klicken.
2 Auf [Device Manager] klicken.
3 Auf [View] klicken.
4 Auf [Devices by type] klicken.
5 Überprüfen, ob [! SONY-Memory Stick] mit vorausgestelltem „!“
vorhanden ist.
– Unter Windows 98/Windows 98SE/Windows Me –
1 Im Fenster „System Properties“ auf die Registerkarte [Device Manager]
klicken.
2 Überprüfen, ob [! SONY-Memory Stick] mit vorausgestelltem „!“
vorhanden ist.
–
3 Falls ein Treiber installiert ist, löschen Sie ihn.
Falls Sie im vorausgegangenen Schritt 2 festgestellt haben, dass
[! Sony-Memory Stick] vorhanden ist, wurde bereits ein anderer
Gerätetreiber installiert.
Führen Sie dann den folgenden Vorgang aus, um den Treiber zu löschen.
Achten Sie darauf, keinen anderen Treiber als [! Sony-Memory Stick] zu
löschen.
1 Auf [! Sony-Memory Stick] klicken.
2 Auf [Remove] klicken. Das Fenster „Comfirm Device Removal“ erscheint.
3 Auf die Schaltfläche [OK] klicken. Das Gerät wird entfernt.
4 Das Fenster „System Properties“ schließen.
5 Das Gerät vom Computer abtrennen, dann den Computer neu
hochstarten.
Installieren Sie den Geräte-Treiber erneut, indem Sie den Vorgang des
Abschnitts „Anschluss des Geräts an den Computer“.
PHinweise
• Nur [! SONY-Memory Stick] darf gelöscht werden. Werden andere Geräte
gelöscht, funktioniert der Computer möglicherweise nicht mehr einwandfrei.
• Der Computer wertet einen „Memory Stick“ mit anderer Kapazität als ein
anderes Gerät.
• Je nach dem verwendeten Betriebssystem und dem „Memory Stick“ erscheint
möglicherweise statt der folgenden Anzeigen die Anzeige
[! Sony-Memory Stick]:
[!Sony Memory Stick]
[!Standard IDE/ESDI Hard Disk Controller]
[!PCMCIA IDE/ATAPI Controller]
Abtrennen des Geräts vom Computer
Nach dem Kopieren von Bilddaten müssen Sie den folgenden Vorgang
ausführen, bevor Sie den „Memory Stick“ aus dem Adapter und den Adapter
aus dem Computer herausnehmen.
In den folgenden Erläuterungen werden die Anzeigen von Windows XP
verwendet.
Bei anderen Betriebssystemen können sich die Anzeigen leicht unterscheiden.
1 Klicken Sie unten rechts in der Taskleiste auf das Symbol „Unplug
or Eject Hardware“.
Auf dieses Symbol klicken.
2 Klicken Sie auf „Safely remove Sony Memory Stick-Drive(F:)“.
PHinweis
Je nach dem verwendeten Betriebssystem und dem „Memory Stick“ können
folgende Laufwerkanzeigen erscheinen:
[Sony-Memory Stick Drive (F:)]
[Standard IDE/ESDI Hard Disk Controller Drive (F:)]
[PCMCIA IDE/ATAPI Controller (F:)]
3 „Sony Memory Stick can be removed safely“ erscheint.
Die Daten sind nun gesichert, und der Adapter kann vom Computer
entfernt werden.
* Je nach dem verwendeten Betriebssytem kann die Anzeige unterschiedlich
sein.
4 Drücken Sie die Auswurftaste am PC-Kartenschacht, um den
Adapter aus dem Computer herauszunehmen.
PHinweis
Während die Zugriffslampe blinkt, darf der „Memory Stick“ jedoch nicht aus dem
Adapter herausgenommen werden, da sonst die Daten im „Memory Stick“
beschädigt werden können.
BVerwendung
(Bei Verwendung eines Macintosh)
Anschließen des Adapters an den
Computer und Installieren der Treiber
Der Standardtreiber des Betriebssystms kann verwenden werden.
Führen Sie die folgenden Schritte aus:
1 Schalten Sie den Computer ein, und starten Sie das MacOS.
2 Schieben Sie den Adapter mit eingesetztem „Memory Stick“ ganz
in den PC-Kartenschacht des Computers ein.
Zum Anschluss des Adapters an den Computer den nachfolgenden
Abschnitt „Anschluss des Geräts an den Computer“.
3 Die Treiber-Installation beginnt. Die Treiber werden automatisch im
Computer installiert.
4 Wenn die Treiber-Installation beendet ist, erscheint das Symbol
Memory Stick auf dem Desktop. Der Adapter ist nun betriebsbereit.
Entfernen des Adapters vom Computer
1 Schließen Sie das Programm, das auf den Adapter zugreift.
2 Stellen Sie sicher, dass die Zugriffslampe am Adapter nicht leuchtet.
3 Ziehen Sie das Symbol Memory Stick in den [Trash].
Während das Symbol Memory Stick gewählt ist, wählen Sie
„Uninstall“ in [Special]-Menü oben links auf dem Bildschirm.
4 Nehmen Sie den Adapter aus dem Computer heraus.
PHinweis
Während die Zugriffslampe blinkt, darf der „Memory Stick“ jedoch nicht aus dem
Adapter herausgenommen werden, da sonst die Daten im „Memory Stick“ beschädigt
werden können.
Störungsüberprüfungen
Symptom
Das Symbol [Removable
Disk] erscheint nicht.
Bei eingesetztem
„Memory Stick“ blinkt
die Zugriffslampe.
Beim Auslesen von
Daten aus dem „Memory
Stick“, beim Schreiben
von Daten auf den
„Memory Stick“ und
beim Kopieren erscheint
ein blauer Bildschirm
und eine Warnmeldung.
Es erschien keine
Meldung, dass der
„Memory Stick“ den
Schreib- oder
Löschvorgang nicht
ausgeführt hat.
Der „Memory Stick“
kann nicht aus dem
Memory Stick PCKartenadapter
herausgenommen
werden.
Technische Daten
Memory Stick-PC-Kartenadapter
Interface: PCMCIA ATA 16 Bit (PC Card Type II)
Systemanforderungen
Empfohlene Windows-Umgebung
Betriebssytem: Microsoft Windows 98/Windows 98 Second Edition
Empfohlene Macintosh-Umgebung
Betriebssystem: Mac OS 8.5~9.2.2/X (v10.1.2~10.2.2)
PHinweise
• Die obigen Betriebssysteme müssen werksseitig bereits im Computer installiert
worden sein.
• Wenn die obigen Betriebssysteme aus einem Upgrade hervorgegangen sind, ist kein
Betrieb gewährleistet.
• Standardmäßiger PC Card Type II-kompatibler PC-Kartenschacht.
• In bestimmten Fällen ist auch mit Computern, die die obigen Voraussetzungen
erfüllen, kein Betrieb gewährleistet.
Betriebsspannung 3,3/5,0 V Gleichspannung
Stromaufnahme Max. 90 mA Gleichspannung
Außenabmessungen ca. 54 × 5,0 × 85,6 mm (B × H × T)
Gewicht ca. 30 g (ausschl. „Memory Stick“)
Umgebungsbedingungen Temperatur: 0 °C bis 60 °C (nicht kondensiert)
Änderungen, die dem technischen Fortschritt dienen, bleiben vorbehalten.
Bei Fragen oder Kommentaren zu diesem Produkt besuchen Sie bitte
unsere Kunden-Support-Website:
http://www.sony.net/memorystick/supporte
Ursache/Abhilfe
•Der Anschluss stimmt nicht.
t Das Kabel richtig anschließen. („Anschluss des
Geräts an den Computer“)
•Der Treiber ist nicht installiert.
t Den Treiber von der mitgelieferten CD-ROM
starten. („Anschluss des Geräts an den
Computer“)
•Es ist kein „Memory Stick“ eingesetzt.
t Einen „Memory Stick“ einsetzen.
•Die Kontakte des „Memory Stick“ sind verschmutzt
oder verstaubt.
t Die Kontakte des „Memory Stick“ auf Schmutz
und Staub überprüfen, gegebenenfalls säubern,
dann den „Memory Stick“ wieder einsetzen.
•Der „Memory Stick“ ist schreibgeschützt.
t Den LOCK-Schalter deaktivieren. („Wichtige
Hinweise zum „Memory Stick““)
•Der „Memory Stick“ ist als „Local Disk“ definiert
(bei Verwendung von Windows 98/Windows
98SE/Windows Me).
t Die Einstellungen des „Memory Stick“ zu
„Removable Disk“ ändern. („So können Sie den
einwandfreien Anschluss überprüfen“ - Bei
Verwendung von Windows 98/Windows 98SE/
Windows Me -)
•Der „Memory Stick“ ist schreibgeschützt.
t Den LOCK-Schalter deaktivieren. („Wichtige
Hinweise zum „Memory Stick““)
t Niemals versuchen, auf den „Memory Stick“
Daten zu schreiben, während der LOCK-Schalter
aktiviert ist.
•Der „Memory Stick“ ist als „Local Disk“ definiert
(bei Verwendung von Windows 98/Windows
98SE/Windows Me).
t Die Einstellungen des „Memory Stick“ zu
„Removable Disk“ ändern. („So können Sie den
einwandfreien Anschluss überprüfen“ - Bei
Verwendung von Windows 98/Windows 98SE/
Windows Me -)
•Die Auswurftaste ist in den PC-Kartenadapter
gedrückt.
t Den „Memory Stick“ mit den Fingern
herausziehen.
t Der Memory Stick PC-Kartenadapter ist nicht
beschädigt.
Nachdem der „Memory Stick“ einmal
herausgenommen wurde, kann er weiter
verwendet werden.
t Möglicherweise wurde beim Einsetzen des
„Memory Stick“ zu stark auf das
Adaptergehäuse gedrückt. Beim Einsetzen des
„Memory Stick“ darf nicht auf das Gehäuse
gedrückt werden.
(Windows 98SE)/Windows Millennium Edition (Windows
Me)/Windows 2000 Professional (Windows 2000)/
Windows XP Home Edition/XP Professional (Windows XP)
Microsoft Windows CE/1.0/2.0/2.11/3.0
Feuchtigkeit: 20 % bis 80 % (nicht kondensiert)
 Loading...