

Sony MRW62E - USB 2.0 Flash Memory Card Reader, Memory Stick MRW62E-S2 Operating Instructions Manual
Page 1
IT
4-152-816-21 (1)
Multi-Card
Reader/Writer
Operating Instructions
Before operating the unit, please read this document
thoroughly, and retain it for future reference.
JP
FR
DE
ES
IT
CS
MRW62E-S2
© 2008 Sony Corporation
Page 2
Safety regulations
WARNING
Keep the unit away from children. If
any part of the unit is swallowed,
promptly see a doctor.
To reduce the risk of fire or electric
shock, do not expose this apparatus
to rain or moisture.
To avoid electrical shock, do not open
the cabinet. Refer servicing to
qualified personnel only.
Notice for the customer in the
countries applying EU Directives
The manufacturer of this product is Sony
Corporation, 1-7-1 Konan Minato-ku Tokyo,
108-0075 Japan. The Authorized
Representative for EMC and product safety is
Sony Deutschland GmbH, Hedelfinger
Strasse 61, 70327 Stuttgart, Germany. For
any service or guarantee matters please refer
to the addresses given in separate service or
guarantee documents.
NOTICE TO USERS
Documentation ©2006 Sony Corporation.
All rights reserved. This manual described
herein, in whole or in part, may not be
reproduced, translated to any machinereadable form without prior written approval
from Sony Corporation.
IN NO EVENT SHALL SONY
CORPORATION BE LIABLE FOR ANY
INCIDENTAL, CONSEQUENTIAL OR
SPECIAL DAMAGES, WHETHER
BASED ON TORT, CONTRACT, OR
OTHERWISE, ARISING OUT OF OR IN
CONNECTION WITH THIS MANUAL,
THE DEVICE DRIVERS OR OTHER
INFORMATION CONTAINED HEREIN
OR THE USE THEREOF.
Sony Corporation reserves the right to make
any modification to this manual or the
information contained herein at any time
without notice.
SONY CORPORATION IS NOT
RESPONSIBLE FOR ANY DAMAGE TO
OR LOSS OF ANY PROGRAMS, DATA,
OR OTHER INFORMATION STORED ON
ANY MEDIA.
Copyright law prohibits unauthorized use of
any recorded audio/video for any other
purpose than personal enjoyment. Please be
warned that the “Memory Stick” containing
images and data protected by copyright shall
be strictly used within copyright law.
Trademarks
• , “Memory Stick,” “Memory Stick
Duo,” “MagicGate Memory Stick,”
“Memory Stick PRO,” “Memory Stick
PRO Duo,” “Memory Stick Micro,” and
“M2” are registered trademarks or
trademarks of Sony.
• Microsoft
logo are trademarks or registered
trademarks of Microsoft Corporation in the
United States of America and/or other
countries.
• Macintosh
trademarks of Apple Inc. in the United
States of America and/or other countries.
• Other system names, product names, and
company names appearing in this manual
are trademarks or registered trademarks of
their respective holders, even though not
indicated by the ® or ™ marks.
®
, Windows®, and the Windows
®
and Mac OS® are registered
2
Page 3
Disposal of Old Electrical &
Electronic Equipment (Applicable in
the European Union and other
European countries with separate
collection systems)
This symbol on the product or
on its packaging indicates that
this product shall not be
treated as household waste.
Instead it shall be handed over
to the applicable collection
point for the recycling of
electrical and electronic equipment.
By ensuring this product is disposed of
correctly, you will help prevent potential
negative consequences for the environment
and human health, which could otherwise be
caused by inappropriate waste handling of
this product.
The recycling of materials will help to
conserve natural resources. For more
detailed information about recycling of this
product, please contact your local Civic
office, your household waste disposal
service or the shop where you purchased the
product.
Table of contents
Safety regulations .............................. 2
Overview ........................................... 4
Package Contents ............................... 4
System Requirements ........................ 4
Supported Media ............................... 5
Parts and Functions ............................ 6
Connecting the Reader/Writer to a
Computer ........................................... 7
Using the Reader/Writer .................... 9
Inserting a Memory Card ............... 9
Reading and Writing Data on a
Memory Card ............................... 10
Removing a Memory Card ........... 11
Reading the Access Indicator ....... 12
Disconnecting the Reader/Writer
From the Computer .......................... 13
Installing the Drive Letter
Recognition Software
(Windows Only) .............................. 14
About Memory Stick ....................... 15
Usage Notes ..................................... 16
Troubleshooting ............................... 18
Specifications .................................. 19
Technical Support ............................ 19
End User License Agreement .......... 20
Before you use the reader/writer
for the first time, you are
encouraged to install the Drive
Letter Recognition Software on
your computer.
Before connecting the reader/writer, see
page 14 for details about the Drive Letter
Recognition Software installation
procedure. Also see the end user license
agreement on page 20.
3
Page 4
Overview
System
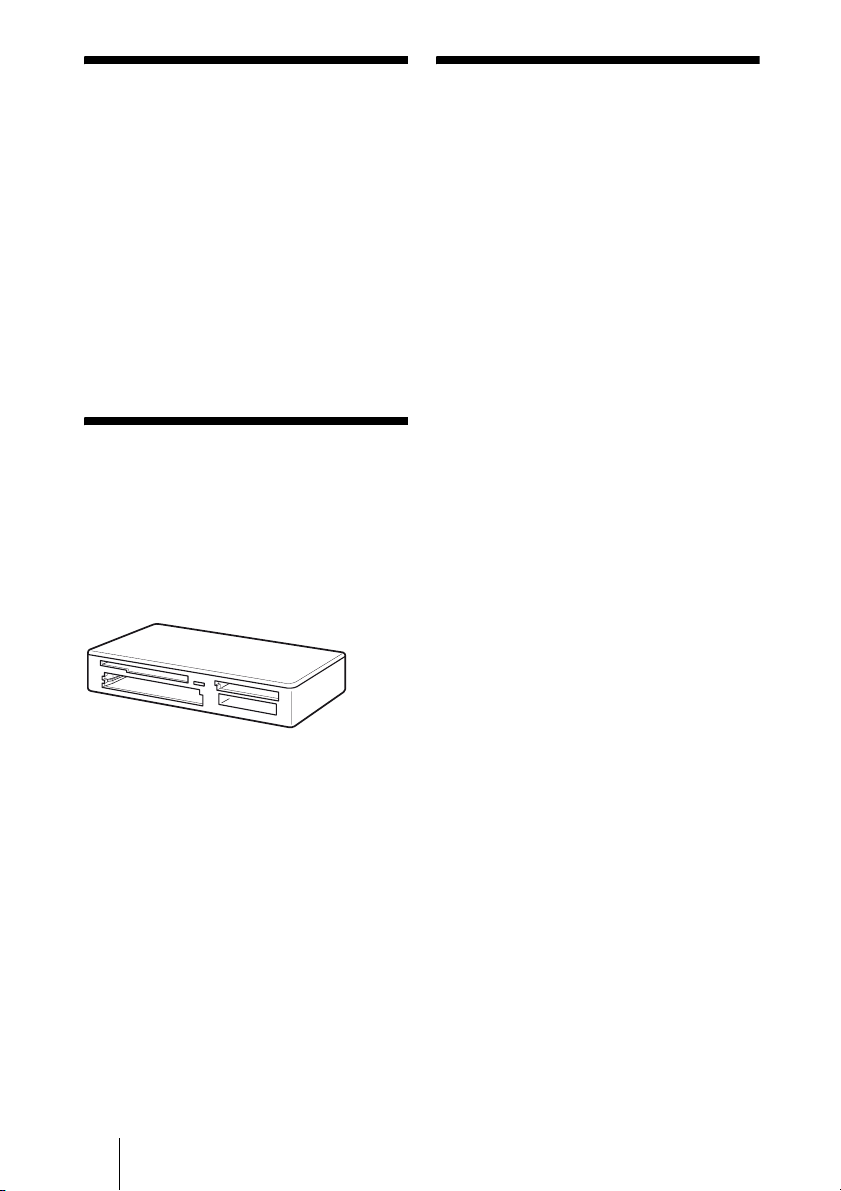
The MRW62E-S2 (hereafter referred to as
the “reader/writer”) has the following
features:
• Quick and simple data transfer – easily
transfer images from camera to PC
• Compatible with “Memory Stick,”
“Memory Stick PRO,” “Memory Stick
Duo,” CompactFlash, Microdrive,
xD-Picture Card, SmartMedia,
MultiMediaCard, SD Memory Card
• Quick to Connect – Hot-pluggable
USB-powered design
Package Contents
When you unpack the box, make sure that it
contains all the accessories listed below.
If anything is missing or damaged, contact
your retailer.
• MRW62E-S2 Multi-Card Reader/Writer
Requirements
The reader/writer requires the following
minimum system configuration:
• OS
– Windows Vista
– Windows® XP Home or Professional
– Windows
Pack 4 or later)
– Windows
– Mac OS X 10.1.2 or later
This product works with the standard
drivers in Windows.
®
®
2000 Professional (Service
®
Me
• USB cable
• Read Me First
4
Page 5

Supported Media
The reader/writer supports the following
media:
“Memory Stick” media
• “Memory Stick” (without MagicGate)
• “MagicGate Memory Stick”
*1*2
• “Memory Stick” (with MagicGate)
• “Memory Stick Duo” (without MagicGate)
*1
• “MagicGate Memory Stick Duo”
• “Memory Stick Duo” (with MagicGate)
*1*2*3
• “Memory Stick PRO”
• “Memory Stick PRO Duo”
*2*3
*2*3
• “Memory Stick PRO-HG Duo”
• “Memory Stick Micro” (“M2”)
*1 “MagicGate” is the general name of a
copyright protection technology developed
by Sony.
*2 Recording or playback of MagicGate data
that uses MagicGate technology is not
supported.
4-bit parallel data transfer is supported. It,
*3
however, varies depending on each medium
how long it takes to read/write data.
*4 “M2” is an abbreviation of “Memory Stick
Micro.” In this document, hereinafter, the
abbreviation “M2,” is used.
*5 With adaptor (not supplied) only.
SD memory cards
• SD Memory Card
• SDHCTM Memory Card
• miniSDTM Card
• miniSDHCTM Card
• microSDTM Card
• microSDHC
*6 Recording or playback of data that uses SD
technology is not supported.
*7 With adaptor (not supplied) only.
Other memory cards
• MultiMediaCard
• RS-MMC
• CompactFlash
• Microdrive®
• SmartMedia
• xD-Picture Card
*6
*6
*6*7
*6*7
*6*7
Card
®
*9
TM
*6*7
*8
TM
*8
TM
*1
*1*2*3
*1*2
*2*3
*2*3*4*5
*8 MMCplus and MMCmobile are supported.
*9 The Microdrive requires more power than
other memory cards. When using a
Microdrive, remove other memory cards;
otherwise an error may occur due to a
shortage of power.
Notes
• Not all memory cards are guaranteed to work.
Operation is not assured if non-supported
memory cards are used.
• The capacity of a file to be recorded/played back
is smaller than 4 GB per file according to the
specifications of the file system incorporated in
“Memory Stick.”
• Although operation check of this product has
been performed with up to 8 GB “Memory
Stick,” please note that the operation is not
guaranteed for every type of “Memory Stick.”
• In this manual, all types of media listed in
“Supported Media” are generically called
memory cards.
• I/O cards that are not memory cards, such as
GPS cards, are not supported.
• MultiMediaCards and SD Memor y Cards use the
same slot, so you cannot use them at the same
time.
• The “Memory Stick” media all use the same slot,
so you cannot use them at the same time.
• Only DOS format is supported. Memory cards in
other formats are not supported.
5
Page 6
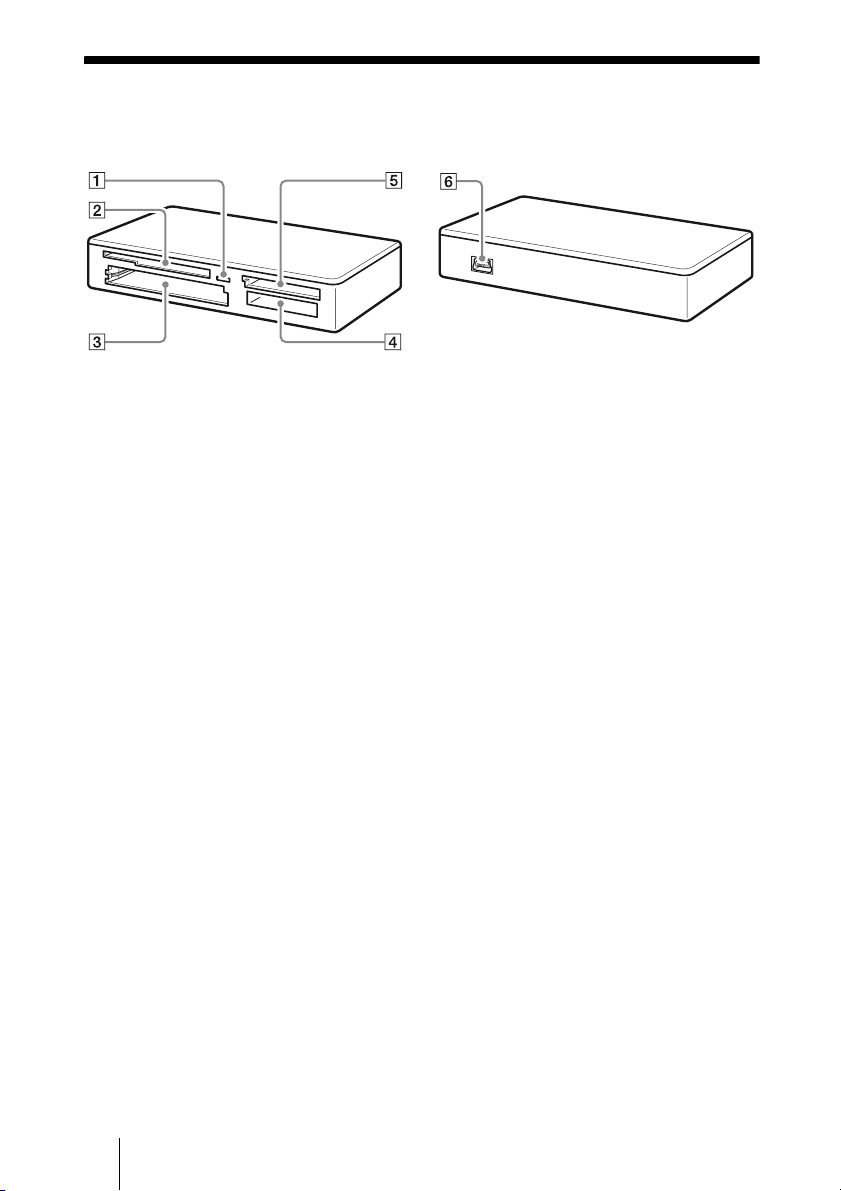
Parts and Functions
Front
A
Access Indicator
This indicator is always lit. The indicator
blinks when the reader/writer accesses
data on a memory card.
B SmartMedia/xD-Picture Card Slot
Insert either a SmartMedia memory card
or xD-Picture Card here.
C CompactFlash/Microdrive Slot
Insert either a CompactFlash or
Microdrive memory card here.
Remove all other memory cards before
using a Microdrive, because of its large
power consumption.
D “Memory Stick” Slot
Insert a “Memory Stick” media here.
When inserting a “Memory Stick Micro”
(“M2”), use an adaptor (not supplied).
E MultiMediaCard/SD Memory Card
Slot
Insert either a MultiMediaCard or an SD
Memory Card here.
When inserting a miniSD Card,
miniSDHC Card, microSD Card or
microSDHC Card, use an adaptor (not
supplied).
Rear
F
USB Port (mini B)
Connect to a computer using the supplied
USB cable.
6
Page 7
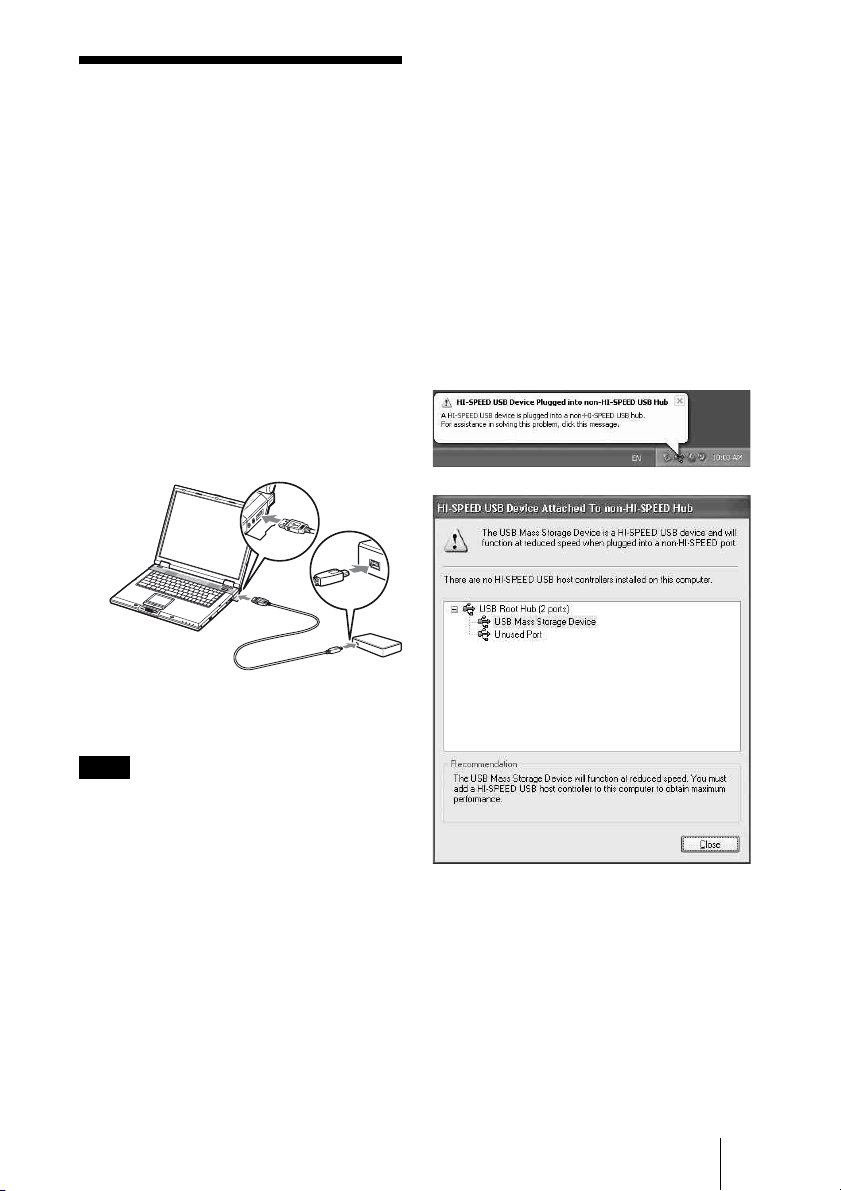
Connecting the Reader/Writer to a Computer
Simply connect the reader/writer to a
computer using the supplied USB cable.
1 Start the computer.
2 Connect the smaller connector
of the USB cable to the USB port
on the rear of the reader/writer.
3 Connect the larger connector of
the USB cable to the USB port on
the computer.
x For Windows
• On some computers, a message may appear
asking you to insert the operating system
disc. When this happens, follow the
computer’s instructions.
• On some computers, the “HI-SPEED USB
Device Plugged into non-HI-SPEED USB
Hub” message may appear, indicating that
a hi-speed USB device has been connected
to a USB port which does not support hispeed USB. If your computer has multiple
USB ports, try connecting to a different
port.
Otherwise, close the message and continue
using the reader/writer with the current
port.
The computer recognizes the reader/
writer as a removable disk, and the
reader/writer is ready for use.
Notes
• Do not connect to a computer via a USB hub.
• Depending on the computer and the status of its
operating system, the reader/writer may not
operate or may become unstable. If this occurs,
refer to the “Troubleshooting” section.
• After disconnecting the USB cable, wait at least
5 seconds before reconnecting it. (Otherwise, the
reader/writer may not be recognized.)
• When t wo or more USB devices are c onnected to
one computer, the read er/writer is not guaranteed
to operate simultaneously with some types of
USB device.
• You cannot access two or more memory cards
simultaneously on a single computer by
connecting additional memory card devices.
Remove any memory cards from the reader/
writer or turn off the other devices.
7
Page 8

• Follow the steps below to turn off
the write cache setting for
removable disk drives. Leaving this
setting on may cause the reader/
writer to malfunction.
– On Windows Vista:
Open the following items in the
following order: [Start] button - [Control
Panel] - [System and Maintenance] [Device Manager] button (When clicking
on [Device Manager] button, the User
Account Control window will appear,
click on [Continue]) - [Disk drives] [Sony Card_R/W -MS USB Device].On
the [Policies] tab in the properties dialog
box that appears, make sure that
[Optimize for quick removal] is selected.
In the same way, select [Optimize for
quick removal] on the [Policies] tab of
the [Sony Card_R/W -CF USB Device],
[Sony Card_R/W -SD USB Device] and
[Sony Card_R/W -SM/xD USB Device].
–On Windows XP:
Open the following items in the
following order: [Start] button –
[Control Panel] – [Performance and
Maintenance] – [System] – [Hardware]
tab – [Device Manager] button – [Disk
drives] – [Sony Card_R/W -MS USB
Device]. On the [Policies] tab in the
properties dialog box that appears, make
sure that [Optimize for quick removal] is
selected.
In the same way, select [Optimize for
quick removal] on the [Policies] tab of
the [Sony Card_R/W -CF USB Device],
[Sony Card_R/W -SD USB Device] and
[Sony Card_R/W -SM/xD USB Device].
– On Windows 2000:
Open the following items in the
following order: [Start] button –
[Settings] – [Control Panel] – [System] –
[Hardware] tab – [Device Manager]
button – [Disk drives] – [Sony Card_R/
W -MS USB Device]. On the [Disk
Properties] tab in the properties dialog
box that appears, make sure the [Write
Cache enabled] check box is not selected.
In the same way, clear the [Write Cache
enabled] check box on the [Disk
Properties] tab of the [Sony Card_R/W CF USB Device], [Sony Card_R/W -SD
USB Device] and [Sony Card_R/W SM/xD USB Device].
– On Windows Me:
Open the following items in the
following order: [Start] button –
[Settings] – [Control Panel] – [System] –
[Performance] tab – [File System]
button. On the [Removable Disk] tab in
the properties dialog box that appears,
make sure the [Enable write-behind
caching on all removable disk drives.]
check box is not selected.
8
Page 9
Using the Reader/ Writer
Caution
Do not touch and remove a memory card from the
reader/writer while the access indicator is blinking.
The data stored on the memory card may be
damaged.
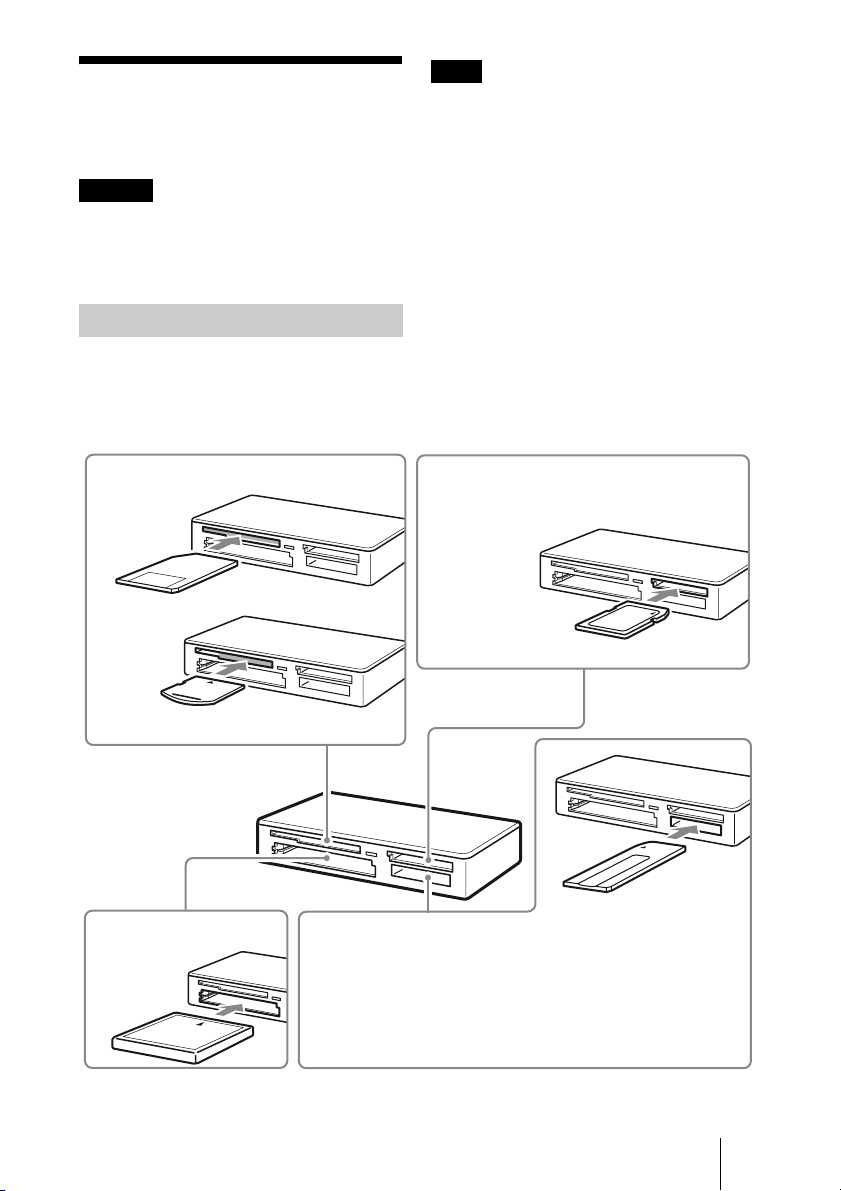
Inserting a Memory Card
Insert a memory card into the corresponding
slot on the reader/writer.
When inserting a card, push it in as far as it
can go.
Notes
• Each card slot is designed so a card can only be
inserted in the correct direction.
• Insert only one memory card into the
corresponding slot. Do not insert multiple cards
at the same time.
• When inserting a “Memory Stick Micro” (“M2”)
or a miniSD Card, miniSDHC Card, microSD
Card or microSDHC Card, use an appropriate
adaptor (not supplied).
• Do not insert a card upside down.
• Forcibly inserting the card may damage the card
or the slot.
• If a memory card is insert ed incorrectly, you may
not be able to remove it. In the unlikely event
that a memory card becomes stuck in the reader/
writer, consult your local Sony dealer.
Insert one of the following cards in this slot:
• SmartMedia
• xD-Picture
Card*
* Push at the right side.
Insert one of the following
cards in this slot:
• CompactFlash
• Microdrive
Insert one of the following cards in this slot:
• “Memory Stick” • “MagicGate Memory Stick
(without MagicGate) Duo”
• “MagicGate Memory Stick” • “Memory Stick Duo”
• “Memory Stick” (with MagicGate)
(with MagicGate) • “Memory Stick PRO”
• “Memory Stick Duo” • “Memory Stick PRO Duo”
(without MagicGate) • “Memory Stick PRO-HG Duo”
* Use an appropriate adaptor (not supplied).
Insert one of the following cards in this slot:
• MultiMediaCard
• RS-MMC
• SD Memory Card
• SDHC Memory Card
• miniSD Card*
• miniSDHC Card*
• microSD Card*
• microSDHC
Card*
* Use an appropriate adaptor (not supplied).
• “Memory Stick Micro” (“M2”)*
9
Page 10
Reading and Writing Data on a Memory Card
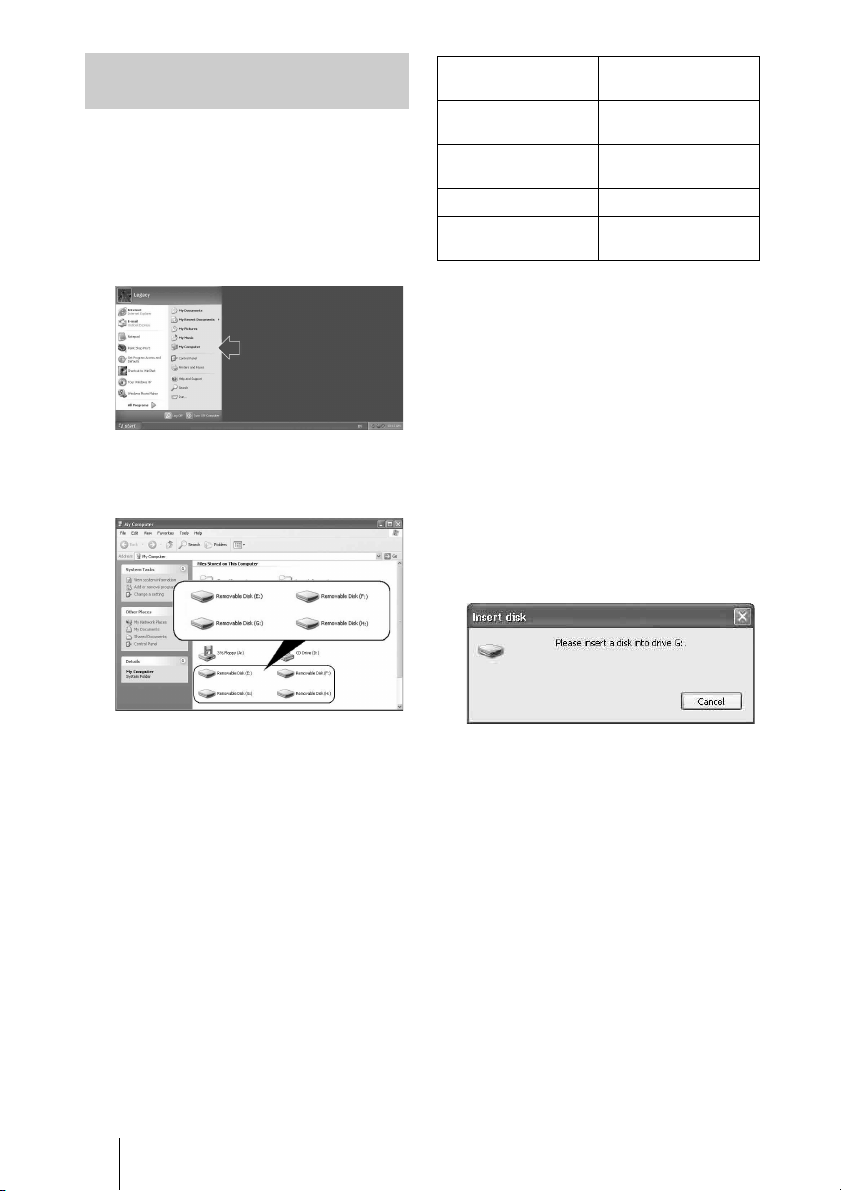
x For Windows
The following explanation is illustrated with
screens from Windows XP.
The screens may differ for other versions of
Windows.
1 Open [My Computer].
2 Make sure the removable disk
icons appear in [My Computer].
Computer drive
name
Removable Disk (E:)
Removable Disk (F:)
Removable Disk (G:) “Memory Stick” media
Removable Disk (H:)
Corresponding
memory card
CompactFlash
Microdrive
SmartMedia
xD-Picture Card
MultiMediaCard
SD Memory Card
3 Insert a memory card into the
corresponding slot.
When a volume label has been assigned
to the memory card, the volume label will
be displayed together with the removable
disk icon.
4 Use the removable disk icon to
read or write data on the memory
card.
If the following message appears, the
memory card has not been recognized
correctly, even though the access
indicator lights up. Remove the card and
insert it again.
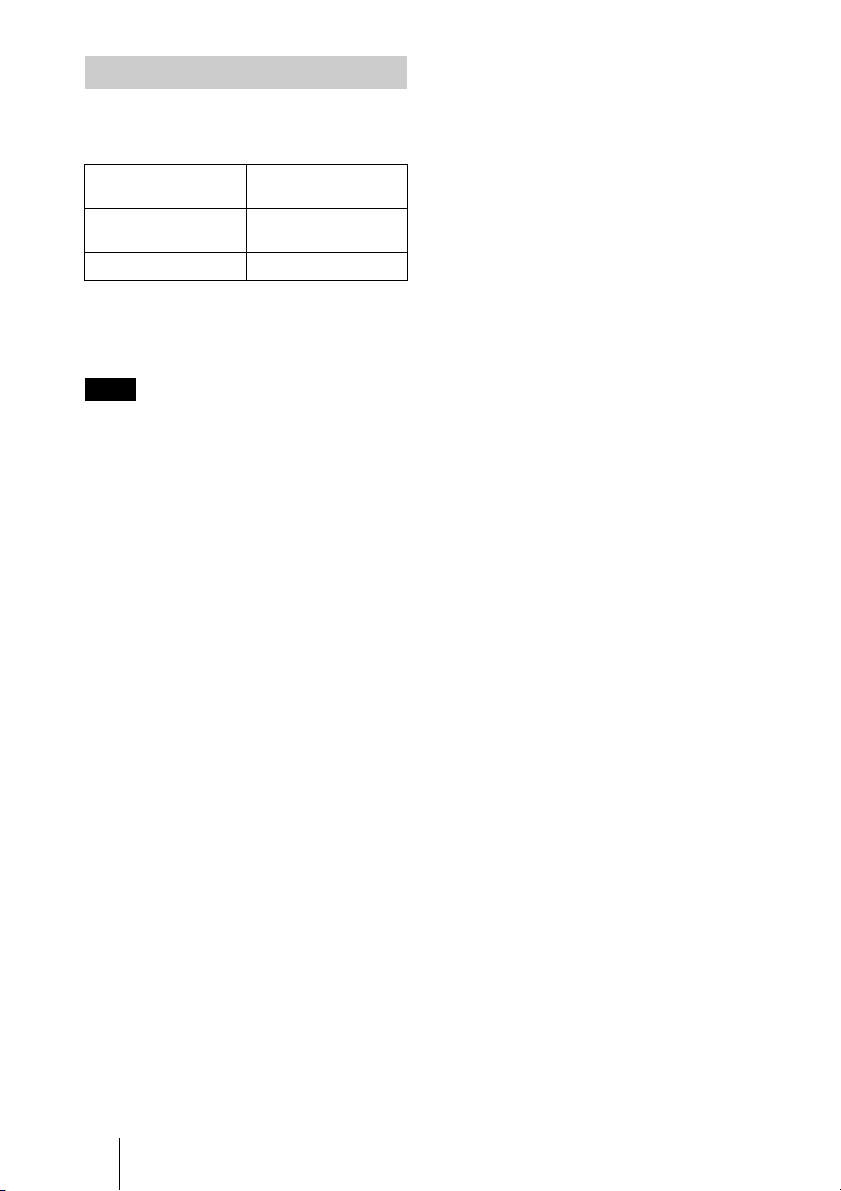
Drive letters for the removable disk icons
are assigned in alphabetical order to the
CompactFlash/Microdrive Slot,
SmartMedia/xD-Picture Card Slot,
“Memory Stick” Slot, and
MultiMediaCard/SD Memory Card Slot.
For example, if the computer has an A:,
C:, and D: drive before connecting the
reader/writer, the drive letters will be
assigned as follows when the reader/
writer is connected:
10
Page 11
Notes
• Use the removable disk icon for the memory
card you are using.
• It may take a while for the removable disk
icons to appear.
• If the removable disk icons do not appear,
follow the steps under “Disconnecting the
Reader/Writer From the Computer” on
page 13 to disconnect the reader/writer, and
then wait at least 5 seconds before
reconnecting it.
If the [Safely Remove Hardware] icon
mentioned in step 1 of “Disconnecting the
Reader/Writer From the Computer” is not
displayed, skip the rest of the procedure and
immediately disconnect the reader/writer.
• Depending on your operating system and
the type of memory card you are using, the
reader/writer drives may be recognized as
“Local Disks” instead of “Removable
Disks,” but this will not affect their
operation.
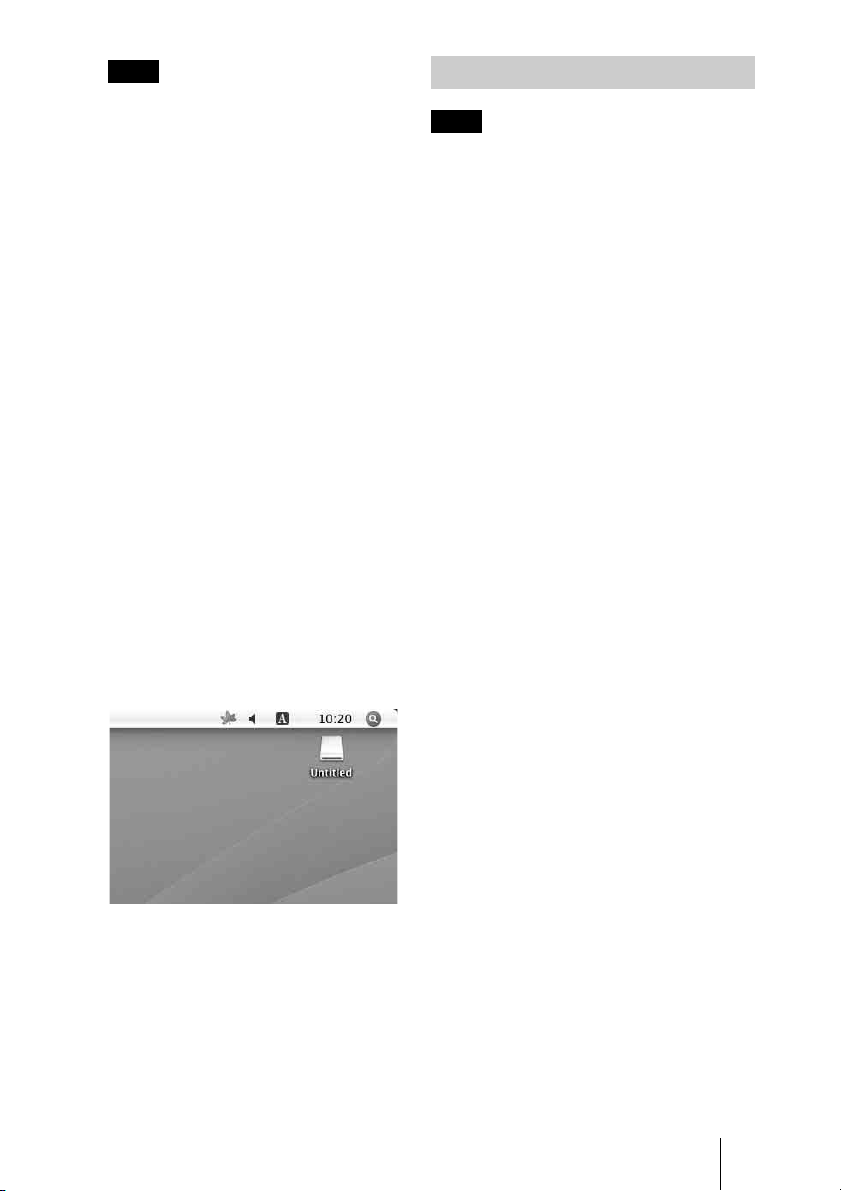
x For Macintosh
1 Insert a memory card into the
corresponding slot.
The removable disk icon appears on the
desktop.
When a volume label is assigned to the
memory card, the volume label will be
displayed together with the removable
disk icon.
Removing a Memory Card
Note
Be sure to follow the steps described below.
Sony accepts no responsibility for any damage or
loss that results from removing a memory card
without following the procedure described below.
x For Windows
1 Make sure the access indicator
is not blinking.
2 Open [My Computer].
3 Right-click the removable disk
icon, and select [Eject].
4 Pull the memory card straight
out.
x For Macintosh
1 Close the files saved on the
memory card, and exit any
currently running applications.
2 Make sure the access indicator
is not blinking.
3 Drag the removable disk icon to
the [Trash].
Alternatively, select the removable disk
icon, access the [File] menu on the menu
bar, and select [Eject “Untitled”]
* Depending on the memory card, a different
label than “Untitled” may be shown.
*
.
2 Use the removable disk icon to
read or write data on the memory
card.
4 Pull the memory card straight
out.
11
Page 12
Reading the Access Indicator
The access indicator changes according to the
status of the reader/writer, as follows:
Reader/writer
status
Connected to a
computer
Reading/writing data Blinks
* Depending on your operating environment and
the memory card you are using, the access
indicator may blink so quickly it appears to be
lit. Be careful not to misread the access indicator.
Note
If data cannot be read from or written to the
memory card while the access indicator is lit, make
sure the card is fully inserted into the slot.
Access indicator
Lights up
*
12
Page 13
Disconnecting the Reader/Writer From the Computer
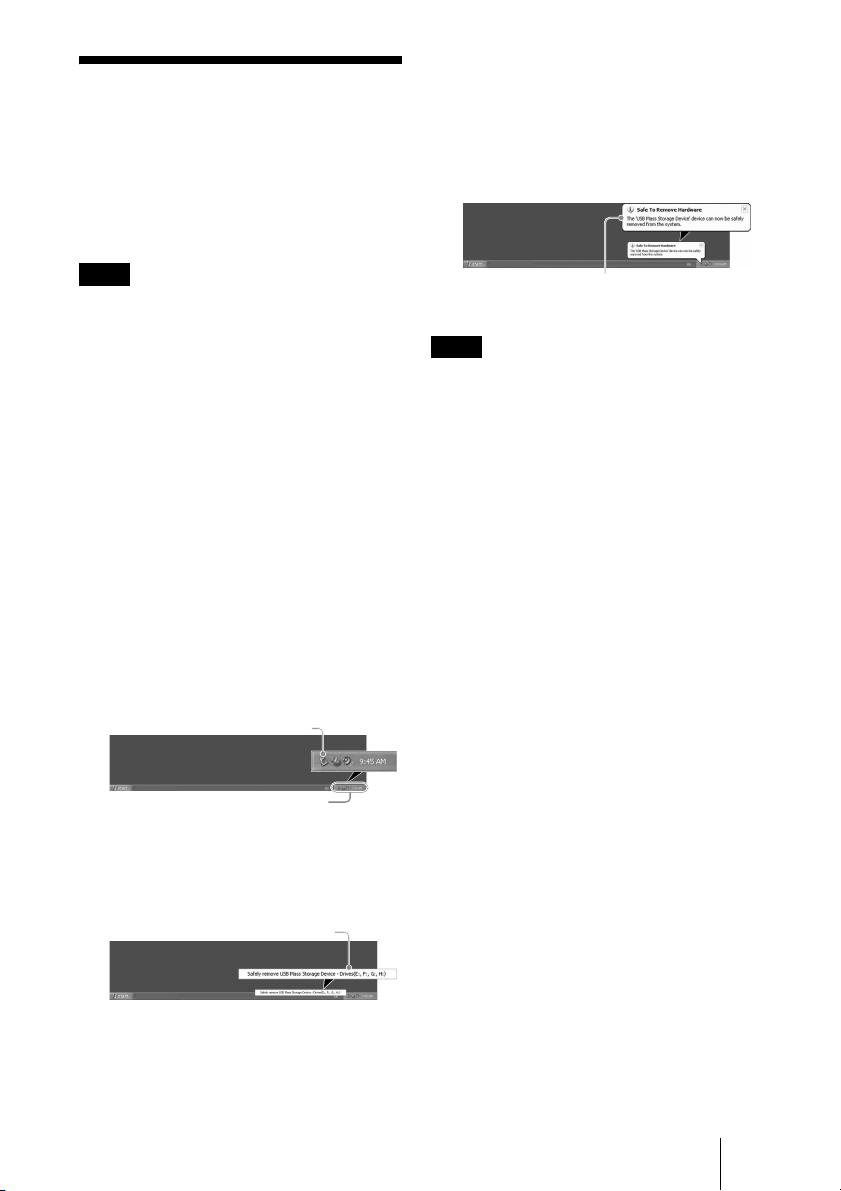
3 Make sure the message “The
‘USB Mass Storage Device’
device can now be safely
removed from the system.”
appears, and then disconnect
the reader/writer.
Notes
• Do not disconnect the reader/writer from the
computer while the access indicator is blinking.
Doing so may cause damage to the data stored on
the memory card.
• Be sure to follow the steps described below.
Sony accepts no responsibil ity for any damage or
loss that results from disconnecting the reader/
writer without following the procedure
described below.
x For Windows
The following explanation is illustrated with
screens from Windows XP, and assumes that
drive names E:, F:, G:, and H: are assigned to
the four slots of the reader/writer.
The screens may differ for other versions of
Windows.
1 Click [Safely Remove Hardware]
on the task tray, located at the
lower right corner of the screen.
Click this icon
Task tray
2 Click [Safely remove USB Mass
Storage Device - Drives (E:, F:,
G:, H:)].
Click here
The ‘USB Mass Storage Device’ device
can now be safely removed from the
system.
Note
The above steps are not required when removing a
memory card from the reader/writer.
x For Macintosh
1 Close the files saved on the
memory card, and exit any
currently running applications.
2 Make sure the access indicator
is not blinking.
3 Drag the removable disk icon to
the [Trash].
Alternatively, select the removable disk
icon, access the [File] menu on the menu
bar, and select [Eject “Untitled”]
* Depending on the memory card, a different
label than “Untitled” may be shown.
If no memory card is inserted into the
reader/writer, skip this step.
*
.
4 Disconnect the reader/writer
from the computer.
13
Page 14
Installing the Drive Letter Recognition Software (Windows Only)
Notes on Icons
Once the Drive Letter Recognition Software
is installed, the Removable Disk icons and
their descriptions change.
For example, if the computer has an A:, C:,
and D: drive before connecting the reader/
writer, the drive letters will be assigned as
follows when the reader/writer is connected:
Before starting installation, read the “End
User License Agreement.”
1 Download the installer file from
the web site. The installer file
(Sony_DLRS_RV1.01.exe) can
be downloaded from the
following URL
http://support.sony-europe.com
2 Close all programs that are still
running.
3 Double click the installer file.
(For windows Vista, User
Account Control window will
appear, click on [Allow].)
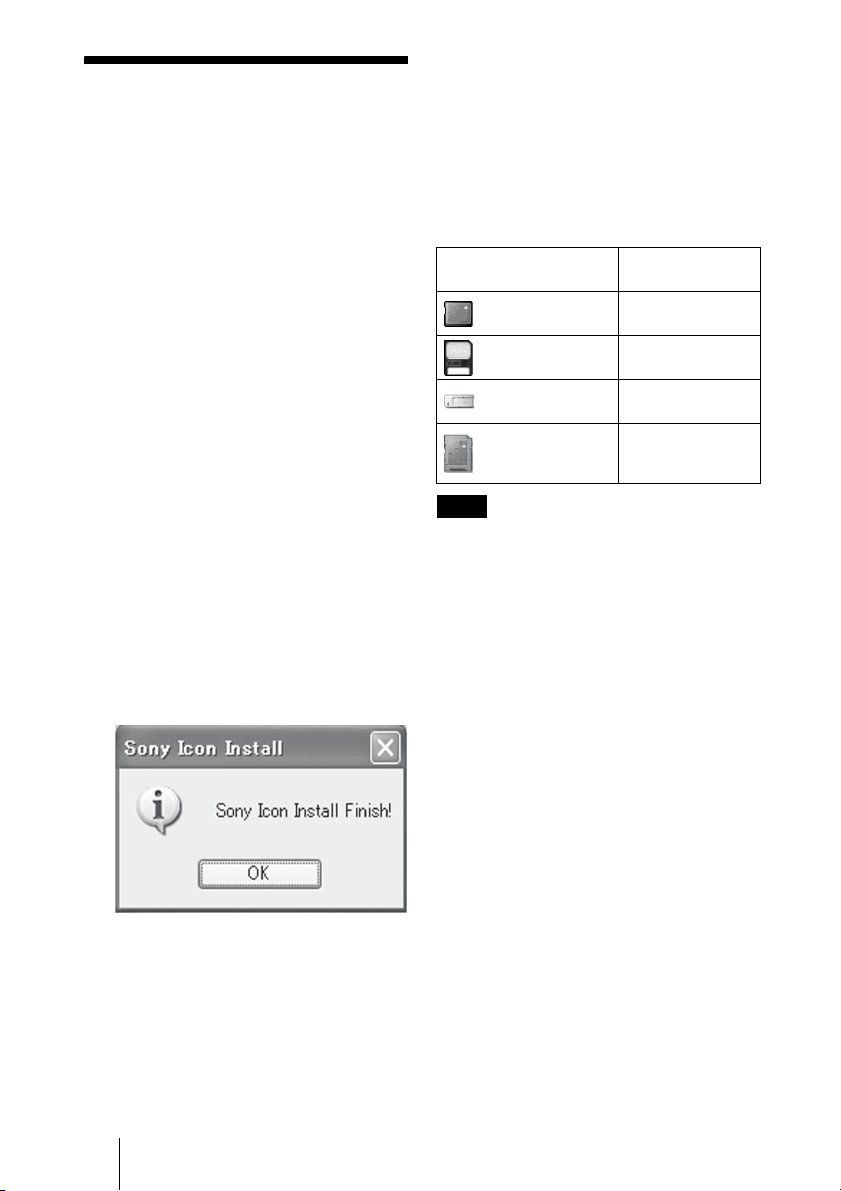
4 When the following window
appears, the installing is
completed, and click [OK].
Computer drive name
CF/Microdrive (E:)
SmartMedia (F:)
Memory Stick (G:)
MMC/SD (H:)
Notes
• The use of this software is intended only for this
reader/writer. Other re ader/writers may not work
with this software.
• Uninstall any similar software before installation
to ensure that the software functions properly.
Corresponding
memory card
CompactFlash
Microdrive
SmartMedia
xD-Picture Card
“Memory Stick”
media
MultiMediaCard
SD Memory Card
14
Page 15

About Memory Stick
What is “Memory Stick”?
“Memory Stick” is a compact-size IC
recording medium with a large capacity. It
has been designed not only for exchanging/
sharing digital data among “Memory Stick”
compliant products, but also for serving as an
insertable/removable external storage
medium that can save data.
Notes on “Memory Stick”
On formatting (initialization)
• If you format a medium in which data has
been already written, all the data and
software will be erased. Please be cautious
not to mistakenly erase any important data.
• Please make sure to format (initialize) a
medium with the formatter of a “Memory
Stick” compliant product. If it is initialized
with Windows Explorer, a FORMAT
ERROR occurs, and data on the medium
can no longer be used by this product.
• When you use “Memory Stick Duo” on this
product, please make sure to insert it in the
right direction.
• “Memory Stick Duo” should be kept away
from small children to prevent them from
accidentally swallowing it.
• When you use “Memory Stick Micro” on
this product, please make sure to attach the
medium into M2 adaptor.
If you attempt to insert “Memory Stick
Micro” without attaching to M2 adaptor,
there is a possibility that it cannot be pulled
out.
About the size of “Memory Stick”
• This product has a slot that can take both
standard size and Duo size. All the products
with such a slot as this are equipped with a
system which automatically measures the
size of an inserted medium. That’s why
both standard-size “Memory Stick” and
smaller “Memory Stick Duo” can be used
on this product without any Memory Stick
Duo Adaptor.
• Do not insert multiple “Memory Sticks” at
the same time. It might cause damage to the
product.
15
Page 16
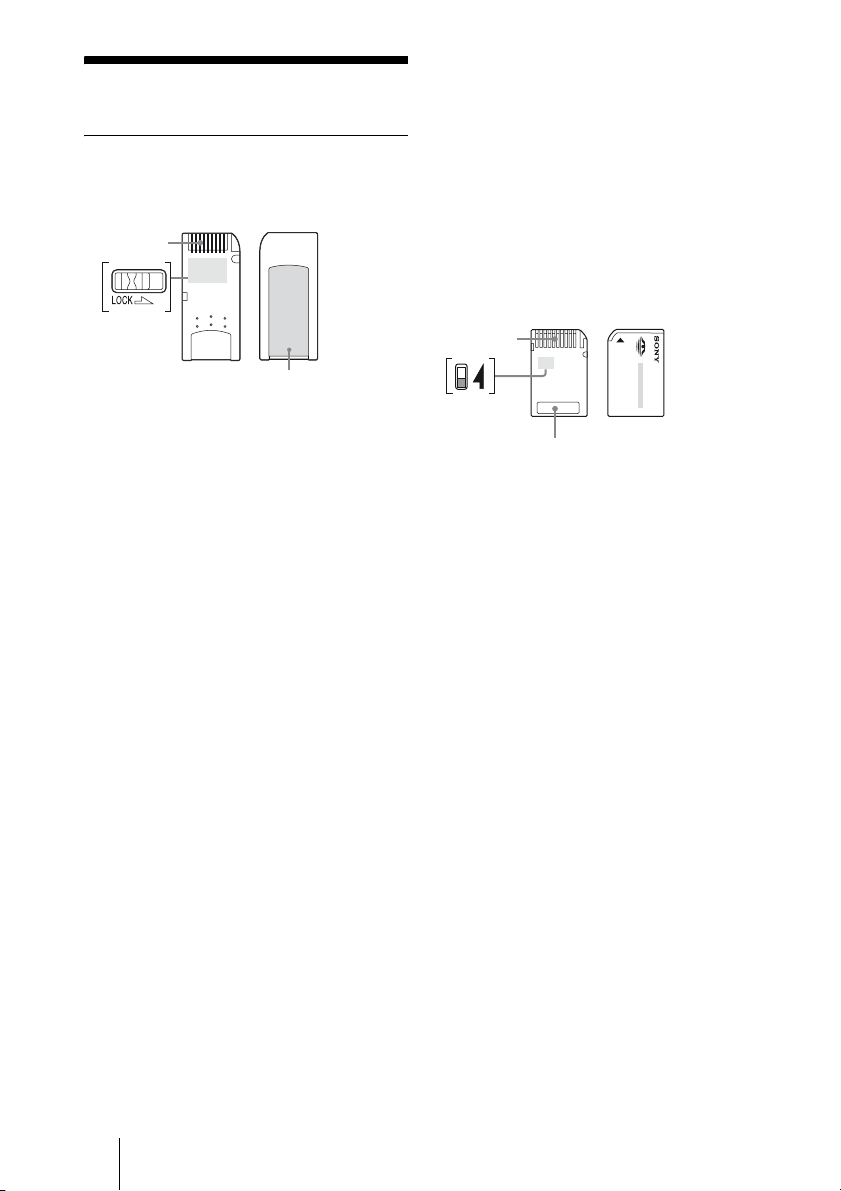
Usage Notes
“Memory Stick” Media
Notes on using “Memory Stick”
media
Terminal
WriteProtected
switch
Label area
• Do not remove “Memory Stick” while data
is being read or written.
• Data may be damaged if:
– You remove “Memory Stick” or
disconnect the USB cable while data is
being read or written.
– You use “Memory Stick” in a place
where it is susceptible to static electricity
or electric noise.
• You can keep backup copies of important
data on a “Memory Stick.”
• Avoid touching the metal terminals on the
“Memory Stick” to prevent damage from
static discharge.
• Do not subject the “Memory Stick” to
excessive stress or shock.
• Do not disassemble or modify “Memory
Stick.”
• Keep “Memory Stick” and other media
away from water, excessive heat and
humidity, and from corrosive elements.
• Do not use or keep “Memory Stick” under
an unfavorable condition as below:
– Extremely hot place (such as in a parked
car with windows closed in summer, a
spot under direct sunlight, or near an
electrical appliance that radiates heat).
– Humid place.
– Place near corrosive substances.
• If you set Write-Protected switch “LOCK,”
data cannot be recorded, edited, or erased.
• Do not stick anything other than the
supplied labels on the label area of
“Memory Stick.”
• Stick a label precisely within the label area.
Make sure that the label does not go beyond
the area.
• Carry and keep “Memory Stick” in the
supplied case.
Notes on using “Memory Stick Duo/
Memory Stick PRO Duo”
Terminal
WriteProtected
switch
Memo area
• When you use “Memory Stick Duo/
Memory Stick PRO Duo” without WriteProtected switch, be careful not to edit or
erase important data by mistake.
• When you use “Memory Stick Duo/
Memory Stick PRO Duo” with WriteProtected switch, data cannot be recorded,
edited, or erased by “LOCK” the switch.
• Use an object with a sharp tip to move the
Write-Protected switch.
• Do not press on the memo area strongly
when writing.
• Carry and keep “Memory Stick” in the
supplied case.
16
Page 17
SmartMedia Cards
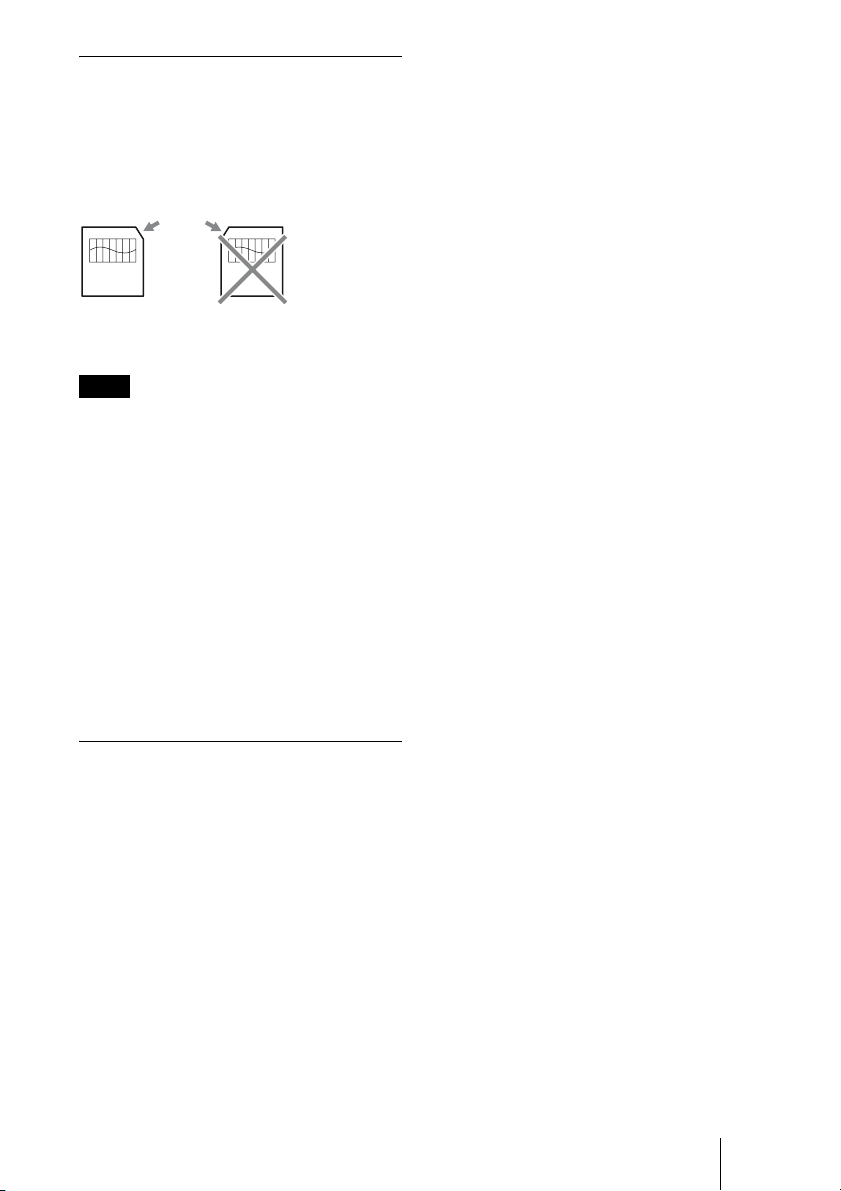
Supported SmartMedia cards
The reader/writer supports 3.3-volt and 3volt SmartMedia cards, but not the older 5volt type.
Notch
5 V type3.3 V and
3 V type
Standby
The reader/writer supports standby functions
based on the PC2000 standard, which may
not cover the standby function of all
computers. Disable the standby function of
your computer if it causes any problems.
While the computer is in standby, do not
insert or remove any media.
Antivirus software
If you have memory-resident antivirus
software on your computer, the computer
may hang or become unusually slow. In this
case, set your antivirus software so it does not
scan the media in the reader/writer.
Note
Do not insert a 5-volt SmartMedia card into the
reader/writer forcibly.
SmartMedia card handling
If the gold contact area of a SmartMedia card
is dirty, a read error may occur. Keep the
contact area clean. Otherwise do not touch
the gold contact area. Do not twist or warp
the card.
Protect the card from static electricity.
SmartMedia card with ID
The reader/writer does not support the ID
information on SmartMedia cards, but allows
any SmartMedia card with an ID to be used as
regular media.
Other Points to Note
Media formatting
Do not format (initialize) memory cards with
a computer. If you format a memory card
with a computer, devices such as digital
cameras may not be able to use it due to
differences in format type (FAT size, cluster
size, hard disk type, or super floppy disk
type). If you use a digital camera, format
memory cards with your camera, instead.
Do not attempt to dismantle, repair,
or alter the reader/writer yourself
Do not, under any circumstances, attempt to
dismantle, repair, or alter the reader/writer
yourself. You may not only permanently
damage the reader/writer and/or your
computer, but may also cause fire or personal
injury through electrical shock.
Operating and storage
environments
• Do not place the reader/writer close to heat
sources or in direct sunlight; in dusty, dirty,
or humid locations; under precipitation
such as rain; or leave it in a vehicle with the
windows closed.
• If the reader/writer interferes with the
reception of radio or television signals,
move the reader/writer away from the radio
or television.
• When using the reader/writer, do not wrap
it in cloth, sheets, or covers as this may
cause a malfunction or fire.
Restrictions on DOS mode
In Windows, the reader/ writer does not
operate in DOS mode.
To use the reader/writer, start up Windows.
17
Page 18
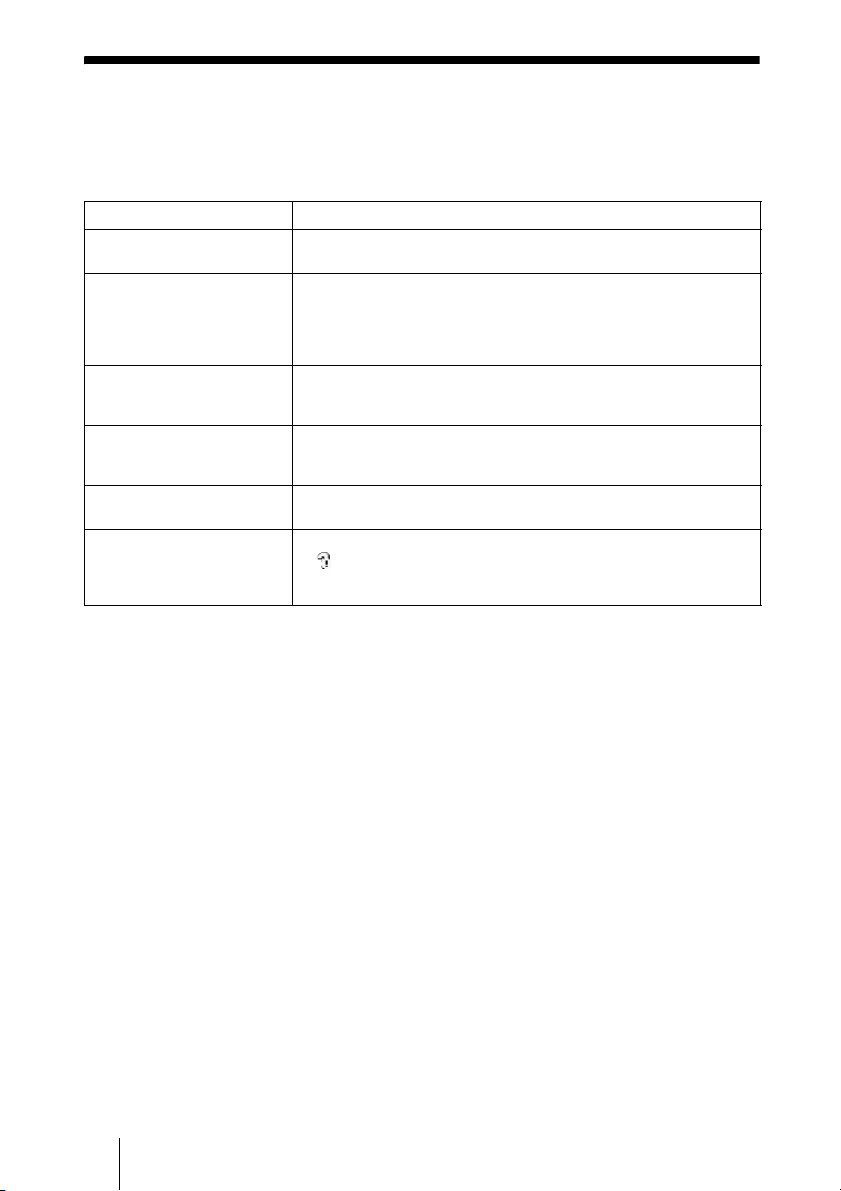
Troubleshooting
Before consulting your Sony representative, verify the following.
If the problem still persists, consult your local Sony dealer.
Problem Solution
The computer does not detect
the reader/writer.
The removable disk icon does
not appear.
The memory card cannot be
accessed with Windows
Explorer or My Computer.
The computer does not
recognize the memory card.
The read/write speed is slow. c The speed may vary depending on the environment or the memory
With Windows 2000 or
Windows Me, the drive icon of
the unit does not appear in the
“My Computer” window.
c
Your computer and the reader/writer may not be properly connected.
Disconnect the reader/writer from the computer and reconnect it.
c Your computer and the reader/writer may not be properly connected.
See “Connecting the Reader/Writer to a Computer” and make sure
the connection is correct.
c A USB device other than the reader/writer is connected to the USB
port on the computer.
c No memory card is inserted. Insert a memory card into the proper
slot.
c The memory card is not fully inserted. Insert the card completely.
c The memory card is not inserted straight. Remove the card and insert
it again.
card being used. This is not a malfunction.
c Make sure that the “USB Mass Storage Device” is not displayed as
in the “Device Manager.” If it is, delete it, disconnect the USB
cable from your computer, and then reconnect it.
18
Page 19

Specifications
Technical Support
USB transfer rate
Full-speed (12 Mbps)
High-speed (480 Mbps)
This high-speed transfer rate is a theoretical
value for the USB standard.
Actual performance is dependent on the
device.
Power requirements
4.75 V to 5.25 V DC
Current consumption
Max. 500 mA
*
Access indicator
Always lit
Blinks on access
Operating environment
Temperature: 5 °C to 40 °C
(41°F to 104°F)
Humidity: 30% to 80% RH
Storage environment
Temperature: –30 °C to + 60 °C
(–22 °F to +140 °F)
Humidity: No condensation
Dimensions (W × H × D)
Approx. 86 × 15.7 × 50 mm
(3 3/8 × 5/8 × 2 inches)
(excluding protrusions)
• For customers in Europe
Refer to “Sony at your service” of the
EUROPEAN GUARANTEE
INFORMATION DOCUMENT or check
on-line under
❑
http://www.sony-europe.com/
Mass
Approx. 55 g (1.9oz.)
*
Except when using Microdrive
19
Page 20

End User License Agreement
IMPORTANT NOTICE
The following “END USER LICENSE
AGREEMENT” applies to the Drive Letter
Recognition Software provided by Sony.
Please read the following “END USER
LICENSE AGREEMENT” before installing.
By installing the Drive Letter Recognition
Software, you agree to the “END USER
LICENSE AGREEMENT.”
END USER LICENSE AGREEMENT
This is a legal agreement between you
(hereafter referred to as the User) and Sony
Corporation (hereafter referred to as Sony)
pertaining to the right to use the software
(hereafter referred to as the PROGRAM).
Using the PROGRAM indicates your
acceptance of these terms and conclusion of
the Agreement between the User and Sony.
1. Copyright and all other rights relating
to the PROGRAM and documents
accompanying the PROGRAM are
owned by Sony or the original rightful
person or organization (hereafter
referred to as the original rightful
person) granting Sony the right to use
the PROGRAM. The User is granted
no rights other than those specified in
this agreement.
2. Sony grants the User the non-exclusive,
indivisible and nontransferable right to
use the PROGRAM for the purpose of
using the Sony product Multi-Card
Reader/Writer for which the
PROGRAM designates.
3. The User may not transfer the Right of
Use described above to any third party
nor allow for any third party to use the
PROGRAM unless the User obtains
the advance written permission of
Sony.
4. The User may not export or transport
the PROGRAM or documents
accompanying the PROGRAM from
the country where the User installed
the PROGRAM to any other country.
5. The User may not (i) update, add to, or
modify nor (ii) deassemble or decompile the PROGRAM either in
whole or in part.
6. THE PROGRAM IS PROVIDED “AS
IS” WITHOUT EXPRESS OR
IMPLIED WARRANTIES,
INCLUDING WARRANTIES OF
MERCHANTABILITY AND
FITNESS FOR A PARTICULAR
PURPOSE OR NONDEFECTIVENESS.
7. If any dispute relating to infringement of
copyright, patent, or other intangible
property rights arises between the User
and a third party as a consequence of use
of the PROGRAM, the User shall settle
the dispute at the User’s own expense,
and shall make no claim against Sony or
the original rightful person.
8. Sony may terminate your license upon
notice for failure to comply with any of
these Terms. Any such termination
shall not affect any payments, any
compensation for damage. Upon
termination, you must immediately
destroy the Software together with all
copies in any form.
9. This Agreement has several nonEnglish language versions for the
reference purpose only. In the event of
any discrepancy between the English
language version and any other
language version, the English language
version shall prevail.
20
Page 21

 Loading...