

Sony MPS-VS500P, MPS-VS500 Operating Instructions Manual
EN
F
D
Operating Instructions
Before operating the unit, please read this manual thoroughly and retain it for
future reference.
Mode d’emploi
Avant d’utiliser cet appareil, lisez attentivement ce manuel et conservez-le comme
référence ultérieure.
Bedienungsanleitung
Lesen Sie diese Anleitung vor Inbetriebnahme des Geräts bitte genau durch, und
bewahren Sie sie zum späteren Nachschlagen sorgfältig auf.
Picture MD
Viewer Station
3-856-664-11 (1)
©1996 by Sony Corporation
MPS-VS500
MPS-VS500P
LOGO
2
(EN)
Owner’s Record
The model and serial numbers are located at the bottom.
Record these numbers in the spaces provided below.
Refer to them whenever you call upon your Sony dealer
regarding this product.
Model No. _____________________________
Serial No. ______________________________
WARNING
To prevent fire or shock hazard, do not
expose the unit to rain or moisture.
To avoid electrical shock, do not open
the cabinet. Refer servicing to qualified
personnel only.
Caution
The equipment should be connected to an easily
accessible mains outlet socket, so that it may be
disconnected from the mains if required.
This symbol is intended to alert the
user to the presence of uninsulated
“dangerous voltage” within the
product’s enclosure that may be of
sufficient magnitude to constitute a risk
of electric shock to persons.
This symbol is intended to alert the
user to the presence of important
operating and maintenance (servicing)
instructions in the literature
accompanying the appliance.
The graphical symbols are on the bottom enclosure.
For the Customers in the
U.S.A.
This equipment has been tested and found to comply
with the limits for a Class B digital device, pursuant to
Part 15 of the FCC Rules. These limits are designed to
provide reasonable protection against harmful
interference in a residential installation. This equipment
generates, uses, and can radiate radio frequency energy
and, if not installed and used in accordance with the
instructions, may cause harmful interference to radio
communications.
However, there is no guarantee that interference will not
occur in a particular installation. If this equipment does
cause harmful interference to radio or television
reception, which can be determined by turning the
equipment off and on, the user is encouraged to try to
correct the interference by one or more of the following
measures:
• Reorient or relocate the receiving antenna.
• Increase the separation between the equipment and
receiver.
• Connect the equipment into an outlet on a circuit
different from that to which the receiver is connected.
• Consult the dealer or an experienced radio/TV
technician for help.
You are cautioned that any changes or modifications not
expressly approved in this manual could void your
authority to operate this equipment.

3
(EN)
EN
Note
It is forbidden to copy or duplicate copyrighted
matters without the permission of the copyright
holder. Possession of copies or duplicates of currency,
coins, securities, uncancelled stamps or postcards,
revenue stamps and other certificates of value is
punishable by law.
Description of signal words
WARNING: Used for the critical situation which may
possibly cause a death or serious injury if
the situation is not avoided.
CAUTION: Used for the critical situation which may
possibly cause a slight injury or a medium
degree of injury if the situation is not
avoided. This word is also used for the
critical situation under which a material
damage will be caused.

4
(EN)
Features
The Picture MD Viewer Station (MPS-VS500/VS500P) allows two units of the Picture MD
Photo Viewer (MPS-V500/V500P) to be mounted and supplied with DC power.
By using the viewer station, you can expand the uses of the viewer to include such
functions as sound recording and disc copying.
p DC power is provided to two viewers
You can mount two viewers on the viewer station and operate them independently.
p Narration/BGM (BackGround Music) can be recorded onto an MD
Two types of recording are possible: narration recording which enables you to record
sound on each picture recorded on the Picture MD independently, and BGM recording
with which sound is recorded throughout one album.
p Disc copying from one viewer to the other is possible
By mounting two viewers on the viewer station, all of the data on a Picture MD disc can be
duplicated from one viewer to the other. As the compressed data is copied, the copy
processing requires less time (approx. 20 minutes for an MD with full data).
p Simultaneous charging of two battery packs for viewers is possible
The viewer station is equipped with two chargers which charge two battery packs for
viewers simultaneously.

5
(EN)
Table of contents
Table of contents
Getting Started
Mounting viewers ............................................................................................................6
Connecting the audio source .......................................................................................... 8
Recording Sound
Recording sound to a single picture — Narration Recording ( NRT)........................10
Adding sound to an album — BGM Recording ( BGM) ............................................. 12
Playing back sound ........................................................................................................ 14
Listening to the narration of one picture ........................................................... 14
Listening to the BGM or narration during auto play ...................................... 15
Erasing sound .................................................................................................................17
Erasing the narration ............................................................................................ 17
Erasing the BGM ................................................................................................... 17
Advanced Operations
Copying an MD............................................................................................................... 18
Charging batteries ......................................................................................................... 20
Connecting optional equipment...................................................................................21
For Your Information
About the Picture MD.................................................................................................... 22
Precautions .....................................................................................................................23
Troubleshooting............................................................................................................. 24
Error messages................................................................................................................ 25
Specifications..................................................................................................................26
Index to parts and controls............................................................................................ 27
6
(EN)
Getting Started
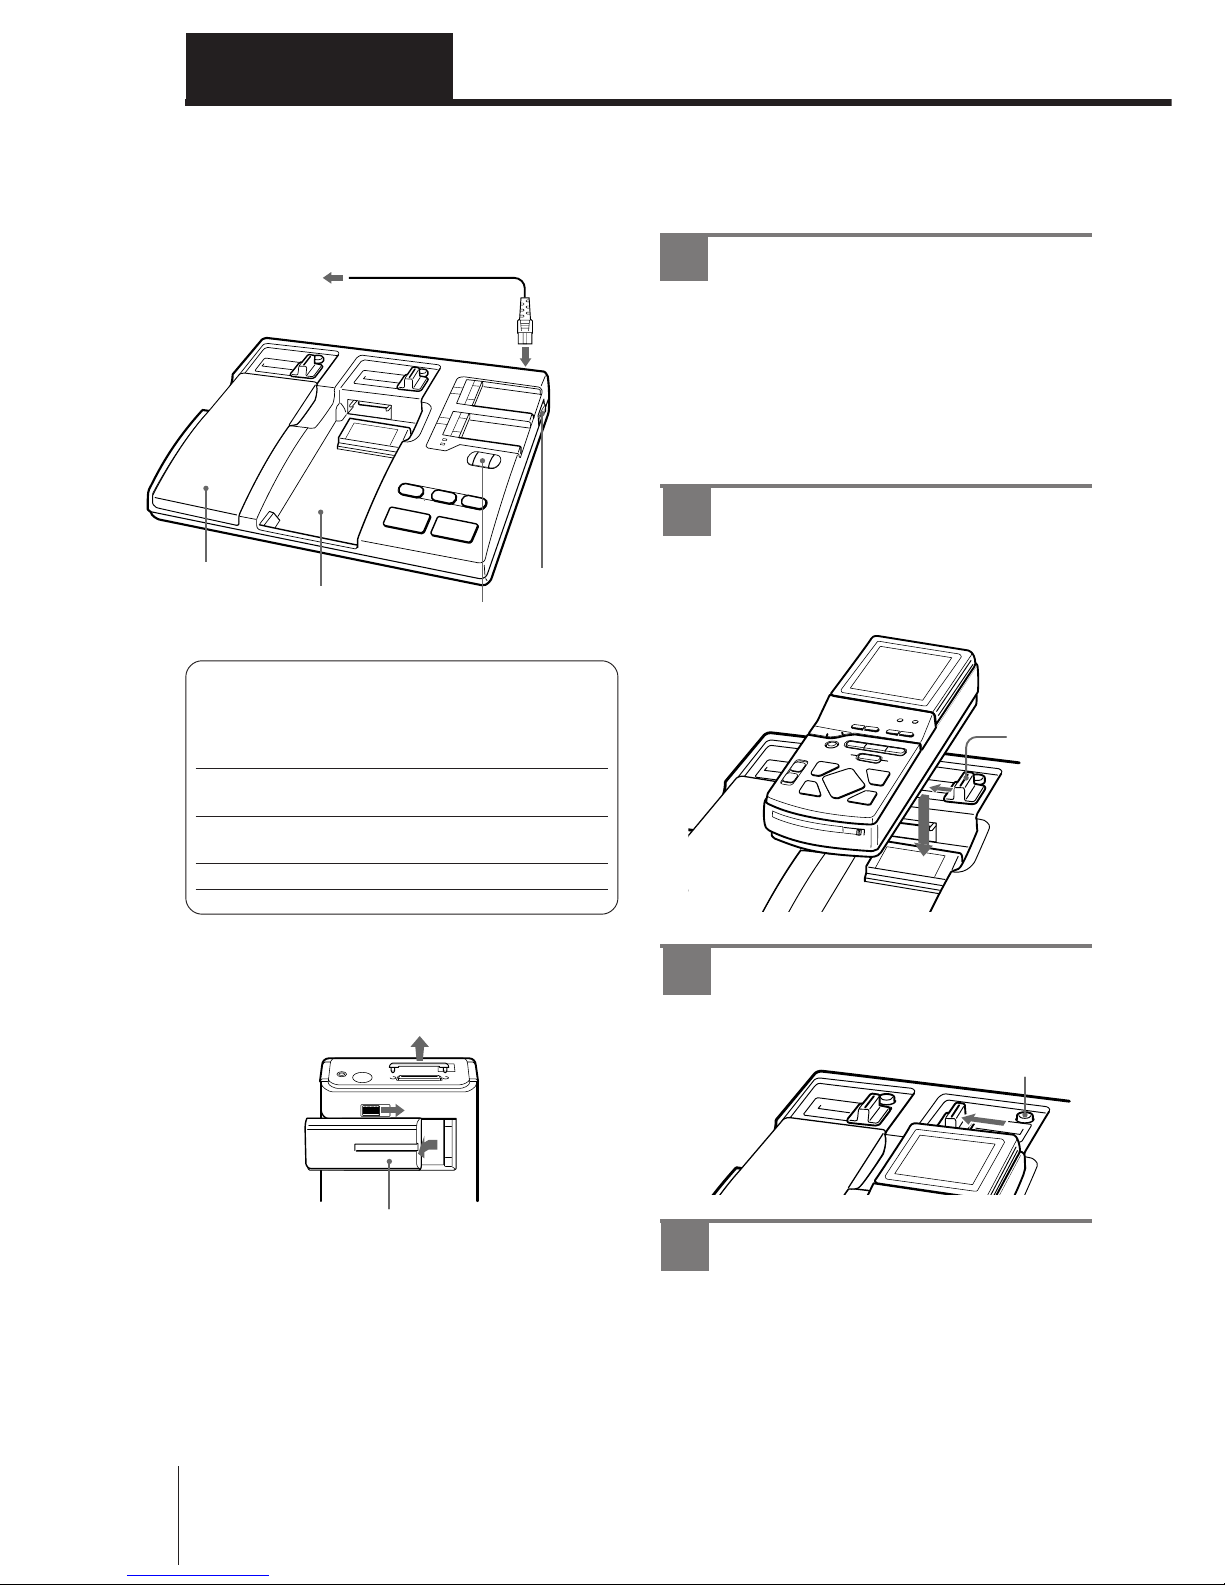
Mounting viewers
You can mount two Picture MD Photo Viewers (MPSV500/V500P) on the unit and supply the power to
them. Mount the viewer(s) in the RECORDER and/or
PLAYER compartment(s) according to your needs.
Viewer
compartment
RECORDER
PLAYER
Audio
recording
Yes
No
Playback
Yes
Yes
Disc copy
Yes
(destination)
Yes (original)
Before mounting a viewer
Remove the battery pack and the cover on the STATION
terminal from the viewer.
You can keep the STATION terminal cover attached to the hooks
on the rear of the viewer compartment cover.
Note
The unit and the viewer are not turned on even if the VIEWER
ON/OFF key on the unit is pressed, unless the viewer is locked
onto the unit. Be sure to slide the LOCK knob fully to the left.
Remove the terminal
cover.
Remove the battery pack.
Getting Started
PLAYER
compartment
RECORDER
compartment
VIEWER ON/
OFF
Main power
switch (MPS-
VS500P only)
Power cord
(supplied)
AC IN
to a wall outlet
LOCK knob
Place the viewer so that the protruding area on the
unit fits on the battery compartment located on the
rear of the viewer. Press the viewer down lightly
until the LOCK knob clicks and shifts to the left.
RELEASE button
1 Make sure that the power of the
unit is turned off.
Set the main power switch on the right side of
the unit to “O (off).” (MPS-VS500P)
Make sure that the VIEWER ON/OFF key
indicator lights in red. If the indicator lights in
green, press the VIEWER ON/OFF key to turn it
to red. (MPS-VS500)
2 Set the viewer to the
compartment.
3 Slide the LOCK knob fully to the
left.
The RELEASE button protrudes and the viewer
is locked onto the unit.
4 Set the main power switch to “I
(on)” (MPS-VS500P only), and
press the VIEWER ON/OFF key.
The VIEWER ON/OFF key indicator turns from
red to green, and the unit and the viewers are
turned on. The viewer screen lights up.
You can operate the viewer with its keys. (See
the operating instructions of the viewer for
details on its operation.)
7
(EN)
Getting Started
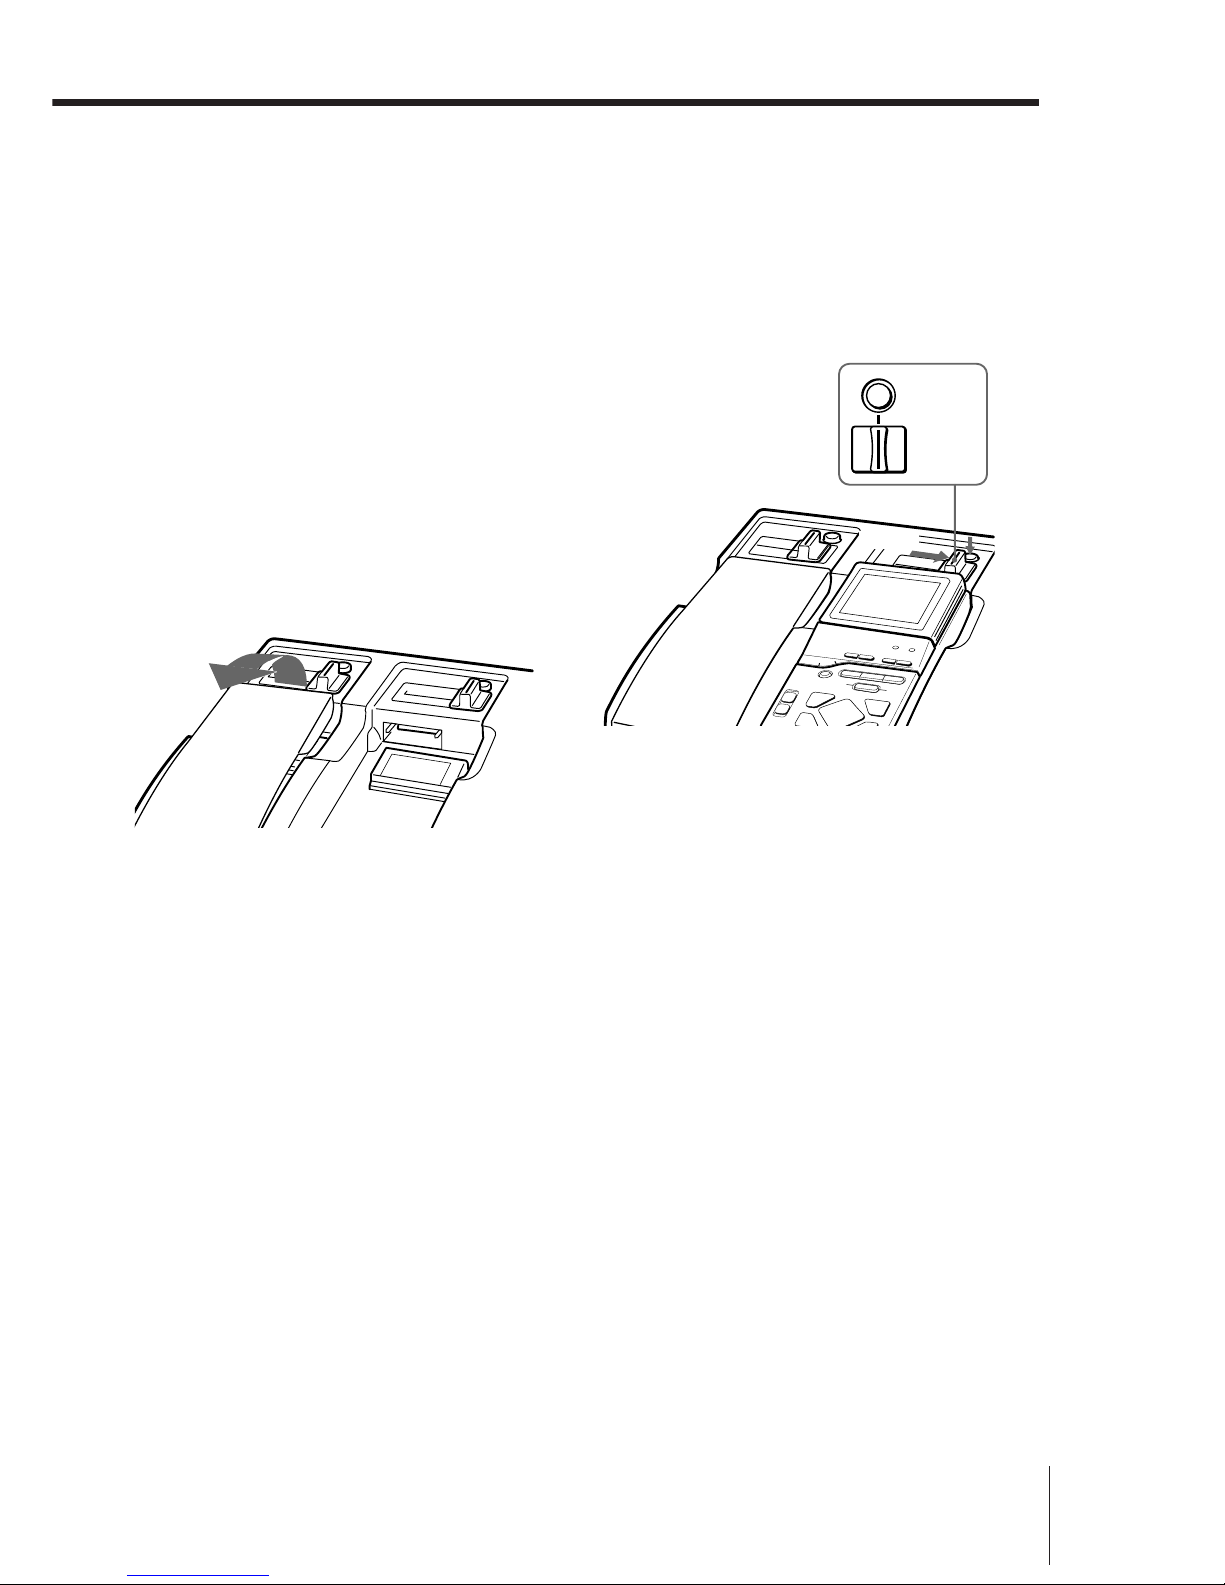
To remove the viewer
1 Turn off the power of the unit.
2 While holding down the RELEASE button, slide the
LOCK knob fully to the right.
The viewer is unlocked and is raised slightly.
3 Remove the viewer.
Caution
Make sure to turn off the unit before removing the
viewer to avoid damaging the data of the MD.
The alarm beeps if you press the RELEASE button to
remove the viewer with the power on. First turn off the
power and remove the viewer by pressing the RELEASE
button and sliding the LOCK knob.
To turn off the unit
Press the VIEWER ON/OFF key on the unit.
The unit and the viewers are turned off and the VIEWER
ON/OFF key indicator lights in red.
To turn off the main power (MPSVS500P only)
Set the main power switch on the right side of the unit to
“O (off).”
To mount the viewer in the PLAYER
compartment
Remove the viewer compartment cover, and set the
viewer to the PLAYER compartment.
The setting procedure is the same as that for the
RECORDER compartment.
When two viewers are mounted
You can operate the viewers mounted in the PLAYER
and RECORDER compartments independently.
Align the
lines.
While holding
down
Slide.
8
(EN)
Getting Started
Connect an audio source to be recorded onto a Picture
MD.
You can connect a microphone for narration recording
or audio equipment (CD player, MD player, etc.) for
BGM recording.
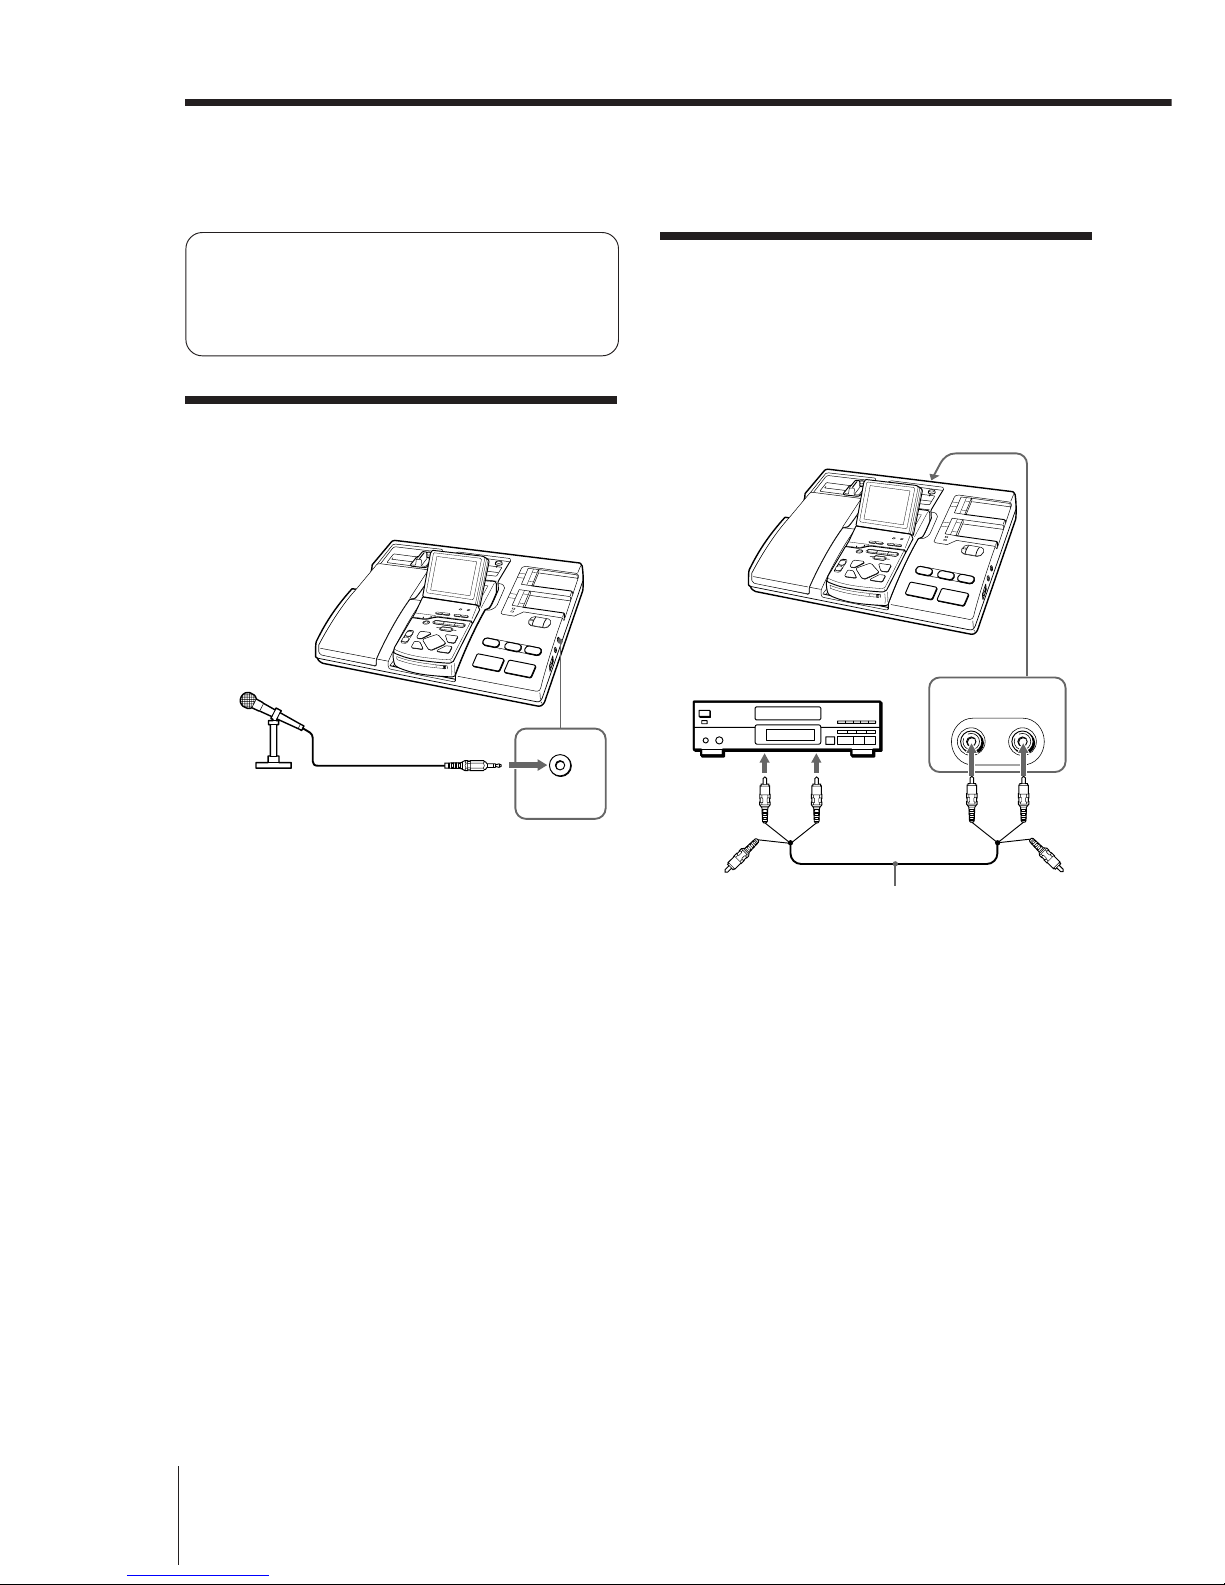
Connecting a microphone
Connect a microphone with a miniplug to the MIC jack.
Monaural recording is made through the MIC jack.
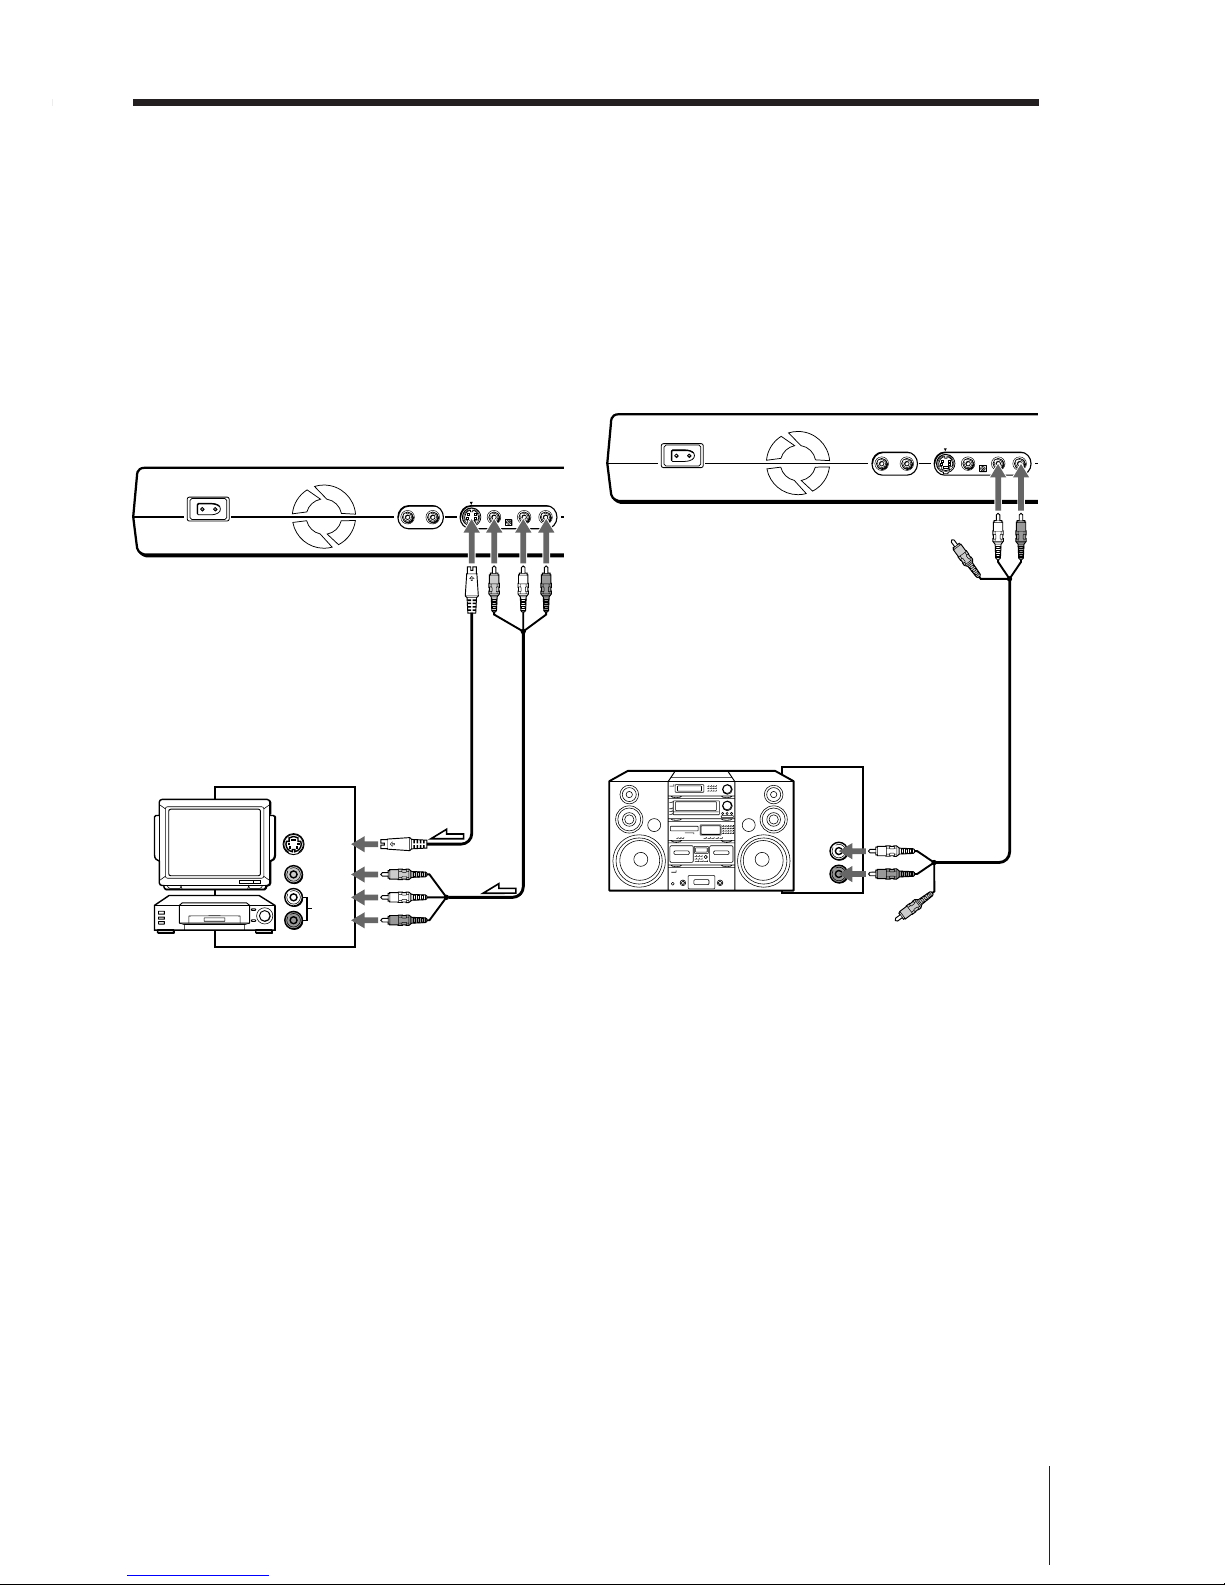
Connecting the audio source
Connecting audio
equipment
Connect audio equipment such as a CD player or MD
player to the LINE IN AUDIO L/R jacks using the
supplied AV connecting cord. Leave the yellow plugs of
the AV connecting cord free.
Stereo recording is made through the LINE IN jacks.
If the audio equipment is monaural
Connect the white plug of the AV connecting cord to the
LINE IN AUDIO L jack of the unit. Leave the red and
yellow plugs free.
When both a microphone and audio equipment
are connected to the unit
The microphone input has priority, and the input from
the audio equipment is disconnected automatically.
Note
The stereo or monaural recording mode cannot be
changed even if you change the connections during
audio recording.
LINE IN
AUDIO
RL
to audio
outputs
Audio equipment
AV connecting cord
(supplied)
Microphone
MIC
9
(EN)
Getting Started
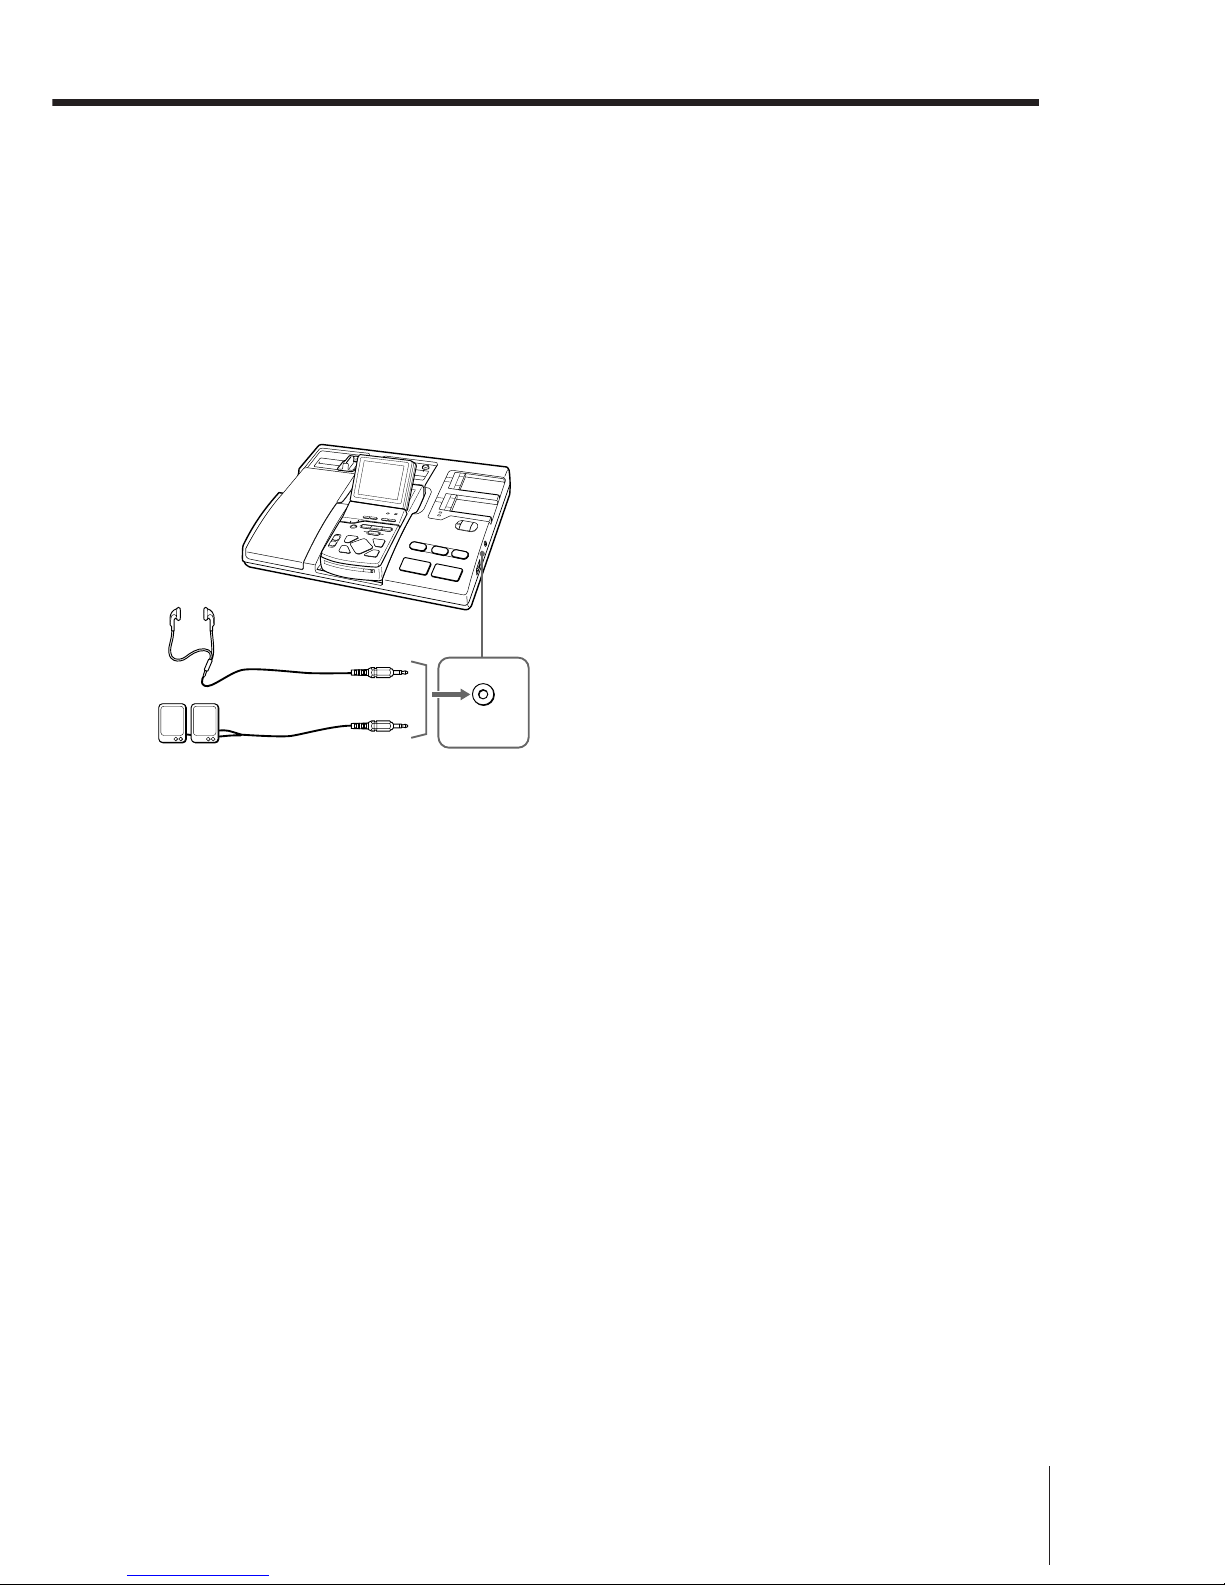
To listen through headphones or
external speakers
You can listen to the sound being recorded or played
back on the viewer in the RECORDER compartment in
stereo. Connect headphones or speakers with a built-in
amplifier to the PHONES jack.
Adjust the volume of the headphones or speakers using
the VOLUME control located next to the PHONES jack.
PHONES
Headphones
Speakers
10
(EN)
Recording Sound
Information on the screen
Audio recording time
The audio recording time varies
according to the number of
pictures recorded on the Picture
MD, the recording resolution, etc.
Press the AUDIO REC key to
display the remaining recording
time (REMAIN TIME).
Standard audio recording time
When one picture is recorded on
the disc:
Approx. 60 minutes for stereo
recording
Approx. 120 minutes for
monaural recording
When you press the AUDIO REC
key when the disc is full of the
picture data, “DISC FULL” appears
and audio recording is not
possible.
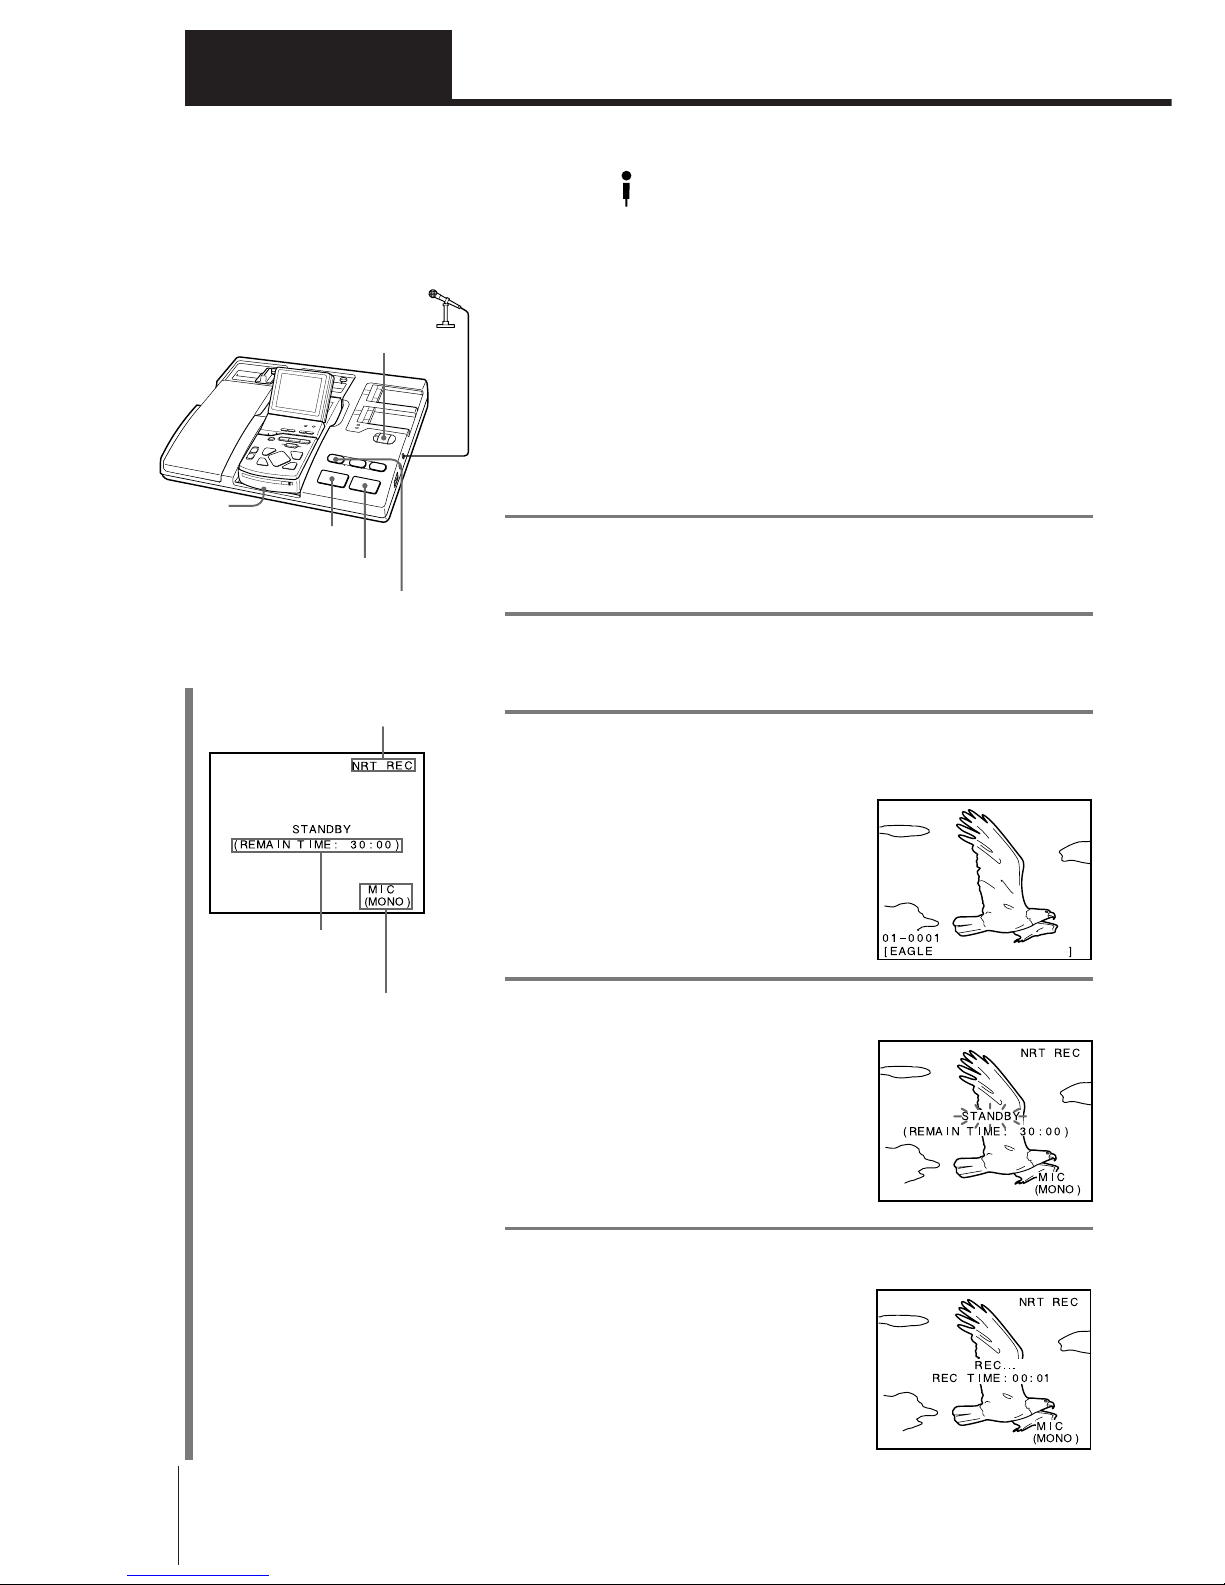
Recording sound on each picture is called “narration recording.” This section
explains recording narration through a microphone as an example. You can
also perform narration recording from audio equipment connected to the LINE
IN jacks in the same manner.
Preparations
• Connect a microphone. (page 8)
• Mount a viewer in the RECORDER compartment. (page 6)
• Insert a Picture MD with recorded pictures on which you want to record
narration.
• Set the main power switch on the right side of the unit to “I (on).” (MPSVS500P only)
1 Press the VIEWER ON/OFF key on the unit.
The power of the viewer is turned on and “PICTURE MD” appears.
2 Press the ^ key on the viewer.
A picture appears.
3 Keep pressing the keys on the viewer until the
picture on which you want to record narration is
displayed.
4 Press the AUDIO REC key on the unit.
The AUDIO REC key indicator and
“STANDBY” on the screen flash, and
the unit stands by for narration
recording.
5 Press the START key on the unit and start talking.
Recording starts.
The recording time (REC TIME) is
displayed on the screen.
Adding sound to a single picture
— Narration Recording ( NRT)
Recording Sound
VIEWER ON/OFF
RECORDER
compartment
START
STOP
AUDIO REC
Indicates narration recording
Audio source and
stereo/mono (ex.
microphone, monaural)
Remaining time of
audio recording
(min.:sec.)
11
(EN)
Recording Sound
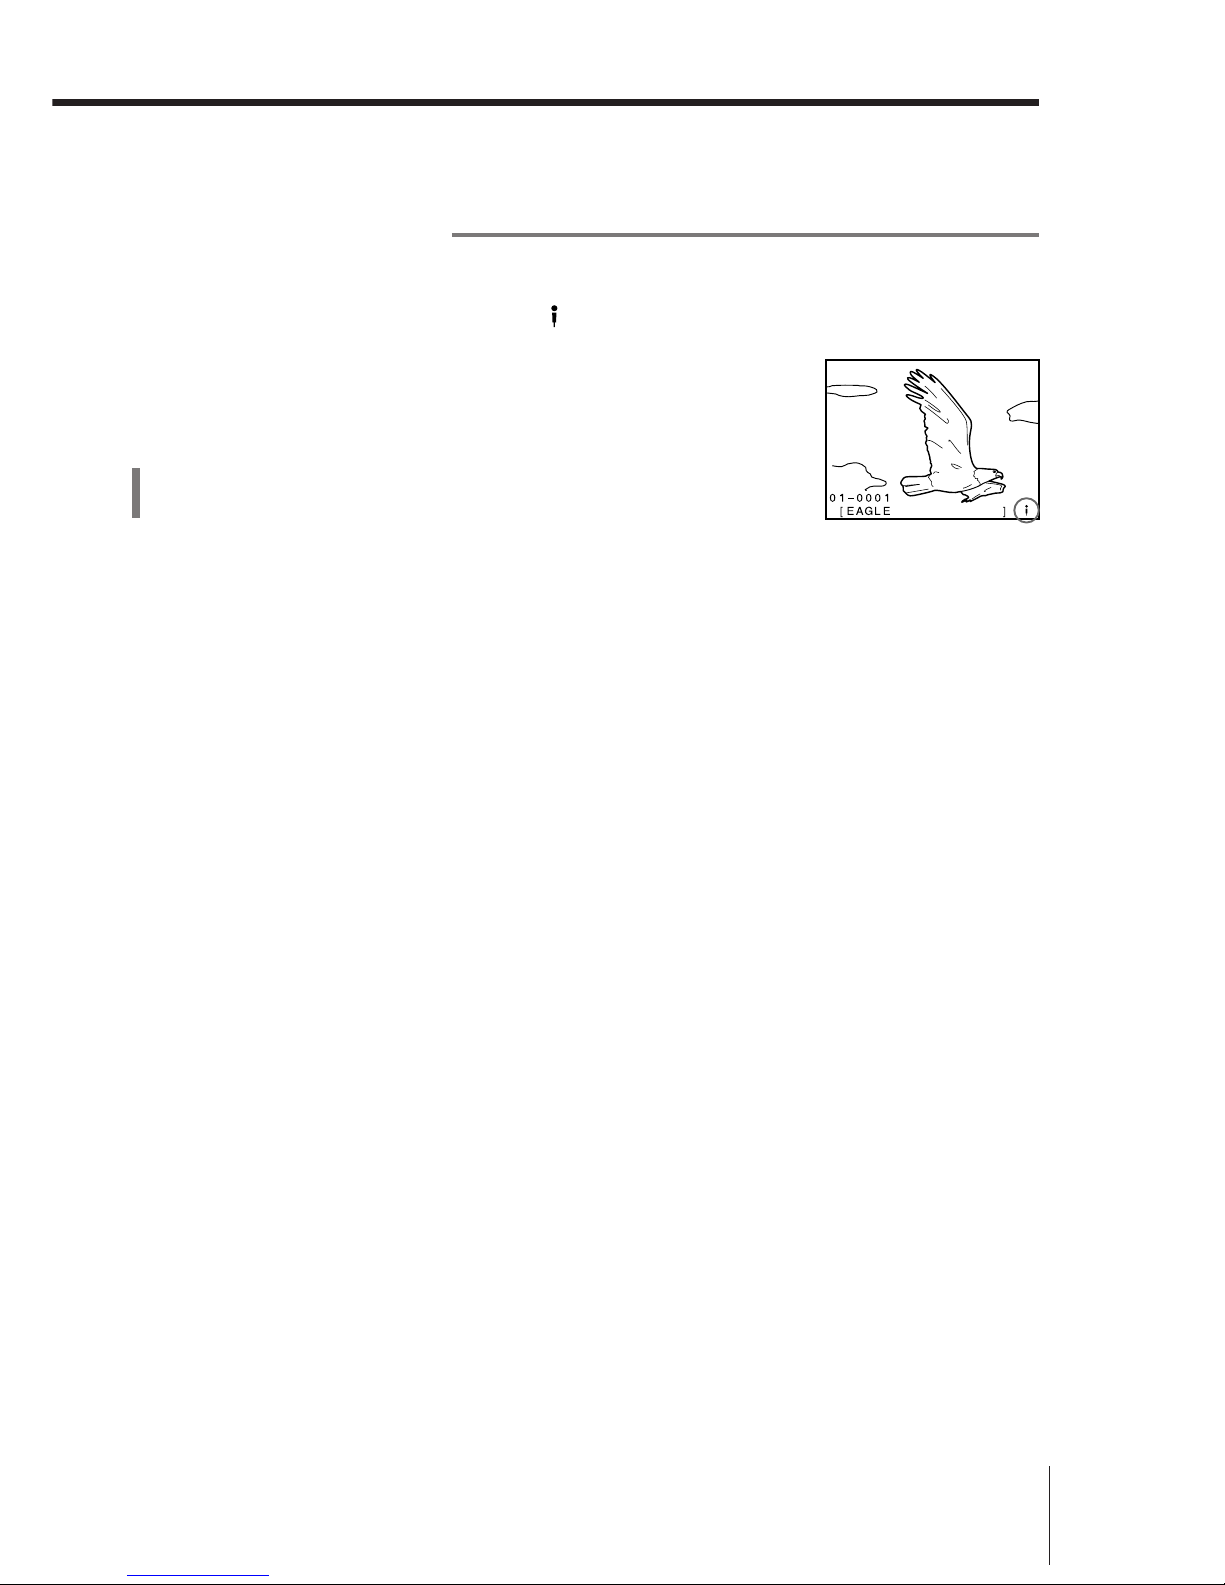
6 Press the STOP key of the unit.
“END” appears, and the display returns to the original picture.
The
mark (microphone) is displayed on the bottom right, which
indicates that the picture contains narration recording.
About “NO REC” message
When you press the AUDIO REC key in step 4, “NO REC” appears in the
following cases and narration recording cannot be performed.
– The inserted disc is an MD DATA for playback only, Hybrid MD DATA, or
audio MiniDisc that cannot be recorded with this unit.
– A picture is not displayed on the whole screen.
– The selected picture already contains recorded narration. (To record
narration for this picture, erase the current narration. See page 17 for
details on erasing.)
To listen to the recorded narration
See page 14.
12
(EN)
Recording Sound
Adding sound to an album
— BGM Recording ( BGM)
Recording sound on a whole album is called “BGM recording.” You can play
back the recorded sound in the background while the pictures switch
automatically during auto play. (See page 16 for details on the relation
between the picture and sound playback during auto play.)
This section explains recording from a CD player as an example. You can also
perform BGM recording from a microphone in the same manner.
Preparations
• Connect audio equipment to the LINE IN AUDIO jacks. (page 8)
• Mount a viewer in the RECORDER compartment. (page 6)
• Insert a Picture MD with recorded pictures on which you want to record
BGM.
• Set the main power switch on the right side of the unit to “I (on).” (MPSVS500P only)
1 Press the VIEWER ON/OFF key on the unit.
The power of the viewer is turned on and “PICTURE MD” appears.
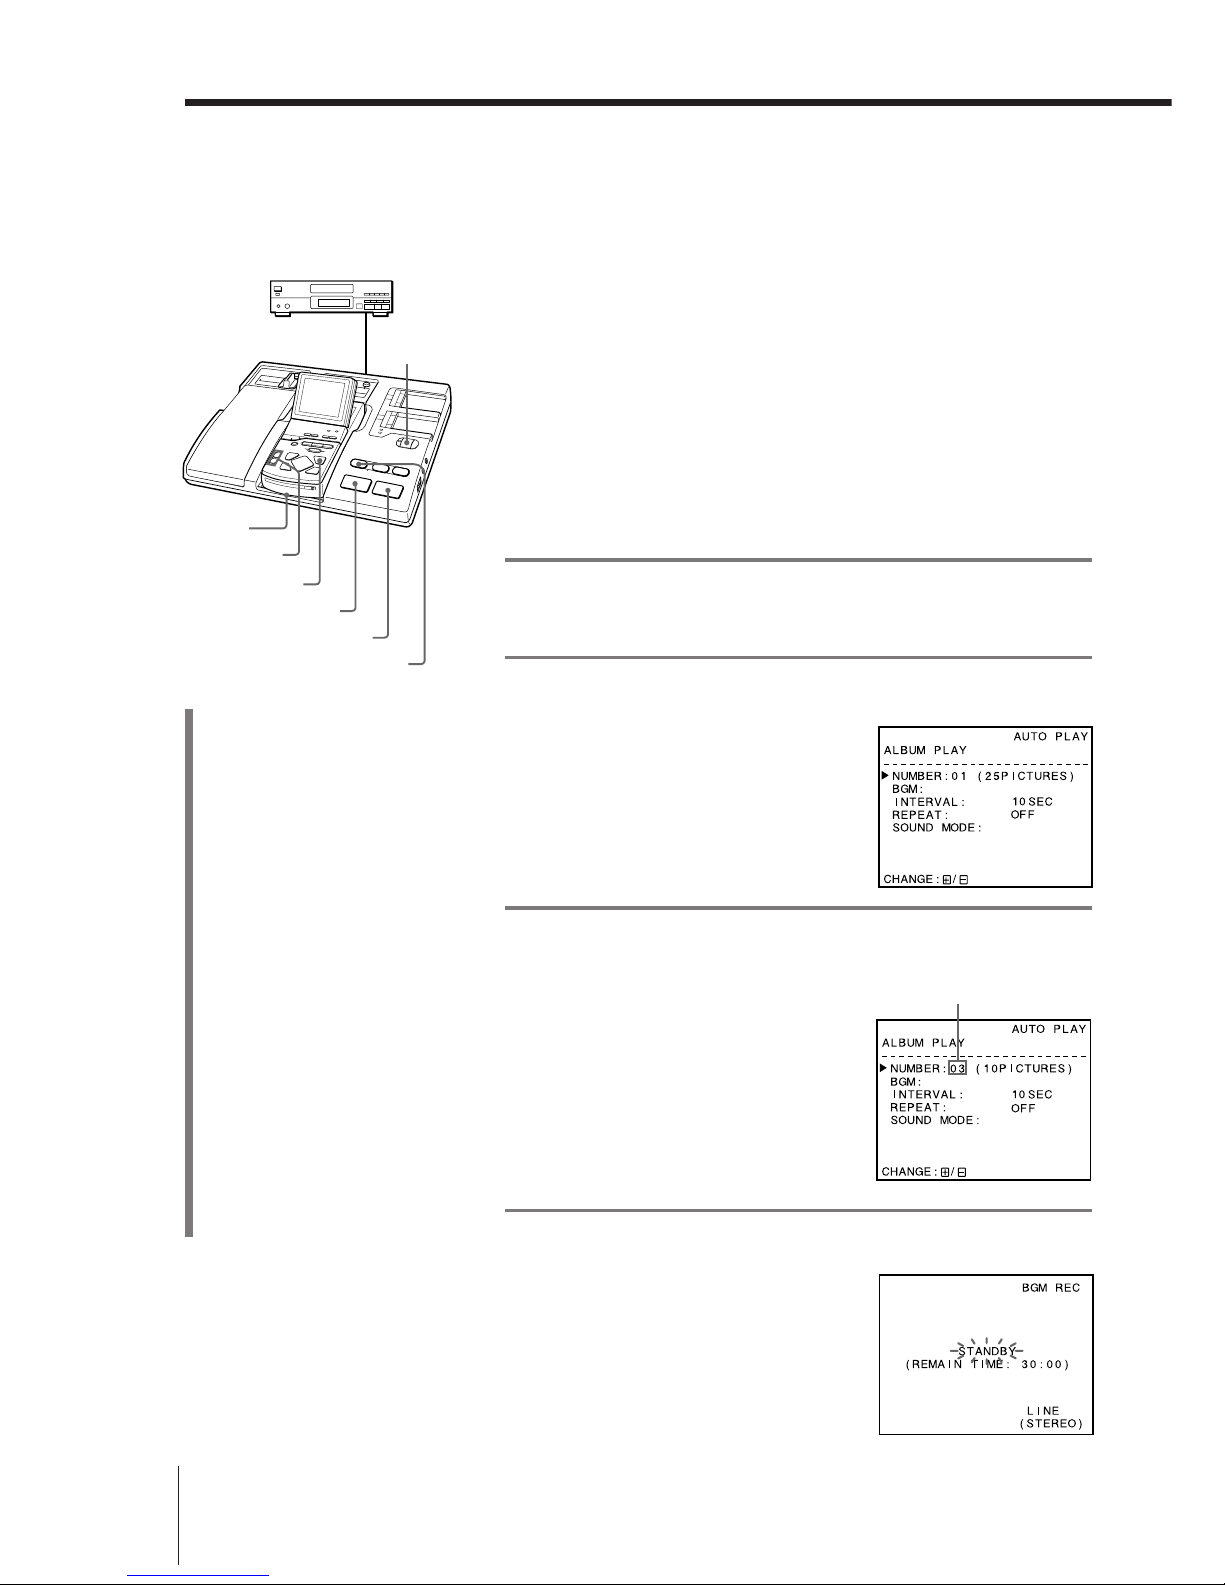
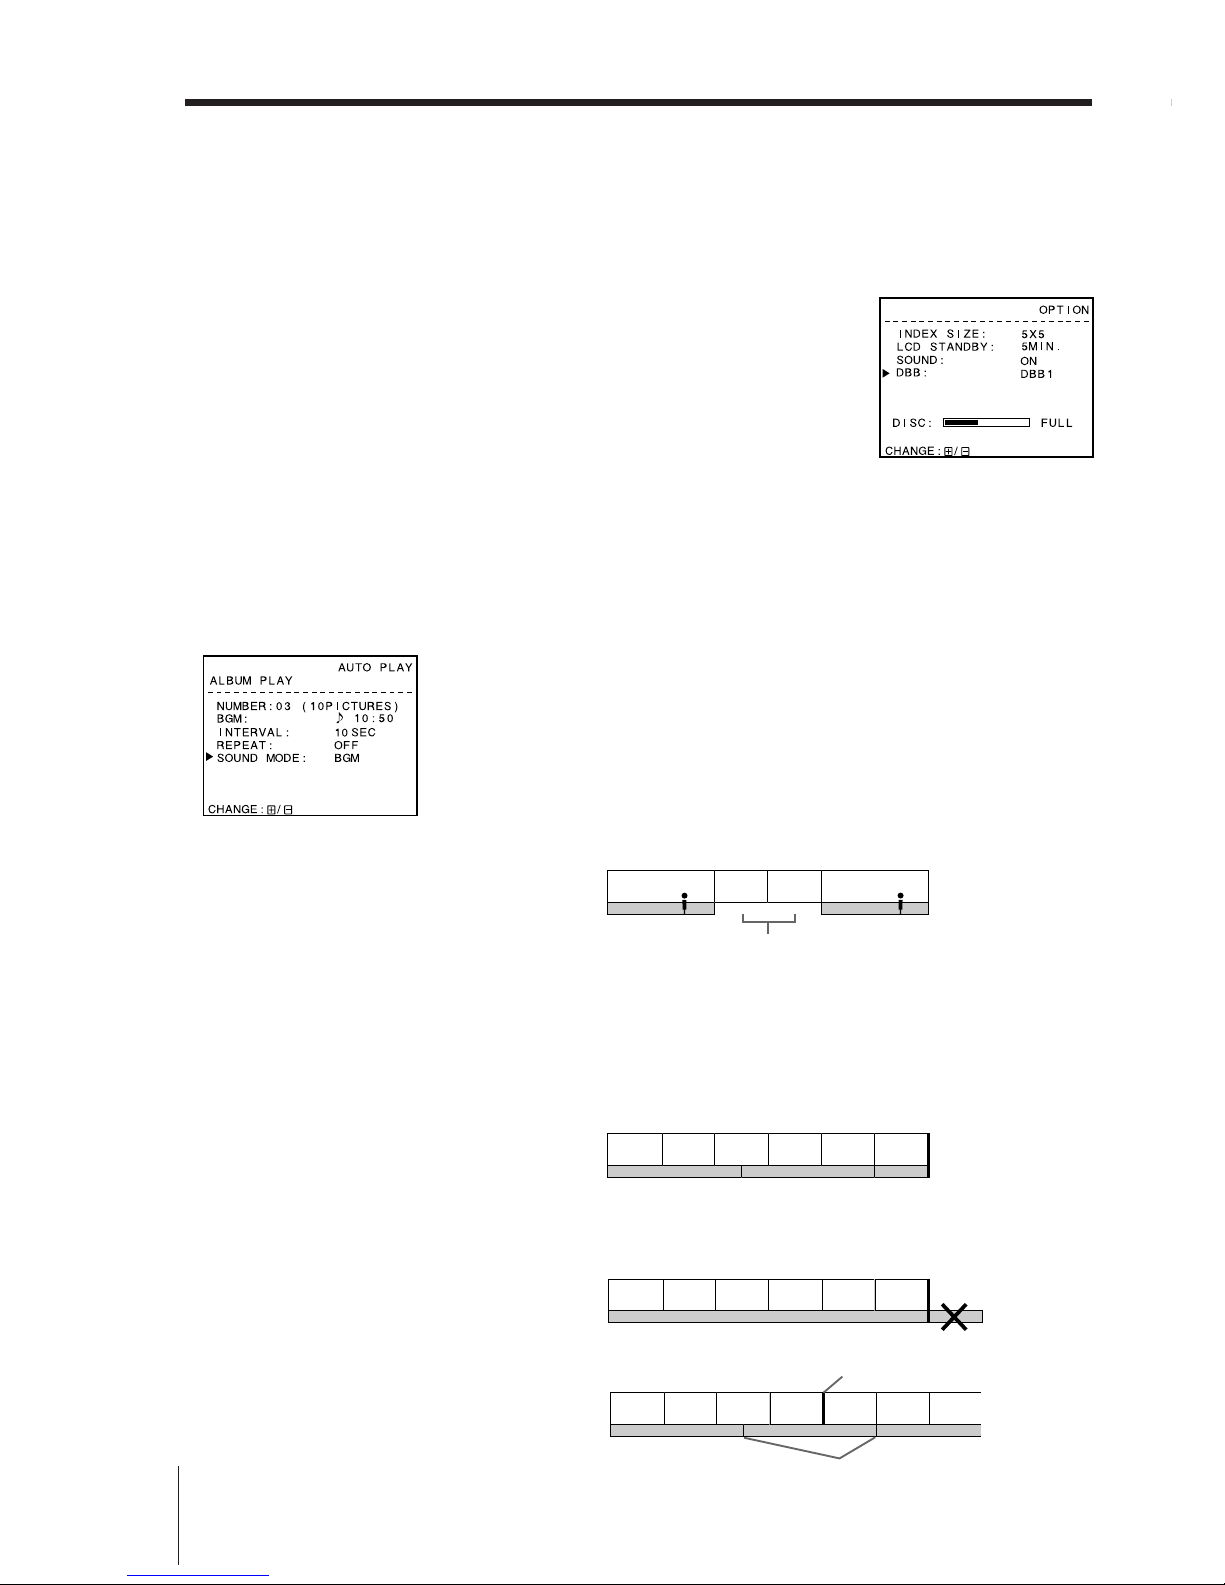
2 Press the AUTO PLAY key on the viewer.
The AUTO PLAY screen appears.
3 Press the ZOOM +/– keys on the viewer to select
the number of the album on which you want to
record BGM.
If necessary, display the picture
using the keys on the viewer, then
return the display to the AUTO
PLAY screen by pressing the AUTO
PLAY key.
4 Press the AUDIO REC key on the unit.
The AUDIO REC key indicator and
“STANDBY” on the screen flash, and
the unit stands by for BGM
recording.
VIEWER
ON/OFF
ZOOM +/–
AUTO PLAY
START
STOP
AUDIO REC
RECORDER
compartment
Note
When recording BGM through the
audio source connected to the LINE
IN jacks, be sure to disconnect the
micropohone. If it is connected, BGM
recording will be made through the
microphone.
Audio recording time
The audio recording time varies
according to the number of pictures
recorded on the Picture MD, the
recording resolution, etc. Press the
AUDIO REC key to display the
remaining recording time (REMAIN
TIME).
Standard audio recording time
When one picture is recorded on the
disc:
Approx. 60 minutes for stereo
recording
Approx. 120 minutes for monaural
recording
When you press the AUDIO REC key
when the disc is full of the picture
data, “DISC FULL” appears and
audio recording is not possible.
Album number
13
(EN)
Recording Sound
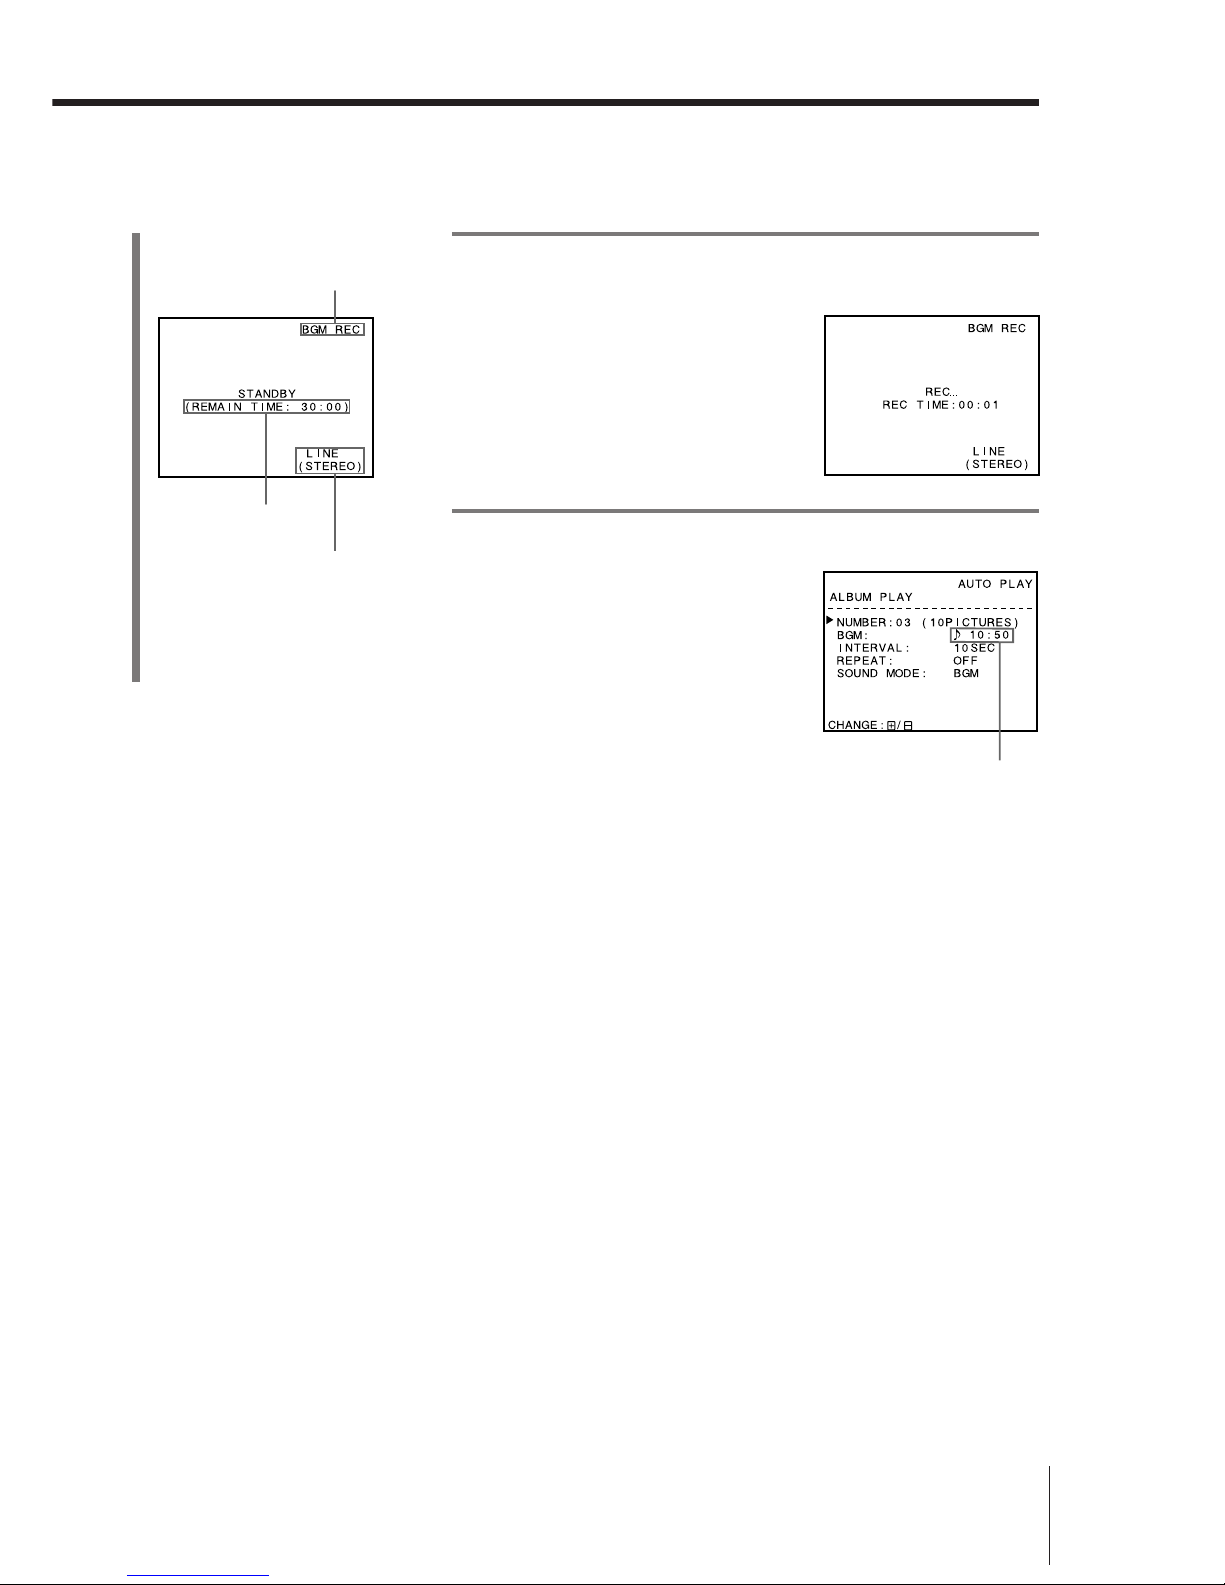
5 Play the audio source and press the START key
on the unit.
Recording starts.
The recording time (REC TIME) is
displayed on the screen.
6 Press the STOP key on the unit.
“END” appears, and the display returns
to the AUTO PLAY screen.
The BGM recording time is displayed.
BGM recording time (min.:sec.)
About “NO REC” message
When you press the AUDIO REC key in step 4, “NO REC” appears in the
following cases and BGM recording cannot be performed.
– The inserted disc is an MD DATA for playback only, Hybrid MD DATA, or
audio MiniDisc that cannot be recorded with this unit.
– The AUTO PLAY screen is not displayed.
– The selected album already contains recorded BGM. (To record BGM for
this album, erase the current BGM. See page 17 for details on erasing.)
Information on the screen
Indicates BGM
recording.
Remaining time of BGM
recording (min.:sec.)
Audio source and stereo/
monaural (ex. line input, stereo)
To listen to the recorded BGM
See page 15.
14
(EN)
Recording Sound
Playing back sound
Use the keys on the viewer to play back narration/BGM.
Listening to the narration of one
picture
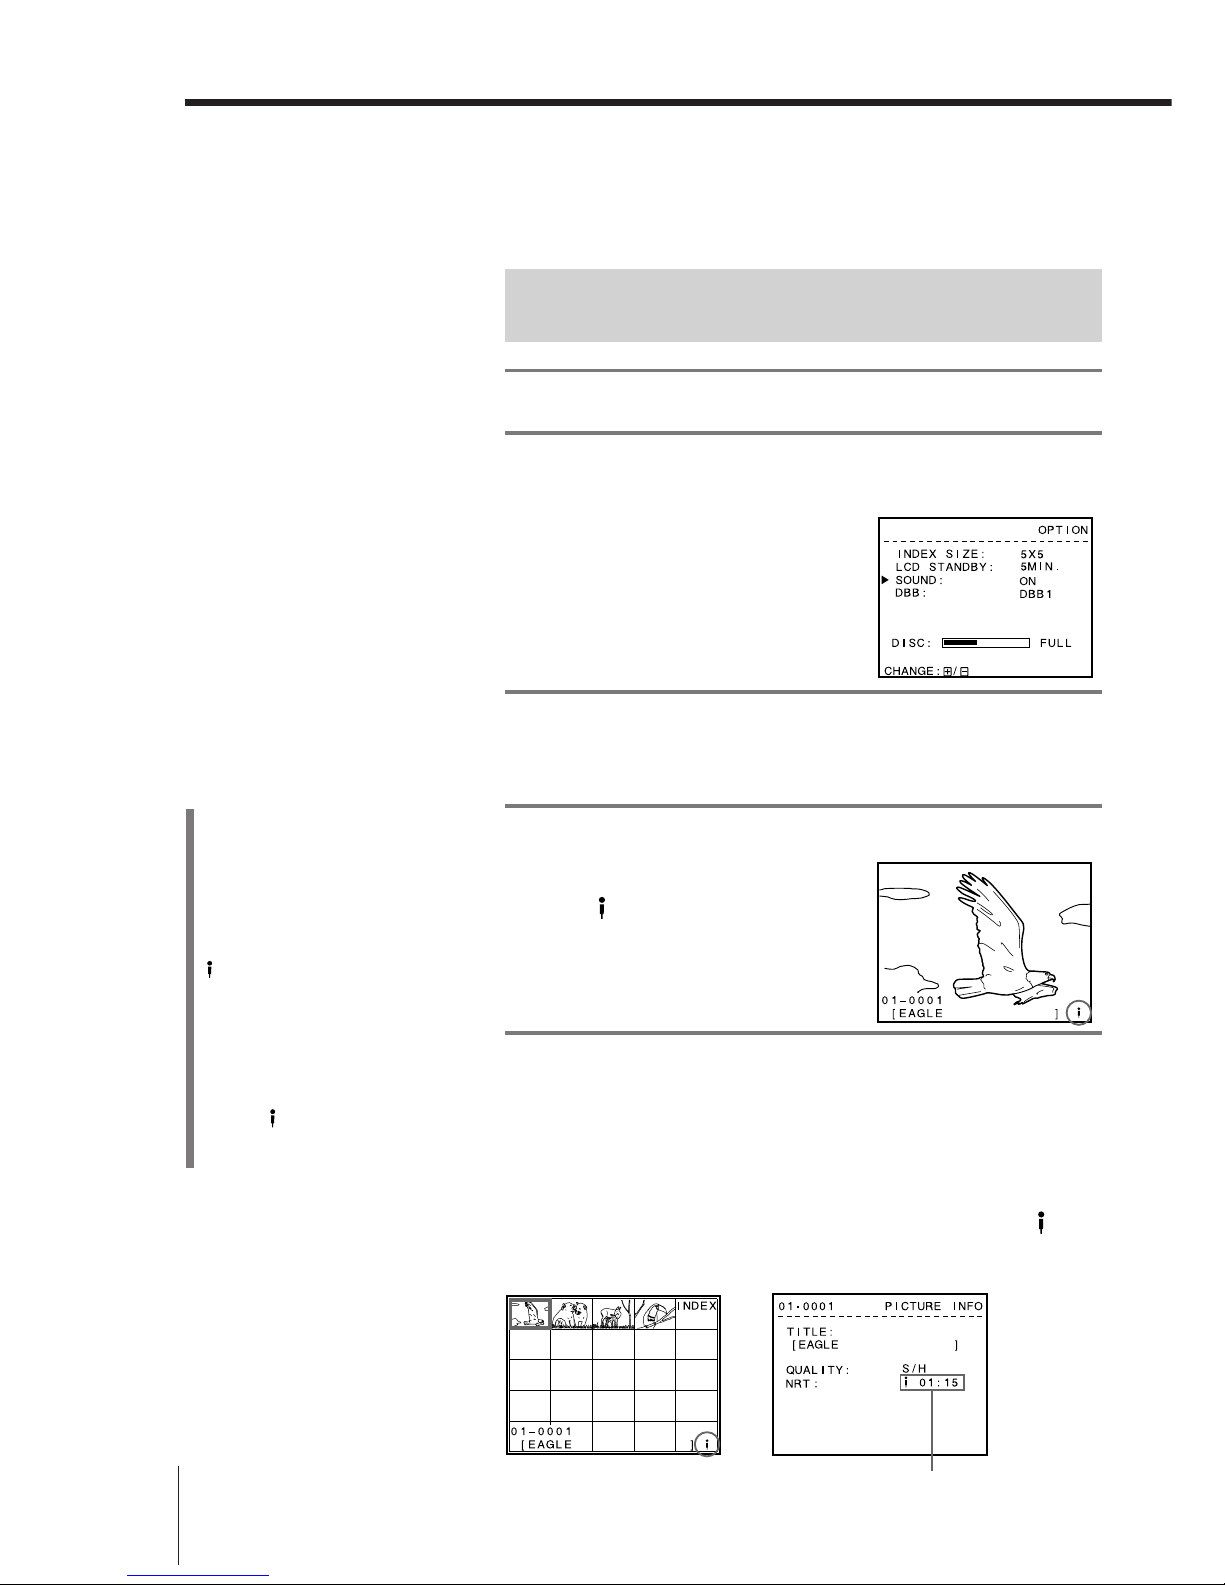
1 Press the MENU key to display the OPTION screen.
2 Press the / keys to move the cursor to
“SOUND,” and press the ZOOM +/– keys to select
“ON.”
3 Press the EXEC/ROTATE key to cancel the OPTION
screen.
The unit is ready to play back sound.
4 Display a picture with a narration recording.
Narration is played back
automatically. During playback,
the
mark flashes.
The narration of the selected picture is
played back automatically when a new
picture is selected.
5 Press the VOLUME +/– keys to adjust the volume.
To deactivate the narration playback
Set “SOUND” to “OFF” on the OPTION screen, and press the EXEC/ROTATE
key. The narration will not be played back.
About the narration recording indication
When you select a picture with narration recording on the viewer, the
mark
or the narration recording time is displayed as follows:
On the INDEX screen On the PICTURE INFO screen
Narration recording time
To play the narration of the
displayed picture
Press the ^ key. The same
narration is played back each time
you press the ^ key.
Note
During narration playback (while the
mark is flashing), you cannot
perform any other operations such as
changing the picture.
About the display of “NRT: ” item
on the PICTURE INFO screen
• Only “NRT:” is displayed when
there is no narration recording.
• “NRT: XX:XX (narration
recording time)” is displayed
when there is narration recording.
INDEX
15
(EN)
Recording Sound
Listening to the BGM or narration
during auto play
You can select BGM or narration.
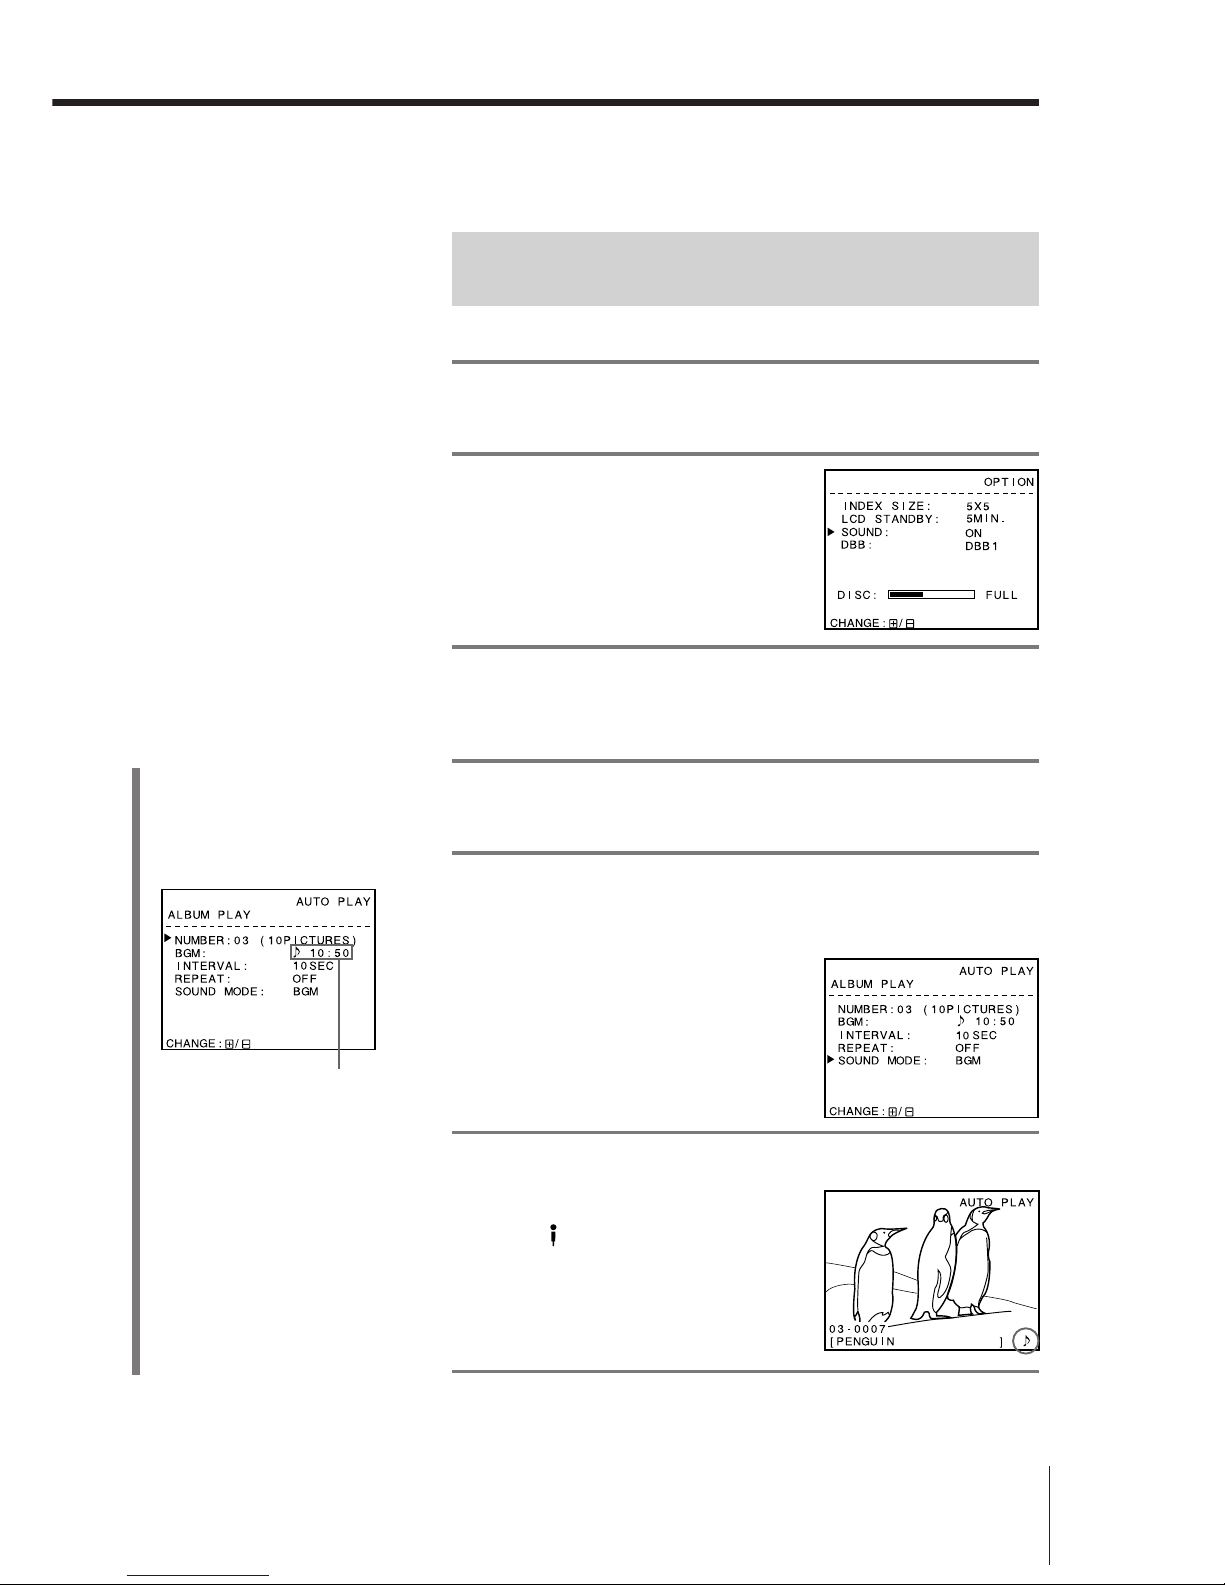
1 Press the MENU key to display the OPTION
screen.
2 Press the / keys to
move the cursor to
“SOUND,” and press the
ZOOM +/– keys to select
“ON.”
3 Press the EXEC/ROTATE key to cancel the
OPTION screen.
The unit is ready to play back sound.
4 Press the AUTO PLAY key to display the AUTO
PLAY screen.
5 Press the / keys to move the cursor to
“SOUND MODE” and press the ZOOM +/– keys to
select BGM/narration.
BGM: To play back BGM recording
during auto play.
NRT: To play back narration
recording each time the
pictures change during auto
play.
6 Press the EXEC/ROTATE key.
Auto play starts and the selected
sound is played back.
The
mark or the mark flashes
during playback.
(See page 16 for details on the
relation between the picture and
sound playback during auto play.)
7 Press the VOLUME +/– keys to adjust the
volume.
(continued)
About the display of “BGM: ” item
• Only “BGM: ” is displayed when
there is no BGM recording.
• “BGM: XX:XX (BGM recording
time)” is displayed when there is
BGM recording.
About the display of “SOUND
MODE” item
• The SOUND MODE item is not
displayed when “SOUND” is set to
“OFF” on the OPTION screen.
• Only “SOUND MODE: ” is
displayed when “SOUND” is set to
“ON” on the OPTION screen but
there is no BGM or narration
recording.
• The SOUND MODE option does
not change by pressing the ZOOM
+/– keys when either BGM or
narration is recorded.
BGM recording time
16
(EN)
Recording Sound
Playing back sound
To emphasize the bass during playback
— DBB (Dynamic Bass Boost) function
1 Press the MENU key so that the OPTION
screen appears.
2 Press the
/ keys to move the cursor to
“DBB,” and press the ZOOM +/– keys to
select the option.
DBB1: To set to medium DBB level
DBB2: To set to high DBB level
NORMAL: DBB off
3 Press the EXEC/ROTATE key to cancel the
OPTION screen.
Relation between the picture and sound playback
during auto play
The following explains the relation between the INTERVAL setting with
which the pictures switch automatically during auto play and the narration/
BGM playback, as well as the REPEAT setting. Set the INTERVAL and
REPEAT items on the AUTO PLAY screen appropriately before playback.
When SOUND MODE is set to NRT
You can set “INTERVAL” to 4 seconds or more (4, 6, 8, 10, 15, 20, 25 or 30
SEC).
The playback time of each picture depends on the narration recording time.
The display advances to the next picture when narration is completed.
Pictures without recorded narration advance at an interval of a selected
duration.
When SOUND MODE is set to BGM
You can set “INTERVAL” to 10 seconds or more (10, 15, 20, 25 or 30 SEC).
The pictures advance at intervals of a selected duration.
• If the BGM recording time is shorter than the total playback time of all the
pictures of the album, the same BGM is played back repeatedly until auto
play is completed (when REPEAT is set to OFF).
• If the BGM recording time is longer than the total playback time of all the
pictures of the album, the BGM playback stops midway at the end of the
auto play of the pictures (when REPEAT is set to OFF).
• If REPEAT is set to ON, the auto play of the pictures and BGM playback are
performed independently.
AUTO PLAY screen
‡
1 2 3 4 5 6
1 2 3 4
Pictures
Narration
Pictures 2 and 3 advance at intervals of the selected duration.
‡
‡
‡
1 2 3 4 5 6
Pictures
BGM
Pictures
BGM
‡
‡
‡
1 2 3 4 1 2 3
Pictures
BGM
This portion is not
played back.
Repeat point of auto play
Repeat points of BGM
17
(EN)
Recording Sound
Erasing sound
Erase the recorded narration and BGM.
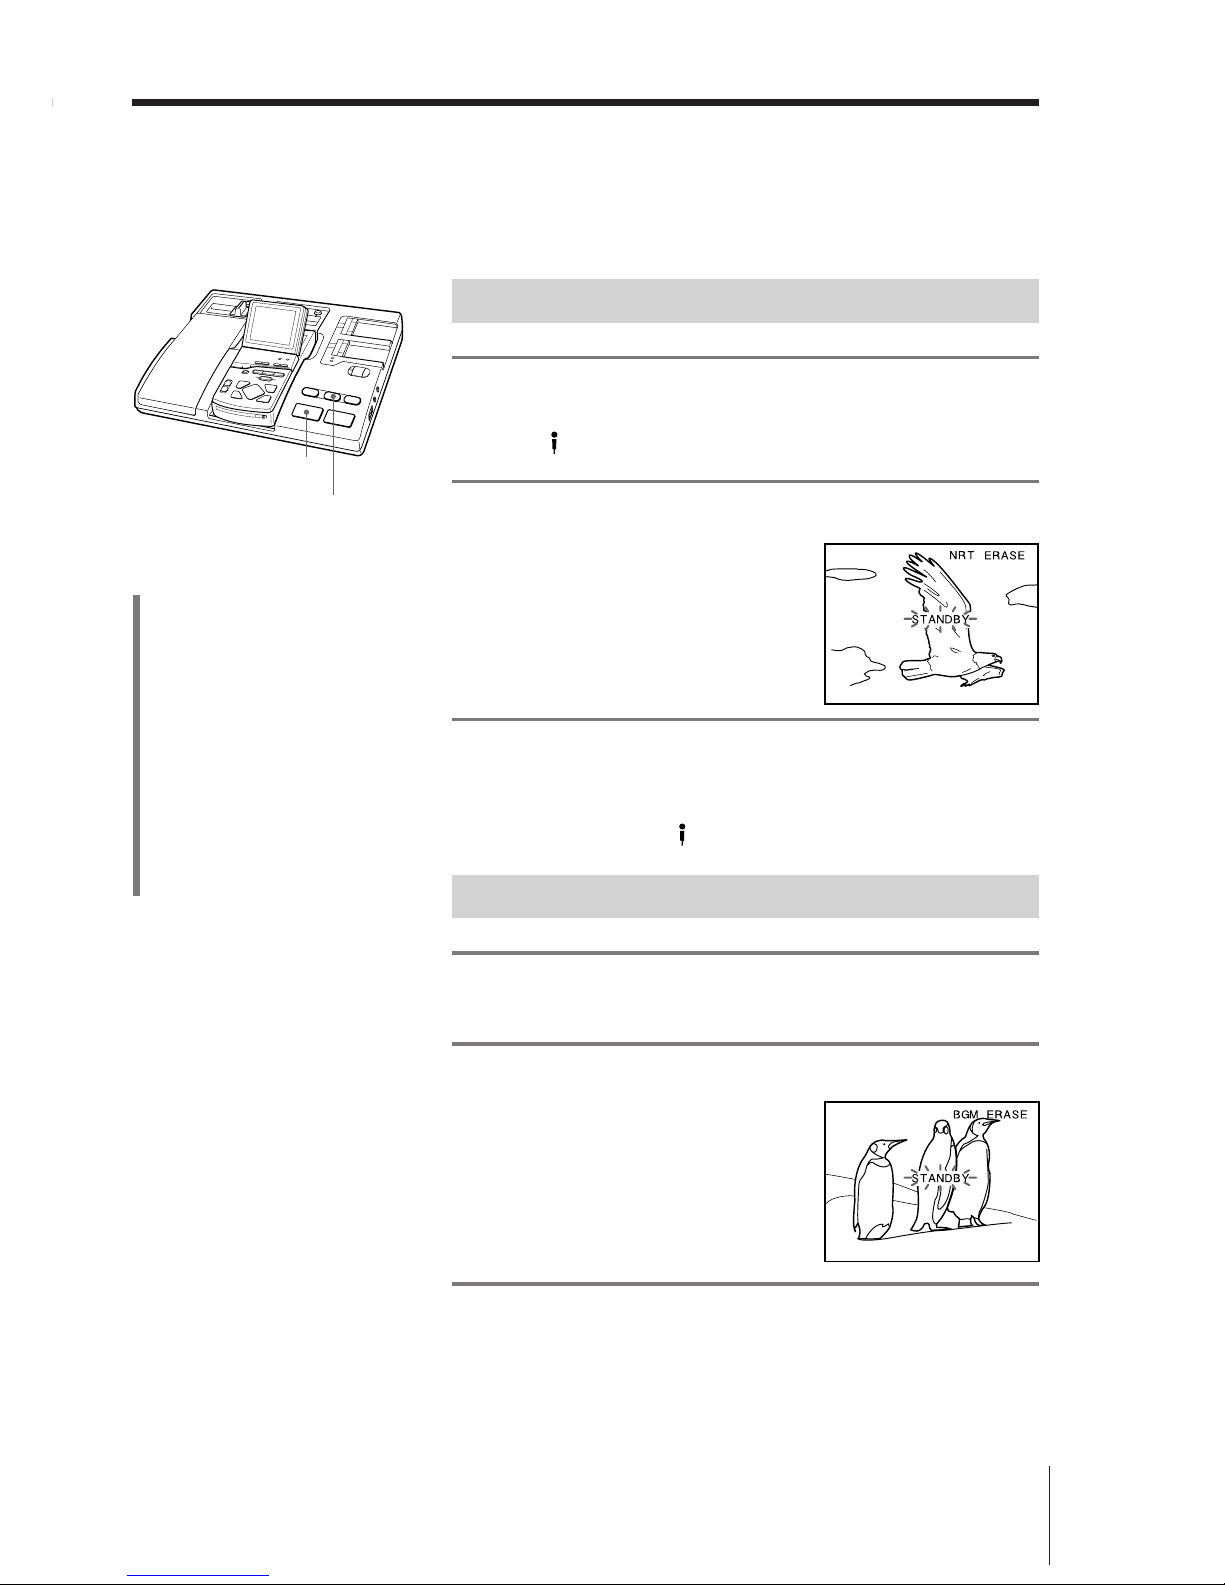
Erasing the narration
1 Display a picture whose narration you want to
erase.
The mark appears on the screen.
2 Press the AUDIO ERASE key on the unit.
The AUDIO ERASE key indicator and
“STANDBY” on the screen flash, and
the unit stands by for narration
erasing.
3 Press the START key on the unit.
Erasing starts. “ERASE...” is displayed during erasing.
“END” appears after erasing finishes, and the display returns to the
original picture. The
mark disappears.
Erasing the BGM
1 Select the number of the album whose BGM you
want to erase on the AUTO PLAY screen.
2 Press the AUDIO ERASE key on the unit.
The AUDIO ERASE key indicator and
“STANDBY” on the screen flash, and
the unit stands by for BGM erasing.
3 Press the START key on the unit.
Erasing starts. “ERASE...” is displayed during erasing.
“END” appears after erasing finishes, and the display returns to the
AUTO PLAY screen. The BGM recording time disappears and only
“BGM: ” is displayed.
START
AUDIO ERASE
About “NO ERASE” message
When you press the AUDIO ERASE
key, “NO ERASE” appears in the
following cases and erasing cannot be
performed.
– The inserted disc is an MD DATA
for playback only, Hybrid MD
DATA, or audio MiniDisc that
cannot be erased with this unit.
– The selected picture does not
contain recorded narration or the
selected album does not contain
recorded BGM.
– The picture is not displayed on the
whole screen or the AUTO PLAY
screen is not displayed.
18
(EN)
Advanced Operations
Copying an MD
Copy the data of the Picture MD from one viewer to the other.
Preparations
• Turn off the unit and mount viewers in the RECORDER and PLAYER
compartments. (page 6)
• Insert the original MD into the viewer in the PLAYER compartment, and
the destination MD into the viewer in the RECORDER compartment.
(The viewers mounted in the PLAYER and RECORDER compartments are
referred to as PLAYER and RECORDER respectively hereafter.)
• Set the main power switch on the right side of the unit to “I (on).” (MPSVS500P only)
1 Press the VIEWER ON/OFF key on the unit.
The viewers are turned on and “PICTURE MD” is displayed on the
PLAYER screen.
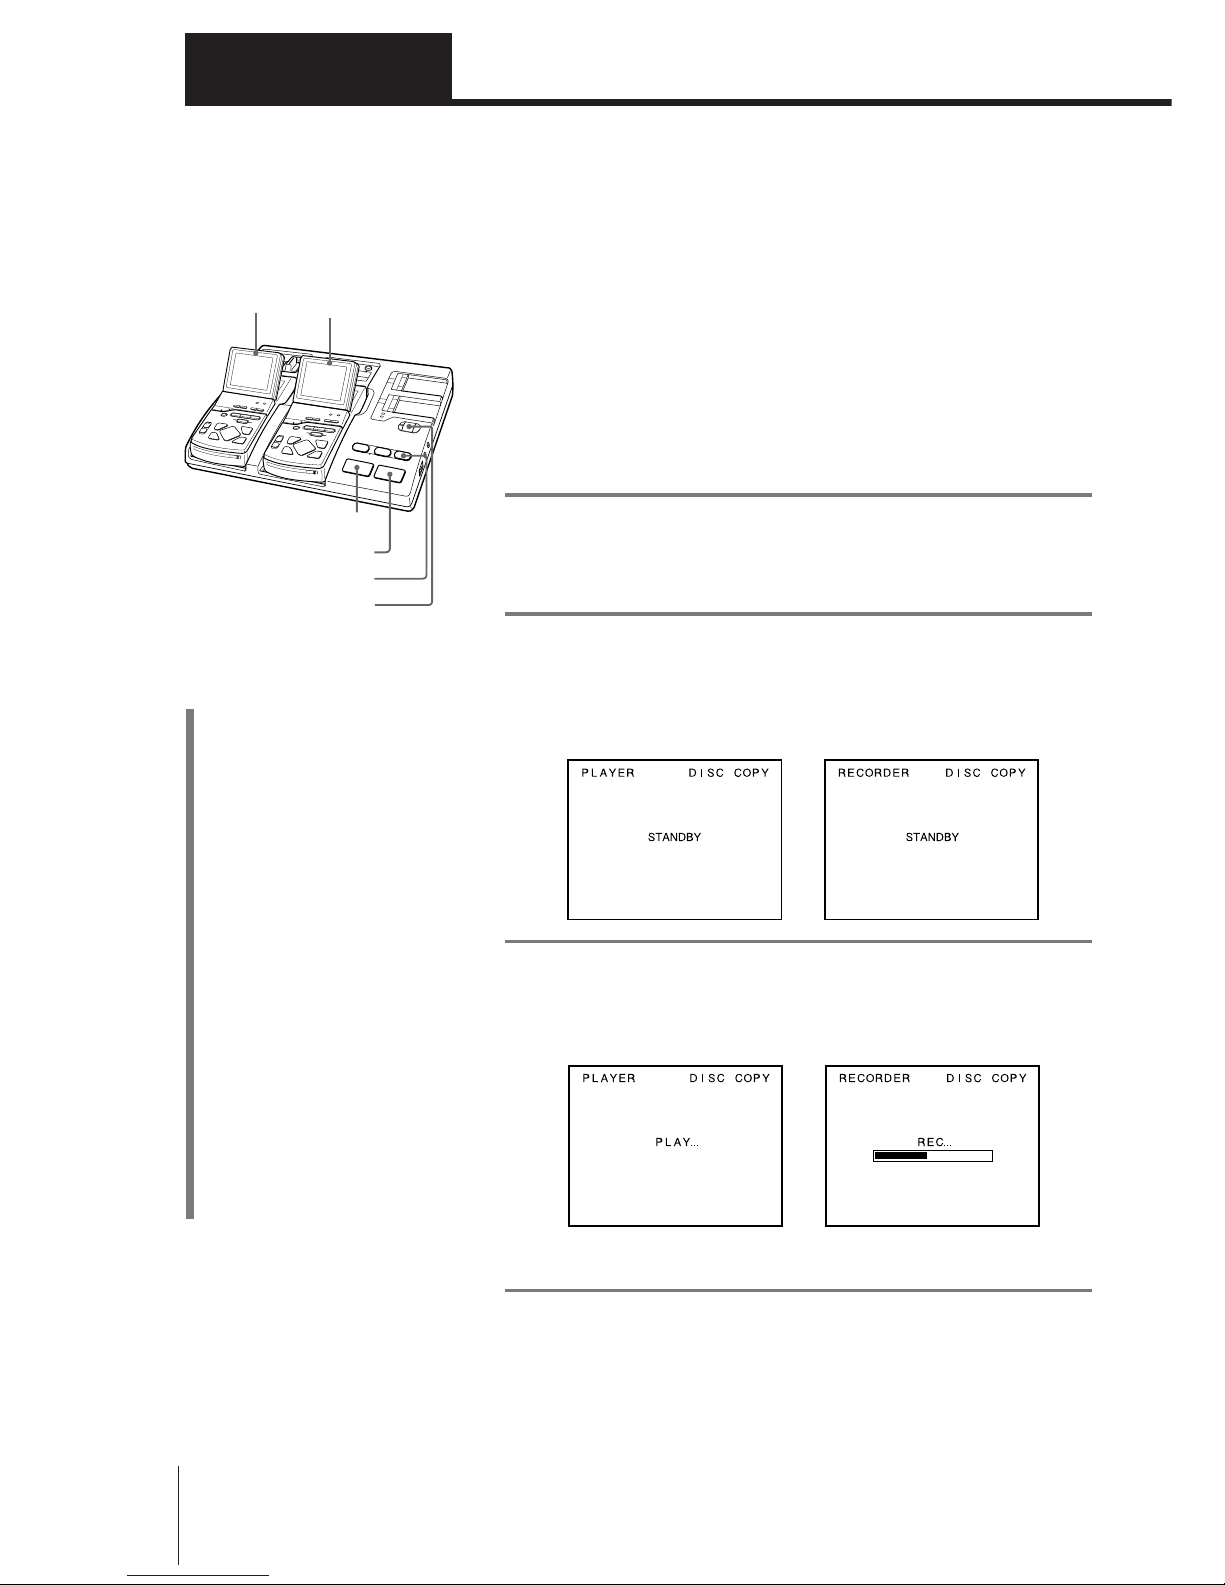
2 Press the DISC COPY key on the unit.
The DISC COPY key indicator lights, “STANDBY” is displayed on
both screens, and the unit stands by for disc copying.
PLAYER screen RECORDER screen
3 Press the START key on the unit.
Disc copying starts.
PLAYER screen RECORDER screen
When copying finishes, “COMPLETE” is displayed on both screens.
4 Press any key on the unit to make “COMPLETE”
disappear.
Advanced Operations
START
STOP
DISC COPY
VIEWER ON/OFF
Note
An MD DATA for playback only,
Hybrid MD DATA, or audio
MiniDisc cannot be copied.
If you press the DISC COPY key with
such a disc inserted, “NO COPY”
message appears.
Standard copy time
It takes about 20 minutes to copy a
Picture MD that contains full data.
The copy time varies according to the
data quantity in the MD.
To cancel copying in the middle
1 Press the STOP key on the unit.
“CANCEL?” is displayed on the
screen of the RECORDER.
2 Press the START key.
“CANCEL” is displayed on the
screens of the RECORDER and
PLAYER, and copying is canceled.
Note
The data of the destination MD is not
guaranteed when you forcibly cancel
copying in the middle.
PLAYER RECORDER

19
(EN)
Advanced Operations
To copy onto a recorded MD
If the MD inserted in the RECORDER already contains data, “STANDBY (NO
BLANK DISC)” is displayed when the DISC COPY key is pressed. In this
case, operate as follows.
1 Press the START key.
“ALL ERASE?” appears on the RECORDER
screen.
2 Make sure that you do not need all the data in the destination MD in the
RECORDER. If you start disc copying, all the data stored in the MD will
be erased.
To cancel disc copying and check the contents of the MD, press the STOP
key.
3 To start disc copying, press the START key again.
The previous data in the MD will be erased.
4 Press any key on the unit to make “COMPLETE” disappear.
To cancel copying and replace the
MD with another one
Press the STOP key while
“STANDBY (NO BLANK DISC)” or
“ALL ERASE?” is displayed to cancel
disc copying. Then replace the MD.
Caution
If you perform disc copying on the
recorded MD, the previous data is
erased. Check the MD contents
before copying.
20
(EN)
Advanced Operations
Charging batteries
You can charge two NP-520/F530/720/F730 rechargeable battery packs (not
supplied) for the viewer simultaneously.
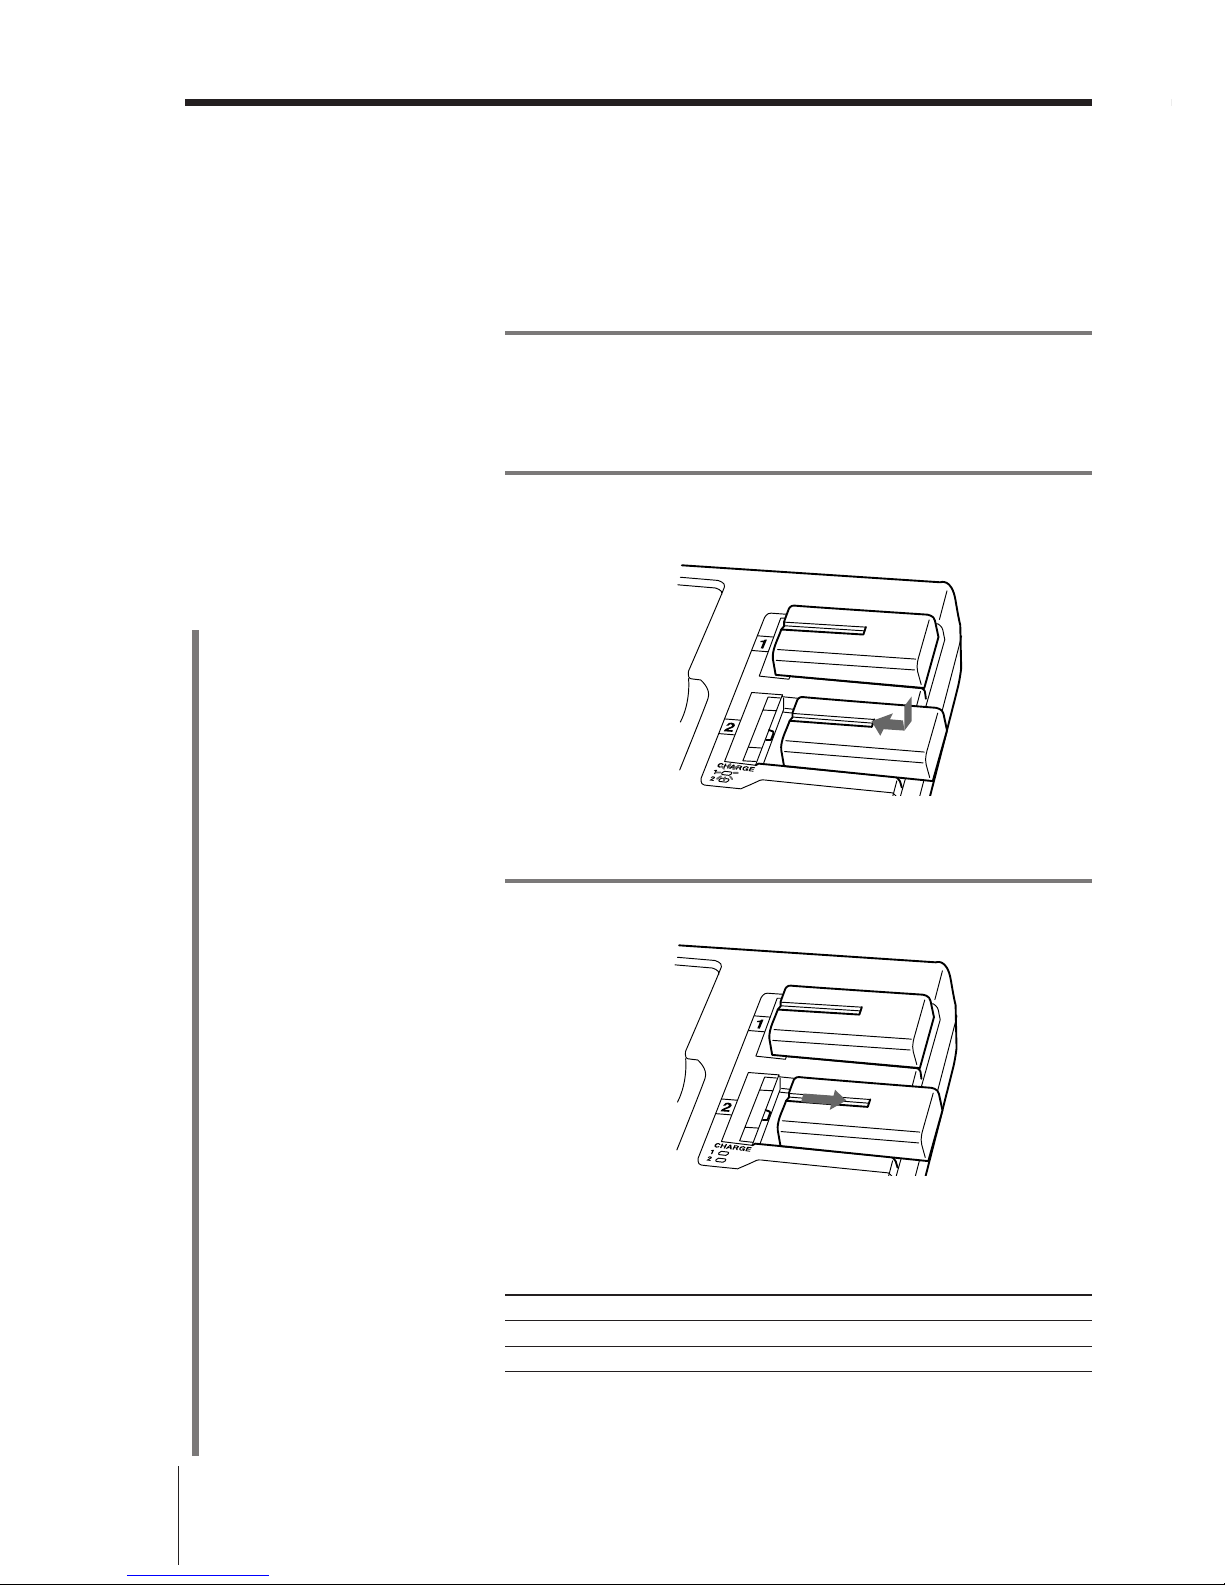
Charging
1 Connect the unit to an AC outlet.
Set the main power switch on the right side of
the unit to “I (on).” (MPS-VS500P only)
2 Place one or two battery packs on the charger(s)
on the unit.
The CHARGE lamp(s) (orange) light(s) up and charging starts.
When charging is complete, the CHARGE lamp(s) go(es) out.
3 Remove the battery pack(s).
Charging time
The following table shows the charging time for two battery packs which are
completely discharged. When charging is complete, the CHARGE lamp(s)
go(es) out.
Battery pack Charging time
NP-520 Approx. 2 hours 30 minutes
NP-720 Approx. 5 hours
• Charging time varies according to the battery conditions.
• The charging time for one battery pack is about the same as above.
• The charging time is the same either when the unit is in operation or the
power of the unit is off.
To use the battery pack
immediately
You can use the battery pack even
before it is fully charged. However,
the shorter the charging time, the
shorter the life of the battery pack.
Notes on charging
• When you use the battery pack for
the first time or after a long period
of disuse, the battery life may be
diminished. The battery life will
be restored by charging and
discharging it several times.
• Remove the battery pack when
charging is completed.
• The remaining capacity indicator
on the NP-F530/F730 does not
function with this unit.
Battery charging tips
• A rechargeable battery does
not need to be discharged before
recharging. You can recharge a
half-charged battery. However,
a rechargeable battery
discharges little by little even
while it is not in use. We
recommend that you charge it
before every use.
• Keep a few spare battery packs. To
avoid a power shortage, prepare a
few extra rechargeable battery
packs, model NP-520/F530/720/
F730.
• For a longer battery life, we
recommend storing the battery
pack in a cool place and charging
it under temperatures ranging
from 10 - 30°C (50 - 86°F).
• When the battery pack is not to be
used for a long period of time,
remove the battery pack from the
unit.
21
(EN)
Advanced Operations
Connecting audio equipment
When connecting monaural audio equipment
Connect the white plug of the AV connecting cord to the
AUDIO L jack of the unit and to the audio input jack of
the audio equipment. Leave the red and yellow plugs
free. (The output sound is monaural.)
Using the DC OUT connector
The DC OUT connector on the side of the PLAYER
compartment supplies power to a viewer without
mounting it to the PLAYER compartment.
Connect the viewer to the DC OUT connector using the
DC cord supplied with the viewer.
Note
When the DC OUT connector is used, you cannot mount
a viewer to the PLAYER compartment.
Connecting optional equipment
You can watch the picture and listen to the sound
playing on the viewer in the RECORDER compartment
with audio/video equipment connected to the unit.
Connecting video equipment
Connect video equipment using the NTSC system only
(for MPS-VS500), or video equipment using the PAL
system only (for MPS-VS500P).
When connecting the S video cable
Leave the yellow plugs of the AV connecting cord free.
When connecting monaural equipment
Connect the white plug of the AV connecting cord to the
AUDIO L jack of the unit and to the audio input jack of
the video equipment. Leave the red plugs free. (The
output sound is monaural.)
When connecting a TV without audio/video
inputs
Use an RFU adaptor (Sony RFU-89, etc., not supplied) to
connect the LINE OUT V/AUDIO jacks and the RFU DC
OUT jack of the unit to the antenna terminal of the TV.
For details, refer to the Operating Instructions of the
RFU adaptor.
Audio system
AV connecting
cord (supplied)
LINE OUT
AUDIO L/R
Rear
LINE IN
AUDIO
RL
LINE OUT
AUDIO
RL
VS-VIDEO
RFU DC OUT
INPUT
L
R
Video monitor, TV, VCR, etc.
S video cable
(not supplied)
S-VIDEO
LINE OUT V,
AUDIO L/R
Rear
AV connecting
cord
(supplied)
INPUT
S VIDEO
VIDEO
AUDIO
LINE IN
AUDIO
RL
LINE OUT
AUDIO
RL
VS-VIDEO
RFU DC OUT
22
(EN)
For Your Information
Types of MD
Picture MD is....
The so-called MiniDisc (MD) can be classified into two
types: MiniDisc for enjoying music, and MD DATA for
handling data for computers. Picture MD used for this
unit is an MD DATA which is formatted for recording
and playing back still images and music.
Use the following MD when recording and editing
images from photos with the Picture MD photo writer or
Picture MD photo editor:
• MD DATA with “Picture MD” label
• MD DATA formatted with the Picture MD photo
writer or Picture MD photo editor
Types of MD
MD DATA
This type is used for handling digital data such as
computer data. The following three types are available.
• MD DATA for recording
This is a disc for recording/playing back.
• MD DATA for playback
This is a disc for playback only, such as for CD-ROM
software.
• Hybrid MD DATA
This disc contains both a playback only portion and
recording/playback portion.
MiniDisc
This type is for audio. The following two types are
available.
• MiniDisc for playback only
This is for playing back music such as compact discs.
• MiniDisc for recording
This is a recordable disc.
“MD DATA” and “Picture MD” are the trademarks of
Sony Corporation.
Shutter
Cartridge
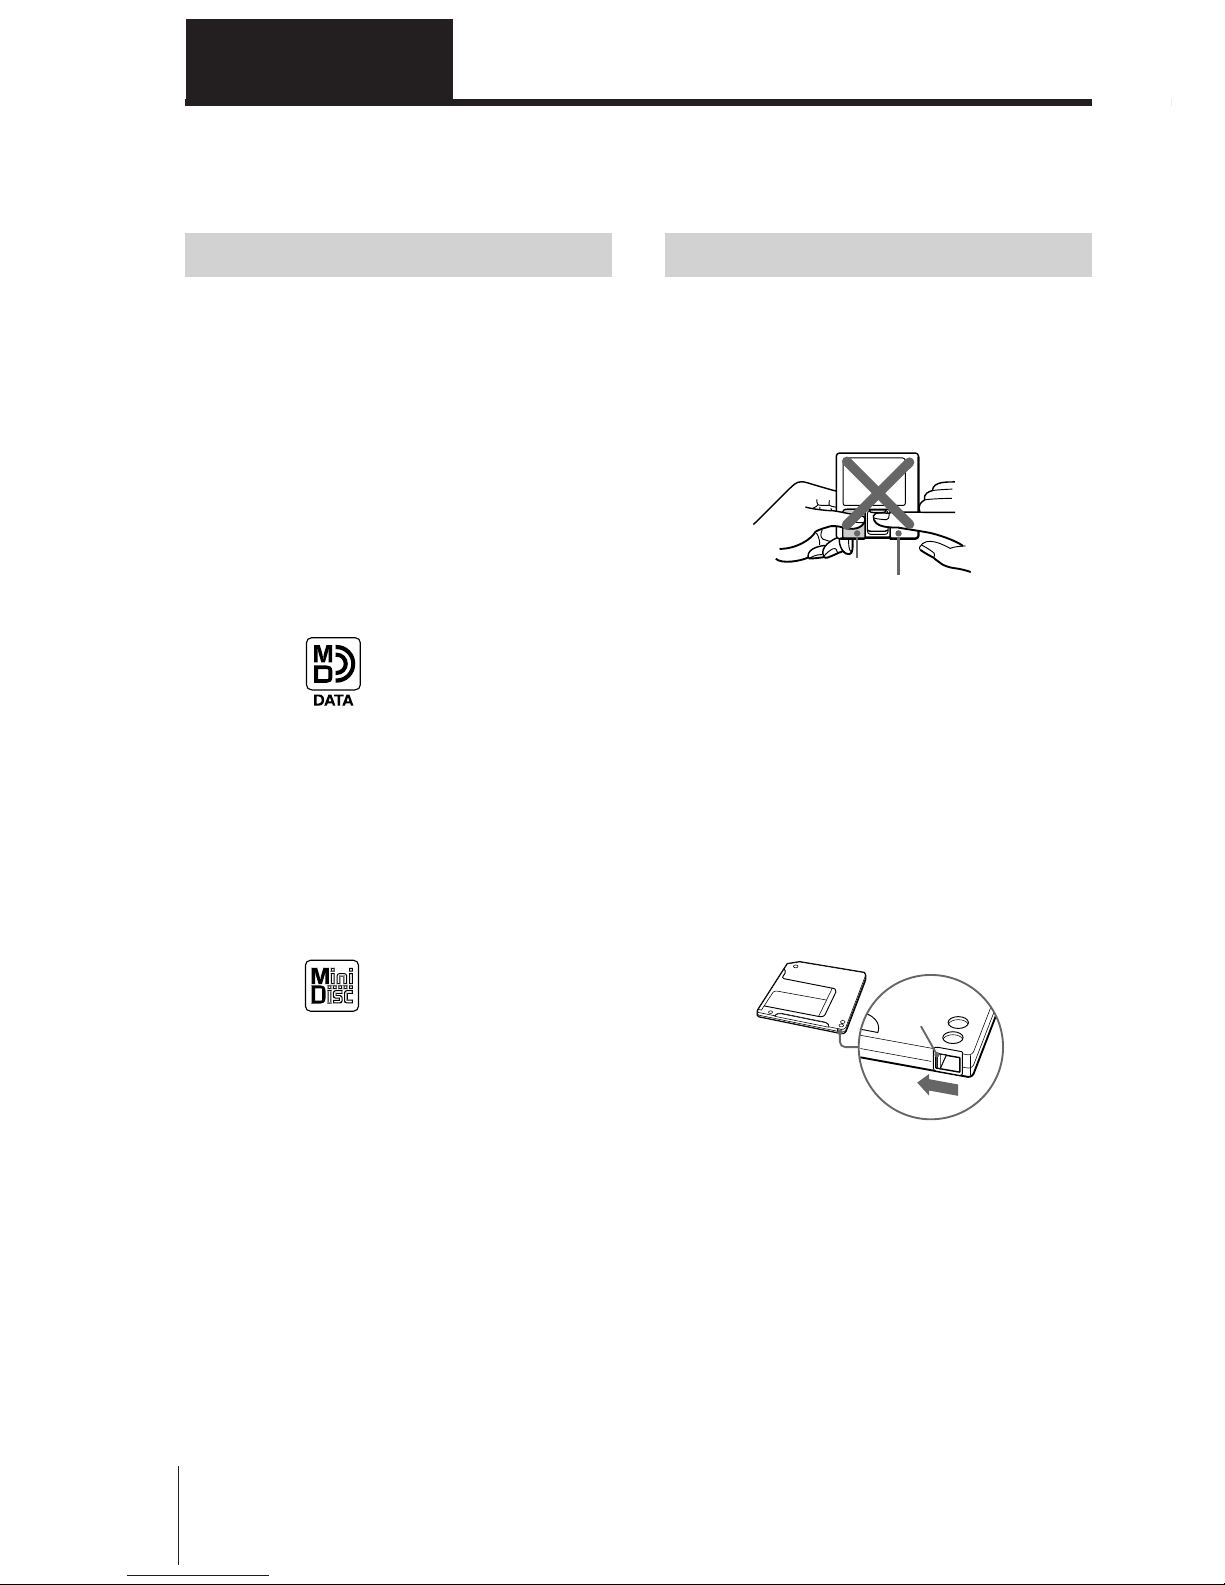
Handling the MD
The MD itself is contained in a cartridge so that you can
handle it without worrying about dust and fingerprints.
However, as dirty or bent cartridges may cause
misoperation, please take the following precautions.
Do not touch the MD directly
Do not open the shutter with your hand
Trying to open it forcibly could break it.
Storage
Do not keep the MD in the direct sunlight or where the
temperature or humidity is high. Do not leave the MD
where sand could enter, such as on a beach.
To protect the recorded data from accidental
erasure
Slide the safety tab so that a hole opens. The recorded
data is protected and new data cannot be recorded.
Close the hole by sliding the tab back when rerecording.
Regular maintenance
Wipe the cartridge with a dry cloth to remove dust.
Use with a personal computer
The MD DATA disc can be handled with a personal
computer by using the special MD DATA drive such as
Sony MDH-10. However, this unit cannot operate
properly with the MD DATA whose data is processed or
erased using the personal computer.
About the Picture MD
For Your Information
Rear of the MD
Safety
tab

23
(EN)
For Your Information
Precautions
NOTICE TO USERS
IN NO EVENT SHALL SONY CORPORATION BE
LIABLE FOR ANY INCIDENTAL, CONSEQUENTIAL
OR SPECIAL DAMAGES, WHETHER BASED ON
TORT, CONTRACT, OR OTHERWISE, ARISING OUT
OF OR IN CONNECTION WITH THIS MANUAL, THE
SOFTWARE OR OTHER INFORMATION
CONTAINED HEREIN OR THE USE THEREOF.
Sony Corporation reserves the right to make any
modification to this manual or the information
contained herein at any time without notice.
The software described herein may also be governed by
the terms of a separate user license agreement.
On safety
• The rating plate indicating operating voltage, power
consumption, etc. is located at the rear.
• Should any solid object or liquid fall into the cabinet,
unplug the unit and have it checked by qualified
personnel before operating it further.
• Unplug the unit from the wall outlet if it is not to be
used for several days or more.
• To disconnect the AC power cord, pull it out by the
plug. Never pull the cord itself.
On installation
• Allow adequate air circulation to prevent internal heat
build-up. Do not place the unit on surfaces (rugs,
blankets, etc.) or near materials (curtains, draperies)
that may block the fan on the rear of the unit.
• Do not install the unit in a location near heat sources
such as radiators or air ducts, or in a place subject to
direct sunlight, excessive dust or humidity, continuous
mechanical vibration or shock.
• If the unit is brought directly from a cold to a warm
location, moisture may condense inside the unit and
cause damage to the unit. When you first install the
unit, or when you move it from a cold to a warm
location, wait for a while before operating the unit.
On heat build-up
Heat builds up in the unit if it is used for an extended
period of time. If this occurs, allow the unit to cool
down.
On cleaning
To keep the unit looking brand-new, periodically clean it
with a mild detergent solution. Never use strong
solvents, such as thinner or benzine, or abrasive
cleansers since these will damage the cabinet. As a safety
precaution, unplug the unit before cleaning it.
On repacking
Do not throw away the carton and packing materials.
They make an ideal container in which to transport the
unit.
When shipping the unit to another location, repack it as
illustrated on the carton.
If you have any questions about this unit, contact
your authorized Sony dealer.

24
(EN)
For Your Information
Troubleshooting
If you run into any problems using the viewer station,
use the following check list. You can also refer to the
Operating Instructions of the Picture MD photo viewer
(MPS-V500/V500P).
Should any problem persist after you have made the
checks below, consult your nearest Sony dealer.
The viewer cannot be mounted to the
compartment.
m Check if the LOCK knob is in the RELEASE
position. If it is not, slide the LOCK knob fully to
the right (RELEASE position) while holding down
the RELEASE button. (page 7)
The viewer comes up even if you press it down.
m The viewer was not pressed down firmly enough.
Press it down until it clicks. (page 6)
The LOCK knob cannot slide to the left.
m Press down the viewer until it clicks and slide the
knob again. (page 6)
m If it still does not slide, return the LOCK knob fully
to the right while holding down the RELEASE
button, and try mounting the viewer again.
The viewer cannot be removed.
m Check if the LOCK knob is in the RELEASE
position. If it is not, slide the LOCK knob fully to
the right while holding down the RELEASE button.
Remove the viewer after it is lifted up. (page 7)
The unit cannot operate.
m Check if the power cord is connected correctly.
m Check if a disc is inserted into the viewer. (If not,
“NO DISC” message appears.)
m Check if operations have been performed correctly.
(If not, an error message corresponding to the
incorrect operation appears.)
m Check if the unit was subjected to strong noise
during operation, due to mechanical shock,
excessive static electricity, irregular power supply
from lightning, etc. If so, restart the operation as
follows:
1. Disconnect all the power sources.
2. Leave the unit for about 30 seconds.
3. Connect the power source.
m Check if the unit was subjected to continuous
vibration. (If so, “SYSTEM ERR” message appears.)
m Check if the unit was subjected to a temperature or
humidity beyond the limits of operating conditions.
(If so, “SYSTEM ERR” message appears.) Use the
unit under the operating conditions described in
“Specifications” on page 26.
The LCD screen of the viewer does not light.
m Press any key on the viewer to cancel the LCD
standby condition.
m Press the LCD ON/OFF key on the viewer to turn
on the LCD.
Recording from the equipment connected to the
LINE IN jacks is not possible.
m Check if the microphone is disconnected from the
unit.
Monaural recording from the equipment
connected to the LINE IN jacks is not possible.
m Check if the equipment is connected to the AUDIO
L jack.
The recorded sound cannot be played back.
m Check if SOUND is set to “ON” on the OPTION
screen.
Playback sound is intermittent.
m Use the unit in a place where it is protected from
mechanical vibration.
Playback sound is noisy.
m If the unit is subjected to mechanical vibration from
a television, etc., move it away from the television,
etc.
Charging is not possible.
m Check if the battery is set to the charger correctly.
Sound is not heard through headphones.
m Check if the headphones are plugged in firmly.
Sound is not heard through the built-in speaker
of the viewer.
m Check if the headphones are disconnected from the
unit.
 Loading...