

Page 1

Ster eo
Cassette Deck
3-860-243-31(1)
Operating Instructions
Mode d’emploi
Manual de instrucciones
Manual de Instruções
EN
EN
GB
GB
F
F
ES
ES
P
P
TC-WE405
TC-WR661
1997 by Sony Corporation
Page 2

WARNING
To prevent fire or shock
hazard, do not expose
the unit to rain or
moisture.
EN
2
Page 3

Welcome!
Thank you for purchasing the Sony
Stereo Cassette Deck. Before operating
the unit, please read this manual
thoroughly and retain it for future
reference.
About This Manual
The instructions in this manual are for
models TC-WE405 and TC-WR661.
Check your model number by looking
at the rear panel of your tape deck. In
this manual, the TC-WE405 is the model
used for illustration purposes. Any
difference in operation is clearly
indicated in the text, for example, “TCWE405 only.”
Type of differences
Model
Feature
Dolby HX PRO
PHONES jack
Convention
The following icon is used in this
manual:
WE405
•
•
WR661
TABLE OF CONTENTS
Getting Started
Unpacking 4
Hooking Up the System 4
Playing a Tape 5
Recording on a Tape 6
Advanced Recording Operations
Adjusting the Recording Level Automatically (Auto Rec Level) 8
Fading In and Out (Fader) 9
Dubbing a Tape 9
Inserting a Blank Space During Recording (Record Muting) 10
Additional Information
Precautions 11
Notes on Cassette Tapes 11
Cleaning 12
Troubleshooting 13
Specifications 14
Index 15
EN
Indicates hints and tips for
z
making the task easier.
EN
3
Page 4
Getting Started
Ç
ç
REC OUT IN
LINE
OUTIN
L
R
TAPE
L
R
L
R
Getting Started
Unpacking
Check that you received the following items:
• Audio connecting cords (2)
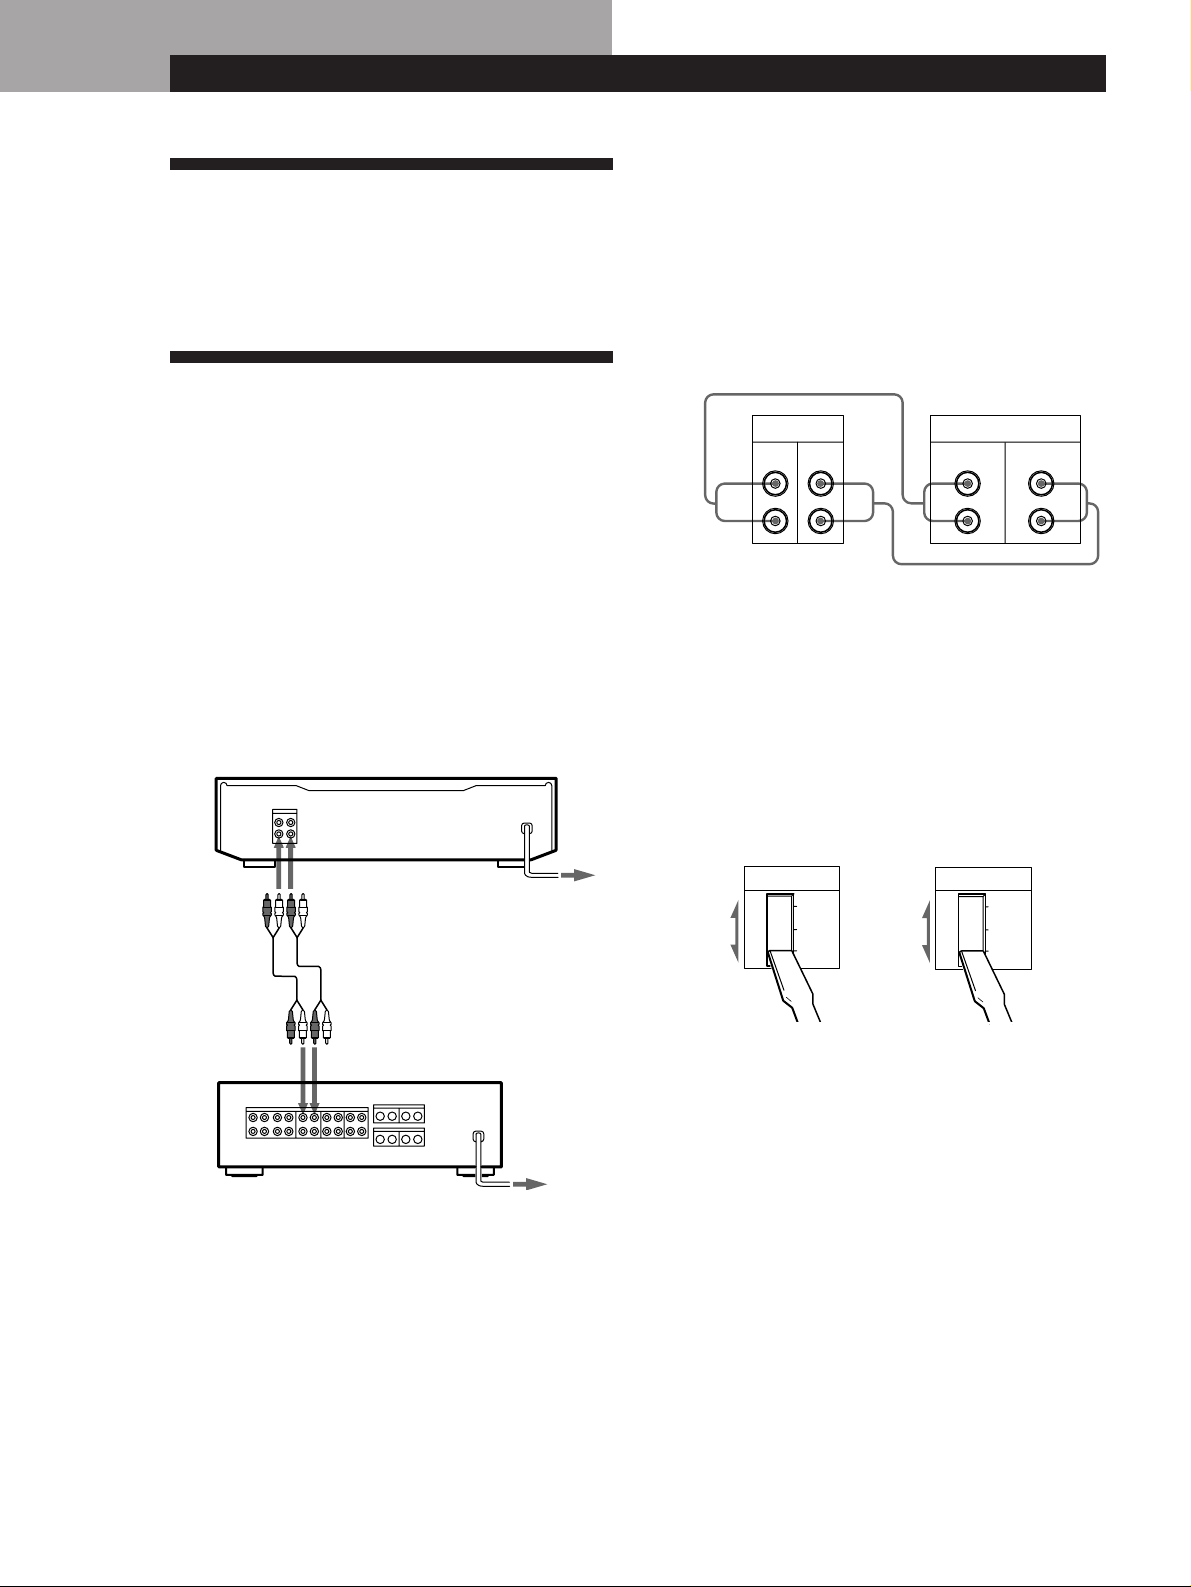
Hooking Up the System
This section describes how to hook up the tape deck to
an amplifier. Be sure to turn off the power of each
component before making the connections.
To purchasers of the TC-WR661
For information on connecting your tape deck to the TAAV561 Amplifier, refer to the Operating Instructions
included with the TA-AV561.
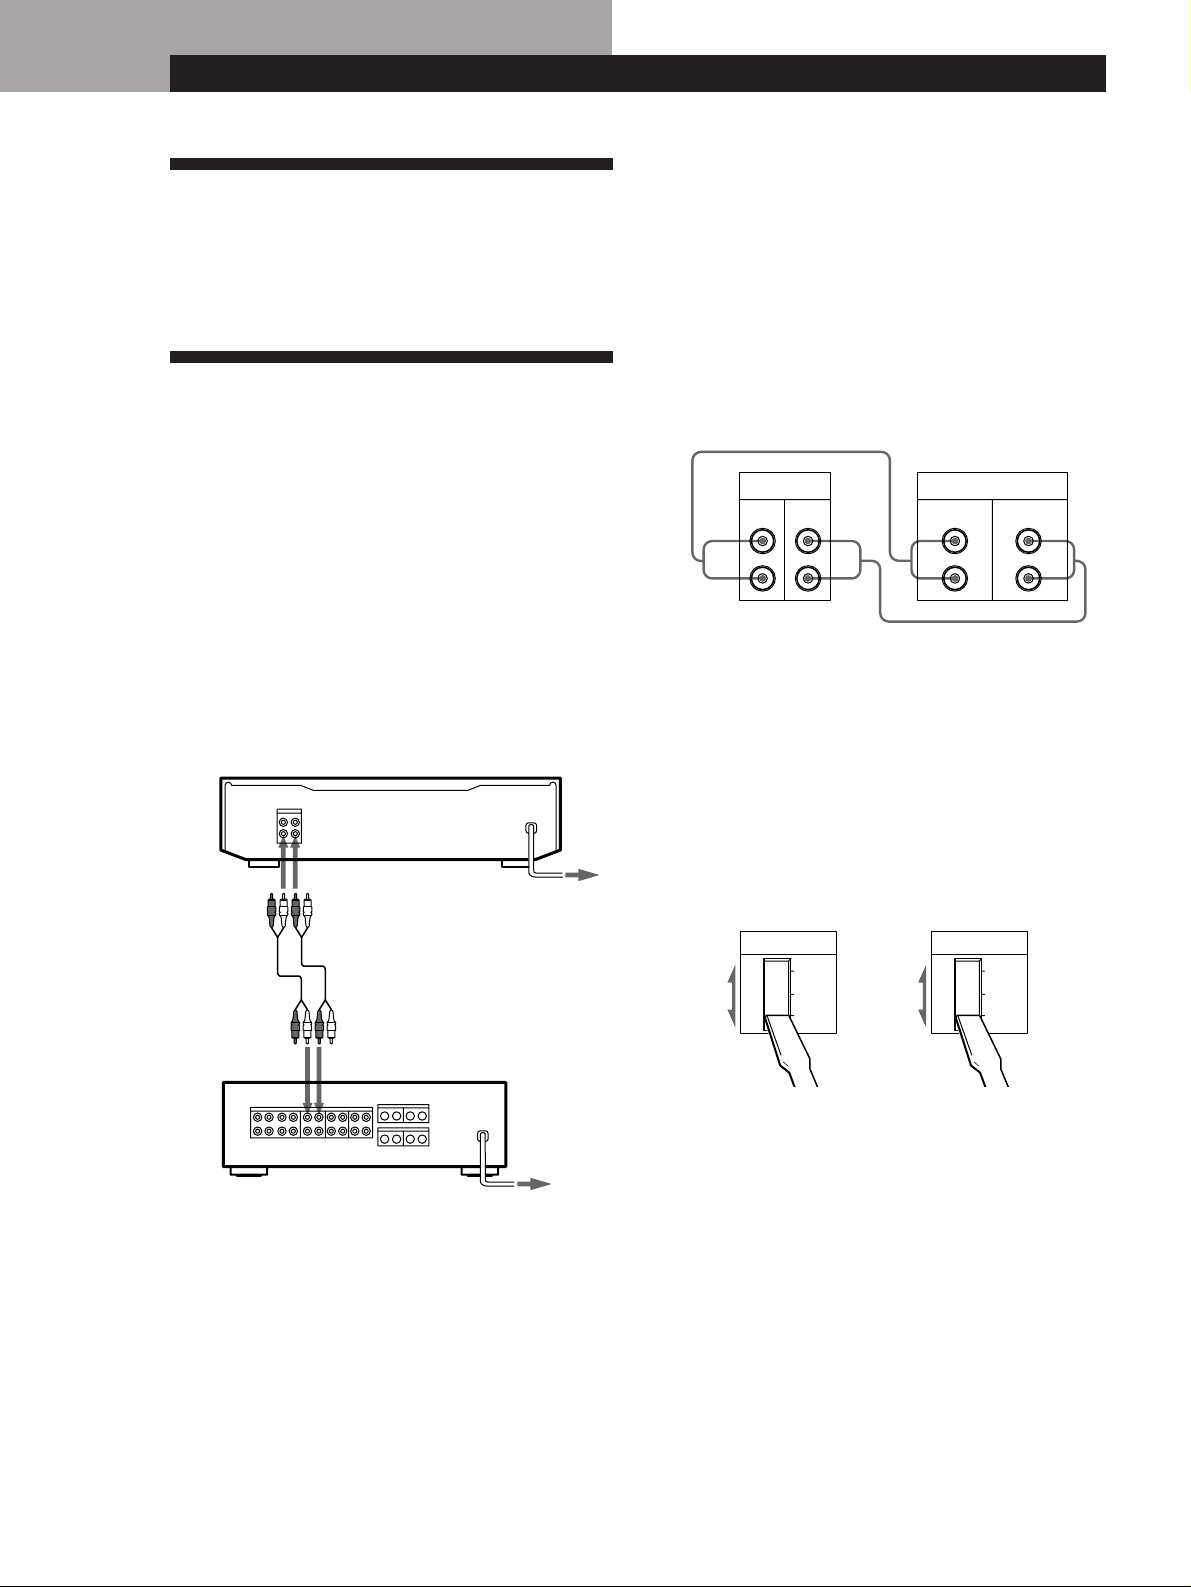
Hookups
When connecting an audio connecting cord, be sure to
match the color-coded cord to the appropriate jacks on
the components: Red (right) to Red and White (left) to
White. Be sure to make connections firmly to avoid
hum and noise.
Connect the tape deck to the amplifier as shown below.
Tape deck Amplifier
ç: Signal flow
To purchasers of the TC-WE405
Follow the instructions below to connect your tape deck to
an amplifier.
TC-WE405
to LINE IN
to REC OUT
to LINE OUT
to TAPE IN
to an AC
outlet
Amplifier
to a
wall outlet
Setting the voltage selector (only on
models supplied with a voltage selector)
Check that the voltage selector on the rear panel of the
tape deck is set to the local power line voltage. If not,
set the selector to the correct position using a
screwdriver before connecting the AC power cord to
an AC outlet.
TC-WR661TC-WE405
VOLTAGE
220V
240V
120V
VOLTAGE
220V
230
240V
120V
–
Connecting the AC power cord
Connect the AC power cord to an AC outlet.
Where do I go next?
Now you’re ready to use your tape deck.
For basic operations, go to pages 5 to 7; for advanced
operations, go to the sections starting from page 8.
EN
4
Page 5
Basic Operations
Playing a Tape
24 3
DECK A DECK B
COUNTER RESET
0
p
)
ª·
§
POWER
Basic Operations
AUTO
REC LEVEL
DOLBY NR
DIRECTION
RELAY
Da
SYNCHRO DUBBING A→B
HIGH/NORMAL
START(DECK B P)
PAUSE REC MUTE REC
PrR
0)
p
§
OFF B C
FADER ARL
ª·
5
6
4
3
2
1
0
10
PHONES
7
8
9
• See page 4 for hookup
information.
• You can use either deck for
playback.
z To locate the beginning of
a tape and start playback
automatically (Auto Play)
Press 0 while holding
down ·. For the reverse
side, press ) while holding
down ª.
z To play a tape recorded
with the Dolby NR*
system
Set DOLBY NR to the same
position that the tape was
recorded in—B or C.
z What is the Dolby NR
system?
The Dolby NR (noise
reduction) system eliminates
tape hiss noise by boosting
low-level signals in the highfrequency range during
recording, then lowering
them during playback. Type
C provides greater noise
reduction than type B.
z You can connect the
headphones to PHONES
(TC-WE405 only)
* Dolby noise reduction
manufactured under license
from Dolby Laboratories
Licensing Corporation.
“DOLBY“ and the double-D
symbol a are trademarks of
Dolby Laboratories Licensing
Corporation.
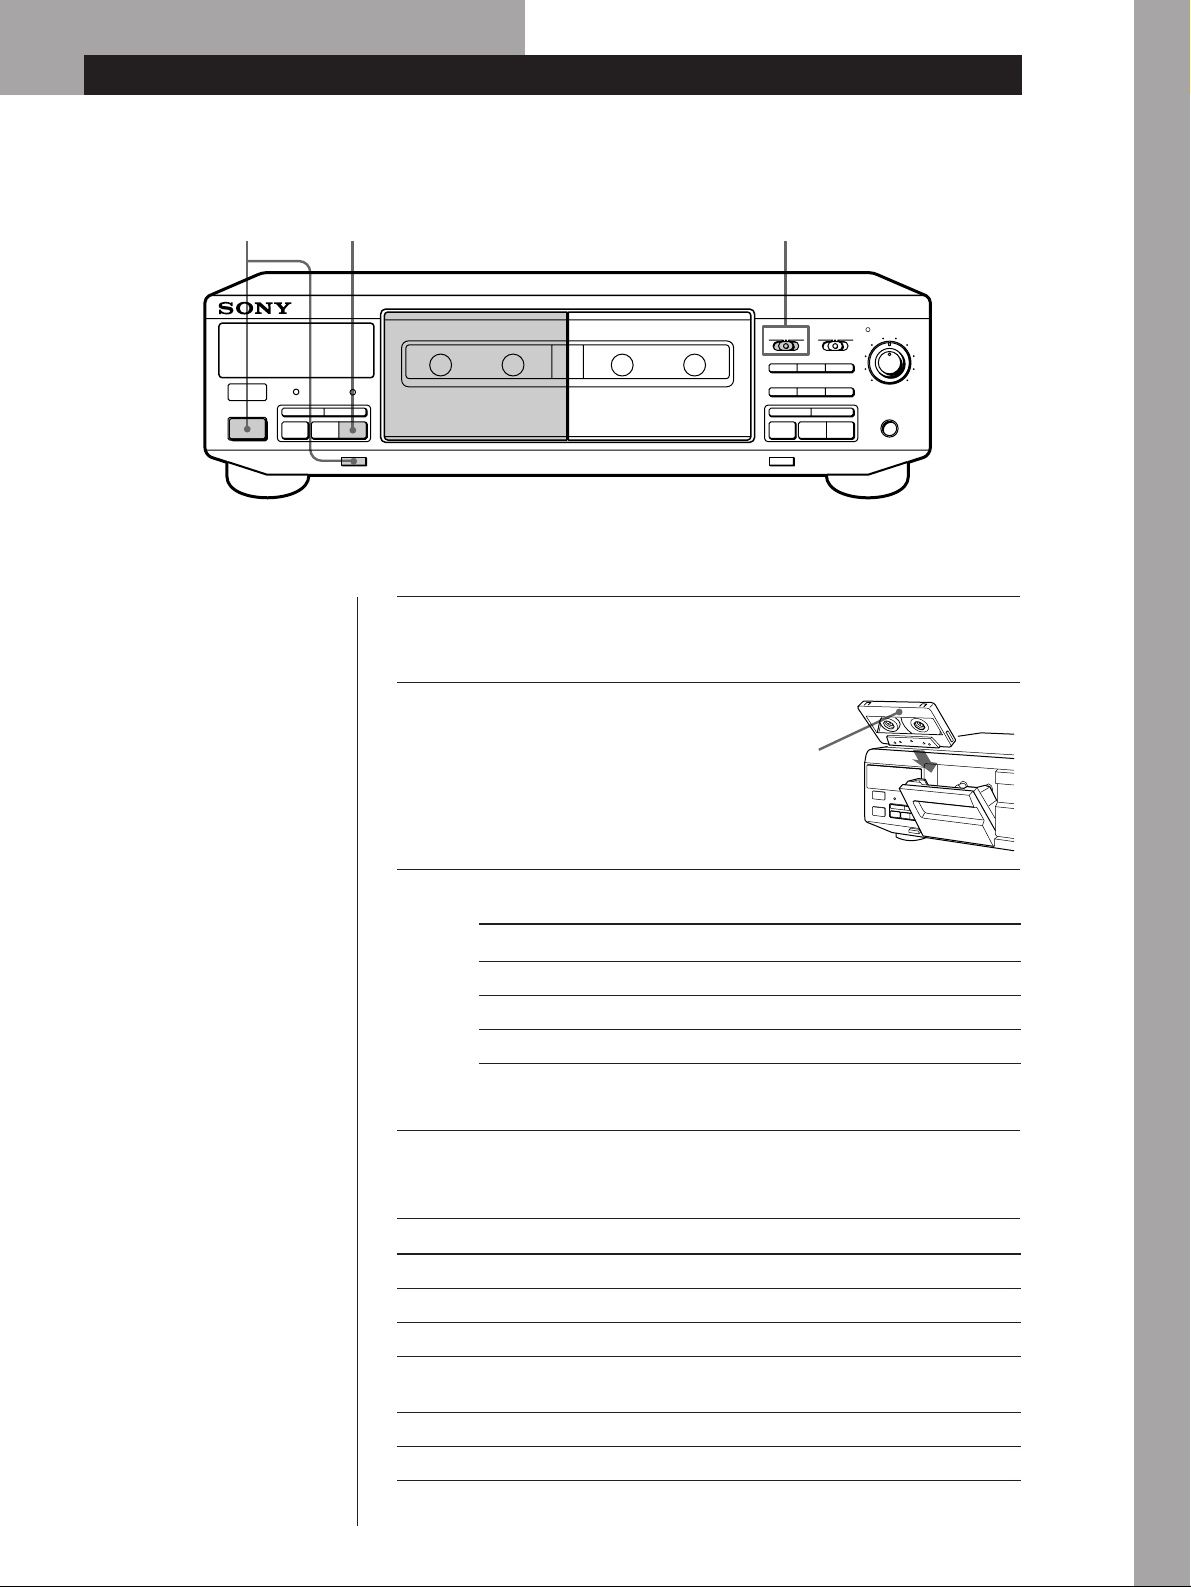
Turn on the amplifier and select the tape deck position.
1
Press POWER, and then press §
2
and insert a cassette.
With the side you want to play
facing you
Set DIRECTION.
3
To play back Set to
One side only A
Both sides continuously* a
Both decks in succession* RELAY
* The deck automatically stops after playing back five times.
Press ·.
4
The deck starts playing. Adjust the volume on the amplifier.
To
Stop playing p
Start playback from the reverse side ª
Pause (deck B only) PAUSE P. Press the button again to
Fast-forward or rewind ) or 0 when the deck is stopped
Take out the cassette § after stopping playing
Press
resume play.
Basic Operations
EN
5
Page 6
Basic Operations
Basic Operations
Recording on a Tape
234
DECK A DECK B
COUNTER RESET
0
p
)
ª·
§
POWER
DIRECTION
RELAY
Da
SYNCHRO DUBBING A→B
HIGH/NORMAL
START(DECK B P)
PAUSE REC MUTE REC
PrR
0)
p
§
DOLBY NR
OFF B C
FADER ARL
ª·
5
AUTO
REC LEVEL
5
6
4
3
7
2
8
1
9
0
10
PHONES
• See page 4 for hookup
information.
• Use deck B (on your right
hand side) for recording.
• See "Dubbing a Tape" (page
9) to make a copy of the
tape.
Note
When deck B is recording or in
recording pause, all buttons on
deck A do not work.
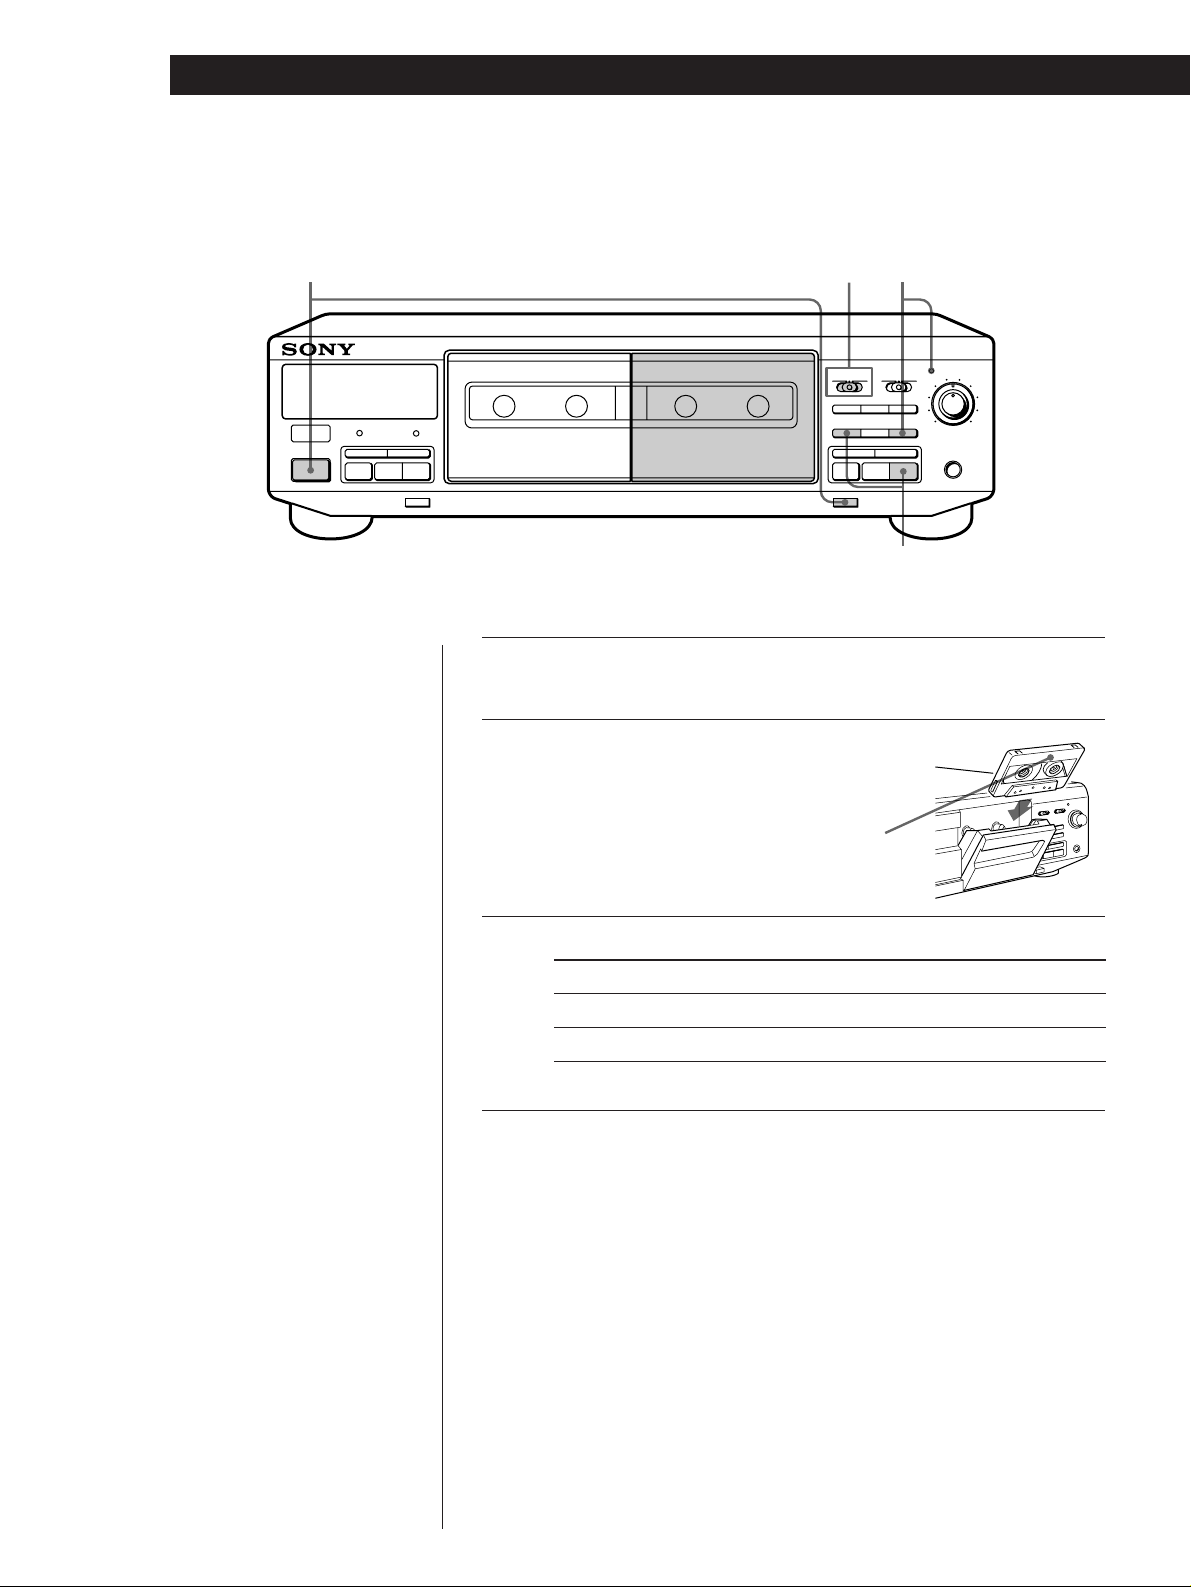
Turn on the amplifier and play the program source you want
1
to record.
Press POWER, and then press § and
2
insert a cassette into deck B.
With the side you want to record
facing you
Set DIRECTION.
3
To record on
Set to
Only one side A
Both sides* a
* Recording stops when the tape reaches the end of reverse side.
Press REC r.
4
· lights up for recording on the side facing you. If it doesn’t,
press · once.
The tape deck automatically adjusts the recording level
(see page 8). After the AUTO indicator lights up continuously,
stop playing the program source. If you wish to adjust the
recording level manually, see “To adjust the recording level
manually” on page 7.
EN
6
Page 7

Basic Operations
PHONES
POWER
DECK A DECK B
COUNTER RESET
PAUSE REC MUTE REC
START(DECK B P)
SYNCHRO DUBBING A→B
HIGH/NORMAL
FADER ARL
DIRECTION
Da
RELAY
DOLBY NR
OFF B C
AUTO
PrR
0)
p
ª·
§
0
)
p
ª·
§
REC LEVEL
5
4
3
2
1
0
6
7
8
9
10
z To protect recordings
against accidental erasure
Break out the record-protect
tab(s) (see page 11).
z The Dolby HX PRO*
system automatically
works during recording
(TC-WE405 only)
Distortion and noise in the
high-frequency response are
reduced to produce highquality sound that can be
enjoyed even during
playback on other tape decks.
Press PAUSE P or ·.
5
Recording starts.
Start playing the program source.
6
To
Stop recording
Start recording from the reverse side ª twice in Step 5
Pause PAUSE P. Press the button again to
Take out the cassette § after stopping recording
Use these switches (controls) to perform additional
operations
Press
p
resume recording.
DOLBY NR REC LEVEL
Basic Operations
* HX Pro headroom extension
originated by Bang & Olufsen
and manufactured under license
from Dolby Laboratories
Licensing Corporation.
“DOLBY“, the double-D symbol
a and “HX PRO” are
trademarks of Dolby
Laboratories Licensing
Corporation.
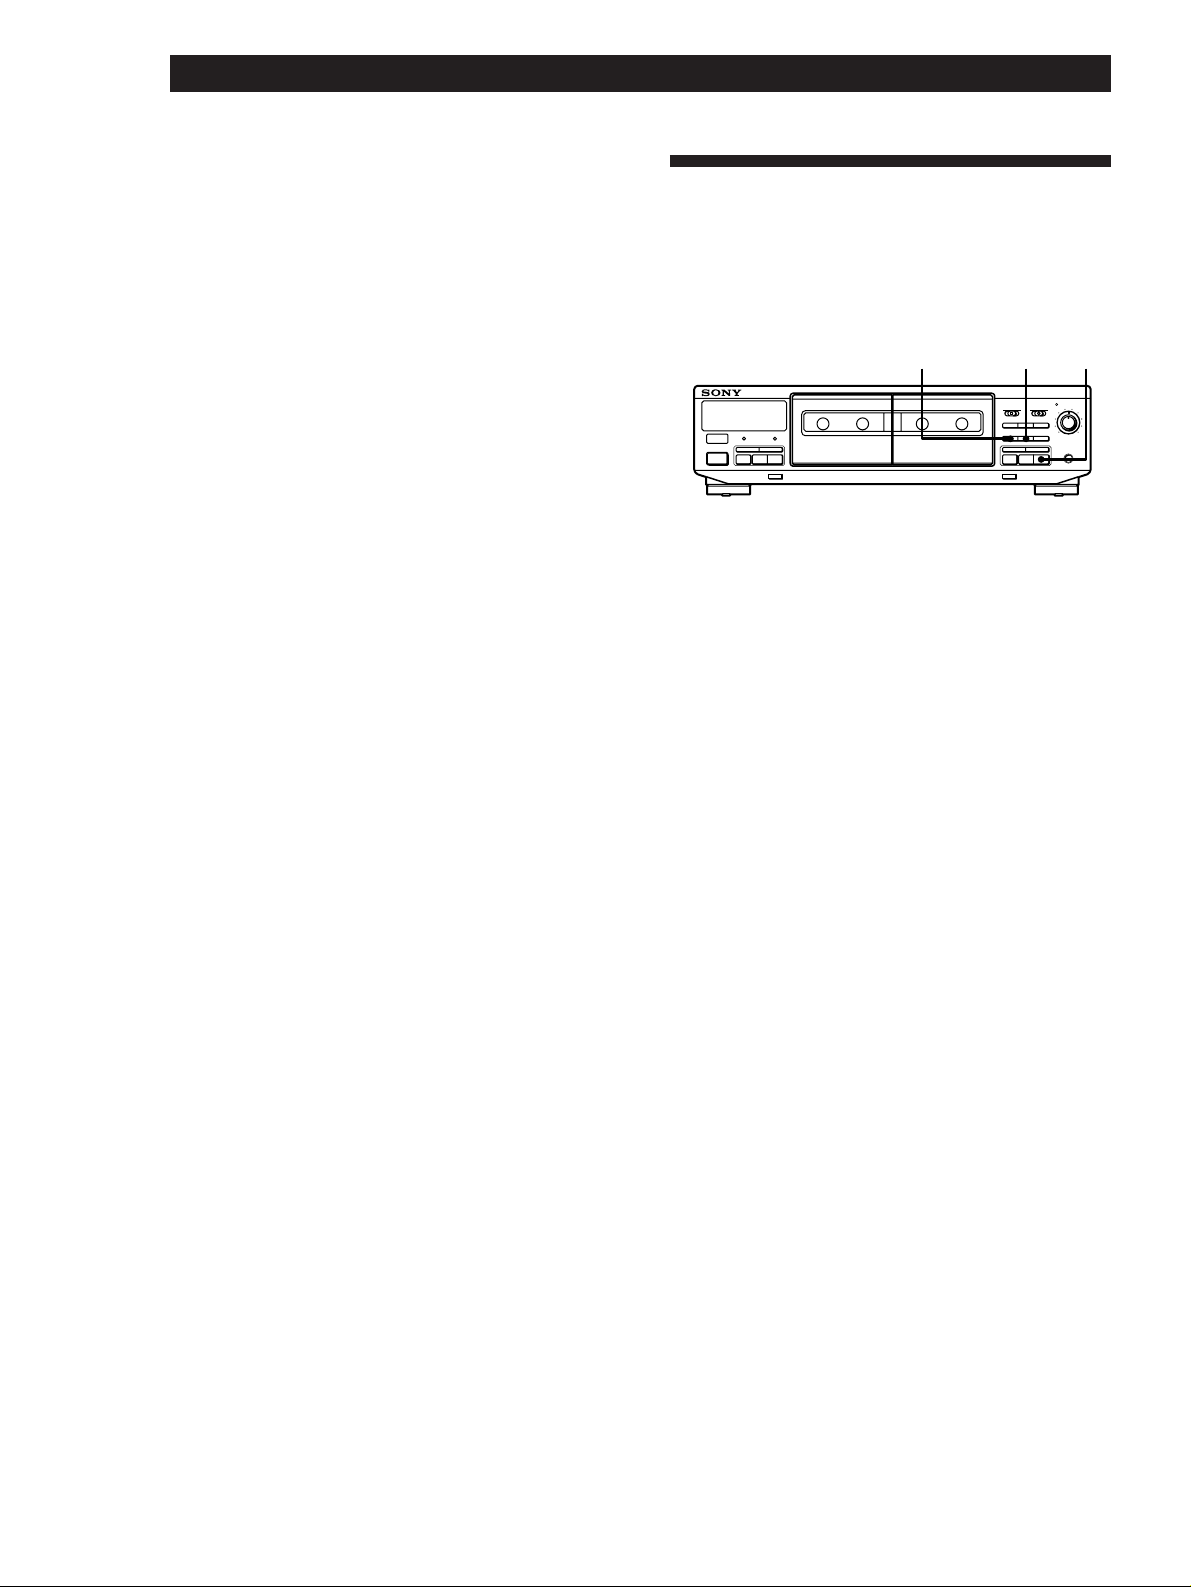
To record with the Dolby NR system
Set DOLBY NR to B or C before you start recording.
To adjust the recording level manually
After pressing REC r in Step 4 on page 6, turn
REC LEVEL so that the peak level meters reach
the recommended level for the corresponding
tape type. After completing the adjustment, stop
playing the program source, then continue the
procedure from Step 5.
–10–20–
30
–
∞
dB
L
R
For type I or
type II tape
For type IV tape
4
8
EN
7
+
+40
–
Page 8

Advanced Recording Operations
Advanced Recording Operations
Adjusting the Recording Level
Automatically (Auto Rec Level)
The Auto Rec Level function automatically measures
the peak signal level and adjusts the recording level
accordingly.
PAUSE P REC r·
AUTO
REC LEVEL
DIRECTION
DOLBY NR
RELAY
OFF B C
FADER ARL
PrR
0)
ª·
5
6
4
3
7
2
8
1
9
0
10
PHONES
Da
SYNCHRO DUBBING A→B
HIGH/NORMAL
START(DECK B P)
DECK A DECK B
COUNTER RESET
0
)
POWER
p
ª·
§
PAUSE REC MUTE REC
p
§
1 Follow Steps 1 to 3 of “Recording on a Tape” on
page 6.
Make sure that record-protect tabs on the cassette
have not been removed.
2 Press REC r.
The AUTO indicator flashes and the deck
automatically adjusts the recording level. The
AUTO indicator lights up continuously after the
recording level has been adjusted.
3 Press PAUSE P or ·.
Recording starts.
To cancel the Auto Rec Level function
Press ARL or turn REC LEVEL so that the AUTO indicator
goes off. If you do either of these during recording,
recording will continue but with the Auto Rec Level function
turned off.
z You should adjust the recording level manually with
REC LEVEL in the following cases:
—The recording level cannot be adjusted properly due
to excessive noise in the program source.
—The program source level is too low and the recording
level does not increase.
During a quiet passage in a program source such as
classical music, the recording level may not increase
for some time. If a high sound level is expected later
on in the track, play that portion first so that the right
adjustment can be obtained.
—The recording level does not decrease for a long time.
The Auto Rec Level function may not work properly
when you try to record sound produced by a graphic
equalizer that has extremely high-level signals.
z To record with the optimum recording level
• To prevent changes in the recording level after
recording starts, press REC r while playing the
highest sound level portion of the program source to
be recorded. The result is a more natural-sounding
recording.
• If you play the entire program source after the AUTO
indicator has stopped flashing and is lit continuously,
the deck will set the recording level for the portion of
the program source with the highest signal level.
z Recording level setting remains even after the
recording has ended
After you have finished recording with the Auto Rec
Level function, the AUTO indicator remains on and the
recording level setting remains the same. To cancel the
setting, do one of the following:
• Press ARL to turn off the AUTO indicator
• Turn REC LEVEL
• Turn the deck off.
To stop recording
Press p.
z What is the Auto Rec Level function?
The Auto Rec Level function automatically sets the
recording level according to the peak signal level of the
program source. While the AUTO indicator is flashing,
the deck sets the recording level as high as possible
without causing distortion. If the signal level rises
excessively after the start of recording, the deck
gradually decreases the recording level.
EN
8
Page 9

Advanced Recording Operations
Fading In and Out (Fader)
You can gradually increase the recording level at the
beginning of a recording (fade in) or gradually
decrease the recording level at the end of a recording
(fade out).
It is convenient to use this function, for example, when
the tape reaches to its end and you don’t want the track
to be cut off abruptly.
You can do fade in or out recording only when you
have adjusted the recording level manually
(see page 7).
FADER
AUTO
REC LEVEL
DIRECTION
DOLBY NR
RELAY
OFF B C
FADER
PrR
0)
p
ª·
§
5
6
4
3
7
2
8
ARL
1
9
0
10
PHONES
Da
SYNCHRO DUBBING A→B
HIGH/NORMAL
START(DECK B P)
DECK A DECK B
COUNTER RESET
0
)
POWER
p
ª·
§
PAUSE REC MUTE REC
To Do the following:
Fade in 1 Follow Steps 1 to 4 of “Recording on a
Fade out Press FADER when you want to start
Tape” on page 6.
2 Press FADER. During fade-in, the
AUTO indicator flashes, then goes off
when the fade-in has completed.
fading out while recording. When the
fade-out has completed, “REC” flashes
in the display and the deck pauses.
Note
Fade-in or fade-out is not possible when REC LEVEL is set to
0 (minimum).
Dubbing a Tape
You can copy a tape in deck A to a tape in deck B at
normal or high speed.
p
PAUSE P
DECK A DECK B
COUNTER RESET
0
)
POWER
p
ª·
§
1 Insert the recorded cassette into deck A and a
blank cassette into deck B.
Make sure the record-protect tabs on the cassette
in deck B have not been removed.
2 Select the side(s) to be recorded on.
To record on
One side A
Both sides a.
3 Select the dubbing speed.
To select
Normal speed
High speed
HIGH / NORMAL
DIRECTION
DIRECTION
RELAY
Da
SYNCHRO DUBBING A→B
HIGH/NORMAL
FADER ARL
START(DECK B P)
PAUSE REC MUTE REC
PrR
0)
p
§
Set DIRECTION to
Recording on the reverse side on
deck B starts independently of
playback on deck A.
RELAY.
Recording on the reverse side on
deck B starts simultaneously with
playback of the reverse side on
deck A.
Press HIGH/NORMAL
Once
Twice
DOLBY NR
OFF B C
ª·
ª / ·
AUTO
REC LEVEL
5
6
4
3
7
2
8
1
9
0
10
PHONES
“HIGH” or “NORM” appears in the display.
The tape deck changes to dubbing standby.
4 Select the side from which to start dubbing.
To record from
The front side ·
The reverse side ª
Press
5 Press PAUSE P to start dubbing.
To stop dubbing
During
Normal-speed dubbing
High-speed dubbing
Press
p on deck B
p on either deck
EN
9
Page 10
Advanced Recording Operations
PHONES
POWER
DECK A DECK B
COUNTER RESET
PAUSE REC MUTE REC
START(DECK B P)
SYNCHRO DUBBING A→B
HIGH/NORMAL
FADER ARL
DIRECTION
Da
RELAY
DOLBY NR
OFF B C
AUTO
PrR
0)
p
ª·
§
0
)
p
ª·
§
REC LEVEL
5
4
3
2
1
0
6
7
8
9
10
PAUSE P REC MUTE R·
z During high-speed dubbing
Only p is operative.
Inserting a Blank Space During
z You don‘t have to adjust the recording level or
select the Dolby NR system during dubbing
Dubbing is automatically performed with the same
recording level and Dolby NR system as the original in
deck A. If, however, you want to monitor the sound
during normal-speed dubbing, set DOLBY NR to match
the tape in deck A (see page 5).
Note
If a TV set is placed near the tape deck, noise may occur
during high-speed dubbing. In that case, turn the television
set off or move it away from the tape deck.
Dubbing only specific portions
You can do this only during the normal-speed
dubbing.
1 Press p on deck A at the portion you want to
skip.
Deck B changes to recording pause.
2 Locate the point you want to resume recording on
deck A, then stop the tape.
Recording (Record Muting)
You can insert a blank space of 4 seconds between each
track or erase unwanted portions on a tape.
1 Start recording.
2 Press REC MUTE R where you want to insert a
blank space.
“REC” flashes in the display and a blank is
recorded on the tape.
After 4 seconds, P lights up and the tape deck
changes to recording pause.
3 Press PAUSE P or · to resume recording.
3 Press PAUSE P to resume dubbing.
z If you want to insert a blank space longer than 4
seconds
Hold down REC MUTE R as long as you want. After 4
seconds, “REC” flashes faster.
When you release REC MUTE R, P lights up and the
tape deck changes to recording pause.
Press PAUSE P or · to resume recording.
EN
10
Page 11
Additional Information
Additional Information
Precautions
On safety
• Do not disassemble the cabinet — this may result in an
electrical shock. Refer servicing to qualified personnel
only.
• Should any solid object or liquid fall into the cabinet,
unplug the tape deck and have it checked by qualified
personnel before operating it any further.
On power sources
• Before operating the tape deck, check that the operating
voltage of the tape deck is identical with your local power
supply. The operating voltage is indicated on the
nameplate at the rear of the tape deck.
• The unit is not disconnected from the AC power source
(mains) as long as it is connected to the wall outlet, even if
the unit itself has been turned off (not applicable to
European models).
• If you are not going to use the tape deck for a long time,
be sure to disconnect the tape deck from the wall outlet.
To disconnect the AC power cord, grasp the plug itself;
never pull the cord.
• AC power cord must be changed only at the qualified
service shop.
On operation
• Because of a safety mechanism, the function buttons will
not operate if the cassette holder is not completely closed,
if there is no cassette in the cassette holder, or if a cassette
has been incorrectly inserted into the cassette holder.
• Be sure to stop the tape before turning off the tape deck.
Otherwise, the tape may be damaged.
On placement
• Place the tape deck in a location with adequate ventilation
to prevent heat build-up in the tape deck.
• Do not place the tape deck:
— on a soft surface such as a rug that might block the
ventilation holes on the bottom.
— in a location near heat sources.
— in a place subject to direct sunlight.
— in an inclined position.
— in a place subject to excessive dust or mechanical shock.
On cleaning the tape deck
Clean the cabinet, panel and controls with a soft cloth
slightly moistened with a mild detergent solution. Do not
use any type of abrasive pad, scouring powder or solvent
such as alcohol or benzine.
Notes on Cassette Tapes
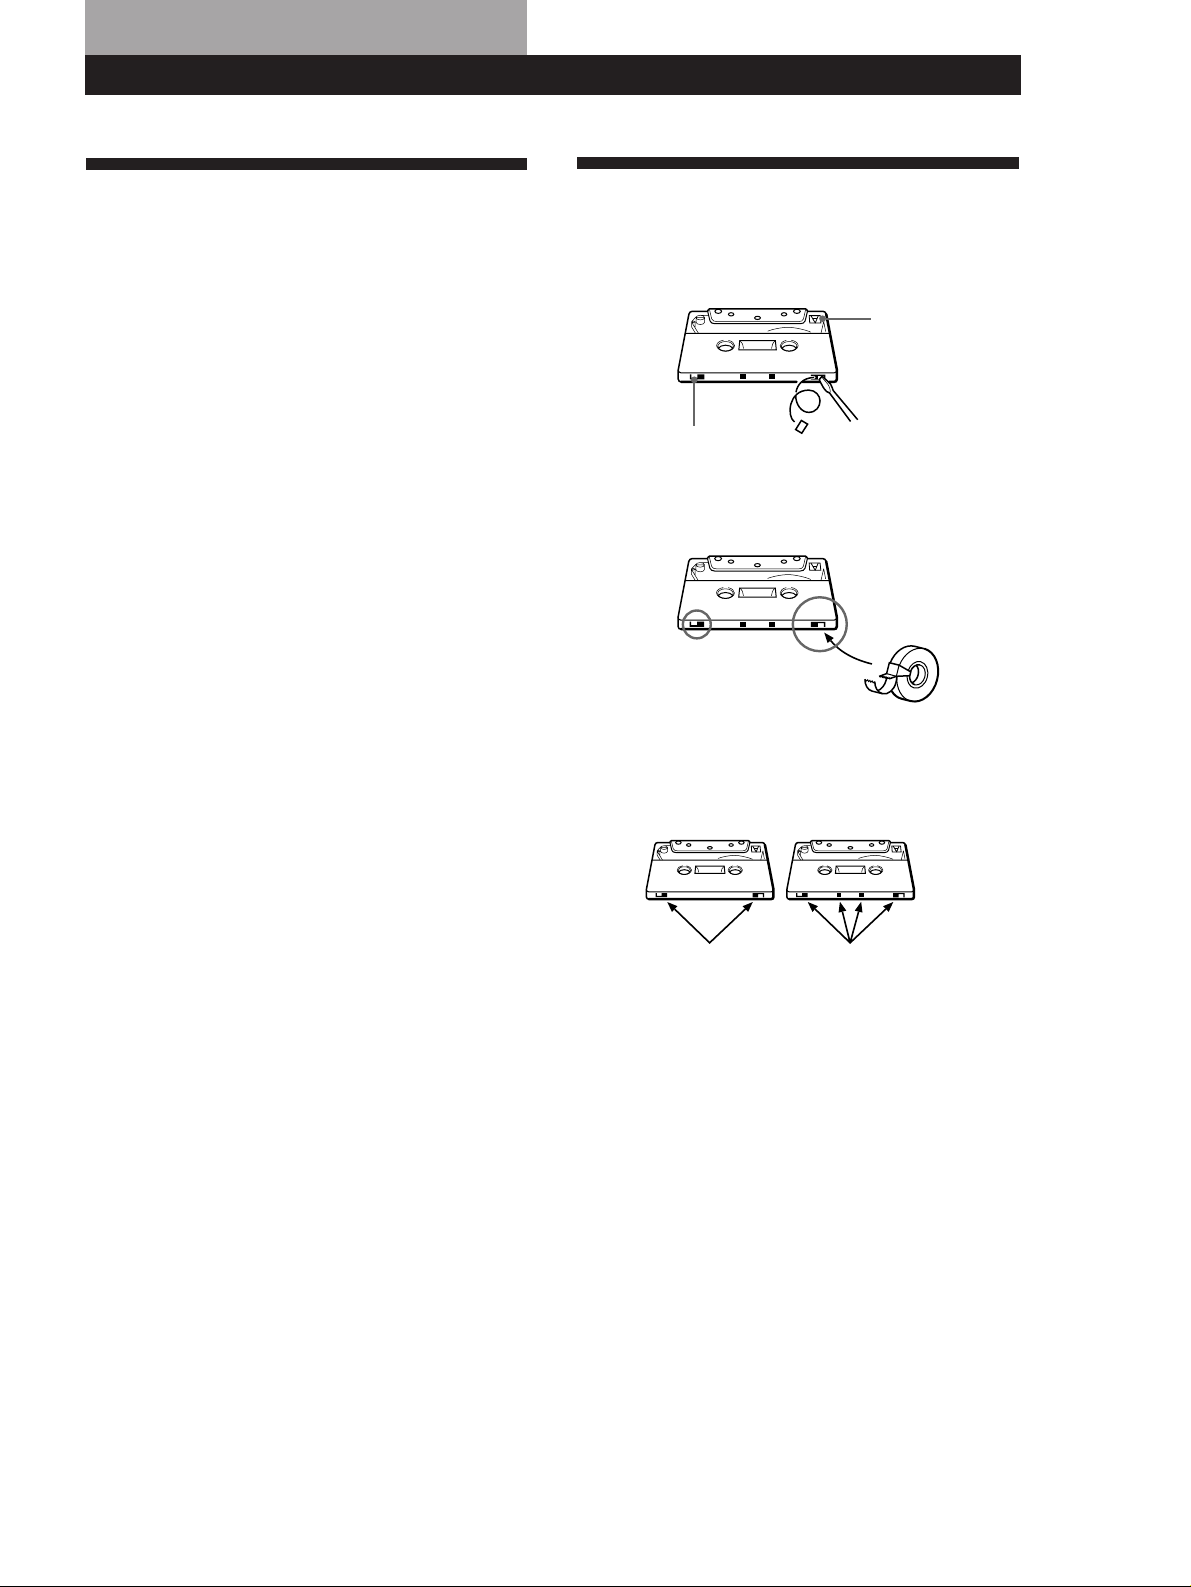
To protect a recording on side A or B
Break out the respective tab.
Side A
Tab for side B
To record on a tape with a missing record-protect tab
Cover the respective tab hole with adhesive tape.
When you are using a type II or type IV tape, be careful not
to cover the detector slots that the deck uses to determine
the tape type.
Type II
Detector slots
On tapes longer than 90 minutes
We do not recommend the use of tapes longer than 90
minutes except for a long continuous recording or playback.
They are very thin and tend to stretch easily.
On handling cassettes
• To prevent the heads and tape path from getting dirty,
avoid touching the tape surface of a cassette.
• Place cassettes away from equipment with magnets, such
as speakers and amplifiers, which may cause tape
distortion or erase the recordings.
• Do not expose cassettes to direct sunlight, extremely cold
temperature, or moisture.
Tab for side A
Type IV
Detector slots
If you have any questions or problems concerning your
tape deck, please consult your nearest Sony dealer.
11
EN
Page 12

Additional Information
Cleaning
Head assembly of deck B
Pinch rollers
Capastans
Erasing head
Recording/playback head
DECK A DECK B
COUNTER RESET
0
)
POWER
p
ª·
§
SYNCHRO DUBBING A→B
START(DECK B P)
DIRECTION
Da
HIGH/NORMAL
PAUSE REC MUTE REC
PrR
0)
p
§
Demagnetizing the heads
After 20 to 30 hours of use, or when you notice a
hissing sound or loss of high frequencies, demagnetize
the heads with a commercially available demagnetizer
for tape decks. Please refer to the instructions of the
demagnetizer.
AUTO
REC LEVEL
DOLBY NR
5
RELAY
OFF B C
6
4
3
7
2
8
FADER ARL
1
9
0
10
PHONES
ª·
§
Cleaning the heads and tape path
Clean the heads and tape path of the tape deck after
every 10 hours of operation to guard against:
• low-quality sound
• a decrease in sound level
• excessive wow or flutter
• sound dropout
• incomplete erasure
• impairment of recording function
To ensure better recording, we recommend that you
clean the heads and tape path before every recording.
1 Press § to open the cassette holder. Grasp the
front cover on both sides and gently lift to remove
it.
2 With the tape deck turned off, wipe the heads, the
pinch rollers and the capstans with a cotton swab
slightly moistened with alcohol or a commercially
available cleaning fluid for tape decks.
3 Replace the front cover.
12
EN
Page 13

Troubleshooting
If you’ve experienced any of the following difficulties
while using the tape deck, use this troubleshooting
guide to help you remedy the problem. Should the
problem persist, consult your nearest Sony dealer.
The function buttons do not work.
/ The tape deck has been just turned on and does
not operate for about 3 seconds. Wait until P
stops flashing.
/ Check that the cassette is inserted correctly and
the cassette holder is closed completely.
The tape deck does not play or record.
/ There is no cassette in the cassette holder.
/ The tape has come to the end.
/ The tape is slack. Take up the tape slack.
/ The record-protect tab has been removed from
the cassette (see page 11).
/ Make sure the amplifier setting is correct.
/ Check that the tape deck connections are
secure.
/ The heads and tape path are dirty. Clean them
(see page 12).
/ The recording/playback head is magnetized.
Demagnetize it (see page 12).
Additional Information
There is excessively loud tape transport noise during
fast-forwarding or rewinding.
/ This noise is caused by the cassette and is not a
mechanical problem.
§ does not work.
/ There has been a power failure or the power
cord has been disconnected during tape
operation. Reconnect the power.
There is a short break in sound output during playback.
/ You pressed ), 0, or p on one deck while
the other deck was playing.
Or you pressed PAUSE P, ·, or ª on deck B
while deck A was playing.
There is excessive wow, flutter or sound drop-out.
/ The capstans and pinch rollers are dirty. Clean
them (see page 12).
There is a decrease in sound level, sound drop-out, or
poor reproduction of high frequencies./The tape does not
erase completely./Noise increases.
/ The recording/playback or erasing head and
tape path are dirty. Clean them (see page 12).
/ The recording/playback or erasing head is
magnetized. Demagnetize it (see page 12).
There is hum or noise.
/ The tape deck is placed near a TV or VCR.
Move the tape deck away from the TV or VCR.
/ The tape deck is placed on or under the
amplifier. Move the tape deck away from the
amplifier.
There is an unbalanced tone.
/ Check that DOLBY NR position is the same as
when the tape was recorded.
/ The tape deck is placed near a TV or VCR.
Move the tape deck away from the TV or VCR.
The tape stops before the tape has been fully rewound.
/ The tape is slack. Take up the tape slack.
/ The cassette shell is bent. Use another cassette.
13
EN
Page 14

Additional Information
Specifications
General
Power requirements
System
Recording system
4-track 2-channel stereo
Fast-winding time (approx.)
180 sec. (with Sony C-60 cassette)
Bias
AC bias
Signal-to-noise ratio (at peak level and weighted with Dolby NR off)
Type I tape, Sony Type I (NORMAL): 55 dB
Type II tape, Sony Type II (HIGH): 57 dB
Type IV tape, Sony Type IV (METAL): 58 dB
S/N ratio improvement (approximate values)
With Dolby B NR on: 5 dB at 1 kHz, 10 dB at 5 kHz
With Dolby C NR on: 15 dB at 500 Hz, 20 dB at 1 kHz
Harmonic distortion
0.4% (with Type I tape, Sony Type I (NORMAL):
160 nWb/m 315 Hz, 3rd H.D.)
1.8% (with Type IV tape, Sony Type IV (METAL):
250 nWb/m 315 Hz, 3rd H.D.)
Frequency response (Dolby NR off)
Type I tape, Sony Type I (NORMAL): 30 - 16,000 Hz
(±3 dB, IEC)
Type II tape, Sony Type II (HIGH): 30 - 17,000 Hz
(±3 dB, IEC)
Type IV tape, Sony Type IV (METAL): 30 - 19,000 Hz
(±3 dB, IEC)
30 - 13,000 Hz (±3 dB, –4 dB recording)
Type I tape, Sony Type I (NORMAL): 20 - 17,000 Hz
(±6 dB)
Type II tape, Sony Type II (HIGH): 20 - 18,000 Hz
(±6 dB)
Type IV tape, Sony Type IV (METAL): 20 - 20,000 Hz
(±6 dB)
Where purchased Power requirements
U.S.A. and Canada 120 V AC, 60 Hz
U.K. and Continental Europe 220 - 230 V AC, 50/60 Hz
Australia 240 V AC, 50/60 Hz
Other countries TC-WE405:
Power consumption
120/220/240 V AC, 50/60 Hz
TC-WR661:
120/220/230 - 240 V AC, 50/60 Hz
18 W
Dimensions (approx) (w/h/d)
430 × 120 × 305 mm (w/h/d)
(17 × 4 3/
4 × 12
1
/
8 inches)
including projecting parts and controls
Mass (approx.)
3.8 kg (8 lbs 7 oz)
Supplied accessories
Audio connecting cords (2 phono plugs - 2 phono
plugs) (2)
Optional accessory
Remote commander RM-J910
For more information on the availability of the remote
commander, contact your nearest Sony dealer.
Design and specifications are subject to change without
notice.
14
Wow and flutter
±0.15% W. Peak (IEC)
0.1% W. RMS (NAB)
±0.2% W. Peak (DIN)
Inputs
Line inputs (phono jacks)
Sensitivity : 0.16 V
Input impedance : 47 kilohms
Outputs
Line outputs (phono jacks)
Rated output level : 0.5 V at a load impedance of
47 kilohms
Load impedance : Over 10 kilohms
Headphones (stereo phone jack) (TC-WE405 only)
Output level : 0.25 mW at a load impedance of
32 ohms
EN
Page 15

Index
Index
A, B
Adjusting
recording level automatically. See Auto rec
level
recording level manually 7
volume 5
Audio connecting cord 4, 14
Auto play 5
Auto rec level 8
C
Cassette. See Tape
Cleaning
cabinet 11
heads and tape path 12
Connecting. See Hooking up
D, E, F, G
Dolby HX PRO system 7
Dolby NR system 5, 7
Dubbing
high-speed dubbing 9
normal-speed dubbing 9, 10
only specific portions 10
Fader 9
Fading
in. See Fader
out. See Fader
H, I, J, K, L, M, N, O
Heads
cleaning 12
demagnetizing 12
Hooking up
hookups 4
overview 4
Insert
blank space 10
cassette 5, 6
Index
Names of Controls
Buttons
ARL (automatic recording level adjustment) 8
FADER 9
HIGH/NORMAL 9
PAUSE P 5, 7 - 10, 13
REC (recording) r 6 - 8
REC MUTE (record muting) R 10
§ (eject) 5 - 7, 12, 13
p (stop) 5, 7 - 10, 13
· (forward play) 5 - 10, 13
ª (reverse play) 5, 7, 9, 13
), 0 (fast-forwarding and rewinding) 5, 13
Switches
DIRECTION 5, 6, 9
DOLBY NR 5, 7, 10, 13
POWER 5, 6
Controls
REC (recording) LEVEL 7 - 9
Jacks
LINE IN 4
LINE OUT 4
PHONES 5
Others
AUTO indicator 6, 8, 9
Cassette holder 5, 6, 12
Peak level meters 7
P, Q, R, S
Playing
auto play 5
basic play 5
Recording 6
Record muting 10
Specifications 14
T, U, V, W, X, Y, Z
Tape
ejecting 5, 7
notes 11
path cleaning 12
protect the recording 11
type 11
Troubleshooting 13
Unpacking 4
15
EN
Page 16

AVERTISSEMENT
Afin d’éviter tout risque
d’incendie ou
d’électrocution, ne pas
exposer cet appareil à la
pluie ou à l’humidité.
F
2
Page 17

Bienvenue!
Merci pour l’achat de cette platine à
cassette stéréo Sony. Avant de la mettre
en service, veuillez lire attentivement ce
mode d’emploi et le conserver pour
toute référence future.
A propos de ce
Table des matièr es
Préparatifs
Déballage 4
Raccordement de la platine 4
Lecture d’une cassette 5
Enregistrement sur une cassette 6
manuel
Les instructions de ce mode d’emploi
concernent les modèles TC-WE405 et
TC-WR661. Vérifiez le numéro de votre
modèle sur le panneau arrière de la
platine. Les illustrations de ce mode
d’emploi représentent le TC-WE405.
Toute différence de fonctionnement est
clairement indiquée dans le texte, par
exemple “TC-WE405 uniquement”.
Type de différences
Modèle WR661WE405
Fonction
Dolby HX PRO
Prise PHONES
Convention
Le symbole suivant est utilisé dans ce
mode d’emploi:
Indique des conseils et des
suggestions qui facilitent une
z
manipulation.
•
•
Fonctions élaborées pour l’enregistrement
Réglage automatique du niveau d’enregistrement (fonction d’autoréglage du son) 8
Fondu à l’ouverture et fondu à la fermeture (Fader) 9
Copie d’une cassette 9
Insertion d’un espace vierge pendant l’enregistrement
(Silencieux d’enregistrement) 10
Informations complémentaires
Précautions 11
Remarques sur les cassettes 11
Nettoyage 12
En cas de panne 13
Spécifications 14
Index 15
F
F
3
Page 18
Ç
ç
REC OUT IN
LINE
OUTIN
L
R
TAPE
L
R
L
R
Préparatifs
Déballage
Vérifiez si les éléments suivants se trouvent bien dans
l’emballage:
• Cordons de liaison audio (2)
Raccordement de la platine
Cette partie explique comment raccorder la platine à
l’amplificateur. N’oubliez pas d’éteindre les deux
appareils avant de les raccorder.
Pour les acheteurs du TC-WR661
Consultez le mode d’emploi de l’amplificateur TA-AV561
pour le raccordement de votre platine à cassette à cet
appareil.
Raccordements
Quand vous branchez un cordon de liaison audio,
vérifiez la couleur de la prise et celle de la fiche du
cordon: Fiche rouge (droite) dans la prise rouge et
fiche blanche (gauche) dans la prise blanche. Veillez à
bien enfoncer les fiches pour éviter tout ronflement ou
bruit.
Raccordez la platine à l’amplificateur comme indiqué
ci-dessous.
Platine à cassette Amplificateur
Pour les acheteurs du TC-WE405
Suivez les instructions ci-dessous pour raccorder votre
platine à cassette à un amplificateur.
TC-WE405
vers LINE IN
vers REC OUT
vers LINE OUT
vers TAPE IN
vers une prise
secteur
Amplificateur
vers une prise
murale
ç: Flux du signal
Réglage du sélecteur de tension
(uniquement pour les modèles avec
sélecteur de tension)
Vérifiez que le sélecteur de tension sur le panneau
arrière de la platine à cassette est réglé sur la tension
du secteur local. Si ce n’est pas le cas, réglez-le sur la
position correcte avec un tournevis avant de brancher
le cordon d’alimentation secteur sur une prise secteur.
TC-WR661TC-WE405
VOLTAGE
220V
240V
120V
VOLTAGE
220V
230
240V
120V
–
Branchement du cordon d’alimentation
secteur
Branchez le cordon sur une prise secteur.
Que faire ensuite?
Maintenant la platine à cassette est prête.
Pour les fonctions de base, voir pages 5 à 7; pour les
fonctions élaborées, voir les paragraphes à partir de la page 8.
F
4
Page 19

Fonctionnement de base
Lecture d’une cassette
24 3
Da
SYNCHRO DUBBING A→B
START(DECK B P)
POWER
DECK A DECK B
COUNTER RESET
0
)
p
ª·
§
DIRECTION
OFF B C
RELAY
HIGH/NORMAL
FADER ARL
PAUSE REC MUTE REC
PrR
0)
p
ª·
§
DOLBY NR
AUTO
REC LEVEL
5
6
4
3
7
2
8
1
9
0
10
PHONES
• Voir page 4 pour le
raccordement.
• Vous pouvez utiliser les deux
platines pour la lecture.
z Pour localiser le début
d’une bande et
commencer la lecture
automatiquement (Auto
Play)
Appuyez sur 0 tout en
maintenant · enfoncé. Pour
la face arrière, appuyez sur
) en maintenant ª
enfoncé.
z Pour écouter une cassette
avec le système de
réduction de bruit Dolby*
Sélectionnez pour DOLBY
NR le même réglage - B ou C
- que lors de l’enregistrement
de la cassette.
z Qu’est-ce que le système
de réduction de bruit
Dolby?
Le système de réduction
Dolby élimine le ronflement
en accentuant les signaux de
basses fréquences sur la
plage de hautes fréquences
pendant l’enregistrement,
puis en les réduisant pendant
la lecture. Le type C assure
une réduction du bruit
supérieure à celle du type B.
z Vous pouvez brancher le
casque sur PHONES (TCWE405 uniquement)
* Réduction de bruit Dolby
fabriquée sous licence de Dolby
Laboratories Licensing
Corporation.
DOLBY et le symbole double-D
a sont des marques de Dolby
Laboratories Licensing
Corporation.
Allumez l’amplificateur et sélectionnez la fonction platine.
1
Appuyez sur POWER puis sur § et introduisez une cassette.
2
Tournez la face à lire vers vous.
Réglez DIRECTION.
3
Pour reproduire Réglez sur
Une face seulement A
Les deux faces continuellement* a
Les deux platines successivement* RELAY
* La platine s’arrête automatiquement au bout de cinq lectures
consécutives.
Appuyez sur ·.
4
La lecture commence. Réglez le volume sur l’amplificateur.
Appuyez surPour
Arrêter la lecture p
Démarrer la lecture sur la face arrière ª
Faire une pause (platine B uniquement) PAUSE P. Appuyez une nouvelle fois
sur cette touche pour poursuivre la
lecture.
Avancer rapidement ou rebobiner la
bande
Sortir la cassette § après avoir arrêté la lecture
) ou 0 quand la platine est arrêtée
Fonctionnement de base
F
5
Page 20

Fonctionnement de base
Fonctionnement de base
Enregistrement sur une cassette
234
AUTO
REC LEVEL
DOLBY NR
POWER
DECK A DECK B
COUNTER RESET
0
)
p
ª·
DIRECTION
OFF B C
RELAY
Da
SYNCHRO DUBBING A→B
HIGH/NORMAL
FADER ARL
START(DECK B P)
PAUSE REC MUTE REC
PrR
0)
p
ª·
§
§
5
6
4
3
7
2
8
1
9
0
10
PHONES
5
• Voir page 4 pour le
raccordement.
• Utilisez la platine B (côté
droit) pour l’enregistrement.
• Voir “Copie d’une cassette”
(page 9) pour copier une
cassette.
Remarque
Quand la platine B enregistre ou
est en pause d’enregistrement,
toutes les touches de la platine A
sont inopérantes.
Allumez l’amplificateur et reproduisez la source de
1
programme que vous voulez enregistrer.
Appuyez sur POWER puis sur §, et introduisez
2
une cassette dans la platine B.
Tournez la face à enregistrer
vers vous.
Réglez DIRECTION.
3
Pour enregistrer sur
Réglez sur
Une face seulement A
Les deux faces* a
* L’enregistrement s’arrête quand la face arrière est finie.
Appuyez sur REC r.
4
· s’allume pour indiquer que l’enregistrement commence sur
la face tournée vers vous. Si ce n’est pas le cas, appuyez une
fois sur ·.
La platine à cassette ajuste automatiquement le niveau
d’enregistrement (voir page 8). Après l’allumage de
l’indicateur AUTO, arrêtez la source de programme. Si vous
souhaitez ajuster le niveau d’enregistrement manuellement,
voir “Pour ajuster manuellement le niveau d’enregistrement”
(page 7).
F
6
Page 21

PHONES
POWER
DECK A DECK B
COUNTER RESET
PAUSE REC MUTE REC
START(DECK B P)
SYNCHRO DUBBING A→B
HIGH/NORMAL
FADER ARL
DIRECTION
Da
RELAY
DOLBY NR
OFF B C
AUTO
PrR
0)
p
ª·
§
0
)
p
ª·
§
REC LEVEL
5
4
3
2
1
0
6
7
8
9
10
Fonctionnement de base
–
4
L
R
–
∞
+
8
dB
+40
–10–20–
30
z Pour protéger vos
enregistrements contre un
effacement accidentel
Brisez la ou les languettes de
protection (voir page 11).
z Le système Dolby HX
PRO* s’active
automatiquement
pendant l’enregistrement
(TC-WE405 uniquement)
La distorsion et le bruit sont
réduits dans la réponse de
hautes fréquences pour
produire un son de haute
qualité dont on pourra
profiter même pendant la
lecture sur d’autres platines à
cassette.
Appuyez sur PAUSE P ou ·.
5
L’enregistrement commence.
Démarrez la source de programme.
6
Pour
Arrêter l’enregistrement
Démarrer l’enregistrement sur la face
arrière
Faire une pause
Sortir la cassette
Utilisez aussi les sélecteurs et interrupteurs (commandes)
suivants
Pour enregistrer avec le système de réduction de bruit Dolby
Réglez DOLBY NR sur B ou C avant de commencer l’enregistrement.
Appuyez sur
p
ª deux fois à l’étape 5
PAUSE P. Appuyez une nouvelle fois
sur cette touche pour poursuivre
l’enregistrement.
§ après avoir arrêté l’enregistrement
DOLBY NR REC LEVEL
Fonctionnement de base
Pour ajuster manuellement le niveau d’enregistrement
Après la pression de REC r à l’étape 4 de la
page 6, tournez REC LEVEL de sorte que les
décibelmètres atteignent le niveau
recommandé pour le type de cassette utilisée.
Une fois ces réglages effectués, arrêtez la source de
programme et continuez la procédure à partir de
l’étape 5.
* HX Pro headroom extension
d’origine Bang & Olufsen et
fabriqué sous licence de Dolby
Laboratories Licensing
Corporation.
DOLBY, le symbole double-D
a et HX PRO sont des marques
de Dolby Laboratories Licensing
Corporation.
pour une
cassette de
type I ou II
pour une
cassette de type
IV
F
7
Page 22

Fonctions élaborées pour l’enregistrement
Fonctions élaborées pour l’enregistrement
z Réglez le niveau d’enregistrement manuellement
Réglage automatique du
niveau d’enregistrement
(fonction d’auto-réglage du
son)
La fonction d’auto-réglage du son assure le réglage
automatique du niveau d’enregistrement en fonction
du niveau de crête de la source.
PAUSE P REC r·
AUTO
REC LEVEL
DIRECTION
DOLBY NR
RELAY
OFF B C
FADER ARL
0)
ª·
5
6
4
3
7
2
8
1
9
0
10
PHONES
Da
SYNCHRO DUBBING A→B
HIGH/NORMAL
START(DECK B P)
DECK A DECK B
COUNTER RESET
0
)
POWER
p
ª·
§
PAUSE REC MUTE REC
PrR
p
§
avec la commande REC LEVEL dans les cas suivants:
—Le niveau d’enregistrement ne peut pas être réglé
correctement à cause de bruits excessifs dans la
source de programme.
—Le niveau de la source de programme est trop faible
et le niveau d’enregistrement n’augmente pas.
Pendant un passage calme dans la source de
programme, par exemple dans de la musique
classique, le niveau d’enregistrement peut rester
faible pendant un certain temps. Si la source contient
des passages à niveau sonore plus élevé plus loin sur
la piste, reproduisez le passage au niveau le plus
élevé pour pouvoir régler correctement le niveau.
—Le niveau d’enregistrement ne diminue pas pendant
un certain temps.
La fonction d’auto-réglage du son risque de ne pas
fonctionner correctement si vous essayez
d’enregistrer le son traité par un égalisateur
graphique de niveau très élevé.
1 Suivez les étapes 1 à 3 “Enregistrement sur une
cassette (voir page 6).
Vérifiez que les languettes de protection de la
cassette n’ont pas été brisées.
2 Appuyez sur REC r.
Le voyant AUTO clignote et la platine règle
automatiquement le niveau d’enregistrement.
Une fois que le niveau d’enregistrement est réglé,
le voyant AUTO cesse de clignoter et reste allumé.
3 Appuyez sur PAUSE P ou ·.
L’enregistrement commence.
Pour annuler la fonction d’auto-réglage du son
Appuyez sur ARL ou tournez REC LEVEL de sorte que le
voyant AUTO s’éteigne. En agissant de l’une de ces deux
manières pendant l’enregistrement, l’enregistrement
continuera, mais la fonction Auto Rec Level sera annulée.
Pour arrêter l’enregistrement
Appuyez sur p.
z Pour enregistrer avec un niveau d’enregistrement
optimal
• Appuyez sur la touche REC r pendant la lecture du
passage au niveau le plus élevé à enregistrer pour
éviter que le niveau d’enregistrement change après le
commencement de l’enregistrement. Vous obtiendrez
un enregistrement plus naturel.
• Si vous reproduisez la source de programme jusqu’à
la fin après l’arrêt du clignotement du voyant AUTO
et son allumage, la platine réglera le niveau
d’enregistrement optimal en fonction du passage de
la source de programme contenant le niveau le plus
élevé.
z Le réglage du niveau d’enregistrement est maintenu
même après la fin de l’enregistrement
Après l’enregistrement avec la fonction d’auto-réglage
du son, le voyant AUTO reste allumé et le réglage du
niveau d’enregistrement est inchangé. Procédez de l’une
des manières suivantes pour annuler ce réglage:
• Appuyez sur ARL pour éteindre le voyant AUTO.
• Tournez REC LEVEL.
• Mettez la platine hors tension.
z Qu’est-ce que la fonction d’auto-réglage du son?
La fonction d’auto-réglage du son règle
automatiquement le niveau d’enregistrement en
fonction du niveau de crête de la source de programme.
Pendant le clignotement du voyant AUTO, la platine
règle le niveau d’enregistrement aussi haut que possible
sans qu’il y ait de distorsion. En cas d’entrée sonore
excessive après le début de l’enregistrement, la platine
réduit graduellement le niveau d’enregistrement.
F
8
Page 23

Fonctions élaborées pour l’enregistrement
Fondu à l’ouverture et fondu à
la fermeture (F ader)
Vous pouvez graduellement augmenter le niveau
sonore au début de l’enregistrement (fondu à
l’ouverture) ou le diminuer à la fin de l’enregistrement
(fondu à la fermeture).
Cette fonction est très pratique, par exemple quand la
cassette se termine avant la fin du disque, car ainsi la
dernière plage n’est pas coupée abruptement.
Vous pouvez effectuer un fondu à l’ouverture ou à la
fermeture seulement si le niveau d’enregistrement a été
réglé manuellement (voir page 7).
FADER
AUTO
REC LEVEL
DIRECTION
DOLBY NR
OFF B C
RELAY
FADER
PAUSE REC MUTE REC
PrR
0)
p
ª·
§
5
6
4
3
7
2
8
ARL
1
9
0
10
PHONES
Da
SYNCHRO DUBBING A→B
HIGH/NORMAL
DECK A DECK B
COUNTER RESET
0
)
POWER
p
ª·
§
START(DECK B P)
Pour effectuer Effectuez les démarches suivantes:
un fondu à
l’ouverture
un fondu à la
fermeture
1 Suivez les étapes 1 à 4 de
“Enregistrement sur une cassette”
(voir page 6).
2 Appuyez sur FADER. Le voyant
AUTO clignote pendant le fondu à
l’ouverture, puis s’éteint quand il
est terminé.
Appuyez sur FADER au moment
où vous souhaitez commencer le
fondu à la fermeture pendant
l’enregistrement. Une fois le fondu
à la fermeture terminé, “REC”
clignote sur l’affichage et la platine
passe en pause d’enregistrement.
Remarque
Le fondu à l’ouverture ou à la fermeture est impossible
quand REC LEVEL est réglé à 0 (minimum).
Copie d’une cassette
Vous pouvez copier une cassette de la platine A sur
une cassette de la platine B à vitesse normale ou
rapide.
p
PAUSE P
DECK A DECK B
COUNTER RESET
0
)
POWER
p
ª·
§
1 Introduisez une cassette enregistrée dans la
platine A et une cassette vierge dans la platine B.
Assurez-vous que les languettes de protection de
la cassette dans la platine B n’ont pas été enlevées.
2 Sélectionnez la ou les faces sur lesquelles
enregistrer.
Pour enregistrer
sur
Une face
Les deux faces
3 Sélectionnez la vitesse de copie.
Pour sélectionner Appuyez sur HIGH/NORMAL
Vitesse normale Une fois
Vitesse rapide Deux fois
HIGH / NORMAL
DIRECTION
DOLBY NR
DIRECTION
OFF B C
RELAY
Da
SYNCHRO DUBBING A→B
HIGH/NORMAL
FADER ARL
START(DECK B P)
PAUSE REC MUTE REC
PrR
0)
p
ª·
§
Réglez DIRECTION sur
A
a.
L’enregistrement sur la face arrière
de la cassette dans la platine B
commence indépendamment de la
lecture de la cassette dans la
platine A.
RELAY.
L’enregistrement sur la face arrière
de la cassette dans la platine B
commence simultanément avec la
lecture de la face arrière de la
cassette dans la platine A.
ª / ·
AUTO
REC LEVEL
4
3
2
1
0
PHONES
5
6
7
8
9
10
“HIGH” ou “NORM” apparaît dans l’afficheur.
La platine se met en pause de copie.
4 Sélectionnez la face à partir de laquelle la copie
doit commencer.
Pour enregistrer à
Appuyez sur
partir de
La face avant ·
La face arrière ª
5 Appuyez sur PAUSE P pour commencer la copie.
F
9
Page 24

Fonctions élaborées pour l’enregistrement
PHONES
POWER
DECK A DECK B
COUNTER RESET
PAUSE REC MUTE REC
START(DECK B P)
SYNCHRO DUBBING A→B
HIGH/NORMAL
FADER ARL
DIRECTION
Da
RELAY
DOLBY NR
OFF B C
AUTO
PrR
0)
p
ª·
§
0
)
p
ª·
§
REC LEVEL
5
4
3
2
1
0
6
7
8
9
10
PAUSE P REC MUTE R·
Pour arrêter la copie
Pendant
La copie normale
Appuyez sur
p sur la platine B
La copie rapide p sur les deux platines
Insertion d’un espace vierge
pendant l’enregistrement
(Silencieux d’enregistrement)
z Pendant la copie rapide
Seule la touche p peut être utilisée.
z Vous n’avez pas besoin de régler le niveau
d’enregistrement ou de sélectionner le système de
réduction de bruit Dolby pendant la copie
La copie est automatiquement effectuée au même
niveau d’enregistrement et le système Dolby sélectionné
est le même que celui de l’enregistrement original dans
la platine A. Si toutefois vous voulez contrôler le son
pendant la copie normale, réglez DOLBY NR sur le
système utilisé pour la cassette dans la platine A (voir
page 5).
Remarque
Si un téléviseur se trouve à proximité de la platine à cassette,
du bruit peut être audible pendant la copie rapide. Dans ce
cas, éteignez le téléviseur ou éloignez-le de la platine.
Copie de passages particuliers
Ceci n’est possible que pendant la copie normale.
1 Appuyez sur p de la platine A au début du
passage que vous voulez omettre.
La platine B se met en pause d’enregistrement.
2 Localisez le point où vous voulez poursuivre
l’enregistrement sur la platine A, puis arrêtez la
cassette.
3 Appuyez sur PAUSE P pour poursuivre la copie.
Il est possible d’insérer un espace vierge de 4 secondes
entre les pistes ou d’effacer des parties inutiles sur une
bande.
1 Commencez l’enregistrement.
2 Appuyez sur REC MUTE R à l’endroit où vous
voulez insérer un espace vierge.
“REC” clignote dans l’afficheur et un espace
vierge est enregistré sur la cassette.
Au bout de 4 secondes, P s’allume et la platine se
met en pause d’enregistrement.
3 Appuyez sur PAUSE P ou · pour poursuivre
l’enregistrement.
z Si vous voulez insérer un espace vierge de plus de 4
secondes
Tenez R REC MUTE enfoncée tant que nécessaire. Au
bout de 4 secondes, “REC” clignote plus rapidement.
Quand vous relâchez REC MUTE R, P s’allume et la
platine se met en pause d’enregistrement.
Appuyez sur PAUSE P ou · pour poursuivre
l’enregistrement.
F
10
Page 25

Informations complémentaires
Informations complémentaires
Précautions
Sécurité
• Ne pas démonter le coffret car il y a risque d’électrocution.
Pour toute réparation adressez-vous uniquement à un
technicien qualifié.
• Si un liquide ou un solide tombait dans le coffret,
débranchez la platine et faites-la contrôler par un
technicien qualifié avant de la remettre en service.
Sources d’alimentation
• Avant de mettre la platine en marche, vérifiez que sa
tension de fonctionnement est identique à celle du secteur
local. La tension de fonctionnement est indiquée sur la
plaque signalétique à l’arrière de la platine.
• Même s’il est mis hors tension, l’appareil n’est pas
déconnecté de la source d’alimentation secteur tant qu’il
reste branché sur une prise secteur (non applicable aux
modèles pour l’Europe).
• Si la platine ne doit pas être utilisée pendant longtemps,
débranchez-la de la prise secteur. Pour débrancher le
cordon d’alimentation, tirez sur la fiche. Ne jamais tirer
sur le cordon proprement dit.
• Le cordon d’alimentation secteur ne doit être changé que
par un technicien compétent.
Fonctionnement
• A cause d’un mécanisme de sécurité, les touches de
fonction sont inopérantes si le logement de la cassette
n’est pas complètement clos, si aucune cassette ne se
trouve dans le logement ou si la cassette a été mal
introduite.
• N’oubliez pas d’arrêter la bande avant de mettre la platine
à cassette hors tension. Sinon, la bande pourrait être
endommagée.
Remarques sur les cassettes
Pour protéger un enregistrement sur la face A ou B
Brisez la languette appropriée.
Face A
Languette pour la face B
Pour enregistrer une cassette sans languette de
protection
Recouvrez l’orifice approprié avec du ruban adhésif.
Quand vous utilisez une cassette de type II ou IV, veillez à
ne pas recouvrir les orifices de détection servant à
déterminer le type de cassette.
Type II
Languette pour la face A
Type IV
Orifices de détectionOrifices de détection
Installation
• Installez la platine à cassette dans un endroit où la
ventilation est suffisante afin d’éviter toute surchauffe
interne.
• Ne pas installer la platine:
— sur une surface molle comme une couverture, car les
orifices de ventilation pourraient être bouchés;
— près d’une source de chaleur;
— en plein soleil;
— en position inclinée;
— dans un lieu exposé à de la poussière ou à ces chocs
mécaniques.
Nettoyage
Nettoyez le coffret, le panneau et les commandes avec un
chiffon doux légèrement imprégné d’une solution détergente
neutre. Ne pas utiliser de tampons abrasifs, poudre à récurer
ou diluant, comme l’alcool ou la benzine.
Pour toute question ou problème au sujet de la platine,
veuillez contacter votre revendeur Sony le plus proche.
A propos des cassettes de plus de 90 minutes
Il n’est pas conseillé d’utiliser des cassettes de plus de 90
minutes, sauf pour un enregistrement ou une lecture de
longue durée. Les bandes de ces cassettes sont très fines et se
détendent facilement.
Manipulation des cassettes
• Afin de ne pas salir les têtes et le parcours de la bande,
évitez de toucher la surface de la bande.
• Evitez de poser des cassettes près d’appareils contenant
un aimant, comme un haut-parleur ou un amplificateur,
car ils risquent de causer des distorsions et d’effacer
l’enregistrement.
• Ne pas exposer les cassettes au soleil, à des températures
extrêmement basses ni à l’humidité.
11
F
Page 26

Informations complémentaires
Nettoyage
Assemblage des têtes de la platine B
Galets presseurs
Cabestans
Tête d’effacement
Tête d’enregistrement/
lecture
AUTO
REC LEVEL
DOLBY NR
DIRECTION
5
OFF B C
RELAY
Da
6
4
3
7
SYNCHRO DUBBING A→B
2
8
HIGH/NORMAL
FADER ARL
1
9
START(DECK B P)
PAUSE REC MUTE REC
0
DECK A DECK B
COUNTER RESET
0
)
POWER
p
ª·
§
PrR
0)
p
§
ª·
10
PHONES
Démagnétisation des têtes
Au bout de 20 à 30 heures d’utilisation, ou quand vous
remarquez un sifflement ou une perte des hautes
fréquences, démagnétisez les têtes avec un
démagnétiseur pour platines à cassette en vente dans le
commerce. Veuillez suivre les instructions du
démagnétiseur.
§
Nettoyage des têtes et du parcours de la
bande
Nettoyez les têtes et le parcours de la bande toutes les
10 heures de fonctionnement pour prévenir:
• une détérioration de la qualité du son
• une diminution du niveau sonore
• un pleurage et un scintillement excessifs
• une perte de son
• un effacement incomplet
• une altération de la fonction d’enregistrement
Pour obtenir un enregistrement optimal, il est conseillé
de nettoyer les têtes et le parcours de la bande avant
chaque enregistrement.
1 Appuyez sur § pour ouvrir le logement de la
cassette. Saisissez le volet avant des deux côtés et
soulevez-le avec précaution pour l’enlever.
2 Arrêtez la platine et essuyez les têtes, les galets
presseurs et les cabestans avec un coton-tige
légèrement imprégné d’alcool ou de liquide de
nettoyage pour platine en vente dans le
commerce.
12
3 Remettez le volet du logement en place.
F
Page 27

En cas de panne
Si vous rencontrez une des difficultés suivantes quand
vous utilisez la platine à cassette, consultez ce guide
pour résoudre le problème. Si le problème persiste,
adressez-vous à votre revendeur Sony.
Informations complémentaires
Son déséquilibré.
/ Vérifiez que la position de la commande
DOLBY NR est la même que lors de
l’enregistrement de la cassette.
/ La platine à cassette est installée près d’un
téléviseur ou d’un magnétoscope.
Eloignez la platine du téléviseur ou du
magnétoscope.
Les touches de fonction ne sont pas opérantes.
/
La platine vient juste d’être allumée et ne
fonctionne pas pendant 3 secondes. Attendez
que P cesse de clignoter.
/ Vérifiez que la cassette est bien introduite et
que le logement de la cassette est complètement
fermé.
La lecture ou l’enregistrement est impossible.
/
Il n’y a pas de cassette dans le logement.
/ La cassette est terminée.
/ La bande est détendue. Retendez-la.
/ La languette de protection a été enlevée de la
cassette (voir page 11).
/ Vérifiez si le réglage de l’amplificateur est
correct.
/ Vérifiez si les fiches ne sont pas desserrées.
/ Les têtes et le parcours de la bande sont sales.
Nettoyez-les (voir page 12).
/ La tête d’enregistrement/lecture est
magnétisée. Démagnétisez-la (voir page 12).
Pleurage et scintillement excessifs ou perte de son
/ Les cabestans et les galets presseurs sont sales.
Nettoyez-les (voir page 12).
La bande s’arrête avant d’être entièrement rebobinée.
/
La bande est détendue. Retendez-la.
/ Le boîtier de la cassette est déformé. Utilisez
une autre cassette.
Pendant l’avance rapide ou le rebobinage, le bruit de la
bande est excessif.
/
Ce bruit est causé par la cassette et ne provient
pas d’un problème mécanique.
§ ne fonctionne pas.
/ Il y a eu une panne de courant ou le cordon
d’alimentation a été débranché en cours de
fonctionnement. Remettez sous tension.
Courte coupure dans le son pendant la lecture.
/ Vous avez appuyé sur ), 0, ou p de l’une
des platines pendant la lecture sur l’autre.
Ou bien vous avez appuyé sur PAUSE P, ·,
ou ª e la platine B pendant la lecture sur la
platine A.
Diminution du niveau sonore, perte de son ou mauvaise
reproduction des hautes fréquences/Effacement
incomplet de la cassette/Augmentation du bruit.
/
La tête d’enregistrement/lecture ou
d’effacement et le parcours de la bande sont
sales. Nettoyez-les (voir page 12).
/ La tête d’enregistrement/lecture ou
d’effacement est magnétisée. Démagnétisez-la
(voir page 12).
Bourdonnement ou bruit.
/ La platine à cassette est près d’un téléviseur ou
d’un magnétoscope. Eloignez la platine du
téléviseur ou du magnétoscope.
/ La platine est installée sur ou sous
l’amplificateur. Eloignez-la de l’amplificateur.
13
F
Page 28

Informations complémentaires
Spécifications
Généralités
Alimentation
Système
Système d’enregistrement
4 pistes, 2 canaux stéréo
Temps d’avance rapide (approx.)
180 sec. (avec une cassette Sony C-60)
Courant de polarisation
Courant alternatif
Rapport signal sur bruit (à niveau de crête et pondéré avec Dolby NR
hors service)
Cassette type I, Sony Type I (NORMAL): 55 dB
Cassette type II, Sony Type II (HIGH): 57 dB
Cassette type IV, Sony Type IV (METAL): 58 dB
Amélioration du rapport signal/bruit (valeurs approximatives)
Avec Dolby B en service: 5 dB à 1 kHz, 10 dB à 5 kHz
Avec Dolby C en service: 15 dB à 500 Hz, 20 dB à
1 kHz
Distorsion harmonique
0,4% (avec cassette type I, Sony Type I (NORMAL):
160 nWb/m 315 Hz, 3e H.D.)
1,8% (avec cassette type IV, Sony Type IV (METAL):
250 nWb/m 315 Hz, 3e H.D.)
Réponse en fréquence (Dolby hors service)
Cassette type I, Sony Type I (NORMAL):
30 - 16.000 Hz (±3 dB, IEC)
Cassette type II, Sony Type II (HIGH):
30 - 17.000 Hz (±3 dB, IEC)
Cassette type IV, Sony Type IV (METAL):
30 - 19.000 Hz (±3 dB, IEC)
30 - 13.000 Hz (±3 dB, –4 dB enregistrement)
Cassette type I, Sony Type I (NORMAL):
20 - 17.000 Hz (±6 dB)
Cassette type II, Sony Type II (HIGH):
20 - 18.000 Hz (±6 dB)
Cassette type IV, Sony Type IV (METAL):
20 - 20.000 Hz (±6 dB)
Lieu d’achat Source d’alimentation
Etats-Unis et Canada CA 120 V, 60 Hz
Royaume-Uni et Europe
continentale
Australie CA 240 V, 50/60 Hz
Autres pays
Consommation
CA 220 - 230 V, 50/60 Hz
TC-WE405:
CA 120/220/240 V, 50/60 Hz
TC-WR661:
CA 120/220/230 - 240 V, 50/60 Hz
18 W
Dimensions (approx.) (l/h/p)
430 × 120 × 305 mm (17 × 4 3/
4 × 12
1
/
8 po.)
Saillies et commandes comprises
Poids (approx.)
3,8 kg (8 li. 7 on.)
Accessoires fournis
Cordons de liaison audio (2 fiches cinch - 2 fiches
cinch) (2)
Accessoire en option
Télécommande RM-J910
S’adresser au revendeur Sony le plus proche pour la
disponibilité de la télécommande.
La conception et les spécifications peuvent être modifiées
sans préavis.
14
Pleurage et scintillement
±0,15% W. crête (IEC)
0,1% W.RMS (NAB)
±0,2% W. crête (DIN)
Entrées
Entrées de ligne (prises cinch)
Sensibilité: 0,16 V
Impédance d’entrée: 47 kohms
Sorties
Sorties de ligne (prises cinch)
Niveau de sortie nominal: 0,5 V à impédance de
charge de 47 kohms
Impédance de charge: Supérieure à 10 kohms
Casque (prise stéréo 6,35) (TC-WE405 uniquement)
Niveau de sortie: 0,25 mW à impédance de charge de
32 ohms
F
Page 29

Index
Index
A, B, C
Cassette
Ejection 5, 7
Nettoyage du parcours de la bande 12
Protection de l’enregistrement 11
Remarques 11
Types 11
Copie
Copie à vitesse normale 9, 10
Copie rapide 9
de passages particuliers 10
Cordon de liaison audio 4, 14
D, E, F, G, H
Déballage 4
En cas de panne 13
Enregistrement 6
Fader 9
Fondu
à la fermeture. Voir Fader
à l’ouverture. Voir Fader
I, J, K, L, M, N, O, P, Q
Insertion
d’un espace vierge 10
d’une cassette 5, 6
Lecture
Lecture automatique 5
Lecture de base 5
Lecture automatique 5
Nettoyage
Coffret 11
Têtes et parcours de la bande 12
Niveau d’enregistrement automatique 8
Nomenclature
Touches
ARL (réglage automatique du niveau
d’enregistrement) 8
FADER 9
HIGH/NORMAL 9
PAUSE P 5, 7-10, 13
REC r (enregistrement) 6-8
REC MUTE R (silencieux d’enregistrement) 10
§ (éjection) 5-7, 12, 13
p (arrêt) 5, 7-10, 13
· (lecture face avant) 5-10, 13
ª (lecture face arrière) 5, 7, 9, 13
), 0(avance rapide et rebobinage) 5, 13
Sélecteurs et interrupteurs
DIRECTION 5, 6, 9
DOLBY NR 5, 7, 10, 13
POWER 5, 6
Commandes
REC LEVEL (niveau d’enregistrement) 7-9
Prises
LINE IN 4
LINE OUT 4
PHONES 5
Divers
Décibelmètres 7
Logement de cassette 5, 6, 12
Voyant AUTO 6, 8, 9
R, S
Raccordement
Aperçu 4
Raccordements 4
Réglage
Réglage manuel du niveau d’enregistrement 7
Volume 5
Réglage automatique du niveau
d’enregistrement. Voir Niveau
d’enregistrement automatique
Silencieux d’enregistrement 10
Spécifications 14
Système de réduction de bruit Dolby 5, 7
Système Dolby HX PRO 7
T, U, V, W, X, Y, Z
Têtes
Démagnétisation 12
Nettoyage 12
15
F
Page 30

ADVERTENCIA
Para evitar incendios o el
riesgo de electrocución,
no exponga la unidad a la
lluvia ni a la humedad.
ES
2
Page 31

¡Bienvenido!
Muchas gracias por la adquisición de
este deck de cassettes estéreo Sony.
Antes de utilizar el deck de cassettes,
lea detenidamente ese manual y
consérvelo para futuras referencias.
Información sobre
este manual
Este manual de instrucciones es para los
modelos TC-WE405 y TC-WR661.
Compruebe el número de su modelo
observando el panel posterior de su
deck de cassettes. En las ilustraciones
de este manual se utiliza el modelo TCWE405. En caso de existir cualquier
diferencia, ésta se indicará claramente
en el texto, por ejemplo, “solamente
para TC-WE405”.
Tipos de diferencias
Modelo WR661
Característica
Dolby HX PRO
Toma PHONES
WE405
•
•
ÍNDICE
Preparativos
Desembalaje 4
Conexión a un sistema 4
Reproducción de cintas 5
Grabación de cintas 6
Operaciones avanzadas de grabación
Ajuste automático del nivel de grabación (Nivel de grabación
automático) 8
Aumento gradual y desvanecimiento (Desvanecedor) 9
Duplicación de cintas 9
Inserción de espacios en blanco durante la grabación (Silenciamiento
de la grabación) 10
Información adicional
Precauciones 11
Notas sobre los cassettes 11
Limpieza 12
Guía para la solución de problemas 13
Especificaciones 14
Índice alfabético 15
ES
Convencionalismo
En este manual se utiliza el icono
siguiente:
Indica puntos y consejos para
z
facilitar las tareas.
ES
3
Page 32

Preparativos
Desembalaje
Compruebe si ha recibido los accesorios siguientes:
• Cables conectores de audio (2)
Conexión a un sistema
Conexiones
Cuando conecte cables conectores de audio, cerciórese
de hacer coincidir sus conductores codificados en color
con las tomas apropiadas de los componentes: Color
rojo (canal derecho) a rojo y blanco (canal izquierdo) a
blanco. Para evitar zumbidos y ruidos, realice
conexiones seguras.
Conecte el deck de cassettes al amplificador como se
muestra a continuación.
En esta sección se describe cómo conectar el deck de
cassettes a un amplificador. Antes de realizar las
conexiones, cerciórese de desconectar la alimentación
de cada componente.
Para los compradores del TC-WR661
Para más detalles sobre la conexión de su deck de cassettes al
amplificador TA-AV561, consulte el Manual de instrucciones
que viene con el TA-AV561.
Para los compradores del TC-WE405
Siga las instrucciones mencionadas a continuación para
conectar su deck de cassettes a un amplificador.
TC-WE405
a LINE IN
a REC OUT
a LINE OUT
a TAPE IN
a un
tomacorriente
de CA
Amplificador
Deck de cassettes Amplificador
Ç
LINE
OUTIN
L
R
TAPE
REC OUT IN
L
R
L
R
ç
ç: Flujo de señal
Ajuste del selector de tensión (modelos
suministrados con selector de tensión
solamente)
Compruebe si el selector de tensión del panel posterior
del deck de cassettes está ajustado de acuerdo con la
tensión de la red local. En caso contrario, póngalo en la
posición correcta utilizando un destornillador antes de
enchufar el cable de alimentación en una toma de la
red de CA.
TC-WR661TC-WE405
VOLTAGE
220V
240V
120V
VOLTAGE
220V
230
240V
120V
–
Conexión del cable de alimentación
a una toma de
la red
Enchufe el cable de alimentación en una toma de la red
de CA.
¿Qué hacer a continuación?
Ahora podrá utilizar su deck de cassettes.
Con respecto a las operaciones básicas, vaya a las páginas 5 a
7; y para las operaciones avanzadas, vaya a las secciones que
empiezan en la página 8.
ES
4
Page 33

Operaciones básicas
Reproducción de cintas
24 3
DIRECTION
RELAY
Da
SYNCHRO DUBBING A→B
HIGH/NORMAL
FADER ARL
START(DECK B P)
PAUSE REC MUTE REC
PrR
0)
p
ª·
§
POWER
DECK A DECK B
COUNTER RESET
0
)
p
ª·
§
DOLBY NR
OFF B C
AUTO
REC LEVEL
5
6
4
3
7
2
8
1
9
0
10
PHONES
• Con respecto a la
información sobre las
conexiones, consulte la
página 4.
• Usted podrá utilizar ambos
decks para reproducción.
z Para ubicar el principio de
una cinta y empezar a
reproducirla
automáticamente (Auto
Play)
Presione 0 mientras se
mantiene presionado ·.
Para el otro lado, presione
) mientras mantiene
presionado ª.
z Para reproducir una cinta
grabada con el sistema
Dolby NR*
Ponga DOLBY NR en la
misma posición que la
utilizada para grabar la cinta
– B o C.
z ¿Qué es el sistema de
reducción de ruidos
Dolby?
El sistema de reducción de
ruidos Dolby NR elimina el
ruido del siseo de la cinta
reforzando las señales de
graves durante la grabación y
bajándolas a su nivel normal
durante la reproducción. El
tipo C reduce todavía más el
ruido que el tipo B.
z Usted podrá conectar
unos auriculares a
PHONES (solamente para
TC-WE405)
* Reducción de ruido Dolby
fabricado bajo licencia de Dolby
Laboratories Licensing
Corporation.
DOLBY y el símbolo de la D
doble a son marcas de Dolby
Laboratories Licensing
Corporation.
Conecte la alimentación del amplificador y seleccione la
1
posición correspondiente al deck de cassettes.
Presione POWER, presione §,
2
y después inserte un cassette.
Con la cara que desee reproducir
hacia usted
Ajuste DIRECTION.
3
Para reproducir
una cara solamente A
ambas caras continuamente* a
sucesivamente en ambos decks* RELAY
* El deck se parará automáticamente después de que la reproducción se
haya realizado cinco veces.
Presione ·.
póngalo en
4
El deck iniciará la reproducción. Ajuste el volumen del
amplificador.
Para presione
parar la reproducción p
iniciar la reproducción desde la cara
posterior
realizar una pausa (deck B solamente) PAUSE P. Para reanudar la
hacer que la cinta avance rápidamente
o que se rebobine
extraer el cassette § después de haber parado la
ª
reproducción vuelva a presionar
la tecla.
) o 0 con el deck parado
reproducción
Operaciones básicas
ES
5
Page 34

Operaciones básicas
Grabación de cintas
234
DECK A DECK B
COUNTER RESET
0
p
)
ª·
§
POWER
DIRECTION
RELAY
Da
SYNCHRO DUBBING A→B
HIGH/NORMAL
START(DECK B P)
PAUSE REC MUTE REC
PrR
0)
p
§
DOLBY NR
OFF B C
FADER ARL
ª·
5
AUTO
REC LEVEL
5
6
4
3
7
2
8
1
9
0
10
PHONES
• Con respecto a la
información sobre la
conexión, consulte la página
4.
• Para la grabación, utilice el
deck B (el situado a la
derecha).
• Para copiar cintas, consulte
“Duplicación de cintas”
(página 9).
Nota
Cuando se graba en el deck B o
ésta está en la pausa de grabación,
no podrá usar ninguno de los
botones del deck A.
Conecte la alimentación del amplificador y ponga en
1
reproducción la fuente del programa que desee grabar.
Presione POWER, después presione §,
2
e inserte un cassette en el deck B.
Con la cara que desee grabar
hacia usted
Ajuste DIRECTION.
3
Para grabar en
una sola cara A
ambas caras* a
* La grabación se parará cuando finalice la cinta de la cara posterior.
Presione REC r.
póngalo en
4
· se encenderá para la grabación de la cara situada hacia
usted. Si no se enciende, presione · una vez.
El deck de cassettes ajusta automáticamente el nivel de la
grabación (consulte la página 8). Cuando se encienda
completamente el indicador AUTO, deje de reproducir la
fuente de programa. Si desea ajustar manualmente el nivel de
la grabación, consulte “Para ajustar manualmente el nivel de la
grabación” en la página 7.
ES
6
Page 35

Operaciones básicas
PHONES
POWER
DECK A DECK B
COUNTER RESET
PAUSE REC MUTE REC
START(DECK B P)
SYNCHRO DUBBING A→B
HIGH/NORMAL
FADER ARL
DIRECTION
Da
RELAY
DOLBY NR
OFF B C
AUTO
PrR
0)
p
ª·
§
0
)
p
ª·
§
REC LEVEL
5
4
3
2
1
0
6
7
8
9
10
z Para proteger grabaciones
contra el borrado
accidental
Rompa la(s) lengüeta(s) de
protección contra el borrado
(consulte la página 11).
z El sistema Dolby HX PRO*
funciona automáticamente
durante la grabación
(solamente para TC-WE405)
La distorsión y los ruidos en la
respuesta de alta frecuencia se
reducen para que pueda
disfrutar sonidos sean de
superior calidad incluso
durante la reproducción en
otro deck.
Presione PAUSE P o ·.
5
Se iniciará la grabación
Ponga en reproducción la fuente de programas.
6
Para
parar la grabación
iniciar la grabación desde la cara
posterior
realizar una pausa PAUSE P. Para reanudar la grabación,
extraer el cassette § después de haber parado la grabación
Utilización de estos interruptores (controles) para realizar
operaciones adicionales
presione
p
ª dos veces en el paso 5
vuelva a presionar la tecla.
DOLBY NR REC LEVEL
Operaciones básicas
* HX Pro Headroom extension
producido por Bang & Olufsen y
fabricado bajo licenciá de Dolby
Laboratories Licensing
Corporation.
DOLBY, el símbolo de la D
doble a y HX PRO son marcas
de Dolby Laboratories Licensing
Corporation.
Para grabar con el sistema Dolby NR
Ponga DOLBY NR en B o C antes de iniciar la grabación.
Para ajustar manualmente el nivel de la grabación
Después de presionar REC r en el paso 4 de
la página 6, gire REC LEVEL para que los
medidores de nivel de pico puedan subir
hasta el nivel recomendado para cada tipo de
cinta.
Después de hacer el ajuste, deje de reproducir
la fuente de programa y continúe desde el
paso 5.
30
–
∞
dB
L
R
Para cintas
del tipo I o
del tipo II
Para cintas
del tipo IV
4
8
ES
7
+
+40
–
–10–20–
Page 36

Operaciones avanzadas de grabación
Operaciones avanzadas de grabación
Ajuste automático del nivel de
grabación (Nivel de grabación
automático)
La función de nivel de grabación automático mide
automáticamente el nivel de grabación pico y ajusta el
nivel de grabación de acuerdo a dicha medición.
PAUSE P REC r·
AUTO
REC LEVEL
DIRECTION
DOLBY NR
RELAY
OFF B C
FADER ARL
0)
ª·
5
6
4
3
7
2
8
1
9
0
10
PHONES
Da
SYNCHRO DUBBING A→B
HIGH/NORMAL
START(DECK B P)
DECK A DECK B
COUNTER RESET
0
)
POWER
p
ª·
§
PAUSE REC MUTE REC
PrR
p
§
z Ajuste manualmente el nivel de la grabación
utilizando REC LEVEL en los casos siguientes:
—El nivel de la grabación no puede ajustar
correctamente debido a que hay muchos ruidos
parásitos en la fuente de programa.
—El nivel de la fuente de programa está demasiado bajo
y el nivel de la grabación no sube.
Durante los pasajes silenciosos de una fuente de
programa como en la música clásica, el nivel de la
grabación puede no aumentar durante un tiempo. Si
después de ese pasaje se espera otro pasaje con un
nivel de sonido alto, reproduzca dicha parte primero
para que puedan obtenerse los ajustes correctos.
—El nivel de grabación no disminuye durante un largo
período de tiempo. La función de nivel de grabación
automático puede no funcionar correctamente cuando
se trata de grabar el sonido procesado por un
ecualizador gráfico que posee un nivel de sonido
extremadamente alto.
1 Siga los pasos 1 a 3 de “Grabación de cintas” en la
página 6.
Confirme que las lengüetas de protección de la
grabación en el cassette están intactas.
2 Presione REC r.
El indicador AUTO parpadea y el deck de
cassettes ajusta automáticamente el nivel de la
grabación. El indicador AUTO se enciende
permanentemente una vez ajustado el nivel de la
grabación.
3 Presione PAUSE P o ·.
Se inicia la grabación.
Para cancelar la función de nivel de grabación
automático
Presione ARL o gire REC LEVEL para que se apague el
indicador AUTO. Si lo hace en el medio de la grabación, ésta
se seguirá haciendo pero se desactivará la función de nivel
de grabación automático.
Para parar la grabación
Presione p.
z Para grabar con el nivel de grabación óptimo
• Para que no se produzcan cambios en el nivel de la
grabación después de que empieza la grabación,
presione REC r mientras reproduce la sección de
nivel más alto del sonido fuente, que desea grabar.
Podrá realizar grabaciones más naturales.
• Si se reproduce toda la fuente de programa después
de que haya dejado de parpadear el indicador AUTO
y permanezca encendida, el deck de cassettes ajustará
el nivel de grabación para la parte de la fuente de
programa con el nivel de señal más alto.
z El ajuste del nivel de grabación se mantiene includo
después de haber terminado la grabación
Después de haber terminado la grabación con la función
de nivel de grabación automático, el indicador AUTO
permanece encendido y el ajuste del nivel de grabación
permanece incambiado. Para cancelar este ajuste utilice
uno de los siguientes procedimientos:
• Presione ARL para que se apague el indicador AUTO
• Gire REC LEVEL
• Desconecte el deck de cassettes.
z ¿Qué es la función de nivel de grabación
automático?
La función de nivel de grabación automático establece
automáticamente el nivel de grabación de acuerdo al
nivel de pico del sonido de la fuente de programa.
Mientras el indicador AUTO esté parpadeando, el deck
de cassettes ajusta el nivel de la grabación lo más alto
posible sin provocar una distorsión de los sonidos. Si el
nivel de la señal sube demasiado después de haberse
iniciado la grabación, el deck de cassettes reducirá
gradualmente el nivel de la grabación.
ES
8
Page 37

Operaciones avanzadas de grabación
Aumento gradual y
desvanecimiento
(Desvanecedor)
Usted puede aumentar gradualmente el nivel de
grabación al comienzo de una grabación (aumento
gradual) o reducirlo gradualmente al final de la misma
(desvanecimiento).
Esta función es muy conveniente, por ejemplo, cuando
la cinta finalice y usted no desee cortar bruscamente la
canción.
Usted solamente podrá utilizar el aumento gradual y el
desvanecimiento si se ha ajustado el nivel de grabación
manualmente (consulte la página 7).
FADER
AUTO
REC LEVEL
DIRECTION
DOLBY NR
RELAY
OFF B C
FADER
PAUSE REC MUTE REC
PrR
0)
p
ª·
§
5
6
4
3
7
2
8
ARL
1
9
0
10
PHONES
Da
SYNCHRO DUBBING A→B
HIGH/NORMAL
DECK A DECK B
COUNTER RESET
0
)
POWER
p
ª·
§
START(DECK B P)
Para Haga lo siguiente
Aumento gradual 1 Realice los pasos 1 a 4 de “Grabación
Desvanecimiento Presione FADER cuando desee iniciar
de cintas” en la página 6.
2 Presione FADER. Durante el aumento
gradual, el indicador AUTO parpadea
y se apaga cuando haya finalizado el
aumento gradual.
el desvanecimiento durante la
grabación. Cuando se haya
desvanecido, destella “REC” en el
visualizador y el deck de cassettes
entra en pausa.
Nota
El aumento gradual y el desvanecimiento no son posibles
cuando el REC LEVEL está en su posición de 0 (mínimo).
Duplicación de cintas
Usted podrá copiar una cinta del deck A al deck B a
velocidad normal o a gran velocidad.
p
PAUSE P
DECK A DECK B
COUNTER RESET
0
)
POWER
p
ª·
§
1 Inserte el cassette grabado en el deck A y un
cassette en blanco en el deck B.
Cerciórese de que el cassette del deck B posea
lengüeta de protección contra el borrado.
2 Seleccione la(s) cara(s) que desee grabar.
Para grabar ponga DIRECTION en
una cara A
ambas caras a.
3 Seleccione la velocidad de duplicación.
Para seleccionar Presione HIGH/NORMAL
Velocidad normal Una vez
Alta velocidad Dos veces
En el visualizador aparecerá “HIGH” o “NORM”.
El deck cambiará a duplicación ne espera.
HIGH / NORMAL
DIRECTION
DOLBY NR
DIRECTION
OFF B C
RELAY
Da
SYNCHRO DUBBING A→B
HIGH/NORMAL
FADER ARL
START(DECK B P)
PAUSE REC MUTE REC
PrR
0)
p
ª·
§
La grabación de la cara posterior
del deck B se iniciará
independientemente de la
reproducción de la cara A.
RELAY.
La grabación de la cara posterior
del deck B se iniciará
simultáneamente con la
reproducción de la cara posterior
del deck A.
ª / ·
AUTO
REC LEVEL
5
6
4
3
2
1
0
10
PHONES
7
8
9
4 Seleccione la cara en la que dese iniciar la
duplicación.
Para grabar desde la Presione
cara frontal ·
la cara posterior
ª
5 Para iniciar la duplicación, presione PAUSE P.
ES
9
Page 38

Operaciones avanzadas de grabación
Para parar la duplicación
Durante
la duplicación a velocidad normal
la duplicación a gran velocidad
presione
p del deck B
p de cualquier deck
Inserción de espacios en
blanco durante la grabación
(Silenciamiento de la
grabación)
z Durante la duplicación a gran velocidad
Solamente funcionará p.
z Usted no tendrá que ajustar el nivel de grabación ni
seleccionar el sistema Dolby NR durante la
duplicación
La función de duplicación se realizará automáticamente
con el mismo nivel de grabación y el sistema de
reducción de ruido Dolby que los del cassette del deck
A. Sin embargo, si desea escuchar el sonido durante la
duplicación a velocidad normal, ajuste DOLBY NR de
acuerdo con el cassette el deck A (consulte la página 5).
Nota
Si hay un televisor cerca del deck de cassettes, es posible que
se produzca ruido durante la duplicación a gran velocidad.
En este caso, desconecte la alimentación del televisor o
aléjelo del deck de cassettes.
Duplicación de partes específicas
solamente
Usted solamente podrá realizar esto durante la
duplicación a velocidad normal.
1 Presione p del deck A en el punto en el que desee
saltar.
El deck B cambiará al modo de grabación en
pausa.
2 Localice el punto en el que desee reanudar la
grabación en el deck A, y después pare la cinta.
3 Para reanudar la duplicación, presione PAUSE P.
Usted podrá insertar un espacio en blanco de 4
segundos entre cada canción o borrar partes no
deseadas de la cinta.
PAUSE P REC MUTE R·
AUTO
REC LEVEL
DOLBY NR
DIRECTION
Da
SYNCHRO DUBBING A→B
HIGH/NORMAL
START(DECK B P)
DECK A DECK B
COUNTER RESET
0
)
POWER
p
ª·
§
PAUSE REC MUTE REC
OFF B C
RELAY
FADER ARL
PrR
0)
p
ª·
§
5
6
4
3
7
2
8
1
9
0
10
PHONES
1 Inicie la grabación.
2 Presione REC MUTE R donde desee insertar un
espacio en blanco.
En el visualizador parpadeará “REC” y en la cinta
se insertará un espacio en blanco.
Después de 4 segundos, se encenderá P y el deck
de cassettes cambiará al modo de grabación en
pausa.
3 Para reanudar la grabación, presione PAUSE P o
·.
z Si desea dejar un espacio en blanco de más de 4
segundos
Mantenga presionada REC MUTE R el tiempo deseado.
Después de 4 segundos, “REC” parpadeará con mayor
rapidez.
Cuando suelte REC MUTE R, se encenderá P y el deck
de cassettes cambiará al modo de grabación en pausa.
Para reanudar la grabación, presione PAUSE P o ·.
10
ES
Page 39

Información adicional
Información adicional
Precauciones
Seguridad
• No desarme el deck de cassettes, ya que podría recibir
descargas eléctricas. En caso de avería, solicite solamente
los servicios de personal cualificado.
• Si dentro del deck de cassettes entra cualquier objeto
sólido o líquido, desenchúfelo y haga que sea comprobado
por personal cualificado.
Fuentes de alimentación
• Antes de utilizar el deck de cassettes, compruebe si la
tensión de alimentación del mismo coincide con la de la
red local. La tensión de alimentación está indicada en la
placa de características del panel posterior del deck de
cassettes.
• La unidad no se desconectará de la red de CA, aunque
ponga en OFF su interruptor de alimentación, mientras
esté enchufada en una toma de la misma (no aplicable a
modelos europeos).
• Cuando no vaya a utilizar el deck de cassettes durante
mucho tiempo, cerciórese de desenchufarlo de la toma de
la red. Para desconectar el cable de alimentación, tire del
enchufe. No tire nunca del propio cable.
• El cable de alimentación de CA solamente deberá ser
reemplazado por personal cualificado.
Operación
• Debido al mecanismo de seguridad, las teclas de función
no trabajarán si el portacassette no está completamente
cerrado, si no hay cassette en el mismo, o si el cassette no
está correctamente insertado en su portacassette.
• Asegúrese de parar la cinta antes de desconectar el deck
de cassettes. De lo contrario, puede dañarse la cinta.
Notas sobre los cassettes
Para proteger la grabación de la cara A o de la B
Rompa la lengüeta de protección contra el borrado.
Cara A
Lengüeta para la cara B
Para grabar un casete carente de lengüetas de
protección contra el borrado
Cubra el orificio correspondiente a la lengüeta
correspondiente con cinta adhesiva.
Cuando utilice cassettes de tipo II o IV, tenga cuidado de no
cubrir las ranuras detectoras que utiliza el deck para
determinar el tipo de cinta.
Tipo II
Lengüeta para la cara A
Tipo IV
Ubicación
• Coloque el deck de evitar evitar cassettes en un lugar
adecuadamente ventilado a fin de evitar que se recaliente
el deck.
• No coloque el deck de cassettes:
— sobre una superficie suave, como una alfombra, ya que
podrían bloquearse los orificios de su parte inferior.
— en un lugar cercano a fuentes térmicas.
— en un lugar sometido a la luz solar directa.
— en posición inclinada.
— en un lugar excesivamente polvoriento o sometido a
golpes.
Limpieza del deck de cassettes
Limpie la caja, el panel, y los controles con un paño suave
ligeramente humedecido en una solución poco concentrada
de detergente. No utilice ningún tipo de estropajos, polvos
abrasivos, ni disolventes como alcohol o bencina.
Si tiene alguna pregunta o problema en relación con
este deck de cassettes, consulte a su proveedor Sony.
Ranuras detectorasRanuras detectoras
Cintas de más de 90 minutos
No se recomienda utilizar cintas de más de 90 minutos
excepto para grabación o reproducción continua. Estas
cintas son muy finas y tienden a estirarse fácilmente.
Manejo de los cassettes
• Para evitar que la trayectoria de paso de la cinta, evite
tocar la superficie de la cinta.
• Coloque los cassettes aleados de equipos con imanes,
como altavoces o amplificadores, ya que la cinta podría
distorsionarse o la grabación podría borrarse.
• No exponga los cassettes a la luz solar directa, a
temperaturas extremadamente frías, ni a la humedad.
11
ES
Page 40

Información adicional
Limpieza
Conjunto de cabezas del deck B
Rodillos compresores
Ejes de
arrastre
Cabeza borradora
Cabeza grabadora/reproductora
DECK A DECK B
COUNTER RESET
0
)
POWER
p
ª·
§
Da
SYNCHRO DUBBING A→B
START(DECK B P)
§
DIRECTION
RELAY
HIGH/NORMAL
PAUSE REC MUTE REC
PrR
0)
p
§
FADER ARL
ª·
Desmagnetización de las cabezas
Después de 20 o 30 horas de utilización, o cuando note
siseo y/o pérdida de altas frecuencias, desmagnetice
las cabezas con un desmagnetizador adquirido en una
tienda del ramo. Consulte el manual de instrucciones
del desmagnetizador.
AUTO
REC LEVEL
DOLBY NR
5
OFF B C
6
4
3
7
2
8
1
9
0
10
PHONES
Limpieza de las cabezas y la trayectoria de
la cinta
Limpie todas las superficies por las que pase la cinta
cada 10 horas de operación a fin de impedir:
• sonido de baja calidad
• reducción en el nivel del sonido
• fluctuación o trémolo excesivos, u omisión de sonido
• pérdida del sonido
• borrado incompleto
• grabación de mala calidad
Para obtener grabaciones de gran calidad, se
recomienda efectuar la limpieza antes de cada
grabación.
1 Presione § para abrir el portacassette.
Sujete la cubierta frontal por ambos lados y
levántela suavemente para extraerla.
2 Con la alimentación de la unidad desconectada,
limpie las cabezas, los rodillos compresores, y los
ejes de arrastre con un palillo de algodón
ligeramente humedecido en alcohol o en líquido
limpiador para decks de cassettes adquirido en
una tienda del ramo.
12
3 Vuelva a instalar la cubierta frontal.
ES
Page 41

Guía para la solución de
problemas
Si experimenta cualquiera de las dificultades siguientes
cuando utilice el deck de cassettes, utilice la guía
siguiente para resolverla. Si el problema persiste
después de haber realizado estas comprobaciones,
consulte a su proveedor Sony.
Las teclas de función no trabajan.
/ El deck de cassettes no funcionará durante
unos 3 segundos después de haber conectado
su alimentación. Espere hasta que P deje de
parpadear.
/ Compruebe si el cassette está correctamente
insertado y si el portacassette está
completamente cerrado.
La cinta no se reproduce o no se graba.
/ No hay cassette en el portacassette.
/ La cinta ha finalizado.
/ La cinta está floja. Ténsela.
/ El cassette carece de lengüeta(s) de protección
contra el borrado (consulte la página 11).
/ Compruebe si el ajuste del amplificador es
correcto.
/ Compruebe si las conexiones del deck de
cassettes son seguras.
/ Las cabezas y la trayectoria de la cinta están
sucias. Límpielas (consulte la página 12).
/ La cabeza grabadora/reproductora está
magnetizada. Desmagnetícela (consulte la
página 12).
Información adicional
El tono está desequilibrado.
/ Compruebe si la posición de DOLBY NR es
igual que cuando grabó la cinta.
/ El deck de cassettes está situado cerca de un
televisor o de una videograbadora. Aléjelo.
La cinta se para antes de haberse rebobinado
completamente.
/ La cinta está floja. Ténsela.
/ El casco del cassette está alabeado. Utilice otro
cassette.
El ruido de transporte de la cinta es demasiado fuerte
durante el avance rápido o el rebobinado.
/ Este ruido se debe al cassette y no significa
ningún problema mecánico.
§ no trabaja.
/ Se produjo un corte del suministro eléctrico, o
el cable de alimentación está desconectado
durante la operación de la cinta. Vuelva a
conectar la alimentación.
Hay un corte en el sonido durante la reproducción
/ Se ha presionado ), 0, o p en uno de los
deck mientras el otro estaba reproduciendo.
O se ha presionado PAUSE P, ·, o ª en el
deck B cuando se estaba reproduciendo en el
deck A.
La fluctuación, el efecto de trémolo, o la pérdida de
sonido es excesivo.
/ Los ejes de arrastre y los rodillos compresores
están sucios. Límpielos (consulte la página 12).
El nivel del sonido es bajo, el sonido se pierde, o la
reproducción de altas frecuencias deficiente./La cinta no
se ha borrado completamente./El ruido aumenta.
/ Las cabezas de grabación/reproducción o
borrado y la trayectoria de la cinta están sucias.
Límpielas (consulte la página 12).
/ Las cabezas de grabación/reproducción o
borrado están magnetizadas. Desmagnetícelas
(consulte la página 12).
Hay zumbido o ruido.
/ El deck de cassettes está situado cerca de un
televisor o de una videograbadora. Aléjelo.
/ El deck de cassettes está situado sobre o debajo
del amplificador. Aléjelo.
13
ES
Page 42

Información adicional
Especificaciones
Sistema
Sistema de grabación
Estéreo de 4 pistas y 2 canales
Tiempo de avance rápido y rebobinado
Aprox. 180 seg (con cassette C-60 de Sony)
Polarización
De CA
Relación señal-ruido (al nivel de pico ponderada sin el sistema Dolby
NR)
Tipo de cinta I, tipo I Sony (NORMAL): 55 dB
Tipo de cinta II, tipo II Sony (HIGH): 57 dB
Tipo de cinta IV, tipo IV Sony (METAL): 58 dB
Relación seña-ruido (valores aproximados)
Con el sistema Dolby NR B: 5 dB a 1 kHz, 10 dB a
5 kHz
Con el sistema Dolby NR C: 15 dB a 500 Hz, 20 dB a
1 kHz
Generales
Alimentación
Lugar de adquisición Requisitos de alimentación
EE.UU. y Canadá 120 V CA, 60 Hz
Reino Unido y Europa
continental
Australia 240 V CA, 50/60 Hz
Otros países TC-WE405:
Consumo
18 W
Dimensiones (aprox.) (an/al/prf)
430 × 120 × 305 mm
incluyendo partes y controles salientes
Masa (aprox.)
3,8 kg
220 - 230 V CA, 50/60 Hz
120/220/240 V CA, 50/60 Hz
TC-WR661:
120/220/230 - 240 V CA, 50/60 Hz
Distorsión armónica
0,4% (con una cinta tipo I, tipo I Sony (NORMAL):
160 nWb/m, 315 Hz, distorsión de la 3.a armónica)
1,8% (con una cinta tipo IV, tipo IV Sony (METAL):
250 nWb/m, 315 Hz, distorsión de la 3.a armónica)
Respuesta en frecuencia (sin sistema Dolby NR)
Cinta tipo I, tipo I Sony (NORMAL): 30 - 16.000 Hz
(±3 dB, IEC)
Cinta tipo II, tipo II Sony (HIGH): 30 - 17.000 Hz
(±3 dB, IEC)
Cinta tipo IV, tipo IV Sony (METAL): 30 - 19.000 Hz
(±3 dB, IEC)
30 - 13.000 Hz (±3 dB, grabación a –4dB)
Cinta tipo I, tipo I Sony (NORMAL): 20 - 17.000 Hz
(±6 dB)
Cinta tipo II, tipo II Sony (HIGH): 20 - 18.000 Hz
(±6 dB)
Cinta tipo IV, tipo IV Sony (METAL): 20 - 20.000 Hz
(±6 dB)
Fluctuación y trémolo
±0,15%, ponderación de pico (IEC)
0,1%, ponderación eficaz (NAB)
±0,2%, ponderación de pìco (DIN)
Entradas
Entradas de línea (tomas fono)
Sensibilidad: 0,16 V
Impedancia de entrada: 47 kiloohmios
Accesorios suministrados
Cables conectores de audio (2 clavijas fono - 2 clavijas
fono) (2)
Accesorio opcional
Telemando RM-J910
Para más detalles sobre la posibilidad de adquirir el
mando a distancia, consulte con su distribuidor de
productos de Sony más cercano.
Diseño y especificaciones sujetos a cambio sin previo aviso.
14
Salidas
Salidas de línea (tomas fono)
Nivel nominal de salida: 0,5 V a una impedancia de
carga de 47 kiloohmios
Impedancia de carga: Más de 10 kiloohmios
Auriculares (toma telefónica estéreo) (solamente para TC-WE405)
Nivel de salida: 0,25 mW a una impedancia de carga
de 32 ohmios
ES
Page 43

Índice alfabético
Índice alfabético
A, B
Ajuste
automático del nivel de grabación. Consulte
Nivel de grabación automático
manualmente el nivel de la grabación 7
volumen 5
C
Cabezas
desmagnetización 12
limpieza 12
Cable conector de audio 4, 14
Cassette. Consulte Cinta
Cinta
extracción 5, 7
limpieza de la trayectoria 12
notas 11
protección de la grabación 11
tipo 11
Conexión
conexiones 4
descripción general 4
D, E, F, G, H
Desembalaje 4
Desvanecedor
aumento gradual 9
desvanecimiento 9
Duplicación
duplicación a gran velocidad 9
duplicación a velocidad normal 9, 10
partes específicas solamente 10
Especificaciones 14
Grabación 6
Guía para la solución de problemas 13
Index
Denominación de los controles
Botones
ARL (ajuste de nivel de grabación automático) 8
FADER (desvanecedor) 9
HIGH/NORMAL (gran velocidad/normal) 9
PAUSE P (pausa) 5, 7-10, 13
REC (grabación) r 6-8
REC MUTE (silenciamiento de la grabación) R 10
§ (expulsión) 5-7, 12, 13
p (parada) 5, 7-10, 13
· (reproducción progresiva) 5-10, 13
ª (reproducción regresiva) 5, 7, 9, 13
), 0 (avance rápido y rebobinado) 5, 13
Interruptores
DIRECTION (sentido) 5, 6, 9
DOLBY NR (sistema de reducción de ruido
Dolby) 5, 7, 10, 13
POWER (alimentación) 5, 6
Controles
REC LEVEL (nivel de grabación) 7-9
Tomas
LINE IN (entrada de línea) 4
LINE OUT (salida de línea) 4
PHONES (auriculares) 5
Otros
Indicador AUTO 6, 8, 9
Portacassette 5, 6, 12
Medidores de nivel de pico 7
I, J, L, M, N, O, P, Q
Inserción
casete 5, 6
espacios en blanco 10
Limpieza
cabezas y trayectoria de la cinta 12
deck de cassettes 11
Nivel de grabación automático 8
R, S, T, U, V, W, X, Y, Z
Reproducción
reproducción automática 5
reproducción básica 5
Reproducción automática 5
Silenciamiento de la grabación 10
Sistema Dolby HX PRO 7
Sistema Dolby NR 5, 7
15
ES
Page 44

ADVERTÊNCIA
Para evitar o risco de
incêndio ou de choque
eléctrico, não exponha o
aparelho à chuva nem à
humidade.
P
2
Page 45

Bem-vindo!
Agradecemos-lhe pela aquisição do
Deck de Cassetes Estéreo da Sony.
Antes de utilizar o aparelho, leia
atentamente este manual e guarde-o
para futuras consultas.
Índice
Preparativos
Desempacotamento 4
Ligação do sistema 4
Acerca deste manual
As instruções neste manual valem para
os modelos TC-WE405 e TC-WR661.
Verifique o número do modelo no
painel posterior do seu deck de cassetes.
Neste manual, o TC-WE405 é o modelo
utilizado para propósitos de ilustração.
Quaisquer diferenças no funcionamento
estão claramente indicadas no texto, por
exemplo, com os dizeres “somente TCWE405”.
Tipos de diferença
Modelo
Característica
Dolby HX PRO
Tomada PHONES
Convenção
O símbolo a seguir é utilizado neste
manual:
Indica conselhos e lembretes para
z
tornar as operações mais fáceis.
•
•
WR661WE405
Leitura de cassetes 5
Gravação de cassetes 6
Operações avançadas de gravação
Ajustamento automático do nível de gravação
(Nível de gravaçao automático) 8
Início e término graduais (Graduador) 9
Duplicação de cassetes 9
Inserção de um espaço em branco durante a gravação
(Silenciamento de gravação) 10
Informações adicionais
Precauções 11
Notas acerca das cassetes 11
Limpeza 12
Verificação de problemas 13
Especificações 14
Índice remissivo 15
P
P
3
Page 46

Preparativos
Desempacotamento
Certifique-se de que os seguintes itens estão presentes:
• Cabos de ligação de áudio (2)
Ligação do sistema
Esta secção descreve como ligar o deck de cassetes a
um amplificador. Certifique-se de desligar a
alimentação de cada componente antes de efectuar as
ligações.
Aos proprietários do TC-WR661
Para informações quanto a como ligar o deck de cassetes ao
amplificador TA-AV561, consulte o Manual de Instruções
que acompanha o TA-AV561.
Aos proprietários do TC-WE405
Siga as instruções abaixo para ligar o seu deck de cassetes
a um amplificador.
TC-WE405
a LINE IN
a REC OUT
a LINE OUT
a TAPE IN
a uma tomada
da rede CA
Amplificador
Ligações
Quando da ligação de um cabo de ligação de áudio,
certifique-se de combinar os cabos codificados por cores com
as tomadas correspondentes nos componentes: vermelho
(direita) com vermelho e branco (esquerda) com
branco. Assegure-se de efectuar as ligações firmemente
a fim de evitar zumbidos e interferências.
Ligue o deck de cassetes ao amplificador tal como
ilustrado abaixo.
AmplificadorDeck de cassetes
Ç
LINE
OUTIN
L
R
ç: Fluxo de sinais
TAPE
REC OUT IN
L
R
ç
L
R
Ajuste do selector de voltagem (somente
nos modelos fornecidos com um selector de
voltagem)
Verifique se o selector de voltagem localizado no
painel posterior do deck de cassetes está ajustado de
acordo com a tensão da rede eléctrica local. Caso não o
esteja, ajuste o selector à posição correcta, utilizando
uma chave de fenda, antes de ligar o cabo de
alimentação CA a uma tomada da rede CA.
TC-WE405
VOLTAGE
220V
240V
120V
TC-WR661
VOLTAGE
220V
230
240V
120V
–
Ligação do cabo de alimentação CA
Ligue o cabo de alimentação CA a uma tomada da rede
a uma tomada
da rede
CA.
Qual é o próximo passo?
Agora, o seu deck de cassetes está pronto para ser utilizado.
Para as operações básicas, consulte as páginas de 5 a 7; para
operações mais avançadas, consulte as secções que começam
na página 8.
P
4
Page 47

P
Operações básicas
Leitura de cassetes
24 3
DECK A DECK B
COUNTER RESET
0
p
)
ª·
§
POWER
Operações básicas
AUTO
REC LEVEL
DOLBY NR
DIRECTION
RELAY
Da
SYNCHRO DUBBING A→B
HIGH/NORMAL
START(DECK B P)
PAUSE REC MUTE REC
PrR
0)
p
§
OFF B C
FADER ARL
ª·
5
6
4
3
7
2
8
1
9
0
10
PHONES
• Consulte a página 4 quanto
a informações acerca da
ligação do sistema.
• Podem-se utilizar ambos os
decks para a leitura.
z Para localizar o começo da
fita e iniciar a reproduzir
automaticamente (Leitura
automática)
Pressione 0 mantendo ·
pressionado. Para o lado
reverso, pressione )
mantendo pressionado ª.
z Para reproduzir uma
cassete gravada com o
sistema Dolby NR*
Ajuste o DOLBY NR para a
mesma posição utilizada para
a gravação da fita: B ou C.
z O que vem a ser o sistema
Dolby NR?
O sistema Dolby NR
(redução de ruído) elimina o
chiado da fita amplificando
os sinais de baixo nível na
banda de alta frequência
durante as gravações, e
reduzindo-os durante
reproduções. O tipo C
proporciona uma maior
redução de ruídos que o tipo
B.
z É possível ligar
auscultadores à tomada
PHONES (somente TCWE405)
* Redução de ruído Dolby
fabricada sob licença de Dolby
Laboratories Licensing
Corporation.
Ligue a alimentação do amplificador e seleccione a posição do
1
deck de cassetes.
Pressione POWER, a seguir carregue
2
em § e insira uma cassete.
Com o lado que deseja reproduzir
voltado para fora.
Ajuste DIRECTION.
3
Para reproduzir Ajuste para
somente um dos lados A
ambos os lados continuamente* a
ambos os decks em sucessão* RELAY
* O deck cessa automaticamente após reproduzir cinco vezes.
Pressione ·.
4
O deck inicia a leitura. Ajuste o volume no amplificador.
Para
cessar a leitura p
iniciar a leitura a partir do lado reverso ª
pausar (somente deck B) PAUSE P. Pressione a tecla novamente
avançar rapidamente ou rebobinar ) ou 0 quando o deck estiver em
Pressione
para retomar a leitura.
paragem
§ após cessar a leituraretirar a cassete
Operações básicas
DOLBY e o símbolo dos dois D
a são marcas de Dolby
Laboratories Licensing
Corporation.
P
5
Page 48

Operações básicas
Operações básicas
Gravação de cassetes
234
DECK A DECK B
COUNTER RESET
0
p
)
ª·
§
POWER
DIRECTION
RELAY
Da
SYNCHRO DUBBING A→B
HIGH/NORMAL
START(DECK B P)
PAUSE REC MUTE REC
PrR
0)
p
§
DOLBY NR
OFF B C
FADER ARL
ª·
5
AUTO
REC LEVEL
5
6
4
3
7
2
8
1
9
0
10
PHONES
• Consulte a página 4 quanto
a informações acerca da
ligação do sistema.
• Utilize o deck B (à sua
direita) para a gravação.
• Consulte “Duplicação de
cassetes” (página 9) para
realizar uma cópia da
cassete.
Nota
Quando o deck B estiver gravando
ou em pausa na gravação, nenhum
dos botões do deck A funcionará.
Ligue a alimentação do amplificador e reproduza a fonte de
1
programa que deseja gravar.
Pressione POWER, a seguir carregue na
2
tecla § e insira uma cassete no deck B.
Com o lado que deseja reproduzir
voltado para fora.
Ajuste DIRECTION.
3
Para gravar em
somente um dos lados A
ambos os lados* a
* A gravação cessará quando a fita atingir o final do lado reverso.
Pressione REC r.
4
O indicador · acende-se para indicar a gravação no lado
voltado para fora. Caso não se acenda, pressione a tecla ·
uma vez.
Ajuste-o para
O deck de cassetes ajusta o nível de gravação automaticamente
(consulte página 8). Depois que o indicador AUTO ficar aceso
continuamente, cesse a leitura da fonte de programa. Caso se
queira ajustar o nível de gravação manualmente, consulte
“Para ajustar o nível de gravação manualmente” na página 7.
P
6
Page 49

P
PHONES
POWER
DECK A DECK B
COUNTER RESET
PAUSE REC MUTE REC
START(DECK B P)
SYNCHRO DUBBING A→B
HIGH/NORMAL
FADER ARL
DIRECTION
Da
RELAY
DOLBY NR
OFF B C
AUTO
PrR
0)
p
ª·
§
0
)
p
ª·
§
REC LEVEL
5
4
3
2
1
0
6
7
8
9
10
Operações básicas
z Para proteger gravações
contra apagamentos
acidentais
Quebre a(s) lingueta(s) para a
protecção de gravações
(consulte a página 11).
z O sistema Dolby HX PRO* é
ativado automaticamente
durante gravações
(somente TC-WE405)
Distorções e ruídos em
resposta de alta frequência são
reduzidos a fim de produzir
gravações de alta qualidade
que possam ser desfrutadas
mesmo quando reproduzidas
em outros decks de cassetes.
Pressione PAUSE P ou ·.
5
Tem início a gravação.
Dê início à leitura da fonte de programa.
6
Para
cessar a gravação
iniciar a gravação a partir do lado
reverso
pausar
retirar a cassete § após cessar a gravação
Utilize estas teclas (controlos) para executar as operações
adicionais
Pressione
p
ª duas vezes no passo 5
PAUSE P. Pressione-a novamente para
retomar a gravação.
DOLBY NR REC LEVEL
Operações básicas
* HX Pro Headroom extension
desenvolvide por Bang &
Olufsen e fabricada sob licença
de Dolby Laboratories Licensing
Corporation.
DOLBY, o símbolo dos dois D
a e HX PRO são marcas de
Dolby Laboratories Licensing
Corporation.
Para gravar com o sistema Dolby NR
Ajuste DOLBY NR para B ou C antes de iniciar a gravação.
Para ajustar o nível de gravação manualmente
Após ter pressionado REC r no passo 4 da
página 6, gire o REC LEVEL de modo que o
medidor do nível de pico alcance o nível
recomendado para o tipo de fita correspondente.
Após ter efectuado os ajustamentos, cesse a
leitura da fonte de programa, e continue com os
procedimentos a partir do passo 5.
30
–
∞
dB
L
R
Para
cassetes do
tipo I ou II
Para cassetes
do tipo IV
–10–20–
4
8
P
7
+
+40
–
Page 50

Operações avançadas de gravação
Operações avançadas de gravação
Ajustamento automático do
nível de gravação (Nível de
gravação automático)
A função Nível de gravação automático mede
automaticamente o nível de pico dos sinais e ajusta o
nível de gravação conforme o mesmo.
PAUSE P REC r·
AUTO
REC LEVEL
DIRECTION
DOLBY NR
RELAY
OFF B C
FADER ARL
PrR
0)
p
ª·
§
5
6
4
3
2
1
0
10
PHONES
Da
SYNCHRO DUBBING A→B
HIGH/NORMAL
START(DECK B P)
DECK A DECK B
COUNTER RESET
0
)
POWER
p
ª·
§
PAUSE REC MUTE REC
z Deve-se ajustar o nível de gravação manualmente
com o REC LEVEL nos seguintes casos:
—Impossibilidade de ajustar o nível de gravação
apropriadamente devido a ruídos excessivos na fonte
de programa.
—O nível da fonte de programa é demasiado baixo e o
nível de gravação não aumenta.
Durante um trecho mais baixo em uma fonte de
programa tal como música clássica, o nível de
gravação poderá não eleva-se por algum tempo. Caso
um nível sonoro mais alto seja previsível mais tarde
na faixa, execute aquela porção primeiro de modo a
obter um nível de gravação correcto.
7
8
9
—O nível de gravação não diminui por um longo
tempo.
A função Nível de gravação automático poderá não
funcionar apropriadamente quando se tentar gravar
sons produzidos por um equalizador gráfico que
tenha sinais de nível extremamente altos.
1 Efectue os passos de 1 a 3 da “Gravação de
cassetes” na página 6.
Certifique-se de que as linguetas de protecção de
gravações não foram removidas da cassete.
2 Pressione REC r.
O indicador AUTO acende-se intermitentemente e
o deck ajusta automaticamente o nível de
gravação. O indicador AUTO ficará aceso
continuamente depois que o nível de gravação
tenha sido ajustado.
3 Pressione PAUSE P ou ·.
A gravação terá início.
Para cancelar a função Nível de gravação automático
Pressione ARL ou gire o REC LEVEL de modo que o
indicador AUTO apague-se. Caso qualquer um destes atos
seja efectuado durante gravações, a gravação terá
prosseguimento mas com a função Nível de gravação
automático desligada.
Para cessar a gravação
Pressione p.
z Para gravar com o nível de gravação mais adequado
• Para previnir mudanças no nível de gravação depois
que a gravação tenha início, pressione REC r
enquanto da leitura da porção da fonte de programa
com o mais alto nível sonoro a ser gravado. Isto
resulta em uma gravação com sonoridade mais
natural.
• Caso se efectue a leitura de toda a fonte de programa
depois que o indicador AUTO tenha cessado de
piscar e estiver aceso continuamente, o deck ajustará
o nível de gravação para a porção da fonte de
programa com o nível de sinal mais alto.
z O ajuste do nível de gravação permanece o mesmo
depois que a gravação terminar
Após ter terminado a gravação com a função Nível de
gravação automático, o indicador AUTO permanece
ligado e o ajuste do nível de gravação permanecerá o
mesmo. Para cancelar o ajuste, execute um dos
seguintes procedimentos:
• Pressione ARL para desligar o indicador AUTO
• Gire o REC LEVEL
• Desligue o deck
z O que vem a ser a função Nível de gravação
automático?
A função Nível de gravação automático ajusta
automaticamente o nível de gravação de acordo com o
nível de pico dos sinais da fonte de programa. Enquanto
o indicador AUTO estiver piscando, o deck ajusta o
nível de gravação o mais alto possível sem causar
distorções. Caso o nível dos sinais eleve-se
excessivamente depois de iniciada a gravação, o deck
baixará gradualmente o nível de gravação.
P
8
Page 51

Operações avançadas de gravação
Início e término graduais
(Graduador)
Pode-se aumentar gradualmente o nível de gravação
no início da gravação (início gradual) ou diminuir
gradualmente o nível de gravação no final da gravação
(término gradual).
Esta função é conveniente, por exemplo, quando a
cassete chegar ao seu final e não se desejar que a faixa
termine abruptamente.
Gravações com início ou término graduais somente
serão possíveis quando o nível de gravação tenha sido
ajustado manualmente (consulte página 7).
FADER
AUTO
REC LEVEL
DIRECTION
DOLBY NR
RELAY
OFF B C
FADER
PrR
0)
p
ª·
§
5
6
4
3
7
2
8
ARL
1
9
0
10
PHONES
Da
SYNCHRO DUBBING A→B
HIGH/NORMAL
START(DECK B P)
DECK A DECK B
COUNTER RESET
0
)
POWER
p
ª·
§
PAUSE REC MUTE REC
Para Faça o seguinte:
Início gradual 1 Siga os passos de 1 a 4 de “Gravação de
Término gradual Pressione FADER quando se desejar
cassetes” na página 6.
2 Pressione FADER. Durante o início
gradual, o indicador AUTO pisca, e
então desliga-se quando o início
gradual ter sido completado.
iniciar o término gradual durante a
gravação. Quando o término gradual
ter sido completado, “REC” pisca no
mostrador e o deck entra em pausa.
Duplicação de cassetes
Pode-se copiar a fita inserida no deck A em uma fita no
deck B a uma velocidade normal ou a alta velocidade.
p
PAUSE P
DECK A DECK B
COUNTER RESET
0
)
POWER
p
ª·
§
1 Insira a cassete matriz (gravada) no deck A e a
cassete em branco no deck B.
Certifique-se de que as linguetas de protecção de
gravações na cassete do deck B não tenham sido
removidas.
2 Seleccione o(s) lado(s) a ser(em) gravado(s).
Para gravar em Ajuste DIRECTION para
um só lado A
ambos os lados a.
3 Escolha da velocidade de duplicação.
HIGH / NORMAL
DIRECTION
DOLBY NR
DIRECTION
OFF B C
RELAY
Da
SYNCHRO DUBBING A→B
HIGH/NORMAL
FADER ARL
START(DECK B P)
PAUSE REC MUTE REC
PrR
0)
p
ª·
§
A gravação no lado reverso da
cassete do deck B tem início
independentemente da leitura no
deck A.
RELAY.
A gravação no lado reverso da
cassete do deck B tem início
simultaneamente com a leitura do
lado reverso da cassete no deck A.
ª / ·
AUTO
REC LEVEL
5
6
4
3
7
2
8
1
9
0
10
PHONES
Nota
Início ou término graduais não serão possíveis quando REC
LEVEL estiver ajustado em 0 (mínimo).
Para escolher Pressione HIGH/NORMAL
Velocidade normal Uma vez
Velocidade alta Duas vezes
A indicação “HIGH” ou “NORM” aparecerá no
mostrador.
O deck de cassetes altera-se para o modo de
espera para a duplicação.
4 Seleccione o lado a partir do gual deseja iniciar a
duplicação.
Para gravar
a partir do lado frontal ·
Pressione
ªa partir do lado reverso
5 Pressione PAUSE P para dar início à duplicação.
P
9
Page 52

Operações avançadas de gravação
Para cessar a duplicação
Durante a
duplicação à velocidade normal p no deck B
Carregue em
Inserção de um espaço em
branco durante a gravação
duplicação a alta velocidade p em um dos decks
z Durante a duplicação em alta velocidade
Somente a tecla p estará funcionante.
z Não é necessário ajustar o nível de gravação ou
seleccionar o sistema Dolby NR durante a duplicação
A duplicação é automaticamente executada com o
mesmo nível de gravação e ajuste do sistema Dolby NR
originais da cassete no deck A. Entretanto, caso deseje
monitorizar o som durante a duplicação à velocidade
normal, ajuste DOLBY NR de modo a corresponder à
fita no deck A (consulte a página 5).
Nota
Caso um televisor esteja situado nas proximidades do deck
de cassetes, interferências poderão ocorrer durante a
duplicação em alta velocidade. Neste caso, desligue o
televisor ou afaste-o do deck de cassetes.
Duplicação somente de trechos específicos
Isto pode ser realizado somente durante a duplicação
à velocidade normal.
(Silenciamento de gravação)
Pode-se inserir um espaço em branco de 4 segundos
entre cada faixa ou apagar trechos não desejados da
fita.
PAUSE P REC MUTE R·
AUTO
REC LEVEL
DOLBY NR
DIRECTION
Da
SYNCHRO DUBBING A→B
HIGH/NORMAL
START(DECK B P)
DECK A DECK B
COUNTER RESET
0
)
POWER
p
ª·
§
PAUSE REC MUTE REC
p
§
1 Inicie a gravação.
2 Pressione REC MUTE R onde desejar inserir um
espaço em branco.
A indicação “REC” piscará no mostrador e um
espaço em branco será gravado na fita.
Após 4 segundos, o indicador P acender-se-á e o
deck de cassetes entrará no modo de gravação em
pausa.
OFF B C
RELAY
FADER ARL
PrR
0)
ª·
5
6
4
3
7
2
8
1
9
0
10
PHONES
1 Pressione p do deck A no trecho que deseja
saltar.
O deck B passa ao modo de gravação em pausa.
2 Localize o ponto onde deseja retomar a gravação
no deck A, e a seguir cesse o movimento da fita.
3 Pressione PAUSE P para retomar a duplicação.
3 Pressione PAUSE P ou · para retomar a
gravação.
z Caso deseje inserir um espaço em branco de duração
maior que 4 segundos
Mantenha pressionada REC MUTE R durante o tempo
desejado de duração. Após 4 segundos, a indicação
“REC” passará a piscar mais rapidamente.
Quando REC MUTE R for liberada, o indicador P
acender-se-á e o deck de cassetes passará ao modo de
gravação em pausa.
Pressione PAUSE P ou · para retomar a gravação.
10
P
Page 53

Informações adicionais
Informações adicionais
Precauções
Segurança
• Não desmonte o aparelho — isto pode acarretar um
choque eléctrico. Solicite assistência técnica somente a
pessoal qualificado.
• Se algum objecto sólido ou líquido cair dentro do
aparelho, desligue o deck de cassetes da rede eléctrica e
submeta-o a uma averiguação técnica por pessoal
qualificado antes de voltar a utilizá-lo.
Fontes de alimentação
• Antes de utilizar o deck de cassetes, verifique se a
voltagem de funcionamento do mesmo é idêntica à tensão
da rede eléctrica local. A voltagem de funcionamento está
indicada na placa localizada na parte posterior do deck de
cassetes.
• Mesmo quando o interruptor de alimentação estiver
desligado, o aparelho não estará desligado da rede CA
enquanto estiver ligado à tomada da parede (não aplicável
aos Modelos Europeus).
• Caso não vá utilizar o deck de cassetes durante um longo
período, certifique-se de desligá-lo da tomada da rede.
Para desligar o cabo de alimentação CA, puxe-o pela ficha;
nunca pelo cabo em si.
• A troca do cabo de alimentação CA deverá ser executada
somente em serviços técnicos qualificados.
Funcionamento
• Devido a um mecanismo de segurança, as teclas de função
estarão inoperantes se o compartimento de cassete não
estiver completamente fechado, se não houver cassete
inserida no compartimento, ou se uma cassete estiver
inserida de maneira incorrecta no compartimento.
• Assegure-se de parar a fita antes de desligar o toca-fitas.
Caso contrário, a fita poderá ser danificada.
Localização
• Instale o deck de cassetes em um local com ventilação
adequada, de modo a evitar o sobreaquecimento interno
do deck de cassetes.
• Não instale o deck de cassetes:
— sobre uma superfície macia, tal como um tapete, que
possa bloquear os orifícios de ventilação localizados na
base do aparelho;
— em um local próximo a fontes de calor;
— em um local sujeito à luz solar directa;
— em uma posição inclinada;
— em um local sujeito a poeira excessiva ou choques
mecânicos.
Limpeza do deck de cassetes
Limpe a parte externa, o painel e os controlos com um pano
macio levemente humedecido com uma solução de
detergente suave. Não utilize nenhum tipo de escova
abrasiva, pó saponáceo ou solvente, tal como álcool ou
benzina.
Notas acerca das cassetes
Para proteger uma gravação no lado A ou B
Quebre a respectiva lingueta.
Lado A
Lingueta para o lado B
Para gravar numa fita sem uma lingueta de protecção de
gravações
Cubra o respectivo orifício de lingueta com fita adesiva.
Quando estiver a utilizar uma cassete do tipo II ou IV, seja
cuidadoso para não cobrir as aberturas de detecção a serem
utilizadas pelo deck para determinar o tipo de cassete.
Tipo II
Aberturas de detecção
Acerca de cassetes com duração superior a 90 minutos
Não se recomenda a utilização de cassetes com duração
superior a 90 minutos, excepto para gravações ou leituras
contínuas e prolongadas. Tais fitas são muito finas e tendem
a deformar-se com facilidade.
Acerca do manuseamento de cassetes
• Para evitar o depósito de sujidades nas cabeças e no
trajecto da fita, evite tocar na superfície da fita de uma
cassete.
• Deixe as cassetes distantes de equipamentos com ímans,
tais como altifalantes e amplificadores, que podem causar
distorções na fita ou apagamento de gravações.
• Não exponha as cassetes à luz solar directa, a
temperaturas extremamente baixas ou à humidade.
Lingueta para o lado A
Tipo IV
Aberturas de
detecção
Caso surjam quaisquer dúvidas ou problemas
concernentes a este deck de cassetes, consulte o seu
agente Sony mais próximo.
11
P
Page 54

Informações adicionais
Limpeza
Conjunto das cabeças do deck B
Roletes pressores
Veios de
arrasto
Cabeça de
apagamento
Cabeça de gravação/leitura
DECK A DECK B
COUNTER RESET
0
)
POWER
p
ª·
§
SYNCHRO DUBBING A→B
START(DECK B P)
DIRECTION
Da
HIGH/NORMAL
PAUSE REC MUTE REC
PrR
0)
p
§
RELAY
OFF B C
FADER ARL
ª·
Desmagnetização das cabeças
Após 20 ou 30 horas de utilização, ou caso perceba um
ruído sibilante ou a perda das altas frequências,
desmagnetize as cabeças com um desmagnetizador
disponível no comércio para decks de cassetes.
Consulte o manual de instruções do desmagnetizador.
AUTO
REC LEVEL
DOLBY NR
5
6
4
3
7
2
8
1
9
0
10
PHONES
§
Limpeza das cabeças e do trajecto da fita
Limpe as cabeças e o trajecto da fita do deck de
cassetes a cada 10 horas de funcionamento para evitar:
• sons de baixa qualidade;
• diminuição do nível sonoro;
• choro ou flutuação excessiva;
• perdas de som;
• apagamento incompleto;
• avarias na função de gravação.
Para assegurar melhores gravações, recomendamos a
limpeza das cabeças e do trajecto da fita antes de cada
gravação.
1 Pressione § para abrir o compartimento de
cassete. Segure a tampa frontal em ambos os
lados e suspenda-a delicadamente para removêla.
2 Com o deck de cassetes desligado, limpe as
cabeças, os roletes pressores e os veios de arrasto
com uma haste de algodão levemente
humedecida com álcool ou um fluido de limpeza
disponível no comércio, destinado a decks de
cassetes.
12
3 Recoloque a tampa frontal.
P
Page 55

Verificação de problemas
Na ocorrência de alguma das dificuldades a seguir
durante a utilização do deck de cassetes, utilize este
guia como auxílio para solucionar o problema. Caso o
problema persista, consulte o seu agente Sony mais
próximo.
As teclas de função não funcionam.
/
O deck de cassetes acabou de ser ligado e não
funcionará por aproximadamente 3 segundos.
Aguarde até que o indicador P pare de piscar.
/ Verifique se a cassete está inserida
correctamente e o compartimento de cassete
está completamente fechado.
O deck de cassetes não reproduz ou não grava.
/
Ausência de cassete no compartimento de
cassete.
/ A fita atingiu o seu término.
/ A fita está frouxa. Bobine a folga da fita.
/ A lingueta de protecção de gravações foi
removida da cassete (consulte a página 11).
/ Certifique-se de que o ajuste do amplificador
está correcto.
/ Verifique se as ligações do deck de cassetes
estão firmes.
/ As cabeças e o trajecto da fita estão
contaminados. Limpe-os (consulte a página 12).
/ A cabeça de gravação/leitura está
magnetizada. Desmagnetize-a (consulte a
página 12).
Informações adicionais
Ocorrência de desequilíbrio de tonalidade.
/ Verifique se a posição do ajuste DOLBY NR é a
mesma de quando a fita foi gravada.
/ O deck de cassetes está localizado nas
proximidades de um televisor ou
videogravador. Afaste o deck de cassetes do
televisor ou videogravador.
O movimento da fita cessa antes desta ter sido
completamente rebobinada.
/
A fita está frouxa. Retire a folga da fita.
/ O invólucro da cassete está arqueado. Utilize
uma outra cassete.
Ocorrência de ruído de transporte da fita excessivamente
alto durante o avanço rápido ou a rebobinagem.
/
Este ruído é causado pela cassete e não
significa um problema mecânico.
A tecla § não funciona.
/ Houve um corte no fornecimento de
alimentação ou o cabo de alimentação foi
desligado. Ligue novamente a alimentação
durante a operação da fita cassete.
Ocorrência de um penqueno intervalo na saída sonora
durante reproduções.
/ ), 0, ou p foi pressionado em um dos
decks enquanto o outro estava reproduzindo.
Ou PAUSE P, ·, ou ª foi pressionado no
deck B enquanto o deck A estava
reproduzindo.
Ocorrência excessiva de choro, flutuações ou perdas
sonoras.
/
Os veios de arrasto e os roletes pressores estão
contaminados. Limpe-os (consulte a página 12).
Ocorrência de diminuição do nível sonoro, perdas
sonoras ou reprodução insatisfatória das altas
frequências./ Apagamento incompleto da fita./ Aumento
de ruídos.
/
A cabeça de gravação/leitura ou a cabeça de
apagamento e o trajecto da fita estão
contaminados. Limpe-os (consulte a página 12).
/ A cabeça de gravação/leitura ou a cabeça de
apagamento está magnetizada. Desmagnetize-a
(consulte a página 12).
Presença de zumbidos e ruídos de interferências.
/ O deck de cassetes está localizado nas
proximidades de um televisor ou
videogravador. Afaste o deck de cassetes do
televisor ou videogravador.
/ O deck de cassetes está localizado sobre ou sob
o amplificador. Afaste o deck de cassetes do
amplificador.
13
P
Page 56

Informações adicionais
Especificações
Generalidades
Alimentação
Sistema
Sistema de gravação
Estéreo de 4 pistas e 2 canais
Tempo de bobinagem rápida (aproximado)
180 seg. (com cassetes C-60 da Sony)
Corrente de polarização
Polarização de corrente alternada
Relação sinal/ruído (ao nível de pico e ponderado com Dolby NR
desactivado)
Fitas tipo I, Type I da Sony (NORMAL): 55 dB
Fitas tipo II, Type II da Sony (HIGH): 57 dB
Fitas tipo IV, Type IV da Sony (METAL): 58 dB
Aprimoramento da relação sinal/ruído (valores aproximados)
Com Dolby B NR activado: 5 dB a 1 kHz,
10 dB a 5 kHz
Com Dolby C NR activado: 15 dB a 500 Hz,
20 dB a 1 kHz
Distorção harmónica
0,4% (com fitas tipo I, Type I da Sony (NORMAL):
160 nWb/m 315 Hz, 3ª D.H.)
1,8% (com fitas tipo IV, Type IV da Sony (METAL):
250 nWb/m 315 Hz, 3ª D.H.)
Resposta em frequência (com Dolby NR desactivado)
Fitas tipo I, Type I da Sony (NORMAL):
30 - 16.000 Hz (±3 dB, IEC)
Fitas tipo II, Type II da Sony (HIGH):
30 - 17.000 Hz (±3 dB, IEC)
Fitas tipo IV, Type IV da Sony (METAL):
30 - 19.000 Hz (±3 dB, IEC)
30 - 13.000 Hz (±3 dB, –4 dB em gravações)
Fitas tipo I, Type I da Sony (NORMAL):
20 - 17.000 Hz (±6 dB)
Fitas tipo II, Type II da Sony (HIGH):
20 - 18.000 Hz (±6 dB)
Fitas tipo IV, Type IV da Sony (METAL):
20 - 20.000 Hz (±6 dB)
Local de aquisição Alimentação requerida
E.U.A. e Canadá 120 V CA, 60 Hz
Reino Unido e Europa
continental
Austrália 240 V CA, 50/60 Hz
Outros países TC-WE405:
Consumo
18 W
Dimensões (aprox.) (l/a/p)
430 × 120 × 305 mm (l/a/p)
incluindo controlos e partes salientes
Peso (aprox.)
3,8 kg
220 - 230 V CA, 50/60 Hz
120/220/240 V CA, 50/60 Hz
TC-WR661:
120/220/230 - 240 V CA, 50/60 Hz
Acessórios fornecidos
Cabos de ligação de áudio (2 fichas RCA - 2 fichas
RCA) (2)
Acessório opcional
Telecomando RM-J910
Para maiores informações quanto à disponibilidade do
commander remoto, contacte o seu revendedor Sony
mais próximo.
Design e especificações sujeitos a alterações sem aviso
prévio.
14
Choro e flutuação
±0,15% pico ponderado (IEC)
0,1% eficaz ponderado (NAB)
±0,2% pico ponderado (DIN)
Entradas
Linhas de entrada (tomadas RCA)
Sensibilidade: 0,16 V
Impedância de entrada: 47 kohms
Saídas
Linhas de saída (tomadas RCA)
Nível de saída nominal: 0,5 V a uma impedância de
carga de 47 kohms
Impedância de carga: superior a 10 kohms
Auscultadores (tomada universal estéreo) (somente TC-WE405)
Nível de saída: 0,25 mW a uma impedância de carga
de 32 ohms
P
Page 57

Índice remissivo
Índice remissivo
A, B
Ajuste
nivel de gravação automaticamente.
Consulte Nível de gravação automático
nivel de gravação manualmente, do 7
volume, do 5
C
Cabeças
desmagnetização, das 12
limpeza, das 12
Cabo de ligação de áudio 4, 14
Cassete
ejecção, da 5, 7
limpeza do trajecto da fita 12
notas acerca, da 11
protecções de gravações, na 11
tipo 11
Conexões. Consulte Ligações
D, E, F, G, H
Desempacotamento 4
Dolby HX PRO, sistema 7
Dolby NR, sistema 5, 7
Duplicação
duplicação à velocidade normal 9, 10
duplicação em alta velocidade 9
somente trechos específicos, de 10
Especificações 14
Graduação
Início gradual. Consulte Graduador
Término gradual. Consulte Graduador
Graduador 9
Gravação 6
Gravação silenciada 10
Nomes dos controlos
Teclas
ARL (ajuste automático do nível de gravação) 8
FADER (graduador) 9
HIGH/NORMAL 9
PAUSE P 5, 7-10, 13
REC (gravação) r 6-8
REC MUTE (gravação silenciada) R 10
§ (ejecção) 5-7, 12, 13
p (paragem) 5, 7-10, 13
· (leitura progressiva) 5-10, 13
ª (leitura reversa) 5, 7, 9, 13
), 0 (avanço rápido e rebobinagem) 5, 13
Interruptores
DIRECTION de sentido de movimento
da fita 5, 6, 9
DOLBY NR de redução de ruídos
Dolby 5, 7, 10, 13
POWER de alimentação 5, 6
Controlos
REC LEVEL do nível de gravação 7-9
Tomadas
LINE IN de entrada de linha 4
LINE OUT de saída de linha 4
PHONES dos auscultadores 5
Outros
Compartimento de cassete 5, 6, 12
Indicador AUTO 6, 8, 9
Medidores do nível de pico 7
GB
GBGB
15
I, J, K, L, M, N, O, P, Q
Inserção
cassete, da 5,6
espaço em branco 10
Leitura automática 5
Ligações
introdução 4
ligações 4
Limpeza
cabeças e do trajecto da fita, das 12
parte externa, da 11
Nível de gravação automático 8
R, S, T, U
Reprodução
reprodução automática 5
reprodução normal 5
V, W, X, Y, Z
Verificação de problemas 13
15
P
Page 58

Índice remissivo
16
P
Page 59

GB
GBGB
17
17
P
Page 60

Sony Corporation Printed in China
 Loading...