

Page 1

4-230-237-11(1)
Stereo Cassette
Deck
Operating Instructions
TC-SP55
©2000 Sony Corporation
Page 2

Do not install the appliance in a confined space,
such as a bookcase or built-in cabinet.
This system is equipped with the Dolby* B-type noise
reduction system.
* Manufactured under license from Dolby
Laboratories.
“Dolby” and the double-D symbol are trademarks
of Dolby Laboratories.
The TC-SP55 tape deck is
designed only for the
CMT-SP55MD Micro Hi-Fi
component system
Here are some of the features you can use with
this tape deck when connected with the
CMT-SP55MD Micro Hi-Fi component system
(see page 4).
Auto Power On/Off
The tape deck power is tied with the
CMT-SP55MD Micro Hi-Fi component system.
Synchro Recording
You can easily record a CD onto a tape (see
pages 6 and 10).
Automatic Source Selection
You can switch from another source to the tape
deck and start playing a tape just by pressing H
or h on the tape deck (see page 8).
Timer
You can wake up to music or record a radio
programme at a preset time. For details, refer to
“Falling asleep to music” and “Waking up to
music” in the CMT-SP55MD Operating
Instructions, and “Timer recording radio
programmes” on page 15.
Remote Control
You can operate the tape deck using the remote
supplied with CMT-SP55MD.
2
Page 3

Table of Contents
Getting Started
Hooking up the system.............................. 4
Operations
Recording a CD on a tape
— CD-TAPE Synchro Recording ...... 6
Playing a tape ............................................ 7
Recording a tape on an MD ...................... 9
Recording your favourite CD tracks
on a tape
— CD-TAPE Synchro Recording .... 10
Recording an MD on a tape .................... 11
Recording your favourite portions
on a tape
— Manual Recording ....................... 13
Recording from the radio ........................ 14
Timer recording radio programmes ........ 15
Additional Information
Precautions .............................................. 17
Troubleshooting ...................................... 18
Messages ................................................. 19
Specifications .......................................... 19
Index..........................................Back cover
3
Page 4
Getting Started
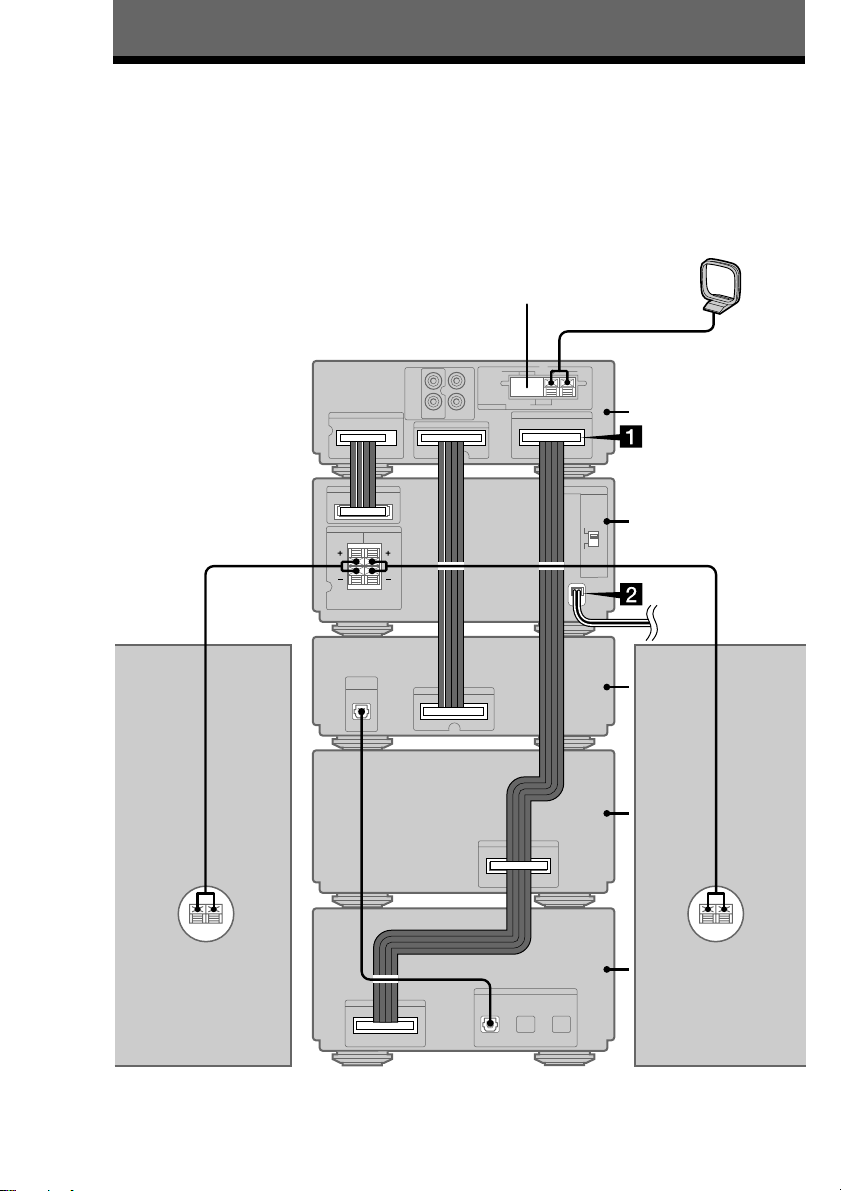
Hooking up the system
Perform the following procedure 1 and 2 to hook up your system using the supplied cord.
Note
Be sure to hook up the system with the mains lead unplugged from the mains. Hooking up the system with the
mains lead plugged in may cause the system to malfunction.
AM loop aerial
FM aerial
CMT-SP55MD
rear panel
Tuner
Amplifier
4
Right
speaker
Left
speaker
CD player
Tape deck
MD deck
Page 5
Preparations
S
Y
S
T
E
M
C
O
N
T
R
O
L
3
S
Y
S
T
E
M
C
O
N
T
R
O
L
3
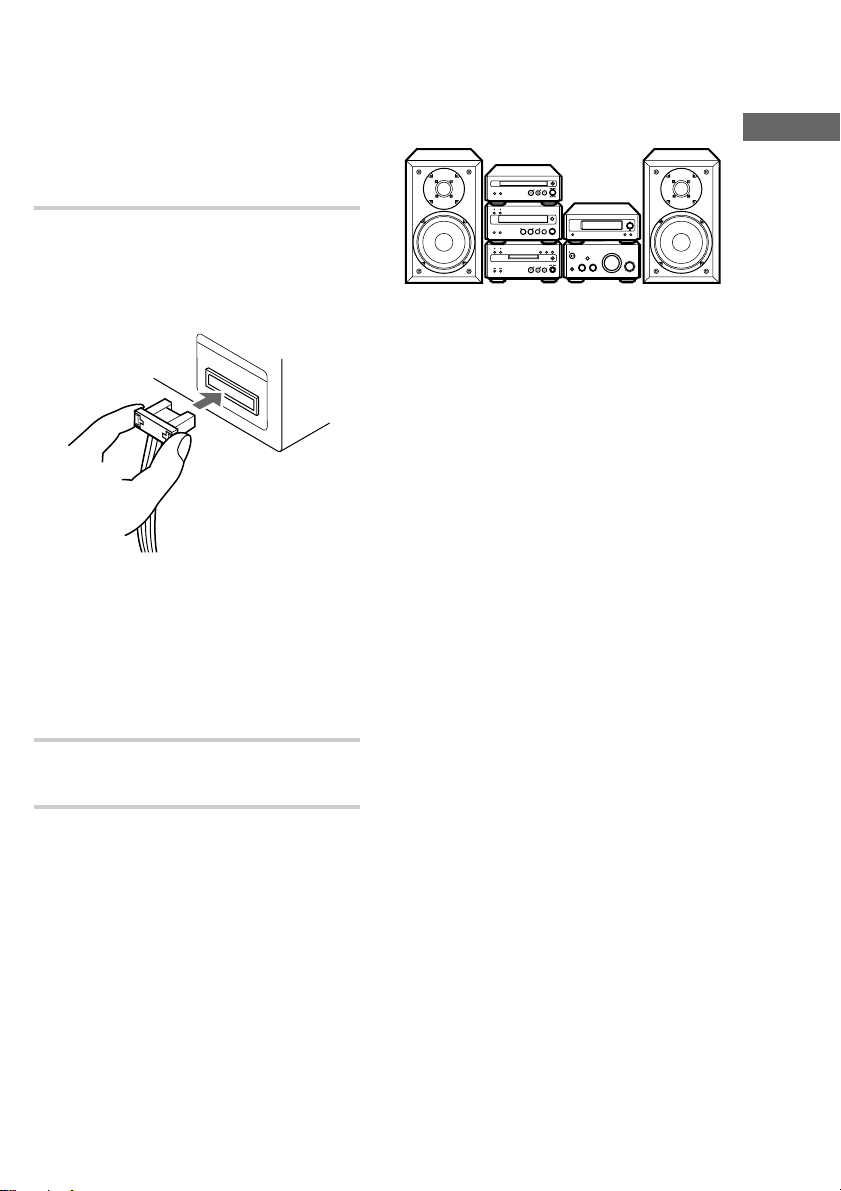
1 Stack the components vertically in the order of
tuner, amplifier, CD player, tape deck and MD
deck.
2 Disconnect the system cable supplied with
CMT-SP55MD from the SYSTEM CONTROL
3 connectors on the tuner and MD deck.
1 Connect the SYSTEM CONTROL 3
connectors (red) in the order of the
tuner, tape deck and MD deck using the
system cable supplied with TC-SP55.
Notes
• The system cable is used to send signals and
electricity between the components for
interlinked operation.
Be sure to insert the connector horizontally
until it clicks into place. Otherwise the system
will not operate correctly.
• Keep the system cable away from the aerials
to prevent noise or malfunction.
Arranging the components side
by side
Once you have finished the connections, you can
rearrange the components as desired.
Getting Started
Tip
All information for the TC-SP55 tape deck appears in
the display on the tuner of CMT-SP55MD.
2 Connect the mains lead to the mains
after you complete all the connections.
5
Page 6
Operations
Recording a CD on a
tape
You can make an analogue recording of a CD on a
tape. You can use TYPE I (normal) or TYPE II
(CrO2) tape. The recording level is automatically
adjusted.
You can also record a programme of favourite
tracks (see page 10).
To turn on the system, press ?/1 (power).
The tape deck turns on automatically.
— CD-TAPE Synchro Recording
?/1 (power)
3
2
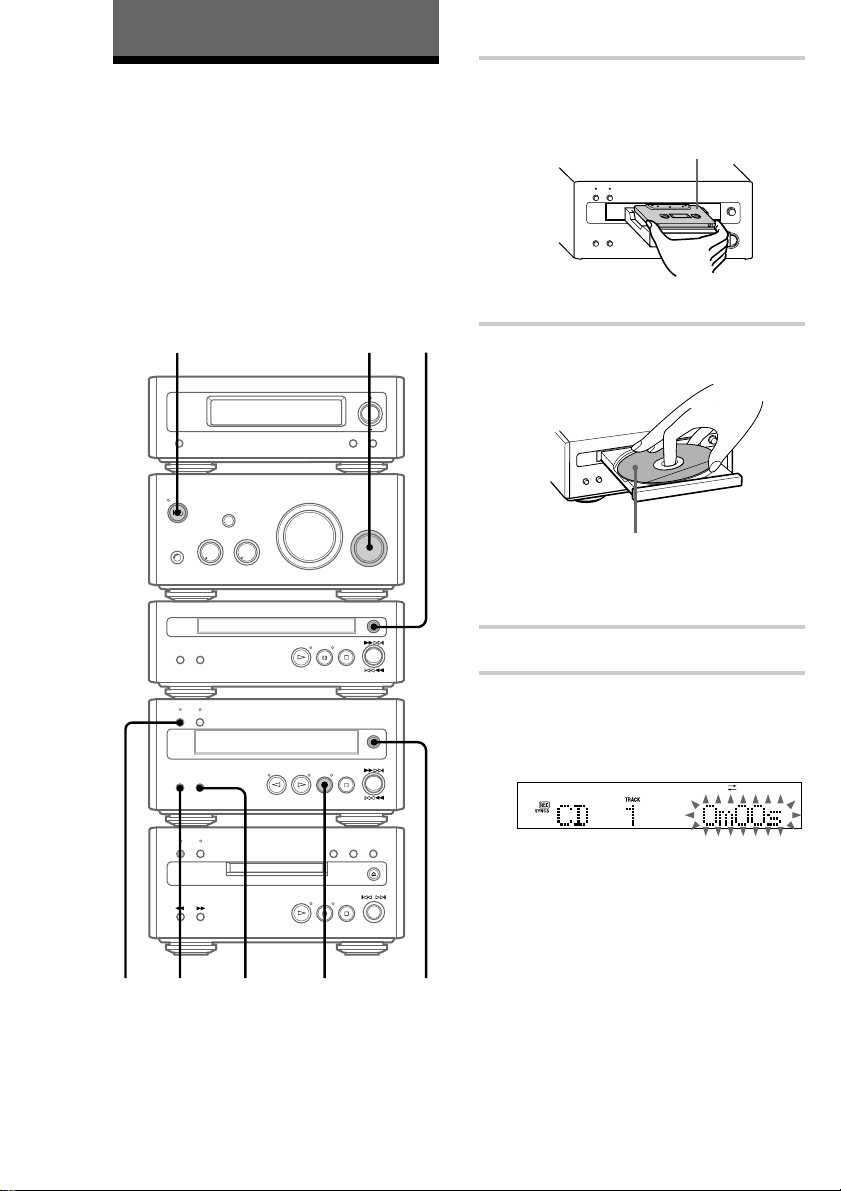
1 Press A on the tape deck to open the
cassette tray and insert a blank tape.
With the side you want to record on facing
up.
Press A again to close the cassette tray.
2 Press A on the CD player and place a
CD on the disc tray.
With the label side up.
When you play a CD single (8 cm CD),
place it on the inner circle of the tray.
Press A again to close the disc tray.
3 Turn FUNCTION until “CD” appears.
DOLBY NR*
4
* This tape deck is equipped with the Dolby B-type
noise reduction system.
5
6
6
4 Press CD SYNC REC on the tape deck.
The CD SYNC REC indicator lights up. The
tape deck stands by for recording and the CD
player pauses for play.
1
Page 7

5 Press DIRECTION repeatedly until g
appears to record on one side or h (or
j) to record on both sides.
6 Press S on the tape deck.
Recording starts.
When the recording is completed, the CD
player and the tape deck stop automatically.
To Do this
Stop recording Press s on the tape deck or CD
Remove the
tape and CD
player.
Press A on the tape deck and CD
player in stop mode.
Playing a tape
You can use any type of tape, TYPE I (normal),
TYPE II (CrO2) or TYPE IV (metal), since the
tape deck automatically detects the tape type
(ATS*).
1
Operations
Tips
• When you want to record on the reverse side, press
h on the tape deck in step 5.
• When you record on both sides, be sure to start
from the front side. If you start from the reverse
side, recording stops at the end of the reverse side.
• If you select both sides recording and the tape
reaches the end of the front side part-way through a
track, the entire track is recorded again from the
beginning of the reverse side.
• When you want to reduce the hiss noise in highfrequency signals recorded at low level, press
DOLBY NR after step 5 so “DOLBY NR” appears
in the display. Turning DOLBY NR on reduces the
noise when playing back these types of signals.
DOLBY NR**
* ATS: Automatic Tape Selection
**This tape deck is equipped with the Dolby B-type
noise reduction system.
3
4
1 Press A on the tape deck to open the
cassette tray and insert a recorded tape.
With the side you want to play facing up.
Press A again to close the cassette tray.
2 Turn FUNCTION on the amplifier until
“TAPE” appears.
3 Press DIRECTION repeatedly until g
appears to play one side or h (or
j*) to play both sides.
* The tape deck stops automatically after
repeating the sequence five times.
continued
7
Page 8

Playing a tape (continued)
4 Press H on the tape deck.
The indicator on the H button lights up,
then the tape starts playing from the front
side.
Press h on the tape deck to play the reverse
side.
To Do this
Stop play Press s on the tape deck.
Pause Press S on the tape deck. The
Find the
succeeding track
(AMS*)
Find the
preceding track
(AMS*)
indicator on the S button lights
up. Press again to resume play.
Press ML on the tape deck
for the front side during
playback.
Press lm on the tape deck
for the reverse side during
playback.
Each time you press the button,
the display shows the number of
tracks to be skipped.
Press lm on the tape deck
for the front side during
playback.
Press ML on the tape deck
for the reverse side during
playback.
Each time you press the button,
the display shows the number of
tracks to be skipped.
To Do this
Fast-forward Press lm or ML on
Rewind Press lm or ML on
Remove or replace
the tape
Adjust the volume Turn VOLUME.
* The Automatic Music Sensor (AMS) feature
detects a blank space of more than four seconds
between tracks to locate tracks quickly.
the tape deck in stop mode.
the tape deck in stop mode.
Press A on the tape deck.
Tips
• You can switch from another source to the tape
deck and start playing a tape just by pressing H or
h on the tape deck (Automatic Source
Selection).
• To listen to a tape recorded with the Dolby noise
reduction system, press DOLBY NR so “DOLBY
NR” appears in the display.
Note
The AMS feature may not work in the following
cases:
— the blank space between tracks is four seconds
or less.
— the sound source recorded on the right channel
is different from that on the left channel.
— low volume or low sound continues for a long
time.
— the TV is too close to the system.
8
Page 9

Recording a tape on an MD
You can make an analogue recording of a tape on
an MD. You can use TYPE I (normal), TYPE II
(CrO2) tape. The recording level is automatically
adjusted.
3 Turn FUNCTION on the amplifier until
“TAPE” appears.
4 Press z REC on the MD deck.
The MD deck stands by for recording.
Operations
4
6
5
2
1 Insert a recordable MD.
With the arrow pointing toward the deck.
With the label side up, and the shutter on
the righthand side.
2 Press A on the tape deck to open the
cassette tray and inset a tape.
With the side you want to play facing up.
Tape playback side
>>> appears for the front side, and <<< for
the reverse side. To play the side not
indicated, press s on the tape deck and
remove the tape to reverse the tape side, then
do steps 3 and 4 again.
5 Press H on the MD deck.
Recording starts.
6 Press H on the tape deck.
To stop recording
Press s on the MD deck.
Tips
• If you use a partially recorded MD, recording starts
after the recorded tracks. To erase the recorded
contents, refer to “Erasing recordings” in the
CMT-SP55MD Operating Instructions.
• If the Smart Space function is on and there is no
sound input for about 3 seconds or more (but less
than 30 seconds) while recording, the MD deck
replaces this silence with a blank of about 3 seconds
and continues recording. However, this function
may not activate if there is noise.
Note
If the MD is record protected, “C11” and “Protected”
appear alternately and the MD cannot be recorded.
Remove the MD, then slide the record protection tab
to the closed position.
Press A again to close the cassette tray.
9
Page 10

Recording your favourite
Selecting the tracks
CD tracks on a tape
— CD-TAPE Synchro Recording
You can select your favourite CD tracks with the
Programme Play feature, then record the
programme on a tape using the Synchro Recording
feature. This lets you rearrange the track order
while making sure the playback time fits on each
side of the tape.
8
9
10
11
`/1
2
1 Press CD on the remote to switch the
function to CD.
2 Press PLAY MODE on the remote
repeatedly until “PROGRAM” appears.
3 Press the track number of the track you
want to record.
To select track number 11
and higher
Press >10 once and then the number buttons
of the track number.
For example, to select track 32, press >10, 3,
and 2.
4 Repeat step 3 to select the tracks to be
recorded on the side where recording is
to start.
5 Press X on the remote.
Recording pauses at the end of the side
where recording starts. “P” appears and the
total playing time display changes to
“0m00s”.
6 Repeat step 3 to select the tracks to be
recorded on the reverse side.
10
3,4,6
5
1
Recording on a tape
7 Insert a blank tape.
8 Press CD SYNC REC on the tape deck.
The tape deck stands by for recording and
the CD player pauses for play.
Page 11

9 Press H on the tape deck to record
starting from the front side.
To record from the reverse side, press
h on the tape deck.
10 Press DIRECTION repeatedly until g
appears to record on one side or h (or
j) to record on both sides.
If you select both sides recording and the
tape reaches the end of the front side partway through a track, the entire track is
recorded again from the beginning of the
reverse side. When you start recording from
the reverse side, the recording stops at the
end of the reverse side even though you
select h.
11 Press S on the tape deck.
CD play and tape recording start.
When the recording is completed, the CD
player and the tape deck stop automatically.
To stop recording
Press s on the tape deck or CD player.
If the tape becomes full during
recording
The CD player and the tape deck automatically
stop.
Tip
When you want to reduce the hiss noise in highfrequency signals recorded at low level, press
DOLBY NR after step 10 so “DOLBY NR” appears
in the display. Turning DOLBY NR on reduces the
noise when playing back these types of signals.
Recording an MD on a tape
You can make an analogue recording of an MD on
a tape with the tracks in the same sequence as the
original MD.
You can also record a programme of favourite
tracks.
Recording tracks in the same
sequence as the original MD
4
7
6
1 Insert a blank tape.
2 Insert an MD.
3 Turn FUNCTION on the amplifier until
“MD” appears.
4 Press z REC on the tape deck.
The tape deck stands by for recording.
5
Operations
5 Press H on the tape deck to record
starting from the front side.
To record from the reverse side, press
h on the tape deck.
continued
11
Page 12

Recording an MD on a tape
(continued)
6 Press DIRECTION repeatedly until g
appears to record on one side or h (or
j) to record on both sides.
If you select both sides recording and the
tape reaches the end of the front side partway through a track, the entire track is
recorded again from the beginning of the
reverse side. When you start recording from
the reverse side, the recording stops at the
end of the reverse side even though you
select h.
Recording your favourite MD
tracks
You can select your favourite MD tracks with the
Programme Play feature, then record the
programme on a tape.
`/1
2
7 Press S on the tape deck.
Recording starts.
8 Press H on the MD deck.
MD play starts.
When the recording is completed, the MD
deck stops.
To stop recording
Press s on the tape deck.
Tip
When you want to reduce the hiss noise in highfrequency signals recorded at low level, press
DOLBY NR after step 6 so “DOLBY NR” appears in
the display. Turning DOLBY NR on reduces the
noise when playing back these types of signals.
3
5
1
1 Press MD to switch the function to MD.
2 Press PLAY MODE repeatedly until
“PROGRAM” appears in stop mode.
12
Page 13

3 Press the track number of the track you
want to record.
To select track number 11
and higher
Press >10 once and then the number buttons
of the track number.
For example, to select track 32, press >10, 3,
and 2.
To select track number 100
and higher
Press >10 twice and then the number buttons
of the track number.
Recording your favourite
portions on a tape
— Manual Recording
With manual recording, you can record just the
portions you like from a CD or an MD on a tape.
The recording level is automatically adjusted.
3
Operations
Selected track
number
Total playing time
4 To programme additional tracks, repeat
step 3.
Each time you programme, the total time of
the programme is displayed. You can make a
programme of up to 25 tracks.
Last programmed
track number
Total playing time
5 Insert a blank tape.
6 Do steps 3 to 8 of “Recording tracks in
the same sequence as the original MD”
(see page 11).
5
4
6
1 Insert a blank tape.
2 Turn FUNCTION on the amplifier until
“CD” or “MD” appears.
• CD: Recording from the CD
• MD: Recording from the MD
3 Press z REC on the tape deck.
The tape deck stands by for recording.
4 Press H on the tape deck to record
starting from the front side.
To record from the reverse side, press
h on the tape deck.
continued
13
Page 14

Recording your favourite
portions on a tape (continued)
Recording from the
5 Press DIRECTION repeatedly until g
appears to record on one side or h (or
j) to record on both sides.
When you start recording from the reverse
side, the recording stops at the end of the
reverse side even though you select h.
6 Press S on the tape deck.
Recording starts.
7 Press H on the CD player or MD
deck.
To Press
Stop recording s on the tape deck.
Pause S on the tape deck.
Tip
When you want to reduce the hiss noise in highfrequency signals recorded at low level, press
DOLBY NR after step 5 so “DOLBY NR” appears in
the display. Turning DOLBY NR on reduces the
noise when playing back these types of signals.
radio
You can make an analogue recording a radio
programme on a tape. You can use TYPE I
(normal) or TYPE II (CrO2) tape. The recording
level is automatically adjusted.
5
768
1 Insert a blank tape.
2 Press TUNER/BAND repeatedly on the
tuner to select “AM” or “FM”.
3 Press TUNING MODE on the tuner
repeatedly until “PRESET” appears.
4 Press TUNING + or – on the tuner to
select the desired preset station.
14
Preset number and frequency (or station
name* or RDS station name)
The station name appears only if you have
*
labelled the station (refer to the
CMT-SP55MD Operating Instructions).
5 Press z REC on the tape deck.
The z REC indicator lights up.
The tape deck stands by for recording.
Page 15

6 Press H on the tape deck to record
starting from the front side.
To record from the reverse side, press
h on the tape deck.
7 Press DIRECTION repeatedly until g
appears to record on one side or h (or
j) to record on both sides.
If you select both sides recording and the
tape reaches the end of the front side partway through a track, the entire track is
recorded again from the beginning of the
reverse side. When you start recording from
the reverse side, the recording stops at the
end of the reverse side even though you
select h.
8 Press S on the tape deck.
Recording starts.
To Do this
Stop recording Press s on the tape deck.
Pause Press S on the tape deck.
Press S again or H on the
tape deck to restart recording.
Remove the tape Press A on the tape deck in
stop mode.
Timer recording radio programmes
To timer record, you must first preset the radio
station and set the clock (refer to the
CMT-SP55MD Operating Instructions).
`/1
8
2
3–6
3–6
3–6
Operations
Tips
• If noise is heard while recording an AM radio
programme, move the AM loop aerial to reduce the
noise or connect a ground wire to the U terminal
(refer to the CMT-SP55MD Operating
Instructions).
• When you record on both sides, be sure to start
from the front side. If you start from the reverse
side, recording stops at the end of the reverse side.
• If you select both sides recording and the tape
reaches the end of the front side part-way through a
track, the entire track is recorded again from the
beginning of the reverse side.
• When you want to reduce the hiss noise in highfrequency signals recorded at low level, press
DOLBY NR after step 7 so “DOLBY NR” appears
in the display. Turning DOLBY NR on reduces the
noise when playing back these types of signals.
1 Tune in the preset radio station (refer to
the CMT-SP55MD Operating
Instructions).
2 Press CLOCK/TIMER SET.
3 Press . or > repeatedly until
“SET TAPE REC” appears, then press
ENTER/YES.
The hour indication flashes.
continued
15
Page 16

Timer recording radio
programmes (continued)
To cancel the procedure
Press CLOCK/TIMER SET.
4 Set the time to start recording.
Press . or > repeatedly to set the hour,
then press ENTER/YES.
The minute indication flashes.
Press . or > repeatedly to set the
minute, then press ENTER/YES.
The hour indication flashes again.
5 Set the time to stop recording following
the procedure in step 4.
“OFF TIME NG” appears if the start time
and the stop time settings are the same.
Change the stop time.
6 Press . or > repeatedly to select
the recording source, then press
ENTER/YES.
The indication changes as follows:
When recording on a tape
t TUNER c TAPE
r
AUX* c TAPE
* You can select the connected component for
recording source. Set the timer on both
systems to the same time.
To change the setting
Start over from step 1.
To check the setting/activate
the timer
Press CLOCK/TIMER SELECT and press .
or > repeatedly until “SEL TAPE REC”
appears. Then press ENTER/YES.
It is not necessary to set the start and stop times
every time.
To cancel the timer
Press CLOCK/TIMER SELECT and press .
or > repeatedly until “TIMER OFF” appears.
Then press ENTER/YES.
Tip
The system automatically turns on about 30 seconds
before the start time and prepares for timer-recording.
Recording starts as soon as the system is ready, so
recording may start earlier than the preset time.
Notes
• You cannot activate Daily Timer and the recording
timer at the same time.
• Do not operate the system from the time the system
turns on until the recording starts (about 30 seconds
before the preset time).
• If the system is on about 30 seconds before the
preset time, the timer-recording will not be
activated.
• The volume is reduced to minimum during
recording.
When you press ENTER/YES, the start time,
stop time and other setting contents appear in
turn, then the original display returns.
“REC” lights up.
7 Insert a blank tape.
8 Press ?/1 to turn off the system.
16
Page 17

Additional Information
Precautions
On safety
• The unit is not disconnected from the AC power
source (mains) as long as it is connected to the wall
outlet, even if the unit itself has been turned off.
• Unplug the system from the mains if it is not to be
used for an extended period of time.
To disconnect the mains lead, pull it out by the
plug. Never pull the cord itself.
• Should any solid object or liquid fall into the
system, unplug the system and have it checked by
qualified personnel before operating it any further.
• When you connect the mains lead to the mains,
even if the power is off, the system begins charging
for remote and timer functions. Therefore the
surface of this unit become warm, this is normal.
On placement
• Place the system in a location with adequate
ventilation to prevent heat build up.
• Do not place the system in an inclined position.
• Do not place the system in locations where it is;
– Extremely hot or cold
– Dusty or dirty
– Very humid
– Subject to vibrations
– Subject to direct sunlight.
On operation
If the system is brought directly from a cold to a
warm location, or is placed in a very damp room,
moisture may condense on the pinch roller and heads
inside the tape deck. Should this occur, the system
will not operate properly. Remove the tape and leave
the system turned on for about an hour until the
moisture evaporates.
If you have any questions or problems concerning
your system, please consult your nearest Sony dealer.
Cleaning the cabinet
Use a soft cloth slightly moistened with mild
detergent solution.
Before placing a cassette in the
tape deck
Take up any slack in the tape. Otherwise, the tape
may get entangled in the parts of the tape deck and
become damaged.
When using a tape longer than
90 minutes
The tape is very elastic. Do not change the tape
operations such as play, stop, and fast-winding
frequently. The tape may get entangled in the tape
deck.
To save a tape permanently
To prevent a tape from being accidentally recorded
over, break off the cassette tab from side A or B as
illustrated.
Detector slots
Tab of side B Tab of side A
Side A
Break off the
cassette tab
of side A
If you later want to reuse the tape for recording, cover
the broken tab with adhesive tape. However, be
careful not to cover the detector slots which allow the
tape deck to automatically detect the type of tape.
TYPE II (CrO
2) TYPE I (normal)
Operations/Additional Information
Detector slots
continued
17
Page 18

Precautions (continued)
Cleaning the tape heads
Clean the tape heads after every 10 hours of use.
When the tape heads become dirty;
— the sound is distorted
— there is a decrease in sound level
— the sound drops out
— the tape does not erase completely
— the tape does not record.
Be sure to clean the tape heads before you start an
important recording or after playing an old tape.
Use a separately sold dry-type or wet-type cleaning
cassette. For details, refer to the instructions of the
cleaning cassette.
Demagnetising the tape heads
Demagnetise the tape heads and the metal parts that
has contact with the tape after every 20 to 30 hours of
use with a separately sold demagnetising cassette. For
details, refer to the instructions of the demagnetising
cassette.
Troubleshooting
If you have any problem using this system, use the
following checklist.
First, check that the mains lead is connected
firmly and that the speakers are connected
correctly and firmly.
Should any problem persist, consult your nearest
Sony dealer. When bringing the system in for
repairs, be sure to bring in the entire system. This
product is a system product, and the entire system
is needed to determine the location requiring
repair.
The cassette tray does not close.
• Turn on the power again, and close the
cassette tray.
The tape does not record.
• No cassette is inserted. Insert a cassette.
• The tab has been removed from the cassette.
Cover the broken tab with adhesive tape (see
page 17).
• The tape has wound to the end.
The tape does not record or play, or there
is a decrease in sound level.
• The heads are dirty. Clean them.
• There is slack in the tape. Take up any slack
in the tape.
• The record/playback heads are magnetised.
Demagnetise them (see this page).
The tape does not erase completely.
• The record/playback heads are magnetised.
Demagnetise them (see this page).
There is excessive wow or flutter, or the
sound drops out.
• The capstans or pinch rollers in the tape deck
are dirty. Clean them using a cleaning cassette
(see this page).
Noise increases or the high frequencies
are erased.
• The record/playback heads are magnetised.
Demagnetise them (see this page).
18
Page 19

Messages
Specifications
One of the following messages may appear or
flash in the display during operation.
Cannot SYNC
• There is no tape in the tape deck, or the tab
has been removed from the cassette.
• The tabs and the direction setting do not
match.
No TAB
You cannot record the tape because the tab has
been removed from the cassette.
No Tape
There is no tape in the tape deck.
Tape deck section (TC-SP55)
Recording system 4-track 2-channel stereo
Frequency response (DOLBY NR OFF)
General
Dimensions (w/h/d) incl. projecting parts and controls
Mass Approx. 1.9 kg
Supplied accessory System cable (1)
Design and specifications are subject to change
without notice.
40 – 14,000 Hz (±3 dB),
using Sony TYPE I cassettes
40 – 15,000 Hz (±3 dB),
using Sony TYPE II cassettes
Approx. 202 × 101 × 283 mm
Additional Information
19
Page 20

Index
S
Saving recordings 17
A, B
Adjusting the volume 8
Automatic Source Selection 8
C, D, E, F, G
CD-TAPE Synchro Recording 6,
10
Connecting. See Hooking up
H, I, J, K, L
Hooking up the system 4
M, N, O
Messages 19
P , Q
Playing a tape 7
Protecting recordings 17
R
Recording
a CD 6, 10, 13
a radio programme 14
a tape 9
an MD 11, 13
manual recording 13, 14
timer-recording 15
T, U, V, W, X, Y, Z
Timer-recording 15
Troubleshooting 18
Sony Corporation Printed in Malaysia
 Loading...