

Page 1

Bluetooth™
Audio System
2-693-038-31 (1)
Operating Instructions
Manu al de instr uc ciones
To cancel the demonstration (Demo) display, see page 19.
Para cancelar la pantalla de demostración (Demo), consulte la página 20.
GB
ES
CS
MEX-BT5000
© 2006 Sony Corporation
Page 2
Be sure to install this unit in the dashboard of
the car for safety. For installation and
connections, see the supplied installation/
connections manual.
Warning
This equipment has been tested and found to
comply with the limits for a Class B digital
device, pursuant to Part 15 of the FCC Rules
and RSS-Gen of IC Rules.
These limits are designed to provide reasonable
protection against harmful interference in a
residential installation. This equipment
generates, uses, and can radiate radio frequency
energy and, if not installed and used in
accordance with the instructions, may cause
harmful interference to radio communications.
However, there is no guarantee that interference
will not occur in a particular installation. If this
equipment does cause harmful interference to
radio or television reception, which can be
determined by turning the equipment off and on,
the user is encouraged to try to correct the
interference by one or more of the following
measures:
– Reorient or relocate the receiving antenna.
– Increase the separation between the equipment
and receiver.
– Connect the equipment into an outlet on a
circuit different from that to which the receiver
is connected.
– Consult the dealer or an experienced radio/TV
technician for help.
This transmitter must not be co-located or
operated in conjunction with any other antenna
or transmitter.
This equipment complies with FCC and IC
radiation exposure limits set forth for
uncontrolled equipment and meets the FCC
radio frequency (RF) Exposure Guidelines in
Supplement C to OET65 and RSS-102 of the
IC radio frequency (RF) Exposure rules. This
equipment has very low levels of RF energy
that it deemed to comply without maximum
permissive exposure evaluation (MPE). But it
is desirable that it should be installed and
operated with at least 20 cm and more between
the radiator and person's body (excluding
extremities: hands, wrists, feet and legs).
Warning if your car’s ignition has no
ACC position
After turning the ignition off, be sure to press
and hold (OFF) on the unit until the display
disappears.
Otherwise, the display does not turn off and
this causes battery drain.
This label is located on the bottom of the
chassis.
Manufactured under license
R
from BBE Sound, Inc.
The BBE MP process
improves digitally compressed sound, such as
MP3, by restoring and enhancing the higher
harmonics lost through compression. BBE MP
works by generating even-order harmonics from
the source material, effectively recovering
warmth, detail and nuance.
The Bluetooth word mark and logos are owned
by the Bluetooth SIG, Inc. and any use of such
marks by Sony Corporation is under license.
Other trademarks and trade names are those of
their respective owners.
SonicStage and its logo are trademarks of Sony
Corporation.
“ATRAC” and are trademarks of
Sony Corporation.
Microsoft, Windows Media,
and the Windows logo are
trademarks or registered
trademarks of Microsoft
Corporation in the United States and/or other
countries.
You are cautioned that any changes or
modifications not expressly approved in this
manual could void your authority to operate this
equipment.
2
Page 3
Table of Contents
Welcome ! . . . . . . . . . . . . . . . . . . . . . . . . . . . . . 4
Getting Started
Resetting the unit. . . . . . . . . . . . . . . . . . . . . . . . 6
Setting the clock . . . . . . . . . . . . . . . . . . . . . . . . 6
Detaching the front panel . . . . . . . . . . . . . . . . . 6
Attaching the front panel . . . . . . . . . . . . . . . 7
Inserting the disc in the unit . . . . . . . . . . . . . . . 7
Ejecting the disc . . . . . . . . . . . . . . . . . . . . . . 7
Location of controls and basic
operations
Audio function . . . . . . . . . . . . . . . . . . . . . . . 8
Bluetooth function . . . . . . . . . . . . . . . . . . . 10
CD
Display items . . . . . . . . . . . . . . . . . . . . . . . 12
Repeat and shuffle play. . . . . . . . . . . . . . . . 12
Radio
Storing and receiving stations . . . . . . . . . . . . . 12
Storing automatically — BTM . . . . . . . . . . 12
Storing manually. . . . . . . . . . . . . . . . . . . . . 12
Receiving the stored stations . . . . . . . . . . . 12
Tuning automatically . . . . . . . . . . . . . . . . . 12
Receiving a station through a list
— LIST. . . . . . . . . . . . . . . . . . . . . . . . . . . . 13
Bluetooth function
Before using the Bluetooth function. . . . . . . . 13
Menu operations of the Bluetooth
function . . . . . . . . . . . . . . . . . . . . . . . . . . . 13
Configuring Bluetooth Settings . . . . . . . . . 13
Pairing and connecting this unit with a
Bluetooth device. . . . . . . . . . . . . . . . . . . . . 14
Connecting to registered devices . . . . . . . . 15
Handsfree talking . . . . . . . . . . . . . . . . . . . . . . 15
Making calls. . . . . . . . . . . . . . . . . . . . . . . . 15
Receiving calls . . . . . . . . . . . . . . . . . . . . . . 16
Ending calls . . . . . . . . . . . . . . . . . . . . . . . . 16
Using the Phonebook . . . . . . . . . . . . . . . . . 16
Using the Preset Dial . . . . . . . . . . . . . . . . . 17
Music streaming . . . . . . . . . . . . . . . . . . . . . . . 17
Listening to music from an audio
device . . . . . . . . . . . . . . . . . . . . . . . . . . . . . 17
Operating an audio device with this
unit . . . . . . . . . . . . . . . . . . . . . . . . . . . . . . . 17
Other settings . . . . . . . . . . . . . . . . . . . . . . . . . 17
Setting a handsfree device . . . . . . . . . . . . . 17
Deleting the registration of a connected
device . . . . . . . . . . . . . . . . . . . . . . . . . . . . . 18
Auto connection function. . . . . . . . . . . . . . 18
Other functions
Adjusting menu items — MENU . . . . . . . . . . 18
Customizing the equalizer curve
— EQ3 Tune . . . . . . . . . . . . . . . . . . . . . . . 19
Using optional equipment. . . . . . . . . . . . . . . . 20
CD/MD changer. . . . . . . . . . . . . . . . . . . . . 20
Auxiliary audio equipment. . . . . . . . . . . . . 21
Rotary commander RM-X4S . . . . . . . . . . . 21
Additional Information
Precautions . . . . . . . . . . . . . . . . . . . . . . . . . . . 22
Notes on discs . . . . . . . . . . . . . . . . . . . . . . 22
About MP3/WMA files . . . . . . . . . . . . . . . 22
About ATRAC CD. . . . . . . . . . . . . . . . . . . 23
About Bluetooth function. . . . . . . . . . . . . . 23
Maintenance . . . . . . . . . . . . . . . . . . . . . . . . . . 24
Removing the unit. . . . . . . . . . . . . . . . . . . . . . 25
Specifications . . . . . . . . . . . . . . . . . . . . . . . . . 25
Troubleshooting . . . . . . . . . . . . . . . . . . . . . . . 26
Error displays/Messages. . . . . . . . . . . . . . . 28
3
Page 4
Welcome !
Thank you for purchasing this Sony Bluetooth™
Audio System. You can enjoy your drive with the
following functions.
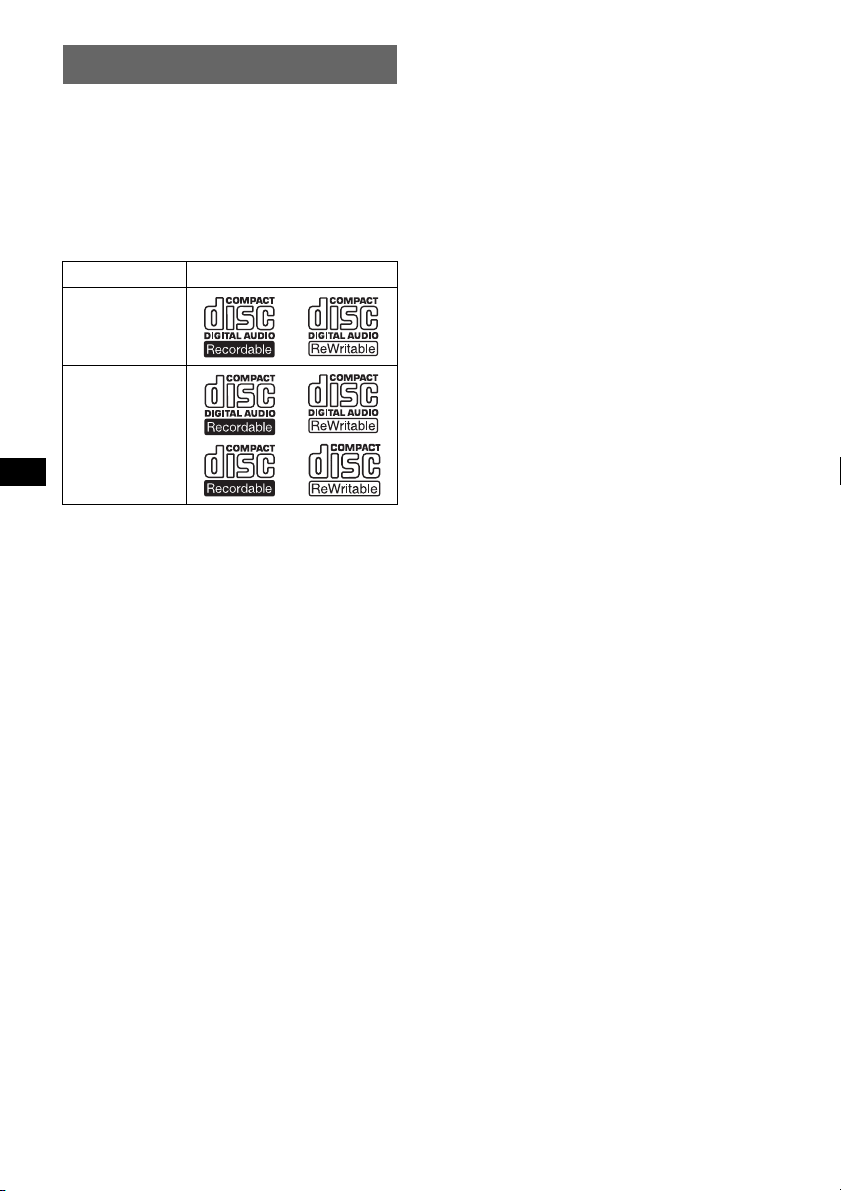
• CD playback
You can play CD-DA (also containing CD
TEXT*), CD-R/CD-RW (MP3/WMA files also
containing Multi Session (page 22)) and
ATRAC CD (ATRAC3 and ATRAC3plus
format (page 23)).
Type of discs Label on the disc
CD-DA
MP3
WMA
ATRAC CD
• Radio reception
– You can store up to 6 stations per band (FM1,
FM2, FM3, AM1 and AM2).
– BTM (Best Tuning Memory): the unit selects
strong signal stations and stores them.
• Bluetooth function
– Handsfree talking with your cellular phone in
the car.
– Phonebook transfer from your cellular phone.
– Music streaming from your cellular phone or
portable audio device.
– HFP 1.0, A2DP, OPP and AVRCP profiles
supported.
• Sound adjustment
– EQ3 parametric: You can choose any one
of 7 preset equalizer curves, and adjust as
desired.
– DSO (Dynamic Soundstage Organizer):
creates a more ambient sound field, using
virtual speaker synthesis, to enhance the
sound of speakers, even if they are installed
low in the door.
– BBE MP: improves digitally compressed
sound such as MP3.
* A CD TEXT disc is a CD-DA that includes
information such as disc, artist and track name.
4
Page 5

Caution
IN NO EVENT SHALL SONY BE LIABLE FOR
ANY INCIDENTAL, INDIRECT OR
CONSEQUENTIAL DAMAGES OR OTHER
DAMAGES INCLUDING, WITHOUT
LIMITATION, LOSS OF PROFITS, LOSS OF
REVENUE, LOSS OF DATA, LOSS OF USE OF
THE PRODUCT OR ANY ASSOCIATED
EQUIPMENT, DOWNTIME, AND
PURCHASER’S TIME RELATED TO OR
ARISING OUT OF THE USE OF THIS
PRODUCT, ITS HARDWARE AND/OR ITS
SOFTWARE.
IMPORTANT NOTICE!
Safe and efficient use
Changes or modifications to this unit not expressly
approved by Sony may void the user’s authority to
operate the equipment.
Please check for exceptions, due to national
requirement or limitations, in usage of Bluetooth
equipment before using this product.
Driving
Check the laws and regulations on the use of cellular
phones and handsfree equipment in the areas where
you drive.
Always give full attention to driving and pull off the
road and park before making or answering a call if
driving conditions so require.
Connecting to other devices
When connecting to any other device, please read its
user guide for detailed safety instructions.
Emergency calls
This Bluetooth car handsfree and the electronic
device connected to the handsfree operate using
radio signals, cellular, and landline networks as well
as user-programmed function, which cannot
guarantee connection under all conditions.
Therefore do not rely solely upon any electronic
device for essential communications (such as
medical emergencies).
Remember, in order to make or receive calls, the
handsfree and the electronic device connected to the
handsfree must be switched on in a service area with
adequate cellular signal strength.
Emergency calls may not be possible on all cellular
phone networks or when certain network services
and/or phone features are in use.
Check with your local service provider.
Radio frequency exposure
RF signals may affect improperly installed or
inadequately shielded electronic systems in cars,
such as electronic fuel injection systems, electronic
antiskid (antilock) braking systems, electronic speed
control systems or air bag systems. For installation
or service of this device, please consult with the
manufacturer or its representative of your car. Faulty
installation or service may be dangerous and may
invalidate any warranty that may apply to this
device.
Consult with the manufacturer of your car to ensure
that the use of your cellular phone in the car will not
affect its electronic system.
Check regularly that all wireless device equipment
in your car is mounted and operating properly.
5
Page 6

Getting Started
Detaching the front panel
Resetting the unit
Before operating the unit for the first time, or
after replacing the car battery or changing the
connections, you must reset the unit.
Detach the front panel and press the RESET
button with a pointed object, such as a ballpoint
pen.
RESET
button
Note
Pressing the RESET button will erase the clock setting
and some stored contents.
Setting the clock
The clock uses a 12-hour digital indication.
1 Press (MENU).
2 Push the joystick up/down until
“Setup” appears, then push it right.
3 Push the joystick up/down until “Clock
Adjust” appears, then push it right.
4 Push the joystick up/down to set the
hour and minutes.
To move the digital indication, push the
joystick left/right.
5 After setting the clock, press the
joystick.
The clock starts.
You can detach the front panel of this unit to
prevent theft.
Caution alarm
If you turn the ignition switch to the OFF
position without detaching the front panel, the
caution alarm will sound for a few seconds.
The alarm will only sound if the built-in
amplifier is used.
1 Press (OFF).
The unit is turned off.
2 Press (OPEN).
The front panel is flipped down.
3 Slide the front panel to the right, then
gently pull out the left end of the front
panel.
1
2
Notes
• Do not drop or put excessive pressure on the front
panel and display window.
• Do not subject the front panel to heat/high
temperature or moisture. Avoid leaving it in a parked
car or on a dashboard/rear tray.
6
Page 7
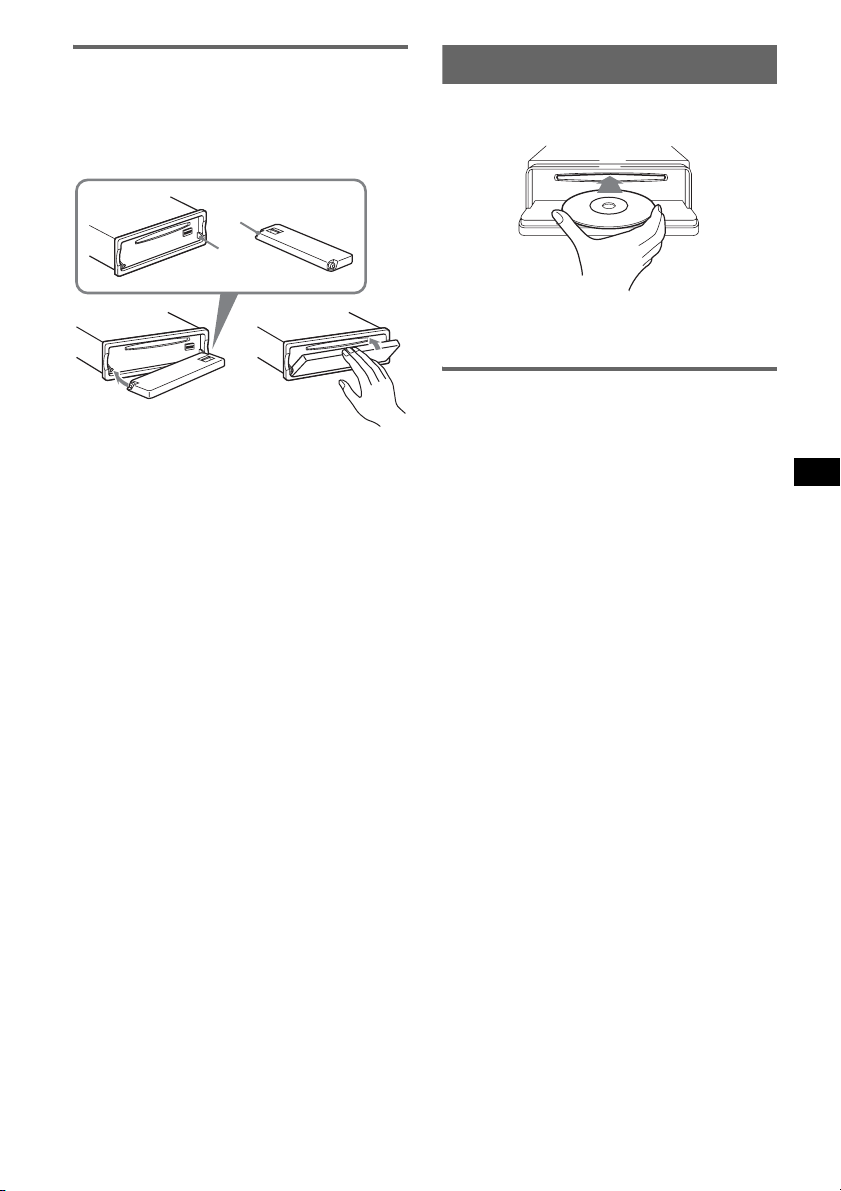
Attaching the front panel
Place the hole A of the front panel onto the
spindle B on the unit, then lightly push the left
side in.
Press (SOURCE) on the unit (or insert a disc) to
operate the unit.
A
B
c
Note
Do not put anything on the inner surface of the front
panel.
Inserting the disc in the unit
1 Press (OPEN).
2 Insert the disc (label side up).
3 Close the front panel.
Playback starts automatically.
Ejecting the disc
1 Press (OPEN).
2 Press Z.
The disc is ejected.
3 Close the front panel.
7
Page 8
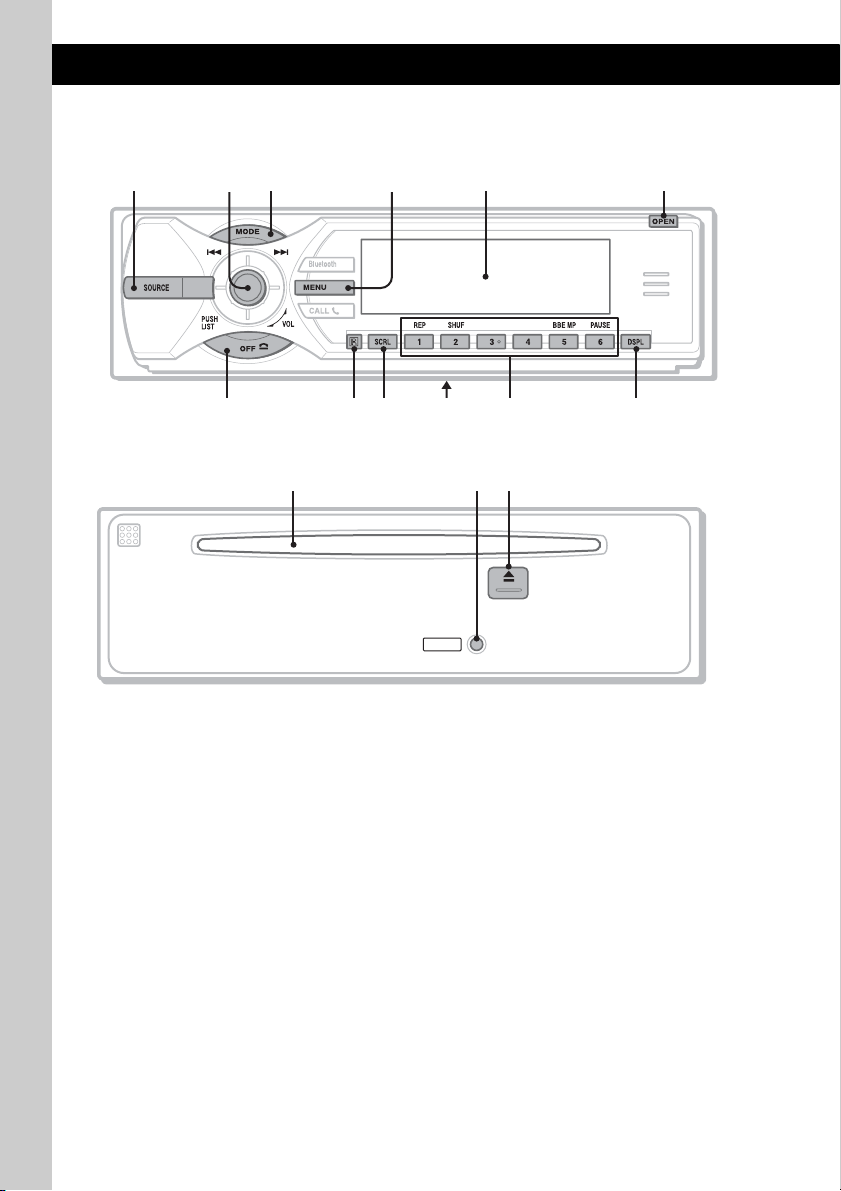
Location of controls and basic operations
Audio function
Main unit
1
35624
790 qsqa
Front panel removed
Refer to the pages listed for details. The
corresponding buttons on the card remote
commander control the same functions as those
on the unit.
A SOURCE button
To power on; change the source (Radio/CD/
1
MD*
/Bluetooth AUDIO/AUX).
B Joystick/LIST button 13, 20
Rotate to: Adjust the volume.
Push up/down/left/right to: Select a menu
item.
Press to: Apply a setting.
CD/MD*
Push up/down to*
– Skip groups*
– Skip groups*
Push left/right to:
– Skip tracks (push).
– Skip tracks continuously (push, then push
– Reverse/fast-forward a track (push and
1
:
2
:
3
/albums*4 (push).
3
(push and hold).
again within about 2 seconds and hold).
hold).
/albums*4 continuously
8
8
MEX-BT5000
qgqfqd
RESET
Radio:
Push up/down to:
– Receive stored station.
Push left/right to:
– Tune in stations automatically (push).
– Find a station manually (push and hold).
Press to:
– Display the list.
C MODE button 12, 20
To select the radio band (FM/AM)/select the
5
unit*
.
D MENU button
To enter menu.
E Display window
F OPEN button 7
G OFF button
To power off; stop the source.
H Receptor for the card remote
commander
I SCRL (scroll) button 12
To scroll display item.
Page 9
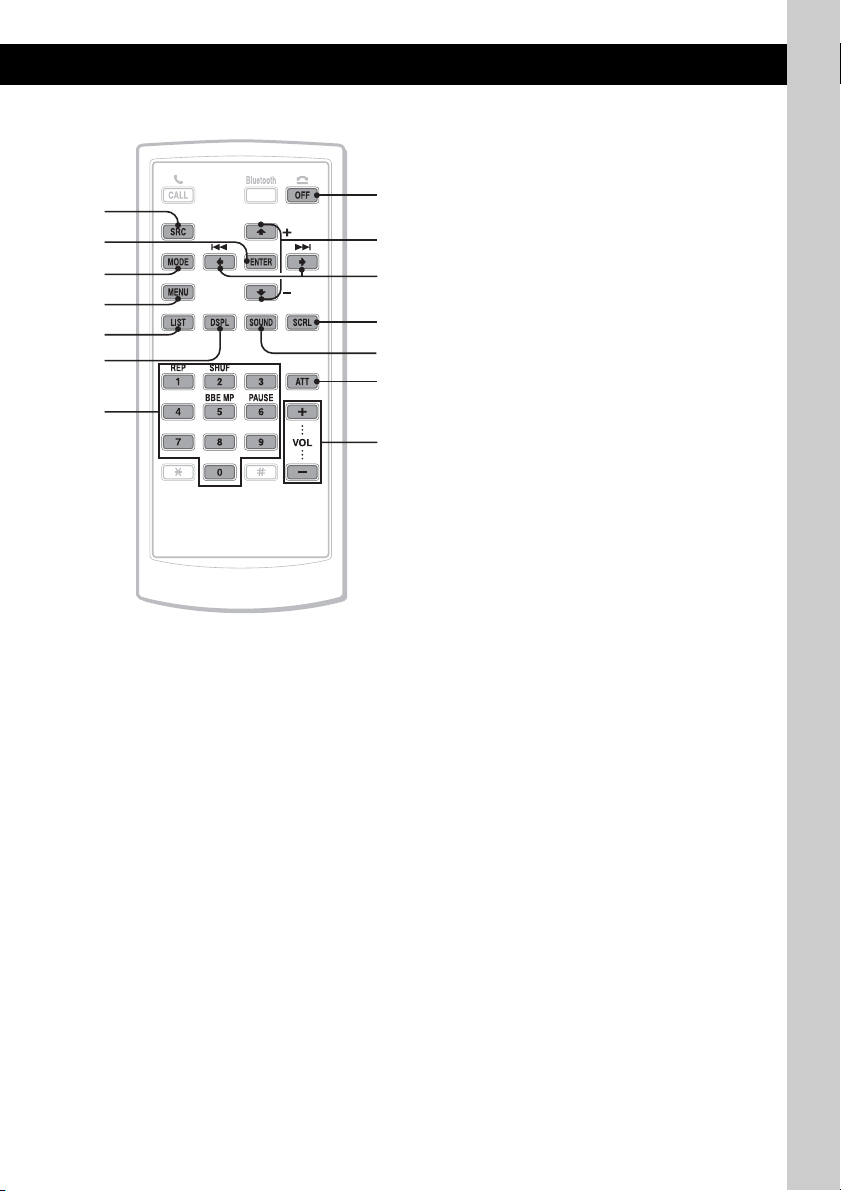
Card remote commander RM-X303
1
qh
3
7
ql
w;
4
qj
qs
9
wa
ws
qk
wd
J Frequency select switch (located on the
bottom of the unit)
See “Frequency select switch” in the
supplied installation/connections manual.
K Number buttons
CD/MD*
(1): REP 12, 20
(2): SHUF 12, 20
(5): BBE MP*
(6): PAUSE *
Radio:
To receive stored stations (press); store
stations (press and hold).
L DSPL (display) button 12
To change display items.
M Disc slot 7
To insert the disc.
N RESET button 6
O Z (eject) button 7
To eject the disc.
1
:
6
To activate the BBE MP function, set
“BBE MP on.” To cancel, set “BBE MP
off.”
To pause playback. To cancel, press
again.
2
6
The following buttons on the card remote
commander have also different buttons/functions
from the unit.
qh ENTER button
To apply a setting.
qj LIST button
To list up.
qk Number buttons
Buttons 1 to 6 share the same functions as
the number buttons on the unit.
ql M (+)/m (–) buttons
The same as pushing the joystick up/down.
w; < (.)/, (>) buttons
The same as pushing the joystick left/right.
wa SOUND button
To select sound items.
ws ATT (attenuate) button
To attenuate the sound. To cancel, press
again.
wd VOL (volume) +/– buttons
To adjust volume.
*1 When an MD changer is connected.
*2 If the changer is connected, the operation is
different, see page 20.
*3 When an ATRAC CD is played.
*4 When an MP3/WMA is played.
*5 When a CD/MD changer is connected.
*6 When playing back on this unit.
Note
If the unit is turned off and the display disappears, it
cannot be operated with the card remote commander
unless (SOURCE) on the unit is pressed, or a disc is
inserted to activate the unit first.
Tip
For details on how to replace the battery, see
“Replacing the lithium battery of the card remote
commander” on page 24.
9
Page 10
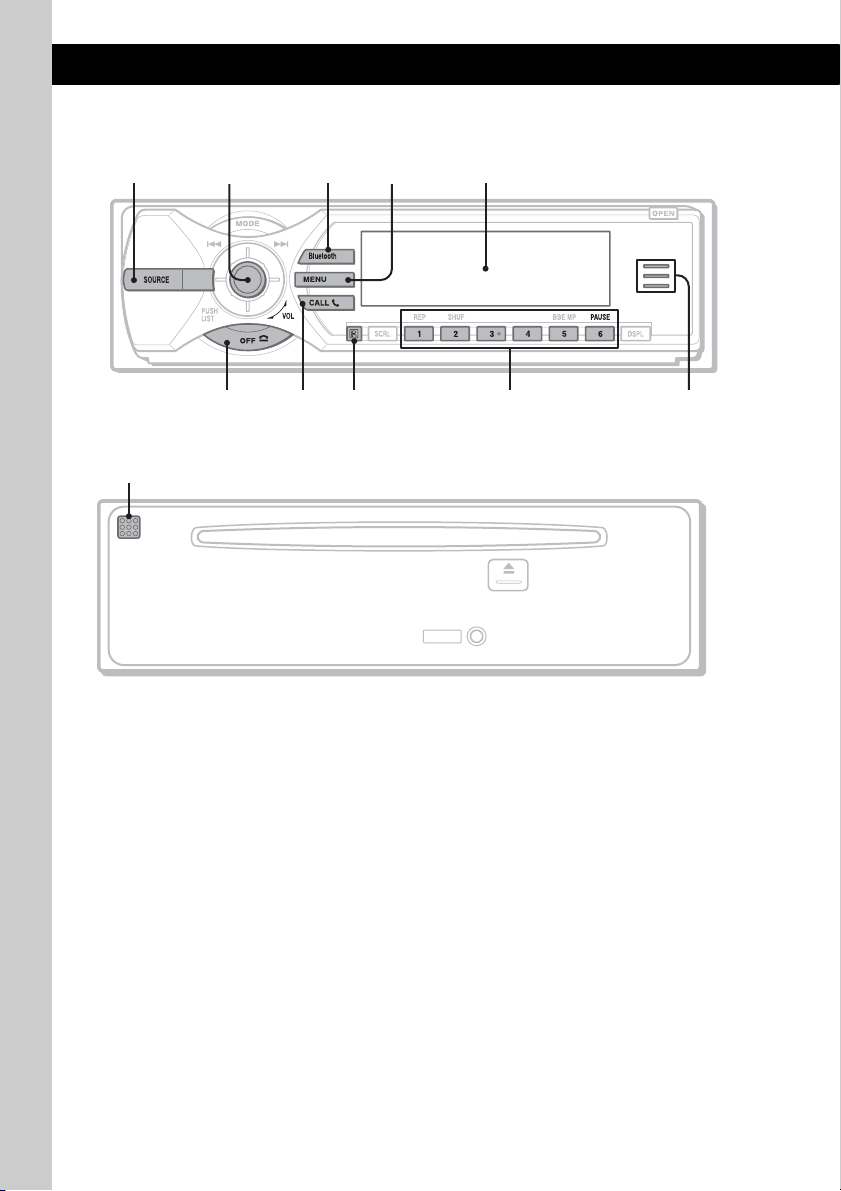
Bluetooth function
6097
8
Main unit
1
Front panel removed
qa
Refer to the pages listed for details. The
corresponding buttons on the card remote
commander control the same functions as those
on the unit.
A SOURCE button
To power on; change the source (Radio/CD/
1
MD*
/Bluetooth AUDIO/AUX).
B Joystick
Rotate to: Adjust the volume.
Push up/down/left/right to: Select a menu
item.
Press to: Apply a setting.
Bluetooth audio device*
Push left/right to:
– Skip tracks (push).
– Reverse/fast-forward a track (push and
hold).
C Bluetooth button 13, 14, 15, 16, 17, 18
To access the Bluetooth functions; receive a
call.
2
:
10
3524
RESET
D MENU button 16
To enter menu; receive a call.
E Display window
F OFF button 16
To power off; stop the source; end or reject a
call.
G CALL button 16
To access the telephone functions; receive a
call.
H Receptor for the card remote
commander
I Number buttons
To call stored dials.
Bluetooth audio device*
(6): PAU SE
To pause playback.
J Bluetooth indicator
Lights up when the Bluetooth signal is input/
output. Goes off when the Bluetooth signal is
off.
K Microphone 15
MEX-BT5000
2
:
Page 11
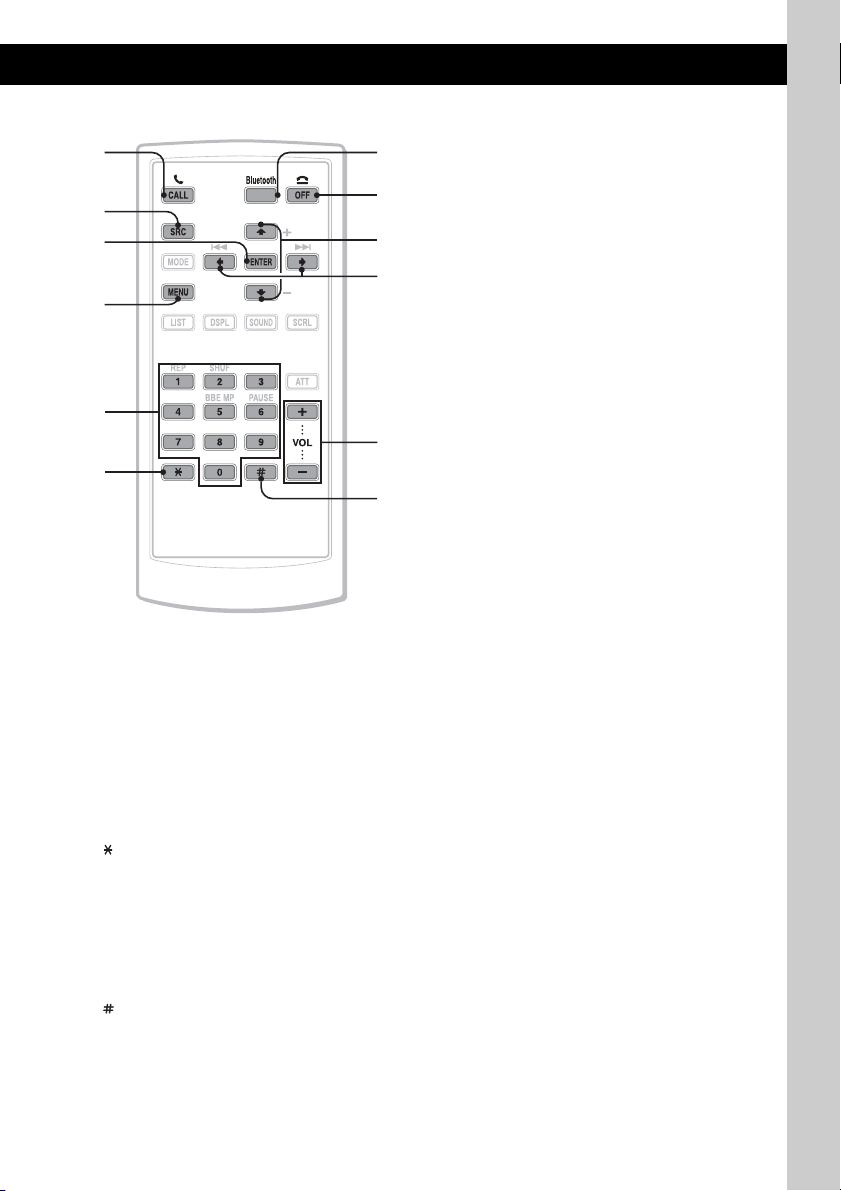
Card remote commander RM-X303
73
1
qs
6
qg
Note
If the unit is turned off and the display disappears, it
cannot be operated with the card remote commander
unless (SOURCE) on the unit is pressed, or a disc is
inserted to activate the unit first.
Tip
For details on how to replace the battery, see
“Replacing the lithium battery of the card remote
commander” on page 24.
qh
4
qd
qj
qf
qk
The following buttons on the card remote
commander have also different buttons/functions
from the unit.
qs ENTER button
To apply a setting.
qd Number buttons 14, 15, 16
To input numbers (phone number, passcode,
etc.).
Buttons 1 to 6 share the same functions as
the number buttons on the unit.
qf
button 16
qg M (+)/m (–) buttons
The same as pushing the joystick up/down.
qh < (.)/, (>) buttons
The same as pushing the joystick left/right.
qj VOL (volume) +/– buttons
To adjust volume.
button 16
qk
*1 When an MD changer is connected.
*2 When a Bluetooth audio device (supports AVRCP
of Bluetooth technology) is connected. Depending
on the device, certain operations may not be
available.
11
Page 12
CD
For details on selecting a CD/MD changer, see
page 20.
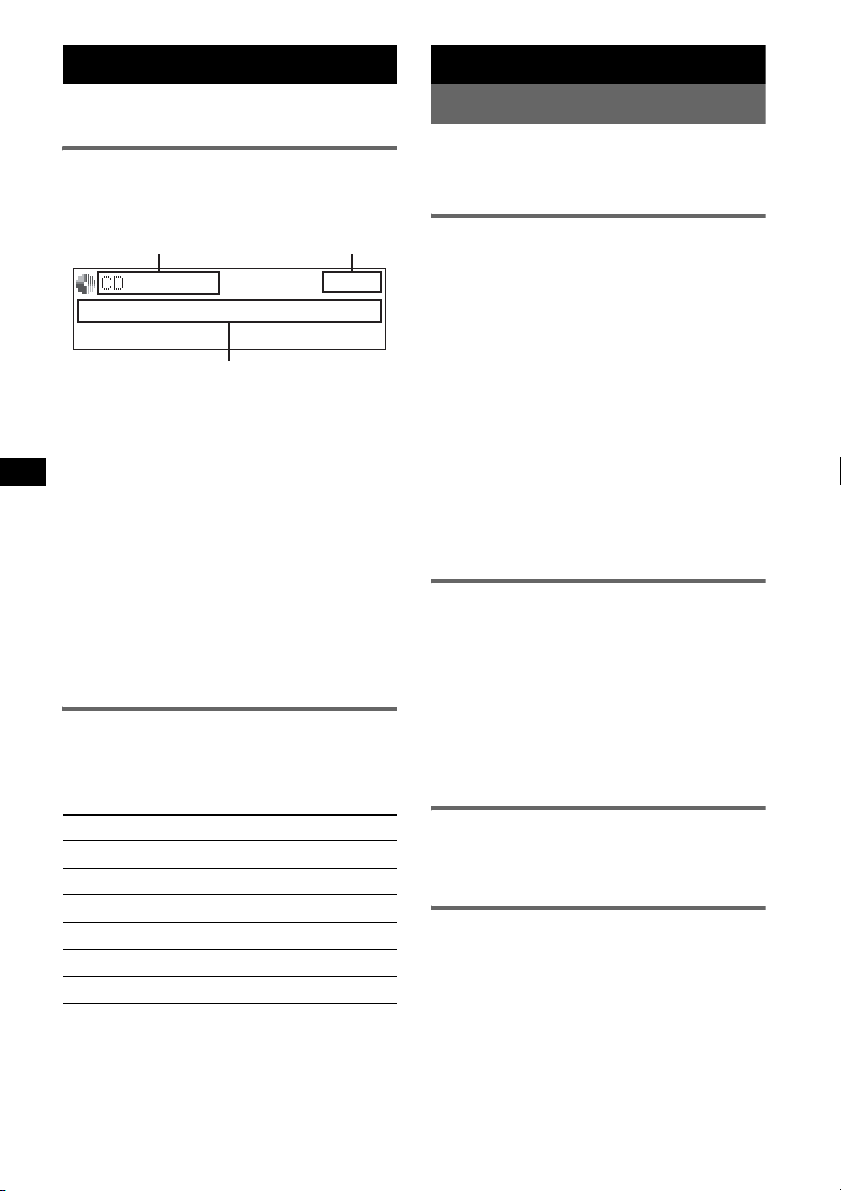
Display items
Example: when you set Info (information) mode
to “All” (page 19).
A B
C
A Source/MP3/ATRAC/WMA indication
B Clock
C Track number/Elapsed playing time, Disc/
artist name, Album/group number, Album/
group name, Track name, Text information*
* When playing an MP3, ID3 tag is displayed, when
playing ATRAC CD, text information written by
SonicStage, etc., is displayed, and when playing
WMA, WMA tag is displayed.
To change display items C, press (DSPL);
scroll display items C, press (SCRL) or set
“Auto Scroll on” (page 19).
Tip
Displayed items will differ, depending on the disc type,
recorded format and settings. For details on MP3/
WMA, see page 22; ATRAC CD, see page 23.
Repeat and shuffle play
1 During playback, press (1) (REP) or
(2) (SHUF) repeatedly until the
desired setting appears.
Select To play
Repeat Track track repeatedly.
Repeat Album*1album repeatedly.
2
Repeat Group*
Shuffle Album*1album in random order.
Shuffle Group*
Shuffle Disc disc in random order.
*1 When an MP3/WMA is played.
*2 When an ATRAC CD is played.
To return to normal play mode, select “Repeat
off” or “Shuffle off.”
group repeatedly.
2
group in random order.
12
Radio
Storing and receiving stations
Caution
When tuning in stations while driving, use Best
Tuning Memory (BTM) to prevent an accident.
Storing automatically — BTM
1 Press (SOURCE) repeatedly until
“TUNER” appears.
To change the band, press (MODE)
repeatedly. You can select from FM1, FM2,
FM3, AM1 or AM2.
2 Press (MENU).
3 Push the joystick up/down until
“Receive Mode” appears, then push it
right.
4 Push the joystick up/down until “BTM”
appears.
5 Press the joystick.
The unit stores stations in order of frequency
on the number buttons.
A beep sounds when the setting is stored.
Storing manually
1 While receiving the station that you
want to store, press and hold a
number button ((1) to (6)) until
“MEM” appears.
The number button indication appears in the
display.
Note
If you try to store another station on the same number
button, the previously stored station will be replaced.
Receiving the stored stations
1 Select the band, then press a number
button ((1) to (6)).
Tuning automatically
1 Select the band, then push the joystick
left/right to search for the station.
Scanning stops when the unit receives a
station. Repeat this procedure until the
desired station is received.
Tip
If you know the frequency of the station you want to
listen to, push and hold the joystick left/right to locate
the approximate frequency, then push the joystick left/
right to fine adjust to the desired frequency (manual
tuning).
Page 13
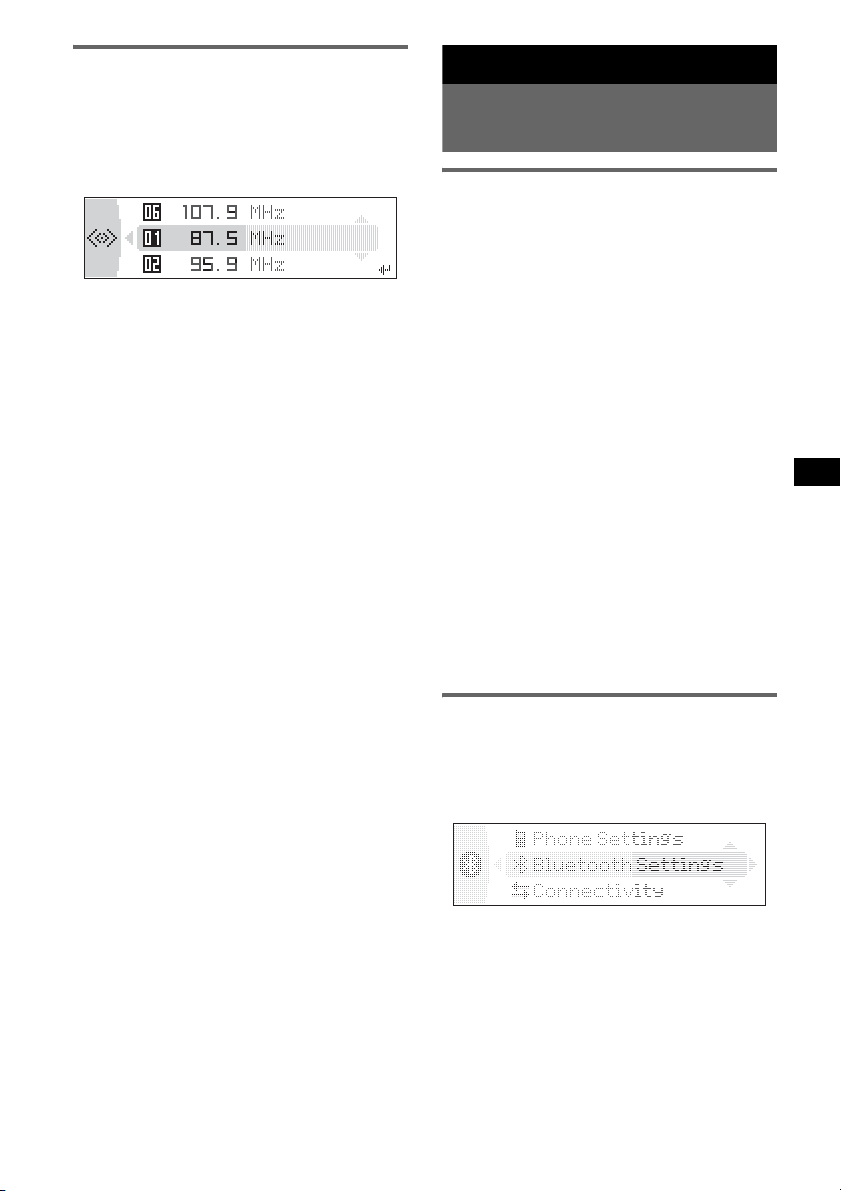
Receiving a station through a list
— LIST
You can list up the frequency.
1 Select the band, then press the
joystick.
The frequency appears.
2 Push the joystick up/down until the
desired station appears.
3 Press the joystick to receive the
station.
The display returns to normal reception
mode.
Bluetooth function
Before using the Bluetooth
function
Menu operations of the Bluetooth
function
The Bluetooth settings can be configured from
the Bluetooth function menu or CALL menu.
Menu operations can generally be performed
using the joystick.
1 Press (Bluetooth) or (CALL).
The Bluetooth function menu or CALL menu
appears.
2 Push the joystick up/down until the
desired setting item appears, then
push it right.
The digital indication moves to the right
(setting selection) side.
3 Push the joystick up/down to select
the setting, then press it.
The setting is complete.
4 Press (Bluetooth) or (CALL).
The normal display appears.
To input a character
Push the joystick up/down to select a character,
and push left/right to move the cursor.
The characters that can be input are A – Z, a – z,
0 – 9 and a blank space.
Configuring Bluetooth Settings
Before connecting to a Bluetooth device,
configure the Bluetooth Settings on this unit.
1 Press (Bluetooth).
The Bluetooth function menu appears.
2 Select “Bluetooth Settings.”
3 Select the desired menu.
4 Select the setting.
5 Press (Bluetooth).
continue to next page t
13
Page 14
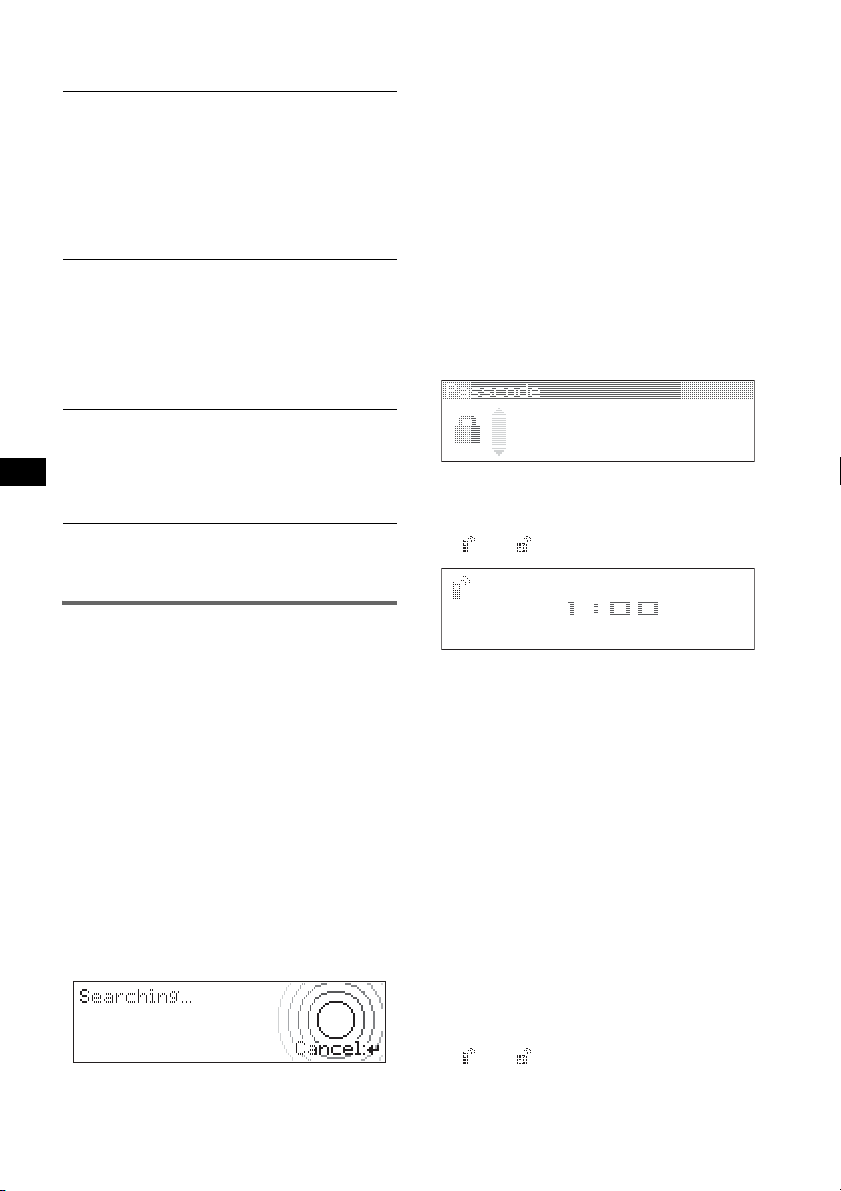
Bluetooth Settings menu
“z” indicates the default settings.
Signal
To switch the Bluetooth signal output of this
unit to “ON” or “OFF.”
– “ON”: to output the Bluetooth signal (RF 2.4
GHz).
–“OFF” (
Be sure to set to “ON” when you connect to the
Bluetooth device.
Visibility
To allow other Bluetooth devices to search for
this unit.
– “Show”: to allow the other device to search.
– “Hide” (
Be sure to set to “Show” when you search for
this unit from a Bluetooth device.
Device Name
To change the name of this unit displayed on
connected device. (Default setting: “Xplod”)
Select “Rename” and input characters. Up to 12
characters can be input.
To restore “Xplod,” select “Default” c “yes.”
Note
For details on the settings of other Bluetooth devices,
see their respective manuals.
z): to not output the Bluetooth signal
(RF 2.4 GHz).
z): to not allow the other device to
search.
Pairing and connecting this unit
with a Bluetooth device
When connecting Bluetooth devices for the first
time, mutual registration is required. This is
called “pairing.” This registration (pairing) is
required only for the first time, as this unit and
the other devices will recognize each other
automatically from the next time. (Depending on
the device, you may need to input a passcode for
each connection.)
Searching for a Bluetooth device
from this unit
Check that the other Bluetooth device is set to
allow for searching (discoverable) beforehand.
1 Press (Bluetooth).
The Bluetooth function menu appears.
2 Select “Connectivity” c “Search.”
14
The process of searching for a connectable
device begins, then the detected device
name(s) appear in a list. If a device name
cannot be received, “Unknown” will be
displayed.
Search time varies depending on the number
of Bluetooth devices.
3 Select the device to connect.
Pairing starts.
4 Input a passcode*.
Input the same passcode for this unit and the
connecting device using the joystick or card
remote commander. The passcode can be
either your own selected number or the
number determined by the connecting device.
For details, see the manual of the connecting
device.
5 Press the joystick to confirm.
“Connected” appears and connection is
complete.
“ ” or “ ” appears during connection.
* Passcode may be called “passkey,” “PIN code,” “PIN
number” or “Password,” etc., depending on the
device.
Searching for this unit from a
Bluetooth device
Check that “Visibility” in the Bluetooth Settings
menu is set to “Show” (page 14).
1 Set the connecting device to search.
2 When “Allow Connection?” appears
on this unit, select “yes.”
Connection starts.
Depending on the device, the passcode input
display appears.
3 Input the passcode of the connecting
device.
4 Press the joystick to confirm.
“Connected” appears and connection is
complete.
“ ” or “ ” appears during connection.
Tip
The passcode can also be input with the number
buttons of the card remote commander.
Page 15
Notes
• While connecting to a Bluetooth device, this unit
cannot be detected from another device. To be
detected, disconnect the current connection and
search for this unit from another device.
• Depending on the device, searching from this unit
may not be possible. In this case, search for this unit
from the connecting device.
• If you search for this unit and the connecting device
mutually at the same time, this unit will not recognize
the connecting device.
• It may take time to search or connect.
• Depending on the device, the confirmation display of
the connection appears before inputting the
passcode.
• The time limit for inputting the passcode differs
depending on the device.
• This unit can register up to 6 devices each for
handsfree and audio devices.
• This unit cannot be connected to a device that
supports only HSP (Head Set Profile).
Connecting to registered devices
Devices are registered once paired and connected
with this unit. You can select the registered
device and connect it.
1 Press (Bluetooth).
The Bluetooth function menu appears.
2 Select “Connectivity” c “Handsfree
Devices” or “Audio Devices.”
The list of registered devices appears.
3 Select the device to connect.
4 Select “Connect.”
“Connected” appears and connection is
complete.
“ ” or “ ” appears during connection.
To stop the connection
Select “Disconnect” c “yes” in step 4.
Tip
Depending on the device, it may be possible to select
this unit from the device, and then connect.
Handsfree talking
Check that this unit and the cellular phone are
connected beforehand (page 14, 15).
Notes
• For details on operation when a cellular phone with
Bluetooth audio streaming function is connected as
an audio device, see “Listening to music from an
audio device” on page 17.
• The microphone of this unit is located on the rear of
the front panel (page 10). Do not mask the
microphone with tape, etc.
• Even if you activate the ATT function during a call,
the outgoing sound will not be attenuated.
Making calls
You can make a call from the connected cellular
phone by operating this unit.
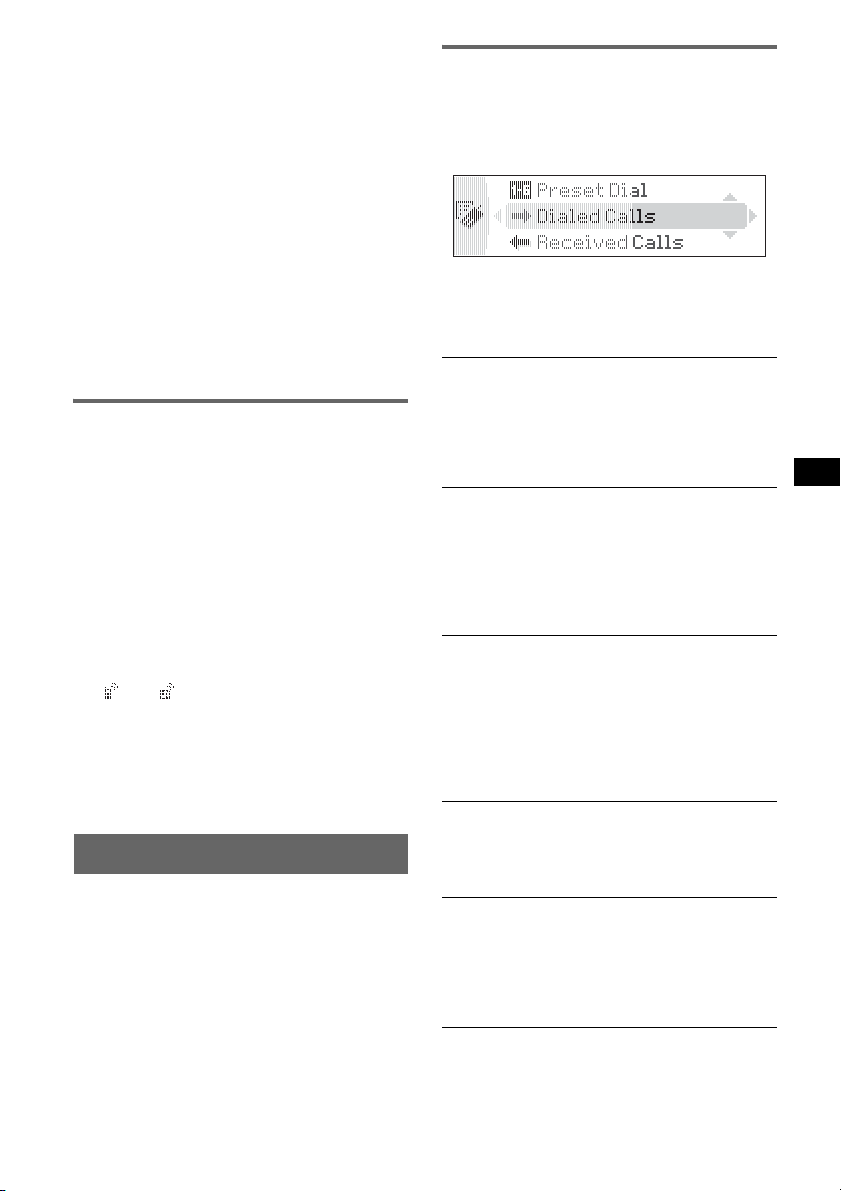
1 Press (CALL).
The CALL menu appears.
2 Select the items in the following order,
then press the joystick to start calling.
CALL menu
Dialed Calls*
Selects from the dialed call history. (Maximum
storable name and phone numbers: 10)
Name and phone number to call c “Call”
Select “Delete” to delete the name and phone
number, “Delete All” to clear the history.
Received Calls*
Selects from the received call history.
(Maximum storable name and phone
numbers:10)
Name and phone number to call c “Call”
Select “Delete” to delete the name and phone
number, “Delete All” to clear the history.
Phonebook*
Selects from the phonebook list. (Maximum
storable name and phone numbers: 50)
“Contact List” c Name to call c the name and
phone number
For details on how to store in the phonebook,
see “Using the Phonebook” on page 16 and
“Setting a handsfree device” on page 17.
Dial
Inputs the phone number using the joystick or
card remote commander.
To input “+,” press and hold the 0 button on the
card remote commander.
Preset Dial*
Selects the phone number stored in a number
button.
Preset number (P1 – P6) c “Call”
For details on how to store in the number
buttons, see “Using the Preset Dial” on page 17.
* If you set “Security” (page 18), “Security Locked”
appears and operation is not possible.
continue to next page t
15
Page 16
Tips
• Preset Dial also allows you to make a call by
pressing a number button twice after pressing
(CALL).
• On the “Dialed Calls,” “Received Calls” and “Preset
Dial” menus, you can make a call by pressing
(CALL) while the phone number is displayed.
Presetting the volume of ring tone
and talker’s voice
You can preset the volume level of the ring tone
and talker’s voice.
To adjust the ring tone:
Rotate the joystick while the phone is ringing.
“Ring Vol” appears and ring tone volume is set.
To adjust the talker’s voice:
Rotate the joystick during a call. “Talk Vol”
appears and the talker’s voice volume is set.
Sending DTMF (Dual Tone Multiple
Frequency) tones
You can send DTMF tones.
To send DTMF tones, use the joystick or press
the required number buttons (0 – 9, or ) on
the card remote commander during a call.
Note
Even if the call is ended, the Bluetooth connection is
not cancelled.
Using the Phonebook
Receiving phonebook data from a
cellular phone
1 Select “Phone Settings” from the Bluetooth
function menu.
2 Select “Receive PB.”
“Waiting…” appears.
3 Send the phonebook data by operating the
cellular phone.
“Data Receiving…” appears while receiving
the phonebook data.
“Complete” appears when receiving is
complete.
Notes
• To cancel the transfer of phonebook data, operate
the cellular phone. Transfer cannot be cancelled
from this unit.
• Depending on the format/characters used for the
phonebook recorded in the cellular phone, it may not
display properly on this unit.
Receiving calls
When receiving a call, ring tone is output from
your car speakers.
For details on the settings for receiving a call and
during a call, see “Setting a handsfree device” on
page 17.
1 When receiving a call, press (CALL),
(MENU) or (Bluetooth).
(Bluetooth)
(MENU)
(CALL)
The phone call starts.
To reject a call
Press (OFF).
Tips
• If you set “Auto Answer” to on, the phone call is
automatically started in the set time (page 17).
• If (CALL) is pressed during a call, the handsfree
function is deactivated, and the microphone and
speaker of the cellular phone are activated. In this
case, the Bluetooth connection may become
disconnected depending on the cellular phone.
Ending calls
1 Press (OFF).
When the call ends, talk time appears for a
few seconds.
16
Storing the numbers from “Dialed
Calls” or “Received Calls”
1 Select “Dialed Calls” or “Received Calls”
from the CALL menu.
2 Select the phone number to store, then select
“Save.”
The “Contact Name” display appears.
3 Input a name.
Up to 20 characters can be input.
4 Select “Save?” c “yes.”
Note
Up to 50 phone numbers can be stored in the
Phonebook. If you try to register more than 50
numbers, “Memory Full” appears.
Deleting from the phonebook
1 Select “Phonebook” c “Contact List” from the
CALL menu.
2 Select the name to delete.
3 Select “Delete” c “yes.”
To clear all phonebook data, select “Delete All”
in step 1. After clearing, confirm that all
phonebook data has been cleared properly.
Changing a name in the phonebook
1 Select “Phonebook” c “Contact List” from the
CALL menu.
2 Select the name to change.
Page 17
3 Select “Edit Name,” then input a new name.
Using the Preset Dial
Storing the Preset Dial
You can store a phone number in the phonebook
to the Preset Dial.
1 Select “Preset Dial” from the CALL menu.
2 Select the preset number (P1 – P6) to store,
then select “Preset Memory.”
3 Select the name to store.
4 Select a phone number of the selected name.
5 Select “yes” when “Save?” appears.
Note
To replace a registered preset number, delete the
existing registration first, then store the new phone
number.
To Do th is
Skip tracks Push the joystick left/right.
Reverse/fast-
forward a track
Pause Press (6) (PAUSE)*.
* Depending on the device, it may be necessary to
press twice.
Operations other than the above should be
performed on the audio device.
Note
Even if the source is changed on this unit, playback of
the audio device does not stop.
Tip
You can connect a cellular phone that supports A2DP
(Advanced Audio Distribution Profile) as an audio
device and listen to music.
Push and hold the joystick left/
right.
Deleting the Preset Dial
1 Select “Preset Dial” from the CALL menu.
2 Select the preset number to delete.
3 Select “Delete” c “yes.”
Music streaming
Listening to music from an audio
device
You can listen to music of an audio device on this
unit if the audio device supports A2DP
(Advanced Audio Distribution Profile) of
Bluetooth technology.
1 Connect this unit and the Bluetooth
audio device (page 15).
“ ” appears during connection.
2 Turn down the volume on this unit.
3 Press (SOURCE) repeatedly until
“Bluetooth AUDIO” appears.
4 Operate the audio device to start
playback.
5 Adjust the volume on this unit.
Operating an audio device with this
unit
You can perform the following operations on this
unit if the audio device supports AVRCP (Audio
Video Remote Control Profile) of Bluetooth
technology. (The operation differs depending on
the audio device.)
Other settings
Setting a handsfree device
You can set various functions when a cellular
phone compatible with the Bluetooth function is
connected as a handsfree device.
1 Press (Bluetooth).
The Bluetooth function menu appears.
2 Select “Phone Settings.”
3 Select the desired menu.
4 Select the setting.
5 Press (Bluetooth).
Phone Settings menu
“z” indicates the default settings.
Receive PB*1*2 (Receive Phonebook)
To receive and store the phonebook data from a
cellular phone (page 16).
Auto Answer
– “on”: to start a call automatically when
received. Set the time to start a call: “1 sec” –
“60 sec”
– “off” (
z): to not start a call until (CALL),
(MENU) or (Bluetooth) is pressed.
Ringtone
To switch the ring tone.
– “Cellular*
with the cellular phone.
– “Default”: to output this unit’s ring tone.
3
” (z): to output the ring tone set
continue to next page t
17
Page 18
EC/NC Mode*4 (Echo Canceller/Noise
Canceller Mode)
To reduce echo and noise in phone call
conversations.
Set to “Mode 1” (
z) normally. If the quality of
the outgoing sound is unsatisfactory, set to
“Mode 2” or “off.”
Speaker Sel*
4
(Speaker Select)
To set the front speaker to output the ring tone,
dial-tone and other party’s voice.
–“FR-L” (
z): to output from the left channel of
front speakers.
– “FR-R”: to output from the right channel of
front speakers.
– “Front”: to output from both front speakers.
Security
To lock the personal information in the
following menus by setting a 4-digit password
(page 15).
“Dialed Calls,” “Received Calls,” “Phonebook,”
“Preset Dial,” “Receive PB”
If you set the security, “Security Locked”
appears when the above menus are operated.
To unlock the security, select “Unlock” and
input the password number.
*1 If “Security” is set, “Security Locked” appears and
operation is not possible.
*2 If a character that cannot be displayed on this unit
is used, it is not displayed correctly.
*3 Depending on the cellular phone, this unit’s ring
tone may be output even if set to “Cellular.”
*4 Configurable during a call.
Note
If you select “Initialize” in the Security setting, all
stored data is deleted (“Dialed Calls,” “Received Calls,”
“Phonebook” and “Preset Dial”).
Deleting the registration of a
connected device
1 Press (Bluetooth).
The Bluetooth function menu appears.
2 Select “Connectivity” c “Handsfree
Devices” or “Audio Devices.”
The list of registered devices appears.
3 Select the device to delete.
4 Select “Delete” c “yes.”
To clear all devices in the selection list, select
“Delete All” in step 4.
Auto connection function
If your car’s ignition switch is set to the ACC
position, this unit reconnects automatically to the
last connected Bluetooth device.
Other functions
Adjusting menu items — MENU
1 Press (MENU).
2 Push the joystick up/down until the
desired menu item appears, then push
it right.
The items changes as follows:
Setup y Display y Receive Mode
y Sound
3 Push the joystick up/down until the
desired setting item appears, then
push it right.
The digital indication moves to the right
(setting selection) side.
4 Push the joystick up/down to select
the setting, then press it.
The setting is complete.
5 Press (MENU).
The display returns to normal play/reception
mode.
Note
Displayed items will differ, depending on the source
and setting.
Tips
• You can go to the next menu level by pressing the
joystick.
• In step 5, push the joystick left until “EXIT” appears,
then press the joystick, instead of pressing (MENU).
• You can enter the Sound setting menu directly by
pressing (SOUND) on the card remote commander.
The following items can be set (follow the page
reference for details):
“
z” indicates the default settings.
Setup
Clock Adjust (page 6)
Beep
To set “on” (z) or “off.”
RM (Rotary Commander)
To change the operative direction of the rotary
commander controls.
–“NORM” (
the factory-set position.
– “REV”: when you mount the rotary
commander on the right side of the steering
column.
AUX Audio*
To turn the AUX source display “on” (z) or
“off” (page 21).
Version*
To display the unit’s firmware version.
z): to use the rotary commander in
1
1
18
Page 19

Display
Image
To set various display images.
– “SpaceProducer” (
z): to create animated on-
screen patterns in time with the music.
– “All”: to step repeatedly through the display
images in all display modes.
– “off”: to not display any image.
– “SA 1 – 5”: to display the Spectrum Analyzer.
– “Movie 1 – 3”: to display a movie.
– “Wallpaper 1 – 3”: to display a wallpaper.
– “SA All”/“Movie All”/“Wallpaper All”: to
step repeatedly through the display images of
each mode.
Info (Information)
To display the items (depending on the source,
etc.).
– “All”: to display all items.
–“Simple” (
z): to not display any items.
– “Clear”: to have items automatically
disappear.
1
Demo*
(Demonstration)
To s et “on” (z) or “off.”
Dimmer
To change the brightness of the display.
–“Auto” (
z): to dim the display automatically
when you turn lights on.
– “on”: to dim the display.
– “off”: to deactivate the dimmer.
Auto Scroll
To scroll long displayed item automatically
when the disc/album/group/track is changed.
–“on”: to scroll.
–“off” (
z): to not scroll.
Receive Mode
Local (Local seek mode)
Mono (Monaural mode)
IF
BTM (page 12)
z): to tune normal reception.
–“off” (
– “on”: to only tune into stations with stronger
signals.
To improve poor FM reception, select monaural
reception mode.
–“off” (
z): to hear stereo broadcast in stereo.
– “on”: to hear stereo broadcasts in monaural.
–“Auto” (
–“Wide”*
z): to automatically narrow the
reception frequency to eliminate noise.
2
: to always hear FM stereo
broadcasts in stereo and with full frequency
reception.
Sound
EQ3 Preset
To select an equalizer type: “Xplod,” “Vocal,”
“Edge,” “Cruise,” “Space,” “Gravity,” “Custom”
or “Off” (
z).
EQ3 Tune
See “Customizing the equalizer curve” on
page 19.
DSO
To select the DSO mode: “1,” “2,” “3” or “off”
(
z). The larger the number, the more enhanced
the effect.
Balance
To adjust the balance between the right and left
speakers: “R10” – “±0” (
z) – “L10”
Fader
To adjust the balance between the front and rear
speakers: “F10” – “±0” (
z) – “R10”
Subwoofer
To adjust the subwoofer volume: “+10” – “±0”
(
z) – “–10”
(“– ∞” is displayed at the lowest setting.)
LPF (Low Pass Filter)
To select the subwoofer cut-off frequency: “off”
(
z), “125Hz” or “78Hz.”
AUX Level
To adjust the volume level for each connected
auxiliary equipment. This setting negates the
need to adjust the volume level between sources
(page 21).
Adjustable level: “+6 dB” – “±0 dB” (
z) –
“–6 dB”
*1 When the unit is turned off.
*2 In such cases, some FM stereo broadcasts may
become monaural while in the stereo reception
mode.
Customizing the equalizer curve
— EQ3 Tune
“Custom” of EQ3 allows you to make your own
equalizer settings.
1 Select a source, then press (MENU).
2 Select “Sound” c “EQ3 Preset” c
“Custom,” using the joystick.
3 Select “EQ3 Tune” using the joystick.
4 Select the desired frequency range
from “LOW,” “MID” and “HI.”
continue to next page t
19
Page 20
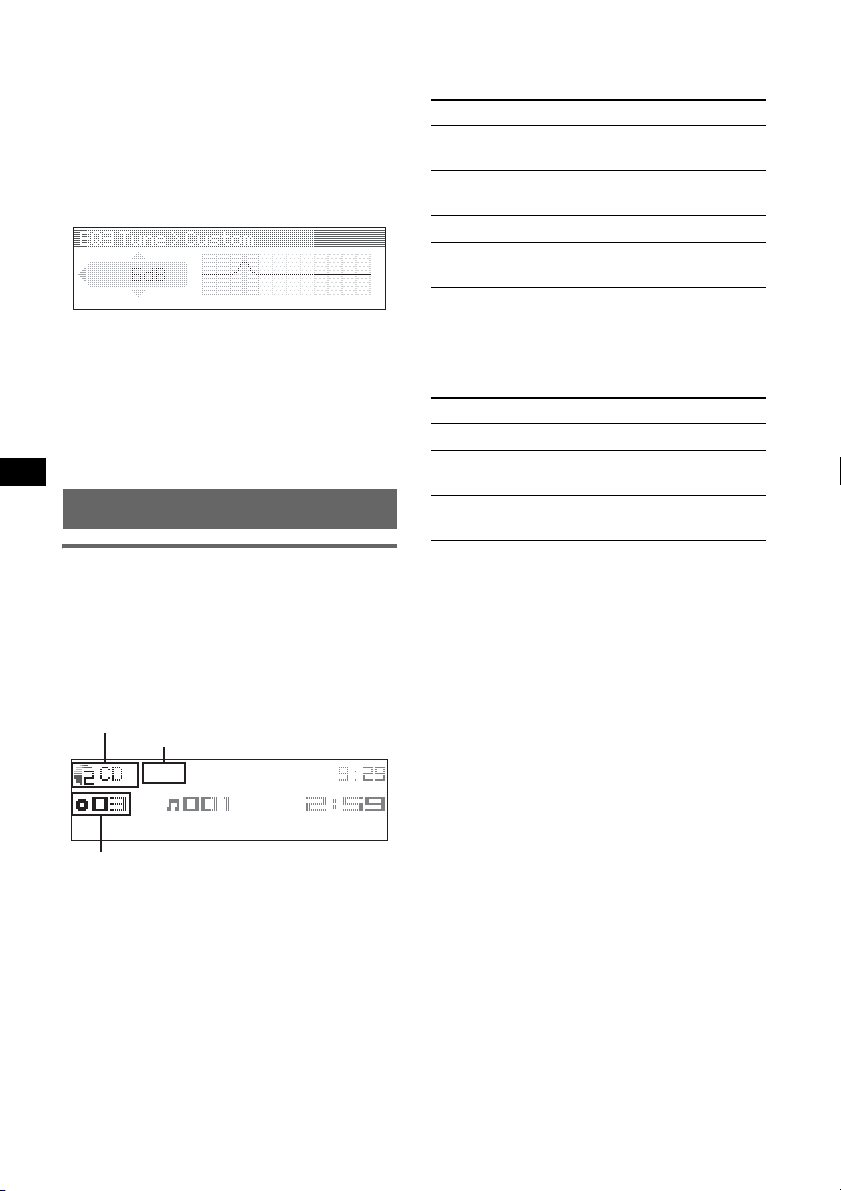
5 Select the frequency you wish to
adjust.
Adjustable frequency in each range:
LOW: 60 Hz or 100 Hz
MID: 500 Hz or 1.0 kHz
HI: 10.0 kHz or 12.5 kHz
6 Adjust the equalizer curve.
The volume level is adjustable in 1 dB steps,
from –10 dB to +10 dB.
7 Press the joystick.
Repeat steps 4 to 7 to adjust other
frequencies.
To restore the factory-set equalizer curve,
select “Initialize” c “Yes” in step 4.
Tip
Other equalizer types are also adjustable.
Using optional equipment
CD/MD changer
Selecting the changer
1 Press (SOURCE) repeatedly until “CD” or
“MD” appears.
2 Press (MODE) repeatedly until the desired
changer appears.
Unit number, MP3 indication*
LP2/LP4 indication*
Disc/Album number
Playback starts.
*1 When an MP3 is played.
*2 When MDLP disc is played.
1
2
Skipping albums and discs
1 During playback, push the joystick up/down.
To skip Push up/down
album and hold for a moment, then
release.
album
continuously
and hold within 2 seconds of
first releasing.
discs repeatedly.
discs
continuously
then push again within 2
seconds and hold.
Repeat and shuffle play
1 During playback, press (1) (REP) or (2)
(SHUF) repeatedly until the desired setting
appears.
Select To play
Repeat Disc*1disc repeatedly.
Shuffle
Changer*
Shuffle All*
tracks in the changer in random
1
order.
2
tracks in all units in random
order.
*1 When one or more CD/MD changers are
connected.
*2 When one or more CD changers, or two or more
MD changers are connected.
To return to normal play mode, select “Repeat
off” or “Shuffle off.”
Tip
“Shuffle All” will not shuffle tracks between CD units
and MD changers.
Locating a disc by name — LIST
You can select a disc from the list when a CD
changer with CD TEXT capability, or MD
changer is connected.
If you assign a name to a disc, the name appears
on the list.
1 During playback, press the joystick.
The disc number or disc name appears.
2 Push the joystick up/down until the desired
disc appears.
3 Press the joystick to play the disc.
The display returns to normal play mode.
20
Page 21
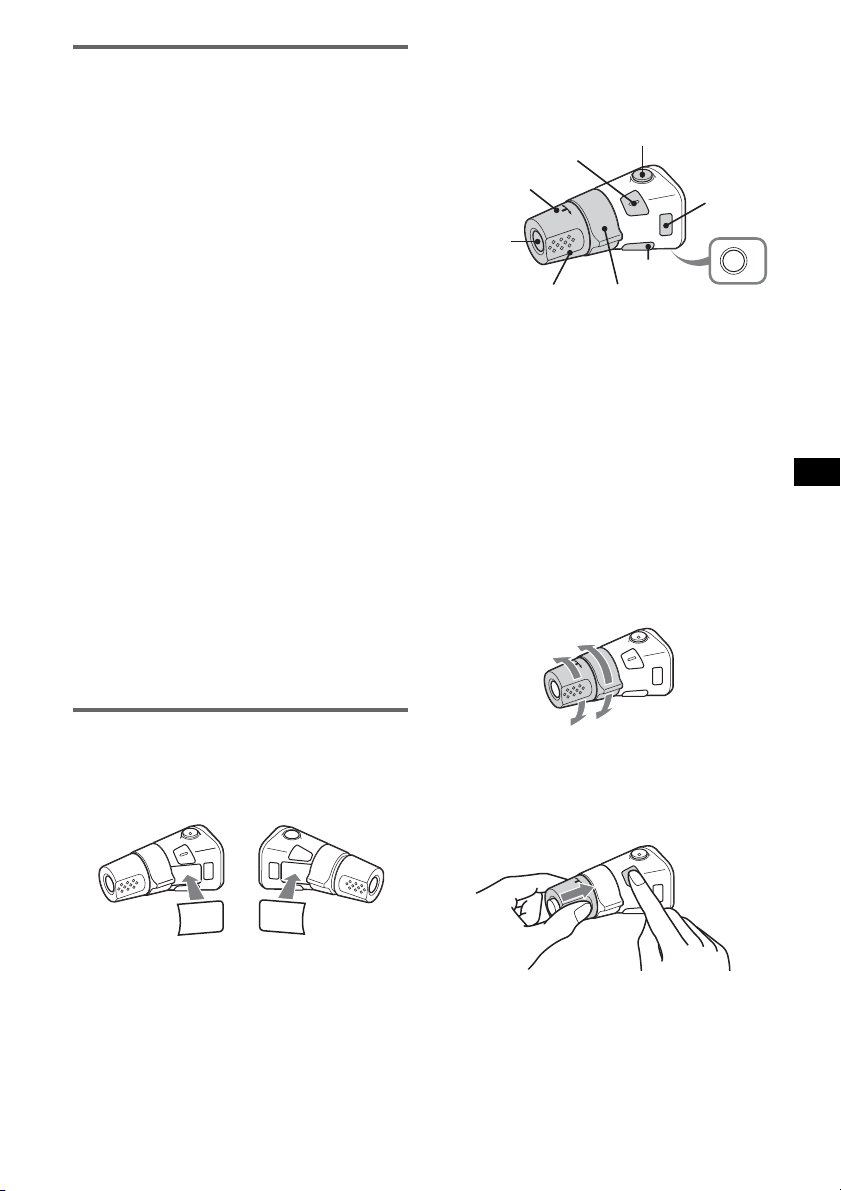
Auxiliary audio equipment
You can connect optional Sony portable devices
to the BUS AUDIO IN/AUX IN terminal on the
unit. If the changer or other device is not
connected to the terminal, the unit allows you to
listen to the portable device on your car speakers.
Note
When connecting a por table device, be sure BUS
CONTROL IN is not connected. If a device is
connected to BUS CONTROL IN, “AUX” cannot be
selected by (SOURCE).
Tip
When connecting both a portable device and a
changer, use the optional AUX-IN selector.
Selecting auxiliary equipment
1 Press (SOURCE) repeatedly until “AUX”
appears.
Operate by the portable device itself.
Adjusting the volume level
Be sure to adjust the volume for each connected
audio device before playback.
1 Turn down the volume on the unit.
2 Press (SOURCE) repeatedly until “AUX”
appears.
3 Start playback of the portable audio device at a
moderate volume.
4 Set your usual listening volume on the unit.
5 Adjust the volume level, following “Adjusting
menu items — MENU” on page 18. The input
level is adjustable from –6 dB to +6 dB.
Location of controls
The corresponding buttons on the rotary
commander control the same functions as those
on this unit.
SOUND*
PRESET/
DISC
SOURCE
VOL
ATT
DSPL
SEEK/AMS
MODE
OFF
OFF
The following controls on the rotary commander
require a different operation from the unit.
• PRESET/DISC control
The same as pushing the joystick up/down on
the unit (push in and rotate).
• VOL (volume) control
The same as rotating the joystick on the unit
(rotate).
• SEEK/AMS control
The same as pushing the joystick left/right on
the unit (rotate, or rotate and hold).
* Not available for this unit.
Changing the operative direction
The operative direction of the controls is factoryset as shown below.
To increase
Rotary commander RM-X4S
Attaching the label
Attach the indication label depending on how
you mount the rotary commander.
D
S
D
N
U
SO
E
D
O
M
L
P
S
D
P
L
M
O
D
E
S
O
U
N
D
To decrease
If you need to mount the rotary commander on
the right hand side of the steering column, you
can reverse the operative direction.
1 While pushing the VOL control, press and
hold (SOUND).
21
Page 22
Additional Information
Precautions
• If your car has been parked in direct sunlight,
allow the unit to cool off before operating it.
• Power aerial will extend automatically while the
unit is operating.
Moisture condensation
On a rainy day or in a very damp area, moisture
condensation may occur inside the lenses and
display of the unit. Should this occur, the unit will
not operate properly. In such a case, remove the disc
and wait for about an hour until the moisture has
evaporated.
To maintain high sound quality
Be careful not to splash juice or other soft drinks
onto the unit or discs.
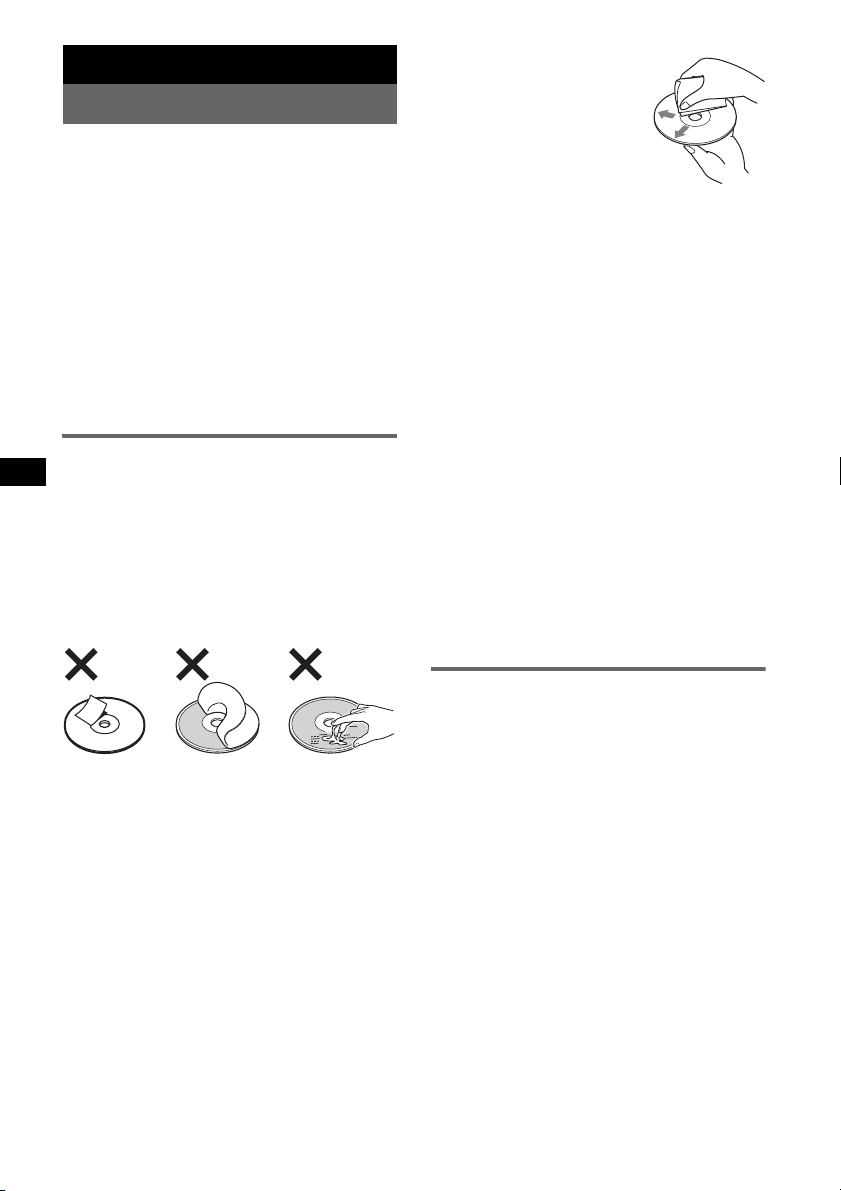
Notes on discs
• To keep a disc clean, do not touch its surface.
Handle the disc by its edge.
• Keep your discs in their cases or disc magazines
when not in use.
• Do not subject discs to heat/high temperature.
Avoid leaving them in a parked car or on a
dashboard/rear tray.
• Do not attach labels, or use discs with sticky ink/
residue. Such discs may stop spinning when used,
causing a malfunction, or may ruin the disc.
• Before playing, clean the discs
with a commercially available
cleaning cloth. Wipe each disc
from the centre out. Do not use
solvents such as benzine,
thinner, commercially available
cleaners, or antistatic spray
intended for analogue discs.
Notes on CD-R/CD-RW discs
• Some CD-Rs/CD-RWs (depending on the
equipment used for its recording or the condition
of the disc) may not play on this unit.
• You cannot play a CD-R/a CD-RW that is not
finalized.
Music discs encoded with copyright
protection technologies
This product is designed to play back discs that
conform to the Compact Disc (CD) standard.
Recently, various music discs encoded with
copyright protection technologies are marketed by
some record companies. Please be aware that among
those discs, there are some that do not conform to
the CD standard and may not be playable by this
product.
Note on DualDiscs
A DualDisc is a two sided disc product which
mates DVD recorded material on one side with
digital audio material on the other side. However,
since the audio material side does not conform to
the Compact Disc (CD) standard, playback on this
product is not guaranteed.
• Do not use any discs with labels or stickers
attached.
The following malfunctions may result from using
such discs:
– Inability to eject a disc (due to a label or sticker
peeling off and jamming the eject mechanism).
– Inability to read audio data correctly (e.g.,
playback skipping, or no playback) due to heat
shrinking of a sticker or label causing a disc to
warp.
• Discs with non-standard shapes (e.g., heart,
square, star) cannot be played on this unit.
Attempting to do so may damage the unit. Do not
use such discs.
• You cannot play 8 cm CDs.
22
About MP3/WMA files
MP3, which stands for MPEG-1 Audio Layer-3, is a
music file compression format standard. It
compresses audio CD data to approximately 1/10 of
its original size.
WMA, which stands for Windows Media Audio, is
another music file compression format standard. It
compresses audio CD data to approximately 1/22*
of its original size.
* only for 64 kbps
• The unit is compatible with the ISO 9660 level 1/
level 2 format, Joliet/Romeo in the expansion
format, and Multi Session.
• The maximum number of:
– folders (albums): 150 (including root and empty
folders).
– MP3/WMA files (tracks) and folders contained
in a disc: 300 (if a folder/file names contain
many characters, this number may become less
than 300).
– displayable characters for a folder/file name is
25 (Joliet), or 50 (Romeo).
• ID3 tag versions 1.0, 1.1, 2.2, 2.3 and 2.4 apply to
MP3 only. Displayable ID3 tag is 30 characters
(1.0 and 1.1), or 50 characters (2.2, 2.3 and 2.4).
Displayable WMA tag is 25 characters.
Page 23
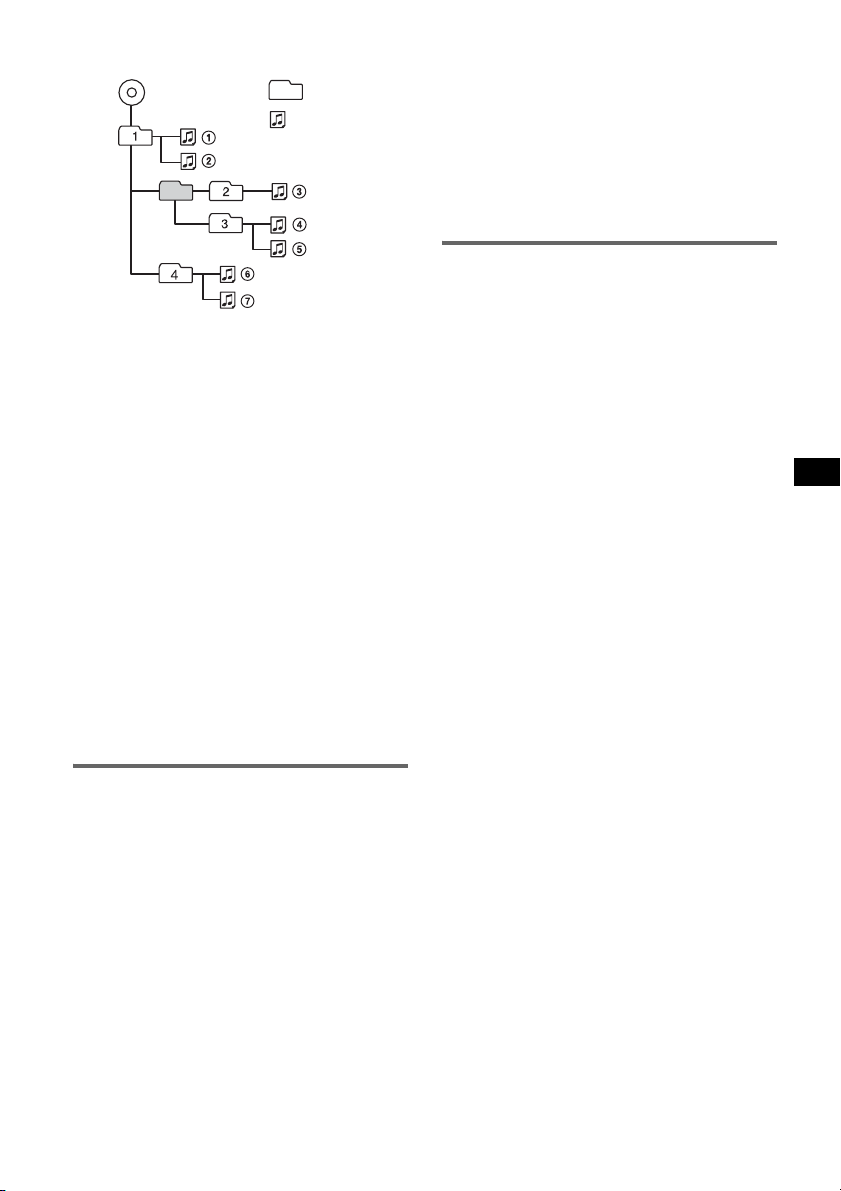
Playback order of MP3/WMA files
MP3/WMA
Notes
• When naming an MP3 file/WMA file, be sure to add
the file extension “.mp3”/“.wma” to the file name.
• During playback of a VBR (variable bit rate) MP3/
WMA file or fast-forward/reverse, elapsed playing
time may not display accurately.
• When the disc is recorded in Multi Session, only the
first track of the first session format is recognized
and played (any other format is skipped). The
priority of the format is CD-DA, ATRAC CD and
MP3/WMA.
– When the first track is a CD-DA, only CD-DA of the
first session is played.
– When the first track is not a CD-DA, an ATRAC CD
or MP3/WMA session is played. If the disc has no
data in any of these formats, “NO Music” is
displayed.
Notes on MP3
• Be sure to finalize the disc before using on the unit.
• If you play a high-bit-rate MP3, such as 320 kbps,
sound may be intermittent.
Notes on WMA
• Files made with lossless compression are not
playable.
• Files protected by copyright are not playable.
Folder
(album)
MP3/WMA file
(track)
About ATRAC CD
ATRAC3plus format
ATRAC3, which stands for Adaptive Transform
Acoustic Coding3, is audio compression
technology. It compresses audio CD data to
approximately 1/10 of its original size.
ATRAC3plus, which is an extended format of
ATRAC3, compresses the audio CD data to
approximately 1/20 of its original size. The unit
accepts both ATRAC3 and ATRAC3plus format.
ATRAC CD
ATRAC CD is recorded audio CD data which is
compressed to ATRAC3 or ATRAC3plus format
using authorized software, such as SonicStage 2.0 or
later, or SonicStage Simple Burner.
• The maximum number of:
– folders (groups): 255
– files (tracks): 999
• The characters for a folder/file name and text
information written by SonicStage are displayed.
For details on ATRAC CD, see the SonicStage or
SonicStage Simple Burner manual.
Note
Be sure to create the ATRAC CD using author ized
software, such as SonicStage 2.0 or later, or
SonicStage Simple Burner 1.0 or 1.1.
If you have any questions or problems concerning
your unit that are not covered in this manual, consult
your nearest Sony dealer.
About Bluetooth function
On Bluetooth communication
• Bluetooth wireless technology operates within a
range of about 10 m.
Maximum communication range may vary
depending on obstacles (person, metal, wall, etc.)
or electromagnetic environment.
• The following conditions may affect the
sensitivity of Bluetooth communication.
– There is an obstacle such as a person, metal, or
wall between this unit and Bluetooth device.
– A device using 2.4 GHz frequency, such as a
wireless LAN device, cordless telephone, or
microwave oven, is in use near this unit.
• Because Bluetooth devices and wireless LAN
(IEEE802.11b/g) use the same frequency,
microwave interference may occur and resulting in
communication speed deterioration, noise, or
invalid connection if this unit is used near a
wireless LAN device. In such as case, perform the
following.
– Use this unit at least 10 m away from the
wireless LAN device.
– If this unit is used within 10 m of a wireless
LAN device, turn off the wireless LAN device.
– Install this unit and Bluetooth device as near to
each other as possible.
• Microwaves emitting from a Bluetooth device may
affect the operation of electronic medical devices.
Turn off this unit and other Bluetooth devices in
the following locations, as it may cause an
accident.
– where inflammable gas is present, in a hospital,
train, airplane, or a petrol station
– near automatic doors or a fire alarm
• This unit supports security capabilities that
comply with the Bluetooth standard to provide a
secure connection when the Bluetooth wireless
technology is used, but security may not be
enough depending on the setting. Be careful when
communicating using Bluetooth wireless
technology.
• We do not take any responsibility for the leakage
of information during Bluetooth communication.
continue to next page t
23
Page 24
• Connection with all Bluetooth devices cannot be
guaranteed.
– A device featuring Bluetooth function is
required to conform to the Bluetooth standard
specified by Bluetooth SIG, and be
authenticated.
– Even if the connected device conforms to the
above mentioned Bluetooth standard, some
devices may not be connected or work correctly,
depending on the features or specifications of the
device.
– While talking on the phone hands free, noise
may occur, depending on the device or
communication environment.
• Depending on the device to be connected, it may
require some time to start communication.
Others
• Using the Bluetooth device may not function on
cellular phones, depending on radio wave
conditions and location where the equipment is
being used.
• If you experience discomfort after using the
Bluetooth device, stop using the Bluetooth device
immediately. Should any problem persist, consult
your nearest Sony dealer.
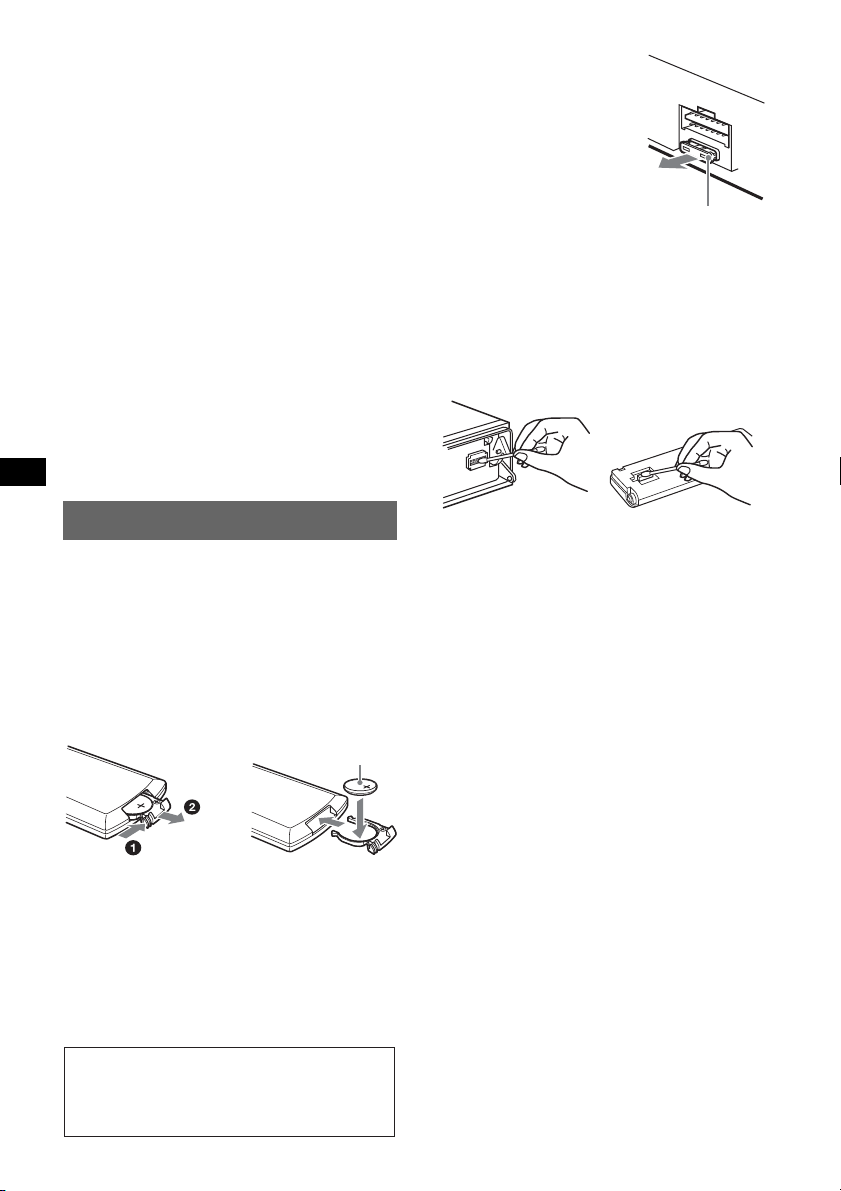
Fuse replacement
When replacing the fuse, be
sure to use one matching the
amperage rating stated on the
original fuse. If the fuse blows,
check the power connection and
replace the fuse. If the fuse
blows again after replacement,
there may be an internal
malfunction. In such a case,
consult your nearest Sony
dealer.
Fuse (10A)
Cleaning the connectors
The unit may not function properly if the connectors
between the unit and the front panel are not clean. In
order to prevent this, detach the front panel (page 6)
and clean the connectors with a cotton swab dipped
in alcohol. Do not apply too much force. Otherwise,
the connectors may be damaged.
Maintenance
Replacing the lithium battery of the
card remote commander
Under normal conditions, the battery will last
approximately 1 year. (The service life may be
shorter, depending on the conditions of use.)
When the battery becomes weak, the range of the
card remote commander becomes shorter. Replace
the battery with a new CR2025 lithium battery. Use
of any other battery may present a risk of fire or
explosion.
c
Notes on the lithium battery
• Keep the lithium battery out of the reach of children.
Should the battery be swallowed, immediately
consult a doctor.
• Wipe the battery with a dry cloth to assure a good
contact.
• Be sure to observe the correct polarity when
installing the battery.
• Do not hold the battery with metallic tweezers,
otherwise a short-circuit may occur.
WARNING
Battery may explode if mistreated.
Do not recharge, disassemble, or dispose of
in fire.
24
+ side up
Main unit Back of the front
Notes
• For safety, turn off the ignition before cleaning the
connectors, and remove the key from the ignition
switch.
• Never touch the connectors directly with your fingers
or with any metal device.
panel
Page 25
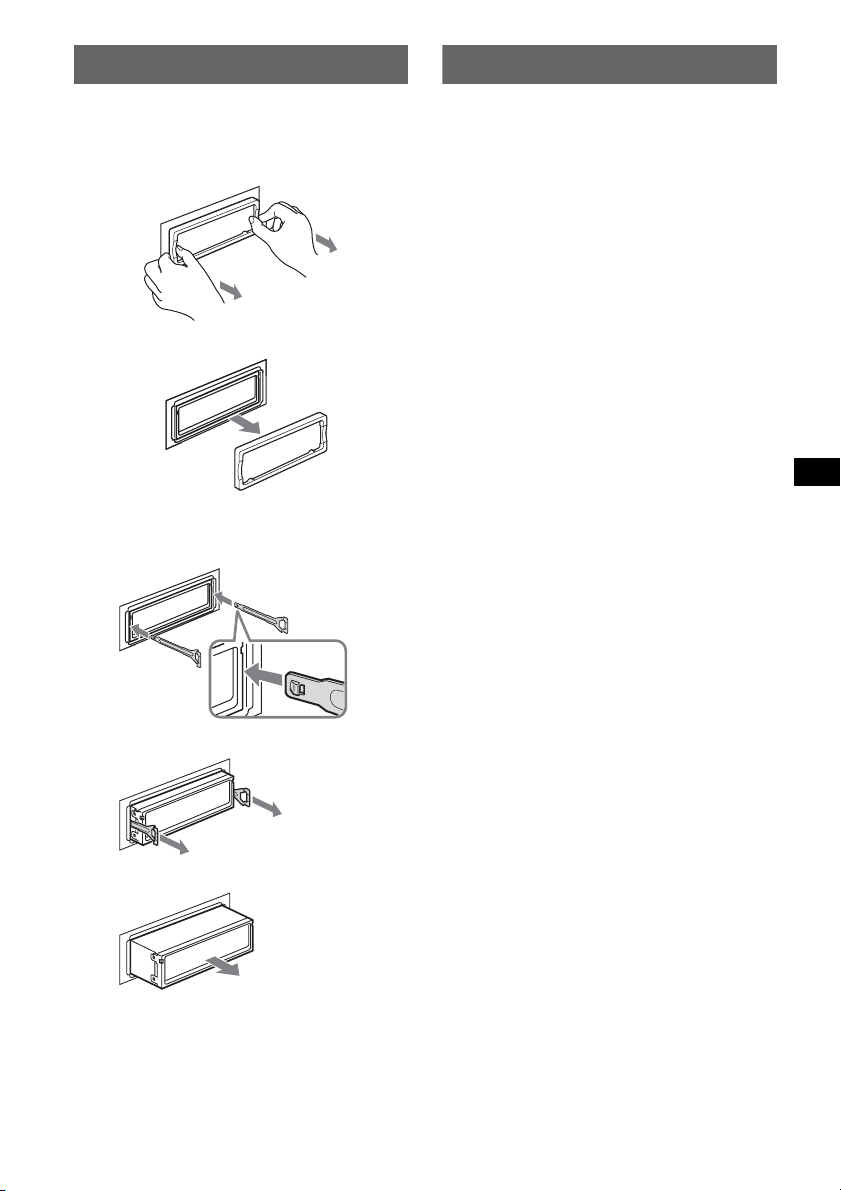
Removing the unit
Specifications
1 Remove the protection collar.
1 Detach the front panel (page 6).
2 Pinch both edges of the protection collar,
then pull it out.
x
2 Remove the unit.
1 Insert both release keys simultaneously
until they click.
Hook facing
inwards.
2 Pull the release keys to unseat the unit.
3 Slide the unit out of the mounting.
CD Player section
Signal-to-noise ratio: 120 dB
Frequency response: 10 – 20,000 Hz
Wow and flutter: Below measurable limit
Tuner section
FM
Tuning range:
87.5 – 108.0 MHz (at 50 kHz step)
87.5 – 107.9 MHz (at 200 kHz step)
FM tuning interval: 50 kHz/200 kHz switchable
Aerial terminal: External aerial connector
Intermediate frequency: 10.7 MHz/450 kHz
Usable sensitivity: 9 dBf
Selectivity: 75 dB at 400 kHz
Signal-to-noise ratio: 67 dB (stereo), 69 dB (mono)
Harmonic distortion at 1 kHz: 0.5 % (stereo),
0.3 % (mono)
Separation: 35 dB at 1 kHz
Frequency response: 30 – 15,000 Hz
AM
Tuning range:
531 – 1,602 kHz (at 9 kHz step)
530 – 1,710 kHz (at 10 kHz step)
AM tuning interval: 9 kHz/10 kHz switchable
Aerial terminal: External aerial connector
Intermediate frequency: 10.7 MHz/450 kHz
Sensitivity: 30 µV
Wireless Communication
Communication System:
Bluetooth Standard version 2.0
Output:
Bluetooth Standard Power Class 2 (Max. +4 dBm)
Maximum communication range:
Line of sight approx. 10 m*
Frequency band:
2.4 GHz band (2.4000 – 2.4835 GHz)
Modulation method: FHSS
Compatible Bluetooth Profiles*
A2DP (Advanced Audio Distribution Profile)
AVRCP (Audio Video Remote Control Profile)
HFP (Handsfree Profile)
OPP (Object Push Profile)
*1 The actual range will vary depending on factors
such as obstacles between devices, magnetic
fields around a microwave oven, static electricity,
reception sensitivity, antenna's perfomance,
operating system, software application, etc.
*2 Bluetooth standard profiles indicate the purpose of
Bluetooth communication between devices.
1
2
:
Power amplifier section
Outputs: Speaker outputs (sure seal connectors)
Speaker impedance: 4 – 8 ohms
Maximum power output: 52 W × 4 (at 4 ohms)
continue to next page t
25
Page 26

General
Outputs:
Audio outputs terminal (front/rear)
Subwoofer output terminal (mono)
Power aerial relay control terminal
Power amplifier control terminal
Inputs:
Telephone ATT control terminal
Illumination control terminal
BUS control input terminal
BUS audio input/AUX IN terminal
Remote controller input terminal
Aerial input terminal
Tone controls:
Low: ±10 dB at 60 Hz or 100 Hz (XPLOD)
Mid: ±10 dB at 500 Hz or 1 kHz (XPLOD)
High: ±10 dB at 10 kHz or 12.5 kHz (XPLOD)
Power requirements: 12 V DC car battery
(negative earth)
Dimensions: Approx. 178 × 50 × 183 mm (w/h/d)
Mounting dimensions: Approx. 182 × 53 × 162 mm
(w/h/d)
Mass: Approx. 1.2 kg
Supplied accessories:
Card remote commander: RM-X303
Parts for installation and connections (1 set)
Optional accessories/equipment:
Rotary commander: RM-X4S
BUS cable (supplied with an RCA pin cord):
RC-61 (1 m), RC-62 (2 m)
CD changer (10 discs): CDX-757MX, CDX-656X
CD changer (6 discs): CDX-T69
Source selector: XA-C30, XA-C40
AUX-IN selector: XA-300
Your dealer may not handle some of the above listed
accessories. Please ask the dealer for detailed
information.
US and foreign patents licensed from Dolby
Laboratories.
MPEG Layer-3 audio coding technology and
patents licensed from Fraunhofer IIS and Thomson.
Note
This unit cannot be connected to a digital preamplifier
or an equalizer which is Sony BUS system compatible.
Design and specifications are subject to change
without notice.
• Lead-free solder is used for soldering.
• Halogenated flame retardants are not used in the
certain printed wiring boards.
• Halogenated flame retardants are not used in
cabinets.
• Paper is used for the packaging cushions.
Troubleshooting
The following checklist will help you remedy
problems you may encounter with your unit.
Before going through the checklist below, check the
connection and operating procedures.
General
No power is being supplied to the unit.
• Check the connection. If everything is in order, check
the fuse.
• If the unit is turned off and the display disappears, it
cannot be operated with the remote commander.
t Turn on the unit.
The power aerial does not extend.
The power aerial does not have a relay box.
No sound.
• The volume is too low.
• The ATT function is activated, or the Telephone ATT
function (when the interface cable of a car telephone
is connected to the ATT lead) is activated.
• The position of the fader control is not set for a 2speaker system.
• The CD changer is incompatible with the disc format
(MP3/WMA/ATRAC CD).
t Play back with a Sony MP3 compatible CD
changer, or this unit.
No beep sound.
• The beep sound is cancelled (page 18).
• An optional power amplifier is connected and you are
not using the built-in amplifier.
The contents of the memory have been erased.
• The RESET button has been pressed.
t Store again into the memory.
• The power connecting lead or battery has been
disconnected.
• The power connecting lead is not connected properly.
Stored stations and correct time are erased.
The fuse has blown.
Makes noise when the position of the ignition
key is switched.
The leads are not matched correctly with the car’s
accessory power connector.
The display disappears from/does not appear
in the display window.
• The dimmer is set “Dimmer on” (page 19).
• The display disappears if you press and hold (OFF).
t Press and hold (OFF) on the unit until the
display appears.
• The connectors are dirty (page 24).
DSO does not function.
Depending on the type of car interior or type of music,
DSO may not have a desirable effect.
Any display items do not display.
t Set to “Info All” (page 19).
26
Page 27
CD/MD playback
The disc cannot be loaded.
• Another disc is already loaded.
• The disc has been forcibly inserted upside down or in
the wrong way.
The disc does not playback.
• Defective or dirty disc.
• The CD-Rs/CD-RWs are not for audio use (page 22).
MP3/WMA files cannot be played back.
The disc is incompatible with the MP3/WMA format
and version (page 22).
MP3/WMA files take longer to play back than
others.
The following discs take a longer time to start
playback.
– a disc recorded with a complicated tree structure.
– a disc recorded in Multi Session.
– a disc to which data can be added.
The ATRAC CD cannot play.
• The disc is not created by authorized software, such
as SonicStage or SonicStage Simple Burner.
• Tracks that are not included in the group cannot be
played.
The display items do not scroll.
• For discs with very many characters, those may not
scroll.
• “Auto Scroll” is set to “off.”
t Set “Auto Scroll on” (page 19) or press (SCRL).
The sound skips.
• Installation is not correct.
t Install the unit at an angle of less than 45° in a
sturdy part of the car.
• Defective or dirty disc.
The operation buttons do not function.
The disc will not eject.
Press the RESET button (page 6).
Radio reception
The stations cannot be received.
The sound is hampered by noises.
• Connect a power aerial control lead (blue) or
accessory power supply lead (red) to the power
supply lead of a car’s aerial booster (only when your
car has built-in FM/AM aerial in the rear/side glass).
• Check the connection of the car aerial.
• The auto aerial will not go up.
t Check the connection of the power aerial control
lead.
• Check the frequency.
• When the DSO mode is on, the sound is sometimes
hampered by noises.
t Set the DSO mode to “off” (page 19).
Preset tuning is not possible.
• Store the correct frequency in the memory.
• The broadcast signal is too weak.
Automatic tuning is not possible.
• The local seek mode is set to “on.”
t Set to “Local off” (page 19).
• The broadcast signal is too weak.
t Perform manual tuning.
During FM reception, the “ST” indication
flashes.
• Tune in the frequency accurately.
• The broadcast signal is too weak.
t Set to “Mono on” (page 19).
An FM programme broadcast in stereo is heard
in monaural.
The unit is in monaural reception mode.
t Set to “Mono off” (page 19).
Bluetooth function
The connecting device cannot detect this unit.
• Set “Signal” to “ON” (page 14).
• Set “Visibility” to “Show” (page 14).
• While connecting to the other Bluetooth device, this
unit cannot be detected from another device.
Disconnect the current connection and search for this
unit from another device. The disconnected device
can be reconnected by selecting from the list of
registered devices.
This unit cannot detect the connecting device.
Check the Bluetooth setting of the connecting device.
Connection is not possible.
• Depending on the other device, searching from this
unit may not be possible.
t Search for this unit from the other device.
• Depending on the status of the other device,
searching from this unit may not be possible.
t Search for this unit from the other device.
• Check the pairing and connection procedures in the
manual of the other device, etc., and perform the
operation again.
The name of the detected device does not
appear.
Depending on the status of the other device, it may not
be possible to obtain the name.
No ring tone.
• Adjust the volume in “Ring Vol” (page 16).
• Depending on the connecting device, the ring tone
may not be sent properly.
t Set “Ringtone” to “Default” (page 17).
The talker’s voice volume is low.
Adjust the volume in “Talk Vol” (page 16).
Echo or noise occurs in phone call
conversations.
• Lower the volume.
• “EC/NC Mode” is set to “off.”
t Set “EC/NC Mode” to “Mode 1” or “Mode 2”
(page 18).
• If the ambient noise other than the phone call sound
is loud, try reducing this noise.
E.g.: If a window is open and road noise, etc., is loud,
shut the window. If the air conditioner is loud, lower
the air conditioner.
continue to next page t
27
Page 28
The phone sound quality is poor.
Phone sound quality depends on reception conditions
of cellular phone.
t Move your car to a place where you can enhance
the cellular phone's signal if the reception is poor.
The volume of the connected audio device is
low (high).
Volume level will differ depending on the audio
device.
t Adjust the volume of the connected audio device or
this unit.
The sound skips during playback of a
Bluetooth audio device.
• Reduce the distance between the unit and the
Bluetooth audio device.
• If the Bluetooth audio device is stored in a case
which interrupts the signal, remove the audio device
from the case while using.
• Several Bluetooth devices or other devices which
emit radio waves are used nearby.
tTurn off the other devices.
tReduce the distance from the other devices.
The connected Bluetooth audio device cannot
be controlled.
Check that the connected Bluetooth audio device
supports AVRCP.
Some functions do not work.
Check that the connecting device supports the
functions in question.
The name of the other party does not appear
when a call is received.
• The other party is not stored in the phonebook.
tStore in the phonebook (page 16).
• The calling phone is not set to send the phone
number.
A call starts unintentionally.
• The connecting phone is set to start a call
automatically.
• “Auto Answer” of this unit is set to “on” (page 17).
Pairing failed in Time Over.
Depending on the connecting device, the time limit for
pairing may be short. Try completing the pairing
within the time by setting a single digit passcode.
The ring tone or other party’s voice is output
only from one speaker.
“Speaker Sel” is set to “FR-L” or “FR-R.”
t Set “Speaker Sel” to “Front” (page 18).
No sound is output from the car speakers
during handsfree call.
If the sound is output from the cellular phone, set the
cellular phone to output the sound from the car
speakers.
Error displays/Messages
Audio function
Blank Disc
Tracks have not been recorded on the MD.
t Play an MD with recorded tracks.
Error
• The disc is dirty or inserted upside down.
t Clean or insert the disc correctly.
• The disc cannot play due to a problem.
t Insert another disc.
Failure (Illuminates until any button is pressed.)
The connection of speakers/amplifiers is incorrect.
t See the installation guide manual of this model to
check the connection.
Load
The changer is loading the disc.
t Wait until loading is complete.
Local Seek +/–
The local seek mode is on during automatic tuning.
NO Disc
The disc is not inserted in the CD/MD changer.
t Insert discs in the changer.
NO Disc Name
A disc name is not written in the track.
NO Group Name
A group name is not written in the track on the ATRAC
CD.
NO ID3 Tag
ID3 tag information is not written in the MP3 file.
NO Information
Text information is not written in the ATRAC3/
ATRAC3plus or WMA file.
NO Magazine
The disc magazine is not inserted in the CD changer.
t Insert the magazine in the changer.
NO Music
The disc is not a music file.
t Insert a music CD in this unit or MP3 playable
changer.
NO Track Name
A track name is not written in the track.
Offset
There may be an internal malfunction.
t Check the connection. If the error indication
remains on in the display, consult your nearest
Sony dealer.
Push Reset
The CD unit and CD/MD changer cannot be operated
due to a problem.
t Press the RESET button (page 6).
Read
The unit is reading all track and group information on
the disc.
t Wait until reading is complete and playback starts
automatically. Depending on the disc structure, it
may take more than a minute.
28
Page 29
“” or “”
During reverse or fast-forward, you have reached the
beginning or the end of the disc and you cannot go any
further.
“”
The character cannot be displayed with the unit.
Bluetooth function
Busy
The Bluetooth process is not complete.
tDiscontinue receiving the phonebook data.
tStop the current operation and wait for a while.
Connection Complete
The Bluetooth connection is complete.
Connection Failed
• Cannot be connected to the device due to problem.
• Cannot be connected to the device because the input
passcode is incorrect.
• The time limit for connection has been exceeded.
Disconnected
The Bluetooth signal is disconnected.
Empty
• There is no data in “Dialed Calls,” “Received Calls”
or “Phonebook” in the CALL menu.
• There is no data in the phonebook when storing to the
Preset Dial.
Error
The phonebook data cannot be received due to a
problem.
HF Device is not available
Handsfree device is not connected.
Invalid Code
The input security code is incorrect.
Memory Full
• The phonebook memory of this unit became full
while the phonebook data is received.
• The phonebook memory of this unit is full.
Not Available
Bluetooth AUDIO is selected as the source, but no
Bluetooth audio device is connected.
No Devices Found
• No connectable device is found after searching.
• The device is not registered in “Handsfree Devices”
or “Audio Devices.”
t Register the device in “Handsfree Devices” or
“Audio Devices.”
Security Locked
Security is set.
Turn ON Bluetooth
The Bluetooth setting is off.
tSet the Bluetooth setting to on.
Support site
If you have any questions or for the latest
support information on this product, visit the
web site below:
Customers in Latin America:
http://esupport.sony.com/ES/LA/
Customers in Asia and Oceania:
http://www.sony-asia.com/caraudio/
If these solutions do not help improve the situation,
consult your nearest Sony dealer.
If you take the unit to be repaired because of CD
playback trouble, bring the disc that was used at the
time the problem began.
29
Page 30
Asegúrese de instalar esta unidad en el tablero
del automóvil por razones de seguridad. Para
realizar la instalación y las conexiones,
consulte el manual de conexiones y de
instalación suministrado.
Advertencia: si el encendido del
automóvil no dispone de una posición
ACC
Tras apagar el motor, mantenga presionado
(OFF) en la unidad hasta que se apague la
pantalla.
Si no lo hace, la pantalla no se desactiva y se
desgasta la batería.
Esta etiqueta está situada en la parte inferior
del chasis.
Bajo licencia de BBE Sound,
R
Inc.
El proceso BBE MP mejora
el sonido comprimido digitalmente (por
ejemplo, archivos MP3) mediante la
restauración y el realce de los armónicos más
altos perdidos durante la compresión. BBE MP
actúa generando armónicos nivelados a partir
del material original, recuperando de manera
eficaz la calidez, el detalle y el matiz.
Los logotipos y la marca de Bluetooth son
propiedad de Bluetooth SIG, Inc. y cualquier uso
de dichas marcas por parte de Sony Corporation
es bajo licencia. Las demás marcas y marcas
comerciales son aquellas de sus respectivos
propietarios.
SonicStage y su logotipo son marcas comerciales
de Sony Corporation.
“ATRAC” y son marcas
comerciales de Sony Corporation.
Microsoft, Windows Media
y el logotipo de Windows
son marcas comerciales o
marcas comerciales
registradas de Microsoft Corporation en
Estados Unidos o en otros países.
2
Page 31
Tabla de contenido
Bienvenido. . . . . . . . . . . . . . . . . . . . . . . . . . . . . 4
Procedimientos iniciales
Restauración de la unidad . . . . . . . . . . . . . . . . . 6
Ajuste del reloj . . . . . . . . . . . . . . . . . . . . . . . . . 6
Extracción del panel frontal. . . . . . . . . . . . . . . . 6
Colocación del panel frontal. . . . . . . . . . . . . 7
Inserción del disco en la unidad . . . . . . . . . . . . 7
Expulsión del disco. . . . . . . . . . . . . . . . . . . . 7
Ubicación de los controles y
operaciones básicas
Función de audio. . . . . . . . . . . . . . . . . . . . . . 8
Función Bluetooth. . . . . . . . . . . . . . . . . . . . 10
CD
Elementos de la pantalla. . . . . . . . . . . . . . . 12
Reproducción repetida y aleatoria . . . . . . . 12
Radio
Almacenamiento y recepción de emisoras . . . 13
Almacenamiento automático — BTM . . . . 13
Almacenamiento manual . . . . . . . . . . . . . . 13
Recepción de las emisoras almacenadas. . . 13
Sintonización automática . . . . . . . . . . . . . . 13
Sintonización de una emisora mediante una
lista — LIST . . . . . . . . . . . . . . . . . . . . . . . . 13
Función Bluetooth
Antes de usar la función Bluetooth. . . . . . . . . 14
Las operaciones del menú de la función
Bluetooth . . . . . . . . . . . . . . . . . . . . . . . . . . 14
Configuración de los ajustes de
Bluetooth . . . . . . . . . . . . . . . . . . . . . . . . . . 14
Emparejamiento y conexión de esta unidad
con un dispositivo Bluetooth . . . . . . . . . . . 14
Conexión con dispositivos registrados. . . . 15
Conversación con manos libres . . . . . . . . . . . 16
Realización de llamadas. . . . . . . . . . . . . . . 16
Recepción de llamadas. . . . . . . . . . . . . . . . 17
Finalización de las llamadas. . . . . . . . . . . . 17
Uso del directorio telefónico . . . . . . . . . . . 17
Uso de la marcación predefinida . . . . . . . . 18
Transmisión continua de música. . . . . . . . . . . 18
Escuchar música desde un dispositivo de
audio. . . . . . . . . . . . . . . . . . . . . . . . . . . . . . 18
Operación de un dispositivo de audio con
esta unidad . . . . . . . . . . . . . . . . . . . . . . . . . 18
Otras configuraciones. . . . . . . . . . . . . . . . . . . 18
Configuración de un dispositivo de manos
libres. . . . . . . . . . . . . . . . . . . . . . . . . . . . . . 18
Eliminación del registro de un dispositivo
conectado . . . . . . . . . . . . . . . . . . . . . . . . . . 19
Función de conexión automática . . . . . . . . 19
Otras funciones
Ajuste de elementos de menú — MENU . . . . 20
Personalización de la curva de ecualizador
— EQ3 Tune . . . . . . . . . . . . . . . . . . . . . . . 21
Uso de un equipo opcional . . . . . . . . . . . . . . . 22
Cambiador de CD/MD. . . . . . . . . . . . . . . . 22
Equipo auxiliar de audio . . . . . . . . . . . . . . 22
Mando rotatorio RM-X4S . . . . . . . . . . . . . 23
Información complementaria
Precauciones . . . . . . . . . . . . . . . . . . . . . . . . . . 24
Notas sobre los discos . . . . . . . . . . . . . . . . 24
Acerca de los archivos MP3/WMA . . . . . . 24
Acerca de los CD de ATRAC . . . . . . . . . . 25
Acerca de la función Bluetooth . . . . . . . . . 25
Mantenimiento . . . . . . . . . . . . . . . . . . . . . . . . 26
Extracción de la unidad. . . . . . . . . . . . . . . . . . 27
Especificaciones . . . . . . . . . . . . . . . . . . . . . . . 27
Solución de problemas . . . . . . . . . . . . . . . . . . 28
Mensajes/indicaciones de error . . . . . . . . . 31
3
Page 32
Bienvenido
Gracias por adquirir este sistema de audio Sony
Bluetooth™. Mientras maneja puede disfrutar de
las funciones siguientes:
• Reproducción de CD
Puede reproducir CD-DA (incluidos CD
TEXT*), CD-R/CD-RW (archivos MP3/WMA,
incluidos los CD multisesión (página 24)) y CD
de ATRAC (formato ATRAC3 y ATRAC3plus
(página 25)).
Tipos de discos Etiqueta del disco
CD-DA
MP3
WMA
CD de ATRAC
• Recepción de radio
– Puede almacenar hasta 6 emisoras de radio
por banda (FM1, FM2, FM3, AM1 y AM2).
– BTM (Memoria de la mejor sintonía): la
unidad selecciona las emisoras que emiten la
señal más intensa y las almacena.
• Función Bluetooth
– Permite usar su teléfono celular en el
automóvil en modo de manos libres.
– Permite transferir los datos del directorio
telefónico desde el teléfono celular.
– Transmisión continua de música desde su
teléfono celular o dispositivo de audio
portátil.
– Compatible con los perfiles HFP 1.0, A2DP,
OPP y AVRCP.
• Ajuste del sonido
– EQ3 paramétrico: es posible seleccionar
entre 7 curvas de ecualizador preajustadas y
ajustarlas del modo que desee.
– DSO (Organizador de sonido de baja
frecuencia dinámico): crea un campo de
sonido más ambiental, utilizando una síntesis
de altavoces virtuales para mejorar el sonido
de los altavoces, incluso si éstos están
instalados en una posición baja en la puerta.
– BBE MP: mejora el sonido comprimido
digitalmente, como en el caso de archivos
MP3.
* Un disco CD TEXT es un CD-DA que incluye
información como el nombre del disco, del artista y
de la pista.
4
Page 33

Precaución
SONY NO SERÁ RESPONSABLE DE NINGÚN
DAÑO INCIDENTAL, INDIRECTO O
DERIVADO NI DE OTROS DAÑOS
INCLUYENDO, SIN LÍMITES, PÉRDIDA DE
GANANCIAS, PÉRDIDA DE INGRESOS,
PÉRDIDAD DE DATOS, PÉRDIDA DE LA
UTILIDAD DEL PRODUCTO O DE
CUALQUIER EQUIPO RELACIONADO,
TIEMPO DE INACTIVIDAD NI TIEMPO DEL
COPRADOR RELACIONADO CON O
RESULTANTE DE LA UTILIZACIÓN DE ESTE
PRODUCTO, SU HARDWARE Y / O SU
SOFTWARE.
AVISO IMPORTANTE
Utilización segura y eficaz
Los cambios o modificaciones que se realicen en
esta unidad sin la aprobación de Sony pueden anular
la autorización del usuario para utilizar el equipo.
Revise las excepciones, debido a requisitos
nacionales o limitaciones, en cuanto a la utilización
de los equipos Bluetooth antes de utilizar el equipo.
Manejo
Revise las leyes y normas acerca de la utilización de
teléfonos celulares y equipos de manos libres en las
áreas en las que conduce.
Preste siempre atención a la carretera y estacione el
automóvil antes de realizar o contestar una llamada
si las condiciones lo requieren.
Conexión a otros dispositivos
Al conectar el equipo a cualquier otro dispositivo,
lea el manual de instrucciones para obtener las
instrucciones de seguridad.
Llamadas de emergencia
El dispositivo de manos libres Bluetooth para
automóviles y el dispositivo electrónico conectados
al manos libres funcionan utilizando redes de
señales de radio, celulares y terrestres así como
también la función programada por el usuario, que
no pueden garantizar la conexión bajo todas las
condiciones.
Por lo tanto, no dependa únicamente de un
dispositivo electrónico para las comunicaciones
esenciales (como las emergencias médicas).
Recuerde que, para realizar o recibir llamadas, el
dispositivo de manos libres y el dispositivo
electrónico conectado al manos libres deben operar
en una zona de servicio que tenga una intensidad de
señal para celulares adecuada.
Es posible que no se pueda realizar llamadas de
emergencia en todas las redes de teléfonos celulares
o cuando se estén utilizando ciertos servicios de la
red y/o características del teléfono.
Verifíquelo con su proveedor de servicio local.
Exposición a radiofrecuencia
Las señales de radiofrecuencia pueden afectar a los
sistemas electrónicos que no hayan sido instalados o
protegidos correctamente en automóviles, como los
sistemas electrónicos de inyección de combustible,
sistemas electrónicos de frenado antideslizante
(antibloqueo), sistemas electrónicos de control de
velocidad o sistemas de bolsas de aire. Para la
instalación o mantenimiento de este dispositivo,
consulte al fabricante de su automóvil o su
representante. La instalación o mantenimiento
incorrectos podrían ser peligrosos e invalidar
cualquier garantía aplicada a este dispositivo.
Consulte al fabricante de su automóvil para
asegurarse que el uso del teléfono celular en el
mismo no afectará su sistema electrónico.
Controle regularmente que todos los equipos del
dispositivo inalámbrico de su automóvil estén
instalados y funcionen correctamente.
5
Page 34
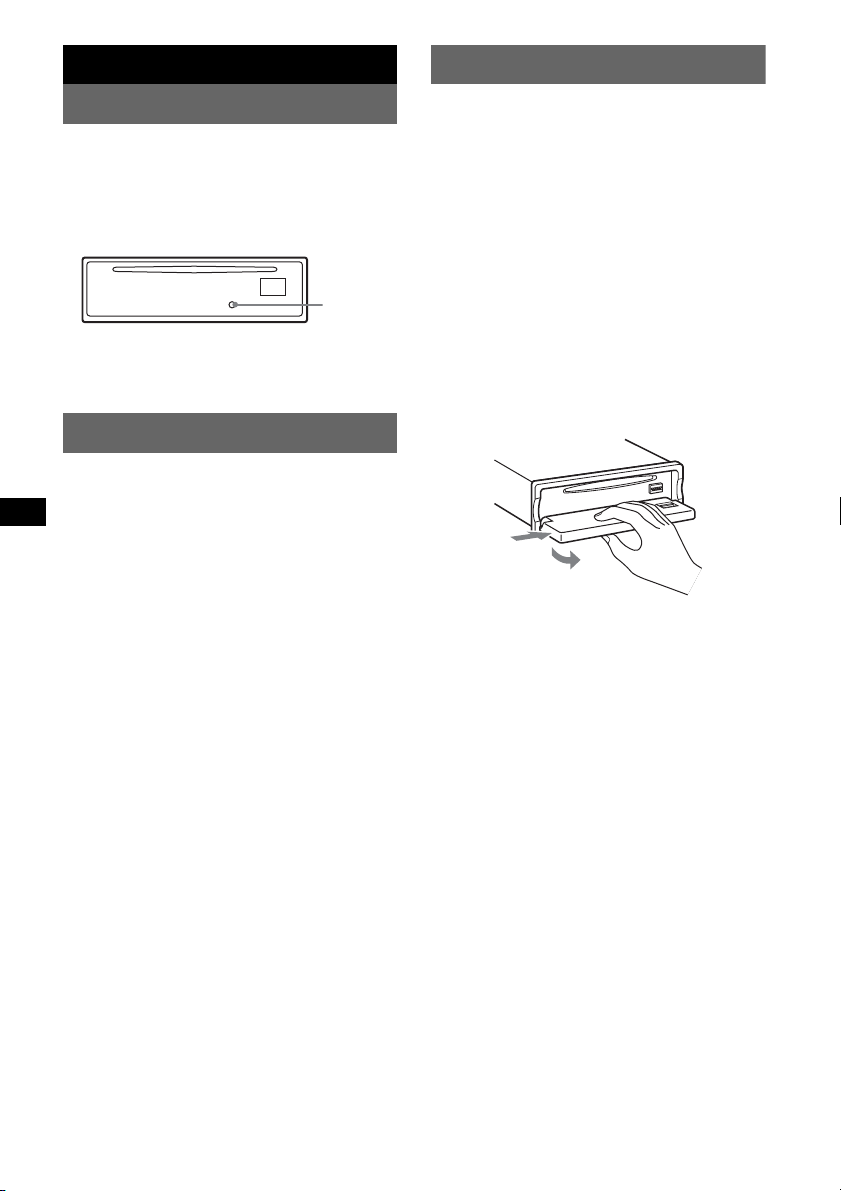
Procedimientos iniciales
Extracción del panel frontal
Restauración de la unidad
Antes de utilizar la unidad por primera vez, o
después de sustituir la batería del automóvil o de
cambiar las conexiones, debe restaurarla.
Extraiga el panel frontal y presione el botón
RESET con un objeto puntiagudo, como un
bolígrafo.
Botón
RESET
Nota
Al presionar el botón RESET, se borrará el ajuste del
reloj y algunos contenidos memorizados.
Ajuste del reloj
El reloj emplea una indicación digital de
12 horas.
1 Presione (MENU).
2 Mueva la palanca de mando hacia
abajo o hacia arriba hasta que
aparezca “Setup” y, a continuación,
muévala hacia la derecha.
3 Mueva la palanca de mando hacia
abajo o hacia arriba hasta que
aparezca “Clock Adjust
continuación, muévala hacia la
derecha.
4 Mueva la palanca de mando hacia
arriba o hacia abajo para ajustar las
horas y los minutos.
Para mover la indicación digital, accione la
palanca de mando hacia la izquierda o hacia
la derecha.
5 Cuando termine de de ajustar el reloj,
presione la palanca de mando.
El reloj se pone en funcionamiento.
” y, a
Puede extraer el panel frontal de la unidad para
evitar que la roben.
Alarma de precaución
Si gira el interruptor de encendido hasta la
posición OFF sin haber extraído el panel frontal,
la alarma de precaución sonará durante unos
segundos.
La alarma sonará únicamente si se utiliza el
amplificador incorporado.
1 Presione (OFF).
La unidad se apaga.
2 Presione (OPEN).
El panel frontal se abate.
3 Deslice el panel frontal hacia la
derecha y tire suavemente de su
extremo izquierdo para extraerlo.
1
2
Notas
• No deje caer ni ejerza excesiva presión sobre el
panel frontal ni la pantalla.
• No someta el panel frontal al calor ni a temperaturas
altas o excesiva humedad. Evite dejarlo en un
automóvil estacionado o sobre el tablero o la
bandeja trasera.
6
Page 35
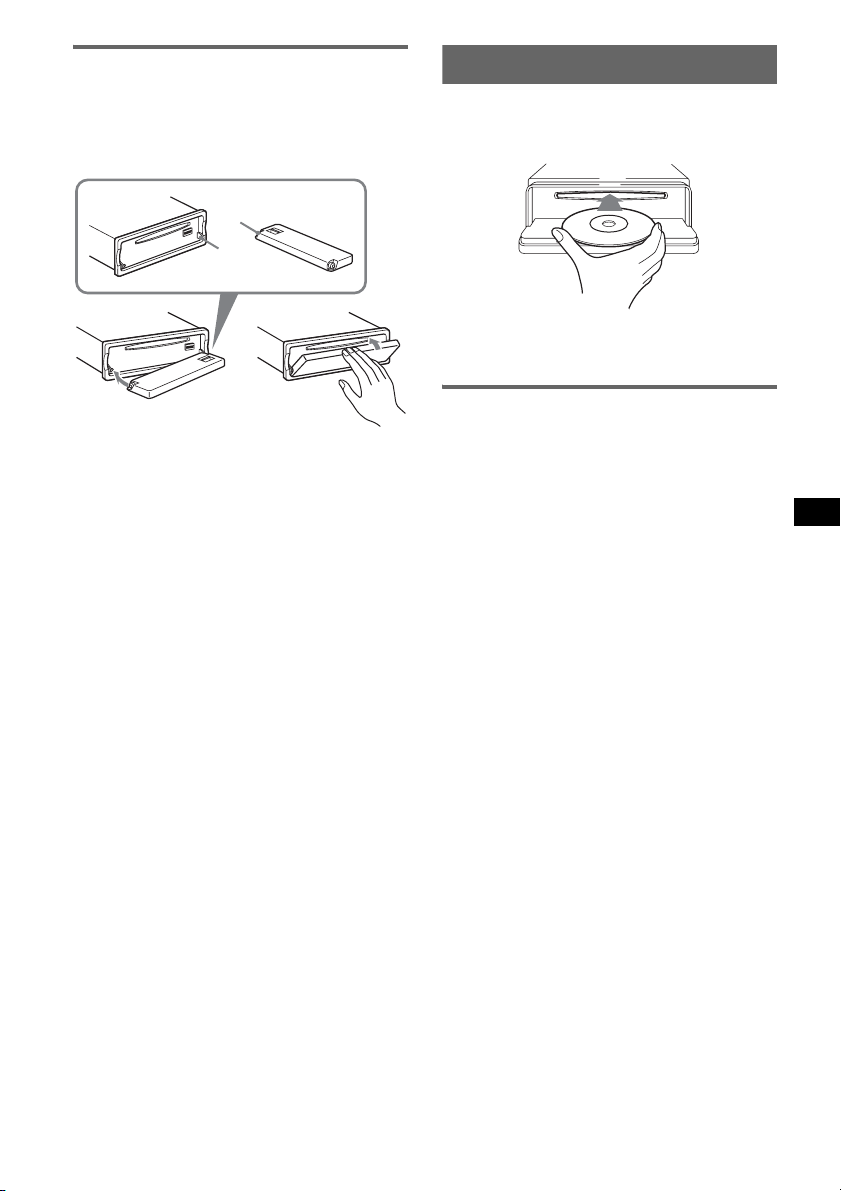
Colocación del panel frontal
Coloque el orificio A del panel frontal en el eje
B de la unidad y, a continuación, presione
ligeramente el lado izquierdo hacia adentro.
Presione (SOURCE) en la unidad (o inserte un
disco) para utilizarla.
A
B
c
Nota
No coloque ningún objeto sobre la superficie interior
del panel frontal.
Inserción del disco en la unidad
1 Presione (OPEN).
2 Inserte el disco (con la etiqueta hacia
arriba).
3 Cierre el panel frontal.
La reproducción se inicia automáticamente.
Expulsión del disco
1 Presione (OPEN).
2 Presione Z.
El disco se expulsa.
3 Cierre el panel frontal.
7
Page 36
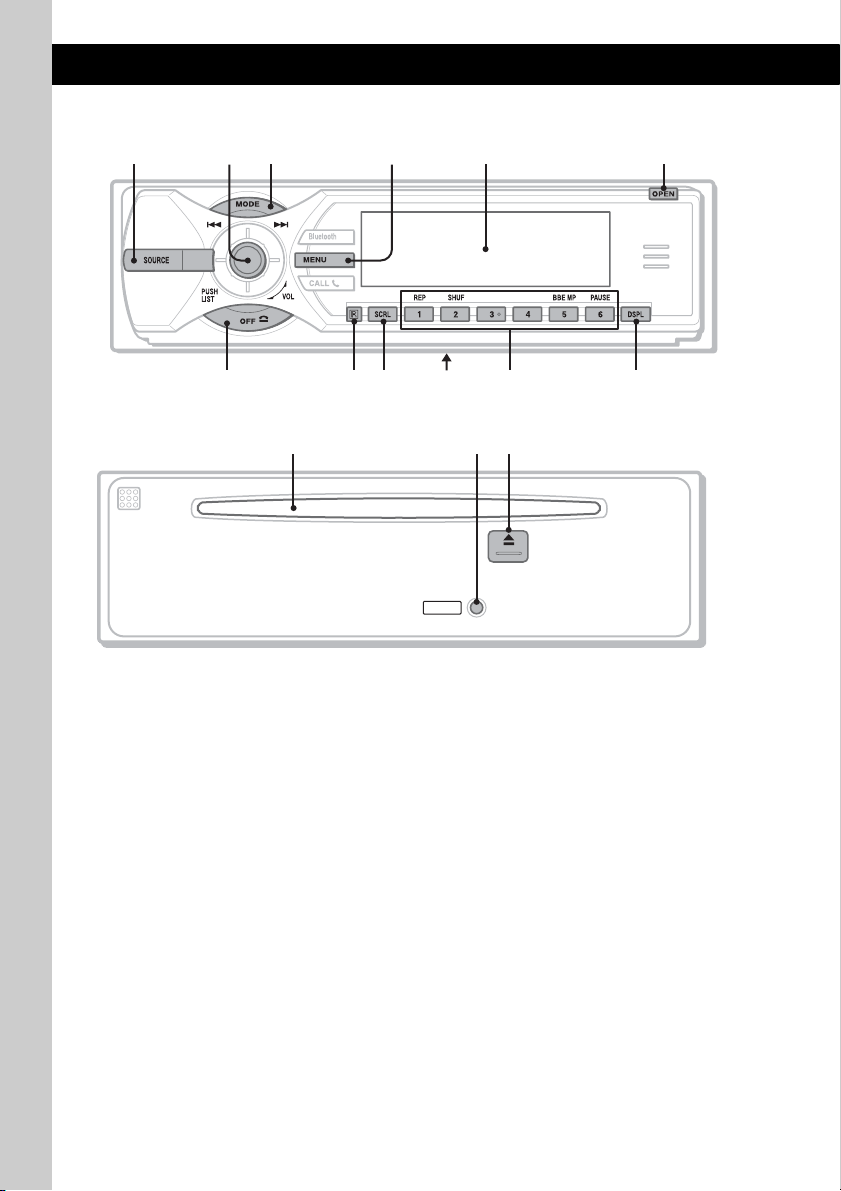
Ubicación de los controles y operaciones básicas
8
Función de audio
Unidad principal
1
35624
790 qsqa
Panel frontal extraído
Consulte las páginas indicadas para obtener
información detallada. Los botones
correspondientes en el control remoto de tarjeta
controlan las mismas funciones que los de la
unidad.
A Botón SOURCE
Para encender la unidad o cambiar la fuente
(Radio/CD/MD*
B Palanca de mando/Botón LIST 13, 22
Gírela para ajustar el volumen.
Muévala hacia arriba/abajo/izquierda/derecha
para seleccionar un elemento del menú.
Presiónela para aplicar una configuración.
CD/MD*
Mueva la palanca hacia arriba o hacia abajo
2
para*
:
– Omitir grupos*
vez).
– Omitir grupos*
continua (presione y mantenga
presionado).
Mueva la palanca hacia la izquierda o hacia
la derecha para:
– Omitir pistas (presione una vez).
– Omitir pistas de manera continua (presione
y, al cabo de 2 segundos, vuelva a presionar
8
y manténgala presionada).
1
/Bluetooth AUDIO/AUX).
1
:
3
/álbumes*4 (presione una
3
/álbumes*4 de manera
MEX-BT5000
qgqfqd
RESET
– Retroceder o avanzar una pista (presione y
mantenga presionado).
Radio:
Mueva la palanca hacia arriba o hacia abajo
para:
– Recibir una emisora almacenada.
Mueva la palanca hacia la izquierda o
derecha para:
– Sintonizar emisoras automáticamente
(presione una vez).
– Buscar una emisora manualmente
(presione y mantenga presionado).
Presione para:
– Ver la lista.
C Botón MODE 13, 22
Para seleccionar la banda de radio (FM/AM)
o seleccionar la unidad*
D Botón MENU
Para entrar en el menú.
E Pantalla
F Botón OPEN 7
G Botón OFF
Para apagar o detener la fuente.
H Receptor del control remoto de tarjeta
I Botón SCRL (desplazamiento) 12
Para desplazar el elemento de la pantalla.
5
.
Page 37
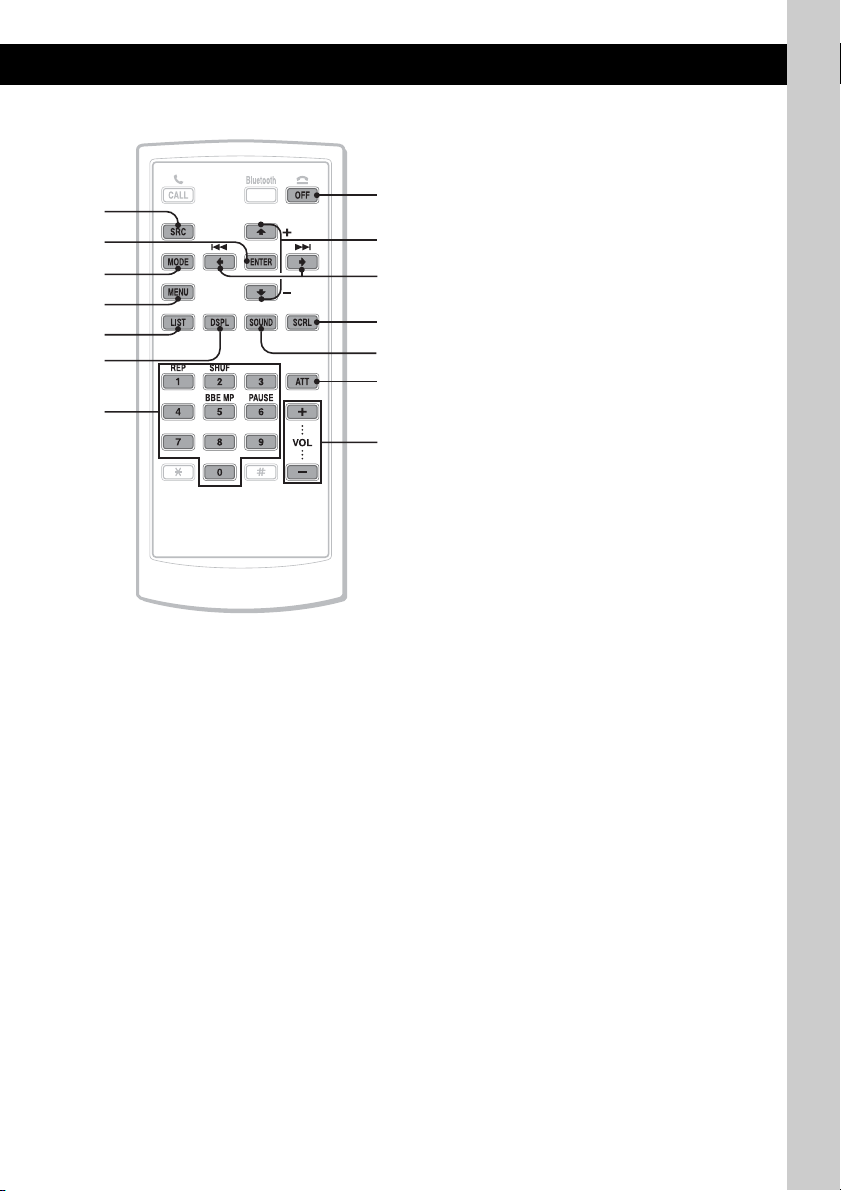
Control remoto de tarjeta RM-X303
1
qh
3
7
ql
w;
4
qj
qs
9
wa
ws
qk
wd
J Selector de frecuencias (ubicado en la
parte inferior de la unidad)
Consulte “Selector de frecuencias” en el
manual de instalación y conexiones
suministrado.
K Botones numéricos
CD/MD*
(1): REP 12, 22
(2): SHUF 12, 22
(5): BBE MP*
(6): PAUSE *
Radio:
Para recibir las emisoras almacenadas
(presionar); para almacenar emisoras
(mantener presionado).
L Botón DSPL (pantalla) 12
Para cambiar los elementos en pantalla.
M Ranura del disco 7
Para insertar el disco.
N Botón RESET 6
1
:
6
Para activar la función BBE MP, defina
“BBE MP on”. Para cancelar, defina
“BBE MP off
Para hacer una pausa en la
reproducción. Para cancelar esta
función, vuelva a presionarlo.
2
”.
6
O Botón Z (expulsar) 7
Para expulsar el disco.
Los botones siguientes del control remoto de
tarjeta también presentan botones y funciones
distintos de los de la unidad.
qh Botón ENTER
Para aplicar una configuración.
qj Botón LIST
Para mostrar una lista.
qk Botones numéricos
Los botones del 1 al 6 comparten las mismas
funciones que los botones numéricos en la
unidad.
ql Botones M (+)/m (–)
Cumplen la misma función que mover la
palanca de mando hacia arriba o hacia abajo.
w; Botones < (.)/, (>)
Cumplen la misma función que mover la
palanca de mando hacia la izquierda o
derecha.
wa Botón SOUND
Para seleccionar elementos de sonido.
ws Botón ATT (atenuación)
Para atenuar el sonido. Para cancelar esta
función, vuelva a presionarlo.
wd Botones VOL (volumen) +/–
Para ajustar el volumen.
*1 Si se conectó un cambiador de MD.
*2 Si se conectó el cambiador, la operación es
diferente. Consulte la página 22.
*3 Cuando se reproduce un CD de ATRAC.
*4 Cuando se reproduce un archivo MP3/WMA.
*5 Si se conectó un cambiador de CD/MD.
*6 Si se reproduce en esta unidad.
Nota
Si la unidad está apagada y desaparece la indicación
de pantalla, no se podrá utilizar con el control remoto
de tarjeta salvo que se presione (SOURCE) en la
unidad o se inser te un disco para activarla en primer
lugar.
Sugerencia
Si desea obtener información adicional sobre cómo
sustituir la pila, consulte “Sustitución de la pila de litio
del control remoto de tarjeta” en la página 26.
9
Page 38
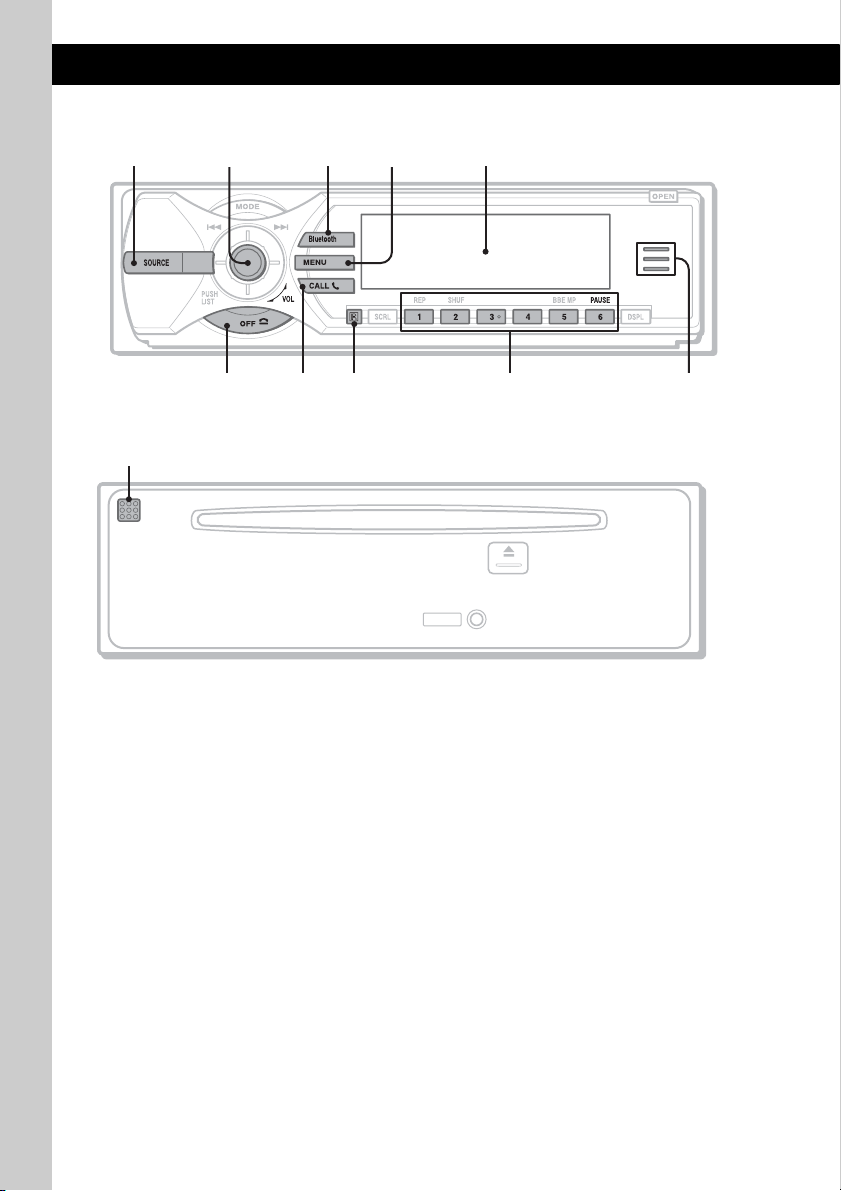
Función Bluetooth
Función Bluetooth
Unidad principal
1
6097
Panel frontal extraído
3524
8
qa
Consulte las páginas indicadas para obtener
información detallada. Los botones
correspondientes en el control remoto de tarjeta
controlan las mismas funciones que los de la
unidad.
A Botón SOURCE
Para encender o cambiar la fuente (Radio/
CD/MD*
B Palanca de mando
Gírela para: Ajustar el volumen.
Muévala hacia arriba/abajo/izquierda/
derecha para: Seleccionar un elemento del
menú.
Presione para: Aplicar una configuración.
Dispositivo de audio Bluetooth*
Muévala hacia la izquierda o hacia la
derecha para:
– Omitir pistas (presionar).
– Retroceder/avanzar una pista (presionar y
C Botón Bluetooth 14, 15, 17, 18, 19
Permite acceder a todas las funciones de
Bluetooth o recibir una llamada.
1
/Bluetooth AUDIO/AUX).
mantener en esa posición).
2
:
MEX-BT5000
RESET
D Botón MENU 17
Para entrar al menú o recibir una llamada.
E Pantalla
F Botón OFF 17
Para apagar o detener la fuente o para
finalizar o rechazar una llamada.
G Botón CALL 17
Para acceder a todas las funciones del
teléfono o recibir una llamada.
H Receptor del control remoto de tarjeta
I Botones numéricos
Para llamar a los números marcados
almacenados.
Dispositivo de audio Bluetooth*
(6): PAU SE
Para hacer una pausa en la
reproducción.
J Indicador Bluetooth
Se enciende cuando se emite o se recibe una
señal Bluetooth. Se apaga cuando finaliza la
señal Bluetooth.
K Micrófono 16
2
:
10
Page 39
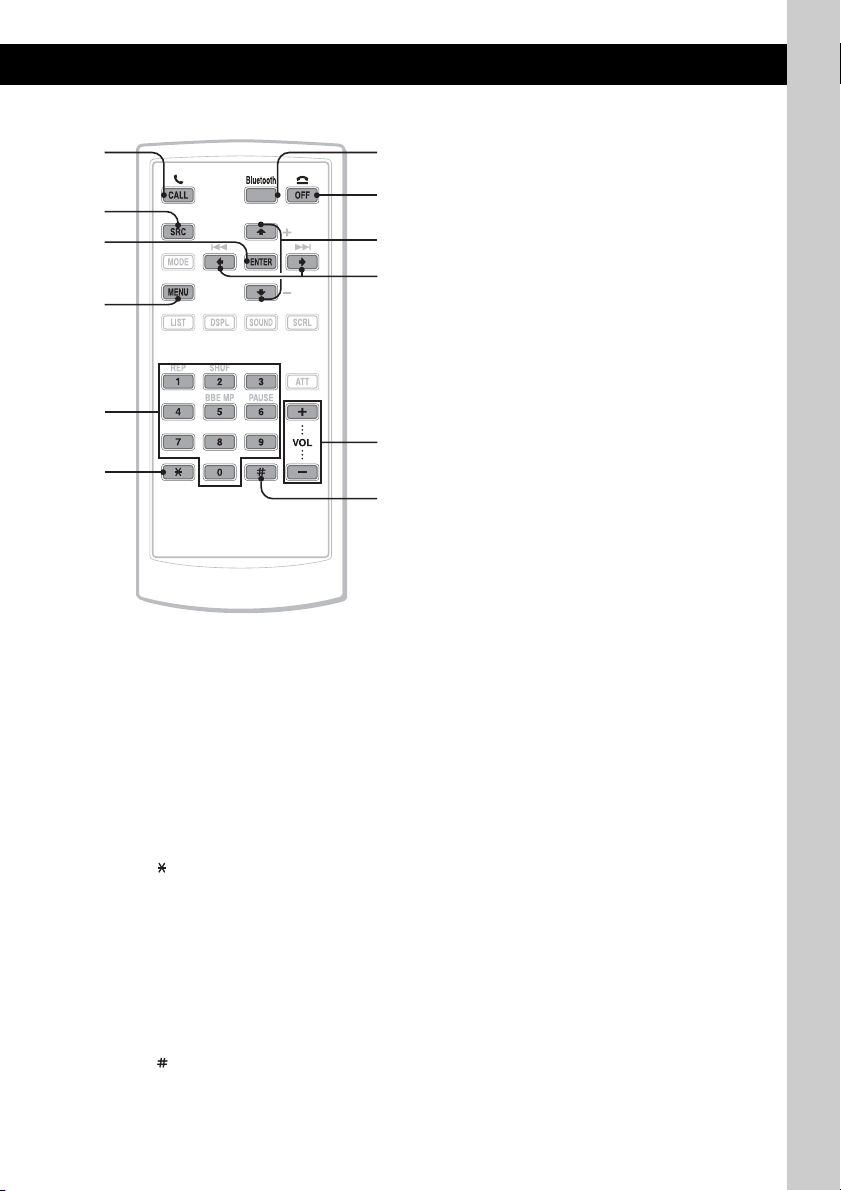
Control remoto de tarjeta RM-X303
73
1
qs
6
qg
qh
4
*1 Si se conectó un cambiador de MD.
*2 Cuando se conecta un dispositivo de audio
Bluetooth (compatible con el AVRCP de la
tecnología Bluetooth). Según el tipo de dispositivo,
hay algunas operaciones que no se encuentran
disponibles.
Nota
Si la unidad está apagada y desaparece la indicación
de pantalla, no se podrá utilizar con el control remoto
de tarjeta salvo que se presione (SOURCE) en la
unidad o se inser te un disco para activarla en primer
lugar.
Sugerencia
Si desea obtener información adicional sobre cómo
sustituir la pila, consulte “Sustitución de la pila de litio
del control remoto de tarjeta” en la página 26.
qd
qj
qf
qk
Los botones siguientes del control remoto de
tarjeta también presentan botones y funciones
distintos de los de la unidad.
qs Botón ENTER
Para aplicar una configuración.
qd Botones numéricos 15, 16, 17
Para ingresar números (números telefónicos,
contraseñas, etc.).
Los botones del 1 al 6 comparten las mismas
funciones que los botones numéricos en la
unidad.
qf Botón 17
qg Botones M (+)/m (–)
Igual que al empujar la palanca de mando
hacia arriba/hacia abajo.
qh Botones < (.)/, (>)
Igual que al empujar la palanca de mando
hacia la izquierda/hacia la derecha.
qj Botones VOL (volumen) +/–
Para ajustar el volumen.
qk Botón 17
11
Page 40
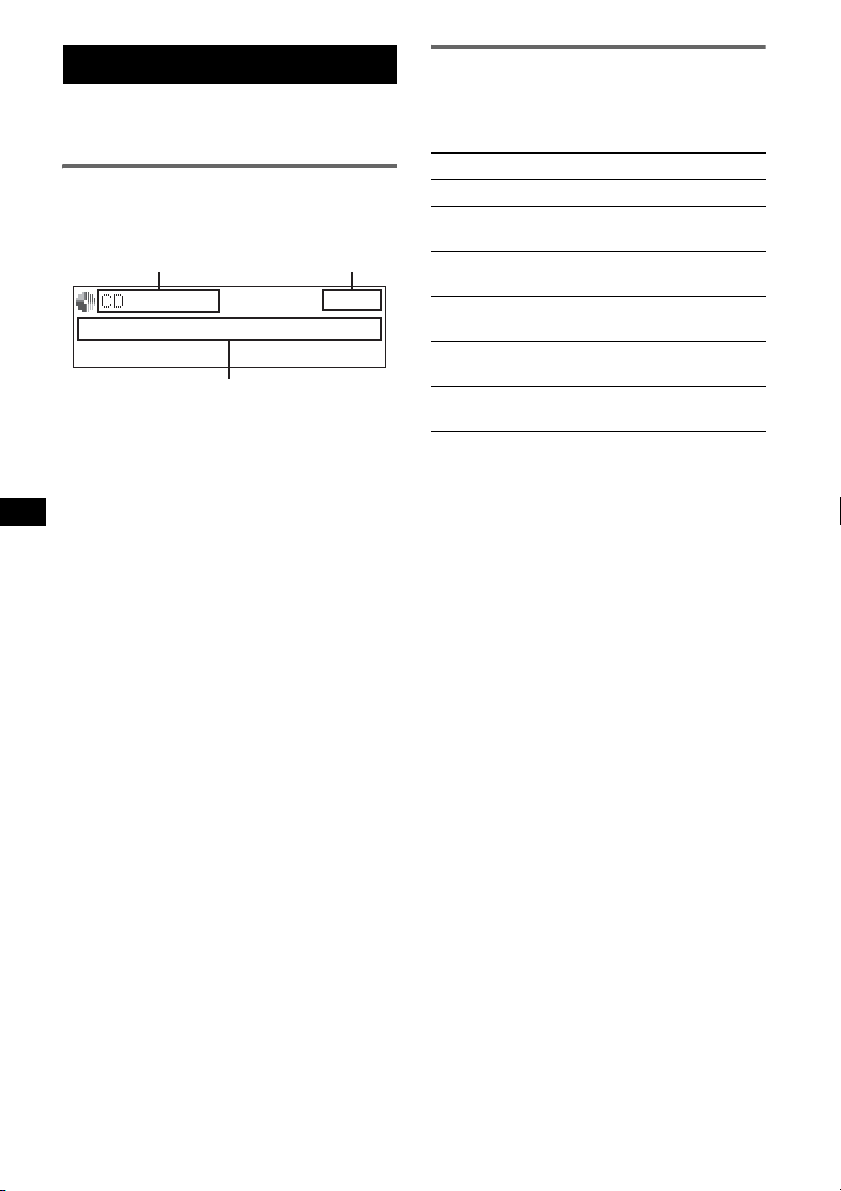
CD
Si desea obtener más información sobre cómo
seleccionar un cambiador de CD/MD, consulte la
página 22.
Elementos de la pantalla
Ejemplo: con el modo Info (información) en
“All” (página 20).
A B
C
A Indicación de fuente MP3/ATRAC/WMA
B Reloj
C Número de pista
transcurrido, Nombre del disco/artista,
Número del álbum/grupo, Nombre del álbum
grupo, Nombre de la pista, Información de
texto*
* Cuando se reproduce un archivo MP3, se muestra
el indicador ID3; cuando se reproduce un CD de
ATRAC, se muestra la información de texto grabada
por SonicStage u otros programas; cuando se
reproducen archivos WMA, se muestra el indicador
WMA.
Para cambiar los elementos de pantalla C,
presione (DSPL); para desplazar los elementos
de pantalla C, presione (SCRL) o seleccione
“Auto Scroll on” (página 20).
Sugerencia
Los elementos que se muestran variarán en función
del tipo de disco, el formato de grabación y los
ajustes. Si desea obtener más información acerca de
los archivos MP3/WMA, consulte la página 24; para
CD de ATRAC, consulte la página 25.
/
Tiempo de reproducción
Reproducción repetida y aleatoria
1 Durante la reproducción, presione
(1) (REP) o (2) (SHUF) varias veces
hasta que aparezca el ajuste deseado.
Seleccione Para reproducir
Repeat Track pistas en forma repetida.
1
Repeat Album*
Repeat Group*
Shuffle Album*
Shuffle Group*
Shuffle Disc discos en orden
*1 Cuando se reproduce un archivo MP3/WMA.
*2 Cuando se reproduce un CD de ATRAC.
/
Para regresar al modo de reproducción normal,
seleccione “Repeat off
álbumes en forma
repetida.
2
grupos en forma
repetida.
1
álbumes en orden
aleatorio.
2
grupos en orden
aleatorio.
aleatorio.
” o “Shuffle off ”.
12
Page 41
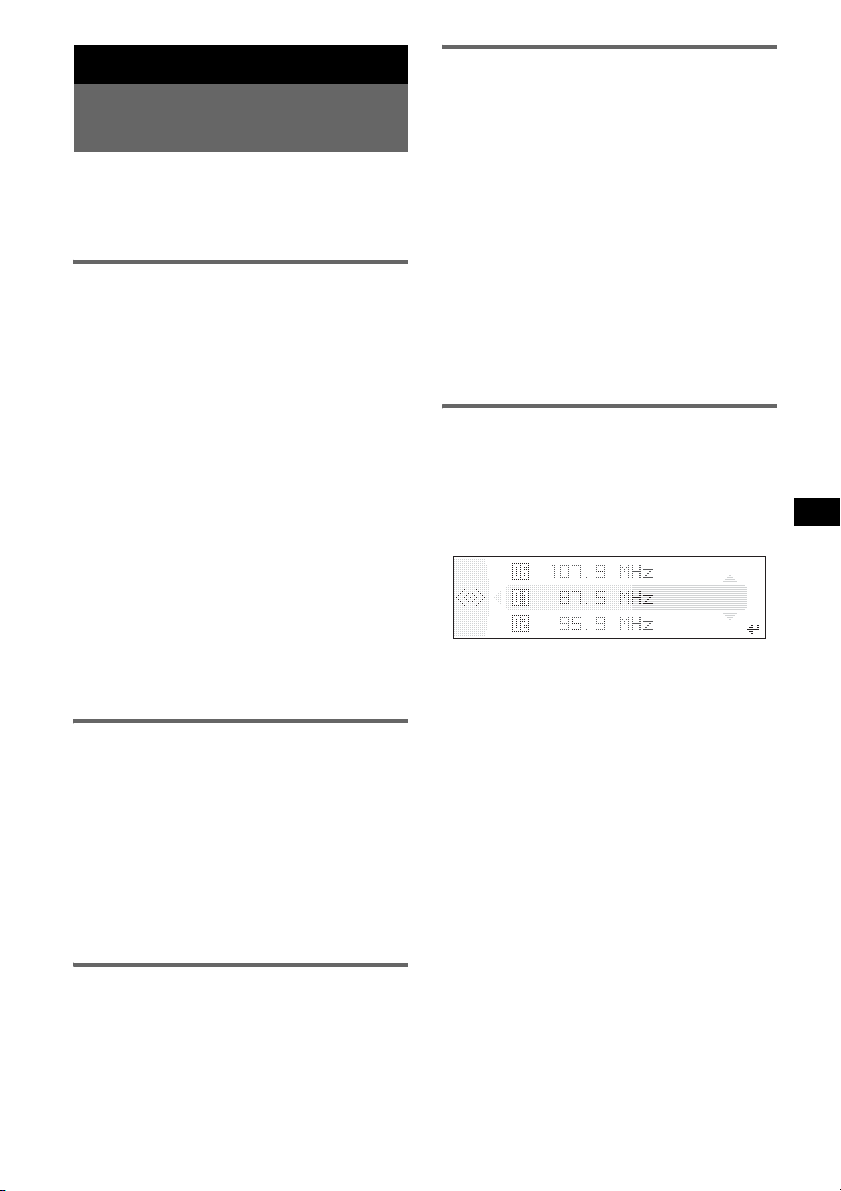
Radio
Almacenamiento y recepción
de emisoras
Precaución
Para sintonizar emisoras mientras maneja, utilice
la función Memoria de la mejor sintonía (BTM)
para evitar accidentes.
Almacenamiento automático
— BTM
1 Presione (SOURCE) varias veces hasta
que aparezca “
Para cambiar de banda, presione (MODE)
varias veces. Puede seleccionar entre FM1,
FM2, FM3, AM1 y AM2.
2 Presione (MENU).
3 Mueva la palanca de mando hacia
abajo o hacia arriba hasta que
aparezca “Receive Mode” y, a
continuación, muévala hacia la
derecha.
4 Mueva la palanca de mando hacia
arriba o hacia abajo hasta que
aparezca “BTM”.
5 Presione la palanca de mando.
La unidad almacena las emisoras en el orden
de frecuencia en los botones numéricos.
La unidad emite un pitido al almacenar el
ajuste.
Almacenamiento manual
1 Mientras recibe la emisora que desea
almacenar, mantenga presionado un
botón numérico (del (1) al (6)) hasta
que aparezca “MEM”.
La indicación del botón numérico aparece en
pantalla.
Nota
Si intenta almacenar otra emisora en el mismo botón
numérico, se reemplazará la que estaba almacenada
previamente.
TUNER”.
Sintonización automática
1 Seleccione la banda y, a continuación,
mueva la palanca de mando hacia la
derecha o hacia la izquierda para
buscar la emisora.
La búsqueda se detiene cuando la unidad
recibe una emisora. Repita este
procedimiento hasta recibir la emisora
deseada.
Sugerencia
Si sabe cuál es la frecuencia de la emisora que desea
escuchar, mueva la palanca de mando hacia la
izquierda o hacia la derecha y manténgala en esta
posición para localizar la frecuencia aproximada. A
continuación, mueva la palanca de mando hacia la
derecha o hacia la izquierda para ajustar con
precisión la frecuencia deseada (sintonización
manual).
Sintonización de una emisora
mediante una lista — LIST
Puede utilizar una lista de frecuencias.
1 Seleccione la banda y, a continuación,
presione la palanca de mando.
Aparece la frecuencia.
2 Mueva la palanca de mando hacia
arriba o hacia abajo hasta que
aparezca la emisora deseada.
3 Presione la palanca de mando para
recibir la emisora.
La unidad vuelve al modo de recepción
normal.
Recepción de las emisoras
almacenadas
1 Seleccione la banda y, a continuación,
presione un botón numérico (del (1) a
(6)).
13
Page 42
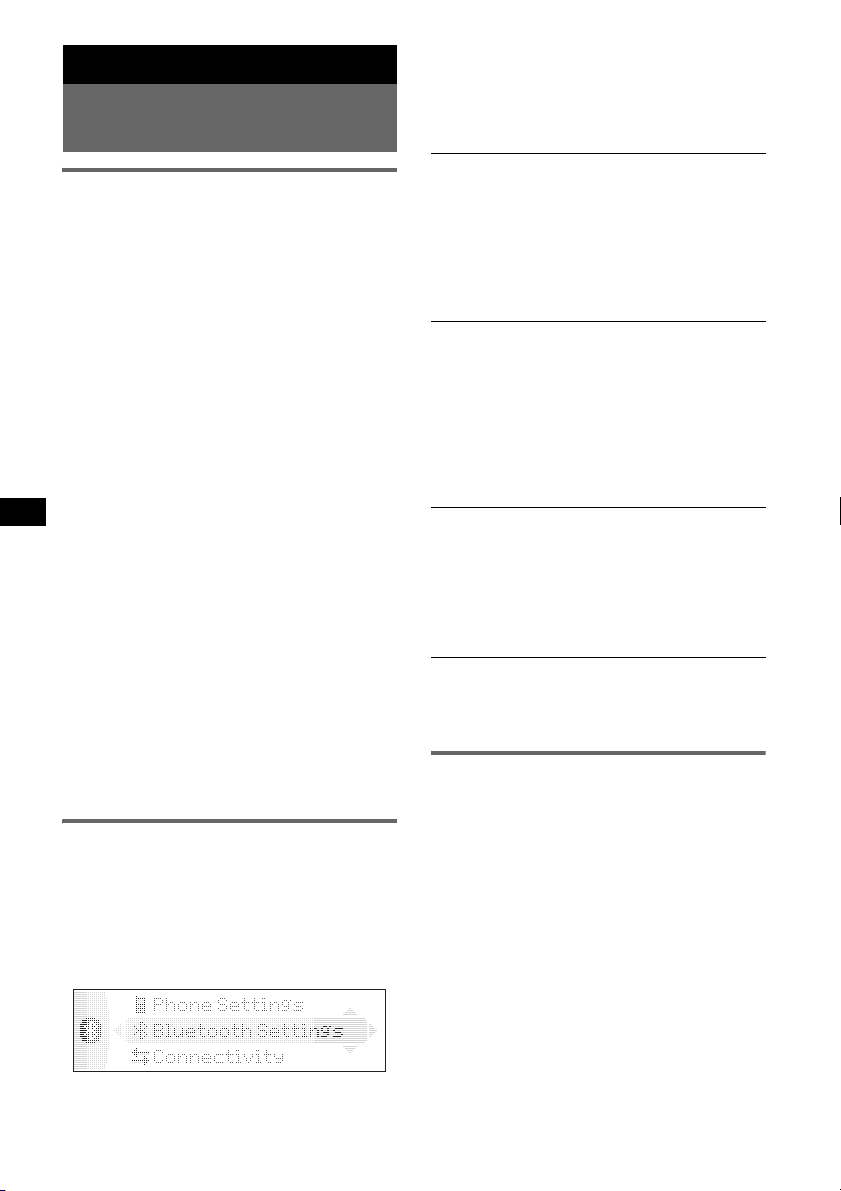
Función Bluetooth
Antes de usar la función
Bluetooth
Las operaciones del menú de la
función Bluetooth
La configuración Bluetooth puede establecerse
desde el menú de la función Bluetooth o desde el
menú CALL (Llamada). Las operaciones del
menú generalmente pueden realizarse con la
palanca de mando.
1 Presione (Bluetooth) o (CALL).
Aparece la función del menú Bluetooth o el
menú CALL (Llamada).
2 Mueva la palanca de mando hacia
arriba o hacia abajo hasta que
aparezca el elemento de configuración
deseado. A continuación, muévala
hacia la derecha.
La indicación digital se desplaza hacia la
derecha (selección de la configuración).
3 Mueva la palanca de mando hacia
arriba o hacia abajo para seleccionar
la configuración, a continuación,
presione la palanca.
Se completó la configuración.
4 Presione (Bluetooth) o (CALL).
Aparece la pantalla normal.
Para ingresar un carácter
Mueva la palanca de mando hacia arriba o hacia
abajo para seleccionar un carácter. A
continuación, muévala hacia la derecha o hacia la
izquierda para mover el cursor.
Los caracteres que pueden se ingresar son A – Z,
a – z, 0 – 9 y el espacio en blanco.
Configuración de los ajustes de
Bluetooth
Antes de conectar un dispositivo Bluetooth,
conf
igure los ajustes de Bluetooth en esta
unidad.
1 Presione (Bluetooth).
Aparece el menú de las funciones Bluetooth.
4 Seleccione el ajuste.
5 Presione (Bluetooth).
Menú Bluetooth Settings
“z” indica el ajuste predeterminado.
Signal
Para cambiar la salida de la señal Bluetooth a
“ON
” u “OFF ”.
– “ON”: para enviar señales Bluetooth (RF
2,4 GHz).
–“OFF
” (z): para no enviar señales Bluetooth
(RF 2,4 GHz).
Asegúrese de seleccionar “ON” para conectarse
al dispositivo Bluetooth.
Visibility
Para permitir que otros dispositivos Bluetooth
detecten esta unidad.
– “Show”: permite la detección por otros
dispositivos.
–“Hide” (
Asegúrese de seleccionar “Show” cuando
busque esta unidad desde un dispositivo
Bluetooth.
Device Name
Para cambiar el nombre de esta unidad que
aparece en el dispositivo conectado.
(Configuración predeterminada: “Xplod”)
Seleccione “Rename” para ingresar caracteres.
Se pueden ingresar hasta 12 caracteres.
Para restaurar “Xplod”, seleccione “Default” c
“yes”.
Nota
Para obtener más información acerca de la
configuración de otros dispositivos Bluetooth, consulte
sus respectivos manuales.
Emparejamiento y conexión de
esta unidad con un dispositivo
Bluetooth
Cuando dos dispositivos Bluetooth se conectan
por primera vez, se requiere un registro mutuo.
Esto se llama “emparejamiento”. Sólo es
necesario realizar el registro (emparejamiento) la
primera vez, ya que, una vez emparejados, los
dispositivos se reconocerán entre sí
automáticamente. (Según el tipo de dispositivo,
es posible que necesite ingresar una contraseña
para cada conexión.)
z): impide la detección por otros
dispositivos.
2 Seleccione “Bluetooth Settings”.
3 Seleccione el menú deseado.
14
Búsqueda de un dispositivo
Bluetooth desde esta unidad
Antes de empezar, debe comprobar que el otro
dispositivo Bluetooth esté configurado para la
búsqueda (que pueda detectarse).
Page 43
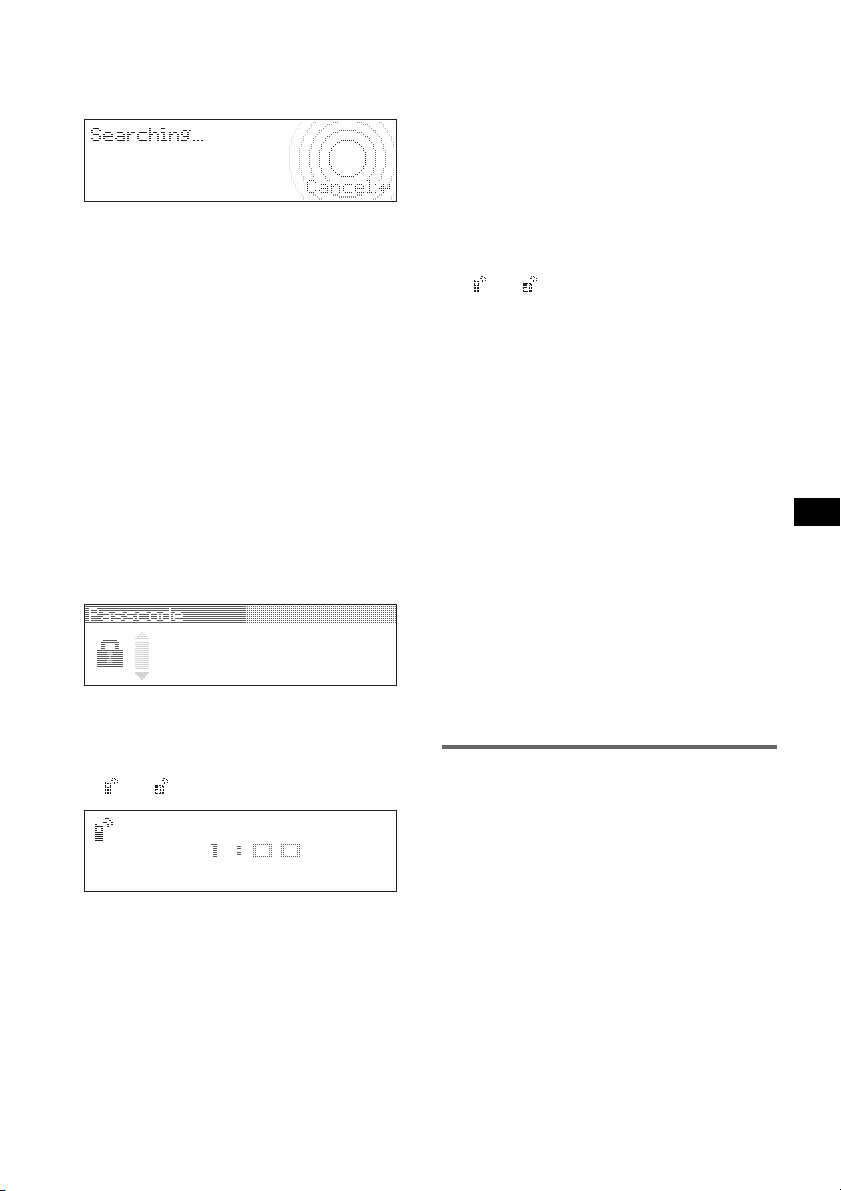
1 Presione (Bluetooth).
Aparece el menú de las funciones Bluetooth.
2 Seleccione “Connectivity
” c “Search”.
Comienza el proceso de búsqueda de
dispositivos con capacidad de conexión y, a
continuación, se muestra una lista con los
nombres detectados. Si no se puede recibir el
nombre de un dispositivo, se muestra el texto
“Unknown”.
El tiempo de búsqueda varía según el número
de dispositivos Bluetooth.
3 Seleccione el dispositivo con el que
desea conectar.
Comienza el emparejamiento.
4 Ingrese una contraseña*.
Ingrese la misma contraseña en esta unidad y
en el dispositivo que desea conectar con la
palanca de mando o el control remoto de
tarjeta. La contraseña puede ser un número de
su elección o un número determinado por el
dispositivo de conexión.
Para obtener más información, consulte el
manual del dispositivo de conexión.
5 Presione la palanca de mando para
confirmar.
Aparece la palabra “Connected” y se
completa la conexión.
“ ” o “ ” aparece durante la conexión.
* La contraseña puede denominarse “passkey”, “PIN
code”, “PIN number
tipo de dispositivo.
” o “Password”, etc., según el
Detección de esta unidad desde un
dispositivo Bluetooth
Compruebe que el ajuste “Visibility” del menú
Settings esté establecido en “Show” (página 14).
1 Inicie la búsqueda en el dispositivo de
conexión.
2 Cuando “Allow Connection?”
aparezca en esta unidad, seleccione
“yes”.
Comienza la conexión.
Según el tipo de dispositivo, puede aparecer
la pantalla para ingresar la contraseña.
3 Ingrese la contraseña del dispositivo
de conexión.
4 Presione la palanca de mando para
confirmar.
Aparece “Connected” y se completa la
conexión.
“ ” o “ ” aparece durante la conexión.
Sugerencia
La contraseña también puede ingresarse con los
botones numéricos del control remoto de tarjeta.
Notas
• Mientras se conecta a un dispositivo Bluetooth, esta
unidad no puede detectarse desde otro dispositivo.
Para detectarla, desconecte la conexión actual y
busque esta unidad desde otro dispositivo.
• Según el dispositivo, puede que no sea posible
realizar la búsqueda desde esta unidad. En este
caso, busque esta unidad desde el dispositivo de
conexión.
• Si se lleva a cabo la búsqueda desde los dos
dispositivos a la vez, esta unidad no reconocerá al
dispositivo de conexión.
• La búsqueda o la conexión puede tomar cierto
tiempo.
• Según el tipo de dispositivo, aparece la pantalla de
confirmación de la conexión antes de que se ingrese
la contraseña.
• El límite de tiempo para ingresar la contraseña varía
según el tipo de dispositivo.
• Esta unidad puede registrar hasta 6 dispositivos que
pueden ser dispositivos de audio o manos libres.
• Esta unidad no puede conectarse a un dispositivo
que solo admita HSP (Head Set Profile).
Conexión con dispositivos
registrados
Los dispositivos están registrados una vez que se
emparejan y se conectan con esta unidad. Puede
seleccionar el dispositivo registrado y conectarlo.
1 Presione (Bluetooth).
Aparece el menú de las funciones Bluetooth.
2 Seleccione “Connectivity” c
“Handsfree Devices” o “Audio
Devices”.
Se muestra la lista de los dispositivos
registrados.
3 Seleccione el dispositivo que desea
conectar.
continúa en la página siguientet
15
Page 44
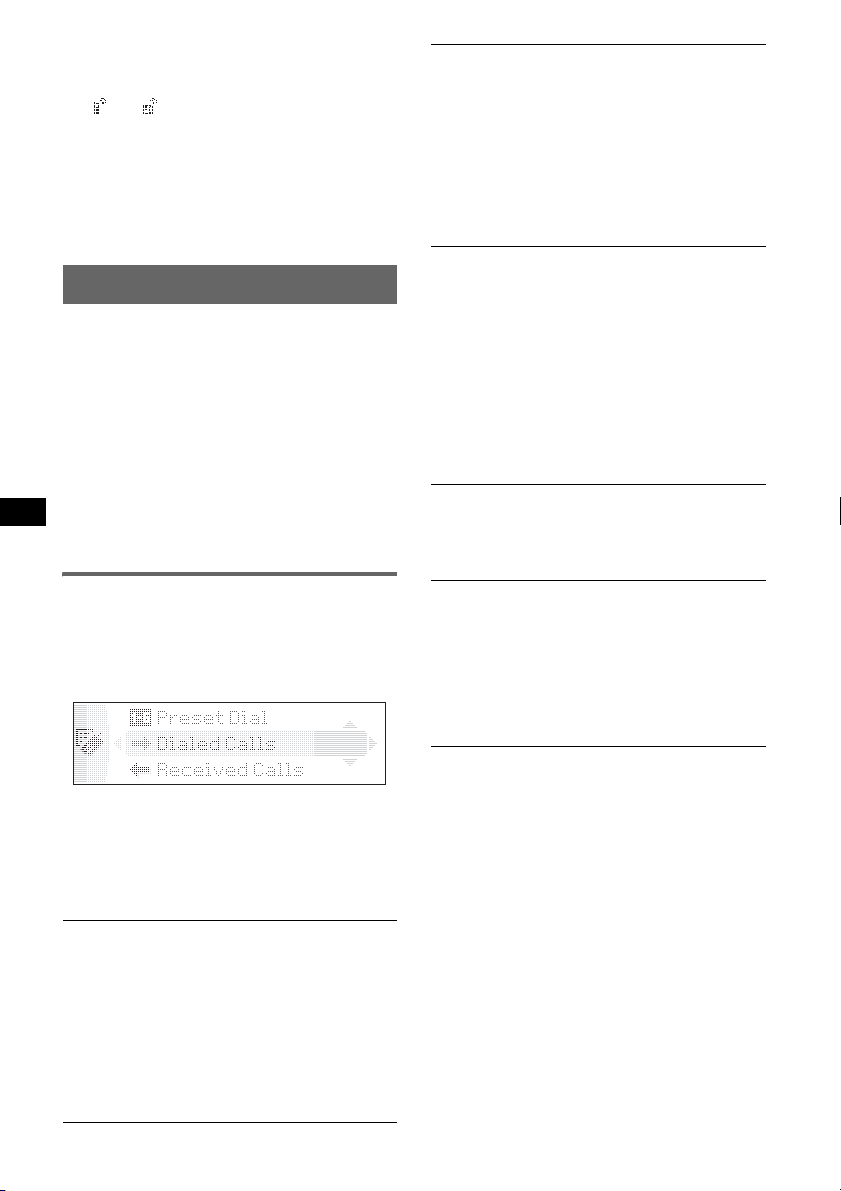
4 Seleccione “Connect
”.
Aparece “Connected” y se completa la
conexión.
“ ” o “ ” aparece durante la conexión.
Interrupción de la conexión
Seleccione “Disconnect” c “yes” en el paso 4.
Sugerencia
Según el dispositivo, es posible seleccionar esta
unidad desde el dispositivo y, a continuación,
conectarse.
Conversación con manos libres
Para empezar, compruebe que esta unidad y el
teléfono celular estén conectados (páginas 14,
15).
Notas
• Para obtener información acerca del funcionamiento
de un teléfono celular con función Bluetooth de
transmisión continua de audio está conectado como
dispositivo de audio, consulte “Escuchar música
desde un dispositivo de audio” en la página 18.
• El micrófono de esta unidad se encuentra en la
parte posterior del panel frontal (página 10). No
cubra el micrófono con cinta, etc.
• Incluso si activa la función ATT durante una llamada,
el sonido de salida no se atenuará.
Realización de llamadas
Con los controles de la unidad, puede hacer una
llamada desde el teléfono celular conectado.
1 Presione (CALL).
Aparece el menú CALL.
2 Seleccione los elementos en el
siguiente orden y, a continuación,
presione la palanca de mando para
comenzar una llamada.
Menú CALL
Dialed Calls*
Permite seleccionar desde el historial de
llamadas realizadas. (Cantidad máxima de
nombres y números telefónicos que se pueden
almacenar: 10)
Nombre y número telefónico para llamar
c “Call”
Seleccione “Delete” para eliminar el nombre y
número de teléfono y “Delete All” para borrar el
historial.
16
Received Calls*
Permite seleccionar desde el historial de
llamadas realizadas. (Cantidad máxima de
nombres y números telefónicos que se pueden
almacenar: 10)
Nombre y número telefónico para llamar c
“Call”
Seleccione “Delete” para eliminar el nombre y
el número de teléfono y “Delete All” para borrar
el historial.
Phonebook*
Permite seleccionar desde la lista del directorio
telefónico. (Cantidad máxima de nombres y
números telefónicos que se pueden almacenar:
50)
“Contact List” c Name to call c el nombre y el
número telefónico.
Para obtener más información acerca de cómo
almacenar datos en el directorio telefónico,
consulte “Uso del directorio telefónico” en la
página 17 y “Configuración de un dispositivo de
manos libres” en la página 18.
Dial
Ingrese el número de teléfono con la ayuda de la
palanca de mando o el control remoto de tarjeta.
Para ingresar el signo “+”, mantenga presionado
el botón 0 del control remoto de tarjeta.
Preset Dial*
Permite seleccionar un número teléfono
almacenado en un botón numérico.
Número predefinido (P1 – P6) c “Call”.
Para obtener más información acerca de cómo
almacenar datos en los botones numéricos,
consulte “Uso de la marcación predefinida” en
la página 18.
* Si el ajuste “Security” está seleccionado
(página 19), aparece “Security Locked” y no es
posible utilizar esta opción.
Sugerencias
• Preset Dial también le permite realizar una llamada
presionando dos veces un botón numérico después
de presionar (CALL).
• En los menús “Dialed Calls”, “Received Calls” y
“Preset Dial” puede realizar una llamada
presionando (CALL)mientras se muestra el número
telefónico.
Ajuste del volumen del tono de
llamada y de la voz de la persona que
habla
Puede establecer el nivel del volumen del tono de
llamada y de la voz de la persona que habla.
Page 45
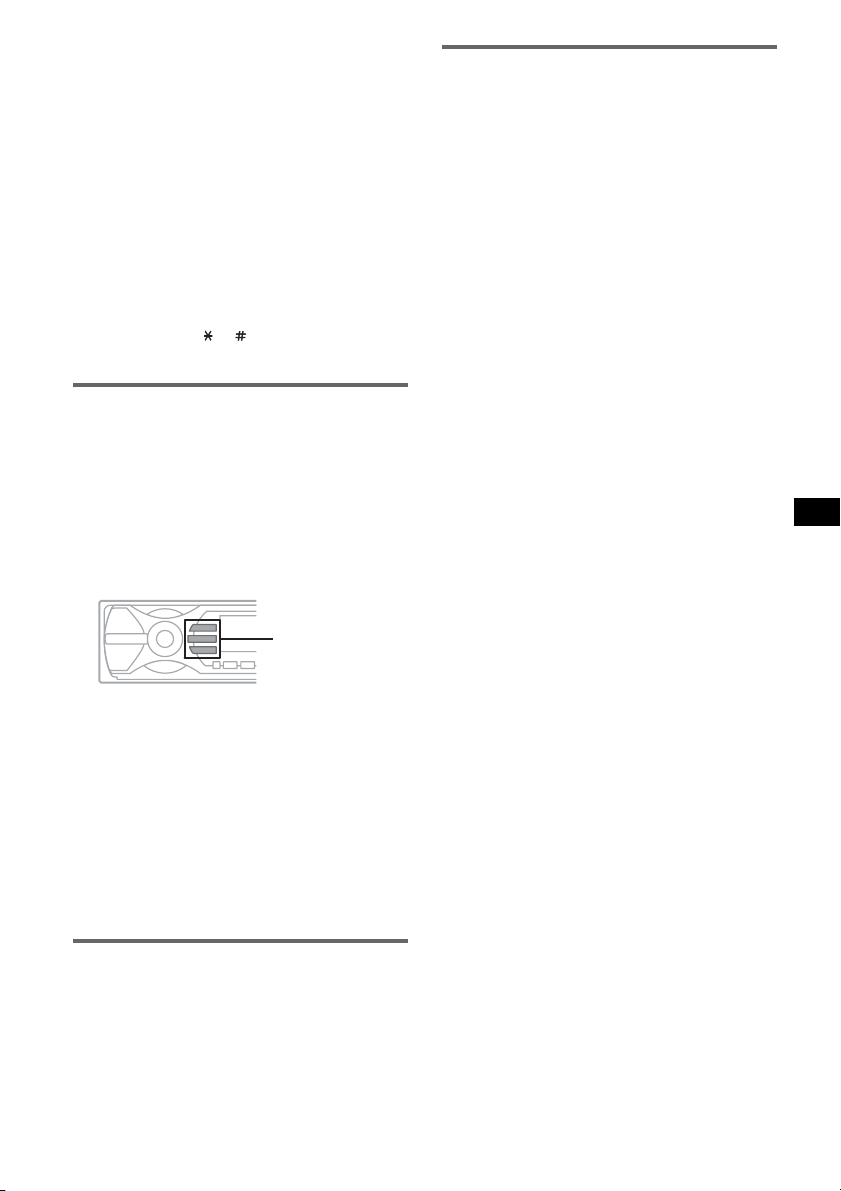
Para ajustar el tono de llamada:
Gire la palanca de mando mientras suena el
teléfono. Aparece “Ring Vol” y se ajusta el
volumen del tono de llamada.
Para ajustar el volumen de la voz de la
persona que habla:
Gire la palanca de mando durante una llamada.
Aparece “
Talk Vol” y se ajusta el volumen de la
voz de la persona que habla.
Envío de tonos DTMF (Dual Tone
Multiple Frequency)
Puede enviar tonos DTMF.
Para enviar tonos DTMF; utilice la palanca de
mando, o presione los botones numéricos
necesarios, (0 – 9, o ) en el control remoto
de tarjeta durante una llamada.
Recepción de llamadas
Cuando se recibe una llamada, se emite un tono
de llamada a través de los altavoces de su
automóvil.
Para obtener más información acerca de los
ajustes de la recepción de una llamada y durante
una llamada, consulte “Configuración de un
dispositivo de manos libres” en la página 18.
1 Cuando reciba una llamada, presione
(CALL), (MENU) o (Bluetooth).
(Bluetooth)
(MENU)
(CALL)
Comienza la llamada telefónica.
Para rechazar una llamada
Presione (OFF).
Sugerencias
• Si la opción “Auto Answer
comienza automáticamente en el tiempo
establecido (página 19).
• Si presiona (CALL) durante una llamada, la función
manos libres se desactiva y el micrófono y el altavoz
del celular se activan. En este caso, es posible que
la conexión Bluetooth se interrumpa en función del
tipo de teléfono celular.
” está activada, la llamada
Finalización de las llamadas
1 Presione (OFF).
Al finalizar la llamada, aparecerá el tiempo de
conversación durante unos segundos.
Nota
Aun si la llamada se termina, la conexión Bluetooth no
se interrumpe.
Uso del directorio telefónico
Recepción de datos de directorio
telefónico desde otro teléfono
celular
1 Seleccione “Phone Settings” desde el menú de
funciones Bluetooth.
2 Seleccione “Receive PB”.
Aparece “Waiting...”.
3 Utilice las funciones de su teléfono celular
para enviar los datos del directorio telefónico.
Aparece “Data Receiving...” mientras se
reciben los datos del directorio telefónico.
Aparece “Complete” cuando se completa la
recepción.
Notas
• Para cancelar la transferencia de datos del
directorio telefónico, utilice el teléfono celular. Desde
esta unidad no se puede cancelar la transferencia.
• Es posible que el directorio telefónico grabado en el
teléfono celular no se visualice correctamente
dependiendo del formato o caracteres utilizados.
Almacenamiento de números desde
“Dialed Calls” o “Received Calls”
1 Seleccione “Dialed Calls” o “Received Calls”
desde el menú CALL.
2 Seleccione el número telefónico que desea
almacenar y, a continuación, seleccione
“Save”.
Aparece la pantalla “Contact Name”.
3 Ingrese un nombre.
Se pueden ingresar hasta 20 caracteres.
4 Seleccione “Save?” c “yes”.
Nota
Se pueden almacenar hasta 50 números telefónicos
en el directorio. SI intenta registrar más de
50 números, aparece “Memory Full”.
Eliminación de contactos del
directorio telefónico
1 Seleccione “Phonebook” c “Contact List”
desde el menú CALL.
2 Seleccione el nombre que desea eliminar.
3 Seleccione “Delete” c “yes”.
Para borrar todos los datos del directorio
telefónico, seleccione “Delete All” en el paso 1.
Después de la eliminación, confirme que todos
los datos del directorio telefónico han sido
correctamente borrados.
continúa en la página siguientet
17
Page 46
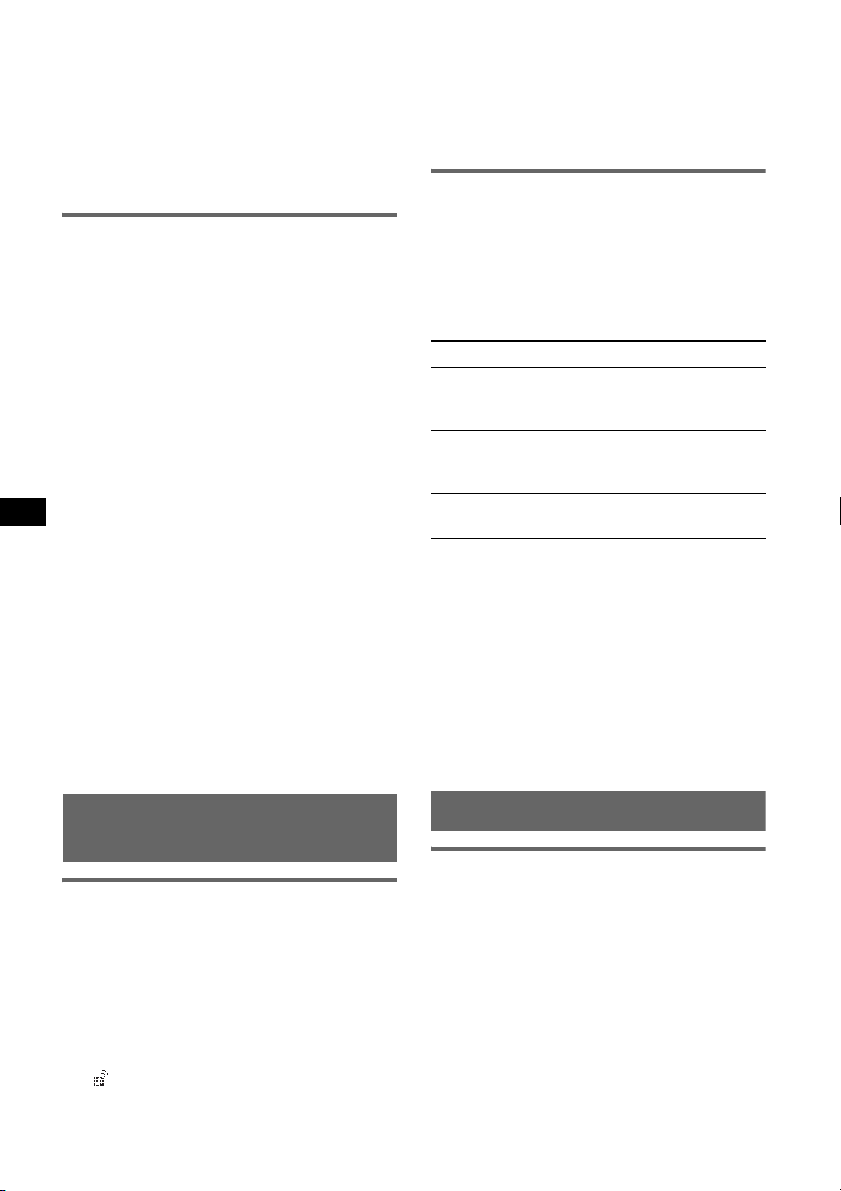
Modificación de un nombre en el
directorio telefónico
1 Seleccione “Phonebook” c “Contact List”
desde el menú CALL.
2 Seleccione el nombre que desea cambiar.
3 Seleccione “Edit Name” e ingrese un nombre
nuevo.
Uso de la marcación predefinida
Almacenamiento de la marcación
predefinida
Puede almacenar un número telefónico en el
directorio de marcación predefinida.
1 Seleccione “Preset Dial” desde el menú
CALL.
2 Seleccione el número predefinido (P1 – P6)
que desea almacenar y, a continuación,
seleccione “Preset Memory”.
3 Seleccione el nombre que desea almacenar.
4 Seleccione un número telefónico del nombre
seleccionado.
5 Cuando aparezca “Save?” seleccione “yes”.
Nota
Para reemplazar un número predefinido registrado,
elimine primero el registro existente y, a continuación,
almacene el número telefónico nuevo.
Eliminación de la marcación
predefinida
1 Seleccione “Preset Dial” desde el menú
CALL.
2 Seleccione el número telefónico predefinido
que desea eliminar.
3 Seleccione “Delete” c “yes.”
3 Presione (SOURCE) varias veces hasta
que aparezca “Bluetooth AUDIO”.
4 Para comenzar la reproducción utilice
las funciones del dispositivo de audio.
5 Ajuste el volumen en la unidad.
Operación de un dispositivo de
audio con esta unidad
Puede realizar las siguientes operaciones en esta
unidad si el dispositivo de audio es compatible
con AVRCP (Audio Video Remote Control
Profile) de la tecnología Bluetooth. (La
operación puede variar en función del tipo de
dispositivo de audio.)
Para Realice lo siguiente
Omitir pistas Mueva la palanca de mando
Retroceder o
avanzar una
pista
Insertar una
pausa
* Según el tipo de dispositivo, es posible que sea
necesario presionar dos veces.
Cualquier otra operación se debe realizar
directamente en el dispositivo de audio.
Nota
Es posible cambiar la fuente en la unidad sin que se
interrumpa la reproducción de la señal del dispositivo
de audio.
Sugerencia
Puede conectar un teléfono celular que admita A2DP
(Advanced Audio Distribution Profile) como dispositivo
de audio y escuchar música.
hacia la izquierda o hacia la
derecha.
Presione la palanca de mando y,
sin soltarla, muévala hacia la
izquierda o hacia la derecha.
Presione (6) (PAUSE)*.
Transmisión continua de
música
Escuchar música desde un
dispositivo de audio
Esta unidad permite escuchar música de un
dispositivo de audio si el dispositivo de audio es
compatible con A2DP (Advanced Audio
Distribution Profile) de la tecnología Bluetooth.
1 Conecte a esta unidad y al dispositivo
de audio Bluetooth entre sí
(página 15).
“ ” aparece durante la conexión.
2 Baje el volumen de esta unidad.
18
Otras configuraciones
Configuración de un dispositivo de
manos libres
Puede configurar varias funciones cuando está
conectado un teléfono celular compatible con la
función Bluetooth como dispositivo de manos
libres.
1 Presione (Bluetooth).
Aparece el menú de las funciones Bluetooth.
2 Seleccione “Phone Settings”.
3 Seleccione el menú deseado.
4 Seleccione la configuración.
5 Presione (Bluetooth).
Page 47
Menú Phone Settings
“z” indica el ajuste predeterminado.
Receive PB*
Para recibir y almacenar los datos del directorio
telefónico desde un teléfono celular (página 17).
Auto Answer
– “on”: para contestar automáticamente a una
llamada cuando se recibe. Establezca el
tiempo para contestar a una llamada: “1 sec” –
“60 sec”
– “off
no se presione (CALL), (MENU) o
(Bluetooth).
Ringtone
Para cambiar el tono de llamada.
–“Cellular*
llamada establecido en el teléfono celular.
– “Default”: para utilizar el tono de llamada de
esta unidad.
EC/NC Mode*
cancelación de ruido)
Para reducir el eco y el ruido en las
conversaciones telefónicas.
Ajuste en “Modo 1” (
no es la deseada, ajuste en “Modo 2
Speaker Sel*
Permite seleccionar el altavoz frontal para el de
tono de llamada, el tono de marcado y la voz de
la otra persona.
–“FR-L” (
los altavoces frontales.
– “FR-R”: para utilizar el canal derecho de los
altavoces frontales.
– “Front”: para la salida a través de ambos
altavoces.
Security
Permite bloquear la información personal en los
siguientes menús al establecer una contraseña
de 4 dígitos (página 16).
“Dialed Calls”, “Received Calls”, “Phonebook”,
“Preset Dial”, “Receive PB”
Si activa la opción de seguridad, aparece
“Security Locked” cuando se operan los menús
anteriores.
Para desactivar la opción de seguridad,
seleccione “Unlock” e ingrese la contraseña.
*1 Si “Security” está activada, aparece “Security
Locked” y la operación no es posible.
*2 Si se utiliza un carácter que no se puede mostrar
en esta unidad, no se mostrará correctamente.
*3 Según el tipo de teléfono celular, es posible que el
tono de llamada utilizado sea el de esta unidad,
incluso si se ha seleccionado “Cellular”.
*4 Permite su configuración durante una llamada.
1*2
(Recibir directorio telefónico)
” (z): la llamada no se contesta hasta que
3
” (z): para utilizar el tono de
4
(Modo cancelación de eco/
z). Si la calidad del sonido
4
(Selección del altavoz)
z): para utilizar el canal izquierdo de
” o en “off ”.
Nota
Si selecciona “Initialize” en la configuración de
seguridad, se borran todos los datos almacenados
(“Dialed Calls”, “Received Calls”, “Phonebook” y
“Preset Dial”).
Eliminación del registro de un
dispositivo conectado
1 Presione (Bluetooth).
Aparece el menú de las funciones Bluetooth.
2 Seleccione “Connectivity” c
“Handsfree Devices” o “Audio
Devices”:
Aparece la lista de los dispositivos
registrados.
3 Seleccione el dispositivo que desea
eliminar.
4 Seleccione “Delete” c “yes”.
Para borrar todos los dispositivos en la lista de
selección, seleccione “Delete All” en el paso 4.
Función de conexión automática
Si el interruptor de encendido de su automóvil
está en la posición ACC, la unidad vuelve a
conectarse automáticamente al último dispositivo
Bluetooth conectado.
19
Page 48
Otras funciones
Ajuste de elementos de menú
— MENU
1 Presione (MENU).
2 Mueva la palanca de mando hacia
arriba o hacia abajo hasta que
aparezca el elemento de menú
deseado. A continuación, mueva la
palanca a la derecha.
El elemento cambia de la siguiente manera:
Setup y Display y Receive Mode
y Sound
3 Mueva la palanca de mando hacia
arriba o hacia abajo hasta que
aparezca el elemento de configuración
deseado. A continuación, muévala
hacia la derecha.
La indicación digital se desplaza hacia la
derecha (selección de la configuración).
4 Mueva la palanca de mando hacia
arriba o hacia abajo para seleccionar
la configuración, a continuación,
presione la palanca.
Se completó la configuración.
5 Presione (MENU).
La pantalla vuelve al modo de reproducción o
recepción normal.
Nota
Los elementos que se muestran en pantalla variarán
en función de la fuente y del ajuste.
Sugerencias
• Para pasar al siguiente nivel del menú presione la
palanca de mando.
• En el paso 5, mueva la palanca de mando hacia la
derecha hasta que aparezca “EXIT
continuación, presione la palanca de mando, en vez
de presionar (MENU).
• Para utilizar el menú de configuración del sonido,
presione (SOUND) directamente en el control
remoto de tarjeta.
Se pueden ajustar los elementos siguientes
(consulte la referencia de página para obtener
más información):
“
z” indica el ajuste predeterminado.
Configuración
Clock Adjust (página 6)
Beep
Para ajustarlo en “on” (z) u “off”.
”. A
RM (Mando rotatorio)
Para cambiar el sentido de funcionamiento de
los controles del mando rotatorio.
–“NORM” (
z): para usar el mando rotatorio en
la posición de fábrica.
– “REV”: si monta el mando rotatorio en el lado
derecho de la columna de la dirección.
AUX Audio*
1
Para ajustar en “on” (z) u “off ” (página 22) la
pantalla de fuente AUX.
Version*
1
Para mostrar la versión del firmware de la
unidad.
Pantalla
Image
Para seleccionar entre distintas imágenes de
pantalla.
– “SpaceProducer” (
en pantalla sincronizados con la música.
– “All”: para mostrar de forma continua las
imágenes en todos los modos de visión.
–“off
”: para no mostrar ninguna imagen.
– “SA 1 – 5”: para mostrar el Analizador del
espectro.
– “Movie 1 – 3”: para ver una película.
– “Wallpaper 1 – 3”: para ver una imagen de
fondo de pantalla.
– “SA All”/“Movie All”/“Wallpaper All”: para
pasar varias veces las imágenes de la pantalla
de cada modo.
Info (Información)
Para mostrar los elementos (en función de la
fuente, etc.).
– “All”: para mostrar todos los elementos.
–“Simple” (
– “Clear”: para que los elementos desaparezcan
automáticamente.
1
Demo*
(Demostración)
Para ajustarlo en “on” (z) u “off ”.
Dimmer
Para cambiar el brillo de la pantalla.
–“Auto” (
z): para atenuar la pantalla
automáticamente cuando se encienden las
luces.
– “on”: para atenuar la pantalla.
–“off
”: para desactivar el atenuador.
Auto Scroll
Para desplazar automáticamente los elementos
largos en pantalla cuando se cambia de disco/
álbum/grupo/pista.
– “on”: para desplazarlo.
–“off
” (z): para no desplazarlo.
z): crea patrones animados
z): para no mostrar los elementos.
20
Page 49
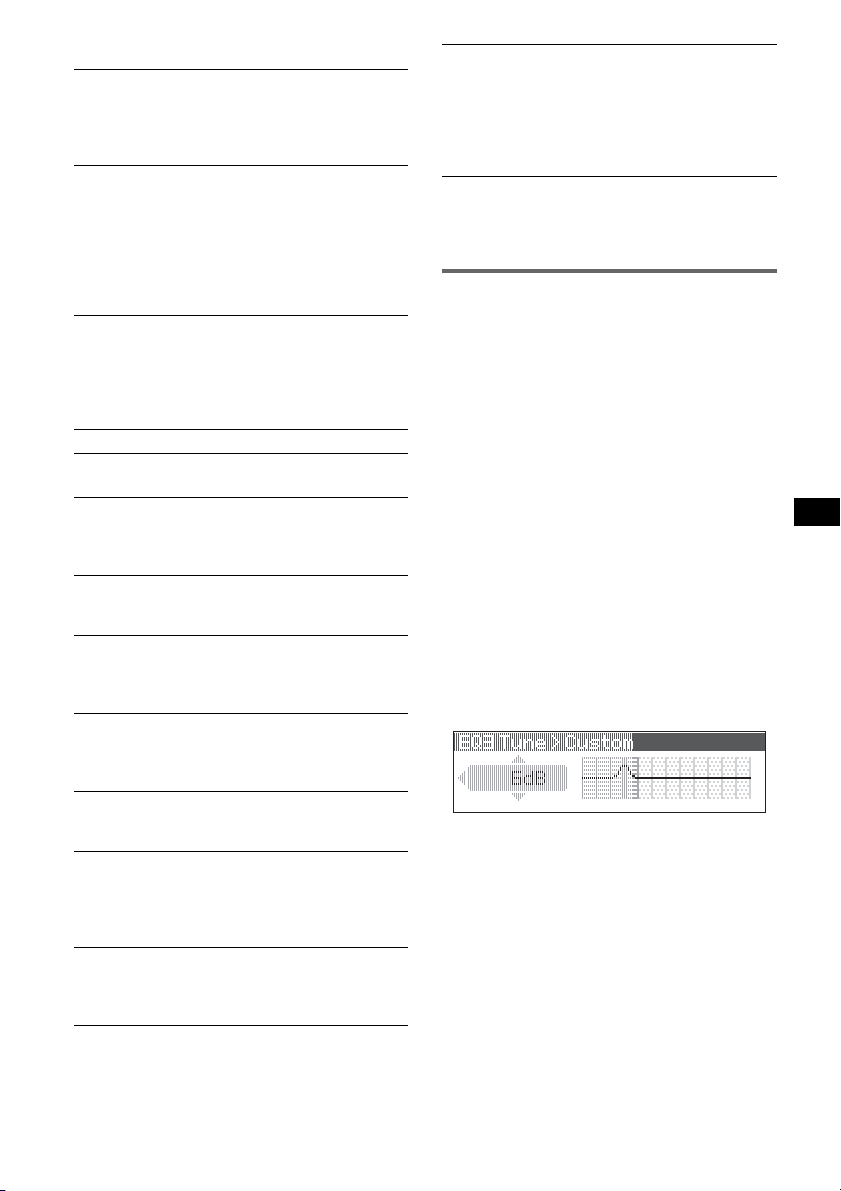
Modo de recepción
Local (Modo de búsqueda local)
–“off
” (z): para sintonizar con una recepción
normal.
– “on”: para sintonizar únicamente las emisoras
con una señal más intensa.
Mono (Modo monoaural)
Seleccione el modo de recepción monoaural
para mejorar una recepción de FM de mala
calidad.
–“off
” (z): para escuchar emisiones estéreo en
estéreo.
– “on”: para escuchar emisiones estéreo en
monoaural.
IF
–“Auto” (
–“Wide”*
z): para reducir automáticamente la
frecuencia de recepción para eliminar ruido.
2
: para escuchar siempre las
emisiones estéreo de FM en estéreo y con una
recepción total de la frecuencia.
BTM (página 13)
Sonido
EQ3 Preset
Para seleccionar un tipo de ecualización:
“Xplod”, “Vocal”, “Edge”, “Cruise”, “Space”,
“Gravity”, “Custom” u “Off
EQ3 Tune
Consulte “Personalización de la curva del
ecualizador” en la página 21.
DSO
Para seleccionar el modo DSO “1”, “2”, “3” u
“off
” (z). Cuanto más alto sea el número, mejor
será el efecto.
Balance
Permite ajustar el balance entre el altavoz
derecho y el izquierdo “R10” – “±0” (
“L10”
Fader
Permite ajustar el balance entre los altavoces
frontales y posteriores “F10” – “±0” (
Subwoofer
Permite ajustar el volumen del subwoofer
(altavoz potenciador de graves) “+10” –
“±0” (
z) – “–10”
(“– ∞” se muestra en la posición más baja).
LPF (Filtro de paso bajo)
Para seleccionar la frecuencia de corte del
altavoz potenciador de graves: “off
“125Hz” o “ 78Hz”.
” (z).
z) –
z) – “R10”
” (z),
AUX Level
Para ajustar el nivel de volumen de cada equipo
auxiliar conectado. Esta configuración evita la
necesidad de ajustar el nivel de volumen entre
las fuentes (página 22).
Nivel ajustable: “+6 dB” – “±0 dB” (
z) –
“–6 dB”
*1 Cuando la unidad está apagada.
*2 En tales casos, es posible que algunas emisiones
de FM en estéreo se reciban en monoaural aunque
se encuentren en el modo de recepción estéreo.
Personalización de la curva de
ecualizador — EQ3 Tune
La función “Custom” de EQ3 le permite realizar
sus propios ajustes del ecualizador.
1 Seleccione una fuente y, a
continuación, presione (MENU).
2 Seleccione “Sound” c “EQ3 Preset” c
“Custom,” con la palanca de mando.
3 Seleccione “EQ3 Tune” con la palanca
de mando.
4 Seleccione el rango de frecuencia
deseado entre “LOW”, “MID” y “HI”.
5 Seleccione la frecuencia que desea
ajustar.
Frecuencias ajustables en cada rango:
LOW: 60 Hz o 100 Hz
MID: 500 Hz o 1,0 kHz
HI: 10,0 kHz o 12,5 kHz
6 Ajuste de la curva de ecualizador.
El nivel de volumen puede ajustarse en
intervalos de 1 dB entre –10 dB y +10 dB.
7 Presione la palanca de mando.
Repita los pasos del 4 al 7 para ajustar otras
frecuencias.
Para restaurar la curva del ecualizador
establecida de fábrica, seleccione
“Initialize” c “yes” en el paso 4.
Sugerencia
También es posible ajustar otros tipos de ecualizador.
21
Page 50
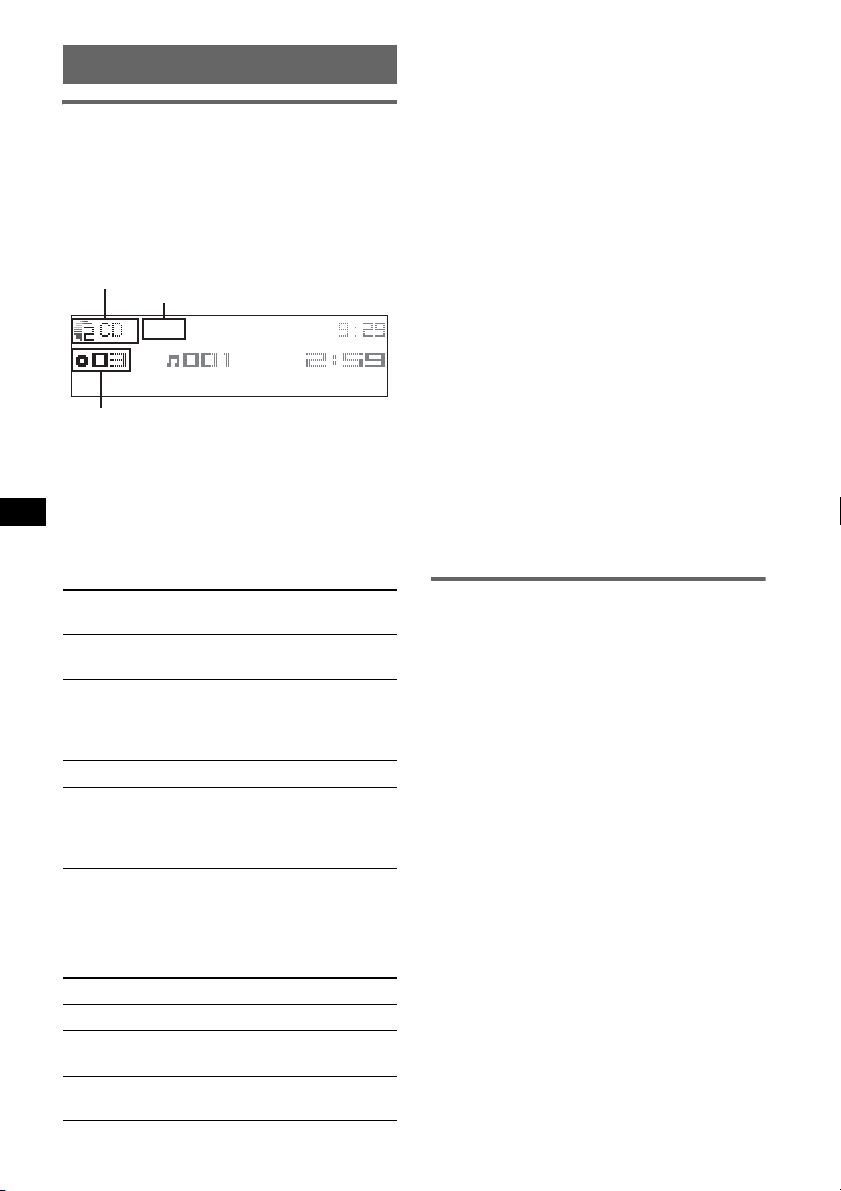
Uso de un equipo opcional
Cambiador de CD/MD
Selección del cambiador
1 Presione (SOURCE) varias veces hasta que
aparezca “CD” o “MD”.
2 Presione (MODE) varias veces hasta que
aparezca el cambiador deseado.
Número de unidad, indicador de MP3*
Indicador de LP2/LP4*
Número de disco/álbum
2
Se inicia la reproducción.
*1 Al reproducir un archivo MP3.
*2 Al reproducir discos MDLP.
Omisión de álbumes y discos
1 Durante la reproducción, mueva la palanca de
mando hacia arriba o hacia abajo.
Para omitir
Mueva la palanca hacia
arriba o hacia abajo
álbumes y manténgala un momento,
después suéltela.
álbumes en
forma continua
y, a los 2 segundos de haberla
soltado, muévala de nuevo
hacia arriba o abajo y mantenga
la posición.
discos varias veces.
discos en forma
continua
y, a los 2 segundos de haberla
soltado, muévala de nuevo
hacia arriba o abajo y mantenga
la posición.
Reproducción repetida y aleatoria
1 Durante la reproducción, presione (1) (REP)
o (2) (SHUF) varias veces hasta que aparezca
el ajuste deseado.
Seleccione Para reproducir
Repeat Disc*1un disco varias veces.
Shuffle
Changer*
Shuffle All*
las pistas del cambiador en
1
orden aleatorio.
2
las pistas de todas las unidades
en orden aleatorio.
22
*1 Si se conectaron uno o más cambiadores de
MD.
CD/
*2 Si se conectaron uno o más cambiadores de CD, o
dos o más cambiadores de MD.
Para regresar al modo de reproducción normal,
seleccione “Repeat off
Sugerencia
“Shuffle All” no reproduce las pistas en orden aleatorio
entre las unidades de CD y los cambiadores de MD.
” o “Shuffle off ”.
Localización de discos por nombre
1
— LIST
Puede seleccionar un disco de la lista cuando esté
conectado un cambiador de CD con capacidad
CD TEXT o un cambiador MD.
Si asigna un nombre al disco, el nombre aparece
en la lista.
1 Durante la reproducción, presione la palanca
de mando.
Aparece el número o el nombre del disco.
2 Mueva la palanca de mando hacia arriba o
hacia abajo hasta que aparezca el disco
deseado.
3 Presione la palanca de mando para reproducir
el disco.
La unidad vuelve al modo de reproducción
normal.
Equipo auxiliar de audio
Puede conectar dispositivos portátiles de Sony
opcionales al terminal BUS AUDIO IN/AUX IN
de la unidad. Si el cambiador u otro dispositivo
no está conectado al terminal, la unidad le
permitirá escuchar el dispositivo portátil a través
de los altavoces del automóvil.
Nota
Cuando conecte un dispositivo portátil, asegúrese de
que BUS CONTROL IN no esté conectado. Si se
conecta un dispositivo a BUS CONTROL IN, “AUX” no
se podrá seleccionar con (SOURCE).
Sugerencia
Cuando conecte un dispositivo portátil y un
cambiador, utilice el selector opcional AUX-IN.
Selección del equipo auxiliar
1 Presione (SOURCE) varias veces hasta que
aparezca “AUX
”.
Realice las operaciones correspondientes
desde el dispositivo portátil.
Ajuste del nivel de volumen
Asegúrese de ajustar el volumen de cada
dispositivo de audio conectado antes de iniciar la
reproducción.
1 Baje el volumen de la unidad.
Page 51
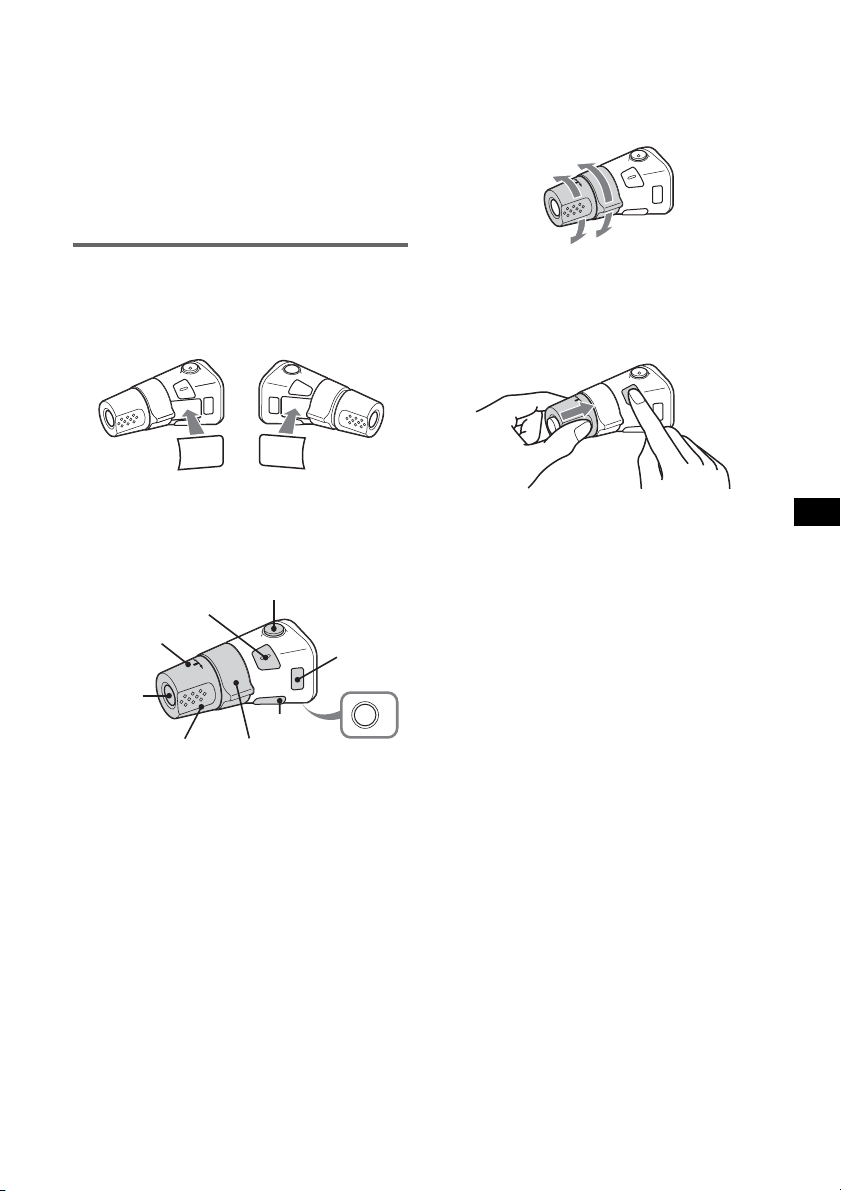
2 Presione (SOURCE) varias veces hasta que
aparezca “AUX
”.
3 Inicie la reproducción en el dispositivo de
audio portátil con un volumen moderado.
4 Seleccione el volumen habitual en la unidad.
5 Ajuste el nivel de volumen, siguiendo “Ajuste
de elementos de menú — MENU” en la
página 20. El nivel de entrada puede ajustarse
de –6 dB a +6 dB.
Mando rotatorio RM-X4S
Colocación de la etiqueta
Coloque la etiqueta de indicación según el modo
en que instale el mando rotatorio.
D
S
D
N
U
O
S
E
D
O
M
L
SP
D
P
L
M
O
D
E
S
O
U
N
D
Ubicación de los controles
Los botones correspondientes en el mando
rotatorio controlan las mismas funciones que los
de esta unidad.
SOUND*
PRESET/
DISC
ATT
MODE
Cambio del sentido de
funcionamiento
El sentido de funcionamiento de los controles
está establecido de fábrica como se muestra a
continuación.
Para aumentar
Para disminuir
Si necesita instalar el mando rotatorio en el lado
derecho de la columna de la dirección, puede
invertir el sentido de funcionamiento.
1 Mientras presiona el control VOL, mantenga
presionado (SOUND).
SOURCE
DSPL
VOL
SEEK/AMS
OFF
La operación de los controles siguientes del
mando rotatorio es distinta que en la unidad.
• Control PRESET/DISC
Igual que al presionar la palanca de mando
hacia arriba /hacia abajo en la unidad
(presionar y girar).
• Control VOL (volumen)
Funciona de igual manera que la palanca de
control en la unidad (girar).
• Control SEEK/AMS
Igual que al empujar la palanca de mando hacia
la izquierda /hacia la derecha en la unidad
(girar y mantener en esta posición).
* No disponible en esta unidad.
OFF
23
Page 52
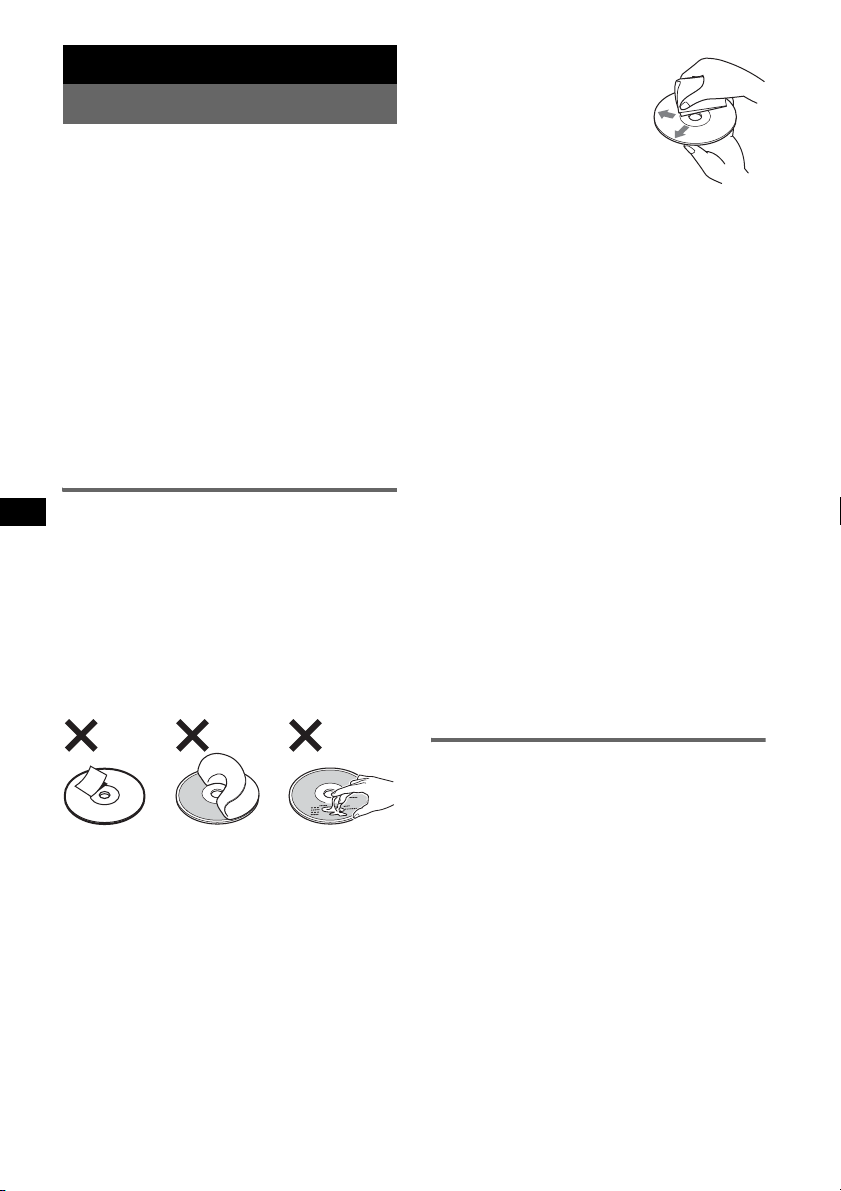
Información complementaria
Precauciones
• Si estaciona el automóvil bajo la luz directa del
sol, deje que la unidad se enfríe antes de usarla.
• La antena motorizada se extenderá
automáticamente mientras la unidad se encuentre
en funcionamiento.
Condensación de humedad
En días lluviosos o en zonas muy húmedas, es
posible que se condense humedad en el interior de
las lentes y la pantalla de la unidad. Si esto ocurre, la
unidad no funcionará de forma correcta. En tal caso,
extraiga el disco y espere una hora
aproximadamente hasta que se haya evaporado la
humedad.
Para mantener una alta calidad de
sonido
Asegúrese de no derramar jugos ni refrescos sobre
la unidad o los discos.
Notas sobre los discos
• Para mantener los discos limpios, no toque su
superficie. Tómelos por los bordes.
• Guarde los discos en sus cajas o en los estuches de
discos cuando no los use.
• No someta los discos al calor ni a altas
temperaturas. Evite dejarlos en un automóvil
estacionado, o sobre el tablero o la bandeja trasera.
• No adhiera etiquetas ni utilice discos con residuos
de pegamento o tinta. Tales discos pueden dejar de
girar durante el uso, lo que provocaría una falla de
funcionamiento, o pueden dañarse.
• Antes de reproducir discos,
límpielos con un paño de
limpieza disponible en el
mercado. Hágalo desde el
centro hacia los bordes. No
utilice disolventes como
bencina, diluyentes, productos
de limpieza comerciales ni
aerosoles antiestáticos para
discos analógicos.
Notas sobre los discos CD-R/CD-RW
• Según el estado del disco o el equipo utilizado
para su grabación, es posible que algunos discos
CD-R y CD-RW no puedan reproducirse en esta
unidad.
• No es posible reproducir un disco CD-R o un
CD-RW que no esté finalizado.
Discos de música codificados con
tecnologías de protección de los
derechos de autor
Este producto se diseñó para reproducir discos que
cumplen con el estándar Compact Disc (CD).
Recientemente, algunas compañías discográficas
comercializan discos de música codificados con
tecnologías de protección de derechos de autor.
Tenga en cuenta que, entre estos discos, algunos no
cumplen con el estándar CD, por lo que no podrán
reproducirse con esta unidad.
Nota sobre discos DualDisc
Un DualDisc es un disco de dos caras que combina
material grabado en DVD en una cara con material
de audio digital en la otra cara. Sin embargo, como
el lado del material de audio no cumple con la
norma Compact Disc (CD), no es seguro que la
reproducción pueda hacerse en este producto.
• No use discos con etiquetas o autoadhesivos.
Su uso puede producir las siguientes fallas de
funcionamiento:
– Imposibilidad de expulsar el disco (debido a que
se haya despegado la etiqueta o el autoadhesivo
y se haya obstruido el mecanismo de expulsión).
– Imposibilidad de leer los datos de audio
correctamente (por ejemplo, se producen
interrupciones en la reproducción del disco o
éste no se reproduce) debido a que el calor
contrae el autoadhesivo o la etiqueta y hace que
el disco se deforme.
• No se pueden reproducir en esta unidad discos con
formas no estandarizadas (por ejemplo, formas de
corazón, cuadrado o estrella). Si lo intenta, puede
dañar la unidad. No use este tipo de discos.
• No se pueden reproducir discos compactos de
8 cm.
24
Acerca de los archivos MP3/WMA
MP3, que significa MPEG-1 Audio Layer-3, es un
formato estándar que permite comprimir archivos de
música. Comprime los datos de CD de audio a
aproximadamente 1/10 de su tamaño original.
WMA, que significa Windows Media Audio, es otro
formato de compresión estándar de archivos de
música. Comprime los datos de CD de audio a
aproximadamente 1/22* de su tamaño original.
* sólo para los archivos con velocidad de 64 kbps
• La unidad es compatible con la norma ISO 9660
de formato de nivel 1/nivel 2, con la norma Joliet/
Romeo en cuanto al formato de expansión y con
Multi Session.
• Cantidad máxima de:
– carpetas (álbumes): 150 (incluidas la carpeta raíz
y las carpetas vacías).
– archivos MP3/WMA (pistas) y carpetas
contenidas en un disco: 300 (si un nombre de
archivo o carpeta contiene muchos caracteres,
este número puede ser inferior a 300).
Page 53
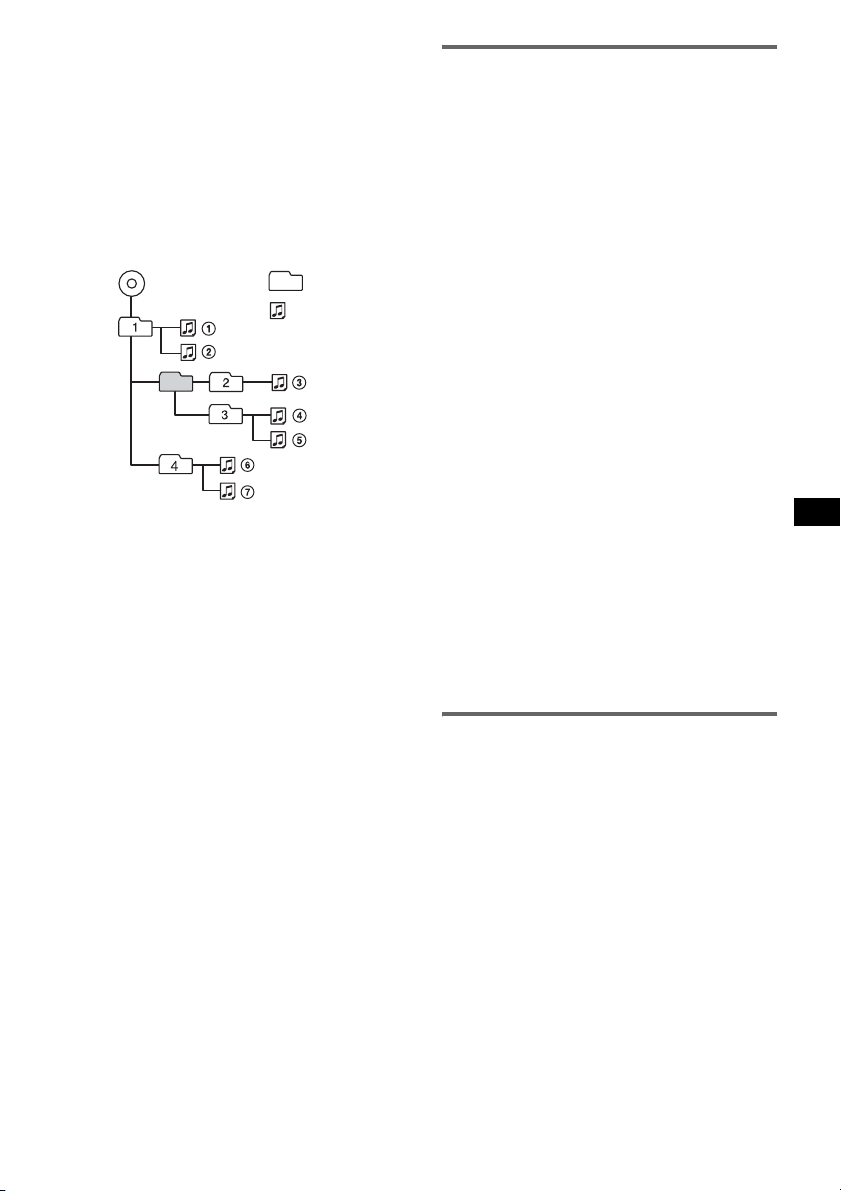
– caracteres que se pueden visualizar en el nombre
de una carpeta o archivo: 25 (Joliet) o
50 (Romeo).
• Las versiones 1.0, 1.1, 2.2, 2.3 y 2.4 del indicador
ID3 se aplican únicamente a archivos MP3. El
indicador ID3 que se puede visualizar tiene
30 caracteres (versiones 1.0 y 1.1) o 50 caracteres
(versiones 2.2, 2.3 y 2.4). El indicador WMA que
se puede visualizar tiene 25 caracteres.
Orden de reproducción de los
archivos MP3/WMA
MP3/WMA
Notas
• Al asignar un nombre a un archivo MP3 o WMA,
asegúrese de añadir la extensión “.mp3”/
nombre de archivo.
• Durante la reproducción de un archivo MP3/WMA
de VBR (velocidad de bits variable), o al avanzar o
retroceder rápidamente, es posible que el tiempo de
reproducción transcurrido no se muestre con
precisión.
• Si el disco se grabó en Multi Session, sólo se
reconoce y reproduce la primera pista del formato
de la primera sesión (cualquier otro formato se
omitirá). La prioridad del formato es CD-DA, CD de
ATRAC y MP3/WMA.
– Cuando la primera pista es un CD-DA, sólo se
reproduce el CD-DA de la pr imera sesión.
– Cuando la primera pista no es un CD-DA, se
reproduce una sesión de CD de ATRAC o
MP3/WMA. Si el disco no contiene datos en
ninguno de estos formatos, aparece “NO Music”.
Notas sobre MP3
• Asegúrese de finalizar el disco antes de utilizarlo en
la unidad.
• Si reproduce un archivo MP3 de alta velocidad de
bits, como 320 kbps, el sonido puede ser
discontinuo.
Notas sobre WMA
• No es posible reproducir archivos con compresión
sin pérdidas.
• No es posible reproducir archivos protegidos por
derechos de autor.
Carpeta
(álbum)
Archivo MP3/
WMA (pista)
“.wma” al
Acerca de los CD de ATRAC
Formato ATRAC3plus
ATRAC3, que significa Adaptive Transform
Acoustic Coding3, es una tecnología de compresión
de audio. Comprime los datos de CD de audio a
aproximadamente 1/10 de su tamaño original.
ATRAC3plus, un formato extendido de ATRAC3,
comprime los datos de CD de audio a
aproximadamente 1/20 de su tamaño original. La
unidad admite los formatos ATRAC3 y
ATRAC3plus.
CD de ATRAC
Un CD de ATRAC contiene datos grabados de CD
de audio que se comprimen al formato ATRAC3 o
ATRAC3plus mediante el uso de software
autorizado, como SonicStage 2.0 o posterior, o
SonicStage Simple Burner.
• Cantidad máxima de:
– carpetas (grupos): 255
– archivos (pistas): 999
• Se muestran los caracteres correspondientes al
nombre de una carpeta o archivo y la información
de texto escrita por SonicStage.
Si desea obtener más información acerca de los CD
de ATRAC, consulte el manual de SonicStage o
SonicStage Simple Burner.
Nota
Asegúrese de crear el CD de ATRAC con el software
autorizado, como SonicStage 2.0 o posterior, o
SonicStage Simple Burner 1.0 ó 1.1.
Si desea realizar alguna consulta o solucionar algún
problema relativo a la unidad que no se trate en este
manual, póngase en contacto con el distribuidor
Sony más cercano.
Acerca de la función Bluetooth
Acerca de la comunicación Bluetooth
• La tecnología inalámbrica Bluetooth tiene una
cobertura de unos 10 m.
El área de cobertura puede variar en función de los
obstáculos (personas, objetos metálicos, paredes,
etc.) o del entorno electromagnético.
• Las condiciones siguientes pueden afectar la
sensibilidad de la comunicación Bluetooth.
– La existencia de obstáculos como, por ejemplo,
una persona, un objeto metálico o una pared
entre esta unidad y el dispositivo Bluetooth.
– El uso de dispositivos que utilicen una
frecuencia de 2,4 GHz como, por ejemplo, un
dispositivo LAN inalámbrico o un microondas
cerca de la unidad.
continúa en la página siguientet
25
Page 54
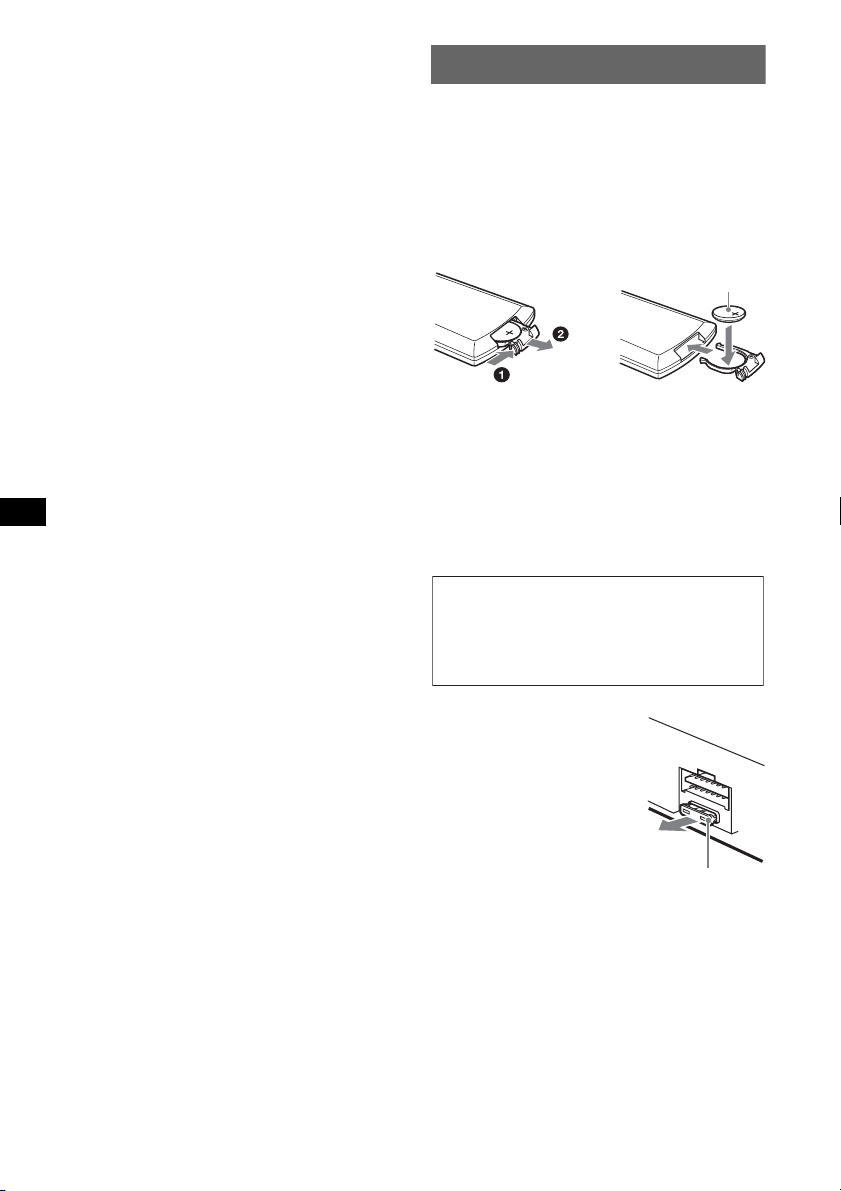
• Como los dispositivos Bluetooth y las LAN
inalámbricas (IEEE802.11b/g) utilizan la misma
frecuencia, pueden producirse interferencias de
microondas que provoquen el deterioro de la
velocidad de comunicación, la aparición de ruido
o una conexión no válida si la unidad se utiliza
cerca de un dispositivo LAN inalámbrico. En este
caso, realice el procedimiento siguiente.
– Utilice esta unidad a una distancia mínima de 10
m del dispositivo LAN inalámbrico.
– Si utiliza esta unidad a menos de 10 m de un
dispositivo LAN inalámbrico, apague el
dispositivo LAN inalámbrico.
– Instale esta unidad y el dispositivo Bluetooth a la
distancia más corta posible entre sí.
• Las microondas que emite un dispositivo
Bluetooth pueden afectar al funcionamiento de
dispositivos médicos electrónicos. Apague esta
unidad y los demás dispositivos Bluetooth en los
lugares siguientes, ya que podrían provocar un
accidente.
– donde exista gas inflamable, en un hospital, tren,
avión o gasolinera.
– cerca de puertas automáticas o alarmas de
incendio.
• Esta unidad admite capacidades de seguridad que
cumplen con el estándar Bluetooth para
proporcionar una conexión segura al utilizar la
tecnología inalámbrica Bluetooth, pero es posible
que la seguridad sea insuficiente según el ajuste.
Tenga cuidado al realizar una comunicación con la
tecnología inalámbrica Bluetooth.
• No se aceptan responsabilidades por la pérdida de
información que pudiera producirse durante una
comunicación Bluetooth.
• No se garantiza la comunicación con todos los
dispositivos Bluetooth.
– Un dispositivo que disponga de la función
Bluetooth debe cumplir el estándar Bluetooth
SIG y estar autenticado.
– Incluso en el caso de que el dispositivo
conectado cumpla el estándar Bluetooth
mencionado anteriormente, es posible que
algunos dispositivos no puedan conectarse o
funcionar correctamente, según las
características o las especificaciones del
dispositivo.
– Mientras esté hablando con el manos libres del
teléfono, puede producirse ruido, según el
dispositivo o el entorno de comunicación.
• En función del dispositivo que vaya a conectarse,
es posible que transcurra cierto tiempo antes de
que se inicie la comunicación.
Otros
• Es posible que el dispositivo Bluetooth no
funcione en teléfonos celulares, dependiendo de
las condiciones de las ondas de radio y la
ubicación en la que se utilice el equipo.
• Si no se siente cómodo después de utilizar el
dispositivo Bluetooth, deje de utilizarlo
inmediatamente. Si el problema persiste, consulte
con el distribuidor Sony más cercano.
Mantenimiento
Sustitución de la pila de litio del
control remoto de tarjeta
En condiciones normales, la pila dura
aproximadamente 1 año (la duración puede ser
menor en función de las condiciones de uso).
El alcance del control remoto de tarjeta disminuye a
medida que se agota la pila. Sustitúyala por una pila
de litio CR2025 nueva. El uso de cualquier otra pila
podría provocar un incendio o una explosión.
Lado + hacia arriba
c
Notas sobre la pila de litio
• Mantenga la pila de litio fuera del alcance de los
niños. Si se ingiriese, póngase inmediatamente en
contacto con un médico.
• Limpie la pila con un paño seco para garantizar un
contacto óptimo.
• Asegúrese de obser var la polaridad correcta al
instalarla.
• No agarre la pila con pinzas metálicas, ya que
puede producirse un cortocircuito.
ADVERTENCIA
La pila puede explotar si no se emplea
adecuadamente.
No recargue la pila; tampoco la desmonte ni
la arroje al fuego.
Sustitución del fusible
Al sustituir el fusible, asegúrese
de utilizar uno cuyo amperaje
coincida con el especif
el original. Si el fusible se
funde, verifique la conexión de
alimentación y sustitúyalo. Si
vuelve a fundirse después de
sustituirlo, es posible que exista
alguna falla de funcionamiento
interno. En tal caso, póngase en
contacto con el distribuidor
Sony más cercano.
icado en
Fusible (10 A)
26
Page 55
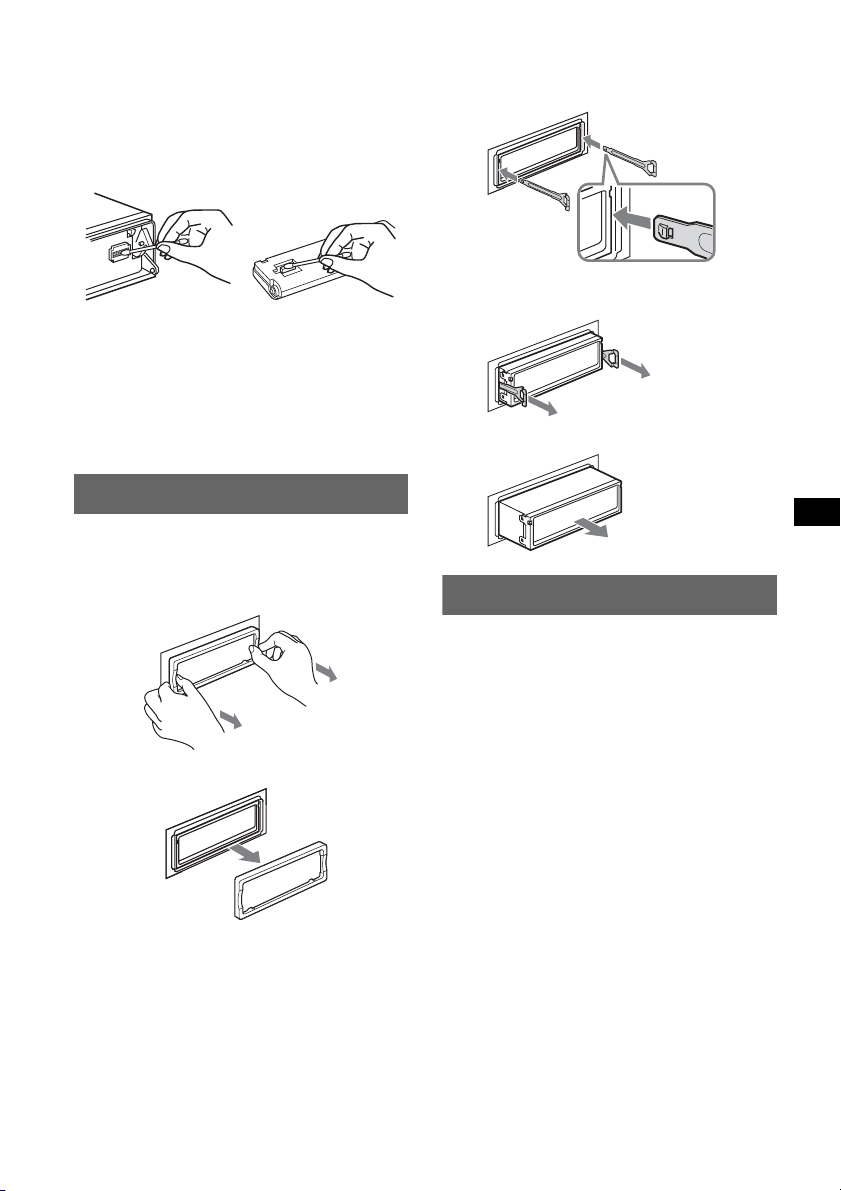
Limpieza de los conectores
Es posible que la unidad no funcione correctamente
si los conectores entre ésta y el panel frontal están
sucios. Para evitar esta condición, extraiga el panel
frontal (página 6) y limpie los conectores con un
hisopo de algodón humedecido en alcohol. No
aplique demasiada fuerza, ya que podría dañar los
conectores.
Unidad principal
Notas
• Por razones de seguridad, apague el motor antes de
limpiar los conectores y extraiga la llave del
interruptor de encendido.
• No toque nunca los conectores directamente con los
dedos ni con ningún dispositivo metálico.
Parte posterior
del panel frontal
Extracción de la unidad
1 Extraiga el marco de protección.
1 Extraiga el panel frontal (página 6).
2 Tome el marco de protección por los
bordes y extráigalo.
2 Extraiga la unidad.
1 Inserte las dos llaves de liberación
simultáneamente hasta oír un clic.
El gancho debe
mirar hacia
adentro.
2 Tire de las llaves de liberación para extraer
la unidad.
3 Deslice la unidad para extraerla del marco.
Especificaciones
Sección del reproductor de CD
Relación señal-ruido: 120 dB
Respuesta de frecuencia: de 10 a 20 000 Hz
Fluctuación y trémolo: inferior al límite medible
x
Sección del sintonizador
FM
Rango de sintonización:
de 87,5 a 108,0 MHz (a intervalos de 50 kHz)
de 87,5 a 107,9 MHz (a intervalos de 200 kHz)
Intervalo de sintonización de FM: 50 kHz/200 kHz
conmutable
Terminal de la antena aérea: conector de antena aérea
Frecuencia intermedia: 10,7 MHz/450 kHz
Sensibilidad útil: 9 dBf
Selectividad: 75 dB a 400 kHz
Relación señal-ruido: 67 dB (estéreo), 69 dB (mono)
Distorsión armónica a 1 kHz: 0,5% (estéreo),
0,3% (mono)
Separación: 35 dB a 1 kHz
Respuesta de frecuencia: de 30 a 15 000 Hz
AM
Rango de sintonización:
de 531 a 1 602 kHz (a intervalos de 9 kHz)
de 530 a 1 710 kHz (a intervalos de 10 kHz)
Intervalo de sintonización de AM: 9 kHz/10 kHz
conmutable
Terminal de la antena aérea: conector de antena aérea
continúa en la página siguientet
27
Page 56
Frecuencia intermedia: 10,7 MHz/450 kHz
Sensibilidad: 30 µV
Comunicación inalámbrica
Sistema de comunicación:
Versión estándar Bluetooth 2.0
Salida:
Energía estándar Bluetooth Clase 2 (Máx. +4 dBm)
Alcance máximo de la comunicación:
Línea de visión aprox. 10 m*
Banda de frecuencias:
banda de 2,4 GHz (2,4000 – 2,4835 GHz)
Método de modulación: FHSS
Perfiles compatibles de Bluetooth*
A2DP (Advanced Audio Distribution Profile)
AVRCP (Audio Video Remote Control Profile)
HFP (Handsfree Profile)
OPP (Object Push Profile)
*1 El alcance real variará según factores como los
obstáculos entre los dispositivos, los campos
magnéticos alrededor de un horno de microondas,
electricidad estática, sensibilidad de recepción,
funcionamiento de la antena, sistema operativo,
aplicación del software, etc.
*2 Los perfiles estándar de Bluetooth indican el
propósito de la comunicación Bluetooth entre
dispositivos.
1
2
:
Sección del amplificador de potencia
Salidas: salidas de altavoz (conectores de sellado
seguro)
Impedancia de altavoces: de 4 a 8 Ω
Salida máxima de potencia: 52 W × 4 (a 4 Ω)
Generales
Salidas:
Terminal de salidas de audio (frontal/posterior)
Terminal de salida del altavoz potenciador de
graves (mono)
Terminal de control del relé de la antena
motorizada
Terminal de control del amplificador de potencia
Entradas:
Terminal de control ATT de teléfono
Terminal de control de iluminación
Terminal de entrada de control BUS
Entrada de audio BUS/terminal AUX IN
Terminal de entrada de control remoto
Terminal de entrada de antena
Controles de tono:
Graves: ±10 dB a 60 Hz o 100 Hz (XPLOD)
Medios: ±10 dB a 500 Hz o 1 kHz (XPLOD)
Agudos: ±10 dB a 10 kHz o 12,5 kHz (XPLOD)
Requisitos de alimentación: batería de automóvil de
cc 12 V (masa negativa)
Dimensiones: aprox. 178 × 50 × 183 mm (an/al/prf)
Dimensiones de montaje: aprox. 182 × 53 × 162 mm
(an/al/prf)
Peso: aprox. 1,2 kg
Accesorios suministrados:
Control remoto de tarjeta: RM-X303
Componentes de instalación y conexiones
(1 juego)
Equipo y accesorios opcionales:
Mando rotatorio: RM-X4S
Cable BUS (suministrado con un cable con
terminales RCA): RC-61 (1 m), RC-62 (2 m)
Cambiador de CD (10 discos): CDX-757MX,
CDX-656X
Cambiador de CD (6 discos): CDX-T69
Selector de fuente: XA-C30, XA-C40
Selector AUX-IN: XA-300
Es posible que su distribuidor no comercialice
algunos de los accesorios que figuran en la lista
anterior. Consulte al distribuidor para obtener
información detallada.
Patentes de los EE.UU. y otros países usados con
licencia de Dolby Laboratories.
Tecnología de codificación de audio MPEG
Layer-3 y pantentes bajo licencia de Fraunhofer IIS
y Thomson.
Nota
Esta unidad no puede conectarse a un
preamplificador digital ni a un ecualizador que sea
compatible con el sistema BUS de Sony.
El diseño y las especificaciones están sujetos a
cambios sin previo aviso.
• Se ha utilizado soldadura sin plomo.
• Ciertas placas del circuito impreso no contienen
retardantes de llama halogenados.
• Las carcasas no contienen retardantes de llama
halogenados.
• Para el material de relleno y protección se ha
utilizado papel.
Solución de problemas
La siguiente lista de comprobación le ayudará a
solucionar los problemas que puedan producirse con
la unidad.
Antes de consultarla, revise los procedimientos de
conexión y de funcionamiento.
Generales
La unidad no recibe alimentación.
• Revise la conexión. Si todo está en orden, compruebe
el fusible.
• Si la unidad está apagada y desaparece la indicación
de pantalla, no se puede utilizar con el control
remoto.
t Encienda la unidad.
La antena motorizada no se extiende.
La antena motorizada no tiene una caja de relé.
28
Page 57
No se emite el sonido.
• El volumen es demasiado bajo.
• Está activada la función ATT o la función ATT de
teléfono (cuando se conecta el cable de interfaz de un
teléfono para automóvil al cable ATT).
• La posición del control de equilibrio no está ajustada
para un sistema de 2 altavoces.
• El cambiador de CD no es compatible con el formato
del disco (MP3/WMA/CD de ATRAC).
t Reproduzca con un cambiador de CD de Sony
compatible con MP3 o con esta unidad.
No se escuchan pitidos.
• El sonido de los pitidos ha sido cancelado
(página 20).
• Se encuentra conectado un amplificador de potencia
opcional y no está usando el amplificador
incorporado.
El contenido de la memoria se borró.
• Presionó el botón RESET.
t Vuelva a almacenar los datos en la memoria.
• Se desconectó el cable de conexión de la
alimentación o la pila.
• El cable de conexión de la alimentación no está
conectado de forma correcta.
Las emisoras almacenadas y la hora correcta
se borraron.
Se fundió el fusible.
Se escucha ruido cuando se cambia la
posición de la llave de encendido.
Los cables no se conectaron de forma correcta al
conector de alimentación auxiliar del automóvil.
Las indicaciones desaparecen de la pantalla o
no aparecen en ella.
• El atenuador está ajustado en “Dimmer on”
(página 20).
• La pantalla se apaga si mantiene presionado (OFF).
t Mantenga presionado (OFF) en la unidad hasta
que se ilumine la pantalla.
• Los conectores están sucios (página 27).
La opción DSO no funciona.
Según el tipo de interior del automóvil o el tipo de
música, DSO puede no producir el efecto deseado.
Algunos elementos de pantalla no se
visualizan.
tEstablezca “Info All” (página 20).
Reproducción de CD/MD
No es posible insertar el disco.
• Ya hay un disco insertado.
• El disco se insertó a la fuerza al revés o de forma
incorrecta.
No se inicia la reproducción.
• Disco defectuoso o sucio.
• Los discos CD-R/CD-RW no son para audio
(página 24).
No es posible reproducir archivos MP3/WMA.
El disco no es compatible con el formato y la versión
de los archivos MP3/WMA (página 24).
Los archivos MP3/WMA tardan más tiempo en
reproducirse que los demás.
El inicio de la reproducción de los siguientes discos
tarda algo más de tiempo.
– disco grabado con una estructura de árbol
complicada.
– disco grabado en Multi Session.
– disco al que es posible añadir datos.
No es posible reproducir un CD de ATRAC.
• El disco no se creó con software autorizado como
SonicStage o SonicStage Simple Burner.
• No es posible reproducir pistas que no están incluidas
en el grupo.
Los elementos de pantalla no se desplazan.
• En el caso de discos con muchos caracteres, es
posible que éstos no se desplacen.
• “Auto Scroll” está ajustado en “off
t Establezca “Auto Scroll on” (página 20) o
presione (SCRL).
Se producen saltos de sonido.
• La instalación no es correcta.
t Instale la unidad en un ángulo inferior a 45° en
una parte firme del automóvil.
• Disco defectuoso o sucio.
Los botones de operación no funcionan.
El disco no se expulsa.
Presione el botón RESET (página 6).
”.
Recepción de radio
No es posible recibir las emisoras.
Hay ruidos que obstaculizan el sonido.
• Conecte un cable de control de antena motorizada
(azul) o un cable de fuente de alimentación auxiliar
(rojo) al cable de suministro de alimentación del
amplificador de antena del automóvil (sólo si el
automóvil tiene una antena de FM/AM incorporada
en el cristal trasero o lateral).
• Revise la conexión de la antena del automóvil.
• La antena automática no se extiende.
t Revise la conexión del cable de control de la
antena motorizada.
• Revise la frecuencia.
• Cuando el modo DSO está activado, el sonido se
escucha ocasionalmente con ruido.
t Ajuste el modo DSO en “off
No es posible utilizar la sintonización
programada.
• Almacene la frecuencia correcta en la memoria.
• La señal de emisión es demasiado débil.
No es posible utilizar la sintonización
automática.
• El modo de búsqueda local está ajustado en “on”.
t Establezca “Local off
• La señal de emisión es demasiado débil.
t Use la sintonización manual.
” (página 21).
” (página 21).
continúa en la página siguientet
29
Page 58
Durante la reproducción de FM, la indicación
” parpadea.
“ST
• Sintonice la frecuencia con precisión.
• La señal de emisión es demasiado débil.
tEstablezca “Mono on” (página 21).
Un programa de FM emitido en estéreo se
escucha en monoaural.
La unidad se encuentra en el modo de recepción
monoaural.
t Establezca “Mono off
” (página 21).
Función Bluetooth
El dispositivo de conexión no puede detectar
esta unidad.
• Establezca “Signal” en “ON
• Establezca “Visibility” en “Show
• Mientras esta unidad se encuentra conectada al otro
dispositivo Bluetooth, no es posible detectarla desde
otro dispositivo. Desconecte la conexión actual y
busque esta unidad desde otro dispositivo. Es posible
volver a conectar el dispositivo desconectado
seleccionando a partir de la lista de dispositivos
registrados.
Esta unidad no puede detectar el dispositivo
de conexión.
Revise la configuración Bluetooth del dispositivo de
conexión.
No es posible realizar la conexión.
• Según el tipo de dispositivo, es posible que no se
pueda realizar la búsqueda desde esta unidad.
tBusque esta unidad desde el otro dispositivo.
• Según el estado del otro dispositivo, es posible que
no se pueda realizar la búsqueda desde esta unidad.
tBusque esta unidad desde el otro dispositivo.
• Compruebe el proceso de emparejamiento y
conexión en el manual del otro dispositivo, etc. y
repítalo.
No aparece el nombre del dispositivo
detectado.
Según el estado del otro dispositivo, es posible que no
se pueda obtener el nombre.
No hay tono de llamada.
• Ajuste el volumen en “Ring Vol” (página 17).
• Según el dispositivo de conexión, es posible que el
tono de llamada no se envíe correctamente.
tAjuste “Ringtone” en “Default
El volumen de la voz de la persona que habla
es bajo.
Ajuste el volumen en “Talk Vol” (página 17).
Se producen ecos o ruidos durante las
conversaciones telefónicas.
• Baje el volumen.
• “EC/NC Mode” está establecido en “off
tAjuste “EC/NC Mode” en “Mode 1” o “Mode 2”
(página 19).
• Si el ruido del ambiente es alto, sin tomar en cuenta
el sonido de la llamada, intente reducir dicho ruido.
Ej.: Si hay una ventanilla abierta y el ruido de la
calle, etc., es alto, cierre la ventanilla. Si el aire
acondicionado está alto, baje el aire acondicionado.
” (página 14).
” (página 14).
” (página 19).
30
La calidad de sonido del teléfono es baja.
La calidad del sonido del teléfono depende de las
condiciones de recepción del teléfono celular.
t Mueva su automóvil a un lugar en el que pueda
mejorar la señal del teléfono celular si la recepción
es de mala calidad.
El volumen del dispositivo de audio conectado
es bajo (alto).
El nivel de volumen cambiará dependiendo del
dispositivo de audio.
t Ajuste el volumen del dispositivo de audio
conectado o de esta unidad.
Se omite el sonido durante la reproducción de
un dispositivo de audio Bluetooth.
• Reduzca la distancia entre la unidad y el dispositivo
de audio Bluetooth.
• Si el dispositivo de audio Bluetooth está guardado en
una caja que interrumpe la señal, retire la caja el
dispositivo de de audio para utilizarlo.
• En los alrededores se utilizan varios dispositivos
Bluetooth u otros dispositivos que emiten ondas de
radio.
t Apague los otros dispositivos.
t Reduzca la distancia que lo separa de los otros
dispositivos.
No es posible controlar el dispositivo de audio
Bluetooth conectado.
Compruebe que el dispositivo de audio Bluetooth
conectado sea compatible con AVRCP.
Algunas funciones no funcionan.
Compruebe que el dispositivo de conexión sea
compatible con las funciones en cuestión.
Al recibir una llamada no aparece el nombre de
la otra persona.
• La otra persona no está almacenada en el directorio
telefónico.
t Almacénelo en el directorio telefónico
(página 17).
• El teléfono con el que se realiza la llamada no está
configurado para enviar el número telefónico.
Se realiza una llamada accidentalmente.
• El teléfono con el que se conecta está configurado
para realizar automáticamente la llamada.
• “Auto Answer
(página 19).
Falló el emparejamiento por falta de tiempo.
Según el dispositivo de conexión, es posible que el
límite de tiempo para el emparejamiento sea corto.
Intente completar el emparejamiento dentro del tiempo
estableciendo una contraseña de un dígito.
El tono de timbre o la voz de la otra persona se
envía desde un altavoz.
”.
“Speaker Sel” está establecido en “FR-L” o “FR-R”.
t Establezca “Speaker Sel” en “Front
Durante la llamada con manos libres, los
altavoces del automóvil no emiten ningún
sonido.
Si el sonido de salida viene del teléfono celular, ajuste
el teléfono para que el sonido se emita por los
altavoces del automóvil.
” de esta unidad está ajustado en “on”
” (página 19).
Page 59
Mensajes/indicaciones de error
Función de audio
Blank Disk
No hay pistas grabadas en el MD.
tReproduzca un MD que tenga pistas grabadas.
Error
• El disco está sucio o se insertó al revés.
t Límpielo o insértelo de forma correcta.
• No es posible reproducir el disco debido a un
problema.
t Inserte otro disco.
Failure (Se ilumina hasta que se presiona algún botón).
La conexión de los altavoces y amplificadores no es
correcta.
tConsulte el manual de instalación de este modelo
para revisar la conexión.
Load
El cambiador está cargando el disco.
tEspere hasta que finalice.
Local Seek +/–
El modo de búsqueda local está activado durante la
sintonización automática.
NO Disc
El disco no está insertado en el cambiador de CD/MD.
tInserte discos en el cambiador.
NO Disc Name
El nombre del disco no está escrito en la pista.
NO Group Name
El nombre del grupo no está escrito en la pista en el
CD de ATRAC.
NO ID3 Tag
No se grabó la información del indicador ID3 en el
archivo MP3.
NO Information
No se grabó información de texto en el archivo
ATRAC3/ATRAC3plus o WMA.
NO Magazine
El cargador de discos no está insertado en el cambiador
de CD.
tInserte el cargador en el cambiador.
NO Music
El disco no es un archivo de música.
tInserte un CD de música en esta unidad o en un
cambiador con capacidad para reproducir archivos
MP3.
NO Track Name
El nombre de la pista no está escrito en la pista.
Offset
Es posible que se haya producido una falla interna.
tRevise la conexión. Si el indicador de error
permanece en pantalla, póngase en contacto con el
distribuidor Sony más cercano.
Push Reset
La unidad de CD y el cambiador de CD/MD no pueden
utilizarse debido a un problema.
tPresione el botón RESET (página 6).
Read
La unidad está leyendo toda la información de pistas y
de grupos del disco.
t Espere hasta que finalice la lectura y se inicie la
reproducción automáticamente. Es posible que
demore más de un minuto en función de la
estructura del disco.
“” o “”
Durante la operación de avance o retroceso rápido,
llegó al principio o al final del disco, por lo que no es
posible continuar.
“”
No se puede mostrar el carácter con la unidad.
Función Bluetooth
Busy
No se completó el proceso Bluetooth.
t Interrumpa la recepción de los datos del directorio
telefónico.
t Detenga la operación actual y espere un momento.
Connection Complete
La conexión Bluetooth se ha completado.
Connection Failed
• No es posible realizar la conexión a un dispositivo
debido a un problema.
• No es posible realizar la conexión al dispositivo
porque la contraseña es incorrecta.
• Se ha excedido el tiempo de conexión.
Disconnected
La señal Bluetooth se encuentra desconectada.
Empty
• No hay datos en “Dialed Calls” (Llamadas
realizadas), “Received Calls” (Llamadas recibidas) o
“Phonebook” (Directorio telefónico) en el menú
CALL
• No hay datos en el directorio telefónico al almacenar
en discado preestablecido.
Error
No es posible recibir los datos del directorio telefónico
debido a un problema.
HF Device is not available
El dispositivo de manos libres no está conectado.
Invalid Code
El código de seguridad de entrada es incorrecto.
Memory Full
• La memoria del directorio telefónico de esta unidad
se llenó mientras se recibían los datos del directorio
telefónico.
• La memoria del directorio telefónico de esta unidad
está llena.
Not Available
A pesar de que la fuente está ajustada en Bluetooth
AUDIO, no hay ningún dispositivo de audio Bluetooth
conectado.
continúa en la página siguientet
31
Page 60
No Devices Found
• No se han encontrado dispositivos conectables luego
de la búsqueda.
• El dispositivo no está registrado en “Handsfree
Devices” (Dispositivos de manos libres) ni en “Audio
Devices” (Dispositivos de audio).
tRegistre el dispositivo en “Handsfree Devices” o
en “Audio Devices”.
Security Locked
La seguridad está configurada.
Turn ON Bluetooth
La configuración Bluetooth está apagada.
t Ajuste la configuración Bluetooth en “on”.
Si estas soluciones no ayudan a mejorar la situación,
póngase en contacto con el distribuidor Sony más
cercano.
Si entrega la unidad para su reparación a causa de
problemas en la reproducción de CD, lleve el disco
que se utilizó cuando se produjo el problema.
Sitio web de asistencia al cliente
Si desea realizar alguna consulta u obtener la
información de asistencia más reciente para
este producto, consulte el siguiente sitio web:
Clientes de Latinoamérica:
http://esupport.sony.com/ES/LA/
Clientes de Asia y Oceanía:
http://www.sony-asia.com/caraudio/
32
Page 61

33
Page 62
请务必将本机安装在汽车的仪表板中以确
保安全。有关安装和线路连接的注意事项,
请参阅附带的安装 / 线路连接说明书。
R
Bluetooth 字标和图标归 Bluetooth SIG,
Inc. 所有,Sony Corporation 对此类标记的
使用已经许可。其他商标和商品名称归各自
拥有者所有。
SonicStage 及其标志是 Sony Corporation 的
商标。
“ATRAC”和 是 Sony
Corporation 的商标。
2
Page 63
目录
鸣谢惠顾! . . . . . . . . . . . . . . . . . . . . . . . . . . . . 4
入门指南
重设本机 . . . . . . . . . . . . . . . . . . . . . . . . . . . . . . 6
设定时钟 . . . . . . . . . . . . . . . . . . . . . . . . . . . . . . 6
拆卸前面板 . . . . . . . . . . . . . . . . . . . . . . . . . . . . 6
安装前面板 . . . . . . . . . . . . . . . . . . . . . . . . . 7
将光盘插入本机 . . . . . . . . . . . . . . . . . . . . . . . . 7
退出光盘 . . . . . . . . . . . . . . . . . . . . . . . . . . . 7
控制器位置和基本操作
音频功能 . . . . . . . . . . . . . . . . . . . . . . . . . . . 8
Bluetooth 功能 . . . . . . . . . . . . . . . . . . . . . 10
CD
显示项目 . . . . . . . . . . . . . . . . . . . . . . . . . . 12
重复和随机播放 . . . . . . . . . . . . . . . . . . . . 12
收音机
存储和接收电台 . . . . . . . . . . . . . . . . . . . . . . . 12
自动储存- BTM . . . . . . . . . . . . . . . . . . . . . 12
手动储存 . . . . . . . . . . . . . . . . . . . . . . . . . . 12
收听已储存的电台 . . . . . . . . . . . . . . . . . . 12
自动调谐 . . . . . . . . . . . . . . . . . . . . . . . . . . 12
通过列表接收电台- LIST . . . . . . . . . . . . 13
Bluetooth 功能
使用 Bluetooth 功能之前 . . . . . . . . . . . . . . 13
Bluetooth 功能的菜单操作. . . . . . . . . . . 13
配置 Bluetooth 设定 . . . . . . . . . . . . . . . . 13
将本机与 Bluetooth 设备进行配对和
连接 . . . . . . . . . . . . . . . . . . . . . . . . . . . . . . 14
连接已注册的设备 . . . . . . . . . . . . . . . . . . 15
免提通话 . . . . . . . . . . . . . . . . . . . . . . . . . . . . 15
拨打电话 . . . . . . . . . . . . . . . . . . . . . . . . . . 15
接听电话 . . . . . . . . . . . . . . . . . . . . . . . . . . 16
结束通话 . . . . . . . . . . . . . . . . . . . . . . . . . . 16
使用电话簿 . . . . . . . . . . . . . . . . . . . . . . . . 16
使用预设拨号 . . . . . . . . . . . . . . . . . . . . . . 16
音乐流 . . . . . . . . . . . . . . . . . . . . . . . . . . . . . . 16
从音频设备聆听音乐 . . . . . . . . . . . . . . . . 16
用本机操作音频设备 . . . . . . . . . . . . . . . . 17
其他设定 . . . . . . . . . . . . . . . . . . . . . . . . . . . . 17
设定免提设备 . . . . . . . . . . . . . . . . . . . . . . 17
删除所连接设备的注册信息 . . . . . . . . . . 17
自动连接功能 . . . . . . . . . . . . . . . . . . . . . . 17
其他功能
调节菜单项目- MENU . . . . . . . . . . . . . . . . . . 18
自定义均衡曲线- EQ3 Tune. . . . . . . . . . 19
使用选购设备 . . . . . . . . . . . . . . . . . . . . . . . . 19
CD/MD 换碟机. . . . . . . . . . . . . . . . . . . . . . . 19
辅助音频设备 . . . . . . . . . . . . . . . . . . . . . . 20
旋转式遥控器 RM-X4S. . . . . . . . . . . . . . . . 20
附加信息
使用前注意事项 . . . . . . . . . . . . . . . . . . . . . . 21
光盘注意事项 . . . . . . . . . . . . . . . . . . . . . . 21
关于 MP3/WMA 文件 . . . . . . . . . . . . . . . . . . 22
关于 ATRAC CD. . . . . . . . . . . . . . . . . . . . . . 22
关于 Bluetooth 功能 . . . . . . . . . . . . . . . . 22
保养 . . . . . . . . . . . . . . . . . . . . . . . . . . . . . . . . 23
取出本机 . . . . . . . . . . . . . . . . . . . . . . . . . . . . 24
规格 . . . . . . . . . . . . . . . . . . . . . . . . . . . . . . . . 24
故障排除 . . . . . . . . . . . . . . . . . . . . . . . . . . . . 25
出错显示 / 信息 . . . . . . . . . . . . . . . . . . . . 27
3
Page 64
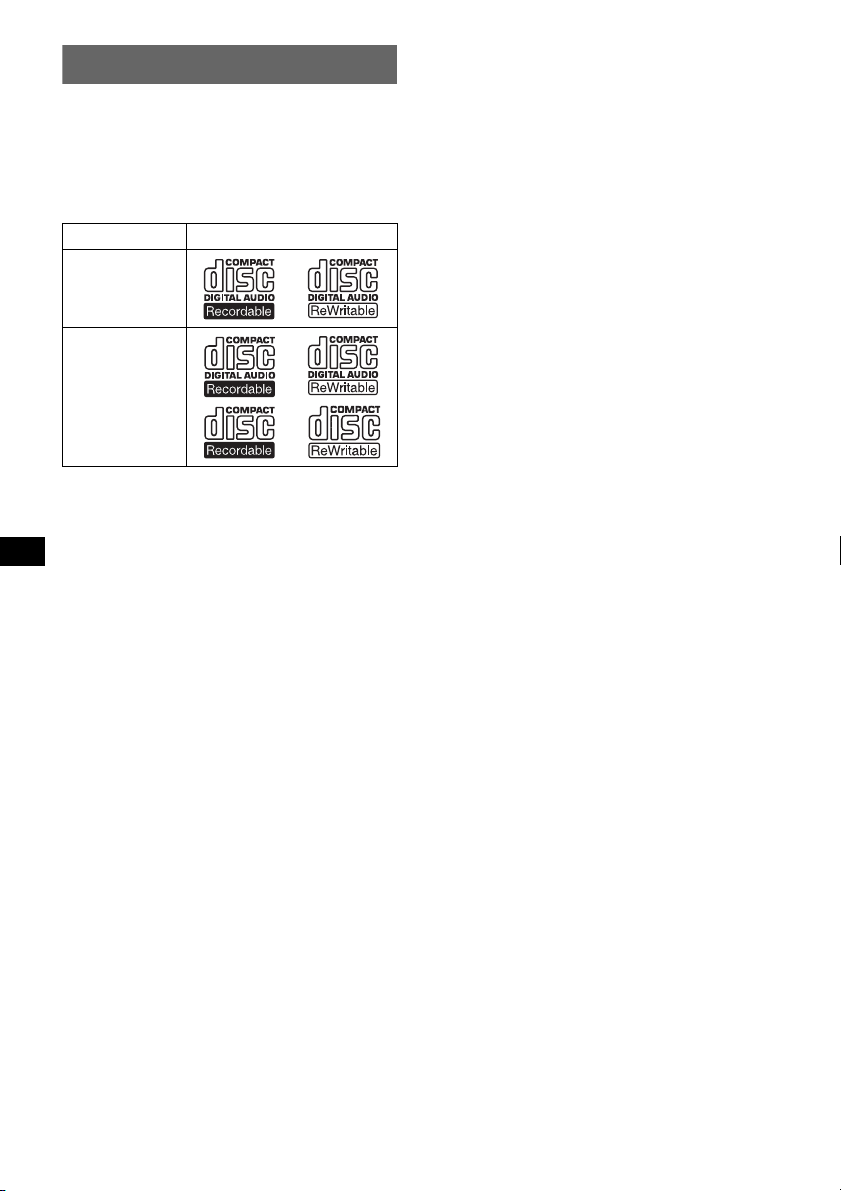
鸣谢惠顾!
感谢您惠购 Sony Bluetooth™ 音频系统使用
以下功能,您可以享受驾驶的乐趣。
• CD 播放
您可播放 CD-DA(也包含 CD TEXT*)、CD-R/
CD-RW (也包含 Multi Session 的 MP3/WMA
文件 (第 22 页))和 ATRAC CD (ATRAC3 和
ATRAC3plus 格式 (第 22 页))。
光盘类型 光盘上的标签
CD-DA
MP3
WMA
ATRAC CD
• 无线电接收
- 每个波段 (FM1、FM2、FM3、AM1 和 AM2)
最多可以存储 6 个电台。
- BTM (最佳调谐记忆功能):本机选择信号
强的电台并储存。
• Bluetooth 功能
- 在汽车内使用手提电话进行免提通话。
- 从手提电话传送电话簿。
- 从手提电话或手提式音频设备输出音乐。
- 支持 HFP 1.0、A2DP、OPP 和 AVRCP 协议。
• 声音调节
- EQ3 参数:您可以从 7 种预设均衡曲线中
选择任一种,并根据需要进行调整。
- DSO (动态摄影棚管理器):采用虚拟扬声
器合成创造更具现场效果的声场,即使扬
声器安装在门上较低的位置,也可以增强
扬声器的声音。
- BBE MP:改善数字压缩声音,如 MP3。
* CD TEXT 光盘是含有光盘、艺术家和曲目名称等信息
的 CD-DA。
4
Page 65

警告
在任何情况下,SONY 均不对任何附带、间接或
继起损害或其它损害,包括但不限于利润损失、
收入损失、数据丢失、产品或相关设备使用受
损、停机时间以及购买者与产品 / 产品硬件和 /
或软观相关或由其使用而产生的时间等,承担
赔偿责任。
重要通告!
安全和有效使用
未经Sony公司明确许可对本机进行更改或修改,
则可能会使用户无权操作设备。
在使用本产品之前,请根据国家要求或限制确认
使用 Bluetooth 设备的特殊情况。
驾车
确认您驾车所在地对于使用手提电话和免提设
备的法律和法规。
若驾车情况如此,请务必小心驾车,驶离车道并
停下车,然后再拨打或接听电话。
连接其他设备
当连接至其他设备时,请参阅详细安全指示的用
户指南。
射频发射
RF 信号可能会对安装在汽车中的安装不当或未
进行充分屏蔽的电子系统产生不良影响,如电
子喷油系统、电子防滑 (防锁)刹车系统、电
子速度控制系统或安全气囊系统。有关本设备
的安装或维修,请联系厂商或汽车的代理商。
安装或维修错误可能会有危险,并有可能会使
适用于本设备的保修卡失效。
请与汽车厂商联系,确保手提电话在车内的使用
不会影响汽车的电子系统。
请定期检查汽车内的所有无线设备是否正确安
装和操作。
紧急呼叫
Bluetooth 汽车免提设备和连接至免提设备的电
子设备使用无线电信号、蜂窝信号和路上网络以
及用户编程功能,并不保证所有情况下的通信正
常。
因此对于必需的通信 (如医疗紧急事件),请勿
完全依靠电子设备。
请记住,为了拨打或接听电话,免提设备和连接
至免提设备的电子设备必须在蜂窝信号足够强
的服务区内开启。
当在蜂窝电话网络内或某网络服务和 / 或电话功
能正在使用中时,可能无法进行紧急呼叫。
请与当地的服务提供商协商。
5
Page 66
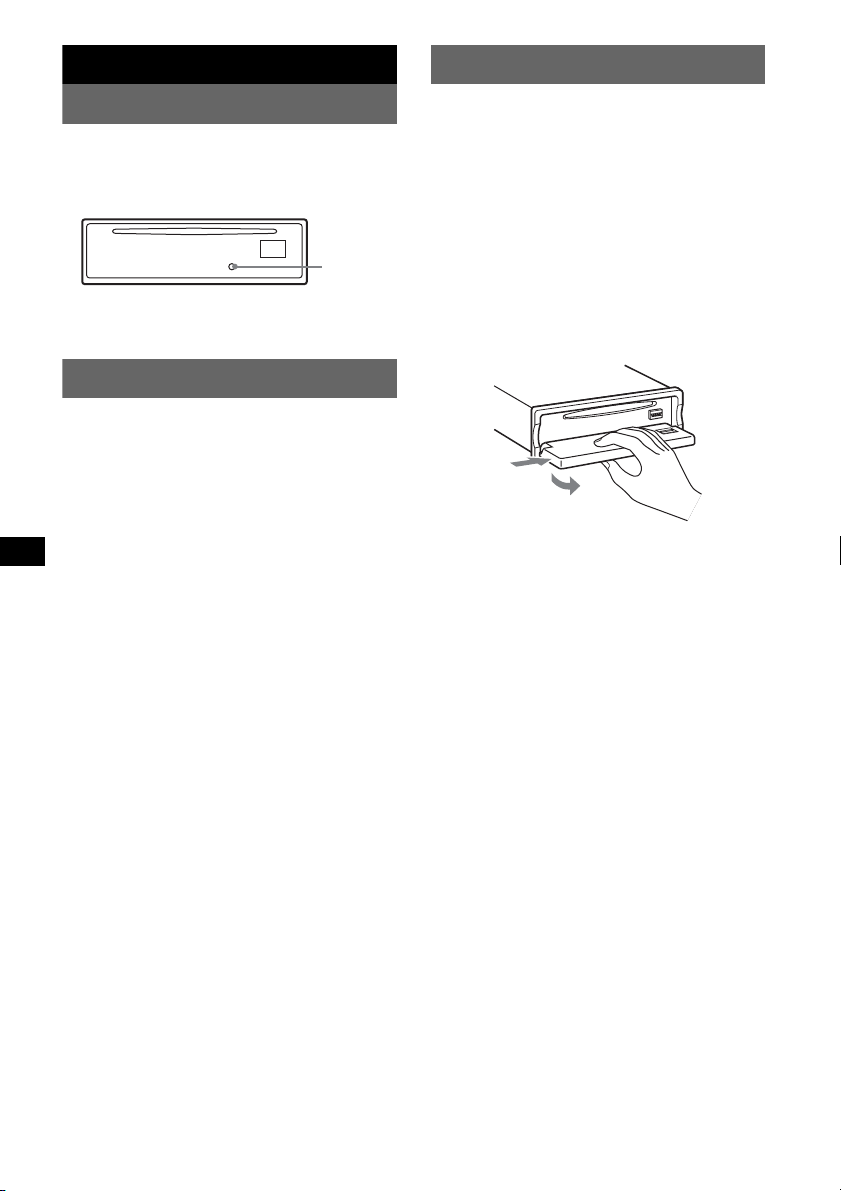
入门指南
拆卸前面板
重设本机
在第一次使用本机前,或更换汽车电瓶或改
变连接后,必须重设本机。
卸下前面板,并用带尖头的物体,如圆珠笔
等,按 RESET 按钮。
RESET 按钮
注意
按 RESET 按钮,将消除时钟设定和某些已储存的内容。
设定时钟
时钟采用 12 小时制数字显示。
1 按 (MENU)。
2 向上 / 向下推控制杆直至出现 “Setup”,
然后将其向右推。
3 向上 / 向下推控制杆直至出现 “Clock
Adjust”,然后将其向右推。
4 向上 / 向下推控制杆设定小时和分钟。
若要移动数字指示,则向左 / 向右推控制
杆。
5 设定完时钟后,按控制杆。
时钟开始走时。
您可以拆下本机的前面板以防止本机被盗。
警报
若您未拆除前面板即把点火开关旋转至 OFF
档,警报器将发出数秒钟的警报声。
只有使用内置放大器时警报器才会发出警报
声。
1 按 (OFF)。
本机关闭。
2 按 (OPEN)。
前面板向下弹出。
3 向右滑动前面板,然后轻轻拉出前面板的
左端。
1
2
注意
• 切勿摔落或猛按前面板及显示窗。
• 切勿使前面板受热 / 高温或受潮。避免将前面板遗留
在停放的车中或仪表盘 / 后托架上。
6
Page 67
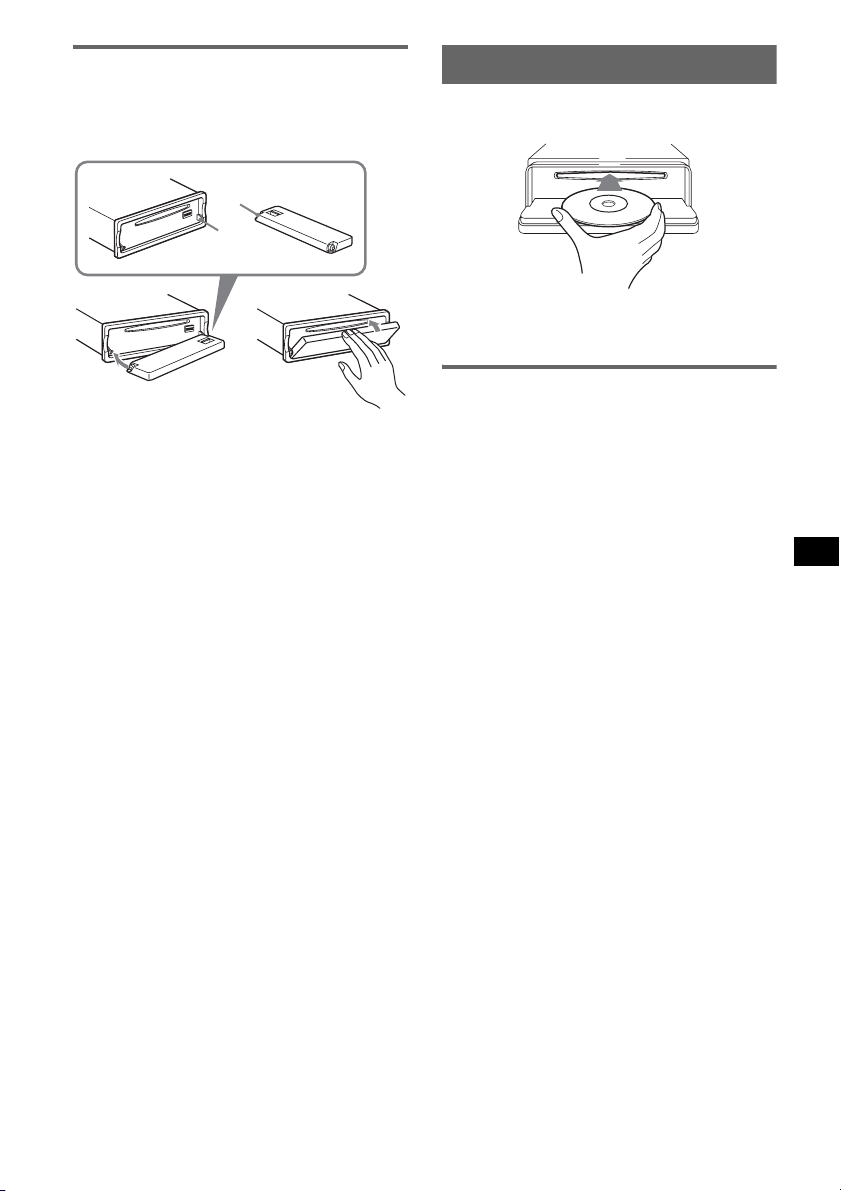
安装前面板
将前面板上的孔 A 放在设备的轴 B 上,然后
将左侧轻轻推入。
按本机上的 (SOURCE) (或插入光盘)开始
操作本机。
A
B
将光盘插入本机
1 按 (OPEN)。
2 插入光盘 (标签面朝上)。
c
注意
切勿在前面板内表面放任何东西。
3 关上前面板。
播放自动开始。
退出光盘
1 按 (OPEN)。
2 按 Z。
光盘退出。
3 关上前面板。
7
Page 68
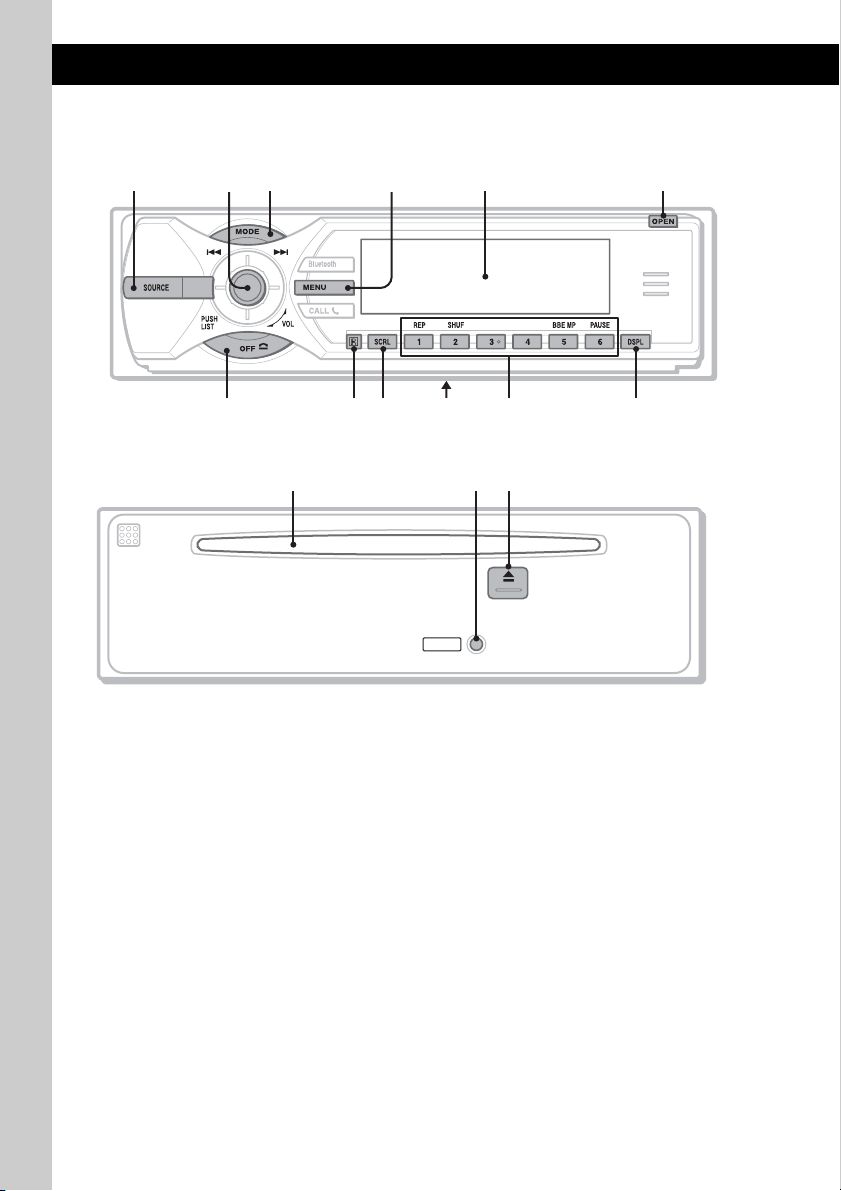
控制器位置和基本操作
音频功能
主机
1
35624
790 qsqa
拆下前面板
详细说明,请参阅列出页。卡片式遥控器上与
本机上对应的按钮控制相同的功能。
A SOURCE 按钮
打开电源;改变音源 (收音机 /CD/MD*
Bluetooth AUDIO/AUX)。
B 控制杆 /LIST 按钮 13、 20
转动:调节音量。
向上 / 向下 / 向左 / 向右推:选择菜单项
目。
按:应用设定。
1
CD/MD*
:
向上 / 向下推 *2:
- 跳过群组 *
- 连续跳过群组 *
放)。
向左 / 向右推:
- 跳过曲目 (推)。
- 连续跳过曲目 (推,然后在 2 秒钟内再
推住不放)。
- 后退 / 快进一个曲目 (推住不放)。
3
/乐曲集*4(推)。
3
/ 乐曲集 *4(推住不
8
8
qgqfqd
RESET
收音机:
向上 / 向下推:
- 接收已储存的电台。
1
/
向左 / 向右推:
- 自动调入电台 (推)。
- 手动搜台 (推住不放)。
按:
- 显示列表。
C MODE 按钮 12、 19
选择无线电波段 (FM/AM)/ 选择本
5
机 *
。
D MENU 按钮
进入菜单。
E 显示窗
F OPEN 按钮 7
G OFF 按钮
关闭电源;停止音源。
H 卡片式遥控器接收器
I SCRL (滚动)按钮 12
滚动显示项目。
MEX-BT5000
Page 69
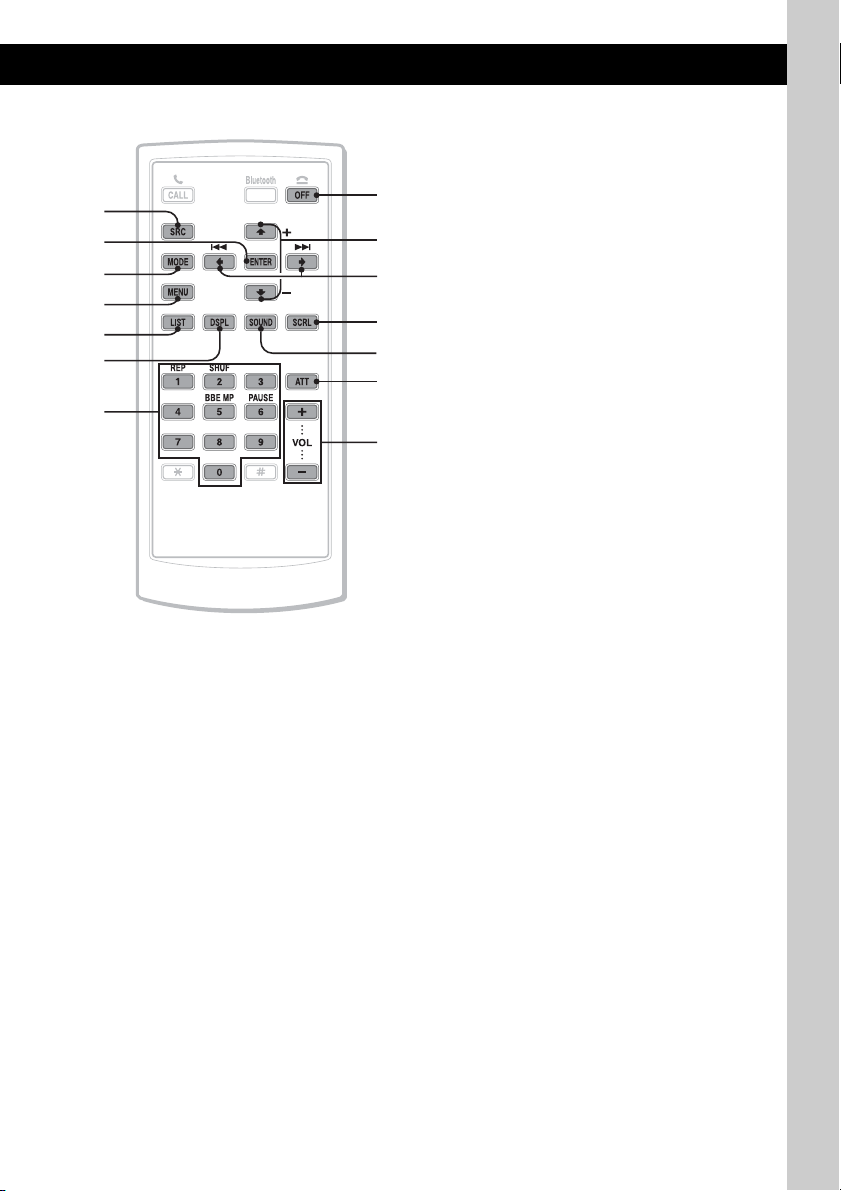
卡片式遥控器 RM- X303
1
qh
3
7
ql
w;
4
qj
qs
9
wa
ws
qk
wd
J 频率选择开关 (位于本机底部)
请参阅附带的安装 / 线路连接说明书中的
“频率选择开关”。
K 数字按钮
L DSPL (显示)按钮 12
M 光盘槽 7
N RESET 按钮 6
O Z (退出)按钮 7
卡片式遥控器上的以下按钮与本机上的按钮 /
功能不同。
1
CD/MD*
:
(1):REP 12、 20
(2):SHUF 12、 20
(5):BBE MP*
(6):PAUSE*
暂停播放。若要取消,则再按一次。
收音机:
接收已储存的电台(按);储存电台(按
住)。
改变显示项目。
插入光盘。
退出光盘。
6
启动 BBE MP 功能,设定 “BBE MP
on”。若要取消,设定 “BBE MP
off”。
2
6
qh ENTER 按钮
应用设定。
qj LIST 按钮
显示列表。
qk 数字按钮
按钮 1 至 6 具有与本机的数字按钮相同的
功能。
ql M (+)/m (–)按钮
与向上 / 向下推控制杆功能相同。
w; < (.)/, (>)按钮
与向左 / 向右推控制杆功能相同。
wa SOUND 按钮
选择声音项目。
ws ATT (降低)按钮
降低声音。若要取消,则再按一次。
wd VOL (音量)+/- 按钮
调节音量。
*1 连接了 MD 换碟机时。
*2 如果连接了换碟机,操作则不同,请参阅第 19 页。
*3 播放 ATRAC CD 时。
*4 播放 MP3/WMA 时。
*5 连接了 CD/MD 换碟机时。
*6 在本机上播放时。
注意
如果关闭本机且显示消失,除非先按本机上的
(SOURCE) 或插入光盘启动本机,否则无法使用卡片式
遥控器操作。
提示
有关如何更换电池的详细信息,请参阅第 23 页的 “更
换卡片式遥控器的锂电池”。
9
Page 70
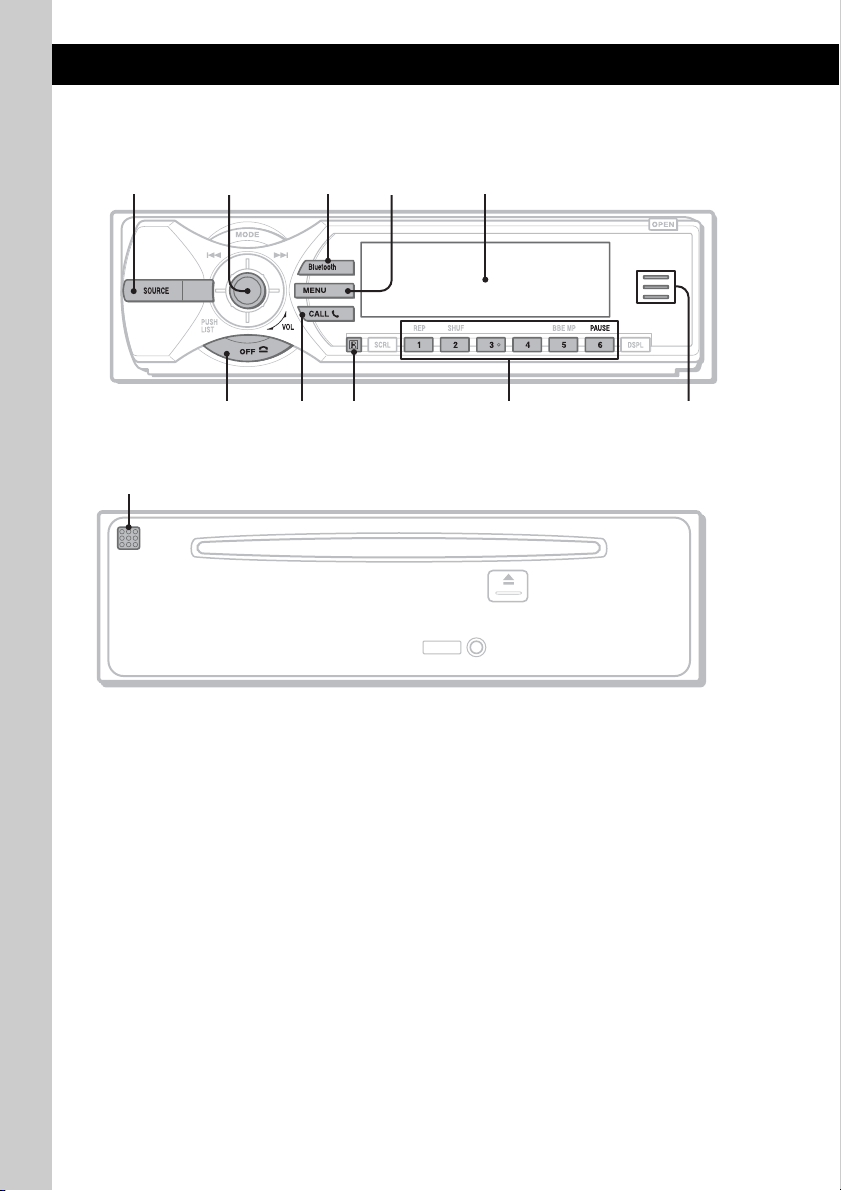
Bluetooth 功能
8
主机
1
3524
6097
拆下前面板
qa
详细说明,请参阅列出页。卡片式遥控器上与
本机上对应的按钮控制相同的功能。
A SOURCE 按钮
打开电源;改变音源 (收音机 /CD/MD*
Bluetooth AUDIO/AUX)。
B 控制杆
转动:调节音量。
向上/向下/向左/向右推:选择菜单项目。
按:应用设定。
Bluetooth 音频设备 *
向左 / 向右推:
- 跳过曲目 (推)。
- 后退 / 快进一个曲目 (推住不放)。
C Bluetooth 按钮 13、 14、 15、 16、 17
使用 Bluetooth 功能;接听电话。
D MENU 按钮 16
进入菜单;接听电话。
2
:
RESET
E 显示窗
F OFF 按钮 16
1
/
关闭电源;停止音源;结束或拒接电话。
G CALL 按钮 16
使用电话功能;接听电话。
H 卡片式遥控器接收器
I 数字按钮
拨打已储存的电话号码。
Bluetooth 音频设备 *
(6):PAUSE
J Bluetooth 指示灯
当输入 / 输出 Bluetooth 信号时亮起。
Bluetooth 信号中断时熄灭。
K 麦克风 15
MEX-BT5000
暂停播放。
2
:
10
Page 71
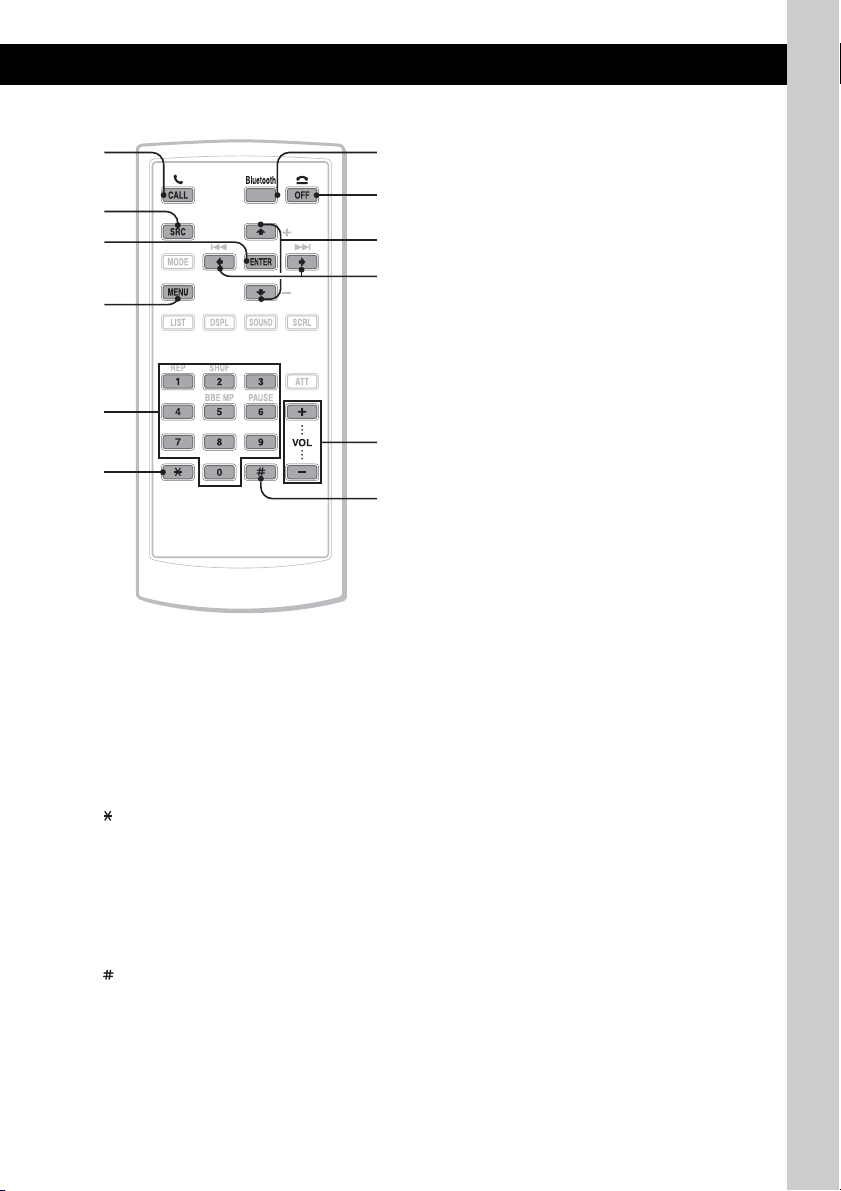
卡片式遥控器 RM- X303
73
提示
有关如何更换电池的详细信息,请参阅第 23 页的 “更
换卡片式遥控器的锂电池”。
1
qs
6
qg
qh
4
qd
qj
qf
qk
卡片式遥控器上的以下按钮与本机上的按钮 /
功能不同。
qs ENTER 按钮
应用设定。
qd 数字按钮 14、 15
输入数字 (电话号码、密码等)。
按钮 1 至 6 具有与本机的数字按钮相同的
功能。
qf
按钮 15
qg M (+)/m (-) 按钮
与向上 / 向下推控制杆功能相同。
qh < (.)/, (>)按钮
与向左 / 向右推控制杆功能相同。
qj VOL (音量)+/- 按钮
调节音量。
qk
按钮 15
*1 连接了 MD 换碟机时。
*2 当连接 Bluetooth 音频设备(支持 Bluetooth 技术的
AVRCP)时。视设备而定,某些操作可能会无效。
注意
如果关闭本机且显示消失,除非先按本机上的
(SOURCE) 或插入光盘启动本机,否则无法使用卡片式
遥控器操作。
11
Page 72
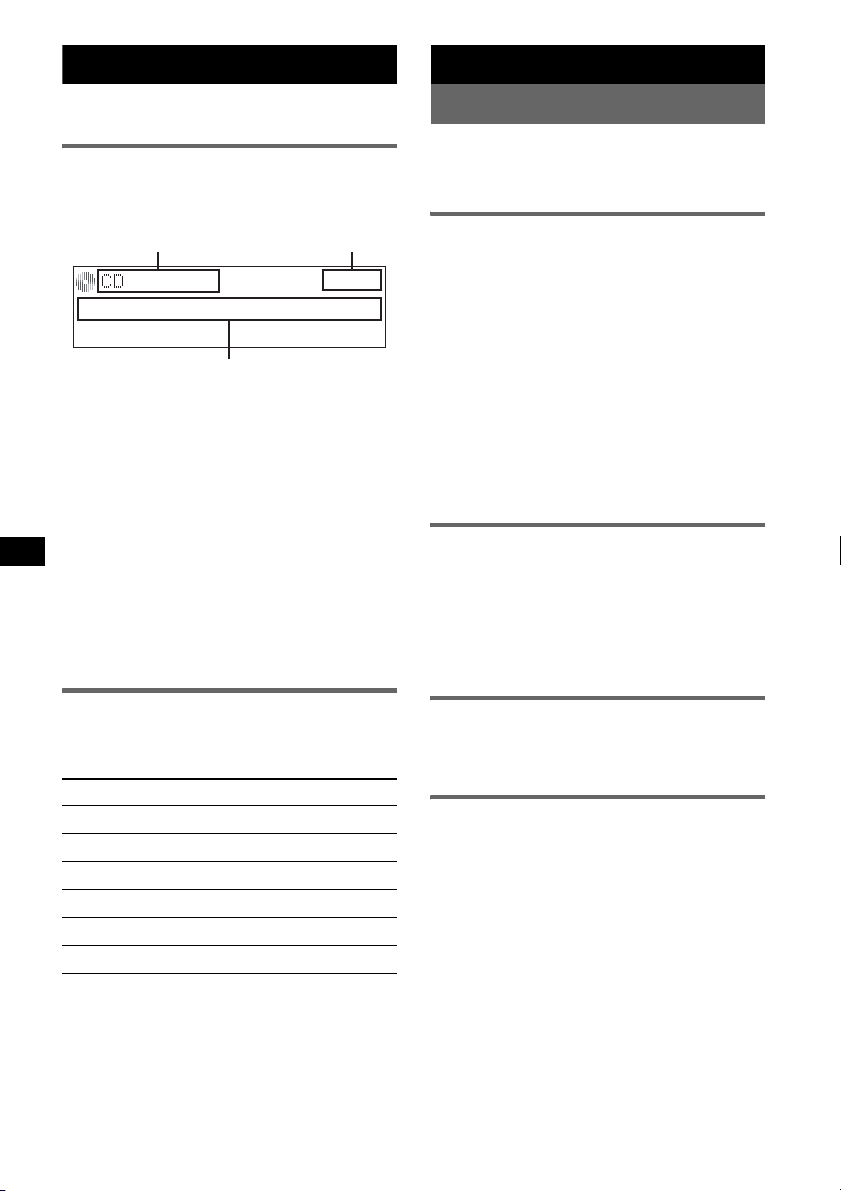
CD
C
关于选择 CD/MD 换碟机的详细信息,请参阅
第19页。
显示项目
例如:将 Info (信息)模式设定为 “All”
(第 18 页)。
A B
A 音源 /MP3/ATRAC/WMA 指示
B 时钟
C 曲目编号 / 已播放时间,光盘 / 艺术家名
称,专辑 / 群组编号,专辑 / 群组名称,
曲目名称,文本信息 *
* 播放 MP3时,显示ID3标记;播放 ATRAC CD时,显示用
SonicStage 等写入的文本信息;播放 WMA 时,显示
WMA 标记。
若要更改显示项目 C,则按 (DSPL); 若要滚
动显示项目 C,则按 (SCRL) 或设定 “Auto
Scroll on”(第 18 页)。
提示
显示的项目视光盘类型、录制格式和设定而异。关于
MP3/WMA 的详细信息,请参阅第 22 页;关于 ATRAC CD,
请参阅第 22 页。
收音机
存储和接收电台
警告
当在驾车过程中要调谐电台时,须使用最佳
调谐记忆功能 (BTM),以免发生事故。
自动储存- BTM
1 反复按 (SOURCE),直至出现 “TUNER”。
若要改变波段,则反复按 (MODE)。您可
以从 FM1、FM2、FM3、AM1 或 AM2 中选择。
2 按 (MENU)。
3 向上 / 向下推控制杆直至出现 “Receive
Mode”,然后将其向右推。
4 向上 / 向下推控制杆直至出现 “BTM”。
5 按控制杆。
本机将各电台按其频率顺序储存在数字按
钮上。
当设定存储完毕时,本机发出一声提示
音。
手动储存
1 接收您要储存的电台时,按住一个数字按
钮((1) 至 (6))不放,直至出现“MEM”。
数字按钮指示会在显示屏上出现。
注意
若您试图在同一个数字按钮上储存另一个电台,则以前
存入的电台将被替换。
重复和随机播放
1 播放过程中,反复按 (1) (REP) 或
(2) (SHUF),直至出现所需设定。
选择 播放
Repeat Track 重复播放曲目。
Repeat Album*
Repeat Group*
Shuffle Album*
Shuffle Group*
Shuffle Disc 以随机顺序播放光盘。
*1 播放 MP3/WMA 时。
*2 播放 ATRAC CD 时。
若要返回正常播放模式,则选择 “Repeat
off”或 “Shuffle off”。
1
重复播放专辑。
2
重复播放群组。
1
以随机顺序播放专辑。
2
以随机顺序播放群组。
12
收听已储存的电台
1 选择波段,然后按一个数字按钮 ((1) 至
(6))。
自动调谐
1 选择波段,然后向左/向右推控制杆进行搜
台。
当本机接收到一个电台时,扫描即停止。
如此反复操作直至接收到所要的电台。
提示
若您知道所要收听的电台频率,请向左 / 向右推控制杆
不放找到近似频率,然后向左 / 向右推控制杆精确调整
到所需频率 (手动调谐)。
Page 73
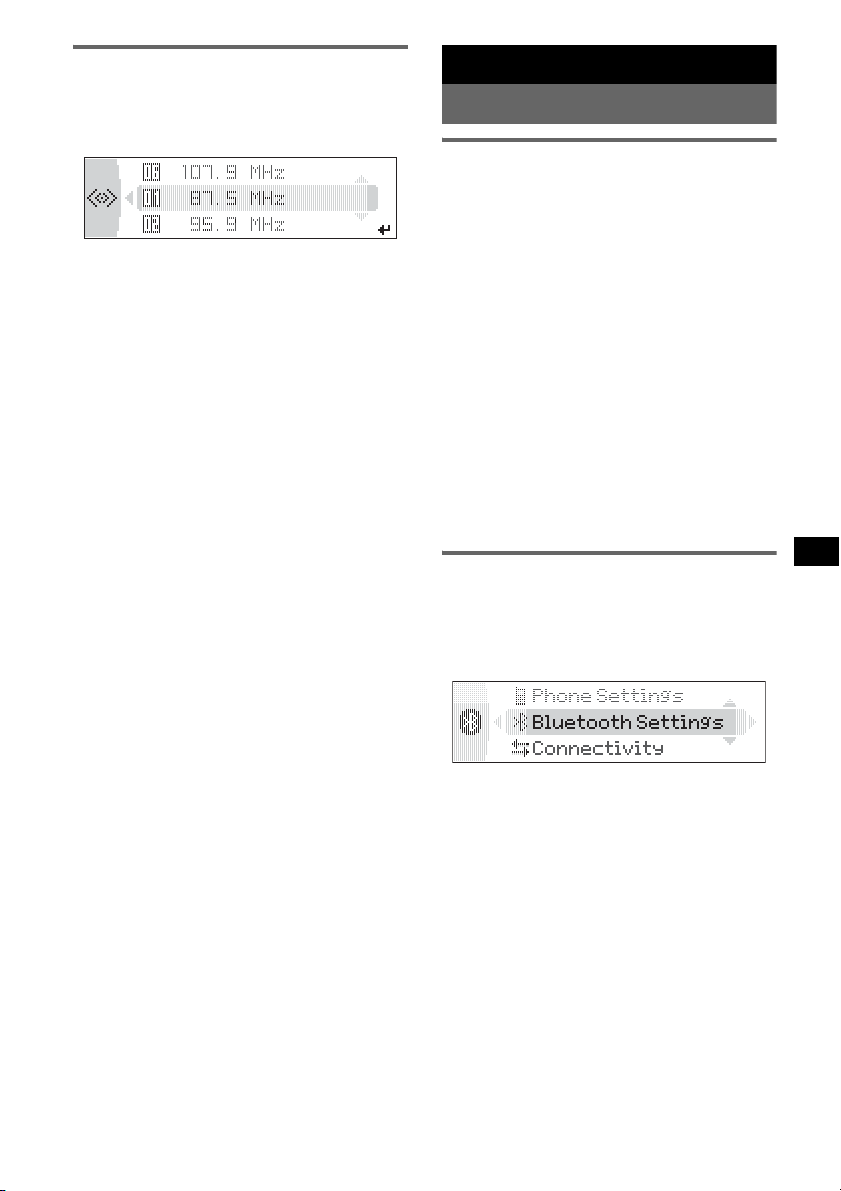
通过列表接收电台- LIST
可显示频率列表。
1 选择波段,然后按控制杆。
出现频率。
2 向上/向下推控制杆直至出现所需的电台。
3 按控制杆接收电台。
画面返回至正常接收模式。
Bluetooth 功能
使用 Bluetooth 功能之前
Bluetooth 功能的菜单操作
可从 Bluetooth 功能或CALL菜单对Bluetooth
设定进行配置。通常,可使用控制杆进行菜单
操作。
1 按 (Bluetooth) 或 (CALL)。
Bluetooth 功能菜单或 CALL 菜单出现。
2 向上 / 向下推控制杆直至出现所需的设定
项目,然后向右按。
数字指示移至右 (设定选择)端。
3 向上/向下推控制杆选择设定,然后按控制
杆。
设定完成。
4 按 (Bluetooth) 或 (CALL)。
出现正常画面。
输入字符
向上 / 向下推控制杆选择字符,然后向左 / 向
右推移动光标。
可输入的字符:A – Z、a – z、0 – 9 和空格。
配置 Bluetooth 设定
连接 Bluetooth 设备之前,请在本机上配置
Bluetooth 设定。
1 按 (Bluetooth)。
出现 Bluetooth 功能菜单。
2 选择 “Bluetooth 设定”。
3 选择所需菜单。
4 选择设定。
5 按 (Bluetooth)。
续下页 t
13
Page 74
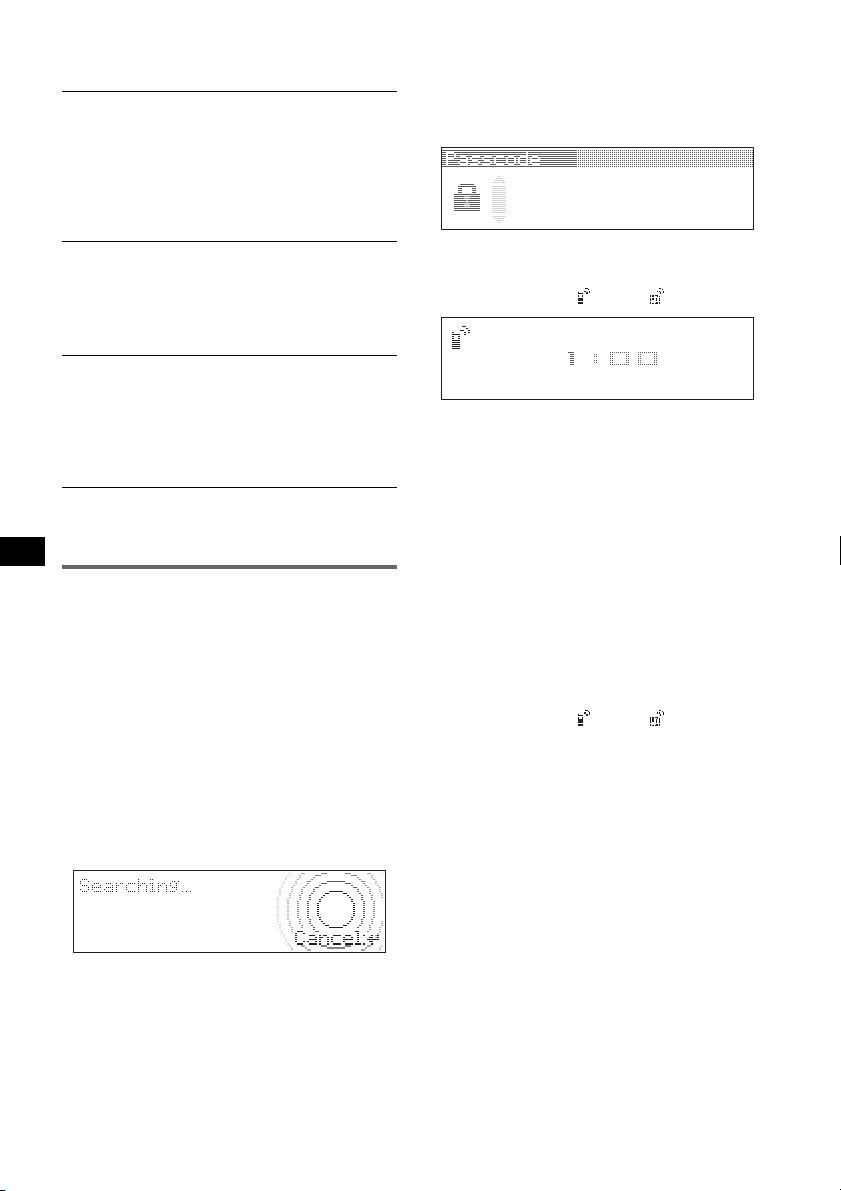
Bluetooth 设定菜单
“
z”表示默认设定。
Signal
将本机的 Bluetooth 信号输出切换为 “ON”
或 “OFF”。
-“ON”:输出Bluetooth信号(RF 2.4 GHz)。
-“OFF” (
z
):不输出 Bluetooth 信号 (RF
2.4 GHz)。
当连接至 Bluetooth 设备时请务必设定为
“ON”。
Visibility
允许其他 Bluetooth 设备搜索本机。
-“Show”:允许其他设备进行搜索。
-“Hide”(
z
):不允许其他设备进行搜索。
当从 Bluetooth 设备搜索本机时,请务必设
定为 “Show”。
Device Name
更改显示在所连设备上的本机名称。(默认
设定:“Xplod”)
选择 “Rename”并输入字符。最多可输入
12 个字符。
若要恢复 “Xplod”,请选择 “Default” c
“yes”。
注意
有关其他 Bluetooth 设备设定的详细信息,请参阅其相
关的说明书。
将本机与Bluetooth 设备进行配对和连
接
当第一次连接 Bluetooth 设备时,需要进行相
互注册。此操作被称为 “配对”。仅在第一次
连接时需要注册(配对),从下次起本机和其
他设备会自动相互识别。(视设备而定,可能
每次连接都需要输入密码。)
从本机搜索 Bluetooth 设备
请事先确认其他Bluetooth设备设成了允许搜
索 (可发现)。
1 按 (Bluetooth)。
出现 Bluetooth 功能菜单。
2 选择 “Connectivity” c “Search”。
开始搜索可连接的设备,然后检测到的设
备名称出现在列表中。如果无法接收到设
备名称,将会显示 “Unknown”。
搜索时间因 Bluetooth 设备的数量而异。
3 选择要连接的设备。
开始配对。
4 输入密码 *。
用控制杆或卡片式遥控器输入相同的本机
与所连设备的密码。密码既可以是您自己
选择的数字或由所连设备限定的数字。
详细信息,请参阅所连设备的说明书。
5 按控制杆进行确认。
出现 “Connected”,连接完成。
在连接时出现 “ ”或 “ ”。
* 视设备而定,密码可能会被称为 “passkey”、“PIN
code”、“PIN number”或 “Password”等。
从 Bluetooth 设备搜索本机
确认 Bluetooth 设定菜单中的“Visibility”
设成了 “Show”(第 14 页)。
1 设定要搜索的相连设备。
2 当本机上出现 “Allow Connection?”时,
请选择 “yes”。
开始连接。
视设备而定,可能会出现密码输入画面。
3 输入所连设备的密码。
4 按控制杆进行确认。
出现 “Connected”,连接完成。
在连接时出现 “ ”或 “ ”。
提示
也可用卡片式遥控器上的数字按钮输入密码。
注意
• 当连接 Bluetooth 设备时,无法从其他设备上检测到
本机。若要本机被检测到,请断开当前的连接,并从
其他设备上搜索本机。
• 视设备而定,可能无法从本机进行搜索。在此情况
下,从所连的设备搜索本机。
• 如果同时相互搜索本机和所连的设备,则本机无法识
别所连的设备。
• 搜索或连接可能需要一段时间。
• 视设备而定,在输入密码前可能会出现连接的确认画
面。
• 输入密码的时限因设备而异。
• 对于每个免提和音频设备,本机最多可注册 6个设备。
• 本机无法连接至仅支持 HSP(Head Set Profile)的设
备。
14
Page 75
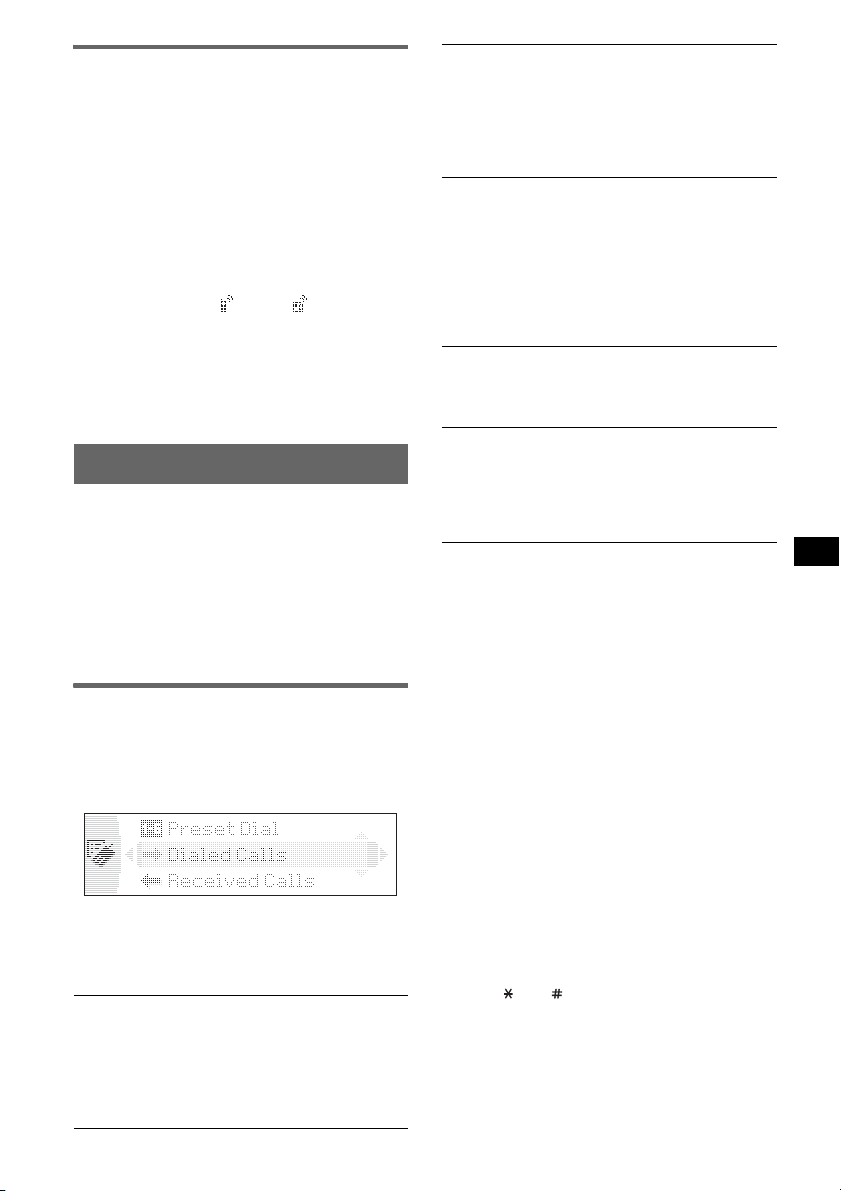
连接已注册的设备
设备被配对注册一次,并且与本机相连接。可
选择注册的设备并进行连接。
1 按 (Bluetooth)。
出现 Bluetooth 功能菜单。
2 选择 “Connectivity” c “Handsfree
Devices”或 “Audio Devices”。
出现注册设备的列表。
3 选择要连接的设备。
4 选择 “Connect”。
出现 “Connected”,连接完成。
在连接时出现 “ ”或 “ ”。
停止连接
在步骤 4 中选择 “Disconnect” c “yes”。
提示
视设备而定,可能会从设备上选择本机,然后进行连
接。
免提通话
请事先确认本机和手提电话已进行连接
(第 14、15 页)。
注意
• 当具有 Bluetooth 音频流功能的手提电话被作为音频
设备连接时,有关操作的详细信息,请参阅第 16 页的
“从音频设备聆听音乐”。
• 本机的麦克风位于前面板的后侧(第 10 页)。请勿用
磁带等物品挡住麦克风。
• 即使在通话过程中启动 ATT 功能,输出的声音也不会
降低。
拨打电话
通过操作本机,您可从所连的手提电话拨打
电话。
1 按 (CALL)。
出现 CALL 菜单。
Received Calls*
从已接电话的历史记录中选择。(最多可储
存的姓名和电话号码:10)
要拨打的姓名和电话号码 c “Call”
选择 “Delete”删除姓名和电话号码,选择
“Delete All”清除历史记录。
Phonebook*
从电话簿列表中选择。(最多可储存的姓名
和电话号码:50)
“Contact List” c 要拨打的姓名 c 姓名和
电话号码
有关如何储存进电话簿的详细信息,请参阅
第 16 页的 “使用电话簿”和第 17 页的 “设
定免提设备”。
Dial
用控制杆或卡片式遥控器输入电话号码。
若要输入“+”,则按住卡片式遥控器上的按
钮0。
Preset Dial*
选择储存在数字按钮上的电话号码。
预设号码 (P1 – P6) c “Call”
有关如何储存进数字按钮的详细信息,请参
阅第 16 页的 “使用预设拨号”。
* 如果设定“Security”(第 17 页),则出现“Security
Locked”,且操作可能无法进行。
提示
• 按 (CALL) 后,通过按两次数字按钮,预设拨号可供您
拨打电话。
• 在 “Dialed Calls”、“Received Calls”、和
“Preset Dia”菜单上,当显示电话号码时,通过按
(CALL) 您可拨打电话。
预设铃声和通话者声音的音量
可预设铃声和通话者声音的音量。
调节铃声:
当电话铃声响起时,请转动控制杆。出现
“Ring Vol”,且铃声音量被设定。
调节通话者话音:
拨打电话时转动控制杆。出现 “Talk Vol”,
且通话者话音音量被设定。
2 根据以下顺序选择项目,然后按控制杆开
始拨打电话。
CALL 菜单
Dialed Calls*
从已拨电话的历史记录中选择。(最多可储
存的姓名和电话号码:10)
要拨打的姓名和电话号码 c “Call”
选择 “Delete”删除姓名和电话号码,选择
“Delete All”清除历史记录。
发送 DTMF (Dual Tone Multiple
Frequency)音调
可发送 DTMF 音调。
若要发送 DTMF 音调,请在拨打电话时使用控
制杆,或按卡片式遥控器上的所需按钮
(0 – 9、 或
)。
续下页
t
15
Page 76
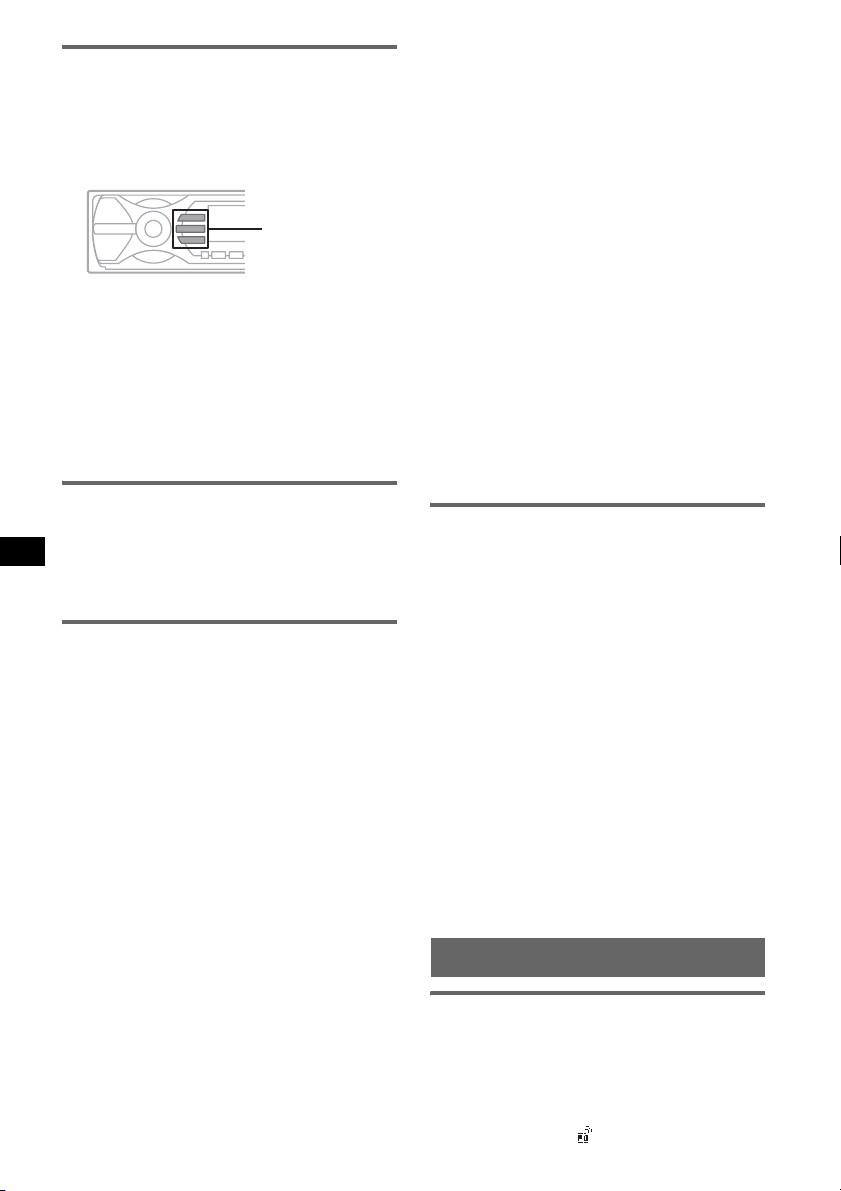
接听电话
接听电话时,铃声从汽车扬声器上输出。
有关对于接听电话和在通话过程中的设定,
请参阅第 17 页的 “设定免提设备”。
1 当接听电话时,请按 (CALL)、(MENU) 或
(Bluetooth)。
(Bluetooth)
(MENU)
(CALL)
开始通话。
拒接电话
按 (OFF)。
提示
• 如果您将 “Auto Answer”设定为开启,则会在设定
时间内自动接听电话 (第 17 页)。
• 如果在通话过程中按 (CALL),则免提功能被禁用,手
提电话的麦克风和扬声器启用。在此情况下,视手提
电话而定,Bluetooth 连接可能会断开。
结束通话
1 按 (OFF)。
当通话结束时,通话时间会显示数秒钟。
注意
即使通话结束,Bluetooth 连接并不取消。
使用电话簿
从手提电话接收电话簿数据
1 从 Bluetooth 功能菜单选择 “Phone
Settings”。
2 选择 “Receive PB”。
出现 “Waiting…”。
3 通过操作手提电话发送电话簿数据。
当接收电话簿数据时出现 “Data
Receiving…”。
当接收完成时出现 “Complete”。
注意
• 若要取消传送电话簿数据,请使用手提电话。无法从
本机上取消传送。
• 视手提电话中记录的电话簿所使用的格式 / 字符而
定,在本装置上可能无法正确显示。
从 “Dialed Calls”或 “Received
Calls”储存数字
1 从 CALL 菜单选择 “Dialed Calls”或
“Received Calls”。
2 选择电话号码进行储存,然后选择
“Save”。
出现 “Contact Name”画面。
16
3 输入姓名。
最多可输入 20 个字符。
4 选择 “Save?” c “yes”。
注意
在电还簿中最多可储存 50 个电话号码。如果您试图注
册 50 个号码以上,则会出现 “Memory Full”。
从电话簿删除
1 从 CALL 菜单选择“Phonebook”c “Contact
List”。
2 选择要删除的姓名。
3 选择 “Delete” c “yes”。
若要清除所有电话簿数据,请在步骤 1 中选择
“Delete All”。在清除后,请确认所有电话
簿数据已被正确清除。
更改电话簿中的姓名
1 从 CALL 菜单选择“Phonebook”c “Contact
List”。
2 选择要更改的姓名。
3 选择 “Edit Name”,然后输入新的姓名。
使用预设拨号
储存预设拨号
您可将电话簿中的电话号码储存至预设拨
号。
1 从 CALL 菜单选择 “Preset Dial”。
2 选择要储存的预设号码(P1 – P6),然后选
择 “Preset Memory”。
3 选择要储存的姓名。
4 选择所选姓名的电话号码。
5 当出现 “Save?”时选择 “yes”。
注意
若要更换注册的预设号码,请首先将现存的注册删除,
然后储存新的电话号码。
删除预设拨号
1 从 CALL 菜单选择 “Preset Dial”。
2 选择要删除的预设号码。
3 选择 “Delete” c “yes”。
音乐流
从音频设备聆听音乐
如果音频设备支持 Bluetooth 技术 的 A2DP
(Advanced Audio Distribution Profile),
您可在本机上聆听音频设备的音乐。
1 连接本机和 Bluetooth 音频设备 (第 15
页)。
在连接时出现 “ ”。
Page 77
2 调低本机上的音量。
3 反复按 (SOURCE) 直至出现 “Bluetooth
AUDIO”。
4 操作音频设备开始播放。
5 调节本机上的音量。
用本机操作音频设备
如果音频设备支持 Bluetooth 技术的 AVRCP
(Audio Video Remote Control Profile),则
您可在本机上执行以下操作。(操作因音频设
备而异。)
目的 操作
跳过曲目 向左 / 向右推控制杆。
后退/快进曲目向左 / 向右推住控制杆不放。
暂停 按 (6) (PAUSE)*。
* 视设备而定,可能需要按两次。
除上述以外的操作应该在音频设备上执行。
注意
即使本机上的音源更改,也不会停止播放音频设备。
提示
您可像连接音频设备那样连接支持 A2DP (Advanced
Audio Distribution Profile)的手提电话,并聆听音
乐。
其他设定
设定免提设备
当与Bluetooth功能兼容的手提电话像免提设
备一样连接,则您可设定各种功能。
1 按 (Bluetooth)。
出现 Bluetooth 功能菜单。
2 选择 “Phone Settings”。
3 选择所需菜单。
4 选择设定。
5 按 (Bluetooth)。
电话设定菜单
“
z”表示默认设定。
1*2
Receive PB*
接收和储存来自手提电话的电话簿数据
(第 16 页)。
Auto Answer
-“on”:接收时自动开始通话。设定时间开
始通话:“1 sec”- “60 sec”
-“off” (
(Bluetooth) 后才开始通话。
(接收电话簿)
z
):按 (CALL)、 (MENU) 或
Ringtone
切换铃声。
-“Cellular*
3
”(z):输出使用手提电话设定
的铃声。
-“Default”:输出本机的铃声。
EC/NC Mode*
4
(回声消除器 / 噪音消除器模
式)
降低电话通话中的回声和噪音。
通常设定为 “Mode 1”(
z
)。如果输出音质
不佳,请设定为 “Mode 2”或 “off”。
Speaker Sel*
4
(扬声器选择)
设定前扬声器输出铃声、拨号音和对方的话
音。
-“FR-L”(
z
):从前扬声器的左声道输出。
-“FR-R”:从前扬声器的右声道输出。
-“Front”:从前扬声器的左右声道输出。
Security
通过设定 4 位数字的密码锁住下列菜单中的
个人信息(第15页)。
“Dialed Calls” 、“Received Calls” 、
“Phonebook”、“Preset Dial”、“Receive
PB”
如果您设定了加密,则当操作上述菜单时会
出现 “Security Locked”。
若要解除加密,则选择 “Unlock”并输入密
码。
*1 如果设定 “Security”,则会出现 “Security
Locked”,且操作可能无法进行。
*2 如果使用了无法在本机上显示的字符,则该字符无
法正确显示。
*3 视手提电话而定,即使设定成了 “Cellular” ,本
机的铃声可能也会被输出。
*4 可在通话时配置。
注意
如果您在加密设定中选择 “Initialize”,则储存的所
有数据会被删除 (“Dialed Calls”、“Received
Calls”、“Phonebook”和 “Preset Dial”)。
删除所连接设备的注册信息
1 按 (Bluetooth)。
出现 Bluetooth 功能菜单。
2 选择 “Connectivity” c “Handsfree
Devices”或 “Audio Devices”。
出现注册设备的列表。
3 选择要删除的设备。
4 选择 “Delete” c “yes”。
若要清除选择列表中的所有设备,则在步骤 4
中选择 “Delete All”。
自动连接功能
如果您汽车的点火开关设定在 ACC 位置,则
本机会自动重新连接至最近连接的 Bluetooth
设备。
17
Page 78
其他功能
调节菜单项目- MENU
1 按 (MENU)。
2 向上 / 向下推控制杆直至出现所需的菜单
项目,然后向右按。
项目将如下改变:
Setup y Display y Receive Mode y
Sound
3 向上 / 向下推控制杆直至出现所需的设定
项目,然后向右按。
数字指示移至右 (设定选择)端。
4 向上/向下推控制杆选择设定,然后按控制
杆。
设定完成。
5 按 (MENU)。
画面返回至正常播放 / 接收模式。
注意
显示的项目视音源和设定而异。
提示
• 通过按控制杆,您可进入上一个菜单等级。
• 在步骤 5 中,向左推控制杆直至出现“EXIT”,然 后 按
控制杆,而不按 (MENU)。
• 通过按卡片式遥控器上的 (SOUND),您可直接进入声
音设定菜单。
可以设定以下项目 (详细说明请参阅参考
页):
“
z”表示默认设定。
设定
Clock Adjust (第 6 页)
Beep
设定 “on”(
RM (旋转式控制器)
改变旋转式控制器控制器的操作方向。
-“NORM”(
转式控制器。
-“REV”:当您将旋转式控制器安装在转向柱
的右侧。
AUX Audio*
将 AUX 音源显示转换为“on”(z)或“off”
(第 20 页)。
Version*
显示本机的固件版本。
z
)或 “off”。
z
):使用处于出厂设定位置的旋
1
1
显示
Image
设定各种显示图像。
-“SpaceProducer”(
z
):在播放音乐时创
建屏幕动画图案。
-“All”:反复逐步通过所有显示模式中的显
示图像。
-“off”:不显示任何图像。
-“SA 1 – 5”:显示频谱分析图形。
-“Movie 1 – 3”:显示动画。
-“Wallpaper 1 – 3”:显示壁纸。
-“SA All”/ “Movie All”/ “Wallpaper
All”: 反复逐步显示各模式的显示图像。
Info (信息)
显示项目 (视音源等而定)。
-“All”:显示所有项目。
-“Simple”(
z
):不显示任何项目。
-“Clear”:显示项目自动消失。
1
Demo*
(演示)
设定 “on”(
z
)或 “off”。
Dimmer
改变显示屏亮度。
-“Auto”(
z
):打开汽车照明时,显示屏自
动变暗。
-“on”:显示屏变暗。
-“off”:关闭调光器。
Auto Scroll
更改了光盘 / 专辑 / 群组 / 曲目时,自动滚
动显示较长的项目。
-“on”:滚动。
-“off”(
z
):不滚动。
接收模式
Local (本地搜寻模式)
-“off”(z):调入正常接收。
-“on”:仅调入信号较强的电台。
Mono (单声道模式)
若要改善信号较差的 FM 接收,则选择单声道
接收模式。
-“off”(
-“on”:以单声道收听立体声广播。
IF
-“Auto”(
消除噪音。
-“Wide” *
式收听 FM 立体声广播。
BTM (第12页)
z
):以立体声收听立体声广播。
z
):自动缩小接收频率的范围以
2
:总是以立体声和全频率接收方
18
Page 79
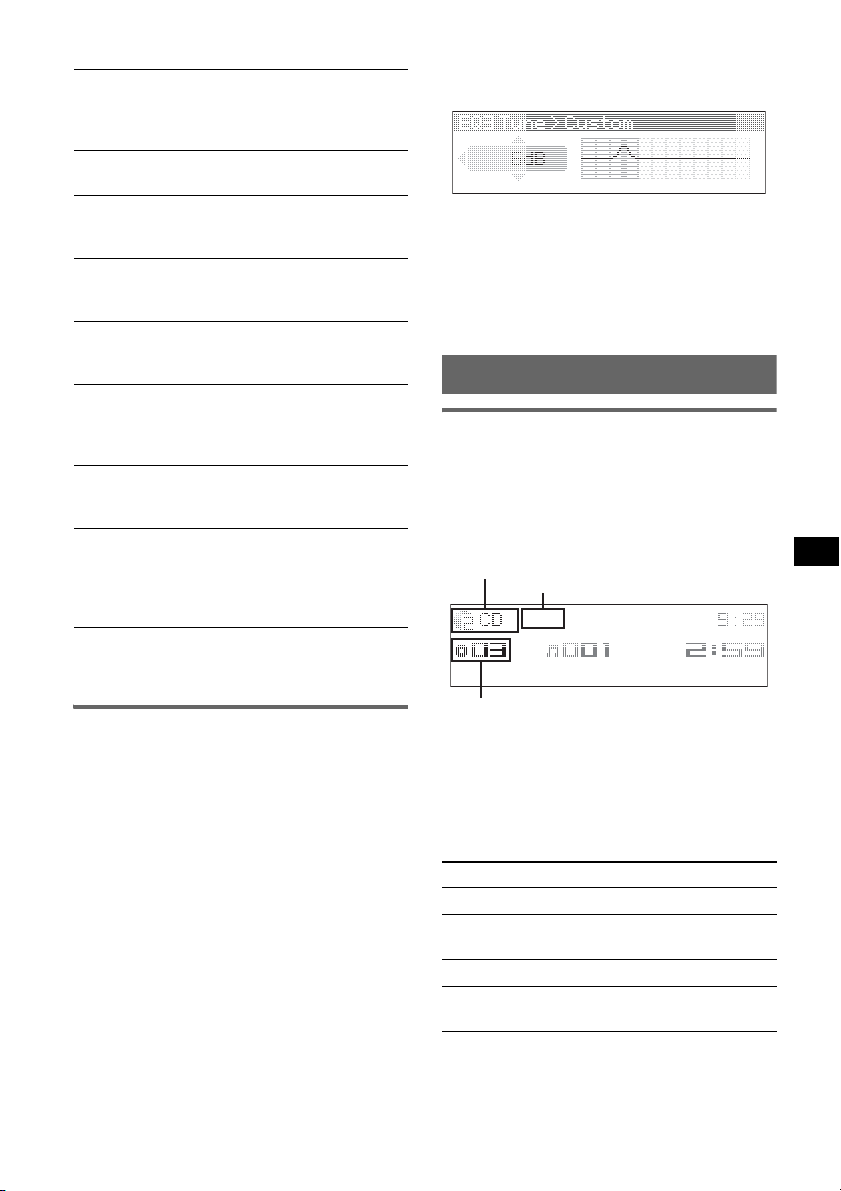
声音
EQ3 Preset
选择均衡器类型:“Xplod”、“Vocal”、
“Edge”、“Cruise”、“Space”、
“Gravity”、“Custom”或 “Off”(
z
)。
EQ3 Tune
请参阅第 19 页上的 “自定义均衡曲线”。
DSO
选择 DSO 模式:“1”、“2”、“3”或 “off”
z
(
)。数字越大,增强的效果越大。
Balance
在左右扬声器之间调节平衡:“R10”-
“± 0”(
z
)- “L10”
Fader
在前后扬声器之间调节平衡:“F10”-
“± 0”(
z
)- “R10”
Subwoofer
调节超低音扬声器音量:“+10”- “± 0”
z
(
)- “-10”
(最低设定显示为 “- ∞”。)
LPF (低通滤波器)
选择超低音扬声器的截止频率:“off”(
z
)、
“125Hz”或 “78Hz”。
AUX Level
调节各所连设备的音量电平。该设定不需要
调节音源之间的音量电平 (第 20 页)。
可调电平范围:“+6 dB”-“±0 dB”(
z
)-
“-6 dB”
*1 本机关闭时。
*2 在此情况下,当在立体声接收模式下,某些立体声
广播可能会变成单声道。
自定义均衡曲线- EQ3 Tune
EQ3 的“Custom”可让您进行自己的均衡器设
定。
1 选择音源,然后按 (MENU)。
2 使用控制杆选择“Sound”c“EQ3 Preset”
c “Custom”。
3 使用控制杆选择 “EQ3 Tune”。
4 从 “LOW”、“MID”和 “HI”中选择所需
的频率范围。
5 选择您想要调节的频率。
各范围内的可调频率:
LOW: 60 Hz 或 100 Hz
MID: 500 Hz 或 1.0 kHz
HI: 10.0 kHz 或 12.5 kHz
6 调节均衡曲线。
音量电平以 1 dB 为级差,从 -10 dB 至
+10 dB 进行调整。
7 按控制杆。
重复步骤 4 至 7 调节其他频率。
若要恢复出厂时设定的均衡曲线,在步骤
4 中选择 “Initialize” c “Yes”。
提示
其他均衡器类型也可调整。
使用选购设备
CD/MD 换碟机
选择换碟机
1 反复按 (SOURCE),直至出现 “CD”或
“MD”。
2 反复按 (MODE),直至出现想要的换碟机。
设备编号、MP3 指示 *
光盘/专辑编号
LP2/LP4 指示 *
播放开始。
*1 播放 MP3 时。
*2 播放 MDLP 光盘时。
跳过乐曲集和光盘
1 在播放过程中,向上 / 向下推控制杆。
跳过 向上 / 向下推
专辑 并按住片刻,然后松开。
连续跳过专辑 并在第一次松开后的 2 秒钟内
光盘 重复播放。
连续跳过光盘 然后在 2 秒钟内再按下并推住
1
2
按住。
不放。
续下页
t
19
Page 80
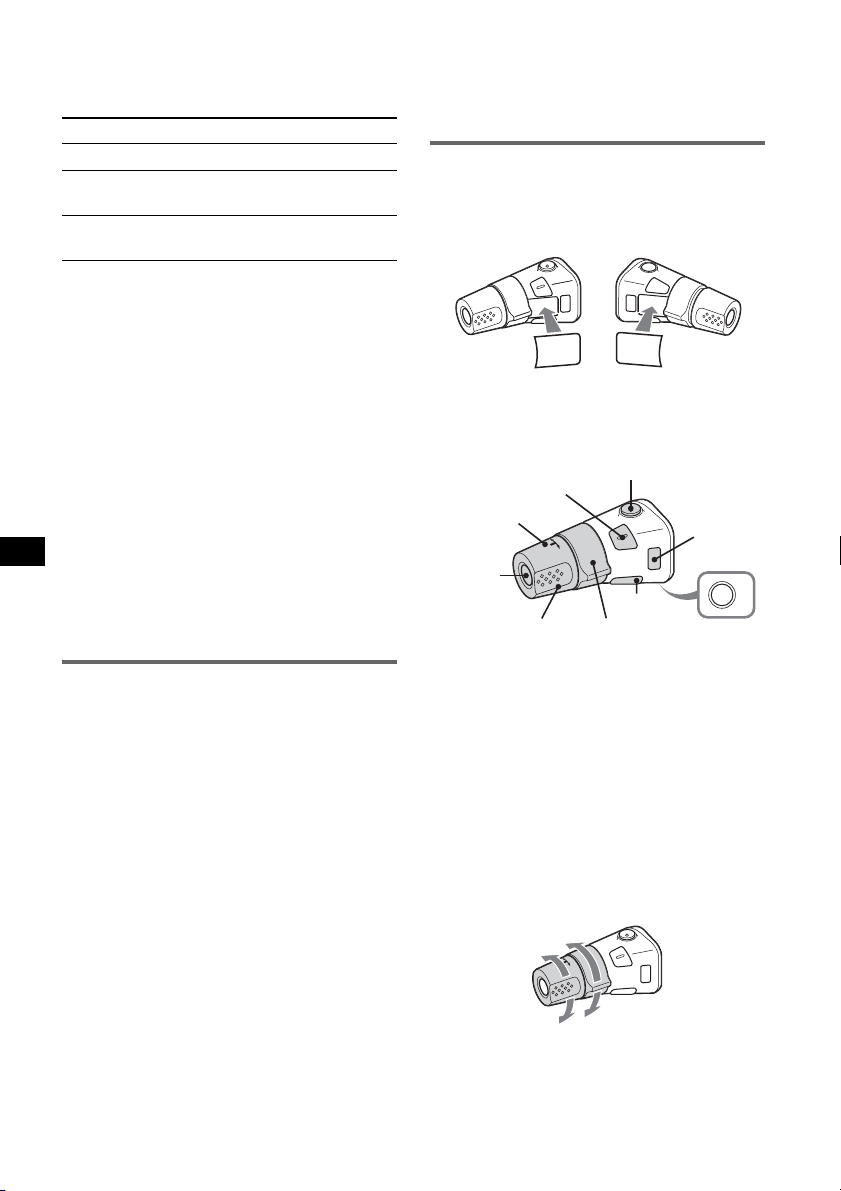
重复和随机播放
1 播放过程中,反复按 (1) (REP) 或
(2) (SHUF),直至出现所需设定。
选择 播放
Repeat Disc*1重复播放光盘。
Shuffle
Changer*
Shuffle All*
以随机顺序播放换碟机中的
1
曲目。
2
以随机顺序播放所有设备中
的曲目。
*1 连接了一台或多台 CD/MD 换碟机时。
*2 连接了一台或多台 CD 换碟机,或者连接了两台或多
台MD换碟机时。
若要返回正常播放模式,则选择“Repeat
off”或 “Shuffle off”。
提示
“Shuffle All”不会随机播放 CD 设备和 MD 换碟机之间
的曲目。
按名称寻找光盘- LIST
当连接了具有 CD TEXT 功能的 CD 换碟机或 MD
换碟机时,您可从列表中选择光盘。
如果您指定了光盘的名称,则在列表中会出
现名称。
1 在播放过程中,按控制杆。
会出现光盘编号或光盘名称。
2 向上 / 向下推控制杆直至出现所需的光盘。
3 按控制杆播放光盘。
画面返回至正常播放模式。
辅助音频设备
您可以将选购的 Sony 便携式设备连接至本机
的 BUS AUDIO IN/AUX IN 端子。如果换碟机或
其他设备没有连接在这个端子上,则本机能
让您在汽车扬声器上收听该便携式设备。
注意
连接便携式设备时,请勿连接 BUS CONTROL IN。如果有
设备连接在 BUS CONTROL IN,则无法用 (SOURCE) 选
择 “AUX”。
提示
同时连接便携式设备和换碟机时,请使用选购的 AUX-IN
选择器。
选择辅助设备
1 反复按 (SOURCE) 直至出现 “AUX”。
由便携式设备本身进行操作。
4 在本机上设定通常的收听音量。
5 根据第 18 页的“调节菜单项目- MENU”,调
整音量电平。输入电平的可调范围为 –6 dB
至 +6 dB。
旋转式遥控器 RM-X4S
贴标签
根据您安装旋转式遥控器的方式贴指示标
签。
D
S
D
UN
SO
E
D
O
M
PL
S
D
P
L
M
O
D
E
S
O
U
N
D
控制器位置
旋转式控制器与本机相对应的按钮控制相同
的功能。
SOUND*
PRESET/
DISC
SOURCE
VOL
ATT
DSPL
SEEK/AMS
MODE
OFF
OFF
旋转式控制器上的以下控制器与设备的操作
不同。
• PRESET/DISC 控制器
与在本机上向上 / 向下推控制杆相同(推入
并转动)。
• VOL (音量)控制
与在本机上转动控制杆相同 (转动)。
• SEEK/AMS 控制器
与在本机上向左 / 向右推控制杆相同 (转
动,或转动不放)。
* 对本机无效。
改变操作方向
控制器操作方向的工厂设定如下图所示。
调高
调整音量电平
必须在播放之前调整每个连接的音频设备的
音量。
1 调低本机上的音量。
2 反复按 (SOURCE) 直至出现 “AUX”。
3 以适中的音量开始播放便携式音频设备。
20
调低
若需要将旋转式控制器安装在汽车转向柱的
右侧,您可以将控制器的操作方向反置。
Page 81
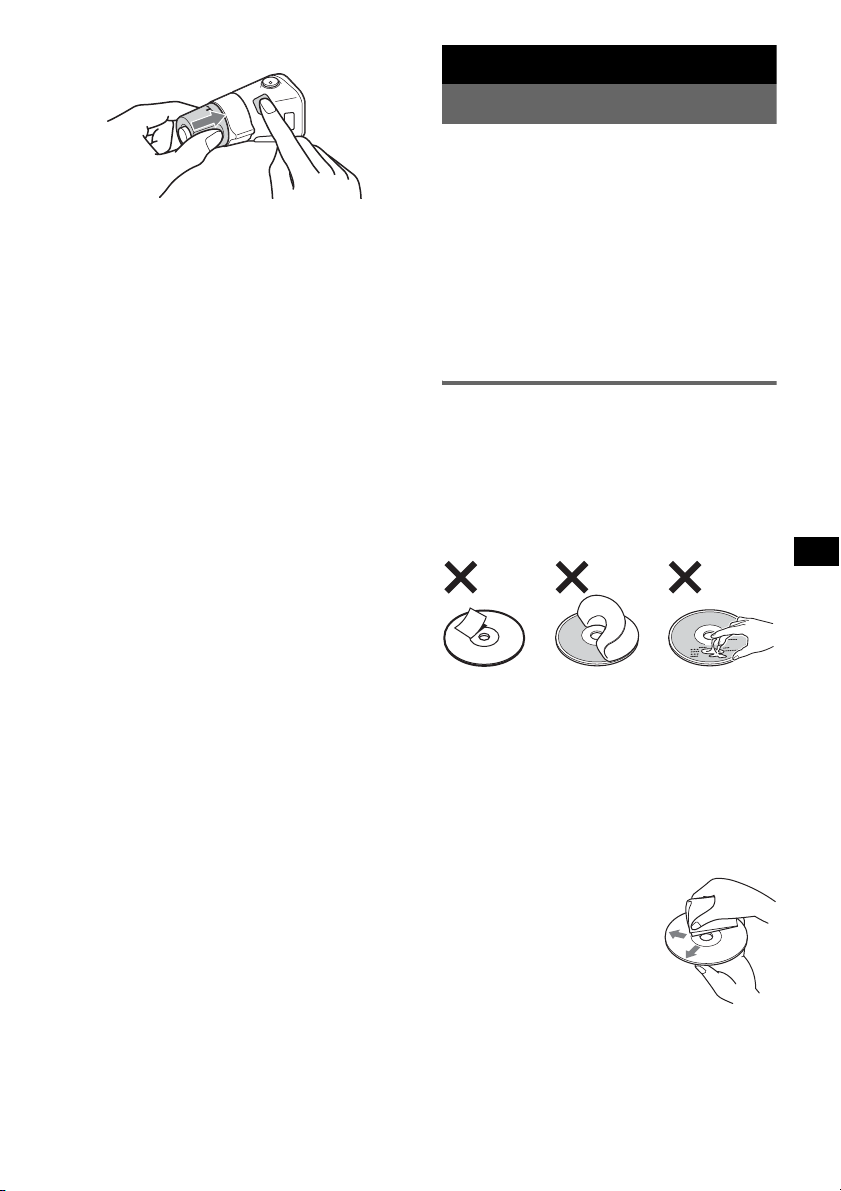
1 推 VOL 控制器时,按住 (SOUND)。
附加信息
使用前注意事项
• 倘若您的汽车停在直射阳光下,则在操作前必
须先使本机充分冷却。
• 本机工作时,电动天线将自动伸出。
湿气凝结
在雨天或非常潮湿的地区,本机的透镜和显示屏
内会产生湿气凝结。一旦如此,本机将无法正常
运行。此时,请将光盘取出,并等待约一小时,
直至湿气蒸发。
为保持高质量声音
请随时注意,切勿将果汁或其他软饮料溅在本机
或光盘上。
光盘注意事项
• 为保持光盘清洁,切勿接触其表面。拿光盘时
请持其边缘。
• 不使用时请将光盘装入光盘盒或光盘匣。
• 切勿使光盘受到热源 / 高温的影响。避免将光
盘遗留在停放的车中或仪表盘 / 后托架上。
• 切勿贴标签,或使用带有黏性墨水 / 残留物的
光盘。这类光盘在使用时会停止转动,从而造
成故障或损坏光盘。
• 切勿使用任何贴有标签或贴纸的光盘。
使用此类光盘可能会引起如下故障:
- 不能退出光盘 (由于标签或贴纸剥落并卡住
弹出设备)。
- 不能正确读取音频数据 (例如,跳跃播放或
不播放) ,由于热源使贴纸或标签皱缩造成
光盘弯曲。
• 本机不能播放非标准形状的光盘 (例如,心
形、正方形、星形)。若试图播放此类光盘,则
可能会损坏本机。切勿使用此类光盘。
• 您不能播放 8cm CD。
• 在播放之前,请使用市售清洁
布清洁光盘。从光盘的中心向
外擦拭。切勿使用汽油、稀释
剂、市场销售的清洁剂,以及
用于留声机唱片的抗静电喷
雾剂等溶剂。
CD-R/CD-RW 光盘的注意事项
• 某些 CD-R/CD-RW(视用于录制的设备或光盘情
况而定)可能无法在设备上播放。
• 您无法播放未最终化的 CD-R/CD-RW。
续下页 t
21
Page 82
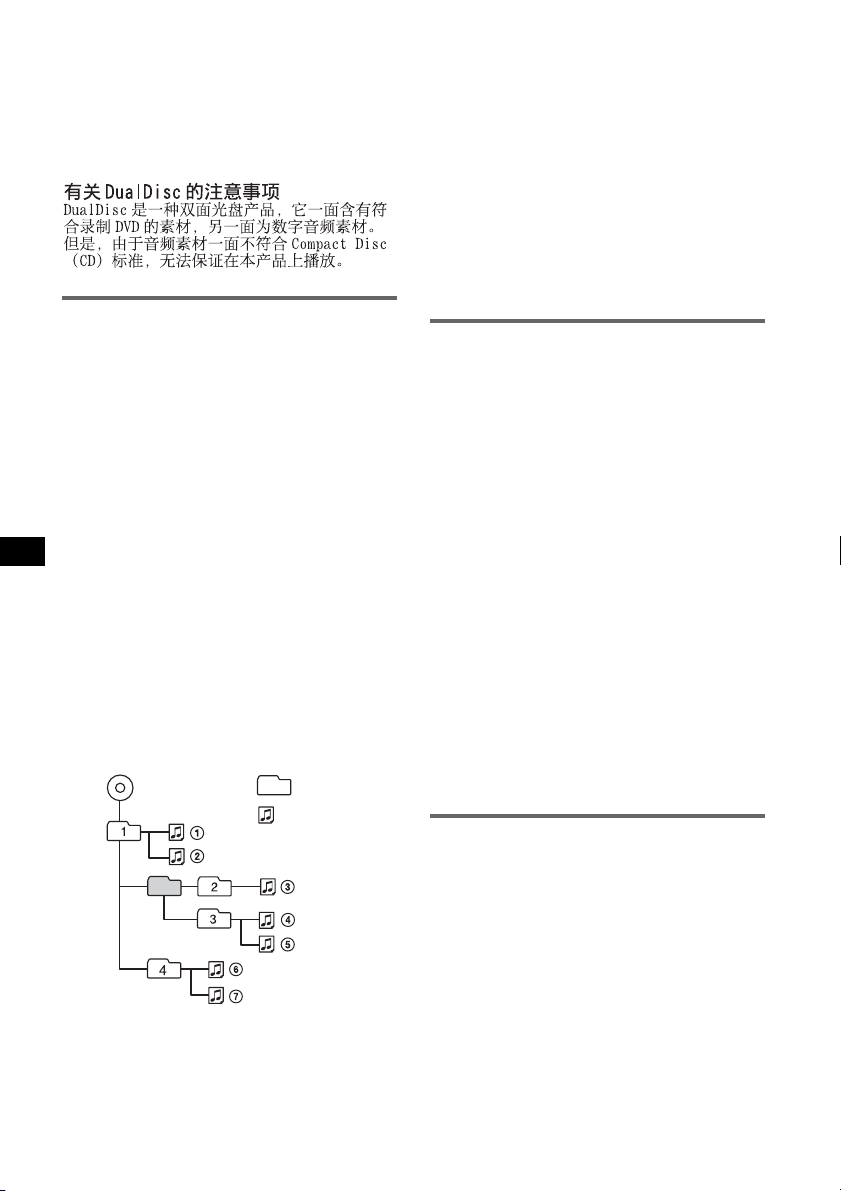
采用版权保护技术编码的音乐光盘
本产品是专为播放符合 Compact Disc (CD)标
准光盘而设计。
近来,许多唱片公司都推出各种采用版权保护技
术编码的音乐光盘。请注意,这些光盘中可能会
有不符合 CD 标准的光盘,并且可能无法使用本
产品播放。
关于 MP3/WMA 文件
MP3 表示 MPEG-1 Audio Layer-3,是一项音乐文
件压缩格式标准。此格式将音频 CD 数据压缩到
原大小的 1/10 左右。
WMA 表示 Windows Media Audio,为另一项音乐
文件压缩格式标准。此格式将音频 CD 数据压缩
到原大小的 1/22* 左右。
* 仅适用于 64 kbps
• 本机与 ISO 9660 level 1/level 2 格式、
Joliet/Romeo 扩展格式和 Multi Session 兼
容。
• 最大数量:
- 文件夹 (专辑):150 (包括根文件夹和空文
件夹)。
- 光盘中含有的 MP3/WMA 文件 (曲目)和文件
夹:300 (如果文件夹 / 文件名称包含许多字
符,该数量可能小于 300)。
- 文件夹 / 文件名称的可显示字符数为
25 (Joliet)或 50 (Romeo)。
• ID3 标记 1.0、1.1、2.2、2.3 和 2.4 版仅应用
于 MP3。可显示的 ID3 标记为 30 个字符 (1.0
和 1.1 版),或 50 个字符 (2.2、2.3 和 2.4
版)。可显示的 WMA 标记为 25 个字符。
MP3/WMA 文件的播放顺序
MP3/WMA
注意
• 命名 MP3/WMA 文件时,必须在文件名称后面加上文件
扩展名 “.mp3”/ “.wma”。
• 在 VBR (可变比特率)MP3/WMA 文件播放过程中或快
进 / 后退过程中,已播放时间可能不会精确显示。
文件夹
(专辑)
MP3/WMA 文件
(曲目)
22
• 当光盘是以 Multi Session 录制时,只有第一个区段
格式的第一个曲目被识别并播放 (任何其他格式被跳
过)。格式的优先顺序为CD-DA、ATRAC CD和MP3/WMA。
- 当第一个曲目为 CD-DA 时,只播放第一个区段的
CD-DA。
- 当第一个曲目不是 CD-DA 时,会播放 ATRAC CD 或
MP3/WMA 的区段。如果光盘中没有这些格式的数据,
则显示 “NO Music”。
MP3 的注意事项
• 在本机上使用之前,必须最终化光盘。
• 如果播放如 320 kbps 高比特率 MP3,则声音可能会断
断续续。
WMA 的注意事项
• 无损压缩做成的文件不可播放。
• 有版权保护的文件不可播放。
关于 ATRAC CD
ATRAC3plus 格式
ATRAC3 表示 Adaptive Transform Acoustic
Coding3,是音频压缩技术。此格式将音频 CD 数
据压缩到原大小的 1/10 左右。ATRAC3plus 是
ATRAC3 的扩充格式,将音频 CD 数据压缩到原大
小的 1/20 左右。本机接受 ATRAC3 和 ATRAC3plus
格式。
ATRAC CD
ATRAC CD是录制的音频CD数据,使用SonicStage
2.0 或更新版本,或 SonicStage Simple Burner
等许可软件压缩成 ATRAC3 或 ATRAC3plus 格式。
• 最大数量:
- 文件夹 (群组):255
-文件(曲目):999
• 显示文件夹 / 文件名称字符和由 SonicStage 写
入的文本信息。
关于 ATRAC CD 的详细信息,请参阅 SonicStage
或 SonicStage Simple Burner 的说明书。
注意
必须使用 SonicStage 2.0 或更新版本,或 SonicStage
Simple Burner 1.0 或 1.1 等许可软件制作 ATRAC CD。
如果您对设备有疑问或问题,而本说明书中未提
及,请向附近的 Sony 经销商咨询。
关于 Bluetooth 功能
关于 Bluetooth 通信
• Bluetooth 无线技术在约 10 m 的范围内有效。
最大通信范围可能会因障碍物 (人、金属、墙
壁等)或电磁环境而异。
• 以下情况可能会影响 Bluetooth 通信的灵敏
度。
- 在本机与 Bluetooth 设备之间存在如人、
金属或墙壁等障碍物。
- 使用 2.4 GHz 频率的设备 (如无线 LAN 设
备、无绳电话或微波炉等)正在本机附近
使用。
• 由于 Bluetooth 设备与无线 LAN
(IEEE802.11b/g)使用相同的频率,因此如果
本机在无线 LAN 设备附近使用,则可能会发生
微波干扰并导致通信速度降低、出现噪音或无
效连接。在此情况下,请按如下方式操作。
Page 83
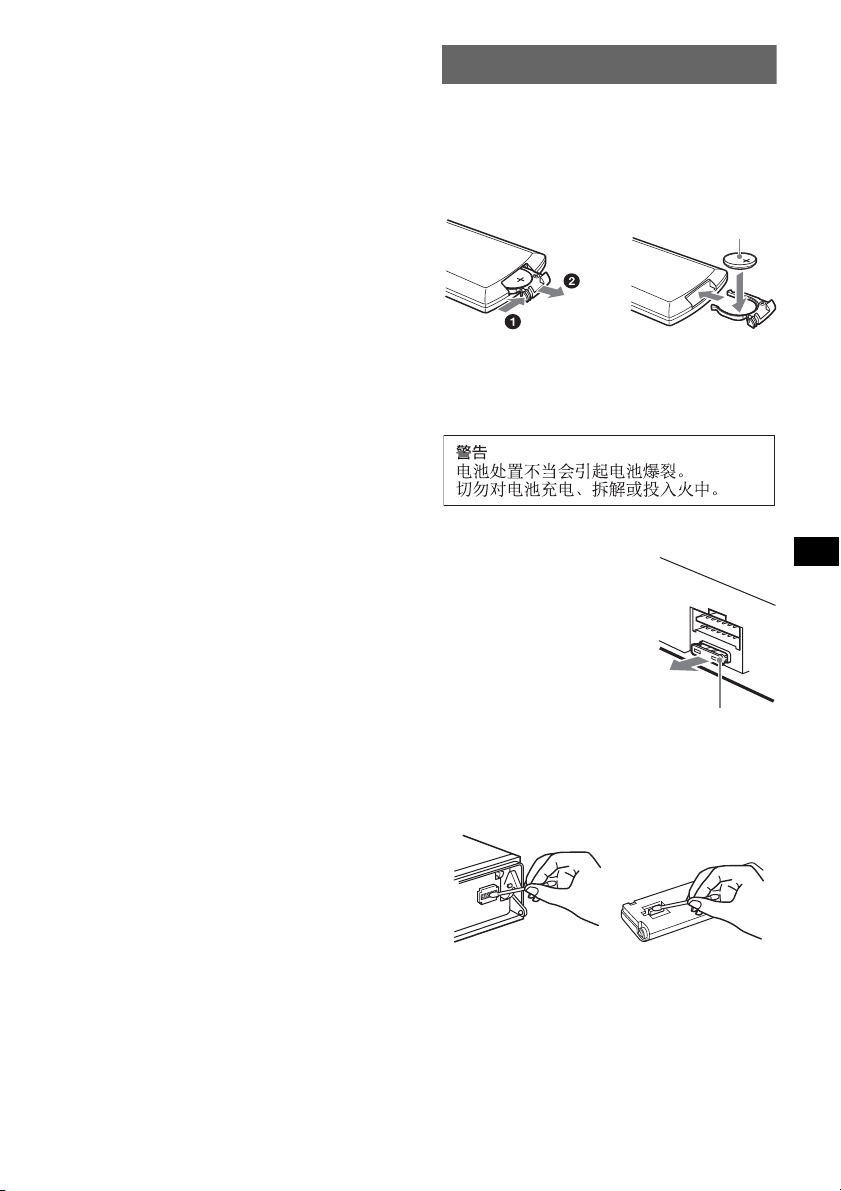
- 请在离无线 LAN 设备至少 10m 的地方使用
本机。
- 如果在无线 LAN 设备 10m范围内使用本机,
请关闭无线 LAN 设备。
- 尽可能近地安装本机和 Bluetooth 设备。
• Bluetooth 设备发出的微波可能会影响电子医
疗设备的使用。关闭下列场所中的本机和其他
Bluetooth 设备,否则可能会引起事故。
- 有可燃性气体的地方、医院、火车、飞机
或汽油站。
- 自动门或火警报警器附近。
• 本机支持符合 Bluetooth 标准的安全性能,可
在使用 Bluetooth 无线技术时提供安全连接,
但视设定而定,安全性可能会不够。当使用
Bluetooth 无线技术时请务必小心。
• 对于在 Bluetooth 通信过程中的信息泄漏,我
们不承担任何责任。
• 无法保证所有 Bluetooth 设备的正常连接。
- 具有 Bluetooth 功能的设备必须符合由
Bluetooth SIG 指定的 Bluetooth 标准,并
经过其认证。
- 即使所连的设备符合以上提及的
Bluetooth 标准,视设备的功能或规格而
定,某些设备也有可能无法连接或正常工
作。
- 当在免提设备上进行通话时,视设备或通
信环境而定,可能会出现噪音。
• 视所要连接的设备而定,可能需要片刻时间开
始通信。
其他
• 视无线电电波的情况和使用设备的场所而定,
在手提电话上可能无法使用 Bluetooth 设备。
• 如果在使用 Bluetooth 设备后您身体出现任何
不适,请立即停止使用 Bluetooth 设备。若症
状依旧,请与最近的 Sony 经销商联系。
保养
更换卡片式遥控器的锂电池
一般情况下,电池能维持大约一年时间。(使用
寿命可能会变短,这取决于电池的使用状况)。
当电池的电力变弱时,卡片式遥控器的操控范围
将变短。请更换一枚新的 CR2025 锂电池。使用
其他电池可能会引起火灾或爆炸的危险。
+ 极面朝上
c
锂电池的注意事项
• 锂电池应放在儿童不易触及的地方。万一误吞了电
池,请立即就医。
• 用干布擦拭电池,以保持接触良好。
• 安装电池时,必须保证极性正确。
• 切勿用金属镊子夹电池,否则可能会引起短路。
更换保险丝
更换保险丝时,必须确保所使
用的保险丝与原保险丝的额
定安培数相同。如果保险丝烧
断,请检查电源连接并更换保
险丝。如果保险丝更换后又被
烧断,则可能是内部故障。此
时,请向附近的 Sony 经销商
咨询。
清洁连接器
如果本机与前面板之前的连接器不干净,则本机
可能会运作不正常。为防止这种情况发生,请卸
下前面板 (第 6 页),然后用蘸有酒精的棉签清
洁连接器。切勿施加太大的力量。否则,可能会
损坏连接器。
保险丝 (10A)
主机 前面板的背面
注意
• 为了安全起见,在清洁连接器之前,应关闭引擎并从
点火开关上拔下钥匙。
• 千万不要用手指或任何金属工具直接接触连接器。
23
Page 84
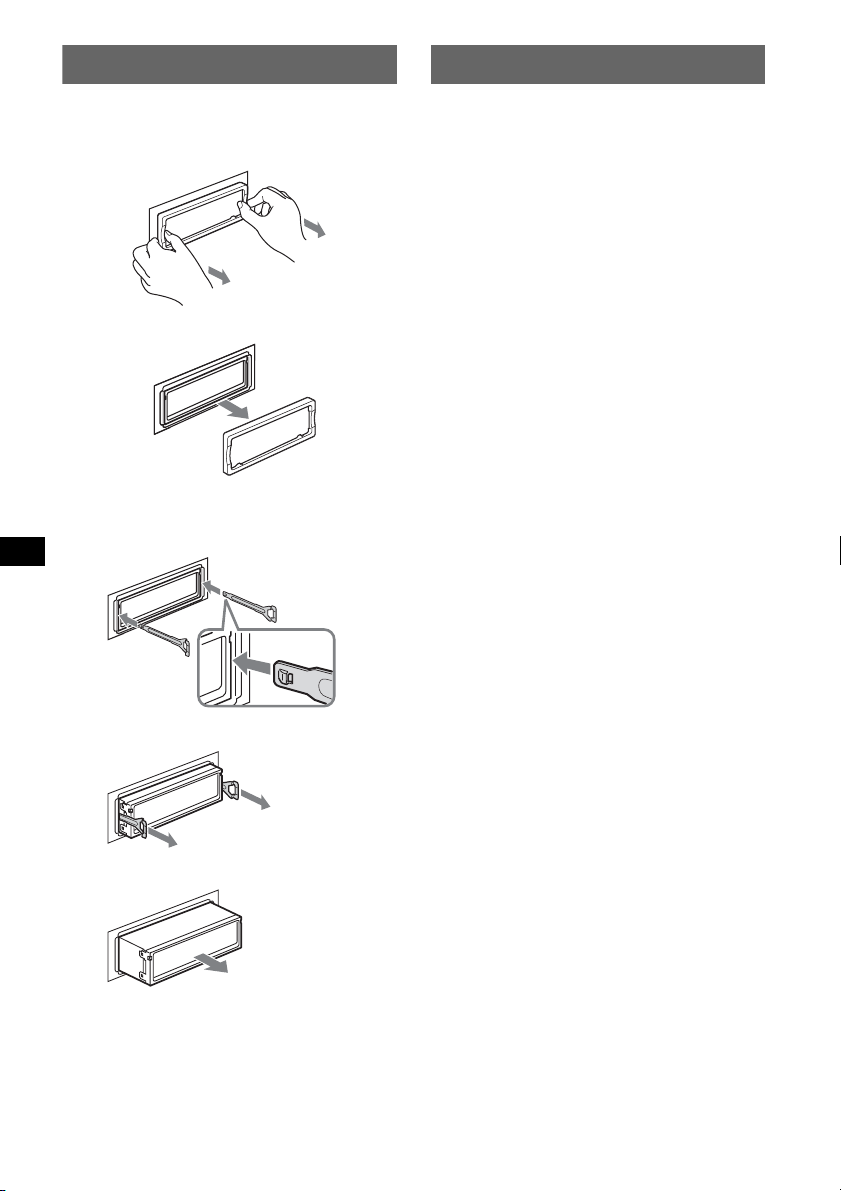
取出本机
规格
1 拆卸保护环。
1 拆卸前面板 (第 6 页)。
2 夹住保护环的的两边,然后将其拉出。
x
2 取出本机。
1 将两把开锁钥匙同时插入,直至听到喀
嗒声。
挂钩朝里。
2 拉出开锁钥匙,使设备脱离原位。
3 将本机从安装位置滑出。
CD 播放机部分
信噪比:120 dB
频率响应:10 - 20000 Hz
抖晃率:低于可测限制
调谐器部分
FM
调谐范围:
87.5 - 108.0 MHz (以 50 kHz 为一级)
87.5 - 107.9 MHz (以 200 kHz 为一级)
FM 调谐间隔: 50 kHz/200 kHz 可切换
天线端子:外接天线连接器
中频:10.7 MHz/450 kHz
可用灵敏度:9 dBf
选择度:400 kHz 时为 75 dB
信噪比:67 dB (立体声),69 dB (单声道)
1 kHz 时谐波失真:0.5 % (立体声),
0.3 % (单声道)
分离度:1 kHz 时 35 dB
频率响应:30 - 15000 Hz
AM
调谐范围:
531 - 1602 kHz (以 9 kHz 为一级)
530 - 1710 kHz (以 10 kHz 为一级)
AM 调谐间隔: 9 kHz/10 kHz 可切换
天线端子:外接天线连接器
中频:10.7 MHz/450 kHz
灵敏度:30 μV
无线通信
通信系统:
Bluetooth 标准 2.0 版
输出:
Bluetooth Standard Power Class 2 (Max.
+4 dBm)
最大通信范围:
视线范围内约 10 m*
频率波段:
2.4 GHz 波段 (2.4000 - 2.4835 GHz)
调制方式: FHSS
兼容 Bluetooth Profiles*
A2DP (Advanced Audio Distribution
Profile)
AVRCP (Audio Video Remote Control
Profile)
HFP (Handsfree Profile)
OPP (Object Push Profile)
*1 视某些因素 (如设备间的障碍物、微波炉周围的磁
场、静电、接收灵敏度、天线性能、操作系统、软
件程序等)而定,实际的范围可能会有所不同。
*2 Bluetooth 标准协议明示了设备间蓝牙通信的用途。
1
2
:
24
功率放大器部分
输出:扬声器输出 (可靠的绝缘连接器)
扬声器阻抗:4 - 8 Ω
最大功率输出: 52 W × 4 (4 Ω时)
Page 85
常规
输出:
音频输出端子 (前 / 后)
超低音输出端子 (单声道)
电动天线继电器控制端子
功率放大器控制端子
输入:
电话 ATT 控制端子
照明控制端子
BUS 控制输入端子
BUS 音频输入 /AUX IN 端子
遥控器输入端子
天线输入端子
音调控制:
低:60 Hz 或 100 Hz 时± 10 dB (XPLOD)
中:500 Hz 或 1 kHz 时± 10 dB (XPLOD)
高:10 kHz 或 12.5 kHz 时± 10 dB (XPLOD)
电源要求:12 V DC 汽车电瓶 (负接地)
尺寸: 约 178 × 50 × 183 mm(宽/高/深)
安装尺寸: 约 182 × 53 × 162 mm(宽/高/深)
质量: 约 1.2 kg
附件:
卡片式遥控器:RM-X303
安装和连接用配件 (1 套)
选购的附件 / 设备:
旋转式控制器:RM-X4S
BUS 电缆 (附带一根 RCA 针导线):
RC-61 (1 m),RC-62 (2 m)
CD 换碟机 (10 碟式):CDX-757MX、CDX-656X
CD换碟机(6碟式):CDX-T69
音源选择器:XA-C30、XA-C40
AUX-IN 选择器:XA-300
您的经销商可能不提供以上列出的部分附件。
关于详细信息,请询问经销商。
注意
本机不能连接至与 Sony BUS 系统兼容的数字前置放大
器或均衡器。
设计和规格若有变更,恕不另行通知。
故障排除
下列检查表有助于解决您使用本机时可能遇到
的问题。
在使用下面的检查表之前,请检查连接和操作步
骤是否正确。
常规
本机无供电。
• 检查连接。若一切正常,则请检查保险丝。
• 如果本机关闭且显示消失,则本机无法用遥控器
操作。
t 打开本机。
电动天线未伸出。
电动天线未装继电器盒。
无声音。
• 音量太低。
• 启动了 ATT 功能,或启动了电话 ATT 功能(当车载
电话的接口电缆连接至 ATT 导线时)。
• 未对 2 扬声器系统设定音量衰减控制器的位置。
• CD 换碟机与光盘格式 (MP3/WMA/ATRAC CD)不兼
容。
t 请使用与 Sony MP3 兼容的 CD 换碟机或本机进
行播放。
无提示音。
• 提示音被取消 (第 18 页)。
• 连接了选购的功率放大器,且您没有使用内置放
大器。
内存内容已被消除。
• 已按过 RESET 按钮。
t 再将设定存入内存中。
• 电源连接线或电池已断开连接。
• 电源连接线未被正确连接。
储存的电台及正确时间被消除。
保险丝已熔断。
切换点火钥匙位置时产生噪音。
导线与汽车附件电源连接器不匹配。
显示从显示窗口消失或不出现在显示窗口中。
• 调光器设定为 “Dimmer on”(第 18 页)。
• 如果按住 (OFF),则显示消失。
t 按住设备上的 (OFF),直至出现显示。
• 连接器脏了 (第 23 页)。
DSO 无法运作。
根据汽车内部类型或音乐类型,DSO 功能不一定能
得到满意的效果。
不显示任何显示项目。
t 设定为 “Info All”(第 18 页)。
CD/MD 播放
无法装入光盘。
• 已装入另外的光盘。
• 光盘倒置,或以错误的方法被强行插入。
续下页 t
25
Page 86
光盘不播放。
• 光盘有缺陷或脏了。
• CD-R/CD-RW 不作音频使用 (第 21 页)。
无法播放 MP3/WMA 文件。
光盘与 MP3/WMA 格式以及版本不兼容(第 22 页)。
MP3/WMA 文件的开始播放时间较其他文件长。
以下光盘要花费较长时间才能开始播放。
- 以复杂的树形结构录制的光盘。
- 以 Multi Session 录制的光盘。
- 能增加数据的光盘。
无法播放 ATRAC CD。
• 光盘不是通过 SonicStage 或 SonicStage Simple
Burner 等许可软件制作的。
• 无法播放群组里不包含的曲目。
显示项目不滚动。
• 对于有许多字符的光盘,可能无法滚动显示。
•“Auto Scroll”设定为 “off”。
t请设定为“Auto Scroll on”(第 18 页)或按
(SCRL)。
跳音。
• 安装不正确。
t以小于 45° 的角度将设备安装在汽车坚固位
置。
• 光盘有缺陷或脏了。
操作按钮无效。
光盘不退出。
按 RESET 按钮 (第 6 页)。
无线电接收
无法接收电台。
有噪音干扰。
• 请将电动天线控制导线 (蓝色)或附件电源导线
(红色)连接至汽车天线升缩器的电源导线 (仅
当您的汽车在后 / 侧玻璃内有内置 FM/AM 天线
时)。
• 检查汽车天线的连接。
• 自动天线不能上升。
t检查电动天线控制导线的连接。
• 检查频率。
• DSO 模式开启时,声音有时会受到噪音的影响。
t将 DSO 模式设定为 “off”(第 19 页)。
不能预设调谐。
• 将正确的频率储存在内存中。
• 广播信号太弱。
不能自动调谐。
• 本地搜寻模式设成了 “on”。
t设定为 “Local off”(第 18 页)。
• 广播信号太弱。
t进行手动调谐。
FM 接收时,“ST”指示闪烁。
• 精确地调谐电台频率。
• 广播信号太弱。
t设定为 “Mono on”(第 18 页)。
收听到的立体声 FM 广播节目是单声道。
本机处在单声道接收模式。
t 设定为 “Mono off”(第 18 页)。
26
Bluetooth 功能
所连接的设备无法检测到本机。
• 将 “Signal”设为 “ON”(第 14 页)。
• 将 “Visibility”设为 “Show”(第 14 页)。
• 当连接其他Bluetooth设备时,无法从其他设备上
检测到本机。请断开当前的连接,并从其他设备
上搜索本机。通过从已注册的设备的列表中进行
选择,可重新连接已断开的设备。
本机无法检测到连接的设备。
检查所连设备的 Bluetooth 设定。
无法进行连接。
• 视其他设备而定,可能无法从本机进行搜索。
t 从其他设备搜索本机。
• 视其他设备的状态而定,可能无法从本机进行搜
索。
t 从其他设备搜索本机。
• 在其他设备等的说明书中查看配对和连接的步
骤,并再次执行操作。
不出现已检测到设备的名称。
视其他设备的状态而定,可能无法获取名称。
无铃声。
• 在 “Ring Vol”中调节音量 (第 15 页)。
• 视所连的设备而定,铃声可能不会正常发送。
t 将“Ringtone”设为“Default”(第 17 页)。
通话者话音音量低。
在 “Talk Vol”中调节音量 (第 15 页)。
在电话通话中出现回声或噪音。
• 调低音量。
•“EC/NC Mode”被设为 “off”。
t 将 “EC/NC Mode”设为 “Mode 1”或
“Mode 2”(第 17 页)。
• 如果除电话通话声音以外的环境噪音很大,请试
着降低环境噪音。
例如:如果窗户开着且道路噪音很大,请关闭噪
音。如果空调噪音过大,请降低空调噪音。
电话声音质量不佳。
电话声音质量视手提电话的接收条件而定。
t 如果接收不佳,请将汽车行驶至可增强手提电
话信号的地方。
所连音频设备的音量低 (高)。
音量电平会因音频设备而异。
t 调节所连音频设备或本机的音量。
在播放 Bluetooth 音频设备过程中跳音。
• 缩短本机与 Bluetooth 音频设备的距离。
• 如果 Bluetooth 音频设备存放在会干扰信号的盒
中,则在使用时将其从盒中取出音频设备。
• 数个 Bluetooth 设备或其他可发出无线电波的设
备在附近使用。
t 关闭其他设备。
t 缩短与其他设备的距离。
无法控制所连的 Bluetooth 音频设备。
检查所连的 Bluetooth 音频设备是否支持 AVRCP。
某些功能不工作。
检查所连的设备是否支持有问题功能。
当接听电话时,对方的姓名不出现。
• 对方未被储存在电话簿中。
t 储存进电话簿 (第 16 页)。
• 拨打的电话没有设定成发送电话号码。
Page 87
无故开始通话。
• 所连的电话被设成了自动开始通话。
• 本机的 “Auto Answer”被设成了 “on”(第 17
页)。
在限定时间内未完成配对。
视所连的设备而定,配对的时间限定可能会过短。
试着通过设定单个数字的密码在时限内完成配对。
铃声或对方话音仅从一个扬声器输出。
“Speaker Sel”被设成了 “FR-L”或 “FR-R”。
t将“Speaker Sel”设为“Front”(第 17 页)。
在拨打免提电话时,没有声音从汽车扬声器输出。
如果声音从手提电话输出,请设定手提电话使声音
从汽车扬声器输出。
出错显示 / 信息
音频功能
Blank Disc
MD 上没有录制曲目。
t播放录制有曲目的 MD。
Error
• 光盘脏了或被倒置插入。
t 将光盘擦拭干净或正确插入光盘。
• 由于故障光盘无法播放。
t 插入另一盘光盘。
Failure (按任意按钮后熄灭。)
扬声器 / 放大器连接不正确。
t参阅此型号的安装指导说明书进行连接检查。
Load
换碟机正在装入光盘。
t请等待至装载完成。
Local Seek +/-
在自动调谐时,本地搜索模式为开启状态。
NO Disc
CD/MD 换碟机内未插入光盘。
t将光盘插入换碟机。
NO Disc Name
曲目中未写入光盘名称。
NO Group Name
ATRAC CD 内的曲目中未写入群组名称。
NO ID3 Tag
MP3 文件中未写入 ID3 标记信息。
NO Information
ATRAC3/ATRAC3plus 或WMA文件中未写入文本信息。
NO Magazine
光盘匣未插入 CD 换碟机。
t将光盘匣插入换碟机。
NO Music
此光盘不是音乐文件。
t将音乐 CD 插入本机或可播放 MP3 的换碟机中。
NO Track Name
曲目中未写入曲目名称。
Offset
可能发生内部故障。
t 检查连接。如果此出错指示仍然显示在显示屏
中,请联系附近的 Sony 经销商。
Push Reset
由于某个原因,CD 设备和 CD/MD 换碟机无法操作。
t 按 RESET 按钮 (第 6 页)。
Read
本机正在读取光盘上所有曲目和群组信息。
t 请等待至读取完成并自动开始播放。视光盘的
结构而定,可能要花一分多钟。
“”或“”
后退或快进过程中,您已到达光盘的开头或结尾,
无法再继续向前。
“”
本机无法显示此字符。
Bluetooth 功能
Busy
Bluetooth 进程未完成。
t 停止接收电话簿数据。
t 停止当前操作并等待片刻。
Connection Complete
Bluetooth 连接已完成。
Connection Failed
• 由于故障无法连接至设备。
• 由于输入密码不正确,无法连接至设备。
• 超出了连接的时限。
Disconnected
Bluetooth 信号已中断。
Empty
• CALL 菜单的 “Dialed Calls”、“Received
Calls”或 “Phonebook”中无数据。
• 当储存至预设拨号时,电话簿中无数据。
Error
由于故障,电话簿数据无法被接收。
HF Device is not available
未连接免提设备。
Invalid Code
输入的密码不正确。
Memory Full
• 当接收到电话簿数据时,本机的电话簿内存变
满。
• 本机的电话簿内存满了。
Not Available
Bluetooth AUDIO被选为音源,但未连接 Bluetooth
音频设备。
No Devices Found
• 搜索后未发现可连接的设备。
• 设备未注册到 “Handsfree Devices”或 “Audio
Devices”中。
t 将设备注册到 “Handsfree Devices”或
“Audio Devices”中。
续下页 t
27
Page 88
Security Locked
设定了加密。
Turn ON Bluetooth
Bluetooth 设定关闭。
t 将 Bluetooth 设定为开启。
如果这些解答仍无法助您改善情况,请向您附近
的 Sony 经销商咨询。
如果因为 CD 播放故障而将本机送修,请带好出
现问题时所使用的光盘。
支持的网站
如果您对本产品有任何疑问或需要相关的
最新支持信息,请访问以下网站:
对于拉丁美洲顾客:
http://esupport.sony.com/ES/LA/
对于亚洲和大洋洲顾客:
http://www.sony-asia.com/caraudio/
Support site
If you have any questions or for the latest support
information on this product, visit the web site below:
Customers in Latin America:
http://esupport.sony.com/ES/LA/
Customers in Asia and Oceania:
http://www.sony-asia.com/caraudio/
Sony Corporation Printed in Thailand
 Loading...