

Page 1
4-125-661-41 (1)
Bluetooth
®
Audio System
To cancel the demonstration (DEMO) display, see page 6.
Operating Instructions
GB
MEX-BT4750U
©2009 Sony Corporation
Page 2
Be sure to install this unit in the dashboard of
the car for safety. For installation and
connections, see the supplied installation/
connections manual.
This label is located on the bottom of the
chassis.
Note on the lithium battery
Do not expose the battery to excessive heat such as
direct sunlight, fire or the like.
2
Page 3
The Bluetooth word mark and logos are owned
by the Bluetooth SIG, Inc. and any use of such
marks by Sony Corporation is under license.
Other trademarks and trade names are those of
their respective owners.
ZAPPIN is a trademark of Sony Corporation.
Windows Media, and the
Windows logo are trademarks
or registered trademarks of
Microsoft Corporation in the
United States and/or other countries.
iPod is a trademark of Apple Inc., registered in
the U.S. and other countries.
iPhone is a trademark of Apple Inc.
MPEG Layer-3 audio coding technology and
patents licensed from Fraunhofer IIS and Thomson.
This product is protected by certain intellectual
property rights of Microsoft Corporation. Use or
distribution of such technology outside of this
product is prohibited without a license from
Microsoft or an authorized Microsoft subsidiary.
Content providers are using the digital rights
management technology for Windows Media
contained in this device (“WM-DRM”) to protect
the integrity of their content (“Secure Content”) so
that their intellectual property, including copyright,
in such content is not misappropriated.
This device uses WM-DRM software to play
Secure Content (“WM-DRM Software”). If the
security of the WM-DRM Software in this device
has been compromised, owners of Secure Content
(“Secure Content Owners”) may request that
Microsoft revoke the WM-DRM Software’s right
to acquire new licenses to copy, display and/or
play Secure Content. Revocation does not alter the
WM-DRM Software’s ability to play unprotected
content. A list of revoked WM-DRM Software is
sent to your device whenever you download a
license for Secure Content from the Internet or
from a PC. Microsoft may, in conjunction with
such license, also download revocation lists onto
your device on behalf of Secure Content Owners.
Warning if your car’s ignition has no
ACC position
Be sure to set the Auto Off function (page 21).
The unit will shut off completely and
automatically in the set time after the unit is
turned off, which prevents battery drain.
If you do not set the Auto Off function, press
and hold (OFF) until the display disappears
each time you turn the ignition off.
3
Page 4

Table of Contents
Getting Started
Playable discs on this unit . . . . . . . . . . . . . . . . . 6
Notes on Bluetooth . . . . . . . . . . . . . . . . . . . . . . 6
Resetting the unit. . . . . . . . . . . . . . . . . . . . . . . . 6
Canceling the DEMO mode . . . . . . . . . . . . . . . 6
Preparing the card remote commander . . . . . . . 7
Setting the clock . . . . . . . . . . . . . . . . . . . . . . . . 7
Detaching the front panel . . . . . . . . . . . . . . . . . 7
Attaching the front panel . . . . . . . . . . . . . . . 7
Location of controls and basic
operations
Main unit. . . . . . . . . . . . . . . . . . . . . . . . . . . . 8
Card remote commander RM-X304 . . . . . . 10
Searching for a track . . . . . . . . . . . . . . . . . . . . 11
Searching a track by name
— Quick-BrowZer . . . . . . . . . . . . . . . . . . . 11
Searching a track by listening to track passages
— ZAPPIN™ . . . . . . . . . . . . . . . . . . . . . . . 12
Radio
Storing and receiving stations . . . . . . . . . . . . . 12
Storing automatically — BTM . . . . . . . . . . 12
Storing manually. . . . . . . . . . . . . . . . . . . . . 12
Receiving the stored stations . . . . . . . . . . . 12
Tuning automatically . . . . . . . . . . . . . . . . . 12
CD
Playing a disc. . . . . . . . . . . . . . . . . . . . . . . . . . 13
Display items . . . . . . . . . . . . . . . . . . . . . . . 13
Repeat and shuffle play. . . . . . . . . . . . . . . . 13
Bluetooth (Handsfree calling and
Music streaming)
Bluetooth operations. . . . . . . . . . . . . . . . . . . . 17
Pairing. . . . . . . . . . . . . . . . . . . . . . . . . . . . . . . 17
About Bluetooth icons . . . . . . . . . . . . . . . . 17
Connection . . . . . . . . . . . . . . . . . . . . . . . . . . . 18
To switch the Bluetooth signal output of this
unit to on . . . . . . . . . . . . . . . . . . . . . . . . . . 18
Connecting a cellular phone. . . . . . . . . . . . 18
Connecting an audio device . . . . . . . . . . . . 18
Handsfree calling . . . . . . . . . . . . . . . . . . . . . . 18
Receiving calls . . . . . . . . . . . . . . . . . . . . . . 18
Making calls. . . . . . . . . . . . . . . . . . . . . . . . 19
Call transfer . . . . . . . . . . . . . . . . . . . . . . . . 19
Voice Dial Activation . . . . . . . . . . . . . . . . 19
Music streaming . . . . . . . . . . . . . . . . . . . . . . . 19
Listening to music from an audio
device . . . . . . . . . . . . . . . . . . . . . . . . . . . . . 19
Operating an audio device with this
unit . . . . . . . . . . . . . . . . . . . . . . . . . . . . . . . 20
Deleting registration of all paired
devices . . . . . . . . . . . . . . . . . . . . . . . . . . . . . . 20
Other functions
Changing the sound settings . . . . . . . . . . . . . . 20
Adjusting the sound characteristics . . . . . . 20
Customizing the equalizer curve
— EQ3 . . . . . . . . . . . . . . . . . . . . . . . . . . . . 21
Adjusting setup items — SET . . . . . . . . . . . . 21
Using optional equipment. . . . . . . . . . . . . . . . 22
Auxiliary audio equipment. . . . . . . . . . . . . 22
Rotary commander RM-X4S . . . . . . . . . . . 23
External microphone XA-MC10 . . . . . . . . 23
USB devices
Playing back a USB device . . . . . . . . . . . . . . . 13
Display items . . . . . . . . . . . . . . . . . . . . . . . 14
Repeat and shuffle play. . . . . . . . . . . . . . . . 14
iPod
Playing back iPod . . . . . . . . . . . . . . . . . . . . . . 15
Display items . . . . . . . . . . . . . . . . . . . . . . . 16
Setting the play mode . . . . . . . . . . . . . . . . . . . 16
Repeat and shuffle play. . . . . . . . . . . . . . . . 16
Operating an iPod directly
— Passenger control . . . . . . . . . . . . . . . . . . . . 16
4
Additional Information
Precautions . . . . . . . . . . . . . . . . . . . . . . . . . . . 24
Notes on discs . . . . . . . . . . . . . . . . . . . . . . 24
Playback order of MP3/WMA/AAC
files. . . . . . . . . . . . . . . . . . . . . . . . . . . . . . . 24
About iPod . . . . . . . . . . . . . . . . . . . . . . . . . 24
About Bluetooth function. . . . . . . . . . . . . . 25
Maintenance . . . . . . . . . . . . . . . . . . . . . . . . . . 25
Removing the unit. . . . . . . . . . . . . . . . . . . . . . 26
Specifications . . . . . . . . . . . . . . . . . . . . . . . . . 27
Troubleshooting . . . . . . . . . . . . . . . . . . . . . . . 28
Error displays/Messages. . . . . . . . . . . . . . . 30
Page 5
Support site
If you have any questions or for the latest support information on this
product, please visit the web site below:
Customers in Latin America:
http://esupport.sony.com/ES/LA/
Customers in Pan Asia:
http://www.sony-asia.com/section/support
http://www.sony-asia.com/caraudio/
Provides information on:
• Models and manufacturers of compatible digital audio players
• Supported MP3/WMA/AAC files
• Models and manufacturers of compatible cellular phones and the FAQ
about Bluetooth function
5
Page 6
Getting Started
Playable discs on this unit
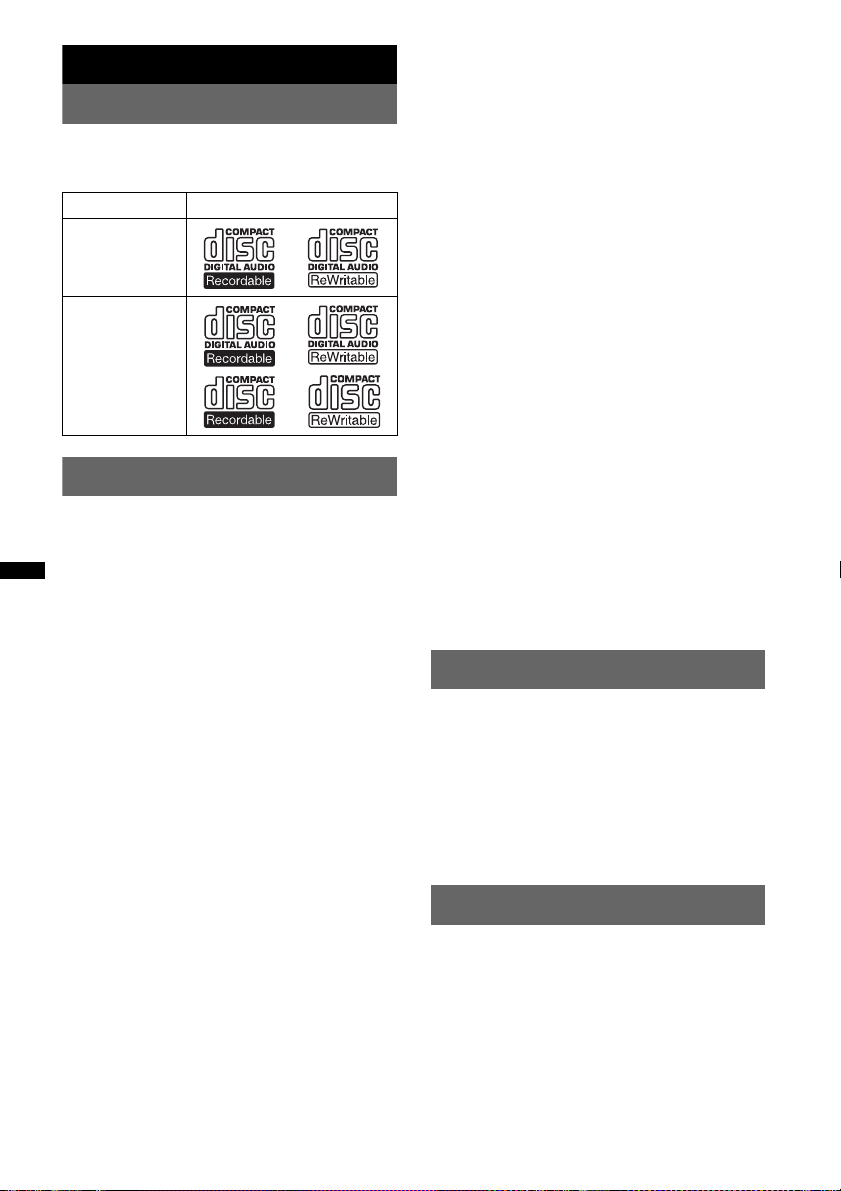
This unit can play CD-DA (also containing CD
TEXT) and CD-R/CD-RW (MP3/WMA/AAC
files (page 24)).
Type of discs Label on the disc
CD-DA
Radio frequency exposure
RF signals may affect improperly installed or
inadequately shielded electronic systems in cars,
such as electronic fuel injection systems, electronic
antiskid (antilock) braking systems, electronic speed
control systems or air bag systems. For installation
or service of this device, please consult with the
manufacturer or its representative of your car. Faulty
installation or service may be dangerous and may
invalidate any warranty that may apply to this
device.
Consult with the manufacturer of your car to ensure
that the use of your cellular phone in the car will not
affect its electronic system.
Check regularly that all wireless device equipment
in your car is mounted and operating properly.
MP3
WMA
AAC
Notes on Bluetooth
Caution
IN NO EVENT SHALL SONY BE LIABLE FOR
ANY INCIDENTAL, INDIRECT OR
CONSEQUENTIAL DAMAGES OR OTHER
DAMAGES INCLUDING, WITHOUT
LIMITATION, LOSS OF PROFITS, LOSS OF
REVENUE, LOSS OF DATA, LOSS OF USE OF
THE PRODUCT OR ANY ASSOCIATED
EQUIPMENT, DOWNTIME, AND
PURCHASER’S TIME RELATED TO OR
ARISING OUT OF THE USE OF THIS
PRODUCT, ITS HARDWARE AND/OR ITS
SOFTWARE.
IMPORTANT NOTICE!
Safe and efficient use
Changes or modifications to this unit not expressly
approved by Sony may void the user’s authority to
operate the equipment.
Please check for exceptions, due to national
requirement or limitations, in usage of Bluetooth
equipment before using this product.
Driving
Check the laws and regulations on the use of cellular
phones and handsfree equipment in the areas where
you drive.
Always give full attention to driving and pull off the
road and park before making or answering a call if
driving conditions so require.
Connecting to other devices
When connecting to any other device, please read its
user guide for detailed safety instructions.
Emergency calls
This Bluetooth car handsfree and the electronic
device connected to the handsfree operate using
radio signals, cellular, and landline networks as well
as user-programmed function, which cannot
guarantee connection under all conditions.
Therefore do not rely solely upon any electronic
device for essential communications (such as
medical emergencies).
Remember, in order to make or receive calls, the
handsfree and the electronic device connected to the
handsfree must be switched on in a service area with
adequate cellular signal strength.
Emergency calls may not be possible on all cellular
phone networks or when certain network services
and/or phone features are in use.
Check with your local service provider.
Resetting the unit
Before operating the unit for the first time, or
after replacing the car battery or changing the
connections, you must reset the unit.
Detach the front panel (page 7) and press the
RESET button (page 8) with a pointed object,
such as a ball-point pen.
Note
Pressing the RESET button will erase the clock setting
and some stored contents.
Canceling the DEMO mode
You can cancel the demonstration display which
appears during turning off.
1 Press and hold the select button.
The setup display appears.
2 Press the select button repeatedly
until “DEMO” appears.
3 Rotate the control dial to select
“DEMO-OFF.”
6
Page 7
4 Press and hold the select button.
The setup is complete and the display returns
to normal play/reception mode.
Preparing the card remote commander
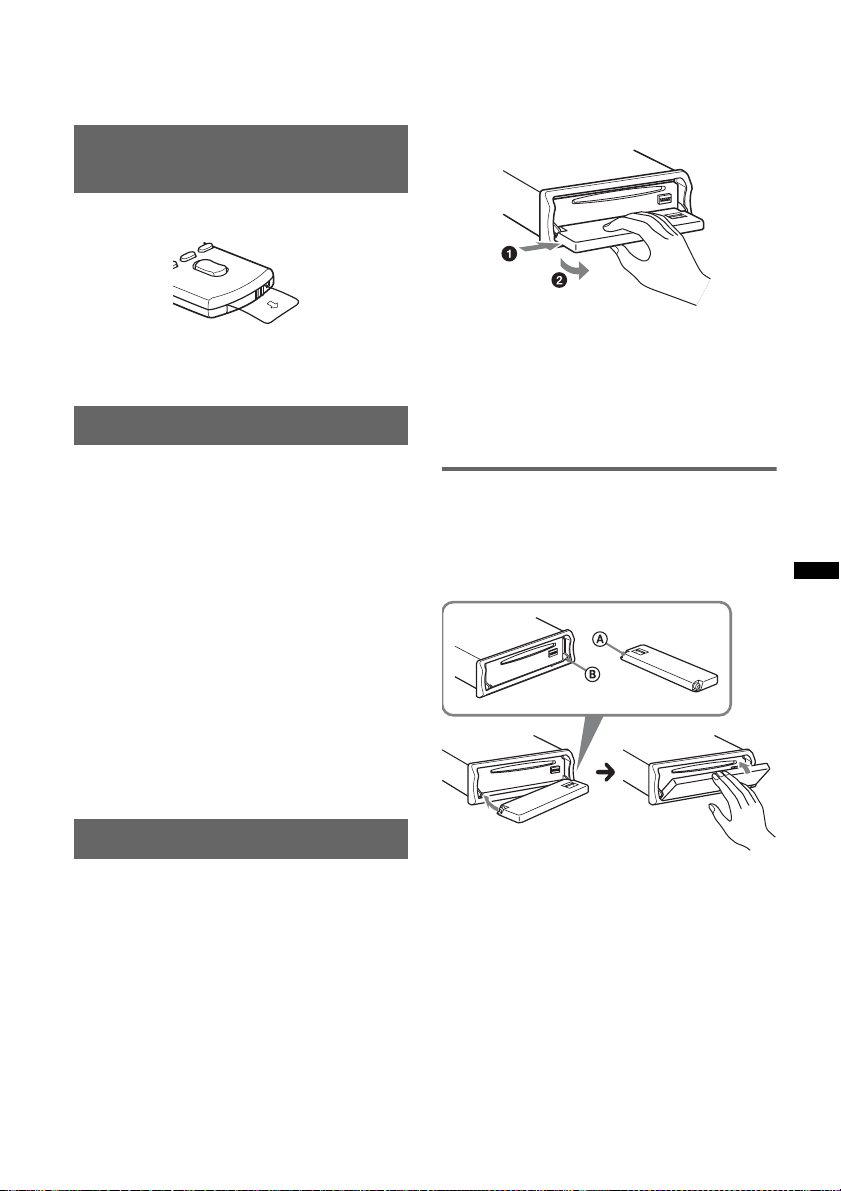
Remove the insulation film.
Tip
For how to replace the batter y, see page 25.
Setting the clock
The clock uses a 12-hour digital indication.
1 Press and hold the select button.
The setup display appears.
2 Press the select button repeatedly
until “CLOCK-ADJ” appears.
3 Press (SEEK) +.
The hour indication flashes.
4 Rotate the control dial to set the hour
and minute.
To move the digital indication, press (SEEK)
+/–.
5 After setting the minute, press the
select button.
The setup is complete and the clock starts.
To display the clock, press (DSPL). Press
(DSPL) again to return to the previous display.
2 Press (OPEN).
The front panel is flipped down.
3 Slide the front panel to the right, then
gently pull out the left end of the front
panel.
Notes
• Do not drop or put excessive pressure on the front
panel and display window.
• Do not subject the front panel to heat/high
temperature or moisture. Avoid leaving it in a parked
car or on a dashboard/rear tray.
• Do not detach the front panel during playback of the
USB device, otherwise USB data may be damaged.
Attaching the front panel
Place the hole A of the front panel onto the
spindle B on the unit, then lightly push the left
side in.
Press (SOURCE) on the unit (or insert a disc) to
operate the unit.
Detaching the front panel
You can detach the front panel of this unit to
prevent theft.
Caution alarm
If you turn the ignition switch to the OFF
position without detaching the front panel, the
caution alarm will sound for a few seconds.
The alarm will only sound if the built-in
amplifier is used.
1 Press (OFF).
The unit is turned off.
Note
Do not put anything on the inner surface of the front
panel.
7
Page 8
Location of controls and basic operations
q
q
q
q
q
q
q
q
Main unit
1
;
2
OFF
3
SEEK
SOURCE
BLUETOOTH
BT
SEEK
a
ZAP
MODE
s
Front panel removed
RESET
4 65 7
P
/
T
U
C
S
E
H
L
E
E
S
N
/
T
R
E
d
w;qk waql
ALBUM REP MICSHUF PAUSE SCRL
BTM
312 456
f
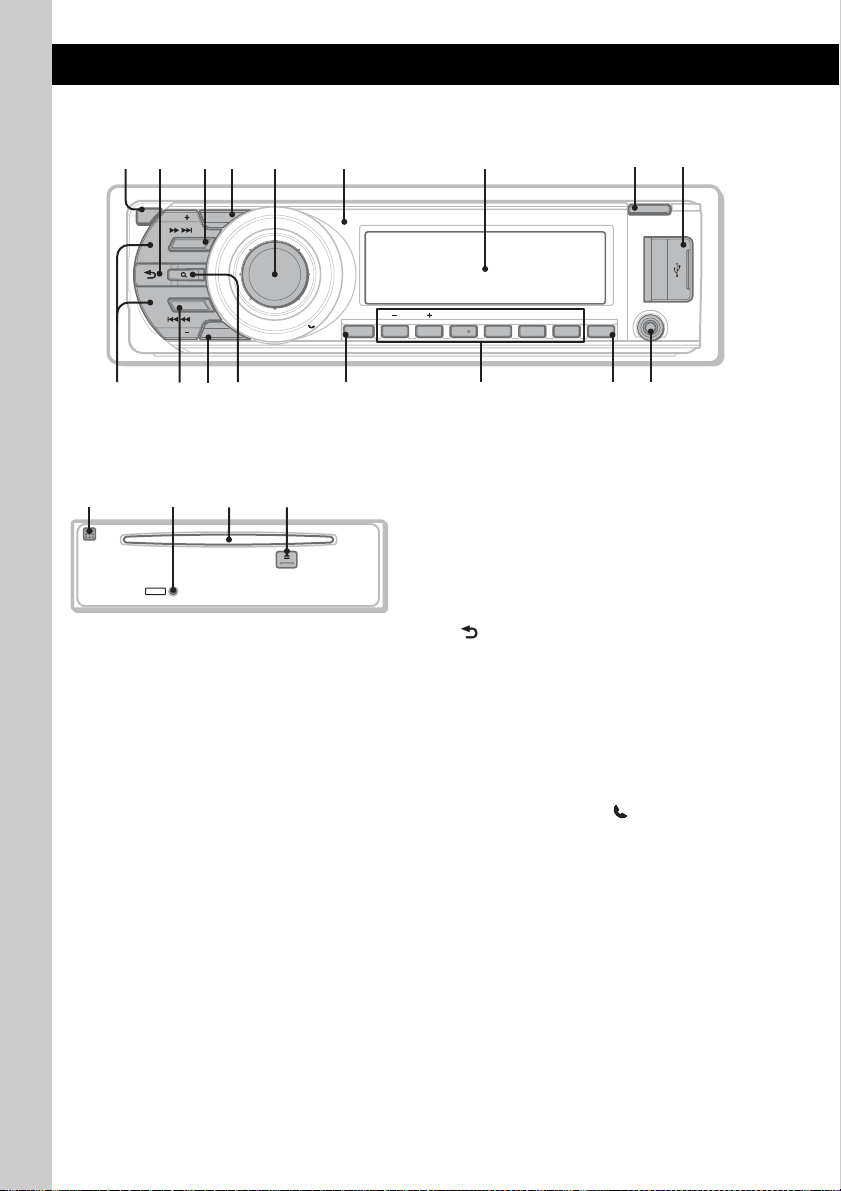
This section contains instructions on the location
of controls and basic operations. For details, see
the respective pages.
The corresponding buttons on the card remote
commander control the same functions as those
on the unit.
A OFF button
To power off; stop the source.
B (BACK) button page 11
Press to: Return to the previous display.
C SOURCE button
To power on; change the source (Radio/CD/
USB/AUX/Bluetooth audio/Bluetooth
phone).
D ZAP button page 12
To enter ZAPPIN™ mode.
E Control dial/select/ (handsfree)
button
To adjust volume/select search category
(rotate); select setup items (press and rotate);
receive/end a call (press).
F Receptor for the card remote
commander
G Display window
H OPEN button page 7
I USB terminal page 13
To connect to the USB device.
8 9
OPEN
AUX
DSPL
g
j
h
8
Page 9

J SEEK +/– buttons
CD/USB:
To skip tracks (press); skip tracks
continuously (press, then press again within
about 1 second and hold); reverse/fastforward a track (press and hold).
Radio:
To tune in stations automatically (press); find
a station manually (press and hold).
Bluetooth audio device*:
To skip tracks (press).
K BT (BLUETOOTH) button page 17
For Bluetooth signal on/off, pairing.
L MODE button page 12, 15, 16
Press to: Select the radio band (FM/AM)/
select the play mode of iPod.
Press and hold to: Enter/cancel the passenger
control.
M (BROWSE) button page 11
To enter the Quick-BrowZer mode.
N BTM button page 12
To start the BTM function (press and hold).
O Number buttons
CD/USB:
(1)/(2): ALBUM –/+ (during MP3/WMA/
AAC playback)
To skip albums (press); skip albums
continuously (press and hold).
(3): REP page 13, 14, 16
(4): SHUF page 13, 14, 16
(6): PAUS E
To pause playback. To cancel, press
again.
Radio:
To receive stored stations (press); store
stations (press and hold).
Bluetooth audio device:
(6): PAUS E
To pause playback. To cancel, press
again.
Bluetooth phone:
(5): MIC page 18
P DSPL (display)/SCRL (scroll) button
page 13, 14, 16
To change display items (press); scroll the
display item (press and hold).
Q AUX input jack page 22
To connect a portable audio device.
R
Microphone page 18
Note
Do not cover the microphone, the handsfree
function may not work properly.
S RESET button page 6
T Disc slot
To insert the disc.
U Z (eject) button
To eject the disc.
* When a Bluetooth audio device (suppor ts AVRCP of
Bluetooth technology) is connected. Depending on
the device, certain operations may not be available.
Notes
• When ejecting/inserting a disc, keep any USB
devices disconnected to avoid damage to the disc.
• If the unit is turned off and the display disappears, it
cannot be operated with the card remote
commander unless (SOURCE) on the unit is
pressed, or a disc is inser ted to activate the unit first.
9
Page 10
Card remote commander RM-X304
1
2
3
OFF
SOURCE
SEL
ATT
MODE
+
6
7
8
9
–
VOL
SCRL
0
qa
+
–
4
DSPL
132
465
5
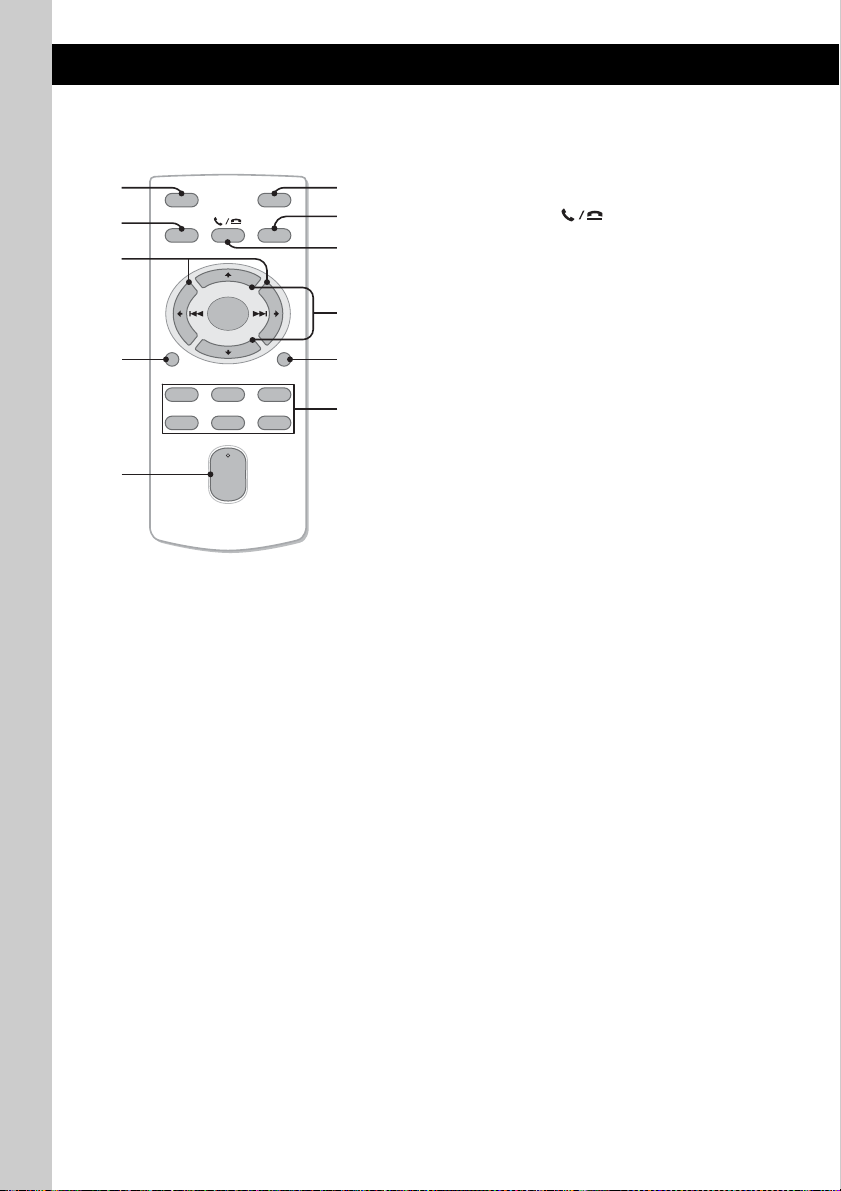
Some of the following buttons on the card remote
commander have different functions, or are
different from the unit. Remove the insulation
film before use (page 7).
A OFF button
To power off; stop the source.
B SOURCE button
To power on; change the source (Radio/CD/
USB/AUX/Bluetooth audio/Bluetooth
phone).
C < (.)/, (>) buttons
To control radio/CD/USB/Bluetooth audio,
the same as (SEEK) –/+ on the unit.
Setup, sound setting, etc., can be operated by
< ,.
D DSPL (display) button
To change display items.
E VOL (volume) +/– button
To adjust volume.
F ATT (attenuate) button
To attenuate the sound. To cancel, press
again.
G MODE button
Press to: Select the radio band (FM/AM)/
select the play mode of iPod.
Press and hold to: Enter/cancel the passenger
control.
H SEL (select)/ (handsfree) button
The same as the select button on the unit.
I M (+)/m (–) buttons
To control CD/USB, the same as (1)/(2)
(ALBUM –/+) on the unit.
Setup, sound setting, etc., can be operated by
M m.
J SCRL (scroll) button
To scroll the display item.
K Number buttons
To receive stored stations (press); store
stations (press and hold).
10
Page 11
Searching for a track
Searching a track by name
— Quick-BrowZer
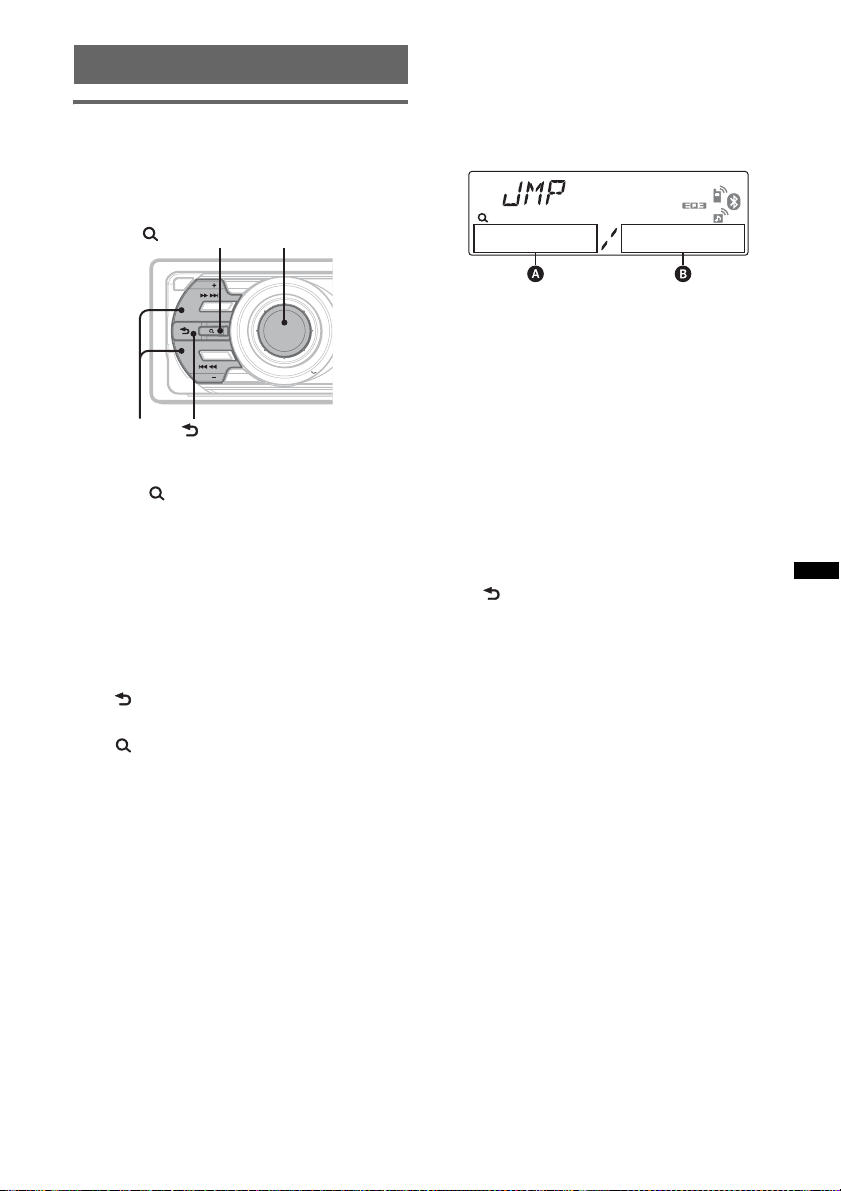
You can search for a track in a CD or USB device
easily by category.
Searching by skip items
— Jump mode
When many items are in a category, you can
search the desired item quickly.
1 Press (SEEK) + in Quick-BrowZer mode.
The following display appears.
SEEK
ZAP
SOURCE
BLUETOOTH
BT
SEEK
MODE
(BACK)
Control dial/
select button
/
P
T
U
C
S
E
H
L
E
E
S
N
/
T
R
E
(BROWSE)
OFF
SEEK +/–
1 Press (BROWSE).
The unit enters the Quick-BrowZer mode,
and the list of search categories appears.
2 Rotate the control dial to select the
desired search category, then press it
to confirm.
3 Repeat step 2 until the desired track is
selected.
Playback starts.
To return to the previous display
Press (BACK).
To exit the Quick-BrowZer mode
Press (BROWSE).
Note
When entering the Quick-BrowZer mode, the repeat/
shuffle setting is canceled.
A Current item number
B Total item number in the current layer
Then the item name will appear.
2 Rotate the control dial to select the desired
item, or one near the desired item.
It skips in steps of 10% of the total item
number.
3 Press the select button.
The display returns to the Quick-BrowZer
mode and the selected item appears.
4 Rotate the control dial to select the desired
item and press it.
Playback starts if the selected item is a track.
To cancel Jump mode
Press (BACK) or (SEEK) –.
11
Page 12
Searching a track by listening to
1
2
3
4
track passages — ZAPPIN™
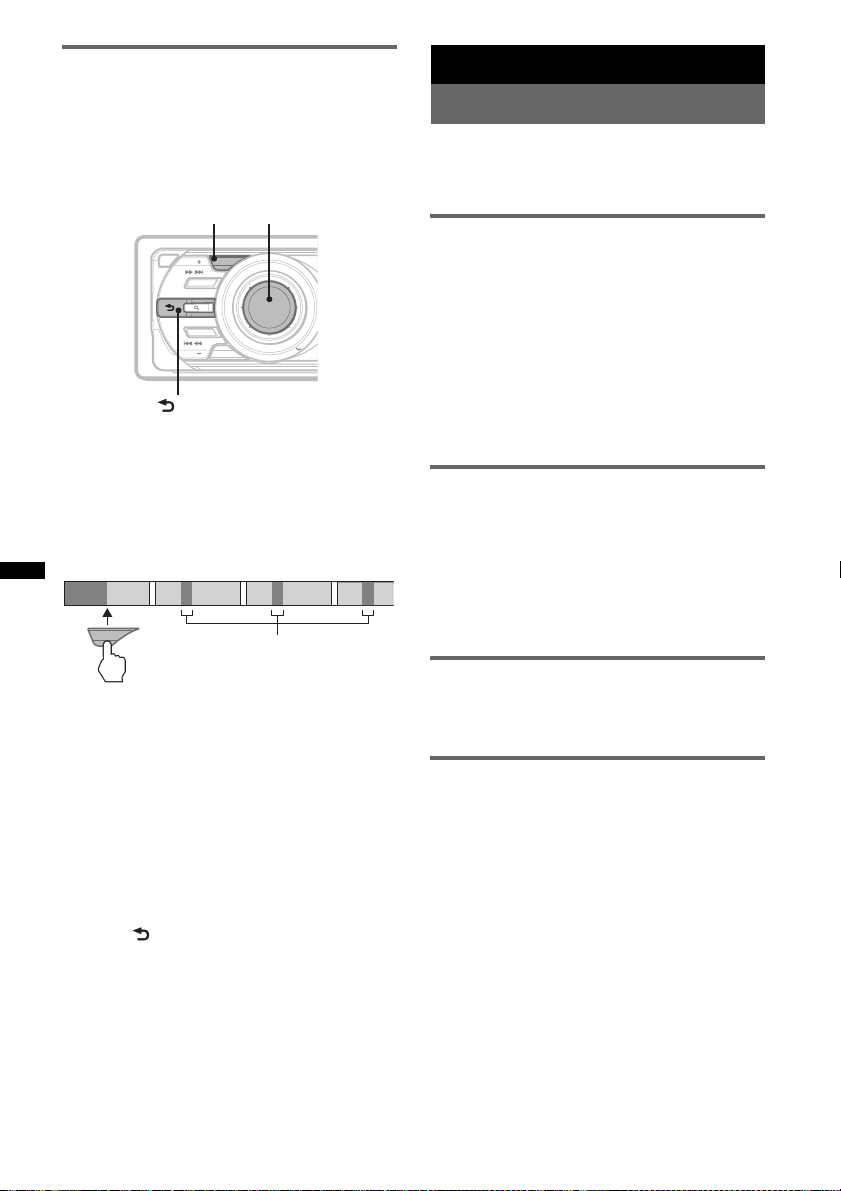
While playing back short track passages in a CD
or USB device in sequence, you can search for a
track you want to listen to.
ZAPPIN mode is suitable for searching for a
track in shuffle or shuffle repeat mode.
ZAP Select button
OFF
SEEK
ZAP
SOURCE
BLUETOOTH
BT
SEEK
(BACK)
MODE
/
P
T
U
C
S
E
H
L
E
E
S
N
/
T
R
E
1 Press (ZAP) during playback.
After “ZAPPIN” appears in the display,
playback starts from a passage of the next
track.
The passage is played for the set time, then a
click sounds and the next passage starts.
Tra ck
1
ZAP
2
3
The part of each track to
playback in ZAPPIN mode.
4
2 Press the select button or (ZAP) when
a track you want to listen is played
back.
The track that you select returns to normal
play mode from the beginning.
To search a track by ZAPPIN mode again,
repeat steps 1 and 2.
Tips
• You can select the playback time from about 6
seconds/9 seconds/30 seconds (page 21).You
cannot select the passage of the track to playback.
• Press (SEEK) –/+ or (1)/(2) (ALBUM –/+) in
ZAPPIN mode to skip a track or album.
• Pressing (BACK) also confirms a track to
playback.
Radio
Storing and receiving stations
Caution
When tuning in stations while driving, use Best
Tuning Memory (BTM) to prevent an accident.
Storing automatically — BTM
1 Press (SOURCE) repeatedly until
“TUNER” appears.
To change the band, press (MODE)
repeatedly. You can select from FM1, FM2,
FM3, AM1 or AM2.
2 Press and hold (BTM) until “BTM”
flashes.
The unit stores stations in order of frequency
on the number buttons.
A beep sounds when the setting is stored.
Storing manually
1 While receiving the station that you
want to store, press and hold a
number button ((1) to (6)) until
“MEM” appears.
Note
If you try to store another station on the same number
button, the previously stored station will be replaced.
Receiving the stored stations
1 Select the band, then press a number
button ((1) to (6)).
Tuning automatically
1 Select the band, then press (SEEK) +/–
to search for the station.
Scanning stops when the unit receives a
station. Repeat this procedure until the
desired station is received.
Tip
If you know the frequency of the station you want to
listen to, press and hold (SEEK) +/– to locate the
approximate frequency, then press (SEEK) +/–
repeatedly to fine adjust to the desired frequency
(manual tuning).
12
Page 13
CD
Playing a disc
1 Press (OPEN).
2 Insert the disc (label side up).
3 Close the front panel.
Playback starts automatically.
Ejecting the disc
1 Press (OPEN).
2 Press Z.
The disc is ejected.
3 Close the front panel.
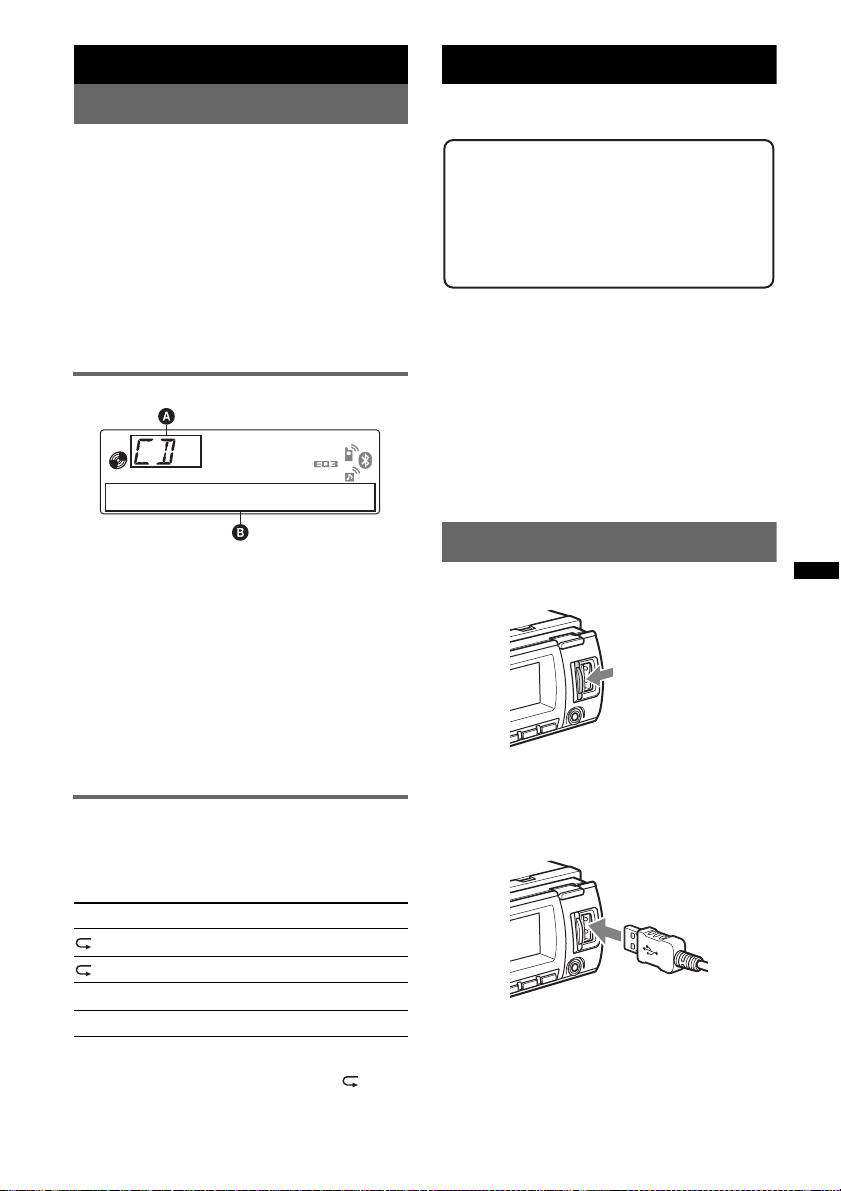
Display items
USB devices
For details on the compatibility of your USB
device, visit the support site.
Support site
Customers in Latin America:
http://esupport.sony.com/ES/LA/
Customers in Pan Asia:
http://www.sony-asia.com/section/support
http://www.sony-asia.com/caraudio/
• MSC (Mass Storage Class) and MTP (Media
Transfer Protocol) type USB devices compliant
with the USB standard can be used.
• Corresponding codec is MP3 (.mp3), WMA
(.wma) and AAC (.m4a).
• Backup of data in a USB device is
recommended.
Note
Connect the USB device after starting the engine.
Depending on the USB device, malfunction or damage
may occur if it is connected before starting the engine.
A Source
B Track name*
name*
Track number/Elapsed playing time, Clock
*1 The information of a CD TEXT, MP3/WMA/AAC is
displayed.
*2 Album number is displayed only when the album is
changed.
To change display items B, press (DSPL).
Tip
Displayed items will differ depending on the disc type,
recording format and settings.
1
, Disc/artist name*1, Artist
1
, Album number*2, Album name*1,
Repeat and shuffle play
1 During playback, press (3) (REP) or
(4) (SHUF) repeatedly until the
desired setting appears.
Select To play
TRACK track repeatedly.
ALBUM* album repeatedly.
SHUF ALBUM* album in random order.
SHUF DISC disc in random order.
* When an MP3/WMA/AAC is played.
To return to normal play mode, select “ OFF”
or “SHUF OFF.”
Playing back a USB device
1 Slide the USB cover.
2 Connect the USB device to the USB
terminal.
When using a cable, use the one supplied with
the USB device to connect.
Playback starts.
continue to next page t
13
Page 14
If a USB device is already connected, to start
playback, press (SOURCE) repeatedly until
“USB” appears.
Press (OFF) to stop playback.
Removing the USB device
1 Stop the USB device playback.
2 Remove the USB device.
If you remove your USB device during
playback, data in the USB device may be
damaged.
Notes
• Do not use USB devices so large or heavy that they
may fall down due to vibration, or cause a loose
connection.
• Do not detach the front panel during playback of the
USB device, otherwise USB data may be damaged.
• This unit cannot recognize USB devices via a USB
hub.
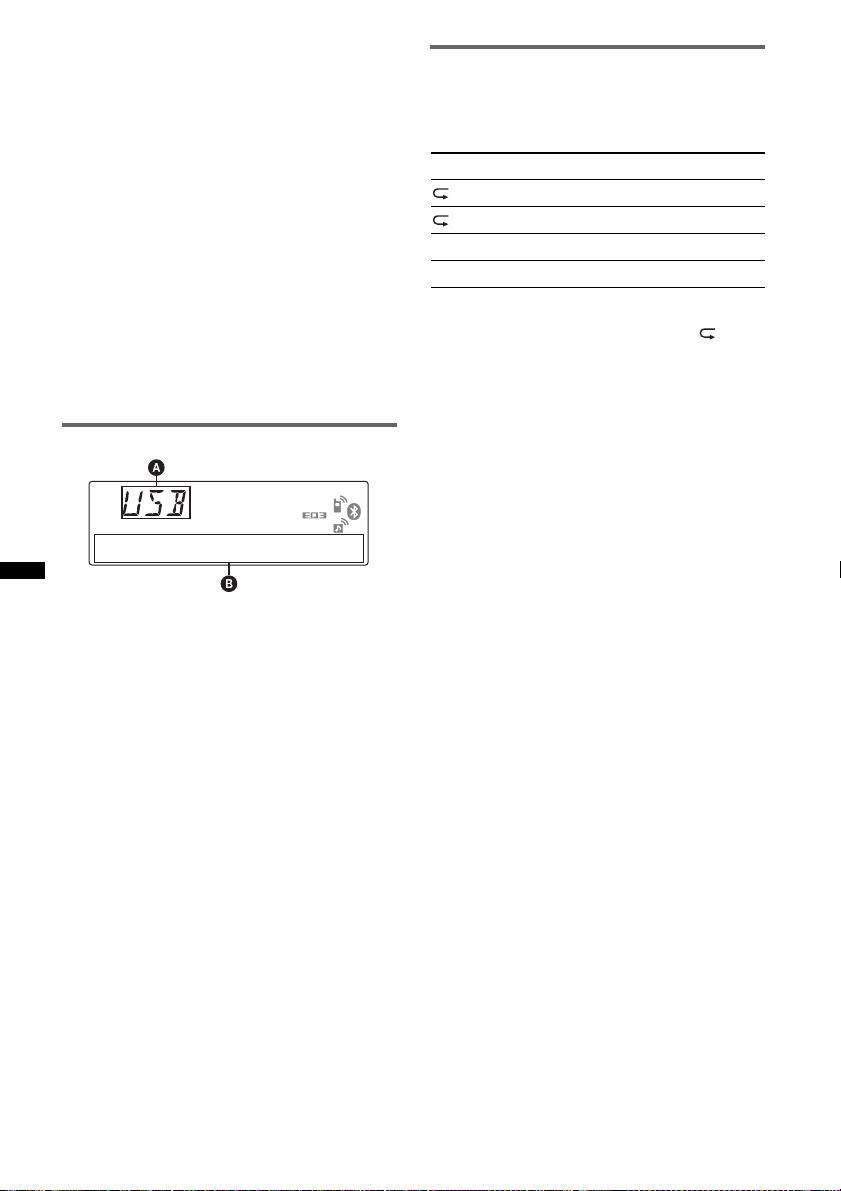
Display items
A Source
B Track name, Artist name, Album number*,
Album name, Track number/Elapsed playing
time, Clock
* Album number is displayed only when the album is
changed.
To change display items B, press (DSPL).
Notes
• Displayed items will differ, depending on the USB
device, recorded format and settings. For details,
visit the support site.
• The maximum number of displayable data is as
follows.
– folders (albums): 128
– files (tracks) per folder: 500
• Do not leave a USB device in a parked car, as
malfunction may result.
• It may take time for playback to begin, depending on
the amount of recorded data.
• DRM (Digital Rights Management) files may not be
played.
• During playback or fast-forward/reverse of a VBR
(Variable Bit Rate) MP3/WMA/AAC file, elapsed
playing time may not display accurately.
• Playback of the following MP3/WMA/AAC files is not
supported.
– lossless compression
– copyright-protected
Repeat and shuffle play
1 During playback, press (3) (REP) or
(4) (SHUF) repeatedly until the
desired setting appears.
Select To play
TRACK track repeatedly.
ALBUM album repeatedly.
SHUF ALBUM album in random order.
SHUF DEVICE device in random order.
After 3 seconds, the setting is complete.
To return to normal play mode, select “ OFF”
or “SHUF OFF.”
14
Page 15
iPod
For details on the compatibility of your iPod, see
“About iPod” on page 24 or visit the support site.
In these Operating Instructions, “iPod” is used as
a general reference for the iPod functions on the
iPod and iPhone, unless otherwise specified by
the text or illustrations.
Support site
Customers in Latin America:
http://esupport.sony.com/ES/LA/
Customers in Pan Asia:
http://www.sony-asia.com/section/support
http://www.sony-asia.com/caraudio/
The tracks on the iPod start playing
automatically from the point last played.
If an iPod is already connected, to start
playback press (SOURCE) repeatedly until
“USB” appears. (“IPD” appears in the display
when iPod is recognized.)
* If the iPod was played back in the passenger control
last time, this will not appear.
3 Press (MODE) to select the play mode.
The mode changes as follows:
RESUMING t ALBUM t TRACK t
PODCAST* t GENRE t PLAYLIST
t ARTIST
* May not appear depending on iPod setting.
4 Adjust the volume.
Press (OFF) to stop playback.
Playing back iPod
Before connecting the iPod, turn down the
volume of the unit.
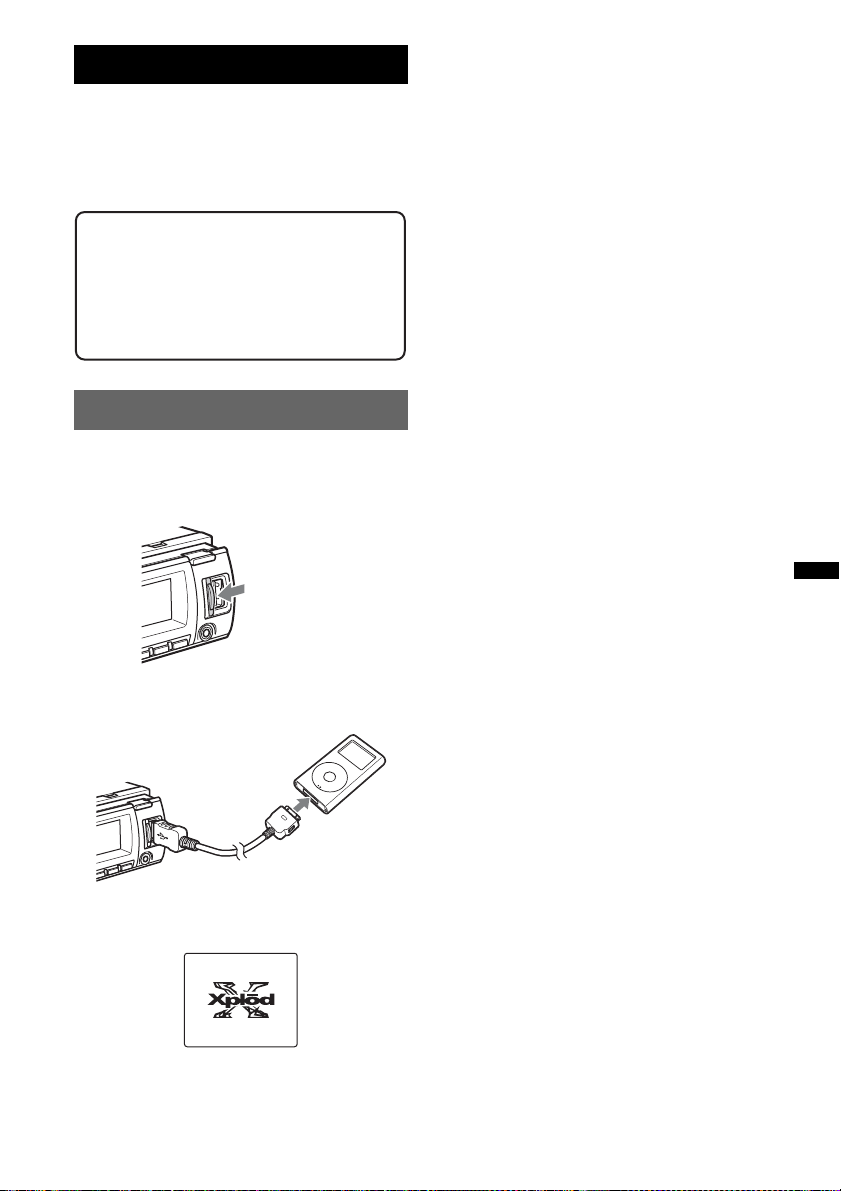
1 Slide the USB cover.
2 Connect the iPod to the USB terminal
via the dock connector to USB cable.
M
E
N
U
>
.
The iPod will turn on automatically, and the
display will appear on the iPod screen as
below.*
Removing the iPod
1 Stop the iPod playback.
2 Remove the iPod.
Caution for iPhone
When you connect an iPhone via USB, telephone
volume is controlled by iPhone itself. In order to avoid
sudden loud sound after a call, do not increase the
volume on the unit during a telephone call.
Notes
• Do not detach the front panel during playback of the
iPod, otherwise data may be damaged.
• This unit cannot recognize iPod via a USB hub.
Tips
• When the ignition key is turned to the ACC position,
and the unit is on, the iPod will be recharged.
• If the iPod is disconnected during playback, “NO
DEV” appears in the display of the unit.
Resume mode
When the iPod is connected to the dock
connector, the mode of this unit changes to
resume mode and playback starts in the mode set
by the iPod.
In resume mode, the following buttons do not
function.
– (3) (REP)
– (4) (SHUF)
Tip
We recommend the RC-100IP USB cable (not
supplied) to connect the dock connector.
15
Page 16
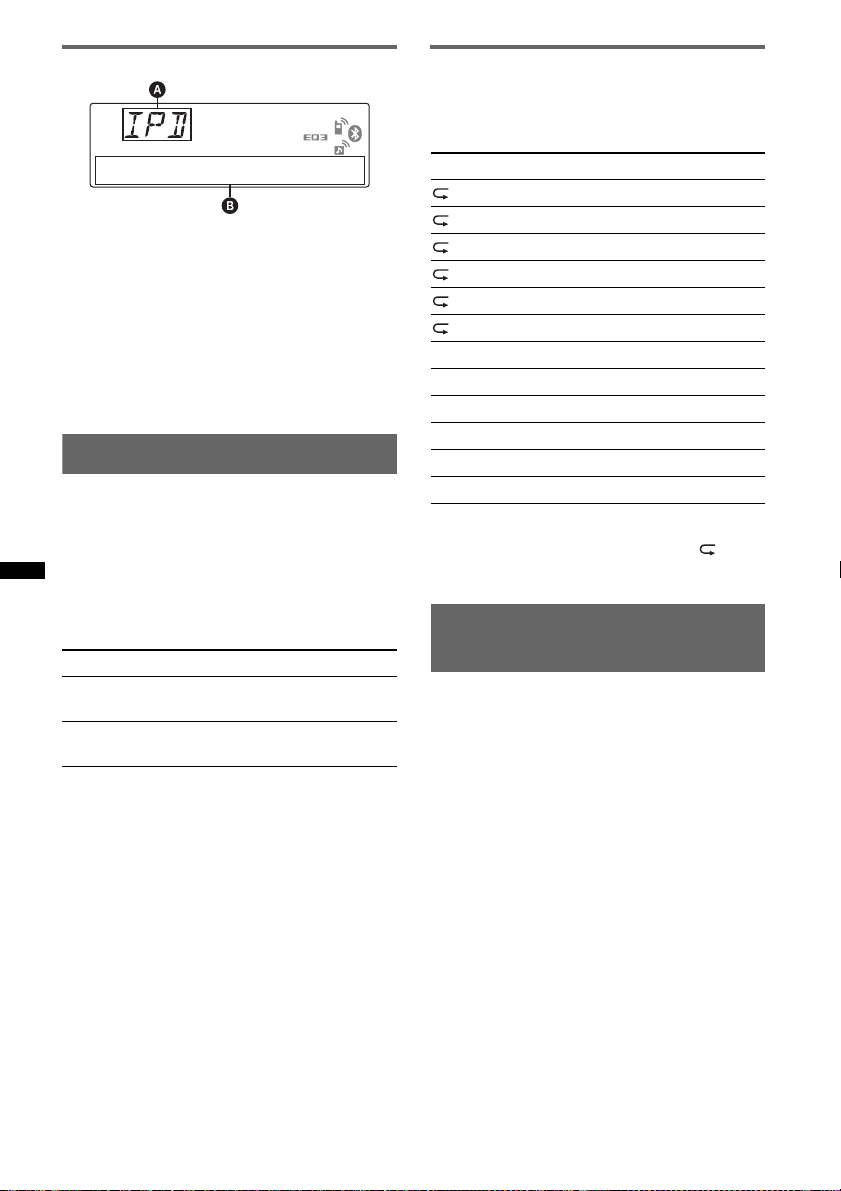
Display items
A Source (iPod) indication
B Track name, Artist name, Album name, Track
number/Elapsed playing time, Clock
To change display items B, press (DSPL).
Tip
When album/podcast/genre/artist/playlist is changed,
its item number appears momentarily.
Note
Some letters stored in iPod may not be displayed
correctly.
Setting the play mode
1 During playback, press (MODE).
The mode changes as follows:
ALBUM t TRACK t PODCAST* t
GENRE t PLAYLIST t ARTIST
* May not appear depending on iPod setting.
Repeat and shuffle play
1 During playback, press (3) (REP) or
(4) (SHUF) repeatedly until the
desired setting appears.
Select To play
TRACK track repeatedly.
ALBUM album repeatedly.
PODCAST podcast repeatedly.
ARTIST artist repeatedly.
PLAYLIST playlist repeatedly.
GENRE genre repeatedly.
SHUF ALBUM album in random order.
SHUF PODCAST podcast in random order.
SHUF ARTIST artist in random order.
SHUF PLAYLIST playlist in random order.
SHUF GENRE genre in random order.
SHUF DEVICE device in random order.
After 3 seconds, the setting is complete.
To return to normal play mode, select “ OFF”
or “SHUF OFF.”
Skipping albums, podcasts, genres,
playlists and artists
To Pre ss
Skip (1)/(2) (ALBUM –/+)
Skip
continuously
[press once for each]
(1)/(2) (ALBUM –/+)
[hold to desired point]
16
Operating an iPod directly
— Passenger control
You can operate an iPod connected to the dock
connector directly.
1 During playback, press and hold
(MODE).
“MODE IPOD” appears and you will be able
to operate the iPod directly.
To change the display items
Press (DSPL).
The display items change as follows:
Track name t Artist name t Album name t
MODE IPOD t Clock
To exit the passenger control
Press and hold (MODE).
Then “MODE AUDIO” will appear and the play
mode will change to “RESUMING.”
Notes
• The volume can be adjusted only by the unit.
• If this mode is canceled, the repeat setting will be
turned off.
Page 17
Bluetooth (Handsfree calling and Music streaming)
Bluetooth operations
To use the Bluetooth function, the following
procedure is necessary.
1 Pairing
When connecting Bluetooth devices for the
first time, mutual registration is required. This
is called “pairing.” This registration (pairing)
is required only for the first time, as this unit
and the other devices will recognize each
other automatically from the next time. You
can pair up to 8 devices. (Depending on the
device, you may need to input a passcode for
each connection.)
2 Connection
To use the device after pairing is made, start
the connection. Sometimes pairing allows to
connect automatically.
3 Handsfree calling/Music streaming
You can talk handsfree and listen to music
when the connection is made.
Support site
Customers in Latin America:
http://esupport.sony.com/ES/LA/
Customers in Pan Asia:
http://www.sony-asia.com/section/support
http://www.sony-asia.com/caraudio/
Pairing
First, register (“pair”) a Bluetooth device
(cellular phone, etc.) and this unit with each
other. You can pair up to 8 devices. Once pairing
is established, there is no need for pairing again.
1 Place the Bluetooth device within 1 m
(3 ft) of this unit.
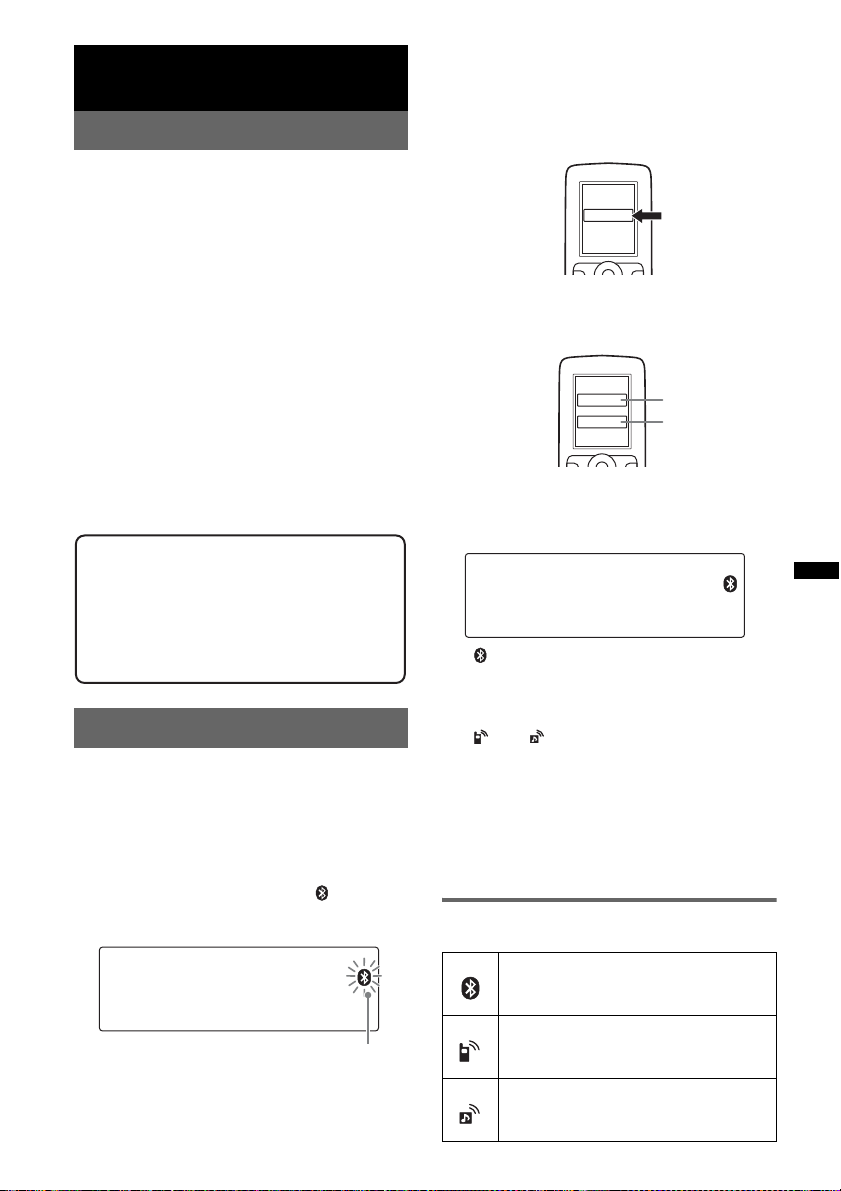
2 Press and hold (BT) until “ ” flashes
(about 5 seconds).
The unit enters pairing standby mode.
flashing
3 Set the Bluetooth device to search for
this unit.
A list of detected devices appears in the
display of the device to be connected. This
unit is displayed as “XPLOD” on the device
to be connected.
DR-BT30Q
XPLOD
XXXXXXX
4 If Passcode* input is required on the
display of the device to be connected,
input “0000.”
Input passcode .
XXXX
This unit and the Bluetooth device memorize
each other’s information, and when pairing is
made, the unit is ready for connection to the
device.
“ ” flashes and then stays lit after pairing is
complete.
“0000”
5 Set the Bluetooth device to connect to
this unit.
“ ” or “ ” appears when the connection is
made.
* Passcode may be called “passkey,” “PIN code,” “PIN
number” or “Password,” etc., depending on the
device.
Note
Pairing standby mode is not released until the
connection is made.
About Bluetooth icons
The following icons are used by this unit.
lit:
flashing:
off:
lit:
flashing:
off:
lit:
flashing:
off:
Bluetooth signal on
Pairing standby mode
Bluetooth signal off
Connection successful
Connecting
No connection
Connection successful
Connecting
No connection
17
Page 18
Connection
If pairing has already been achieved, start
operation from here.
To switch the Bluetooth signal output of this unit to on
To use the Bluetooth function, switch the
Bluetooth signal output of this unit to on.
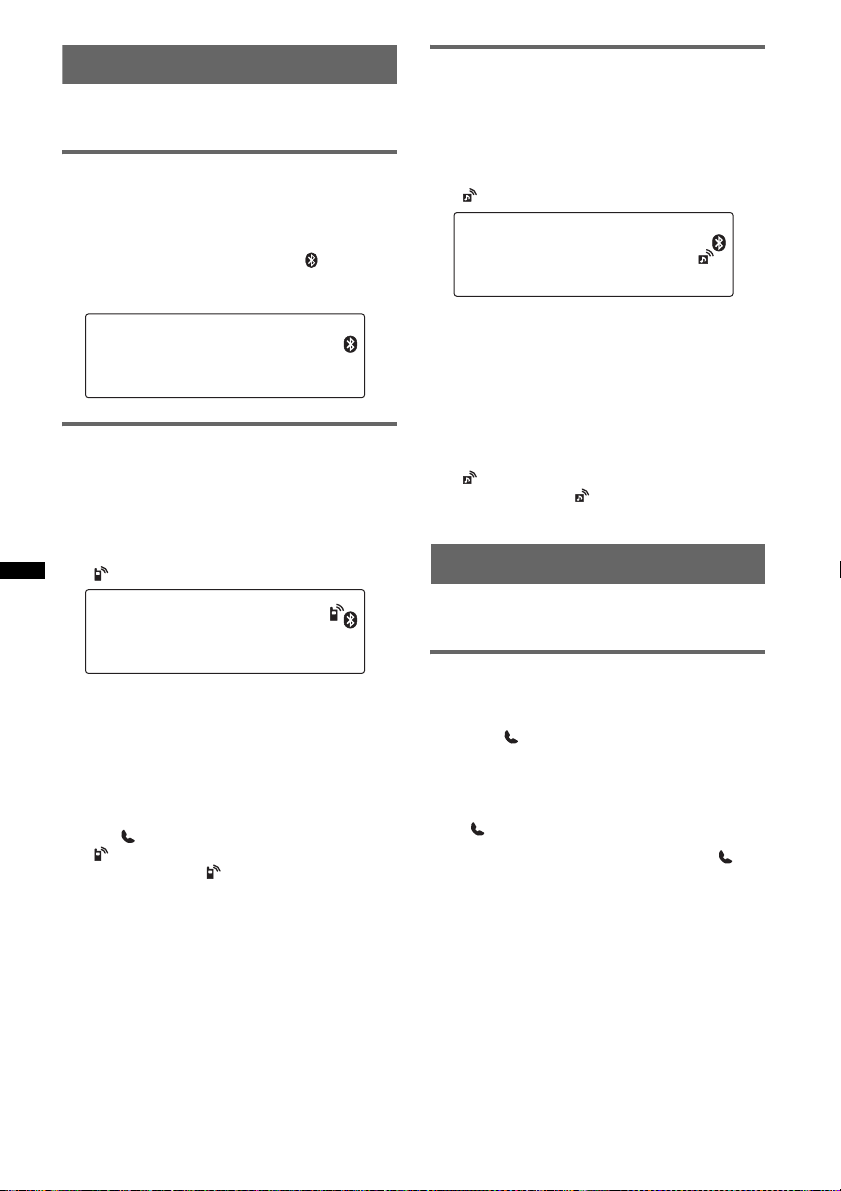
1 Press and hold (BT) until “ ” lights
(about 3 seconds).
Bluetooth signal is switched to on.
Connecting a cellular phone
1 Be sure that both this unit and the
cellular phone are switched to
Bluetooth signal on.
2 Connect to this unit using the cellular
phone.
“ ”appears when the connection is made.
Connecting an audio device
1 Be sure that both this unit and the
audio device are switched to
Bluetooth signal on.
2 Connect to this unit using the audio
device.
“ ” appears when the connection is made.
Connecting the last-connected audio
device from this unit
1 Be sure that both this unit and the audio device
are switched to Bluetooth signal on.
2 Press (SOURCE) repeatedly until “BT
AUDIO” appears.
3 Press (6).
“ ” flashes while the connection is being
made. And then “ ” stays lit when the
connection is made.
Handsfree calling
Check that the unit and cellular phone are
connected beforehand.
Connecting the last-connected
cellular phone from this unit
1 Be sure that both this unit and the cellular
phone are switched to Bluetooth signal on.
2 Press (SOURCE) repeatedly until “BT
PHONE” appears.
3 Press (handsfree).
“ ” flashes while the connection is being
made. And then “ ” stays lit when the
connection is made.
Note
While streaming Bluetooth audio, you cannot connect
from this unit to the cellular phone. Connect from the
cellular phone to this unit instead. A connecting noise
may be heard over playback sound.
Tip
With Bluetooth signal on: when the ignition is switched
to on, this unit reconnects automatically to the lastconnected cellular phone. But automatic connection
also depends on the cellular phone’s specification. If
this unit does not reconnect automatically, connect
manually.
18
Receiving calls
When receiving a call, a ring tone is output from
your car speakers.
1 Press (handsfree) when a call is
received with a ring tone.
The phone call starts.
To end a call
Press (handsfree) again, or (OFF).
To reject an incoming call, press and hold
(handsfree) for 2 seconds.
Mic Gain adjustment
You can switch between two volume levels
(“LOW” or “HI”) to set a suitable level for the
other party during a call.
1 Press (5) during a call.
The item changes as follows:
MIC-LOW y MIC-HI
Note
The microphone of this unit is located on the rear of
the front panel (page 8). Do not cover the microphone
with tape, etc.
Page 19
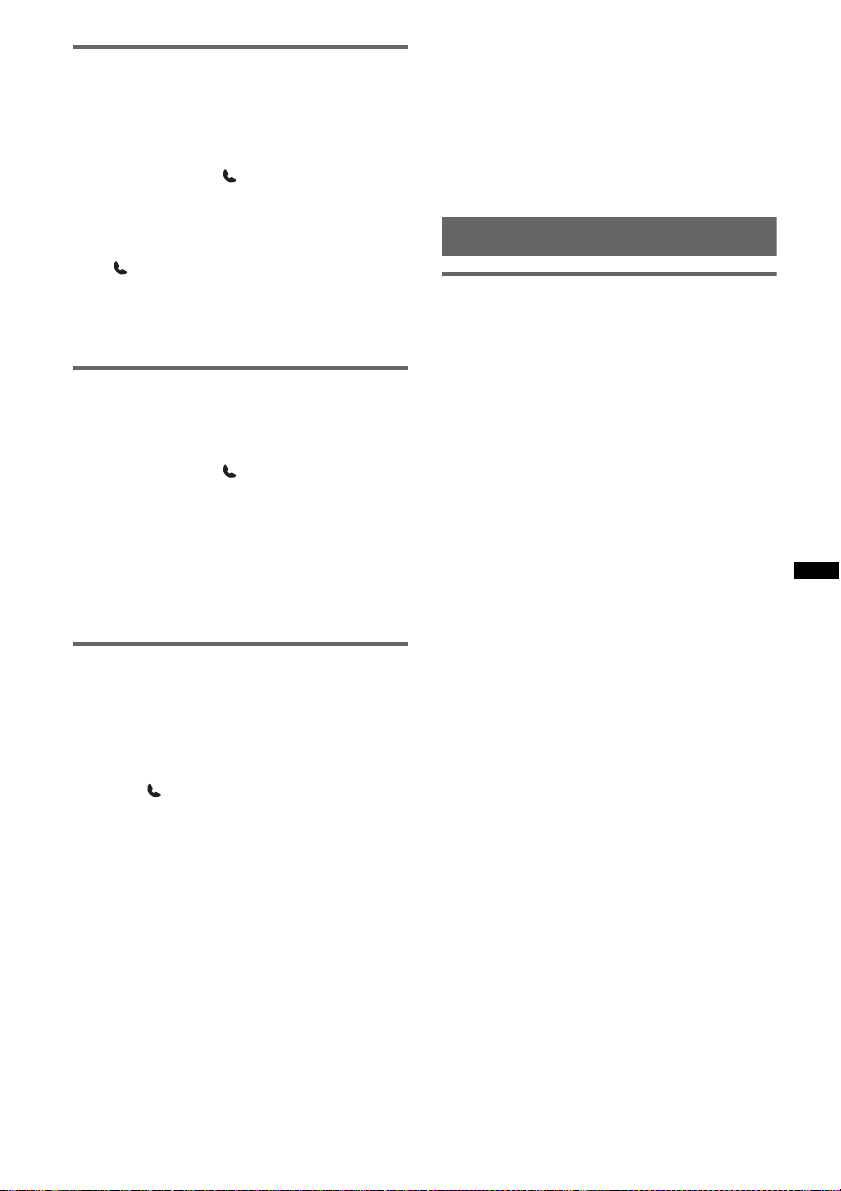
Making calls
In the case of making calls from this unit, redial
is used.
1 Press (SOURCE) repeatedly until “BT
PHONE” appears.
2 Press and hold (handsfree) for 3
seconds or more.
The phone call starts.
To end a call
Press (handsfree) again, or (OFF).
To call another phone, use your cellular phone,
and then transfer the call.
For call transfer details, check the following.
Call transfer
In order to activate/deactivate the appropriate
device (this unit/cellular phone), check the
following.
1 Press and hold (handsfree) or use
your cellular phone.
For details on cellular phone operation, refer to
your cellular phone manual.
Note
Depending on the cellular phone, handsfree
connection may be cut off when call transfer is
attempted.
Voice Dial Activation
You can activate voice dialing with a cellular
phone connected to this unit by saying the voice
tag stored on the cellular phone, then make a call.
1 Press (SOURCE) repeatedly until “BT
PHONE” appears.
2 Press (handsfree).
The cellular phone enters voice dialing mode.
3 Say the voice tag stored on the cellular
phone.
Your voice is recognized, and the call is
made.
Notes
• Check that unit and cellular phone are connected
beforehand.
• Store a voice tag on your cellular phone beforehand.
• If you activate voice dialing with a cellular phone
connected to this unit, this function may not always
work in some cases.
• Noises such as the engine running may interfere
with sound recognition. In order to improve
recognition, operate under conditions where noise is
minimized.
• Voice dialing may not work in some situations,
depending on the effectiveness of the cellular
phone’s recognition function. For details, see the
support site (page 28).
Tips
• Speak in the same way as you did when you stored
the voice tag.
• Store a voice tag while seated in the car, via this unit
with “BT PHONE” source selected.
Music streaming
Listening to music from an audio device
You can listen to music of an audio device on this
unit if the audio device supports A2DP
(Advanced Audio Distribution Profile) of
Bluetooth technology.
1 Turn down the volume on this unit.
2 Press (SOURCE) repeatedly until “BT
AUDIO” appears.
3 Operate the audio device to start
playback.
4 Adjust the volume on this unit.
Adjusting the volume level
The volume level is adjustable for any difference
between the unit and the Bluetooth audio device.
1 Start playback of the Bluetooth audio device at
a moderate volume.
2 Set your usual listening volume on the unit.
3 Press the select button repeatedly until “BTA”
appears, and rotate the volume control dial to
adjust the input level (–8 dB to +18 dB).
19
Page 20
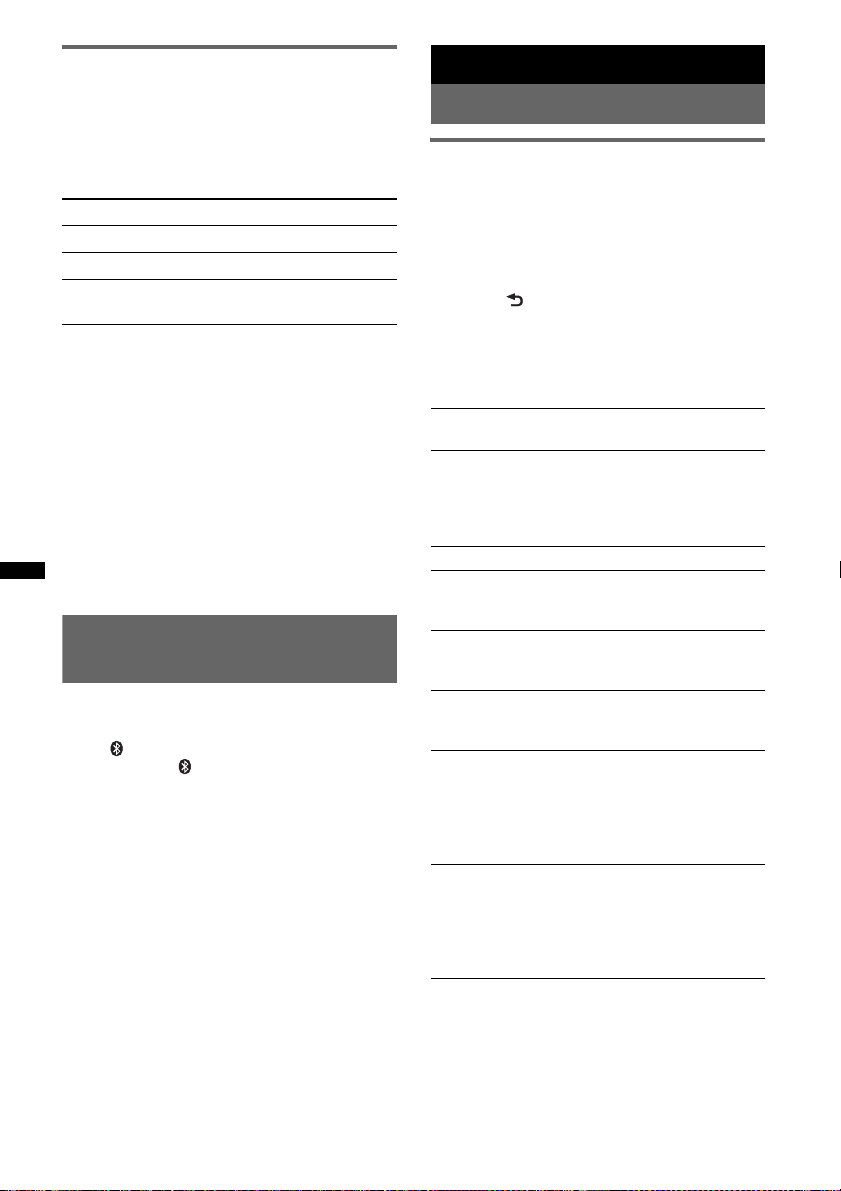
Operating an audio device with this unit
You can perform the following operations on this
unit if the audio device supports AVRCP (Audio
Video Remote Control Profile) of Bluetooth
technology. (The operation differs depending on
the audio device.)
To Pre ss
Play (6) (PAUSE)* on this unit.
Pause (6) (PAUSE)* on this unit.
Skip tracks SEEK –/+ (
* Depending on the device, it may be necessary to
press twice.
Operations other than the above should be
performed on the audio device.
Notes
• During audio device playback, information such as
track number/time, playback status, etc., of a
connected audio device is not displayed on this unit.
• Even if the source is changed on this unit, playback
of the audio device does not stop.
Tip
You can connect a cellular phone that supports A2DP
(Advanced Audio Distribution Profile) as an audio
device and listen to music.
each track]
./>) [once for
Deleting registration of all paired devices
1 Press (OFF).
This unit is turned off.
2 If “ ” lights, press and hold
(BT) until “ ” turns off.
3 Press and hold the select button.
4 Press the select button repeatedly
until “BT INIT” appears.
5 Press (SEEK) +.
Initializing starts.
It takes 3 seconds to cancel all registration.
Do not turn off the power while “INITIAL” is
flashing.
Other functions
Changing the sound settings
Adjusting the sound characteristics
1 Press the select button repeatedly
until the desired item appears.
2 Rotate the control dial to adjust the
selected item.
3 Press (BACK).
The setting is complete and the display
returns to normal play/reception mode.
The following items can be set (follow the page
reference for details):
EQ3
Selects an equalizer curve from 7 music types.
DSO (Dynamic Soundstage Organizer)
Creates a more ambient sound field.
To select the DSO mode: “1,” “2,” “3” or “OFF.”
The larger the number, the more enhanced the
effect.
1
LOW*
, MID*1, HI*1 (page 21)
BAL (Balance)
Adjusts the sound balance between the left and
right speakers.
FAD (Fader)
Adjusts the relative level between the front and
rear speakers.
SUB (Subwoofer volume)
Adjusts the subwoofer volume.
(“ATT” is the lowest setting.)
2
AUX*
(AUX level)
Adjusts the volume level for each connected
auxiliary equipment: “+18 dB” – “0 dB” – “–8
dB.”
This setting negates the need to adjust the
volume level between sources.
3
BTA*
(BT-Audio level)
Adjusts the volume level for each connected
Bluetooth audio device: “+18 dB” – “0 dB” –
“–8 dB.”
This setting negates the need to adjust the
volume level between sources (page 19).
*1 When EQ3 is activated.
*2 When AUX source is activated.
*3 When Bluetooth audio source is activated
(page 19).
20
Page 21
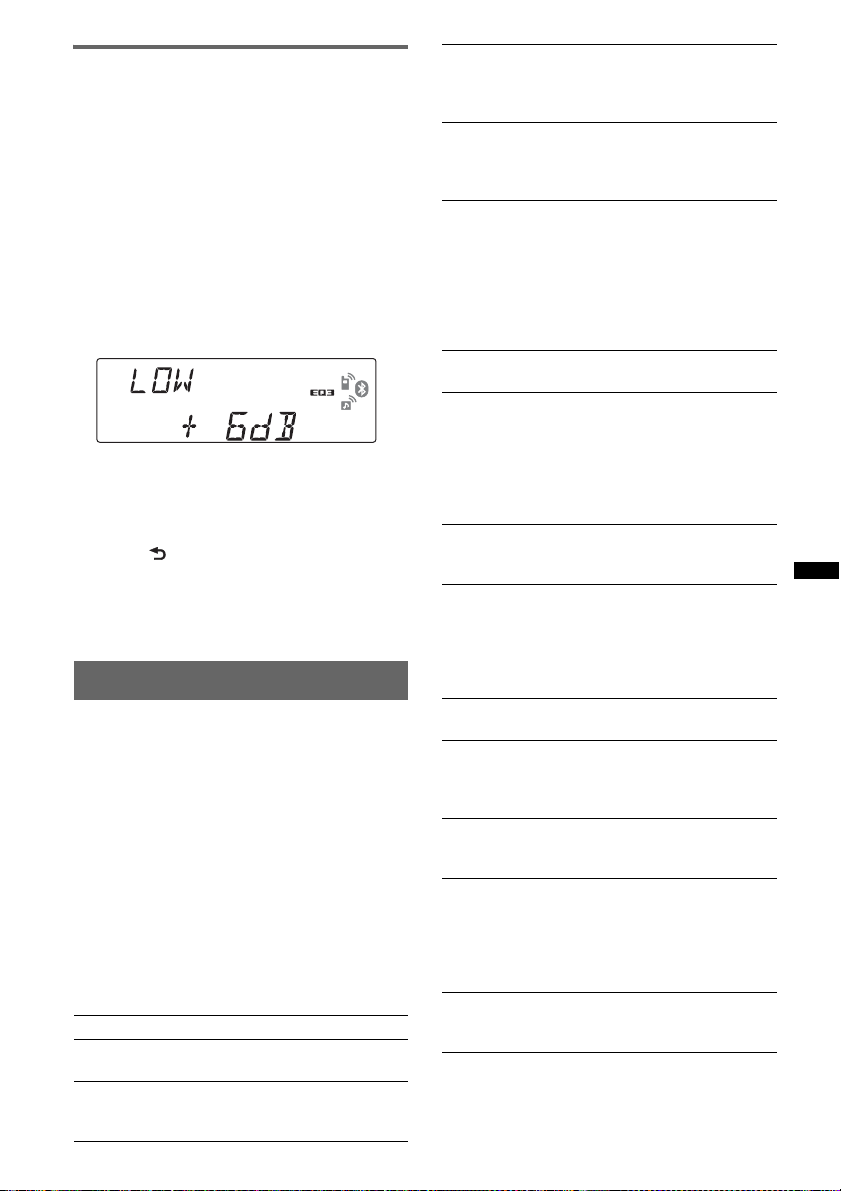
Customizing the equalizer curve
— EQ3
“CUSTOM” of EQ3 allows you to make your
own equalizer settings.
1 Select a source, then press the select
button repeatedly to select “EQ3.”
2 Rotate the control dial to select
“CUSTOM.”
3 Press the select button repeatedly
until “LOW,” “MID” or “HI” appears.
4 Rotate the control dial to adjust the
selected item.
The volume level is adjustable in 1 dB steps,
from –10 dB to +10 dB.
Repeat steps 3 and 4 to adjust the equalizer
curve.
To restore the factory-set equalizer curve,
press and hold the select button before the
setting is complete.
5 Press (BACK).
The setting is complete and the display
returns to normal play/reception mode.
Tip
Other equalizer types are also adjustable.
Adjusting setup items — SET
1 Press and hold the select button.
The setup display appears.
2 Press the select button repeatedly
until the desired item appears.
3 Rotate the control dial to select the
setting (example “ON” or “OFF”).
4 Press and hold the select button.
The setup is complete and the display returns
to normal play/reception mode.
Note
Displayed items will differ, depending on the source
and setting.
The following items can be set (follow the page
reference for details):
CLOCK-ADJ (Clock Adjust) (page 7)
BEEP
Activates the beep sound: “ON,” “OFF.”
AUX -A*
1
Activates the AUX source display: “ON,”
“OFF” (page 22).
(AUX Audio)
AUTO OFF
Shuts off automatically after a desired time
when the unit is turned off: “NO,” “30S
(seconds),” “30M (minutes),” “60M (minutes).”
1
MIC*
– “EXT”: to automatically switch to the external
microphone when it is connected.
– “INT”: to select only the internal microphone.
B.OUT (Black Out)
Turns off the illumination automatically for any
source (e.g., during CD playback/radio
reception, etc.) if no operation is performed for
5 seconds: “ON,” “OFF.”
To bring the light back on, press any button on
the unit. (When activated, remote operation is
unavailable.)
DEMO
(Demonstration)
Activates the demonstration: “ON,” “OFF.”
DIMMER
Changes the display brightness.
– “AT”: to dim the display automatically when
you turn lights on. (Available only when the
illumination control lead is connected.)
– “ON”: to dim the display.
– “OFF”: deactivate the dimmer.
CONTRAST
Adjusts the contrast of the display. The contrast
level is adjustable in 7 steps.
M.DSPL (Motion Display)
Selects the Motion Display mode.
– “SA”: to show moving patterns and spectrum
analyzer.
– “ON”: to show moving patterns.
– “OFF”: to deactivate the Motion Display.
A.SCRL*
Scrolls long items automatically: “ON,” “OFF.”
LOCAL (Local Seek Mode)
– “ON”: to only tune into stations with stronger
– “OFF”: to tune normal reception.
MONO*
Selects monaural reception mode to improve
poor FM reception: “ON,” “OFF.”
ZAP.TIME*
Selects the playback time for the ZAPPIN
function.
– “ZAP.TIME-1 (about 6 seconds),”
LPF (Low Pass Filter)
Selects the subwoofer cut-off frequency: “OFF,”
“80Hz,” “100Hz,” “120Hz,” “140Hz,” “160Hz.”
2
(Auto Scroll)
signals.
3
(Monaural Mode)
2
(Zappin Time)
“ZAP.TIME-2 (about 9 seconds),”
“ZAP.TIME-3 (about 30 seconds).”
continue to next page t
21
Page 22
LPF NORM/REV (Low Pass Filter Normal/
Reverse)
Selects the phase when the LPF is on: “NORM,”
“REV.”
HPF (High Pass Filter)
Selects the front/rear speaker cut-off frequency:
“OFF,” “80Hz,” “100Hz,” “120Hz,” “140Hz,”
“160Hz.”
LOUD (Loudness)
Reinforces bass and treble for clear sound at low
volume levels: “ON,” “OFF.”
BTM (page 12)
2
DM+*
To set the DM+ function: “ON,”“OFF.”
1
BT INIT*
*1 When the unit is turned off.
*2 When CD/USB source is activated.
*3 When FM is received.
(page 20)
Using optional equipment
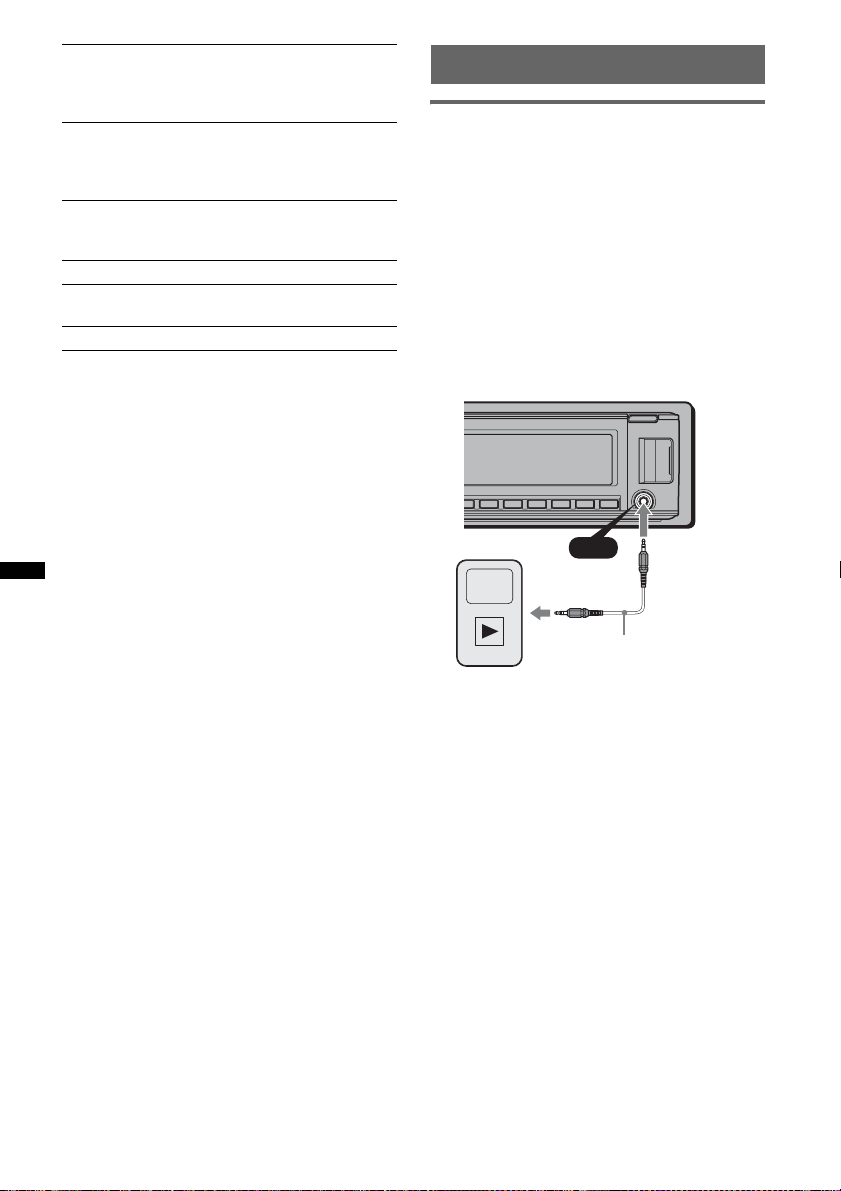
Auxiliary audio equipment
By connecting an optional portable audio device
to the AUX input jack (stereo mini jack) on the
unit and then simply selecting the source, you
can listen on your car speakers. The volume level
is adjustable for any difference between the unit
and the portable audio device. Follow the
procedure below:
Connecting the portable audio
device
1 Turn off the portable audio device.
2 Turn down the volume on the unit.
3 Connect to the unit.
AUX
22
Connecting cord*
(not supplied)
* Be sure to use a straight type plug.
Adjust the volume level
Be sure to adjust the volume for each connected
audio device before playback.
1 Turn down the volume on the unit.
2 Press (SOURCE) repeatedly until “AUX”
appears.
“AUX FRONT IN” appears.
3 Start playback of the portable audio device at a
moderate volume.
4 Set your usual listening volume on the unit.
5 Adjust the input level (page 20).
Page 23
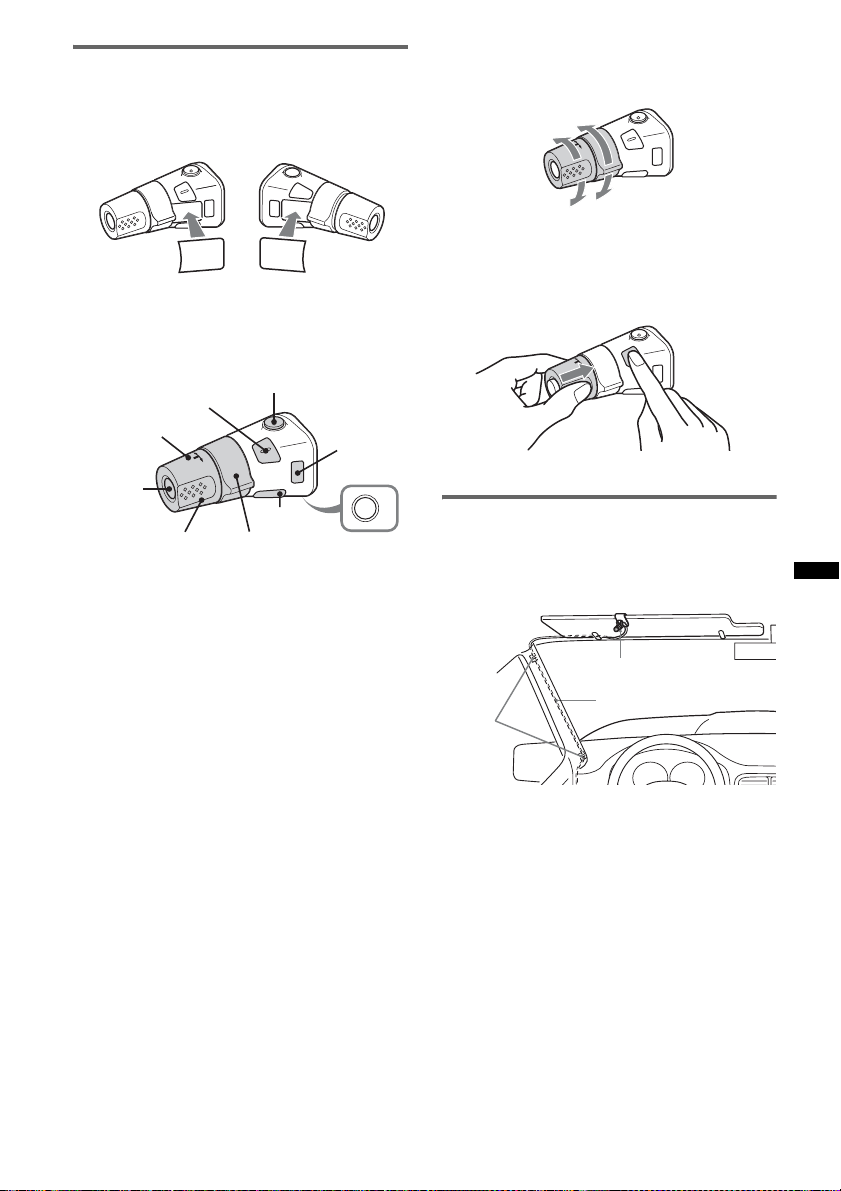
Rotary commander RM-X4S
Attaching the label
Attach the indication label depending on how
you mount the rotary commander.
D
S
P
SEL
E
D
O
M
SPL
D
L
M
O
D
E
S
E
L
Location of controls
The corresponding buttons on the rotary
commander control the same functions as those
on this unit.
SEL
PRESET/
DISC
SOURCE
VOL
The following controls on the rotary commander
require a different operation from the unit.
• ATT (attenuate) button
To attenuate the sound. To cancel, press again.
• SEL (select) button
The same as the select button on the unit.
• PRESET/DISC* control
CD/USB: The same as (1)/(2) (ALBUM –/+)
on the unit (push in and rotate).
Radio: To receive stored stations (push in and
rotate).
• VOL (volume) control
The same as the control dial on the unit (rotate).
• SEEK/AMS control
The same as (SEEK) +/– on the unit (rotate, or
rotate and hold).
• DSPL (display) button
To change display items.
* Not available for this unit.
ATT
DSPL
SEEK/AMS
MODE
OFF
OFF
Changing the operative direction
The operative direction of the controls is factoryset as shown below.
To increase
To decrease
If you need to mount the rotary commander on
the right hand side of the steering column, you
can reverse the operative direction.
1 While pushing the VOL control, press and
hold (SEL).
External microphone XA-MC10
By connecting an optional external microphone
to the microphone input connector, you can
improve audio quality while talking thorough
this unit.
External microphone
Clamps
Tip
You can set the priority of the microphones (page 21).
Note
Connect XA-MC10 as the external microphone. You
may not be able to call or malfunction may occur if
another device is connected.
Connecting cord
23
Page 24
Additional Information
Precautions
– CD-R/CD-RW other than those recorded in
music CD format or MP3 format conforming to
ISO9660 Level 1/Level 2, Joliet/Romeo or
multi-session.
• Cool off the unit beforehand if your car has been
parked in direct sunlight.
• Power antenna (aerial) extends automatically.
Moisture condensation
Should moisture condensation occur inside the unit,
remove the disc and wait for about an hour for it to
dry out; otherwise the unit will not operate properly.
To maintain high sound quality
Do not splash liquid onto the unit or discs.
Notes on discs
• Do not expose discs to direct sunlight or heat
sources such as hot air ducts, nor leave it in a car
parked in direct sunlight.
• Before playing, wipe the discs
with a cleaning cloth from the
center out. Do not use solvents
such as benzine, thinner,
commercially available
cleaners.
• This unit is designed to
playback discs that conform to
the Compact Disc (CD)
standard. DualDiscs and some of the music discs
encoded with copyright protection technologies do
not conform to the Compact Disc (CD) standard,
therefore, these discs may not be playable by this
unit.
• Discs that this unit CANNOT play
– Discs with labels, stickers, or sticky tape or
paper attached. Doing so may cause a
malfunction, or may ruin the disc.
– Discs with non-standard shapes (e.g., heart,
square, star). Attempting to do so may damage
the unit.
1
–8 cm (3
/4 in) discs
Notes on CD-R/CD-RW discs
• The maximum number of: (CD-R/CD-RW only)
– folders (albums): 150 (including root folder)
– files (tracks) and folders: 300 (may less than 300
if folder/file names contain many characters)
– displayable characters for a folder/file name: 32
(Joliet)/64 (Romeo)
• If the multi-session disc begins with a CD-DA
session, it is recognized as a CD-DA disc, and
other sessions are not played back.
• Discs that this unit CANNOT play
– CD-R/CD-RW of poor recording quality.
– CD-R/CD-RW recorded with an incompatible
recording device.
– CD-R/CD-RW which is finalized incorrectly.
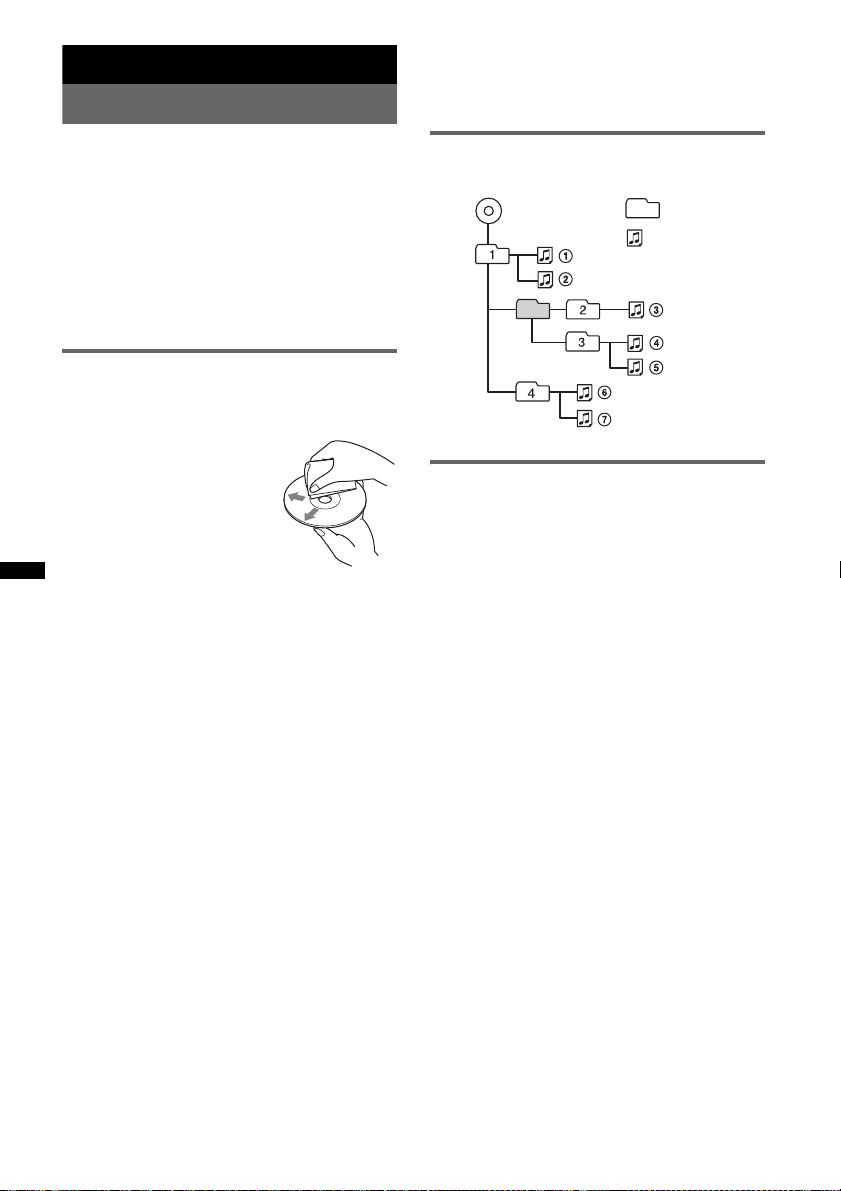
Playback order of MP3/WMA/AAC files
MP3/WMA/AAC
Folder
(album)
MP3/WMA/
AAC file
(track)
About iPod
• You can connect to the following iPod models.
Update your iPod devices to the latest software
before use.
– iPod touch
– iPod classic
– iPod with video*
– iPod nano (3rd generation)
– iPod nano (2nd generation)
– iPod nano (1st generation)*
– iPhone and iPhone 3G
* Passenger control is not available for iPod nano (1st
generation) or iPod with video.
• “Made for iPod” means that an electronic
accessory has been designed to connect
specifically to iPod and has been certified by the
developer to meet Apple performance standards.
• “Works with iPhone” means that an electronic
accessory has been designed to connect
specifically to iPhone and has been certified by the
developer to meet Apple performance standards.
• Apple is not responsible for the operation of this
device or its compliance with safety and
regulatory standards.
24
Page 25
About Bluetooth function
What is Bluetooth technology?
• Bluetooth wireless technology is a short-range
wireless technology that enables wireless data
communication between digital devices, such as a
cellular phone and a headset. Bluetooth wireless
technology operates within a range of about 10 m
(about 33 feet). Connecting two devices is
common, but some devices can be connected to
multiple devices at the same time.
• You do not need to use a cable for connection
since Bluetooth technology is a wireless
technology, neither is it necessary for the devices
to face one another, such is the case with infrared
technology. For example, you can use such a
device in a bag or pocket.
• Bluetooth technology is an international standard
supported by millions of companies all over the
world, and employed by various companies
worldwide.
On Bluetooth communication
• Bluetooth wireless technology operates within a
range of about 10 m.
Maximum communication range may vary
depending on obstacles (person, metal, wall, etc.)
or electromagnetic environment.
• The following conditions may affect the
sensitivity of Bluetooth communication.
– There is an obstacle such as a person, metal, or
wall between this unit and Bluetooth device.
– A device using 2.4 GHz frequency, such as a
wireless LAN device, cordless telephone, or
microwave oven, is in use near this unit.
• Because Bluetooth devices and wireless LAN
(IEEE802.11b/g) use the same frequency,
microwave interference may occur and result in
communication speed deterioration, noise, or
invalid connection if this unit is used near a
wireless LAN device. In such as case, perform the
following.
– Use this unit at least 10 m away from the
wireless LAN device.
– If this unit is used within 10 m of a wireless
LAN device, turn off the wireless LAN device.
– Install this unit and Bluetooth device as near to
each other as possible.
• Microwaves emitting from a Bluetooth device may
affect the operation of electronic medical devices.
Turn off this unit and other Bluetooth devices in
the following locations, as it may cause an
accident.
– where inflammable gas is present, in a hospital,
train, airplane, or petrol station
– near automatic doors or a fire alarm
• This unit supports security capabilities that
comply with the Bluetooth standard to provide a
secure connection when the Bluetooth wireless
technology is used, but security may not be
enough depending on the setting. Be careful when
communicating using Bluetooth wireless
technology.
• We do not take any responsibility for the leakage
of information during Bluetooth communication.
• Connection with all Bluetooth devices cannot be
guaranteed.
– A device featuring Bluetooth function is
required to conform to the Bluetooth standard
specified by Bluetooth SIG, and be
authenticated.
– Even if the connected device conforms to the
above mentioned Bluetooth standard, some
devices may not be connected or work correctly,
depending on the features or specifications of the
device.
– While talking on the phone hands free, noise
may occur, depending on the device or
communication environment.
• Depending on the device to be connected, it may
require some time to start communication.
Others
• Using the Bluetooth device may not function on
cellular phones, depending on radio wave
conditions and location where the equipment is
being used.
• If you experience discomfort after using the
Bluetooth device, stop using the Bluetooth device
immediately. Should any problem persist, consult
your nearest Sony dealer.
If you have any questions or problems concerning
your unit that are not covered in this manual, consult
your nearest Sony dealer.
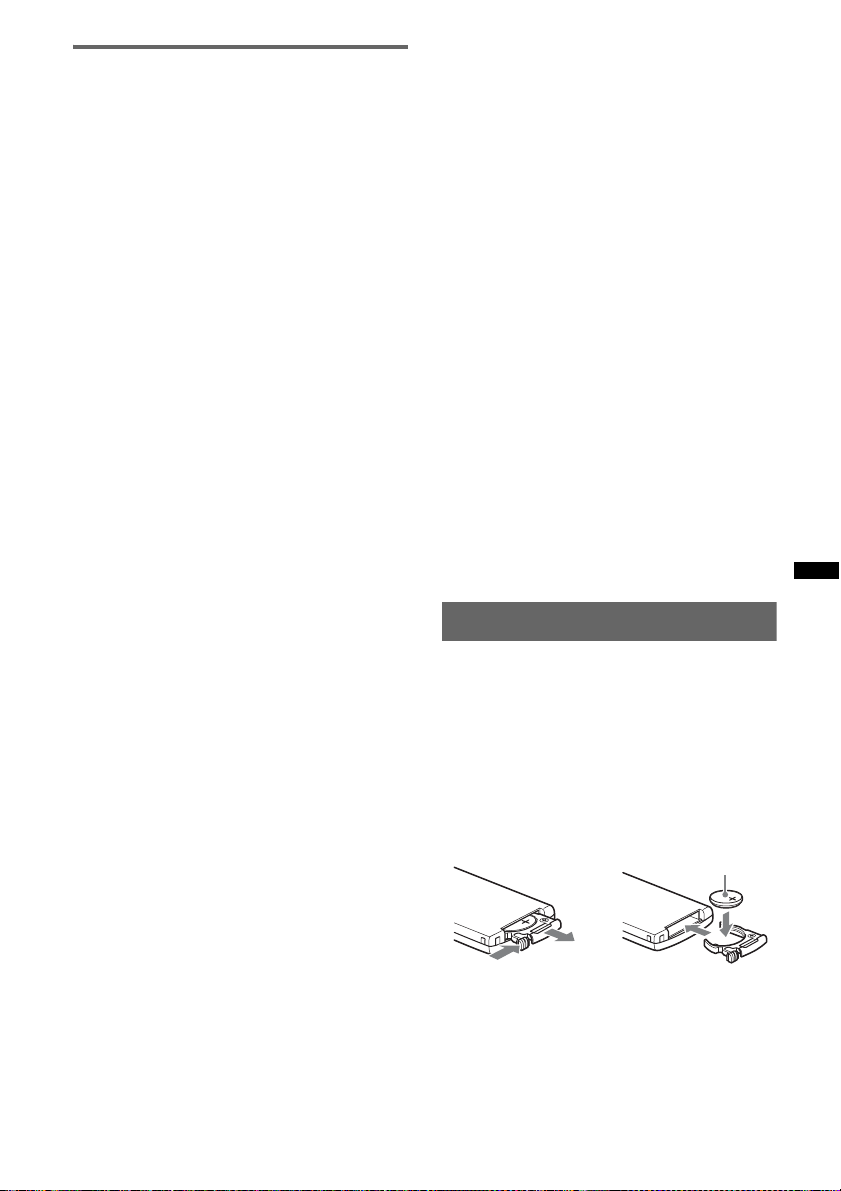
Maintenance
Replacing the lithium battery of the
card remote commander
Under normal conditions, the battery will last
approximately 1 year. (The service life may be
shorter, depending on the conditions of use.)
When the battery becomes weak, the range of the
card remote commander becomes shorter. Replace
the battery with a new CR2025 lithium battery. Use
of any other battery may present a risk of fire or
explosion.
+ side up
2
c
1
continue to next page t
25
Page 26
Notes on the lithium battery
• Keep the lithium battery out of the reach of children.
Should the battery be swallowed, immediately
consult a doctor.
• Wipe the battery with a dry cloth to assure a good
contact.
• Be sure to observe the correct polarity when
installing the battery.
• Do not hold the battery with metallic tweezers,
otherwise a short-circuit may occur.
WARNING
Battery may explode if mistreated.
Do not recharge, disassemble, or dispose of
in fire.
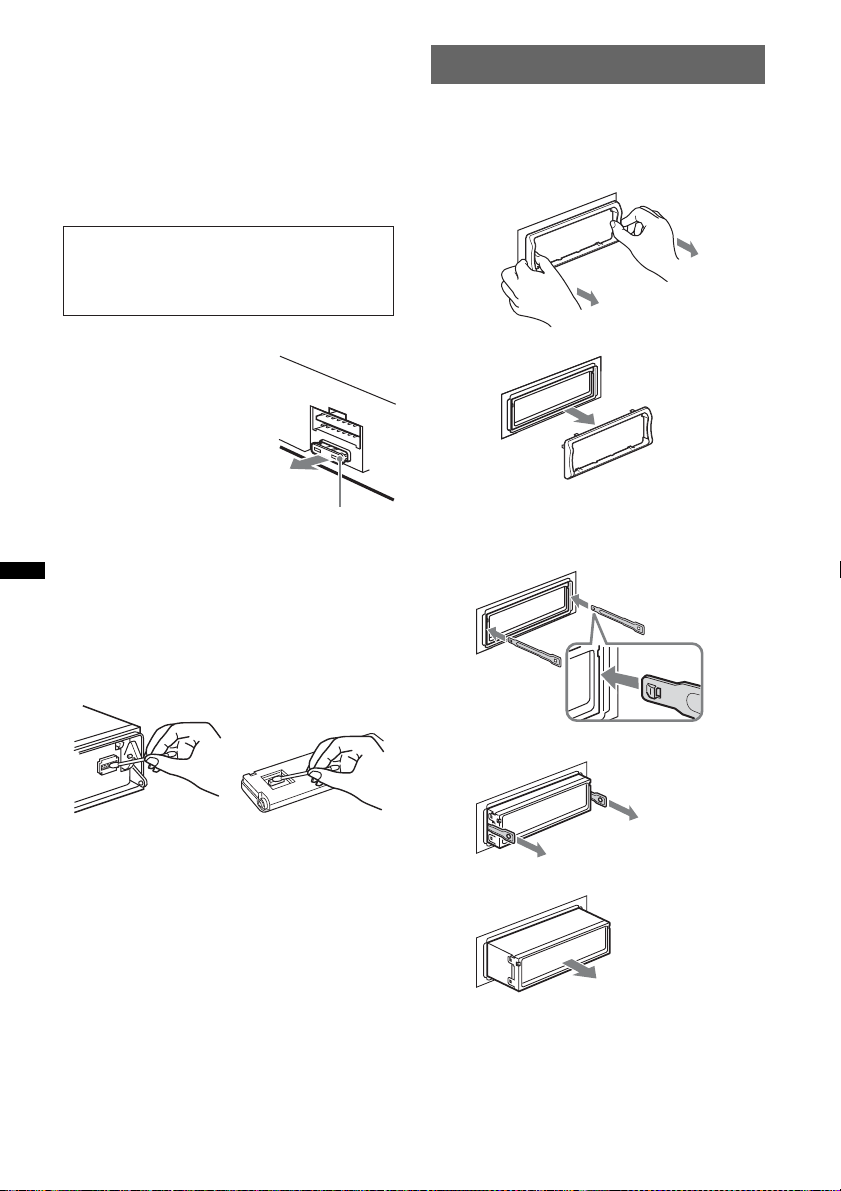
Removing the unit
1 Remove the protection collar.
1Detach the front panel (page 7).
2Pinch both edges of the protection collar,
then pull it out.
Fuse replacement
When replacing the fuse, be
sure to use one matching the
amperage rating stated on the
original fuse. If the fuse blows,
check the power connection and
replace the fuse. If the fuse
blows again after replacement,
there may be an internal
malfunction. In such a case,
consult your nearest Sony
dealer.
Fuse (10 A)
Cleaning the connectors
The unit may not function properly if the connectors
between the unit and the front panel are not clean. In
order to prevent this, detach the front panel (page 7)
and clean the connectors with a cotton swab. Do not
apply too much force. Otherwise, the connectors
may be damaged.
Main unit
Notes
• For safety, tur n off the ignition before cleaning the
connectors, and remove the key from the ignition
switch.
• Never touch the connectors directly with your fingers
or with any metal device.
Back of the front
panel
x
2 Remove the unit.
1Insert both release keys simultaneously
until they click.
Hook facing
inwards.
2Pull the release keys to unseat the unit.
3Slide the unit out of the mounting.
26
Page 27

Specifications
CD Player section
Signal-to-noise ratio: 120 dB
Frequency response: 10 – 20,000 Hz
Wow and flutter: Below measurable limit
Tuner section
FM
Tuning range:
87.5 – 108.0 MHz (at 50 kHz step)
Antenna (aerial) terminal:
External antenna (aerial) connector
Intermediate frequency: 150 kHz
Usable sensitivity: 10 dBf
Selectivity: 75 dB at 400 kHz
Signal-to-noise ratio: 70 dB (mono)
Separation: 40 dB at 1 kHz
Frequency response: 20 – 15,000 Hz
AM
Tuning range:
531 – 1,602 kHz (at 9 kHz step)
Antenna (aerial) terminal:
External antenna (aerial) connector
Intermediate frequency: 25 kHz
Sensitivity: 26 µV
USB Player section
Interface: USB (Full-speed)
Maximum current: 500mA
Wireless Communication
Communication System:
Bluetooth Standard version 2.0
Output:
Bluetooth Standard Power Class 2 (Max. +4 dBm)
Maximum communication range:
Line of sight approx. 10 m (33 ft)*
Frequency band:
2.4 GHz band (2.4000 – 2.4835 GHz)
Modulation method: FHSS
Compatible Bluetooth Profiles*
A2DP (Advanced Audio Distribution Profile)
AVRCP (Audio Video Remote Control Profile)
HFP (Handsfree Profile) 1.5
HSP (Headset Profile)
*1 The actual range will vary depending on factors
such as obstacles between devices, magnetic
fields around a microwave oven, static electricity,
reception sensitivity, antenna’s performance,
operating system, software application, etc.
*2 Bluetooth standard profiles indicate the purpose of
Bluetooth communication between devices.
1
2
:
General
Outputs:
Audio outputs terminal (front/rear)
Subwoofer output terminal (mono)
Power antenna (aerial) relay control terminal
Power amplifier control terminal
Inputs:
Remote controller input terminal
Antenna (aerial) input terminal
Telephone ATT control terminal
Illumination control terminal
AUX input jack (stereo mini jack)
USB signal input terminal
Tone controls:
Low: ±10 dB at 60 Hz (XPLOD)
Mid: ±10 dB at 1 kHz (XPLOD)
High: ±10 dB at 10 kHz (XPLOD)
Power requirements: 12 V DC car battery
(negative ground (earth))
Dimensions: Approx. 178 × 50 × 182 mm
1
(7
/8 × 2 × 71/4 in) (w/h/d)
Mounting dimensions: Approx. 182 × 53 × 162 mm
1
(7
/4 × 21/8 × 61/2 in) (w/h/d)
Mass: Approx. 1.3 kg (2 lb 14 oz)
Supplied accessories:
Card remote commander: RM-X304
Parts for installation and connections (1 set)
Optional accessories/equipment:
Rotary commander: RM-X4S
USB connection cable for iPod: RC-100IP
External microphone: XA-MC10
Your dealer may not handle some of the above listed
accessories. Please ask the dealer for detailed
information.
Design and specifications are subject to change
without notice.
• Halogenated flame retardants are not used in the
certain printed wiring boards.
• Halogenated flame retardants are not used in
cabinets.
• Packaging cushions are made from paper.
Power amplifier section
Output: Speaker outputs (sure seal connectors)
Speaker impedance: 4 – 8 ohms
Maximum power output: 52 W × 4 (at 4 ohms)
27
Page 28
Troubleshooting
The following checklist will help you remedy
problems you may encounter with your unit.
Before going through the checklist below, check the
connection and operating procedures.
If the problem is not solved, visit the following
support site.
Support site
Customers in Latin America:
http://esupport.sony.com/ES/LA/
Customers in Pan Asia:
http://www.sony-asia.com/section/support
http://www.sony-asia.com/caraudio/
General
No power is being supplied to the unit.
• Check the connection or fuse.
• If the unit is turned off and the display disappears, it
cannot be operated with the remote commander.
tTurn on the unit.
The power antenna (aerial) does not extend.
The power antenna (aerial) does not have a relay box.
No sound.
• The ATT function is activated, or the Telephone ATT
function (when the interface cable of a car telephone
is connected to the ATT lead) is activated.
• The position of the fader control “FAD” is not set for
a 2-speaker system.
• The Bluetooth audio device is in pause.
tCancel pause.
No beep sound.
• The beep sound is canceled (page 21).
• An optional power amplifier is connected and you are
not using the built-in amplifier.
The contents of the memory have been erased.
• The RESET button has been pressed.
tStore again into the memory.
• The power supply lead or battery has been
disconnected or it is not connected properly.
Stored stations and correct time are erased.
The fuse has blown.
Makes noise when the position of the ignition
is switched.
The leads are not matched correctly with the car’s
accessory power connector.
During playback or reception, demonstration
mode starts.
If no operation is performed for 5 minutes with
“DEMO-ON” set, demonstration mode starts.
t Set “DEMO-OFF” (page 21).
The display disappears from/does not appear
in the display window.
• The dimmer is set “DIMMER-ON” (page 21).
• The display disappears if you press and hold (OFF).
t Press and hold (OFF) on the unit until the
display appears.
• The connectors are dirty (page 26).
The Auto Off function does not operate.
The unit is turned on. The Auto Off function activates
after turning off the unit.
t Turn off the unit.
The display disappears while the unit is
operating.
The Black Out function is set to on (page 21).
Card remote commander operation is not
possible.
If the Black Out function is activated (no lighting),
card remote commander operation is not possible
(page 21).
CD playback
The disc cannot be loaded.
• Another disc is already loaded.
• The disc has been forcibly inserted upside down or in
the wrong way.
The disc does not playback.
• Defective or dirty disc.
• The CD-Rs/CD-RWs are not for audio use (page 24).
MP3/WMA/AAC files cannot be played back.
The disc is incompatible with the MP3/WMA/AAC
format and version. For details on playable discs and
formats, visit the support site.
MP3/WMA/AAC files take longer to play back
than others.
The following discs take a longer time to start
playback.
– a disc recorded with a complicated tree structure.
– a disc recorded in Multi Session.
– a disc to which data can be added.
The display items do not scroll.
• For discs with very many characters, those may not
scroll.
• “A.SCRL” is set to “OFF.”
t Set “A.SCRL-ON” (page 21).
t Press and hold (DSPL) (SCRL).
The sound skips.
• Installation is not correct.
t Install the unit at an angle of less than 45° in a
sturdy part of the car.
• Defective or dirty disc.
The operation buttons do not function.
The disc will not eject.
Press the RESET button (page 6).
28
Page 29
Radio reception
The stations cannot be received.
The sound is hampered by noises.
The connection is not correct.
t Connect a power antenna (aerial) control lead
(blue) or accessory power supply lead (red) to the
power supply lead of a car’s antenna (aerial)
booster (only when your car has built-in FM/AM
antenna (aerial) in the rear/side glass).
t Check the connection of the car antenna (aerial).
t If the auto antenna (aerial) will not go up, check
the connection of the power antenna (aerial)
control lead.
Preset tuning is not possible.
• Store the correct frequency in the memory.
• The broadcast signal is too weak.
Automatic tuning is not possible.
• Setting of the local seek mode is not correct.
t Tuning stops too frequently:
Set “LOCAL-ON” (page 21).
t Tuning does not stop at a station:
Set “LOCAL-OFF” (page 21).
• The broadcast signal is too weak.
t Perform manual tuning.
During FM reception, the “ST” indication
flashes.
• Tune in the frequency accurately.
• The broadcast signal is too weak.
t Set “MONO-ON” (page 21).
An FM program broadcast in stereo is heard in
monaural.
The unit is in monaural reception mode.
tSet “MONO-OFF” (page 21).
USB playback
You cannot play back items via a USB hub.
This unit cannot recognize USB devices via a USB
hub.
Cannot play back items.
A USB device does not work.
tReconnect it.
The USB device takes longer to play back.
The USB device contains files with a complicated tree
structure.
A beep sounds.
During playback, the USB device has been
disconnected.
tBefore disconnecting a USB device, make sure to
stop playback first for data protection.
The sound is intermittent.
The sound may be intermittent at a high-bit-rate of
more than 320 kbps.
Bluetooth function
The connecting device cannot detect this unit.
• Before the pairing is made, set this unit to pairing
standby mode.
• While connected to a Bluetooth device, this unit
cannot be detected from another device. Disconnect
the current connection and search for this unit from
another device.
• When the device pairing is made, set the Bluetooth
signal output to on (page 18).
Connection is not possible.
• Connect to this unit from a Bluetooth device or vice
versa. The connection is controlled from one side
(this unit or Bluetooth device), but not both.
• Check the pairing and connection procedures in the
manual of the other device, etc., and perform the
operation again.
The talker’s voice volume is low.
Adjust the volume level.
A call partner says that the volume is too low
or high.
Adjust the volume accordingly using Mic Gain
adjustment (page 18).
Echo or noise occurs in phone call
conversations.
• Lower the volume.
• If the ambient noise other than the phone call sound
is loud, try reducing this noise.
E.g.: If a window is open and road noise, etc., is loud,
shut the window. If the air conditioner is loud, lower
the air conditioner.
The phone is not connected.
When the Bluetooth audio is played back, the phone is
not connected even if you press (handsfree).
t Connect from the phone.
The phone sound quality is poor.
Phone sound quality depends on reception conditions
of cellular phone.
t Move your car to a place where you can enhance
the cellular phone’s signal if the reception is poor.
The volume of the connected audio device is
low (high).
Volume level will differ depending on the audio
device.
t Adjust the volume of the connected audio device or
this unit.
continue to next page t
29
Page 30
The sound skips during playback of a
Bluetooth audio device.
• Reduce the distance between the unit and the
Bluetooth audio device.
• If the Bluetooth audio device is stored in a case
which interrupts the signal, remove the audio device
from the case while using.
• Several Bluetooth devices or other devices which
emit radio waves are used nearby.
tTurn off the other devices.
tReduce the distance from the other devices.
• The playback sound stops momentarily when the
connection between this unit and the cellular phone is
being made. This is not a malfunction.
The connected Bluetooth audio device cannot
be controlled.
Check that the connected Bluetooth audio device
supports AVRCP.
Some functions do not work.
Check if the connecting device supports the functions
in question.
A call is answered unintentionally.
The connecting phone is set to answer a call
automatically.
No sound is output from the car speakers
during handsfree call.
If the sound is output from the cellular phone, set the
cellular phone to output the sound from the car
speakers.
“OFF BT” appears when initializing.
Press and hold (BT) until “ ” turns off. Then
initialize again (page 20).
The external microphone does not work.
The setting of the microphone is not correct.
t Set “MIC-EXT” (page 21).
Error displays/Messages
CHECKING
The unit is confirming the connection of a USB device.
t Wait until confirming the connection is finished.
ERROR
• The disc is dirty or inserted upside down.
tClean or insert the disc correctly.
• A blank disc has been inserted.
• The disc cannot play due to a problem.
tInsert another disc.
• USB device was not automatically recognized.
tReconnect it again.
• Press Z to remove the disc.
FAILURE
The connection of speakers/amplifiers is incorrect.
t See the installation guide manual of this model to
check the connection.
HUB NO SUPRT
USB hub is not supported on this unit.
L. SEEK +/–
The local seek mode is on during automatic tuning.
30
NO DEV (No Device)
(SOURCE) is selected without a USB device
connected. A USB device or a USB cable has been
disconnected during playback.
t Be sure to connect a USB device and USB cable.
NO MUSIC
The disc or USB device does not contain a music file.
t Insert a music CD in this unit.
t Connect a USB device with a music file in it.
NO NAME
A disc/album/artist/track name is not written in the
track.
OFFSET
There may be an internal malfunction.
t Check the connection. If the error indication
remains on in the display, consult your nearest
Sony dealer.
OVERLOAD
USB device is overloaded.
t Disconnect the USB device, then change the source
by pressing (SOURCE).
t Indicates that the USB device is out of order, or an
unsupported device is connected.
READ
The unit is reading all track and album information on
the disc.
t Wait until reading is complete and playback starts
automatically. Depending on the disc structure, it
may take more than a minute.
RESET
The CD unit or USB device cannot be operated due to
a problem.
t Press the RESET button (page 6).
USB NO SUPRT (USB Not Support)
The connected USB device is not supported.
t For details on the compatibility of your USB
device, visit the support site.
“” or “”
During reverse or fast-forward, you have reached the
beginning or the end of the disc and you cannot go any
further.
“”
The character cannot be displayed with the unit.
If these solutions do not help improve the situation,
consult your nearest Sony dealer.
If you take the unit to be repaired because of CD
playback trouble, bring the disc that was used at the
time the problem began.
Page 31
(زﺎﻬﺟ ﺪﺟﻮﻳ ﻻ) NO DEV
ﻞﺼﻓ ﻢﺗ .USB زﺎﻬﺟ ﻞﻴﺻﻮﺗ نوﺪﺑ
(SOURCE) رﺪﺼﳌا رﺎﻴﺘﺧا ﻢﺗ
.ضﺮﻌﻟا ءﺎﻨﺛأ USB ﻞﺒﻛ وأ USB زﺎﻬﺟ
.USB ﻞﺒﻛو USB زﺎﻬﺟ ﻞﻴﺻﻮﺗ ﻦﻣ ﺪﻛﺄﺗ T
NO MUSIC
.ﻰﻘﻴﺳﻮﻣ ﻒﻠﻣ ﲆﻋ يﻮﺘﺤﻳ ﻻ USB زﺎﻬﺟ وأ ﺔﻧاﻮﻄﺳﻷا
.ةﺪﺣﻮﻟا هﺬﻫ ﰲ CD ﺔﻧاﻮﻄﺳأ لﺎﺧدﺈﺑ ﻢﻗ T
.ﻲﻘﻴﺳﻮﻣ ﻒﻠﻣ ﲆﻋ يﻮﺘﺤﻳ USB زﺎﻬﺟ ﻞﻴﺻﻮﺘﺑ ﻢﻗ T
NO NAME
.ﺔﻋﻮﻄﻘﳌا ﰲ بﻮﺘﻜﻣ ﻏ ﺔﻋﻮﻄﻘﳌا /نﺎﻨﻔﻟا /مﻮﺒﻟﻷا /ﺔﻧاﻮﻄﺳﻷا ﻢﺳا
OFFSET
.ﲇﺧاد ﻞﻠﺧ ﺪﺟﻮﻳ ﺪﻗ
ً
،ﺔﺷﺎﺸﻟا ﲆﻋ
ﺎﺿوﺮﻌﻣ ﻞﻠﺨﻟا ﴍﺆﻣ ﻞﻇ اذإ .ﻞﻴﺻﻮﺘﻟا ﻦﻣ ﺪﻛﺄﺗ
.Sony ﻮﺳ ﻞﻴﻛو بﺮﻗأ ﴩﺘﺳا
OVERLOAD
.USB زﺎﻬﺠﻟ طﺮﻔﻣ ﻞﻴﻤﺤﺗ
.(SOURCE) رﺰﻟا ﻂﻐﻀﺑ رﺪﺼﳌا ﻴﻐﺘﺑ ﻢﻗ ﻢﺛ ،USB زﺎﻬﺟ ﻞﺼﻓا
ﻏ زﺎﻬﺟ ﻞﻴﺻﻮﺗ ﻢﺗ وأ ،ﺐﻴﺗﱰﻟا جرﺎﺧ USB زﺎﻬﺟ نأ ﱃإ ﺸﻳ T
.مﻮﻋﺪﻣ
READ
ﲆﻋ ﺔﻠﺠﺴﳌا مﻮﺒﻟﻷاو ﺔﻋﻮﻄﻘﳌا تﺎﻣﻮﻠﻌﻣ ﻊﻴﻤﺟ ةءاﺮﻘﺑ زﺎﻬﺠﻟا مﻮﻘﻳ
.ﺔﻧاﻮﻄﺳﻷا
ً
ﺎﻴﺋﺎﻘﻠﺗ ضﺮﻌﻟا أﺪﺒﻳو ةءاﺮﻘﻟا ﺔﻴﻠﻤﻋ ﻲﻬﻨﺗ نأ ﱃإ ﺮﻈﺘﻧا
ًﺎﻘﻓو .
.ﺔﻘﻴﻗد ﻦﻣ ﻛأ ﻚﻟذ قﺮﻐﺘﺴﻳ ﺪﻗ ،ﺔﻧاﻮﻄﺳﻷا ﺔﺒﻴﻛﱰﻟ
RESET
زﺎﻬﺟ وأ CD ﺔﻧاﻮﻄﺳأ ﻐﻣ وأ CD ﺔﻧاﻮﻄﺳأ ةﺪﺣو ﻞﻴﻐﺸﺗ ﻦﻜ ﻻ
.ﺔﻠﻜﺸﻣ دﻮﺟو ﺐﺒﺴﺑ USB
.(6 ﺔﺤﻔﺻ) RESET رﺰﻟا ﻂﻐﺿا
(مﻮﻋﺪﻣ ﻏ USB زﺎﻬﺟ) USB NO SUPRT
.مﻮﻋﺪﻣ ﻏ لﻮﺻﻮﳌا USB زﺎﻬﺟ
ﻊﻗﻮﻣ ةرﺎﻳز ﻰﺟﺮﻳ ،ﻚﻳﺪﻟ USB زﺎﻬﺟ ﺔﻴﻘﻓاﻮﺗ ﻦﻋ ﻞﻴﺻﺎﻔﺘﻠﻟ T
.ةﺪﻋﺎﺴﳌا
"
" وأ " "
ﺔﻳﺎﻬﻧ وأ ﺔﻳاﺪﺑ ﱃإ ﺖﻠﺻو ﺪﻘﻟ ،ﻊﻳﴪﻟا ﻢﻳﺪﻘﺘﻟا وأ ﻊﻴﺟﱰﻟا لﻼﺧ
.ﻚﻟذ ﻦﻣ ﻛأ مﺪﻘﺘﻟا ﻚﻨﻜ ﻻو ﺔﻧاﻮﻄﺳﻷا
.زﺎﻬﺠﻟا اﺬﻫ ﺔﻄﺳاﻮﺑ ﺰﻣﺮﻟا ضﺮﻋ ﻦﻜ ﻻ
،ﻒﻗﻮﳌا ﲆﻋ ﺐﻠﻐﺘﻟا ﰲ ﻚﺗﺪﻋﺎﺴﻣ ﻦﻣ لﻮﻠﺤﻟا هﺬﻫ ﻦﻜﻤﺘﺗ اذإ
.Sony ﻮﺳ ﻞﻴﻛو بﺮﻗأ ﴩﺘﺳا
ﺔﻧاﻮﻄﺳأ ضﺮﻌﺑ ﻖﻠﻌﺘﺗ ﺔﻠﻜﺸﻣ ﺐﺒﺴﺑ ﺢﻴﻠﺼﺘﻠﻟ زﺎﻬﺠﻟا تﺬﺧا اذإ
.ﺔﻠﻜﺸﳌا ثوﺪﺣ ﺪﻨﻋ ﺎﻬﻟﻌﺘﺳا ﻢﺗ ﻲﺘﻟا ﺔﻧاﻮﻄﺳﻷا ﻚﻌﻣ ﺬﺧ ،CD
T
T
T
T
"
.Bluetooth تﻮﺻ زﺎﻬﺟ ﻦﻣ ضﺮﻌﻟا ءﺎﻨﺛا تﻮﺼﻟا ﻲﻄﺨﺗ ﻢﺘﻳ
.Bluetooth تﻮﺻ زﺎﻬﺟو ةﺪﺣﻮﻟا ﺑ ﺔﻓﺎﺴﳌا ﻞﻴﻠﻘﺘﺑ ﻢﻗ •
ﻢﻗ ،ةرﺎﺷﻻا ﻖﻴﻌﺗ ﺔﺒﻠﻋ ﰲ Bluetooth تﻮﺻ زﺎﻬﺟ ﻦﻳﺰﺨﺗ ﻢﺗ اذا •
.لﻌﺘﺳﻻا ءﺎﻨﺛا ﺔﺒﻠﻌﻟا ﻦﻣ تﻮﺼﻟا زﺎﻬﺟ جاﺮﺧﺎﺑ
تﺎﺟﻮﻣ ﺚﻌﺒﺗ ىﺮﺧا ةﺰﻬﺟا وا Bluetooth ةﺰﻬﺟا ةﺪﻋ لﻌﺘﺳا ﻢﺗ •
.ﺾﻌﺒﻟا ﺎﻬﻀﻌﺑ ﻦﻣ بﺮﻘﻟﺎﺑ ﺔﻴﻜﻠﺳﻻ
.ىﺮﺧﻻا ةﺰﻬﺟﻻا ﺊﻔﻃا T
.ىﺮﺧﻻا ةﺰﻬﺟﻻا ﻦﻣ ﺔﻓﺎﺴﳌا ﻞﻠﻗ T
ةﺪﺣﻮﻟا هﺬﻫ ﺑ لﺎﺼﺗﻻا ﺬﻴﻔﻨﺗ ﺪﻨﻋ ًﺎﻴﻈﺤﻟ ضﺮﻌﻟا تﻮﺻ ﻒﻗﻮﺘﻳ •
.ﻼﻠﺧ ﺪﻌﻳ ﻻ اﺬﻫ .يﻮﻠﺨﻟا ﻒﺗﺎﻬﻟاو
.لﻮﺻﻮﳌا Bluetooth تﻮﺻ زﺎﻬﺠﺑ ﻢﻜﺤﺘﻟا ﻦﻜ ﻻ
ﺔﻔﻴﻇو ﻢﻋﺪﻳ لﻮﺻﻮﳌا Bluetooth تﻮﺻ زﺎﻬﺟ نا ﻦﻣ ﺪﻛﺄﺗ
.ﻒﺋﺎﻇﻮﻟا ﺾﻌﺑ ﻞﻤﻌﺗ ﻻ
.ﺔﻴﻨﻌﳌا ﺔﻔﻴﻇﻮﻟا ﻢﻋﺪﻳ لﻮﺻﻮﳌا زﺎﻬﺠﻟا نا ﻦﻣ ﺪﻛﺄﺗ
.ﺪﺼﻗ ﻏ ﻦﻋ ﺔﳌﺎﻜﳌا ﲆﻋ ﺔﺑﺎﺟﻻا ﻢﺘﺗ
.ًﺎﻴﺋﺎﻘﻠﺗ ﺔﳌﺎﻜﳌا ﲆﻋ ﺔﺑﺎﺟﻼﻟ لﻮﺻﻮﳌا ﻒﺗﺎﻬﻟا ﻂﺒﺿ ﻢﺗ
.ﺔﻳوﺪﻳﻼﻟا ﺔﳌﺎﻜﳌا ءﺎﻨﺛا ةرﺎﻴﺴﻟا تﺎﻋﺳ ﻦﻣ تﻮﺻ رﺪﺼﻳ ﻻ
يﻮﻠﺨﻟا ﻒﺗﺎﻬﻟا ﻂﺒﺿا ،يﻮﻠﺨﻟا ﻒﺗﺎﻬﻟا ﻦﻣ رﺪﺼﻳ تﻮﺼﻟا نﺎﻛ اذا
.ةرﺎﻴﺴﻟا تﺎﻋﺳ ﻦﻣ تﻮﺼﻟا جاﺮﺧﻻ
.ﻂﺒﻀﻟا ةدﺎﻋا ﺪﻨﻋ "OFF BT" ﺮﻬﻈﻳ
ﺬﻴﻔﻨﺘﺑ ﻢﻗ ﻢﺛ ."
" ﺊﻔﻄﻨﻳ نا ﱃا ﻪﻄﻐﻀﺑ ﻆﻔﺘﺣاو (BT) ﻂﻐﺿا
.(20 ﺔﺤﻔﺻ) ىﺮﺧا ةﺮﻣ ﻂﺒﻀﻟا ةدﺎﻋا
.ﻲﺟرﺎﺨﻟا نﻮﻓﺮﻜﻴﳌا ﻞﻤﻌﻳ ﻻ
.ﺔﺤﻴﺤﺻ ﻏ ﻲﺟرﺎﺨﻟا نﻮﻓﺮﻜﻴﳌا ﺔﺌﻴﻬﺗ
.(21 ﺔﺤﻔﺻ) "MIC-EXT" ﺔﺌﻴﻬﺘﺑ ﻢﻗ
ﻞﻠﺨﻟا ضﺮﻋ تﺎﻧﺎﻴﺑ /تارﺎﻄﺧا
.USB زﺎﻬﺟ ﻞﻴﺻﻮﺗ ﻦﻣ ةﺪﺣﻮﻟا ﻖﻘﺤﺘﺗ
.ﻖﻘﺤﺘﻟا ﺔﻴﻠﻤﻋ ﻲﻬﺘﻨﺗ نأ ﱃإ ﺮﻈﺘﻧا T
"
.ﻞﻴﺻﻮﺘﻟا ﻦﻣ ﻖﻘﺤﺘﻠﻟ ﻞﻳدﻮﳌا اﺬﻬﺑ صﺎﺨﻟا تﻴﻠﻌﺘﻟا ﻞﻴﻟد ﻊﺟار
.ﺔﺑﻮﻠﻘﻣ ةرﻮﺼﺑ ﺎﻬﻟﺎﺧدا ﻢﺗ وأ ﺔﺨﺴﺘﻣ ﺔﻧاﻮﻄﺳﻷا •
.ﺢﻴﺤﺻ ﻞﻜﺸﺑ ﺎﻬﻠﺧدأ وأ ﺔﻧاﻮﻄﺳﻷا ﻒﻴﻈﻨﺘﺑ ﻢﻗ T
.ﺔﻏرﺎﻓ ﺔﻧاﻮﻄﺳأ لﺎﺧدا ﻢﺗ •
.ﺎﻣ ﺔﻠﻜﺸﻣ دﻮﺟو ﺐﺒﺴﺑ ﺔﻧاﻮﻄﺳﻷا ضﺮﻋ ﻦﻜ ﻻ •
.ىﺮﺧأ ﺔﻧاﻮﻄﺳأ لﺎﺧدﺈﺑ ﻢﻗ T
.ًﺎﻴﺋﺎﻘﻠﺗ USB زﺎﻬﺟ ﲆﻋ فﺮﻌﺘﻟا ﻢﺘﻳ •
.ىﺮﺧأ ةﺮﻣ ﻪﻠﻴﺻﻮﺗ ﺪﻋأ T
.ﺔﻧاﻮﻄﺳﻷا جاﺮﺧﻻ رﺰﻟا ﻂﻐﺿا •
.ﺢﻴﺤﺻ ﻏ تﻮﺼﻟا تﺨﻀﻣ /تﺎﻋﺴﻟا ﻞﻴﺻﻮﺗ
.ةﺪﺣﻮﻟا هﺬﻫ ﺔﻄﺳاﻮﺑ مﻮﻋﺪﻣ ﻏ USB ﻢﺴﻘﻣ
.ﺔﻴﺋﺎﻘﻠﺘﻟا ﺔﻔﻟاﻮﳌا ءﺎﻨﺛأ ﻞﻴﻐﺸﺗ ﺔﻟﺎﺣ ﰲ ﲇﺤﳌا ﺚﺤﺒﻟا ﻊﺿو
.AVRCP
T
CHECKING
ERROR
FAILURE
T
HUB NO SUPRT
L. SEEK +/–
30
Page 32
T
T
T
Bluetooth ﺔﻔﻴﻇو
.ةﺪﺣﻮﻟا هﺬﻫ فﺎﺸﺘﻛا ﻦﻣ ﻦﻜﻤﺘﻳ ﻻ لﻮﺻﻮﳌا زﺎﻬﺠﻟا
.ﻖﻓاﻮﺘﻠﻟ داﺪﻌﺘﺳﻻا ﻊﺿﻮﻟ ةﺪﺣﻮﻟا هﺬﻫ ﻂﺒﺿا ،ﻖﻓاﻮﺘﻟا ﻞﺒﻗ •
هﺬﻫ فﺎﺸﺘﻛا ﺮﺧا زﺎﻬﺠﻟ ﻦﻜ ﻻ ،Bluetooth زﺎﻬﺟ ﻞﻴﺻﻮﺗ ءﺎﻨﺛا •
زﺎﻬﺟ ﻦﻣ ةﺪﺣﻮﻟا هﺬﻫ ﻦﻋ ﺚﺤﺑاو ﱄﺎﺤﻟا لﺎﺼﺗﻻا ﻞﺼﻓا .ةﺪﺣﻮﻟا
ﻊﺿو ﱃا Bluetooth ةرﺎﺷا جﺮﺧ ﻂﺒﺿا ،زﺎﻬﺠﻟا ﻖﻓاﻮﺗ ﺬﻴﻔﻨﺗ ﺪﻨﻋ •
.(18 ﺔﺤﻔﺻ) ﻞﻴﻐﺸﺘﻟا
.ﺲﻜﻌﻟﺎﺑ وا Bluetooth زﺎﻬﺟ ﻦﻣ ةﺪﺣﻮﻟا هﺬﻬﺑ لﺎﺼﺗﻻﺎﺑ ﻢﻗ •
زﺎﻬﺟ ﻦﻣ ةﺪﺣﻮﻟا هﺬﻫ) ﺪﺣاو ﺐﻧﺎﺟ ﻦﻣ لﺎﺼﺗﻻﺎﺑ ﻢﻜﺤﺘﻟا ﻢﺘﻳ
.ﻫﻼﻛ ﻦﻣ ﺲﻴﻟو ،(Bluetooth
صﺎﺨﻟا ﻞﻴﻟﺪﻟا ﰲ ةدراﻮﻟا لﺎﺼﺗﻻاو ﻖﻓاﻮﺘﻟا ﺐﻴﻟﺎﺳا ﻦﻣ ﻖﻘﺤﺗ •
.ىﺮﺧا ةﺮﻣ ﻞﻴﻐﺸﺘﻟا ﺔﻴﻠﻤﻋ ﺬﻴﻔﻨﺘﺑ ﻢﻗو ﺦﻟا ،ﺮﺧﻵا زﺎﻬﺠﻟﺎﺑ
.ﺾﻔﺨﻨﻣ ثﺪﺤﺘﳌا تﻮﺻ ىﻮﺘﺴﻣ
.تﻮﺼﻟا ىﻮﺘﺴﻣ ﻂﺒﺿا
.ًاﺪﺟ ﱄﺎﻋ وا
ً
اﺪﺟ ﺾﻔﺨﻨﻣ تﻮﺼﻟا ىﻮﺘﺴﻣ نا لﻮﻘﻳ ﻞﺼﺘﳌا فﺮﻄﻟا
.(18 ﺔﺤﻔﺻ) نﻮﻓﺮﻜﻴﳌا ﻞﻴﺼﺤﺗ ﻂﺒﻀﻟ ًﺎﻘﻓو تﻮﺼﻟا ىﻮﺘﺴﻣ ﻂﺒﺿا
.ﻒﺗﺎﻬﻟا ﱪﻋ ﺔﺛدﺎﺤﻟا ﰲ ءﺎﺿﻮﺿ وا ىﺪﺻ ثﺪﺤﻳ
.تﻮﺼﻟا ىﻮﺘﺴﻣ ﺾﻴﻔﺨﺘﺑ ﻢﻗ •
ﺾﻴﻔﺨﺗ لوﺎﺣ ،ﻒﺗﺎﻬﻟا ﱪﻋ ﺔﳌﺎﻜﳌا تﻮﺻ ﻏ ءﺎﺿﻮﺿ عﺳ ﻢﺗ اذا •
ﻢﻗ ،ﺔﻴﻟﺎﻋ ﻖﻳﺮﻃ ءﺎﺿﻮﺿ ﺪﺟﻮﺗو ﺔﺣﻮﺘﻔﻣ ﺬﻓاﻮﻨﻟا ﺖﻧﺎﻛ اذا :لﺎﺜﻣ
ﻒﻴﻜﻣ ﺾﻴﻔﺨﺘﺑ ﻢﻗ ،ﱄﺎﻋ ءاﻮﻬﻟا ﻒﻴﻜﻣ نﺎﻛ اذا .ﺬﻓاﻮﻨﻟا قﻼﻏﺎﺑ
.لﻮﺻﻮﻣ ﻏ ﻒﺗﺎﻬﻟا
ﻮﻟ ﻰﺘﺣ ﻒﺗﺎﻬﻟﺎﺑ لﺎﺼﺗﻻا ﻢﺘﻳ ﻦﻟ ،Bluetooth تﻮﺻ ضﺮﻋ ﺪﻨﻋ
.(يوﺪﻳﻻ)
.ﻒﺗﺎﻬﻟا ﻦﻣ ﻞﺼﺗا T
ﺔﺌﻳدر ﻒﺗﺎﻬﻟا تﻮﺻ ةدﻮﺟ
.يﻮﻠﺨﻟا ﻒﺗﺎﻬﻟا فوﺮﻇ ﲆﻋ ﻒﺗﺎﻬﻟا تﻮﺻ ةدﻮﺟ ﺪﻤﺘﻌﺗ
ﺔﻳﻮﻗ يﻮﻠﺧ ﻒﺗﺎﻫ ةرﺎﺷا ﻪﻴﻓ ﺪﺟﻮﺗ نﺎﻜﻣ ﰲ ﻚﺗرﺎﻴﺳ ﻚﻳﺮﺤﺘﺑ ﻢﻗ T
.ﻒﻴﻌﺿ لﺎﺼﺗﻻا نﺎﻛ اذا
.(ﱄﺎﻋ) ﻒﻴﻌﺿ لﻮﺻﻮﳌا تﻮﺼﻟا زﺎﻬﺟ تﻮﺻ ىﻮﺘﺴﻣ
.تﻮﺼﻟا زﺎﻬﺠﻟ
ً
ﺎﻘﻓو تﻮﺼﻟا ىﻮﺘﺴﻣ ﻒﻠﺘﺨﻳ
.ةﺪﺣﻮﻟا هﺬﻫ وا لﻮﺻﻮﳌا تﻮﺼﻟا زﺎﻬﺟ تﻮﺻ ىﻮﺘﺴﻣ ﻂﺒﺿا
ﺔﻴﻟﺎﺘﻟا ﺔﺤﻔﺼﻟا ﲆﻋ ﻊﺒﺘﻳ
.ﺮﺧا
.ﻦﻜﻤﻣ ﻏ لﺎﺼﺗﻻا
.ءﺎﺿﻮﻀﻟا
.ءاﻮﻬﻟا
ﺖﻄﻐﺿ
T
ﻮﻳداﺮﻟا لﺎﺒﻘﺘﺳا
.تﺎﻄﺤﳌا لﺎﺒﻘﺘﺳا ﻦﻜ ﻻ
.ءﺎﺿﻮﻀﻟﺎﺑ تﻮﺼﻟا ﺶﻳﻮﺸﺗ ﻢﺘﻳ
ﻞﻴﺻﻮﺗ ﻚﻠﺳ وأ (قرزأ) ﱄﻵا اﻮﻬﻟﺎﺑ ﻢﻜﺤﺘﻟا ﻚﻠﺳ ﻞﻴﺻﻮﺘﺑ ﻢﻗ
اﻮﻫ زﺰﻌﳌ ﺔﻗﺎﻄﻟا ﻞﻴﺻﻮﺗ ﻚﻠﺴﺑ (ﺮﻤﺣأ) ﺔﻴﻟﻜﻟا ﺔﻗﺎﻃ
ﰲ FM/AM اﻮﻬﺑ ةﺰﻬﺠﻣ ﻚﺗرﺎﻴﺳ نﻮﻜﺗ ﺎﻣﺪﻨﻋ ﻂﻘﻓ) ةرﺎﻴﺴﻟا
.ةرﺎﻴﺴﻟا اﻮﻫ ﻞﻴﺻﻮﺗ ﻦﻣ ﺪﻛﺄﺗا
ﻢﻜﺤﺘﻟا ﻚﻠﺳ ﻞﻴﺻﻮﺗ ﺺﺤﻓا ،ﲆﻋﻸﻟ ﱄﻵا اﻮﻬﻟا ﻊﻔﺗﺮﻳ اذإا
.ةﺮﻛاﺬﻟا ﰲ ﺢﻴﺤﺼﻟا ددﱰﻟا ﻦﻳﺰﺨﺘﺑ ﻢﻗ •
.ﺔﺤﻴﺤﺻ ﻏ ﲇﺤﳌا ﺚﺤﺒﻟا ﻊﺿو ﺔﺌﻴﻬﺗ •
:ًاﺜﻛ رﺮﻜﺘﻣ ﻞﻜﺸﺑ ﺔﻔﻟاﻮﳌا ﻒﻗﻮﺘﺗ
.(21 ﺔﺤﻔﺻ) "LOCAL-ON" ﺔﺌﻴﻬﺘﺑ ﻢﻗ
:ﺔﻨﻴﻌﻣ ﺔﻄﺤﻣ ﺪﻨﻋ ﺔﻔﻟاﻮﳌا ﻒﻗﻮﺘﺗ ﻻ T
.(21 ﺔﺤﻔﺻ) "LOCAL-OFF" ﺔﺌﻴﻬﺘﺑ ﻢﻗ
.ﺔﻳوﺪﻴﻟا ﺔﻔﻟاﻮﳌا ﺬﻴﻔﻨﺘﺑ ﻢﻗ T
."ST" ﴍﺆﳌا ﺾﻣﻮﻳ ،FM ﺚﺑ لﺎﺒﻘﺘﺳا ءﺎﻨﺛأ
.(21 ﺔﺤﻔﺻ) "MONO-ON" ﺔﺌﻴﻬﺘﺑ ﻢﻗ T
.ﻮﻳﺘﺳ ﻏ تﻮﺼﺑ ﻪﻋﺳ ﻢﺘﻳ ﻮﻳﺘﺴﻟا FM ﺞﻣﺎﻧﺮﺑ ﺚﺑ
.ﻮﻳﺘﺳ ﻏ ﺚﺑ لﺎﺒﻘﺘﺳا ﻊﺿو ﰲ زﺎﻬﺠﻟا
.(21 ﺔﺤﻔﺻ) "MONO-OFF" ﺔﺌﻴﻬﺘﺑ ﻢﻗ T
.USB ﻢﺴﻘﻣ ﱪﻋ دﻮﻨﺑ ضﺮﻋ ﻚﻨﻜ ﻻ
.USB ﻢﺴﻘﻣ ﱪﻋ USB ةﺰﻬﺟأ ﲆﻋ فﺮﻌﺘﻟا ﻦﻣ زﺎﻬﺠﻟا اﺬﻫ ﻦﻜﻤﺘﻳ ﻻ
.ﻪﺿﺮﻋ ﻢﺘﻳ نأ ﱃإ لﻮﻃأ ًﺎﺘﻗو USB زﺎﻬﺟ قﺮﻐﺘﺴﻳ
.ةﺪﻘﻌﻣ ﺔﻴﻣﺮﻫ ﺔﺒﻴﻛﱰﺑ تﺎﻔﻠﻣ ﲆﻋ USB زﺎﻬﺟ يﻮﺘﺤﻳ
.USB زﺎﻬﺟ ﻞﺼﻓ ﻢﺗ ،ضﺮﻌﻟا لﻼﺧ
ﺔﻳﺤﻟ ﻚﻟذو ًﻻوأ ضﺮﻌﻟا فﺎﻘﻳا ﻦﻣ ﺪﻛﺄﺗ ،USB زﺎﻬﺟ ﻞﺼﻓ ﻞﺒﻗ
.ﺔﻴﻧﺎﺜﻟﺎﺑ ﺖﺑﻮﻠﻴﻛ 320 زوﺎﺠﺘﻳ ﱄﺎﻋ ﺖﺑ لﺪﻌ تﻮﺼﻟا ﻊﻄﻘﻨﻳ ﺪﻗ
.ﺢﻴﺤﺻ ﻏ ﻞﻴﺻﻮﺘﻟا
.(ﻲﺒﻧﺎﺠﻟا /ﻲﻔﻠﺨﻟا جﺎﺟﺰﻟا
.ﱄﻵا اﻮﻬﻟﺎﺑ
.ﺔﻨﻜﻤﻣ ﻏ ﺔﻘﻴﻗﺪﻟا ﺔﻔﻟاﻮﳌا
.ًاﺪﺟ ﺔﻔﻴﻌﺿ ﺚﺒﻟا ةرﺎﺷا •
.ﺔﻨﻜﻤﻣ ﻏ ﺔﻴﺋﺎﻘﻠﺘﻟا ﺔﻔﻟاﻮﳌا
.ًاﺪﺟ ﺔﻔﻴﻌﺿ ﺚﺒﻟا ةرﺎﺷا •
.ﺔﻗﺪﺑ ددﱰﻟا ﺔﻔﻟاﻮ ﻢﻗ •
.ًاﺪﺟ ﺔﻔﻴﻌﺿ ﺚﺒﻟا ةرﺎﺷا •
USB زﺎﻬﺟ ضﺮﻋ
.دﻮﻨﺒﻟا ضﺮﻋ ﻚﻨﻜ ﻻ
.USB زﺎﻬﺟ ﻞﻤﻌﻳ ﻻ
.ﻪﻠﻴﺻﻮﺗ ﺪﻋأ
.ﻪﻴﺒﻨﺗ ﺔﻤﻐﻧ عﺳ ﻢﺘﻳ
.تﻮﺼﻟا ﻊﻄﻘﻨﻳ
T
T
T
T
.تﺎﻧﺎﻴﺒﻟا
T
T
29
Page 33
.ضﺮﻌﻟا ةﺬﻓﺎﻧ ﰲ ﺮﻬﻈﻳ ﻻ /ﻦﻣ ضﺮﻌﻟا ﻲﻔﺘﺨﻳ
.(.(2121 ﺔﺤﻔﺻ) "
A.SCRL-ON
" ﺔﺌﻴﻬﺘﺑ ﻢﻗ
T
.(21 ﺔﺤﻔﺻ) "DIMMER-ON" ﱃإ ﻢﺘﻌﳌا ﺔﺌﻴﻬﺗ ﻢﺗ •
.(OFF) رﺰﻟا ﻂﻐﻀﺑ راﺮﻤﺘﺳﻻا ﺪﻨﻋ ضﺮﻌﻟا ﻲﻔﺘﺨﻳ •
.ﺔﺷﺎﺸﻟا ﺮﻬﻈﺗ نأ ﱃإ زﺎﻬﺠﻟا ﲆﻋ (OFF) رﺰﻟا ﻂﻐﻀﺑ ﺮﻤﺘﺳا T
.(26 ﺔﺤﻔﺻ) ﺔﺨﺴﺘﻣ ﻞﻴﺻﻮﺘﻟا فاﺮﻃأ •
.ﺎﻘﻠﺘﻟا فﺎﻘﻳﻹا ﺔﻔﻴﻇو ﻞﻤﻌﺗ ﻻ
ءﺎﻔﻃا ﺪﻌﺑ ﺎﻘﻠﺘﻟا فﺎﻘﻳﻹا ﺔﻔﻴﻇو ﻞﻴﻐﺸﺗ ﻢﺘﻳ .زﺎﻬﺠﻟا ﻞﻴﻐﺸﺗ ﻢﺗ
.زﺎﻬﺠﻟا
.زﺎﻬﺠﻟا ﺊﻔﻃا
.زﺎﻬﺠﻟا ﻞﻴﻐﺸﺗ ءﺎﻨﺛأ ﺔﺷﺎﺸﻟا ﻲﻔﺘﺨﺗ
.(21 ﺔﺤﻔﺻ) ﻞﻴﻐﺸﺘﻟا ﻊﺿو ﱃإ دﻮﺳﻷا جﺮﺨﻟا ﺔﻔﻴﻇو ﺔﺌﻴﻬﺗ ﻢﺗ
.ﺪﻌﺑ ﻦﻋ ﻢﻜﺤﺘﻟا ﺔﻗﺎﻄﺑ ﻞﻴﻐﺸﺗ ﻦﻜ ﻻ
ﻞﻴﻐﺸﺗ ﻦﻜ ﻻ ،(ةءﺎﺿا نوﺪﺑ) دﻮﺳﻷا جﺮﺨﻟا ﺔﻔﻴﻇو ﻞﻴﻐﺸﺗ ﻢﺗ اذإ •
.(21 ﺔﺤﻔﺻ) ﺪﻌﺑ ﻦﻋ ﻢﻜﺤﺘﻟا ﺔﻗﺎﻄﺑ
ﻪﺣﻼﺻاو ﻞﻠﺨﻟا يﺮﺤﺗ
ﺪﻗ ﻲﺘﻟا ﻞﻛﺎﺸﳌا ﲆﻋ ﺐﻠﻐﺘﻟا ﰲ ﺔﻴﻟﺎﺘﻟا ﺺﺤﻔﻟا ﺔﺎﻗ كﺪﻋﺎﺴﺘﺳ
.زﺎﻬﺠﻟا لﻌﺘﺳا ءﺎﻨﺛأ ﻚﻬﺟاﻮﺗ
تاءاﺮﺟاو ﻞﻴﺻﻮﺘﻟا ﻦﻣ ﺪﻛﺄﺗ ،هﺎﻧدأ ﺺﺤﻔﻟا ﺔﺎﻗ ﺔﻌﺟاﺮﻣ ﻞﺒﻗ
.ﻞﻴﻐﺸﺘﻟا
.ﱄﺎﺘﻟا ةﺪﻋﺎﺴﳌا ﻊﻗﻮﻣ ةرﺎﻳز ﻰﺟﺮﻳ ،ﺔﻠﻜﺸﳌا ﲆﻋ ﺐﻠﻐﺘﻟا ﻢﺘﻳ اذإ
T
CD ﺔﻧاﻮﻄﺳأ ضﺮﻋ
.ﺔﻧاﻮﻄﺳﻷا ﻞﻴﻤﺤﺗ ﻦﻜ ﻻ
.ﺔﺌﻃﺎﺧ ﺔﻘﻳﺮﻄﺑ وأ ﺔﺑﻮﻠﻘﻣ ةرﻮﺼﺑ ةﻮﻘﺑ ﺔﻧاﻮﻄﺳﻷا لﺎﺧدا ﻢﺗ •
ﻮﺼﻟا لﻌﺘﺳﻼﻟ ﺔﺼﺼﺨﻣ ﻏ CD-R/CD-RW تﺎﻧاﻮﻄﺳأ •
.MP3/WMA/AAC ﺔﺨﺴﻧو ﺔﻐﻴﺻ ﻊﻣ ﺔﻘﻓاﻮﺘﻣ ﻏ ﺔﻧاﻮﻄﺳﻷا
ﻊﻗﻮﻣ ةرﺎﻳز ﻰﺟﺮﻳ ،ضﺮﻌﻠﻟ ﺔﻠﺑﺎﻘﻟا ﻎﻴﺼﻟاو تﺎﻧاﻮﻄﺳﻷا ﻦﻋ ﻞﻴﺻﺎﻔﺘﻠﻟ
نأ ﱃإ ﺎﻫﻏ ﻦﻣ لﻮﻃأ ًﺎﺘﻗو قﺮﻐﺘﺴﺗ MP3/WMA/AAC تﺎﻔﻠﻣ
.ﺎﻬﺿﺮﻋ أﺪﺒﻳ نأ ﱃإ لﻮﻃأ ًﺎﺘﻗو قﺮﻐﺘﺴﺗ ﺔﻴﻟﺎﺘﻟا تﺎﻧاﻮﻄﺳﻷا
ﻢﺘﻳ ﻻ ﺪﻗ ،ًاﺪﺟ ةﺜﻛ زﻮﻣر ﲆﻋ يﻮﺘﺤﺗ ﻲﺘﻟا تﺎﻧاﻮﻄﺳﻷا صﻮﺼﺨﺑ •
ﻦﻣ يﻮﻗ ءﺰﺟ ﰲ ﺔﺟرد 45 ﻦﻣ ﻞﻗأ ﺔﻳواﺰﺑ زﺎﻬﺠﻟا ﺐﻴﻛﱰﺑ ﻢﻗ T
.ﺔﻧاﻮﻄﺳﻷا جاﺮﺧا ﻢﺘﻳ ﻦﻟ فﻮﺳ .ﻞﻴﻐﺸﺘﻟا رارزأ ﻞﻤﻌﺗ ﻻ
.ًﻼﺻأ ﺔﻠﻤﺤﻣ ىﺮﺧأ ﺔﻧاﻮﻄﺳأ ﺪﺟﻮﺗ •
.ﺔﻧاﻮﻄﺳﻷا ضﺮﻋ ﻢﺘﻳ ﻻ
.ﺔﺨﺴﺘﻣ وأ ﺔﻔﻟﺎﺗ ﺔﻧاﻮﻄﺳﻷا •
.(24 ﺔﺤﻔﺻ)
.MP3/WMA/AAC تﺎﻔﻠﻣ ضﺮﻋ ﻦﻜ ﻻ
.ةﺪﻋﺎﺴﳌا
.ﺎﻬﺿﺮﻋ أﺪﺒﻳ
.ةﺪﻘﻌﻣ ﺔﻴﻣﺮﻫ ﺔﺒﻴﻛﱰﺑ ﺔﻠﺠﺴﻣ ﺔﻧاﻮﻄﺳأ –
.ةدﺪﻌﺘﻣ ﻊﻃﺎﻘ ﺔﻠﺠﺴﻣ ﺔﻧاﻮﻄﺳأ –
.ﺎﻬﻴﻟإ تﺎﻧﺎﻴﺑ ﺔﻓﺎﺿا ﻦﻜ ﺔﻧاﻮﻄﺳأ –
.ضﺮﻌﻟا دﻮﻨﺑ ﺮﻳﺮ ﻢﺘﻳ ﻻ
."OFF" ﱃإ "A.SCRL" ﺔﺌﻴﻬﺗ ﻢﺗ •
ﺔﺤﻔﺻ) "
.(SCRL) (DSPL) رﺰﻟا ﻂﻐﻀﺑ ﺮﻤﺘﺳا T
A.SCRL-ON
.ﺔﺨﺴﺘﻣ وأ ﺔﻔﻟﺎﺗ ﺔﻧاﻮﻄﺳﻷا •
.(6 ﺔﺤﻔﺻ) RESET رﺰﻟا ﻂﻐﺿا
.ﺎﻫﺮﻳﺮ
" ﺔﺌﻴﻬﺘﺑ ﻢﻗ
.تﻮﺼﻟا ﻲﻄﺨﺗ ﻢﺘﻳ
.ﺢﻴﺤﺻ ﻏ ﺐﻴﻛﱰﻟا •
.ةرﺎﻴﺴﻟا
T
.زﺎﻬﺠﻟا ﱃإ ﺔﻗﺎﻄﻟا ﻞﻴﺻﻮﺗ ﻢﺘﻳ ﻻ
ةﺪﺣو ﺔﻄﺳاﻮﺑ ﻪﻠﻴﻐﺸﺗ ﻦﻜ ﻻ ،ﺔﺷﺎﺸﻟا ﺖﻔﺘﺧاو زﺎﻬﺠﻟا ﺊﻔﻄﻧا اذإ •
.ﺔﺑوﺎﻨﻣ قوﺪﻨﺻ ﲆﻋ ﱄﻵا اﻮﻬﻟا يﻮﺘﺤﻳ ﻻ
ﺾﻴﻔﺨﺘﺑ ﻢﻜﺤﺘﻟا ﺔﻔﻴﻇو وأ ATT ﺾﻴﻔﺨﺘﻟا ﺔﻔﻴﻇو ﻞﻴﻐﺸﺗ ﻢﺗ •
ﺔﻴﻨﻴﺒﻟا ﺔﻠﺻﻮﻟا ﻞﺒﻛ ﻞﻴﺻﻮﺗ ﺪﻨﻋ) Telephone ATT ﻒﺗﺎﻬﻟا تﻮﺻ
.ﺘﻋﺳ مﺎﻈﻨﻟ طﻮﺒﻀﻣ ﻏ "FAD" ﻞﺋﺎﻀﳌﺎﺑ ﻢﻜﺤﺘﻟا حﺎﺘﻔﻣ ﻊﺿﻮﻣ •
.ﺖﻗﺆﳌا ﻒﻗﻮﺘﻟا ﻊﺿو ﰲ Bluetooth تﻮﺻ زﺎﻬﺟ •
.(21 ﺔﺤﻔﺻ) ﻪﻴﺒﻨﺘﻟا ﺔﻤﻐﻧ تﻮﺻ ءﺎﻐﻟا ﻢﺗ •
ﻢﺨﻀﻣ لﻌﺘﺳﺎﺑ ﻢﻘﺗ و يرﺎﻴﺘﺧا ﻂﺸﻧ تﻮﺻ ﻢﺨﻀﻣ ﻞﻴﺻﻮﺗ ﻢﺗ •
ﻞﻜﺸﺑ ﻬﻠﻴﺻﻮﺗ مﺪﻋ وأ ﺔﻳرﺎﻄﺒﻟا وأ ﺔﻗﺎﻄﻟا داﺪﻣا ﻚﻠﺳ ﻞﺼﻓ ﻢﺗ •
.ةﺮﻛاﺬﻟا ﰲ ﻧﺰﺨﳌا ﺢﻴﺤﺼﻟا ﺖﻗﻮﻟاو تﺎﻄﺤﳌا ﺢﺴﻣ ﻢﺗ
ةرﺎﻴﺴﻟا ﺔﻗﺎﻃ ﻞﺻﻮﻣ ﻊﻣ ﺢﻴﺤﺻ ﻞﻜﺸﺑ ﻞﻴﺻﻮﺘﻟا فاﺮﻃأ ﺔاﻮﻣ مﺪﻋ
.ﻲﺣﺎﻀﻳﻹا ضﺮﻌﻟا ﻊﺿو أﺪﺒﻳ ،لﺎﺒﻘﺘﺳﻻا وأ ضﺮﻌﻟا لﻼﺧ
ﺔﺌﻴﻬﺗ ﻊﻣ ﻖﺋﺎﻗد 5 لﻼﺧ ﻞﻴﻐﺸﺗ ﺔﻴﻠﻤﻋ ﺔﻳأ ﺬﻴﻔﻨﺗ ﻢﺘﻳ اذإ
.ﻲﺣﺎﻀﻳﻹا ضﺮﻌﻟا ﻊﺿو أﺪﺒﻳ ،"DEMO-ON"
.(21 ﺔﺤﻔﺻ) "DEMO-OFF" ﺔﺌﻴﻬﺘﺑ ﻢﻗ
.زﻮﻴﻔﻟا وأ ﻞﻴﺻﻮﺘﻟا ﺺﺤﻓا •
.ﺪﻌﺑ ﻦﻋ ﻢﻜﺤﺘﻟا
.زﺎﻬﺠﻟا ﻞﻴﻐﺸﺘﺑ ﻢﻗ T
.ﱄﻵا اﻮﻬﻟا ﺪﻳﺪ ﻢﺘﻳ ﻻ
.تﻮﺻ رﺪﺼﻳ ﻻ
.(ATT ﻞﺻﻮﻣ ﻰﻟإ ةرﺎﻴﺴﻟا ﻒﺗﺎﻬﻟ
.ﺖﻗﺆﳌا ﻒﻗﻮﺘﻟا ﻊﺿو ﻲﻐﻟا
.ﻪﻴﺒﻨﺗ ﺔﻤﻐﻧ تﻮﺻ رﺪﺼﻳ ﻻ
.ﲇﺧاﺪﻟا تﻮﺼﻟا
.ةﺮﻛاﺬﻟا تﺎﻳﻮﺘﺤﻣ ﺢﺴﻣ ﻢﺗ
.RESET رﺰﻟا ﻂﻐﺿ ﻢﺗ •
.ىﺮﺧأ ةﺮﻣ ةﺮﻛاﺬﻟا ﰲ ﻦﻳﺰﺨﺘﻟﺎﺑ ﻢﻗ
.لﺎﻌﺷﻻا حﺎﺘﻔﻣ ﺮﻳوﺪﺗ ﺪﻨﻋ ءﺎﺿﻮﺿ ثﺪﺤﺗ
T
T
.ﺢﻴﺤﺻ
.زﻮﻴﻔﻟا ﺐﻄﻌﻧا
.ﺔﻴﻟﻜﻟا ﱃإ
مﺎﻋ
T
28
Page 34
مﺎﻋ
(ﻮﻳﺘﺳ ﻏ) ﻲﻋﺮﻔﻟا ﺔﻀﻴﻔﺨﻟا تاددﱰﻟا رﺎﻬﺠﻣ جﺮﺧ فﺮﻃ
Telephone ATT ﻒﺗﺎﻬﻟا تﻮﺻ ﺾﻴﻔﺨﺘﺑ ﻢﻜﺤﺘﻟا فﺮﻃ
(ﻖﻤﻋ /عﺎﻔﺗرا /ضﺮﻋ)
(ﻖﻤﻋ /عﺎﻔﺗرا /ضﺮﻋ)
(ﻲﻔﻠﺨﻟا /ﻲﻣﺎﻣﻷا) تﻮﺼﻟا جﺮﺧ فاﺮﻃ
ﱄﻵا اﻮﻬﻟﺎﺑ بوﺎﻨﺘﳌا ﻢﻜﺤﺘﻟا فﺮﻃ
ﻂﺸﻨﻟا تﻮﺼﻟا ﻢﺨﻀ ﻢﻜﺤﺘﻟا فﺮﻃ
ﺪﻌﺑ ﻦﻋ ﻢﻜﺤﺘﻟا ةﺪﺣو لﺎﺧدا فﺮﻃ
(ﻐﺻ ﻮﻳﺘﺳ ﺲﺒﻘﻣ) AUX ﻞﺧﺪﻟا ﺲﺒﻘﻣ
(XPLOD) ﺰﺗﺮﻫ 60 ﺪﻨﻋ ﻞﺒﺴﻳد ±10 :ﺾﻔﺨﻨﻣ
(XPLOD) ﺰﺗﺮﻫﻮﻠﻴﻛ 1 ﺪﻨﻋ ﻞﺒﺴﻳد ±10 :ﻂﺳﻮﺘﻣ
(XPLOD) ﺰﺗﺮﻫﻮﻠﻴﻛ 10 ﺪﻨﻋ ﻞﺒﺴﻳد ±10 :ﱄﺎﻋ
ةرﺎﻴﺴﻟا ﺔﻳرﺎﻄﺑ ﻦﻣ ﻂﻟﻮﻓ 12 ﴍﺎﺒﻣ رﺎﻴﺗ :ﺔﻗﺎﻄﻟا كﻼﻬﺘﺳا
ً
ﺎﺒﻳﺮﻘﺗ ﻢﻣ 162 × 53 × 182 :ﺐﻴﻛﱰﻟا دﺎﻌﺑأ
RM-X304 :ﺪﻌﺑ ﻦﻋ ﻢﻜﺤﺘﻟا ﺔﻗﺎﻄﺑ
RC-100IP زاﺮﻄﻟا :iPod زﺎﻬﺠﻟ USB ﻞﻴﺻﻮﺗ ﻞﺒﻛ
ةءﺎﺿﻻﺎﺑ ﻢﻜﺤﺘﻟا فﺮﻃ
USB ةرﺎﺷا لﺎﺧدا فﺮﻃ
((ﴈرأ) ﺐﻟﺎﺳ ﺾﻳرﺄﺗ)
ً
ﺎﺒﻳﺮﻘﺗ ﻢﻣ 182 × 50 × 178 :دﺎﻌﺑﻷا
(1 ﻢﻘﻃ) ﻞﻴﺻﻮﺘﻟاو ﺐﻴﻛﱰﻠﻟ ءاﺰﺟأ
RM-X4S :ةراوﺪﻟا ﻢﻜﺤﺘﻟا ةﺪﺣو
XA-MC10 :ﻲﺟرﺎﺧ نﻮﻓﺮﻜﻴﻣ
ﺔﻘﻓﺮﳌا تﺎﻴﻟﻜﻟا ﺾﻌﺑ ﻊﻣ ﻚﻨﻣ ﺐﻳﺮﻘﻟا ﻞﻴﻛﻮﻟا ﻞﻣﺎﻌﺘﻳ ﻻ ﺪﻗ
.ﻞﻴﻛﻮﻟا ﻦﻣ تﺎﻣﻮﻠﻌﳌا ﻦﻣ ﺪﻳﺰﻣ ﲆﻋ لﻮﺼﺤﻟا ﻰﺟﺮﻳ .هﻼﻋأ
.ﻖﺒﺴﻣ رﺎﻌﺷا نود ﻴﻐﺘﻠﻟ ﺔﺿﺮﻋ تﺎﻔﺻاﻮﳌاو ﻢﻴﻤﺼﺘﻟا
كﻼﺳﻷا ﺾﻌﺑ ﰲ ﺔﻴﻨﻴﺟﻮﻟﺎﻬﻟا ﺐﻬﻠﻟا تﺎﻗﻮﻌﻣ لﻌﺘﺳا ﻢﺗ ﺪﻗ ﻦﻜﻳ •
.ﻞﻛﺎﻴﻬﻟا ﰲ ﺔﻠﻤﻌﺘﺴﻣ ﻏ ﺔﻴﻨﻴﺟﻮﻟﺎﻬﻟا ﺐﻬﻠﻟا تﺎﻗﻮﻌﻣ •
.قرﻮﻟا ﻦﻣ ﺔﻋﻮﻨﺼﻣ تﺎﻴﺸﺤﻟا ﺪﺋﺎﺳو •
:جﺮﺨﻟا فاﺮﻃأ
:ﻞﺧﺪﻟا فاﺮﻃأ
اﻮﻬﻟا ﻞﺧد فﺮﻃ
:ﺔﻤﻐﻨﻟﺎﺑ ﻢﻜﺤﺘﻟا ﺢﻴﺗﺎﻔﻣ
ً
ﺎﺒﻳﺮﻘﺗ ﻢﺠﻛ 1.3 :نزﻮﻟا
:ﺔﻘﻓﺮﳌا تﺎﻴﻟﻜﻟا
:ﺔﻳرﺎﻴﺘﺧا ﺔﻴﻟﻛ /زﺎﻬﺟ
.ﺔﻋﻮﺒﻄﳌا
تﺎﻔﺻاﻮﳌا
ﺔﻧاﻮﻄﺳﻷا ﻞﻐﺸﻣ ﻢﺴﻗ
ﻞﺒﺴﻳد 120 :ءﺎﺿﻮﻀﻟا ﱃإ ةرﺎﺷﻻا لﺪﻌﻣ
ﺰﺗﺮﻫ 20000 – 10 :ددﱰﻟا ﺔﺑﺎﺠﺘﺳا
سﺎﻴﻘﻠﻟ ﻞﺑﺎﻘﻟا ﺪﺤﻟا ﻦﻣ دأ :نﺎﻘﻔﺨﻟاو توﺎﻔﺘﻟا
ﻒﻟاﻮﳌا ﻢﺴﻗ
(ﺰﺗﺮﻫﻮﻠﻴﻛ 50 ﺔﻠﺣﺮ) ﺰﺗﺮﻫﺎﺠﻴﻣ 108.0 – 87.5 :ﺔﻔﻟاﻮﳌا ىﺪﻣ
+4 ﴡﻗا ﺪﺣ) Bluetooth Standard Power Class 2 مﺎﻈﻧ :جﺮﺨﻟا
(ﺰﺗﺮﻫﺎﺠﻴﺟ 2.4835 – 2.4000) ﺰﺗﺮﻫﺎﺠﻴﺟ 2.4 ﺔﺟﻮﻣ :ﺔﺟﻮﳌا ددﺮﺗ
(ةرﻮﺼﻟاو تﻮﺼﻟﺎﺑ ﺪﻌﺑ ﻦﻋ ﻢﻜﺤﺘﻟا ﺔﻔﻴﻇو) AVRCP ﺔﻔﻴﻇو
وأ ةﺰﻬﺟﻷا ﺑ ﻖﺋاﻮﻌﻟا ﻞﺜﻣ ﻞﻣاﻮﻌﻠﻟ ًﺎﻘﻓو ﲇﻌﻔﻟا ىﺪﳌا ﻒﻠﺘﺨﻴﺳ 1*
ﺔﻴﻜﻴﺗﺎﺘﺳﻻا ﺔﻴﺑﺮﻬﻜﻟا وأ ﻒﻳووﺮﻜﻳﺎﳌا ناﺮﻓأ لﻮﺣ ﺔﻴﺴﻴﻃﺎﻨﻐﳌا تﻻﺎﺠﳌا
ﺞﻣﺎﻧﱪﻟا وأ ﻞﻴﻐﺸﺘﻟا مﺎﻈﻧ وأ اﻮﻬﻟا ءادا وأ لﺎﺒﻘﺘﺳﻻا ﺔﻴﺳﺎﺴﺣ وأ
ﺑ Bluetooth لﺎﺼﺗا ضﺮﻏ ﱃإ ﺸﻳ ﺔﻴﺳﺎﻴﻘﻟا Bluetooth ﻒﺋﺎﻇو 2*
ﻲﺟرﺎﺧ اﻮﻫ ﻞﻴﺻﻮﺗ فﺮﻃ :اﻮﻬﻟا ﻞﻴﺻﻮﺗ فﺮﻃ
ةﻮﻗ ﻞﺒﺴﻳد 10 :لﻌﺘﺳﻼﻟ ﺔﻠﺑﺎﻘﻟا ﺔﻴﺳﺎﺴﺤﻟا
(ﻮﻳﺘﺳ ﻏ) ﻞﺒﺴﻳد 70 :ءﺎﺿﻮﻀﻟا ﱃإ ةرﺎﺷﻻا لﺪﻌﻣ
(ﺰﺗﺮﻫﻮﻠﻴﻛ 9 ﺔﻠﺣﺮ) ﺰﺗﺮﻫﻮﻠﻴﻛ 1,602 – 531 :ﺔﻔﻟاﻮﳌا ىﺪﻣ
ﻲﺟرﺎﺧ اﻮﻫ ﻞﻴﺻﻮﺗ فﺮﻃ :اﻮﻬﻟا ﻞﻴﺻﻮﺗ فﺮﻃ
2.0 راﺪﺻﻻا ﳼﺎﻴﻗ Bluetooth زﺎﻬﺟ :لﺎﺼﺗﻻا مﺎﻈﻧ
1
*ًﺎﺒﻳﺮﻘﺗ رﺎﺘﻣأ 10 ﺮﻈﻨﻟا ىﻮﺘﺴﻣ :لﺎﺼﺗﻼﻟ ﴡﻗﻷا ىﺪﳌا
(ﺔﻣﺪﻘﺘﳌا تﻮﺼﻟا ﻊﻳزﻮﺗ ﺔﻔﻴﻇو) A2DP ﺔﻔﻴﻇو
1.5 (يوﺪﻳﻼﻟا لﺎﺼﺗﻻا ﺔﻔﻴﻇو) HFP ﺔﻔﻴﻇو
ﺰﺗﺮﻫﻮﻠﻴﻛ 150 :ﻂﺳﻮﺘﳌا ددﱰﻟا
ﺰﺗﺮﻫﻮﻠﻴﻛ 400 ﺪﻨﻋ ﻞﺒﺴﻳد 75 :ﺔﻴﺋﺎﻘﺘﻧﻻا
ﺰﺗﺮﻫﻮﻠﻴﻛ 1 ﺪﻨﻋ ﻞﺒﺴﻳد 40 :ﻞﺼﻔﻟا
ﺰﺗﺮﻫ 15000 – 20 :ددﱰﻟا ﺔﺑﺎﺠﺘﺳا
ﺰﺗﺮﻫﻮﻠﻴﻛ 25 :ﻂﺳﻮﺘﳌا ددﱰﻟا
ﻂﻟﻮﻓ وﺮﻜﻴﻣ 26 :ﺔﻴﺳﺎﺴﺤﻟا
USB (Full-speed) :ﺔﻴﻨﻴﺒﻟا ﺔﻠﺻﻮﻟا
ﺒﻣأ ﲇﻠﻴﻣ 500 :رﺎﻴﺘﻠﻟ ﴡﻗﻷا ﺪﺤﻟا
(تاو ﲇﻠﻴﻣ ﻞﺒﺴﻳد
FHSS :ﻤﻀﺘﻟا بﻮﻠﺳأ
:2*ﺔﻘﻓاﻮﺘﳌا Bluetooth ﻒﺋﺎﻇو
(ﺔﻋﺴﻟا ﺔﻔﻴﻇو) HSP ﺔﻔﻴﻇو
FM ﺔﺟﻮﻣ
AM ﺔﺟﻮﻣ
USB ﻞﻐﺸﻣ ﻢﺴﻗ
ﻠﺳﻼﻟا لﺎﺼﺗﻻا
.ﺦﻟا ،ﻲﻘﻴﺒﻄﺘﻟا
.ةﺰﻬﺟﻷا
27
(ﺔﻟزﺎﻋ ﻞﻴﺻﻮﺗ فاﺮﻃأ) ﺔﻋﺴﻟا جﺮﺧ فاﺮﻃأ :جﺮﺨﻟا
ﻂﺸﻨﻟا تﻮﺼﻟا ﻢﺨﻀﻣ ﻢﺴﻗ
موأ 8 – 4 :ﺔﻋﺴﻟا ﺔﻗوﺎﻌﻣ
(موأ 4 ﺪﻨﻋ) 4 × طاو 52 :ىﻮﺼﻘﻟا ﺔﻗﺎﻄﻟا جﺮﺧ
Page 35
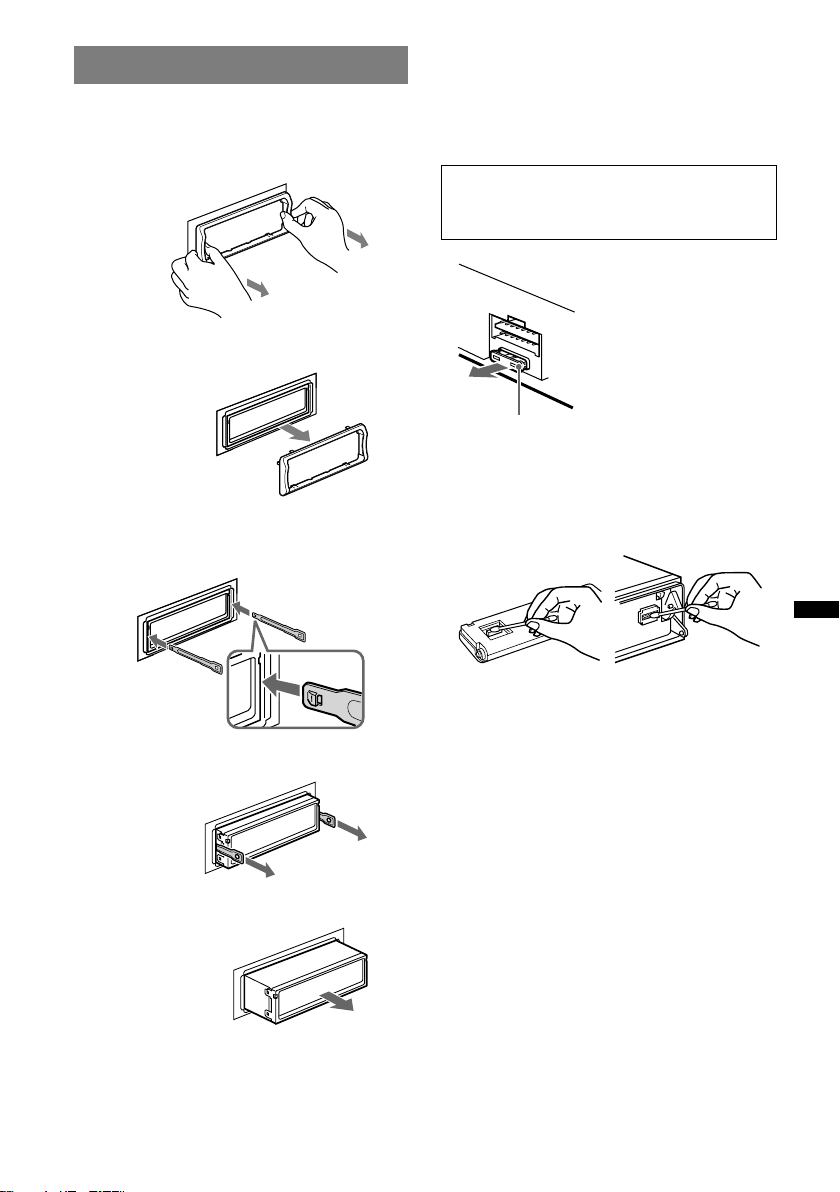
زﺎﻬﺠﻟا جاﺮﺧا
.ﺔﻳﺤﻟا قﻮﻃ جاﺮﺧﺈﺑ ﻢﻗ 1
.(7 ﺔﺤﻔﺻ) ﺔﻴﻣﺎﻣﻷا ﺔﺣﻮﻠﻟا ﻞﺼﻓا
.جرﺎﺨﻠﻟ ﻪﺒﺤﺳا ﻢﺛ ،ﺔﻳﺤﻟا قﻮﻃ ﻲﺘﻓﺎﺣ ﻚﺴﻣا
.زﺎﻬﺠﻟا جاﺮﺧﺈﺑ ﻢﻗ 2
.ﺔﻘﻃ ﻊﻤﺴﺗ نأ ﱃإ ﺪﺣاو نآ ﰲ ﺮﻳﺮﺤﺘﻟا ﻲﺣﺎﺘﻔﻣ ﻞﺧدأ
ﻪﺠﺘﻣ فﺎﻄﺧ
.ﻞﺧاﺪﻠﻟ
.زﺎﻬﺠﻟا طﺎﺒﺗرا ﻚﻔﻟ ﺮﻳﺮﺤﺘﻟا ﻲﺣﺎﺘﻔﻣ ﺐﺤﺳا
عﻼﺘﺑا ﺔﻟﺎﺣ ﰲ .لﺎﻔﻃﻷا لوﺎﻨﺘﻣ ﻦﻋ ًاﺪﻴﻌﺑ مﻮﻴﺜﻴﻠﻟا ﺔﻳرﺎﻄﺒﺑ ﻆﻔﺘﺣا •
.ﺪﻴﺟ ﻞﻴﺻﻮﺗ نﻀﻟ ﺔﻓﺎﺟ ﺔﻗﺮﺨﺑ ﺔﻳرﺎﻄﺒﻟا ﺢﺴﻣا •
.ﺔﻳرﺎﻄﺒﻟا ﺐﻴﻛﺮﺗ ﺪﻨﻋ ﺔﺤﻴﺤﺼﻟا ﺔﻴﺒﻄﻘﻟا ﺔﻈﺣﻼﻣ ﻦﻣ ﺪﻛﺄﺗ •
.ﺎﺑﺮﻬﻛ سﺎ ثﺪﺤﻳ ﺪﻗ ﻻإو ،ﺪﻌﻣ ﻂﻘﻠ ﺔﻳرﺎﻄﺒﻟا ﻚﺴ ﻻ •
مﻮﻴﺜﻴﻠﻟا ﺔﻳرﺎﻄﺑ لﻮﺣ تﺎﻈﺣﻼﻣ
.ًارﻮﻓ ﺐﻴﺒﻄﻟا ﴩﺘﺳا ،ﺔﻳرﺎﻄﺒﻟا
ﺮﻳﺬﺤﺗ
.ﺎﻬﻌﻣ ﻞﻣﺎﻌﺘﻟا ﺊﻴﺳأ اذإ ﺔﻳرﺎﻄﺒﻟا ﺮﺠﻔﻨﺗ ﺪﻗ
.رﺎﻨﻟﺎﺑ ﺎﻬﻴﻣر وأ ﺎﻬﻜﻴﻜﻔﺗ وأ ﺔﻳرﺎﻄﺒﻟا ﻦﺤﺷ ةدﺎﻋﺈﺑ ﻢﻘﺗ ﻻ
زﻮﻴﻔﻟا لاﺪﺒﺘﺳا
لﻌﺘﺳا ﻦﻣ ﺪﻛﺄﺗ ،زﻮﻴﻔﻟا لاﺪﺒﺘﺳا ﺪﻨﻋ
بﻮﺘﻜﳌا ﺔﻳﺒﻣﻻا لﺪﻌﻣ ﻊﻣ ﻢﺋﻼﺘﻳ زﻮﻴﻓ
،زﻮﻴﻔﻟا قﱰﺣا اذإ .ﲇﺻﻷا زﻮﻴﻔﻟا ﲆﻋ
لﺪﺒﺘﺳاو ﺔﻗﺎﻄﻟا ﻞﻴﺻﻮﺗ ﻦﻣ ﺪﻛﺄﺗ
ﺪﻌﺑ ىﺮﺧأ ةﺮﻣ زﻮﻴﻔﻟا قﱰﺣا اذإ .زﻮﻴﻔﻟا
ﰲ .ﲇﺧاد ﻞﻠﺧ ﺪﺟﻮﻳ ﺪﻗ ،لاﺪﺒﺘﺳﻻا
ﻮﺳ ﻞﻴﻛو بﺮﻗأ ﴩﺘﺳا ،ﺔﻟﺎﺤﻟا هﺬﻫ
(ﺒﻣأ 10) زﻮﻴﻓ
.Sony
ﻞﻴﺻﻮﺘﻟا فاﺮﻃأ ﻒﻴﻈﻨﺗ
ﻞﻴﺻﻮﺘﻟا فاﺮﻃأ ﻒﻴﻈﻨﺗ ﻢﺘﻳ اذا ﺢﻴﺤﺻ ﻞﻜﺸﺑ زﺎﻬﺠﻟا ﻞﻤﻌﻳ ﻻ ﺪﻗ
ﺔﺣﻮﻠﻟا ﻞﺼﻓا ،ﻚﻟذ ثوﺪﺣ يدﺎﻔﺘﻟ .ﺔﻴﻣﺎﻣﻷا ﺔﺣﻮﻠﻟاو زﺎﻬﺠﻟا ﺑ
.ﺔﻴﻨﻄﻗ ﺔﺤﺴﻤ ﻞﻴﺻﻮﺘﻟا فاﺮﻃأ ﻒﻴﻈﻨﺘﺑ ﻢﻗو (7 ﺔﺤﻔﺻ) ﺔﻴﻣﺎﻣﻷا
.ﻒﻠﺘﻠﻟ ﻞﻴﺻﻮﺘﻟا فاﺮﻃأ ضﺮﻌﺘﺗ ﺪﻗ ﻻإو .ﺔﻃﺮﻔﻣ ةﻮﻗ ﻞﻤﻌﺘﺴﺗ ﻻ
ﺔﻴﺴﻴﺋﺮﻟا ةﺪﺣﻮﻟاﺔﻴﻣﺎﻣﻷا ﺔﺣﻮﻠﻟا ﻦﻣ ﺔﻴﻔﻠﺨﻟا ﺔﻬﺠﻟا
،ﻞﻴﺻﻮﺘﻟا فاﺮﻃأ ﻒﻴﻈﻨﺗ ﻞﺒﻗ كﺮﺤﳌا ﻞﻴﻐﺸﺗ ﺊﻔﻃأ ،ﺔﻣﻼﺴﻟا ﻲﻋاوﺪﻟ •
.كﺮﺤﳌا لﺎﻌﺷا مﺎﻈﻧ ﻦﻣ حﺎﺘﻔﳌا جاﺮﺧﺈﺑ ﻢﻗو
ﺔﻴﻧﺪﻌﻣ ةادأ يﺄﺑ وأ ﻚﻌﺑﺎﺻﺄﺑ ﻞﻴﺻﻮﺘﻟا فاﺮﻃأ ﺲﳌ ﱃإ ًﺎﻘﻠﻄﻣ ﺪﻤﻌﺗ ﻻ •
تﺎﻈﺣﻼﻣ
.ةﴍﺎﺒﻣ
.ﺐﻴﻛﱰﻟا ةﺪﻋﺎﻗ جرﺎﺧ ﱃإ زﺎﻬﺠﻟا ﺐﺤﺳا
26
Page 36
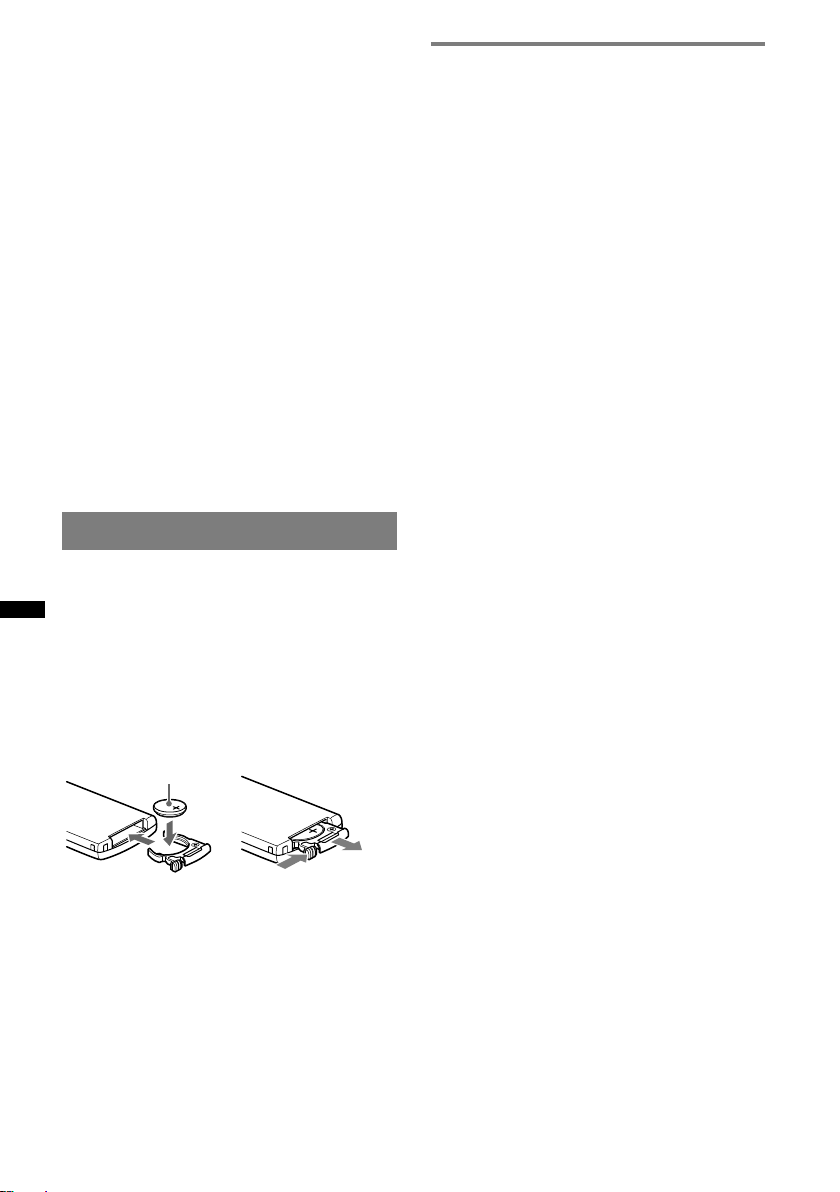
ﺔﻴﻨﻘﺘﺑ لﺎﺼﺗﻻا ءﺎﻨﺛا تﺎﻣﻮﻠﻌﳌا ﺐﻳﴪﺗ ﺔﻴﻟوﺆﺴﻣ يا ﻞﻤﺤﺘﻧ ﻻ •
.Bluetooth
.Bluetooth ةﺰﻬﺟا ﻊﻴﻤﺠﺑ لﺎﺼﺗﻻا نﺿ ﻦﻜ ﻻ •
ﻳﺎﻌﻣ تﺎﺒﻠﻄﺘﻣ ﻲﺒﻠﻳ نا ﺐﺠﻳ Bluetooth ﺔﻴﻨﻘﺘﺑ ﻞﻤﻌﻳ زﺎﻬﺟ –
ناو ،Bluetooth SIG ﺔﻛﴍ ﻞﺒﻗ ﻦﻣ ةدﺪﺤﳌا Bluetooth
.ًﺎﻘﺛﻮﻣ نﻮﻜﻳ
ﻳﺎﻌﻣ تﺎﺒﻠﻄﺘﻣ ﻲﺒﻠﻳ لﻮﺻﻮﳌا زﺎﻬﺠﻟا نﺎﻛ ﻮﻟ ﻰﺘﺣ –
ﻻ وا ةﺰﻬﺟﻻا ﺾﻌﺑ ﻞﺼﺘﺗ ﻻ ﺪﻗ ،هﻼﻋا ةرﻮﻛﺬﳌا Bluetooth
.زﺎﻬﺠﻟا تﺎﻔﺻاﻮﻣ وا ﺎﻳاﺰﳌ ًﺎﻘﻓو ،ﺔﺤﻴﺤﺻ ةرﻮﺼﺑ ﻞﻤﻌﺗ
ًﺎﻘﻓو ءﺎﺿﻮﺿ ثﺪﺤﺗ ﺪﻗ ،يوﺪﻳﻼﻟا ﻒﺗﺎﻬﻟا ﱪﻋ ﺚﻳﺪﺤﻟا ءﺎﻨﺛا –
.لﺎﺼﺗﻻا ﺔﺌﻴﺑ وا زﺎﻬﺠﻠﻟ
.لﺎﺼﺗﻻا أﺪﺒﻳ نا ﱃا ﺖﻗﻮﻟا ﺾﻌﺑ ﺮ ﺪﻗ ،لﻮﺻﻮﳌا زﺎﻬﺠﻠﻟ ًﺎﻘﻓو •
ىﺮﺧ ا
ًﺎﻘﻓو ،يﻮﻠﺨﻟا ﻒﺗﺎﻬﻟا ﲆﻋ Bluetooth زﺎﻬﺟ لﻌﺘﺳا ﻦﻜ ﻻ ﺪﻗ •
.زﺎﻬﺠﻟا لﻌﺘﺳا نﺎﻜﻣو ﺔﻴﻜﻠﺳﻼﻟا ﺔﺟﻮﳌا فوﺮﻈﻟ
ﻒﻗوا ،Bluetooth زﺎﻬﺟ لﻌﺘﺳا ﺪﻌﺑ ﺔﻠﻜﺸﻣ يا ﻚﺘﻬﺟاو اذا •
ﴩﺘﺳا ،ﺔﻠﻜﺸﻣ يﻻ ﺖﺿﺮﻌﺗ اذا .ًارﻮﻓ Bluetooth زﺎﻬﺟ لﻌﺘﺳا
.Sony ﻮﺳ عزﻮﻣ بﺮﻗا
ﰲ ةدراو ﻏو كزﺎﻬﺠﺑ ﻖﻠﻌﺘﺗ ﻞﻛﺎﺸﻣ وأ ﺔﻠﺌﺳأ يأ ﻚﻳﺪﻟ ﺖﻧﺎﻛ اذإ
.Sony ﻮﺳ ﻞﻴﻛو بﺮﻗﺄﺑ لﺎﺼﺗﻻا ﻰﺟﺮﻳ ،ﻞﻴﻟﺪﻟا اﺬﻫ
ﺔﻧﺎﻴﺼﻟا
ﻦﻋ ﻢﻜﺤﺘﻟا ﺔﻗﺎﻄﺒﺑ ﺔﺻﺎﺨﻟا مﻮﻴﺜﻴﻠﻟا ﺔﻳرﺎﻄﺑ لاﺪﺒﺘﺳا
ﺪﻌﺑ
ﺪﻗ) .ًﺎﺒﻳﺮﻘﺗ ةﺪﺣاو ﺔﻨﺳ ةﺪﳌ ﺔﻳرﺎﻄﺒﻟا ﻞﻤﻌﺘﺳ ،ﺔﻳدﺎﻌﻟا فوﺮﻈﻟا ﰲ
(.لﻌﺘﺳﻻا فوﺮﻈﻟ ًﺎﻘﻓو ،ﴫﻗأ ﺔﻳرﺎﻄﺒﻟا ﺔﻣﺪﺧ ﺮﻤﻋ ﺢﺒﺼﻳ
ﺪﻌﺑ ﻦﻋ ﻢﻜﺤﺘﻟا ﺔﻗﺎﻄﺑ ىﺪﻣ نﻮﻜﻳ ،ﺔﻔﻴﻌﺿ ﺔﻳرﺎﻄﺒﻟا ﺢﺒﺼﺗ ﺎﻣﺪﻨﻋ
مﺎﻴﻘﻟا .CR2025 ةﺪﻳﺪﺟ مﻮﻴﺜﻴﻟ ﺔﻳرﺎﻄﺒﺑ ﺔﻳرﺎﻄﺒﻟا لﺪﺒﺘﺳا .ﴫﻗأ
ﺮﻃﺎﺨﻣ لﺘﺣا ﰲ ﺐﺒﺴﺘﻳ ﺪﻗ تﺎﻳرﺎﻄﺒﻟا ﻦﻣ ﺮﺧآ عﻮﻧ يأ لﻌﺘﺳﺎﺑ
.رﺎﺠﻔﻧا وأ ﻖﻳﺮﺣ بﻮﺸﻧ
ﲆﻋﻸﻟ + ﺐﺟﻮﳌا ﺐﻧﺎﺠﻟا
ﺔﻴﻟﺎﺘﻟا ﺔﺤﻔﺼﻟا ﲆﻋ ﻊﺒﺘﻳ
C
Bluetooth ﺔﻔﻴﻇو لﻮﺣ
؟ Bluetooth ﺔﻴﻨﻘﺗ ﻲﻫﺎﻣ
ةﺼﻗ ﺔﻴﻜﻠﺳﻻ ﺔﻴﻨﻘﺗ ﻦﻋ ةرﺎﺒﻋ ﻲﻫ ﺔﻴﻜﻠﺳﻼﻟا Bluetooth ﺔﻴﻨﻘﺗ •
،ﺔﻴﻤﻗﺮﻟا ةﺰﻬﺟﻻا ﺑ ﺎًﻴﻜﻠﺳﻻ تﺎﻧﺎﻴﺒﻟا ﻞﻘﻧ ﺔﻴﻧﺎﻜﻣا ﺢﻴﺘﺗ ىﺪﳌا
Bluetooth ﺔﻴﻨﻘﺗ ﻞﻤﻌﺗ .سأﺮﻟا ﺔﻋﺳو يﻮﻠﺨﻟا ﻒﺗﺎﻬﻟﺎﻛ
ﻞﻴﺻﻮﺗ ﺔﻴﺳﺎﺳﻻا ﺎﻬﺘﻔﻴﻇو .رﺎﺘﻣا 10 قﺎﻄﻧ ﻦﻤﺿ ﺔﻴﻜﻠﺳﻼﻟا
ﺲﻔﻨﺑ ةدﺪﻌﺘﻣ ةﺰﻬﺟﺄﺑ ةﺰﻬﺟﻻا ﺾﻌﺑ ﻞﻴﺻﻮﺗ ﻦﻜ ﻦﻜﻟ ،ﻦﻳزﺎﻬﺟ
.ﺖﻗﻮﻟا
ﺔﻴﻨﻘﺗ ﻲﻫ Bluetooth ﺔﻴﻨﻘﺗ نا ﺎﳌﺎﻃ ﻞﻴﺻﻮﺘﻠﻟ ﻞﺒﻛ ﱃا جﺎﺘﺤﺗ ﻻ •
،ﺾﻌﺒﻟا ﺎﻬﻀﻌﺑ ﻮﺤﻧ ﺔﻠﺑﺎﻘﺘﳌا ةﺰﻬﺟﻼﻟ ﺔﻳروﴐ ﺖﺴﻟو ،ﺔﻴﻜﻠﺳﻻ
ﻚﻨﻜ ،لﺎﺜﳌا ﻞﻴﺒﺳ ﲆﻋ .ءاﺮﻤﺤﻟا ﺖﺤﺗ ﺔﻌﺷﻻا ﺔﻴﻨﻘﺗ ﺔﻟﺎﺣ ﰲ ﻛ
.ﺐﻴﺠﻟا وا ﺔﺒﻴﻘﺣ ﰲ زﺎﻬﺠﻟا اﺬﻫ لﻌﺘﺳا
ﻳﻼﻣ ﺎﻬﻤﻋﺪﺗ ﺔﻴﳌﺎﻋ ﺔﻴﻜﻠﺳﻻ ﺔﻴﻨﻘﺗ ﻲﻫ Bluetooth ﺔﻴﻨﻘﺗ •
ﰲ تﺎﻛﴩﻟا ﻦﻣ ﺜﻜﻟا ﺎﻬﻣﺪﺨﺘﺴﺗ ﻛ ،ﺎﻌﻟا مﻮﻤﻋ ﰲ تﺎﻛﴩﻟا
.ﺎﻌﻟا ءﺎﺤﻧا ﻊﻴﻤﺟ
Bluetooth لﺎﺼﺗا لﻮﺣ
ﺪﻗ .رﺎﺘﻣا 10 قﺎﻄﻧ ﻦﻤﺿ ﺔﻴﻜﻠﺳﻼﻟا Bluetooth ﺔﻴﻨﻘﺗ ﻞﻤﻌﺗ •
ةدﺎﻣ ،ﺺﺨﺷ) ﻖﺋاﻮﻌﻠﻟ ًﺎﻘﻓو لﺎﺼﺗﻻا قﺎﻄﻨﻟ ﴡﻗﻻا ﺪﺤﻟا ﻒﻠﺘﺨﻳ
.ﺔﻴﺴﻴﻃﺎﻨﻐﻣوﱰﻜﻟﻻا تﺎﺌﻴﺒﻟاوا (ﺦﻟا ،ﻂﺋﺎﺣ ،ﺔﻴﻧﺪﻌﻣ
.Bluetooth لﺎﺼﺗا ﺔﻴﺳﺎﺴﺣ ﲆﻋ ﺔﻴﻟﺎﺘﻟا فوﺮﻈﻟا ﺮﺛﺆﺗ ﺪﻗ •
زﺎﻬﺟو ةﺪﺣﻮﻟا ﺑ ﺔﻴﻧﺪﻌﻣ ةدﺎﻣ وا ﺺﺨﺸﻛ ﻖﺋﺎﻋ دﻮﺟو –
.Bluetooth
ﺔﻜﺒﺷ زﺎﻬﺠﻛ ،ﺰﺗﺮﻫﺎﺠﻴﺟ 2.4 ددﺮﺗ ﻞﻤﻌﺘﺴﻳ زﺎﻬﺟ ماﺪﺨﺘﺳا –
بﺮﻘﻟﺎﺑ ،ﻒﻳووﺮﻜﻳﺎﻣ نﺮﻓ وا ﻠﺳﻻ ﻒﺗﺎﻫ وا ﻠﺳﻻ LAN
.ةﺪﺣﻮﻟا هﺬﻫ ﻦﻣ
ﺔﻴﻜﻠﺳﻼﻟا LAN ﺔﻜﺒﺷ ةﺰﻬﺟاو Bluetooth ةﺰﻬﺟا نا ﺎ •
ﻊﻣ ﻞﺧاﺪﺗ ثﺪﺤﻳ ﺪﻗ ،ددﱰﻟا ﺲﻔﻧ ﻞﻤﻌﺘﺴﺗ (IEEE802.11b/g)
وا لﺎﺼﺗﻻا ﺔﻋﴎ ﲆﻋ ﺛﺄﺘﻟا ﰲ ﺐﺒﺴﺘﻳو ﻒﻳووﺮﻜﻳﺎﳌا تﺎﺟﻮﻣ
ةﺪﺣﻮﻟا هﺬﻫ لﻌﺘﺳا ﻢﺗ اذا لﺎﺼﺗﻻا قﺎﻔﺧا وا ءﺎﺿﻮﺿ ثوﺪﺣ
ﻢﻗ ،ﺔﻟﺎﺤﻟا هﺬﻫ ﻞﺜﻣ ﰲ .ﻠﺳﻻ LAN ﺔﻜﺒﺷ زﺎﻬﺟ ﻦﻣ بﺮﻘﻟﺎﺑ
.ﱄﺎﺘﻟا ﺬﻴﻔﻨﺘﺑ
زﺎﻬﺟ ﻦﻣ ﻞﻗﻻا ﲆﻋ رﺎﺘﻣا 10 ﺪﻌﺑ ﲆﻋ ةﺪﺣﻮﻟا هﺬﻫ ﻞﻤﻌﺘﺳا –
.ﻠﺳﻻ LAN ﺔﻜﺒﺷ
ﻦﻣ ﻞﻗﻻا ﲆﻋ رﺎﺘﻣا 10 ﻦﻤﺿ ةﺪﺣﻮﻟا هﺬﻫ لﻌﺘﺳا ﻢﺗ اذا –
LAN ﺔﻜﺒﺷ زﺎﻬﺟ ﻞﻴﻐﺸﺗ ﻒﻗوا ،ﻠﺳﻻ LAN ﺔﻜﺒﺷ زﺎﻬﺟ
.ﻠﺳﻼﻟا
ﻦﻣ بﺮﻘﻟﺎﺑ Bluetooth زﺎﻬﺟو ةﺪﺣﻮﻟا هﺬﻫ ﺐﻴﻛﱰﺑ ﻢﻗ –
.عﺎﻄﺘﺴﳌا رﺪﻗ ﺾﻌﺒﻟا ﻬﻀﻌﺑ
ﲆﻋ ﺮﺛﺆﺗ ﺪﻗ Bluetooth زﺎﻬﺟ ﻦﻣ ﺔﺜﻌﺒﻨﳌا ﻒﻳووﺮﻜﻳﺎﳌا تﺎﺟﻮﻣ •
ةﺪﺣﻮﻟا هﺬﻫ ﻞﻴﻐﺸﺗ ﻒﻗوا .ﺔﻴﻧوﱰﻜﻟﻻا ﺔﻴﺒﻄﻟا ةﺰﻬﺟﻻا ﻞﻴﻐﺸﺗ
نا ﻦﻜ ﺚﻴﺣ ،ﺔﻴﻟﺎﺘﻟا ﻦﻛﺎﻣﻻا ﰲ ىﺮﺧﻻا Bluetooth ةﺰﻬﺟاو
.ثدﺎﺣ عﻮﻗو ﰲ ﺐﺴﺘﺗ
رﺎﻄﻘﻟاوا ﻰﻔﺸﺘﺴﳌا ﰲ ،لﺎﻌﺘﺷﻼﻟ ﻞﺑﺎﻗ زﺎﻏ ﻪﻴﻓ ﺪﺟﻮﻳ نﺎﻜﻣ ﰲ –
دﻮﻗﻮﻟا ﺔﻄﺤﻣ وا ةﺮﺋﺎﻄﻟا وا
ﻖﻳﺮﺤﻟا راﺬﻧا ةﺰﻬﺟا وا ﺔﻴﻧوﱰﻜﻟﻻا باﻮﺑﻻا ﻦﻣ بﺮﻘﻟﺎﺑ –
تﺎﺒﻠﻄﺘﻣ ﻲﺒﻠﺗ ﻲﺘﻟا لﺎﺼﺗﻻا تاءﺎﻔﻛ ﻢﻋﺪﺗ ةﺪﺣﻮﻟا هﺬﻫ •
ﺔﻴﻨﻘﺗ لﻌﺘﺳا ﺪﻨﻋ ﻢﻜﺤﻣ لﺎﺼﺗا ﻖﻴﻘﺤﺘﻟ Bluetooth رﺎﻴﻌﻣ
نﻮﻜﻳ ﻻ ﺪﻗ لﺎﺼﺗﻻا نﺿ نا ﻻا ،ﺔﻴﻜﻠﺳﻼﻟا Bluetooth
ﺔﻴﻨﻘﺗ لﻌﺘﺳﺎﺑ لﺎﺼﺗﻻا ﺪﻨﻋ ًارﺬﺣ ﻦﻛ .ﺔﺌﻴﻬﺘﻠﻟ
.ﺔﻴﻜﻠﺳﻼﻟا Bluetooth
ً
ﺎﻘﻓو ًﺎﻴﻓﺎﻛ
25
Page 37
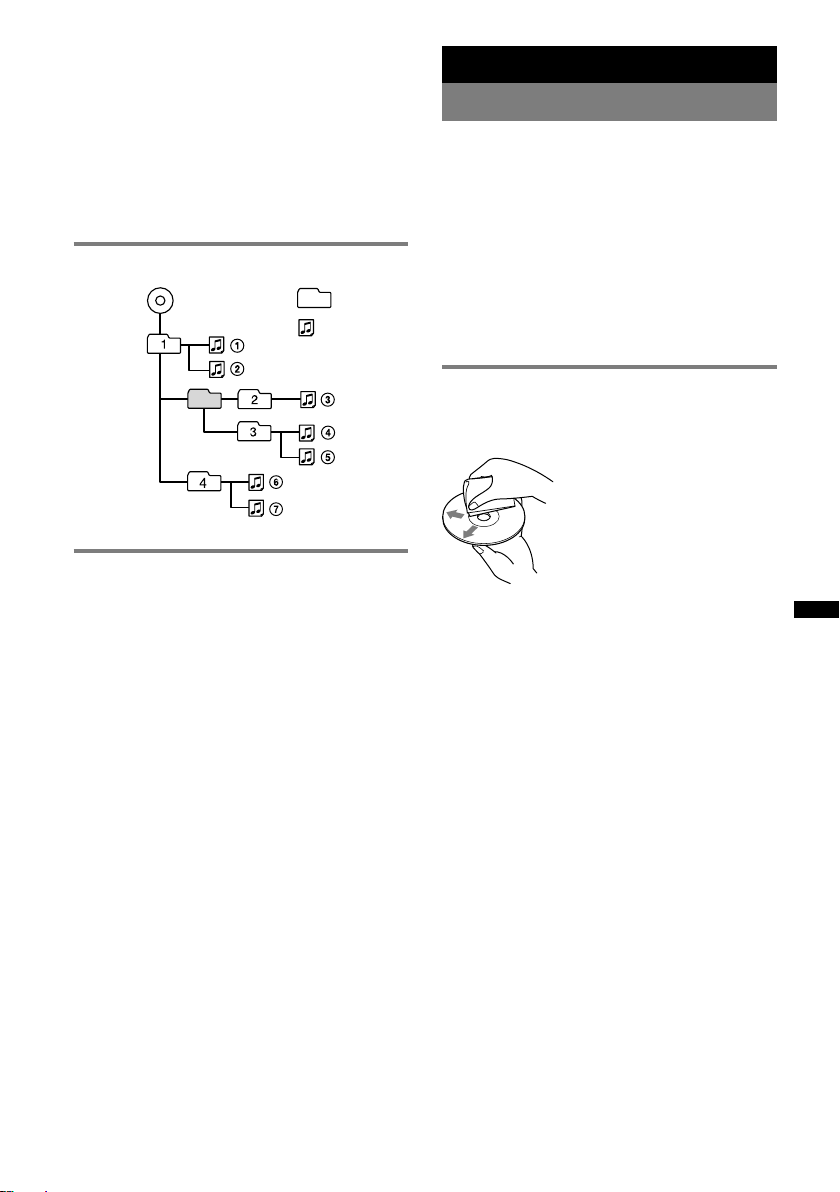
ﺎﻬﺿﺮﻋ ﻦﻣ ةﺪﺣﻮﻟا هﺬﻫ ﻦﻜﻤﺘﺗ ﻻ ﻲﺘﻟا تﺎﻧاﻮﻄﺳﻷا •
.ﺔﺌﻳدر ﻞﻴﺠﺴﺗ ةدﻮﺠﺑ ﺔﻠﺠﺴﳌا CD-R/CD-RW ﺔﻧاﻮﻄﺳأ –
ﻏ ﻞﻴﺠﺴﺗ زﺎﻬﺠﺑ ﺔﻠﺠﺴﳌا CD-R/CD-RW ﺔﻧاﻮﻄﺳأ –
.ﻖﻓاﻮﺘﻣ
.ﺢﻴﺤﺻ ﻏ ﻞﻜﺸﺑ ﺔﻤﺘﺘﺨﳌا CD-R/CD-RW ﺔﻧاﻮﻄﺳأ –
ﺔﻠﺠﺴﳌا تﺎﻧاﻮﻄﺳﻷا ﻚﻠﺗ ﻏ CD-R/CD-RW ﺔﻧاﻮﻄﺳأ –
ﺔﻴﻓﻮﺘﺴﳌا MP3 ﺔﻐﻴﺼﺑ وأ ﺔﻴﻘﻴﺳﻮﳌا CD ﺔﻧاﻮﻄﺳأ ﺔﻐﻴﺼﺑ
وأ Joliet/Romeo ،ISO9660 Level 1/Level 2 ﻳﺎﻌﳌ
.ةدﺪﻌﺘﳌا ﻊﻃﺎﻘﳌا
MP3/WMA/AAC تﺎﻔﻠﻣ ضﺮﻋ ﺐﻴﺗﺮﺗ
MP3/WMA/AAC
(مﻮﺒﻟأ) ﺪﻠﺠﻣ
MP3/ ﻒﻠﻣ
WMA/AAC
(ﺔﻋﻮﻄﻘﻣ)
iPod زﺎﻬﺟ صﻮﺼﺨﺑ
.ﺔﻴﻟﺎﺘﻟا iPod تﻼﻳدﻮﻣ ﱃإ ﻞﻴﺻﻮﺘﻟا ﻦﻜ •
.لﻌﺘﺳﻻا ﻞﺒﻗ ﺞﻣﺎﻧﺮﺑ ثﺪﺣﻷ iPod ةﺰﻬﺟأ ﺚﻳﺪﺤﺘﺑ ﻢﻗ
iPod touch زﺎﻬﺟ –
iPod classic زﺎﻬﺟ –
*ﻮﻳﺪﻴﻓ ﻊﻣ iPod زﺎﻬﺟ –
(ﺚﻟﺎﺜﻟا ﻞﻴﺠﻟا) iPod nano زﺎﻬﺟ –
(ﺎﺜﻟا ﻞﻴﺠﻟا) iPod nano زﺎﻬﺟ –
*(لوﻷا ﻞﻴﺠﻟا) iPod nano زﺎﻬﺟ –
iPhone 3G زﺎﻬﺟو iPhone زﺎﻬﺟ –
ﻞﻴﺠﻟا) iPod nano زﺎﻬﺠﻟ ﺐﻛاﺮﻟا ﻞﺒﻗ ﻦﻣ ﻢﻜﺤﺘﻟا ﻊﺿو ﺮﻓﻮﺘﻳ ﻻ *
ﺎﻬﻤﻴﻤﺼﺗ ﻢﺗ ﺔﻴﻧوﱰﻜﻟإ ﺔﻴﻟﻛ ﻲﻨﻌﻳ “Made for iPod” ﺢﻠﻄﺼﳌا •
ﻞﺒﻗ ﻦﻣ ﺎﻬﻴﻠﻋ ﺔﻗدﺎﺼﳌا ﺖو iPod زﺎﻬﺟ ﱃإ ﻞﻴﺻﻮﺘﻠﻟ ًﺎﺼﻴﺼﺧ
.Apple ﺔﻛﴍ ءادأ ﻳﺎﻌﻣ ﻲﺒﻠﺘﻟ ةرﻮﻄﳌا ﺔﻬﺠﻟا
ﻢﺗ ﺔﻴﻧوﱰﻜﻟإ ﺔﻴﻟﻛ ﻲﻨﻌﻳ “Works with iPhone” ﺢﻠﻄﺼﳌا •
ﺎﻬﻴﻠﻋ ﺔﻗدﺎﺼﳌا ﺖو iPod زﺎﻬﺟ ﱃإ ﻞﻴﺻﻮﺘﻠﻟ ًﺎﺼﻴﺼﺧ ﺎﻬﻤﻴﻤﺼﺗ
.Apple ﺔﻛﴍ ءادأ ﻳﺎﻌﻣ ﻲﺒﻠﺘﻟ ةرﻮﻄﳌا ﺔﻬﺠﻟا ﻞﺒﻗ ﻦﻣ
ﻳﺎﻌﳌ ﻪﻟﺎﺜﺘﻣا وأ زﺎﻬﺠﻟا اﺬﻫ ءادا ﻦﻋ ﺔﻟوﺆﺴﻣ ﻏ Apple ﺔﻛﴍ •
.ﻮﻳﺪﻴﻓ ﻊﻣ iPod زﺎﻬﺠﻟ وأ (لوﻷا
.ﺔﻴﻤﻴﻈﻨﺘﻟا ﻳﺎﻌﳌاو ﺔﻣﻼﺴﻟا
ﺔﻴﻓﺎﺿا تﺎﻣﻮﻠﻌﻣ
ﺔﻴﻃﺎﻴﺘﺣا تﺎﻬﻴﺒﻨﺗ
عد ،ةﴍﺎﺒﳌا ﺲﻤﺸﻟا ﺔﻌﺷا ﺖﺤﺗ بآﺮﻣ ﰲ ةرﺎﻴﺴﻟا فﺎﻘﻳا ﻢﺗ اذإ •
.ﻪﻠﻴﻐﺸﺗ ﻞﺒﻗ دﱪﻳ زﺎﻬﺠﻟا
.ًﺎﻴﺋﺎﻘﻠﺗ ﱄﻵا اﻮﻬﻟا ﺪﻳﺪ ﻢﺘﻴﺳ •
ﺔﺑﻮﻃﺮﻟا ﻒﺜﻜﺗ
ﺮﻈﺘﻧاو ﺔﻧاﻮﻄﺳﻷا جاﺮﺧﺈﺑ ﻢﻗ ،زﺎﻬﺠﻟا ﻞﺧاد ﺔﺑﻮﻃﺮﻟا ﺖﻔﺜﻜﺗ اذإ
ﻢﺘﻳ ﻦﻟ فﻮﺳ ﻻإو ،ﺔﺑﻮﻃﺮﻟا ﺮﺨﺒﺘﺗ نأ ﱃإ ًﺎﺒﻳﺮﻘﺗ ةﺪﺣاو ﺔﻋﺎﺳ ةﺪﳌ
.ﺔﺒﺳﺎﻨﻣ ةرﻮﺼﺑ زﺎﻬﺠﻟا ﻞﻴﻐﺸﺗ
ةدﻮﺠﻟا ﱄﺎﻋ تﻮﺻ ﲆﻋ لﻮﺼﺤﻟا نﻀﻟ
.تﺎﻧاﻮﻄﺳﻷا وأ زﺎﻬﺠﻟا ﲆﻋ ﻞﺋاﻮﺴﻟا بﺎﻜﺴﻧا مﺪﻋ ﲆﻋ صﺮﺣا
تﺎﻧاﻮﻄﺳﻷا لﻮﺣ تﺎﻈﺣﻼﻣ
ةراﺮﺤﻟا ردﺎﺼﻣ وأ ةﴍﺎﺒﳌا ﺲﻤﺸﻟا ﺔﻌﺷﻷ تﺎﻧاﻮﻄﺳﻷا ضﺮﻌﺗ ﻻ •
بآﺮﻣ ﰲ ﺔﻓﻮﻔﺼﻣ ةرﺎﻴﺳ ﰲ ﺎﻬﻛﱰﺗ ﻻو ،رﺎﺤﻟا ءاﻮﻬﻟا ةﺰﻬﺟأ ﻞﺜﻣ
.ةﴍﺎﺒﳌا ﺲﻤﺸﻟا ﺔﻌﺷا ﺖﺤﺗ
ﺔﻗﺮﺨﺑ تﺎﻧاﻮﻄﺳﻷا ﺢﺴﻣا ،ضﺮﻌﻟا ﻞﺒﻗ •
.جرﺎﺨﻠﻟ ًﺎﻬﺠﺘﻣ ﺰﻛﺮﳌا ﻦﻣ ﻒﻴﻈﻨﺗ
ﻖﻗﺮﻣ وأ ﻦﻳﺰﻨﺒﻟا ﻞﺜﻣ ﻞﻴﻟﺎﺤﻣ ﻞﻤﻌﺘﺴﺗ ﻻ
.ًﺎﻳرﺎﺠﺗ ةﺮﻓﻮﺘﳌا تﺎﻔﻈﻨﳌا وأ ءﻼﻄﻟا
تﺎﻧاﻮﻄﺳﻷا ضﺮﻌﻟ ﻢﻤﺼﻣ زﺎﻬﺠﻟا اﺬﻫ •
ﺔﺠﻣﺪﳌا ﺔﻧاﻮﻄﺳﻷا رﺎﻴﻌﻣ ﻊﻣ ﺔﻘﻓاﻮﺘﳌا
ﺾﻌﺑو ﻪﺟﻮﻟا ﺔﻴﺋﺎﻨﺜﻟا تﺎﻧاﻮﻄﺳﻷا .(CD)
ﻻ ﴩﻨﻟا قﻮﻘﺣ ﺔﻳﺣ تﺎﻴﻨﻘﺘﺑ ةﺮﻔﺸﳌا ﺔﻴﻘﻴﺳﻮﳌا تﺎﻧاﻮﻄﺳﻷا
ضﺮﻋ ﻢﺘﻳ ﻻ ﺪﻗ ،ﻚﻟﺬﻟ ،(CD) ﺔﺠﻣﺪﳌا ﺔﻧاﻮﻄﺳﻷا رﺎﻴﻌﻣ ﰲﻮﺘﺴﺗ
.زﺎﻬﺠﻟا اﺬﻫ ﺔﻄﺳاﻮﺑ تﺎﻧاﻮﻄﺳﻷا ﻚﻠﺗ
ﺎﻬﺿﺮﻋ ﻦﻣ ةﺪﺣﻮﻟا هﺬﻫ ﻦﻜﻤﺘﺗ ﻻ ﻲﺘﻟا تﺎﻧاﻮﻄﺳﻷا •
ﺔﻘﺼﻠﳌا وأ ،تﺎﻘﺼﻠﻣوأ تﺎﻗﺎﻄﺑ ﺎﻬﻴﻠﻋ ﺔﻘﺼﻠﳌا تﺎﻧاﻮﻄﺳﻷا –
وأ ،ﻞﻠﺧ ﱃإ يدﺆﻳ ﺪﻗ ﻚﻟﺬﺑ مﺎﻴﻘﻟا .ﻖﺻﻻ ﻂﻳﴍ وأ ﺔﻗرو ﺎﻬﻴﻠﻋ
.ﺔﻧاﻮﻄﺳﻷا ﻣﺪﺗ ﱃإ يدﺆﻳ ﺪﻗ
،لﺎﺜﳌا ﻞﻴﺒﺳ ﲆﻋ) ﺔﻴﻣﺎﻈﻧ ﻏ لﺎﻜﺷﺄﺑ نﻮﻜﺗ ﻲﺘﻟا تﺎﻧاﻮﻄﺳﻷا –
ﺔﻟوﺎﺤ مﺎﻴﻘﻟا .(ﺔﻤﺠﻧ ﻞﻜﺷ ﲆﻋ ،ﺔﻌﺑﺮﻣ ،ﺐﻠﻗ ﻞﻜﺷ ﲆﻋ
.زﺎﻬﺠﻟا ﻒﻠﺘﻳ ﺪﻗ ﺎﻬﺿﺮﻋ
.ﻢﺳ 8 سﺎﻘﻣ CD تﺎﻧاﻮﻄﺳأ –
CD-R/CD-RW تﺎﻧاﻮﻄﺳأ لﻮﺣ تﺎﻈﺣﻼﻣ
(ﻂﻘﻓ CD-R/CD-RW تﺎﻧاﻮﻄﺳأ) :دﺪﻌﻟ ﻰﺼﻗﻷا ﺪﺤﻟا •
(رﺬﺠﻟا ﺎﻬﻨﻤﻀﺑ) 150 :(تﺎﻣﻮﺒﻟﻷا) تاﺪﻠﺠﻤﻟا –
اﺬﻫ ﺢﺒﺼﻳ ﺪﻗ) 300 :تاﺪﻠﺠﻤﻟاو (تﺎﻋﻮﻄﻘﻤﻟا) تﺎﻔﻠﻤﻟا –
ﻰﻠﻋ ﻒﻠﻤﻟا /ﺪﻠﺠﻤﻟا ﻢﺳا ىﻮﺘﺣا اذإ 300 ﻦﻣ ﻞﻗأ دﺪﻌﻟا
.(زﻮﻣﺮﻟا ﻦﻣ ﺮﻴﺜﻜﻟا
:ﻒﻠﻤﻟا /ﺪﻠﺠﻤﻟا ﻢﺳﺈﺑ ﺔﺻﺎﺨﻟا ضﺮﻌﻠﻟ ﺔﻠﺑﺎﻘﻟا زﻮﻣﺮﻟا –
.32 (Joliet)/64 (Romeo)
ﻞﺠﺴﻣ ﻊﻄﻘﻤﺑ تأﺪﺑ اذإ ةدﺪﻌﺘﻣ ﻊﻃﺎﻘﻤﺑ ﺔﻠﺠﺴﻣ ﺔﻧاﻮﻄﺳﻷا •
ﻻو ،CD-DA ﺔﻧاﻮﻄﺳﺄﻛ ﺎﻬﻴﻠﻋ فﺮﻌﺘﻟا ﻢﺘﻴﺳ ،CD-DA ﺔﻐﻴﺼﺑ
.ىﺮﺧﻷا ﻊﻃﺎﻘﻤﻟا ضﺮﻋ ﻢﺘﻳ
24
Page 38
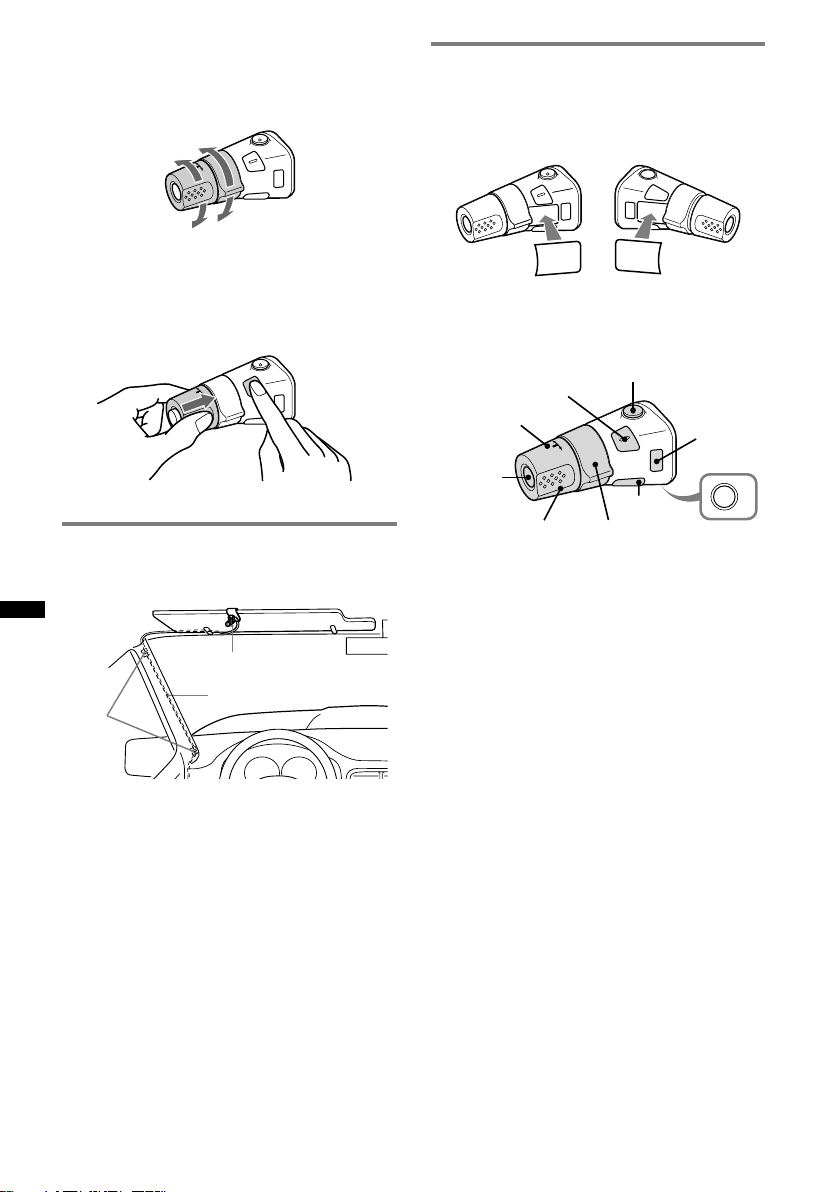
ﲇﻴﻐﺸﺘﻟا هﺎﺠﺗﻻا ﻴﻐﺗ
ﻛ ًﺎﻘﺒﺴﻣ ﻊﻨﺼﳌا ﰲ طﻮﺒﻀﻣ ﻢﻜﺤﺘﻟا ﺢﻴﺗﺎﻔﳌ ﲇﻴﻐﺸﺘﻟا هﺎﺠﺗﻻا
.هﺎﻧدأ ﺒﻣ
ةدﺎﻳﺰﻠﻟ
ﻞﻴﻠﻘﺘﻠﻟ
ﺔﻠﺠﻋ دﻮﻤﻋ ﲆﻋ ةراوﺪﻟا ﻢﻜﺤﺘﻟا ةﺪﺣو ﺐﻴﻛﺮﺗ تدرا اذإ
.ﲇﻴﻐﺸﺘﻟا هﺎﺠﺗﻻا ﺲﻜﻋ ﻚﻨﻜ ،ةدﺎﻴﻘﻟا
رﺰﻟا ﻂﻐﻀﺑ ﺮﻤﺘﺳاو ﻂﻐﺿا ،VOL ﻢﻜﺤﺘﻟا رز ﻂﻐﺿ ءﺎﻨﺛأ
.(SEL)
XA-MC10 ﻲﺟرﺎﺧ نﻮﻓﺮﻜﻴﻣ
،نﻮﻓﺮﻜﻴﳌا لﺎﺧدا فﺮﻃ ﱃإ يرﺎﻴﺘﺧا ﻲﺟرﺎﺧ نﻮﻓﺮﻜﻴﻣ ﻞﻴﺻﻮﺘﺑ
.زﺎﻬﺠﻟا اﺬﻫ لﻼﺧ ﻦﻣ ثﺪﺤﺘﻟا ءﺎﻨﺛأ تﻮﺼﻟا ةدﻮﺟ ﺴﺤﺗ ﻦﻜ
ﻲﺟرﺎﺧ نﻮﻓﺮﻜﻴﻣ
ﻞﻴﺻﻮﺘﻟا ﻚﻠﺳ
ﻚﺑﺎﺸﻣ
ﻪﻴﺟﻮﺗ
.(21 ﺔﺤﻔﺻ) تﺎﻧﻮﻓﺮﻜﻴﳌا ﺑ ﺔﻳﻮﻟوﻷا ﺔﺌﻴﻬﺗ ﻦﻜ
ﺔﻈﺣﻼﻣ
ﻦﻣ ﻦﻜﻤﺘﺗ ﻻ ﺪﻗ .ﻲﺟرﺎﺧ نﻮﻓﺮﻜﻴﻤﻛ XA-MC10 نﻮﻓﺮﻜﻴﳌا ﻞﻴﺻﻮﺘﺑ ﻢﻗ
.ﺮﺧآ زﺎﻬﺟ ﻞﻴﺻﻮﺗ ﻢﺗ اذا ﻞﻠﺧ ثﺪﺤﻳ ﺪﻗ وأ ﺔﳌﺎﻜﻣ ءاﺮﺟا
RM-X4S ةراوﺪﻟا ﻢﻜﺤﺘﻟا ةﺪﺣو
ﺎﻬﻴﻓ ﺐﻛﺮﺗ ﻲﺘﻟا ﺔﻴﻔﻴﻜﻟا ﺐﺴﺣ ﺔﻴﻠﻴﻟﺪﻟا ﺔﻗﺎﻄﺒﻟا ﺖﻴﺒﺜﺘﺑ ﻢﻗ
.ةراوﺪﻟا ﻢﻜﺤﺘﻟا ةﺪﺣو
D
S
P
L
E
S
E
D
O
M
L
P
S
D
1
ﻒﺋﺎﻇو ﺲﻔﻧ يدﺆﺗ ةراوﺪﻟا ﻢﻜﺤﺘﻟا ةﺪﺣو ﲆﻋ ﺔﻠﺛﺘﳌا رارزﻷا
SEL
PRESET/
DISC
SOURCE
VOL
SEEK/ AMS
ﺐﻠﻄﺘﺗ ةراوﺪﻟا ﻢﻜﺤﺘﻟا ةﺪﺣو ﲆﻋ ﺔﻴﻟﺎﺘﻟا ﻢﻜﺤﺘﻟا ﺢﻴﺗﺎﻔﻣ
.زﺎﻬﺠﻟا ﻦﻣ ﺎﻫﺬﻴﻔﻨﺗ ﻢﺘﻳ ﻲﺘﻟا ﻚﻠﺗ ﻦﻋ ﺔﻔﻠﺘﺨﻣ ﻞﻴﻐﺸﺗ تﺎﻴﻠﻤﻋ
.ىﺮﺧأ ةﺮﻣ ﻂﻐﺿا ،ءﺎﻐﻟﻺﻟ .تﻮﺼﻟا ﺾﻴﻔﺨﺘﻟ
ALBUM)
(1)/(2) رﺰﻟا ﺔﻔﻴﻇو ﺲﻔﻧ :CD/USB ﻊﺿو
.(ردأو ﻂﻐﺿا) ﺔﻧﺰﺨﻣ تﺎﻄﺤﻣ لﺎﺒﻘﺘﺳﻻ :ﻮﻳداﺮﻟا
(تﻮﺼﻟا ىﻮﺘﺴ) VOL ﻢﻜﺤﺘﻟا رز •
.(ردأ) زﺎﻬﺠﻟا ﲆﻋ ﻢﻜﺤﺘﻟا صﺮﻗ ﺔﻔﻴﻇو ﺲﻔﻧ
ﺮﻤﺘﺳا وأ ،ردأ) زﺎﻬﺠﻟا ﲆﻋ (SEEK) +/– رﺰﻟا ﺔﻔﻴﻇو ﺲﻔﻧ
L
M
O
D
E
S
E
L
ﻢﻜﺤﺘﻟا ﺢﻴﺗﺎﻔﻣ ﻊﺿاﻮﻣ
.زﺎﻬﺠﻟا اﺬﻫ ﲆﻋ رارزﻷا
ATT
DSPL
(ﺾﻴﻔﺨﺘﻟا) ATT رز •
.زﺎﻬﺠﻟا ﲆﻋ رﺎﻴﺘﺧﻻا رز ﺲﻔﻧ
*PRESET/DISC ﻢﻜﺤﺘﻟا رز •
.(ردأو ﻂﻐﺿا) زﺎﻬﺠﻟا ﲆﻋ (–/+
SEEK/AMS ﻢﻜﺤﺘﻟا رز •
(ﺔﺷﺎﺸﻟا) DSPL رز •
.ﺔﺷﺎﺸﻟا دﻮﻨﺑ ﻴﻐﺘﻟ
.ةﺪﺣﻮﻟا هﺬﻬﻟ حﺎﺘﻣ ﻏ *
ﺔﻗﺎﻄﺒﻟا ﺖﻴﺒﺜﺗ
MODE
OFF
OFF
(رﺎﻴﺘﺧا) SEL رﺰﻟا •
.(ﺮﻳوﺪﺘﻟﺎﺑ
23
Page 39
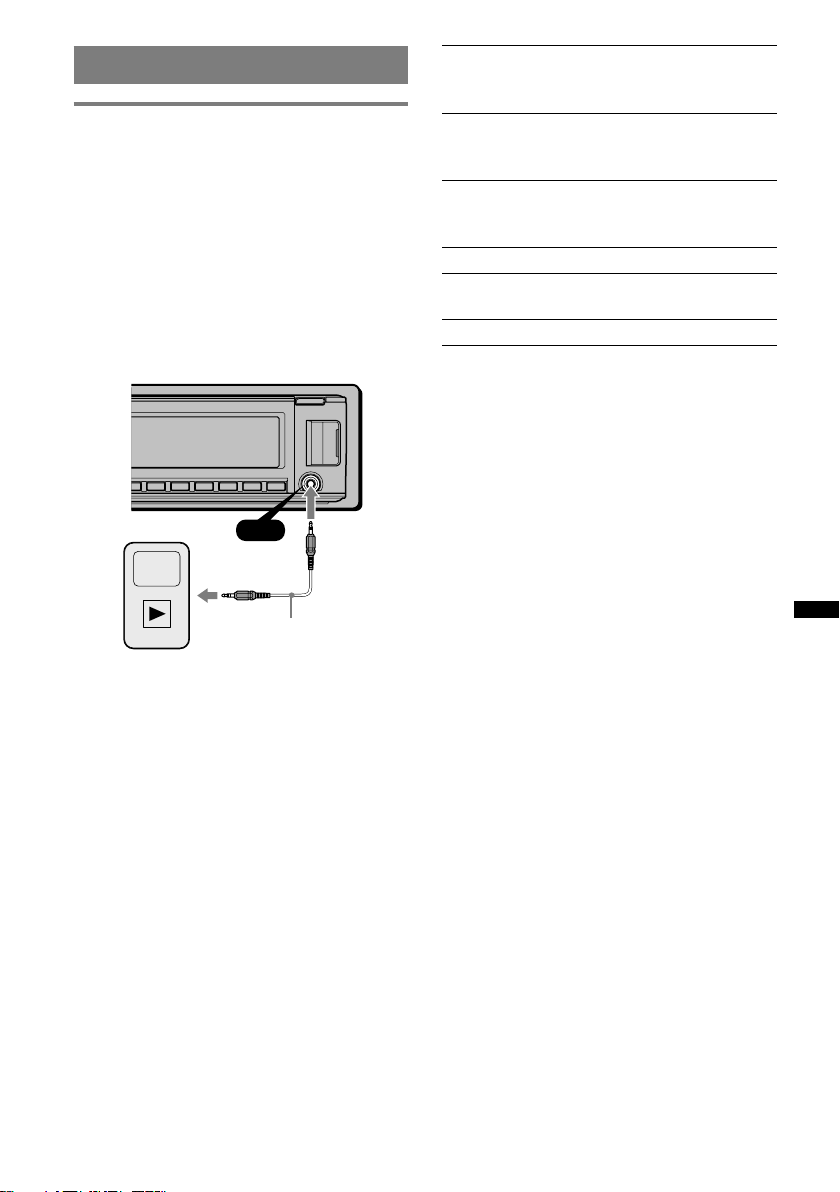
يرﺎﻴﺘﺧا زﺎﻬﺟ لﻌﺘﺳا
ﰲﺎﺿا تﻮﺻ زﺎﻬﺟ
AUX ﻞﺧﺪﻟا ﺲﺒﻘﻣ ﱃإ يرﺎﻴﺘﺧا لﻮﻤﺤﻣ تﻮﺻ زﺎﻬﺟ ﻞﻴﺻﻮﺘﺑ
،رﺪﺼﳌا رﺎﻴﺘﺧا ﻢﺛ ﻦﻣو زﺎﻬﺠﻟا ﲆﻋ (ﻐﺻ ﻮﻳﺘﺳ ﺲﺒﻘﻣ)
ﻂﺒﺿ ﻦﻜ .ةرﺎﻴﺴﻟا تﺎﻋﺳ ﺔﻄﺳاﻮﺑ تﻮﺼﻠﻟ عﺘﺳﻻا ﻚﻨﻜ
.لﻮﻤﺤﳌا تﻮﺼﻟا زﺎﻬﺟو زﺎﻬﺠﻟا ﺑ فﻼﺘﺧا يﻷ تﻮﺼﻟا ىﻮﺘﺴﻣ
:ﱄﺎﺘﻟا ءاﺮﺟﻹا ﻊﺒﺗا
لﻮﻤﺤﳌا تﻮﺼﻟا زﺎﻬﺟ ﻞﻴﺻﻮﺗ
.لﻮﻤﺤﳌا تﻮﺼﻟا زﺎﻬﺟ ﺊﻔﻃا 1
.ةﺪﺣﻮﻟا تﻮﺻ ىﻮﺘﺴﻣ ﺾﻔﺧا 2
.ةﺪﺣﻮﻟا ﻞﻴﺻﻮﺘﺑ ﻢﻗ 3
AUX
*ﻞﻴﺻﻮﺘﻟا ﻞﺒﻛ
(ﻖﻓﺮﻣ ﻏ)
(بﻮﻠﻘﻣ /يدﺎﻌﻟا ﺾﻴﻔﺨﻟا ﻬﺠﻟا ﺢﺷﺮﻣ) LPF NORM/REV
:LPF ﺾﻴﻔﺨﻟا ﻬﺠﻟا ﺢﺷﺮﻣ ﻞﻴﻐﺸﺗ ﺪﻨﻋ ﺔﻠﺣﺮﳌا رﺎﺘﺨﻳ
."REV" وأ "NORM"
(ﱄﺎﻌﻟا ﻬﺠﻟا ﺢﺷﺮﻣ) HPF
وأ "OFF" :ﺔﻴﻔﻠﺨﻟا /ﺔﻴﻣﺎﻣﻷا ﺔﻋﺴﻟا ﻊﻄﻗ ددﺮﺗ رﺎﺘﺨﻳ
."160Hz" وأ "140Hz" وأ "120Hz" وأ "100Hz" وأ "80Hz"
(تﻮﺼﻟا ةرﺎﻬﺟ) LOUD
تﺎﻳﻮﺘﺴ تﻮﺼﻠﻟ عﺘﺳﻼﻟ ﱄﺎﻌﻟا تﻮﺼﻟا وأ ﻬﺠﻟا زﺰﻌﻳ
."OFF" وأ "ON" :حﻮﺿﻮﺑ ﺔﻀﻔﺨﻨﻣ
(12 ﺔﺤﻔﺻ) BTM ﺔﻔﻴﻇو
2
*DM+ ﻊﺿﻮﻟا
."OFF"وأ "ON" :DM+ ﺔﻔﻴﻇو ﺔﺌﻴﻬﺘﻟ
(20 ﺔﺤﻔﺻ)
1
*BT INIT ﻊﺿﻮﻟا
.ﺊﻔﻄﻣ زﺎﻬﺠﻟا نﻮﻜﻳ ﺎﻣﺪﻨﻋ 1*
.CD/USB رﺪﺼﻣ ﻞﻴﻐﺸﺗ ﺪﻨﻋ 2*
.FM ﺚﺑ لﺎﺒﻘﺘﺳا ﺪﻨﻋ 3*
.ﴍﺎﺒﳌا عﻮﻨﻟا ﻦﻣ ﺲﺑﺎﻗ لﻌﺘﺳا ﻦﻣ ﺪﻛﺄﺗ *
تﻮﺼﻟا ىﻮﺘﺴﻣ ﻂﺒﺿ
ﻞﺒﻗ لﻮﺻﻮﳌا تﻮﺼﻟا زﺎﻬﺟ تﻮﺻ ىﻮﺘﺴﻣ ﻂﺒﺿ ﻦﻣ ﺪﻛﺄﺗ
.ضﺮﻌﻟا
.ةﺪﺣﻮﻟا تﻮﺻ ىﻮﺘﺴﻣ ﺾﻔﺧا
ﺮﻬﻈﻳ نأ ﱃإ ًارﺮﻜﺘﻣ ًﺎﻄﻐﺿ (SOURCE) رﺰﻟا ﻂﻐﺿا 2
."AUX"
."AUX FRONT IN" ﺮﻬﻈﻳ
تﻮﺻ ىﻮﺘﺴ لﻮﻤﺤﳌا تﻮﺼﻟا زﺎﻬﺟ تﻮﺻ ضﺮﻋ أﺪﺒﻳ
.لﺪﺘﻌﻣ
.ةﺪﺣﻮﻠﻟ يدﺎﻌﻟا عﺘﺳﻻا تﻮﺻ ىﻮﺘﺴﻣ ﺔﺌﻴﻬﺘﺑ ﻢﻗ
.(20 ﺔﺤﻔﺻ) ﻞﺧﺪﻟا تﻮﺻ ىﻮﺘﺴﻣ ﻂﺒﺿا 5
1
3
4
22
Page 40
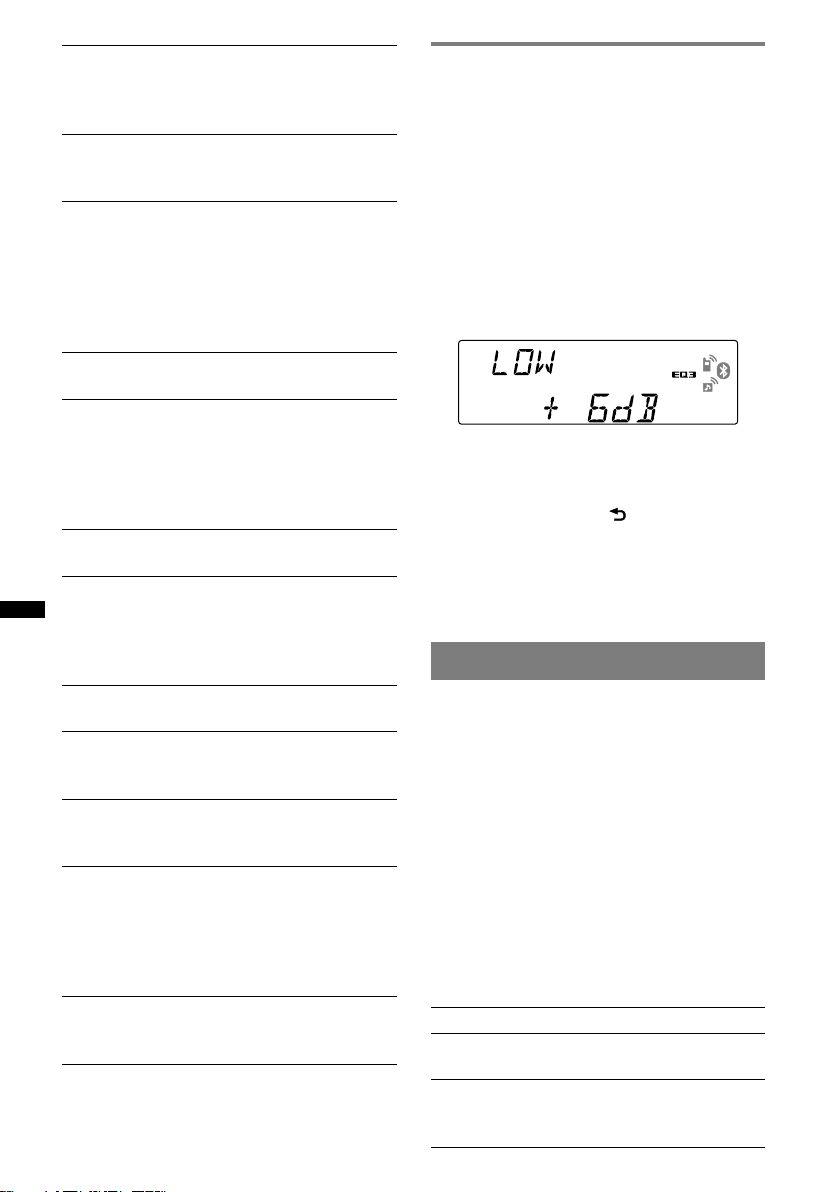
AUTO OFF ﻊﺿﻮﻟا
:زﺎﻬﺠﻟا ءﺎﻔﻃا ﺪﻨﻋ ﺔﺑﻮﻏﺮﳌا ةﺪﳌا ءﺎﻀﻘﻧا ﺪﻌﺑ ًﺎﻴﺋﺎﻘﻠﺗ ﺊﻔﻄﻨﻳ
وأ "30M (minutes)" وأ "30S (seconds)" وأ "NO"
"60M (minutes)"
.ﻪﻠﻴﺻﻮﺗ ﺪﻨﻋ ﻲﺟرﺎﺨﻟا نﻮﻓﺮﻜﻴﳌا ﱃإ ًﺎﻴﺋﺎﻘﻠﺗ ﻞﻳﻮﺤﺘﻠﻟ :"EXT" –
.ﻂﻘﻓ ﲇﺧاﺪﻟا نﻮﻓﺮﻜﻴﳌا رﺎﻴﺘﺧﻻ :"INT" –
(دﻮﺳأ جﺮﺧ) B.OUT
ضﺮﻋ ءﺎﻨﺛأ ،لﺎﺜﳌا ﻞﻴﺒﺳ ﲆﻋ) رﺪﺼﻣ يﻷ ًﺎﻴﺋﺎﻘﻠﺗ ةءﺎﺿﻻا ءﺎﻔﻃﻻ
ﺔﻴﻠﻤﻋ يأ ﺬﻴﻔﻨﺗ ﻢﺘﻳ اذا (ﺦﻟا ،ﻮﻳداﺮﻟا لﺎﺒﻘﺘﺳا /CD ﺔﻧاﻮﻄﺳأ
."OFF" و "ON" :ناﻮﺛ 5 لﻼﺧ ﻞﻴﻐﺸﺗ
ﺪﻨﻋ) .زﺎﻬﺠﻟا ﲆﻋ رز يأ ﻂﻐﺿا ،ﺔﻴﻔﻠﺨﻟا ةءﺎﺿﻻا ﻞﻴﻐﺸﺘﻟ
ﻦﻋ ﻢﻜﺤﺘﻟا ﺔﻗﺎﻄﺑ ﺔﻄﺳاﻮﺑ ﻞﻴﻐﺸﺘﻟا ﺢﺒﺼﻳ ،ﻊﺿﻮﻟا اﺬﻫ ﻞﻴﻐﺸﺗ
(ﻲﺣﺎﻀﻳإ ضﺮﻋ) DEMO
."OFF" وأ "ON" :ﻲﺣﺎﻀﻳﻻا ضﺮﻌﻟا ﻊﺿو ﻞﻴﻐﺸﺘﺗ ﱃإ يدﺆﻳ
DIMMER ﻢﻴﺘﻌﺘﻟا ﻊﺿو
.ﺔﺷﺎﺸﻟا عﻮﻄﺳ ﻐﻳ
حﺎﺘﻣ) .ﺢﻴﺑﺎﺼﻤﻟا ﻞﻴﻐﺸﺗ ﺪﻨﻋ ًﺎﻴﺋﺎﻘﻠﺗ ﺔﺷﺎﺸﻟا ﻢﻴﺘﻌﺘﻟ :"AT" –
(.ةءﺎﺿﻻﺎﺑ ﻢﻜﺤﺘﻟا ﻚﻠﺳ ﻞﻴﺻﻮﺗ ﺪﻨﻋ ﻂﻘﻓ
.ﺔﺷﺎﺸﻟا ﻢﻴﺘﻌﺘﻟ :"ON" –
.ﻢﺘﻌﻤﻟا ﻞﻴﻐﺸﺗ ءﺎﻐﻟﻻ :"OFF" –
CONTRAST ﻦﻳﺎﺒﺘﻟا
.ﻞﺣاﺮﻣ 7 ﰲ ﻦﻳﺎﺒﺘﻟا ىﻮﺘﺴﻣ ﻂﺒﺿ ﻢﺘﻳ .ﺔﺷﺎﺸﻟا ﻦﻳﺎﺒﺗ ﻂﺒﻀﻳ
(كﺮﺤﺘﳌا ضﺮﻌﻟا ﺔﺷﺎﺷ) M.DSPL
.كﺮﺤﺘﳌا ضﺮﻌﻟا ﺔﺷﺎﺷ ﻊﺿو رﺎﺘﺨﻳ
.ﻲﺋﻮﻀﻟا ﻒﻴﻄﻟا ﻞﻴﻠﺤﺗو ﺔﻛﺮﺤﺘﻤﻟا طﺎﻤﻧﻷا رﺎﻬﻇﻻ :"SA" –
.ﺔﻛﺮﺤﺘﻤﻟا طﺎﻤﻧﻷا رﺎﻬﻇﻻ :"ON" –
.كﺮﺤﺘﻤﻟا ضﺮﻌﻟا ﺔﺷﺎﺷ ﻞﻴﻐﺸﺗ ءﺎﻐﻟﻻ :"OFF" –
(ﺎﻘﻠﺗ ﺮﻳﺮ)
."OFF" وأ "ON" :ًﺎﻴﺋﺎﻘﻠﺗ ضوﺮﻌﳌا ﺪﻨﺒﻟا ﱃإ ﺮﻳﺮﻤﺘﻠﻟ
(ﲇﺤﳌا ﺚﺤﺒﻟا ﻊﺿو) LOCAL
.ﻂﻘﻓ ىﻮﻗأ تارﺎﺷا تاذ تﺎﻄﺤﻣ ﻰﻟإ ﺔﻔﻟاﻮﻤﻠﻟ :"ON" –
.يدﺎﻋ لﺎﺒﻘﺘﺳا ﻰﻟإ ﺔﻔﻟاﻮﻤﻠﻟ :"OFF" –
(ﻮﻳﺘﺳ ﻏ ﻊﺿو)
FM ﺚﺑ لﺎﺒﻘﺘﺳا ﺴﺤﺘﻟ ﻮﻳﺘﺴﻟا ﻏ لﺎﺒﻘﺘﺳﻻا ﻊﺿو رﺎﺘﺨﻳ
."OFF" وأ "ON" :ﻒﻴﻌﻀﻟا
(ﺼﻗ ﻊﻄﻘﳌ عﺘﺳﻻا ةﺪﻣ)
2
تﺎﻋﻮﻄﻘﳌا ﻦﻣ ﻊﻃﺎﻘﻣ ﱃإ عﺘﺳﻻا ﺔﻔﻴﻇﻮﻟ ضﺮﻌﻟا ةﺪﻣ رﺎﺘﺨﻳ
،"ZAP.TIME-1 (ًﺎﺒﻳﺮﻘﺗ ناﻮﺛ 6)" –
،"ZAP.TIME-2 (ًﺎﺒﻳﺮﻘﺗ ناﻮﺛ 9)"
."ZAP.TIME-3 (ًﺎﺒﻳﺮﻘﺗ ﺔﻴﻧﺎﺛ 30)"
(ﺾﻴﻔﺨﻟا ﻬﺠﻟا ﺢﺷﺮﻣ) LPF
وأ "OFF" :ﻲﻋﺮﻔﻟا ﺔﻀﻴﻔﺨﻟا تاددﱰﻟا رﺎﻬﺠﻣ ﻊﻄﻗ ددﺮﺗ رﺎﺘﺨﻳ
."160Hz" وأ "140Hz" وأ "120Hz" وأ "100Hz" وأ "80Hz"
ﺔﻴﻟﺎﺘﻟا ﺔﺤﻔﺼﻟا ﲆﻋ ﻊﺒﺘﻳ
21
1
*MIC ﻊﺿﻮﻟا
(.ﻦﻜﻤﻣ ﻏ ﺪﻌﺑ
2
*A.SCRL
3
*MONO
*ZAP.TIME ﻊﺿو
.ZAPPIN
ﺐﻠﻄﻟا ﺐﺴﺣ تاﻮﺻﻸﻟ ﺎﻴﺒﻟا لدﺎﻌﳌا ﻲﻨﺤﻨﻣ ﺔﺌﻴﻬﺗ
EQ3 –
ﺬﻴﻔﻨﺘﺑ EQ3 ﻊﺿﻮﺑ ﺔﺻﺎﺨﻟا "CUSTOM" ﺔﻔﻴﻇﻮﻟا ﻚﻟ ﺢﻤﺴﺗ
.تاﻮﺻﻸﻟ ﺎﻴﺒﻟا لدﺎﻌﳌﺎﺑ ﺔﺻﺎﺨﻟا ﻚﺗﺎﺌﻴﻬﺗ
."EQ3" رﺎﻴﺘﺧﻻ ًارﺮﻜﺘﻣ ًﺎﻄﻐﺿ رﺎﻴﺘﺧﻻا رز ﻂﻐﺿا ﻢﺛ ،رﺪﺼﻣ ﱰﺧا
."CUSTOM" رﺎﻴﺘﺧﻻ ﻢﻜﺤﺘﻟا صﺮﻗ ردأ 2
وأ "LOW" ﺮﻬﻈﻳ نأ ﱃإ ًارﺮﻜﺘﻣ ًﺎﻄﻐﺿ رﺎﻴﺘﺧﻻا رز ﻂﻐﺿا 3
."HI" وأ "MID"
.رﺎﺘﺨﳌا ﺪﻨﺒﻟا ﻂﺒﻀﻟ ﻢﻜﺤﺘﻟا صﺮﻗ ردأ
+10 ﱃإ ﻞﺒﺴﻳد –10 ﻦﻣ تﻮﺼﻟا ىﻮﺘﺴﻣ ﻂﺒﺿ ﻦﻜ
.ﻞﺒﺴﻳد 1 ﺎﻫراﺪﻘﻣ تاﻮﻄﺨﺑ ﻞﺒﺴﻳد
.تاﻮﺻﻸﻟ ﺎﻴﺒﻟا لدﺎﻌﳌا ﻲﻨﺤﻨﻣ ﻂﺒﻀﻟ 4 و 3 تاﻮﻄﺨﻟا رﺮﻛ
ﰲ ﺔﺌﻴﻬﳌا تاﻮﺻﻸﻟ ﺎﻴﺒﻟا لدﺎﻌﳌا ﻲﻨﺤﻨﻣ ﺔﺌﻴﻬﺗ ةدﺎﻌﺘﺳﻻ
.ﺔﺌﻴﻬﺘﻟا لﺘﻛا ﻞﺒﻗ رﺎﻴﺘﺧﻻا رز ﻂﻐﻀﺑ ﺮﻤﺘﺳا ،ًﺎﻘﺒﺴﻣ ﻊﻨﺼﳌا
. (BACK) رﺰﻟا ﻂﻐﺿا 5
لﺎﺒﻘﺘﺳﻻا /ضﺮﻌﻟا ﻊﺿو ﱃإ ﺔﺷﺎﺸﻟا دﻮﻌﺗو ﺔﺌﻴﻬﺘﻟا ﻞﻤﺘﻜﺗ
.يدﺎﻌﻟا
.ًﺎﻀﻳأ ﻂﺒﻀﻠﻟ ﺔﻠﺑﺎﻗ تاﻮﺻﻸﻟ ﺎﻴﺒﻟا لدﺎﻌﳌا ﻦﻣ ىﺮﺧﻷا عاﻮﻧﻷا
ﻪﻴﺟﻮﺗ
SET – ﺔﺌﻴﻬﺘﻟا دﻮﻨﺑ ﻂﺒﺿ
.رﺎﻴﺘﺧﻻا رز ﻂﻐﻀﺑ ﺮﻤﺘﺳا 1
.ﺔﺌﻴﻬﺘﻟا ﺔﺷﺎﺷ ﺮﻬﻈﺗ
.بﻮﻏﺮﳌا ﺪﻨﺒﻟا ﺮﻬﻈﻳ نأ ﱃإ ًارﺮﻜﺘﻣ ًﺎﻄﻐﺿ رﺎﻴﺘﺧﻻا رز ﻂﻐﺿا 2
"ON" ،لﺎﺜﳌا ﻞﻴﺒﺳ ﲆﻋ) ﺔﺌﻴﻬﺘﻟا رﺎﻴﺘﺧﻻ ﻢﻜﺤﺘﻟا صﺮﻗ ردأ 3
.("OFF" وأ
.رﺎﻴﺘﺧﻻا رز ﻂﻐﻀﺑ ﺮﻤﺘﺳا
لﺎﺒﻘﺘﺳﻻا /ضﺮﻌﻟا ﻊﺿو ﱃإ ﺔﺷﺎﺸﻟا دﻮﻌﺗو ﺔﺌﻴﻬﺘﻟا ﻞﻤﺘﻜﺗ
.يدﺎﻌﻟا
.ﺔﺌﻴﻬﺘﻟاو رﺪﺼﻤﻠﻟ ًﺎﻘﻓو ،ﺔﺿوﺮﻌﳌا دﻮﻨﺒﻟا ﻒﻠﺘﺨﺘﺳ
ﲆﻋ لﻮﺼﺤﻠﻟ ﻊﺟﺮﳌا ﺔﺤﻔﺻ ﻊﺟار) ﺔﻴﻟﺎﺘﻟا دﻮﻨﺒﻟا ﺔﺌﻴﻬﺗ ﻦﻜ
(7 ﺔﺤﻔﺻ) (ﺔﻋﺎﺴﻟا ﻂﺒﺿ) CLOCK-ADJ
."OFF" وأ "ON" :ﻪﻴﺒﻨﺘﻟا ﺔﻤﻐﻧ تﻮﺻ ﻞﻴﻐﺸﺗ ﻰﻟإ يدﺆﻳ
(AUX ﰲﺎﺿا تﻮﺻ)
وأ "ON" :AUX ﰲﺎﺿﻻا رﺪﺼﳌا ﺔﺷﺎﺷ ﻞﻴﻐﺸﺗ ﱃإ يدﺆﻳ
.(22 ﺔﺤﻔﺻ) "OFF"
ﺔﻈﺣﻼﻣ
:(ﻞﻴﺻﺎﻔﺘﻟا
BEEP ﻊﺿﻮﻟا
1
*AUX-A ﻊﺿﻮﻟا
1
4
4
Page 41
ىﺮﺧأ ﻒﺋﺎﻇو
تﻮﺼﻟا تﺎﺌﻴﻬﺗ ﻴﻐﺗ
تﻮﺼﻟا تاﺰﻴﻤﻣ ﻂﺒﺿ
ﺪﻨﺒﻟا ﺮﻬﻈﻳ نأ ﱃإ ًارﺮﻜﺘﻣ ًﺎﻄﻐﺿ رﺎﻴﺘﺧﻻا رز ﻂﻐﺿا 1
.بﻮﻏﺮﳌا
.رﺎﺘﺨﳌا ﺪﻨﺒﻟا ﻂﺒﻀﻟ ﻢﻜﺤﺘﻟا صﺮﻗ ردأ
. (BACK) رﺰﻟا ﻂﻐﺿا 3
لﺎﺒﻘﺘﺳﻻا /ضﺮﻌﻟا ﻊﺿو ﱃإ ﺔﺷﺎﺸﻟا دﻮﻌﺗو ﺔﺌﻴﻬﺘﻟا ﻞﻤﺘﻜﺗ
.يدﺎﻌﻟا
ﲆﻋ لﻮﺼﺤﻠﻟ ﻊﺟﺮﳌا ﺔﺤﻔﺻ ﻊﺟار) ﺔﻴﻟﺎﺘﻟا دﻮﻨﺒﻟا ﺔﺌﻴﻬﺗ ﻦﻜ
:(ﻞﻴﺻﺎﻔﺘﻟا
EQ3 ﻊﺿو
.ﻰﻘﻴﺳﻮﳌا ﻦﻣ عاﻮﻧأ 7 ﺑ ﻦﻣ لدﺎﻌﻣ ﻲﻨﺤﻨﻣ يأ رﺎﺘﺨﻳ
(ﻴﻣﺎﻨﻳﺪﻟا تﻮﺼﻟا ﺔﻠﺣﺮﻣ ﻢﻈﻨﻣ) DSO ﻊﺿو
.تﻮﺼﻟا لﺎﺠﻣ ﻂﻴﺤﻣ ﻦﻣ ﺪﻳﺰﻣ ﻖﻠﺨﻳ
."OFF" وأ "3" وأ "2" وأ "1" :DSO ﻊﺿو رﺎﻴﺘﺧﻻ
.ﻛأ زﺰﻌﻣ ﺛﺄﺘﻟا ﺢﺒﺼﻳ ،ﱪﻛأ ﻢﻗﺮﻟا نﺎﻛ ﻠﻛ
(21 ﺔﺤﻔﺻ)
.ىﴪﻴﻟاو ﻰﻨﻤﻴﻟا تﺎﻋﺴﻟا ﺑ تﻮﺼﻟا نزاﻮﺗ ﻂﺒﻀﻳ
.ﺔﻴﻔﻠﺨﻟاو ﺔﻴﻣﺎﻣﻷا تﺎﻋﺴﻟا ﺑ ﻲﺒﺴﻨﻟا ىﻮﺘﺴﳌا ﻂﺒﻀﻳ
(ﻲﻋﺮﻔﻟا ﺔﻀﻴﻔﺨﻟا تاددﱰﻟا رﺎﻬﺠﻣ تﻮﺻ ىﻮﺘﺴﻣ) SUB ﻊﺿﻮﻟا
.ﻲﻋﺮﻔﻟا ﺔﻀﻴﻔﺨﻟا تاددﱰﻟا رﺎﻬﺠﻣ تﻮﺻ ىﻮﺘﺴﻣ ﻂﺒﻀﻳ
(AUX ﰲﺎﺿﻻا زﺎﻬﺠﻟا تﻮﺻ ىﻮﺘﺴﻣ)
:لﻮﺻﻮﻣ AUX ﰲﺎﺿا زﺎﻬﺟ ﻞﻜﻟ تﻮﺼﻟا ىﻮﺘﺴﻣ ﻂﺒﻀﻳ
.ردﺎﺼﳌا ﺑ تﻮﺼﻟا ىﻮﺘﺴﻣ ﻂﺒﻀﻟ ﺔﺟﺎﺤﻟا ﻲﻐﻠﺗ ﺔﺌﻴﻬﺘﻟا هﺬﻫ
Bluetooth تﻮﺻ ةﺰﻬﺟأ ﻦﻣ زﺎﻬﺟ ﻞﻜﻟ تﻮﺼﻟا ىﻮﺘﺴﻣ ﻂﺒﻀﻳ
ردﺎﺼﳌا ﺑ تﻮﺼﻟا ىﻮﺘﺴﻣ ﻂﺒﻀﻟ ﺔﺟﺎﺤﻟا ﻲﻐﻠﺗ ﺔﺌﻴﻬﺘﻟا هﺬﻫ
1
*HI وأ 1*MID وأ 1*LOW ﻊﺿﻮﻟا
(نزاﻮﺗ) BAL ﻊﺿﻮﻟا
(ﻞﺋﺎﻀﻣ) FAD ﻊﺿﻮﻟا
(.ﺔﺌﻴﻬﺘﻟا ﻦﻣ ىﻮﺘﺴﻣ ﺾﻔﺧأ "ATT")
2
*AUX ﻊﺿﻮﻟا
."−8 dB" – "0 dB" – "+18 dB"
3
*BTA ﻊﺿﻮﻟا
"–8 dB" – "0 dB" – "+18 dB" :ﺔﻟﻮﺻﻮﳌا
.(19 ﺔﺤﻔﺻ)
.EQ3 ﻊﺿو ﻞﻴﻐﺸﺗ ﺪﻨﻋ 1*
ﰲﺎﺿا رﺪﺼﻣ ﻞﻴﻐﺸﺗ ﺪﻨﻋ 2*
.(19 ﺔﺤﻔﺻ) Bluetooth تﻮﺻ رﺪﺼﻣ ﻞﻴﻐﺸﺗ ﺪﻨﻋ 3*
.AUX
ةﺪﺣﻮﻟا هﺬﻫ ﺔﻄﺳاﻮﺑ ﻮﺼﻟا زﺎﻬﺠﻟا ﻞﻴﻐﺸﺗ
نﺎﻛ اذا ةﺪﺣﻮﻟا هﺬﻫ ﲆﻋ ﺔﻴﻟﺎﺘﻟا ﻞﻴﻐﺸﺘﻟا تﺎﻴﻠﻤﻋ ﺬﻴﻔﻨﺗ ﻚﻨﻜ
ﺪﻌﺑ ﻦﻋ ﻢﻜﺤﺘﻟا ﻢﻴﻤﺼﺗ) AVRCP ﺔﻔﻴﻇو ﻢﻋﺪﻳ ﻮﺼﻟا زﺎﻬﺠﻟا
ﺔﻴﻠﻤﻋ ﻒﻠﺘﺨﺗ) .Bluetooth ﺔﻴﻨﻘﺘﺑ ﺔﺻﺎﺨﻟا (ﻮﻳﺪﻴﻔﻟاو تﻮﺼﻟﺎﺑ
(.ﻮﺼﻟا زﺎﻬﺠﻠﻟ ﺎﻘﻓو ﻞﻴﻐﺸﺘﻟا
(6)
2
ﻞﻜﻟ ةﺮﻣ] (/) SEEK –/+
[ﺔﻋﻮﻄﻘﻣ
.ًﺎﻳروﴐ ﺗﺮﻣ ﻂﻐﻀﻟا نﻮﻜﻳ ﺪﻗ ،زﺎﻬﺠﻠﻟ ًﺎﻘﻓو *
زﺎﻬﺠﻟا ﻊﻣ هﻼﻋأ ةرﻮﻛﺬﳌا ﻏ ﻞﻴﻐﺸﺘﻟا تﺎﻴﻠﻤﻋ ﺬﻴﻔﻨﺗ ﺐﺠﻳ
ةﺪﻣ / ﻢﻗر ﻞﺜﻣ تﺎﻣﻮﻠﻌﳌا ضﺮﻋ ﻢﺘﻳ ﻻ ،ﻮﺼﻟا زﺎﻬﺠﻟا ﲆﻋ ضﺮﻌﻟا ءﺎﻨﺛا •
هﺬﻫ ﲆﻋ لﻮﺻﻮﳌا ﻮﺼﻟا زﺎﻬﺠﻟﺎﺑ ﺔﺻﺎﺨﻟا ﺦﻟا ،ضﺮﻌﻟا تﺎﻧﺎﻴﺑ ،ﺔﻋﻮﻄﻘﳌا
ﲆﻋ ضﺮﻌﻟا ﻒﻗﻮﺘﻳ ﻻ ،ةﺪﺣﻮﻟا هﺬﻫ ﲆﻋ رﺪﺼﳌا ﻴﻐﺗ ﻢﺗ ﻮﻟ ﻰﺘﺣ •
تﻮﺼﻟا ﻊﻳزﻮﺗ ﻢﻴﻤﺼﺗ) A2DP ﺔﻔﻴﻇو ﻢﻋﺪﻳ يﻮﻠﺧ ﻒﺗﺎﻫ ﻞﻴﺻﻮﺗ ﻚﻨﻜ
.ﻰﻘﻴﺳﻮﳌا ﱃا عﺘﺳﻻاو ﻮﺻ زﺎﻬﺠﻛ (مﺪﻘﺘﳌا
ﺔﻠﺠﺴﳌا ةﺰﻬﺟﻻا ﻊﻴﻤﺟ ﻞﻴﺠﺴﺗ فﺬﺣ
.(OFF) ﻂﻐﺿا 1
نا ﱃا
(BT) ﻂﻐﻀﺑ ﻆﻔﺘﺣاو ﻪﻄﻐﺿا ،" " ءﺎﺿا اذا 2
.فﺎﻘﻳﻻا ﻊﺿو ﱃا " " ﻞﻴﻐﺸﺗ
.ﻪﻄﻐﻀﺑ ﻆﻔﺘﺣاو رﺎﻴﺘﺧﻻا رز ﻂﻐﺿا
."BT INIT" ﺮﻬﻈﻳ نا ﱃا ًارﺮﻜﺘﻣ ًﺎﻄﻐﺿ رﺎﻴﺘﺧﻻا رز ﻂﻐﺿا 4
.(SEEK) + ﻂﻐﺿا 5
.ﺪﻴﻬﻤﺘﻟا ﺔﻴﻠﻤﻋ أﺪﺒﺗ
.ﻞﻴﺠﺴﺘﻟا ءﺎﻐﻟﻻ ناﻮﺛ 3 ﺔﻴﻠﻤﻌﻟا قﺮﻐﺘﺴﺗ
."INITIAL" ﺾﻴﻣو ءﺎﻨﺛا ةﺪﺣﻮﻟا فﺎﻘﻳﺈﺑ ﻢﻘﺗ ﻻ
ﻞﺟا ﻦﻣﻂﻐﺿا
ضﺮ ﻌ ﻟا.ةﺪﺣﻮﻟا هﺬﻫ ﲆﻋ *(PAUSE)
ﺖﻗﺆﳌا فﺎﻘﻳﻻا.ةﺪﺣﻮﻟا هﺬﻫ ﲆﻋ *(PAUSE) (6)
تﺎﻋﻮﻄﻘﳌا ﻲﻄﺨﺗ
.ﻮﺼﻟا
تﺎﻈﺣﻼﻣ
.ةﺪﺣﻮﻟا
.ﻮﺼﻟا زﺎﻬﺠﻟا
ﻪﻴﺟﻮﺗ
ﺔﻘﻓاﻮﺘﳌاو
.ةﺪﺣﻮﻟا ﺊﻔﻄﻨﺗ
3
20
Page 42
ﺔﻗﺎﻄﺒﻟا ﻦﻳﺰﺨﺘﺑ ﺖﻤﻗ ﺎﻣﺪﻨﻋ ﻪﻴﻓ ﺖﺛﺪﺤﺗ يﺬﻟا بﻮﻠﺳﻻا ﺲﻔﻨﺑ ثﺪﺤﺗ •
تﺎﻬﻴﺟﻮﺗ
.ﺔﻴﺗﻮﺼﻟا
هﺬﻫ لﻼﺧ ﻦﻣ ،ةرﺎﻴﺴﻟا ﰲ ًﺎﺴﻟﺎﺟ نﻮﻜﺗ ﻨﻴﺑ تﻮﺻ ﺔﻗﺎﻄﺑ ﻦﻳﺰﺨﺘﺑ ﻢﻗ •
.رﺎﺘﺨﳌا "BT PHONE" رﺪﺼﻣ ﺔﻄﺳاﻮﺑ ةﺪﺣﻮﻟا
ﻰﻘﻴﺳﻮﳌا راﺪﺻا
ﻮﺻ زﺎﻬﺟ ﻦﻣ ﻰﻘﻴﺳﻮﳌا ﱃا عﺘﺳﻻا
ةﺪﺣﻮﻟا هﺬﻫ ﲆﻋ ﻮﺻ زﺎﻬﺟ ﻦﻣ ﻰﻘﻴﺳﻮﳌا ﱃا عﺘﺳﻻا ﻚﻨﻜ
ﻊﻳزﻮﺗ ﻢﻴﻤﺼﺗ) A2DP ﺔﻔﻴﻇو ﻢﻋﺪﻳ ﻮﺼﻟا زﺎﻬﺠﻟا نﺎﻛ اذا
.Bluetooth ﺔﻴﻨﻘﺘﺑ ﺔﺻﺎﺨﻟا (مﺪﻘﺘﳌا تﻮﺼﻟا
.ةﺪﺣﻮﻟا هﺬﻫ ﲆﻋ تﻮﺼﻟا ىﻮﺘﺴﻣ ﺾﻴﻔﺨﺘﺑ ﻢﻗ
BT" ﺮﻬﻈﻳ نا ﱃا ًارﺮﻜﺘﻣ ًﺎﻄﻐﺿ (SOURCE) ﻂﻐﺿا 2
."AUDIO
.ضﺮﻌﻟا ءﺪﺒﻟ ﻮﺼﻟا زﺎﻬﺠﻟا ﻞﻴﻐﺸﺘﺑ ﻢﻗ
.ةﺪﺣﻮﻟا هﺬﻫ ﲆﻋ تﻮﺼﻟا ىﻮﺘﺴﻣ ﻂﺒﺿا 4
تﻮﺼﻟا ىﻮﺘﺴﻣ ﻂﺒﺿ
زﺎﻬﺠﻟاو ةﺪﺣﻮﻟا ﺑ فﻼﺘﺧا يﻷ ﻂﺒﻀﻠﻟ ﻞﺑﺎﻗ تﻮﺼﻟا ىﻮﺘﺴﻣ
.Bluetooth ﻮﺼﻟا
.ﻂﺳﻮﺘﻣ ىﻮﺘﺴ Bluetooth ﻮﺼﻟا زﺎﻬﺠﻟا ضﺮﻋ أﺪﺑا
.ةﺪﺣﻮﻟا ﲆﻋ ﻚﻳﺪﻟ فﻮﻟﺄﳌا عﺘﺳﻻا ىﻮﺘﺴﻣ ﻂﺒﺿا 2
ﻢﻗو ،"BTA" ﺮﻬﻈﻳ نا ﱃا ًارﺮﻜﺘﻣ ًﺎﻄﻐﺿ رﺎﻴﺘﺧﻻا رز ﻂﻐﺿا 3
-8) ﻞﺧﺪﻟا ىﻮﺘﺴﻣ ﻂﺒﻀﻟ تﻮﺼﻟﺎﺑ ﻢﻜﺤﺘﻟا صﺮﻗ ﺮﻳوﺪﺘﺑ
.(ﻞﺒﺴﻳد +18 ﱃا ﻞﺒﺴﻳد
رز لﻌﺘﺳا ﻢﺘﻳ ،ةﺪﺣﻮﻟا هﺬﻫ ﻦﻣ ﺔﳌﺎﻜﻣ ءاﺮﺟا ﺔﻟﺎﺣ ﰲ
ﺮﻬﻈﻳ نا ﱃا ًارﺮﻜﺘﻣ ًﺎﻄﻐﺿ
(SOURCE) ﻂﻐﺿا 1
.ﻛا وا ناﻮﺛ 3 ةﺪﳌ ﻪﻄﻐﻀﺑ ﻆﻔﺘﺣاو (يوﺪﻳﻻ)
.ﻒﺗﺎﻬﻟا ﺔﳌﺎﻜﻣ أﺪﺒﺗ
.(OFF) وا ،ىﺮﺧا ةﺮﻣ (يوﺪﻳﻻ) ﻂﻐﺿا
ﻞﻘﻧا ﻢﺛ ﻦﻣو ،يﻮﻠﺨﻟا ﻒﺗﺎﻬﻟا ﻞﻤﻌﺘﺳا ،ﺮﺧا ﻒﺗﺎﻬﺑ لﺎﺼﺗﻼﻟ
1
3
.ﺔﻴﻟﺎﺘﻟا طﺎﻘﻨﻟا ﻦﻣ ﻖﻘﺤﺗ ،ﺔﳌﺎﻜﳌا ﻞﻘﻧ ﻦﻋ ﻞﻴﺻﺎﻔﺘﻠﻟ
/ ةﺪﺣﻮﻟا هﺬﻫ) ﺐﺳﺎﻨﳌا زﺎﻬﺠﻟا ﻞﻴﻐﺸﺗ فﺎﻘﻳا / ﻞﻴﻐﺸﺘﻟ
.ﺔﻴﻟﺎﺘﻟا طﺎﻘﻨﻟا ﻦﻣ ﻖﻘﺤﺗ ،(يﻮﻠﺨﻟا ﻒﺗﺎﻬﻟا
ﻒﺗﺎﻬﻟا ﻞﻤﻌﺘﺳا وا ﻪﻄﻐﻀﺑ ﻆﻔﺘﺣاو (يوﺪﻳﻻ)
ﻞﻴﻐﺸﺗ ﻞﻴﻟد ﻊﺟار ،يﻮﻠﺨﻟا ﻒﺗﺎﻬﻟا ﻞﻴﻐﺸﺗ ﻦﻋ ﻞﻴﺻﺎﻔﺘﻠﻟ
1
ﻞﻘﻧ ﺔﻟوﺎﺤﻣ ﺪﻨﻋ يوﺪﻳﻼﻟا لﺎﺼﺗﻻا ﻊﻄﻘﻨﻳ ﺪﻗ ،يﻮﻠﺨﻟا ﻒﺗﺎﻬﻠﻟ ًﺎﻘﻓو
ﻮﺼﻟا لﺎﺼﺗﻻا ﻞﻴﻐﺸﺗ
يﻮﻠﺨﻟا ﻒﺗﺎﻬﻟا ﻞﻴﺻﻮﺗ ﺔﻄﺳاﻮﺑ ﻮﺼﻟا لﺎﺼﺗﻻا ﻞﻴﻐﺸﺗ ﻚﻨﻜ
ﰲ ﺔﻧﺰﺨﳌا ﺔﻴﺗﻮﺼﻟا ﺔﻗﺎﻄﺒﻟا ﻖﻄﻧ ﻖﻳﺮﻃ ﻦﻋ ةﺪﺣﻮﻟا هﺬﻬﺑ
.ﺔﳌﺎﻜﻣ ءاﺮﺟا ﻢﺛ ﻦﻣو ،يﻮﻠﺨﻟا ﻒﺗﺎﻬﻟا
BT" ﺮﻬﻈﻳ نا ﱃا ًارﺮﻜﺘﻣ ًﺎﻄﻐﺿ
.ﻮﺼﻟا لﺎﺼﺗﻻ ﻊﺿو ﰲ يﻮﻠﺨﻟا ﻒﺗﺎﻬﻟا ﻞﺧﺪﻳ
.يﻮﻠﺨﻟا ﻒﺗﺎﻬﻟا ﰲ ﺔﻧﺰﺨﳌا ﺔﻴﺗﻮﺼﻟا ﺔﻗﺎﻄﺒﻟا ﻖﻄﻧا
.ﺔﳌﺎﻜﳌا ءاﺮﺟاو ،ﻚﺗﻮﺻ ﲆﻋ فﺮﻌﺘﻟا ﻢﺘﻳ
.ًﺎﻘﺒﺴﻣ يﻮﻠﺨﻟا ﻒﺗﺎﻬﻟاو ةﺪﺣﻮﻟا ﻞﻴﺻﻮﺗ ﻦﻣ ﺪﻛﺄﺗ •
.ًﺎﻘﺒﺴﻣ يﻮﻠﺨﻟا ﻚﻔﺗﺎﻫ ﰲ ﺔﻴﺗﻮﺻ ﺔﻗﺎﻄﺑ ﻦﻳﺰﺨﺘﺑ ﻢﻗ •
هﺬﻬﺑ يﻮﻠﺨﻟا ﻒﺗﺎﻬﻟا ﻞﻴﺻﻮﺗ ﺔﻄﺳاﻮﺑ ﻮﺼﻟا لﺎﺼﺗﻻا ﻞﻴﻐﺸﺘﺑ ﺖﻤﻗ اذا •
.تﻻﺎﺤﻟا ﺾﻌﺑ ﰲ ًﺎاد ﺔﻔﻴﻇﻮﻟا هﺬﻫ ﻞﻤﻌﺗ ﻻ ،ةﺪﺣﻮﻟا
ﺴﺤﺘﻟ .دراﻮﻟا تﻮﺼﻟا ﻊﻣ كﺮﺤﳌا ﻞﻴﻐﺸﺗ ﻞﺜﻣ ءﺎﺿﻮﺿ ﻞﺧاﺪﺘﺗ ﺪﻗ •
.ﺔﻠﻴﻠﻗ ءﺎﺿﻮﻀﻟا ﺎﻬﻴﻓ نﻮﻜﺗ فوﺮﻇ ﰲ ﻞﻴﻐﺸﺘﻟﺎﺑ ﻢﻗ ،دراﻮﻟا تﻮﺼﻟا
ﺔﻔﻴﻇو ﺔﻴﻠﻋﺎﻔﻟ ًﺎﻘﻓو ،ﻒﻗاﻮﳌا ﺾﻌﺑ ﰲ ﻮﺼﻟا لﺎﺼﺗﻻا ﻞﻤﻌﻳ ﻻ ﺪﻗ •
ةﺪﻋﺎﺴﳌاو ﻢﻋﺪﻟا ﻊﻗﻮﻣ ﻊﺟار ،ﻞﻴﺻﺎﻔﺘﻠﻟ .يﻮﻠﺨﻟا ﻒﺗﺎﻬﻟا لﺎﺒﻘﺘﺳا
(SOURCE) ﻂﻐﺿا 1
.(يوﺪﻳﻻ)
ﺔﳌﺎﻜﻣ ءاﺮﺟا
.لﺎﺼﺗﻻا
."BT PHONE"
ﻂﻐﺿا 2
ﺔﳌﺎﻜﻣ ءﺎﻬﻧﻻ
.ﺔﳌﺎﻜﳌا
ﺔﳌﺎﻜﻣ ﻞﻘﻧ
ﻂﻐﺿا 1
.يﻮﻠﺨﻟا
.يﻮﻠﺨﻟا ﻚﻔﺗﺎﻫ
ﺔﻈﺣﻼﻣ
.ﺔﳌﺎﻜﳌا
."PHONE
ﻂﻐﺿا 2
3
تﺎﻈﺣﻼﻣ
.(28 ﺔﺤﻔﺻ)
19
Page 43
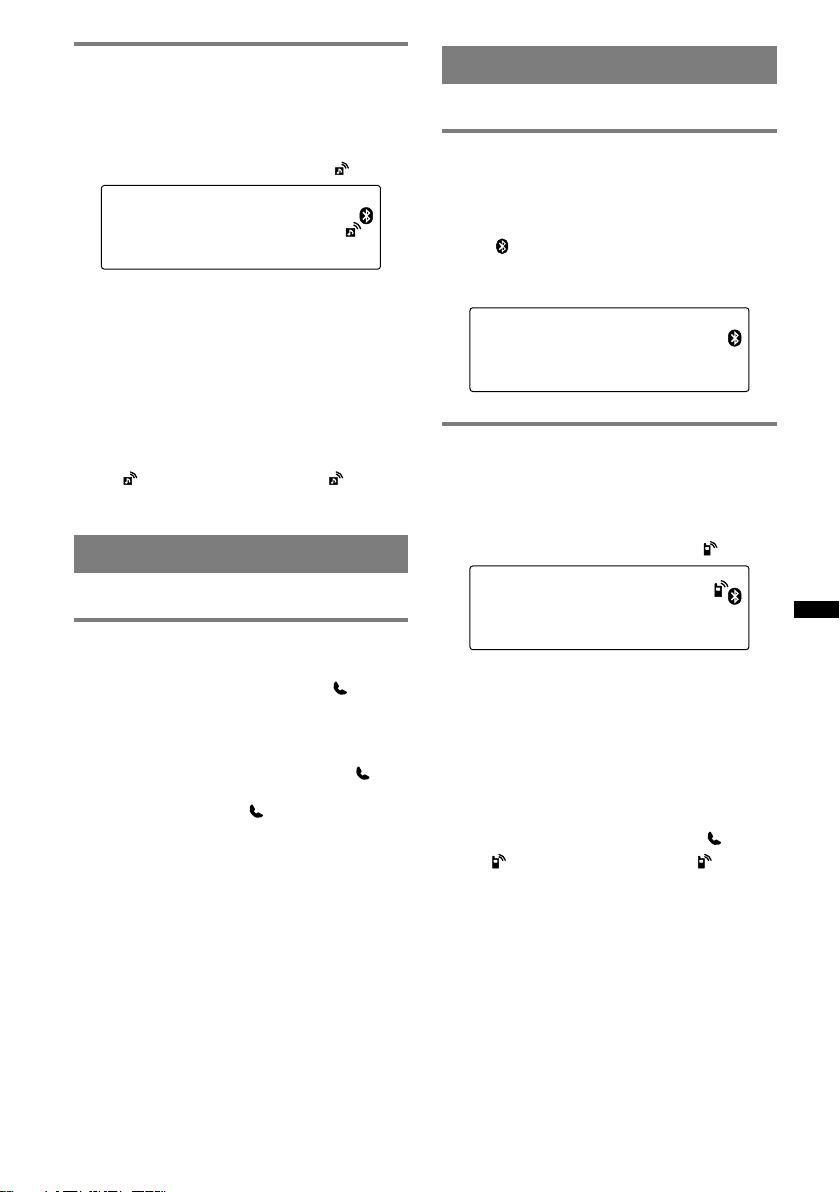
ﻮﺻ زﺎﻬﺟ ﱃا ﻞﻴﺻﻮﺘﻟا
ﱃا ﻮﺼﻟا زﺎﻬﺠﻟاو ةﺪﺣﻮﻟا هﺬﻫ ﻦﻣ ﻞﻛ ﻞﻳﻮﺤﺗ ﻦﻣ ﺪﻛﺄﺗ 1
.Bluetooth ةرﺎﺷﺎﺑ ﻞﻴﻐﺸﺘﻟا ﻊﺿو
.ﻮﺼﻟا زﺎﻬﺠﻟا ًﺎﻣﺪﺨﺘﺴﻣ ةﺪﺣﻮﻟا هﺬﻫ ﻞﻴﺻﻮﺘﺑ ﻢﻗ
.ﻞﻴﺻﻮﺘﻟا ﺬﻴﻔﻨﺗ ﺪﻨﻋ " " ﺮﻬﻈﻳ
هﺬﻫ ﻦﻣ ﻪﺑ لﺎﺼﺗﻻا ﻢﺗ ﻮﺻ زﺎﻬﺟ ﺮﺧا ﻞﻴﺻﻮﺗ
ةﺪﺣﻮﻟا
ﱃا ﻮﺼﻟا زﺎﻬﺠﻟاو ةﺪﺣﻮﻟا هﺬﻫ ﻦﻣ ﻞﻛ ﻞﻳﻮﺤﺗ ﻦﻣ ﺪﻛﺄﺗ 1
.Bluetooth ةرﺎﺷا ﻞﻴﻐﺸﺗ ﻊﺿو
BT" ﺮﻬﻈﻳ نا ﱃا ًارﺮﻜﺘﻣ ًﺎﻄﻐﺿ
اءﺎﻀﻣ " " ﻞﻈﻳ ﻢﺛ ﻦﻣو .لﺎﺼﺗﻻا ﺬﻴﻔﻨﺗ ءﺎﻨﺛا " " ﺾﻣﻮﻳ
(SOURCE) ﻂﻐﺿا 2
."AUDIO
(6) ﻂﻐﺿا 3
.
.لﺎﺼﺗﻻا ﺬﻴﻔﻨﺗ ﺪﻨﻋ
ﺔﻳوﺪﻳﻻ ﺔﳌﺎﻜﻣ
.ًﺎﻘﺒﺴﻣ نﻻﻮﺻﻮﻣ يﻮﻠﺨﻟا ﻒﺗﺎﻬﻟاو ةﺪﺣﻮﻟا نا ﻦﻣ ﺪﻛﺄﺗ
ﺔﳌﺎﻜﻣ مﻼﺘﺳا
.ﻚﺗرﺎﻴﺳ تﺎﻋﺳ ﻦﻣ ﺔﻧر ﺔﻤﻐﻧ رﺪﺼﺗ ،ﺔﳌﺎﻜﻣ مﻼﺘﺳا ﺪﻨﻋ
.ﺔﻧر ﺔﻤﻐﻧ ﻊﻣ ﺔﳌﺎﻜﻣ مﻼﺘﺳا ﺪﻨﻋ (يوﺪﻳﻻ)
.ﻒﺗﺎﻬﻟا لﺎﺼﺗا أﺪﺒﻳ
.(OFF) وا ،ىﺮﺧا ةﺮﻣ (يوﺪﻳﻻ) ﻂﻐﺿا
ةﺪﳌ ﻪﻄﻐﻀﺑ ﻆﻔﺘﺣاو (يوﺪﻳﻻ)
ﻂﻐﺿا ،ةدراو ﺔﳌﺎﻜﻣ ﺾﻓﺮﻟ
نﻮﻓﺮﻜﻴﳌا ﻞﻴﺼﺤﺗ ﻂﺒﺿ
ﻂﺒﻀﻟ ("HI" وا "LOW") تﻮﺻ ﻲﻳﻮﺘﺴﻣ ﺑ ﻞﻳﻮﺤﺘﻟا ﻚﻨﻜ
.ﺔﳌﺎﻜﳌا ءﺎﻨﺛا ﺮﺧﻻا فﺮﻄﻠﻟ ﺐﺳﺎﻨﳌا ىﻮﺘﺴﳌا
.ﺔﳌﺎﻜﳌا ءﺎﻨﺛا
MIC-LOW MIC-HI
ﺔﺤﻔﺻ) ﺔﻴﻣﺎﻣﻻا ﺔﺣﻮﻠﻟا ﻦﻣ ﺔﻴﻔﻠﺨﻟا ﺔﻬﺠﻟا ﰲ ةﺪﺣﻮﻟا هﺬﻫ نﻮﻓﺮﻜﻴﻣ ﺪﺟﻮﻳ
.ﺦﻟا ،ﻂﻳﴩﺑ نﻮﻓﺮﻜﻴﳌا ﺔﻴﻄﻐﺗ ﱃا ﺪﻤﻌﺗ ﻻ .(8
ﻂﻐﺿا 1
ﺔﳌﺎﻜﻣ ءﺎﻬﻧﻻ
.ﺘﻴﻧﺎﺛ
(5) ﻂﻐﺿا 1
:ﻻﺎﻛ ﺪﻨﺒﻟا ﻐﺘﻳ
ﺔﻈﺣﻼﻣ
.ﺎﻨﻫ ﻦﻣ ﻞﻴﻐﺸﺘﻟا ﺔﻴﻠﻤﻋ أﺪﺑا ،ًﻼﺻا ﻖﻓاﻮﺘﻟا ﻖﻴﻘﺤﺗ ﻢﺗ اذا
2
هﺬﻫ ﻦﻣ ﺔﺟرﺎﺨﻟا Bluetooth ةرﺎﺷا ﻞﻳﻮﺤﺘﻟ
ﻞﻴﻐﺸﺘﻟا ﻊﺿو ﱃا ةﺪﺣﻮﻟا
Bluetooth ةرﺎﺷا ﻞﻳﻮﺤﺘﺑ ﻢﻗ ،Bluetooth ﺔﻔﻴﻇو لﻌﺘﺳﻻ
.ﻞﻴﻐﺸﺘﻟا ﻊﺿو ﱃا ةﺪﺣﻮﻟا هﺬﻫ ﻦﻣ ﺔﺟرﺎﺨﻟا
3 ةﺪﳌ) "
" ﺾﻣﻮﻳ نا ﱃا ﻪﻄﻐﻀﺑ ﻆﻔﺘﺣاو (BT) ﻂﻐﺿا 1
.Bluetooth ةرﺎﺷا ﻞﻴﻐﺸﺗ ﻢﺘﻳ
يﻮﻠﺧ ﻒﺗﺎﻫ ﻞﻴﺻﻮﺗ
يﻮﻠﺨﻟا ﻒﺗﺎﻬﻟاو ةﺪﺣﻮﻟا هﺬﻫ ﻦﻣ ﻞﻛ ﻞﻳﻮﺤﺗ ﻦﻣ ﺪﻛﺄﺗ 1
.Bluetooth ةرﺎﺷﺎﺑ ﻞﻴﻐﺸﺘﻠﻟ
.يﻮﻠﺨﻟا ﻒﺗﺎﻬﻟا ًﺎﻣﺪﺨﺘﺴﻣ ةﺪﺣﻮﻟا هﺬﻬﺑ لﺎﺼﺗﻻﺎﺑ ﻢﻗ
.ﻞﻴﺻﻮﺘﻟا ﺬﻴﻔﻨﺗ ﺪﻨﻋ " " ﺮﻬﻈﻳ
هﺬﻫ ﻦﻣ ﻪﺑ لﺎﺼﺗﻻا ﻢﺗ يﻮﻠﺧ ﻒﺗﺎﻫ ﺮﺧا ﻞﻴﺻﻮﺗ
ﱃا يﻮﻠﺨﻟا ﻒﺗﺎﻬﻟاو ةﺪﺣﻮﻟا هﺬﻫ ﻦﻣ ﻞﻛ ﻞﻳﻮﺤﺗ ﻦﻣ ﺪﻛﺄﺗ 1
.Bluetooth ةرﺎﺷا ﻞﻴﻐﺸﺗ ﻊﺿو
BT" ﺮﻬﻈﻳ نا ﱃا ًارﺮﻜﺘﻣ ًﺎﻄﻐﺿ
اءﺎﻀﻣ " " ﻞﻈﻳ ﻢﺛ ﻦﻣو .لﺎﺼﺗﻻا ﺬﻴﻔﻨﺗ ءﺎﻨﺛا " " ﺾﻣﻮﻳ
ﱃا ةﺪﺣﻮﻟا هﺬﻫ ﻦﻣ لﺎﺼﺗﻻا ﻚﻨﻜ ﻻ ،Bluetooth تﻮﺻ راﺪﺻا ءﺎﻨﺛا
.ةﺪﺣﻮﻟا هﺬﻫ ﱃا يﻮﻠﺨﻟا ﻒﺗﺎﻬﻟا ﻦﻣ ﻞﺼﺗا ﻚﻟذ ﻦﻣ
.ضﺮﻌﻟا تﻮﺻ ﰲ ﻞﻴﺻﻮﺗ ءﺎﺿﻮﺿ عﺳ ﻢﺘﻳ ﺪﻗ
ﻊﺿو ﱃا كﺮﺤﳌا ﻞﻴﻐﺸﺗ حﺎﺘﻔﻣ ﺮﻳوﺪﺗ ﺪﻨﻋ :Bluetooth ةرﺎﺷا ﻞﻴﻐﺸﺗ ﺪﻨﻋ
ﻻا .ًﺎﻴﺋﺎﻘﻠﺗ يﻮﻠﺧ ﻒﺗﺎﻫ ﺮﺧﺂﺑ ةﺪﺣﻮﻟا هﺬﻫ لﺎﺼﺗا ةدﺎﻋا ﻢﺘﻳ ،ﻞﻴﻐﺸﺘﻟا
ﻢﺘﻳ اذا .يﻮﻠﺨﻟا ﻒﺗﺎﻬﻟا تﺎﻔﺻاﻮﻣ ﲆﻋ
(SOURCE) ﻂﻐﺿا 2
.(يوﺪﻳﻻ)
.لﺎﺼﺗﻻا ﺬﻴﻔﻨﺗ ﺪﻨﻋ
ً
ﺎﻀﻳا ﺪﻤﺘﻌﻳ ﺎﻘﻠﺘﻟا لﺎﺼﺗﻻا نا
.ًﺎﻳوﺪﻳ ﻞﺼﺗا ،ًﺎﻴﺋﺎﻘﻠﺗ هﺬﻫ لﺎﺼﺗا ةدﺎﻋا
لﺎﺼﺗﻻا
.(ًﺎﺒﻳﺮﻘﺗ ناﻮﺛ
ةﺪﺣﻮﻟا
."PHONE
ﻂﻐﺿا 3
ﺔﻈﺣﻼﻣ
ً
ﻻﺪﺑ .يﻮﻠﺨﻟا ﻒﺗﺎﻬﻟا
ﻪﻴﺟﻮﺗ
2
18
Page 44
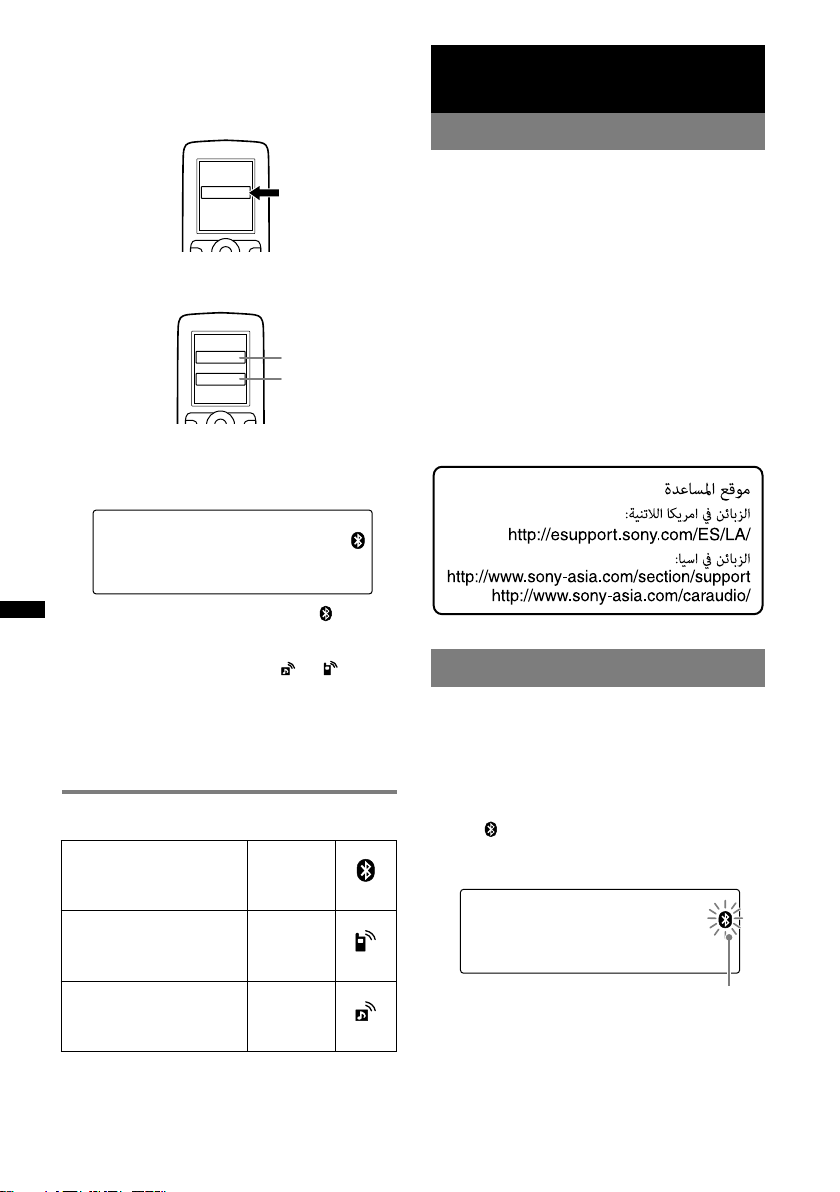
.ةﺪﺣﻮﻟا ﻦﻋ ﺚﺤﺒﻠﻟ Bluetooth زﺎﻬﺟ ﻂﺒﺿا 3
ضﺮﻋ ﺔﺷﺎﺷ ﰲ ﺎﻬﻓﺎﺸﺘﻛا ﻢﺗ ﻲﺘﻟا ةﺰﻬﺟﻻﺎﺑ ﺔﺎﻗ ضﺮﻋ ﻢﺘﻳ
"XPLOD" ﺎﻬﻧا ﲆﻋ ةﺪﺣﻮﻟا ضﺮﻋ ﻢﺘﻳ .لﻮﺻﻮﳌا زﺎﻬﺠﻟا
.لﻮﺻﻮﳌا زﺎﻬﺠﻟا ﲆﻋ
DR-BT30Q
XPLOD
XXXXXXX
زﺎﻬﺠﻟا ضﺮﻋ ﺔﺷﺎﺷ ﲆﻋ بﻮﻠﻄﻣ *روﺮﳌا ﺰﻣر لﺎﺧدا نﺎﻛ اذا 4
."0000" لﺎﺧدﺎﺑ ﻢﻗ ،لﻮﺻﻮﳌا
روﺮﳌا ﺰﻣر ﻞﺧدا
XXXX
"0000"
تﺎﻣﻮﻠﻌﻣ نﺎﻧﺰﺨﻳ Bluetooth زﺎﻬﺟو ةﺪﺣﻮﻟا هﺬﻫ ﻦﻣ ﻞﻛ
نﻮﻜﺗ ،ﻖﻓاﻮﺘﻟا ﺬﻴﻔﻨﺗ ﺎﻣﺪﻨﻋ و ،ةﺮﻛاﺬﻟا ﰲ ﺾﻌﺒﻟا ﻬﻀﻌﺑ
.زﺎﻬﺠﻟﺎﺑ لﺎﺼﺗﻼﻟ ةﺰﻫﺎﺟ ةﺪﺣﻮﻟا
.ﻖﻓاﻮﺘﻟا لﺘﻛا ﺪﻌﺑ اًءﺎﻀﻣ ﻞﻈﻳو " " ﺾﻣﻮﻳ
.ةﺪﺣﻮﻟﺎﺑ لﺎﺼﺗﻼﻟ Bluetooth زﺎﻬﺟ ﻂﺒﺿا
.ﻞﻴﺻﻮﺘﻟا ﺬﻴﻔﻨﺗ ﺪﻨﻋ " " وا " " ﺮﻬﻈﻳ
وا «PIN ﻢﻗر» وا «PIN ﺰﻣر» وا «روﺮﳌا حﺎﺘﻔﻣ» ﻰﻤﺴﻳ ﺪﻗ روﺮﳌا ﺰﻣر *
.ﻞﻴﺻﻮﺘﻟا ﻢﺘﻳ نا ﱃا ﻖﻓاﻮﺘﻠﻟ داﺪﻌﺘﺳﻻا ﻊﺿو ﺮﻳﺮﺤﺗ ﻢﺘﻳ ﻻ
.زﺎﻬﺠﻠﻟ ًﺎﻘﻓو ﺦﻟا ،«روﺮﳌا ﺔﻤﻠﻛ»
ﺔﻈﺣﻼﻣ
Bluetooth تﺎﻧﻮﻘﻳا لﻮﺣ
.ةﺪﺣﻮﻟا هﺬﻫ ﰲ ﺔﻴﻟﺎﺘﻟا تﺎﻧﻮﻘﻳﻻا ﻞﻤﻌﺘﺴﺗ
Bluetooth ةرﺎﺷا ﻞﻴﻐﺸﺗ
ﻖﻓاﻮﺘﻠﻟ داﺪﻌﺘﺳﻻا ﻊﺿو
Bluetooth ةرﺎﺷا ءﺎﻔﻃا
لﺎﺼﺗﻻا حﺎﺠﻧ
لﺎﺼﺗا
لﺎﺼﺗا ﺪﺟﻮﻳ ﻻ
لﺎﺼﺗﻻا حﺎﺠﻧ
لﺎﺼﺗا
لﺎﺼﺗا ﺪﺟﻮﻳ ﻻ
:ةءﺎﺿا
:ﺾﻴﻣو
:ءﺎﻔﻃا
:ةءﺎﺿا
:ﺾﻴﻣو
:ءﺎﻔﻃا
:ةءﺎﺿا
:ﺾﻴﻣو
:ءﺎﻔﻃا
يوﺪﻳﻼﻟا لﺎﺼﺗﻻا) Bluetooth ﺔﻔﻴﻇو
(ﻰﻘﻴﺳﻮﳌا ﻖﻓﺪﺗو
Bluetooth ﻞﻴﻐﺸﺗ تﺎﻴﻠﻤﻋ
.يروﴐ ﱄﺎﺘﻟا ءاﺮﺟﻻا ، Bluetooth ﺔﻔﻴﻇو لﻌﺘﺳﻻ
مﺎﻴﻘﻟا ﺐﺠﻳ ،ةﺮﻣ لوﻻ Bluetooth ةﺰﻬﺟا ﻞﻴﺻﻮﺗ ﺪﻨﻋ
ﻞﻴﺠﺴﺘﻟا اﺬﻫ ."ﻖﻓاﻮﺘﻟا" ﻰﻤﺴﻳ اﺬﻫ .كﱰﺸﻣ ﻞﻴﺠﺴﺘﺑ
هﺬﻫ فﺮﻌﺘﺗ ﺎﻣﺪﻨﻋ ،ﻂﻘﻓ ةﺮﻣ لوﻻ يروﴐ ،(ﻖﻓاﻮﺘﻟا)
ﻦﻣ ﺎًﻴﺋﺎﻘﻠﺗ ﺾﻌﺒﻟا ﻬﻀﻌﺑ ﻊﻣ ىﺮﺧﻷا ةﺰﻬﺟﻷاو ةﺪﺣﻮﻟا
.ةﺰﻬﺟا 8 ﱃا ﻞﺼﻳ ﺎﳌ ﻖﻓاﻮﺘﻟا ﻖﻴﻘﺤﺗ ﻚﻨﻜ .ﺔﻣدﺎﻘﻟا ةﺮﳌا
(.زﺎﻬﺟ ﻞﻜﻟ روﺮﳌا ﺰﻣر لﺎﺧدﻻ جﺎﺘﺤﺗ ﺪﻗ ،زﺎﻬﺠﻠﻟ
ﺾﻌﺑ ﰲ .ﻞﻴﺻﻮﺘﻟا أﺪﺑا ،ﻖﻓاﻮﺘﻟا ﺬﻴﻔﻨﺗ ﺪﻌﺑ زﺎﻬﺠﻟا لﻌﺘﺳﻻ
.ﺎﻘﻠﺘﻟا ﻞﻴﺻﻮﺘﻟﺎﺑ ﻖﻓاﻮﺘﻟا ﻚﻟ ﺢﻤﺴﻳ نﺎﻴﺣﻻا
ﻰﻘﻴﺳﻮﳌا ﻖﻓﺪﺗ / ﺔﻳوﺪﻳﻻ ﺔﳌﺎﻜﻣ
ﺬﻴﻔﻨﺗ ﺪﻨﻋ ﻰﻘﻴﺳﻮﳌا ﱃا عﺘﺳﻻاو ﺎًﻳوﺪﻳﻻ ﺚﻳﺪﺤﻟا ﻚﻨﻜ
5
Bluetooth زﺎﻬﺟ ("ﻖﻓاﻮﺘﻟا") ﻞﻴﺠﺴﺘﺑ ﻢﻗ ،ءﳾ ﻞﻛ ﻞﺒﻗ
ﻖﻓاﻮﺘﻟا ﻖﻴﻘﺤﺗ ﻚﻨﻜ .ةﺪﺣﻮﻟا هﺬﻫ ﻊﻣ (ﺦﻟا ،يﻮﻠﺧ ﻒﺗﺎﻫ)
هﺬﻴﻔﻨﺘﻟ ﻲﻋاد ﻻ ،ﻖﻓاﻮﺘﻟا ﻖﻴﻘﺤﺗ دﺮﺠ .ةﺰﻬﺟا 8 ﱃا ﻞﺼﻳ ﺎﳌ
.ةﺪﺣﻮﻟا هﺬﻫ ﻦﻣ ﺪﺣاو ﱰﻣ ﻦﻤﺿ Bluetooth زﺎﻬﺟ ﻊﺿ
5 ةﺪﳌ) " " ﺾﻣﻮﻳ نا ﱃا ﻪﻄﻐﻀﺑ ﻆﻔﺘﺣاو (BT) ﻂﻐﺿا 2
.ﻖﻓاﻮﺘﻟﺎﺑ داﺪﻌﺘﺳﻻا ﻊﺿو ﰲ ةﺪﺣﻮﻟا ﻞﺧﺪﺗ
ﻖﻓاﻮﺘﻟا
ً
ﺎﻘﻓو)
ﻞﻴﺻﻮﺘﻟا
.ﻞﻴﺻﻮﺘﻟا
ﻖﻓاﻮﺘﻟا
.ىﺮﺧا ةﺮﻣ
.(ًﺎﺒﻳﺮﻘﺗ ناﻮﺛ
ﺾﻣﻮﻳ
1
17
Page 45
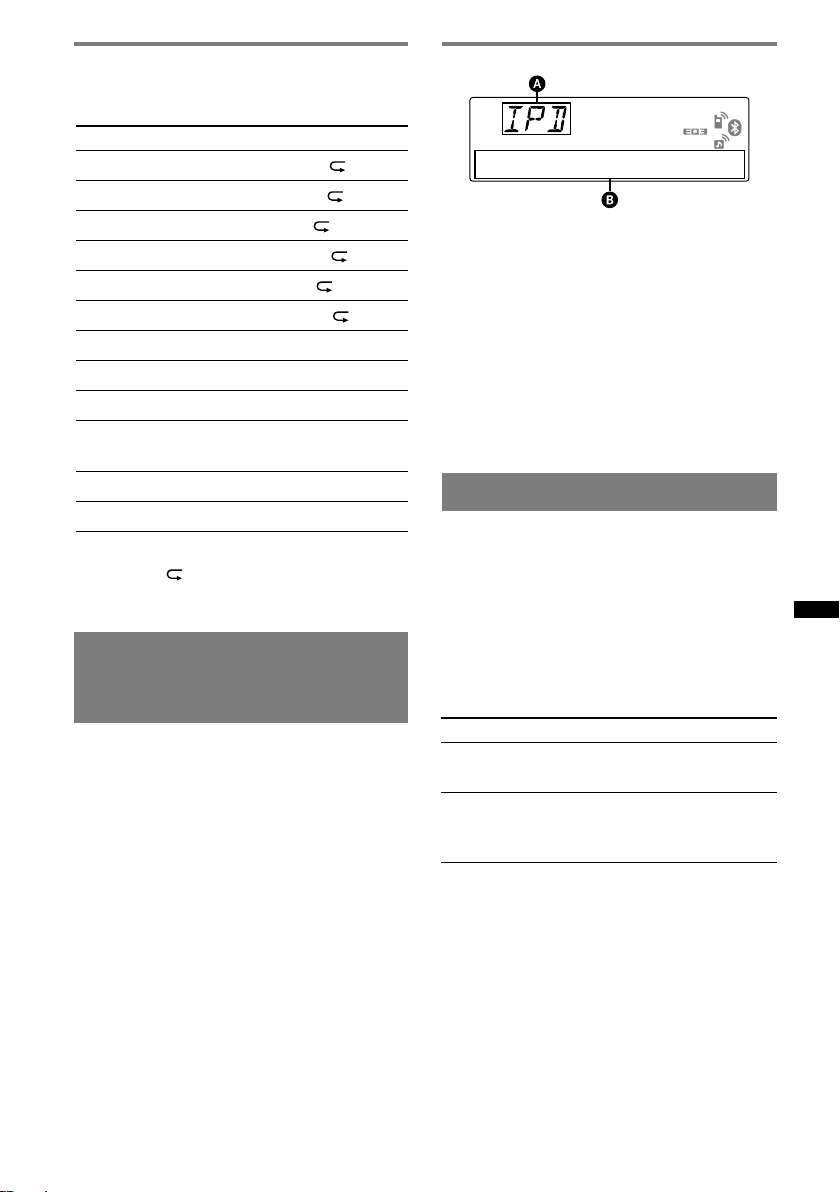
اﻮﺸﻌﻟاو رﺮﻜﺘﳌا ضﺮﻌﻟا
(SHUF)
(4)
وأ (REP)
.ﺔﺑﻮﻏﺮﳌا ﺔﺌﻴﻬﺘﻟا ﺮﻬﻈﺗ نأ ﱃإ ًارﺮﻜﺘﻣ ًﺎﻄﻐﺿ
.ةرﺮﻜﺘﻣ ةرﻮﺼﺑ ﺔﻋﻮﻄﻘﻤﻟا
.ةرﺮﻜﺘﻣ ةرﻮﺼﺑ مﻮﺒﻟﻷا
.ﻲﺋاﻮﺸﻋ ﺐﻴﺗﺮﺘﺑ مﻮﺒﻟﻷا
.ﻲﺋاﻮﺸﻋ ﺐﻴﺗﺮﺘﺑ ﺖﺳﺎﻛدﻮﺒﻟا
.ﻲﺋاﻮﺸﻋ ﺐﻴﺗﺮﺘﺑ نﺎﻨﻔﻟا
.ﻲﺋاﻮﺸﻋ ﺐﻴﺗﺮﺘﺑ عﻮﻨﻟا
.ﻲﺋاﻮﺸﻋ ﺐﻴﺗﺮﺘﺑ زﺎﻬﺠﻟا
وأ " OFF" ﱰﺧا ،يدﺎﻌﻟا ضﺮﻌﻟا ﻊﺿو ﱃإ عﻮﺟﺮﻠﻟ
.ﻲﺋاﻮﺸﻋ
(3)
رﺰﻟا ﻂﻐﺿا ،ضﺮﻌﻟا ءﺎﻨﺛا 1
PODCAST.ةرﺮﻜﺘﻣ ةرﻮﺼﺑ ﺖﺳﺎﻛدﻮﺒﻟا
PLAYLIST.ةرﺮﻜﺘﻣ ةرﻮﺼﺑ ضﺮﻌﻟا ﺔﻤﺋﺎﻗ
SHUF ALBUM
SHUF PODCAST
SHUF ARTIST
SHUF PLAYLIST ﺐﻴﺗﺮﺘﺑ ضﺮﻌﻟا ﺔﻤﺋﺎﻗ
SHUF GENRE
SHUF DEVICE
.ﺔﺌﻴﻬﺘﻟا ﻞﻤﺘﻜﺗ ،ناﻮﺛ 3 ﺪﻌﺑ
."SHUF OFF"
TRACK
ALBUM
ARTIST.ةرﺮﻜﺘﻣ ةرﻮﺼﺑ نﺎﻨﻔﻟا
GENRE.ةرﺮﻜﺘﻣ ةرﻮﺼﺑ عﻮﻨﻟا
ةﴍﺎﺒﻣ iPod زﺎﻬﺟ ﻞﻴﻐﺸﺗ
Passenger ﺐﻛاﺮﻟا ﻞﺒﻗ ﻦﻣ ﻢﻜﺤﺘﻟا –
control
.ةﴍﺎﺒﻣ ﻞﺠﺴﳌا ﻞﺻﻮ لﻮﺻﻮﳌا iPod زﺎﻬﺟ ﻞﻴﻐﺸﺗ ﻦﻜ
.
(MODE) رﺰﻟا ﻂﻐﻀﺑ ﺮﻤﺘﺳا ،ضﺮﻌﻟا ءﺎﻨﺛأ 1
زﺎﻬﺟ ﻞﻴﻐﺸﺗ ﲆﻋ ًاردﺎﻗ نﻮﻜﺘﺳو "MODE IPOD" ﺮﻬﻈﻳ
.ةﴍﺎﺒﻣ iPod
ضﺮﻌﻟا دﻮﻨﺑ ﻴﻐﺘﻟ
.(DSPL) رﺰﻟا ﻂﻐﺿا
:ﻲﺗﻵﺎﻛ ضﺮﻌﻟا دﻮﻨﺑ ﺮﻴﻐﺘﻳ
T مﻮﺒﻟﻷا ﻢﺳا T نﺎﻨﻔﻟا ﻢﺳا T ﺔﻋﻮﻄﻘﻤﻟا ﻢﺳا
ﺔﻋﺎﺴﻟا T MODE IPOD
ﺐﻛاﺮﻟا ﻞﺒﻗ ﻦﻣ ﻢﻜﺤﺘﻟا ﻊﺿو ﻦﻣ جوﺮﺨﻠﻟ
.(MODE) رﺰﻟا ﻂﻐﻀﺑ ﺮﻤﺘﺳا
ﱃإ ضﺮﻌﻟا ﻊﺿو ﻐﺘﻳو "MODE AUDIO" ﺮﻬﻈﻴﺳ ﻢﺛ
."RESUMING"
تﺎﻈﺣﻼﻣ
.ﻂﻘﻓ زﺎﻬﺠﻟا ﺔﻄﺳاﻮﺑ تﻮﺼﻟا ىﻮﺘﺴﻣ ﻂﺒﺿ ﻦﻜ •
.رﺮﻜﺘﳌا ضﺮﻌﻟا ﺔﺌﻴﻬﺗ ﺊﻔﻄﻨﺘﺳ ،ﻊﺿﻮﻟا اﺬﻫ ءﺎﻐﻟا ﻢﺗ اذإ •
ﺔﺷﺎﺸﻟا دﻮﻨﺑ
ﱰﺧاضﺮ ﻌ ﻟ
(iPod زﺎﻬﺟ) رﺪﺼﻣ ﴍﺆﻣ
/ﺔﻋﻮﻄﻘﳌا ﻢﻗر ،مﻮﺒﻟﻷا ﻢﺳا ،نﺎﻨﻔﻟا ﻢﺳا ،ﺔﻋﻮﻄﻘﳌا ﻢﺳا
ﺔﻋﺎﺴﻟا ،ﺔﻴﻀﻘﻨﳌا ضﺮﻌﻟا ةﺪﻣ
.(DSPL) رﺰﻟا ﻂﻐﺿا ، ضﺮﻌﻟا دﻮﻨﺑ ﻴﻐﺘﻟ
ﻪﻴﺟﻮﺗ
ﺮﻬﻈﻳ ،ضﺮﻌﻟا ﺔﻤﺋﺎﻗ /نﺎﻨﻔﻟا /عﻮﻨﻟا /ﺖﺳﺎﻛدﻮﺑ /مﻮﺒﻟﻷا ﺮﻴﻐﺘﻳ ﺎﻣﺪﻨﻋ
.ًﺎﻴﻈﺤﻟ ﻪﺑ صﺎﺨﻟا ﺪﻨﺒﻟا ﻢﻗر
ﺔﻈﺣﻼﻣ
ﻞﻜﺸﺑ iPod زﺎﻬﺟ ﻲﻓ ﺔﻧﺰﺨﻤﻟا فوﺮﺤﻟا ﺾﻌﺑ ضﺮﻋ ﻢﺘﻳ ﻻ ﺪﻗ
.ﺢﻴﺤﺻ
ضﺮﻌﻟا ﻊﺿو ﺔﺌﻴﻬﺗ
.(MODE) رﺰﻟا ﻂﻐﺿا ،ضﺮﻌﻟا ءﺎﻨﺛأ 1
:ﻵﺎﻛ ﻊﺿﻮﻟا ﻐﺘﻳ
T *PODCAST T TRACK T ALBUM
ARTIST T PLAYLIST T GENRE
.iPod زﺎﻬﺟ ﺔﺌﻴﻬﺘﻟ ًﺎﻘﻓو ﺮﻬﻈﻳ ﻻ ﺪﻗ *
ﻢﺋاﻮﻗو عاﻮﻧﻷاو ﺖﺳﺎﻛدﻮﺒﻟاو تﺎﻣﻮﺒﻟﻷا ﻲﻄﺨﺗ
ﻧﺎﻨﻔﻟاو ضﺮﻌﻟا
ﻞﺟأ ﻦﻣﻂﻐﺿا
.(1)/(2) (ALBUM –/+)
[رز ﻞﻜﻟ ةﺪﺣاو ﺔﻄﻐﺿ]
.
(1)/(2) (ALBUM –/+)
ﺔﻄﻘﻨﻟا ﻰﻟإ ﻂﻐﻀﻟﺎﺑ ﺮﻤﺘﺳا]
[ﺔﺑﻮﻏﺮﻤﻟا
ﻲﻄﺨﺘﻟا
ﺮﻤﺘﺴﻤﻟا ﻲﻄﺨﺘﻟا
16
Page 46
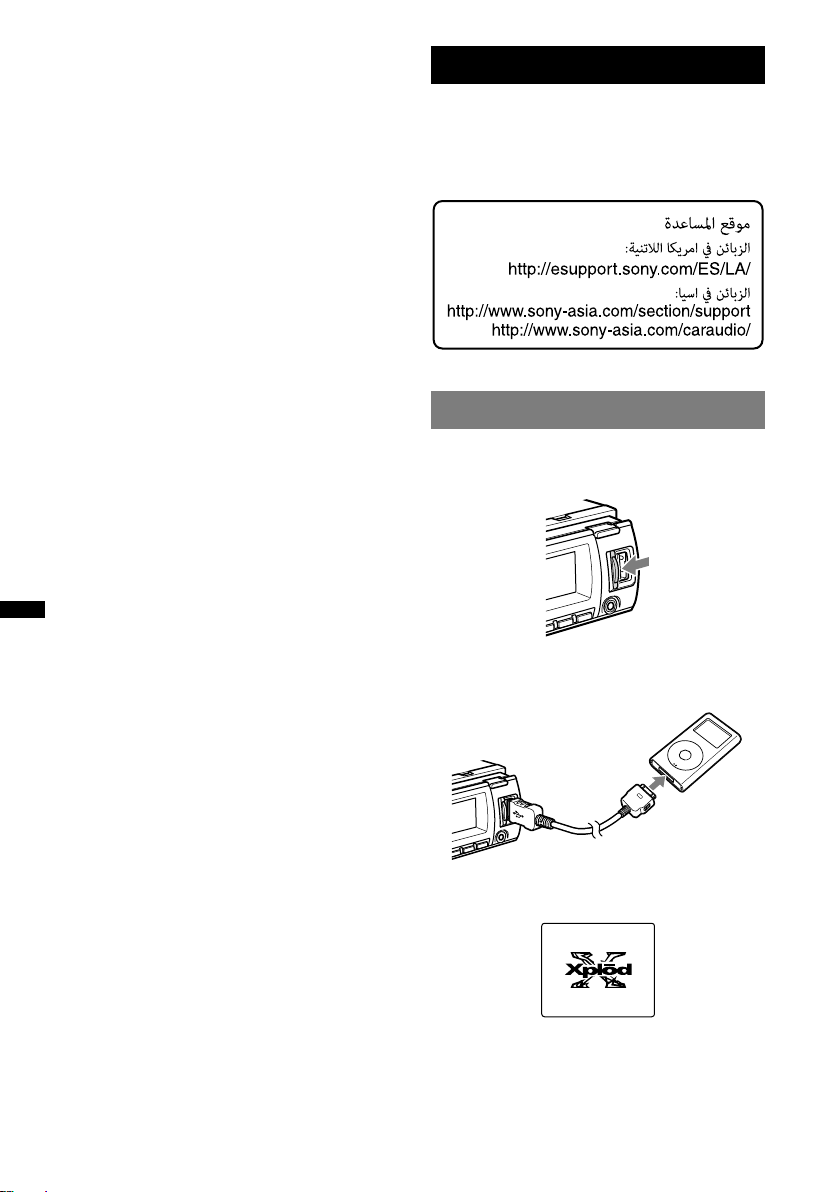
ﺔﻄﻘﻨﻟا ﻦﻣ ًﺎﻴﺋﺎﻘﻠﺗ iPod زﺎﻬﺟ ﰲ ﺔﻠﺠﺴﳌا ﺔﻋﻮﻄﻘﳌا ضﺮﻋ أﺪﺒﻳ
.ةﺮﻣ ﺮﺧآ ﺎﻬﺿﺮﻋ ﻢﺗ ﻲﺘﻟا
رﺰﻟا ﻂﻐﺿا ضﺮﻌﻟا ءﺪﺒﻟ ،ًﻼﺻأ لﻮﺻﻮﻣ iPod زﺎﻬﺟ نﺎﻛ اذإ
ﺮﻬﻈﻳ) ."USB" ﺮﻬﻈﻳ نأ ﱃإ ًارﺮﻜﺘﻣ ًﺎﻄﻐﺿ (SOURCE)
(.iPod زﺎﻬﺟ ﲆﻋ فﺮﻌﺘﻟا ﺪﻨﻋ ﺔﺷﺎﺸﻟا ﰲ "IPD"
فﻮﺳ ،ةﺮﻣ ﺮﺧآ ﺐﻛاﺮﻟا ﻞﺒﻗ ﻦﻣ ﻢﻜﺤﺘﻟا ﻊﺿﻮﺑ iPod زﺎﻬﺟ ضﺮﻋ ﻢﺗ اذإ *
.ﴍﺆﳌا اﺬﻫ ﺮﻬﻈﻳ ﻦﻟ
.ضﺮﻌﻟا ﻊﺿو رﺎﻴﺘﺧﻻ (MODE) رﺰﻟا ﻂﻐﺿا 3
:ﻵﺎﻛ ﻊﺿﻮﻟا ﻐﺘﻳ
T TRACK T ALBUM T RESUMING
T PLAYLIST T GENRE T *PODCAST
ARTIST
.iPod زﺎﻬﺟ ﺔﺌﻴﻬﺘﻟ ًﺎﻘﻓو ﺮﻬﻈﻳ ﻻ ﺪﻗ *
.تﻮﺼﻟا ىﻮﺘﺴﻣ ﻂﺒﺿا 4
.ضﺮﻌﻟا فﺎﻘﻳﻻ (OFF) رﺰﻟا ﻂﻐﺿا
iPod زﺎﻬﺟ جاﺮﺧا
.iPod زﺎﻬﺟ ضﺮﻋ ﻒﻗوأ 1
.iPod زﺎﻬﺟ جاﺮﺧﺈﺑ ﻢﻗ 2
iPhone زﺎﻬﺟ صﻮﺼﺨﺑ ﻪﻴﺒﻨﺗ
ىﻮﺘﺴ ﻢﻜﺤﺘﻟا ﻢﺘﻳ ،USB ﻞﻴﺻﻮﺗ فﺮﻃ ﱪﻋ iPhone زﺎﻬﺟ ﻞﻴﺻﻮﺗ ﺪﻨﻋ
ﱄﺎﻋ تﻮﺻ راﺪﺻا يدﺎﻔﺘﻟ .ﻪﺴﻔﻧ iPhone زﺎﻬﺟ ﺔﻄﺳاﻮﺑ ﻒﺗﺎﻬﻟا تﻮﺻ
ﺔﳌﺎﻜﳌا لﻼﺧ زﺎﻬﺠﻟا ﲆﻋ تﻮﺼﻟا ىﻮﺘﺴﻣ ﻊﻓﺮﺗ ﻻ ،ﺔﳌﺎﻜﳌا ﺪﻌﺑ ﺊﺟﺎﻔﻣ
.ﺔﻴﻔﺗﺎﻬﻟا
تﺎﻈﺣﻼﻣ
ضﺮﻌﺘﺗ ﺪﻗ ﻻإو ،iPod زﺎﻬﺟ ضﺮﻋ ءﺎﻨﺛأ ﺔﻴﻣﺎﻣﻷا ﺔﺣﻮﻠﻟا ﻞﺼﻔﺗ ﻻ •
.ﻒﻠﺘﻠﻟ تﺎﻧﺎﻴﺒﻟا
.USB ﻢﺴﻘﻣ ﱪﻋ iPod زﺎﻬﺟ ﲆﻋ فﺮﻌﺘﻟا ﻦﻣ زﺎﻬﺠﻟا اﺬﻫ ﻦﻜﻤﺘﻳ ﻻ
تﺎﻬﻴﺟﻮﺗ
ﻞﻴﻐﺸﺗو ،ACC تﺎﻴﻟﻜﻟا ﻊﺿﻮﻣ ﱃإ كﺮﺤﳌا ﻞﻴﻐﺸﺗ حﺎﺘﻔﻣ ﺮﻳوﺪﺗ ﺪﻨﻋ •
.iPod زﺎﻬﺟ ﻦﺤﺷ ﻢﺘﻴﺳ ،زﺎﻬﺠﻟا
ﺔﺷﺎﺷ ﰲ "NO DEV" ﺮﻬﻈﻳ ،ضﺮﻌﻟا لﻼﺧ iPod زﺎﻬﺟ ﻞﺼﻓ ﻢﺗ اذإ
.زﺎﻬﺠﻟا
iPod زﺎﻬﺟ
صﻮﺼﺨﺑ» ﻢﺴﻘﻟا ﻊﺟار ،iPod كزﺎﻬﺟ ﺔاﻮﻣ ﻦﻋ ﻞﻴﺻﺎﻔﺘﻠﻟ
.ةﺪﻋﺎﺴﳌا ﻊﻗﻮﻣ ةرﺎﻳﺰﺑ ﻢﻗ وأ 24 ﺔﺤﻔﺻ ﰲ «iPod زﺎﻬﺟ
مﺎﻋ ﻊﺟﺮﻤﻛ "iPod" ﺢﻠﻄﺼﳌا لﻌﺘﺳا ﻢﺗ ،ﻞﻴﻐﺸﺘﻟا تﻴﻠﻌﺗ ﰲ
دﺪﺤُﻳ ﺎﻣ ،iPhone زﺎﻬﺟ وأ iPod زﺎﻬﺟ ﲆﻋ iPod ﻒﺋﺎﻇﻮﻟ
.ﺔﻴﺤﻴﺿﻮﺘﻟا لﺎﻜﺷﻷا وأ ﺺﻨﻟﺎﺑ
iPod زﺎﻬﺟ ضﺮﻋ
.زﺎﻬﺠﻟا تﻮﺻ ىﻮﺘﺴﻣ ﺾﻔﺧا ،iPod زﺎﻬﺟ ﻞﻴﺻﻮﺗ ﻞﺒﻗ
.USB ءﺎﻄﻏ ﺐﺤﺳا
ﻞﺻﻮﻣ ﱪﻋ USB ﻞﻴﺻﻮﺗ فﺮﻃ ﱃإ iPod زﺎﻬﺟ ﻞﻴﺻﻮﺘﺑ ﻢﻗ 2
•
•
.USB ﻞﺒﻛ ﱃإ ﻞﺠﺴﳌا
1
M
E
N
U
ً
ﻊﺿو ﻐﺘﻳ ،ﻞﺠﺴﳌا ﻞﺻﻮﻣ ﱃإ
ﻻﻮﺻﻮﻣ iPod زﺎﻬﺟ نﻮﻜﻳ ﺎﻣﺪﻨﻋ
ﻢﺗ يﺬﻟا ﻊﺿﻮﻟا ﰲ ضﺮﻌﻟا أﺪﺒﻳو فﺎﻨﺌﺘﺳﻻا ﻊﺿو ﱃإ زﺎﻬﺠﻟا اﺬﻫ
.iPod زﺎﻬﺟ ﺔﻄﺳاﻮﺑ ﻪﺘﺌﻴﻬﺗ
.ﺔﻴﻟﺎﺘﻟا رارزﻷا ﻞﻤﻌﺗ ﻻ ،فﺎﻨﺌﺘﺳﻻا ﻊﺿو ﰲ
15
فﺎﻨﺌﺘﺳﻻا ﻊﺿو
ﺔﺷﺎﺷ ﲆﻋ ﺔﺷﺎﺸﻟا ﺮﻬﻈﺗو ،ًﺎﻴﺋﺎﻘﻠﺗ iPod زﺎﻬﺟ ﻞﻴﻐﺸﺗ ﻢﺘﻴﺳ
*.هﺎﻧدأ ﺒﻣ ﻛ iPod زﺎﻬﺟ
(REP) (3) –
(SHUF) (4) –
ﻪﻴﺟﻮﺗ
ﻞﻴﺻﻮﺘﻟ (ﻖﻓﺮﻣ ﻏ) RC-100IP زاﺮﻄﻟا ﻦﻣ USB ﻞﺒﻛ ماﺪﺨﺘﺳﺎﺑ ﺢﺼﻨﻧ
.ﻞﺠﺴﳌا ﻞﺻﻮﻣ
Page 47
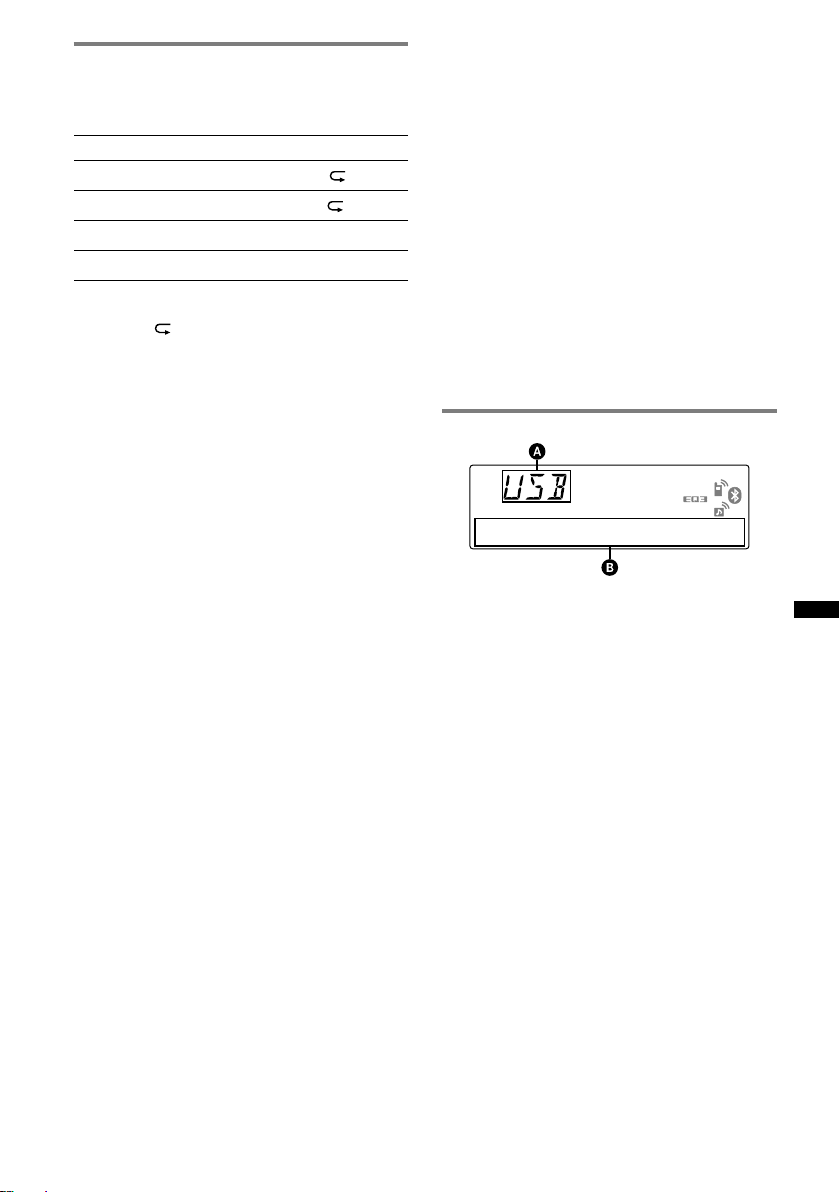
اﻮﺸﻌﻟاو رﺮﻜﺘﳌا ضﺮﻌﻟا
(SHUF) (4) وأ (REP) (3) رﺰﻟا ﻂﻐﺿا ،ضﺮﻌﻟا ءﺎﻨﺛا 1
.ﺔﺑﻮﻏﺮﳌا ﺔﺌﻴﻬﺘﻟا ﺮﻬﻈﺗ نأ ﱃإ ًارﺮﻜﺘﻣ ًﺎﻄﻐﺿ
ﱰﺧاضﺮﻌ ﻟ
TRACK.ةرﺮﻜﺘﻣ ةرﻮﺼﺑ ﺔﻋﻮﻄﻘﻤﻟا
ALBUM.ةرﺮﻜﺘﻣ ةرﻮﺼﺑ مﻮﺒﻟﻷا
SHUF ALBUM.ﻲﺋاﻮﺸﻋ ﺐﻴﺗﺮﺘﺑ مﻮﺒﻟﻷا
SHUF DEVICE. .ﻲﺋاﻮﺸﻋ ﺐﻴﺗﺮﺘﺑ زﺎﻬﺠﻟا
.ﺔﺌﻴﻬﺘﻟا ﻞﻤﺘﻜﺗ ،ناﻮﺛ 3 ﺪﻌﺑ
SHUF" وأ "
OFF" ﱰﺧا ،يدﺎﻌﻟا ضﺮﻌﻟا ﻊﺿو ﱃإ عﻮﺟﺮﻠﻟ
."OFF
رﺰﻟا ﻂﻐﺿا ،ضﺮﻌﻟا ءﺪﺒﻟ ،ًﻼﺻأ لﻮﺻﻮﻣ USB زﺎﻬﺟ نﺎﻛ اذإ
."USB" ﺮﻬﻈﻳ نأ ﱃإ ًارﺮﻜﺘﻣ ًﺎﻄﻐﺿ (SOURCE)
.ضﺮﻌﻟا فﺎﻘﻳﻻ (OFF) رﺰﻟا ﻂﻐﺿا
USB زﺎﻬﺟ ﻞﺼﻓ
.USB زﺎﻬﺟ ضﺮﻋ ﻒﻗوأ 1
.USB زﺎﻬﺟ ﻞﺼﻓا 2
زﺎﻬﺟ تﺎﻧﺎﻴﺑ ضﺮﻌﺘﺗ ﺪﻗ ،ضﺮﻌﻟا ءﺎﻨﺛأ USB زﺎﻬﺟ ﺖﻠﺼﻓ اذإ
.ﻒﻠﺘﻠﻟ USB
تﺎﻈﺣﻼﻣ
ﺐﺒﺴﺑ ﻂﻘﺴﺗ نأ ﻦﻜ ﻲﺘﻟا ﺔﻠﻴﻘﺜﻟا وأ ةﺒﻜﻟا USB ةﺰﻬﺟأ ﻞﻤﻌﺘﺴﺗ ﻻ •
.لﺎﺼﺗﻻا ناﺪﻘﻓ ﰲ ﺐﺒﺴﺘﺗ ﺪﻗ ﻲﺘﻟا وأ زاﺰﺘﻫﻻا
تﺎﻧﺎﻴﺑ ضﺮﻌﺘﺗ ﺪﻗ ﻻإو ،USB زﺎﻬﺟ ضﺮﻋ لﻼﺧ ﺔﻴﻣﺎﻣﻷا ﺔﺣﻮﻠﻟا ﻞﺼﻔﺗ ﻻ
.ﻒﻠﺘﻠﻟ USB زﺎﻬﺟ
.USB ﻢﺴﻘﻣ ﱪﻋ USB ةﺰﻬﺟأ ﲆﻋ فﺮﻌﺘﻟا ﻦﻣ زﺎﻬﺠﻟا اﺬﻫ ﻦﻜﻤﺘﻳ ﻻ
ضﺮﻌﻟا دﻮﻨﺑ
رﺪﺼﻤﻟا
ﻢﻗر ،مﻮﺒﻟﻷا ﻢﺳا ،*مﻮﺒﻟﻷا ﻢﻗر ،نﺎﻨﻔﻟا ﻢﺳا ،ﺔﻋﻮﻄﻘﻤﻟا ﻢﺳا
ﺔﻋﺎﺴﻟا ،ﺔﻴﻀﻘﻨﻤﻟا ضﺮﻌﻟا ةﺪﻣ /ﺔﻋﻮﻄﻘﻤﻟا
.مﻮﺒﻟﻷا ﻐﺘﻳ ﺎﻣﺪﻨﻋ ﻂﻘﻓ مﻮﺒﻟﻷا ﻢﻗر ضﺮﻋ ﻢﺘﻳ *
.(DSPL) رﺰﻟا ﻂﻐﺿا ، ضﺮﻌﻟا دﻮﻨﺑ ﻴﻐﺘﻟ
تﺎﻈﺣﻼﻣ
.تﺎﺌﻴﻬﺘﻟاو ﻞﻴﺠﺴﺘﻟا ﺔﻐﻴﺻو USB زﺎﻬﺠﻟ ًﺎﻘﻓو ﺔﺿوﺮﻌﳌا دﻮﻨﺒﻟا ﻒﻠﺘﺨﺘﺳ •
.ةﺪﻋﺎﺴﳌا ﻊﻗﻮﻣ ةرﺎﻳز ﻰﺟﺮﻳ ،ﻞﻴﺻﺎﻔﺘﻠﻟ
.ﻵﺎﻛ ضﺮﻌﻠﻟ ﺔﻠﺑﺎﻘﻟا تﺎﻧﺎﻴﺒﻟا دﺪﻌﻟ ﴡﻗﻷا ﺪﺤﻟا
128 :(تﺎﻣﻮﺒﻟﻷا) تاﺪﻠﺠﳌا –
500 :ﺪﻠﺠﻣ ﻞﻜﻟ (تﺎﻋﻮﻄﻘﳌا) تﺎﻔﻠﳌا –
ﱃإ ﻚﻟذ يدﺆﻳ ﺪﻗ ﺚﻴﺣ ،بآﺮﻣ ﰲ ﺔﻓﻮﻔﺼﻣ ةرﺎﻴﺳ ﰲ USB زﺎﻬﺟ كﱰﺗ ﻻ •
.ﻞﻠﺧ
.ﺔﻠﺠﺴﳌا تﺎﻧﺎﻴﺒﻟا راﺪﻘﳌ ًﺎﻘﻓو ،ضﺮﻌﻟا أﺪﺒﻳ نأ ﱃإ ﺖﻗﻮﻟا ﺾﻌﺑ ﺮ ﺪﻗ
.(ﺔﻴﻤﻗﺮﻟا قﻮﻘﺤﻟا ةرادا) DRM تﺎﻔﻠﻣ ضﺮﻋ ﻦﻜ ﻻ ﺪﻗ •
ﻊﺿﻮﺑ MP3/WMA/AAC تﺎﻔﻠﻣ ﻊﻴﺟﺮﺗ /ﻊﻳﴎ ﻢﻳﺪﻘﺗ وأ ضﺮﻋ لﻼﺧ •
ﺔﻴﻀﻘﻨﳌا ضﺮﻌﻟا ةﺪﻣ ضﺮﻋ ﻢﺘﻳ ﻻ ﺪﻗ ،(ﻐﺘﳌا ﺖﺒﻟا لﺪﻌﻣ) VBR
.ﻖﻴﻗد ﻞﻜﺸﺑ
.مﻮﻋﺪﻣ ﻏ ﺔﻴﻟﺎﺘﻟا MP3/WMA/AAC تﺎﻔﻠﳌا ضﺮﻋ
تﺎﻧﺎﻴﺒﻠﻟ ناﺪﻘﻓ ﻼﺑ ﺔﻃﻮﻐﻀﻣ –
ﺦﺴﻨﻟا ﻦﻣ ﺔﻴﻤﺤﻣ –
•
•
•
•
•
14
Page 48
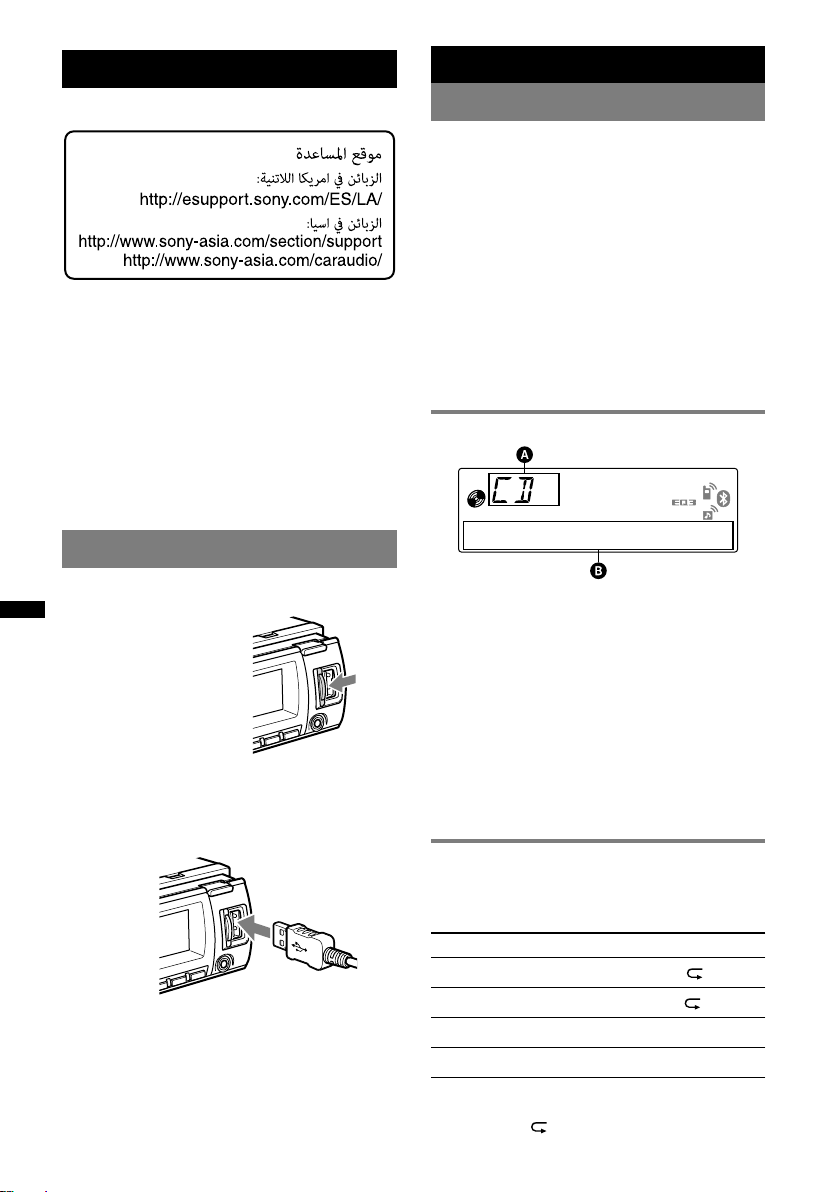
USB ةﺰﻬﺟأ
.ةﺪﻋﺎﺴﳌا ﻊﻗﻮﻣ ةرﺎﻳز ﻰﺟﺮﻳ ،USB كزﺎﻬﺟ ﺔاﻮﻣ ﻦﻋ ﻞﻴﺻﺎﻔﺘﻠﻟ
Mass Storage) MSC عﻮﻨﻟا ﻦﻣ USB ةﺰﻬﺟأ لﻌﺘﺳا ﻦﻜ •
ﻊﻣ ﺔاﻮﺘﳌا (Media Transfer Protocol) MTP و (Class
.USB رﺎﻴﻌﻣ
WMA و (.mp3) MP3 ﻲﻫ ﺔاﻮﺘﳌا ﻔﺸﺘﻟا ﺔﻐﻴﺻ •
.(.m4a) AAC و (.wma)
.USB زﺎﻬﺟ ﰲ تﺎﻧﺎﻴﺒﻠﻟ ﺔﻴﻃﺎﻴﺘﺣا ﺔﺨﺴﻧ ﻞﻤﻌﺑ ﴅﻮﻳ •
ﺔﻈﺣﻼﻣ
.كﺮﺤﳌا ﻞﻴﻐﺸﺗ ﺪﻌﺑ USB زﺎﻬﺟ ﻞﻴﺻﻮﺘﺑ ﻢﻗ
ﻞﻴﻐﺸﺗ ﻞﺒﻗ ﻪﻠﻴﺻﻮﺗ ﻢﺗ اذا رﴐ وأ ﻞﻠﺧ ﻪﻴﻓ ثﺪﺤﻳ ﺪﻗ ،USB زﺎﻬﺠﻟ ًﺎﻘﻓو
.كﺮﺤﳌا
USB زﺎﻬﺟ ضﺮﻋ
CD ﺔﻧاﻮﻄﺳأ
ﺔﻧاﻮﻄﺳأ ضﺮﻋ
.(OPEN) رﺰﻟا ﻂﻐﺿا 1
.(ﲆﻋﻸﻟ ﺔﻗﺎﻄﺒﻟا ﻪﻴﻠﻋ يﺬﻟا ﺐﻧﺎﺠﻟا) ﺔﻧاﻮﻄﺳأ لﺎﺧدﺈﺑ ﻢﻗ 2
.ﺔﻴﻣﺎﻣﻷا ﺔﺣﻮﻠﻟا ﻖﻠﻏأ 3
.ًﺎﻴﺋﺎﻘﻠﺗ ضﺮﻌﻟا أﺪﺒﻳ
ﺔﻧاﻮﻄﺳﻷا جاﺮﺧا
.(OPEN) رﺰﻟا ﻂﻐﺿا 1
. رﺰﻟا ﻂﻐﺿا 2
.ﺔﻧاﻮﻄﺳﻷا جاﺮﺧا ﻢﺘﻳ
.ﺔﻴﻣﺎﻣﻷا ﺔﺣﻮﻠﻟا ﻖﻠﻏأ
ﺔﺷﺎﺸﻟا دﻮﻨﺑ
3
.USB ﻞﻴﺻﻮﺗ فﺮﻃ ﱃإ USB زﺎﻬﺟ ﻞﻴﺻﻮﺘﺑ ﻢﻗ 2
USB زﺎﻬﺟ ﻊﻣ ﻖﻓﺮﳌا ﻞﺒﻜﻟا ﻞﻤﻌﺘﺳا ،ﻞﺒﻛ لﻌﺘﺳا ﺪﻨﻋ
ﺔﻴﻟﺎﺘﻟا ﺔﺤﻔﺼﻟا ﲆﻋ ﻊﺒﺘﻳ
13
.USB ءﺎﻄﻏ ﺐﺤﺳا 1
.ﻞﻴﺻﻮﺘﻠﻟ
.ضﺮﻌﻟا أﺪﺒﻳ
رﺪﺼﳌا
،1*نﺎﻨﻔﻟا ﻢﺳا ،1*نﺎﻨﻔﻟا /ﺔﻧاﻮﻄﺳﻷا ﻢﺳا ،1*ﺔﻋﻮﻄﻘﳌا ﻢﺳا
ضﺮﻌﻟا ةﺪﻣ/ﺔﻋﻮﻄﻘﳌا ﻢﻗر ،1*مﻮﺒﻟﻷا ﻢﺳا ،2*مﻮﺒﻟﻷا ﻢﻗر
ﺔﻋﺎﺴﻟا ،ﺔﻴﻀﻘﻨﳌا
ﺔﻧاﻮﻄﺳأ ،CD TEXT ﺔﻧاﻮﻄﺳﺄﺑ ﺔﻘﻠﻌﺘﳌا تﺎﻣﻮﻠﻌﳌا ضﺮﻋ ﻢﺘﻳ 1*
.مﻮﺒﻟﻷا ﻐﺘﻳ ﺎﻣﺪﻨﻋ ﻂﻘﻓ مﻮﺒﻟﻷا ﻢﻗر ضﺮﻋ ﻢﺘﻳ 2*
.(DSPL) رﺰﻟا ﻂﻐﺿا ، ﺔﺷﺎﺸﻟا دﻮﻨﺑ ﻴﻐﺘﻟ
.تﺎﺌﻴﻬﺘﻟاو ﻞﻴﺠﺴﺘﻟا ﺔﻐﻴﺻو ﺔﻧاﻮﻄﺳﻷا عﻮﻨﻟ ًﺎﻘﻓو ﺔﺿوﺮﻌﳌا دﻮﻨﺒﻟا ﻒﻠﺘﺨﺘﺳ
.MP3/WMA
/AAC
ﻪﻴﺟﻮﺗ
اﻮﺸﻌﻟاو رﺮﻜﺘﳌا ضﺮﻌﻟا
(SHUF) (4) وأ (REP) (3) رﺰﻟا ﻂﻐﺿا ،ضﺮﻌﻟا ءﺎﻨﺛا 1
.ﺔﺑﻮﻏﺮﳌا ﺔﺌﻴﻬﺘﻟا ﺮﻬﻈﺗ نأ ﱃإ ًارﺮﻜﺘﻣ ًﺎﻄﻐﺿ
ﱰﺧاضﺮﻌ ﻟ
TRACK.ةرﺮﻜﺘﻣ ةرﻮﺼﺑ ﺔﻋﻮﻄﻘﳌا
*
ALBUM.ةرﺮﻜﺘﻣ ةرﻮﺼﺑ مﻮﺒﻟﻷا
*SHUF ALBUM.اﻮﺸﻋ ﺐﻴﺗﱰﺑ مﻮﺒﻟﻷا
SHUF DISC.اﻮﺸﻋ ﺐﻴﺗﱰﺑ ﺔﻧاﻮﻄﺳﻷا
.MP3/WMA/AAC ﺔﻧاﻮﻄﺳأ ضﺮﻋ ﺪﻨﻋ *
."SHUF OFF" وأ " OFF" ﱰﺧا ،يدﺎﻌﻟا ضﺮﻌﻟا ﻊﺿو ﱃإ عﻮﺟﺮﻠﻟ
Page 49
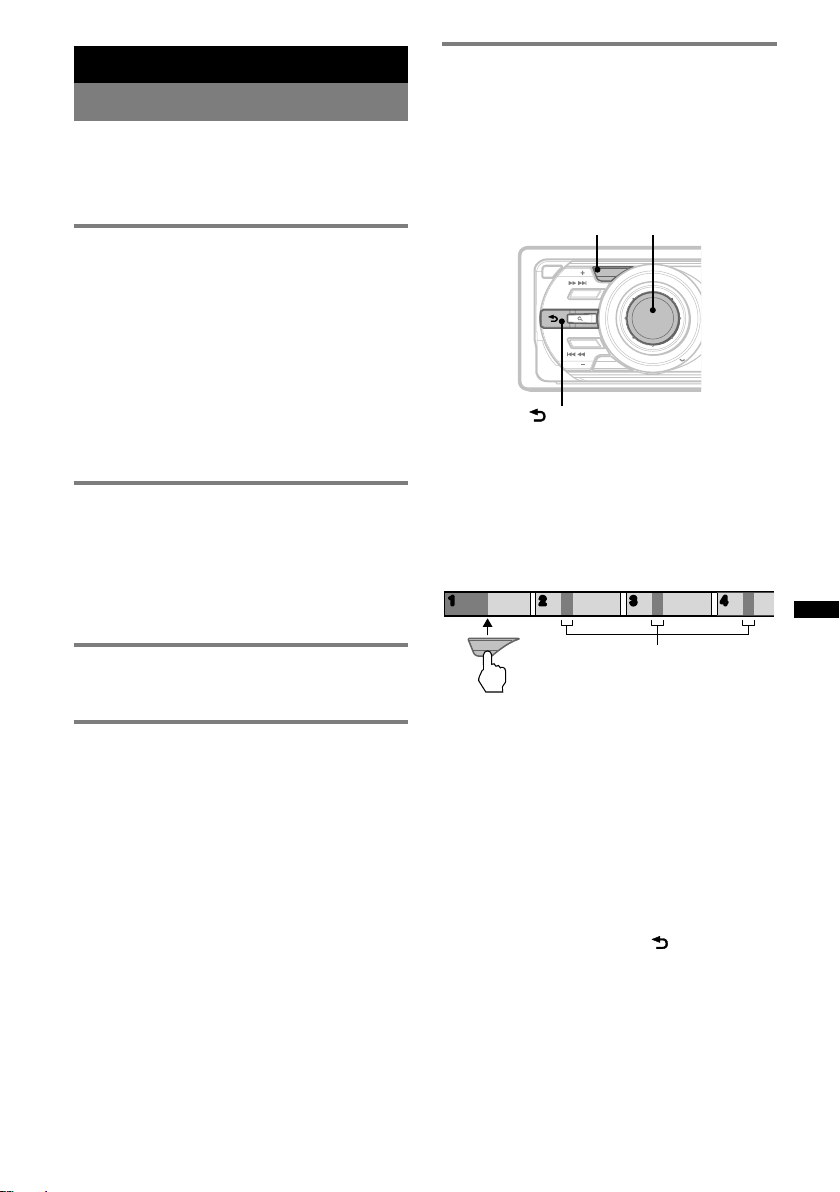
ﻮﻳداﺮﻟا
تﺎﻄﺤﳌا ﻦﻳﺰﺨﺗو لﺎﺒﻘﺘﺳا
ﻪﻴﺒﻨﺗ
ﺔﻔﻟاﻮﻣ ﻞﻀﻓأ ةﺮﻛاذ ﻞﻤﻌﺘﺳا ،ةدﺎﻴﻘﻟا ءﺎﻨﺛأ تﺎﻄﺤﻣ ﺔﻔﻟاﻮﻣ ﺪﻨﻋ
.ثدﺎﺣ عﻮﻗو يدﺎﻔﺘﻟ (BTM)
BTM ﺔﻔﻴﻇو –
ﺮﻬﻈﻳ نأ ﱃإ ًارﺮﻜﺘﻣ ًﺎﻄﻐﺿ (SOURCE) رﺰﻟا ﻂﻐﺿا 1
.ًارﺮﻜﺘﻣ ًﺎﻄﻐﺿ (MODE) ﻂﻐﺿا ،ﺔﺟﻮﳌا ءﺎﻐﻟﻻ
AM1 وأ FM3 وأ FM2 وأ FM1 ﺔﺟﻮﳌا رﺎﻴﺘﺧا ﻚﻨﻜ ﻛ
."BTM" ﺾﻣﻮﻳ نأ ﱃإ
(BTM) رﺰﻟا ﻂﻐﻀﺑ ﺮﻤﺘﺳا 2
ﺐﻴﺗﺮﺗ ﺐﺴﺣ مﺎﻗرﻷا رارزأ ﰲ تﺎﻄﺤﳌا ﻦﻳﺰﺨﺘﺑ زﺎﻬﺠﻟا مﻮﻘﻳ
.ﺔﺌﻴﻬﺘﻟا ﻦﻳﺰﺨﺗ ﻢﺘﻳ ﺎﻣﺪﻨﻋ ﻪﻴﺒﻨﺗ تﻮﺻ راﺪﺻا ﻢﺘﻳ
رز ﻂﻐﻀﺑ ﻆﻔﺘﺣا ،ﺎﻬﻨﻳﺰﺨﺗ ﺪﻳﺮﺗ ﻲﺘﻟا ﺔﻄﺤﳌا لﺎﺒﻘﺘﺳا ءﺎﻨﺛأ 1
."MEM" ﺮﻬﻈﻳ نأ ﱃإ ((6) ﱃإ (1)) ﻢﻗﺮﻟا
ﺎﻬﻟاﺪﺒﺘﺳا ﻢﺘﻴﺳ ،ﻢﻗﺮﻟا رز ﺲﻔﻧ ﲆﻋ ىﺮﺧأ ﺔﻄﺤﻣ ﻦﻳﺰﺨﺗ ﺖﻟوﺎﺣ اذإ
ﺔﻧﺰﺨﳌا تﺎﻄﺤﳌا لﺎﺒﻘﺘﺳا
.((6) ﱃإ (1)) ﻢﻗﺮﻟا رز ﻂﻐﺿا ﻢﺛ ،ﺔﺟﻮﳌا ﱰﺧا 1
ﻦﻋ ﺚﺤﺒﻠﻟ (SEEK) +/– رﺰﻟا ﻂﻐﺿا ﻢﺛ ،ﺔﺟﻮﳌا ﱰﺧا 1
اﺬﻫ رﺮﻛ .ﺎﻣ ﺔﻄﺤﻣ زﺎﻬﺠﻟا ﻞﺒﻘﺘﺴﻳ ﺎﻣﺪﻨﻋ عﻼﻄﺘﺳﻻا ﻒﻗﻮﺘﻳ
.ﺔﺑﻮﻏﺮﳌا ﺔﻄﺤﳌا لﺎﺒﻘﺘﺳا ﻢﺘﻳ نأ ﱃإ ءاﺮﺟﻹا
رﺰﻟا ﻂﻐﻀﺑ ﺮﻤﺘﺳا ،ﺎﻬﻴﻟإ عﺘﺳﻻا ﺪﻳﺮﺗ ﻲﺘﻟا ﺔﻄﺤﳌا ددﺮﺗ فﺮﻌﺗ ﺖﻨﻛ اذإ
رﺰﻟا ﻂﻐﺿا ﻢﺛ ،ﻲﺒﻳﺮﻘﺘﻟا ددﱰﻟا ﱃإ لﻮﺻﻮﻠﻟ (SEEK) +/–
ﺔﻘﻴﻗد ﺔﻔﻟاﻮﻣ بﻮﻏﺮﳌا ددﱰﻟا ﱃإ ﺔﻔﻟاﻮﻤﻠﻟ ًارﺮﻜﺘﻣ ًﺎﻄﻐﺿ (SEEK) +/–
ﺎﻴﺋﺎﻘﻠﺗ ﻦﻳﺰﺨﺘﻟا
ً
."TUNER"
.AM2 وأ
.ددﱰﻟا
ﺎﻳوﺪﻳ ﻦﻳﺰﺨﺘﻟا
ً
ﺔﻈﺣﻼﻣ
.ًﺎﻘﺒﺴﻣ ﺔﻧﺰﺨﳌا ﺔﻄﺤﳌﺎﺑ
ﺎﻴﺋﺎﻘﻠﺗ ﺔﻔﻟاﻮﳌا
ً
.ﺔﻄﺤﳌا
ﻪﻴﺟﻮﺗ
.(ﺔﻳوﺪﻳ ﺔﻔﻟاﻮﻣ)
ﻊﻃﺎﻘﻣ ﱃإ عﺘﺳﻻا ﺔﻄﺳاﻮﺑ ﺔﻋﻮﻄﻘﻣ ﻦﻋ ﺚﺤﺒﻟا
ZAPPINTM ﻊﺿﻮﻟا — تﺎﻋﻮﻄﻘﳌا ﻦﻣ
ﺔﻠﺠﺴﳌا تﺎﻋﻮﻄﻘﳌا ﻦﻣ ةﺼﻗ ﻊﻃﺎﻘﻣ ﱃإ عﺘﺳﻻا ءﺎﻨﺛأ
ﻦﻋ ﺚﺤﺒﻟا ﻚﻨﻜ ،ﻊﺑﺎﺘﺘﻟﺎﺑ USB زﺎﻬﺟ وأ CD ﺔﻧاﻮﻄﺳأ ﰲ
.ﺎﻬﻴﻟإ عﺘﺳﻻا ﰲ ﺐﻏﺮﺗ ﻲﺘﻟا ﺔﻋﻮﻄﻘﳌا
ضﺮﻌﻟا ﻊﺿﻮﺑ ﺔﻋﻮﻄﻘﻣ ﻦﻋ ﺚﺤﺒﻠﻟ ﺐﺳﺎﻨﻣ ZAPPIN ﻊﺿﻮﻟا
.اﻮﺸﻌﻟا رﺮﻜﺘﳌا وأ اﻮﺸﻌﻟا
رﺎﻴﺘﺧﻻا رز
ZAP
OFF
SEEK
ZAP
SOURCE
BLUETOOTH
BT
SEEK
MODE
(BACK)
.ضﺮﻌﻟا لﻼﺧ (ZAP) رﺰﻟا ﻂﻐﺿا 1
ﻦﻣ ضﺮﻌﻟا أﺪﺒﻳ ،ﺔﺷﺎﺸﻟا ﰲ "ZAPPIN" ﺮﻬﻈﻳ نأ ﺪﻌﺑ
.ﺔﻴﻟﺎﺘﻟا ﺔﻋﻮﻄﻘﳌﺎﺑ صﺎﺨﻟا ﻊﻄﻘﳌا
أﺪﺒﻳو ﺔﻘﻃ رﺪﺼﺗ ﻢﺛ ،ﺔﺌﻴﻬﳌا ةﺪﳌا ﰲ ﻊﻄﻘﳌا ضﺮﻋ ﻢﺘﻳ
11 22 33 44
ZAP
ﻢﺘﻳ يﺬﻟا ﺔﻋﻮﻄﻘﻣ ﻞﻛ ﻦﻣ ءﺰﺟ
.ZAPPIN ﻊﺿﻮﻟا ﰲ ﻪﺿﺮﻋ
ضﺮﻋ ﻢﺘﻳ ﺎﻣﺪﻨﻋ (ZAP) رﺰﻟا وأ رﺎﻴﺘﺿﻻا رز ﻂﻐﺿا 2
.ﺎﻬﻴﻟإ عﺘﺳﻻا ﺪﻳﺮﺗ ﻲﺘﻟا ﺔﻋﻮﻄﻘﳌا
ﻦﻣ يدﺎﻌﻟا ضﺮﻌﻟا ﻊﺿو ﱃإ ﺎﻬﺗﱰﺧا ﻲﺘﻟا ﺔﻋﻮﻄﻘﳌا دﻮﻌﺗ
،ىﺮﺧأ ةﺮﻣ ZAPPIN ﻊﺿﻮﻟا ﺔﻄﺳاﻮﺑ ﺔﻋﻮﻄﻘﻣ ﻦﻋ ﺚﺤﺒﻠﻟ
ًﺎﺒﻳﺮﻘﺗ ﺔﻴﻧﺎﺛ 30 /ناﻮﺛ 9 /ناﻮﺛ 6 ﺑ ﻦﻣ ضﺮﻌﻟا ةﺪﻣ رﺎﻴﺘﺧا ﻚﻨﻜ •
.ﻪﺿﺮﻌﻟ ﺔﻋﻮﻄﻘﳌﺎﺑ صﺎﺨﻟا ﻊﻄﻘﳌا رﺎﻴﺘﺧا ﻚﻨﻜ ﻻ .(21 ﺔﺤﻔﺻ)
ﻊﺿﻮﻟا ﰲ (ALBUM –/+ ) (1)/(2) وأ (SEEK) –/+ رﺰﻟا ﻂﻐﺿا •
.ضﺮﻌﻠﻟ ﺔﻋﻮﻄﻘﻣ رﺎﻴﺘﺧا ﺪﻴﻛﺄﺗ ﱃإ ًﺎﻀﻳأ يدﺆﻳ (BACK) رﺰﻟا ﻂﻐﺿ •
.مﻮﺒﻟﻷا وأ ﺔﻋﻮﻄﻘﳌا ﻲﻄﺨﺘﻟ ZAPPIN
/
P
T
U
C
S
E
H
L
E
E
S
N
/
T
R
E
.ﱄﺎﺘﻟا ﻊﻄﻘﳌا
.2 و 1 تاﻮﻄﺨﻟا رﺮﻛ
ﺔﻋﻮﻄﻘﳌا
.ﺔﻳاﺪﺒﻟا
تﺎﻬﻴﺟﻮﺗ
12
Page 50
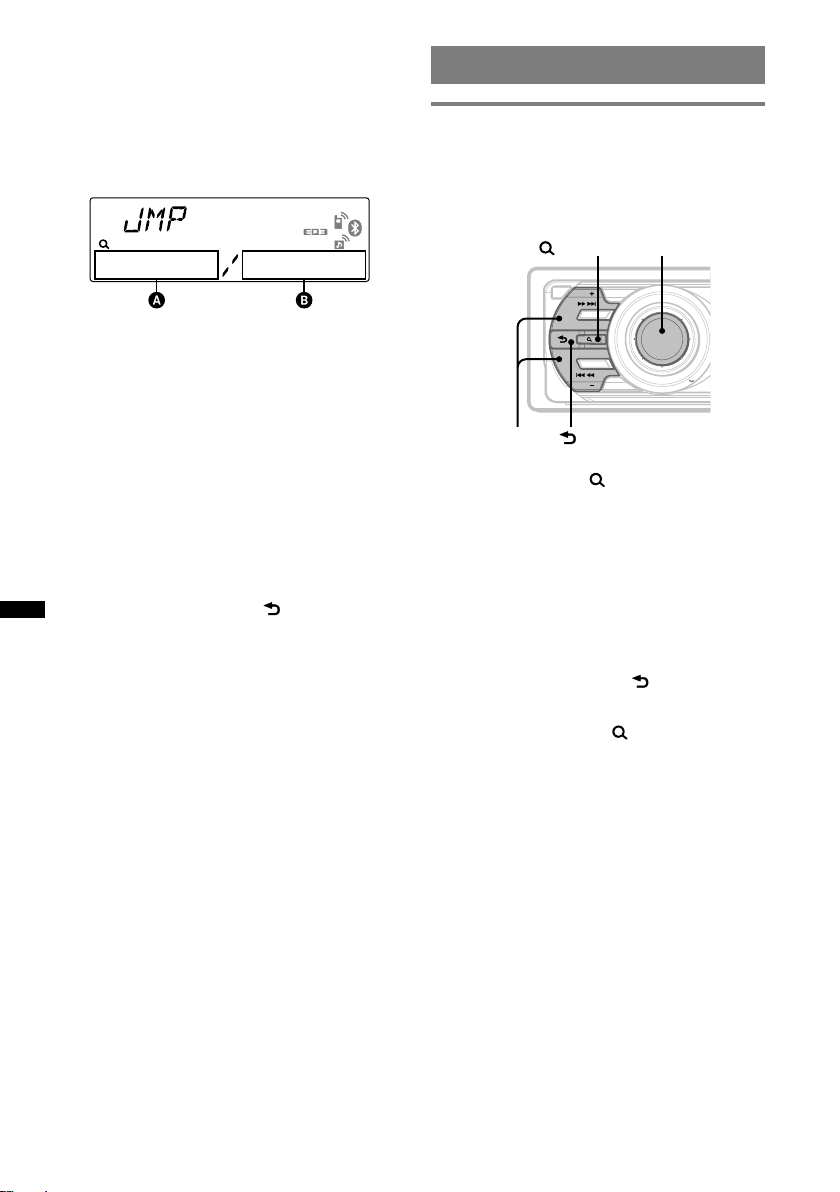
دﻮﻨﺒﻟا ﻲﻄﺨﺗ ﺔﻄﺳاﻮﺑ ﺚﺤﺒﻟا
Jump mode ﺰﻔﻘﻟا ﻊﺿو –
ﺪﻨﺒﻟا ﻦﻋ ﺚﺤﺒﻟا ﻚﻨﻜ ،ﺔﺌﻔﻟا ﰲ دﻮﻨﺒﻟا ﻦﻣ ﺪﻳﺪﻌﻟا ﺪﺟﻮﺗ ﺎﻣﺪﻨﻋ
.ﺔﻋﴪﺑ بﻮﻏﺮﳌا
.Quick-BrowZer ﻊﺿﻮﻟا ﰲ
.ﻪﻨﻣ ﺐﻳﺮﻗ ﺪﻨﺑ وأ ،بﻮﻏﺮﳌا ﺪﻨﺒﻟا رﺎﻴﺘﺧﻻ ﻢﻜﺤﺘﻟا صﺮﻗ ردأ
.دﻮﻨﺒﻟا دﺪﻋ ﱄﺟا ﻦﻣ 10% راﺪﻘ ﻲﻄﺨﺘﻟا ﻢﺘﻳ
ﺪﻨﺒﻟا ﺮﻬﻈﻳو Quick-BrowZer ﻊﺿﻮﻟا ﱃإ ﺔﺷﺎﺸﻟا دﻮﻌﺗ
.ﻪﻄﻐﺿاو بﻮﻏﺮﳌا ﺪﻨﺒﻟا رﺎﻴﺘﺧﻻ ﻢﻜﺤﺘﻟا صﺮﻗ ردأ
.ﺔﻋﻮﻄﻘﻣ رﺎﺘﺨﳌا ﺪﻨﺒﻟا نﺎﻛ اذا ضﺮﻌﻟا أﺪﺒﻳ
.(SEEK) – وأ (BACK) رﺰﻟا ﻂﻐﺿا
(SEEK) + رﺰﻟا ﻂﻐﺿا 1
.ﺔﻴﻟﺎﺘﻟا ﺔﺷﺎﺸﻟا ﺮﻬﻈﺗ
ﱄﺎﺤﻟا ﺪﻨﺒﻟا ﻢﻗر
ﺔﻴﻟﺎﺤﻟا ﺔﻘﺒﻄﻟا ﰲ دﻮﻨﺒﻟا دﺪﻋ ﱄﺟا
.ﺪﻨﺒﻟا ﻢﺳا ﺮﻬﻈﻳ ﻢﺛ
.ﻢﻜﺤﺘﻟا صﺮﻗ ﻂﻐﺿا
.رﺎﺘﺨﳌا
Jump mode ﺰﻔﻘﻟا ﻊﺿو ءﺎﻐﻟﻻ
ﺔﻋﻮﻄﻘﻣ ﻦﻋ ﺚﺤﺒﻟا
ﻢﺳﻻا ﺔﻄﺳاﻮﺑ ﺔﻋﻮﻄﻘﻣ ﻦﻋ ﺚﺤﺒﻟا
Quick-BrowZer ﻊﺿﻮﻟا –
USB زﺎﻬﺟ وأ CD ﺔﻧاﻮﻄﺳأ ﰲ ﺔﻋﻮﻄﻘﻣ ﻦﻋ ﺚﺤﺒﻟا ﻚﻨﻜ
.ﺔﻟﻮﻬﺴﺑ ﺔﺌﻔﻟا ﺔﻄﺳاﻮﺑ
/ﻢﻜﺤﺘﻟا صﺮﻗ
(BROWSE)
OFF
SEEK
SOURCE
BLUETOOTH
BT
SEEK
2
SEEK
+/–
(BACK)
3
.
ﺔﺎﻗ ﺮﻬﻈﺗو ،Quick-BrowZer ﻊﺿﻮﻟا ﰲ زﺎﻬﺠﻟا ﻞﺧﺪﻳ
4
ﻪﻄﻐﺿا ﻢﺛ ،ﺔﺑﻮﻏﺮﳌا ﺚﺤﺒﻟا ﺔﺌﻓ رﺎﻴﺘﺧﻻ ﻢﻜﺤﺘﻟا صﺮﻗ ردأ
.ﺔﺑﻮﻏﺮﳌا ﺔﻋﻮﻄﻘﳌا رﺎﻴﺘﺧا ﻢﺘﻳ نأ ﱃإ 2 ةﻮﻄﺨﻟا رﺮﻛ
Quick-BrowZer ﻊﺿﻮﻟا ﻦﻣ جوﺮﺨﻠﻟ
/رﺮﻜﺘﳌا ضﺮﻌﻟا ﺔﺌﻴﻬﺗ ءﺎﻐﻟا ﻢﺘﻳ ،Quick-BrowZer ﻊﺿﻮﻟا ﰲ لﻮﺧﺪﻟا ﺪﻨﻋ
رﺎﻴﺘﺧﻻا رز
ZAP
P
U
MODE
S
H
E
N
T
R
E
(BROWSE) رﺰﻟا ﻂﻐﺿا 1
ﺔﻘﺑﺎﺴﻟا ﺔﺷﺎﺸﻟا ﱃإ عﻮﺟﺮﻠﻟ
(BACK) رﺰﻟا ﻂﻐﺿا
.
(BROWSE) رﺰﻟا ﻂﻐﺿا
.
/
T
C
E
L
E
S
/
.ﺚﺤﺒﻟا تﺎﺌﻓ
.ﺪﻴﻛﺄﺘﻠﻟ
.ضﺮﻌﻟا أﺪﺒﻳ
2
3
ﺔﻈﺣﻼﻣ
.اﻮﺸﻌﻟا
11
Page 51
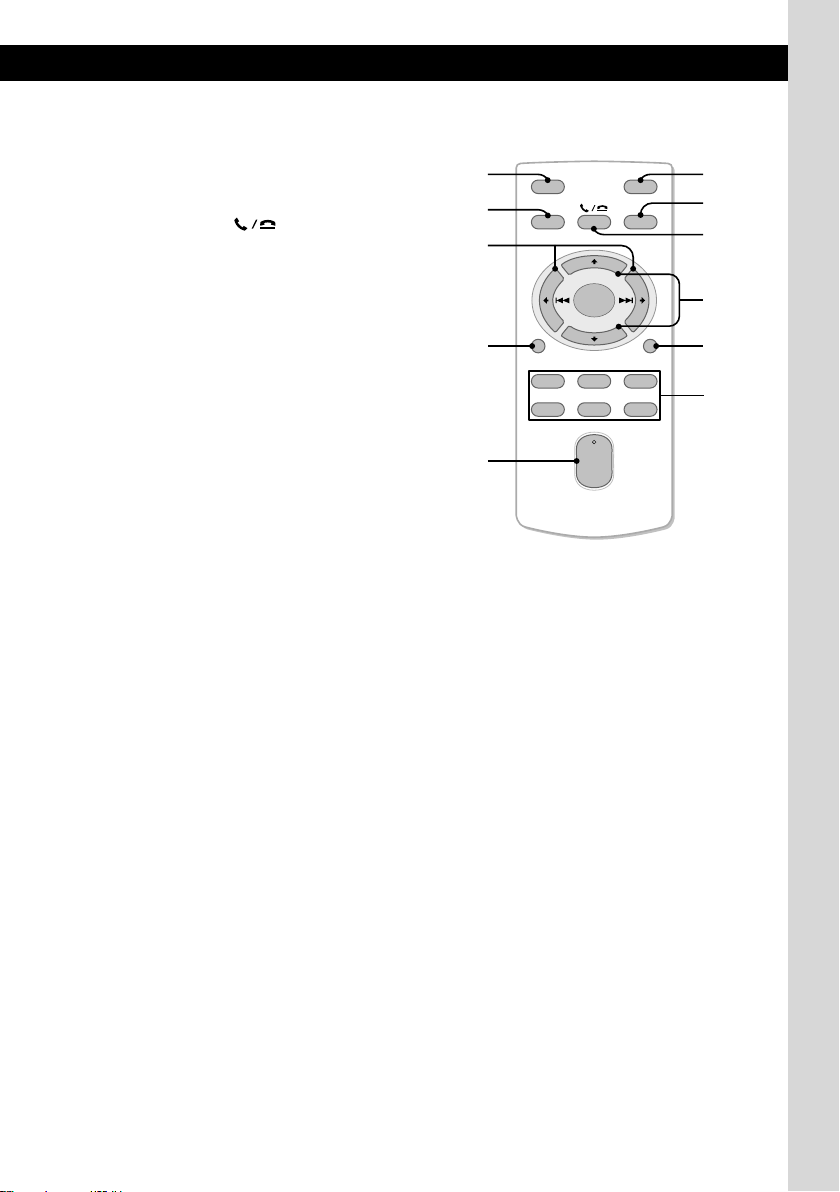
MODE رﺰﻟا
رﺎﻴﺘﺧا /(FM/AM) ﻮﻳداﺮﻟا ﺔﺟﻮﻣ رﺎﻴﺘﺧا :ﻞﺟأ ﻦﻣ ﻂﻐﺿا
.iPod زﺎﻬﺠﻟ ضﺮﻌﻟا ﻊﺿو
ﻊﺿو ءﺎﻐﻟا /ﰲ لﻮﺧﺪﻟا :ﻞﺟأ ﻦﻣ ﻂﻐﻀﻟﺎﺑ ﻆﻔﺘﺣاو ﻂﻐﺿا
.ﺐﻛاﺮﻟا ﻞﺒﻗ ﻦﻣ ﻢﻜﺤﺘﻟا
(يوﺪﻳﻻ لﺎﺼﺗا)
/(رﺎﻴﺘﺧا) SEL رﺰﻟا
.زﺎﻬﺠﻟا ﲆﻋ رﺎﻴﺘﺧﻻا رز ﰲ ﻛ
(+)/(–) رارزﻷا
(1)/(2) رﺰﻟا ﰲ ﻛ ،CD/USB ﻊﺿﻮﺑ ﻢﻜﺤﺘﻠﻟ
.زﺎﻬﺠﻟا ﲆﻋ (ALBM –/+)
ﺔﻄﺳاﻮﺑ ﺦﻟا ،تﻮﺼﻟا ﺔﺌﻴﻬﺗ ،ﺔﺌﻴﻬﺘﻟا ﺔﻔﻴﻇو ﻞﻴﻐﺸﺗ ﻦﻜ
. رﺰﻟا
(ﺮﻳﺮ) SCRL رﺰﻟا
.ﺔﺷﺎﺸﻟا دﻮﻨﺑ ﺮﻳﺮﻤﺘﻟ
مﺎﻗرﻷا رارزأ
تﺎﻄﺤﻣ ﻦﻳﺰﺨﺘﻟ ؛(ﻂﻐﺿا) ﺔﻧﺰﺨﻣ تﺎﻄﺤﻣ لﺎﺒﻘﺘﺳﻻ
.(ﻂﻐﻀﻟﺎﺑ ﺮﻤﺘﺳاو ﻂﻐﺿا)
RM-X304 ﻞﻳدﻮﳌا ﺪﻌﺑ ﻦﻋ ﻢﻜﺤﺘﻟا ﺔﻗﺎﻄﺑ
OFF
SOURCE
SEL
ATT
MODE
+
–
DSPL
132
465
ﻒﺋﺎﻇو ﺎﻬﻟ ﺪﻌﺑ ﻦﻋ ﻢﻜﺤﺘﻟا ﺔﻗﺎﻄﺑ ﲆﻋ ﺔﻴﻟﺎﺘﻟا رارزﻷا ﺾﻌﺑ
جاﺮﺧﺈﺑ ﻢﻗ .زﺎﻬﺠﻟا ﲆﻋ ﻲﺘﻟا ﻚﻠﺗ ﻦﻋ ﻒﻠﺘﺨﺗ ﺎﻬﻧا وأ ،ﺔﻔﻠﺘﺨﻣ
.(7 ﺔﺤﻔﺻ) لﻌﺘﺳﻻا ﻞﺒﻗ لزﺎﻌﻟا ءﺎﺸﻐﻟا
/CD ﺔﻧاﻮﻄﺳأ /ﻮﻳداﺮﻟا) رﺪﺼﳌا ﻴﻐﺘﻟ ؛ﺔﻗﺎﻄﻟا ﻞﻴﻐﺸﺘﻟ
ﻒﺗﺎﻫ /Bluetooth تﻮﺻ /AUX زﺎﻬﺟ /USB زﺎﻬﺟ
تﻮﺻ /USB زﺎﻬﺟ /CD ﺔﻧاﻮﻄﺳأ /ﻮﻳداﺮﻟﺎﺑ ﻢﻜﺤﺘﻠﻟ
.زﺎﻬﺠﻟا ﲆﻋ (SEEK) –/+ رﺰﻟا ﰲ ﻛ ،Bluetooth
ﺔﻄﺳاﻮﺑ ﺦﻟا ،تﻮﺼﻟا ﺔﺌﻴﻬﺗ ،ﺔﺌﻴﻬﺘﻟا ﺔﻔﻴﻇو ﻞﻴﻐﺸﺗ ﻦﻜ
.ىﺮﺧأ ةﺮﻣ ﻂﻐﺿا ،ءﺎﻐﻟﻺﻟ .تﻮﺼﻟا ﺾﻴﻔﺨﺘﻟ
SCRL
+
VOL
–
.رﺪﺼﳌا فﺎﻘﻳا ؛ﺔﻗﺎﻄﻟا ﻊﻄﻘﻟ
()/ (
(ﺔﺷﺎﺸﻟا) DSPL رﺰﻟا
(تﻮﺼﻟا ىﻮﺘﺴﻣ) VOL +/– رﺰﻟا
.تﻮﺼﻟا ىﻮﺘﺴﻣ ﻂﺒﻀﻟ
(ﺾﻴﻔﺨﺘﻟا) ATT رﺰﻟا
RB
OFF رﺰﻟا
SOURCE رﺰﻟا
.(Bluetooth
) رارزﻷا
. رﺰﻟا
.ﺔﺷﺎﺸﻟا دﻮﻨﺑ ﻴﻐﺘﻟ
10
Page 52

18 ﺔﺤﻔﺻ نﻮﻓﺮﻜﻴﻣ
يوﺪﻳﻼﻟا لﺎﺼﺗﻻا ﺔﻔﻴﻇو ﻞﻤﻌﺗ ﻻ ﺪﻗ ،نﻮﻓﺮﻜﻴﳌا ﺔﻴﻄﻐﺘﺑ ﻢﻘﺗ ﻻ
.ﺢﻴﺤﺻ ﻞﻜﺸﺑ
ﺔﻈﺣﻼﻣ
6 ﺔﺤﻔﺻ RESET ﺔﺌﻴﻬﺘﻟا ةدﺎﻋإ رز
ﺔﻧاﻮﻄﺳﻷا ﺔﺤﺘﻓ
.ﺔﻧاﻮﻄﺳﻷا لﺎﺧدﻻ
(جاﺮﺧﻻا)
رز
.ﺔﻧاﻮﻄﺳﻷا جاﺮﺧﻻ
AVRCP ﺔﻴﻨﻘﺗ ﻊﻣ ﻖﻓاﻮﺘﻣ) Bluetooth تﻮﺻ زﺎﻬﺟ نﻮﻜﻳ ﺎﻣﺪﻨﻋ *
تﺎﻴﻠﻤﻋ ﺾﻌﺑ ﺮﻓﻮﺘﺗ ﻻ ﺪﻗ ،ًﻻﻮﺻﻮﻣ (Bluetooth ﺔﻔﻴﻇﻮﺑ ﺔﺻﺎﺨﻟا
USB ةﺰﻬﺟأ ﻦﻣ زﺎﻬﺟ يأ ﻞﺼﻓ ﺐﺠﻳ ،ﺔﻧاﻮﻄﺳأ لﺎﺧدا /جاﺮﺧا ﺪﻨﻋ •
ﺔﻗﺎﻄﺑ ﺔﻄﺳاﻮﺑ ﻪﻠﻴﻐﺸﺗ ﻦﻜ ﻻ ،ﺔﺷﺎﺸﻟا ﺖﻔﺘﺧاو زﺎﻬﺠﻟا ءﺎﻔﻃا ﻢﺗ اذإ •
وأ ،زﺎﻬﺠﻟا ﲆﻋ
(SOURCE) رﺰﻟا ﻂﻐﺿ ﻢﺘﻳ ﺎﻣ ﺪﻌﺑ ﻦﻋ ﻢﻜﺤﺘﻟا
.زﺎﻬﺠﻠﻟ ًﺎﻘﻓو ،ﻞﻴﻐﺸﺘﻟا
تﺎﻈﺣﻼﻣ
.ﻒﻠﺘﻠﻟ ﺔﻧاﻮﻄﺳﻷا ضﺮﻌﺗ يدﺎﻔﺘﻟ
.ًﻻوأ زﺎﻬﺠﻟا ﻞﻴﻐﺸﺘﻟ ﺔﻧاﻮﻄﺳأ لﺎﺧدا
SEEK +/– رارزﻷا
:CD/USB ﻊﺿو
ﻞﻜﺸﺑ تﺎﻋﻮﻄﻘﳌا ﻲﻄﺨﺘﻟ ؛(ﻂﻐﺿا) تﺎﻋﻮﻄﻘﳌا ﻲﻄﺨﺘﻟ
ةﺪﺣاو ﺔﻴﻧﺎﺛ لﻼﺧ ىﺮﺧأ ةﺮﻣ ﻂﻐﺿا ﻢﺛ ،ﻂﻐﺿا) ﺮﻤﺘﺴﻣ
ﻂﻐﺿا) ًﺎﻌﻳﴎ ﺎﻬﺪﻘﺗ/ﺔﻋﻮﻄﻘﳌا ﻊﻴﺟﱰﻟ ؛(ﻂﻐﻀﻟﺎﺑ ﺮﻤﺘﺳاو
.(ﻂﻐﻀﻟﺎﺑ ﺮﻤﺘﺳاو
:ﻮﻳداﺮﻟا
ًﺎﻳوﺪﻳ ﺔﻄﺤﻣ دﺎﺠﻳﻻ ؛(ﻂﻐﺿا) ًﺎﻴﺋﺎﻘﻠﺗ تﺎﻄﺤﳌا ﺔﻔﻟاﻮﳌ
.(ﻂﻐﻀﻟﺎﺑ ﺮﻤﺘﺳاو ﻂﻐﺿا)
:*Bluetooth تﻮﺻ زﺎﻬﺟ
.(ﻂﻐﺿا) تﺎﻋﻮﻄﻘﳌا ﻲﻄﺨﺘﻟ
17 ﺔﺤﻔﺻ (BLUETOOTH) BT رﺰﻟا
.ﺔﺟواﺰﻣ ،Bluetooth ةرﺎﺷا فﺎﻘﻳا /ﻞﻴﻐﺸﺘﻟ
16 ،15 ،12 ﺔﺤﻔﺻ MODE ﻊﺿﻮﻟا رز
رﺎﻴﺘﺧا/(FM/AM) ﻮﻳدار ﺔﺟﻮﻣ رﺎﻴﺘﺧا :ﻞﺟأ ﻦﻣ ﻂﻐﺿا
.iPod ضﺮﻋ ﻊﺿو
ﻦﻣ ﻢﻜﺤﺘﻟا ﻊﺿو ءﺎﻐﻟا/لﺎﺧدا :ﻞﺟأ ﻦﻣ ﻂﻐﻀﻟﺎﺑ ﺮﻤﺘﺳا
.ﺐﻛاﺮﻟا ﻞﺒﻗ
11 ﺔﺤﻔﺻ
(BROWSE) رﺰﻟا
Quick-BrowZer ﻊﺿو ﰲ لﻮﺧﺪﻠﻟ
12 ﺔﺤﻔﺻ BTM رﺰﻟا
.(ﻂﻐﻀﻟﺎﺑ ﺮﻤﺘﺳا) BTM ﺔﻔﻴﻇو ﻞﻴﻐﺸﺗ ءﺪﺒﻟ
مﺎﻗرﻷا رارزأ
:CD/USB ﻊﺿو
MP3/ﺔﻧاﻮﻄﺳأ ضﺮﻋ ءﺎﻨﺛأ) ALBUM –/+ :(1)/(2)
(WMA/AAC
تﺎﻣﻮﺒﻟﻷا ﻲﻄﺨﺘﻟ ؛(ﻂﻐﺿا) تﺎﻣﻮﺒﻟﻷا ﻲﻄﺨﺘﻟ
.(ﻂﻐﻀﻟﺎﺑ ﺮﻤﺘﺳا) ﺮﻤﺘﺴﻣ ﻞﻜﺸﺑ
16 ،14 ،13 ﺔﺤﻔﺻ REP رﺰﻟا :(3)
16 ،14 ،13 ﺔﺤﻔﺻ SHUF رﺰﻟا :(4)
PAUSE رﺰﻟا :(6)
.ىﺮﺧأ ةﺮﻣ ﻂﻐﺿا ،ءﺎﻐﻟﻺﻟ .ًﺎﺘﻗﺆﻣ ضﺮﻌﻟا فﺎﻘﻳﻹ
:ﻮﻳداﺮﻟا
تﺎﻄﺤﻣ ﻦﻳﺰﺨﺘﻟ ؛(ﻂﻐﺿا) ،ﺔﻧﺰﺨﻣ تﺎﻄﺤﻣ لﺎﺒﻘﺘﺳﻻ
.(ﻂﻐﻀﻟﺎﺑ ﺮﻤﺘﺳا)
:Bluetooth تﻮﺻ زﺎﻬﺟ
PAUSE رﺰﻟا :(6)
.ىﺮﺧأ ةﺮﻣ ﻂﻐﺿا ،ءﺎﻐﻟﻺﻟ .ًﺎﺘﻗﺆﻣ ضﺮﻌﻟا فﺎﻘﻳﻹ
:Bluetooth ﻒﺗﺎﻫ
18 ﺔﺤﻔﺻ MIC رﺰﻟا :(5)
16 ،14 ،13 ﺔﺤﻔﺻ (ﺮﻳﺮﻤﺘﻟا) SCRL/(ﺔﺷﺎﺸﻟا) DSPL رز
ﻂﻐﺿا) ﺔﺷﺎﺸﻟا دﻮﻨﺑ ﺮﻳﺮﻤﺘﻟ ؛(ﻂﻐﺿا) ﺔﺷﺎﺸﻟا دﻮﻨﺑ ﻴﻐﺘﻟ
.(ﻂﻐﻀﻟﺎﺑ ﺮﻤﺘﺳاو
22 ﺔﺤﻔﺻ AUX ﻞﺧﺪﻟا ﺲﺒﻘﻣ
.لﻮﻤﺤﻣ تﻮﺻ زﺎﻬﺟ ﻞﻴﺻﻮﺘﻟ
9
Page 53
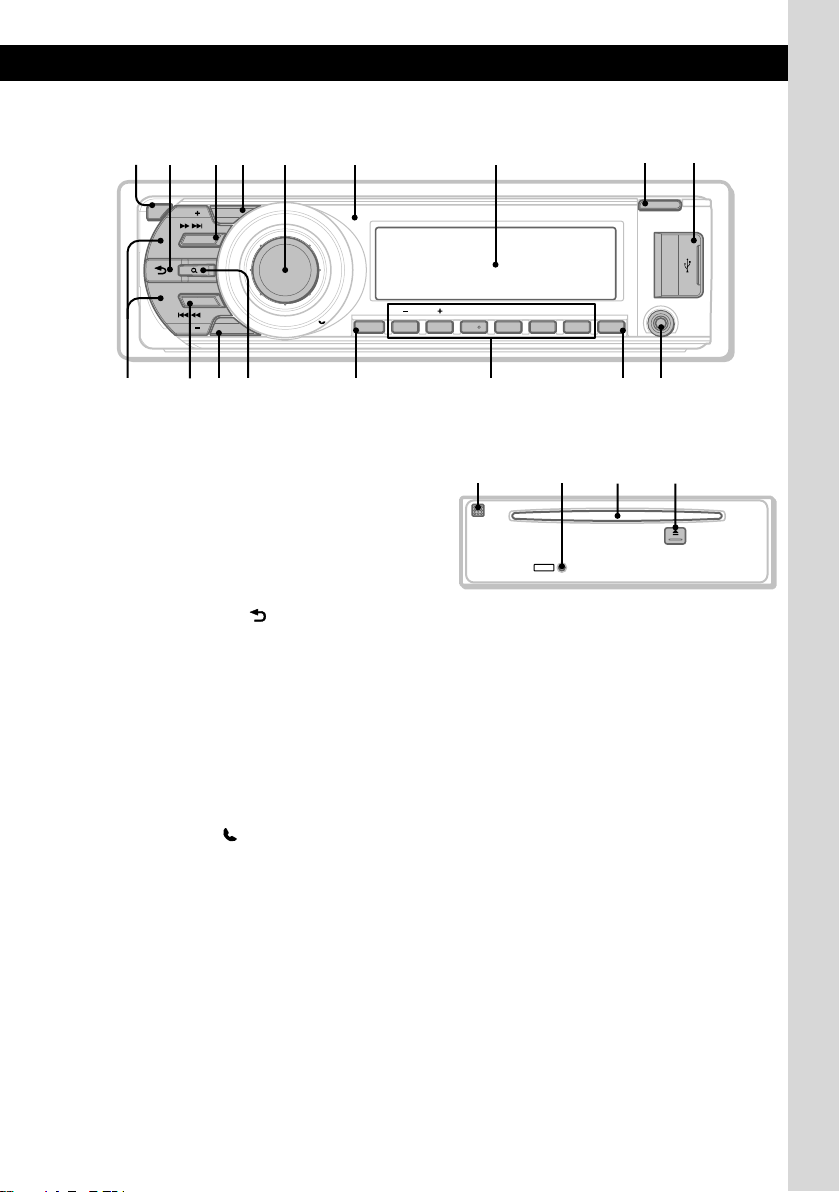
ﺔﻴﺳﺎﺳﻷا ﻞﻴﻐﺸﺘﻟا تﺎﻴﻠﻤﻋو ﻢﻜﺤﺘﻟا ﺢﻴﺗﺎﻔﻣ ﻊﺿاﻮﻣ
ﺔﻴﺴﻴﺋﺮﻟا ةﺪﺣﻮﻟا
OFF
SEEK
ZAP
SOURCE
BLUETOOTH
BT
SEEK
RBR
P
MODE
RE RKRH
/
T
U
S
H
E
S
N
/
T
R
E
BTM
C
E
L
E
ﻢﻜﺤﺘﻟا ﺢﻴﺗﺎﻔﻣ ﻊﺿاﻮﻣ ﻦﻋ تﻴﻠﻌﺗ ﲆﻋ يﻮﺘﺤﻳ ﻢﺴﻘﻟا اﺬﻫ
تﺎﺤﻔﺼﻟا ﻊﺟار ،ﻞﻴﺻﺎﻔﺘﻠﻟ .ﺔﻴﺳﺎﺳﻷا ﻞﻴﻐﺸﺘﻟا تﺎﻴﻠﻤﻋو
.ﺔﺻﺎﺨﻟا
ﻒﺋﺎﻇو ﺲﻔﻧ يدﺆﺗ ﺪﻌﺑ ﻦﻋ ﻢﻜﺤﺘﻟا ﺔﻗﺎﻄﺑ ﲆﻋ ﺔﻠﺛﺘﳌا رارزﻷا
.زﺎﻬﺠﻟا ﲆﻋ رارزﻷا
OFF رﺰﻟا
.رﺪﺼﳌا فﺎﻘﻳﻻ ؛ﺔﻗﺎﻄﻟا ﻊﻄﻘﻟ
11 ﺔﺤﻔﺻ
(BACK) عﻮﺟﺮﻟا رز
.ﺔﻘﺑﺎﺴﻟا ﺔﺷﺎﺸﻟا ﱃإ عﻮﺟﺮﻠﻟ
SOURCE رﺰﻟا
زﺎﻬﺟ /CD ﺔﻧاﻮﻄﺳأ /ﻮﻳدار) رﺪﺼﳌا ﻴﻐﺗ ؛ﺔﻗﺎﻄﻟا ﻞﻴﻐﺸﺘﻟ
ﻒﺗﺎﻫ /Bluetooth تﻮﺻ زﺎﻬﺟ /AUX زﺎﻬﺟ /USB
.(Bluetooth
12 ﺔﺤﻔﺻ ZAP رﺰﻟا
تﺎﻋﻮﻄﻘﳌا ﻦﻣ ﻊﻃﺎﻘﻣ ﱃإ عﺘﺳﻻا ﻊﺿو ﰲ لﻮﺧﺪﻠﻟ
.ZAPPIN
TM
(يوﺪﻳﻻ لﺎﺼﺗا) /رﺎﻴﺘﺧﻻا رز /ﻢﻜﺤﺘﻟا صﺮﻗ
رﺎﻴﺘﺧﻻ ؛(ردأ) ﺚﺤﺒﻟا ﺔﺌﻓ رﺎﻴﺘﺧﻻ /تﻮﺼﻟا ىﻮﺘﺴﻣ ﻂﺒﻀﻟ
.(ﻂﻐﺿا) ﺔﳌﺎﻜﻣ ءﺎﻬﻧا /مﻼﺘﺳﻻ ؛(ردأو ﻂﻐﺿا) ﺔﺌﻴﻬﺘﻟا دﻮﻨﺑ
ﺪﻌﺑ ﻦﻋ ﻢﻜﺤﺘﻟا ﺔﻗﺎﻄﺑ ةرﺎﺷا ﻞﺒﻘﺘﺴﻣ
ضﺮﻌﻟا ةﺬﻓﺎﻧ
7 ﺔﺤﻔﺻ OPEN ﺢﺘﻔﻟا رز
13 ﺔﺤﻔﺻ USB ﻞﻴﺻﻮﺗ فﺮﻃ
.USB زﺎﻬﺟ ﻞﻴﺻﻮﺘﻟ
ALBUM REP MICSHUF PAUSE SCRL
312 456
DSPL
RIRGRT
XRL XBRM
RESET
OPEN
AUX
ﺔﻋﻮﻠﺨﻣ ﺔﻴﻣﺎﻣﻷا ﺔﺣﻮﻠﻟا
8
Page 54
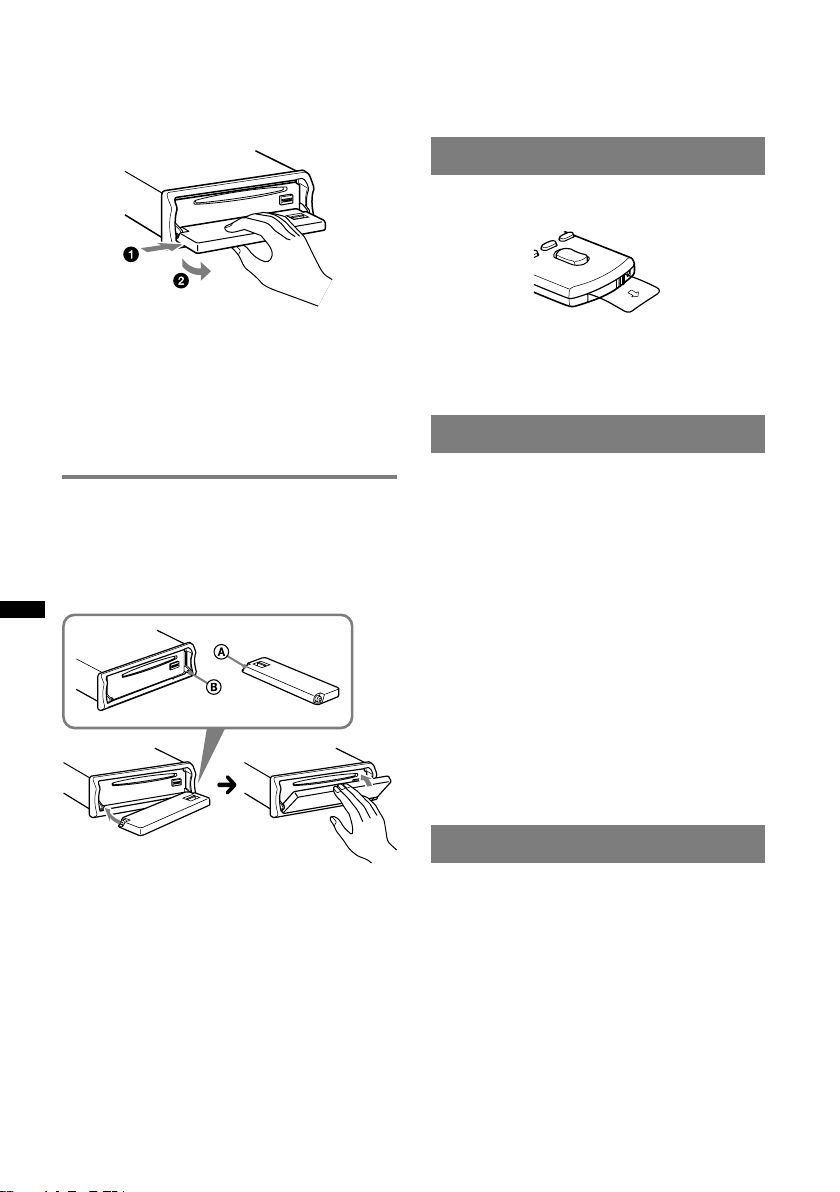
.(OPEN) رﺰﻟا ﻂﻐﺿا 2
.ﻞﻔﺳﻸﻟ ﺔﻴﻣﺎﻣﻷا ﺔﺣﻮﻠﻟا لﺪﺴﻨﺗ
ﻦﻣ ﴪﻳﻷا فﺮﻄﻟا ﺐﺤﺳا ﻢﺛ ،ﻤﻴﻠﻟ ﺔﻴﻣﺎﻣﻷا ﺔﺣﻮﻠﻟا ﺐﺤﺳا
.ﻒﻄﻠﺑ جرﺎﺨﻠﻟ ﺔﻴﻣﺎﻣﻷا ﺔﺣﻮﻠﻟا
.رﺎﻴﺘﺧﻻا رز ﻂﻐﻀﺑ ﺮﻤﺘﺳا 4
لﺎﺒﻘﺘﺳﻻا/ضﺮﻌﻟا ﻊﺿو ﱃإ ﺔﺷﺎﺸﻟا دﻮﻌﺗو ﺔﺌﻴﻬﺘﻟا ﻞﻤﺘﻜﺗ
3
.يدﺎﻌﻟا
ﺪﻌﺑ ﻦﻋ ﻢﻜﺤﺘﻟا ﺔﻗﺎﻄﺑ داﺪﻋإ
.لزﺎﻌﻟا ءﺎﺸﻐﻟا جاﺮﺧﺎﺑ ﻢﻗ
ءﺎﻴﺷأ ﻞﻌﺠﺗ ﻻو ﺪﺋاز ﻂﻐﻀﻟ ضﺮﻌﻟا ةﺬﻓﺎﻧو ﺔﻴﻣﺎﻣﻷا ﺔﺣﻮﻠﻟا ضﺮﻌﺗ ﻻ •
تﺎﻈﺣﻼﻣ
.ﻬﻴﻠﻋ ﻂﻘﺴﺗ
ﺐﻨﺠﺗ .ﺔﺑﻮﻃﺮﻠﻟ وأ ﺔﻴﻟﺎﻋ ةراﺮﺣ ﺔﺟرد/ةراﺮﺤﻠﻟ ﺔﻴﻣﺎﻣﻷا ﺔﺣﻮﻠﻟا ضﺮﻌﺗ ﻻ •
.ﺔﻴﻔﻠﺨﻟا ﺔﻴﻨﻴﺼﻟا/تاداﺪﻌﻟا ﺔﺣﻮﻟ ﲆﻋ وأ ﺔﻓﻮﻔﺼﻣ ةرﺎﻴﺳ ﻞﺧاد ﺎﻬﻛﺮﺗ
تﺎﻧﺎﻴﺑ ضﺮﻌﺘﺗ ﺪﻗ ﻻإو ،USB زﺎﻬﺟ ضﺮﻋ ءﺎﻨﺛأ ﺔﻴﻣﺎﻣﻷا ﺔﺣﻮﻠﻟا ﻞﺼﻔﺗ ﻻ •
.ﻒﻠﺘﻠﻟ USB
ﺔﻴﻣﺎﻣﻷا ﺔﺣﻮﻠﻟا ﺐﻴﻛﺮﺗ
دﻮﺟﻮﳌا رﻮﺤﳌا ﲆﻋ ﺔﻴﻣﺎﻣﻷا ﺔﺣﻮﻠﻟا ﻦﻣ ﺔﺤﺘﻔﻟا ﻊﺿ
.ًﻼﻴﻠﻗ ﻞﺧاﺪﻠﻟ ﴪﻳﻷا ﺐﻧﺎﺠﻟا ﻂﻐﺿا ﻢﺛ ،زﺎﻬﺠﻟا ﲆﻋ
(ﺔﻧاﻮﻄﺳأ لﺎﺧدﺈﺑ ﻢﻗ وأ) زﺎﻬﺠﻟا ﲆﻋ (SOURCE) ﻂﻐﺿا
زﺎﻬﺠﻟا ﻞﻴﻐﺸﺘﻟ
ﺔﻈﺣﻼﻣ
.ﺔﻴﻣﺎﻣﻷا ﺔﺣﻮﻠﻟا ﻦﻣ ﲇﺧاﺪﻟا ﺢﻄﺴﻟا ﲆﻋ ﺊﺷ يأ ﻊﻀﺗ ﻻ
.25 ﺔﺤﻔﺻ ،ﺔﻳرﺎﻄﺒﻟا ﺐﻴﻛﺮﺗ ةدﺎﻋا ﺔﻴﻔﻴﻛ لﻮﺣ
ﺔﻋﺎﺴﻟا ﺔﺌﻴﻬﺗ
.ﺔﻋﺎﺳ 12 مﺎﻈﻨﺑ ﺔﻴﻤﻗﺮﻟا ةءاﺮﻘﻟا ﴍﺆﻣ ﺔﻋﺎﺴﻟا ﻞﻤﻌﺘﺴﺗ
.رﺎﻴﺘﺧﻻا رز ﻂﻐﻀﺑ ﻆﻔﺘﺣا
.ﺔﺌﻴﻬﺘﻟا ﺔﺷﺎﺷ ﺮﻬﻈﺗ
ﺮﻬﻈﻳ نأ ﱃإ ًارﺮﻜﺘﻣ ًﺎﻄﻐﺿ رﺎﻴﺘﺧﻻا رز ﻂﻐﺿا
."CLOCK-ADJ"
.
(SEEK) + ﻂﻐﺿا 3
.ﺔﻋﺎﺴﻟا ﴍﺆﻣ ﺾﻣﻮﻳ
.ﻖﺋﺎﻗﺪﻟاو ﺔﻋﺎﺴﻟا ﺔﺌﻴﻬﺘﻟ ﻢﻜﺤﺘﻟا صﺮﻗ ردأ
.(SEEK) +/− ﻂﻐﺿا ،ﻲﻤﻗﺮﻟا ﴍﺆﳌا ﻚﻳﺮﺤﺘﻟ
.رﺎﻴﺘﺧﻻا رز ﻂﻐﺿا ،ﻖﺋﺎﻗﺪﻟا ﺔﺌﻴﻬﺗ ﺪﻌﺑ
.ﺔﻋﺎﺴﻟا ﻞﻴﻐﺸﺗ أﺪﺒﻳو ﺔﺌﻴﻬﺘﻟا ﺔﻴﻠﻤﻋ ﻞﻤﺘﻜﺗ
(DSPL) ﻂﻐﺿا .(DSPL) ﻂﻐﺿا ،ﺔﻋﺎﺴﻟا ضﺮﻌﻟ
ىﺮﺧأ ةﺮﻣ
.ﺔﻘﺑﺎﺴﻟا ﺔﺷﺎﺸﻟا ﱃإ عﻮﺟﺮﻠﻟ
ﺔﻴﻣﺎﻣﻷا ﺔﺣﻮﻠﻟا ﻞﺼﻓ
.ﻪﺘﻗﴎ نود ﺔﻟﻮﻠﻴﺤﻠﻟ زﺎﻬﺠﻟا اﺬﻬﻟ ﺔﻴﻣﺎﻣﻷا ﺔﺣﻮﻠﻟا ﻞﺼﻓ ﻚﻨﻜ
ﻪﻴﺒﻨﺘﻟا زﺎﻬﺟ
ﻞﺼﻓ نود OFF ﻊﺿﻮﳌا ﱃإ كﺮﺤﳌا ﻞﻴﻐﺸﺗ حﺎﺘﻔﻣ تردأ اذإ
.ناﻮﺛ ﻊﻀﺒﻟ ﻪﻴﺒﻨﺘﻟا زﺎﻬﺟ ﻦﻣ تﻮﺻ رﺪﺼﻴﺳ ،ﺔﻴﻣﺎﻣﻷا ﺔﺣﻮﻠﻟا
ﻢﺨﻀﻣ لﻌﺘﺳا ﺪﻨﻋ ﻂﻘﻓ ﻪﻴﺒﻨﺘﻟا زﺎﻬﺟ ﻦﻣ تﻮﺻ رﺪﺼﻴﺳ
.ﲇﺧاﺪﻟا تﻮﺼﻟا
.
(OFF) ﻂﻐﺿا 1
.زﺎﻬﺠﻟا ﺊﻔﻄﻨﻳ
ﻪﻴﺟﻮﺗ
1
2
4
5
7
Page 55
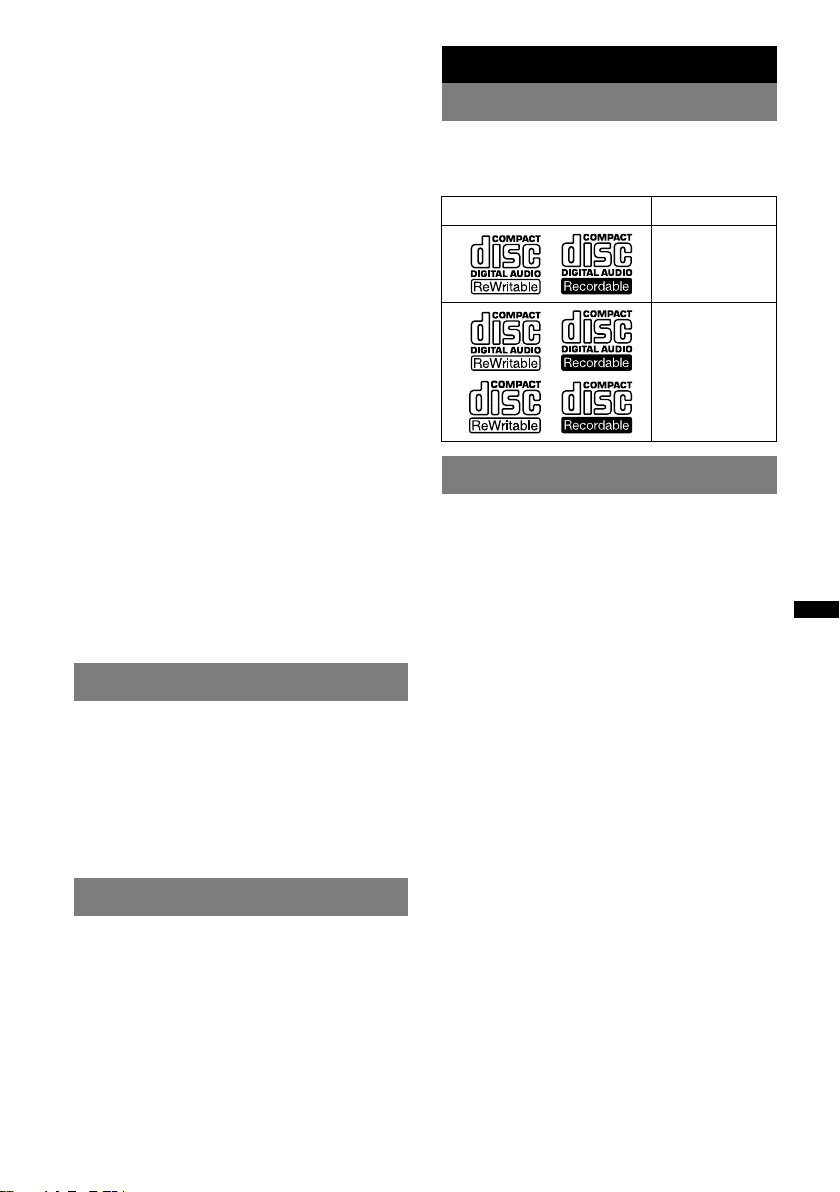
ﻮﻳداﺮﻟا ددﺮﺗ فﺎﺸﺘﻛا
ﺔﺒﻛﺮﳌا ﺔﻴﻧوﱰﻜﻟﻻا ﺔﻤﻈﻧﻻﺎﺑ (RF) ﻮﻳداﺮﻟا ددﺮﺗ تارﺎﺷا ﺮﺛﺄﺘﺗ ﺪﻗ
،تارﺎﻴﺴﻟا ﰲ ﺔﻼﻣ ﻏ ﺔﻘﻳﺮﻄﺑ ةﺎﻄﻐﳌا وا ﺔﺤﻴﺤﺻ ﻏ ةرﻮﺼﺑ
ﺔﻌﻧﺎﳌا ﻞﻣاﺮﻔﻟا ﺔﻤﻈﻧا وا ﺔﻴﻧوﱰﻜﻟﻻا دﻮﻗﻮﻟا ﻦﻘﺣ ﺔﻤﻈﻧا ﻞﺜﻣ
ﻢﻜﺤﺘﻠﻟ ﺔﻴﻧوﱰﻜﻟﻻا ﺔﻤﻈﻧﻻاوا (سﺎﺒﺘﺣﻼﻟ ﺔﻌﻧﺎﳌا) قﻻﺰﻧﻼﻟ
اﺬﻫ ﺔﻧﺎﻴﺻ وا ﺐﻴﻛﱰﻟ .ﺔﻴﺋاﻮﻬﻟا سﺎﻴﻛﻷا ﺔﻤﻈﻧأ وأ ﺔﻋﴪﻟﺎﺑ
ﻏ ﺐﻴﻛﱰﻟا .ﻪﻠﻴﻛو وا ﻚﺗرﺎﻴﺳ ﻊﻧﺎﺻ ةرﺎﺸﺘﺳا ﻰﺟﺮﻳ ،زﺎﻬﺠﻟا
ﻲﻐﻠﺗ ﺪﻗ و ةﻄﺧ نﻮﻜﺗ ﺪﻗ ﺔﺤﻴﺤﺼﻟا ﻏ ﺔﻧﺎﻴﺼﻟا وا ﺢﻴﺤﺼﻟا
.ةرﺎﻴﺴﻟا هﺬﻫ ﻞﻤﺸﺗ نﺿ يا
ﻒﺗﺎﻬﻟا لﻌﺘﺳا نا نﻀﻟ ﻚﺗرﺎﻴﺳ ﻊﻧﺎﺻ ةرﺎﺸﺘﺳا ﻰﺟﺮﻳ
.وﱰﻜﻟﻻا ﺎﻬﻣﺎﻈﻧ ﲆﻋ ﺮﺛﺆﻳ ﻻ ةرﺎﻴﺴﻟا ﰲ يﻮﻠﺨﻟا
ﻚﺗرﺎﻴﺳ ﰲ ةﺰﻬﺠﳌا ﺔﻴﻜﻠﺳﻼﻟا ةﺰﻬﺟﻻا ﻊﻴﻤﺟ نﺄﺑ مﺎﻈﺘﻧﺎﺑ ﺪﻛﺄﺗ
.ﺔﺤﻴﺤﺻ ةرﻮﺼﺑ ﻞﻤﻌﺗ و ﺔﺒﻛﺮﻣ
ءﺪﺒﻟا
زﺎﻬﺠﻟا اﺬﻫ ﲆﻋ ضﺮﻌﻠﻟ ﺔﻠﺑﺎﻘﻟا تﺎﻧاﻮﻄﺳﻷا
ﻚﻟﺬﻛ) CD-DA تﺎﻧاﻮﻄﺳأ ضﺮﻋ ﲆﻋ ردﺎﻗ زﺎﻬﺠﻟا اﺬﻫ
تﺎﻔﻠﻣ) CD-R/CD-RW تﺎﻧاﻮﻄﺳأو (CD-TEXT تﺎﻧاﻮﻄﺳأ
.((24 ﺔﺤﻔﺻ) (MP3/WMA/AAC
تﺎﻧاﻮﻄﺳﻷا عﻮﻧﺔﻧاﻮﻄﺳﻷا ﲆﻋ ﺔﻗﺎﻄﺒﻟا
CD-DA
ﺔﺋرﺎﻄﻟا تﻻﺎﺼﺗﻻا
ةرﺎﻴﺴﻟا ﰲ لﻌﺘﺳﻼﻟ ﺺﺼﺨﳌا اﺬﻫ يوﺪﻳﻼﻟا Bluetooth زﺎﻬﺟ
تارﺎﺷا ﻞﻤﻌﺘﺴﻳ يوﺪﻳﻼﻟا ﻞﻴﻐﺸﺘﻠﻟ لﻮﺻﻮﳌا وﱰﻜﻟﻻا زﺎﻬﺠﻟاو
ﺔﺠﻣﺮﺑ ﺔﻔﻴﻇو ﻚﻟﺬﻛو ﺔﻴﺿرا طﻮﻄﺧ تﺎﻜﺒﺷو ﻒﺗﺎﻫو ﺔﻴﻜﻠﺳﻻ
.لاﻮﺣﻷا ﻊﻴﻤﺠﺑ ﺎﻬﻠﻴﺻﻮﺗ نﺿ ﻦﻜ ﻻ ﻲﺘﻟا ،مﺪﺨﺘﺴﳌا
تﻻﺎﺼﺗا ﻖﻴﻘﺤﺘﻟ وﱰﻜﻟا زﺎﻬﺟ يا ﲆﻋ اًﺜﻛ لﻮﻌﺗ ﻻ ﻚﻟﺬﻟ
.(يراﻮﻄﻟا ﺔﺑﺎﺒﻃ تﺎﻣﺪﺨﺑ لﺎﺼﺗﻻﺎﻛ) ﺔﻴﺳﺎﺳا
ﺐﺠﻳ ،ﺔﳌﺎﻜﻣ لﺎﺒﻘﺘﺳا وا ءاﺮﺟا ﻞﺟا ﻦﻣ ،ﻚﻟذ ﱃا ﺔﻓﺎﺿﻻﺎﺑ
ﺎﻬﻴﻓ ﺪﺟﻮﺗ ﺔﻣﺪﺧ ﺔﻘﻄﻨﻣ ﰲ وﱰﻜﻟﻻاو يوﺪﻳﻼﻟا زﺎﻬﺠﻟا ﻞﻴﻐﺸﺗ
.ﺔﻳﻮﻗ يﻮﻠﺧ ﻒﺗﺎﻫ ةرﺎﺷا
ﻒﺗﺎﻬﻟا تﺎﻜﺒﺷ ﲆﻋ ﺔﻨﻜﻤﻣ يراﻮﻄﻟا تﻻﺎﺼﺗا نﻮﻜﺗ ﻻ ﺪﻗ
ﻦﻜ ﻻ وا /و ﺔﻨﻴﻌﻣ ﺔﻧﺎﻴﺻ لﻋا ﺬﻴﻔﻨﺗ ﺪﻨﻋ وا يﻮﻠﺨﻟا
.ﻒﺗﺎﻬﻟا ﺎﻳاﺰﻣ لﻌﺘﺳا
.ﲇﺤﳌا ﺔﻣﺪﺨﻟا ﺰﻬﺠﻣ ﻦﻣ ﻖﻘﺤﺗ
زﺎﻬﺠﻟا ﺔﺌﻴﻬﺗ ةدﺎﻋإ
وأ ةرﺎﻴﺴﻟا ﺔﻳرﺎﻄﺑ لاﺪﺒﺘﺳا ﺪﻌﺑ وأ ،ةﺮﻣ لوﻷ زﺎﻬﺠﻟا ﻞﻴﻐﺸﺗ ﻞﺒﻗ
.زﺎﻬﺠﻟا ﺔﺌﻴﻬﺗ ةدﺎﻋﺈﺑ مﻮﻘﺗ نأ ﺐﺠﻳ ،تﻼﻴﺻﻮﺘﻟا ﻴﻐﺗ
ﺔﺌﻴﻬﺘﻟا ةدﺎﻋا رز ﻂﻐﺿاو (7 ﺔﺤﻔﺻ) ﺔﻴﻣﺎﻣﻷا ﺔﺣﻮﻠﻟا ﻞﺼﻓا
.ًﻼﺜﻣ فﺎﺟ ﱪﺣ ﻢﻠﻘﻛ ،ﺔﺒﺑﺪﻣ ةادأ ﺔﻄﺳاﻮﺑ (8 ﺔﺤﻔﺻ) RESET
ﺔﻈﺣﻼﻣ
ﺾﻌﺑو ﺔﻋﺎﺴﻟا ﺔﺌﻴﻬﺗ ءﺎﻐﻟا ﱃإ يدﺆﻴﺳ RESET ﺔﺌﻴﻬﺘﻟا ةدﺎﻋا رز ﻂﻐﺿ
.ﺔﻧﺰﺨﳌا تﺎﻳﻮﺘﺤﳌا
ﻲﺣﺎﻀﻳﻻا ضﺮﻌﻟا ﻊﺿو ءﺎﻐﻟا
.زﺎﻬﺠﻟا ءﺎﻔﻃا ﺪﻨﻋ ﺮﻬﻈﻳ يﺬﻟا ﻲﺣﺎﻀﻳﻻا ضﺮﻌﻟا ءﺎﻐﻟا ﻦﻜ
.رﺎﻴﺘﺧﻻا رز ﻂﻐﻀﺑ ﺮﻤﺘﺳا
.ﺔﺌﻴﻬﺘﻟا ﺔﺷﺎﺷ ﺮﻬﻈﺗ
."DEMO" ﺮﻬﻈﻳ نأ ﱃإ ًارﺮﻜﺘﻣ ًﺎﻄﻐﺿ رﺎﻴﺘﺧﻻا رز ﻂﻐﺿا
."DEMO-OFF" رﺎﻴﺘﺧﻻ ﻢﻜﺤﺘﻟا صﺮﻗ ﺮﻳوﺪﺘﺑ ﻢﻗ 3
Bluetooth ﺔﻔﻴﻇو لﻮﺣ تﺎﻈﺣﻼﻣ
ةﴍﺎﺒﳌا راﴐﻻا ﻦﻋ ﺔﻴﻟوﺆﺴﻣ يا Sony ﻮﺳ ﺔﻛﴍ ﻞﻤﺤﺘﺗ ﻻ
ناﺪﻘﻓ ﻞﺜﻣ ،دﻮﻴﻗ نوﺪﺑو ،ﺔﻴﺿﺮﻌﻟا ثداﻮﺤﻟا ﻦﻋ ﺔﻤﺟﺎﻨﻟا وا
ةرﺪﻘﻟا مﺪﻋ وا تﺎﻧﺎﻴﺒﻟا ناﺪﻘﻓ وا تﺎﻜﻠﺘﻤﳌا ناﺪﻘﻓ وا ﺔﻌﻔﻨﳌا
ﺖﻗو وا ﻂﺒﻀﻟا ﺪﻨﻋ ،ﻪﺑ ﻂﺒﺗﺮﻣ ﺞﺘﻨﻣ يا وا ﺞﺘﻨﳌا لﻌﺘﺳا ﲆﻋ
ﺔﺒﻠﺼﻟا تﺎﻧﻮﻜﳌا وا ﺞﺘﻨﳌا اﺬﻫ لﻌﺘﺳا ﻦﻣ ﺔﻤﺟﺎﻨﻟا وا ءاﴩﻟا
.ﻪﺗﺎﻴﺠﻣﺮﺑ وا /و ﻪﻴﻓ
ءﻮﻔﻜﻟا لﻌﺘﺳﻻاو ﺔﻣﻼﺴﻟا
ﻮﺳ ﺔﻛﴍ ﺎﻬﻴﻠﻋ قدﺎﺼﺗ تﻼﻳﺪﻌﺗ وا تاﻴﻐﺗ ءاﺮﺟﺎﺑ مﺎﻴﻘﻟا
ﻞﻴﻐﺸﺘﻟ مﺪﺨﺘﺴﻤﻠﻟ حﻮﻨﻤﳌا ﺺﻴﺧﱰﻟا ﻲﻐﻠﻳ ﺪﻗ حﻮﺿﻮﺑ Sony
تﺎﺒﻠﻄﺘﳌاو دﻮﻴﻘﻟا ﺐﺒﺴﺑ ،تاءﺎﻨﺜﺘﺳﻻا ﻦﻣ ﻖﻘﺤﺘﻟا ﻰﺟﺮﻳ
لﻌﺘﺳا ﻞﺒﻗ Bluetooth زﺎﻬﺟ لﻌﺘﺳﺎﺑ ﺔﺻﺎﺨﻟا ،ﺔﻴﻨﻃﻮﻟا
ﺔﻳﻮﻠﺨﻟا ﻒﺗاﻮﻬﻟا لﻌﺘﺳﺎﺑ ﺔﺻﺎﺨﻟا ﻧاﻮﻘﻟاو ﺔﻤﻈﻧﻻا ﻦﻣ ﻖﻘﺤﺗ
.ﺎﻬﻴﻓ ةرﺎﻴﺴﻟا دﻮﻘﺗ ﻲﺘﻟا ﻖﻃﺎﻨﳌا ﰲ ﺔﻳوﺪﻳﻼﻟا ةﺰﻬﺟﻻاو
ﻦﻣ جوﺮﺨﻟاو ةدﺎﻴﻘﻟا ﱃا ﺔﻠﻣﺎﻛ ةرﻮﺼﺑ هﺎﺒﺘﻧﻻا ﺰﻴﻛﺮﺗ ﺐﺠﻳ ﻛ
ﺔﳌﺎﻜﻣ ﲆﻋ ﺔﺑﺎﺟﻻاوا ﺔﳌﺎﻜﻣ ءاﺮﺟا ﻞﺒﻗ ةرﺎﻴﺴﻟا فﺎﻘﻳاو ﻖﻳﺮﻄﻟا
1
2
صﺎﺨﻟا مﺪﺨﺘﺴﳌا ﻞﻴﻟد ةءاﺮﻗ ﻰﺟﺮﻳ ،ﺮﺧا زﺎﻬﺟ يا ﻞﻴﺻﻮﺗ ﺪﻨﻋ
.تاءاﺮﺟﻻا ﻚﻠﺗ ةدﺎﻴﻘﻟا طوﴍ ﺐﻠﻄﺘﺗ ﺖﻧﺎﻛ اذا
ىﺮﺧا ةﺰﻬﺟا ﱃا ﻞﻴﺻﻮﺘﻟا
.ﺔﻴﻠﻴﺼﻔﺘﻟا ﺔﻣﻼﺴﻟا تﻴﻠﻌﺗ ﺔﻓﺮﻌﳌ ﻪﺑ
MP3
WMA
AAC
ﻪﻴﺒﻨﺗ
!ﺔﻤﻬﻣ ﺔﻈﺣﻼﻣ
.زﺎﻬﺠﻟا
.ﺞﺘﻨﳌا اﺬﻫ
ةدﺎﻴﻘﻟا
6
Page 56
5
Page 57

تﺎﻳﻮﺘﺤﳌا لوﺪﺟ
(ﻰﻘﻴﺳﻮﳌا ﻖﻓﺪﺗو يوﺪﻳﻼﻟا لﺎﺼﺗﻻا) Bluetooth ﺔﻔﻴﻇو
17 ................................................Bluetooth ﻞﻴﻐﺸﺗ تﺎﻴﻠﻤﻋ
17 ...............................................................................ﻖﻓاﻮﺘﻟا
17 .............................................Bluetooth تﺎﻧﻮﻘﻳا لﻮﺣ
18 .............................................................................. لﺎﺼﺗﻻا
18 ..................هﺬﻫ ﻦﻣ ﺔﺟرﺎﺨﻟا Bluetooth ةرﺎﺷا ﻞﻳﻮﺤﺘﻟ
18 .....................................................يﻮﻠﺧ ﻒﺗﺎﻫ ﻞﻴﺻﻮﺗ
18 .................................................ﻮﺻ زﺎﻬﺟ ﱃا ﻞﻴﺻﻮﺘﻟا
18 .................................................................... ﺔﻳوﺪﻳﻻ ﺔﳌﺎﻜﻣ
18 ................................................................ ﺔﳌﺎﻜﻣ مﻼﺘﺳا
19 ..................................................................ﺔﳌﺎﻜﻣ ءاﺮﺟا
19 ....................................................................ﺔﳌﺎﻜﻣ ﻞﻘﻧ
19 ..................................................ﻮﺼﻟا لﺎﺼﺗﻻا ﻞﻴﻐﺸﺗ
19 ..................................................................ﻰﻘﻴﺳﻮﳌا راﺪﺻا
19 ............................ﻮﺻ زﺎﻬﺟ ﻦﻣ ﻰﻘﻴﺳﻮﳌا ﱃا عﺘﺳﻻا
20 ...................ةﺪﺣﻮﻟا هﺬﻫ ﺔﻄﺳاﻮﺑ ﻮﺼﻟا زﺎﻬﺠﻟا ﻞﻴﻐﺸﺗ
20 ..................ﺔﻘﻓاﻮﺘﳌاو ﺔﻠﺠﺴﳌا ةﺰﻬﺟﻻا ﻊﻴﻤﺟ ﻞﻴﺠﺴﺗ فﺬﺣ
ىﺮﺧأ ﻒﺋﺎﻇو
20 ...........................................................تﻮﺼﻟا تﺎﺌﻴﻬﺗ ﻴﻐﺗ
20 .................................................. تﻮﺼﻟا تاﺰﻴﻤﻣ ﻂﺒﺿ
ﺐﻠﻄﻟا ﺐﺴﺣ تاﻮﺻﻸﻟ ﺎﻴﺒﻟا لدﺎﻌﳌا ﻲﻨﺤﻨﻣ ﺔﺌﻴﻬﺗ
21 ........................................................................ EQ3 –
21 ...................................................SET – ﺔﺌﻴﻬﺘﻟا دﻮﻨﺑ ﻂﺒﺿ
22 ...................................................... يرﺎﻴﺘﺧا زﺎﻬﺟ لﻌﺘﺳا
22 .........................................................ﰲﺎﺿا تﻮﺻ زﺎﻬﺟ
23 .................................. RM-X4S ةراوﺪﻟا ﻢﻜﺤﺘﻟا ةﺪﺣو
23 .......................................XA-MC10 ﻲﺟرﺎﺧ نﻮﻓﺮﻜﻴﻣ
ﺔﻴﻓﺎﺿا تﺎﻣﻮﻠﻌﻣ
24 ............................................................... ﺔﻴﻃﺎﻴﺘﺣا تﺎﻬﻴﺒﻨﺗ
24 ...........................................تﺎﻧاﻮﻄﺳﻷا لﻮﺣ تﺎﻈﺣﻼﻣ
24 ..................... MP3/WMA/AAC تﺎﻔﻠﻣ ضﺮﻋ ﺐﻴﺗﺮﺗ
24 .....................................................iPod زﺎﻬﺟ صﻮﺼﺨﺑ
25 ...............................................Bluetooth ﺔﻔﻴﻇو لﻮﺣ
25 ...............................................................................ﺔﻧﺎﻴﺼﻟا
26 ...................................................................... زﺎﻬﺠﻟا جاﺮﺧا
27 .......................................................................... تﺎﻔﺻاﻮﳌا
28 .........................................................ﻪﺣﻼﺻاو ﻞﻠﺨﻟا يﺮﺤﺗ
30 ...................................... ﻞﻠﺨﻟا ضﺮﻋ تﺎﻧﺎﻴﺑ /تارﺎﻄﺧا
ءﺪﺒﻟا
6 ............................زﺎﻬﺠﻟا اﺬﻫ ﲆﻋ ضﺮﻌﻠﻟ ﺔﻠﺑﺎﻘﻟا تﺎﻧاﻮﻄﺳﻷا
6 .......................................Bluetooth ﺔﻔﻴﻇو لﻮﺣ تﺎﻈﺣﻼﻣ
6 ................................................................زﺎﻬﺠﻟا ﺔﺌﻴﻬﺗ ةدﺎﻋإ
6 ..................................................ﻲﺣﺎﻀﻳﻻا ضﺮﻌﻟا ﻊﺿو ءﺎﻐﻟا
7 ................................................ﺪﻌﺑ ﻦﻋ ﻢﻜﺤﺘﻟا ﺔﻗﺎﻄﺑ داﺪﻋإ
7 ........................................................................ ﺔﻋﺎﺴﻟا ﺔﺌﻴﻬﺗ
7 .............................................................ﺔﻴﻣﺎﻣﻷا ﺔﺣﻮﻠﻟا ﻞﺼﻓ
7 .....................................................ﺔﻴﻣﺎﻣﻷا ﺔﺣﻮﻠﻟا ﺐﻴﻛﺮﺗ
ﺔﻴﺳﺎﺳﻷا ﻞﻴﻐﺸﺘﻟا تﺎﻴﻠﻤﻋو ﻢﻜﺤﺘﻟا ﺢﻴﺗﺎﻔﻣ ﻊﺿاﻮﻣ
8 ............................................................. ﺔﻴﺴﻴﺋﺮﻟا ةﺪﺣﻮﻟا
10 ................................RM-X304 ﺪﻌﺑ ﻦﻋ ﻢﻜﺤﺘﻟا ﺔﻗﺎﻄﺑ
11 ...........................................................ﺔﻋﻮﻄﻘﻣ ﻦﻋ ﺚﺤﺒﻟا
ﻢﺳﻻا ﺔﻄﺳاﻮﺑ ﺔﻋﻮﻄﻘﻣ ﻦﻋ ﺚﺤﺒﻟا
11 ..........................................Quick-BrowZer ﻊﺿﻮﻟا –
ﻦﻣ ﻊﻃﺎﻘﻣ ﱃإ عﺘﺳﻻا ﺔﻄﺳاﻮﺑ ﺔﻋﻮﻄﻘﻣ ﻦﻋ ﺚﺤﺒﻟا
تﺎﻋﻮﻄﻘﳌا
12 .................................................. ZAPPINTM ﻊﺿﻮﻟا –
ﻮﻳداﺮﻟا
12 ...................................................تﺎﻄﺤﳌا ﻦﻳﺰﺨﺗو لﺎﺒﻘﺘﺳا
12 .....................................BTM ﺔﻔﻴﻇو – ًﺎﻴﺋﺎﻘﻠﺗ ﻦﻳﺰﺨﺘﻟا
12 ...............................................................ًﺎﻳوﺪﻳ ﻦﻳﺰﺨﺘﻟا
12 ..............................................ﺔﻧﺰﺨﳌا تﺎﻄﺤﳌا لﺎﺒﻘﺘﺳا
12 ...............................................................ًﺎﻴﺋﺎﻘﻠﺗ ﺔﻔﻟاﻮﳌا
CD ﺔﻧاﻮﻄﺳأ
13 .................................................................... ﺔﻧاﻮﻄﺳأ ضﺮﻋ
13 ................................................................. ﺔﺷﺎﺸﻟا دﻮﻨﺑ
13 ...............................................اﻮﺸﻌﻟاو رﺮﻜﺘﳌا ضﺮﻌﻟا
USB ةﺰﻬﺟأ
13 ................................................................USB زﺎﻬﺟ ضﺮﻋ
14 .................................................................. ضﺮﻌﻟا دﻮﻨﺑ
14 ...............................................اﻮﺸﻌﻟاو رﺮﻜﺘﳌا ضﺮﻌﻟا
iPod زﺎﻬﺟ
15 ................................................................iPod زﺎﻬﺟ ضﺮﻋ
16 ................................................................. ﺔﺷﺎﺸﻟا دﻮﻨﺑ
16 ..............................................................ضﺮﻌﻟا ﻊﺿو ﺔﺌﻴﻬﺗ
16 ...............................................اﻮﺸﻌﻟاو رﺮﻜﺘﳌا ضﺮﻌﻟا
ةﴍﺎﺒﻣ iPod زﺎﻬﺟ ﻞﻴﻐﺸﺗ
16 ...................Passenger control ﺐﻛاﺮﻟا ﻞﺒﻗ ﻦﻣ ﻢﻜﺤﺘﻟا –
4
Page 58

ﻏ ﻚﺗرﺎﻴﺴﺑ صﺎﺨﻟا كﺮﺤﳌا لﺎﻌﺷا مﺎﻈﻧ نﺎﻛ اذا ﺮﻳﺬﺤﺗ
ACC تﺎﻴﻟﻜﻟا ﻊﺿﻮ ﺰﻬﺠﻣ
.(21 ﺔﺤﻔﺻ) ﺎﻘﻠﺘﻟا فﺎﻘﻳﻹا ﺔﻔﻴﻇو ﺔﺌﻴﻬﺗ ﻦﻣ ﺪﻛﺄﺗ
ﺪﻌﺑ دﺪﺤﳌا ﺖﻗﻮﻟا ﰲ ًﺎﻴﺋﺎﻘﻠﺗ ﻞﻣﺎﻛ ﻞﻜﺸﺑ زﺎﻬﺠﻟا ﺊﻔﻄﻨﻴﺳ
.ﺔﻳرﺎﻄﺒﻟا ﺔﻨﺤﺷ كﻼﻬﺘﺳا يدﺎﻔﺘﻟ ﻚﻟذو ،زﺎﻬﺠﻟا ءﺎﻔﻄﻧا
ﻂﻐﻀﺑ ﻆﻔﺘﺣا ،ﺎﻘﻠﺘﻟا فﺎﻘﻳﻹا ﺔﻔﻴﻇو ﺔﺌﻴﻬﺘﺑ ﻢﻘﺗ اذإ
ءﺎﻔﻃﺈﺑ ﺖﻤﻗ ﻠﻛ ﺔﺷﺎﺸﻟا ﻲﻔﺘﺨﺗ نأ ﱃإ (OFF) رﺰﻟا
.كﺮﺤﳌا لﺎﻌﺷا مﺎﻈﻧ
ﺔﻛﴩﻟ ﺎﻬﺘﻴﻜﻠﻣ دﻮﻌﺗ ﺎﻬﺑ ﺔﻄﺒﺗﺮﳌا تارﺎﻌﺸﻟاو Bluetooth ﺔﻣﻼﻌﻟا
ﻦﻣ تﺎﻣﻼﻌﻟا هﺬﻫ ﻞﺜﳌ لﻌﺘﺳا يأو Bluetooth SIG, Inc.
.ﺺﻴﺧﱰﺑ نﻮﻜﻳ نا ﺐﺠﻳ Sony Corporation ﻮﺳ ﺔﻛﴍ ﻞﺒﻗ
.ﺎﻬﻴﻜﻟﺎﳌ دﻮﻌﺗ ىﺮﺧﻷا ﺔﻳرﺎﺠﺘﻟا ءﺳﻻاو ﺔﻳرﺎﺠﺘﻟا تﺎﻣﻼﻌﻟا
Sony ﺔﻛ ﴩﻟ ﺔﻳرﺎﺠﺗ ﺔﻣﻼﻋ ﻲﻫ ZAPPIN ﺔﻣﻼﻌﻟا
.Corporation
رﺎﻌﺸﻟاو Windows Media ﺔﻣﻼﻌﻟا
ﺔﻳرﺎﺠﺗ تﺎﻣﻼﻋ ﻲﻫ Windows
ﺔﻛﴩﻟ ﺔﻠﺠﺴﻣ ﺔﻳرﺎﺠﺗ تﺎﻣﻼﻋ وأ
ناﺪﻠﺑ وأ /و ةﺪﺤﺘﳌا تﺎﻳﻻﻮﻟا ﰲ Microso Corporation
.ىﺮﺧأ
ﰲ ﺔﻠﺠﺴﻣ ،Apple Inc. ﺔﻛﴩﻟ ﺔﻳرﺎﺠﺗ ﺔﻣﻼﻋ iPod ﺔﻣﻼﻌﻟا
.ىﺮﺧأ ناﺪﻠﺑو ةﺪﺤﺘﳌا تﺎﻳﻻﻮﻟا
.Apple Inc. ﺔﻛﴩﻟ ﺔﻳرﺎﺠﺗ ﺔﻣﻼﻋ iPhone ﺔﻣﻼﻌﻟا
ﺔﺼﺧﺮﻣ MPEG Layer-3 تﻮﺻ ﻔﺸﺗ ﺔﻴﻨﻘﺗو عاﱰﺧﻻا تاءاﺮﺑ
.Fraunhofer IIS and omson ﺔﻛﴍ ﻦﻣ
ﺔﻳﺮﻜﻔﻟا ﺔﻴﻜﻠﳌا قﻮﻘﺣ ﻦﻣ ﺔﻴﻨﻌﻣ قﻮﻘﺤﺑ ﻲﻤﺤﻣ زﺎﻬﺠﻟا اﺬﻫ
لﻌﺘﺳﺎﺑ مﺎﻴﻘﻟا زﻮﺠﻳ ﻻ .Microso Corporation ﺔﻛﴩﻟ
ﻢﺘﻳ ﺎﻣ ﺞﺘﻨﳌا اﺬﻫ دوﺪﺣ جرﺎﺧ ﺔﻴﻨﻘﺘﻟا هﺬﻫ ﻞﺜﻣ ﻊﻳزﻮﺗو
وأ Microso Corporation ﺔﻛﴍ ﻦﻣ ﺺﻴﺧﺮﺗ ﲆﻋ لﻮﺼﺤﻟا
.Microso ﺔﻛﴩﻟ ﺔﻌﺑﺎﺗ ﺔﻴﻋﺮﻓ ﺔﻛﴍ ﻦﻣ
ﺔﻴﻤﻗﺮﻟا قﻮﻘﺤﻟا ةرادا ﺔﻴﻨﻘﺗ نﻮﻠﻤﻌﺘﺴﻳ تﺎﻳﻮﺘﺤﳌا يﺰﻬﺠﻣ
زﺎﻬﺠﻟا اﺬﻫ ﰲ ﻦﻤﻀﺘﳌا Windows Media ﺞﻣﺎﻧﱪﻟ
(ﻦﻣﺆﻣ ىﻮﺘﺤﻣ) ىﻮﺘﺤﳌا ﺔﻣﻼﺳ ﺔﻳﺤﻟ ("WM-DRM")
ﺔﻴﻜﻠﳌا قﻮﻘﺤﻟا ﺔﻗﴎ ﻢﺘﻳ ﻻ ﺚﻴﺤﺑ ("Secure Content")
.ىﻮﺘﺤﳌا اﺬﻫ ﰲ ﺔﻨﻤﻀﺘﻟا ،ﴩﻨﻟا قﻮﻘﺣ ﻚﻟذ ﰲ ﺎ ،ﻢﻬﻟ ةﺪﺋﺎﻌﻟا
ﺔﻣﻼﺳ ضﺮﻌﻟ WM-DRM ﺞﻣﺎﻧﱪﻟا ﻞﻤﻌﺘﺴﻳ زﺎﻬﺠﻟا اﺬﻫ
.
Secure Content ("WM-DRM Soware") ﺞﻣﺎﻧﱪﻠﻟ ىﻮﺘﺤﳌا
اﺬﻫ ﰲ ﻞﻤﻌﺘﺴﳌا WM-DRM ﺞﻣﺎﻧﱪﻟا ﺔﻳﴎ ﺖﻔﺸﻜﻧا اذإ
ﻦﻣﺆﳌا ىﻮﺘﺤﳌا ﻟﺎﻣ مﺪﻘﺘﻳ ﺪﻗ ،ﺞﺘﻨﳌا
Microso ﺔﻛﴍ ﱃإ ﺐﻠﻄﺑ ("Secure Content Owners")
ﺺﻴﺧاﺮﺗ ﲆﻋ لﻮﺼﺤﻠﻟ WM-DRM ﺞﻣﺎﻧﱪﻟا قﻮﻘﺣ ءﺎﻐﻟﻻ
ﻦﻣﺆﳌا ىﻮﺘﺤﳌا ضﺮﻋ وأ/و ﻒﺸﻛ وأ/و ﺦﺴﻨﻟ ةﺪﻳﺪﺟ
ةرﺪﻗ ﲆﻋ ﺮﺛﺆﺗ ﻻ ﺺﻴﺧﱰﻟا ءﺎﻐﻟا ةدﺎﻋا .Secure Content
لﺎﺳرا ﻢﺘﻳ .ﺔﻴﻤﺤﳌا ﻏ تﺎﻳﻮﺘﺤﳌا ضﺮﻌﻟ WM-DRM ﺞﻣﺎﻧﱪﻟا
مﻮﻘﺗ ﺎﻣﺪﻨﻋ كزﺎﻬﺟ ﱃإ ﻲﻐﻠﳌا WM-DRM ﺞﻣﺎﻧﱪﺑ ﺔﺎﻗ
ﺖﻧﱰﻧﻻا ﻦﻣ Secure Content ﻦﻣﺆﳌا ىﻮﺘﺤﳌا ﺺﻴﺧﺮﺗ ﻞﻳﺰﻨﺘﺑ
اﺬﻜﻫ ﻞﺜﻣ رﺎﻃا ﰲ ،Microso ﺔﻛﴍ مﻮﻘﺗ ﺪﻗ .ﺮﺗﻮﻴﺒﻤﻜﻟا ﻦﻣ وأ
ﻟﺎﻣ ﻦﻋ ﺔﺑﺎﻴﻨﻟﺎﺑ كزﺎﻬﺟ ﲆﻋ ءﺎﻐﻟﻻا ﻢﺋاﻮﻗ ﻞﻳﺰﻨﺘﺑ ،ﺾﻴﺧﺮﺗ
.Secure Content ﻦﻣﺆﳌا ىﻮﺘﺤﳌا قﻮﻘﺣ
3
Page 59
ةرﺎﻴﺴﻟا تاداﺪﻋ ﺔﺣﻮﻟ ﰲ ةﺪﺣﻮﻟا هﺬﻫ ﺐﻴﻛﺮﺗ ﻦﻣ ﺪﻛﺄﺗ
ﻞﻴﻟد ﻊﺟار ،تﻼﻴﺻﻮﺘﻟاو ﺐﻴﻛﱰﻟا صﻮﺼﺨﺑ .ﺔﻣﻼﺴﻟا ﻖﻴﻘﺤﺘﻟ
.ﻖﻓﺮﳌا تﻼﻴﺻﻮﺘﻟا /ﺐﻴﻛﱰﻟا
.ﻞﻜﻴﻬﻟا ﻦﻣ ﺔﻴﻠﻔﺴﻟا ﺔﻬﺠﻟا ﰲ ﺔﻗﺎﻄﺒﻟا هﺬﻫ ﺪﺟﻮﺗ
رﺎﻨﻟا وأ ةﴍﺎﺒﳌا ﺲﻤﺸﻟا ﺔﻌﺷﺄﻛ ةﺪﻳﺪﺷ ةراﺮﺤﻟ مﻮﻴﺜﻴﻠﻟا ﺔﻳرﺎﻄﺑ ضﺮﻌﺗ ﻻ
مﻮﻴﺜﻴﻠﻟا ﺔﻳرﺎﻄﺑ لﻮﺣ تﺎﻈﺣﻼﻣ
.ﻪﺑﺎﺷ ﺎﻣ وأ
2
Page 60
®
Bluetooth
Audio System
AR
ﻞﻴﻐﺸﺘﻟا تﻴﻠﻌﺗ
http://www.sony.net/
Sony Corporation Printed in Thailand
.6 ﺔﺤﻔﺻ ﻊﺟار ،(DEMO) ﻲﺣﺎﻀﻳﻹا ضﺮﻌﻟا ﺔﺷﺎﺷ ءﺎﻐﻟﻻ
MEX-BT4750U
 Loading...